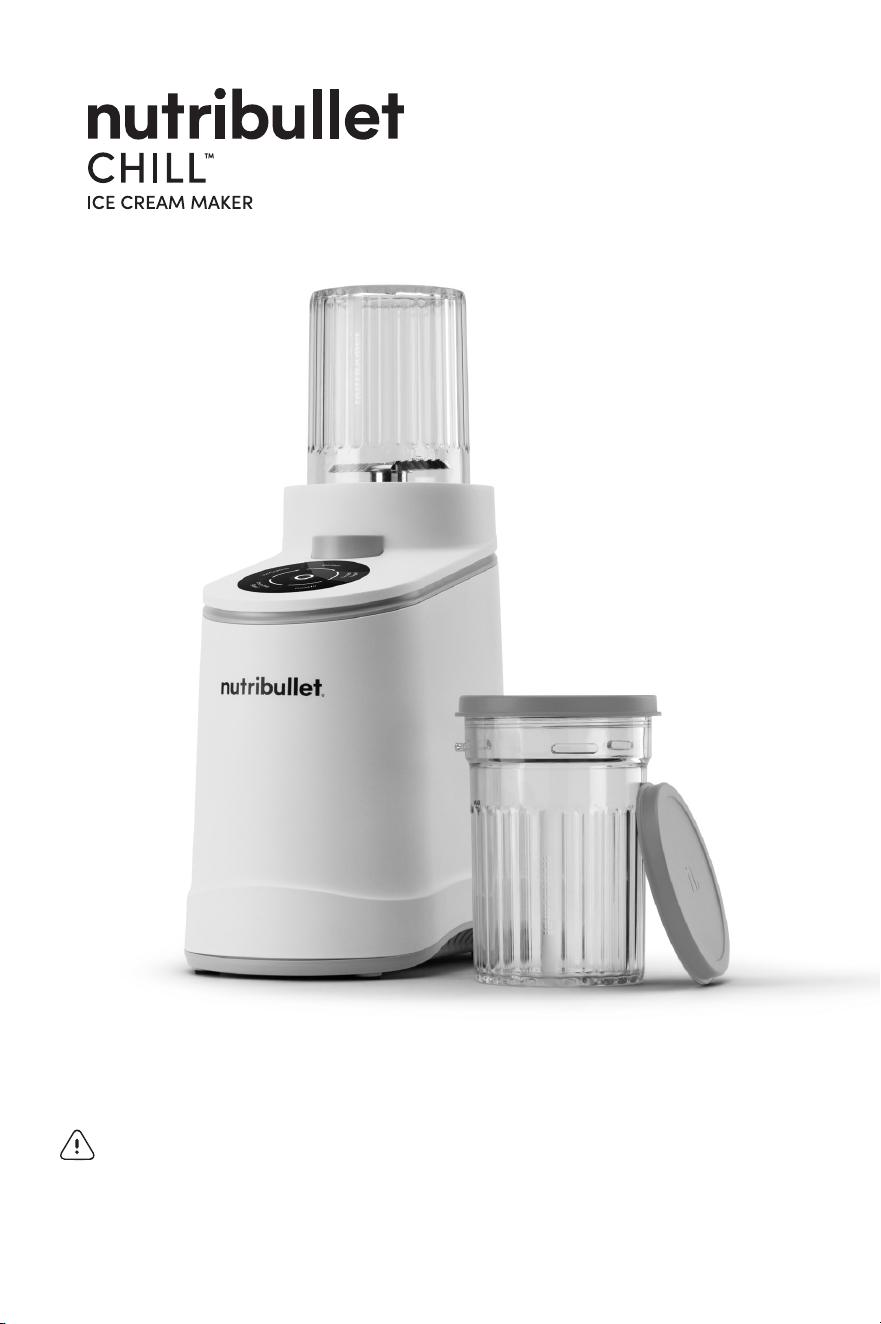
User guide
WARNING! Reduce the risk of serious injury by reading the User
Guides to your nutribullet Chill
™
Ice Cream Maker before operating.
Save these instructions. Ensure anyone who uses the nutribullet
®
knows how to do so safely.
32
IMPORTANT SAFEGUARDS
When operating your nutribullet Chill
™
Ice Cream Maker, remember:
SAFETY COMES FIRST. READ CAREFULLY AND THOROUGHLY
BEFORE OPERATING.
WARNING! To avoid the risk of serious injury, carefully read all
instructions before operating your nutribullet Chill
™
Ice Cream Maker.
When using any electrical appliance, basic safety precautions should
always be observed, including the following important information.
If you let anyone else use your nutribullet Chill
™
Ice Cream Maker, make
sure that they understand the health and safety information in this User
Guide, as well as any additional safety or usage instructions provided.
Each person using a device should carefully read the User Guide in its
entirety to become familiar with the safe operation of the unit.
!
SAVE THESE INSTRUCTIONS!
FOR HOUSEHOLD USE ONLY
GENERAL SAFEGUARDS:
WARNING! BLADES ARE
SHARP HANDLE WITH CARE.
TO REDUCE THE RISK OF
INJURY, NEVER STORE THE
EXPOSED BLADE ON THE
BASE. ALWAYS ATTACH THE
BLADE COVER TO THE
BLADE OR ATTACH THE
BLADE TO THE PINT CUP
WHEN STORING.
THE USE OF ATTACHMENTS,
INCLUDING CUPS AND
BLADES, FROM OTHER
MANUFACTURERS IS NOT
RECOMMENDED. THEY ARE
NOT SPECIFICALLY DESIGNED
FOR YOUR NUTRIBULLET
®
DEVICE — USE OF SUCH
ATTACHMENTS MAY CAUSE
RISK OF SERIOUS INJURY.
• DO NOT leave the nutribullet
®
device unattended while
in use.
• This device is not intended for
use by children or by persons
with reduced physical, sensory,
or mental capabilities, or lack
of experience and knowledge.
• CLOSE SUPERVISION IS
NECESSARY WHEN ANY
APPLIANCE IS USED NEAR
CHILDREN. CHILDREN
SHOULD BE SUPERVISED TO
ENSURE THAT THEY DO NOT
PLAY WITH THE APPLIANCE.
WARNING! NEVER USE
YOUR HANDS, FINGERS, OR
TONGUE TO REMOVE ANY
MIXTURE FROM THE BLADE.
THE BLADES ARE SHARP AND
MAY CAUSE SEVERE BODILY
INJURIES.
OPERATING SAFETY:
WARNING! NEVER BLEND HOT,
WARM, OR CARBONATED
INGREDIENTS IN THE
NUTRIBULLET CHILL
™
PINT CUP
WHILE USING A COMPATIBLE
NUTRIBULLET
®
BLENDER
AS THE CONTENTS MAY
PRESSURIZE AND ERUPT UPON
OPENING, CAUSING SERIOUS
BODILY INJURIES OR DAMAGE.
WARNING! DO NOT BLEND
INGREDIENTS USING A
COMPATIBLE NUTRIBULLET
®
BLENDER FOR LONGER THAN
30 SECONDS. BLENDING
CAUSES INGREDIENTS TO HEAT
UP, WHICH BUILDS PRESSURE
IN THE PINT CUP OVER TIME.
CONTINUOUS BLENDING FOR
MORE THAN 30 SECONDS MAY
CAUSE THE PINT CUP TO
SEPARATE, EXPOSING THE
BLADE, OR EXPEL HEATED
CONTENTS, BOTH OF WHICH
MAY CAUSE INJURY.
• DO NOT overfill the Pint
Cup. Keep ingredients at or
below the MAX line, prior to
freezing and before using to
prevent leaks, damage,
or injury.
• Ensure contents inside the Pint
Cup are completely frozen.
Thawed or liquid ingredients
can lead to unsafe operation
that can damage the unit
or cause bodily injury.
• Ensure the unit is fully
assembled and the Pint
Cup and Blade Block are
securely attached before
inserting into the Motor
Base before operating.
WARNING! NEVER USE THE
NUTRIBULLET CHILL
™
UNIT TO
MIX HOT INGREDIENTS.
THIS CAN PRESSURIZE
THE CONTENTS OF THE PINT
CUP, CREATING A RISK OF
SERIOUS BODILY INJURIES
OR PROPERTY DAMAGE.
• DO NOT USE hard ingredients,
loose frozen fruit, or ice.
The device is not an ice
crusher nor intended for use
as a dry ingredient grinder.
• DO NOT operate the unit
with an empty Pint Cup.
• NEVER remove the Cup
assembly while the device
is running.
• Wait for Blades to come
to a full stop before
removing the Cup assembly
or disassembling components.
Avoid contact with moving
parts.
ELECTRICAL SAFETY:
WARNING! NEVER USE
ADAPTERS OR CONVERTERS,
OR IN LOCATIONS WITH
DIFFERENT ELECTRICAL
SPECIFICATIONS.
• DO NOT modify the plug.
• Always unplug when not in use,
before cleaning, and before
assembling or disassembling.
• Unplug by grasping the plug,
not the cord.
• DO NOT let the cord hang over
the edge of a table or counter
and DO NOT use the unit with
an extension cord.
• DO NOT let the cord contact
hot surfaces, including
the stove.

54
• This appliance has a
polarized plug (one blade
is wider than the other). To
reduce the risk of electric
shock, this plug will fit into
a polarized outlet only one
way. If the plug does not
fit fully inside the outlet,
reverse the plug. If it still does
not fit, contact a qualified
electrician. Do not modify the
plug in any way.
• This appliance has important
markings on the plug. The
entire power cord is not
suitable for replacement.
If damaged, please contact
customer service.
• DO NOT use outdoors.
• NEVER attempt to bypass
or defeat the unit’s interlock
mechanism.
• DO NOT immerse the
Motor Base, cord, or plug
in water or any liquid. If
it is damaged. Contact
nutribullet
®
for service.
ADDITIONAL SAFEGUARDS:
• Remove and discard all
packaging before first use.
• Always inspect the Pint Cup
for cracks and the Blade
Block for damage before
each use. Do not operate
your nutribullet
®
if any of the
parts and accessories are or
appear to be damaged in
any manner that may impair
proper function or create a
safety hazard. If you notice
any damage immediately
contact nutribullet
®
Customer
Service for assistance.
• DO NOT use the Blade Block
shaft as a handle to carry
the Cup assembly. Hold by
grasping the Pint Cup and the
Blade Block with both hands.
• For best results, place the Pint
Cup on a level surface in the
freezer. DO NOT freeze the
contents of the Pint Cup at
an angle.
• Remove all utensils from the
Pint Cup before operating.
Failure to remove utensils
can cause the Pint Cup to
shatter, or cause damage
to the blades that may result
in bodily injury or property
damage.
• Only use the Cup and Blade
attachments supplied with
this nutribullet
®
device.
• Always operate the
appliance on a stable, level,
and dry surface.
• Clean and dry any spills on or
under the device before use.
• Allow adequate air circulation
on all sides during operation.
• Unplug when not in use,
before assembling and
disassembling, and before
cleaning.
• DO NOT use the dishwasher’s
heat or sanitize cycle to clean
the parts and accessories.
• If the device malfunctions,
stop use immediately and
contact nutribullet
®
Customer
Service at 1 (800) 523-5993.
Replacement parts are
available at nutribullet.com
or via Customer Service.
WARNING! RUNNING THE
UNIT MULTIPLE TIMES IN
SUCCESSION CAN CAUSE
THE BLADE SHAFT TO HEAT
UP, MAKING IT HOT TO
THE TOUCH.
WARNING! BLADE OR
BLADE SHAFT MAY BE HOT
AFTER USE. AFTER USE,
HANDLE BLADE HOLDER
ASSEMBLY BY THE PLASTIC
GRIP FEATURE, NOT BY THE
BLADE, SHAFT, OR BLADE
COVER. IF THE BLADE
SHAFT FEELS WARM, RUN
UNDER COOL WATER
BEFORE HANDLING.
• Do not use parts, accessories,
or attachments from other
manufacturers. Use of parts,
accessories, or attachments
NOT specifically designed for
your particular nutribullet
®
device may damage your unit
or cause serious bodily injury,
fire, or electric shock.
• Use only genuine nutribullet
®
attachments/accessories
specifically designed for
your nutribullet
®
device.
Aftermarket parts are
not made to nutribullet
®
specifications and may
damage your unit or cause
serious injury.
!
SAVE THESE
INSTRUCTIONS!
76
Contents
02 Important safeguards
08 What’s included
09 Assembly guide
10 Control panel
11 Using the programs
12 Assembly & use
12 Before first use
13 Using the nutribullet Chill
™
Ice Cream Maker
17 Important usage instructions
19 Troubleshooting
20 Error code decoder key
22 Best practices & usage tips
23 Care & maintenance
24 Replacement parts
25 nutribullet Chill
™
Ice Cream Maker
one-year limited warranty
28 Product Registration
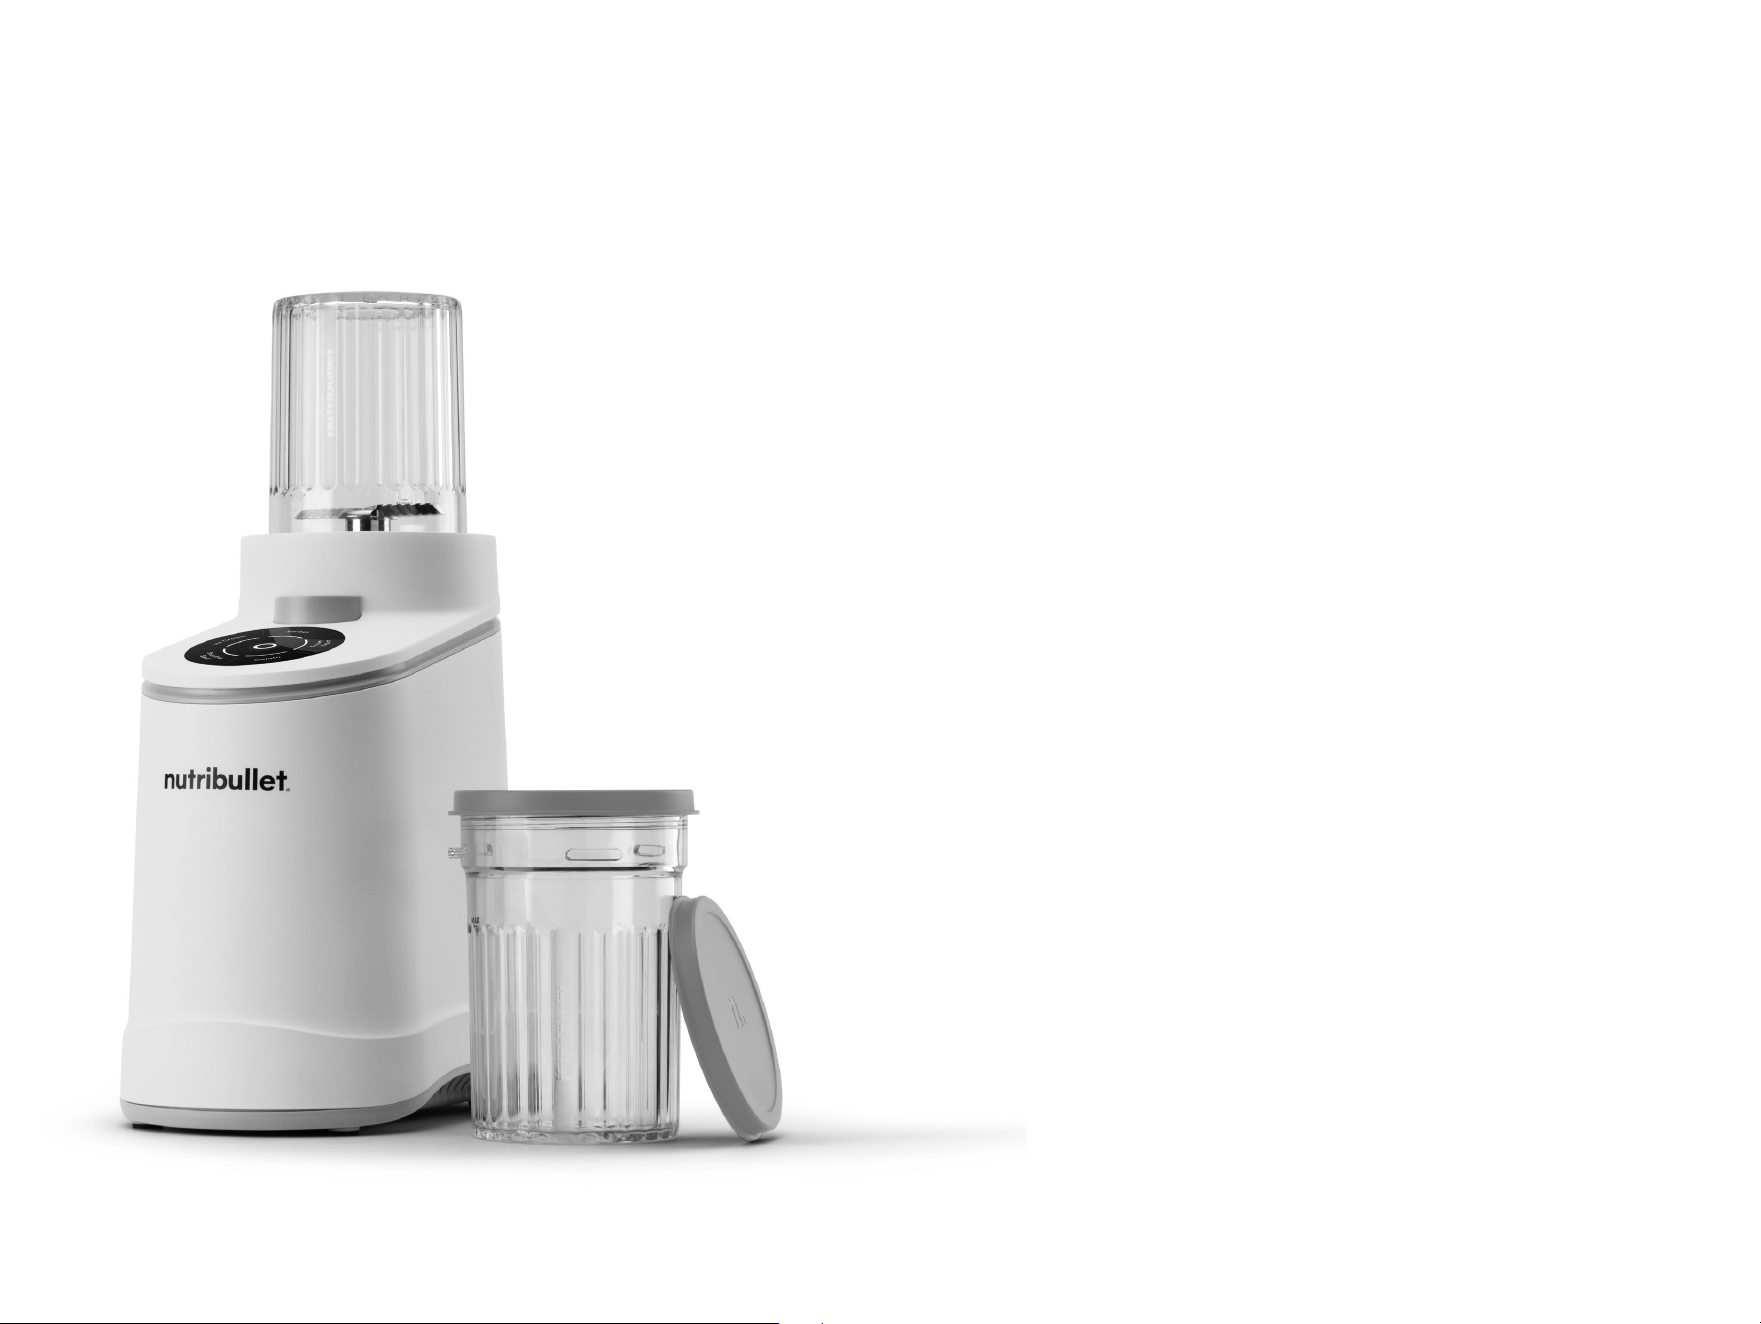
Thank you for purchasing the nutribullet Chill
™
Ice Cream Maker.
98
Product configurations may vary. To see our full list of nutribullet
®
accessories,
please visit nutribullet.com
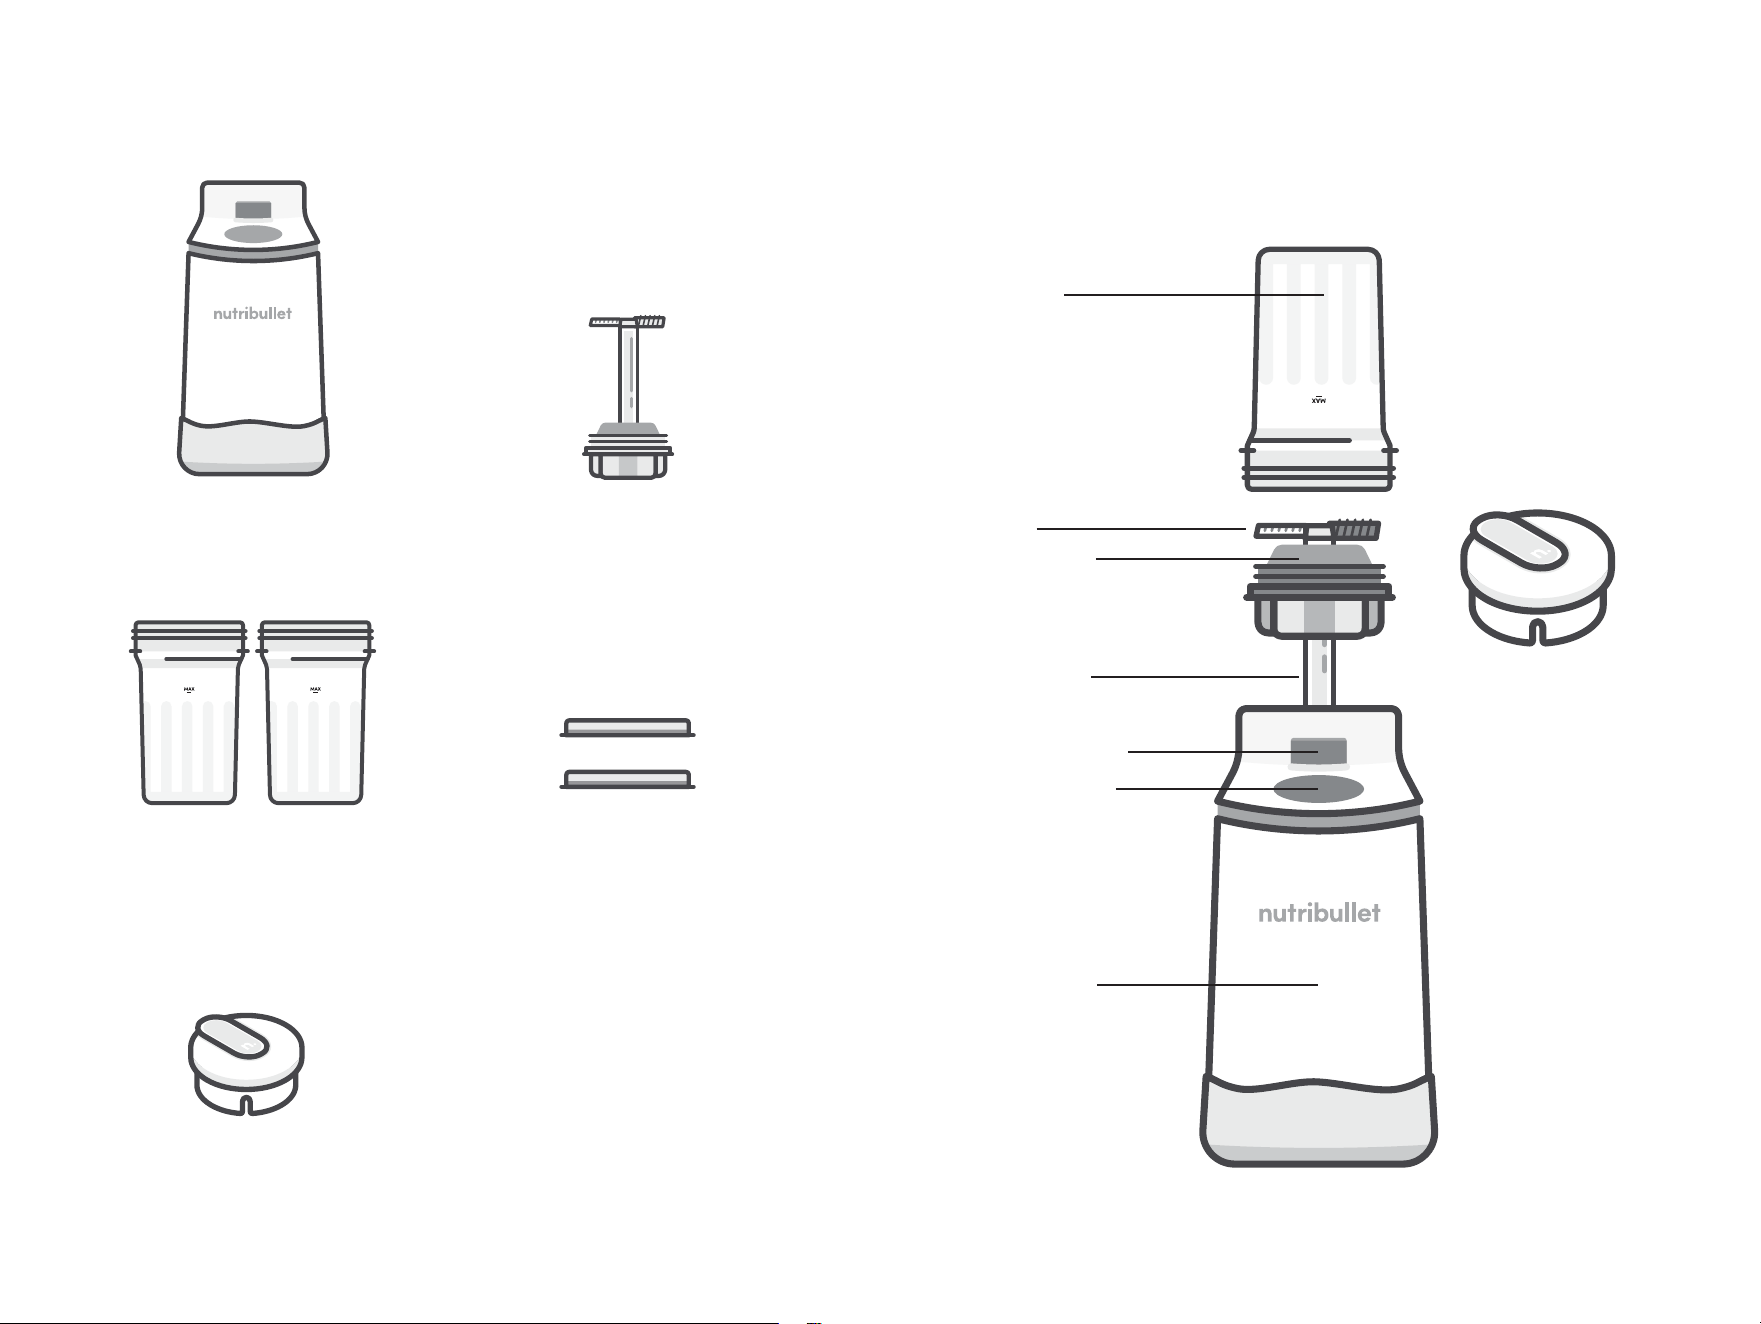
What’s included
motor base
pint cups
blade block cover
blade, blade block,
& blade shaft
pint cup lids
blade block
cover
Assembly guide
pint cup
control panel
release button
blade
blade shaft
blade block
motor base
motor base
blade block cover
16oz chill pint cups
16oz chill pint cups
chill pint cup lids
chill pint cup lids
1110
Control panel
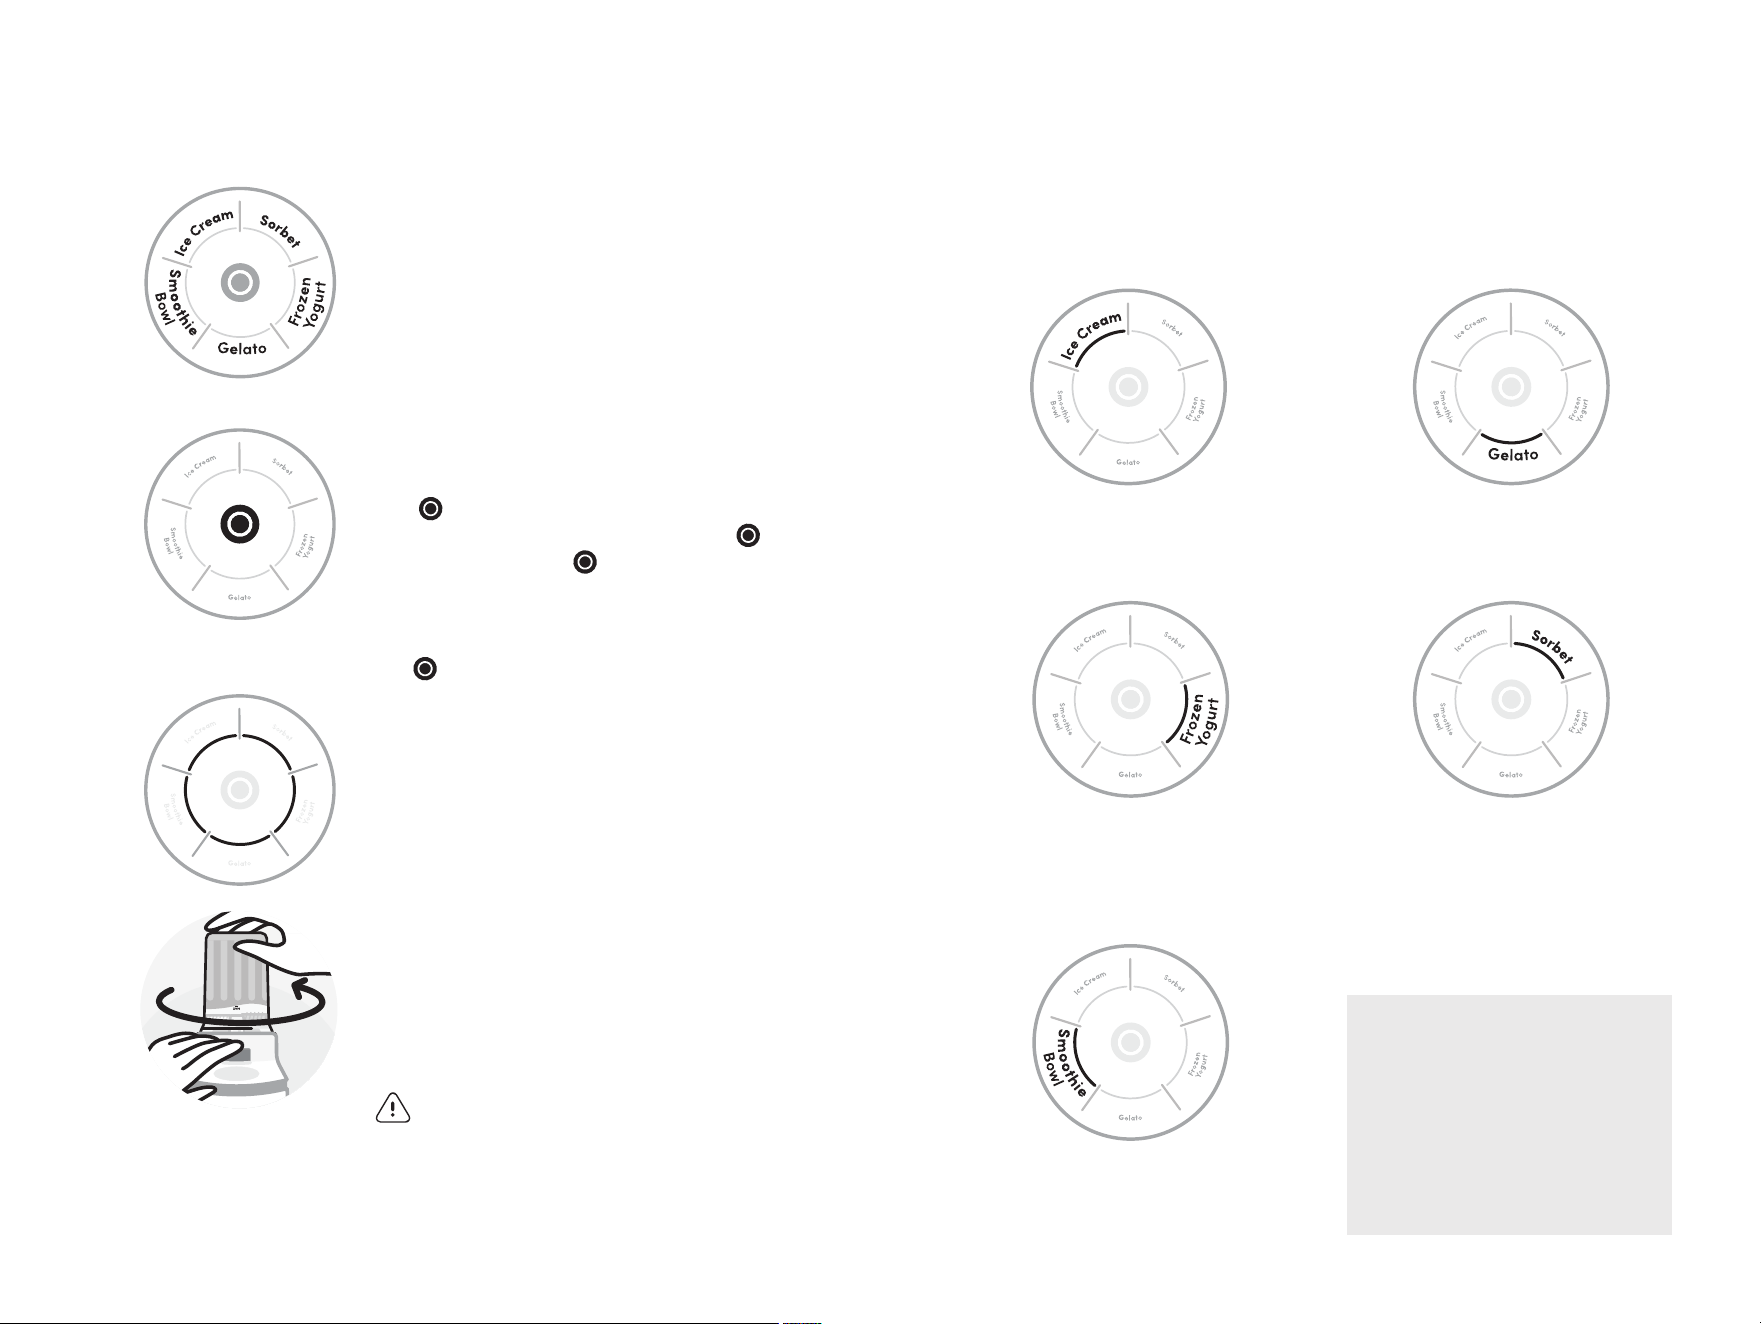
PROGRESS RING:
Indicates the progress of your
program. When all 5 segments
are illuminated your program
is complete.
CUP RELEASE BUTTON:
Push and hold the release
button while turning Pint Cup
counter-clockwise to remove Pint
Cup from Motor Base.
START / STOP:
Once a program is selected, press
to start. To pause the program at
any time during mixing, tap the
button. Tap the button again to
resume the program. To cancel the
program and return the Blade to the
home position, press and hold the
button for 2 seconds.
PROGRAMS:
Press to select any of the
five programs designed to create a
delicious frozen treat in minutes.
GELATO:
Create smooth, rich
Italian-style ice cream.
SORBET:
Transform fruit into
refreshing sorbets.
FROZEN YOGURT:
Combine regular or Greek
yogurt and flavors to make
delicious frozen yogurt.
SMOOTHIE BOWL:
Reinvent your favorite smoothie
recipes into scoopable
frozen treats.
ICE CREAM:
Make creamy, churned
ice cream classics.
WARNING! NEVER use the
nutribullet Chill
™
unit to mix hot
ingredients which can pressurize
the contents of the Cup, creating
a risk of serious bodily injury or
property damage.
B
o
w
l
Turns the nutribullet Chill™ ON or OFF.
Pre-set programs: Ice cream
Pre-set programs: Ice cream
Pre-set programs: Ice cream
Pre-set programs: Ice cream
Pre-set programs: Ice cream
Start button
Progress ring
The nutribullet Chill
™
Ice Cream Maker oers five programs for
easy operation. Each program is optimized to create a delicious
frozen treat in minutes. Programs range from approximately
3 minutes to 4 1/2 minutes.
Using the programs
NOTE: Programs may have
multiple segments with pauses in
between. When the program is
complete, the unit will beep.
Once the program is complete, press and hold the Release Button while
turning the Pint Cup counterclockwise to remove from the Motor Base.
1312
Assembly & use
1. UNPACK
Open box. Remove the Motor
Base and all attachments.
Place all parts on a flat,
dry surface.
WARNING! The Blade is sharp.
Adjust the Blade’s position
on the Blade Block using the
Shaft, not the Blade. Handle
with care.
2. CLEAN
Prior to using the dishwasher,
remove the Blade from the
Blade Block. If washing by
hand, use a sponge and dish
soap to gently clean the circular
opening on Blade Block. All
parts except the Motor Base
are top rack dishwasher safe,
or can be cleaned by rinsing
with warm, soapy water.
Clean the Motor Base with a
clean, damp cloth.
NOTE: DO NOT use the heat or sanitize
cycle of the dishwasher to clean parts
and accessories
WARNING! Never submerge
the Motor Base in water or
any other liquid. See Care &
Maintenance instructions on
page 23 for more detailed
cleaning instructions.
WARNING! Before each use
always inspect the Pint Cup
for cracks and Blade Block for
damage. Do not operate
your nutribullet
Chill
™
if any of
the parts and accessories are
or appear to be damaged in
any manner that may impair
proper function or create a
safety hazard.
Using the nutribullet Chill
™
(Liquid)
Fill the Pint Cup with your prepared recipe. Reference
the nutribullet Chill™ recipe guide for inspiration.
24h
Snap on the Storage Lid and freeze the pint cup for at least 24 hours.
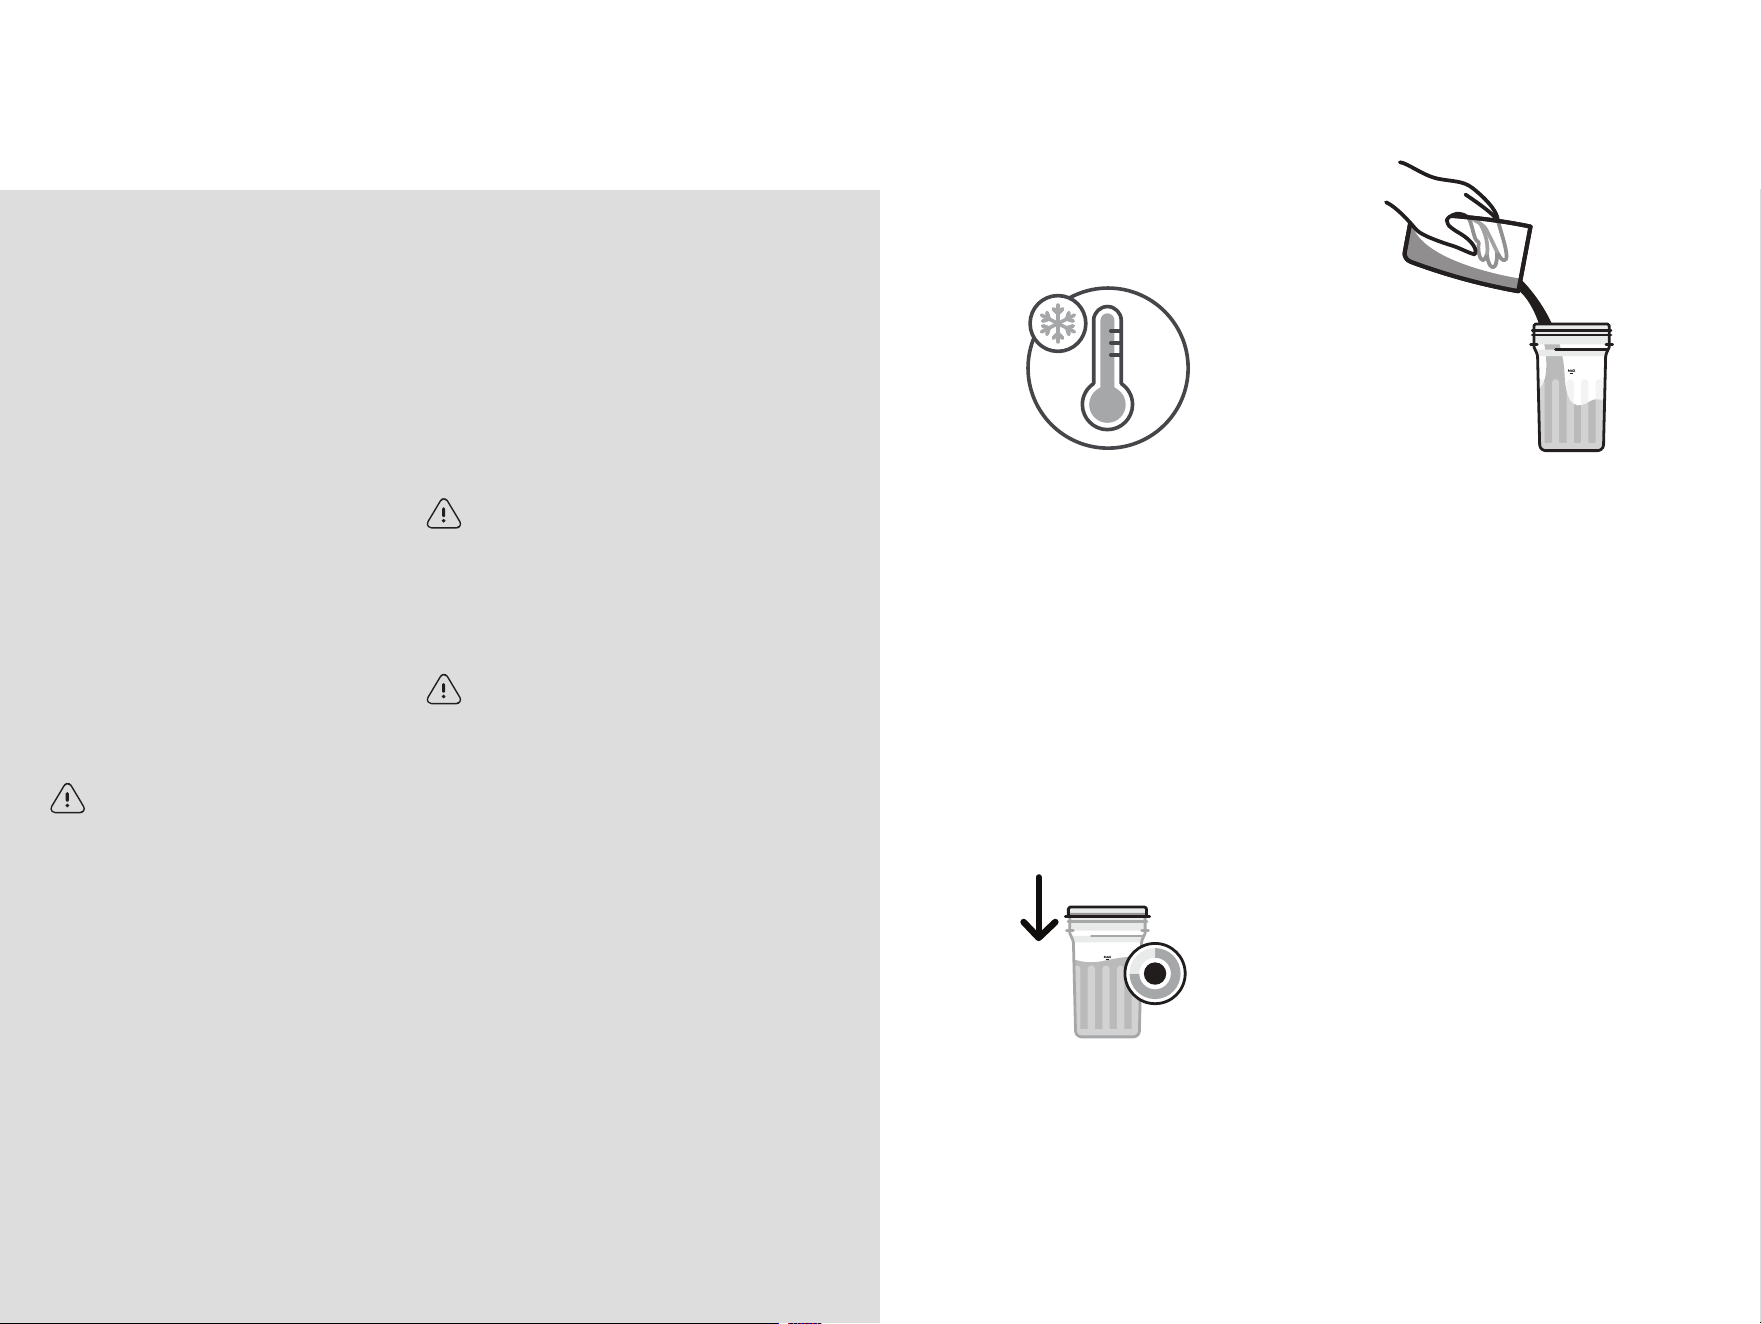
1 Adjust your freezer’s
temperature. For best
results set your freezer
between -5° and 5°F.
The nutribullet Chill
™
performs best when
recipes are frozen at this
temperature.
NOTE: Recipes frozen outside
this temperature range may not
produce optimal results.
3 Snap on the Storage Lid
and freeze the Pint Cup for
at least 24 hours.
NOTE: Place the Pint Cup on a
level surface in your freezer, to
avoid uneven freezing.
2 Fill the Pint Cup with your
prepared recipe. Reference
nutribullet Chill
™
recipes
at nutribullet.com/
nourishbynutribullet for
inspiration.
NOTE: MAX FILL: Do not exceed the
MAX FILL line to avoid leaking or
damage to the unit.
MIN FILL: Recipes below the
MIN FILL line may result in error.
Prep:
-1 5/-2 0 °C
Adjust your freezer’s temperature- For best
results set your freezer between X and X.
IMPORTANT! Review
all warning and caution
statements in the Important
Safeguards section (pages
2-5) before proceeding.
Before using your nutribullet
Chill
™
Ice Cream Maker for
the first time, please take a
moment to perform the
steps below:
Before first use
1514
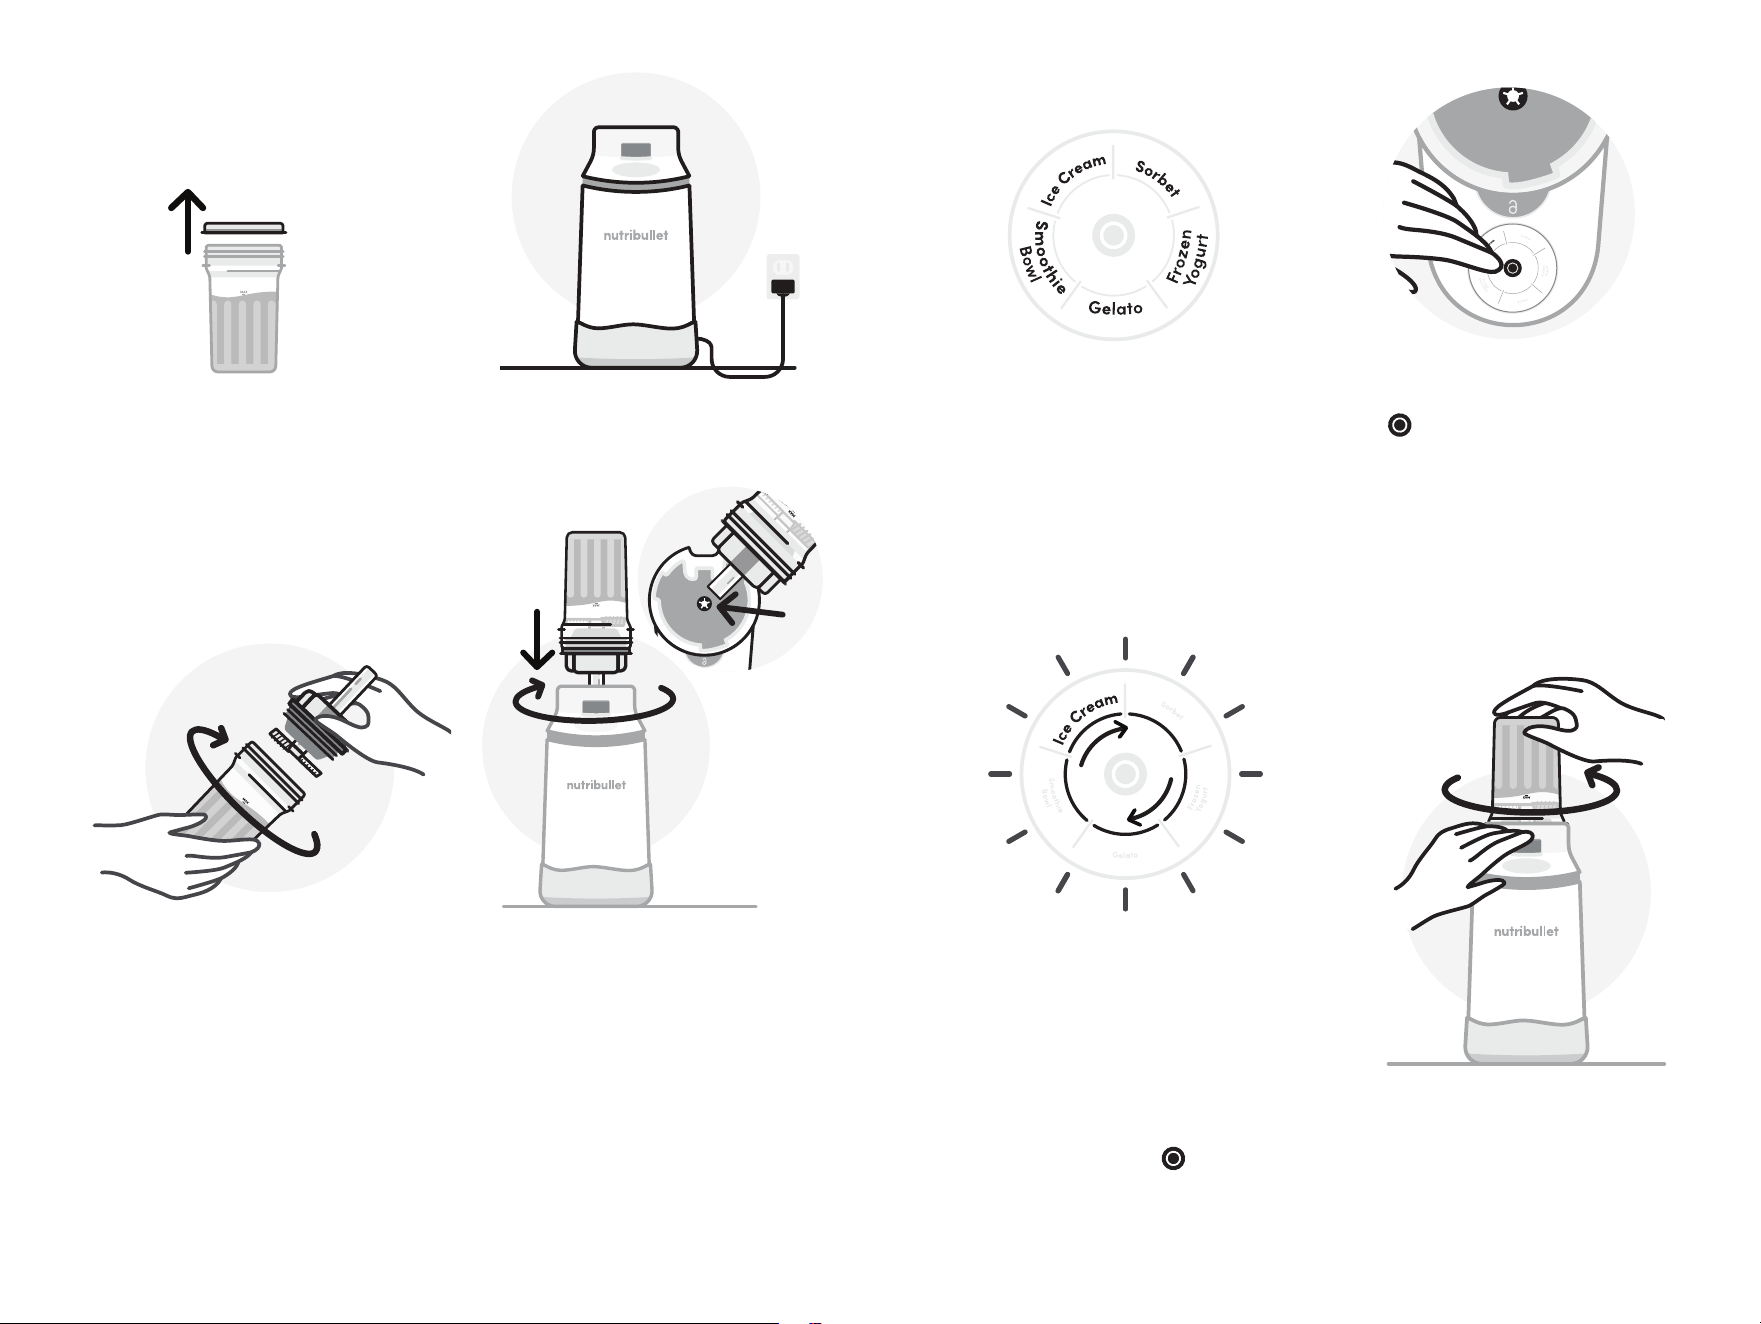
5 Place the Motor Base on
a clean, dry, level surface.
Plug in the unit.
7 Place the Pint Cup with
Blade, Blade Block and Blade
Shaft onto the Motor Base,
fitting over the drive shaft,
making sure to lower in the
Blade Shaft first. The Pint
Cup will be upside down. Line
up the tabs on the Pint Cup
with the notches on the Motor
Base. Press down on the
Pint Cup and turn clockwise
to lock into place until you
hear a CLICK.
8 The programs on the
Control Panel will
illuminate.
6 Install the Blade, Blade
Block, and Blade Shaft on
to the Pint Cup by turning
clockwise to secure it
into place.
NOTE: If the Blade is not installed
correctly, the CHECK BLADE error
light will illuminate. Fully retract the
Blade Shaft with the Blade touching
the top of the Blade Block and gently
install onto the Motor Base to
avoid having the Blade pop-up
out of position.
9 Select your desired
program, then press the
button to start. The
nutribullet Chill
™
will
automatically run the
selected program.
NOTE: Depending on the program,
your Chill
™
may start and stop
several times mid-run before it
finishes. At the end of each run,
your Chill
™
will pause and do a
quick pulse.
11 Once the program is
complete, push and hold the
release button while turning
Pint Cup counter-clockwise
to detach it from the
Motor Base.
10 The selected program will
remain illuminated, and the
Progress Ring will begin
flashing in a clockwise
sequence. The program will
beep when finished.
NOTE: To cancel the program
at any time during processing,
press and hold the button
for 2 seconds.
Place the Motor Base on a clean, dry, level surface. Plug in the unit.
Place the Pint Cup with Blade and Shaft onto the Motor Base, making sure
to lower in the Shaft first.
Install the 360 DoubleCream Blade and Shaft to the Pint Cup,
turning clockwise to secure it into place.
Select your desired preset
and press the X button to start.
Aligning the extended shaft with the internal component
Remove the frozen pint from your freezer and remove the Storage Lid.
4 Remove the frozen Pint
Cup from your freezer and
remove the Storage Lid.
NOTE: PROCESS WITHIN 5
MINUTES. Exceeding this time
may thaw the ingredients and
lead to a condition which may
damage your nutribullet Chill
™
.
Mix:
Progress ring
Once the program is complete, press and hold the Release Button while
turning the Pint Cup counterclockwise to remove from the Motor Base.
16
14 Enjoy your frozen treat
directly from the Pint Cup
or transfer to a dish.
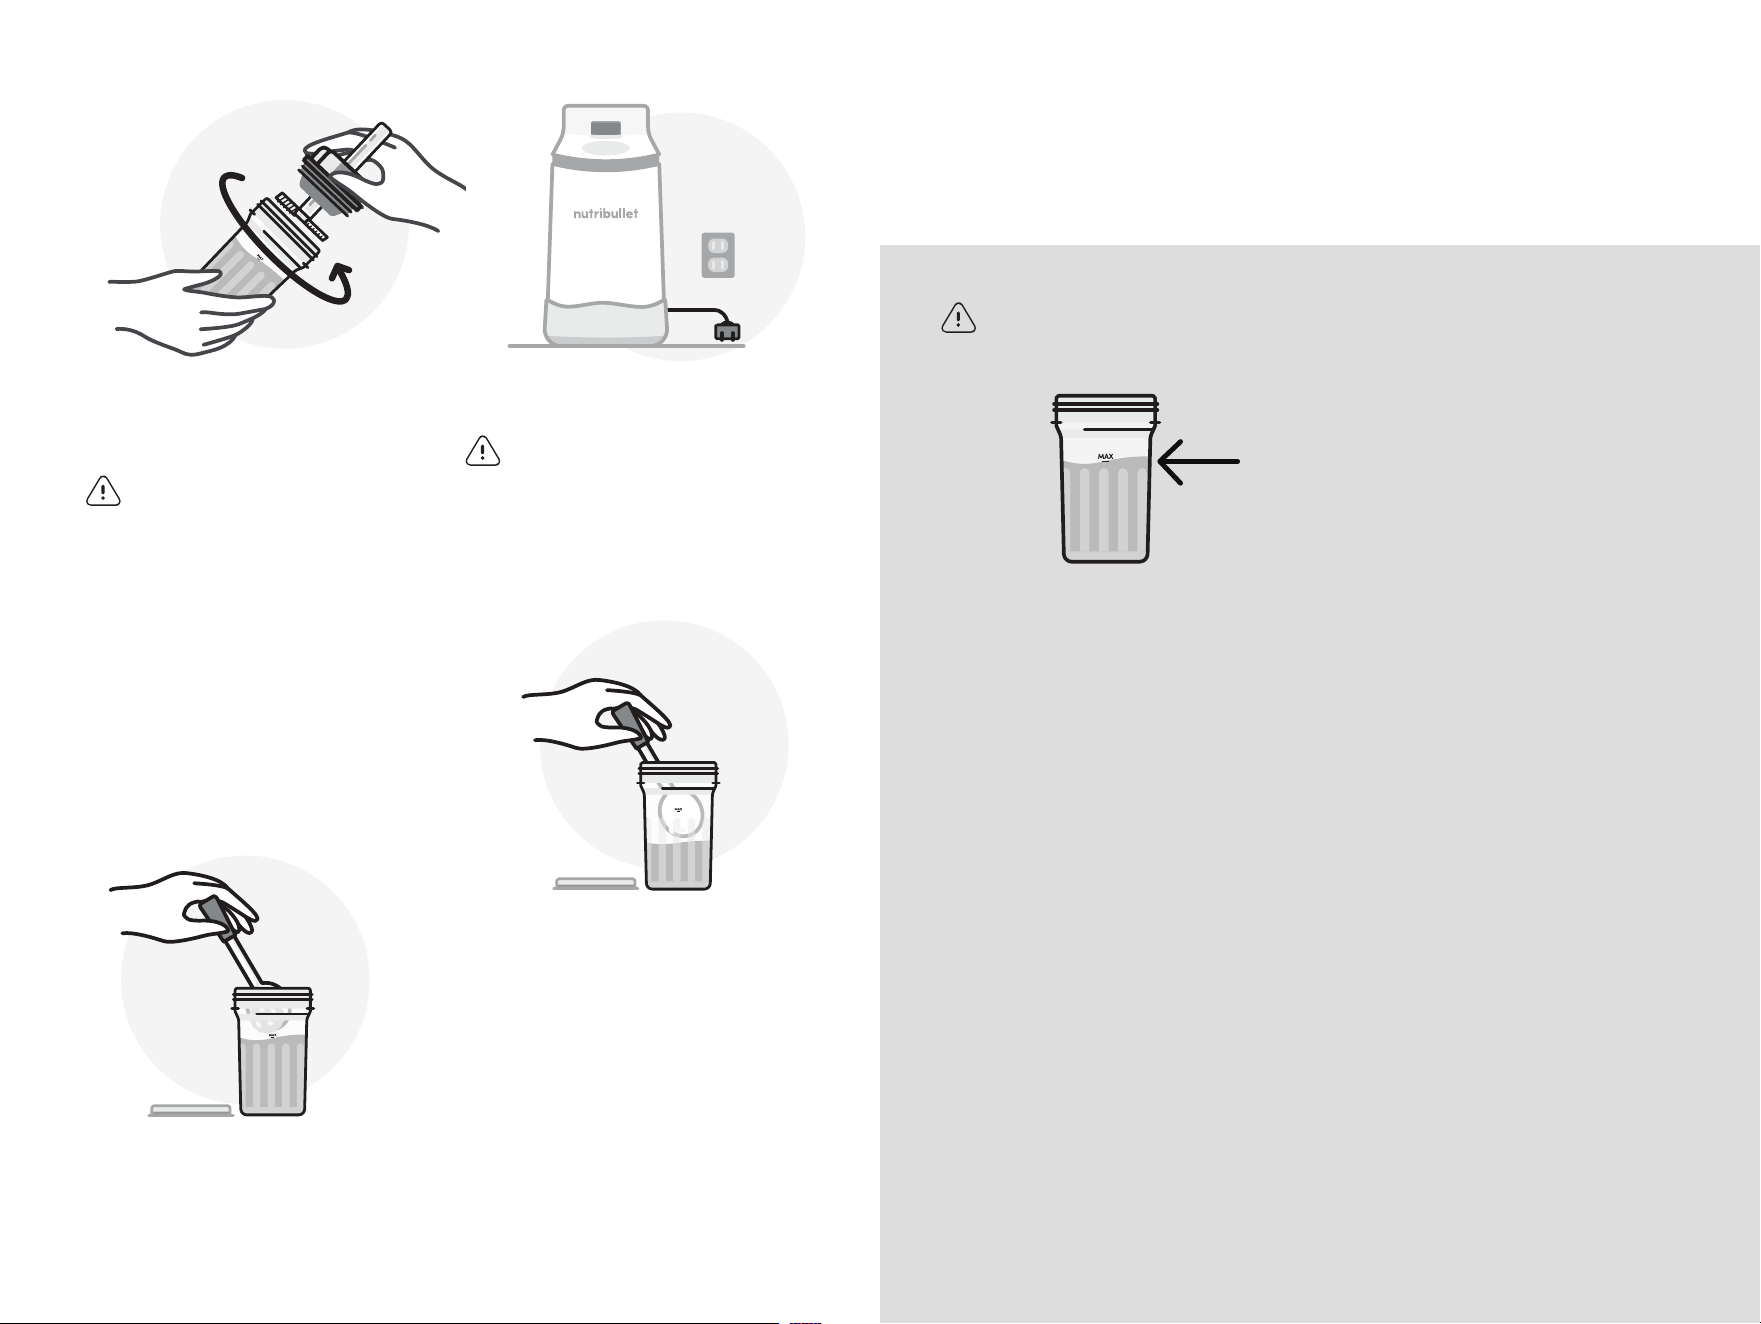
15 Didn’t finish your pint? If
you wish to refreeze your
leftover recipe to make
again later, use a spoon to
compact ingredients down
into the Pint Cup.
NOTE: Ingredients must come
up past the MIN FILL line.
Prior to refreezing, use a towel
to thoroughly clean the inside rim
of the Pint Cup to ensure the Blade
Block can be installed after freezing.
13 Unplug your nutribullet
Chill
™
when finished.
WARNING! NEVER use your
finger or tongue to remove
any mixture from the Blade.
The Blades are sharp and
may cause severe laceration
injuries.
Important usage
instructions
WARNING! NEVER EXCEED
THE MAX-FILL LINE.
• Overfilling the the Pint Cup
may cause the vessel to leak,
or prevent the Blade Block
from being fully installed on
the Pint Cup.
• Upon freezing, the ingredients
may rise above the MAX FILL
line. This is acceptable and
will not interfere with normal
operation, as long as the Blade
Block can be fully installed. A
spoon can be used to remove
excess ingredients if the Blade
Block cannot be fully installed.
• Do not add loose ingredients
such as candy or nuts before
processing. All loose ingredients
will fall to the bottom of the Pint
Cup and will not be processed.
• Loose ingredients may
damage your unit.
• Sprinkle toppings onto your
frozen treat once processing
is complete.
• This machine is not intended
to be used as an ice shaver.
Do not process ice cubes, a
solid block of ice, or frozen
liquids like lemonade, juice,
or soda.
• Remove vessel from freezer
and PROCESS WITHIN 5
MINUTES. Exceeding
this time may thaw the
ingredients and lead to a
condition which may damage
your nutribullet Chill
™
.
• NEVER microwave a frozen
Pint Cup.
• Make sure Blade Shaft is
completely dry inside and out
before inserting into Base.
12 To remove the Blade Block,
turn counterclockwise and
carefully lift it from the
Pint Cup.
NOTE: It is normal for some recipes
to appear dry / crumbly at the top
of the Pint Cup when the recipe is
fully processed. If you would like
to further soften your recipe we
recommend running a second
cycle using the Ice Cream program.
WARNING! Wait for Blades
to come to a full stop before
removing the Cup assembly
or disassembling, avoid
contact with moving parts.
Install the 360 DoubleCream Blade and Shaft to the Pint Cup,
turning clockwise to secure it into place.
Unplug when finished.
Enjoy your frozen treat directly from the Pint Cup or transfer to a dish.
Remove the frozen pint from your freezer and remove the Storage Lid.
Enjoy your frozen treat directly from the Pint Cup or transfer to a dish.
Enjoy:
17

1918
Troubleshooting
WARNING! This machine
should be used for frozen
recipes only. Thawed or
liquid ingredients can lead
to safety issues that can
damage the unit or cause
bodily injury.
WARNING! DO NOT use the
Blade Shaft as a handle to
carry the Cup assembly.
Hold by grasping the Pint
Cup and the Blade Block
with both hands.
WARNING! DO NOT USE
hard ingredients, loose
frozen fruit, or ice. The
device is not an ice crusher
nor intended to use as a dry
ingredient grinder. DO NOT
operate the unit with an
empty Pint Cup.
WARNING! NEVER LEAVE
AN EXPOSED BLADE
BLOCK ON THE MOTOR
BASE, ALWAYS PROPERLY
ATTACH THE BLADE COVER
WHEN STORING.
THE USE OF ATTACHMENTS,
INCLUDING CUPS AND
BLADES, FROM OTHER
MANUFACTURERS IS
NOT RECOMMENDED.
THEY ARE NOT
SPECIFICALLY DESIGNED
FOR YOUR NUTRIBULLET
®
DEVICE. USE OF SUCH
ATTACHMENTS MAY CAUSE
RISK OF SERIOUS INJURY.
PROBLEM
Unit does not power on.
SOLUTIONS
Ensure the power cord is
securely plugged into a
working outlet.
Make sure the Pint Cup is
secured in place on the Motor
Base. The unit will not operate
unless properly assembled.
Ensure the Blade Shaft is
fully retracted with the
Blade touching the top of
the Blade Block.
PROBLEM
Device stopped mid-cycle.
SOLUTION
Refer to the Error Code
Decoder key section.
PROBLEM
CHECK BLADE indicator
is illuminated.
SOLUTION
Ensure the Blade Shaft is
fully retracted with the Blade
touching the top of the Blade
Block. If the Blade is not in this
position CHECK BLADE error
will illuminate.
PROBLEM
My recipe came out
dry / crumbly.
SOLUTION
It is normal for some recipes
to appear dry / crumbly at the
top of the Pint Cup when the
recipe is fully processed. If you
would like to further soften your
recipe, we recommend running
a second cycle using the Ice
Cream program.
2120
Error code key
The nutribullet Chill
™
is equipped with error detection. If any Red
indicator lights appear on your Control Panel, reference Error Code Key.
Check
Blade
Start button
CONTROL PANEL
WHAT IT MEANS HOW TO RESOLVE
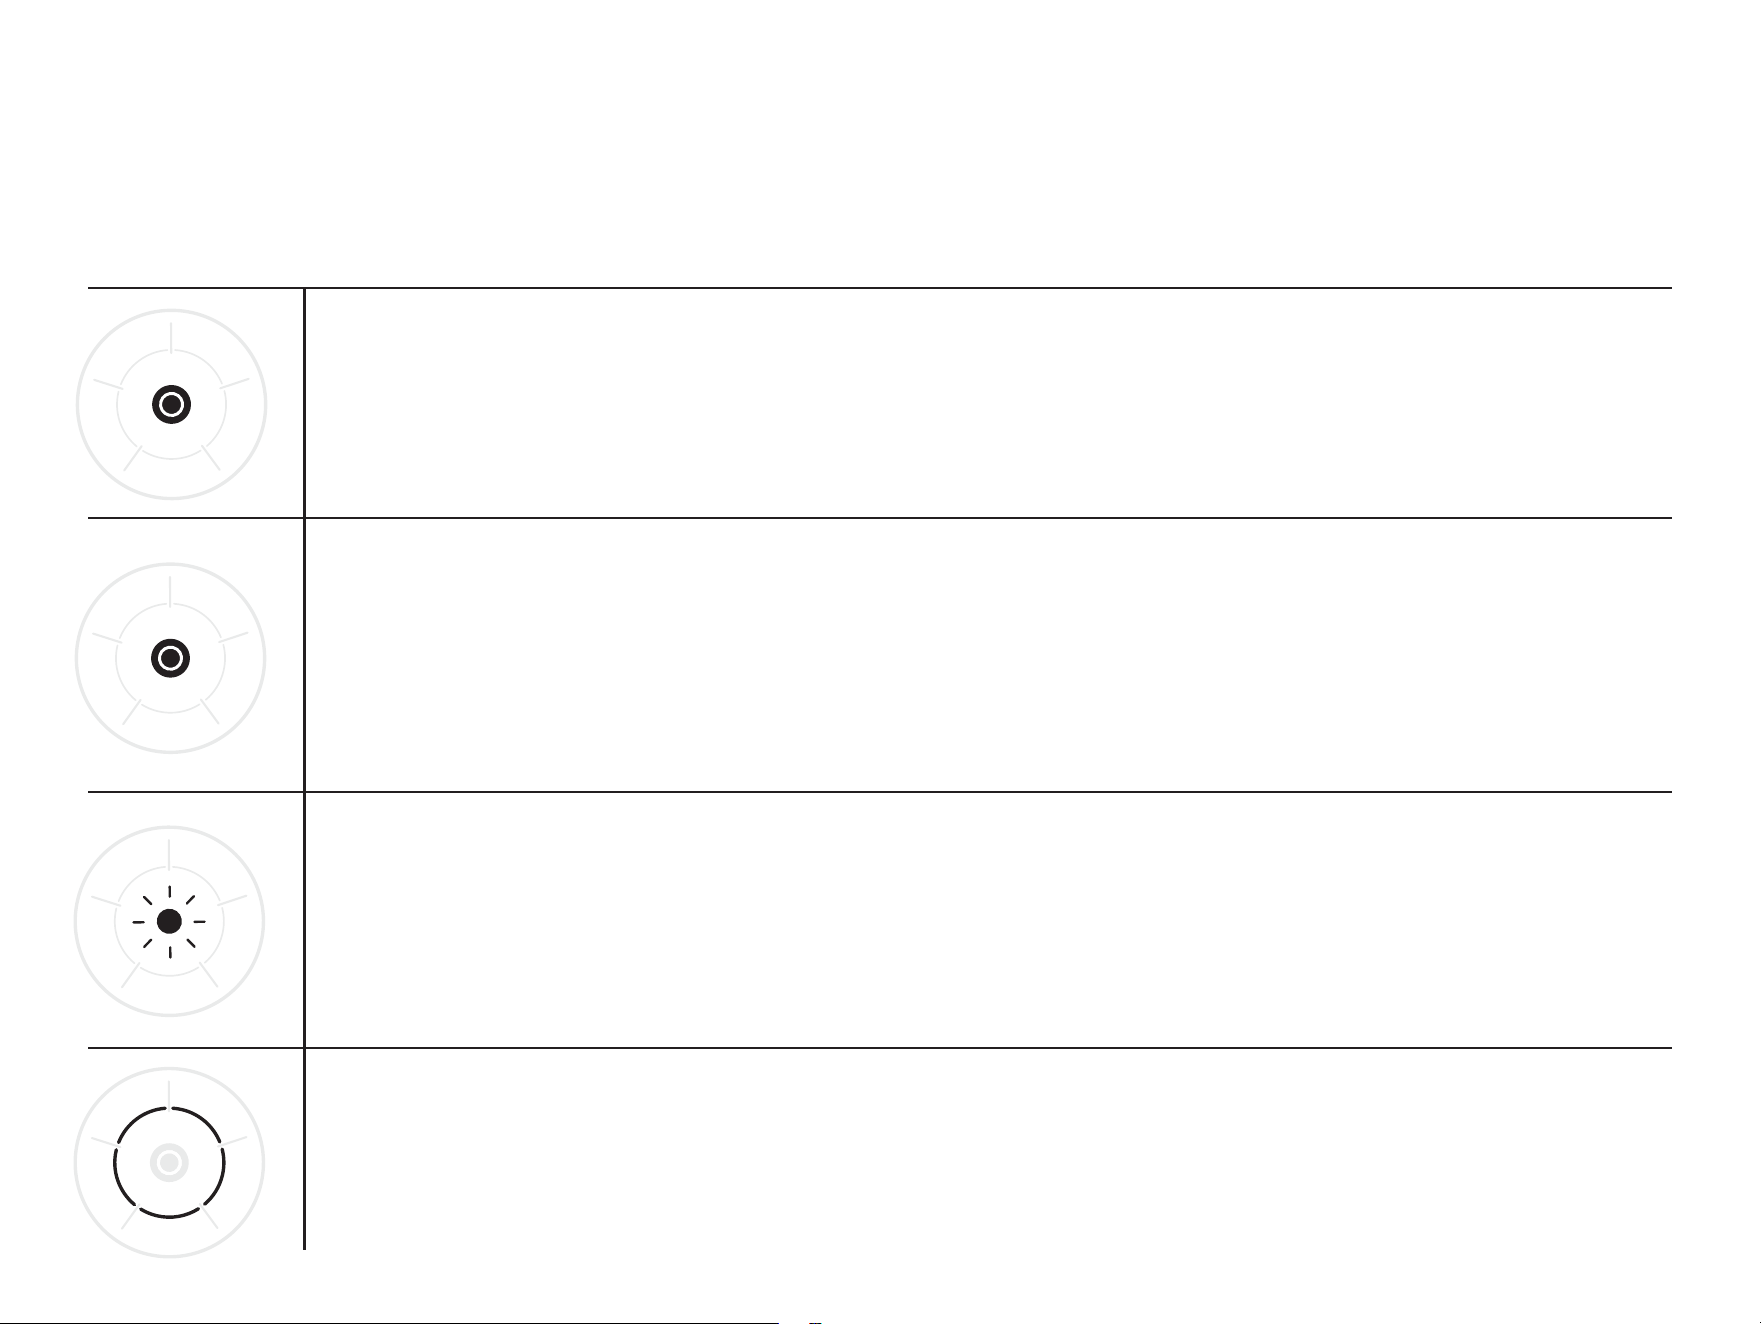
CENTER BUTTON AND CHECK BLADE SOLID RED
Your nutribullet Chill
™
may be experiencing the
following issues:
• The Blade is not installed correctly.
• The Blade Shaft decoupled during mixing.
CENTER BUTTON SOLID RED
Your nutribullet Chill
™
may be experiencing the
following issues:
• The Cup may have been removed during operation.
• The Blade may have experienced a blockage or
improper load during mixing.
PROGRESS RING SOLID RED
The unit has detected an internal hardware error.
CENTER BUTTON FLASHING RED
Your nutribullet Chill
™
may be experiencing the
following issues:
• The drive shaft was not in the home position before
starting run.
• The drive shaft is currently not in the home position
while the Cup and Blade are installed.
• There was excessive load on the motor due to a
blockage or improper load during mixing.
• There was no mixture detected during operation.
If this occurred before mixing: Please remove the Cup and Blade Block and make
sure to pull the Blade Shaft until the Blade is resting against the Blade Block.
If this occurred during or after mixing: Your mixture may not be fully processed.
Please remove the Cup and Blade Block and make sure to pull the Blade Shaft until
the Blade is resting against the Blade Block. Please follow the Best Practices and
Usage Tips section of the User Guide for recipe creation.
If the mixing was interrupted by the user and Cup was removed: Please clear the
remaining mixture before reinstalling. Reset the Blade and re-install Cup and Blade
Block into base.
If the mixing was interrupted automatically: Please remove the Cup and Blade
Block, and ensure that any blockage or remaining mixture is clear. Reset the Blade
and re-install cup and Blade Block into base.
After re-installing the Cup and Blade Block, you will be prompted to tap the home
button to reset the Blade.
If this occurred upon Blade Block and Cup install: Please tap the center button to
reset the Blade back to the home position.
If the mixing was interrupted automatically: Please remove the Cup and Blade
Block, and ensure that any blockage or remaining mixture is clear. Reset the Blade
and re-install Cup and Blade Block into base. Please be advised that the mixture
should be above minimum fill line, and below maximum fill line for best results.
Please call Customer Service for support.

2322
Best practices
& usage tips
Care & maintenance
Always UNPLUG the nutribullet
Chill
™
when not in use or before
cleaning. Wait until all parts have
stopped moving before handling.
WARNING! Handle blades
with care — they are sharp.
DETACHABLE PARTS:
• The Pint Cup, Lid, Blade, Blade
Block and Blade Shaft are top
rack dishwasher-safe. They
can also be hand-washed with
warm, soapy water.
• To clean the Blade, Blade Block
and Shaft in the dishwasher,
remove the Blade from the
Blade Block before placing on
the top rack of the dishwasher.
• If hand washing, use use use a
sponge and dish soapto gently
clean the circular opening on
Blade Block and around the
Blade Shaft.
Note: Do not use the sanitize cycle, steel
wool, or abrasive cleaners.
• Clean all parts after each use to
prevent buildup.
MOTOR BASE:
• Wipe with a damp sponge or
cloth and mild soapy water.
• If needed, use a cleaning brush
to clean around the top of the
motor base where the Pint
Cup attaches.
• Avoid liquids near the drive shaft
and center hole on Motor Base,
which may damage the unit.
• NEVER submerge the Motor
Base in water or place it in the
dishwasher.
HOW TO STORE:
STEP 1:
Ensure all parts are clean and dry.
STEP 2:
Store the unit unplugged with the
Blade Cover properly attached to
the Blade or attach the Blade to
the Pint Cup when storing.
WARNING! NEVER store an
exposed Blade Block on the
Motor Base. Always attach the
Blade Cover to the Blade or
attach the Blade to the Pint
Cup when storing.
PREPARING SMOOTHIE-BASED
RECIPES:
To help prevent settling in
smoothie-based recipes, use
ingredients like dairy or
non-dairy milks and yogurts.
REFREEZING LEFTOVERS:
If you wish to refreeze your
leftover recipe to make again
later, use a spoon to compact
ingredients down into the Pint
Cup.
Note: Ingredients must come up past
the MIN FILL line or it may result in
an error.
Prior to refreezing, use a towel
to thoroughly clean the inside
rim of the Pint Cup to ensure
the Blade Block can be installed
after freezing.
MIXING SUGAR:
• Sugar needs to be dissolved
to avoid settling, and to ensure
consistent flavor.
• Use a bowl and whisk to
dissolve sugar in liquid
ingredients before freezing.
Alternatively, dissolve sugar
by heating it in your milk/
cream mixture. Allow it to cool
completely before freezing.
• Consider using simple syrup or
agave in place of sugar.
BLENDER COMPATIBILITY:
• The nutribullet Chill
™
Pint
Cup is compatible with
nutribullet Turbo
™
, Ultra, and
SmartSense
™
Blade Blocks.
For recipes that require
blending ingredients prior
to freezing, simply attach
the nutribullet
©
blender
Blade Block to the Pint
Cup and attach to your
blender base.

2524
To order additional parts and accessories, please visit our website
at nutribullet.com/shop/accessories or feel free to contact
Customer Service: 1 (800) 523-5993.
Use only genuine nutribullet
®
attachments/accessories specifically
designed for your nutribullet
®
device. Aftermarket parts are not
made to nutribullet
®
specifications and may damage your unit or
cause serious injury.
Replacement parts
nutribullet Chill
™
Ice
Cream Maker one-year
limited warranty
LIMITED WARRANTY
FOR NUTRIBULLET
®
nutribullet
®
, LLC’s and Capital
Brands Distribution, LLC’s
(together, “nutribullet
®
”)
limited warranty obligations
are confined to the terms
set forth below:
nutribullet
®
warrants
nutribullet
®
products against
defects in materials and
workmanship for a period
of one year from the date
of original retail purchase,
product pick up, or delivery
– whichever is later – as
applicable in your jurisdiction.
This limited warranty is valid
only in the country* in which
the product is purchased
and comes with the product
at no extra charge, however,
shipping and processing fees
will be incurred for returns,
replacements, and/or refunds.
An additional three-year
warranty extension can be
purchased separately – please
see details below.
If a defect exists and is subject
to this limited warranty, at
its option nutribullet
®
will
(1) repair the product at
no charge, using new or
refurbished replacement parts,
(2) exchange the product with
a product that is new or that
has been manufactured from
new or serviceable used parts,
and is at least functionally
equivalent to the original
product, or (3) refund the
purchase price of the product.
A replacement product
assumes the remaining
warranty of the original
product. A repaired product
has a one-year warranty from
the date of repair. When a
product or part is exchanged,
any replacement item
becomes your property and
the replaced item becomes
nutribullet’s property. When a
refund is given, your product
becomes nutribullet’s property.
OBTAINING WARRANTY
SERVICE
For limited warranty service,
simply call our customer
service department at
800-523-5993 or contact us
via email from our website at
nutribullet.com/contact-us
simply click the Contact Us
link, fill out and submit the

2726
customer contact form and we
will be glad to help you. When
you contact our customer
service department you will be
asked to furnish your name,
address, telephone number
and to provide proof of the
original purchase (receipt)
containing a description of
the product(s), purchase
date, and the appropriate
nutribullet
®
bar code(s).
Before you send your product
for limited warranty service,
please make sure to keep a
copy of all relevant documents
for your files (receipt, etc.). It
is always recommended to
purchase product insurance
and tracking services when
sending your product for
service. Remember, shipping
and processing fees will be
incurred by you and are not
covered by the one-year
limited warranty.
EXCLUSIONS AND
LIMITATIONS
This nutribullet
®
One-
Year Limited Warranty
applies only to nutribullet
®
products distributed by or
for nutribullet
®
that can be
identified by the “nutribullet
®
”
trademark, trade name, logo
axed to it, and bar code.
nutribullet’s One-Year Limited
Warranty does not apply to
any unauthentic products
or accessories that were
not distributed/ sold by
nutribullet
®
or through
nutribullet.com. Normal
wear and tear is not covered
by this limited warranty.
This limited warranty applies
to consumer use only, and
is void when the product
is used in a commercial or
institutional setting.
This limited warranty
extends only to the original
consumer purchaser and is
not transferable. In addition,
proof of purchase must be
demonstrated.
Repair or replacement of
the product (or, if repair or
replacement is not feasible, a
refund of the purchase price)
is the exclusive remedy of the
consumer under this limited
warranty. nutribullet
®
shall not
be liable for any incidental or
consequential damages for
breach of this limited warranty
or any implied warranty on this
product. This limited warranty
gives you specific legal rights,
and you may also have other
rights which vary from state to
state. nutribullet
®
is not liable
for any damage to products
not covered by this warranty
(e.g., cups, book, User Guide).
This limited warranty does not
apply: (a) to damage caused
by accident, abuse, misuse,
or misapplication; (b) to
damage caused by improper
maintenance (including
unauthorized parts service); (c)
to a product or a part that has
been modified in any way; (d)
if any nutribullet
®
bar code or
trademark has been removed
or defaced; and/or (e) if the
product has been used with an
adapter/converter.
THIS LIMITED WARRANTY
AND THE REMEDIES
SET FORTH ABOVE ARE
EXCLUSIVE AND IN LIEU OF
ALL OTHER WARRANTIES,
REMEDIES AND CONDITIONS,
WHETHER ORAL OR WRITTEN,
EXPRESS OR IMPLIED.
NUTRIBULLET
®
SPECIFICALLY
DISCLAIMS ANY AND ALL
IMPLIED WARRANTIES,
INCLUDING, WITHOUT
LIMITATION, WARRANTIES
OF MERCHANTABILITY AND
FITNESS FOR A PARTICULAR
PURPOSE. IF NUTRIBULLET
®
CANNOT LAWFULLY DISCLAIM
IMPLIED WARRANTIES UNDER
THIS LIMITED WARRANTY,
ALL SUCH WARRANTIES,
INCLUDING WARRANTIES
OF MERCHANTABILITY AND
FITNESS FOR A PARTICULAR
PURPOSE ARE LIMITED IN
DURATION TO THE DURATION
OF THIS LIMITED WARRANTY.
No nutribullet
®
reseller, agent,
or employee is authorized to
make any modification to
this warranty.
NUTRIBULLET
®
IS NOT
RESPONSIBLE FOR DIRECT,
SPECIAL, INCIDENTAL OR
CONSEQUENTIAL DAMAGES
RESULTING FROM ANY
BREACH OF WARRANTY
OR CONDITION, OR
UNDER ANY OTHER LEGAL
THEORY, INCLUDING BUT
NOT LIMITED TO LOST
PROFITS, DOWNTIME,
GOODWILL, DAMAGE TO
OR REPLACEMENT OF
EQUIPMENT AND PROPERTY.
NUTRIBULLET
®
SPECIFICALLY
DOES NOT REPRESENT THAT
IT WILL BE ABLE TO REPAIR
ANY PRODUCT UNDER THIS
LIMITED WARRANTY.
Some states and provinces
do not allow the exclusion
or limitation of incidental or
consequential damages or
exclusions or limitations on the
duration of implied warranties
or conditions, so the above
limitations or exclusions
may not apply to you. This
warranty gives you specific
legal rights, and you may also
have other rights that vary
by state or province.
28
Product registration
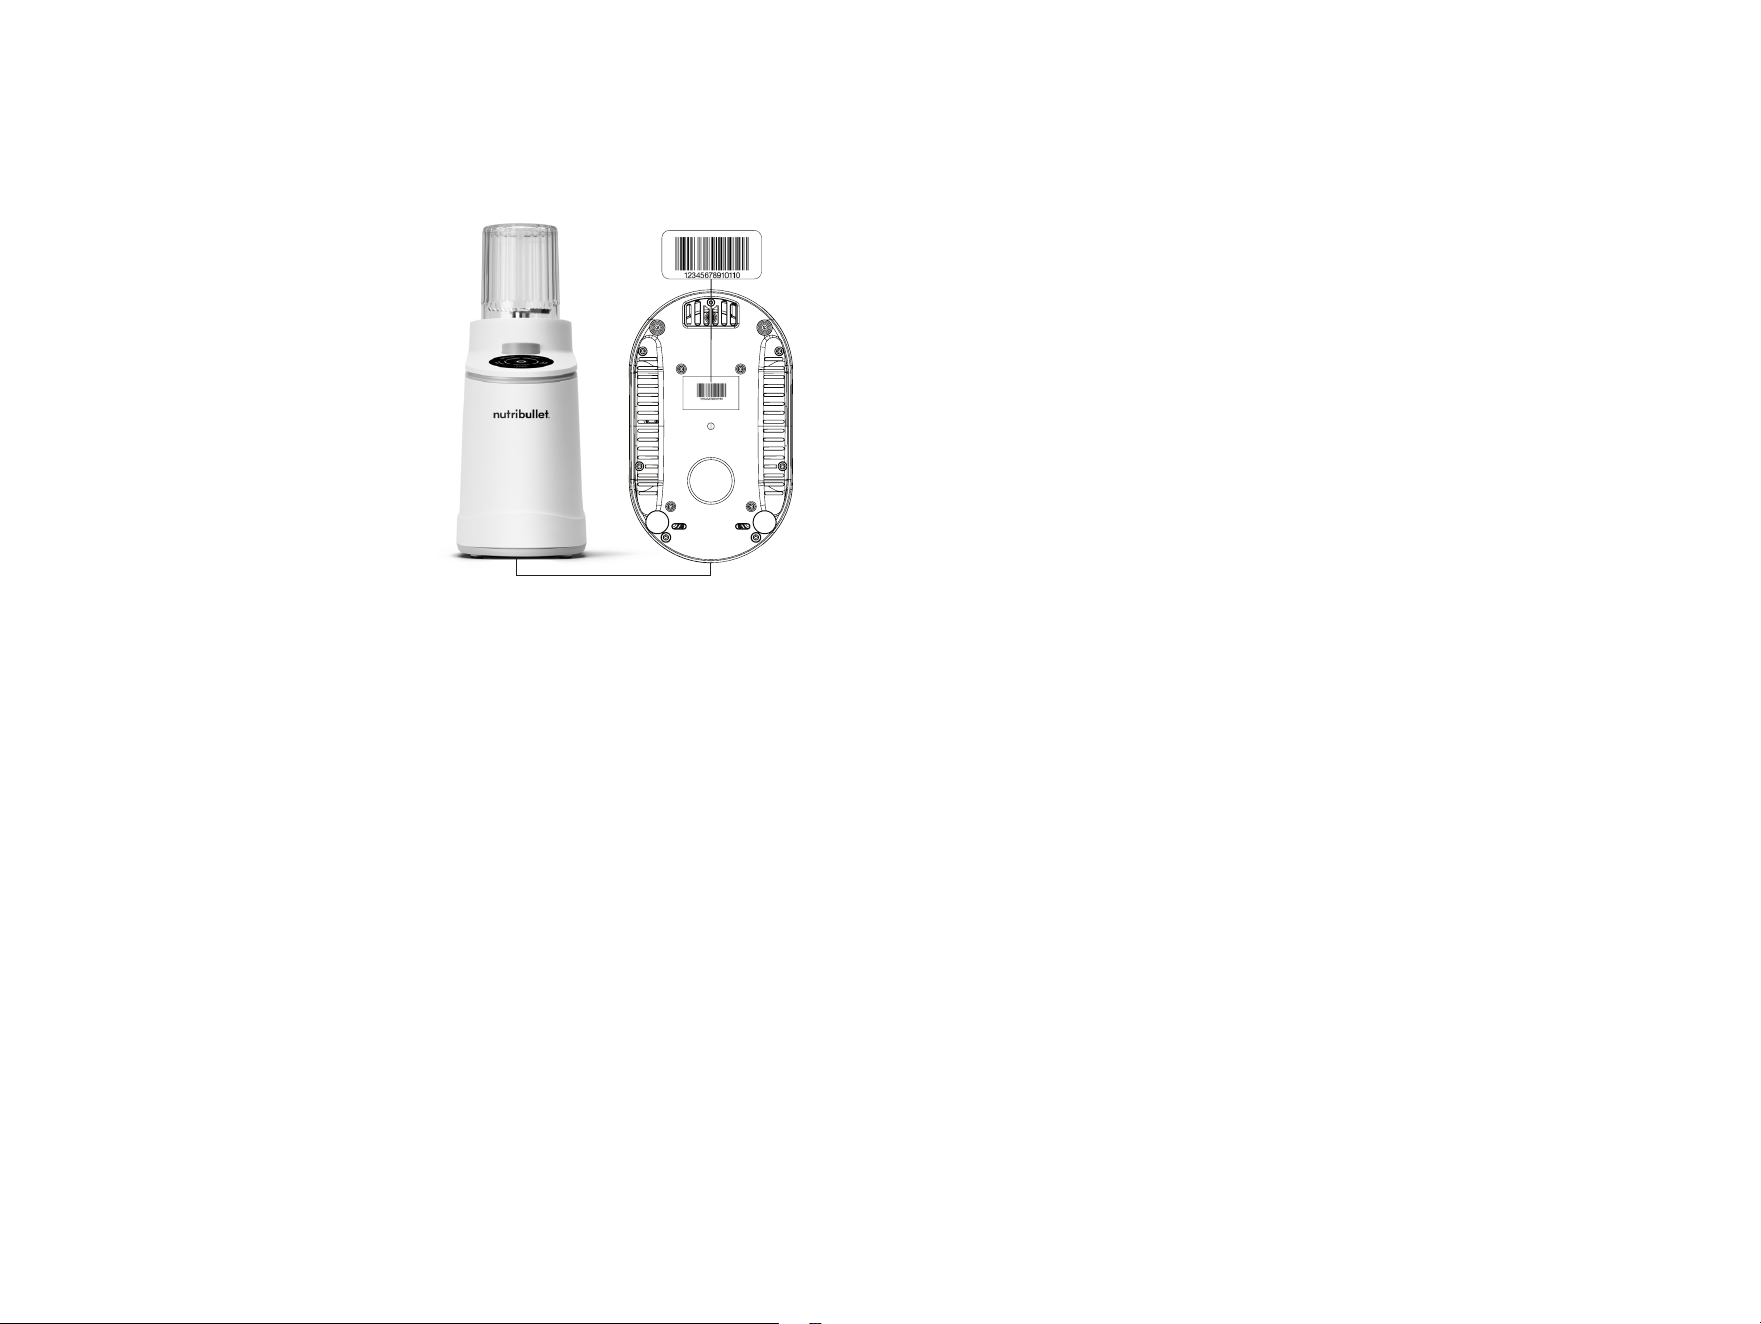
How to find the serial number
under the Motor Base.
Please visit nutribullet.com/
shop/accessories or call
1 (800) 523-5993 to register
your new nutribullet
Chill
™
Ice
Cream Maker. You will be asked
to enter the serial number
of your product, along with
the purchase date or date of
actual delivery of the product
and place of purchase. The
information submitted is for
product registration only.
Failure to complete the product
registration does not diminish
your warranty rights.
The registration will enable us to
contact you in the unlikely event
of a product safety notification.
By registering your product,
you acknowledge to have read
and understood the instructions
for use and warnings set forth in
the accompanying instructions.

Capital Brands Distribution, LLC | nutribullet.com | All rights reserved.
nutribullet
®
and the nutribullet
®
logo are trademarks of CapBran Holdings,
LLC registered in the U.S.A. and worldwide.
Illustrations may dier from the actual product. We are constantly striving
to improve our products, therefore the specifications contained herein
are subject to change without notice.
260327_NBD50100