
INSTRUCTION GUIDE
CARRO DE MESÓN
GUÍA DE INSTRUCCIONES
CHARIOT DE COMPTOIR
GUIDE D'INSTRUCTION
Model No: HO-1006-XNA

2
TABLE OF CONTENTS
04
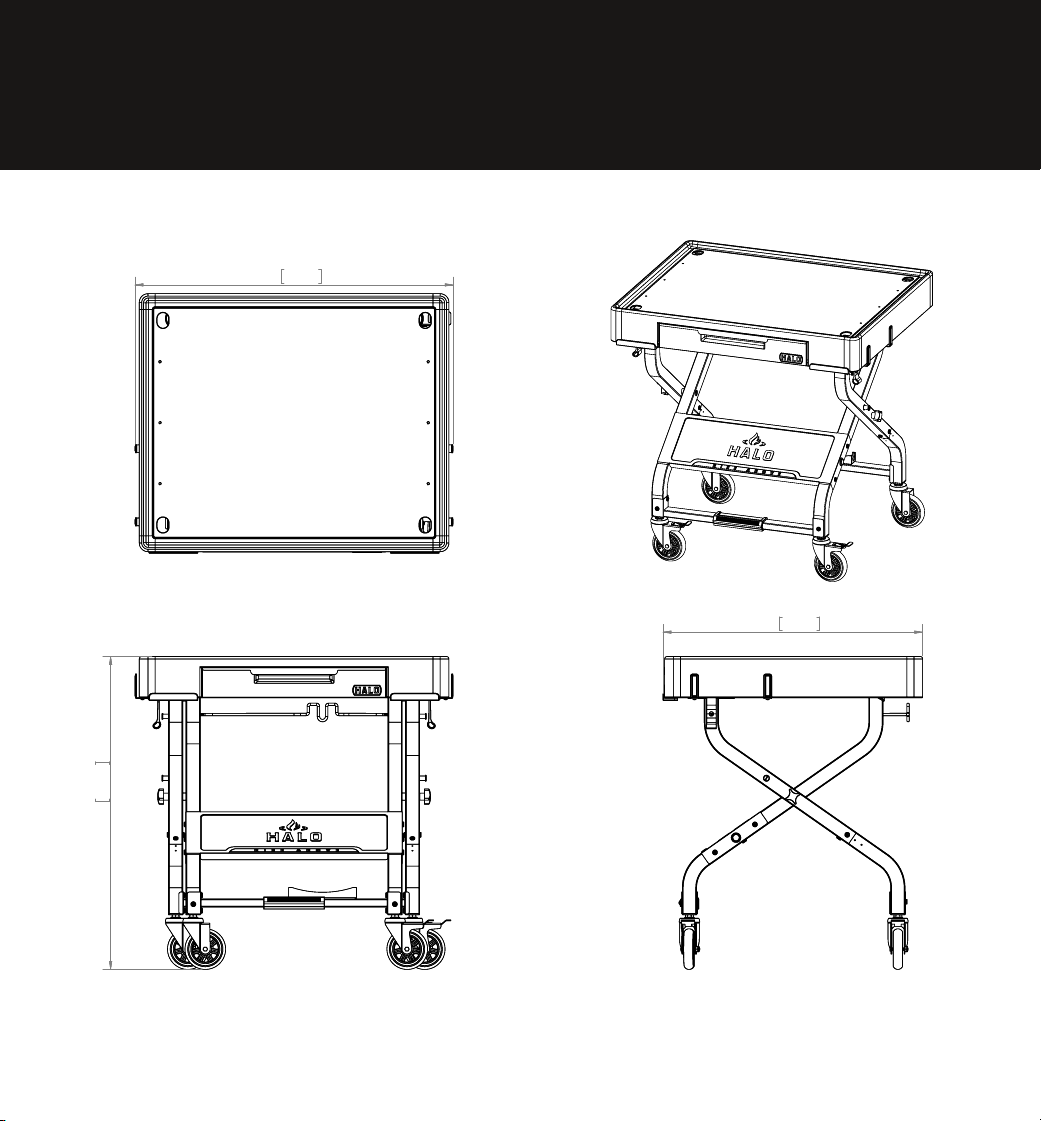
ABOUT THE COUNTERTOP CART
05
FOR USE WITH THE VERSA 16 OUTDOOR PIZZA OVEN
AND PRIME 300 COUNTERTOP PELLET GRILL
06
OWNER'S MANUAL
11
ASSEMBLY INSTRUCTIONS
24
HOW TO COLLAPSE THE COUNTERTOP CART
08
COUNTERTOP CART PARTS LIST
07
PRODUCT INSTALLATION RECORD
10
ASSEMBLY PREPARATION
23
ASSEMBLED DIMENSIONS
25
FIVE (5) YEAR LIMITED WARRANTY

28
MANUAL DEL USUARIO
33
INSTRUCCIONES DE MONTAJE
30
LISTA DE PIEZAS DEL CARRO DE MESÓN
32
PREPARACIÓN DEL MONTAJE
DIMENSIONES DE MONTAJE
45
GARANTÍA LIMITADA DE CINCO (5) AÑOS
47
46
CÓMO COLAPSAR EL CARRO DE MESÓN
3
29
REGISTRO DE INSTALACIÓN DEL PRODUCTO
50
MANUEL DU PROPRIÉTAIRE
55
INSTRUCTIONS DE MONTAGE
52
LISTE DES PIÈCES DU CHARIOT DE COMPTOIR
54
PRÉPARATION DE L'ASSEMBLAGE
DIMENSIONS DE L'ASSEMBLAGE
67
GARANTIE LIMITÉE DE CINQ (5) ANS
69
68
COMMENT REPLIER LE CHARIOT DE COMPTOIR
51
DOSSIER D'INSTALLATION DU PRODUIT
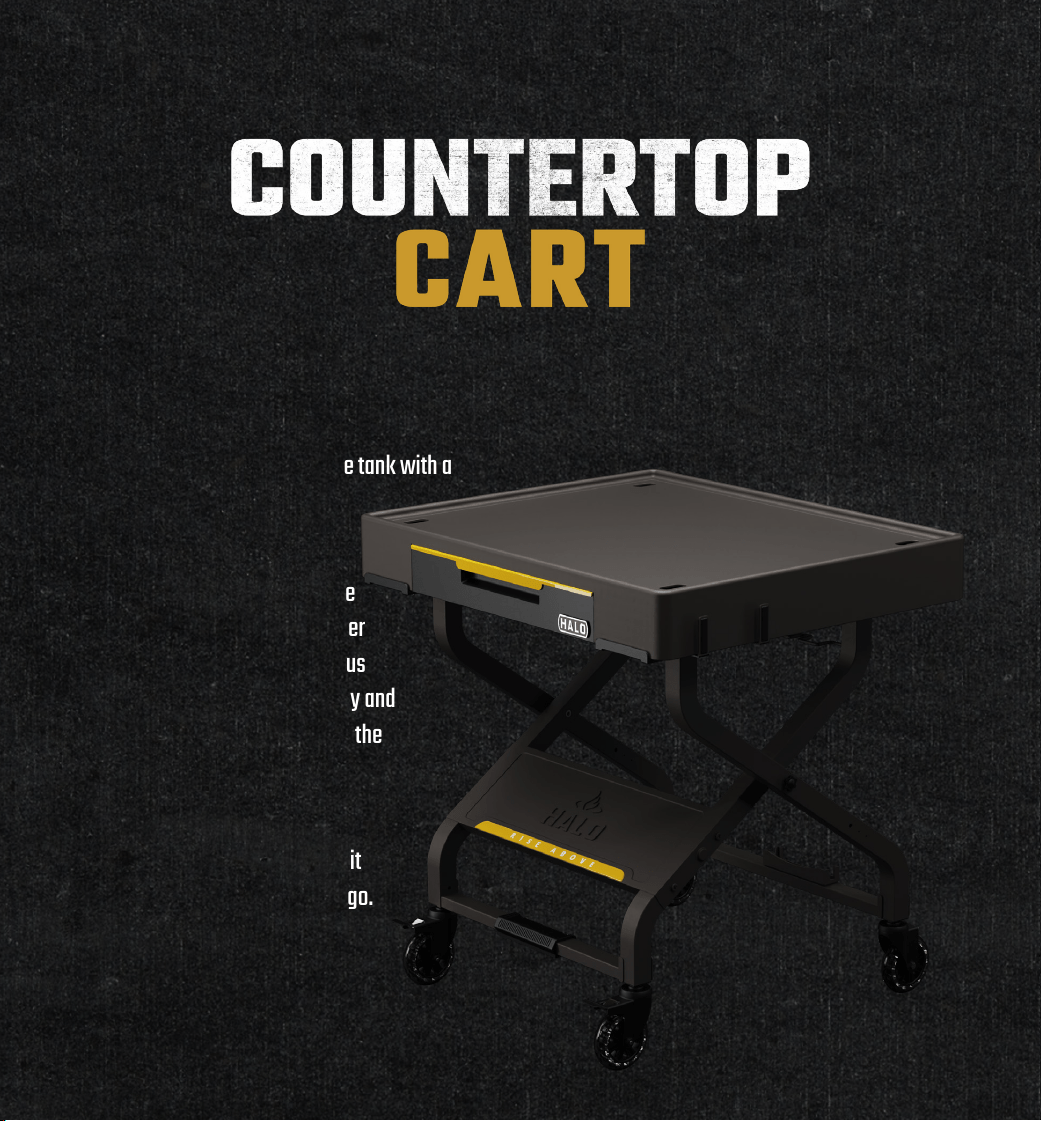
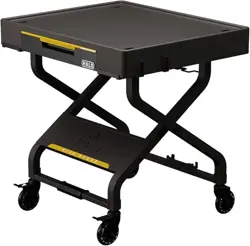
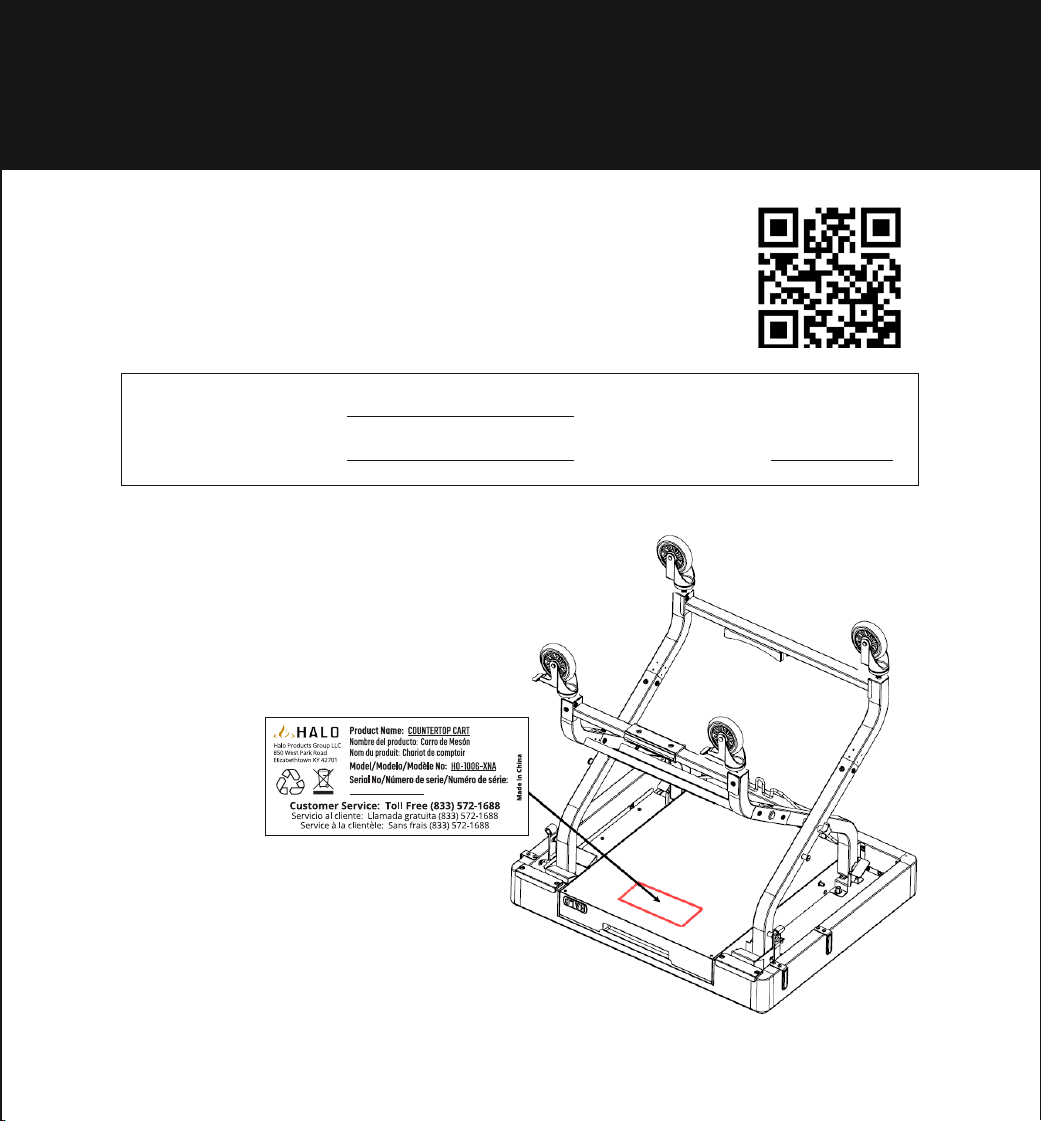
ABOUT THE
The HALO Countertop Cart’s unique features perfectly pair with any Halo countertop
product. Free up clutter and keep your space clean with a hidden drop-down drawer,
strategically placed drainage holes, and a magnetic attachment to access cooking utensils.
Safely store your 20lb propane tank with a
lock-in-place setting at the
cart's rear base.
The CTC also has a 360-degree
rolling range and durable caster
wheels compatible with various
rolling surfaces, making it easy and
comfortable to transition from the
deck to outdoor terrain.
Easily collapsible, the simple
detach and drop detail makes it
perfect for the patio or on the go.
Outdoor storage never
looked so sleek!
4

PIZZA OVEN AND PELLET GRILL SOLD SEPARATELY
5

SCAN FOR
Product Registration
Online Owner’s Guide
Assembly Videos
6
OWNER'S MANUAL
MODEL NO: HO-1006-XNA
SAVE THIS MANUAL FOR FUTURE REFERENCE.
READ ALL INSTRUCTIONS BEFORE INSTALLING AND USING THE
COUTERTOP CART.
WARNING
This product can expose you to chemicals known to the
State of California to cause cancer and birth defects or
other reproductive harm. For more information go to
www.P65Warnings.ca.gov
WARNING
CALIFORNIA PROPOSITION 65

7
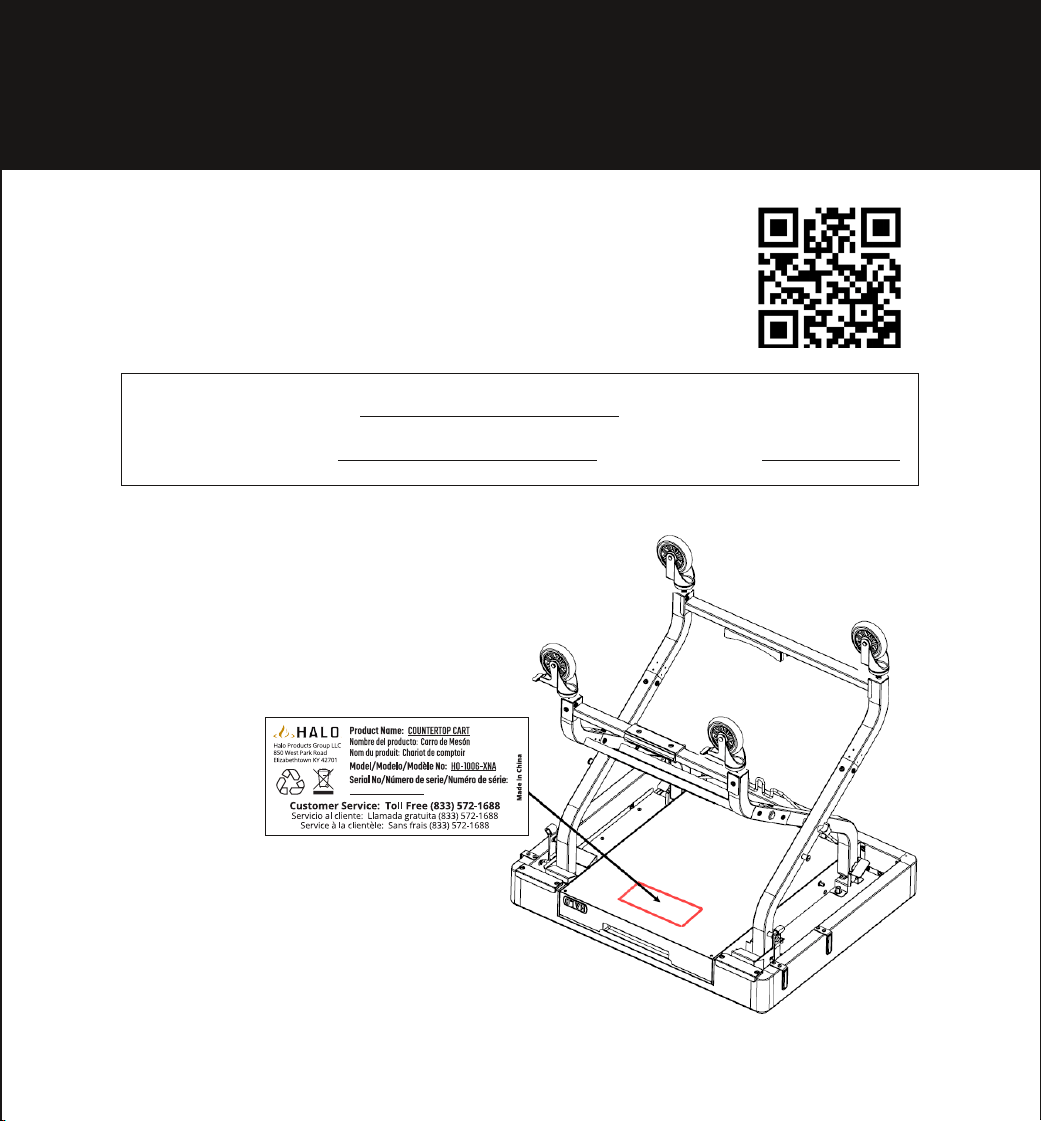
PRODUCT INSTALLATION RECORD
NOTICE: Model number
and Serial Number
located on bottom of the
drawer.
Model Number:
Serial Number: Purchase Date:
7
IMPORTANT: FILL OUT PRODUCT RECORD INFORMATION BELOW, OR
TO REGISTER YOUR PRODUCT, VISIT OUR WEBSITE AT halo-pg.com.
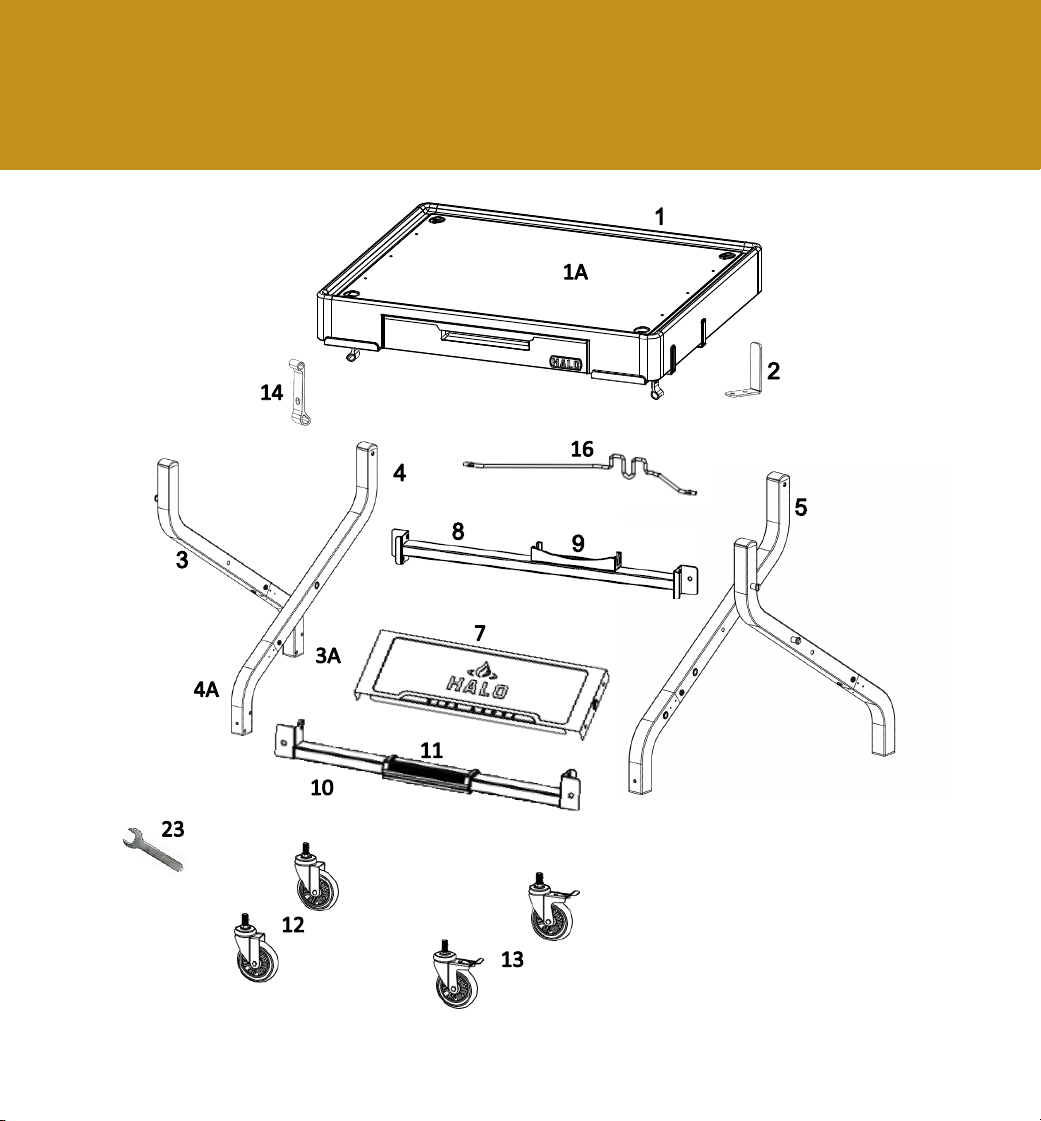
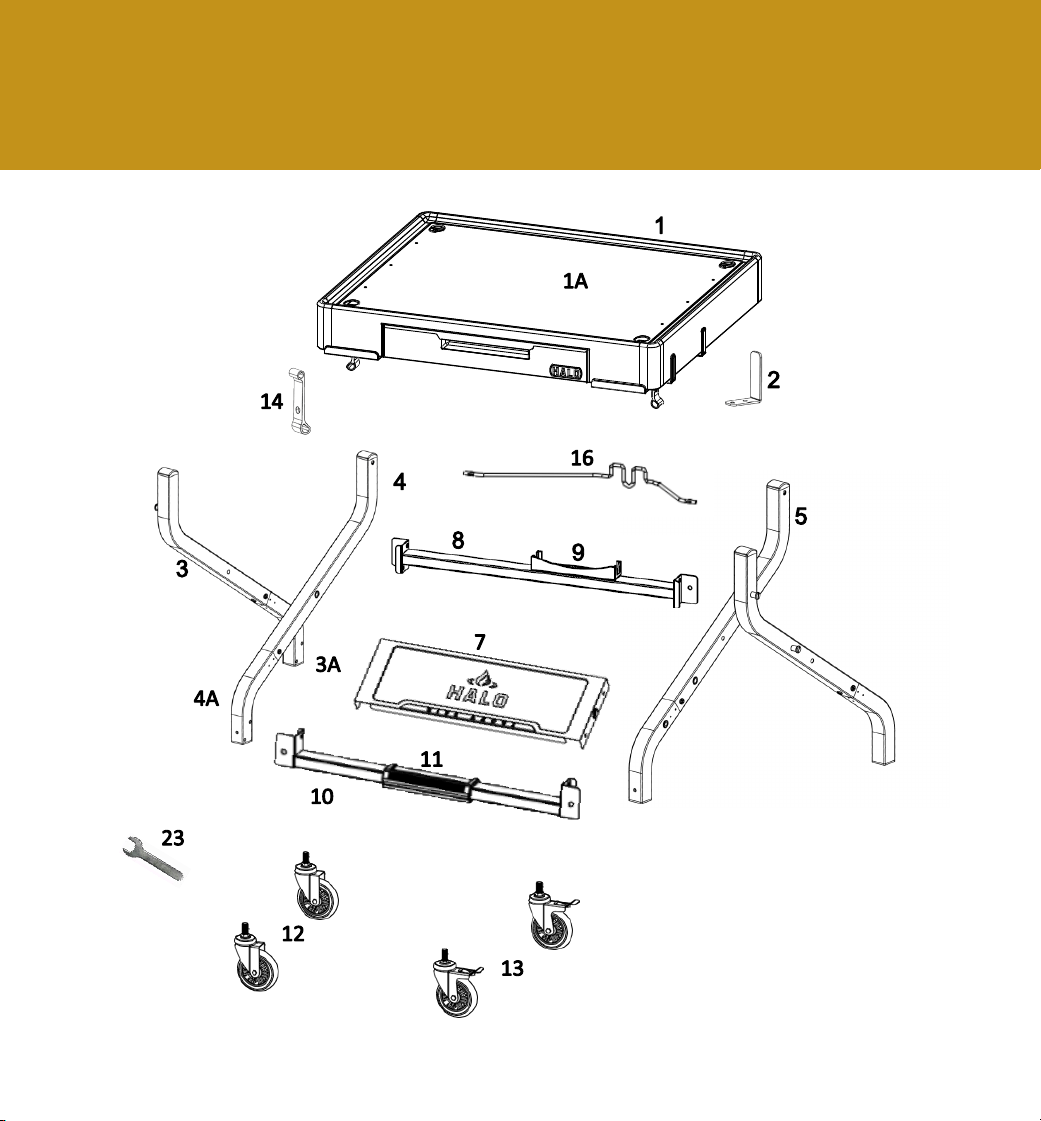
CART PARTS LIST
8
5A
6
6A
15
NOTE: Item 2 included in hardware pack.

CART PARTS LIST
Countertop Assembly HO-1006-XNA-1 1
Countertop Panel HO-1006-XNA-1A 1
Magnetic Tool Hook HO-1006-XNA-2 4
Left-Outer Leg-Long HO-1006-XNA-3 1
Left-Outer Leg-Short HO-1006-XNA-3A 1
Left-Inner Leg-Long HO-1006-XNA-4 1
Left-Inner Leg-Short HO-1006-XNA-4A 1
Right-Inner Leg-Long HO-1006-XNA-5 1
Right-Inner Leg-Short HO-1006-XNA-5A 1
Right-Outer Leg-Long HO-1006-XNA-6 1
Right-Outer Leg-Short HO-1006-XNA-6A 1
Front Panel with Logo HO-1006-XNA-7 1
Rear Brace HO-1006-XNA-8 1
Tank Support Bracket HO-1006-XNA-9 1
Front Brace HO-1006-XNA-10 1
Footrest Pad HO-1006-XNA-11 1
Caster-Non-swivel HO-1006-XNA-12 2
Caster-with Lock HO-1006-XNA-13 2
Latch-Common HZ-1004-03 2
Leg Cap HO-1006-XNA-14 4
Tank Retention Wire HO-1006-XNA-15 1
Hardware Blister Pack HO-1006-XNA-16 1
M6 x 14 Screw HO-1006-XNA-17 26
M4 x 12 Screw HO-1006-XNA-17A 14
M6 Shoulder Screw HO-1006-XNA-19 4
Leg Bushing HO-1006-XNA-20 2
M6 Knob with Threaded Shaft HO-1006-XNA-21 2
8mm Pivot Pin HO-1006-XNA-22 2
Cotter Pin HO-1006-XNA-23A 2
Flat Washer HO-1006-XNA-23B 2
17mm Caster Wrench HO-1006-XNA-23 1
ITEM PART DESCRIPTION PART NO.
1
1A
2
3
3A
4
4A
5
5A
6
6A
7
8
9
10
11
12
13
14
15
16
17
18
QTY.
18A
19
20
21
9
22
22A
22B
23
1010
IMPORTANT: It is advised to read each step entirely before starting assembly on
instructions. Do not tighten screws completely until all screws for that step have
been installed.
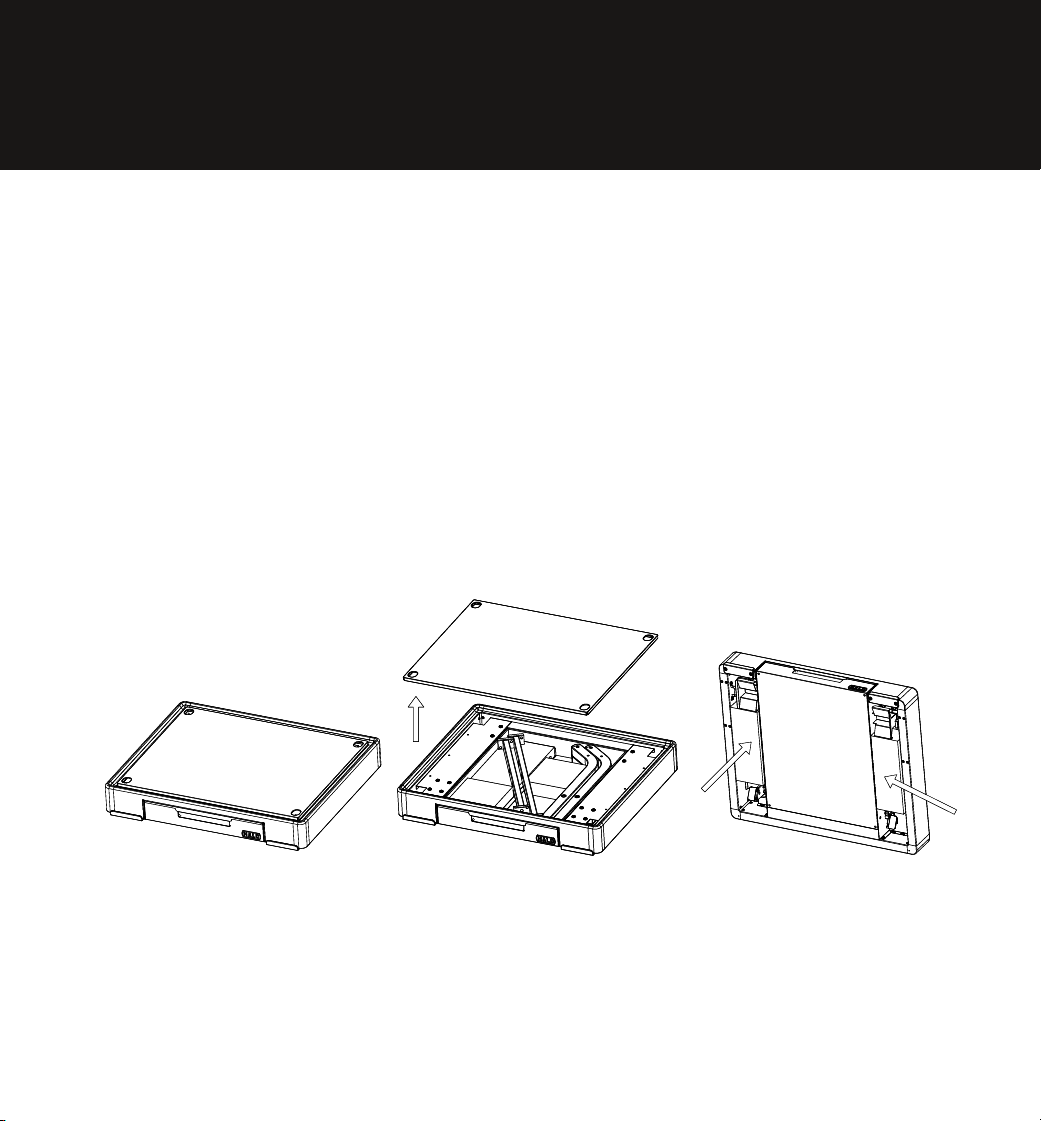
ASSEMBLY PREPARATION
Parts are located throughout the shipping carton, including inside the
drawer. Inspect all parts, and hardware blister pack after removing from
the protective shipping carton. Discard all packaging materials from
inside and outside of the cart before assembly, then review and inspect
all parts by referencing the parts list. If any part is missing or damaged,
do not attempt to assemble. Contact Halo Customer Service for parts.
Halo Customer Service:
Monday-Friday, 8am-5pm
Toll Free: 1-833-572-1688
NOTE: The packaging carton can be attened and use as protective pad to help
painted surface from scratch during assembly.
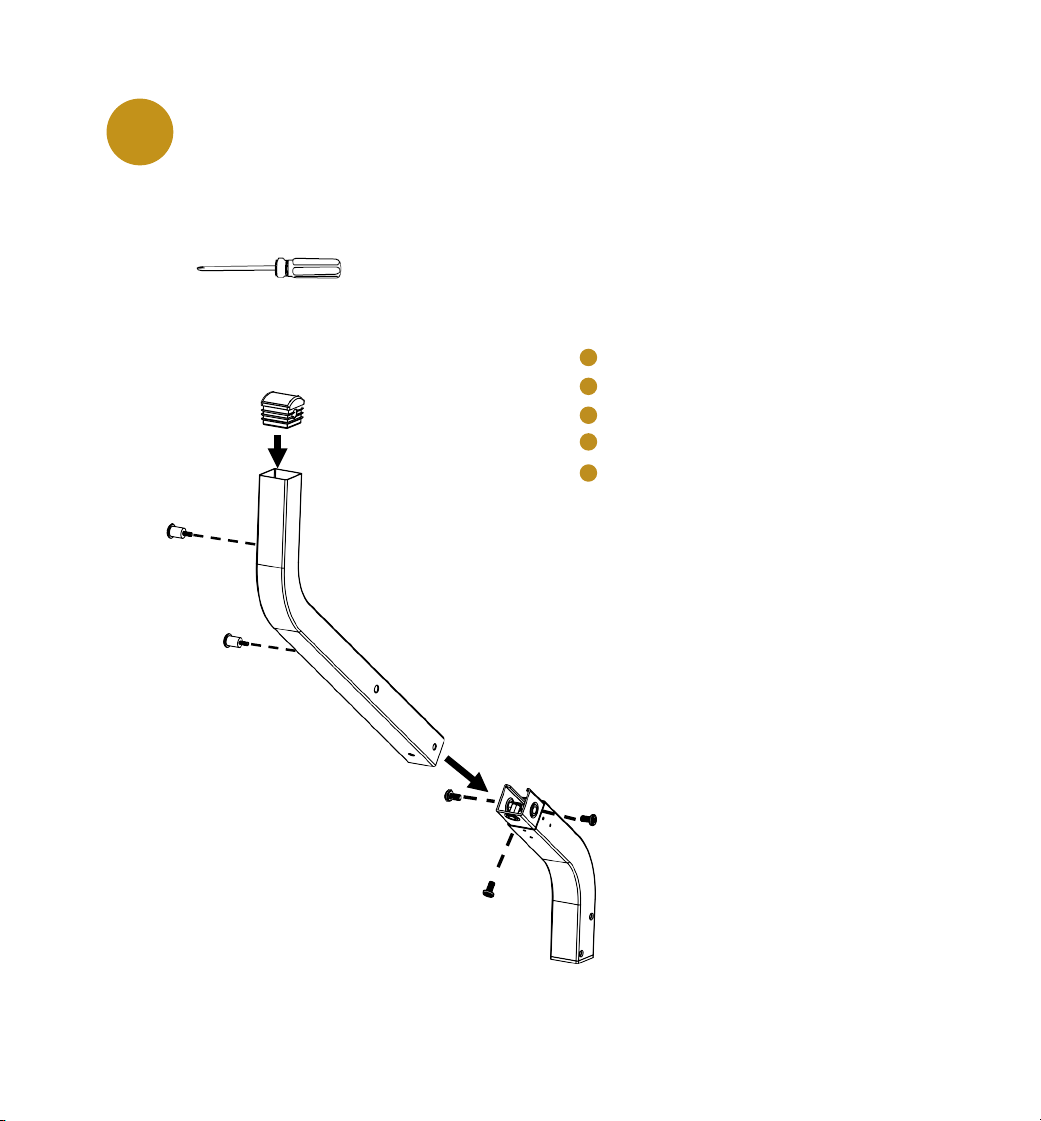
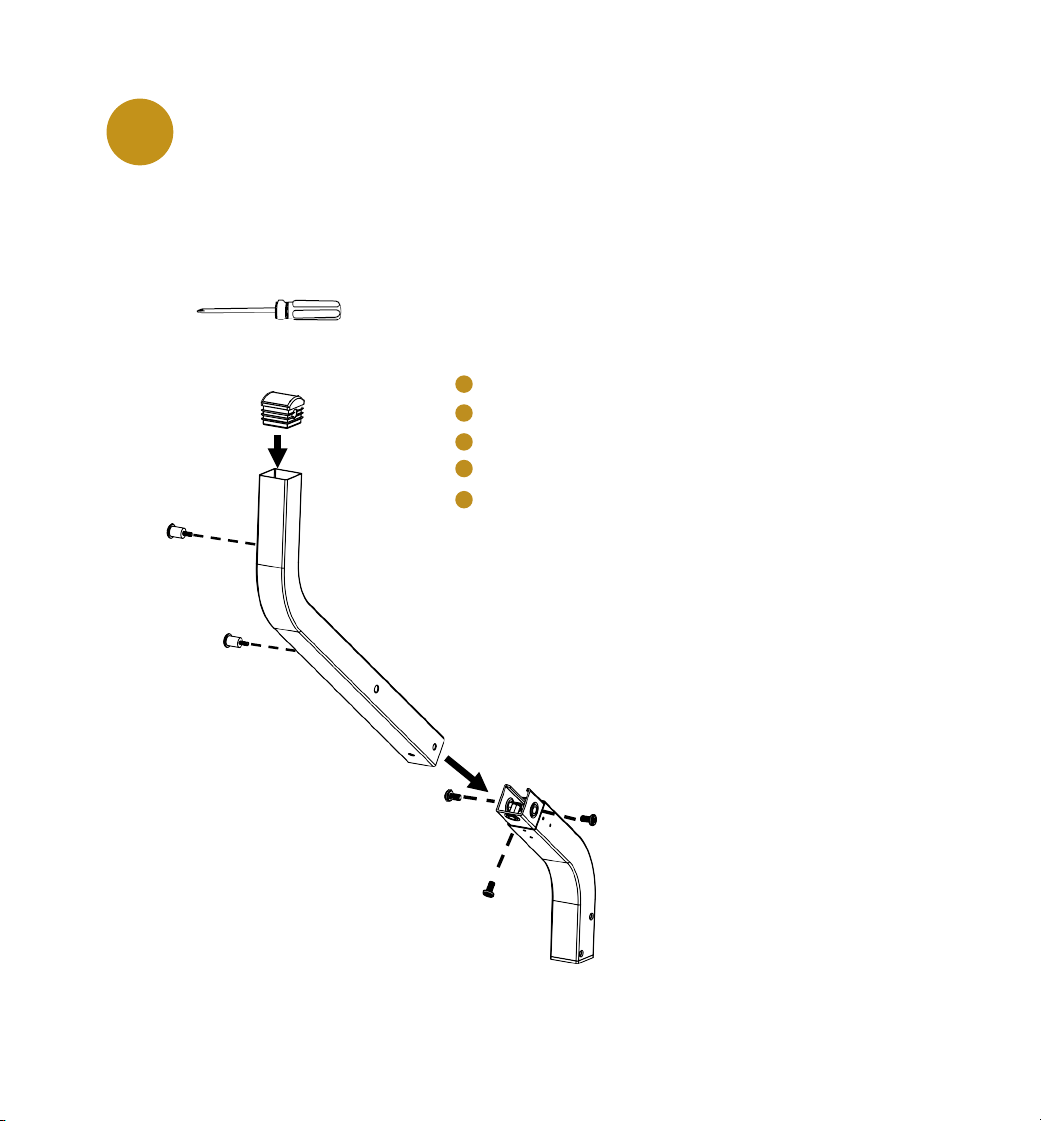
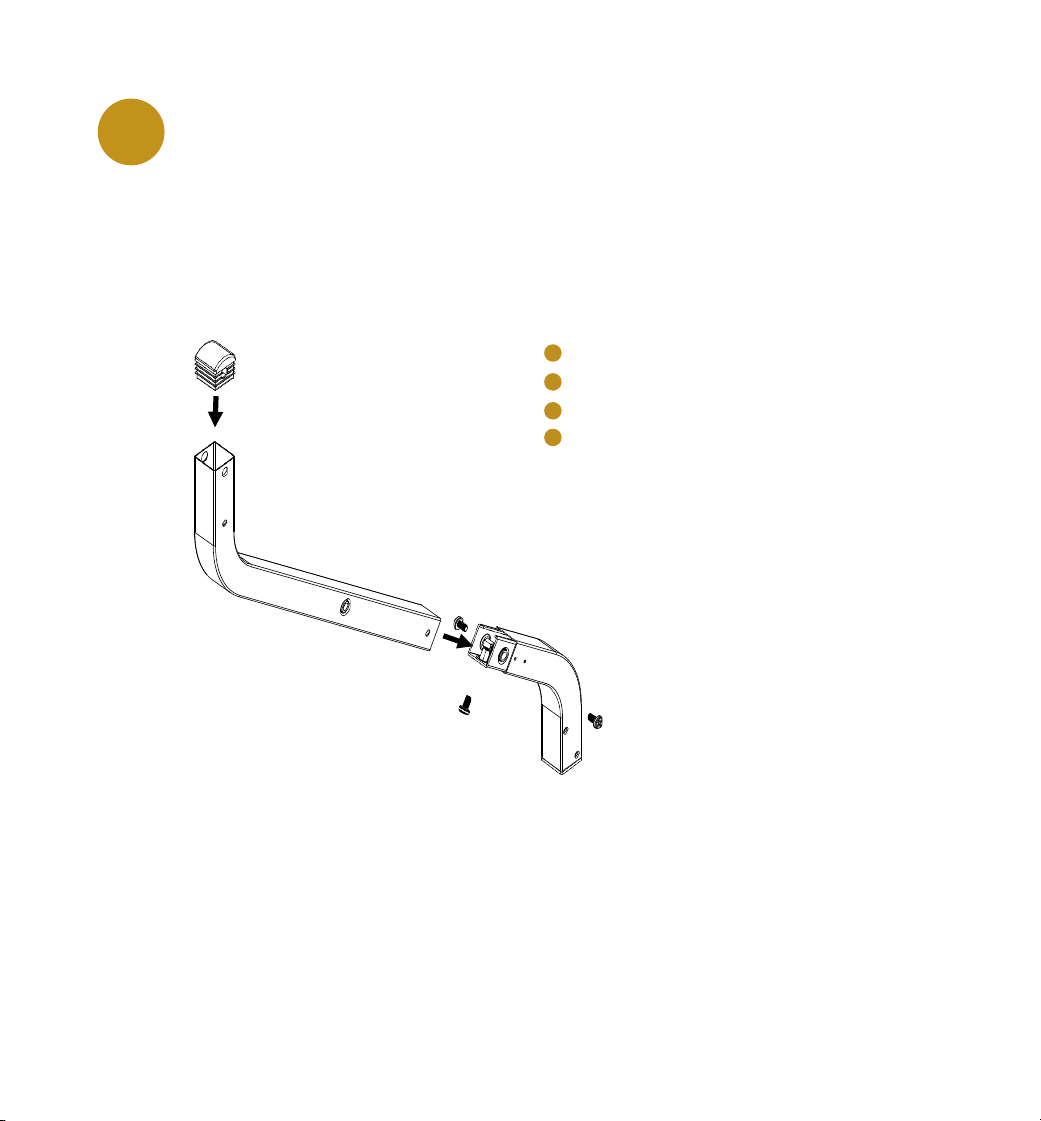
Install Left Outer Leg using 3-M6 x 14
screws, install Leg Cap.
1
Tool required for assembly: #2 Phillips Screwdriver
11
IMPORTANT: Do not
tighten screws completely
until all screws for that
step have been installed.
3
3A
15
19
18
Left-Outer Leg-Long 1
Left-Outer Leg-Short 1
M6 x 14 Screw 3
Shoulder Screw 2
Leg Cap 1
ITEM PART DESCRIPTION
3
3A
18
19
15
QTY.
12
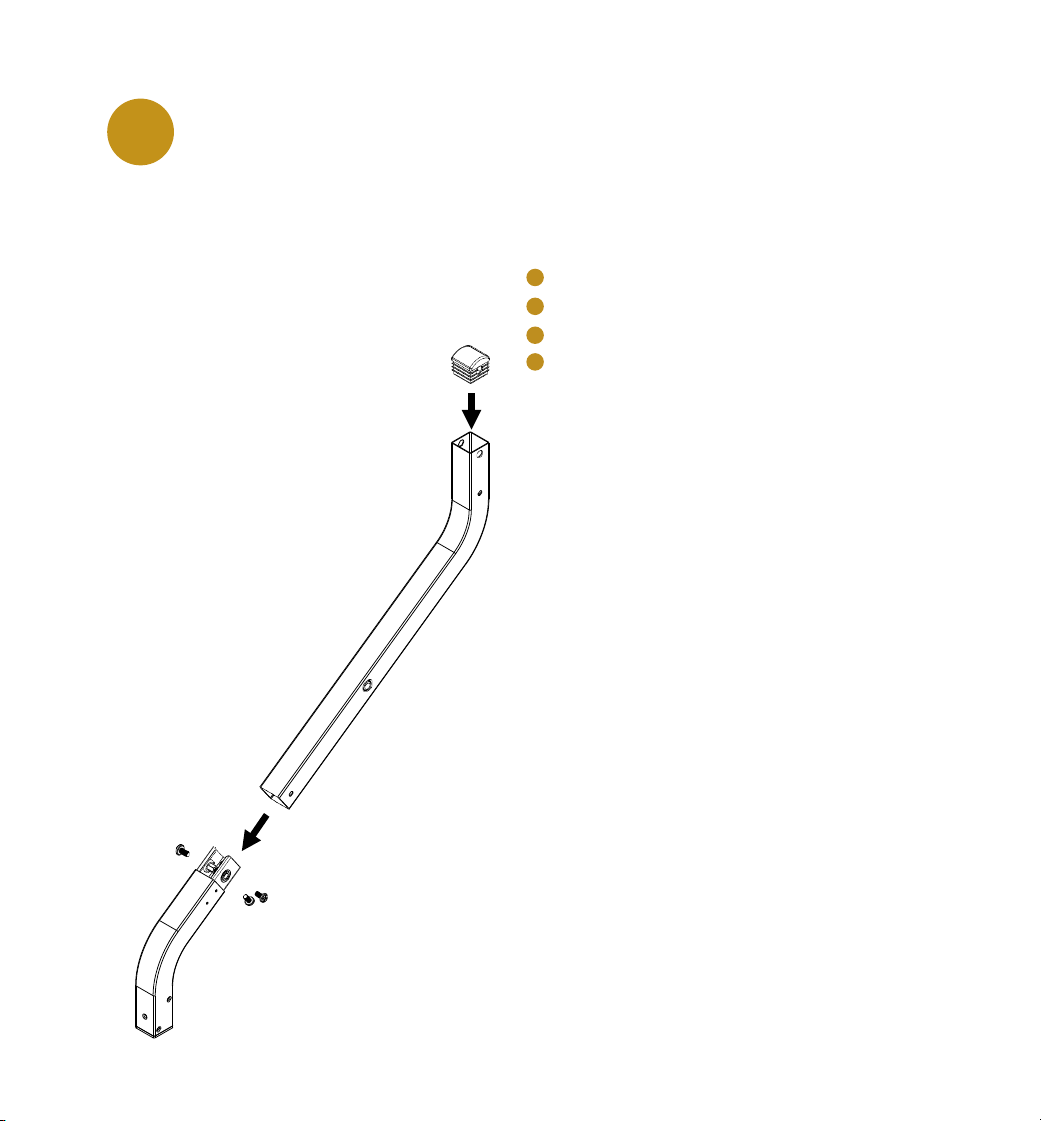
2
IMPORTANT: Do not
tighten screws completely
until all screws for that
step have been installed.
Left-Inner Leg-Long 1
Left-Inner Leg-Short 1
M6 x 14 Screw 3
Leg Cap 1
ITEM PART DESCRIPTION
4
4A
18
15
QTY.
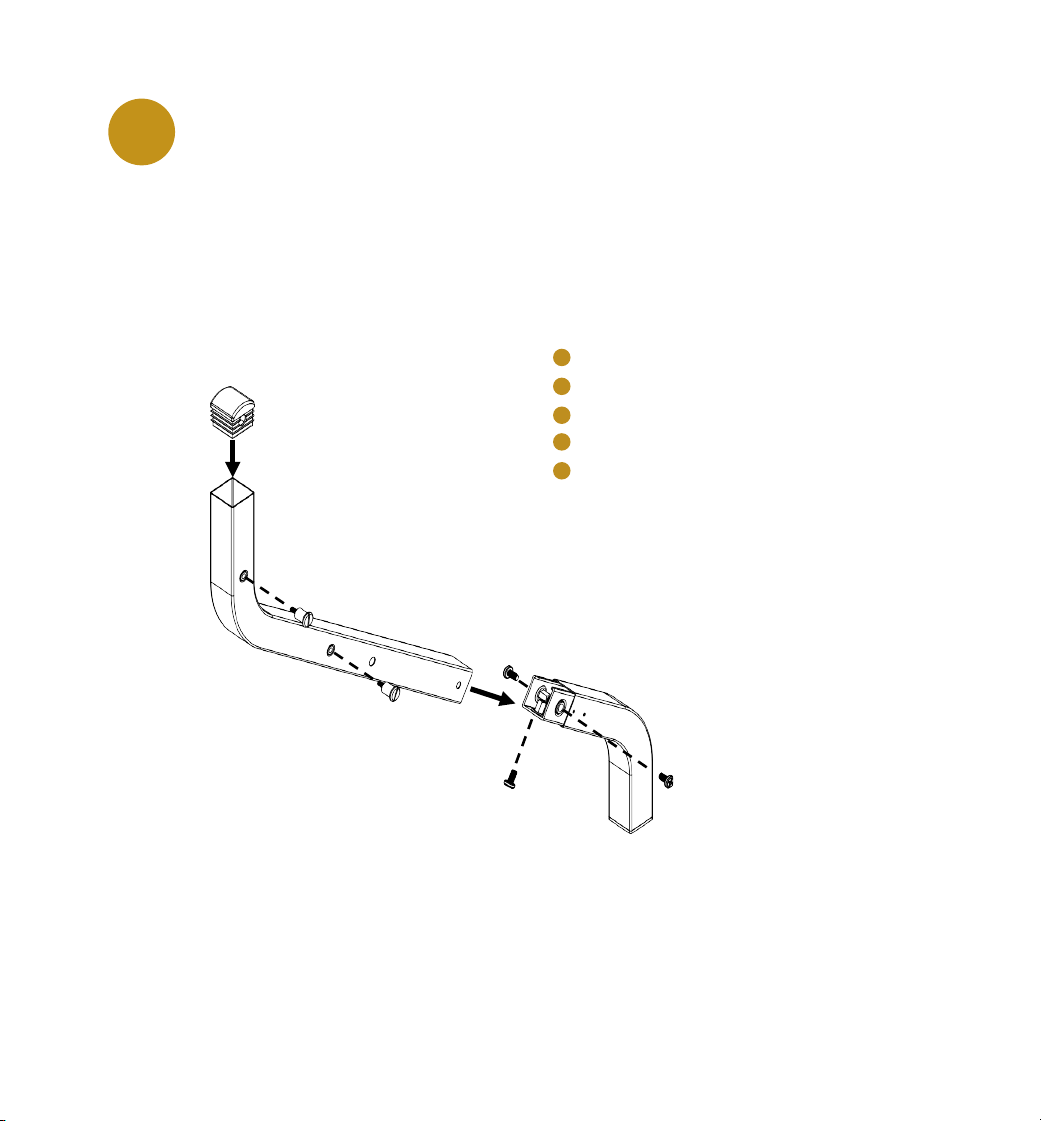
4
4A
15
18
Install Left Inner Leg using 3-M6 x 14
screws, install Leg Cap.
Install Left Outer Leg assembly and Left
Inner Leg assembly using M6-Knob with
Threaded Shaft, placing Leg Bushing in
between. Set assembly aside.
3
13
20
21
3/3A
4/4A
Left Outer Leg Assembly 1
Left Inner Leg Assembly 1
Leg Bushing 1
M6 Knob with Threaded Shaft 1
ITEM PART DESCRIPTION
3
4
20
21
QTY.
3A
4A
4
14
IMPORTANT: Do not
tighten screws completely
until all screws for that
step have been installed.
Right-Inner Leg-Long 1
Right-Inner Leg-Short 1
M6 x 14 Screw 3
Leg Cap 1
ITEM PART DESCRIPTION
5
5A
18
15
QTY.
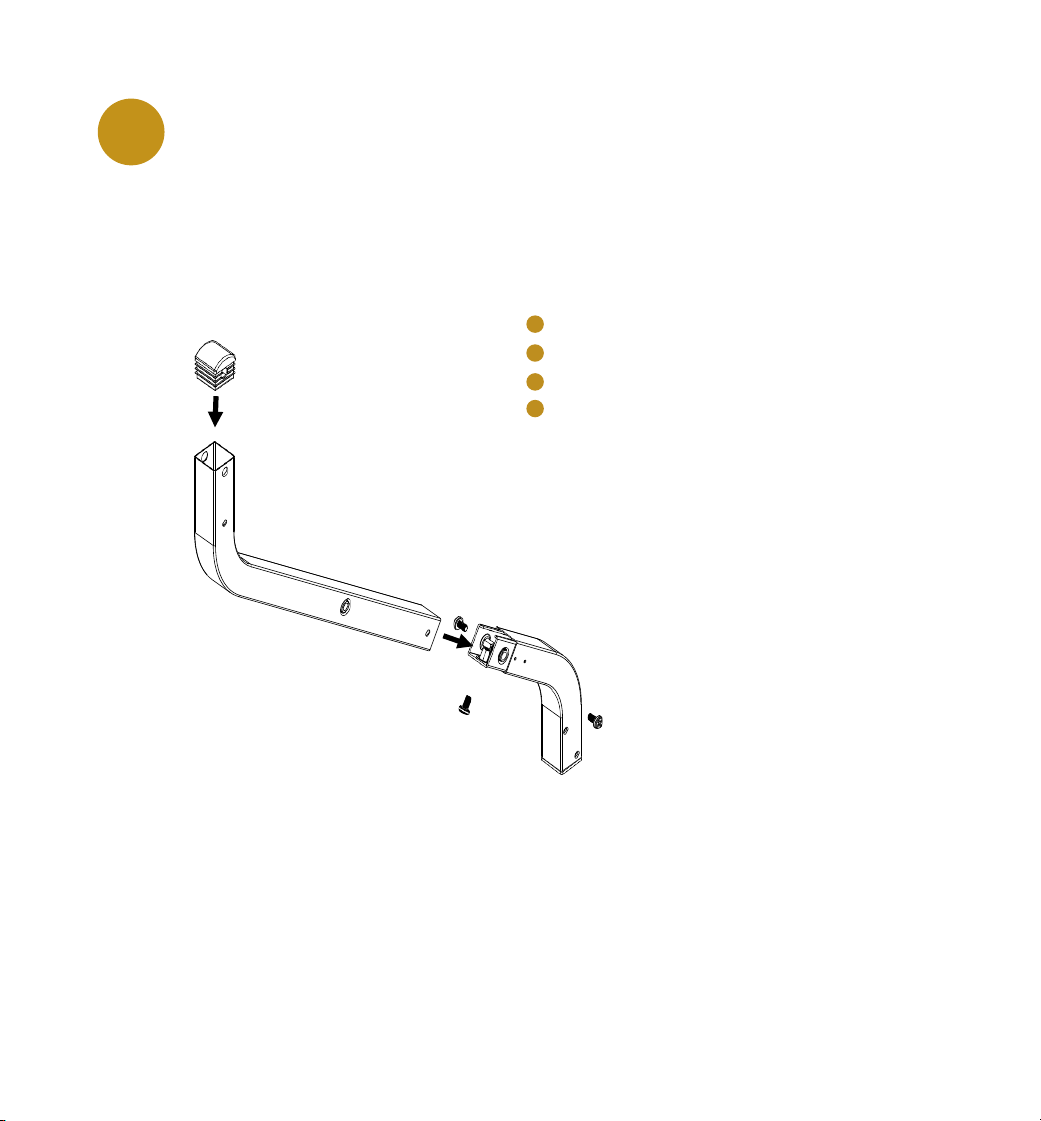
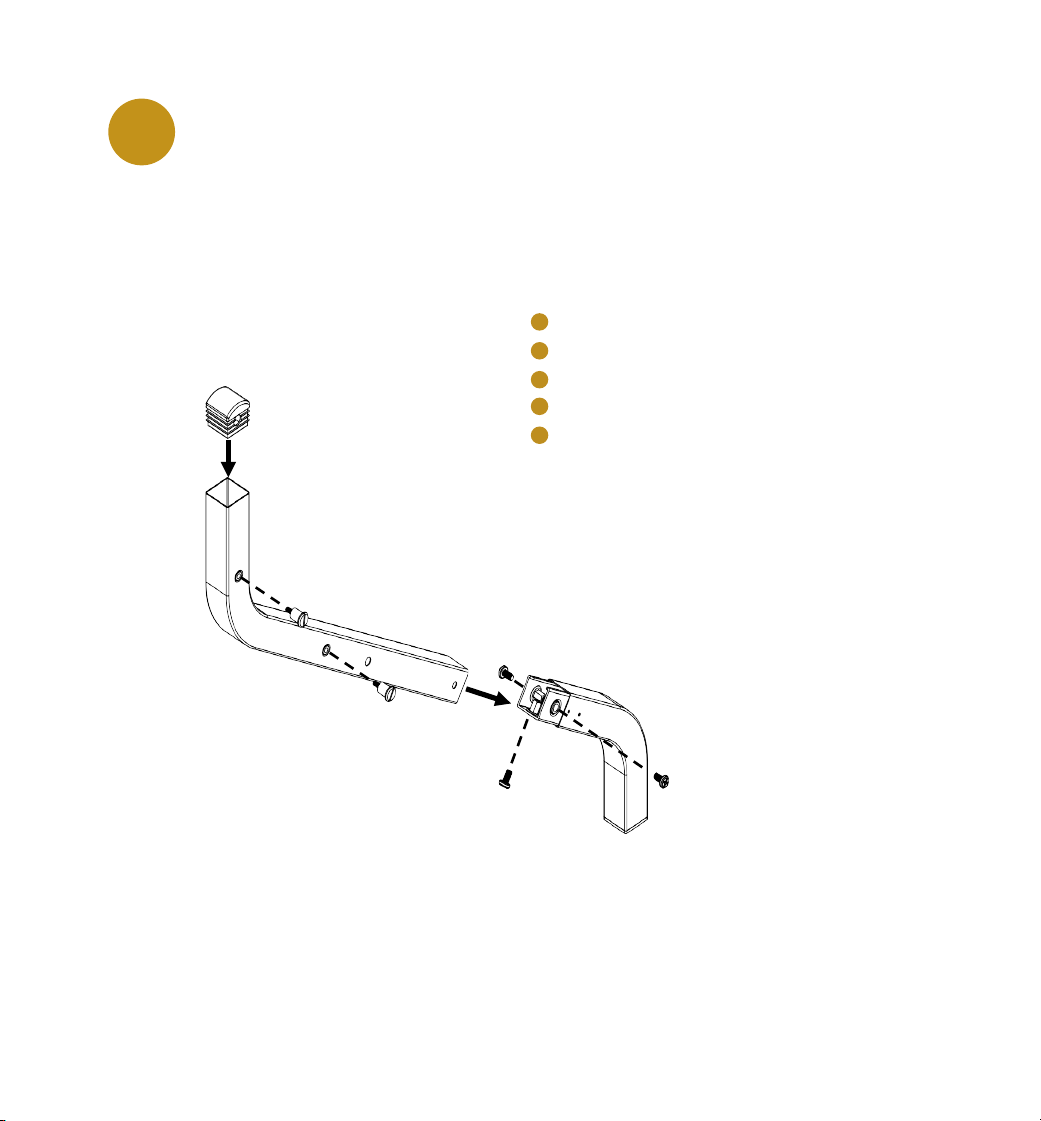
Install Right Inner Leg assembly using
3-M6 x 14 screws, install Leg Cap.
15
5
5A
18
15
Install Right Outer Leg assembly using
3-M6 x 14 and 2-M6 shoulder screws.
5
IMPORTANT: Do not
tighten screws completely
until all screws for that
step have been installed.
6
15
6A
19
Right-Inner Leg-Long 1
Right-Inner Leg-Short 1
M6 x 14 Screw 3
M6 Shoulder Screw 2
Leg Cap 1
ITEM PART DESCRIPTION
6
6A
18
19
QTY.
15
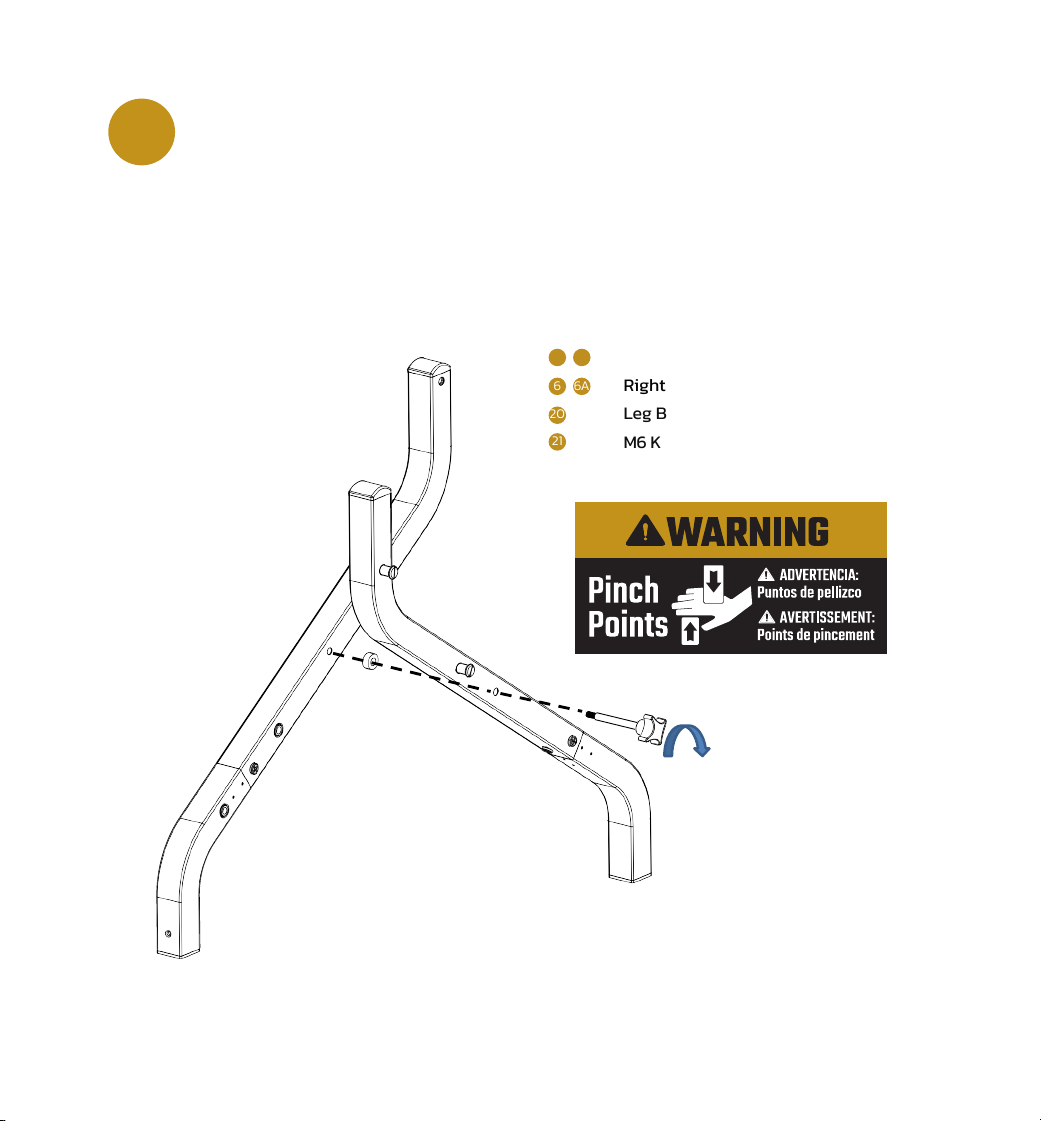
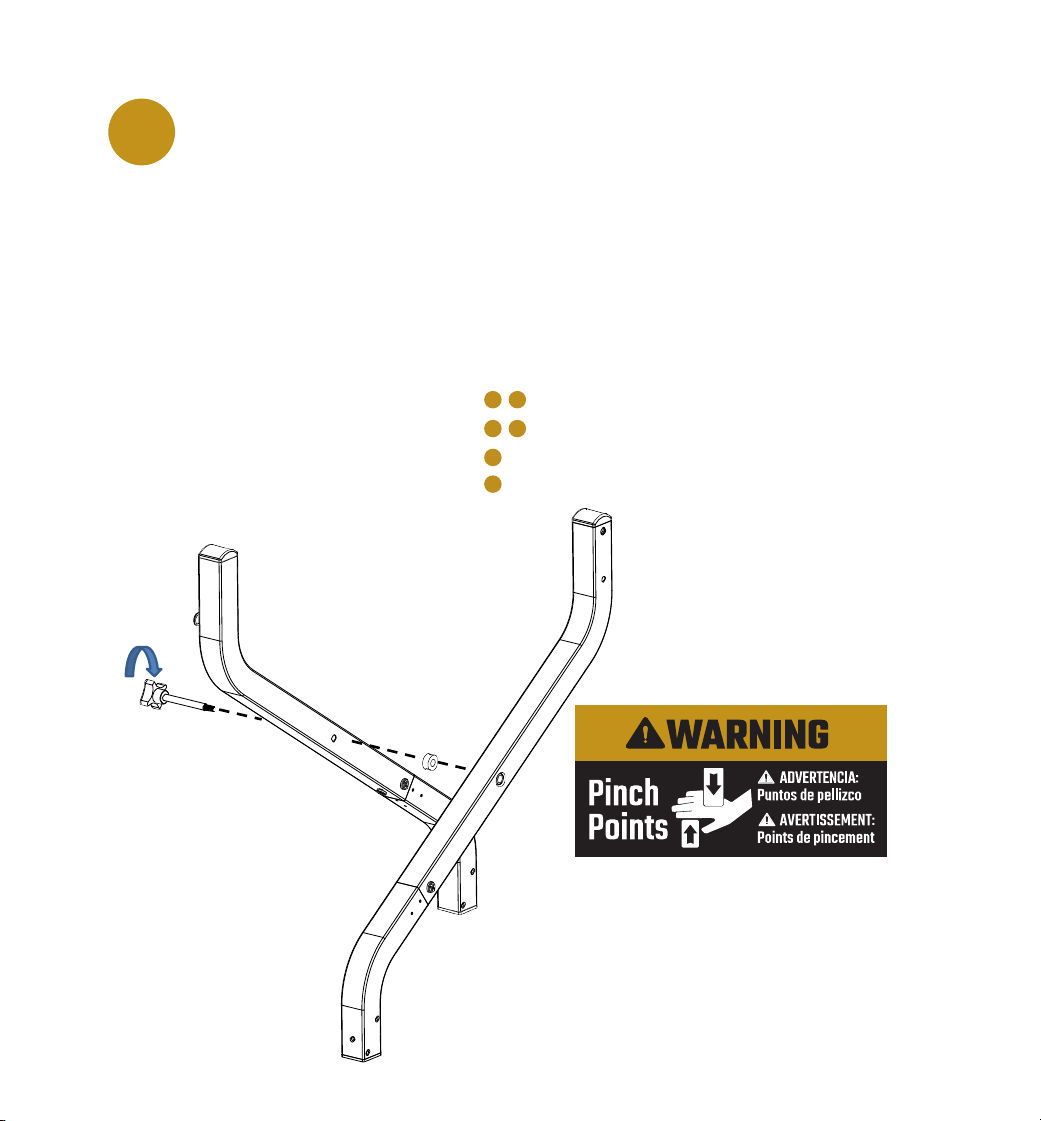
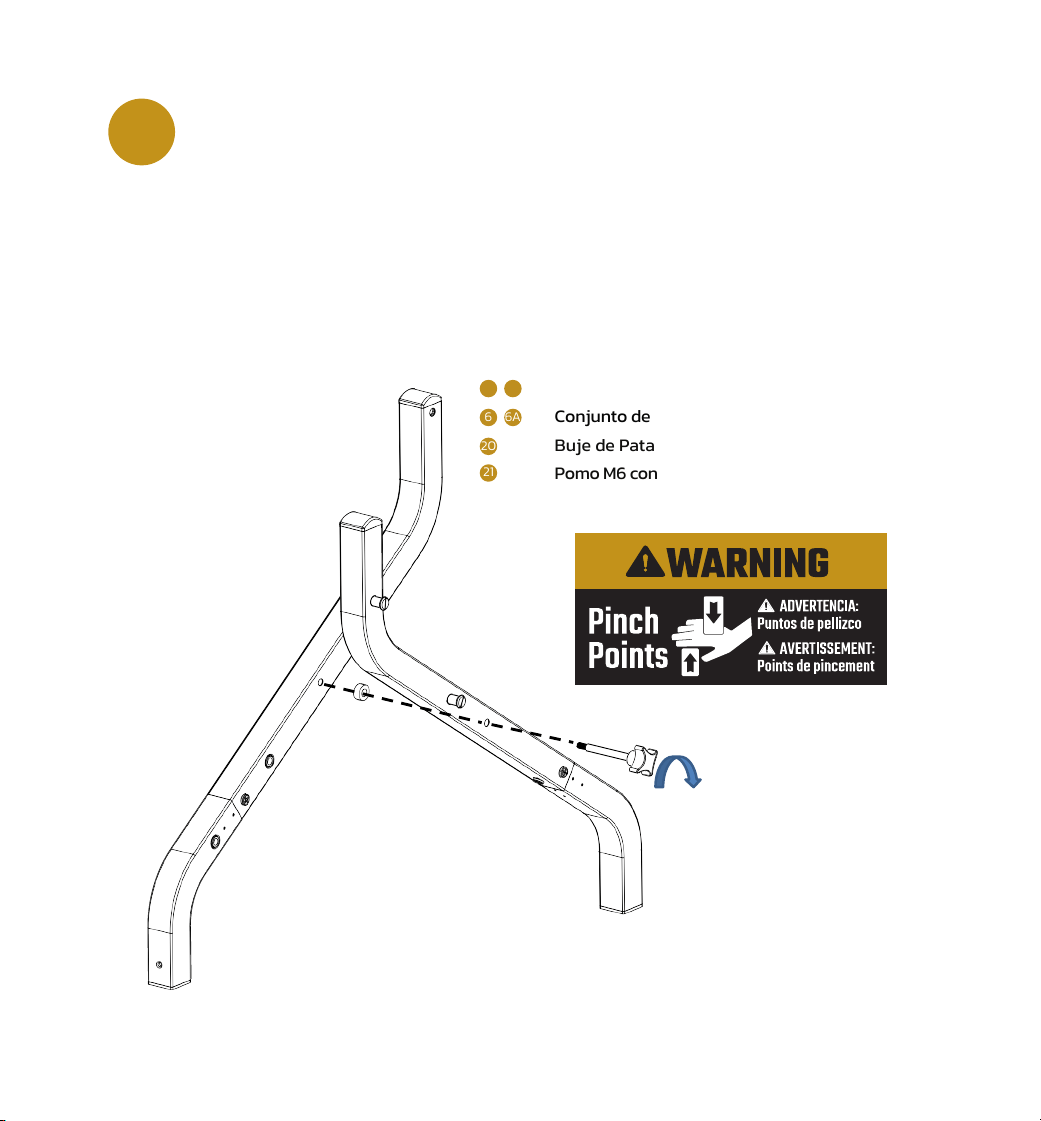
16
Install Right Inner Leg assembly and
Right Outer Leg assembly using M6-
Knob with Threaded Shaft and Leg
Bushing and tie firmly.
6
Right Inner Leg Assembly 1
Right Outer Leg Assembly 1
Leg Bushing 1
M6 Knob with Threaded Shaft 1
ITEM PART DESCRIPTION
5
6
20
21
QTY.
5A
6A
20
21
5
6
5A
6A
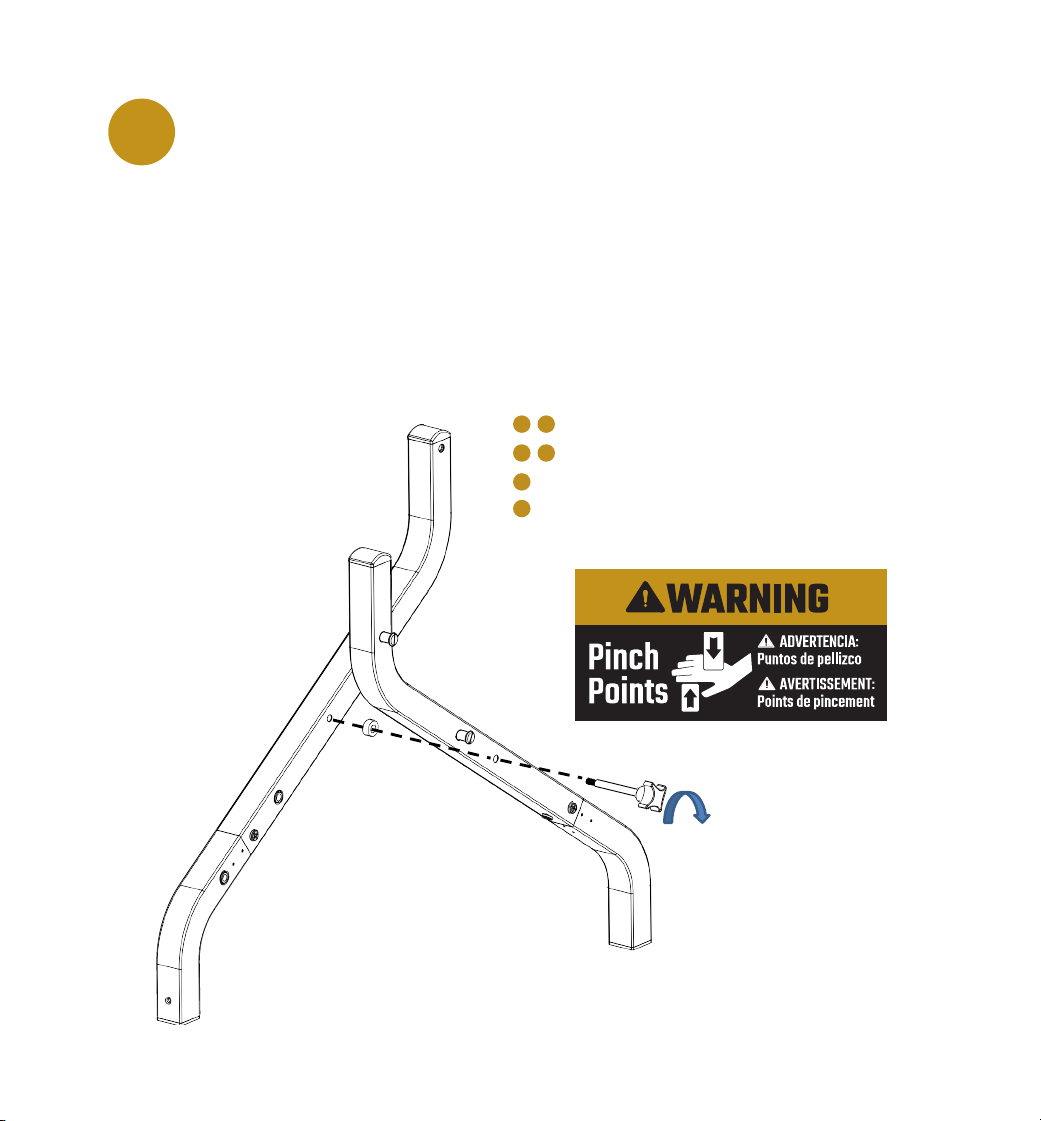
17
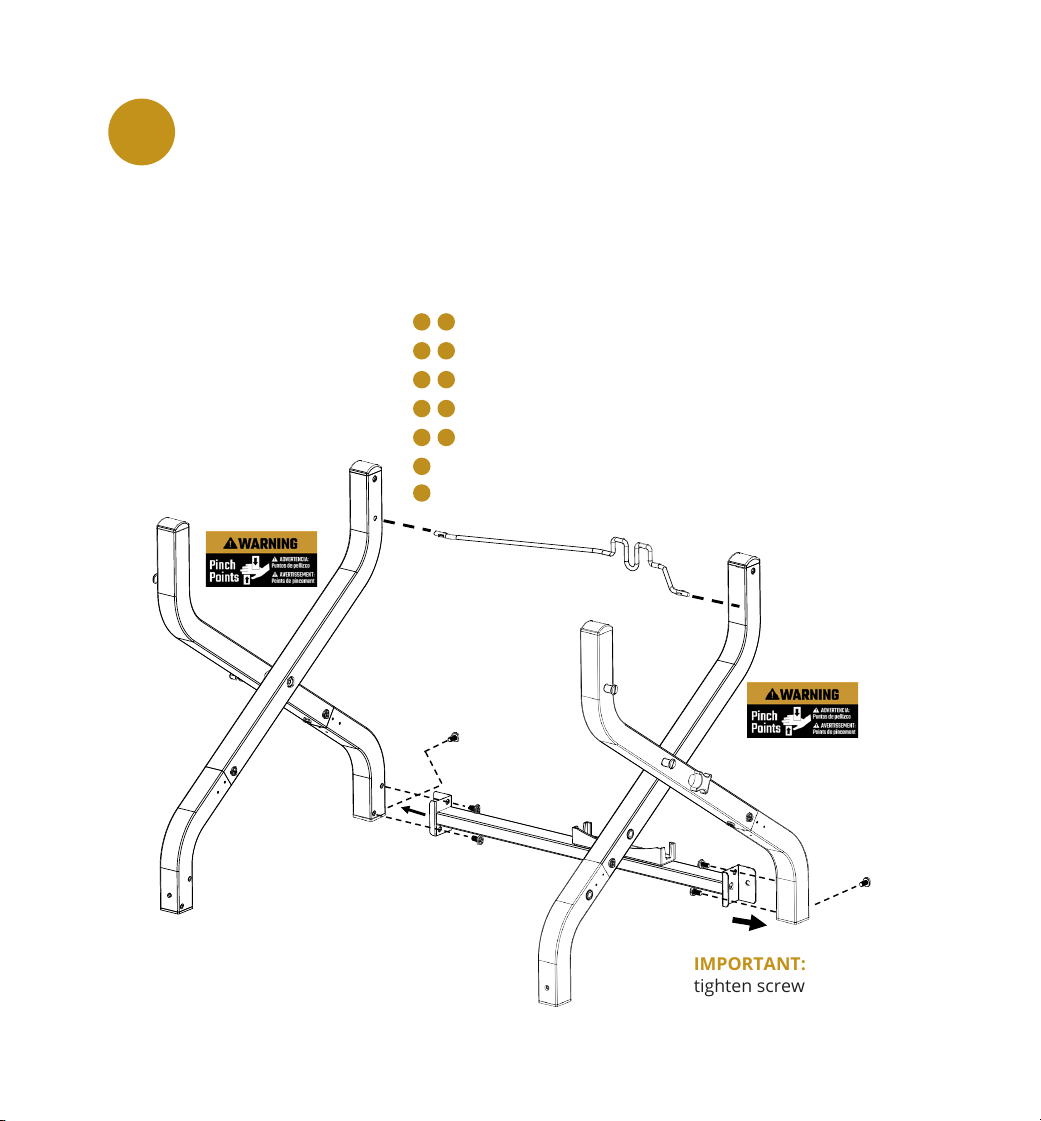
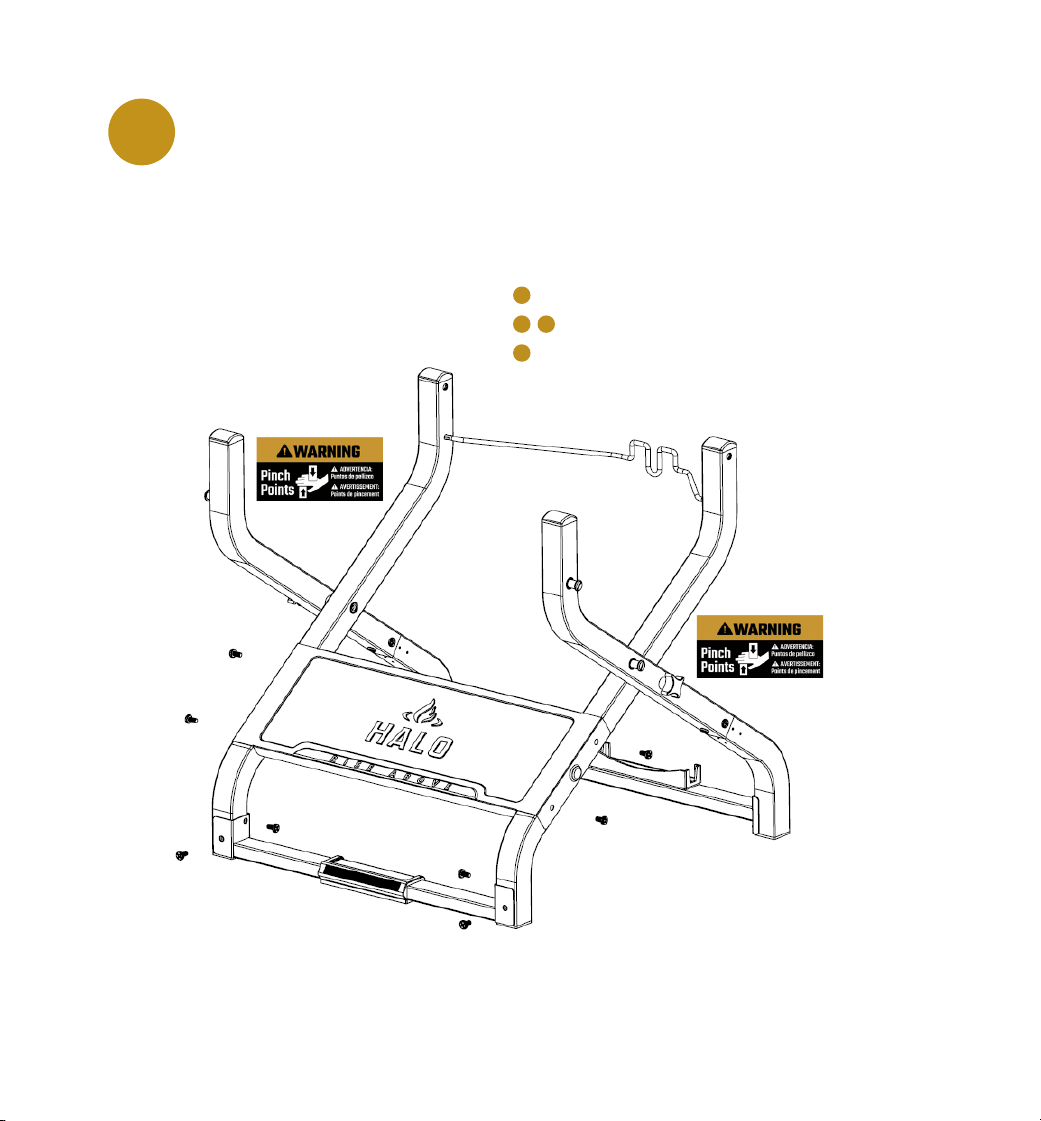
Install Tank Retention and Rear Brace
using 6-M6 x 14 screws.
7
IMPORTANT: Do not
tighten screws completely
until all screws for that
step have been installed.
NOTE: Tie all screws with hand tie and wait until next step.
16
8/9
4/4A
3/3A
5/5A
6/6A
Left Outer Leg Assembly 1
Left Inner Leg Assembly 1
Right Inner Leg Assembly 1
Right Outer Leg Assembly 1
Rear Brace, Tank Support Assembly 1
Tank Retention Wire 1
M6 x 14 Screw 6
ITEM PART DESCRIPTION
3
4
16
18
QTY.
3A
4A
5
6
5A
6A
8 9
18
18
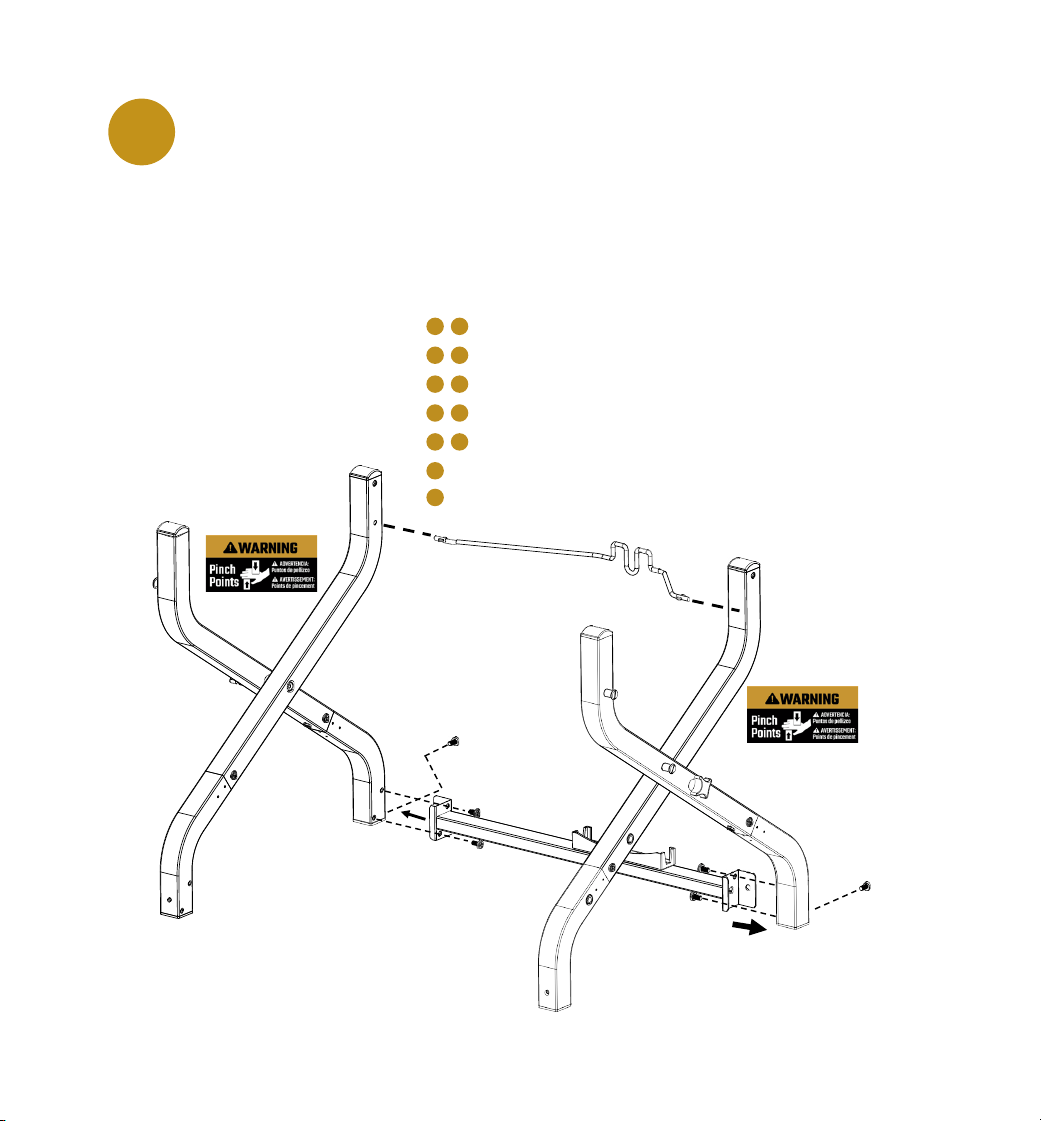
7
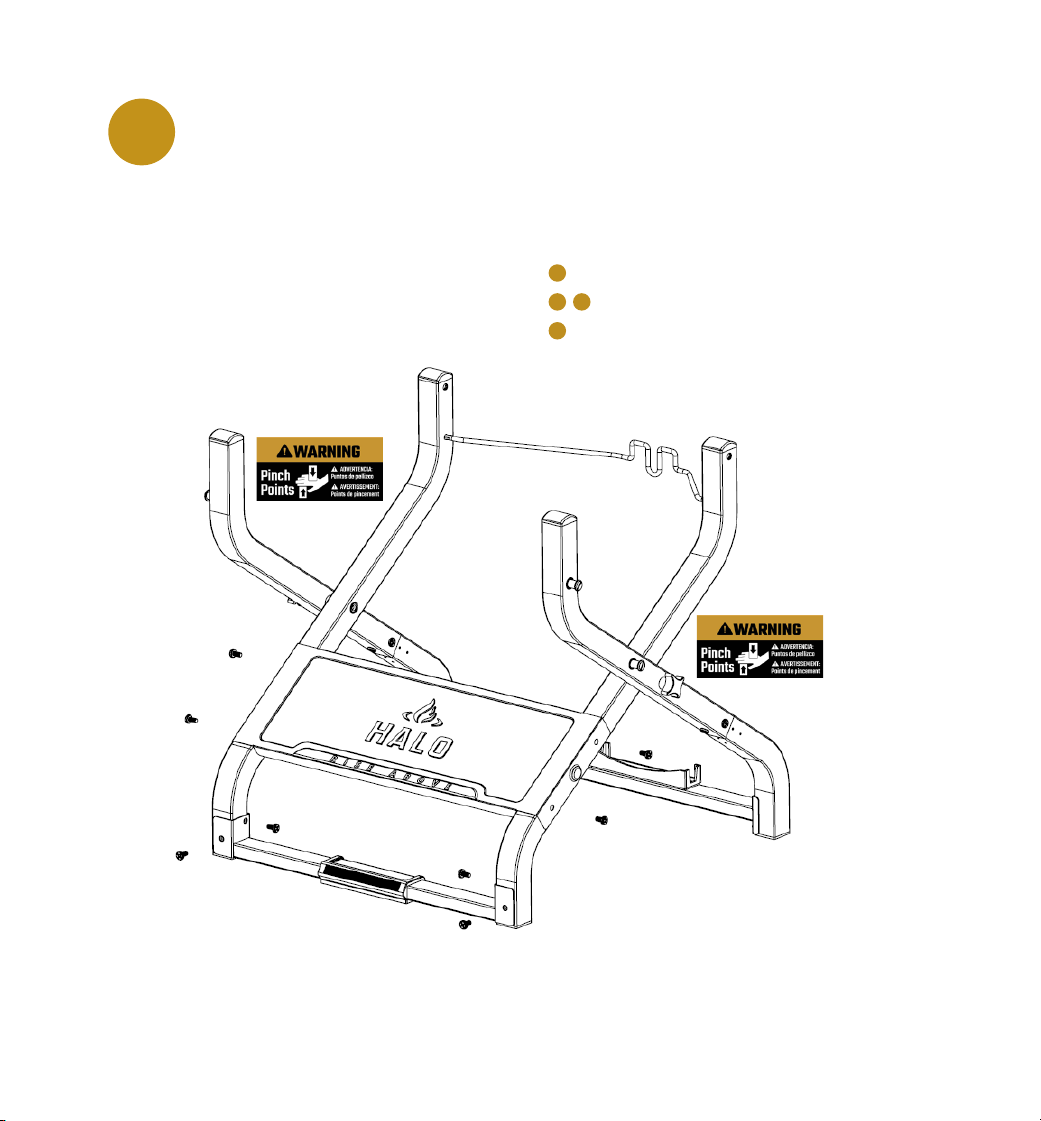
10/11
18
18
18
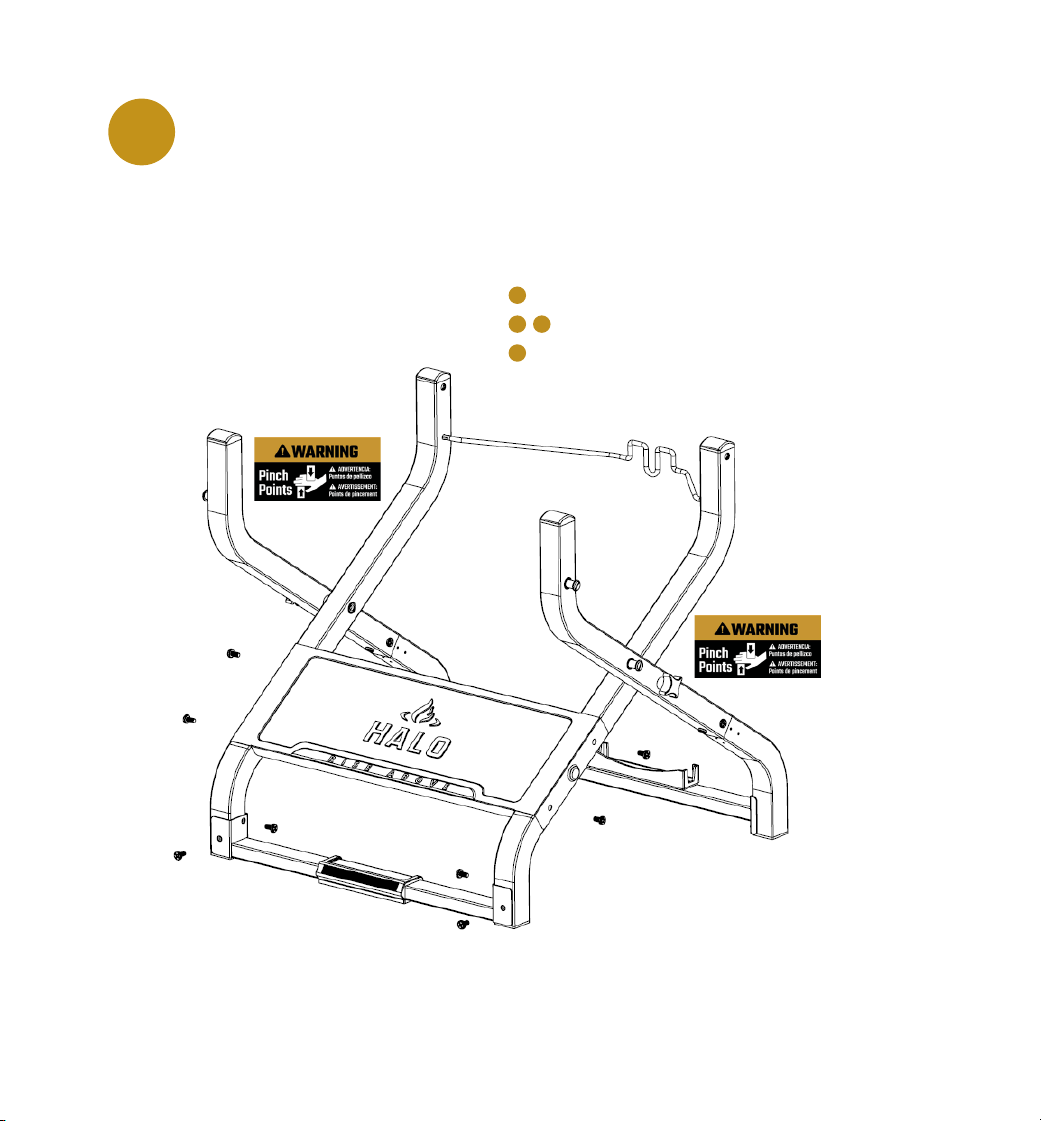
Install Front Panel and Front Brace
using 8-M6 x 14 screws.
8
Front Panel with Logo 1
Front Brace 1
M6 x 14 Screw 8
ITEM PART DESCRIPTION
7
10
18
QTY.
11
IMPORTANT: Do not
tighten screws completely
until all screws for that
step have been installed.
NOTE: Tie all screws rmly.
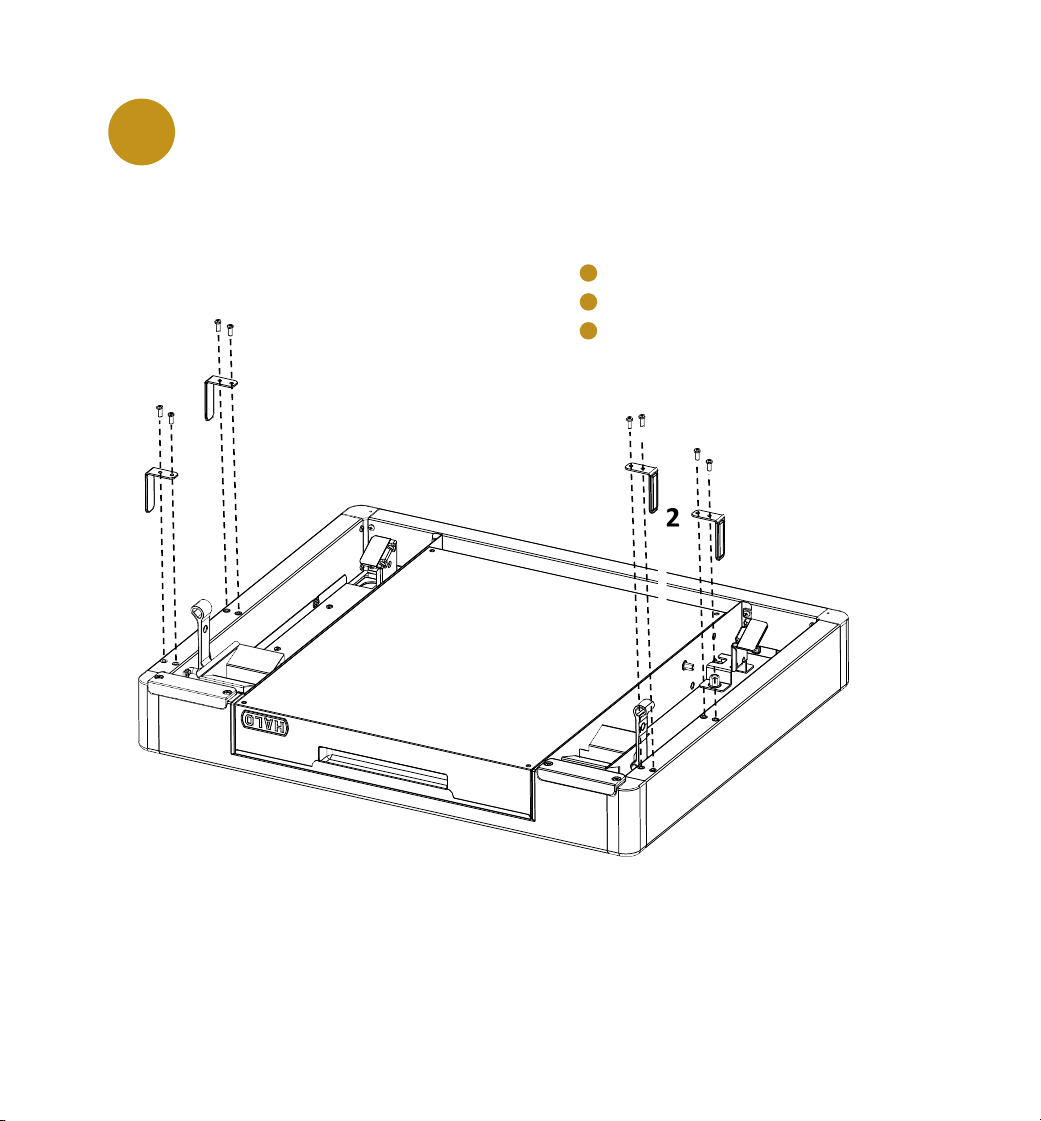
19
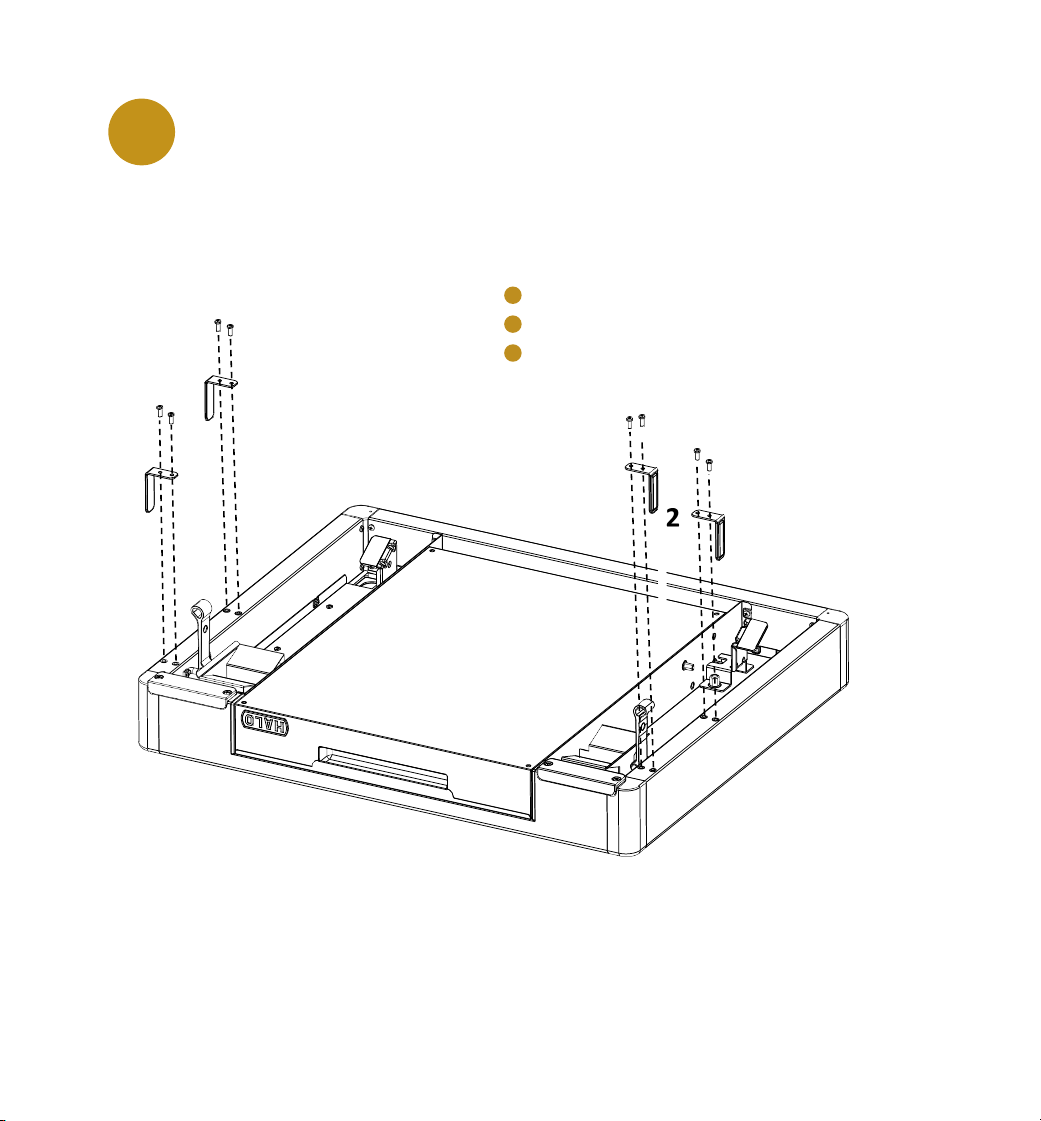
Install Magnetic Tool Hooks using
8-M4 x 12 screws.
9
1
18A
2
18A
Countertop Panel 1
Magnetic Tool Hook 4
M4 x 12 Screw 8
ITEM PART DESCRIPTION
1A
2
18A
QTY.
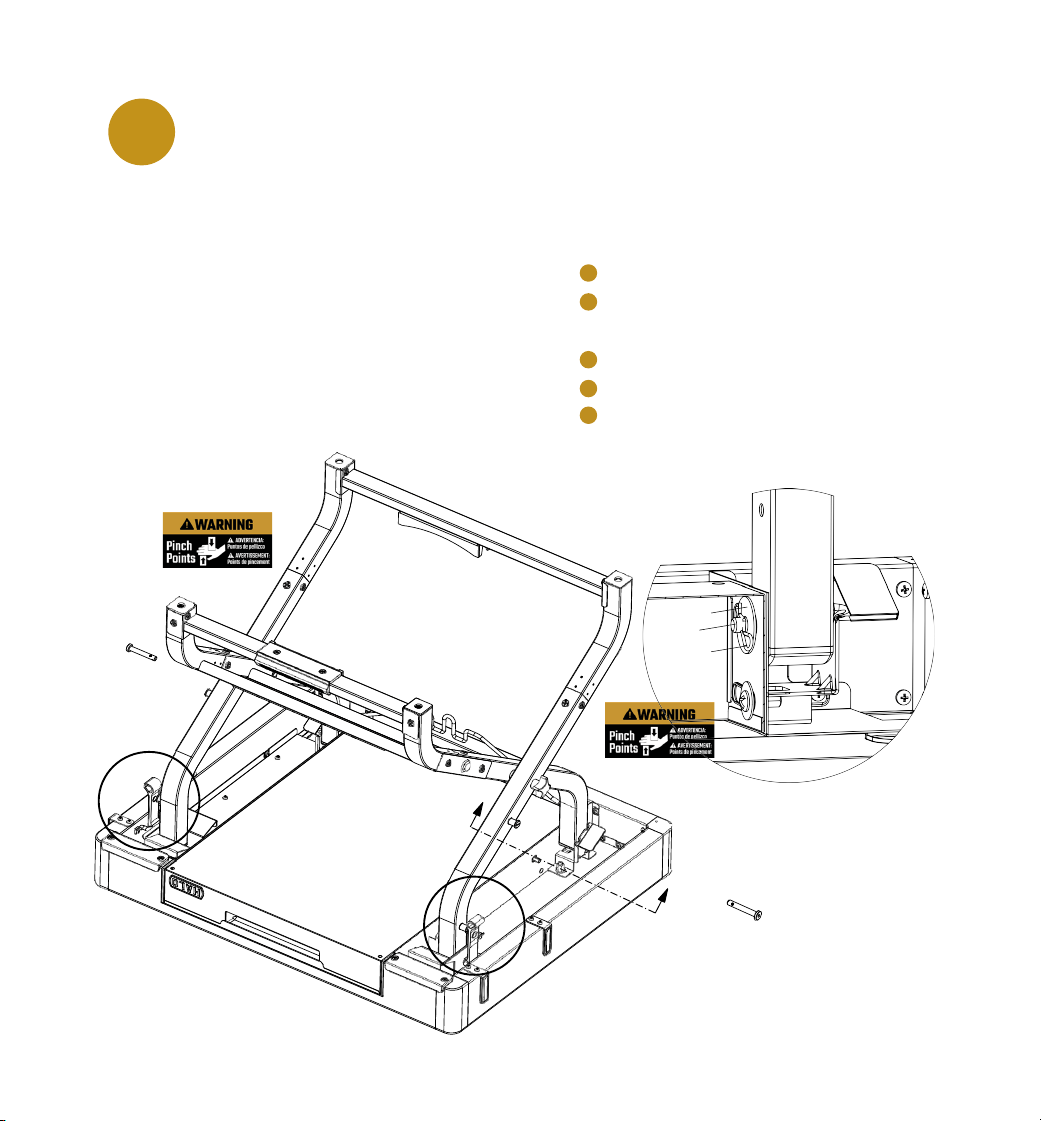
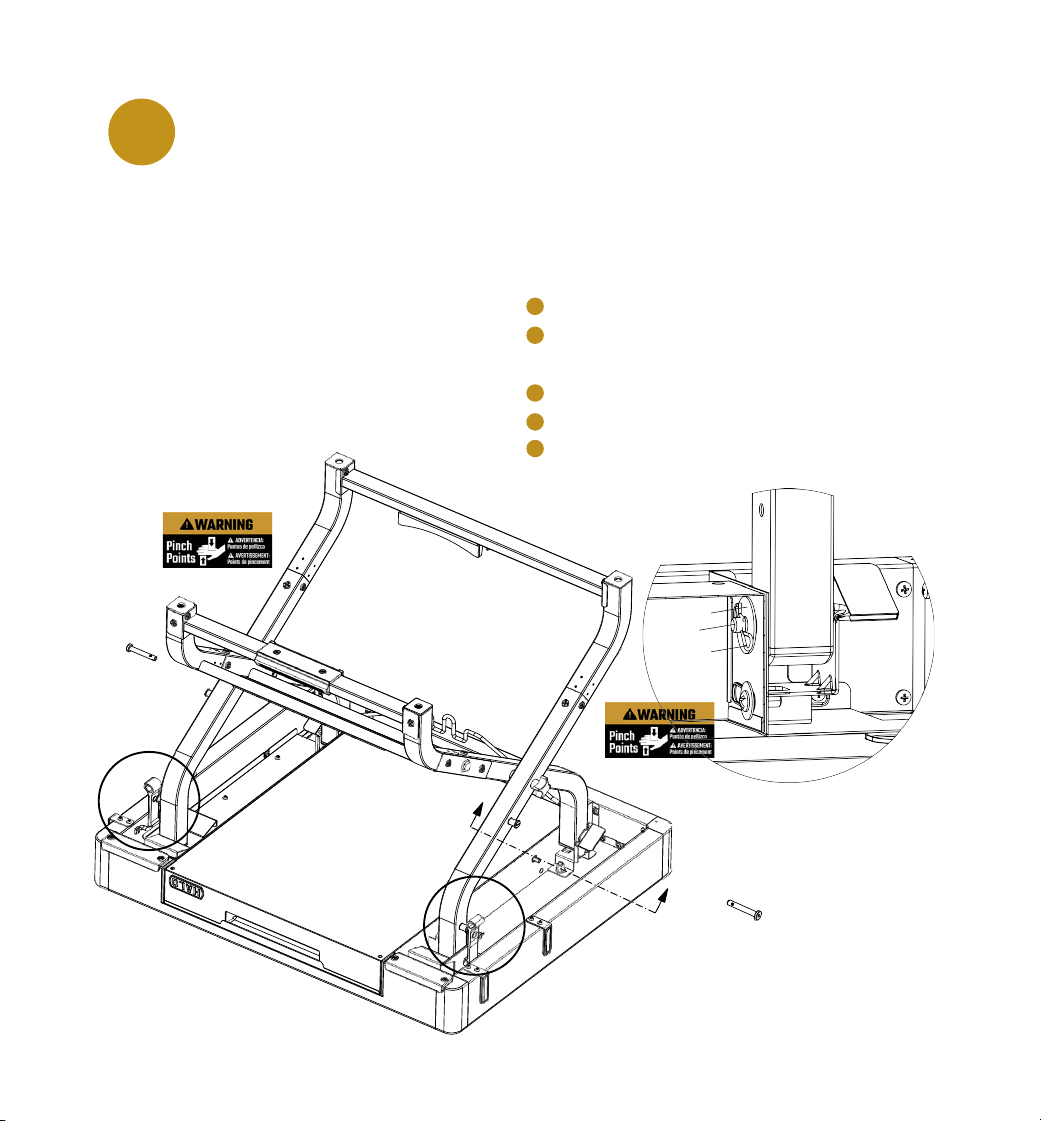
20
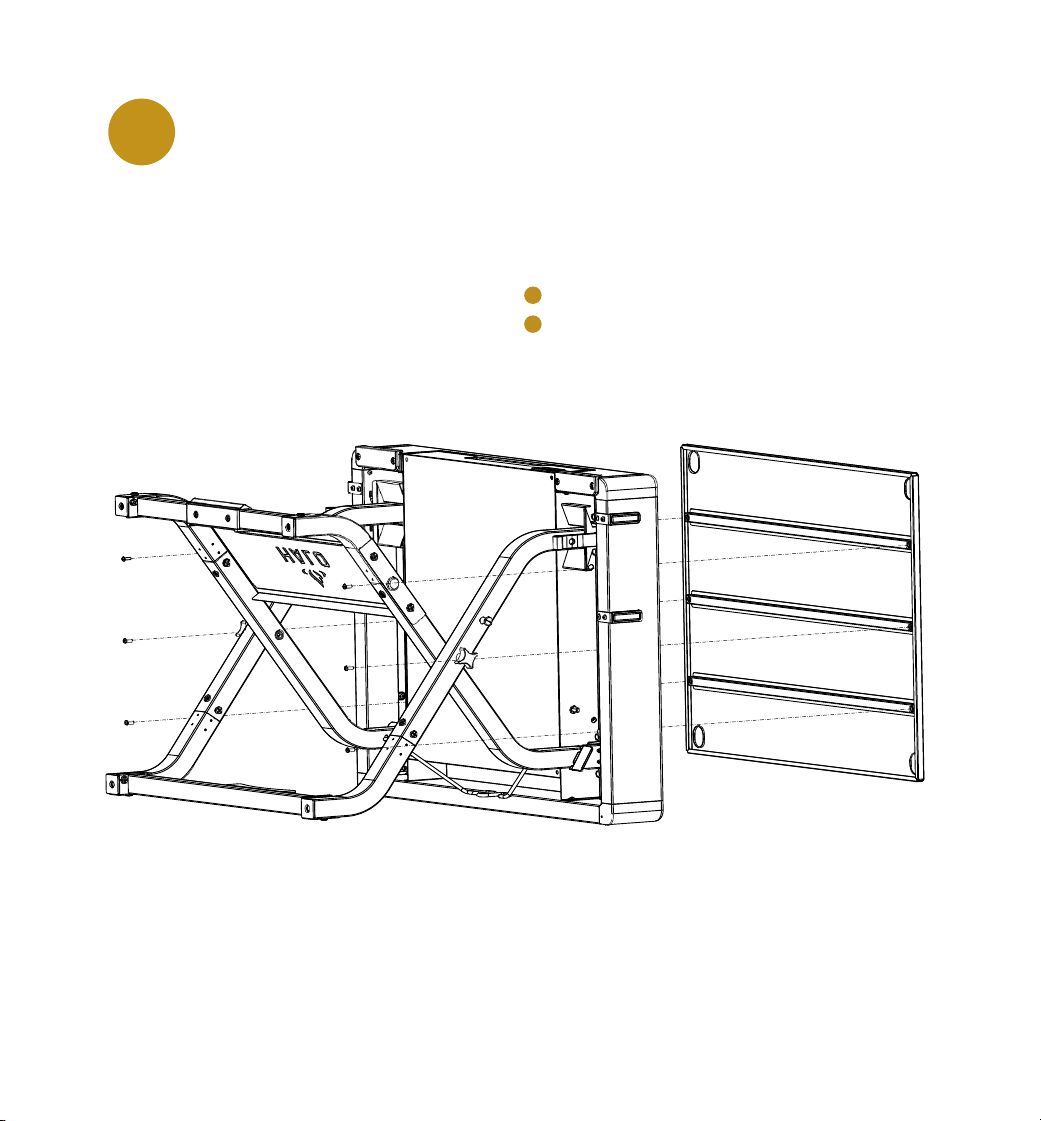
Install Cart assembly to Countertop
using 2-8mm Pivot Pins and fasten
Latches in place.
10
Countertop Assembly 1
Latch 2
Cart Assembly 1
8mm Pivot Pin 2
Cotter Pin 2
Flat Washer 2
ITEM PART DESCRIPTION
1
14
QTY.
22
22
B
B
22
14
14
SECTION B-B
22B
22A
22
22A
22B
N/A
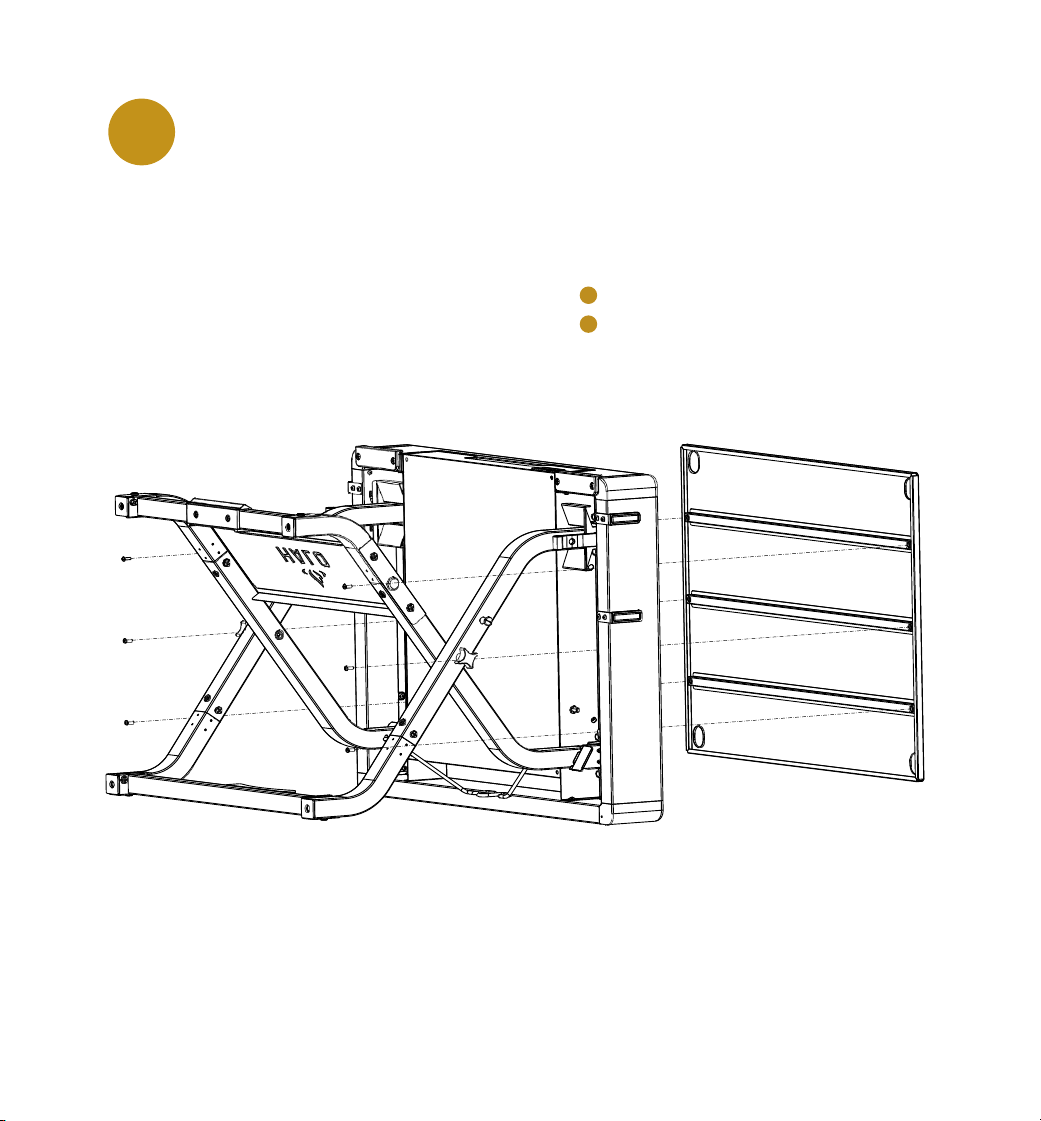
21
Install Countertop panel to Countertop
using 6-M4 x 12 screws.
11
Countertop Panel 1
M4 x 12 Screw 6
ITEM PART DESCRIPTION
1A
18A
QTY.
1A
18A
NOTE: Tie all screws rmly.
23
13
12
12
13
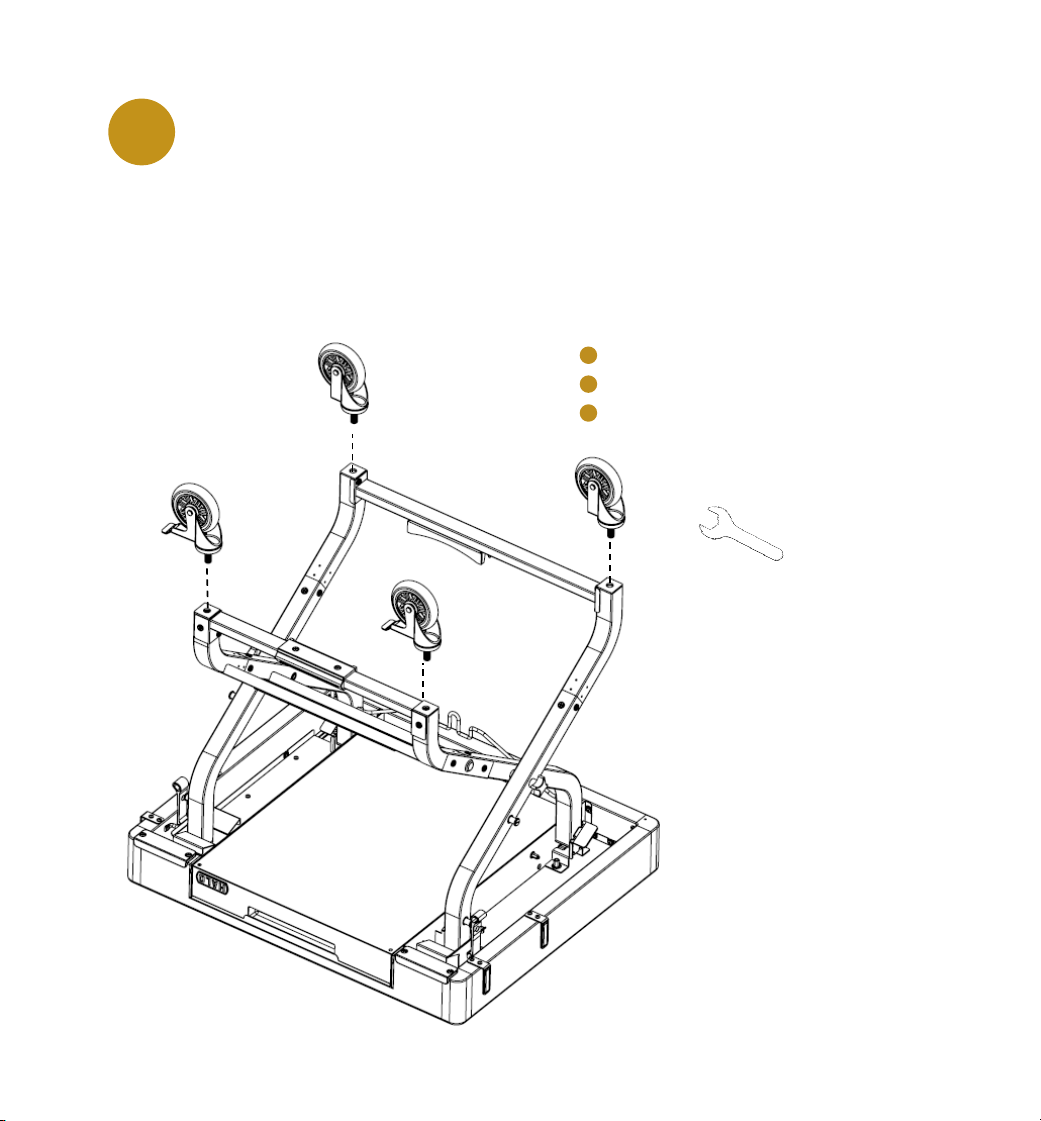
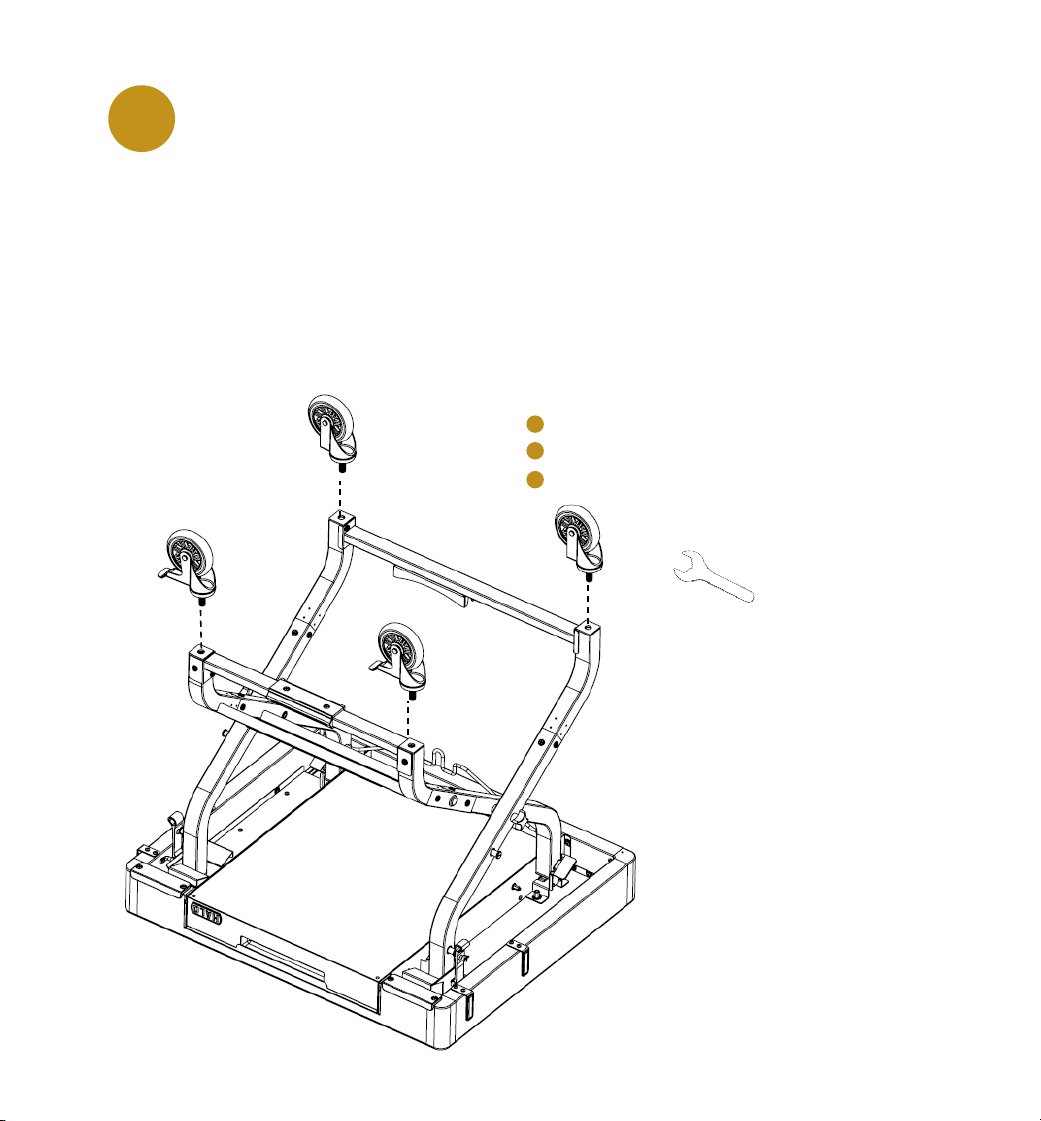
22
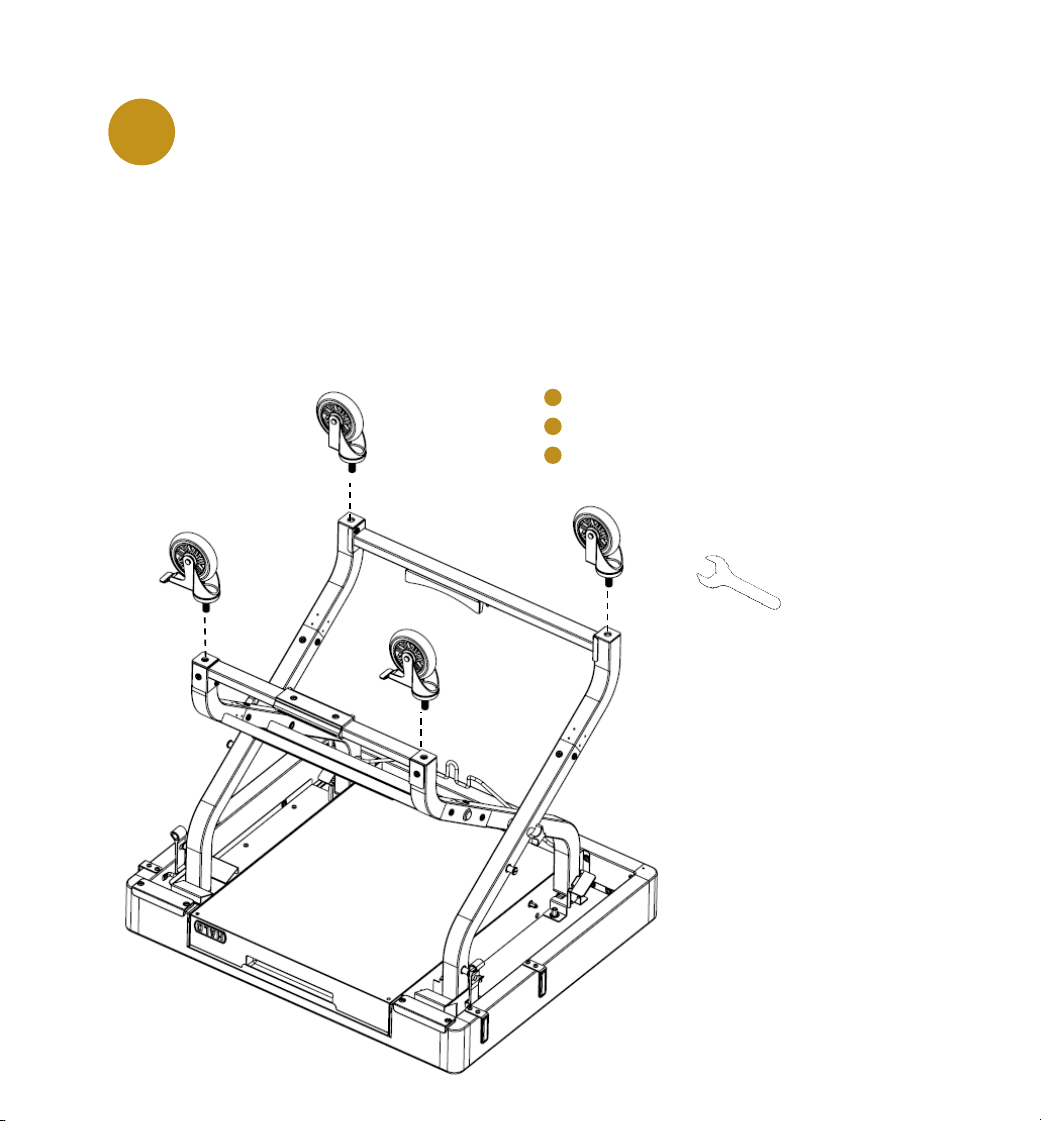
Connect the Casters using 17mm caster
wrench. Mount Locking Casters to front legs.
Mount Non-Locking Casters to rear legs.
12
NOTE: For casters with lock, you can lock the cater which will lock the caster and will allow
you assemble the caster without using caster wrench.
Non-Locking Caster 2
Locking Caster 2
17mm Caster Wrench 1
ITEM PART DESCRIPTION
12
13
QTY.
23

ASSEMBLED DIMENSIONS
23
30.32 770.10
30.83 783.00
25.16 639.00
30.32 770.10
30.83 783.00
25.16 639.00
30.32 770.10
30.83 783.00
25.16 639.00
30.32 770.10
30.83 783.00
25.16 639.00
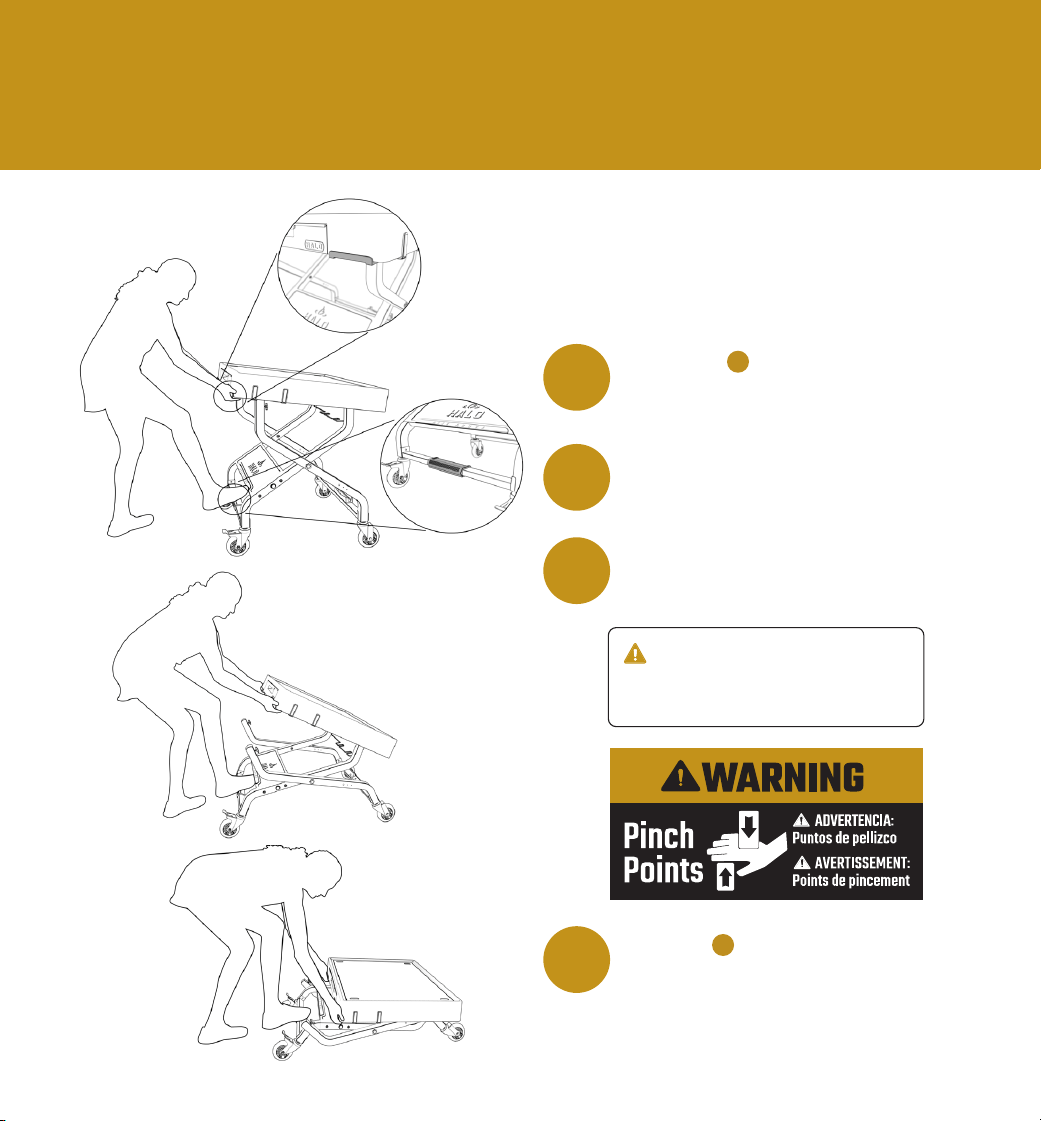
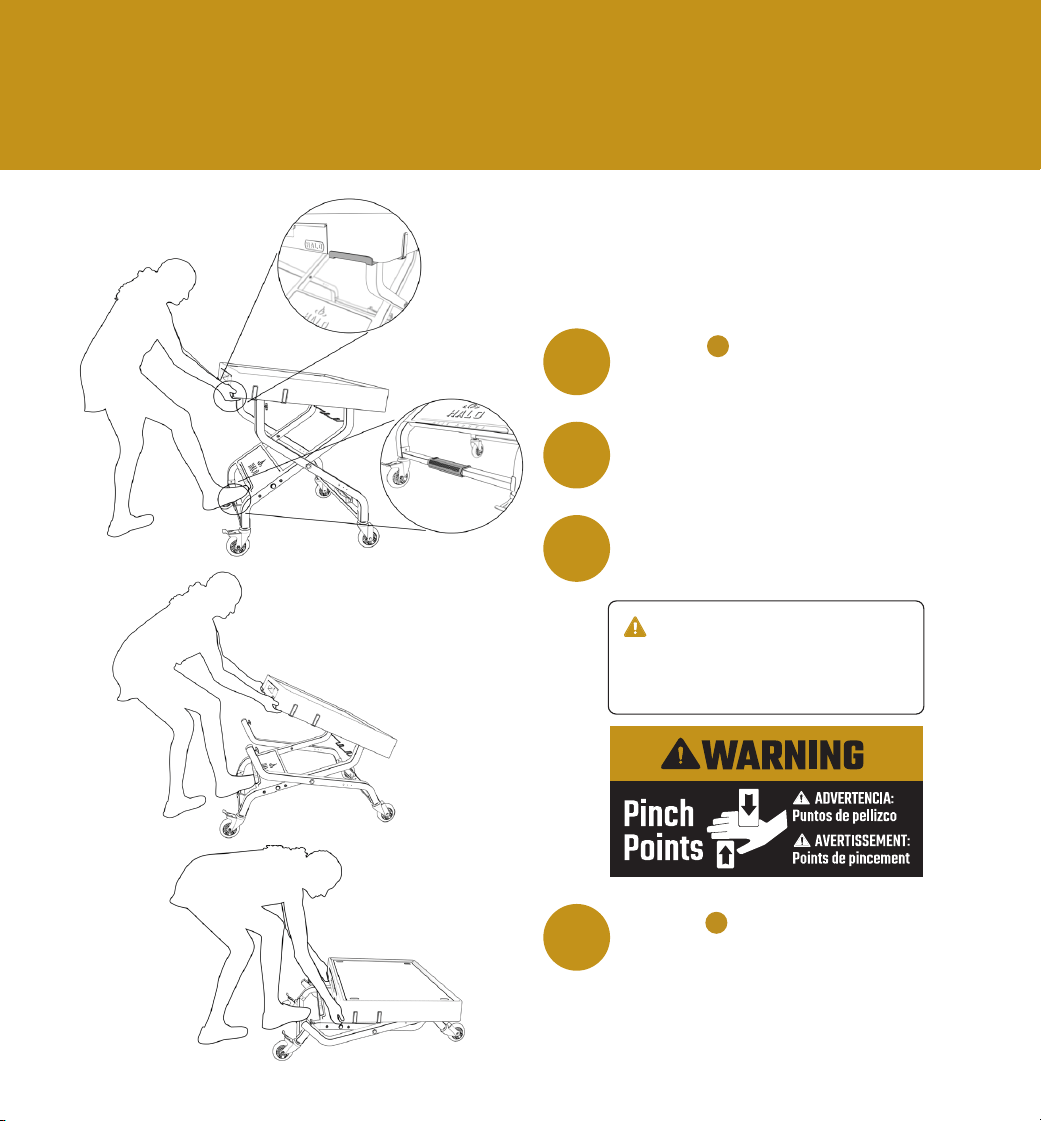
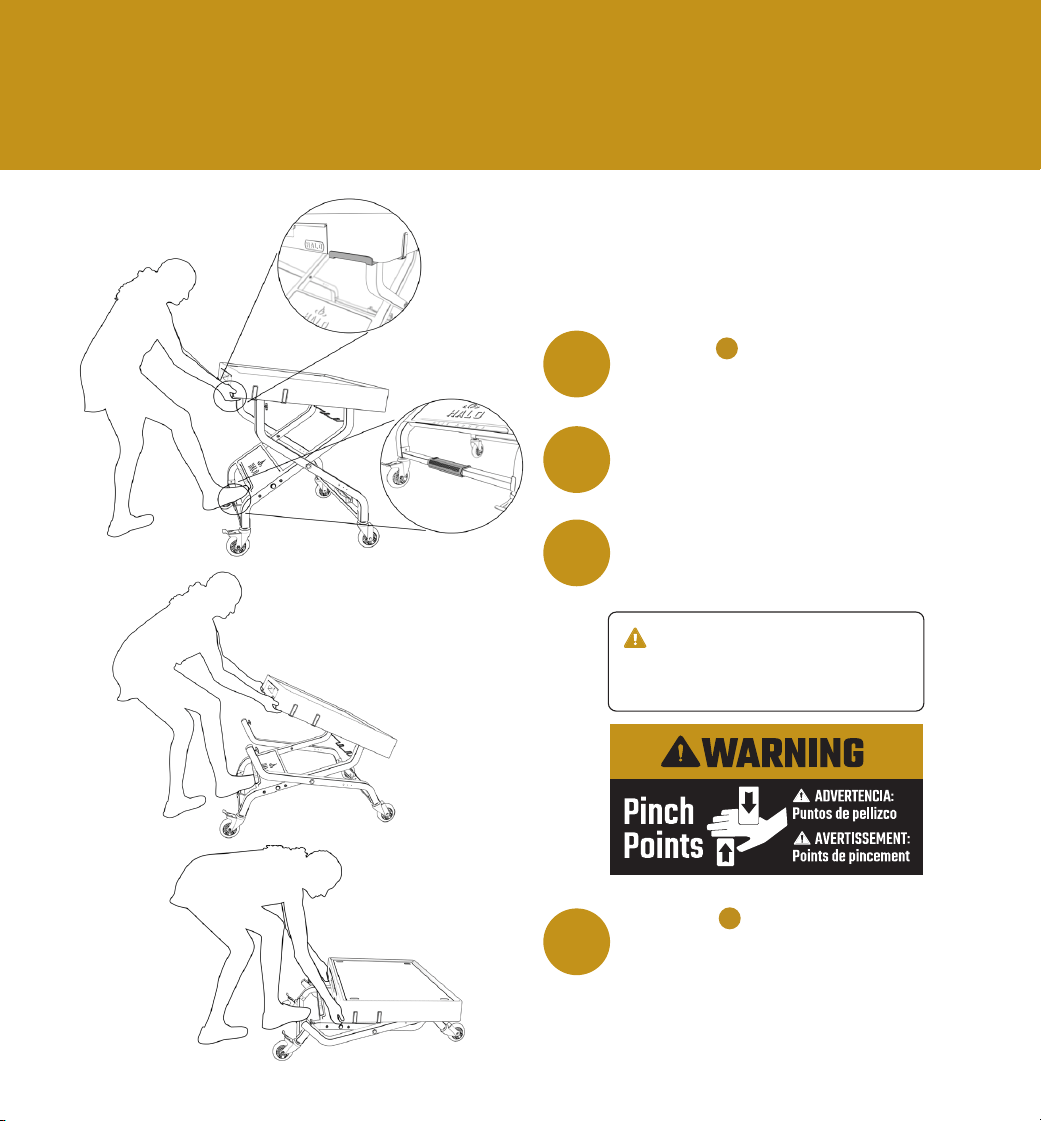
HOW TO COLLAPSE THE CTC
24
The cart weight gravity will move away from you
very quickly. Move hands and feet away from
pinch point at all times.
WARNING
Release Latches on both
sides of the cart.
1
Lock the front casters.
2
Lift the cart and lower it
slowly.
3
Fasten Latches on both
sides for storage or for
taking your cart on the go.
4
Follow these steps to fold the
Halo Countertop Cart.
14
14

SCOPE OF COVERAGE
PERIOD OF COVERAGE
TYPE OF FAILURE COVERAGE
PERFORATION, MANUFACTURING,
AND MATERIAL DEFECTS ONLY
Paint
All Components
1 Year
5 Years
FIVE (5) YEAR LIMITED
WARRANTY
This warranty only applies to units purchased from an authorized retailer.
Manufacturer warrants to the original consumer-purchaser only that this product
shall be free from defects in workmanship and materials after correct assembly and
under normal and reasonable home use for the periods indicated below beginning
on the date of purchase.
The manufacturer reserves the right to require that defective parts be returned,
postage and or freight pre-paid by the consumer for review and examination.
Please retain a copy of your proof of purchase to validate your warranty. You may be
requested to send in a copy of your receipt to conrm any warranty requests.
The original consumer-purchaser will be responsible for all shipping charges for parts
replaced under the terms of this limited warranty. This limited warranty is applicable
in the United States and Canada only, is only available to the original owner of the
product and is not transferable. Manufacturer requires proof of your date of purchase.
Therefore, you should retain your sales slip or invoice. Registering your product is
not a substitute for proof of purchase and the manufacturer is not responsible for
or required to retain proof of purchase records. This limited warranty applies to
the functionality of the product ONLY and does not cover cosmetic issues such as
scratches, dents, corrosions or discoloring by heat, abrasive and chemical cleaners
or any tools used in the assembly or installation of the appliance, surface rust, or the
discoloration of stainless-steel surfaces. Paint is not warranted and will require touch
up. RUST is not considered a manufacturing or materials defect.
This limited warranty will not reimburse you for the cost of any inconvenience,
food, personal injury, or property damage.
25

ITEMS MANUFACTURER WILL NOT PAY FOR
1. Shipping cost, standard or expedited, for warranty and replacement parts.
2. Service calls to your home.
3. Repairs when your product is used for other than normal, single-family
household or residential use.
4. Damage, failures, or operating difculties resulting from accident, alteration,
careless handling, misuse, abuse, re, ood, improper installation or
maintenance, installation not in accordance with electrical or plumbing codes,
or use of products not approved by the manufacturer.
5. Any food loss due to product failures or operating difculties.
6. Replacement parts or repair labor costs for units operated outside the United
States or Canada.
7. Pickup and delivery of your product.
8. Repairs to parts or systems resulting from unauthorized modications made
to the product.
9. The removal and/or reinstallation of your product.
DISCLAIMER OF IMPLIED WARRANTIES AND LIMITATION OF REMEDIES
Repair or replacement of defective parts is your exclusive remedy under the terms
of this limited warranty. In the event of parts availability issues, the manufacturer
reserves the right to substitute like or similar parts that are equally functional.
Manufacturer will not be responsible for any consequential or incidental damages
arising from the breach of either this limited warranty or any applicable implied
warranty, or for failure or damage resulting from acts of God, improper care and
maintenance, grease re, accident, alteration, replacement
of parts by anyone other than Manufacturer, misuse,
transportation, commercial use, abuse, hostile environments
(inclement weather, acts of nature, animal tampering),
improper installation or installation not in accordance with
local codes or printed manufacturer instructions.
26

THIS LIMITED WARRANTY IS THE SOLE EXPRESS WARRANTY GIVEN BY THE
MANUFACTURER. NO PRODUCT PERFORMANCE SPECIFICATION OR DESCRIPTION
WHEREVER APPEARING IS WARRANTED BY MANUFACTURER EXCEPT TO THE
EXTENT SET FORTH IN THIS LIMITED WARRANTY. ANY IMPLIED WARRANTY
PROTECTION ARISING UNDER THE LAWS OF ANY STATE, INCLUDING IMPLIED
WARRANTY OF MERCHANTABILITY OR FITNESS FOR A PARTICULAR PURPOSE
OR USE, IS HEREBY LIMITED IN DURATION TO THE DURATION OF THIS LIMITED
WARRANTY.
Manufacturer’s maximum liability, in any event, shall not exceed the purchase price
of the product paid by the original consumer. NOTE: Some states do not allow an
exclusion or limitation of incidental or consequential damages, so some of the
above limitations or exclusions may not apply to you. This limited warranty gives
you specic legal rights as set forth herein. You may also have other rights which
vary from state to state. In the state of California only, if renishing or replacement
of the product is not commercially practicable, the retailer selling this product
or the Manufacturer will refund the purchase price paid for the product, less the
amount directly attributable to use by the original consumer-purchaser prior to
discovery of the nonconformity. In addition, in the state of California only, you may
take the product to the retail establishment selling this product in order to obtain
performance under this limited warranty. If you wish to obtain performance of any
obligation under this limited warranty, you should write to:
Halo Products Group LLC 850 West Park Rd Elizabethtown KY, 42701
Consumer returns will not be accepted unless a valid Return Authorization is rst
acquired. Authorized returns are clearly marked on the outside of the package with
an RA number and the package is shipped freight with postage pre-paid. Consumer
returns that do not meet these standards will be refused.
CUSTOMER SERVICE
For questions regarding your product, or if you need replacement parts, contact us at:
Toll free: 1-833-572-1688 or
Visit us online at www.halo-pg.com
27

BUSCAR
Registro del Producto
Guía del Usuario En Línea
Videos de Montaje
28
MANUAL DEL
USUARIO
MODELO: HO-1006-XNA
GUARDE ESTE MANUAL PARA FUTURAS CONSULTAS.
LEA TODAS LAS INSTRUCCIONES ANTES DE INSTALAR Y UTILIZAR EL
CARRO DE MESÓN.
ADVERTENCIA
Este producto puede exponerle a sustancias químicas, que
el Estado de California conoce como causantes de cáncer y
defectos de nacimiento u otros daños reproductivos. Para
más información, visite www.P65Warnings.ca.gov
ADVERTENCIA
CALIFORNIA PROPOSICIÓN 65
REGISTRO DE INSTALACIÓN DEL PRODUCTO
29
REGISTRO DE INSTALACIÓN DEL PRODUCTO
AVISO: El número de
modelo y el número de
serie se encuentran en la
parte inferior del cajón.
Número de Modelo:
Número de Serie: Fecha de Compra:
29
IMPORTANTE: LLENE LA INFORMACIÓN DE REGISTRO DEL PRODUCTO
A CONTINUACIÓN, O PARA REGISTRAR SU PRODUCTO, VISITE NUESTRA
PÁGINA WEB EN halo-pg.com.
LISTA DE PIEZAS DEL CARRO DE MESÓN
30
5A
6
6A
15
NOTA: El artículo 2 incluido en el paquete de hardware.

Montaje en Mesón HO-1006-XNA-1 1
Panel de Mesón HO-1006-XNA-1A 1
Gancho Magnético para Herramientas HO-1006-XNA-2 4
Pierna Izquierda - Larga Externa HO-1006-XNA-3 1
Pierna Izquierda - Corta Externa HO-1006-XNA-3A 1
Pierna Izquierda - Larga Interior HO-1006-XNA-4 1
Pierna Izquierda - Corta Interior HO-1006-XNA-4A 1
Pierna Derecha - Larga Interna HO-1006-XNA-5 1
Pierna Derecha - Corta Interna HO-1006-XNA-5A 1
Pierna Derecha - Larga Externa HO-1006-XNA-6 1
Pierna Derecha - Corta Externa HO-1006-XNA-6A 1
Panel Frontal con Logotipo HO-1006-XNA-7 1
Tirante Trasero HO-1006-XNA-8 1
Soporte del Tanque HO-1006-XNA-9 1
Tirante Delantero HO-1006-XNA-10 1
Protector de Reposapiés HO-1006-XNA-11 1
Ruedas No Giratorias HO-1006-XNA-12 2
Ruedas con Cerradura HO-1006-XNA-13 2
Pestillo-Común HZ-1004-03 2
Cubierta de Pata HO-1006-XNA-14 4
Alambre de Retención del Tanque HO-1006-XNA-15 1
Blister de Hardware HO-1006-XNA-16 1
Tornillo M6 x 14 HO-1006-XNA-17 26
Tornillo M4 x 12 HO-1006-XNA-17A 14
Tornillo Shoulder M6 HO-1006-XNA-19 4
Buje de Pata HO-1006-XNA-20 2
Pomo M6 con Eje Roscado HO-1006-XNA-21 2
Pasador de Pivote de 8 mm HO-1006-XNA-22 2
Clavija HO-1006-XNA-23A 2
Arandela Plana HO-1006-XNA-23B 2
Llave de Ruedas de 17 mm HO-1006-XNA-23 1
ARTÍCULO DESCRIPCIÓN DE LA PIEZA NÚMERO DE PIEZA
1
1A
2
3
3A
4
4A
5
5A
6
6A
7
8
9
10
11
12
13
14
15
16
17
18
CANTIDAD
18A
19
20
21
31
22
22A
22B
23

3232
IMPORTANTE: Se aconseja leer completamente cada paso antes de comenzar el
montaje en las instrucciones. No apriete los tornillos completamente hasta que
se hayan instalado todos los tornillos de ese paso.
PREPARACIÓN DEL MONTAJE
Las piezas se encuentran en toda la caja de envío, incluso en el interior
del cajón. Inspeccione todas las piezas y el blíster de hardware después
de sacarlo de la caja protectora de envío. Deseche todos los materiales de
embalaje del interior y del exterior del carro antes de ensamblarlo, luego
revise e inspeccione todas las piezas consultando la lista de piezas. Si
falta alguna pieza o está dañada, no intente armarlo. Póngase en contacto
con el servicio de atención al cliente de Halo para obtener piezas.
Servicio de Atención al Cliente de Halo:
De lunes a viernes, 8am-5pm
Llamada gratuita: 1-833-572-1688
NOTA: El cartón del embalaje puede aplanarse y utilizarse como almohadilla
protectora para evitar que la supercie pintada se raye durante el montaje.
Instale la Pata Exterior Izquierda con
tornillos 3-M6 x 14, instale la Tapa de
la Pata.
1
Herramienta necesaria para el montaje: #Destornillador Phillips nº 2
33
IMPORTANTE: No
apriete los tornillos
completamente hasta que
se hayan instalado todos
los tornillos de ese paso.
3
3A
15
19
18
Pierna Izquierda - Larga Externa 1
Pierna Izquierda - Corta Externa 1
Tornillo M6 x 14 3
Tornillo Shoulder M6 2
Cubierta de Pata 1
3
3A
18
19
15
ARTÍCULO DESCRIPCIÓN DE LA PIEZA CANTIDAD
ARTÍCULO DESCRIPCIÓN DE LA PIEZA CANTIDAD
34
2
IMPORTANTE: No
apriete los tornillos
completamente hasta que
se hayan instalado todos
los tornillos de ese paso.
Pierna Izquierda - Larga Interior 1
Pierna Izquierda - Corta Interior 1
Tornillo M6 x 14 3
Cubierta de Pata 1
4
4A
18
15
4
4A
15
18
Instale la Pata Interior Izquierda con
tornillos 3-M6 x 14, instale la Tapa de
la Pata.
Instale el conjunto de la Pata Exterior
Izquierda y el conjunto de la Pata Interior
Izquierda utilizando el Pomo M6 con Eje
Roscado, colocando el casquillo de la
pata en medio. Aparte el montaje.
3
35
20
21
3/3A
4/4A
Conjunto de la Pata Exterior Izquierda 1
Conjunto de la Pata Interior Izquierda 1
Buje de Pata 1
Pomo M6 con Eje Roscado 1
3
4
20
21
3A
4A
ARTÍCULO DESCRIPCIÓN DE LA PIEZA CANTIDAD
4
36
Pierna Derecha - Larga Interna 1
Pierna Derecha - Corta Interna 1
Tornillo M6 x 14 3
Cubierta de Pata 1
5
5A
18
15
Instale el conjunto de la Pata Interior
Derecha con tornillos 3-M6 x 14,
instale la tapa de la pata.
15
5
5A
18
ARTÍCULO DESCRIPCIÓN DE LA PIEZA CANTIDAD
IMPORTANTE: No
apriete los tornillos
completamente hasta que
se hayan instalado todos
los tornillos de ese paso.
37
Instale el conjunto de la Pata Exterior
Derecha con tornillos de 3-M6 x 14 y
2-M6.
5
6
15
6A
19
Pierna Derecha - Larga Interna 1
Pierna Derecha - Corta Interna 1
Tornillo M6 x 14 3
Tornillo Shoulder M6 2
Cubierta de Pata 1
6
6A
18
19
15
ARTÍCULO DESCRIPCIÓN DE LA PIEZA CANTIDAD
IMPORTANTE: No
apriete los tornillos
completamente hasta que
se hayan instalado todos
los tornillos de ese paso.
38
Instale el conjunto de la pata interior
derecha y el conjunto de la pata
exterior derecha utilizando M6-Knob
con eje roscado y buje de la pata y ate
firmemente.
6
Conjunto de la Pata Interior Derecha 1
Conjunto de la Pata Exterior Derecha 1
Buje de Pata 1
Pomo M6 con Eje Roscado 1
5
6
20
21
5A
6A
20
21
5
6
5A
6A
ARTÍCULO DESCRIPCIÓN DE LA PIEZA CANTIDAD
39
Instale la Retención del Tanque y
la Abrazadera Trasera con tornillos
6-M6 x 14.
7
IMPORTANT: Do not
tighten screws completely
until all screws for that
step have been installed.
NOTA: Ate todos los tornillos con un amarre de mano y espere hasta el siguiente paso.
16
8/9
4/4A
3/3A
5/5A
6/6A
Conjunto de la Pata Exterior Izquierda 1
Conjunto de la Pata Interior Izquierda 1
Conjunto de la Pata Interior Derecha 1
Conjunto de la Pata Exterior Derecha 1
Soporte Trasero, Conjunto de Soporte del Tanque 1
Alambre de Retención del Tanque 1
Tornillo M6 x 14 6
3
4
16
18
3A
4A
5
6
5A
6A
8 9
ARTÍCULO DESCRIPCIÓN DE LA PIEZA CANTIDAD
18
18
7
10/11
18
18
40
Instale el Panel Frontal y la Abrazadera
Frontal con tornillos 8-M6 x 14.
8
Panel Frontal con Logotipo 1
Tirante Delantero 1
Tornillo M6 x 14 8
7
10
18
11
NOTA: Asegure rmemente todos los tornillos.
ARTÍCULO DESCRIPCIÓN DE LA PIEZA CANTIDAD
IMPORTANTE: No
apriete los tornillos
completamente hasta que
se hayan instalado todos
los tornillos de ese paso.
41
Instale los Ganchos Magnéticos para
Herramientas con tornillos 8-M4 x 12.
9
1
18A
2
18A
Panel de Mesón 1
Gancho Magnético para Herramientas 4
Tornillo M4 x 12 8
1A
2
18A
ARTÍCULO DESCRIPCIÓN DE LA PIEZA CANTIDAD

42
Instale el Carro en el mesón utilizando
Pasadores de pivote de 2-8 mm y fije
los Pestillos en su Sitio.
10
Montaje en Mesón 1
Pestillo 2
Montaje del Carro 1
Pasador de Pivote de 8 mm 2
Clavija 2
Arandela Plana 2
1
14
22
22
B
B
22
14
14
22A
22B
N/A
ARTÍCULO DESCRIPCIÓN DE LA PIEZA CANTIDAD
SECTION B-B
22B
22A
22
SECCIÓN B-B
43
Instale el panel de Mesón en el Mesón
con tornillos 6-M4 x 12.
11
Panel de Mesón 1
Tornillo M4 x 12 6
1A
18A
ARTÍCULO DESCRIPCIÓN DE LA PIEZA CANTIDAD
1A
18A
NOTA: Asegure rmemente todos los tornillos.
23
13
12
12
13
44
Conecte las ruedas con una llave de ruedas
de 17 mm. Monte las ruedas de bloqueo en
las patas delanteras. Monte las ruedas sin
bloqueo en las patas traseras.
12
Ruedas sin bloqueo 2
Rueda de bloqueo 2
Llave de Ruedas de 17 mm 1
12
13
23
ARTÍCULO DESCRIPCIÓN DE LA PIEZA CANTIDAD
NOTA: Para las ruedas con cerradura, puede bloquear el cater que bloqueará la rueda y le
permitirá ensamblar la rueda sin usar la llave giratoria.

DIMENSIONES ENSAMBLADAS
45
30.32 770.10
30.83 783.00
25.16 639.00
30.32 770.10
30.83 783.00
25.16 639.00
30.32 770.10
30.83 783.00
25.16 639.00
30.32 770.10
30.83 783.00
25.16 639.00
CÓMO COLAPSAR EL CARRO DE MESON
46
Por la fuerza de gravedad y el peso del carro se
alejará de usted muy rápidamente. Aleje las
manos y los pies del punto de pellizco en todo
momento.
ADVERTENCIA
Libere los Pestillos en
ambos lados del carro.
1
Bloquee las ruedas
delanteras.
2
Levante el carro y bájelo
lentamente.
3
Cierre los Pestillos
en ambos lados para
guardarlos o para llevar el
carro a cualquier parte.
4
Siga estos pasos para plegar el
Carro de Mesón Halo.
14
14

GARANTÍA LIMITADA DE
CINCO (5) AÑOS
Esta garantía sólo se aplica a las unidades adquiridas en un distribuidor autorizado.
El fabricante garantiza únicamente al consumidor-comprador original que este
producto estará libre de defectos de mano de obra y materiales después de un
montaje correcto y bajo un uso doméstico normal y razonable durante los períodos
indicados a continuación a partir de la fecha de compra.
47
ALCANCE DE LA
COBERTURA
PERFORACIÓN, FABRICACIÓN,
Y DEFECTOS MATERIALES ÚNICAMENTE
Pintura
Todos los Componentes
1 Año
5 Años
El fabricante se reserva el derecho de exigir que las piezas defectuosas sean devueltas,
con pago previo del envío por parte del consumidor, para su revisión y examinación.
Conserve una copia del comprobante de compra para validar su garantía. Es posible
que se le pida que envíe una copia de su recibo para conrmar cualquier solicitud de
garantía.
El consumidor-comprador original será responsable de todos los gastos de envío
de las piezas sustituidas bajo los términos de esta garantía limitada. Esta garantía
limitada es aplicable únicamente en Estados Unidos y Canadá, sólo está disponible
para el propietario original del producto y no es transferible. El fabricante requiere una
prueba de la fecha de compra. Por lo tanto, debe conservar el comprobante de venta o
la factura. El registro de su producto no sustituye a la prueba de compra y el fabricante
no es responsable ni está obligado a conservar los registros de prueba de compra. Esta
garantía limitada se aplica SÓLO a la funcionalidad del producto y no cubre problemas
estéticos como arañazos, abolladuras, corrosiones o decoloración por el calor,
limpiadores abrasivos y químicos o cualquier herramienta utilizada en el montaje
o instalación del aparato, óxido de la supercie o decoloración de las supercies de
acero inoxidable. La pintura no está incluida en la garantía y requerirá retoques. La
OXIDACIÓN no se considera un defecto de fabricación o de los materiales.
Esta garantía limitada no le reembolsará el coste de cualquier inconveniente,
comida, lesión personal o daño a la propiedad.
PERÍODO DE
COBERTURA
TIPO DE COBERTURA
DE FALLAS

ARTÍCULOS QUE EL FABRICANTE NO PAGARÁ
1. Gastos de envío, estándar o prioritario, para la garantía y las piezas de recambio.
2. Llamadas de servicio a domicilio.
3. Reparaciones cuando su producto se utiliza para un uso distinto al normal,
doméstico o residencial.
4. Los daños, fallos o dicultades de funcionamiento resultantes de accidentes,
alteraciones, manipulación descuidada, mal uso, abuso, incendio, inundación,
instalación o mantenimiento inadecuados, instalación no conforme a los códigos
eléctricos o de fontanería, o uso de productos no aprobados por el fabricante.
5. Cualquier pérdida de alimentos debida a fallos del producto o a dicultades de
funcionamiento.
6. Los costos de las piezas de repuesto o de la mano de obra de reparación de las
unidades que se utilizan fuera de los Estados Unidos o Canadá.
7. Recogida y entrega de su producto.
8. Las reparaciones de piezas o sistemas resultantes de modicaciones no
autorizadas realizadas en el producto.
9. La retirada y/o reinstalación de su producto.
RENUNCIA A LAS GARANTÍAS IMPLÍCITAS Y LIMITACIÓN DE LOS RECURSOS
La reparación o el reemplazo de las piezas defectuosas es el único recurso que
le corresponde según los términos de esta garantía limitada. En caso de que
haya problemas de disponibilidad de piezas, el fabricante se reserva el derecho
de sustituirlas por otras iguales o similares que sean igualmente funcionales.
El fabricante no será responsable de ningún daño consecuente o incidental
que surja del incumplimiento de esta garantía limitada o de cualquier garantía
implícita aplicable, ni de los fallos o daños resultantes de actos fortuitos,
cuidado y mantenimiento inadecuados, incendio por grasa, accidente, alteración,
sustitución de piezas por alguien que no sea el fabricante, uso
indebido, transporte, uso comercial, abuso, entornos hostiles
(inclemencias del clima, actos de la naturaleza, manipulación
de animales), instalación inadecuada o instalación que no
cumpla con los códigos locales o las instrucciones impresas del
fabricante.
48

ESTA GARANTÍA LIMITADA ES LA ÚNICA GARANTÍA EXPRESA OFRECIDA POR
EL FABRICANTE. NINGUNA ESPECIFICACIÓN O DESCRIPCIÓN DEL RENDIMIENTO
DEL PRODUCTO, DONDEQUIERA QUE APAREZCA, ESTÁ GARANTIZADA POR
EL FABRICANTE, EXCEPTO EN LA MEDIDA ESTABLECIDA EN ESTA GARANTÍA
LIMITADA. CUALQUIER PROTECCIÓN DE GARANTÍA IMPLÍCITA QUE SURJA BAJO
LAS LEYES DE CUALQUIER ESTADO, INCLUYENDO LA GARANTÍA IMPLÍCITA DE
COMERCIABILIDAD O IDONEIDAD PARA UN PROPÓSITO O USO PARTICULAR, SE
LIMITA POR LA PRESENTE A LA DURACIÓN DE ESTA GARANTÍA LIMITADA.
La responsabilidad máxima del fabricante, en cualquier caso, no superará el precio de
compra del producto pagado por el consumidor original. NOTA: Algunos estados no
permiten la exclusión o limitación de los daños incidentales o consecuentes, por lo que
algunas de las limitaciones o exclusiones anteriores pueden no aplicarse en su caso.
Esta garantía limitada le otorga los derechos legales especícos que se establecen en
el presente documento. También puede tener otros derechos que varían de un estado
a otro. Sólo en el estado de California, si el reacondicionamiento o la sustitución
del producto no son comercialmente viables, el minorista que vende este producto
o el fabricante reembolsarán el precio de compra pagado por el producto, menos
la cantidad directamente atribuible al uso por parte del consumidor-comprador
original antes de descubrir la no conformidad. Además, sólo en el estado de California,
puede llevar el producto al establecimiento de venta del producto para obtener el
cumplimiento de esta garantía limitada. Si desea exigir el cumplimiento de cualquier
obligación en virtud de esta garantía limitada, debe escribir a:
Halo Products Group LLC 850 West Park Rd Elizabethtown KY, 42701
No se aceptarán devoluciones de consumidores a menos que se adquiera primero
una Autorización de Devolución válida. Las devoluciones autorizadas se marcan
claramente en el exterior del paquete con un número RA y el paquete se envía con
franqueo pagado. Las devoluciones de los consumidores que no cumplan estas
normas serán rechazadas.
SERVICIO AL CLIENTE
Si tiene preguntas sobre su producto, o si necesita piezas de repuesto, póngase en
contacto con nosotros:
Llamada gratuita: 1-833-572-1688 o
Visítenos en línea en www.halo-pg.com
49

MANUEL DU
PROPRIÉTAIRE
RECHERCHE
Enregistrement du produit
Guide du propriétaire en ligne
Vidéos d'assemblage
50
CONSERVEZ CE MANUEL POUR VOUS Y RÉFÉRER À L'AVENIR
LISEZ TOUTES LES INSTRUCTIONS AVANT D'INSTALLER ET D'UTILISER LE CHARIOT
DE COMPTOIR.
AVERTISSEMENT
Ce produit peut vous exposer à des produits chimiques connus de
l'État de Californie pour provoquer des cancers et des anomalies
congénitales ou d'autres problèmes de reproduction. Pour plus
d'informations, consultez le site www.P65Warnings.ca.gov
AVERTISSEMENT
PROPOSITION 65 DE LA CALIFORNIE
MODÈLE Nº: HO-1006-XNA
51
DOSSIER D'INSTALLATION DU PRODUIT
AVIS: Le numéro de
modèle et le numéro de
série se trouvent sur le
fond du tiroir.
Numéro de modèle:
Numéro de série:
Date d'achat:
51
IMPORTANT: REMPLISSEZ LES INFORMATIONS RELATIVES À
L'ENREGISTREMENT DU PRODUIT CIDESSOUS, OU POUR ENREGISTRER
VOTRE PRODUIT, VISITEZ NOTRE SITE WEB À l'adresse halopg.com.
DU CHARIOT DE COMPTOIR
52
5A
6
6A
15
REMARQUE: Point 2 inclus dans le pack matériel.

Assemblage du comptoir HO-1006-XNA-1 1
Panneau de comptoir HO-1006-XNA-1A 1
Crochet magnétique pour outils HO-1006-XNA-2 4
Pied extérieur gauche-long HO-1006-XNA-3 1
Pied extérieur gauche-court HO-1006-XNA-3A 1
Pied intérieur gauche-long HO-1006-XNA-4 1
Pied intérieur gauche-court HO-1006-XNA-4A 1
Pied intérieur droit-long HO-1006-XNA-5 1
Pied intérieur droit-court HO-1006-XNA-5A 1
Pied extérieur droit-long HO-1006-XNA-6 1
Pied extérieur droit-court HO-1006-XNA-6A 1
Panneau frontal avec logo HO-1006-XNA-7 1
Renfort arrière HO-1006-XNA-8 1
Support de réservoir HO-1006-XNA-9 1
Support avant HO-1006-XNA-10 1
Repose-pieds HO-1006-XNA-11 1
Roulette non pivotante HO-1006-XNA-12 2
Roulette avec verrouillage HO-1006-XNA-13 2
Loquet Commun HZ-1004-03 2
Capuchon de pied HO-1006-XNA-14 4
Fil de rétention du réservoir HO-1006-XNA-15 1
Blister de matériel HO-1006-XNA-16 1
Vis M6 x 14 HO-1006-XNA-17 26
Vis M4 x 12 HO-1006-XNA-17A 14
Vis à épaulement M6 HO-1006-XNA-19 4
Douille de pied HO-1006-XNA-20 2
Bouton M6 avec tige letée HO-1006-XNA-21 2
Axe de pivotement de 8 mm HO-1006-XNA-22 2
Goupille fendue HO-1006-XNA-23A 2
Rondelle plate HO-1006-XNA-23B 2
Clé à roulette de 17 mm HO-1006-XNA-23 1
PIÈCE DESCRIPTION DES PIÈCES N° DE PIÈCE
1
1A
2
3
3A
4
4A
5
5A
6
6A
7
8
9
10
11
12
13
14
15
16
17
18
QUANTITÉ
18A
19
20
21
53
22
22A
22B
23
LISTE DES PIÈCES
5454
IMPORTANT: Il est conseillé de lire entièrement chaque étape avant de commencer
le montage sur les instructions. Ne serrez pas complètement les vis avant que
toutes les vis de cette étape aient été installées.
PRÉPARATION DE L'ASSEMBLAGE
Les pièces se trouvent partout dans le carton d'expédition, y compris à
l'intérieur du tiroir. Inspectez toutes les pièces et le matériel sous blister
après les avoir sortis du carton d'expédition. Jetez tous les matériaux
d'emballage à l'intérieur et à l'extérieur du chariot avant de l'assembler,
puis examinez et inspectez toutes les pièces en vous référant à la liste des
pièces. Si une pièce est manquante ou endommagée, n'essayez pas de
l'assembler. Contactez le service clientèle de Halo pour obtenir des pièces.
Service clientèle de Halo:
Lundi-vendredi, 8h-17h
Numéro gratuit: 1-833-572-1688
REMARQUE: Le carton d'emballage peut être aplati et utilisé comme tampon de
protection pour éviter de rayer la surface peinte pendant le montage.
Installez le pied extérieur gauche à
l'aide de vis 3-M6 x 14, puis installez
le capuchon du pied.
1
Outil requis pour l'assemblage: Tournevis Phillips #2
55
IMPORTANT: Ne serrez
pas complètement les vis
avant que toutes les vis de
cette étape aient été
installées.
3
3A
15
19
18
Pied extérieur gauche-long 1
Pied extérieur gauche-court 1
Vis M6 x 14 3
Vis à épaulement 2
Capuchon de pied 1
PIÈCE DESCRIPTION DES PIÈCES
3
3A
18
19
15
QUANTITÉ
IMPORTANT: Ne serrez
pas complètement les vis
avant que toutes les vis de
cette étape aient été
installées.
56
2
4
4A
18
15
4
4A
15
18
Installez le pied intérieure gauche à
l'aide de vis 3-M6 x 14, puis installez
le capuchon du pied.
Pied intérieur gauche-long 1
Pied intérieur gauche-court 1
Vis M6 x 14 3
Capuchon de pied 2
PIÈCE DESCRIPTION DES PIÈCES QUANTITÉ
Installez l'ensemble du pied extérieur
gauche et l'ensemble du pied intérieur
gauche à l'aide de la Bouton M6 avec tige
filetée, en plaçant la douille de pied entre
les deux. Mettez l'ensemble de côté.
3
57
20
21
3/3A
4/4A
Assemblage du pied extérieur gauche 1
Assemblage du pied intérieur gauche 1
Douille de pied 1
Bouton M6 avec tige letée 1
3
4
20
21
3A
4A
PIÈCE DESCRIPTION DES PIÈCES QUANTITÉ
4
58
Pied intérieur droit-long 1
Pied intérieur droit-court 1
Vis M6 x 14 3
Capuchon de pied 1
5
5A
18
15
Installez l'ensemble du pied intérieur
droit à l'aide de vis 3-M6 x 14,
installez le capuchon du pied.
15
5
5A
18
IMPORTANT: Ne serrez
pas complètement les vis
avant que toutes les vis de
cette étape aient été
installées.
PIÈCE DESCRIPTION DES PIÈCES QUANTITÉ
59
Installez le pied extérieur droit à l'aide
de vis à épaulement 3-M6 x 14 et 2-M6.
5
6
15
6A
19
Pied intérieur droit-long 1
Pied intérieur droit-court 1
Vis M6 x 14 3
Vis à épaulement M6 2
Capuchon de pied 1
6
6A
18
19
15
IMPORTANT: Ne serrez
pas complètement les vis
avant que toutes les vis de
cette étape aient été
installées.
PIÈCE DESCRIPTION DES PIÈCES QUANTITÉ
20
21
5
6
5A
6A
60
Installez l’assemblage de la jambe
intérieure droite et l’ensemble de la
jambe extérieure droite en utilisant
M6-Knob avec arbre fileté et bague de
jambe et attachez fermement.
6
Assemblage du pied intérieur droit 1
Assemblage du pied extérieur droit 1
Douille de pied 1
Bouton M6 avec tige letée 1
5
6
20
21
5A
6A
PIÈCE DESCRIPTION DES PIÈCES QUANTITÉ
16
8/9
4/4A
3/3A
5/5A
6/6A
61
Installez le dispositif de retenue du
réservoir et le support arrière à l'aide
de vis 6-M6 x 14
7
REMARQUE: Attachez toutes les vis avec une attache à main et attendez l'étape suivante.
Assemblage du pied extérieur gauche 1
Assemblage du pied intérieur gauche 1
Assemblage du pied intérieur droit 1
Assemblage du pied extérieur droit 1
Support arrière, ensemble de support de réservoir 1
Fil de rétention du réservoir 1
Vis M6 x 14 6
3
4
16
18
3A
4A
5
6
5A
6A
8 9
PIÈCE DESCRIPTION DES PIÈCES QUANTITÉ
IMPORTANT: Ne serrez
pas complètement les vis
avant que toutes les vis de
cette étape aient été
installées.
18
18
7
10/11
18
18
62
Installez le panneau frontal et le support
frontal à l'aide de vis 8-M6 x 14.
8
Panneau frontal avec logo 1
Support avant 1
Vis M6 x 14 8
7
10
18
11
REMARQUE: Attachez fermement toutes les vis.
IMPORTANT: Ne serrez
pas complètement les vis
avant que toutes les vis de
cette étape aient été
installées.
PIÈCE DESCRIPTION DES PIÈCES QUANTITÉ
63
Installez les crochets d'outils
magnétiques à l'aide de vis 8-M4 x 12.
9
1
18A
2
18A
Panneau de comptoir 1
Crochet magnétique pour outils 4
Vis M4 x 12 8
1A
2
18A
PIÈCE DESCRIPTION DES PIÈCES QUANTITÉ
64
Installez le chariot sur le comptoir à
l'aide de goupilles pivotantes de 2 à
8 mm et fixez les loquets en place.
10
Assemblage du comptoir 1
Loquet 2
Assemblage du chariot 1
Axe de pivotement de 8 mm 2
Goupille fendue 2
Rondelle plate 2
1
14
22
22
B
B
22
14
14
SECTION B-B
22B
22A
22
22A
22B
N/A
PIÈCE DESCRIPTION DES PIÈCES QUANTITÉ

65
Installez le panneau du comptoir sur le
comptoir à l'aide de vis 6-M4 x 12.
11
Panneau de comptoir 1
Vis M4 x 12 6
1A
18A
PIÈCE DESCRIPTION DES PIÈCES QUANTITÉ
1A
18A
REMARQUE: Attachez fermement toutes les vis.
Connectez les roulettes à l'aide d'une
clé à roulette de 17 mm. Montez des
roulettes verrouillables sur les pieds
avant. Montez des roulettes non
verrouillables sur les pieds arrière.
23
13
12
12
13
66
12
Roulette non verrouillable 2
Roulette de verrouillage 2
Clé à roulette de 17 mm 1
12
13
23
PIÈCE DESCRIPTION DES PIÈCES QUANTITÉ
REMARQUE: pour les roulettes avec serrure, vous pouvez verrouiller le traiteur qui
verrouillera la roulette et vous permettra d’assembler la roulette sans utiliser de clé à
roulettes.
DIMENSIONS DE MONTAGE
30.32 770.10
30.83 783.00
25.16 639.00
30.32 770.10
30.83 783.00
25.16 639.00
30.32 770.10
30.83 783.00
25.16 639.00
30.32 770.10
30.83 783.00
25.16 639.00
67
COMMENT REPLIER LE CTC
68
Le poids du chariot s'éloigne très rapidement de
vous. Éloignez à tout moment les mains et les
pieds du point de pincement.
AVERTISSEMENT
Libérez les loquets des
deux côtés du chariot.
1
Verrouillez les roulettes avant.
2
Soulevez le chariot et
descendez-le lentement.
3
Fermez les loquets des
deux côtés pour le rangement
ou pour emmener votre
chariot en déplacement.
4
Suivez ces étapes pour plier le
Chariot de Comptoir Halo.
14
14

ÉTENDUE DE LA
COUVERTURE
PERFORATION, FABRICATION,
ET DÉFAUTS MATÉRIELS UNIQUEMENT
Peinture
Tous les composants
1 An
5 Ans
GARANTIE LIMITÉE DE
CINQ (5) ANS
Cette garantie ne s'applique qu'aux appareils achetés chez un détaillant agréé. Le fabricant
garantit à l'acheteur original que ce produit est exempt de défauts de fabrication et de
matériaux après un assemblage correct et dans le cadre d'une utilisation domestique normale
et raisonnable pendant les périodes indiquées ci-dessous, à compter de la date d'achat.
Le fabricant se réserve le droit d'exiger que les pièces défectueuses soient renvoyées,
port et/ou fret prépayés par le consommateur pour examen et vérication.
Veuillez conserver une copie de votre preuve d'achat pour valider votre garantie. Il peut
vous être demandé d'envoyer une copie de votre reçu pour conrmer toute demande
de garantie.
Le consommateur-acheteur d'origine sera responsable de tous les frais d'expédition
des pièces remplacées dans le cadre de cette garantie limitée. Cette garantie limitée ne
s'applique qu'aux États-Unis et au Canada, n'est valable que pour le propriétaire initial
du produit et n'est pas transférable. Le fabricant exige une preuve de votre date d'achat.
Vous devez donc conserver votre ticket de caisse ou votre facture. L'enregistrement de
votre produit ne remplace pas la preuve d'achat et le fabricant n'est pas responsable ni
tenu de conserver les preuves d'achat. Cette garantie limitée s'applique UNIQUEMENT
à la fonctionnalité du produit et ne couvre pas les problèmes esthétiques tels que les
rayures, les bosses, les corrosions ou les décolorations dues à la chaleur, ux nettoyants
abrasifs et chimiques ou à tout outil utilisé pour l'assemblage ou l'installation de
l'appareil, la rouille de surface ou la décoloration des surfaces en acier inoxydable. La
peinture n'est pas garantie et devra être retouchée. La ROUILLE n'est pas considérée
comme un défaut de fabrication ou de matériel.
Cette garantie limitée ne vous remboursera pas le coût des inconvénients, des
aliments, des blessures corporelles ou des dommages matériels.
69
PÉRIODE DE
COUVERTURE
TYPE DE COUVERTURE
DES DÉFAILLANCES

ARTICLES POUR LESQUELS LE FABRICANT NE PAIERA PAS
1. Frais d'expédition, standard ou accéléré, pour la garantie et les pièces de rechange.
2. Appels de service à votre domicile.
3. Les réparations lorsque votre produit est utilisé à des ns autres que l'usage
normal, domestique ou résidentiel d'une seule famille.
4. Les dommages, les défaillances ou les difcultés de fonctionnement résultant
d'un accident, d'une modication, d'une manipulation négligente, d'une mauvaise
utilisation, d'un incendie, d'une inondation, d'une installation ou d'un entretien
inadéquat, d'une installation non conforme aux codes de l'électricité ou de la
plomberie ou de l'utilisation de produits non approuvés par le fabricant.
5. Toute perte de nourriture due à des défaillances du produit ou à des difcultés de
fonctionnement.
6. Le coût des pièces de rechange ou de la main-d'œuvre de réparation pour les
appareils utilisés en dehors des États-Unis ou du Canada.
7. Enlèvement et livraison de votre produit.
8. Les réparations de pièces ou de systèmes résultant de modications non
autorisées apportées au produit.
9. Le retrait et/ou la réinstallation de votre produit.
EXCLUSION DE GARANTIE IMPLICITE ET LIMITATION DES RECOURS
La réparation ou le remplacement des pièces défectueuses est votre seul recours
selon les termes de cette garantie limitée. En cas de problèmes de disponibilité des
pièces, le fabricant se réserve le droit de substituer des pièces similaires ou de même
fonction. Le fabricant ne peut être tenu responsable de tout dommage indirect ou
accessoire découlant de la violation de la présente garantie limitée ou de toute
garantie implicite applicable, ou de toute défaillance ou tout dommage résultant
d'une catastrophe naturelle, d'un entretien inadéquat, d'un incendie de graisse,
d'un accident, d'une modication, du remplacement de pièces par une personne
autre que le fabricant, d'une mauvaise utilisation, du transport,
d'une utilisation commerciale, d'un abus, d'un environnement
hostile (intempéries, catastrophes naturelles, altération par des
animaux), d'une installation inadéquate ou non conforme aux
codes locaux ou aux instructions imprimées du fabricant.
70

CETTE GARANTIE LIMITÉE EST LA SEULE GARANTIE EXPRESSE DONNÉE PAR
LE FABRICANT. AUCUNE SPÉCIFICATION OU DESCRIPTION DES PERFORMANCES
DU PRODUIT, OÙ QU'ELLE APPARAISSE, N'EST GARANTIE PAR LE FABRICANT,
SAUF DANS LA MESURE PRÉVUE PAR LA PRÉSENTE GARANTIE LIMITÉE. TOUTE
PROTECTION DE GARANTIE IMPLICITE DÉCOULANT DES LOIS DE TOUT ÉTAT, Y
COMPRIS LA GARANTIE IMPLICITE DE QUALITÉ MARCHANDE OU D'ADÉQUATION
À UN USAGE PARTICULIER, EST LIMITÉE PAR LA PRÉSENTE À LA DURÉE DE LA
PRÉSENTE GARANTIE LIMITÉE.
La responsabilité maximale du fabricant, dans tous les cas, ne dépassera pas le
prix d'achat du produit payé par le consommateur initial. REMARQUE: Certains
États n'autorisent pas l'exclusion ou la limitation des dommages accessoires
ou indirects, de sorte que certaines des limitations ou exclusions ci-dessus
peuvent ne pas s'appliquer à votre cas. Cette garantie limitée vous donne des
droits légaux spéciques tels qu'énoncés dans le présent document. Vous pouvez
également disposer d'autres droits qui varient d'un État à l'autre. Dans l'État de
Californie uniquement, si la remise en état ou le remplacement du produit n'est
pas commercialement réalisable, le détaillant qui vend ce produit ou le fabricant
remboursera le prix d'achat payé pour le produit, moins le montant directement
attribuable à l'utilisation par le consommateur-acheteur initial avant la découverte
de la nonconformité. En outre, dans l'État de Californie uniquement, vous pouvez
apporter le produit à l'établissement de vente au détail qui vend ce produit an
d'obtenir des performances dans le cadre de cette garantie limitée. Si vous souhaitez
obtenir l'exécution d'une quelconque obligation au titre de la présente garantie
limitée, vous devez écrire à l'adresse suivante:
Halo Products Group LLC 850 West Park Rd Elizabethtown KY, 42701
Les retours de consommateurs ne seront pas acceptés à moins qu'une autorisation
de retour valide ne soit obtenue au préalable. Les retours autorisés sont clairement
marqués à l'extérieur du colis avec un numéro RA et le colis est expédié en port payé.
Les retours des consommateurs qui ne respectent pas ces normes seront refusés.
SERVICE À LA CLIENTÈLE
Pour toute question concernant votre produit, ou si vous avez besoin de pièces de
rechange, contactez-nous à l'adresse suivante:
Sans frais: 1-833-572-1688 ou
Visitez-nous en ligne à l'adresse www.halo-pg.com
71

© 2022 Halo Products Group LLC
Halo and the Halo ame are registered trademarks of Halo Products Group LLC
www.halo-pg.com
Halo Products Group LLC
850 West Park Rd
Elizabethtown KY 42701
Toll free: 1-833-572-1688
STAY CONNECTED WITH US!
HALO Products Group
Halo Products Group
@haloproductsgroup
@haloproductsgroup
SCAN TO REGISTER
YOUR PRODUCT