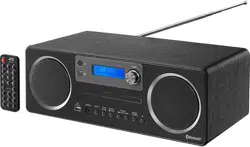
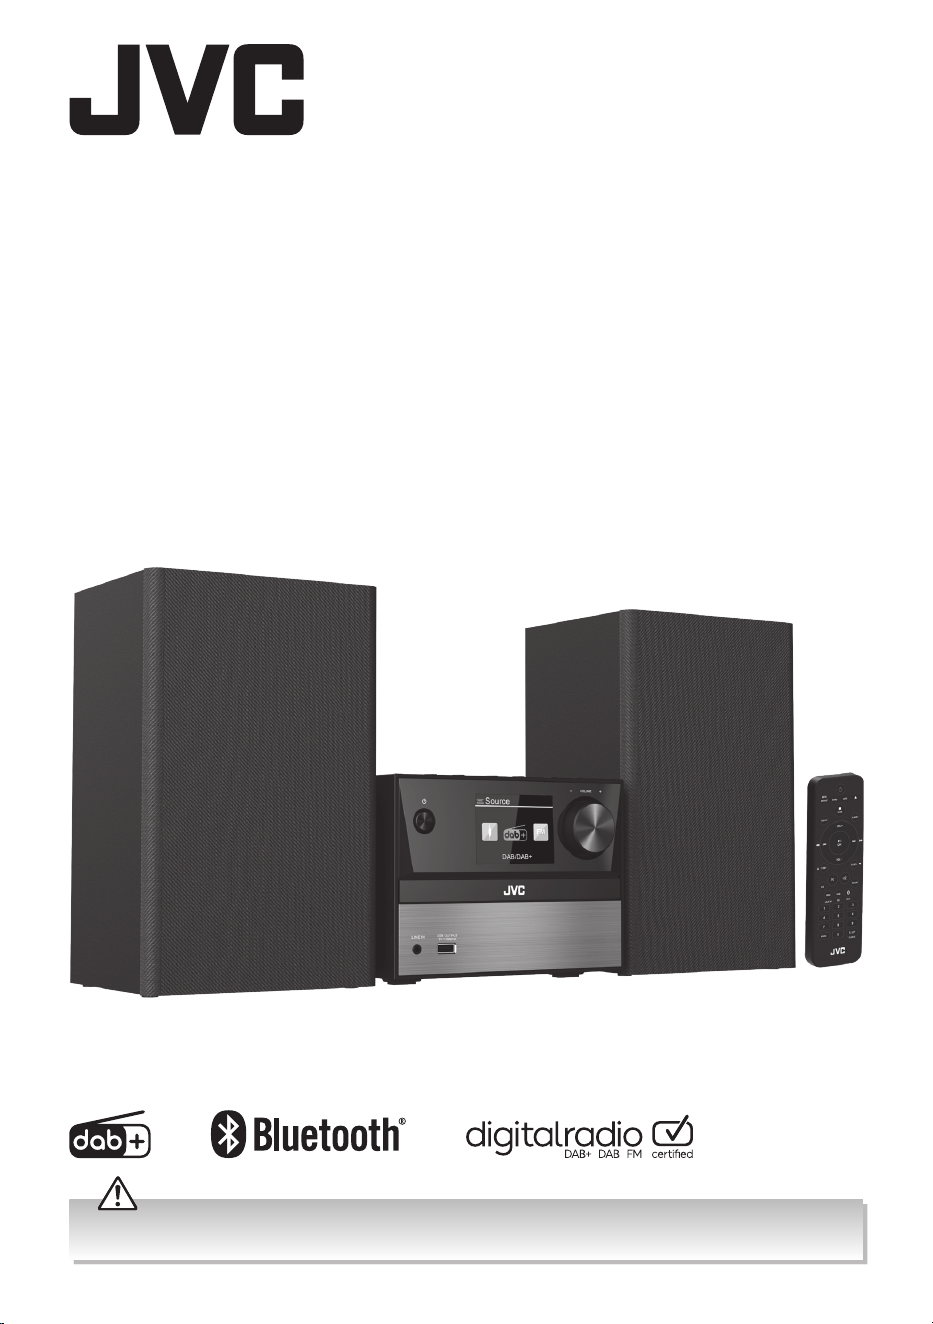
Instruction Manual
Wireless Traditional
Hi-Fi System
UX-D225B
Before using this appliance, read all safety instructions carefully rst in the Safety Warnings booklet and keep
them for future reference.

Contents
Safety Warnings ..........................................................................Safety Warnings booklet
Unpacking .............................................................................................................................4
Product Overview ................................................................................................................4
Main Unit ......................................................................................................................................................... 4
Remote Control ............................................................................................................................................5
Preparation ...........................................................................................................................6
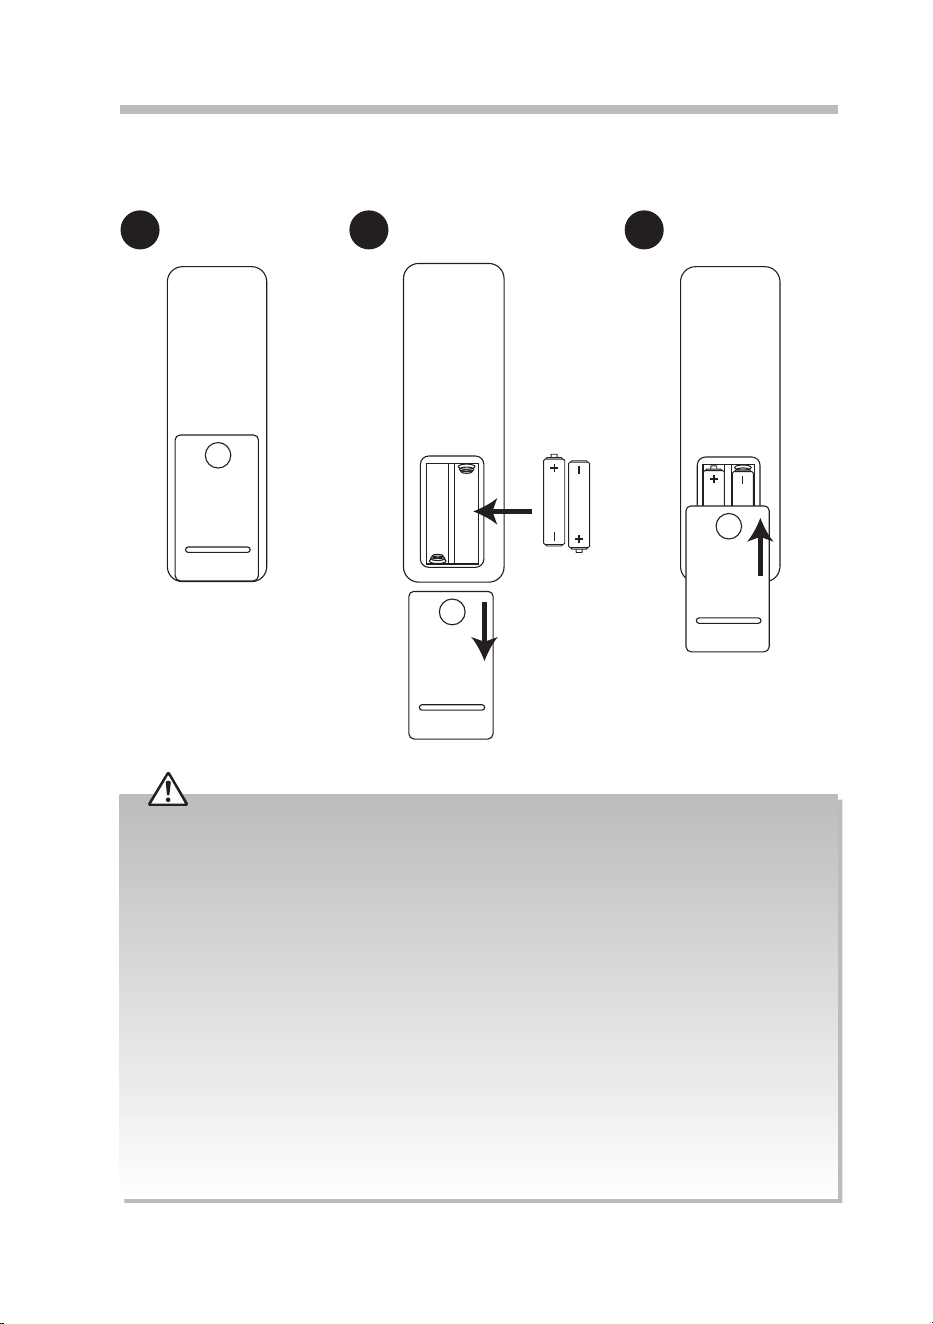
Battery Replacement for the Remote Control ..................................................................................6
Remote Control Operation Range ......................................................................................................... 7
Connections ..........................................................................................................................8
Connecting the FM Aerial .........................................................................................................................8
Speakers Connection .................................................................................................................................8
Connecting Mobile Devices .....................................................................................................................9
Connecting to the Mains Supply ...........................................................................................................9
Basic Operation ..................................................................................................................10
Switching ON / OFF .................................................................................................................................. 10
ECO-Power Mode ...................................................................................................................................... 10
Selecting Modes ........................................................................................................................................ 10
Adjust the Speaker Level Settings and Eects .............................................................................. 10
System Settings ..................................................................................................................11
Time / Date Settings .................................................................................................................................11
Backlight ........................................................................................................................................................11
Language ......................................................................................................................................................11
Factory Reset ...............................................................................................................................................12
Software Upgrade .....................................................................................................................................12
Software Version ........................................................................................................................................12
Clock Operation .................................................................................................................13
Setting Time and Date in Standby mode .........................................................................................13
Setting the Sleep Timer ...........................................................................................................................13
DAB Operation ...................................................................................................................13
First Time Auto Scan .................................................................................................................................14
To Select and Listen to the Found Stations ......................................................................................14
Secondary Services ...................................................................................................................................14
Full Scan.........................................................................................................................................................14
Manual Tuning ............................................................................................................................................14
DRC (Dynamic Range Compression) ..................................................................................................15
Preset Stations ............................................................................................................................................15
Recalling Preset Stations .........................................................................................................................15
DAB Display Modes .................................................................................................................................. 16
FM Radio Operation ...........................................................................................................17
Tuning in a Station .....................................................................................................................................17
Scan Settings ...............................................................................................................................................17
Audio Settings............................................................................................................................................ 18
Preset Stations ........................................................................................................................................... 18
Recalling Preset Stations ........................................................................................................................ 18
FM Display Modes ......................................................................................................................................19

CD/MP3 Operation .............................................................................................................19
Compatible Disc Types ............................................................................................................................19
Playback ........................................................................................................................................................ 20
To Skip Search or Search and Play ...................................................................................................... 20
Selecting an Album (for MP3 disc) ..................................................................................................... 20
Repeat Playback ........................................................................................................................................ 21
Programme Play ........................................................................................................................................ 21
USB Playback Operation .................................................................................................. 22
LINE IN (AUX IN) Operation .............................................................................................. 22
Bluetooth® Operation ....................................................................................................... 23
Maintenance ...................................................................................................................... 24
Cleaning the Unit ...................................................................................................................................... 24
Handling Discs ........................................................................................................................................... 24
Cleaning Discs ............................................................................................................................................ 24
Storing Discs ............................................................................................................................................... 24
Hints and Tips .................................................................................................................... 25
Product Fiche and Specifications .................................................................................... 26
1
Safety Warnings
DAB all-in-one Hi-Fi
Ventilation
• To prevent the risk of electric shock or
re hazard due to overheating, ensure
that curtains and other materials do not
obstruct the ventilation vents.
• A minimum distance of 5 cm around the
unit should be maintained to allow for
sucient ventilation.
• Do not install or place this unit in a
bookcase, built-in cabinet or in another
conned space. Ensure the unit is well
ventilated.
Safety
• Always disconnect the unit from the mains
supply before connecting/disconnecting
other devices or moving the unit.
• Unplug the unit from the mains socket
during a lightning storm.
• In the interests of safety and to avoid
unnecessary energy consumption,
never leave the unit switched on while
unattended for long periods of time, e.g.
overnight, while on holiday or while out of
the house. Switch it o and disconnect the
mains plug from the mains socket.
Mains Cable
• Make sure the unit or unit stand is not
resting on top of the mains cable, as the
weight of the unit may damage the mains
cable and create a safety hazard.
• If the mains cable is damaged it must be
replaced by the manufacturer, its service
agent, or similarly qualied persons in
order to avoid a hazard.
Use only power supplies listed in
the user instrucitons.
The mains plug is used as
disconnect device, the disconnect
device shall remain readily
operable.
Interference
• Do not place the unit on or near appliances
which may cause electromagnetic
interference. If you do, it may adversely aect
the operating performance of the unit,
and cause a distorted picture or sound.
• Read all the instructions carefully before
using the unit and keep them for future
reference.
• Retain the manual. If you pass the unit
onto a third party make sure to include this
manual.
• Check that the voltage marked on the
rating label matches your mains voltage.
Damage
• Please inspect the unit for damage after
unpacking.
• Do not continue to operate the unit if you
are in any doubt about it working normally,
or if it is damaged in any way – switch o,
withdraw the mains plug and consult
your dealer.
Location of Unit
• The unit must be placed on a at stable
surface and should not be subjected to
vibrations.
• Do not place the unit on sloped or unstable
surfaces as the unit may fall o or tip over.
• The mains socket must be located near the
unit and should be easily accessible.
• This unit is designed for indoor, domestic
use only.
Temperature
• Avoid extreme degrees of temperature,
either hot or cold. Place the unit well away
from heat sources such as radiators or gas/
electric res.
• Avoid exposure to direct sunlight and other
sources of heat.
Naked Flames
• Never place any type of candle or naked
ame on the top of or near the unit.
Moisture
• To reduce the risk of re, electric shock or
product damage, do not expose this unit
to rain, moisture, dripping or splashing.
No objects lled with liquids, such as vases,
should be placed on the unit. Do not
operate the unit with wet hands, near
water or other liquid.
• If you spill any liquid into the unit, it can
cause serious damage. Switch it o at the
mains immediately. Withdraw the mains
plug and consult your dealer.
2
Batteries
• Batteries used in the remote control for this
unit are easily swallowed by young children
and this is dangerous.
• Keep loose batteries away from young
children and make sure that the battery
holder tray is secure in the unit. Seek
medical advice if you believe a cell has
been swallowed.
• Please dispose of batteries correctly by
following the guidance in this manual.
• Do not expose the battery to direct
sunlight or sources of excessive heat.
• Attention should be drawn to the
environmental aspects of battery disposal.
• Do not ingest the battery. Chemical Burn
Hazard.
• Keep new and used battery away from
children.
• If the battery compartment does not close
securely, stop using the product and keep
it away from children.
• If you think batteries might have been
swallowed or placed inside any part of the
body, seek immediate medical attention.
Supervision
• Children should be supervised to ensure
that they do not play with the unit and the
remote control.
• Never let anyone especially children push
anything into the holes, slots or any other
openings in the case - this could result in
a fatal electric shock.
Class 1 Laser Product
CLASS 1
LASER PRODUCT
• This unit
utilises a laser.
Use of controls,
adjustments or
performance of procedures other than
those specied herein may result in
hazardous radiation exposure.
• Before moving the unit, ensure the disc
tray is empty.
• Always remove the disc when the unit is
not in use.
• Failure to do so will risk severely damaging
the disc and the unit.
• Do not stack devices, heat from other
devices may aect the performance of
the unit.
CAUTION
RISK OF ELECTRIC SHOCK
DO NOT OPEN
The lightning ash with arrowhead
symbol, within an equilateral
triangle, is intended to alert the
user to the presence of uninsulated
“dangerous voltage” within the
unit’s enclosure that may be of
sucient magnitude to constitute
a risk of electric shock.
The exclamation point within an
equilateral triangle is intended to
alert the user to the presence of
important operating and
maintenance (servicing)
instructions in the manual
accompanying the unit.
Service
• To reduce the risk of electric shock, do not
remove screws. The unit does not contain
any user-serviceable parts. Please leave all
maintenance work to qualied personnel.
• Do not open any xed covers as this may
expose dangerous voltages.
Maintenance
• Ensure to unplug the unit from the mains
socket before cleaning.
• Do not use any type of abrasive pad or
abrasive cleaning solutions as these may
damage the unit’s surface.
• Do not use liquids to clean the unit.
•
This equipment is a Class II or double
insulated electrical appliance. It has
been designed in such a way that it
does not require a safety connection
to electrical earth.
~ AC voltage: This symbol indicates that the
rated voltage marked with the symbol is AC
voltage.
DC voltage: This symbol indicates that the
rated voltage marked with the symbol is DC
voltage.
To prevent the
spread of re, keep
candles or other
open ames away
from this product
at all times.
3
Useful Information and Licences
Visit Partmaster.co.uk today for the easiest way to buy electrical
spares and accessories. With over 1 million spares and accessories
available we can deliver direct to your door the very next day. Visit www.partmaster.co.uk or
call 0344 800 3456 (UK customers only). Calls charged at National Rate.
The symbol on the product or its packaging indicates that this product
must not be disposed of with your other household waste. Instead, it is
your responsibility to dispose of your waste equipment by handing it over
to a designated collection point for the recycling of waste electrical and
electronic equipment. The separate collection and recycling of your waste
equipment at the time of disposal will help conserve natural resources and
ensure that it is recycled in a manner that protects human health and the
environment.
For more information about where you can drop o your waste for
recycling, please contact your local authority, or where you purchased your
product.
Notes for Battery Disposal
The batteries used with this product contain chemicals that are harmful to
the environment. To preserve our environment, dispose of used batteries
according to your local laws or regulations. Do not dispose of batteries with
normal household waste.
For more information, please contact the local authority or your retailer
where you purchased the product.
All trademarks are the property of their respective owners and all rights are acknowledged.
The Bluetooth® word mark and logos are registered trademarks owned by Bluetooth SIG,
Inc. and any use of such marks by Currys Group Limited is under license. Other trademarks
and trade names are those of their respective owners.

(Safety-JVC DAB Hi-Fi System-260513V8)
This product is distributed and warranted exclusively by Currys Group Limited.
“JVC” is the trademark of JVCKENWOOD Corporation,
used by Currys Group Limited under license.
UK Representative
Currys Group Limited (No. 504877)
Currys Newark Campus, Long Hollow Way, Newark, NG24 2NH, UK
https://www.currys.co.uk
EU Representative
Currys Ireland Limited (No. 259460)
3rd Floor Oce Suite, Omni Park SC, Santry, Dublin 9, Republic of Ireland
https://www.currys.ie
UK & EU Contact details: business.standards@currys.co.uk
4
Unpacking
Remove all items from the packaging. Retain the packaging. If you dispose of it please do so
according to local regulations.
The following items are included:
• Main Unit
• Speaker × 2
• Remote Control & AAA Battery × 2
• Aerial
• 3.5 mm to 3.5 mm Stereo Audio Cable
• Instruction Manual & Safety Warnings
• Quick Start Guide
• If items are missing, or damaged please contact Partmaster (UK only). Tel: 0344 800 3456 for assistance.
• If you require additional assistance:
For UK, please call our UK Call Centre on 0344 561 1234.
For Ireland, please call our Ireland Call Centre on 0818 810575.
Product Overview
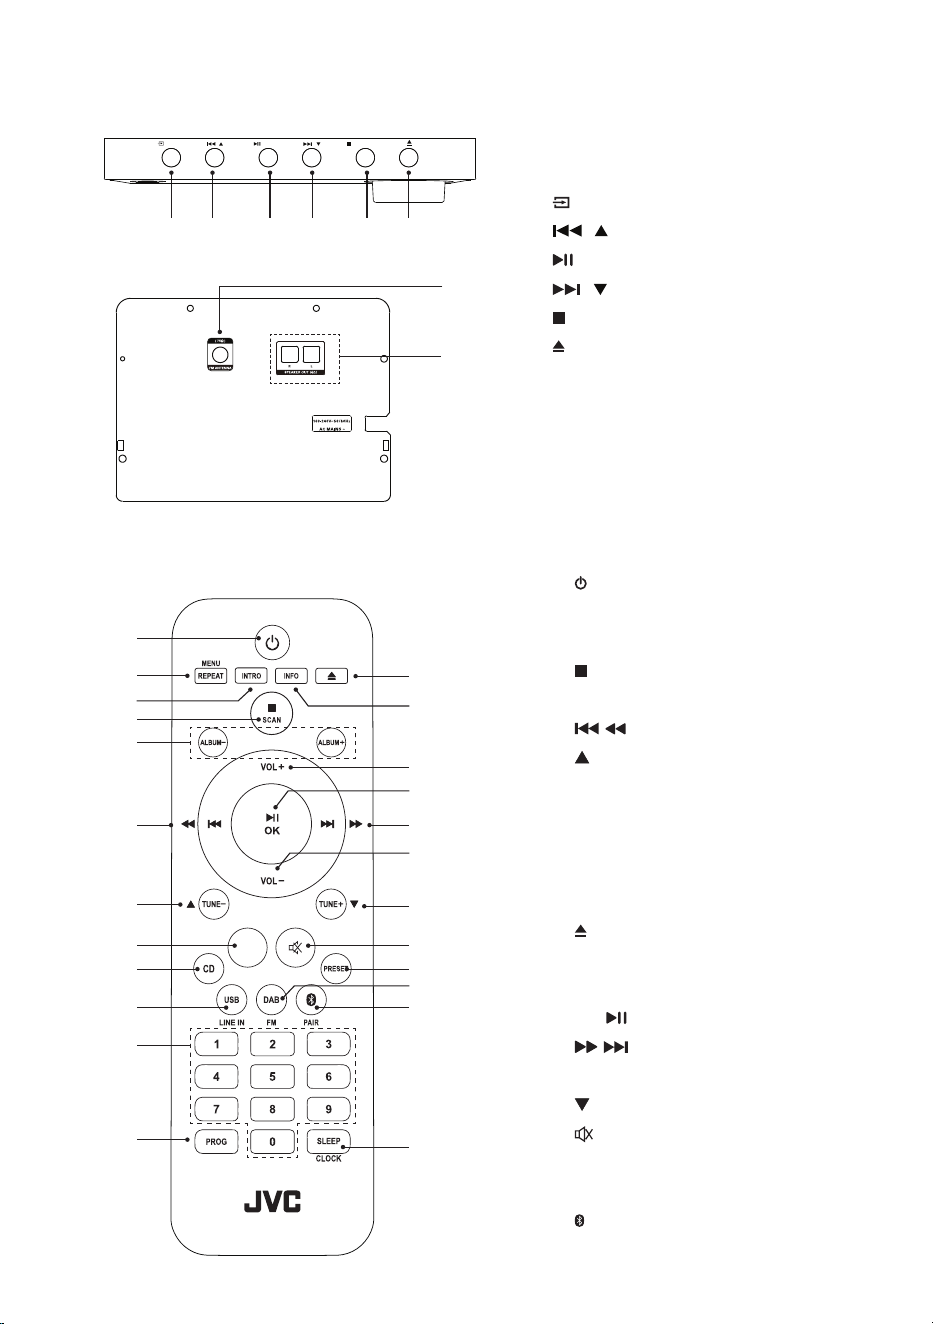
Main Unit
Front View
1. Standby Button
2. Remote Control’s Sensor
3. Display
4. VOLUME+/– Dial
Turn clockwise/anticlockwise to
increase/decrease volume.
5. LINE IN (AUX IN) Socket
6. USB OUTPUT
5V
500mA
Socket
USB O UTPUT
5
V 500 mA
1
2
4
3
65
5
Rear View
13
14
7. Source / MENU Button
8.
/
Button
9.
/ SELECT Button
10.
/ Button
11.
/ SCAN / PAIR Button
12.
Open/Close Button
13. FM ANTENNA (75Ω) Socket
14. SPEAKER OUT (4Ω) L/R Sockets
Remote Control
1. Standby Button
2. REPEAT/MENU Button
3. INTRO Button
4.
/SCAN Button
5. ALBUM+/ALBUM– Button
6.
/ Button
7.
/TUNE– Button
8. EQ Button
9. CD Button
10. USB/LINE IN Button
11. Number Pad
12. PROG Button
13.
Open/Close Button
14. INFO Button
15. VOL+ Button
16. OK/
Button
17.
/ Button
18. VOL– Button
19.
/TUNE+ Button
20.
Mute Button
21. PRESET Button
22. DAB/FM Button
23.
/PAIR Button
24. SLEEP/CLOCK Button
EQ
1
2
3
13
20
19
22
23
21
24
15
18
17
16
4
6
5
7
8
9
11
10
14
12
Top View
7 8 9 10 11 12
// SEL ECT
// SSCCAANN // PPAAIIRR
/
//
/ ME NU
6
Preparation
Battery Replacement for the Remote Control
Handling the Battery
• Improper or incorrect use of batteries may cause corrosion or battery leakage, which could cause re,
personal injury or damage to property.
• Install the battery correctly by following the polarity (+ and –) indications in the battery compartment.
• When the battery is exhausted, the remote control will not function.
• Only use the battery type indicated in this manual.
• Do not dispose of the used battery as domestic waste. Dispose of it in accordance with local
regulations.
Handling the Remote Control
• Be aware of your ngernails when removing the battery cover and the battery.
• Do not drop the remote control.
• Do not allow anything to impact the remote control.
• Do not spill water or any liquid on the remote control.
• Do not place the remote control on a wet object.
• Do not place the remote control under direct sunlight or near sources of excessive heat.
• Remove the battery from the remote control when not in use for a long period of time, as corrosion or
battery leakage may occur and result in physical injury, and/or property damage, and/or re.
• When the battery is exhausted, the remote control will not function.
32
1
7
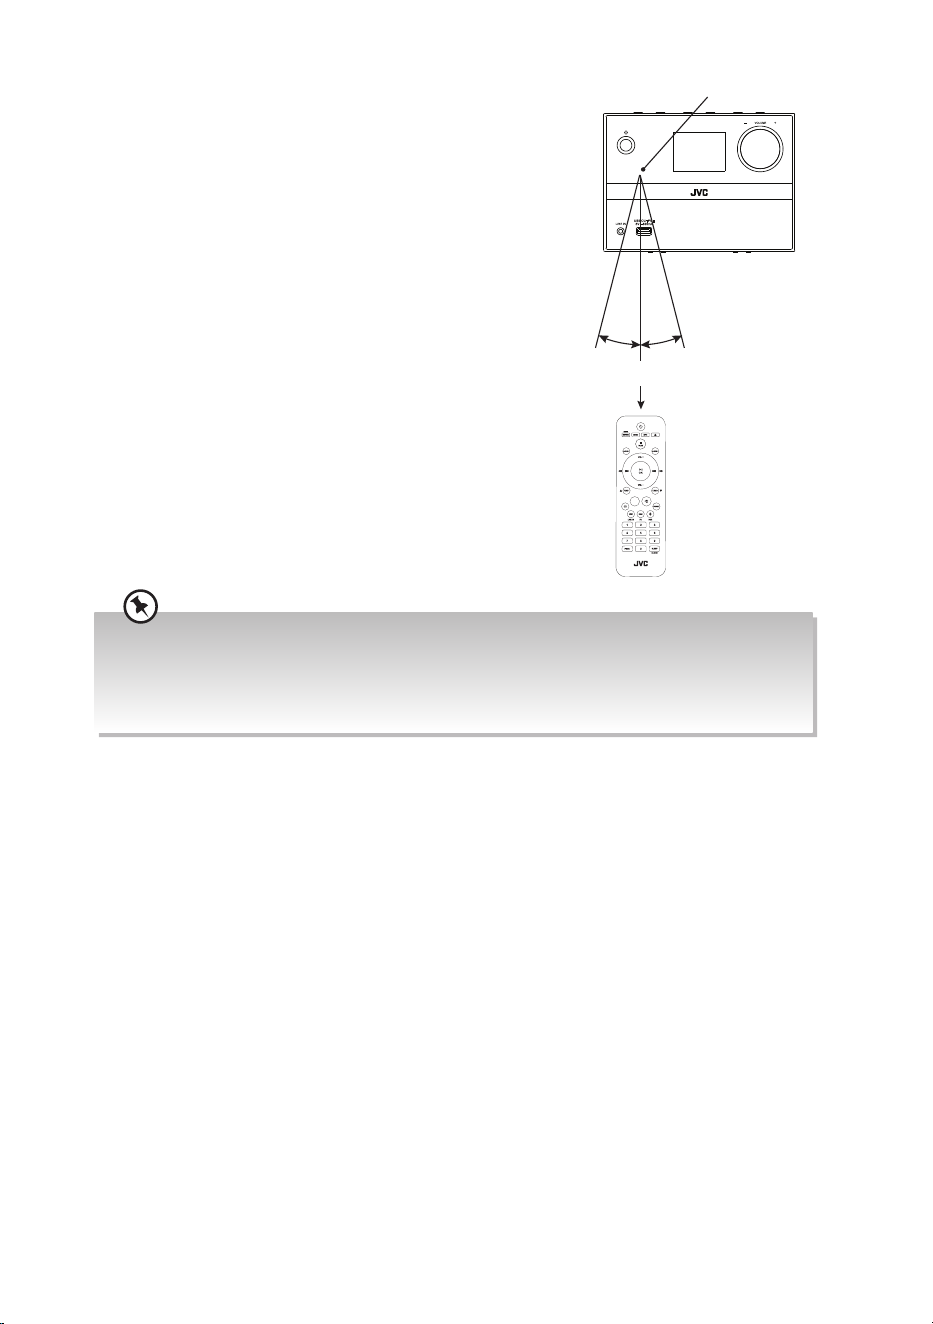
• Make sure that there is no obstacle between the infrared remote sensor of the unit and remote
control. If you install the unit on rack, etc., the remote controllable range may decrease depending on
the thickness or colour of glass door of rack.
• Do not expose the infrared remote sensor to direct sunlight or other strong light, such as inverter
uorescent light.
Remote sensor
USB OU TPUT
5
V 500m A
30°
30°
Max. 6 m
EQ
Remote Control Operation Range
• Point the remote control to the unit no more than 6
meters from the remote control sensor and within 60°
horizontally and 20° vertically of the front of the unit.
• Please note that the operating distance may vary
depending on the brightness of the room.
8
Connections
Connecting the FM Antenna
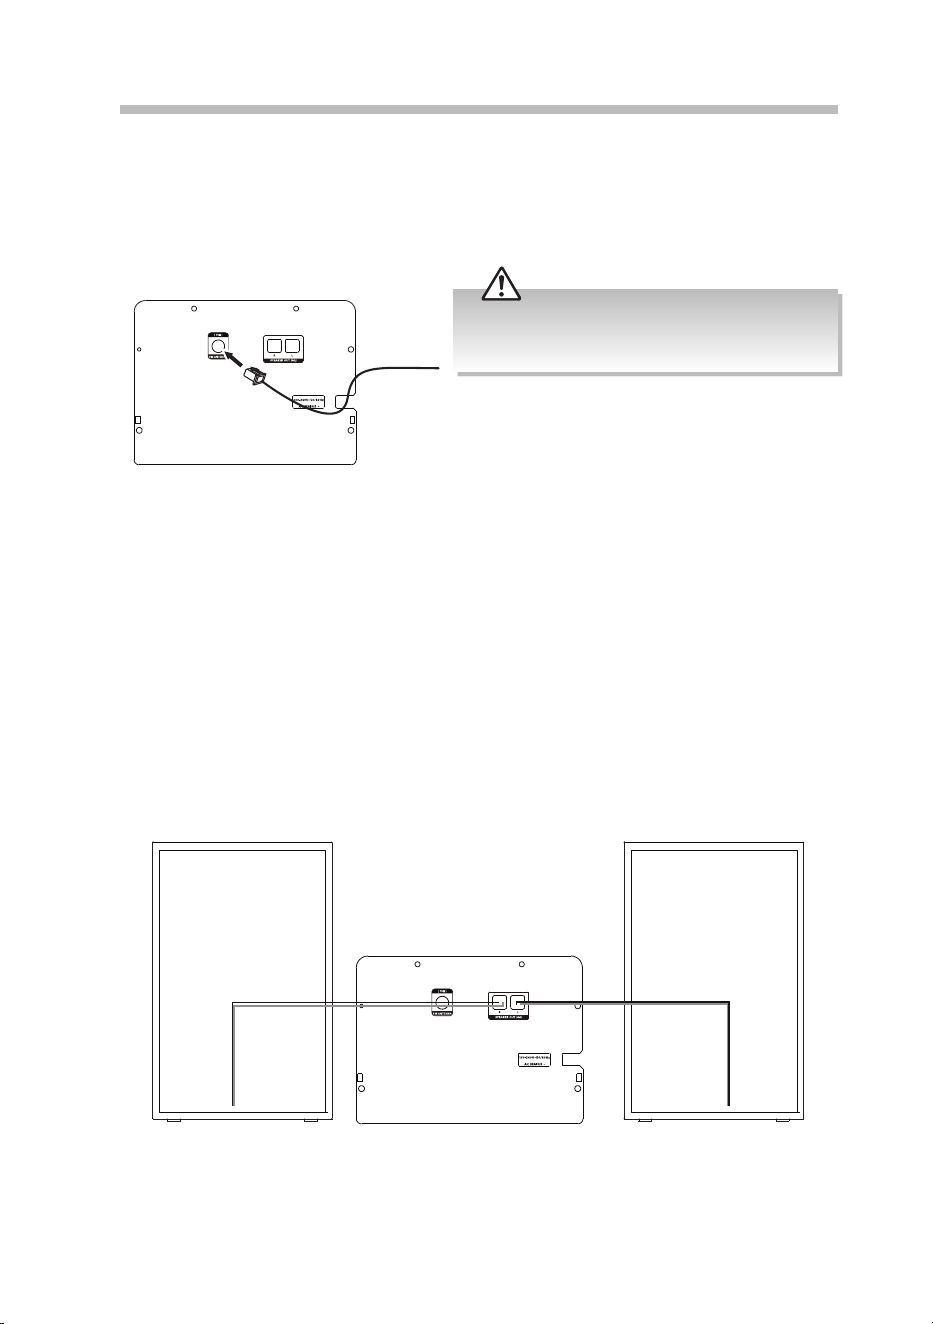
Fully extend the aerial. Connect to the FM ANETNNA (75Ω) socket on the rear of the unit.
Speakers Connection
Connect the speaker cables at the back of the speakers to the SPEAKER OUT (4Ω ) L/R
sockets at the rear of the unit.
• Do not overtighten, this could damage the aerial.
• To avoid noise, keep the aerial away from the unit,
the connecting cables and the mains cable.
Rear View of the Main Unit
Rear View of the Main Unit
Rear View of the
Right Speaker
Rear View of the
Left Speaker
9
Connecting Mobile Devices
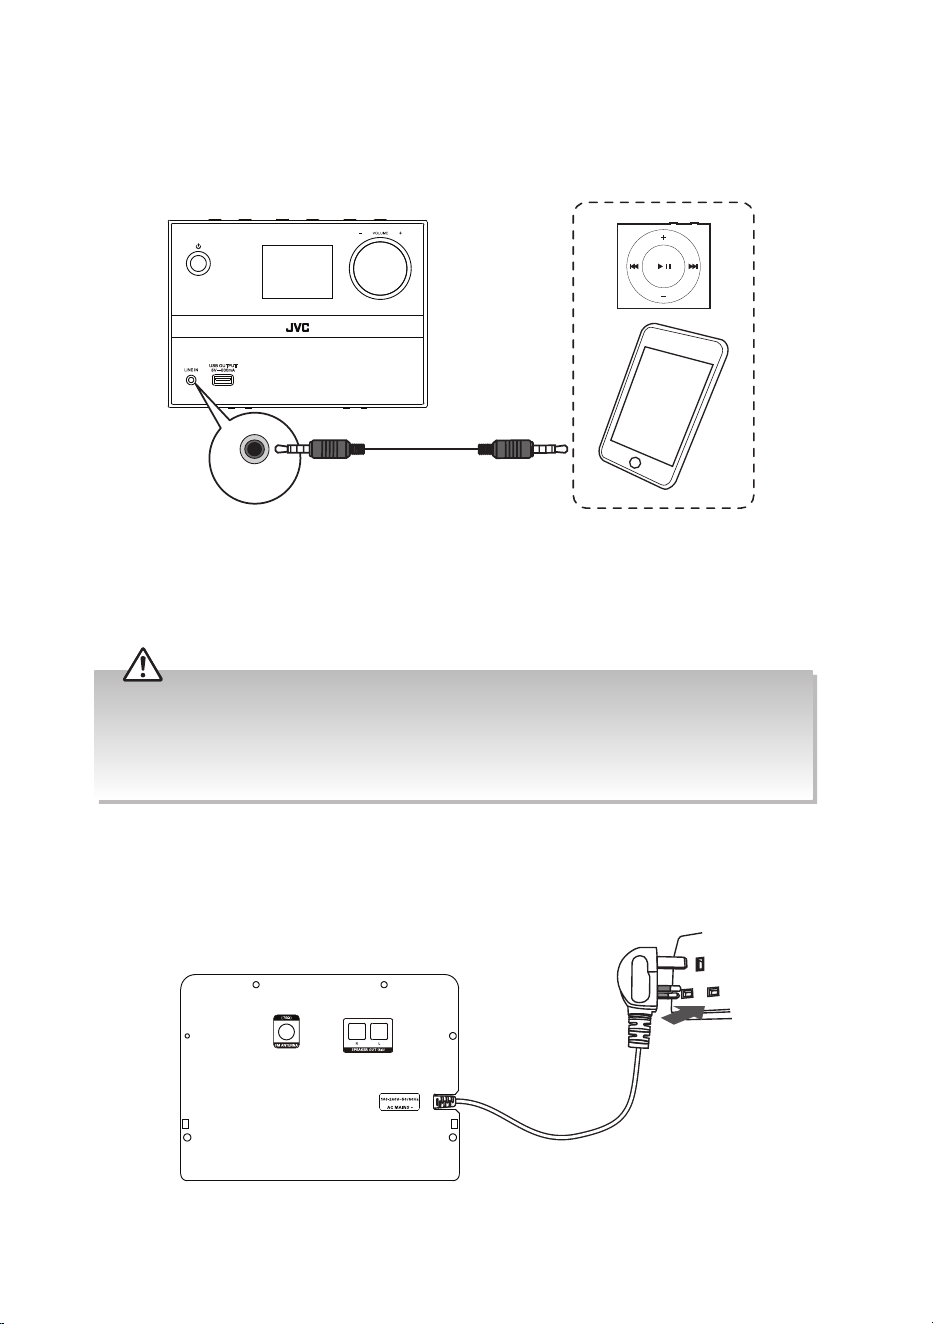
Connect the LINE IN (AUX IN) socket on the front of the main unit to the headphone jack on
a mobile device with an 3.5 mm to 3.5 mm stereo audio cable illustrated below.
To the mains socket
Rear View of the Main Unit
Connecting to the Mains Supply
• Ensure all audio connections of the unit are connected before connecting to the mains power socket.
• Make sure the mains plug is rmly inserted into the mains socket.
• To switch the unit o completely, remove the mains plug from the mains socket.
• Please turn the unit o completely to save energy when not in use.
• Use the mains cable as the disconnect device. The disconnect device shall remain readily operable.
Unwind the mains cable to its full length. Insert the mains plug into the mains socket.
USB O UTPUT
5
V 500 mA
LINE IN
3.5 mm to 3.5 mm
stereo audio cable
Front View of the Main Unit
Mobile Devices
10
Basic Operation
When you rst connect the unit to the mains socket, the unit will show “JVC“, and then the
unset time clock. The display will show “Time is not set”, and “00:00” ashing. If the unit can
receive a DAB signal in your location, it will synchronize to the current local time.
Switching ON / OFF
• Press Standby button on the unit or remote control to switch the unit on. Your unit
will switch on in DAB mode and automatically scan for DAB radio stations (rst time
you switch on ONLY). Otherwise it will switch on in the last mode you had been using.
• Press
Standby button on the unit or remote control again to switch the unit back into
standby mode. The display will show the clock.
• To switch the unit o completely, remove the mains plug from the mains socket.
• To save energy, turn the unit o completely when not in use.
ECO-Power Mode
This unit features an ECO-Power/Standby mode. It automatically turns to Standby mode
after 15 minutes if the unit is idle in Bluetooth, DAB, CD or USB mode or the external unit
is disconnected, or switched o.
Selecting Modes
Press button on the unit to enter Source menu, and then press / or / on the
remote control to switch between DAB/DAB+, FM, Bluetooth, CD, USB, LINE IN mode. The
selected mode will show on the display.
Alternatively, you can directly press the followings buttons on the remote control to switch to your
desired mode:
• to switch to Bluetooth mode.
• CD to switch to CD mode.
• USB/LINE IN to switch to USB/LINE IN mode.
• DAB/FM to switch to DAB/FM mode.
Adjust the Speaker Level Settings and Eects
Adjust the Volume
To increase or decrease the volume, turn the VOLUME+/– dial on the unit or press VOL+/
VOL– button on the remote control.
Mute Sound
If you wish to turn the sound o, press button. Press button again, or turn the
VOLUME+/– dial on the unit, or press VOL+/VOL– button on the remote control to resume
normal listening.
Preset Equalizer
You can adjust the sound reproduced simply by choosing from 5 preset equalizers.
During play, press the EQ button on the remote control repeatedly to select: POP / ROCK /
JAZZ / CLASSIC / FLAT.
11
System Settings
You may use both the main unit and remote control to select and conrm an option on the display menu.
Select an option
• Press
or on the unit, or / or / on the remote control.
Conrm your option
• Press
/SELECT on the unit, or OK/ on the remote control.
Time / Date Settings
1. Press and hold REPEAT/MENU button on the remote control, and then press / or
/ to select <SYSTEM>. Press OK/ to conrm.
2. Press
/ or / to select <Time>. Press OK/ to conrm.
3. Press
/ or / to select your desired options, and then press OK/ to conrm
setting.
Set Time/Date Here you can manually set the time and date.
Auto update Choose how you want the time to be automatically updated.
Update from Any / Update from DAB / Update from FM / No
Update
Set 12/24 hour Set 24 hour or Set 12 hour display
Set date format Select between DD-MM-YYYY and MM-DD-YYYY.
Backlight
1. Press and hold REPEAT/MENU button on the remote control, and then press / or
/ to select <SYSTEM>. Press OK/ to conrm.
2. Press
/ or / to select <Backlight>. Press OK/ to conrm.
3. Press
/ or / to select your desired options, and then press OK/ to conrm
setting.
Timeout 10 sec / 20 sec / 30 sec / 45 sec / 60 sec / 90 sec / 120 sec / 180 sec
/ On
On level High / Medium / Low
Dim level High / Low / O
Language
1. Press and hold REPEAT/MENU button on the remote control, and then press / or
/ to select <SYSTEM>. Press OK/ to conrm.
2. Press
/ or / to select <Language>. Press OK/ to conrm.
3. Press
/ or / to select between <English>, <Deutsch>, <Italiano> and
<Français>, and then press OK/ to conrm setting.
12
Factory Reset
If you want to delete all your stations and settings, you can return your radio back to the
default setting by running a System Reset.
1. Press and hold REPEAT/MENU button on the remote control, and then press
/ or
/ to select <SYSTEM>. Press OK/ on the remote control to conrm.
2. Press
/ or / to select <Factory Reset>. Press OK/ on the remote control to
conrm.
3. Press
/ or / to select <Yes>, and then press OK/ on the remote control to
conrm.
After system reset, all tuned stations, preset stations settings will be erased then your radio will switch
back on.
Software Upgrade
The software upgrade option is for service only.
1. Press and hold REPEAT/MENU button on the remote control, and then press
/ or
/ to select <SYSTEM>. Press OK/ on the remote control to conrm.
2. Press
/ or / to select <Software Upgrade>. Press OK/ on the remote
control to conrm.
3. Press
/ or / to select <Yes>. Press OK/ on the remote control to conrm.
Software Version
This information may be requested when dealing with technical support issues.
1. Press and hold REPEAT/MENU button on the remote control, and then press
/ or
/ to select <SYSTEM>. Press OK/ on the remote control to conrm.
2. Press
/ or / to select <SW Version>. Press OK/ on the remote control to
conrm.
13
Clock Operation
Setting Time and Date in Standby mode
1. In Standby mode, press and hold SLEEP/CLOCK button on the remote control. The
display will show the “Set time” menu, and the hour indicator will blink.
2. Press
/ or /
button
to set the hour.
3. Press the OK/
button to conrm. The minute indicator will blink.
4. Press
/ or /
button to set the minute.
5. Press the OK/
button to conrm.
6. The display will now show the “Set date” menu, and the day indicator will blink.
7. Press
/ or /
button
to set the day.
8. Press the OK/
button to conrm. The month indicator will blink.
9. Press
/ or /
button
to set the month.
10. Press the OK/
button to conrm. The year indicator will blink.
11. Press
/ or /
button
to set the year.
12. Press the OK/
button to conrm.
• If no button is pressed in approximately 10 seconds, the unit exits clock setting mode automatically.
• If a power failure occurs or the unit is disconnected from the mains, the clock setting will be lost.
Setting the Sleep Timer
Use the sleep timer to turn the system o after a certain number of minutes in play mode.
By setting the sleep timer, you can fall asleep to music and know that your system will turn
o by itself rather than play all night.
While the unit is in On mode, press SLEEP/CLOCK on the remote control repeatedly to set
the sleep time between 15 minutes / 30 minutes / 45 minutes / 60 minutes / 90 minutes /
120 minutes / O.
DAB Operation
Select DAB mode
• Using the Remote Control
Press DAB/FM button repeatedly on the remote control to select DAB/DAB+ mode.
• Using the unit
Press
button to enter Source menu, and then press or button to select
DAB/DAB+ mode. Press /SELECT button to conrm.
14
First Time Auto Scan
If the unit is connected to the mains power and then switched on to DAB mode for the rst
time, the unit will automatically start scanning. During the scan the display will show a slide
bar that indicates the progress of the scan and the amount of stations that have been found
so far.
Once the scan has nished, the unit will select the rst alphanumerically found station.
To Select and Listen to the Found Stations
Press or button on the unit, or /TUNE– / /TUNE+ on the remote control.
Then press /SELECT on the unit, or OK/ on the remote control to conrm.
Secondary Services
The unit will show “>>” before the name of the station to indicate primary services, and “<<“
after the name to indicate secondary services on Station List.
These secondary services contain extra services that are related to the primary station. e.g.
a sports station may want to add extra commentaries.
Full Scan
The full scan will search for the entire DAB Band III channels. After the scan has nished, the
rst alphanumerically found station will be automatically selected.
• Using the Remote Control
Press
/ SCAN button to activate auto scan.
Or
1. Press and hold REPEAT/MENU button. Select FULL SCAN.
2. Press OK/
to start auto scan.
• Using the main unit
Press and hold
/SELECT button. Select FULL SCAN. Press /SELECT button to start
auto scan.
All the stations that have been found will be stored automatically.
Manual Tuning
As well as the auto tune function, you can manually tune the receiver. This can help you
when aligning your aerial or when adding stations that were missed while auto tuning.
1. Press and hold REPEAT/MENU on the remote control, and then press
or
on the unit, or /TUNE– / /TUNE+ on the remote control to select <Manual tune>.
Press /SELECT on the unit or OK/ on the remote control to conrm.
2. Press
or on the unit, or /TUNE– / /TUNE+ on the remote control to
cycle through the DAB channels, which are numbered from 5A to 13F.
15
DRC (Dynamic Range Compression)
If you are listening to music with high dynamic range in a noisy environment, you may wish
to compress the audio dynamic range.
1. During DAB mode, press and hold REPEAT/MENU on the remote control.
2. Press
or on the unit, or /TUNE– / /TUNE+ on the remote control to
select <DRC>. Press /SELECT on the unit or OK/ on the remote control to conrm.
3. Press
or on the unit, or /TUNE– / /TUNE+ on the remote control to
select between <DRC o>, <DRC low> and <DRC high>. Press /SELECT on the unit
or OK/ on the remote control to conrm.
Preset Stations
You can store up to 30 of your favourite stations to the memory. This will enable you to
access your favourite stations quickly and easily.
To store a preset, you must rst be listening to the station that you would like to save.
1. Press and hold PRESET. The display will show “Preset Store” menu.
2. Press
/TUNE– / /TUNE+ to select your desired preset station number.
3. Press OK/
button to conrm.
4. The station will be stored and the screen will then show “Preset ## stored“.
Recalling Preset Stations
To recall a preset, you must rst have stored preset stations in the unit.
• Using the Remote Control
Press
/ or / to select your desired preset station.
OR
Simply recall the preset station by pressing 0-9 on the remote control.
OR
1. Press PRESET to enter the preset menu.
2. Press
/TUNE– / /TUNE+ to select your desired preset station number.
3. Press OK/
button to conrm.
• Using the main unit
1. Press PRESET on the remote control to enter the preset menu.
2. Press
or to select your desired preset station number.
3. Press
/SELECT to conrm.
The stored stations will be saved into the memory and power o will not erase it. Storing a new station
into a preset location will erase the previously stored station in that location.
16
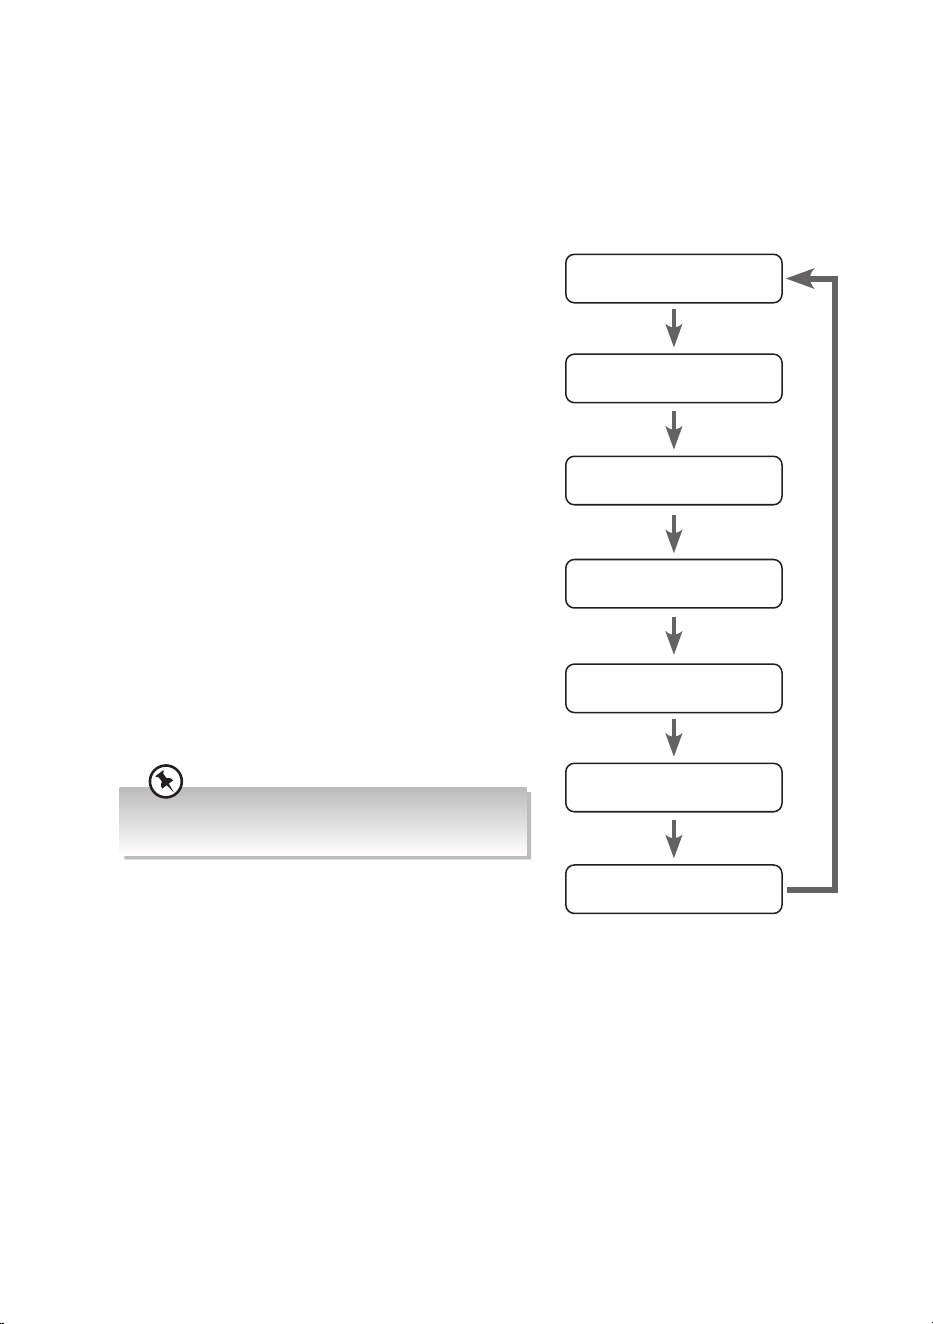
DAB Display Modes
Press INFO on the remote control, the display will switch through the following display
modes.
DLS (Dynamic Label Segment)
Dynamic label segment is a scrolling message that
the broadcaster may include with their transmissions.
The message usually includes information, such as
programme details etc.
Signal Error
This displays a number showing the error rate. If the
number is 0, it means the signal received is error free
and the signal strength is strong. If the error rate is
high, it is recommended to re-orient the aerial or re-
position the unit.
Programme Type
This describes the “style” or “genre” of the programme
that is being broadcast.
Ensemble
This displays the name of the multiplex that contains
the station you are listening to. A multiplex is a
collection of radio stations that are bundled and
transmitted on one frequency. There are national and
local multiplexes. Local ones contain stations that are
specic to that area.
DAB – unlike normal radio, groups together several radio
stations and transmits them on one frequency.
Frequency
This displays the frequency of the present station, such
as “220.352” (MHz).
Audio Bit Rate
The display will show the digital audio bit rate being
received.
Date
This displays the current date provided automatically
by the broadcaster.
DLS
Signal Error
Ensemble
Frequency
Programme Type
Audio Bit Rate
Date
17
FM Radio Operation
• Make sure that you have correctly connected and fully extended the antenna.
• The search may not stop at a station with a very weak signal.
• If reception is still poor, try to adjust the FM aerial location.
Select FM mode
• Using the Remote Control
Press DAB/FM button repeatedly on the remote control to select FM mode.
• Using the main unit
Press
button to enter Source menu, and then press or to select FM mode.
Press
/SELECT button to conrm.
Tuning in a Station
Auto Tuning
Press / SCAN / PAIR on the unit, or / SCAN on the remote control to start auto tuning.
Press again to stop the auto tuning.
The search may not stop at a station with a very weak signal.
Manual Tuning
Press and hold /TUNE– / /TUNE+ on the remote control to start the forward or reverse
scanning. The display will show the frequency being searched. Once a station has been
found, the scanning will stop automatically. Continue to change the frequency until you
nd the station you want.
With FM radio it may be necessary to ne tune each station by pressing /TUNE– / /TUNE+ button on
the remote control repeatedly. Each press will adjust the frequency by 0.05MHz. If reception is still poor
adjust the position of the aerial or try moving the radio to another location.
Scan Settings
By default, FM scans stop at any available station. This may result in a poor signal-to-noise
ratio (hiss) from weak stations.
1. Press and hold REPEAT/MENU on the remote control to enter FM menu, and then
press
or on the unit or /TUNE– / /TUNE+ on the remote control to
select <Scan setting>. Press /SELECT on the unit or OK/ on the remote control to
conrm.
2. Press
or on the unit or /TUNE– / /TUNE+ on the remote control to
select <All stations> or <Strong stations only>. Press /SELECT on the unit or OK/
on the remote control to conrm.
18
Audio Settings
By default, all stereo stations are reproduced in stereo. For weak stations, this may result in a
poor signal-to-noise ratio (hiss).
1. Press and hold REPEAT/MENU on the remote control to enter FM menu, and then press
or on the unit or /TUNE– / /TUNE+ on the remote control to select
<Audio setting>. Press /SELECT on the unit or OK/ on the remote control to
conrm.
2. Press
or on the unit or /TUNE– / /TUNE+ on the remote control to
select <Stereo allowed> or <Forced mono>. Press /SELECT on the unit or OK/ on
the remote control to conrm.
Preset Stations
You can store up to 30 of your favourite stations to the memory. This will enable you to
access your favourite stations quickly and easily.
To store a preset, you must rst be listening to the station that you would like to save.
1. Press and hold PRESET. The display will show “Preset Store” menu.
2. Press
/TUNE– / /TUNE+ to select your desired preset station number.
3. Press OK/
button to conrm.
4. The station will be stored and the screen will then show “Preset ## stored“.
Recalling Preset Stations
To recall a preset, you must rst have stored preset stations in the unit.
• Using the Remote Control
Press
/ or / to select your desired preset station.
OR
Simply recall the preset station by pressing 0-9 on the remote control.
OR
1. Press PRESET to enter the preset menu.
2. Press
/TUNE– / /TUNE+ to select your desired preset station number.
3. Press OK/
button to conrm.
• Using the Main Unit
1. Press PRESET on the remote control to enter the preset menu.
2. Press
or to select your desired preset station number.
3. Press
/SELECT to conrm.
The stored stations will be saved into the memory and power o will not erase it. Storing a new station
into a preset location will erase the previously stored station in that location.
19
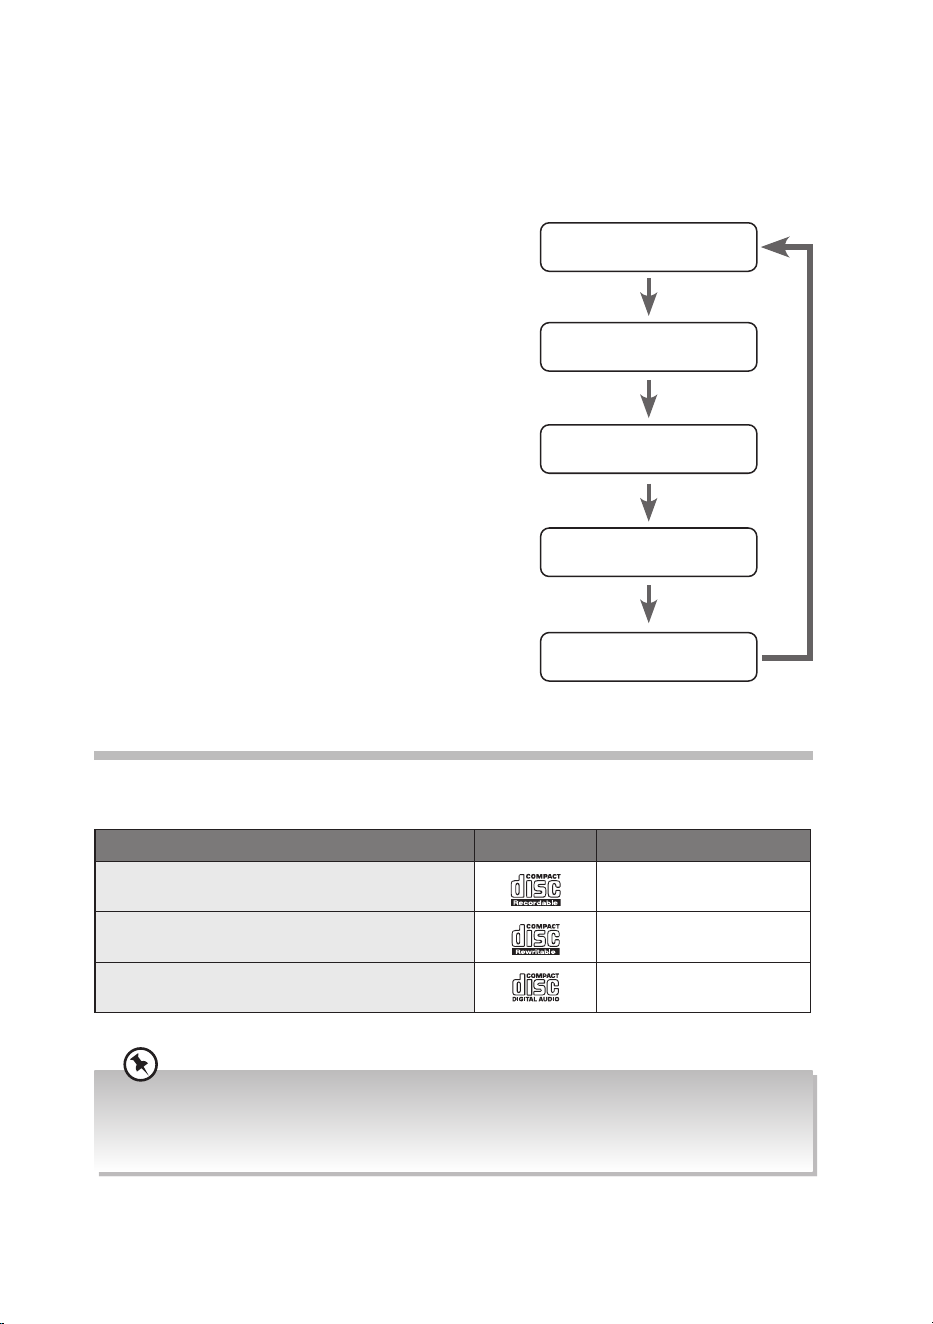
FM Display Modes
Press INFO on the remote control, the display will switch through the following display
modes.
Radio Text
The broadcaster can include a message that displays
information about the current programme.
Programme Type (PYT)
This describes the “style” or “genre” of the programme
that is being broadcast.
Name
The display will show the name of the radio station.
Audio Bit Rate
The display will show the digital audio bit rate being
received.
Date
This displays the current date provided automatically
by the broadcaster.
Radio Text
Programme Type
Audio Bit Rate
Date
Name
CD/MP3 Operation
Compatible Disc Types
Disc Types Disc Logo Recorded Content
CD-R (CD Recordable - Audio/MP3)
AUDIO / MP3
CD-RW (CD-Rewritable - Audio/MP3)
AUDIO / MP3
AUDIO-CD (Compact Disc Digital Audio)
AUDIO
• Some recorded les may not be able to be played due to the type and format of disc or condition of
the recording.
• If you are having trouble playing a certain disc, it is recommended to use USB input instead for best
MP3 playback.
20
Select DISC mode
• Using the Main Unit
Press
button to enter Source menu, and then press or button to select
DISC mode. Press /SELECT button to conrm.
• Using the Remote Control
Press CD button on the remote control to enter DISC mode.
Playback
1. In DISC mode, press button on the unit or remote control to open the disc tray.
2. Place the disc with the label side up into the CD compartment, and then press the
button on the unit or remote control to close the tray.
3. After closing the disc tray, the unit will read the disc and play it automatically.
• If there is no disc or the disc can’t be read, “No Disc” will show on the display.
• If in stop mode, please press
on the unit, or OK/ on the remote control to start playing the
disc.
4. Press /SELECT on the unit, or OK/ on the remote control to pause the playback. To
resume playback, press
/SELECT on the unit, or OK/ on the remote control again.
5. Press
/ SCAN / PAIR on the unit, or / SCAN on the remote control to stop the disc
playing. Press button if you want to remove the disc.
To Skip Search or Search and Play
• Press once or more to skip to beginning of the current track or the previous track.
• Press
once or more to skip forward to the next track.
• Press and hold
/ to search for the position that you intend to start playing.
Release to resume normal playback.
Selecting an Album (for MP3 disc)
• Press ALBUM+/ALBUM– on the remote control to select the next/previous album, and
play the rst track of this album.
21
Repeat Playback
ONE and ALL Repeat Play
• CD Disc
Press the REPEAT/MENU button repeatedly to set the function.
First press : To repeat the same track.
Second press : To repeat playing all tracks on a disc.
Third press : To randomly play all tracks.
Fourth press : To cancel the repeat playing.
• MP3 Disc
Press the REPEAT/MENU button repeatedly to set the function.
First press : To repeat the same track.
Second press : To repeat playing all tracks on a disc.
Third press : To repeat playing album.
Fourth press : To randomly play all tracks.
Fifth press : To cancel the repeat playing.
Programme Play
You can program up to 20 tracks to play in any desired order.
1. Make sure the disc is inserted and in STOP mode.
2. Press PROG button on the remote control to enter the programme mode.
3. Press ALBUM+/ALBUM– button to select desired folder (for MP3 disc).
4. Press
/ or /
to select the desired track number.
5. Press PROG button to store.
6. Repeat steps 3-4 to program more tracks.
7. Once it is completed, press the
/SELECT on the unit, or OK/ on the remote control
to start programme play.
8. Press
/ SCAN / PAIR on the unit, or / SCAN on the remote control once to stop the
programme play. Press twice to clear programme.
Opening the CD tray and closing it again will cancel the programme and erase the memory.
22
USB Playback Operation
By connecting a USB mass storage device (including USB ash memory, USB ash players or
memory cards) to this unit, you can enjoy the device’s stored music through the unit.
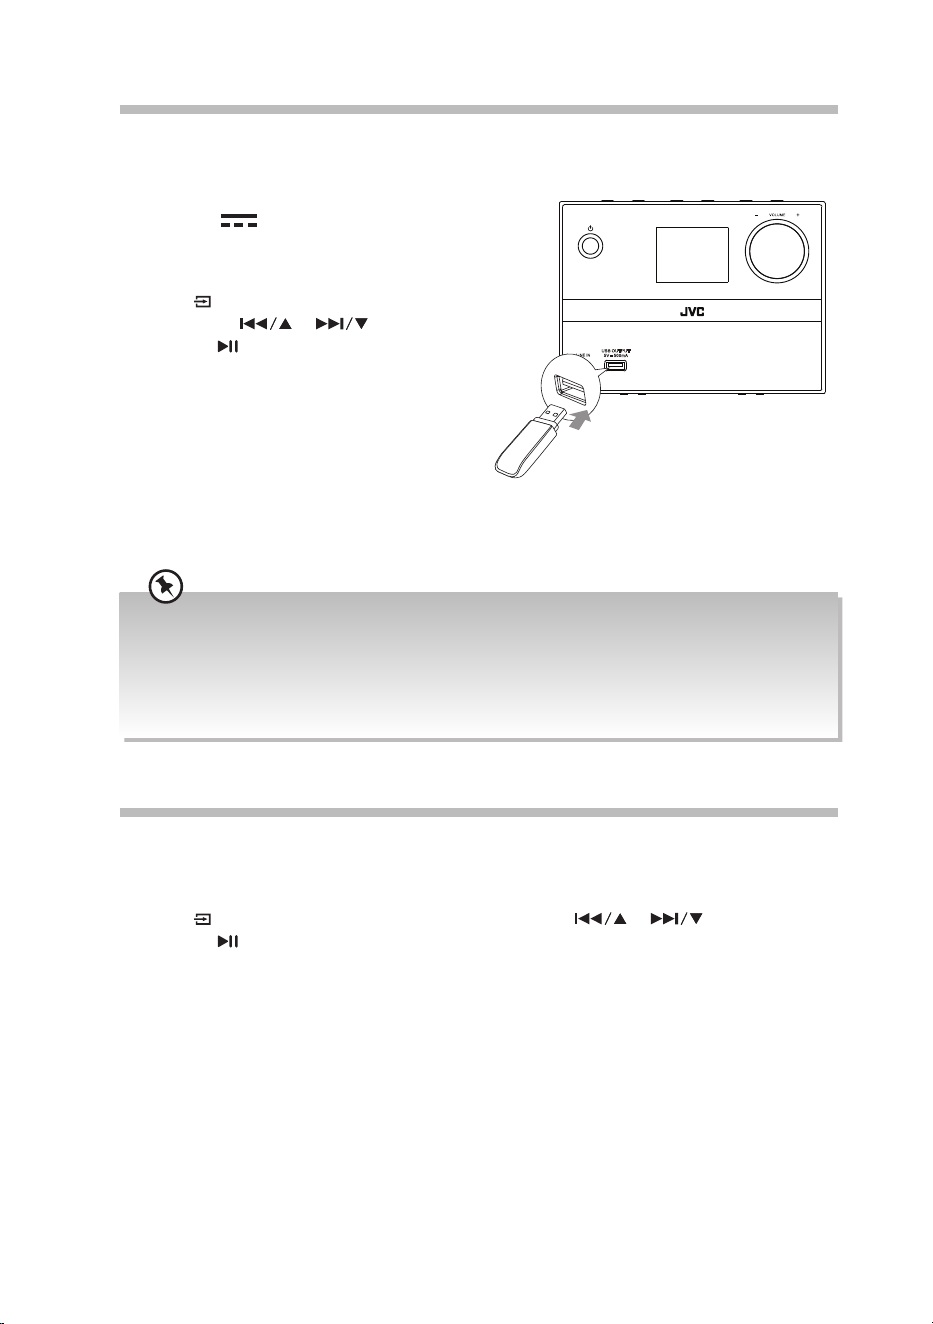
Insert the USB device’s USB plug into the
USB
OUTPUT
5V
500mA socket at the front
of unit.
• Using the Main Unit
Press the
button to enter Source menu,
and then press
or to select USB
mode. Press /SELECT button to conrm.
• Using the Remote Control
Press USB/LINE IN button repeatedly on the
remote control to select USB mode.
1. Press ALBUM+/ALBUM– button to select
next/previous album, and play the rst
track.
2. Other playback features are the same as if you
were playing an CD.
• The player supports the USB music le format of MP3 only.
• If your USB device is loaded with MP3 les but the display keeps showing ‘NO SONG” on the display,
the format of your USB device might not be compatible with the unit.
• The unit can support USB devices with up to 32 GB of memory.
• The unit may not be compatible with all USB devices, this is not an indication of a problem with the
unit.
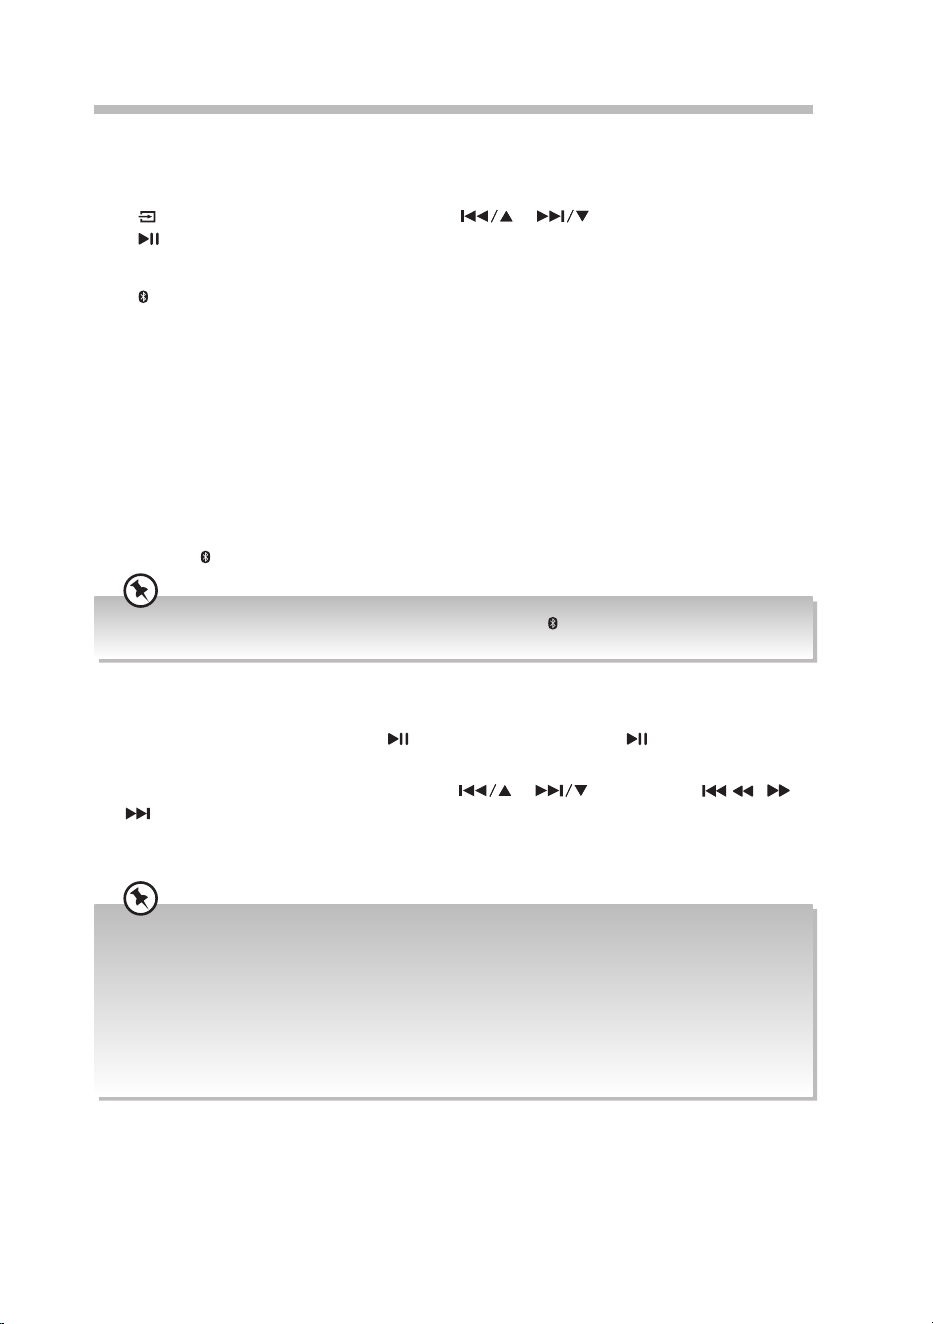
LINE IN (AUX IN) Operation
Select LINE IN mode
• Using the Main Unit
Press the
button to enter Source menu, and then press or to select LINE IN
mode. Press
/SELECT button to conrm.
• Using the Remote Control
Press USB/LINE IN button to enter LINE IN mode.
1. Operate your audio device directly for playback features.
2. Turn the VOLUME+/– dial on the unit or press the VOL+/VOL– button on the remote
control to adjust the volume to your desired level.
USB O UTPUT
5
V 500 mA
23
Bluetooth® Operation
Select Bluetooth mode
• Using the Main Unit
Press
to enter Source menu, and then press or to select Bluetooth mode.
Press /SELECT button to conrm.
• Using the Remote Control
Press
/PAIR button to enter Bluetooth mode.
Pair your device
1. Activate your Bluetooth® device and select the search mode. “UX-D225B” will appear
on your Bluetooth® device list.
2. Select “UX-D225B” and enter “0000” for the password if necessary. If connection is
successful, and the unit will prompt a tone, and the display will show “Connected“.
3. To disconnect the Bluetooth® function,
• Switch to another function on the unit;
• Disable the function from your Bluetooth® device.
• Press
/PAIR button on the remote control.
To reconnect your device to the unit, you may also press and hold /PAIR button for about 3 seconds on
the remote control. Make sure it has been paired with the unit.
If your Bluetooth® device supports A2DP, play music via your device.
If your Bluetooth® device supports AVRCP, use supplied remote control to control play.
• To pause/resume playback, press
/SELECT on the unit, or OK/ on the remote
control.
• To skip backward/forward to a track, press
or on the unit or / / /
on the remote control.
• Turn the VOLUME+/– dial on the unit or press the VOL+/VOL– button on the remote
control to increase or decrease the volume.
• The operational range between the unit and the device is approximately 10 metres.
• Before connecting a Bluetooth® device to the unit, ensure you know the device’s capabilities.
• Compatibility with all Bluetooth® devices is not guaranteed.
• Any obstacle between the device and the unit can reduce operational range.
• Keep this player away from other electronic devices that may cause interference.
• If no other Bluetooth® devices paired with this unit within 1 minutes, the unit will recover to its
previous connection.
• The player will also be disconnected when your device is moved beyond the operational range.
24
Maintenance
Cleaning the Unit
Ensure the unit is fully unplugged from the mains socket before cleaning.
• To clean the units, wipe the case with a slightly moist, lint-free cloth.
• Do not use any cleaning uids containing alcohol, ammonia or abrasives.
• Do not spray aerosol at or near the unit.
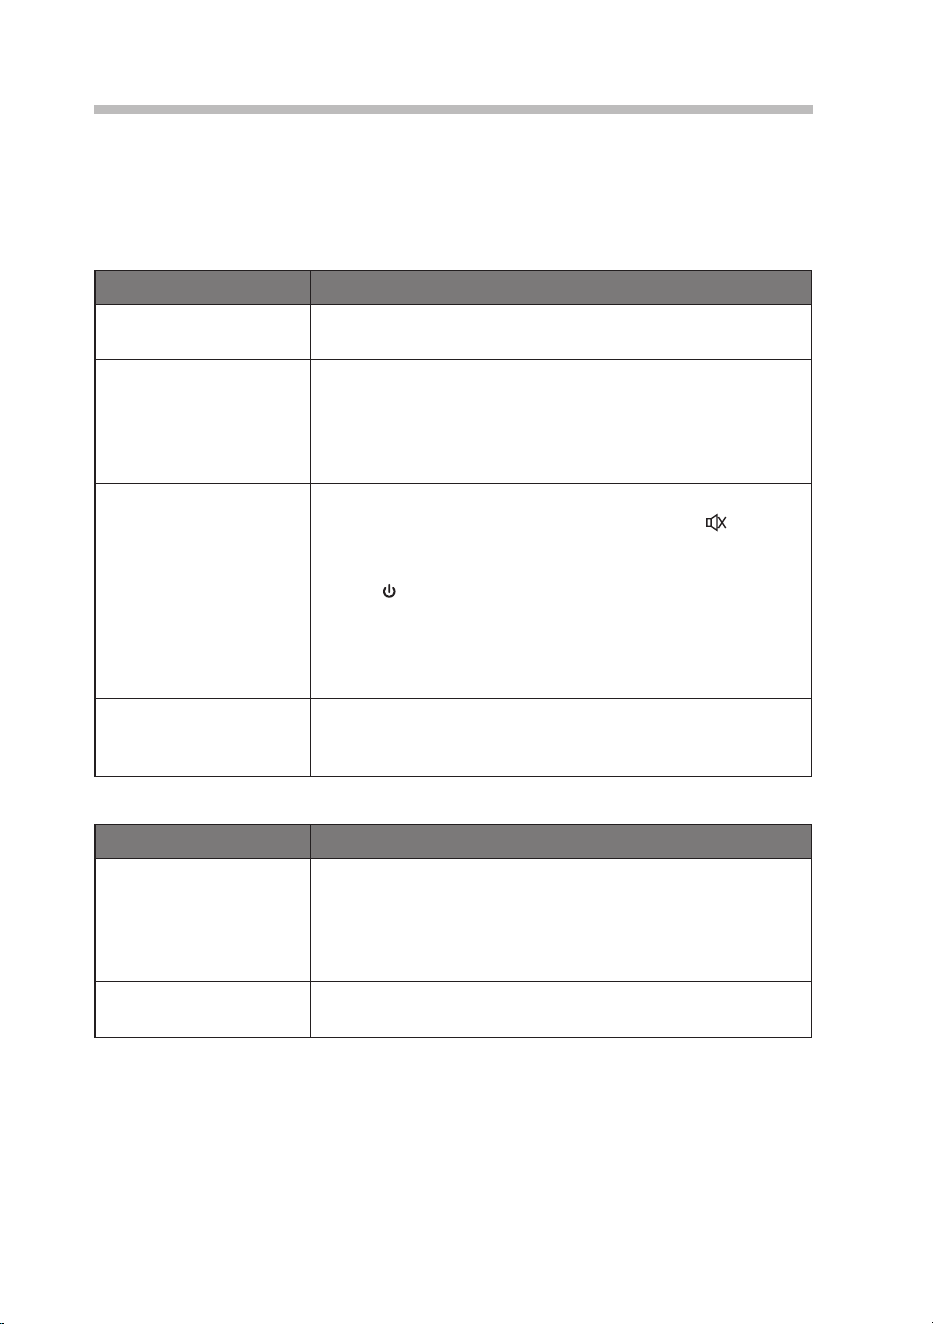
Handling Discs
• Do not touch the playback side of the disc.
• Do not attach paper or tape to the disc.
Playback side
Cleaning Discs
• Fingerprints and dust on the disc cause picture and sound deterioration. Wipe the disc
from the centre outwards with a soft cloth. Always keep the disc clean.
• If you cannot wipe o the dust with a soft cloth, wipe the disc lightly with a slightly
moistened soft cloth and nish with a dry cloth.
• Do not use any type of solvent such as thinner, benzine, commercially available
cleaners or antistatic spray. They may damage the disc.
Storing Discs
• Do not store discs in places subjected to direct sunlight or near heat sources.
• Do not store discs in places subjected to moisture and dust such as a bathroom or near
a humidier.
• Storing discs vertically in a case, stacking discs or placing objects on discs outside of
their cases may cause warping.
25
Hints and Tips
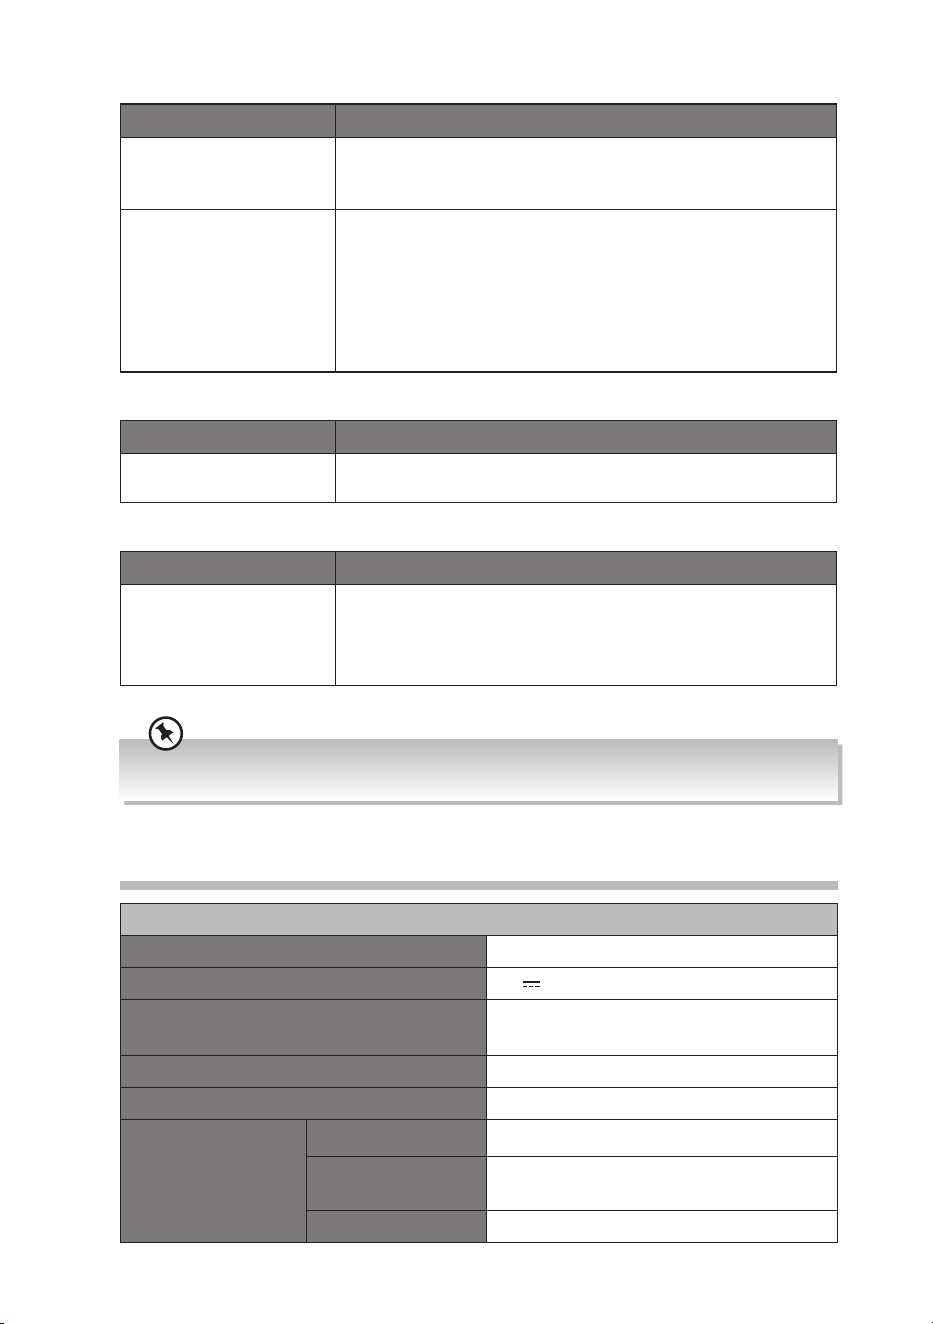
If a problem does occur, it may often be due to something very minor. The following table
contains various tips. If you require additional assistance
• For UK, please call our UK Call Centre on 0344 561 1234.
• For Ireland, please call our Ireland Call Centre on 0818 810575.
General
Problem Solution
No power. • Ensure the mains plug is connected.
• Make sure that you select the ON mode.
The remote control is
not function.
• Use the remote control near the unit.
• Point the remote control at the remote sensor on the unit.
• Replace the battery in the remote control with a new one.
• Remove any obstacles between the remote control and
the unit.
No sound from the unit. Please try either one of the solutions below:
• Make sure that the unit is not muted. Press the
or
the VOL+/VOL– on the remote control, or turn the
VOLUME+/– dial on the unit to resume normal listening.
• Press on the unit or on the remote control to switch
the unit to standby mode. Then press the button again to
switch the unit on.
• Unplug the unit from the mains socket, then plug them
again. Switch on the unit.
The unit does not
respond when pressing
any buttons.
• The unit may freeze up during use. Switch the unit o and
then on again at the mains socket to reset the unit.
CD
Problem Solution
Disc in place but the unit
won’t play.
• Make sure you’ve selected CD mode.
• Make sure the disc label is facing up.
• Make sure the disc is clean.
• PAUSE mode may be activated, deactivate it.
• Disc may be damaged or dirty; check and clean the disc.
Disc skips • Make sure the unit is on a secure spot. Vibrations or
jarring can cause the disc to skip.
26
Radio
Problem Solution
Poor radio reception. • Electrical interference in your home can cause poor
reception. Move the unit away from them (especially those
with motors and transformers).
Desired station not
found.
FM
• Weak signal. Search manually.
• If reception is still poor, adjust the position of the aerial.
DAB
• No DAB coverage in your area or poor reception. Adjust the
position of the unit.
• Perform a system reset and then a DAB full scan.
USB
Problem Solution
Unable to insert USB
device
• Insert the USB device the other way round.
Bluetooth®
Problem Solution
I cannot nd
“UX-D225B” on my
Bluetooth® device.
• Ensure the Bluetooth® function is activated on your
Bluetooth® device.
• Ensure you have paired your unit with the Bluetooth®
device.
If any functional abnormality is encountered, unplug the unit from the mains socket and reconnect it
again.
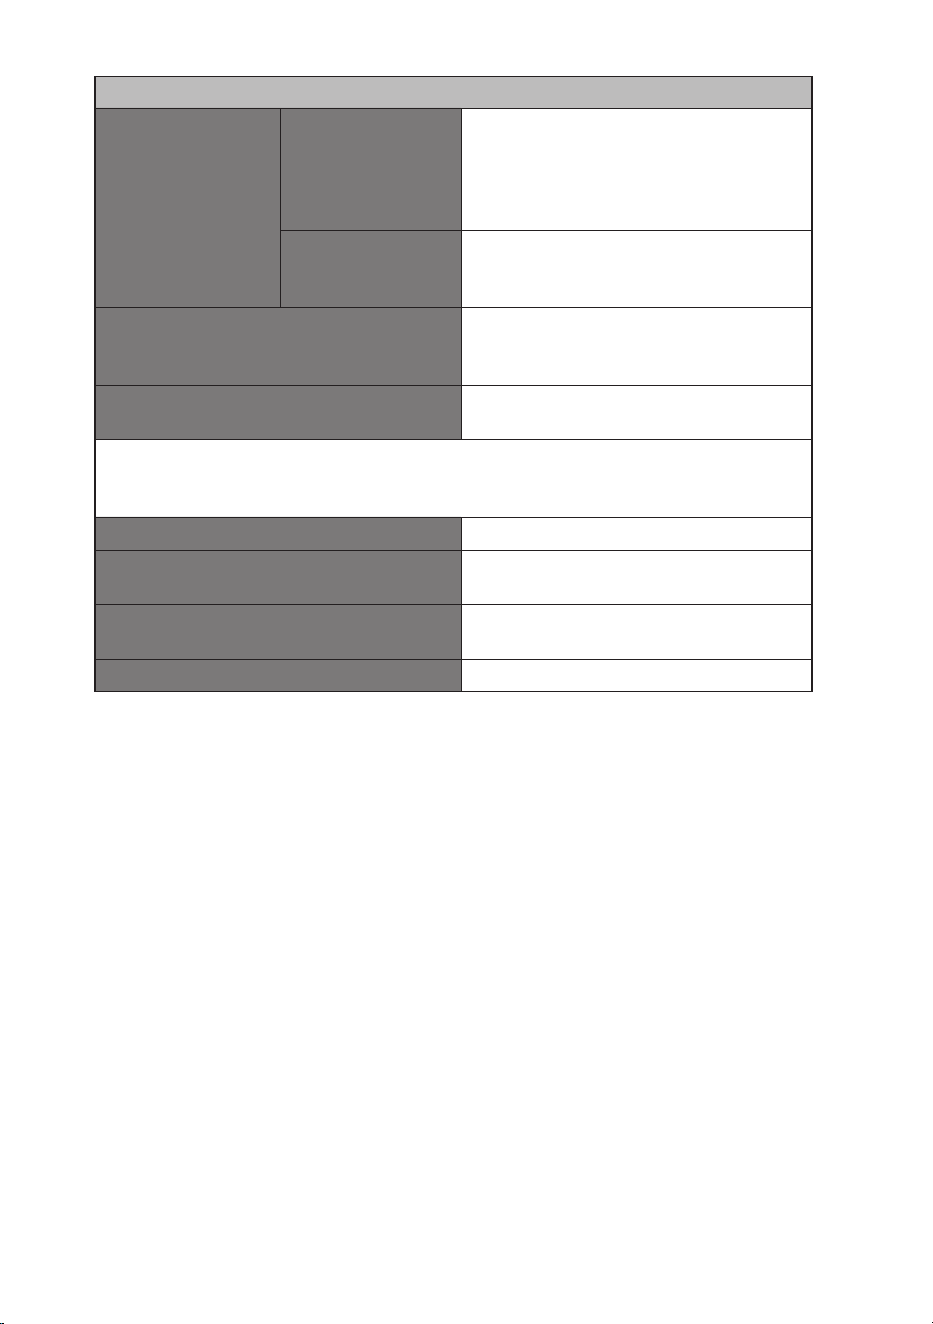
Product Fiche and Specifications
System Section
Input Rating 100 - 240 V ~ 50/60 Hz, 20 W
USB Output 5 V
500 mA
Frequency Band FM: 87.5 - 108 MHz
DAB/DAB+: 174.928 - 239.200 MHz
Speaker Output Power 15W × 2
Compatible Disc format CD, CD-R, CD-RW, MP3
Bluetooth® Bluetooth® Version Bluetooth® V5.0
Maximum power
transmitted
4 dBm
Frequency bands 2402 - 2480 MHz
27
Ecodesign Information
Power
Consumption
Information
Standby Power
Consumption
(when the unit
is operating at
standby mode)
≤ 0.8 W
Network Standby
Power
Consumption
N/A
Time interval for power management
function switches the unit automatically
into standby mode
The unit should switch to standby mode
automatically when the unit is not playing
audio signal for 15 minutes.
Power consumption in network standby
if all wireless network ports are activated
N/A
How to activate wireless network port: N/A
How to deactivate wireless network port: N/A
USB Memory compatible size 32 GB
Net Weight Main Unit: 1.7 kg
Speakers: 2.3 kg
Unit Dimension (W) × (D) × (H) Main Unit: 180 mm × 234 mm × 136 mm
Speaker: 155 mm × 128 mm × 254 mm
Remote control battery type AAA (1.5V x 2)
Features and specications are subject to change without prior notice.
For the latest version of the Safety and Instruction Manual, please visit the ocial website
below (other websites may not contain the full and most updated version):
https://www.currys.co.uk/services/repairs-maintenance/product-service-manuals.html

(IB-UX-D225B-260424V2)
For Help and Support Call
UK: 0344 561 1234
Ireland: 0818 810575
Declaration of Conformity (RED)
Hereby, Currys Group Limited declares that the radio
equipment type [UX-D225B] is in compliance with
Directive 2014/53/EU.
The full text of the EU declaration of conformity is
available at the following internet address:
https://www.currys.co.uk/
Declaration of Conformity (RER)
Hereby, Currys Group Limited declares that the radio
equipment type [UX-D225B] is in compliance with Radio
Equipment Regulations 2017 (S.I. 2017/1206).
The full text of the UK declaration of conformity is
available at the following internet address:
https://www.currys.co.uk/
This product is distributed and warranted exclusively by Currys Group Limited.
“JVC” is the trademark of JVCKENWOOD Corporation,
used by Currys Group Limited under license.