
Due to the regular upgrades of systems and products, ZKTeco could not guarantee exact consistency between the
actual product and the written information in this manual.
Quick Start Guide
Model: SW11/SW12/SW13 Series
Version: 1.0
English
Important Notes
1.
2.
If you have any problems, please read this manual carefully or contact
Customer Care.
It's recommended that a qualified electrician perform the installation,
especially if you are unsure about any parts of these instructions.
1
3.
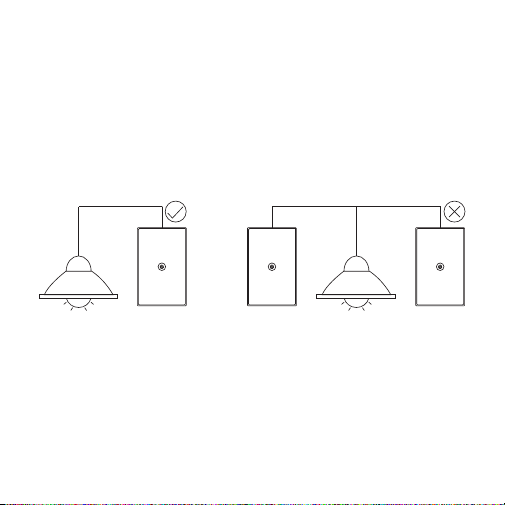
This product CAN NOT be used to replace the dimmer switch, 3-way
switch or multi-way switch.
4.
The neutral wire is required for installation.
5.
Make sure the circuit breaker is turned off before the removal or
installation.
6.
The overall power of all electric connected equipment must not
exceed the smart switch's maximum power.
7.
Place the device in a secure location away from children's range.
8.
The device is only designed for dry indoor areas.

9.
The device can only connect to 2.4GHz Wi-Fi networks. Make sure
that your phone is linked to the 2.4GHz network if you have a dual-
band router with distinct 2.4GHz and 5GHz networks.
2
10.
Make sure that the entered Wi-Fi password is correct when adding a new
device.
11.
Please make sure the device is near to the router for a stable network
connection.
12.
We couldn't guarantee the exact consistency between the actual
product and the written information in this manual due to the regular
app and product updates.

Table of Contents
3
Product Overview....................................................................................4
Installation..............................................................................................5
Setup........................................................................................................7
Connecting the Device to ZSmart App......................................................................7
Connecting the Device to Amazon Alexa or Google Assistant..........................9
Product Features...................................................................................10

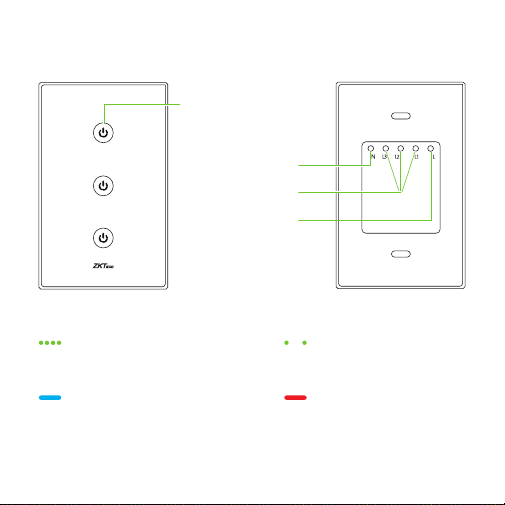
Product Overview
ON/OFF Button
Neutral Wire Port
Load Wire Port
Line Wire Port
Status LED Description:
Rapid Blinking Green
In Pairing Mode (EZ Mode)
Slow Blinking Green
In Pairing Mode (AP Mode)
Solid Blue
Power On
Solid Red
Power Off
4
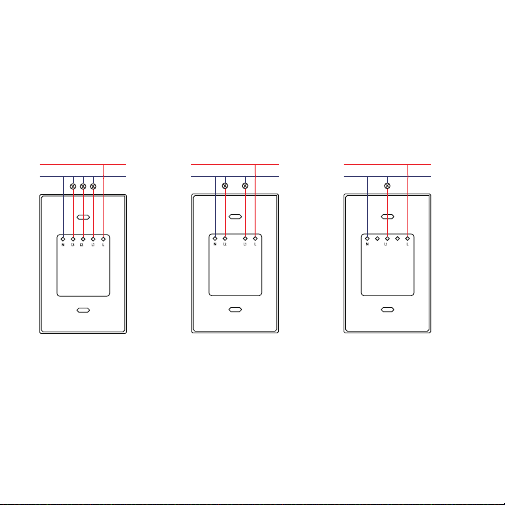
Note: The above picture is only taken the model SW13-US as an example,
please refer to the actual purchased products.
Status LED Indicator
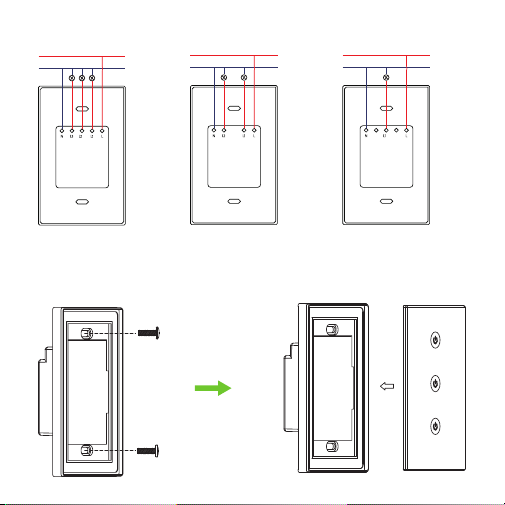
Step 3: Install the New Smart Switch
1.
2.
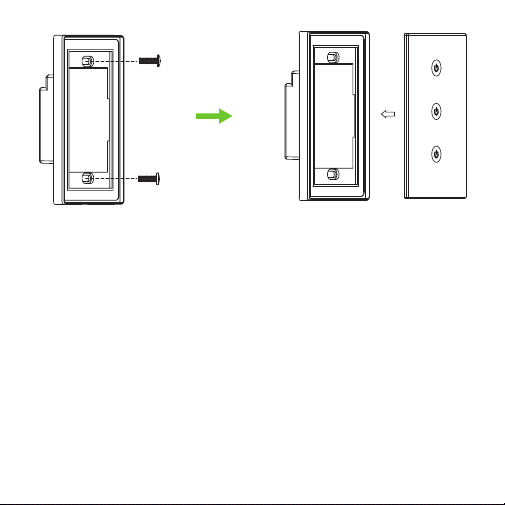
Use a screwdriver to separate the main unit (receptacle) and the faceplate.
According to the following wiring diagram, connect the wires to
corresponding wire ports.
5
Installation
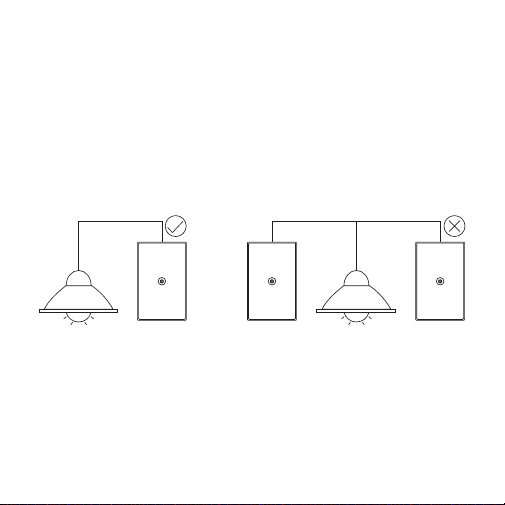
Step 1: Remove the Existing Switch
WARNING
Risk of electric shock!
Make sure the power to every switch has been turned off before installation.
1.
2.
Turn off the power at circuit breaker or fuse box.
Use an electrical tester to test the power is off before installation.
3.
Unscrew the existing switch and pull it out from the wall to reveal the wires.
Step 2: Identify the Wires
1.
2.
Identity the specific wires with some labels.
Disconnect all of the wires from the existing switch.
Important Note: A neutral wire is required to install the smart switch.
6
Wiring Diagram:
3.
Carefully insert the main unit into the switch box, and mount it by the screws.
LINE
NEUTRAL
LINE
NEUTRAL
LINE
NEUTRAL
4.
Finally, snap the faceplate onto the main unit. When the installation is
completed, test each button to make sure the device is wired properly.
7
Setup
Connecting the Device to ZSmart App
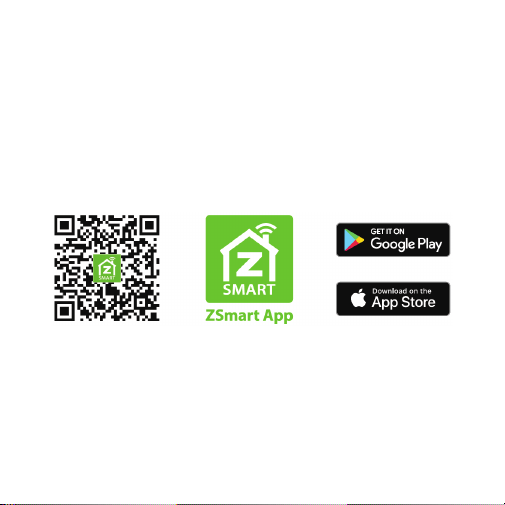
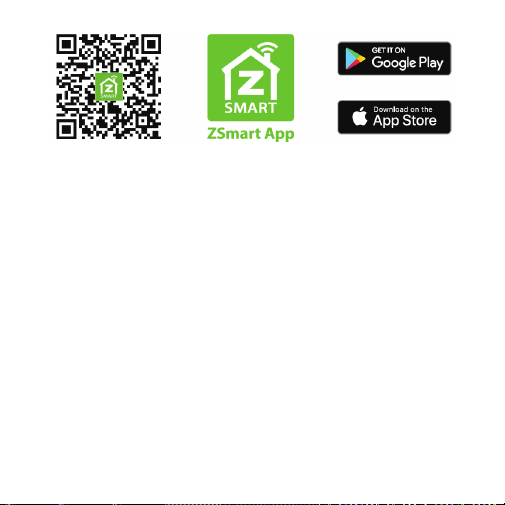
Step 1: Download the App and Register Your Account
Search for the ZSmart App in Apple App Store or Google Play Store and
download the App to your mobile phone.
Open the ZSmart App and log in with your account. If you do not have an
account, create an account with your phone number or Email ID.
Step 2: Power on the Device
Turn on the power of the device. Wait a few seconds until the green LED
light begins to blink rapidly, indicating that the Pairing Mode is active.
Note: If the device does not begin to flashing green, press and hold any
button for 5 seconds until the LED light begins to flash green.

8
2.
1.
Open the app, tap the "+" button on the top right corner of the interface,
and then select the ”Add Device” option. Select the ”Electrical” option
and then choose the corresponding model purchased.
Enter the correct password for the Wi-Fi network you've selected. Then
press the "Next" button.
3.
Select "Next" if you've completed the above steps on the interface.
Step 3: Add the Device to the App
4.
You can change the name of the device manually once the notification
"Added successfully" displayed on the mobile app. To complete the
process, tap the "Done" button.
Important Notes:
The default pairing mode is EZ Mode in the App. If you still failed to
connect your device to Wi-Fi, please try to change to AP Mode to
configure the device again. The operation steps are as follows:
1.
Make sure the green LED blinks rapidly.
2.
Press and hold any button for 5 seconds until the green LED light
blinks slowly.
3.
Open the Adding Device interface, tap on the top right corner to
change Net Pairing Mode to "AP Mode", then follow the on-screen
instructions to connect the device's hotspot and complete the setup.

9
Tap on EDIT Button in the upper right corner of the device interface after
successfully connecting the device to the ZSmart App. To link your ZSmart
Account to Amazon Alexa or Google Assistant, select the Amazon Alexa or
Google Assistant icon and follow the on-screen instructions.
Connecting the Device to Amazon Alexa
or Google Assistant
After completing the setup, you can use the supported voice commands
that include:
Echo, turn on <device name>.
Echo, turn off <device name>.
Hey Google, turn on <device name>.
Hey Google, turn off <device name>.
Note: Each time when you change the name of the linked device, you
must identify it again to update the name.

10
Product Features
Switch: From any location, turn on or off the device.
Timer: Cu stomize the s ch edule for the device to turn o n or off
automatically.
Co unt dow n: Afte r a spe cifie d a moun t o f t i me, the d e vic e wil l
automatically turn on or off.
All On/All Off: All the switches will be turned on or off at one time. The
model SW11-US/SW11-EU can't support this feature.
Multi-Control Association: The same light can be controlled by two or
multiple independent switches (maximum quantity: 4) at the same time,
which means that the associated switches will synchronize the ON and
OFF status automatically.
Group Control: Create groups to control multiple devices at one time.
Voice Control: To turn on or off the device, use Amazon Alexa or Google
Assistant voice commands.

Modelo: Serie SW11/SW12/SW13
Versión: 1.0
Español
Guía Rápida
Debido a las actualizaciones periódicas de los sistemas y productos, ZKTeco no puede garantizar la consistencia
exacta entre el producto real y la información escrita en este manual.
1.
2.
Lea atentamente este manual o comuníquese con atención al cliente
para cualquier consulta.
Se recomienda que un electricista profesional realice la instalación,
especialmente si no está seguro acerca de alguna parte de estas
instrucciones.
1
3.
Este producto NO PUEDE usarse para reemplazar el regulador de
intensidad de luz, el interruptor de 3 vías o el interruptor de múltiples vías.
4.
Se requiere el cable neutro para la instalación.
5.
Asegú res e de q ue el d isyuntor e sté a pag ado a ntes de l a
instalación o desinstalación.
6.
La potencia total de todos los equipos eléctricos conectados no
debe exceder la potencia máxima del interruptor inteligente.
7.
Coloque el dispositivo en condiciones seguras y asegúrese de que
esté fuera del alcance de los niños.
Notas Importantes

8.
El dispositivo está diseñado sólo para uso en interiores.
2
9.
Este dispositivo sólo trabaja con redes Wi-Fi de 2.4GHz. Si tiene un
enrutador doble banda con redes de 2.4 GHz y 5 GHz, asegúrese de que
su teléfono esté conectado a la de 2.4 GHz.
10.
Asegúrese de que la contraseña Wi-Fi ingresada sea correcta al agregar
un nuevo dispositivo.
11.
Para una conexión de red estable, asegúrese de que el dispositivo esté
colocado cerca del enrutador.
12.
Debido a las actualizaciones periódicas de la aplicación y los productos,
no podemos garantizar la coherencia exacta entre el producto real y la
información escrita en este manual.

3
Tabla de Contenidos
Descripción del Producto........................................................................4
Instalación...............................................................................................5
Conguración .........................................................................................7
Conexión del Equipo con la App ZSmart...................................................................7
Conexión del Equipo con Amazon Alexa o Google Assistant.............................9
Características del Producto.................................................................10
LED Indicador de Estado:
En Modo de Emparejamiento
(Modo EZ)
Parpadeo Lento en Verde
En Modo de
Emparejamiento (Modo AP)
Azul Sólido
Encendido
Rojo Sólido
Apagado
4
Nota: La imagen de arriba solo toma el modelo SW13-US como ejemplo,
por favor refiérase al producto real comprado.
Descripción del Producto
Botón de Encendido
/Apagado,
Indicador LED
Puerto de
Cable Neutro
Puerto de
Cable de Línea
Puerto de Cable
de Carga
Parpadeo Rápido en Verde
5
Instalación
Paso 1: Quite el Interruptor Existente
ATENCIÓN
¡Riesgo de descargas eléctricas!
Asegúrese de que todos los interruptores estén apagados antes de la
instalación.
1.
2.
Apague la alimentación en el disyuntor o en la caja de fusibles.
Use un comprobador eléctrico para comprobar que la energía está
apagada antes de la instalación.
3.
Desatornille el interruptor existente y retírelo de la pared para exponer
los cables.
Paso 2: Identificar los cables
1.
2.
Identifique los cables específicos con algunas etiquetas.
Desconecte todos los cables del interruptor existente.
Notas Importantes: Se requiere un cable neutro para instalar el
interruptor inteligente.
2.
Conecte los cables a los puertos correspondientes según el siguiente
diagrama de cableado.
Paso 3: Instale el nuevo interruptor inteligente
1.
Utilice un destornillador para separar la unidad principal (receptáculo)
y la placa frontal.
Diagrama de Cableado:
3.
Inserte con cuidado la unidad principal en la caja del interruptor y
móntela con los tornillos.
4.
Finalmente, encaje la placa frontal en la unidad principal. Cuando se
complete la instalación, pruebe cada botón para asegurarse de que el
dispositivo esté cableado correctamente.
6
Línea
Neutro
Línea
Neutro
Línea
Neutro
Configuración
Conexión del Equipo con la App ZSmart
Paso 1: Descargue la App y Registre su Cuenta
Busque la aplicación ZSmart en Apple App Store o Google Play Store y
descargue la aplicación en su teléfono móvil.
Abra la aplicación ZSmart e inicie sesión con su cuenta. Si no tiene una
cuenta, cree una cuenta con su número de teléfono o correo electrónico.
7
Paso 2: Encienda el Equipo
Encienda la alimentación del dispositivo. Espere unos segundos hasta que
el LED verde parpadea rápidamente, lo que significa que está en modo de
emparejamiento.
Nota: Si el dispositivo no comienza a parpadear en verde, presione y
mantenga presionado cualquier botón por 5 segundos hasta que el LED
comience a parpadear en verde.
2.
1.
Abra la aplicación, toque el botón "+" en la esquina superior derecha
de la interfaz y luego seleccione la opción "Agregar dispositivo".
S e l e c ci o n e l a o p c i ó n “ E l éc t ri c o ” y l u eg o e l ij a e l m o d e l o
correspondiente comprado.
Seleccione el Wi-Fi deseado e ingrese la contraseña correcta. Luego
toque el botón "Siguiente".
3.
Marque "Siguiente" si ha terminado los pasos anteriores en la interfaz.
Paso 3: Añada el Equipo a la App
8

Después de conectar correctamente el dispositivo a la aplicación ZSmart,
toque el botón EDITAR en la esquina superior derecha de la interfaz del
dispositivo. Seleccione el ícono de Amazon Alexa o Google Assistant,
luego siga las instrucciones en pantalla para vincular su cuenta ZSmart a
Amazon Alexa o Google Assistant.
Conexión del Equipo con Amazon Alexa
o Google Assistant
4.
Una vez que vea el mensaje “Se agregó con éxito" en la aplicación,
puede editar el nombre del dispositivo manualmente. Toque el botón
“Finalizado" para completar la configuración.
Notas Importantes:
El modo de emparejamiento predeterminado es el Modo EZ en la
aplicación. Si aún no pudo conectar su dispositivo a Wi-Fi, intente
cambiar al Modo AP para configurar el dispositivo nuevamente. Los pasos
de la operación son los siguientes:
1.
Asegúrese de que el LED verde parpadee rápidamente.
2.
Presione y mantenga presionado cualquier botón durante 5 segundos
hasta que el LED verde parpadee lentamente.
3.
Abra la interfaz Agregar Dispositivo, toque en la esquina superior
derecha para cambiar el Modo de Emparejamiento de Red a "Modo
AP", luego siga las instrucciones en la pantalla para conectar el hotspot
del dispositivo y completar la configuración.
9

Echo, enciende <nombre del dispositivo>.
Echo, apaga <nombre del dispositivo>.
Hey Google, enciende <nombre del dispositivo>.
Hey Google, apaga <nombre del dispositivo>.
Nota: Después de cambiar el nombre del dispositivo vinculado, actualice
nuevamente la cuenta para actualizar el nombre.
Después de completar la configuración, puede usar los comandos de voz
admitidos que incluyen:
Características del Producto
Cambiar: Encender o apagar el dispositivo de forma remota desde
cualquier lugar.
Calendario: Cree un horario específico para que el dispositivo realice la
acción de encendido o apagado automáticamente.
Temporizador: El dispositivo se encenderá o apagará automáticamente
después de un período de tiempo predeterminado.
Encendido/Apagado General: Todos los interruptores se encenderán o
apagarán a la vez. El modelo SW11-US / SW11-EU no admite esta función.
10
Asociación Multicontrol: Una misma luz puede ser controlada por dos o
múltiples interruptores independientes (cantidad máxima: 4) al mismo
tiempo, lo que significa que los interruptores asociados sincronizarán el

estado de ENCENDIDO y APAGADO automáticamente.
Control de Grupo: Cree grupos para controlar múltiples dispositivos a la
vez.
Control por Voz: Use los comandos de voz para encender o apagar el
dispositivo a través de Amazon Alexa y el Asistente de Google.
11
Warning:
This device complies with Part 15 of the FCC Rules. Operation is subject to the following
two conditions: (1) This device may not cause harmful interference, and (2) this device
must accept any interference received, including interference that may cause undesired
operation.
This equipment has been tested and found to comply with the limits for a Class B digital
device, pursuant to Part 15 of the FCC Rules. These limits are designed to provide
reasonable protection against harmful interference in a residential installation. This
equipment generates, uses, and can radiate radio frequency energy and, if not installed
and used in accordance with the instructions, may cause harmful interference to radio
communications. However, there is no guarantee that interference will not occur in a
particular installation. If this equipment does cause harmful interference to radio or
television reception, which can be determined by turning the equipment off and on, the
user is encouraged to try to correct the interference by one or more of the following
measures:
FCC RF Radiation Exposure Statement:
Connect the equipment into an outlet on a circuit different from that to which the
receiver is connected.
Consult the dealer or an experienced radio/TV technician for help.
Reorient or relocate the receiving antenna.
Increase the separation between the equipment and receiver.
This Transmitter must not be co-located or operating in conjunction with any other
antenna or transmitter.
IMPORTANT! Any changes or modifications not expressly approved by the party
responsible for compliance could void the user's authority to operate the equipment.
This equipment complies with RF radiation exposure limits set forth for an
uncontrolled environment.

ZKTeco Industrial Park, No. 32, Industrial Road,
Tangxia Town, Dongguan, China.
Phone : +86 769 - 82109991
Fax : +86 755 - 89602394
www.zkteco.com
Copyright © 2022 ZKTECO CO., LTD. All Rights Reserved.


