
INSTRUCTION AND
RECIPE BOOKLET
HM-C
Power Advantage
®
Deluxe Chopper/Grinder
For your safety and continued enjoyment of this product,
always read the instruction book carefully before using.

2
CONTENTS
Important Safeguards...................................................2
Features and Components ...........................................5
Assembly ......................................................................5
Operation ......................................................................7
Cleaning and Maintenance ...........................................8
Chopper/Grinder Guide ................................................8
Recipes .......................................................................10
Warranty ...................................................................... 15
IMPORTANT
SAFEGUARDS
When using an electrical appliance, basic safety
precautions should always be taken, especially when
children are present, including the following:
1. Read all instructions.
2. This appliance is not intended for use by children
or by persons with reduced physical, sensory,
or mental capabilities, or lack of experience and
knowledge. Close supervision is necessary when
any appliance is used near children. Children
should be supervised to ensure that they do not
play with the appliance.
3. Turn the appliance OFF, then unplug from
the outlet when not in use, before assembling
or disassembling parts and before cleaning.
To unplug, grasp the plug and pull from the outlet.
Never pull from the power cord.
4. Avoid contact with moving parts. Keep hands,
hair, clothing, as well as spatulas and other
utensils away from beaters and blades during
operation to reduce risk of injury to persons,
and/or damage to the mixer, and the attachment.
5. Do not operate any appliance with a damaged
cord or plug or after the appliance malfunctions,
or is dropped or damaged in any manner. Contact
the manufacturer at their customer service

3
telephone number for information on examination,
repair, or adjustment.
6. The use of attachments not recommended by
Cuisinart may cause fire, electric shock, or risk
of injury.
7. Do not use outdoors or anywhere the cord or mixer
might come into contact with water while in use.
8. To avoid possibility of mixer or attachment being
accidentally pulled off work area, which could result
in damage to the appliance or in personal injury, do
not let cord hang over edge of table or counter.
9. To avoid damage to cord and possible fire or
electrocution hazard, do not let cord contact hot
surface, including the stove.
10. Do not operate your appliance in an appliance
garage or under a wall cabinet. When storing
in an appliance garage, always unplug the unit
from the electrical outlet. Not doing so could
create a risk of fire, especially if the appliance
touches the walls of the garage or the door
touches the unit as it closes.
11. Blades are SHARP. Handle carefully when removing,
inserting or cleaning. Exercise the same care when
removing or inserting the cutting blade, or reversing
blade for the food chopper/grinder attachment.
12. To reduce the risk of injury, never place chopper/
grinder attachment cutting blade on base without
first putting work bowl properly in place.
13. Be certain the chopper/grinder attachment cover
is securely locked in place before operating
appliance. Do not attempt to remove cover until
blade has stopped rotating.
14. Check work bowl for presence of foreign objects
before using.
15. For use with Cuisinart model HM-8 only.
SAVE THESE
INSTRUCTIONS

4
FOR HOUSEHOLD
USE ONLY
NOTICE
This appliance has a polarized plug (one prong is
wider than the other). As a safety feature, this plug
will fit into a polarized outlet only one way. If the plug
does not fit fully into the outlet, reverse the plug.
If it still does not fit, contact a qualified electrician.
Do not modify the plug in any way.
UNPACKING INSTRUCTIONS
Place the package containing the Cuisinart
®
chopper/grinder attachment on a sturdy surface.
Unpack the chopper bowl from its box and remove
all support materials.
Save packaging for possible repacking of the unit.
NOTE: All blades are extremely sharp. Be careful
when removing and/or handling.
1
2
5
FEATURES AND COMPONENTS
1. Chopper/Grinder Attachment with 2-Cup Bowl
Chop, mince and grind with the Cuisinart
®
chopper/grinder attachment.
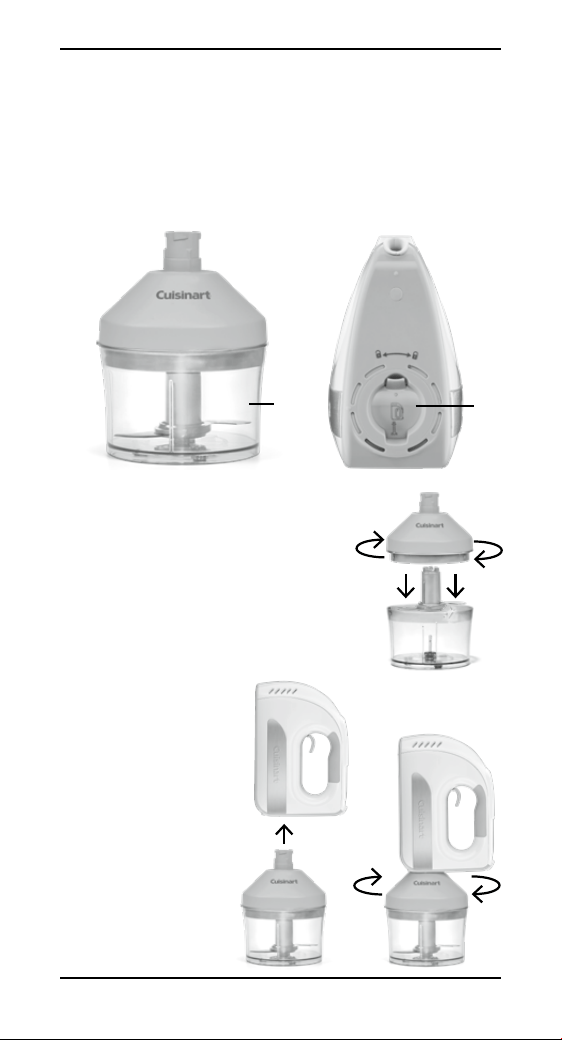
2. HM-8 Port
Chopper/grinder attaches to port on hand mixer
in place of blending shaft attachment.
ASSEMBLY
1. Place the chopper/grinder
blade assembly into center of
the chopping cup over metal
blade shaft.
2. Place your ingredients into
the chopper cup. Close cover,
rotating clockwise to lock in place
3. Connect chopper
to hand mixer:
Slide open
door cover of
attachment
port. Insert
attachment and
turn clockwise
to secure into
locked position.
4. To remove,
turn attachment
counterclockwise
C
D
G
F
E
B
A
6
and remove from port. Door cover will
automatically spring back into closed position.
REVERSIBLE BLADE
The chopper/grinder attachment is equipped with
a reversible blade – sharp on one side and blunt on
the other. The blade is attached to a plastic ring
that slides over the plastic blade shaft, so it can be
easily turned over to select the appropriate blade.
To reverse the blade, see detailed instructions below.
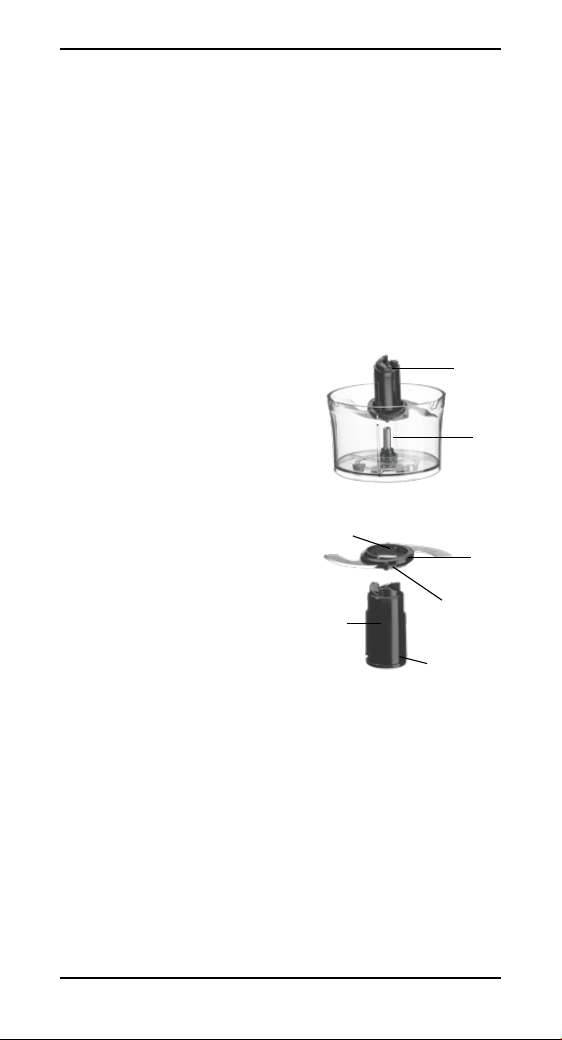
ASSEMBLE THE PARTS
1. Place the chopping cup on a flat, dry, stable
surface.
2. The metal blade assembly
shaft (A) is attached to the
bottom of the chopping
cup. If not already in place,
slide the fully assembled
blade assembly (B) over
the top of the metal blade
assembly shaft.
2a. Put together the
blade assembly if
not assembled:
Very carefully
connect the blade
ring (C) to the plastic
blade shaft (D).
Line up the blade
ring opening with the plastic sheath. There are
notches (E) on opposite sides of the interior of
the ring. These fit over ridges on the sides of
the plastic blade sheath (G). Let the blade ring
slide to the bottom of the plastic shaft. HOLD
THE BLADE RING BY THE CENTRAL HUB,
HOLDING RIBS (grips) (F) ONLY. DO NOT
TOUCH THE RAZOR-SHARP BLADES. Pick up
the blade ring by its hub, holding ribs (grips)
and turn it very slightly clockwise. This locks
it in place on the plastic blade sheath and
prevents it from sliding up during processing.
Note these important features of the blade ring.
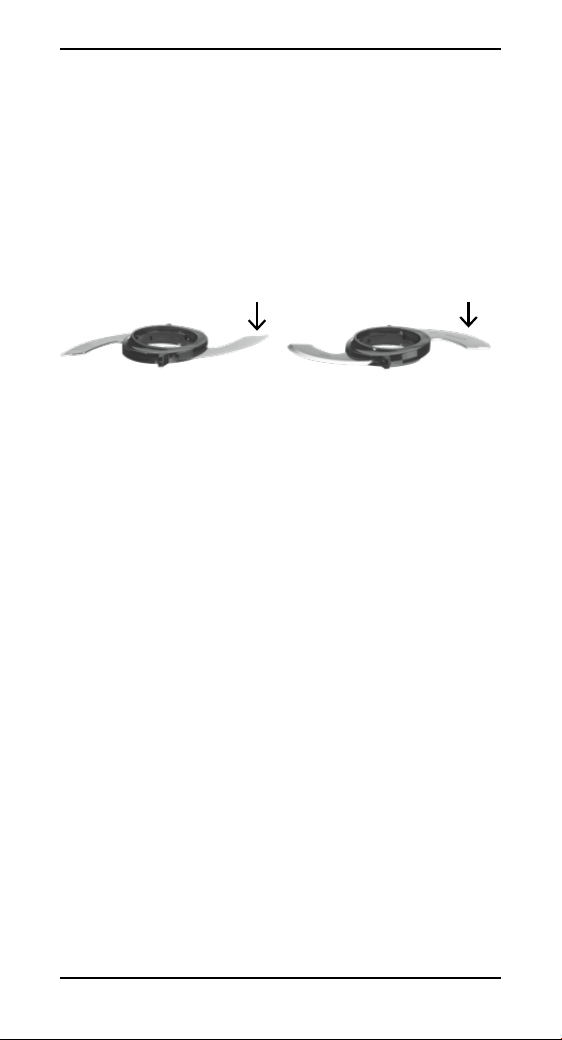
7
The blade ring can be placed over the plastic
blade shaft in two different ways: If you hold it
this way (A), you will see the word “Sharp” on
the blade. Assemble the blade this side up to
use the sharp edge. If you hold it this way (B),
you will see no writing on the blade. Assemble
the blade this side up to use the blunt edge.
(See the section on processing food, pages 8–9,
for information about when to use the blunt edge.)
OPERATION
CHOPPING AND GRINDING
Put the chopping cup firmly on a flat, dry, sturdy
surface, like a countertop. Be sure the blade is
assembled to use the blade edge that is appropriate
for the food to be processed.
Put food into the chopping cup. Be sure the food is cut
into small, uniform pieces and the cup is not overloaded.
Put the chopper/grinder cover on top of the chopping
cup. Be sure the cover is properly seated. Then attach
hand mixer power unit to the cup cover.
TO TURN THE CHOPPER/GRINDER ON
1. Press hand mixer ON/OFF button. LED will show
Speed 1.
2. Then press UNLOCK button, LED will show “U.”
3. Then lift and hold the beater release lever.
4. Press “+/-” button to change speed setting, LED
will show 1, 2, 3, as motor speed changes.
5. To pulse, release the beater release lever, which will
stop the chopper/grinder action. Pull on the beater
release lever to reactivate chopper/grinder function.
6. Press the hand mixer ON/OFF button to turn off
the unit.
SHARP
SIDE
A
BLUNT
SIDE UP
B

8
7. Unplug immediately after use.
WHEN THE BLADE STOPS MOVING, remove the
blending shaft attachment from the chopper/grinder
cover, and remove the cover from the chopping cup.
NOTE: Do not operate the chopper/grinder
attachment without food in the chopping cup.
CLEANING AND MAINTENANCE
To simplify cleaning, rinse the chopping cup, blade
and chopping cup cover immediately after use,
so that food won’t dry on them. Do not submerge
the chopping cup cover in water or put it in the
dishwasher. Clean the underside of the chopping cup
cover with a sponge or damp cloth to remove any
food. Wipe the motor body and top of the chopping cup
cover with a damp sponge or cloth. Dry immediately.
Wash the chopping blade and chopping cup in warm,
soapy water. Rinse and dry. Wash the blade carefully.
Avoid leaving the blade in soapy water where it may
disappear from sight. You can wash the chopping
cup and chopping blade on the top rack of your
dishwasher. Unload the dishwasher carefully to avoid
contact with the sharp blade.
CHOPPER/GRINDER GUIDE
Ingredient
Suggested
Blade
Speed Comments
Baby Foods
(always consult
a pediatrician or
family physician for
appropriate food
recommendations)
Sharp Blade 1–3
Place small amounts of cooked
food into chopper/grinder
bowl. Add small amount of
appropriate liquid. Pulse to
chop, then hold to blend.
Breadcrumbs
fresh or dry (day old)
Sharp Blade 3
Pulse to chop, then process until
desired consistency is reached.
Hard Cheeses
(Asiago, Locatelli,
Parmesan,
Romano, etc.)
(Not recommended
for softer cheeses
unless making a
dip or dressing)
Sharp Blade 3
Cut into ¼-inch pieces.
Pulse to chop, then process
until desired consistency
is reached.

9
Chocolate Sharp Blade 3
Cut into ½-inch pieces; may
chill in freezer for 3 minutes
before chopping. Pulse to chop,
then process, no more than 1
ounce at a time, until desired
texture is reached.
Creamy Dressings
and Dips
Sharp Blade 1
Place ingredients in chopper/
grinder bowl; do not cover or
spill on stem. Use pulse action
to chop, then continuous-hold
action to blend to desired
consistency.
Garlic Sharp Blade 3 Peel up to 6 cloves. Pulse to chop.
Ginger (fresh) Sharp Blade 3
Peel, cut into ½-inch pieces.
Pulse to chop, ½ ounce at
a time.
Hard Spices
(coriander, dill,
poppy, star anise,
etc.)
Sharp Blade 3
Pulse to chop until desired
consistency is reached.
Pulse with sharp blade to
get fine results.
Herbs (fresh) Sharp Blade 3
½ cup; must be clean/dry.
Pulse to chop.
Nuts Blunt Blade 3
Shelled; toast first for best
flavor. Pulse to chop, process
up to a ¹⁄
³
cup at a time, until
desired consistency is reached.
May be processed to nut-butter
stage.
Onion Sharp Blade 3
Peel, cut into ½-inch pieces.
Pulse to chop, up to ½ cup at
a time, until desired chop is
reached.
Vegetables
(cooked)
Sharp Blade 1–3
Cut into 1-inch pieces; pulse
to chop, up to ½ cup at a time.
Add cooking liquid, stock or
milk to process to a purée. It is
not recommended for making
mashed potatoes.
Vegetables
(uncooked)
Sharp Blade 3
Peel as needed; cut into ½-inch
pieces. Peel celery with peeler
to remove tough strings. Chop/
process up to ½ cup at a time.
Raw Meat
(beef, pork)
Sharp Blade 3
4 oz. or 175g, cut into ½-inch
pieces. Pulse until desired
consistency.
Simple Blending Blunt Blade 1–3
For light mixing and
incorporating.

10
RECIPES
In the recipes that follow, all use the sharp side of the
chopper/grinder attachment blade.
Strawberry Butter
Spread on bagels or toast, or on top of a pile
of pancakes, this will be a sweet addition to your
next breakfast.
Makes about ²⁄
³
cup
8 tablespoons (1 stick) unsalted butter,
cut into 1-inch pieces, room temperature
2 tablespoons confectioners’ sugar, sifted
Pinch fine sea salt
¼ cup diced fresh strawberries
Put the butter into the work bowl of the chopper/
grinder attachment. Run on Speed 2 until creamy,
about 30 to 40 seconds, stopping to scrape
down sides of bowl as necessary. Add remaining
ingredients and mix on Speed 1 until completely
combined, another 15 to 20 seconds.
Nutritional information per teaspoon:
Calories 39 (86% from fat) • carb. 1g • pro. 0g • fat 4g
sat. fat 2g • chol. 10mg • sod. 6mg • calc. 2mg • fiber 0g

11
Strawberry Ricotta Bruschetta
Savory and sweet pair beautifully in this impressively
simple appetizer.
Makes about 2 cups of topping, 24 servings
1 baguette, cut into ½-inch slices, lightly toasted
Ricotta Topping:
¾ ounce Parmesan or Pecorino Romano,
cut into ½-inch cubes
1 pound ricotta, strained
1 teaspoon extra virgin olive oil
1 teaspoon fresh thyme leaves
½ teaspoon fresh lemon juice
Pinch kosher salt
Pinch freshly ground black pepper
Strawberry Topping:
1 cup strawberries, hulled (halved if the
strawberries are on the larger size)
2 teaspoons fresh basil leaves
Balsamic glaze for drizzling, optional
1. Put the Parmesan/Pecorino Romano into the work
bowl of the chopper/grinder attachment. Pulse on
Speed 1 until broken up, and then run on Speed 3
until finely ground. Add remaining ricotta topping
ingredients and run on Speed 1 until combined.
Reserve in a separate bowl. Clean work bowl and
blade.
2. Put the strawberries and basil into the work bowl
of the chopper/grinder attachment. Pulse on
Speed 1 until finely chopped.
3. Assemble the bruschetta. Top each slice of toasted
bread with about 1 to 2 tablespoons of the ricotta
mixture, and then top with the strawberries and
basil. Finish with a drizzle of balsamic glaze, if using.
4. Serve immediately.
Nutritional information per serving:
Calories 39 (64% from fat) • carb. 1g • pro. 2g • fat 3g
sat. fat 2g • chol. 8mg • sod. 37mg • calc. 57mg • fiber 0g

12
Parmesan and Herb Popcorn
Take movie night up a notch with this cheesy and
herbaceous popcorn. It is also great served on the
side of briny olives and cocktails for a classier affair.
Makes about 10 cups
2 tablespoons fresh rosemary leaves
3 tablespoons fresh thyme leaves
1½ ounces Parmesan, cut into small cubes
10 cups popped popcorn
2 tablespoons extra virgin olive oil
Pinch kosher or sea salt
Pinch freshly ground black pepper
1. Put the herbs into the work bowl of the
chopper/grinder attachment. Run on Speed 3
until roughly chopped.
2. Add the Parmesan and pulse on Speed 1
until broken up, and then run on Speed 3 until
finely ground.
3. Put the popcorn in a large mixing bowl. Toss with
the olive oil and the salt and pepper, then top with
the herb/cheese mixture. Toss to fully coat, adding
more oil as necessary.
4. Serve immediately.
Nutritional information per cup:
Calories 73 (53% from fat) • carb. 6g • pro. 3g • fat 4g
sat. fat 1g • chol. 4mg • sod. 79mg • calc. 52mg • fiber 1g

13
Pistachio Biscotti
We love the combination of pistachios and
cranberries, and the dip in the chocolate is a great
way to finish off this yummy cookie that is perfect
for the holidays.
Makes about 50 biscotti
1½ cups unbleached, all-purpose flour
¼ cup cornstarch
½ teaspoon baking powder
¹⁄
8
teaspoon kosher salt
2 large eggs, room temperature
¾ cup granulated sugar
1 tablespoon pure vanilla extract
1 teaspoon fresh lemon juice
½ cup shelled raw pistachios, plus more
for garnish
½ cup dried cranberries
Egg wash (1 large egg whisked with 1
teaspoon water and pinch of salt)
1 cup white and/or semisweet chocolate chips
or chopped chocolate (this can be chopped
in the work bowl)
1. Preheat oven to 350°F. Line two baking sheets
with parchment paper.
2. Put the flour, cornstarch, baking powder, and salt
into a small mixing bowl. Using the beaters, mix
on Speed 1 until combined, about 20 seconds.
Reserve.
3. Put the eggs, sugar, vanilla extract, and lemon
juice into a large mixing bowl. Using the
beaters, mix on Speeds 2 to 6 until thick and
smooth, about 2 minutes. Gradually add the dry
ingredients, one-third at a time, mixing on Speed
2 for 30 seconds in between additions. Add the
pistachios and cranberries, continuing to mix on
Speed 2 until just combined.
4. Place dough onto a lightly floured surface and
divide into two equal pieces. Using floured hands,

14
form each into a 10-inch-x-3-inch rectangular log.
Transfer to the prepared baking sheets.
5. Using a pastry brush, lightly brush the top of each
log with the beaten egg wash. Bake in preheated
oven until lightly browned, about 25 minutes.
Remove and cool slightly.
6. Carefully transfer one log to a large cutting
board. Using a serrated knife, cut each log on the
diagonal into ½-inch thick slices, about 25 slices
per log. Repeat with remaining log.
7. Transfer slices to the cookie sheets, and bake,
cut side up, until lightly browned and crisp, about
8 to 10 minutes, flipping halfway through baking
time. Remove from oven and cool completely.
8. While cookies are baking, prepare the chocolate
and garnish. Put the desired chocolate, chopped,
into a double boiler set over simmering water.
Once the chocolate is almost melted, remove
the double boiler from the heat and allow to cool
slightly. Whisk any lumps if necessary; reserve.
9. Put the pistachios in the work bowl of the
chopper/grinder attachment. Pulse on Speed 1
to finely chop. Reserve.
10. When biscotti have cooled, line a baking tray, or
large platter, with parchment paper. Dip half of
the cookie into the melted chocolate and place on
the lined tray/platter. Sprinkle with the chopped
pistachios. Once all have been dipped and
garnished, transfer to a refrigerator to chill and set.
Nutritional information per biscotti
(dipped in semisweet chocolate):
Calories 65 (26% from fat) • carb. 11g • pro. 1g • fat 2g
sat. fat 1g • chol. 9mg • sod. 15mg • calc. 5mg • fiber 1g

15
WARRANTY
Limited Three-Year Warranty
This warranty is available to U.S. consumers only.
You are a consumer if you own a Cuisinart
®
Power
Advantage
®
Deluxe Chopper/Grinder Attachment that
was purchased at retail for personal, family or household
use. Except as otherwise required under applicable
law, this warranty is not available to retailers or other
commercial purchasers or owners. We warrant that your
Cuisinart
®
Power Advantage
®
Deluxe Chopper/Grinder
Attachment will be free of defects in materials and
workmanship under normal home use for 3 years from
the date of original purchase.
We recommend that you visit our website,
www.cuisinart.com for a fast, efficient way to complete
your product registration. However, product registration
does not eliminate the need for the consumer to maintain
the original proof of purchase in order to obtain the
warranty benefits. In the event that you do not have proof
of purchase date, the purchase date for purposes of this
warranty will be the date of manufacture.
CALIFORNIA RESIDENTS ONLY
California law provides that for In-Warranty Service,
California residents have the option of returning a
nonconforming product (A) to the store where it was
purchased or (B) to another retail store that sells
Cuisinart products of the same type. The retail store
shall then, according to its preference, either repair the
product, refer the consumer to an independent repair
facility, replace the product, or refund the purchase
price less the amount directly attributable to the
consumer’s prior usage of the product. If neither of the
above two options results in the appropriate relief to
the consumer, the consumer may then take the product
to an independent repair facility, if service or repair
can be economically accomplished. Cuisinart and not
the consumer will be responsible for the reasonable
cost of such service, repair, replacement, or refund
for nonconforming products under warranty. California
residents may also, according to their preference, return
nonconforming products directly to Cuisinart for repair
or, if necessary, replacement by calling our Consumer
Service Center toll-free at 800-726-0190. Cuisinart will
be responsible for the cost of the repair, replacement,
and shipping and handling for such nonconforming
products under warranty.

16
IB-16712-ESP
©2020 Cuisinart
East Windsor, NJ 08520
Printed in China
20CE071549
Trademarks or service
marks of third parties
referred to herein are the
trademarks or service marks
of their respective owners.
HASSLE-FREE REPLACEMENT WARRANTY
Your ultimate satisfaction in Cuisinart products is
our goal, so if your Cuisinart
®
Power Advantage
®
Deluxe Chopper/Grinder Attachment should fail within
the generous warranty period, we will repair it or, if
necessary, replace it at no cost to you. To obtain a return
shipping label, email us at https://www.cuisinart.com/
customer-care/product-return. Or call our toll-free
customer service department at 1-800-726-0190 to
speak with a representative.
Your Cuisinart
®
Power Advantage
®
Deluxe Chopper/
Grinder Attachment has been manufactured to the
strictest specifications and has been designed for
use only in 120-volt outlets and only with authorized
accessories and replacement parts. This warranty
expressly excludes any defects or damages caused by
attempted use of this unit with a converter, as well as
use with accessories, replacement parts or repair service
other than those authorized by Cuisinart. This warranty
does not cover any damage caused by accident,
misuse, shipment or other than ordinary household use.
This warranty excludes all incidental or consequential
damages. Some states do not allow the exclusion or
limitation of these damages, so these exclusions may not
apply to you. You may also have other rights, which vary
from state to state.
Important: If the nonconforming product is to be
serviced by someone other than Cuisinart’s Authorized
Service Center, please remind the servicer to call our
Consumer Service Center at 1-800-726-0190 to ensure
that the problem is properly diagnosed, the product is
serviced with the correct parts, and to ensure that the
product is still under warranty.
