1
Instruction
& Recipe
Booklet
ESPAÑOL INCLUIDO
For your safety and continued enjoyment of this product,
always read the instruction book carefully before using.
5-Speed Hand Mixer
with Storage Case
HM-150S SERIES
GARANTÍA DE
TRES AÑOS

2
Contents
Important Safeguards ...................................... 2
Features and Benefits ...................................... 3
Use, Care, and Maintenance ........................... 4
Quick Reference Guide ..................................... 5
Warranty ................................................................ 6
Recipes .................................................................. 8
Important
Safeguards
When using an electrical appliance, basic safety
precautions should always be followed, including
the following:
1. Read all instructions.
2. Turn the appliance OFF, then unplug from the
outlet when not in use, before assembling or
disassembling parts, and before cleaning. To
unplug, grasp the plug and pull from the outlet.
Never pull from the power cord.
3. To protect against risk of electric shock, do not put
the hand mixer motor housing or cord in water or
other liquids. If hand mixer motor housing or cord
falls into liquid, unplug the cord from outlet
immediately. Do not reach into the liquid.
4. To avoid accidental injury, close supervision is
necessary when any appliance is used by or near
children.
5. Avoid contact with moving parts. Keep hands, hair,
clothing, and spatulas and other utensils away
from beaters/whisk during operation to reduce risk
of injury to persons and/or damage to the mixer.
6. Remove beaters or whisk from the mixer before
washing.
7. Do not operate any appliance with a damaged cord
or plug, or after the appliance malfunctions or is
dropped or damaged in any manner. Return
appliance to the nearest authorized Cuisinart
®
service facility for examination, repair, or
mechanical or electrical adjustment.
8. The use of attachments not recommended by
Cuisinart may cause re, electric shock, or risk
of injury.
9. Do not use outdoors or anywhere the cord or mixer
might come into contact with water while in use.
10. To avoid possibility of mixer being accidentally
pulled o work area, which could result in damage
to the mixer or in personal injury, do not let cord
hang over edge of table or counter.
11. To avoid damage to cord and possible re or
electrocution hazard, do not let cord come in
contact with hot surfaces, including the stove.
12. The chef’s whisk should be used without any
other attachment; leave second attachment port
empty.
13. This appliance is not intended for use by persons
(including children) with reduced physical, sensory,
or mental capabilities, or lack of experience and
knowledge, unless they are closely supervised and
instructed concerning use of the appliance by a
person responsible for their safety. Close
supervision is necessary when any appliance is
used by or near children. Children should be
supervised to ensure that they do not play with
the appliance.
14. Do not use this appliance for other than
intended use.

3
Save These
Instructions
For Household
Use Only
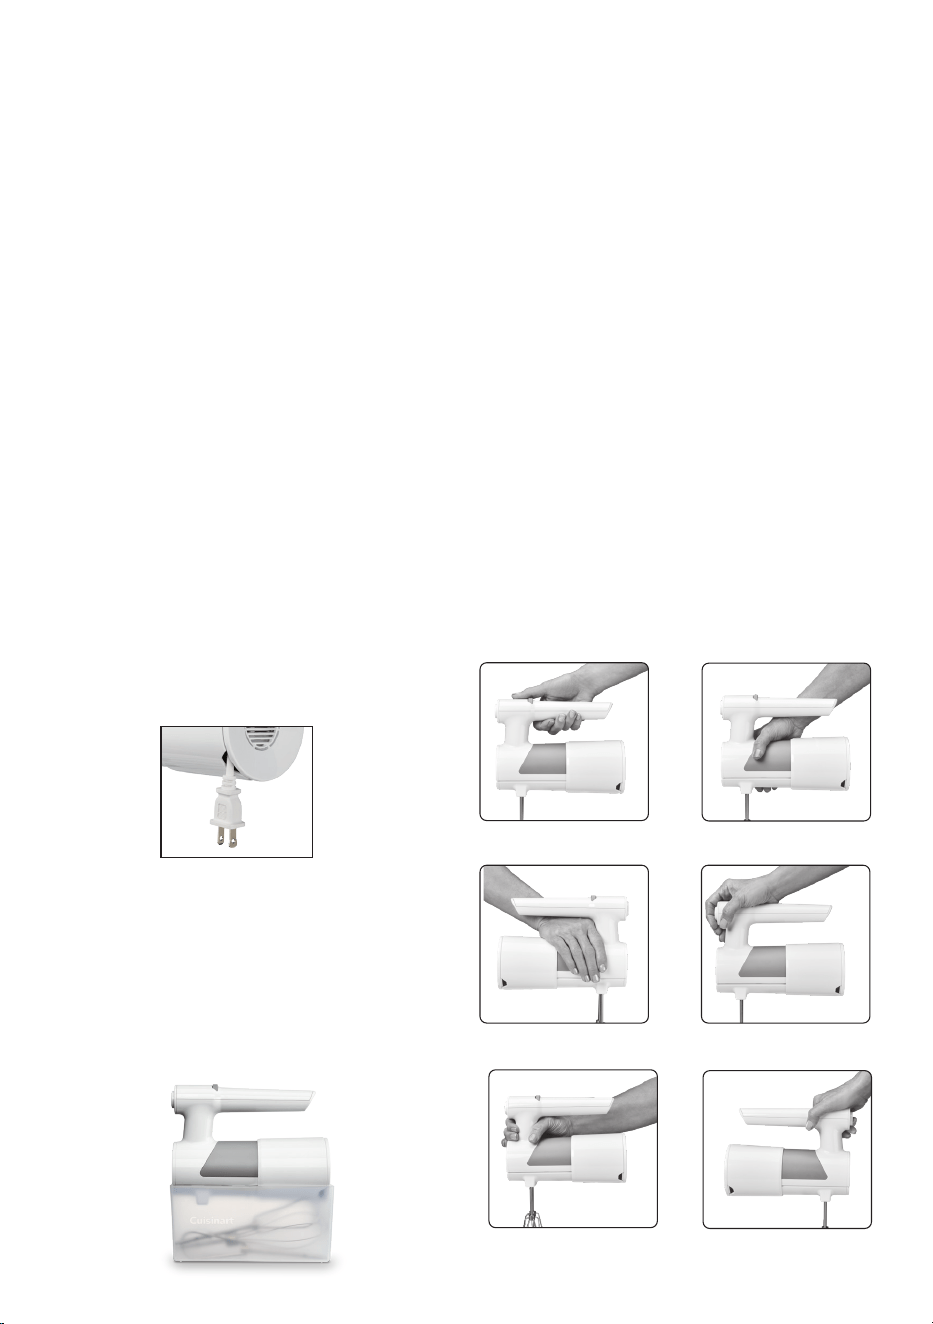
Notice
This appliance has a polarized plug (one prong is
wider than the other). As a safety feature, this plug
will t into a polarized outlet only one way. If the plug
does not t fully into the outlet, reverse the plug. If it
still does not t, contact a qualied electrician. Do
not modify the plug in any way.
Features and Benefits
Strong and Comfortable to Use
• Innovative Handle and Body Design: Ergonomically
designed body and handle for unparalleled comfort
and control at any angle.
• SmoothStart
®
: When the mixer is turned on, the
beaters/whisk start spinning very slowly to prevent
ingredients from splattering.
• Easy to Clean: Smooth, sealed housing wipes clean
easily. Mixing beaters, chef’s whisk, and storage
case are dishwasher safe.
• Heel Rest: Allows mixer to rest on countertop
vertically.
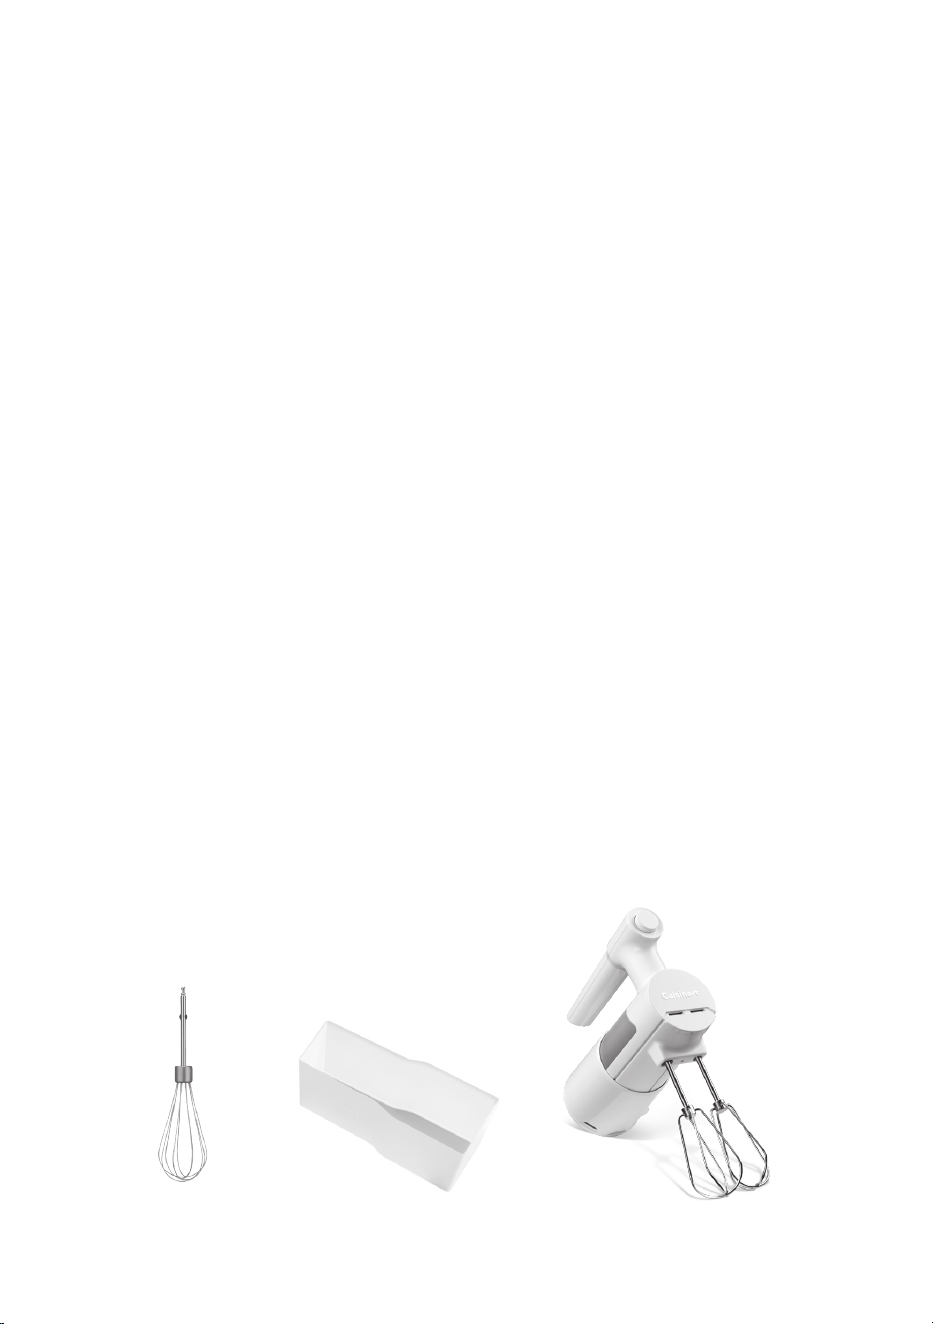
Parts
• Storage Case: Compact, easy storage. Sturdy case
holds mixing beaters and chef’s whisk. Accessories
t into case and snaps on for compact storage.
• Lighted LED Speed Display: Digital speed settings
are easy to read.
• 5-Speed Control Dial: Allows you to change speeds
quickly while you are mixing.
• Integrated Cord Wrap: Saves space for easy storage.
• Beater Release Button: Conveniently located for
easy ejection of mixing beaters or chef’s whisk.
• Mixing Beaters: Extra-wide beaters allow for
superior mixing with faster aeration. Designed
without center post to prevent ingredients from
clogging beaters. Beaters are easy to clean and
dishwasher safe.
• Chef’s Whisk: 1.75-inch-diameter whisk adds
volume to whipped cream and creates sti,
ne-textured egg whites. Provides superior
whipping and aerating, is easy to clean,
and is dishwasher safe.
Chef’s Whisk
Storage Case
Mixing Beaters
Innovative
Handle
4
Use, Care, and
Maintenance
To Turn Hand Mixer On/O
Ensure the dial is all the way to the left and the mixer
is o. Plug mixer into outlet. Scroll the dial to the
right to the desired speed. Mixer will immediately
begin with the SmoothStart
®
feature at any speed
selected. To turn mixer o, scroll the dial all the way
back to the left.
To Insert Beaters
1. Ensure unit is turned o and unplugged.
2. Insert beater with collar into the larger hole. Push
beater in until it clicks into place. Insert the beater
without collar into the smaller hole. Push beater in
until it clicks into place.
To Insert Chef’s Whisk
1. Ensure unit is turned o and unplugged.
2. Holding chef’s whisk by its hub, insert it into either
hole and push in until it clicks. DO NOT HOLD OR
PUSH WHISK FROM WIRE END AS IT MAY DAMAGE
WIRES.
3. To release attachment, simply push the release
button at handle front.
Cord Wrap
Slide the cord cover o the mixer to expose the cord
storage area. Wrap the cord, making sure to insert
plug in as well. Slide cord cover back to cover cord.
To Attach/Detach Storage Case
1. To attach: Place accessories in case. Slide cord
sleeve toward front of mixer to expose cord reel
and wrap cord around back of mixer, ensuring plug
is at the bottom. Slide cord sleeve toward back of
mixer to lock in. Place mixer down onto storage
case and press down gently to attach.
2. T o detach: Grasp front of storage case rmly with
one hand and, with the other hand, hold back of
mixer and pull up.
To Remove Attachments
Ensure the hand mixer is o by turning the dial to the
left, and then unplug from wall outlet. Press the
beater release button and remove the attachments
from the mixer.
Cleaning
1. Wash all attachments after each use in hot, soapy
water or in a dishwasher. Wash storage case in hot
soapy water or on the top rack of the dishwasher.
2. NEVER PUT THE MOTOR HOUSING IN WATER OR
OTHER LIQUIDS TO CLEAN. Wipe it with a damp
cloth or sponge. Do not use abrasive cleansers,
which could scratch the surface.
3. To clean the hand mixer body, rst remove back
cover. Spot clean. Do not run body under water.
Then slide the cord cover o the mixer, and wash
separately by hand.
NOTE: DO NOT USE THE CUISINART
®
HAND MIXER
WITH NONSTICK COOKWARE.
Maintenance
Any other servicing should be performed by an
authorized service representative.
Hand Grips

5
Quick Reference
Guide
Mixing Techniques
The hand mixer should always be set on the lowest
speed when you start mixing.
NOTE: Use the chef’s whisk only for light whipping, as
with heavy cream or egg whites. For all other mixing
tasks, use the beaters.
Speed 1
• Start mixing most ingredients together
• Combine dry ingredients
• Start creaming butter and sugar
• Start whipping cream
• Start whipping egg whites.
• Add our to batters, or liquids to dry ingredients
Speed 2
• Sift and aerate dry ingredients
• Mash potatoes/squash
• Mix heavy cookie doughs
• Add nuts, chips, and dried fruit to doughs and
batters
• Add eggs to doughs and batters
• Mix pudding ingredients
• Cut cold butter into dry ingredients
(for pie doughs, biscuits, and pastries)
Speed 3
• Complete beating cake mixes and batters
• Complete mixing frostings
• Whip potatoes/squash
• Beat whole eggs/yolks
• Cream butter and sugar until light and uy
Speed 4
• Whip butter or cream cheese to light and uy
consistency for dips and spreads
Speed 5
• Complete whipping cream
• Complete whipping egg whites/meringues
Mixing Tips
Measure ingredients before beginning the mixing
process.
For best results, do not measure our directly from
the bag. Pour into a container or bowl, scoop out the
our, and level with the back of a knife or spatula.
For our stored in a container, stir before measuring.
When needing softened butter, remove butter for
recipe from refrigerator rst and cut into ½-inch
pieces, then measure out remaining ingredients for
recipe. This will hasten the warming process. Do not
warm butter for baking in a microwave unless
instructed to do so. Microwaving can melt butter;
melted butter will change the
nal product.
The best cheesecakes are made when the eggs and
cream cheese are at a similar room temperature.
While the Cuisinart
®
5-Speed Hand Mixer can easily
mix cold cream cheese, the trick is not to add too
much air, which can cause cracking.
For best results, use heavy cream, cold from the
refrigerator, for whipped cream.
To separate eggs for any recipe, break one at a time
into a small bowl, gently remove yolk, then transfer
egg white to spotlessly clean mixing bowl. If a yolk
breaks into the egg white, reserve that egg for
another use. Just a drop of egg yolk will prevent the
whites from whipping properly.
To achieve the highest volume of egg whites, the
mixing bowl and chef’s whisk attachment or beaters
must be spotlessly clean and free of any fat, oil, etc.
For best results, use a spotlessly clean stainless steel
or glass mixing bowl. If available, use a copper mixing
bowl. (Plastic bowls are not recommended for
whipping egg whites.) The presence of any trace of fat
or oil will prevent egg whites from increasing in
volume. Wash bowl and attachments thoroughly
before beginning again.
Occasionally, ingredients may stick to the sides of the
mixing bowl. When this occurs, turn mixer o and
scrape the sides of the bowl with a rubber spatula.

6
LIMITED
WARRANTY
Subject to the exclusions and limitations contained
herein, Conair LLC dba Cuisinart (“Cuisinart”) warrants
that the
Cuisinart
®
5-Speed Hand Mixer
(“Product”)
will be free from material defects in materials and
workmanship under normal home use conditions for
a period of THREE (3) years beginning on the date the
Product was purchased in its original, sealed packag-
ing, unless otherwise specified in this Limited Warranty.
This Limited Warranty is only for U.S. consumers
(defined herein as purchasers at retail for personal,
family, or household use) who originally purchase the
Product from Cuisinart or an authorized Cuisinart
®
reseller (if you are unsure whether a retailer or other
point of sale is an authorized or unauthorized Cuisinart
reseller, contact Cuisinart).
This Limited Warranty does NOT cover:
• Normal wear and tear;
• Any Product purchased by commercial purchasers
or for commercial or nonhousehold uses;
• Accessories, parts, or software added to the Product
after the system is shipped from Cuisinart;
• Any costs associated with the replacement
or repair of the Product, including labor, installation,
or other costs incurred by you without prior
Cuisinart approval;
• Damage to the Product, defective conditions, or
nonconformities due to: (1) external causes, includ-
ing shipping, accidents, problems with electrical
power (Product designed only for use with 120-volt
outlets), abnormal conditions (such as mechanical
or environmental); (2) usage not in accordance with
Product instructions; (3) misuse, neglect, unauthor-
ized alteration, unauthorized repair; and (4) acts of
God or other events beyond Cuisinart’s control;
• Damage caused by you or any unauthorized third
party, even though necessary repairs and mainte-
nance might be performed by any company.
• Damage caused by accessories or replacement parts
not specifically authorized by Cuisinart; and
• Any Product where the original Product identification
markings (trademark or serial number) have been
removed, altered, or obliterated.
It is recommended that you visit the website, https://
www.cuisinart.com/register-your-product.html, for a
fast, efficient way to complete your Product registra-
tion. However, Product registration does not eliminate
the need for the consumer to maintain the original
proof of purchase in order to obtain the warranty
benefits. In the event that you do not have proof of
purchase date, the purchase date for purposes of this
Limited Warranty will be the date of manufacture.
HASSLE-FREE WARRANTY
If the Product that is the subject of this Limited
Warranty fails during the warranty period for reasons
covered by this Limited Warranty, Cuisinart will, at its
option, repair the Product, replace the Product with
another identical or reasonably equivalent product, or
if Cuisinart is unable to repair or replace the Product,
refund the purchase price, less the amount directly
attributable to the consumer’s prior usage of the
Product. To obtain a return shipping label, email us at
https://www.cuisinart.com/customer-care/product-
assistance/product-inquiry/, or call our Consumer
Service Center toll-free at 1-800-726-0190 to speak
with a representative.
Upon receipt of the Product, Cuisinart will inspect the
Product and, if required under this Limited Warranty,
attempt to repair, replace, or refund the Product within
thirty (30) days. However, there may be delays beyond
Cuisinart’s control, in which case that time period may
be extended as reasonably necessary.
IMPORTANT: If the nonconforming Product is to be
serviced by someone other than Cuisinart’s Authorized
Service Center, please remind the servicer to call our
Consumer Service Center at 1-800-726-0190 to ensure
that the problem is properly diagnosed, the Product is
serviced with the correct parts, and the Product is still
under warranty.
CALIFORNIA RESIDENTS ONLY
The THREE (3) year Limited Warranty period begins
on the date the Product was delivered, which may be
different than the date the Product was purchased.
California residents also have the option of obtaining
the benefits of this Limited Warranty by bringing the
Product to (A) the store where it was purchased or
(B) another retail store that sells Cuisinart products of
the same type. The retail store shall then, according
to its preference, either repair the Product, refer the
consumer to an independent repair facility, replace the
Product with another identical or reasonably equivalent
product, or refund the purchase price less the amount
directly attributable to the consumer’s prior usage of
the Product. California residents may also, according
to their preference, return nonconforming Products
directly to Cuisinart for repair or, if necessary, replace-
ment with another identical or reasonably equivalent
Product by calling our Consumer Service Center toll-
free at 1-800-726-0190. Cuisinart will be responsible for

7
the cost of such repair, replacement, and/or shipping
and handling for such nonconforming Products under
warranty.
THIS LIMITED WARRANTY GIVES YOU SPECIFIC LEGAL
RIGHTS, AND YOU MAY ALSO HAVE OTHER RIGHTS THAT
VARY FROM STATE TO STATE OR BY JURISDICTION. IN
THE EVENT THIS LIMITED WARRANTY IS BREACHED,
YOU MAY HAVE CLAIMS FOR REPLACEMENT, DAMAGES,
OR OTHER PENALTIES.
LIMITATIONS OF LIABILITY/ADDITIONAL LIMITATIONS
AND EXCLUSIONS
ALL EXPRESS AND IMPLIED WARRANTIES ARE
LIMITED IN DURATION TO THE LIMITED WARRANTY
PERIOD. NO WARRANTIES APPLY AFTER THAT PERIOD.
SOME STATES (OR JURISDICTIONS) DO NOT ALLOW
LIMITATIONS ON HOW LONG AN IMPLIED WARRANTY
LASTS, SO THIS LIMITATION MAY NOT APPLY TO
YOU. CUISINART’S RESPONSIBILITY UNDER THIS OR
ANY OTHER WARRANTY, IMPLIED OR EXPRESS, IS
LIMITED TO REPAIR, REPLACEMENT, OR REFUND, AS
SET FORTH ABOVE. THESE REMEDIES ARE THE SOLE
AND EXCLUSIVE REMEDIES FOR ANY BREACH OF
WARRANTY. TO THE MAXIMUM EXTENT PERMITTED
BY LAW, CUISINART IS NOT RESPONSIBLE FOR
ANY DIRECT, INDIRECT, SPECIAL, INCIDENTAL, OR
CONSEQUENTIAL DAMAGES RESULTING FROM ANY
BREACH OF WARRANTY, OR UNDER ANY OTHER LEGAL
THEORY (INCLUDING, BUT NOT LIMITED TO, LOST
PROFITS, DOWNTIME, LOSS OF GOODWILL, DAMAGE
TO OR REPLACEMENT OF EQUIPMENT AND PROPERTY,
AND ANY COSTS OF RECOVERING, REPROGRAMMING,
OR REPRODUCING ANY PROGRAM OR DATA STORED
IN OR USED WITH A SYSTEM CONTAINING THE
PRODUCT), EVEN IF CUISINART HAS BEEN ADVISED OF
THE POSSIBILITY OF SUCH DAMAGES. SOME STATES
(OR JURISDICTIONS) DO NOT ALLOW THE EXCLUSION
OR LIMITATION OF INCIDENTAL OR CONSEQUENTIAL
DAMAGES, SO THE ABOVE LIMITATIONS OR EXCLUSIONS
MAY NOT APPLY TO YOU. ALL EXPRESS AND IMPLIED
WARRANTIES ARE LIMITED IN DURATION TO THE
LIMITED WARRANTY PERIOD. NO WARRANTIES
APPLY AFTER THAT PERIOD. SOME STATES (OR
JURISDICTIONS) DO NOT ALLOW LIMITATIONS ON
HOW LONG AN IMPLIED WARRANTY LASTS, SO THIS
LIMITATION MAY NOT APPLY TO YOU.
This Limited Warranty is issued by:
Conair LLC
1 Cummings Point Road
Stamford, CT 06902
1-800-726-0190

8
Recipes
Gluten-Free Banana Muffins .............................. 8
Lemon-Thyme Shortbread .................................. 9
Edible Cookie Dough ............................................ 9
Ginger Cookies ......................................................10
Pavlova with Blood Orange
and Pomegranate ................................................ 10
Chocolate Cream Pie ............................................ 11
Yellow Buttermilk Sheet Cake
with Fluffy Chocolate Frosting ......................... 12
Creamy Mashed Potatoes ..................................12
Buffalo Chicken Dip ............................................. 13
Pimento Cheese Spread ...................................13
Gluten-Free Banana Muffins
Gluten-free all-purpose our blends make gluten-
free baking easy and convenient. There are a
number of dierent brands on the market, so try a
few and nd your favorite.
Makes 12 muns
Nonstick cooking spray
2 cups gluten-free all-purpose our
½ cup whole rolled oats (not quick cooking)
¹⁄
³
cup granulated sugar
¹⁄
³
cup packed light brown sugar
1½ teaspoons baking powder
¼ teaspoon baking soda
½ teaspoon kosher salt
½ teaspoon xanthan gum (optional; use only if
our blend does not include it)
½ teaspoon ground cinnamon
1½ cups mashed, very ripe bananas (about 3
medium bananas)
½ cup vegetable oil
2 large eggs, room temperature
½ teaspoon pure vanilla extract
1. Preheat the oven to 375°F with the rack in the
middle position. Lightly coat a regular 12-cup
mun pan with nonstick cooking spray; reserve.
2. Put the our, oats, sugars, baking powder, baking
soda, salt, xanthan gum (if using), and cinnamon
into a mixing bowl. Using the beaters, mix on
Speeds 1 to 2 until fully combined, about 30
seconds.
3. In a separate large mixing bowl, combine the
bananas, oil, eggs, and vanilla extract on Speed 3
until smooth and creamy, 1 to 2 minutes. Add the
dry ingredients and mix on Speed 2 until fully
combined.
4. Divide evenly among the prepared mun cups.
Bake until the tops of the muns spring back to
the touch, about 16 to 18 minutes. Transfer pan to
a wire rack. Enjoy muns warm or at room
temperature.

9
Lemon-Thyme Shortbread
While thyme may seem like an unlikely ingredient
for a sweet cookie, you will quickly learn why
these are so popular.
Makes about 3 dozen cookies
Cookie Dough:
1¾ cups unbleached all-purpose our
½ teaspoon kosher salt
16 tablespoons (2 sticks; ½ pound) European-style
unsalted butter, cut into 8 pieces, room
temperature
¹⁄
³
cup granulated sugar
¹⁄
³
cup confectioners’ sugar, sifted
2 large egg yolks, room temperature
1 to 2 tablespoons fresh thyme leaves
2 tablespoons grated lemon zest
Lemon Icing:
½ cup confectioners’ sugar, sifted
2 tablespoons heavy cream
2 teaspoons fresh lemon juice
Pinch ne sea salt
1. Put the our and salt into a medium mixing bowl.
Using the beaters, mix on Speed 1 to fully
combine, about 30 seconds. Reserve.
2. Put the butter into a large mixing bowl. Mix on
Speeds 2 to 3 until creamy, then add the sugars.
Mix on Speeds 2 to 3 until light, then add the egg
yolks, and beat until combined. Add the dry
ingredients, and mix on Speed 2 until evenly
combined. Add the thyme and lemon zest, and
gently mix into dough.
3. Divide dough into two disks. Place each piece of
dough between two separate pieces of
parchment. Roll each out to ¼-inch thickness.
Transfer the dough to a baking sheet and cover
tightly with plastic wrap. Refrigerate overnight.
4. Preheat the oven to 350°F with racks in the lower
and upper thirds of the oven. Line two rimmed
baking sheets with parchment paper.
5. Take the dough out of the refrigerator. Use a
1½-inch round cutter to form small disks. Transfer
to the prepared baking sheets. Chill for about 10
minutes. Repeat with remaining dough, reforming
and rerolling the scraps as necessary.
6. Bake the chilled dough until just browned around
the edges, about 12 minutes, rotating the pans if
necessary. Cool the cookies completely.
7. While cookies are cooling, prepare the icing. Put
the sugar, cream, lemon juice, and salt into a
medium mixing bowl, and then mix on Speed 1
until very smooth and spreadable. If the icing
seems too thick, add more cream, 1 teaspoon at a
time. If it seems too thin, add more confectioners’
sugar, 1 teaspoon at a time. Spread on top of the
cooled cookies.
Edible Cookie Dough
Enjoy that dough guilt-free (well, egg-free!) with this
edible cookie dough. Eat by the scoop, or even
crumble into vanilla ice cream; there are so many
possibilities.
Makes about 3½ cups
8 tablespoons (1 stick) unsalted butter, cut into 4
pieces, room temperature
⅔ cup packed light brown sugar
⅓ cup granulated sugar
2 tablespoons milk (any fat variety or nondairy
alternative)
1 tablespoon pure vanilla extract
1⅓ cups unbleached all-purpose our (you can
substitute a gluten-free all-purpose our
blend)*
½ teaspoon kosher salt
1 cup semisweet chocolate chips
1. Put the butter and sugars into a large mixing bowl.
Mix on Speeds 2 to 4 until very light and creamy,
about 2 minutes. Stop to scrape down the bowl as
needed.
2. While mixing on Speed 2, add the milk and vanilla
extract. Add the our and salt, and mix on Speed
2 until completely combined. Add the chips and
mix on Speed 2.
3. Scoop the dough into desired-size pieces. While
the dough can be eaten immediately, it is best
chilled. Store in the refrigerator for up to 1 week
or in the freezer for up to 1 month.
* It is important to precook our because it can
contain harmful bacteria. It is simple to do in your
own home oven. Spread the our that you will be
using on a rimmed baking pan. Put into a 350°F
oven and cook for about 5 minutes, stirring halfway
through. The our needs to reach 160°F to be sure
that it is safe to eat.

10
Ginger Cookies
Not your ordinary ginger cookie. We up the zing with
chopped crystallized ginger in these chewy and spicy
treats.
Makes about 2½ dozen cookies
2¼ cups unbleached all-purpose our
1 teaspoon baking soda
1 tablespoon ground ginger
1 teaspoon ground cinnamon
½ teaspoon ground allspice
¾ teaspoon kosher salt
¼ cup nely chopped crystallized ginger
12 tablespoons (1½ sticks) unsalted butter, cut into
1-inch pieces, room temperature
¼ cup molasses
¾ cup packed light brown sugar
¼ cup granulated sugar
1 large egg, room temperature
1 teaspoon pure vanilla extract
¹⁄
³
cup turbinado sugar, for rolling
1. Preheat the oven to 350°F with racks in the lower
and upper thirds of the oven. Line two baking
sheets with parchment paper.
2. Put the our, baking soda, spices, and salt into a
medium mixing bowl. Using the beaters, mix on
Speed 1 to fully combine, at least 30 seconds. Add
the chopped ginger and mix on Speed 1 to coat;
reserve.
3. Put the butter and molasses into a large mixing
bowl. Mix, starting at Speed 2 and increasing to
Speed 4, until smooth, about 2 minutes. Scrape
down the bowl and then add the sugars. Mix on
Speeds 2 to 4 until very light and the sugar has
dissolved into the butter and molasses, about 2
minutes. Add the egg, mixing on Speeds 2 to 3,
and then the vanilla extract. Add the dry
ingredients and mix on Speed 2 until just
combined.
4. Put the turbinado sugar into a shallow bowl or
baking pan.
5. Scoop the dough into golfball-size pieces. Roll in
the turbinado sugar and then place on the
prepared baking sheets. Gently atten each piece
of dough with the bottom of a clean glass.
6. Bake until just set at the edges, 12 to 15 minutes.
Allow pans to cool between batches of cookies.
Pavlova with Blood Orange
and Pomegranate
A showstopping dessert. This gorgeous creation
needs to be eaten the day it is made, preferably a
day that is not humid!
Makes 12 servings
Meringue:
4 large egg whites
Pinch cream of tartar
Pinch kosher salt
1 cup granulated sugar
2 teaspoons cornstarch, sifted
1 teaspoon white vinegar
¼ teaspoon pure vanilla extract
½ teaspoon grated citrus zest
Topping:
2 blood oranges, peeled and segmented
3 tablespoons pomegranate seeds (arils)
½ cup granulated sugar
½ cup water
1 cup blood orange juice (for a pink-red syrup,
substitute with pomegranate juice; blood
orange makes a dark orange-colored syrup)
¾ cup heavy cream
¼ cup sifted confectioners’ sugar
1 teaspoon pure vanilla extract
Finely grated citrus zest, for garnish (optional)
1. Preheat the oven to 350°F with the rack in the
middle position. Line a cookie sheet with
parchment paper. (If a cookie sheet is not
available, a rimmed baking pan is OK, but be sure
to invert it so you are using the bottom. This will
make transferring the meringue easier once it has
baked.)
2. Prepare the meringue. Put the egg whites, cream
of tartar, and salt into a large mixing bowl (make
sure it is spotlessly clean). Using the whisk, start
mixing on Speed 1 and very gradually increase to
Speed 3. Whip until the whites form soft peaks.
With the mixer running, gradually add the
granulated sugar. Increase to Speed 5 and whip
until sti peaks form, about 8 minutes. Add the
cornstarch, vinegar, vanilla, and zest, and gently
mix on Speed 2 to combine.
3. Transfer the meringue to the parchment-lined
baking pan. Shape into an 8-inch circle and, using
a spatula or knife, scrape the sides upward, from

11
the bottom of the meringue to the top, to create
smooth edges along the sides of the meringue
and little peaks at the top.
4. Transfer to the oven and then immediately reduce
the temperature to 200°F.
5. Bake for 1½ hours, until the edges and top are dry;
the meringue should be very pale. At the end of
baking time, turn o the oven, but leave the
meringue in the oven until it has cooled
completely, about 1 hour.
6. While the meringue is cooling, prepare the
topping. Be sure that the oranges have no visible
white pith on the segments. Reserve on a plate
with the pomegranate seeds.
7. Prepare the orange syrup. Put the sugar and water
into a heavy-bottomed saucepan. Cook over
medium heat until the sugar has dissolved, then
add the juice. Cook until the mixture thickens and
coats the bottom of the pan, 20 to 25 minutes.
Reserve and cool. NOTE: If the syrup seems too
thick to use, you can thin it with hot water, adding
a teaspoon at a time.
8. Once the meringue is fully cool, prepare the
whipped cream. Put the cream into a large mixing
bowl. Using the whisk, start whipping the cream
on Speed 1, gradually increasing to Speed 3, for
about 1 minute, so that the cream has some body.
Add the sugar and vanilla extract, and continue to
whip to Speed 4 until cream forms soft peaks.
9. Assemble the pavlova. Put the meringue on a
serving plate. Fill with the whipped cream and
then, using a slotted spoon, top the whipped
cream with the fruit. Drizzle the syrup around the
plate. You may garnish with grated zest as well.
10. Serve immediately.
Chocolate Cream Pie
This crowd-pleasing pie is perfect for any holiday
or special occasion.
Makes about 12 servings
Crust:
2½ cups chocolate cookie crumbs (from about 24
chocolate sandwich cookies)
5 tablespoons unsalted butter, melted
Filling:
¼ cup packed light brown sugar
¼ cup granulated sugar
3 tablespoons unsweetened cocoa powder
2½ tablespoons cornstarch
¼ teaspoon kosher salt
3 cups half-and-half
3 large eggs, lightly beaten
4 ounces semisweet chocolate, chopped
3 tablespoons unsalted butter, cut into small dice
Topping:
2 cups heavy cream, well-chilled
¼ cup plus 2 tablespoons granulated sugar
Chocolate curls, for garnish
1. Make the crust. Preheat the oven to 350°F with
the rack in the middle position.
2. Put the cookie crumbs and melted butter into a
medium mixing bowl. Using the beaters, mix on
Speeds 1 to 2 to fully combine. Transfer the crumb
mixture to a 9-inch pie plate. Press evenly into
the bottom and sides.
3. Bake for 10 to 15 minutes, until fully set. Cool
completely while preparing the lling.
4. Put the sugars, cocoa powder, cornstarch, and
salt into a large, wide saucepan (be sure not to
use a nonstick coated pan as the beaters could
damage the coating). Using the beaters, mix on
Speed 1 to combine. While still mixing on Speed 1,
gradually add the half-and-half and then the eggs,
and continue to mix until completely smooth.
5. Place the pan over medium-low heat. Mix
occasionally on Speeds 1 to 2 to prevent the
mixture from sticking to the bottom of the pan
(do not leave the pan unattended).
6. Cook the mixture, continuing to mix on Speed 1,
until just about boiling and thickened, and then
remove from the heat. Using a heatproof spatula
or spoon, stir in the chopped chocolate and butter
by hand until completely incorporated. Strain the
lling through a ne-mesh strainer into a medium
bowl, and then transfer the lling into the cooled
crust. Cover the lling directly with waxed paper
or plastic wrap to prevent a skin from forming.
Transfer to the refrigerator, and chill until set.
7. After the lling is set, prepare the whipped cream.
Put the cream into a large mixing bowl. Using the
whisk, start whipping the cream on Speed 1,
gradually increasing to Speed 3, for about 1 minute
so that the cream has some body. Add the sugar
and continue to whip to Speed 4 until the cream
forms medium-sti peaks.
8. Top the pie evenly with the whipped cream.
Garnish with chocolate curls prior to serving.
Yellow Buttermilk Sheet Cake

12
with Fluffy Chocolate Frosting
The go-to cake recipe for all you yellow cake lovers
out there. This goes well with just about
any frosting, but we especially love it with our
chocolate frosting for a classic combination.
Makes one 13x9-inch sheet cake (16 servings)
Cake:
Nonstick cooking spray
3 cups cake our (not self-rising)
1¾ cups granulated sugar
1 tablespoon baking powder
¾ teaspoon kosher salt
1½ cups buttermilk, room temperature
2 large eggs, room temperature
2 large egg yolks, room temperature
2 teaspoons pure vanilla extract
1 cup vegetable oil
Chocolate Frosting:
4 cups confectioners’ sugar, sifted
4 ounces unsweetened chocolate, melted and
cooled
2 ounces semisweet chocolate, melted and
cooled
8 tablespoons (1 stick) unsalted butter, cut into
½-inch pieces, room temperature
2 teaspoons pure vanilla extract
¼ teaspoon ne sea salt
10 to 12 tablespoons milk or cream
1. Preheat the oven to 350°F with the rack in the
middle position. Spray a 13x9-inch cake pan with
nonstick cooking spray and line the bottom with
parchment paper. Reserve.
2. Put the our, sugar, baking powder, and salt into a
large mixing bowl. Using the beaters, mix on
Speed 1 to fully combine, at least 30 seconds.
Reserve.
3. Put the buttermilk, eggs, yolks, and vanilla extract
into a medium bowl. Mix on Speed 3.
4. Reduce to Speed 2. Gradually add the oil to the
wet ingredients, and mix until combined, then
increase to Speeds 3 to 4 and mix until smooth,
about 1½ minutes.
5. Gradually add the liquid mixture to the dry
ingredients, mixing on, mixing on Speed 2 until
completely combined.
6. Pour the batter evenly into the prepared cake pan.
Tap gently on the countertop to remove any
bubbles, and then place in the oven. Bake until
the center springs back to the touch and a cake
tester comes out clean when inserted in the
center, about 25 minutes.
7. Remove from the oven. Put the pan on a wire rack
until cool to the touch, then transfer the cake to a
wire cooling rack to cool completely before
frosting.
8. While cake is cooling, prepare the frosting. Put the
sugar, chocolates, butter, and vanilla extract into a
large mixing bowl. Using the whisk, mix on Speed
2 for 2 minutes. Add 10 tablespoons of the milk.
Increase speed to 4 and beat until smooth and
uy, scraping down the bowl as needed, about 4
minutes. If the frosting seems thick or sti, add
milk, 1 tablespoon at a time, until easily
spreadable.
Creamy Mashed Potatoes
This recipe is a blank canvas. We keep it simple,
but it can easily be changed with mix-ins or
toppings, such as chopped chives or scallions,
crispy bacon bits, or grated Cheddar.
Makes about 6 cups
2½ pounds Yukon Gold potatoes, peeled and cut
into 1-inch pieces
½ cup whole milk, room temperature
3 tablespoons unsalted butter, cut into 1-inch
pieces, room temperature
¾ teaspoon kosher salt
½ teaspoon freshly ground black pepper
½ cup mascarpone cheese or crème fraîche, room
temperature
1. Put the potatoes into a medium to large stockpot
(be sure not to use a nonstick coated pan as the
beaters could damage the coating); add cold water
to cover by 2 inches. Set over medium-high heat.
Bring to a boil, and then reduce to simmer until
the potatoes are very soft, 10 to 15 minutes.
2. Drain the potatoes and then return to the pot.
Using the beaters, mix on Speeds 1 to 2 to mash
to desired consistency, about 30 seconds. Add the
remaining ingredients and mix on Speed 2 until
fully incorporated.

13
3. Taste and adjust seasoning according to
preference.
Buffalo Chicken Dip
For the big game or the next holiday gathering, this
dip is sure to please a hungry crowd. The hand mixer
makes quick work of shredding cooked chicken.
Use this trick for weekly meal prep; shredded chicken
can be the foundation for countless meals.
Makes about 6 cups
Nonstick cooking spray or olive oil
1 whole roasted chicken, warm, about 3½ to
4 pounds
16 ounces (2 standard packages) cream cheese,
each package cut into 4 pieces, room
temperature
1 celery stalk, diced
1 teaspoon kosher salt
½ teaspoon freshly ground black pepper
6 to 8 tablespoons hot sauce*
1 cup crumbled blue cheese
Cut veggies, bread pieces, or tortilla chips,
for serving
1. Preheat the oven to 375°F with the rack in the
middle position. Lightly coat the inside of a
1½-quart baking dish with cooking spray. Reserve.
2. Remove all meat from the roasted chicken,
discarding the skin and bones. Put the chicken
meat into a large mixing bowl. Using the beaters,
mix on Speed 2 to shred the chicken, about 30
seconds. Once shredded, add the cream cheese,
celery, salt, pepper, and hot sauce. Continue to
mix on Speed 2 until ingredients are well
combined, about 1 minute.
3. Transfer the dip to the prepared baking dish and
top with the crumbled blue cheese. Bake until hot
and bubbling, about 40 minutes.
4. Serve hot with cut veggies, bread pieces, or
tortilla chips.
* We developed this recipe to be on the milder side,
so either adjust the hot sauce accordingly or serve
with some hot sauce on the side, for those who
like it extra spicy.
Pimento Cheese Spread
This recipe stays pretty close to the beloved
Southern favorite. It can be spread on crackers or
toasted bread, or used as a lling as a twist on a
grilled cheese sandwich.
Makes about 2 cups
4 ounces cream cheese, cut into 1-inch pieces,
room temperature
¼ cup mayonnaise
2 cups shredded sharp Cheddar
1 jar (7 ounces) pimentos, drained
½ teaspoon onion powder
¼ teaspoon kosher salt
Pinch freshly ground black pepper
2 dashes hot sauce
1. Put the cream cheese into a medium mixing bowl.
Using the beaters, mix on Speed 3 until softened,
about 30 seconds. Add remaining ingredients and
mix on Speed 2 to fully combine, about 20
seconds.
2. Serve immediately.

Índice
Medidas de seguridad importantes .......... 14
Piezas y características .............................. 15
Uso, limpieza y mantenimiento ................ 16
Guía de referencia rápida ........................... 17
Garantía ........................................................... 18
Recetas ........................................................... 20
Medidas de
seguridad
importantes
Al usar aparatos eléctricos, siempre se deben tomar
precauciones básicas de seguridad, entre ellas las
siguientes:
1. Lea todas las instrucciones.
2. Apague y desenchufe el aparato cuando no esté en
uso, antes de instalar/quitar piezas y antes de
limpiarlo. Para desenchufar, agarre el enchufe y
jálalo de la toma de corriente. Nunca jale el cable.
3. Para reducir el riesgo de descarga eléctrica, no
ponga la carcasa del aparato, el cable ni el enchufe
en agua u otros líquidos. Si el aparato o el cable se
caen al agua, desconecte el cable de la toma de
corriente inmediatamente. No toque el agua.
4. Supervise el uso de este aparato con cuidado
cuando sea usado por o cerca de niños.
5. Evite el contacto con las piezas móviles. Para evitar
el riesgo de lesiones personales o daños al aparato,
mantenga las manos, cabello, ropa, espátulas y
otros utensilios lejos de los batidores durante el
funcionamiento.
6. Siempre expulse los batidores o el batidor de
alambre antes de lavarlos.
7. No use este aparato si el cable o el enchufe están
dañados, después de un mal funcionamiento,
después de una caída, o si está dañado. devuélvelo
a un centro de servicio autorizado para su revisión,
reparación o ajuste (mecánico o eléctrico).
8. El uso de accesorios no recomendados por
Cuisinart presenta un riesgo de incendio, descarga
eléctrica o lesiones personales.
9. No lo use en exteriores ni en lugares donde el
aparato o el cable podrían mojarse.
10. No deje que el cable cuelgue de la encimera o de
la mesa, donde se pueda jalar o tropezar.
11. Para evitar el riesgo de daño al cable, incendio o
electrocución, no deje que el cable tenga contacto
con supercies calientes, incluso hornillos.
12. El batidor de alambre debe usarse solo; no lo use
junto con otro accesorio.
13. Los niños o las personas que carezcan de la
experiencia o de los conocimientos necesarios
para manipular el aparato, o aquellas cuyas
capacidades físicas, sensoriales o mentales estén
limitadas, no deben usar el aparato sin la
supervisión o la dirección de una persona
responsable por su seguridad. Supervise el uso de
este aparato con cuidado cuando sea usado por o
cerca de niños. No deje que los niños jueguen con
este aparato.
14. Use este producto solo para el uso previsto
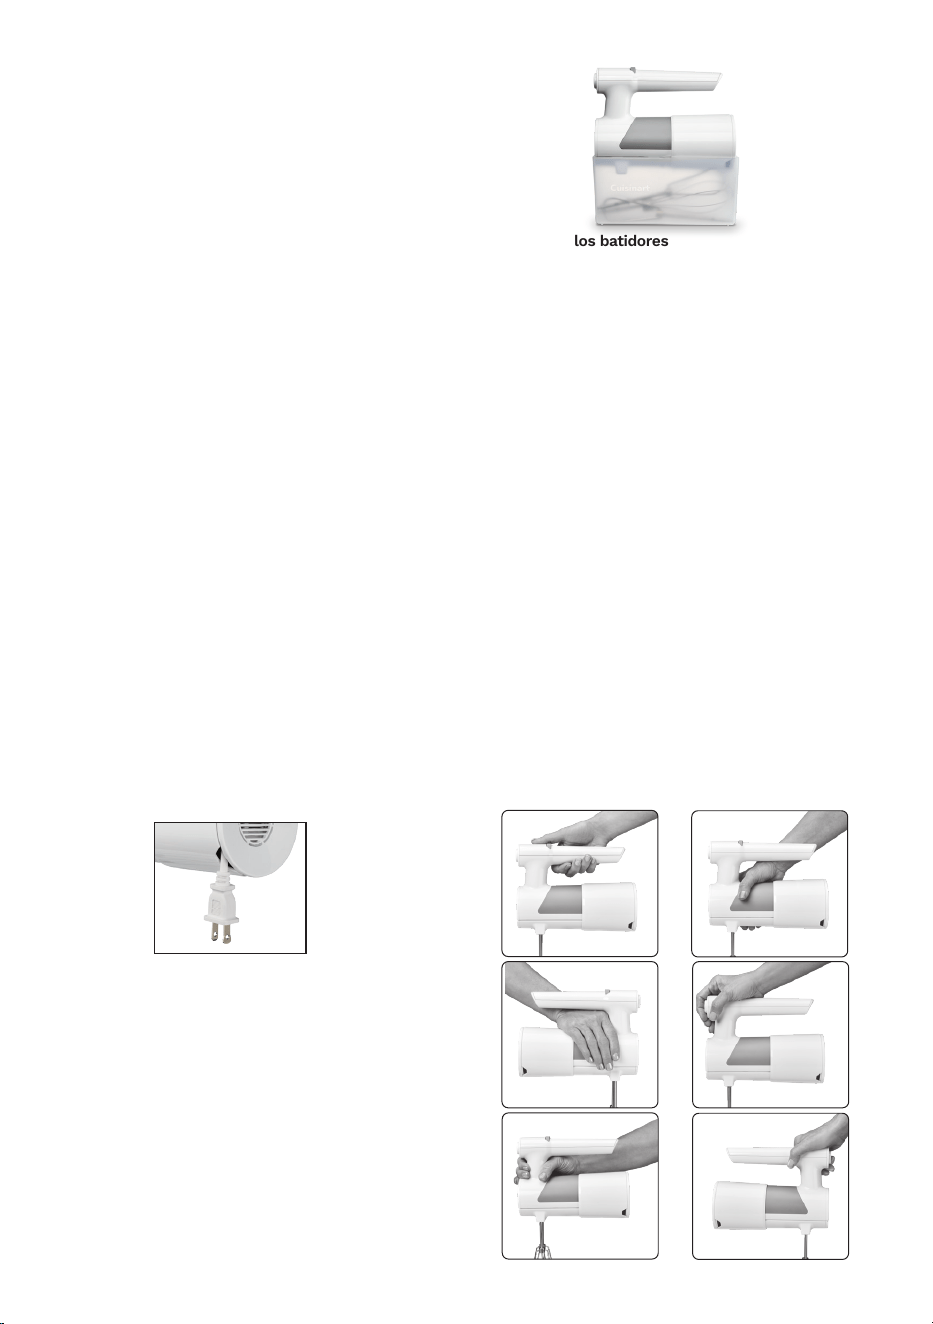
Batidor de
alambre
Caja de
almacenamiento
Batidores
Empuñadura
innovadora
15
Guarde estas
instrucciones
PARA USO
DOMÉSTICO
SOLAMENTE
AVISO
El cable de este aparato cuenta con un enchufe
polarizado (una pata es más ancha que otra). Como
medida de seguridad, aquel enchufe se podrá
enchufar de una sola manera en las tomas de
corriente polarizadas. Si el enchufe no entra en la
toma de corriente, inviértalo. Si aún así no entra
completamente, comuníquese con un electricista. No
intente modicarlo.
Piezas y características
Resistente y cómoda de usar
• Diseño innovador: Diseño de carcasa y mango
ergonómico para una comodidad y un control
inigualables en cualquier ángulo.
• Sistema de arranque suave SmoothStart
®
: Al
encender la batidora, los batidores empiezan a
girar muy lentamente para evitar las salpicaduras.
• Fácil de limpiar: El bloque-motor sellado se
limpia con un simple paño. Los batidores, el
batidor de alambre y la caja de almacenamiento
son aptos para lavavajillas.
• Soporte trasero: Permite colocar la batidora
verticalmente en la encimera.
Piezas
• Caja de almacenamiento: Almacenamiento fácil y
compacto. La resistente caja permite guardar los
batidores regulares y el batidor de alambre. La
caja encaja sobre la batidora para un
almacenamiento compacto.
• Pantalla LED iluminada: Indica claramente la
velocidad elegida.
• Perilla de control de velocidad con 5 velocidades:
Permite cambiar la velocidad rápidamente, sin
dejar de mezclar.
• Sistema de enrollado del cable: Ahora espacio
para un fácil almacenamiento.
• Botón de expulsión de los batidores: Permite
expulsar fácilmente los batidores.
• Batidores: Batidores extra anchos que incorporan
aire más rápido, para un mezclado superior.
Diseñados sin eje central para evitar que los
alimentos se atasquen. Fáciles de limpiar y aptos
para lavavajillas.
• Batidor de alambre: Batidor de 1¾in(4.5cm) de
diámetro, perfecto para montar nata o claras.
Ideal para batir e incorporar aire. Apto para
lavavajillas.
16
Uso, limpieza y
mantenimiento
Para encender/apagar el aparato:
Compruebe que el aparato esté apagado y que el
selector de velocidad esté completamente a la
izquierda. Enchufe el cable en una toma de corriente.
Elija la velocidad deseada; el aparato se encenderá a
la velocidad de arranque suave SmoothStart
®
. Para
apagar, gire el selector de velocidad completamente
hasta la izquierda.
Cómo insertar los batidores
1. Compruebe que el aparato esté apagado y
desenchufado.
2. Introduzca el eje del batidor con collarín en el
oricio más grande. Empújelo hasta que encaje.
Introduzca el eje del batidor sin collarín en el
oricio más pequeño. Empújelo hasta que encaje.
Cómo insertar el batidor de alambre
1. Compruebe que el aparato esté apagado y
desenchufado.
2. Sosteniendo el batidor de alambre por el buje,
introduzca el eje en cualquiera de los oricios y
empuje hasta que encaje. NO SOTENGA EL
BATIDOR POR LOS ALAMBRES, NI LOS APRIETE;
ESTO PUEDE DAÑARLOS.
3. Para quitar los batidores, presione el botón de
expulsión situado en el frente de la empuñadura.
Sistema de enrollado del cable
Deslice la tapa del compartimento del cable para
exponer el compartimento del cable. Enrolle el cable,
procurando introducir también el enchufe. Deslice la
tapa del compartimento del cable para cubrir este.
Cómo acoplar/desacoplar la caja de almacenamiento
1. Para acoplar: Coloque los accesorios en la caja.
Deslice la cubierta deslizante hacia la parte
delantera del aparato en enrolle el cable;
comprobando que el enchufe esté abajo. Deslice la
cubierta deslizante hacia la parte trasera del
aparato hasta que se bloquee. Coloque el aparato
sobre la caja de almacenamiento y presione hasta
que encaje.
2. Para desacoplar: Agarre rmemente la parte
delantera de la caja de almacenamiento. Con la
otra mano, sostenga la parte trasera de aparato y
jale hacia arriba.
Cómo quitar los batidores
Compruebe que el aparato esté apagado, girando el
selector de velocidad hacia la izquierda, y desenchufe
el aparato. Presione el botón de expulsión y jale el/los
batidor(es).
Limpieza
1. Lave los accesorios en agua caliente con jabón o en
el lavavajillas después de cada uso. Lave la caja de
almacenamiento en agua caliente con jabón o en la
bandeja superior del lavavajillas.
2. NUNCA SUMERJA EL BLOQUE-MOTOR EN AGUA U
OTROS LÍQUIDOS. Límpielo con un paño o una
esponja ligeramente humedecida. No use
limpiadores abrasivos; esto puede rayar la
supercie.
3. Para limpiar la carcasa del aparato, quite primero la
cubierta trasera. Limpiar las zonas sucias con un
paño humedecido. No lave la carcasa en agua
corriente. La tapa del compartimento del cable
puede lavarse a mano, por separado.
NOTA: NO USE LA BATIDORA DE MANO CUISINART
®
EN CACEROLAS/OLLA/SARTENES ANTIADHERENTES.
Mantenimiento
Cualquier otro servicio debe ser realizado por un
técnico autorizado.
Tipo de agarres

17
Guía de referencia
rápida
Técnicas de mezcla
Siempre empiece a batir usando la velocidad más
baja, y luego incremente progresivamente la velocidad
al nivel deseado.
NOTA: El batidor de alambre es ideal para montar
claras o batir crema. Para todos los otros trabajos,
use los batidores regulares.
Velocidad 1
• Para empezar a mezclar la mayoría de los
ingredientes
• Para combinar ingredientes secos
• Para empezar a acremar mantequilla con azúcar
• Para empezar a batir crema/nata
• Para empezar a montar claras.
• Para incorporar harina a mezclas , o líquidos a
ingredientes secos
Velocidad 2
• Para tamizar e incorporar aire a mezclas de
ingredientes secos
• Para hacer puré de papas/calabacitas
• Para mezclar masas de galleta densas
• Para incorporar nueces, chispas de chocolate o
frutas secas a masas y mezclas
• Para agregar huevos a masas y mezclas
• Para mezclar ingredientes de budín
• Para agregar mantequilla fría a ingredientes secos
(para hacer masa de tarta, galleta y hojaldres)
Velocidad 3
• Para terminar de mezclar mezclas y mezclas
preparadas
• Para terminar de mezclar coberturas/glaseados
• Para terminar de hacer puré de papas/calabaza
• Para batir huevos enteros o yemas
• Para acremar mantequilla con azúcar
Velocidad 4
• Para batir mantequilla o queso crema para preparar
salsas para mojar o cremas para untar
Velocidad 5
• Para terminar de batir crema/nata
• Para terminar de montar claras/merengues
Consejos
Mida los ingredientes antes de empezar.
Para obtener resultados óptimos, no mida la harina
directamente de la bolsa. Colóquela en un tazón y
mézclela antes de medirla.
Si guarda la harina en un recipiente hermético,
tamícela antes de medirla.
Si una receta incluye mantequilla suavizada, sáquela
del refrigerador antes de empezar y córtela en
pedacitos; esto le hará llegar a temperatura ambiente
más rápido. No derrita la mantequilla, a menos que la
receta lo especique; esto cambiaría el resultado
nal.
Las mejores tortas de queso se preparan con huevos
y queso crema a temperatura ambiente. Aunque su
batidora es capaz de batir queso crema frío, hacerlo
puede incorporar demasiado aire y hacer que la torta
se agriete.
Para preparar deliciosas natas montadas/cremas
batidas, use crema líquida para batir (“heavy cream”)
fría.
Separe las claras en otro recipiente que el recipiente
donde piensa batirlas. Si cae yema en la clara, guarde
el huevo para otro uso. El mínimo rastro de yema
puede impedir que se monten las claras.
Lave el tazón y los accesorios cuidadosamente antes
de montar claras. Para mejores resultados, use un
tazón de acero inoxidable o vidrio (o de cobre si
tiene). No se recomienda montar claras en un
recipiente de plástico. El mínimo rastro de grasa/
aceite puede impedir que se monten las claras. Lave
el tazón y los accesorios con cuidado antes de
empezar.
Si los ingredientes se pegan al tazón, apague la
batidora y raspe el tazón con una espátula de goma.

18
GARANTÍA
LIMITADA
Sujeto a las exclusiones y limitaciones contenidas en
este documento, Conair LLC/Cuisinart (“Cuisinart”)
garantiza que la
batidora de mano de 5 velocidades
Cuisinart
®
(“Producto”) estará libre de defectos de
materiales y fabricación en condiciones normales de
uso doméstico durante un período de TRES (3) años
a partir de la fecha de compra del Producto en su
embalaje original sellado, a menos que se especifique
lo contrario en esta Garantía Limitada. Esta Garantía
Limitada es solo para consumidores de Estados Unidos
(definidos aquí como compradores al por menor para
uso personal, familiar o doméstico) que compren
originalmente el Producto a Cuisinart o a un revendedor
autorizado de Cuisinart. Si no está seguro de si un
minorista u otro punto de venta es un revendedor
autorizado de Cuisinart, póngase en contacto con
Cuisinart.
Esta Garantía Limitada NO cubre:
• El desgaste normal;
• Cualquier Producto adquirido por compradores
comerciales o para usos comerciales o no
domésticos;
• Accesorios, piezas o programas añadidos al Producto
después de que Cuisinart lo haya enviado;
• Cualquier costo asociado con el reemplazo o
reparación del Producto, incluyendo mano de obra,
instalación u otros costos incurridos por usted sin
previa aprobación de Cuisinart;
• Daños, defectos y fallas debidos a: (1) causas
externas, incluyendo el envío, accidentes, problemas
con el suministro eléctrico (el Producto está
diseñado para su uso exclusivo con enchufes de
120 V), condiciones anormales (como mecánicas
o medioambientales); (2) uso no conforme a las
instrucciones del Producto; (3) uso indebido,
negligencia, alteración no autorizada, reparación
no autorizada; y (4) casos fortuitos u otros
acontecimientos fuera del control de Cuisinart;
• Daños causados por usted o terceros no autorizados,
aunque cualquier empresa puede realizar las
reparaciones y el mantenimiento necesarios;
• Daños causados por accesorios o repuestos no
autorizados específicamente por Cuisinart; y
• Cualquier Producto cuyas marcas de identificación
originales (marca comercial o número de serie) hayan
sido retiradas, alteradas o borradas.
Se recomienda llenar el formulario de registro
disponible en https://www.cuisinart.com/register-your-
product.html a fin de facilitar la verificación de la fecha
de compra original de este producto. Sin embargo,
registrar el producto no es necesario para recibir
servicio bajo esta garantía. En ausencia de prueba de la
fecha de compra, el período de garantía será calculado
a partir de la fecha de fabricación del producto.
GARANTÍA SIN DIFICULTADES
Si el Producto objeto de esta Garantía Limitada falla
durante el período de garantía por razones cubiertas
por esta Garantía Limitada, Cuisinart, a su elección,
reparará el Producto, sustituirá el Producto por otro
idéntico o razonablemente equivalente, o si Conair no
puede reparar o sustituir el Producto, reembolsará al
consumidor el precio de compra, menos la cantidad
directamente atribuible al uso anterior del Producto
por parte del consumidor. Para obtener una etiqueta
de devolución, contáctenos, visitando https://www.
cuisinart.com/customer-care/product-assistance/
product-inquiry/ o llamando a nuestro servicio de
atención al cliente, al1-800-726-0190, para hablar con
un representante.
Tras la recepción del Producto, Conair lo inspeccionará
y, si lo requiere esta Garantía Limitada, intentará
reparar, reemplazar o reembolsarlo en un plazo de
treinta (30) días. No obstante, pueden producirse
retrasos fuera del control de Cuisinart, en cuyo caso
dicho plazo podrá ampliarse en la medida en que sea
razonablemente necesario.
IMPORTANTE: Si debe llevar el aparato defectuoso
a un centro de servicio no autorizado, por favor
informe al personal del centro de servicio que deben
llamar al servicio de atención al cliente de Cuisinart,
al 1-800-726-0190 a fin de diagnosticar el problema
correctamente, usar las piezas correctas para repararlo,
y comprobar que el producto aún esté bajo garantía.
RESIDENTES DE CALIFORNIA
El período de Garantía Limitada de TRES (3) años
comienza en la fecha de entrega del Producto, que
puede ser diferente de la fecha de compra del
Producto. Los residentes en California también tienen
la opción de obtener los beneficios de esta Garantía
Limitada devolviendo el producto defectuoso (A) a
la tienda donde lo compraron, o (B) a otra tienda que
venda productos Cuisinart
®
del mismo tipo. La tienda
podrá, a su elección, reparar el producto, referir al
consumidor a un centro de servicio independiente,
sustituir el producto por uno idéntico o razonablemente
equivalente, o reembolsar al consumidor el precio de
compra menos la cantidad directamente atribuible
al uso anterior del producto por el consumidor. Los

19
residentes de California también pueden, si lo desean,
enviar el producto defectuoso directamente a Cuisinart
para que sea reparado o sustituido por uno idéntico o
razonablemente equivalente. Para esto, deben llamar
a nuestro servicio de atención al cliente al
1-800-726-
0190. Cuisinart será responsable por los gastos de
reparación, reemplazo, manejo y envío de los productos
defectuosos durante el período de garantía.
ESTA GARANTÍA LIMITADA LE OTORGA DERECHOS
LEGALES ESPECÍFICOS, Y TAMBIÉN PUEDE TENER
OTROS DERECHOS QUE VARÍAN DE UN ESTADO A
OTRO O EN FUNCIÓN DE LA JURISDICCIÓN. EN CASO
DE INCUMPLIMIENTO DE ESTA GARANTÍA LIMITADA,
USTED PUEDE RECLAMAR LA SUSTITUCIÓN, UNA
INDEMNIZACIÓN POR DAÑOS Y PERJUICIOS U OTRAS
SANCIONES.
LIMITACIONES DE RESPONSABILIDAD/LIMITACIONES Y
EXCLUSIONES ADICIONALES:
TODAS LAS GARANTÍAS EXPRESAS E IMPLÍCITAS TIENEN
UNA DURACIÓN LIMITADA AL PERÍODO DE GARANTÍA
LIMITADA. NO SE APLICARÁ NINGUNA GARANTÍA
DESPUÉS DE ESTE PERÍODO. ALGUNOS ESTADOS (O
JURISDICCIONES) NO PERMITEN LIMITACIONES EN LA
DURACIÓN DE UNA GARANTÍA IMPLÍCITA, DE MODO
QUE LAS LIMITACIONES MENCIONADAS PUEDEN
NO REGIR PARA USTED. LA RESPONSABILIDAD DE
CUISINART BAJO ESTA O CUALQUIER OTRA GARANTÍA,
IMPLÍCITA O EXPRESA, SE LIMITA A LA REPARACIÓN,
SUSTITUCIÓN O REEMBOLSO, SEGÚN LO ESTABLECIDO
ANTERIORMENTE. ESTOS RECURSOS SON LOS ÚNICOS
Y EXCLUSIVOS EN CASO DE INCUMPLIMIENTO DE LA
GARANTÍA. EN LA MEDIDA MÁXIMA PERMITIDA POR LA
LEY, CUISINART NO SE HACE RESPONSABLE DE NINGÚN
DAÑO DIRECTO, INDIRECTO, ESPECIAL, INCIDENTAL
O CONSECUENTE RESULTANTE DE CUALQUIER
INCUMPLIMIENTO DE LA GARANTÍA O BAJO CUALQUIER
OTRA TEORÍA LEGAL (INCLUYENDO, PERO NO LIMITADO
A, LUCRO CESANTE, TIEMPO DE INACTIVIDAD, PÉRDIDA
DEL FONDO DE COMERCIO, DAÑOS O SUSTITUCIÓN
DE EQUIPOS Y BIENES, Y CUALQUIER COSTE DE
RECUPERACIÓN, REPROGRAMACIÓN O REPRODUCCIÓN
DE CUALQUIER PROGRAMA O DATOS ALMACENADOS
EN O UTILIZADOS CON UN SISTEMA QUE CONTENGA
EL PRODUCTO), INCLUSO SI CUISINART HA SIDO
ADVERTIDO DE LA POSIBILIDAD DE TALES DAÑOS.
ALGUNOS ESTADOS (O JURISDICCIONES) NO PERMITEN
LA EXCLUSIÓN O LIMITACIÓN DE DAÑOS ESPECIALES,
INCIDENTALES O CONSECUENTES, DE MODO QUE
LAS LIMITACIONES MENCIONADAS PUEDEN NO REGIR
PARA USTED. TODAS LAS GARANTÍAS EXPRESAS E
IMPLÍCITAS TIENEN UNA DURACIÓN LIMITADA AL
PERÍODO DE GARANTÍA LIMITADA. NO SE APLICARÁ
NINGUNA GARANTÍA DESPUÉS DE ESTE PERÍODO.
ALGUNOS ESTADOS (O JURISDICCIONES) NO PERMITEN
LIMITACIONES EN LA DURACIÓN DE UNA GARANTÍA
IMPLÍCITA, DE MODO QUE LAS LIMITACIONES
MENCIONADAS PUEDEN NO REGIR PARA USTED.
Esta Garantía Limitada es emitida por:
Conair LLC
1 Cummings Point Road
Stamford, CT 06902
1-800-726-0190

20
Recetas
Muffins de banana sin gluten ..................... 20
Galletas de mantequilla
con limón y tomillo .......................................... 21
Masa de galleta cruda comestible .............. 22
Galletas de jengibre ........................................ 22
“Pavlova” con naranja roja y granada.......... 22
Tarta de crema de chocolate ....................... 23
Pastel amarillo de suero de leche
bañado en chocolate ...................................... 24
Puré de papas cremoso ................................. 25
Salsa para mojar de pollo Búfalo ................ 26
Crema para untar de queso
con pimentón ................................................... 26
Muffins de banana sin gluten
Las harinas sin gluten hacen que hacer productos
sin gluten sea fácil y práctico. Hay muchas marcas
entre las cuales elegir, así que pruebe algunas y
encuentre su favorita.
Rinde 12 muns
Aceite en aerosol/rocío vegetal
2 tazas (250 g) de harina sin gluten
½ taza (40 g) de copos de avena (no use avena
instantánea)
¹⁄
³
taza (65 g) de azúcar granulada
¹⁄
³
taza llena (65 g) de azúcar rubia (azúcar de caña
integral)
1½ cucharaditas de polvo de hornear
¼ cucharadita de bicarbonato de sodio
½ cucharadita de sal kosher
½ cucharadita de goma xantana (opcional;
solamente si la harina no tiene)
½ cucharadita de canela en polvo
3 bananas medianas maduras, aplastadas
½ taza (120ml) de aceite vegetal
2 huevos grandes, a temperatura ambiente
½ cucharadita de extracto natural de vainilla
1. Colocar la rejilla del horno en el centro de este y
precalentar a 375°F (175°C). Engrasar ligeramente
12 moldes de muns con aceite en aerosol/rocío
vegetal; reservar.
2. Colocar la harina, la avena, el azúcar, el polvo de
hornear, el bicarbonato, la sal, la goma xantana (si
la usa) y la canela en un tazón. Usando los
batidores, revolver a velocidad 1 o 2 por aprox. 30
segundos para combinar.
3. Colocar las bananas, el aceite, los huevos y la
vainilla en otro tazón grande; mezclar a velocidad
3 por 1-2 minutos, hasta conseguir una mezcla
suave y cremosa. Agregar los ingredientes secos y
mezclar a velocidad 2 para incorporar.
4. Dividir uniformemente la mezcla entre los moldes.
Hornear por aprox. 16-18 minutos, hasta que un
probador salga limpio. Sacar del horno y dejar
enfriar, en el molde, sobre una rejilla. Disfrutar
tibios o a temperatura ambiente.

21
Galletas de mantequilla
con limón y tomillo
El tomillo puede parecer un ingrediente extraño para
galletas dulces, pero pronto verá por qué estas
galletas son tan populares.
Rinde aprox. 3 docenas de galletas
Masa de galletas:
1¾ tazas (220 g) de harina común
½ cucharadita de sal kosher
16 cucharadas (225 g) de mantequilla sin sal a
temperatura ambiente, en 8 pedazos
¹⁄
³
taza (65 g) de azúcar granulada
¹⁄
³
taza (40 g) de azúcar glasé, tamizado
2 yemas de huevo grande, a temperatura
ambiente
1-2 cucharadas de hojas de tomillo fresco
2 cucharadas de ralladura de limón
Glaseado de limón:
½ taza (60 g) de azúcar glasé, tamizado
2 cucharadas (30ml) de crema líquida para batir
(“heavy cream”)
2 cucharaditas de jugo de limón fresco
1 pizca de sal marina na
1. Colocar la harina y la sal en un tazón mediano.
Usando los batidores, mezclar a velocidad 1 por
aprox. 30 segundos para combinar. Reservar.
2. Poner la mantequilla en un tazón grande. Mezclar
a velocidad 2-3 hasta que esté cremosa, y luego
agregar los azucares. Mezclar a velocidad 2-3
hasta conseguir una mezcla ligera. A continuación,
agregar las yemas y seguir mezclando para
combinar. Agregar los ingredientes secos y
mezclar a velocidad 2 para incorporar. Agregar el
tomillo y la ralladura, y mezclar suavemente.
3. Dividir la masa en dos porciones iguales y formar
un disco con cada porción. Colocar cada porción
entre dos hojas de papel sulfurizado. Estirar cada
porción de masa con un rodillo hasta formar un
disco de ¼in(5mm) de espesor. Colocar en una
placa para horno y cubrir con papel lm/plástico.
Refrigerar por una noche.
4. Colocar las rejillas del horno en los tercios inferior
y superior de este y precalentar a 350°F (175°C).
Forrar dos placas para horno de bordes altos con
papel sulfurizado.
5. Sacar la masa del refrigerador. Cortar discos
pequeños usando un cortador de galletas de
1½in(4cm). Disponer sobre las placas para horno
preparadas. Refrigerar por aprox. 10 minutos.
Repetir con el resto de la masa, reusando las
sobras.
6. Hornear por aprox. 12 minutos hasta que las
horillas estén ligeramente doradas (girar las
placas si es necesario). Dejar enfriar
completamente.
7. Mientras las galletas se están enfriando, preparar
el glaseado. Colocar el azúcar, la crema, el jugo de
limón y la sal en un tazón mediano. Mezclar a
velocidad 1 hasta conseguir una mezcla muy
suave. Si el glaseado parece demasiado espeso,
añadir más crema, 1 cucharadita a la vez. Si
parece demasiado líquido, agregar más azúcar
glasé, 1 cucharadita a la vez. Esparcir por encima
de las galletas enfriadas.
Masa de galleta cruda
comestible
Disfruta de esa masa libre de culpa (bueno, ¡libre de
huevo!) con una de nuestras recetas de masa de
galleta comestible. Cómasela con cuchara o
desmenúcela en helado de vainilla... ¡Hay tantas
posibilidades!
Rinde aprox. 3½ tazas (830ml)
8 cucharadas (115 g) de mantequilla sin sal, a
temperatura ambiente, en 8 pedazos
⅔ taza (150 g) de azúcar rubia (azúcar de caña
integral)
⅓ taza (65 g) de azúcar granulada
2 cucharadas de leche (cualquier variedad,
incluyendo leche vegetal)
1 cucharada (15ml) de extracto natural de vainilla
1⅓ tazas (165 g) de harina común (también puede
usar harina sin gluten)*
½ cucharadita de sal kosher
1 taza (175 g) de chispas de chocolate semidulce
1. Colocar la mantequilla y los azucares en un tazón
grande. Mezclar por aprox. 2 minutos, usando la
velocidad 2-4, hasta obtener una mezcla muy
ligera y cremosa. Apagar para raspar el bol cuando
sea necesario.
2. Con la batidora encendida en la velocidad 2,
agregar lentamente la leche y la vainilla. Agregar la
harina y la sal, y mezclar a velocidad 2 para
combinar. Agregar las chispas de chocolate y
mezclar a velocidad 2.

22
3. Formar bolas de masa del tamaño deseado,
usando una cuchara. La masa puede comerse
inmediatamente, pero es aún mejor helada.
Conservar en el refrigerador por un máximo de 1
semana, o en el congelador por un máximo de 1
mes.
* Es importante precocinar la harina porque contiene
bacterias dañinas. Es fácil de hacer al horno.
Esparcir la harina en una placa para horno con
bordes altos. Hornear en 350°F (175°C) por aprox.
5 minutos, revolviendo a la mitad del tiempo. La
harina debe alcanzar una temperatura de 160°F
(71°C) para que sea apta para el consumo.
Galletas de jengibre
Estas galletas suaves no son sus típicas galletas de
jengibre. Usamos jengibre picado y jengibre
cristalizado para un toque picante interesante.
Rinde aprox. 2½ docenas de galletas
2¼ tazas (280 g) de harina común
1 cucharadita de bicarbonato de sodio
1 cucharada de Jengibre en polvo
1 cucharadita de canela en polvo
½ cucharadita de pimienta de Jamaica en polvo
¾ cucharadita de sal kosher
¼ taza (30 g) de jengibre cristalizado namente
picado
12 cucharadas (180 g) de mantequilla sin sal
temperatura ambiente, en pedazos de
1in(2.5cm)
¼ taza (85 g) de melaza
¾ taza (150 g) de azúcar rubia (azúcar de caña
integral)
¼ taza (50 g) de azúcar granulada
1 huevo grande, a temperatura ambiente
1 cucharadita de extracto natural de vainilla
¹⁄
³
taza (65 g) de azúcar turbinado, para cubrir las
galletas
1. Colocar las rejillas del horno en los tercios inferior
y superior de este y precalentar a 350°F (175°C).
Forrar dos placas para horno con papel
sulfurizado.
2. Colocar la harina, el bicarbonato, las especias y la
sal en un tazón mediano. Usando los batidores,
revolver a velocidad 1 por un mínimo de 30
segundos para combinar. Agregar el jengibre
picado y mezclar a velocidad 1 para cubrir;
reservar.
3. Colocar la mantequilla y la melaza en un tazón
grande. Mezclar por aprox. 2 minutos, empezando
en la velocidad 2 y aumentando gradualmente la
velocidad al nivel 4, hasta conseguir una mezcla
homogénea. Raspar el bol y agregar los azúcares.
Mezclar a velocidad 2-4 por aprox. 2 minutos,
hasta que la mayoría del azúcar se haya disuelto
en la mezcla de mantequilla/melaza. Agregar los
huevos, uno a la vez, mezclando a velocidad 2-3
después de cada adición, y luego agregar la
vainilla. Agregar los ingredientes secos y mezclar a
velocidad 2 para incorporar.
4. Colocar el azúcar turbinado en un cuenco poco
profundo o una bandeja de hornear.
5. Formar bolas de masa del tamaño de una pelota
de golf, usando una cuchara. Rodar las bolas en el
azúcar turbinado y colocarlas en las placas
preparadas. Presionar suavemente cada bola con
el fondo de un vaso limpio para aplastarlas.
6. Hornear por aprox. 12-15 minutos, hasta que las
orillas estén ligeramente rmes. Dejar que las
placas para horno se enfríen antes de hornear
más galletas.
“Pavlova” con naranja
roja y granada
Un postre espectacular. Esta magníca creación
necesita ser comida el día de su elaboración (¡y
mejor si ese día no es húmedo!)
Rinde 12 porciones
Merengue:
4 claras de huevo grande
1 pizca de crémor tártaro
1 pizca de sal kosher
1 taza (200 g) de azúcar granulada
2 cucharaditas de maicena, tamizada
1 cucharadita de vinagre blanco
¼ cucharadita de extracto natural de vainilla
½ cucharadita de ralladura de limón
Guarnición:
2 naranjas rojas, en segmentos
3 cucharadas de semillas (arilos) de granada
½ taza (100 g) de azúcar granulada
½ taza (120ml) de agua

23
1 taza (235ml) de jugo de naranja roja (para
conseguir un jarabe naranja oscuro) o de jugo de
granada (para conseguir un jarabe rosado-rojo)
¾ taza (175ml) de crema líquida para batir (“heavy
cream”)
¼ taza (30 g) de azúcar tamizado glasé
1 cucharadita de extracto natural de vainilla
Ralladura na de limón/naranja, para decorar
(opcional)
1. Colocar la rejilla del horno en el centro de este y
precalentar a 350°F (175°C). Forrar una placa para
galletas con papel sulfurizado. Nota: También
puede usar una bandeja invertida, de manera que
se use la parte de abajo; esto facilitará sacar el
merengue una vez horneado.
2. Preparar el merengue: Colocar las claras, el
crémor tártaro y la sal en un tazón grande
impecablemente limpio. Usando el batidor de
alambre, batir, empezando en la velocidad 1 y
aumentando muy progresivamente la velocidad al
nivel 3. Batir hasta que las claras formen picos
suaves. Sin dejar de batir, agregar lentamente el
azúcar granulada. Ajustar la velocidad al nivel 5 y
batir por aprox. 8 minutos, hasta que se formen
picos rmes. Añadir la maicena, el vinagre, la
vainilla y la ralladura, y mezclar suavemente a
velocidad 2 para combinar.
3. Colocar el merengue en la placa para horno
preparada. Usando una espátula o un cuchillo,
formar círculos de 8in(20cm); raspar las orillas
desde abajo hasta arriba para crear bordes lisos y
pequeños picos arriba.
4. Meter al horno y reducir inmediatamente la
temperatura a 200°F (100°C).
5. Hornear el merengue por 1½ horas, hasta que las
orillas y la parte superior estén secos (el color
debe ser muy pálido). Después de este tiempo,
apagar el horno y dejar el merengue en el horno
por aprox. 1 hora, hasta que se enfríe
completamente.
6. Mientras el merengue se está enfriando, preparar
la cobertura. Cerciorarse de que las naranjas
estén completamente segmentadas (sin el
albedo/la piel blanca amarga en los segmentos).
Reservar en un plato, junto con las semillas de
granada.
7. Preparar el jarabe de naranja: Colocar el azúcar y
agua en una cacerola de fondo grueso. Cocinar a
fuego medio hasta que el azúcar se haya disuelto,
y luego agregar el jugo. Cocinar por aprox. 20-25
minutos, hasta que el jarabe se espese. Reservar y
dejar enfriar. NOTA: Si el jarabe parece muy
espeso, puede diluirlo con agua caliente,
agregando una cucharadita a la vez.
8. Cuando el merengue esté frío, preparar la crema
batida. Colocar la crema en un tazón grande.
Instalar el batidor de alambre. Batir por aprox. 1
minuto, empezando a velocidad 1 y aumentando
gradualmente la velocidad al nivel 3, hasta
obtener una mezcla con cuerpo. Agregar el azúcar
y la vainilla, y seguir batiendo a velocidad 4 hasta
obtener picos suaves.
9. Armar la “pavlova”: Colocar el merengue en un
plato de servir. Llenar con crema batida cubrir con
frutas, usando una cuchara calada. Rociar el
jarabe en las orillas del plato. Decorar con
ralladura si desea.
10. Servir inmediatamente.
Tarta de crema de chocolate
¡Esta tarta perfecta para cualquier esta u ocasión
especial les encantará a todos!
Rinde aprox. 12 porciones
Corteza/Base:
2½ tazas (375 g) de galletas de chocolate molidas
(aprox. 24 galletas de chocolate)
5 cucharadas (70 g) de mantequilla sin sal,
derretida
Relleno:
¼ taza (50 g) de azúcar rubia (azúcar de caña
integral)
¼ taza (50 g) de azúcar granulada
3 cucharadas de cacao en polvo sin azúcar
2½ cucharadas de maicena
¼ cucharadita de sal kosher
3 tazas (710ml) de crema líquida “half-and-half”
(mitad leche/mitad crema)
3 huevos grandes, ligeramente batidos
4 onzas (115 g) de chocolate semidulce, picado
3 cucharadas (45 g) de mantequilla sin sal, en
pedacitos
Cobertura:
2 tazas (475ml) de crema líquida para batir
(“heavy cream”) helada
¼ taza + 2 cucharadas (80g) de azúcar granulada
Virutas de chocolate, para decorar

24
1. Preparar el fondo/la base de tarta. Colocar la rejilla
del horno en el centro de este y precalentar a
350°F (190°C).
2. Colocar las galletas molidas y la mantequilla de
derretida en un tazón mediano. Usando los
batidores, revolver a velocidad 1 o 2 por aprox. 30
segundos para combinar. Colocar la mezcla en un
molde de tarta de 9in(23cm). Comprimir
uniformemente en el fondo y los costados del
molde.
3. Hornear por 10-15 minutos, hasta que esté rme.
Dejar enfriar por completo mientras preparar el
relleno.
4. Colocar los azucares, el polvo de cacao, la
maicena y la sal en una cacerola ancha grande (no
usar cacerola antiadherente o los batidores
podrían dañar el revestimiento). Mezclar a
velocidad 1, usando los batidores. Sin dejar de
mezclar, agregar lentamente la crema líquida, y
luego los huevos; seguir mezclando hasta
conseguir una mezcla muy suave.
5. Poner la mezcla a calentar a fuego medio-lento,
revolviendo ocasionalmente a velocidad 1-2. No
dejar la cacerola desatendida.
6. Seguir cocinando, mezclando a velocidad 1, hasta
que la mezcla empiece a hervir y se espese.
Luego, retirar del fuego. Agregar el chocolate
picado y la mantequilla y revolver a mano, usando
una espátula resistente al calor, hasta que el
chocolate esté completamente incorporado. Colar
el relleno con un colador de malla na y
esparcirlo sobre la base enfriada. Cubrir el relleno
directamente con papel encerado o papel lm/
plástico para evitar que se forme una “piel”.
Refrigerar hasta que esté rme.
7. Cuando el relleno esté rme, preparar la crema
batida. Colocar la crema en un tazón grande.
Instalar el batidor de alambre. Batir por aprox. 1
minuto, empezando a velocidad 1 y aumentando
gradualmente la velocidad al nivel 3, hasta obtener
una mezcla con cuerpo. Agregar el azúcar y seguir
batiendo a velocidad 4 hasta que se formen picos
medio-rmes.
8. Cubrir uniformemente la tarta con crema batida.
Decorar con virutas de chocolate antes de servir.
Pastel amarillo
de suero de leche
bañado en chocolate
Esta receta les encantará a todos los amantes del
pastel amarillo tradicional. Queda bien con casi
cualquier glaseado, pero nos encanta con nuestro
glaseado de chocolate para una combinación
clásica.
Rinde 16 porciones; un pastel de 9 x 13in(23 x
33cm)
Pastel:
Aceite en aerosol/rocío vegetal
3 tazas (405 g) de harina de repostería sin
levadura
1¾ tazas (350 g) de azúcar granulada
1 cucharada de polvo de hornear
¾ cucharadita de sal kosher
1½ tazas (365 g) de suero de leche (“buttermilk”), a
temperatura ambiente
2 huevos grandes, a temperatura ambiente
2 yemas de huevo grande, a temperatura
ambiente
2 cucharaditas de extracto natural de vainilla
1 taza (235ml) de aceite vegetal
Baño de chocolate:
4 tazas (240 g) de azúcar glasé, tamizado
4 onzas (115 g) de chocolate amargo, derretido y
ligeramente enfriado
2 onzas (55 g) de chocolate semidulce, derretido y
ligeramente enfriado
8 cucharadas (115 g) de mantequilla sin sal a
temperatura ambiente, en pedacitos de
½in(1.5cm)
2 cucharaditas de extracto natural de vainilla
¼ cucharadita de sal marina na
10-12 cucharadas (150-180ml) de leche o crema
1. Colocar la rejilla del horno en el centro de este y
precalentar a 350°F (175°C). Engrasar dos moldes
redondos de 9in(23cm) con aceite en aerosol/
rocío vegetal y forrarlos con papel sulfurizado.
Reservar.
2. Colocar la harina, los azucares, el polvo de
hornear y la sal en un tazón grande. Usando los
batidores, revolver a velocidad 1 por un mínimo de
30 segundos para combinar. Reservar.

25
3. Colocar el suero de leche, los huevos, las yemas y
la vainilla en un tazón mediano. Batir a velocidad
3.
4. Reducir la velocidad al nivel 2 y agregar
lentamente el aceite a la mezcla. Cuando esté
bien combinado, incrementar la velocidad al nivel
3-4 y mezclar por aprox. 1½ minutos adicionales,
hasta conseguir una mezcla suave.
5. Agregar gradualmente la mezcla líquida a la
mezcla de ingredientes secos y mezclar a
velocidad 2 hasta que esté completamente
combinado.
6. Verter la mezcla en el molde.. Dar golpecitos en la
encimera para eliminar las burbujas y meter al
horno. Hornear por aprox. 25 minutos, hasta que
un probador introducido en el centro salga limpio.
7. Sacar del horno y dejar enfriar sobre una rejilla (en
el molde) hasta que esté frío al tacto. A
continuación, desmoldar y terminar de enfriar
sobre una rejilla.
8. Mientras el pastel se está enfriando, preparar el
baño de chocolate. Colocar el azúcar, el
chocolate, la sal y la vainilla en un tazón grande.
Batir a velocidad 2 por 2 minutos, usando el
batidor de alambre. Agregar 10 cucharadas
(120ml) de la leche/crema. Ajustar la velocidad al
nivel 4 y batir por aprox. 4 minutos, raspando el
tazón si es necesario, hasta obtener una mezcla
suave y esponjosa. Si el baño de chocolate parece
demasiado espeso o duro, agregar leche/crema, 1
cucharada a la vez, hasta conseguir una
consistencia untable.
Puré de papas cremoso
Esta receta es un poco como un lienzo en blanco. Es
simple, pero puede cambiarse fácilmente añadiendo
mezclas o aderezos, tales como cebollinos o
cebolletas picadas, trozos de tocino crujientes o
queso Cheddar rallado.
Rinde aprox. 6 tazas
2½ libras (1.1kg) de papas Yukon Gold, peladas y
cortadas en pedazos de 1in(2.5cm)
½ taza (120ml) de leche entera, a temperatura
ambiente
3 cucharadas (85 g) de mantequilla sin sal a
temperatura ambiente, en pedazos de
1in(2.5cm)
¾ cucharadita de sal kosher
½ cucharadita de pimienta negra recién molida
½ taza (110 g) de queso Mascarpone o de “crème
fraîche” (crema fresca), a temperatura ambiente
1. Colocar las papas en una olla grande y cubrir con
2in (5cm) de agua fría. Nota: No usar olla
antiadherente o los batidores podrían dañar el
revestimiento. Calentar a fuego medio-alto.
Cuando empiece a hervir, reducir el fuego y
cocinar a fuego lento por 10-15 minutos, hasta que
las papas estén muy suaves.
2. Escurrir las papas y volver a la olla. Usando los
batidores, batir a velocidad 1-2 por aprox. 30
segundos para hacer puré. Agregar el resto de los
ingredientes y mezclar a velocidad 2 para
combinar.
3. Probar y ajustar la sazón al gusto.

26
Salsa para mojar
de pollo Búfalo
Esta salsa para mojar les encantará a todos.
¡Sírvala con alitas de pollo picante en su próxima
esta! La batidora de mano hace que sea rápido
desmenuzar pollo cocinado.
Use este truco para la preparación de la comida
semanal; el pollo desmenuzado puede ser la base
de innumerables comidas.
Rinde aprox. 6 tazas
Aceite en aerosol/rocío vegetal o 1 cucharada de
aceite de oliva virgen extra
1 pollo rostizado de aprox. 3½-4 lb (1.5-1.8kg),
tibio
16 onzas (465 g) de queso crema bajo en grasa
pedazos, a temperatura ambiente
1 rama de apio, picada
1 cucharadita de sal kosher
½ cucharadita de pimienta negra recién molida
6-8 cucharadas de salsa picante*
1 taza (140 g) de queso azul desmenuzado
Vegetales crudos, pedazos de pan o chips de
maíz/totopos, para servir
1. Colocar la rejilla del horno en el centro de este y
precalentar a 375°F (175°C). Engrasar una fuente
para horno de 1 L con aceite en aerosol/rocío
vegetal. Reservar.
2. Quitar la carne del pollo asado y colocarla en un
tazón grande. Usando los batidores, revolver a
velocidad 2 por aprox. 30 segundos para triturar.
Una vez desmenuzado, agregar el queso crema, el
apio, la sal, la pimienta y la salsa picante. Seguir
mezclando a velocidad 2 por aprox. 1 minuto para
combinar los ingredientes.
3. Colocar la mezcla en la fuente preparada y cubrir
con el queso azul desmenuzado. Hornear por 40
minutos, hasta que esté caliente y burbujeante.
4. Servir caliente con vegetales crudos, pan o chips
de maíz/totopos.
* Esta receta es medio-picante. Ajustar la receta al
gusto, o servir salsa picante al lado para aquellos a
quienes les gusta extrapicante.
Crema para untar
de queso con pimentón
Esta receta es bastante parecida al amado plato
sureño. La crema puede untarse en galletas o pan
tostado, o usarse para aderezar sándwiches de
queso a la parrilla.
Rinde aprox. 2 tazas
4 onzas (115 g) de queso crema en pedazos de
1in(2.5cm), a temperatura ambiente
¼ taza (60ml) de mayonesa
2 tazas (240 g) de queso Cheddar extrafuerte
rallado
1 lata/jarra de 7 oz (200 g) de pimentones,
escurridos
½ cucharadita de cebolla en polvo
¼ cucharadita de sal kosher
1 pizca de pimienta negra recién molida
2 pizcas de salsa picante
1. Colocar el queso crema en un tazón mediano.
Usando los batidores, revolver a velocidad 3 por
aprox. 30 segundos para suavizar. Agregar el resto
de los ingredientes y mezclar a velocidad 2 por
aprox. 20 segundos para combinar.
2. Servir inmediatamente.

27
©2025 Cuisinart
Glendale, AZ 85307
Printed in China
Impreso en China
25CE200499
IB-18845