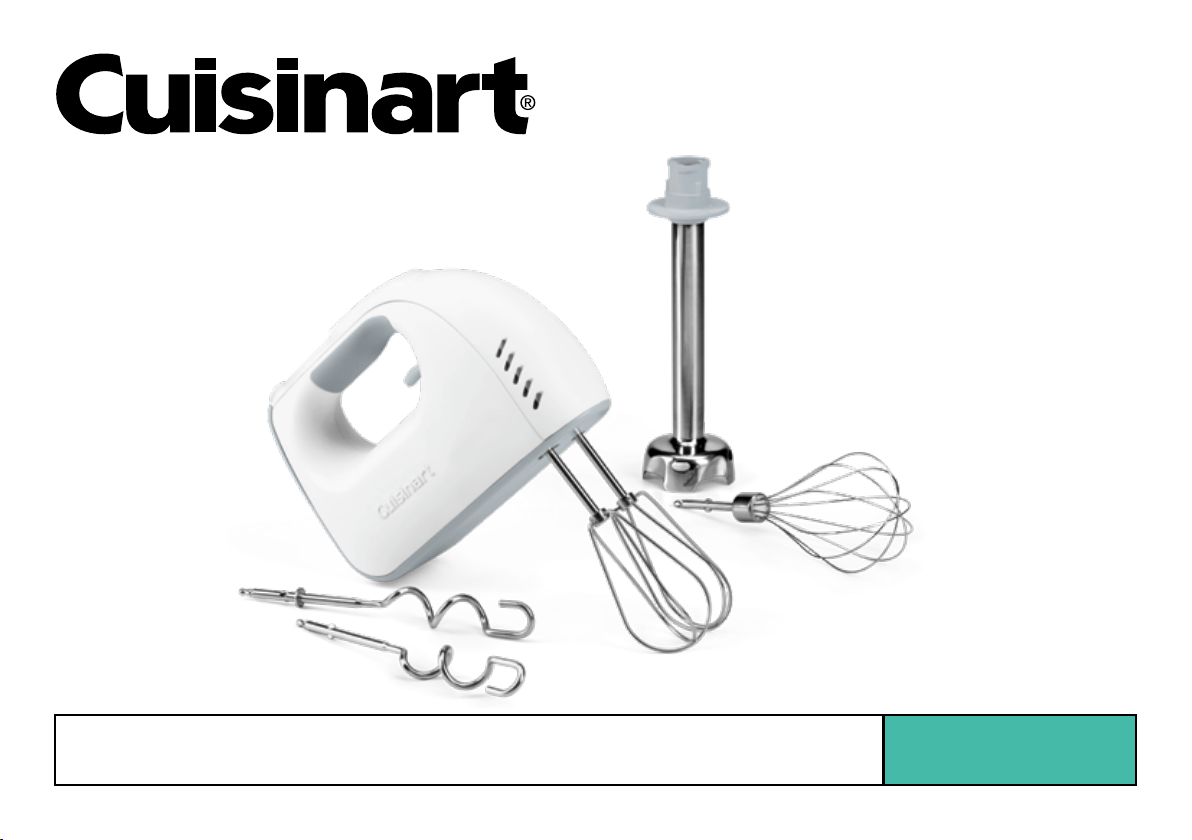
HM-8 SeriesPower Advantage
®
Deluxe 8-Speed Hand Mixer
For your safety and continued enjoyment of this product, always read the instruction book carefully before using.
INSTRUCTION AND RECIPE BOOKLET

2
CONTENTS
Important Safeguards..................... 2
Features and Benefits .................... 3
Use, Care and Maintenance. . . . . . . . . . . . . . . . 4
Quick Reference Guide ................... 5
Warranty ............................... 7
Recipes................................ 8
IMPORTANT
SAFEGUARDS
When using an electrical appliance, basic
safety precautions should always be taken,
including the following:
1. Read all instructions.
2. Turn the appliance OFF, then unplug from
the outlet when not in use, before
assembling or disassembling parts and
before cleaning. To unplug, grasp the
plug and pull from the outlet. Never pull
from the power cord.
3. To protect against risk of electric shock, do
not put the hand mixer motor housing or
cord in water or other liquids. If hand mixer
motor housing or cord falls into liquid,
unplug the cord from outlet immediately.
Do not reach into the liquid.
4. This appliance is not intended for use by
children or by persons with reduced
physical, sensory, or mental capabilities, or
lack of experience and knowledge. Close
supervision is necessary when any
appliance is used near children. Children
should be supervised to ensure that they do
not play with the appliance.
5. Avoid contact with moving parts. Keep
hands, hair, clothing, as well as spatulas
and other utensils away from beaters and
other accessories/attachments during
operation to reduce risk of injury to persons,
and/or damage to the mixer.
6. Remove all accessories/attachments from the
mixer before washing.
7. Do not operate any appliance with a
damaged cord or plug or after the appliance
malfunctions, or is dropped or damaged in
any manner. Contact the manufacturer at
their customer service telephone number for
information on examination, repair, or
adjustment.
8. The use of attachments not recommended
by Cuisinart may cause fire, electric shock,
or risk of injury.
9. Do not use outdoors or anywhere the cord
or mixer might come into contact with water
while in use.
10. To avoid possibility of mixer being
accidentally pulled off work area, which
could result in damage to the mixer or in
personal injury, do not let cord hang over
edge of table or counter.
11. To avoid damage to cord and possible fire
or electrocution hazard, do not let cord con
-
tact hot surfaces, including the stove.
12. Blades are SHARP. Handle carefully when
removing, inserting or cleaning. ALWAYS
USE BLADE STORAGE COVER WHEN
NOT IN USE.
13. When mixing liquids, especially hot liquids,
use a tall container or mix small quantities
in separate batches to reduce spillage,
splattering and possibility of injury from
burning.
14. Use storage pouch to specifically store
hand blender unit and attachments.
Be sure blade storage cover is in place on
detachable blending shaft before putting
in storage pouch.
SAVE THESE
INSTRUCTIONS
FOR HOUSEHOLD
USE ONLY
NOTICE
To reduce the risk of electric shock, this
appliance has a polarized plug (one prong is
wider than the other). As a safety feature, this
plug will fit into a polarized outlet only one
way. If the plug does not fit fully into the
outlet, reverse the plug. If it still does not fit,
contact a qualified electrician. Do not modify
the plug in any way. The maximum rating
is based on the HM-C Chopper/Grinder
attachment (available separately), which
draws the greatest load (power); other
recommended attachments may draw
significantly less power.

3
FEATURES AND
BENEFITS
250 Watt DC Motor
Powerful enough to easily cut through a
double batch of cookie dough or butter right
out of the refrigerator.
Maximum Comfort
Balanced to do more work for you. The shape
of the mixer allows for maximum possible
power and balance. Stress-free grip provides
unparalleled comfort and control, even during
extended mixing.
Automatic Feedback
No need for a power boost. An electronic
feedback mechanism automatically feeds in extra
power when needed. It assures that the mixer will
not bog down, even when mixing heavy loads.
SmoothStart
®
When the mixer is turned on, the beaters start
spinning very slowly to prevent ingredients
from splattering.
Easy to Clean
The Power Advantage
®
Deluxe Hand Mixer has
a smooth, sealed base; wipes clean instantly.
1. One-Step ON/OFF Button
One-step power button allows you to turn
mixer on and off in a single operation.
2. Blending Mode
Activates hand blending mode.
3. LED Speed Display
Digital speed settings are easy to read.
4. One-Touch Speed Control
Allows you to change speeds quickly while
you are mixing.
5. Rotating Cord
Unique center cord will freely rotate with
comfort for right or left-handed use.
6. Soft-Grip Handle
For maximum comfort.
7. Beater Release Lever
Conveniently located for easy ejection of
beaters, whisk, or dough hooks. Also activates
hand blending mode.
8. Attachment Port
Compatible with included blending shaft
attachment and optional Chopper/Grinder
attachment, available for purchase (HM-C).
9. Heel Rest
Allows mixer to rest upright on countertop.
10. Easy Clean Beaters
Two extra-wide beaters for easy aerating,
mixing, and creaming. Designed with no center
post to prevent ingredients from clogging up
beaters. Beaters are easy to clean and
dishwasher safe.
11. Balloon Whisk
Great for whipping heavy cream or egg
whites. May also be used for anything that
you would normally whisk by hand, like
crêpe batters or eggs for omelets.
12. Dough Hooks
For preparing and kneading yeast doughs
such as pizza and bread doughs. Easy to
clean and dishwasher safe.
13. Blending Shaft Attachment with
Stainless Steel Blade
Attaches to hand mixer, allowing you to
blend, mix, and purée all kinds of foods.
14. Blade Storage Cover (not shown)
Ensures safety and extends life of blade.
15. Canvas Storage Pouch (not shown)
Safely store hand mixer, blending shaft,
and accessories.
16. BPA Free (not shown)
All materials that come in contact with food
are BPA free.
1
3
2
4
5
8
9
10 11 12 13
6
7
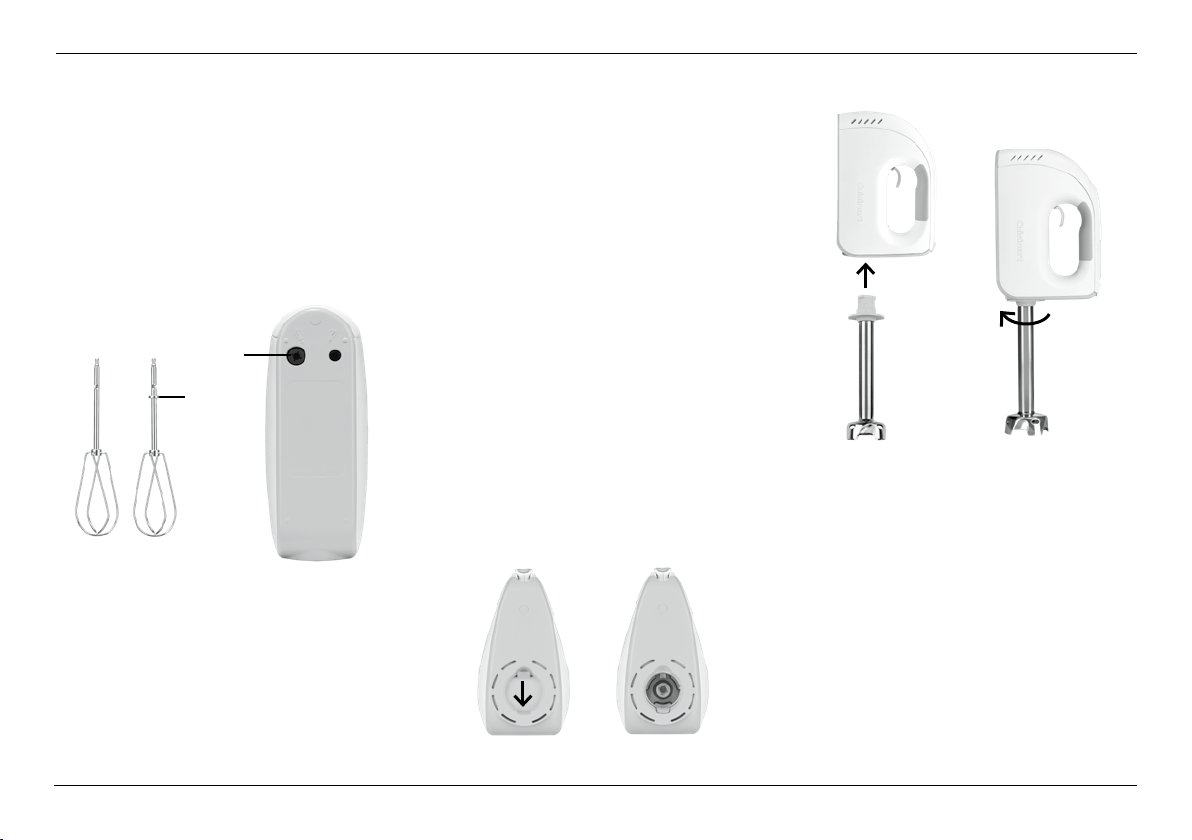
Port: Closed Port: Open
Collar
Larger
Hole
4
USE, CARE AND
MAINTENANCE
USING THE MIXER
Inserting Beaters and Dough Hooks
With the mixer off and unplugged, insert
beater with collar into the larger hole. Push
beater or dough hook in until it clicks into
place. Insert the beater or dough hook without
collar into the smaller hole. Push beater or
dough hook in until it clicks into place.
Inserting Balloon Whisk
With the mixer off and unplugged, hold
balloon whisk at stem end, and insert into
either hole. Push whisk in until it clicks
into place. DO NOT PUSH WHISK IN FROM
WIRE END, AS YOU MAY DAMAGE WIRES.
Turning Mixer ON/OFF
Plug mixer into outlet. Press ON/OFF button
to turn mixer on. Mixer will immediately begin
to mix on Speed 1. To turn mixer off, press
ON/OFF button again.
Changing Speeds
Press the + button on the digital touchpad
to increase the speed. Press the – button to
decrease the speed.
Removing All Accessories
Press the OFF button and unplug from wall
outlet. Lift the beater release lever and remove
the accessories from the mixer.
HAND BLENDING MODE
The specially designed blade blends, mixes,
and purées all kinds of foods, including salad
dressings, smoothies, and protein shakes,
soups and sauces.
This blade is designed to add only minimal
air to your mixture. A gentle up-and-down
motion lets you achieve the most flavorful,
full-bodied results. Be careful never to remove
the blending shaft from the liquid while in
operation.
Attaching Blending Shaft
NOTE: The blending shaft port will not open if
beaters are inserted.
Slide open the door cover of blending shaft port.
Insert blending shaft attachment and turn
clockwise to secure into locked position.
To remove, turn attachment counterclockwise
and remove from port. Door cover will
automatically spring back into closed position.
Operation
1. With the unit off and unplugged, connect
the blending shaft to the blending shaft port.
2.
Plug electric cord into a wall outlet.
3.
Immerse the blade end of the blending
shaft into mixture to be blended. You can
blend in a tall cup, bowl, pot, saucepan
or pitcher.
4.
To turn on the blending shaft, press ON/
OFF button. LED will show Speed 1.
5.
To activate the hand blender, press the
Unlock button. LED will show “U.”

5
6.
Lift and hold the beater release lever for
blending action to begin. To change the
speed setting, press the “+/-“ button.
LED will show Speed 1, 2 or 3. The motor
will adjust speeds accordingly.
7.
To pulse, release the blender release
lever, which will stop the blender action.
Pull on the blender release lever to
reactivate blender function.
8.
Press the ON/OFF button to turn off the
unit. Unplug immediately after use.
CLEANING
1. Wash beaters, dough hooks and whisk
after each use in hot, soapy water or in a
dishwasher.
2.
NEVER PUT THE MOTOR HOUSING
IN WATER OR OTHER LIQUIDS TO
CLEAN. Wipe it with a damp cloth or
sponge. Do not use abrasive cleansers,
which could scratch the surface.
3.
To clean blending shaft, wash by hand
in hot water using mild detergent.
The blending shaft is NOT dishwasher
safe. Be mindful of the fixed-mount, razor-
sharp blade edges.
4.
When not in use, your hand mixer should
be disconnected, wiped down and stored
in a safe, dry location out of reach of
children.
Use the storage pouch provided with
hand mixer.
MAINTENANCE
Any other servicing should be performed by
an authorized service representative.
NOTE: DO NOT USE THE CUISINART
®
POWER ADVANTAGE
®
DELUXE HAND
MIXER WITH NONSTICK COOKWARE.
QUICK REFERENCE
GUIDE
MIXING TECHNIQUES
For mixing attachments only.
NOTE: The balloon whisk attachment is used
only for light whipping. For all other mixing
tasks, use the beaters or dough hooks.
Speed 1
• Start mixing most ingredients together
• Start whipping cream
• Start whipping egg whites
• Fold delicate creams and egg whites into
batters
• Mix muffin and pancake batters
Speed 2
• Add nuts, chips, and dried fruit to doughs
and batters
• Sift and aerate dry ingredients
• Add dry ingredients to batters/doughs
• Mix heavy cookie doughs
• Start kneading yeast doughs
Speed 3
• Cut cold butter into dry ingredients
(for pie doughs, biscuits, and pastries)
• Mix cake batters
• Whip potatoes/squash
• Finish kneading yeast doughs
Speed 4
• Mix cookie dough
• Cream butter and sugar until light and fluffy
• Add eggs to batters/doughs
Speed 5
• Finish mixing frostings
• Beat whole eggs/yolks
Speed 6
• Whip egg whites
Speed 7
• Finish whipping cream
Speed 8
• Finish whipping meringues and egg whites
BLENDING TIPS & HINTS
1. Liquid should not come closer than 1
inch from where the shaft attaches to the
blending shaft port.
2.
Always start blending on Speed 1.
Gradually increase to Speeds 2 and 3 as
mixture gets smoother.
3.
Do not immerse motor body housing in
water or any other liquids.
4.
Cut solid foods into ½-inch pieces for
easier blending.
5.
To avoid splatter, be sure the protective
blade guard on the blending shaft
remains submerged in the liquid while
blending. Never remove it from the liquid
while the motor is running.
6.
Do not let hand blender stand in a hot pot
on stove while not in use.
7.
Do not put fruit pits, bones, or other hard
material into the blending mixture, as
these are liable to damage the blades.

6
8.
Do not fill mixing containers too full.
The level of mixture will rise when
blending, and can overflow.
9.
With the hand blender, using a gentle
up-and-down motion is the best way
to blend and incorporate ingredients
uniformly.
10.
To whip air into a mixture, always
hold the blending blade just under
the surface.

7
WARRANTY
Limited Three-Year Warranty
This warranty is available to U.S. consumers
only. You are a consumer if you own a
Cuisinart
®
Power Advantage
®
Deluxe 8-Speed
Hand Mixer with Storage Case that was
purchased at retail for personal, family or
household use. Except as otherwise required
under applicable law, this warranty is not
available to retailers or other commercial
purchasers or owners. We warrant that your
Cuisinart
®
Power Advantage
®
Deluxe 8-Speed
Hand Mixer with Storage Case will be free of
defects in materials and workmanship under
normal home use for 3 years from the date of
original purchase.
We recommend that you visit our website,
www.cuisinart.com for a fast, efficient way
to complete your product registration.
However, product registration does not
eliminate the need for the consumer to
maintain the original proof of purchase in
order to obtain the warranty benefits. In the
event that you do not have proof of purchase
date, the purchase date for purposes of this
warranty will be the date of manufacture.
CALIFORNIA RESIDENTS ONLY
California law provides that for In-Warranty
Service, California residents have the option
of returning a nonconforming product (A) to
the store where it was purchased or (B) to
another retail store that sells Cuisinart
products of the same type. The retail store
shall then, according to its preference, either
repair the product, refer the consumer to an
independent repair facility, replace the
product, or refund the purchase price less
the amount directly attributable to the
consumer’s prior usage of the product. If
neither of the above two options results in the
appropriate relief to the consumer, the
consumer may then take the product to an
independent repair facility, if service or repair
can be economically accomplished. Cuisinart
and not the consumer will be responsible for
the reasonable cost of such service, repair,
replacement, or refund for nonconforming
products under warranty. California residents
may also, according to their preference,
return nonconforming products directly to
Cuisinart for repair or, if necessary,
replacement by calling our Consumer Service
Center toll-free at 800-726-0190. Cuisinart
will be responsible for the cost of the repair,
replacement, and shipping and handling for
such nonconforming products under warranty.
HASSLE-FREE REPLACEMENT
WARRANTY
Your ultimate satisfaction in Cuisinart
products is our goal, so if your Cuisinart
®
Power Advantage
®
Deluxe 8-Speed Hand
Mixer with Storage Case should fail within the
generous warranty period, we will repair it or,
if necessary, replace it at no cost to you.
To obtain a return shipping label, email us at
https://www.cuisinart.com/customer-care/
product-return. Or call our toll-free
customer service department at 1-800-726-
0190 to speak with a representative.
Your Cuisinart
®
Power Advantage
®
Deluxe
8-Speed Hand Mixer with Storage Case
has been manufactured to the strictest
specifications and has been designed for
use only in 120-volt outlets and only with
authorized accessories and replacement
parts. This warranty expressly excludes any
defects or damages caused by attempted
use of this unit with a converter, as well as
use with accessories, replacement parts or
repair service other than those authorized by
Cuisinart. This warranty does not cover any
damage caused by accident, misuse,
shipment or other than ordinary household
use. This warranty excludes all incidental or
consequential damages. Some states do not
allow the exclusion or limitation of these
damages, so these exclusions may not apply
to you. You may also have other rights, which
vary from state to state.
Important: If the nonconforming product is
to be serviced by someone other than
Cuisinart’s Authorized Service Center, please
remind the servicer to call our Consumer
Service Center at 1-800-726-0190 to ensure
that the problem is properly diagnosed, the
product is serviced with the correct parts,
and to ensure that the product is still under
warranty.

8
RECIPES
Breakfast
Crêpes with Lemon Cream
and Fresh Fruit ................................................9
Lemon Ginger Scones.....................................9
Blueberry Muffins ..........................................10
Pumpkin Spice Muffins .................................10
Gluten-Free Banana Muffins ......................... 11
Apple Cider Doughnuts ................................. 11
Cinnamon Swirl Coffee Cake ........................ 12
Lemon Pound Cake ...................................... 13
Quick Berry Jam ............................................ 13
Maple Butter .................................................. 14
Simple Fruit Smoothie ................................... 14
Berries and Greens Smoothie ....................... 14
Mango-Lime Smoothie .................................. 15
Sweet Protein Smoothie................................15
Matcha Latte ................................................. 15
Cold Brew Latte ............................................15
Savories
Deviled Eggs ................................................. 16
Bacon and Swiss Quiche .............................. 16
Ricotta-Thyme Tart ........................................ 17
Spinach Artichoke Dip...................................17
Buffalo Chicken Dip ......................................18
Pimento Cheese Spread ...............................18
Guacamole .................................................... 18
Hummus ........................................................ 19
Creamy Mashed Potatoes .............................19
Mashed Maple Sweet Potatoes .................... 19
Cauliflower Mash ........................................... 20
Spinach and Feta Soufflé ..............................20
Sweet Potato Biscuits ................................... 21
Popovers ....................................................... 21
Three Cheese Calzones ................................22
Basic Tomato Sauce ..................................... 22
Bright Greens Soup .......................................23
Winter White Bean Soup ............................... 23
Sweets
Lemon-Thyme Shortbread ............................ 24
Strawberry Sandwich Cookies ...................... 25
Buckwheat Chocolate
Chunk Cookies .............................................. 25
Crunchy Peanut Butter Chip Cookies ........... 26
Ginger Cookies .............................................. 27
No-Bake Keto Bites ...................................... 27
Edible Cookie Dough
(with variations) ............................................. 28
Bittersweet Espresso Brownies .................... 28
Blonde Brownies (Blondies) ..........................29
Blueberry Crumble Bars ................................ 29
Golden Layer Cake........................................30
Berries and Cream Frosting .......................... 31
Deep Chocolate Layer Cake ......................... 31
Cream Cheese Frosting ................................ 32
Gluten-Free (and Vegan!)
Golden Cupcakes with Dairy-Free
Vanilla Frosting .............................................. 32
Angel Food Cake ........................................... 33
Pavlova with Blood Orange
and Pomegranate .......................................... 33
Sour Cream Cheesecake ..............................34
Chocolate Cream Pie ....................................35
Pumpkin Pie .................................................. 36
Classic Whipped Cream ................................36
Royal Icing ..................................................... 36
Chocolate Peanut Butter
Ice Cream Shake ...........................................37
Breads/Doughs
Pizza/Focaccia Dough .................................. 37
Pâte Brisée .................................................... 38
Cuisinart Classic White Bread .......................38
Honey Whole-Wheat Bread...........................39
Rosemary Olive Oil Rolls ............................... 39

9
Crêpes with Lemon Cream
and Fresh Fruit
The lemon cream is delicious for either
breakfast or dessert, but the crêpes can
also be filled with savory items, such as
scrambled eggs and vegetables.
Makes about 18 filled crêpes
Crêpe Batter:
¼ cup unsalted butter, cut into
tablespoons
1 cup reduced-fat milk,
room temperature
¾ cup unbleached, all-purpose flour
½ teaspoon kosher salt
1 tablespoon granulated sugar
3 large eggs, room temperature
1 teaspoon pure vanilla extract
1 teaspoon unsalted butter,
room temperature
Lemon Cream Filling:
½ cup heavy cream, cold
1½ teaspoons pure vanilla extract
¼ cup real maple syrup
Pinch fine sea salt
½ cup plain, whole milk yogurt
1 teaspoon grated lemon zest
1 teaspoon fresh lemon juice
2 medium bananas, thinly sliced
1 pound fresh strawberries,
hulled and thinly sliced
Confectioners’ sugar, for serving
(optional)
1. Prepare the crêpes: Put the butter with
the milk in a small saucepan over low
heat. When the butter is melted, remove
from heat and cool slightly.
2.
While butter/milk is heating, put the
flour, salt, and sugar in a medium bowl.
Using the beaters, mix on Speeds 1 to
2 to combine, about 30 seconds. Add
the eggs and vanilla extract and beat
until mixture resembles a thick and sticky
batter. While mixing on Speed 2, mix in the
milk and butter mixture until the batter is
smooth. Rest the batter in the refrigerator
for a minimum of 30 minutes, or up to
overnight.
3.
While batter is resting, just before cooking
crêpes, prepare the filling. Put the heavy
cream into a medium mixing bowl.
Starting on Speed 1 and very gradually
increasing to Speed 8, whip cream
to medium-stiff peaks, about 1 minute.
Add the vanilla extract, maple syrup, and
salt and mix on Speeds 1 to 3 until fully
combined. Add the remaining ingredients,
except for the fruit, and mix on Speed 1
until combined. Reserve.
4.
Cook the crêpes. Mix the crêpe batter
briefly using the beaters on Speed 2 to
remove any lumps that may have formed.
If lumps remain, pour through a fine
strainer. Set an 8- to 10-inch crêpe pan
or nonstick skillet over medium/medium-
high heat. Once pan is hot, add the 1
teaspoon of butter. Tilt pan to evenly
distribute the butter; let pan rest on heat
for an additional 30 seconds. Add a small
amount of batter, a scant ¼ cup, and
with the pan in hand, quickly and evenly
rotate it so the crêpe batter thinly coats
the entire bottom surface. Allow to cook
until set, about 2 minutes (traditionally
the crêpe should not brown). Flip and
cook on the second side for no more than
30 seconds. Remove and repeat with
remaining batter.
5.
To serve, put 2 tablespoons of the lemon
cream in the center of each crêpe and
then top with a portion of the bananas
and strawberries. Fold sides of crêpes
over. Dust with powdered sugar, if using,
and serve.
Nutritional information per filled crêpe:
Calories 156 (46% from fat) • carb. 17g • pro. 4g
fat 8g • sat. fat 5g • chol. 68mg • sod. 131mg
calc. 52mg • fiber 1g
Lemon Ginger Scones
Not too sweet, these scones are a perfect
match for a steamy cup of tea in the morning.
Makes 8 scones
2½ cups cake flour, plus more for
shaping
2 tablespoons granulated sugar
1½ teaspoons baking powder
¼ teaspoon baking soda
1 teaspoon kosher salt
Grated zest of 1 lemon
(about 1 tablespoon)
6 tablespoons unsalted butter, cut into
½-inch cubes, room temperature

10
(for about 5 to 10 minutes, be sure
the butter is not soft)
1 cup buttermilk
1 large egg
¼ cup chopped candied ginger
Egg wash (1 large egg plus
1 teaspoon water, whisked well)
Turbinado sugar, for sprinkling
1. Put the flour, sugar, baking powder,
baking soda, salt, and zest in a large
mixing bowl. Using the beaters, mix
the dry ingredients on Speed 1 to fully
combine. Reserve.
2.
Put the buttermilk and egg in a small
bowl. Mix on Speed 1 to combine. Add
the butter to the dry ingredients and
mix on Speed 3 until mixture is shaggy.
Reduce the speed to 1. With the mixer
running, slowly add the liquid ingredients,
and then the ginger, until just combined;
do not over-mix.
3.
Pour the mixture onto a clean counter/
large cutting board. Form the dough
into a 10-inch cylinder. Using a sharp
knife, cut into 8 even rounds. Place on
a parchment-lined baking sheet. Cover
lightly and transfer to a refrigerator to
chill for a minimum of 1 hour, or up to
overnight.
4.
Once chilled, preheat oven to 400°F with
the rack in the middle position. Brush
each scone with egg wash and sprinkle
with the turbinado sugar.
5.
Bake in preheated oven for about 25 to
30 minutes, or until golden brown. Allow
to cool before serving.
Nutritional information per scone:
Calories 264 (35% from fat) • carb. 40g • pro. 5g
fat 9g • sat. fat 6g • chol. 47g • sod. 440g
calc. 99 mg • fiber 1g
Blueberry Muffins
Everyone has a favorite muffin,
and this is quickly becoming ours.
The orange zest should not be overlooked – it
pairs so perfectly with the bright blueberry
flavor.
Makes 12 muffins
Nonstick cooking spray
2 cups unbleached, all-purpose flour
¹⁄
³
cup granulated sugar
¹⁄
³
cup packed light brown sugar
1 teaspoon baking powder
¼ teaspoon baking soda
½ teaspoon kosher salt
½ teaspoon ground cinnamon
½ teaspoon grated orange zest
¾ cup buttermilk, room temperature
½ cup vegetable oil
1 large egg, room temperature
1 teaspoon pure vanilla extract
1 cup fresh or frozen, thawed,
blueberries
½ teaspoon turbinado sugar
1. Preheat oven to 400°F with the rack in
the middle position. Lightly coat a regular
12-cup muffin pan with nonstick cooking
spray; reserve.
2.
Put the flour, sugars, baking powder and
soda, salt, cinnamon, and zest in a large
mixing bowl. Using the beaters, mix on
Speed 1 until well combined, about 40
seconds. Reserve.
3.
In a small bowl, mix the buttermilk, oil,
egg, and vanilla extract on Speed 1.
Using Speed 1, gradually add the liquid
ingredients to the bowl of dry ingredients.
Once almost fully mixed in, add the
blueberries and gently mix until just
combined. Spoon evenly into prepared
muffin cups. Sprinkle the turbinado sugar
on the top of each muffin.
4.
Bake in the preheated oven for about
18 to 20 minutes, or until a cake tester
comes out clean.
Nutritional information per muffin:
Calories 209 (41% from fat) • carb. 28g • pro. 3g
fat 10g • sat. fat 1g • chol. 16g • sod. 178g
calc. 45mg • fiber 1g
Pumpkin Spice Muffins
An obvious choice for the fall months, the
warm spices and toasted nuts complement
the pumpkin in these moist and tasty muffins.
Makes 12 muffins
Nonstick cooking spray
2 cups unbleached, all-purpose flour
½ teaspoon kosher salt
1 teaspoon baking powder
¼ teaspoon baking soda
½ teaspoon ground cinnamon
¼ teaspoon ground nutmeg

11
¼ teaspoon ground allspice
½ cup vegetable oil
1¾ cups granulated sugar
¼ cup packed light brown sugar
1 cup pumpkin purée
1 teaspoon pure vanilla extract
2 large eggs, room temperature
½ cup toasted, chopped walnuts
1. Preheat oven to 375°F with the rack in
the middle position. Lightly coat a regular
12-cup muffin pan with nonstick cooking
spray; reserve.
2.
Put the flour, salt, baking powder and
soda, cinnamon, nutmeg, and allspice in
a medium mixing bowl. Using the beaters,
mix on Speed 1 until well combined,
about 40 seconds. Reserve.
3.
In a large bowl, mix the oil, sugars,
pumpkin, and vanilla extract using
Speeds 1 to 3. Gradually add the eggs,
using Speed 2, until well incorporated.
4.
While mixing on Speed 1, gradually add
the dry ingredients to the sugar/oil/
pumpkin mixture. Once almost fully mixed
in, add the walnuts and gently mix until
just combined. Spoon evenly into
prepared muffin cups.
5.
Bake in the preheated oven for about
18 to 20 minutes, or until a cake tester
comes out clean.
Nutritional information per muffin:
Calories 342 (34% from fat) • carb. 54g • pro. 5g
fat 13g • sat. fat 2g • chol. 31g • sod. 197g
calc. 13mg • fiber 2g
Gluten-Free Banana Muffins
The all-purpose gluten-free flour mixes make
gluten-free baking easy and convenient.
There are a number of different brands on the
market to choose from, so taste a few and
find your favorite.
Makes 12 muffins
Nonstick cooking spray
2 cups gluten-free, all-purpose flour
½ cup rolled oats, not quick cooking
¹⁄
³
cup granulated sugar
¹⁄
³
cup packed light brown sugar
1½ teaspoons baking powder
¼ teaspoon baking soda
½ teaspoon kosher salt
½ teaspoon xanthan gum
(optional – only if flour blend does
not have it in list of ingredients)
½ teaspoon ground cinnamon
½ cup vegetable oil
2 large eggs, room temperature
½ teaspoon pure vanilla extract
1½ cups mashed, very ripe bananas
(about 3 medium bananas)
1. Preheat oven to 375°F with the rack in
the middle position. Lightly coat a regular
12-cup muffin pan with nonstick cooking
spray; reserve.
2.
Put the flour, oats, sugars, baking powder
and soda, salt, xanthan gum (if using),
and cinnamon into a mixing bowl. Using
the beaters, mix on Speeds 1 to 2 until
fully combined, about 30 seconds.
3.
In a separate, large mixing bowl, mix
the remaining ingredients on Speed 3
until smooth and creamy, about 1 to 2
minutes. Add the dry ingredients and mix
on Speed 2 until fully combined.
4.
Spoon evenly into prepared muffin cups.
Bake in the preheated oven for about
16 to 18 minutes, or until a cake tester
comes out clean.
Nutritional information per muffin:
Calories 248 (38% from fat) • carb. 37g • pro. 3g
fat 11g • sat. fat 1g • chol. 31g • sod. 223g
calc. 92mg • fiber 3g
Apple Cider Doughnuts
Be sure to use the best quality cider that you
can find, not juice, for a true apple flavor.
Makes 12 doughnuts
Nonstick cooking spray,
or softened butter
2 cups unbleached, all-purpose flour
1 teaspoon ground cinnamon
¼ teaspoon ground nutmeg
1½ teaspoons baking powder
½ teaspoon kosher salt
6 tablespoons unsalted butter,
cut into four pieces, room
temperature
²
⁄
³
cup packed light brown sugar
¼ cup granulated sugar
2 tablespoons maple syrup

12
2 large eggs, room temperature
1 teaspoon pure vanilla extract
¾ cup apple cider
¼ cup buttermilk, room temperature
6 tablespoons unsalted butter,
melted and warm
²
⁄
³
cup granulated sugar
1 teaspoon ground cinnamon
Pinch kosher salt
1. Coat a standard doughnut pan with
nonstick cooking spray or softened
butter; reserve. Preheat oven to 350°F
with the rack in the middle position.
2.
Put the flour, 1 teaspoon of cinnamon,
nutmeg, baking powder, and ½ teaspoon
of salt into a medium mixing bowl.
Using the beaters, mix on Speed 2 to
thoroughly combine, a minimum of 30
seconds; reserve.
3.
Put the room temperature butter, brown
sugar, ¼ cup of granulated sugar, and
maple syrup in a large mixing bowl.
Starting on Speed 2, increase to Speed
4 until light and creamy, about 1 minute.
Gradually add the eggs, one at a time,
using Speed 2, and then the vanilla
extract.
4.
Combine the apple cider and buttermilk
in a liquid measuring cup. Add the
dry ingredients to the batter, in three
additions, alternating with the cider/
buttermilk. Be sure to mix gently, but
thoroughly, using Speed 2.
5.
Transfer batter to the prepared doughnut
molds.
6.
Put in the preheated oven and bake until
browned and set, about 15 to 20 minutes
(this will depend on the oven and pan
being used).
7.
While doughnuts are baking, keep the 6
tablespoons of melted butter warm and
then combine with the
²
⁄
³
cup granulated
sugar, 1 teaspoon of cinnamon, and
salt together in a shallow bowl. Using
the hand mixer on Speed 1, whisk until
combined; reserve.
8.
Remove pan from the oven and allow
doughnuts to rest in the pan for 5 to 6
minutes. Once they have rested, carefully
remove, brush with melted butter, then
gently toss in the cinnamon sugar.
These are best served and consumed
immediately!
Nutritional information per doughnut:
Calories 299 (35% from fat) • carb. 45g • pro. 3g
fat 12g • sat. fat 7g • chol. 61mg • sod. 146mg
calc. 18mg • fiber 1g
Cinnamon Swirl Coffee Cake
This coffee cake is rich, buttery, and
chock-full of cinnamon. It is best made and
served the same day.
Makes one 9-inch round cake; 12 servings
Filling/Topping:
unsalted butter, softened
½ cup toasted walnuts, chopped
¼ cup granulated sugar
1 tablespoon ground cinnamon
Pinch kosher salt
Cake:
1¾ cups unbleached, all-purpose flour
½ teaspoon kosher salt
½ teaspoon baking powder
¼ teaspoon baking soda
8 tablespoons (1 stick) unsalted
butter, cut into 4 pieces, room
temperature, plus more for pan
½ cup granulated sugar
¼ cup packed light brown sugar
2 large eggs, room temperature
1 teaspoon pure vanilla extract
1 cup plain Greek yogurt, preferably
full fat
1. Coat 9-inch round pan with softened
butter; reserve. Preheat oven to 350°F
with the rack in the middle position.
2.
Put the filling/topping ingredients into a
small mixing bowl. Using the beaters, mix
on Speed 1 until combined. Reserve.
3.
Put the flour, salt, baking powder and
soda into a medium mixing bowl. Mix
on Speed 2 to thoroughly combine, a
minimum of 30 seconds; reserve.
4.
Put the butter and sugars into a large
mixing bowl. Mix, starting on Speed 2
and increasing to Speed 4, until light and
creamy, about 2 minutes. Gradually add
the eggs, one at a time, using Speed
3, and then the vanilla extract and the
yogurt. Add the dry ingredients in two
additions and be sure to mix gently, but
thoroughly, using Speed 2.

13
5.
Transfer half of the batter to the prepared
cake pan. Top with half of the nut filling/
topping, and then add the remaining
batter. Smooth to the edges of the pan,
and then top with the remaining nut
mixture.
6.
Put in the preheated oven and bake until
browned and set, about 45 minutes.
Nutritional information per serving:
Calories 245 (41% from fat) • carb. 31g
pro. 5g • fat 11g • sat. fat 5g • chol. 51mg
sod. 161mg • calc. 50mg • fiber 1g
Lemon Pound Cake
A traditional, moist pound cake with
a lemon twist.
Makes one 9-inch loaf cake; 16 servings
Cake:
Unsalted butter, softened,
or nonstick cooking spray
2 cups unbleached, all-purpose flour
1 teaspoon baking powder
1 teaspoon kosher salt
14 tablespoons unsalted butter,
cut into 1-inch pieces, room
temperature
1¹⁄
³
cups granulated sugar
3 tablespoons grated lemon zest
4 tablespoons vegetable oil
4 teaspoons fresh lemon juice
2 large eggs, room temperature
1 large egg yolk, room temperature
²
⁄
³
cup sour cream, room temperature
Icing:
1 cup confectioners’ sugar, sifted
3 tablespoons heavy cream
2 tablespoons fresh lemon juice
Pinch fine sea salt
1. Preheat oven to 350°F with the rack in
the lower third position. Lightly coat a 9
x 5 x 3-inch loaf pan with softened butter
or nonstick cooking spray; reserve.
2.
Put the flour, baking powder, and salt
together in a small mixing bowl. Using the
beaters, mix on Speed 1 until well sifted,
about 30 seconds. Reserve.
3.
Put the butter into a large mixing bowl
and using Speeds 2 to 4, cream butter
until softened. Add the sugar and lemon
zest. Mix well, using Speeds 2 to 5, until
very light in color, about 2 minutes.
4.
Combine the oil, lemon juice, eggs, egg
yolk, and sour cream in a small bowl. Mix
on Speed 1 to combine.
5.
While mixing on Speeds 1 to 2, gradually
add one-third of the dry ingredients to the
butter/sugar mixture, and then half of the
wet ingredients, alternating until all of the
ingredients are added and well mixed.
6.
Transfer the batter to the prepared cake
pan and then place in the preheated
oven. Bake until cake is set in the middle
and a cake tester comes out clean, about
1 hour and 10 minutes.
7.
Allow cake to cool in pan on a cooling
rack for about 10 to 15 minutes, and then
remove from the pan and immediately
wrap in plastic wrap to cool a bit further.
8.
While the cake is cooling, prepare
the lemon icing. Put all of the icing
ingredients into a small to medium mixing
bowl and using the whisk, mix on Speeds
1 to 3 until completely smooth, adding
more sifted sugar or cream to achieve
desired consistency.
9.
Once the cake is mostly cool, place on
the cooling rack atop a baking pan (or foil
or parchment, something that will catch
excess icing). Drizzle or spread over cake
as desired. Allow icing to set and cake
to cool completely before cutting and
serving.
Nutritional information per serving:
Calories 275 (44% from fat) • carb. 36g • pro. 3g
fat 14g • sat. fat 8g • chol. 71mg • sod. 164mg
calc. 13mg • fiber 2g
Quick Berry Jam
For those who have a fear of pressure
canning, or those who are trying to get
through a small batch of seasonal berries,
this is the recipe for you. It takes less than
40 minutes from start to finish, and can be
spread warm on some toast, or refrigerated
for up to 3 weeks.
Makes 1 cup
1½ pounds mixed berries
²
⁄
³
to ¾ cup granulated sugar, depending
on ripeness and sweetness of fruit
and preference

14
1 teaspoon fresh lemon juice
Pinch kosher salt
1. Prepare berries. If using strawberries, hull
and cut into pieces no larger than 1 inch
in size. Put all ingredients into a small to
medium saucepan and set over medium
heat. Stirring occasionally, bring the
mixture to a boil. Reduce to a simmer
and cook until mixture is thickened.
The jam should fully coat the back of a
spoon without dripping off to determine if
it is thick enough. Depending on the pot
being used, and the stove, this could take
anywhere from 30 to 40 minutes.
2.
Remove from heat and allow to cool for
about 10 minutes. Using the hand blender
attachment, blend on Speed 1 until
smooth. Transfer to a jar for storage and
cool to room temperature. Cover and
refrigerate until ready to use. Refrigerator
jam is good up to 3 weeks (it must stay
chilled).
Nutritional information per tablespoon:
Calories 59 (3% from fat) • carb. 14g • pro. 1g
fat 0g • sat. fat 0g • chol. 0mg • sod. 11mg
calc. 12mg • fiber 2g
Maple Butter
Serve on top of waffles and pancakes, or
even on top of toast, this delicious butter
should be served at room temperature.
Makes ½ cup
½ cup unsalted butter, room
temperature and cut into 4 pieces
2½ tablespoons pure maple syrup
Pinch fine sea salt
Put the butter in a medium mixing bowl.
Using the beaters, mix on Speeds 2 to
3 until creamy, about 30 to 40 seconds.
Add remaining ingredients and mix until
completely combined, another 40 to 50
seconds.
Nutritional information per teaspoon:
Calories 39 (86% from fat) • carb. 1g • pro. 0g
fat 4g • sat. fat 2g • chol. 10mg • sod. 6mg
calc. 2mg • fiber 0g
Simple Fruit Smoothie
This recipe works great with any type
of fruit or juice.
Makes 1 serving (about 12 ounces)
1 cup mixed fruit, fresh or frozen
½ cup juice (use your favorite)
1. Put ingredients into a tall cup.
2.
Using the hand blender attachment, start
blending on Speed 1, gradually increasing
to Speed 3 until smooth, about 30 to 45
seconds.
3.
Serve immediately.
Nutritional information per serving:
Calories 144 (4% from fat) • carb. 48g • pro. 3g
fat 1g • sat. fat 0g • chol. 0mg • sod. 3mg
calc. 27mg • fiber 5g
Berries and Greens Smoothie
The fat from both the avocado and coconut
oil will be sure to keep you from reaching for
those mid-morning snacks.
Makes 2 servings (about 16 ounces)
1 cup mixed frozen berries
½ avocado, cut into 4 pieces
½ cup baby spinach or kale
1 tablespoon coconut oil
1 cup water
1. Put all ingredients, in the order listed, into
a tall cup.
2.
Using the hand blender attachment, start
blending on Speed 1, gradually increasing
to Speed 3 until smooth, about 1 minute.
3.
Serve immediately.
Nutritional information per serving (8 ounces):
Calories 149 (4% from fat) • carb. 11g • pro. 1g
fat 12g • sat. fat 7g • chol. 0mg • sod. 5mg
calc. 16mg • fiber 5g

15
Mango-Lime Smoothie
For a creamier smoothie, increase the
amount of yogurt to ½ cup.
Makes 1 serving (about 8 ounces)
1 cup mango, fresh or frozen, cut
into 1-inch chunks
¹⁄
³
cup plain yogurt
1½ teaspoons fresh lime juice
½ teaspoon grated lime zest
¼ cup cold water (or coconut water)
1. Put all ingredients, in the order listed,
into a tall cup.
2.
Using the hand blender attachment, start
blending on Speed 1, gradually increasing
to Speed 3 until smooth, about 30 to 45
seconds.
3.
Serve immediately.
Nutritional information per serving
(when made with full-fat yogurt and water):
Calories 195 (15% from fat) • carb. 39g
pro. 5g • fat 3g • sat. fat 2g • chol. 10mg
sod. 53mg • calc. 156mg • fiber 3g
Sweet Protein Smoothie
Nut butter, banana and sweet dates — what’s
not to like? Plus, the combo is packed with
protein that is sure to fill you up.
Makes 1 serving (about 12 ounces)
1 banana, cut into 1-inch pieces
1 to 2 fresh dates, pitted
1 tablespoon nut butter
1 scoop (¼ cup) protein powder
1 teaspoon unsweetened cocoa
powder
¾ cup unsweetened almond milk
1. Put all ingredients, in the order listed,
into a tall cup.
2.
Using the hand blender attachment, start
blending on Speed 1, gradually increasing
to Speed 3 until smooth, about 30 to 45
seconds.
3.
Serve immediately.
Nutritional information per serving:
Calories 240 (52% from fat) • carb. 27g
pro. 23g • fat 6g • sat. fat 1g • chol. 0mg
sod. 232mg • calc. 95mg • fiber 5g
Matcha Latte
No need to bother your barista when
you can prepare this coffee shop favorite
at home.
Makes 2 servings
2 cups milk (any type, or alternative
milk)
2 teaspoons matcha powder
1 teaspoon honey or agave, optional
1. Put the milk into a small saucepan. Set
over medium heat and bring to a simmer.
2.
Once simmering, remove from heat and
add the matcha and sweetener, if using.
Using the hand blender attachment, blend
on Speed 1, keeping the blade end of the
blending blade just under the surface of
the mixture to produce the best froth.
3.
Divide between 2 glasses and serve
immediately.
Nutritional information per serving
(using nonfat milk):
Calories 90 (0% from fat) • carb. 13g • pro. 0g
fat 0g • sat. fat 0g • chol. 5mg • sod. 135mg
calc. 300mg • fiber 0g
Cold Brew Latte
Lattes need not be hot. Cool down
with this popular cold brew version.
If cold brew is not available, strong black
coffee, chilled, can be used.
Makes 1 serving
½ cup milk
1 cup cold brew
Ice, optional
1. Put ingredients into a tall cup.
2.
Using the hand blender attachment,
blend on Speed 1, keeping the blade of
the blending shaft just under the surface
of the mixture to produce the best froth.
3.
Add ice, if desired, and enjoy
immediately.
Nutritional information per serving:
Calories 59 (35% from fat) • carb. 5g
pro. 4g • fat 2g • sat. fat 1g • chol. 9mg
sod. 58mg • calc. 141mg • fiber 0g

16
Deviled Eggs
This timeless hors d’oeuvre is welcome at any
party or brunch table.
Makes 24 servings
12 large, hard-boiled eggs
½ cup mayonnaise
1½ teaspoons Dijon-style mustard
1½ teaspoons fresh lemon juice
1 teaspoon Worcestershire sauce
1 tablespoon capers, drained
½ teaspoon kosher salt
¼ teaspoon freshly ground black
pepper
Paprika for garnish
1. Peel the cooked eggs and carefully slice
in half. Place the egg white halves on a
clean work surface. Remove yolks and
put them into a medium mixing bowl.
Using the hand blender attachment,
blend on Speed 1 until yolks are broken
up into small pieces, about 45 seconds.
Add the remaining ingredients and blend,
on Speed 1, until completely smooth.
Taste and adjust seasoning as desired.
2.
Using either a small spoon, or a piping
bag fitted with a star tip, scoop or pipe
the yolk mixture into the center of each
white. Sprinkle with paprika before serving.
Nutritional information per serving:
Calories 54 (70% from fat) • carb. 1g • pro. 3g
fat 4g • sat. fat 1g • chol. 108mg • sod. 144mg
calc. 15mg • fiber 0g
Bacon and Swiss Quiche
An American take on the classic French
Quiche Lorraine, we substitute bacon for the
traditional lardons.
Makes 12 servings
½ recipe Pâte Brisée (page 38)
8 ounces thick-cut bacon, diced
1 small shallot, finely chopped
1 cup half & half
4 large eggs
Pinch kosher salt
Pinch freshly ground black pepper
1 cup finely shredded Gruyère cheese
(or another similar Swiss cheese)
1 tablespoon thinly sliced chives
1. Preheat oven to 350°F with one rack in
the lower position and one rack in the
middle position.
2.
Roll out the rested pâte brisée dough and
fit into a 9-inch tart pan with removable
bottom. Prick the bottom and sides of the
dough with the tines of a fork, being sure
to not pierce all the way through. Chill
until firm, 15 minutes in the freezer, or 30
minutes in the refrigerator. Once chilled,
line the dough with foil, and then weigh it
down with pie weights (dried beans or rice
work just as well). Place the tart pan in the
lower position of the preheated oven and
bake for 25 minutes, or until the dough
no longer looks wet. Carefully remove
the foil with weights and then move the
shell to the middle rack for an additional 5
minutes, or until lightly browned.
3.
Remove and allow to cool completely
before filling.
4.
In a medium to large skillet, cook the
diced bacon until browned and crispy.
Remove and transfer to a paper towel-lined
plate to drain excess oil. Remove all but
about 1 tablespoon of the bacon grease
and then return the skillet to the stove.
Set over medium-low heat and then add
the shallot. Sauté until softened. Remove
and allow to cool slightly.
5.
Put the half & half, eggs, salt, and pepper
into a medium mixing bowl. Using the
beaters, mix on Speeds 2 to 3 until
completely combined, about 1 minute;
you want to be sure there are no flecks
of egg yolk.
6.
Place the cooled tart pan onto a rimmed
baking sheet (this will make it easier to
transfer to the oven). Sprinkle the bacon
and shallot evenly on the bottom of the
blind-baked tart shell. Pour the half & half/
egg batter over the bacon and shallot,
and then top with the shredded cheese.
Sprinkle the chives on top of the cheese.
7.
Carefully place the filled shell on the pan
onto the middle rack of the preheated
oven. Bake until it is just set around the
edges, but still a little jiggly in the center,
about 20 to 22 minutes.
8.
Remove and allow to cool slightly before
slicing and serving.
Nutritional information per serving:
Calories 283 (72% from fat) • carb. 8g • pro. 11g
fat 23g • sat. fat 12g • chol. 120mg • sod. 571mg
calc. 76mg • fiber 0g

17
Ricotta-Thyme Tart
A very simple tart with only a handful
(or two) of ingredients. We keep it simple with
just ricotta, herbs and spices, but you can
top it with other items, such as microgreens,
grilled or sautéed vegetables, etc. If you need
a quick appetizer, skip the pastry dough and
just make the filling to serve as a dip
for veggies or as a spread on toasted
baguette slices.
Makes 12 servings
½ recipe Pâte Brisée (page 38)
15 to 16 ounces ricotta, strained
¾ ounce grated Pecorino Romano
1 teaspoon olive oil
1 teaspoon fresh thyme leaves
½ teaspoon fresh lemon juice
Pinch kosher salt
Pinch freshly ground black pepper
1. Preheat oven to 350°F with one rack in
the lower position and one rack in the
middle position.
2.
Roll out the rested pâte brisée dough and
fit it into a 9-inch tart pan with removable
bottom. Prick the bottom and sides of the
dough with the tines of a fork, being sure
to not pierce all the way through. Chill
until firm, 15 minutes in the freezer, or 30
minutes in the refrigerator. Once chilled,
line the dough with foil, and then weigh
it down with pie weights (dried beans or
rice work just as well). Place the tart pan
in the lower position of the preheated
oven and bake for 25 minutes, or until
the dough no longer looks wet. Carefully
remove the foil with weights and then
move the shell to the middle rack for an
additional 10 to 15 minutes, or until nicely
browned.
3.
Remove and allow to cool completely
before filling.
4.
Put the filling ingredients into a medium
mixing bowl. Using the beaters, mix on
Speeds 2 to 3 until completely combined,
about 40 seconds.
5.
Once the tart shell is completely cool,
fill with the ricotta filling. Serve at room
temperature.
Nutritional information per serving:
Calories 173 (67% from fat) • carb. 8g • pro. 6g
fat 13g • sat. fat 8g • chol. 36mg • sod. 170mg
calc. 112mg • fiber 0g
Spinach Artichoke Dip
A bit of a twist on the standard spinach
artichoke dip, for the more grown-up palate.
The combination of Gruyère and Parmesan
gives the dip a pleasant nuttiness. No special
pan required – we found that using a pie
plate was the best and quickest way to warm
this dish.
Makes 2 cups
Olive oil or nonstick cooking spray
12 ounces cream cheese, cut into
1-inch pieces, room temperature
2 ounces Gruyère cheese, finely grated
1 ounce Parmesan cheese,
finely grated
1 garlic clove, finely chopped
½ small shallot, finely chopped
8 ounces frozen chopped spinach,
thawed and drained well
1 can (15 ounces) quartered
artichoke hearts, drained
2 tablespoons heavy cream
½ teaspoon crushed red pepper
1. Preheat oven to 350°F with the rack in
the middle position. Lightly coat a 9-inch
pie or cake pan with olive oil or nonstick
cooking spray; reserve.
2.
Put the cream cheese in a large mixing
bowl. Using the beaters, mix on Speed
3 until softened, about 30 seconds. Add
remaining ingredients and mix on Speed
1 to fully combine, about 20 seconds.
3.
Transfer mixture to the prepared pie/cake
pan and transfer to the oven. Bake 20
minutes, and then broil for an additional
6 to 8 minutes, or until top is nicely
browned.
4.
Serve immediately with pita chips, crusty
bread, and crisp vegetables.
Nutritional information per serving
(2 tablespoons):
Calories 115 (76% from fat) • carb. 3g • pro. 4g
fat 10g • sat. fat 6g • chol. 30mg • sod. 218mg
calc. 71mg • fiber 1g

18
Buffalo Chicken Dip
For the big game or the next holiday
gathering, this dip is sure to please a hungry
crowd. The hand mixer makes quick work of
shredding cooked chicken. Use this trick for
weekly meal prep; shredded chicken can be
the foundation for countless meals.
Makes about 6 cups
Olive oil or nonstick cooking spray
1 whole roasted chicken, warm,
about 3½ pounds
1 celery stalk, cut into small dice
16 ounces (2 standard packages)
cream cheese, each package cut
into 4 pieces, room temperature
1 teaspoon kosher salt
½ teaspoon freshly ground black
pepper
6 to 8 tablespoons hot sauce*
1 cup crumbled blue cheese
1. Preheat oven to 375°F with the rack in the
middle position. Lightly coat the inside
of a 1½-quart baking dish with cooking
spray. Reserve.
2.
Remove all meat from the roasted
chicken (discard skin and bones) and put
into a large mixing bowl. Using the
beaters, mix on Speed 2 to shred the
chicken, about 30 seconds. Once
shredded, add the celery, cream cheese,
salt, pepper, and hot sauce. Continue to
mix on Speed 2 until ingredients are well
combined, about 1 minute.
3.
Transfer the dip to the prepared baking
dish and top with the crumbled blue
cheese. Bake for about 40 minutes, until
hot and bubbling.
4.
Serve with cut veggies, bread pieces,
or tortilla chips.
* We developed this recipe to be on the
milder side, so either adjust the hot sauce
accordingly or serve with some hot sauce on
the side, for those who like it extra spicy.
Nutritional information per serving (½ cup):
Calories 213 (75% from fat) • carb. 2g • pro. 12g
fat 18g • sat. fat 10g • chol. 69mg • sod. 704mg
calc. 64mg • fiber 0g
Pimento Cheese Spread
This recipe stays pretty close to the beloved
Southern dish. It can be spread on crackers
or toasted bread, or made as a twist on a
grilled cheese sandwich.
Makes about 2 cups
4 ounces cream cheese, cut into
1-inch pieces, room temperature
¼ cup mayonnaise
8 ounces sharp Cheddar, shredded
1 jar (7 ounces) pimentos, drained
½ teaspoon onion powder
¼ teaspoon kosher salt
Pinch freshly ground black pepper
2 dashes hot sauce
1. Put the cream cheese in a medium mixing
bowl. Using the beaters, mix on Speed 3
until softened, about 30 seconds.
Add remaining ingredients and mix on
Speed 2 to fully combine, about 20 seconds.
2.
Use immediately.
Nutritional information per serving
(2 tablespoons):
Calories 113 (83% from fat) • carb. 1g • pro. 4g
fat 10g • sat. fat 6g • chol. 25mg • sod. 174mg
calc. 101mg • fiber 0g
Guacamole
Our fresh guacamole is perfect for the
Sunday game or served alongside quesadillas
for a festive dinner.
Makes about 2 cups
1 garlic clove, peeled
½ jalapeño, seeded and cut into
1-inch pieces
½ small onion, cut into 1-inch pieces
1 tablespoon fresh cilantro leaves
3 ripe avocados, halved, pitted,
flesh scooped from skin and
roughly chopped
1 tablespoon fresh lime juice
½ to 1 teaspoon kosher salt
1. Put all the ingredients, in the order listed,
into a medium mixing bowl or a large,
wide, measuring cup. Using the hand
blender, press the blade of the blending
shaft into the avocado pieces and blend
on Speed 1 until mixture begins to
soften, about 15 to 20 seconds. Continue
blending with a gentle up-and-down
motion until desired texture is reached,
about 20 to 30 seconds longer.

19
2.
Taste and adjust seasoning as desired.
Serve immediately.
Nutritional information per serving
(2 tablespoons):
Calories 88 (74% from fat) • carb. 5g • pro. 1g
fat 8g • sat. fat 1g • chol. 0mg • sod. 147mg
calc. 9mg • fiber 4g
Hummus
This hummus is heavy on the sesame flavor,
so if you prefer a milder hummus, start
with 2 tablespoons of tahini and increase
as desired.
Makes about 2 cups
1 can (15.5 ounces) chickpeas,
rinsed and drained
¹⁄
³
cup tahini
½ cup cold water, plus more
as needed
2 tablespoons fresh lemon juice
2 garlic cloves, peeled
¾ teaspoon kosher salt
½ teaspoon ground cumin
Extra virgin olive oil, for finishing
Pinch za´atar (optional),
for finishing
1. Put all of the ingredients, in the order
listed, into a small mixing bowl, or a large,
wide, measuring cup. Using the hand
blender attachment, press the blade of
the blending shaft into chickpeas while
blending on Speed 1. As the mixture
starts to blend, increase to Speed 3 and
blend until fully smooth, about 40 to
60 seconds. If a thinner consistency is
desired, add water as needed.
2.
Taste and adjust seasoning as desired.
To serve, drizzle with olive oil and sprinkle
with za’atar (if using).
Nutritional information per serving
(2 tablespoons):
Calories 56 (47% from fat) • carb. 6g • pro. 2g
fat 3g • sat. fat 0g • chol. 0mg • sod. 80mg
calc. 32mg • fiber 2g
Creamy Mashed Potatoes
This recipe is a bit of a blank canvas. We
keep it simple, but it can easily be changed
by adding mix-ins or toppings, such as
chopped chives or scallions, crispy bacon
bits, or grated Cheddar.
Makes about 6 cups
2½ pounds Yukon Gold potatoes,
peeled and cut into 1-inch pieces
½ cup whole milk, room temperature
3 tablespoons unsalted butter, cut into
1-inch pieces, room temperature
¾ teaspoon kosher salt
½ teaspoon freshly ground black
pepper
½ cup mascarpone cheese or crème
fraiche, room temperature
1. Put the potatoes into a medium to
large stockpot; add cold water to cover
potatoes by 2 inches. Set over medium-
high heat to bring to a boil, and then
reduce to simmer until the potatoes are
very soft.
2.
Drain the potatoes and return to the
pot. Using the beaters, mix on Speeds
1 to 2 to mash to desired consistency,
about 30 seconds. Add the remaining
ingredients and mix on Speed 2 until fully
incorporated.
3.
Taste and adjust seasoning according to
preference.
Nutritional information per serving (½ cup):
Calories 117 (38% from fat) • carb. 16g • pro. 2g
fat 5g • sat. fat 3g • chol. 16mg • sod. 159mg
calc. 35mg • fiber 2g
Mashed Maple Sweet Potatoes
The perfect mix of fall flavors makes this dish
a must-have for the holiday table.
Makes about 6 cups
3 pounds sweet potatoes or yams,
peeled and cut into 1-inch pieces
2 teaspoons kosher salt, divided
4 tablespoons unsalted butter,
cut into 1-inch pieces, room
temperature
¼ cup orange juice
¼ cup maple syrup
½ teaspoon ground cinnamon
¹⁄
8 teaspoon freshly ground nutmeg
1. Put potatoes into a medium to large
stockpot and cover with water by 2
inches.

20
2.
Add 1 teaspoon of the salt to the pot and
place over medium-high heat. Bring water
to a boil and allow potatoes to simmer
until very tender. Drain water well and put
potatoes back in stockpot.
3.
Using the hand blender attachment on
Speed 2, mash the potatoes directly in
the pot to desired consistency.
4.
Add the remaining ingredients and mix on
Speed 2 until completely incorporated.
5.
Taste and adjust seasoning as desired.
Serve immediately.
Nutritional information serving (½ cup):
Calories 192 (18% from fat) • carb. 38g • pro. 2g
fat 4g • sat. fat 2g • chol. 10mg • sod. 189mg
calc. 26mg • fiber 5g
Cauliflower Mash
A great alternative to traditional mashed
potatoes, plus this recipe is dairy free.
Makes about 4 cups
1½ pounds cauliflower, cut into florets,
about 6 cups
½ pound Yukon Gold potatoes,
peeled and cut into 2-inch pieces
3 tablespoons extra virgin olive oil
1¼ teaspoons kosher salt
½ teaspoon freshly ground
black pepper
1. Put the cauliflower and potatoes into
a medium to large stockpot. Add cold
water to cover cauliflower and potatoes
by 2 inches. Set over medium-high heat
to bring to a boil, and then reduce to
simmer until the vegetables are very soft,
about 25 minutes, depending on the
stovetop and cookware being used.
2.
Once tender, drain the water, return to
the pot and set over medium-low heat.
Continue to cook until all water has
evaporated. Using the hand blender
attachment, mix on Speeds 1 to 2 to
mash to desired consistency, about 30
seconds. Add the remaining ingredients
and blend on Speed 2 until fully
incorporated.
3.
Taste and adjust seasoning according to
preference.
Nutritional information per serving (½ cup):
Calories 170 (28% from fat) • carb. 28g • pro. 5g
fat 6g • sat. fat 1g • chol. 0mg • sod. 375mg
calc. 41mg • fiber 6g
Spinach and Feta Soufflé
Soufflés are quite impressive. They grow to
a lofty, light, and airy dish that is surprisingly
filling. Be sure to serve it right out of the oven
for maximum height, and praise!
Makes 8 servings
6 tablespoons unsalted butter,
divided
½ cup Parmesan, grated, divided
5 large eggs
½ cup unbleached, all-purpose flour
1½ cups whole milk
3 ounces feta, broken into pieces
or crumbled
¼ teaspoon plus one pinch sea salt
¼ teaspoon freshly ground black
pepper
¹⁄
8 teaspoon freshly ground nutmeg
¼ teaspoon grated lemon zest
4 cups well-packed, fresh spinach
¼ teaspoon cream of tartar
1. Preheat oven to 325°F.
2.
Generously butter a 2-quart soufflé dish
thoroughly with 1 tablespoon of butter.
Sprinkle ¼ cup of Parmesan in the dish
so that the bottom and sides are coated.
Shake out any excess. Wipe the rim of
the dish with a paper towel to ensure that
no butter or cheese is on it; reserve.
3.
Separate eggs, placing each in separate
large mixing bowls. Break up yolks with a
fork. Reserve both.
4.
Place remaining butter in a saucepan over
medium-low heat. Once butter is melted,
stir flour into pan for 2 to 3 minutes in
order to cook off any raw flour taste.
Using the beaters, mix the butter/flour
mixture directly in the pan on Speeds 2
to 3, while slowly adding the milk. Once
all the milk is added, continue mixing,
increasing to Speed 6 until a smooth and
homogenous consistency is achieved.
Remove from heat and beat in remaining
Parmesan and feta, ¼ teaspoon salt,
pepper, nutmeg and lemon zest.
5.
Spoon a small amount of the milk mixture
into the yolks while simultaneously mixing
on Speed 1. Continue mixing in the
remaining mixture, one-third at a time.
Stir in the spinach; reserve.

21
6.
Replace the beaters in the hand mixer
with the whisk. Starting on Speed 1,
begin to whip the egg whites. After 1
to 2 minutes, once the whites begin to
show some bubbles around the edges,
gradually raise speed to 3. Once the
whites begin to foam, add the remaining
salt and the cream of tartar. Gradually
increase to Speed 7, until medium-stiff
peaks are achieved.
7.
Mix ½ cup of the egg whites into the
spinach mixture until evenly combined.
Continue by carefully folding in egg
whites with a large rubber spatula. Don’t
over-fold.
8.
Pour mixture into prepared dish and
gently smooth the top to ensure an even
rise. Bake in the middle of preheated
oven until golden and just set, about 45
to 50 minutes.
9.
Serve immediately.
Nutritional information per serving:
Calories 208 (64% from fat) • carb. 9g • pro. 9g
fat 15g • sat. fat 8g • chol. 167mg • sod. 416mg
calc. 175mg • fiber 1g
Sweet Potato Biscuits
Sweet potato lends moisture for supremely
light and tender biscuits.
We love these warm with butter and a simple
drizzle of honey or maple syrup.
Makes 12 biscuits
2 cups unbleached, all-purpose flour
2½ teaspoons baking powder
½ teaspoon baking soda
2 teaspoons granulated sugar
1 teaspoon kosher salt
6 tablespoons cold, unsalted butter,
cut into ½-inch cubes
²
⁄
³
cup cooked mashed or puréed
sweet potato (about 1 small
sweet potato)
½ cup buttermilk, cold
Nonstick cooking spray
Heavy cream, for brushing biscuits
1. Preheat oven to 400°F with the rack in
the middle position.
2.
Sift the flour, baking powder, baking soda,
sugar, and salt into a large mixing bowl.
Add the cold butter. Using the beaters,
begin to mix on Speed 1, pressing the
beaters into the cubes of butter to cut
them into the flour. Gradually increase to
Speed 3. Mix until only pea-sized pieces
of butter remain.
3.
Add the sweet potato and buttermilk.
Continue to mix until just combined, 15 to
30 seconds. The dough will be shaggy.
4.
Turn out the dough onto a lightly floured
surface. Roll out the dough, or press
with floured hands, into a rectangle.
Fold the dough in half and roll/press out
again, repeating this process 3 or 4 times
(folding creates layers in the dough). At
last, roll the dough into a rectangle of
¾-inch thickness. Use a 2½-inch round
cutter to cut out 12 biscuits, pressing
together scraps if necessary.
5.
Arrange the biscuits tightly in 3 rows
of 4 on a parchment-lined sheet pan.
Brush the tops with heavy cream. Bake
biscuits until puffed and golden, 20 to 22
minutes.
6.
Allow biscuits to rest for 5 minutes. Pull
apart and serve warm.
Nutritional information per biscuit:
Calories 145 (36% from fat) • carb. 19g • pro. 3g
fat 6g • sat. fat 4g • chol. 15mg • sod. 197mg
calc. 470mg • fiber 1g
Popovers
Light and airy, these are best served hot
out of the oven.
Makes 6 popovers
Softened butter for greasing the pan
3 tablespoons unsalted butter
1 cup whole milk
3 large eggs, room temperature
1 cup unbleached, all-purpose flour,
sifted
½ teaspoon kosher salt
1. Preheat oven to 450°F with the rack in
the lower third position. Heavily butter
a popover pan with softened butter.
Reserve.
2.
Put the 3 tablespoons of butter and milk
in a small saucepan set over medium-
low heat. Warm until butter has melted;
remove and cool to room temperature.
3.
Put the eggs into a large mixing bowl.
Add the cooled butter/milk mixture. Using
the beaters, begin to mix on Speed 1,
gradually increasing to Speed 3, until well
combined. Add the flour and salt and mix,

22
gradually increasing to Speed 5. Mix for
about a minute longer, or until the batter
is completely smooth, with no visible
lumps.
4.
Evenly divide the batter among the 6
cups of the buttered popover pan (it will
fill each to about ½ to
²
⁄
³
full). Put pan
directly on the oven rack and bake for
35 minutes, or until very deeply browned
and puffed. Do not open oven door while
popovers are baking or they may deflate.
5.
Remove from oven and carefully unmold
from pan. Serve immediately.
NOTE: Popovers are easily adaptable. You can
make them cheesy (stir ¼ cup finely shredded
cheese into the batter), herby (1½ teaspoons
of herbes de Provence or 2 tablespoons of
fresh chives), or sweet (once out of oven,
brush with melted butter and sprinkle with
cinnamon sugar).
Nutritional information per popover:
Calories 183 (46% from fat) • carb. 17g • pro. 7g
fat 9g • sat. fat 5g • chol. 128mg • sod. 146mg
calc. 60mg • fiber 1g
Cheese Calzones
We use our own pizza dough recipe,
but if you want to save time, store-bought
dough works just as well.
Makes 6 individual calzones
15–16 ounces whole-milk ricotta,
drained well
2 garlic cloves, finely chopped
2 ounces (½ cup) grated Parmesan
¼ teaspoon kosher salt
Pinch freshly ground black pepper
Pinch crushed red pepper flakes
3 tablespoons fresh basil, thinly
sliced or torn into small pieces
2 ounces shredded mozzarella
1 recipe (1½ pounds) Pizza/Focaccia
Dough (page 37)
Unbleached, all-purpose flour
(for dusting)
Cornmeal (for dusting)
Water, for sealing the dough
Olive oil, for brushing calzones
1. Preheat oven to 500°F. If you have a
pizza stone, place the stone on the oven
rack and preheat. Once the oven comes
to temperature, let stone heat for an
additional 30 minutes. This will add an
extra crispiness to your calzones.
2.
In a large bowl, combine the ricotta,
garlic, Parmesan, salt, pepper, and
crushed red pepper. Using the beaters,
mix on Speeds 2 to 3 to fully combine.
3.
Lightly dust work surface with flour.
Divide the dough into six equal pieces.
Lightly cover with plastic wrap until using.
4.
Roll one piece into a circle about 6 inches
in diameter. Spread a generous ½ cup of
filling onto the bottom half of the dough
circle, leaving a 1-inch border. Top with
a sprinkle of the basil and 2 tablespoons
of the mozzarella. Using your fingers,
or a small pastry brush, wet the outer
edge of the dough with water. Fold top
half over the filling and press the edges
of the dough together. Crimp the edges
all around to fully seal. Using a sharp
knife, cut 2 small slits into the top of the
calzone to allow steam to escape while
baking. Reserve on a cornmeal-dusted
baking sheet and repeat with remaining
rounds.
5.
Using a pizza peel or a large turner,
transfer prepared calzones to the
preheated pizza stone (if you are not
using a pizza stone, just keep the
calzones on the cornmeal-dusted baking
sheet). Bake in preheated oven for about
18 to 20 minutes, or until fully browned.
Let cool slightly before serving.
Nutritional information per calzone:
Calories 473 (36% from fat) • carb. 56g • pro. 21g
fat 10g • sat. fat 10g • chol. 44mg • sod. 1091mg
calc. 278mg • fiber 2g
Basic Tomato Sauce
A simple and delicious sauce.
Makes about 7 cups
2 tablespoons extra virgin olive oil
2 large garlic cloves, peeled
2 cans (28 ounces each) whole,
peeled tomatoes
10–15 fresh basil leaves
1 teaspoon kosher salt
1. Put olive oil into a medium saucepan over
medium heat. When oil is hot, add garlic
and cook until lightly golden and fragrant,
2 to 3 minutes. Add tomatoes, cover and
reduce heat to simmer, stirring frequently,

23
until sauce is reduced slightly and
thickened, about 20 to 25 minutes.
2.
Remove sauce from heat. Discard garlic
cloves if desired. Using the hand blender
attachment, blend on Speed 1, using a
gentle up-and-down motion. Increase to
Speed 2 until smooth, about 1½ minutes,
or until desired consistency is achieved.
3.
Tear up basil and add to sauce. Add salt,
taste and adjust seasoning as needed.
Nutritional information per serving (½ cup sauce):
Calories 58 (43% from fat) • carb. 7g • pro. 1g
fat 3g • sat. fat 0g • chol. 0mg • sod. 557mg
calc. 28 mg • fiber 1g
Bright Greens Soup
The potatoes add a false creaminess to
this yummy, blended soup that is a perfect
springtime lunch.
Makes about 5 cups
3 tablespoons olive oil, divided
1 medium onion, chopped
1 clove garlic, chopped
¾ teaspoon kosher salt, divided
Pinch freshly ground black pepper
3 cups chicken or vegetable broth,
low sodium (be sure it is light in
color. Some vegetable broths can
be dark brown, and this will make
the finished soup dark)
8 ounces Yukon Gold potatoes,
peeled and cut into 1-inch pieces
10 ounces baby spinach
2 ounces watercress (optional. If you
cannot find watercress, or wish
not to use it, you can substitute
additional spinach in its place)
Pinch ground nutmeg
2 tablespoons fresh lemon juice
1. Put the oil into a medium stockpot or
large saucepan set over medium-low
heat. Once hot, add the onion and garlic
with a pinch of the salt and pepper.
Cook until softened and fragrant, about
4 minutes.
2.
Add the broth and the potatoes.
Increase heat to high to bring to a boil.
Once boiling, reduce to a simmer and
cook, partially covered, until potatoes
are soft, about 12 to 15 minutes.
3.
Remove the pot from the heat and stir
in the spinach and watercress. Stir until
wilted and then add the nutmeg and
lemon juice.
4.
Using the hand blender attachment,
blend on Speed 1, gradually increasing
to Speed 3, until smooth. If using a larger
saucepan, tilt the pan to one side, away
from you, to ensure that the protective
guard of the blade is fully submerged to
prevent splatter.
5.
Taste and adjust seasoning as desired.
Nutritional information per serving (1 cup):
Calories 135 (54% from fat) • carb. 12g • pro. 4g
fat 9g • sat. fat 1g • chol. 0mg • sod. 760mg
calc. 79mg • fiber 3g
Winter White Bean Soup
A rich and creamy soup, serve with a nice,
crusty loaf of bread.
Makes about 6 cups
4 slices bacon, finely chopped
1½ teaspoons olive oil, divided
1 garlic clove, chopped
1 medium onion, chopped
1 celery stalk, chopped
½ teaspoon kosher salt, divided
1 tablespoon dry white wine,
or vermouth
2 cans (15.5 ounces each) cannellini
beans, drained, or 1 pound dried,
soaked overnight*
1 rosemary sprig
1 bay leaf
Pinch freshly ground black pepper
4 cups chicken or vegetable broth,
low sodium (be sure it is light in
color. Some vegetable broths can
be dark brown, and this will make
the finished soup dark)
Grated Parmesan for garnish
1. Put the bacon into a medium stockpot
or large saucepan set over medium heat.
Cook until crispy. Remove and reserve.
2.
When bacon is done cooking and has
been reserved, reduce the heat to
medium low. Add the olive oil. Once
hot, add the chopped vegetables with a
pinch of the salt to the pot. Sauté until
softened, about 4 to 6 minutes. Add the

24
wine/vermouth, stirring to deglaze the
pan (picking up the brown bits from the
bottom of the pan and working them
into the mixture); let cook until fully
evaporated. Add the beans, rosemary,
bay leaf, remaining salt and pepper and
stir to mix. Heat until beans are warmed
through, about 4 to 5 minutes. Add the
broth and increase the heat to bring to
a boil. Once boiling, reduce heat and
simmer, partially covered, for about 60 to
75 minutes. Remove the rosemary sprig
and bay leaf.
3.
Using the hand blender attachment,
blend on Speed 1, gradually increasing
to Speed 3, until smooth. If using a larger
saucepan, tilt the pan to one side, away
from you, to ensure that the protective
guard of the blade is fully submerged to
prevent splatter.
4.
Taste and adjust seasoning as desired.
Garnish with a sprinkling of the cooked
bacon and grated Parmesan.
* When using soaked, dried beans, you may
need to add more broth and a bit more salt
as well.
Nutritional information per serving (1 cup):
Calories 245 (9% from fat) • carb. 36g • pro. 18g
fat 2g • sat. fat 0g • chol. 0mg • sod. 500mg
calc. 119mg • fiber 13g
Lemon Thyme Shortbread
While thyme may seem like an unlikely
ingredient for a sweet cookie, you will quickly
learn why these are so popular.
Makes about 3 dozen cookies
Cookie Dough:
1¾ cups unbleached, all-purpose flour
½ teaspoon kosher salt
16 tablespoons (2 sticks; ½ pound)
European style, unsalted butter,
cut into 8 pieces, room temperature
¹⁄
³
cup granulated sugar
¹⁄
³
cup confectioners’ sugar, sifted
2 large egg yolks, room temperature
1 to 2 tablespoons fresh thyme leaves
2 tablespoons grated lemon zest
Lemon Icing:
½ cup confectioners’ sugar, sifted
2 tablespoons heavy cream
2 teaspoons fresh lemon juice
Pinch fine sea salt
1. Put the flour and salt into a medium
mixing bowl. Using the beaters, mix
on Speed 1 to fully combine, about 30
seconds. Reserve.
2.
Put the butter into a large mixing bowl.
Mix on Speeds 2 to 3 until creamy, then
add the sugars. Mix on Speeds 2 to 3
until light, then add the egg yolks and mix
until combined. Add the dry ingredients
and mix on Speed 2 until evenly mixed.
Add the thyme and lemon zest and gently
mix into dough.
3.
Divide dough into two discs. Wrap in
wax paper/parchment, then wrap well in
plastic wrap, and refrigerate overnight.
4.
Take dough out of fridge to soften slightly.
Preheat oven to 350°F with two racks in
the lower and upper middle thirds of the
oven. Line two rimmed baking sheets
with parchment paper.
5.
Roll dough out to ¼-inch thickness and
use a 1½-inch round cutter to form small
discs. Put onto baking sheets and chill for
about 10 minutes.
6.
Bake chilled cookies for about 12
minutes, until just browned around the
edges, rotating pans if necessary. Cool
cookies completely.
7.
While cookies are cooling, prepare the
icing. Put all of the ingredients into a
medium mixing bowl and mix on Speed 1
until very smooth. If the icing appears to
be too thick, add more cream, 1 teaspoon
at a time. If it appears to be too thin, add
more confectioners’ sugar, 1 teaspoon at
a time. Spread on top of cooled cookies
as desired.
Nutritional information per cookie
(with ½ teaspoon icing):
Calories 89 (56% from fat) • carb. 9g • pro. 1g
fat 5g • sat. fat 3g • chol. 25mg • sod. 32mg
calc. 2mg • fiber 0g

25
Strawberry Sandwich Cookies
The great part about these cookies is that you
can enjoy the taste of summer fruit any time
of year, thanks to the intense flavor in freeze-
dried strawberries. Adjust the amount in the
filling if a richer strawberry flavor is desired.
Makes about 2 dozen sandwich cookies
Cookie Dough:
1¾ cups unbleached, all-purpose flour
½ teaspoon kosher salt
16 tablespoons (2 sticks; ½ pound)
European style, unsalted butter,
cut into 8 pieces, room temperature
¹⁄
³
cup granulated sugar
¼ cup confectioners’ sugar, sifted
½ teaspoon pure vanilla extract
1 cup freeze-dried strawberries,
finely ground and sifted*
2 large egg yolks, room temperature
Strawberry Filling:
4 tablespoons unsalted butter,
room temperature
2 ounces cream cheese,
room temperature
2 cups confectioners’ sugar, sifted
Pinch kosher salt
2 tablespoons whole milk, room
temperature
¼ teaspoon pure vanilla extract
½ cup freeze-dried strawberries,
finely ground and sifted*
1. Prepare the cookie dough. Put the flour
and salt into a medium mixing bowl.
Using the beaters, mix on Speed 1 to fully
combine, about 30 seconds. Reserve.
2.
Put the butter into a large mixing bowl.
Mix on Speeds 2 to 3 until creamy, then
add the sugars and vanilla extract. Mix
on Speeds 2 to 3 until light, then add the
egg yolks and mix until combined. Add
the dry ingredients and mix on Speed
2 until evenly mixed. Add the ground
strawberries and mix until fully combined.
3.
Divide dough into two discs. Wrap in
wax paper/parchment, then wrap well in
plastic wrap. Refrigerate overnight.
4.
Take dough out of fridge to soften slightly.
Preheat oven to 350°F with two racks in
the lower and upper thirds of the oven.
Line two rimmed baking sheets with
parchment paper.
5.
Roll dough out to ¼-inch thickness and
use a 1½-inch round cutter to form small
discs. Put onto baking sheets and chill for
about 10 minutes.
6.
Bake chilled cookies for about 12
minutes, until just set, rotating pans if
necessary – you want to avoid browning
of any kind. Cool cookies completely.
7.
While cookies are cooling, prepare the
filling. Put the butter and cream cheese
into a large mixing bowl. Again, using the
beaters, mix on Speeds 2 to 3 to soften
and fully combine, about 1 minute. Add
the sugar, salt, milk, and vanilla extract
and mix on Speeds 1 to 3 until light and
fluffy. Add the ground strawberries and
mix on Speed 1 until fully incorporated.
8.
Once cookies are fully cooled, scoop
filling onto the bottom of one cookie,
about 1 tablespoon, and then top with
another cookie to make a sandwich.
Repeat with remaining cookies.
* A spice or coffee grinder is the best way to
achieve the finest grind.
Nutritional information per cookie sandwich:
Calories 201 (47% from fat) • carb. 25g • pro. 1g
fat 10g • sat. fat 7g • chol. 43mg • sod. 57mg
calc. 8mg • fiber 1g
Buckwheat Chocolate
Chunk Cookies
The nuttiness of the buckwheat is a perfect
match for chunks of bittersweet chocolate.
Makes about 4 dozen cookies
1½ cups unbleached, all-purpose flour
¾ cup buckwheat flour (or may
substitute whole-wheat flour)
1 teaspoon baking soda
1 teaspoon kosher salt
½ teaspoon espresso powder
16 tablespoons (2 sticks) unsalted
butter, cut into 1-inch pieces,
room temperature
1 cup packed light brown sugar
½ cup granulated sugar
2 large eggs, room temperature
1½ teaspoons pure vanilla extract
2 cups chopped bittersweet chocolate
Flaked sea salt, for sprinkling

26
1. Put the flours, baking soda, salt, and
espresso powder into a medium mixing
bowl. Using the beaters, mix on Speed
1 to fully combine, at least 30 seconds.
Reserve.
2.
Put the butter into a large mixing bowl.
Mix, starting at Speed 1 and increasing
to Speed 3, until light and creamy. Add
the sugars and mix on Speeds 2 to 4
until very light, scraping down the sides
of the bowl as necessary, where it seems
that much of the sugar has dissolved
into the butter, about 2 minutes. Add the
eggs, one at a time, mixing on Speed 2,
and then the vanilla extract. Add the dry
ingredients and mix on Speed 2 until just
combined, and then add the chopped
chocolate and mix on Speed 2 until
evenly incorporated.
3.
Scoop the dough into even, golf ball-
sized rounds and place on a parchment-
lined tray or baking sheet. Wrap well and
allow to chill for a minimum of 1 hour, or
up to overnight.
4.
Preheat oven to 350°F with racks in the
lower and upper thirds of the oven. Line
two baking sheets with parchment paper.
5.
Once the oven has preheated, place the
chilled dough onto the baking sheets and
bake until just browned and set at the
edges, about 15 minutes. Remove and
immediately sprinkle baked cookies with
a pinch of flaked sea salt. Allow pans to
cool prior to baking remaining dough.
Nutritional information per cookie:
Calories 137 (48% from fat) • carb. 17g • pro. 2g
fat 8g • sat. fat 4g • chol. 18mg • sod. 78mg
calc. 3mg • fiber 1g
Crunchy Peanut Butter
Chip Cookies
Using a mixture of creamy peanut butter
and shelled, roasted peanuts makes each
bite of these tender cookies packed full of
peanut flavor.
Makes about 5 dozen cookies
2 cups unbleached, all-purpose flour
¾ teaspoon kosher salt
½ teaspoon baking powder
¼ teaspoon baking soda
16 tablespoons (2 sticks) unsalted
butter, cut into 1-inch pieces,
room temperature
1½ cups creamy peanut butter,
preferably unsweetened (both
traditional and natural styles work
well, just be sure to fully stir the
natural to prevent separation)
1 cup packed light brown sugar
½ cup granulated sugar
2 large eggs, room temperature
1 teaspoon pure vanilla extract
1 cup roasted, unsalted peanuts
½ cup miniature chocolate chips
Turbinado sugar mixed with flaked
sea salt, for sprinkling
1. Preheat oven to 350°F with racks in the
lower and upper thirds of the oven. Line
two baking sheets with parchment paper.
2.
Put the flour, salt, baking powder, and
soda into a medium mixing bowl. Using
the beaters, mix on Speed 1 to fully
combine, at least 30 seconds. Reserve.
3.
Put the butter and peanut butter into
a large mixing bowl. Mix, starting at
Speed 2 and increasing to Speed 5, until
homogenous, about 2 minutes. Scrape
down the sides of the bowl and then add
the sugars. Mix on Speeds 2 to 4 until
very light, where it seems that much of
the sugar has dissolved into the butter/
peanut butter, about 2 minutes. Add the
eggs, one at a time, mixing on Speeds 2
to 3, and then the vanilla extract. Add the
dry ingredients and mix on Speed 2 until
just combined, and then add the peanuts
and chocolate chips. Mix on Speed 2
until evenly combined.
4.
Scoop the dough into evenly sized, golf-
ball rounds and place on a parchment-
lined tray or baking sheet. Press each
round down with a fork and then sprinkle
with the sugar and flaked sea salt.
5.
Bake in the preheated oven until just set
at the edges, about 12 to 15 minutes.
Allow pans to cool before baking
remaining dough.
Nutritional information per cookie:
Calories 124 (57% from fat) • carb. 11g • pro. 3g
fat 8g • sat. fat 3g • chol. 15mg • sod. 70mg
calc. 7mg • fiber 1g

27
Ginger Cookies
Not your ordinary ginger cookie. We up the
zing with chopped, crystalized ginger in these
chewy and spicy treats.
Makes about 2½ dozen cookies
2¼ cups unbleached, all-purpose flour
1 teaspoon baking soda
1 tablespoon ground ginger
1 teaspoon ground cinnamon
½ teaspoon ground allspice
¾ teaspoon kosher salt
¼ cup finely chopped crystalized
ginger
12 tablespoons (1½ sticks) unsalted
butter, cut into 1-inch pieces,
room temperature
¼ cup molasses
¾ cup packed light brown sugar
¼ cup granulated sugar
1 large egg, room temperature
1 teaspoon pure vanilla extract
¹⁄
³
cup turbinado sugar, for rolling
1. Preheat oven to 350°F with racks in the
lower and upper thirds of the oven. Line
two baking sheets with parchment paper.
2.
Put the flour, baking soda, spices, and
salt into a medium mixing bowl. Using
the beaters, mix on Speed 1 to fully
combine, at least 30 seconds. Add the
chopped ginger and mix on Speed 1 to
coat; reserve.
3.
Put the butter and molasses into a large
mixing bowl. Mix, starting at Speed 2 and
increasing to Speed 5, until homogenous,
about 2 minutes. Scrape down the sides
of the bowl and then add the sugars.
Mix on Speeds 2 to 4 until very light,
where it seems that much of the sugar
has dissolved into the butter/molasses,
about 2 minutes. Add the egg, mixing
on Speeds 2 to 3, and then the vanilla
extract. Add the dry ingredients and mix
on Speed 2 until just combined.
4.
Put the turbinado sugar into a shallow
bowl or baking pan.
5.
Scoop the dough into evenly sized,
golf-ball rounds. Roll in the turbinado
sugar and then place the sugared dough
on a parchment-lined tray or baking
sheet. Gently press each round down
with the bottom of a clean glass.
6.
Bake in the preheated oven until just set
at the edges, about 12 to 15 minutes.
Allow pans to cool before baking
remaining dough.
Nutritional information per cookie:
Calories 96 (23% from fat) • carb. 18g • pro. 1g
fat 2g • sat. fat 2g • chol. 12mg • sod. 99mg
calc. 10mg • fiber 0g
No-Bake Keto Bites
Packed full of good-for-you fat and protein,
just one of these bites will fill you up and
keep you energized.
Makes 16 bites
½ cup almond butter
2 tablespoons coconut oil
2 tablespoons chia seeds
1 cup shredded, unsweetened
coconut
1 tablespoon cocoa powder
1 teaspoon pure vanilla extract
2 teaspoons granulated monk
fruit sweetener or ½ teaspoon
granulated stevia
¼ teaspoon kosher salt
½ teaspoon ground cinnamon
1. Put all of the ingredients into a large
mixing bowl. Using the beaters, mix
on Speeds 1 to 3 until completely
incorporated, about 1 minute.
2.
Scoop the dough into desired-size
pieces and form into balls (gloves are
recommended). Chill in the refrigerator
for a minimum of 30 minutes, or in the
freezer for 10 minutes before enjoying.
Nutritional information per bite:
Calories 148 (58% from fat) • carb. 6g • pro. 3g
fat 10g • sat. fat 5g • chol. 0mg • sod. 39mg
calc. 47mg • fiber 2g

28
Edible Cookie Dough
(with variations)
Eat that dough guilt free (well, egg free!)
with one of our edible cookie dough recipes.
There are gluten-free options, as well as a
kid-favorite snickerdoodle. Eat by the scoop,
or even crumble into vanilla ice cream; there
are so many possibilities.
Makes 3½ cups
8 tablespoons (1 stick) unsalted
butter, cut into 4 pieces, room
temperature
²⁄
³
cup packed light brown sugar
¹⁄
³
cup granulated sugar
2 tablespoons milk (any fat variety or
nondairy alternative)
1 tablespoon pure vanilla extract
1¹⁄
³
cups unbleached, all-purpose flour
(you can substitute a gluten-free,
all-purpose flour blend)
½ teaspoon kosher salt
1 cup semisweet chocolate chips
1. Put the butter and sugars into a large
mixing bowl. Using the beaters, mix on
Speeds 2 to 4 until very light and creamy,
about 2 minutes. Stop to scrape down
sides of bowl as needed.
2.
While mixing on Speed 2, add the milk
and vanilla extract. Add the flour and
salt and mix on Speed 2 until completely
combined. Add the chips and mix on
Speed 2.
3.
Scoop the dough into desired-size
pieces. While the dough can be eaten
right away, it is best eaten chilled.
Variations:
Snickerdoodle:
Add ½ teaspoon ground cinnamon and
do not add the chocolate chips. Scoop into
tablespoon-size balls and roll in cinnamon
sugar.
Oatmeal Cranberry:
Add ½ cup rolled oats and ¼ teaspoon
ground cinnamon with the flour. Substitute
dried cranberries for the chocolate chips.
Nutritional information per serving
(1 tablespoon, Chocolate Chip):
Calories 55 (41% from fat) • carb. 8g • pro. 0g
fat 3g • sat. fat 2g • chol. 4mg • sod. 22mg
calc. 2mg • fiber 0g
Nutritional information per serving
(1 tablespoon, Snickerdoodle):
Calories 42 (35% from fat) • carb. 6g • pro. 0g
fat 2g • sat. fat 1g • chol. 4mg • sod. 21mg
calc. 1mg • fiber 0g
Nutritional information per serving
(1 tablespoon, Oatmeal Cranberry):
Calories 49 (32% from fat) • carb. 8g • pro. 0g
fat 2g • sat. fat 1g • chol. 4mg • sod. 22mg
calc. 1mg • fiber 0g
Bittersweet Espresso Brownies
Rich and fudgy, these brownies are for the
true chocolate lover.
Makes 16 brownies
Nonstick cooking spray
¾ cup (1½ sticks) unsalted butter,
cubed
4 ounces unsweetened chocolate,
chopped
4 ounces bittersweet chocolate,
chopped
2 tablespoons cocoa powder
2 teaspoons espresso powder
½ cup unbleached, all-purpose flour
¾ teaspoon kosher salt
3 large eggs, room temperature
1½ cups granulated sugar
2 teaspoons pure vanilla extract
1. Preheat oven to 350°F with the rack in
the middle position. Lightly coat a 9-inch
square baking pan with nonstick cooking
spray and line with parchment paper;
reserve.
2.
Put the butter and both chocolates into
a heatproof bowl and place over a pot
of simmering water. Once the butter/
chocolate mixture is almost completely
melted, stir in cocoa powder and
espresso powder. When chocolate is
completely melted, stir in flour and salt;
set aside to cool to room temperature.
3.
Put the eggs into a large mixing bowl.
Using the beaters, beat the eggs, on

29
Speed 2, to break them up slightly,
then gradually add the sugar. Increase
to Speed 4 and mix until light and
thickened, about 2 to 3 minutes. Add
the vanilla extract and mix until well
combined. Add the cooled chocolate
mixture into the egg mixture and gently
mix on Speed 1, until the batter is no
longer streaky, but be sure not to add too
much air. Pour the batter into prepared
pan. Tap pan on the counter a few times
to remove any air bubbles.
4.
Bake in the preheated oven for 25 to 30
minutes, or until edges are just dry. Cool
completely before cutting and serving.
Nutritional information per brownie:
Calories 249 (54% from fat) • carb. 28g • pro. 3g
fat 16g • sat. fat 10g • chol. 57mg • sod. 120mg
calc. 12mg • fiber 2g
Blonde Brownies (Blondies)
Often the sweeter, and obviously lighter,
cousin of the brownie, this recipe is rather
traditional, but it can easily be altered by
changing the type of chips or nuts to make it
your own.
Makes 24 blonde brownies
Unsalted butter, softened,
or nonstick cooking spray
2 cups unbleached, all-purpose flour
1½ teaspoons kosher salt
½ teaspoon ground cinnamon
16 tablespoons (2 sticks) unsalted
butter, cubed, room temperature
½ cup granulated sugar
1 cup packed light brown sugar
3 large eggs, room temperature
1 tablespoon pure vanilla extract
1½ cups bittersweet chocolate, chopped
1 cup white chocolate chips
1 cup walnuts
1. Preheat oven to 350°F with the rack in
the middle position. Lightly coat a 13 x
9-inch baking pan with softened butter
or nonstick cooking spray; line with
parchment paper. Reserve.
2.
Put the flour, salt, and cinnamon into a
medium bowl. Using the beaters, mix on
Speed 1 for about 20 seconds, or until
fully combined, reserve.
3.
Put the butter into a large mixing bowl.
Using Speed 3, beat until lightened, about
30 seconds. Gradually add both sugars
and beat on Speed 4 until lightened,
another 30 seconds to 1 minute. Reduce
to Speed 3 and add the eggs, one at a
time, and the vanilla extract; mix until well
combined. Reduce to Speed 1 and slowly
add the dry ingredients. Once almost
fully mixed, add the chopped chocolate,
chips, and nuts.
4.
Transfer mixture to the prepared pan.
Bake in the preheated oven until edges
are set and lightly browned, about 30
to 35 minutes. The brownies should be
fully cooled before cutting.
Nutritional information per blonde brownie:
Calories 320 (48% from fat) • carb. 39g • pro. 3g
fat 18g • sat. fat 10g • chol. 45mg • sod. 150mg
calc. 10mg • fiber 1g
Blueberry Crumble Bars
When you cannot decide between a cookie and
a crumble, this dessert satisfies both cravings.
Makes 12 servings
Nonstick cooking spray
Crust:
8 tablespoons (1 stick) unsalted
butter, cut into 4 pieces, room
temperature
¼ cup packed light brown sugar
2 tablespoons granulated sugar
1¼ cups unbleached, all-purpose flour
¼ teaspoon kosher salt
Pinch ground cinnamon
Filling:
¼ cup granulated sugar
¼ cup packed light brown sugar
2 tablespoons tapioca starch
¼ teaspoon kosher salt
Pinch ground cinnamon
Pinch ground ginger
¼ teaspoon pure vanilla extract
4 cups fresh blueberries
Topping:
¾ cup unbleached, all-purpose flour
½ cup rolled oats (not quick cooking)
½ cup packed light brown sugar
¼ teaspoon ground cinnamon
¼ teaspoon kosher salt
6 tablespoons unsalted butter,
cubed, cold

30
1. Lightly coat a 9-inch square baking pan
with nonstick cooking spray and line with
parchment paper; reserve.
2.
Prepare the crust. Put the butter and
sugars into a medium mixing bowl.
Using the beaters, mix on Speeds 2 to
3 until creamy. Add the remaining crust
ingredients and mix on Speed 2 until
combined. Transfer the crust mixture into
the prepared pan and press down firmly
to pack into the bottom of the pan. Chill
in refrigerator until firm.
3.
While the crust is chilling, prepare the
filling. Put the sugars, starch, salt, and
spices into a large mixing bowl; using
the beaters, mix on Speed 1 to combine.
Add the vanilla extract and blueberries
and stir until blueberries are well coated.
Then mix on Speed 1 until about half of
the blueberries have burst open, about 2
minutes. Reserve.
4.
Put all of the topping ingredients, except
for the butter, into a medium mixing bowl.
Mix on Speed 1 to combine. Add the
butter and mix on Speed 2 until large
crumbs form.
5.
Once the crust has sufficiently chilled,
preheat oven to 350°F with the rack in
the middle position. When the oven
is preheated, bake until crust is firm and
golden at the edges, about 20 minutes.
Remove and spread filling on top of the
hot, baked crust and return to the oven
for an additional 15 minutes, or until
it’s bubbling at the edges. Cover evenly
with the crumb topping and return to the
oven for a final 15 minutes. The bars
are done when the topping is evenly
browned.
6.
Cool completely prior to cutting and
serving.
Nutritional information per bar:
Calories 282 (41% from fat) • carb. 39g • pro. 3g
fat 13g • sat. fat 8g • chol. 35g • sod. 143mg
calc. 4mg • fiber 2g
Golden Layer Cake
The go-to cake recipe for all of the “yellow
cake” lovers out there. This goes well with
just about any filling and frosting, but we
especially love it with our summer-inspired
Berries and Cream Frosting (recipe follows).
Makes two 9-inch layers (16 servings)
Nonstick cooking spray
3 cups cake flour, not self-rising
1¾ cups granulated sugar
1 tablespoon baking powder
¾ teaspoon kosher salt
2 large eggs, room temperature
2 large egg yolks, room temperature
1½ cups buttermilk, room temperature
2 teaspoons pure vanilla extract
1 cup vegetable oil
1. Preheat oven to 350°F with the rack in
the middle position. Spray two 9-inch
cake pans with nonstick cooking spray
and line the bottoms with parchment
paper. Reserve.
2.
Put the flour, sugar, baking powder, and
salt together into a large mixing bowl.
Using the beaters, mix on Speed 1 to
fully combine, a minimum of 30 seconds.
Reserve.
3.
Put the eggs, yolks, buttermilk, and
vanilla extract together into a medium
bowl. Mix on Speed 3.
4.
Reduce to Speed 2, gradually add the
oil to the dry ingredients and mix until
combined, then increase to Speeds 4 to
5 and mix until completely homogenous,
about 1½ minutes.
5.
Gradually add the egg/buttermilk mixture
and mix on Speed 2 until completely
combined.
6.
Divide batter between the two prepared
cake pans. Tap gently on the countertop
to remove bubbles and place in
preheated oven. Bake until the center
springs back
to the touch and a cake tester comes
out clean when inserted in the center,
about 25 minutes.
7.
Remove from oven, cool in pans on a
wire rack until cool to the touch, then
transfer cakes to a wire cooling rack to
cool completely before frosting.
Nutritional information per serving (unfrosted):
Calories 324 (42% from fat) • carb. 43g • pro. 4g
fat 16g • sat. fat 2g • chol. 47mg • sod. 225mg
calc. 52mg • fiber 0g

31
Berries and Cream Frosting
The flavor, and color, can be adjusted by the
number of freeze-dried berries that are used
in the recipe. Start with ½ cup and then add
more as desired.
Makes about 3 cups, enough to frost one
9-inch layer cake (16 servings)
8 tablespoons (1 stick) unsalted
butter, cut into 8 pieces, room
temperature
4 ounces cream cheese, cut into
4 pieces, room temperature
4 cups (1 pound) confectioners’
sugar, sifted
¼ teaspoon kosher salt
¼ cup whole milk or heavy cream
2 tablespoons light corn syrup
(optional, if a shiny finish is desired)
½ cup freeze-dried berries, preferably
raspberries or strawberries, or a
mix of the two, finely ground (using
a spice grinder works best for this
task) and sifted
1. Put the butter and cream cheese into a
large mixing bowl. Using the beaters, mix
on Speeds 2 to 4 to lighten and combine,
about 2 minutes. Add the confectioners’
sugar and salt and mix until fully
combined, about 1 minute.
2.
While mixing on Speed 1, gradually add
the milk (or cream) and continue to mix
until lightened. If using light corn syrup,
mix in at this time as well, using Speed 1.
3.
Add the finely ground, sifted berries and mix
to desired consistency. Use immediately.
NOTE: If not using immediately, cover with
a damp towel and plastic wrap and keep at
room temperature until ready to use.
Nutritional information per serving (3 tablespoons):
Calories 214 (34% from fat) • carb. 35g • pro. 1g
fat 8g • sat. fat 5g • chol. 23mg • sod. 62mg
calc. 6mg • fiber 0g
Deep Chocolate Layer Cake
Frost this moist chocolate cake with our
Cream Cheese Frosting on page 32.
Makes two 9-inch cakes (16 servings)
Unsalted butter, softened,
or nonstick cooking spray
6 ounces bittersweet chocolate,
chopped
¾ cup cocoa powder, Dutch process,
sifted
2 teaspoons espresso powder
½ teaspoon baking soda
1 cup boiling water
2½ cups unbleached, all-purpose flour
1 cup granulated sugar
½ cup packed light brown sugar
1 teaspoon baking powder
¾ teaspoon kosher salt
1 cup vegetable oil
1 cup buttermilk, room temperature
4 large eggs, lightly beaten,
room temperature
2 teaspoons pure vanilla extract
1. Preheat oven to 350°F with the rack in
the middle position. Grease two 9-inch
round cake pans with cooking spray or
softened butter and line the bottoms with
parchment paper. Reserve.
2.
Put the bittersweet chocolate, cocoa
powder, espresso powder, and baking
soda into a medium bowl and pour the
boiling water over the ingredients. Stir
until chocolate has melted. Cool to room
temperature and reserve.
3.
Put the flour, sugars, baking powder, and
salt into a large mixing bowl. Using the
beaters, mix on Speed 2 until fully
combined, a minimum of 30 seconds.
Reserve.
4.
Using Speed 2, mix the oil, buttermilk,
eggs, and vanilla extract into the cooled
chocolate mixture.
5.
While mixing on Speed 2, slowly add the
liquid mixture to the dry ingredients. Mix
until smooth, about 1 minute, stopping as
necessary to scrape entire bowl.
6.
Divide the batter evenly between the
prepared pans. Bake in preheated oven
until a cake tester comes out clean when
inserted into the center, about 30 to 35
minutes.
7.
Remove from oven and cool in pans on a
wire rack until cool to the touch. Cool
cakes completely before frosting.
Nutritional information per serving (unfrosted):
Calories 345 (50% from fat) carb. 41g • pro. 6g
fat 21g • sat. fat 5g • chol. 47mg • sod. 195mg
calc. 31mg • fiber 3g

32
Cream Cheese Frosting
A classic cream cheese frosting,
perfect for a variety of cakes, especially
carrot and chocolate.
Makes about 5 cups
5½ cups confectioners’ sugar, sifted
¼ teaspoon kosher salt
1 pound (two standard 8-ounce
packages) cream cheese,
room temperature
8 tablespoons (1 stick) unsalted
butter, cut into 1-inch pieces,
room temperature
1 teaspoon pure vanilla extract
1. Put the sugar and salt into a large mixing
bowl. Using the beaters, mix on Speed
1 to completely mix, a minimum of 30
seconds.
2.
Put cream cheese into a separate, large
mixing bowl. Mix on Speeds 2 to 4 until
smooth, about 1½ to 2 minutes. Add
butter and beat until fully incorporated
and smooth. Reduce to Speed 1 and,
with the hand mixer running, slowly add
the sifted confectioners’ sugar/salt to the
bowl and mix until incorporated, about
2 minutes. Scrape the entire bowl well.
Add vanilla extract. Mix on Speed 2 until
combined. Use immediately.
Nutritional information per serving (¼ cup):
Calories 250 (44% from fat) carb. 34g • pro. 1g
fat 12g • sat. fat 8g • chol. 47mg • sod. 101mg
calc. 22mg • fiber 0g
Gluten-Free (and Vegan!) Golden
Cupcakes with Vanilla Frosting
Unlike our muffin recipe that uses a gluten-
free flour blend, here we call for individual
ingredients that are now easily found in most
grocery stores.
Makes 12 standard cupcakes
Nonstick cooking spray
2 cups sorghum flour
1 cup potato starch
½ cup arrowroot starch
1 tablespoon baking powder
½ teaspoon baking soda
1 teaspoon xanthan gum
1 teaspoon kosher salt
1½ cups agave nectar
½ cup olive oil
¾ cup butternut squash purée,
room temperature
2 tablespoons pure vanilla extract
1 teaspoon white vinegar
1. Preheat oven to 350°F. Lightly coat a
standard cupcake pan with cooking
spray. Cupcake liners may be used (these
may also be sprayed, so that the liners
cleanly come off the cupcakes).
2.
Put the flour, starches, baking powder,
soda, xanthan gum, and salt into a large
mixing bowl. Using the beaters, mix on
Speed 1 to sift the ingredients together,
about 30 seconds.
3.
With the mixer running on Speed 2, add
the remaining ingredients, in the order
listed, and mix until all ingredients are
incorporated. Scrape the entire bowl to
ensure all of the ingredients are evenly
combined and mix an additional 20
seconds if necessary.
4.
Scoop batter into the prepared cupcake
pan. Bake until golden and a cake tester
comes out clean, about 20 to 22 minutes.
Remove from oven, cool in pans on a
wire rack until cool to the touch, and then
transfer cupcakes to a wire cooling rack
to cool completely before frosting.
Nutritional information per cupcake (unfrosted):
Calories 396 (22% from fat) carb. 77g • pro. 4g
fat 10g • sat. fat 1g • chol. 0mg • sod. 359mg
calc. 50mg • fiber 2g
Dairy-Free Vanilla Frosting
This frosting pairs very well with the
Gluten-Free Golden Cupcakes, but is also a
great alternative to any vanilla frosting.
Makes about 2 cups
1 cup non-hydrogenated vegetable
shortening
2 cups confectioners’ sugar, sifted
1 tablespoon pure vanilla extract
¼ teaspoon kosher salt
1 to 2 teaspoons water, optional
1. Put the shortening into a medium mixing
bowl. Using the beaters, mix on Speeds 2
to 4 to make creamy, about 30 seconds.
Add the sugar and mix on Speeds 2 to 5,

33
then add the vanilla extract and salt.
Mix again, on the same speeds, until
smooth and fluffy, about 30 seconds.
2.
If the frosting is too thick, add enough
water to mix to desired consistency.
Nutritional information per serving
(2 tablespoons):
Calories 182 (61% from fat) • carb. 19g • pro. 0g
fat 13g • sat. fat 6g • chol. 0mg • sod. 33mg
calc. 36mg • fiber 0g
Angel Food Cake
Serve with whipped cream and fresh berries
for a light and delicious summer dessert.
Makes one 9-inch cake (12 servings)
1½ cups granulated sugar, divided
1¼ cups cake flour, not self-rising
12 large egg whites
1¼ teaspoons cream of tartar
¼ teaspoon kosher salt
1 teaspoon pure vanilla extract
1. Preheat oven to 325°F.
2.
Put ¾ cup of the sugar into a large mixing
bowl with the cake flour. Using the whisk,
mix on Speeds 1 to 2 to fully sift, a
minimum of 30 seconds; reserve.
3.
Put the egg whites into a large mixing
bowl. Using the whisk, begin mixing on
Speed 1. When the egg whites appear
foamy, add cream of tartar and salt.
Gradually increase to Speed 6.
4.
Add the remaining ¾ cup of granulated
sugar and vanilla extract and continue to
mix, on Speeds 6 to 8, until firm, glossy
peaks form. Stop mixing.
5.
Sift about ½ cup of the reserved flour and
sugar over the whites and carefully fold
in with a rubber spatula. Continue with
the remaining flour and sugar. Gently fold
until no pockets of dry ingredients remain.
6.
Spoon batter into an ungreased 9-inch
tube pan. Even out the top with the
spatula. Bake for 45 minutes, until a
toothpick that has been inserted comes
out clean. Invert pan onto the neck
of a bottle and allow the cake to cool
completely.
7.
Use a knife to free the cake from the pan.
Nutritional analysis per serving:
Calories 167 (1% from fat) • carb. 37g • pro. 5g
fat 0g • sat. fat 0g • chol. 0mg • sod. 278mg
calc. 5mg • fiber 0g
Pavlova with Blood Orange
and Pomegranate
A show-stopping dessert. This gorgeous
creation needs to be eaten the day it is made
(and best if that day is not humid!).
Makes 12 servings
Meringue:
4 large egg whites
Pinch cream of tartar
Pinch kosher salt
1 cup granulated sugar
2 teaspoons cornstarch, sifted
1 teaspoon white vinegar
¼ teaspoon pure vanilla extract
½ teaspoon grated citrus zest
Topping:
2 blood oranges, peeled and
segmented
3 tablespoons pomegranate berries
½ cup granulated sugar
½ cup water
1 cup blood orange juice (You can
substitute with pomegranate juice
if a more red/pink syrup is desired.
Blood orange makes a dark,
orange-colored syrup.)
¾ cup heavy cream
1 teaspoon pure vanilla extract
¼ cup confectioners’ sugar
1. Preheat oven, with the rack in the middle
position, to 350°F. Line a baking pan with
parchment paper (if your baking pan is
rimmed, invert it so you are using the
bottom. This will make transferring the
meringue easier once it has baked).
2.
Prepare the meringue. Put the egg whites,
cream of tartar, and salt into a large
mixing bowl (make sure it is spotlessly
clean). Using the whisk, start mixing on
Speed 1 and very gradually increase to
Speed 6. Whip until whites have formed
soft peaks. While still whipping, gradually
add the granulated sugar. Increase
to Speed 8 and whip until stiff peaks
have formed, about 8 minutes. Add the
remaining meringue ingredients and
gently mix on Speed 2 to combine.

34
3.
Transfer meringue to the parchment-lined
baking pan. Shape into an 8-inch circle
and, using a spatula or knife, scrape the
sides upward (from the bottom of the
meringue to the top) to create smooth
edges along the sides of the meringue
and little peaks at the top.
4.
Transfer to the oven and immediately
reduce temperature to 200°F.
5.
Bake meringue for 1½ hours, until the
edges and top are dry – the color should
still be very pale. After the time has
elapsed, turn off the oven, but leave the
meringue in until it has cooled completely,
about 1 hour.
6.
While the meringue is cooling, prepare
the topping. Be sure that the oranges are
fully segmented (no visible white pith on
the segments). Reserve on a plate with
the pomegranate berries.
7.
Prepare the orange syrup. Put the
sugar and water into a heavy-bottomed
saucepan. Cook over medium heat until
the sugar has dissolved, then add the
juice. Cook until the mixture is thickened/
coats the bottom of the pan, about 20 to
25 minutes. Reserve and cool. NOTE: If
the syrup seems too thick to use, you can
thin it with hot water, adding a teaspoon
at a time.
8.
Once the pavlova is fully cooled, prepare
the whipped cream. Put the cream into a
large mixing bowl. Using the whisk, start
whipping cream on Speed 1, gradually
increasing to Speed 3, for about one
minute, so that the cream has some
body. Add the sugar and vanilla extract
and continue to whip to Speed 4 until
cream forms soft peaks.
9.
Assemble the pavlova. Put the baked
meringue on desired serving dish/plate.
Top with the whipped cream and then,
using a slotted spoon, top with the fruit.
Drizzle the syrup around the plate if
desired. You may garnish with grated
zest as well.
10.
Serve immediately.
Nutritional information per serving:
Calories 169 (27% from fat) • carb. 27g • pro. 1g
fat 5g • sat. fat 4g • chol. 20mg • sod. 37mg
calc. 3mg • fiber 0g
Sour Cream Cheesecake
This recipe is rather straightforward. While it
is simple, it can be elevated by topping with
fresh or cooked fruit, chocolate shavings, or
chopped cookies.
Makes one 8-inch cheesecake (12 servings)
1 tablespoon unsalted butter,
room temperature
Graham Cracker Crust:
1 cup graham cracker crumbs
2 tablespoons granulated sugar
¼ teaspoon ground cinnamon
4 tablespoons (½ stick) unsalted
butter, melted and cooled slightly
Filling:
24 ounces (3 standard packages)
cream cheese, each cut into 4
pieces, room temperature
1½ cups granulated sugar
¼ teaspoon kosher salt
5 large eggs, room temperature
1 cup sour cream, room temperature
1½ teaspoons pure vanilla extract
1. Preheat oven to 325°F with the rack in
the lower third of the oven. Coat the
inside of an 8-inch springform pan with
the tablespoon of butter. Reserve.
2.
Prepare the crust. Put cookie crumbs, 2
tablespoons sugar, cinnamon, and melted
butter into a small mixing bowl. Using
the beaters, mix on Speed 2 until the
mixture comes together. Pat crumb crust
evenly into the bottom of the prepared
springform pan, using the bottom of a
glass if necessary, to make it even. Put in
the preheated oven and bake for about
8 to
10 minutes, until the crust is just set.
Allow to cool while preparing the filling.
3.
Wipe the beaters of crumbs. Put the
cream cheese into a large mixing bowl.
Starting on Speed 1 and increasing to
Speed 4, mix until very smooth – you
want to be sure there are no lumps.
Scrape the mixing bowl and beaters.
While mixing on Speed 2, gradually add
the sugar, about ¼ cup at a time, and the
salt, mixing until very smooth. Add the
eggs, one at a time, mixing on Speeds 2
to 3, being sure each is fully incorporated
into batter before adding the next. Scrape
down the bowl and beaters and then add
the sour cream and vanilla extract. Mix on
Speed 1 until creamy, about 1 minute.

35
4.
Wrap the cooled springform pan well with
both plastic and foil wraps – to come up
about two-thirds up the sides of the pan.
5.
Pour into cooled, prepared crust – do not
scrape any thick bits from the sides of the
bowl, as they are not thoroughly mixed
in and will change the texture of your
finished cheesecake.
6.
Put the filled pan into a roasting pan, or
something similar in size and oven safe,
and then add hot water so it comes about
halfway up the sides of the cake pan.
7.
Transfer the filled pan to the preheated
oven and bake for 45 minutes. The
cheesecake will still be jiggly at this point,
but that is OK. After the 45 minutes have
expired, turn the oven off and allow it to
rest in the warm oven for an additional 45
minutes.
8.
Remove and bring to room temperature.
Cover well and refrigerate to fully chill
prior to serving.
Nutritional information per serving:
Calories 449 (61% from fat) • carb. 36g • pro. 8g
fat 31g • sat. fat 18g • chol. 163mg • sod. 330mg
calc. 39mg • fiber 0g
Chocolate Cream Pie
Crowd-pleasing pie for any holiday or
special occasion!
Makes about 12 servings
Crust:
2½ cups chocolate cookie crumbs
(from about 24 chocolate sandwich
cookies)
5 tablespoons unsalted butter, melted
Filling:
¼ cup packed light brown sugar
¼ cup granulated sugar
3 tablespoons unsweetened
cocoa powder
2½ tablespoons cornstarch
¼ teaspoon kosher salt
3 cups half & half
3 large eggs, lightly beaten
4 ounces semisweet chocolate,
chopped
3 tablespoons unsalted butter,
cut into small dice
Topping:
2 cups heavy cream, well chilled
¼ cup plus 2 tablespoons granulated
sugar
Chocolate curls for garnish
1. Make the crust. Preheat oven to 350°F
with the rack in the middle position.
2.
Put the cookie crumbs and melted butter
into a medium mixing bowl. Using the
beaters, mix on Speeds 1 to 2 to fully
combine. Transfer crumb mixture to
a 9-inch pie plate. Press evenly into the
bottom and sides.
3.
Bake in preheated oven for 10 to 15
minutes, until crumb crust is fully set.
Cool completely while preparing the filling.
4.
Put the sugars, cocoa powder,
cornstarch, and salt into a large, wide
saucepan. Using the beaters once again,
mix on Speed 1 to combine. While still
mixing on Speed 1, gradually add the half
& half, and then the eggs, and continue to
mix until completely smooth.
5.
Set the pan over medium-low heat and
mix on Speeds 1 to 2, occasionally, to
prevent the mixture from overcooking –
do not leave the pot unattended.
6.
Allow the mixture to heat gradually,
until just about boiling. At this point, the
mixture will get quite thick. Continue to
mix on Speed 1 and when thickened,
remove from heat. Mix in the chopped
chocolate and butter until completely
incorporated. Strain the filling through
a fine mesh strainer and then transfer
the strained filling into the cooled crust.
Cover the filling directly with wax paper
or plastic wrap so that the filling does not
form a skin. Chill in the refrigerator until
set.
7.
After the filling is well chilled and ready
to serve, prepare the whipped cream. Put
the cream into a large mixing bowl. Using
the whisk, start whipping cream on Speed
1, gradually increasing to Speed 3, for
about one minute, so that the cream has
some body. Add the sugar and continue
to whip to Speed 4 until cream holds
medium-stiff peaks that have formed.
8.
Top the pie evenly with the whipped
cream and garnish with chocolate curls
prior to serving.
Nutritional information per serving:
Calories 515 (63% from fat) • carb. 43g • pro. 5g
fat 36g • sat. fat 23g • chol. 142mg • sod. 231mg
calc. 74mg • fiber 1g

36
Pumpkin Pie
While most popularly a staple on
Thanksgiving, this pie really shouldn’t
be forgotten during the rest of the autumn
season.
Makes about 12 servings
½ recipe Pâte Brisée (page 38)
1 can (15 ounces) pumpkin purée,
about 2 cups
½ cup granulated sugar
¼ cup packed light brown sugar
1 teaspoon ground cinnamon
¼ teaspoon ground cloves
¼ teaspoon ground ginger
¹⁄
8 teaspoon ground nutmeg
¾ teaspoon kosher salt
3 large eggs, room temperature
½ cup heavy cream or evaporated milk
1 teaspoon pure vanilla extract
Whipped cream, for topping
(next recipe)
1. Put a rimmed baking sheet on the middle
rack in the oven (this will aid in making a
nice crust for the pie). Preheat to 325°F.
2.
While the oven is preheating, roll the pâte
brisée out to a large round and fit it into
a pie plate, about 1½ inches in depth.
Gently prick all over with the tines of
a fork, being sure not to fully puncture
through the dough. Chill in the refrigerator
while preparing the pumpkin filling.
3.
Put the pumpkin, sugars, spices, and salt
into a large mixing bowl. Using the hand
blender attachment, blend on Speed 1
until fully mixed, about 1 minute. Add the
eggs and cream/evaporated milk, and
vanilla extract and blend on Speed 1 until
combined.
4.
Pour the custard into the chilled pie crust.
Transfer the filled pie plate onto the hot
baking sheet and bake in preheated oven
until the edges are set and the middle is
still jiggly, about 35 minutes.
5.
Cool completely before serving. Serve with
freshly whipped cream.
Nutritional information per serving:
Calories 212 (51% from fat) • carb. 23g • pro. 3g
fat 12g • sat. fat 7g • chol. 80mg • sod. 257mg
calc. 15mg • fiber 2g
Classic Whipped Cream
Whether for topping ice cream and pie, or
as a dip for fruit, everyone should have a
foolproof formula for a basic, sweetened
whipped cream.
Makes about 2¼ cups
1 cup heavy cream, well chilled
¼ cup confectioners’ sugar, sifted
1 teaspoon pure vanilla extract
Pinch fine sea salt
1. Put heavy cream into a large mixing bowl.
2.
Using the whisk, start whipping cream on
Speed 1, gradually increasing to Speed
3, for about one minute so that the cream
has some body. Add the sifted sugar
and vanilla extract and continue to whip
to Speed 7 until cream holds stiff peaks,
about 1½ minutes.
Nutritional information per serving (2 tablespoons):
Calories 52 (84% from fat) • carb. 2g • pro. 0g
fat 4g • sat. fat 3g • chol. 18mg • sod. 8mg
calc. 0mg • fiber 0g
Royal Icing
This icing is great for decorating sugar
cookies or cakes. You can add food coloring
to color it or extracts to flavor it.
Makes 1½ cups
4 cups (1 pound) confectioners’
sugar, sifted
2 large egg whites, slightly beaten
1 tablespoon whole milk
1 teaspoon fresh lemon juice
1. Put the sugar into a large mixing bowl.
Using the whisk, start mixing on Speed 1,
and then slowly add in the egg whites
until fully incorporated, about 1 minute.
While continuing with the whisk, add the
milk and lemon juice and mix until fully
incorporated. Scrape the entire bowl as
necessary. Continue on Speeds 1 to 5
until soft peaks form, about 2 minutes.
2.
Use immediately or cover the bowl with a
damp cloth so the icing does not harden.
If using coloring or a flavoring extract for the
icing, add it with the milk and lemon juice.
Nutritional analysis per serving (2 tablespoons):
Calories 133 (0% from fat) • carb. 33g • pro. 1g • fat 0g
sat. fat 0g • chol. 0mg • sod. 10mg • calc. 2mg • fiber 0g

37
Chocolate Peanut Butter
Ice Cream Shake
This will satisfy your sweet tooth.
Makes 2 cups (4 servings)
¾ cup chocolate ice cream
1 teaspoon creamy peanut butter
1 teaspoon chocolate syrup
¹⁄
³
cup whole milk
1. Put all ingredients, in the order listed, into
a tall cup or a large, wide measuring cup.
2.
Using the hand blender, blend on Speed
1, using a gentle up-and-down motion,
until smooth and homogenous, about 30
to 40 seconds.
3.
Serve immediately.
Nutritional information per serving (½ cup):
Calories 156 (46% from fat) • carb. 18g • pro. 4g
fat 8g • sat. fat 5g • chol. 23mg • sod. 69mg
calc. 112mg • fiber 1g
Pizza/Focaccia Dough
One of the simplest doughs to prepare at
home to take your pizza night to the next
level. And if shaping pizza is not your thing,
we give instructions on how to turn this into a
delicious, herby focaccia.
Makes about 1½ pounds; 12 servings (enough
for two 10-inch pizzas)
1¹⁄
³
cups warm (100°F to 110°F) water
2¼ teaspoons active dry yeast
1 teaspoon granulated sugar
3½ cups unbleached bread or
all-purpose flour
2 teaspoons kosher salt
2 tablespoons extra virgin olive oil
For Focaccia:
1 tablespoon extra virgin olive oil
2 tablespoons chopped fresh rosemary
½ teaspoon kosher salt
1. Put the warm water, yeast, and sugar into
a large mixing bowl. Stir to dissolve the
yeast and let stand for 5 to 10 minutes.
Mixture will foam and bubble – this
means the yeast is active and alive.
2.
In a separate bowl, combine flour and
salt. Using the dough hooks, mix on
Speed 1 for 5 to 10 seconds; reserve.
3.
Add the 2 tablespoons of olive oil and ½
cup flour to the yeast mixture. Using the
dough hooks, mix on Speed 1 until smooth,
about 30 to 40 seconds. Running on
Speed 2, continue to add the remaining
flour mixture, ½ cup at a time, mixing
completely, about 30 to 40 seconds,
until no flour is visible after each addition.
The dough at first will be a batter, and
slowly, as the flour is added, it will become
a dough ball. After all the flour mixture
has been incorporated, and the dough
has formed a dough ball that cleans
the sides of the mixing bowl, knead at
Speed 3 for an additional minute.
4.
Lightly dust the dough with flour and place
it in a large mixing bowl covered with either
a damp towel or plastic wrap. Allow to rise
in a warm place for about 45 minutes, or
until the dough has doubled in size.
5.
Put the dough on a lightly floured
surface and gently punch down. Shape
into desired size(s) for pizza, or use for
preparing calzones (see page 22).
6.
For focaccia, press dough into an oiled
13 x 9-inch baking pan, or a rimmed
baking pan. Lightly cover with plastic
wrap and allow to rise for an additional 45
minutes – dough will be nice and puffy.
Preheat oven to 425°F with the rack in
the middle position. Brush the remaining
1 tablespoon of olive oil on top of the
dough and, using your fingers, make
indentations all over the dough. Sprinkle
with the rosemary and salt. Bake for about
18 to 20 minutes, or until nicely golden.
Nutritional information per serving (Pizza Dough):
Calories 140 (15% from fat) • carb. 26g • pro. 4g
fat 2g • sat. fat 0g • chol. 0mg • sod. 356mg
calc. 1mg • fiber 1g
Nutritional information per serving (Focaccia):
Calories 151 (21% from fat) • carb. 26g • pro. 4g
fat 4g • sat. fat 1g • chol. 0mg • sod. 445mg
calc. 2mg • fiber 1g

38
Pâte Brisée
This versatile dough can be used for sweet
or savory treats.
Makes two 9-inch crusts (24 servings)
2 cups unbleached, all-purpose flour
1 teaspoon kosher salt
16 tablespoons (2 sticks) unsalted
butter, cut into ½-inch cubes,
and sitting at room temperature
for 15 minutes
¼ cup ice water
1. Put the flour and salt into a large mixing
bowl. Using the beaters, mix on Speed 1
to fully combine, about 5 to 10 seconds.
Add the butter and mix on Speed 1 until
the butter has been worked into the flour
and is about the size of peas.
2.
Slowly add the water, about 1 teaspoon
at a time, and mix until the flour is
hydrated, but not wet. The dough will not
be fully together, just shaggy.
3.
Turn the dough out onto a clean, lightly
floured surface and knead by hand a few
times to bring it together. Divide into two
pieces and form each into a flat disc.
Wrap in plastic wrap and chill until ready
to use, a minimum of 2 hours, or up to
2 days.*
* As long as it is wrapped, this pastry freezes
well for up to 6 months.
Nutritional information per serving:
Calories 100 (66% from fat) • carb. 7g • pro. 1g
fat 7g • sat. fat 5g • chol. 20mg • sod. 95mg
calc. 0mg • fiber 0g
Cuisinart Classic White Bread
Spoil your family with homemade bread.
Makes 1 loaf (10 servings)
1 cup warm water (105°F to 110°F)
2¼ teaspoons active dry yeast
1½ teaspoons granulated sugar
2 cups unbleached, all-purpose flour
1 teaspoon kosher salt
2 tablespoons unsalted butter, cut into
1-inch pieces, room temperature
Nonstick cooking spray or unsalted
butter, softened, for greasing the
loaf pan
1. Put the warm water, yeast and sugar into
a large mixing bowl. Stir to dissolve the
yeast and let stand for 5 to 10 minutes.
Mixture will foam and bubble – this
means the yeast is active and alive.
2.
Put the flour and salt into a separate
mixing bowl. Using the dough hooks, mix
on Speed 1 for 5 to 10 seconds; reserve.
3.
Using the dough hooks, mix the yeast
mixture on Speeds 1 to 2 while adding
the flour/salt, ½ cup at a time. Mix in
each addition of flour well, before adding
the next, so that no flour is visible in
between. The dough at first will be a
batter, and slowly, as the flour is added,
the batter will form a dough ball and
clean the sides of the mixing bowl.
4.
Once all of the flour has been
incorporated, add the butter and knead
on Speed 3 for about 2 minutes. Dust the
dough ball lightly with flour and place it in
a resealable food storage bag, pressing
out any air before sealing. Let rise in a
warm, draft-free place until doubled in
size, about 1 hour.
5.
Lightly coat one standard loaf pan with
cooking spray or unsalted butter. Punch
dough to deflate. Shape into loaf and
place in prepared pan. Cover and let rise
until nearly doubled, about 1 hour.
6.
About 15 minutes before baking, preheat
oven to 400°F. Place loaf in preheated
oven and bake for 30 to 35 minutes, until
bread is browned and sounds hollow
when tapped. Remove from loaf pan and
cool on a wire rack. Bread slices best
when allowed to cool completely before
cutting. If top of bread is too crispy for
your taste, brush with butter for a softer
crust.
Nutritional information per serving (1 slice):
Calories 157 (14% from fat) • carb. 27g • pro. 5g
fat 2g • sat. fat 1g • chol. 6mg • sod. 113mg
calc. 0mg • fiber 1g

39
Honey Whole-Wheat Bread
A hearty wheat bread flavored with honey.
Makes 1 loaf (10 servings)
1 cup warm water (105°F to 110°F)
1 tablespoon honey
2 teaspoons active dry yeast
1½ cups whole-wheat flour
¾ cup bread flour
¾ teaspoon salt
1½ tablespoons unsalted butter, cut into
½-inch pieces, room temperature
Nonstick cooking spray or unsalted
butter, softened, for greasing the
loaf pan
1. Put the warm water, honey and yeast into
a large mixing bowl. Stir to dissolve the
yeast and let stand for 5 to 10 minutes.
Mixture will foam and bubble – this
means the yeast is active and alive.
2.
Put the flours and salt in a separate
mixing bowl. Using the dough hooks, mix
on Speed 1 for 5 to 10 seconds; reserve.
Using the dough hooks, mix the yeast
mixture on Speeds 1 to 2 while adding
the flour/salt, ½ cup at a time. Mix in
each addition of flour, before adding the
next, so that no flour is visible in between.
The dough at first will be a batter, and
slowly, as the flour is added, the batter
will form a rough dough ball. (If a good
amount of dough is clinging to the
walls of the bowl, add an additional 1
to 3 tablespoons of bread flour; avoid
adding more).
3.
Once all of the flour has been
incorporated, add the butter and knead
on Speed 3 for about 2 minutes. The
dough will feel sticky. Dust the dough
ball lightly with flour and place it in a
resealable food storage bag, pressing out
any air before sealing. Let rise in a warm,
draft-free place until doubled in size,
about 1 hour.
4.
Lightly coat one standard loaf pan with
cooking spray or unsalted butter. Punch
dough to deflate. Shape into loaf and
place in prepared pan. Cover and let rise
until nearly doubled, about 1 hour.
5.
About 15 minutes before baking, preheat
oven to 400°F. Place loaf in preheated
oven and bake for 30 to 35 minutes, until
bread is browned and sounds hollow
when tapped. Remove from loaf pan and
cool on a wire rack. Bread slices best
when allowed to cool completely before
cutting. Crust will soften as it cools.
Nutritional information per serving (1 slice):
Calories 123 (15% from fat) • carb. 21g • pro. 4g
fat 2g • sat. fat 1g • chol. 5mg • sod. 1mg
calc. 14mg • fiber 3g
Rosemary Olive Oil Rolls
These rolls go well with dinner, but could also
be used as small sandwich rolls.
Makes 12 rolls
¼ cup flavorful, extra virgin olive oil
1½ tablespoons chopped,
fresh rosemary
2¼ teaspoons active dry yeast
1 cup warm water (105°F to 110°F)
3¼ cups unbleached bread or
all-purpose flour
1¾ teaspoons kosher salt
Cornmeal for the baking sheet
1. Combine the olive oil and rosemary, let
stand 10 minutes or longer. Put the yeast
and warm water into a large mixing bowl
with a pinch of the flour. Stir to dissolve
yeast and let stand for 5 to 10 minutes.
Mixture will foam and bubble – this
means the yeast is alive and active.
2.
Put the flour and salt into a separate,
small mixing bowl. Using the dough
hooks, mix on Speed 1 for 5 to 10
seconds; reserve. Using the dough
hooks, mix the yeast mixture on Speed
1 while adding the olive oil/rosemary,
following with ½ cup of the flour/salt. Mix
on Speeds 1 to 2 until smooth, about 30
to 40 seconds. Continue adding the flour,
½ cup at a time, mixing completely, about
30 to 40 seconds, until no flour is visible
after each addition. The dough at first
will be a batter, and slowly, as the flour is
added, the batter will form a dough ball
that cleans the sides of the mixing bowl.

40
After all the flour has been incorporated,
knead on Speed 3 for about 2 minutes.
3.
Dust dough ball lightly with flour and
place it in a resealable food storage bag,
press out air and seal. Let rise in a warm,
draft-free place until doubled in size,
about 1 hour. Punch down and let rise
again for 1 hour (this second rise can be
skipped if pressed for time – but it adds
to the flavor and texture).
4.
After second rise, punch dough to deflate
and let rest 10 minutes. Lightly dust a
baking sheet with cornmeal. Divide dough
into 12 equal-size pieces. Roll each piece
of dough on a work surface and shape
into a ball. Flatten slightly. Transfer to
prepared baking sheet and cover with
plastic wrap. Let rise at room temperature
until almost doubled, about 45 to 60
minutes.
5.
Fifteen minutes before baking, preheat
the oven to 450°F. Uncover rolls and bake
at 450°F for 10 minutes. Reduce the heat
to 375°F and bake for an additional 10
to 15 minutes, until browned and hollow
sounding when tapped. Place on a wire
rack to cool.
Nutritional information per roll:
Calories 151 (28% from fat) • carb. 24g • pro. 4g
fat 5g • sat. fat 1g • chol. 0mg • sod. 312mg
calc. 2mg • fiber 1g
©2020 Cuisinart
East Windsor, NJ 08520
Printed in China
20CE065154
IB-16615-ESP
Trademarks or service marks of third parties
referred to herein are the trademarks or
service marks of their respective owners.

Serie HM-8
Batidora de mano de lujo de 8 velocidades Power Advantage
®
Para su seguridad y para disfrutar plenamente de este producto, siempre lea cuidadosamente las instrucciones antes del uso.
MANUAL DE INSTRUCCIONES
Y LIBRO DE RECETAS

2
ÍNDICE
Medidas de seguridad importantes 2
Piezas y características ................. 3
Uso, limpieza y mantenimiento . . . . . . . . . . . 4
Guía de referencia rápida. . . . . . . . . . . . . . . . 5
Garantía ............................. 7
Recetas ............................. 8
MEDIDAS DE
SEGURIDAD
IMPORTANTES
Al usar aparatos eléctricos, siempre debe tomar
precauciones básicas de seguridad, entre ellas
las siguientes:
1.
Lea todas las instrucciones.
2.
Apague (“OFF”) y desenchufe el aparato
cuando no esté en uso, antes de instalar/
sacar piezas y antes de limpiarlo. Para
desenchufar, agarre el enchufe y jálelo
para sacarlo de la toma de corriente.
Nunca jale el cable.
3. Para reducir el riesgo de descarga eléctrica,
no ponga la carcasa del aparato, el cable
ni el enchufe en agua ni en ningún otro
líquido. Si el aparato o el cable se caen al
agua, desconecte el cable de la toma de
corriente inmediatamente; No toque el agua.
4. Los niños o las personas que carezcan
de la experiencia o de los conocimientos
necesarios para manipular el aparato,
o aquellas cuyas capacidades físicas,
sensoriales o mentales estén limitadas,
no deben usar este aparato. Supervise el
uso de este aparato cuidadosamente cuando
sea usado cerca de niños. No permita que los
niños jueguen con este aparato.
5. Evite el contacto con las piezas móviles.
Para evitar el riesgo de heridas o daños al
aparato, mantenga los dedos, cabello, ropa,
espátulas y otros utensilios lejos de los
batidores y otros accesorios/aditamentos
durante el funcionamiento.
6. Quite todos los accesorios/aditamentos de
la batidora antes de lavarlos.
7. No use este aparato si el cable o el enchufe
están dañados, si no funciona correctamente,
si está dañado, o después de que se haya
caído, incluso en el agua; llame al servicio
de atención al cliente del fabricante para
obtener información sobre cómo hacer
revisar, reparar o ajustar el aparato.
8. El uso de accesorios no recomendados o
provistos por Cuisinart presenta un riesgo
de incendio, descarga eléctrica o heridas.
9. No lo use en exteriores ni en lugares donde
el aparato o el cable podrían mojarse.
10. Para evitar la posibilidad de que el aparato
sea jalado accidentalmente del área de
trabajo, lo que podría resultar en daños al
aparato o lesiones personales, no permita
que el cable cuelgue en el borde de la mesa
o de la encimera.
11. Para evitar el riesgo de daño al cable,
incendio o electrocución, no permita que
el cable tenga contacto con superficies
calientes, incluso hornillas.
12.
las cuchillas son MUY AFILADAS;
manipúlelas con sumo cuidado al retirar,
instalar o limpiarlas. SIEMPRE CUBRA
LAS CUCHILLAS DEL ACCESORIO
LICUADOR CON EL PROTECTOR DE
CUCHILLAS CUANDO NO ESTÉ EN USO.
13. Para reducir el riesgo de salpicaduras o
quemadura al mezclar líquidos, especialmente
líquidos calientes, use un recipiente alto o
procese pequeñas cantidades a la vez.
14. Guarde la batidora de mano y sus
accesorios/aditamentos en el estuche de
almacenaje. Cerciórese de cubrir las
cuchillas del accesorio licuador con el
protector de cuchillas antes de colocarlo
en el estuche de almacenaje.
GUARDE ESTAS
INSTRUCCIONES
PARA USO
DOMÉSTICO
SOLAMENTE
AVISO
Para reducir el riesgo de descarga eléctrica, el
cable de este aparato cuenta con un enchufe
polarizado (una pata es más ancha que la otra).
Como medida de seguridad, aquel enchufe se
podrá enchufar de una sola manera en las tomas
de corriente polarizadas. Si el enchufe no entra
en la toma de corriente, inviértelo. Si aun así
no entra completamente, comuníquese con un
electricista. No intente modificarla. La potencia
nominal máxima está basada en el accesorio/
aditamento que consume más electricidad
(el aditamento picador/moledor, modelo HM-C,
vendido por separado); otros accesorios pueden
usar menos electricidad.
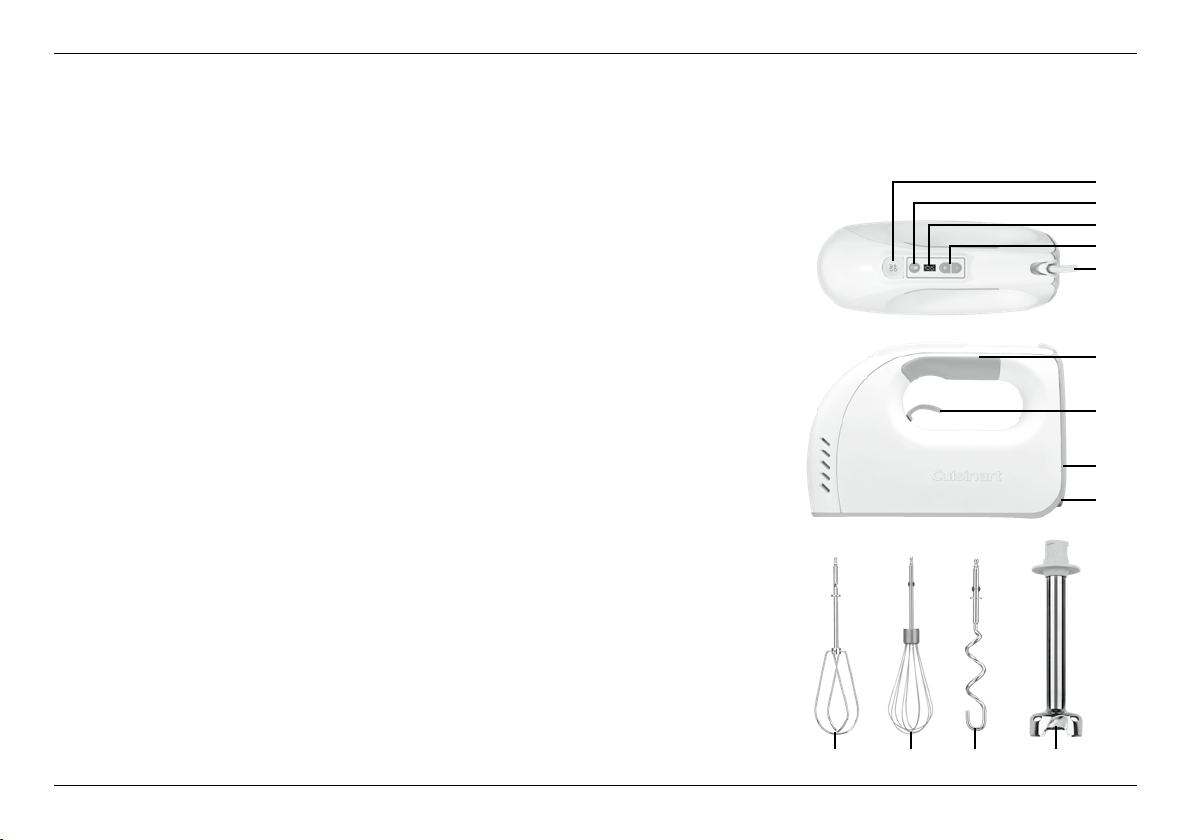
3
PIEZAS Y
CARACTERÍSTICAS
Motor DC 250 vatios
Suficientemente potente como para mezclar
masas densas o batir mantequilla fría.
Máxima comodidad
Diseño ergonómico, para eficacia máxima y
comodidad. La forma de la batidora ha sido
estudiada para combinar máxima potencia
y perfecto equilibrio. Su diseño ergonómico
proporciona mayor comodidad y control, incluso
durante los trabajos largos.
Sistema de retroalimentación automático
Más potencia, sin necesidad de oprimir un botón.
Un sistema electrónico de retroalimentación
incrementa el poder automáticamente para que la
batidora nunca haga fuerza, incluso cuando
mezcle masas muy densas.
SmoothStart
®
Sistema de arranque lento que previene las
salpicaduras.
Fácil de limpiar
Bloque-motor sellado, limpio en segundos con
un simple paño.
1. Botón de encendido/apagado
La batidora se enciende y se apaga usando
el mismo botón, para mayor facilidad.
2. Botón para licuar
Activa el modo de licuado.
3. Pantalla LED
Indica claramente la velocidad elegida.
4. Control de velocidad de un solo toque
Permite cambiar la velocidad rápidamente,
sin dejar de mezclar.
5. Cable giratorio
Cable único que puede posicionarse donde
desea para que nunca le moleste durante
el batido, que sea diestro o zurdo.
6. Mango de agarra suave
Para máxima comodidad.
7. Palanca de expulsión de los batidores
Permite expulsar fácilmente los batidores/
ganchos. También activa el modo de licuado.
8. Puerto de conexión para aditamentos
Permite conectar el aditamento licuador
incluido y el aditamento picador/moledor
vendido por separado (modelo HM-C).
9. Soporte
Para colocar la batidora recta en la encimera.
10. Batidores de fácil limpieza
Dos batidores extra-anchos, para incorporar
aire, mezclar y Crema fácilmente. Diseñados
sin eje central, para evitar las obstrucciones.
Fáciles de limpiar y aptos para lavavajillas.
11. Batidor de alambre
Excelente para montar claras o batir crema.
También puede usarse para preparar mezcla
de “crêpes” (crepas) o tortillas de huevos.
12. Ganchos amasadores
Ideales para preparar y amasar masas
fermentadas, tal como masa de pan o de
pizza. Fácil de limpiar y apto para lavavajillas.
13. Aditamento licuador con cuchillas de
acero inoxidable
Se conecta a la batidora de mano para licuar,
mezclar y hacer puré una variedad de
alimentos.
14. Protector de cuchillas (no ilustrado)
Protege las cuchillas del aditamento licuador,
para mayor seguridad y durabilidad.
15. Estuche de almacenaje (no ilustrado)
Guarda de manera segura la batidora de
mano, el aditamento licuador y todos
los accesorios.
16. Sin BPA (no ilustrado)
Ninguna de las piezas en contacto con
los alimentos contiene bisfenol A (BPA).
1
3
2
4
5
8
9
10 11 12 13
6
7
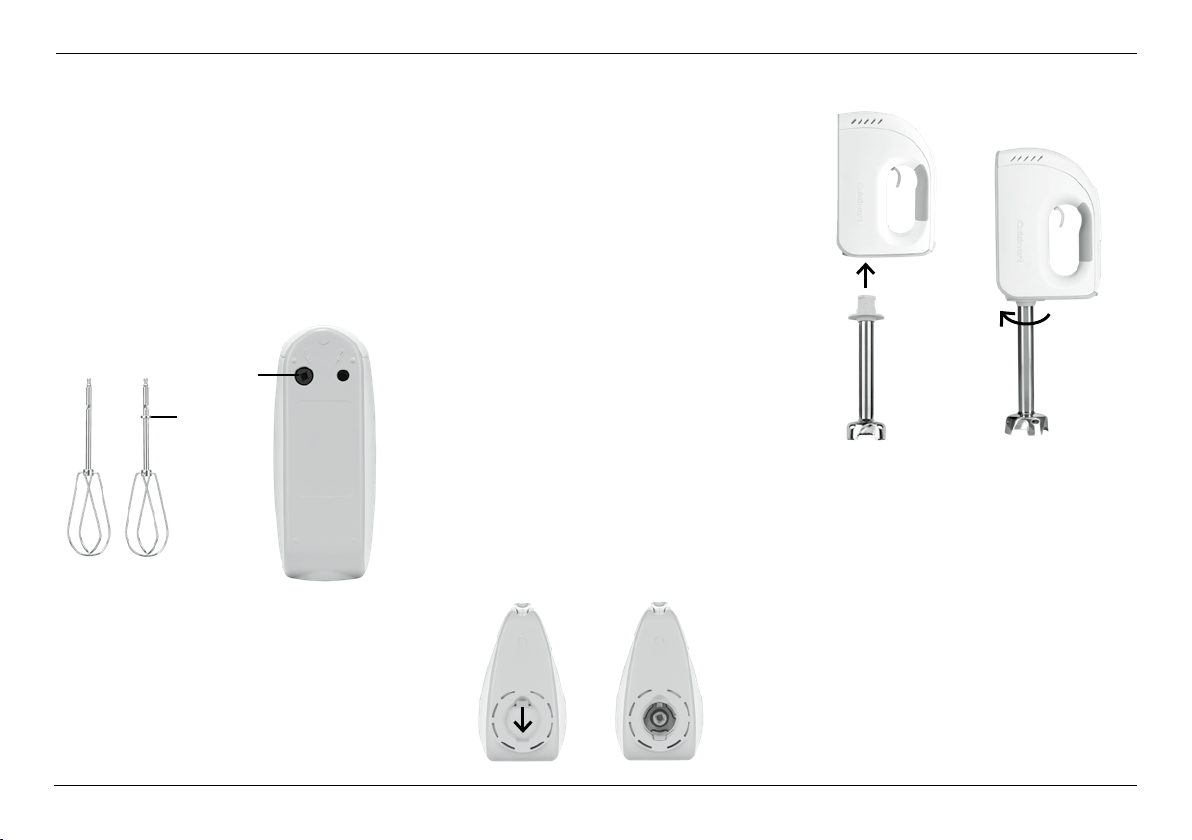
4
USO, LIMPIEZA Y
MANTENIMIENTO
INSTRUCCIONES DE USO
Cómo insertar los batidores/ganchos
Con la batidora apagada y desenchufada,
introduzca el eje del batidor con collarín
en el orificio más grande. Empuje el batidor
o el gancho amasador hasta que encaje.
Introduzca el eje del batidor sin collarín o del
gancho amasador en el orificio más pequeño.
Empuje el batidor o el gancho amasador hasta
que encaje.
Cómo insertar el batidor de alambre
Con la batidora apagada y desenchufada,
introduzca el eje del batidor en cualquier de
los orificios. Empuje el batidor hasta que
encaje. NO APRIETE LOS ALAMBRES; ESTO
PODRÍA DAÑARLOS.
Cómo encender/apagar la unidad
Enchufe el cable en una toma de corriente.
Oprima el botón ON/OFF para encender el
aparato; la batidora se pondrá en marcha
automáticamente a la velocidad 1. Para
apagarla, vuelva a oprimir el botón ON/OFF.
Cómo cambiar la velocidad
Oprima el botón + para incrementar la velocidad.
Oprima el botón – para reducir la velocidad.
Cómo quitar los accesorios
Oprima el botón ON/OFF y desenchufe el
aparato. Alce la palanca de expulsión y jale
los accesorios.
MODO LICUADOR
El aditamento licuador ha sido diseñada
para licuar y mezclar una gran variedad de
alimentos, incluso aderezos, batidos, bebidas
en polvo, sopas y salsas.
Su cuchilla está diseñada para incorporar un
mínimo de aire a la mezcla. Un movimiento
suave hacia arriba y abajo es todo lo que
necesita para preparar las más sabrosas
recetas. Para evitar las salpicaduras, procure
no sacar la cuchilla del líquido durante el uso.
Cómo conectar el aditamento licuador
NOTA: El puerto de conexión del aditamento
licuador no se abrirá si los batidores están
insertados.
Abra la tapa del puerto de conexión.
Introduzca el aditamento licuador y gire en
sentido horario para sujetar.
Para quitarlo, gire el aditamento en sentido
antihorario y jálelo fuera del puerto de
conexión. La tapa del puerto de conexión se
cerrará automáticamente.
Operación
1. Con la batidora apagada y desenchufada,
conecte el aditamento licuador al puerto
de conexión.
2.
Enchufe el cable en una toma de
corriente.
3.
Sumerja la varilla en la mezcla que desea
licuar. Nota: Puede licuar en un vaso alto,
un recipiente, una olla o una jarra.
4.
Para encender, oprima el botón ON/OFF;
la pantalla LED mostrará “1”.
Collarín
Orificio
más grande
Puerto cerrado Puerto abierto

5
5.
Para activar la licuadora de mano,
oprima el botón con el candado abierto;
la pantalla LED mostrará “U”.
6.
Alce y mantenga alzado el botón de
expulsión de los batidores para licuar.
Para cambiar la velocidad, oprima los
botones +/-; la pantalla LED mostrará
la velocidad, “1”, “2” o “3” y el motor
ajustará la velocidad en consecuencia.
7.
Para pulsar, suelte el botón de expulsión
de los batidores; esto detendrá el licuado.
Jale el botón de expulsión otra vez para
reactivar el modo de licuado.
8.
Oprima el botón ON/OFF para apagar
la unidad. Desenchufe el aparato
inmediatamente después del uso.
LIMPIEZA
1. Lave los batidores, el batidor de alambre
y el gancho amasador en agua jabonosa
caliente o en el lavavajillas después de
cada uso.
2.
NUNCA SUMERJA EL BLOQUE-MOTOR
EN AGUA NI EN NINGÚN OTRO
LÍQUIDO Límpielo con un paño o una
esponja ligeramente humedecida. No use
limpiadores abrasivos; esto puede rayar
la superficie.
3.
Lave el aditamento licuador a mano o
en el lavavajillas, usando un detergente
suave. NOTA: La varilla NO es apta para
lavavajillas. Tenga mucho cuidado al
manipular la varilla, ya que la cuchilla es
muy afilada.
4.
Después del uso, desenchufe la batidora
de mano, límpiela con un paño y guárdela
en un lugar seco y seguro, fuera del
alcance de los niños.
Guarde la batidora de mano y sus
accesorios en el estuche de almacenaje
provisto.
MANTENIMIENTO
Cualquier otro servicio debe ser realizado por
un técnico autorizado.
NOTA: NO USE LA BATIDORA DE MANO
CUISINART
®
POWER ADVANTAGE
®
EN CACEROLAS/OLLA/SARTENES
ANTIADHERENTES.
GUÍA DE
REFERENCIA
RÁPIDA
SELECCIÓN DE LA VELOCIDAD
(solo para los accesorios de mezcla)
NOTA: use el batidor de alambre para batir
mezclas ligeras solamente. Para todas las
otras mezclas, use los batidores regulares o
los ganchos amasadores.
Velocidad 1
• Para empezar a mezclar la mayoría de
los ingredientes
• Para terminar de batir crema/nata
• Para empezar a montar claras
• Para incorporar cremas delicadas o claras
montadas a mezclas
• Para mezclar mezcla de “muffins” o de
panqueque.
Velocidad 2
• Para incorporar nueces, chispas de
chocolate o frutas secas a masas y mezclas
• Para tamizar e incorporar aire a mezclas de
ingredientes secos
• Para incorporar ingredientes secos en
masas/mezclas
• Para mezclar masas de galleta densas
• Para empezar a amasar masa de levadura
Velocidad 3
• Para agregar mantequilla fría a ingredientes
secos (para hacer masa de tarta, galleta y
hojaldres)
• Para mezclar ingredientes de pastel
• Para terminar de hacer puré de papas/
calabaza
• Para terminar de amasar masa de levadura
Velocidad 4
• Para mezclar masas de galleta
• Para acremar mantequilla con azúcar
• Para incorporar huevos a mezclas/masas
Velocidad 5
• Para terminar de mezclar coberturas/
glaseados
• Para batir huevos enteros o yemas
Velocidad 6
• Para montar claras
Velocidad 7
• Para terminar de batir crema/nata
Velocidad 8
• Para terminar de batir merengue y claras
CONSEJOS Y SUGERENCIAS PARA
LICUAR
1. No sumerja la varilla hasta menos de 1
pulgada (2.5 cm) del bloque-motor.
2.
Siempre empiece a batir en la velocidad
1. Incremente progresivamente la
velocidad al nivel 2 o 3, y licuar hasta
obtener una mezcla completamente suave.

6
3.
No sumerja el bloque-motor en agua ni
en ningún otro líquido.
4.
Corte los alimentos en cubos de ½
pulgada (1.5 cm) para facilitar el licuado.
5.
Para evitar las salpicaduras, cerciórese
de que el protector de cuchilla está
completamente sumergido antes de
empezar a licuar, y que permanece
en la mezcla durante el licuado.
Nunca lo saque del líquido durante el
funcionamiento.
6.
No deje el aparato dentro de una
cacerola/olla caliente.
7.
No licue/pique/muela alimentos que
contengan huesos, pepas, etc.; esto
puede dañar las cuchillas.
8.
No sobrellene los recipientes de mezcla;
la mezcla se expande durante el licuado
y puede desbordarse.
9.
Un movimiento suave hacia arriba y
abajo es la mejor manera de conseguir
resultados uniformes y homogéneos.
10.
Para incorporar aire a una mezcla,
mantenga la cuchilla del aditamento
licuador justo debajo de la superficie.

7
GARANTÍA
Garantía limitada de tres años
Esta garantía es para los consumidores que
residen en los EE.UU. solamente. Usted es un
consumidor si posee una batidora de mano de
8 velocidades Cuisinart
®
que fue comprado en
una tienda para uso personal, familiar o
casero. A menos que la ley aplicable exija lo
contrario, esta garantía no es para los
minoristas u otros consumidores/compradores
comerciales. Cuisinart garantiza este producto
contra todo defecto de materiales o
fabricación durante 3 años después de la
fecha de compra original, siempre que el
aparato haya sido usado para uso doméstico
y según las instrucciones.
Le aconsejamos que llene el formulario de
registro disponible en www.cuisinart.com a
fin de facilitar la verificación de la fecha de
compra original. Sin embargo, no es necesario
registrar el producto para recibir servicio bajo
esta garantía. En ausencia de prueba de la
fecha de compra, el período de garantía será
calculado a partir de la fecha de fabricación
del producto.
RESIDENTES DE CALIFORNIA
La ley del estado de California ofrece dos
opciones bajo el período de garantía. Los
residentes del estado de California pueden
regresar el producto defectuoso (A) a la tienda
donde lo compraron o (B) a otra tienda que
venda productos Cuisinart
®
de este tipo.
La tienda podrá, a su elección, reparar el
producto, referir el consumidor a un centro de
servicio independiente, sustituir el producto,
o reembolsar al consumidor el precio de
compra menos la cantidad directamente
atribuible al uso anterior del producto por el
consumidor. Si estas dos opciones no
satisfacen al consumidor, podrá llevar el
aparato a un centro de servicio independiente,
siempre que se pueda arreglar o reparar el
aparato de manera económica. Cuisinart
(no el consumidor) será responsable por los
gastos de servicio, reparación, sustitución o
reembolso de los productos defectuosos bajo
garantía. Los residentes de California también
pueden, si así lo desean, mandar el aparato
defectuoso directamente a Cuisinart para que
sea reparado o sustituido. Para esto, deben
llamar a nuestro servicio de atención al cliente
al 800-726-0190. Cuisinart será responsable
por los gastos de reparación, reemplazo,
manejo y envío de los productos defectuosos
durante el período de garantía.
GARANTÍA DE REEMPLAZO SIN
DIFICULTADES
Su máxima satisfacción es nuestra prioridad,
así que si este producto Cuisinart
®
falla
dentro del generoso período de garantía,
lo repararemos o, de ser necesario,
lo reemplazaremos, sin costo alguno para
usted. Para obtener una etiqueta de envío de
devolución, envíenos un correo electrónico,
visitando www.cuisinart.com/customer-
care/product-return. o llamando sin cargo
a nuestro servicio de atención al cliente, al
1-800-726-0190, para hablar con un
representante.
Este aparato satisface las más altas
exigencias de fabricación y ha sido diseñado
para uso sobre corriente de 120 V, usando
accesorios y piezas de repuesto autorizados
solamente. Esta garantía excluye
expresamente los defectos o daños causados
por accesorios, piezas o reparaciones no
autorizados por Cuisinart, así como los
defectos o daños causados por el uso de
un convertidor de voltaje. Esta garantía
no cubre el uso comercial o industrial del
producto, y no es válida en caso de daños
causados por mal uso, negligencia o
accidente. Esta garantía excluye todos
los daños incidentales o consecuentes.
Algunos Estados no permiten la exclusión
o limitación de daños incidentales o
consecuentes, de modo que las limitaciones
mencionadas pueden no regir para usted.
Usted puede tener otros derechos que varían
de un Estado a otro.
Importante: Si debe llevar el producto
defectuoso a un centro de servicio no
autorizado, por favor informe al personal
del centro de servicio que deben llamar al
servicio Cuisinart, al 1-800-726-0190, a fin
de diagnosticar el problema correctamente,
usar las piezas correctas para repararlo
y asegurarse de que el producto aún está
bajo garantía.

8
RECETAS
Desayunos
“Crêpes” con crema de limón y
frutas frescas ................................................... 9
“Scones” de limón y jengibre ........................ 10
“Muffins” de arándanos azules ..................... 10
“Muffins” de calabaza con especias ............. 11
“Muffins” de banana sin gluten .................... 11
Rosquillas (“donuts”) de sidra de manzana .. 12
“Coffee cake” de canela ............................... 13
Bizcocho de limón ......................................... 13
Mermelada rápida de frutas del bosque ....... 14
Mantequilla de jarabe de arce.......................15
Batido de frutas simple ................................. 15
“Smoothie” de frutas del bosque
y verduras ...................................................... 15
“Smoothie” de mango y limón ...................... 16
“Smoothie” proteico ...................................... 16
“Latté” de té matcha ..................................... 16
“Latté” en frío ................................................ 17
Entremeses salados y aliños
Huevos rellenos ............................................. 17
“Quiche” de tocino y queso suizo ................ 17
Tarta de requesón con tomillo ...................... 18
Salsa para mojar de espinaca y alcachofa ... 19
Salsa de pollo Búfalo .................................... 19
Crema para untar de queso con pimentón ... 20
Guacamole .................................................... 20
Humus ........................................................... 20
Puré de papas cremoso ................................ 21
Puré de camote con jarabe de arce ............. 21
Puré de coliflor .............................................. 21
Suflé de espinaca y queso Feta .................... 22
Panecillos de camote .................................... 23
“Popovers” .................................................... 23
“Calzones” de tres quesos ........................... 24
Salsa de tomate básica ................................. 25
Crema de verduras ........................................ 25
Sopa invernal de frijoles blancos .................. 26
Dulces
Galletas de mantequilla con limón
y tomillo ......................................................... 26
Galletas rellenas de fresa .............................. 27
Galletas de chocolate de trigo sarraceno ..... 28
Galletas de mantequilla de maní con
chispas de chocolate .................................... 29
Galletas de jengibre ...................................... 29
Botanas “keto” sin hornear ........................... 30
Masa de galleta cruda comestible
(con variaciones) ........................................... 30
“Brownies” expreso semiamargos ................ 31
“Blondies”
(“Brownies” de chocolate blanco) ................. 32
Barras de arándanos azules con cobertura
crujiente ......................................................... 32
Torta de capas dorada ................................. 33
Cobertura de crema y bayas ........................ 34
Torta de capas de chocolate ........................ 34
Baño de queso crema ................................... 35
Recetas sin gluten (¡y veganas!)
“Cupcakes” dorados con cobertura de
vainilla sin lácteos ......................................... 35
Pastel de ángel .............................................. 36
“Pavlova” con naranja roja y granada ........... 37
Pastel de queso de crema agria ................... 38
Tarta de crema de chocolate ........................ 39
Tarta de calabaza con corteza de galletas
Graham y pacanas ........................................ 39
Crema batida clásica .................................... 40
Glaseado real ................................................ 40
Batido de helado de chocolate con
mantequilla de maní ...................................... 41
Panes/Masas
Masa de pizza/focaccia ................................ 41
“Pâte brisée” (masa quebrada) ..................... 42
Pan blanco clásico Cuisinart ......................... 42
Pan de trigo integral con miel ....................... 43
Pancitos de romero y aceite de oliva ........... 43

9
“Crêpes” con crema de limón y
frutas frescas
La crema de limón es deliciosa tanto para
el desayuno como para el postre, pero
los “crêpes” también pueden ser rellenados
con artículos salados, tales como huevos
revueltos y verduras.
Rinde aprox. 18 “crêpes” rellenos
Mezcla:
¼ taza (55 g) de mantequilla sin sal,
en pedazos
1 taza (235 ml) de leche baja
en grasa/semidescremada, a
temperatura ambiente
¾ taza (95 g) de harina común
½ cucharadita de sal kosher
1 cucharada (10 g) de azúcar
granulada
3 huevos grandes, a temperatura
ambiente
1 cucharadita de extracto natural
de vainilla
1 cucharadita de mantequilla sin sal,
a temperatura ambiente
Crema de limón:
½ taza (120 ml) de crema líquida para
batir (“heavy cream”) fría
1½ cucharaditas de extracto natural
de vainilla
¼ taza (60 ml) de jarabe de arce/
maple puro
1 pizca de sal marina fina
½ taza (120 ml) de yogur natural de
leche entera
1 cucharadita de ralladura de limón
1 cucharadita de jugo de limón
fresco
2 bananas medianas, en rodajas finas
1 libra (455 g) de fresas frescas,
en rodajas finas
Azúcar glasé, para servir(opcional)
1. Para preparar las “crêpes”: Derretir la
mantequilla con la leche a fuego medio,
en una cacerola pequeña. Una vez que
la mantequilla esté derretida, retirar del
fuego y dejar enfriar ligeramente.
2.
Colocar la harina, la sal y el azúcar
en un tazón mediano. Usando los
batidores, revolver a velocidad 1 o 2
por aprox. 30 segundos para combinar.
Agregar los huevos y la vainilla, y batir
hasta conseguir una mezcla espesa y
pegajosa. Agregar la mezcla de leche/
mantequilla y seguir batiendo a velocidad
2 hasta conseguir una mezcla suave
y homogénea. Poner la mezcla en un
recipiente y dejar reposar en la nevera
por un mínimo de 30 minutos, hasta un
máximo de 12 horas.
3.
Mientras la mezcla está reposando, y
justo antes de cocinar los “crêpes”,
preparar el relleno. Colocar la crema en
un tazón mediano. Licuar por aprox. 1
minuto, empezando en la velocidad 1
e incrementando progresivamente la
velocidad al nivel 8, hasta que se formen
picos medio-firmes. Agregar la vainilla,
el jarabe de arce y la sal, y mezclar a
velocidad 1 a 3 hasta que esté bien
combinado. Agregar el resto de los
ingredientes, excepto las frutas, y
mezclar a velocidad 1 para combinar.
Reservar.
4.
Cocinar los “crêpes”. Mezclar la mezcla
brevemente a velocidad 2, usando los
batidores, para eliminar los grumos.
Si quedan grumos después de batir,
color la masa con colador de malla fina.
Poner un sartén antiadherente de 8 a 10
pulgadas (20 a 25 cm) a calentar a fuego
medio/medio-alto. Cuando el sartén
esté caliente, agregar 1 cucharadita
de mantequilla. Mover el sartén para
cubrir el fondo con la mantequilla y dejar
calentar por 30 segundos más. Verter ¼
de taza (60 ml) de la mezcla en el sartén
y mover el sartén rápidamente para cubrir
el fondo. Cocinar por aprox. 2 minutos,
hasta cuajarse (las crepas tradicionales
no deben dorarse), Después de este
tiempo, dar la vuelta y cocinar el otro
lado por un máximo de 30 segundos.
Retirar y repetir con el resto de la mezcla.
5.
Para servir, colocar 2 cucharadas de la
crema de limón en el centro de cada
“crêpe” y cubrir con unas rodajas de
banana y de fresa. Doblar el “crêpe” a
la mitad. Espolvorear con azúcar glasé
(opcional) y servir.
Información nutricional por crêpe relleno:
Calorías 156 (46% de grasa) • Carbohidratos 17g
Proteínas 4g • Grasa 8g • Grasa saturada 5g
Colesterol 68mg • Sodio 131mg • Calcio 52mg
Fibra 1g

10
“Scones” de limón y jengibre
No muy dulces, estos “scones” son
perfectos para acompañar una taza de té
caliente en la mañana.
Rinde 8 “scones”
2½ tazas (335 g) de harina de
repostería + un poco más para
darle forma
2 cucharadas (35 g) de azúcar
granulada
1½ cucharaditas de polvo de hornear
¼ cucharadita de bicarbonato de sodio
1 cucharadita de sal kosher
1 cucharada de ralladura de limón
6 cucharadas (85 g) de mantequilla
sin sal, en pedazos de ½ in.
(1.5 cm), a temperatura ambiente
(por aprox. 5 a 10 minutos;
la mantequilla no debe estar
demasiado suave)
1 taza (245 g) de suero de leche
(“buttermilk”)
1 huevo grande
¼ taza (30 g) de jengibre cristalizado
picado
Huevo para barnizar (1 huevo
grande + 1 cucharadita de agua,
bien batidos)
Azúcar turbinado para espolvorear
1. Colocar la harina, el azúcar, el polvo de
hornear, el bicarbonato de sodio, la sal y
la ralladura en un tazón grande. Usando
los batidores, mezclar los ingredientes
secos a velocidad 1 para combinar.
Reservar.
2.
Colocar el suero de leche y el huevo en
un tazón pequeño. Mezclar a velocidad
1 para combinar. Agregar la mantequilla
y los ingredientes secos, y mezclar
a velocidad 3 hasta que la mezcla
adquiera la textura de una masa que se
desmigaja. Ajustar la velocidad al nivel
1 y agregar lentamente los ingredientes
líquidos; mezclar justo hasta incorporar
los ingredientes, teniendo cuidado de no
mezclar demasiado.
3.
Colocar la masa en la encimera limpia
o en una tabla de picar grande. Formar
un cilindro de 10 in. (25 cm) de largo.
Usando un cuchillo afilado, cortar 8
rodajas uniformes. Colocar sobre una
placa para horno forrada con papel
sulfurizado. Cubrir con papel film/plástico
y refrigerar por un mínimo de 1 hora,
hasta un máximo de una noche.
4.
Poner la rejilla del horno en el centro del
mismo y precalentar el horno a 400°F
(200°C). Cepillar cada “scone” con el
barniz de huevo y rociar con azúcar de
turbinado.
5.
Hornear por 25 a 30 minutos, hasta
dorarse. Dejar enfriar antes de servir.
Información nutricional por “scone”:
Calorías 264 (35% de grasa) • Carbohidratos 40g
Proteínas 5g • Grasa 9g • Grasa saturada 6g
Colesterol 47g • Sodio 440g • Calcio 99mg
Fibra 1g
“Muffins” de arándanos azules
Todo el mundo tiene un “muffin” favorito, y
este se está convirtiendo rápido en el nuestro.
No omita la ralladura de naranja; se combina
perfectamente con el brillante sabor de
los arándanos.
Rinde 12 “muffins”
Spray vegetal
2 tazas (250 g) de harina común
¹⁄
³
taza (65 g) de azúcar granulada
¹⁄
³
taza llena (65 g) de azúcar rubia
(azúcar de caña integral)
1 cucharadita de polvo de hornear
¼ cucharadita de bicarbonato de
sodio
½ cucharadita de sal kosher
½ cucharadita de canela en polvo
½ cucharadita de ralladura de naranja
¾ taza (185 g) de suero de leche
(“buttermilk”), a temperatura
ambiente
½ taza (120 ml) de aceite vegetal
1 huevo grande, a temperatura
ambiente
1 cucharadita de extracto natural
de vainilla
1 taza (125 g) de arándanos azules
congelados, descongelados
½ cucharadita de azúcar turbinado
1. Poner la rejilla del horno en el medio
del mismo y precalentar el horno a
400°F (200°C). Engrasar ligeramente

11
12 moldecitos para “muffins” con spray
vegetal; reservar.
2.
Colocar la harina, el azúcar, el polvo
de hornear, el bicarbonato de sodio, la
canela, la sal y la ralladura en un tazón
grande. Usando los batidores, revolver a
velocidad 1 por aprox. 40 segundos para
combinar. Reservar.
3.
Colocar el suero de leche, el aceite, el
huevo y la vainilla en un tazón pequeño;
revolver a velocidad 1 para mezclar. Sin
dejar de revolver, agregar poco a poco
la mezcla al tazón de ingredientes secos.
Cuando esté casi combinado, incorporar
suavemente los arándanos. Verter la
mezcla en los moldecitos preparados.
Esparcir azúcar turbinado por encima de
cada “muffin”.
4.
Hornear por aprox. 18 a 20 minutos,
hasta que un probador introducido en el
centro salga limpio.
Información nutricional por “muffin”:
Calorías 209 (41% de grasa) • Carbohidratos 28g
Proteínas 3g • Grasa 10g • Grasa saturada 1g
Colesterol 16g • Sodio 178g • Calcio 45mg
Fibra 1g
“Muffins” de calabaza con especias
Una elección obvia para los meses de
otoño, las especias y las nueces tostadas
complementan la calabaza en estos húmedos
y sabrosos panecillos.
Rinde 12 “muffins”
Spray vegetal
2 tazas (250 g) de harina común
½ cucharadita de sal kosher
1 cucharadita de polvo de hornear
¼ cucharadita de bicarbonato de
sodio
½ cucharadita de canela en polvo
¼ cucharadita de nuez moscada
rallada
¼ cucharadita de pimienta de
Jamaica en polvo
½ taza (120 ml) de aceite vegetal
1¾ tazas (350 g) de azúcar granulada
¼ taza llena (50 g) de azúcar rubia
(azúcar de caña integral)
1 taza (200 g) de puré de calabaza
1 cucharadita de extracto natural
de vainilla
2 huevos grandes, a temperatura
ambiente
½ taza (50 g) de nueces tostadas,
picadas
1. Poner la rejilla del horno en el medio
del mismo y precalentar el horno a
375°F (190°C). Engrasar ligeramente
12 moldecitos para “muffins” con spray
vegetal; reservar.
2.
Colocar la harina, la sal, el polvo de
hornear, el bicarbonato, la canela, la nuez
moscada y la pimienta de Jamaica en un
tazón mediano. Usando los batidores,
revolver a velocidad 1 por aprox. 40
segundos para combinar. Reservar.
3.
Colocar el aceite, el azúcar, la calabaza
y la vainilla en un tazón grande; revolver
a velocidad 1 a 3 para mezclar. Agregar
gradualmente los huevos, usando la
velocidad 2 para combinar.
4.
Mezclando a velocidad 1, agregar
gradualmente los ingredientes secos a la
mezcla de azúcar/aceite/calabaza.
Cuando esté casi combinado, incorporar
suavemente las nueces. Verter la mezcla
en los moldecitos preparados.
5.
Hornear por aprox. 18 a 20 minutos,
hasta que un probador introducido en el
centro salga limpio.
Información nutricional por “muffin”:
Calorías 342 (34% de grasa) • Carbohidratos 54g
Proteínas 5g • Grasa 13g • Grasa saturada 2g
Colesterol 31g • Sodio 197g • Calcio 13mg
Fibra 2g
“Muffins” de banana sin gluten
Las mezclas de harina sin gluten para todo
uso hacen que hacer productos sin gluten
sea fácil y cómodo. Hay muchas marcas entre
las cuales elegir, así que pruebe algunas y
encuentre su favorita.
Rinde 12 “muffins”
Spray vegetal
2 tazas (250 g) de harina sin gluten
½ taza (40 g) de copos de avena
(no use avena instantánea)
¹⁄
³
taza (65 g) de azúcar granulada
¹⁄
³
taza llena (65 g) de azúcar rubia
(azúcar de caña integral)
1½ cucharaditas de polvo de hornear
¼ cucharadita de bicarbonato de sodio
½ cucharadita de sal kosher

12
½ cucharadita de goma xantana
(opcional; solamente si la harina
no tiene)
½ cucharadita de canela en polvo
½ taza (120 ml) de aceite vegetal
2 huevos grandes, a temperatura
ambiente
½ cucharadita de extracto natural
de vainilla
3 bananas maduras, aplastadas
1. Poner la rejilla del horno en el medio
del mismo y precalentar el horno a
375°F (190°C). Engrasar ligeramente
12 moldecitos para “muffins” con spray
vegetal; reservar.
2.
Colocar la harina, la avena, el azúcar, el
polvo de hornear, el bicarbonato, la sal,
la goma xantana (si la usa) y la canela en
un tazón. Usando los batidores, revolver
a velocidad 1 o 2 por aprox. 30 segundos
para combinar.
3.
Colocar los ingredientes restantes en
otro tazón grande; mezclar a velocidad 3
por 1 a 2 minutos, hasta conseguir una
mezcla suave y cremosa. Agregar los
ingredientes secos y mezclar a velocidad
2 para incorporar.
4.
Verter la mezcla en los moldecitos
preparados. Hornear por aprox. 16 a
18 minutos, hasta que un probador
introducido en el centro salga limpio.
Información nutricional por “muffin”:
Calorías 248 (38% de grasa) • Carbohidratos 37g
Proteínas 3g • Grasa 11g • Grasa saturada 1g
Colesterol 31g • Sodio 223g • Calcio 92mg
Fibra 3g
Rosquillas (“donuts”) de sidra
de manzana
Cerciórese de usar la mejor calidad de sidra
(no jugo) que pueda encontrar, para obtener
un verdadero sabor a manzana.
Rinde aprox. 12 rosquillas (“donuts”)
Spray vegetal o mantequilla a
temperatura ambiente
2 tazas (250 g) de harina común
1 cucharadita de canela en polvo
¼ cucharadita de nuez moscada
rallada
1½ cucharaditas de polvo de hornear
½ cucharadita de sal kosher
6 cucharadas (85 g) de mantequilla
sin sal a temperatura ambiente,
en pedazos de 1 in. (2.5 cm)
²
⁄
³
taza llena (135 g) de azúcar rubia
(azúcar de caña integral)
¼ taza (50 g) de azúcar granulada
2 cucharadas (30 g) de jarabe de
arce/maple
2 huevos grandes, a temperatura
ambiente
1 cucharadita de extracto natural
de vainilla
¾ taza (175 ml) de sidra de manzana
¼ taza (60 g) de suero de leche
(“buttermilk”), a temperatura
ambiente
6 cucharadas (85 g) de mantequilla
sin sal, derretida y tibia
²
⁄
³
taza (135 g) de azúcar granulada
1 cucharadita de canela en polvo
1 pizca de sal kosher
1. Engrasar un molde para rosquillas con
spray vegetal o mantequilla a temperatura
ambiente; reservar. Poner la rejilla
del horno en el medio del mismo y
precalentar el horno a 350°F (180°C).
2.
Poner la harina, 1 cucharada de la canela,
la nuez moscada, el polvo de hornear
y ½ cucharadita de sal en un tazón
mediano. Usando los batidores, mezclar
a velocidad 2 por un mínimo de 30
segundos para combinar; reservar.
3.
Colocar la mantequilla suave, el
azúcar rubio, ¼ de taza (50 g) del
azúcar granulado y el jarabe arce en
un tazón grande. Mezclar por aprox.
1 minuto, empezando en la velocidad
2 y aumentando progresivamente la
velocidad al nivel 4, hasta conseguir
una mezcla ligera y cremosa. Agregar
los huevos, uno a la vez, mezclando a
velocidad 2 después de cada adición, y
luego la vainilla.
4.
Colocar la sidra de manzana y el suero
de leche en una taza de medir; revolver.
Agregar los ingredientes secos a la
mezcla, en tres adiciones, alternando
con la mezcla de sidra/suero de leche.
Cerciorarse de mezclar suavemente, pero
bien, usando la velocidad 2.
5.
Verter mezcla en los moldes preparados.
6.
Hornear por aprox. 15 a 20 minutos,
hasta que estén dorados (el tiempo
depende del horno y del molde usados).

13
7.
Mientras las rosquillas se están
horneando, mantener 6 cucharadas (85
g) de mantequilla tibia y mezclar
²
⁄
³
de
taza (135 g) de azúcar granulada con 1
cucharadita de canela y una pizca de sal
en un cuenco poco profundo. Revolver a
velocidad 1 para mezclar; reservar.
8.
Retirar el molde del horno y dejar las
rosquillas descansar en el molde por 5
a 6 minutos. Después de este tiempo,
desmoldar con cuidado las rosquillas,
cepillarlas con la mantequilla derretida,
cubrir suavemente con azúcar con
canela. ¡Servir inmediatamente!
Información nutricional por rosquilla:
Calorías 299 (35% de grasa) • Carbohidratos 45g
Proteínas 3g • Grasa 12g • Grasa saturada 7g
Colesterol 61mg • Sodio 146mg • Calcio 18mg
Fibra 1g
“Coffee cake” de canela
Este “coffee cake” es rico, mantecoso y lleno
de canela. Se aconseja servirlo el mismo día
que se prepara.
Rinde 12 porciones; un pastel redondo de
9 in. (23 cm)
Relleno/Cobertura:
Mantequilla sin sal, a temperatura
ambiente
½ taza (60 g) de nueces tostadas,
picadas
¼ taza (50 g) de azúcar granulada
1 cucharada de canela en polvo
1 pizca de sal kosher
Pastel:
1¾ tazas (220 g) de harina común
½ cucharadita de sal kosher
½ cucharadita de polvo de hornear
¼ cucharadita de bicarbonato de sodio
8 cucharadas (115 g) de mantequilla
sin sal a temperatura ambiente,
en 4 pedazos
½ taza (100 g) de azúcar granulada
¼ taza llena (50 g) de azúcar rubia
(azúcar de caña integral)
2 huevos grandes, a temperatura
ambiente
1 cucharadita de extracto natural
de vainilla
1 taza (235 ml) de yogur griego,
preferiblemente no bajo en grasa
1. Engrasar ligeramente un molde redondo
de 9 in. (23 cm) con mantequilla suave;
reservar. Poner la rejilla del horno en el
medio del mismo y precalentar el horno a
350°F (180°C).
2.
Colocar los ingredientes del relleno/
cobertura en un tazón pequeño. Licuar
a velocidad 1, usando los batidores.
Reservar.
3.
Poner la harina, la sal, el polvo de hornear
y el bicarbonato en un tazón mediano.
Mezclar a velocidad 2 por un mínimo de
30 segundos para combinar; reservar.
4.
Poner la mantequilla y los azucares en
un tazón grande. Mezclar por aprox.
2 minutos, empezando en la velocidad
2 y aumentando progresivamente la
velocidad al nivel 4, hasta conseguir
una mezcla ligera y cremosa. Agregar
los huevos, uno a la vez, mezclando a
velocidad 3 después de cada adición,
y luego agregar la vainilla y el yogurt.
Agregar los ingredientes secos, en
dos adiciones, mezclando a velocidad
2 después de cada adición (mezclar
suavemente, pero completamente).
5.
Verter la mitad la mezcla en el molde
preparado. Cubrir con la mitad de la mezcla
de nueces, y luego añadir el resto de la
mezcla. Suavizar las orillas, y luego cubrir
con el resto de la mezcla de nueces.
6.
Hornear por aprox. 45 minutos, hasta que
esté firme y dorado.
Información nutricional por porción:
Calorías 245 (41% de grasa) • Carbohidratos 31g
Proteínas 5g • Grasa 11g • Grasa saturada 5g
Colesterol 51mg • Sodio 161mg • Calcio 50mg
Fibra 1g
Bizcocho de limón
Un bizcocho jugoso tradicional con
un nuevo giro.
Rinde 16 porciones; una barra de 9 in. (23 cm)
Pastel:
Mantequilla sin sal suave o spray
vegetal
2 tazas (250 g) de harina común
1 cucharadita de polvo de hornear
1 cucharadita de sal kosher
14 cucharadas (210 g) de mantequilla
sin sal a temperatura ambiente,
en pedazos de 1 in. (2.5 cm)

14
1¹∕
³
tazas (265 g) de azúcar granulada
3 cucharadas de ralladura de limón
4 cucharadas de aceite vegetal
4 cucharaditas de jugo de limón
fresco
2 huevos grandes, a temperatura
ambiente
1 yema de huevo grande,
a temperatura ambiente
²
⁄
³
taza (160 ml) de crema agria,
a temperatura ambiente
Glaseado:
1 taza (120 g) de azúcar glasé,
tamizado
3 cucharadas de crema líquida para
batir (“heavy cream”)
2 cucharadas de jugo de limón fresco
1 pizca de sal marina fina
1. Poner la rejilla del horno en el tercio
inferior del mismo y precalentar el horno
a 350°F (180 °C). Engrasar un molde de
barra de 9x5 x 3 in. (23 x 13 x 8 cm)
con spray vegetal o mantequilla sin sal;
reservar.
2.
Poner la harina, el bicarbonato y la sal en
un tazón pequeño. Usando los batidores,
revolver a velocidad 1 por aprox. 30
segundos para combinar. Reservar.
3.
Colocar la mantequilla en un tazón
grande y acremar, usando la velocidad 2
a 4, hasta que esté suave. Agregar el
azúcar y la ralladura de limón. Revolver
por aprox. 2 minutos, usando la velocidad
2 a 5, hasta obtener una mezcla muy clara.
4.
Colocar el aceite, el jugo de limón, los
huevos, la yema y la crema agria en un
tazón pequeño. Mezclar a velocidad 1
para combinar.
5.
Revolviendo a velocidad 1 a 2, agregar
un tercio de los ingredientes secos a la
mezcla de mantequilla/azúcar, y luego
la mitad de los ingredientes líquidos;
repetir hasta haber agregado todos los
ingredientes.
6.
Verter la mezcla en el molde preparado y
meter al horno. Hornear por aprox. 1 hora
y 10 minutos, hasta que un probador
introducido en el centro salga limpio.
7.
Sacar del horno y dejar enfriar en una
rejilla (en el molde) por 10 a 15. Luego,
desmoldar y envolver inmediatamente en
papel film/plástico y dejar que se enfríe
completamente.
8.
Mientras el pastel se está enfriando,
preparar el glaseado de limón. Colocar
todos los ingredientes del glaseado en
un tazón pequeño a mediano y revolver
a velocidad 1 a 3, usando el batidor de
alambre, hasta obtener una muy suave
(añadir más azúcar tamizada o crema
para obtener la consistencia deseada).
9.
Después de que el bizcocho se haya
enfriado un poco, colocarlo en una rejilla
colocada encima de una bandeja, de
papel de aluminio, o de papel sulfurizado
(cualquier cosa que recoja el exceso de
glaseado). Rociar o esparcir el glaseado
en el bizcocho. Dejar que el glaseado se
solidifique y que el bizcocho se enfríe
completamente antes de cortar y servir.
Información nutricional por porción:
Calorías 275 (44% de grasa) • Carbohidratos 36g
Proteínas 3g • Grasa 14g • Grasa saturada 8g
Colesterol 71mg • Sodio 164mg • Calcio 13mg
Fibra 2g
Mermelada de frutas
del bosque rápida
Esta receta es perfecta para aquellos que
tienen miedo al hacer mermelada tradicional
o tienen un exceso de frutas de bosque.
Es deliciosa tibia en tostadas, toma menos
de 40 minutos de principio a fin, y puede ser
refrigerada hasta por 3 semanas.
Rinde 1 taza (235 ml)
1½ libras (680 g) de frutas del bosque
mixtas
²
⁄
³
a ¾ taza (135 a 150 g) de azúcar
granulada, dependiendo del nivel
de dulzura de las frutas o de su
preferencia
1 cucharadita de jugo de limón
fresco
1 pizca de sal kosher
1. Preparar las futas. Si usa fresas, quitar
el corazón y cortar en pedazos de no
más de 1 pulgada (2.5 cm). Colocar
todos los ingredientes en una cacerola
mediana y calentar a fuego medio.
Calentar hasta que la mezcla empiece
a hervir, revolviendo ocasionalmente.
Bajar el fuego para que la mezcla hierva a
fuego lento y seguir cocinando hasta que
se espese. La mermelada debe cubrir
completamente el dorso de una cuchara

15
sin gotear. Dependiendo de la cacerola
usada y de la estufa, esto puede tomar
entre 30 y 40 minutos.
2.
Retirar del fuego y dejar enfriar por aprox.
10 minutos. Usando el aditamento
licuador, licuar a velocidad 1 hasta que
esté suave. Reservar, en un frasco, y
dejar enfriar a temperatura ambiente.
Cubrir y refrigerar hasta el momento de
usar. La mermelada se conservará hasta
3 semanas (debe refrigerarse).
Información nutricional por cucharada:
Calorías 59 (3% de grasa) • Carbohidratos 14g
Proteínas 1g • Grasa 0g • Grasa saturada 0g
Colesterol 0mg • Sodio 11mg • Calcio 12mg
Fibra 2g
Mantequilla de jarabe de arce
Úsela en waffles y panqueques, o incluso en
tostadas, esta deliciosa mantequilla debe ser
servida a temperatura ambiente.
Rinde ½ taza (120 ml)
½ taza (115 g) de mantequilla
sin sal, a temperatura ambiente,
en pedacitos
2½ cucharadas de jarabe de
arce/maple puro
1 pizca de sal marina fina
Colocar la mantequilla en un tazón
mediano. Usando los batidores, revolver
a velocidad 2 o 3 por aprox. 30 a 40
segundos hasta que esté cremosa. Agregar
los ingredientes restantes y mezclar por 40
a 50 segundos para combinar.
Información nutricional por cucharadita:
Calorías 39 (86% de grasa) • Carbohidratos 1g
Proteínas 0g • Grasa 4g • Grasa saturada 2g
Colesterol 10mg • Sodio 6mg • Calcio 2mg
Fibra 0g
Batido de frutas simple
Esta receta puede servir para preparar muchos
batidos, usando cualquier tipo de jugo o fruta.
Rinde 1 porción de aprox. 12 onzas (355 ml)
1 taza (250 g) de frutas del bosque
frescas o congeladas
½ taza (120 ml) de su jugo favorito
1. Colocar los ingredientes en un vaso alto.
2.
Usando el aditamento licuador, licuar
por 30 a 45 segundos, empezando
en la velocidad 1 y aumentando
progresivamente la velocidad al nivel 3,
hasta conseguir una mezcla suave.
3.
Servir inmediatamente.
Información nutricional por porción:
Calorías 144 (4% de grasa) • Carbohidratos 48g
Proteínas 3g • Grasa 1g • Grasa saturada 0g
Colesterol 0mg • Sodio 3mg • Calcio 27mg
Fibra 5g
“Smoothie” de frutas del bosque
y verduras
La grasa del aguacate y del aceite de
coco le impedirá alcanzar esos bocadillos de
media mañana.
Rinde 2 porciones de aprox. 16 onzas (475 ml)
1 taza (150 g) de frutas del bosque
congeladas
½ aguacate, cortado en 4 pedazos
½ taza (15 g) de espinaca tierna
(espinaca “baby”) o col rizada
1 cucharada (15 ml) de aceite de coco
1 taza (235 ml) de agua
1. Colocar todos los ingredientes en un
vaso alto, en el orden indicado.
2.
Usando el aditamento licuador, licuar
por aprox. 1 minuto, empezando
en la velocidad 1 y aumentando
progresivamente la velocidad al nivel 3,
hasta conseguir una mezcla suave.
3.
Servir inmediatamente.
Información nutricional por porción
de 8 onzas (235 ml):
Calorías 149 (4% de grasa) • Carbohidratos 11g
Proteínas 1g • Grasa 12g • Grasa saturada 7g
Colesterol 0mg • Sodio 5mg • Calcio 16mg
Fibra 5g

16
“Smoothie” de mango y limón
Para conseguir un “smoothie” aún más
cremoso, use ½ taza (120 ml) de yogur.
Rinde 1 porción de aprox. 8 onzas (355 ml)
1 taza (140 g) de cubos de mango
frescos o congelados
¹⁄
³
taza (80 ml) de yogur natural
1½ cucharaditas de jugo de lima/limón
verde fresco
½ cucharadita de ralladura de
lima/limón verde
¼ taza (60 ml) de agua fría (o de agua
de coco)
1. Colocar todos los ingredientes en un
vaso alto, en el orden indicado.
2.
Usando el aditamento licuador, licuar
por 30 a 45 segundos, empezando
en la velocidad 1 y aumentando
progresivamente la velocidad al nivel 3,
hasta conseguir una mezcla suave.
3.
Servir inmediatamente.
Información nutricional por porción (hecho con
yogur de leche entera y agua):
Calorías 195 (15% de grasa) • Carbohidratos 39g
Proteínas 5g • Grasa 3g • Grasa saturada 2g
Colesterol 10mg • Sodio 53mg • Calcio 156mg
Fibra 3g
“Smoothie” proteico
Mantequilla de nuez, banana y cacao –
¿A quién no le va a gustar? Además, este
combo está repleto de sustanciosas proteínas.
Rinde 1 porción de aprox. 12 onzas (355 ml)
1 banana, en trozos
1 a 2 dátiles, deshuesados
1 cucharada (15 g) de la mantequilla
de nuez de su elección
¼ taza (30 g) de proteínas en polvo
1 cucharadita de cacao amargo
en polvo
¾ taza (175 ml) de leche de almendra
sin azúcar
1. Colocar todos los ingredientes en un
vaso alto, en el orden indicado.
2.
Usando el aditamento licuador, licuar
por 30 a 45 segundos, empezando
en la velocidad 1 y aumentando
progresivamente la velocidad al nivel 3,
hasta conseguir una mezcla suave.
3.
Servir inmediatamente.
Información nutricional por porción:
Calorías 240 (52% de grasa) • Carbohidratos 27g
Proteínas 23g • Grasa 6g • Grasa saturada 1g
Colesterol 0mg • Sodio 232mg • Calcio 95mg
Fibra 5g
“Latté” de té matcha
No hay necesidad de molestar a su camarero
cuando puede preparar este favorito de
cafetería en casa.
Rinde 2 porciones
2 tazas (475 ml) de leche (cualquier
variedad) o leche vegetal
2 cucharaditas de té verde matcha
en polvo
1 cucharadita de miel o agave,
opcional
1. Colocar la leche en una cacerola
pequeña. Calentar a fuego medio hasta
que empiece a hervir.
2.
Cuando empiece a hervir, retirar del fuego
y añadir el té matcha y la miel (opcional).
Usando el aditamento licuador, licuar a
velocidad 1, manteniendo la cuchilla justo
debajo de la superficie, para espumar.
3.
Dividir entre 2 vasos y servir
inmediatamente.
Información nutricional por porción
(usando leche sin grasa):
Calorías 90 (0% de grasa) • Carbohidratos 13g
Proteínas 0g • Grasa 0g • Grasa saturada 0g
Colesterol 5mg • Sodio 135mg • Calcio 300mg
Fibra 0g

17
“Latté” en frío
Los “lattés” no tienen por qué estar calientes.
Refrésquese con esta popular versión fría.
Si no tiene café en frío, puede utilizar café
fuerte refrigerado.
Rinde 1 porción
½ taza (120 ml) de leche
1 taza (235 ml) de café en frío
Hielo, opcional
1. Colocar los ingredientes en un vaso alto.
2.
Usando el aditamento licuador, licuar a
velocidad 1, manteniendo la varilla justo
debajo de la superficie, para espumar.
3.
Agregar hielo si desea, y disfrutar
inmediatamente.
Información nutricional por porción:
Calorías 59 (35% de grasa) • Carbohidratos 5g
Proteínas 4g • Grasa 2g • Grasa saturada 1g
Colesterol 9mg • Sodio 58mg • Calcio 141mg
Fibra 0g
Huevos rellenos
Este eterno aperitivo es bienvenido en
cualquier fiesta o mesa de brunch.
Rinde 24 porciones
12 huevos grandes cocinados
½ taza (120 ml) de mayonesa
1½ cucharaditas de mostaza de Dijon
1½ cucharaditas de jugo de limón fresco
1 cucharadita de salsa Worcestershire
1 cucharada de alcaparras, escurridas
½ cucharadita de sal kosher
¼ cucharadita de pimienta negra
recién molida
Páprika para decorar
1. Pelar los huevos y cortarlos cuidadosamente
a la mitad. Colocar las mitades de clara
sobre una superficie limpia. Colocar las
yemas en un tazón mediano. Usando el
aditamento licuador, licuar a velocidad 1
por aprox. 45 segundos, para picar las
yemas. Agregar los ingredientes restantes
y licuar a velocidad 1 hasta conseguir
una mezcla muy suave. Probar y ajustar
la sazón al gusto.
2.
Usando una cuchara o una manga
pastelera con una boquilla de estrella,
colocar la mezcla en el centro de cada
clara. Rociar con páprika antes de servir.
Información nutricional por porción:
Calorías 54 (70% de grasa) • Carbohidratos 1g
Proteínas 3g • Grasa 4g • Grasa saturada 1g
Colesterol 108mg • Sodio 144mg • Calcio 15mg
Fibra 0g
“Quiche” de tocino y queso suizo
Una versión americana de la clásica “Quiche
Lorraine” francesa. Sustituimos los lardones
tradicionales con tocino.
Rinde 12 porciones
½ receta de “pâte brisée”
(masa quebrada) (página 42)
8 onzas (115 g) de tocino grueso,
en cubos
1 chalote pequeño, finamente picado
1 taza (235 ml) de crema líquida
“half-and-half” (mitad leche/mitad
crema)
4 huevos grandes
1 pizca de sal kosher
1 pizca de pimienta negra recién
molida
1 taza (120 g) de Gruyère (u otro
queso suizo similar) finamente
rallado
1 cucharada de cebollinos (“chives”)
finamente rebanados
1. Colocar una de las rejillas del horno en
la posición más baja y la otra rejilla en
el medio. Precalentar el horno a 350°F
(180°C).
2.
Estirar la masa quebrada para formar
un disco de 9 in. (23 cm) de diámetro.
Acomodar en un molde de tarta con
fondo removible. Pinchar levemente la
masa con un tenedor, teniendo cuidado
de no perforarla completamente.
Refrigerar hasta que esté firme, 15
minutos en el congelador o 30 minutos
en la nevera. Cuando esté fría, poner una
hoja de papel de aluminio encima de la
masa y llenar parcialmente con bolas
de cerámica para hornear, arroz crudo
o frijoles secos. Colocar el molde en el
horno, en la rejilla inferior, y hornear por
aprox. 25 minutos, hasta que la masa
ya no se vea húmeda. Con cuidado,
quitar el papel de aluminio y las bolas
de cerámica, y volver a colocar el molde
en el horno, pero en el centro esta vez.
Hornear por 5 minutos adicionales, hasta
que la masa esté ligeramente dorada.

18
3.
Retirar del horno y dejar que se enfríe
completamente antes de llenar.
4.
En un sartén medio a grande, cocinar el
tocino hasta que esté dorado y crujiente.
Colocar sobre un plato forrado con papel
absorbente para absorber el exceso
de grasa. Dejando solamente aprox.
1 cucharada de grasa de tocino en el
sartén, devolver el sartén a la estufa.
Calentar a fuego medio-lento, y luego
agregar el chalote. Saltear hasta que esté
suave. Retirar del fuego y dejar enfriar
ligeramente.
5.
Colocar la crema líquida, los huevos, la
sal y la pimienta en un tazón mediano.
Usando los batidores, mezclar a
velocidad 2 a 3 por aprox. 1 minuto,
hasta que no queden rastros de yema.
6.
Colocar el molde de tarta en una bandeja
de hornear con borde (esto facilitará la
transferencia al horno). Esparcir el tocino
y el chalote uniformemente sobre el
fondo de tarta horneado en blanco. Verter
la mezcla de crema líquida/huevo por
encima del tocino y del chalote, y luego
cubrir con queso rallado. Rociar con
cebollinos.
7.
Con cuidado, colocar la tarta en el horno,
en la rejilla del centro. Hornear por aprox.
20 a 22 minutos, hasta que las orillas
estén firmes, pero que el centro siga suave.
8.
Retirar y dejar enfriar ligeramente antes
de cortar y servir.
Información nutricional por porción:
Calorías 283 (72% de grasa) • Carbohidratos 8g
Proteínas 11g • Grasa 23g • Grasa saturada 12g
Colesterol 120mg • Sodio 571mg • Calcio 76mg
Fibra 0g
Tarta de requesón con tomillo
Una tarta muy simple con solo un puñado
(o dos) de ingredientes. Lo mantenemos
simple con solo requesón, hierbas y especias,
pero puedes usar otros ingredientes, tales
como microverduras, verduras a la parrilla o
salteadas, etc. Si necesita un aperitivo rápido,
sirva el relleno como salsa para
mojar vegetales o untado en rebanadas de
baguette tostado.
Rinde 12 porciones
½ receta de “pâte brisée”
(masa quebrada) (página 42)
15 a 16 onzas (425 a 455 g) de requesón/
queso ricota, escurrido
¾ onza (25 g) de queso Pecorino
Romano rallado
1 cucharadita de aceite de oliva
1 cucharadita de tomillo fresco
½ cucharadita de jugo de limón
fresco
1 pizca de sal kosher
1 pizca de pimienta negra recién
molida
1. Colocar una de las rejillas del horno en
la posición más baja y la otra rejilla en
el medio. Precalentar el horno a 350°F
(180°C).
2.
Estirar la masa quebrada para formar
un disco de 9 in. (23 cm) de diámetro.
Acomodar la masa en un molde de tarta
con fondo removible. Pinchar levemente
la masa con un tenedor, teniendo
cuidado de no perforarla completamente.
Refrigerar hasta que esté firme, 15
minutos en el congelador o 30 minutos
en la nevera. Cuando esté fría, poner una
hoja de papel de aluminio encima de la
masa y llenar parcialmente con bolas
de cerámica para hornear, arroz crudo
o frijoles secos. Colocar el molde en el
horno, en la rejilla inferior, y hornear por
aprox. 25 minutos, hasta que la masa
ya no se vea húmeda. Con cuidado,
quitar el papel de aluminio y las bolas
de cerámica, y volver a colocar el molde
en el horno, pero en el centro esta vez.
Hornear por 10 a 15 minutos adicionales,
hasta que la masa esté bien dorada.
3.
Retirar del horno y dejar que se enfríe
completamente antes de llenar.
4.
Colocar los ingredientes del relleno en un
tazón grande. Usando los batidores, batir
a velocidad 2 o 3 por aprox. 40 segundos
para combinar.
5.
Una vez que el fondo de tarta esté
completamente frío, rellenar con el relleno
de queso. Servir a temperatura ambiente.
Información nutricional por porción:
Calorías 173 (67% de grasa) • Carbohidratos 8g
Proteínas 6g • Grasa 13g • Grasa saturada 8g
Colesterol 36mg • Sodio 170mg • Calcio 112mg
Fibra 0g

19
Salsa para mojar de espinaca
y alcachofa
Crema para mojar tradicional, con un giro
especial para el paladar de los adultos. La
combinación de Gruyère y Parmesano le da
un agradable sabor a nuez. No requiere ningún
tipo de fuente especial; un molde de tarta es
el método más rápido para calentar este plato.
Rinde 2 tazas (475 ml)
Aceite de oliva o spray vegetal
12 onzas (115 g) de queso crema
en pedazos de 1 in. (2.5 cm),
a temperatura ambiente
2 onzas (55 g) de Gruyère, finamente
rallado
1 onza (30 g) de queso Parmesano,
finamente rallado
1 diente de ajo, finamente picado
½ chalote grande pequeño,
finamente picado
8 onzas (225 g) de espinaca
descongelada, escurrida,
exprimida y picada
1 lata de 15 onzas (425 g) de
corazones de alcachofa, escurridos
2 cucharadas de crema líquida para
batir (“heavy cream”)
½ cucharadita de hojuelas de
pimiento rojo
1. Poner la rejilla del horno en el medio del
mismo y precalentar el horno a 350°F
(180°C). Engrasar ligeramente un molde
redondo de 9 in. (23 cm) con aceite de
oliva o spray vegetal; reservar.
2.
Colocar el queso crema en un tazón
grande. Usando los batidores, revolver
a velocidad 3 por aprox. 30 segundos
para suavizar. Agregar los ingredientes
restantes y mezclar a velocidad 1 por
aprox. 20 segundos para combinar.
3.
Colocar la mezcla en el molde preparado
y colocar este en el horno. Hornear por
20 minutos, y luego gratinar por 6 a 8
minutos adicionales, hasta que la parte
superior esté bien dorada.
4.
Servir inmediatamente con chips de pan
pita, pan crujiente y vegetales crudos.
Información nutricional por porción (2 cucharadas):
Calorías 115 (76% de grasa) • Carbohidratos 3g
Proteínas 4g • Grasa 10g • Grasa saturada 6g
Colesterol 30mg • Sodio 218mg • Calcio 71mg
Fibra 1g
Salsa de pollo Búfalo
Esta salsa para mojar le encantará a todo el
mundo. ¡Sírvala con alitas de pollo picante
durante su próxima fiesta! La batidora de
mano hace que sea rápido desmenuzar pollo
cocinado. Use este truco para la preparación
de la comida semanal; el pollo desmenuzado
puede ser la base de innumerables comidas.
Rinde aprox. 6 tazas (475 ml)
Aceite de oliva o spray vegetal
1 pollo rostizado de aprox. 3½ libras
(1.5 kg), tibio
1 rama de apio, picada
16 onzas (465 g) de queso crema bajo
en grasa pedazos, a temperatura
ambiente
1 cucharadita de sal kosher
½ cucharadita de pimienta negra
recién molida
6 a 8 cucharadas de salsa picante*
1 taza (140 g) de queso azul
desmenuzado
1. Poner la rejilla del horno en el medio del
mismo y precalentar el horno a 375°F
(190°C). Engrasar una fuente para el
horno de 1 L con spray vegetal. Reservar.
2.
Quitar la carne del pollo rostizado (tirar la
piel y los huesos) y colocarla en un tazón
grande. Usando los batidores, revolver a
velocidad 2 por aprox. 30 segundos para
triturar. Una vez desmenuzada la carne,
agregar el apio, el queso crema, la sal,
la pimienta y la salsa picante. Seguir
mezclando a velocidad 2 por aprox. 1
minuto para combinar los ingredientes.
3.
Colocar la mezcla en la fuente para
horno preparada y cubrir con el queso
azul desmenuzado. Hornear por
aproximadamente 40 minutos, hasta que
esté caliente y burbujeante.
4.
Servir con vegetales crudos, pan o chips
de maíz.
* Esta receta es medio-picante. Ajustar la
salsa picante al gusto, o sirva salsa picante
al lado para aquellos a quienes les gusta
extra-picante.
Información nutricional por porción
de ½ taza (120 ml):
Calorías 213 (75% de grasa) • Carbohidratos 2g
Proteínas 12g • Grasa 18g • Grasa saturada 10g
Colesterol 69mg • Sodio 704mg • Calcio 64mg
Fibra 0g

20
Crema para untar de queso
con pimentón
Esta receta se mantiene bastante cerca del
amado plato sureño. La crema puede untarse
en galletas o pan tostado, o usarse para
aderezar sándwiches de queso a la parrilla.
Rinde aprox. 2 tazas (475 ml)
4 onzas (115 g) de queso crema
en pedazos de 1 in. (2.5 cm), a
temperatura ambiente
¼ taza (60 ml) de mayonesa
8 onzas (225 g) de queso Cheddar,
rallado
1 lata de 7 onzas (225 g) de
pimentones, escurridos
½ cucharadita de cebolla en polvo
¼ cucharadita de sal kosher
1 pizca de pimienta negra recién
molida
2 gotas de salsa picante
1. Colocar el queso crema en un tazón
mediano. Usando los batidores, revolver
a velocidad 3 por aprox. 30 segundos
para suavizar. Agregar los ingredientes
restantes y mezclar a velocidad 2 por
aprox. 20 segundos para combinar.
2.
Usar inmediatamente.
Información nutricional por porción
(2 cucharadas):
Calorías 113 (83% de grasa) • Carbohidratos 1g
Proteínas 4g • Grasa 10g • Grasa saturada 6g
Colesterol 25mg • Sodio 174mg • Calcio 101mg
Fibra 0g
Guacamole
Nuestro guacamole fresco es perfecto para
comer con chips/totopos de maíz frente al
televisor, o para servir con quesadillas.
Rinde aprox. 2 tazas (475 ml)
1 diente de ajo
½ jalapeño, sin semillas, en trozos de
1 in. (2.5 cm)
½ cebolla pequeña, en pedazos
1 cucharada de albahaca fresca
3 aguacates maduros, partidos a la
mitad
1 cucharada de jugo de lima/limón
verde fresco
½ a 1 cucharadita de sal kosher
1. Colocar todos los ingredientes en un
tazón mediano o un vaso medidor
grande, en el orden indicado. Usando el
aditamento licuador, licuar a velocidad 1
por 15 a 20 segundos, hasta que
el aguacate empiece a suavizarse.
Seguir licuando por 20 a 30 segundos
más, con un movimiento suave hacia
arriba y abajo.
2.
Probar y ajustar la sazón al gusto.
Servir inmediatamente.
Información nutricional por porción
(2 cucharadas):
Calorías 88 (74% de grasa) • Carbohidratos 5g
Proteínas 1g • Grasa 8g • Grasa saturada 1g
Colesterol 0mg • Sodio 147mg • Calcio 9mg
Fibra 4g
Humus
Este humus tiene mucho sabor a sésamo,
así que, si prefiere un humus más suave,
empiece con solo 2 cucharadas de Tahini y
aumente según desee.
Rinde aprox. 2 tazas (475 ml)
1 lata de 15.5 onzas (425 g) de
garbanzos, escurridos y enjuagados
¹⁄
³
taza (80 ml) de Tahini
½ taza (120 ml) de agua fría (usar
más si es necesario)
2 cucharadas de jugo de limón fresco
2 dientes de ajo
¾ cucharadita de sal kosher
½ cucharadita de comino en polvo
Aceite de oliva virgen extra
1 pizca de “za’atar” (opcional)
1. Colocar todos los ingredientes en un
tazón pequeño o en un vaso medidor
ancho y grande, en el orden indicado.
Usando el aditamento licuador, empiece
a licuar los garbanzos a velocidad 1.
Cuando la mezcla empiece a licuarse,
ajustar la velocidad al nivel 3 y licuar por
aprox. 40 a 60 segundos, hasta conseguir
una mezcla muy suave. Si desea una
consistencia menos espesa, agregar agua.
2.
Probar y ajustar la sazón al gusto.
Para servir, rociar con aceite de oliva y
salpicar con “za’atar” (opcional).
Información nutricional por porción (2 cucharadas):
Calorías 56 (47% de grasa) • Carbohidratos 6g
Proteínas 2g • Grasa 3g • Grasa saturada 0g
Colesterol 0mg • Sodio 80mg • Calcio 32mg • Fibra 2g

21
Puré de papas cremoso
Esta receta es un poco como un lienzo en
blanco. Es simple, pero puede cambiarse
fácilmente añadiendo mezclas o aderezos,
tales como cebollinos o cebolletas picadas,
trozos de tocino crujiente o queso
Cheddar rallado.
Rinde aprox. 6 tazas (475 ml)
2½ libras (1.1 kg) de papas Yukon
Gold, peladas y cortadas en
pedazos de 1 in. (2.5 cm)
½ taza (120 ml) de leche entera,
a temperatura ambiente
3 cucharadas (45 g) de mantequilla
sin sal a temperatura ambiente,
en pedazos de 1 in. (2.5 cm)
¾ cucharadita de sal kosher
½ cucharadita de pimienta negra
recién molida
½ taza (110 g) de queso Mascarpone
o de “crème fraîche”, a
temperatura ambiente
1. Colocar las papas en una olla mediana a
grande y cubrir con 2 in. (5 cm) de agua.
Calentar a fuego medio-alto hasta que
empiece a hervir y luego reducir el fuego
y seguir cocinando a fuego lento hasta
que estén muy suaves.
2.
Escurrir las patatas y volver a la olla.
Usando los batidores, batir a velocidad
1 o 2 por aprox. 30 segundos para hacer
puré. Agregar los ingredientes restantes y
mezclar a velocidad 2 para combinar.
3.
Probar y ajustar la sazón al gusto.
Información nutricional por porción
de ½ taza (120 ml):
Calorías 117 (38% de grasa) • Carbohidratos 16g
Proteínas 2g • Grasa 5g • Grasa saturada 3g
Colesterol 16mg • Sodio 159mg • Calcio 35mg
Fibra 2g
Puré de camote con jarabe de arce
La mezcla perfecta de sabores otoñales hace
que este plato sea imprescindible para la mesa
del día de acción de gracias.
Rinde aprox. 6 tazas (475 ml)
3 libras (1.35 kg) de camote/batata/
boniato, pelados y cortados en
pedazos de 1 in. (2.5 cm)
2 cucharaditas de sal kosher
4 cucharadas (210 g) de mantequilla
sin sal a temperatura ambiente,
en pedazos de 1 in. (2.5 cm)
¼ taza (60 ml) de jugo de naranja
¼ taza (60 ml) de jarabe de arce/maple
½ cucharadita de canela en polvo
¹⁄
8 cucharadita de nuez moscada
recién rallada
1. Poner el camote en una olla y cubrir con
2 pulgadas (5 cm) de agua.
2.
Agregar 1 cucharadita de la sal y poner a
cocinar a fuego medio- alto. Cuando el
agua empiece a hervir, bajar el fuego y
cocinar a fuego lento hasta que las papas
estén muy suaves. Escurrir y volver a la olla.
3.
Hacer puré directamente en la olla,
mezclando a velocidad 2 hasta conseguir
la consistencia deseada.
4.
Agregar los ingredientes restantes y
mezclar a velocidad 2 para combinar.
5.
Probar y ajustar la sazón al gusto.
Servir inmediatamente.
Información nutricional por porción
de ½ taza (120 ml):
Calorías 192 (18% de grasa) • Carbohidratos 38g
Proteínas 2g • Grasa 4g • Grasa saturada 2g
Colesterol 10mg • Sodio 189mg • Calcio 26mg
Fibra 5g
Puré de coliflor
¡Una excelente alternativa al puré de
papa tradicional! Además, esta receta no
contiene lácteos.
Rinde aprox. 4 tazas (475 ml)
1½ libras (680 g) de cogollos de
coliflor
½ libras (225 g) de papas Yukon
Gold, peladas y cortadas en
pedazos
3 cucharadas de aceite de oliva
virgen extra
1¼ cucharaditas de sal kosher
½ cucharadita de pimienta negra
recién molida
1. Colocar la coliflor y las papas en una olla
mediana a grande. Agregar suficiente
agua como para cubrir la coliflor y las
papas con 2 pulgadas (5 cm) de agua.
Calentar a fuego medio-alto hasta que
el agua empiece a hervir, y luego reducir
el fuego y seguir hirviendo a fuego lento
por aprox. 25 minutos (dependiendo de

22
la estufa y de la olla usada), hasta que los
vegetales estén muy suaves.
2.
Cuando estén tiernos, escurrir el agua y
devolver los vegetales a la olla. Seguir
cocinando a fuego medio-lento hasta que
toda el agua se haya evaporado. Usando
el aditamento licuador, batir a velocidad
1 o 2 por aprox. 30 segundos para hacer
puré. Agregar los ingredientes restantes y
licuar a velocidad 2 para combinar.
3.
Probar y ajustar la sazón al gusto.
Información nutricional por porción
de ½ taza (120 ml):
Calorías 170 (28% de grasa) • Carbohidratos 28g
Proteínas 5g • Grasa 6g • Grasa saturada 1g
Colesterol 0mg • Sodio 375mg • Calcio 41mg
Fibra 6g
“Soufflé” (suflé) de espinaca y
queso Feta
Los “soufflés” son bastante impresionantes.
Crecen hasta convertirse en un plato alto,
ligero y aireado, pero sorprendentemente
sustancioso. Cerciórese de servirlo
directamente del horno para obtener la
máxima altura, ¡y elogio!
Rinde 8 porciones
6 cucharadas (85 g) de mantequilla
sin sal
½ taza (60 g) de queso Parmesano
rallado
5 huevos grandes
½ taza (60 g) de harina común
1½ tazas (355 ml) de leche entera
3 onzas (85 g) de queso Feta
desmenuzado
¼ cucharadita + una pizca de sal
marina
¼ cucharadita de pimienta negra
recién molida
¹⁄
8 cucharadita de nuez moscada
recién rallada
¼ cucharadita de ralladura de limón
4 tazas llenas (120 g) de espinaca
fresca
¼ cucharadita de crémor tártaro
1. Precalentar el horno a 325°F (160°C).
2.
Engrasa generosamente un molde de
“soufflé” de 2 cuartos de galón (1.9 L)
con 1 cucharada (15 g) de la mantequilla.
Rociar con ¼ de taza (30 g) de queso
Parmesano para cubrir el fondo y los
lados del molde. Sacudir el exceso.
Limpiar la orilla del molde con una toalla
de papel para que quede limpia; reservar.
3.
Romper los huevos, separando las
claras y las yemas en tazones diferentes.
Romper las yemas con un tenedor.
Reservar.
4.
Derretir la mantequilla restante a fuego
medio-lento, en una cacerola mediana.
Cuando la mantequilla esté derretida,
agregar la harina y revolver por 2 a
3 minutos para cocinar. Usando los
batidores, agregar lentamente la leche
a la mezcla de harina, mezclando a
velocidad 2 a 3. Después de haber
agregado toda la leche, ajustar
la velocidad al nivel 6 y batir hasta
conseguir una consistencia suave y
homogénea. Retirar del fuego y agregar
el resto del queso Parmesano, el queso
Feta, ¼ de cucharadita de sal, la pimienta,
la nuez moscada y la ralladura; batir.
5.
Agregar una pequeña cantidad de la
mezcla de leche a las yemas, mezclando
a velocidad 1. Seguir agregando la
mezcla, un tercio a la vez, mezclando
después de cada adición. Agregar la
espinaca; reservar.
6.
Quitar los batidores e instalar el batidor
de alambre. Empezar a batir las claras a
velocidad 1. Después de 1 a 2 minutos,
cuando burbujas aparezcan en las orillas,
ajustar la velocidad gradualmente al
nivel 3. Cuando las claras empiecen
a espumarse, agregar la sal restante
y el crémor tártaro. Incrementar
progresivamente la velocidad al nivel 7,
hasta que se formen picos medio-firmes.
7.
Incorporar ½ taza de las claras
montadas a la mezcla de espinaca.
Seguir incorporando las claras con
cuidado, usando una espátula de hule
grande. No mezclar demasiado.
8.
Verter la mezcla en el molde y suavizar
ligeramente la parte de encima. Hornear
por 45 a 50 minutos, en el centro, hasta
dorarse y cuajarse ligeramente.
9.
Servir inmediatamente.
Información nutricional por porción:
Calorías 208 (64% de grasa) • Carbohidratos 9g
Proteínas 9g • Grasa 15g • Grasa saturada 8g
Colesterol 167mg • Sodio 416mg • Calcio 175mg
Fibra 1g

23
Panecillos de camote
El camote proporciona humedad para
conseguir panecillos sumamente ligeros y
tiernos. Nos encantan estos panecillos tibios
con mantequilla y un simple rocío de miel o
jarabe de arce.
Rinde 12 panecillos
2 tazas (250 g) de harina común
2½ cucharaditas de polvo de hornear
½ cucharadita de bicarbonato de sodio
2 cucharaditas de azúcar granulada
1 cucharadita de sal kosher
6 cucharadas (85 g) de mantequilla
sin sal, en cubitos
²
⁄
³
taza (150 g) de puré de camote
(aprox. 1 camote mediano)
½ taza (125 g) de suero de leche
(“buttermilk”), frío
Spray vegetal
Crema líquida para batir
(“heavy cream”), para cepillar
los panecillos
1. Poner la rejilla del horno en el medio del
mismo y precalentar el horno a 400°F
(200°C).
2.
Colocar la harina, el polvo de hornear,
el bicarbonato, el azúcar y la sal en un
tazón grande. Agregar la mantequilla fría.
Usando los batidores, empezar a mezclar
a velocidad 1, aplastando la mantequilla
con los batidores para incorporarla a
la harina. Aumentar progresivamente la
velocidad al nivel 3. Mezclar hasta que la
mezcla se parezca a migajas del tamaño
de arvejas.
3.
Agregar el camote y el suero de leche.
Seguir mezclando por 15 a 30 segundos.
La masa se desmigajará.
4.
Colocar la masa sobre una superficie
ligeramente enharinada. Estirar la masa
con un rodillo, o presionarla con las
manos enharinadas, hasta que tenga
forma de rectángulo. Doblar la masa por
la mitad y estirar/presionar de nuevo.
Repetir este proceso 3 o 4 veces (plegar
crea “capas” en la masa). Finalmente,
estirar la masa con rodillo hasta formar
un rectángulo de ¾ in. (2 cm) de
espesor. Usar un cortador redondo de
2½ pulgadas para cortar 12 panecillos,
presionando juntos los desechos si es
necesario.
5.
Disponer los panecillos de forma
apretada en 3 filas de 4 en una bandeja
forrada con papel sulfurizado. Cepillar la
parte superior con crema líquida. Hornear
por 20 a 22 minutos, hasta que estén
hinchados y dorados.
6.
Dejar reposar por 5 minutos. Separar y
servir tibios.
Información nutricional por panecillo:
Calorías 145 (36% de grasa) • Carbohidratos 19 g
Proteínas 3g • Grasa 6g • Grasa saturada 4g
Colesterol 15mg • Sodio 197mg • Calcio 470mg
Fibra 1g
“Popovers”
Ligeros y suaves, estos bollos son aún más
sabrosos cuando salen del horno.
Rinde 6 “popovers”
Mantequilla suave para engrasar
el molde
3 cucharadas (45 g) de mantequilla
sin sal
1 taza (235 ml) de leche entera
3 huevos grandes, a temperatura
ambiente
1 taza (125 g) de harina común,
tamizada
½ cucharadita de sal kosher
1. Poner la rejilla del horno en el tercio
inferior del mismo y precalentar el
horno a 450°F (230 °C). Engrasar
generosamente un molde para “popover”
con mantequilla suave. Reservar.
2.
Calentar las 3 cucharadas (45 g)
mantequilla y la leche a fuego medio-
lento, hasta que la mantequilla esté
derretida. Retirar del fuego y dejar enfriar
a temperatura ambiente.
3.
Colocar los huevos en un tazón grande.
Agregar la mezcla de mantequilla/leche
enfriada. Usando los batidores, batir
la mezcla hasta que los ingredientes
estén bien combinados, empezando
a velocidad 1 y aumentando
progresivamente la velocidad al nivel
3. Agregar la harina y la sal; batir,
aumentando progresivamente la
velocidad al nivel 5. Batir por un minuto

24
adicional, o hasta que la mezcla esté muy
suave, sin grumos visibles.
4.
Verter la mezcla en el molde para “popover”;
llenará cada moldecito hasta la mitad o
los dos tercios. Hornear por 35 minutos,
directamente sobre la rejilla del horno, hasta
que estén hinchados y dorados. No abrir
la puerta del horno durante la cocción, o
los “popovers” podrían desinflarse.
5.
Retirar del horno y desmoldar con
cuidado. Servir inmediatamente.
NOTA: los “popovers” son muy versátiles.
Puede añadirle queso (agregar ¼ de taza
de queso rallado a la mezcla), hierbas
(1½ cucharaditas de hierbas de Provence o
2 cucharadas de cebollines frescos), o
hacerlos dulces (cepillar con mantequilla
derretida y espolvorear con azúcar con
canela al salir del horno).
Información nutricional por “popover”:
Calorías 183 (46% de grasa) • Carbohidratos 17g
Proteínas 7g • Grasa 9g • Grasa saturada 5g
Colesterol 128mg • Sodio 146mg • Calcio 60mg
Fibra 1g
“Calzones” de queso
Usamos nuestra propia masa, pero puede usar
masa de pizza comprada para ahorrar tiempo.
Rinde 6 “calzones”
15 a 16 onzas (425 a 455 g) de queso
ricota/requesón de leche entera,
bien escurrido
2 dientes de ajo, finamente picados
2 onzas (55 g) de queso Parmesano
rallado
¼ cucharadita de sal kosher
1 pizca de pimienta negra recién
molida
1 pizca de hojuelas de pimiento rojo
3 cucharadas de albahaca, finamente
rebanadas o rotas en pedacitos
2 onzas (55 g) de queso Mozzarella
rallado
1½ libras (680 g) de masa de
pizza/focaccia (página 41)
Harina común para espolvorear
Harina de maíz para espolvorear
Agua para sellar la masa
Aceite de oliva para cepillar los
“calzones”
1. Precalentar el horno a 500°F (260°C).
Si tiene una piedra de hornear, colocarla
sobre la rejilla del horno para que
también caliente. Una vez que el horno
alcanza la temperatura, dejar la piedra
calentar por 30 minutos adicionales. Esto
producirá “calzones” más crujientes.
2.
Colocar el queso ricota/requesón, el ajo,
el queso Parmesano, la sal, la pimienta y
las hojuelas de pimiento rojo en un tazón
grande; revolver. Usando los batidores,
revolver a velocidad 2 o 3 por aprox. 30
segundos para combinar.
3.
Espolvorear ligeramente la superficie de
trabajo con harina. Dividir la masa en seis
porciones iguales. Cubrir sin apretar
con papel film/plástico hasta el momento
de usar.
4.
Formar un círculo de aprox. 8 pulgadas
(20 cm) de diámetro con la primera
porción de masa. Esparcir ½ taza de
la mezcla de queso encima de la mitad
inferior del círculo, dejando 1 pulgada
(2.5cm) sin queso todo alrededor.
Espolvorear con albahaca y 2 cucharadas
de mozzarella. Usando sus dedos o
una brocha, mojar el borde exterior de
la masa con agua. Doblar el círculo a la
mitad y comprimir las orillas. Pellizcar
los bordes todo alrededor para sellar
completamente. Usando un cuchillo muy
afilado, cortar dos pequeñas hendiduras
en la parte superior del “calzone” para
dejar escapar el vapor durante la cocción.
Colocar sobre una placa para horno
enharinada con harina de maíz y repetir
con el resto de la masa.
5.
Usando una pala para pizza, colocar los
“calzones” sobre la piedra de hornear o
la placa para horno. Hornear por 18 a 20
minutos, o hasta que estén bien dorados.
Dejar enfriar ligeramente antes de servir.
Información nutricional por “calzone”:
Calorías 473 (36% de grasa) • Carbohidratos 56g
Proteínas 21g • Grasa 10g • Grasa • saturada 10g
Colesterol 44mg • Sodio 1091mg • Calcio 278mg
Fibra 2g

25
Salsa de tomate básica
Una salsa simple, pero deliciosa.
Rinde aprox. 7 tazas (1.65 L)
2 cucharadas de aceite de oliva
virgen extra
2 dientes de ajo grandes
2 latas de 28 onzas (795 g) de
tomates enteros y pelados
10 a 15 hojas de albahaca fresca
1 cucharadita de sal kosher
1. Calentar el aceite de oliva a fuego medio,
en una cacerola mediana. Cuando el
aceite esté caliente, agregar el ajo y
cocinar por 2 a 3 minutos, hasta que esté
fragante y ligeramente dorado. Agregar los
tomates, tapar y reducir el fuego. Cocinar
a fuego lento por aprox. 25 minutos,
revolviendo frecuentemente, hasta que la
salsa se reduzca ligeramente y se espese.
2.
Retirar del fuego. Quitar y tirar el ajo si
desea. Usando el aditamento licuador,
licuar a velocidad 1, usando un
movimiento suave hacia arriba y abajo.
Aumentar la velocidad al nivel 2 y seguir
licuado por aprox. 1½ minutos, hasta
conseguir la consistencia deseada.
3.
Cortar la albahaca y agregarla a la salsa.
Agregar sal; probar y ajustar la sazón al
gusto.
Información nutricional por porción
de ½ taza (120 ml):
Calorías 58 (43% de grasa) • Carbohidratos 7g
Proteínas 1g • Grasa 3g • Grasa • saturada 0g
Colesterol 0mg • Sodio 557mg • Calcio 28mg
Fibra 1g
Crema de verduras
Las papas añaden una falsa cremosidad a
esta deliciosa sopa licuada. ¡Es un perfecto
almuerzo de primavera!
Rinde aprox. 5 tazas (1.2 L)
3 cucharadas de aceite de oliva
1 cebolla mediana, picada
1 diente de ajo, picado
¾ cucharadita de sal kosher
1 pizca de pimienta negra recién
molida
3 tazas (945 ml) de caldo de pollo
o de vegetales bajo en sodio
(cerciórese de usar caldo claro;
algunos caldos son oscuros, y esto
cambiará el resultado final)
8 onzas (225 g) de papas Yukon
Gold, peladas y cortadas en
pedazos de 1 in. (2.5 cm)
10 onzas (285 g) de espinaca tierna
(espinaca “baby”)
2 onzas (55 g) de berro (opcional;
también puede usar más espinaca)
1 pizca de nuez moscada rallada
2 cucharadas de jugo de limón
fresco
1. Colocar el aceite una olla mediana o
una cacerola grande y calentar a fuego
medio-lento. Cuando esté caliente,
agregar la cebolla, el ajo y una pizca de
sal y de pimienta. Cocinar por aprox. 4
minutos, hasta que esté suave y fragante.
2.
Agregar el caldo y las papas. Subir el
fuego y cocinar a fuego alto hasta que
empiece a hervir. Cuando empiece a
hervir, reducir el fuego y hervir a fuego
lento por 12 a 15 minutos, parcialmente
tapado, hasta que las papas estén suaves.
3.
Retirar del fuego y agregar la espinaca
y el berro. Revolver hasta que las hojas
se marchiten, y luego agregar la nuez
moscada y el jugo de limón.
4.
Usando el aditamento licuador, licuar
hasta que esté suave, empezando
en la velocidad 1 y aumentando
progresivamente la velocidad al
nivel 3. Si usa una cacerola grande,
inclinar ligeramente la cacerola para
que el protector de cuchillas esté
completamente sumergido.
5.
Probar y ajustar la sazón al gusto.
Información nutricional por porción
de 1 taza (235 ml):
Calorías 135 (54% de grasa) • Carbohidratos 12g
Proteínas 4g • Grasa 9g • Grasa saturada 1g
Colesterol 0mg • Sodio 760mg • Calcio 79mg
Fibra 3g

26
Sopa de invierno de frijoles
blancos
Sirva esta sopa rica y cremosa con
pan crujiente.
Rinde aprox. 6 tazas (1.4 L)
4 lonchas de tocino, finamente
picadas
1½ cucharaditas de aceite de oliva
1 diente de ajo, picado
1 cebolla mediana, picada
1 rama de apio, picada
½ cucharadita de sal kosher
1 cucharadas de vino blanco seco,
o vermú
2 latas de 15.5 onzas (440 g) de
frijoles blancos, escurridos (o
1 libra/455 g de frijoles secos,
remojados por la noche)*
1 ramita de romero
1 hoja de laurel
1 pizca de pimienta negra recién
molida
4 tazas (945 ml) de caldo de pollo
o de vegetales bajo en sodio
(cerciórese de usar caldo claro;
algunos caldos son oscuros, y esto
cambiará el resultado final)
Queso Parmesano rallado para
decorar
1. Colocar el tocino en una olla mediana o
una cacerola grande y calentar a fuego
medio. Cocinar hasta que esté crujiente.
Retirar y reservar.
2.
Regresar la olla/cacerola sobre la hornilla
y ajustar el fuego a medio-lento. Agregar
el aceite de oliva. Una vez caliente,
agregar los vegetales picados y una
pizca de sal. Saltear por 4 a 6 minutos,
hasta que estén suaves. Agregar el vino
y raspar el fondo de la cacerola con un
cucharón para despegar los pedazos.
Seguir cocinando hasta que el vino se
haya evaporado casi por completo.
Agregar los frijoles, el romero, la hoja
de laurel, la sal restante y la pimienta;
revolver. Cocinar por 4 a 5 minutos, hasta
que los frijoles estén calientes. Agregar el
caldo y subir el fuego hasta que hierva.
Dejar hervir, y luego reducir el fuego y
hervir a fuego lento, parcialmente tapado,
por 60 a 75 minutos. Quitar el romero y la
hoja de laurel.
3.
Usando el aditamento licuador, licuar
hasta que esté suave, empezando
en la velocidad 1 y aumentando
progresivamente la velocidad al
nivel 3. Si usa una cacerola grande,
inclinar ligeramente la cacerola para
que el protector de cuchillas esté
completamente sumergido.
4.
Probar y ajustar la sazón al gusto.
Decorar con el tocino picado y queso
Parmesano rallado.
* Si usa frijoles secos remojados, puede que
tenga que usar más caldo y sal.
Información nutricional por porción
de 1 taza (235 ml):
Calorías 245 (9% de grasa) • Carbohidratos 36g
Proteínas 18g • Grasa 2g • Grasa saturada 0g
Colesterol 0mg • Sodio 500mg • Calcio 119mg
Fibra 13g
Galletas de mantequilla con limón
y tomillo
El tomillo puede parecer un ingrediente
extraño para galletas dulces, pero verá pronto
por qué estas galletas son tan populares.
Rinde aprox. 3 docenas de galletas
Masa de galletas:
1¾ tazas (220 g) de harina común
½ cucharadita de sal kosher
16 cucharadas (225 g) de mantequilla
sin sal a temperatura ambiente, en
pedacitos
¹⁄
³
taza (65 g) de azúcar granulada
¹⁄
³
taza (40 g) de azúcar glasé,
tamizado
2 yemas de huevo grande,
a temperatura ambiente
1 a 2 cucharadas de hojas de tomillo
fresco
2 cucharadas de ralladura de limón
Glaseado de limón:
½ taza (60 g) de azúcar glasé,
tamizado
2 cucharadas de crema líquida para
batir (“heavy cream”)
2 cucharaditas de jugo de limón
fresco
1 pizca de sal marina fina
1. Poner la harina y la sal en un tazón
mediano. Usando los batidores, revolver
a velocidad 1 por aprox. 30 segundos
para combinar. Reservar.

27
2.
Poner la mantequilla en un tazón grande.
Mezclar a velocidad 2 a 3 hasta que
esté cremosa, y luego agregar los
azucares. Mezclar a velocidad 2 a 3 hasta
conseguir una mezcla ligera, y luego
agregar las yemas; seguir mezclando
para combinar. Agregar los ingredientes
secos y mezclar a velocidad 2 hasta que
esté bien mezclado. Agregar el tomillo y
la ralladura, y mezclar suavemente.
3.
Dividir la masa en dos porciones iguales
y formar un disco con cada porción.
Envolver en papel encerado o papel
sulfurizado, y luego en papel film/plástico,
y refrigerar por una noche.
4.
Sacar la masa del refrigerador para que
se ablande un poco. Poner una rejilla del
horno en la posición inferior, y la otra en
el medio, y precalentar el horno a 350°F
(180 °C). Forrar dos placas para horno
con bordes con papel sulfurizado.
5.
Estirar la masa con rodillo hasta que
tenga ¼ in. (0.5 cm) de espesor y cortar
discos pequeños usando un cortador de
galletas de 1½ in. (4 cm). Colocar en las
placas y refrigerar por aprox. 10 minutos.
6.
Después de este tiempo, hornear las
galletas por aprox. 12 minutos, (cambiar
las placas de nivel si es necesario) hasta
que las orillas estén ligeramente doradas.
Dejar enfriar completamente.
7.
Mientras las galletas se están enfriando,
preparar el glaseado. Poner todos los
ingredientes del glaseado en un tazón
mediano y mezclar a velocidad 1 hasta
obtener una mezcla muy suave. Si el
glaseado parece demasiado espeso,
añadir más crema, 1 cucharadita a la vez.
Si parece demasiado líquido, agregar
más azúcar glasé, 1 cucharadita a la vez.
Esparcir encima de las galletas enfriadas
de la manera deseada.
Información nutricional por galleta
(con ½ cucharadita de glaseado):
Calorías 89 (56% de grasa) • Carbohidratos 9g
Proteínas 1g • Grasa 5g • Grasa saturada 3g
Colesterol 25mg • Sodio 32mg • Calcio 2mg
Fibra 0g
Galletas rellenas de fresa
Lo mejor de estas galletas es que permiten
disfrutar del sabor de esta fruta de verano
en cualquier momento del año, gracias al
intenso sabor de las fresas liofilizadas. Ajuste
la cantidad de fresa en el relleno si desea para
un sabor aún más rico.
Rinde aprox. 2 docenas de galletas rellenas
Masa de galletas:
1¾ tazas (220 g) de harina común
½ cucharadita de sal kosher
16 cucharadas (225 g) de mantequilla
sin sal a temperatura ambiente, en
pedacitos
¹⁄
³
taza (65 g) de azúcar granulada
¼ taza (30 g) de azúcar glasé,
tamizado
½ cucharadita de extracto natural
de vainilla
1 taza (150 g) de fresas liofilizadas,
finamente molidas y tamizadas*
2 yemas de huevo grande,
a temperatura ambiente
Relleno de fresa:
4 cucharadas (55 g) de mantequilla
sin sal, a temperatura ambiente
2 onzas (55 g) de queso crema,
a temperatura ambiente
2 tazas (240 g) de azúcar glasé,
tamizado
1 pizca de sal kosher
2 cucharadas de leche entera,
a temperatura ambiente
¼ cucharadita de extracto natural
de vainilla
½ taza (75 g) de fresas liofilizadas,
finamente molidas y tamizadas**
1. Preparar la masa: Poner la harina y la
sal en un tazón mediano. Usando los
batidores, revolver a velocidad 1 por
aprox. 30 segundos para combinar.
Reservar.
2.
Poner la mantequilla en un tazón grande.
Mezclar a velocidad 2 a 3 hasta que esté
cremosa, y luego agregar los azucares y
la vainilla. Mezclar a velocidad 2 a 3 hasta
conseguir una mezcla ligera, y luego
agregar las yemas; seguir mezclando
para combinar. Agregar los ingredientes
secos y mezclar a velocidad 2 hasta que
esté bien mezclado. Agregar las fresas
molidas y mezclar hasta que estén bien
combinadas.
3.
Dividir la masa en dos porciones iguales
y formar un disco con cada porción.
Envolver en papel encerado o papel
sulfurizado, y luego en papel film/plástico.
Refrigerar por una noche.

28
4.
Sacar la masa del refrigerador para que
se ablande un poco. Poner una rejilla del
horno en la posición inferior, y la otra en
el medio, y precalentar el horno a 350°F
(180 °C). Forrar dos placas para horno
con bordes con papel sulfurizado.
5.
Estirar la masa con rodillo hasta que
tenga ¼ in. (0.5 cm) de espesor y cortar
discos pequeños usando un cortador de
galletas de 1½ in. (4 cm). Colocar en las
placas y refrigerar por aprox. 10 minutos.
6.
Después de este tiempo, hornear las
galletas por aprox. 12 minutos, (cambiar
las placas de nivel si es necesario),
sin permitir que se doren. Dejar enfriar
completamente.
7.
Mientras las galletas se están enfriando,
preparar el relleno. Poner la mantequilla
y el queso crema en un tazón grande.
Usando los batidores, mezclar a
velocidad 2 a 3 por aprox. 1 minuto para
suavizar y combinar. Agregar el azúcar,
la sal, la leche y la vainilla; mezclar a
velocidad 1 a 3 hasta conseguir una
mezcla ligera y espumosa. Agregar las
fresas molidas y mezclar a velocidad 1
para combinar.
8.
Una vez que las galletas estén
completamente frías, colocar aprox. 1
cucharada del relleno en la parte inferior
de una galleta, y luego cubrir con otra
galleta para hacer un “sándwich”. Repetir
con el resto de las galletas.
* La mejor forma de hacer esto es con un
molinillo de especias o de café.
Información nutricional por galleta rellena:
Calorías 201 (47% de grasa) • Carbohidratos 25g
Proteínas 1g • Grasa 10g • Grasa saturada 7g
Colesterol 43mg • Sodio 57mg • Calcio 8mg
Fibra 1g
Galletas de chocolate de trigo
sarraceno
El sabor a nuez del trigo sarraceno es el
complemento perfecto para los trozos de
chocolate agridulce.
Rinde aprox. 4 docenas de galletas
1½ tazas (185 g) de harina común
¾ taza (90 g) de harina de trigo
sarraceno
1 cucharadita de bicarbonato de sodio
1 cucharadita de sal kosher
½ cucharadita de café expreso
instantáneo
16 cucharadas (225 g) de mantequilla
sin sal temperatura ambiente, en
pedacitos
1 taza (200 g) de azúcar rubia
(azúcar de caña integral)
½ taza (100 g) de azúcar granulada
2 huevos grandes, a temperatura
ambiente
1½ cucharaditas de extracto natural
de vainilla
2 tazas (300 g) de chocolate
semiamargo picado
Copos de sal marina, para
espolvorear
1. Colocar la harina, el bicarbonato, la sal y
el expreso en un tazón mediano. Usando
los batidores, revolver a velocidad 1
por un mínimo de 30 segundos para
combinar. Reservar.
2.
Poner la mantequilla en un tazón grande.
Mezclar por aprox. 1 minuto, empezando
en la velocidad 1 y aumentando
progresivamente la velocidad al nivel
3, hasta conseguir una mezcla ligera y
cremosa. Agregar los azucares y mezclar
a velocidad 2 a 4 por aprox. 2 minutos,
raspando los lados del tazón con una
espátula si es necesario, hasta que la
mayoría del azúcar se haya disuelto
en la mantequilla y que la mezcla esté
muy ligera. Agregar los huevos, uno a la
vez, mezclando a velocidad 2 después
de cada adición, y luego agregar la
vainilla. Agregar los ingredientes secos
y mezclar a velocidad 2 para combinar.
Luego, agregar el chocolate picado y
mezclar a velocidad 2 para incorporar
uniformemente.
3.
Formar bolas de masa del tamaño de
pelotas de golf y colocar estas en una
placa para horno o una bandeja forrada
con papel sulfurizado. Envolver bien y
refrigerar por un mínimo de 1 hora, hasta
un máximo de una noche.
4.
Poner la rejilla del horno en la posición
superior y precalentar el horno a 350°F
(180 °C). Forrar dos placas para horno
con papel sulfurizado.
5.
Cuando el horno esté caliente, meter las
galletas al horno y hornear por aprox.
15 minutos, hasta que estén ligeramente
doradas y que las orillas estén

29
firmes. Sacar del horno y espolvorear
inmediatamente con una pizca de copos
de sal marina. Dejar enfriar las bandejas
antes de hornear más galletas.
Información nutricional por galleta:
Calorías 137 (48% de grasa) • Carbohidratos 17g
Proteínas 2g • Grasa 8g • Grasa saturada 4g
Colesterol 18mg • Sodio 78mg • Calcio 3mg
Fibra 1g
Galletas de mantequilla de maní
con chispas de chocolate
Usar una mezcla de mantequilla de maní
cremosa y de maní tostado da aún más sabor
a maní a estas tiernas galletas.
Rinde aprox. 5 docenas de galletas
2 tazas (250 g) de harina común
¾ cucharadita de sal kosher
½ cucharadita de polvo de hornear
¼ cucharadita de bicarbonato de sodio
16 cucharadas (225 g) de mantequilla
sin sal temperatura ambiente, en
pedacitos
1½ tazas (345 g) de mantequilla de
maní cremosa tradicional o natural
(sin azúcar), bien revuelta
1 taza (200 g) de azúcar rubia
(azúcar de caña integral)
½ taza (100 g) de azúcar granulada
2 huevos grandes, a temperatura
ambiente
1 cucharadita de extracto natural
de vainilla
1 taza (145 g) de maní tostado sin sal
½ taza (40 g) de mini chispas de
chocolate
Mezcla de azúcar turbinado
y copos de sal marina, para
espolvorear
1. Poner la rejilla del horno en la posición
superior y precalentar el horno a 350°F
(180 °C). Forrar dos placas para horno
con papel sulfurizado.
2.
Poner la harina, la sal, el polvo de
hornear y el bicarbonato en un tazón
mediano. Usando los batidores, revolver
a velocidad 1 por un mínimo de 30
segundos para combinar. Reservar.
3.
Poner la mantequilla y la mantequilla
de maní en un tazón grande. Mezclar
por aprox. 2 minutos, empezando
en la velocidad 2 y aumentando
progresivamente la velocidad al nivel 5,
hasta conseguir una mezcla homogénea.
Raspar el bol y agregar los azucares.
Mezclar a velocidad 2 a 4 por aprox.
2 minutos, hasta que la mayoría del
azúcar se haya disuelto en la mezcla de
mantequilla/mantequilla de maní. Agregar
los huevos, uno a la vez, mezclando a
velocidad 2 a 3 después de cada adición,
y luego agregar la vainilla. Agregar los
ingredientes secos y mezclar a velocidad
2 para combinar. Luego, agregar
el maní y las chispas de chocolate.
Revolver a velocidad 2 para incorporar
uniformemente.
4.
Formar bolas de masa del tamaño de
pelotas de golf y colocar estas en una
placa para horno o una bandeja forrada
con papel sulfurizado. Aplastar cada bola
con un tenedor, y luego espolvorear con
la mezcla de azúcar turbinado y copos de
sal marina.
5.
Hornear por aprox. 12 a 15 minutos,
hasta que las orillas estén ligeramente
firmes. Dejar enfriar las bandejas antes de
hornear más galletas.
Información nutricional por galleta:
Calorías 124 (57% de grasa) • Carbohidratos 11g
Proteínas 3g • Grasa 8g • Grasa saturada 3g
Colesterol 15mg • Sodio 70mg • Calcio 7mg
Fibra 1g
Galletas de jengibre
Estas galletas suaves no son sus típicas
galletas de jengibre. Usamos jengibre picado
y jengibre cristalizado, para un toque picante
interesante
Rinde aprox. 2½ docenas de galletas
2¼ tazas (280 g) de harina común
1 cucharadita de bicarbonato de
sodio
1 cucharada de Jengibre en polvo
1 cucharadita de canela en polvo
½ cucharadita de pimienta de
Jamaica en polvo
¾ cucharadita de sal kosher
¼ taza (30 g) de jengibre cristalizado
finamente picado
12 cucharadas (180 g) de mantequilla
sin sal temperatura ambiente,
en pedazos de 1 in. (2.5 cm)
¼ taza (85 g) de melaza

30
¾ taza (150 g) de azúcar rubia
(azúcar de caña integral)
¼ taza (50 g) de azúcar granulada
1 huevo grande, a temperatura
ambiente
1 cucharadita de extracto natural
de vainilla
¹⁄
³
taza (65 g) de azúcar turbinado
para cubrir las galletas
1. Poner la rejilla del horno en la posición
superior y precalentar el horno a 350°F
(180 °C). Forrar dos placas para horno
con papel sulfurizado.
2.
Colocar la harina, el bicarbonato, las
especias y la sal en un tazón mediano.
Usando los batidores, revolver a
velocidad 1 por un mínimo de 30
segundos para combinar. Agregar el
jengibre picado y mezclar a velocidad 1
para cubrir; reservar.
3.
Poner la mantequilla y la melaza en
un tazón grande. Mezclar por aprox. 2
minutos, empezando en la velocidad
2 y aumentando progresivamente la
velocidad al nivel 5, hasta conseguir
una mezcla homogénea. Raspar el bol y
agregar los azucares.
Mezclar a velocidad 2 a 4 por aprox.
2 minutos, hasta que la mayoría del
azúcar se haya disuelto en la mezcla de
mantequilla/melaza. Agregar los huevos,
uno a la vez, mezclando a velocidad 2 a 3
después de cada adición, y luego agregar
la vainilla. Agregar los ingredientes secos
y mezclar a velocidad 2 para incorporar.
4.
Colocar el azúcar turbinado en un cuenco
poco profundo o una bandeja de hornear.
5.
Recoger la masa en bolas del tamaño
de pelotas de golf. Rodar las bolas en
el azúcar turbinado y colocarlas sobre
una placa forrada con papel sulfurizado.
Presionar suavemente cada bola con el
fondo de un vaso limpio.
6.
Hornear por aprox. 12 a 15 minutos,
hasta que las orillas estén ligeramente
firmes. Dejar enfriar las bandejas antes de
hornear más galletas.
Información nutricional por galleta:
Calorías 96 (23% de grasa) • Carbohidratos 18g
Proteínas 1g • Grasa 2g • Grasa saturada 2g
Colesterol 12mg • Sodio 99mg • Calcio 10mg
Fibra 0g
Botanas “keto” sin hornear
Llenas de grasa y proteínas saludables, estas
botanas le llenarán y le mantendrán con energía.
Rinde 16 botanas
½ taza (50 g) de mantequilla de
almendra
2 cucharadas de aceite de coco
2 cucharadas de semillas de chía
1 taza (75 g) de coco rallado sin
azúcar
1 cucharada (5 g) de cacao en polvo
1 cucharadita de extracto natural de
vainilla
2 cucharadas de edulcorante
granulado de fruta del monje o ½
cucharadita de estevia granulada
¼ cucharadita de sal kosher
½ cucharadita de canela en polvo
1. Colocar todos los ingredientes en un
tazón grande. Usando los batidores, batir
a velocidad 1 o 3 por aprox. 1 minuto
para combinar.
2.
Usando una cuchara, recoger la masa en
bolas del tamaño de pelotas de golf (se
aconseja usar guantes). Refrigerar por un
mínimo de 30 minutos, o congelar por 10
minutos antes de comer.
Información nutricional por porción:
Calorías 148 (58% de grasa) • Carbohidratos 6g
Proteínas 3g • Grasa 10g • Grasa saturada 5g
Colesterol 0mg • Sodio 39mg • Calcio 47mg
Fibra 2g
Masa de galleta cruda comestible
(con variaciones)
Coma esa masa de galleta comestible libre de
culpa (bueno, ¡libre de huevo!) Hay opciones
sin gluten, e incluso una opción de
masa de galletas “Snickerdoodles”
(las favoritas de los niños). Cómasela con
cuchara o desmenúcela en helado de vainilla...
¡Hay tantas posibilidades!
Rinde aprox. 3½ tazas
8 cucharadas (115 g) de mantequilla
sin sal a temperatura ambiente,
en 4 pedazos
²⁄
³
taza llena (135 g) de azúcar rubia
(azúcar de caña integral)
¹⁄
³
taza (65 g) de azúcar granulada
2 cucharadas de leche (cualquier
variedad, incluyendo leche vegetal)
1 cucharada de extracto natural
de vainilla

31
1¹⁄
³
tazas (165 g) de harina común
(también puede usar harina sin gluten)
½ cucharadita de sal kosher
1 taza (175 g) de chispas de
chocolate semidulce
1. Poner la mantequilla y los azucares en
un tazón grande. Usando los batidores,
mezclar por aprox. 2 minutos, usando
la velocidad 2 a 4, hasta obtener una
mezcla muy ligera y cremosa. Apagar
para raspar el bol si es necesario.
2.
Encender la batidora en la velocidad 2 y
agregar lentamente la leche. Agregar la
harina y la sal y mezclar a velocidad 2
para combinar. Agregar las chispas de
chocolate y mezclar a velocidad 2.
3.
Formar bolas de masa del tamaño
deseado, usando una cuchara. La masa
puede comerse inmediatamente, pero es
aún mejor cuando está refrigerada.
Variaciones:
“Snickerdoodles”:
Agregar ½ cucharadita de canela y omitir las
chispas de chocolate. Formar bolas de masa
de 1 cucharada y cubrir con azúcar con canela.
Avena con arándanos agrios:
Agregarle ½ taza (40 g) de copos de avena
y ¼ de cucharadita de canela en polvo a la
harina. Sustituir las chispas de chocolate con
arándanos agrios secos.
Información nutricional por porción
(1 cucharada, chispas de chocolate):
Calorías 55 (41% de grasa) • Carbohidratos 8g
Proteínas 0g • Grasa 3g • Grasa saturada 2g
Colesterol 4mg • Sodio 22mg • Calcio 2mg • Fibra 0g
Información nutricional por porción
(1 cucharada, versión “Snickerdoodle”):
Calorías 42 (35% de grasa) • Carbohidratos 6g
Proteínas 0g • Grasa 2g • Grasa saturada 1g
Colesterol 4mg • Sodio 21mg • Calcio 1mg • Fibra 0g
Información nutricional por porción
(1 cucharada, avena y arándanos agrios):
Calorías 49 (32% de grasa) • Carbohidratos 8g
Proteínas 0g • Grasa 2g • Grasa saturada 1g
Colesterol 4mg • Sodio 22mg • Calcio 1mg • Fibra 0g
“Brownies” expreso semiamargos
Estos suculentos “brownies” les encantarán a
los amantes del chocolate.
Rinde 16 “brownies”
Spray vegetal
¾ taza (170 g) de mantequilla sin sal,
en cubitos
4 onzas (115 g) de chocolate
amargo, picado
4 onzas (170 g) de chocolate
semiamargo, picado
2 cucharadas (10 g) de cacao en polvo
2 cucharaditas de café expreso
instantáneo
½ taza (60 g) de harina común
¾ cucharadita de sal kosher
3 huevos grandes, a temperatura
ambiente
1½ tazas (300 g) de azúcar granulada
2 cucharaditas de extracto natural
de vainilla
1. Poner la rejilla del horno en el medio del
mismo y precalentar el horno a 350°F
(180°C). Engrasar ligeramente un molde
de 9 x 9 in. (23 x 23 cm) con spray
vegetal y forrarlo con papel sulfurizado;
reservar.
2.
Derretir la mantequilla y el chocolate
picado a baño María. Cuando el
chocolate esté casi derretido, agregar
el cacao y el café expreso; revolver.
Cuando el chocolate esté completamente
derretido, agregar la harina y la sal y dejar
enfriar a temperatura ambiente.
3.
Colocar los huevos en un tazón grande.
Usando los batidores, batir los huevos a
velocidad 2 parta romperlos ligeramente,
y luego agregar gradualmente el azúcar.
Ajustar la velocidad al nivel 4 y batir
por aprox. 2 a 3 minutos, hasta obtener
una mezcla ligera. Agregar la vainilla y
mezcla para combinar. Agregar la mezcla
de chocolate enfriada a la mezcla de
huevo y revolver suavemente a velocidad
1, teniendo cuidado de no incorporar
demasiado aire, hasta conseguir una
mezcla homogénea. Verter la mezcla de
chocolate en el molde preparado. Dar
unos golpecitos sobre la encimera varias
veces para eliminar las burbujas de aire.
4.
Hornear por 25 a 30 minutos, hasta
que las orillas estén ligeramente secas.
Dejar enfriar completamente antes de
cortar y servir.
Información nutricional por “brownie”:
Calorías 249 (54% de grasa) • Carbohidratos 28g
Proteínas 3g • Grasa 16g • Grasa saturada 10g
Colesterol 57mg • Sodio 120mg • Calcio 12mg
Fibra 2g

32
“Blondies” (“Brownies” de
chocolate blanco)
El “blondie” es el primo más dulce y más
claro del famoso “brownie” este primo del
“brownie”. Esta receta es bastante tradicional,
pero puede ser fácilmente modificada a gusto
cambiando el tipo de chispas o nueces.
Rinde 24 “blondies”
Mantequilla sin sal suave o spray
vegetal
2 tazas (250 g) de harina común
1½ cucharaditas de sal kosher
½ cucharadita de canela en polvo
16 cucharadas (225 g) de mantequilla
sin a temperatura ambiente,
en pedacitos
½ taza (100 g) de azúcar granulada
1 taza llena (200 g) de azúcar rubia
(azúcar de caña integral)
3 huevos grandes, a temperatura
ambiente
1 cucharada de extracto natural
de vainilla
1½ tazas (260 g) de chocolate
semiamargo, picado
1 taza (175 g) de chispas de
chocolate blanco
1 taza (120 g) de nueces
1. Poner la rejilla del horno en el medio del
mismo y precalentar el horno a 350°F
(180°C). Engrasar un molde de 9 x 3
in. (23 x 13 x 8 cm) con spray vegetal
o mantequilla sin sal; forrar con papel
sulfurizado. Reservar.
2.
Colocar la harina, la sal y la canela un
tazón mediano. Usando los batidores,
mezclar a velocidad 1 por aprox. 20
segundos para combinar; reservar.
3.
Poner la mantequilla en un tazón
grande. Batir a velocidad 3 por aprox.
30 segundos, hasta que la mezcla esté
suave. Agregar lentamente los azucares
y batir a velocidad 4 por 30 segundos
adicionales, hasta obtener una mezcla
clara y espesa. Ajustar la velocidad al
nivel 3 y agregar los huevos, uno a la
vez, y luego la vainilla; mezclar para
combinar. Reducir la velocidad al nivel
1 y agregar lentamente los ingredientes
secos. Cuando los ingredientes estén
casi incorporados, agregar el chocolate
picado, las chispas de chocolate y las
nueces.
4.
Verter la mezcla en la bandeja preparada.
Hornear por aprox. 30 a 35 minutos,
hasta que estén ligeramente dorados.
Dejar enfriar completamente antes
de cortar.
Información nutricional por “blondie”:
Calorías 320 (48% de grasa) • Carbohidratos 39g
Proteínas 3g • Grasa 18g • Grasa saturada 10g
Colesterol 45mg • Sodio 150mg • Calcio 10mg
Fibra 1g
Barras de arándanos azules con
cobertura crujiente
Cuando usted no puede decidir entre una
galleta o un “crumble”, este postre satisface
ambos antojos.
Rinde 12 porciones
Spray vegetal
Fondo de tarta:
8 cucharadas (115 g) de mantequilla
sin sal a temperatura ambiente, en
4 pedazos
¼ taza llena (50 g) de azúcar rubia
(azúcar de caña integral)
2 cucharadas (35 g) de azúcar
granulada
1¼ tazas (155 g) de harina común
¼ cucharadita de sal kosher
1 pizca de canela en polvo
Relleno:
¼ taza (50 g) de azúcar granulada
¼ taza llena (50 g) de azúcar rubia
(azúcar de caña integral)
2 cucharadas de almidón/fécula de
tapioca
¼ cucharadita de sal kosher
1 pizca de canela en polvo
1 pizca de jengibre en polvo
¼ cucharadita de extracto natural
de vainilla
4 tazas (280 g) de arándanos azules
frescos

33
Cobertura:
¾ taza (95 g) de harina común
½ taza (40 g) de copos de avena
(no use avena instantánea)
½ taza llena (100 g) de azúcar rubia
(azúcar de caña integral)
¼ cucharadita de canela en polvo
¼ cucharadita de sal kosher
6 cucharadas (85 g) de mantequilla
sin sal fría, en cubos
1. Engrasar ligeramente un molde de 9 x
9 in. (23 x 23 cm) con spray vegetal y
forrarlo con papel sulfurizado; reservar.
2.
Preparar la corteza: Poner la mantequilla
y los azucares en un tazón mediano.
Usando los batidores, revolver a
velocidad 2 o 3 hasta conseguir una
mezcla cremosa. Agregar el resto de
los ingredientes de la corteza y mezclar
a velocidad 2 para combinar. Colocar
la mezcla en el molde preparado,
aplastando firmemente para comprimirla
en el fondo del mismo. Refrigerar hasta
que esté firme.
3.
Mientras el fondo de tarta se está
enfriando, preparar el relleno. Poner los
azúcares, la fécula, la sal y las especias
en un tazón grande; mezclar a velocidad
1 para combinar. Agregar la vainilla y los
arándanos azules; revolver para cubrir
los arándanos. A continuación, mezclar a
velocidad 1 por aprox. 2 minutos, hasta
que la mitad de los arándanos se hayan
reventado. Reservar.
4.
Poner todos los ingredientes de la
cobertura, excepto la mantequilla, en un
tazón mediano. Mezclar a velocidad 1
para combinar. Agregar la mantequilla
y mezclar a velocidad 2 hasta que se
formen migajas grandes.
5.
Poner la rejilla del horno en el centro del
mismo y precalentar el horno a 350°F
(180°C). Hornear la corteza por aprox. 20
minutos, hasta que esté firme y que las
orillas estén doradas. Retirar del horno
y esparcir el relleno encima. Meter al
horno otra vez y hornear por aprox. 15
minutos adicionales, hasta que el relleno
esté burbujeante en las orillas. Cubrir
uniformemente con la cobertura crujiente.
Meter al horno otra vez, y hornear por
15 minutos adicionales. Las barras están
listas cuando la parte superior está
uniformemente dorada.
6.
Dejar enfriar completamente antes de
cortar y servir.
Información nutricional por barra:
Calorías 282 (41% de grasa) • Carbohidratos 39g
Proteínas 3g • Grasa 13g • Grasa saturada 8g
Colesterol 35g • Sodio 143mg • Calcio 4mg
Fibra 2g
Torta de capas dorada
Esta receta les encantará a todos los amantes
de la torta dorada tradicional. Es deliciosa con
casi cualquier relleno y glaseado, pero nos
encanta especialmente con nuestro glaseado
de bayas y crema (receta a continuación).
Rinde 16 porciones; dos capas de 9 in. (23 cm)
Spray vegetal
3 tazas (405 g) de harina de
repostería sin levadura
1¾ tazas (350 g) de azúcar granulada
1 cucharada de polvo de hornear
¾ cucharadita de sal kosher
2 huevos grandes, a temperatura
ambiente
2 yemas de huevo grande,
a temperatura ambiente
1½ tazas (365 g) de suero de leche
(“buttermilk”), a temperatura
ambiente
2 cucharaditas de extracto natural
de vainilla
1 taza (235 ml) de aceite vegetal
1. Poner la rejilla del horno en el medio del
mismo y precalentar el horno a 350°F
(180°C). Precalentar el horno a 350°F
(180°C). Engrasar dos moldes redondos
de 9 in. (23 cm) con spray vegetal y
forrarlos con papel sulfurizado. Reservar.
2.
Poner la harina, el azúcar, el bicarbonato
y la sal en un tazón grande. Usando los
batidores, mezclar a velocidad 1 por un
mínimo de 30 segundos para combinar
completamente. Reservar.
3.
Poner los huevos, las yemas, el suero de
leche y la vainilla en un tazón mediano.
Batir a velocidad 3.
4.
Reducir la velocidad al nivel 2 y agregar
lentamente el aceite a la mezcla de
ingredientes secos. Cuando esté bien
combinado, aumentar la velocidad al nivel
4 o 5 y mezclar por aprox. 1½ minutos
adicionales, hasta conseguir una mezcla
completamente homogénea.

34
5.
Agregar poco a poco la mezcla de
huevo/suero de leche y mezclar a
velocidad 2 para incorporar.
6.
Dividir la mezcla entre los dos moldes
preparados. Dar golpecitos en la
encimera para eliminar las burbujas
y meter al horno. Hornear por aprox.
25 minutos, hasta que un probador
introducido en el centro salga limpio.
7.
Retirar del horno y dejar enfriar sobre
una rejilla (en los moldes) hasta que
estén fríos al tacto. Luego, desmoldar y
terminar de enfriar sobre una rejilla.
Información nutricional por porción
(sin cobertura):
Calorías 324 (42% de grasa) • Carbohidratos 43g
Proteínas 4g • Grasa 16g • Grasa saturada 2g
Colesterol 47mg • Sodio 225mg • Calcio 52mg
Fibra 0g
Cobertura de crema y bayas
Ajuste el sabor y el color a gusto, variando
la cantidad de bayas liofilizadas usadas en la
receta. Empiece con media taza, y agregue
cuanto más desee.
Rinde aprox. 3 tazas (710 ml), suficiente para
cubrir un pastel de capas de 9 in. (23 cm)
8 cucharadas (115 g) de mantequilla
sin sal a temperatura ambiente,
en 8 pedazos
4 onzas (115 g) de queso crema,
en 4 pedazos, a temperatura
ambiente
4 tazas (455 g) de azúcar glasé,
tamizado
¼ cucharadita de sal kosher
¼ taza (60 ml) de leche entera
o crema líquida para batir
(“heavy cream”)
2 cucharadas de jarabe de maíz
claro (opcional, si desea un
acabado brillante)
½ taza (75 g) de frambuesas o
fresas liofilizadas (o una mezcla),
finamente molidas (con un
molinillo de especias) y tamizadas
1. Poner la mantequilla y el queso crema en
un tazón grande. Usando los batidores,
mezclar por aprox. 2 minutos, usando
la velocidad 2 a 4, hasta conseguir una
mezcla ligera y cremosa. Agregar el
azúcar glasé y mezclar a por aprox. 1
minuto para combinar.
2.
Sin apagar la máquina, agregar
lentamente la leche (o la crema) y seguir
mezclando hasta conseguir una mezcla
ligera. Si usa jarabe de maíz, agregarlo
ahora y mezclar a velocidad 1 para
combinar.
3.
Agregar las bayas molidas y mezclar
hasta obtener la consistencia deseada.
Usar inmediatamente.
NOTA: Si no la usa inmediatamente, cubrir
con una toalla húmeda y papel film/plástico
y conservar a temperatura ambiente hasta el
momento de usar.
Información nutricional por porción (3 cucharadas):
Calorías 214 (34% de grasa) • Carbohidratos 35g
Proteínas 1g • Grasa 8g • Grasa saturada 5g
Colesterol 23mg • Sodio 62mg • Calcio 6mg
Fibra 0g
Torta de capas de chocolate
Bañe esta suculenta torta de chocolate con
nuestro baño de queso crema (receta en la
página 35).
Rinde 16 porciones; dos tortas de 9 in. (23 cm)
Mantequilla sin sal suave o spray
vegetal
6 onzas (170 g) de chocolate
semiamargo, picado
¾ taza (90 g) de cacao en polvo
(“Dutch Process”), tamizado
2 cucharaditas de café expreso
instantáneo
½ cucharadita de bicarbonato de sodio
1 taza (235 ml) de agua hirviente
2½ tazas (310 g) de harina común
1 taza (200 g) de azúcar granulada
½ taza llena (100 g) de azúcar rubia
(azúcar de caña integral)
1 cucharadita de polvo de hornear
¾ cucharadita de sal kosher
1 taza (235 ml) de aceite vegetal
1 taza (245 g) de suero de leche
(“buttermilk”), a temperatura
ambiente
4 huevos grandes, ligeramente
batidos, a temperatura ambiente
2 cucharaditas de extracto natural
de vainilla
1. Poner la rejilla del horno en el medio del
mismo y precalentar el horno a 350°F
(180°C). Engrasar dos moldes redondos

35
de 9 in. (23 cm) con spray vegetal o
mantequilla y cubrir el fondo de cada
molde con papel sulfurizado. Reservar.
2.
Colocar el chocolate semiamargo, el
cacao, el expreso y el bicarbonato en un
bol mediano; cubrir con el agua hirviente.
Revolver hasta que el chocolate esté
derretido. Dejar enfriar a temperatura
ambiente, y reservar.
3.
Poner la harina, los azucares, el polvo de
hornear y la sal en un tazón grande.
Usando los batidores, mezclar a velocidad
2 por un mínimo de 30 segundos para
combinar completamente. Reservar.
4.
Agregar el aceite, el suero de leche,
los huevos y la vainilla a la mezcla de
chocolate, usando la velocidad 2 para
mezclar.
5.
Agregar lentamente la mezcla líquida
a los ingredientes secos, usando la
velocidad 2 para mezclar. Mezclar por
aprox. 1 minuto, parando para raspar
todo el bol cuando sea necesario, hasta
conseguir una mezcla suave.
6.
Dividir la mezcla entre los moldes
preparados. Hornear por 30 a 35 minutos,
hasta que un probador introducido en el
centro salga limpio.
7.
Retirar del horno y dejar enfriar sobre una
rejilla (en los moldes) hasta que la parte
superior esté fría al tacto. Dejar enfriar
completamente antes de cubrir/glasear.
Información nutricional por porción (sin cobertura):
Calorías 345 (50% de grasa) • Carbohidratos 41g
Proteínas 6g • Grasa 21g • Grasa saturada 5g
Colesterol 47mg • Sodio 195mg • Calcio 31mg
Fibra 3g
Baño de queso crema
Esta cobertura clásica es perfecta para una
variedad de pasteles, pero es especialmente
deliciosa con pastel de zanahoria y pastel
de chocolate.
Rinde aprox. 5 tazas (1.4 L)
5½ tazas (650 g) de azúcar glasé,
tamizado
¼ cucharadita de sal kosher
1 libra (455 g) de queso crema,
a temperatura ambiente
8 cucharadas (115 g) de mantequilla
sin sal temperatura ambiente,
en pedazos de 1 in. (2.5 cm)
1 cucharadita de extracto natural
de vainilla
1. Colocar el azúcar y la sal en un tazón
grande. Usando los batidores, mezclar
a velocidad 1 por un mínimo de 30
segundos para combinar completamente.
2.
Colocar el queso crema en otro tazón
grande. Mezclar a velocidad 2 a 4
por aprox. 1½ a 2 minutos, hasta que
esté suave. Agregar la mantequilla y
batir hasta obtener una mezcla suave
y homogénea. Ajustar la velocidad al
nivel 2 y agregar lentamente la mezcla
de azúcar/sal tamizada; mezclar por
aprox. 2 minutos para incorporar. Raspar
bien el bol. Agregar la vainilla Mezclar
a velocidad 2 para combinar. Usar
inmediatamente.
Información nutricional por porción
de ¼ de taza (60 ml):
Calorías 250 (44% de grasa) • Carbohidratos 34g
Proteínas 1g • Grasa 12g • Grasa • saturada 8g
Colesterol 47mg • Sodio 101mg • Calcio 22mg
Fibra 0g
“Cupcakes” dorados sin gluten
(¡y veganas!) con cobertura
de vainilla
A diferencia de nuestros “muffins” sin gluten
preparados con harina sin gluten preparada,
aquí usamos ingredientes individuales
disponibles en la mayoría de las tiendas
de alimentos.
Rinde 12 “cupcakes” estándares
Spray vegetal
2 tazas (240 g) de harina de sorgo
1 taza (125 g) de fécula/almidón
de papa
½ taza (60 g) de fécula/almidón de
arrurruz
1 cucharada de polvo de hornear
½ cucharadita de bicarbonato de sodio
1 cucharadita de goma xantana
1 cucharadita de sal kosher
1½ tazas (355 ml) de néctar de agave
½ taza (120 ml) de aceite de oliva
¾ taza (165 g) de puré de calabaza
moscada (“butternut squash”),
a temperatura ambiente
2 cucharadas de extracto natural
de vainilla

36
1 cucharadita de vinagre blanco
1. Precalentar el horno a 350°F (180°C).
Engrasar un molde de “cupcakes”
estándar con spray vegetal. Forrar los
moldes con pirotines/moldecitos de papel
si desea.
2.
Poner la harina, las féculas, el
bicarbonato, la goma xantana y la sal en
un tazón grande. Usando los batidores,
revolver a velocidad 1 por aprox. 30
segundos para “tamizar”.
3.
Sin apagar la máquina, agregar el resto
de los ingredientes, en el orden indicado,
y mezclar a velocidad 2 hasta obtener
una mezcla homogénea. Raspar el bol y
mezclar por 20 segundos adicionales si
es necesario.
4.
Verter cucharadas de la mezcla en
los moldes preparados. Hornear por
aprox. 20 a 22 minutos, hasta que estén
dorados y que un probador introducido
en el centro salga limpio. Retirar del
horno y dejar enfriar sobre una rejilla (en
los moldes) hasta que estén fríos al tacto.
Luego, desmoldar y terminar de enfriar
sobre una rejilla.
Información nutricional por “cupcake”
(sin cobertura):
Calorías 396 (22% de grasa) • Carbohidratos 77g
Proteínas 4g • Grasa 10g • Grasa saturada 1g
Colesterol 0mg • Sodio 359mg • Calcio 50mg
Fibra 2g
Baño de vainilla sin lácteos
Este glaseado se combina muy bien con
nuestros “cupcakes” dorados sin gluten, pero
también es una gran alternativa a cualquier
baño/glaseado de vainilla.
Rinde aprox. 2 tazas (475 ml)
1 taza (250 g) de manteca vegetal
no hidrogenada
2 tazas (240 g) de azúcar glasé,
tamizado
1 cucharada de extracto natural
de vainilla
¼ cucharadita de sal kosher
1 a 2 cucharaditas de agua, opcional
1. Colocar la manteca vegetal en un tazón
mediano. Usando los batidores, mezclar a
velocidad 2 o 4 por aprox. 30 segundos,
hasta conseguir una mezcla cremosa.
Agregar el azúcar, mezclar a velocidad
2 a 5, y luego agregar la vainilla y la sal.
Seguir mezclando (usando la misma
velocidad) por aprox. 30 segundos, hasta
conseguir una mezcla suave y esponjosa.
2.
Si el baño está demasiado espeso, añadir
agua, una cucharadita a la vez, hasta
obtener la consistencia deseada.
Información nutricional por porción
(2 cucharadas):
Calorías 182 (61% de grasa) • Carbohidratos 19g
Proteínas 0g • Grasa 13g • Grasa saturada 6g
Colesterol 0mg • Sodio 33mg • Calcio 36mg
Fibra 0g
Pastel de ángel
Sírvalo con crema batida y frutas del
bosque frescas para un ligero y delicioso
postre de verano.
Rinde 12 porciones; un pastel de 9 in. (23 cm)
1½ tazas (300 g) de azúcar granulada
1½ tazas (200 g) de harina de
repostería sin levadura
12 claras de huevo grande
1¼ cucharaditas de crémor tártaro
¼ cucharadita de sal kosher
1 cucharadita de extracto natural
de vainilla
1. Precalentar el horno a 325°F (160°C).
2.
Colocar ¾ de taza (150 g) del azúcar y la
harina de repostería en un tazón grande.
Usando el batidor de alambre, mezclar
a velocidad 1 a 2 por un mínimo de 30
segundos; reservar.
3.
Colocar las claras y la sal en un tazón
grande. Usando el batidor de alambre,
batir a velocidad 1. Cuando las claras
se pongan espumosas, agregar
crémor tártaro y la sal. Aumentar
progresivamente la velocidad al nivel 6.
4.
Agregar ¾ taza (150 g) de azúcar
granulado y la vainilla; seguir batiendo
hasta obtener picos firmes y brillantes.
Apagar la unidad.
5.
Agregar aprox. la mitad de la mezcla de
harina/azúcar a las claras, tamizándola
por encima, e incorporarla delicadamente
con una espátula de caucho. Repetir
con la mezcla de harina/azúcar restante,

37
incorporando delicadamente la mezcla
hasta que no queden rastros de
ingredientes secos.
6.
Verter la mezcla en un molde de rosca
de 9 in. (23 cm) no engrasado. Suavizar
la superficie con una espátula. Hornear
por aprox. 45 minutos, hasta que un
probador introducido en el centro salga
limpio. Retirar del horno, invertir el molde
sobre un cuello de botella, y permitir que
el pastel se enfríe completamente.
7.
Una vez que esté frío, usar un cuchillo
para despegar el pastel del molde.
Información nutricional por porción:
Calorías 167 (1% de grasa) • Carbohidratos 37g
Proteínas 5g • Grasa 0g • Grasa saturada 0g
Colesterol 0mg • Sodio 278mg • Calcio 5mg
Fibra 0g
“Pavlova” con naranja roja
y granada
Un postre impresionante. Esta magnífica
creación necesita ser consumida el día de su
elaboración (¡y mejor si ese día no es húmedo!).
Rinde 12 porciones
Merengue:
4 claras de huevo grande
1 pizca de crémor tártaro
1 pizca de sal kosher
1 taza (200 g) de azúcar granulada
2 cucharaditas de maicena,
tamizada
1 cucharadita de vinagre blanco
¼ cucharadita de extracto natural
de vainilla
½ cucharadita de ralladura de limón
Cobertura:
2 naranjas rojas, en segmentos
3 cucharadas de semillas de granada
½ taza (100 g) de azúcar granulada
½ taza (120 ml) de agua
1 taza (235 ml) de jugo de naranja
roja (también puede usar jugo
de granada para preparar un
jarabe más rosado/rojo; las
naranjas rojas producen un jarabe
anaranjado oscuro)
¾ taza (175 ml) de crema líquida para
batir (“heavy cream”)
1 cucharadita de extracto natural
de vainilla
¼ taza (30 g) de azúcar glasé
1. Colocar la rejilla del horno en el centro
del mismo. Precalentar el horno a 350°F
(180°C). Forrar una placa para horno con
papel sulfurizado (si la placa para horno
tiene un borde, inviértala de modo que
esté usando la parte inferior; esto facilitará
sacar el merengue una vez cocido).
2.
Preparar el merengue. Colocar las claras,
el crémor tártaro y la sal en un tazón grande
impecablemente limpio. Usando el
batidor de alambre, batir, empezando
en la velocidad 1 y aumentando muy
progresivamente la velocidad al nivel 6.
Batir hasta que las claras formen picos
suaves. Sin dejar de batir, agregar
gradualmente el azúcar. Ajustar la
velocidad al nivel 8 y batir por
aproximadamente 8 minutos, hasta que
se formen picos firmes. Añadir el resto de
los ingredientes del merengue y mezclar
suavemente a velocidad 2.
3.
Colocar el merengue en la placa para
horno preparada. Usando una espátula o
un cuchillo, formar círculos de 8 pulgadas
(20 cm); raspar las orillas desde abajo
hasta arriba para crear bordes lisos y
pequeños picos arriba.
4.
Meter al horno y reducir inmediatamente
la temperatura a 200°F (100°C).
5.
Hornear el merengue por 1½ horas, hasta
que las orillas y la parte de arriba estén
secos (el color debería ser muy pálido).
Después de este tiempo, apagar el horno
y dejar el merengue en el horno por
aprox. 1 hora, hasta que se haya enfriado
por completo.
6.
Mientras el merengue se está enfriando,
preparar la guarnición. Cerciorarse de
que las naranjas están completamente
segmentadas (sin piel blanca en los
segmentos). Reservar en un plato, junto
con las semillas de granada.
7.
Preparar el jarabe de naranja: Colocar el
azúcar y agua en una cacerola de fondo
pesado. Cocinar a fuego medio hasta
que el azúcar se haya disuelto, y luego
agregar el jugo. Cocinar por aprox. 20
a 25 minutos, hasta que el jarabe se
espese. Reservar y dejar enfriar. NOTA:
Si el jarabe parece muy espeso, puede
diluirlo con agua caliente, agregando una
cucharadita a la vez.
8.
Una vez que la “pavlova” se haya
enfriado por completo, preparar la
crema batida. Colocar la crema en un

38
tazón grande. Instalar el batidor de
alambre. Batir, empezando a velocidad
1 y aumentando progresivamente la
velocidad al nivel 3, por aprox. 1 minuto,
hasta obtener una mezcla espumosa.
Agregar el azúcar y la vainilla, y mezclar a
velocidad 4 hasta obtener picos suaves.
9.
Armar la “pavlova”. Colocar el merengue
horneado en un plato para servir. Cubrir
con crema batida, y añadir las frutas,
usando una cuchara calada. Rociar el
jarabe en las orillas del plato si desea.
Decorar con ralladura si desea.
10.
Servir inmediatamente.
Información nutricional por porción:
Calorías 169 (27% de grasa) • Carbohidratos 27g
Proteínas 1g • Grasa 5g • Grasa saturada 4g
Colesterol 20mg • Sodio 37mg • Calcio 3mg
Fibra 0g
Pastel de queso de crema agria
Esta receta es bastante sencilla. Si bien es
simple, puede elevarse cubriendo la tarta
con frutas frescas o cocinadas, virutas de
chocolate o galletas picadas.
Rinde 12 porciones; un pastel de 8 in. (23 cm)
1 cucharada (15 g) de mantequilla
sin sal, a temperatura ambiente
Corteza de galletas Graham:
1 taza (50 g) de galletas “Graham”
molidas
2 cucharadas (35 g) de azúcar
granulada
¼ cucharadita de canela en polvo
4 cucharadas (55 g) de mantequilla
sin sal, derretida y ligeramente
enfriada
Relleno:
24 onzas (680 g) de queso crema bajo
en grasa pedazos, a temperatura
ambiente
1½ tazas (300 g) de azúcar granulada
¼ cucharadita de sal kosher
5 huevos grandes, a temperatura
ambiente
1 taza (235 ml) de crema agria,
a temperatura ambiente
1½ cucharaditas de extracto natural
de vainilla
1. Colocar la rejilla del horno en el tercio
inferior del horno y precalentar este
a 325°F (160°C). Engrasar un molde
desmontable de 8 in. (23 cm) con una
cucharada de mantequilla. Reservar.
2.
Preparar la corteza: Colocar las galletas
molidas, 2 cucharadas de azúcar, la
canela, y la mantequilla derretida en un
tazón pequeño; revolver. Instalar los
batidores. Revolver a velocidad 2 hasta
que se forme una “masa”. Colocar la
“masa” en el fondo del molde y presionar
(usar el fondo de un vaso si es necesario)
para formar una corteza uniforme.
Hornear por 8 a 10 minutos, hasta que la
corteza esté ligeramente firme.
Dejar enfriar mientras prepara el relleno.
3.
Limpiar los batidores. Colocar el queso
crema en un tazón grande. Batir hasta
que esté muy suave, empezando
en la velocidad 1 y aumentando
progresivamente la velocidad al nivel
4. Raspar el tazón y los batidores.
Mezclando a velocidad 2, agregar el
azúcar, aprox. ¼ de taza (50 g) a la vez,
y la sal; mezclar hasta conseguir una
mezcla muy suave. Agregar los huevos,
uno a la vez, batiendo a velocidad 2 a 3
y teniendo cuidado de incorporar cada
huevo a la mezcla antes de añadir el
siguiente. Raspar el tazón y los batidores,
y luego agregar la crema agria y la vainilla.
Mezclar a velocidad 1 por aprox. 1 minuto,
hasta obtener una mezcla cremosa.
4.
Envolver el molde desmontable enfriado
con papel film/plástico y papel de
aluminio, hasta llegar a los dos tercios de
los costados del molde.
5.
Verter la en la corteza enfriada, sin raspar
ningún grumo grueso de los lados del bol
(esto cambiaría la textura de la tarta).
6.
Colocar el molde en una bandeja de asar,
o algo similar en tamaño y apto para
horno, y luego agregar agua caliente para
que llegue más o menos a la mitad de los
costados del Pastel.
7.
Hornear por 45 minutos. El pastel no estará
firme; esto es normal. Después de 45
minutos, apagar el horno y dejar el pastel
en el horno tibio por 5 minutos adicionales.
8.
Después de este tiempo, retirar del horno
y dejar enfriar a temperatura ambiente.
Cubrir bien y refrigerar para enfriar
completamente antes de servir.
Información nutricional por porción:
Calorías 449 (61% de grasa) • Carbohidratos 36g
Proteínas 8g • Grasa 31g • Grasa saturada 18g
Colesterol 163mg • Sodio 330mg • Calcio 39mg
Fibra 0g

39
Tarta de crema de chocolate
¡Esta tarta perfecta para cualquier fiesta u
ocasión especial les encantará a todos!
Rinde aprox. 12 porciones
Fondo de tarta:
2½ tazas (375 g) de galletas de
chocolate molidas (aprox. 24
galletas de chocolate)
5 cucharadas (70 g) de mantequilla
sin sal, derretida
Relleno:
¼ taza llena (50 g) de azúcar rubia
(azúcar de caña integral)
¼ taza (50 g) de azúcar granulada
3 cucharadas de cacao amargo en
polvo
2½ cucharadas de maicena
¼ cucharadita de sal kosher
3 tazas (710 ml) de crema líquida
“half-and-half” (mitad leche/mitad
crema)
3 huevos grandes, ligeramente batidos
4 onzas (115 g) de chocolate
semidulce, picado
3 cucharadas (45 g) de mantequilla
sin sal, en pedacitos
Cobertura:
2 tazas (475 ml) de crema líquida
para batir (“heavy cream”), helada
¼ taza + 2 cucharadas (60 g) de
azúcar granulada
Virutas de chocolate para decorar
1. Preparar el fondo de tarta. Poner la
rejilla del horno en el medio del mismo y
precalentar el horno a 350°F (180°C).
2.
Poner las galletas molidas y la
mantequilla de derretida en un tazón
mediano. Usando los batidores, revolver
a velocidad 1 o 2 por aprox. 30 segundos
para combinar. Colocar la mezcla en
un molde de tarta de 9 in. (23 cm).
Comprimir uniformemente en el fondo y
los costados del molde.
3.
Hornear por 10 a 15 minutos, hasta que
el fondo de torta de galletas esté firme.
Mientras el fondo de tarta se está
enfriando, preparar el relleno.
4.
Colocar los azucares, el polvo de cacao,
la maicena y la sal en una cacerola ancha
grande. Licuar a velocidad 1, usando los
batidores. Sin dejar de mezclar, agregar
lentamente la crema líquida, y luego
los huevos; seguir mezclando hasta
conseguir una mezcla muy suave.
5.
Calentar la mezcla a fuego medio-lento,
mezclando ocasionalmente a velocidad
a 1 a 2 para evitar que se cocine
demasiado (no descuidar la cacerola).
6.
Dejar que la mezcla se caliente hasta que
empiece a hervir. Cuando llegue a este
punto, la mezcla se espesará muy rápido.
Seguir mezclando a velocidad 1 y retirar
del fuego ni bien se espese. Agregar el
chocolate picado y la mantequilla; batir
para incorporar completamente. Colar
el relleno con un colador de malla fina y
esparcir sobre el fondo de tarta enfriado.
Cubrir el relleno directamente con papel
encerado o papel film/plástico para evitar
que se forme una “piel”. Refrigerar hasta
que esté firme.
7.
Cuando el relleno esté firme y listo
para servir, preparar la crema batida.
Colocar la crema en un tazón grande.
Instalar el batidor de alambre. Batir,
empezando a velocidad 1 y aumentando
progresivamente la velocidad al nivel 3,
por aprox. 1 minuto, hasta obtener una
mezcla espumosa. Agregar el azúcar y
seguir batiendo a velocidad 4 hasta que
se formen picos medio-firmes.
8.
Cubrir la tarta uniformemente con crema
batida y decorar con virutas de chocolate
antes de servir.
Información nutricional por porción:
Calorías 515 (63% de grasa) • Carbohidratos 43g
Proteínas 5g • Grasa 36g • Grasa saturada 23g
Colesterol 142mg • Sodio 231mg • Calcio 74mg
Fibra 1g
Tarta de calabaza
Imprescindible en el Día de Acción de Gracias,
esta tarta no debería olvidarse durante el resto
de la temporada de otoño.
Rinde aprox. 12 porciones
½ receta de “pâte brisée”
(masa quebrada) (página 42)
1 lata de 15 onzas (425 g) de puré de
calabaza
½ taza (100 g) de azúcar granulada
¼ taza llena (50 g) de azúcar rubia
(azúcar de caña integral)
1 cucharadita de canela en polvo

40
¼ cucharadita de clavo de olor
en polvo
¼ cucharadita de jengibre en polvo
¹⁄
8 cucharadita de nuez moscada
rallada
¾ cucharadita de sal kosher
3 huevos grandes, a temperatura
ambiente
½ taza (120 ml) de crema líquida para
batir (“heavy cream”) o de leche
evaporada
1 cucharadita de extracto natural
de vainilla
Crema batida para cubrir
(receta siguiente)
1. Poner una bandeja de hornear con borde
en la rejilla del medio del horno (esto
ayudará a hacer una buena corteza para
el pastel). Precalentar el horno a 325°F
(160 °C).
2.
Mientras el horno se está calentando,
estirar la masa quebrada hasta que
forme un círculo grande que quepa en
un molde de tarta de aprox. 1½ (4 cm)
de profundidad. Colocar la masa en
el molde. Pinchar suavemente con un
tenedor, teniendo cuidado de no perforar
completamente la masa. Refrigerar
mientras prepara el relleno de calabaza.
3.
Colocar la calabaza, el azúcar, las especias
y la sal en un tazón grande. Usando el
aditamento licuador, licuar a velocidad 1
hasta conseguir una mezcla homogénea.
Agregar los huevos, la crema (o la leche
evaporada) y la vainilla; licuar a velocidad
1 para combinar.
4.
Verter la mezcla por encima del fondo
de tarta enfriado. Meter al horno,
directamente en la bandeja caliente.
Hornear por aprox. 35 minutos, hasta que
las orillas estén firmes pero que el centro
siga suave.
5.
Dejar enfriar completamente antes de
servir. Servir con crema batida.
Información nutricional por porción:
Calorías 212 (51% de grasa) • Carbohidratos 23g
Proteínas 3g • Grasa 12g • Grasa saturada 7g
Colesterol 80mg • Sodio 257mg • Calcio 15mg
Fibra 2g
Crema batida clásica
Ya sea para cubrir helados y pasteles o para
mojar frutas, todo el mundo debería tener una
fórmula infalible para una crema batida básica
y endulzada.
Rinde aprox. 2¼ tazas (530 ml)
1 taza (235 ml) de crema líquida
para batir (“heavy cream”), helada
¼ taza (30 g) de azúcar glasé,
tamizado
1 cucharadita de extracto natural
de vainilla
1 pizca de sal marina fina
1. Colocar la crema en un tazón grande.
2.
Instalar el batidor de alambre. Batir,
empezando a velocidad 1 y aumentando
progresivamente la velocidad al nivel 3,
por aprox. 1 minuto hasta obtener una
mezcla espumosa. Agregar el azúcar y
la vainilla, y mezclar a velocidad 7 por
aprox. 1½ minutos adicionales, hasta
obtener picos firmes.
Información nutricional por porción (2 cucharadas):
Calorías 52 (84% de grasa) • Carbohidratos 2g
Proteínas 0g • Grasa 4g • Grasa saturada 3g
Colesterol 18mg • Sodio 8mg • Calcio 0mg • Fibra 0g
Glaseado real
Perfecto para decorar galletas o tortas. Puede
usar extractos para perfumarlo o colorante
alimentario para darle el color deseado.
Rinde 1½ tazas (355 ml)
4 tazas (455 g) de azúcar glasé,
tamizado
2 claras de huevo grande,
ligeramente batidas
1 cucharada de leche entera
1 cucharadita de jugo de limón
fresco
1. Colocar el azúcar en un tazón grande.
Instalar el batidor de alambre. Empezar
a mezclar a velocidad 1 y agregar
lentamente las claras; mezclar por aprox.
1 minuto, hasta que las claras estén
completamente incorporadas. Sin apagar
la máquina, agregar la leche y el jugo de
limón; seguir revolviendo para mezclar.
Raspar el bol si es necesario. Seguir
mezclando por aprox. 2 minutos, hasta
que se formen picos suaves.
2.
Usar inmediatamente o cubrir con un
paño húmedo para evitar que se seque.
Si desea usar colorante alimentario o
extractos, añadir estos al mismo tiempo
que la leche y el jugo de limón.

41
Información nutricional por porción (2 cucharadas):
Calorías 133 (0% de grasa) • Carbohidratos 33g
Proteínas 1g • Grasa 0g • Grasa saturada 0g
Colesterol 0mg • Sodio 10mg • Calcio 2mg
Fibra 0g
Batido de helado de chocolate
con mantequilla de maní
Este batido satisfará a los aficionados
a los dulces.
Rinde 2 tazas (475 ml); 4 porciones
¾ taza (175 ml) de helado de
chocolate
1 cucharadita de mantequilla de
maní cremosa
1 cucharadita de jarabe de
chocolate
¹∕
³
taza (80 ml) de leche entera
1. Colocar todos los ingredientes en un
vaso alto o un vaso medidor grande y
ancho, en el orden indicado.
2.
Instalar el aditamento licuador. Licuar
a velocidad 1 por 30 a 40 segundos,
usando un movimiento suave hacia arriba
y abajo, hasta conseguir una mezcla
suave y homogénea.
3.
Servir inmediatamente.
Información nutricional por porción
de ½ taza (120 ml):
Calorías 156 (46% de grasa) • Carbohidratos 18g
Proteínas 4g • Grasa 8g • Grasa saturada 5g
Colesterol 23mg • Sodio 69mg • Calcio 112mg
Fibra 1g
Masa de pizza/focaccia
Una de las masas más simples de preparar en
casa para llevar su noche de pizza al siguiente
nivel. Y si dar forma a la pizza no es lo suyo,
le damos instrucciones para convertirla en una
deliciosa focaccia de hierbas.
Rinde aprox. 1½ libras (680 g); 12 porciones,
suficiente para 2 pizzas de 10 in. (25 cm)
1¹⁄
³
tazas (315 ml) de agua tibia
2¼ cucharaditas de levadura seca
activa
1 cucharadita (5 g) de azúcar
granulada
3½ tazas (470 g) de harina para hacer
pan o 3½ tazas (435 g) de harina
común
2 cucharaditas de sal kosher
2 cucharadas de aceite de oliva
virgen extra
Para focaccia:
1 cucharada de aceite de oliva
virgen extra
2 cucharadas de romero fresco picado
½ cucharadita de sal kosher
1. Poner el agua tibia, la levadura y el azúcar
en un tazón grande. Revolver para disolver
la levadura y dejar reposar por 5 a 10
minutos. La mezcla burbujeará, lo que
indica que la levadura está viva y activa.
2.
Colocar la harina y la sal en un tazón
pequeño; revolver. Usando los ganchos
amasadores, mezclar a velocidad por 5
a 10 segundos; reservar.
3.
Agregar el aceite y ½ taza (60 g) de la
harina a la mezcla de levadura. Usando
los ganchos amasadores, revolver a
velocidad 1 por aprox. 30 a 40 segundos,
hasta conseguir una mezcla suave.
Mezclado a velocidad 2, seguir
agregando la harina, ½ taza (60 g) a la
vez, mezclando por 30 a 40 segundos
después de cada adición hasta que la
harina ya no esté visible. La mezcla
adquirirá progresivamente la consistencia
de una masa. Una vez incorporada la
harina, amasar a velocidad 3 por aprox.
un minuto adicional.
4.
Espolvorear la masa con un poco de
harina, colocarla en un tazón grande y
cubrir con una toalla húmeda o papel
film/plástico. Dejar leudar en un lugar
templado por aprox. 45 minutos, al doble
de su volumen.
5.
Colocar la masa sobre una superficie
ligeramente enharinada y aplastar para
desinflar. Formar una pizza o usar para
preparar “calzones” (receta en la página 24).
6.
Para preparar focaccia, comprimir la
masa en el fondo de una bandeja de
hornear de 13 x 9 in. (33 x 23 cm). Cubrir
sin apretar con papel film/plástico y
dejar leudar por 45 minutos adicionales
(la masa estará muy hinchada). Poner la
rejilla del horno en el medio del mismo
y precalentar el horno a 425°F (220°C).
Cepillar la masa con 1 cucharada de
aceite de oliva y, usando sus dedos,
hacer hendiduras en toda la masa. Rociar
con romero y sal. Hornear por 18 a 20
minutos, hasta que esté dorado.

42
Información nutricional por porción (masa de pizza):
Calorías 140 (15% de grasa) • Carbohidratos 26g
Proteínas 4g • Grasa 2g • Grasa saturada 0g
Colesterol 0mg • Sodio 356mg • Calcio 1mg
Fibra 1g
Información nutricional por porción (focaccia):
Calorías 151 (21% de grasa) • Carbohidratos 26g
Proteínas 4g • Grasa 4g • Grasa saturada 1g
Colesterol 0mg • Sodio 445mg • Calcio 2mg
Fibra 1g
“Pâte brisée” (masa quebrada)
Esta masa versátil es perfecta para preparar
recetas saladas o dulces.
Rinde 24 porciones; dos fondos de tarta de
9 in. (23 cm)
2 tazas (250 g) de harina común
1 cucharadita de sal kosher
16 cucharadas (225 g) de mantequilla
sin sal, cortada en pedazos de ½
in. (1.5 cm) y dejada a temperatura
ambiente por 15 minutos
¼ taza (60 ml) de agua helada
1. Colocar la harina y la sal en un tazón
grande. Usando los batidores, revolver a
velocidad 1 por aprox. 5 a 10 segundos
para combinar. Agregar la mantequilla
y seguir mezclando a velocidad 1 hasta
que la mantequilla se haya incorporado a
la harina y que forme bolitas del tamaño
de arvejas.
2.
Agregar lentamente el agua, 1
cucharadita a la vez, y mezclar hasta que
la harina esté húmeda, pero no mojada.
La masa aún se desmigajará.
3.
Voltear la masa sobre una superficie
limpia y ligeramente enharinada y
amasarla a mano unas cuantas veces
para unirla. Dividir la masa en dos
porciones iguales y formar un disco plano
con cada porción. Envolver cada disco
en papel film/plástico y refrigerar por un
mínimo de 2 horas, hasta un máximo de
2 días.*
* Siempre y cuando esté bien envuelta,
la masa se conservará por hasta 6 meses
en el congelador.
Información nutricional por porción:
Calorías 100 (66% de grasa) • Carbohidratos 7g
Proteínas 1g • Grasa 7g • Grasa saturada 5g
Colesterol 20mg • Sodio 95mg • Calcio 0mg
Fibra 0g
Pan blanco clásico Cuisinart
Consienta a su familia con pan fresco hecho
en casa.
Rinde 10 porciones (una barra)
1 taza (235 ml) de agua tibia
2¼ cucharaditas de levadura seca
activa
1½ cucharaditas de azúcar granulada
2 tazas (250 g) de harina común
1 cucharadita de sal kosher
2 cucharadas (45 g) de mantequilla
sin sal a temperatura ambiente,
en pedazos de 1 in. (2.5 cm)
Spray vegetal o mantequilla
a temperatura ambiente para
engrasar el molde
1. Poner el agua tibia, la levadura y el
azúcar en un tazón grande. Revolver para
disolver la levadura y dejar reposar por
5 a 10 minutos. La mezcla burbujeará,
lo que indica que la levadura está viva
y activa.
2.
Poner la harina y la sal en un tazón
mediano. Usando los ganchos
amasadores, mezclar a velocidad por
5 a 10 segundos; reservar.
3.
Usando los ganchos amasadores,
empezar a mezclar la mezcla de
levadura a velocidad 1 a 2 y agregar la
mezcla de harina/sal, ½ taza a la vez.
Mezclar bien después de cada adición,
incorporando completamente la harina
antes de agregar más. A medida que se
agrega la harina, la mezcla se convertirá
progresivamente en masa que deja el
tazón limpio.
4.
Después de haber incorporado toda la
harina, agregar la mantequilla y amasar
a velocidad 3 por aprox. 2 minutos
adicionales. Enharinar ligeramente la
masa y ponerla en una bolsa hermética;
expulsar el aire y cerrar la bolsa. Dejar
leudar al doble de su volumen, en un
lugar templado, por aprox. 1 hora.
5.
Engrasar ligeramente un molde de barra
con spray vegetal o mantequilla sin sal.
Aplastar la masa para desinflar. Formar
una barra y ponerla en el molde. Cubrir
sin apretar con papel film/plástico y dejar
leudar al doble de su volumen por aprox.
1 hora.
6.
Quince minutos antes de hornear,
precalentar el horno a 400 °F (200°C).
Hornear por 30 a 35 minutos, hasta que

43
el pan esté dorado y suene hueco al
golpearlo. Desmoldar y dejar enfriar sobre
una rejilla. El pan es más fácil de cortar
cuando está totalmente frío. Cepillar la
corteza con un poco de mantequilla para
suavizarla si desea.
Información nutricional por porción:
Calorías 157 (14% de grasa) • Carbohidratos 27g
Proteínas 5g • Grasa 2g • Grasa saturada 1g
Colesterol 6mg • Sodio 113mg • Calcio 0mg
Fibra 1g
Pan de trigo integral con miel
Nutritivo pan de trigo con sutil sabor a miel.
Rinde 10 porciones (una barra)
1 taza (235 ml) de agua tibia
1 cucharada (15 g) de miel
2 cucharaditas de levadura seca
activa
1½ tazas (180 g) de harina de trigo
integral
¾ taza (100 g) de harina para hacer
pan
¾ cucharadita de sal
1½ cucharadas (25 g) de mantequilla
sin sal a temperatura ambiente,
en pedazos de ½ in. (1.5 cm)
Spray vegetal o mantequilla
a temperatura ambiente para
engrasar el molde
1. Poner el agua tibia, la miel y la levadura
en un tazón grande. Revolver para
disolver la levadura y dejar reposar por
5 a 10 minutos. La mezcla burbujeará, lo
que indica que la levadura está viva
y activa.
2.
Poner la harina y la sal en un tazón
mediano. Usando los ganchos
amasadores, mezclar a velocidad por 5 a
10 segundos; reservar. Usando los
ganchos amasadores, empezar a mezclar
la mezcla de levadura a velocidad 1 a 2 y
agregar la mezcla de harina/sal, ½ taza a
la vez. Mezclar después de cada adición,
incorporando completamente la harina
antes de agregar más. A medida que se
agrega la harina, la mezcla se convertirá
progresivamente en masa. NOTA: Si la
masa sigue pegando a los lados del tazón,
agregar 1 a 3 cucharadas de harina para
hacer pan, evitando agregar más.
3.
Después de haber incorporado toda la
harina, agregar la mantequilla y amasar
a velocidad 3 por aprox. 2 minutos
adicionales. La masa estará pegajosa.
Enharinar ligeramente la masa y ponerla
en una bolsa hermética; expulsar el aire
y cerrar la bolsa. Dejar leudar al doble de
su volumen, en un lugar templado, por
aprox. 1 hora.
4.
Engrasar ligeramente un molde de barra
con spray vegetal o mantequilla sin sal.
Aplastar la masa para desinflar. Formar
una barra y ponerla en el molde. Cubrir
sin apretar con papel film/plástico y dejar
leudar al doble de su volumen por aprox.
1 hora.
5.
Quince minutos antes de hornear,
precalentar el horno a 400°F (200°C).
Hornear por 30 a 35 minutos, hasta que
el pan esté dorado y suene hueco al
golpearlo. Desmoldar y dejar enfriar sobre
una rejilla. El pan es más fácil de cortar
cuando está totalmente frío. La corteza
se suavizará a medida que el pan se enfría.
Información nutricional por porción:
Calorías 123 (15% de grasa) • Carbohidratos 21g
Proteínas 4g • Grasa 2g • Grasa saturada 1g
Colesterol 5mg • Sodio 1mg • Calcio 14mg
Fibra 3g
Pancitos de romero y aceite
de oliva
Estos pancitos son perfectos para acompañar
la cena o preparar pequeños sándwiches.
Rinde 12 pancitos
¼ taza (60 ml) de aceite de oliva
virgen extra
1½ cucharadas de romero fresco
picado
2¼ cucharaditas de levadura seca
activa
1 taza (235 ml) de agua tibia
3¼ tazas (445 g) de harina para hacer
pan o 3¼ tazas (405 g) de harina
común
1¾ cucharaditas de sal kosher
Harina de maíz para espolvorear
1. Colocar el aceite de oliva y el romero;
revolver y dejar reposar por 10 minutos
o más. Poner la levadura, el agua tibia y
una pizca de harina en un tazón pequeño.
Revolver para disolver la levadura y dejar
reposar por 5 a 10 minutos. La mezcla
burbujeará, lo que indica que la levadura
está viva y activa.

44
2.
Colocar la harina y la sal en un
tazón pequeño. Usando los ganchos
amasadores, mezclar a velocidad por
5 a 10 segundos; reservar. Usando los
ganchos amasadores, empezar a mezclar
la mezcla de levadura a velocidad 1 y
agregar el aceite de oliva/romero, y luego
la mezcla de harina/sal, ½ taza a la vez.
Mezclar a velocidad 1 o 2 por aprox. 30 a
40 segundos, hasta conseguir una mezcla
suave. Seguir agregando la harina, ½
taza (60 g) a la vez, mezclando por 30 a
40 segundos después de cada adición.
La mezcla adquirirá progresivamente la
consistencia de una masa. Después de
haber incorporado toda la harina, amasar
a velocidad 3 por aprox. 2 minutos
adicionales.
3.
Enharinar ligeramente la masa y ponerla
en una bolsa hermética. Expulsar el aire
y cerrar la bolsa. Dejar leudar al doble
de su volumen, en un lugar templado,
por aprox. 1 hora. Aplastar para desinflar
y dejar leudar de nuevo durante 1 hora
(esta etapa puede omitirse, pero no se
recomienda porque produce un pan con
más sabor y textura).
4.
Después de la segunda subida, aplastar
para desinflar y dejar reposar por 10
minutos. Esparcir un poco de harina
de maíz en una placa para horno.
Dividir la masa en 12 porciones iguales.
Formar una bola con cada porción.
Aplastar ligeramente. Poner en la
bandeja preparada y cubrir con papel
film/plástico. Dejar leudar por 45 a 60
minutos, a temperatura ambiente.
5.
Quince minutos antes de hornear,
precalentar el horno a 450°F (230 °C).
Quitar el papel film/plástico panecillos
y hornear por 10 minutos. Ajustar la
temperatura a 375°F (190 °C) y hornear
por 10 a 15 minutos adicionales, hasta
dorarse (la corteza debería sonar hueca
al golpear la parte inferior). Dejar enfriar
sobre una rejilla.
Información nutricional por pancito:
Calorías 151 (28% de grasa) • Carbohidratos 24g
Proteínas 4g • Grasa 5g • Grasa saturada 1g
Colesterol 0mg • Sodio 312mg • Calcio 2mg
Fibra 1g
©2020 Cuisinart
East Windsor, NJ 08520
Impreso en China
20CE065154
IB-16615-ESP
Todas las marcas registradas, comerciales o
de servicio mencionadas en este documento
pertenecen a sus titulares respectivos.