Operator & Parts Manual
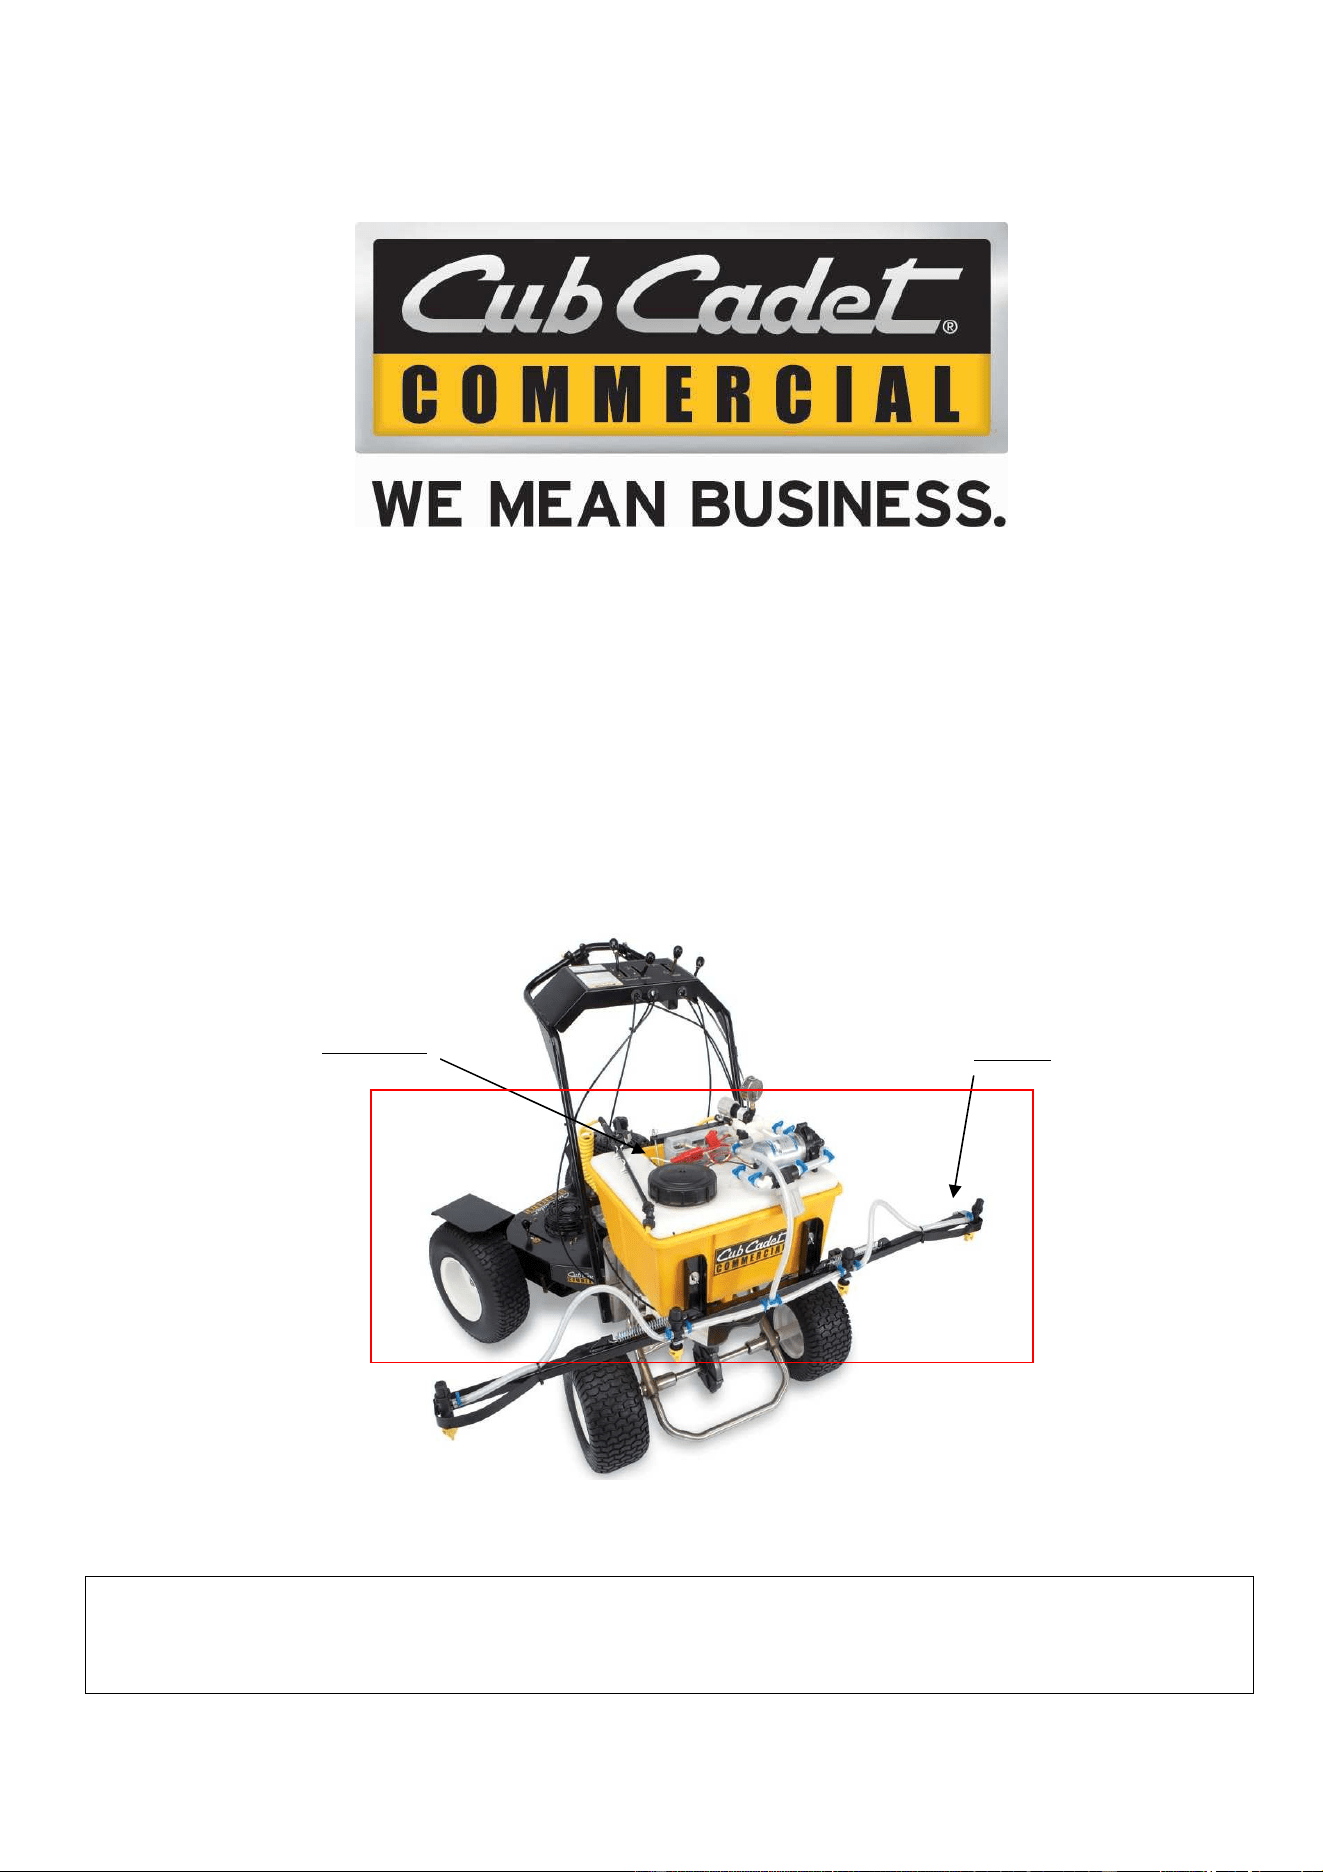
9-Gallon Drop-In Tank w/ Boom Kit
T
A
Drop in Tank
Boom Kit
The 9-gallon Drop-in is a self-contained, drop-in tank unit to convert your spreader into a spray applicator. I
know you will find the Drop-in Tank to be safe, dependable, and accurate tool for your spraying work.

2
BLE OF
C
ONTENTS
Safety precautions............................................................................................................... 2
Set-up procedure................................................................................................................. 3
General operation and maintenance.................................................................................... 6
Initial start up....................................................................................................................... 6
Battery charging .................................................................................................................. 6
Calibration ........................................................................................................................... 7
Troubleshooting................................................................................................................... 7
Emissions............................................................................................................................ 8
Warranty.............................................................................................................................. 9
S
AFETY
P
RECAUTIONS
Pesticides can cause personal injury and harm the environment when used improperly. Be
sure to follow label recommendations concerning safety and disposal. Observe all safety
precautions including wearing of protective clothing and equipment.
The 9-Gallon Drop-in is designed to fit into many, but not all, commercial broadcast spreaders.
Be sure that the overall weight does not exceed the spreader manufacturer’s
recommendations. A full tank and all hardware will add 102 lbs. to the spreader.
•
Use extreme caution to avoid tipping of the spreader.
•
Calibrate and test using clean water.
•
Check with each use for leaks or damage.
S
ET
-U
P
P
ROCEDURE
Your 9-Gallon Drop-in was pressure tested prior to shipment. Some components were
disassembled for packaging and shipment. The basic set-up procedure is as follows:
•
Remove all contents from inside the tank.
•
Remove all contents from the box.
•
Cut the plastic ties holding the boom sections together.
•
Report any missing or damaged items to your dealer immediately.
3
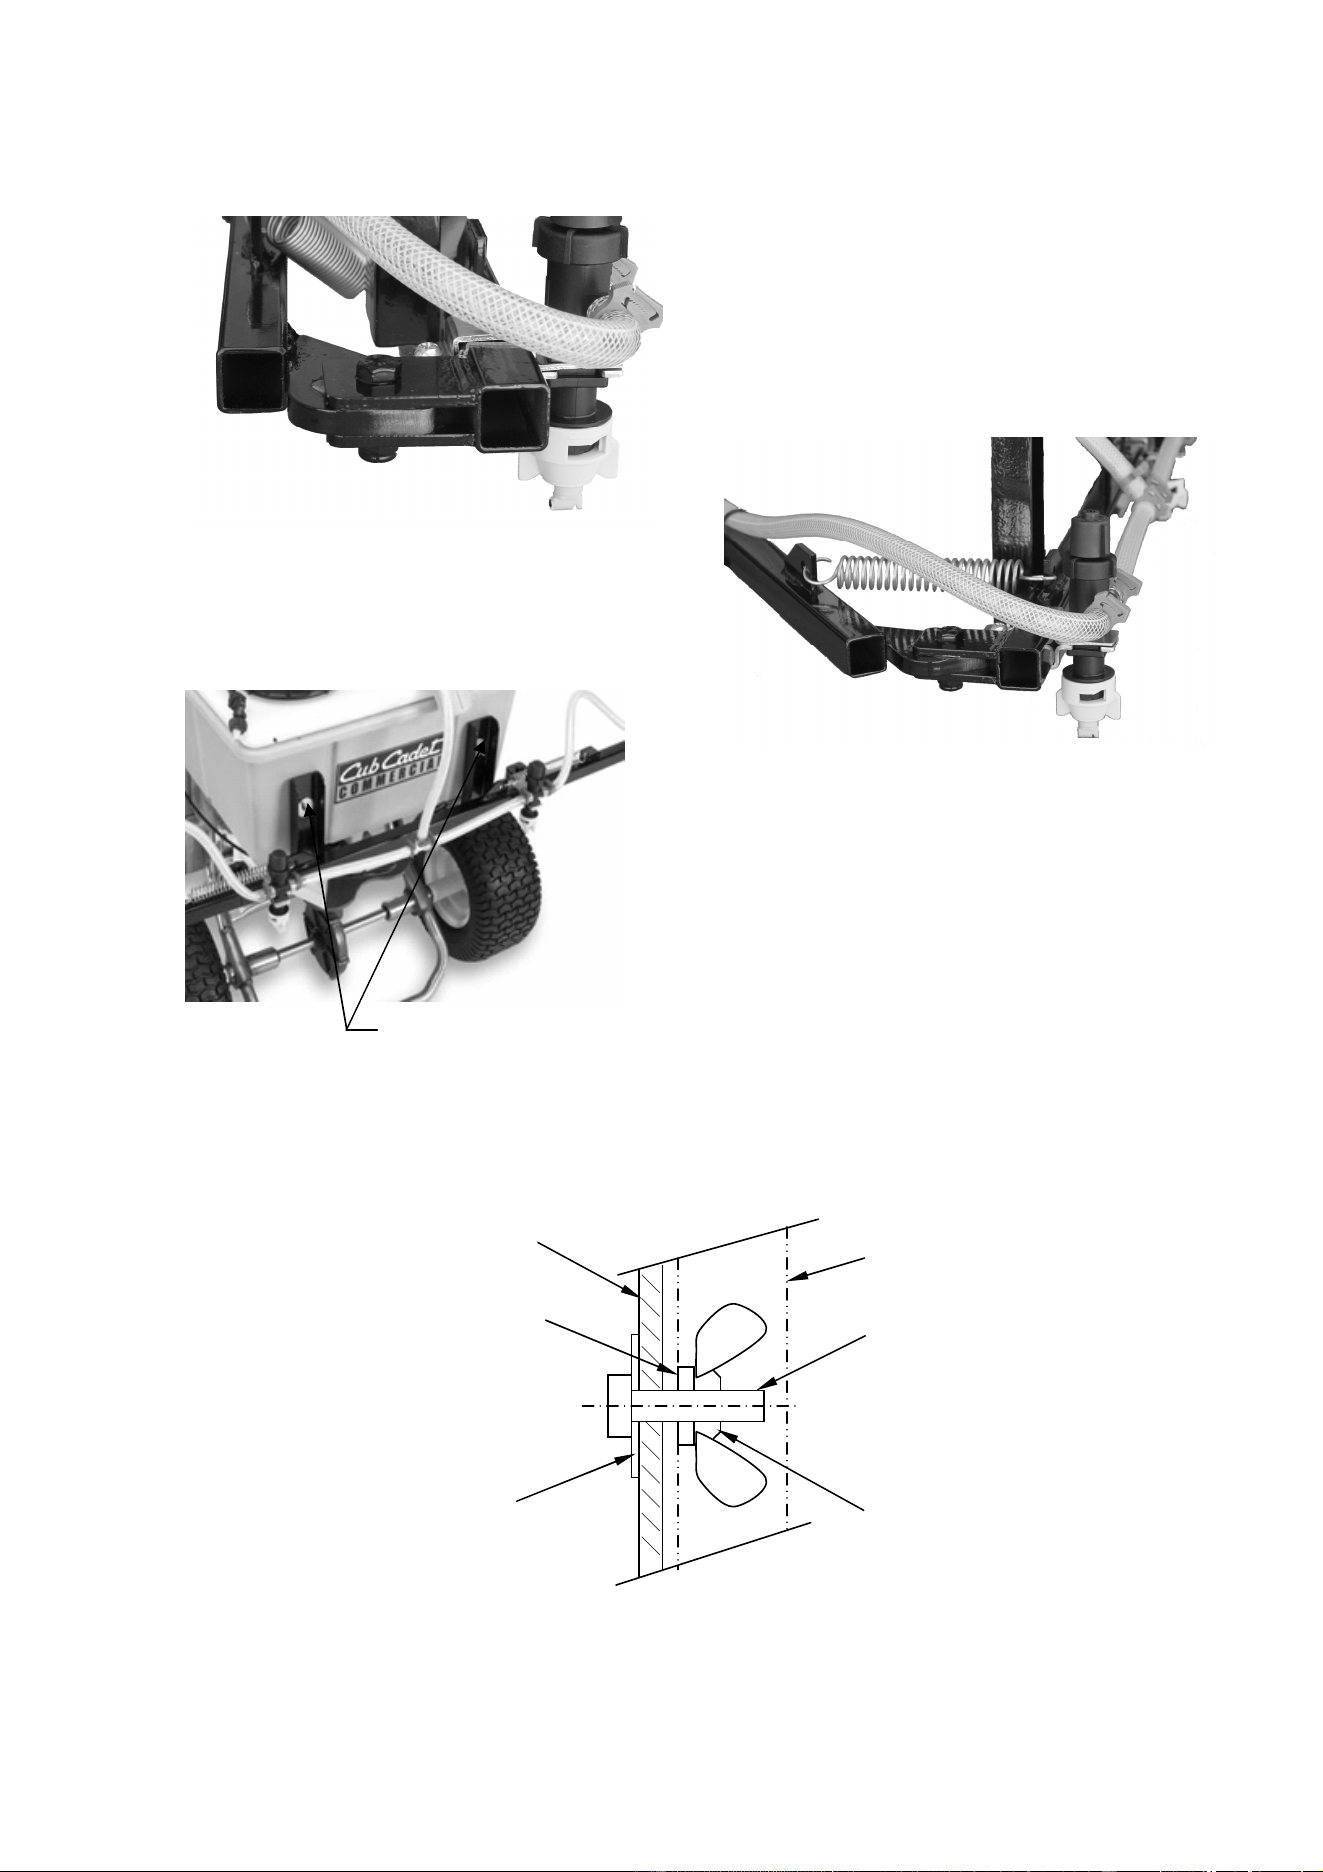
Figure 1
Line up the holes in the boom hinges of the
center and outside sections and install the
bolts and locknuts.
Figure 2
With the boom folded closed, install the
springs on the spring mounting tabs.
Figure 3
Install the boom on the front of the spreader. Set the
opened boom assembly on the tubular hopper
support of the spreader. Center the vertical
mounting brackets horizontally and mark the two
hole locations. Set the boom assembly aside and
drill two 1/4-inch diameter holes for the mounting
hardware.
Place the 1-1/2 inch diameter washers on the inside of the hopper wall and insert the 1/4-20 hex
head bolts in the holes. The bolt heads should be inside the hopper. They should be snug and
will need to be screwed into the holes. Replace the boom assembly and align the bolts with the
mounting holes. The small lockwashers and wingnuts are used to secure the boom while in use.
See illustration below.
Figure 4
Mounting Holes
Hex Bolt
Lock Washer
Inside Washer
Inside Hopper Wall
Wingnut
Boom Mounting
Bracket
4
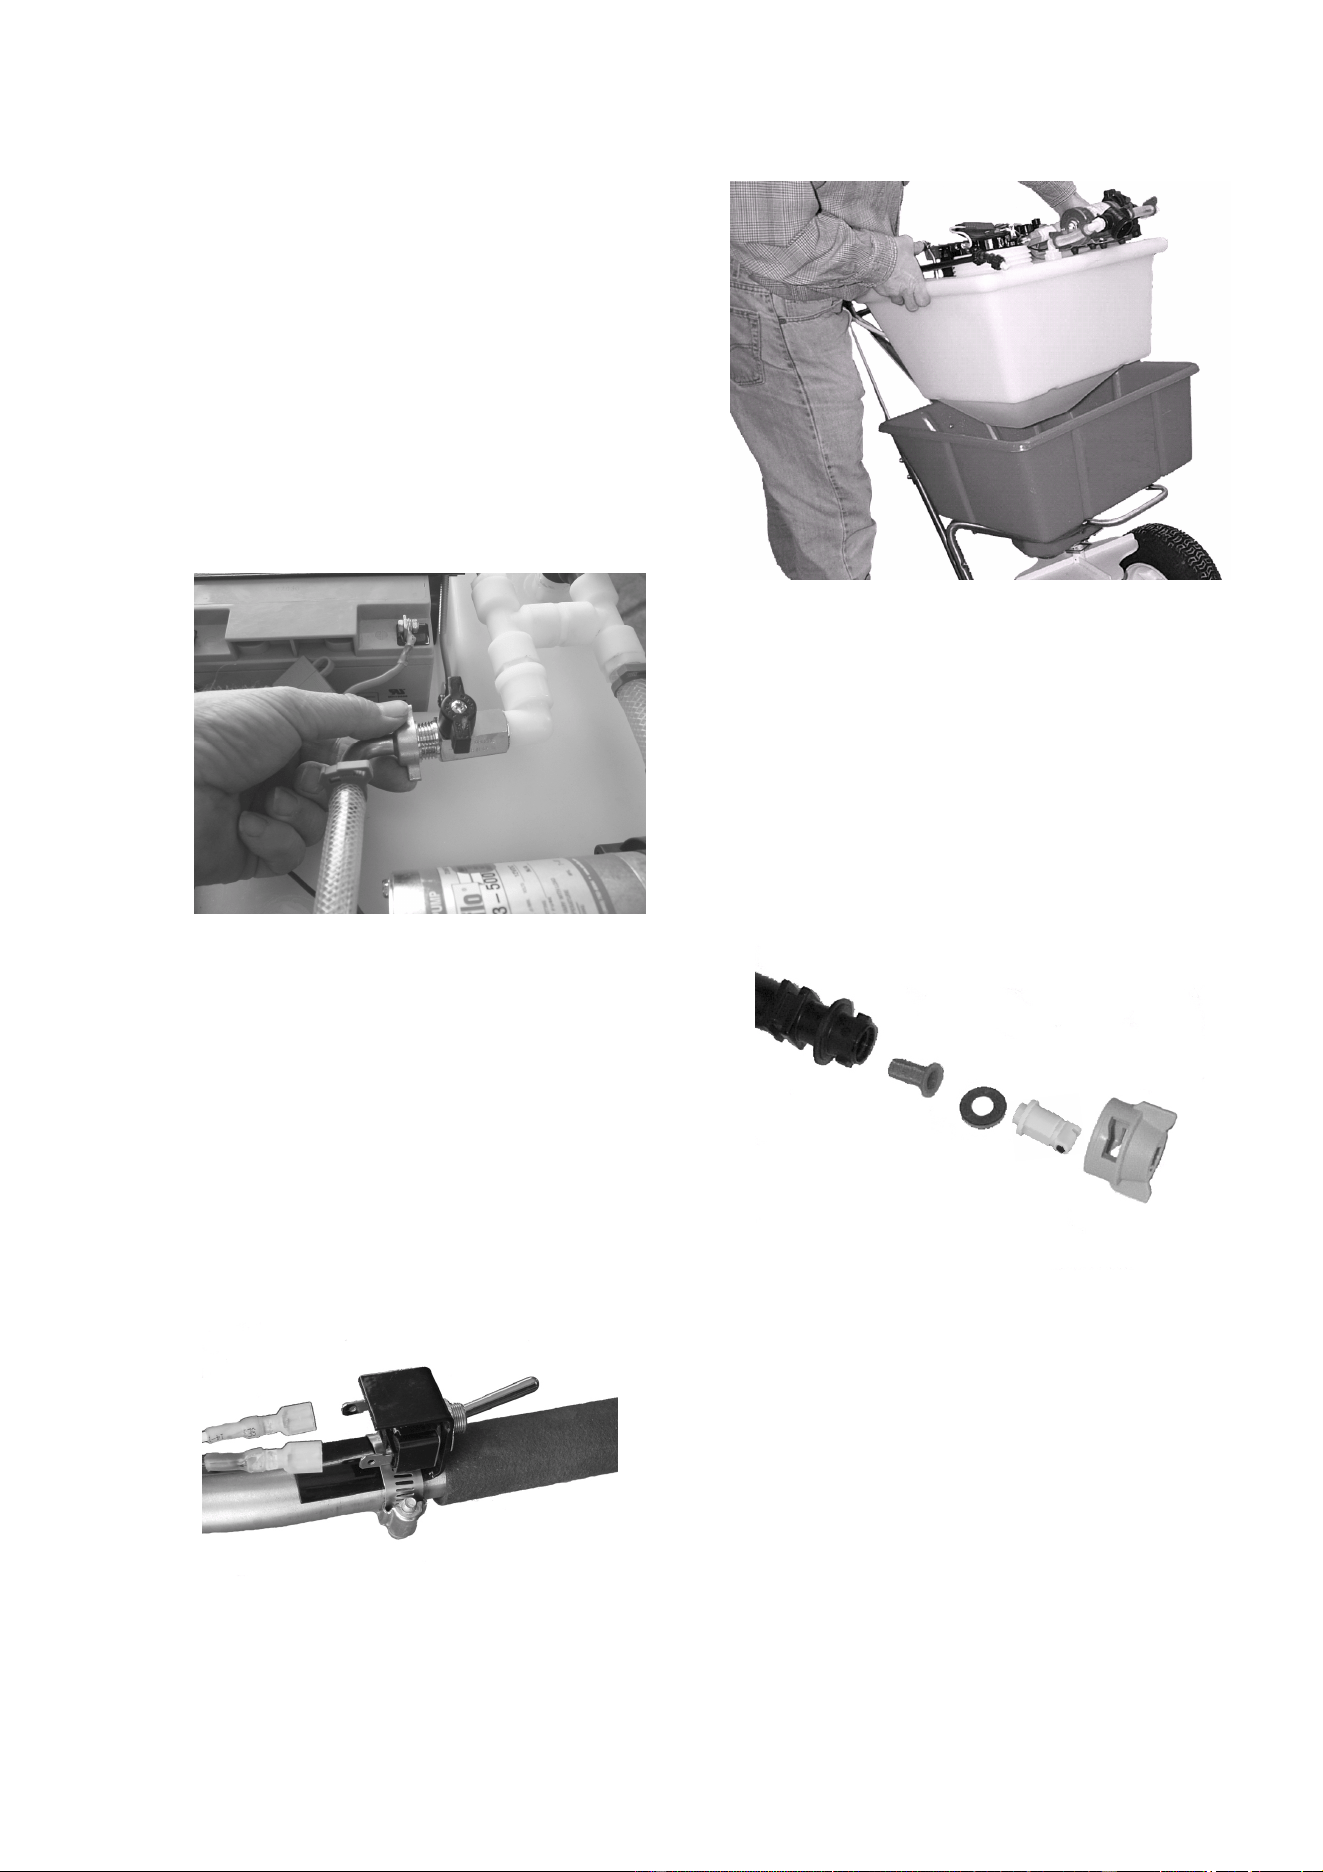
Figure 5
Clean all debris from the spreader hopper.
Place the empty tank assembly in your spreader
hopper with the battery mounted toward the rear.
Figure 6
Hook up the boom hose wingnut to the
boom line valve.
Figure 7
Install the sprayer nozzles,
screens, and caps.
Figure 8
Install the handle thumb switch.
5
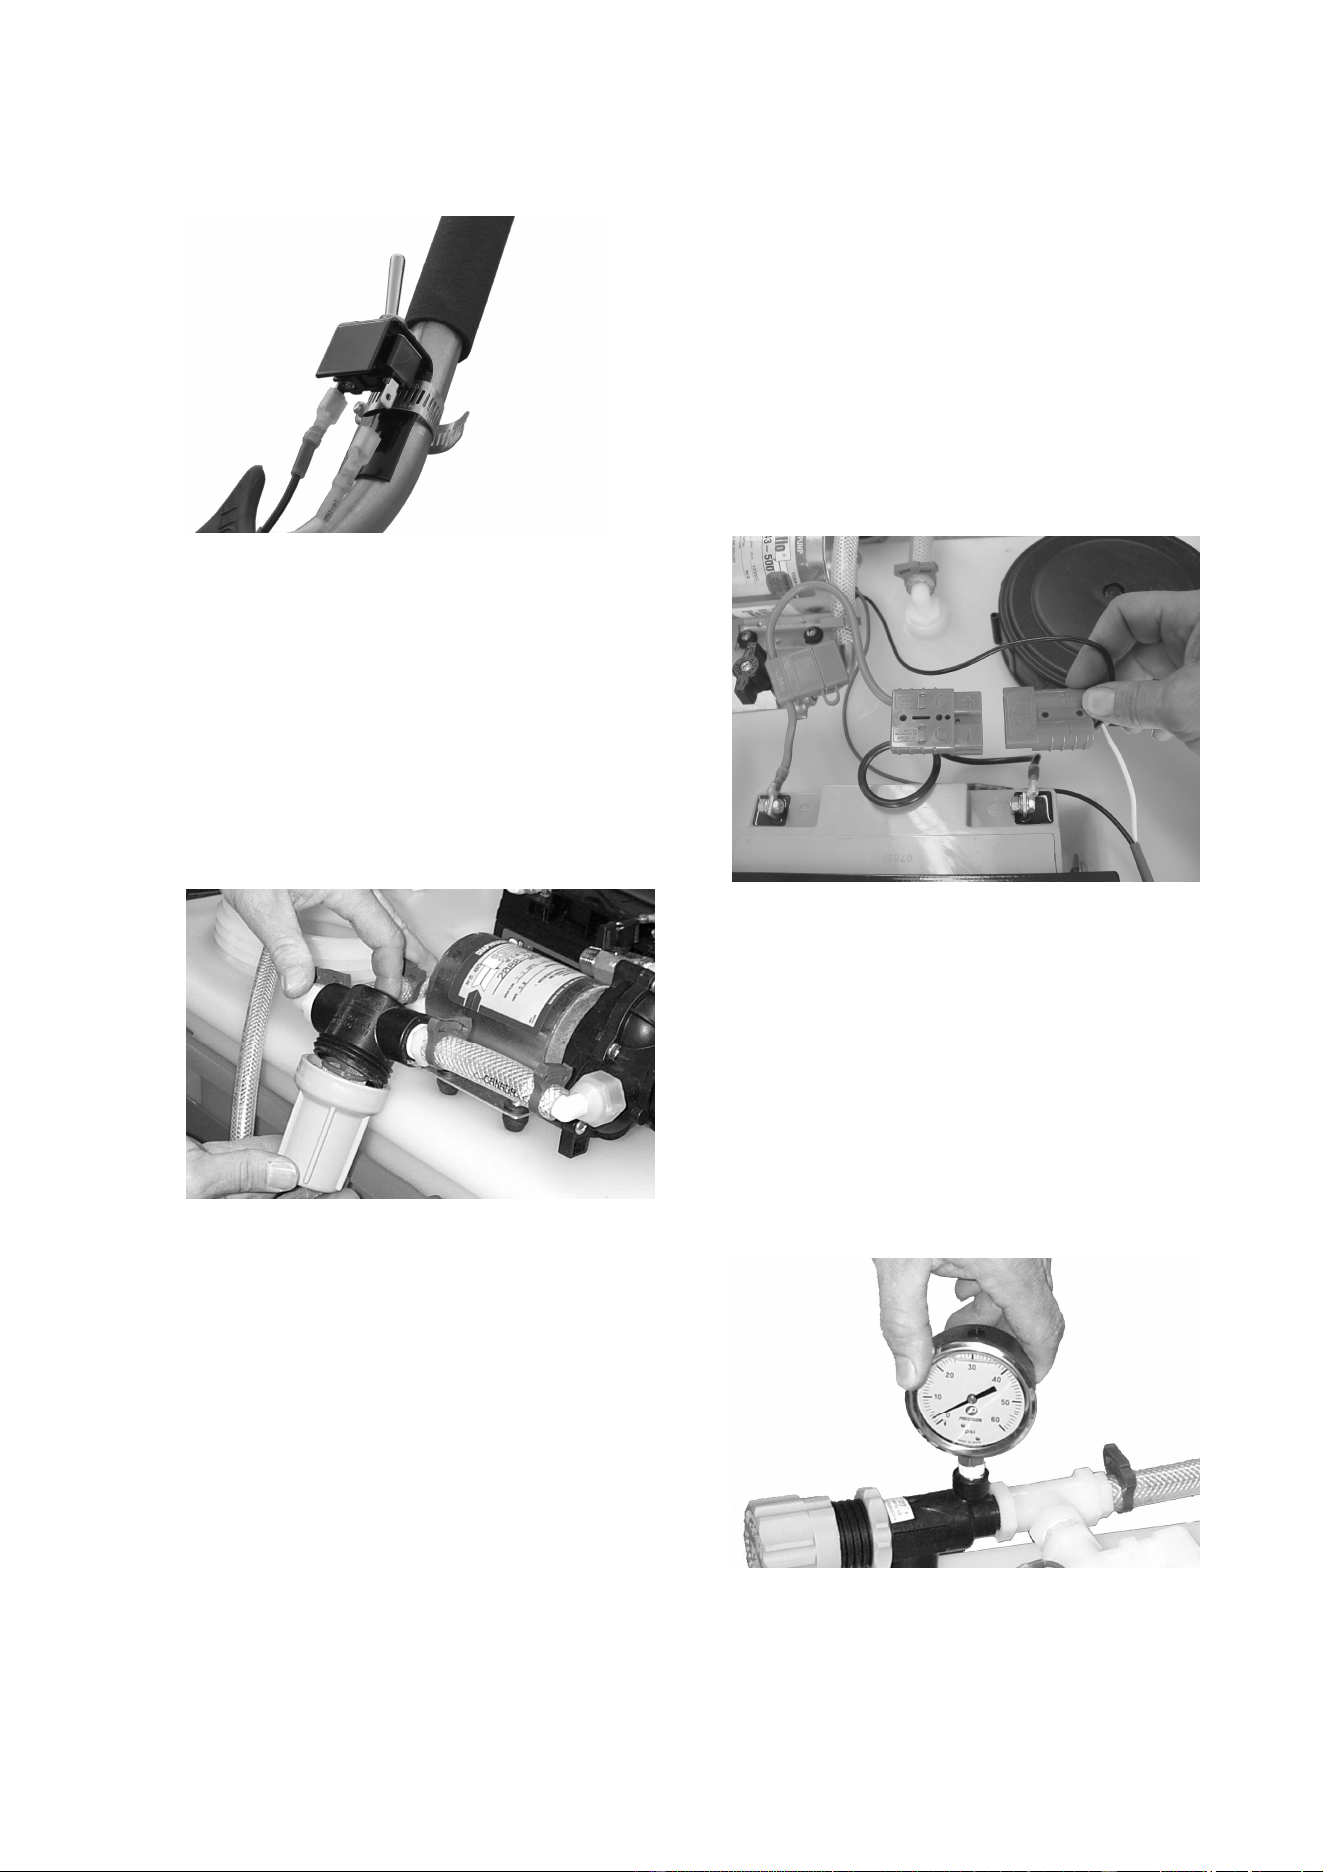
Figure 9
Install the pump wiring assembly
clips to the switch spades.
Figure 10
Connect the battery wires.
Figure 11
Install filter element and bowl.
Figure 12
Install the pressure gauge.
I
MPORTANT
!
Screw in the gauge hand-
tight, with only sufficient force
to prevent leaking.
Overtightening the gauge can
break the regulator housing.

6
G
ENERAL
O
PERATION AND
M
AINTENANCE
The sprayer pump is turned on and off by the thumb switch mounted on the handlebar of the
spreader. Each dripless nozzle body has a special shut-off cap. The nozzle body requires 5
psi of system pressure to open, thus keeping the nozzles from dripping when the pump is
off. The nozzles can be completely shut off by turning the cap clockwise. The operator can
turn off individual nozzles as needed. The hand spray wand is activated by closing the boom
line valve (ball valve on top of the tank) to turn off flow to the boom. To drain the tank of
unused liquids, remove the spray tip from the wand and pump the remaining liquid into the
proper receptacle.
• Clean pump filter daily. • Adjust hinge lock nut tension as necessary.
• Clean tip screens regularly. • Flush with water after each use.
• Prevent from freezing. • Lubricate hinges with grease.
I
NITIAL
S
TART
U
P AND
P
RESSURE
T
ESTING
1. Turn the pressure regulator knob counter-clockwise all the way.
2. Put about one gallon of water in the tank for testing.
3. Be sure that the boom line valve is turned off.
4. Turn on the handlebar thumb switch. You should hear the pump running and see
water moving through the hoses.
5. Slowly turn the pressure regulator knob clockwise to increase the pressure. You
should notice movement of the needle on the pressure gauge. Adjust the pressure
to 30 psi for testing.
6. With the spray wand assembled, operate the trigger valve and check it for leaks.
Note the trigger lock. Also adjust the nozzle and angle adapter orientation to the
desired position.
7. Turn off the switch. Turn on the boom line valve and all four caps on the top of
each boom nozzle body.
8. Turn on the switch and observe the spray pattern from each boom nozzle. Check
the entire boom assembly for leaks.
9. Once the unit has been pressure tested and you are familiar with its operation, you
can begin the calibration procedure.
B
ATTERY
R
ECHARGING
The 9-Gallon Drop-in battery is a sealed, maintenance-free 12-volt battery. Charging at a
low rate (3 amp max.) with an automotive quality battery charger will extend battery life.
A 110-volt powered plug-in battery charger is available as an optional accessory to recharge
the battery when not in use.

7
C
ALIBRATION
The 9-Gallon Drop-in is equipped with Turbo TeeJet Air Induction nozzles. The nozzle table
below will serve as a reference for application rates. The nozzle spacing is 20 inches. The
pressure is adjustable. A working pressure of 20 psi will provide adequate coverage. A four-
inch overlap of the previous spray pass is recommended.
Gallons per Acre at 20” Spacing Turbo TeeJet
Nozzle Number:
Pressure
PSIG
Capacity
1 nozzle
1GPM
2.5 MPH 3 MPH 3.5 MPH
4 MPH 4.5 MPH
5 MPH 5.5 MPH
6 MPH
20 0.14 16.6 13.9 11.9 10.4 9.2 8.3 7.6 6.9
30 0.17 20.2 16.8 14.4 12.6 11.2 10.1 9.2 8.4
40 0.20 23.8 19.8 17.0 14.9 13.2 11.9 10.8 9.9
TTI11002-VP
50 0.22 26.1 21.8 18.7 16.3 14.5 13.1 11.9 10.9
Table 1
Because walking speeds vary, it is always best to perform a field test to confirm the
application rate. The procedure is simple:
1. Measure an area at least 10,000 square feet.
2. Fill the tank with water.
3. Spray the measured area at 20 psi and at a comfortable sustainable walking speed.
4. Refill the tank from a calibrated container keeping track of the amount needed to refill
the tank.
5. Divide the number of gallons used by the square footage of the area sprayed
(Expressed in 1000 square foot increments)
6. Since the tank holds 9 gallons, divide 9 by the result to obtain the expected coverage
per tank full.
Example: 4.5 gallons used
10,000 square feet sprayed
4.5 divided by 10 = .45 gallons per 1000 square feet
9 divided by .45 = 20
The capacity is 9 gallons, so in this example a full tank should cover 20,000 square feet.
T
ROUBLESHOOTING
Problem Possible cause Solution
Pump runs, but little Battery drained Recharge battery
or no flow Tank empty Refill tank
Filter clogged Clean filter screen
Filter bowl not on tight Tighten filter
Filter gasket faulty or missing Check / Replace gasket
Broken fitting or hose Repair as necessary
Pump needs repair Repair as necessary
Plugged intake line Remove obstruction
Pump won’t turn on Battery dead Recharge battery
Loose or faulty connection Repair as necessary
Faulty switch Repair as necessary
Not all nozzles spraying Caps on nozzle bodies turned off Turn all caps to the ON position
Nozzle screen is plugged Clean all nozzle screens
Table 2

Cub Cadet LLC - P.O. Box 361131, Cleveland, Ohio 44136-0019; Phone 1-877-282-8684
MANUFACTURER’S LIMITED WARRANTY FOR CUB CADET COMMERCIAL
LAWN APPLICATION EQUIPMENT
IMPORTANT: To obtain warranty coverage owner may be
required present proof of purchase and applicable maintenance
records to the servicing dealer. Please see the operator’s manual
for information on required maintenance and service intervals. In
addition, Cub Cadet may deny warranty coverage if the hour
meter, or any part thereof, is altered, modified, disconnected or
otherwise tampered with.
The limited warranty set forth below is given by Cub Cadet LLC
with respect to new merchandise used for commercial and related
purposes purchased and used in the United States and/or its
territories and possessions, and by MTD Products Limited with
respect to new merchandise purchased and used in Canada
and/or its territories and possessions (either entity respectively,
“Cub Cadet”).
Cub Cadet warrants this product against defects in material and
workmanship for a period of ninety (90) days from the date of
original retail purchase or lease and will, at its option, repair or
replace, free of charge, any part found to be defective in materials
or workmanship.
HOW TO OBTAIN SERVICE: Warranty service is available,
WITH PROOF OF PURCHASE AND APPLICABLE MAINTAINCE
RECORDS, through your local authorized service dealer. To
locate the dealer in your area;
In the U.S.A.:
Check your Yellow Pages, or contact Cub Cadet LLC at P.O. Box
361131, Cleveland, Ohio 44136-0019, or call 1-877-282- 8684, or
log on to our Web site at www.cubcadetcommercial.com.
In Canada:
For all provinces excluding Quebec contact Modern Power
Products d/o MTD Canada Ltd. At 60 Ottawa Street South,
Kitchener, Ontario N2G 3S7 or call 1-800-567-6775 or log on to
our website at www.cubcadet.ca.
In Quebec contact Les Distributions RVI Ltee. d/o MTD Canada
Ltd. 2955 jean-Baptiste Deschamps, Ville Lachine, Quebec H8T
1C5 or call 1-800-361-5770 or log on to our website at
www.cubcadet.info.
This limited warranty does not provide coverage in the following
cases:
Routine maintenance items such as lubricants, filters, tune-ups,
brake adjustments, clutch adjustments, control linkages, drive
system, engines, and normal deterioration of the exterior finish
due to use or exposure.
Service completed by someone other than an authorized service
dealer.
For products sold or exported outside of the United States and/or
Canada, and their respective possessions and territories, except
those sold through Cub Cadet’s authorized channels of export
distribution.
Damage or failure resulting from the use of defective or improper
peplacement parts and\or accessories other than genuine Cub
Cadet parts.
Transportation charges and service calls.
Failure to operate and maintain the product in accordance with
the Operator’s Manual furnished with the product,
Damages and failures resulting from misuse, abuse, neglect,
accident, improper maintenance, alteration, vandalism, theft, fire,
water, or damage because of other peril or natural disaster.
There are no implied warranties, including without limitation
any implied warranty of merchantability or fitness for a
particular purpose. No warranties shall apply after the
applicable period of express written warranty above. No
other express warranties beyond those mentioned above,
given by any person or entity, including a dealer or retailer,
with respect to any product, shall bind Cub Cadet. The
exclusive remedy is repair or replacement of the product as
set forth above. The terms of this warranty provide the sole
and exclusive remedy arising from the sale and/or lease of
the products covered hereby. Cub Cadet shall not be liable
for any incidental or consequential loss or damage including,
without limitation, expenses incurred for substitute or
replacement lawn care services or for rental expenses to
temporarily replace a warranted product.
Some jurisdictions do not allow the exclusion or limitation of
incidental or consequential damages, or limitations on how long
an implied warranty lasts, so the above exclusions or limitations
may not apply to you. This limited warranty gives you specific
legal rights, and you may also have other rights that vary in
different jurisdictions.
In no event shall recovery of any kind be greater than the amount
of the purchase price of the product sold. Alteration of safety
features of the product shall void this warranty. You assume
the risk and liability for loss, damage, or injury to you and your
property and/or to others and their property arising out of
improper use, misuse or inability to use the product. This limited
warranty shall not extend to anyone other than the original
purchaser/Leasee or to the person for whom it was purchased or
leased as a gift.

