

Product Name and Model Number User
Manual
P a g e | 1 Copyright©2020 ZKTECO CO., LTD. All rights reserved.
Thank you for choosing our product. Please read the instructions carefully
before operation. Follow these instructions to ensure that the product is
functioning properly. The images shown in this manual are for illustrative
purposes only.
For further details, please visit our Company’s website
www.zkteco.com.

VS50-50 & VS50-100 User Manual
P a g e | 1 Copyright © 2025 ZKTECO CO., LTD. All rights reserved.
Copyright © 2025 ZKTECO CO., LTD. All rights reserved.
Without the prior written consent of ZKTeco, no portion of this manual can be copied or forwarded in
any way or form. All parts of this manual belong to ZKTeco and its subsidiaries (hereinafter the
"Company" or "ZKTeco").
Trademark
is a registered trademark of ZKTeco. Other trademarks involved in this manual are owned
by their respective owners.
Disclaimer
This manual contains information on the operation and maintenance of the ZKTeco equipment. The
copyright in all the documents, drawings, etc. in relation to the ZKTeco supplied equipment vests in
and is the property of ZKTeco. The contents hereof should not be used or shared by the receiver with
any third party without express written permission of ZKTeco.
The contents of this manual must be read as a whole before starting the operation and maintenance of
the supplied equipment. If any of the content(s) of the manual seems unclear or incomplete, please
contact ZKTeco before starting the operation and maintenance of the said equipment.
It is an essential pre-requisite for the satisfactory operation and maintenance that the operating and
maintenance personnel are fully familiar with the design and that the said personnel have received
thorough training in operating and maintaining the machine/unit/equipment. It is further essential for
the safe operation of the machine/unit/equipment that personnel has read, understood and followed
the safety instructions contained in the manual.
In case of any conflict between terms and conditions of this manual and the contract specifications,
drawings, instruction sheets or any other contract-related documents, the contract conditions/documents
shall prevail. The contract specific conditions/documents shall apply in priority.
ZKTeco offers no warranty, guarantee or representation regarding the completeness of any information
contained in this manual or any of the amendments made thereto. ZKTeco does not extend the warranty of
any kind, including, without limitation, any warranty of design, merchantability or fitness for a particular
purpose.
ZKTeco does not assume responsibility for any errors or omissions in the information or documents
which are referenced by or linked to this manual. The entire risk as to the results and performance
obtained from using the information is assumed by the user.
ZKTeco in no event shall be liable to the user or any third party for any incidental, consequential,
indirect, special, or exemplary damages, including, without limitation, loss of business, loss of profits,
business interruption, loss of business information or any pecuniary loss, arising out of, in connection
with, or relating to the use of the information contained in or referenced by this manual, even if ZKTeco
has been advised of the possibility of such damages.

VS50-50 & VS50-100 User Manual
P a g e | 2 Copyright © 2025 ZKTECO CO., LTD. All rights reserved.
This manual and the information contained therein may include technical, other inaccuracies or
typographical errors. ZKTeco periodically changes the information herein which will be incorporated
into new additions/amendments to the manual. ZKTeco reserves the right to add, delete, amend or
modify the information contained in the manual from time to time in the form of circulars, letters, notes,
etc. for better operation and safety of the machine/unit/equipment. The said additions or amendments
are meant for improvement /better operations of the machine/unit/equipment and such amendments
shall not give any right to claim any compensation or damages under any circumstances.
ZKTeco shall in no way be responsible (i) in case the machine/unit/equipment malfunctions due to any
non-compliance of the instructions contained in this manual (ii) in case of operation of the machine/
unit/equipment beyond the rate limits (iii) in case of operation of the machine and equipment in
conditions different from the prescribed conditions of the manual.
The product will be updated from time to time without prior notice. The latest operation procedures
and relevant documents are available on http://www.zkteco.com.
If there is any issue related to the product, please contact us.
ZKTeco Headquarters
Address ZKTeco Industrial Park, No. 32, Industrial Road,
Tangxia Town, Dongguan, China.
Phone +86 769 - 82109991
Fax +86 755 - 89602394
For business related queries, please write to us at: sales@zkteco.com.
To know more about our global branches, visit www.zkteco.com.

VS50-50 & VS50-100 User Manual
P a g e | 3 Copyright © 2025 ZKTECO CO., LTD. All rights reserved.
About the Company
ZKTeco is one of the world’s largest manufacturer of RFID and Biometric (Fingerprint, Facial, Finger-vein)
readers. Product offerings include Access Control readers and panels, Near & Far-range Facial
Recognition Cameras, Elevator/floor access controllers, Turnstiles, License Plate Recognition (LPR) gate
controllers and Consumer products including battery-operated fingerprint and face template-reader
Door Locks. Our security solutions are multi-lingual and localized in over 18 different languages. At the
ZKTeco state-of-the-art 700,000 square foot ISO9001-certified manufacturing facility, we control
manufacturing, product design, component assembly, and logistics/shipping, all under one roof.
The founders of ZKTeco have been determined for independent research and development of
biometric verification procedures and the productization of biometric verification SDK, which was
initially widely applied in PC security and identity authentication fields. With the continuous
enhancement of the development and plenty of market applications, the team has gradually
constructed an identity authentication ecosystem and smart security ecosystem, which are based on
biometric verification techniques. With years of experience in the industrialization of biometric
verifications, ZKTeco was officially established in 2007 and now has been one of the globally leading
enterprises in the biometric verification industry owning various patents and being selected as the
National High-tech Enterprise for 6 consecutive years. Its products are protected by intellectual
property rights.
About the Manual
This manual introduces the operations of VS50-50 & VS50-100.
All figures displayed are for illustration purposes only. Figures in this manual may not be exactly
consistent with the actual products.
Features and parameters with
★
are not available in all devices.

VS50-50 & VS50-100 User Manual
P a g e | 4 Copyright © 2025 ZKTECO CO., LTD. All rights reserved.
Document Conventions
Conventions used in this manual are listed below:
GUI Conventions
For Software
Convention
Description
Bold font
Used to identify software interface template names e.g. OK, Confirm, Cancel.
>
Multi-level menus are separated by these brackets. For example, File > Create >
Folder.
For Device
Convention
Description
< >
Button or key names for devices. For example, press <OK>.
[ ]
Window names, menu items, data table, and field names are inside square
brackets. For example, pop up the [New User] window.
/
Multi-level menus are separated by forwarding slashes. For example,
File/Create/Folder.
Symbols
Convention
Description
This represents a note that needs to pay more attention to.
The general information which helps in performing the operations faster.
The information which is significant.
Care taken to avoid danger or mistakes.
The statement or event that warns of something or that serves as a cautionary
example.

VS50-50 & VS50-100 User Manual
P a g e | 5 Copyright © 2025 ZKTECO CO., LTD. All rights reserved.
TABLE OF CONTENTS
1. USER GUIDELINES ....................................................................................................................................7
1.1 SECURITY STATEMENT ........................................................................................................................................................................................7
1.2 DOCUMENTATION PACKAGE CHANGES...........................................................................................................................................................7
1.3 FEEDBACK AND HELP..........................................................................................................................................................................................7
2. OVERVIEW................................................................................................................................................ 8
2.1 FEATURES.............................................................................................................................................................................................................8
2.2 APPEARANCE.......................................................................................................................................................................................................9
3. INSTALLATION....................................................................................................................................... 10
4. WIRING INSTRUCTIONS.........................................................................................................................11
5. LOGIN TO THE WEB SERVER ..................................................................................................................12
6. HOMEPAGE............................................................................................................................................ 13
7. VIDEO SERVICE MANAGEMENT............................................................................................................14
7.1 OPERATIONAL SCENARIO................................................................................................................................................................................14
7.2 ADD DEVICE..................................................................................................................................................................................................... 14
7.2.1 ADD DEVICE VIA THE ONVIF PROTOCOL
.....................................................................................................................................................14
7.2.2 ADD DEVICE VIA THE RTSP PROTOCOL
....................................................................................................................................................... 16
7.2.3 RESULT VERIFICATION
..........................................................................................................................................................................................17
8. VIDEO PREVIEW ..................................................................................................................................... 19
8.1 LIVE PREVIEW....................................................................................................................................................................................................19
8.1.1 SINGLE CAMERA LIVE PREVIEW
.......................................................................................................................................................................19
8.1.2 ONE-CLICK LIVE PREVIEW
...................................................................................................................................................................................20
8.1.3 GROUP CAMERA LIVE PREVIEW
.......................................................................................................................................................................20
8.2 SNAPSHOT.........................................................................................................................................................................................................21
8.3 MANUAL VIDEO RECORDING..........................................................................................................................................................................21
9. VIDEO PLAYBACK .................................................................................................................................. 23
10. PBX MANAGEMENT .............................................................................................................................24
10.1 EXTENSION MANAGEMENT.............................................................................................................................................................................24
10.1.1 EXTENSION LIST
.......................................................................................................................................................................................................24
10.1.2 CREATE AN EXTENSION
....................................................................................................................................................................................... 25
10.1.3 EXTENSION REGISTRATION AND LOGIN
..................................................................................................................................................... 28
10.1.4 EDIT AND DELETE
................................................................................................................................................................................................... 29
10.2 RING GROUP.....................................................................................................................................................................................................29
10.2.1 RING GROUP LIST
....................................................................................................................................................................................................29
10.2.2 CREATE A RING GROUP
........................................................................................................................................................................................29
10.2.3 EDIT AND DELETE
................................................................................................................................................................................................... 30
10.3 ADD INTERACTIVE VOICE RESPONSE (IVR)...................................................................................................................................................30
10.3.1 ADD IVR
........................................................................................................................................................................................................................31
10.3.2 EDIT AND DELETE
................................................................................................................................................................................................... 32
10.4 CALL PROMPT TONE........................................................................................................................................................................................32

VS50-50 & VS50-100 User Manual
P a g e | 6 Copyright © 2025 ZKTECO CO., LTD. All rights reserved.
10.4.1 CONFIGURE THE GENERAL CALL PROMPT TONE.
...................................................................................................................................32
10.4.2 LIST OF PROMPT SOUNDS
..................................................................................................................................................................................34
10.4.3 ADD A NEW CALL PROMPT TONE
...................................................................................................................................................................34
10.4.4 EDIT AND DELETE
................................................................................................................................................................................................... 35
10.5 GENERAL SETTINGS..........................................................................................................................................................................................35
10.5.1 CONFIGURATION OF GENERAL SETTINGS PARAMETERS
................................................................................................................... 35
10.6 CALL LOG..........................................................................................................................................................................................................36
10.6.1 CALL LOG LIST
..........................................................................................................................................................................................................36
10.6.2 RETRIEVE CALL LOGS
............................................................................................................................................................................................ 37
10.6.3 DOWNLOAD CALL LOGS
..................................................................................................................................................................................... 37
10.6.4 DELETE
..........................................................................................................................................................................................................................37
11. GROUP MANAGEMENT....................................................................................................................... 38
11.1 ADD GROUP..................................................................................................................................................................................................... 38
11.2 DELETE GROUP.................................................................................................................................................................................................39
12. PROXY MANAGEMENT........................................................................................................................40
13. SYSTEM CONFIGURATION.................................................................................................................. 42
13.1 SIP CONFIGURATION....................................................................................................................................................................................... 42
13.2 NETWORK CONFIGURATION............................................................................................................................................................................42
13.2.1 IP INFORMATION
.....................................................................................................................................................................................................42
13.2.2 PORT CONFIGURATIONS
.....................................................................................................................................................................................43
13.2.3 GENERAL CONFIGURATIONS
............................................................................................................................................................................ 43
13.2.4 REDIS CONFIGURATIONS
....................................................................................................................................................................................44
13.3 NETWORK DIAGNOSIS.....................................................................................................................................................................................44
13.3.1 NETWORK PACKET CAPTURE
............................................................................................................................................................................44
13.3.2 PING
...............................................................................................................................................................................................................................45
13.4 API AUTHORIZATION CONFIGURATION......................................................................................................................................................... 45
13.5 SYSTEM MAINTENANCE...................................................................................................................................................................................46
13.5.1 UPGRADE
....................................................................................................................................................................................................................46
13.5.2 LOG
................................................................................................................................................................................................................................ 46
13.5.3 MAINTENANCE
.........................................................................................................................................................................................................47
APPENDIX ...................................................................................................................................................52
PRIVACY POLICY ...........................................................................................................................................................................................................52
ECO-FRIENDLY OPERATION.........................................................................................................................................................................................54

VS50-50 & VS50-100 User Manual
P a g e | 7 Copyright © 2025 ZKTECO CO., LTD. All rights reserved.
1. User Guidelines
Security Statement
Regarding the ZKBio HyperSync Server Platform V1.0, a statement on security and privacy is provided.
Safety Operation Statement
Before performing maintenance operations, engineers must comply with the following requirements:
- Any maintenance operation must be authorized by the customer. Operations beyond the scope
approved by the customer are prohibited.
- If problem location data needs to be transmitted outside the customer's network, authorization from
the customer is required. Personal information within the data must be anonymized to ensure that the
equipment provider cannot restore personal information in any way.
Password Statement
- This product contains multiple default passwords. After logging into the serveror application for the first
time using the default password,please change the password immediately.
- To ensurethe security of the device, passwordsshouldbechanged regularly.
- To ensure security, passwords must have a certain level of complexity. It is strongly recommended to set
passwordswith highcomplexity.
Documentation Package Changes
The documentation package changes accumulate the descriptions of each document update. The
latest version of the documentation includes all the updates from previous versions of the
documentation.
NOTE:
There is a version correspondence between the user manual and the software. Please refer to
the manual that matches the software version. Historical versions of the user manual can be
found in the online help documentation embedded in the historical versions of the software.
If there are inconsistencies between the content of the user manual and the actual software
interface, the actual software interface should be taken as the standard.
Documentation Package Version V2.1.0
First official release.
Feedback and help
You can give feedback and ask for help based on the contact information left when selling the
product for sale.

VS50-50 & VS50-100 User Manual
P a g e | 8 Copyright © 2025 ZKTECO CO., LTD. All rights reserved.
2. Overview
ZKBio CVHyperSync is a multifunctional communication and device management server that video
intercom devices (outdoor station and IP indoor monitors), IP camera, and network video recorder
(NVR). By integrating multiple communication protocols and technologies, ZKBio CVHyperSync provides users
with a unifying communication and management solution that supports various business scenarios such as
video surveillance, voice calls, and video calls, suitable for corporate and educational institutional use.
Features
Multi protocol video access
Supports multiple protocols such as ONVIF, RTSP, making it easy to connect to various video surveillance
devices.
Support real-time IP camera video preview, pan-tilt control, pan tilt control, video playback and other
functions tomeet various monitoringneeds. Fade-resistant keys.
Video Intercom
Based on SIP 2.0 Protocol, it supportsvoice and video callfunctions.
Support extension management, ring group configuration, call record query and other functions to
improveinternalcommunication efficiency within the enterprise
Equipment management and grouping
Support batch addition and group management of devices, facilitating the management and monitoring
of large-scale devices deployment.
Provide device status monitoring, proxy management, and other essential functions to ensure stable
operationandseamless coordination ofdevices.
VS50-50 & VS50-100 User Manual
P a g e | 9 Copyright © 2025 ZKTECO CO., LTD. All rights reserved.
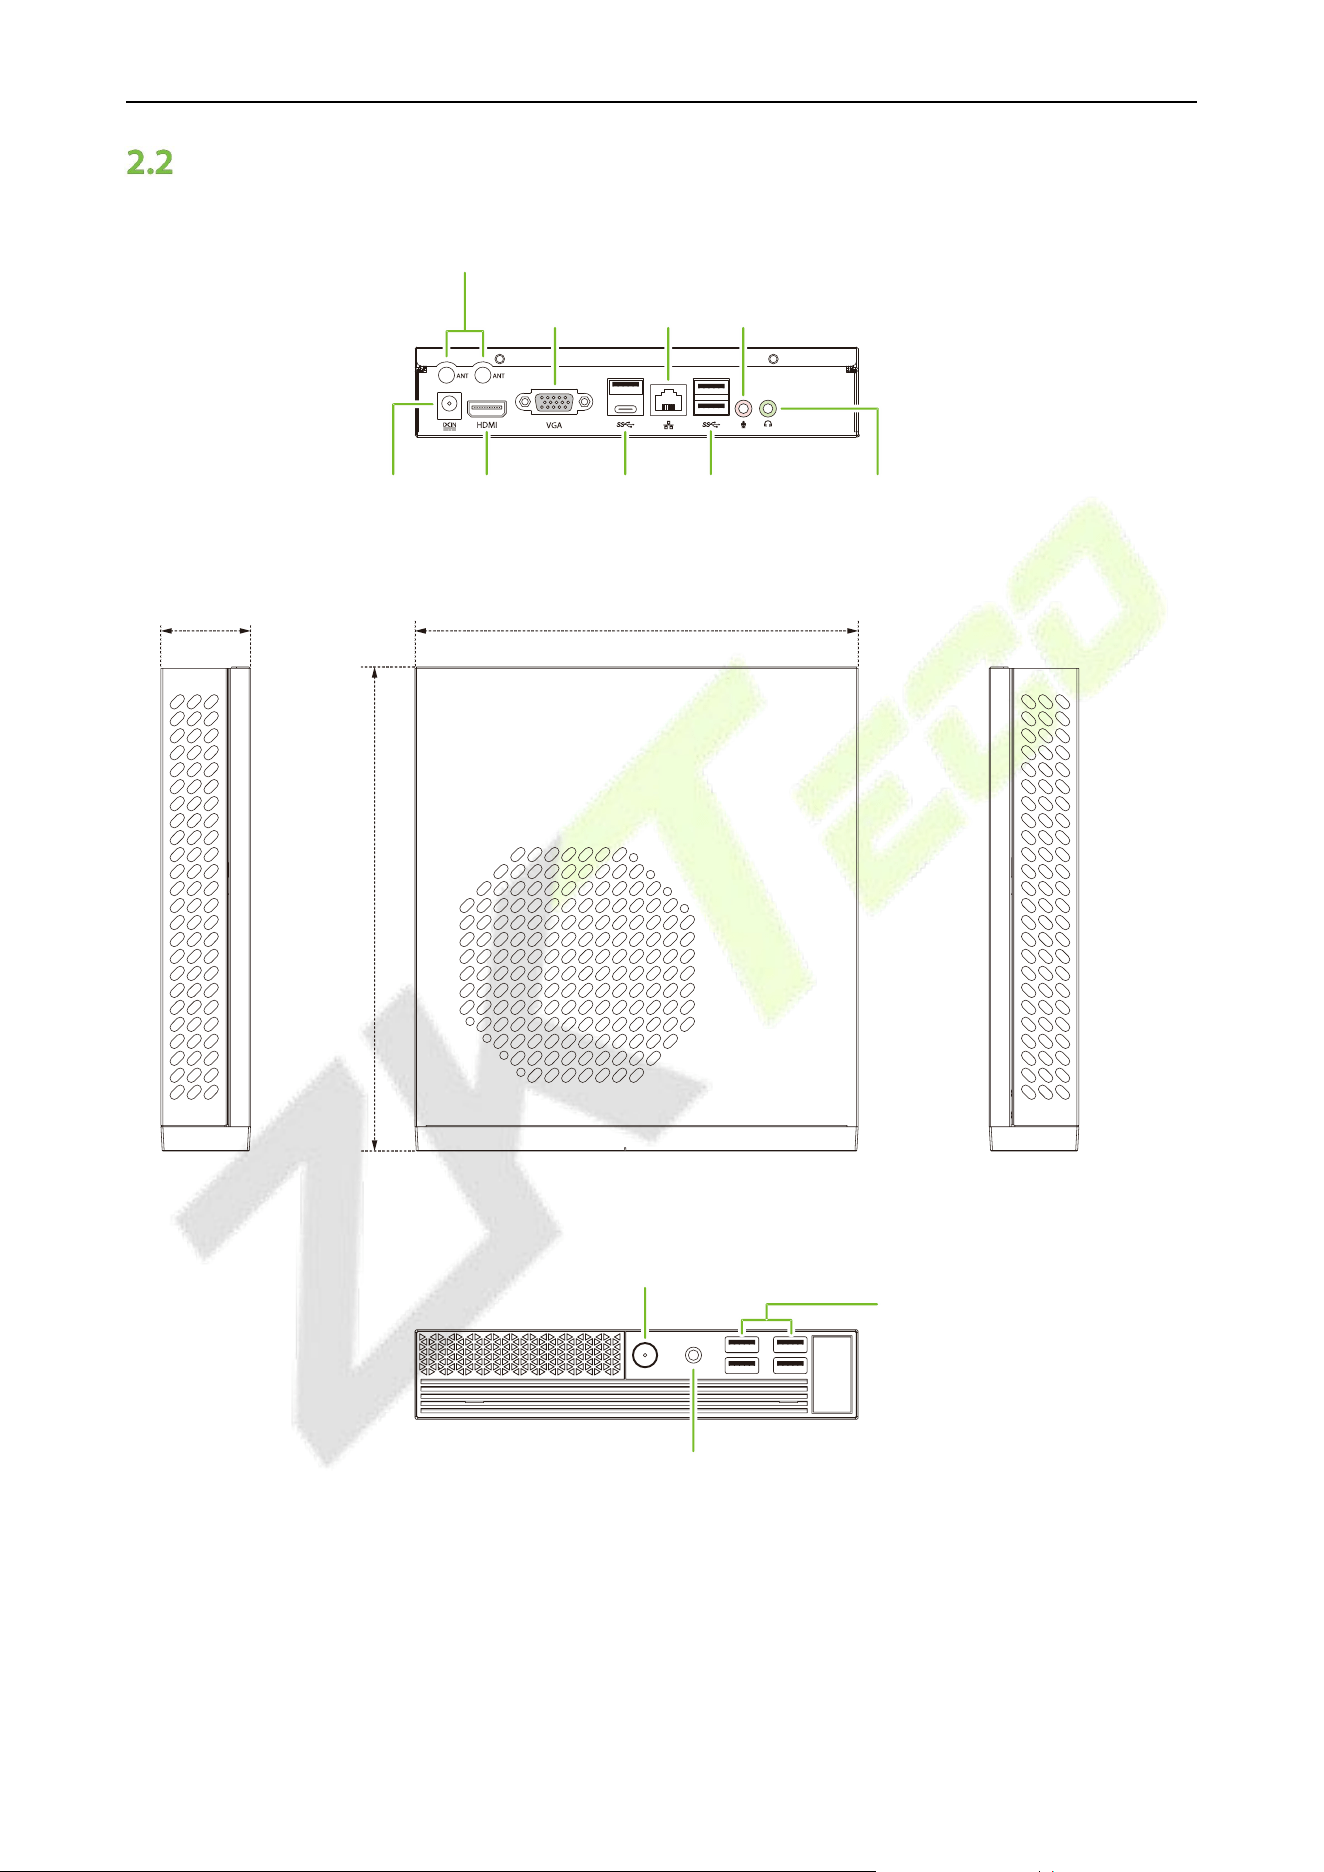
Appearance
7.205" (183mm)
7.858" (199.6mm)
1.457" (37mm)
Antenna Port
DC HDMI
VGA
USB3.0
LAN
USB2.0 Headset
MIC
Power Switch With Indicator Light
TRRS Connector
USB2.0
VS50-50 & VS50-100 User Manual
P a g e | 10 Copyright © 2025 ZKTECO CO., LTD. All rights reserved.
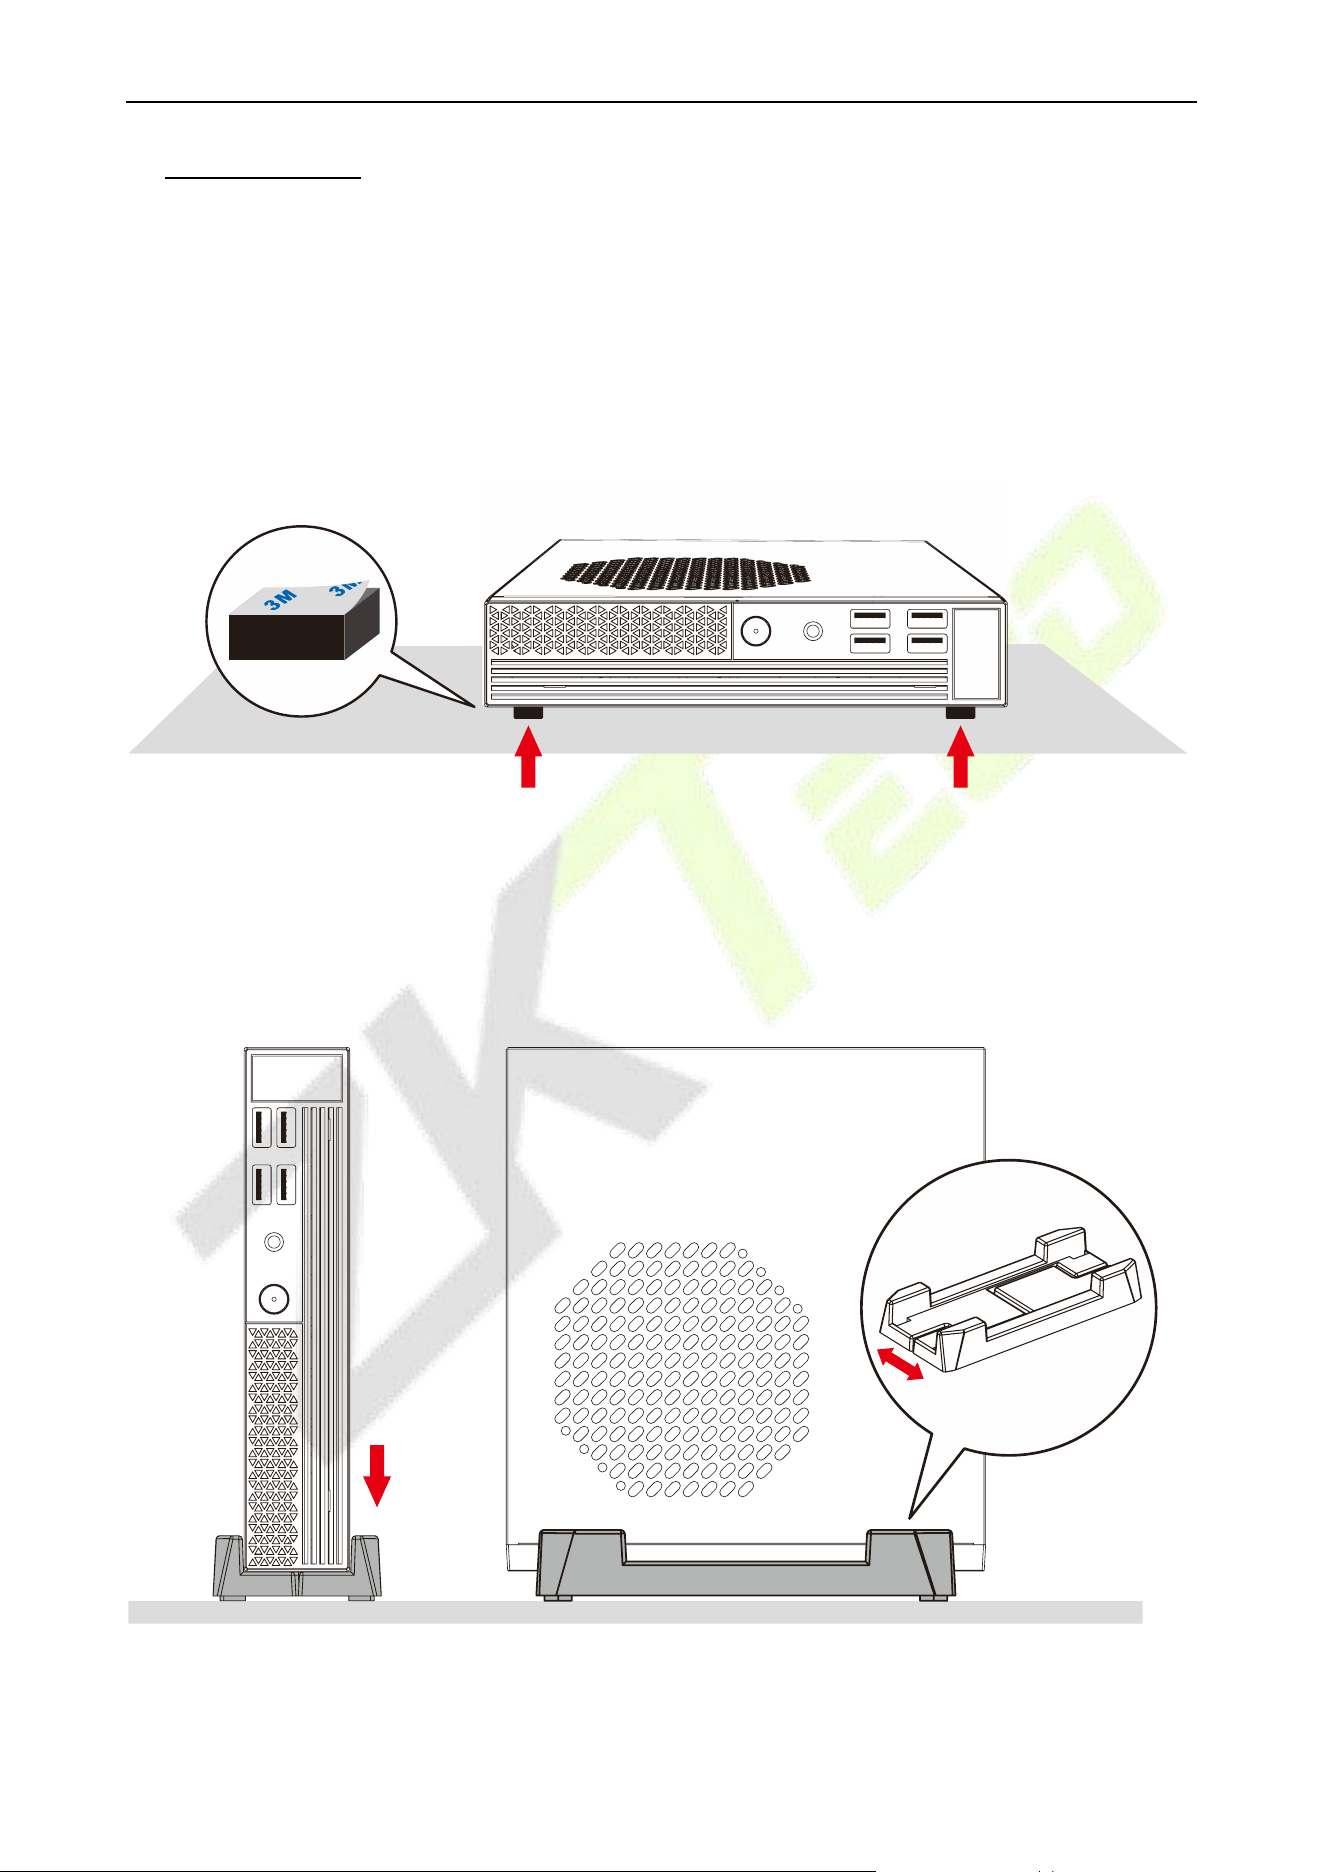
3. Installation
This device can be placed on a desktop (flat surface) and supports both horizontal and vertical
installation methods.
Mode 1: Horizontal Installation
Place adhesive rubber pads (with 3M tape) on the four corners at the bottom of the device and lay it flat
on the desktop.
Mode 2: Vertical Installation
Place the device in the desktop stand and position it vertically on the desktop.
Note: The width of the stand can be adjusted using the screws at the bottom.
Desktop Stand
VS50-50 & VS50-100 User Manual
P a g e | 11 Copyright © 2025 ZKTECO CO., LTD. All rights reserved.
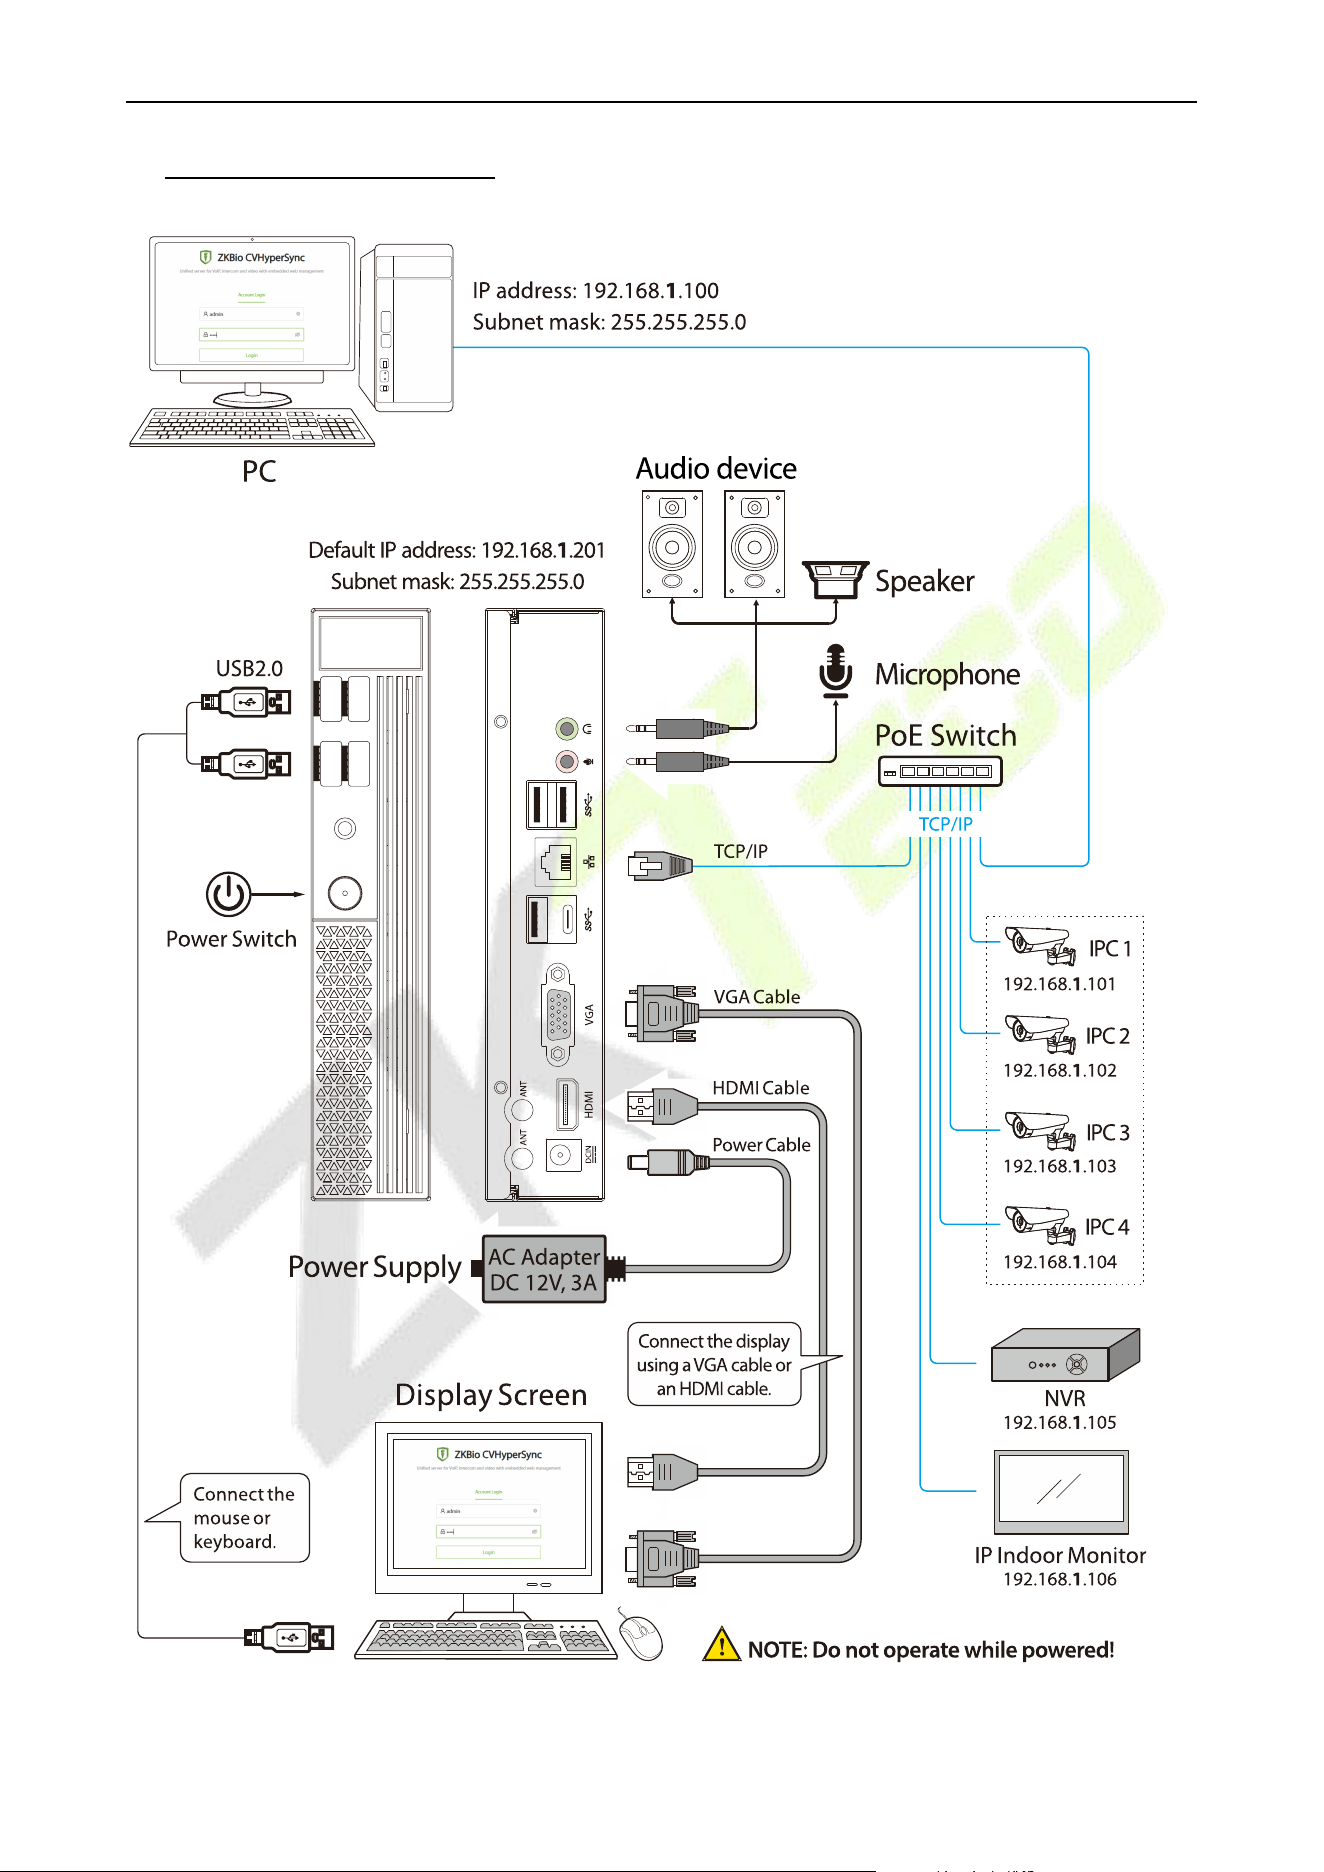
4. Wiring Instructions
VS50-50 & VS50-100 User Manual
P a g e | 12 Copyright © 2025 ZKTECO CO., LTD. All rights reserved.
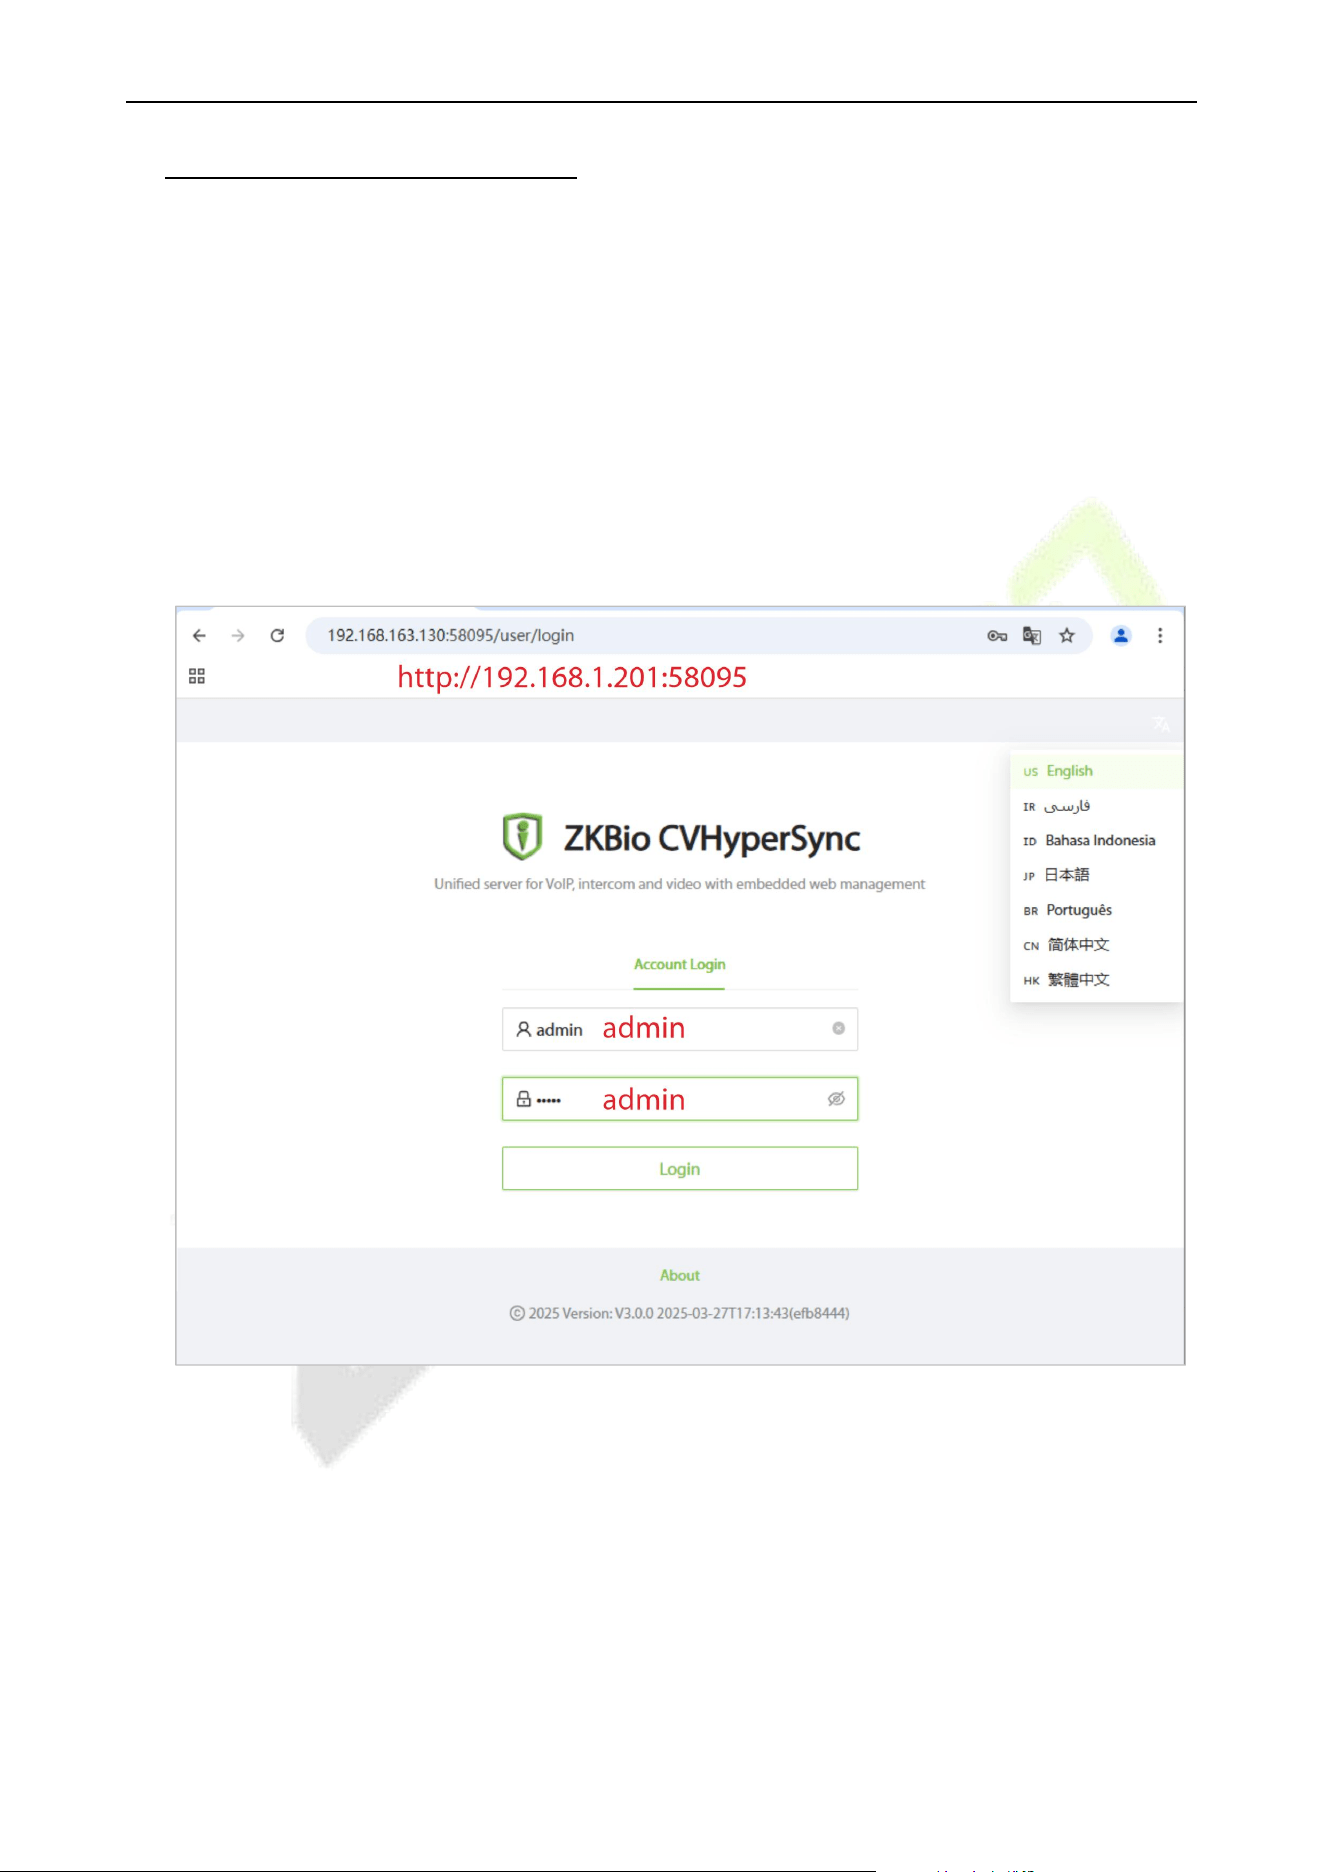
5. Login to the Web server
1. Connect the device to a network cable and a power cable, and then press the power switch to turn
on the device.
2. On the computer, open the recommended browser and enter the IP address and server port in the
address bar. The IP address should be set as: http://device IP address:port (for example: http://
192.168.1.201:58095).
Device IP address: Default is 192.168.1.201.
Port number: Default is 58095.
3. Enter the username and password (both default to admin), and click [Login].
Note:
1) You can select the language in the top right corner.
2) In LAN, IP addresses of the server (PC) and the device must be in the same network segment
when connecting to the software. You can click on [System Conf iguration] - [Network Conf
iguration] - [IP Information] to modify the device's IP address.
VS50-50 & VS50-100 User Manual
P a g e | 13 Copyright © 2025 ZKTECO CO., LTD. All rights reserved.
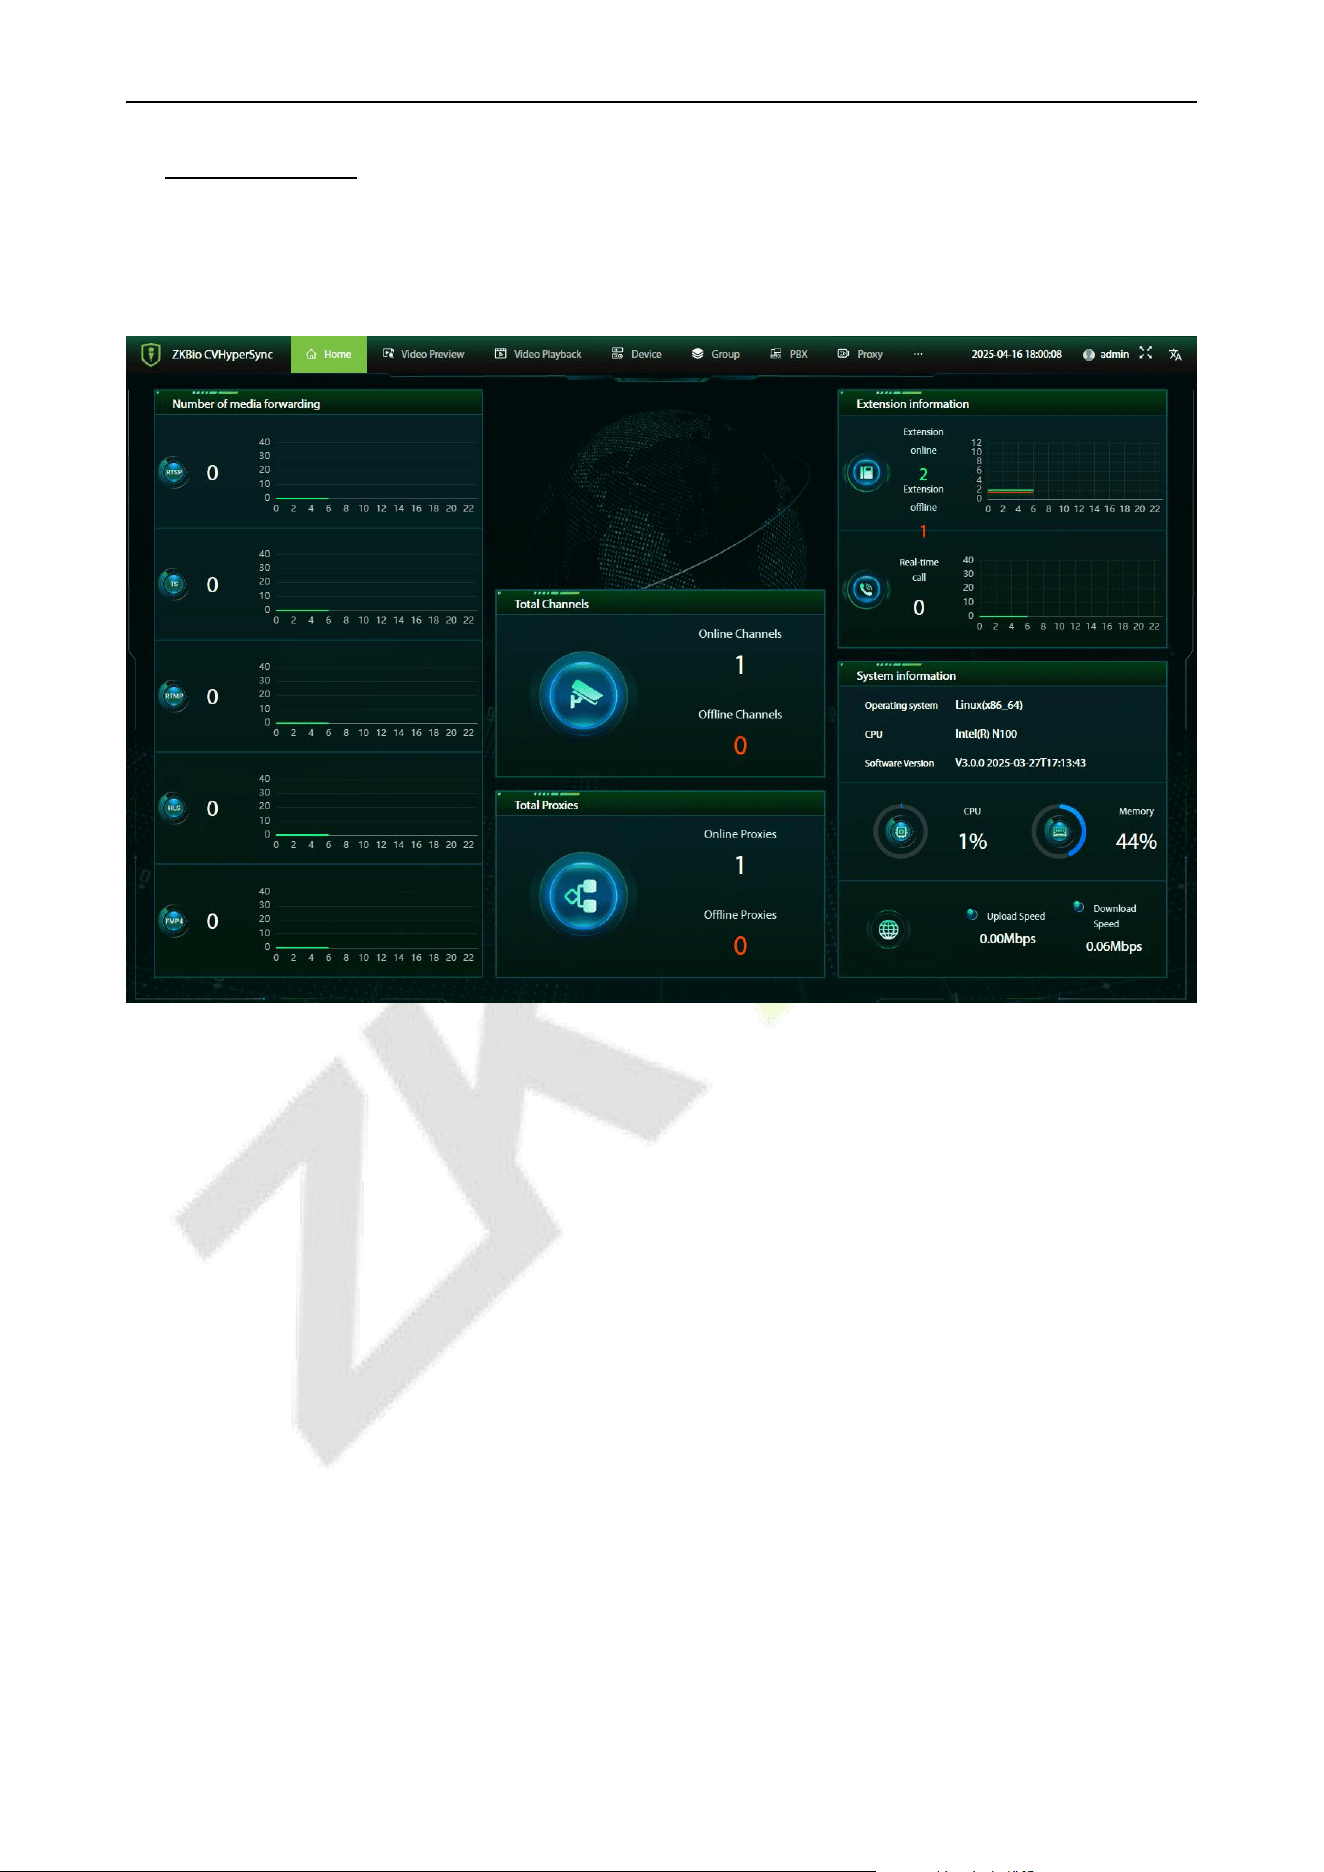
6. Homepage
After logging into the a multifunctional communication and device management server interface, the
page will automatically redirect to the homepage, as shown in the figure below:
On this interface, users can directly check whether the data items are accurate.
RTSP, TS, RTMP, HLS, FMP4: The chart shows thenumberof streams being forwarded by the proxy.
Total Channels: Displays the number of channels online and offline.
Total Proxies: Displays the number of proxies online and offline.
PBX Management: The chart shows the number of extensions online, extensions offline, and active calls
in real-time.
System Information: Displays the server's operating system, CPU, software version, CPU utilization,
memory usage, upload speed, and download speed.

VS50-50 & VS50-100 User Manual
P a g e | 14 Copyright © 2025 ZKTECO CO., LTD. All rights reserved.
7. Video Service Management
7.1 Operational Scenario
This operation is used to guide users how to access and manage the device through the web terminal,
through the web terminal can be accessed to the unified management of the device, such as viewing
the camera's live, video and so on.
Supports the addition of Network Video Recorders (NVRs) and cameras. The supported connection
methods and protocol types are shown in the table below.
Access Method
Operational Scenario
Supported Protocol Types
Search Access
When there is a large number of
online devices that support access
via the ONVIF protocol, they can be
quickly added through the batch
addition method.
Supports ONVIF and RTSP protocols.
Explanation:
The search function only supports the
ONVIF protocol for device discovery.
Devices that use the RTSP protocol
need to be added manually.
Network video recorders (NVRs) that
support access via the ONVIF protocol
(subject to actual conditions) support
the playback function.
Manual Access
To add ONVIF devices that may not
have been detected, you can
manually add them one by one.
When using RTSP devices, it is
necessary to manually enter the
device information in order to add
and use them.
7.2 Add Device
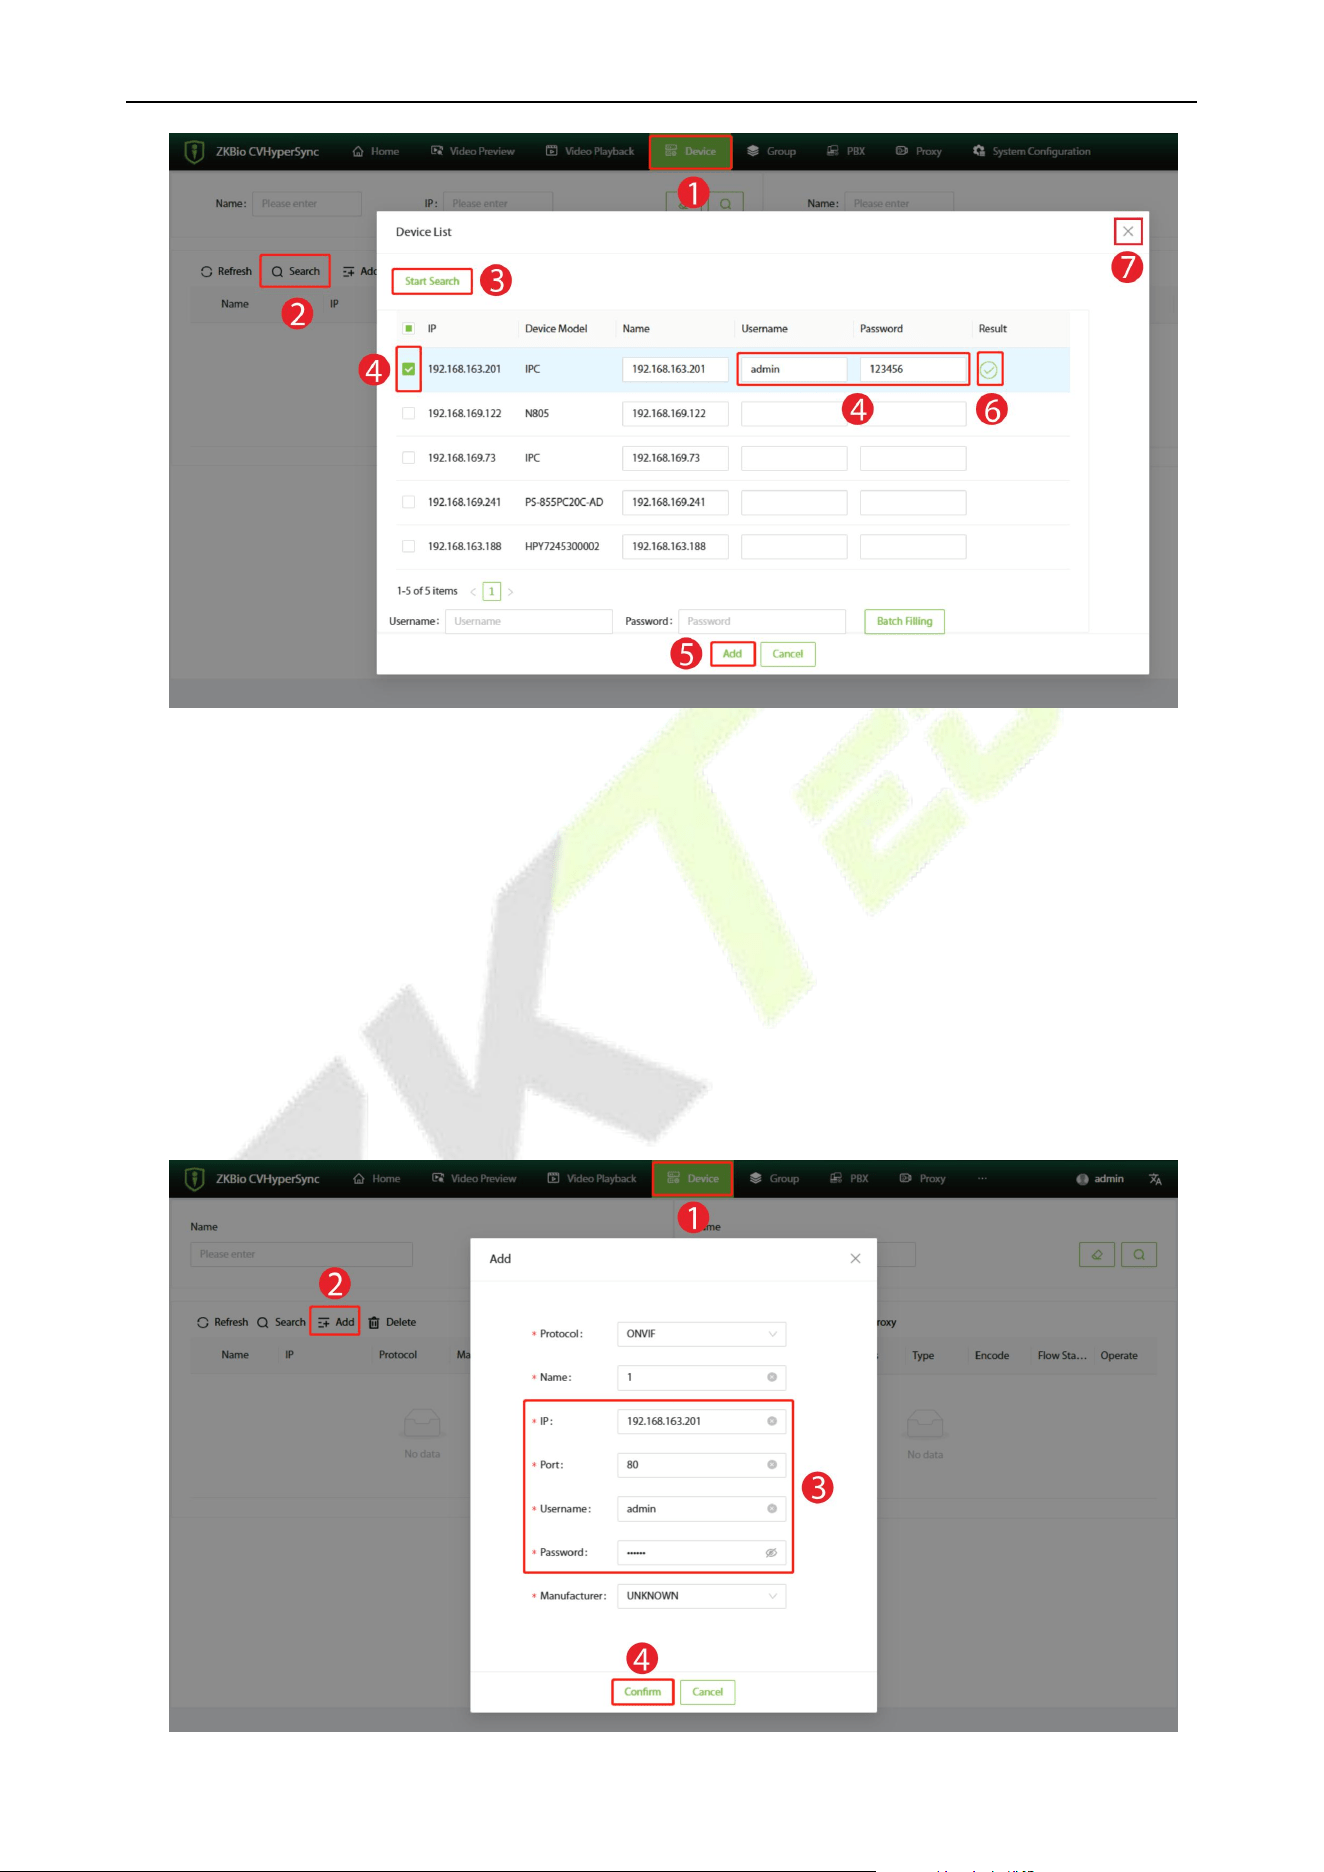
7.2.1 Add device via the ONVIF protocol
When connecting devices using the ONVIF protocol, both searching for devices and manual addition
are supported. Supports the playback function of recorded videos.
Method 1: Add Devices by Searching
1. Click [Device] to enter the device settings interface.
2. Click [Search] to open the Device List interface in the software.
3. Click [Start Search] to start searching for devices.
4. In the list of searched devices, check the devices you want to add. Then enter the username and
password for the device.
5. Then click [Add] to add the device.
6. The appearance of the icon indicates that the addition is successful.
7. After the addition is complete, click the icon to close the current window.
VS50-50 & VS50-100 User Manual
P a g e | 15 Copyright © 2025 ZKTECO CO., LTD. All rights reserved.
Method 2: Manually Add a Device
1. Click [Device] to enter the device settings interface.
2. Click [Add] to open the Add interface in the software.
3. Select the ONVIF protocol, and enter the relevant parameters of the device, such as its IP address,
port, username, and password.
4. Click [Confirm] to add the device.
5. When the interface prompts “Operation successful, automatic refresh” it means that the device
has been added successfully. The added device will be displayed in the device list.
VS50-50 & VS50-100 User Manual
P a g e | 16 Copyright © 2025 ZKTECO CO., LTD. All rights reserved.
Function Description
Menu
Descriptions
Protocol
Select the protocol type as ONVIF for the device to be added.
Name
Customize the device name.
IP
Enter the device's IP address.
Port
Enter the device's ONVIF port.
Username
Enter the device's username.
Password
Enter the device's password.
Manufacturer
The manufacturer of the equipment, mainly for the video playback function.
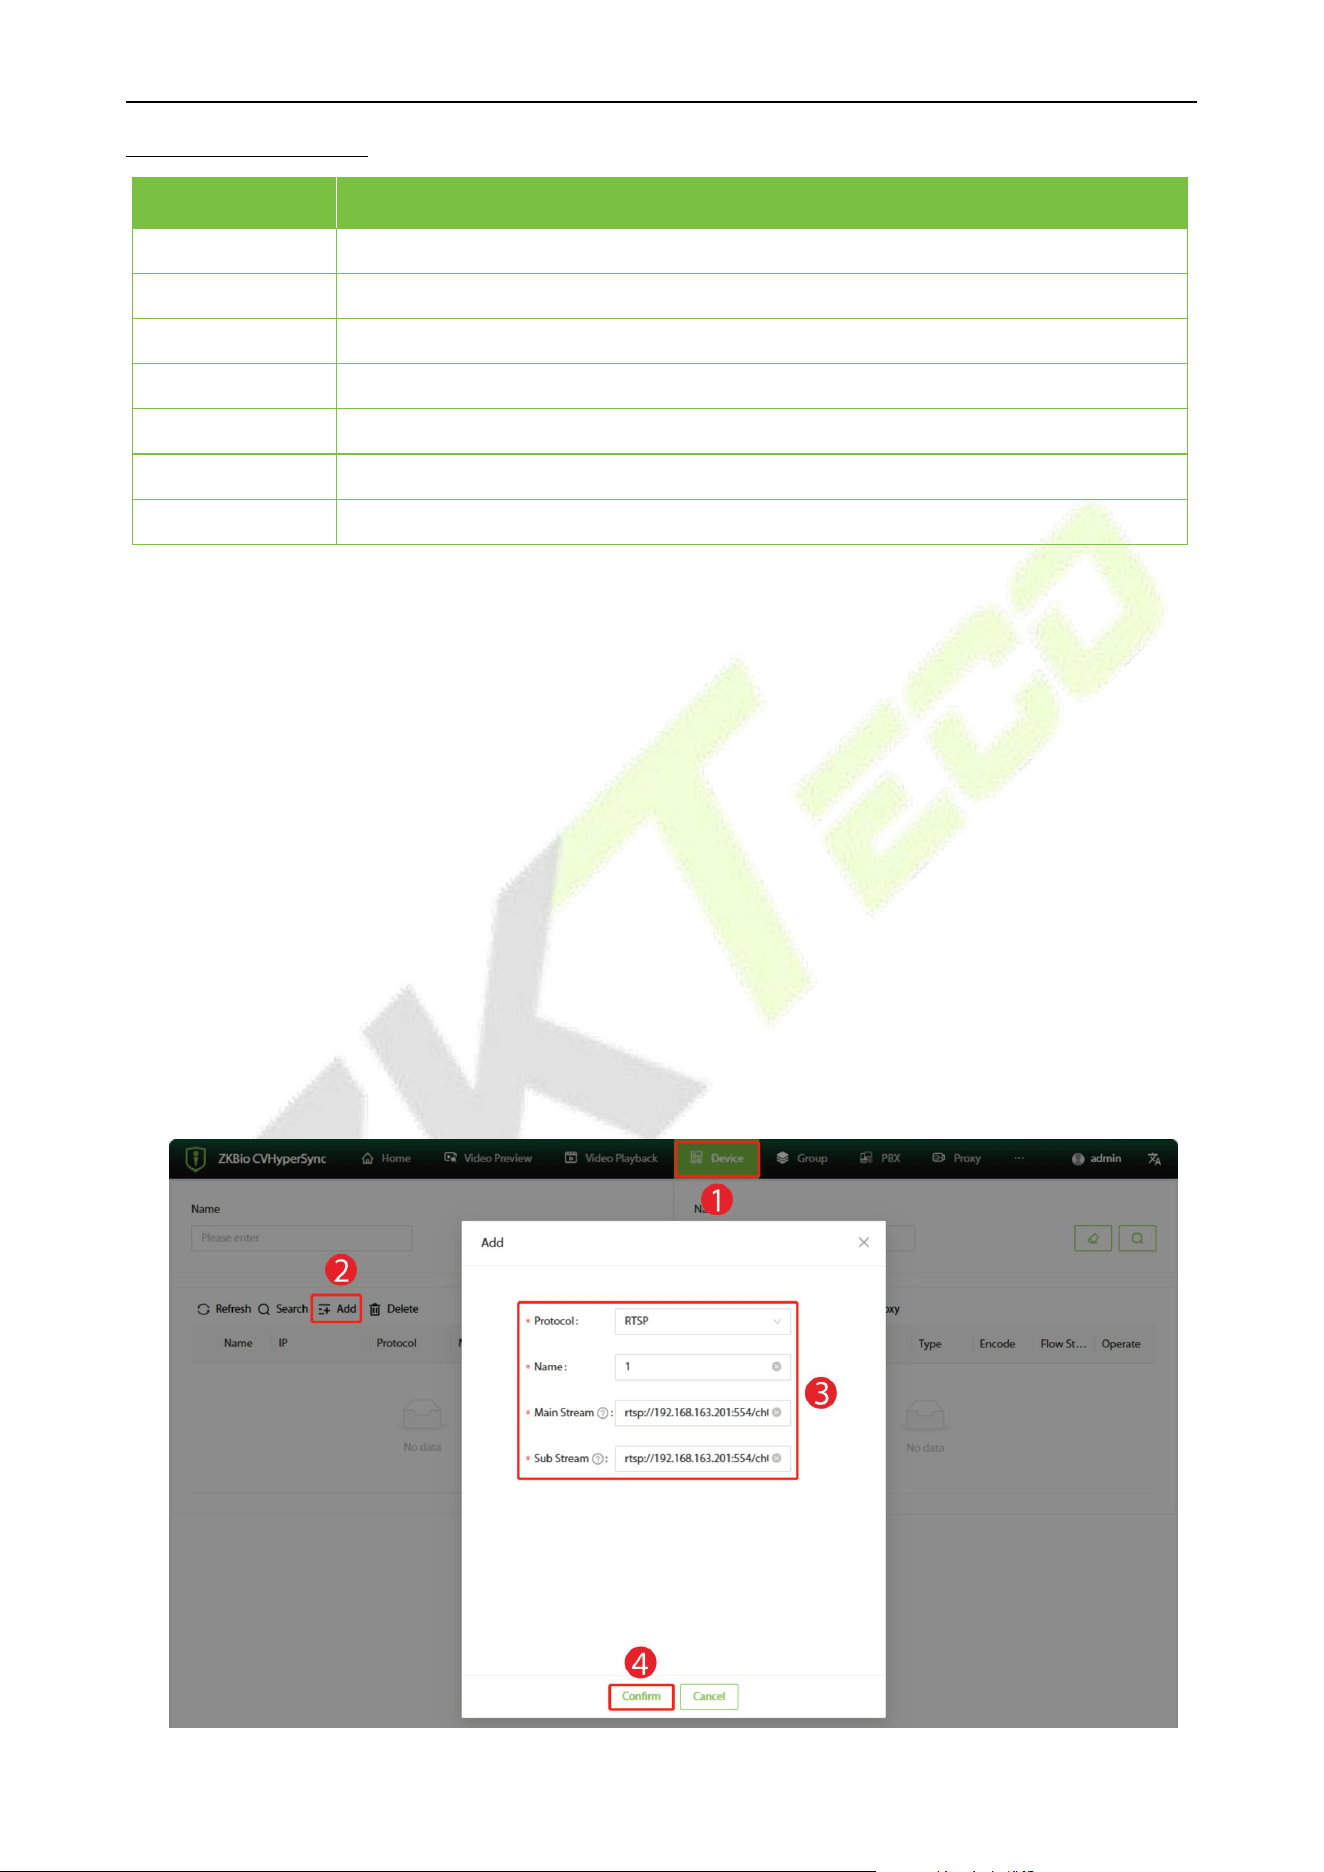
7.2.2 Add device via the RTSP protocol
When connecting devices using the RTSP protocol, only manually adding devices is supported.
Method: Manually Add a Device
1. Click [Device] to enter the device settings interface.
2. Click [Add] to open the Add interface in the software.
3. Select the RTSP protocol, and enter the main stream address and the sub stream address of the
device to be added.
4. Click [Confirm] to add the device.
5. When the interface prompts “Operation successful, automatic refresh” it means that the device
has been added successfully. The added device will be displayed in the device list.
VS50-50 & VS50-100 User Manual
P a g e | 17 Copyright © 2025 ZKTECO CO., LTD. All rights reserved.
Function Description
Menu
Descriptions
Protocol
Select the protocol type as RTSP for the device to be added.
Name
Customize the device name.
MainStream
Enter the mainstream addressof thedevice,for example:
rtsp://xxx.xxx.xxx.xxx:554/ch1.
Sub Stream
Enter the sub streamaddress of the device, for example:
rtsp://xxx.xxx.xxx.xxx:554/ch1_sub.
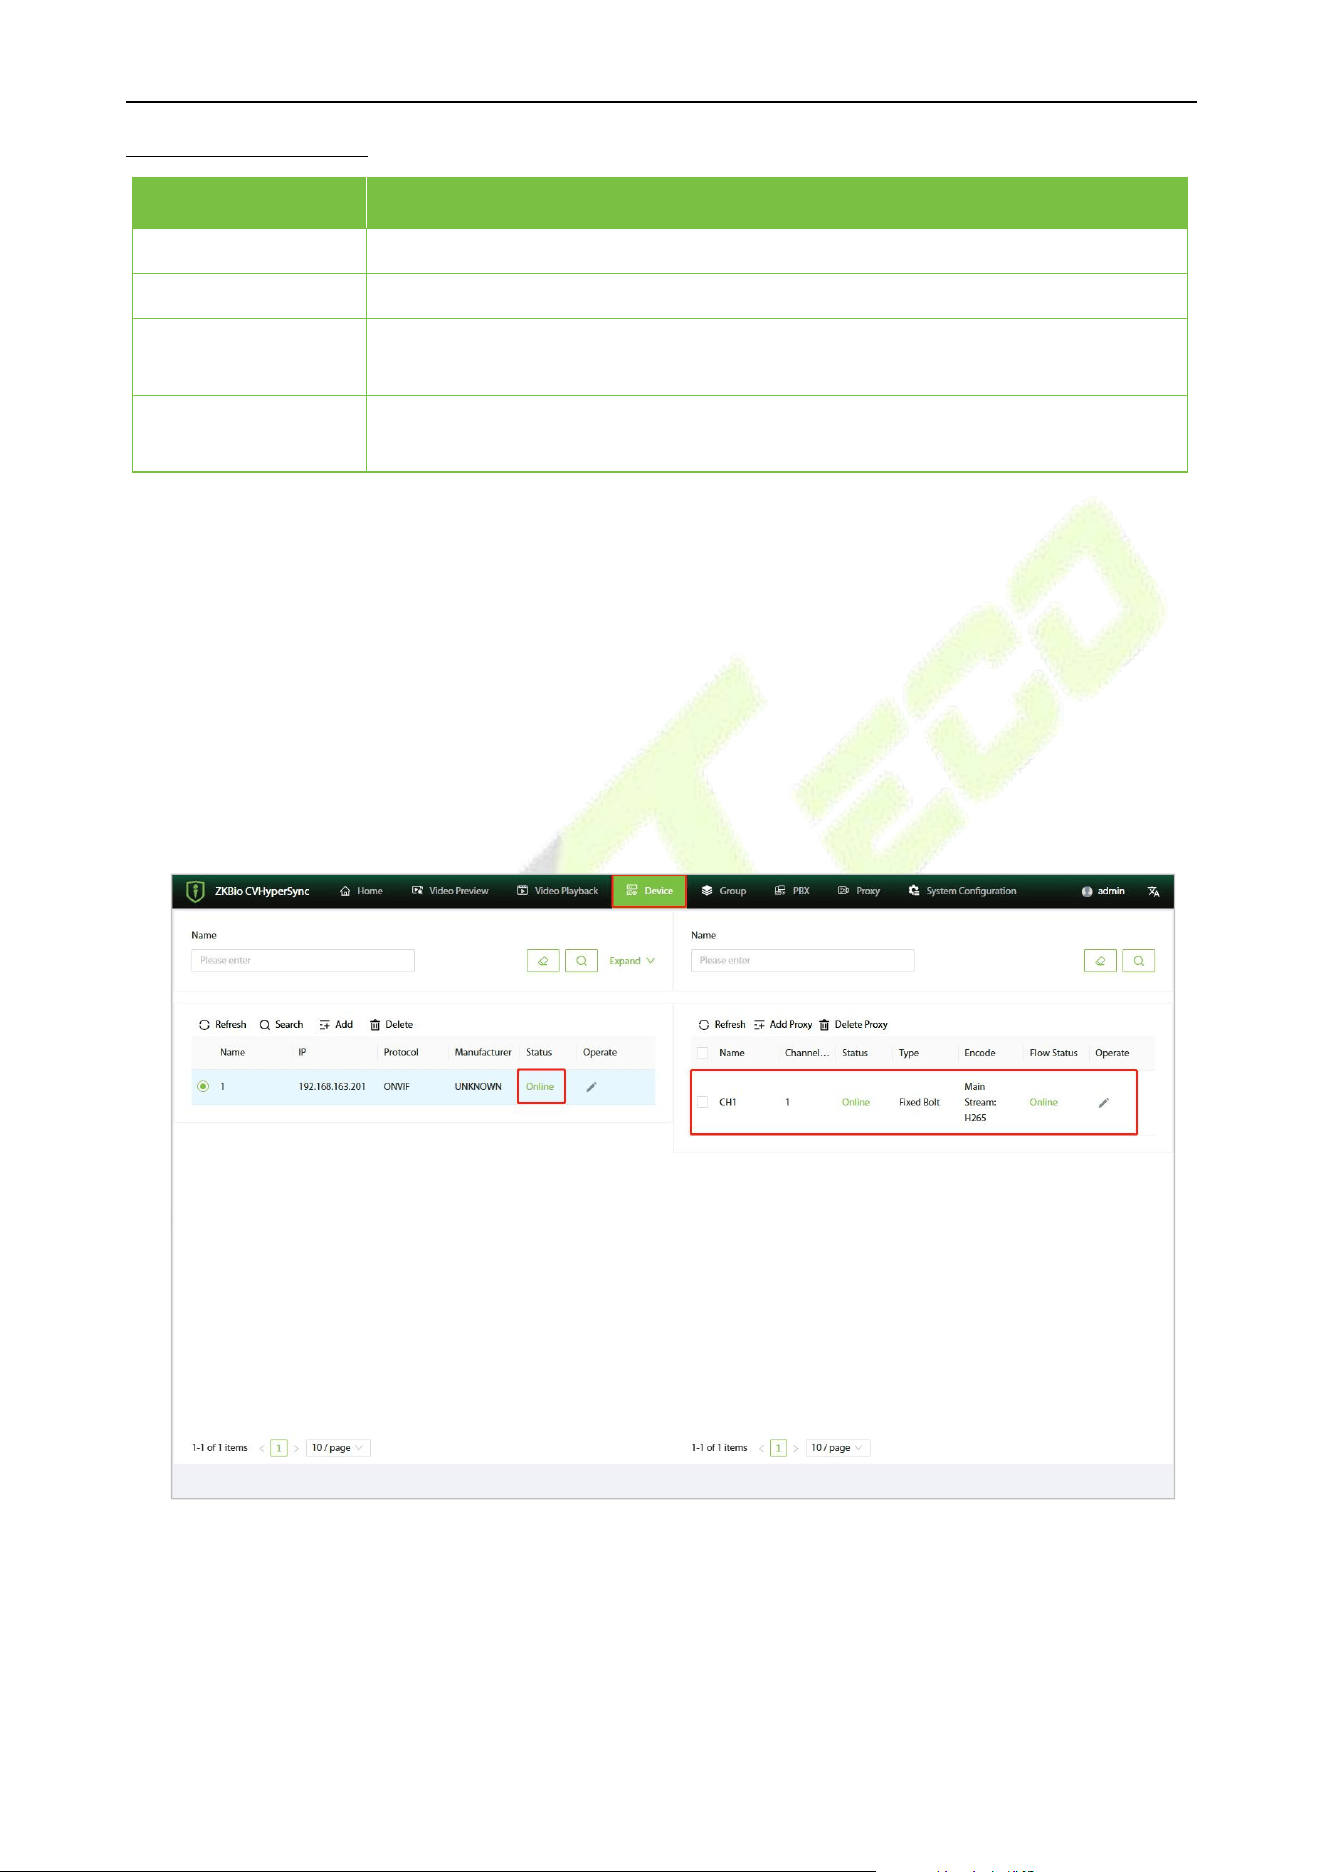
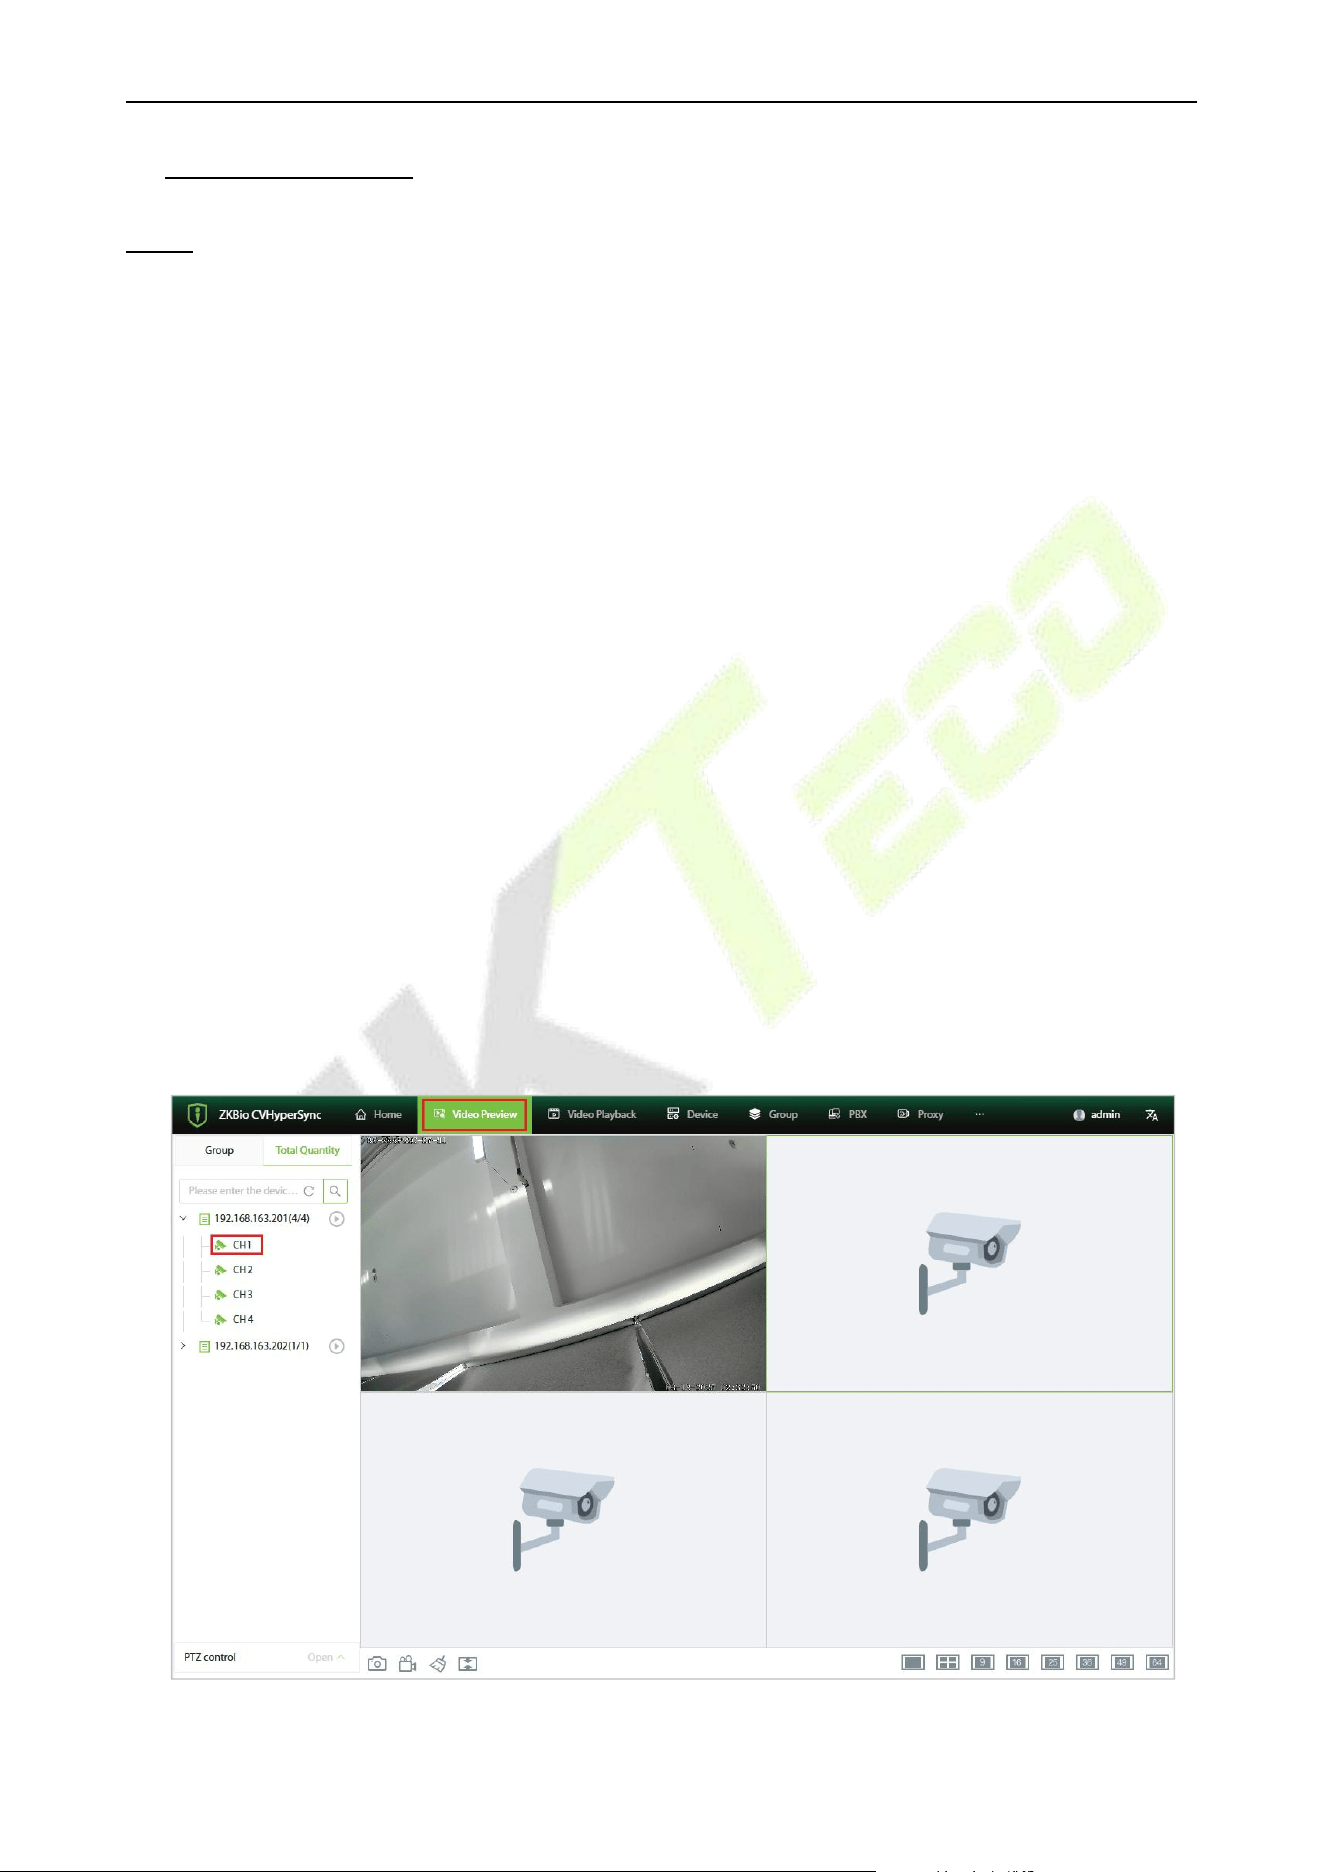
7.2.3 Result Verification
In the device management interface, if the status of the added device is displayed as "Online" and you
can view the live video, which plays normally, this indicates that the device has been added
successfully.
1. Click [Device], in the device list to see whether the device shows “Online”, the right side of the
proxy list has no channel display (Note: RTSP access to the device, regardless of whether the
address is complete are displayed online).
2. Click [Video Preview] to enter the Video Preview screen to view the live video. Drag the added
device to the live window, it can play the live normally, which means the access is successful, as
shown in the following figure:
VS50-50 & VS50-100 User Manual
P a g e | 18 Copyright © 2025 ZKTECO CO., LTD. All rights reserved.
VS50-50 & VS50-100 User Manual
P a g e | 19 Copyright © 2025 ZKTECO CO., LTD. All rights reserved.
8. Video Preview
NOTE: When using this product for applications and maintenance related to video recording, audio
recording, and snapshot capture, you are required to strictly comply with all applicable laws and
regulations. It is prohibited for enterprises or individuals to install such devices in office areas beyond
the scope permitted by local laws to monitor employee behavior, or to use such devices for eavesdropping on
others' privacy for illegal purposes.
8.1 Live Preview
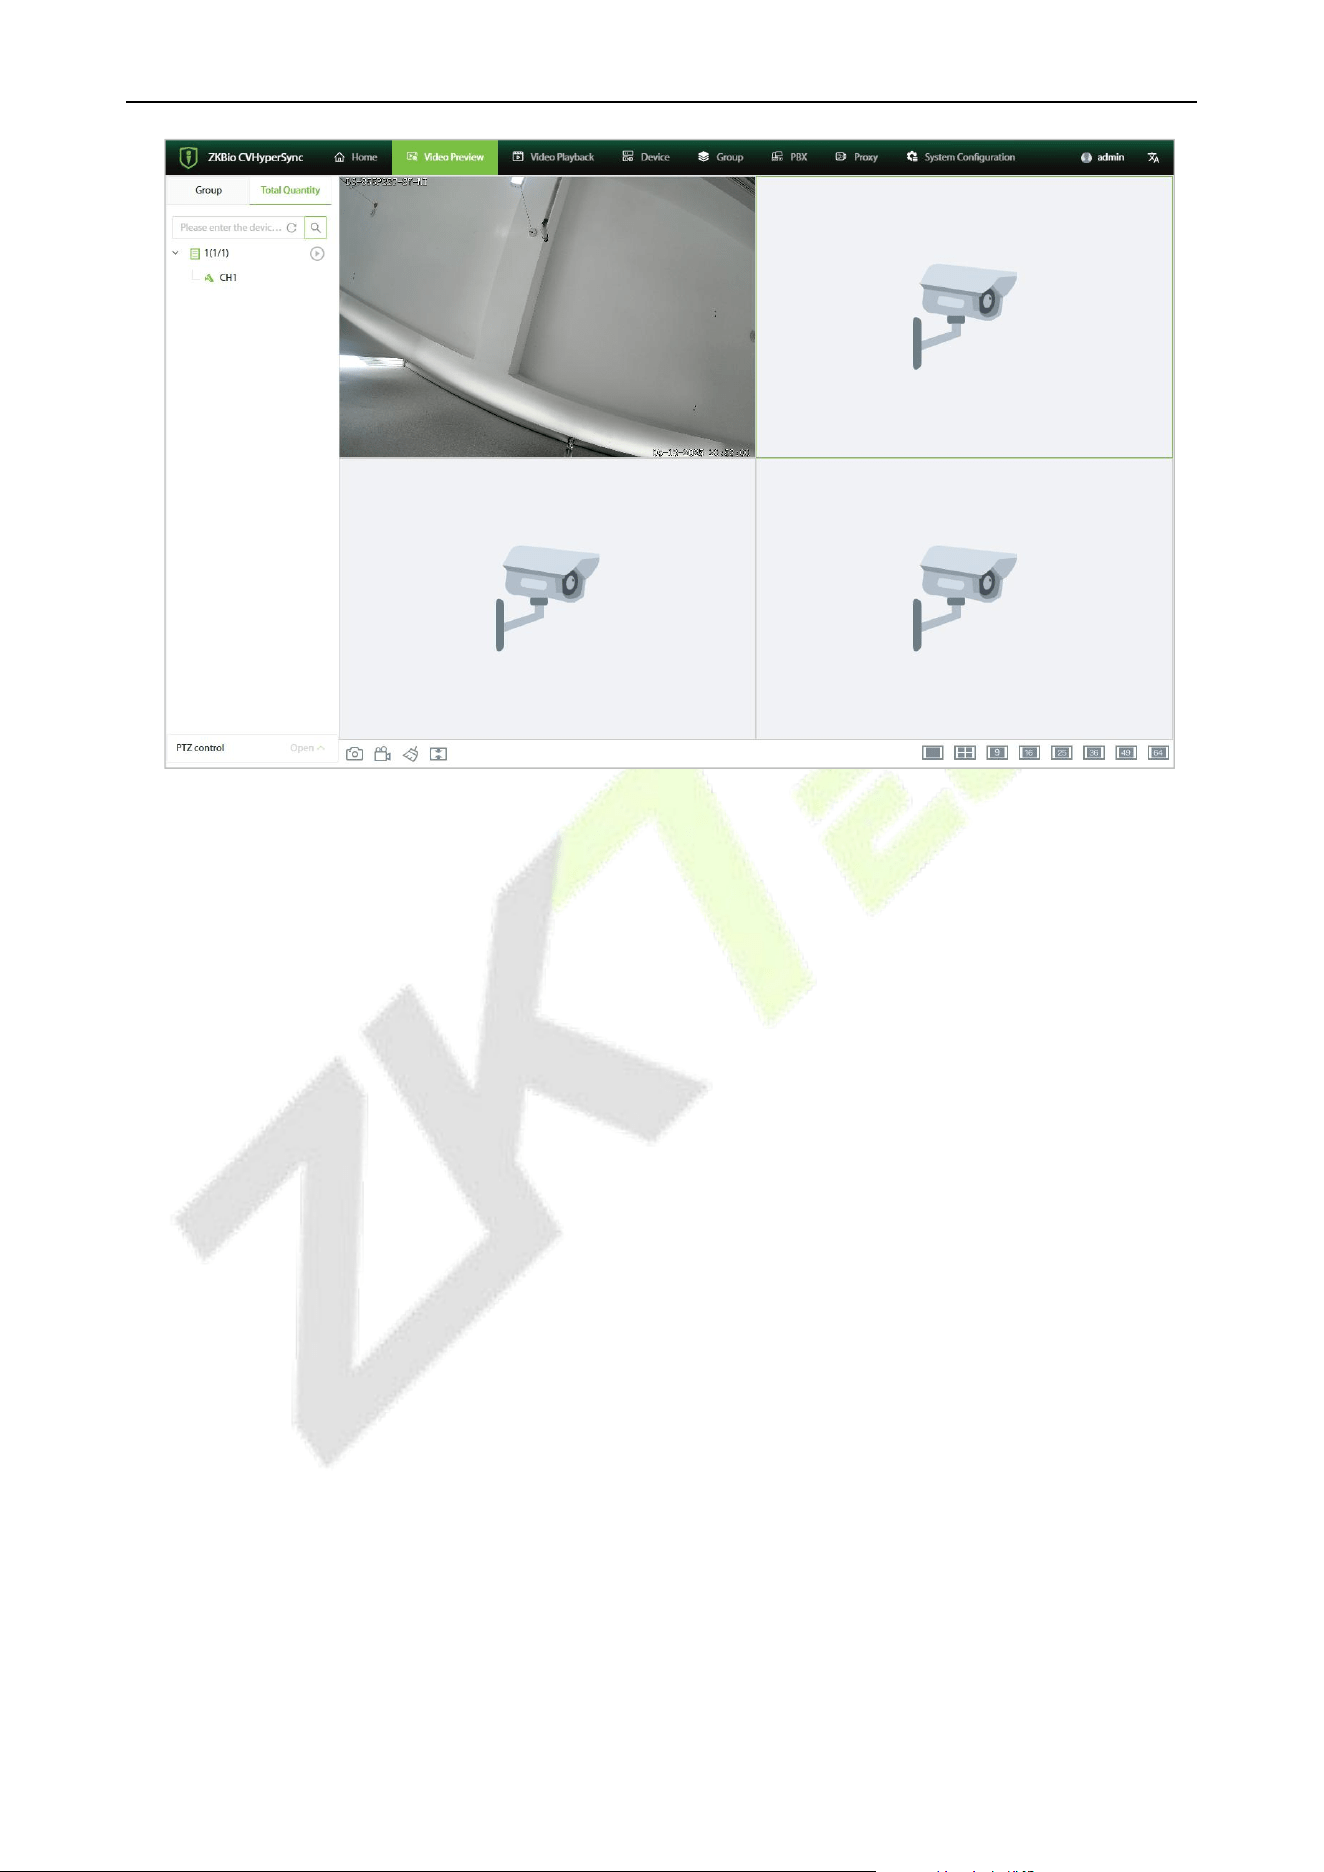
8.1.1 Single Camera Live Preview
Click on [Video Preview] to enter the video preview interface. Among the "Total Quantity", double-
click on the online camera or drag and drop the online camera into the live playback pane to start the
live preview.
Notes:
1) During live preview, do not overlap windows, interfaces, or dialog boxes of other programs on the
window where the live stream is playing. Otherwise, this may cause the live image to become
distorted or the video playback to be choppy.
2) When the network at the site is unstable and the live image experiences freezing or distortion, it is
recommended that users enable the bandwidth adaptation feature on the camera's web interface.
After enabling bandwidth adaptation, the camera can adjust its bitrate according to the network
conditions at the site, thereby ensuring smooth live playback.
VS50-50 & VS50-100 User Manual
P a g e | 20 Copyright © 2025 ZKTECO CO., LTD. All rights reserved.
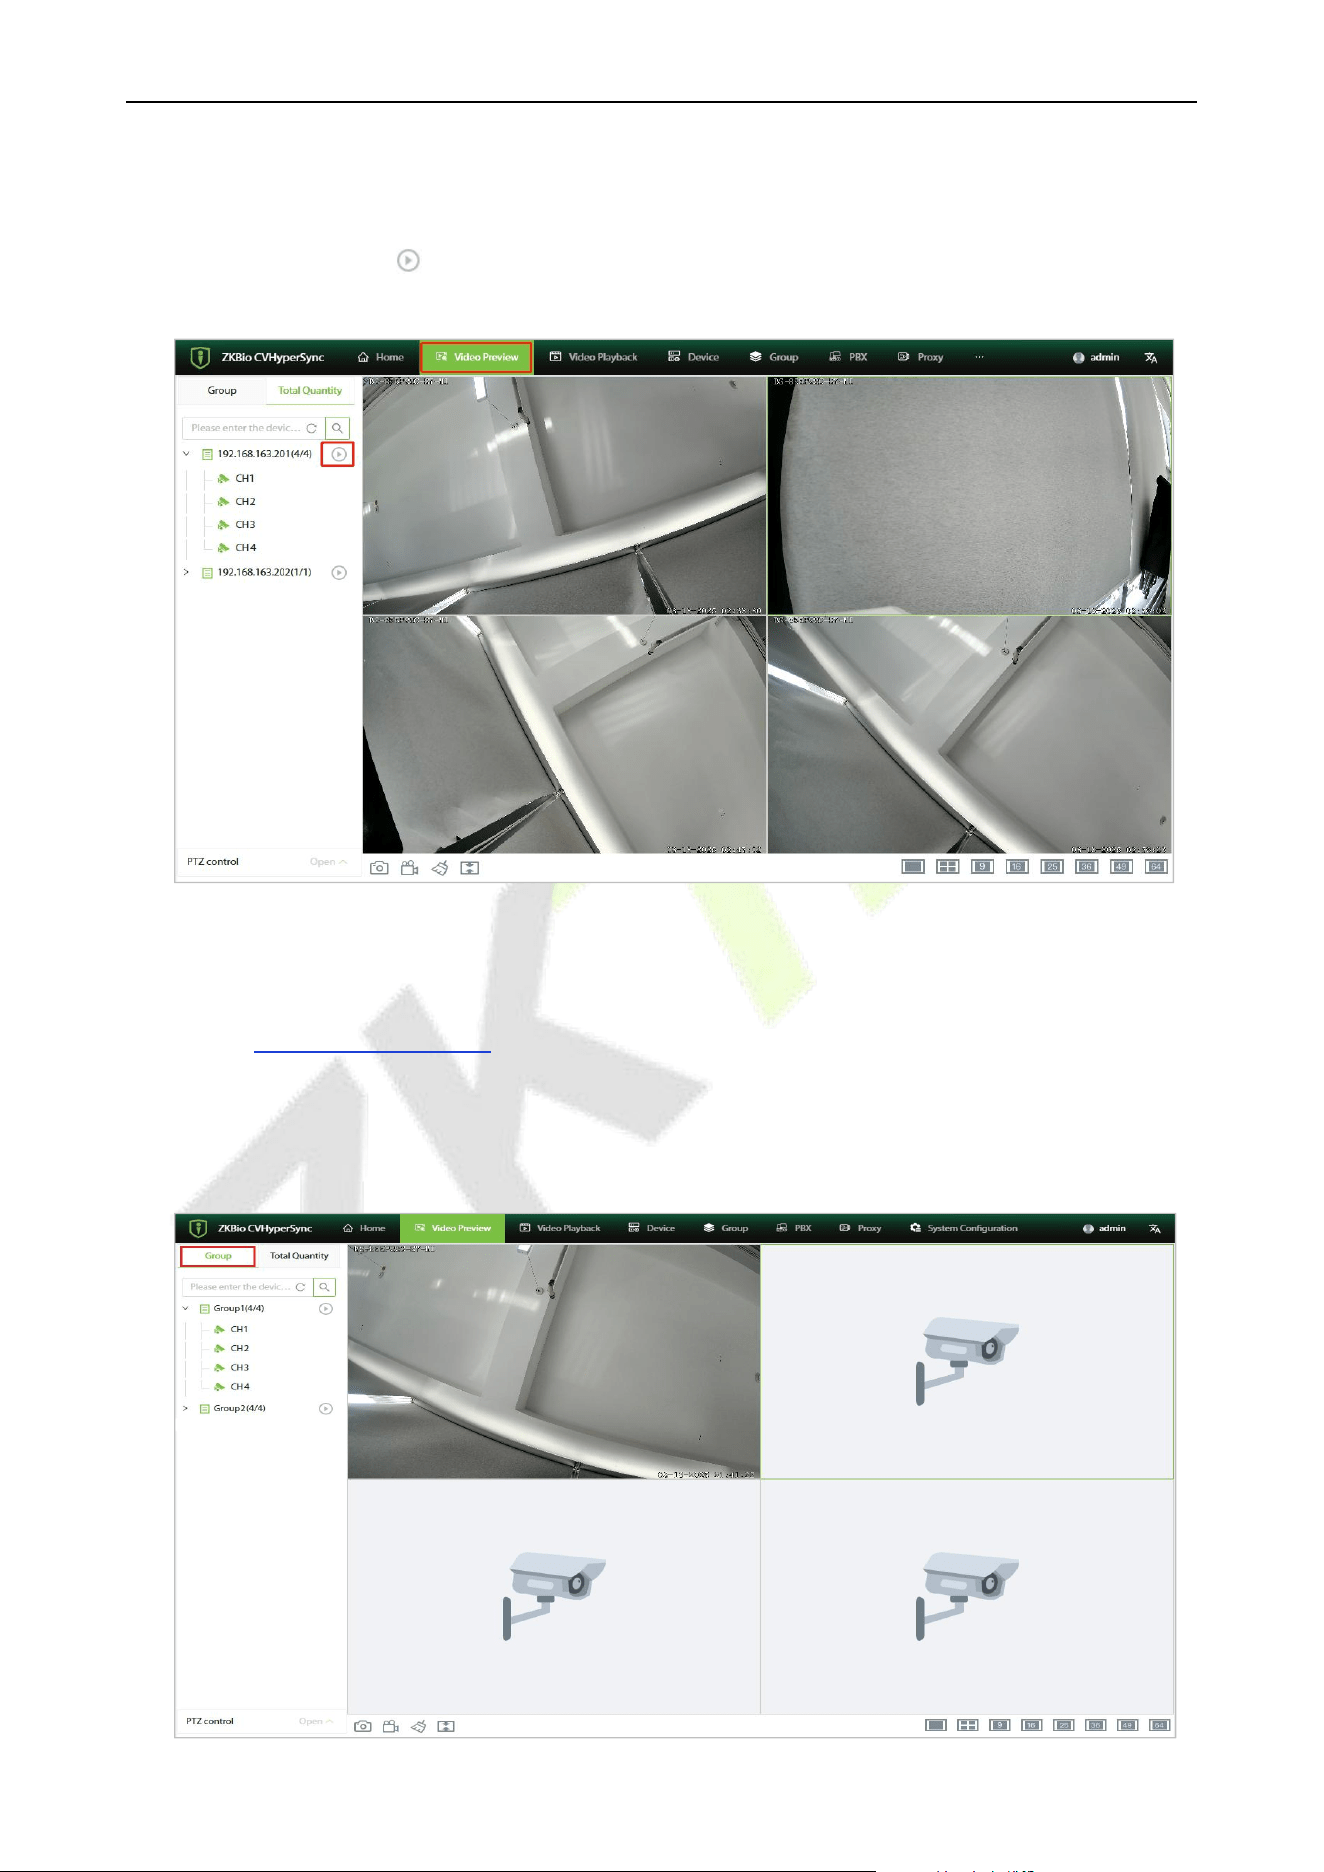
8.1.2 One-Click Live Preview
Click on [Video Preview] to enter the video preview interface. In the "Total Quantity" section, click the
one-click playback button of the main device to start the live preview (by default, it will tile from the
first window until filling up the current layout window), as shown in the figure below:
8.1.3 Group Camera Live Preview
1. Click on [Group] to enter the Group Management interface and create a group. For details, see
Section 10 Group Management.
2. Click on [Video Preview] to enter the video preview interface. In the "Group" devices, double-click
or drag and drop the camera into the playback window, or use the one-click playback feature for
live preview, as shown in the figure below:
VS50-50 & VS50-100 User Manual
P a g e | 21 Copyright © 2025 ZKTECO CO., LTD. All rights reserved.
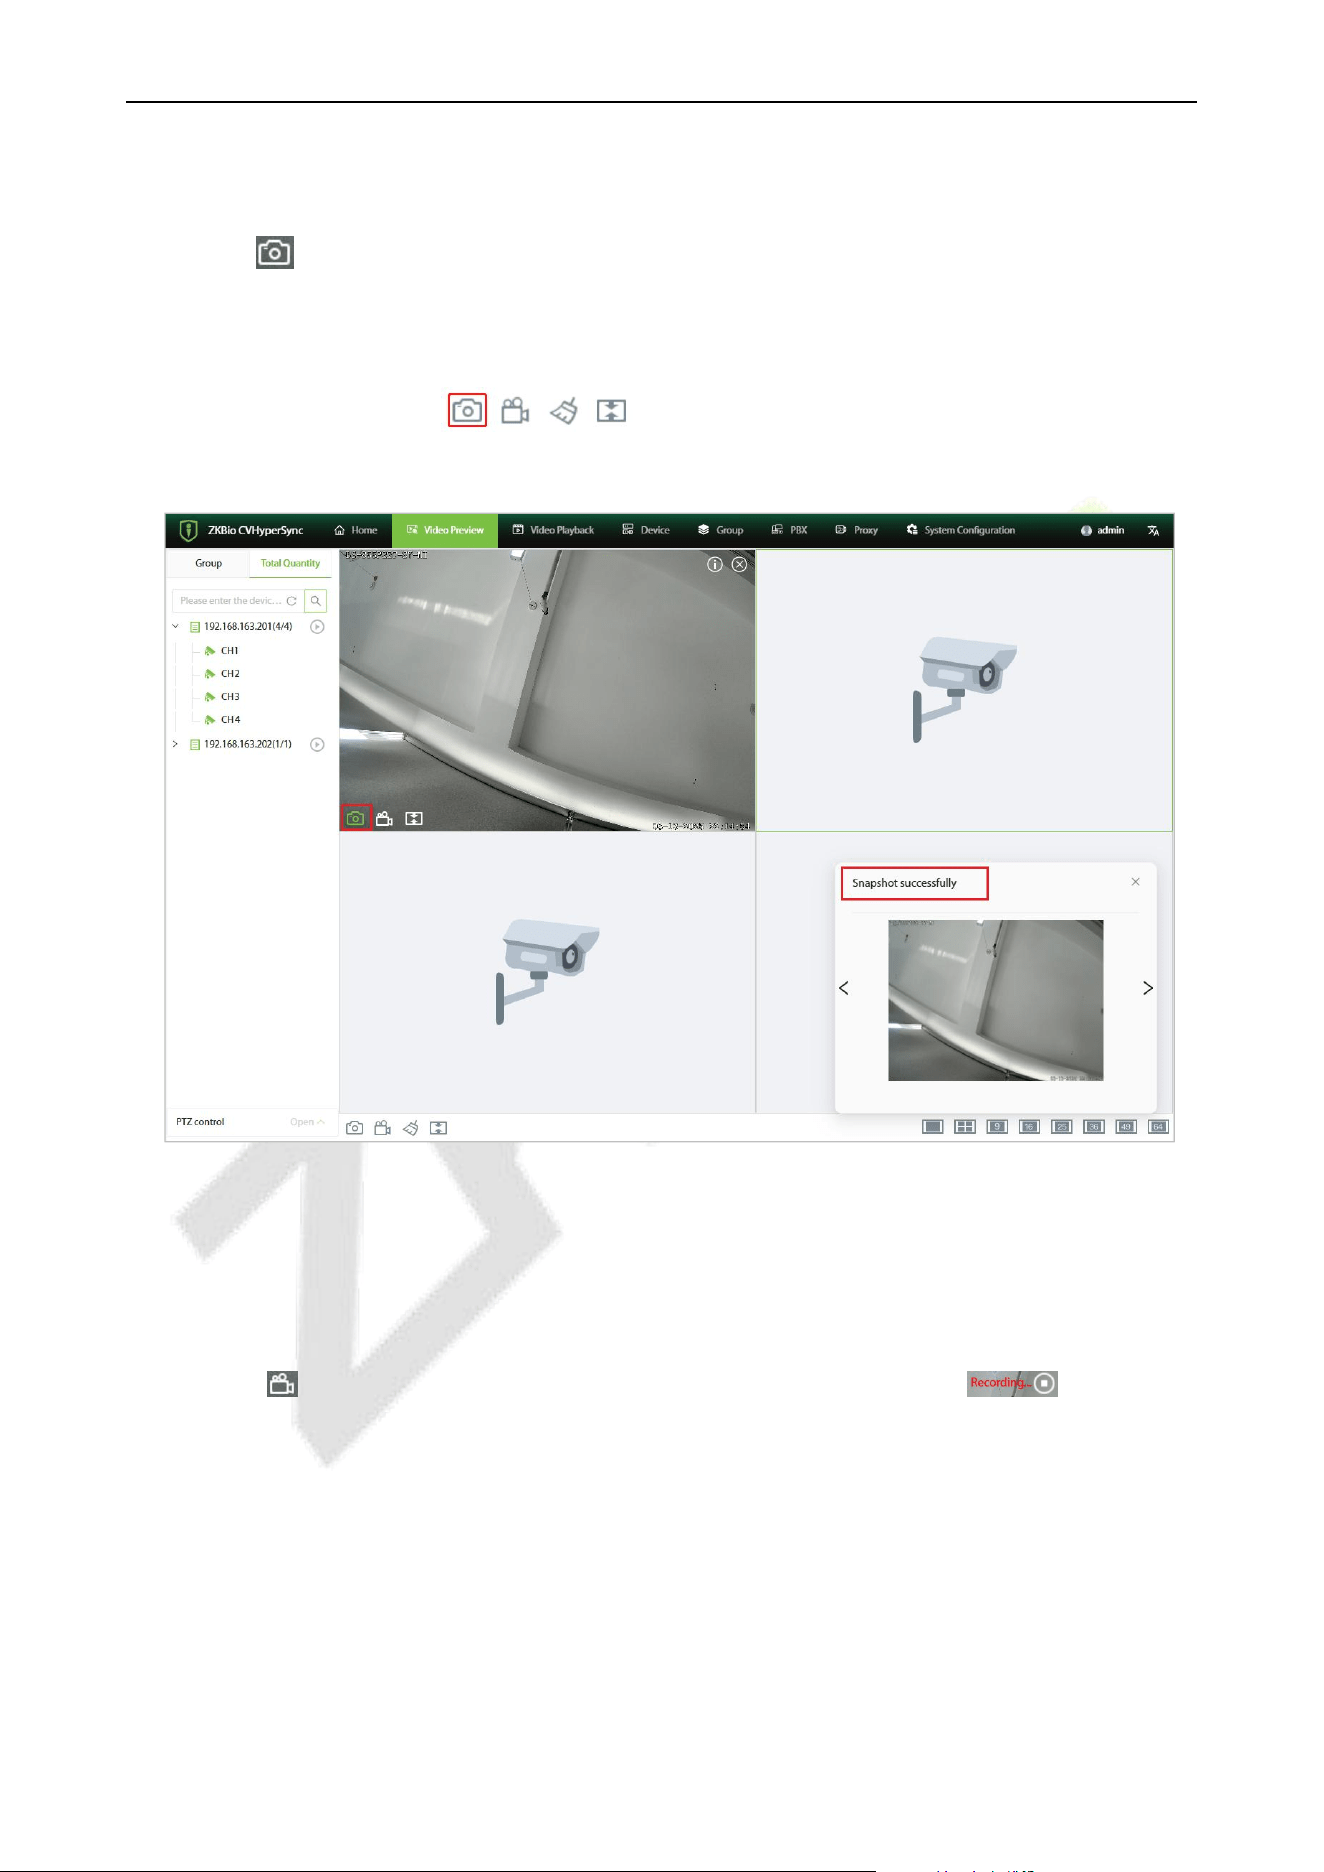
8.2 Snapshot
Click on the icon on the live window to capture the image of the current live window. A prompt
window saying "Snapshot successful" will pop up in the lower right corner. The captured image can
be viewed by accessing the download path in the webpage's "Download Content" section.
If you click the snapshot icon in the menu at the bottom of the interface, it will
capture the images of all the live windows that are currently open simultaneously.
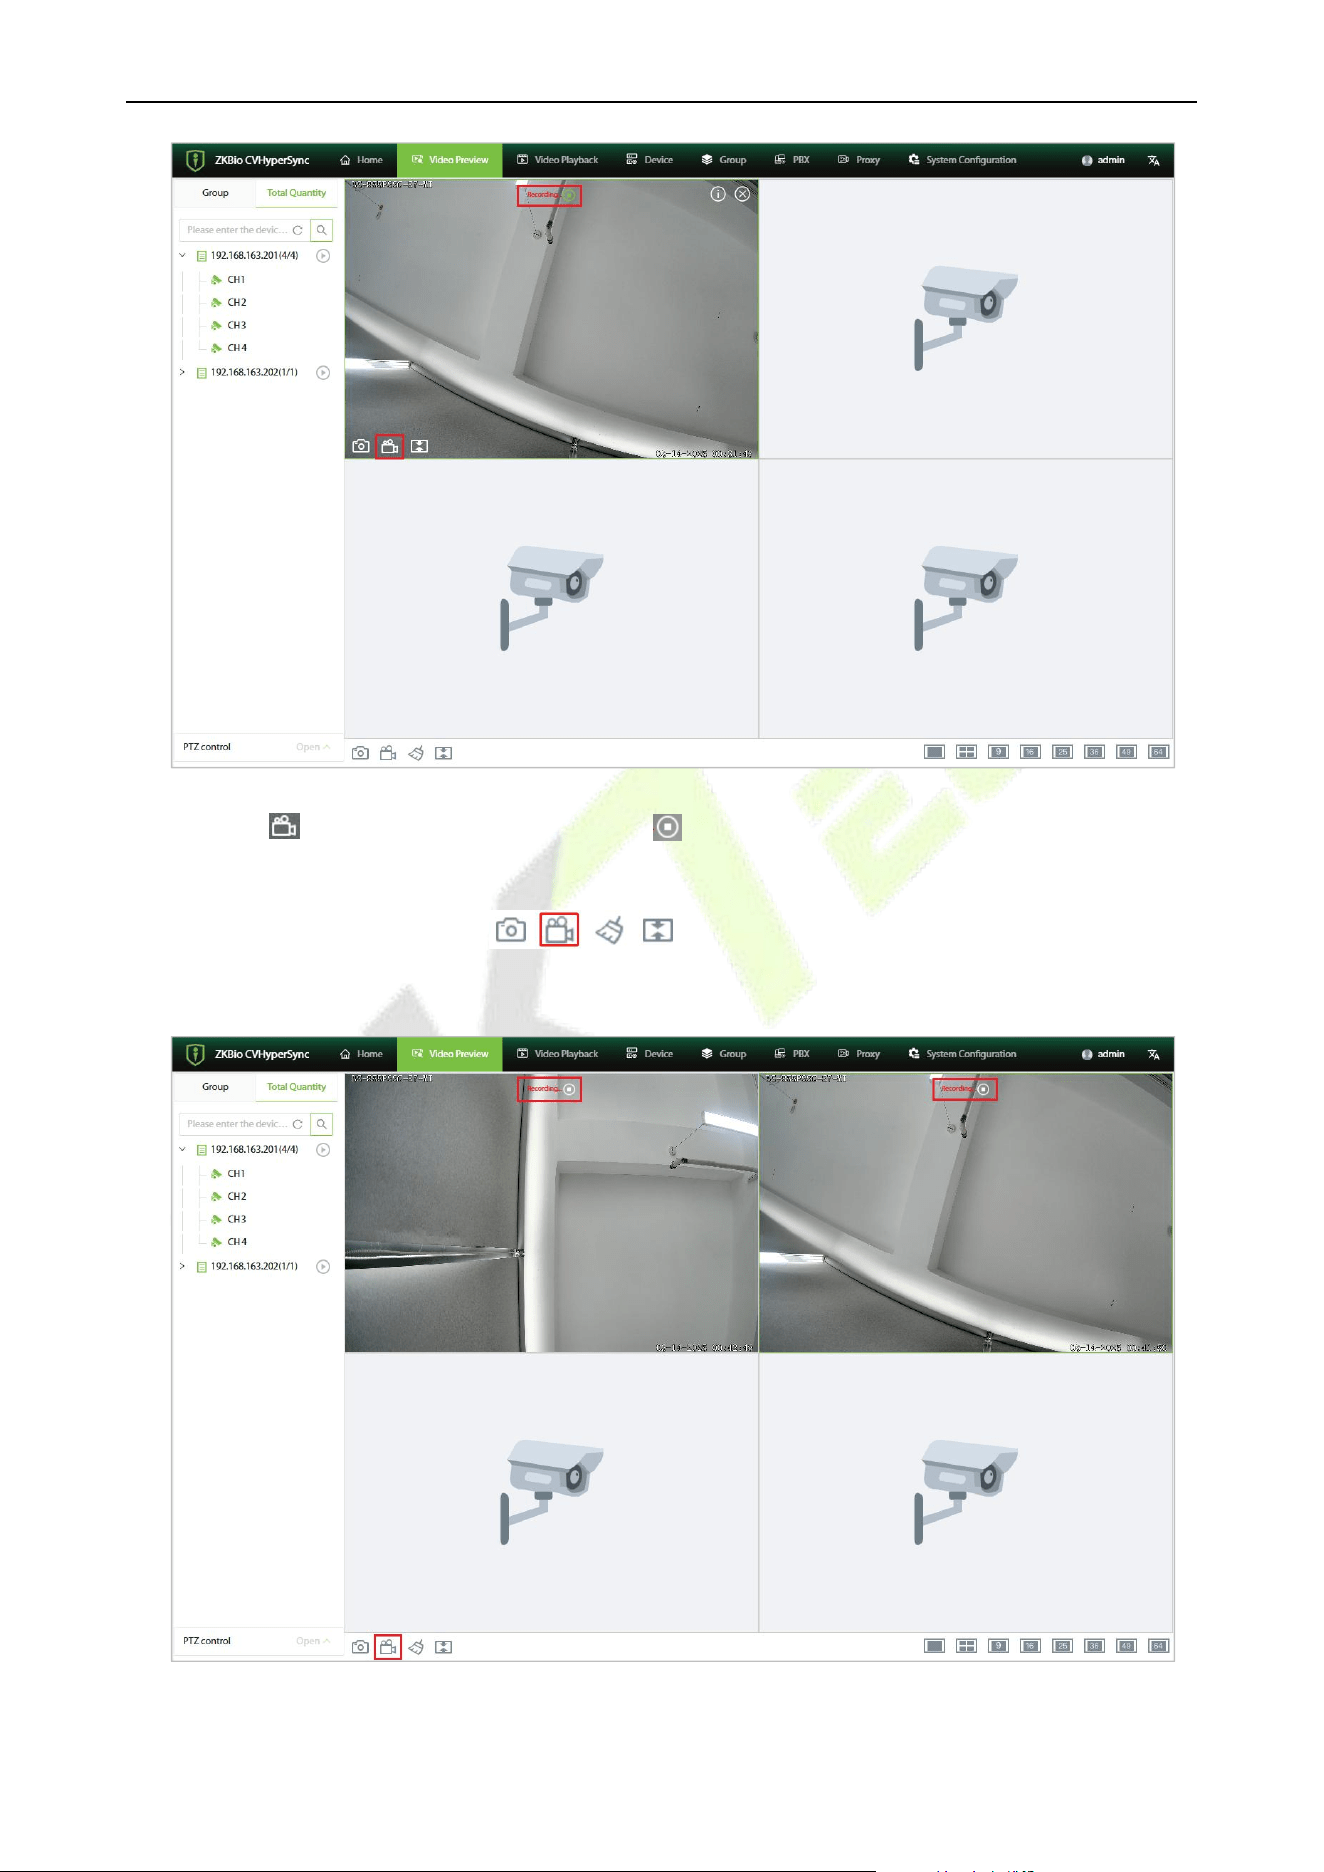
8.3 Manual Video Recording
1. Double-click on the online camera in the "Total Quantity" section, or drag and drop the online
camera to the live playback window to start the live preview.
2. Click the icon on the live window to start recording, and a recording icon will appear
on the video window.
VS50-50 & VS50-100 User Manual
P a g e | 22 Copyright © 2025 ZKTECO CO., LTD. All rights reserved.
3. Click the icon again or the End Recording icon in the video pane, and you can access the
recording by opening the download path in the webpage's "Download Content" section.
4. If you click the recording icon in the menu at the bottom of the interface, all
the live windows that are currently open will start recording simultaneously.
VS50-50 & VS50-100 User Manual
P a g e | 23 Copyright © 2025 ZKTECO CO., LTD. All rights reserved.
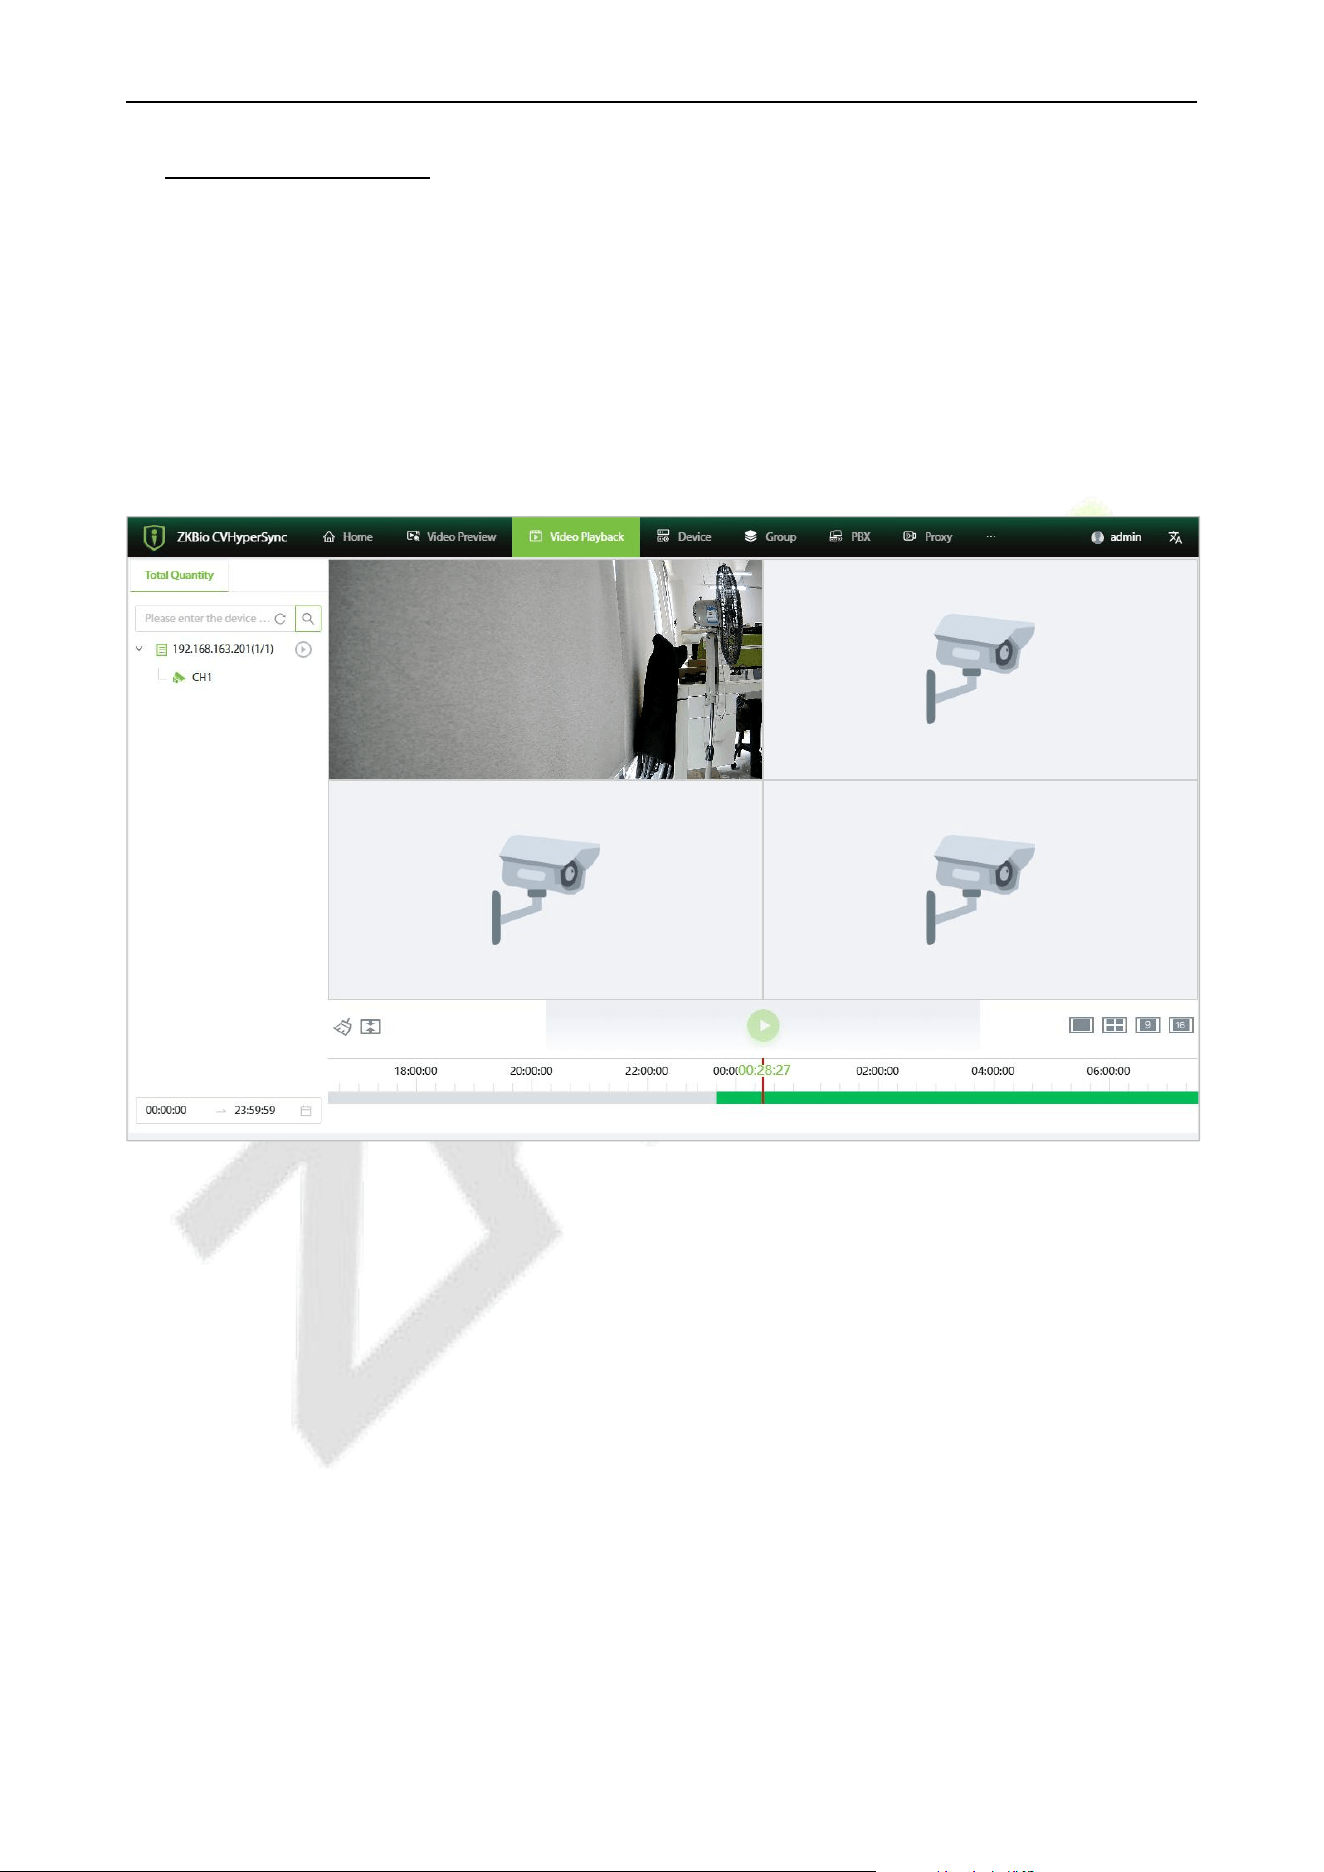
9. Video Playback
Only network video recorders (NVRs) that are connected via the ONVIF protocol (subject to actual
conditions) support the playback function.
1. Click [Video Playback] to enter the video playback interface.
2. Double-click on the online camera in the "Total Quantity" section, or drag and drop the online
camera to the playback window to play the recording.
3. Click on the timeline to select the time for playback and jump to the corresponding recording.
VS50-50 & VS50-100 User Manual
P a g e | 24 Copyright © 2025 ZKTECO CO., LTD. All rights reserved.
10. PBX Management
10.1 Extension Management
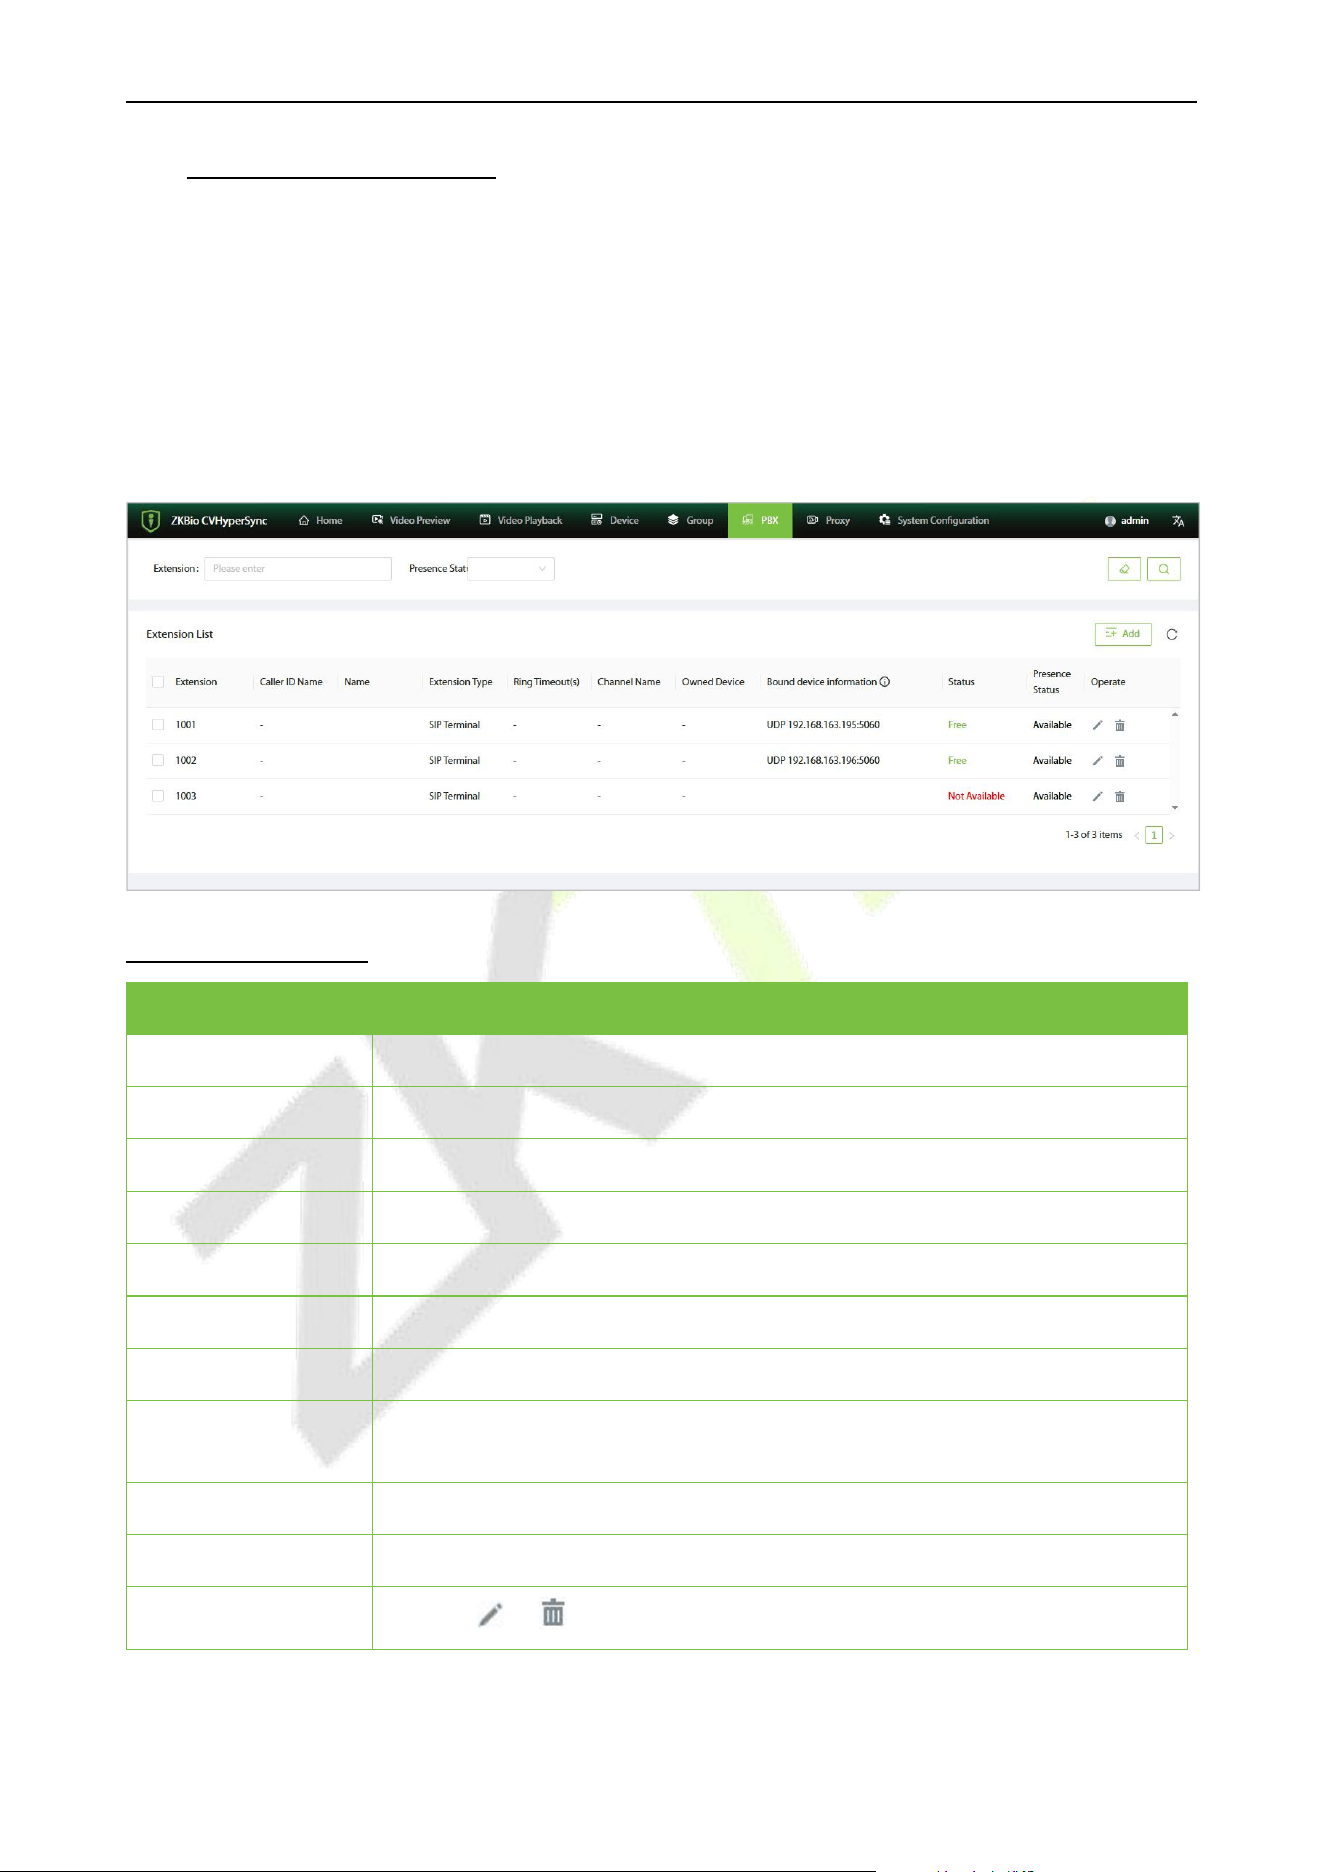
10.1.1 Extension List
Click [PBX] - [Extension] to enter the extension setting interface. You can view and manage added
extensions in the extension list.
Function Description
Menu
Descriptions
Extension
Display extension number
Caller ID Name
Display Caller ID Name
Name
User's name
Extension Type
Display extension number type: SIP terminal, video channel
Ringing Timeout(s)
Extension ring timeout
Channel Name
Channel name (displayed for video type extensions)
Owned Device
Device to which the channel belongs (video type extension display)
Bound device
information
Extension terminal registered IP and port
Status
Extension status displayed: Free, Not Available, Ringing, Busy
Presence Status
Extension online status: Available, Disabled, Do Not Disturb
Operate
Click the or icon to edit or delete an extension.
VS50-50 & VS50-100 User Manual
P a g e | 25 Copyright © 2025 ZKTECO CO., LTD. All rights reserved.
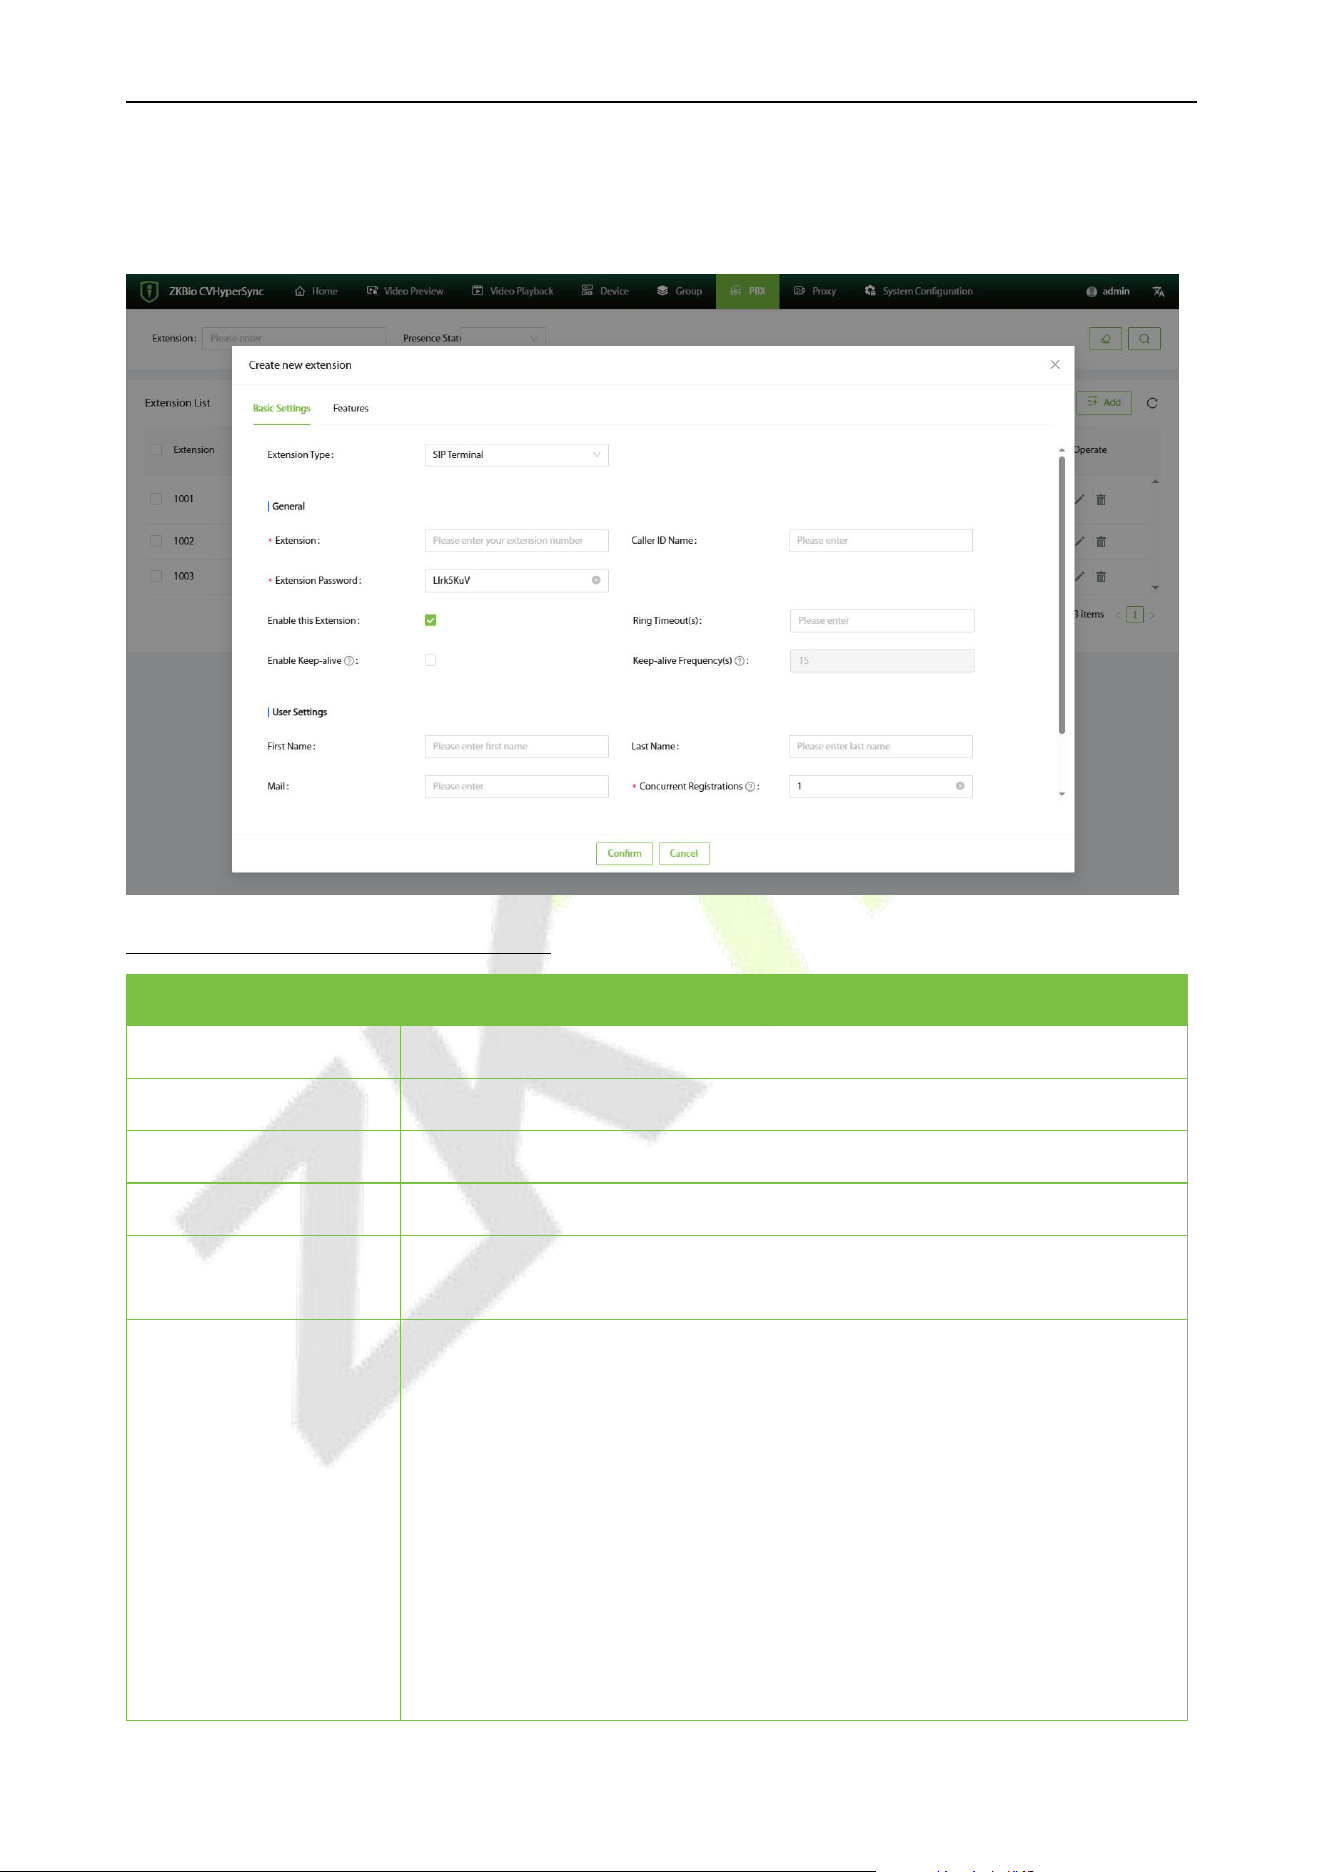
10.1.2 Create an Extension
1. Click [PBX] - [Extension] - [Add] to create an extension.
Basic Setting Parameters Description
Menu
Descriptions
Extension Type
Extension type: SIP terminal, video Channel
Extension
User extension number
Caller ID Name
The name of the caller's display when the user makes an outgoing call
Extension Password
Configure extension password, auto-generate.
Enable this Extension
To disable this extension, leave this item unchecked, it is checked by
default.
Ring Timeout(s)
The ringing time of the device before the incoming call is disconnected, in
seconds.
If not set, the default is the global ringing timeout of 60 seconds, which
can be modified in [General Settings] - [Ringing Timeout(s)].
Valid values range from 3 to 600 seconds.
Note:
1) If the terminal client also sets a ringing timeout, the shortest time will
prevail.
2) If the server-side ringing timeout is set longer than the client-side
ringing timeout, and the call is not answered, it will follow the busy
logic, and the call forwarding will be classified as busy forwarding.
VS50-50 & VS50-100 User Manual
P a g e | 26 Copyright © 2025 ZKTECO CO., LTD. All rights reserved.
Enable Keep-alive
If this option is enabled, the PBX will periodically send SIP OPTION
signaling to detect whether the host is online. The default setting is Off.
Keep-alive
Frequency(s)
When the host is powered on, set the interval for sending keepalive
messages in seconds. The default value is 15 seconds.
Channel
Configured video channel
First Name
Configured user's given name
Last Name
Configured user's surname
Email
User's email address
Concurrent
Registrations
Maximum number of terminals a user can register with the same number,
default is 1.
Mobile Phone Number
User's mobile phone number
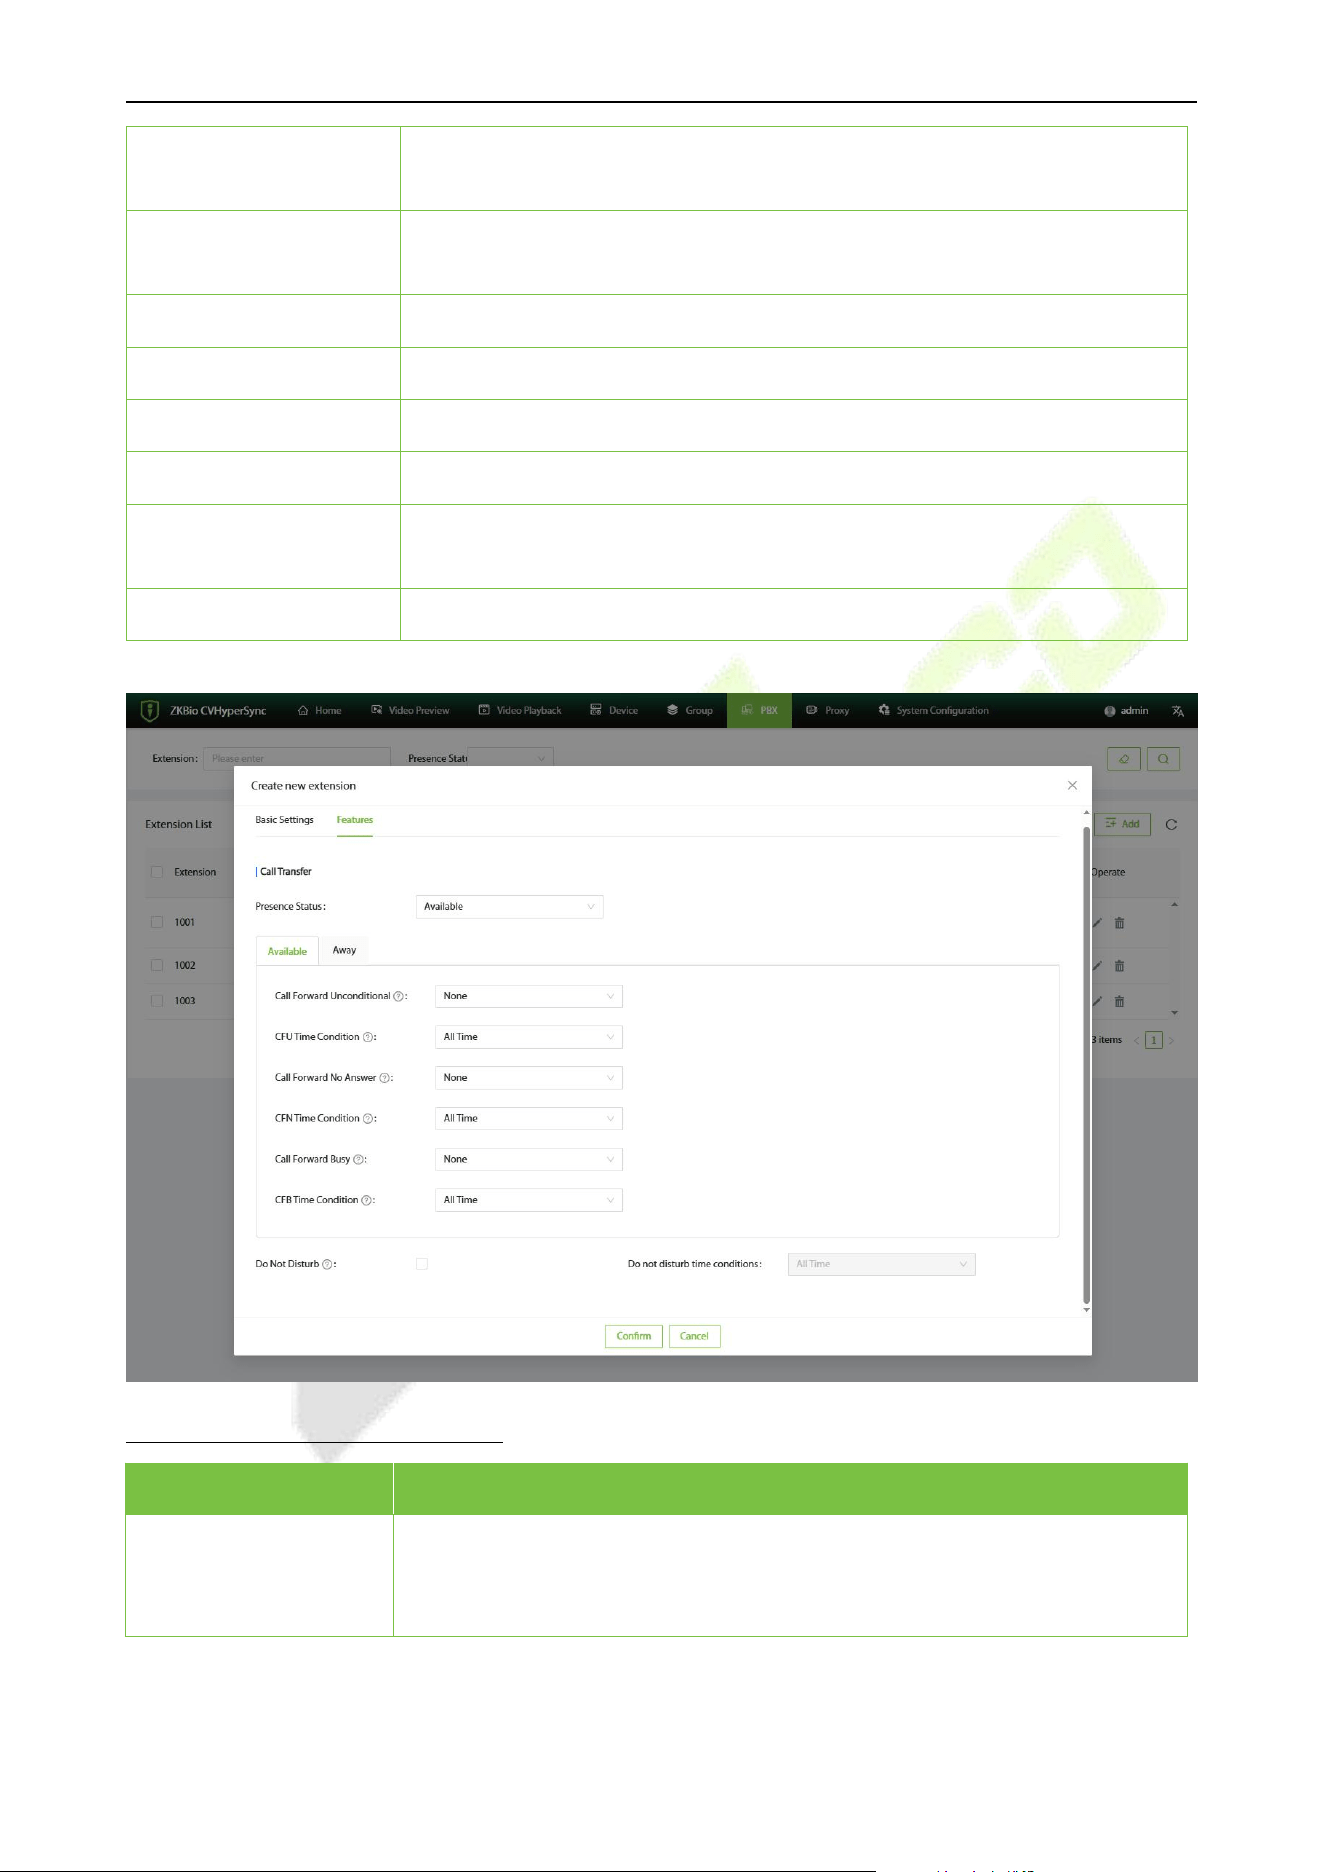
Features Parameters Description
Menu
Descriptions
Presence Status
Set the online status of the extension. The default is Available. If you need
to set a transfer destination, please configure call forwarding.
Three online statuses can be set: Available, Away, and Do Not Disturb.

VS50-50 & VS50-100 User Manual
P a g e | 27 Copyright © 2025 ZKTECO CO., LTD. All rights reserved.
Call Forward
Unconditional
The target extension of unconditional transfer (CFU). All incoming calls will
be unconditionally transferred to this target extension. Note: If left blank, it
will not be activated.
The unconditional transfer options are:
None: Disable unconditional transfer.
Extension: Select an extension on the streaming media as the
destination for unconditional transfer.
Ring Group: The ringing group is selected as the destination of the
unconditional transfer.
The default setting is None.
Note: Leaving it blank indicates that unconditional transfer is not activated.
CFU Time Condition
Set the time conditions for unconditional transfer. Unconditional transfer
can only be performed when these time conditions are met. Currently, only
the "All Time" setting is available.
Call Forward No
Answer
Target extension for no response transfer (CFN). If the extension rings for a
period of time and there is no response, the call will be redirected to the
target extension.
The no-answer transfer options are:
None: Disable no-answer transfer.
Extension: Select an extension on the streaming media as the destination
for no response transfer.
Ring Group: Select an extension from the ring group as the destination
for no response transfer.
The default setting is None.
Note: If left blank, it will not be activated.
CFN Time Condition
The time condition for unresponsive transfer must be met in order to
proceed with unresponsive transfer. Currently, only the "All Time" setting is
available.
Call Forward Busy
Target extension for busy transfer (CFB). When the extension is busy,
incoming calls will be redirected to the target extension.
The busy transfer options are:
None: Disable busy transfer.
Extension: Select an extension on the streaming media as the destination
for busy transfer.
Ring Group: Select an extension from the ring group as the destination
for busy transfer.
The default setting is None.
Note: If left blank, it will not be activated.
CFB Time Condition
The time conditions for busy transfer must be met before the busy transfer
can be carried out. Currently, only the "All Time" setting is available.
VS50-50 & VS50-100 User Manual
P a g e | 28 Copyright © 2025 ZKTECO CO., LTD. All rights reserved.
Do Not Disturb
If no disturbance is enabled, all calls will be ignored, and unconditional
transfer, unresponsive transfer, and busy transfer of the extension will not
take effect.
Do not disturb time
conditions
The time conditions for Do Not Disturb (DND). The DND feature will only be
activated when these conditions are met.
2. After setting the relevant parameters, click [Confirm].
3. The created extension will be displayed in the extension list.
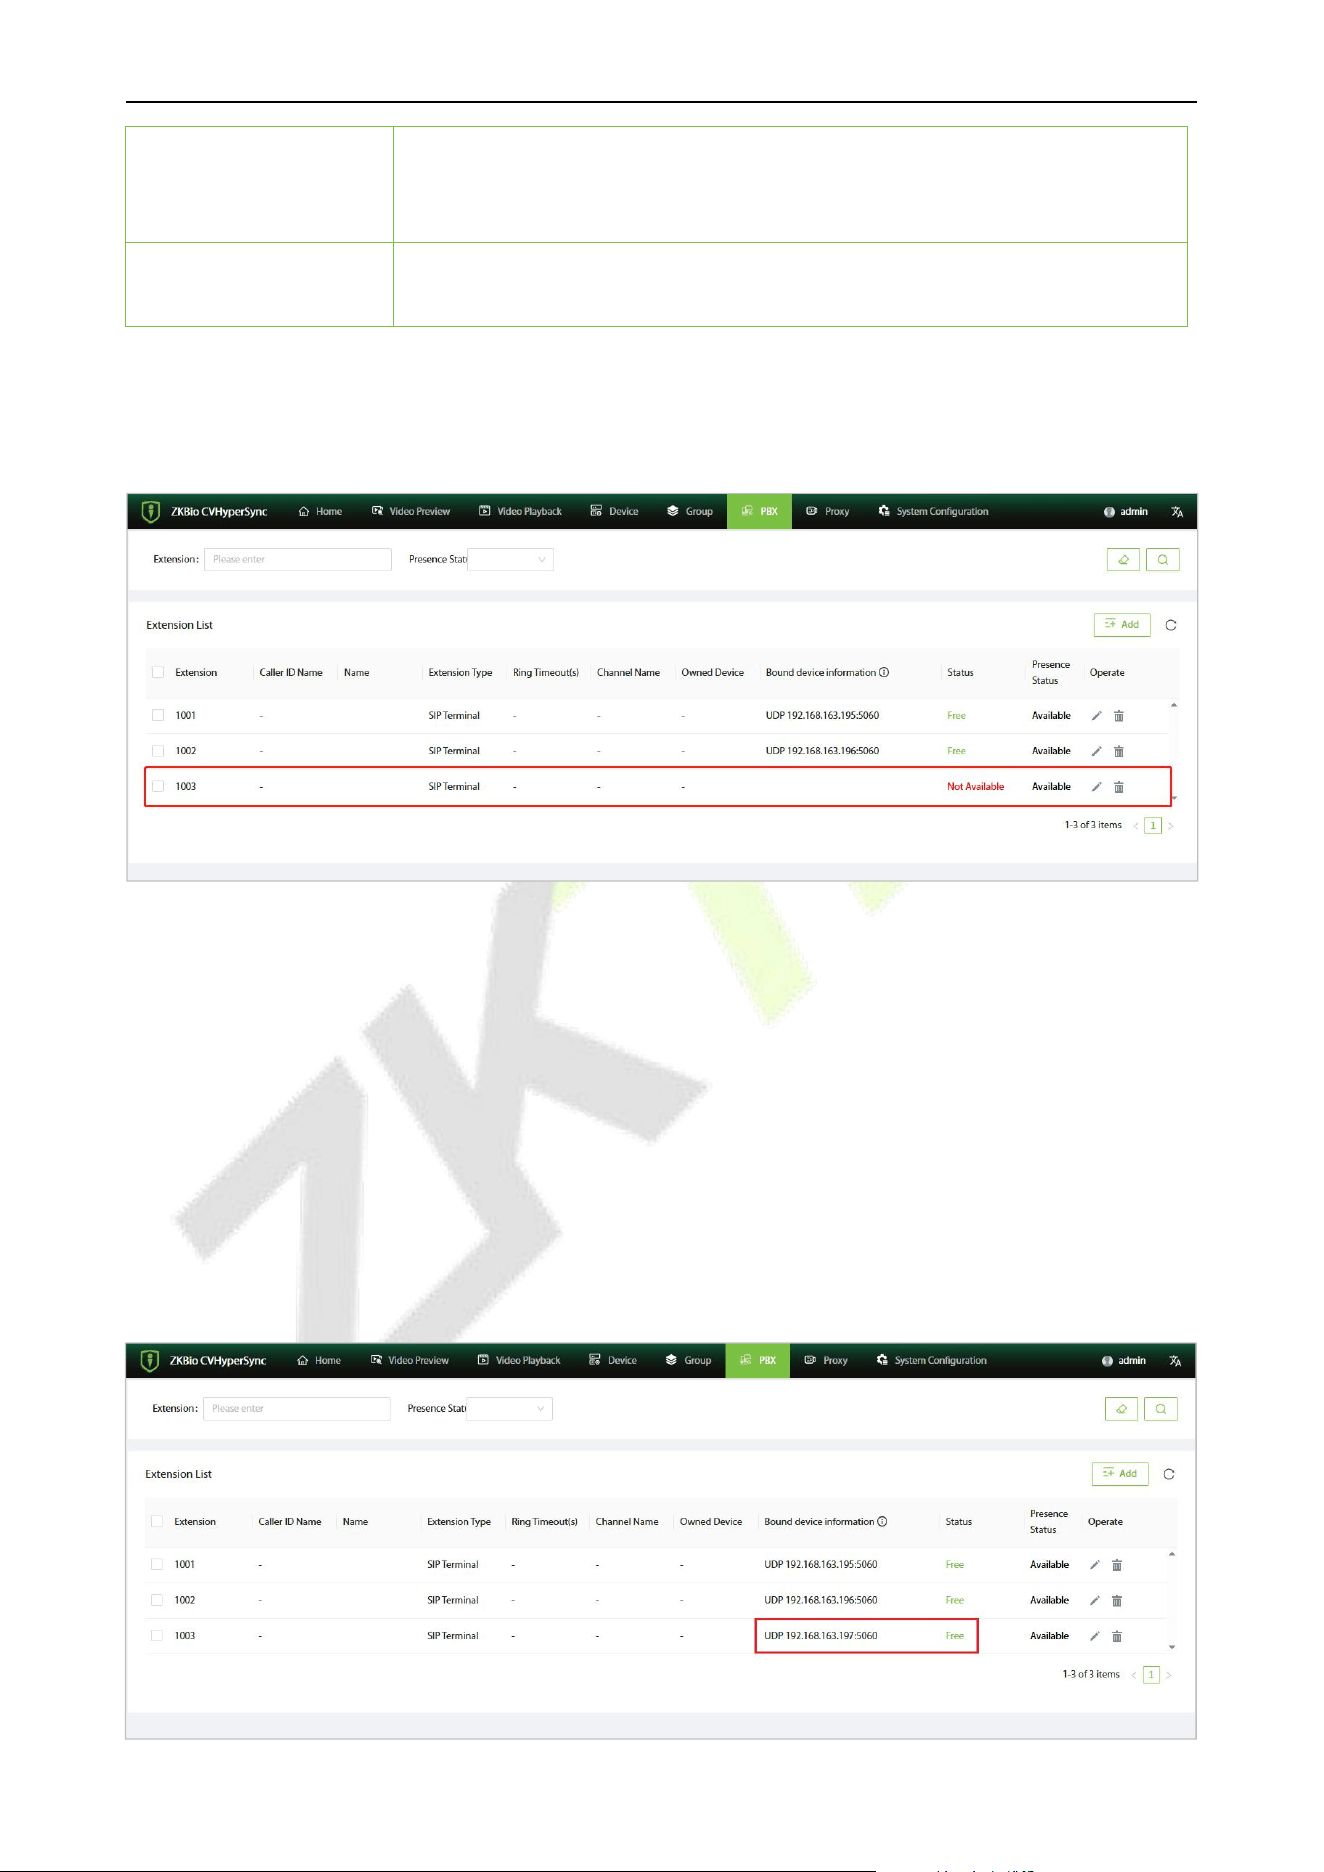
10.1.3 Extension Registration and Login
After a new extension is added on the server, it can be registered and logged in on the device.
1. Log in to the device's web server, click on [Intercom] - [SIP] to enter the SIP settings interface.
2. Enter the extension's username, password (the password automatically generated when the
extension was created), SIP Server Host (the IP address of the server), and other information. After
completing the process, click on [Save] to save the changes and exit.
3. After the settings are completed, in the server extension list interface, the extension status will be
displayed as "Free".

VS50-50 & VS50-100 User Manual
P a g e | 29 Copyright © 2025 ZKTECO CO., LTD. All rights reserved.
10.1.4 Edit and Delete
Select the extension you want to edit or delete from the list, and click the or icon next to it.
10.2 Ring Group
10.2.1 Ring Group List
Click [PBX] - [Ring Group] to enter the Ring Group setting interface. You can view and manage the
created ring groups here.
10.2.2 Create a Ring Group
1. Click [PBX] - [Ring Group] - [Add] to create a ring group.
2. After setting the relevant parameters in the new window, click [Confirm] to create the ring group.

VS50-50 & VS50-100 User Manual
P a g e | 30 Copyright © 2025 ZKTECO CO., LTD. All rights reserved.
Function Description
Menu
Descriptions
Name
Set the ring group name
Extension
Set the ring group extension
Member
Select extensions from the left list and add them to the right list to set ring
group members
Strategy
Select the ringing strategy:
Simultaneous Ringing: All idle members will ring until one of them
answers the call.
Sequential Ringing: Ring members in the order listed.
Note: The online status does not represent the extension status. When
calling the ring group, the call forwarding and Do Not Disturb settings of the
group members will not take effect.
Ringing Time for Each
Member
Set the number of ringing seconds for each call. If set to 0, there is no time
limit. The default setting is 30 seconds.
Note: If the phone has already started the timeout setting, the actual ringing
time may be overwritten.
Replace Host Name
If checked, replace the name of the host with the name of the ringtone
group.
If Extension A is named 1000 and Ring Group A is named 6500, when
Extension A calls Ring Group A, the caller ID displayed for the members of
Ring Group A will show as 6500.
Skip Busy Agents
After enabling, busy members will be skipped, such as extensions that are
already in a call.
10.2.3 Edit and Delete
Select the ring group you want to edit or delete from the list, and click the or icon next to it.
10.3 Add Interactive Voice Response (IVR)
Click [PBX] - [IVR] to enter the IVR settings interface, where you can create, modify, view, and delete
IVRs.

VS50-50 & VS50-100 User Manual
P a g e | 31 Copyright © 2025 ZKTECO CO., LTD. All rights reserved.
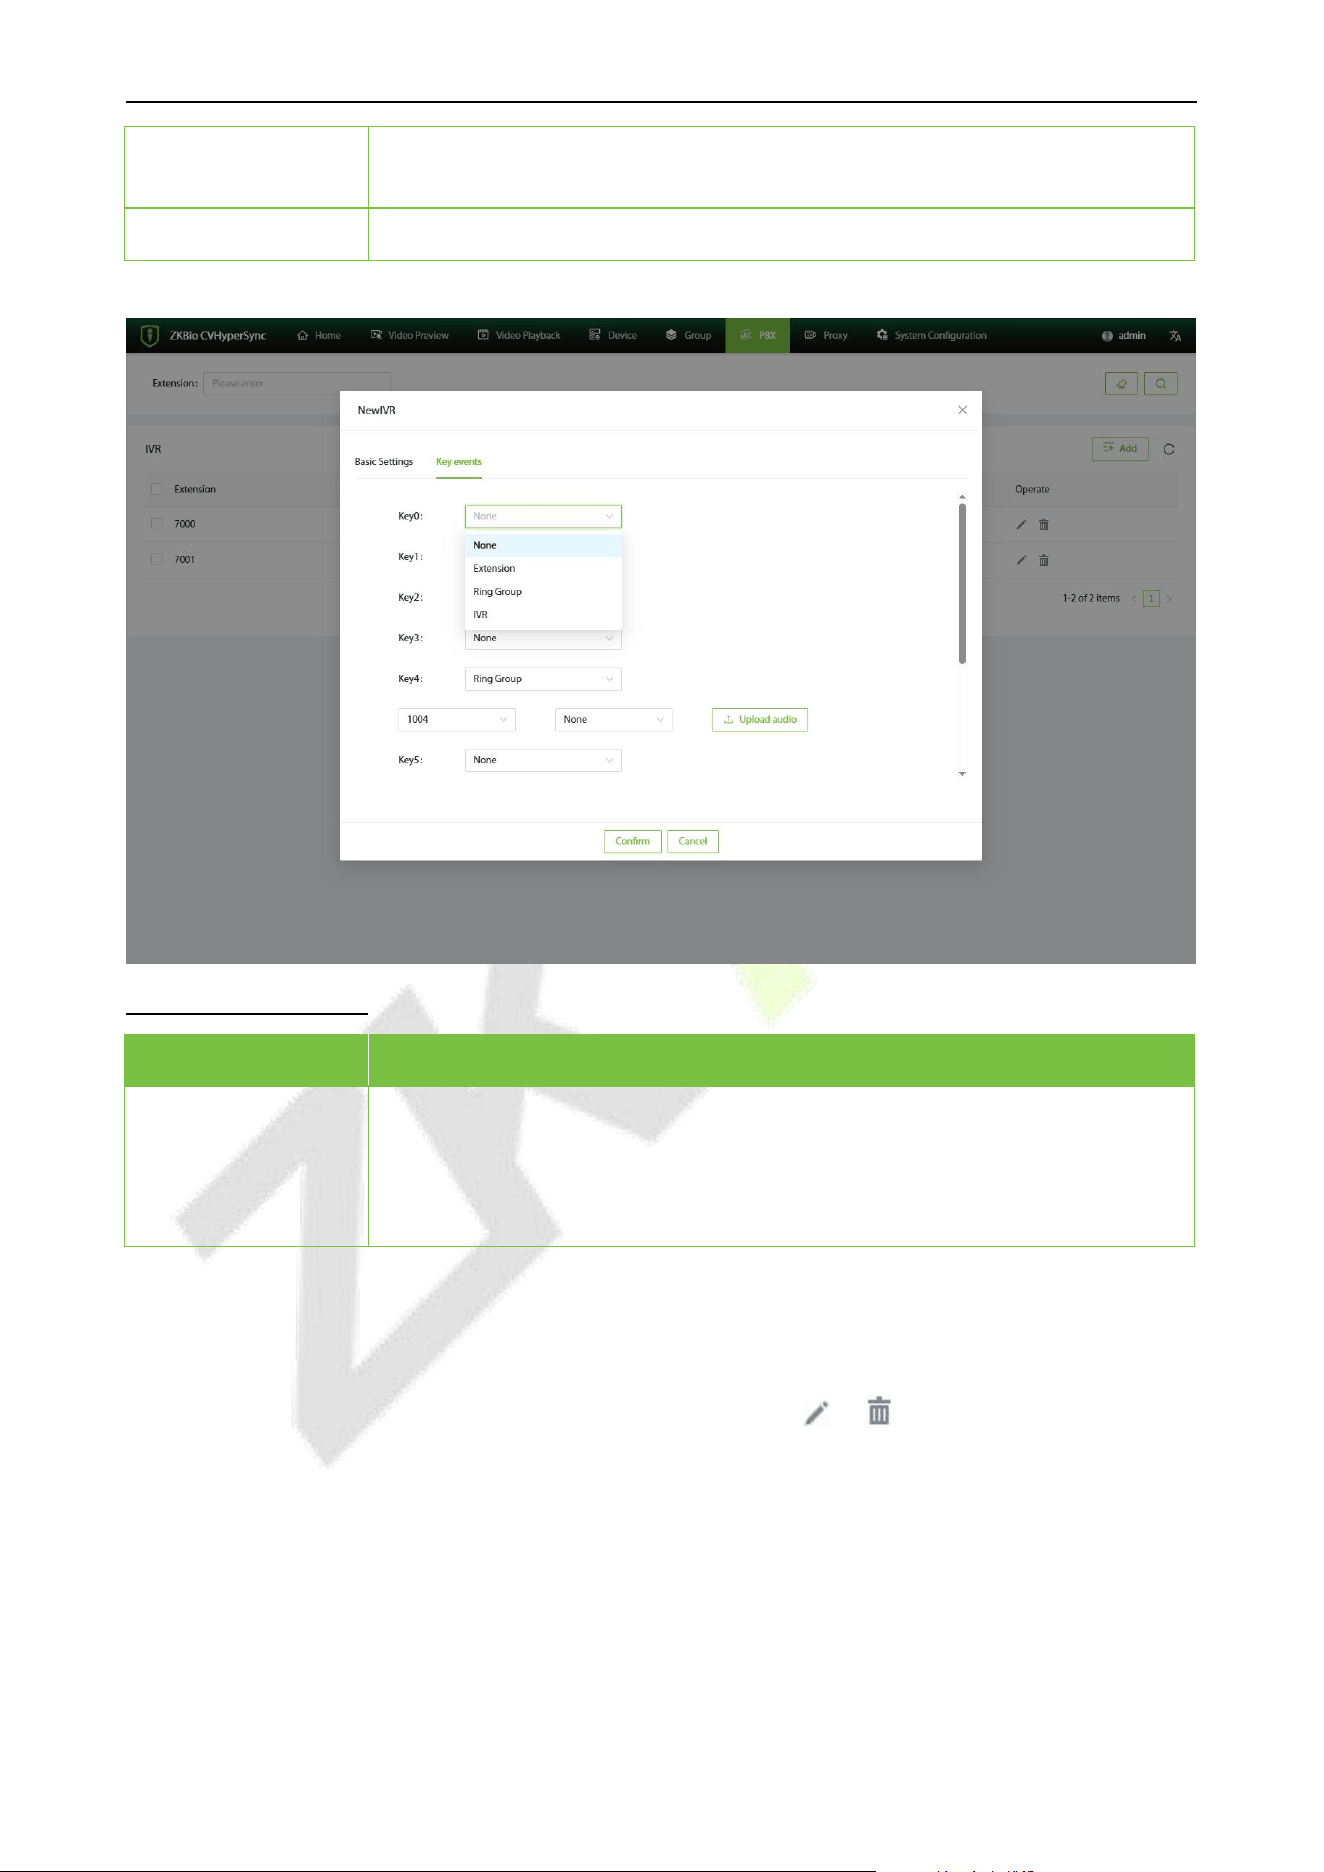
10.3.1 Add IVR
1. Click [PBX] - [IVR] - [Add] to add an IVR.
2. After setting the relevant parameters in the new window, click [Confirm] to create the IVR.
Function Description
Menu
Descriptions
Name
Configure the name of the IVR. It consists of letters, numbers, underscores, and
hyphens.
Extension
Enter the extension number for the automated voice response.
Replace Host Name
If checked, replace the host name with the IVR name.
Return to IVR Menu
Enabling this option will return to the IVR main menu when the IVR button fails
to call the extension.
Prompt sound
The prompt tone will be played when the user enters the IVR. Select an audio
file to play, and you can click "Upload audio" to add a custom audio file.
Response timeout
The answer timeout is the time to wait for user input after the prompt tone has
finished playing. If no DTMF signal is entered, it will be considered as a
timeout. The default setting is 10 seconds.
Response timeout
prompt sound
The answer timeout prompt tone will be played when the answer times out.
Users can click "Upload audio" to set a custom prompt tone.
VS50-50 & VS50-100 User Manual
P a g e | 32 Copyright © 2025 ZKTECO CO., LTD. All rights reserved.
Invalid prompt
sound
The prompt tone will be played when an invalid key is pressed.
Number of cycles
The number of times for timeout loops and invalid loops.
Function Description
Menu
Descriptions
Key and
Destination
Select a key for the event (digits from 0 to 9).
Event options include: None, Extension, Ring Group, IVR.
Custom Audio: Each key can have a custom audio file for the key press prompt
tone.
10.3.2 Edit and Delete
Select the IVR you want to edit or delete from the list, and click the or icon next to it.
10.4 Call Prompt Tone
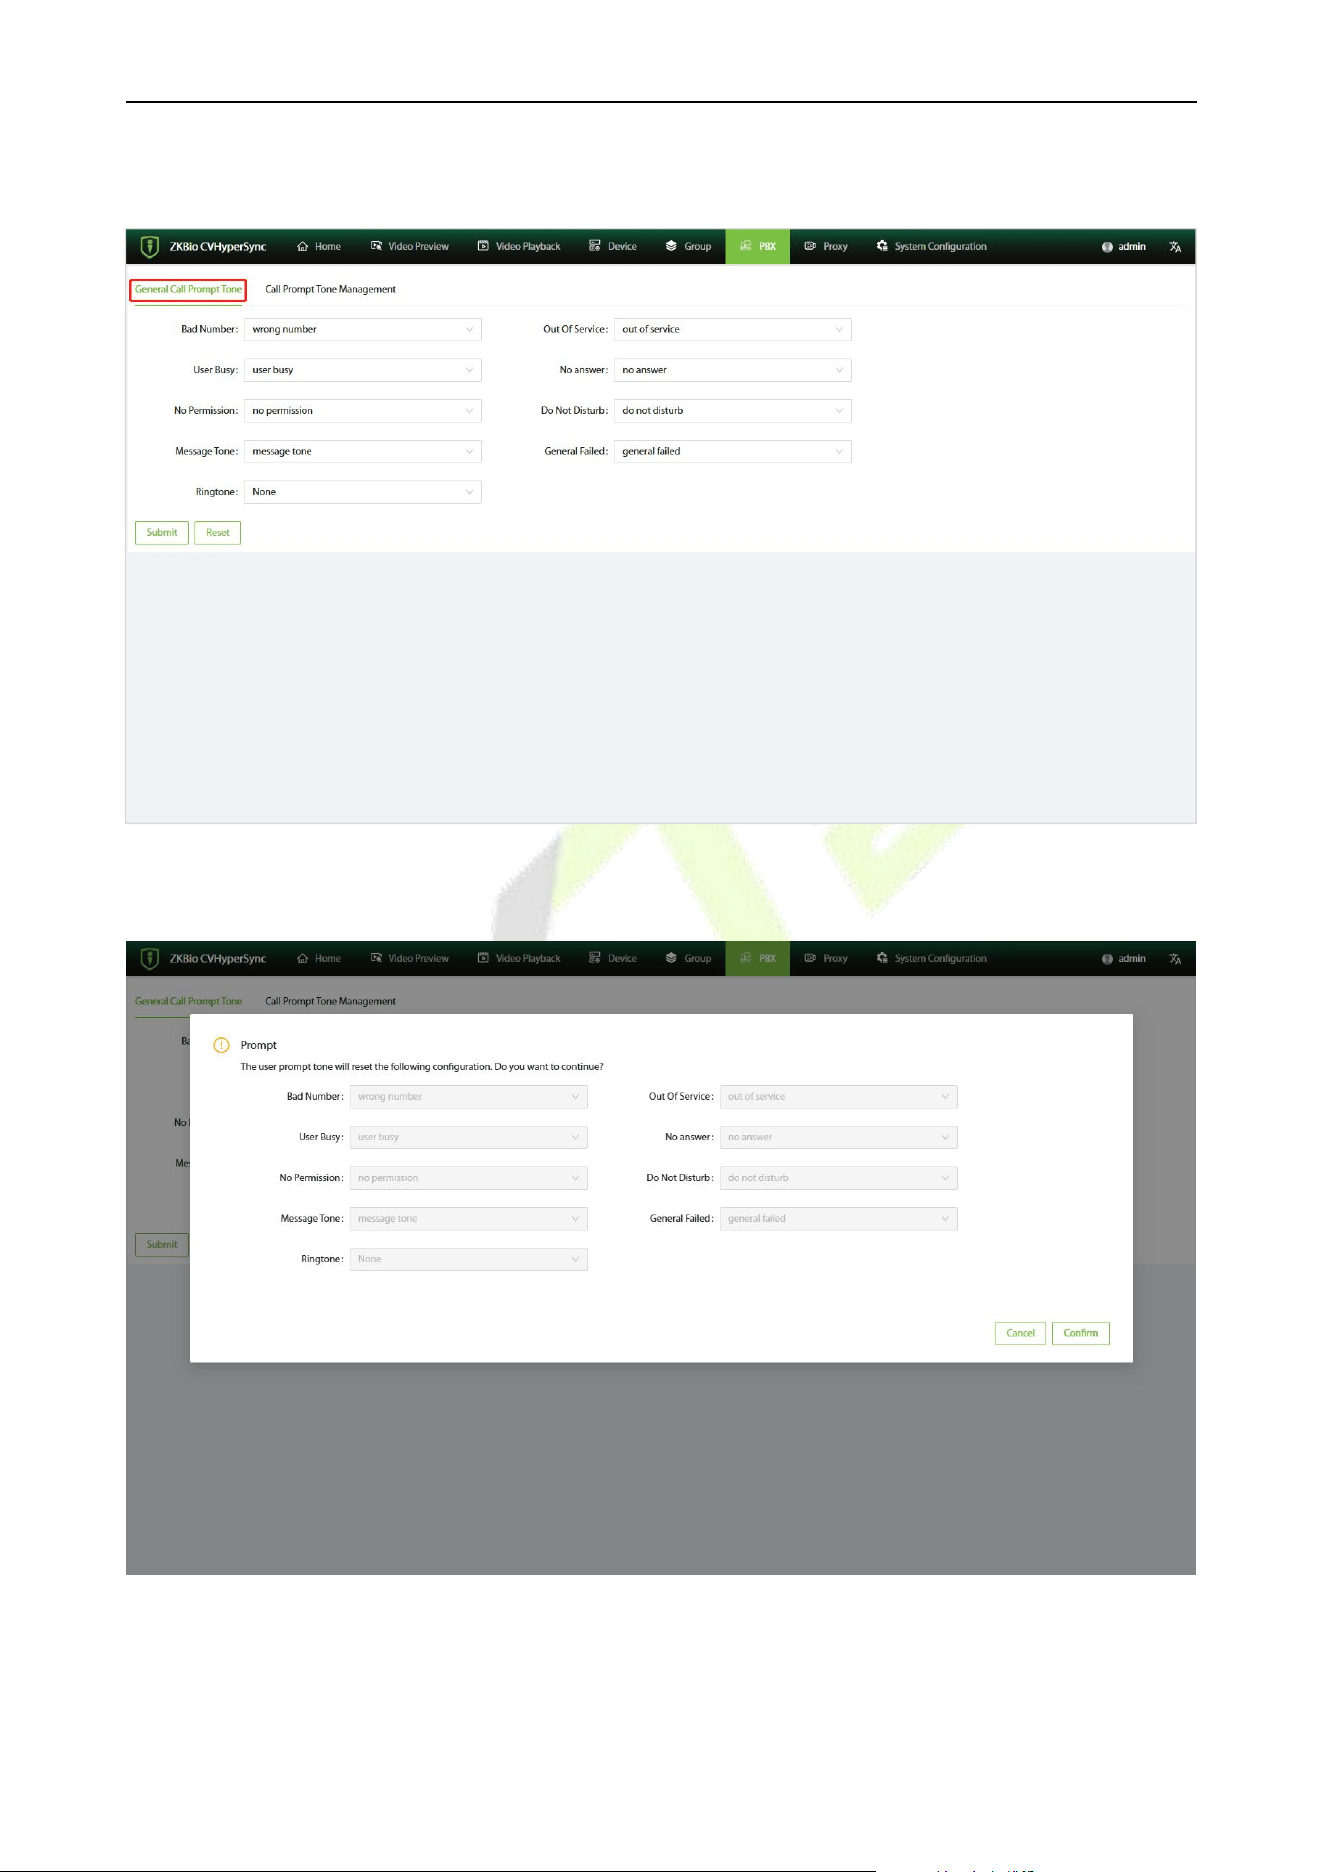
10.4.1 Configure the general call prompt tone.
VS50-50 & VS50-100 User Manual
P a g e | 33 Copyright © 2025 ZKTECO CO., LTD. All rights reserved.
Click [PBX] - [Call Prompt Tone] - [General Call Prompt Tone] to enter the call prompt tone settings
interface.
Reset: Click [Reset] to restore all prompt tones to their default values, as shown in the figure below.
VS50-50 & VS50-100 User Manual
P a g e | 34 Copyright © 2025 ZKTECO CO., LTD. All rights reserved.
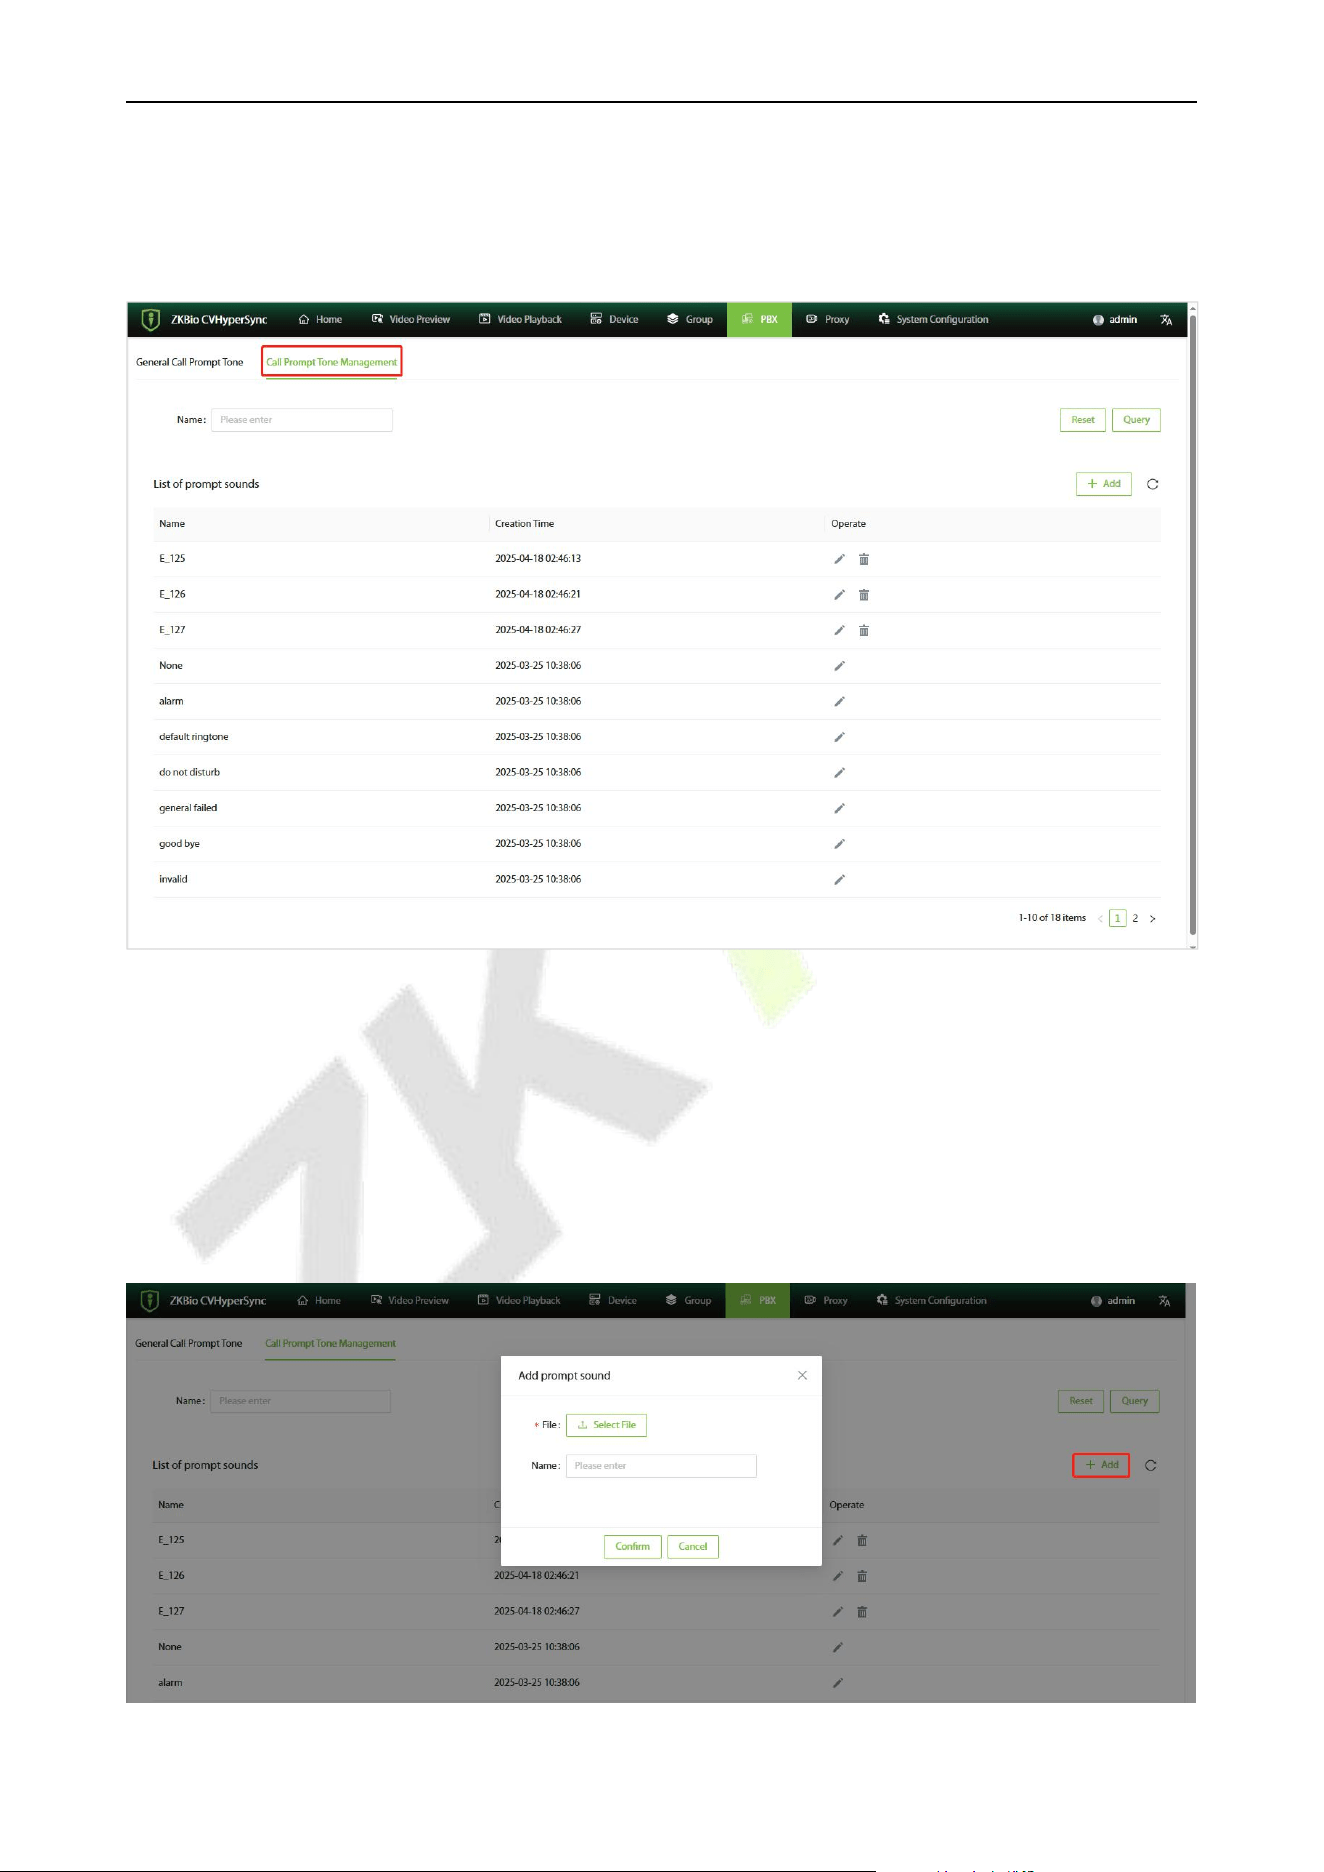
10.4.2 List of prompt sounds
Click [PBX] - [Call Prompt Tone] - [Call Prompt Tone Management] to enter the view the list of
prompt sounds.
10.4.3 Add a New Call Prompt Tone
1. Click [PBX] - [Call Prompt Tone] - [Call Prompt Tone Management] - [Add] to add a new call
prompt tone.
2. Click [Select File] to select the prompt tone file you want to upload.
3. Click [Confirm] to upload the prompt tone.
VS50-50 & VS50-100 User Manual
P a g e | 35 Copyright © 2025 ZKTECO CO., LTD. All rights reserved.
10.4.4 Edit and Delete
Select the prompt tone you want to edit or delete from the list, and click the or icon next to it.
Note:
1) Click the icon to edit only the name of the prompt tone.
2) When you click the icon to delete, the corresponding service configured with this prompt sound
will be cleared.
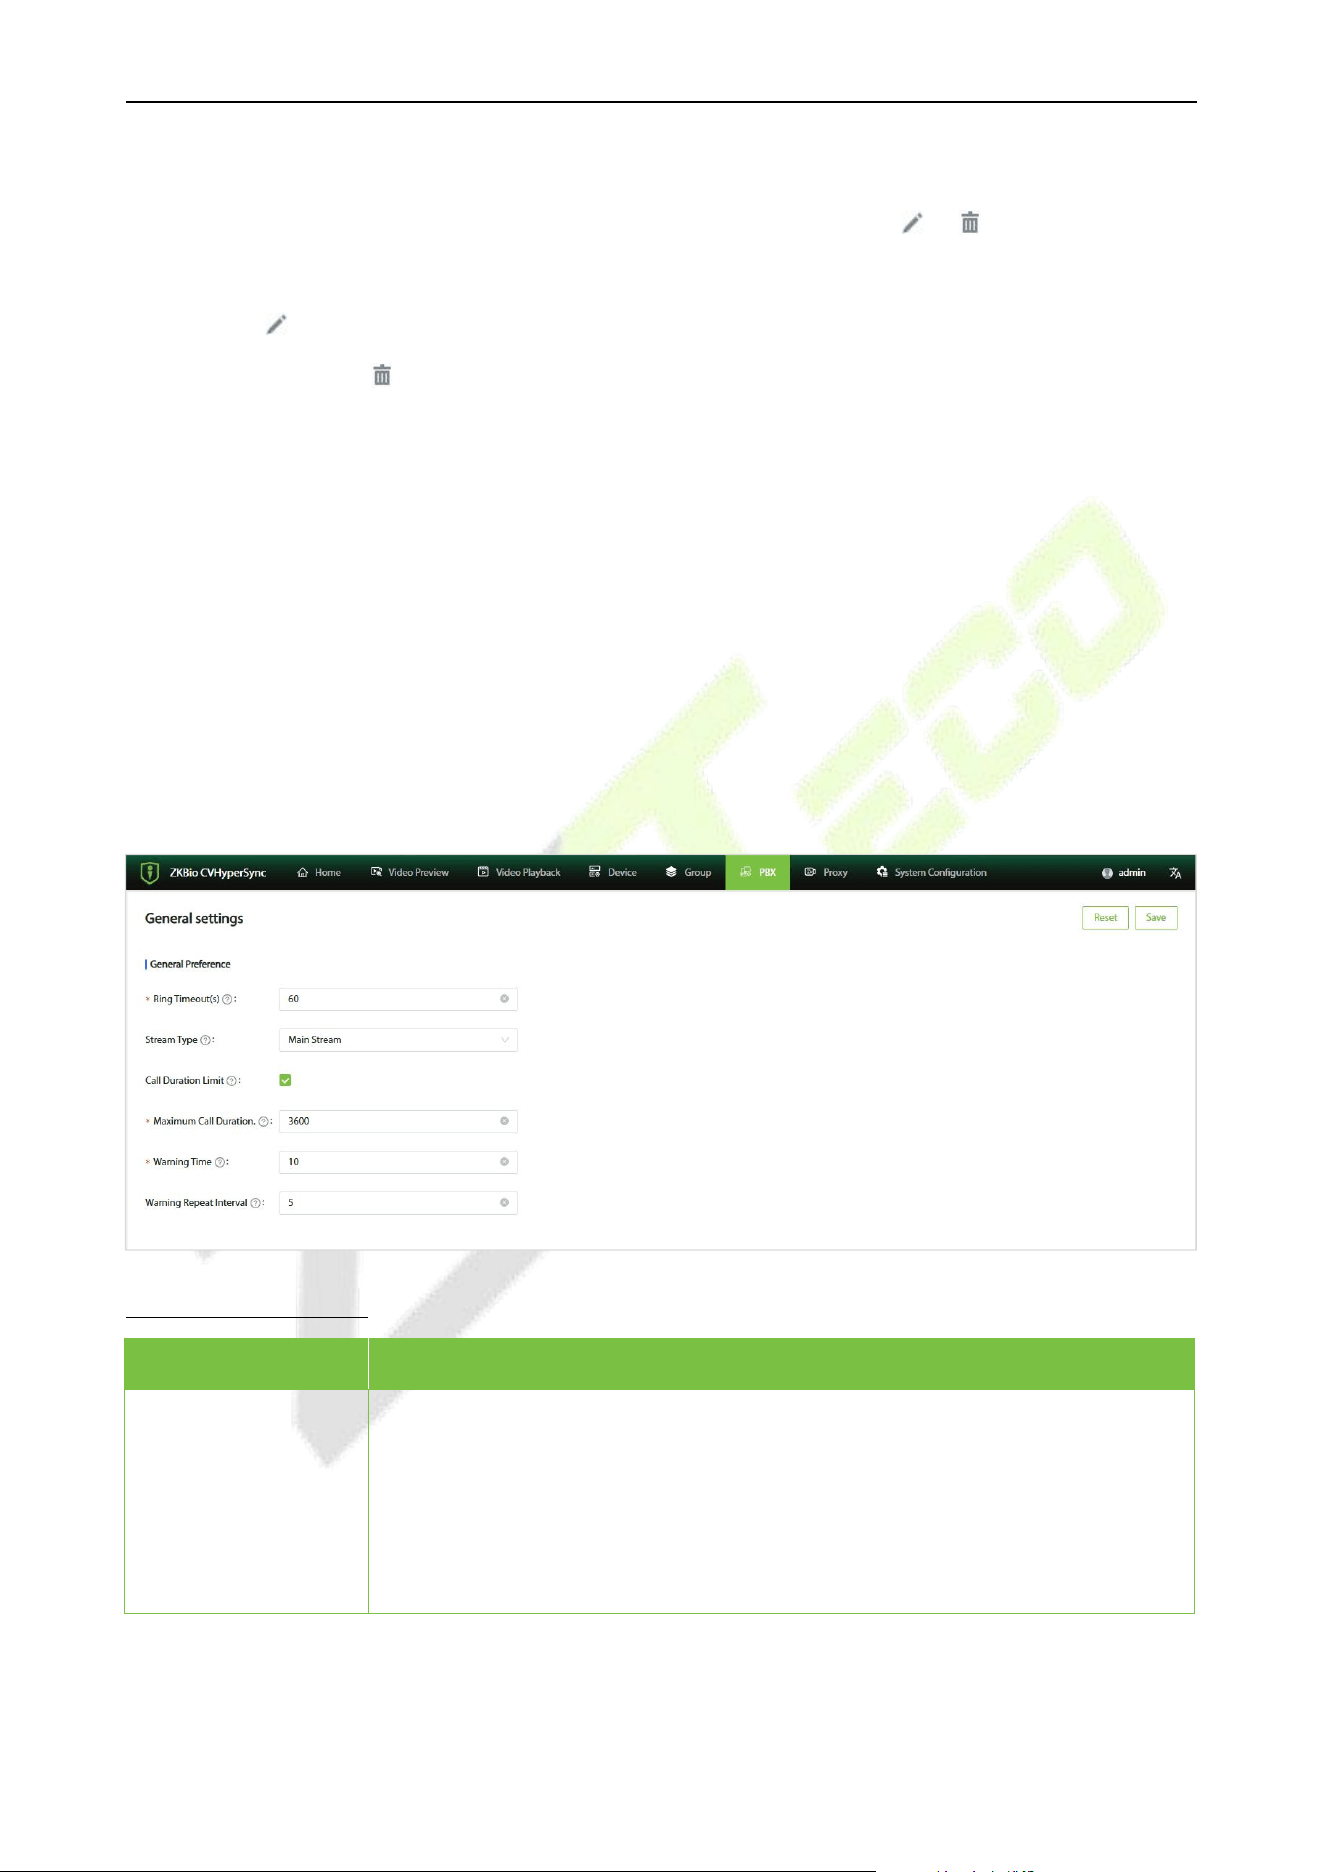
10.5 General Settings
10.5.1 Configuration of General Settings Parameters
1. Click [PBX] - [General Settings] to enter the general settings interface. The parameters configured
in the general settings apply to all extensions and are mainly for the global configuration of
extensions.
2. After setting the parameters, click [Save] to complete the process.
Function Description
Menu
Descriptions
Ring Timeout(s)
The ringing time of the device before the extension is disconnected, in
seconds.
If the extension page does not set a ringing timeout time, the global ringing
timeout time here will be used to ring.
Note: If the extension client has a ringing timeout set, the shorter time will
prevail.
VS50-50 & VS50-100 User Manual
P a g e | 36 Copyright © 2025 ZKTECO CO., LTD. All rights reserved.
Stream Type
The type of video stream played when dialing an extension's video device.
Selecting the main stream means that the device will play the main stream
video by default when dialed. If the RTSP device address connected is a sub-
stream address, dialing this extension's device will result in an unreachable
prompt.
This parameter is only used for extensions that are called automatic (only
video channel online) or video channel type.
Note: Dialing national standard devices is not affected by this parameter.
Call Duration Limit
Limit the maximum duration of calls. If there is no call duration limit set in the
extension page and outgoing route, the global call duration limit here will take
effect.
Maximum Call
Duration
The maximum call duration, in seconds, defaults to 0 as unlimited.
Warning Time
If the alarm time is set to y, a prompt sound will be played to the caller y
seconds after the call ends.
Alert Repeat
Interval
If set to z, the prompt sound will be repeated every z seconds after the first
alarm.
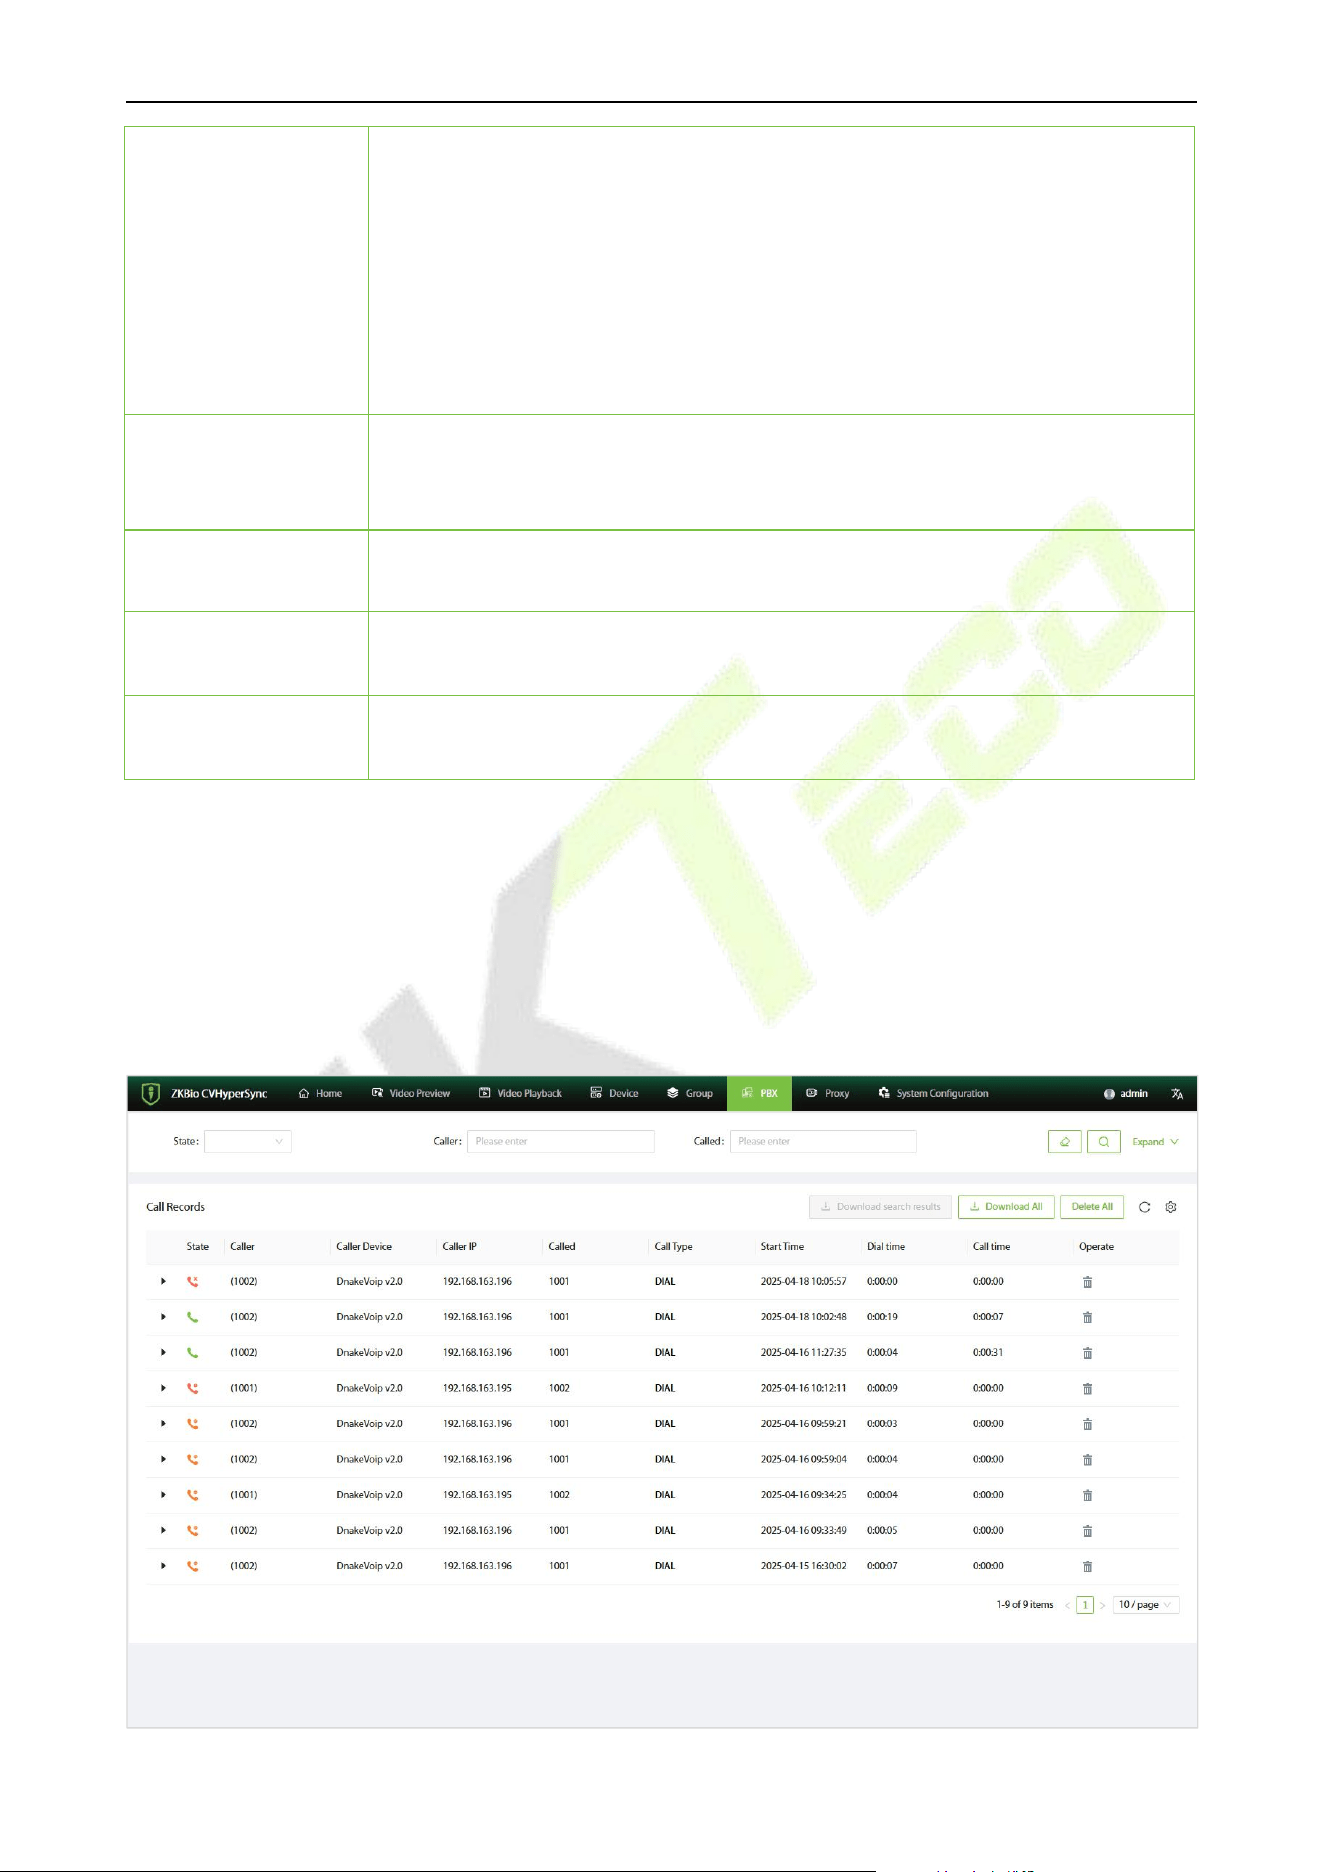
10.6 Call Log
10.6.1 Call Log List
Click [PBX] - [Call Log] to enter the call log interface. You can manage call logs.
VS50-50 & VS50-100 User Manual
P a g e | 37 Copyright © 2025 ZKTECO CO., LTD. All rights reserved.
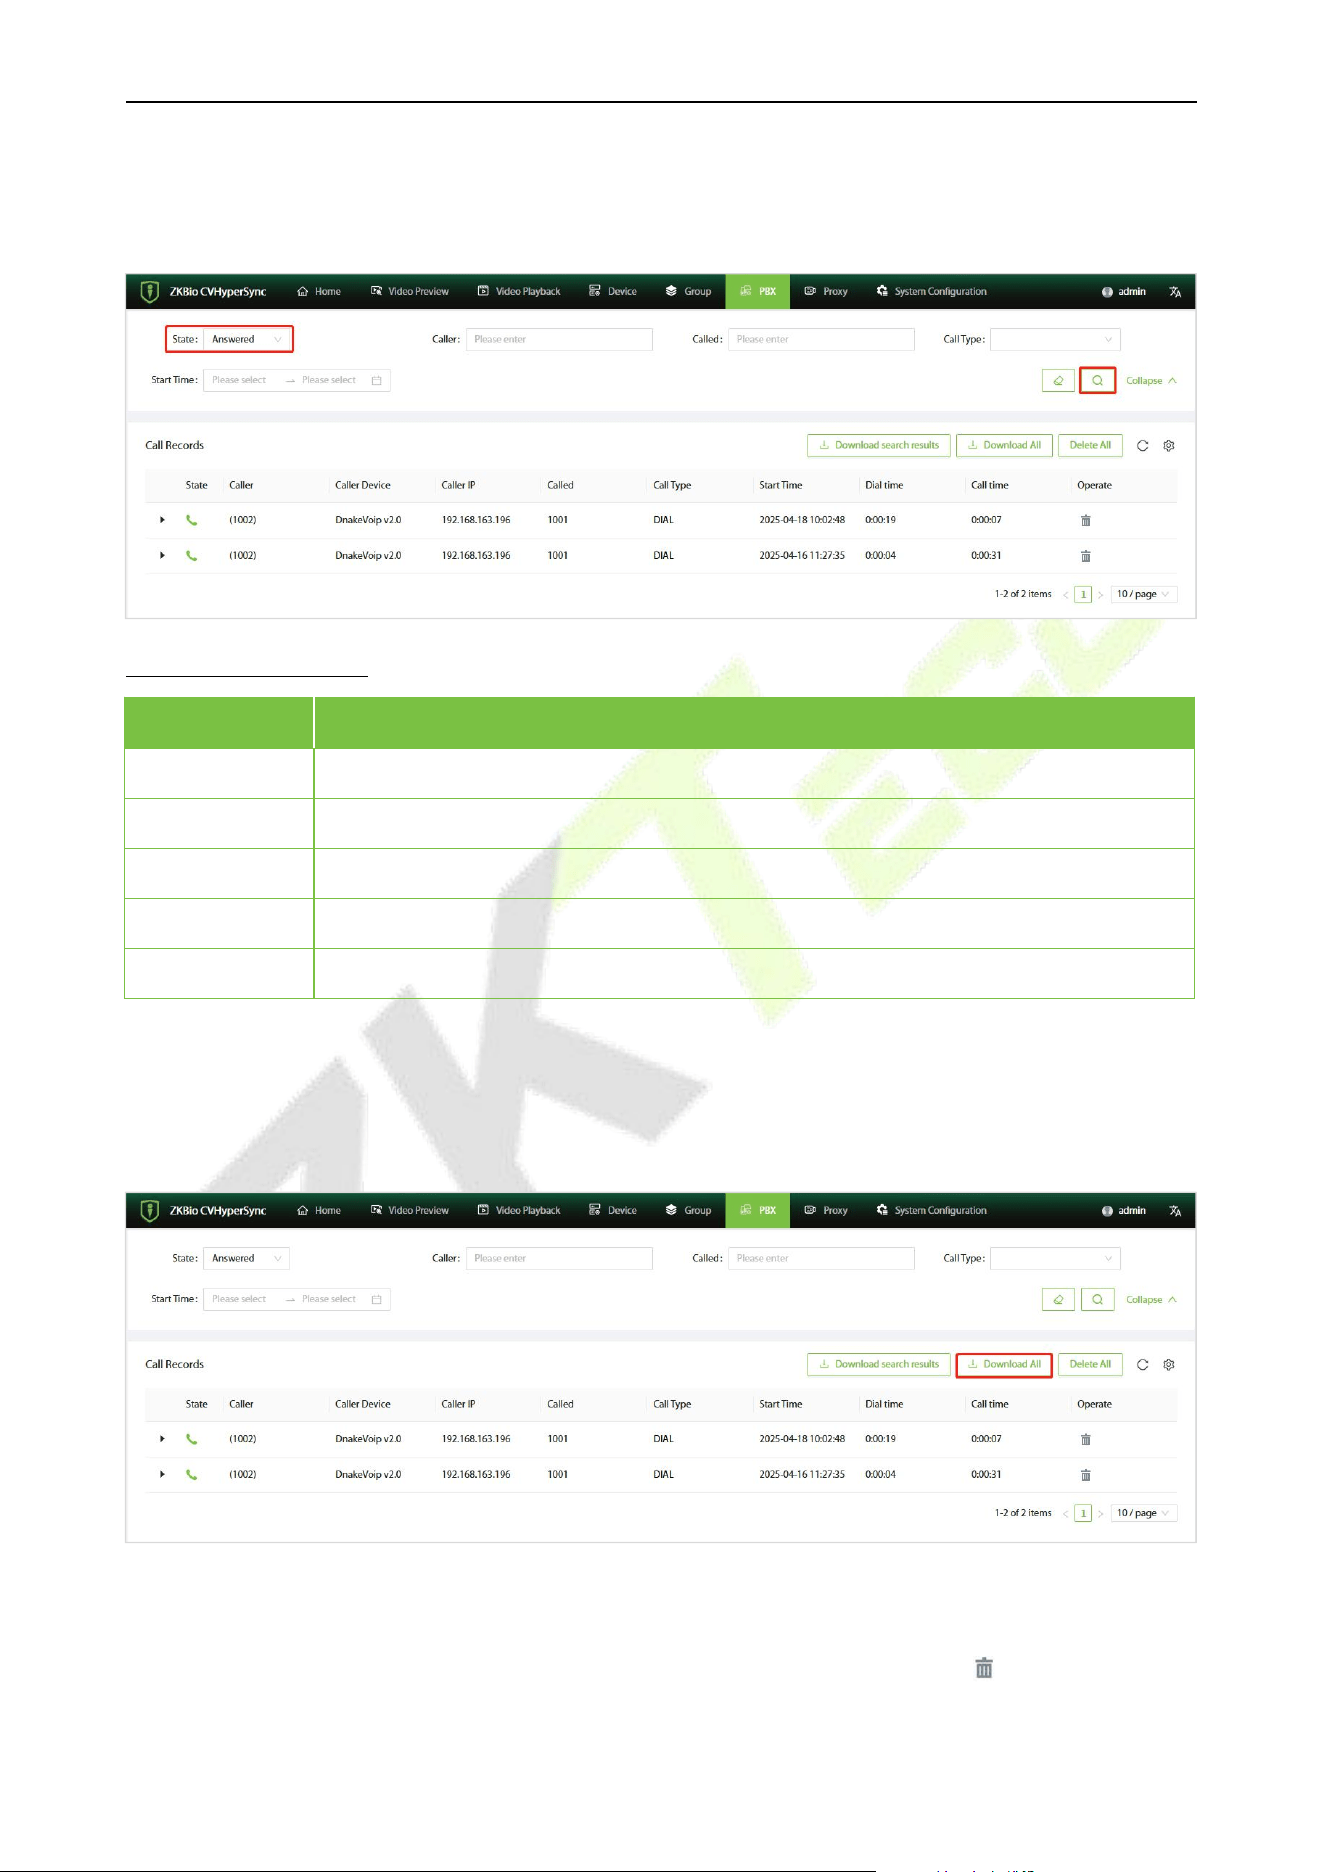
10.6.2 Retrieve Call Logs
In the call log interface, select specific fields to search for call logs.
Function Description
Menu
Descriptions
State
Categorized into Answered, No answer, Busy, and Fail.
Caller
Enter the caller's number to filter calls initiated from this number.
Called
Enter the called's number to filter calls received by this number.
Call Type
Select the type of call to filter the type you want to query.
Start Time
Specify the start and end times to filter the call logs.
10.6.3 Download Call Logs
In the call log interface, click [Download All] to export the records in .csv format.
10.6.4 Delete
You can click [Delete All] to delete all call logs. Alternatively, you can click the icon to delete a
specific record.
VS50-50 & VS50-100 User Manual
P a g e | 38 Copyright © 2025 ZKTECO CO., LTD. All rights reserved.
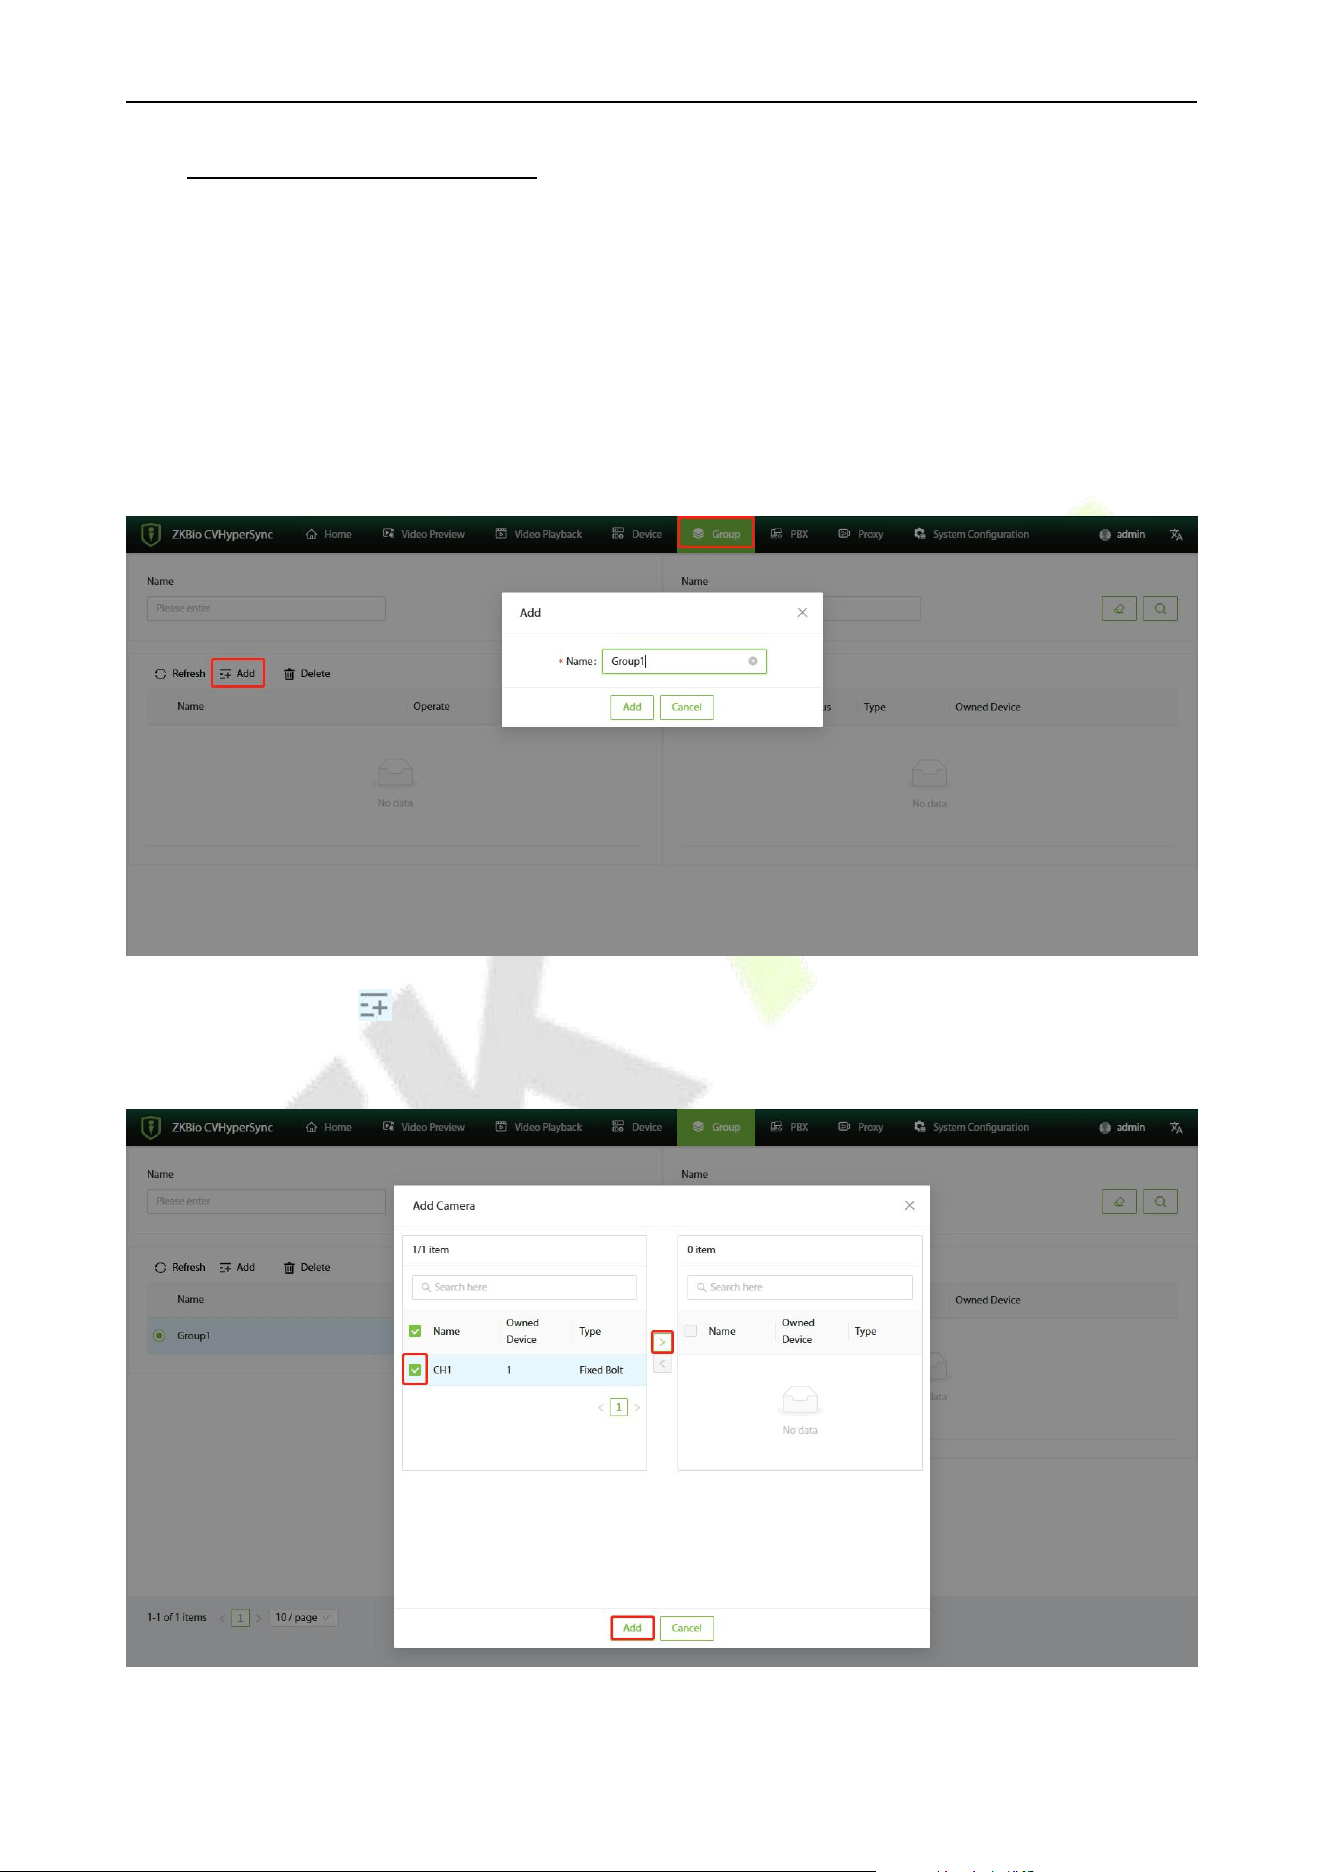
11. Group Management
By creating groups and adding cameras to these groups, batch management can be achieved.
11.1 Add Group
1. Click on [Group] to enter the group setting interface.
2. Click on [Add], enter a name, and create a new group, as shown in the figure below.
3. Click Add Camera icon to add the camera to the new group. In the Add Camera window, select
the camera you want to add to the group and click [Add].
VS50-50 & VS50-100 User Manual
P a g e | 39 Copyright © 2025 ZKTECO CO., LTD. All rights reserved.
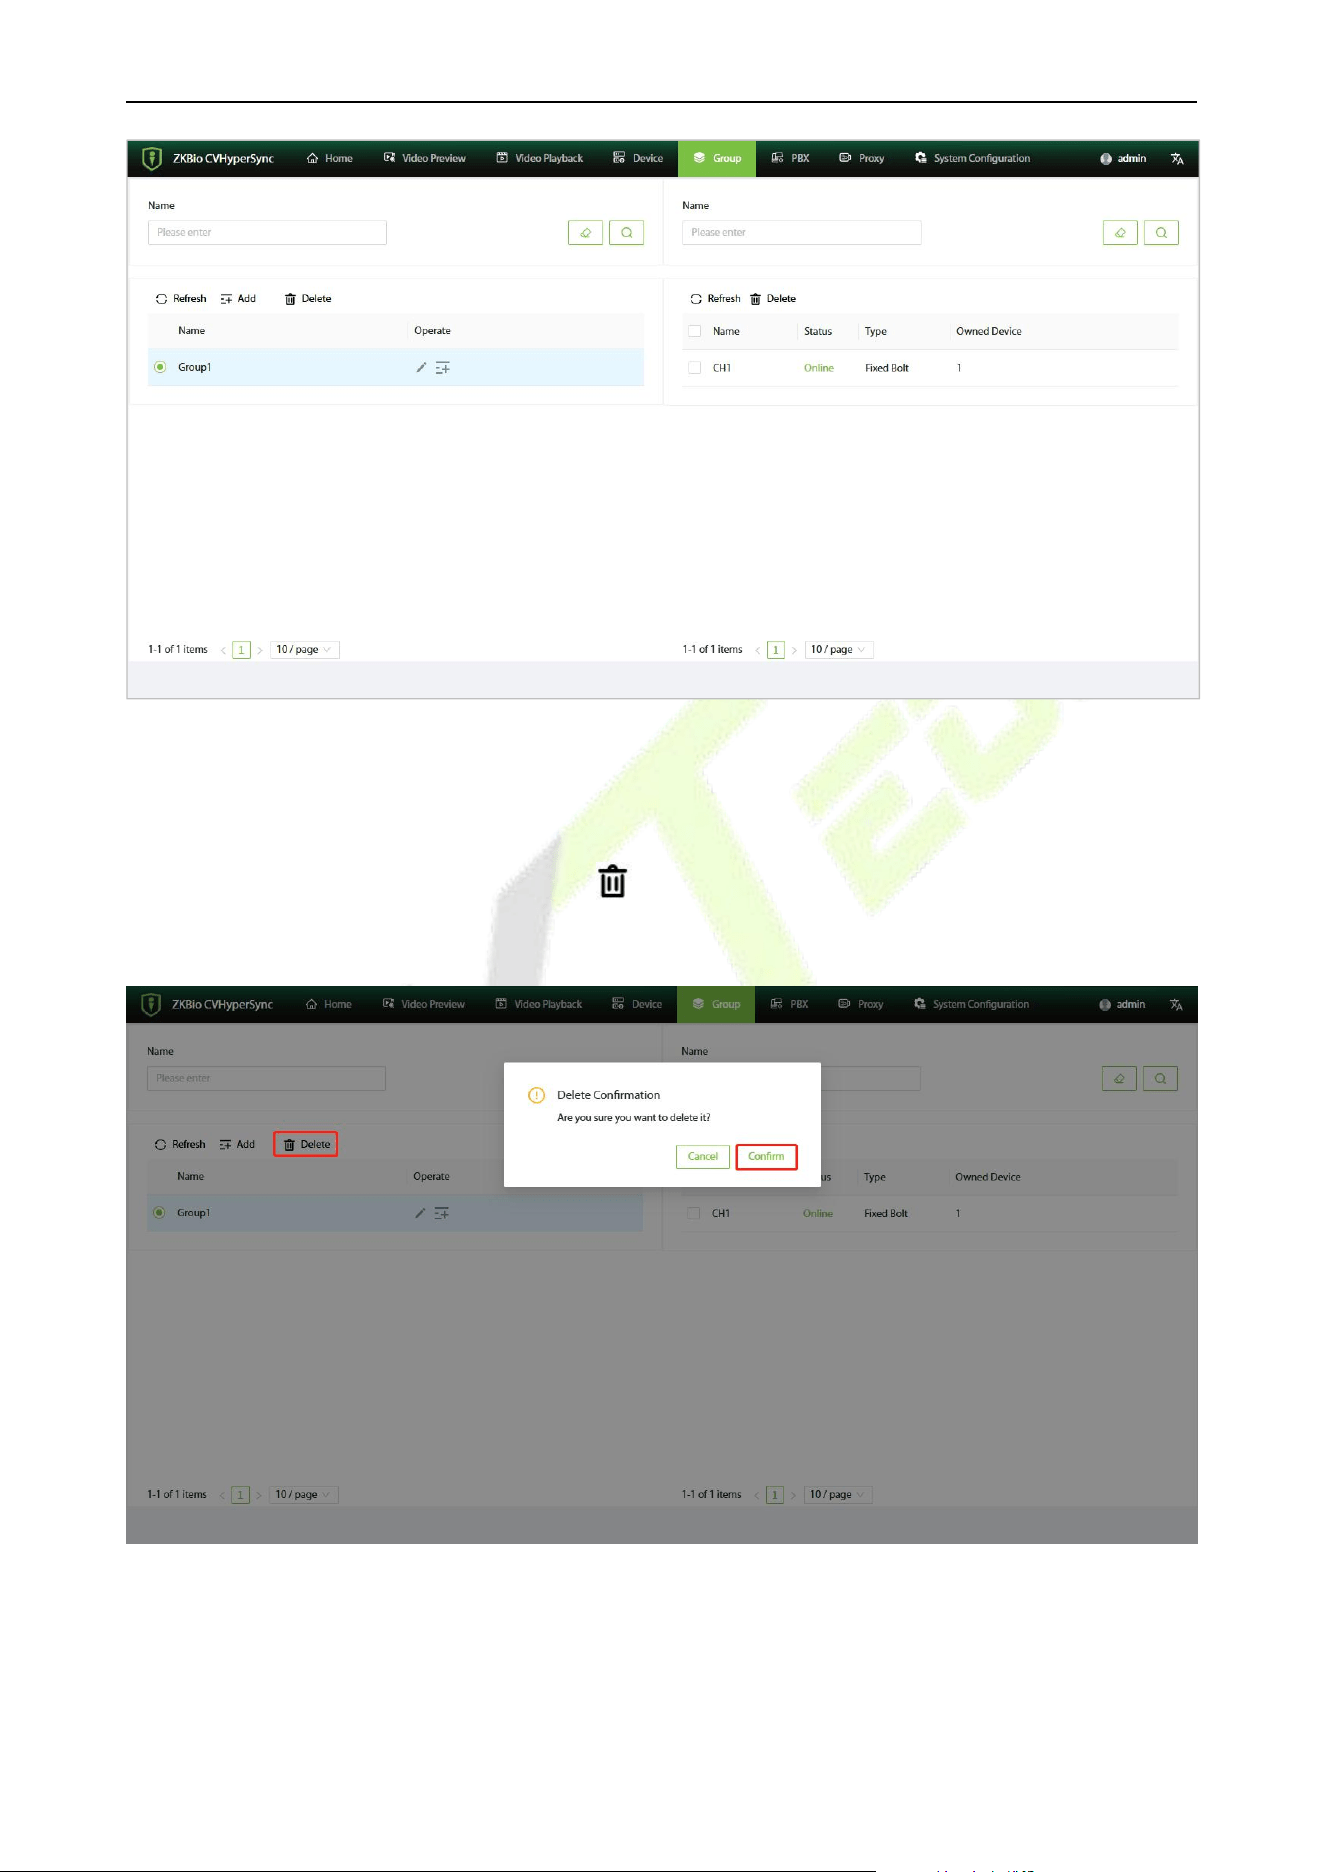
11.2 Delete Group
Select the group you want to delete, click the icon, and then click [Confirm] in the pop-up prompt
window.
VS50-50 & VS50-100 User Manual
P a g e | 40 Copyright © 2025 ZKTECO CO., LTD. All rights reserved.
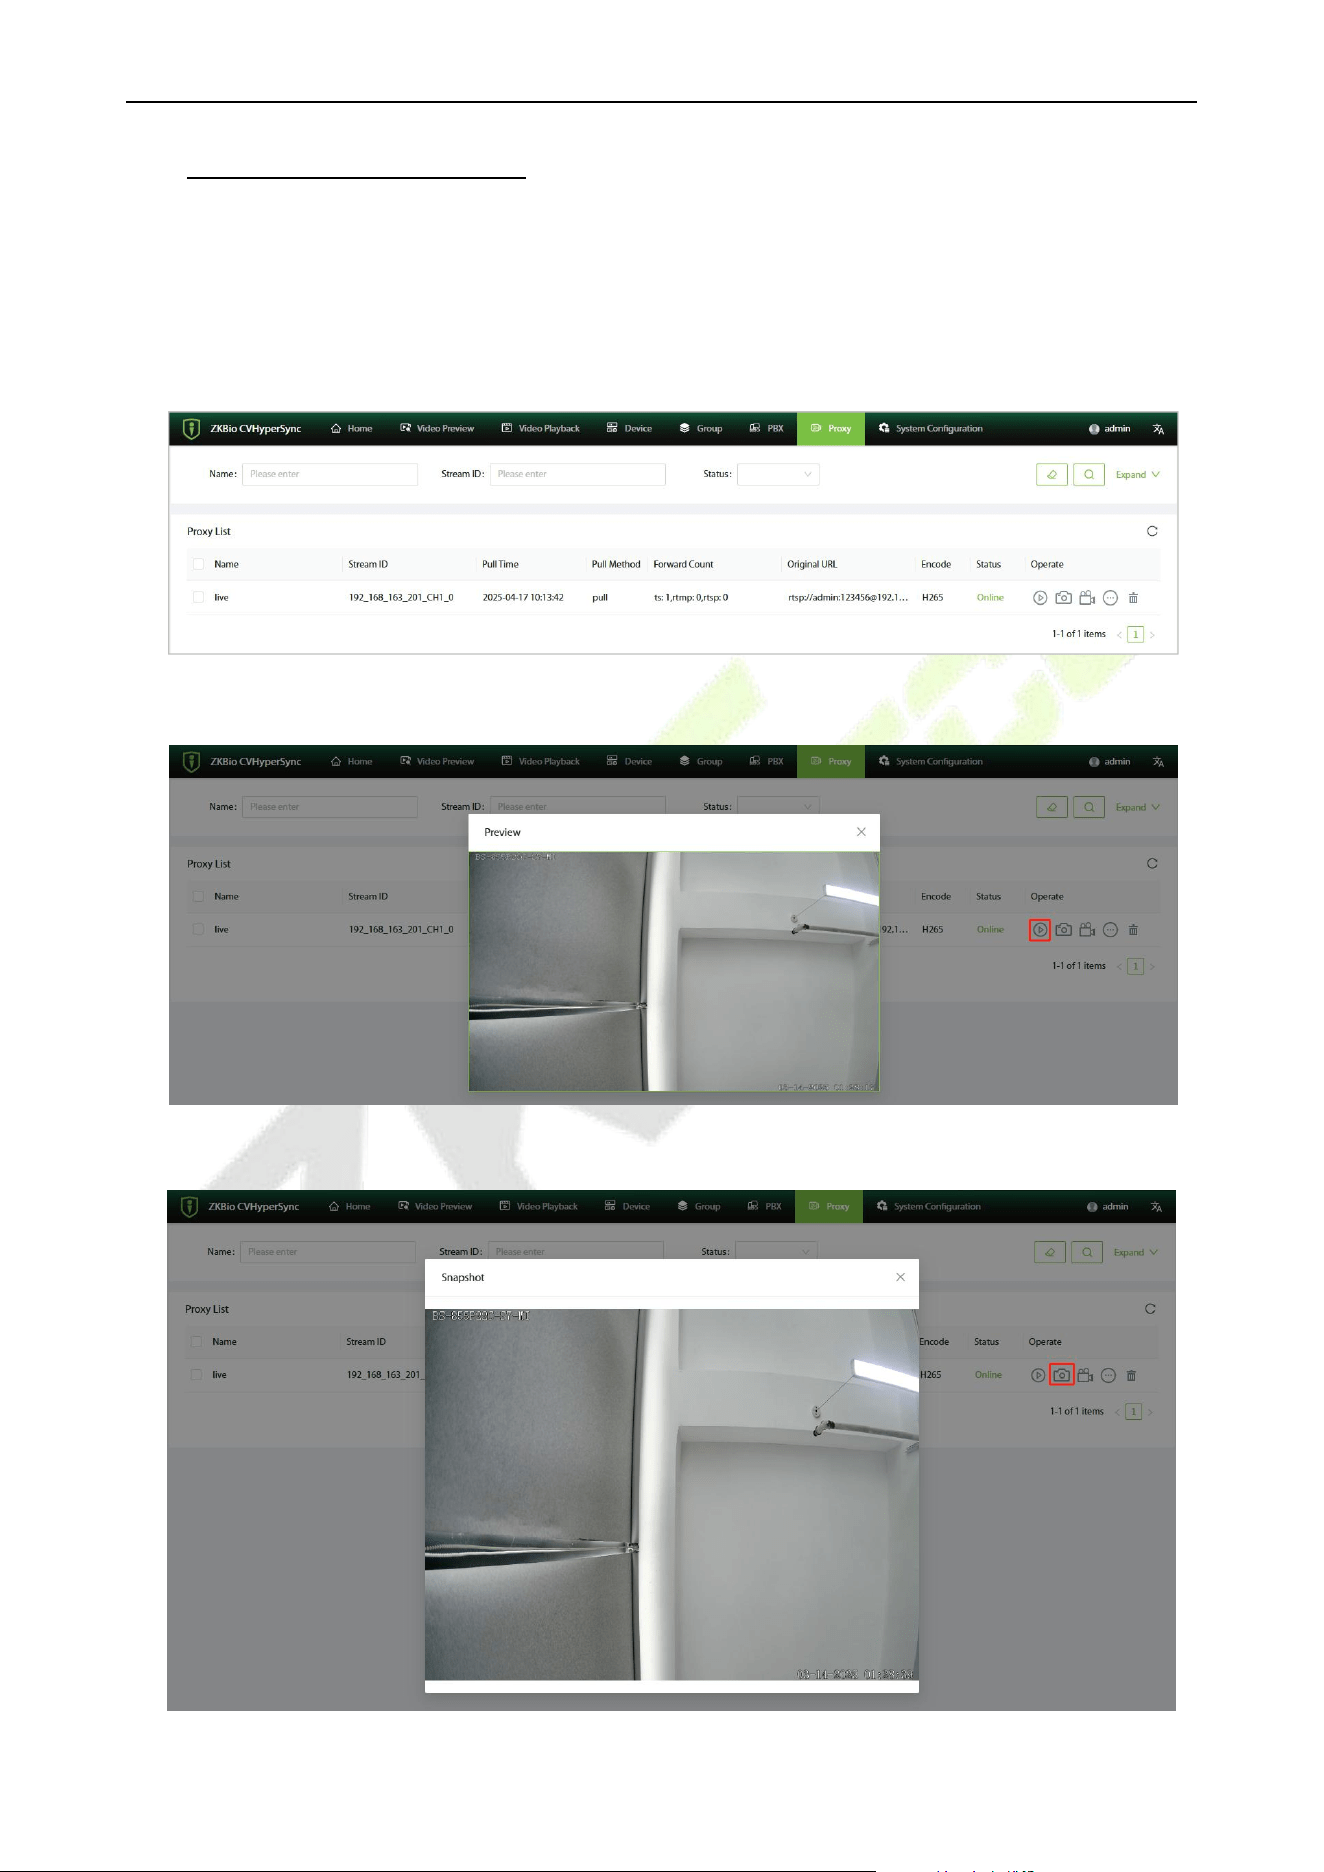
12. Proxy Management
1. Click [Proxy] to enter the proxy setting interface.
2. You can view the proxies generated by live previews and playback of recordings, as well as
manually pushed streams. You can perform operations such as previewing, snapshot capture,
recording, and deletion on these proxies, as shown in the figure below.
Review
Snapshot
VS50-50 & VS50-100 User Manual
P a g e | 41 Copyright © 2025 ZKTECO CO., LTD. All rights reserved.
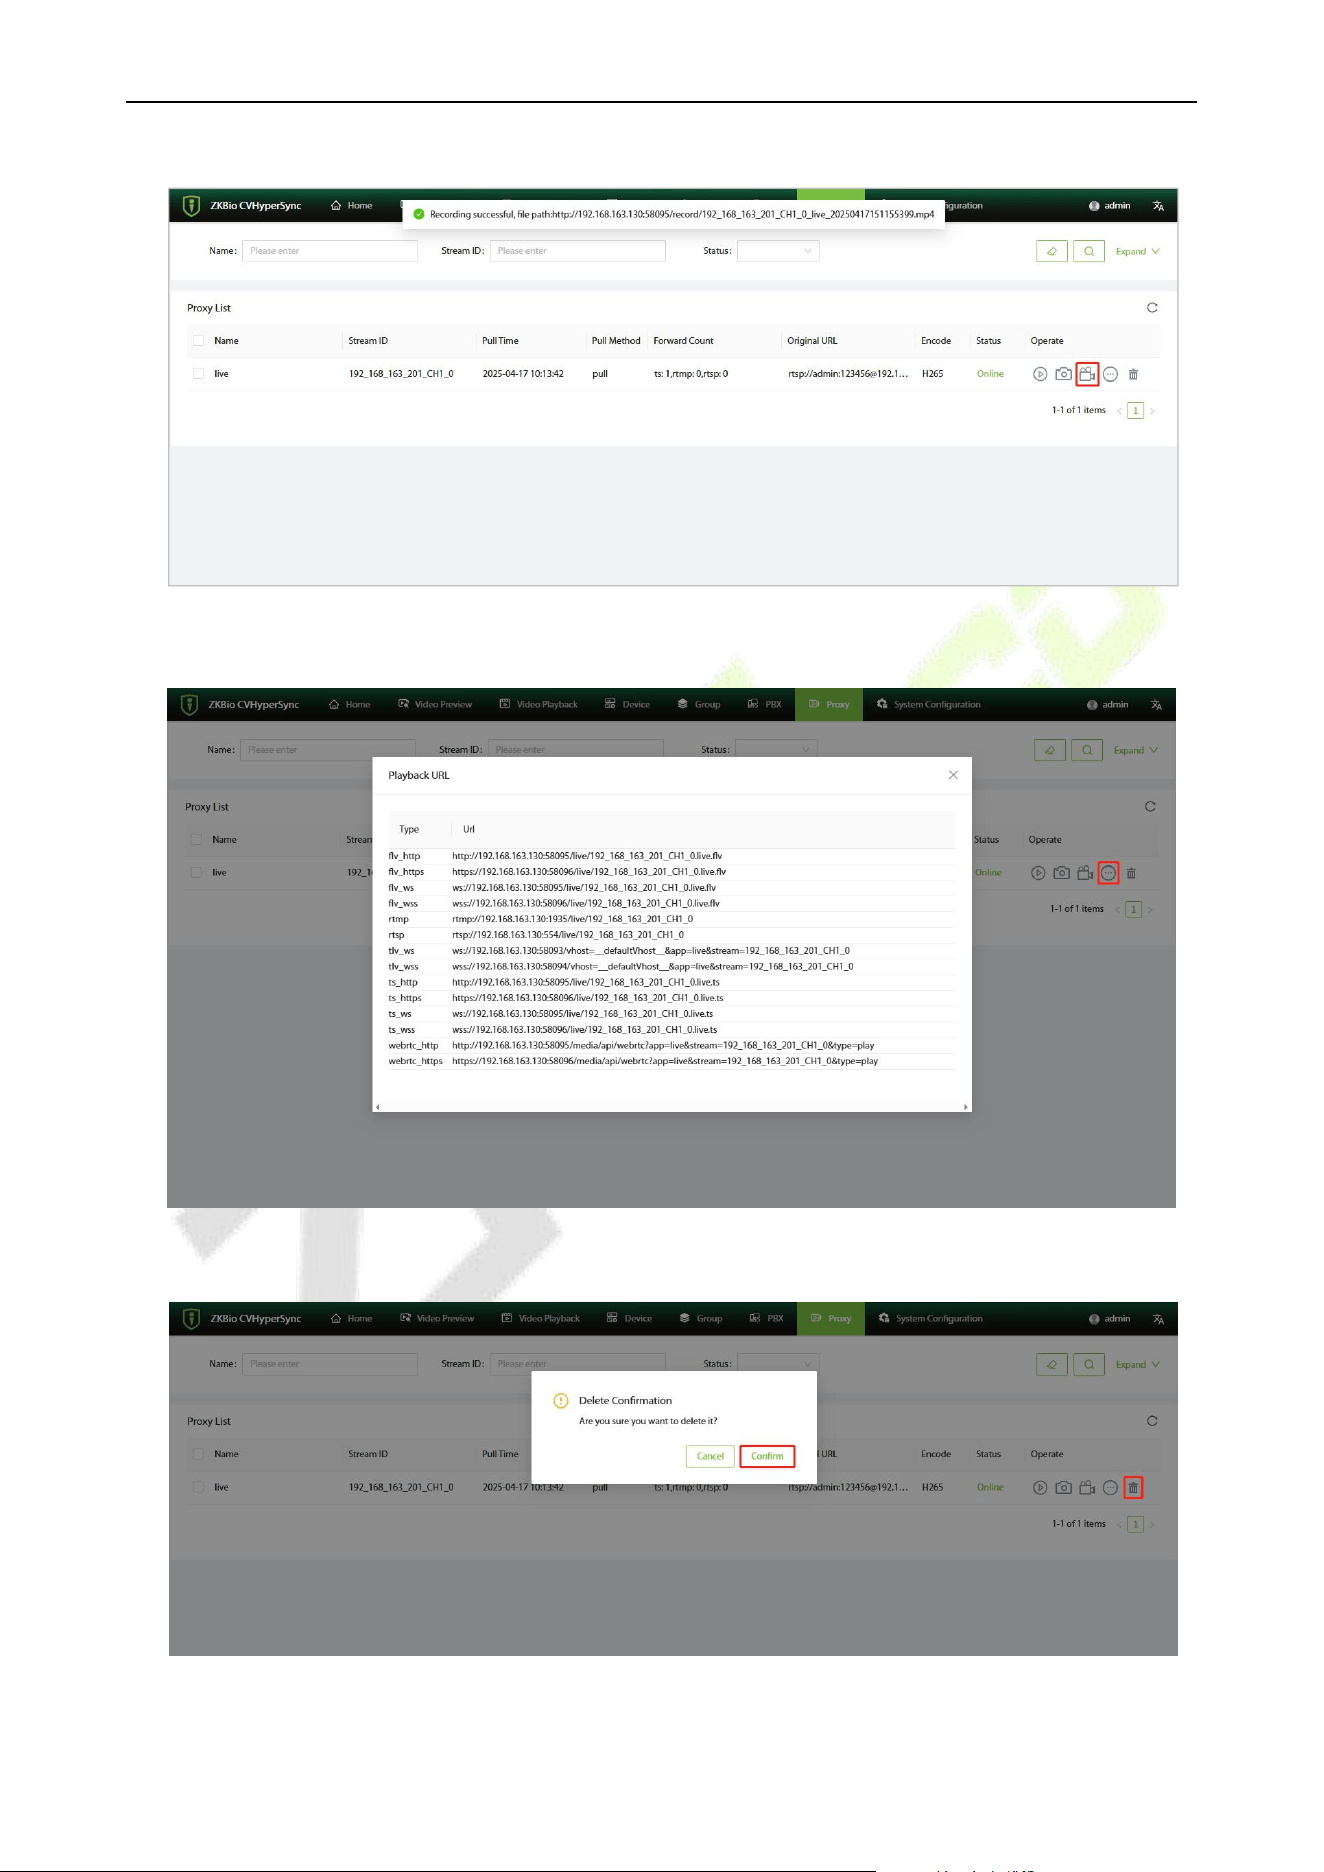
Recording
Playback URL
Delete
VS50-50 & VS50-100 User Manual
P a g e | 42 Copyright © 2025 ZKTECO CO., LTD. All rights reserved.
13. System Configuration
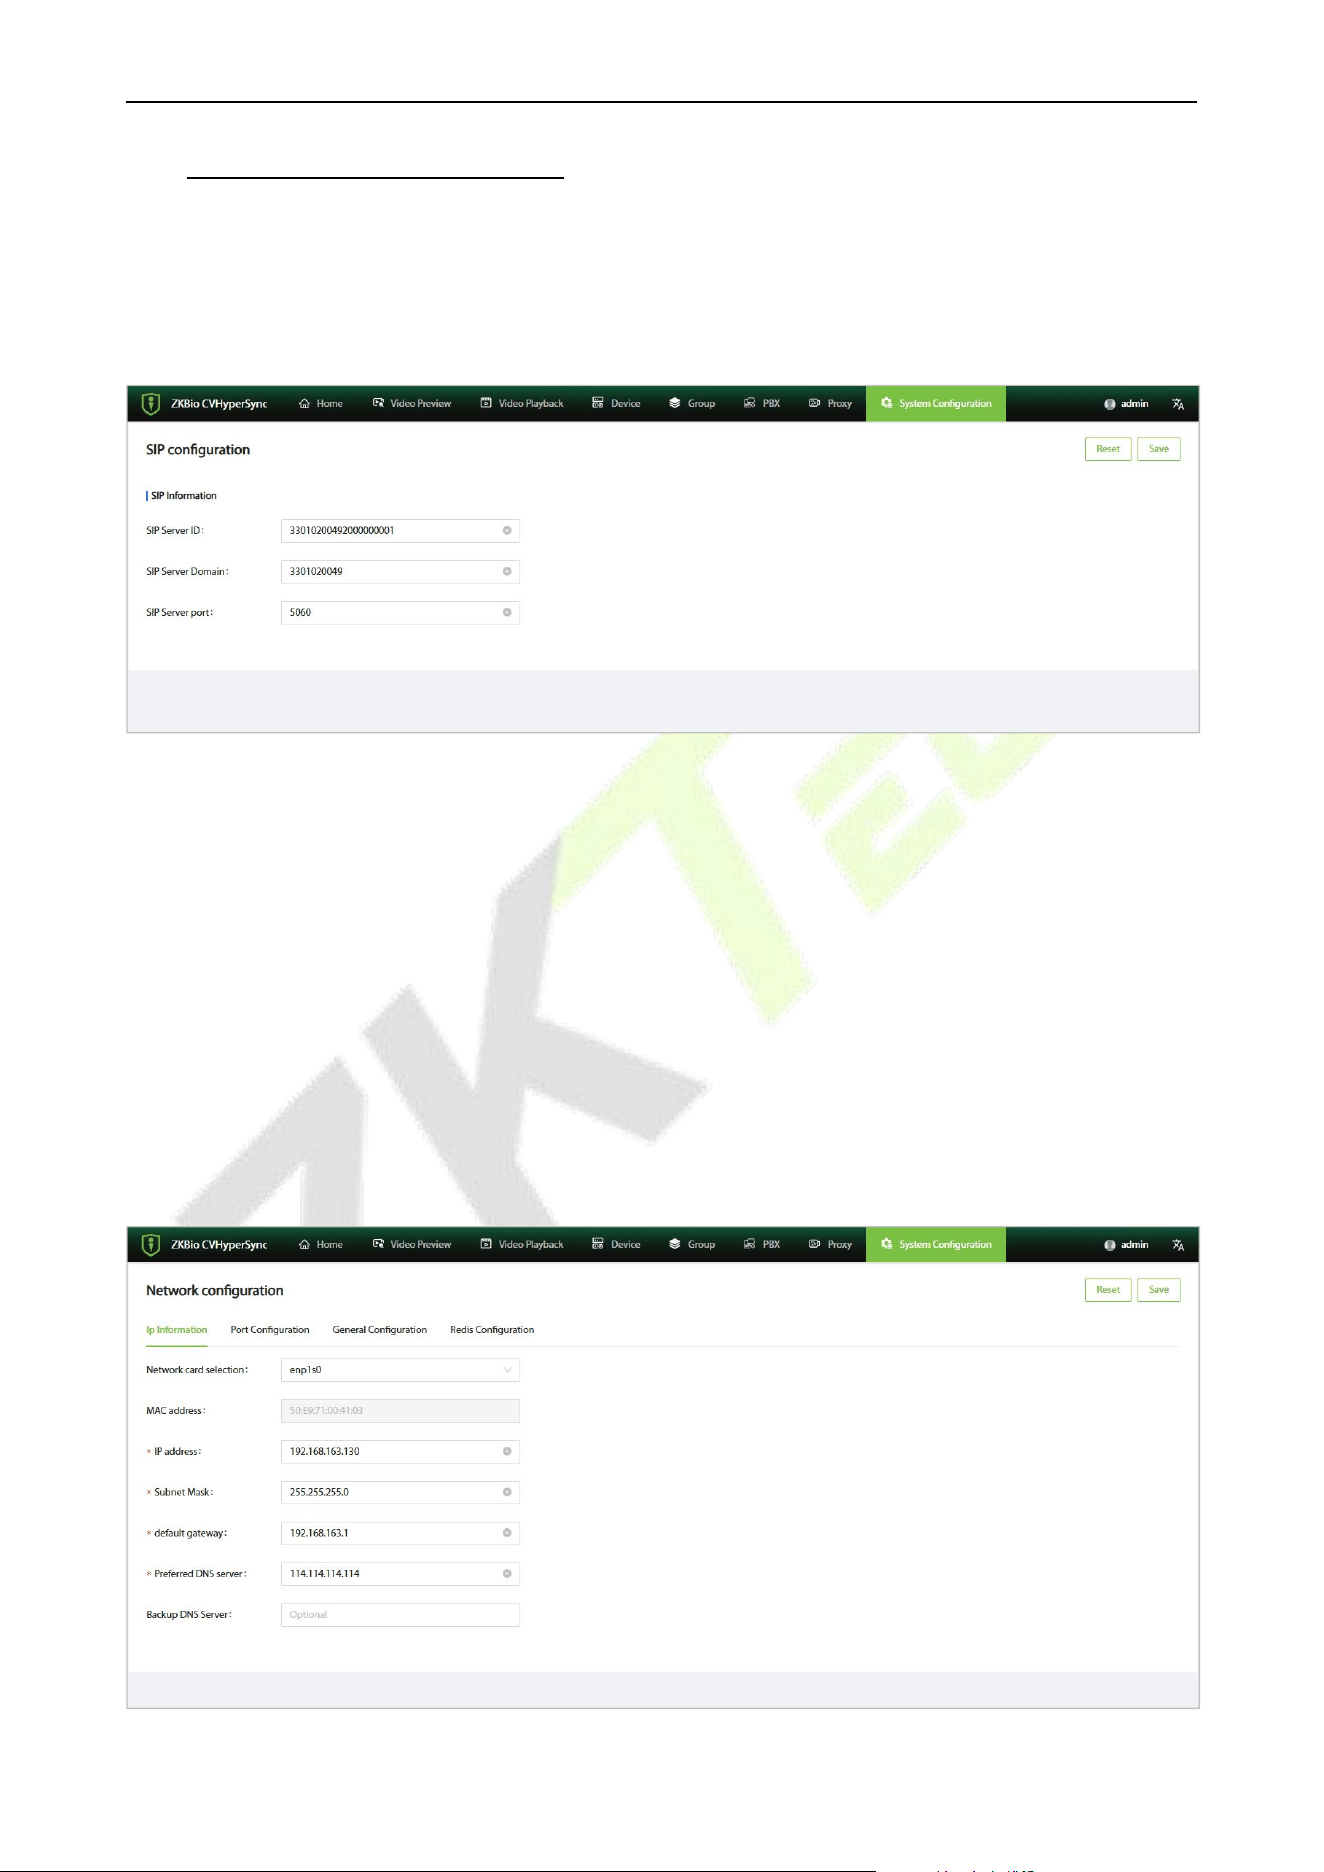
13.1 SIP configuration
Click [System Configuration] - [SIP configuration] to view the SIP information.
13.2 Network configuration
In the network configuration interface, you can view IP information, port configurations, general
configurations, and Redis configurations.
Click [System Configuration] - [Network configuration] to enter the network configuration interface.
13.2.1 IP Information
In the network configuration interface, click on [IP Information] to enter the IP information interface,
where you can modify the device's IP address. The default IP address of the device is: 192.168.1.201.
VS50-50 & VS50-100 User Manual
P a g e | 43 Copyright © 2025 ZKTECO CO., LTD. All rights reserved.
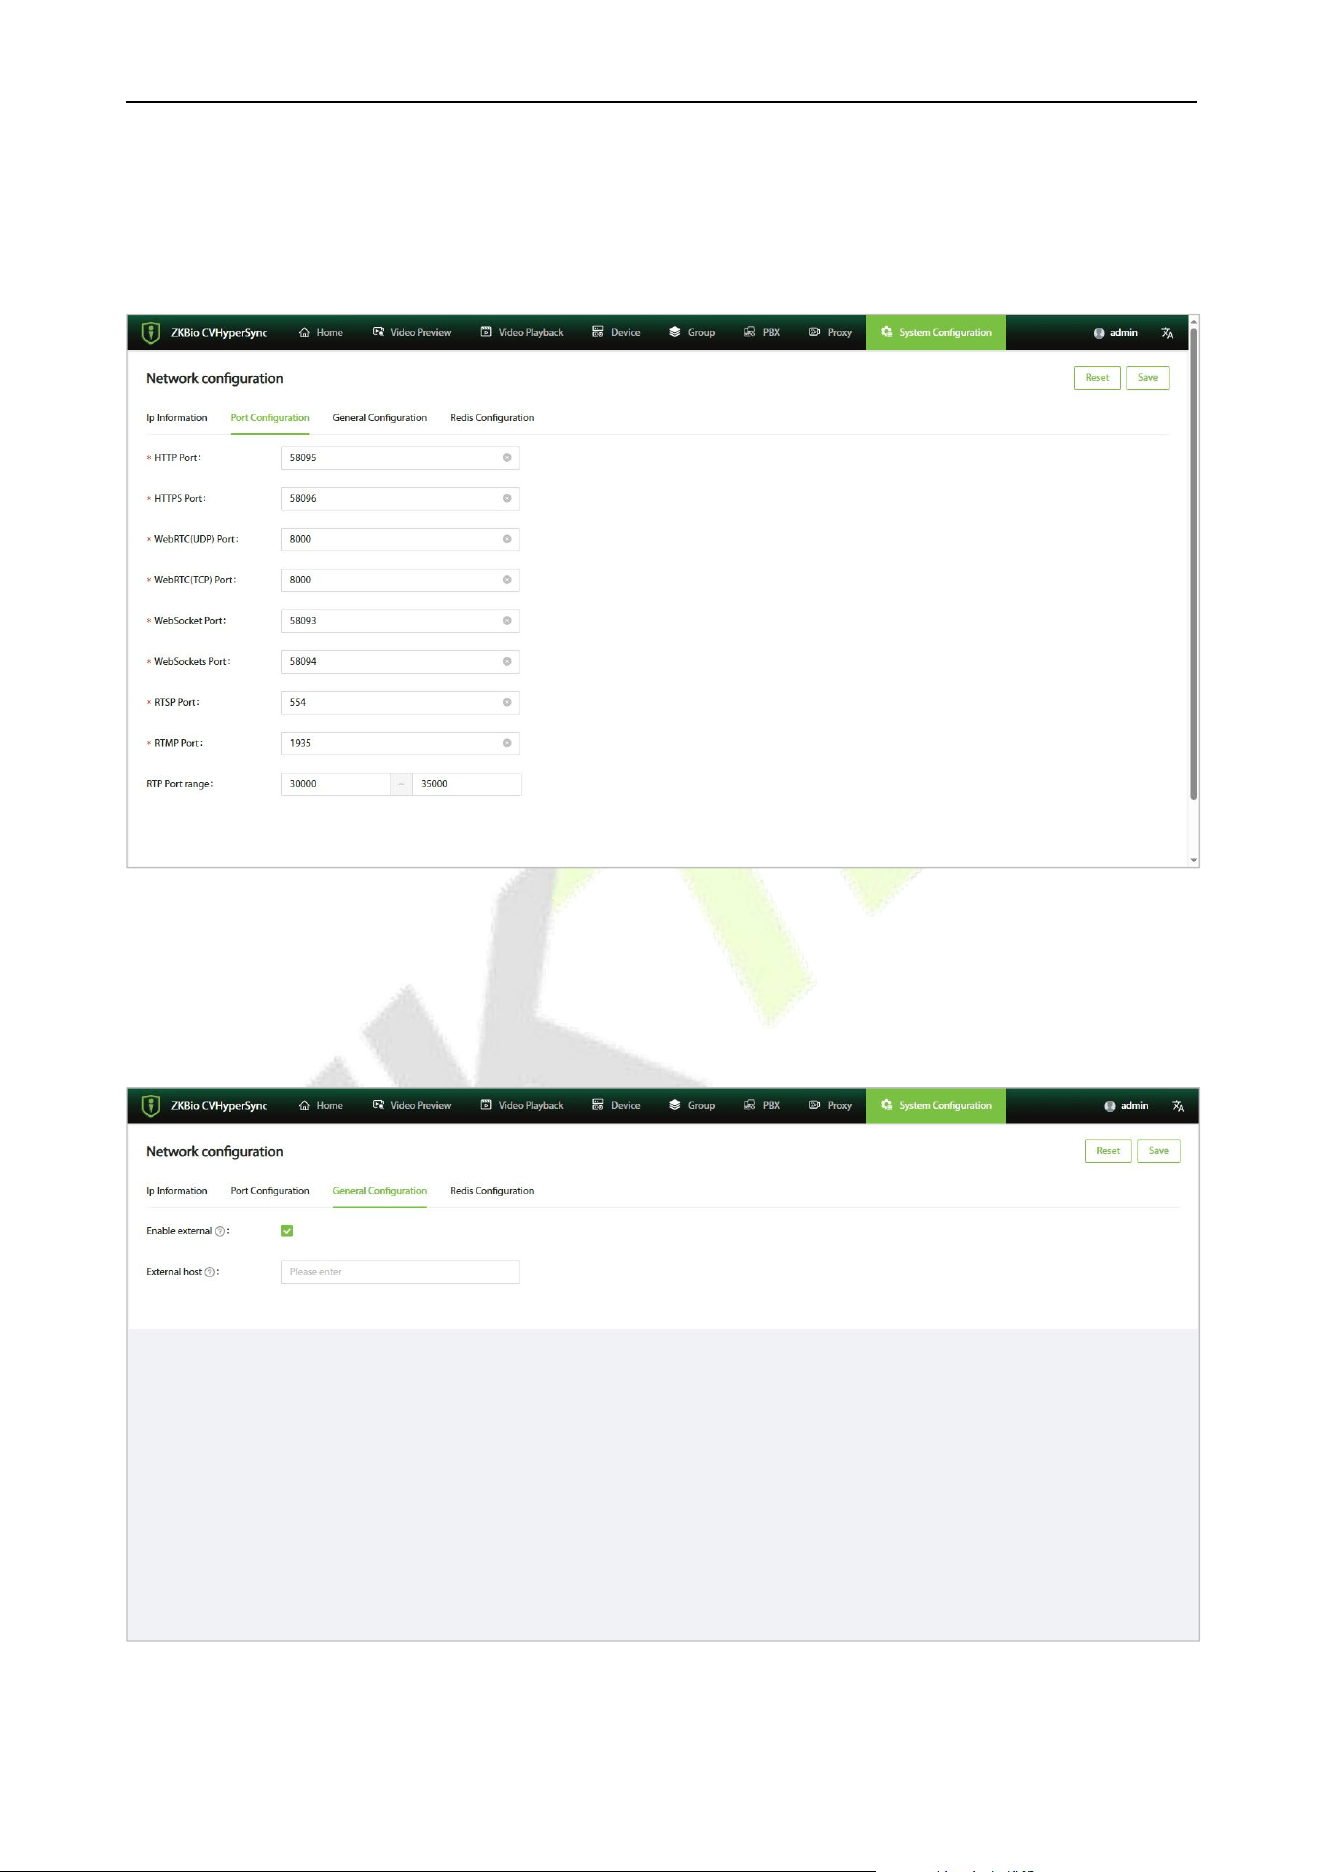
13.2.2 Port Configurations
In the network configuration interface, click on [Port Configurations] to enter the port configurations
interface
13.2.3 General Configurations
In the network configuration interface, click on [General Configurations] to enter the general configurations
interface
VS50-50 & VS50-100 User Manual
P a g e | 44 Copyright © 2025 ZKTECO CO., LTD. All rights reserved.
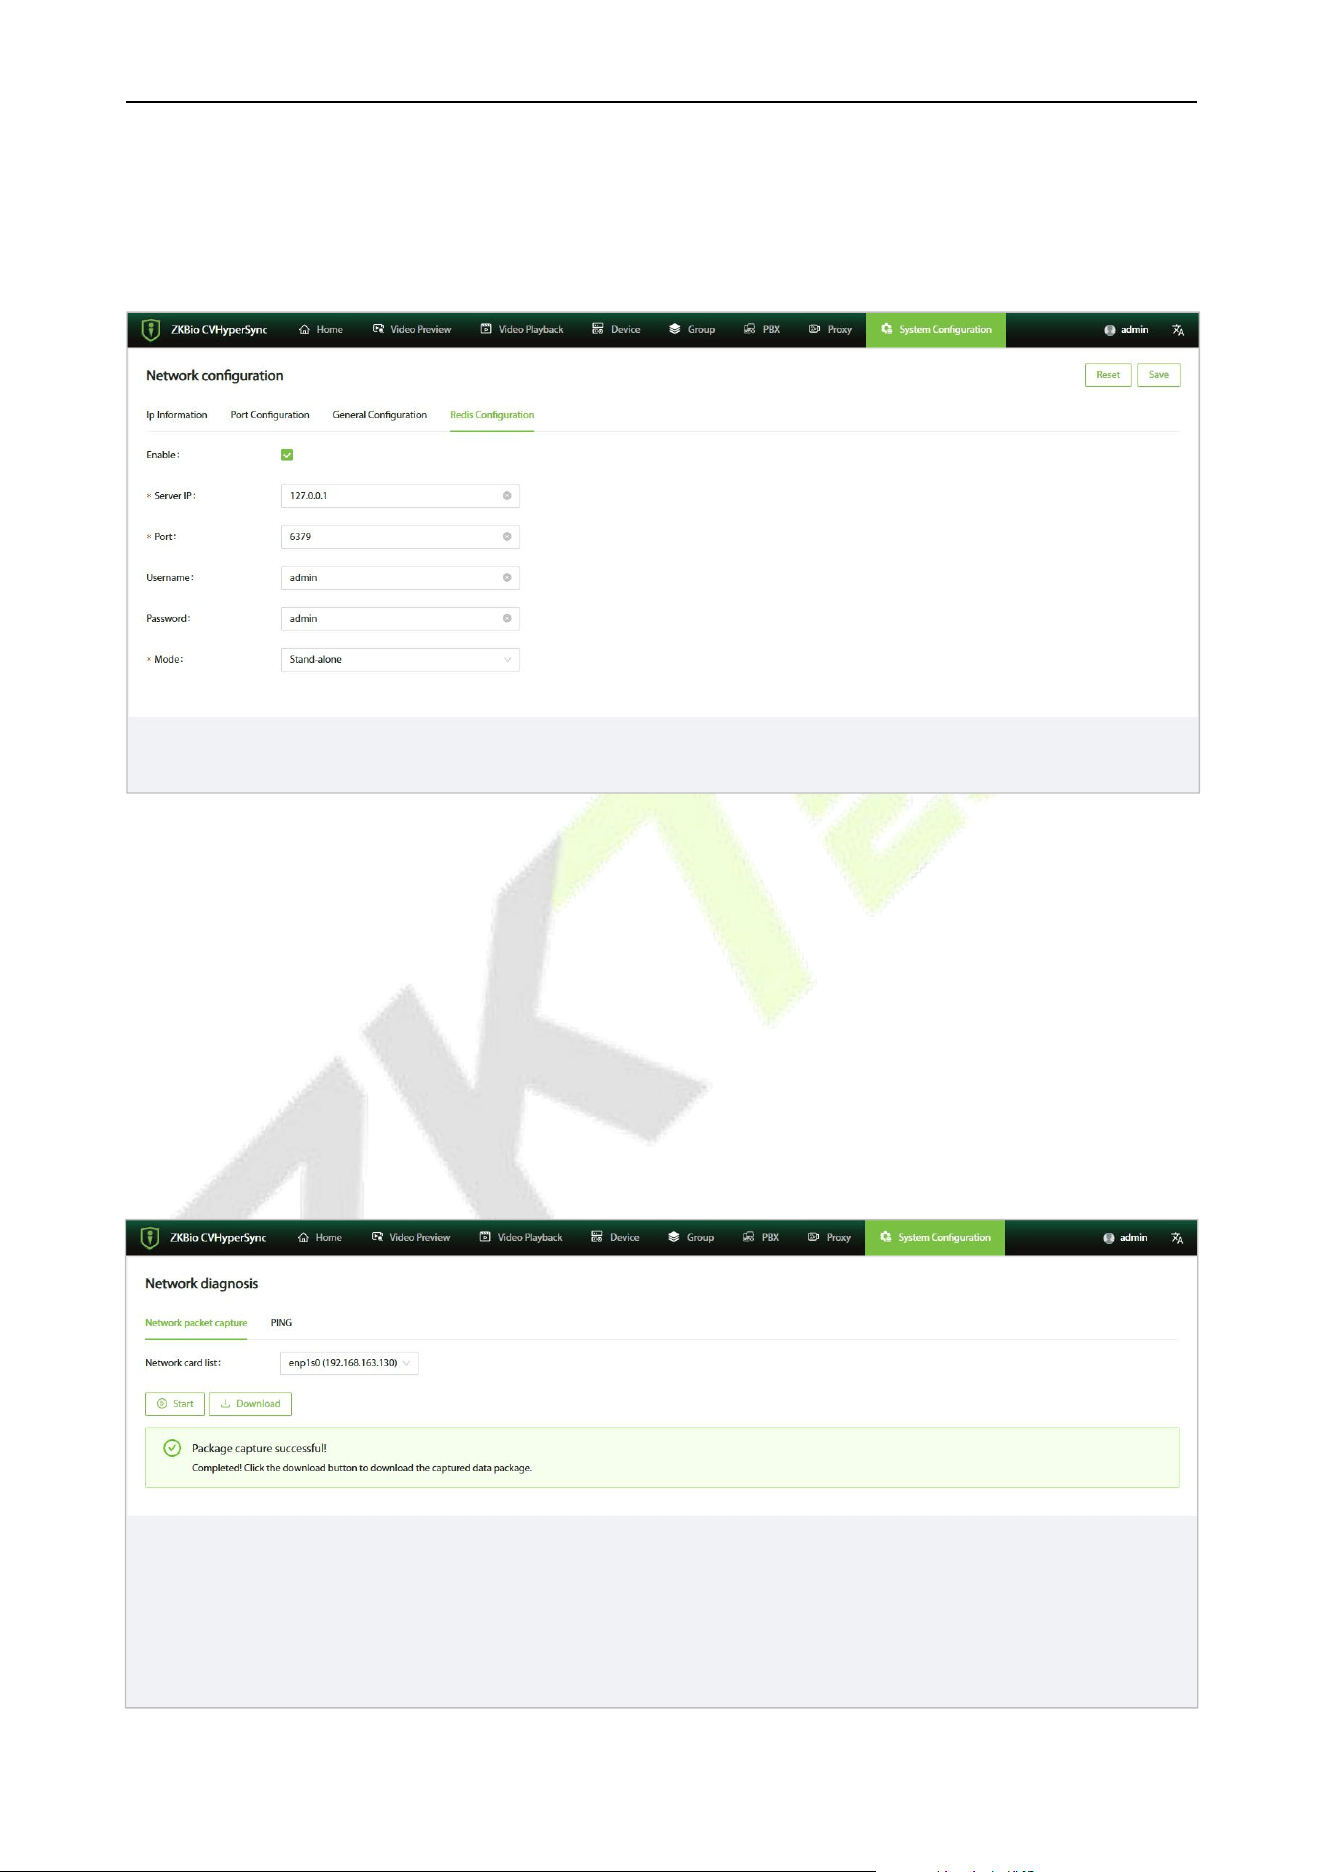
13.2.4 Redis Configurations
In the network configuration interface, click on [Redis Configurations] to enter the redis configurations
interface
13.3 Network Diagnosis
13.3.1 Network packet capture
1. Click [System Configuration] - [Network diagnosis] to enter the network diagnosis interface.
2. Click [Network packet capture], and you can capture packets and download the packet capture
file.
3. View the packet capture file in the browser's download section.
VS50-50 & VS50-100 User Manual
P a g e | 45 Copyright © 2025 ZKTECO CO., LTD. All rights reserved.
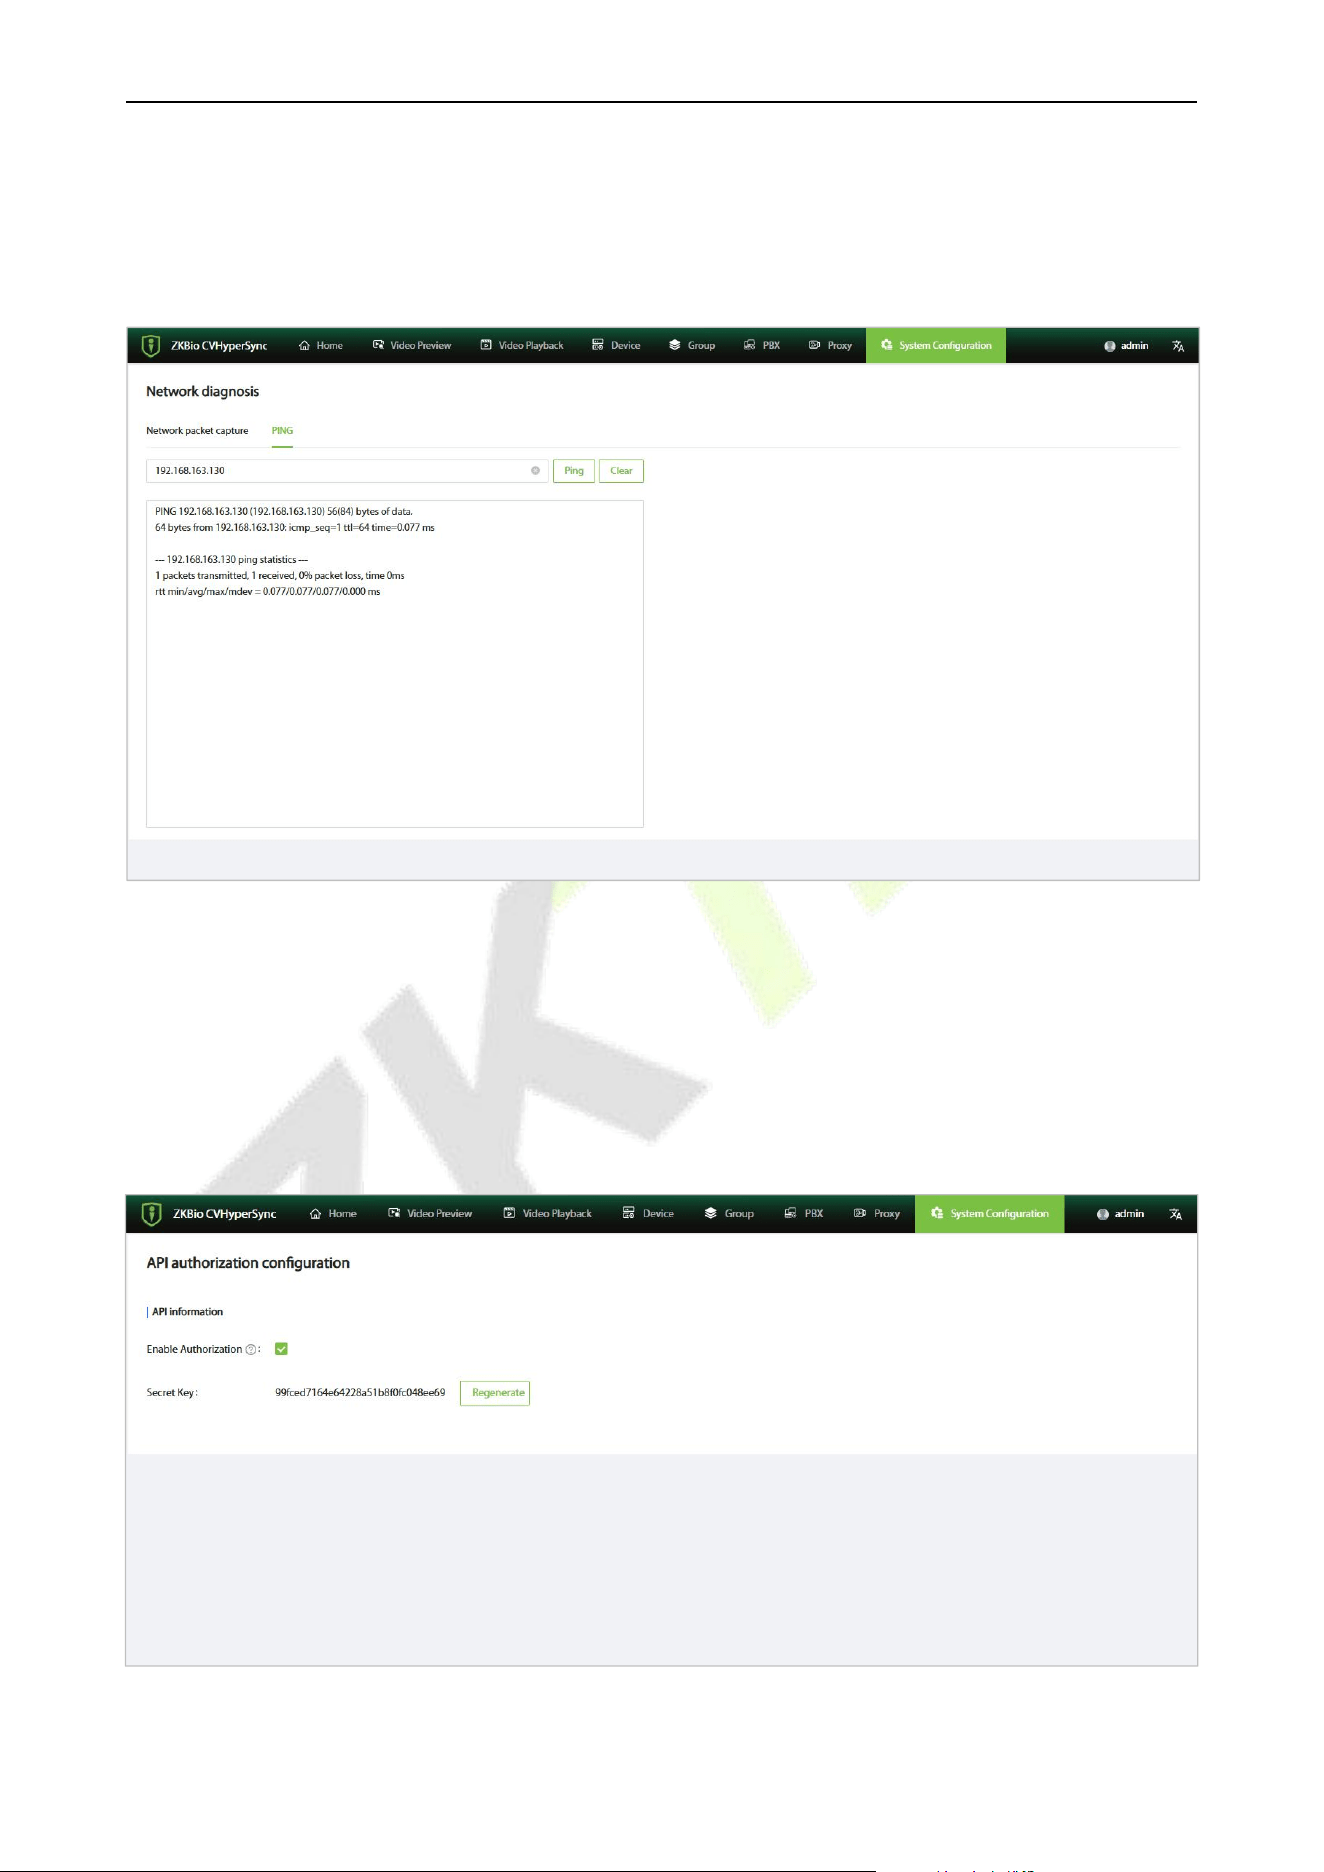
13.3.2 PING
1. Click [System Configuration] - [Network diagnosis] to enter the network diagnosis interface.
2. Click on [PING], enter the IP address or domain name to obtain the results.
13.4 API authorization configuration
1. Click [System Configuration] - [API authorization configuration] to enter the API authorization
configuration interface.
2. Check the box for "Enable Authorization" to call this service interface through a key.
VS50-50 & VS50-100 User Manual
P a g e | 46 Copyright © 2025 ZKTECO CO., LTD. All rights reserved.
13.5 System Maintenance
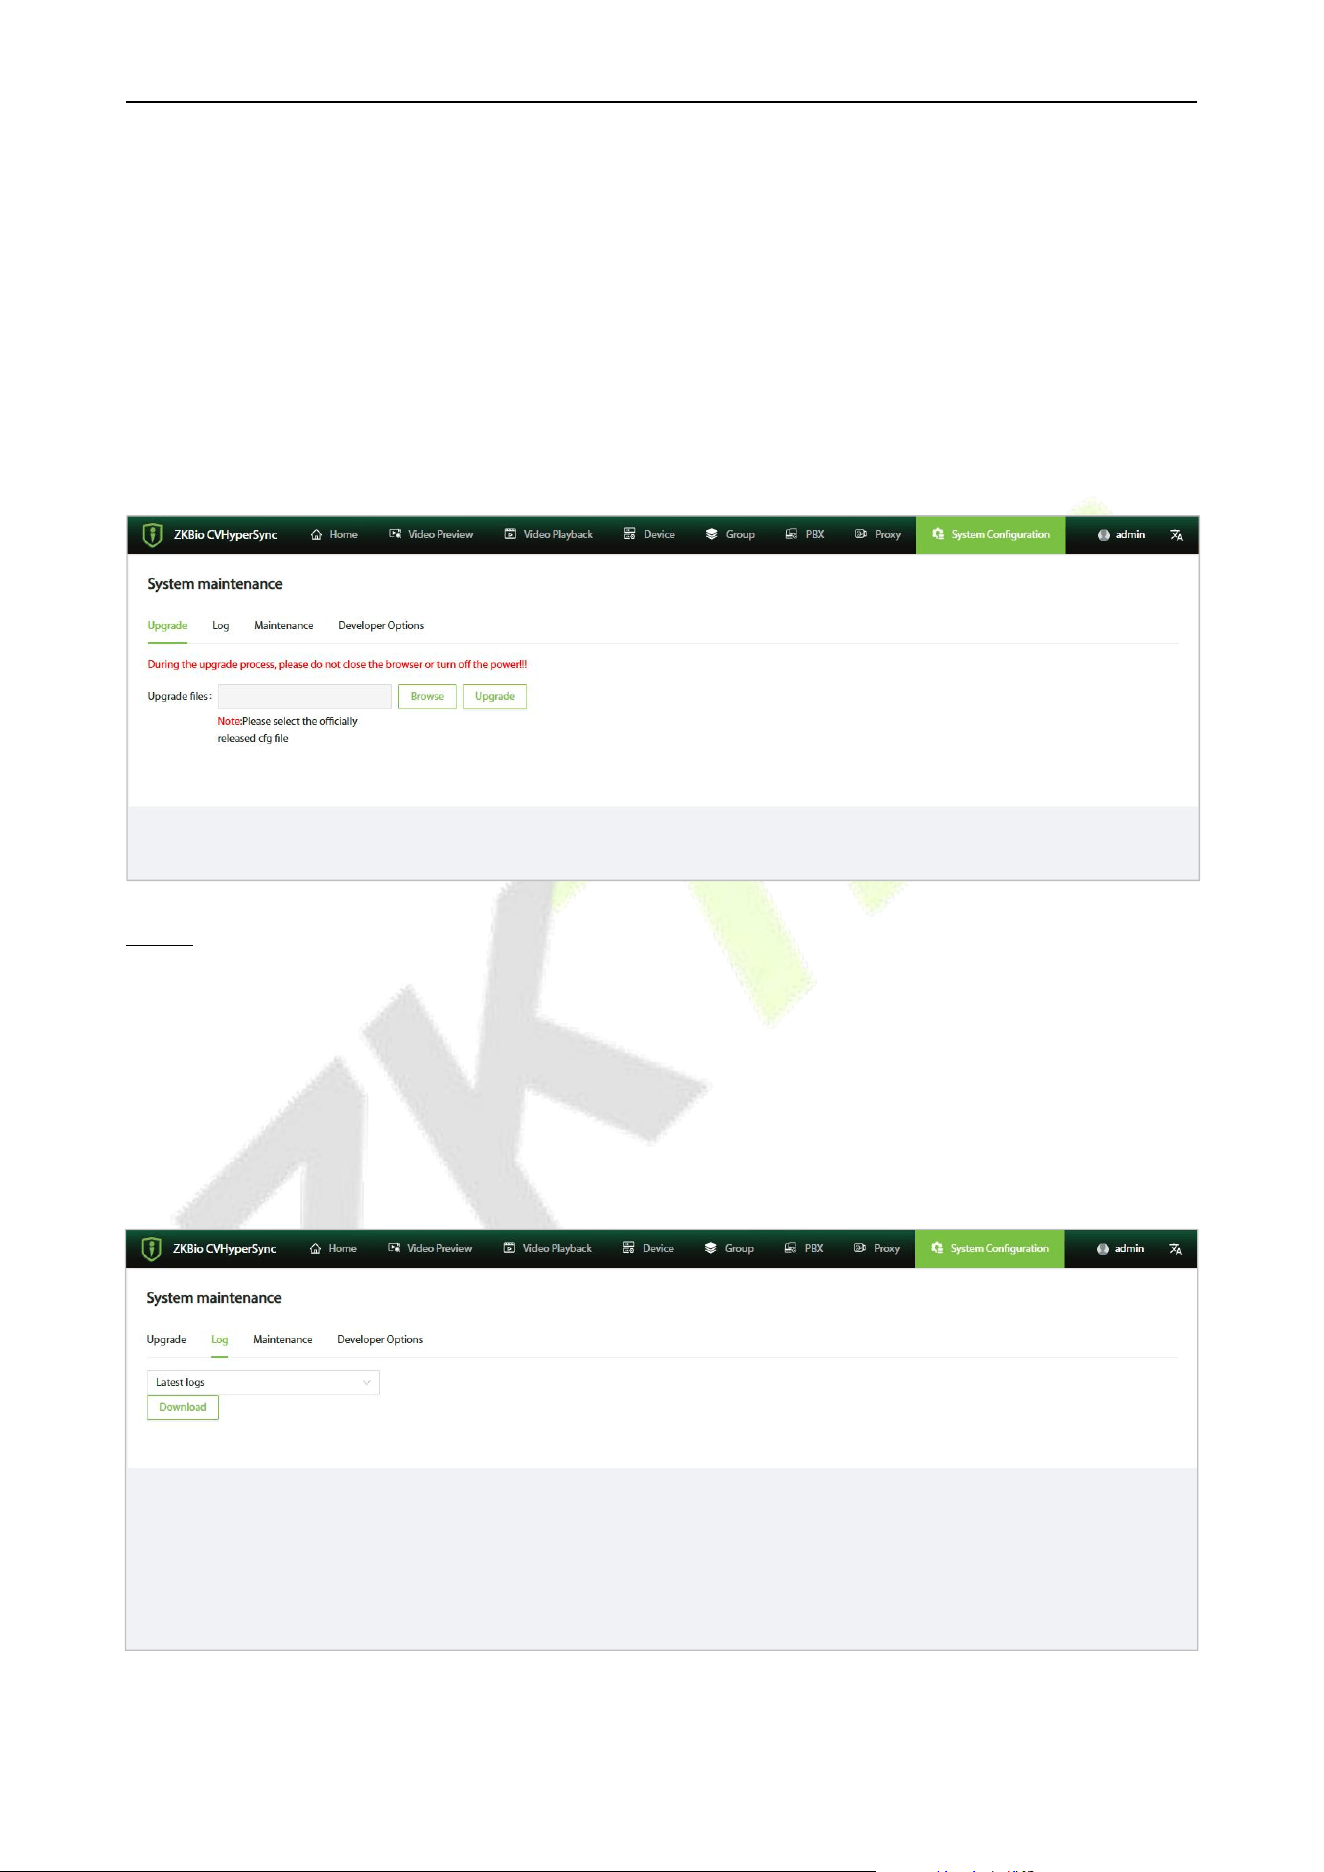
13.5.1 Upgrade
1. Click [System Configuration] - [System maintenance] to enter the system maintenance interface.
2. Click [Browse] to import the upgrade file in .cfg format.
3. Click [Upgrade]. The service will automatically restart after the upgrade. You can check the
upgraded version after logging in again.
NOTE: During the upgrade process, please do not close the browser or turn off the power!!!
13.5.2 Log
1. Click [System Configuration] - [System maintenance] to enter the system maintenance interface.
2. Click on [Log], select either the latest logs or all logs, and you can download the logs for the
current day or all historical logs.

VS50-50 & VS50-100 User Manual
P a g e | 47 Copyright © 2025 ZKTECO CO., LTD. All rights reserved.
13.5.3 Maintenance
Click [System Configuration] - [System Maintenance] - [Maintenance] to enter the Maintenance
setting interface.
13.5.3.1 Backup Configuration File
1. Click on [Maintenance] to enter the maintenance interface, and in the file type column, select the
Configuration file.
2. Click on [Download], set the file password in the pop-up window, and then click [OK].
3. View the downloaded file in the browser's download section.
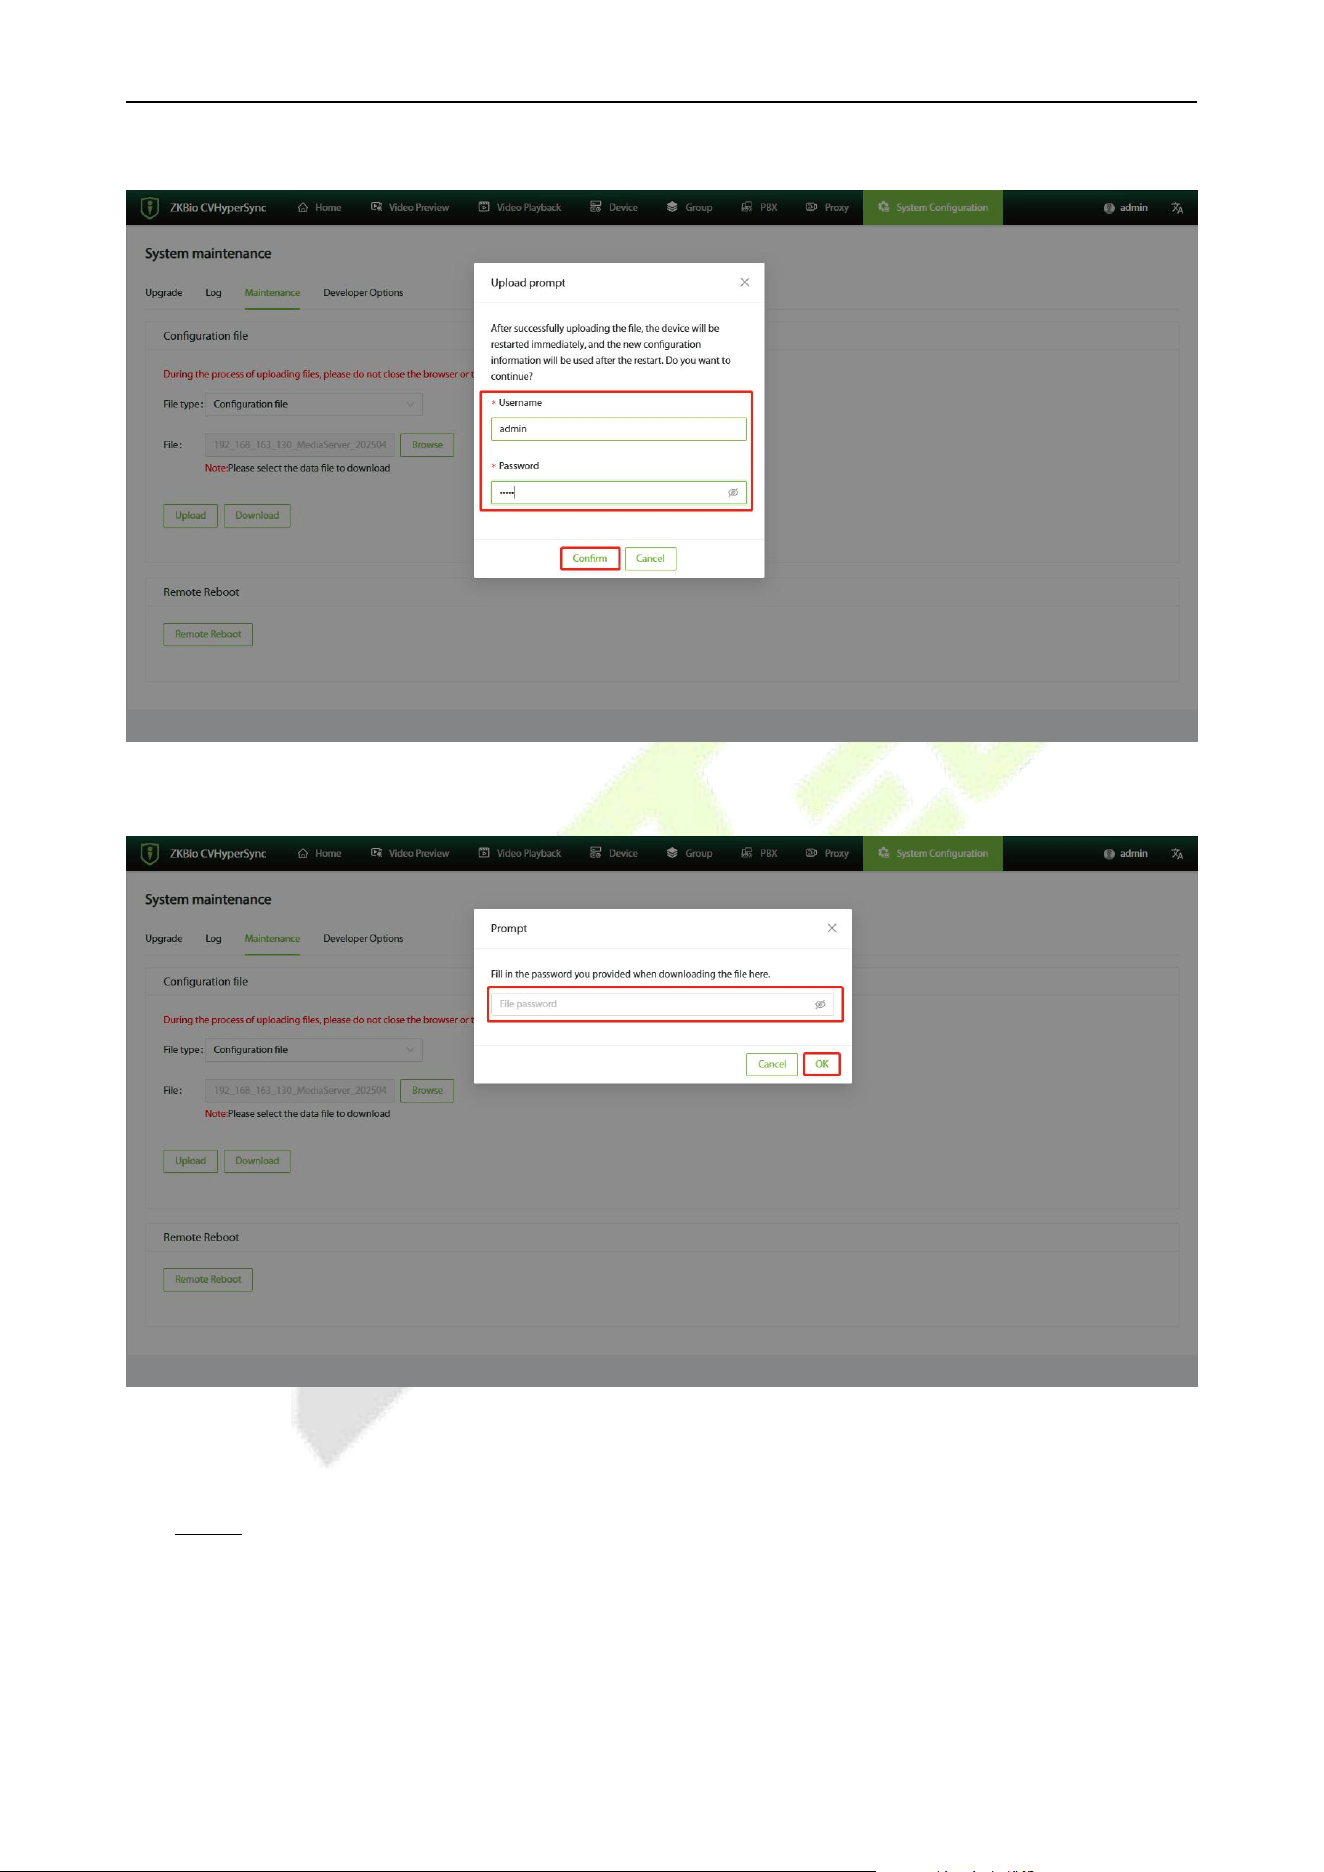
13.5.3.2 Upload Configuration File
1. Click on [Maintenance] to enter the maintenance interface, and in the file type column, select the
Configuration file.
2. Click [Browse] to select the data format file you want to upload.
3. After selecting the correct file, click [Upload].
VS50-50 & VS50-100 User Manual
P a g e | 48 Copyright © 2025 ZKTECO CO., LTD. All rights reserved.
4. Enter the username and password, then click [Confirm].
5. Enter the file password that was set during the download, and then click [OK].
6. After the upload is successful, wait for the service to automatically restart, and the configuration
file will be replaced successfully.
NOTE: During the upgrade process, please do not close the browser or turn off the power!!!
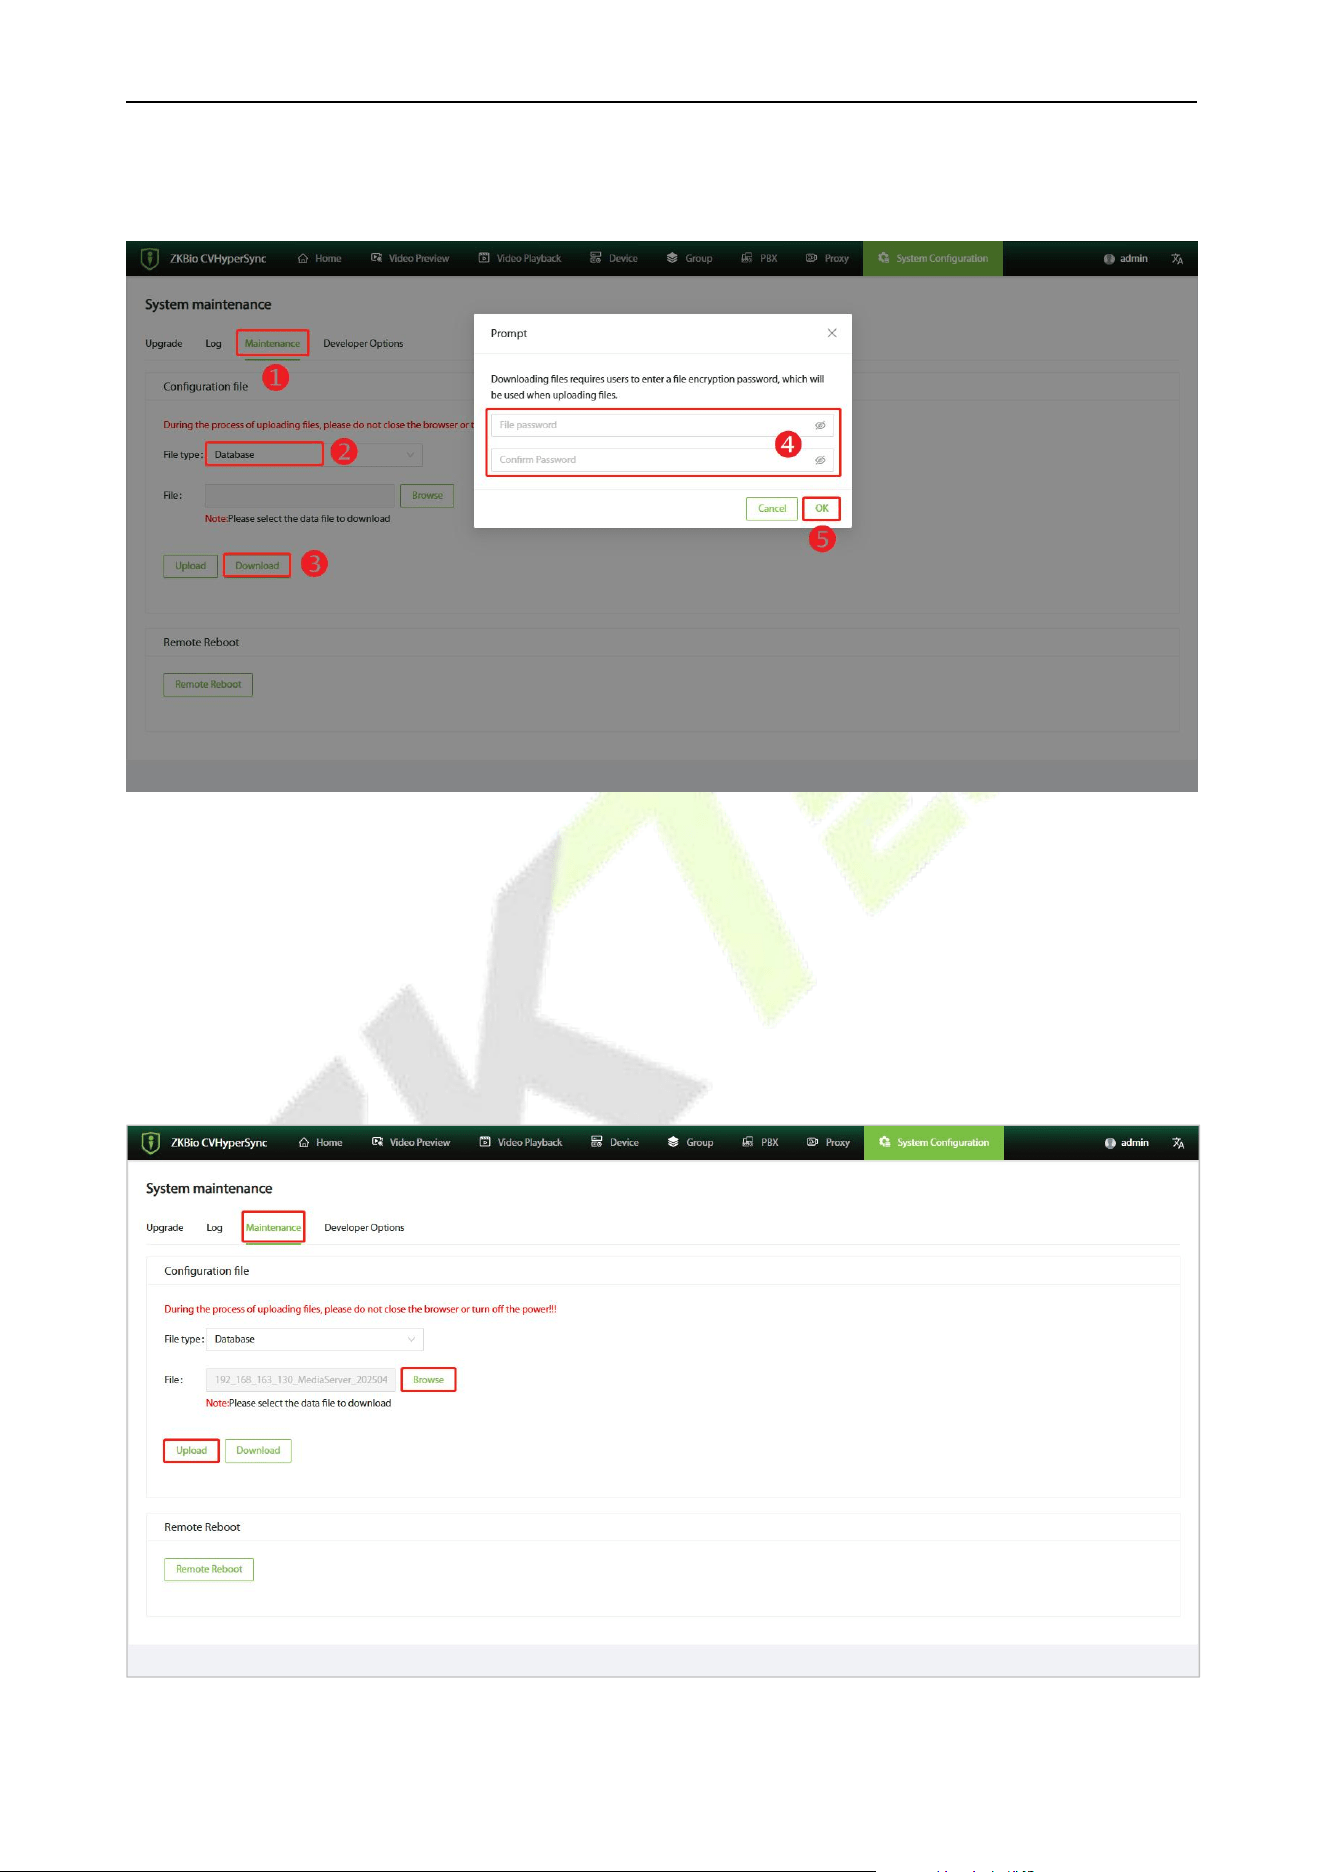
13.5.3.3 Backup Database
1. Click on [Maintenance] to enter the maintenance interface, and in the file type column, select the
Database.
VS50-50 & VS50-100 User Manual
P a g e | 49 Copyright © 2025 ZKTECO CO., LTD. All rights reserved.
2. Click on [Download], set the file password in the pop-up window, and then click [OK].
3. View the downloaded file in the browser's download section.
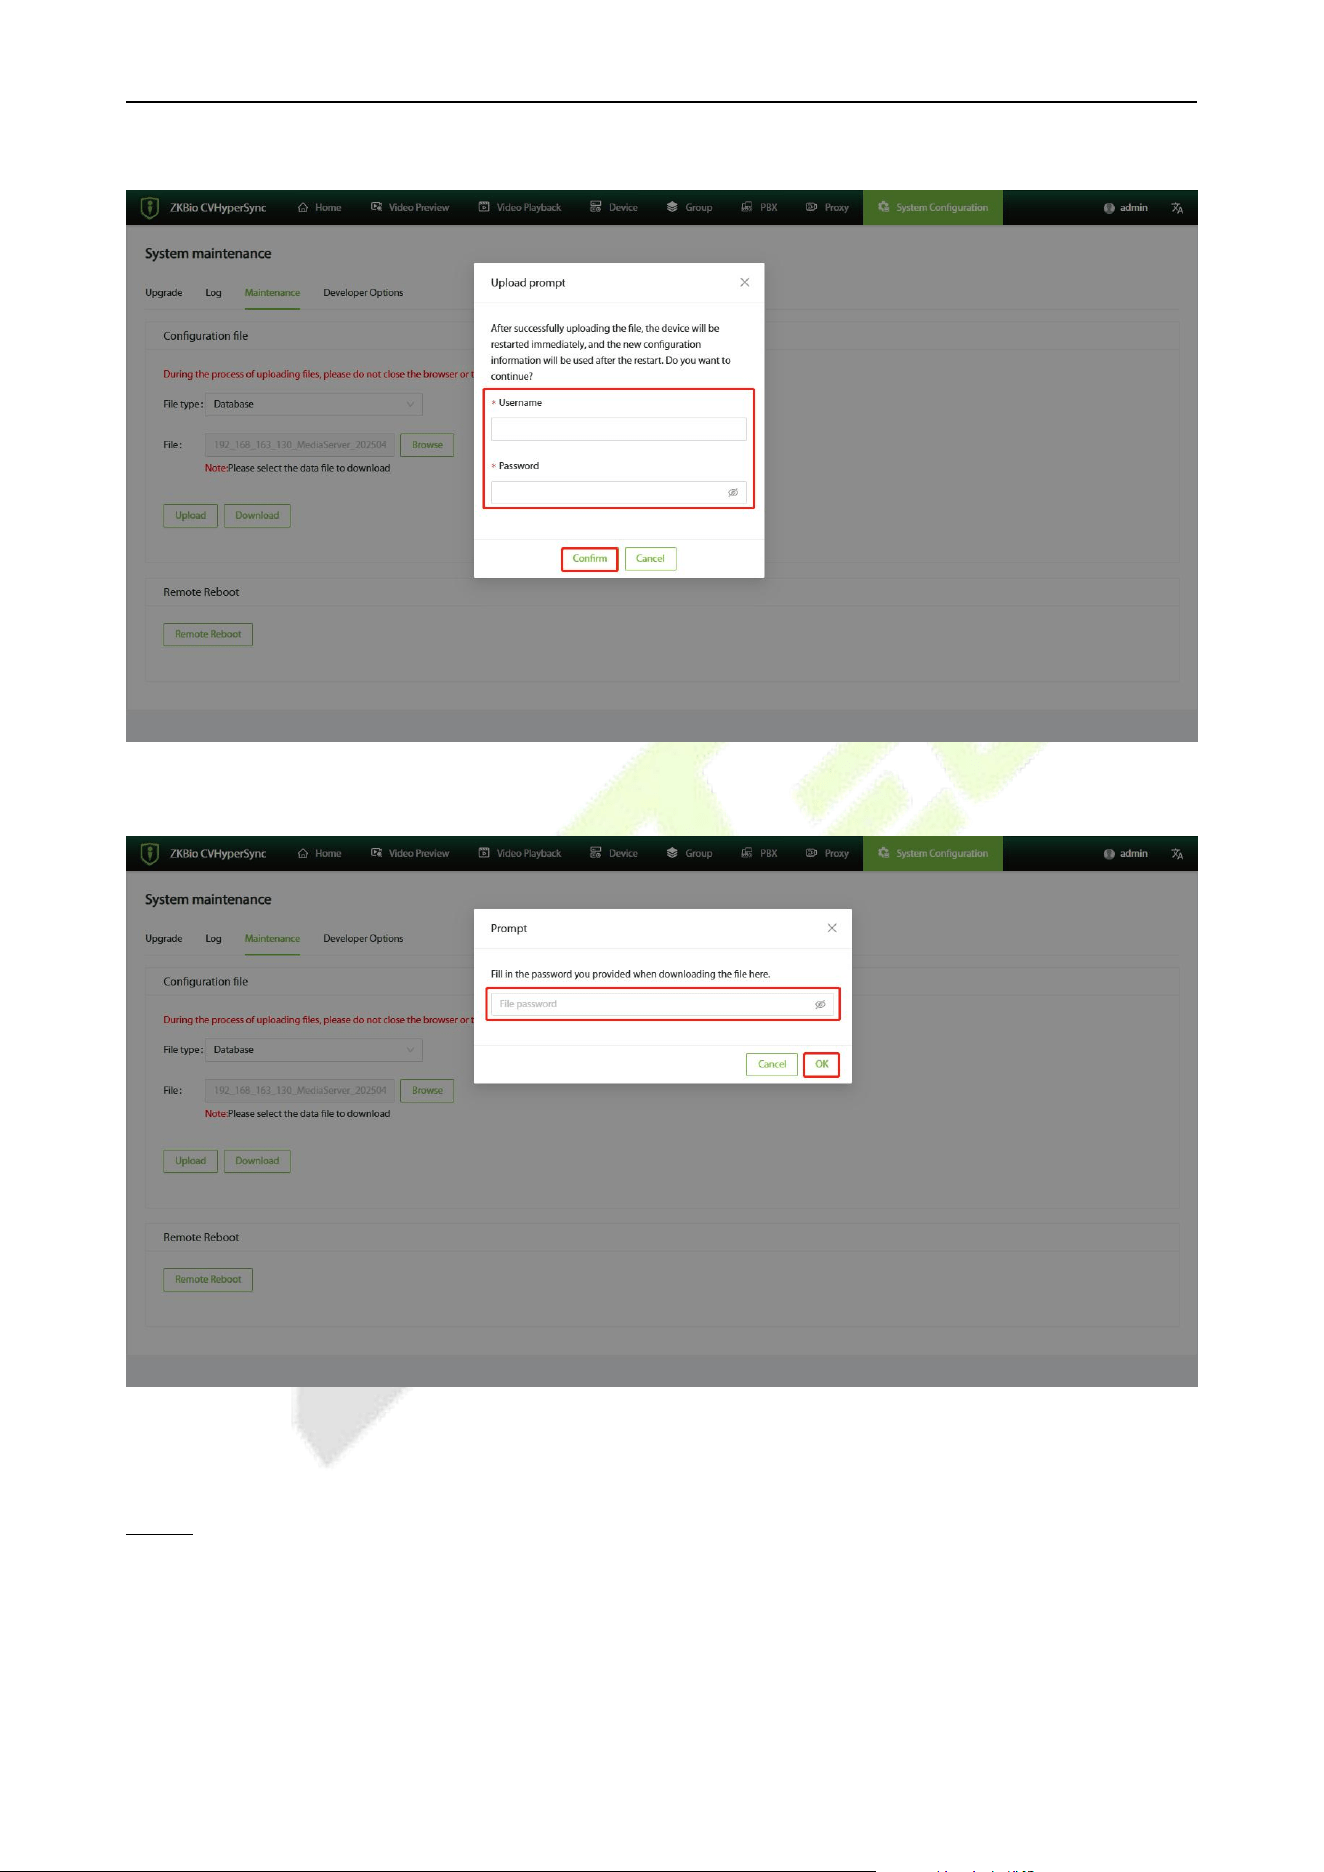
13.5.3.4 Upload Database
1. Click on [Maintenance] to enter the maintenance interface, and in the file type column, select the
Database.
2. Click [Browse] to select the data format file you want to upload.
3. After selecting the correct file, click [Upload].
VS50-50 & VS50-100 User Manual
P a g e | 50 Copyright © 2025 ZKTECO CO., LTD. All rights reserved.
4. Enter the username and password, then click [Confirm].
5. Enter the file password that was set during the download, and then click [OK].
6. After the upload is successful, wait for the service to automatically restart, and the database will be
replaced successfully.
NOTE: During the upgrade process, please do not close the browser or turn off the power!!!
VS50-50 & VS50-100 User Manual
P a g e | 51 Copyright © 2025 ZKTECO CO., LTD. All rights reserved.
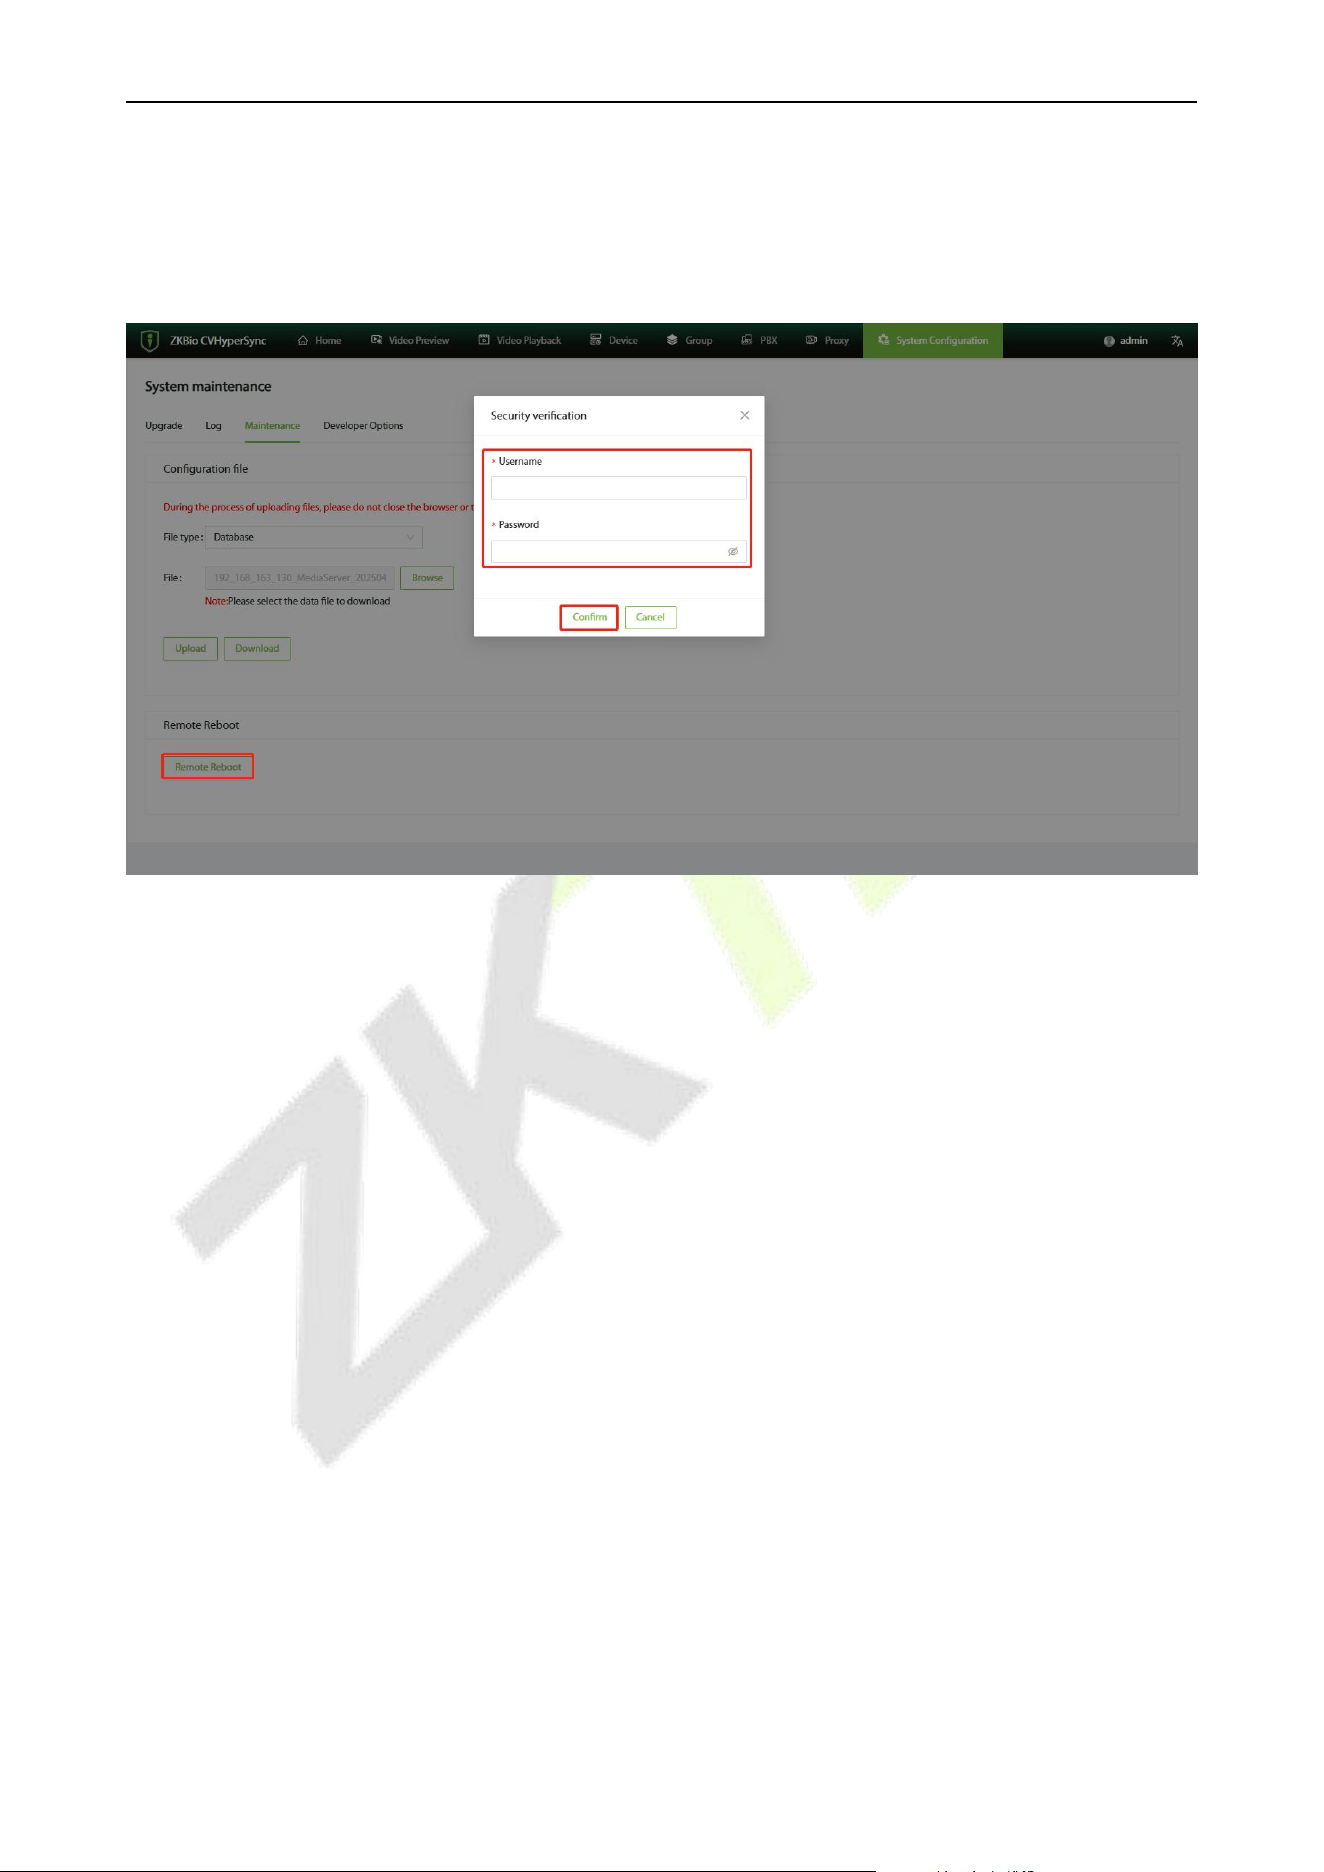
13.5.3.5 Remote Reboot
1. Click on [Maintenance] - [Remote Reboot] to remotely restart the server.
2. Enter the username and password, then click [Confirm].
3. The service will restart and automatically redirect you to the login page.

VS50-50 & VS50-100 User Manual
P a g e | 52 Copyright © 2025 ZKTECO CO., LTD. All rights reserved.
Appendix
Privacy Policy
Notice:
To help you better use the products and services of ZKTeco (hereinafter referred as "we", "our", or "us")
a smart service provider, we consistently collect your personal information. Since we understand the
importance of your personal information, we took your privacy sincerely and we have formulated this
privacy policy to protect your personal information. We have listed the privacy policies below to
precisely understand the data and privacy protection measures related to our smart products and
services.
Before using our products and services, please read carefully and understand all the rules and
provisions of this Privacy Policy. If you do not agree to the relevant agreement or any of its terms,
you must stop using our products and services.
I. Collected Information
To ensure the normal product operation and help the service improvement, we will collect the
information voluntarily provided by you or provided as authorized by you during registration
and use or generated as a result of your use of services.
1. User Registration Information: At your first registration, the feature template
(Fingerprint template/Face template template/Palm template) will be saved on the
device according to the device type you have selected to verify the unique similarity
between you and the User ID you have registered. You can optionally enter your Name
and Code. The above information is necessary for you to use our products. If you do not
provide such information, you cannot use some features of the product regularly.
2. Product information: According to the product model and your granted permission
when you install and use our services, the related information of the product on which our
services are used will be collected when the product is connected to the software,
including the Product Model, Firmware Version Number, Product Serial Number, and
Product Capacity Information. When you connect your product to the software, please
carefully read the privacy policy for the specific software.
II. Product Security and Management
1. When you use our products for the first time, you shall set the Administrator privilege
before performing specific operations. Otherwise, you will be frequently reminded to set
the Administrator privilege when you enter the main menu interface. If you still do not
set the Administrator privilege after receiving the system prompt, you should be
aware of the possible security risk (for example, the data may be manually
modified).

VS50-50 & VS50-100 User Manual
P a g e | 53 Copyright © 2025 ZKTECO CO., LTD. All rights reserved.
2. All the functions of displaying the biometric information are disabled in our products by
default. You can choose Menu > System Settings to set whether to display the biometric
information. If you enable these functions, we assume that you are aware of the personal
privacy security risks specified in the privacy policy.
3. Only your user ID is displayed by default. You can set whether to display other user
verification information (such as Name, Department, Photo, etc.) under the Administrator
privilege. If you choose to display such information, we assume that you are aware of
the potential security risks (for example, your photo will be displayed on the device
interface).
4. The camera function is disabled in our products by default. If you want to enable this
function to take pictures of yourself for attendance recording or take pictures of strangers
for access control, the product will enable the prompt tone of the camera. Once you
enable this function, we assume that you are aware of the potential security risks.
5. All the data collected by our products is encrypted using the AES 256 algorithm. All the
data uploaded by the Administrator to our products are automatically encrypted using
the AES 256 algorithm and stored securely. If the Administrator downloads data from our
products, we assume that you need to process the data and you have known the
potential security risk. In such a case, you shall take the responsibility for storing the data.
You shall know that some data cannot be downloaded for sake of data security.
6. All the personal information in our products can be queried, modified, or deleted. If you
no longer use our products, please clear your personal data.
III. How we handle personal information of minors
Our products, website and services are mainly designed for adults. Without consent of parents or
guardians, minors shall not create their own account. If you are a minor, it is recommended that
you ask your parents or guardian to read this Policy carefully, and only use our services or
information provided by us with consent of your parents or guardian.
We will only use or disclose personal information of minors collected with their parents' or
guardians' consent if and to the extent that such use or disclosure is permitted by law or we have
obtained their parents' or guardians' explicit consent, and such use or disclosure is for the purpose
of protecting minors.
Upon noticing that we have collected personal information of minors without the prior consent
from verifiable parents, we will delete such information as soon as possible.
IV. Others
You can visit https://www.zkteco.com/cn/index/Index/privacy_protection.html to learn more
about how we collect, use, and securely store your personal information. To keep pace with the
rapid development of technology, adjustment of business operations, and to cope with customer
needs, we will constantly deliberate and optimize our privacy protection measures and policies.
Welcome to visit our official website at any time to learn our latest privacy policy.

VS50-50 & VS50-100 User Manual
P a g e | 54 Copyright © 2025 ZKTECO CO., LTD. All rights reserved.
Eco-friendly Operation
The product's "eco-friendly operational period" refers to the time during which this
product will not discharge any toxic or hazardous substances when used in accordance
with the prerequisites in this manual.
The eco-friendly operational period specified for this product does not include batteries or
other components that are easily worn down and must be periodically replaced. The
battery's eco-friendly operational period is 5 years.
Hazardous or Toxic substances and their quantities
Component
Name
Hazardous/Toxic Substance/Element
Lead (Pb)
Mercury
(Hg)
Cadmiu
m (Cd)
Hexavalent
chromium
(Cr6+)
Polybrominate
d Biphenyls
(PBB)
Polybrominated
Diphenyl Ethers
(PBDE)
Chip Resistor
×
○
○
○
○
○
Chip Capacitor
×
○
○
○
○
○
Chip Inductor
×
○
○
○
○
○
Diode
×
○
○
○
○
○
ESD
component
×
○
○
○
○
○
Buzzer
×
○
○
○
○
○
Adapter
×
○
○
○
○
○
Screws
○
○
○
×
○
○
○ indicates that the total amount of toxic content in all the homogeneous materials is below the
limit as specified in SJ/T 11363—2006.
× indicates that the total amount of toxic content in all the homogeneous materials exceeds the limit
as specified in SJ/T 11363—2006.
Note: 80% of this product’s components are manufactured using non-toxic and eco-friendly
materials. The components which contain toxins or harmful elements are included due to the
current economic or technical limitations which prevent their replacement with non-toxic materials
or elements.

ZKTeco Industrial Park, No. 32, Industrial Road,
Tangxia Town, Dongguan, China.
Phone : +86 769 - 82109991
Fax : +86 755 - 89602394
www.zkteco.com
Copyright © 2025 ZKTECO CO., LTD. All Rights Reserved.


