WASHING MACHINE
DRUM TYPE
WASHING MACHINE (DRUM) CONTENTS
SERVICE
Manual
REPAIR GUIDE
1. Safety Instructions
2. FeaturesandSpecications
3. Disassembly and Reassembly
4. Troubleshooting
5. Wiring Diagram
6. Reference
The model code is on the next page.
MODEL CODE
WW7*T****** WW8*T****** WW9*T******
WW70T301MBW WW80T301MBS WW90T304MBW
WW70T301MWW WW80T301MBW WW90T304MWW
WW70T302MBS WW80T301MWW WW90T304PWW
WW70T302MBW WW80T304MBS WW91T304MBW
WW70T302MWW WW80T304MBW WW9FT304PWW
WW70T303MBS WW80T304MWW
WW70T303MBW WW80T304PWW
WW70T303MWW WW81T301MWW
WW70T304MBW WW81T304MWW
WW70T304MWW WW81T304PWW
WW70T304PWW WW8ET304PWW
WW71T301MWW

CONTENTS
1. Safety instructions .........................................................................1
1-1. Safety instructions ...........................................................................1
2. FeaturesandSpecications ................................................................4
2-1. Specications .......................................... ............................... .......4
2-2. ComparingSpecicationswithExistingModels ................................................5
2-3. Accessories ..................................................................................6
3. Disassembly and Reassembly ...............................................................7
3-1. Toolsfordisassemblyandreassembly ......................................................... 7
3-2. Standarddisassemblydrawings ............................. ...... ....... ...... ...... ...... ...8
4. Troubleshooting ..........................................................................26
4-1. InformationCode ...........................................................................26
4-2. ProblemCheckPoint ........................................................................28
5. Wiring diagram ...........................................................................29
5-1. Wiringdiagram .............................................................................29
6. Reference .................................................................................30
6-1. WW3000TM Project Name ..................................................................30
6-2. Terminology ................................................................................31
Safety Instructions _ 1
1. SAFETY INSTRUCTIONS
1-1. SAFETY INSTRUCTIONS
► Makesuretoobservethefollowinginstructionstooperatetheproductcorrectlyandsafelyandpreventpossibleaccidentsand
hazardswhileservicing.
► Twotypesofsafetysymbols,WarningandCaution,areusedinthesafetyinstructions.
WARNING
Hazardsorunsafepracticesthatmayresultinseverepersonalinjuryordeath.
CAUTION
Hazardsorunsafepracticesthatmayresultinminorpersonalinjuryorpropertydamage.
► Followingtherepairbyanon-authorisedserviceprovider,self-repairornon-professionalrepairoftheproduct,Samsungisnot
liableforanydamagetotheproduct,anyinjuryoranyotherproductsafetyissuecausedbyanyattempttorepairtheproduct
whichdoesnotcarefullyfollowtheserepairandmaintenanceinstructions.Anydamagetotheproductcausedbyanattemptto
repairtheproductbyanypersonotherthanaSamsungcertiedserviceproviderwillnotbecoveredbythewarranty.
WARNING
BEFORE SERVICING
• (Whenservicingelectricalpartsorharnesses)Makesuretodisconnectthepowerplugbeforeservicing.
4 Failingtodosomayresultinariskofelectricshock.
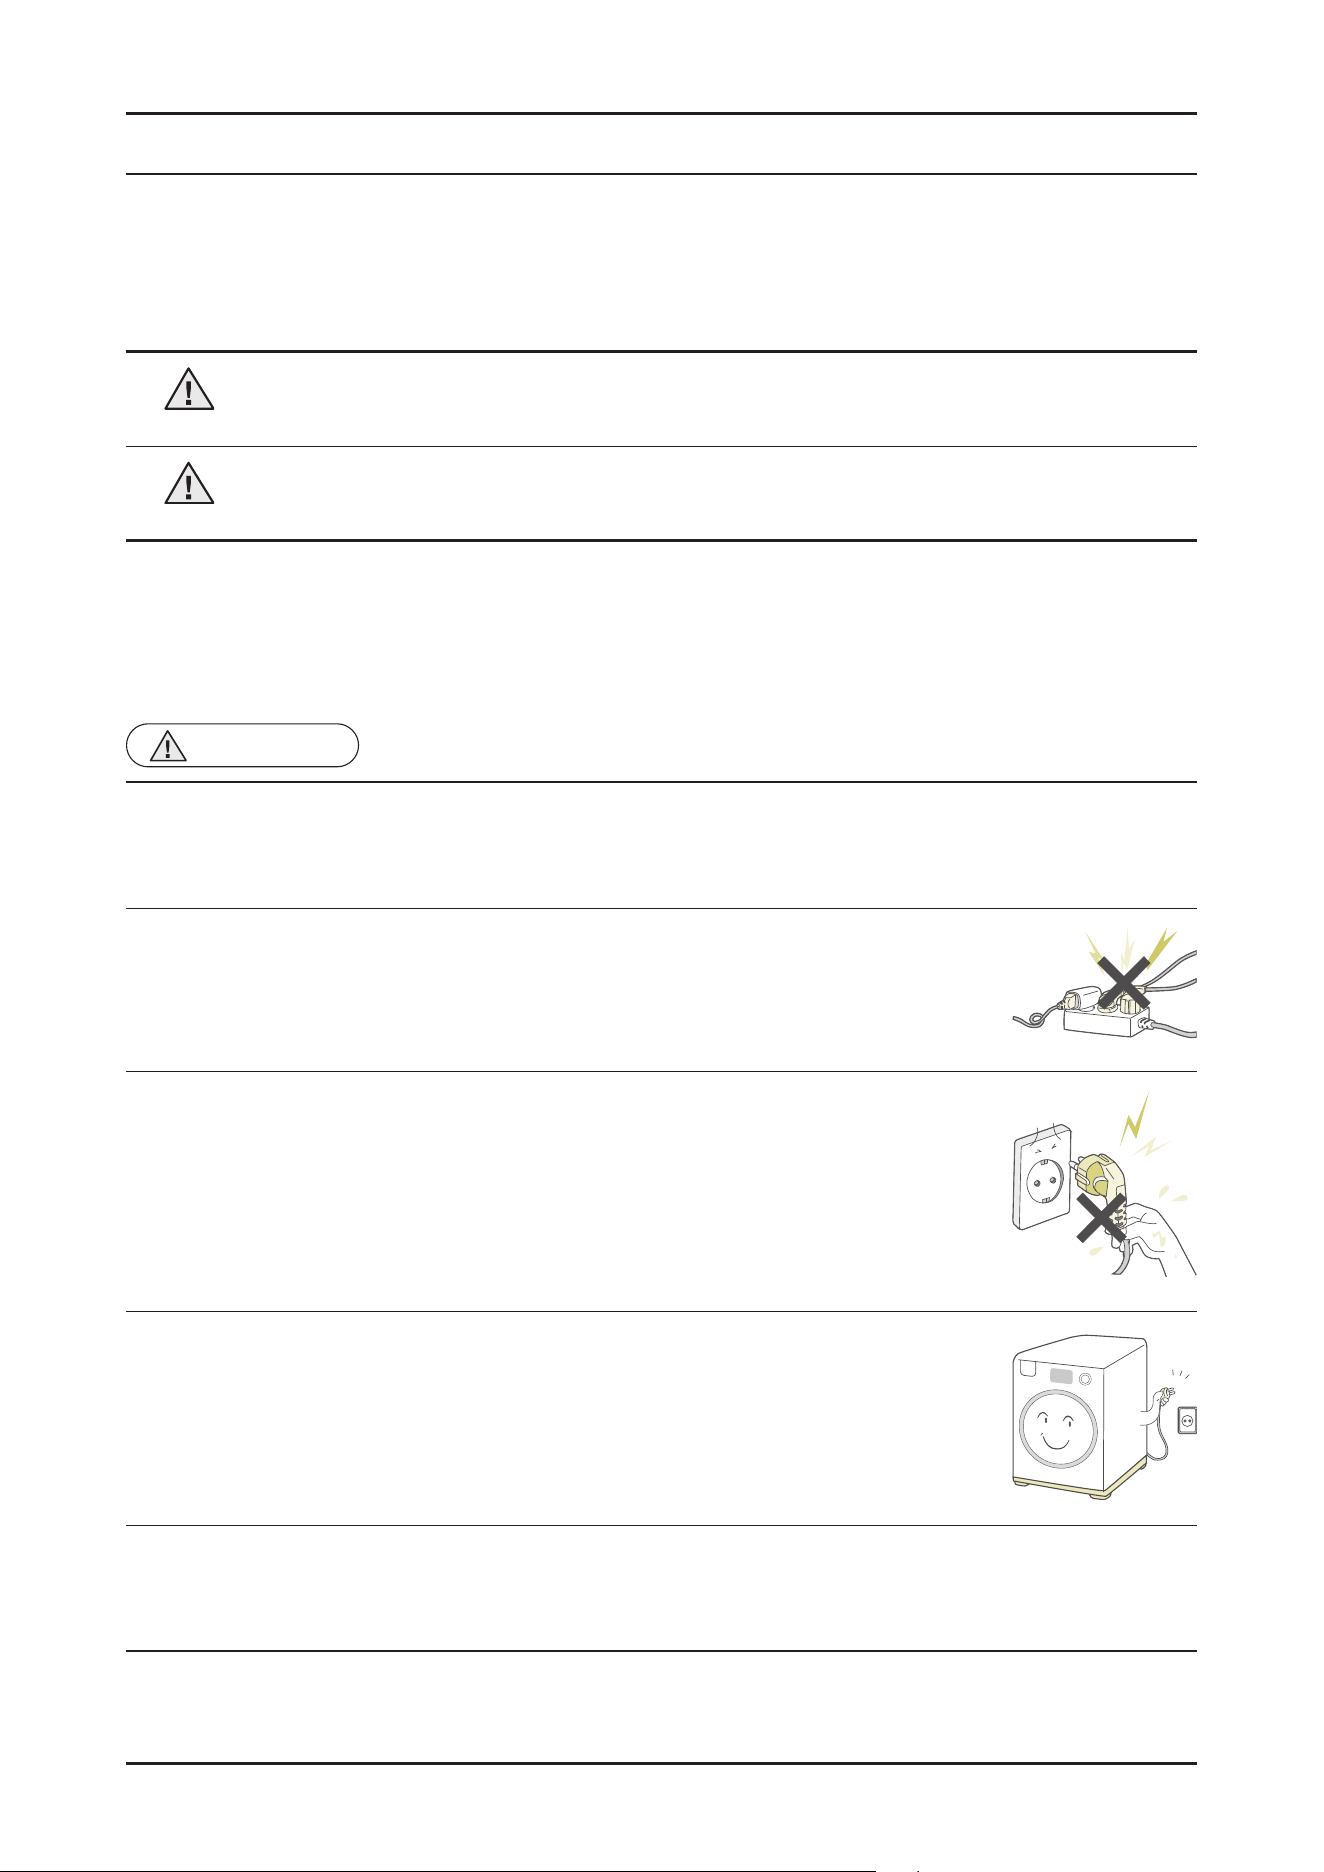
• Adviseconsumersnottoconnectseveralappliancestoasinglepoweroutletatthesametime.
4 Thereisariskofreduetooverheating.
• Whenremovingthepowercord,makesuretoholdthepowerplugwhenpullingtheplugfrom
theoutlet.
4 Failingtodosomaydamagetheplugorpoweroutletandresultinreorelectricshock.
• Whenthewashingmachineisnotbeingused,makesuretodisconnectthepowerplugfromthe
poweroutlet.
4 Failingtodosomayresultinresultinaccidentaloperationofthewashingmachine.
• Donotplaceorusegasoline,thinners,alcohol,orotherammableorexplosivesubstancesnearthewashingmachine.
4 Thereisariskofexplosionandrecausedfromelectricsparks.
2 _ Safety Instructions
WARNING
WHILE SERVICING
• Checkifthepowerplugandoutletaredamaged,attened,cutorotherwisedegraded.
4 Iffaulty,replaceitimmediately.
Failingtodosomayresultinelectricshockorre.
• Completelyremoveanydustorforeignmaterialfromthehousing,wiringandconnectionparts.
4 Thiswillpreventariskofreduetotrackingandshortsinadvance.
• Whenconnectingwires,makesuretoconnectthemusingtherelevantconnectorsandcheckthattheyareproperlyconnected.
4 Donotusetapeinsteadoftheconnectors,itmaycausereduetotracking.
• MakesuretodischargethePBApowerterminalsbeforestartingtheservice.
4 Failingtodosomayresultinahighvoltageelectricshock.
• Whenreplacingtheheater,makesuretofastenthenutafterensuringthatitisinsertedintothebracket-heater.
4 Ifnotinsertedintothebracket-heater,ittouchesthedrumandcausesnoiseandelectricleakage.
• Donotrepairthewashingmachinewithoutsafetygloves.
4 It can cause injury.
WARNING
AFTER SERVICING
• Checkthewiring.
4 Ensurethatthewiringcannotbedamagedbyanysharpedgesormovingparts.
• Checkforanywaterleakage.
4 Performatestrunforthewashingmachineusingthestandardcourseandcheckwhetherthereisanywaterleakage
throughtheoorsectionorthepipes.
• Adviseconsumersnottorepairorserviceanypartofthewashingmachinethemselves.
4 Thismayresultinpersonalinjuryandshortentheproductlifetime.
Safety Instructions _ 3
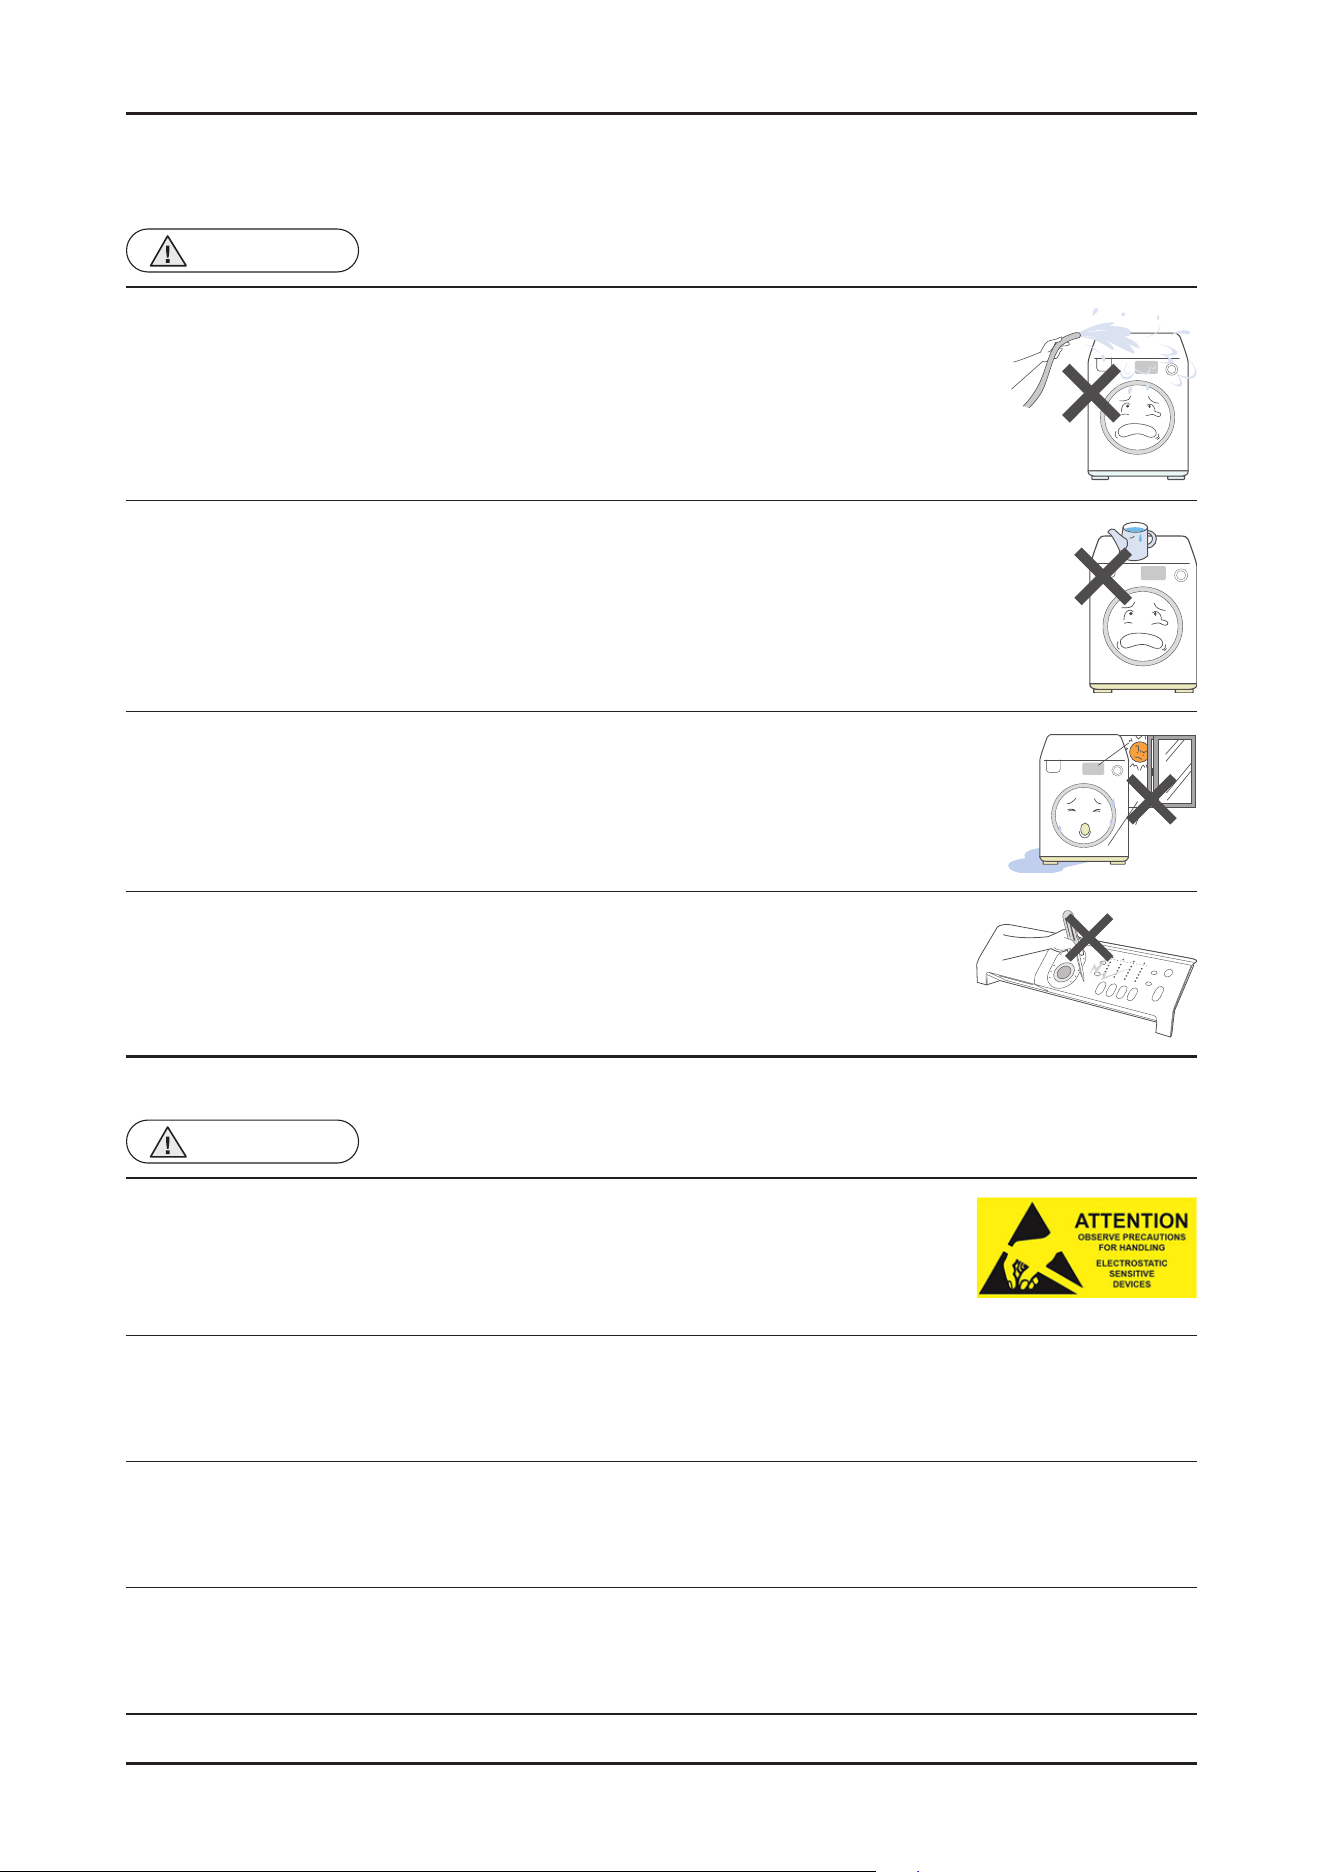
CAUTION
BEFORE SERVICING
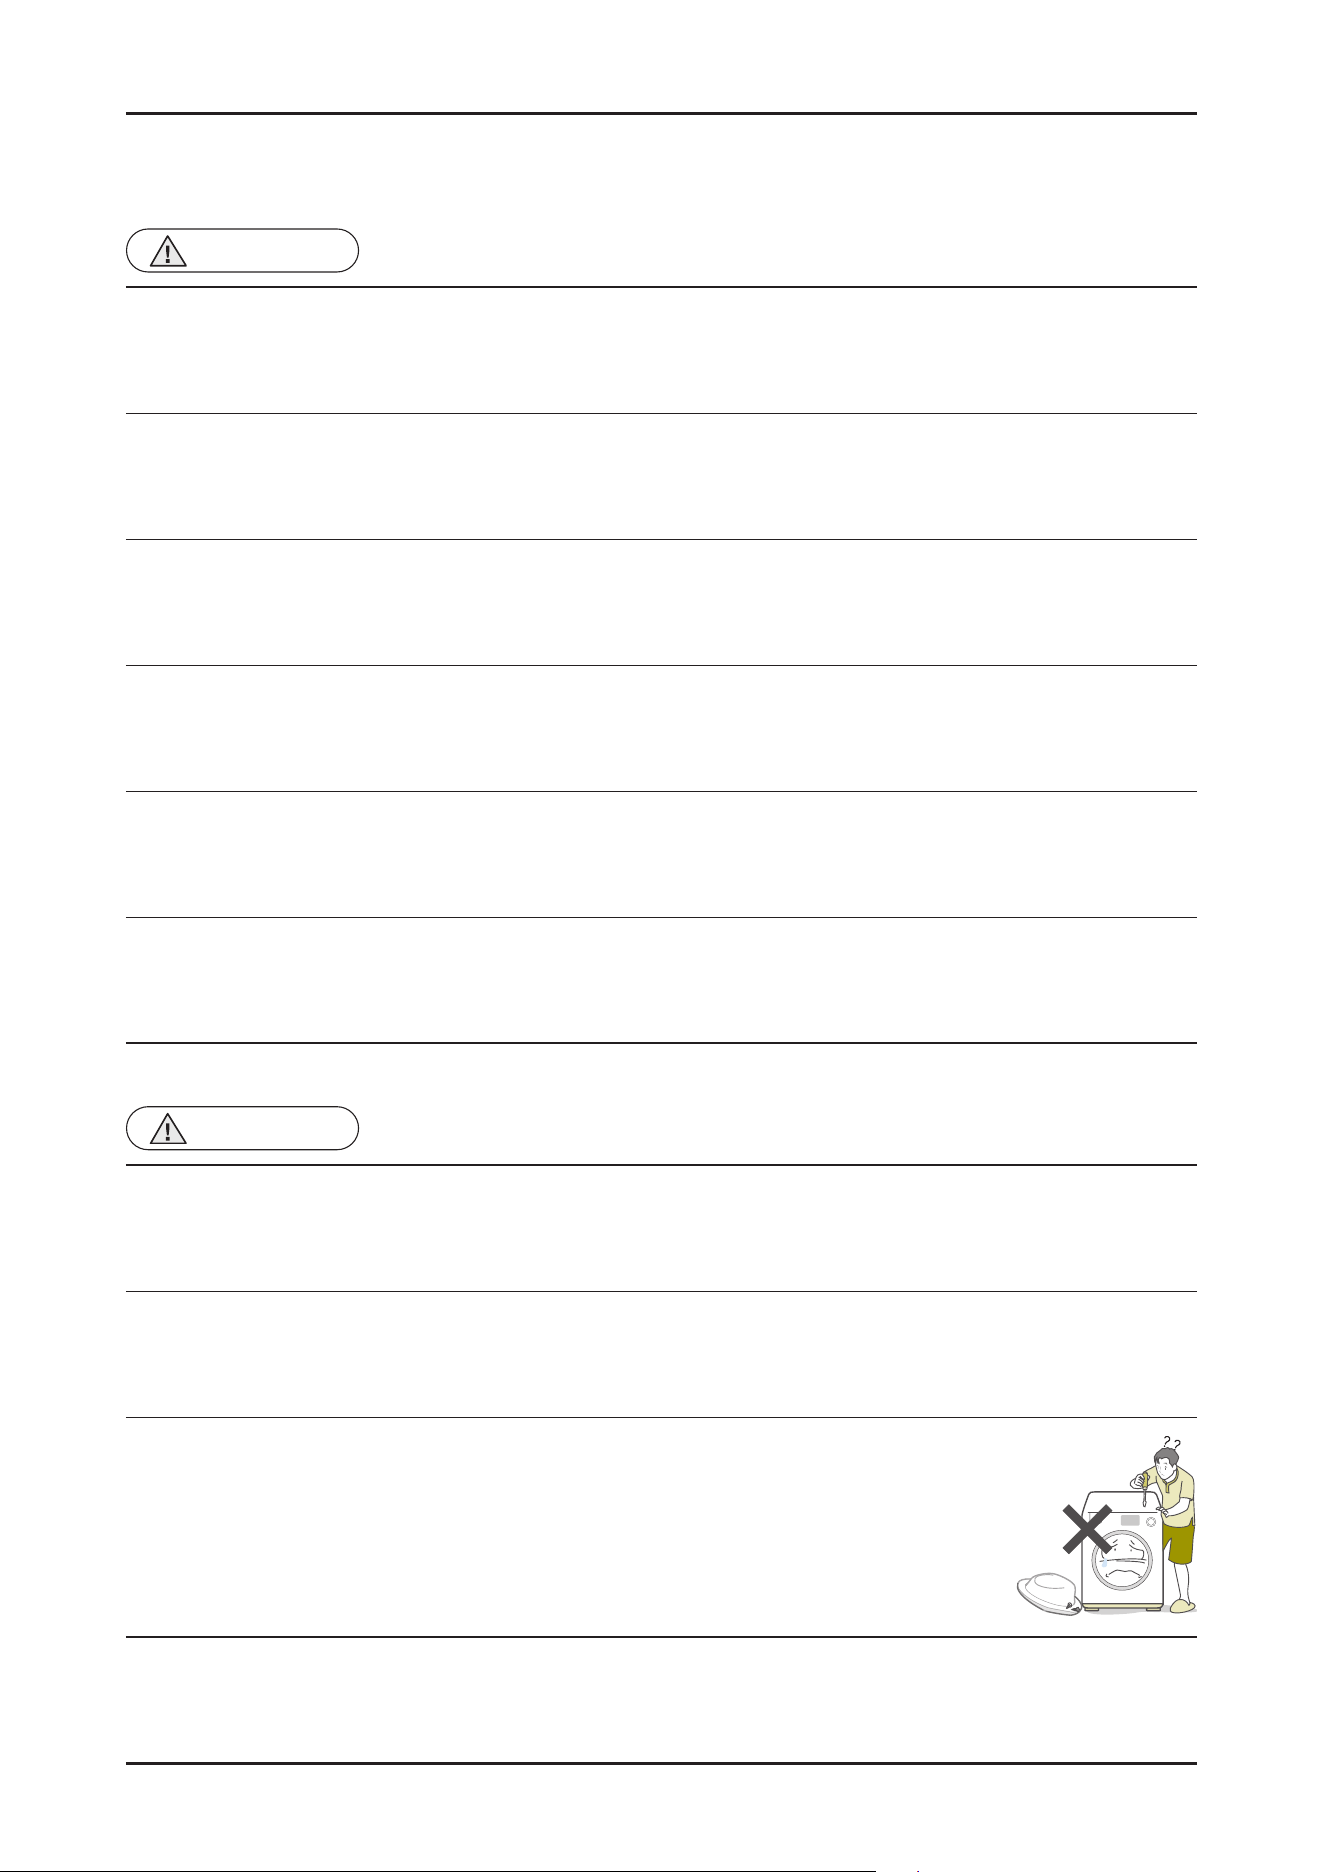
• Donotsprinklewaterontothewashingmachinedirectlywhencleaningit.
4 Thismayresultinelectricshockorre,andmayshortentheproductlifetime.
• Donotplaceanycontainerswithwateroranyotherliquidonthewashingmachine
4 Ifthewaterisspilled,itmayresultinelectricshockorre.Thiswillalsoshortentheproduct
lifetime.
• Donotinstallthewashingmachineinalocationexposedtosnoworrain.
4 Thismayresultinelectricshockorre,andshortentheproductlifetime.
• Donotpressacontrolbuttonusingasharptoolorobject.
4 Thismayresultinelectricshockordamagetotheproduct.
CAUTION
WHILE SERVICING
• Whenwiringaharness,makesuretosealitcompletelysonoliquidcanenter.
4 Takecarewhendisconnectingconnectors,donotuseexcessiveforceasthismaydamage
theconnector.
• Checkifthereisanyresiduethatshowsthatliquidenteredtheelectricpartsorharnesses.
4 Ifanyliquidhasenteredintoapart,replaceitorcompletelyremoveanyremainingmoisturefromit.
• Ifyouneedtoplacethewashingmachineonitsbackforservicingpurposes,placeasupport(s)ontheoorandlayitdown
carefullysoitssideisontheoor.
4 Donotlayitdownonitsfront.Thismayresultintheinsidetubdamagingparts.
• Atleasttwopeopleshouldworkwhenworkingwithheavyproducts.

4_FeaturesandSpecications
2. FEATURES AND SPECIFICATIONS
2-1. SPECIFICATIONS
MODEL
WW7*T30*** WW8*T301*** WW9*T304***
Modelname
Frontloadingwashingmachine
Dimensions(mm)
595*495*850 595*520*850 595*560*850
Water pressure
50kPa-800kPa
Netweight(kg) 59
59 64
Washandspincapacity
7kg 8kg 9kg
Power
consumption
Washing
220V
120 W 120 W 120 W
240V
150 W 150 W 150 W
Washingand
heating
220V
1800 W 1800 W 1800 W
240V
2100 W 2100 W 2100 W
Spin+Pump 220V~240
500 W 500 W 500 W
Spinrevolutions
WW9*T304***
WW9*T303***
WW9*T302***
WW9*T301***
WW8*T304***
WW8*T303***
WW8*T302***
WW8*T301***
WW7*T304***
WW7*T303***
WW7*T302***
WW7*T301***
1400rpm 1200 rpm 1400rpm 1200 rpm 1400rpm 1200 rpm
-
PleasevisitSamsungofcialwebsitetoreceivemostup-to-dateinformationaboutsoftwareandproductmaintenance.
Model
WW7*T30*** WW8*T301*** WW9*T304***
Width(A)
595 mm
Height-Overall(B)
850 mm
Depth(C)
495 520 560
Depthwithdooropen90°(D)
913 938 978
A
B
C
D

FeaturesandSpecications_5
2-2. COMPARING SPECIFICATIONS WITH EXISTING MODELS
Project WW3000TM
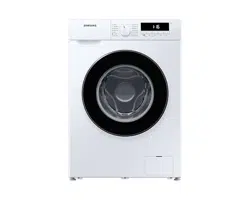
Model Name WW9*T304*** WW8*T30**** WW7*T30****
Image
Feature - - -
Capacity 9.0kg 8.0kg 7.0kg
Main
Spec
DrumVolume 60 L 53 L 49 L
MaxRpm 1400 rpm 1400 / 1200 rpm 1200,1400/1200,1400rpm
Motor DIT DIT/Universal DIT/Universal
ControlSys General General General
WeightDetection Yes Yes Yes
WashHeaterCapacity
1800-2100W /
220-240V
1800-2100W / 220-240V 1800-2100W / 220-240V
WaterSupply ColdOnly ColdOnly ColdOnly
Drainage Pump Pump Pump
Power-OutageCompensation No No No
ZeroStanbyPower
Yes
(0.5WorLess)
Yes
(0.5WorLess)
Yes
(0.5WorLess)
USP
EcoBubble
TM
No No No
DelayEnd Yes Yes Yes
ChildLock Yes Yes Yes
DiamondDrum No No No
Design
Door 450mm 450mm 450mm
CenterJogDial No No No
Display LED LED LED
Dimension(WxDxH) 595x560x850(mm) 595x520x850(mm) 595x495x850(mm)
(★) : Special models only
6_FeaturesandSpecications
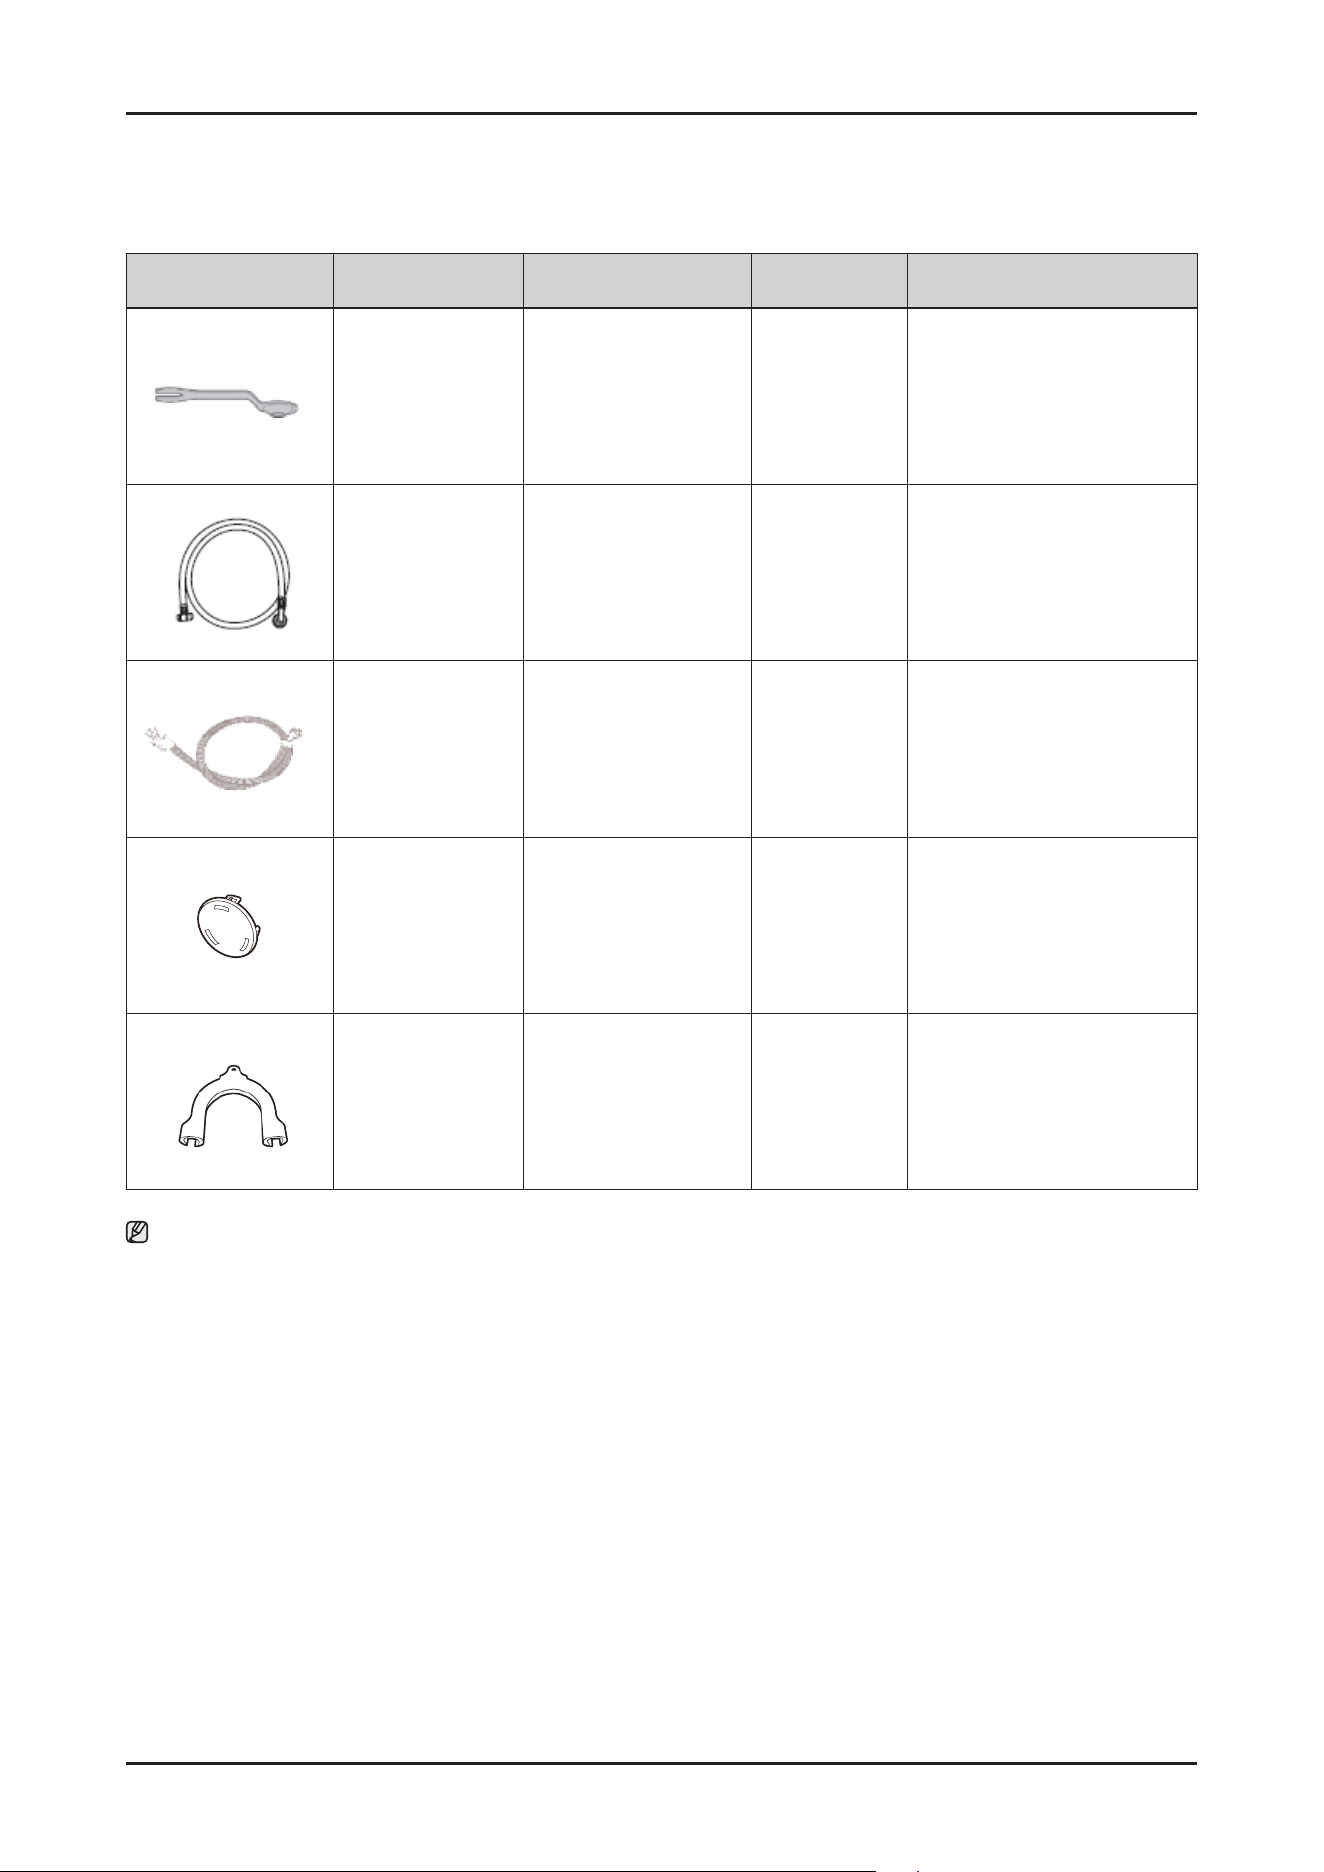
2-3. ACCESSORIES
Figure Unit Code QTY Description
BoltSpanner - 1
Toremovetheshippingbolts
Toadjustthelevelingleg
Assy Hose Water -
Coldonly1(★)
Tosetupwatersupply.
Hose Water
(Aqua-Stop)
-
1(★)
Tosetupwatersupply.
CapFixer - 4
Tocovertheholes.
Hose Hanger - 1 Tosecurethedrainhose.
Note
• (H)issuppliedforspecicmodelsonlyamongthosewithoutwatersupplyhoses.
• Customercanpurchaseadditionalwatersupplyanddrainhosesfromaservicecenter.
• Forbuilt-inmodels,thespanner,watersupplyanddrainhosesarenotsupplied.Boththewatersupplyanddrainhosesare
suppliedduringtheinstallatio.
Disassembly and Reassembly _ 7
3. DISASSEMBLY AND REASSEMBLY
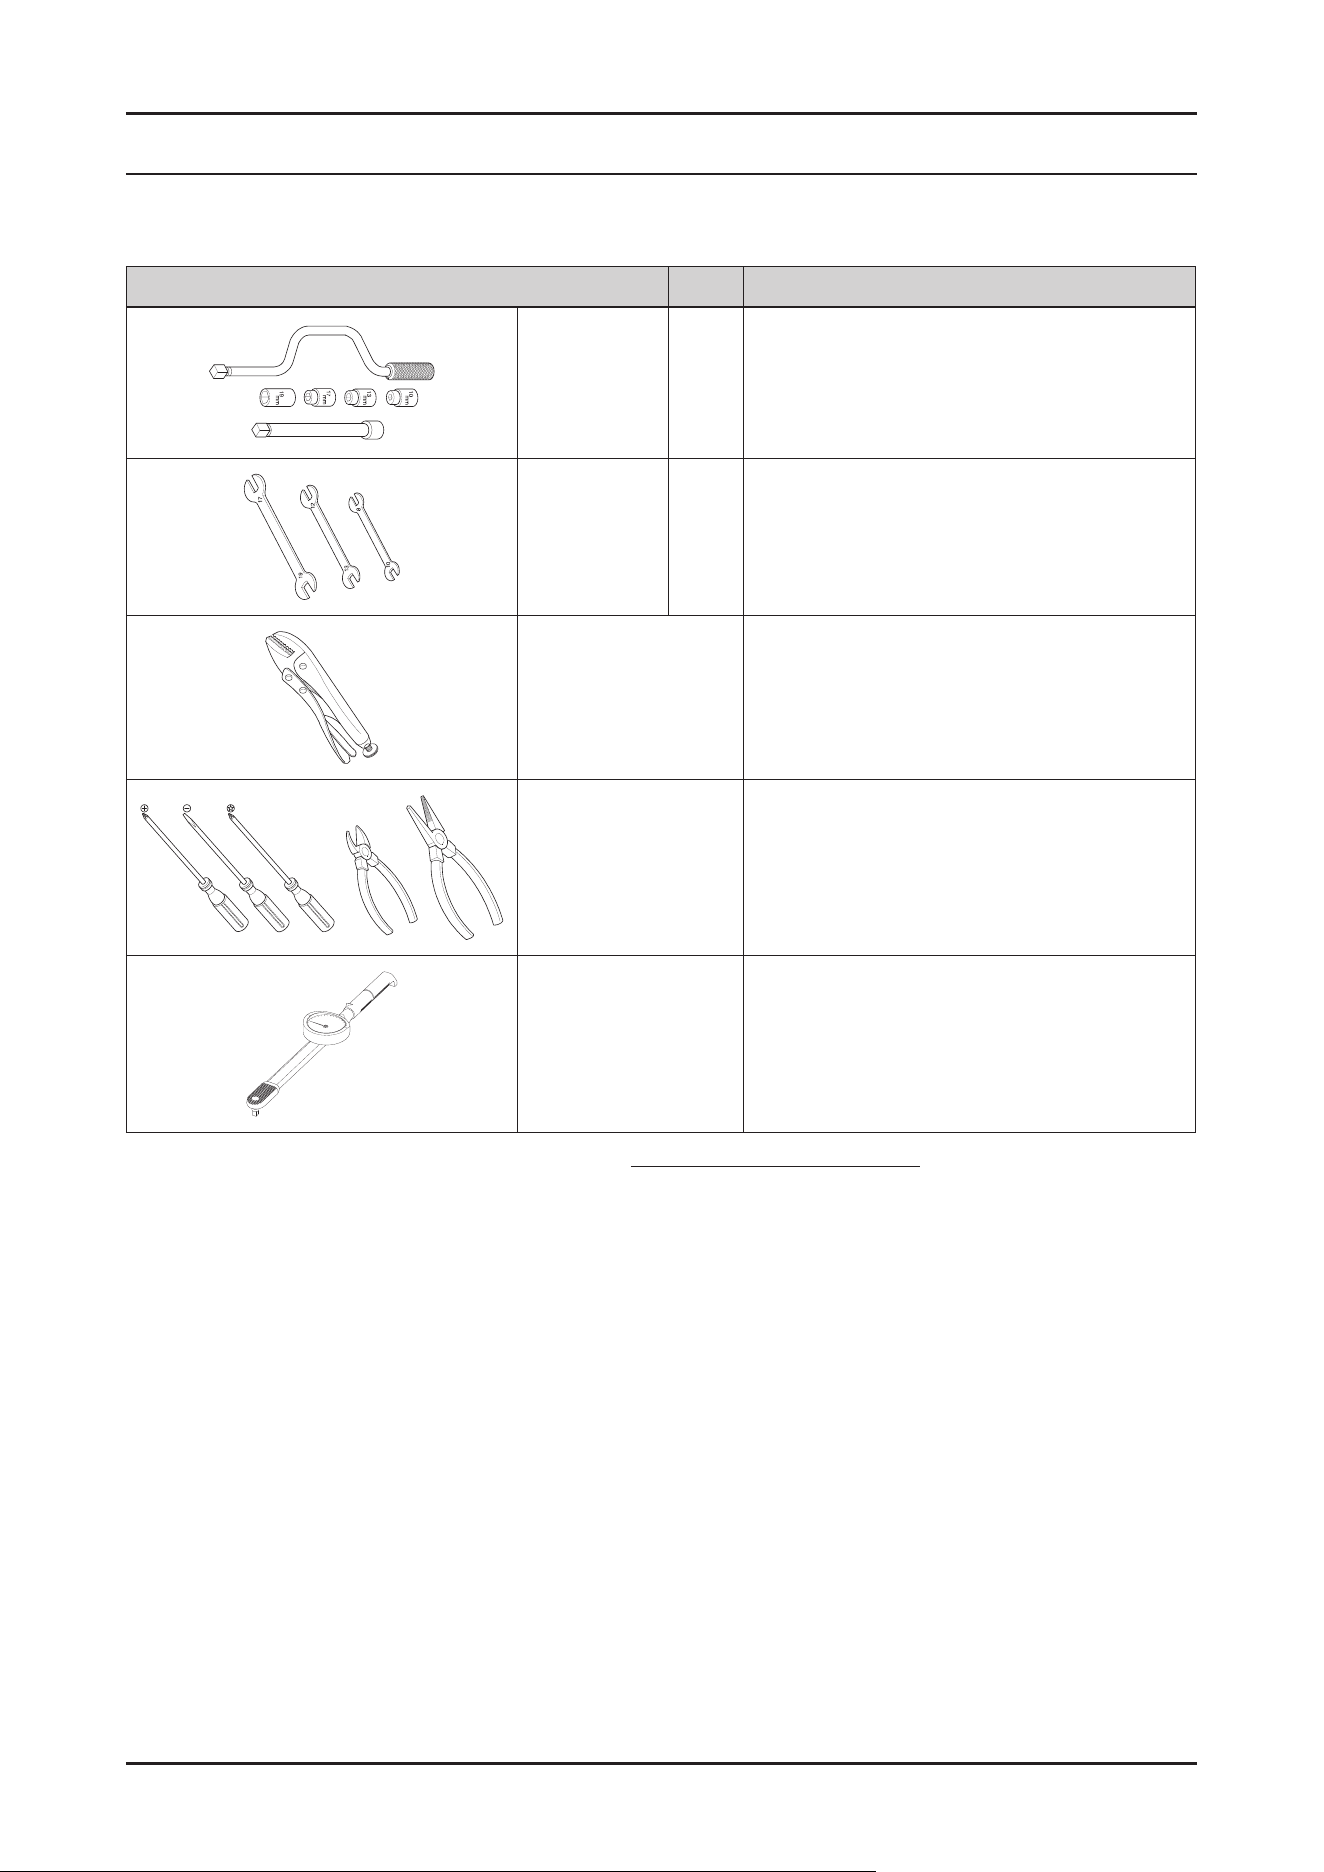
3-1. TOOLS FOR DISASSEMBLY AND REASSEMBLY
Tool Type Remarks
Boxdriver
10mm Heater(1),Tub(12),Fixerscrew(4),Motor(2),
13mm
ShockAbsorber(3holeseachinleft/right),
Damper(3),Damper(friction2),Balance(6)
17mm Pulley(1)
Double-ended
spanner
10mm
13mm
17mm
Replacedbyboxdriver
Leg
Vicepliers
AToolforprotectingemptyturningofboltor
abrasionfromusingboxdriver
FordisassemblyofSpindrum
Others
(screwdriver,nipper,long
nosepliers)
Commontoolsforservicing
Torquewrench TheToolforassemblyofheaterandTub
-Forinformationaboutpurchasingpartsandtool,pleasevisithttp://www.samsung.com/support
-Forthepartcodeinformation,pleaserefertheattachedle'ExplodedView'.
8 _ Disassembly and Reassembly
3-2. STANDARD DISASSEMBLY DRAWINGS
► Thisisastandarddisassemblydiagramandmaydifferfromtheactualproduct.
Usethismaterialasareferencewhendisassemblingandreassemblingtheproduct.
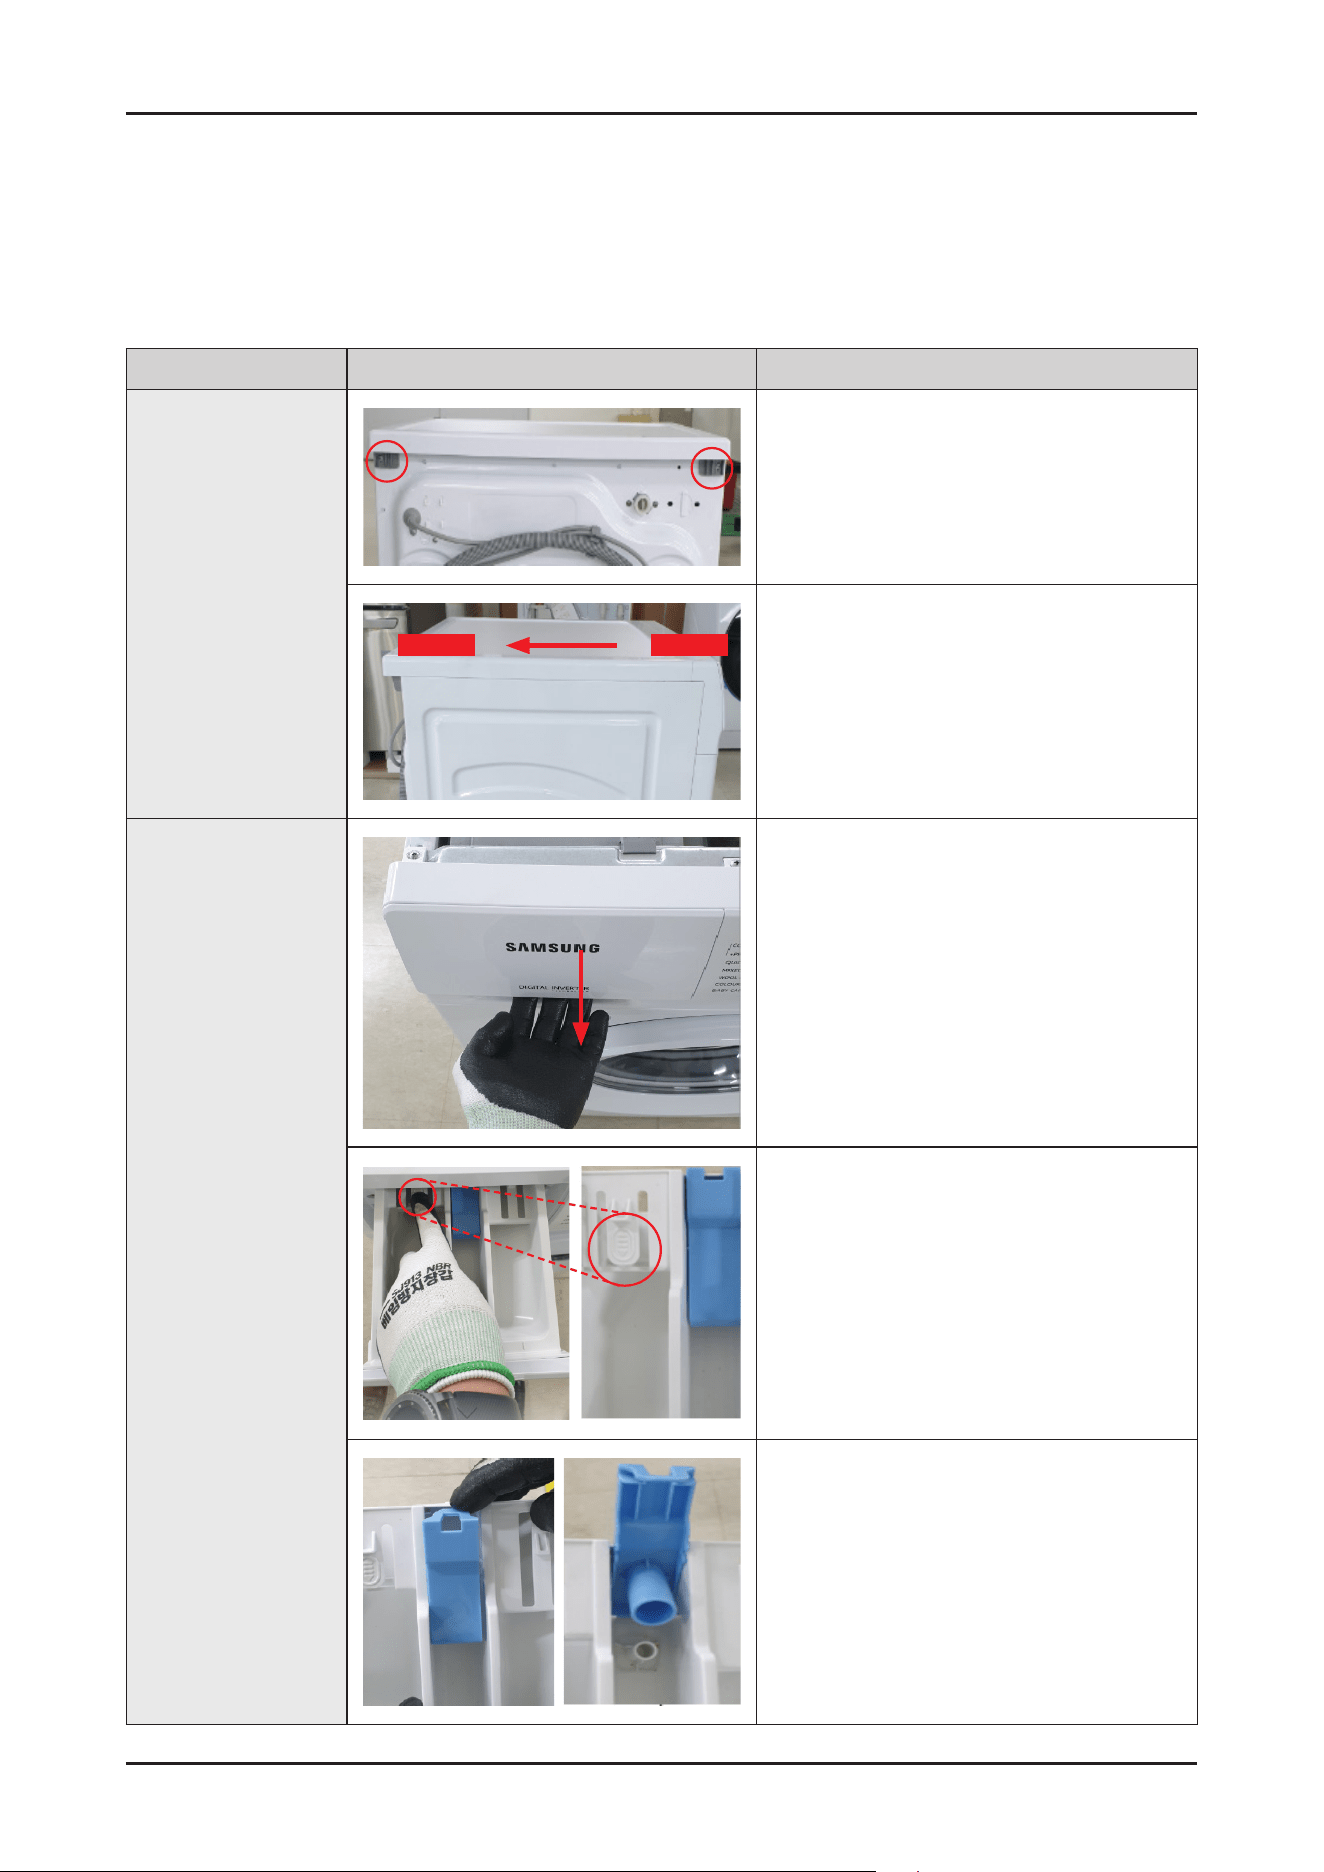
Disassembly
Part Figure Description
Assy Cover Top
1. Remove2screwsholdingtheCoverTopatthe
backoftheunitusing(+)screwdriver.
Back Front
2. RemovetheCoverTopbyliftingitupafter
pullingitbackabout15mm.
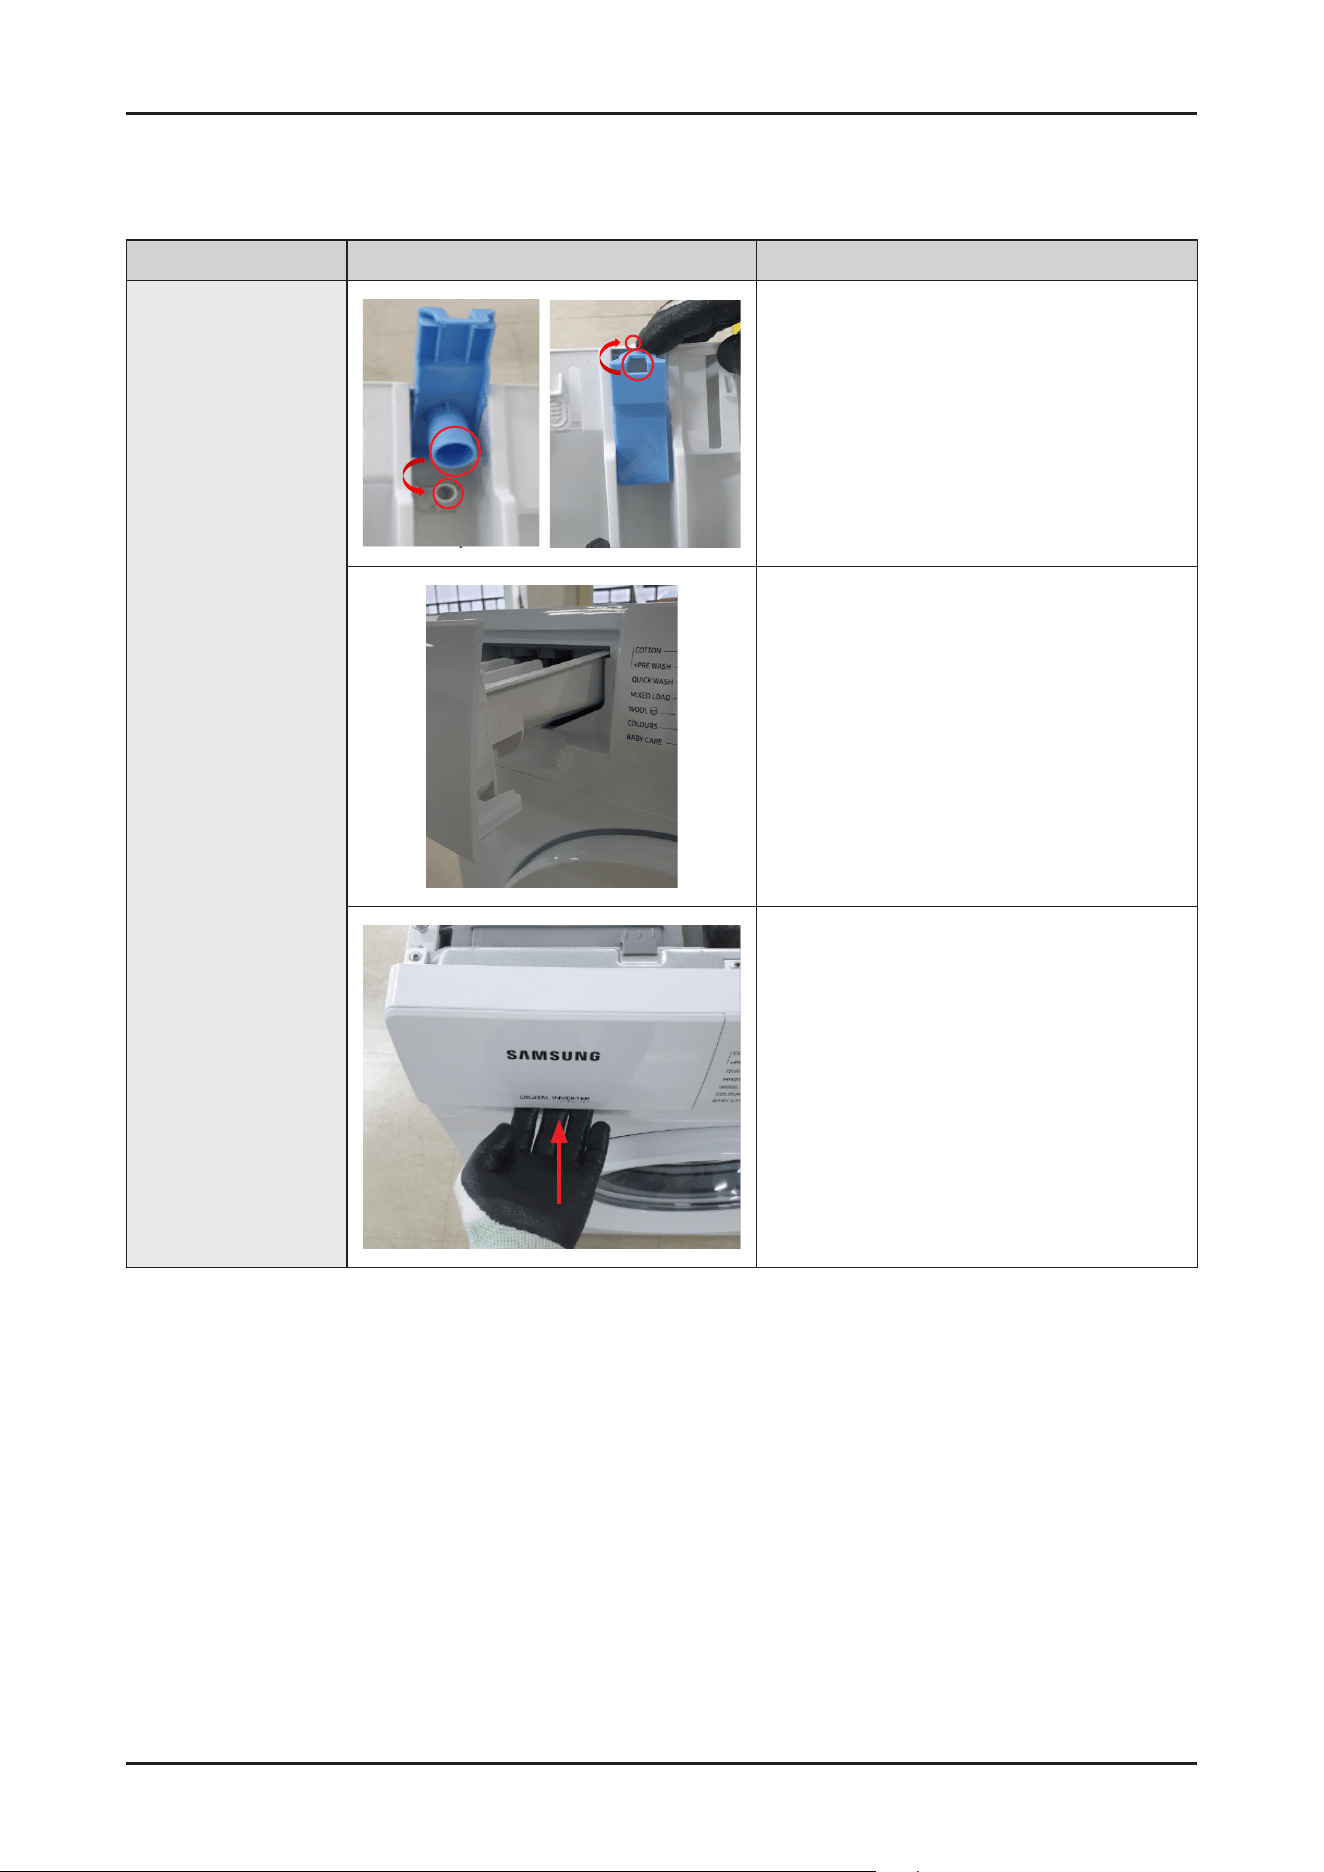
Assy Drawer
1. OpentheDrawerbyhand.
2. Whileholdingdownthereleaseleverinsidethe
Drawer(redbox),slideopentheDrawer.
3. PulluptheCapRinsetoremoveit.
Disassembly and Reassembly _ 9
Reassembly
Part Figure Description
Assy Drawer
1. FittheholeandpresstheCapRinsesothatit
canbeassembled.
2. Makesuretottherailwhenreassemblingthe
AssyDrawer.
3. InserttheDrawerasshowninthepicture.
10 _ Disassembly and Reassembly
Disassembly
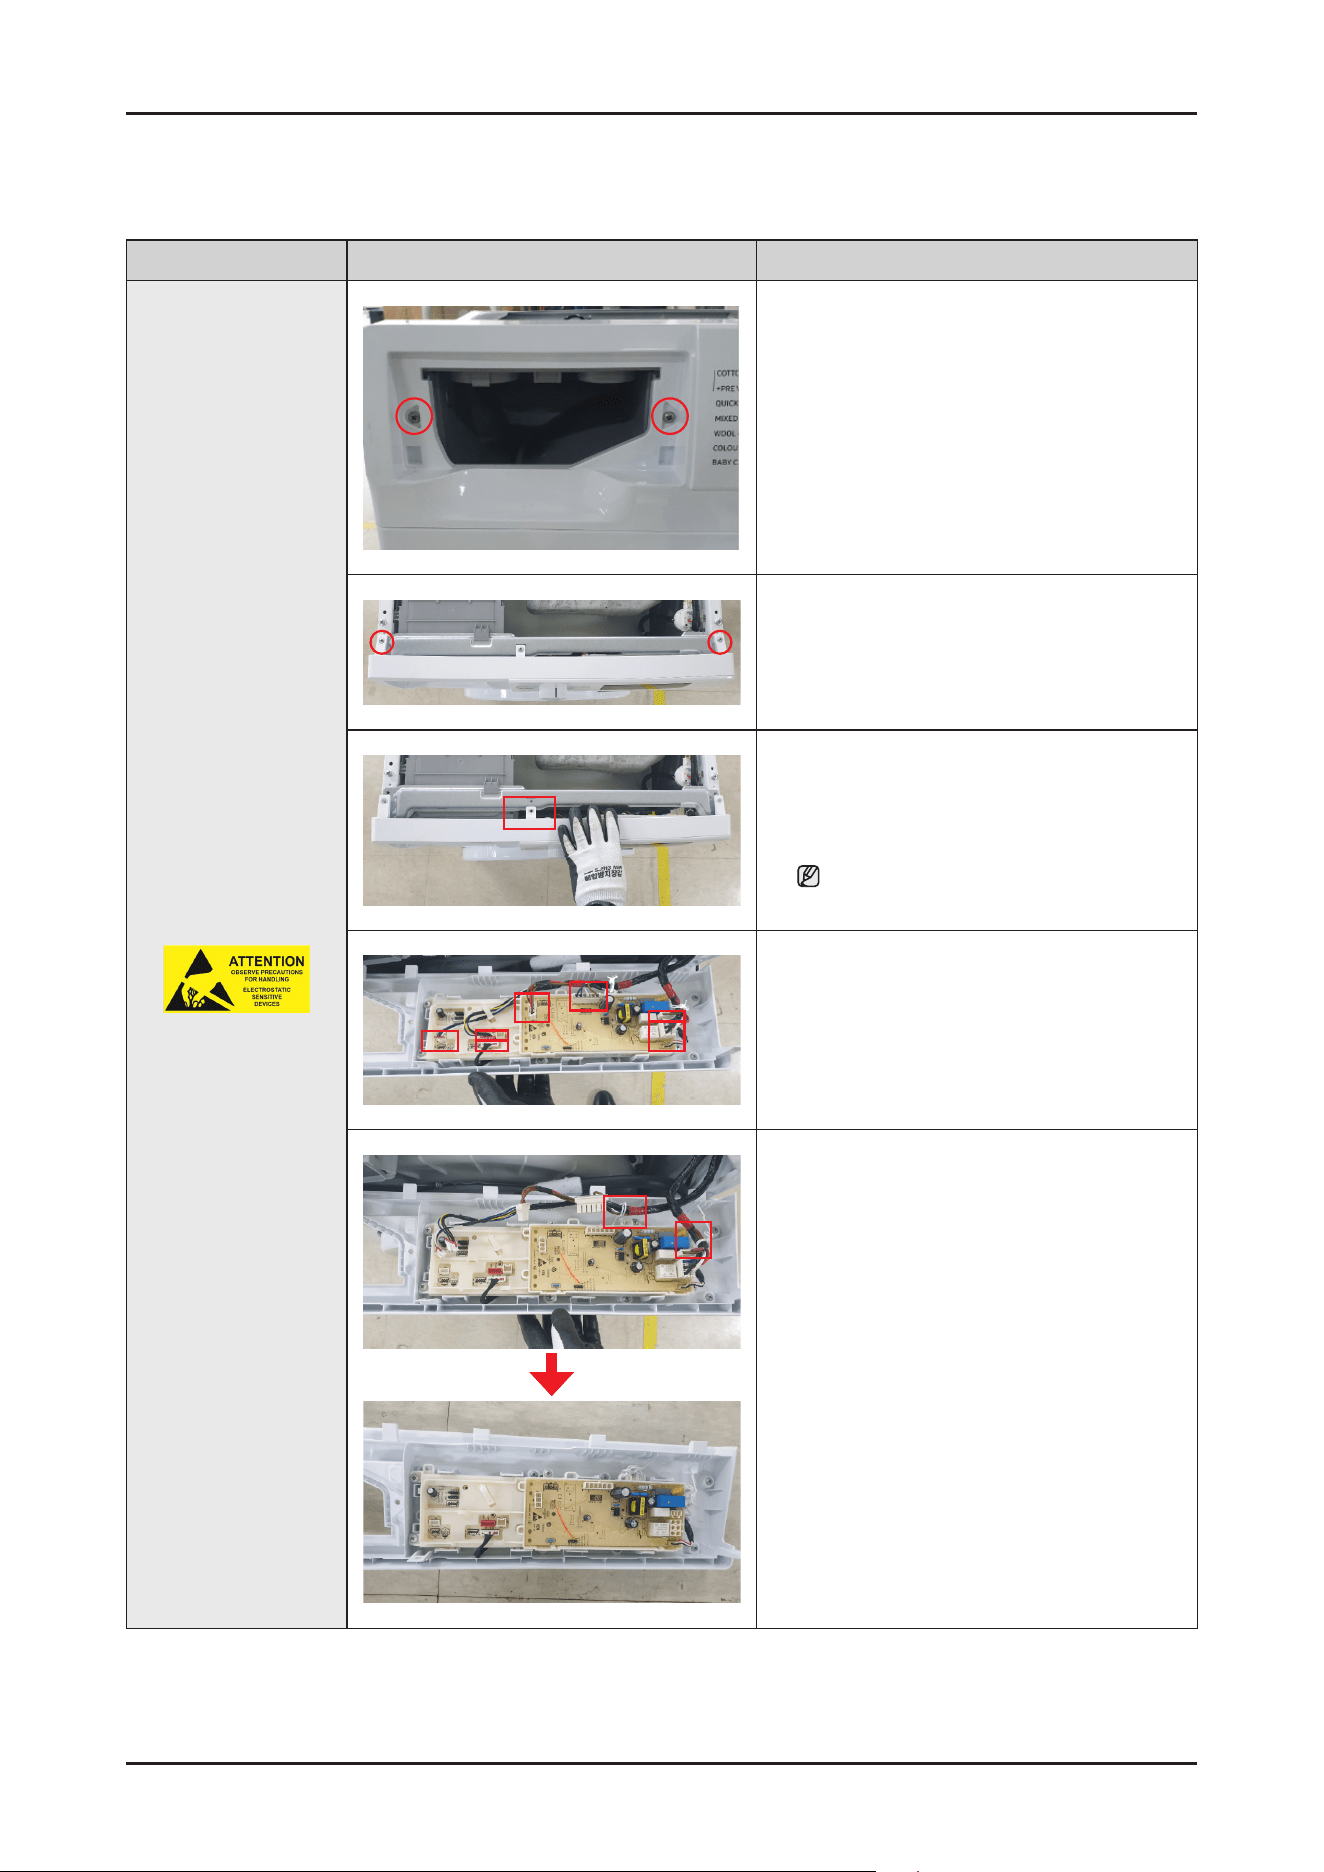
Part Figure Description
Assy Panel Control
1. Remove2screwsholdingtheDrawerandPanel
using(+)screwdriver.
2. Removethe2screwsatthetopoftheAssy
PanelControlusing(+)screwdriver.
3. IfyouholdthePanelandpullitforward,the
HookwillcomeoffandthePanelwillbe
separated.
BecarefulnottobreaktheHook.
4. RemovetheConnectorwhilepressingtheHook
onthe7ConnectorsinsertedinthePBAofthe
AssyPanel.
5. RemovetheCableTiethatisxedintwoplaces
asshowninthepicture.

Disassembly and Reassembly _ 11
Reassembly
Part Figure Description
Assy Panel Control
1. Insertthe7WireConnectorsintoPBAandx
the2CableTies.
MakesuretheHookislockedproperly.
2. AssembletheAssyPanelControltotheproduct.
3. Assemblethe2screwsonbothsidesofthe
AssyPanelControl.
4. Assemble2screwsholdingtheDrawerand
Panelwith(+)screwdriver.
12 _ Disassembly and Reassembly
Disassembly
Part Figure Description
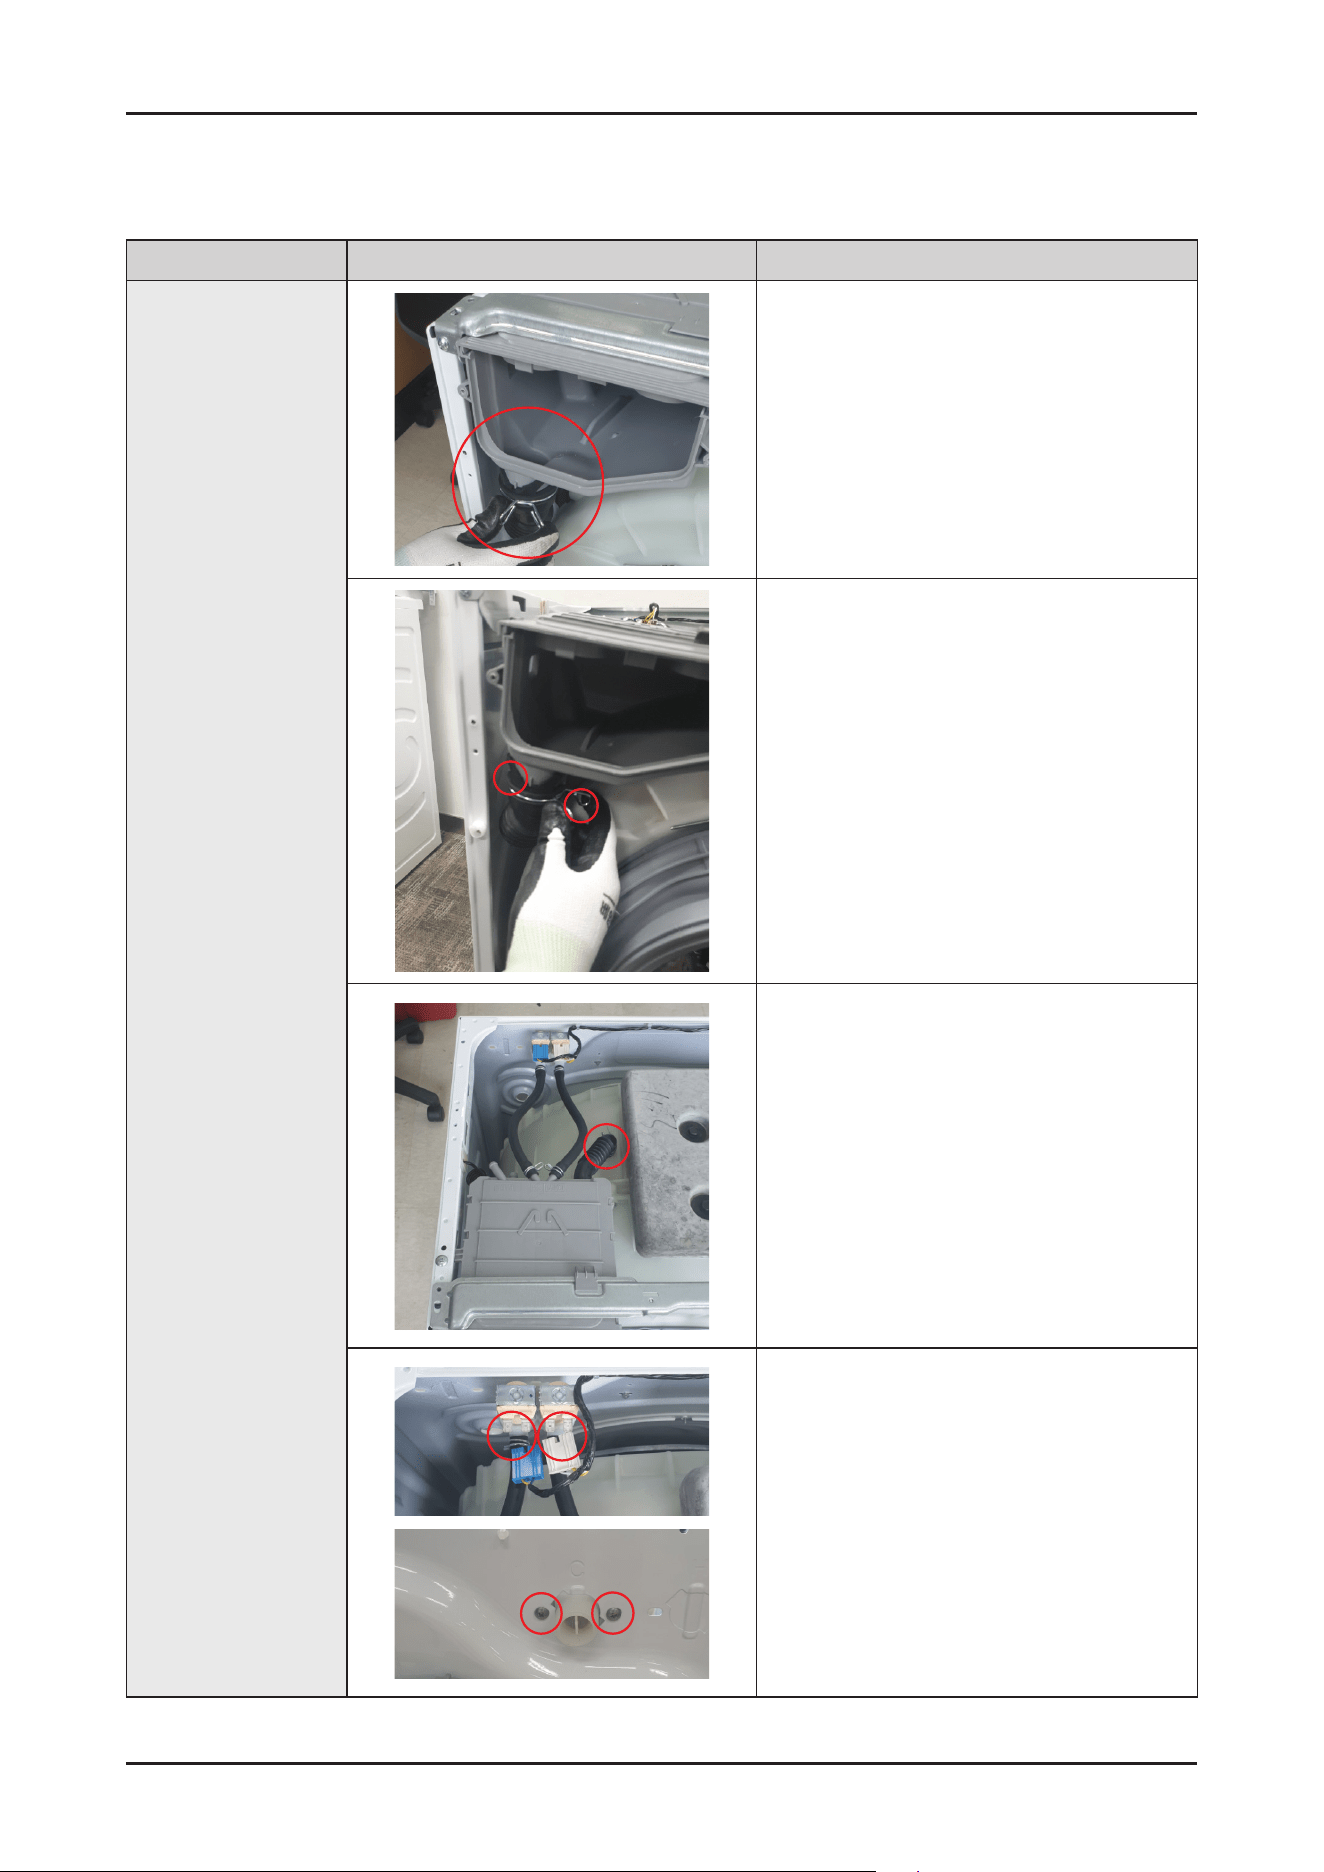
Assy Housing-Drawer
1. SeparatetheClamp.
2. RemovetheHoseDrawerTubxedtotheAssy
Housing-Drawer.
3. SeparatetheClampxedtotheTub.
4. Removethe2Connectorsand2screwsxedto
theWaterValve.
Disassembly and Reassembly _ 13
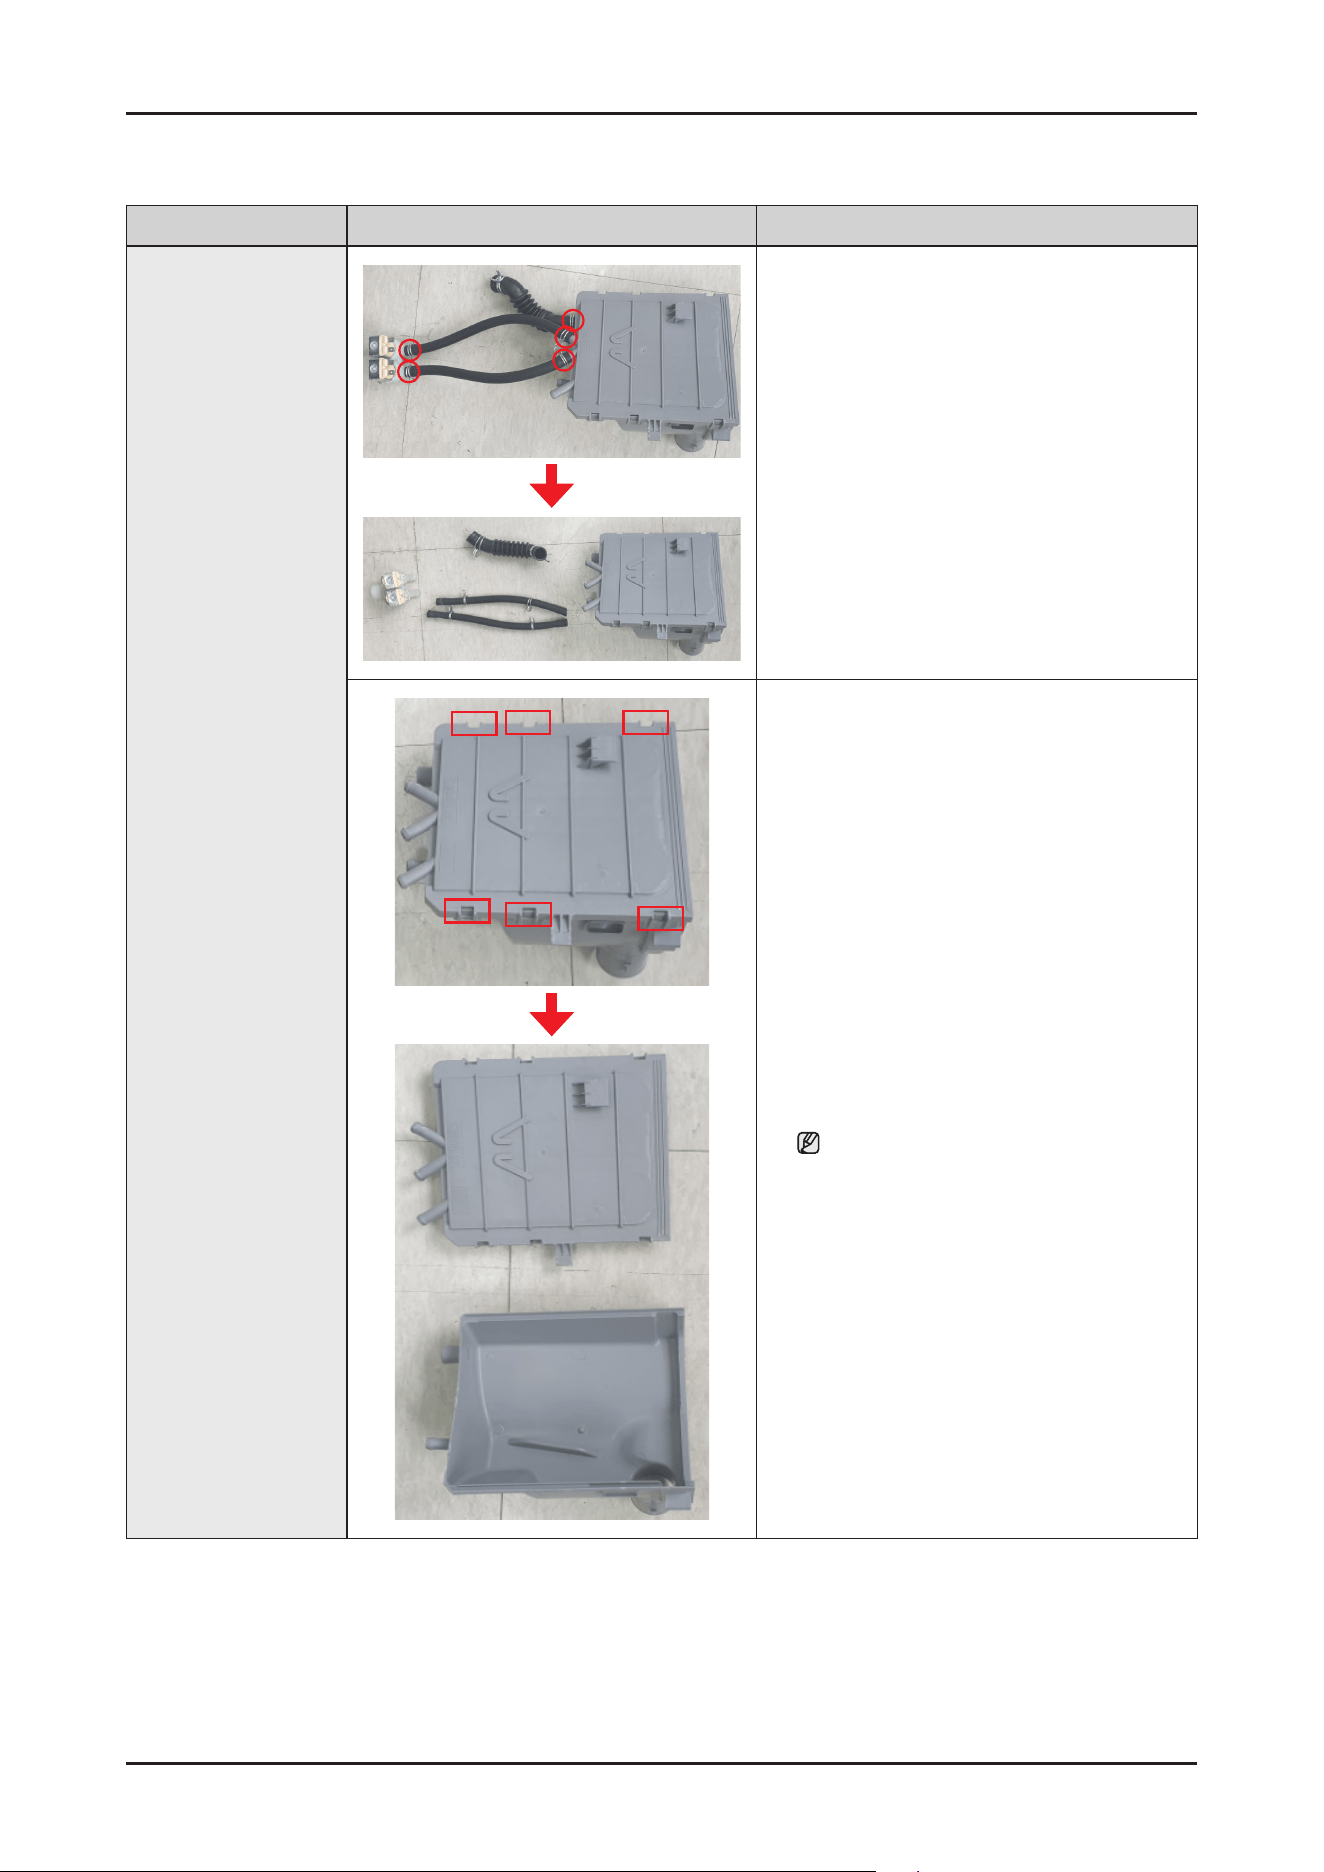
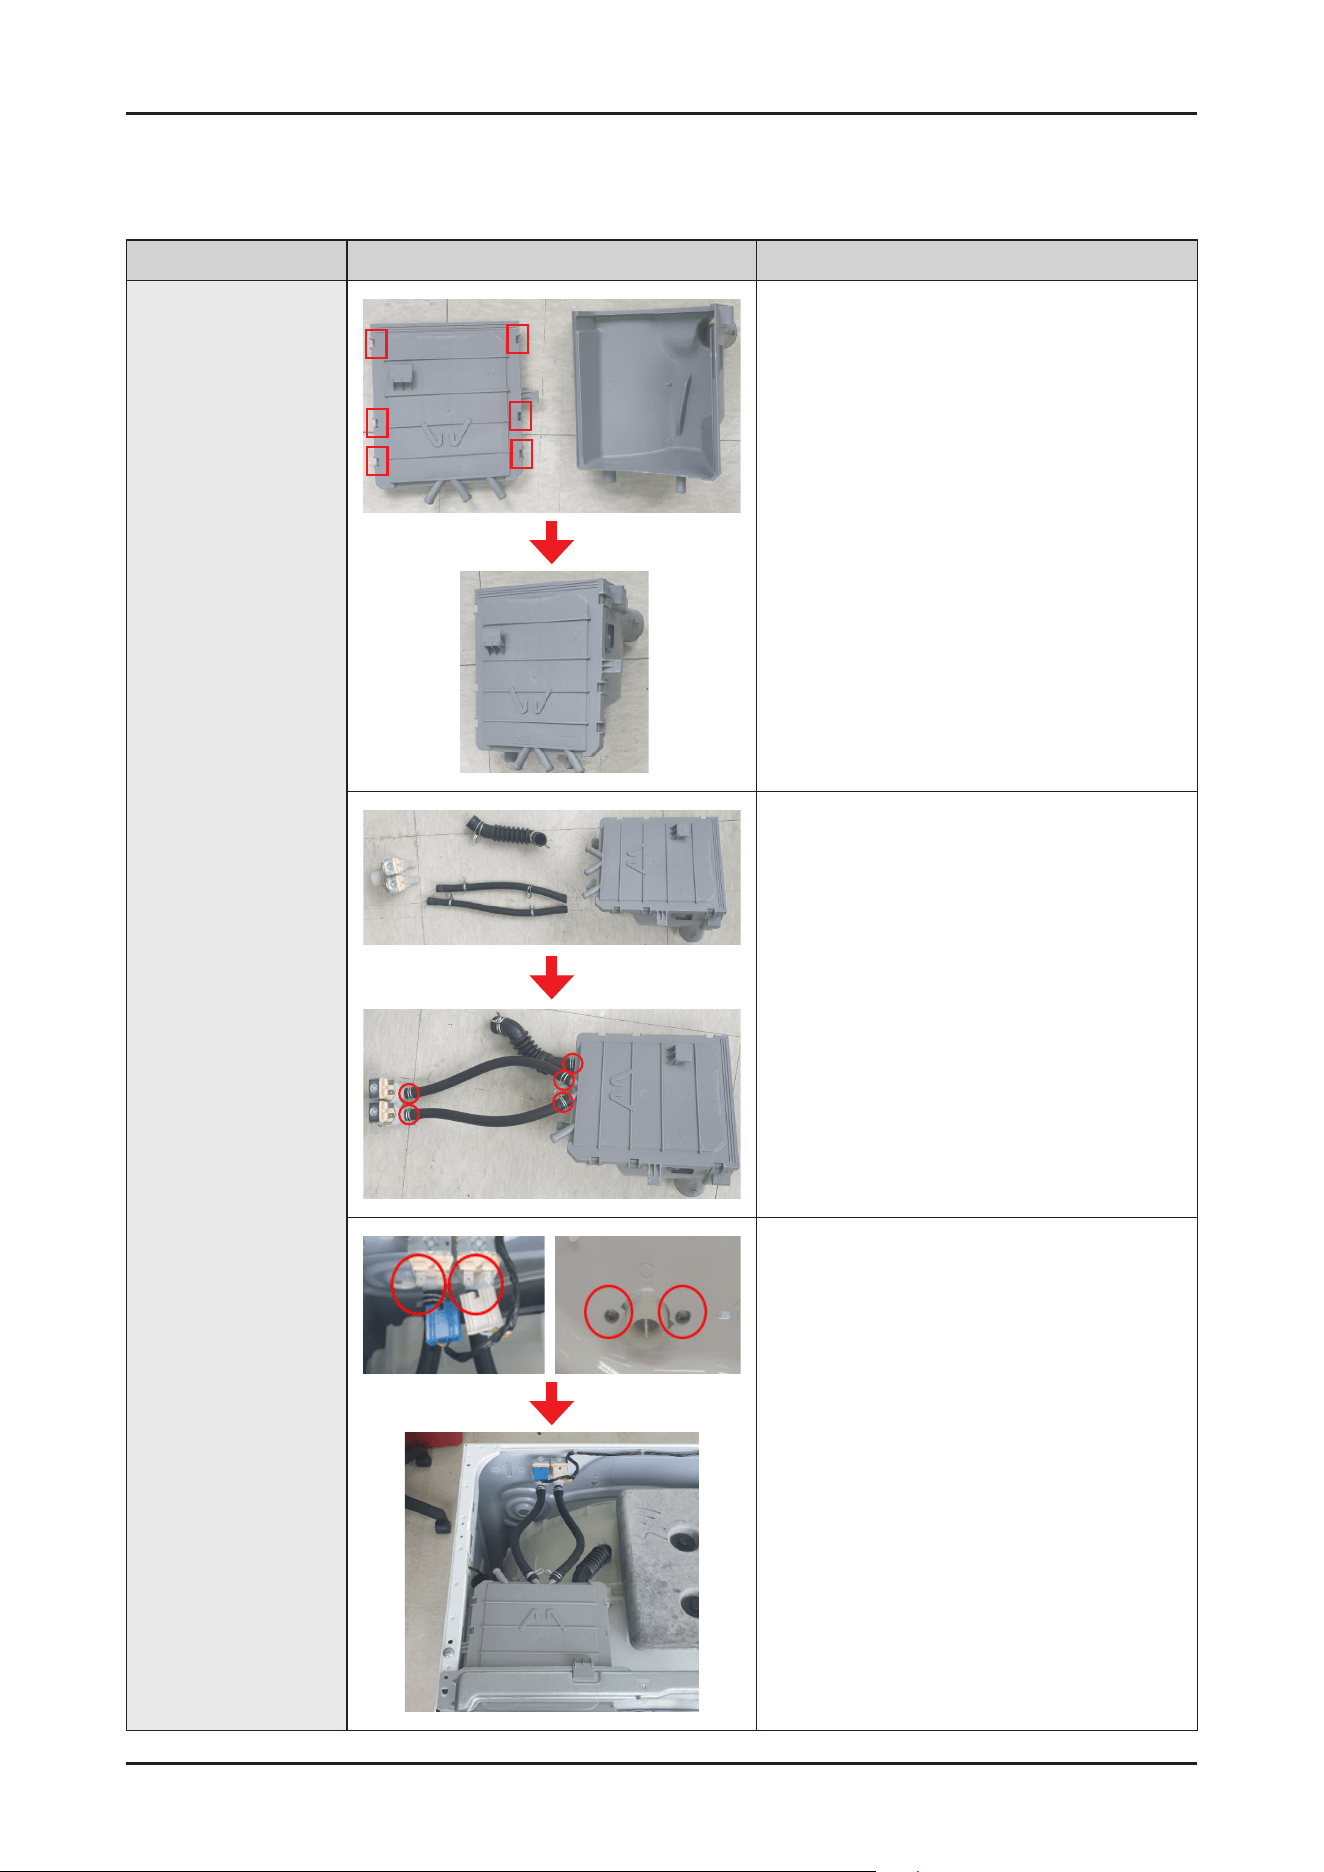
Part Figure Description
Assy Housing-Drawer
1. SeparatetheallClamps.
2. Separatethe6Hooksfrombothsidesof
Housing-Drawer.
BecarefulnottobreaktheHook.
14 _ Disassembly and Reassembly
Reassembly
Part Figure Description
Assy Housing-Drawer
1. Assemblethe6Hooksonbothsidesof
Housing-Drawer.
2. First,assembletheHosetotheWaterValveand
Housing-DrawerandthenxtheClamps.
3. AftermountingtheAssyHousing-Draweron
theproduct,assemblethe2Connectorsand2
screwsontheWaterValve.
Disassembly and Reassembly _ 15
Part Figure Description
Assy Housing-Drawer
4. AssembletheHoseDrawerTubtoAssy
Housing-Drawer.
5. AssembletheClamp.

16 _ Disassembly and Reassembly
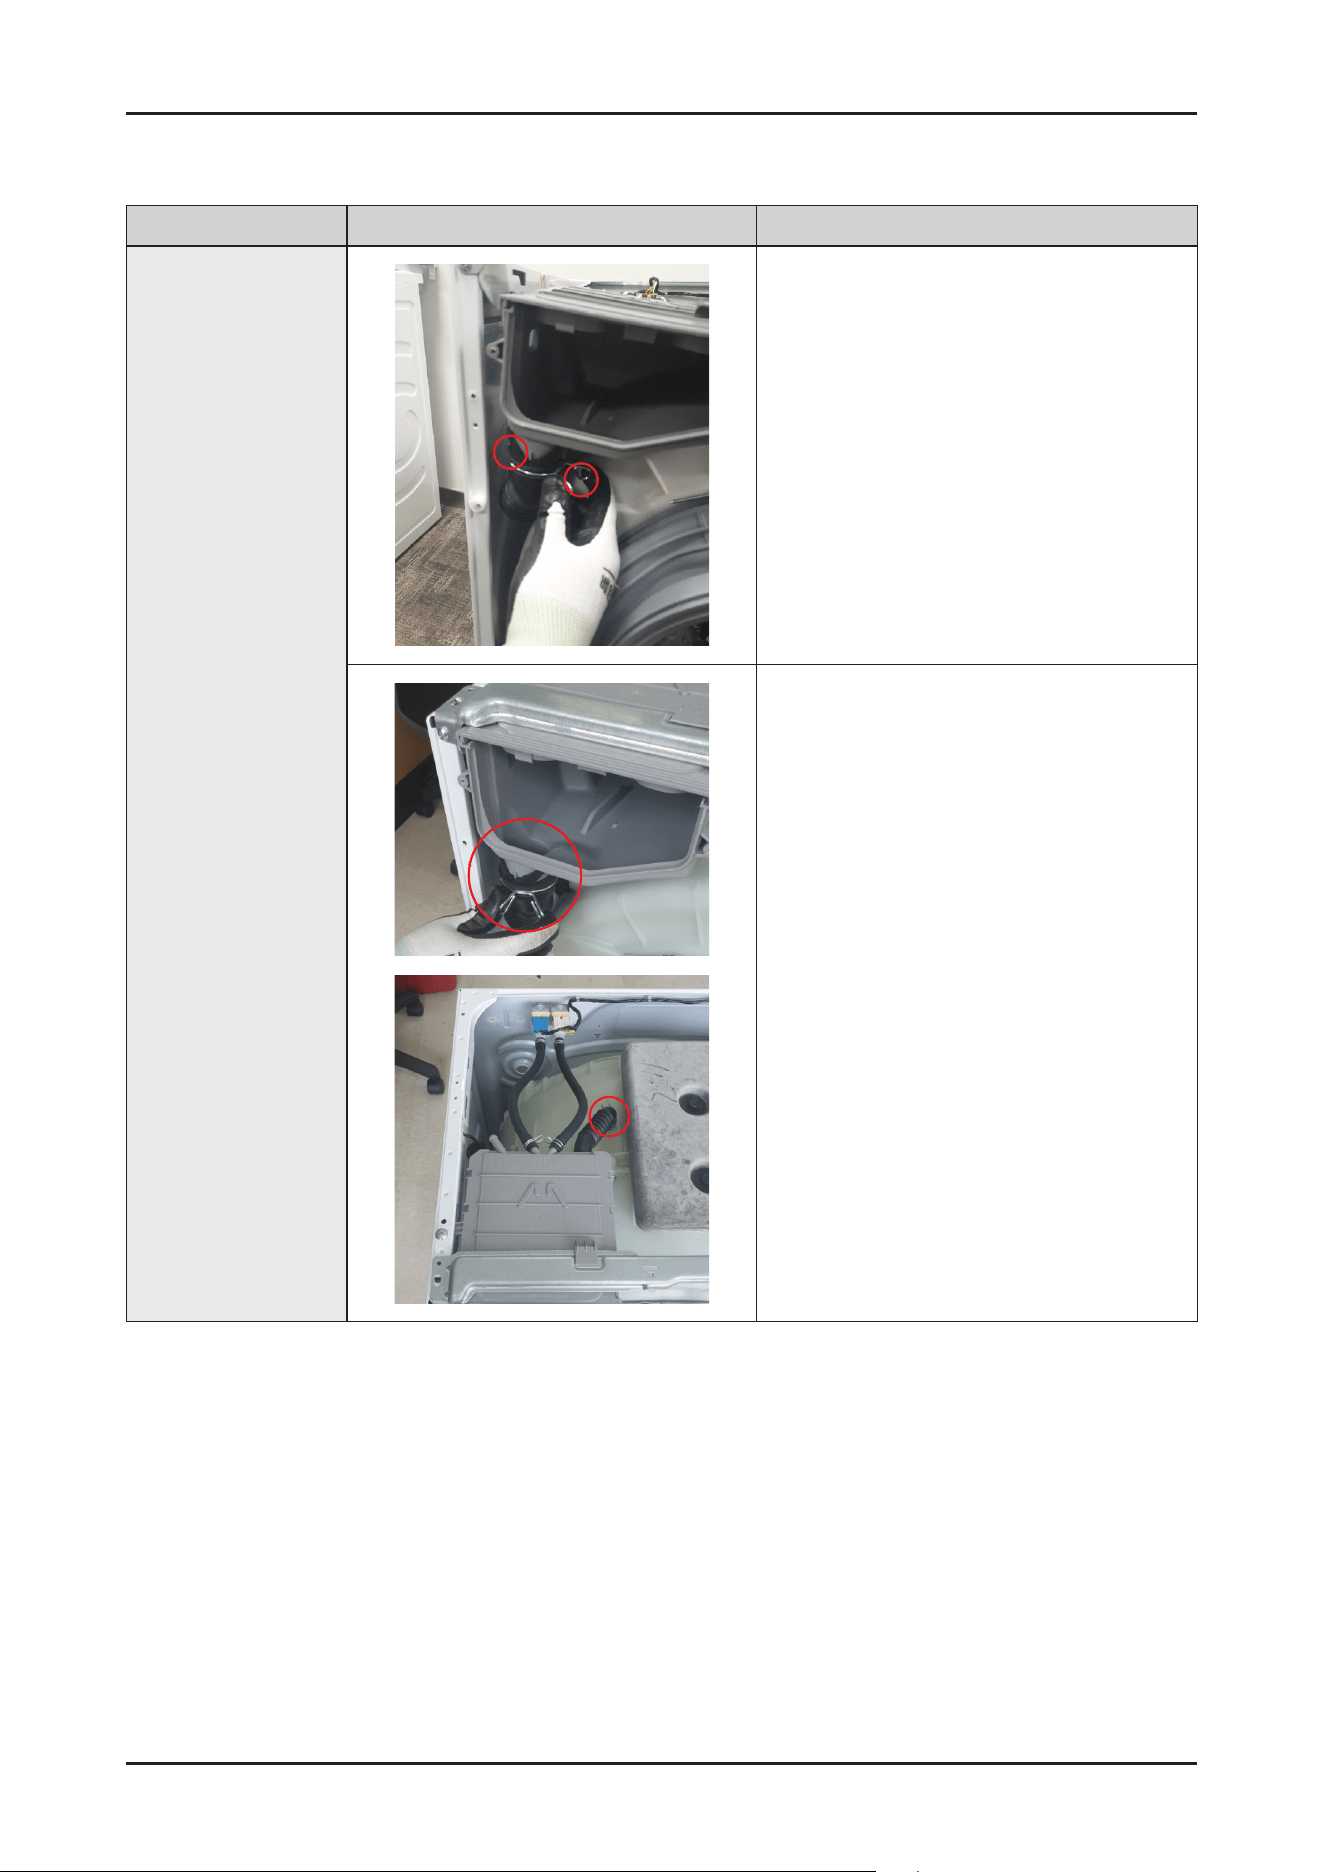
Disassembly
Part Figure Description
Water Valve
1. SeparatetheAssyCoverTop.
2. Separatethe2ConnectorsandClampsbyhand
andremove2Hoseswithlongnosepliers.
3. Removethe2screwsholdingtheWaterValve
using(+)screwdriver.
Reassembly
Part Figure Description
Water Valve
1. Assemblethe2screwsholdingtheWaterValve
using(+)screwdriver.
2. Assemblethe2hosestothewatervalveusing
longnosepliers.
3. Assemblethe2Clampsand2WireConnectors
asshowninthepicture.
MakesuretheHookislockedproperly.
Disassembly and Reassembly _ 17
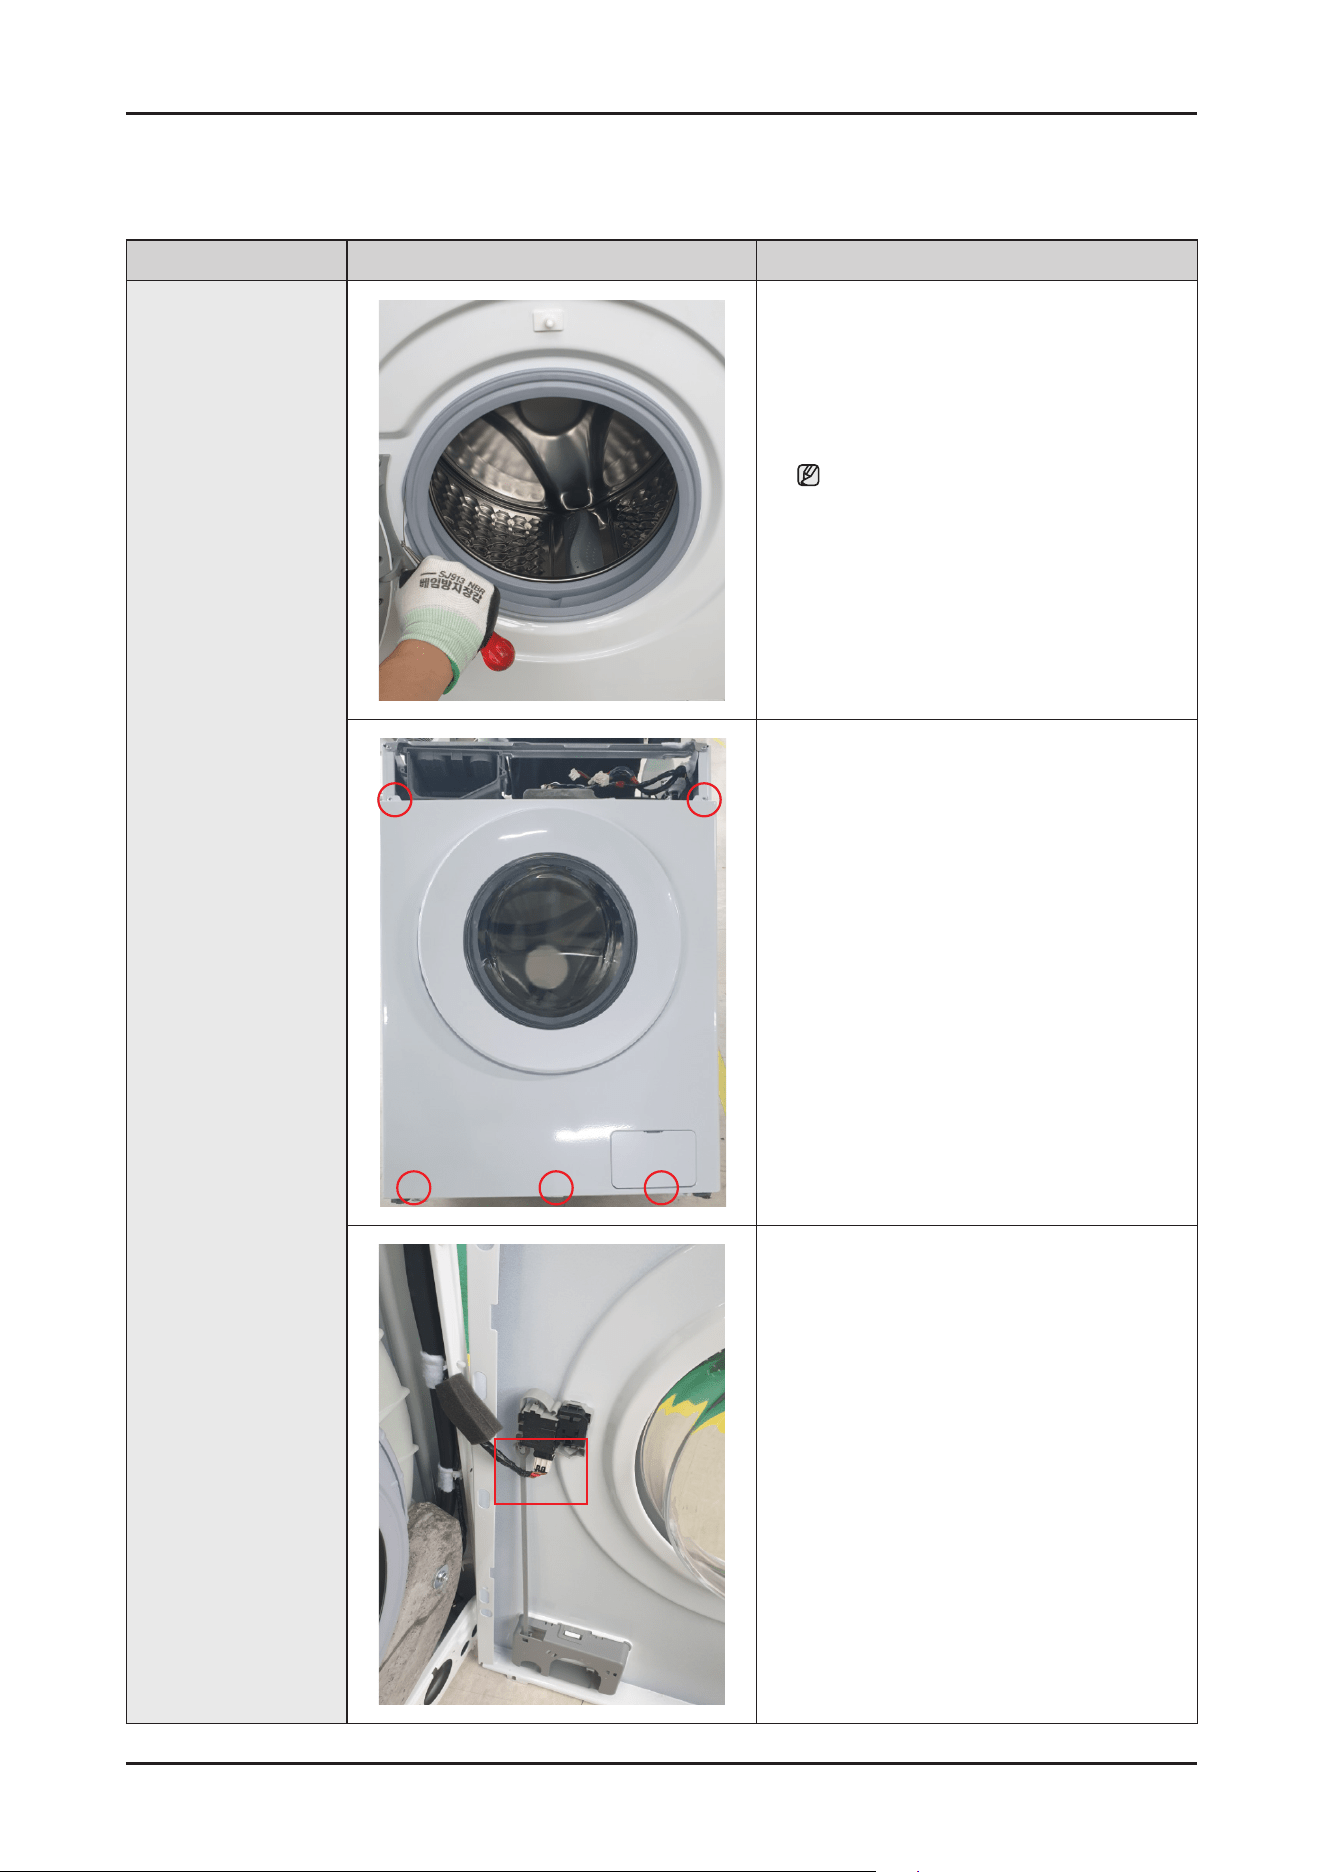
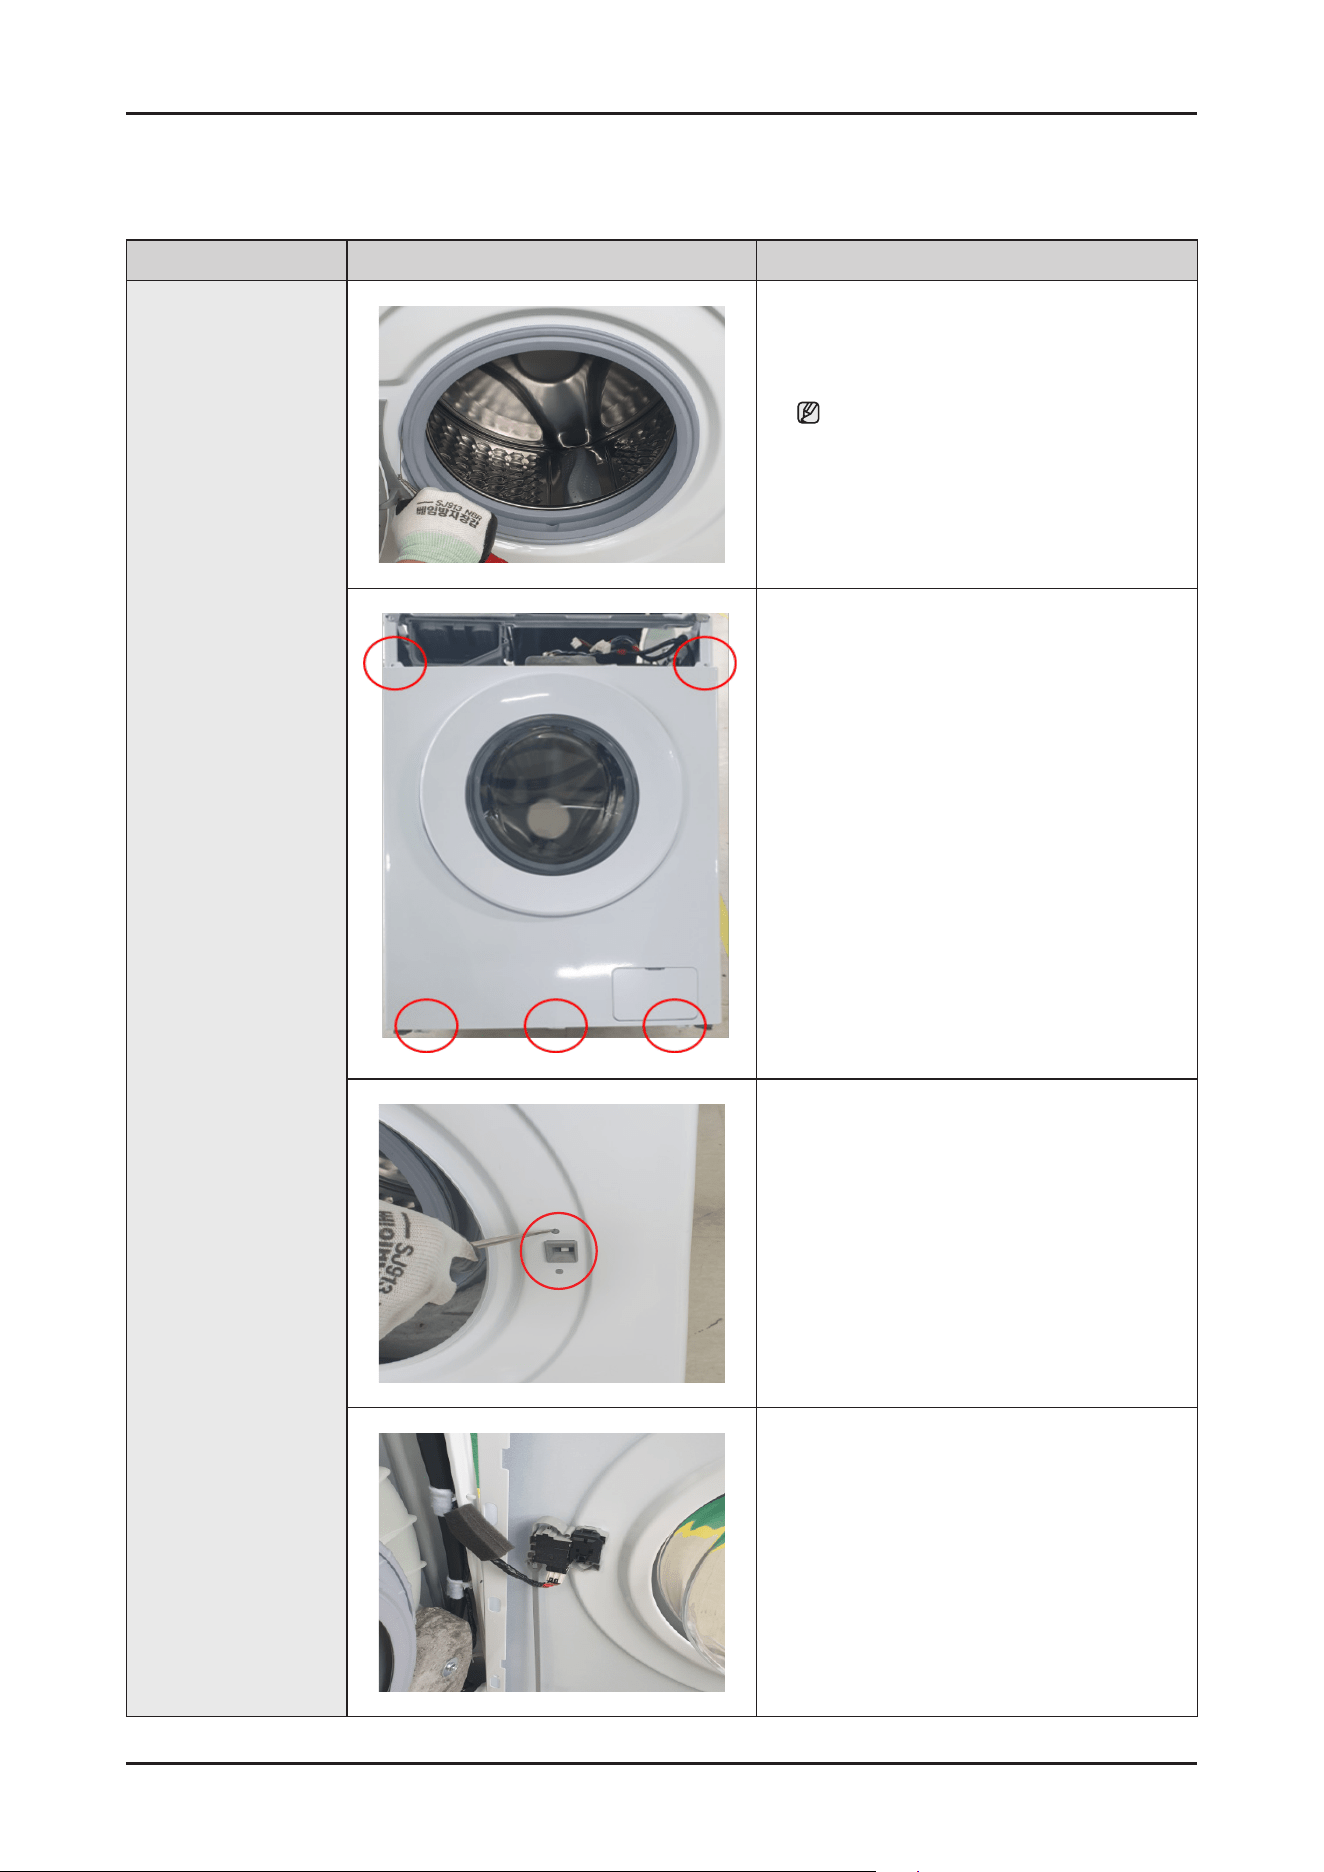
Disassembly
Part Figure Description
Frame Front
Beforeyoustart,disassembleAssyCoverTop,
AssyPanelControl.
BecarefulnottotearuptheDiaphragm.
1. Usinglongnosepliers,pickuponeoftherings
onWire-Diaphragmwhichconnectthespring
andthewireends.Then,separatetheWire-
DiaphragmfromtheFrameFront.
2. Removethe2screwsfromthetopand3screws
fromthebottom.
3. SeparatetheConnectorofDoorS/Wxedinside
theFrameFront.
18 _ Disassembly and Reassembly
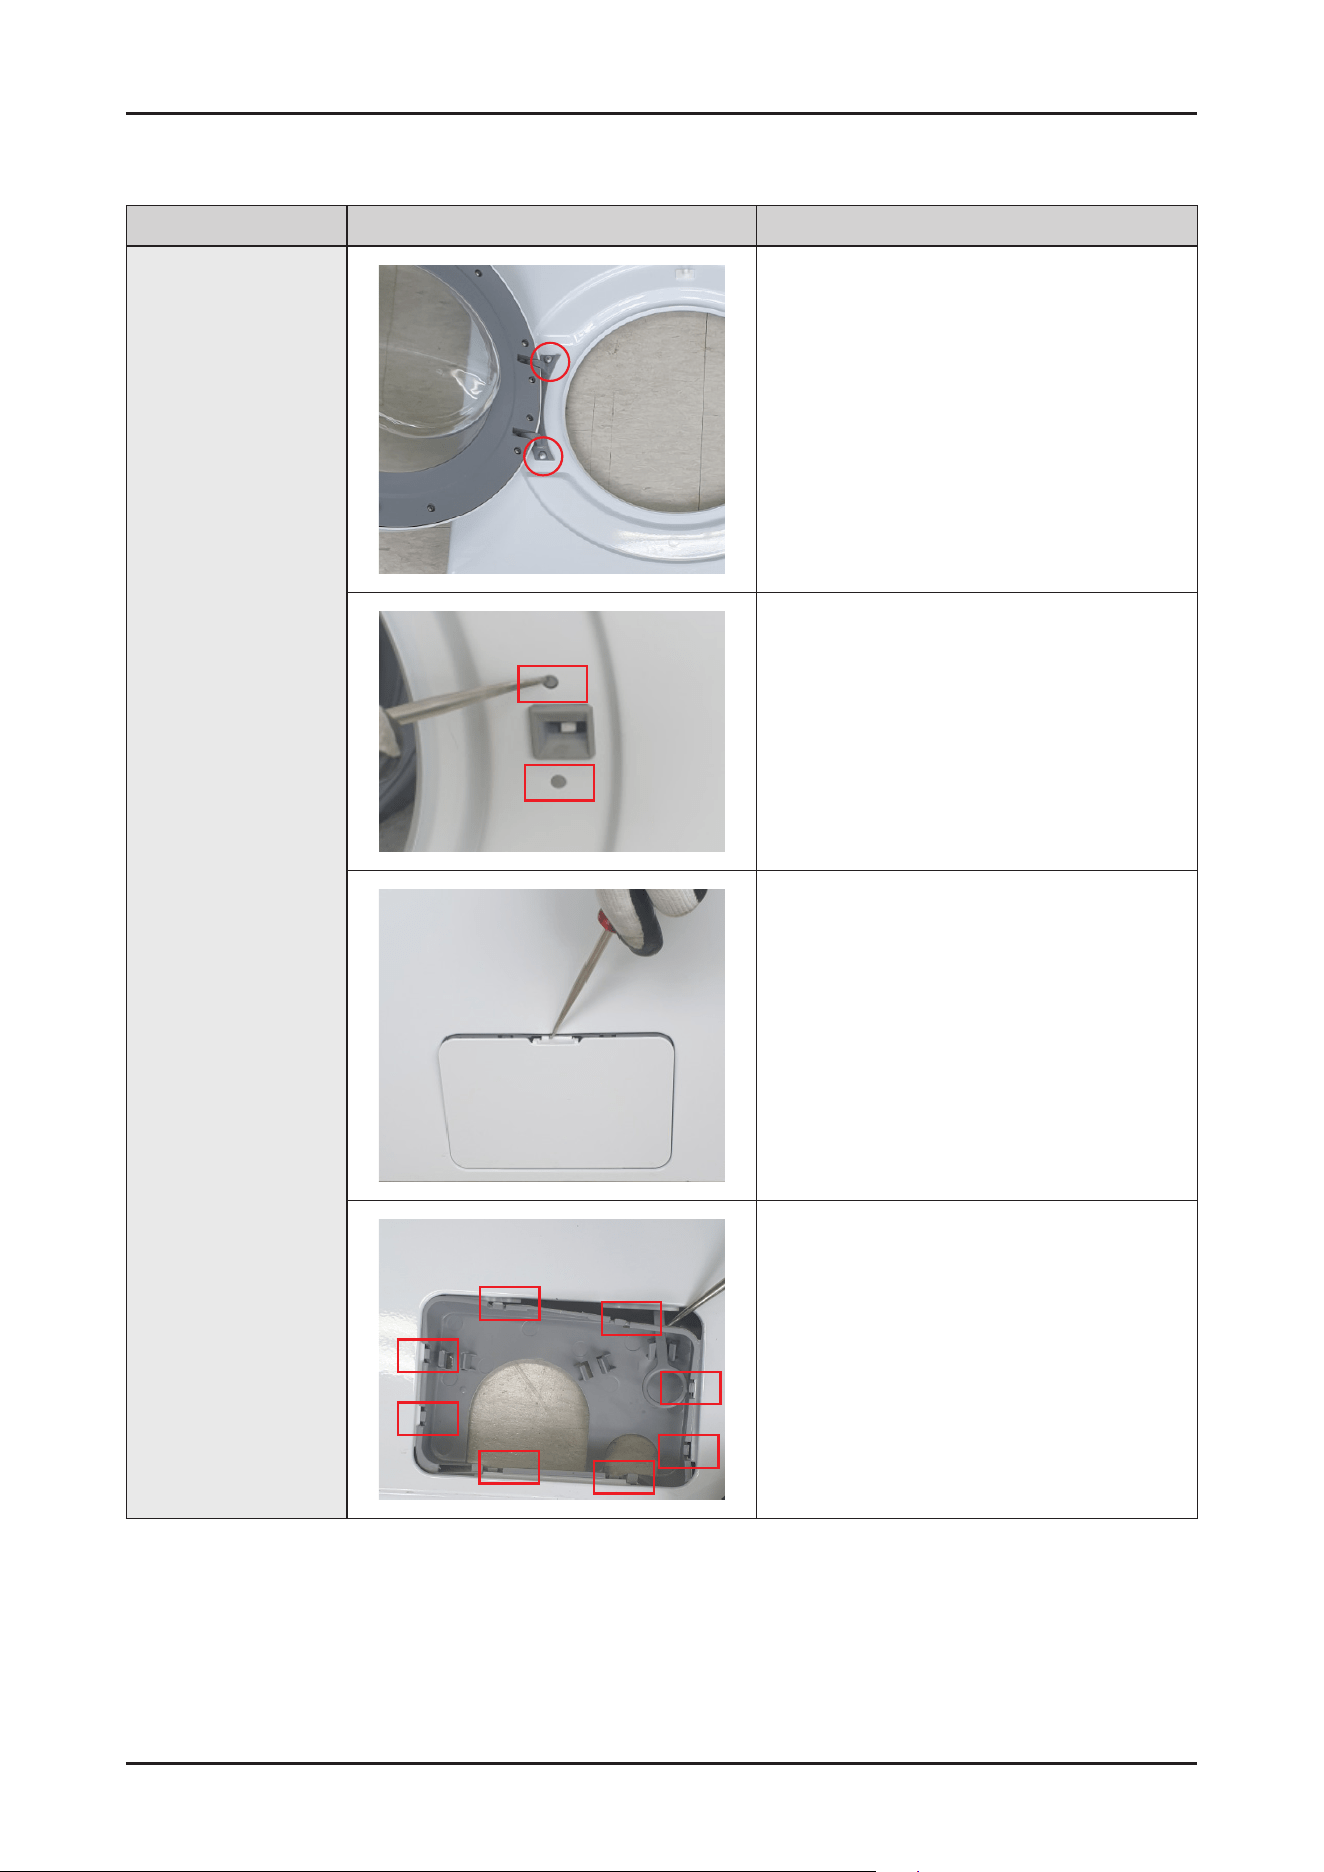
Part Figure Description
Frame Front
4. Removethe2screwsandseparatetheAssyDoor.
5. SeparatetheDoorS/Wbypressingthemolded
objectaboveandbelowDoorS/W.
6. OpentheHookontheupperpartoftheFilter
Coverbypressingitdownwitha(-)screwdriver
orapointedtool.
7. Separatethe8hooksxedtotheFrameFront.
Disassembly and Reassembly _ 19
Reassembly
Part Figure Description
Frame Front
1. Assemblethe8Hooksbycheckingthedirection
oftheGuideFilter.
2. AfterxingtheCoverFiltertothelower2places
oftheGuideFilter,presstheupperpartto
assemble.
3. AssemblebypressingDoorS/Winlinewith
FrameFrontgroove.
4. Assemblebyfastening2screwstoAssyDoor.
20 _ Disassembly and Reassembly
Part Figure Description
Frame Front
5. Fastenthe5screwsintheupper2placesand
thelower3places.
6. AssembletheDoorDiaphragmonFrameFront.
7. FixtheClamp.

Disassembly and Reassembly _ 21
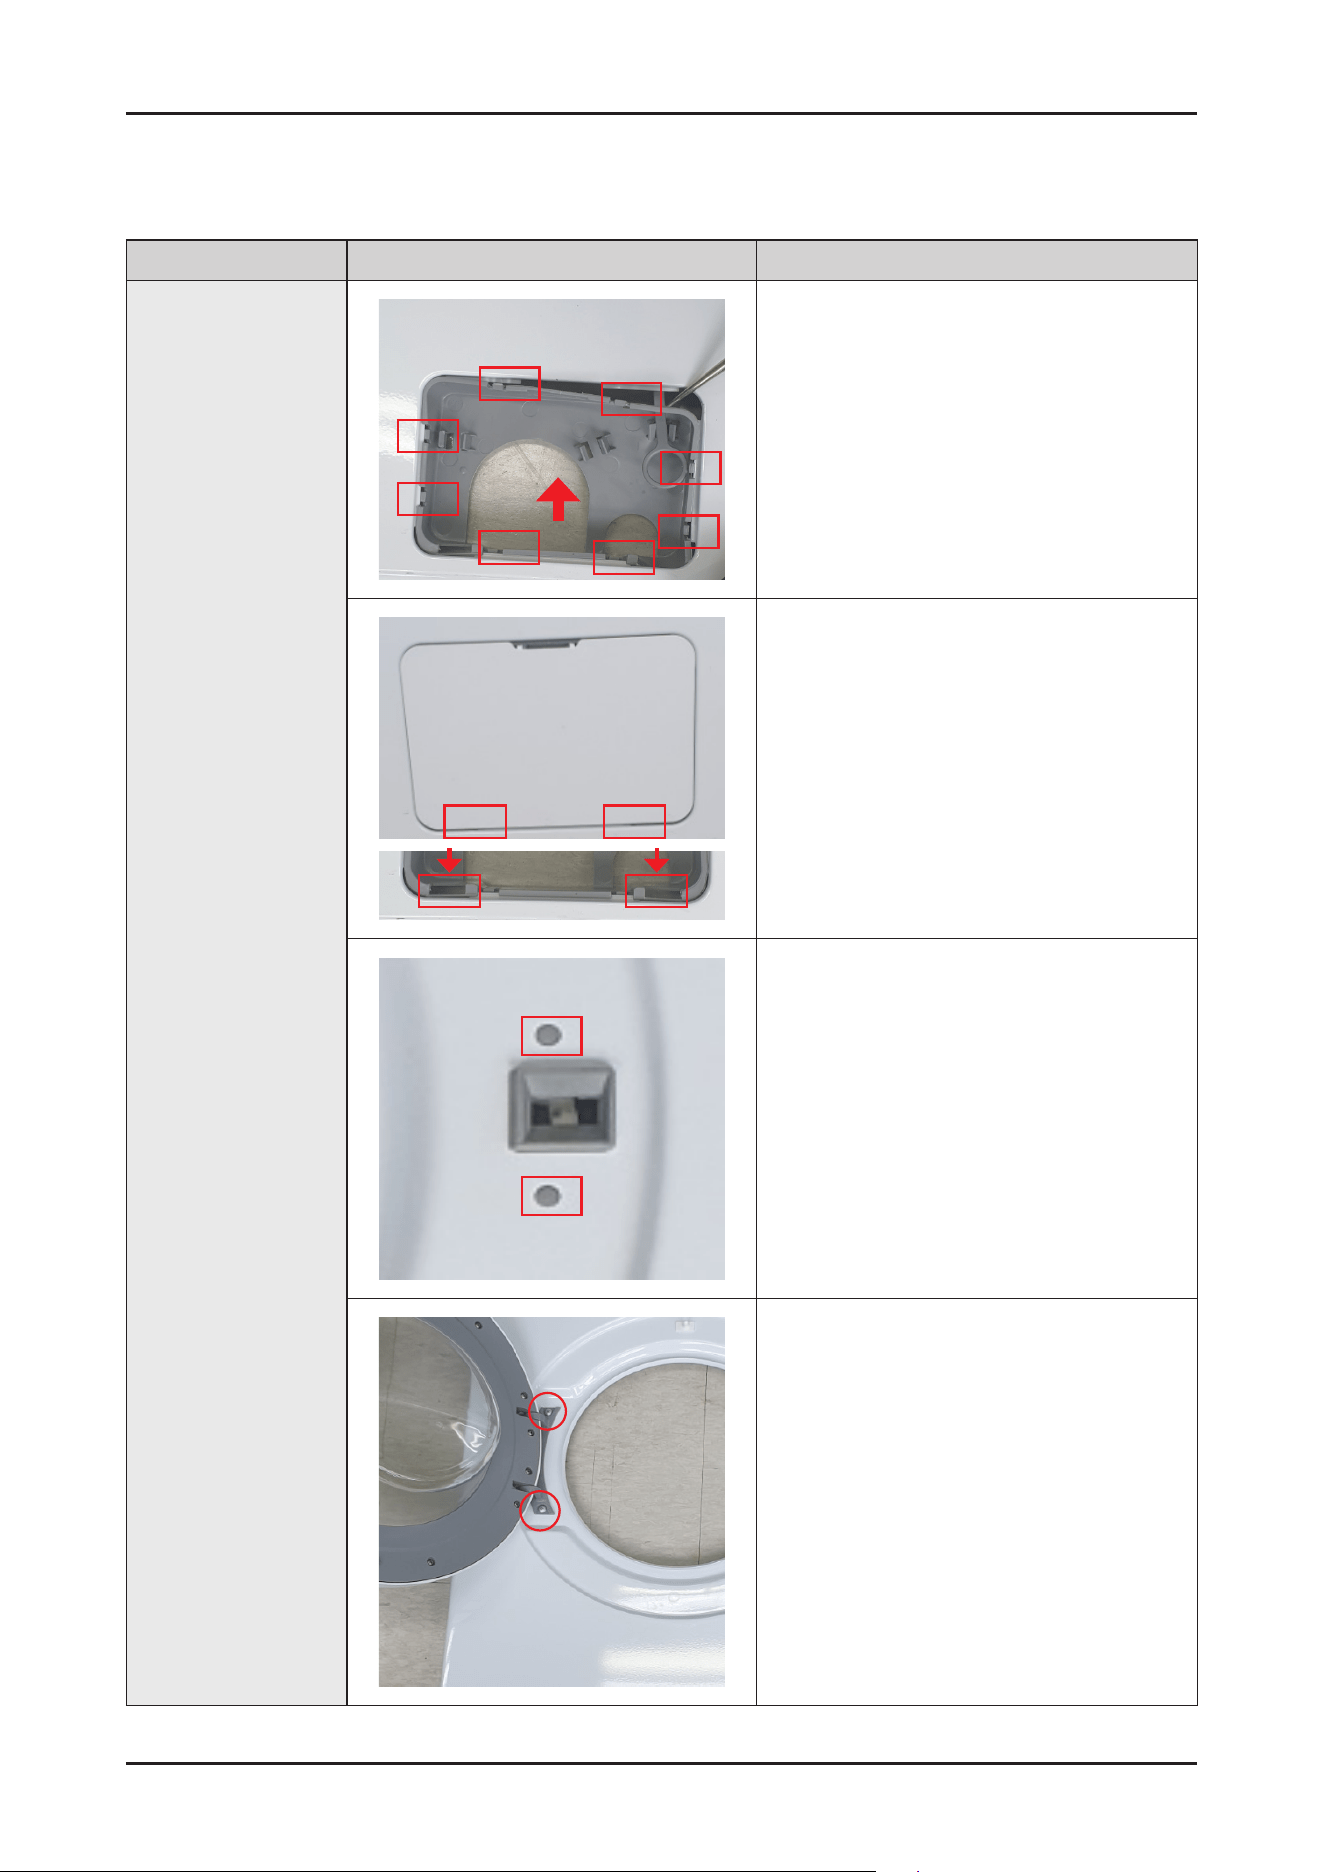
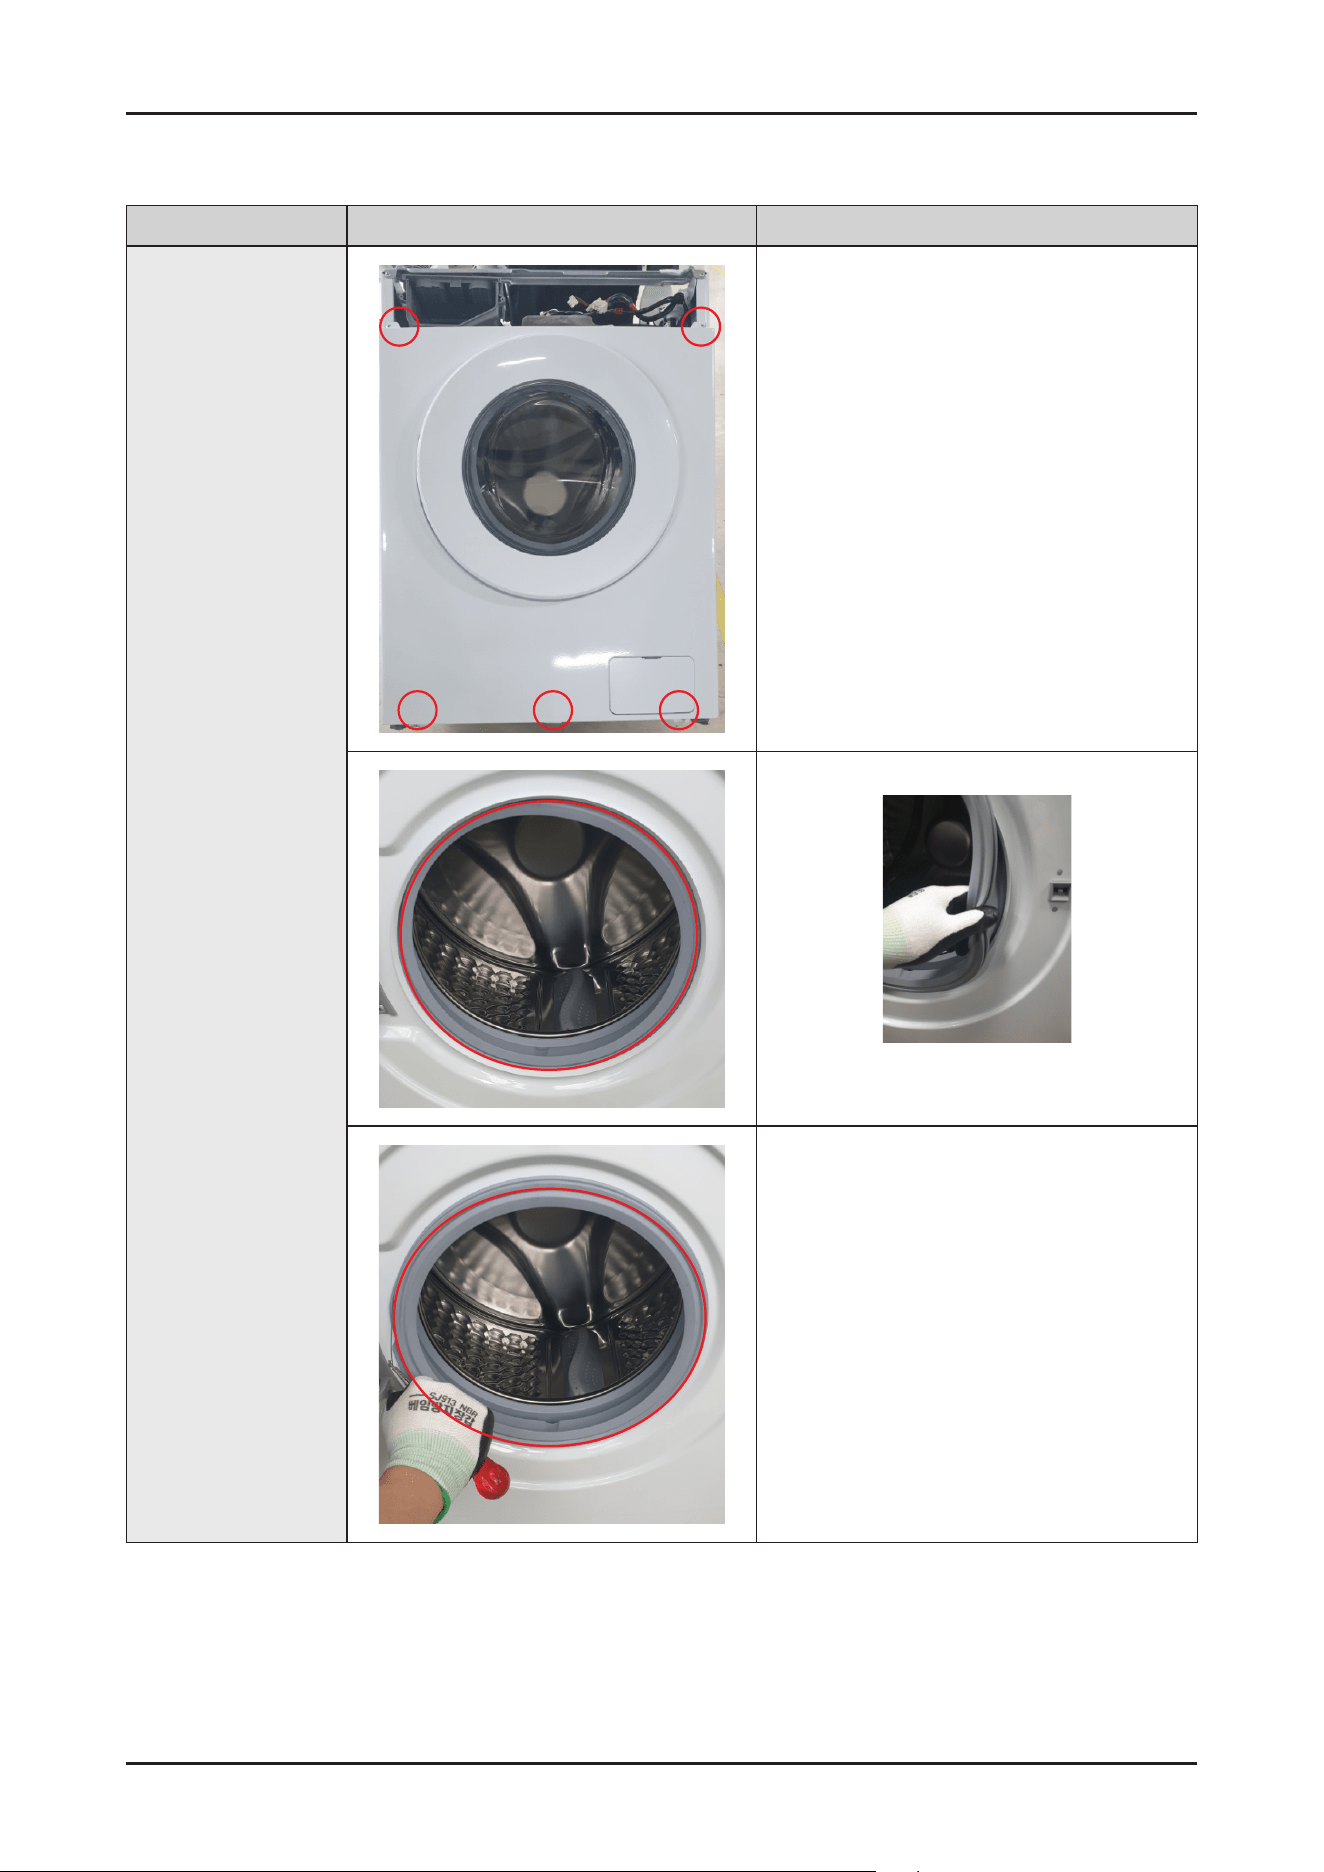
Disassembly
Part Figure Description
Assy Door
OpentheDoor.
Removethe2screwsxedtotheFrameFrontand
Doorusinga(+)screwdriver.
Remove10screwsusinga(+)screwdriver,and
removebyinsertinganawlintotheHolder.
22 _ Disassembly and Reassembly
Part Figure Description
Assy Door
Remove4screwswith(+)screwdriverand
disassembletheDoorHingeandDoorLever
assembledinHolderandthenseparatetheDoor
GlassfromHolderGlassHook.
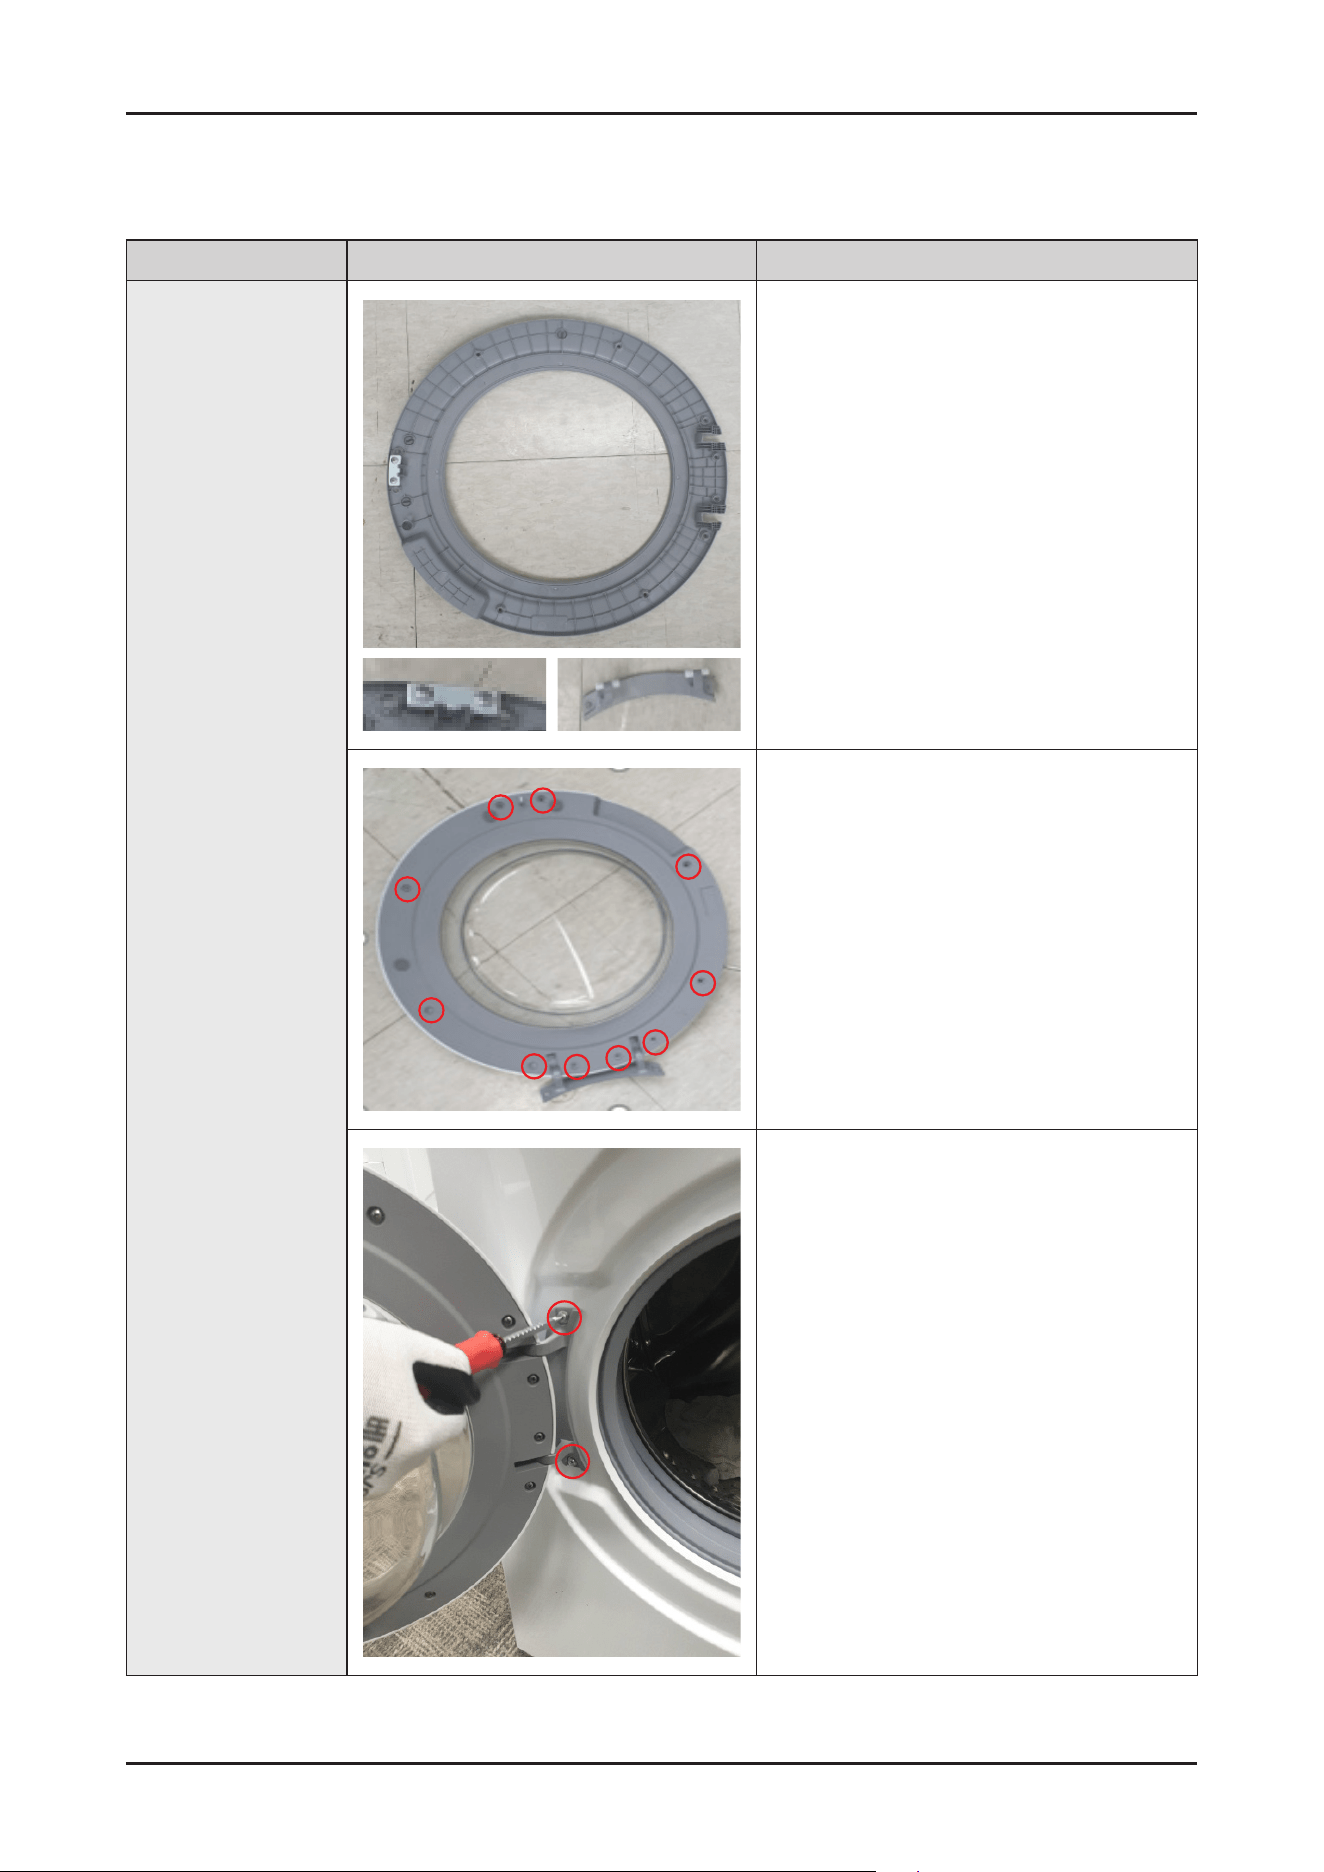
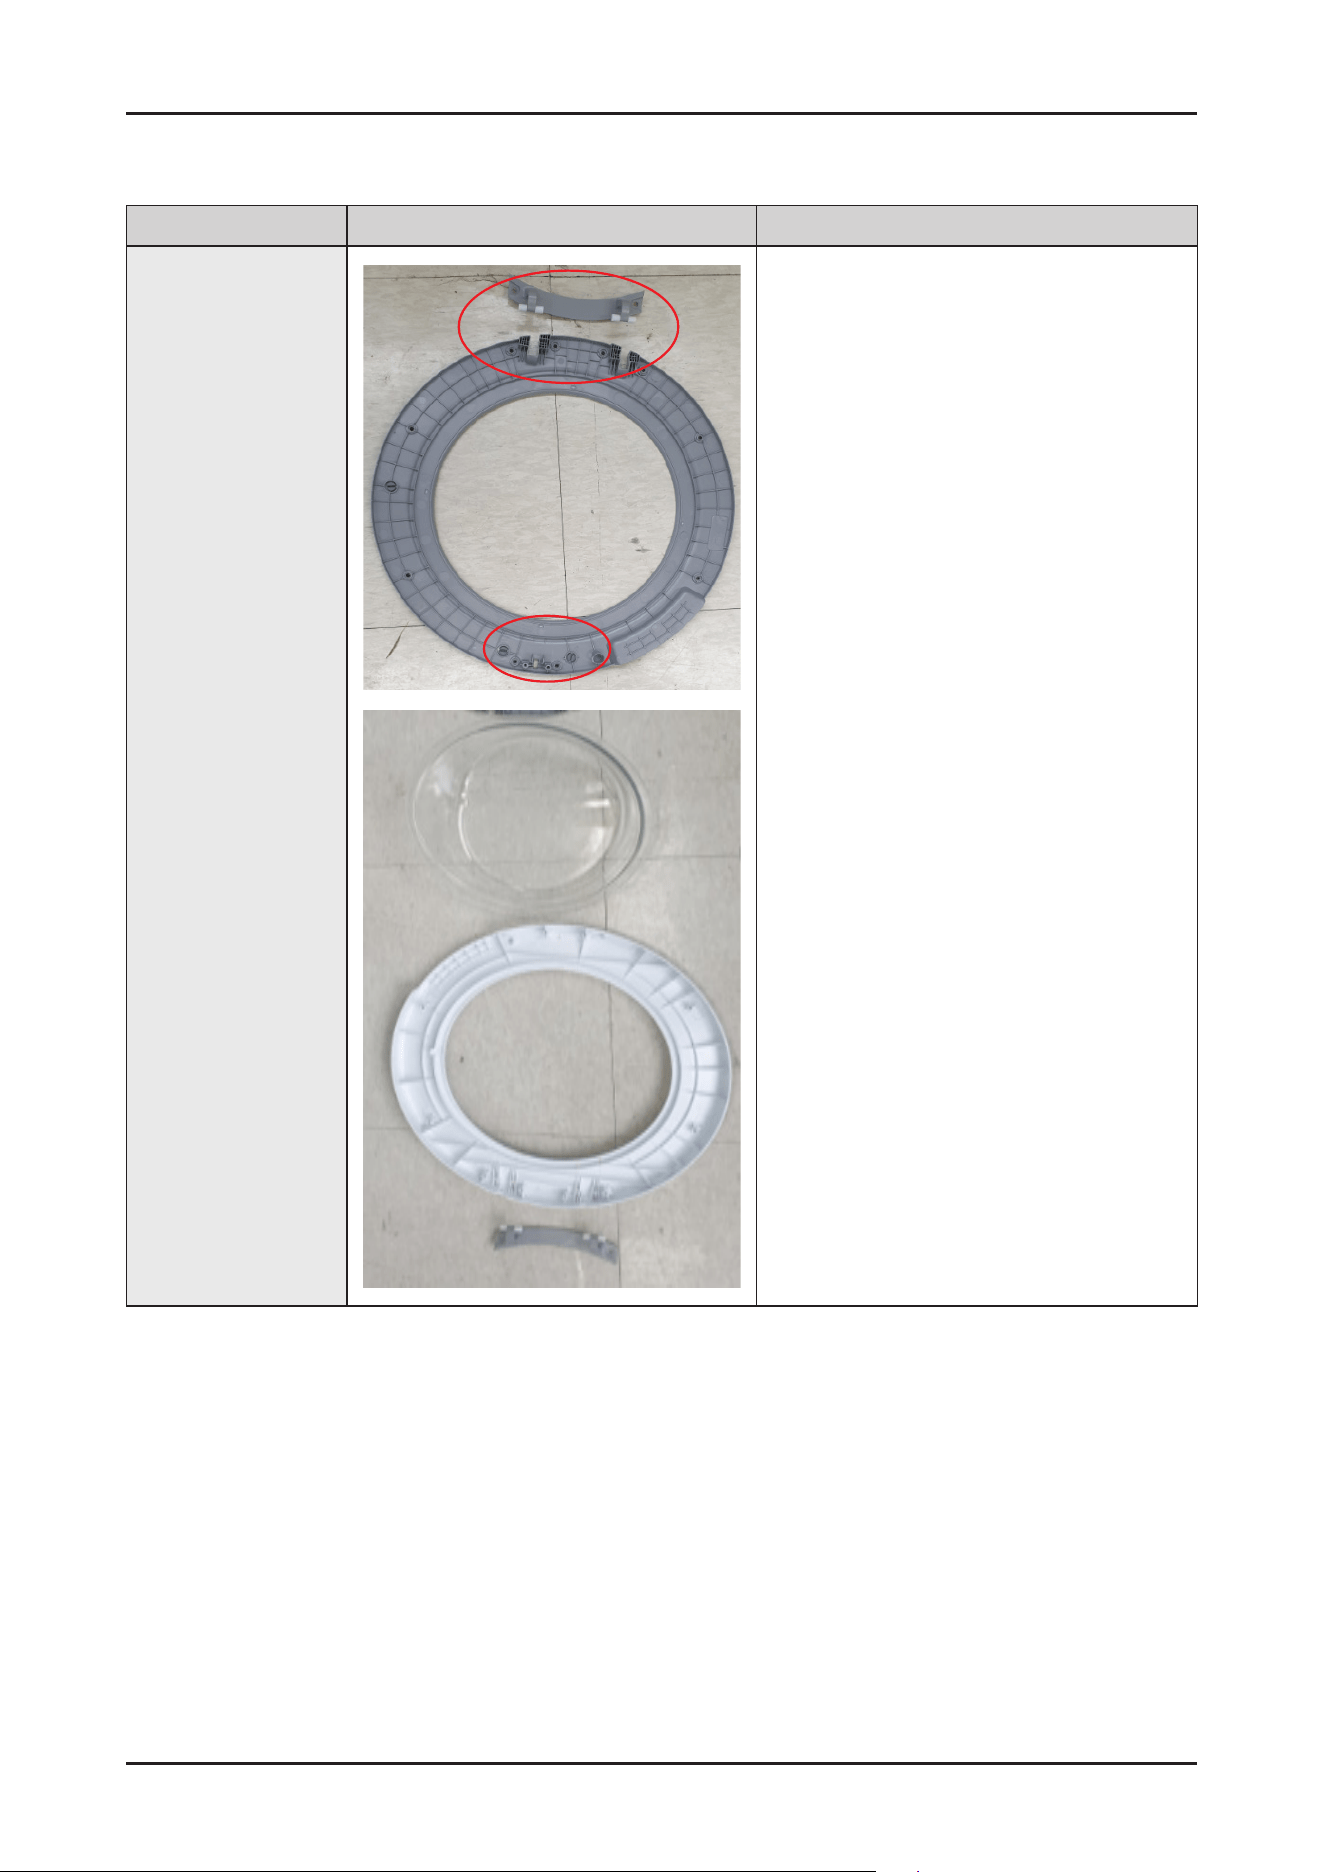
Disassembly and Reassembly _ 23
Reassembly
Part Figure Description
Assy Door
InserttheDoorGlassintotheHolderGlasstotthe
grooveandfastenthedoorleverwithtwoscrews
andthenassembletheHingeDoortoHolderand
fastenwith2screws.
AssembletheCoverDoortoHolderGlassandfasten
the10screws.
AssyDoorisassembledtoFrameFrontbyfastening
2screws.
24 _ Disassembly and Reassembly
Disassembly
Part Figure Description
Door-Lock S/W
Beforeyoustart,disassembleAssyCoverTop,Assy
PanelControl.
BecarefulnottotearuptheDiaphragm.
1. Usinglongnosepliers,pickuponeoftherings
onWire-Diaphragmwhichconnectthespring
andthewireends.Then,separatetheWire-
DiaphragmfromtheFrameFront.
Removethe2screwsfromthetopand3screws
fromthebottom.
SeparatetheDoorS/Wbypressingthemolded
objectaboveandbelowDoorS/W.
SeparatetheConnectorofDoorS/Wxedinsidethe
Frame Front.

Disassembly and Reassembly _ 25
Reassembly
Part Figure Description
Door-Lock S/W
InserttheConnectorofDoorLockS/W.
Insertthe2HoldersofDoorLockS/WintotheHole
of Frame Front.
Fastenthe5screwsintheupper2placesandthe
lower3places.

26 _ Troubleshooting
4. TROUBLESHOOTING
4-1. INFORMATION CODE
► When an abnormal condition occurs, melody sounds and displays Info. code indications as shown in the following Info. codes
are shown until the status has cleared.
No. Information Type
Information
Code
Causes Corrective Actions
1 WaterLevel 0C/1C
-Inletvalvefailure
-Thecomputerboardisfaulty(theSCRofthewaterinletvalve
isshort-circuited)
-Waterlevelsensorfailure(lessthan20KHzormorethan
50KHzbeyondthenormalrange)
-Theterminalofthewaterlevelsensorisnotpluggedinorthe
wiringharnessisfaulty.
•Replacethewaterinletvalve
•Replacecomputerboard
•Replacethewaterlevelsensor
•Checkwhetherthewiringharness
terminalisrmlyconnectedor
replacethewiringharness
2 Motor 3C
-Themotorwiringharnessterminalislooseorthewiring
harnessisfaulty
-Motortemperaturerisetoohighthermalprotectionaction
(lockedrotorfailure,checkthemotorspeedis0for5
consecutivetimes,every5secondsinterval)
-Themotoritselfisfaulty
-Computerboardfailure
-UVWshortcircuit;motorcoilinsulationisdamaged(variable
frequencyvariant)
-UVWwiringisoff(variablefrequencyvariant)
-Poorheatdissipation(variablefrequencyvariant)
•Checkwhetherthewiringharness
terminalsarermlyconnectedor
replacethewiringharness
•Checkiftheclothesaretoomuchor
stuck.Afterpoweroffandcooling
foraperiodoftime,youcanpower
on again
•Replacethemotor
•Replacecomputerboard
•Checkifthewiringharnessterminal
isshortedorreplacethemotor
(variablefrequencyvariant)
•Checkwhetherthewiringharness
terminalisrmlyconnectedor
replacethewiringharness(variable
frequencyvariant)
•Waitingtocooldown(variable
frequencyvariant)
3 WaterSupply 4C
-Thefaucetisnotturnedonorthewaterowistooslow
-Thedrainagepipeisnotsuspended
-Airlevelsensororaircollectiontubeleaks
-Theinletvalveisdamaged
-Thecomputerboardisfaulty(theSCRofthewaterinletvalve
isopenortheSCRofthepumpisbrokendown)
-waterlevelsensorfailure
(alwaysmaintainacertainwaterlevelvalue)
•Checkwhetherthefaucetisturned
onandthesizeofthewaterow
•Hangthedrainpipe
•Checkthewaterlevelsensorandgas
manifoldassembly,orreplace
•Replacethewaterinletvalve
•Replacethecomputerboard
•Replacethewaterlevelsensor
4 Drain 5C
-Drainpumplterisdirty
-Thedrainagepipeisblocked
-Drainpumpfailure
-Thedrainpumpwiringharnessplugisloose,notconnected,
orthewiringharnessisfaulty
-Computerboardfailure(waterlevelsensorterminalshort
circuit)
-Waterlevelsensorfailure(alwayskeephigherthanthe
emptywaterlevelvalue)
•Clearpumplter
•Dredgingthedirtydrainpipe
•Replacethedrainagepump
•Checkwhetherthewiringharness
terminalisrmlyconnectedor
replacethewiringharness
•Replacethecomputerboard
•Replacethewaterlevelsensor
5 Communication
AC
-Theterminalisnotpluggedinorthewiringharnessisfaulty
-Powercomputerboardordisplayboardfailure
•Checkwhetherthewiringharness
terminalsarermlyconnectedor
replacethewiringharness
•Replacecomputerboard
AC6
-Theterminalisnotpluggedinorthewiringharnessisfaulty.
-Computerboardorinverterboardisfaulty
•Checkwhetherthewiringharness
terminalsarermlyconnectedor
replacethewiringharness
•Replacecomputerboardorinverter
board
- -Motherboardvariantandinvertermodeldonotmatch
•Resetvariants
•Replacetheinverter

Troubleshooting _ 27
No. Information Type
Information
Code
Causes Corrective Actions
6 DOOR
DC
-Thedoorisnotclosed
-Microswitchfailure
-Theterminalisnotpluggedinorthewiringharnessisfaulty
-Computerboardfailure
•Checkifthedoorisclosedproperly
•Replacethedoordetectionswitch
•Checkifthewiringharnessterminals
arermlyconnectedorreplace
•Replacecomputerboard
DC1
-Thedoorisnotclosed
-Doorlockfailure
-Theterminalisnotpluggedinorthewiringharnessisfaulty
-Computerboardfailure(triacfailure)
•Checkifthedoorisclosedproperly
•Replacethedoorlock
•Checkifthewiringharnessterminals
arermlyconnectedorreplace
•Replacecomputerboard
7 HEATER HC
-Theterminaloftheheatingpipelineislooseorthewiring
harnessisfaulty.
-Heatingtubefailure
-Computerboardfailure(ordryingcomputerboardfailure)
•Checkwhetherthewiringharness
terminalsarermlyconnectedor
replacethewiringharness
•Replacetheheatingtube
•Replacethecomputerboard
(ordrythecomputerboard)
8 WaterLeakage LC
-Heaterengagementfault.(outofplace)
-Theairhoseisoutofplaceandwaterleakageoccursduring
thespincycle.
-Thetubbackatthesafetyboltsxingpartisbroken.
-Waterleakageoccursatthefrontwithfoamingbecauseof
toomuchdetergent.
-Waterleakageoccursbecausetheconnectinghosetothe
detergentdrawerisconnectedincorrectly.
-Thedrainpumpltercoverisengagedincorrectly.
-Waterleakageoccursatthedrainhose.
-Theductcondensingholdingscrewsareworn.
-Thenozzle-diaphragmisengagedintheoppositedirection
ortherubberpackagingisomitted.
-Waterleakageoccursbecausethescrewsthatholdthetub
backandfrontinplacearefastenedincorrectly.
-Theleakagesensorisfaulty.
•CheckWaterLeakage
•DVCASEforeignmaterialoccurs
•Leakageoftheproductinsidethe
hoseandpartsmoldedproblem
9
Temperature
Sensor
TC1
-Theterminalofthewaterheatingtemperaturesensorwiring
harnessislooseorthewiringharnessisfaulty.
-Temperaturesensorfailure
-Computerboardfailure
•Checkwhetherthewiringharness
terminalsarermlyconnectedor
replacethewiringharness
•Replacetemperaturesensor
•Replacethecomputerboard
10
Variant settings
abnormal
AllDisplay
Blink
-Thevariantsettingsdonotmatchthecurrentsoftware
-Variantinformationstorageabnormality(FlashorEeprom
failure)
•Loginvariantsettingmodeandreset
thevariant
• MCU or Eeprom
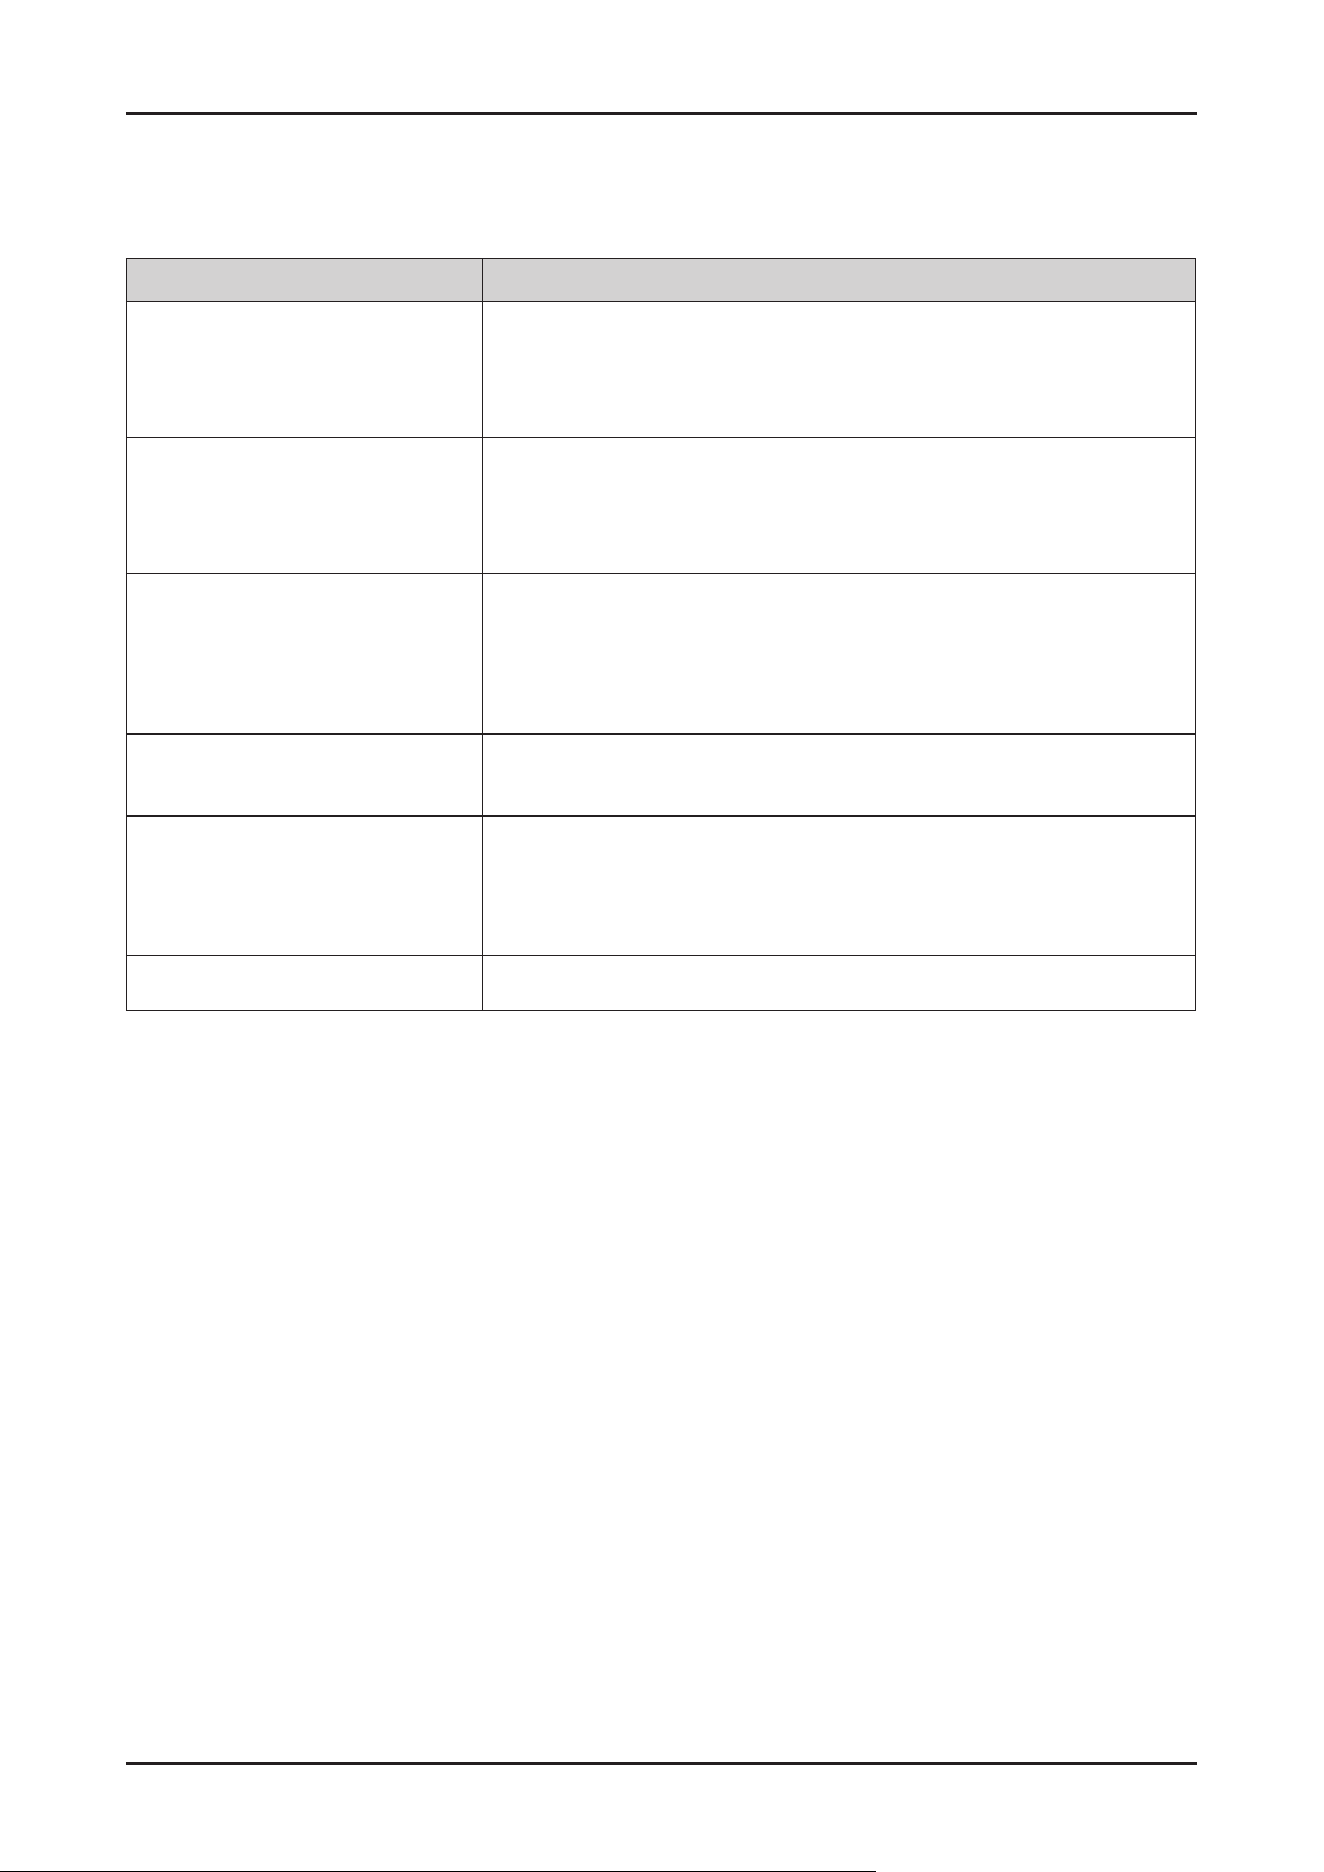
28 _ Troubleshooting
PROBLEM SOLUTION
Thewashingmachinewon’tstart.
•Makesurethewashingmachineispluggedin.
•Makesurethedoorisproperlyclosed.
•Makesurethewatertapisopen.
• Tap Start or Press Start/Pausebuttonagain.
Watersupplyisinsufcient,ornowater
issupplied.
•Openthewatertapfully.
•Makesurethewatersupplyhoseisnotfrozen.
•Makesurethewatersupplyhoseisnotkinkedorclogged.
•Cleanthelteronthewatersupplyhose.
Thewashingmachinevibratesbadly,or
makesnoise.
•Makesurethewashingmachineisinstalledonaleveloor.Iftheoorisnotlevel,
usethelevelingfeettoadjustthelevel.
•Makesurethattheshippingboltsareremoved.
•Makesurethewashingmachineisnottouchinganyotherobject.
•Makesurethelaundryloadisbalanced.
Thewashingmachinedoesnotdrain
and/orspin.
•Makesurethedrainhoseisstraightenedallthewaytothedrainsystem.
•Makesurethedebrislterisnotclogged.
Thedoorwon’topen.
•PresstheStart/Pausebuttontostopthewashingmachine.
•Thedoorstayslockedaslongasthewashingmachineisstillhotinsideaftera
heatingoperation.
•Itmaytakeseveralsecondstodisengagethedoorlockmechanism.
ButtonCheck •bCoccurs.ReferthebCtroubleshooting.
4-2. PROBLEM CHECK POINT
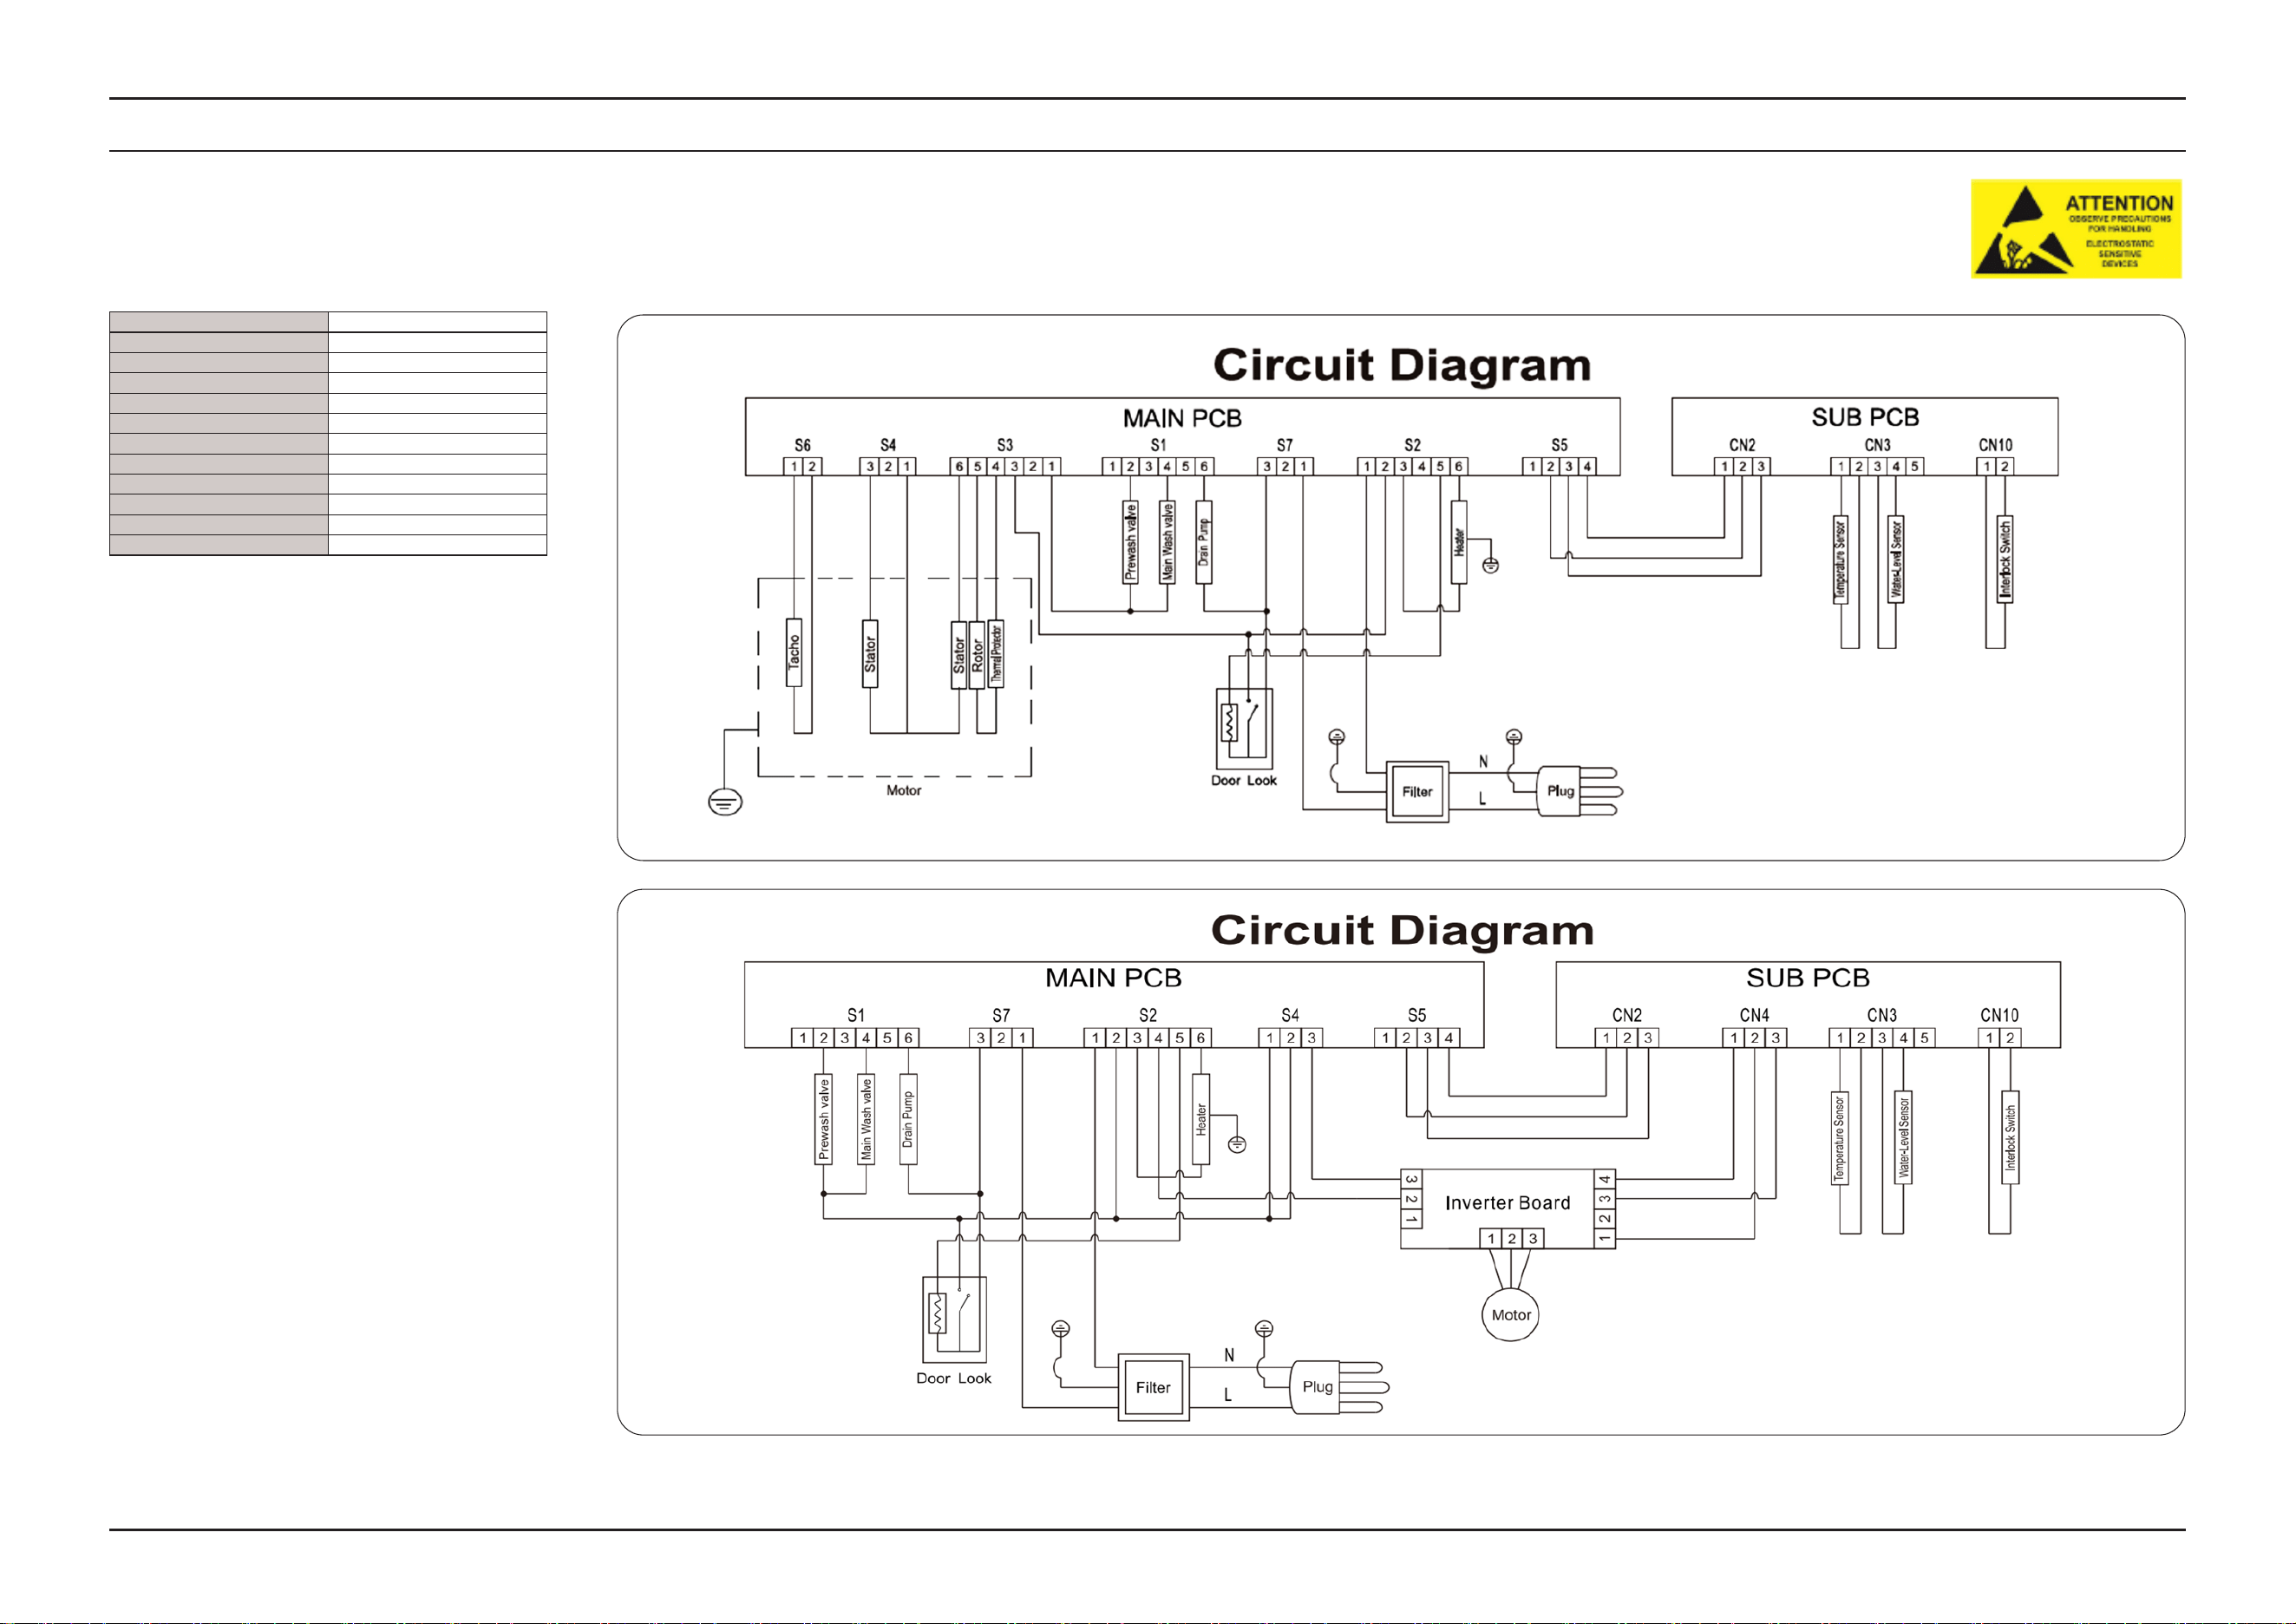
Wiring Diagram _ 29
5. WIRING DIAGRAM
5-1. WIRING DIAGRAM
► ThisDocumentcannotbeusedwithoutSamsung’sauthorization.
n REFERENCE INFORMATION
BLK BLACK
BLU BLUE
GRN GREEN
GRY GRAY
NTR NATURAL
ORG ORANGE
PNK PINK
RED RED
SKYBLU SKYBLUE
VIO VIOLET
WHT WHITE
YEL YELLOW
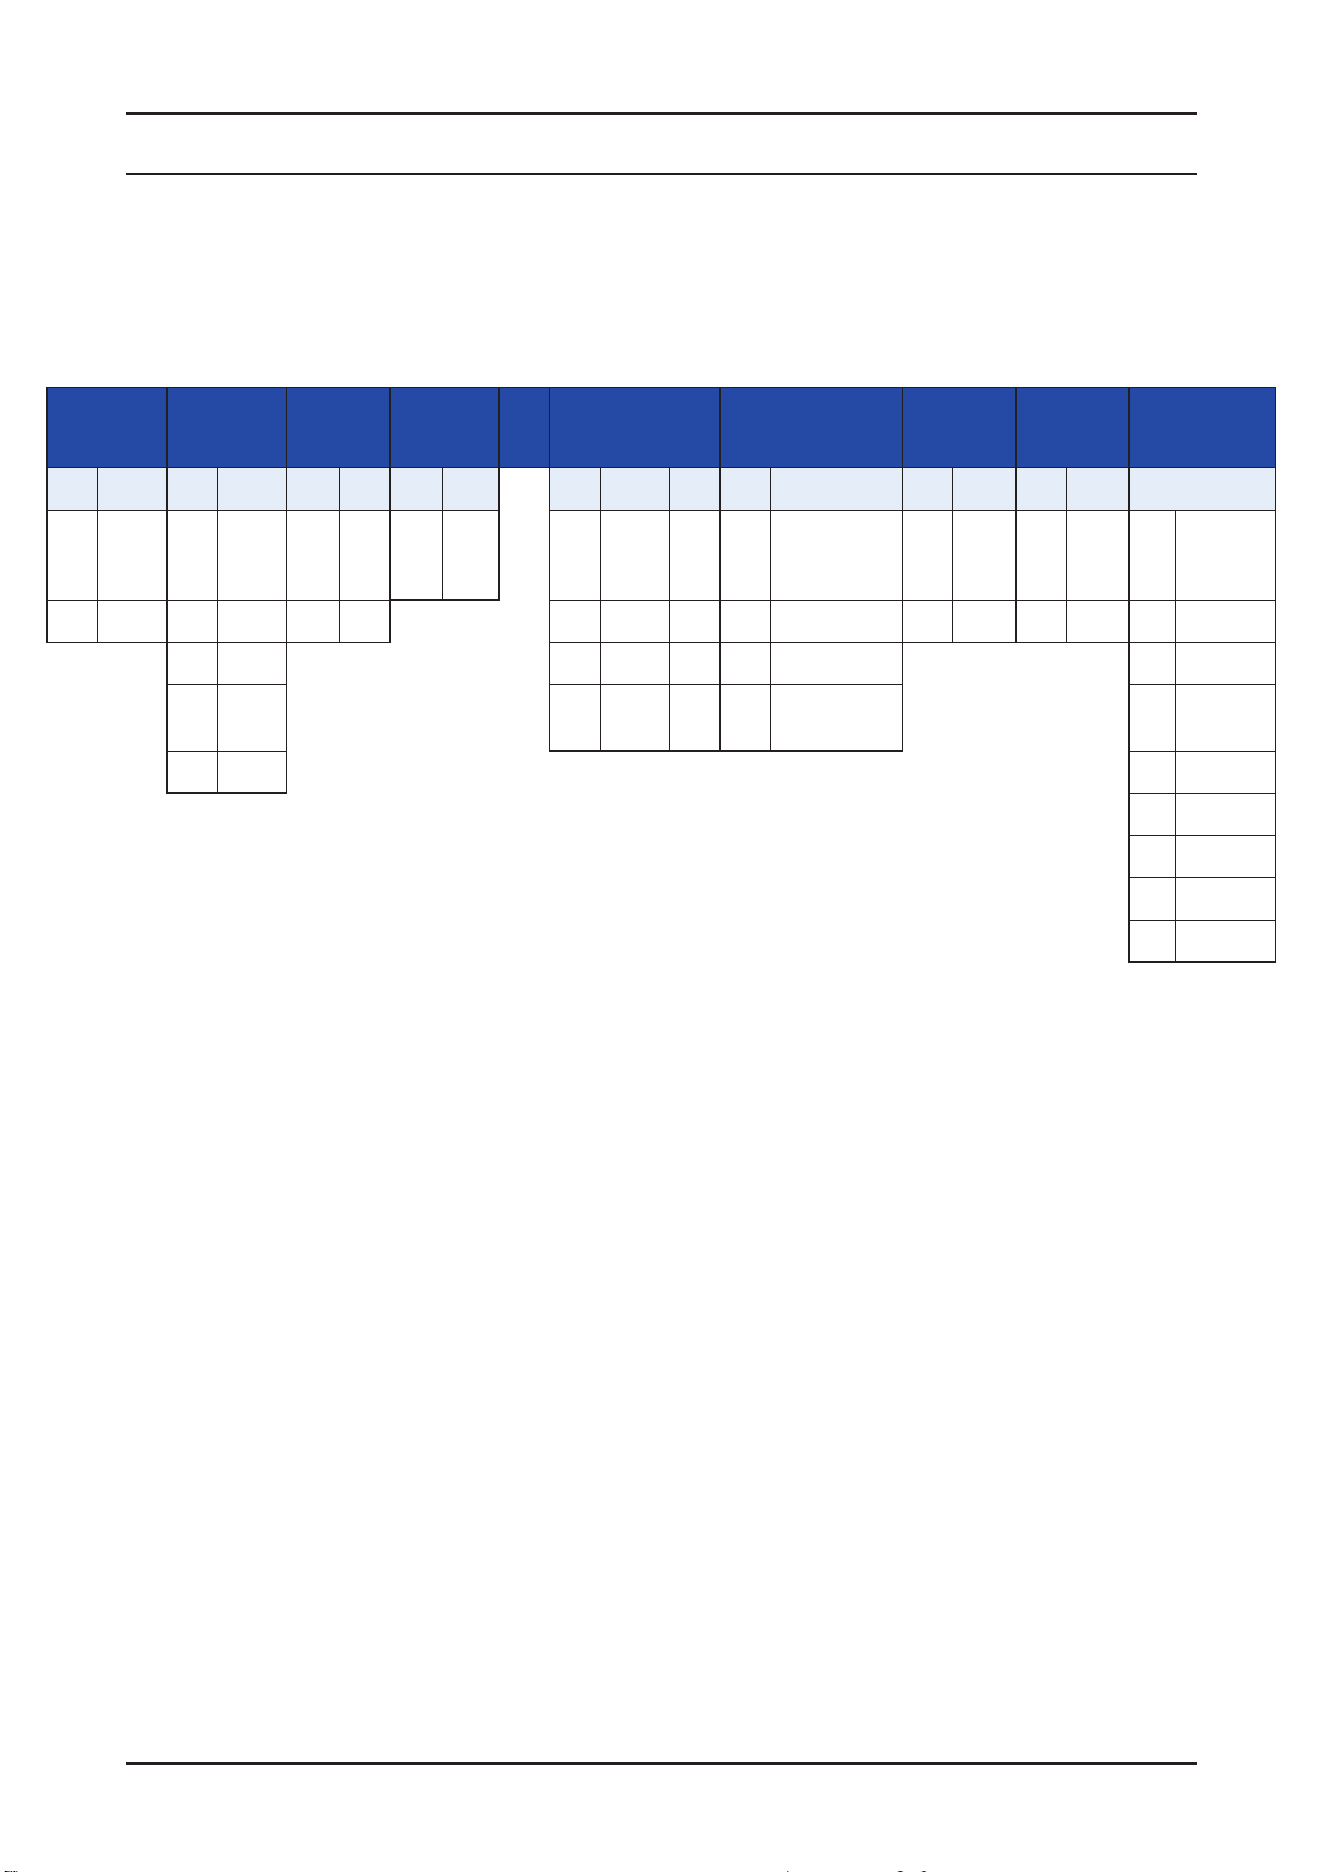
30 _ Reference
6. REFERENCE
6-1. WW3000TM PROJECT NAME
WW 90 T 3 0 4 M W W EP
Type Capa PJT
Product
name
Feature1 Feature2 Door Body Buyer
Code Content Code Content Code Year Code Panel Code MOTOR RPM Code Feature Code Door Code Body Code
WW Washer
90
9E
9F
9kg T 2020 3 Basic 1 UNI 1200 0 Non-functional W WHITE W WHITE SA NewZealand
WD Combo 85 8.5kg 2021 2 DIT 1200 2 AquaHose B BLACK S SILVER SV Vietnam
80 8kg 3 UNI 1400 M CirculationPump EU U.K
70 7kg 4 DIM 1400 P
CirculationPump+
AquaHose
EC Spain
60 6kg EO Poland
EP Portugal
EG Germany
EF France
: :

Reference _ 31
6-2. TERMINOLOGY
1. Drain Pump
Thepumpthatdrainsthewaterfromthewashingmachinegeneratedwhilethewashing
machineisrunning.
2. Heater
Theheaterislocatedonthetubinsidethewashingmachine.
Itheatsthewatertoincreasewashefciency.
3.DoorLockSwitch
Detectswhetherthedoorofthewashingmachineisopenorclosedifthedoorisopenwhile
thewashingmachineisrunningthecycleistemporarystopped.

ThisServiceManualisapropertyofSamsungElectronicsCo.,Ltd.
AnyunauthorizeduseofManualcanbepunishedunderapplicable
Internationaland/ordomesticlaw.
© 2021 Samsung Electronics Co.,Ltd. All rights
reserved.
Printed in Korea
GSPN (GLOBAL SERVICE PARTNER NETWORK)
Area Web Site
Europe,CIS,Mideast&Africa gspn1.samsungcsportal.com
Asia gspn2.samsungcsportal.com
North&LatinAmerica gspn3.samsungcsportal.com
China china.samsungportal.com