
Item # 1004 999 345
Model # DS18854
USE AND CARE GUIDE
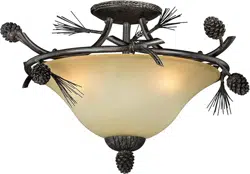
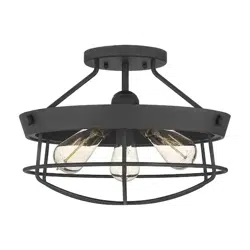
3 LIGHT SEMI FLUSH MOUNT
Questions, problems, missing parts? Before returning to the store,
call Design Solutions International Customer Service
Mon-Fri 9:30 am to 3:00 pm EST
1-800-388-6141 ext. 216
For customer service support and the fastest response, please email us at
Table of Contents
Safety Information
Warranty
READ AND SAVE THESE INSTRUCTIONS.
Table of Contents ........................................................... 2
Safety Information ......................................................... 2
Warranty ......................................................................... 2
Three (3) Year Warranty ................................................
........ 2
What is Covered ....................................................................... 2
What is Not Covered ................................................................. 2
Pre-Installation .............................................................. 3
Planning Installation ................................................................ 3
Tools Required ......................................................................... 3
Hardware Included .................................................................... 3
Package Contents ..................................................................... 4
Installation ...................................................................... 5
Care and Cleaning ......................................................... 6
Troubleshooting ............................................................. 6
Service Parts .................................................................. 7
Model .....................................................................................
7
2
□
□
□
□
□
THREE (3) YEAR WARRANTY
WHAT IS COVERED
WHAT IS NOT COVERED
For your protection and safety, carefully read and understand
the information provided in this manual completely before
attempting to assemble, install, or operate this product. Failure
that could be hazardous or even fatal.
The manufacturer warrants this xture to be free from defects in materials and workmanship for a period of three (3) years from date of
purchase. This warranty applies only to the original consumer purchaser and only to products used in normal use and service. If this product
is found to be defective, the manufacturer’s only obligation and your exclusive remedy, is the repair or replacement of the product at the
cations, alteration,
neglect, or mishandling. This warranty shall not apply to any product that is found to have been improperly installed, set-up, or used in any
way not in accordance with the instructions supplied with the product. This warranty shall not apply to a failure of the product as a result of
an accident, misuse, abuse, negligence, alteration, faulty installation, or any other failure not relating to faulty material or workmanship.
wear and tear
consequential or incidental loss or damage, including but not limited to any labor/expense costs involved in the replacement or repair of said
product
Contact the Customer Service Team at 1-800-388-6141 ext 216 Eastern Time, Mon-Fri 9:30 am to 3:00 pm EST. For customer service
support and the fastest response, please email us at [email protected].
DANGER:
by turning off the circuit breaker, removing the fuse at
the fuse box, or tripping the breaker that controls that
circuit. Tape a sign to the panel warning others to
leave the circuit alone while you work.
CAUTION: CONSULT A QUALIFIED ELECTRICIAN IF
YOU HAVE ANY ELECTRICAL QUESTIONS. If you have
call our Customer Service Team at 1-800-388-6141
ext 216. Please reference your SKU (1004 999 345) or
UPC (802513188547).
Before touching any wire, use a voltage tester to make sure it
is not live.
your hands and feet are dry, and place one hand behind your
back to prevent electricity from making a complete circuit
through your chest. Touch the plug fuse only by its insulated
rim. Remove cartridge fuses with a fuse puller.
Use tools with insulated handles and ladders made of wood or
To protect children, place a safety cover over any unused
outlets.
Pre-Installation
PLANNING INSTALLATION
Read all instructions before installing.
To avoid damaging this product, place it on a soft, non-abrasive surface, such as carpet or cardboard.
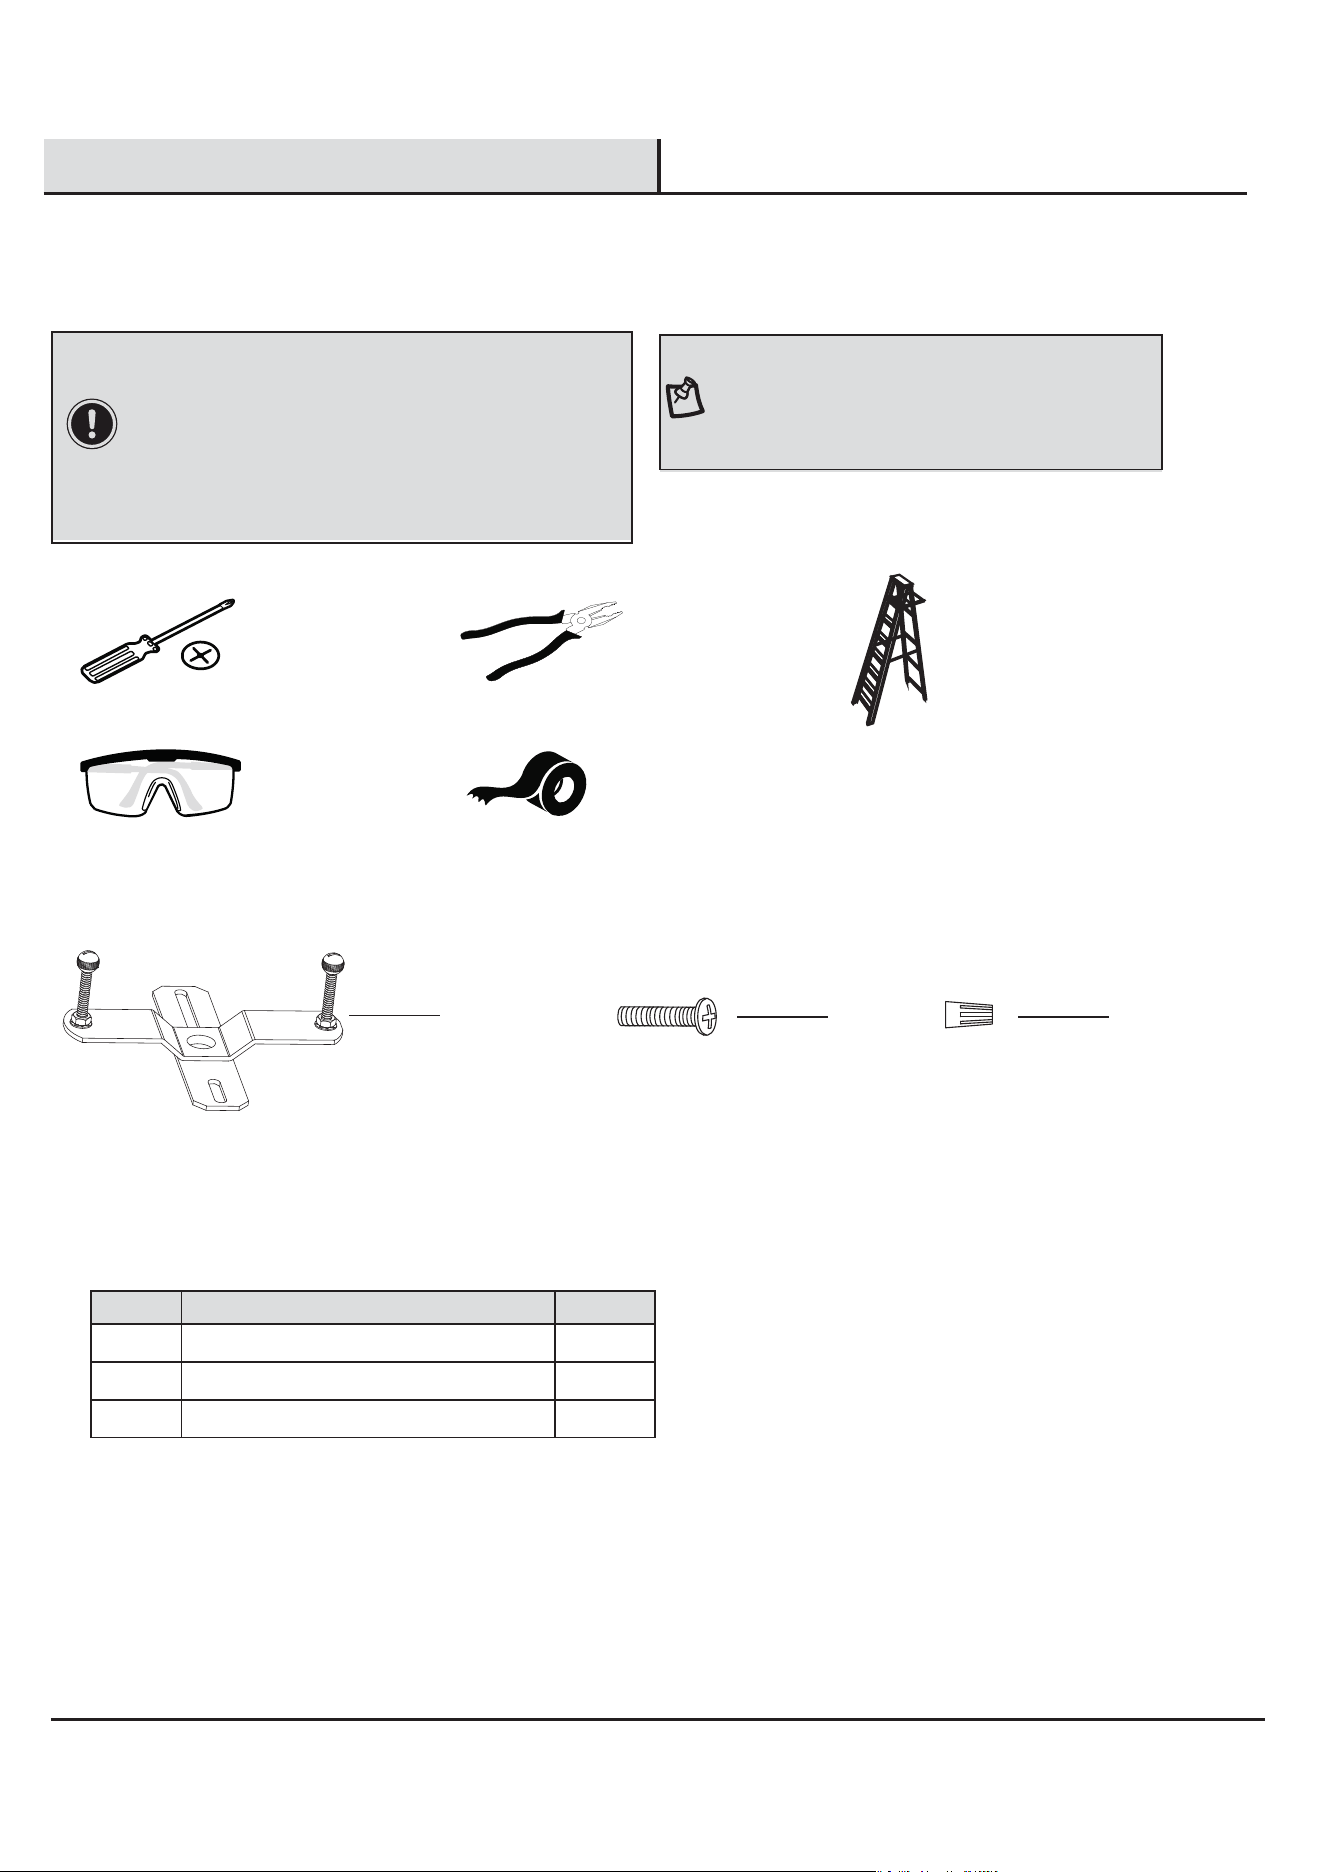
Phillips
Screwdriver
Safety
Goggles
Electrical
Tape
Pliers Ladder
TOOLS REQUIRED (NOT INCLUDED)
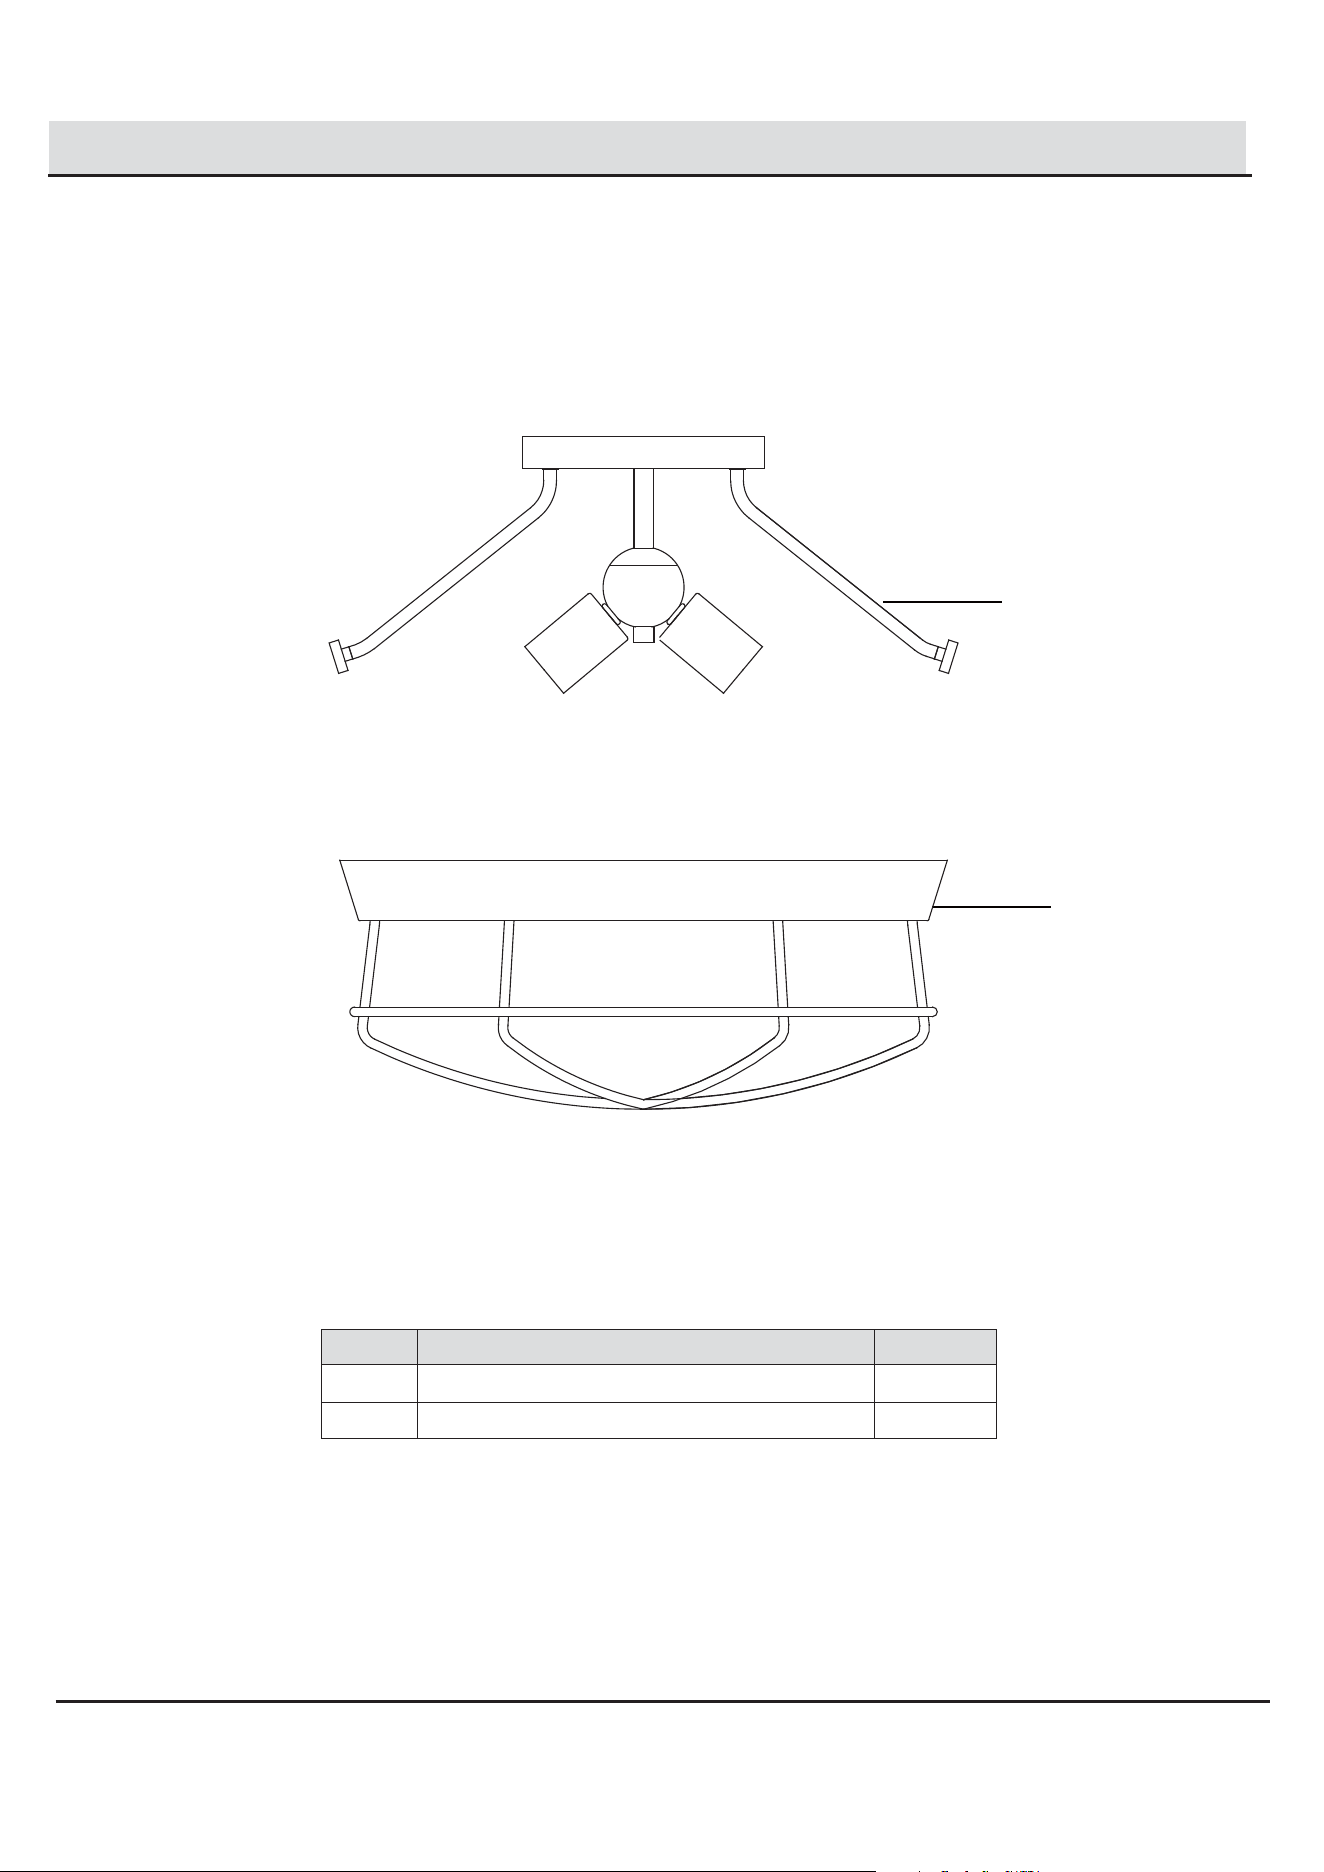
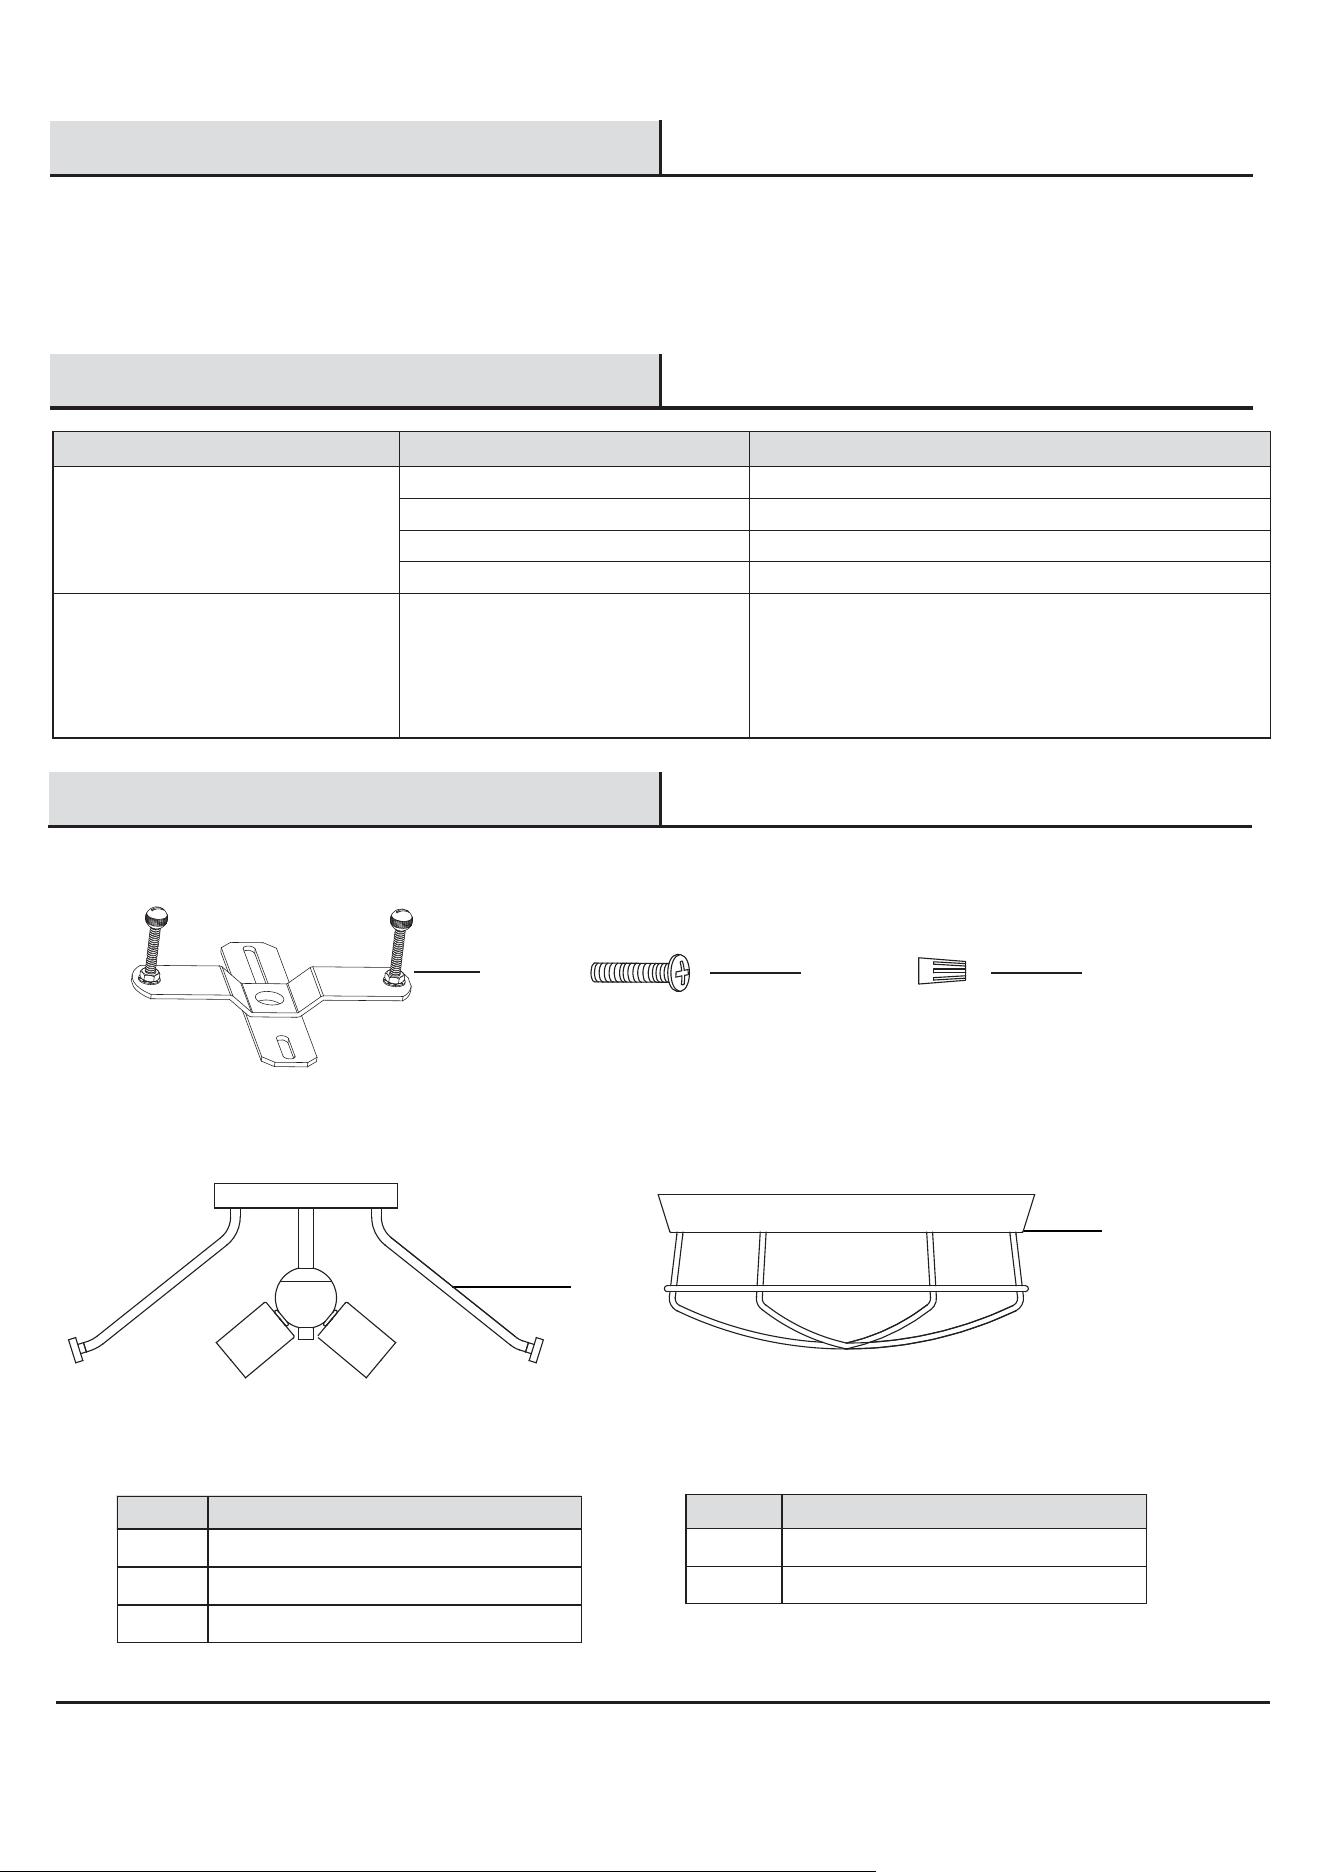
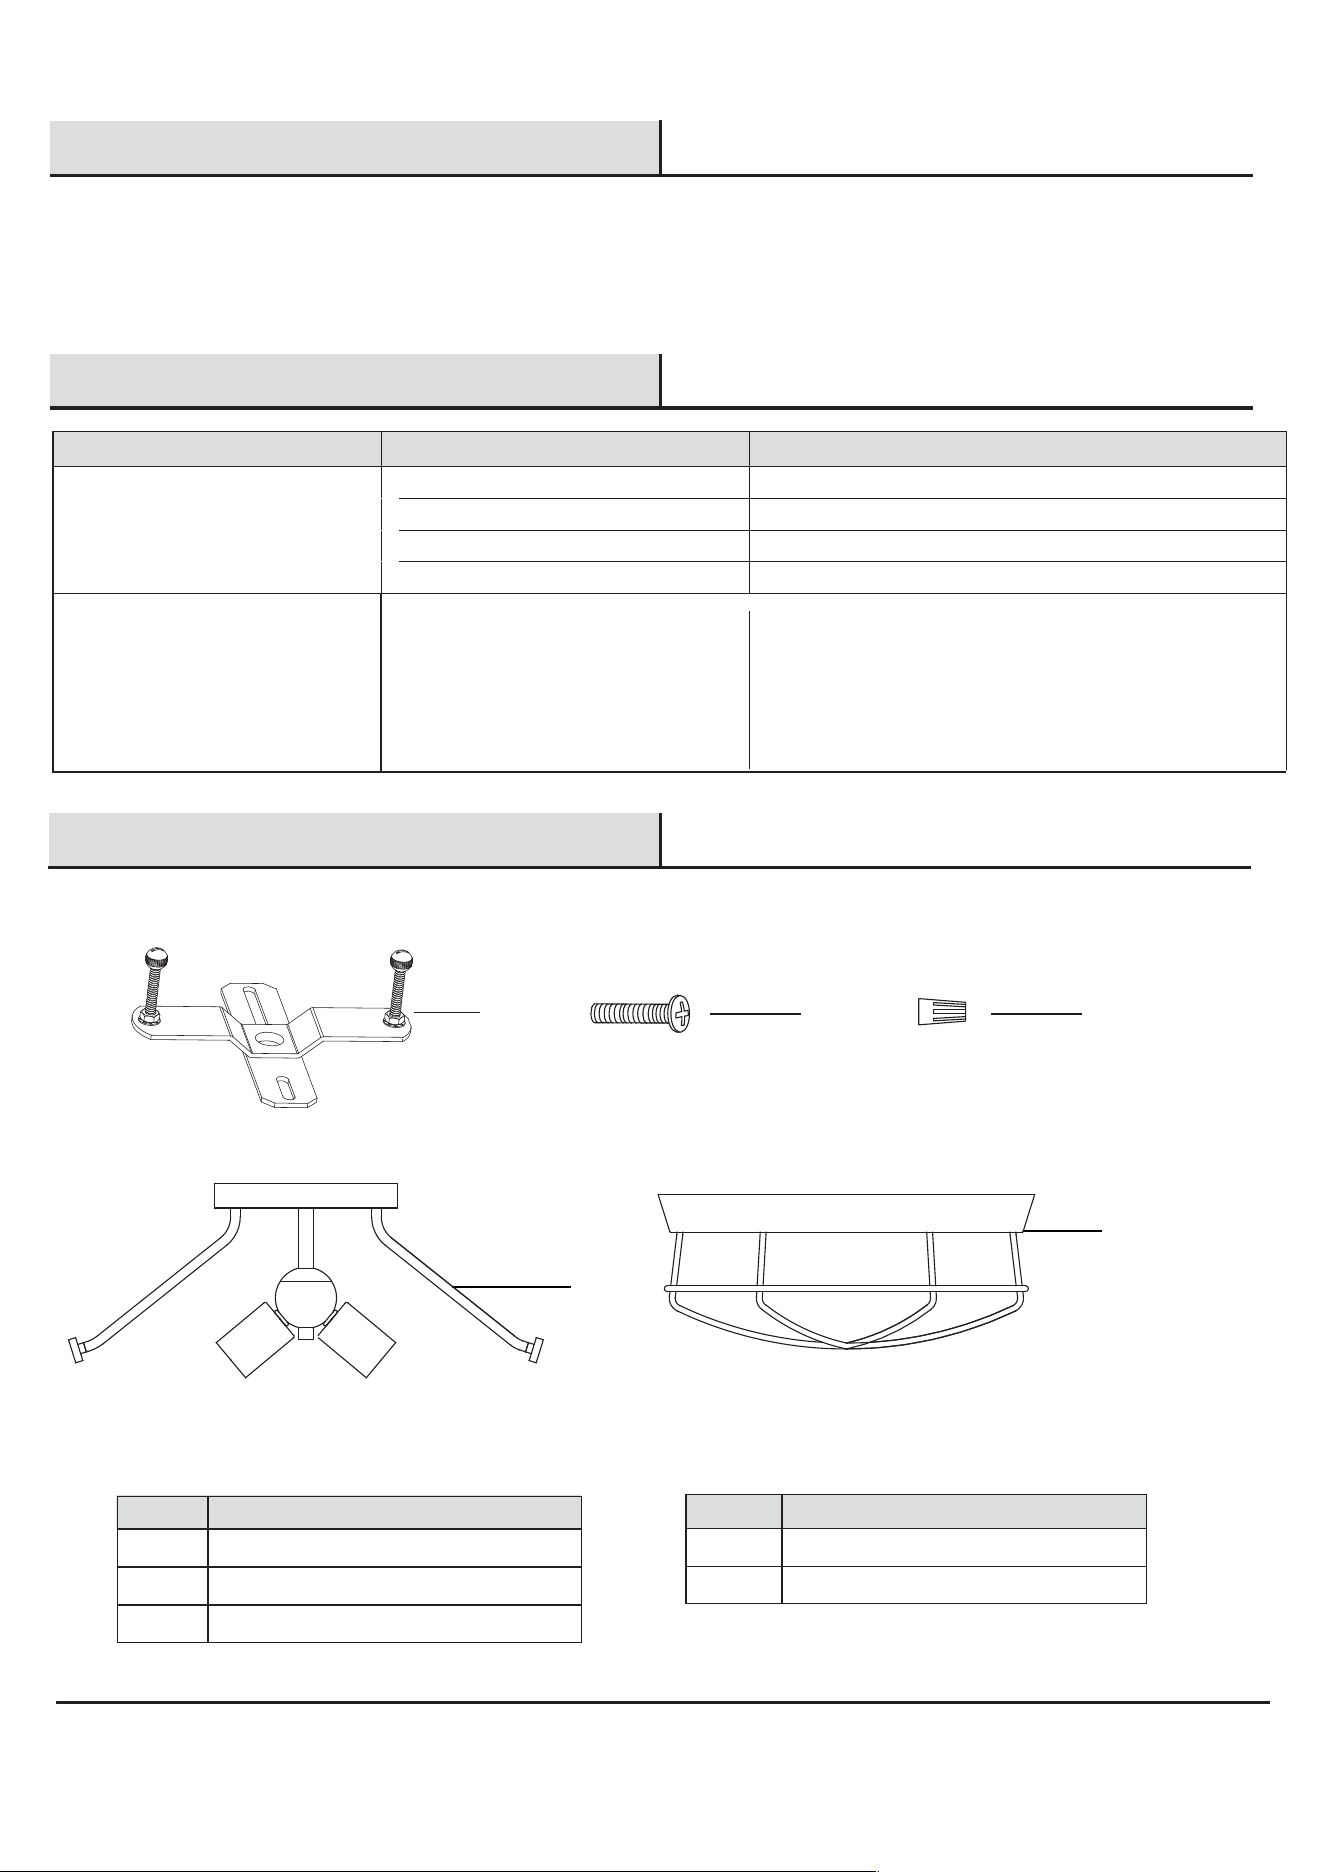
HARDWARE INCLUDED
AA
BB CC
3
Part Description Quantity
AA Crossbar Assembly 1
BB
3
CC
Outlet box screw 2
IMPORTANT: Inspect the wire insulation for any cuts,
abrasions, or exposed copper that may have occurred
during shipping. If there is a defect in the wire, do not
attempt installation. Please call Customer Service Team at
1-800-388-6141 ext 216. For customer service support
and the fastest response, please email us at
Wire connector
NOTE:This product requires three 60W maximum
medium base (E26) type "ST64" or "A" or 7 W
maximum medium base (E26) self-ballasted LED
vintage Edison bulbs (sold separately).
Pre-Installation (continued)
PACKAGE CONTENTS
A
4
B
Part Description Quantity
A Fixture body 1
B Cage 1

Installation
5
□
3
Test Fitting Ceiling Canopy to Crossbar Assembly
Installing the Crossbar Assembly
AA
AA
A
B
BB
2
Installing the Cage
1
□
□
□
□
Remove mounting balls from the crossbar assembly (AA).
Fit the ceiling canopy to the crossbar assembly (AA) and secure with mounting balls.
Note: The ceiling canopy should be snug against the ceiling and the mounting balls.
If not, adjust the length of the mounting screws on the crossbar assembly by unscrewing the preassembled hex nuts.
Then, screw the mounting screws in or out of the crossbar until the desired length is achieved.
Once the ceiling canopy is secure, remove the mounting balls and ceiling canopy and proceed to Step 4.
Secure the crossbar (AA) to the outlet box (not included)
with outlet box screws (BB). Tighten until snug.
□
□
□
Unfold support arms of the xture body (A) to proper
locations. (Refer to Arm Orientation)
Remove mounting screw from the arm.
Conrm that the holes on the cage (B) align with the mounting
holes on the arm. Pass mounting screws through hole of the
cage (B) and thread into the mounting holes on the arm.
Hand-tighten until snug.
NOTE: The preassembled mounting screws on the
crossbar should protrude outward.
Arm Orientation
Mounting Screw
Mounting Balls
□
□
□
4
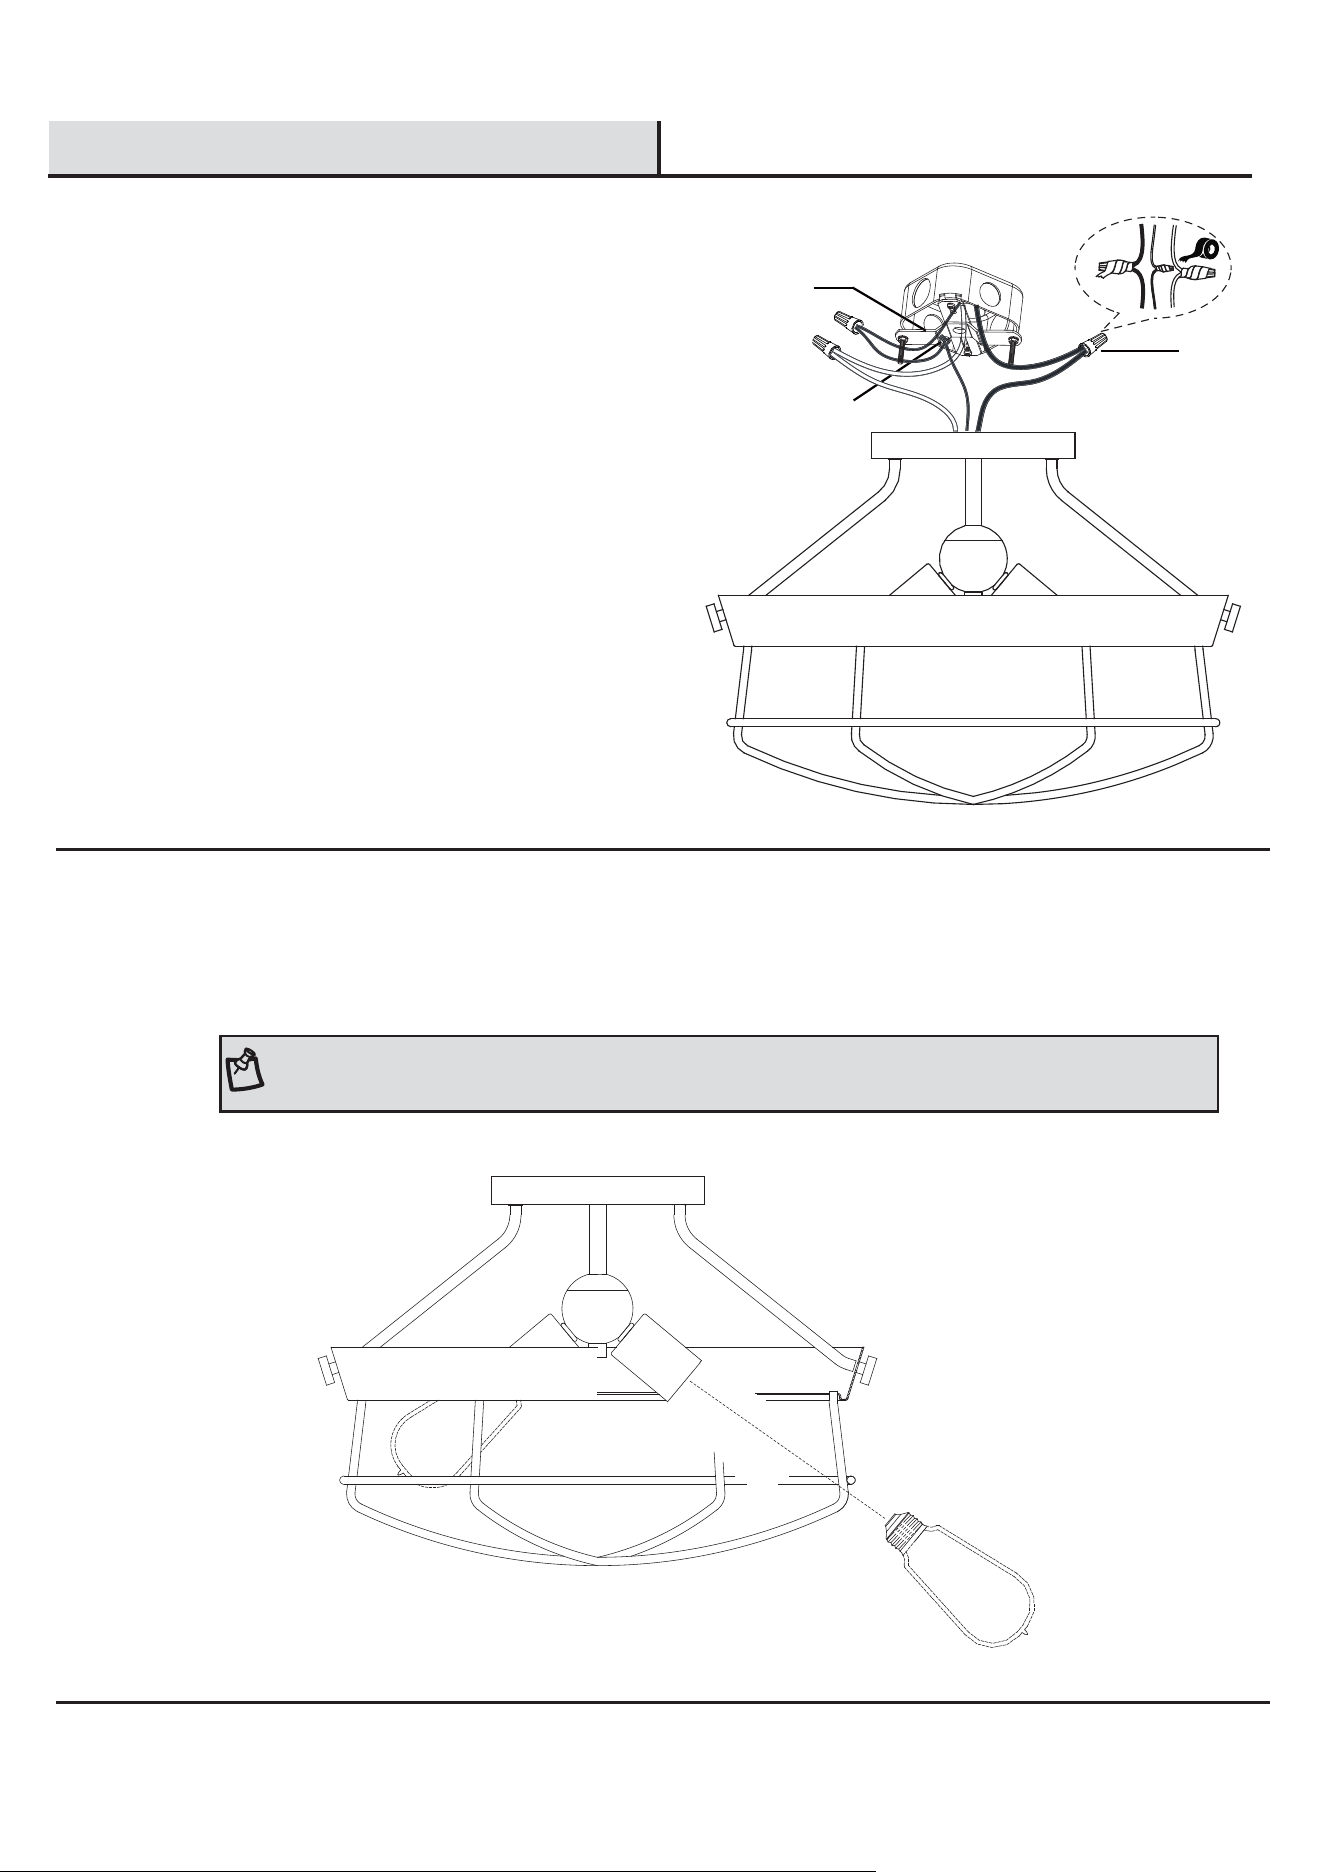
Making the electrical connections
Installation (continued)
6
5
AA
CC
* Use Wire Connectors (supplied) to connect the wires.
Ground Wire:
1. Wrap supply ground wire around green ground screw on
mounting bracket, no less than 2 in. from the end of the wire.
Tighten ground screw.
2. Connect xture ground wire to supply ground wire with wire
connector (CC).
Supply Wire:
1. Connect the supply white wire to the white xture supply
wire with wire connector (CC).
2. Connect the supply black (or red) wire to the black xture
supply wire with wire connector (CC).
3. Wrap each connection with approved electrical tape and
carefully stuff all of the connected wires into the outlet box.
Installing the light bulb
Install the bulbs (not included) into the sockets of the fixture body (A). Install (3) 60W Type-ST64 medium base vintage-style bulbs
.
NOTE: You can also use three 60W maximum medium base (E26)Type "A" bulbs or 7 W maximum medium
base (E26) self-ballasted LED bulbs (sold separately). Do not exceed the recommended wattage.
Green Ground Screw
Care and Cleaning
Troubleshooting
□
□
Problem Possible Cause Solution
The lights will not turn on. The bulb is burned out. Replace the light bulb.
The power is off. Ensure the power supply is turned on.
There is a faulty switch. Test or replace the switch.
Check the wiring.
There is a faulty wire connection.
Do not use any cleaners with chemicals, solvents, or harsh abrasives. Use only a dry, soft cloth to dust or wipe carefully.
To clean the xture, disconnect power by turning off the circuit breaker or by removing the fuse at the fuse box, and use a dry or
slightly dampened, clean cloth to wipe the exterior surface of the xture.
The fuse blows, or the circuit breaker
trips, when the light is turned on.
There are crossed wires, or the power
wire is grounding out.
Discontinue use of the lamp. Check the wire connections.
Contact a qualified electrician or
call Customer Care
Service Team at 1-800-388-6141 ext 216. For customer
service support and the fastest response, please email us at
Service Parts
7
MODEL: DS18854
AA
BB CC
Part Description
AA Crossbar Assembly
BB
CC
Outlet box screw
B
Part Description
A Fixture body
B Cage
Wire connector
A

Questions, problems, missing parts? Before returning to the store,
call Design Solutions International Customer Service
Mon-Fri 9:30 am to 3:00 pm EST
1-800-388-6141 ext. 216
For customer service support and the fastest response, please email us at
Retain this manual for future use.
Artículo núm. 1004 999 345
Modelo DS18854
GUÍA DE USO Y MANTENIMIENTO
SOPORTE DE MONTAJE SEMIEMPOTRADO DE 3 BOMBILLAS
¿Tiene alguna pregunta o algún problema? ¿Le faltan piezas?
Antes de volver a la tienda, llame al Servicio de atención al cliente de
Design Solutions International De lunes a viernes, de 9.30 a 15 h EST
1-800-388-6141 ext. 216
Para obtener ayuda de nuestro Servicio de atención al cliente y la respuesta más rápida,
envíenos un correo electrónico a
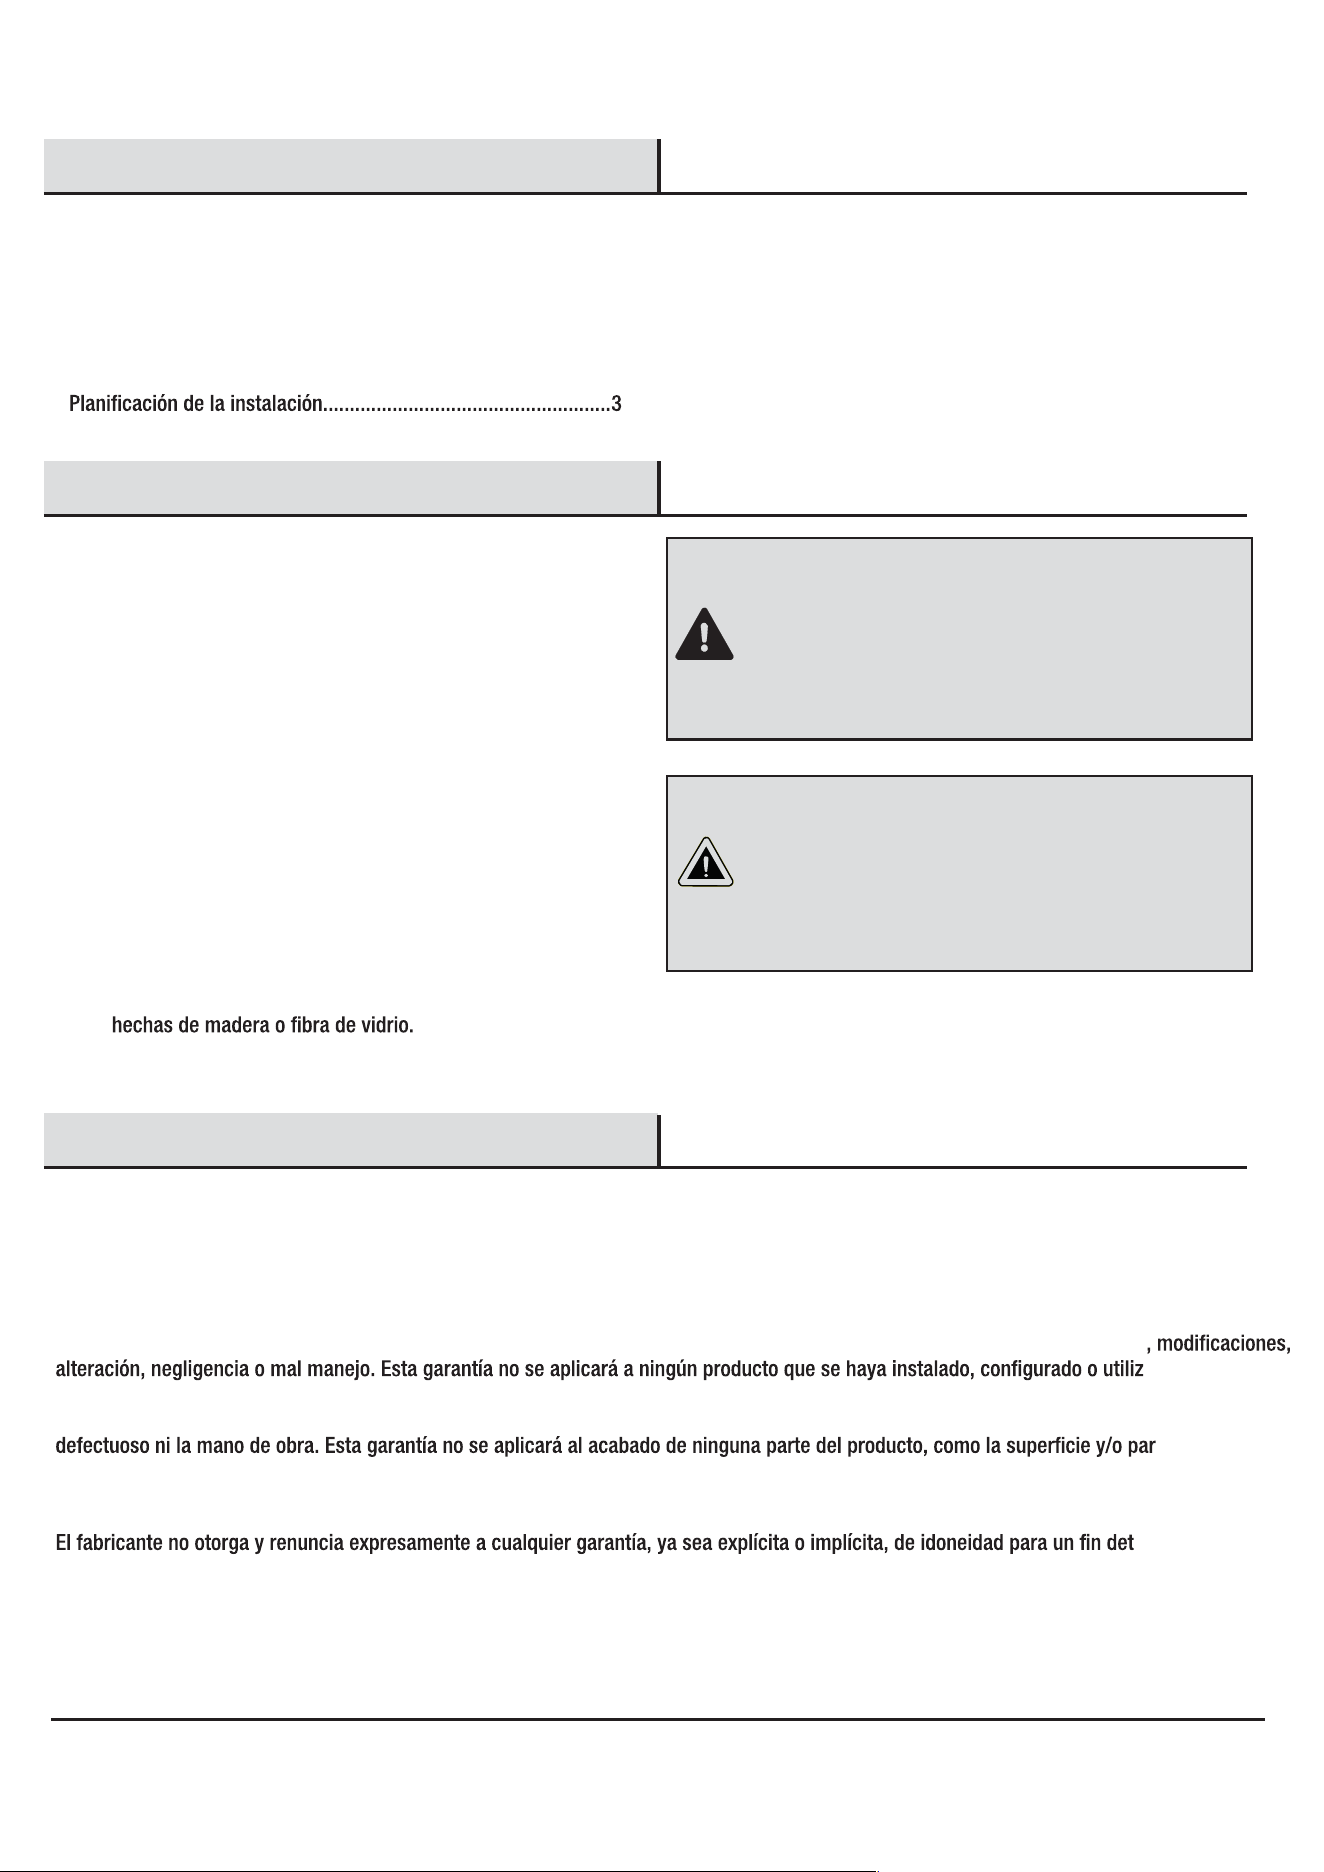
Tabla de contenidos
Información de seguridad
Garantía
LEA Y GUARDE ESTAS INSTRUCCIONES.
Tabla de contenidos....................................................... 2
Información de seguridad.............................................. 2
Garantía........................................................................... 2
Garantía de tres (3) años.............................................................. 2
¿Qué cubre?................................................................................. 2
¿Qué no cubre?............................................................................ 2
Preinstalación.................................................................. 3
Herramientas necesarias............................................................. 3
Tornillería incluida........................................................................ 3
Contenidos del paquete................................................................ 4
Instalación....................................................................... 5
Mantenimiento y limpieza.............................................. 6
Reparación de averías.................................................... 6
Piezas de repuesto......................................................... 7
Modelo......................................................................................... 7
2
□
□
□
□
□
GARANTÍA DE TRES (3) AÑOS
¿QUÉ CUBRE?
¿QUÉ NO CUBRE?
Para su protección y seguridad, lea atentamente y comprenda
toda la información proporcionada en este manual antes de
intentar montar, instalar o poner en funcionamiento este
producto. Si no lo hace, podría producirse una descarga
eléctrica, un incendio u otras lesiones que podrían ser
peligrosas o incluso mortales.
Antes de tocar ningún cable, utilice un comprobador de
tensión para asegurarse de que no tiene tensión.
Al sustituir fusibles, primero, apague la alimentación principal.
Asegúrese de que tiene las manos y los pies bien secos y
colóquese una mano por detrás de la espalda para que la
electricidad no pueda hacer un circuito completo a través de
su pecho. Toque el fusible únicamente por la parte del borde
aislado. Retire los cartuchos del fusible con unas pinzas para
cambiar fusibles.
Utilice escaleras y herramientas con mangos con aislamiento
Para proteger a los niños, coloque una cubierta de seguridad
en las tomas que no se utilicen.
El fabricante garantiza que esta lámpara no presentará defectos de material ni de mano de obra durante un período de tres (3) años a partir de
la fecha de compra. Esta garantía se aplica solo al comprador original y únicamente a los productos que se utilicen en condiciones normales y
reciban un mantenimiento adecuado. Si este producto resulta defectuoso, la única obligación del fabricante, y la única solución, es reparar o
sustituir el producto a discreción del fabricante, siempre que el producto no se haya dañado por uso indebido, abuso, accidente
ado de forma
incorrecta sin haber seguido las instrucciones que incluye el producto. Esta garantía no se aplicará a ningún fallo del producto ocasionado por
accidentes, mal uso, abuso, negligencia, alteración, instalación defectuosa o cualquier otro fallo que no esté relacionado con el material
tes
erosionadas, ya que se considera uso y desgaste normal.
erminado, distinta
de la garantía que incluye este producto. El fabricante renuncia expresamente a cualquier responsabilidad y no se hará responsable de ninguna
pérdida ni daño consiguientes o imprevistos, incluidos pero sin limitarse a, los costes de mano de obra o los gastos derivados de la sustitución o
la reparación de dicho producto.
Póngase en contacto con el equipo del Servicio de atención al cliente llamando al 1-800-388-6141, ext. 216, hora del este, de lunes a viernes,
de 9.30 a 15 h EST. Para obtener ayuda de nuestro Servicio de atención al cliente y la respuesta más rápida, envíenos un correo electrónico a
PELIGRO: Antes de comenzar la instalación de esta
lámpara o de retirar una lámpara anterior, apague el
disyuntor, retire el fusible de la caja de fusibles o accione
el interruptor que controla ese circuito para desconectar
la alimentación. Ponga una señal en el cuadro para
advertir a otras personas que no toquen el circuito
mientras está trabajando.
PRECAUCIÓN: CONSULTE A UN ELECTRICISTA
CUALIFICADO SI TIENE ALGUNA PREGUNTA SOBRE
ELECTRICIDAD. Si tiene alguna pregunta sobre esta
lámpara que no esté relacionada con la electricidad,
llame al teléfono del equipo del Servicio de atención al
cliente: 1-800-388-6141 ext. 216. Proporcione el código
SKU (1004 999 345) o UPC (802513188547).
Preinstalación
PLANIFICACIÓN DE LA INSTALACIÓN
Lea las instrucciones antes de comenzar la instalación.
Para evitar dañar este producto, colóquelo sobre una supercie suave, no abrasiva, como una alfombra o un cartón.
Destornillador
de estrella
Gafas de
seguridad
Cinta eléctrica
EscaleraAlicates
HERRAMIENTAS NECESARIAS (NO INCLUIDAS)
TORNILLERÍA INCLUIDA
AA
BB CC
3
Pieza Descripción Cantidad
AA Soporte de barras cruzadas 1
BB
3
CC
Tornillo de la caja de distribución 2
IMPORTANTE: Inspeccione el aislamiento del cable
para detectar cualquier corte, abrasión o exposición del
cobre que pueda haberse producido durante el envío. Si
el cable tiene algún defecto, no intente realizar la
instalación. Llame al 1-800-388-6141, ext. 216, para
contactar con el equipo del Servicio de atención al cliente.
Para obtener ayuda de nuestro Servicio de atención al
cliente y la respuesta más rápida, envíenos un correo
electrónico a [email protected].
Conector de cables
OBSERVACIÓN: Este producto necesita tres
bombillas de base media (E26) de 60 W como
máximo de tipo “ST64” o “A”, o bien bombillas
LED Edison vintage con balasto propio de base
media (E26) de 7 W como máximo (se venden
por separado).

Preinstalación (continuación)
CONTENIDOS DEL PAQUETE
A
4
B
CantidadDescripción Pieza
1Cuerpo de la lámparaA
1JaulaB
Instalación
5
□
3
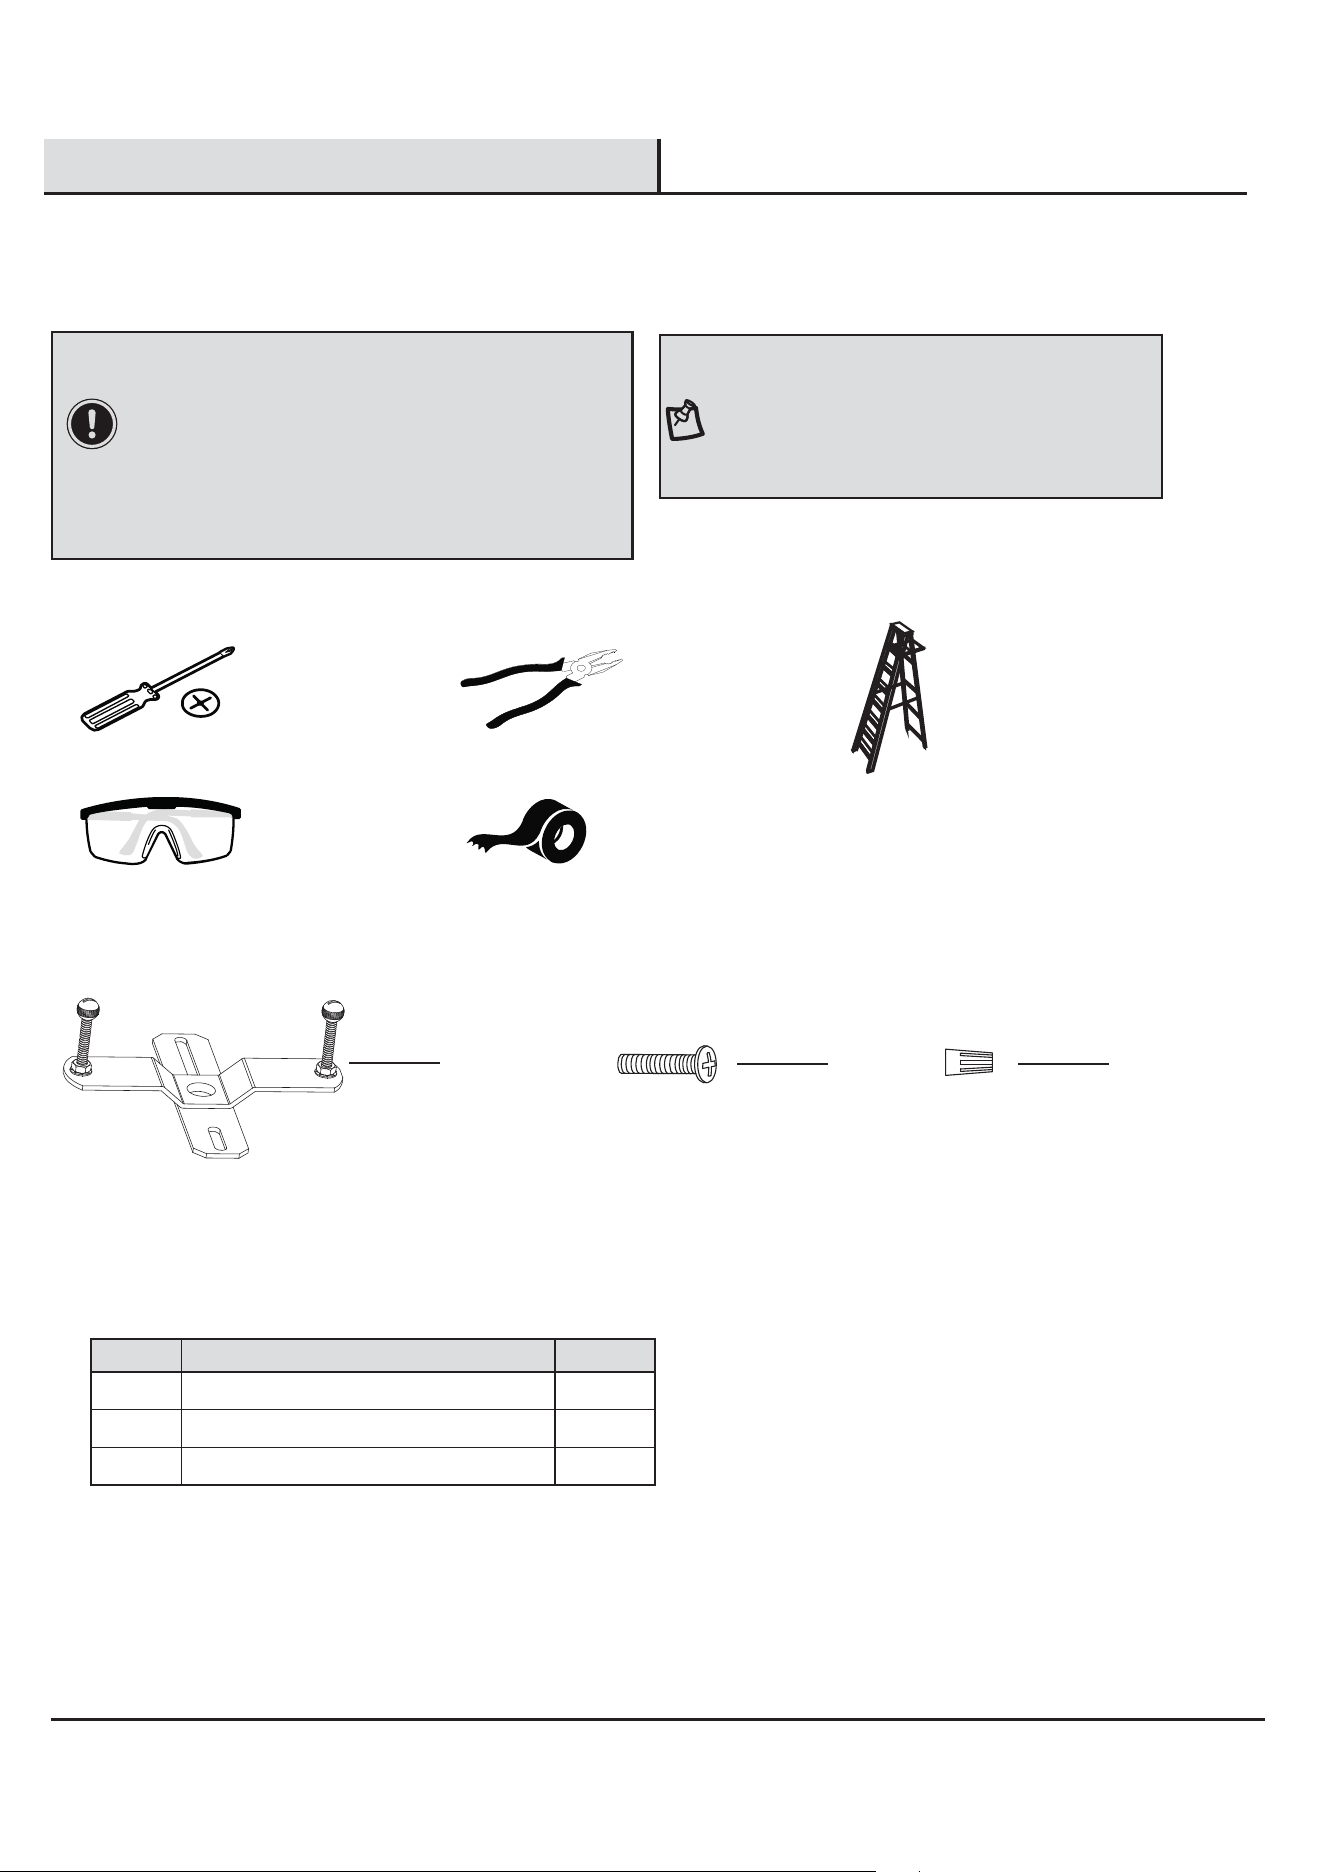
Prueba de instalación de la base del techo en el soporte de barras cruzadas
Instalación del soporte de barras
cruzadas
AA
AA
A
B
BB
2
Instalación de la jaula
1
□
□
□
□
Desenrosque las bolas de montaje del soporte de barras cruzadas (AA).
Acople la base del techo en el soporte de barras cruzadas (AA) y fíjelo con las bolas de montaje.
Observación: La base del techo debe quedar bien sujeta al techo y a las bolas de montaje.
En caso contrario, ajuste la posición de los tornillos de montaje del soporte de barras cruzadas desenroscando las tuercas
hexagonales preinstaladas. A continuación, enrosque o desenrosque los tornillos de montaje de las barras cruzadas hasta lograr
la posición deseada.
Una vez compruebe que la base del techo queda ja, retire las bolas de montaje y la base del techo y continúe con el paso 4.
Fije las barras cruzadas (AA) a la caja de distribución (no
incluida) con los tornillos de la caja de distribución (BB).
Apriételos hasta que queden jos.
□
□
□
Despliegue los brazos de soporte del cuerpo de la lámpara (A)
como corresponde (consulte la orientación de los brazos).
Desenrosque el tornillo de montaje de los brazos.
Compruebe que los oricios de la jaula (B) queden alineados
con los oricios de montaje de los brazos. Pase los tornillos
de montaje por los oricios de la jaula (B) y enrósquelos en los
oricios de montaje de cada brazo. Apriételos a mano hasta
que queden jos.
OBSERVACIÓN: Los tornillos de montaje preinstalados
en las barras cruzadas deben sobresalir.
Orientación de
los brazos
Tornillo de montaje
Bolas de montaje
□
□
□
4
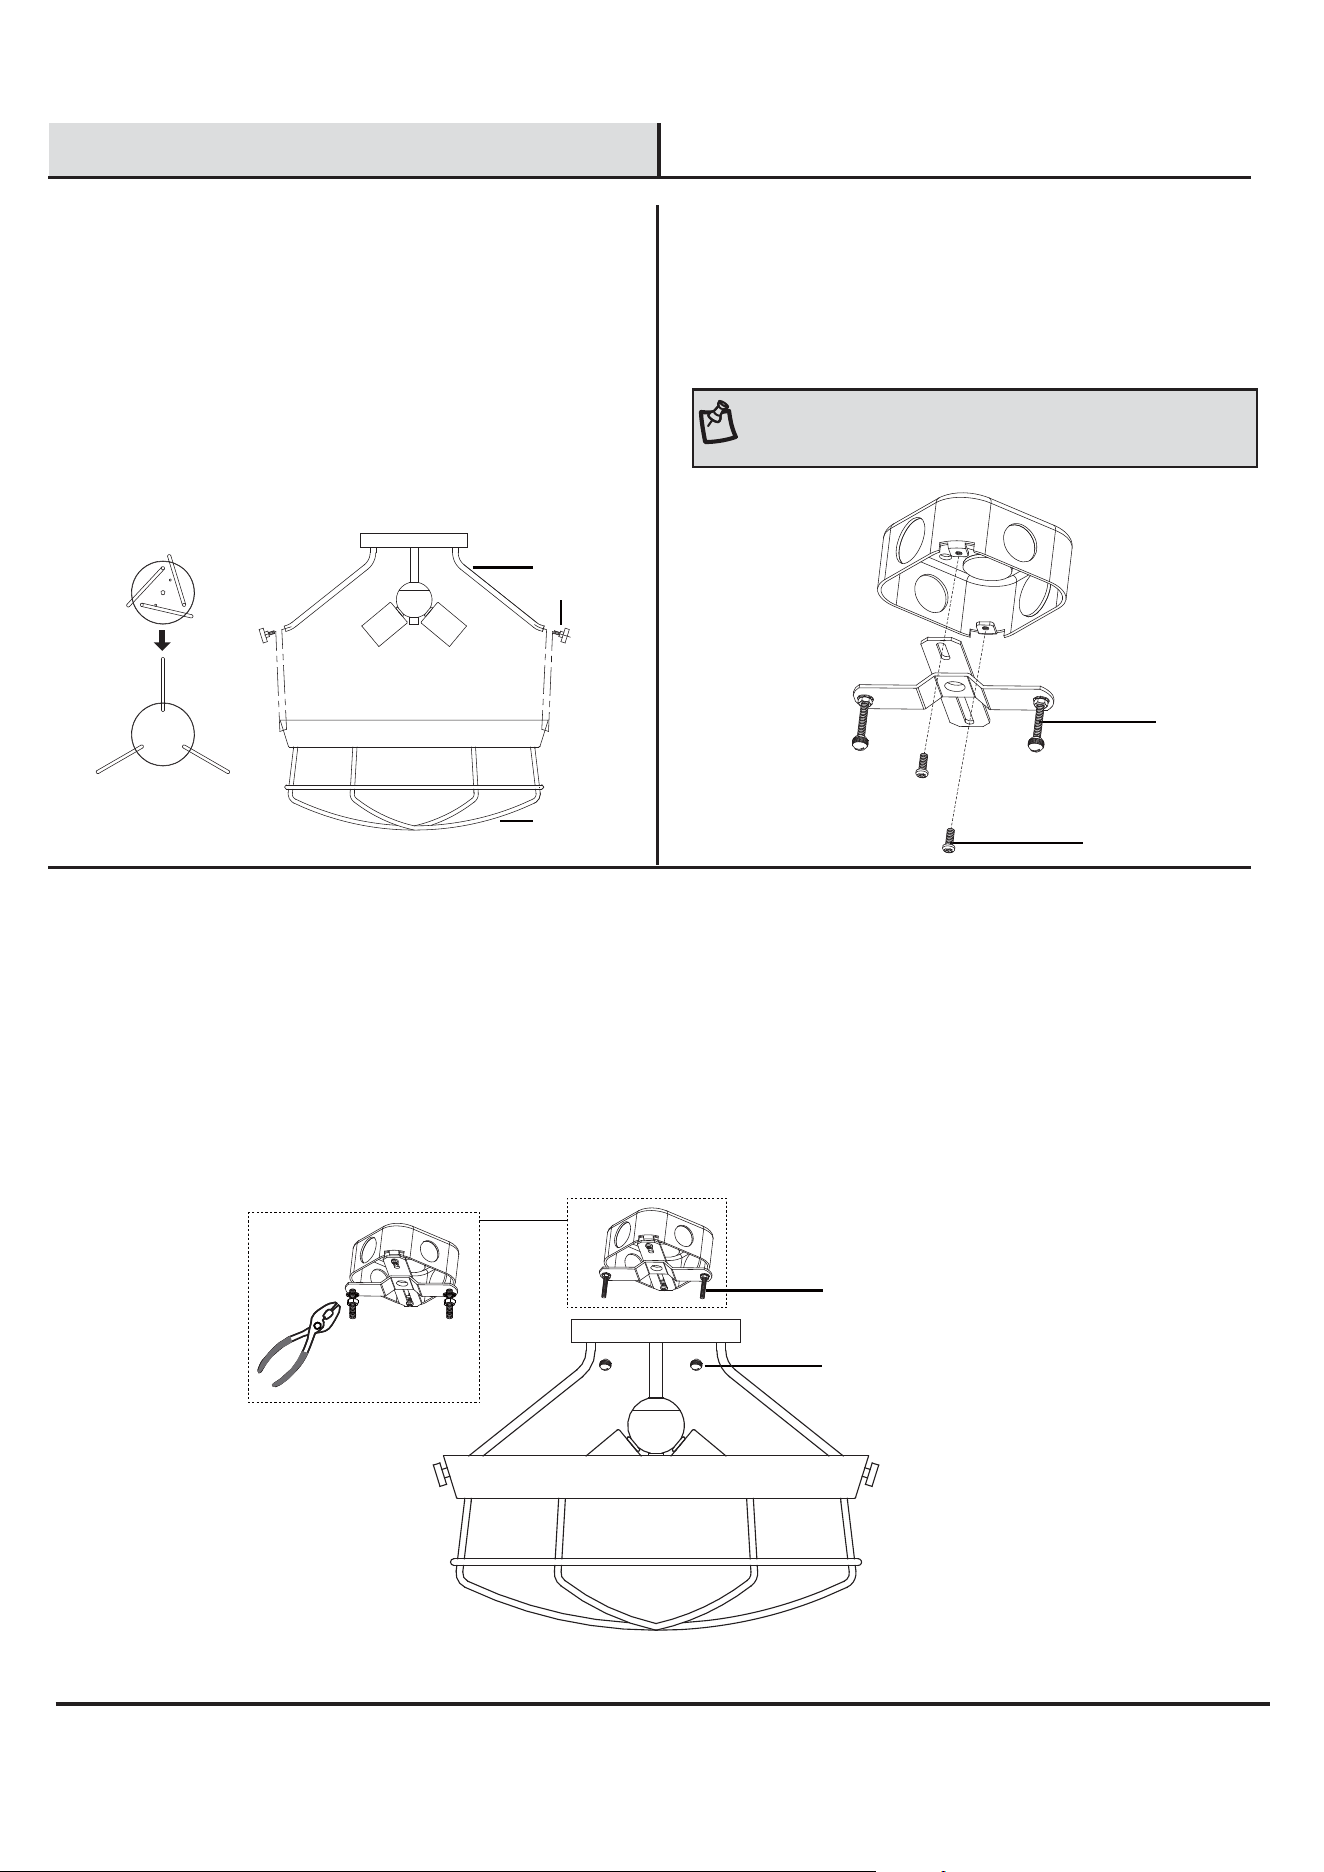
Realización de las conexiones eléctricas
Instalación (continuación)
6
5
AA
CC
* Utilice los conectores de cables (incluidos) para conectar los cables.
Cable de tierra:
1. Enrolle el cable de tierra de la alimentación alrededor del tornillo
de toma a tierra verde en el soporte, no menos de 5 cm desde el
extremo del cable. Apriete el tornillo de toma a tierra.
2. Conecte el cable de la toma de tierra de la lámpara con el cable
de tierra de la alimentación con el conector de cables (CC).
Cable de la fuente de alimentación:
1. Conecte el cable de alimentación blanco con el cable de
alimentación blanco de la lámpara con el conector de cables (CC).
2. Conecte el cable de alimentación negro (o rojo) con el cable
de alimentación negro de la lámpara con el conector de cables (CC).
3. Envuelva cada una de las conexiones con cinta eléctrica
homologada e introduzca con cuidado todos los cables conectados
en la caja de distribución.
Instalación de la bombilla
Instale las bombillas (no incluidas) en los casquillos del cuerpo de la lámpara (A). Instale 3 bombillas de estilo vintage de base media
de 60 W de tipo ST64.
OBSERVACIÓN: También puede utilizar tres bombillas de base media (E26) de 60 W como máximo de
tipo “A”, o bien bombillas LED con balasto propio de base media (E26) de 7 W como máximo (se venden por
separado). No supere la potencia en vatios recomendada.
Tornillo de toma
a tierra verde
Mantenimiento y limpieza
Reparación de averías
□
□
Problema Posible causa Solución
Las luces no se encenderán. La bombilla está quemada. Sustituya la bombilla.
La alimentación está apagada. Asegúrese de que la fuente de alimentación está encendida.
Hay un interruptor defectuoso. Inspeccione o sustituya el interruptor.
Inspeccione los cables.
Hay una conexión de cables defectuosa.
No emplee productos de limpieza que contengan químicos, disolventes ni abrasivos. Utilice únicamente un paño seco para quitar el
polvo o limpiar con cuidado.
Para limpiar la lámpara, desconecte la alimentación apagando el disyuntor del circuito o retirando el fusible de la caja de fusibles y
utilice un paño suave húmedo o ligeramente mojado para limpiar la supercie exterior de la lámpara.
El fusible se quema o se activa el
disyuntor cuando se enciende la luz.
Hay cables cruzados o el cable de
alimentación está separado de tierra.
Interrumpa el uso de la lámpara. Inspeccione las conexiones
de cables. Póngase en contacto con un electricista
cualicado o llame al 1-800-388-6141, ext. 216, para
contactar con el equipo del Servicio de atención al cliente.
Para obtener ayuda de nuestro Servicio de atención al cliente
y la respuesta más rápida, envíenos un correo electrónico a
Piezas de repuesto
7
MODELO: DS18854
AA
BB CC
Pieza Descripción
AA Soporte de barras cruzadas
BB
CC
Tornillo de la caja de distribución
B
Pieza Descripción
A Cuerpo de la lámpara
B Jaula
Conector de cables
A

¿Tiene alguna pregunta o algún problema? ¿Le faltan piezas?
Antes de volver a la tienda, llame al Servicio de atención al cliente de
Design Solutions International De lunes a viernes, de 9.30 a 15 h EST
1-800-388-6141 ext. 216
Para obtener ayuda de nuestro Servicio de atención al cliente y la respuesta más rápida,
envíenos un correo electrónico a
Conserve este manual para futuras consultas.
Conserve este manual para futuras consultas.