
- 1 -
Technical Support and E-Warranty Certificate
www.vevor.com/support
DIVIDING HEAD
MODEL: BS4-KP100-57
We continue to be committed to provide you tools with competitive price.
"Save Half", "Half Price" or any other similar expressions used by us only represents an
estimate of savings you might benefit from buying certain tools with us compared to the major
top brands and does not necessarily mean to cover all categories of tools offered by us. You
are kindly reminded to verify carefully when you are placing an order with us if you are
actually saving half in comparison with the top major brands.

- 1 -
MODEL: BS4-KP100-57
Have product questions? Need technical support? Please feel free to
contact us:
Technical Support and E-Warranty Certificate
www.vevor.com/support
NEED HELP? CONTACT US!
This is the original instruction, please read all manual instructions
carefully before operating. VEVOR reserves a clear interpretation of our
user manual. The appearance of the product shall be subject to the
product you received. Please forgive us that we won't inform you again if
there are any technology or software updates on our product.
DIVIDING HEAD

- 2 -
Warning-To reduce the risk of injury, user must read instructions
manual carefully.
MAINTENANCE INSTRUCTIONS
1. In order to ensure that the machine chuck still has good accuracy after
being used for a long time, lubrication is very important.
2. Molybdenum disulfide grease (black in color) needs to be applied after
each shift, and the grease is poured into the jaws of the chuck until the
grease overflows the jaw surface or the inner hole of the chuck, but if the
chuck is highly rotated or has a large amount of water When cutting oil is
used for processing, it needs more lubrication, which must be determined
according to different situations.
3. Be sure to use an air gun or similar tools to clean the chuck body and the
slide surface when the operation is completed.
4. Remove the chuck at least every 6 months for disassembly and cleaning,
and keep the sliding surface of the jaws clean and lubricated so that the life
of the chuck is prolonged. However, if the cutting cast iron is thoroughly
cleaned at least once or several times every 2 months, check the parts for
cracks and wear and replace them with new ones immediately. After the
inspection is completed, it must be fully oiled before assembly.
5. The use of cutting oil with an anti-rust effect can prevent rust inside the
chuck because the rust of the chuck will reduce the clamping force, and the
workpiece cannot be clamped.
INSTRUCTIONS
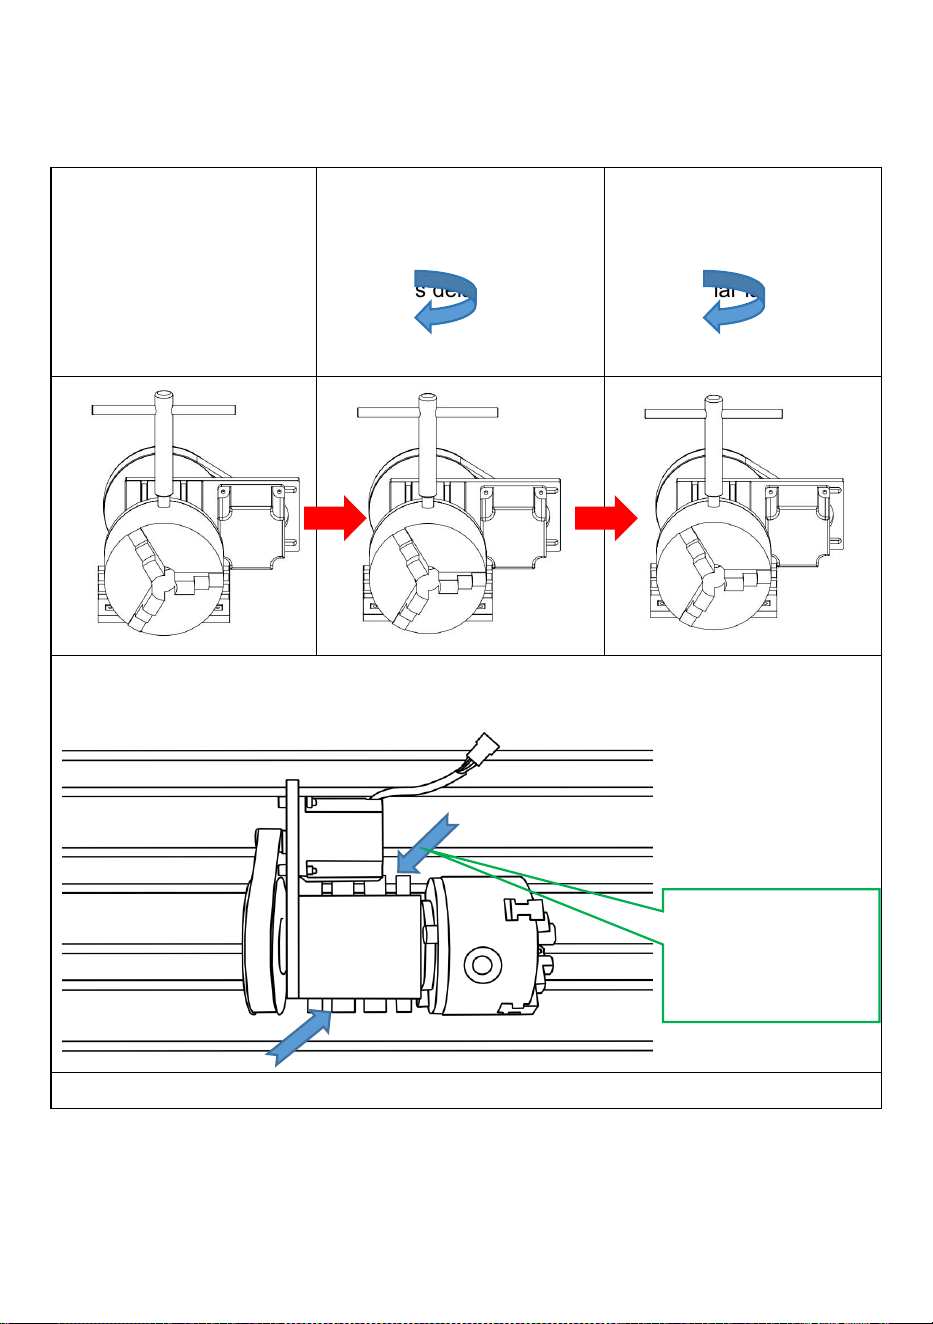
1. First of all, it is necessary to confirm whether the workpiece to be
processed needs a positive claw or a reverse claw. The positive claw can
hold a solid workpiece with a diameter of 48 mm and a hollow pipe of
100mm, and the reverse claw can hold a workpiece with a diameter of
112mm. The replacement steps are as follows.:
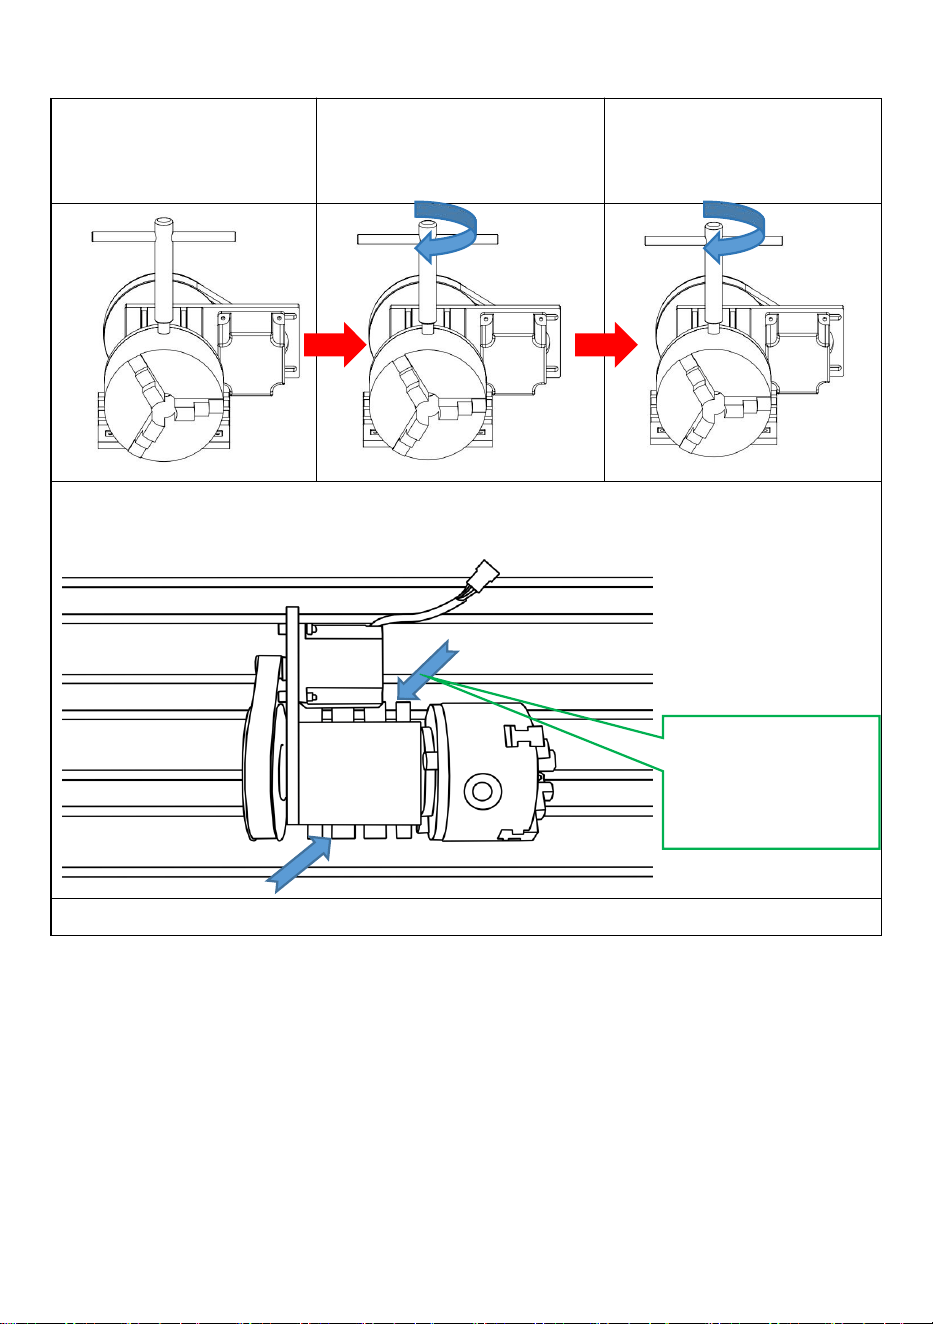
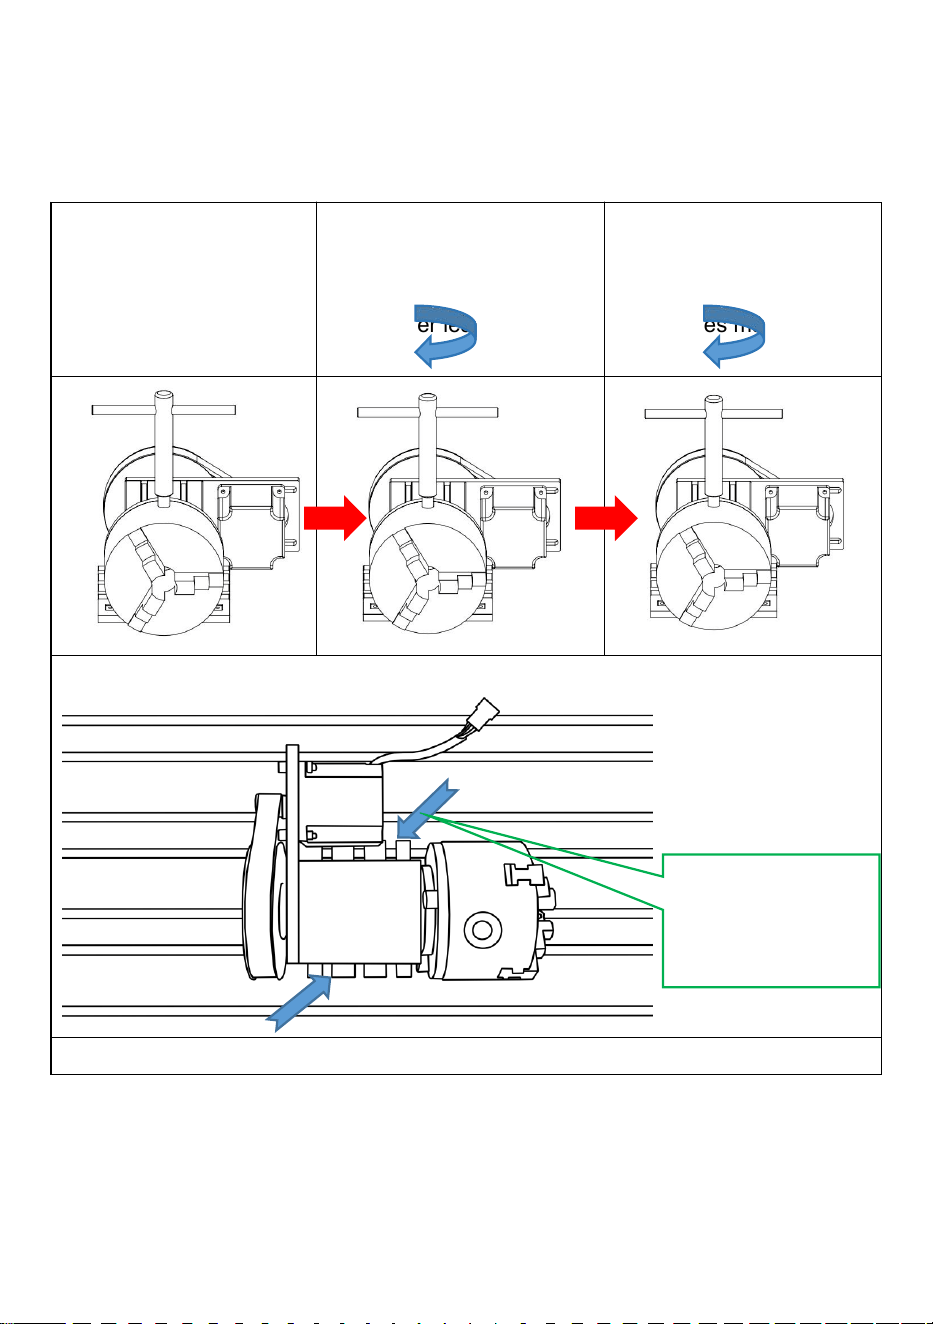
- 3 -
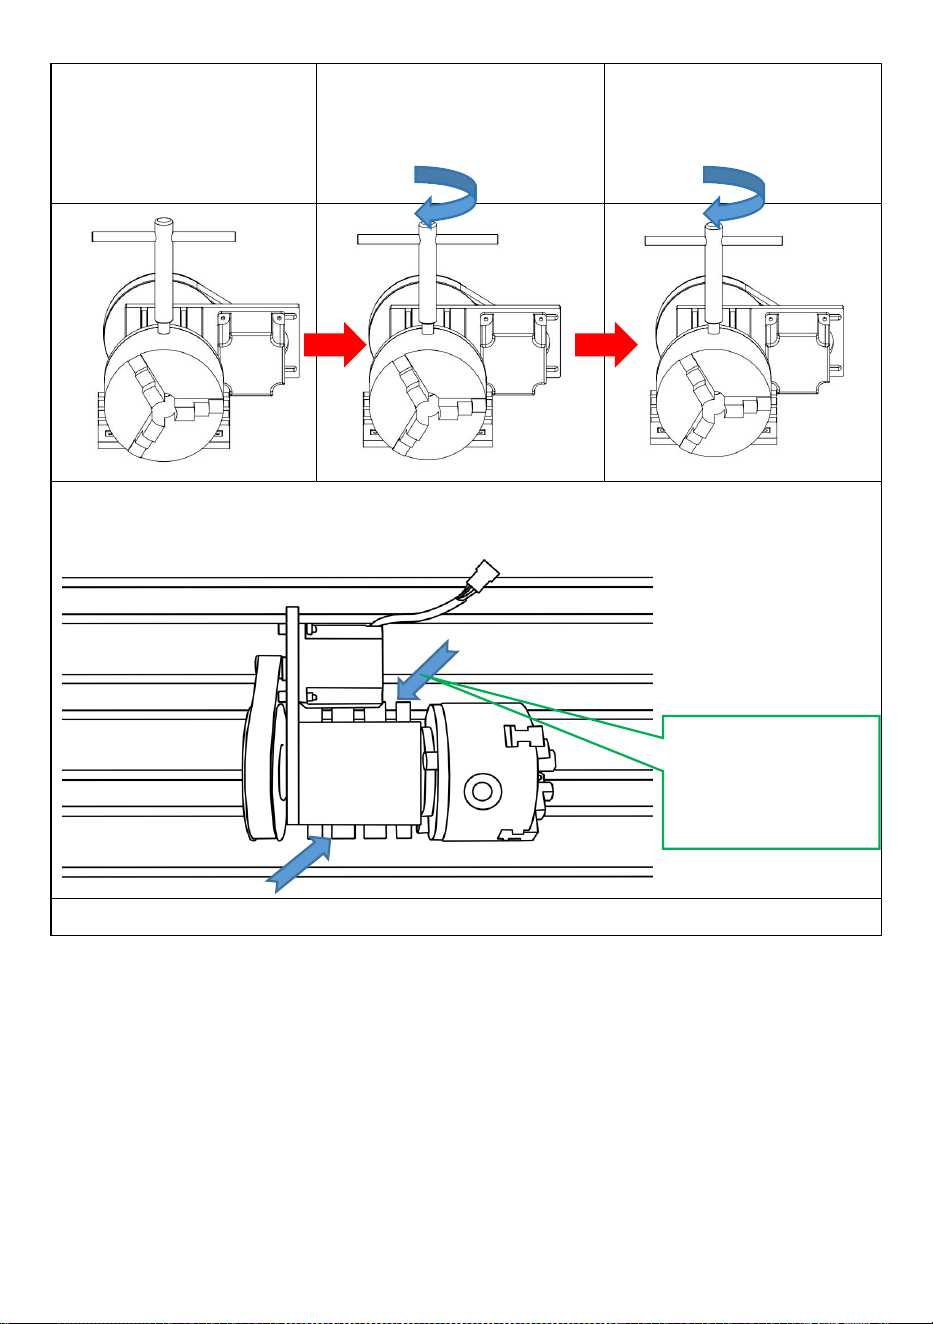
Insert the chuck wrench
into the chuck
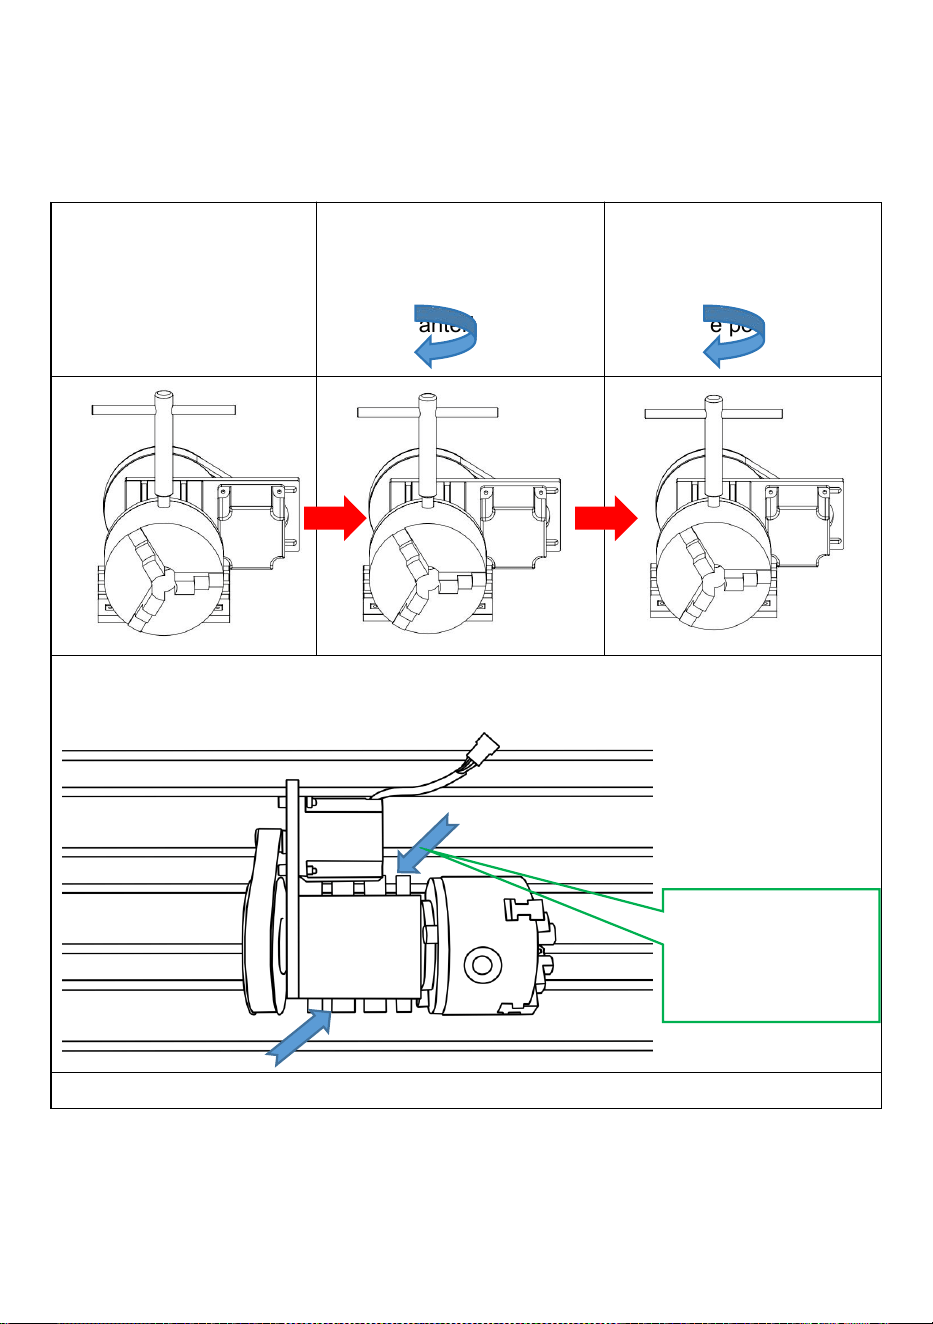
Rotate the chuck wrench
counterclockwise to take
out the front and back jaws
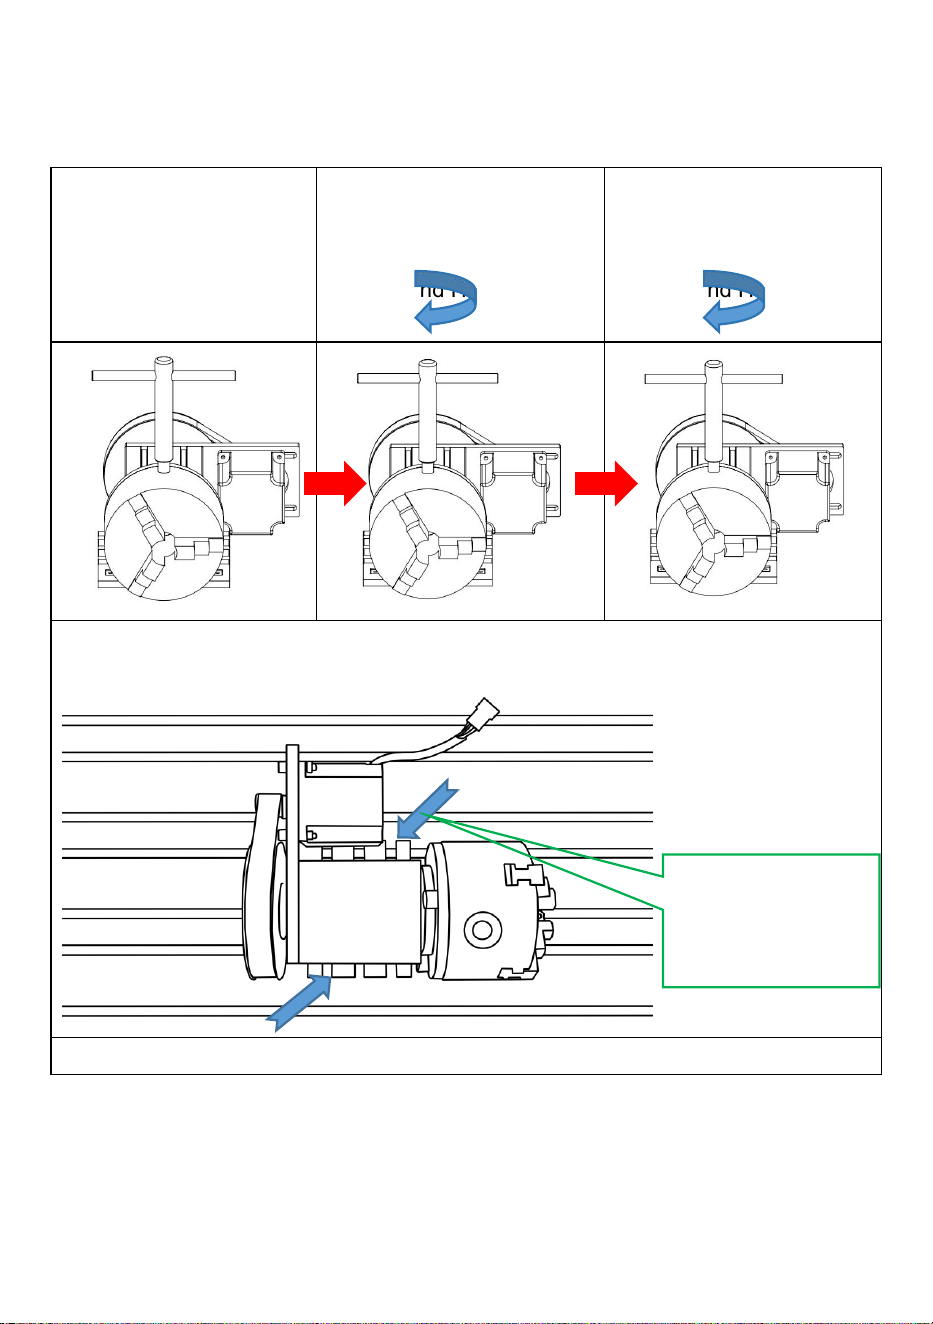
Rotate the chuck wrench
clockwise to install the
front and back jaws
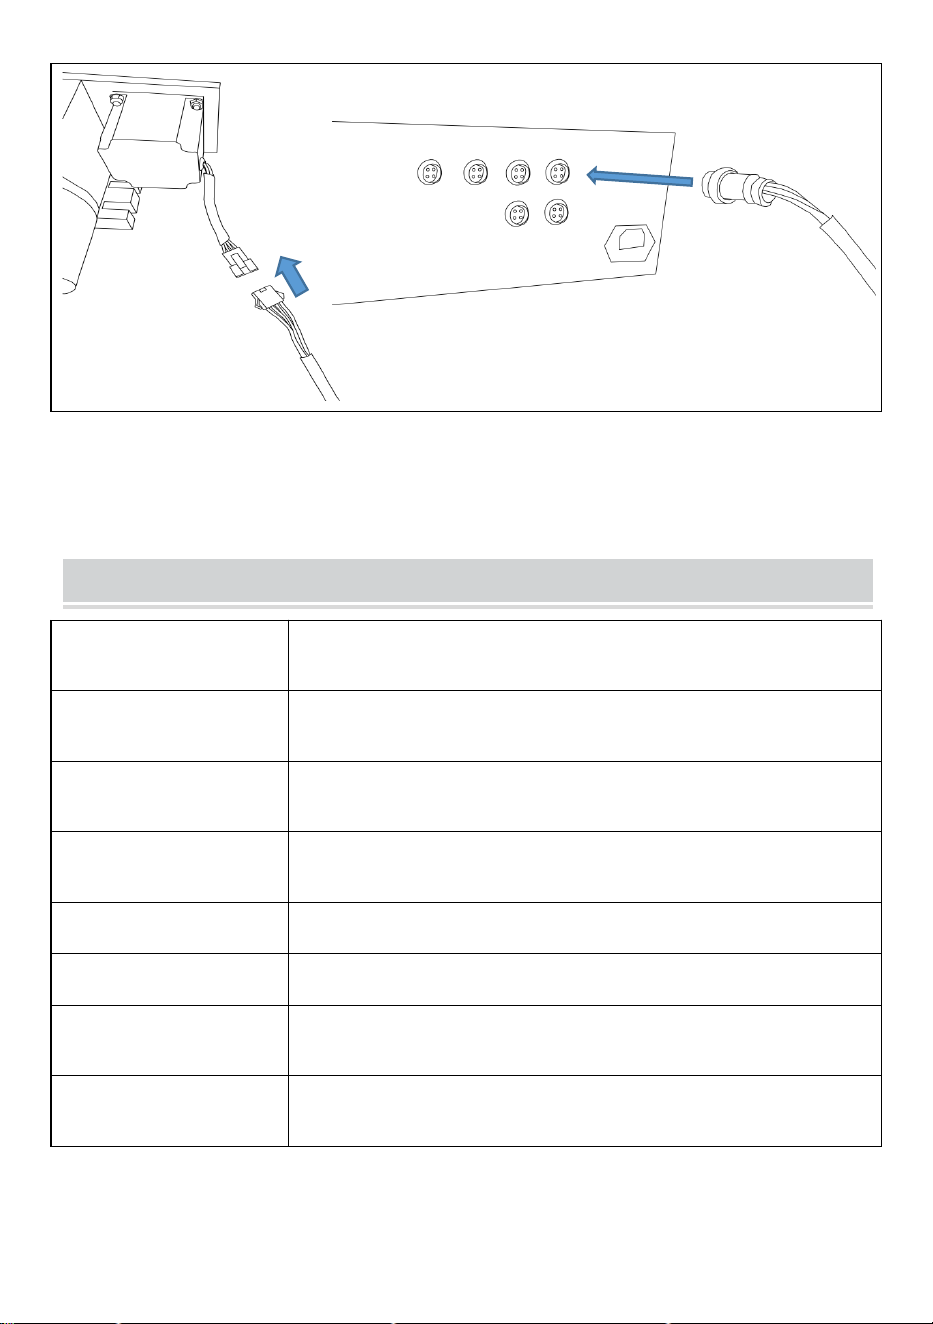
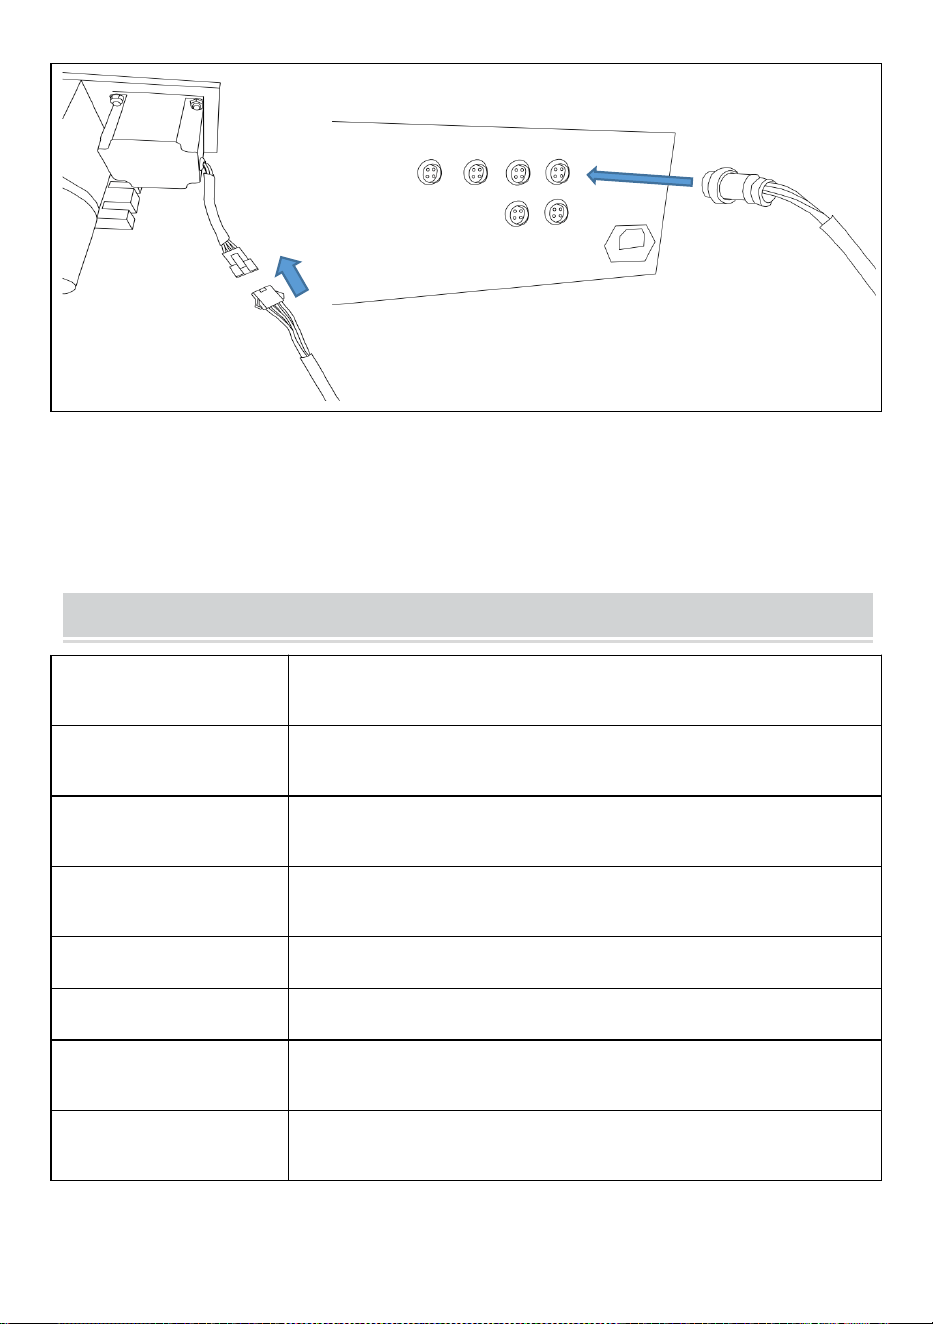
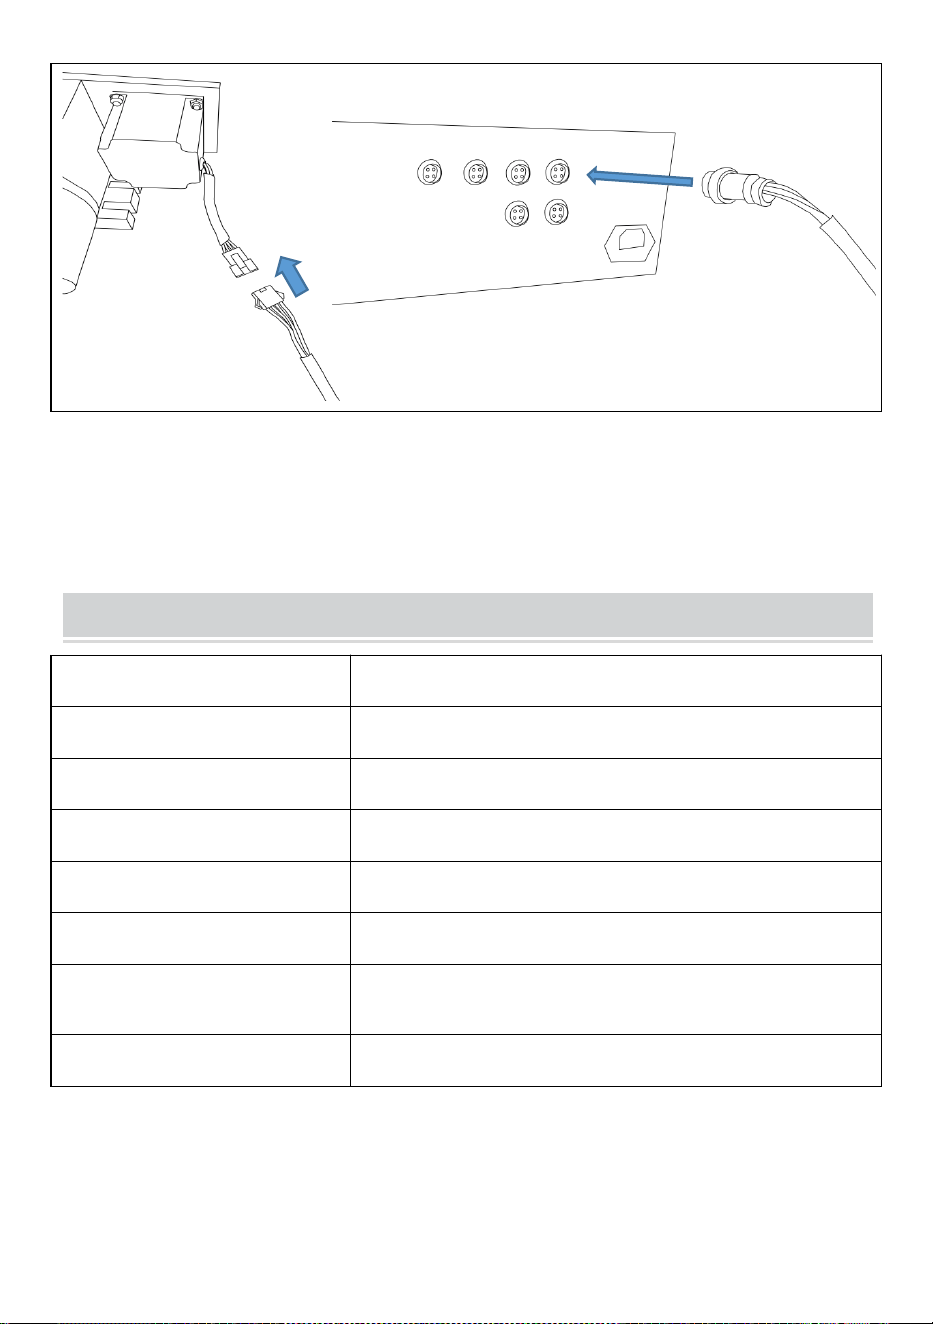
2. Fix the chuck to the processing table and clamp the workpiece to
be processed.
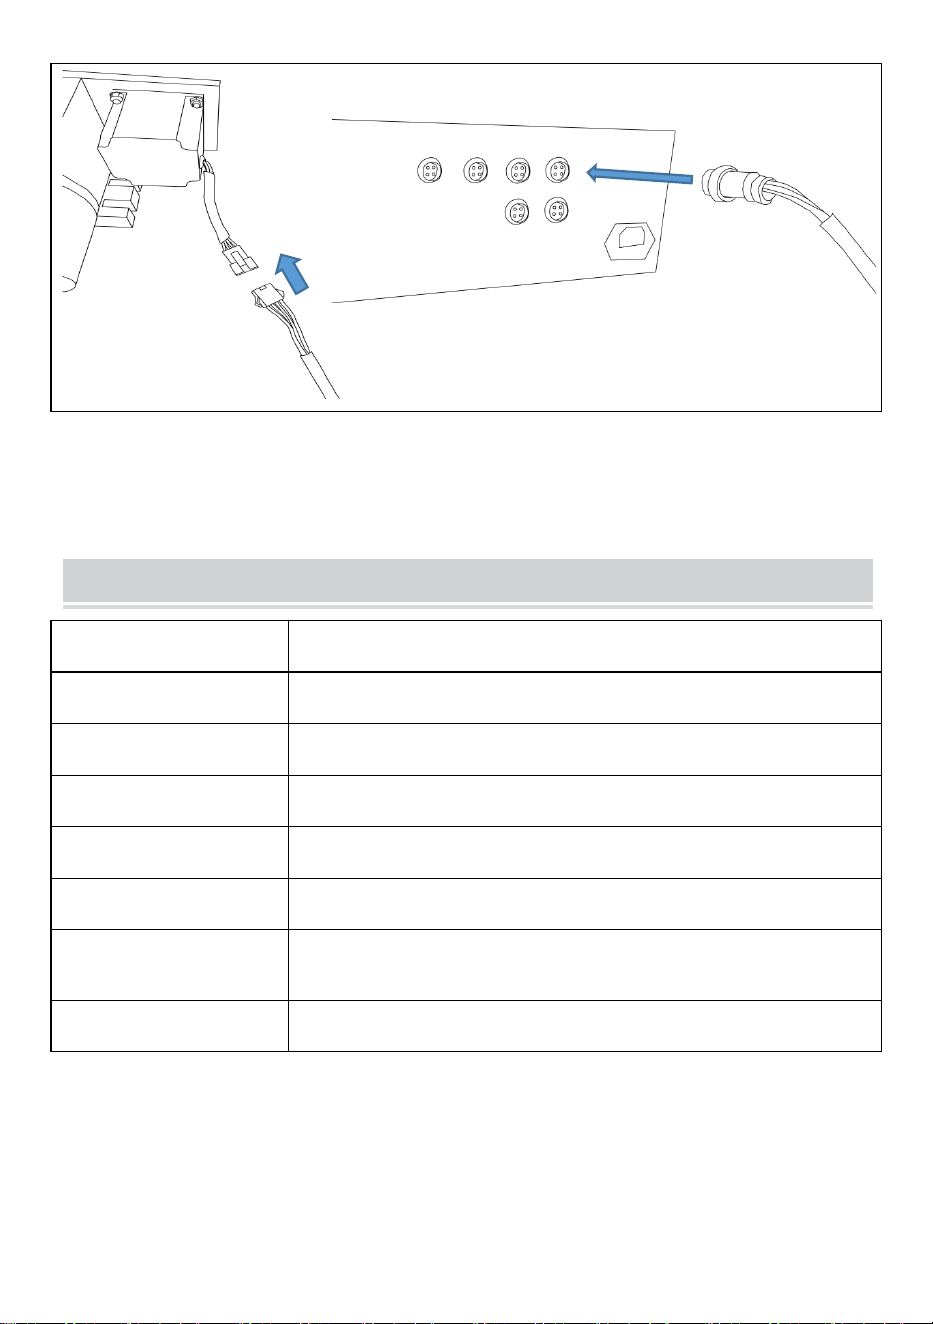
3. Insert and lock both ends of the cable respectively.
Use clamps to hold
the chuck base
- 4 -
X
Y
Z
A
A
4. When the above work is ready, you can start processing. The
screws in the accessories are spare screws and do not need to be
used unless there are special circumstances.
K11-100 HEAD PARAMETER TABLE
Card plate model
K11-100 three-claw self-centering chuck
Clip tight range
2-80mm
Hold tight range
30-90mm
Custody precision
0.05mm
center height
65mm
highness
117MM
Drive the motor
57 stepper motor, 2-phase 3A 57 stepper motor; 57 *
57 * 76MM; 4 lead
gear ratio
6:1; (Belt deceleration mode)

- 5 -
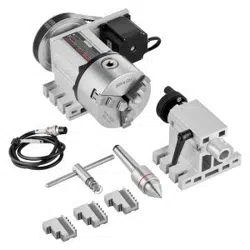
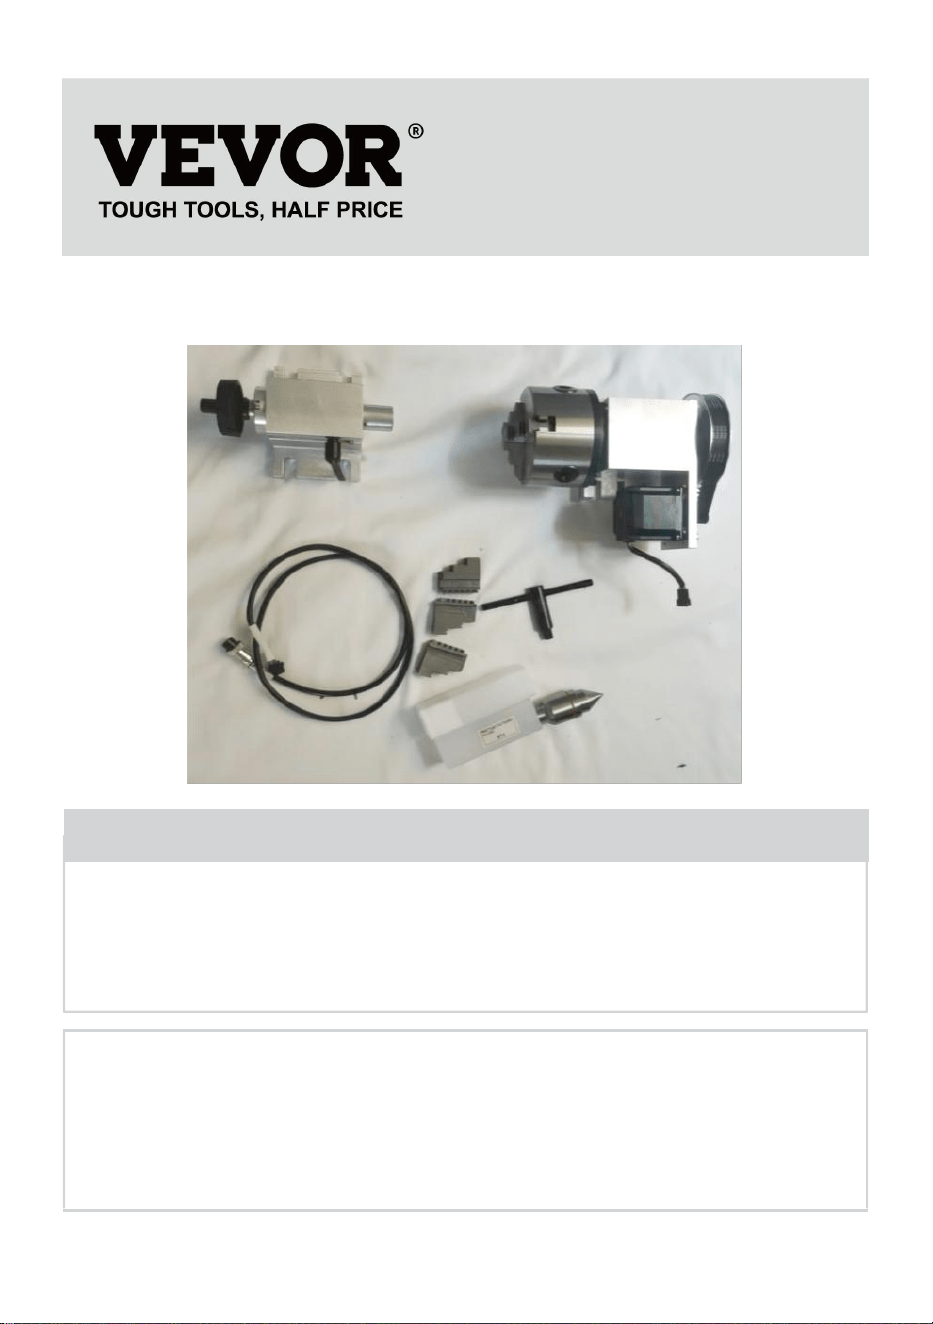
LIST OF ACCESSORIES
sequence number
Accessories name
number of packages
1
Dividing Head(with chuck)
1
2
Rotate the thimble, MT2
1
3
Numerical control cable
1
4
chuck handle
1
5
Card plate anti-claw
3
6
Tailstock
1

- 6 -
Manufacturer: Shanghaimuxinmuyeyouxiangongsi
Address: Shuangchenglu 803nong11hao1602A-1609shi, baoshanqu,
shanghai 200000 CN.
Imported to AUS: SIHAO PTY LTD, 1 ROKEVA STREETEASTWOOD NSW
2122 Australia
Imported to USA: Sanven Technology Ltd., Suite 250, 9166 Anaheim Place,
Rancho Cucamonga, CA 91730
REP
EC
E-CrossStu GmbH
Mainzer Landstr.69, 60329 Frankfurt am Main.
REP
UK
YH CONSULTING LIMITED.
C/O YH Consulting Limited Office 147, Centurion House,
London Road, Staines-upon-Thames, Surrey, TW18 4AX


- 2 -
Technique Certificat d'assistance et de garantie électronique
www.vevor.com/support
TÊTE DE DIVISION
MODÈLE : BS4-KP100-57
We continue to be committed to provide you tools with competitive price.
"Save Half", "Half Price" or any other similar expressions used by us only represents an
estimate of savings you might benefit from buying certain tools with us compared to the major
top brands and does not necessarily mean to cover all categories of tools offered by us. You
are kindly reminded to verify carefully when you are placing an order with us if you are
actually saving half in comparison with the top major brands.

- 1 -
MODÈLE : BS4-KP100-57
Have product questions? Need technical support? Please feel free to
contact us:
Technical Support and E-Warranty Certificate
www.vevor.com/support
NEED HELP? CONTACT US!
This is the original instruction, please read all manual instructions
carefully before operating. VEVOR reserves a clear interpretation of our
user manual. The appearance of the product shall be subject to the
product you received. Please forgive us that we won't inform you again if
there are any technology or software updates on our product.
DIVIDING HEAD

- 2 -
Avertissement - Pour réduire le risque de blessure, l'utilisateur
doit lire attentivement le manuel d'instructions.
MAINTENANCE INSTRUCTIONS
1. Afin de garantir que le mandrin de la machine conserve une bonne
précision après une utilisation prolongée, la lubrification est très
importante.
2. La graisse au bisulfure de molybdène (de couleur noire) doit être
appliquée après chaque quart de travail et la graisse est versée dans les
mâchoires du mandrin jusqu'à ce que la graisse déborde de la surface de
la mâchoire ou du trou intérieur du mandrin, mais si le mandrin est
fortement tourné ou a une grande quantité d'eau Lorsque l'huile de coupe
est utilisée pour le traitement, elle nécessite plus de lubrification, ce qui
doit être déterminé en fonction de différentes situations.
3. Assurez-vous d'utiliser un pistolet à air comprimé ou des outils similaires
pour nettoyer le corps du mandrin et la surface coulissante une fois
l'opération terminée.
4. Retirez le mandrin au moins tous les 6 mois pour le démonter et le
nettoyer, et maintenez la surface coulissante des mâchoires propre et
lubrifiée afin de prolonger la durée de vie du mandrin. Cependant, si la
fonte de coupe est soigneusement nettoyée au moins une ou plusieurs fois
tous les 2 mois, vérifiez que les pièces ne présentent pas de fissures et
d'usure et remplacez-les immédiatement par des neuves. Une fois
l'inspection terminée, elle doit être entièrement huilée avant le montage.
5. L'utilisation d'huile de coupe avec un effet antirouille peut empêcher la
rouille à l'intérieur du mandrin car la rouille du mandrin réduira la force de
serrage et la pièce ne pourra pas être serrée.
INSTRUCTIONS
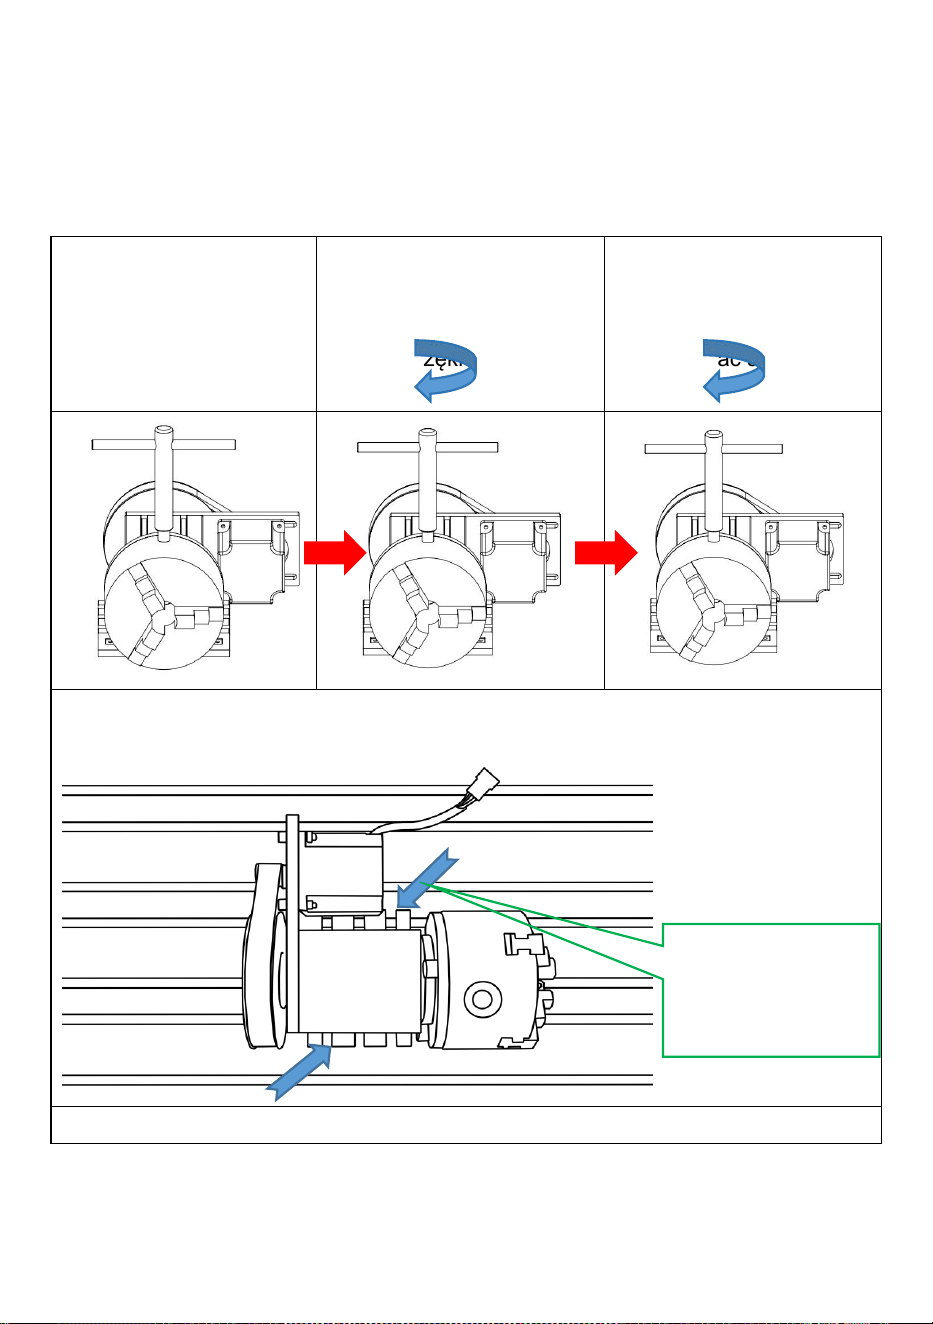
2. Tout d'abord, il faut vérifier si la pièce à usiner nécessite une griffe
positive ou une griffe inversée. La griffe positive peut maintenir une pièce
- 3 -
solide d'un diamètre de 48 mm et un tube creux de 100 mm, et la griffe
inversée peut maintenir une pièce d'un diamètre de 112 mm. Les étapes
de remplacement sont les suivantes :
Insérez la clé à mandrin
dans le mandrin
Tournez la clé à mandrin
dans le sens inverse des
aiguilles d'une montre
pour retirer les mâchoires
avant et arrière
Tournez la clé à mandrin
dans le sens des aiguilles
d'une montre pour
installer les mâchoires
avant et arrière
2. Fixez le mandrin sur la table d'usinage et serrez la pièce à usiner.
3. Insérez et verrouillez respectivement les deux extrémités du câble.
Use clamps to hold
the chuck base
- 4 -
X
Y
Z
A
A
4. Une fois le travail ci-dessus terminé, vous pouvez commencer le
traitement. Les vis des accessoires sont des vis de rechange et n'ont
pas besoin d'être utilisées sauf circonstances particulières.
K11-100 HEAD PARAMETER TABLE
Modèle de plaque
de carton
Mandrin autocentrant à trois griffes K11-100
Plage de serrage
des clips
2-80 mm
Tenez-vous bien à
portée
30-90 mm
Précision de la
garde
0,05 mm
hauteur centrale
65 mm
altesse
117MM
Conduire le moteur
Moteur pas à pas 57, 2 phases 3A Moteur pas à pas
57 ; 57 * 57 * 76MM ; 4 fils
rapport de
démultiplication
6:1; (Mode de décélération de la courroie)

- 5 -
LIST OF ACCESSORIES
numéro de
séquence
Nom des accessoires
nombre de colis
1
Tête de division (avec
mandrin)
1
2
Faire tourner le dé à
coudre, MT2
1
3
Câble de commande
numérique
1
4
poignée de mandrin
1
5
Plaque à cartes anti-griffes
3
6
Contre-pointe
1

- 6 -
Fabricant : Shanghaimuxinmuyeyouxiangongsi
Adresse : Shuangchenglu 803nong11hao1602A-1609shi, baoshanqu,
shanghai 200000 CN.
Importé en Australie : SIHAO PTY LTD, 1 ROKEVA STREET, ASTWOOD
NSW 2122 Australie
Importé aux États-Unis : Sanven Technology Ltd., Suite 250, 9166 Anaheim
Place, Rancho Cucamonga, CA 91730
REP
EC
E-CrossStu GmbH
Mainzer Landstr.69, 60329 Frankfurt am Main.
REP
UK
YH CONSULTING LIMITED.
C/O YH Consulting Limited Office 147, Centurion House,
London Road, Staines-upon-Thames, Surrey, TW18 4AX


- 2 -
Technisch Support und E-Garantie-Zertifikat
www.vevor.com/support
TEILAPPARAT
MODELL: BS4-KP100-57
We continue to be committed to provide you tools with competitive price.
"Save Half", "Half Price" or any other similar expressions used by us only represents an
estimate of savings you might benefit from buying certain tools with us compared to the major
top brands and does not necessarily mean to cover all categories of tools offered by us. You
are kindly reminded to verify carefully when you are placing an order with us if you are
actually saving half in comparison with the top major brands.

- 1 -
MODELL: BS4-KP100-57
Have product questions? Need technical support? Please feel free to
contact us:
Technical Support and E-Warranty Certificate
www.vevor.com/support
NEED HELP? CONTACT US!
This is the original instruction, please read all manual instructions
carefully before operating. VEVOR reserves a clear interpretation of our
user manual. The appearance of the product shall be subject to the
product you received. Please forgive us that we won't inform you again if
there are any technology or software updates on our product.
DIVIDING HEAD

- 2 -
Warnung: Um das Verletzungsrisiko zu verringern, muss der
Benutzer die Bedienungsanleitung sorgfältig lesen.
MAINTENANCE INSTRUCTIONS
1. Um sicherzustellen, dass das Maschinenfutter auch nach längerem
Gebrauch noch eine gute Genauigkeit aufweist, ist die Schmierung sehr
wichtig.
2. Nach jedem Wechsel muss Molybdändisulfidfett (schwarz) aufgetragen
und in die Backen des Spannfutters gegossen werden, bis das Fett über
die Backenoberfläche oder das innere Loch des Spannfutters läuft. Wenn
das Spannfutter jedoch stark rotiert oder eine große Menge Wasser enthält,
ist bei der Verarbeitung mit Schneidöl mehr Schmierung erforderlich, was
je nach Situation bestimmt werden muss.
Gleitfläche nach Abschluss des Vorgangs unbedingt mit einer
Druckluftpistole oder einem ähnlichen Werkzeug .
4. Entfernen Sie das Spannfutter mindestens alle 6 Monate zum Zerlegen
und Reinigen und halten Sie die Gleitfläche der Backen sauber und
geschmiert, damit die Lebensdauer des Spannfutters verlängert wird.
Wenn das Schneidgusseisen jedoch mindestens einmal oder mehrmals
alle 2 Monate gründlich gereinigt wird, überprüfen Sie die Teile auf Risse
und Verschleiß und ersetzen Sie sie sofort durch neue. Nach Abschluss
der Inspektion muss es vor der Montage vollständig geölt werden.
5. Die Verwendung von Schneidöl mit Rostschutzwirkung kann Rost im
Inneren des Spannfutters verhindern, da der Rost im Spannfutter die
Spannkraft verringert und das Werkstück nicht geklemmt werden kann.
INSTRUCTIONS
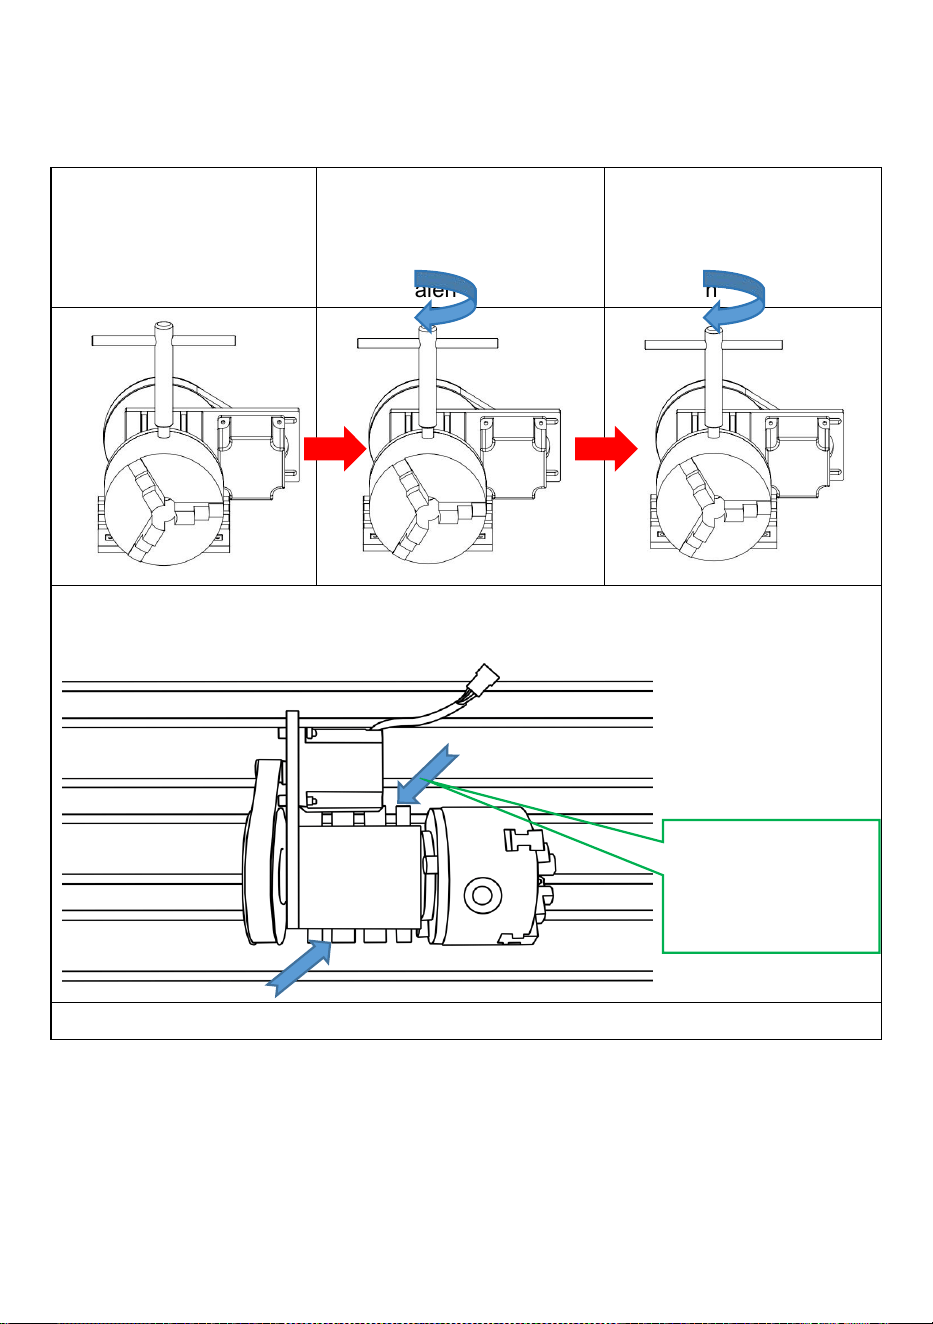
3. Zunächst muss festgestellt werden, ob das zu bearbeitende Werkstück
eine positive Klaue oder eine umgekehrte Klaue benötigt. Die positive
Klaue kann ein festes Werkstück mit einem Durchmesser von 48 halten
mm und ein Hohlrohr von 100 mm, und die umgekehrte Klaue kann ein
- 3 -
Werkstück mit einem Durchmesser von 112 mm halten. Die
Austauschschritte sind wie folgt:
Den Bohrfutterschlüssel
in das Bohrfutter
einsetzen
Drehen Sie den
Spannschlüssel gegen
den Uhrzeigersinn, um die
Vorder- und Hinterbacken
herauszunehmen
Drehen Sie den
Spannschlüssel im
Uhrzeigersinn, um die
Vorder- und Hinterbacken
zu montieren
2. Spannfutter auf dem Bearbeitungstisch fixieren und das zu
bearbeitende Werkstück einspannen.
3. Beide Enden des Kabels einstecken und verriegeln.
Use clamps to hold
the chuck base

- 4 -
X
Y
Z
A
A
4. Wenn die oben genannten Arbeiten abgeschlossen sind, können
Sie mit der Verarbeitung beginnen. Die Schrauben im Zubehör sind
Ersatzschrauben und müssen nur unter besonderen Umständen
verwendet werden.
K11-100 HEAD PARAMETER TABLE
Kartenplattenmodell
K11-100 selbstzentrierendes Spannfutter mit drei
Klauen
Clip-Enge-Bereich
2 bis 80 mm
Engen Bereich halten
30-90 mm
Genauigkeit der
Verwahrung
0,05 mm
Spitzenhöhe
65 mm
Hoheit
117 MM
Den Motor antreiben
57 Schrittmotor, 2-phasig 3A 57 Schrittmotor; 57
* 57 * 76MM; 4 Leitungen
Übersetzungsverhältnis
6:1; (Riemenverzögerungsmodus)

- 5 -
LIST OF ACCESSORIES
Sequenznummer
Zubehörname
Anzahl der
Packstücke
1
Teilkopf (mit Spannfutter)
1
2
Drehen Sie den Fingerhut,
MT2
1
3
Numerisches Steuerkabel
1
4
Spannfuttergriff
1
5
Kartenplatte Anti-Krallen
3
6
Reitstock
1

- 6 -
Hersteller: Shanghaimuxinmuyeyouxiangongsi
Adresse: Shuangchenglu 803nong11hao1602A-1609shi, baoshanqu,
Shanghai 200000 CN.
Nach AUS importiert: SIHAO PTY LTD, 1 ROKEVA STREETEASTWOOD
NSW 2122 Australien
Importiert in die USA: Sanven Technology Ltd., Suite 250, 9166 Anaheim
Place, Rancho Cucamonga, CA 91730
REP
EC
E-CrossStu GmbH
Mainzer Landstr.69, 60329 Frankfurt am Main.
REP
UK
YH CONSULTING LIMITED.
C/O YH Consulting Limited Office 147, Centurion House,
London Road, Staines-upon-Thames, Surrey, TW18 4AX


- 2 -
Tecnico Supporto e certificato di garanzia elettronica
www.vevor.com/support
TESTA DI DIVISIONE
MODELLO: BS4-KP100-57
We continue to be committed to provide you tools with competitive price.
"Save Half", "Half Price" or any other similar expressions used by us only represents an
estimate of savings you might benefit from buying certain tools with us compared to the major
top brands and does not necessarily mean to cover all categories of tools offered by us. You
are kindly reminded to verify carefully when you are placing an order with us if you are
actually saving half in comparison with the top major brands.
- 1 -
MODELLO: BS4-KP100-57
Have product questions? Need technical support? Please feel free to
contact us:
Technical Support and E-Warranty Certificate
www.vevor.com/support
NEED HELP? CONTACT US!
This is the original instruction, please read all manual instructions
carefully before operating. VEVOR reserves a clear interpretation of our
user manual. The appearance of the product shall be subject to the
product you received. Please forgive us that we won't inform you again if
there are any technology or software updates on our product.
DIVIDING HEAD

- 2 -
Attenzione: per ridurre il rischio di lesioni, l'utente deve leggere
attentamente il manuale di istruzioni.
MAINTENANCE INSTRUCTIONS
1. Per garantire che il mandrino della macchina mantenga una buona
precisione anche dopo un lungo periodo di utilizzo, la lubrificazione è molto
importante.
2. Dopo ogni turno, è necessario applicare grasso al bisolfuro di molibdeno
(di colore nero), versando il grasso nelle ganasce del mandrino fino a
quando non trabocca dalla superficie della ganascia o dal foro interno del
mandrino. Tuttavia, se il mandrino ruota molto o contiene una grande
quantità di acqua, quando si utilizza olio da taglio per la lavorazione è
necessaria una maggiore lubrificazione, che deve essere determinata in
base alle diverse situazioni.
3. Assicurarsi di utilizzare una pistola ad aria compressa o strumenti simili
per pulire il corpo del mandrino e la superficie di scorrimento una volta
completata l'operazione.
4. Rimuovere il mandrino almeno ogni 6 mesi per lo smontaggio e la pulizia
e mantenere la superficie di scorrimento delle ganasce pulita e lubrificata
in modo da prolungare la durata del mandrino. Tuttavia, se la ghisa da
taglio viene pulita a fondo almeno una o più volte ogni 2 mesi, controllare le
parti per crepe e usura e sostituirle immediatamente con parti nuove. Dopo
aver completato l'ispezione, deve essere completamente oliato prima del
montaggio.
5. L'uso di olio da taglio con effetto antiruggine può prevenire la ruggine
all'interno del mandrino perché la ruggine del mandrino ridurrà la forza di
serraggio e il pezzo in lavorazione non potrà essere serrato.
INSTRUCTIONS
4. Innanzitutto, è necessario confermare se il pezzo da lavorare necessita
di un artiglio positivo o di un artiglio inverso. L'artiglio positivo può
- 3 -
trattenere un pezzo solido con un diametro di 48 mm e un tubo cavo da
100 mm, e l'artiglio inverso può contenere un pezzo con un diametro di 112
mm. I passaggi di sostituzione sono i seguenti:
Inserire la chiave del
mandrino nel mandrino
Ruotare la chiave del
mandrino in senso
antiorario per estrarre le
ganasce anteriore e
posteriore
Ruotare la chiave del
mandrino in senso orario
per installare le ganasce
anteriore e posteriore
2. Fissare il mandrino al tavolo di lavorazione e bloccare il pezzo da
lavorare.
3. Inserire e bloccare rispettivamente entrambe le estremità del cavo.
Use clamps to hold
the chuck base

- 4 -
X
Y
Z
A
A
4. Quando il lavoro di cui sopra è pronto, puoi iniziare l'elaborazione.
Le viti negli accessori sono viti di ricambio e non devono essere
utilizzate a meno che non ci siano circostanze speciali.
K11-100 HEAD PARAMETER TABLE
Modello di piastra
di carta
Mandrino autocentrante a tre griffe K11-100
Clip a distanza
ravvicinata
2-80mm
Mantenere una
distanza ristretta
30-90mm
Precisione della
custodia
0,05 mm
altezza del centro
65mm
altezza
117MM
Azionare il motore
Motore passo-passo 57, motore passo-passo bifase
3A 57; 57 * 57 * 76MM; 4 cavi
rapporto di
trasmissione
6:1; (Modalità di decelerazione della cinghia)

- 5 -
LIST OF ACCESSORIES
numero di
sequenza
Nome degli accessori
numero di pacchetti
1
Testa divisoria (con
mandrino)
1
2
Ruotare il ditale, MT2
1
3
Cavo di controllo numerico
1
4
Maniglia del mandrino
1
5
Piastra di carta anti-artiglio
3
6
Contropunta
1

- 6 -
Produttore: Shanghaimuxinmuyeyouxiangongsi
Indirizzo: Shuangchenglu 803nong11hao1602A-1609shi, baoshanqu,
shanghai 200000 CN.
Importato in AUS: SIHAO PTY LTD, 1 ROKEVA STREETEASTWOOD NSW
2122 Australia
Importato negli USA: Sanven Technology Ltd., Suite 250, 9166 Anaheim
Place, Rancho Cucamonga, CA 91730
REP
EC
E-CrossStu GmbH
Mainzer Landstr.69, 60329 Frankfurt am Main.
REP
UK
YH CONSULTING LIMITED.
C/O YH Consulting Limited Office 147, Centurion House,
London Road, Staines-upon-Thames, Surrey, TW18 4AX


- 2 -
Técnico Certificado de soporte y garantía electrónica
www.vevor.com/support
CABEZA DIVISORIA
MODELO: BS4-KP100-57
We continue to be committed to provide you tools with competitive price.
"Save Half", "Half Price" or any other similar expressions used by us only represents an
estimate of savings you might benefit from buying certain tools with us compared to the major
top brands and does not necessarily mean to cover all categories of tools offered by us. You
are kindly reminded to verify carefully when you are placing an order with us if you are
actually saving half in comparison with the top major brands.

- 1 -
MODELO: BS4-KP100-57
Have product questions? Need technical support? Please feel free to
contact us:
Technical Support and E-Warranty Certificate
www.vevor.com/support
NEED HELP? CONTACT US!
This is the original instruction, please read all manual instructions
carefully before operating. VEVOR reserves a clear interpretation of our
user manual. The appearance of the product shall be subject to the
product you received. Please forgive us that we won't inform you again if
there are any technology or software updates on our product.
DIVIDING HEAD

- 2 -
Advertencia: Para reducir el riesgo de lesiones, el usuario debe
leer atentamente el manual de instrucciones.
MAINTENANCE INSTRUCTIONS
1. Para garantizar que el mandril de la máquina mantenga una buena
precisión después de un uso prolongado, la lubricación es muy importante.
2. Se debe aplicar grasa de disulfuro de molibdeno (de color negro)
después de cada turno, y la grasa se vierte en las mordazas del mandril
hasta que la grasa se desborde de la superficie de la mordaza o el orificio
interior del mandril, pero si el mandril gira mucho o tiene una gran cantidad
de agua Cuando se usa aceite de corte para el procesamiento, necesita
más lubricación, que debe determinarse de acuerdo con diferentes
situaciones.
3. Asegúrese de utilizar una pistola de aire o herramientas similares para
limpiar el cuerpo del mandril y la superficie deslizante una vez finalizada la
operación.
4. Retire el mandril al menos cada 6 meses para desmontarlo y limpiarlo, y
mantenga la superficie deslizante de las mordazas limpia y lubricada para
prolongar la vida útil del mandril. Sin embargo, si la fundición de hierro de
corte se limpia a fondo al menos una o varias veces cada 2 meses,
verifique las piezas para ver si tienen grietas o desgaste y reemplácelas
por otras nuevas de inmediato. Una vez completada la inspección, debe
engrasarse completamente antes del montaje.
5. El uso de aceite de corte con efecto antioxidante puede evitar la
oxidación dentro del mandril porque la oxidación del mandril reducirá la
fuerza de sujeción y la pieza de trabajo no se podrá sujetar.
INSTRUCTIONS
5. En primer lugar, es necesario confirmar si la pieza a procesar necesita
una garra positiva o una garra inversa. La garra positiva puede sujetar una
pieza sólida con un diámetro de 48 mm y un tubo hueco de 100 mm, y la
- 3 -
garra inversa puede sujetar una pieza de trabajo con un diámetro de 112
mm. Los pasos de reemplazo son los siguientes:
Inserte la llave del
portabrocas en el
portabrocas.
Gire la llave del
portabrocas en sentido
antihorario para sacar las
mordazas delanteras y
traseras.
Gire la llave del
portabrocas en el sentido
de las agujas del reloj
para instalar las
mordazas delanteras y
traseras.
2. Fije el mandril a la mesa de procesamiento y sujete la pieza de
trabajo a procesar.
3. Inserte y bloquee ambos extremos del cable respectivamente.
Use clamps to hold
the chuck base
- 4 -
X
Y
Z
A
A
4. Cuando el trabajo anterior esté listo, puede comenzar a
procesarlo. Los tornillos incluidos en los accesorios son tornillos de
repuesto y no es necesario utilizarlos a menos que se den
circunstancias especiales.
K11-100 HEAD PARAMETER TABLE
Modelo de placa de
tarjeta
Mandril autocentrante de tres garras K11-100
Clip de rango
estrecho
2-80 mm
Mantenga el rango
ajustado
30-90 mm
Precisión de la
custodia
0,05 mm
altura central
65 mm
Alteza
117MM
Conducir el motor
Motor paso a paso 57, motor paso a paso 57 de 2
fases y 3 A; 57 * 57 * 76 MM; 4 cables
relación de
transmisión
6:1; (Modo de desaceleración de la correa)

- 5 -
LIST OF ACCESSORIES
Número de
secuencia
Nombre del accesorio
Número de paquetes
1
Cabezal divisor (con
mandril)
1
2
Gire el dedal, MT2
1
3
Cable de control numérico
1
4
mango del portabrocas
1
5
Placa de tarjeta anti-garra
3
6
Contrapunto
1

- 6 -
Fabricante: Shanghaimuxinmuyeyouxiangongsi
Dirección: Shuangchenglu 803nong11hao1602A-1609shi, baoshanqu,
shanghai 200000 CN.
Importado a AUS: SIHAO PTY LTD, 1 ROKEVA STREETEASTWOOD NSW
2122 Australia
Importado a EE. UU.: Sanven Technology Ltd., Suite 250, 9166 Anaheim
Place, Rancho Cucamonga, CA 91730
REP
EC
E-CrossStu GmbH
Mainzer Landstr.69, 60329 Frankfurt am Main.
REP
UK
YH CONSULTING LIMITED.
C/O YH Consulting Limited Office 147, Centurion House,
London Road, Staines-upon-Thames, Surrey, TW18 4AX


- 2 -
Techniczny Wsparcie i certyfikat e-gwarancji
www.vevor.com/support
GŁOWICA DZIELĄCA
MODELE: BS4-KP100-57
We continue to be committed to provide you tools with competitive price.
"Save Half", "Half Price" or any other similar expressions used by us only represents an
estimate of savings you might benefit from buying certain tools with us compared to the major
top brands and does not necessarily mean to cover all categories of tools offered by us. You
are kindly reminded to verify carefully when you are placing an order with us if you are
actually saving half in comparison with the top major brands.

- 1 -
MODELE: BS4-KP100-57
Have product questions? Need technical support? Please feel free to
contact us:
Technical Support and E-Warranty Certificate
www.vevor.com/support
NEED HELP? CONTACT US!
This is the original instruction, please read all manual instructions
carefully before operating. VEVOR reserves a clear interpretation of our
user manual. The appearance of the product shall be subject to the
product you received. Please forgive us that we won't inform you again if
there are any technology or software updates on our product.
DIVIDING HEAD

- 2 -
Ostrzeżenie: Aby zminimalizować ryzyko obrażeń, użytkownik
powinien uważnie przeczytać instrukcję obsługi.
MAINTENANCE INSTRUCTIONS
1. Aby mieć pewność, że uchwyt maszynowy zachowa dobrą dokładność
po długim okresie użytkowania, bardzo ważne jest smarowanie.
2. Smar dwusiarczkowy molibdenu (czarny) należy nakładać po każdej
zmianie, wlewając smar do szczęk uchwytu, aż zacznie się wylewać z
powierzchni szczęk lub wewnętrznego otworu uchwytu, ale jeśli uchwyt
obraca się mocno lub zawiera dużą ilość wody, podczas obróbki przy
użyciu oleju chłodząco-smarującego wymagane jest więcej smarowania,
co należy ustalić w zależności od różnych sytuacji.
Po zakończeniu operacji należy koniecznie wyczyścić korpus uchwytu i
powierzchnię ślizgową za pomocą pistoletu pneumatycznego lub
podobnego narzędzia .
4. Wyjmij uchwyt co najmniej raz na 6 miesięcy w celu demontażu i
czyszczenia, a także utrzymuj powierzchnię ślizgową szczęk w czystości i
nasmarowaną, aby wydłużyć żywotność uchwytu. Jeśli jednak żeliwo
tnące jest dokładnie czyszczone co najmniej raz lub kilka razy co 2
miesiące, sprawdź części pod kątem pęknięć i zużycia i natychmiast
wymień je na nowe. Po zakończeniu kontroli należy je całkowicie naoliwić
przed montażem.
5. Zastosowanie oleju chłodząco-smarującego o działaniu antykorozyjnym
może zapobiec powstawaniu rdzy wewnątrz uchwytu, ponieważ rdza w
uchwycie zmniejszy siłę mocowania, a obrabiany przedmiot nie będzie
mógł zostać zamocowany.
INSTRUCTIONS
6. Przede wszystkim należy potwierdzić, czy obrabiany przedmiot
- 3 -
wymaga pozytywnego czy odwrotnego pazura. Pozytywny pazur może
utrzymać pełny przedmiot obrabiany o średnicy 48 mm i rurę pustą o
średnicy 100 mm, a pazur odwrotny może utrzymać przedmiot obrabiany o
średnicy 112 mm. Kroki wymiany są następujące.:
Włóż klucz do uchwytu
Obróć klucz zaciskowy
przeciwnie do ruchu
wskazówek zegara, aby
wyjąć szczęki przednie i
tylne
Obróć klucz zaciskowy
zgodnie z ruchem
wskazówek zegara, aby
zamontować szczęki
przednie i tylne
2. Zamocuj uchwyt do stołu obróbczego i zamocuj obrabiany
przedmiot.
3. Włóż i zablokuj oba końce kabla.
Use clamps to hold
the chuck base

- 4 -
X
Y
Z
A
A
4. Gdy powyższe prace są gotowe, możesz rozpocząć
przetwarzanie. Śruby w akcesoriach są śrubami zapasowymi i nie
trzeba ich używać, chyba że zaistnieją szczególne okoliczności.
K11-100 HEAD PARAMETER TABLE
Model płytki
kartowej
Uchwyt samocentrujący trzy-pazurowy K11-100
Przytnij ciasny
zakres
2-80mm
Trzymaj mocno
zasięg
30-90 mm
Precyzja opieki
0,05 mm
wysokość środka
65 mm
wygórowanie
117MM
Napęd silnika
Silnik krokowy 57, 2-fazowy 3A Silnik krokowy 57; 57
* 57 * 76MM; 4 przewody
przełożenie
6:1; (Tryb zwalniania pasa)

- 5 -
LIST OF ACCESSORIES
numer sekwencyjny
Nazwa akcesoriów
liczba paczek
1
Głowica dzieląca (z
uchwytem)
1
2
Obróć nasadkę, MT2
1
3
Przewód sterowania
numerycznego
1
4
uchwyt uchwytu
1
5
Płytka z kartą
anty-drapanie
3
6
Konik
1

- 6 -
Producent: Shanghaimuxinmuyeyouxiangongsi
Adres: Shuangchenglu 803nong11hao1602A-1609shi, baoshanqu, szanghaj
200000 CN.
Importowane do AUS: SIHAO PTY LTD, 1 ROKEVA STREETEASTWOOD
NSW 2122 Australia
Importowane do USA: Sanven Technology Ltd., Suite 250, 9166 Anaheim
Place, Rancho Cucamonga, CA 91730
REP
EC
E-CrossStu GmbH
Mainzer Landstr.69, 60329 Frankfurt am Main.
REP
UK
YH CONSULTING LIMITED.
C/O YH Consulting Limited Office 147, Centurion House,
London Road, Staines-upon-Thames, Surrey, TW18 4AX


- 2 -
Technisch Ondersteuning en E-garantiecertificaat
www.vevor.com/support
VERDEELKOP
MODEL: BS4-KP100-57
We continue to be committed to provide you tools with competitive price.
"Save Half", "Half Price" or any other similar expressions used by us only represents an
estimate of savings you might benefit from buying certain tools with us compared to the major
top brands and does not necessarily mean to cover all categories of tools offered by us. You
are kindly reminded to verify carefully when you are placing an order with us if you are
actually saving half in comparison with the top major brands.

- 1 -
MODEL: BS4-KP100-57
Have product questions? Need technical support? Please feel free to
contact us:
Technical Support and E-Warranty Certificate
www.vevor.com/support
NEED HELP? CONTACT US!
This is the original instruction, please read all manual instructions
carefully before operating. VEVOR reserves a clear interpretation of our
user manual. The appearance of the product shall be subject to the
product you received. Please forgive us that we won't inform you again if
there are any technology or software updates on our product.
DIVIDING HEAD

- 2 -
Waarschuwing: om het risico op letsel te verkleinen, moet de
gebruiker de gebruiksaanwijzing zorgvuldig lezen.
MAINTENANCE INSTRUCTIONS
1. Om ervoor te zorgen dat de klauwplaat van de machine ook na
langdurig gebruik nog steeds nauwkeurig is, is smering erg belangrijk.
2. Na elke dienst moet molybdeendisulfidevet (zwart van kleur) worden
aangebracht en het vet wordt in de kaken van de klauwplaat gegoten totdat
het vet over het klauwoppervlak of het binnenste gat van de klauwplaat
stroomt. Als de klauwplaat echter sterk draait of veel water bevat, is er
meer smering nodig wanneer snijolie wordt gebruikt voor verwerking. Dit
moet worden bepaald op basis van verschillende situaties.
3. Zorg ervoor dat u een luchtpistool of een soortgelijk hulpmiddel gebruikt
om de klauwplaat en het glijvlak schoon te maken wanneer de bewerking
is voltooid.
4. Verwijder de klauwplaat ten minste elke 6 maanden voor demontage en
reiniging, en houd het glijvlak van de kaken schoon en gesmeerd zodat de
levensduur van de klauwplaat wordt verlengd. Als het snijgietijzer echter
ten minste één of meerdere keren per 2 maanden grondig wordt gereinigd,
controleer dan de onderdelen op scheuren en slijtage en vervang ze
onmiddellijk door nieuwe. Nadat de inspectie is voltooid, moet deze
volledig worden geolied voordat deze wordt gemonteerd.
5. Het gebruik van snijolie met een roestwerende werking kan
roestvorming in de klauwplaat voorkomen, omdat roest van de klauwplaat
de klemkracht vermindert en het werkstuk niet kan worden vastgeklemd.
INSTRUCTIONS
7. Allereerst is het noodzakelijk om te bevestigen of het te bewerken
werkstuk een positieve klauw of een omgekeerde klauw nodig heeft. De
positieve klauw kan een massief werkstuk met een diameter van 48
vasthouden mm en een holle pijp van 100 mm, en de omgekeerde klauw
- 3 -
kan een werkstuk met een diameter van 112 mm vasthouden. De
vervangingsstappen zijn als volgt:
Steek de boorkopsleutel
in de boorkop
Draai de boorkopsleutel
tegen de klok in om de
voor- en achterbekken
eruit te halen
Draai de boorkopsleutel
met de klok mee om de
voor- en achterbekken te
installeren
2. Bevestig de klauwplaat aan de bewerkingstafel en klem het te
bewerken werkstuk vast.
3. Plaats en vergrendel beide uiteinden van de kabel.
Use clamps to hold
the chuck base
- 4 -
X
Y
Z
A
A
4. Wanneer het bovenstaande werk klaar is, kunt u beginnen met de
verwerking. De schroeven in de accessoires zijn reserveschroeven
en hoeven niet te worden gebruikt, tenzij er speciale
omstandigheden zijn.
K11-100 HEAD PARAMETER TABLE
Kaartplaatmodel
K11-100 drieklauw zelfcentrerende klauwplaat
Clip krap bereik
2-80mm
Houd een strak bereik
30-90mm
Precisie van de bewaring
0,05 mm
middenhoogte
65mm
hoogheid
117MM
De motor aandrijven
57 stappenmotor, 2-fase 3A 57 stappenmotor;
57 * 57 * 76MM; 4-aderig
overbrengingsverhouding
6:1; (Bandvertragingsmodus)

- 5 -
LIST OF ACCESSORIES
volgnummer
Naam accessoires
aantal pakketten
1
Verdeelkop (met klauw)
1
2
Draai de vingerhoed, MT2
1
3
Numerieke besturingskabel
1
4
klauw handvat
1
5
Kaartplaat anti-klauw
3
6
Losse kop
1

- 6 -
Fabrikant: Shanghaimuxinmuyeyouxiangongsi
Adres: Shuangchenglu 803nong11hao1602A-1609shi, baoshanqu, shanghai
200000 CN.
Geïmporteerd naar AUS: SIHAO PTY LTD, 1 ROKEVA
STREETEASTWOOD NSW 2122 Australië
Geïmporteerd naar de VS: Sanven Technology Ltd., Suite 250, 9166
Anaheim Place, Rancho Cucamonga, CA 91730
REP
EC
E-CrossStu GmbH
Mainzer Landstr.69, 60329 Frankfurt am Main.
REP
UK
YH CONSULTING LIMITED.
C/O YH Consulting Limited Office 147, Centurion House,
London Road, Staines-upon-Thames, Surrey, TW18 4AX


- 2 -
Teknisk Support och e-garanticertifikat
www.vevor.com/support
DELANDE HUVUDET
MODELL: BS4-KP100-57
We continue to be committed to provide you tools with competitive price.
"Save Half", "Half Price" or any other similar expressions used by us only represents an
estimate of savings you might benefit from buying certain tools with us compared to the major
top brands and does not necessarily mean to cover all categories of tools offered by us. You
are kindly reminded to verify carefully when you are placing an order with us if you are
actually saving half in comparison with the top major brands.

- 1 -
MODELL: BS4-KP100-57
Have product questions? Need technical support? Please feel free to
contact us:
Technical Support and E-Warranty Certificate
www.vevor.com/support
NEED HELP? CONTACT US!
This is the original instruction, please read all manual instructions
carefully before operating. VEVOR reserves a clear interpretation of our
user manual. The appearance of the product shall be subject to the
product you received. Please forgive us that we won't inform you again if
there are any technology or software updates on our product.
DIVIDING HEAD

- 2 -
Varning - För att minska risken för skada måste användaren
läsa instruktionerna noggrant.
MAINTENANCE INSTRUCTIONS
1. För att säkerställa att maskinchucken fortfarande har god noggrannhet
efter att ha använts under lång tid är smörjning mycket viktig.
2. Molybdendisulfidfett (svart till färgen) måste appliceras efter varje skift,
och fettet hälls i chuckens käftar tills fettet rinner över käftytan eller det inre
hålet i chucken, men om chucken är kraftigt roterat eller har en stor mängd
vatten När skärolja används för bearbetning behöver den mer smörjning,
vilket måste bestämmas efter olika situationer.
3. Se till att använda en luftpistol eller liknande verktyg för att rengöra
chuckkroppen och glidytan när operationen är klar.
4. Ta bort chucken minst var 6:e månad för demontering och rengöring,
och håll käftarnas glidyta ren och smord så att chuckens livslängd förlängs.
Men om det skärande gjutjärnet rengörs noggrant minst en eller flera
gånger varannan månad, kontrollera delarna med avseende på sprickor
och slitage och byt ut dem omedelbart mot nya. Efter att inspektionen är
klar måste den oljas helt innan montering.
5. Användning av skärolja med rostskyddseffekt kan förhindra rost inuti
chucken eftersom rost på chucken minskar klämkraften och arbetsstycket
kan inte spännas fast.
INSTRUCTIONS
8. Först och främst är det nödvändigt att bekräfta om arbetsstycket som
ska bearbetas behöver en positiv klo eller en omvänd klo. Den positiva
klon kan hålla ett fast arbetsstycke med en diameter på 48 mm och ett
ihåligt rör på 100 mm, och den omvända klon kan hålla ett arbetsstycke
med en diameter på 112 mm. Ersättningsstegen är följande.:
- 3 -
Sätt in chucknyckeln i
chucken
Vrid chucknyckeln moturs
för att ta ut de främre och
bakre käftarna
Vrid chucknyckeln
medurs för att installera
de främre och bakre
käftarna
2. Fäst chucken vid bearbetningsbordet och kläm fast arbetsstycket
som ska bearbetas.
3. Sätt i och lås båda ändarna av kabeln.
Use clamps to hold
the chuck base

- 4 -
X
Y
Z
A
A
4. När ovanstående arbete är klart kan du börja bearbeta. Skruvarna
i tillbehören är reservskruvar och behöver inte användas om det inte
finns särskilda omständigheter.
K11-100 HEAD PARAMETER TABLE
Kortplatta modell
K11-100 treklos självcentrerande chuck
Kläm tätt intervall
2-80 mm
Håll snäv räckvidd
30-90 mm
Förvaringsprecision
0,05 mm
mitthöjd
65 mm
höghet
117 MM
Kör motorn
57 stegmotor, 2-fas 3A 57 stegmotor; 57 * 57 * 76
MM; 4 bly
utväxlingsförhållande
6:1; (Bältets retardationsläge)

- 5 -
LIST OF ACCESSORIES
sekvensnummer
Namn på tillbehör
antal paket
1
Delningshuvud (med
chuck)
1
2
Vrid fingerborgen, MT2
1
3
Numerisk styrkabel
1
4
chuckhandtag
1
5
Kartplatta anti-klo
3
6
Stjärtstock
1

- 6 -
Tillverkare: Shanghaimuxinmuyeyouxiangongsi
Adress: Shuangchenglu 803nong11hao1602A-1609shi, baoshanqu,
shanghai 200000 CN.
Importerad till AUS: SIHAO PTY LTD, 1 ROKEVA STREETEASTWOOD
NSW 2122 Australien
Importerad till USA: Sanven Technology Ltd., Suite 250, 9166 Anaheim
Place, Rancho Cucamonga, CA 91730
REP
EC
E-CrossStu GmbH
Mainzer Landstr.69, 60329 Frankfurt am Main.
REP
UK
YH CONSULTING LIMITED.
C/O YH Consulting Limited Office 147, Centurion House,
London Road, Staines-upon-Thames, Surrey, TW18 4AX

