
USER MANUAL-ENGLISH
MODEL #: ZX-1222 & ZX-1002
WE’RE HERE TO HELP
Call Us:
(833)833) 227-3274
Live Chat With Us:
www.CarAndDriverTech.com
Email Us:
Road Patrol Touch Duo

1
Read Me
Important Safety Instructions
• This Product is not waterproof. Do not expose this product to Rain or
Moisture.
• Do not block any ventilation openings.
• Install in accordance with the manufacturer’s instructions.
• Do not install the device where it will block the driver's view of the
road, mirrors or the deployment of airbags.
• Keep your attention on the road! Do not try to use or adjust any
settings on the Road Patrol Touch Duo while the car is in motion.
• Ensure that the Road Patrol Touch Duo lens is kept clean and ensure
that its field of view is clear of any obstructions.
• Do not install near any heat sources such as radiators, heat registers,
stoves, or other apparatus (including amplifiers) that produce heat.
• Don’t leave the device in direct sunlight for long periods of time.
• Best Operating temperatures will not exceed -20℉- 104℉.
• The user should reformat the SD card at least once a month to
prevent the SD card from being stressed. Note: The user should back
up all saved files before reformatting the card as doing this will delete
all files.
• Never attempt to disassemble, repair or make any modifications to the
Road Patrol Touch Duo as doing so will void the warranty.
• Use only attachments/accessories specified by the manufacturer.
• Unplug this device when unused for long periods of time.
• If repairs are necessary, please use qualified service personnel.
Repairs may be necessary if the device has been damaged in any
way. Such as the power-supply cord or plug being damaged, the
device being exposed to rain or moisture, objects falling into the
device, the device does not operate normally, or has been dropped.
• The Road Patrol Touch Duo is not compatible with Dash Cam
Hardwire Kit's. You should not hardwired this device to your car.
Read these instructions, Keep these instructions, Heed all warnings,
Follow all instructions.
Note: This is not an action camera. It must be plugged into your
vehicle at all times for proper use. The Road Patrol Touch duo will
remain on for only a few seconds when unplugged.

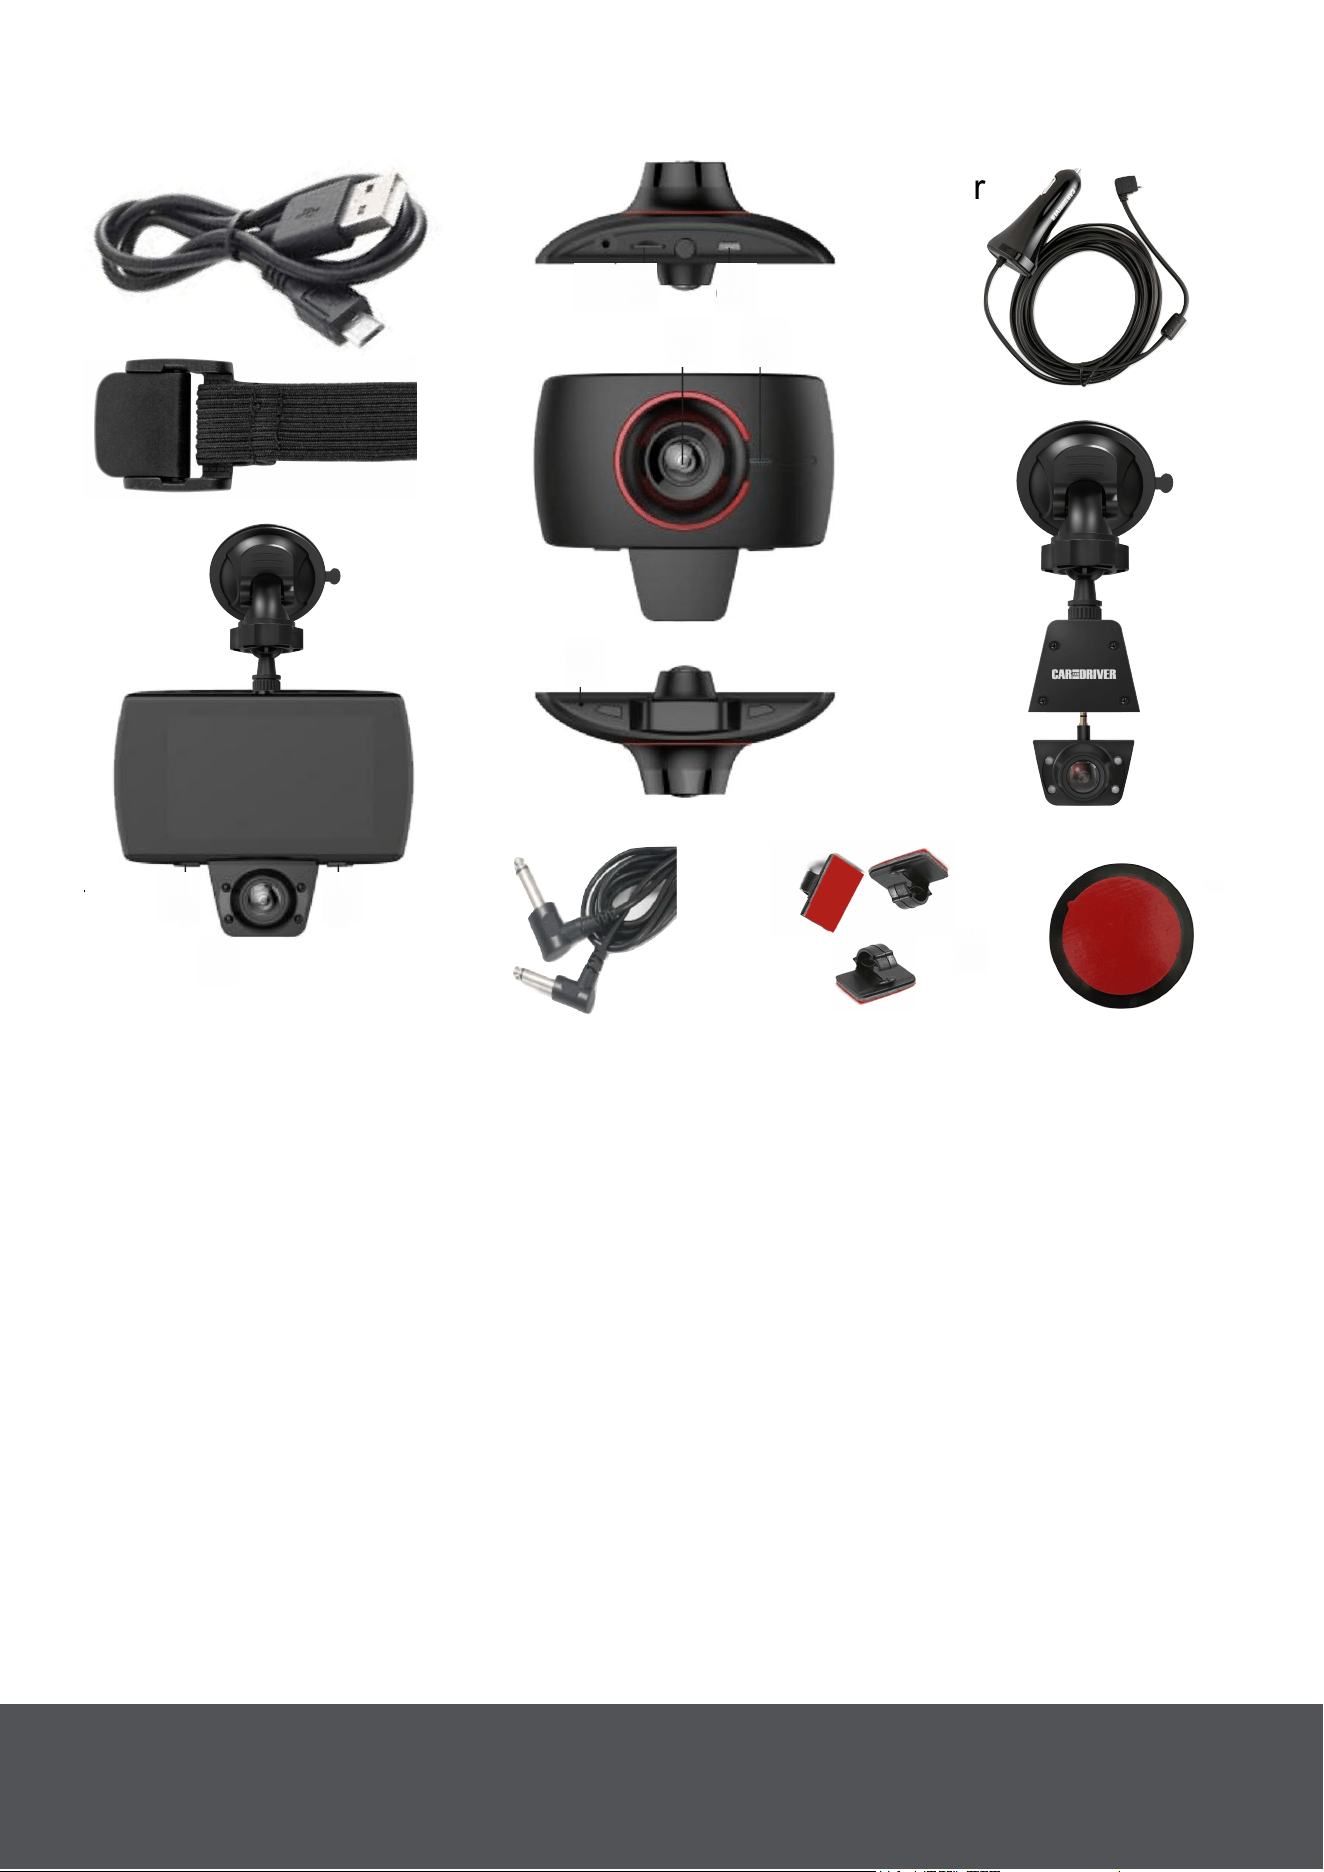
Product Overview
13. Headrest Elastic Band
14. Adhesive Cable Clips
15. Power Cable
16. (2) Suction Cup Mounts
17. USB Data Cable
18. LED Ring
19. Adhesive Disk
1. Micro USB Port
2. Rear Camera
3. Menu/Mode Button
4. Power Button
5. TF Card Slot
6. Microphone
7. Front Camera
8. Speaker
9. Infrared Light
10. Extension Mount
11. AUX Ports For Extension Cable
12. (2) Extension Cables (3 and 16
feet)
4. Power
Top View
Bottom View
-----17
----13
----12
----12
---------18
---14
----2
----10
----16
----15
11----
--
1
--
5
--
11
--
4
--
9
--
3
87
--
6
---19
2
Important Note: The first mention of any accessories and parts will
be followed by their corresponding number in { }. This will allow you to
more easily identify the mentioned part using the product overview on
page. 3.
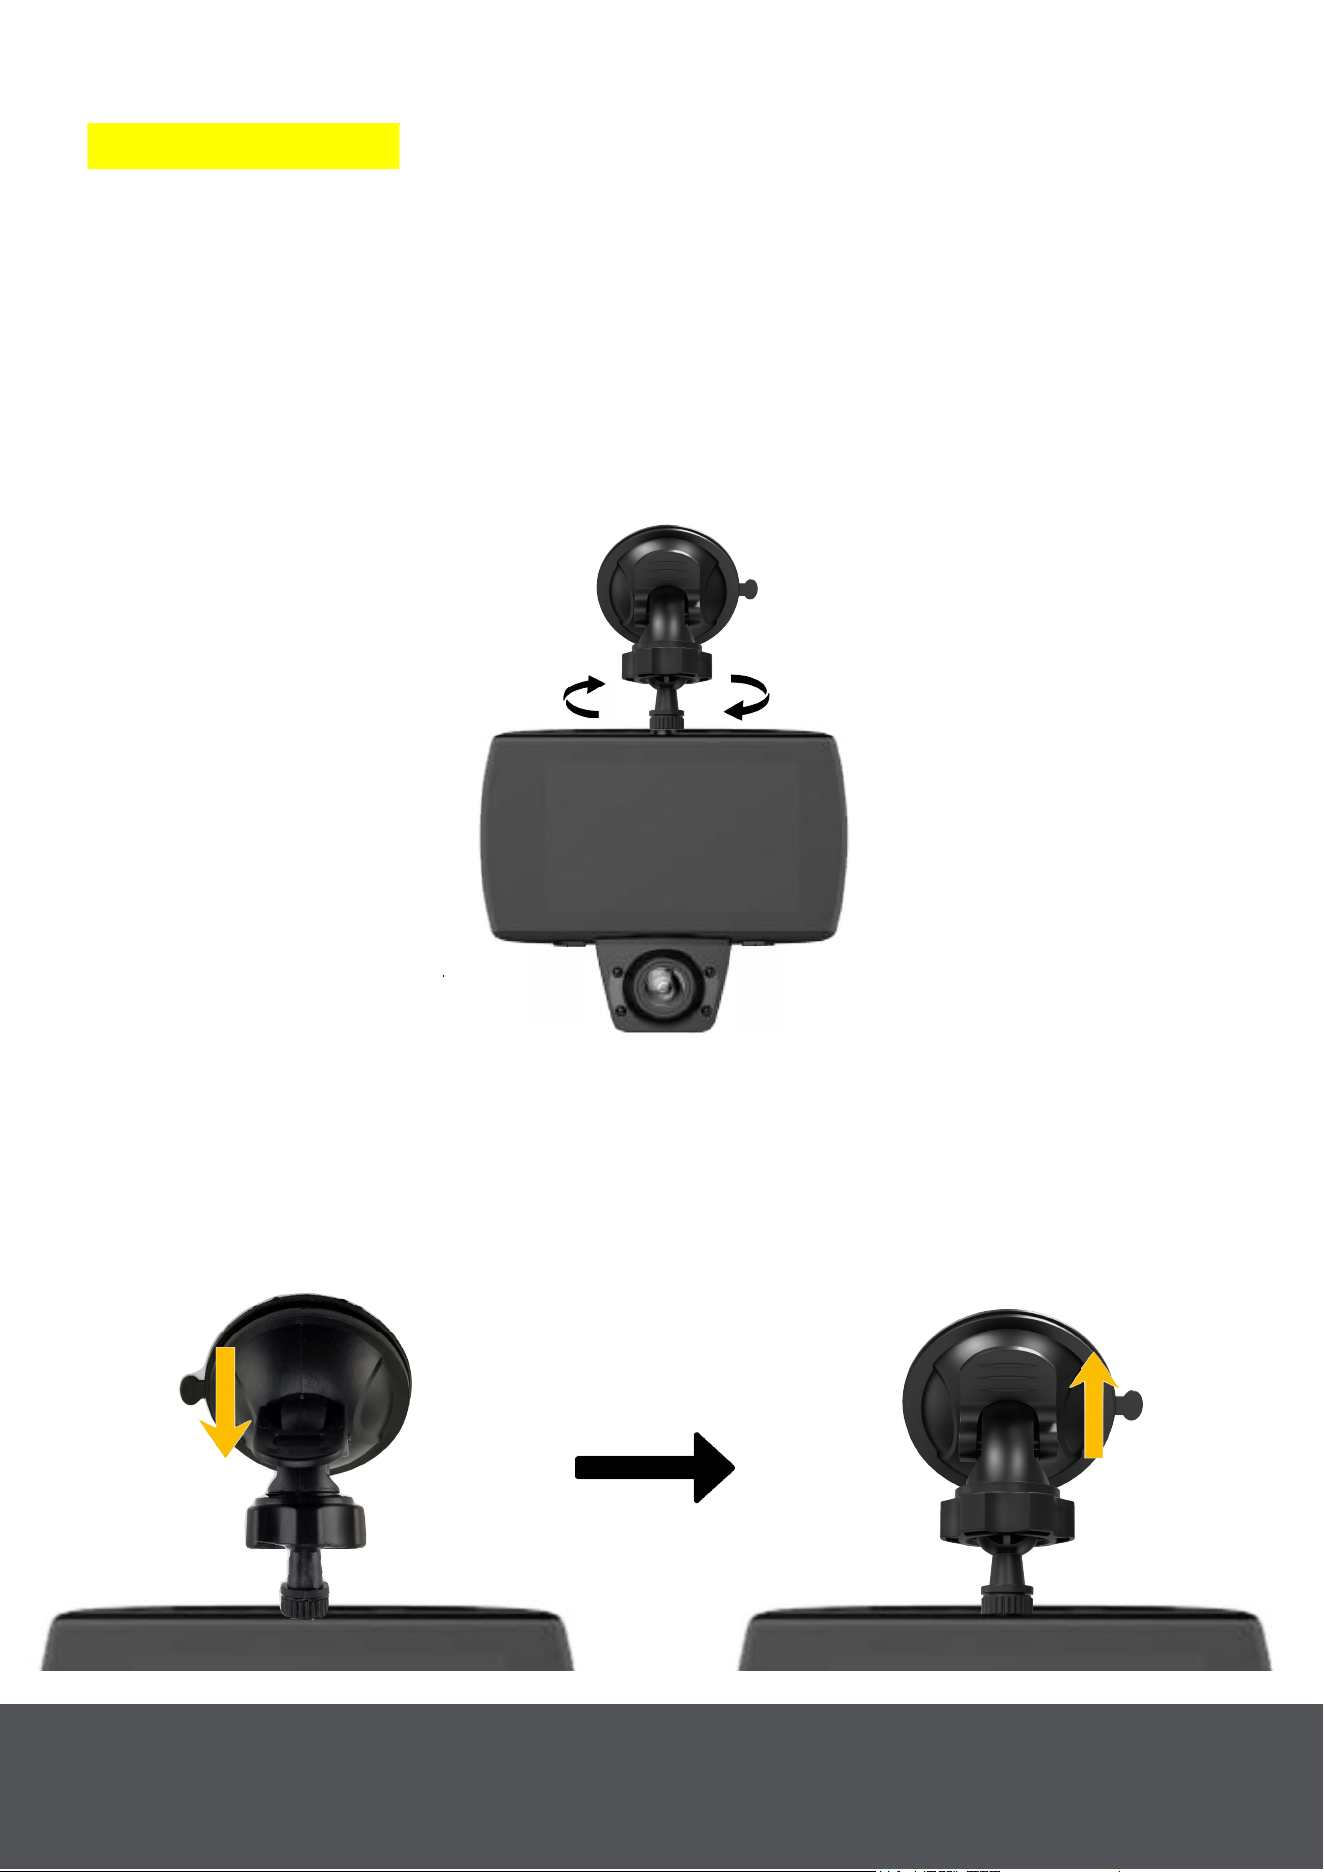
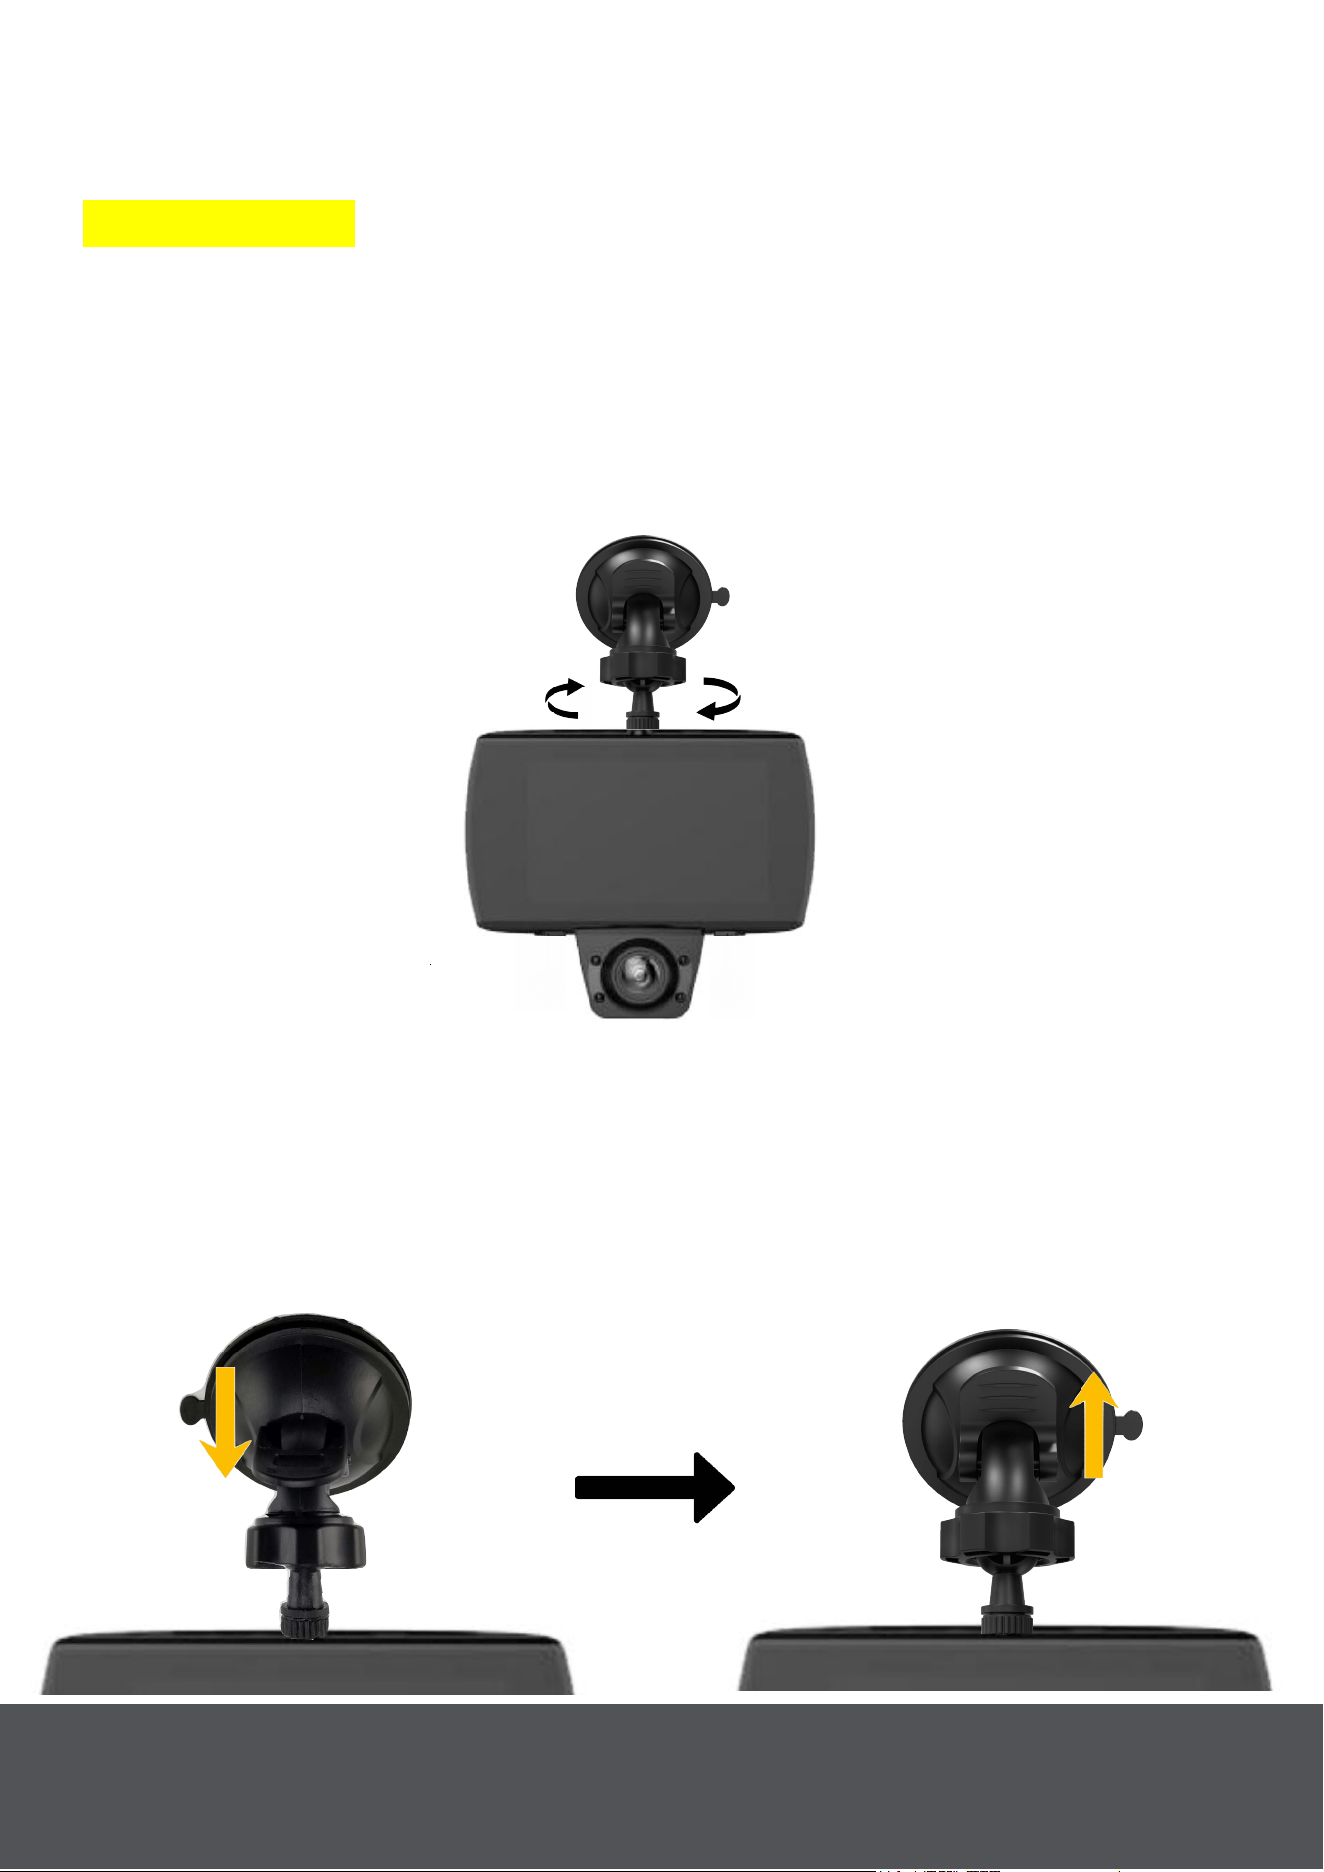
Connect The Road Patrol Touch Duo To The Suction Cup
Mount.
Screw one of the provided Suction Cup Mounts {16} into the main body
of the Road Patrol Touch Duo (Fig. 1).
Mount The Road Patrol Touch Duo On Your Windshield
Take the Suction Cup Mount with attached Road Patrol Touch Duo and
verify that the lock on the suction cup is open (Fig. 2). Press the suction
cup firmly onto your windshield by the rear view mirror and press the
lock closed (Fig. 3) to secure the Road patrol Touch Duo in place.
Fig.1
Fig. 3
________
_
Lock
Closed
Set-Up & Mount The Road Patrol Touch Duo
_
________
Lock
Open
Fig. 2
3
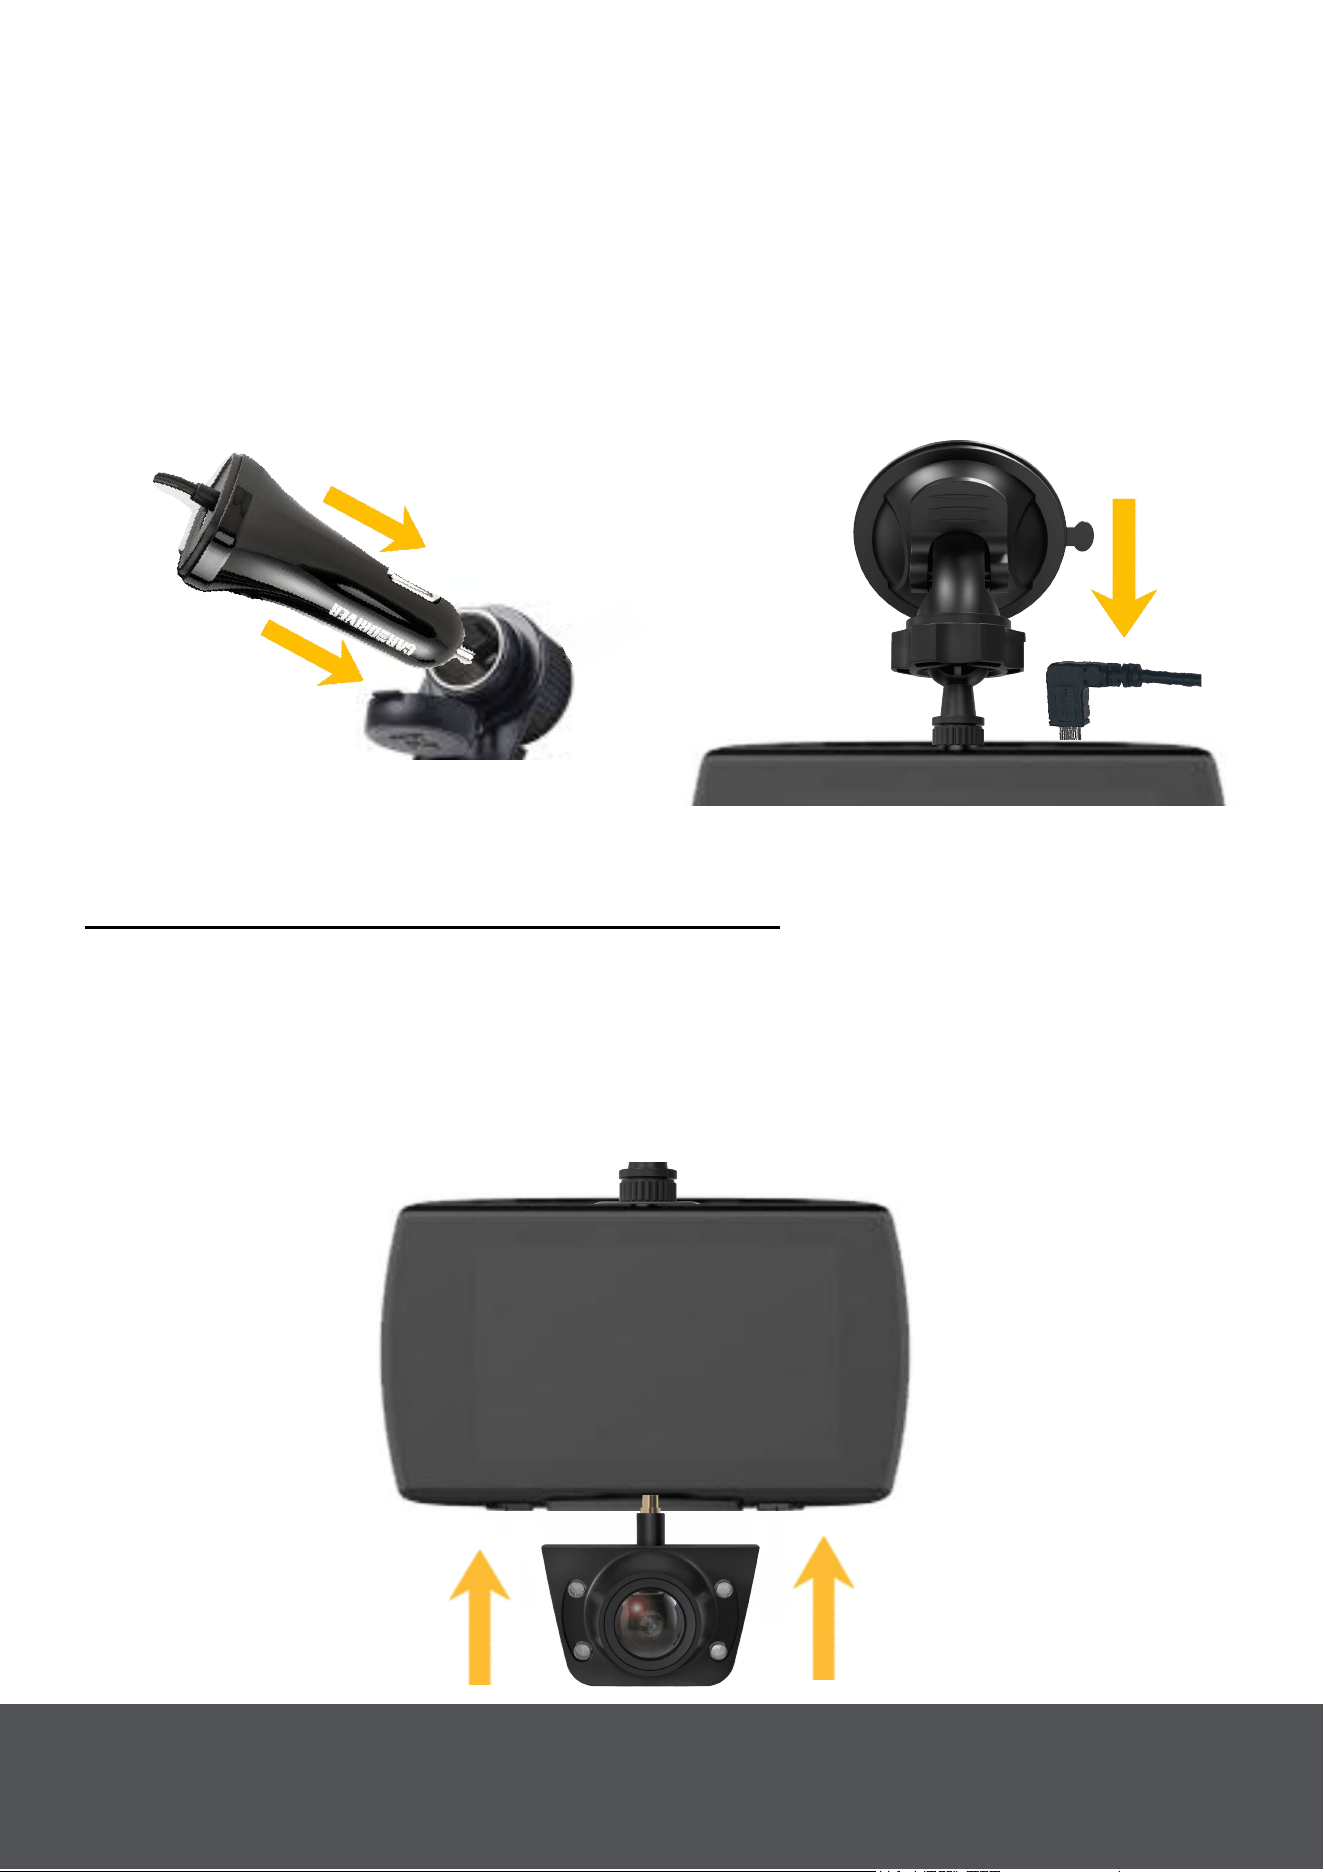
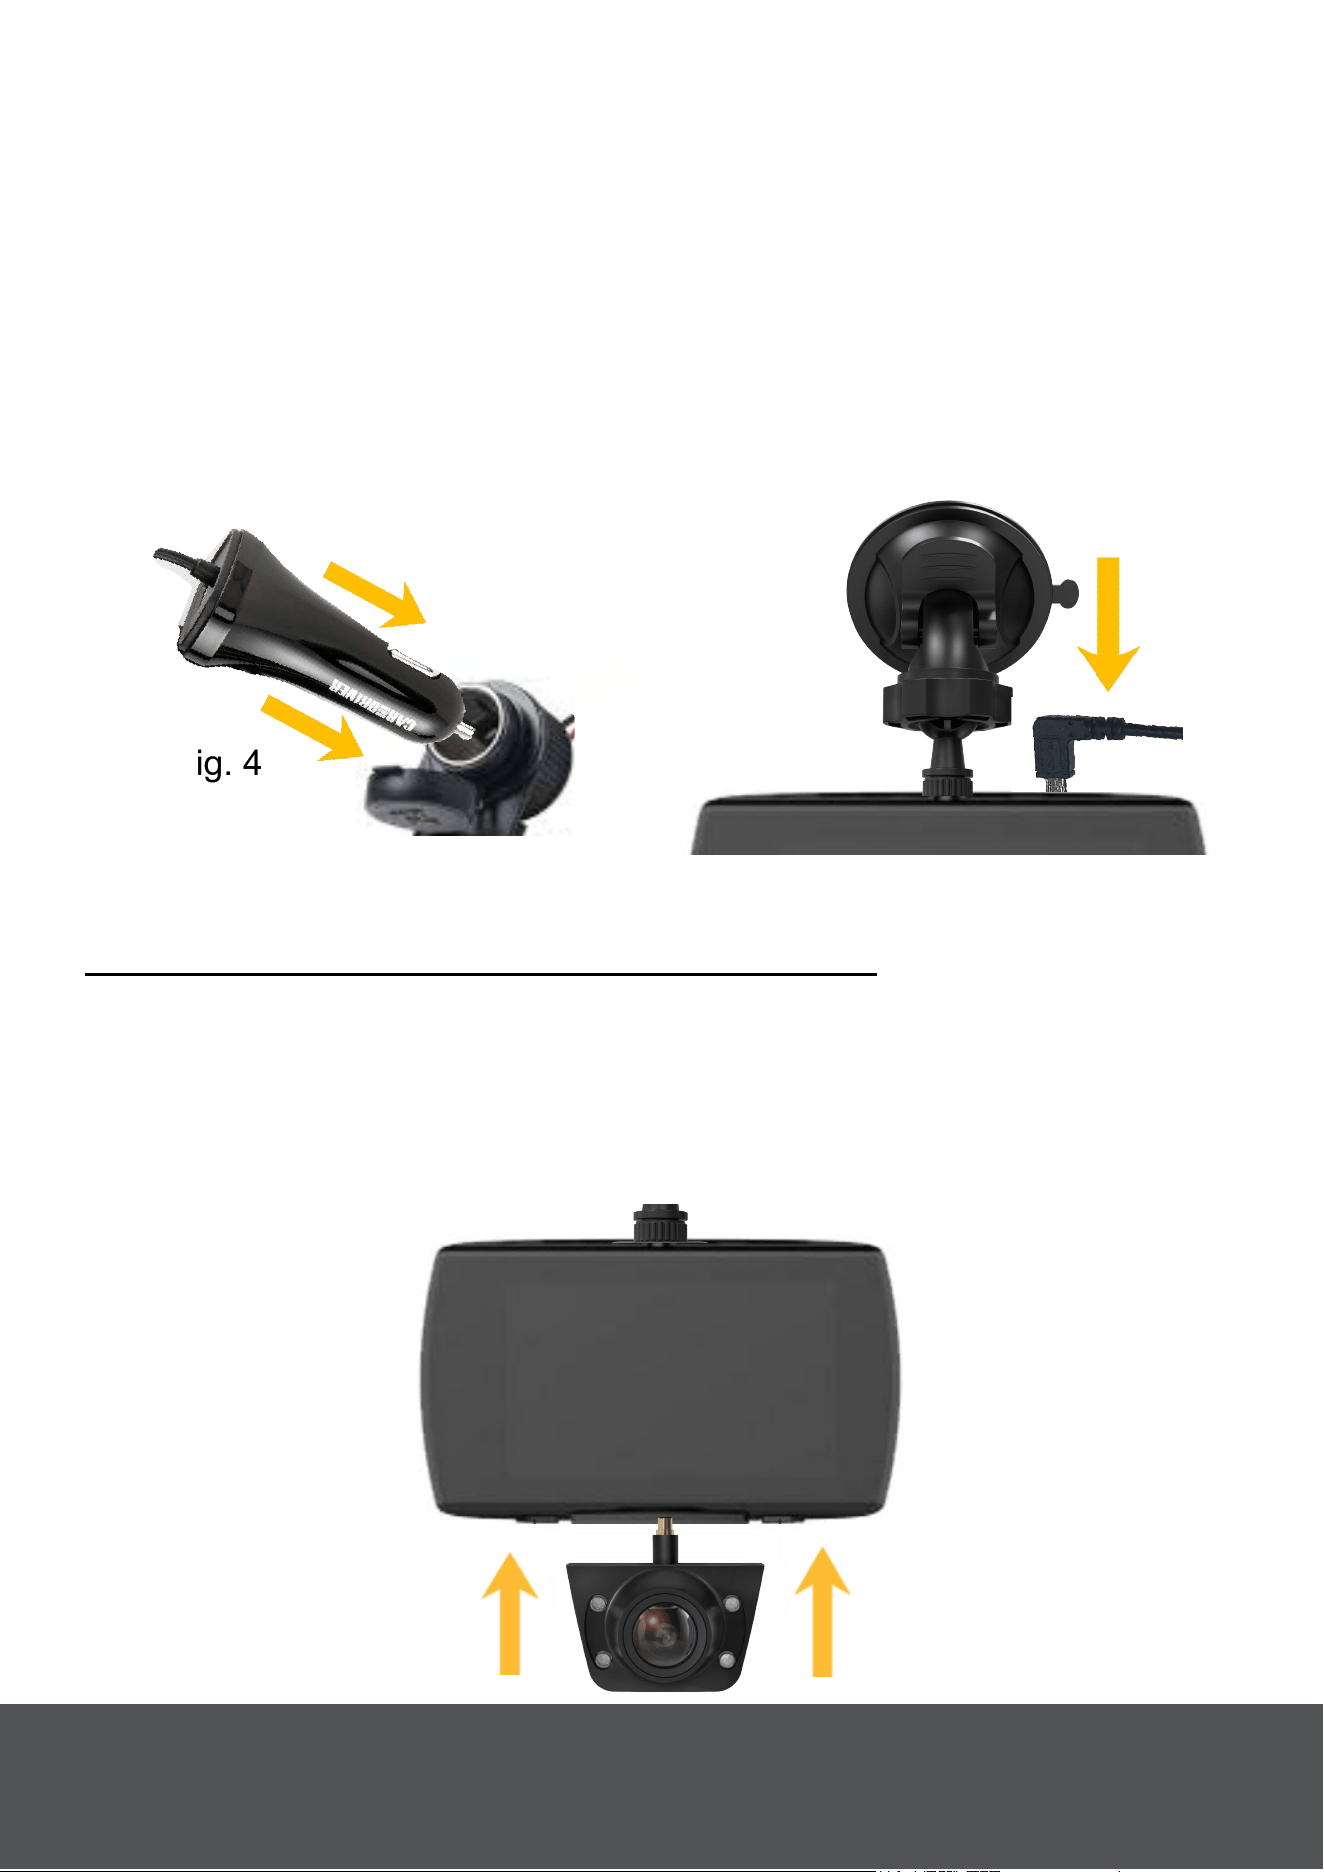
Connect The Road Patrol Touch Duo To Your Car With The
Power Cable
Take the cigarette plug end of the Power Cable
{15} and plug it into your
car's cigarette outlet (Fig. 4). Take the other end of the power cable and
plug it into the Road Patrol Touch Duo (Fig. 5). Make sure the cable is
secured along the edge of the windshield and the headliner using the
Adhesive Cable Clips {14}. As long as the car is powered On/Off the
Road patrol Touch Duo will power On/Off as well.
Fig. 4
Fig. 5
Set-Up Rear Cam
Option 1: Set-Up: Using Suction Cup
Remove The Rear Camera from The Road Patrol Touch Duo
Separate the Rear Camera {2} from the main body of the Road Patrol
Touch Duo (Fig. 6).
Note: Be sure not to pull the Road Patrol Touch Duo from your windshield
if you have previously mounted it.
Fig. 6
4
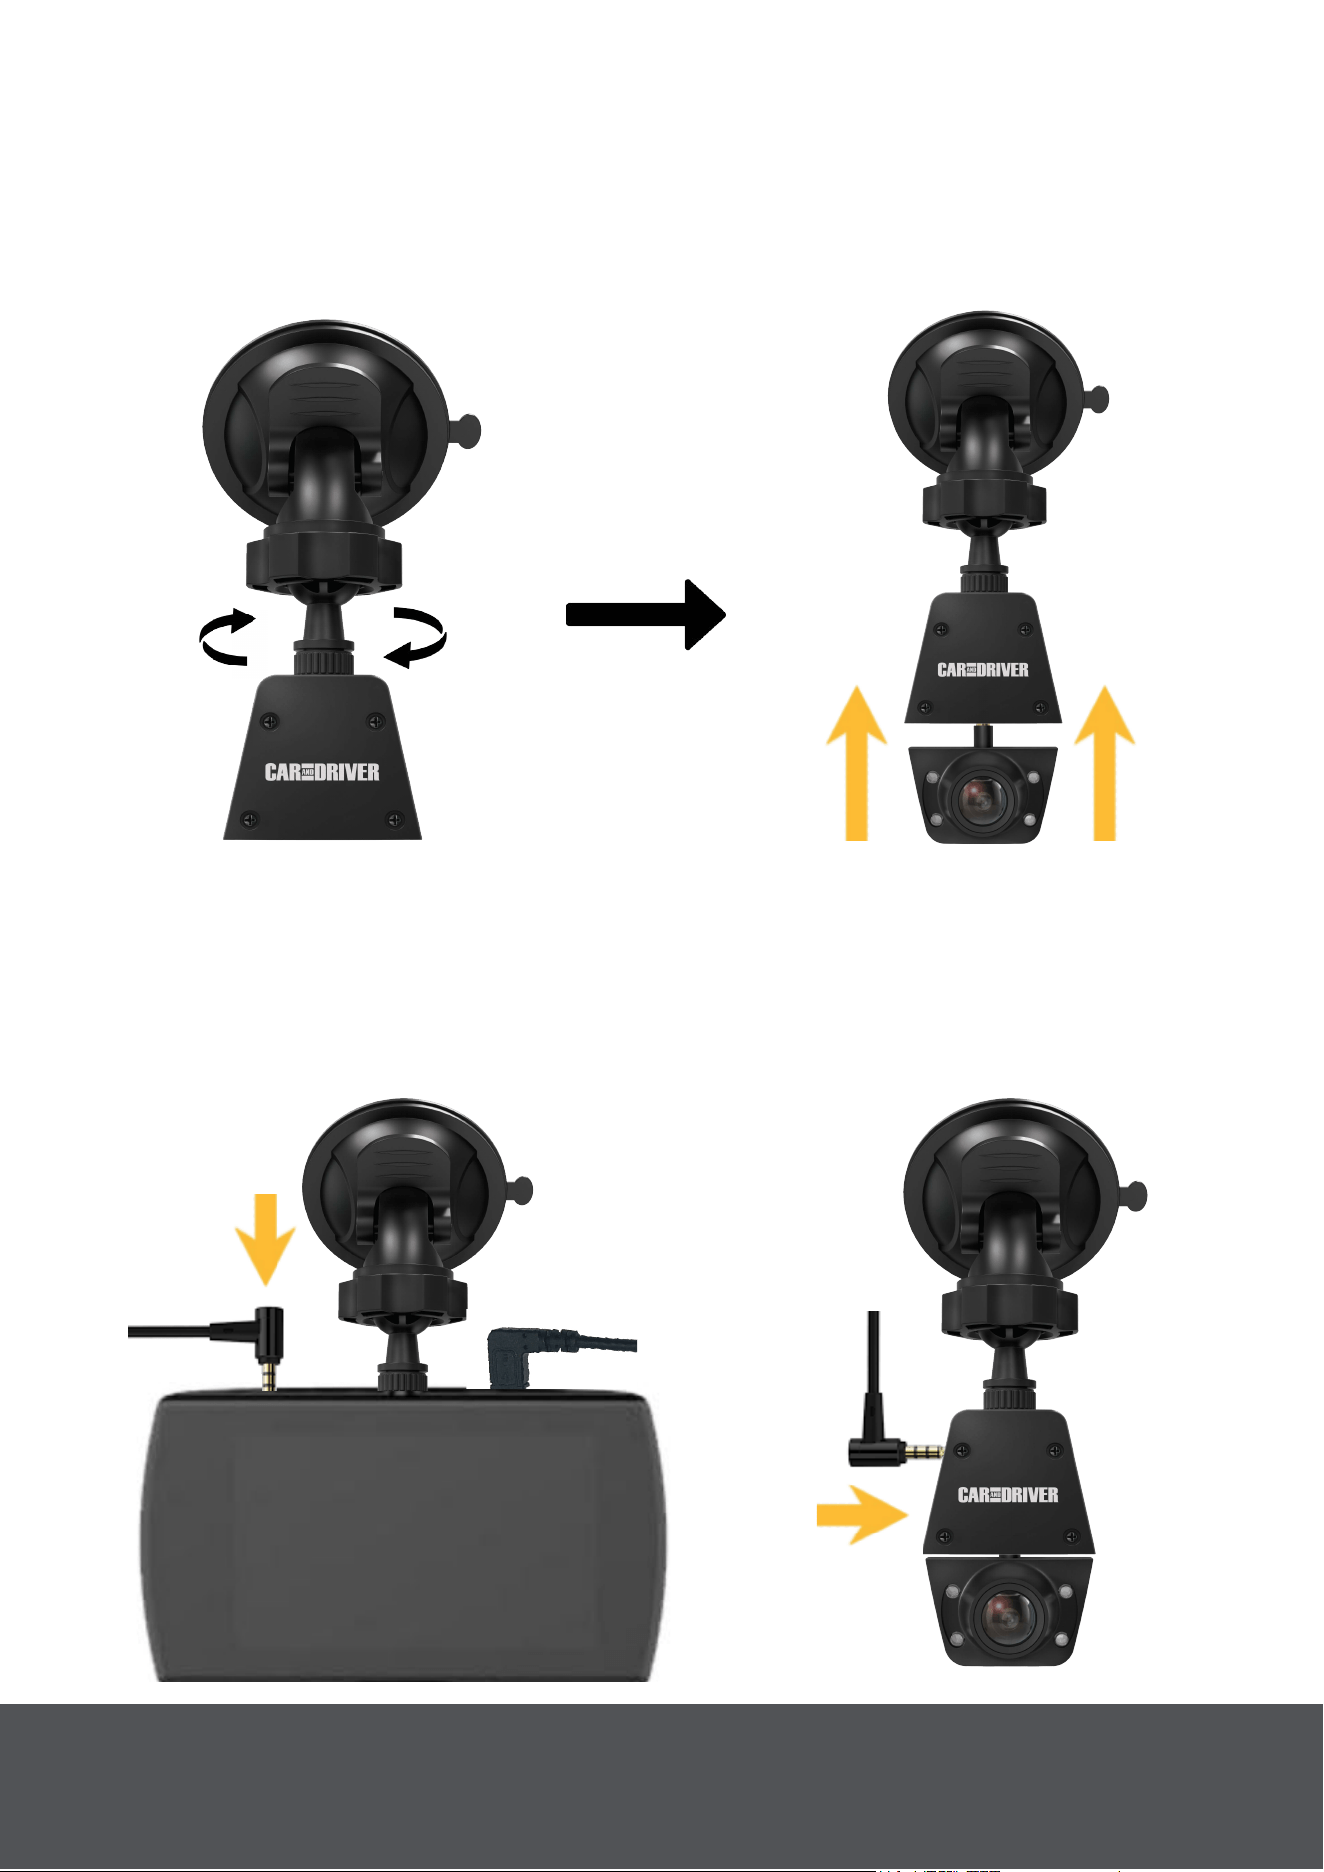
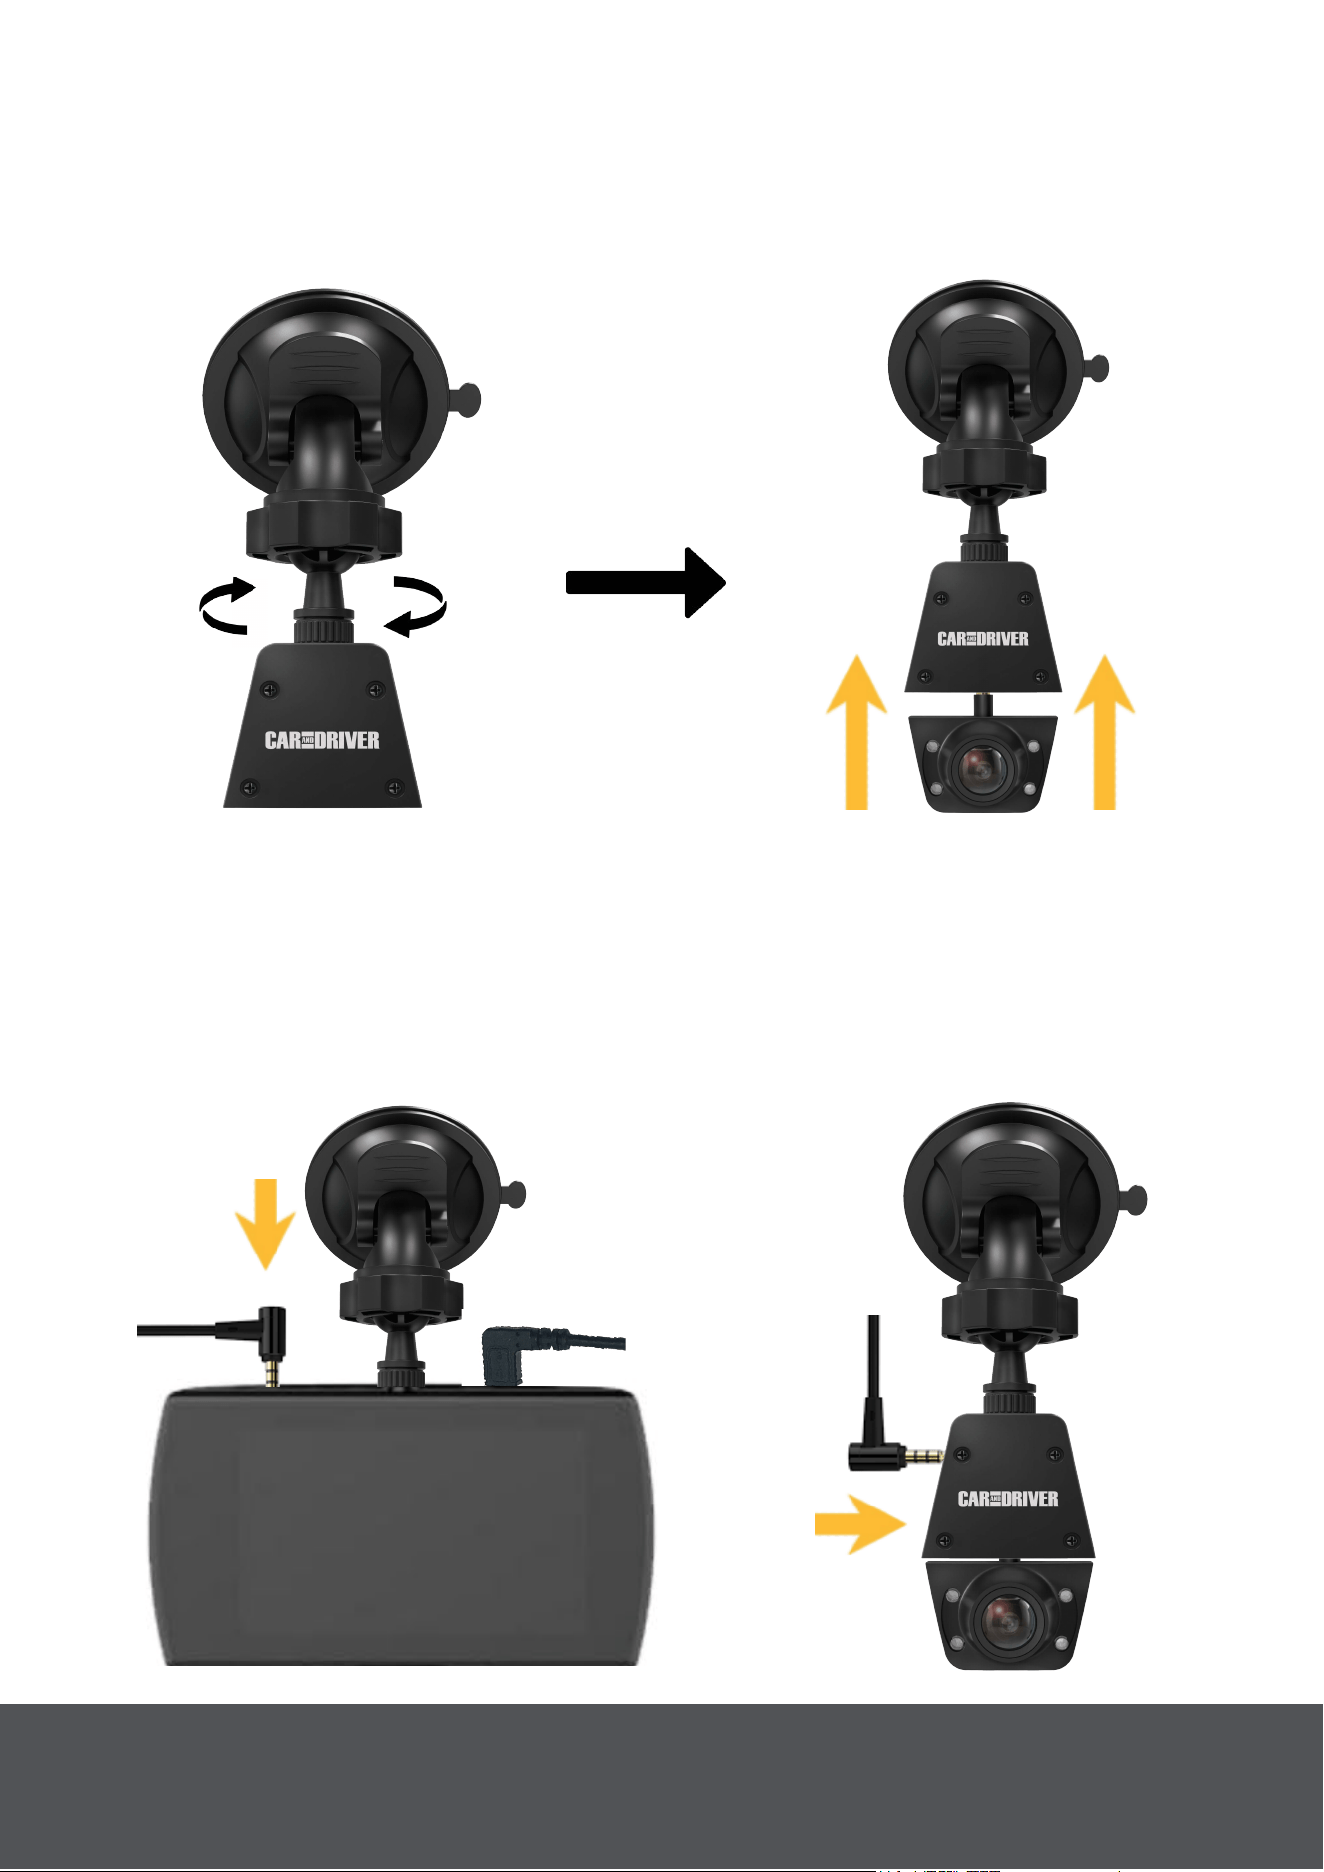
Connect The Road Patrol Touch Duo To The Extension
Mount.
Take the provided Extension Cable {12} and plug one end of it into the
mounted Road Patrol Touch Duo (Fig. 9). Take The other end of t
he
Extension cable and plug it into the Extension Mount (Fig. 10).
Connect The Road Patrol Touch Duo To The Suction Cup
Mount.
Screw the second provided Suction Cup Mount into the Extension
Mount
{10}(Fig. 7). Then insert the Rear Camera into the Extension
Mount (Fig. 8).
Fig. 7
Fig. 8
Fig. 9
Fig. 10
5
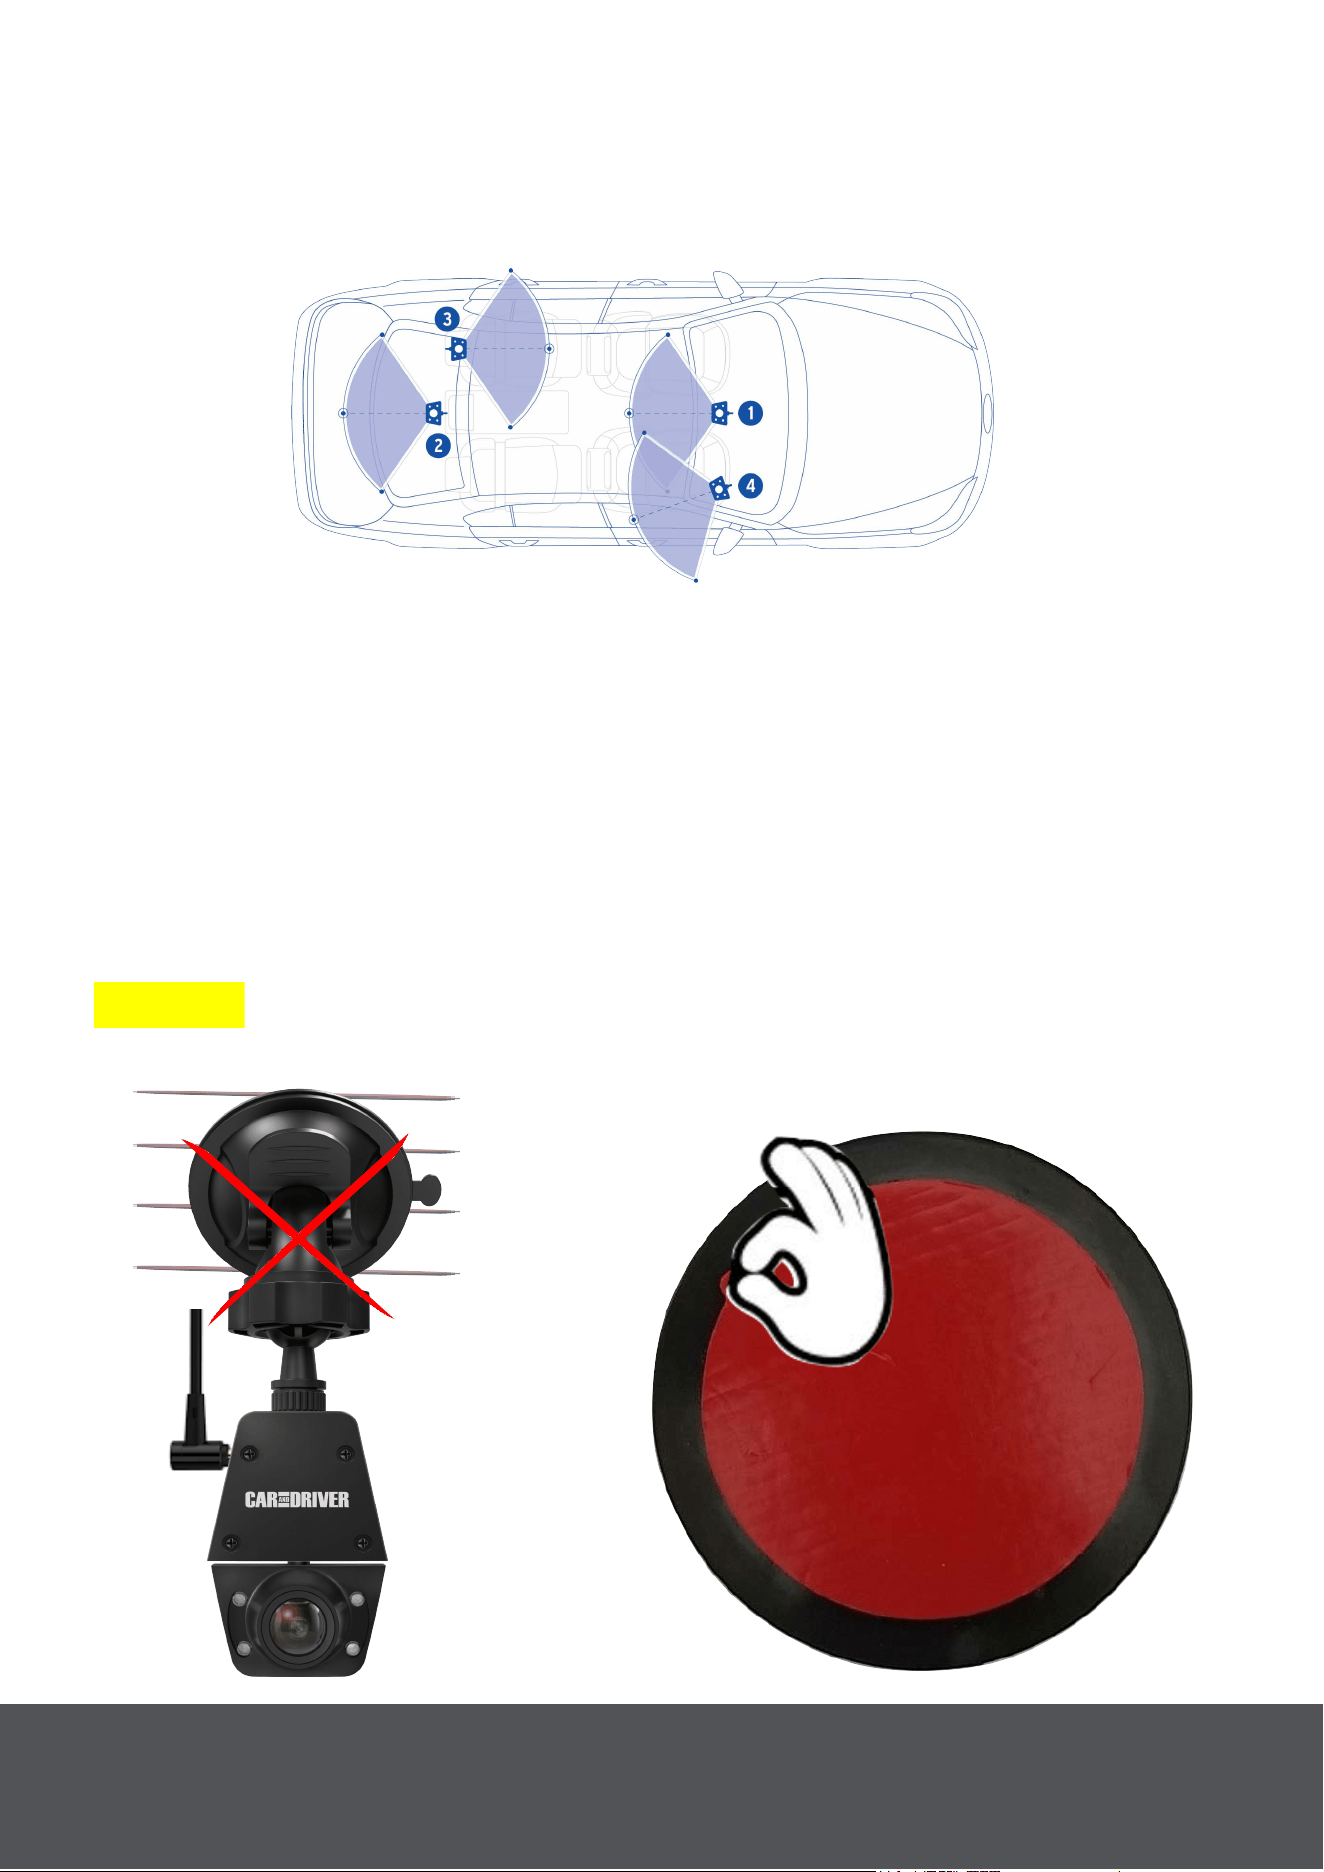
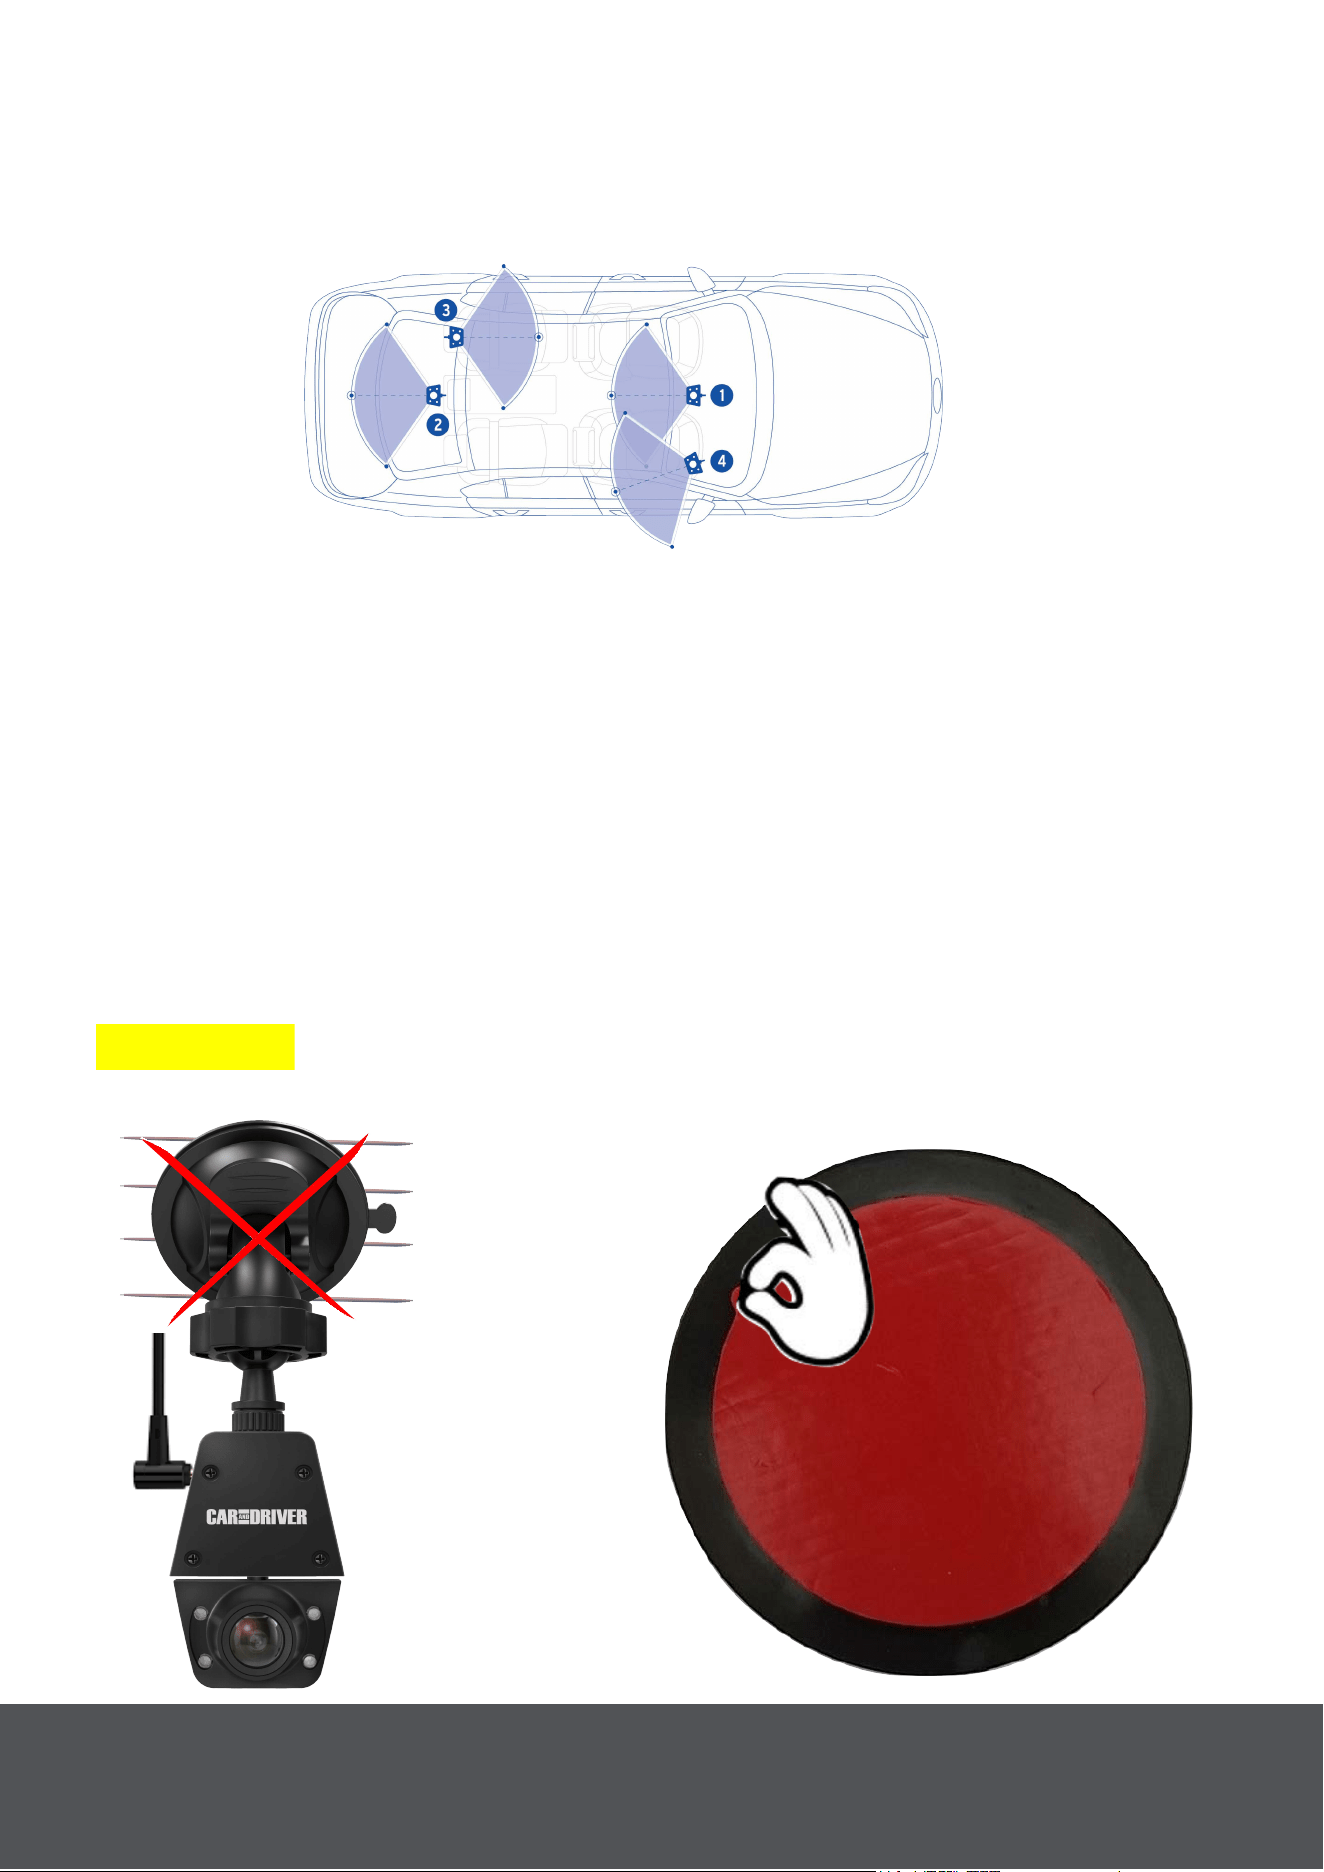
Selecting A Location For Your Rear Camera.
The Rear Camera can be mounted on either your windshield or your
Rear Window. For suggested mounting locations and viewing angles
see (Fig. 11) below.
Fig. 11
Mounting The Rear Camera On Your Rear Window.
Your Road Patrol Touch duo comes with an adhesive disk {19} so that
you can mount your rear camera on the inside of your rear window.
When mounting your rear camera in a location that has defroster lines
(Fig. 12). We recommend that you peel the provided adhesive disk (Fig.
13) and apply it to the window (Fig. 14). This will better secure the
suction cup even when it is experiencing temperature changes (Fig. 15).
Note: You should wait 30 minutes after setting up the adhesive disk
before installing the rear camera, as the adhesive needs time to set.
Warning: The adhesive disk is meant only for use with the Road Patrol
Touch Duo.
Fig. 12
Fig. 13
___
____
May Not
Stick properly
___
_____________
Peel
Red Film
6
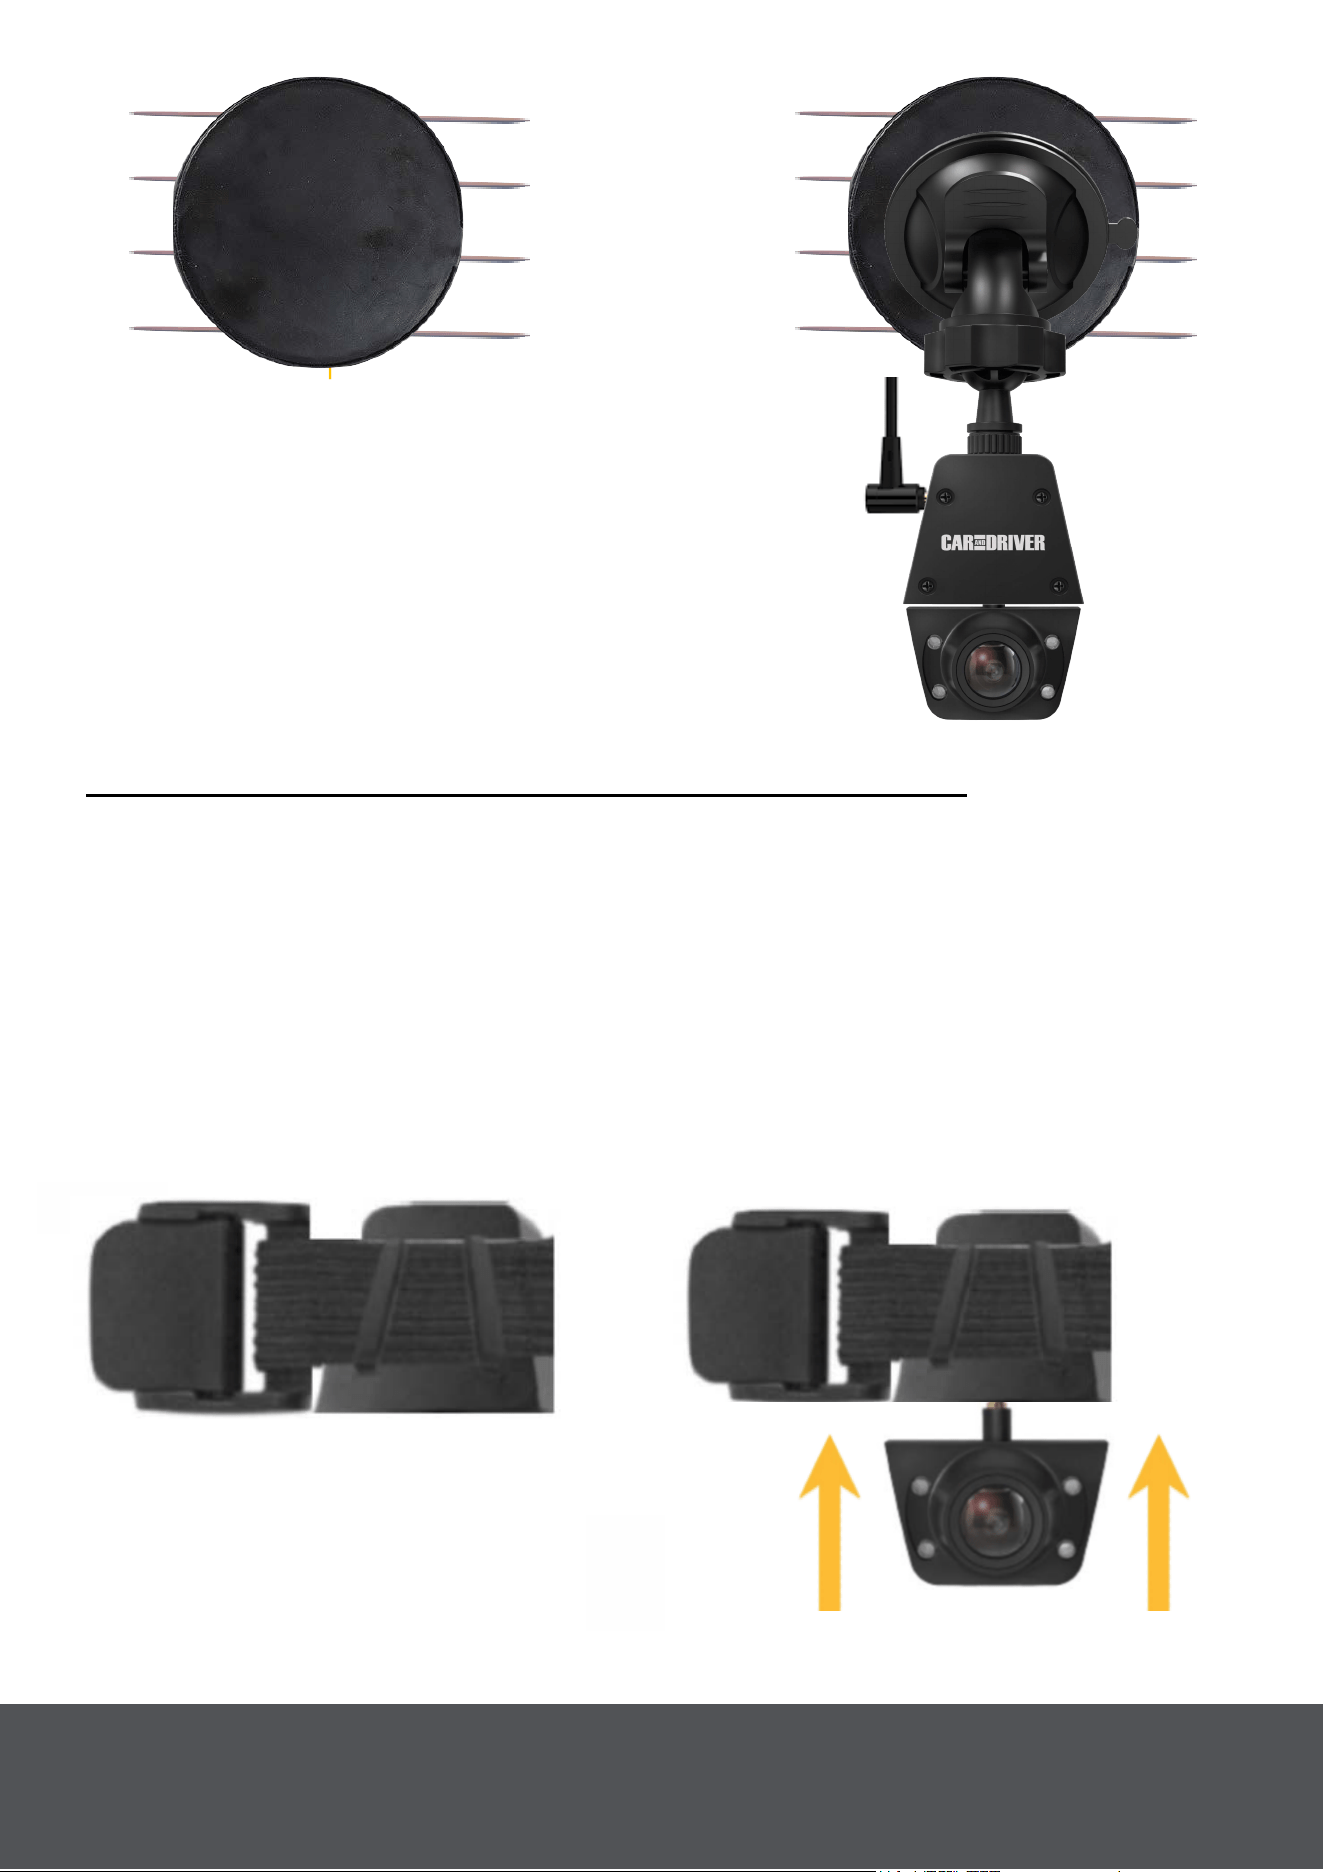
Fig. 17
Fig. 14
Fig. 15
___
Place Adhesive Side
Over Defroster Lines.
______
______
Secure Over
Adhesive
Disk
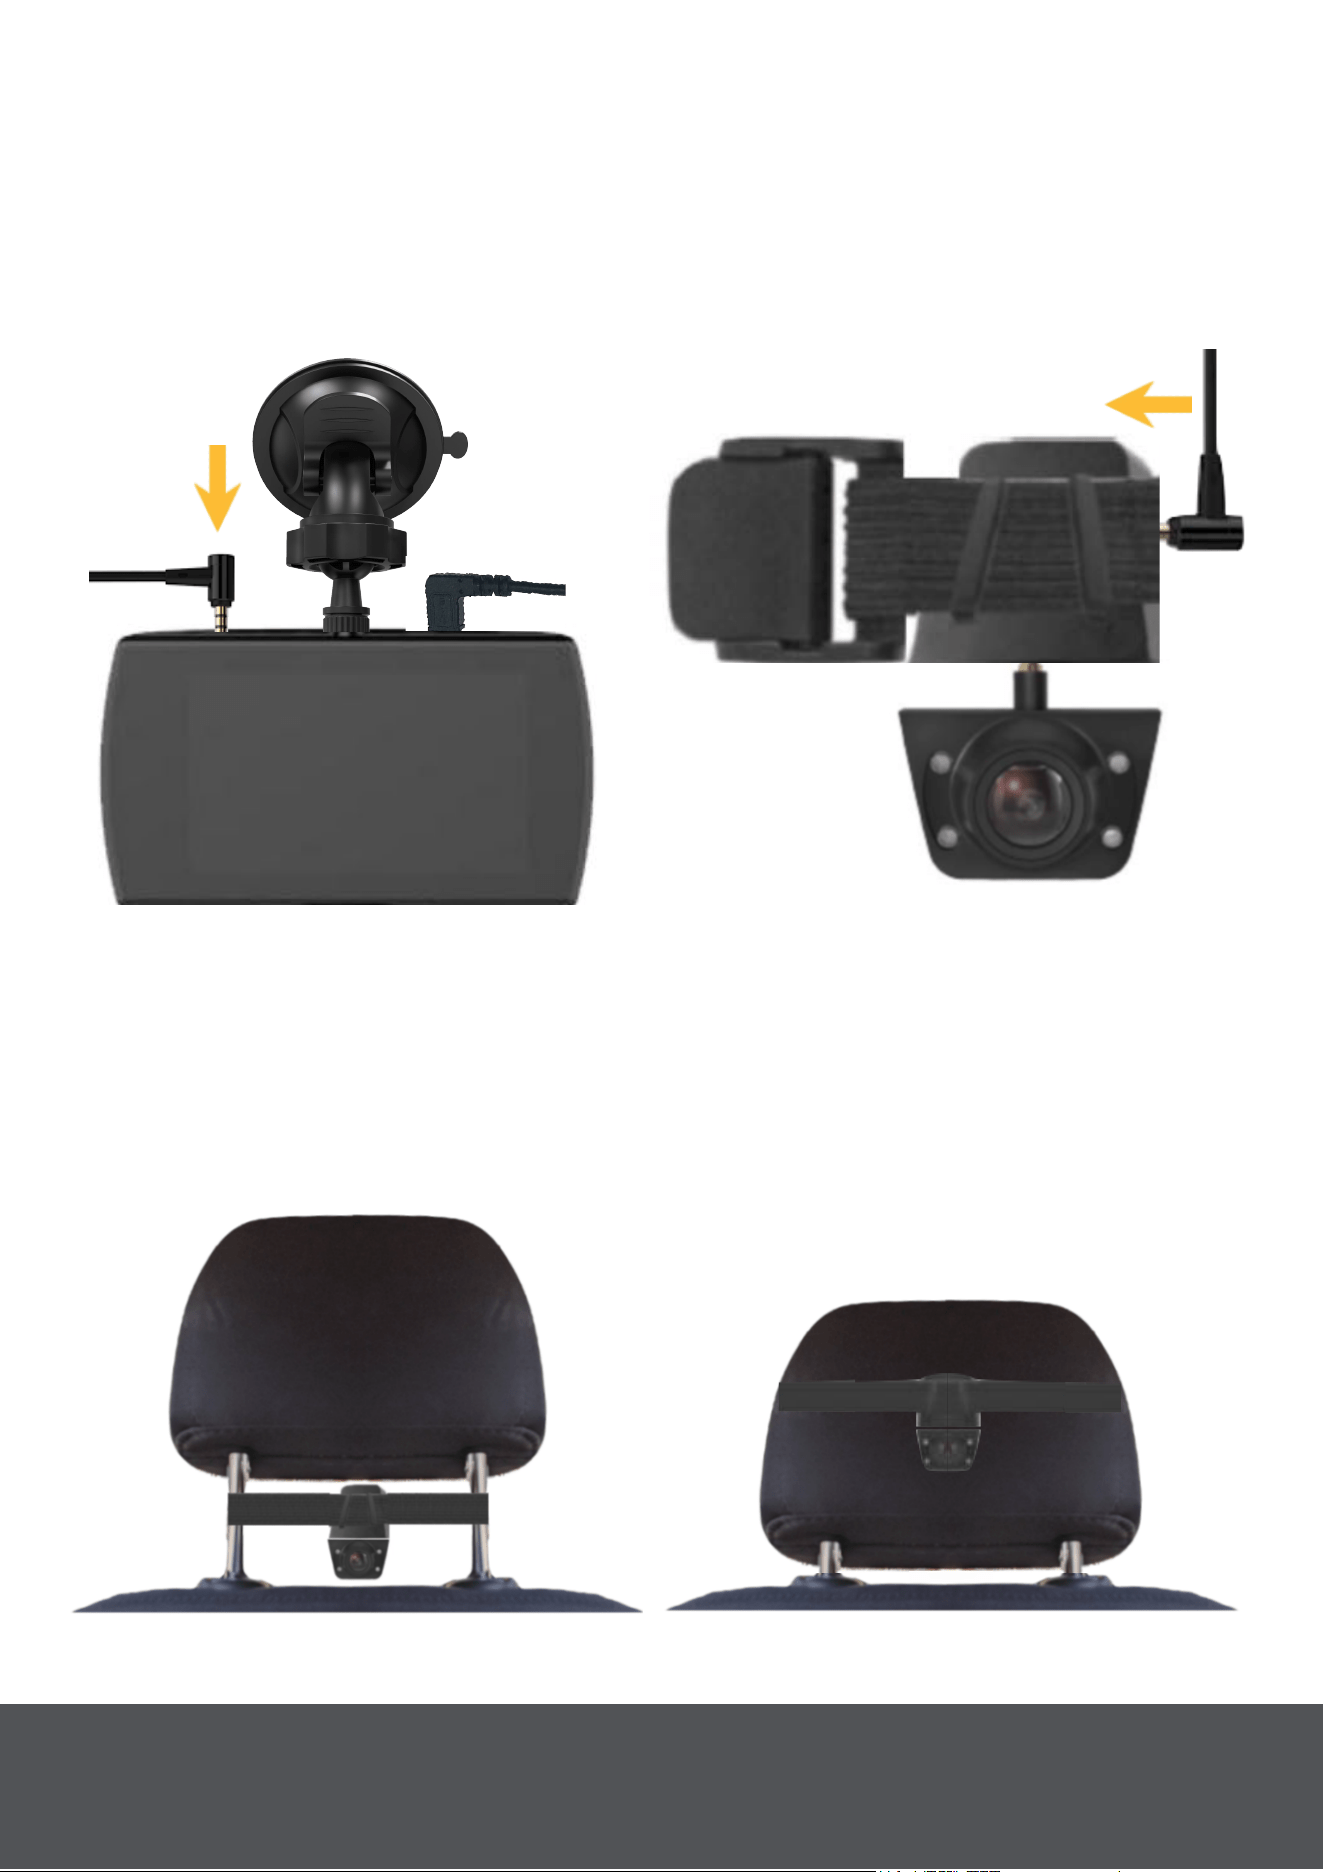
Option 2: Set-Up: Using Headrest Elastic Band
N
ote: See "Remove The Rear Camera from The Road Patrol Touch
Duo" on page 5.
Insert The Elastic Band Into The Extension Mount Of The
Road Patrol Touch Duo.
Thread the provided Headrest Elastic Band {13} into the Extension
Mount {10} (Fig. 16). Then insert the Rear Camera {2} into the
Extension Mount (Fig. 17).
Fig. 16
____
_______
Thread Through
Extension Mount
____
_
7
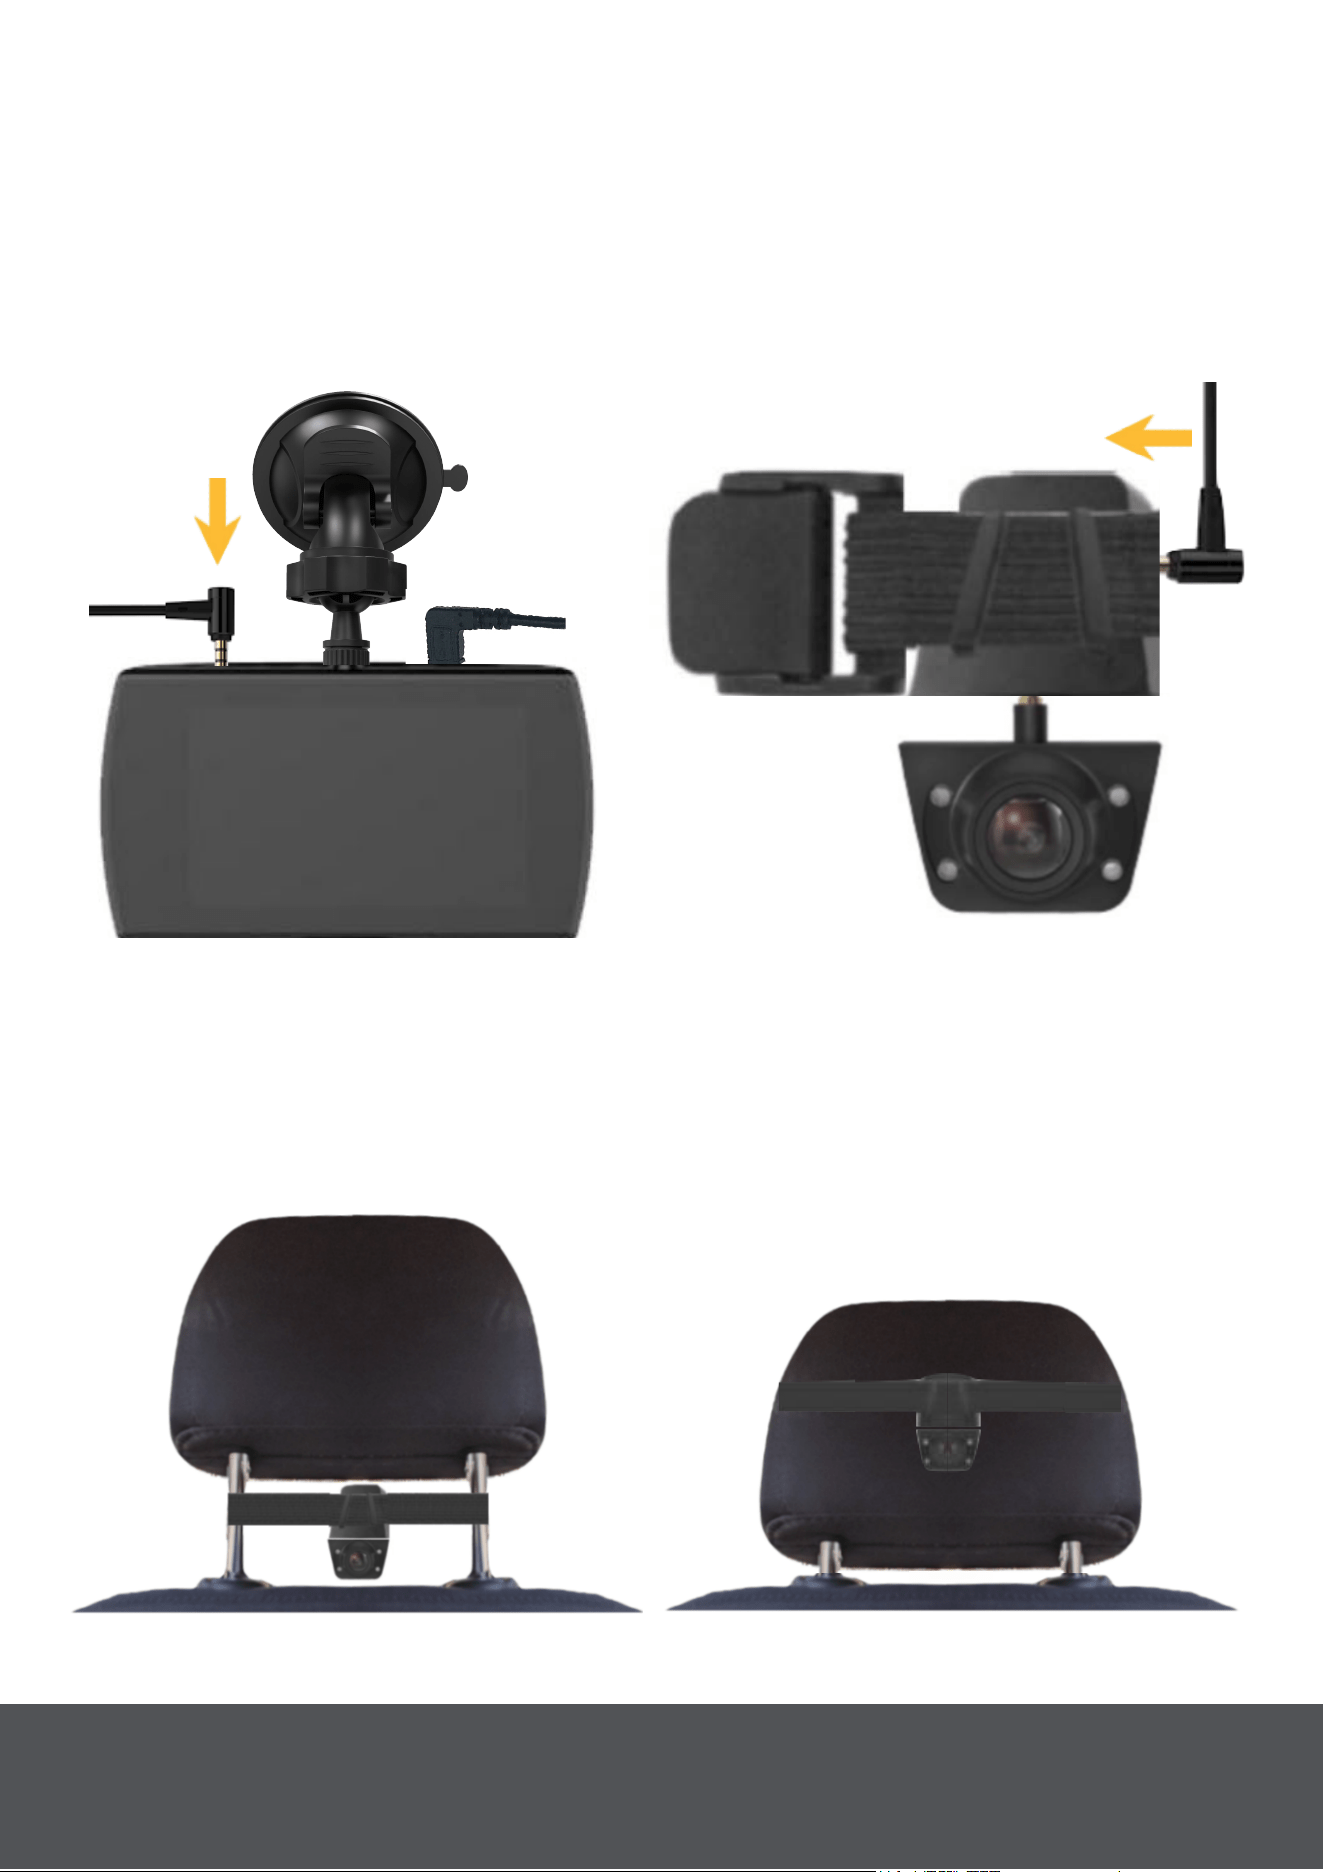
Connect The Road Patrol Touch Duo To The Extension
Mount.
Take the provided Extension Cable {
12} and plug one end of it into the
mounted Road Patrol Touch Duo (Fig. 18). Take The other end of the
Extension cable and plug it into the Extension Mount behind the elastic
band (Fig. 19).
Fig. 18
Fig. 19
Mount the Rear Camera On Either The Back Of The Driver's
or Passenger
's Headrest.
The Rear Camera {2} can be mounted on either the back of the driver's
or passenger's headrest using the Headrest elastic band. See (Fig. 20)
and (Fig. 21) below.
Fig. 20
Fig. 21
8

Powering On The Road Patrol Touch Duo
When the Road Patrol Touch Duo is connected to a car that it is powered
On then the Road Patrol Touch Duo will power on as well. See "Connect
The Road Patrol Touch Duo To Your Car With The Power Cable" on
page 4.
A red charging indicator will begin flashing on the screen demonstrating
that recording has begun.
Note: The user may also manually power On/Off the Road Patrol Touch
Duo by pressing and holding the "Power" button for three seconds.
Note:
Format the Micro SD card before you start recording for the first time.
Be sure that the Micro SD card has been inserted properly before
powering up the device.
Power Off
Option 1: When the car’s engine
is turned off, the device will
automatically turn off shortly after.
Option 2: To manually power off the device press and hold the power
button (4) for at least three seconds. Do not eject the SD card during this
process as it may cause damage to the last recorded file.
Note: It will remain on just long enough to save the current recording.
9
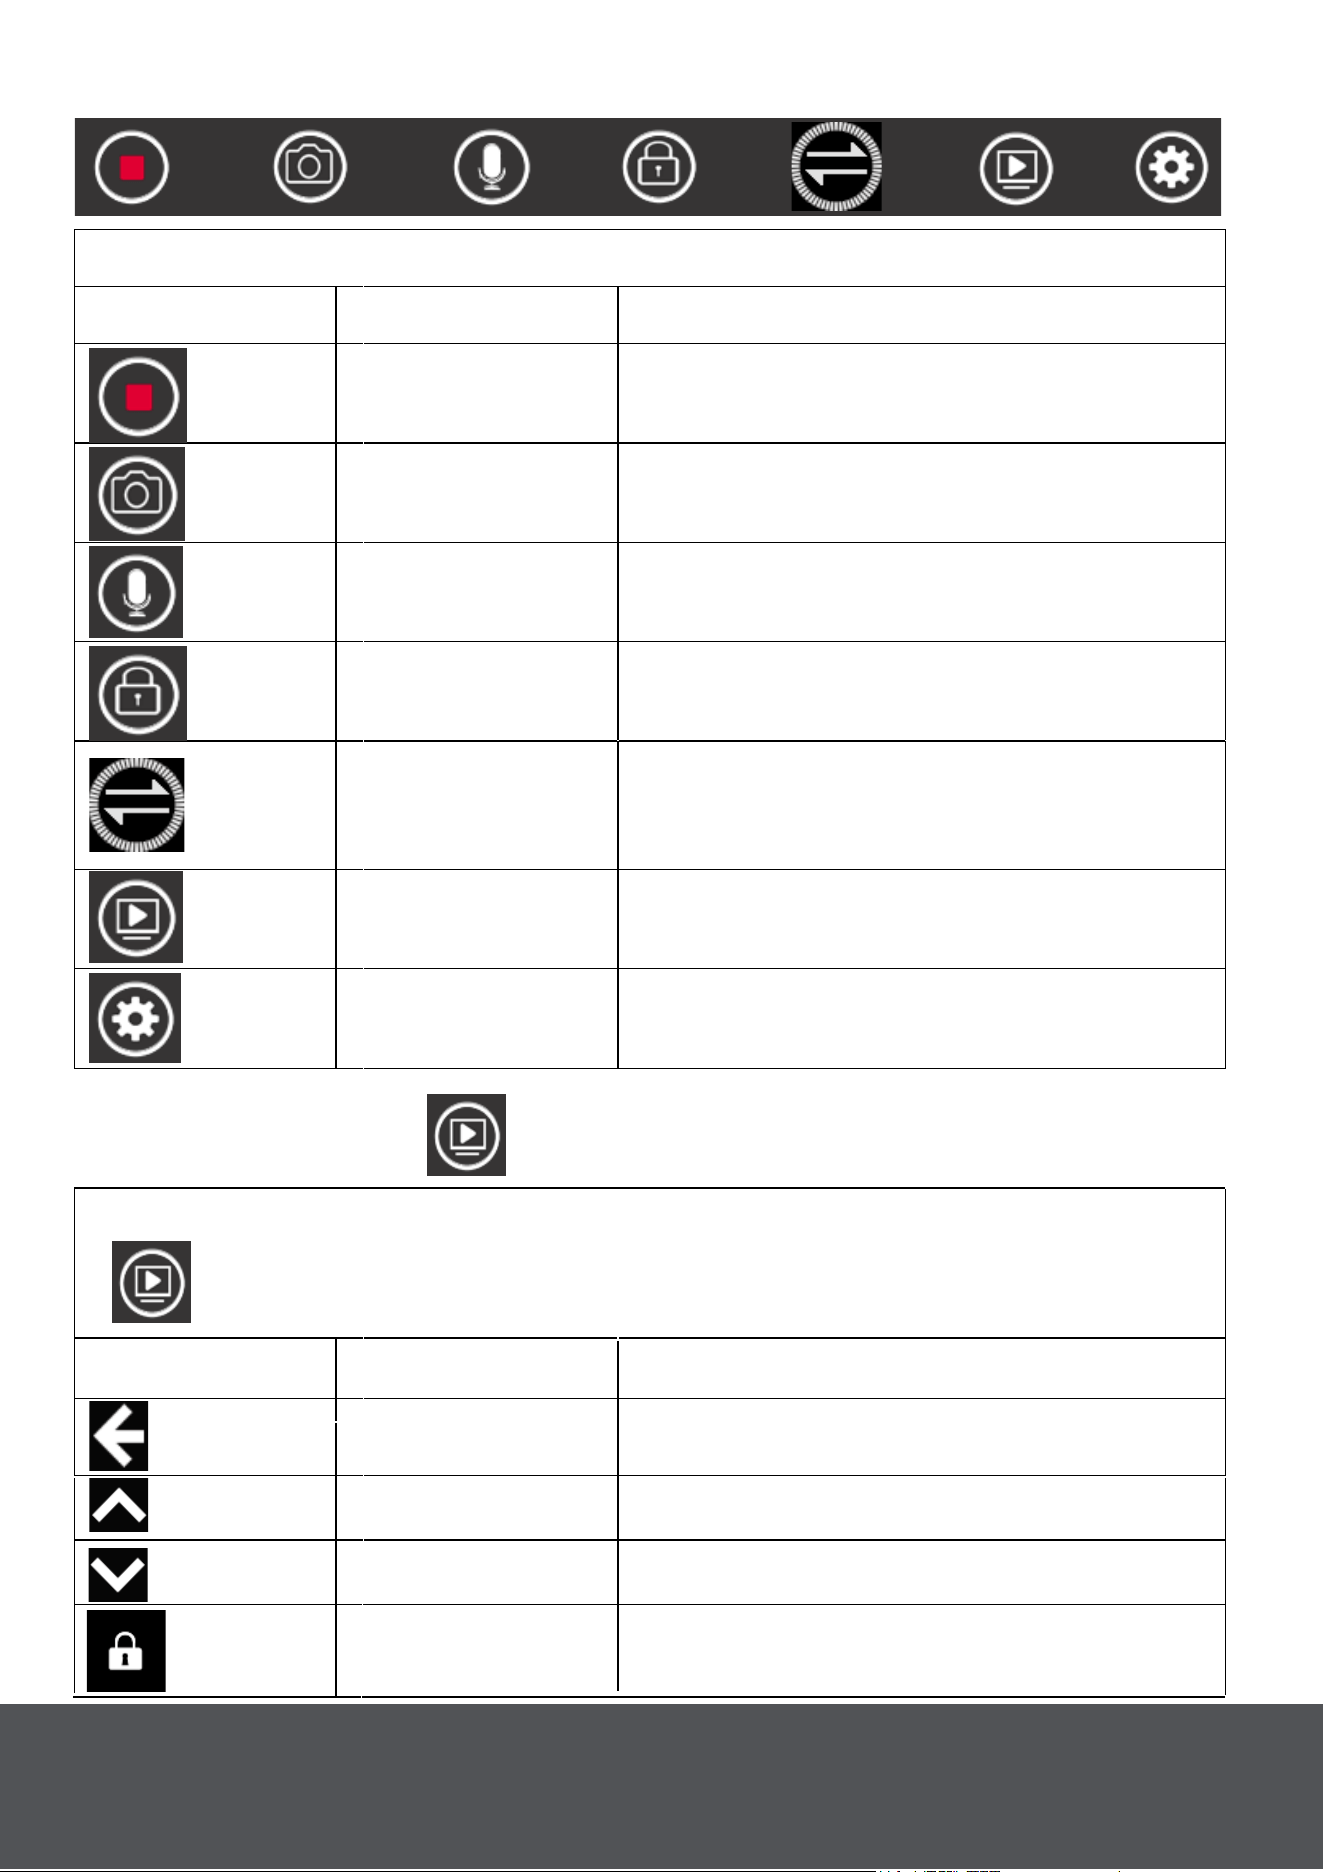
Touch any place on the screen to open the main menu
Icon
Description
Feature
Recording Touch to turn on/off recording
Photo Shooting Touch to take photos.
Audio Touch to turn on/off audio recording.
Lock Video
Touch during recording to lock
the current recording file.
Display Mode
Touch to swap between the Main
Cameras and Rear Camera's view
on screen.
Playback
Touch to open the playback
interface.
System Setting
Touch to open system settings
or press the "Menu" Button.
Main Menu
Playback Folder
Icon
Description Feature
Back
Touch to back to return to the
main interface.
Up Page up.
Touch any place on the screen to open the main menu. Then press
to open playback mode.
Down Page down.
Lock Video Touch to lock the file you selected.
10
Delete Touch to delete the file you selected.
Front Video
Touch to play the Road Patrol
Touch Duo's recordings.
Rear Video
Touch to play the Rear
Camera's recordings.
Locked Front
Video
Touch to view the Road Patrol
Touch Duo's locked recordings.
Locked Rear
Video
Touch to view the Rear
Camera's locked recordings.
Image Touch to see images.
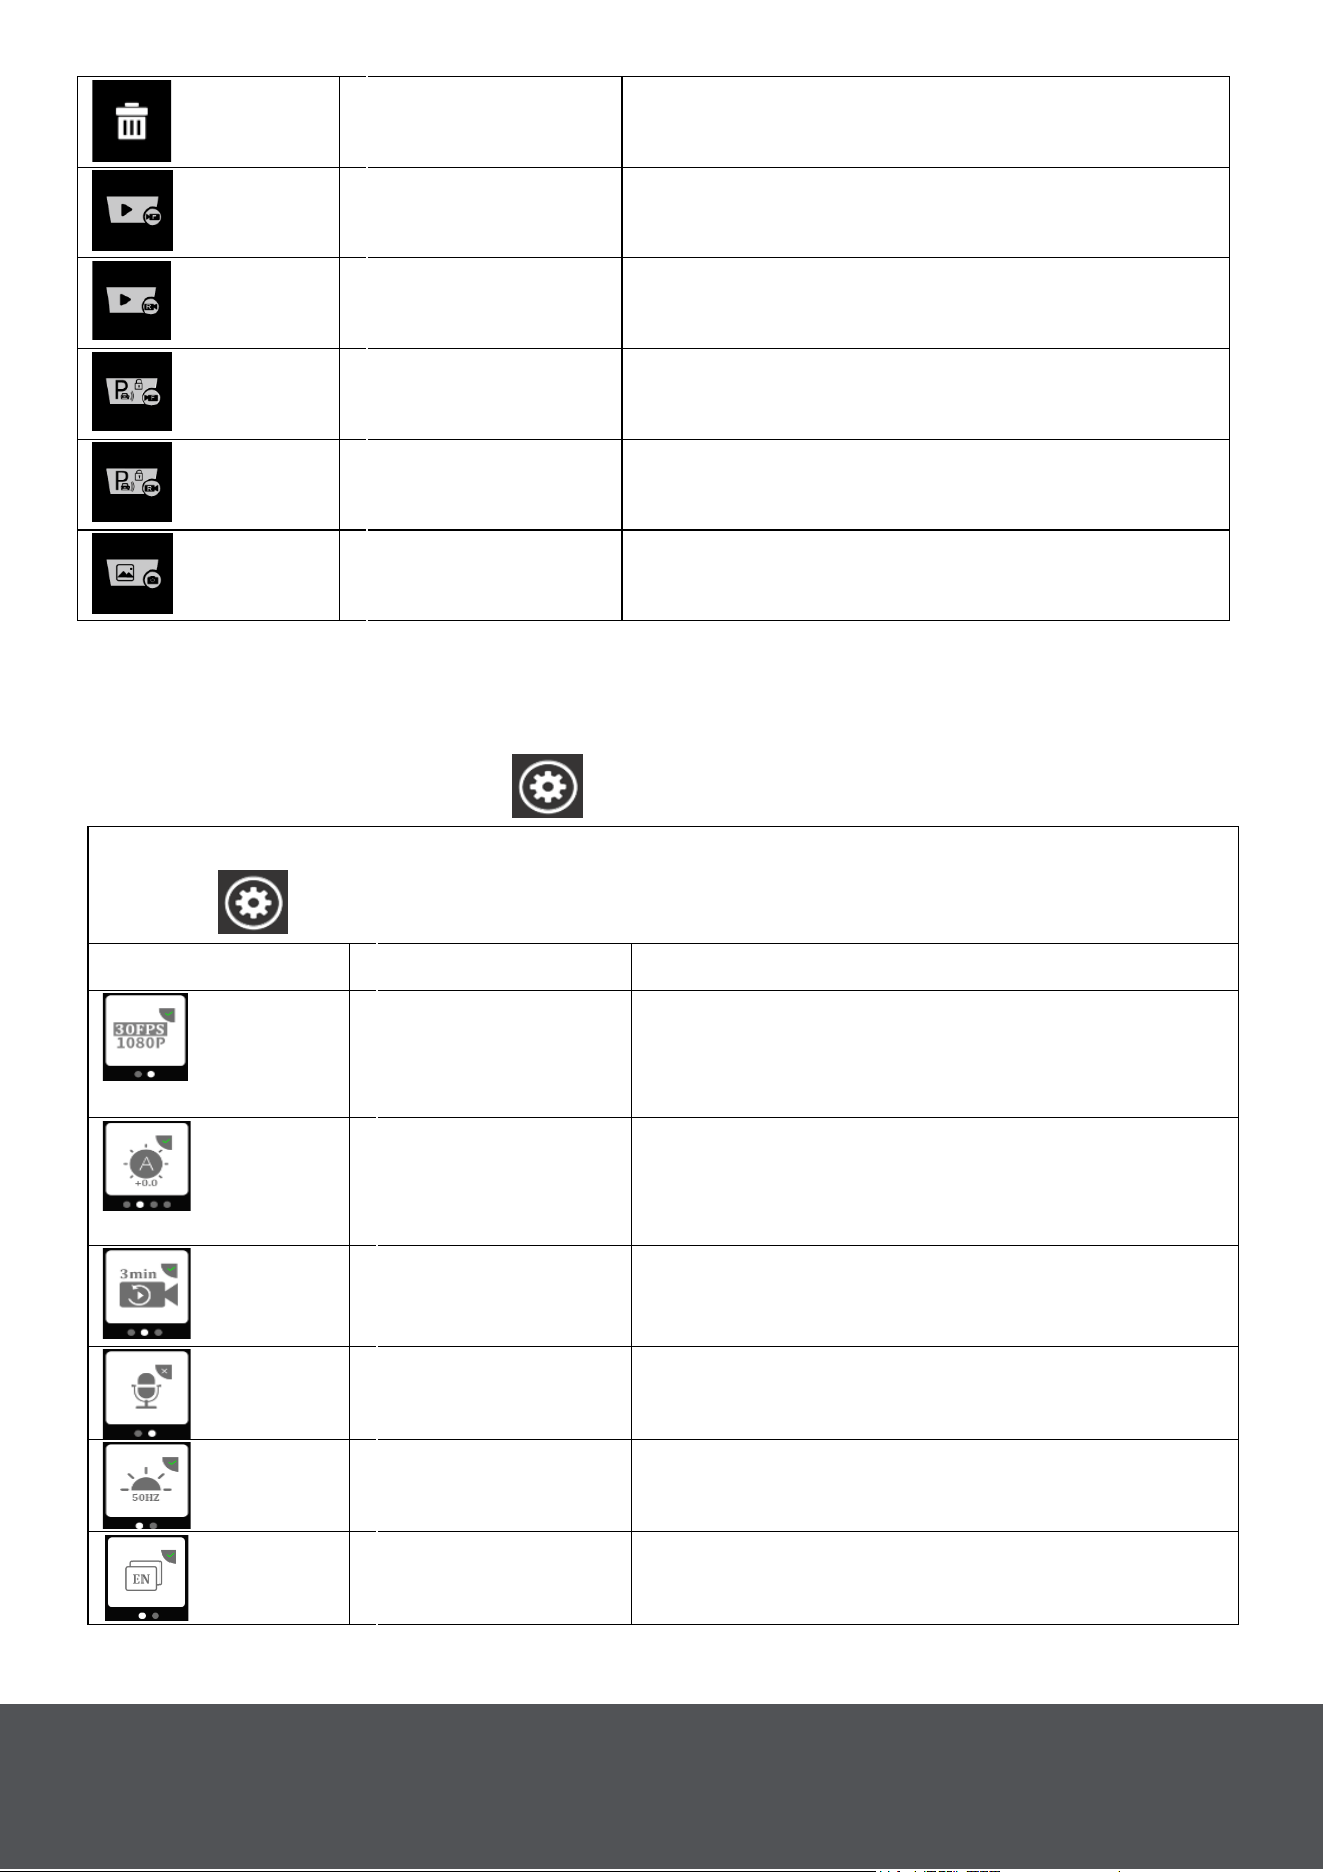
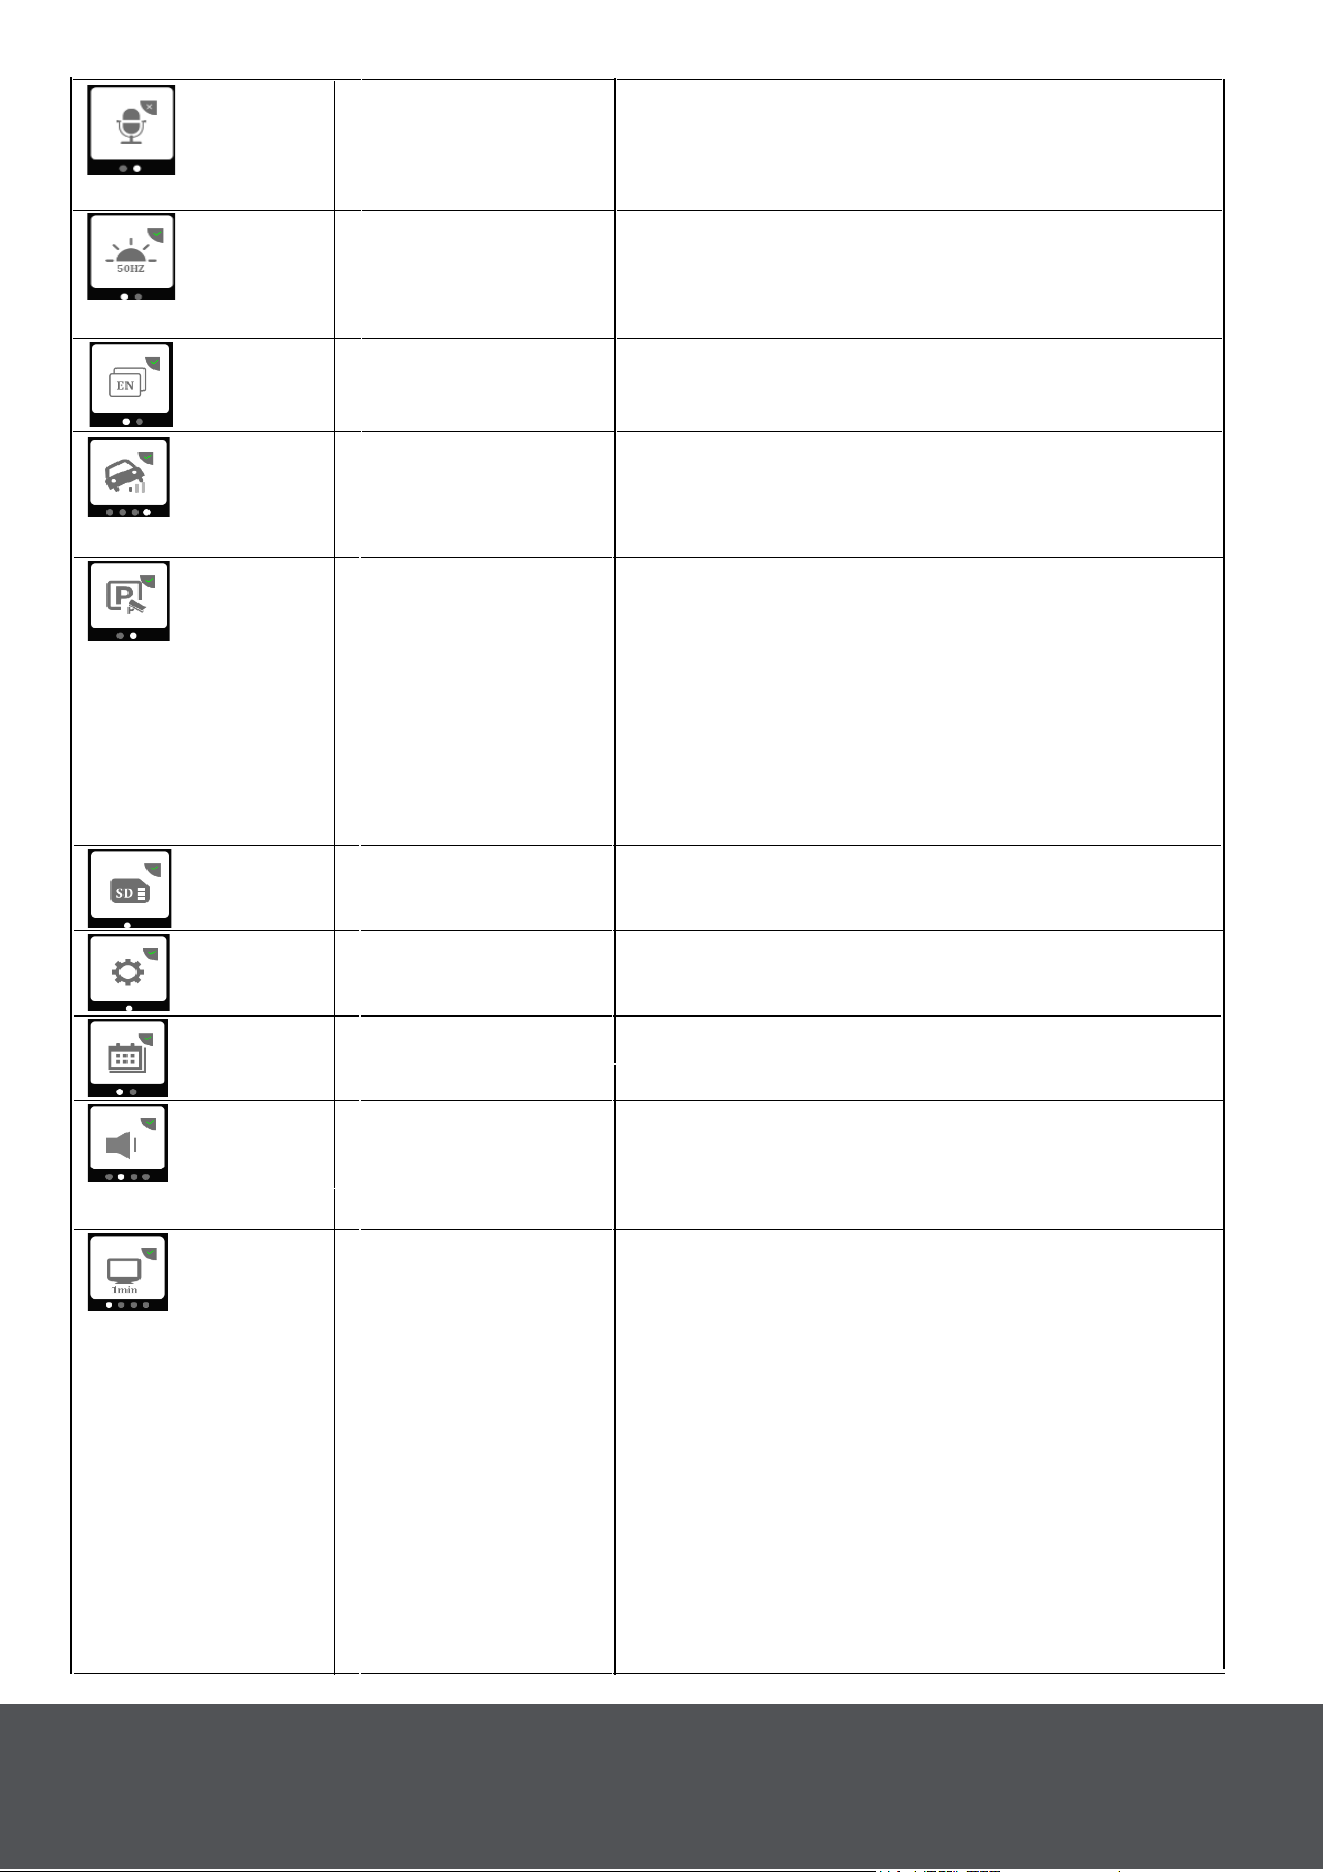
System Setting Menu
Touch any place on the screen to open the main menu, then
Touch to open the Settings.
Icon Description Feature
Resolution
Touch to set recording resolution: 1)
FHD
30fps. 2) HD 30fps.
Default FHD 30fps.
Exposure
Touch to set exposure: 2.0, 1.7,
1.3, 1.0, 0.7, 0.3, 0, -0.3, -0.7, -1.0,
-1.3, -1.7, -2.0. Default 0.
Loop Recording
Touch to set loop recording time:
1min/ 3m
in/ 5min. Default 3min.
Record Audio
Touch to turn on/off audio
recording. Default On.
Frequency
Touch to set frequency:
50Hz/60Hz. Default 50Hz.
Language
Touch to set language. Default
English.
Note: While in the playback Folder all of the oldest video and images will
be stored at the top while the newest ones will be saved at the bottom.
11
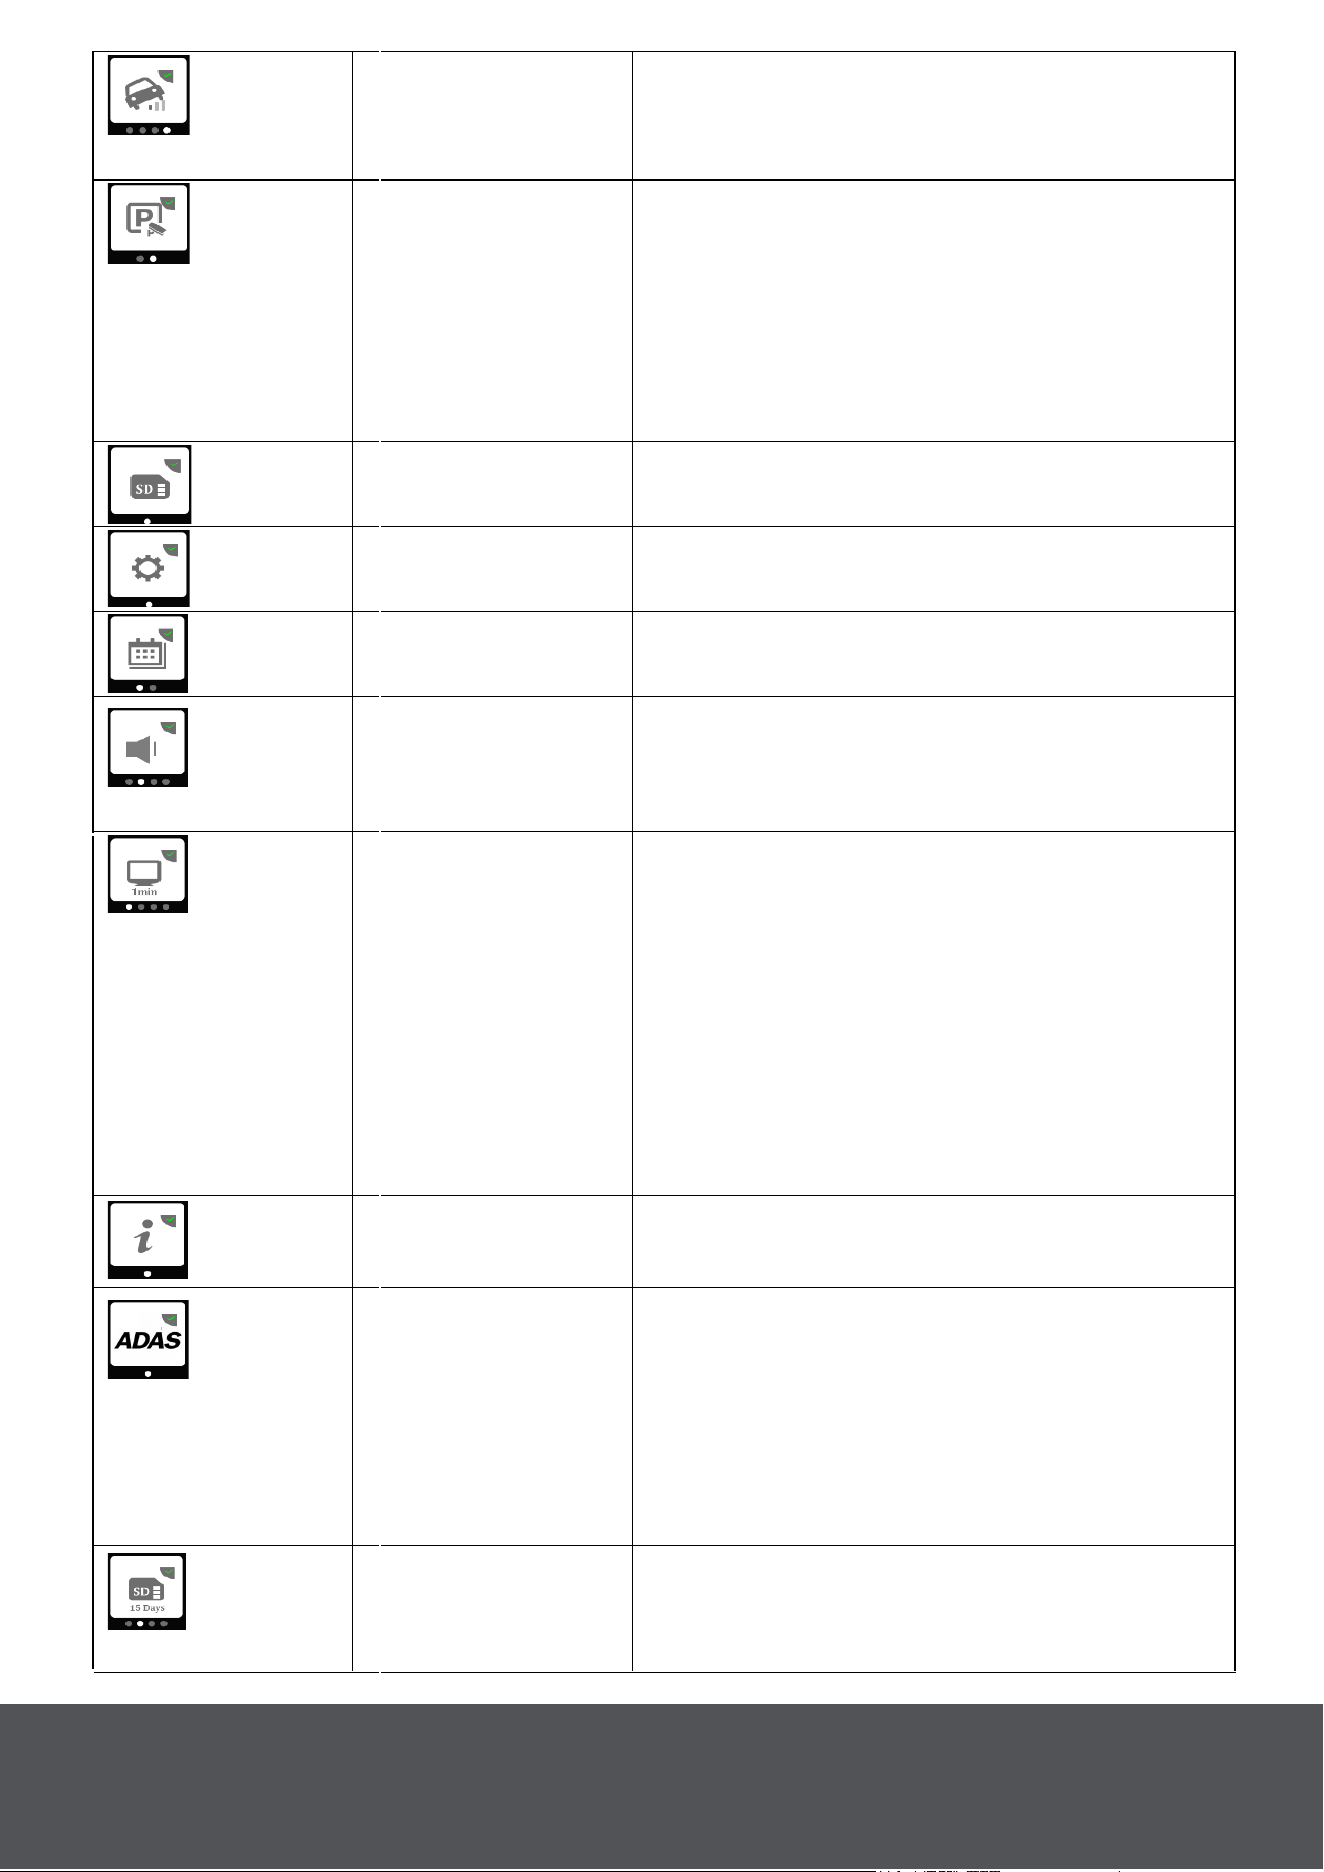
G-sensor
Touch to set G-sensor level: Off/
Low/ Middle/ High.
Default Middle.
Parking Mode
Touch to turn On/Off parking mode.
In Parking Mode, the Road Patrol
Touch duo will utilize the built in G-
sensor to turn itself on and record
(for up to ten seconds) in the event
of an accident while parked.
Format SD-Card Touch to format the inserted SD
Card.
Reset Settings Touch to reset to default settings.
Clock Settings Touch to set date/time.
Volume
Touch to set beep volume: Off/
Low/ Middle/ High.
Default Low.
Backlight
• Touch to set how long the screen
will remain on when not in use.
• There are four settings.
1) Off. 2) 1 min. 3) 2 min. 4) 3 min.
The default setting is Off.
• The screen may glow even when
off. This is a characteristic of the
high definition IPS touch screen.
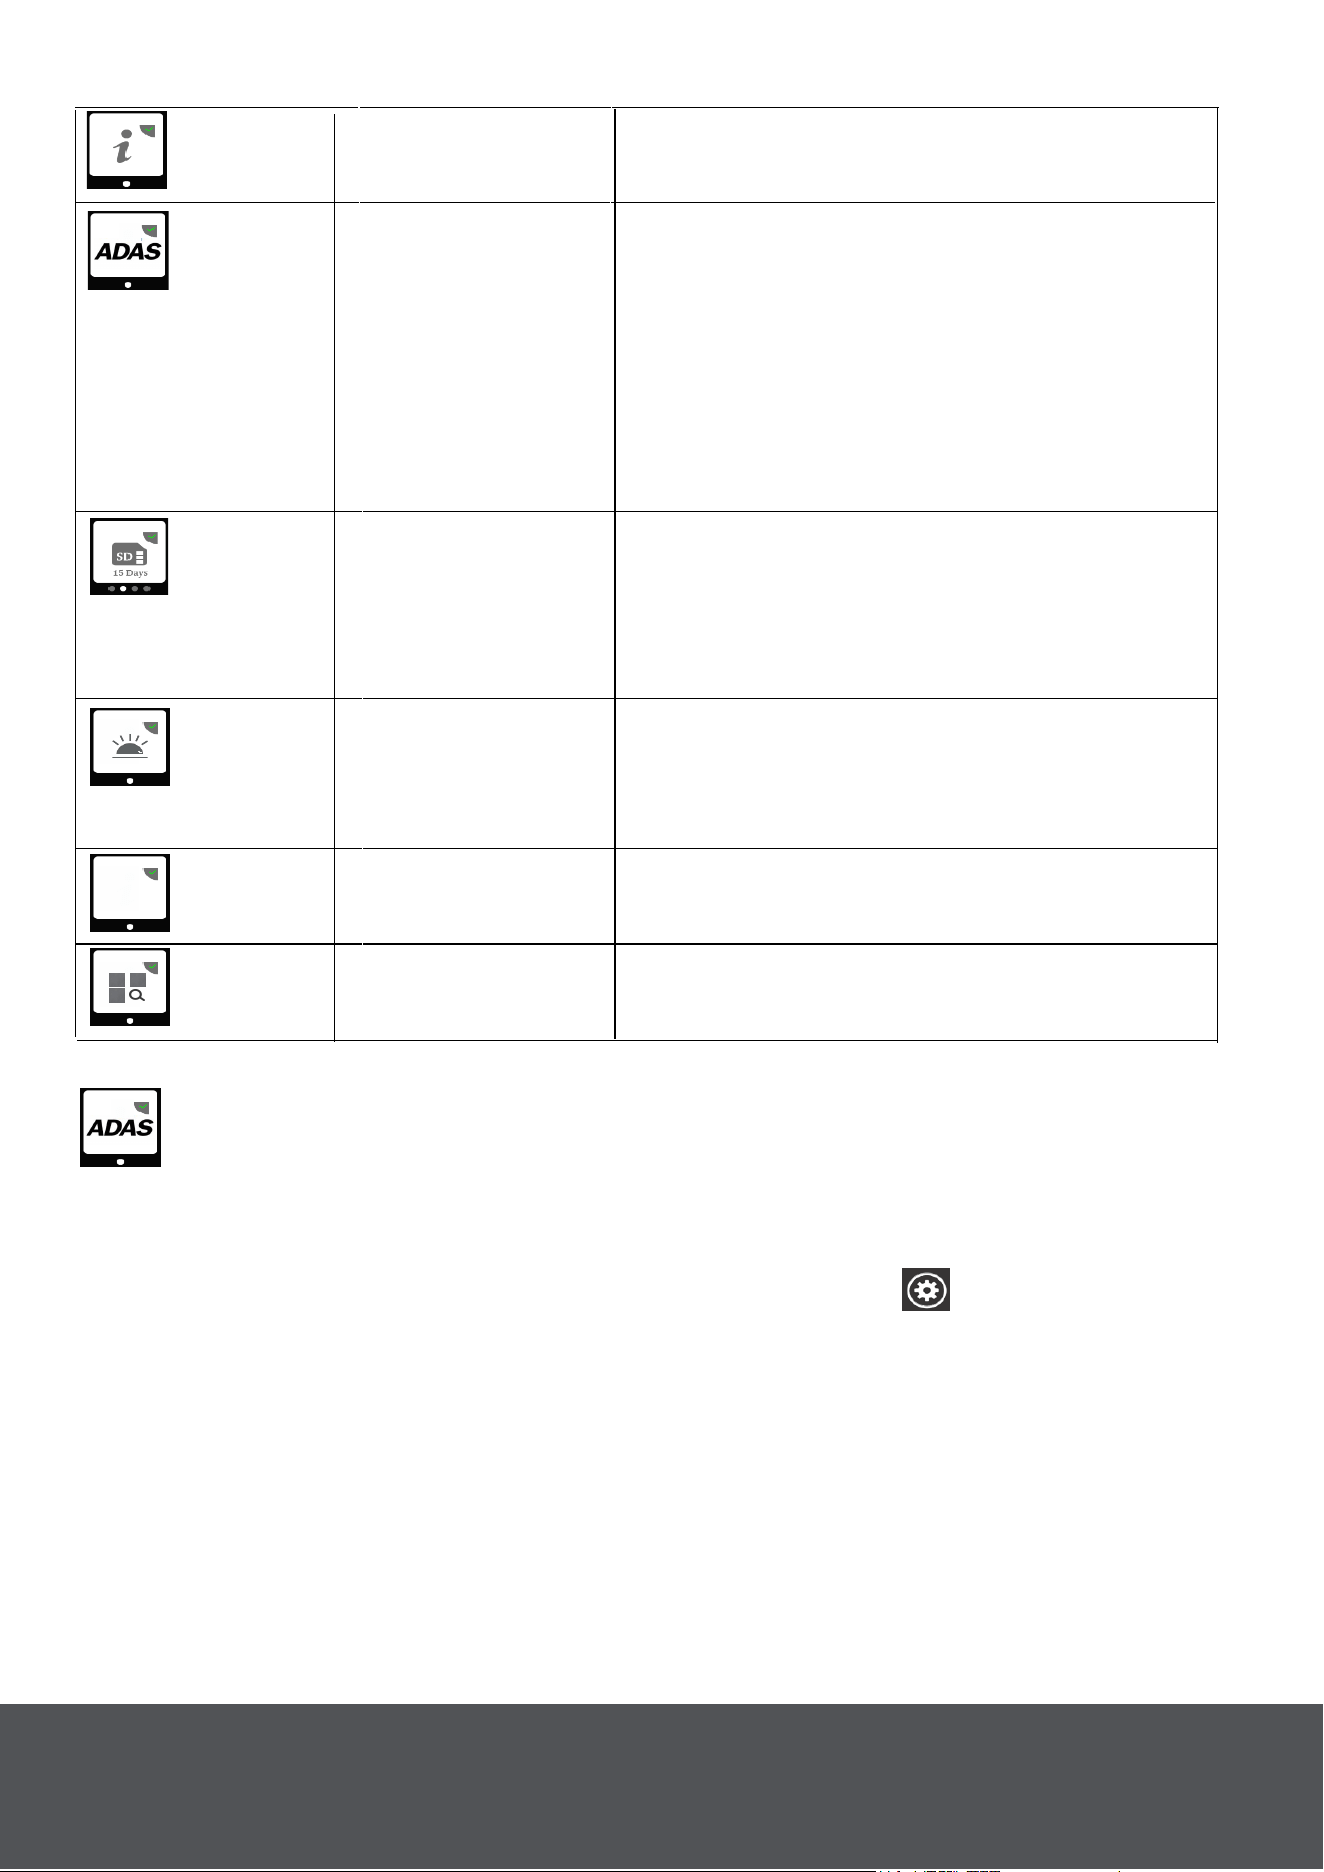
FW Version Touch to check the firmware version.
ADAS -
Advanced Driver
Assistance
System (Drive
Smart Alert
System™)
Format SD
Timer
Touch to set format SD warning:
Off/ 15 Days/ 30 Days/ 60 Days.
Default 30 Days.
Touch to turn On/Off the Lane
Departure and Forward Collision
Warning's. Which provide warnings
when you are either drifting out of
your lane or you are at risk of
colliding with the car in front of you.
12
More Details
On Page. 13
13
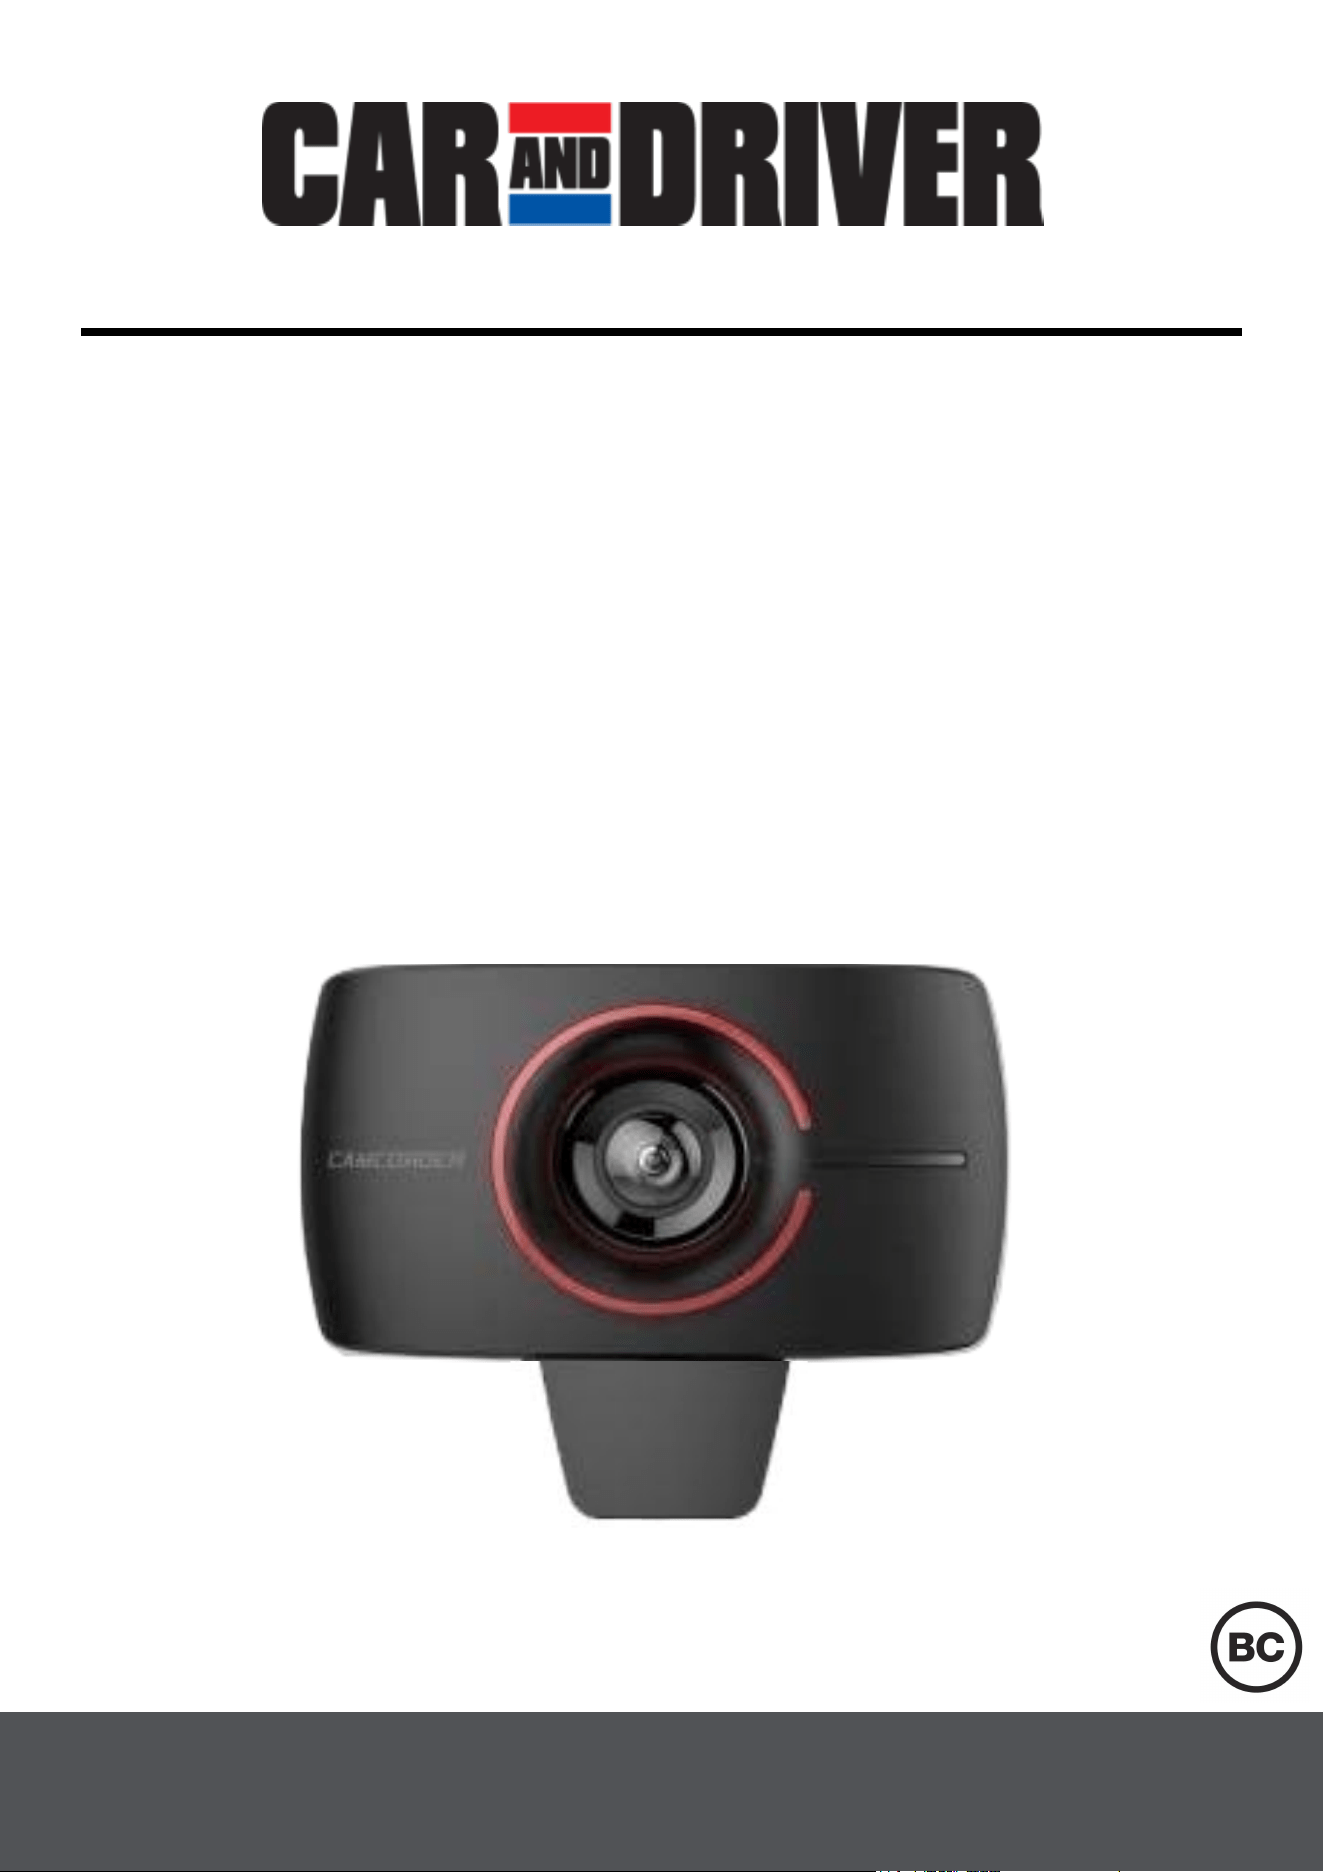
The Forward Collision Warning and the lane Departure warning are
both part of the Drive Smart Alert System and can be turned On/Off in
the System Settings Menu .
Forward Collision Warning: The Road Patrol Touch Duo will sound a
warning when you are approaching within 12-14 feet of the driver in
front of you.
Lane Departure Warning: Alerts you when your car veers from its
lane. Two green lines will be displayed on screen (Fig. 22). These lines
will line up with the lane lines on the road while driving.
__
__
Fig. 22
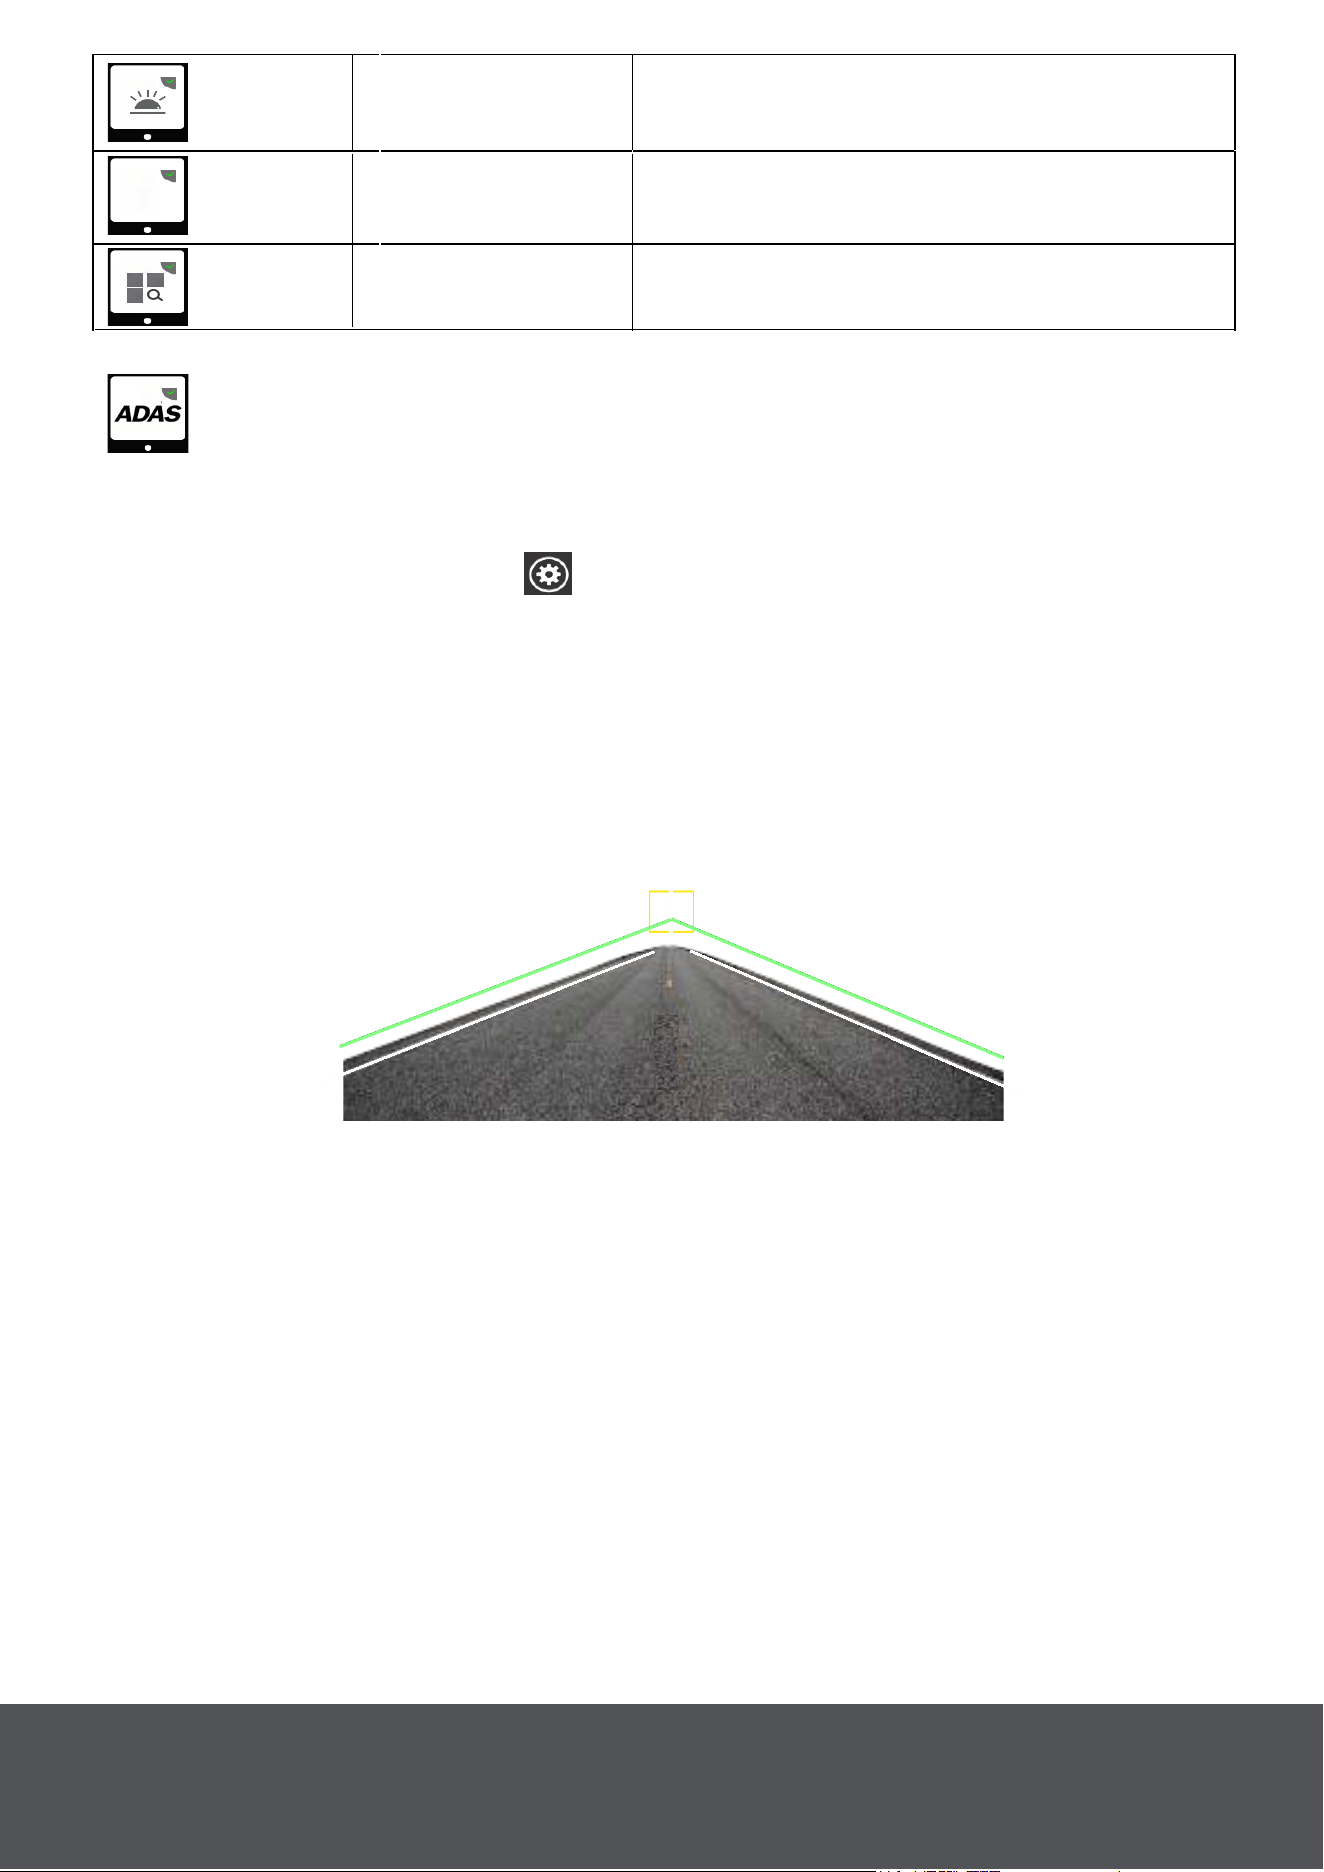
LED Turns the the LED ring On/ Off
Legal &
Regulatory
View Legal and regulatory
information.
LED
Call Us:
(833) 227-3274
Live Chat With Us:
www.CarAndDriverTech.com
Email Us:
FCC Statement
This device complies with part 15 of FCC Rules. Operation is subject
to the following conditions.
1. This device may not cause harmful interference.
2. This device must accept any interference received, including
interference that may cause undesired operation.
Infrared Switch
Turn the Infrared feature On/ Off/
Auto. Default on
ADAS - Advanced Driver Assistance System (Drive Smart
Alert System™)

SUMMIT ELECTRONICS LLC ONE YEAR LIMITED WARRANTY
SUMMIT ELECTRONICS LLC LIMITED WARRANTY (“Warranty”) ― For Product(“
Categories Listed in Chart Below (as applicable, “Product”) Before returning your
Product for service under this Warranty, please (i) read the instruction manual
carefully. If you are still having trouble with your Product, please contact Technical
Support at [email protected]
Warning: Some Products may contain components that are small enough to be
swallowed. Please keep out of reach of children.
Subject to the terms and conditions herein, SUMMIT ELECTRONICS LLC
(hereinafter called “SUMMIT ELECTRONICS LLC”) warrants to the original
purchaser of the Product
(“Customer”) that for the applicable Warranty Period listed below, the Product will be
free from defects in material or workmanship under normal, non-commercial use
(“Defects”). Warranty Period encompasses, as listed below, separate “Coverage
Periods” for Parts and Labor, each Coverage Period for one year, to begin from the
original date of Customer purchase. If Customer returns a defective Product (or any
component thereof) during the applicable
Warranty Period, SUMMIT ELECTRONICS LLC will, at its option, during the
specified Coverage Periods for Parts and Labor (as applicable) either: (i) repair
Product (or, as applicable, any component thereof) or (ii) replace the Product (or, as
applicable, any component thereof) with a new or refurbished Product (or, as
applicable, any component thereof), in either case free of charge to Customer for
Parts and/or Labor
(as applicable) during the specified Coverage Period only, and excluding applicable
shipping charges (noted below), for which the Customer is responsible. The
foregoing states the Customer’s exclusive remedy and SUMMIT ELECTRONICS
LLC’s sole liability for breach of the limited warranty contained herein.
This Warranty specifically excludes any Product (or, as applicable, any component
thereof) that has been subject to or Defects resulting from: (a) any neglect or misuse
by a Customer, an accident, improper application, violation of operating instructions
for the Product, any other Customer-induced damage, or the alteration or removal of
any Product serial number: (b) any modification or repair to Product (or, as
applicable, any component thereof) by any party other than SUMMIT
ELECTRONICS LLC or a party authorized in writing by SUMMIT ELECTRONICS
LLC; (c) any damage to Product (or, as applicable, any component thereof) due to
power surges, incorrect electrical voltage, misconnection to any device, or
malfunction of any device used with the Product (or, as applicable, any component
thereof); (d) cosmetic damage to the Product (or, as applicable, any component
thereof) caused by normal wear and tear; (e) shipping damage that occurs while the
Product is in transit; (f) damage caused by heat sources,
sunlight, electromagnetic conditions, or other climatic conditions; or (g) any acts of
14

God. Product is sold to Customer for personal, non-commercial use only. Product
is not warranted for Customer’s commercial or rental use. In addition, Product is not
warranted against failure, and should not be used by Customer for any application
where (i) there is a risk that any data stored on Product will be breached or
otherwise compromised, or (ii) the data stored on Product is relied upon for medical
or lifesaving applications. SUMMIT ELECTRONICS LLC disclaims any Warranty for
any of the foregoing uses to the fullest extent permitted by law. Customer assumes
any and all risks associated with such uses of Product, and agrees to indemnify
SUMMIT ELECTR-ONICS LLC for any damages claimed against SUMMIT
ELECTRONICS LLC for such uses. EXCEPT FOR EXPRESS WARRANTIES
STATED ABOVE AND TO THE MAXIMUM EXTENT PERMITTED BY LAW, THE
PRODUCTS ARE PROVIDED “AS IS”, AND SUMMIT ELECTRONICS LLC
DISCLAIMS ALL OTHER WARRANTIES, INCLUDING WITHOUT LIMITATION
ANY IMPLIED WARRANTY (I) OF MERCHANTABILITY, (II) OF FITNESS FOR A
PARTICULAR PURPOSE, OR (III) OF NON-INFRINGEMENT OF THIRD PARTY
RIGHTS. TO THE MAXIMUM EXTENT PERMITTED BY APPLICABLE LAW, IN NO
EVENT WILL SUMMIT ELECTRONICS LLC BE LIABLE TO CUSTOMER OR ANY
THIRD PARTY FOR ANY INDIRECT, SPECIAL, INCIDENTAL, CONSEQUENTIAL,
EXEMPLARY OR PUNITIVE DAMAGES, INCLUDING, WITHOUT LIMITATION,
ANY LOST PROFITS OR REVENUES, LOSS OR INACCURACY OF ANY DATA
OR COST OF SUBSTITUTE GOODS, REGARDLESS OF THE THEORY OF
LIABILITY (INCLUDING NEGLIGENCE) AND EVEN IF SUMMIT ELECTRONICS
LLC HAS BEEN ADV ISED OF THE POSSIBILITY OF SUCH DAMAGES,
SUMMIT ELECTRONICS LLC’S AGGREGATE LIABILITY TO CUSTOMER FOR
ACTUAL DIRECT DAMAGES FOR ANY CAUSE WHATSOEVER SHALL BE
LIMITED TO THE CUMULATIVE PRODUCT FEES PAID BY THAT CUSTOMER
FOR THE PRODUCT CAUSING THE DAMAGES, IF ANY. This Warranty gives
Customer specifics rights, and Customer may also have other rights that vary from
jurisdiction to jurisdiction. To obtain Warranty service, Customer must email
SUMMIT ELECTRONICS LLC Technical Support prior to making a Product return.
Customer must include with Product return the following items (failure to enclose
any of these items may result in a delay in the processing of your Warranty claim):
(i) a dated sales receipt that indicates the place of purchase, model number of
Product, and amount paid; (ii) a detailed description of Customer’s problem with
Product; (iii) Customer’s full name, phone number, and return address, and; (iv) a
money order made out to SUMMIT ELECTRONICS LLC Electronics Corporation to
cover return shipping charges to US destinations only, for the applicable dollar
amount shown for the Product in the table above. SUMMIT ELECTRONICS LLC will
not make return shipments to a P.O. Box. For shipping to international addresses,
actual freight will be charged to Customer. Return your Product freight-prepaid in its
original packaging, or packaging that affords an equal measure of protection.
Please allow 4 to 6 weeks for the processing of your claim (6 to 8 weeks from
November to February).
You must email SUMMIT ELECTRONICS LLC Technical Support prior to making a
return. Please ask if you are unsure of which category your product falls under
*US destinations only.
15
MANUAL DE USUARIO - ESPAÑOL
MODELO #: ZX-1222 & ZX-1002
ESTAMOS AQUÍ PARA AYUDAR
Llámenos:
(833)833) 227-3274
Chat En Vivo Con Nosotros::
www.CarAndDriverTech.com
Envíenos Un Correo Electrónico:
Road Patrol Touch Duo

1
• Este producto no es impermeable. No exponga este producto a la lluvia
o a la humedad.
• No bloquee las aberturas de ventilación.
• Instalar de acuerdo con las instrucciones del fabricante.
• No instale el dispositivo donde bloquee la vista del conductor
de la
carretera, los espejos o el despliegue de airbags.
• Mantenga su atención en el camino! No intente utilizar o ajustar ninguna
configuración en el Road Patrol Touch Duo mientras el coche está en
movimiento.
• Asegúrese de que el objetivo Road Patrol Touch Duo se mantenga
limpio y asegúrese de que su campo de visión esté libre de cualquier
obstrucción.
• No instale cerca de ninguna fuente de calor, como radiadores, registros
de calor, estufas u otros aparatos (incluidos los amplificadores) que
produzcan calor.
• No deje el dispositivo bajo la luz solar directa durante largos períodos de
tiempo.
• Las mejores temperaturas de funcionamiento superarán los
-20℉- 104℉ Sí.
• El usuario debe volver a formatear la tarjeta SD al menos una vez al mes
para evitar que la tarjeta SD se estrese. Nota: El usuario debe hacer una
copia de seguridad de todos los archivos guardados antes de volver a
formatear la tarjeta, ya que al hacerlo se eliminarán todos los archivos.
• Nunca intente desmontar, reparar o hacer ninguna modificación al Road
Patrol Touch Duo, ya que al hacerlo se anulará la garantía.
• Utilice únicamente los accesorios/accesorios especificados por el
fabricante.
• Desenchufe este dispositivo cuando no se utilice durante largos períodos
de tiempo.
• Si es necesario realizar reparaciones, utilice personal de servicio
cualificado. Las reparaciones pueden ser necesarias si el dispositivo ha
sido dañado de alguna manera. Como el cable de
alimentación o el enchufe dañado, el dispositivo expuesto a la lluvia o la
humedad, objetos que caen en el dispositivo, el dispositivo no funciona
normalmente o se ha caído.
• El Road Patrol Touch Duo no es compatible con Dash Cam Hardwire Kit.
No debe cablear este dispositivo a su coche.
Léame
Instrucciones De Seguridad Importantes
Lea estas instrucciones, mantenga estas instrucciones, preste atención a
todas las advertencias, siga todas las instrucciones.
Nota: Esto no es una cámara de acción. Debe estar enchufado en su
vehículo en todo momento para un uso adecuado. El dúo Road Patrol
Touch permanecerá encendido durante unos segundos cuando esté
desconectado.
Descripción General Del Producto
13. Banda elástica para
reposacabezas.
14. Clips de cable adhesivos
15. Cable de alimentación
16. (2) Soportes de ventosa
17. Cable de datos USB
18. Anillo LED
19. Disco adhesivo
1. Puerto Micro USB
2. Cámara Trasera
3. Botón Menú/Modo
4. Botón de encendido
5. Ranura para tarjeta TF
6. Micrófono
7. Cámara frontal
8. Altavoz
9. Luz infrarroja
10. Montaje de extensión
11. Puertos AUX para cable de extensión
12. (2) Cables de extensión (3 y 16 pies)
4. Power
Vista Superior
Vista Trasera
-----17
----13
----12
----12
---------18
---14
----2
----10
----16
----15
11----
--
1
--
5
--
11
--
4
--
9
--
3
87
--
6
---19
2
Conecte El Road Patrol Touch Duo Al Soporte De Ventosa.
A
tornille uno de los soportes de ventosa {16} proporcionados en el
c
uerpo principal del Road Patrol Touch Duo (Fig. 1).
Monte El Road Patrol Touch Duo En El Parabrisas
Tome el soporte de ventosa con Road Patrol Touch Duo acoplado y
compruebe que el bloqueo de la ventosa está abierto (Fig. 2). Presione
firmemente la ventosa sobre el parabrisas por el espejo retrovisor y
presione la cerradura cerrada (Fig. 3) para asegurar la Road patrol
Touch Duo en su lugar.
Fig.1
Fig. 3
_
_______
Bloquear
Cerrado
Configuración Y Montaje De El Road Patrol
Touch Duo
_
________
Bloquear
Abierto
Fig. 2
Nota Importante: La primera mención de cualquier accesorio y piezas
seguido de su número correspondiente en { }. Esto le permitirá
identificar más fácilmente la pieza mencionada utilizando la descripción
general del producto en la página. 3.
3
Conecte El Road Patrol Touch Duo A Su Coche Con El
Cable De Alimentación
Toma el extremo del enchufe del cable de alimentación {15} y conéctalo
a la toma de cigarrillos de tu coche (Fig. 4). Tome el otro extremo del
c
able de alimentación y conéctelo al Road Patrol Touch Duo (Fig. 5).
Asegúrese de que el cable está asegurado a lo largo del borde del
parabrisas y del forro del techo utilizando los clips de cable adhesivos
{14}. Mientras el coche esté encendido encendido/apagado, la patrulla
Road Touch Duo también encenderá el encendido/apagado.
Fig. 4
Fig. 5
Configuración De La Leva Trasera
Opción 1: Configuración: Uso De Ventosa
Remove The Rear Camera from The Road Patrol Touch Duo
Separe la cámara trasera {2} del cuerpo principal del Road Patrol Touch
Duo (Fig. 6).
Nota: Asegúrese de no tirar el Road Patrol Touch Duo del parabrisas si
lo ha montado previamente.
Fig. 6
4
Conecte El Road Patrol Touch Duo Al Soporte De
Extensión.
Tome el cable de extensión {12} proporcionado y conecte un extremo
al Road Patrol Touch Duo montado (Fig. 9). Tome el otro extremo del
cable de extensión y conéctelo al soporte de extensión (Fig. 10).
Conecte El Road Patrol Touch Duo Al Soporte De Ventosa.
Atornille el segundo soporte de ventosa proporcionado en el soporte de
extensión {10} (Fig. 7). A continuación, inserte la cámara trasera en el
soporte de extensión (Fig. 8).
Fig. 7
Fig. 8
Fig. 9
Fig. 10
5
Selección De Una Ubicación Para La Cámara Trasera.
La cámara trasera se puede montar en el parabrisas o en la
ventana
trasera. Para las ubicaciones de montaje y los ángulos de
visión sugeridos, véase (Fig. 11) a continuación.
Fig. 11
Montaje De La Cámara Trasera En La Ventana Trasera.
Tu Road Patrol Touch duo viene con un disco adhesivo {19} para
que puedas montar tu cámara trasera en el interior de tu ventana
trasera. Al montar la cámara trasera en un lugar que tenga líneas de
descongelación (Fig. 12). Recomendamos que pele el disco
adhesivo proporcionado (Fig. 13) y lo aplique a la ventana (Fig. 14).
Esto asegurará mejor la ventosa incluso cuando está
experimentando cambios de temperatura (Fig. 15).
Nota: Debe esperar 30 minutos después de configurar el disco
adhesivo antes de instalar la cámara trasera, ya que el adhesivo
necesita tiempo para ajustar.
Advertencia: El disco adhesivo está diseñado sólo para su uso con el
Road Patrol Touch Duo.
Fig. 12
Fig. 13
__
_____
Puede Que No
Se Pegue
Correctamente .
_
_____________
Pelar Película
Roja
6
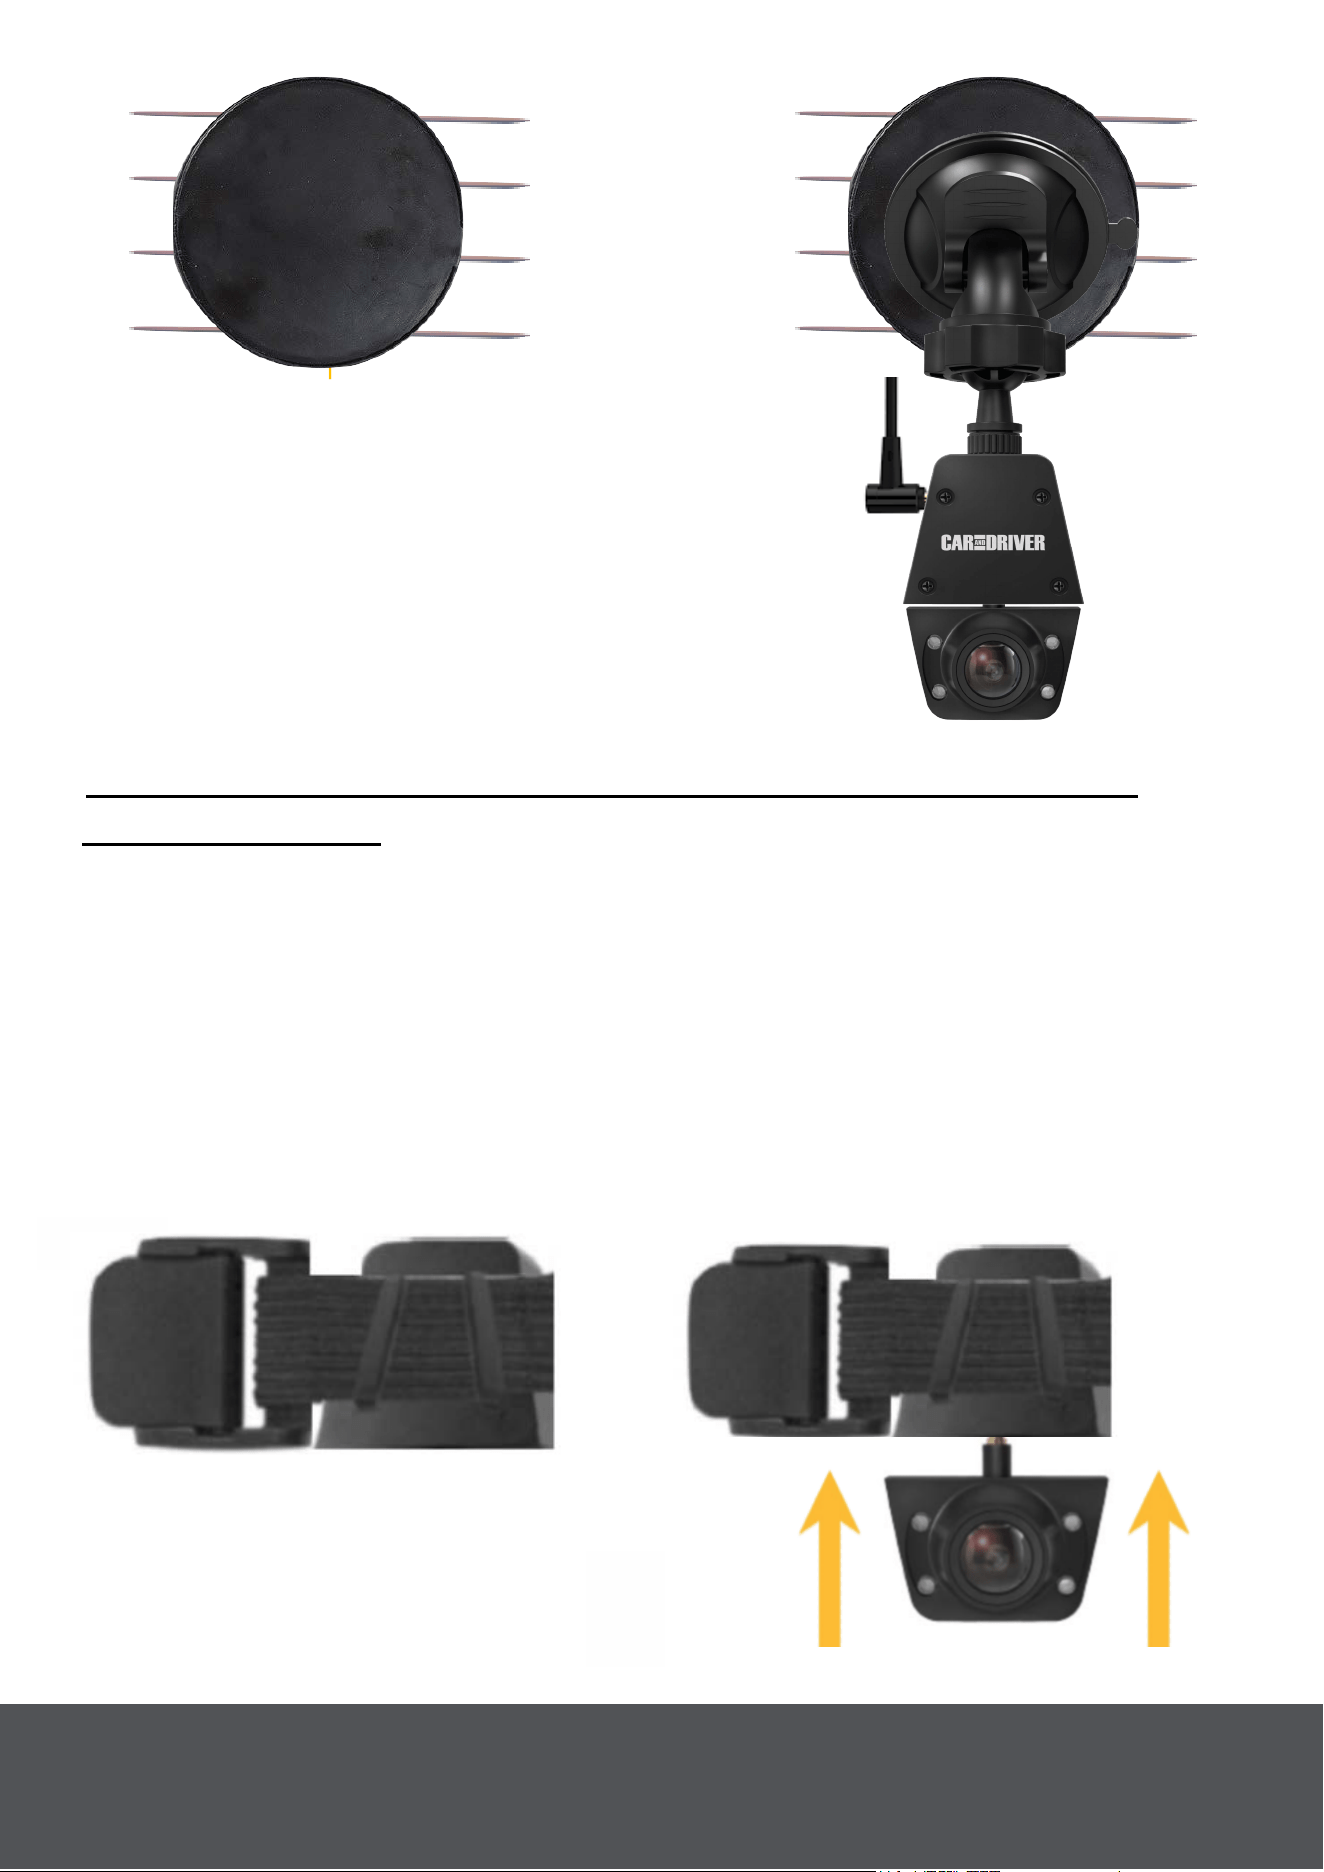
Fig. 17
Fig. 14
Fig. 15
___
Coloca El Lado Adhesivo
Sobre Las L
íneas De
Descongelación.
______
______
Secure
Sobre Disco
Adhesivo
Opción 2: Configuración: Uso De La Banda Elástica Del
Reposacabezas
Nota: Consulte «Quitar la cámara trasera del Road Patrol Touch Duo»
en la página 5.
Inserte La Banda Elástica En El Soporte De Extensión Del
Road Patrol Touch Duo.
Pase la banda elástica del reposacabezas proporcionada {13} en el
soporte de extensión {10} (Fig. 16). A continuación, inserte la cámara
trasera {2} en el soporte de extensión (Fig. 17).
Fig. 16
____
____
______
_
_
Mont
aje De Extensión
De Rosca A Través
7
Conecte El Road Patrol Touch Duo Al Soporte De Extensión.
Tome el cable de extensión {12} proporcionado y conecte un extremo al
Road Patrol Touch Duo montado (Fig. 18). Tome el otro extremo del
c
able de extensión y conéctelo al soporte de extensión detrás de la
banda elástica (Fig. 19).
Fig. 18
Fig. 19
Monte La Cámara Trasera En La Parte Posterior Del
Reposacabezas Del Conductor O Del Pasajero.
La cámara trasera {2} se puede montar en la parte posterior del
r
eposacabezas del conductor o del acompañante utilizando la banda
elástica del reposacabezas. Consulte (Fig. 20) y (Fig. 21) a continuación.
Fig. 20
Fig. 21
8

E
ncendido En El Road Patrol Touch Duo
Cuando el Road Patrol Touch Duo está conectado a un coche que e
stá
encendido, entonces el Road Patrol Touch Duo también se encenderá.
Consulte «Conecte el Road Patrol Touch Duo a su coche con el cable
de alimentación» en la página 4.
Un indicador de carga rojo comenzará a parpadear en la pantalla
demostrando que la grabación ha comenzado.
Nota: El usuario también puede encender y apagar manualmente el
Road Patrol Touch Duo presionando y manteniendo pulsado el botón
«Encendido» durante tres segundos.
Nota:
Formatee la tarjeta Micro SD antes de empezar a grabar por primera
vez.
Asegúrese de que la tarjeta Micro SD se ha insertado correctam
ente
antes de encender el dispositivo.
Apagar
Opción 1: Cuando el motor del coche está apagado, el dispositivo se
apagará automáticamente poco después.
Opción 2: Para apagar manualmente el dispositivo, mantenga pulsado el
botón de encendido (4) durante al menos tres segundos. No expulse la
tarjeta SD durante este proceso, ya que puede causar daños en el último
archivo grabado.
Nota: Se mantendrá encendido el tiempo suficiente para guardar la
grabación actual.
9

Toca cualquier lugar de la pantalla para abrir el menú principal
Icono
Descripción
Característica
Grabando
Toque para activar/desactivar la
grabación
Tiro de fotos
Toque para tomar fotos.
Audio
Toque para activar/desactivar la
grabación de audio.
Bloqueo de
vídeo
Toque durante la grabación para
bloquear el archivo de grabación
actual.
Modo de
visualización
Toque para intercambiar entre las
cámaras principales y la vista de
la cámara trasera en pantalla.
Reproducción
Toque para abrir la interfaz de
reproducción.
Configuración
del sistema
Toque para abrir la configuración
del sistema o pulse el botón
«Menú».
Menú Principal
Carpeta De Reproducción
Icono
Descripción Característica
Espalda
Toque para volver a la interfaz
principal.
Arriba Pág.
Toca cualquier lugar de la pantalla para abrir el menú principal. A
continuación, pulse para abrir el modo de reproducción.
Abajo Pág abajo.
10

Bloqueo de
vídeo
Toque para bloquear el archivo
seleccionado.
Borrar
Toque para eliminar el archivo
seleccionado.
Vídeo frontal
Toca para reproducir las
grabaciones del Road Patrol Touch
Duo.
Vídeo Trasero
Toque para reproducir las
grabaciones de la cámara trasera.
Vídeo frontal
bloqueado
Toca para ver las grabaciones
bloqueadas de Road Patrol Touch
Duo.
Vídeo trasero
bloqueado
Toque para ver las grabaciones
bloqueadas de la cámara trasera.
Imagen Toque para ver imágenes.
Nota: Mientras esté en la carpeta de reproducción, todos los vídeos e
imágenes más antiguos se almacenarán en la parte superior, mientras
que los más nuevos se guardarán en la parte inferior.
System Setting Menu
Toca cualquier lugar de la pantalla para abrir el menú principal y
luego Tócala
para abrir la Configuración.
Icono Descripción Característica
Resolución
Toque para ajustar la resolución de
grabación: FHD 30fps/ HD 30fps.
FHD predeterminado 30 fps.
Exposición
Toque para ajustar la exposición:
2.0, 1.7, 1.3, 1.0, 0.7, 0.3, 0, -0.3,
-0.7, -1.0, -1.3, -1.7, -2.0. Valor
predeterminado 0.
Grabación en
bucle
Toca para ajustar el tiempo de
grabación en bucle: 1 min/3 min/5
min. Valor predeterminado: 3 min.
11
Grabar audio
Toque para activar/desactivar
la grabación de audio.
Activado predeterminado.
Frecuencia
Toque para ajustar la
frecuencia: 50Hz/60Hz. Valor
predeterminado: 50 Hz.
Idioma
Toque para definir Idioma. Inglés
predeterminado.
Sensor G
Toque para ajustar el nivel del
sensor G: apagado/bajo/medio/alto.
Medio predeterminado.
Modo de
aparcamiento
Toque para activar o desactivar el
modo de estacionamiento. En el
modo de estacionamiento, el dúo
Road Patrol Touch utilizará el sensor
G incorporado para encenderlo y
grabar (hasta diez segundos) en
c
aso de accidente.
Formato de
tarjeta SD
Toque para formatear la tarjeta
SD insertada.
Restablecer
configuración
Toque para restablecer la
configuración predeterminada.
Ajustes del reloj Toque para establecer fecha/hora.
Volumen
Retroiluminar
12
• Toque para establecer cuánto
tiempo permanecerá encendida la
pantalla cuando no esté en uso.
• Hay cuatro configuraciones.
1) Apagado. 2) 1 min. 3) 2 min. 4)
3 min.
El valor predeterminado es
Desactivado.
• La pantalla puede brillar incluso
cuando está apagada. Esta es
una característica de la pantalla
táctil IPS de alta definición.
Toque para ajustar el volumen de
pitido: Desactivo/Bajo/Medio/Alto.
V
alor mínimo predeterminado.
Formato
SD Timer
Toque para configurar el formato
SD advertencia: apagado/15
días/30 días/60 días. Valor
predeterminado de 30 días.
Interruptor
infrarrojo
Activa la función Infrarrojos,
Desactiva/Automático. Valor
predeterminado activado.
LED Enciende y apaga el anillo LED
Legal &
Regulatory
Ver información legal y
normativa.
LED
13
La advertencia de colisión directa y la advertencia de salida del carril
forman parte del sistema Drive Smart Alert y se pueden activar o
desactivar en el menú de configuración del sistema .
Advertencia De Colisión Directa: El Road Patrol Touch Duo hará
sonar una advertencia cuando te acerques a 12-14 pies del conductor
frente a ti.
Advertencia De Salida De Carril: Le avisa cuando su coche se desvía
de su carril. Se mostrarán dos líneas verdes en la pantalla (Fig. 22).
Estas líneas se alinearán con las líneas de carril en la carretera mientras
se conduce.
ADAS -
Advanced
Driver
Assistance
System (Drive
Smart Alert
System™)
Toque para activar/desactivar las
advertencias de salida de carril y
colisión directa. Que proporcionan
advertencias cuando usted está a
la deriva fuera de su carril o usted
está en riesgo de colisionar con el
coche delante de usted.
Más detalles en
la página. 13
Versión FW
Toque para comprobar la versión del
firmware.
ADAS - Advanced Driver Assistance System (Drive Smart
Alert System™)

Llámenos:
(833) 227-3274
Chat En Vivo Con Nosotros:
www.CarAndDriverTech.com
Envíenos un correo electrónico:
Declaración de la FCC
Este dispositivo cumple con la parte 15 de las Reglas de la FCC. El
funcionamiento está sujeto a las siguientes condiciones.
1. Este dispositivo no puede causar interferencias dañinas.
2. Este dispositivo debe aceptar cualquier interferencia recibida,
incluidas las interferencias que puedan causar un funcionamiento
no deseado.
14
__
__
Fig. 22

SUMMIT ELECTRONICS LLC GARANTÍA LIMITADA DE UN AÑO
GARANTÍA LIMITADA DE SUMMIT ELECTRONICS LLC («(«Garantía») ― Para las
categorías de productos enumeradas en la tabla siguiente (según corresponda,
«Producto») Antes de devolver su producto para el servicio bajo esta garantía, por
favor (i) lea atentamente el manual de instrucciones. Si sigue teniendo problemas con
su producto, póngase en contacto con el servicio de asistencia técnica en
Advertencia: Algunos productos pueden contener componentes que son lo
suficientemente pequeños para ser tragados. Por favor, manténgalo fuera del alcance
de los niños.
Sujeto a los términos y condiciones aquí presentes, SUMMIT ELECTRONICS LLC
(en adelante denominado «SUMMIT ELECTRONICS LLC») garantiza al comprador
original del Producto («Cliente») que durante el período de garantía aplicable que se
indica a continuación, el Producto estará libre de defectos en el material o la mano de
obra bajo un uso normal y no comercial («Defectos»). El Período de Garantía abarca,
como se indica a continuación, «Períodos de Cobertura» separados para Piezas y
Mano de Obra, cada Período de Cobertura de un año, a partir de la fecha original de
compra del Cliente. Si el Cliente devuelve un Producto defectuoso (o cualquier
componente del mismo) durante el Período de garantía, SUMMIT ELECTRONICS
LLC, a su elección, durante los períodos de cobertura especificados para piezas y
mano de obra (según corresponda): (i) reparar el Producto (o, según corresponda,
cualquier componente del mismo) o (ii) reemplazar el Producto (o, según
corresponda, cualquier componente del mismo) por un Producto nuevo o
reacondicionado (o, según corresponda, cualquier componente del mismo), en
cualquier caso de forma gratuita al Cliente por piezas y/o mano de obra (según
corresponda) durante el período de cobertura especificado, y excluyendo los gastos
de envío aplicables (indicados a continuación), de los que el Cliente es responsable.
Lo anterior indica el recurso exclusivo del Cliente y la única responsabilidad de
SUMMIT ELECTRONICS LLC por incumplimiento de la garantía limitada contenida en
el presente documento.
Esta Garantía excluye específicamente cualquier Producto (o, según corresponda,
cualquier componente del mismo) que haya sido objeto o Defectos resultantes de: (a)
cualquier negligencia o mal uso por parte de un Cliente, un accidente, una aplicación
incorrecta, una violación de las instrucciones de funcionamiento del Producto,
cualquier otro daño inducido por el Cliente, o la alteración o eliminación de cualquier
número de serie del Producto: (b) cualquier modificación o reparación del Producto (o,
según corresponda, cualquier componente del mismo) por cualquier parte que no sea
SUMMIT ELECTRONICS LLC o una parte autorizada por escrito por SUMMIT
ELECTRONICS LLC; (c) cualquier daño al Producto (o, según corresponda, cualquier
componente del mismo) debido a sobretensiones, tensión eléctrica incorrecta, mala
conexión a cualquier dispositivo o mal funcionamiento de cualquier dispositivo
utilizado con el Producto (o, según corresponda, cualquier componente del mismo);
(d) daños cosméticos en el Producto (o, según corresponda, cualquier componente
del mismo) causados por un desgaste normal; (e) daños en el envío que se produce
mientras el Producto está en tránsito; f) los daños causados por fuentes de calor,
luz solar, condiciones electromagnéticas u otras condiciones climáticas; o g) cualquier
acto de ¡Dios mío! El producto se vende al cliente solo para uso personal y no
comercial. El producto no está garantizado para el uso comercial o de alquiler del
Cliente. Además, el Producto no está garantizado contra fallos, y no debe ser utilizado
15

por el Cliente para cualquier aplicación en la que (i) exista el riesgo de que los datos
almacenados en el Producto sean violados o comprometidos de otra manera, o (ii) los
datos almacenados en el Producto sean confiados para aplicaciones médicas o de
salvamento. SUMMIT ELECTRONICS LLC renuncia a cualquier Garantía para
cualquiera de los usos anteriores en la máxima medida permitida por la ley. El Cliente
asume todos y cada uno de los riesgos asociados con dichos usos del Producto y se
compromete a indemnizar a SUMMIT ELECTR-ONICS LLC por cualquier daño
reclamado contra SUMMIT ELECTRONICS LLC por tales usos. EXCEPTO LAS
GARANTÍAS EXPRESAS MENCIONADAS ANTERIORMENTE Y EN LA MEDIDA
MÁXIMA PERMITIDA POR LA LEY, LOS PRODUCTOS SE PROPORCIONAN «TAL
CUAL», Y SUMMIT ELECTRONICS LLC RENUNCIA A TODAS LAS DEMÁS
GARANTÍAS, INCLUYENDO, SIN LIMITACIÓN, CUALQUIER GARANTÍA IMPLÍCITA
(I) DE COMERCIABILIDAD, (II) DE IDONEIDAD PARA UN PROPÓSITO
PARTICULAR, O (III) DE VIOLACIÓN DE LOS DERECHOS DE TERCEROS. EN LA
MEDIDA MÁXIMA PERMITIDA POR LA LEY APLICABLE, EN NINGÚN CASO
SUMMIT ELECTRONICS LLC SERÁ RESPONSABLE ANTE EL CLIENTE O
CUALQUIER TERCERO POR CUALQUIER DAÑO INDIRECTO, ESPECIAL,
INCIDENTAL, CONSECUENTE, EJEMPLAR O PUNITIVO, INCLUYENDO, SIN
LIMITACIÓN, CUALQUIER PÉRDIDA DE BENEFICIOS O INGRESOS, PÉRDIDA O
INEXACTITUD DE CUALQUIER DATO O EL COSTE DE LOS PRODUCTOS
SUSTITUTIVOS, INDEPENDIENTEMENTE DE LA TEORÍA DE LA
RESPONSABILIDAD (INCLUIDA LA NEGLIGENCIA) E INCLUSO SI SUMMIT
ELECTRONICS LLC HA SIDO AÑADIDO DE LA POSIBILIDAD DE TALES DAÑOS,
LA RESPONSABILIDAD AGREGADA DE SUMMIT ELECTRONICS LLC ANTE EL
CLIENTE POR DAÑOS DIRECTOS REALES POR CUALQUIER CAUSA SE
LIMITARÁ A LA TARIFAS ACUMULATIVAS DE PRODUCTO PAGADAS POR ESE
CLIENTE POR EL PRODUCTO QUE CAUSÓ LOS DAÑOS, EN SU CASO. Esta
Garantía otorga al Cliente derechos específicos, y el Cliente también puede tener
otros derechos que varían de una jurisdicción a otra. Para obtener el servicio de
garantía, el Cliente debe enviar un correo electrónico al Soporte Técnico de SUMMIT
ELECTRONICS LLC antes de realizar una devolución del Producto. El Cliente debe
incluir con la devolución del Producto los siguientes artículos (el hecho de no adjuntar
cualquiera de estos artículos puede resultar en un retraso en el procesamiento de su
reclamación de Garantía): (i) un recibo de venta fechado que indique el lugar de
compra, el número de modelo del Producto y la cantidad pagada; (ii) una descripción
detallada de la problema con el Producto; (iii) nombre completo, número de teléfono y
dirección de devolución del Cliente, y (iv) un giro postal realizado a SUMMIT
ELECTRONICS LLC Electronics Corporation para cubrir los gastos de envío de
devolución a destinos de EE. UU., por la cantidad en dólares aplicable que se
muestra para el Producto en la tabla anterior. SUMMIT ELECTRONICS LLC no
realizará envíos de devolución a un apartado postal. Para el envío a direcciones
internacionales, el flete real se cargará al Cliente. Devuelva su Producto con carga
prepagada en su embalaje original, o un embalaje que ofrezca igual medida de
protección. Por favor, espere de 4 a 6 semanas para el procesamiento de su
reclamación (de 6 a 8 semanas de noviembre a febrero).
Debe enviar un correo electrónico al Soporte Técnico de SUMMIT ELECTRONICS
LLC antes de realizar una devolución. Pregunte si no está seguro de qué categoría
pertenece su producto
*Sólo destinos en EE. UU.
16