
Moto Snap
by myGEKOgear
User Manual

1
Thank you for purchasing the myGEKOgear Moto Snap. This
product is specifically designed to record real time video when
riding a scooter or motorcycle.
The content in this document is for informational purposes only
and is subject to change without prior notice. We have made every
effort to ensure that this User Guide is accurate and complete,
however, no liability is assumed for any errors or omissions.
The manufacturer reserves the right to change the technical
specifications or accessories without prior notice.
Notice
1. Please peel off the protective film from the camera lens before use.
2. Do not touch the lens with your fingers. Finger grease may be left on
the lens, resulting in unclear videos or pictures. Inspect and clean the
lens with a soft, non-abrasive cloth regularly.
3. Please charge the unit to full before first use using the provided Type-
C cable or optional charge station. Please do not use another brand
of charging cable to avoid a potential equipment malfunction. The
red LED on the camera will illuminate when charging, and will turn off
upon reaching full charge.
4. If the Moto Snap will not be used for an extended period of time,
please charge at least once every 6 months to maintain the battery's
health and avoid low-voltage related damage.
5. Please download the Moto Snap app from the iOS app store or
Google Play Store before use. The Wi-Fi password is 12345678.
6. By default, Wi-Fi is ON for 3 minutes when the camera is powered on.
If it does not connect to the Moto Snap app within 3 minutes, the
2
Moto Snap will disable Wi-Fi automatically to save power. To turn on
Wi-Fi again, simply power the Moto Snap OFF then ON again.
NOTE: An active Wi-Fi connection will affect total recording time.
7. Ensure the microSD card is V30 or higher, with a capacity of 16GB or
higher (up to 128GB).
8. Format your microSD card regularly and synchronize date/time.
(Recommended: Once per month)
9. In a high humidity environment or when traveling between areas
with a large temperature difference, light moisture or fog, may
appear on the lens. This is normal. If this happens, remove the
microSD card and allow several hours for the moisture to evaporate,
then reinsert the card and resume use.
10. Due to local laws and for your own safety, DO NOT operate the Moto
Snap or Moto Snap app while driving or riding.
11. Use the Moto Snap app to synchronize your date and time before
first use.
12. This product is intended only for non-commercial use, within the
maximum limits permitted by law. We take no responsibility for any
losses as a result of use of this product.
13. The camera may get warm during use. This is normal.
14. Improper use or operation of the Moto Snap may result in damage to
the camera or its accessories and will void the warranty.
This device and its antenna(s) must not be co-located or operated in
conjunction with any other antenna or transmitter.

3
FCC Regulatory Compliance
This device complies with Part 15 of the FCC Rules. Operation is subject to
the following two conditions: (1) this device may not cause harmful
interference, and (2) this device must accept any interference received,
including interference that may cause undesired operation.
Note: This equipment has been tested and found to comply with the limits
for a Class B digital device, pursuant to Part 15 of the FCC Rules. These
limits are designed to provide reasonable protection against harmful
interference in a residential installation. This equipment generates, uses
and can radiate radio frequency energy and, if not installed and used in
accordance with the instructions, may cause harmful interference to radio
communications. However, there is no guarantee that interference will
not occur in a particular installation.
If this equipment does cause harmful interference to radio or television
reception, which can be determined by turning the equipment off and on,
the user is encouraged to try to correct the interference by one or more of
the following measures:
-- Reorient or relocate the receiving antenna.
-- Increase the separation between the equipment and receiver.
-- Connect the equipment into an outlet on a circuit different from that to
which the receiver is connected.
-- Consult the dealer or an experienced radio/TV technician for help.
Warning: changes or modifications not expressly approved by the party
responsible for compliance could void the user’s authority to operate the
equipment.
Contains FCC ID: please refer to website www.mygekogear.com

4
RF Exposure Compliance
This equipment complies with FCC radiation exposure limits set forth for
an uncontrolled environment. This equipment should be installed and
operated with minimum distance 20cm between the radiator and your
body. This transmitter must not be co-located or operating in conjunction
with any other antenna or transmitter.
Regulatory Notice
This document provides country- and region-specific non-wireless
and wireless regulatory notices and compliance information for
your product. Some of these notices may not apply to your product.
Disposal of a battery into fire or a hot oven, or mechanically
crushing or cutting of a battery can result in an explosion.
Leaving a battery in an extremely high temperature environment
can result in an explosion or the leakage of flammable liquid or gas.
Wi-Fi Signals are unable to pass through buildings. The signal
transmission limit is 5m.
Wi-Fi Operation Channel: Ch1~Ch11
The product employs wireless data communication which may
interfere or be interfered by a nearby camcorder.
Do not use this camcorder in the vicinity of a microwave oven or
where there is radio interference.
Radio wave reception may be worsened in certain environments.
Please be advised that if another camcorder is also using the same
2.4GHz band as this product, the processing speed of both
camcorders may slow down.
The radio frequency (RF) generated by this RF electronic
camcorder may cause adverse effects on the operation of other
electronic camcorders and result in malfunctioning. Wireless
transmitters and circuitry may also interfere with other electronic
camcorders.
Therefore, do observe the following precautions:

5
Aircraft: Never use a radio transmitter when you are in an airplane.
Please switch off the Wi-Fi function of the camcorder.
• Vehicle: The radio frequency transmitted by this camcorder may
affect the electronic system in a motorized vehicle. Please
consult your vehicle manufacturer on possible effects.
• Pacemaker: In order to prevent any potential interference to a
pacemaker, anyone who uses a pacemaker should be advised
that, when using this camcorder, a minimum distance of 15cm (6
inches) should be kept between the camcorder and the
pacemaker; and never put this camcorder in a chest pocket. In
case of any doubt of interference, switch off the camcorder
immediately.
• Medical Camcorder: If you use a personal medical camcorder,
consult the camcorder manufacturer or your physician to
confirm if your camcorder is sufficiently shielded from the RF
transmission of this camcorder.
• Medical Facilities: Hospitals and medical institutes may use
facilities that are sensitive to an external RF signals. Observe
such instructions when the medical care personnel or any posted
sign requests you to switch off any camcorder that may interfere
the radio frequency.
• Explosion sites or any location with a posted sign: In order to
prevent interfering with an explosion activity, observe all the
signage and instructions in the Explosion Area or in a zone with a
“Switch Off 2-way Radios” sign by switching off camcorders that
may interfere with the radio frequency.
myGEKOgear is NOT responsible for the loss of any data/content
during operation.
By using the myGEKOgear Moto Snap, it is assumed that you
agree to all of the above statements.
6
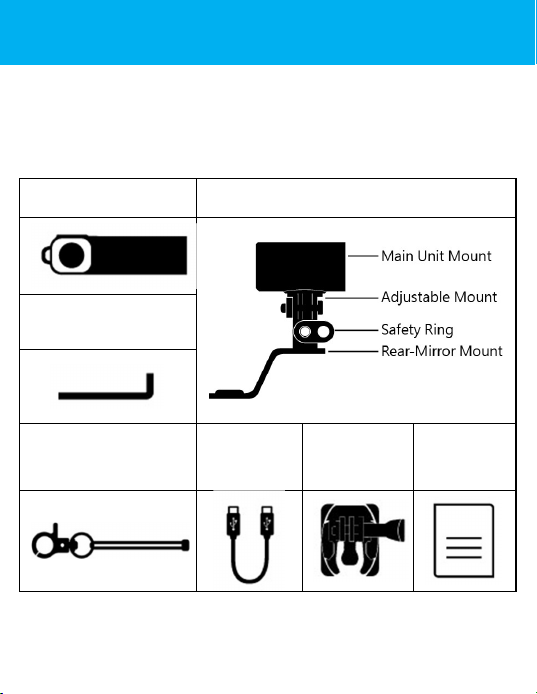
Step 1: Check What's Inside
The package contains the following items. If any items are
missing or damaged, please contact the original place of
purchase immediately.
Main Camera 3-in-1 Mount – Mirror + Snap Mount
Hex Wrench
Safety Cord
USB Cable
(type C)
Helmet
Mount
User
Manual &
Warranty
7
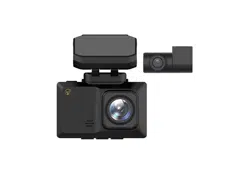
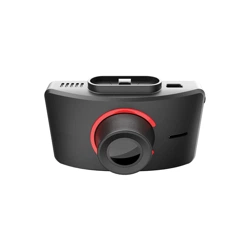
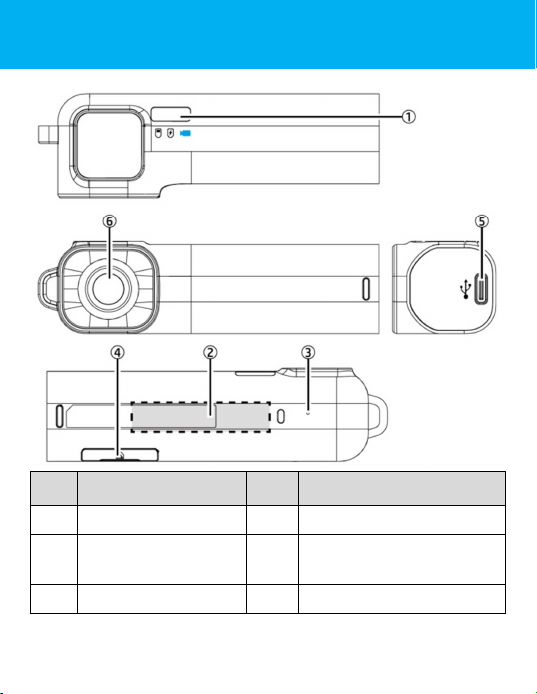
Step 2: Product Overview
No
Description
No
Description
1
LED indicator
4
microSD slot / Reset
2
Power
ON
/
OFF
sensor
5
USB port (type C)
3
Microphone
6
Lens
8
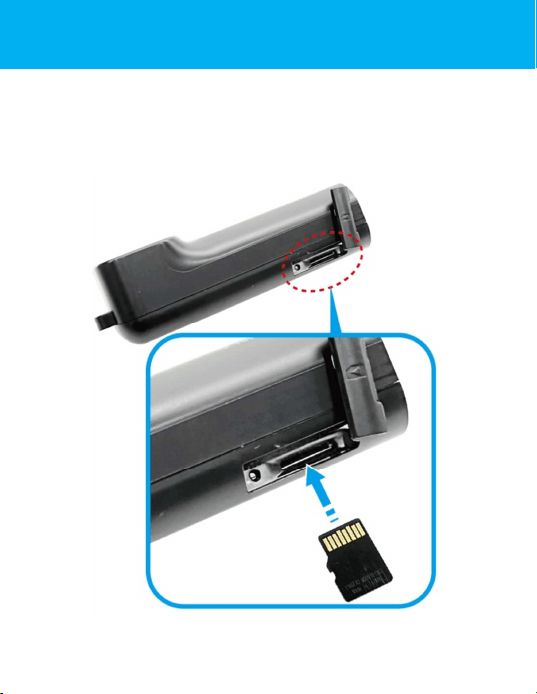
Step 3: Insert microSD Card
Insert the micro SD memory card with the pins facing forward
and the Moto Snap lens facing forward. (See below for proper
installation orientation.) Once the memory card locks into place,
replace the slot cover securely over the slot.
9
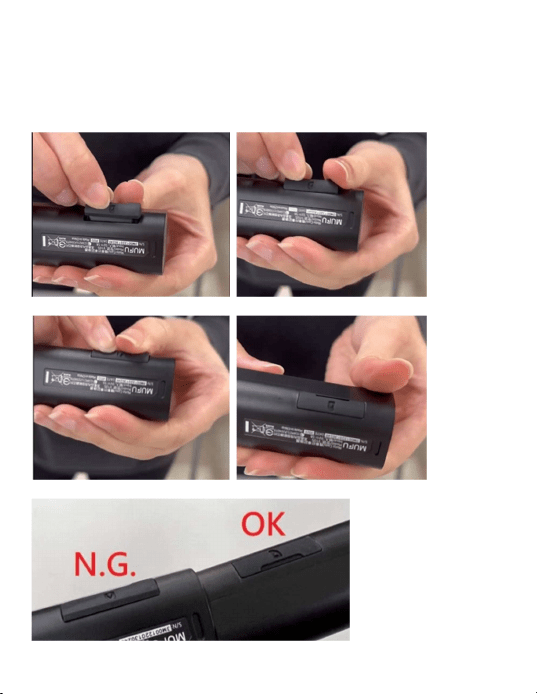
The slot cover must be tightly sealed to prevent moisture from
entering, causing the lens to fog. Insert the lower edge of the
slot cover, then press the top edge and sides of the slot cover
to create a good seal. See below.
(1) (2)
(3) (4)
(5)
10
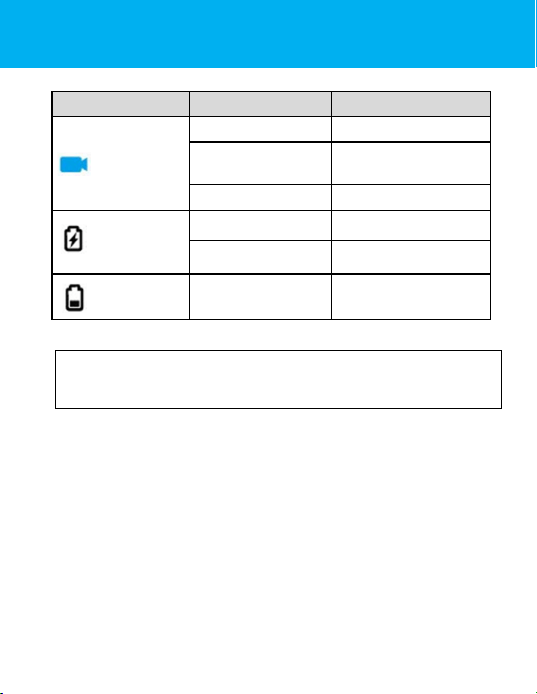
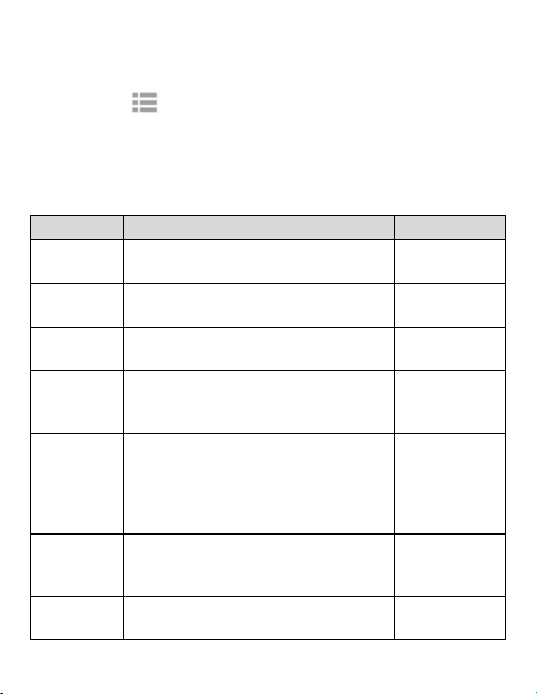
Step 4: LED Indicator
Indicator
Light Status
Description
Recording
Blue, slow flashing
Recording
Blue, solid
Camera ON, not
recording
Blue, rapid flashing
Emergency recording
Charging,
Plugged in
Red, solid
Charging
No Red Light
Fully charged
Battery
Green, rapid
flashing
Low battery
Note: Before first use, use the supplied USB Type-C charging cable to
fully charge the Moto Snap. Charge for at least 5 hours until the red
LED turns off.
11
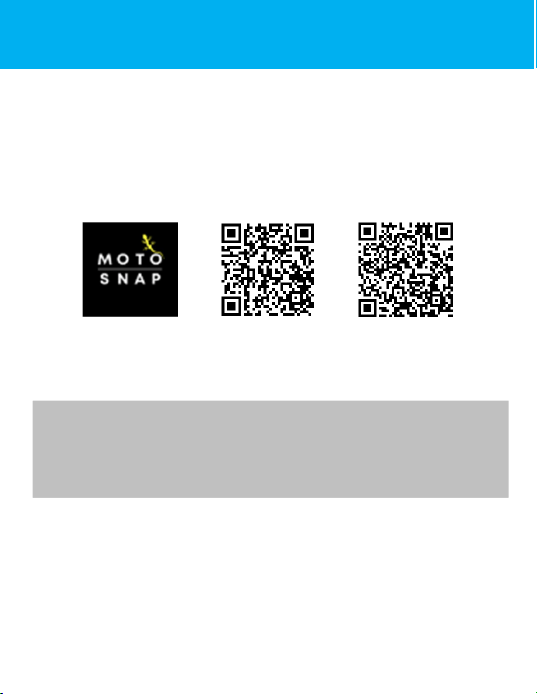
Step 5: Download the App
When using the Moto Snap for the first time, use your
smartphone to download and install the Moto Snap app.
Scan the QR code or search “Moto Snap” in the iOS App Store
or Google Play Store.
iOS
Android
APP layout and features may be changed subject to
different software versions. Please refer to the Google Play
or iOS App Store for the latest version.
12
Step 6: Wi-Fi Connection
When secured into the Snap Mount, the Moto Snap and its
Wi-Fi will automatically power on.
Using your smartphone, search nearby Wi-Fi networks for
MOTO_SNAP and tap to connect. Enter password 12345678 to
connect to and control the Moto Snap.
Once Wi-Fi is connected, open the Moto Snap app
to connect to and control your camera and its settings. For
detailed app operation, please refer to: [Step 10. App
Operation]
Note:
1. Wi-Fi is turned on automatically when the Moto Snap powers on. If the
camera doesn’t connect with the Moto Snap app within 3 minutes, Wi-Fi
will be disabled automatically to preserve battery life. If you want to turn
on Wi-Fi once again, simply unplug the Moto Snap from the mount, wait
for all indicator lights to turn off, and plug it in once again to power on the
camera and reactivate the Wi-Fi.
2. Your smartphone must be within a maximum 5-meter distance from the
Moto Snap with no buildings in between.
3. The language of the app will be consistent with your smartphone.
Beyond the language options, the app will be activated with the default
language.
13
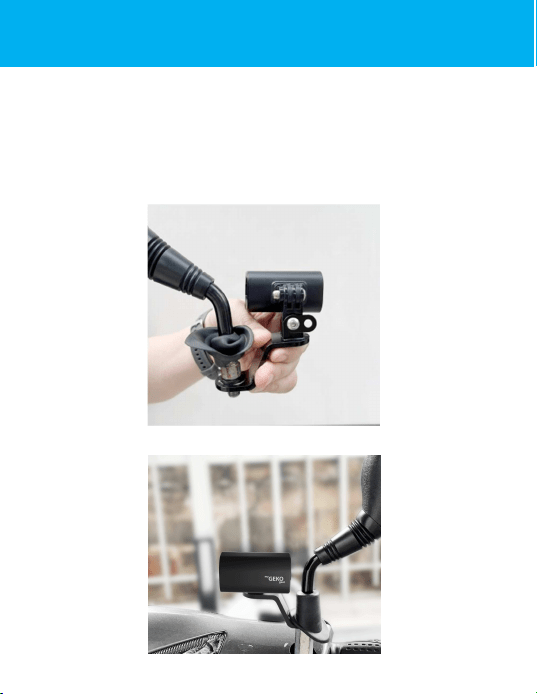
Step 7: Main Unit Installation
The Moto Snap can be installed on the right or left rearview
mirror. Please use the mirror mount and snap mount to adjust
and fine tune the installation position of the camera. See below
for an example of a left side installation.
Unbolt the rearview mirror and install the 3-in-1 mount as
seen below.
Reinstall the mirror and 3-in-1 mount onto the handlebar.
14
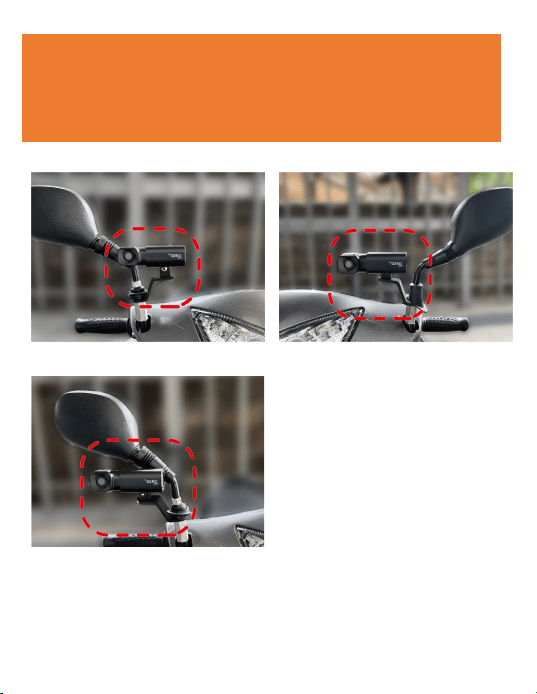
Note: Regardless of whether the camera is installed on the
left or right side, the myGEKOgear logo on the snap mount
must always be upright and face out, with the LED indicator
lights always facing up. Below are installation examples for
reference.
Right side
(inner) installation.
Left side
installation.
Right side
(outer) installation.
15
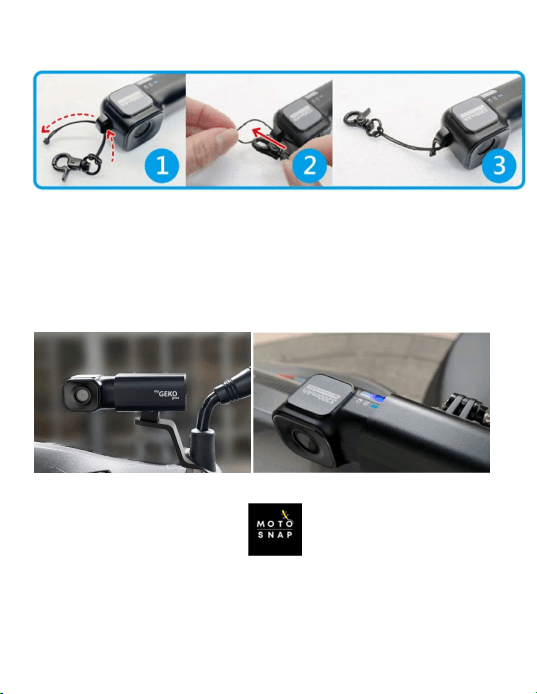
Slip the safety cord into the safety cord hole of the main unit.
Plug the Moto Snap into the Snap Mount and push it to the
bottom until it snaps into place. The blue LED light will
blink slowly to indicate that the camera is now recording. If
recording does not begin, check that the microSD card is
inserted properly.
Make sure your phone is connected via Wi-Fi to MotoSnap
and open the Moto Snap app

16
Fasten the safety cord from the main unit to the safety ring
on the mount to protect your camera from accidentally falling
out of the mount while riding.
17
Step 8: Main Unit Calibration and Use
After adjusting your viewing angle, tap in the Moto Snap
app to enter [Camera Settings]. On first use, be sure to calibrate
the “Tilt Sensor” and “Format” the microSD card.
Calibrate the Tilt Sensor
Hold your motorcycle upright, straight, and as still as possible,
then tap on “Tilt Sensor” in the menu so the Moto Snap can
calibrate the internal tilt sensor. After calibration is completed,
if the camera detects that the motorcycle is toppled over, it will
trigger emergency recording automatically. This is indicated by
the blue LED going from a slow flash to a rapid flash.
Emergency recordings are stored in the emergency video folder.
Format microSD card
Tap “Format” in the menu to format microSD card. It is
recommended to format your card at least once a month to
ensure that it is working properly.
Note:
1. When the Moto Snap is inserted into Snap Mount (or used with the
optional carry-on Power Key), it will automatically power on and start
recording, indicated by a slow-flashing blue LED indicator light. The
recording file will be saved onto the microSD card. When the card reaches
capacity, the loop recording function will overwrite the oldest file to make
room for new files and continue recording.
2. Memory cards have a service life. Long-term use may lead to write
speed degradation and file save failures. If this happens, it is
recommended that you purchase a new memory card.
18
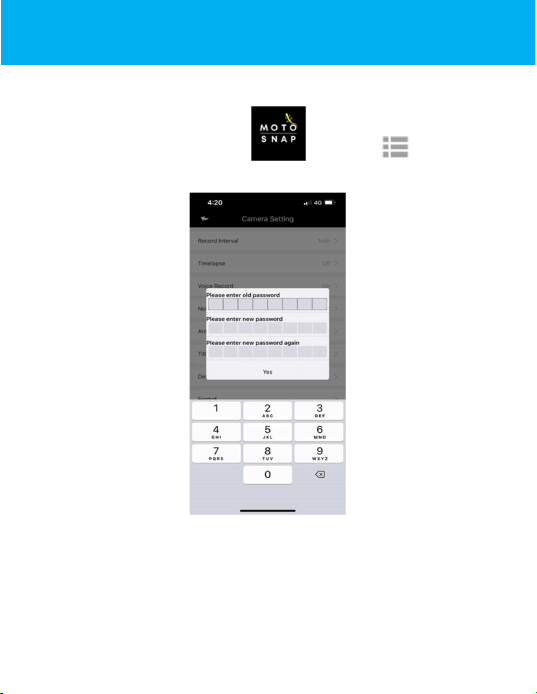
Step 9: Change Password
To change the Wi-Fi password, follow the steps below. If left
unchanged, the default password is 12345678.
Open the Moto Snap app , and tap to enter
[Camera Setting]. Next, tap [Wi-Fi Password].
Enter the old password. (Default password: 12345678)
→ Enter your new password.
→ Enter your new password again to confirm.
→ tap “Yes”, and screen will show message of “SePng Success,
Connect Wi-Fi again”
→ close app, and follow by step
to re-connect Wi-Fi
19
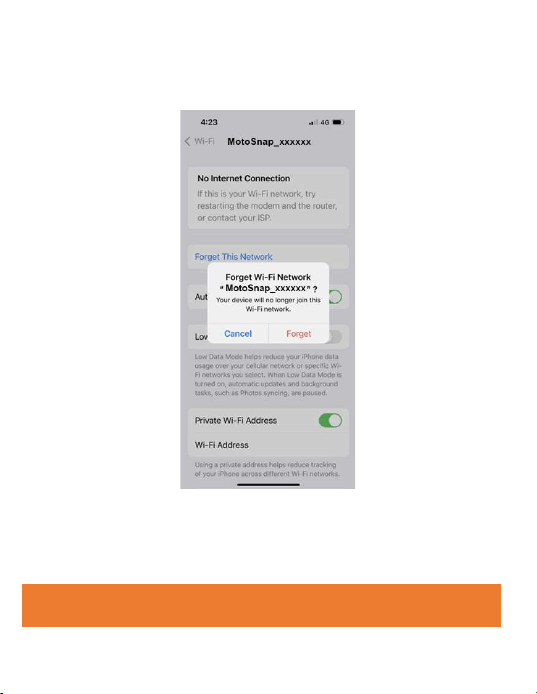
iPhone users: Open the Wi-Fi connection menu and tap the
MotoSnap network. Next, tap “Forget This Network” and
confirm your decision.
*Note: Android phone user can skip this step.
Next, tap the MotoSnap network again to re-enter your
new password and reconnect your smartphone to the Moto
Snap.
Note: Be sure to remember your new password. If you
forget your new password, a factory reset will be necessary.
20
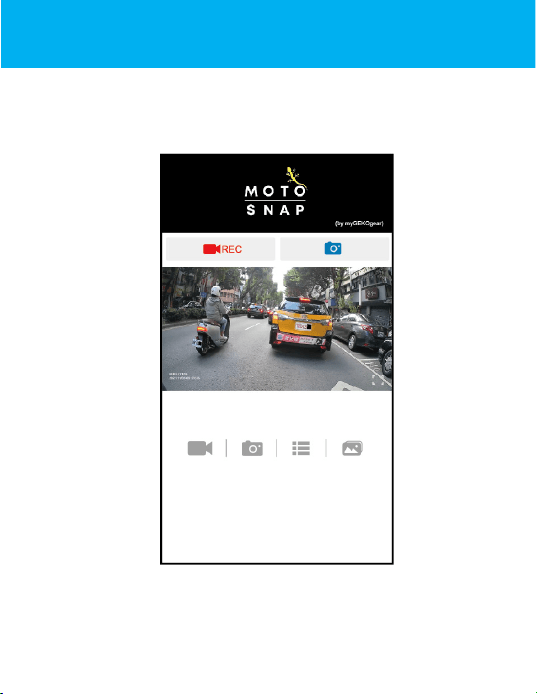
Step 10: App Operation
Main Screen
21
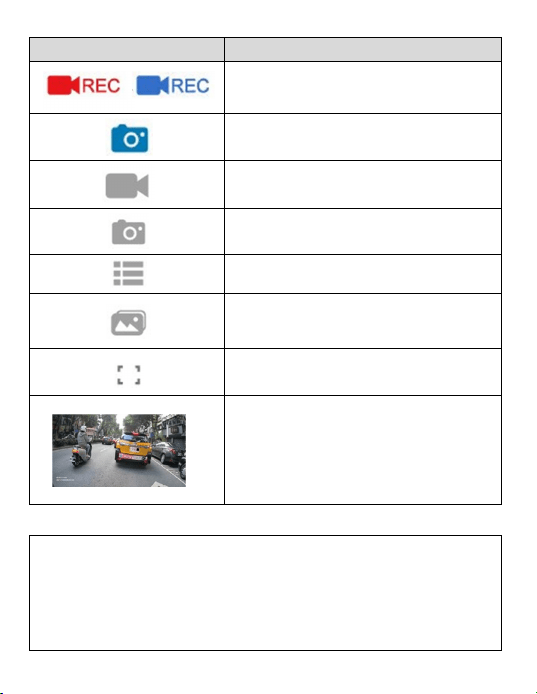
icon
Description
Start/Stop Recording
Take snapshot
Recorded videos
Pictures
Camera Setting
Local Album (review downloaded
files on your smartphone)
Full screen preview
Preview image
Note:
1. The Moto Snap App will auto sync the camera's date/time with your
smartphone.
2. App layout and features are subject to change, depending on the
software version. Refer to the Google Play or iOS App Store for the
latest updates.
/
22
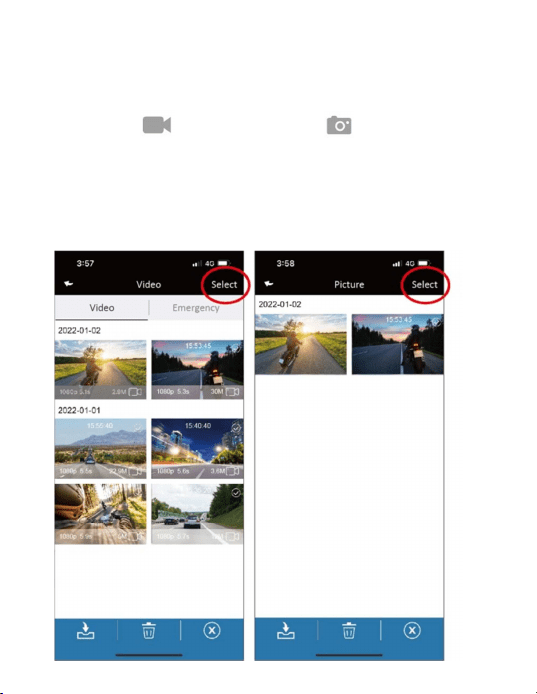
Playback, delete, and download recordings
Use this feature to playback, delete recordings, or download
recordings from the Moto Snap to your smartphone.
1. Tap the icon
[Video playback] or [Picture playback]
to enter file playback list. Recording will stop.
2. The files saved in the Moto Snap’s microSD card will be listing
on your smart phone. Tap the preview thumbnail to playback.
3. Tap the right top corner “Select” and pick up the files that
you want to delete or download and tap below icon to execute.
23
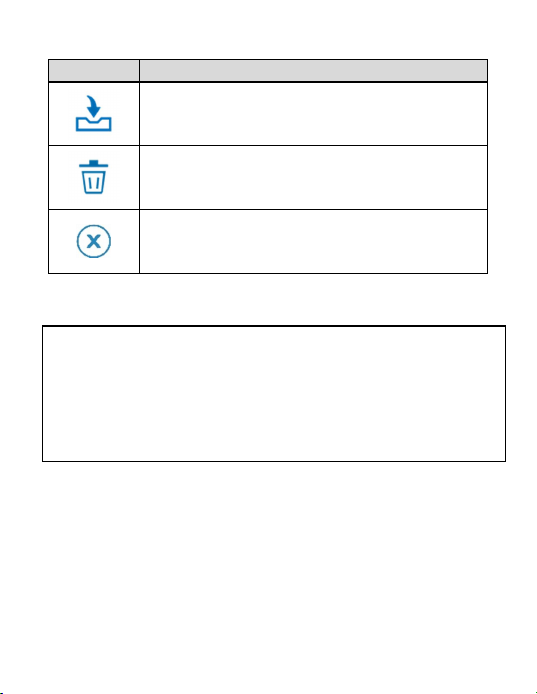
Icon
Description
Download file to smartphone
Delete file
Exit
Note:
1. If recordings have no audio, check if Audio Recording is OFF in the
menu. For video playback, we recommend VLC Media Player.
2. Deleted files cannot be recovered. Backup any important files before
deleting them.
3. If you plan to download a large number of videos and photos, we
recommend connecting directly to a PC/Mac via USB Type-C cable.
24
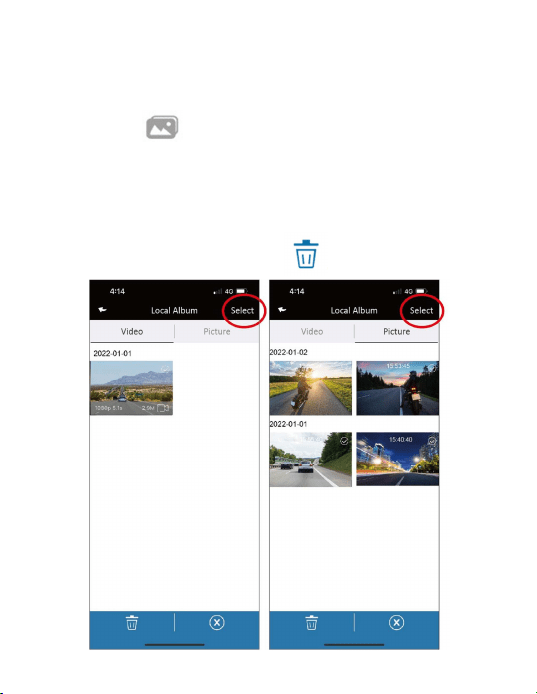
Local Album
You can use this feature to playback or delete the file that you
download to your smart phone.
1. Tap the icon [Local Album]. The camera will stop
recording.
2. Tap the file from preview thumbnail you are going to
playback.
3. Tap the right top corner “Select” and pick up the files that
you want to delete, and tap icon to execute.
25
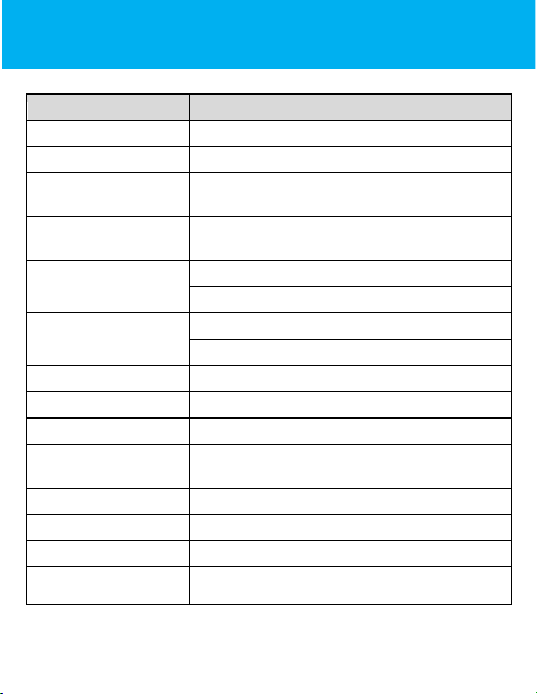
Camera Setting
You can use this feature to set up your preferred options.
1. Tap icon [Camera Setting] on main screen. The camera
will stop recording.
2. See available settings below and adjust to your preferred
options.
Menu
Description
Options
Recording
Interval
Set the length of each individual
recording.
1min / 3min
/ 5min
Time Lapse
In Time Lapse mode, the camera will
record one frame per second.
On / Off
Audio
Recording
Enable/Disable audio recording. On / Off
AI Noise
Reduction
AI Noise Reduction suppresses
surrounding noises so conversations
are more audible in recordings.
On / Off
Flicker
Frequency
Flicker frequency (Hz) varies by
country/region. (USA/Canada: 60Hz)
50Hz / 60Hz
Tilt Sensor
Calibrate the Tilt-Sensor for topple-
over detection.
Yes / No
Default
Settings
Reset the camera to factory default
settings.
Yes / No
26
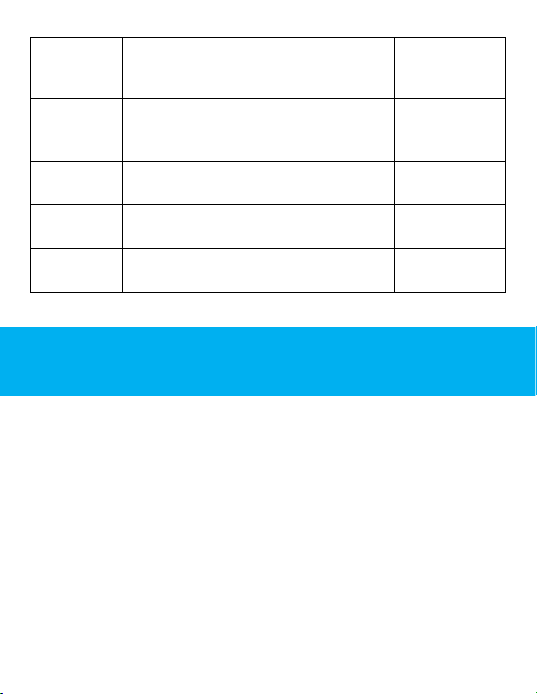
Format
Format the memory card in the Moto
Snap. This will delete all contents
permanently.
Yes / No
Wi-Fi Turn-
on Time
Set the Wi-Fi activation duration.
*Active Wi-Fi will decrease total
recording hours
Always on /
3min off
Wi-Fi
Password
Change the Wi-Fi password. (Default:
12345678)
Firmware
Version
Indicates the current firmware version
of the Moto Snap.
APP
Version
Indicates the current application
version.
Step 11: Final Check
□
Peel off lens protective film
□
Fully charge the camera (Red LED off)
□
Tilt Sensor calibration done
□
Format microSD card done
□
MicroSD card slot cover is closed tightly
□
All Mounts are fixed tightly
□
The safety cord from the main unit is secured to
the safety ring on the mount.
27
Specifications
Item
Description
Image Sensor
SONY’s Starvis Sensor
Effective Pixels
1920 (H) x 1080 (V)
Storage Media
Suggest V30 or higher microSD card, up to
128GB
Lens
Wide angle fixed focus lens
Aperture
:
up to F/2.
2
Video File
Resolution
:
1080P/ 30 fps
Format
:
TS
Picture File
Use App to take snapshot
Format
:
JPG
G
-
Sensor
3
-
Axls G
-
Force senso
r
Microphone
Built
-
in
Battery
3200mAh
Oper
ating
Temperature
-10° ~ 60° C
Oper
ating
Humidity
20 ~ 70% RH
Storage Temperature
-
20° ~ 70° C
Moto Snap
Size
107 x 32 x 29 mm
Moto Snap Weight
Approximately 96g
28
Built-in IEEE 802.11g/n (HT20) Wi-Fi chip: RTL8188FTV
Wi-Fi Frequency
2412~2462MHz
Wi-Fi Channel
Ch1~Ch11
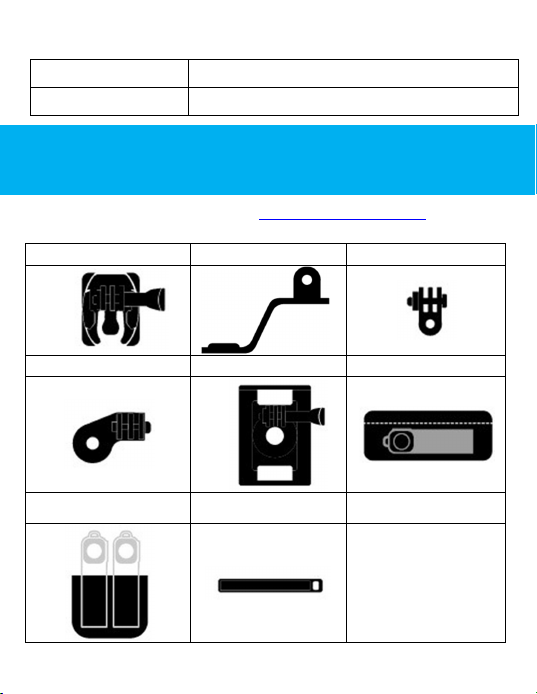
Optional Accessories
Please visit our official website www.mygekogear.com
to
purchase additional accessories for the Moto Snap.
Helmet Mount
Rear-mirror Mount
Adjustable Mount
Car Plate Mount
Shoulder Band
Pouch
Charging Bin
Power Key
29
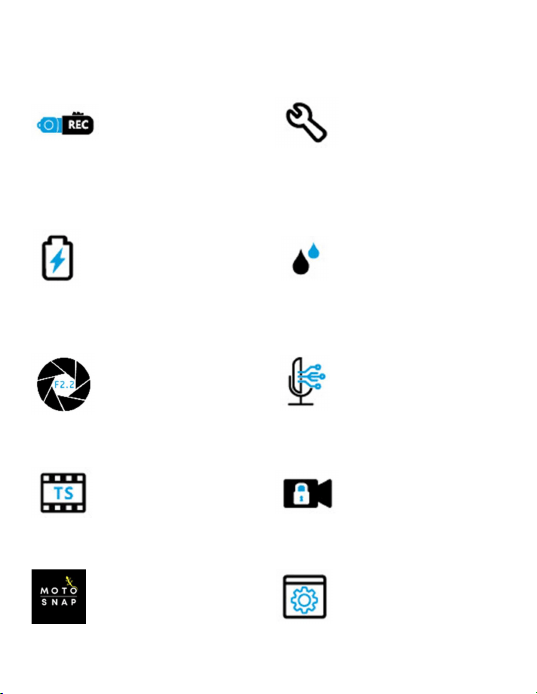
Buttonless Design.
Built-in ON/OFF
sensor detects when
the camera is
snapped in and
automatically begins
recording
Easy DIY Installation
High-capacity battery
for up to 8.5 hours of
continuous recording
(max recording hours
may vary, depending
on current battery
life)
IP66 Water Resistance
Sony STARVIS Sensor
captures excellent
recordings, even at
night.
AI Noise Reduction
TS Video Format
Tilt Sensor detects if
the vehicle has
toppled over and
automatically locks
the recording.
Dedicated Moto Snap
app for adjusting the
camera’s settings and
reviewing recordings.
Optional accessories
are available to use
the Moto Snap in
various other
applications.

30
Technical Support
For technical support please contact our service team:
service@mygekogear.com
Limited Warranty
Our products carry a 12-Month limited warranty from the
date of purchase, covering manufacturing defects or faults in
workmanship. For questions, support, or warranty claims,
contact us at [email protected]om.
*IMPORTANT: Proof of original purchase is required for warranty
service.