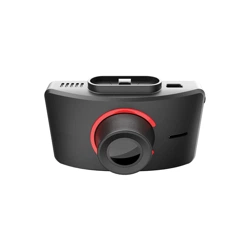
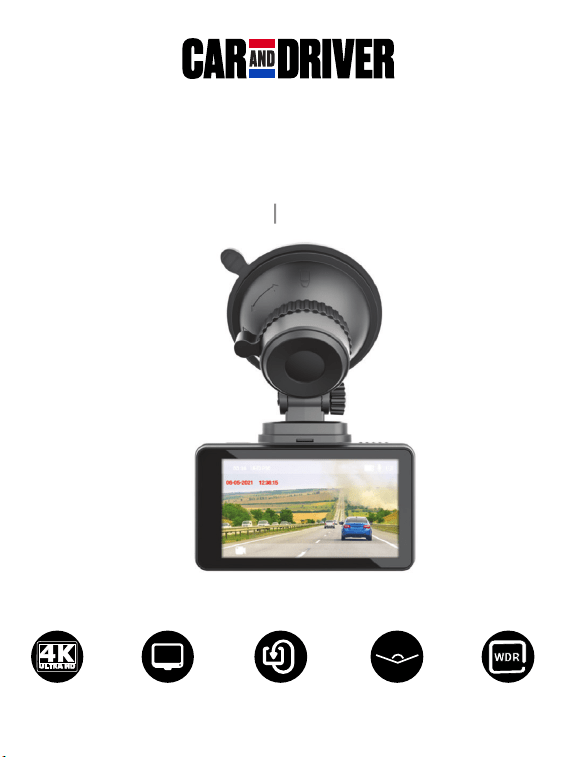
4K UHD DASH CAM
CDC - E4000
User Manual
Manual de usuario
4K UHD
4K UHD WDRPANTALLA IPS DE 3 ’’ GRABACIÓN EN BUCLE SUPER AMPLIO ÁNGULO
3’’ IPS SCREEN LOOP RECORDING SUPER WIDE ANGLE WDR

Table of Contents
Precautions and Notices...............................................................................................2
1. Basics.........................................................................................................................3
1-1 In the Box.......................................................................................................................................3
1-2 Buttons and Parts........................................................................................................................4
2. Getting Started..........................................................................................................5
2-1 Inserting a memory card..........................................................................................................5
2-2 Mounting the Dash Cam..........................................................................................................5
2-3 Connecting the Dash Cam to power supply........................................................................7
3. Operations.................................................................................................................8
3-1 Turning the device on/off.........................................................................................................8
3-2 Date and Time settings............................................................................................................9
3-3 Video Recording Mode...........................................................................................................10
3-3-1 Continuous recording..........................................................................................................10
3-3-2 Manual recording................................................................................................................10
3-4 Playback Mode........................................................................................................................10
3-5 Connecting to Computer.........................................................................................................11
3-5-1 Playback or backup on your computer ............................................................................11
3-5-2
Using as webcam
....................................................................................................................11
3-6 Formatting a memory card....................................................................................................12
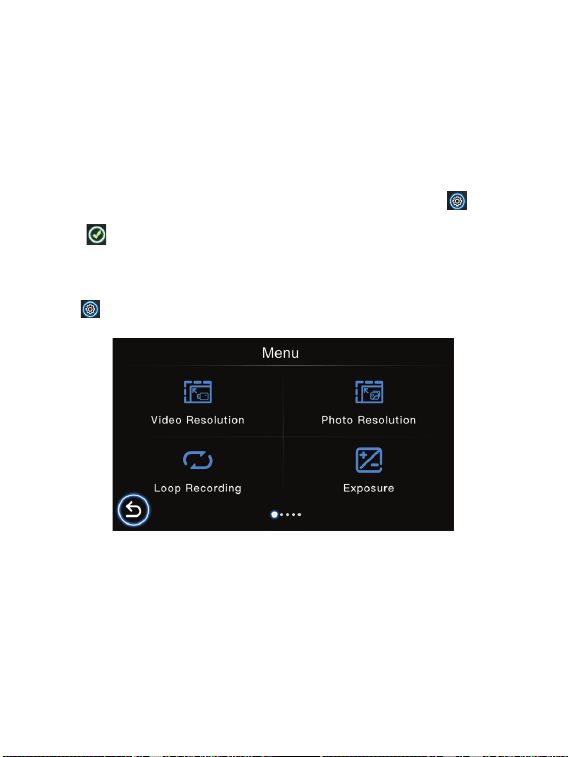
4. Settings....................................................................................................................12
Video Resolution...................................................................................................................12
Photo Resolution...................................................................................................................12
Loop Recording......................................................................................................................12
Exposure..................................................................................................................................12
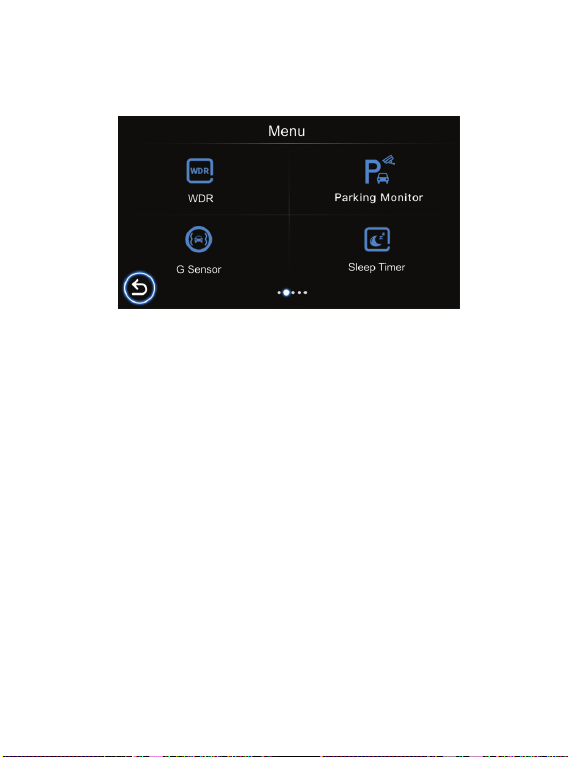
WDR.........................................................................................................................................13
Parking Monitor.....................................................................................................................13
G Sensor..................................................................................................................................13
Sleep Timer.............................................................................................................................13
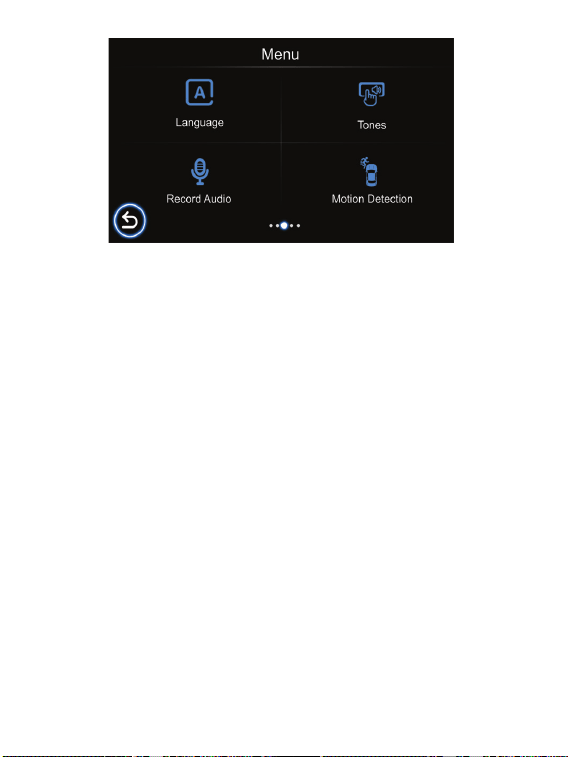
Language.................................................................................................................................14
Tones........................................................................................................................................14
Record Audio..........................................................................................................................14
Motion Detection..................................................................................................................14
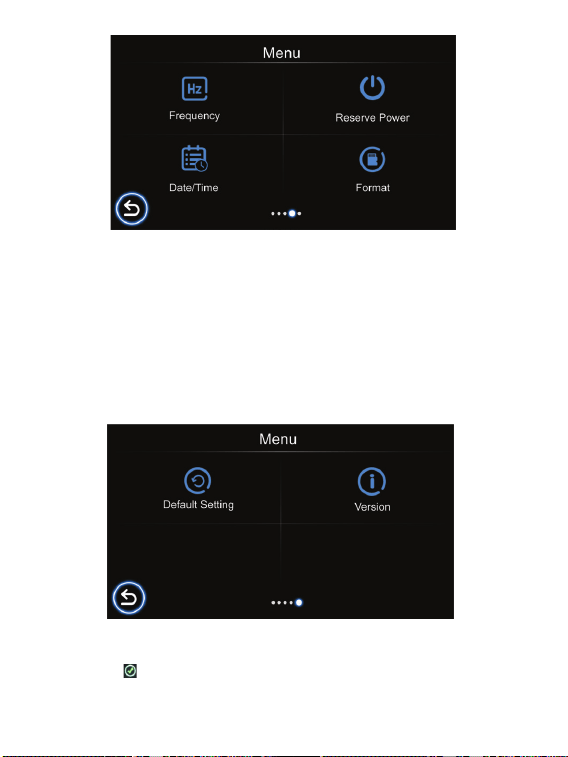
Frequency................................................................................................................................15
Reserve Power........................................................................................................................15
Date/Time..............................................................................................................................15
Format......................................................................................................................................15
Default Setting.......................................................................................................................15
Version.....................................................................................................................................15
Specifications..............................................................................................................16
FCC Statement.............................................................................................................17
Notice...........................................................................................................................17
SUMMIT ELECTRONICS LLC One Year Limited Warranty.........................................18
English
1 EN

Precautions and Notices
• Due to local laws and vehicle safety considerations, do not manually operate
the device while driving.
• Keep the windshield and the Dash Cam lens clean for optimal video quality.
If there is a foreign object attached to the lens, this might reduce the quality
of the recorded videos.
• Before attaching to your windshield, please check in with your local DMV
about trac laws that dictate the positioning/method of mounting the device.
• Keep the device away from excessive heat, such as direct sunlight , fire or
the like.
• Use original or certified cables.
• Do not use any corrosive cleaner/oil to clean.
• Keep out of reach of children. It contains small parts which may be a choking
hazard.
• Observe local laws and regulations while using the device.
• To prevent damage to your device’s parts or internal circuits, do not use it in
dusty, smoky, damp or dirty environments.
• Do not use, store or transport the device where flammables or explosives are stored.
Using your device in these environments increases the risk of explosion or fire.
• Car and Driver is NOT responsible for the loss of any data/content during
operation.
• Car and Driver does NOT guarantee recording of accidents where the impact
may cause the device to be damaged.
• Install the device near your vehicle’s rear-view mirror to obtain the best
open-field view.
• Do NOT install the Dash Cam in a location that will obstruct your view of the
road while you’re driving.
• Make sure that the lens is within wiping range of your windshield wipers to
ensure a clear view even when it rains.
• Do not touch the lens with your fingers. Finger grease left on the lens will
result in unclear videos or snapshots. Clean the lens on a regular basis.
• Do not install the device on a tinted window. Doing so may damage the tint
film. Make sure that the camera’s view is not hindered by a tinted window.
• For some vehicles, a DC power socket will keep providing power after the
engine is turned o. To avoid draining your car battery, please manually
unplug the Dash Cam when the engine is turned o.
• Do not disassemble this device.
• Do not expose this device to rain or moisture or submerge in water.
• Ideal temperatures are 0°C to 35°C. Avoid extreme temperatures.
2 EN

1. Basics
1-1 In the box
CDC-E4000
Mounting option 1: Suction Mount
Mounting Option 2:
3M Adhesive Mount
TF card
USB Car power
adapter
Charging cable
USB- TYPE C cable
Tool for tucking wire
User manual
Cable clips
3 EN
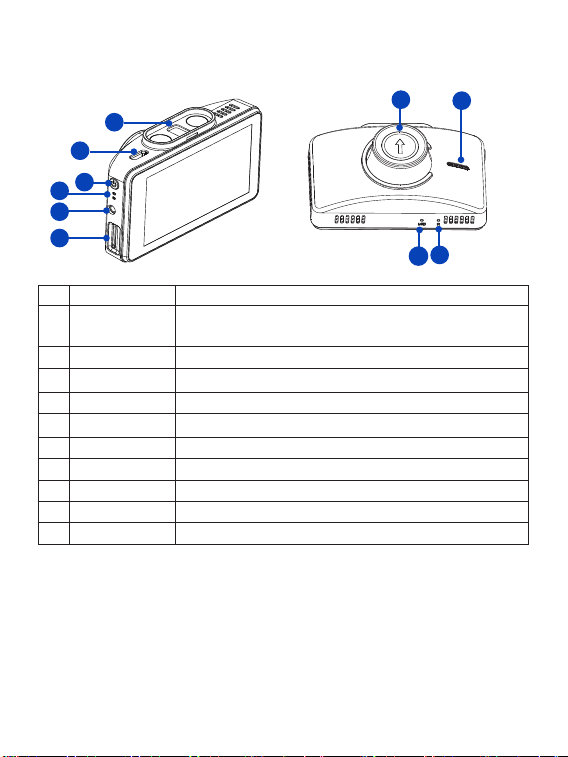
1-2 Buttons and Parts
Front View
Rear View
No. Definition Description
1 Magnetic
Mounting slot
The magnetic mount is inserted here
2 Type C port For DC power input or connecting to computer.
3 Power button
Press and hold for 1 second to manually turn the device on/o.
4 LED Indicator Indicates the device operating status.
5 Rear camera jack For optional backup Camera, not available in all regions
6 TF card slot Slot for included memory card.
7 Camera Lens Front facing camera for video recording.
8 Speaker For audio sound output
9 Reset button Press to restore all the system settings to factory defaults.
10 Microphone For recording audio.
1
5
6
2
3
4
10
7
8
9
4 EN

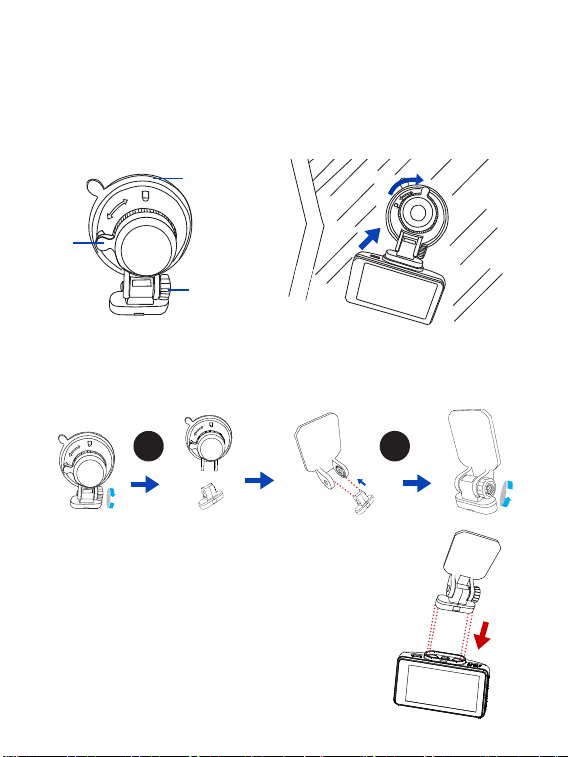
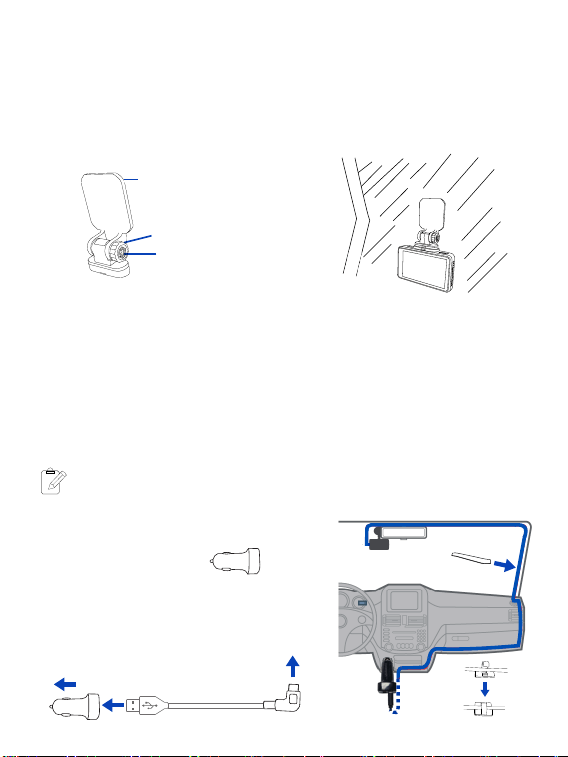
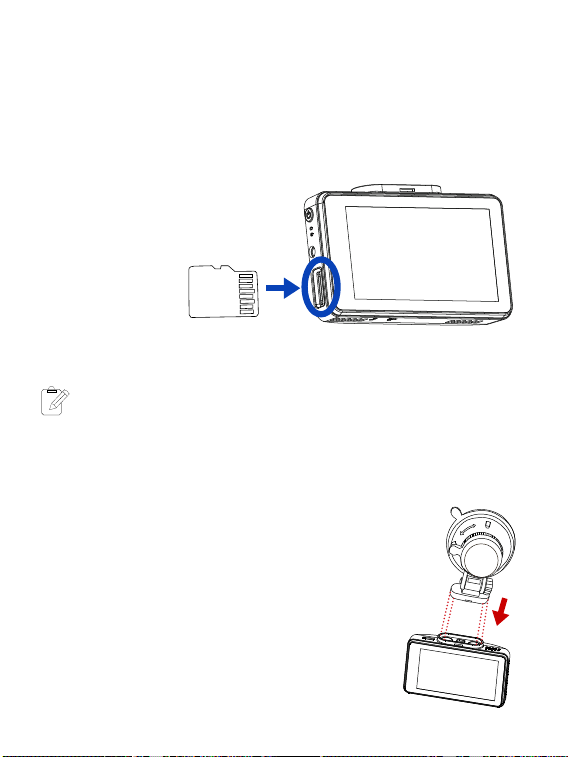
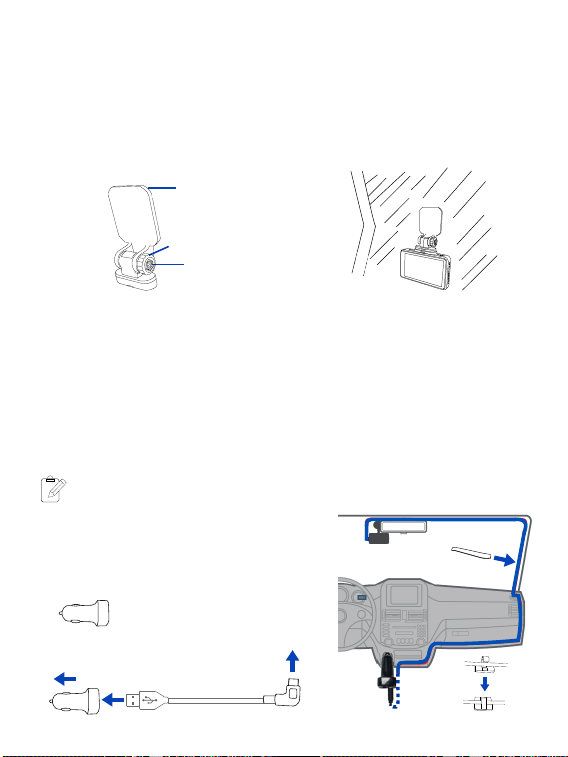
2-2 Mounting your Dash Cam
Method 1: Mounting your Dash Cam with suction cup.
1. Angle the mount so that it can slide into the magnetic
slot on top of the camera. Align the magnets of the
mount with the camera’s magnetic contacts and slide
it into place. Then remove the protective film from the
camera lens and the protective film from the suction
cup.
You can mount the Dash Cam with either of these methods:
2. Getting started
2-1 Inserting a memory card
Class 10 or higher TF memory card with a storage capacity of 8GB - 256GB must be
used.
1. As shown in the illustration, hold the edge of the card, and insert it into the slot, with
the metal contacts facing up. Push until you hear a click.
To remove the TF memory card, gently push on the edge of the card in until it clicks
out from the slot, then pull out the card.
Note: Make sure the contacts of the
TF memory card are facing the same
direction as the display.
Inserting a TF card
Do not apply excessive force to the card or attempt to insert it in the
wrong direction. This may cause damage to the card and the card slot.
Note
5
-
Note
5 EN
6 EN
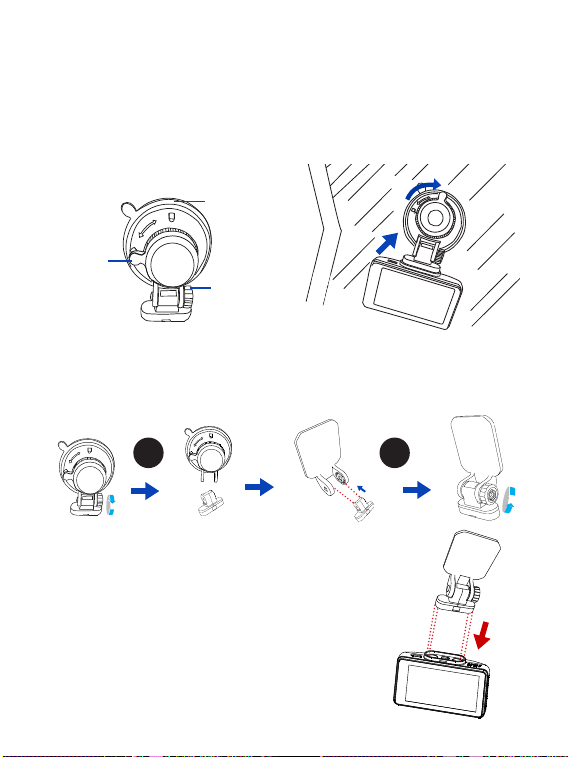
2. Find a good spot on the windshield to install the Dash Cam, and clean the area.
NOTE: The view should be unobstructed, and not blocking the drivers view of the road.
3. Press the mounts Suction Cup into the windshield, and turn the lock clockwise to
secure it in place.
4. Turn the knob of the mount to adjust the camera’s angle. Make sure the Dash Cam
remains level with the vehicle and the road. Turn the Dash Cam on to check the camera
angle.
Suction
Cup
Lock
Knob
Method 2: Mounting your Dash Cam with 3M Adhesive Mount.
1. Unscrew counterclockwise to remove the suction cup from the mount.
2. Attach the 3M Adhesive Mount to the magnetic mount, and make sure the
screw holes are aligned. Screw them tightly counterclockwise.
1 2
3. Angle the mount so that it can slide into the magnetic
slot on top of the camera. Align the magnets of the
mount with the camera’s magnetic contacts and slide
it into place. Then remove the protective film from the
camera lens and the protective film from the suction
cup.
7 EN
1. Connect one end of the supplied USB - Type C cable to the CDC-E4000’s Type
C port, and the other end to the supplied car power adapter. Plug the Car power
adapter into your car’s DC power outlet.
2. Route the power cable around the ceiling/passenger seat so that it does not
interfere with driving. Included cable clips can be used to secure the cables out
of harms’ way. Remove the film from the adhesive side to stick the cable clips on
the dashboard along the routing way, then place the cable into the clip and press
in to fix it.
You may choose to tuck the cable with included tool between the paneling
of your windshield and/or A-pillar space if available.
Make sure that the cable routing does not interfere with your car’s airbags
or other safety features.
4. Find a good spot on the windshield to install the Dash Cam, and clean the area.
NOTE: The view should be unobstructed, and not blocking the drivers view of the road.
5. Remove the film from the adhesive side, and then stick the mount onto the wind-
shield, make sure it is firmly adhered.
6. Turn the knob of the mount to adjust the camera’s angle. Make sure the Dash Cam
remains level with the vehicle and the road. Turn the Dash Cam on to check the camera
angle.
3M adhesive tape
Knob
Screw
2-3 Connecting the Dash Cam to power supply
Notes
5
-
Note
To your car’s DC
power outlet
To CDC-E4000
Dash Cam’s
Type-C port
Press
USB Car power
adapter (Supplied)
8 EN
3. Operations
3-1 Turning the device on/o
The device will automatically turn on when you start your car’s engine, and
automatically turn o when you shut o your car.
To manually turn your Dash Cam on/o, press and hold the Power button for 2
seconds.
LED
Indicator
LED Indicator on the device
Description
Restarting the Dash Cam
Occasionally, you may need to perform a hardware reset if the Dash Cam stops
responding or if it appears to be “frozen” or unresponsive. To restart the Dash
Cam, press and hold the Power button until the system powers o. Press the Power
button again to turn the Dash Cam on.
If the system does not shut down from holding the Power button, you can do a
forced reboot by inserting a paper clip into the “RESET” button hole on the device.
REC
indicator
Charging
indicator
REC
indicator
Charging
indicator
When the device is charging, the
charging indicator glows blue.
When fully charged, the charging
indicator will turn o.
When you turn on the device, the
REC indicator glows blue. While
recording, the REC indicator will
glow blue to indicate that record-
ing is in progress.
AM
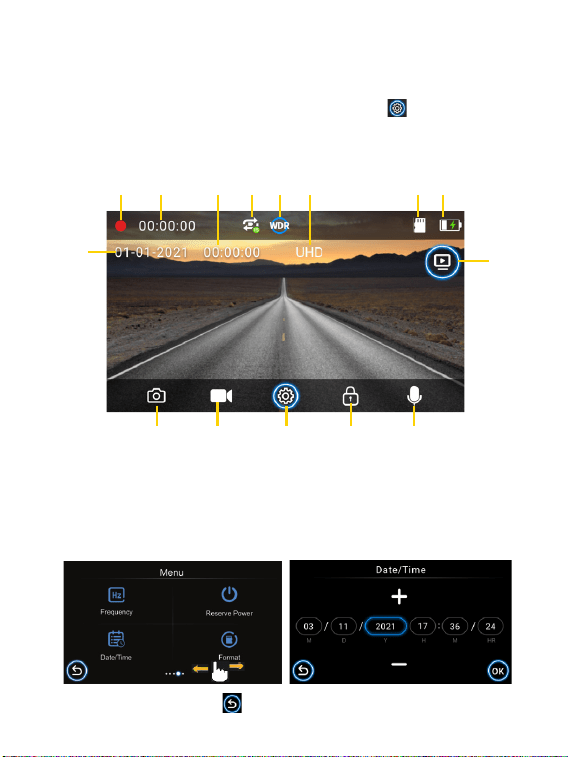
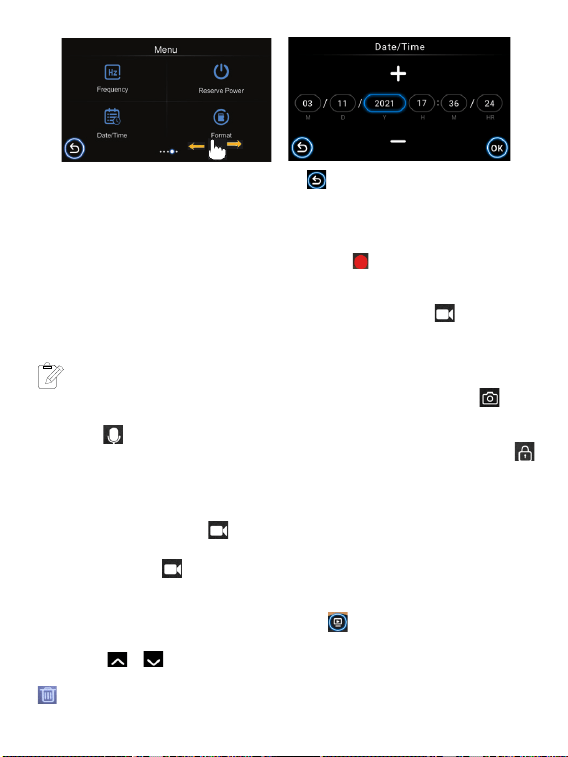
1. When in Video Recording mode, press the Settings icon to go into System
settings, then scroll and select “Date /Time” to enter date and time settings.
2. Press the +/- buttons on the Dash Cam to make changes to date or time, then
press the OK button to confirm.
1
11
9
2
12
3
13
4
14
5
15
6 7 8
10
When done, press the back icon to return to previous menu.
9 EN
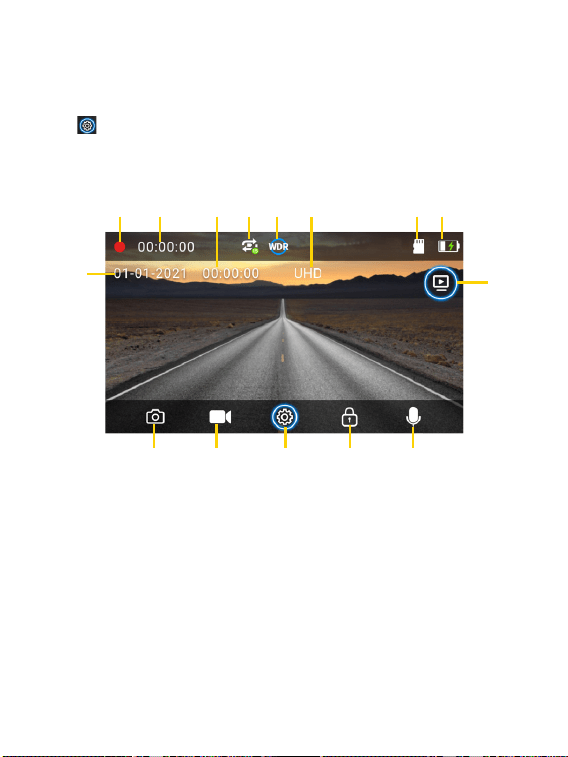
3-2 Date and Time Settings
Make sure you set the date and time before recording to “Protect Your Side of The
Story”.
1. Recording status indicator
2. Recording duration
3. Time
4. Loop Recording (Enabled by default)
5. WDR (Enabled by default)
6. UHD (Current Video resolution)
7. TF card is inserted
8. Battery status
9. Date
10. Playback button
11. Camera button
12. Camera recording button
13. System settings button
14. File lock button
15. Audio recording button (Enabled by
default)
Scroll Left/Right

10 EN
3-3 Video Recording Mode
3-4 Playback Mode
By default, the system will automatically begin continuous recording a few sec-
onds after start-up. The icon on the upper left corner of the screen will flash.
The LED light indicator besides the power button should flash red, indicating that
recording is in progress. You can manually stop the recording by pressing this
icon . Pressing it again will restart recording. The recorded video will be saved
under the “DCIM” folder on your Dash Cam’s TF memory card.
• In Recording mode, you can take photos by pressing this icon .
• You can also enable or disable voice recording by pressing this icon
on
the bottom right corner of the screen.
• You can lock/unlock a recorded file by pressing this icon .
• When the memory card is full, new videos will record over the oldest videos.
3-3-1 Continuous Recording
Notes
5
-
Note
You can press this icon on the Dash Cam to begin manual recording.
Press this icon again to stop manual recording.
3-3-2 Manual Recording
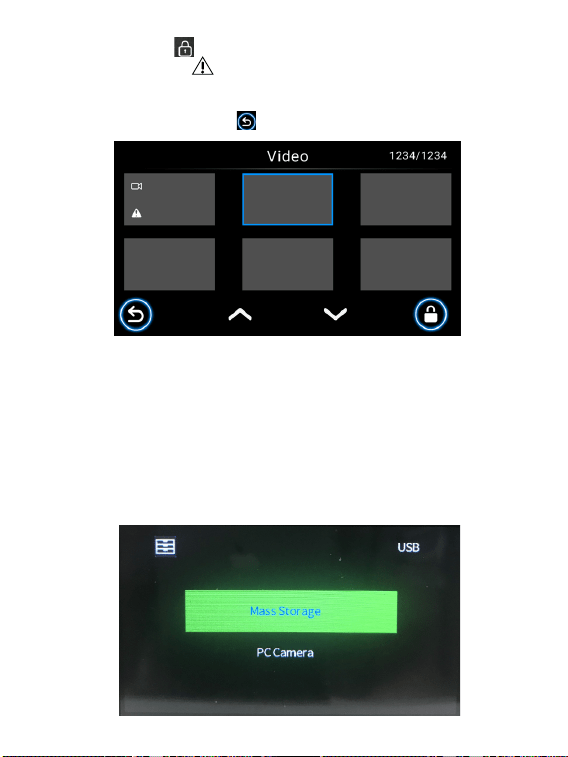
1. When in Recording mode, press this icon to shift to Playback mode.
2. Press / to select your desired video clip or photo, and press it to start
playback. You can also delete it by pressing this icon . A dialog box will ask to
delete the current file or all. Make sure the file is unlocked before you delete it.
3. Press this icon to lock/unlock your file. The file will be labeled with this
icon When you lock a file, it is protected and cannot be replaced by new files
until you delete the file or reformat the memory card.
4. Press the back icon to exit playback mode.
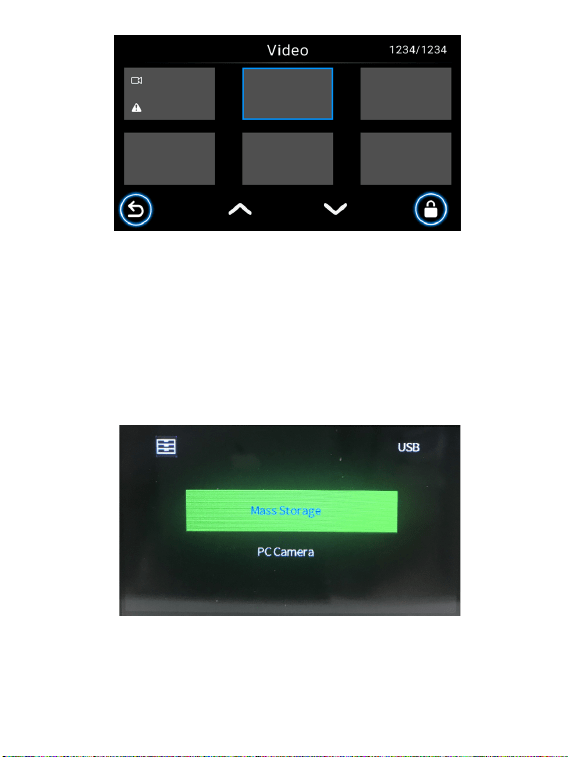
11 EN
Your Dash Cam can act as a “Removable Disk”; you can copy recorded files for
backup and playback on your computer.
1. Connect your supplied USB- TYPE C cable to the Type C port of the Dash Cam,
and to your computer’s USB Port. Tap Mass Storage, and the Dash Cam should
be recognized by your PC.
2. Click to select your desired recorded files to copy and/or play back on your
computer.
Connect your supplied USB- TYPE C cable to the Type C port of the Dash Cam,
and to your computer’s USB Port. Tap PC Camera on your Dash Cam, and click
the Camera App Icon in the Start menu on your computer to open the Camera,
and the Dash Cam will be identified.
3-5-1 Playback on your computer
3-5-2 Using as webcam
3-5 Connecting to your computer
12 EN
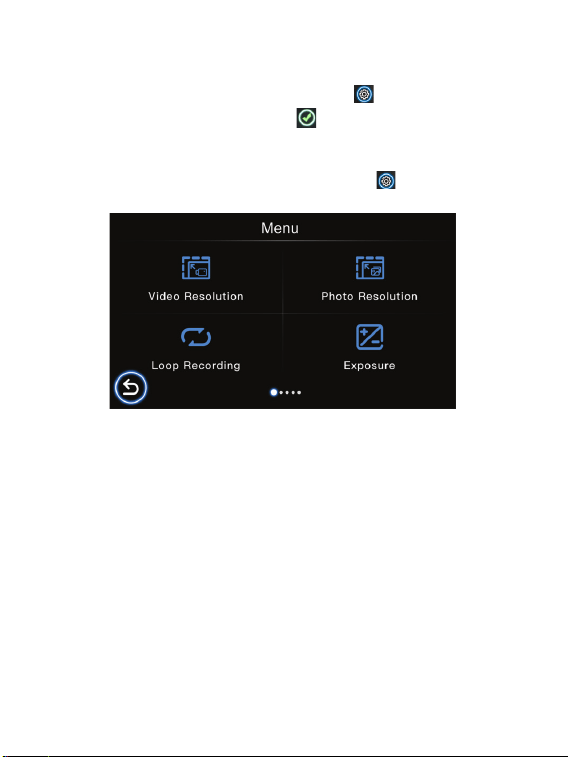
3-6 Formatting TF Memory Card
Video Resolution
Photo Resolution
Loop Recording
Exposure
We recommend you format the TF memory card every 2 weeks to maximize its
lifetime.
To format the memory card, press the Settings icon to enter system settings,
scroll and select Format, then tap the icon and all data will be erased.
Set your video output resolution (3840X2160P 30FPS, 2560X1440P 30FPS,
2304X1296P 30FPS, 1920X1080P 60FPS, 1920X1080P 30FPS).
Set your photo output resolution (4032x3024 12M, 3648x2736 10M,
3264x2448 8M, 2992x1696 5M, 2048x1536 3M, 1920x1080 2M).
Set the length of each video clip for a continuous recording (O, 1 min., 3 min., 5
min.). The default settings is on.
Set or reset the exposure level as desire (+2.0, +5/3, +4/3, +1.0, +2/3, +1/3, +0.0, -1/3,
-2/3, -1.0, -4/3, -5/3, -2.0).
4. Settings
When in Video Recording mode, press the Settings icon to go into System
settings Menu, then scroll and select to enter specific settings.
13 EN
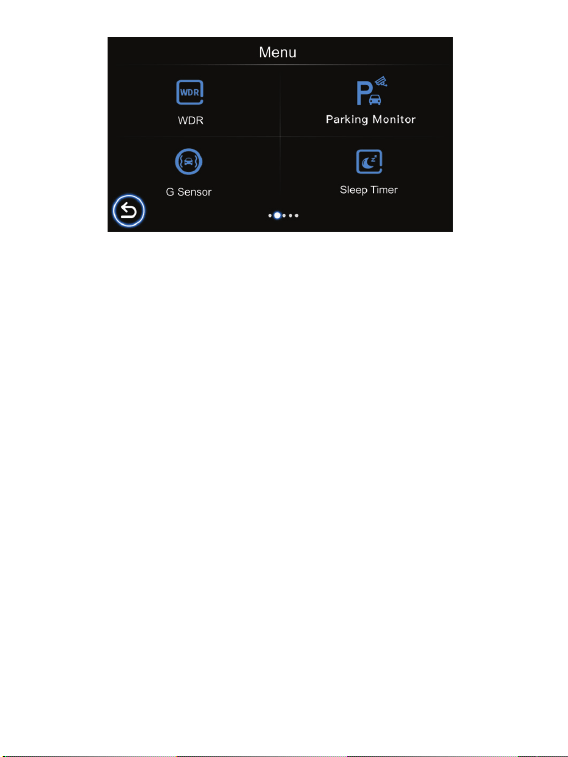
WDR
Parking Monitor
G Sensor
Sleep Timer
The WDR (Wide Dynamic Range) on the device improves the camera’s image quality
under high-contrast lighting conditions where both dimly and brightly lit areas are
present in the field of view. It enables the camera to capture details clearly in both the
poorly and strongly illuminated areas of the video.
The default setting is on.
If the parking monitoring mode is turned on, the device will power o automatically. If
your vehicle is involved in a hit and run while parked, the device will automatically start
up for 15 second recording, then automatically power o again. When the car starts up,
the device will restart
continuous recording.
It can provide around-the-clock protec-
tion and surveillance for the vehicle.
If the G Sensor is turned on, any hard braking/shock/vibration that occurs during
recording device will be automatically locked, ensuring it will not be overwritten.
(Options: O/Low/Medium/High)
Set the Sleep timer (O, 1 Min., 3 Min.,5 Min., 10 Min.) in standby mode. If you set the
Sleep timer to 3 minutes, the Dash Cam will automatically enter sleep mode after 3
minutes of inactivity.
14 EN
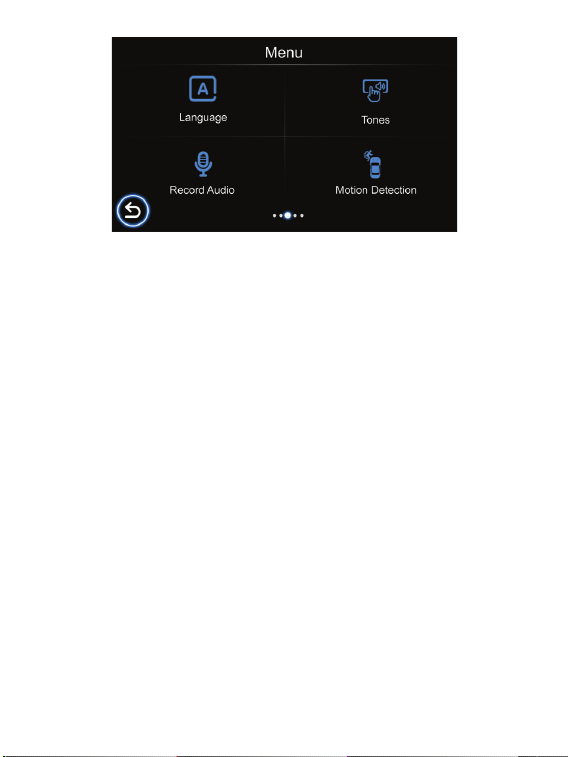
Language
Set the system language.
Tones
Turn tones for tapping on/o
Record Audio
Allows you to turn ON and OFF audio recording for video. The default setting is
on.
Motion Detection
1. To enable “Motion Detection”, check the settings menu and make sure “On” is
selected.
2. When enabled, any movement in the camera’s surrounding area will automatically
begin recording. It will only stop recording after it doesn’t see any movement for 20
seconds.
Attention: Please do not use the Motion Detection feature while driving. The recording
will repeatedly play/pause, which will aect the video’s quality and duration.
15 EN
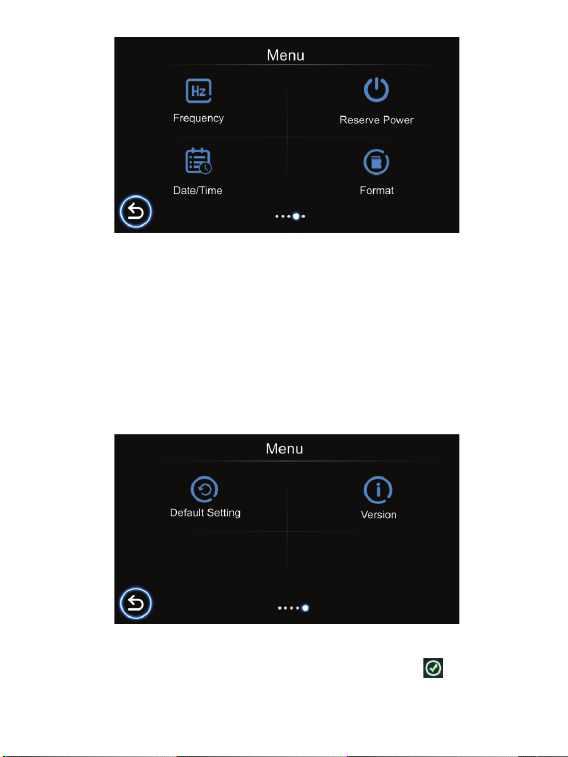
Frequency
Set the light frequency (50Hz, 60Hz).
Reserve Power
When the device is unexpectedly turned o, it can stay on for several seconds.
The amount of time can be customized (O, 5s, 10s, 30s).
Version
Display the system firmware version.
Date/Time
Set the system date and time.
Format
Format the TF memory card to erase all data.
Default Setting
Restores the system settings to factory defaults. Press this icon to confirm.

16 EN
Specifications
Model Name CDC-E4000
Display 3 inch IPS screen
Lens Super wide angle lens
Languages
English/French/Dutch/Spanish/Portuguese/
German/Italian/SimpleChinese/Traditional
Chinese/Hebrew/Japanese
Storage TF memory card, Max 256GB
Video Resolution
3840X2160P 30FPS, 2560X1440P 30FPS,
2304X1296P 30FPS, 1920X1080P 60FPS,
1920X1080P 30FPS
Photo Resolution
4032x3024 12M, 3648x2736 10M,
3264x2448 8M, 2992x1696 5M,
2048x1536 3M, 1920x1080 2M
Video Format MP4
Photo Format JPG
WDR Supported
Microphone Supported
Built-in speaker Supported
Power Input/Output Input: DC 12-24V/2.5A max, Output: DC 5V/4.8A
Battery Capacity Polymer Li Battery 300mAh

17 EN
FCC Statement
This device complies with Part 15 of the FCC Rules. Operation is subject to the fol-
lowing two conditions:
(1) this device may not cause harmful interference, and (2) this device must accept
any interference received, including interference that may cause undesired operation.
Warning: Changes or modifications not expressly approved by the party responsible
for compliance could void the user’s authority to operate the equipment.
Note: This equipment has been tested and found to comply with the limits for a Class
B digital device, pursuant to Part 15 of the FCC Rules. These limits are designed to pro-
vide reasonable protection against harmful interference in a residential installation.
This equipment generates, uses and can radiate radio frequency energy and, if not
installed and used in accordance with the instructions, may cause harmful inter-
ference to radio communications. However, there is no guarantee that interference
will not occur in a particular installation. If this equipment does cause harmful in-
terference to radio or television reception, which can be determined by turning the
equipment o and on, the user is encouraged to try to correct the interference by
one or more of the following measures: (1) Reorient or relocate the receiving anten-
na. (2) Increase the separation between the equipment and receiver. (3) Connect
the equipment into an outlet on a circuit dierent from that to which the receiver is
connected. (4) Consult the dealer or an experienced radio / TV technician for help.
Disclaimer
Notice
All information, design and specifications contained in this manual were correct at
the time of this publication. As the product goes under continuous upgrades and
changes, however, the final device may have slight dierences. The contents of this
manual are subject to change without prior notice, and Summit Electronics LLC will
not be liable for any errors contained herein or for incidental or consequential dam-
ages in connection with the furnishing performance or use of this manual.
This symbol means the product must not be discarded as household waste,
and should be delivered to an appropriate collection facility for recycling.
Follow local rules and never dispose of the product and rechargeable bat-
teries with normal household waste. Correct disposal of old products and
rechargeable batteries helps prevent negative consequences for the envi-
ronment and human health.
CAR AND DRIVER
®
IS A REGISTERED TRADEMARK OF HEARST COMMUNICA-
TION, INC. AND USED UNDER LICENSE BY SUMMIT ELECTRONICS, LLC.
©2021 HEARST COMMUNICATION, INC. ALL RIGHTS RESERVED AND ANY USE
OF SUCH MARKS BY SUMMIT ELECTRONICS LLC IS UNDER LICENSE.
OTHER TRADEMARKS AND TRADE NAMES ARE THOSE OF THEIR RESPECTIVE
OWNERS.
WARNING: CANCER AND REPRODUCTIVE HARM - WWW. P65WARN-
INGS.CA.GOV.

18 EN
SUMMIT ELECTRONICS, LLC LIMITED WARRANTY (“Warranty”) ― For Product
Categories Listed in Chart Below (as applicable, “Product”) Before returning your
Product for service under this Warranty, please (i) read the instruction manual
carefully. If you are still having trouble with your Product, please contact Technical
Support at
Warning: Some Products may contain components that are small enough to be
swallowed. Please keep out of reach of children.
Subject to the terms and conditions herein, SUMMIT ELECTRONICS, LLC warrants to
the original purchaser of the Product (“Customer”) that for the applicable Warranty
Period listed below, the Product will be free from defects in material or workmanship
under normal, non-commercial use (“Defects”). Warranty Period encompasses, as
listed below, separate “Coverage Periods” for Parts and Labor, each Coverage Peri-
od for one year, to begin from the original date of Customer purchase. If Customer
returns a defective Product (or any component thereof) during the applicable War-
ranty Period, SUMMIT ELECTRONICS, LLC will, as its option, during the specified
Coverage Periods for Parts and Labor (as applicable) either: (i) repair the Product
(or, as applicable, any component thereof) or (ii) replace the Product (or, as appli-
cable, any component thereof) with a new or refurbished Product (or, as applicable,
any component thereof), in either case free of charge to Customer for Parts and/
or Labor (as applicable) during the specified Coverage Period only, and excluding
applicable shipping charges (noted below), for which the Customer is responsible.
The foregoing states the Customer’s exclusive remedy and SUMMIT ELECTRONICS,
LLC’s sole liability for breach of the limited warranty contained herein.
This Warranty specifically excludes any Product (or, as applicable, any compo-
nent thereof) that has been subject to or Defects resulting from: (a) any neglect
or misuse by a Customer, an accident, improper application, violation of operating
instructions for the Product, any other Customer-induced damage, or the alteration
or removal of any Product serial number; (b) any modification or repair to Product
(or, as applicable, any component thereof) by any party other than SUMMIT CE
GROUP or a party authorized in writing by SUMMIT ELECTRONICS, LLC; (c) any
damage to Product (or, as applicable, any component thereof) due to power surges,
incorrect electrical voltage, misconnection to any device, or malfunction of any de-
vice used with the Product (or, as applicable, any component thereof); (d) cosmetic
damage to the Product (or, as applicable, any component thereof) caused by normal
wear and tear; (e) shipping damage that occurs while the Product is in transit; (f)
damage caused by heat sources, sunlight, electromagnetic conditions, or other cli-
matic conditions; or (g) any acts of God. Product is sold to Customer for personal,
non-commercial use only. Product is not warranted for Customer’s commercial or
rental use. In addition, Product is not warranted against failure, and should not be
used by Customer for any application where (i) there is a risk that any data stored
on Product will be breached or otherwise compromised, or (ii) the data stored on
Product is relied upon for medical or lifesaving applications.
SUMMIT ELECTRONICS LLC One Year Limited Warranty

WITHOUT LIMITATION ANY IMPLIED WARRANTY (I) OF MERCHANTABILITY,
(II) OF FITNESS FOR A PARTICULAR PURPOSE, OR (III) OF NON-INFRINGEMENT
OF THIRD PARTY RIGHTS. TO THE MAXIMUM EXTENT PERMITTED BY AP-
PLICABLE LAW, IN NO EVENT WILL SUMMIT ELECTRONICS, LLC BE LIABLE TO
CUSTOMER OR ANY THIRD PARTY FOR ANY INDIRECT, SPECIAL, INCIDENTAL,
CONSEQUENTIAL, EXEMPLARY OR PUNITIVE DAMAGES, INCLUDING, WITH-
OUT LIMITATION, ANY LOST PROFITS OR REVENUES, LOSS OR INACCURACY
OF ANY DATA OR COST OF SUBSTITUTE GOODS, REGARDLESS OF THE THEO-
RY OF LIABILITY (INCLUDING NEGLIGENCE) AND EVEN IF SUMMIT ELECTRON-
ICS, LLC HAS BEEN ADVISED OF THE POSSIBILITY OF SUCH DAMAGES, SUM-
MIT ELECTRONICS, LLC’S AGGREGATE LIABILITY TO CUSTOMER FOR ACTUAL
DIRECT DAMAGES FOR ANY CAUSE WHATSOEVER SHALL BE LIMITED TO THE
CUMULATIVE PRODUCT FEES PAID BY THAT CUSTOMER FOR THE PRODUCT
CAUSING THE DAMAGES, IF ANY. This Warranty gives Customer specific rights,
and Customer may also have other rights that vary from jurisdiction to jurisdiction.
To obtain Warranty service, Customer must email SUMMIT ELECTRONICS, LLC
Technical Support prior to making a Product return. Customer must include with
Product return the following items (failure to enclose any of these items may result
in a delay in the processing of your Warranty claim): (i) a dated sales receipt that
indicates the place of purchase, model number of Product, and amount paid; (ii)
a detailed description of Customer’s problem with Product; (iii) Customer’s full
name, phone number, and return address, and; (iv) a money order made out to
SUMMIT ELECTRONICS, LLC Corporation to cover return shipping charges to US
destinations only, for the applicable dollar amount shown for the Product in the
table above. SUMMIT ELECTRONICS, LLC will not make return shipments to a
P.O. Box. For shipping to international addresses, actual freight will be charged to
Customer. Return your Product freight-prepaid in its original packaging, or packag-
ing that aords an equal measure of protection. Please allow 4 to 6 weeks for the
processing of your claim (6 to 8 weeks from November to February).
You must email
SUMMIT ELECTRONICS, LLC
Technical Support prior to making a
return. Please ask if you are unsure of which category your product falls under.
*US destinations only.
SUMMIT ELECTRONICS, LLC disclaims any Warranty for any of the foregoing uses
to the fullest extent permitted by law. Customer assumes any and all risks associ-
ated with such uses of Product, and agrees to indemnify SUMMIT ELECTRONICS,
LLC for any damages claimed against SUMMIT ELECTRONICS, LLC for such uses.
EXCEPT FOR EXPRESS WARRANTIES STATED ABOVE AND TO THE MAXIMUM
EXTENT PERMITTED BY LAW, THE PRODUCTS ARE PROVIDED “AS IS”, AND
SUMMIT ELECTRONICS, LLC DISCLAIMS ALL OTHER WARRANTIES, INCLUDING
19 EN

1 ES
Tabla de Contenido
Precauciones y avisos...................................................................................................2
1. Conceptos básicos......................................................................................................3
1-1 En la caja........................................................................................................................................3
1-2 Botones y piezas.........................................................................................................................4
2. Empezando................................................................................................................5
2-1 Insertar una tarjeta de memoria..............................................................................................5
2-2 Montaje de la Dash Cam.........................................................................................................5
2-3 Conexión de la Dash Cam a la fuente de alimentación....................................................7
3. Operaciones...............................................................................................................8
3-1 Encender / apagar el dispositivo............................................................................................8
3-2 Configuración de fecha y hora...............................................................................................9
3-3 Modo de grabación de video................................................................................................10
3-3-1 Grabación continua..............................................................................................................10
3-3-2 Grabación manual...............................................................................................................10
3-4 Modo de reproducción...........................................................................................................10
3-5 Conexión a su computadora..................................................................................................11
3-5-1 Reproducción en su computadora....................................................................................11
3-5-2
Usar como cámara web
..........................................................................................................12
3-6 Formatear de la tarjeta de memoria TF............................................................................12
4. Ajustes.....................................................................................................................12
Resolución de video..............................................................................................................12
Resolución de la foto............................................................................................................12
Grabación en bucle...............................................................................................................12
Exposición...............................................................................................................................13
WDR.........................................................................................................................................13
Monitor de estacionamiento..............................................................................................13
Sensor G...................................................................................................................................13
Tiempo de dormir..................................................................................................................13
Idioma......................................................................................................................................14
Tonos........................................................................................................................................14
Grabar audio..........................................................................................................................14
Detección de movimiento...................................................................................................14
Frecuencia...............................................................................................................................15
Reserva de energía................................................................................................................15
Fecha y hora............................................................................................................................15
Formato....................................................................................................................................15
Configuración predeterminada..........................................................................................15
Versión.....................................................................................................................................15
Especificaciones..........................................................................................................16
Declaración de la FCC..................................................................................................17
Darse cuenta................................................................................................................17
Garantía limitada de un año de SUMMIT ELECTRONICS LLC....................................18
ESPAÑOL

2 ES
Precauciones y avisos
• Debido a las leyes locales y las consideraciones de seguridad del vehículo, no
opere manualmente el dispositivo mientras conduce.
• Mantenga limpios el parabrisas y la lente de la Dash Cam para obtener una
calidad de video óptima. Si hay un objeto extraño adherido a la lente, esto
podría reducir la calidad de los videos grabados.
• Antes de colocarlo en su parabrisas, consulte con su DMV local acerca de las leyes
de tránsito que dictan el posicionamiento / método de montaje del dispositivo.
• Mantenga el dispositivo alejado del calor excesivo, como la luz solar directa,
el fuego o similares.
• Utilice cables originales o certificados.
• No utilice ningún limpiador / aceite corrosivo para limpiar.
• Mantener fuera del alcance de los niños. Contiene piezas pequeñas que
pueden representar un peligro de asfixia.
• Respete las leyes y normativas locales al utilizar el dispositivo.
• Para evitar daños a las partes o circuitos internos de su dispositivo, no lo use
en ambientes polvorientos, con humo, húmedos o sucios.
• No utilice, almacene ni transporte el dispositivo donde se almacenen inflam-
ables o explosivos. El uso de su dispositivo en estos entornos aumenta el
riesgo de explosión o incendio.
• Car and Driver NO es responsable de la pérdida de datos / contenido durante
el funcionamiento.
• Car and Driver NO garantiza el registro de accidentes en los que el impacto
pueda dañar el dispositivo.
• Instale el dispositivo cerca del espejo retrovisor de su vehículo para obtener la
mejor vista de campo abierto.
• NO instale la Dash Cam en un lugar que obstruya su vista de la carretera
mientras conduce.
• Asegúrese de que la lente esté dentro del rango de limpieza de los lim-
piaparabrisas para garantizar una vista clara incluso cuando llueve.
• No toque la lente con los dedos. La grasa de los dedos que quede en la lente
dará como resultado videos o instantáneas poco claros. Limpia la lente con
regularidad.
• No instale el dispositivo en una ventana tintada. Hacerlo puede dañar la
película de tinte. Asegúrese de que la vista de la cámara no se vea obstaculi-
zada por una ventana tintada.
• Para algunos vehículos, una toma de corriente CC seguirá proporcionando
energía después de que se apague el motor. Para evitar agotar la batería de
su automóvil, desenchufe manualmente la Dash Cam cuando el motor esté
apagado.
• No desmonte este dispositivo.
• No exponga este dispositivo a la lluvia ni a la humedad ni lo sumerja en agua.
• Las temperaturas ideales son de 0 ° C a 35 ° C. Evite las temperaturas
extremas.
3 ES
1. Conceptos básicos
1-1 en la caja
CDC-E4000
Opción de montaje 1: montaje con
ventosa
Opción de montaje 2:
Soporte adhesivo 3M
Tarjeta TF
Alimentación del
coche USB
adaptador
Cable de carga
Cable USB TIPO C
Herramienta para enrollar alambre
Manual de usuario
Clips de cable
4 ES
1-2 botones y piezas
Vista frontal
Vista trasera
No. Definición Descripción
1 Ranura de mon-
taje magnética
El soporte magnético se inserta aquí
2
Puerto tipo C
Para entrada de alimentación de CC o conexión a computa-
dora.
3 Botón de encen-
dido
Mantenga pulsado durante 1 segundo para encender / apagar
manualmente el dispositivo.
4 Indicador LED Indica el estado operativo del dispositivo.
5 Toma de cámara
trasera
Para cámara de respaldo opcional, no disponible en todas las
regiones
6 Ranura para
tarjetas TF
Ranura para tarjeta de memoria incluida.
7 Lente de la
cámara
Cámara frontal para grabación de video.
8 Orador Para salida de sonido de audio
9
Botón de reinicio
Presione para restaurar todas las configuraciones del sistema a los
valores predeterminados de fábrica.
10 Micrófono Para grabar audio.
1
5
6
2
3
4
10
7
8
9
5 ES
2-2 Montaje de su Dash Cam
2. Empezando
2-1 Insertar una tarjeta de memoria
Se debe utilizar una tarjeta de memoria TF de clase 10 o superior con una capacidad de
almacenamiento de 8 GB a 256 GB.
1. Como se muestra en la ilustración, sostenga el borde de la tarjeta e insértela en la
ranura, con los contactos metálicos hacia arriba. Empuje hasta que escuche un clic.
Para quitar la tarjeta de memoria TF, empuje suavemente el borde de la tarjeta hacia
adentro hasta que haga clic en la ranura, luego extraiga la tarjeta.
Nota: asegúrese de que los contactos de
la tarjeta de memoria TF estén orienta-
dos en la misma dirección que la pantalla.
Insertar una tarjeta TF
No aplique una fuerza excesiva a la tarjeta ni intente insertarla en la direc-
ción incorrecta. Esto puede dañar la tarjeta y la ranura de la tarjeta.
Nota
5
-
Note
1. Incline el soporte de modo que pueda deslizarse
dentro de la ranura magnética en la parte superior de la
cámara. Alinee los imanes del soporte con los contactos
magnéticos de la cámara y deslícelo en su lugar. Luego
retire la película protectora de la lente de la cámara y la
película protectora de la ventosa.
Método 1: Montaje de su Dash Cam con ventosa.
Puede montar la Dash Cam con cualquiera de estos métodos:
2. Encuentre un buen lugar en el parabrisas para instalar la Dash Cam y limpie el área.
NOTA: La vista debe estar despejada y no debe bloquear la vista de la carretera por
parte del conductor.
3. Presione la ventosa de los soportes en el parabrisas y gire la cerradura en el sentido
de las agujas del reloj para asegurarla en su lugar.
4. Gire la perilla del soporte para ajustar el ángulo de la cámara. Asegúrese de que la
Dash Cam permanezca nivelada con el vehículo y la carretera. Encienda la Dash Cam
para verificar el ángulo de la cámara.
Succión
taza
Cerrar con
llave
Mando
6 ES
Método 2: Montaje de su Dash Cam con soporte adhesivo 3M.
1. Desatornille en sentido antihorario para quitar la ventosa del soporte.
2. Coloque el soporte adhesivo 3M en el soporte magnético y asegúrese de que
los orificios de los tornillos estén alineados. Atorníllelos firmemente en sentido
antihorario.
1 2
3. Incline el soporte de modo que pueda deslizarse en
la ranura magnética en la parte superior de la cámara.
Alinee los imanes del soporte con los contactos
magnéticos de la cámara y deslícelo en su lugar. Luego
retire la película protectora de la lente de la cámara y la
película protectora de la ventosa.
7 ES
4. Encuentre un buen lugar en el parabrisas para instalar la Dash Cam y limpie el área.
NOTA: La vista debe estar despejada y no debe bloquear la vista de la carretera por
parte del conductor.
5. Retire la película del lado adhesivo y luego pegue el soporte en el parabrisas,
asegúrese de que esté firmemente adherido.
6. Gire la perilla del soporte para ajustar el ángulo de la cámara. Asegúrese de que la
Dash Cam permanezca nivelada con el vehículo y la carretera. Encienda la Dash Cam
para verificar el ángulo de la cámara.
Adhesivo 3M
cinta
Mando
Tornillo
1. Conecte un extremo del cable USB - Tipo C suministrado al puerto Tipo C del
CDC-E4000 y el otro extremo al adaptador de corriente para automóvil suminis-
trado. Enchufe el adaptador de corriente para automóvil en la toma de corriente
CC de su automóvil.
2. Pase el cable de alimentación alrededor del techo / asiento del pasajero para
que no interfiera con la conducción. Los clips de cable incluidos se pueden utilizar
para asegurar los cables fuera de peligro. Retire la película del lado adhesivo para
pegar los clips de cable en el tablero a lo largo del recorrido, luego coloque el
cable en el clip y presione para fijarlo.
Puede optar por meter el cable con la herramienta incluida entre los pane-
les de su parabrisas y / o el espacio del pilar A, si está disponible.
Asegúrese de que el enrutamiento de
los cables no interfiera con las bolsas de
aire de su automóvil u otras característi-
cas de seguridad.
Al DC de tu coche
Toma de corriente
2-3 Conexión de la Dash Cam a la fuente de alimentación
Notas
5
-
Note
Hacia CDC-E4000
Puerto tipo C de Dash
Cam
Prensa
Alimentación del coche USB
adaptador (suministrado)

8 ES
3. Operaciones
3-1 Encender / apagar el dispositivo
El dispositivo se encenderá automáticamente cuando encienda el motor de su
automóvil y se apagará automáticamente cuando lo apague.
Para encender / apagar manualmente su Dash Cam, mantenga presionado el
botón de encendido durante 2 segundos.
DIRIGIÓ
Indicador
Indicador LED en el dispositivo
Descripción
Reinicio de la Dash Cam
Ocasionalmente, es posible que deba realizar un restablecimiento de hardware si
la Dash Cam deja de responder o si parece estar “congelada” o no responde. Para
reiniciar la Dash Cam, mantenga presionado el botón de encendido hasta que el
sistema se apague. Presione el botón de Encendido nuevamente para encender la
Dash Cam.
Si el sistema no se apaga después de mantener presionado el botón de encen-
dido, puede reiniciar forzosamente insertando un clip en el orificio del botón
“RESET” en el dispositivo.
REC
indicador
Cargando
indicador
REC
indicador
Cargando
indicador
Cuando el dispositivo se está cargan-
do, el indicador de carga se ilumina
en azul. Cuando esté completamente
cargado, el indicador de carga se
apagará.
Cuando enciende el dispositivo, el
indicador REC se ilumina en azul.
Durante la grabación, el indicador REC
se iluminará en azul para indicar que la
grabación está en curso.
AM
9 ES
1. Cuando esté en el modo de grabación de video, presione el icono de configu-
ración para ir a la configuración del sistema, luego desplácese y seleccione
“Fecha / Hora” para ingresar la configuración de fecha y hora.
2. Presione los botones +/- en la Dash Cam para realizar cambios en la fecha o la
hora, luego presione el botón OK para confirmar.
1
11
9
2
12
3
13
4
14
5
15
6 7 8
10
3-2 Configuración de fecha y hora
Asegúrese de establecer la fecha y la hora antes de grabar en “Proteja su versión de
los hechos”.
1. Indicador de estado de grabación
2. Duración de la grabación
3 Tiempo
4. Grabación en bucle (habilitada de
forma predeterminada)
5. WDR (habilitado de forma predeter-
minada)
6. UHD (resolución de video actual)
7. La tarjeta TF está insertada
8. Estado de la batería
9. Fecha
10. Botón de reproducción
11. Botón de cámara
12. Botón de grabación de la cámara
13. Botón de configuración del sistema
14. Botón de bloqueo de archivos
15. Botón de grabación de audio (habilita-
do de forma predeterminada)
10 ES
3-3 Modo de grabación de video
3-4 Modo de reproducción
De forma predeterminada, el sistema comenzará automáticamente la grabación
continua unos segundos después del inicio. El icono en la esquina superior
izquierda de la pantalla parpadeará. El indicador de luz LED junto al botón de
encendido debe parpadear en rojo, lo que indica que la grabación está en curso.
Puede detener manualmente la grabación presionando este icono . Si lo
presiona de nuevo, se reiniciará la grabación. El video grabado se guardará en la
carpeta “DCIM” en la tarjeta de memoria TF de su Dash Cam.
• En el modo de grabación, puede tomar fotos presionando este ícono .
• También puede habilitar o deshabilitar la grabación de voz presionando este
ícono en la esquina inferior derecha de la pantalla
• Puede bloquear / desbloquear un archivo grabado presionando este icono
• Cuando la tarjeta de memoria está llena, los videos nuevos se grabarán
sobre los videos más antiguos.
3-3-1 Grabación continua
Notas
5
-
Note
Puede presionar este ícono en la Dash Cam para comenzar la grabación
manual.
Presione este icono nuevamente para detener la grabación manual.
3-3-2 Grabación manual
1. En el modo de grabación, presione este icono para cambiar al modo de
reproducción.
2. Presione / para seleccionar el videoclip o la foto que desee y presióne-
lo para iniciar la reproducción. También puede eliminarlo presionando este icono
. Un cuadro de diálogo le pedirá que elimine el archivo actual o todo.
Asegúrese de que el archivo esté desbloqueado antes de eliminarlo.
Cuando termine, presione el icono de retroceso para regresar al menú anterior.
Desplazarse hacia la
izquierda / derecha
11 ES
3. Presione este icono para bloquear / desbloquear su archivo. El archivo se
etiquetará con este icono . Cuando bloquea un archivo, está protegido y no se
puede reemplazar por archivos nuevos hasta que elimine el archivo o reformatee
la tarjeta de memoria.
4. Presione el icono de retroceso para salir del modo de reproducción.
Su Dash Cam puede actuar como un “Disco extraíble”; puede copiar archivos
grabados para realizar copias de seguridad y reproducirlos en su computadora.
1. Conecte el cable USB-TIPO C suministrado al puerto Tipo C de la Dash Cam
y al puerto USB de su computadora. Toque Almacenamiento masivo y su PC
debería reconocer la Dash Cam.
2. Haga clic para seleccionar los archivos grabados que desee para copiar y / o
reproducir en su computadora.
3-5-1 Reproducción en su computadora
3-5 Conexión a su computadora
12 ES
Conecte el cable USB TIPO C suministrado al puerto Tipo C de la Dash Cam y al
puerto USB de su computadora. Toque Cámara de PC en su Dash Cam y haga clic en el
ícono de la aplicación de la cámara en el menú Inicio de su computadora para abrir la
Cámara, y se identificará la Dash Cam.
3-5-2 Usar como cámara web
3-6 Formateo de la tarjeta de memoria TF
Resolución de video
Resolución de la foto
Grabación en bucle
Le recomendamos que formatee la tarjeta de memoria TF cada 2 semanas para maxi-
mizar su vida útil.
Para formatear la tarjeta de memoria, presione el ícono de Configuración para
ingresar a la configuración del sistema, desplácese y seleccione Formatear, luego toque
el ícono y se borrarán todos los datos.
Configura tu resolución de salida de video (3840X2160P 30FPS, 2560X1440P
30FPS, 2304X1296P 30FPS, 1920X1080P 60FPS, 1920X1080P 30FPS).
Configura la resolución de salida de tus fotos (4032x3024 12M, 3648x2736 10M,
3264x2448 8M, 2992x1696 5M, 2048x1536 3M, 1920x1080 2M).
Establecer la duración de cada videoclip para una grabación continua (O, 1 min.,
3 min., 5 min.). La configuración predeterminada está activada.
4. Ajustes
Cuando esté en el modo de grabación de video, presione el icono de Configu-
ración para ir al Menú de configuración del sistema, luego desplácese y
seleccione para ingresar configuraciones específicas.
3-6 Formateo de la tarjeta de memoria TF
13 ES
Exposición
Establezca o restablezca el nivel de exposición como desee (+2.0, +5/3, +4/3, +1.0,
+2/3, +1/3, +0.0, -1/3, -2/3, -1.0, -4/3, -5/3, -2.0).
WDR
Monitor de estacionamiento
Sensor G
Tiempo de dormir
El WDR (amplio rango dinámico) del dispositivo mejora la calidad de imagen de la
cámara en condiciones de iluminación de alto contraste en las que hay áreas con ilumi-
nación tenue y brillante en el campo de visión. Permite que la cámara capture detalles
claramente en las áreas del video con poca o mucha iluminación. La configuración
predeterminada está activada.
Si el modo de monitoreo de estacionamiento está activado, el dispositivo se apagará
automáticamente. Si su vehículo sufre un atropello y se da a la fuga mientras está esta-
cionado, el dispositivo se iniciará automáticamente durante 15 segundos de grabación
y luego se apagará automáticamente de nuevo. Cuando el automóvil se enciende, el
dispositivo reiniciará la grabación continua. Puede proporcionar protección y vigilancia
las 24 horas del día para el vehículo.
Si el sensor G está encendido, cualquier frenado fuerte / choque / vibración que ocurra
durante la grabación del dispositivo se bloqueará automáticamente, asegurando que no
se sobrescriba. (Opciones: Desactivado / Bajo / Medio / Alto)
Configure el temporizador de apagado (Apagado, 1 Min., 3 Min., 5 Min., 10 Min.) En
el modo de espera. Si configura el temporizador de suspensión en 3 minutos, la Dash
Cam ingresará automáticamente al modo de suspensión después de 3 minutos de
inactividad.
14 ES
Idioma
Configure el idioma del sistema.
Tonos
Activar / desactivar tonos para tocar.
Grabar audio
Le permite ENCENDER y APAGAR la grabación de audio para video. La configuración
predeterminada está activada.
Detección de movimiento
1. Para habilitar la “Detección de movimiento”, verifique el menú de configuración y
asegúrese de que esté seleccionado “Activado”.
2. Cuando está habilitado, cualquier movimiento en el área circundante de la cámara
comenzará a grabar automáticamente. Solo dejará de grabar después de que no vea
ningún movimiento durante 20 segundos.
Atención: no utilice la función de detección de movimiento mientras conduce. La
grabación se reproducirá / pausará repetidamente, lo que afectará la calidad y duración
del video.
15 ES
Frecuencia
Configure la frecuencia de la luz (50 Hz, 60 Hz).
Reserva de energía
Cuando el dispositivo se apaga inesperadamente, puede permanecer encendido
durante varios segundos. La cantidad de tiempo se puede personalizar (Desac-
tivado, 5 s, 10 s, 30 s).
Versión
Muestra la versión de firmware del sistema.
Fecha y hora
Configure la fecha y hora del sistema.
Formato
Formatee la tarjeta de memoria TF para borrar todos los datos.
Configuración predeterminada
Restaura la configuración del sistema a los valores predeterminados de fábrica. Presi-
one este icono para confirmar.

16 ES
Especificaciones
Nombre del modelo CDC-E4000
Monitor Pantalla IPS de 3 pulgadas
Lente Lente súper gran angular
Idiomas
Inglés / francés / holandés / español /
portugués / alemán / italiano / chino simple /
chino tradicional / hebreo / japonés
Almacenamiento Tarjeta de memoria TF, Max 256GB
Resolución de video
3840X2160P 30FPS, 2560X1440P 30FPS,
2304X1296P 30FPS, 1920X1080P 60FPS,
1920X1080P 30FPS
Resolución de la foto
4032x3024 12M, 3648x2736 10M,
3264x2448 8M, 2992x1696 5M,
2048x1536 3M, 1920x1080 2M
Formato de video MP4
Formato de foto JPG
WDR Soportado
Micrófono Soportado
Altavoz incorporado Soportado
Entrada / salida de energía
Entrada: DC 12-24V / 2.5A max, Salida: DC 5V /
4.8A
Capacidad de la batería Batería de polímero de litio 300mAh

17 ES
Declaración de la FCC
Este dispositivo cumple con la Parte 15 de las Reglas de la FCC. El funcionamiento está
sujeto a las dos condiciones siguientes:
(1) este dispositivo no puede causar interferencias dañinas y (2) este dispositivo debe
aceptar cualquier interferencia recibida, incluidas las interferencias que puedan cau-
sar un funcionamiento no deseado.
Advertencia: Los cambios o modificaciones no aprobados expresamente por la parte re-
sponsable del cumplimiento podrían anular la autoridad del usuario para operar el equipo.
Nota: Este equipo ha sido probado y cumple con los límites para un dispositivo digital
de Clase B, de acuerdo con la Parte 15 de las Reglas de la FCC. Estos límites están
diseñados para proporcionar una protección razonable contra interferencias perjudi-
ciales en una instalación residencial.
Este equipo genera, usa y puede irradiar energía de radiofrecuencia y, si no se instala
y usa de acuerdo con las instrucciones, puede causar daños
interferencia a las comunicaciones por radio. Sin embargo, no hay garantía de que no
se produzcan interferencias en una instalación en particular. Si este equipo causa in-
terferencia dañina en la recepción de radio o televisión, lo cual se puede determinar
encendiendo y apagando el equipo, se recomienda al usuario que intente corregir la in-
terferencia mediante una o más de las siguientes medidas: (1) Reorientar o reubicar la
antena receptora. (2) Aumente la separación entre el equipo y el receptor. (3) Conecte
el equipo a una toma de corriente en un circuito diferente al que está conectado el
receptor. (4) Consulte con el distribuidor o con un técnico de radio / TV experimentado
para obtener ayuda.
Descargo de responsabilidad
Darse cuenta
Toda la información, el diseño y las especificaciones contenidas en este manual eran
correctos en el momento de esta publicación. Sin embargo, a medida que el producto
se somete a actualizaciones y cambios continuos, el dispositivo final puede tener lig-
eras diferencias. El contenido de este manual está sujeto a cambios sin previo aviso, y
Summit Electronics LLC no será responsable de los errores contenidos en este manual
o de los daños incidentales o consecuentes en relación con el rendimiento del sumin-
istro o el uso de este manual.
Este símbolo significa que el producto no debe desecharse como basura domésti-
ca y debe entregarse en una instalación de recolección adecuada para su reciclaje.
Siga las reglas locales y nunca deseche el producto y las baterías recargables
con la basura doméstica normal. La eliminación correcta de productos viejos
y baterías recargables ayuda a prevenir consecuencias negativas para el me-
dio ambiente y la salud humana.
CAR AND DRIVER
®
ES UNA MARCA REGISTRADA DE HEARST COMMUNICATION,
INC. Y UTILIZADA BAJO LICENCIA POR SUMMIT ELECTRONICS, LLC.
© 2021 HEARST COMMUNICATION, INC. TODOS LOS DERECHOS RESERVADOS Y
CUALQUIER USO DE DICHAS MARCAS POR PARTE DE SUMMIT ELECTRONICS LLC
ESTÁ BAJO LICENCIA.
OTRAS MARCAS Y NOMBRES COMERCIALES SON DE SUS RESPECTIVOS DUEÑOS.
ADVERTENCIA: CÁNCER Y DAÑO REPRODUCTIVO - WWW. P65WARNINGS.
CA.GOV.

18 ES
GARANTÍA LIMITADA DEL SUMMIT ELECTRONICS, LLC (“Garantía”): para las cat-
egorías de productos enumeradas en el cuadro a continuación (según corresponda,
“Producto”) Antes de devolver su Producto para servicio bajo esta Garantía, (i) lea
atentamente el manual de instrucciones. Si aún tiene problemas con su Producto, co-
muníquese con el Soporte técnico en
Advertencia: algunos productos pueden contener componentes que son lo suficien-
temente pequeños como para tragarlos. Manténgase fuera del alcance de los niños.
Sujeto a los términos y condiciones del presente, SUMMIT ELECTRONICS, LLC ga-
rantiza al comprador original del Producto (“Cliente”) que durante el Período de ga-
rantía aplicable que se indica a continuación, el Producto estará libre de defectos. en
material o mano de obra bajo uso normal, no comercial (“Defectos”). El Período de
garantía abarca, como se indica a continuación, “Períodos de cobertura” separados
para piezas y mano de obra, cada Período de cobertura por un año, a partir de la fe-
cha original de compra del Cliente. Si el Cliente devuelve un Producto defectuoso (o
cualquier componente del mismo) durante el Período de garantía aplicable, SUMMIT
ELECTRONICS, LLC, según su opción, durante los Períodos de cobertura especificados
para piezas y mano de obra (según corresponda): (i) reparará el Producto (o , según
corresponda, cualquier componente del mismo) o (ii) reemplazar el Producto (o,
según corresponda, cualquier componente del mismo) con un Producto nuevo o rea-
condicionado (o, según corresponda, cualquier componente del mismo), en cualquier
caso sin cargo para el Cliente para piezas y / o mano de obra (según corresponda)
durante el Período de Cobertura especificado únicamente, y excluyendo los cargos de
envío aplicables (indicados a continuación), por los cuales el Cliente es responsable.
Lo anterior establece el recurso exclusivo del Cliente y la única responsabilidad de
SUMMIT ELECTRONICS, LLC por el incumplimiento de la garantía limitada contenida
en este documento.
Esta Garantía excluye específicamente cualquier Producto (o, según corresponda,
cualquier componente del mismo) que haya estado sujeto o Defectos resultantes
de: (a) cualquier negligencia o uso indebido por parte de un Cliente, un accidente,
aplicación incorrecta, violación de las instrucciones de funcionamiento del Producto ,
cualquier otro daño inducido por el Cliente, o la alteración o eliminación de cualquier
número de serie del Producto; (b) cualquier modificación o reparación del Producto
(o, según corresponda, cualquier componente del mismo) por cualquier parte que no
sea SUMMIT ELECTRONICS, LLC o una parte autorizada por escrito por SUMMIT
ELECTRONICS, LLC; (c) cualquier daño al Producto (o, según corresponda, a cualquier
componente del mismo) debido a sobrecargas de energía, voltaje eléctrico incorrecto,
conexión incorrecta a cualquier dispositivo o mal funcionamiento de cualquier dispos-
itivo utilizado con el Producto (o, según corresponda, cualquier componente del mis-
mo) ; (d) daño cosmético al Producto (o, según corresponda, a cualquier componente
del mismo) causado por el desgaste normal; (e) daños de envío que se produzcan
mientras el Producto está en tránsito; (f) daños causados por fuentes de calor, luz
solar, condiciones electromagnéticas u otras condiciones climáticas; o (g) cualquier
acto de Dios. El producto se vende al cliente para uso personal y no comercial única-
mente. El producto no está garantizado para uso comercial o de alquiler del Cliente.
Además, el Producto no
Garantía limitada de un año de SUMMIT ELECTRONICS LLC

19 ES
los riesgos asociados con dichos usos del Producto, y acepta indemnizar a SUMMIT
ELECTRONICS, LLC por cualquier daño reclamado contra SUMMIT ELECTRONICS,
LLC por dichos usos. EXCEPTO POR LAS GARANTÍAS EXPRESAS INDICADAS AR-
RIBA Y EN LA MEDIDA MÁXIMA PERMITIDA POR LA LEY, LOS PRODUCTOS SE
SUMINISTRAN “TAL CUAL” Y RENUNCIA DEL SUMMIT ELECTRONICS, LLC TODAS
LAS DEMÁS GARANTÍAS, INCLUYENDO SIN LIMITACIÓN CUALQUIER GARANTÍA
IMPLÍCITA (I) DE COMERCIABILIDAD, (II) DE APTITUD PARA UN PROPÓSITO EN
PARTICULAR O (III) DE NO INFRACCIÓN DE DERECHOS DE TERCEROS. EN LA ME-
DIDA MÁXIMA PERMITIDA POR LA LEY APLICABLE, EN NINGÚN CASO SUMMIT
ELECTRONICS, LLC SERÁ RESPONSABLE ANTE EL CLIENTE O CUALQUIER TERCE-
RO POR CUALQUIER DAÑO INDIRECTO, ESPECIAL, INCIDENTAL, CONSECUENTE,
EJEMPLAR O PUNITIVO, INCLUYENDO, SIN LIMITACIÓN, CUALQUIER DAÑO PÉR-
DIDA O INEXACTITUD DE CUALQUIER DATO O COSTO DE BIENES SUSTITUTOS,
INDEPENDIENTEMENTE DE LA TEORÍA DE LA RESPONSABILIDAD (INCLUYENDO
NEGLIGENCIA) E INCLUSO SI SUMMIT ELECTRONICS, LLC HA SIDO ADVERTIDO
DE LA POSIBILIDAD DE DICHOS DAÑOS, SUMMIT ELECTRONICS, LLC’S AGGRE-
GATE ACGREGATE LIABILIDAD CUALQUIER CAUSA SE LIMITARÁ A LAS TARIFAS
ACUMULATIVAS DEL PRODUCTO QUE PAGA ESE CLIENTE POR EL PRODUCTO
QUE CAUSA LOS DAÑOS, SI LOS HAY. Esta Garantía otorga al Cliente derechos espe-
cíficos, y el Cliente también puede tener otros derechos que varían de una jurisdicción
a otra. Para obtener el servicio de Garantía, el Cliente debe enviar un correo electrónico
al Soporte Técnico de SUMMIT ELECTRONICS, LLC antes de realizar una devolución
del Producto. El cliente debe incluir con la devolución del producto los siguientes el-
ementos (si no se incluye alguno de estos elementos puede producirse un retraso en
el procesamiento de su reclamo de garantía): (i) un recibo de venta con fecha que
indique el lugar de compra, el número de modelo del producto, y monto pagado; (ii)
una descripción detallada del problema del Cliente con el Producto; (iii) el nombre
completo, el número de teléfono y la dirección de devolución del cliente, y; (iv) un giro
postal a nombre de SUMMIT ELECTRONICS, LLC Corporation para cubrir los gastos
de envío de devolución a destinos de EE. UU. únicamente, por el monto en dólares
correspondiente que se muestra para el Producto en la tabla anterior. SUMMIT ELEC-
TRONICS, LLC no realizará envíos de devolución a un apartado de correos. Caja. Para
envíos a direcciones internacionales, el flete real se cargará al Cliente. Devuelva su
Producto con flete prepago en su embalaje original o en un embalaje que ofrezca la
misma medida de protección. Por favor, espere de 4 a 6 semanas para el procesamien-
to de su reclamo (de 6 a 8 semanas de noviembre a febrero).
Debe enviar un correo electrónico al Soporte técnico de
SUMMIT ELECTRONICS,
LLC
antes de realizar una devolución. Pregunte si no está seguro de a qué categoría
pertenece su producto.
* Solo destinos de EE. UU.
está garantizado contra fallas y el Cliente no debe utilizarlo para ninguna aplicación
en la que (i) exista el riesgo de que los datos almacenados en el Producto se violen
o se vean comprometidos, o (ii) los datos almacenados en el Producto se utiliza para
aplicaciones médicas o de salvamento.
SUMMIT ELECTRONICS, LLC
renuncia a cualquier garantía por cualquiera de los usos an-
teriores en la
máxima medida permitida por la ley. El Cliente asume todos y cada uno de

Email Us Envíanos un correo electrónico:
Message to Us
Mensaje para nosotros:
https://caranddriverdashcams.com
Call Us
(833) 227-3274
Llámanos: