

Due to the regular upgrades of systems and products, ZKTeco could not guarantee exact
consistency between the actual product and the written information in this manual.
Model: MS10
Version: 1.0
Quick Start Guide
English

If you have any problems, please read this
manual carefully or contact Customer Care.
1.
The device is only designed for indoor use.
2.
The device can only connect to 2.4GHz
Wi-Fi networks. If you have a dual-band
router with separate 2.4GHz and 5GHz
networks, make sure that your phone is
connected to the 2.4GHz.
3.
When adding a new device, make sure the
Wi-Fi password is correct.
4.
Please make sure that the device is near to
t h e r o u t e r f o r a s t a b l e n e t w o r k
connection.
6.
Due to the frequent app and product
upgrades, we couldn't guarantee exact
consistency between the actual product
and the stated information in this manual.
7.
Important Notes
1
Try to keep away from curtains, plants,
pets, and direct sources of heat or
sunlight.
5.

Table of Contents
2
Product Features.......................................8
Product Overview.....................................3
Installation................................................5
Connecting the Device to ZSmart App..........4
Setup.........................................................4
What's in the Box.......................................3
Installation Steps....................................................6
Installation Location.............................................5
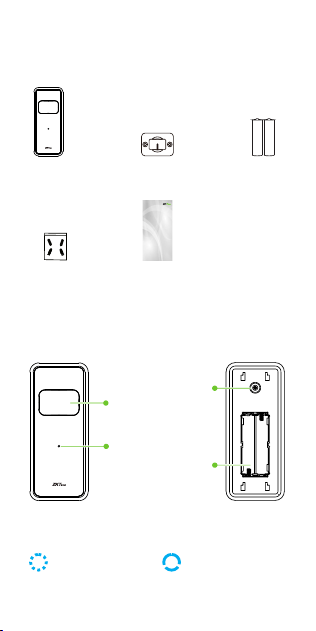
What's in the Box
Product Overview
3
Status LED
Indicator
Reset Button
Battery Slot
Motion
Sensor
Mounting
Bracket
LR03 (AAA)
Battery * 2
Screw Kit
(Mounting
Screws and
Anchors)
Quick Start
Guide
Motion Sensor
(Fresnel Lens)
Due to the regular upgrades of systems and products, ZKTeco could not guarantee exact
consistency between the actual product and the written information in this manual.
Model: MS10
Version: 1.0
Quick Star t Guide
English
Front
Rear
Blinking Blue (once)Blinking Blue
In Pairing Mode
Movement Detected
Status LED Description:

Setup
Connecting the Device to ZSmart
App
Step 1: Download the App and Register
Your Account
Search for the ZSmart in Apple App Store or
Google Play Store and download the App to
your mobile phone.
Open the ZSmart and log in with your
account. If you do not have an account,
create an account with your phone number
or Email ID.
4
Step 2: Power on the Device
Push the mounting plate downward, and
then separate the mounting plate.
1.
2.
I ns e r t t he p ro vi de d t w o L R0 3(AAA )
batteries to power on the device.
3.
Press and hold the Reset Button for 5
seconds until the blue LED light begins
to blink rapidly, indicating that the
Pairing Mode is active.

Step 3: Add the Device to the App
Enable Bluetooth and Wi-Fi permissions
on your smartphone.
1.
Open the app, tap the "+" button on the
top right corner of the interface, and then
select the ”Add Device” option.
2.
Tap the "Add" button once the device
pop-up has appeared. Follow the on-
s cr een p ro m pts t o p a ir t h e d e vic e
automatically.
3.
You can manually change the name of the
device once the notification "Added
successfully" displayed on the mobile
app. To finish the process, tap the "Done"
button.
4.
Note: If you have failed to connect your
device to Wi-Fi, press and hold the Reset
Button for 5 seconds until the LED begins to
flash blue, then repeat the above steps.
5
Installation
The device can be mounted on the wall. The
recommended installation height is 2m to
2.5m.
Installation Location
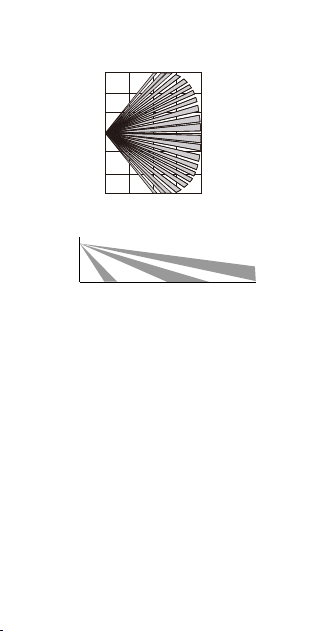
6
Effective Detection Area:
0 2m
4m
6m
8m
6m
4m
2m
0
2m
4m
6m
2.2m
3m
6m
8m
Top View
Side View
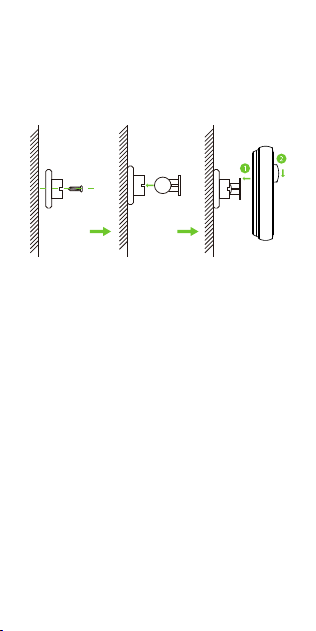
Installation Steps
After confirmation of a successful Wi-Fi
connection and normal working status, you
can select the required position to mount on
the device. There are two methods to install
the device:
Drill two holes in the wall where the
mounting bracket's holes are located, and
then insert the plastic anchor into the
holes; anchors are required for walls made
of hard materials like concrete, brick, or
stucco.
1.
Fix the mounting bracket onto the wall
with two screws.
2.
Method 1: Installing with the Screws

7
Tighten the device to the mounting
bracket by pushing downward.
3.
Adjust the detection coverage by rotating
the device.
4.
Remove the protective film from the
bottom of the device.
1.
Stick the device in the required position.
2.
Method 2: Installing with the Adhesive Strip
I m p o r t a n t N o t e s : M a k e s u r e t h e
installation surface is smooth, flat, stable,
dry and clean. After installation, regularly
check whether the device is attached
firmly to the installation surface.

Product Features
8
Current Status: Displays the real-time status
of any movement or lack of movement.
Record: Check the device's status as well as
the log of a specific time.
Scene: M anag e th e s mart automat ion
settings associated with the device.
Instant App Alerts: Receive the instant push
notifications from your phone when the
device detects the movement.
Remove Device: Remember to Remove the
device from the current account when the
owner of the device changes.
Detection Mode Instructions: After the
last report of "Somebody passes”, the
dev ice won't report an al arm fo r 5
minutes. The sensor will report "Nobody
passes" if no one passes within five
minutes, and it will report an alarm if it is
triggered after receiving a report of
"Somebody passes”.

Debido a las actualizaciones periódicas de los sistemas y productos, ZKTeco no puede garantizar
la consistencia exacta entre el producto real y la información escrita en este manual.
Modelo: MS10
Versión: 1.0
Guía Rápida
Español

L e a a t e n t a m e n t e e s t e m a n u a l o
comuníquese con atención al cliente para
cualquier consulta.
1.
El dispositivo está diseñado sólo para uso
en interiores.
2.
Este dispositivo sólo trabaja con redes
Wi-Fi de 2.4 GHz. Si tiene un enrutador
doble banda con redes de 2.4 GHz y 5 GHz,
ase gúres e d e q u e s u t el é fo no e sté
conectado a la de 2.4 GHz.
3.
Asegúrese de que la contraseña Wi-Fi
ingresada sea correcta al agregar un
nuevo dispositivo.
4.
Pa r a u n a c o ne x i ó n d e r ed e s t ab l e ,
asegúrese de que el dispositivo esté
colocado cerca del enrutador.
6.
Debido a las actualizaciones periódicas de
la aplicación y los productos, no podemos
garantizar la coherencia exacta entre el
producto real y la información escrita en
este manual.
7.
Notas Importantes
1
Mantenga el dispositivo alejado de
cor t i nas, plan tas, mascota s y las
fuentes directas de calor o sol.
5.

Tabla de Contenidos
2
Descripción del Producto.........................3
Configuración...........................................4
Conexión del Equipo con la App ZSmart.......4
Instalación................................................5
Características del Producto..................8
Pasos de Instalación.............................................6
Ubicación de Instalación.....................................5
Contenido.......................................3
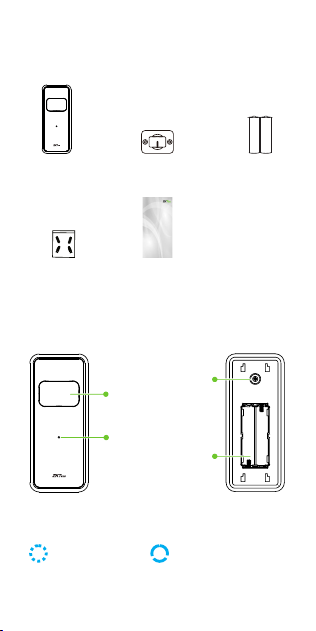
Contenido
Descripción del Producto
3
LED de Estado
Botón de Reinicio
Ranura para Batería
Detector de
Movimiento
Soporte de
Montaje
Batería LR03
(AAA) * 2
Kit de Tornillos
(anclajes,
tornillos de
montaje)
Guía Rápida
Sensor de Movimiento
(Lente de Fresnel)
Parte Delantera
Parte Trasera
Azul intermitente
(una vez)
Azul intermitente
En Modo de
Emparejamiento
Movimiento Detectado
LED Indicador de Estado:
Debido a las actualizaciones periódicas de los sistemas y productos, ZKTeco no puede garantizar
la consistencia exacta entre el producto real y la información escrita en este manual .
Modelo: MS10
Versión: 1.0
Guía Rápida
Español

Configuración
Conexión del Equipo con la App
ZSmart
Paso 1: Descargue la App y Registre su
Cuenta
Busque la aplicación ZSmart en Apple App
Store o Google Play Store y descargue la
aplicación en su teléfono móvil.
Abra la aplicación ZSmart e inicie sesión con
su cuenta. Si no tiene una cuenta, cree una
cuenta con su número de teléfono o correo
electrónico.
4
Paso 2: Encienda el Equipo
Empuje el soporte de montaje hacia arriba
y luego separe la placa de montaje.
1.
2.
I nser te la s do s bate rí as L R0 3 ( AA A)
provistas para encender el dispositivo.
3.
Presione y mantenga presionado el Botón
de Reinicio por 5 segundos hasta que el
L E D a z u l co m i e n c e a p a r p a d e a r
rápidamente, lo que indica que el Modo
de Emparejamiento está activo.

Paso 3: Añada el Equipo a la App
Active los permisos de Bluetooth y Wi-Fi
en el teléfono inteligente.
1.
Abra la aplicación, toque el botón "+" en
la esquina superior derecha de la interfaz
y luego seleccione la opción "Agregar
dispositivo".
2.
Toque el botón "Agregar" una vez que
vea la ventana emergente del dispositivo.
Siga las instrucciones en pantalla para
e m p a r e j a r e l d i s p o s i t i v o
automáticamente.
3.
Una vez que vea el mensaje “Se agregó
con éxito" en la aplicación, puede editar
el nombre del dispositivo manualmente.
To q u e e l b o t ó n “ F i n a l i z a d o " p a r a
completar la configuración.
4.
Nota: Si no pudo conectar su dispositivo a
Wi-Fi, mantenga presionado el botón de
reinicio durante 5 segundos hasta que el
LED comience a parpadear en azul, luego
repita los pasos anteriores.
5
Instalación
El dispositivo se puede montar en la pared.
La altura de montaje recomendada es de 2m
a 2.5 m desde el suelo.
Ubicación de Instalación
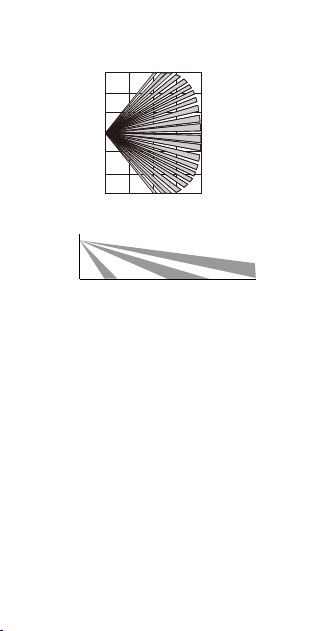
6
Área de Detección Efectiva:
0 2m
4m
6m
8m
6m
4m
2m
0
2m
4m
6m
2.2m
3m
6m
8m
Vista Superior
Vista Lateral
Pasos de Instalación
Después de la confirmación de una conexión
Wi-Fi exitosa y un estado de funcionamiento
norm al, pu ede s el eccio nar l a pos ición
requerida para instalar el dispositivo. Hay dos
métodos para instalar el dispositivo:
Tala dre dos orific io s en la p are d de
acuerdo con las posiciones de los orificios
del soporte de montaje y luego inserte el
anclaje de plástico en los orificios; los
anclajes son necesarios para paredes que
están hechas de materiales duros como
hormigón, ladrillo o estuco.
1.
Fije el soporte de montaje a la pared con
dos tornillos.
2.
Método 1: Instalar con tornillos
7
Refuerce el dispositivo al soporte de
montaje empujando hacia abajo.
3.
G i r e e l d i s p o s i t i v o p a r a a j u s t a r l a
cobertura de detección.
4.
Retire la película protectora de la parte
inferior del dispositivo.
1.
Pe gue e l di sposi tivo en la po sició n
requerida.
2.
Método 2: Instalar con cinta adhesiva
Notas Impor tantes: La super ficie de
instalación debe ser lisa, plana, estable,
seca y limpia. Después de la instalación,
revise periódicamente si el dispositivo
está firmemente sujeto a la superficie de
montaje.

Características del Producto
8
Estado Actual: Muestre el estado en tiempo
re a l d e l m ov i mi e n to d e te c t ado o s i n
movimiento.
Registro del Dispositivo: Ver ifiq ue el
registro de tiempo específico y el estado del
dispositivo.
Escena: Administre la configuración de
automatización inteligente relacionada.
Aler tas Instantáneas de APP: Re ciba
notificaciones automáticas instantáneas
d e s d e s u t e l é f o n o m ó v i l c u a n d o e l
dispositivo detecte el movimiento.
Eliminar Dispositivo: Recuerde ELIMINAR el
dispositivo de la cuenta actual cuando
cambie el propietario del dispositivo.
Instrucciones del Modo de Detección:
Después del último informe "alguien
pasó", el dispositivo no volverá a emitir la
alarma durante 5 minutos. El sensor
informará "Nadie pasa" si nadie pasa en
cinco minutos, e informará una alarma si
se activa después de recibir un informe de
"Alguien pasa".

Warning:
This device complies with Part 15 of the FCC Rules. Operation is
subject to the following two conditions: (1) This device may not
cause harmful interference, and (2) this device must accept any
interference received, including interference that may cause
undesired operation.
This equipment has been tested and found to comply with the
limits for a Class B digital device, pursuant to Part 15 of the FCC
Rules. These limits are designed to provide reasonable protection
against harmful interference in a residential installation. This
equipment generates, uses, and can radiate radio frequency energy
and, if not installed and used in accordance with the instructions,
may c a use harmful inter feren c e to radio communicat i o n s.
However, there is no guarantee that interference will not occur in a
par ticular installation. If this equipment does cause harmful
inter ference to radio or television reception, which can be
determined by turning the equipment off and on, the user is
encouraged to try to correct the interference by one or more of the
following measures:
FCC RF Radiation Exposure Statement:
Connect the equipment into an outlet on a circuit different from
that to which the receiver is connected.
Consult the dealer or an experienced radio/TV technician for help.
Reorient or relocate the receiving antenna.
Increase the separation between the equipment and receiver.
This Transm itter mus t not be co-loc ated or operating in
conjunction with any other antenna or transmitter.
IMPORTANT! Any changes or modifications not expressly approved
by the party responsible for compliance could void the user's
authority to operate the equipment.
This equipment complies with RF radiation exposure limits set
forth for an uncontrolled environment.

ZKTeco Industrial Park, No. 32, Industrial Road,
Tangxia Town, Dongguan, China.
Phone : +86 769 - 82109991
Fax : +86 755 - 89602394
www.zkteco.com
Copyright © 2022 ZKTECO CO., LTD. All Rights Reserved.
