Quick Start Guide
BRAINS
High-Resolution Multi-Engine
Oscillator Module for Eurorack
with 24 Synthesis Engines,
96kHz Sound Quality and
OLEDOscilloscope
V 5.0
3Quick Start Guide2 BRAINS
(EN) Safety Instruction
1. Please read and follow all instructions.
2. Keep the apparatus away from water, except for
outdoor products.
3. Clean only with a dry cloth.
4. Do not block any ventilation openings. Install in
accordance with the manufacturer’s instructions.
5. Do not install near any heat sources such as
radiators, heat registers, stoves or other apparatus
(including ampliers) that produce heat.
6. Use only attachments/accessories specied by
the manufacturer.
7. Use only specied carts, stands,
tripods, brackets, or tables. Use caution to
prevent tip-over when moving the cart/
apparatus combination.
8. Avoid installing in conned spaces like bookcases.
9. Do not place near naked ame sources,
such as lighted candles.
10. Operating temperature range 5° to 45°C
(41° to 113°F).
LEGAL DISCLAIMER
Music Tribe accepts no liability for any loss which may
be suered by any person who relies either wholly or in
part upon any description, photograph, or statement
contained herein. Technical specications, appearances
and other information are subject to change
without notice. All trademarks are the property of their
respective owners. Midas, Klark Teknik, Lab Gruppen, Lake,
Tannoy, Turbosound, TC Electronic, TC Helicon, Behringer,
Bugera, Aston Microphones and Coolaudio are trademarks
or registered trademarks of Music Tribe Global Brands Ltd.
© Music Tribe Global Brands Ltd. 2024 All rights reserved.
LIMITED WARRANTY
For the applicable warranty terms and conditions and
additional information regarding Music Tribe’s Limited
Warranty, please see complete details online at community.
musictribe.com/support.
(ES) Instrucción de seguridad
1. Por favor, lea y siga todas las instrucciones.
2. Mantenga el aparato alejado del agua, excepto para
productos destinados al uso en exteriores.
3. Limpie solo con un paño seco.
4. No bloquee ninguna abertura de ventilación.
Instale de acuerdo con las instrucciones del fabricante.
5. No instale cerca de fuentes de calor como radiadores,
registros de calor, estufas u otros aparatos
(incluyendo amplicadores) que generen calor.
6. Utilice solo accesorios especicados por el fabricante.
7. Use solo carros, soportes, trípodes,
soportes o mesas especicados.
Tenga precaución para evitar el vuelco al
mover la combinación carro/aparato.
8. Evite la instalación en espacios connados
como estanterías.
9. No colocar cerca de fuentes de llama desnuda,
como velas encendidas.
10. Rango de temperatura de funcionamiento de
5° a 45°C (41° a 113° F).
NEGACIÓN LEGAL
Music Tribe no admite ningún tipo de responsabilidad
por cualquier daño o pérdida que pudiera sufrir
cualquier persona por conar total o parcialmente en la
descripciones, fotografías o armaciones contenidas en
este documento. Las especicaciones técnicas, imágenes
y otras informaciones contenidas en este documento
están sujetas a modicaciones sin previo aviso. Todas las
marcas comerciales que aparecen aquí son propiedad de
sus respectivos dueños. Midas, Klark Teknik, Lab Gruppen,
Lake, Tannoy, Turbosound, TC Electronic, TC Helicon,
Behringer, Bugera, Aston Microphones y Coolaudio son
marcas comerciales o marcas registradas de Music Tribe
Global Brands Ltd. © Music Tribe Global Brands Ltd.
2024 Reservados todos los derechos.
GARANTÍA LIMITADA
Si quiere conocer los detalles y condiciones aplicables de la
garantía así como información adicional sobre la Garantía
limitada de Music Tribe, consulte online toda la información
en la web community.musictribe.com/support.
5Quick Start Guide4 BRAINS
(FR) Consignes de sécurité
1. Veuillez lire et suivre toutes les instructions.
2. Gardez l'appareil éloigné de l'eau, sauf pour les
produits destinés à une utilisation en extérieur.
3. Nettoyez uniquement avec un chion sec.
4. Ne bloquez aucune ouverture de ventilation.
Installez conformément aux instructions du fabricant.
5. N'installez pas près de sources de chaleur telles que
radiateurs, grilles de chaleur, cuisinières ou autres appareils
(y compris les amplicateurs) qui produisent de la chaleur.
6. Utilisez uniquement les accessoires spéciés
par le fabricant.
7. Utilisez uniquement des chariots, des
supports, des trépieds, des supports ou des
tables spéciés. Faites attention pour éviter
le renversement lors du déplacement de la
combinaison chariot/appareil.
8. Évitez l'installation dans des espaces connés comme
les bibliothèques.
9. Ne pas placer près de sources de amme nue, telles
que des bougies allumées.
10. Plage de température de fonctionnement de
5° à 45°C (41° à 113°F).
DÉNI LÉGAL
Music Tribe ne peut être tenu pour responsable pour
toute perte pouvant être subie par toute personne
se ant en partie ou en totalité à toute description,
photographie ou armation contenue dans ce document.
Les caractéristiques, l’apparence et d’autres informations
peuvent faire l’objet de modications sans notication.
Toutes les marques appartiennent à leurs propriétaires
respectifs. Midas, Klark Teknik, Lab Gruppen, Lake, Tannoy,
Turbosound, TC Electronic, TC Helicon, Behringer, Bugera,
Aston Microphones et Coolaudio sont des marques ou
marques déposées de Music Tribe Global Brands Ltd.
© Music Tribe Global Brands Ltd. 2024 Tous droits réservés.
GARANTIE LIMITÉE
Pour connaître les termes et conditions de garantie
applicables, ainsi que les informations supplémentaires et
détaillées sur la Garantie Limitée de Music Tribe, consultez
le site Internet community.musictribe.com/support.
(DE) Wichtige Sicherheitshinweise
1. Bitte lesen Sie alle Anweisungen sorgfältig durch und
befolgen Sie diese.
2. Halten Sie das Gerät von Wasser fern, außer für
Produkte, die für den Außeneinsatz vorgesehen sind.
3. Reinigen Sie es nur mit einem trockenen Tuch.
4. Blockieren Sie keine Belüftungsönungen. Installieren
Sie gemäß den Anweisungen des Herstellers.
5. Installieren Sie nicht in der Nähe von Wärmequellen
wie Heizkörpern, Heizregistern, Öfen oder anderen Geräten
(einschließlich Verstärkern), die Wärme erzeugen.
6. Verwenden Sie nur Zubehörteile, die vom Hersteller
angegeben sind.
7. Verwenden Sie nur spezizierte
Wagen, Ständer, Stative, Halterungen oder
Tische. Achten Sie darauf, beim Bewegen
der Wagen-Geräte-Kombination ein
Umkippen zu vermeiden.
8. Vermeiden Sie die Installation in beengten Räumen
wie Bücherregalen.
9. Nicht in der Nähe von oenen Flammenquellen
platzieren, wie brennende Kerzen.
10. Betriebstem-peraturbereich von 5° bis 45°C
(41° bis 113°F).
HAFTUNGSAUSSCHLUSS
Music Tribe übernimmt keine Haftung für Verluste, die
Personen entstanden sind, die sich ganz oder teilweise
auf hier enthaltene Beschreibungen, Fotos oder Aussagen
verlassen haben. Technische Daten, Erscheinungsbild
und andere Informationen können ohne vorherige
Ankündigung geändert werden. Alle Warenzeichen sind
Eigentum der jeweiligen Inhaber. Midas, Klark Teknik,
Lab Gruppen, Lake, Tannoy, Turbosound, TC Electronic,
TC Helicon, Behringer, Bugera, Aston Microphones
und Coolaudio sind Warenzeichen oder eingetragene
Warenzeichen der Music Tribe Global Brands Ltd. © Music
Tribe Global Brands Ltd. 2024 Alle Rechte vorbehalten.
BESCHRÄNKTE GARANTIE
Die geltenden Garantiebedingungen und zusätzliche
Informationen bezüglich der von Music Tribe gewährten
beschränkten Garantie nden Sie online unter community.
musictribe.com/support.
7Quick Start Guide6 BRAINS
(PT) Instruções de Seguranç
Importantes
1. Por favor, leia e siga todas as instruções.
2. Mantenha o aparelho longe da água, exceto para
produtos destinados ao uso externo.
3. Limpe apenas com um pano seco.
4. Não bloqueie nenhuma abertura de ventilação.
Instale de acordo com as instruções do fabricante.
5. Não instale próximo a fontes de calor, como radiadores,
grelhas de calor, fogões ou outros aparelhos (incluindo
amplicadores) que gerem calor.
6. Use apenas acessórios especicados pelo fabricante.
7. Use apenas carrinhos, suportes, tripés,
suportes ou mesas especicados. Tenha
cuidado para evitar tombamentos ao mover
a combinação carrinho/aparelho.
8. Evite instalar em espaços connados, como estantes.
9. Não coloque perto de fontes de chama nua, como
velas acesas.
10. Intervalo de temperatura de operação de
5° a 45°C (41° a 113° F).
LEGAL RENUNCIANTE
O Music Tribe não se responsabiliza por perda alguma
que possa ser sofrida por qualquer pessoa que dependa,
seja de maneira completa ou parcial, de qualquer
descrição, fotograa, ou declaração aqui contidas. Dados
técnicos, aparências e outras informações estão sujeitas
a modicações sem aviso prévio. Todas as marcas são
propriedade de seus respectivos donos. Midas, Klark Teknik,
Lab Gruppen, Lake, Tannoy, Turbosound, TC Electronic,
TC Helicon, Behringer, Bugera, Aston Microphones e
Coolaudio são marcas ou marcas registradas do Music Tribe
Global Brands Ltd. © Music Tribe Global Brands Ltd. 2024
Todos direitos reservados.
GARANTIA LIMITADA
Para obter os termos de garantia aplicáveis e condições e
informações adicionais a respeito da garantia limitada do
Music Tribe, favor vericar detalhes na íntegra através do
website community.musictribe.com/support.
(IT) Istruzioni di sicurezza importanti
1. Per favore, leggere e seguire tutte le istruzioni.
2. Mantenere l'apparecchio lontano dall'acqua,
tranne per i prodotti destinati all'uso all'aperto.
3. Pulire solo con un panno asciutto.
4. Non ostruire alcuna apertura di ventilazione.
Installare in conformità alle istruzioni del produttore.
5. Non installare vicino a fonti di calore come termosifoni,
bocchette di calore, fornelli o altri apparecchi (compresi gli
amplicatori) che producono calore.
6. Utilizzare solo accessori specicati dal produttore.
7. Usare solo carrelli, supporti,
treppiedi, stae o tavoli specicati.
Prestare attenzione per evitare il
ribaltamento durante lo spostamento della
combinazione carrello/apparecchio.
8. Evitare l'installazione in spazi connati come librerie.
9. Non posizionare vicino a fonti di amma nude, come
candele accese.
10. Intervallo di temperatura di funzionamento da
5° a 45°C (41° a 113°F).
DISCLAIMER LEGALE
Music Tribe non si assume alcuna responsabilità per
eventuali danni che possono essere subiti da chiunque si
adi in tutto o in parte a qualsiasi descrizione, fotograa
o dichiarazione contenuta qui. Speciche tecniche, aspetti
e altre informazioni sono soggette a modiche senza
preavviso. Tutti i marchi sono di proprietà dei rispettivi
titolari. Midas, Klark Teknik, Lab Gruppen, Lake, Tannoy,
Turbosound, TC Electronic, TC Helicon, Behringer, Bugera,
Aston Microphones e Coolaudio sono marchi o marchi
registrati di Music Tribe Global Brands Ltd. © Music Tribe
Global Brands Ltd. 2024 Tutti i diritti riservati.
GARANZIA LIMITATA
Per i termini e le condizioni di garanzia applicabili e le
informazioni aggiuntive relative alla garanzia limitata
di Music Tribe, consultare online i dettagli completi su
community.musictribe.com/support.
9Quick Start Guide8 BRAINS
(NL) Belangrijke
veiligheidsvoorschriften
1. Lees alsjeblieft alle instructies en volg deze op.
2. Houd het apparaat uit de buurt van water, behalve
voor producten die bedoeld zijn voor buitengebruik.
3. Reinig alleen met een droge doek.
4. Blokker geen ventilatieopeningen. Installeer volgens
de instructies van de fabrikant.
5. Installeer niet in de buurt van warmtebronnen
zoals radiatoren, warmte registers, fornuizen of andere
apparaten (inclusief versterkers) die warmte produceren.
6. Gebruik alleen accessoires die door de fabrikant
zijn gespeciceerd.
7. Gebruik alleen gespeciceerde
karren, standaards, statieven, beugels of
tafels. Wees voorzichtig om kantelen te
voorkomen bij het verplaatsen van de kar/
apparaatcombinatie.
8. Vermijd installatie in afgesloten ruimtes zoals
boekenkasten.
9. Plaats niet in de buurt van naakte vlambronnen,
zoals brandende kaarsen.
10. Bedrijfstem-peratuurbereik van 5° tot 45°C
(41° tot 113°F).
WETTELIJKE ONTKENNING
Music Tribe aanvaardt geen aansprakelijkheid voor enig
verlies dat kan worden geleden door een persoon die
geheel of gedeeltelijk vertrouwt op enige beschrijving, foto
of verklaring hierin. Technische specicaties, verschijningen
en andere informatie kunnen zonder voorafgaande
kennisgeving worden gewijzigd. Alle handelsmerken zijn
eigendom van hun respectievelijke eigenaren. Midas,
Klark Teknik, Lab Gruppen, Lake, Tannoy, Turbosound,
TC Electronic, TC Helicon, Behringer, Bugera, Aston
Microphones en Coolaudio zijn handelsmerken of
gedeponeerde handelsmerken van Music Tribe Global
Brands Ltd. © Music Tribe Global Brands Ltd. 2024 Alle
rechten voorbehouden.
BEPERKTE GARANTIE
Voor de toepasselijke garantievoorwaarden en aanvullende
informatie met betrekking tot de beperkte garantie van
Music Tribe, zie de volledige details online op community.
musictribe.com/support.
(SE) Viktiga säkerhetsanvisningar
1. Vänligen läs och följ alla instruktioner noggrant.
2. Håll apparaten borta från vatten, förutom
för utomhusprodukter.
3. Rengör endast med en torr trasa.
4. Blockera inte några ventilationsöppningar.
Installera enligt tillverkarens anvisningar.
5. Installera inte nära några värmekällor som element,
värmeregistrar, spisar eller andra apparater
(inklusive förstärkare) som genererar värme.
6. Använd endast tillbehör som anges av tillverkaren.
7. Använd endast specicerade vagnar,
ställ, stativ, fästen eller bord. Var försiktig
för att undvika att vagnen/
apparatkombinationen tippar
när den yttas.
8. Undvik installation i trånga utrymmen som bokhyllor.
9. Placera inte nära öppen låga, såsom tända ljus.
10. Driftstem-peraturområde 5° till 45°C (41° till 113°F).
FRISKRIVNINGSKLAUSUL
Music Tribe tar inget ansvar för någon förlust som kan
drabbas av någon person som helt eller delvis förlitar sig på
någon beskrivning, fotogra eller uttalande som nns här.
Tekniska specikationer, utseenden och annan information
kan ändras utan föregående meddelande. Alla varumärken
tillhör respektive ägare. Midas, Klark Teknik, Lab Gruppen,
Lake, Tannoy, Turbosound, TC Electronic, TC Helicon,
Behringer, Bugera, Aston Microphones och Coolaudio är
varumärken eller registrerade varumärken som tillhör
Music Tribe Global Brands Ltd. © Music Tribe Global Brands
Ltd. 2024 Alla Rättigheter reserverade.
BEGRÄNSAD GARANTI
För tillämpliga garantivillkor och ytterligare information
om Music Tribes begränsade garanti, se fullständig
information online på community.musictribe.com/support.
11Quick Start Guide10 BRAINS
(PL) Ważne informacje o
bezpieczeństwie
1. Proszę przeczytać i ścisłe przestrzegać
wszystkich instrukcji.
2. Trzymaj urządzenie z dala od wody, z wyjątkiem
produktów przeznaczonych do użytku na zewnątrz.
3. Czyść tylko suchą szmatką.
4. Nie blokuj żadnych otworów wentylacyjnych.
Instaluj zgodnie z instrukcjami producenta.
5. Nie instaluj w pobliżu źródeł ciepła, takich jak
grzejniki, rejestratory ciepła, kuchenki lub inne urządzenia
(w tym wzmacniacze), które generują ciepło.
6. Używaj tylko akcesoriów określonych
przez producenta.
7. Używaj tylko określonych wózków,
stojaków, statywów, uchwytów lub stołów.
Uważaj, aby zapobiec przewróceniu się
wózka/aparatu podczas przemieszczania.
8. Unikaj instalacji w ciasnych miejscach, takich jak regały
na książki.
9. Nie umieszczaj w pobliżu źródeł otwartego ognia,
takich jak zapalone świeczki.
10. Zakres temperatury pracy od 5° do 45°C (41° do 113°F).
ZASTRZEŻENIA PRAWNE
Music Tribe nie ponosi odpowiedzialności za jakiekolwiek
straty, które mogą ponieść osoby, które polegają w
całości lub w części na jakimkolwiek opisie, fotograi
lub oświadczeniu zawartym w niniejszym dokumencie.
Specykacje techniczne, wygląd i inne informacje mogą
ulec zmianie bez powiadomienia. Wszystkie znaki
towarowe są własnością ich odpowiednich właścicieli.
Midas, Klark Teknik, Lab Gruppen, Lake, Tannoy,
Turbosound, TC Electronic, TC Helicon, Behringer, Bugera,
Aston Microphones i Coolaudio są znakami towarowymi
lub zastrzeżonymi znakami towarowymi rmy Music Tribe
Global Brands Ltd. © Music Tribe Global Brands Ltd.
2024 Wszystkie prawa zastrzeżone.
OGRANICZONA GWARANCJA
Aby zapoznać się z obowiązującymi warunkami gwarancji
i dodatkowymi informacjami dotyczącymi ograniczonej
gwarancji Music Tribe, zapoznaj się ze wszystkimi
szczegółami w trybie online pod adresem community.
musictribe.com/support.
(JP) 安全指示
1. すべての指示を読んで、従ってください。
2. 屋外の製品を除き、機器を水から遠ざけて
ください。
3. 乾いた布でのみ清掃してください。
4. 通気口を塞がないでください。メーカーの
指示に従ってインストールしてください。
5. 暖房器、ヒートレジスター、ストーブなど
の発熱機器(アンプを含む)の近くには取り付
けないでください。
6. メーカーが指定したアタッチメント/アクセ
サリーのみ使用してください。
7. 指定されたカート、スタン
ド、三脚、ブラケット、またはテ
ーブルのみ使用してください。
カート/機器の組み合わせを移動す
る際には、転倒を防ぐよう注意してください。
8. 書棚などの密閉された空間には設置しない
でください。
9. 裸火のような火の元の近くに置かないで
ください。
10.
動作温度範囲は摂氏 5 度から 45 度
(華氏 41 度から 113 度) です。
法的放棄
ここに含まれる記述、写真、意見の全体または
一部に依拠して、いかなる人が損害を生じさせ
た場合にも、Music Tribe は一切の賠償責任を負
いません。技術仕様、外観およびその他の
情報は予告なく変更になる場合があります。
商標はすべて、それぞれの所有者に帰属し
ます。Midas、Klark Teknik、Lab Gruppen、Lake、Tannoy、
Turbosound、TC Electronic、 TC Helicon、Behringer、Bugera、
Aston Microphones および Coolaudio は Music Tribe
Global Brands Ltd. の商標または登録商標です。
© Music Tribe Global Brands Ltd. 2024 無断転用禁止。
限定保証
適用される保証条件と Music Tribe の限定保
証に関する概要については、オンライン上
community.musictribe.com/support にて詳細をご確
認ください。
13Quick Start Guide12 BRAINS
(CN) 安全须知
1. 请阅读, 保存, 遵守所有的说明, 注意所有的
警示。
2. 请勿在靠近水的地方使用本产品。
3. 请用干布清洁本产品。
4. 请只使用厂家指定的附属设备和配件。 不要堵
塞任何通风口。 按照制造商的说明进行安装。
5. 请只使用厂家指定的或随货
销售的手推车, 架子, 三 角架, 支架和
桌子。 若使用手推车来搬运设备, 请
注意安全放置设备, 以 避免手推车和
设备倾倒而受伤。
6. 请勿安装在密闭空间, 如书柜或类似装置。
7. 请勿将本产品安装在热源附近, 如暖气片,
炉子或其它产生热量的设备 (包括功放器)。 产品上
不要放置裸露的火焰源, 如点燃的蜡烛。
8. 如果液体流入或异物落入设备内, 设备遭雨
淋或受潮, 设备不 能正常运作或被摔坏等, 设备
受损需进行维修时, 所有维修均须由 合格的维修
人员进行维修。
法律声明
对于任何因在此说明书提到的全部或部份描
述、 图片或声明而造成的损失, Music Tribe 不负任
何责任。 技术参数和外观若有更改, 恕不另行通
知。 所有的商标均为其各自所有者的财产。 Midas,
Klark Teknik, Lab Gruppen, Lake, Tannoy, Turbosound,
TC Electronic, TC Helicon, Behringer, Bugera, Aston
Microphones 和 Coolaudio 是 Music Tribe Global Brands
Ltd. 公司的商标或注册商标。 © Music Tribe Global
Brands Ltd. 2024 版权所有。
保修条款
有关音乐集团保修的适用条款及其它相关信息,
请登陆 community.musictribe.com/support 网站查看
完整的详细信息。

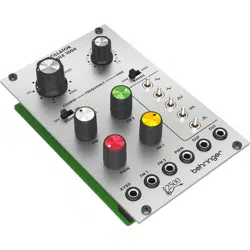
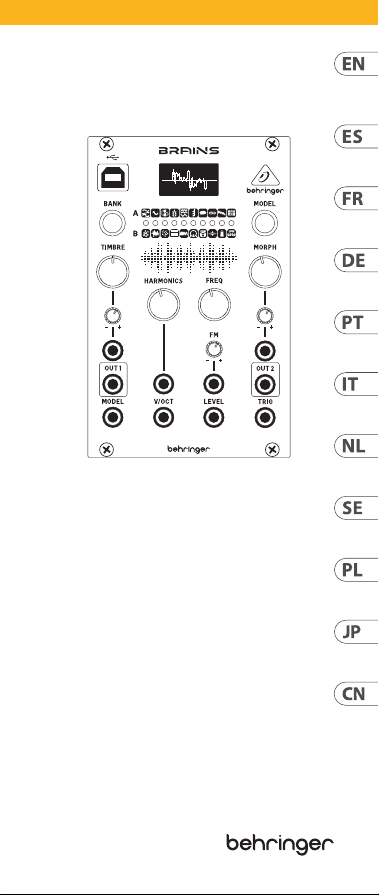
(EN) Controls
BRAINS Controls
1. DISPLAY – Produces a waveform of the audio
content for quick visual feedback.
2. USB – Connect a standard USB cable for
rmware updates.
3. BANK button – Toggles between red,
greenand yellow banks.
4. TIMBRE knob – Function varies depending
on the model selected, but generally sweeps
from darker to brighter content.
5. HARMONICS knob – Function varies
depending on the model selected, but
generally adjusts frequency spread or
tonalbalance.
6. TIMBRE CV LEVEL – Attenuates the voltage
received at the Timbre CV input. If the CV
input is not patched, and a signal is received
at the Trig input, this knob will instead control
the amount of modulation from the internal
envelope generator.
7. TIMBRE CV – Control the Timbre parameter
via external control voltage.
8. OUT 1 – Sends the main processed signal via
3.5 mm TS cable.
9. MODEL jack – Allows model selection to be
made remotely via external control voltage.
10. MODEL button – Scrolls through the
available models in the currently-active bank.
The current model is displayed on the OLED
display (1).
11. MODEL/BANK LEDs – indicate the current
model and bank, in either red, green or yellow.
12. MORPH knob – Function varies depending
on the model selected, but generally controls
the character.
13. FREQ knob – Covers a range of 8 octaves,
butcan be narrowed down to 14 semitones.
15Quick Start Guide14 BRAINS

14. MORPH CV LEVEL – Attenuates the voltage
received at the Morph CV input. If the CV input
is not patched, and a signal is received at
the Trig input, this knob will instead control
the amount of modulation from the internal
envelope generator.
15. MORPH CV – Control the Morph parameter
via external control voltage.
16. OUT 2 – Sends an alternate or variant of the
Out 1 signal via 3.5 mm TS cable.
17. TRIG – Performs several functions:
• Triggers the internal envelope generator.
• Excites the physical and percussive models.
• Strikes the internal low-pass gate.
• Samples and holds the value of the Model
CV input.
18. HARMONICS CV – Control the Harmonics
parameter via external control voltage.
19. V/OCT – Controls the fundamental frequency
relative to the root selected by the Freq knob.
20. FM CV – Control the FM parameter via
external control voltage.
21. LEVEL – Opens the internal low-pass gate on
the output signal, controlling both output level
and brightness. Also triggers an accent when the
physical or percussive models are active.
22. FM CV LEVEL – Attenuates the voltage
received at the FM CV input.
1. PANTALLA – Produce una forma de onda del
contenido de la señal audio para una rápida
comprobación visual.
2. USB – Conecte un cable USB standard para
actualizaciones de rmware.
3. Botón BANK – Alterna entre bancos rojo,
verde y amarillo.
4. Mando TIMBRE – Su función varía
dependiendo del modelo elegido, pero por lo
general produce un barrido del contenido de
más oscuro a más brillante.
5. Mando HARMONICS – Su función varía
dependiendo del modelo elegido, pero por lo
general ajusta la dispersión de la frecuencia o
el balance tonal.
6. TIMBRE CV LEVEL – Esto atenúa el
voltaje recibido en la entrada de voltaje
de control Timbre CV. Si la entrada CV
no está interconectada y es recibida una
señal en la entrada de disparador (Trig),
este mando controlará en su lugar la
cantidad de modulación del generador de
envolventeinterno.
7. TIMBRE CV – Controla el parámetro de timbre
a través de un voltaje de control externo.
8. OUT 1 – Envía la señal principal procesada a
través de un cable con conector TS de 3,5 mm.
9. Toma MODEL – Le permite realizar la
selección de modelo de forma remota a través
de un voltaje de control externo.
10. Botón MODEL –
Le permite ir pasando a
través de los modelos disponibles en el banco
activo.
El modelo actual se muestra en la
pantalla OLED
(1)
.
11. MODEL/BANK LEDs – Indique el modelo actual
y el banco, ya sea en rojo, verde o amarillo.
(ES) Controles
17Quick Start Guide16 BRAINS

12. Mando MORPH – Su función varía
dependiendo del modelo elegido, pero por lo
general controla el ajuste de carácter.
13. Mando FREQ – Cubre un rango de 8 octavas,
pero puede hacerlo más estrecho hasta tan
solo 14 semitonos.
14. MORPH CV LEVEL – Esto atenúa el voltaje
recibido en la entrada CV Morph. Si la entrada
CV no está interconectada y es recibida una
señal en la entrada de disparador (Trig), este
mando controlará en su lugar la cantidad de
modulación del general de envolvente interno.
15. MORPH CV – Controla el parámetro Morph a
través de un voltaje de control externo.
16. OUT 2 – Da salida a una señal alternativa o
variante de la señal Out 1 a través de un cable
con conector TS de 3,5 mm.
17. TRIG – Realiza varias funciones:
• Actúa como disparador del generador de
envolvente interno.
• Excita los modelos físicos y percusivos.
• Dispara la puerta de pasabajos interna.
• Actúa como un “Sample and hold” del valor
de la entrada CV de modelo.
18. HARMONICS CV – Controla el parámetro
de armónicos por medio de un voltaje de
controlexterno.
19. V/OCT – Controla la frecuencia fundamental
relativa a la raíz elegida por el mando Freq.
20. FM CV – Controla el parámetro FM a través de
un voltaje de control externo.
21. LEVEL – Abre la puerta pasabajos interna en
la señal de salida, controlando tanto el nivel
de salida como el brillo. Dispara también un
acento cuando están activos los modelos
físicos o percusivos.
22. FM CV LEVEL – Atenúa el voltaje recibido en
la entrada CV FM.
1. AFFICHEUR – Reproduit la forme d’onde
du signal audio du modèle pour un retour
visuelrapide.
2. USB – Permet de connecter un câble USB
standard pour mettre le rmware à jour.
3. Bouton BANK – Bascule entre les banques
rouge, verte et jaune.
4. Potentiomètre TIMBRE – Son eet varie en
fonction du modèle sélectionné, mais permet
généralement de rendre le son plus sombre ou
plus brillant.
5. Potentiomètre HARMONICS – Son eet
varie en fonction du modèle sélectionné, mais
permet généralement de régler l’étalement
des fréquences ou la tonalité du son.
6. TIMBRE CV LEVEL – Permet d’atténuer la
tension reçue à l’entrée Timbre CV. Siaucune
connexion n’est eectuée à l’entrée CV
et qu’un signal est détecté à l’entrée Trig,
ce potentiomètre permet de contrôler
l’intensité de la modulation du générateur
d’enveloppeinterne.
7. TIMBRE CV – Permet de modier le réglage
Timbre avec une tension externe.
8. OUT 1 – Ce connecteur Minijack porte le
signalprincipal.
9. Connecteur MODEL – Permet de
sélectionner le modèle avec une
tension externe.
10. Bouton MODEL – Permet de faire déler
les diérents modèles de sons de la banque
sélectionnée. Le modèle actuel est aché sur
l’écran OLED (1).
11. MODEL/BANK LEDs
– indiquer le modèle et la
banque actuels, en rouge, vert ou jaune.
12. Potentiomètre MORPH – Son eet varie en
fonction du modèle sélectionné, mais permet
généralement de régler le caractère.
(FR) Réglages
19Quick Start Guide18 BRAINS
13. Potentiomètre FREQ – Couvre une plage
totale de 8 octaves pouvant être réduite à
14semi tons.
14. MORPH CV LEVEL – Permet d’atténuer la
tension reçue à l’entrée Morph CV. Siaucune
connexion n’est eectuée à l’entrée CV
et qu’un signal est détecté à l’entrée Trig,
ce potentiomètre permet de contrôler
l’intensité de la modulation du générateur
d’enveloppeinterne.
15. MORPH CV – Permet de modier le réglage
Morph avec une tension externe.
16. OUT 2 – Ce connecteur Minijack porte une
version alternative du signal de la sortie Out 1.
17. TRIG – Cette entrée a plusieurs fonctions :
• Déclenchement du générateur
d’enveloppeinterne.
• Modication des modèles physiques
etpercussifs.
• Ouverture du passe-bas interne.
• Génération d’un Sample and hold de la
valeur de l’entrée Model CV.
18. HARMONICS CV – Permet de modier le
réglage Harmonics avec une tension externe.
19. V/OCT – Permet de régler la fréquence
fondamentale en fonction de la racine
sélectionnée par le potentiomètre Freq.
20. FM CV – Permet de modier le réglage FM
avec une tension externe.
21. LEVEL – Permet d’ouvrir le passe-bas interne
appliqué au signal de sortie et agit donc sur le
niveau de sortir et la brillance du son. Permet
également d’ajouter un accent lorsque les
modèles physiques ou percussifs sont activés.
22. FM CV LEVEL – Permet d’atténuer la tension
reçue à l’entrée FM CV.
1. DISPLAY – erzeugt eine Wellenform des
Audioinhalts für eine schnelle visuelle
Rückmeldung.
2. USB – Hier schließen Sie ein standard USB-
Kabel für Firmware-Updates an.
3. BANK-Taste – Schaltet zwischen roten,
grünen und gelben Ufern um.
4. TIMBRE-Drehregler – Die Funktion variiert
je nach ausgewähltem Modell, geht aber
im Allgemeinen von dunkleren zu helleren
Inhalten über.
5. HARMONICS-Drehregler – Die Funktion
variiert je nach ausgewähltem Modell, regelt
aber im Allgemeinen den Frequenzbereich
oder die tonale Balance.
6. TIMBRE CV LEVEL – bedämpft die am
Timbre-CV-Eingang empfangene Spannung.
Wenn der CV-Eingang nicht gepatcht ist
und ein Signal am Trig-Eingang anliegt,
steuert dieser Regler stattdessen die
Stärke der Modulation durch den internen
Hüllkurvengenerator.
7. TIMBRE CV – steuert den Timbre-Parameter
über eine externe Steuerspannung.
8. OUT 1 – sendet das bearbeitete Hauptsignal
über ein 3,5 mm TS-Kabel.
9. MODEL-Buchse – ermöglicht die
ferngesteuerte Modellauswahl über eine
externe Steuerspannung.
10. MODEL-Taste – scrollt durch die verfügbaren
Modelle in der aktuell aktiven Bank. TDas
aktuelle Modell wird auf dem OLED-Display
angezeigt (1).
11. MODEL/BANK LEDs – Zeigen Sie das aktuelle
Modell und die Bank in rot, grün oder gelb an.
12. MORPH-Drehregler – Die Funktion variiert
je nach ausgewähltem Modell, steuert aber im
Allgemeinen den Klangcharakter.
(DE) Bedienelemente
21Quick Start Guide20 BRAINS
13. FREQ-Drehregler – deckt einen Bereich von
8 Oktaven ab, kann aber bis auf 14 Halbtöne
eingegrenzt werden.
14. MORPH CV LEVEL – bedämpft die am
Morph-CV-Eingang empfangene Spannung.
Wenn der CV-Eingang nicht gepatcht ist
und ein Signal am Trig-Eingang empfangen
wird, steuert dieser Regler stattdessen die
Stärke der Modulation durch den internen
Hüllkurvengenerator.
15. MORPH CV – steuert den Morph-Parameter
über eine externe Steuerspannung.
16. OUT 2 – sendet eine Alternative oder Variante
des Out 1-Signals über ein 3,5 mm TS-Kabel.
17. TRIG – Erfüllt mehrere Funktionen:
• Triggert den internen Hüllkurvengenerator.
• Regt die physikalischen und perkussiven
Modelle an.
• Trit auf das interne Tiefpass-Gate.
• Sample & Hold des Werts am Model-CV-
Eingang.
18. HARMONICS CV – steuert den Harmonics-
Parameter über eine externe Steuerspannung.
19. V/OCT – steuert die Grundfrequenz relativ
zu der mit dem Freq-Regler gewählten
Grundtonhöhe.
20. FM CV – steuert den FM-Parameter über eine
externe Steuerspannung.
21. LEVEL – Önet das interne Tiefpass-Gate für
das Ausgangssignal und steuert sowohl den
Ausgangspegel als auch die Helligkeit. Triggert
auch einen Akzent, wenn die technischen oder
perkussiven Modelle aktiv sind.
22. FM CV LEVEL – Bedämpft die am FM-CV-
Eingang empfangene Spannung.
1. DISPLAY – Produz forma de onda de conteúdo
de áudio proporcionando feedback visual rápido.
2. USB – Conecte um cabo USB padrão para fazer
atualizações de rmware.
3. Botão BANK button – Alterna entre bancos
vermelhos, verdes e amarelos.
4. Botão TIMBRE – A função varia dependendo
do modelo selecionado, mas geralmente faz
uma varredura de conteúdo mais escuro a
mais claro.
5. Botão HARMONICS– A função varia
dependendo do modelo selecionado, mas
geralmente ajusta a difusão da frequência ou
balanço de tom.
6. TIMBRE CV LEVEL – Atenua a tensão recebida
na entrada CV de Timbre. Se a entrada CV não
for corrigida e um sinal for recebido na entrada
Trig, este botão controlará a quantidade de
modulação do gerador de envelope interno.
7. TIMBRE CV – Controle o parâmetro Timbre
por tensão de controle externa.
8. OUT 1 – Envia o sinal principal processado por
um cabo TS de 3.5 mm.
9. Jack MODEL – Permite que a seleção de
modelo seja feita remotamente por tensão de
controle externa.
10. Botão MODEL – Percorre os modelos
disponíveis no banco ativo no momento.
Omodelo atual é exibido no visor OLED (1).
11. MODEL/BANK LEDs – indicar o modelo e o
banco atuais, em vermelho, verde ou amarelo.
12. Botão MORPH– A função varia dependendo
do modelo selecionado, mas geralmente
controla o caractere.
13. Botão FREQ – Cobre uma gama de 8 oitavas,
mas pode ser reduzido a 14 semi-tons.
(PT) Controles
23Quick Start Guide22 BRAINS
14. MORPH CV LEVEL – Atenua a tensão recebida
na entrada CV do Morph. Se a entrada CV não
for corrigida e um sinal for recebido na entrada
Trig, este botão controlará a quantidade de
modulação do gerador de envelope interno.
15. MORPH CV – Controle o parâmetro Morph por
tensão de controle externa.
16. OUT 2 – Envia uma alternativa ou uma
variante do sinal da saída OUT 1 por um cabo
TS de 3.5 mm.
17. TRIG – Desempenha diversas funções:
• Aciona o gerador de envelope interno.
• Suscita os modelos físicos e percussivos.
• Passa pelo portão do passa-baixo interno.
• Executa sample e hold do valor da entrada
do CV do Model.
18. HARMONICS CV – Controle o parâmetro
Harmonics por tensão de controle externa.
19. V/OCT – Controla a frequência fundamental
relativa à raiz selecionada pelo botão Freq.
20. FM CV – Controle o parâmetro FM por tensão
de controle externa.
21. LEVEL – Abre o portão de passa-baixa interno
no sinal de saída, controlando tanto o nível
de saída quanto o brilho. Também aciona
uma acentuação quando os modelos físicos e
percussivos estão ativos.
22. FM CV LEVEL – Atenua a tensão recebida na
entrada CV do FM.
1. DISPLAY – Produce una forma d’onda del
contenuto audio per un rapido feedback visivo.
2. USB – Collegare un cavo USB standard per gli
aggiornamenti di rmware.
3. Tasto BANK – Alterna tra banche rosse,
verdie gialle.
4. Manopola TIMBRE – La funzione cambia
secondo il modello selezionato, ma
generalmente varia da un contenuto più scuro
a uno più chiaro.
5. Manopola HARMONICS – La funzione
varia secondo il modello selezionato, ma
generalmente regola la diusione della
frequenza o il bilanciamento tonale.
6. TIMBRE CV LEVEL – Attenua la tensione
ricevuta all’ingresso Timbre CV. Se l’ingresso CV
non è assegnato e riceve un segnale all’ingresso
Trig, allora questa manopola controllerà la
quantità di modulazione dal generatore di
inviluppo interno.
7. TIMBRE CV – Controlla il parametro Timbre
tramite una tensione di controllo esterna.
8. OUT 1 – Invia il segnale principale elaborato
tramite cavo sbilanciato con mini-jack da
3,5 mm.
9. Jack MODEL – Consente la selezione da
remoto del modello tramite una tensione di
controllo esterna.
10. Tasto MODEL – Scorre tra i modelli disponibili
nel Bank attualmente attivo. Il modello
corrente viene visualizzato sul display
OLED (1).
11. MODEL/BANK LEDs – indicare il modello e la
banca attuali, in rosso, verde o giallo.
12. Manopola MORPH – La funzione
varia secondo il modello selezionato,
mageneralmente controlla il carattere.
(IT) Controlli
25Quick Start Guide24 BRAINS
13. Manopola FREQ – Copre una gamma di 8
ottave, ma può essere ridotta a 14 semitoni.
14. MORPH CV LEVEL – Attenua la tensione
ricevuta all’ingresso Morph CV. Se l’ingresso
CV non è assegnato ed è ricevuto un segnale
all’ingresso Trig, allora questa manopola
controllerà la quantità di modulazione dal
generatore di inviluppo interno.
15. MORPH CV – Controlla il parametro Morph
tramite una tensione di controllo esterna.
16. OUT 2 – Invia un’alternativa o una variante
del segnale Out 1 tramite cavo sbilanciato con
mini-jack da 3,5mm.
17. TRIG – Esegue diverse funzioni:
• Attiva il generatore di inviluppo interno.
• Eccita i modelli sici e percussivi.
• Inuenza il gate passa-basso interno.
• Samples and holds del valore dell’ingresso
Model CV
18. HARMONICS CV – Controlla il parametro
Harmonics tramite una tensione di
controlloesterna.
19. V/OCT – Controlla la frequenza fondamentale
relativa alla fondamentale scelta tramite la
manopola Freq.
20. FM CV – Controlla il parametro FM tramite
una tensione di controllo esterna.
21. LEVEL – Sul segnale di uscita apre il gate
passa-basso interno, controllando sia il livello
di uscita che la brillantezza. Inoltre attiva
un accento quando sono attivi i modelli sici
opercussivi.
22. FM CV LEVEL – Attenua la tensione ricevuta
all’ingresso FM CV.
1. DISPLAY – Produceert een golfvorm van de
audiocontent voor snelle visuele feedback.
2. USB – Sluit een standaard USB-kabel aan voor
rmware-updates.
3. BANK-knop – Schakelen tussen rode,
groeneen gele oevers.
4. De TIMBRE-knop – De functie is afhankelijk
van het geselecteerde model, maar schakelt
over het algemeen van donkerder naar
helderder inhoud.
5. HARMONICS-knop – De functie is afhankelijk
van het geselecteerde model, maar past over
het algemeen de frequentiespreiding of tonale
balans aan.
6. TIMBRE CV LEVEL – Verzwakt de spanning
die wordt ontvangen bij de Timbre CV-ingang.
Als de CV-ingang niet is gepatcht en er een
signaal wordt ontvangen bij de Trig-ingang,
dan regelt deze knop in plaats daarvan de
modulatie van de interne envelope-generator.
7. TIMBRE CV – Regelt de parameter Timbre via
de externe stuurspanning (Control Voltage).
8. OUT 1 – Verzendt het verwerkte hoofdsignaal
via 3,5 mm jack-kabel.
9. MODEL-aansluiting – Hiermee kan het
model extern via de externe stuurspanning
worden geselecteerd.
10. MODEL-knop – Navigeert door de
beschikbare models in de huidige bank.
Hethuidige model wordt weergegeven op het
OLED-display (1).
11. MODEL/BANK LEDs – geef het huidige model
en de bank aan, in rood, groen of geel.
12. MORPH-knop – De functie is afhankelijk van
het geselecteerde model, maar regelt over het
algemeen de het karakter.
(NL) Bediening
27Quick Start Guide26 BRAINS
13. FREQ-knop – Bestrijkt een bereik van
8 octaven, maar kan worden verkleind tot
14 halve tonen.
14. MORPH CV LEVEL – Verzwakt de spanning
die wordt ontvangen via de Morph CV-ingang.
Als de CV-ingang niet is gepatcht en er een
signaal wordt ontvangen via de Trig-ingang,
regelt deze knop in plaats daarvan de
modulatie van de interne envelope-generator.
15. MORPH CV – Regelt de parameter Morph via
de externe stuurspanning (CV).
16. OUT 2 – Verzendt een andere of variant van
het Out 1-signaal via 3,5 mm mini-jack-kabel.
17. TRIG – Voert diverse functies uit:
• Triggert de interne envelope-generator.
• Triggert de physical en percussive models.
• Activeert de interne low-pass gate.
• Bemonstert de waarde van de Model
CV-ingang en houdt deze vast.
18. HARMONICS CV – Regelt de parameter
Harmonics via de externe stuurspanning (CV).
19. V/OCT – Regelt de basisfrequentie ten
opzichte van de grondtoon die met de knop
Freq is geselecteerd.
20. FM CV – Regelt de FM-parameter via de
externe stuurspanning (CV).
21. LEVEL – Opent de interne low-pass-gate
op het uitgangssignaal en regelt zowel het
uitgangsniveau als de helderheid. Activeert
ook een accent als de physical of percussive
models actief zijn.
22. FM CV LEVEL – Verzwakt de spanning die
wordt ontvangen via de FM CV-ingang.
1. DISPLAY – Visar en vågform över
ljudinnehållet för snabb visuell återkoppling.
2. USB – Anslut en USB-standardkabel för
rmware-uppdateringar.
3. BANK-knapp – Växlar mellan röda, gröna och
gula banker.
4. TIMBRE-ratt – Funktionen varierar beroende
på vald modell, men sveper i allmänhet från
mörkare till ljusare innehåll.
5. HARMONICS-ratt – Funktionen varierar
beroende på vald modell, men justerar
i allmänhet frekvensspridning eller
tonalbalans.
6. TIMBRE CV LEVEL – Dämpar den spänning
som tas emot i Timbre CV-ingången.
OmCV-ingången inte är patchad och en signal
tas emot i Trig-ingången kommer denna ratt i
stället att styra graden av modulation från den
interna enveloppgeneratorn.
7. TIMBRE CV – Styr Timbre-parametern via
extern styrspänning.
8. OUT 1 – Skickar den behandlade
huvudsignalen via 3,5 mm TS-kabel.
9. MODEL-uttag – Gör det möjligt att ärrvälja
modell via extern styrspänning.
10. MODEL-knapp – Bläddrar igenom de
tillgängliga modellerna i den aktiva banken.
Den aktuella modellen visas på OLED-
displayen (1).
11. MODEL/BANK LEDs – ange aktuell modell
och bank, antingen rött, grönt eller gult.
12. MORPH-ratt – Funktionen varierar beroende
på vald modell, men styr i allmänhet karaktär.
13. FREQ-ratt – Omfattar åtta oktaver, men kan
minskas till 14 halvtoner.
(SE) Kontroller
29Quick Start Guide28 BRAINS

14. MORPH CV LEVEL – Dämpar den spänning
som tas emot i Morph CV-ingången.
OmCV-ingången inte är patchad och en signal
tas emot i Trig-ingången kommer denna ratt i
stället att styra graden av modulation från den
interna enveloppgeneratorn.
15. MORPH CV – Styr Morph-parametern via
extern styrspänning.
16. OUT 2 – Skickar en alternativ eller en variant
av Out 1-signalen via 3,5 mm TS-kabel.
17. TRIG – Fyller era funktioner:
• Triggar den interna enveloppgeneratorn.
• Exciterar de fysiska och perkussiva
modellerna.
• Slår till den interna lågpass-gaten.
• Samplar och håller värdet för Model
CV-ingången.
18. HARMONICS CV – Styr Harmonics-
parametern via extern styrspänning.
19. V/OCT – Styr grundfrekvensen i förhållande
till grunden som är vald med Freq-ratten.
20. FM CV – Styr FM-parametern via
extern styrspänning.
21. LEVEL – Öppnar den interna lågpass-gaten
på utgångssignalen, med styrning av både
utgångsnivå och ljushet. Triggar också en
betoning när de fysiska eller perkussiva
modellerna är aktiva.
22. FM CV LEVEL – Dämpar den spänning som tas
emot i FM CV-ingången.
1. Wyświetlacz – Pokazuje kształt fali
przetwarzanego dźwięku dla szybkiej
wizualizacji.
2. USB – Podłącz standardowy kabel USB,
abyzaktualizować oprogramowanie rmowe.
3. Przycisk BANK – Przełączanie między
czerwonym, zielonym i żółtym brzegiem.
4. Pokrętło TIMBRE – Funkcja różni się
w zależności od wybranego modelu, ale
zazwyczaj przesuwa z ciemniejszego do
jaśniejszego brzmienia.
5. Pokrętło HARMONICS – Funkcja różni się
w zależności od wybranego modelu, ale
zazwyczaj dostosowuje pasmo częstotliwości
lub równowagę brzmienia.
6. TIMBRE CV LEVEL – Zmniejsza otrzymywane
napięcie na wejściu Timbre CV. Jeśli wejście CV
nie jest wpięte, a sygnał jest otrzymywany na
wejściu Trig, to pokrętło będzie kontrolować
poziom modulacji z wewnętrznego
generatoraobwiedni.
7. TIMBRE CV – Kontroluje parametr Timbre
przez zewnętrzną kontrolę napięcia.
8. OUT 1 – Wysyła główny przetworzony sygnał
przez kabel 3.5 mm TS.
9. Jack MODEL – Pozwala na zdalny wybór modelu
przez zewnętrzną kontrolę napięcia.
10. Przycisk MODEL – Przełącza między
dostępnymi modelami w aktywnym banku.
Bieżący model jest wyświetlany na
wyświetlaczu OLED (1).
11. MODEL/BANK LEDs – Wskaż bieżący model
i bank w kolorze czerwonym, zielonym
lubżółtym.
12. Pokrętło MORPH – Funkcja zmienia
się w zależności od wybranego modelu,
lecz zazwyczaj kontroluje balans charakter.
(PL) Sterowanica
31Quick Start Guide30 BRAINS
13. Pokrętło FREQ – Obejmuje skalę 8 oktaw,
alemoże być zredukowane do 14 półtonów.
14. MORPH CV LEVEL – Zmniejsza otrzymywane
napięcie na wejściu Morph CV. Jeśli wejście CV
nie jest wpięte, a sygnał jest otrzymywany na
wejściu Trig, to pokrętło będzie kontrolować
poziom modulacji z wewnętrznego
generatora obwiedni.
15. MORPH CV – Kontroluje parametr Morph
przez zewnętrzną kontrolę napięcia.
16. OUT 2 – Przesyła alternatywę lub wariant
sygnału Out 1 przez kabel 3.5 mm TS.
17. TRIG – Wykonuje kilka funkcji:
• Aktywuje wewnętrzny generator obwiedni.
• Aktywuje modele zyczne oraz perkusyjne.
• Uderza wewnętrzną bramkę
dolnoprzepustową.
• Sampluje i utrzymuje wartość wejścia
Model CV.
18. HARMONICS CV – Kontroluje parametr
Harmonics przez zewnętrzną kontrolę
napięcia.
19. V/OCT – Kontroluje częstotliwość
podstawową względem prymy wybranej
pokrętłem Freq.
20. FM CV – Kontroluje parametr FM przez
zewnętrzną kontrolę napięcia.
21. LEVEL – Otwiera wewnętrzną bramkę
dolnoprzepustową na sygnale wyjściowym,
kontrolując zarówno poziom wyjściowy, jak i
jasność. Aktywuje również akcent, gdy modele
zyczne lub perkusyjne są aktywne.
22. FM CV LEVEL – Zmniejsza napięcie
otrzymywane na wejściu FM CV.
(JP) コントロール
33Quick Start Guide32 BRAINS
1. ディスプレ イ (DISPLAY) – オーディオ
コンテンツの波形を素早く視覚的に表
示します。
2. USB – 標準 USB ケーブル を接 続してファ
ームウェアアップデートをおこないます。
3. BANK (バンク) ボタン – 赤、緑、黄色の
バンクを 切り替えます。
4. TIMBRE (ティンバー) ノブ – 選択したモ
デ ル に よ り 機 能 は 異 な り ま す が 、一 般
的にダークな方から明るい方向へスイ
ープ しま す。
5. HARMONICS (ハーモニクス) ノブ – 選
択したモデルにより機能は異なります
が、一般的に周波数拡散やトーンバラ
ンスを調節します。
6. TIMBRE CV レベル – ティンバー CV 入力
で受信したボルテージを減衰します。
CV 入力がパッチされていない場合は、
信号は Trig (トリガー) 入力で受信さ
れ、このノブでは内部ジェネレーター
のモジュレーション量を調節します。
7. TIMBRE (ティンバー) CV – ティンバーの
パ ラ メ ー タ ー を 、外 部 コ ン ト ロ ー ル ボ ル
テージを通じて制御します。
8. OUT 1 (出力 1) – メインの処理済み信
号を 3.5 mm TS ケーブル を 通じて送 信
します。
9. MODEL (モデル) ジャック – 外部コント
ロールボルテージを通じて、遠隔でモ
デル を選 択します。
10. MODEL ボタン – 現在有 効なバンク内の、
使 用 可 能 な モデル をスクロールします。
現在のモデルが OLEDディスプ レ イに 表 示
されます (1)。
11. MODEL / BANK LEDs モデル / バンク LED –
現 在 の モ デ ル と バ ン ク を 赤 、緑 、ま た は
黄 色 のいず れかで 示します。
12. MORPH ( モ ーフ) ノブ – 機能は選択したモ
デルによって異なりますが、通常はキャ
ラクター を制 御しま す。
35Quick Start Guide34 BRAINS
13. FREQ (周波数) ノブ – 範囲は 8 オクター
ブですが、14 の半音にまで絞ることが
できます。
14. MORPH CV レベル – MORPH CV 入力で受
信したボルテージを減衰します。CV 入力
がパッチされていない場合は、信号は
Trig 入力で 受信され 、このノブでは内部
エ ン ベ ロ ープ ジェネ レ ー ター の モ ジュレ
ーション 量を制 御します。
15. MORPH CV – 外部コントロールボルテー
ジを通じて MORPH パラメーターを制 御
します。
16. OUT 2 (出力 2) – 出力 1 信号のオルタネー
トまたは可 変 信号を、3.5 mm TS ケーブル
を通じて送 信します。
17. TRIG (トリガー) – 複数の機能があります:
• 内 部 エ ン ベ ロ ープ ジ ェ ネ レ ー タ ー を ト
リガーします。
• フ ィ ジ カ ル で パ ー カ ッ シ ブ な モ デ ル に
活気をプラスします。
• 内 部 ロ ー パ ス ゲ ー ト を ス ト ラ イ ク し
ます。
• Model CV 入 力の値 をサンプルアンドホ
ールドします。
18. HARMONICS (ハーモニクス) CV – 外部コン
トロールボルテージを通じて、ハーモニ
クスのパラメー ター を制 御します。
19. V/OCT – Freq (周波数) ノブで選択した
ル ー ト に 相 関 し て 、基 本 周 波 数 を 制 御
します。
20. FM CV – 外部コントロールボルテージを
通じて FM パラメーターを 制御します。
21. LEVEL (レベル) – 出力信号に対し内部ロ
ー パ ス ゲ ー ト を 開 き 、出 力 レ ベ ル と ブ ラ
イ ト ネ ス の 両 方 を 制 御 し ま す 。フ ィ ジ カ
ルまたはパーカッシブなモデルの有効時
には、アクセントをトリガーします。
22. FM CV LEVEL (FM CV レベル) – FM CV 入力で
受信したボルテージを減衰します。
1. 显示屏 (DISPLAY) – 生成音频内容的
波形, 获得快速的视觉反馈。
2. USB – 连接标准 USB 电缆进行固件更新。
3. 系列 (BANK) 按钮 – 在红色、 绿色和黄
色银行之间切换.
4. 音品 (TIMBRE) 旋钮 – 功能所选模型而
异, 但通常为从较暗到较亮调节。
5. 谐波 (HARMONICS) 旋钮 – 功能因所选
模型而异, 但通常会调整频率差或音
色平衡。
6. 音品控制电压电平 (TIMBRE CV LEVEL)
– 衰减从音品控制电压输入处接收的
电压。如果控制电压输入未接通, 而在
触发输入处接收信号, 则此旋钮将控制
来自内部包络生成器的调制量。
7. 音品控制电压 (TIMBRE CV) – 通过外部
控制电压控制音品参数。
8. 输出 1 (OUT 1) – 通过 3.5 毫米 TS 电缆发
送处理后主信号。
9. 模型 (MODEL) 插孔 – 允许通过外部控
制电压远程进行模型选择。
10. 模型 (MODEL) 按钮 – 滚动浏览当前活
动系列中的可用模型。 当前型号显示在
OLED 显示屏 (1) 上。
11. 型号 / 组 LED (MODEL/BANK LEDs) - 以
红色、 绿色或黄色指示当前型号和组.
12. 变形 (MORPH) 旋钮 – 功能因所选型号
而异, 但通常控制字符。
13. 频率 (FREQ) 旋钮 – 涵盖 8 个八度的 范
围, 但可以缩小到 14 个半音。
14. 变形控制电压电平 – 衰减从变形控制
电压输入处接收的电压。 如果控制电
压输入未接通,而在触发输入处接收信
号, 则此旋钮将控制来自内部包络生成
器的调制量。
(CN) 控制
37Quick Start Guide36 BRAINS
15. 变形控制电压 (MORPH CV LEVEL) – 通过
外部控制电压控制变形参数。
16. 输出 2 (OUT 2) – 通过 3.5 毫米 TS 电缆发
送输出 1 信号的替代或变种。
17. 触发 (TRIG) – 执行以下几个功能:
• 触发内部包络生成器。
• 激发物理和打击乐模型。
• 激活内部低通门。
• 取样并保持模型控制电压输入
的值。
18. 谐波控制电压 (HARMONICS CV) – 通过
外部控制电压控制谐波参数。
19. V/OCT – 控制与频率旋钮选择的根音相
对的基频。
20. 调频 (FM) 控制电压 – 通过外部控制电
压控制调频参数。
21. 电平 (LEVEL) – 打开输出信号上的内部
低通门, 控制输出电平和亮度。 当物理模
型或打击乐模型处于活动状态时, 还会
触发重音。
22. 调频 (FM) 控制电压电平 – 衰减从调频
控制电压输入处接收的电压。
Specications
Inputs
Timbre CV input
Type
3.5 mm TS jack,
DC to 2 kHz
Impedance 50 kΩ
Eective Levels ±8 V
Harmonics CV input
Type
3.5 mm TS jack,
DC to 2 kHz
Impedance 100 kΩ
Eective Levels ±5 V
Freq CV input
Type
3.5 mm TS jack,
DC to 2 kHz
Impedance 50 kΩ
Eective Levels ±8 V
Morph CV input
Type
3.5 mm TS jack,
DC to 2 kHz
Impedance 50 kΩ
Eective Levels ±8 V
Model CV input
Type
3.5 mm TS jack,
DC to 2 kHz
Impedance 100 kΩ
Eective Levels ±5 V
39Quick Start Guide38 BRAINS
V/oct input
Type
3.5 mm TS jack,
DC to 2 kHz
Impedance 100 kΩ
Eective Levels -3 to +7 V
Level input
Type
3.5 mm TS jack,
DC to 2 kHz
Impedance 50 kΩ
Eective Levels 0 to +8 V
Trig input
Type
3.5 mm TS jack,
DCto 2 kHz
Impedance 50 kΩ
Eective Levels 0 to +8 V
Outputs
Out 1
Type
3.5 mm TS jack,
DC coupled
Impedance 1 kΩ
Max output level 6.2 V
Out 2
Type
3.5 mm TS jack,
DC coupled
Impedance 1 kΩ
Max output level 6.2 V
Controls
Timbre
Darker or brighter
content
Harmonics
Frequency spread
or tonal balance
Freq
Frequency
adjustment
Morph
Panning or
character
Bank
Toggles between
red, green and
yellow banks
Model
Scrolls through
models in active
bank
Digital Processing
A/D converter
Resolution 16 bit
D/A converter
Resolution 16 bit
Sampling rate 96 kHz
Internal
processing
32-bit oating
point
USB
Type USB 2.0, type B
Power
Power supply Eurorack
Current draw
130 mA (+12 V),
10 mA (-12 V)
Physical
Dimensions
129 x 81 x 42 mm
(5.0 x 3.2 x 1.7")
Rack units 16 HP
Weight 0.16 kg (0.35 lbs)
41Quick Start Guide40 BRAINS
技术参数
输入
木材 CV 输入
类型
3.5 毫米 TS 插孔,
DC 至 2 kHz
阻抗
50 千欧
最大输入电平
±8 V
谐波 CV 输入
类型
3.5 毫米 TS 插孔,
DC 至 2 kHz
阻抗
100 kΩ
最大输入电平
±5 V
频率 CV 输入
类型
3.5 毫米 TS 插孔,
DC 至 2 kHz
阻抗
50 千欧
最大输入电平
±8 V
变形 CV 输入
类型
3.5 毫米 TS 插孔,
DC 至 2 kHz
阻抗
50 千欧
最大输入电平
±8 V
模型 CV 输入
类型
3.5 毫米 TS 插孔,
DC 至 2 kHz
阻抗
100 kΩ
最大输入电平
±5 V
V/oct 输入
类型
3.5 毫米 TS 插孔,
DC 至 2 kHz
阻抗
100 kΩ
最大输入电平
-3 至 +7 V
电平输入
类型
3.5 毫米 TS 插孔,
DC 至 2 kHz
阻抗
50 千欧
最大输入电平
0 至 +8 V
触发输入
类型
3.5 毫米 TS 插孔,
DC 至 2 kHz
阻抗
50 千欧
最大输入电平
0 至 +8 V
输出
出 1
类型
3.5 毫米 TS 插孔,
直流耦合
阻抗
1 千欧
最大输出电平
6.2 V
出 2
类型
3.5 毫米 TS 插孔,
直流耦合
阻抗
1 千欧
最大输出电平
6.2 V
控件
音色
更暗或更亮的
内容
谐波
频率扩展或音
调平衡
频率 频率调整
变形 平移或字符
银行
在红色、 绿色和
黄色银行之间
切换
模型
滚动浏览活动库
中的模型
43Quick Start Guide42 BRAINS
数字处理
模数转换器
解析度
16 位
数模转换器
解析度
16 位
采样率
96 赫兹
内部处理
32 位浮点数
USB
类型
USB 2.0, B 型
力量
电源 欧洲机架
当前平局
130 mA (+12 V)、
10 mA (-12 V)
身体的
方面
129 x 81 x 42 mm
(5.0 x 3.2 x 1.7")
机架单元
16 马力
重量
0.16 kg (0.35 lbs)
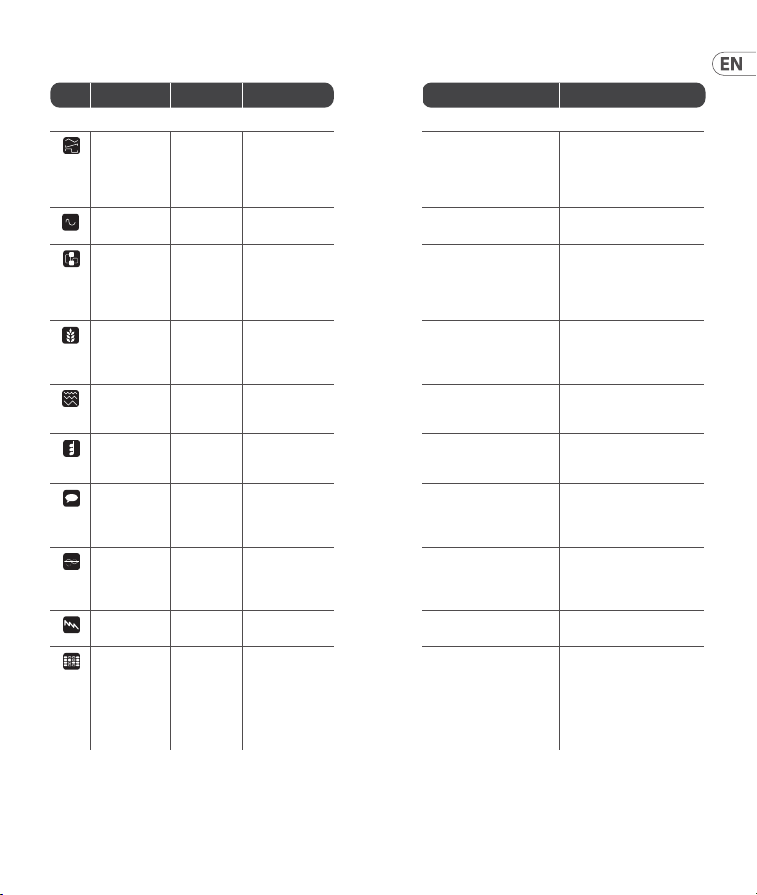
Waveform Parameters
Icon Name Timbre Harmonics Morph Out 2
Red Bank
Virtual
analog
Square wave:
narrow pulse,
full square,
hardsync
formant
Detuning
between waves
Saw: triangle to wide
notch saw
Sum of two hardsync’d
waveforms
Waveshaping Wavefolder
amount
Waveshaper
waveform
Waveform symmetry Variant with another
waveform curve
FM 2
operators
Modulation
mix
Frequency ratio >12:00 – operator
2 modulates own
phase<12:00 – operator
2 modulates operator
1 phase
Sub-oscillator
Grains Formant
frequency
Frequency
between formant
1 and 2
Formant width and shape Simulation of ltered
waveforms – Harmonics
selects lter type (peaking,
LP, BP, HP)
Additive Most
prominent
harmonic
Number of bumps
in spectrum
Bump shape – at and wide
to peaked and narrow
Variant that includes
harmonics from Hammond
organ drawbars
Chords Chord
inversion/
transposition
Chord type Waveform Chord root note
Speech Vocal tamber
from deep to
high
Scrolls through
formant types,
SAM, and LPC
vowles/words
Word segment selection Unltered vocal signal
Karplus
strong
Brightness
and dust
noise
sensitivity
String stiness Decay time Copy of Out 1
Super saw Sets number
of waveforms
Adjusts harmonic
content
Sub-oscillator level Copy of Out 1
Wavetable
oscillator
Rotates
through
dierent
waves
Selects between
4 interpolated
banks followed by
the same
4 banks, in reverse
order, without
interpolation.
Column index Bit reduced version of Out 1
45Quick Start Guide44 BRAINS
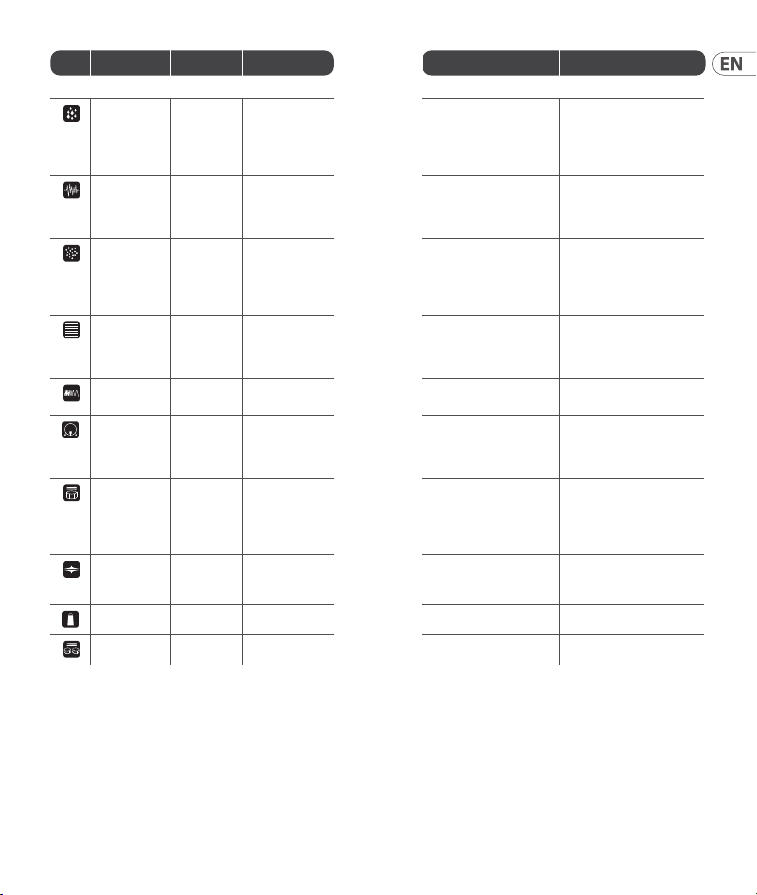
Icon Name Timbre Harmonics Morph Out 2
Green Bank
Rain Rain grain
density
Amount of pitch
randomization
Droplet duration and
overlap, culminating in
a stack of 8 randomly
frequency-modulated
waveforms
Varient with sine wave
oscillators
Noise Clock
frequency
Scrolls through
lter response,
from LP to BP
to HP
Filter resonance Result of 2 BP lters
controlled by Harmonics
knob
Dust Particle
density
Frequency
randomization
Scrolls through
reverberating all-pass
lters followed by
increasingly resonant
BP lters
Raw dust noise
Modal strings Excitation
brightness
and dust
density
Amount of
harmonic
coloration
Decay time Raw exciter signal
FM drum LP lter
cuto
Blend between
harmonic content
Decay time Alternate FM drum model
Bass drum Attack
brightness
and overdrive
amount
Frequency Decay time Alternate bass drum model
Snare drum Balance
between
dierent
modes of the
drum
Blend between
harmonic and
noisy components
Decay time Alternate snare drum model
Hi-hat HP lter
cuto
Blend between
metallic and
ltered noise
Decay time Alternate hi-hat model
Cowbell Brightness Texture Decay time Alternate cowbell model
Toms Tone Resonance Decay time Alternate tom models
47Quick Start Guide46 BRAINS
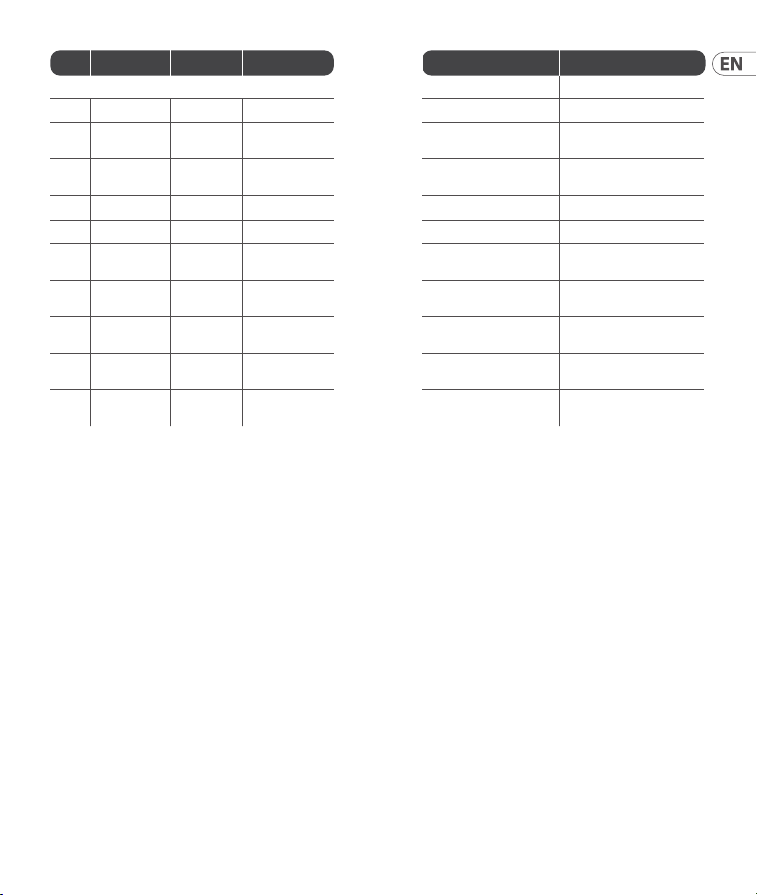
Icon Name Timbre Harmonics Morph Level
Yellow Bank
1 BX7 Vibrato Preset selection Tremolo Velocity
2 BASSLINE Cuto Resonance +
distortion
Env mod + Decay Accent
3 WAVE
GENERATOR
Waveform Bit Crush Sample Rate Level
4 VOX Formant shift Reso Blend Vowels
Level
5 AUDIO SCOPE
6 For
expansion
7 For
expansion
8 For
expansion
9 For
expansion
10 For
expansion
Frequency Range
Press and hold the Model button (10) and use
the Harmonics control (5) to set the range of
the Frequency control (13). The number of lit
LEDs corresponds to the range. 1 LED represents
C0+/- 7 semitones, 2 LEDs C1 +/- 7 semitones
until 8 LEDs represents C7 +/- 7 semitones.
Whenall LEDs are lit then the Frequency control
has an eight octave range covering C0 to C8.
Note 1: for BX7 mode, it is possible to send a DX7
Sysex le using USB, the Sysex will overwrite the
presets present in BRAINSmemory.
Note 2: Model input only controls the red/green
engines.
Note 3: Audio Scope input is via V/Oct socket.
(EN)
Low Pass Gate and Envelope
To adjust the Low Pass Gate press and hold the
Bank button (3) and use the Timbre control to
adjust its response from being a VCA when fully
clockwise to being a true low pass gate when fully
counter-clockwise or the Morph control (12) to
adjust its ring time and increase the decay of the
internal envelope. The settings are shown by the
number of yellow LEDs lit, from 1 – 4.
Low Pass Gates reduce level and cuto
simultaneously, resulting in the signal losing high
frequency content as it gets quieter.
49Quick Start Guide48 BRAINS

(ES)
Puerta de paso bajo y sobre
Para ajustar la puerta de paso bajo, mantenga
presionado el botón de banco (3) y use el control
Timbre para ajustar su respuesta de ser un VCA
cuando está completamente en el sentido de las
agujas del reloj a ser una verdadera puerta de
paso bajo cuando está completamente en sentido
contrario a las agujas del reloj o el control Morph
(12) para ajustar su tiempo de timbre y aumentar
la descomposición de la envolvente interna.
Laconguración se muestra por el número de LED
amarillos encendidos, de 1 a 4.
Las puertas de paso bajo reducen el nivel y el corte
simultáneamente, lo que hace que la señal pierda
contenido de alta frecuencia a medida que se vuelve
más silenciosa.
Rango de frecuencia
Mantén pulsado el botón Modelo (10) y utiliza
el control Armónicos (5) para ajustar el rango
del control de frecuencia (13). El número de
LEDs encendidos corresponde al rango. 1LED
representa C0 +/- 7 semitonos, 2 LEDs C1+/- 7
semitonos hasta 8 LEDs representa C7+/- 7
semitonos. Cuando todos los LED están
encendidos, el control de frecuencia tiene un
rango de ocho octavas que cubre C0 a C8.
(FR)
Porte passe-bas et enveloppe
Pour régler le Low Pass Gate, maintenez enfoncé le
bouton Bank (3) et utilisez le contrôle Timbre pour
ajuster sa réponse d’un VCA dans le sens complet
des aiguilles d’une montre à un véritable ltre
passe-bas dans le sens inverse des aiguilles d’une
montre ou le contrôle Morph (12) pour ajuster son
temps de sonnerie et augmenter la décroissance
de l’enveloppe interne. Lesparamètres sont
indiqués par le nombre de LED jaunes allumées,
de 1 à 4.
Les portes passe-bas réduisent simultanément le
niveau et la coupure, ce qui entraîne la perte de
contenu haute fréquence du signal à mesure qu’il
devient plus silencieux.
Gamme de fréquences
Maintenez enfoncé le bouton Modèle (10) et
utilisez la commande Harmoniques (5) pour régler
la plage du contrôle de fréquence (13). Lenombre
de LED allumées correspond à la portée. 1 LED
représente C0 +/- 7 demi-tons, 2 LED C1 +/- 7
demi-tons jusqu’à 8 LED représente C7 +/- 7
demi-tons. Lorsque toutes les LED sont allumées,
lecontrôle de fréquence a une plage de huit
octaves couvrant C0 à C8.
(DE)
Tiefpass-Gate und Hüllkurve
Um das Tiefpass-Gate einzustellen, halten Sie
die Bank-Taste (3) gedrückt und verwenden
Sie die Timbre-Steuerung, um die Reaktion von
einem VCA im vollen Uhrzeigersinn auf ein echtes
Tiefpass-Gate einzustellen, wenn es vollständig
gegen den Uhrzeigersinn gerichtet ist, oder den
Morph-Regler (12), um die Klingelzeit anzupassen
und den Zerfall der internen Hüllkurve zu erhöhen.
Die Einstellungen werden durch die Anzahl der
leuchtenden gelben LEDs von 1 bis 4 angezeigt.
Low-Pass-Gates reduzieren gleichzeitig den Pegel
und die Abschaltung, was dazu führt, dass das
Signal den Hochfrequenzgehalt verliert, wenn es
leiser wird.
Frequenzbereich
Halten Sie die Modelltaste (10) gedrückt und
verwenden Sie die Oberschwingungssteuerung
(5), um den Bereich des Frequenzreglers (13)
einzustellen. Die Anzahl der leuchtenden LEDs
entspricht der Reichweite. 1 LED steht für C0 +/- 7
Halbtöne, 2 LEDs C1 +/- 7 Halbtöne bis 8 LEDs
für C7 +/- 7 Halbtöne. Wenn alle LEDs leuchten,
hat der Frequenzregler einen Bereich von acht
Oktaven, der C0 bis C8 abdeckt.
51Quick Start Guide50 BRAINS
(PT)
Portão e envelope Low Pass
Para ajustar o Low Pass Gate, pressione e
segure o botão Bank (3) e use o controle
Timbre para ajustar sua resposta de ser um VCA
quando totalmente no sentido horário para
ser um verdadeiro portão low pass quando
totalmente no sentido anti-horário ou o controle
Morph (12) para ajustar seu tempo de anel e
aumentar o decaimento do envelope interno.
Ascongurações são mostradas pelo número de
LEDs amarelos acesos, de 1 a 4.
Os Low Pass Gates reduzem o nível e o corte
simultaneamente, resultando na perda de
conteúdo de alta frequência do sinal à medida que
ca mais silencioso.
Gama de frequências
Mantenha pressionado o botão Modelo (10) e use
o controle Harmonics (5) para denir o alcance
do controle de frequência (13). O número de LEDs
acesos corresponde ao intervalo. 1 LED representa
C0 +/- 7 semitons, 2 LEDs C1 +/- 7 semitons até
8LEDs representam C7 +/- 7 semitons. Quando
todos os LEDs estão acesos, o controle de frequência
tem uma faixa de oito oitavas cobrindo C0 a C8.
(IT)
Cancello passante basso e busta
Per regolare il cancello passa-basso, tenere
premuto il pulsante Bank (3) e utilizzare il controllo
Timbre per regolare la sua risposta dall'essere
un VCA in senso orario ad essere un vero cancello
passa-basso quando è completamente in senso
antiorario o il controllo Morph (12) per regolare
il tempo dell'anello e aumentare il decadimento
dell'inviluppo interno. Le impostazioni sono
mostrate dal numero di LED gialli accesi, da 1 a 4.
I gate passa-basso riducono simultaneamente
il livello e il cuto, con il risultato che il segnale
perde contenuti ad alta frequenza man mano che
diventa più silenzioso.
Gamma di frequenza
Tenete premuto il pulsante Modello (10) e
utilizzate il controllo Armoniche (5) per impostare
l'intervallo del controllo Frequenza (13). Il numero
di LED accesi corrisponde all'intervallo. 1 LED
rappresenta C0 +/- 7 semitoni, 2 LED C1 +/- 7
semitoni no a quando 8 LED rappresentano
C7+/- 7 semitoni. Quando tutti i LED sono accesi,
il controllo di frequenza ha un intervallo di otto
ottave che copre da C0 a C8.
(NL)
Low Pass Gate en Envelop
Om de Low Pass Gate aan te passen, houdt u de
Bank-knop (3) ingedrukt en gebruikt u de Timbre-
besturing om de respons aan te passen van een
VCA wanneer deze volledig met de klok mee is
naar een echte low pass-poort wanneer deze
volledig tegen de klok in is of de Morph-besturing
(12) om de ringtijd aan te passen en het verval van
de interne envelop te vergroten. De instellingen
worden weergegeven door het aantal gele LED's
dat brandt, van 1 – 4.
Low Pass Gates verlagen tegelijkertijd het niveau
en de cuto, waardoor het signaal hoogfrequente
inhoud verliest naarmate het stiller wordt.
Frequentiebereik
Houd de modelknop (10) ingedrukt en gebruik
het harmonische besturingselement (5) om
het bereik van de frequentieregelaar (13) in te
stellen. Het aantal verlichte LED's komt overeen
met het bereik. 1 LED vertegenwoordigt C0 +/- 7
halve tonen, 2 LED's C1 +/- 7 halve tonen tot
8LED's C7+/- 7 halve tonen vertegenwoordigen.
Wanneer alle LED's branden, heeft de
frequentieregelaar een bereik van acht octaven
van C0 tot C8.
53Quick Start Guide52 BRAINS

(SE)
Low Pass Gate och kuvert
För att justera Low Pass Gate, håll ned Bank-
knappen (3) och använd Timbre-kontrollen för att
justera dess svar från att vara en VCA när den är
helt medurs till att vara en riktig lågpassgrind när
den är helt moturs eller Morph-kontrollen (12) för
att justera dess ringtid och öka sönderfallet av det
inre kuvertet. Inställningarna visas med antalet
gula lysdioder som tänds, från 1 - 4.
Low Pass Gates minskar nivån och cuto
samtidigt, vilket resulterar i att signalen förlorar
högfrekvent innehåll när den blir tystare.
Frekvensområde
Tryck och håll ned modellknappen (10) och
använd övertonsreglaget (5) för att ställa in
frekvenskontrollens intervall (13). Antalet
tända lysdioder motsvarar intervallet. 1 LED
representerar C0 +/- 7 halvtoner, 2 lysdioder
C1+/- 7 halvtoner tills 8 lysdioder representerar
C7 +/- 7 halvtoner. När alla lysdioder är tända har
frekvenskontrollen ett åtta oktavintervall som
täcker C0 till C8.
(PL)
Brama dolnoprzepustowa i koperta
Aby wyregulować bramkę dolnoprzepustową,
naciśnij i przytrzymaj przycisk Bank (3) i użyj
kontrolki Timbre, aby dostosować jej reakcję z
VCA, gdy jest w pełni zgodna z ruchem wskazówek
zegara, do prawdziwej bramki dolnoprzepustowej,
gdy jest w pełni przeciwna do ruchu wskazówek
zegara lub kontrolka Morph (12), aby dostosować
czas dzwonka i zwiększyć zanik wewnętrznej
obwiedni. Ustawienia są wyświetlane przez liczbę
żółtych diod LED, od 1 do 4.
Bramy dolnoprzepustowe jednocześnie redukują
poziom i odcięcie, co powoduje, że sygnał traci
zawartość wysokiej częstotliwości, gdy staje
sięcichszy.
Zakres częstotliwości
Naciśnij i przytrzymaj przycisk Model (10) i użyj
przycisku Harmoniczne (5), aby ustawić zakres
regulacji częstotliwości (13). Liczba świecących
diod LED odpowiada zakresowi. 1 dioda LED
reprezentuje C0 +/- 7 półtonów, 2 diody LED
C1+/- 7 półtonów, aż 8 diod LED reprezentuje
C7+/-7 półtonów. Gdy świecą się wszystkie
diody LED, regulacja częstotliwości ma zakres
ośmiu oktaw obejmujący C0 do C8.
(JP)
注 1: BX7 モードでは、USB を使用して
DX7 Sysex ファイルを送信 することが で
き、Sysex は BRAINS メモリに存在するプリセ
ットを 上書きします。
注 2: モデル入力は赤 / 緑のエンジンのみ
を制 御します。
注 3: オーディオスコープの入力は V / Oct ソ
ケットを介して 行 わ れ ま す。
ローパスゲートとエンベロープ
ロ ー パ ス ゲ ー ト を 調 整 す る に は 、バ ン ク ボ タ
ン (3) を押したまま、ティンバーコントロール
を 使 用 し て 、完 全 に 時 計 回 り の VCA から完
全に反時計回りの真のローパスゲートに応
答を調整するか、モーフコントロール (12) を
使 用 し て リ ン グ タ イ ム を 調 整 し 、内 部 エ ン ベ
ロープの減衰を増加させます。設定は、1~4
の黄色の LED が点 灯する数 で 示されます。
ローパスゲートはレベルとカットオフを同
時 に 低 下 さ せ 、信 号 が 静 か に な る に つ れ て
高 周 波 成分を失います。
周波数範囲
モデルボタン (10) を 押 し 続 け 、高 調 波 コ ン
トロール (5) を 使 用して周波 数コントロー
ル (13) の 範 囲 を 設 定 し ま す 。点 灯 す る LED
の数は範囲に対応します。1 つの LED は
C0 +/- 7 半音を表し、2 つの LED は C1 +/- 7
半音を表し、8 つの LED は C7 +/- 7 半音
を 表 し ま す 。す べ て の LED が点灯すると、
55Quick Start Guide54 BRAINS
周波 数コントロール は C0 から C8 をカバ
ーする 8 オクターブの 範 囲になりま す
(CN)
注 1: 对于 BX7 模式, 可以使用 USB 发送
DX7 Sysex 文件, Sysex 将覆盖 BRAINS 内存中
存在的预设。
注 2: 模型输入仅控制红/绿引擎。
注 3: 音频示波器输入通过 V/Oct 插座。
低通栅极和包络
要调整低通门, 请按住 Bank 按钮 (3) 并使
用 Timbre 控件将其响应从完全顺时针时
的 VCA 调整为完全逆时针时的真正低通
门, 或调整 Morph 控制 (12) 调整其振铃时间
并增加内部包络的衰减。 设置由点亮的黄
色 LED 数量显示, 从 1 到 4。
低通门同时降低电平和截止电平,导致信号
在变得更安静时丢失高频成分。
频率范围
按住模型按钮 (10) 并使用谐波控制 (5)
设置频率控制 (13) 的范围。 点亮的 LED 数量
与范围相对应。 1 个 LED 代表 C0 +/- 7 个半
音, 2 个 LED 代表 C1 +/- 7 个半音, 直到 8 个
LED 代表 C7 +/- 7 个半音。 当所有 LED 都点
亮时, 频率控制具有涵盖 C0 至 C8 的八个
倍频程范围。
(EN) CALIBRATION
The BRAINS is factory calibrated with high
precision instruments and should not need any
further calibration. If it does become necessary to
calibrate it, please follow this procedure:
• Disconnect all CV inputs except v/oct, which
should be connected to a well calibrated CV
keyboard or MIDI/CV converter.
• Press the BANK and MODEL buttons
simultaneously, therst LED will ash green.
• Send 1 V to the v/oct input from the keyboard.
• Press any button, the rst LED will now ash
in orange.
• Send 3 V to the v/oct input from the keyboard.
• Press any button, the BRAINS will now leave
calibration mode.
To check that the BRAINS is correctly calibrated
follow thisprocedure:
• Send 0 V to the v/oct input from the keyboard.
• Use the FREQ control (13) to tune the output to
110Hz (MIDI A2)
• Send 1 V to the v/oct input from the keyboard.
Thetuner should now show 220 Hz (A3).
• Send 2 V to the v/oct input from the keyboard.
Thetuner should now show 440 Hz (A4).
• Send 3 V to the v/oct input from the keyboard.
Thetuner should now show 880 Hz (A5).
(ES) CALIBRACIÓN
El BRAINS viene calibrado de fábrica con
instrumentos de alta precisión y no debería
necesitar ninguna calibración posterior, pero si
necesita recalibrarlo, siga estos pasos:
57Quick Start Guide56 BRAINS

• Desconecte todas las entradas de CV
excepto v/oct, que debería estar conectada
a un teclado CV o convertidor MIDI/CV
perfectamente calibrado.
• Pulse simultáneamente los botones BANK
y MODEL; el primer piloto LED parpadeará
enverde.
• Envíe desde el teclado una señal de 1 V a la
entrada v/oct.
• Pulse cualquier botón; el primer piloto LED
parpadeará ahora en color naranja.
• Envíe desde el teclado una señal de 3 V a la
entrada v/oct.
• Pulse después cualquier botón y el BRAINS
saldrá del modo de calibración.
Para vericar si el BRAINS está correctamente
calibrado realice este procedimiento:
• Envíe desde el teclado una señal de 0 V a la
entrada v/oct.
• Use el control FREQ (13) para anar la salida a
110Hz (MIDI A2)
• Envíe desde el teclado una señal de 1 V a la
entrada v/oct. El anador le debería mostrar
ahora 220Hz (A3).
• Envíe desde el teclado una señal de 2 V a la
entrada v/oct. El anador le debería mostrar
ahora 440Hz (A4).
• Envíe desde el teclado una señal de 3 V a la
entrada v/oct. El anador le debería mostrar
ahora 880Hz (A5).
(FR) CALIBRAGE
Le BRAINS est calibré en usine par des appareils
de haute précision et ne devrait pas avoir
besoin de réglages supplémentaires. S’il s’avère
néanmoins nécessaire d’eectuer un calibrage,
suivezcetteprocédure:
• Déconnectez toutes les entrées CV sauf v/oct
qui doit être connectée à un clavier CV ou un
convertisseur MIDI/CV bien calibré.
• Appuyez simultanément sur les boutons BANK
et MODEL. La première LED clignote en vert.
• Transmettez une tension de 1 V à l’entrée v/
oct avec le clavier.
• Appuyez sur n’importe quel bouton.
Lapremière LED clignote alors en orange.
• Transmettez une tension de 3 V à l’entrée v/
oct avec le clavier.
• Appuyez sur n’importe quel bouton.
LeBRAINS quitte le mode de calibrage.
Pour vérier que le BRAINS est correctement
calibré, suivez cette procédure:
• Transmettez une tension de 0 V à l’entrée v/
oct avec le clavier.
• Utilisez le potentiomètre FREQ (13) pour régler
la fréquence en sortie à 110 Hz (La2MIDI)
• Transmettez 1 V à l’entrée v/oct avec le clavier.
L’accordeur doit indiquer 220 Hz (La3).
• Transmettez 2 V à l’entrée v/oct avec le clavier.
L’accordeur doit indiquer 440 Hz (La4).
• Transmettez 3 V à l’entrée v/oct avec le clavier.
L’accordeur doit indiquer 880 Hz (La5).
(DE) KALIBRIERUNG
Das BRAINS ist werkseitig mit
Hochpräzisionsinstrumenten kalibriert und sollte
keine weitere Kalibrierung benötigen. Sollte eine
Kalibrierung dennoch erforderlich sein, gehen Sie
bitte wie folgt vor:
59Quick Start Guide58 BRAINS
• Trennen Sie alle CV-Eingänge mit Ausnahme
von V/OCT, das an ein gut kalibriertes
CV-Keyboard oder einen MIDI/CV-Wandler
angeschlossen werden sollte.
• Drücken Sie die Tasten BANK und MODEL
gleichzeitig, die erste LED blinkt grün.
• Senden Sie 1 V vom Keyboard an den
V/OCT-Eingang.
• Drücken Sie eine beliebige Taste, die erste LED
blinkt nun orange.
• Senden Sie 3 V vom Keyboard an den
V/OCT-Eingang.
• Drücken Sie eine beliebige Taste. Das BRAINS
verlässt nun den Kalibrierungsmodus.
Um zu überprüfen, ob das BRAINS korrekt
kalibriert ist, gehen Sie wie folgt vor:
• Senden Sie 0 V vom Keyboard an den
V/OCT-Eingang.
• Verwenden Sie den FREQ-Regler (13), um den
Ausgang auf 110 Hz (MIDI A2) zu stimmen.
• Senden Sie 1 V vom Keyboard an den V/
OCT-Eingang. Der Tuner sollte nun 220 Hz
(A3) anzeigen.
• Senden Sie 2 V vom Keyboard an den V/
OCT-Eingang. Der Tuner sollte nun 440 Hz
(A4) anzeigen.
• Senden Sie 3 V vom Keyboard an den V/
OCT-Eingang. Der Tuner sollte nun 880 Hz
(A5) anzeigen.
(PT) CALIBRAGEM
O BRAINS é calibrado de fábrica com instrumentos
de alta precisão e não é necessário realizar
calibragens adicionais. Caso seja necessário
calibrá-lo, por favor siga o procedimento a seguir:
• Desconecte todas as entradas CV, exceto a v/oct,
que deveria estar conectada a um teclado CV
bem calibrado ou conversor MIDI/CV.
• Aperte os botões BANK e MODEL
simultaneamente. Oprimeiro LED piscará
com uma luz verde.
• Envie 1 V para a entrada v/oct do teclado.
• Aperte qualquer botão. O primeiro LED piscará
agora com uma luz laranja.
• Envie 3 V para a entrada v/oct do teclado.
• Aperte qualquer botão. O BRAINS sairá agora
do modo calibragem.
Para vericar se o BRAINS foi corretamente
calibrado, sigaesse procedimento:
• Envie 0 V para a entrada v/oct do teclado.
• Use o controle FREQ (13) para sintonizar a saída
em 110 Hz (MIDI A2)
• Envie 1 V para a entrada v/oct do teclado.
Agora o sintonizador deverá exibir 220 Hz (A3).
• Envie 2 V para a entrada v/oct do teclado.
Agora o sintonizador deverá exibir 440 Hz (A4).
• Envie 3 V para a entrada v/oct do teclado.
Agora o sintonizador deverá exibir 880 Hz (A5).
(IT) CALIBRAZIONE
Il BRAINS è calibrato in fabbrica con strumenti di
alta precisione e non dovrebbe richiedere ulteriori
calibrazioni. Se si rendesse necessario calibrarlo
applicate questa procedura:
• Scollegate tutti gli ingressi CV tranne V/OCT
che dovrebbe essere collegato a una tastiera
CV ben calibrata o a un convertitore MIDI/CV.
• Premete contemporaneamente i pulsanti BANK e
MODEL, il primo LED lampeggerà in verde.
61Quick Start Guide60 BRAINS

• Inviate 1 V all’ingresso V/OCT dalla tastiera.
• Premete un pulsante qualsiasi, ora il primo
LED lampeggerà in arancione.
• Inviate 3 V all’ingresso V/OCT dalla tastiera.
• Premete un pulsante qualsiasi, BRAINS uscirà
dal modo di calibrazione.
Per vericare che BRAINS sia correttamente
calibrato seguire questa procedura:
• Inviate 0 V all'ingresso V/OCT dalla tastiera.
• Usate il controllo FREQ (13) per accordare
l'uscita a 110 Hz (MIDI A2).
• Immettete 1 V all'ingresso V/OCT dalla
tastiera. Ora l’accordatore dovrebbe
mostrare 220 Hz (A3).
• Immettete 2 V all'ingresso V/OCT dalla
tastiera. Ora l’accordatore dovrebbe mostrare
440 Hz (A4).
• Immettete 3V all'ingresso V/OCT dalla
tastiera. Ora l’accordatore dovrebbe mostrare
880 Hz (A5).
(NL) KALIBRATIE
De BRAINS is in de fabriek gekalibreerd met zeer
nauwkeurige instrumenten en hoeft niet verder te
worden gekalibreerd. Als kalibratie toch nodig is,
volg dan deze procedure:
• Koppel alle CV-ingangen los, behalve v/oct,
die moeten worden aangesloten op een goed
gekalibreerd CV-keyboard of een goede MIDI/
CV-converter.
• Druk tegelijkertijd op de knoppen BANK en
MODEL, waarna de eerste LED groen knippert.
• Stuur 1 V naar de v/oct-ingang vanaf
hetkeyboard.
• Druk op een willekeurige knop, waarna de
eerste LED nu oranje knippert.
• Stuur 3 V naar de v/oct-ingang vanaf
hetkeyboard.
• Druk op een willekeurige knop, waarna de
BRAINS de kalibratiemodus verlaat.
Volg deze procedure om te controleren of de
BRAINS correct is gekalibreerd:
• Stuur 0 V naar de v/oct-ingang vanaf
hetkeyboard.
• Stel met de FREQ-regelaar (13) de uitgang in
op 110 Hz (MIDI note A2)
• Stuur 1 V naar de v/oct-ingang vanaf
het keyboard. De tuner moet nu 220 Hz
(note A3) weergeven.
• Stuur 2 V naar de v/oct-ingang vanaf
het keyboard. De tuner moet nu 440 Hz
(note A4) weergeven.
• Stuur 3 V naar de v/oct-invoer van
het keyboard. De tuner zou nu 880 Hz
(note A5) weergeven.
(SE) KALIBRERING
BRAINS är fabrikskalibrerad med
högprecisionsinstrument och bör inte behöva
kalibreras ytterligare. Om det blir nödvändigt att
kalibrera den följer du detta förfarande:
• Koppla bort alla CV-ingångar utom v/
oct, som bör anslutas till ett välkalibrerat
CV-tangentbord eller en MIDI/
CV-omvandlare.
• Tryck samtidigt på knapparna BANK och
MODEL. Den första lysdioden blinkar grönt.
• Skicka 1 V till v/oct-ingången från
tangentbordet.
63Quick Start Guide62 BRAINS
• Tryck på en valfri knapp. Den första lysdioden
blinkar nu orange.
• Skicka 3 V till v/oct-ingången från
tangentbordet.
• Tryck på valfri knapp. BRAINS lämnar nu
kalibreringsläget.
För att kontrollera att BRAINS är korrekt kalibrerad
följer du detta förfarande:
• Skicka 0 V till v/oct-ingången från
tangentbordet.
• Använd FREQ-kontrollen (13) för att ställa in
utsignalen på 110 Hz (MIDI A2)
• Skicka 1 V till v/oct-ingången från
tangentbordet. Tunern bör nu visa 220 Hz (A3).
• Skicka 2 V till v/oct-ingången från
tangentbordet. Tunern bör nu visa 440 Hz (A4).
• Skicka 3 V till v/oct-ingången från
tangentbordet. Tunern bör nu visa 880 Hz (A5).
(PL) KALIBRACJA
BRAINS jest skalibrowany fabrycznie za pomocą
instrumentów o wysokiej precyzji i dodatkowa
kalibracja nie powinna być wymagana. Jeśli
jednak zajdzie taka konieczność, prosimy
zastosować się do tej procedury:
• Odłącz wszystkie wejścia CV oprócz v/oct,
które powinno być podłączone do dobrze
skalibrowanej klawiatury CV lub konwertera
MIDI/CV.
• Wciśnij jednocześnie przyciski BANK oraz
MODEL, a pierwsza dioda zamiga na zielono.
• Prześlij 1 V do wejścia v/oct z klawiatury.
• Wciśnij dowolny przycisk, pierwsza dioda
zamiga teraz na pomarańczowo.
• Prześlij 3 V do wejścia v/oct z klawiatury.
• Wciśnij dowolny przycisk, a BRAINS wyjdzie z
trybu kalibracji.
Aby sprawdzić, czy BRAINS jest skalibrowany
poprawnie, zastosuj się do tej procedury:
• Prześlij 0 V do wejścia v/oct z klawiatury.
• Użyj pokrętła FREQ (13), aby nastroić sygnał
wyjściowy do 110 Hz (MIDI A2)
• Prześlij 1 V do wejścia v/oct z klawiatury.
Tuner powinien teraz pokazywać 220 Hz (A3).
• Prześlij 2 V do wejścia v/oct z klawiatury.
Tuner powinien teraz pokazywać 440 Hz (A4).
• Prześlij 3 V do wejścia v/oct z klawiatury.
Tuner powinien teraz pokazywać 880 Hz (A5).
(JP) キャリブレーション
BRAINS
は工場で高精度の機 器で校正されて
お り 、そ れ 以 上 の 校 正 は 不 要 で す 。キ ャ リ ブ
レ ー シ ョ ン が 必 要 に な っ た 場 合 は 、次 の 手
順 に 従ってください:
• v/oct 以外の、すべての CV入力を取り外
し ま す 。 v/oct は、適切に調整された CV
キーボードまたは MIDI/CV コンバータ
ー に接続する必要があります。
• BANK ボタンと MODEL ボタンを同 時 に
押し ますw。1 番目の LED が緑色に点
滅 し ま す 。
• キーボードから 1 V を v/oct 入力に送
り ます。
• いずれかのボタンを押すと、1 番目の LED
が、今度はオレンジ色に点滅します。
• キーボードから、3 V を v/oct 入力に送
ります。
• いずれかのボタンを押すと、BRAINS のキ
ャリブレーションモードが終了します。
65Quick Start Guide64 BRAINS

BRAINS のキャリブレーションが正しく完了
したかどうかを、次の手順で確認します:
• キーボードから 0 V を v/oct 入力に送信
します。
• FREQ コントロ ール (13) を 使 用 し て 、出
力を 110 Hz (MIDI A2) にチューニングし
ます。
• キーボードから v/oct へ 1 V 送信しま
す 。チ ュ ー ナ ー の 表 示 は 220 Hz (A3) と
なります。
• キーボードから v/oct へ 2 V 送信しま
す 。チ ュ ー ナ ー の 表 示 は 440 Hz (A4)
となります。
• キーボードから v/oct へ 3 V 送信しま
す 。チ ュ ー ナ ー の 表 示 は 880 Hz (A5)
となります。
(CN) 校准
BRAINS 在出厂时采用高精度仪器进行校准,
无需任何进一步校准。 如果确实需要校
准它, 请按照以下步骤操作:
• 断开除振荡电压 (V/OCT) 以外的所有控
制电压输入, 而振荡电压应连接到校准
良好的控制电压键盘或 MIDI/CV 转换器。
•
同时按下 “页面”
(BANK)
和 “保存” (MODEL)
按钮, 第一个指示灯将闪烁绿色。
• 从键盘向 V/OCT 输入发送 1 伏。
• 按任意按钮, 第一个指示灯现在将以橙
色闪烁。
• 从键盘向 V/OCT 输入发送 3 伏。
• 按任意按钮, BRAINS 现在将退出校准
模式。
要检查 BRAINS 是否正确校准, 请按照以下
步骤操作:
• 从键盘向 V/OCT 输入发送 0 伏。
• 使用频率控制 (13) 将输出调谐至 110
频率 (MIDI A2)
• 从键盘向 V/OCT 输入发送 1 伏。 调谐器
现在应显示 220 赫兹 (A3)。
• 从键盘向 V/OCT 输入发送 2 伏。 调谐器
现在应显示 440 赫兹 (A4)。
• 从键盘向 V/OCT 输入发送 3 伏。 调谐器
现在应显示 880 赫兹 (A5)。
67Quick Start Guide66 BRAINS
FEDERAL COMMUNICATIONS
COMMISSION COMPLIANCE
INFORMATION
Responsible Party Name: Music Tribe
Commercial NV Inc.
Address: 122 E. 42nd St.1,
8th Floor NY,
NY 10168,
United States
Email Address: [email protected]
BRAINS
This equipment has been tested and found to comply
with the limits for a Class B digital device, pursuant
to part 15 of the FCC Rules. These limits are designed
to provide reasonable protection against harmful
interference in a residential installation. This equipment
generates, uses and can radiate radio frequency energy
and, if not installed and used in accordance with the
instructions, may cause harmful interference to radio
communications. However, there is no guarantee that
interference will not occur in a particular installation. If
this equipment does cause harmful interference to radio
or television reception, which can be determined by
turning the equipment o and on, the user is encouraged
to try to correct the interference by one or more of the
following measures:
• Reorient or relocate the receiving antenna.
• Increase the separation between the equipment
and receiver.
• Connect the equipment into an outlet on a
circuit dierent from that to which the receiver
is connected.
• Consult the dealer or an experienced radio/TV
technician for help.
This equipment complies with Part 15 of the FCC rules.
Operation is subject to the following two conditions:
(1) this device may not cause harmful interference, and
(2) this device must accept any interference received,
including interference that may cause undesired operation.
Behringer
Important information:
Changes or modications to the equipment not expressly
approved by Music Tribe can void the user’s authority to
use the equipment.
Hereby, Music Tribe declares that this product
is in compliance with General Product Safety
Regulation (EU) 2023/988, Directive 2014/30/EU,
Directive 2011/65/EU and Amendment 2015/863/EU,
Directive 2012/19/EU, Regulation 519/2012 REACH SVHC
and Directive 1907/2006/EC.
Full text of EU DoC is available at
https://community.musictribe.com/
EU Representative: Music Tribe Brands DK A/S
Address: Gammel Strand 44, DK-1202
København K, Denmark
UK Representative: Music Tribe Brands UK Ltd.
Address: 8
th
Floor, 20 Farringdon Street London EC4A 4AB,
United Kingdom
Correct disposal of this product: This symbol
indicates that this product must not be
disposed of with household waste, according
to the WEEE Directive (2012/19/EU) and your
national law. This product should be taken to
a collection center licensed for the recycling of waste
electrical and electronic equipment (EEE). The
mishandling of this type of waste could have a possible
negative impact on the environment and human health
due to potentially hazardous substances that are
generally associated with EEE. At the same time, your
cooperation in the correct disposal of this product will
contribute to the ecient use of natural resources. For
more information about where you can take your waste
equipment for recycling, please contact your local city
oce, or your household waste collection service.
型号: BRAINS 合成器与采样器
制造商: Empower Tribe Commercial FZE
Made in China 中国制造
CAN ICES–003 (B)/NMB–003 (B)
BRAINS
69Quick Start Guide68 BRAINS

We Hear You