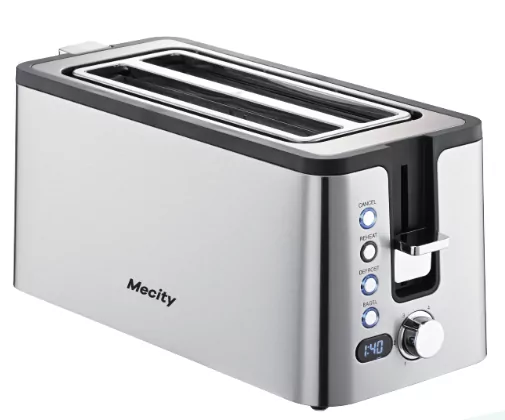
Mecity T-42AUB TOASTER USER MANUAL
Please read the user manual carefully and keep for future reference.
Follow basic safety precautions, including:
- This appliance can be used by children aged from 8 years and above and persons with reduced physical, sensory or mental capabilities or lack of experience and knowledge if they have been supervised instructed and understand the hazards involved.
- Children shall not play with the appliance.
- Cleaning and user maintenance shall not be done by children unless they are older than 8 and supervised.
- Keep the appliance and cable out of reach of children under 8.
- Bread may burn therefore do not use the appliance near or below combustible materials such as curtains. Never use the appliance below wall cupboards or shelves.
- Do not leave the appliance unattended while it is in use.
- The surfaces of the appliance will get hot.
- Remove and empty the crumb tray regularly. Wipe with a damp cloth, dry, then replace in the toaster.
- If the cable is damaged, please contact customer after-sale service. Email: Ronghewan- [email protected]
- This appliance is intended to be used in household and similar applications such as: staff kitchen areas in shops, offices and other working environments; by clients in hotels, motels and other residential type environments; bed and breakfast type environments; farm houses.
- Do not use this appliance near bathtubs, showers, basins or other vessels containing water.
- Don't toast or reheat bread that is too thick, buttered, torn, or misshapen.
- Take extra care when toasting items that contain sugar, jam, seeds, currants, etc. These can melt or drop into the toaster and cause overheating or fire
- If bread gets jammed, unplug the toaster, let it cool, and carefully remove the bread.
- Never use a knife, fork or any other implement to remove jammed bread. As well as potentially damaging the toaster, there is a risk of electric shock!
Diagram
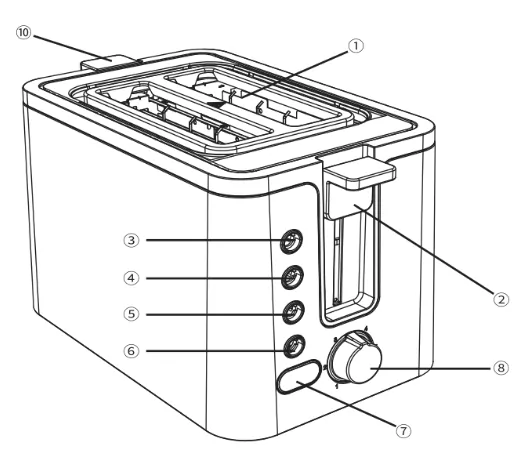
- 2 Extra-Wide Toasting Slots
- Toast Lever
- Cancel Button
- Reheat Button
- Defrost Button
- Bagel Button
- LED Display
- Browning Control
- Crumb Tray
- Warming Rack-Lever
Before First Use
- Remove all packaging from inside the toasting slots.
- Set the browning level to maximum, operate your toaster without any bread in it. Recommend to repeat this operation for 2-3 times to remove the slight odor.
Tips: The slight odor is normal and not a course for concern. Ensure the room is well ventilated.
Toasting
Toasting involves exposing bread to a controlled heat, which causes a chemical reaction called the "Maillard Reaction'. This doesn't just brown the bread, but alters the flavor and texture, which is why toast tastes so good!
Since toasting is a combination of drying then cooking the bread, it is affected by various factors such as differences in the bread's thickness, freshness and surface texture.
Browning Control
The browning control regulates how much the bread is toasted- in other words, the color of the toast. Lower settings produce lighter toast and higher settings produce darker toast.
When setting the browning control, remember that dry or thin slices of bread will toast quicker and require a lower setting. Moist or thick slices of bread will require a higher setting.
The toasting process can be stopped at any time by pressing the cancel button.
Toasting Bread
- Set the toaster upright on a firm, level, and heat-resistant surface.
- Put the plug into the power socket.
- Turn the browning control to the required setting (1 = light, 6 = dark, please refer to the shade setting card).
- Put bread into the toasting slots. Recommend to place the bread in the middle of the slot.
- Press the lever down fully. It won’t lock down unless the toaster is connected to the electricity supply.
- The LED display will show the selected browning setting and countdown of toasting.
- When the LED displays “0”, the toast will pop up.
- To stop toasting, press the cancel button.
Tips: The toasting time may be affected by the temperature of the toaster. For example, when you repeat toasting, the countdown time on the LED display will be shorter than the first toasting.
Defrost Function
- Leave the browning control at your favored setting, insert the frozen bread, lower the lever, then press the defrost button.
- The light will come on, and the toasting time will be altered automatically to give the same degree of browning you get with unfrozen bread.
- The LED display will show the selected browning setting and countdown of toasting.
- When the LED displays “0”, the toast will pop up.
Bagel Function
Your toaster can toast only one side, while warming the outside of a cut bagel, English muffin or bun with the bagel setting.
- Place the toast into the toaster.
- Press the button "BAGEL", the bagel indicator will light up.
- Set the browning control to a required setting as normal.
- Press the loading handle down.
- The toast lever will rise automatically when finish.
LED Display
You can read the working parameters of the toaster through the LED display.
- When you connect the power and press the toast lever, the LED display lights up.
- When you turn the Browning Control, the LED display will show the gear number about the shade selector. After 2-3 seconds, it will automatically jump to the corresponding countdown. You can read the working gear and remaining time through the LED display.
Reheating Toast
The reheat function will heat up toast that has cooled or gone cold.
- Put bread into the toasting slots.
- Set the browning control to reheat, lower the lever.
- The LED display will show the selected browning setting and countdown of toasting.
- When the LED displays "O", the toast will pop up.
Warming Rack
Note: Do not use the warming rack to warm frozen, buttered, coated, iced, or filled buns.
- Lift up the warming rack.
- Place the buns on top of the warming rack.
- Set the browning level at your favored setting. Then lower the lever.
- When the lever pops up, remove the warmed buns.
- Don't touch the warming rack wires - they'll be hot.
- Lift down the warming rack when not in use.
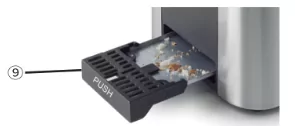
Crumb Removal
It is important that crumbs are not allowed to build up inside your toaster. Excess crumbs are unhygienic and could catch fire. Crumbs can be removed by sliding the crumb tray out from the bottom of your toaster. You can then tip the crumbs out. Always make sure that your toaster has completely cooled down and is disconnected from the mains supply before removing crumbs. Never use your toaster without the crumb tray fitted- always clean the Crumble Tray
- Click on the PUSH, the crumble tray will pop out.
- Take out the crumble tray, discard the crumbles.
- Put the crumble tray into the slot.
- Click on the PUSH button again, to lock the crumble tray inside.
Cleaning and Care
- Unplug the appliance and let it cool.
- Wipe outer surfaces with a damp cloth.
- Please clean the crumb tray after each use.
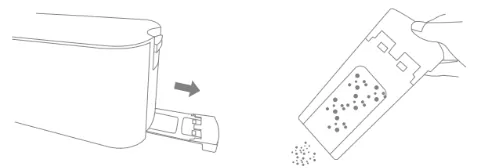
- If there is small crumb left or big crumb stuck inside the toaster, please turn the toaster upside down and shake gently. Never use a hard or sharp object to touch internal parts of the toaster, otherwise, it may damage the toaster or cause safety risks.
- Never use harsh, abrasive or caustic cleaners.
- Never immerse the toaster or power cord and plug in water or any other liquid.
- Always switch off, unplug and allow to cool before moving, cleaning or storing.
We offer 12 months worry- free guarantee.
Customer Support
Any issues or questions regarding your new product, please feel free to contact us.
Email: Ronghewan- [email protected]
*Please have your order number ready before contacting Customer Support.
Safety Instructions
- 1This appliance is not intended for use by persons (including children) with reduced physical, sensory or mental capabilities, or lack of experience and knowledge, unless they have been given supervision or instruction concerning use of the appliance by a person responsible for their safety. Children should be supervised to ensure that they do not play with the appliance.
- type Y attachment: If the supply cord is damaged, it must be replaced by the manufacturer, its service agent or similarly qualified persons in order to avoid a hazard.
- CAUTION: In order to avoid a hazard due to inadvertent resetting of the thermal cut- out, this appliance must not be supplied through an external switching device, such as a timer, or connected to a circuit that is regularly switched on and off by the utility.
- This appliance can be used by children aged from 8 years and above and persons with reduced physical, sensory or mental capabilities or lack of experience and knowledge if they have been given supervision or instruction concerning use of the appliance in a safe way and understand the hazards involved. Children shall not play with the appliance. Cleaning and user maintenance shall not be made by children without supervision. Keep the appliance and its cord out of reach of children less than 8 years.
- The appliances are not intended to be operated by means of an external timer or separate remote- control system.
- This appliance is intended to be used in household and similar applications such as:
- staff kitchen areas in shops, offices and other working environments;
- farm houses;
- by clients in hotels, motels and other residential type environments;
- bed and breakfast type environments.
- The door or the outer surface may get hot when the appliance is operating.

