
Installation Guide
Version: 1.0
English
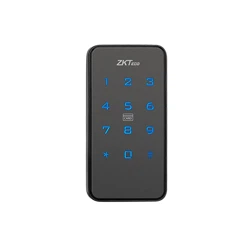
Model: SL06-CL20H
Due to the regular upgrades of systems and products, ZKTeco could
not guarantee exact consistency between the actual product
and the written information in this manual.

Important Notes
Please read this Installation Guide carefully before
installation and contact the Customer Care Service if you
have any questions regarding the installation.
To avoid any future service charges that may arise as a
result of incorrect installation, it is recommended that
installation must be performed by a professional
technician to prevent any potential service charges that
may occur due to incorrect installation.
We regularly revise the contents of this Installation Guide
and update our products to enhance the quality and
performance without prior notice.
Do not install the batteries until the lock is installed.
Table of Contents
What’s in the Box.......................................................1
Drill Holes..................................................................2
Installation Procedure..............................................3
Wood Cabinet Situation...........................................................3
1.
2.
3.
4.
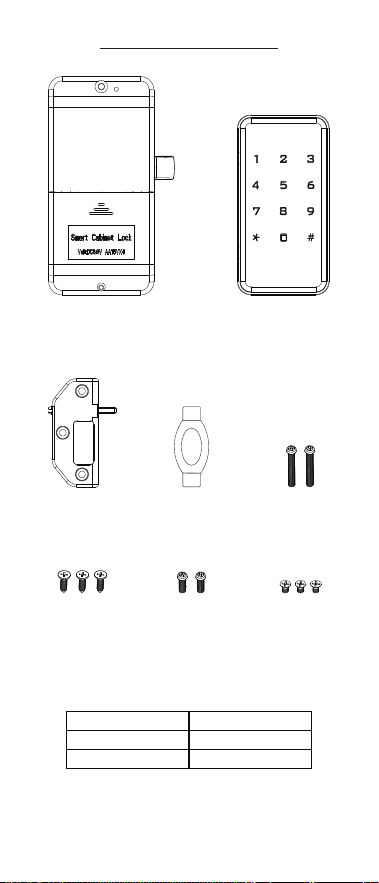
What’s in the Box
Screw A Screw B 30mm
Screw C
Indoor Unit Outdoor Unit
Screw B 35mmIC WristbandStrike Plate
Note: This type of cabinet lock suits the cabinet of thickness
15mm to 25mm. If customization is required, please
contact us.
1
Door Thickness
15 to 20mm
20 to 25mm
Stud
Screw B 30mm
Screw B 35mm

Drill Holes
Drill holes on the cabinet door. (Unit: mm)
31.6 31.6
31.3
131.0
48.7
8.0
24.0
8.0
63.2
2
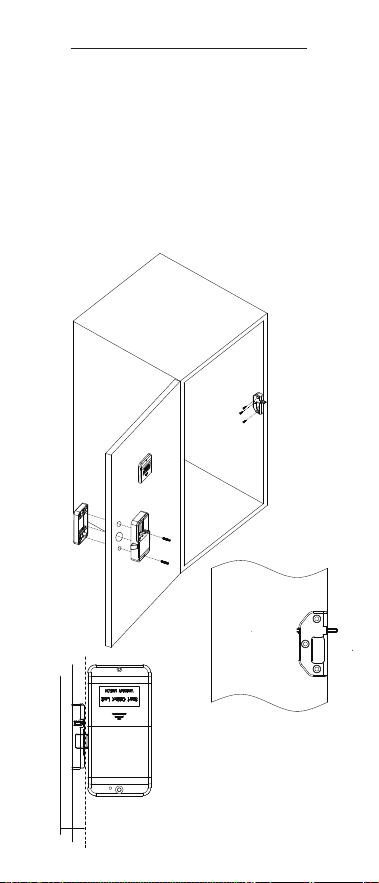
Installation Procedure
Wood Cabinet Situation
Situation I:
Install the indoor and outdoor units with screw B.
Install the Strike Plate with Screw A.
Note:
The Strike Plate Installation Distance: Align the strike plate to
the cabinet wall, or make the strike plate under the cabinet wall
about 1mm.
Indoor Unit Installation Distance: Equals Cabinet Wall plus
Strike Plate.
A.
B.
Screw A
Screw B
Indoor Unit
Outdoor Unit
Strike Plate
Battery Cover
Cabinet Wall
The Strike Plate Installation
Distance: Align the strike plate
to the cabinet wall, or make the
strike plate under the cabinet
wall about 1mm.
Distance =
Cabinet Wall + Strike Plate
3
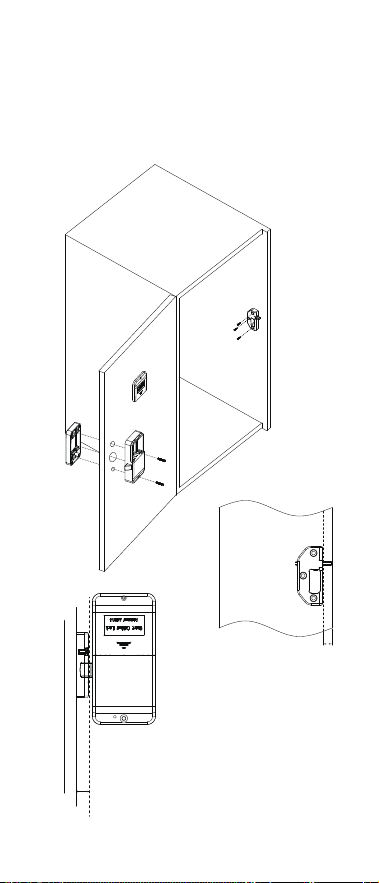
Situation II:
Install the indoor and outdoor units with screw B.
Install the Strike Plate with Screw A.
Note:
The Strike Plate Installation Distance: Equals Width of cabinet
wall plus 1mm.
Indoor Unit Installation Distance: Equals Width of Strike Plate.
A.
B.
Screw A
Screw B
Indoor Unit
Outdoor Unit
Strike Plate
Battery Cover
Cabinet Wall
Distance =
Width of cabinet wall +1mm
Distance =
Width of Strike Plate
4

User Manual
Version: 1.0
English
Model: SL06-CL20H
Due to the regular upgrades of systems and products, ZKTeco could
not guarantee exact consistency between the actual product
and the written information in this manual.

Important Notes
This device is divided into self-service password mode
and independent password mode. Please conrm which
mode you need.
Please keep your master card in a safe place, and
remember the master password.
Do not remove the batteries from the lock while it is in
operation.
It is necessary to replace the batteries when the device
beeps non-stop after being turned on.
Our smart cabinet lock is powered by a DC 6V power
supply. Four 1.5V AA alkaline batteries (AA batteries) are
recommended. When using other non-alkaline batteries,
the performance of this smart lock may be aected;
especially when the power is insucient, the function of
the low-voltage alarm will be lost, and if you do not
replace the battery in time, it may not be able to unlock.
Table of Contents
Product Overview.....................................................1
Denition (Public Mode)..........................................2
How to Use.................................................................3
Denition (Private Mode).........................................5
How to Use.................................................................6
1.
2.
4.
3.
5.

Product Overview
63.2
131.0
25.5
3.5
14.2
69.2
55.2
14.7
108.0
28.0 10.5 12.0
65.0
1
(Unit: mm)

Denition
(Public Mode)
Public Mode: The public mode means that the latch will
not pop out automatically after unlocking. This feature it is
suitable for public uses, such as Gyms, Spas, Clubs, etc.
Card Type: This mode has three card types, Administrator
Card, Manager Card and Guest Card.
Initialization: All registered cards and passwords data will
be deleted and restored to the factory settings, all data
needs to be reset.
Note: The Reset button is located next to the screw hole in the
Indoor Unit and needs to be reset by poking it with something
like a paper clip.
Random Password: To secure the password, users may
enter their password with random digits before or after the
actual password. Example: If the correct password is 123456,
then the random password can be 89123456807,
1234562363, 389123456, etc.
Low Battery Warning: If the battery power is low, the
device beeps non-stop after being turned on.
Emergency Charging: A interface is provided at the
bottom of the Outdoor Unit.
Latch Instructions:
Both public and private modes are factory equipped
latches. If the customer wants to switch modes during
use, contact Technical Support to change the latch
orientation.
When our cabinet locks are shipped from the factory, the
door latches are in the open state, and the door latches
are retracted into the lock body (to protect the latch). The
door latch will unlock when you swipe an authorized
door card or enter the correct password.
In both public mode and private mode, the door latch
will be extended only after swiping the authorized door
card or entering the correct password.
In public mode, the door latch is in a retracted state when
it is not in use. When a guest needs access, the latch
extends automatically after entering the guest password.
1.
2.
3.
4.
2

How to Use
1. Reset the Lock
Press the Reset button once the lock beeps twice and the
keypad keeps ashing.
2. Register the Administrator Card
After swiping a card to register it as an Administrator Card,
the lock has been successfully reset to public mode.
Note: Press the Reset button to switch the mode, and the
keypad light ashes for 10s. If the Administrator Card is not
registered within 10s, the switching mode fails, and the original
settings will be retained.
3. Register the Manager Card
When you swipe the Administrator Card that you set up;
the keypad light is always on.
While the keypad light is on, swipe another card and wait
for the keypad light to turn o to register it as a Manager
Card.
Note: When locked, swipe the manager card and wait 2 to 3
seconds to unlock it.
4. Register the Guest Card
When you swipe the Manager Card that you set up, the
keypad light is always on.
While the keypad light is on, swipe another card and wait
for the keypad light to turn o to register it as a Guest
Card.
Note: In this mode, a maximum of 5 cards can be registered:
one Administrator Card, three Manager Cards and one Guest
Card.
5. Register the Administrator Password
When you swipe the Administrator Card that you set up,
the keypad light is always on.
While the keypad light is on, you can enter key
+ ”6-digit
passcode” + key. Once you hear a beep, enter key +
”6-digit passcode” + key again. Then you can enter the
password you set and press the key to unlock the lock.
a.
b.
a.
b.
a.
b.
3

6. Register the Guest Password
In the case of unlocked, swipe the Guest Card you set up,
the keypad light is always on.
While the keypad light is on, you can enter key
+ ”6-digit
passcode” + key. Once you hear a beep, enter key +
”6-digit passcode” + key again. Then you can swipe the
Guest Card and enter the password you set, and press the
# key to verify and unlock the lock.
Note: After the manager card is unlocked, only the temporary
password is invalidated, and the guest card remains valid. To
expire the guest card, you need to swipe the manager card
twice.
7. Set a One-time Temporary Password
When the Guest Card is not registered, touch the keypad
to activate the lock.
While the keypad light is on, you can enter key
+ ”6-digit
passcode” + key. Once you hear a beep, enter key +
”6-digit passcode” + key again.
Note: You can enter the password you set, and press the key
to verify and unlock the lock. The password expires after being
used once and cannot be the same as the Administrator
Password. When the Guest Card is not registered, you can set an
Administrator Password and a One-time Temporary Password.
When the Guest Card is registered, you can set an Administrator
Password and a Guest Password.
8. Delete Card and Password
Delete the Guest Card: Swipe the Manager Card twice
within 5s and wait for the keypad light to turn o.
Delete the Manager Card: Swipe the Administrator Card
twice within 5s and wait for the keypad light to turn o.
Note: When the manager card is deleted, the guest card can
still be used.
Delete the Administrator Password: Swipe the Administra-
tor Card three times within 5s and wait for the keypad light
to turn o.
a.
b.
a.
b.
4

Denition
(Private Mode)
Private Mode: The private mode means that the latch will
pop out automatically after unlocking, This feature it is
suitable for personnel or high-level security applications.
Card Type: Private mode includes three types of cards —
Administrator Card, Manager Card, and Guest Card.
Initialization: All registered cards and passwords data will
be deleted and restored to the factory settings, all data
needs to be reset.
Note: The Reset button is located next to the screw hole in the
Indoor Unit and needs to be reset by poking it with something
like a paper clip.
Random Password: To secure the password, users may
enter their password with random digits before or after the
actual password. Example: If the correct password is 123456,
then the random password can be 89123456807,
1234562363, 389123456, etc.
Low Battery Warning: If the battery power is low, the
device beeps non-stop after being turned on.
Emergency Charging: A interface is provided at the
bottom of the Outdoor Unit.
Latch Instructions:
Both public and private mode are factory equipped
latches. If the customer wants to switch modes during
use, contact Technical Support to change the latch
orientation.
When our cabinet locks are shipped from the factory, the
door latches are in the open state, and the door latches
are retracted into the lock body (to protect the latch). The
door latch will unlock when you swipe an authorized
door card or enter the correct password.
The door latch is generally extended while in use. It
retracts when unlocked and then extends automatically.
1.
2.
3.
5

How to Use
1. Reset the Lock
Continuously press the Reset button until you hear two
beeps from the lock, followed by a Do-ra-mi sound, while
the keypad continues ashing.
2. Register the Administrator Card
After Swiping a card to register it as an Administrator Card,
the lock has been successfully reset to private mode.
Note: Press the Reset button to switch the mode, and the
keypad light ashes for 10s. If the Administrator Card is not
registered with in 10s, the switching mode fails, and the original
settings will be retained.
3. Register the Manager Card
When you swipe the Administrator Card that you set up,
the keypad light is always on.
While the keypad light is on, swipe another card and wait
for the keypad light to turn o to register it as a. Manager
Card.
Note: When locked, swipe the manager card and wait 2 to 3
seconds to unlock it. After that, the guest card becomes invalid.
4. Register the Guest Card
Swipe the Manager Card you have set up, the keypad
light stays on.
While the keypad light is on, swipe another card and wait
for the keypad light to turn o to register it as a Guest Card.
Note: When locked, swipe the Guest card to unlock it. This
mode allows registration of up to 5 cards: one Administrator
Card, three Manager Cards, and one Guest Card.
5. Register the Administrator Password
When you swipe the Administrator Card that you set up,
the keypad light is always on.
While the keypad light is on, you can enter key
+ ”6-digit
passcode” + key. Once you hear a beep, enter key +
”6-digit passcode” + key again. Then you can enter the
password you set and press the key to unlock the lock.
6. Register the Manager Password
Swipe the Manager Card you set up, the keypad light is
always on.
a.
b.
a.
b.
a.
b.
a.
6

While the keypad light is on, enter key + “6-digit
passcode” + key. When a beep is heard, enter key +
“6-digit passcode” + key again. Then you can enter the
password you set and press the key to unlock the lock.
Note: When locked, input the Manager Password to unlock.
7. Set the Combined Unlock Mode
The manager card is swiped twice continuously within 5
seconds to switch to the combined unlock mode.
Note: In combined unlock mode, both the Guest Card and
Manager Password are required for unlocking.
8. Delete Card and Password
Delete the Manager Card: Swipe the Administrator Card
twice within 5 s and wait for the keypad light to turn o.
Note: When the manager card is deleted, the guest card can
still be used.
Delete the Combined Unlock Mode: Swipe the Manager
Card three times within 5s and wait for the keypad light to
turn o. Then, you can use both the Manager Password and
the Guest Card independently to unlock the door latch.
Delete the Administrator Password: Swipe the Administra-
tor Card three times within 5s and wait for the keypad light
to turn o.
7
b.
