Battery Model Number is 24LB4005-CN
Charger Model Number is 24LFC14-ETL
Operator's Manual
MX 24V Lithium-Ion Robotic Lawn Mower VBRM601YCM
Save this manual for future reference
* Maximum initial battery workload voltage (measured without a workload) is 24 volts.
Nominal voltage is 21.6 volts.
Read all safety rules and instructions carefully before operating this tool.
Distributed By: Suzhou Cleva Electric Appliance Co., Ltd.
NO.8 Ting Rong Street 215122 Suzhou - China

2
Section Page
TABLE OF CONTENTS
TABLE OF CONTENTS 2
SPECIFICATIONS 3-4
IMPORTANT SAFETY INSTRUCTIONS 5-9
SYMBOLS 10-12
KNOW YOUR ROBOTIC MOWER 13-14
ASSEMBLY 15-16
BATTERY PACK AND CHARGER 17-19
OPERATION 20-29
MAINTENANCE 30-33
ENVIRONMENTALLY SAFE BATTERY DISPOSAL 34
TROUBLESHOOTING 35-39
LAWNMASTER
®
WARRANTY 40
EXPLODED VIEW 41
PARTS LIST 42
NOTES 43-44

3
Voltage 24 V D.C.
No-load Speed 3500 RPM
Cutting System 3 Pivoting Cutting Blades
Cutting Width 6'' (15.5 cm)
Cutting Height Adjustment 1''-2.5'’ (25-65 mm)
Power Consumption during Cutting 40 W±20%
Maximum Incline 20º
IP-Classication IPX4
SPECIFICATIONS
Length 16.73'' (42.5 cm)
Width 13.78'' (35 cm)
Height 8.66'' (22 cm)
Weight (Without 4.0Ah Battery) 13.4 lbs (6.1 kg)
DIMENSIONS
MOWING
Model Number 24LB4005-CN
Rated Voltage of Battery 24 V Max* D.C.
Capacity of Battery 4.0 Ah
Battery Type Lithium-ion
BATTERY PACK
Model Number 24LFC14-ETL
Charger Input 120 V ~ 60 Hz 70 W
Charger Output 24 V D.C. 2.5 A
Charging Time 100 minutes (For 24LB4005-CN)
* Maximum initial battery workload voltage (measured without a workload) is 24 volts.
Nominal voltage is 21.6 volts.
BATTERY CHARGER

4
SPECIFICATIONS
Sound Power Level (L
WA
) Measured 64 dB(A)
Noise Emissions Uncertainties K
WA
3 dB(A)
Sound Power Level (L
WA
) Guaranteed 68 dB(A)
Sound Pressure Level (L
PA
) at the Operator’s Ear 57 dB(A)
NOISE EMISSIONS MEASURED IN THE ENVIRONMENT AS SOUND POWER
ABOUT THIS PRODUCT
Thank you for choosing the LawnMaster
®
VBRM601YCM robotic lawn mower. This mower will
independently mow the lawn in a random pattern without the use of a boundary wire and charging
station and will operate during daylight hours only. The mower detects grass in order to know where
to mow, and is also equipped with ultrasonic sensors which detect higher obstacles such as shrubs
and fences. For successful operation, the lawn must be dened with at borders such as paving, or
raised edges. When the mower does not detect grass or encounters an obstacle, it changes route in
a random manner and starts mowing again in a new direction. The mower can be moved around to
different lawn areas provided that they are dened as described in this instruction manual.
The mower uses a detachable MX 24V battery which is compatible with all products in the
LawnMaster
®
24V range. It is designed to be used once or twice a week for several hours, and then
stored away in a garage or shed until it is needed again. It will mow approximately 1076 sq. ft /
0.025 acres (100 m
2
) on a single charge depending on lawn conditions. Excessively long or wet grass
may impact performance, it is therefore important to maintain a regular mowing schedule to keep on
top of growth and develop a neat lawn nish.
The noise emission declarations conforms to EN 50636-2-107:2015
Noise emissions in the environment measured as sound power (L
WA
) in conformity with EC directive
2000/14/EC. The guaranteed sound power level includes variation in production as well as variation
from the test code with 1-3 dB(A).
Sound pressure noise uncertainties KpA, 2-4 dB (A)
FIRST OPERATION
The VBRM601YCM is designed to detect grass and move into areas it identies as grass. If it cannot
see a clear boundary it will continue to move into areas off the lawn and into plants that it may identify
as grass. Trimming the lawn edge with a grass trimmer before use will help define a better lawn
edge. During rst operation on a new lawn it is important to monitor the robot as it detects edges to
see where the boundary denition needs to be improved. Please do read the instructions fully; our
instructions have been written to help you to get the best results and also provides useful ideas for
temporary boundaries as well as examples of how to dene a better lawn edge in all seasons.
FOR YOUR SAFETY: CAREFULLY READ AND UNDERSTAND ALL INSTRUCTIONS.
5
IMPORTANT!
IMPORTANT SAFETY INSTRUCTIONS
TRAINING
■ Read the instructions carefully. Be familiar with the controls and the proper use of the machine.
■ Never allow people unfamiliar with these instructions or children to use the machine. Local
regulations may restrict the age of the operator.
■ The operator or user is responsible for accidents or hazards occurring to other people or their
property.
■ The operator or user is responsible for informing neighbors about the risks. Keep a safe distance
from the machine when operating.
■ If your lawn is open to the street and/or your neighbors, you must be present during the mower’s
operation to prevent others from accessing your lawn. Alternatively, you must protect/fence your
lawn so that others do not access the mower during operation.
■ This appliance is not intended for use by persons (including children) with reduced physical,
sensory or mental capabilities, or lack of experience and knowledge, unless they have been given
supervision or instruction concerning use of the appliance by a person responsible for their safety.
Children should be supervised to ensure that they do not play with the appliance.
PREPARATION
■ Ensure that the lawn area is dened as described in the section Preparing the Mowing Area and
Dening the Mowing Area.
■ Periodically inspect the area where the machine is to be used and remove all stones, sticks, wires,
pet toys, and other foreign objects.
■ Periodically visually inspect to see that the blades, blade bolts and cutting assembly are not worn or
damaged. Replace worn or damaged blades and bolts in sets to preserve balance.
■ On multi-spindle machines, take care as rotating one blade can cause other blades to rotate.
OPERATION
■ Do not not leave the machine to operate unattended if you know that there are pets, children or
people in the vicinity.
■ Never operate the machine with defective guards, or without safety devices, for example deectors
in place.
■ Do not put hands or feet near or under rotating parts. Do not touch moving hazardous parts before
these have come to a complete stop.
READ CAREFULLY BEFORE USE. KEEP FOR FUTURE REFERENCE.
WARNING
WARNING
The robotic lawn mower can be dangerous if used incorrectly.
Never use the robotic lawn mower when people, especially children or pets, are in the cutting area.

6
IMPORTANT SAFETY INSTRUCTIONS
■ Never pick up or carry a machine while the motor is running.
■ Always remove the safety key:
- Before clearing a blockage.
- Before checking, cleaning or working on the machine.
■ It is not permitted to modify the original design of the mower. All modications are made at your own
risk.
■ Avoid using the mower and its peripherals in bad weather conditions especially when there is a risk
of lightning.
■ Do not use the mower for any purpose other than cutting lawn.
■ In the event of accident or breakdown while the mower is operating, immediately press the STOP
button.
■ Do not put anything on top of the mower. Never allow people or animals to sit on the mower.
■ Do not use the mower if the On/Off switch does not work.
■ Do not use the mower when a sprinkler system is running. Ensure that the mower and the sprinkler
system do not operate at the same time. Do not wash the mower with running water and do not
immerse it in water. This product is not waterproof.
■ Always switch off the mower by removing the safety key when the mower is not in use.
■ The robotic lawn mower must never be stored, operated or charged in temperatures below 32ºF (0°C)
or above 122ºF (50°C). This might cause damage to the product or battery.
■ Mow only in daylight or in good articial light. The mower requires good light to correctly identify the
lawn area.
■ Avoid operating the machine in very long or wet grass.
■ Never use the machine in explosive and/or ammable environments.
■ Do not operate the machine when barefoot or wearing open sandals. Always wear substantial
footwear and long pants.
■ Always be sure of your footing on slopes.
■ Always switch on the motor according to instructions keeping feet away from the blade(s).
■ Warning signs shall be placed around the working area of the robotic lawn mower if it is used in
public areas. The signs shall have the following text:
Warning! Automatic lawn mower! Keep away from the machine! Supervise children!
MAINTENANCE AND STORAGE
■ Keep all nuts, bolts, and screws tight to be sure the machine is in safe working condition.
■ Replace worn or damaged parts for safety.
■ Only use replacement blades recommended by the manufacturer.
■ In the event of coming into contact with electrolytes cause by battery leakage, ush the affected
area with water/neutralizing agent for several minutes. Seek medical attention if ingested, or if it
comes into contact with your eyes, or if skin irritation persists.
■ Servicing of the machine should be according to manufacturers’ instructions.
■ In case of abnormal vibrations, stop the mower, remove the safety key and the battery pack and
check for any damage to the blade. Replace a worn or damaged blade to preserve balance. If the
vibration continues, contact Customer Service.
■ Use heavy gloves when inspecting or servicing blades.
■ Cleaning and maintenance must not be performed by unsupervised children.
■ Do not use the mower when the cutting blade is damaged. Replace the cutting blade.
■ Use only original equipment and accessories. It is not permitted to modify the original design of the
mower. All modications are made at your own risk.
■ Always remove the battery pack before storing the mower.

7
IMPORTANT SAFETY INSTRUCTIONS
TRANSPORTATION
Within the working area:
■ Press the STOP button to stop the mower. Use both hands to carry the mower at the front and rear
sections under the mower. Alternatively, you can carry the mower using the transport handle on the
top of the mower deck. Carry the mower with the blade disc away from the body.
Long distances:
■ When transporting your mower over long distances, press the STOP button and remove the safety
key and the battery pack.
■ IMPORTANT! It is recommended to keep the original packaging to avoid damage during
transportation over long distances.
BATTERY PACK
■ The battery pack is only compatible with LawnMaster
®
24LFC14-ETL, 24LFC02-ETL or 24LSC01-
ETL chargers.
■ Recharge only with the charger specied by the manufacturer and listed in this manual. A charger
that is suitable for one type of battery pack may create a risk of re when used with another battery
pack.
■ Do not charge battery in a damp or wet location. Following this rule will reduce the risk of electric
shock.
■ Do not place battery powered lawn mowers or their batteries near re or heat. This will reduce the
risk of explosion and possibly injury.
■ Do not open or mutilate the battery. Released electrolyte is corrosive and may cause damage to the
eyes or skin. It may be toxic if swallowed. Fumes may be emitted. In such situations, move to a well
ventilated area, preferably outdoors and seek medical assistance in the event of discomfort.
■ Do not dispose of battery packs in re. They will explode or leak and cause injury. Liquid ejected
from the battery may cause irritation or burns.
■ Do not crush, drop or damage the battery pack. Do not use a battery pack or charger that has been
dropped or received a sharp blow. A damaged battery is subject to explosion. Properly dispose of a
dropped or damaged battery immediately.
■ Batteries can explode in the presence of a source of ignition, such as a pilot light. To reduce the
risk of serious personal injury, never use any cordless product in the presence of open ame. An
exploded battery can propel debris and chemicals. If exposed, ush with water immediately.
■ Under extreme usage or temperature conditions, battery leakage may occur. If liquid comes in
contact with your skin, wash immediately with soap and water. If liquid gets into your eyes, ush
them with clean water for at least 10 minutes, then seek immediate medical attention. Following this
rule will reduce the risk of serious personal injury.
■ When the battery pack is not in use, keep it away from other metal objects, like paper clips, coins,
keys, nails, screws, or other small metal objects, that can make a connection from one terminal to
another. Shorting the battery terminals together may cause burns or a re.
■ Do not expose a battery pack or lawn mower to re or excessive temperature. Exposure to re or
temperature above 265°F (130°C) may cause an explosion.
■ Do not modify or attempt to repair the lawn mower or the battery pack (as applicable) except as
indicated in the instructions for use and care.
■ Follow all charging instructions and do not charge the battery pack or lawn mower outside of the
temperature range specied in the instructions. Charging improperly or at temperatures outside of
the specied range may damage the battery and increase the risk of re.
■ All tool services should be performed by a qualied repair person using only identical replacement
parts. This will ensure that the safety of the product is maintained.

8
IMPORTANT SAFETY INSTRUCTIONS
BATTERY CHARGER
■ This charger is only compatible with LawnMaster
®
24LB4005-CN, 24LB4005-C, 24LB1304,
24LB2004, 24LB2605, or 24LB4005 lithium-ion batteries.
■ To reduce the risk of injury, charge only the specied lithium-ion rechargeable batteries. Other types
of batteries may burst, causing personal injury or damage.
■ Keep cord and charger away from heat to prevent damage to housing or internal parts.
■ Do not operate charger with a damaged cord or plug, which could cause shorting and electric shock.
If damaged, immediately discontinue use. Replace the charger with the identical unit as listed in the
Parts List of this manual.
■ Do not use a charger that has been dropped or received a sharp blow.
■ Do not disassemble charger. Take it to a qualied service center for check or replacement. Incorrect
reassembly may result in a risk of electric shock or re.
■ Do not abuse the charger cord. Never use the cord for carrying, pulling or unplugging.
■ Keep cord away from heat, oil, sharp edges or moving parts. Damaged or entangled cords increase
the risk of electric shock. If the charger cord is damaged, replace the charger with an identical
model as listed in this manual.
■ A charger that is suitable for one type of battery pack may create a risk of re when used with
another battery pack.
■ Charge the battery at the normal charging temperature between 40°F (4°C) and 100°F (38°C).
PRODUCT END OF USE
■ The mower and its accessories should be recycled correctly at the end of their life to prevent waste
electrical and electronic equipment from ending up in landll sites, and to protect and improve the
quality of the environment.
■ Do not dispose of the mower or any other of its parts as unsorted municipal waste - they should be
collected separately.
■ Do not dispose of the battery pack in a re, and do not place used batteries in your household
waste.
■ Dispose of batteries in accordance with the local regulations where they will be recycled in an
environmentally friendly manner.
FCC COMPLIANCE
■ This device complies with Part 15 of the FCC Rules. Operation is subject to the following two
conditions:
- This device may not cause harmful interference, and
- This device must accept any interference received, including interference that may cause undesired
operation.
■
NOTE:
This equipment has been tested and found to comply with the limits for a Class B digital
device, pursuant to Part 15 of the FCC Rules. These limits are designed to provide reasonable
protection against harmful interference in a residential installation.
■ This equipment generates, uses and can radiate radio frequency energy and, if not installed and
used in accordance with the instructions, may cause harmful interference to radio communications.
However, there is no guarantee that interference will not occur in a particular installation. If
this equipment does cause harmful interference to radio or television reception, which can be
determined by turning the equipment off and on, the user is encouraged to try to correct the
interference by one or more of the following measures:

9
IMPORTANT SAFETY INSTRUCTIONS
- Reorient or relocate the receiving antenna.
- Increase the separation between the equipment and receiver.
- Connect the equipment into an outlet on a circuit different from that of the receiver.
- Consult the dealer or an experienced radio/ TV technician for help.
SAVE THESE INSTRUCTIONS
Refer to them frequently and use them to instruct others who may use this appliance. If you loan
someone this appliance, loan them these instructions also.
10
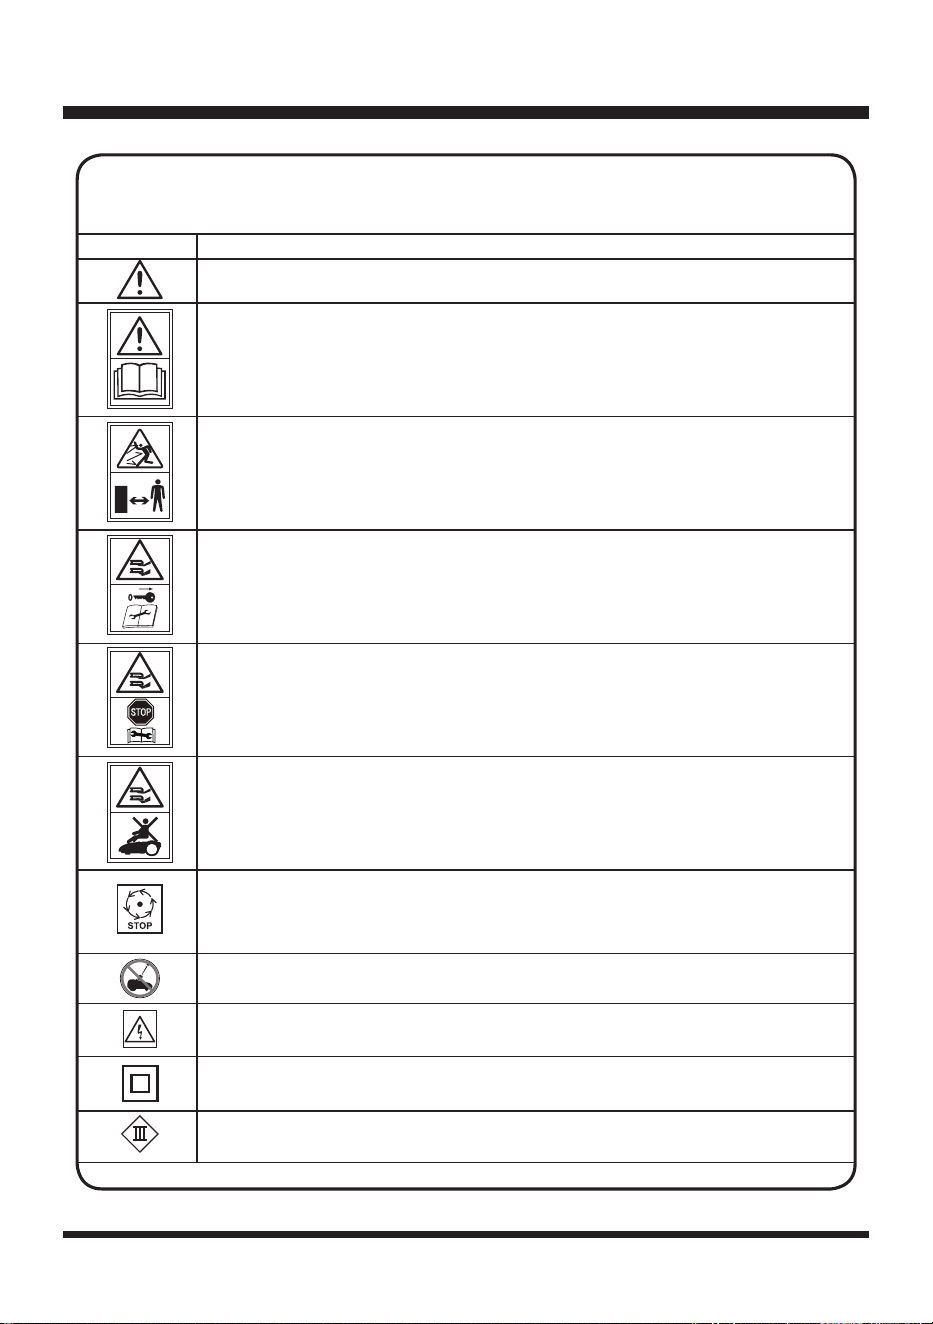
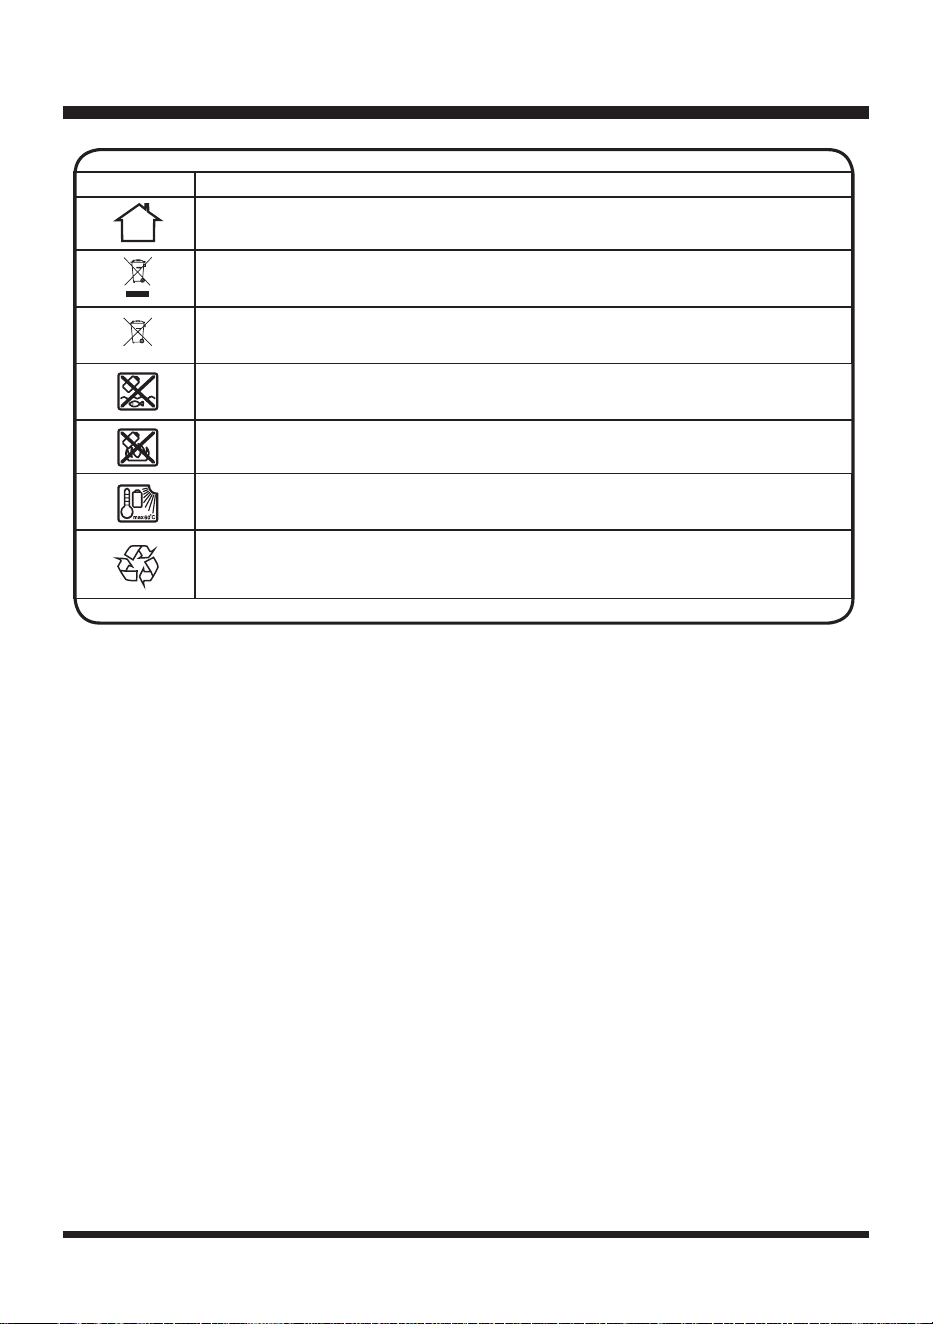
SYMBOLS
Some of the following symbols may be used on this product. Please study them and
learn their meaning. Proper interpretation of these symbols will allow you to operate
the product better and safer.
SYMBOL DESIGNATION/EXPLANATION
WARNING - The robotic lawnmower can be dangerous if used incorrectly.
Read instruction manual before operating the machine.
Keep bystanders away.
Remove the safety key before working on or lifting the machine.
Operate the safety key before working on or lifting the machine.
Do not ride on the machine.
Wait until all moving parts have stopped completely before touching them.
The blade may continue to rotate after the machine is switched off, a rotating
blade can cause injury.
Do not wash or immerse the machine in water.
WARNING! Beware of electric shocks.
Protection class II (Double insulation)
Class III machines.
11
SYMBOLS
SYMBOL DESIGNATION/EXPLANATION
Only recharge battery packs with the supplied charger indoors.
Electrical appliances must not be disposed of with the domestic waste.
Batteries contain Lithium-ion. Do not dispose of batteries in household waste.
Do not dispose of battery packs in rivers or immerse in water.
Do not dispose of battery packs in explode or leak and cause injury.
Do not expose battery packs to heat in excess of 140ºF (60ºC).
Recycle electrical waste products in an environmentally safe way where
facilities exist.
Li-ion
12
SYMBOLS
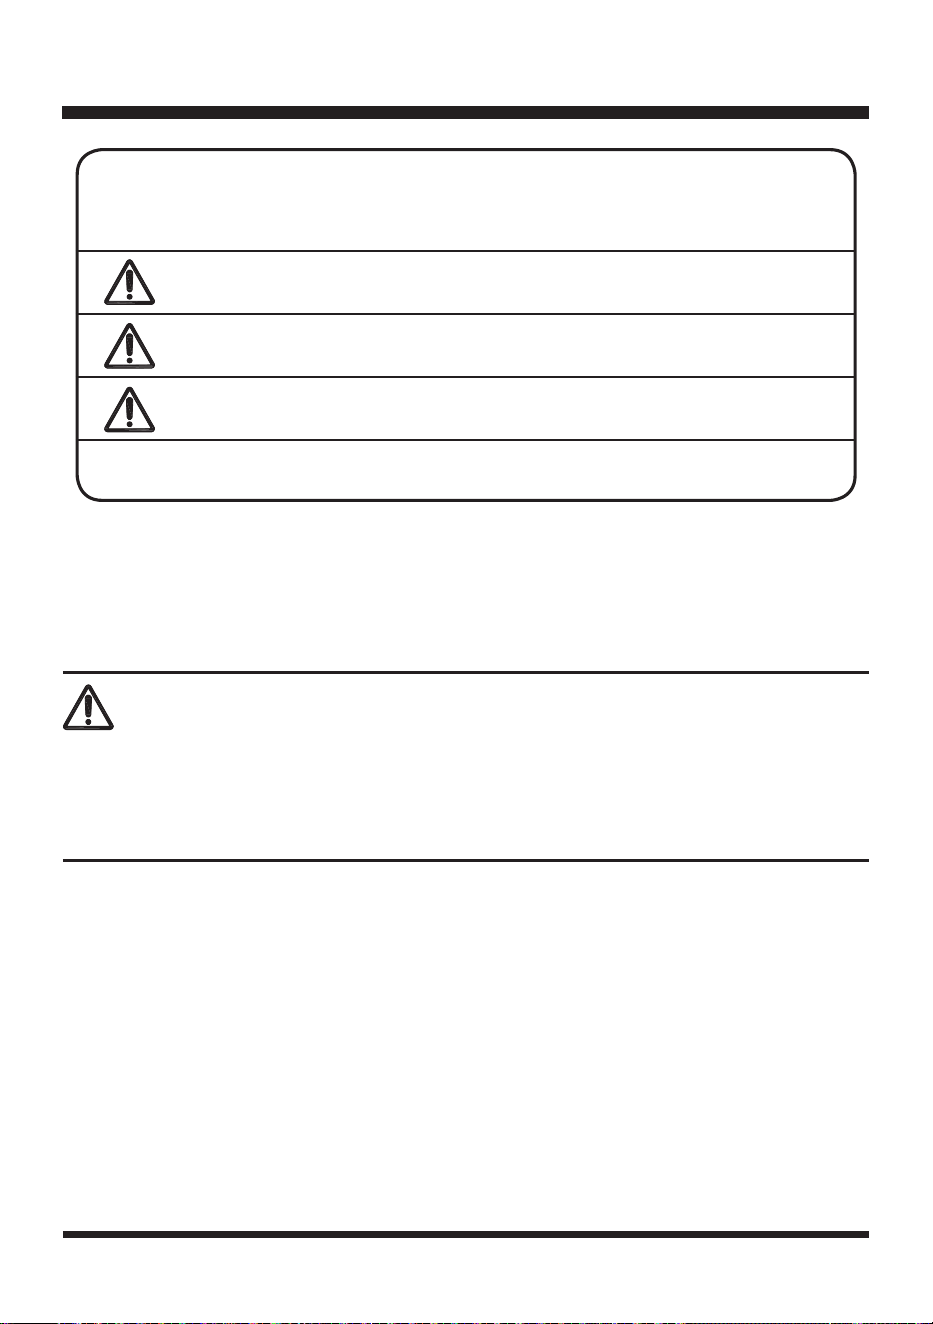
SYMBOL SIGNAL MEANING
DANGER
Indicates an imminently hazardous situation, which, if not
avoided, will result in death or serious injury.
WARNING
Indicates a potentially hazardous situation, which, if not
avoided, could result in death or serious injury.
CAUTION
Indicates a potentially hazardous situation, which, if not
avoided, may result in minor or moderate injury.
NOTICE
(Without Safety Alert Symbol) Indicates a situation that may
result in property damage.
The following signal words and meanings are intended to explain the levels of risk
associated with this product.
To avoid serious personal injury, do not attempt to use this product until you read thoroughly and
understand completely the Operator’s Manual.
If you do not understand the warnings and instructions in the Operator’s Manual, do not use this
product. Call Customer Service for assistance (Toll free number 866-384-8432).
WARNING
SERVICE
Service requires extreme care and knowledge and should be performed only by a qualied service
technician. When servicing, use only identical replacement parts.
For troubleshooting or replacement, please call Customer Service for assistance (Toll free number
866-384-8432).
13
KNOW YOUR ROBOTIC MOWER
12
15
17
16
18
21
1
2
3
4
57
6
12
13
14
11
10
8
9
2 3
4
1
20
19
22
23

14
KNOW YOUR ROBOTIC MOWER
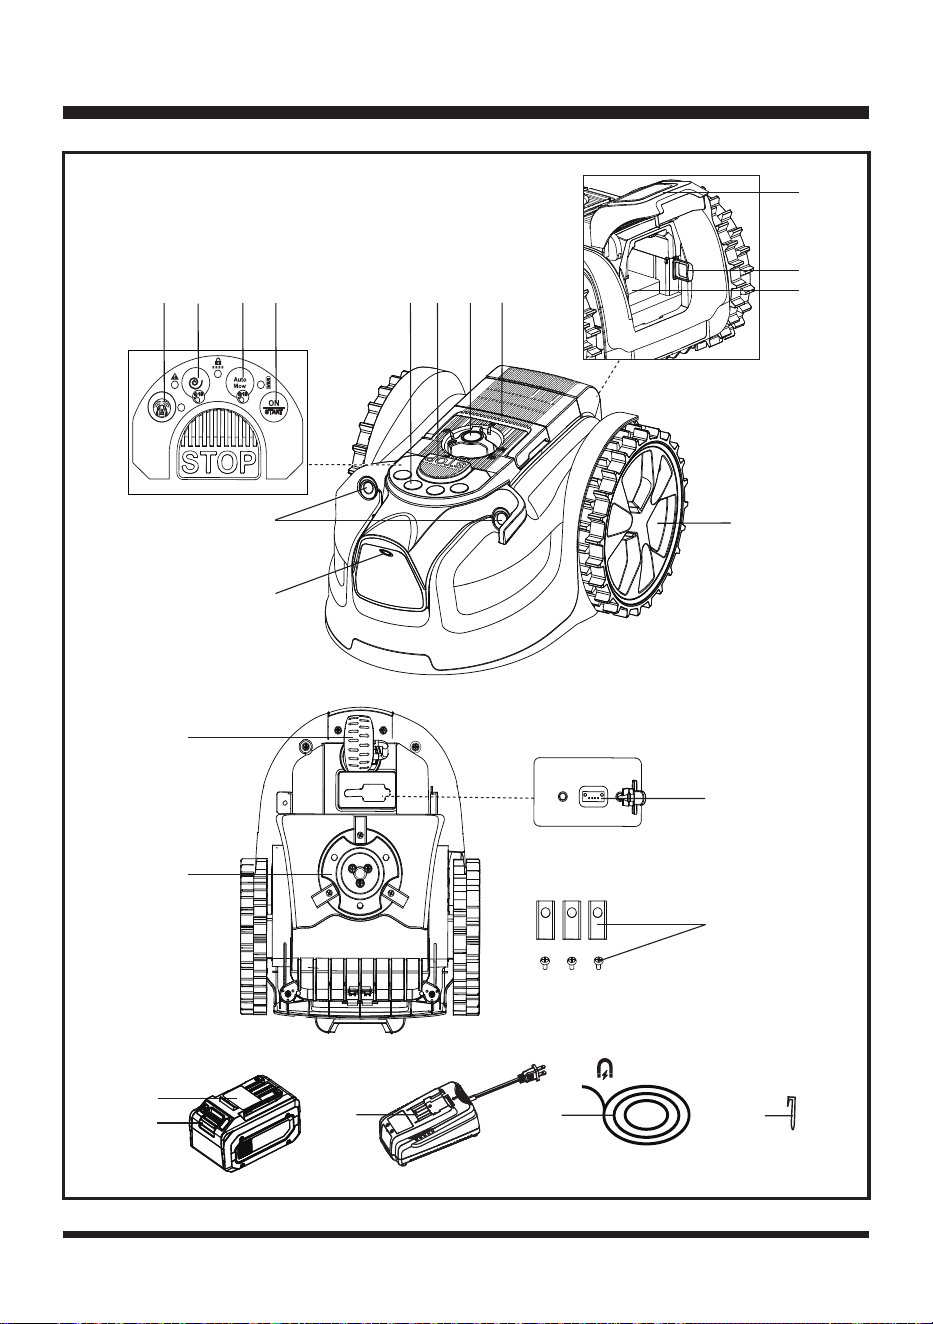
Components
1.Carry Handle
2.Cutting Height
Adjustment Knob
3.STOP Button
4.Control Panel
5.START/ON Button
6.Auto Mow Button
7.Spiral Mow Button
8.Ultrasonic On/Off Button
9.Ultrasonic Object Sensors
10.Lawn Detection Camera
11.Rear Wheel
12.Battery Compartment Cover
13.Safety Key
14.Battery Compartment
15.Front Wheel
16.Blade Disc
17.USB Port (Covered by
Rubber Cap)
18.Blade and Screw (X6,
3 Pre-installed on
Blade Disc)
19.Battery Pack
20.Battery Release Button
21.Battery Charger
22.Magnetic Strip
23.Magnetic Strip Peg
(X12)
KNOW YOUR ROBOTIC MOWER
The safe use of this product requires an understanding of the information on the product and in this Operator’s
Manual as well as a knowledge of the project you are attempting. Before use of this product, familiarize
yourself with all operating features and safety rules.
15
INSTALLING / REMOVING THE BATTERY PACK
ASSEMBLY
UNPACKING
This product has been shipped completely assembled.
■ Carefully remove the product and any accessories from the box. Make sure that all items listed in
the packing list are included.
■ Inspect the product carefully to make sure no breakage or damage occurred during shipping.
■ Do not discard the packing material until you have carefully inspected and satisfactorily operated
the product.
■ If any parts are damaged or missing, do not operate the product. Please call Customer Service (Toll
free number 866-384-8432).
PACKING LIST
(1) Robotic Mower
(1) Safety Key (Attached inside the Battery Pack Compartment of Mower)
(1) Magnetic Strip (32.8 ft /10 m)
(12) Magnetic Strip Pegs
(6) Blades and Screws (3 Pre-installed on Blade Disc)
(1) 24V Max* 4.0 Ah Lithium-Ion Battery
(1) 24V Max* Battery Charger
(1) Operator's Manual
WARNING
Do not use this product if any parts on the Packing List are already assembled to your product when
you unpack it. Parts on the packing list are not assembled to the product and require customer
installation. Use of a product that may have been improperly assembled could result in serious
personal injury.
Ensure the safety key is not tted before installing the battery.
WARNING
IMPORTANT! The battery pack is not charged when it is purchased. Before using the mower, read all
safety precautions, and follow the instructions in the Battery Pack and Charger section. With regular
use, it will need shorter charging time. If storing for a prolonged period of time, remove the battery.
When ready to use again, charge the battery pack.
16
Fig. 1
Fig. 2
ASSEMBLY
1
2
Fig. 3
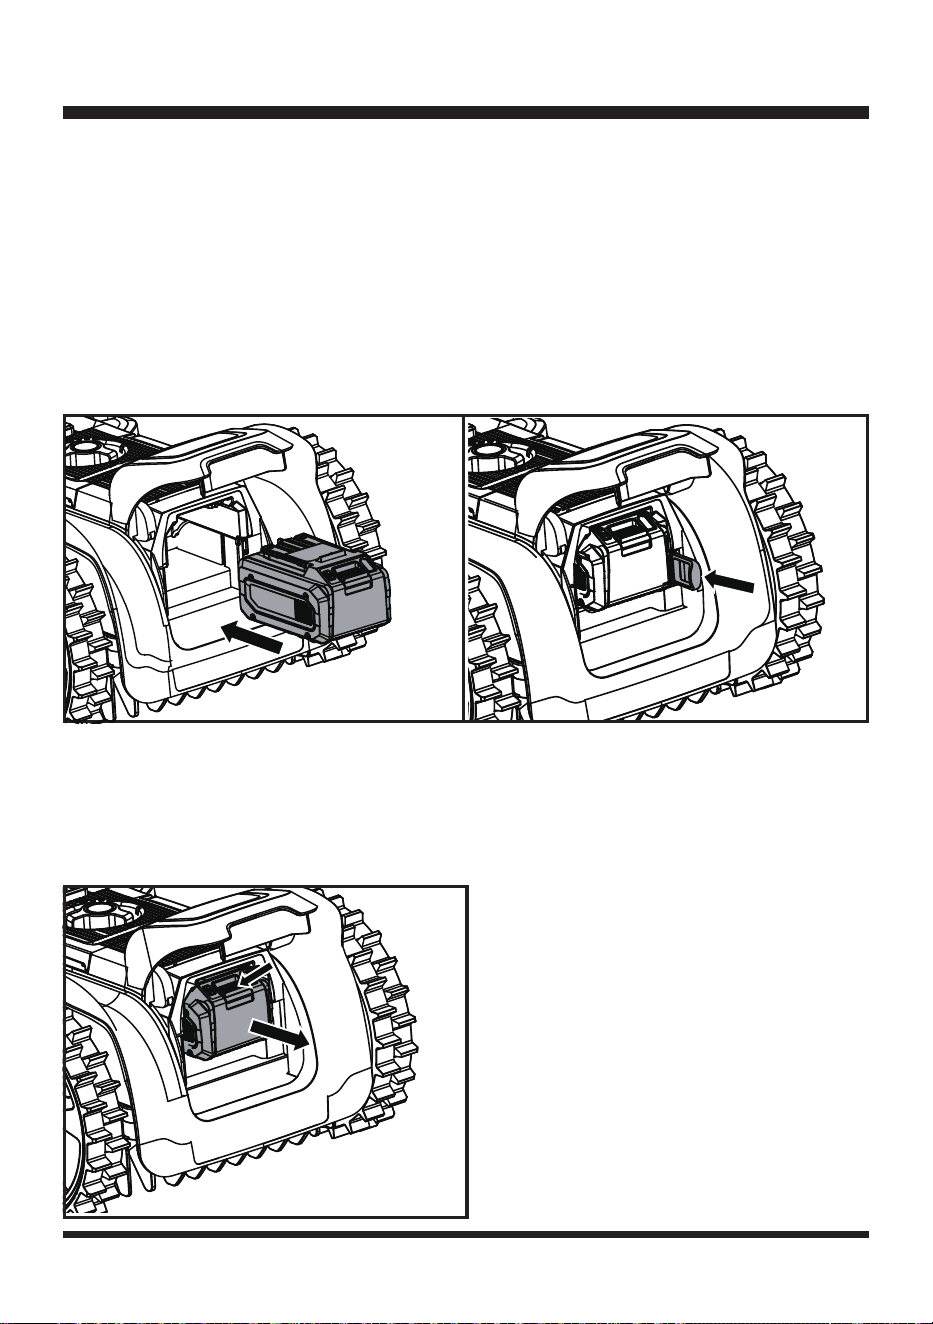
To install the battery pack:
1. Lift the battery compartment cover.
2. Align the support rails located within the battery compartment with the guides in the battery pack, and then
insert the battery pack into the compartment (Fig. 1).
3. Push the battery pack until you hear a “click”.
4. Insert the safety key into the keyholes located near the battery compartment (Fig. 2).
NOTE:
The safety key only ts into the keyholes in one direction. Do not force it.
5. Close the battery compartment cover.
NOTE:
Make sure that battery pack rmly snaps into place and is secured to the mower before starting
operation.
To remove the battery pack:
1. Stop the lawn mower. Lift the battery compartment cover and remove the safety key.
2. Press and hold the release button on the battery pack (1), grasp the battery pack rmly and pull out (2) of
the battery compartment (Fig. 3).
3. Close the battery compartment cover.
17
BATTERY PACK AND CHARGER
BATTERY CHARGING
1. Use only with 24V LawnMaster
®
battery chargers. The battery charger supplied is specically designed for
the lithium-Ion battery used in this garden appliance.
2. Check the power voltage! Battery chargers operate on 120 V.
3. The battery is charged between 40°F (4°C) and 100°F (38°C). This ensures an optimum battery service life.
4. Protect the battery from heat, from continuous exposure to sun and keep away from radiation or other heat
sources. Do not leave the battery in the mower in direct sunlight over long periods.
5. The battery is supplied partially charged. To ensure full capacity of the battery, charge the battery before
using your appliance for the rst time. The lithium-ion battery can be charged at any time without reducing
its service life. Interrupting the charging procedure does not affect the battery.
LED CHARGER STATUS
1. If the battery is not inserted into the charger,
a continuous red LED light
indicates that the charger is
plugged into a power supply socket and is now ready to begin charging.
2. Charging:
A ashing green LED
on the charger indicates that the battery is charging normally.
3. Charged:
Continuous green LED
on the charger indicates that the battery is ready for use.
The indicator lights on the charger show the charger status:
4. The intelligent charger ensures maximum battery life, because it measures the existing charge level of the
battery and then charges with the required current and voltage. Charge battery fully before storage.
5.
Technical Issue: A ashing red LED
light on the charger indicates that battery pack has a charging
problem or might be defective.
a) One possible condition is the battery temperature is not within the charging temperature range of 40°F
(4°C) and 104°F (40°C). As soon as the permitted temperature is reached, the battery charger will
automatically switch to charging.
SYMBOL INDICATOR LIGHTS STATUS
Red, blinking
Charging paused. See
Technical Issue.
Red, continuous Connected to power supply.
Green, blinking Charging.
Green,
continuous
Fully charged.
18
BATTERY PACK AND CHARGER
CHARGING THE BATTERY PACK
Fig. 4
LEDs on Battery
(Continuous Lighting)
Battery Capacity
3 LEDs (inc 2 green)
Fully charged.
2 LEDs (orange & red)
≥40%
1 LED (red only)
<40% (Recharge required).
Indicator Lights
b) If the temperature range is correct and ashing red LED light continues, then remove and reinstall
the battery pack. If the LED status repeats a second time, try to charge another identical battery. If
the battery charges normally, dispose of the defective battery pack (see Environmental Safe Battery
Disposal section).
c) If the ashing red light continues after installing the second battery (ensure the battery temperature is
normal), the charger may be defective. Replace with a new one.
6. After continuous or repeated charging cycles without interruption, the charger may warm up. This is normal
and does not indicate a technical defect of the battery charger.
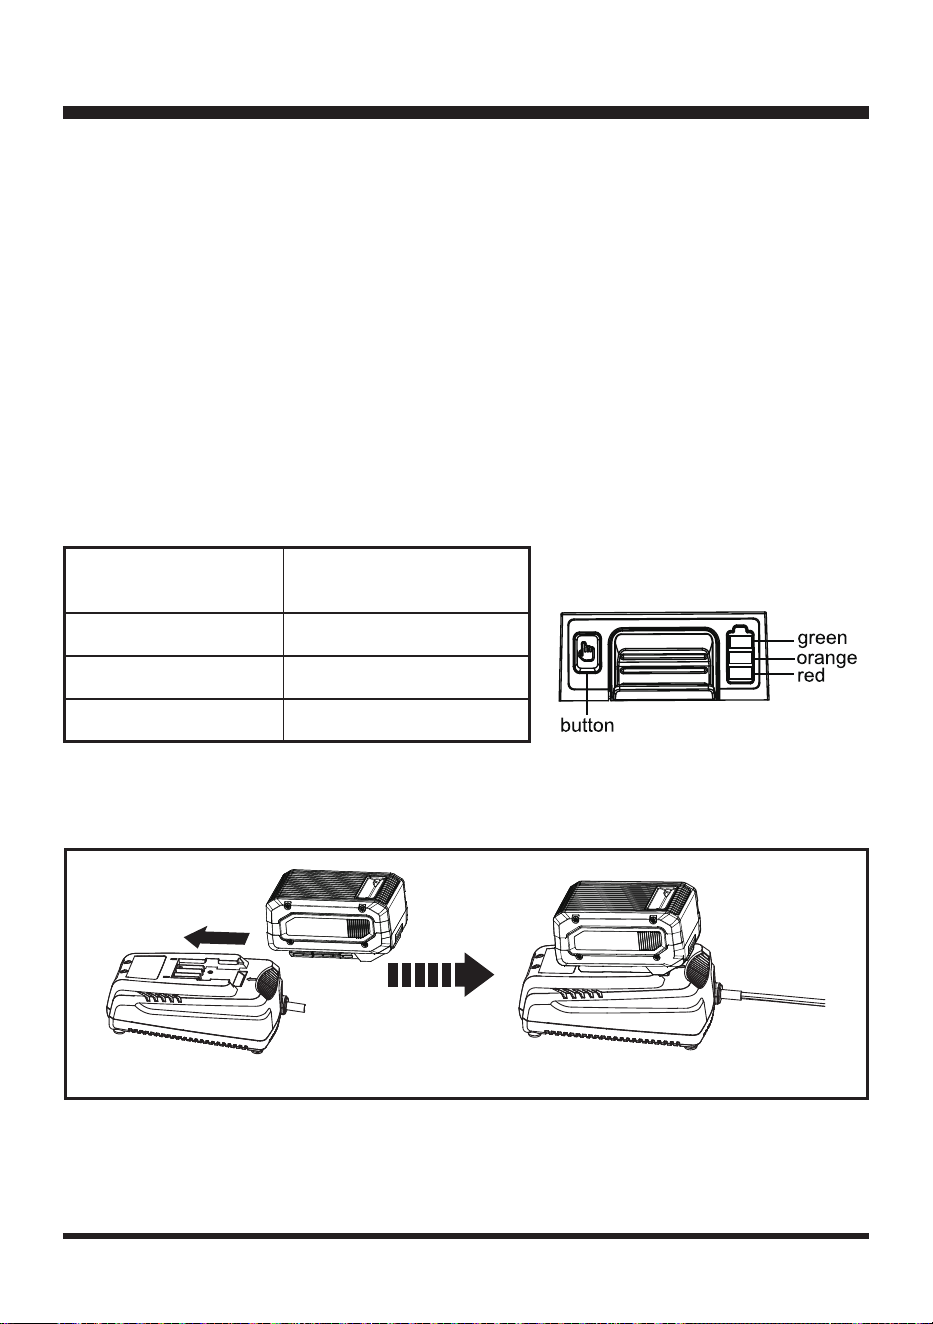
BATTERY LED PANEL
1. The panel consists of 3 LEDs on the battery. Press and hold the button, then release it, the LEDs will show
you the charge levels.
2. The battery’s charge level can be checked either when the battery is attached on the mower/charger or
removed from the mower/charger.

19
BATTERY PACK AND CHARGER
If any part of the charger is missing or damaged, do not operate it! Replace the charger with a new one.
Failure to heed this warning could result in possible serious injury.
Check the voltage! The voltage must comply with the information on the rating label.
1. Align the slot of the battery pack with the rail on the charger. Slide the battery onto the rail until the battery
pack secures into place (Fig. 4).
2. Connect the charger to the power supply.
3. Allow sufcient charging time (see Specications), and then disconnect the charger from the power supply.
4. Press the release button on the battery pack and remove it from the charger.
NOTE:
It is normal for the battery pack and the charger to become warm (but not hot) during charging
process. If the battery does not charge properly, check to make sure the electrical outlet is operational. Always
charge the battery before storage!
WARNING
20
PREPARING THE MOWING AREA
Lawn Surface
1. The lawn surface should be as uniform as possible. Bare patches and leaves can disrupt the
operation of the mower. Clear leaves at regular intervals and repair dead patches with grass seed
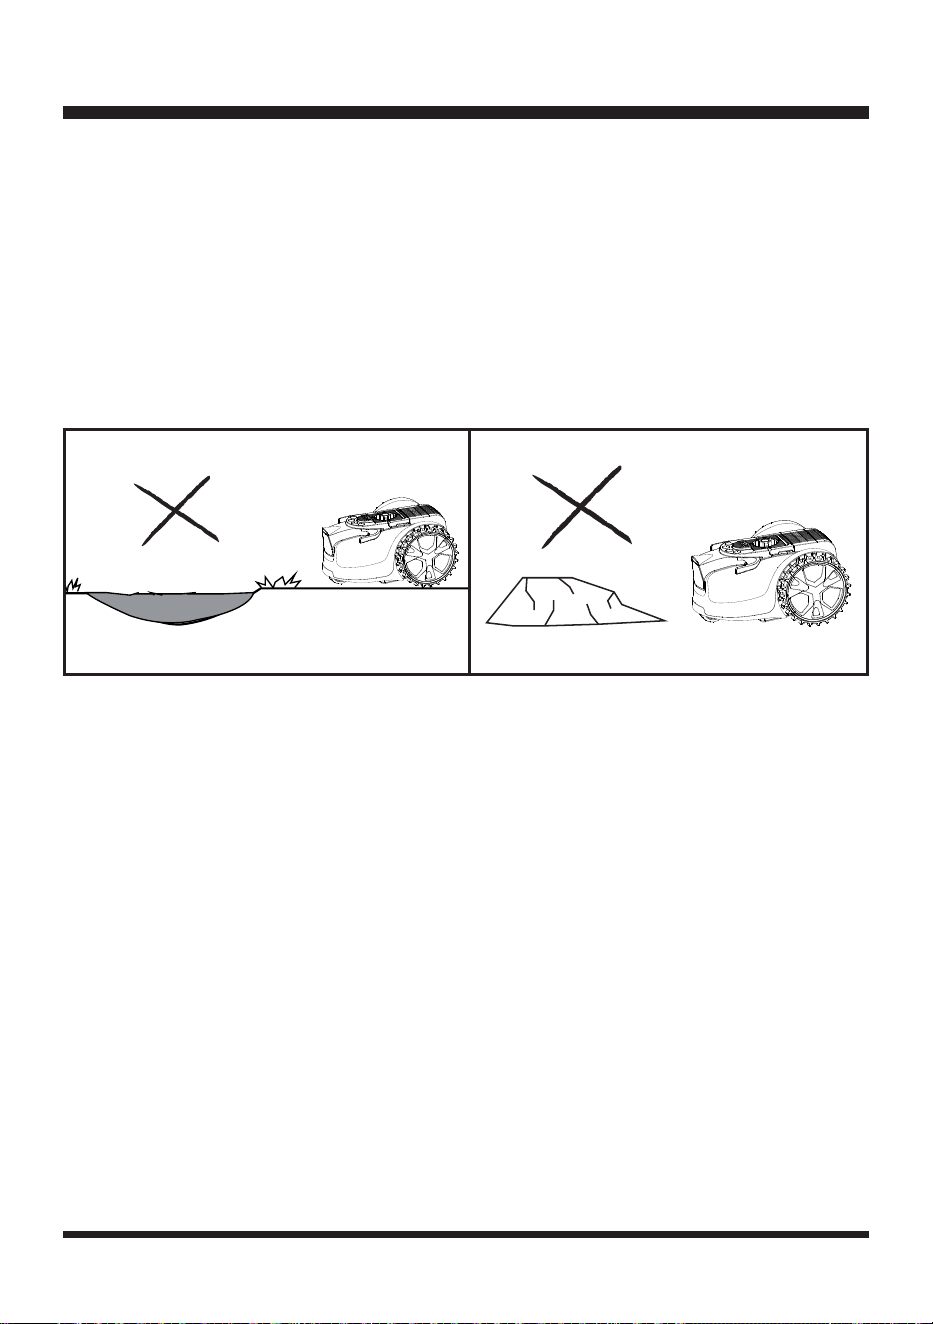
2. Inspect the lawn for holes or hollows. Fill them with topsoil to prevent rainwater from forming pools
of water on the lawn and to prevent mower from becoming stuck. The mower may be damaged if it
is operated in pools of water (Fig. 5).
3. If there are stones on the lawn that may damage the mower, they should be removed or excluded
from the working area (Fig. 6).
NOTE:
This mower is not designed to cut excessively long or overgrown and neglected areas. For
best performance mow or trim grass down to 2.36'' (60 mm) before use. Do not allow grass to grow
excessively long between uses.
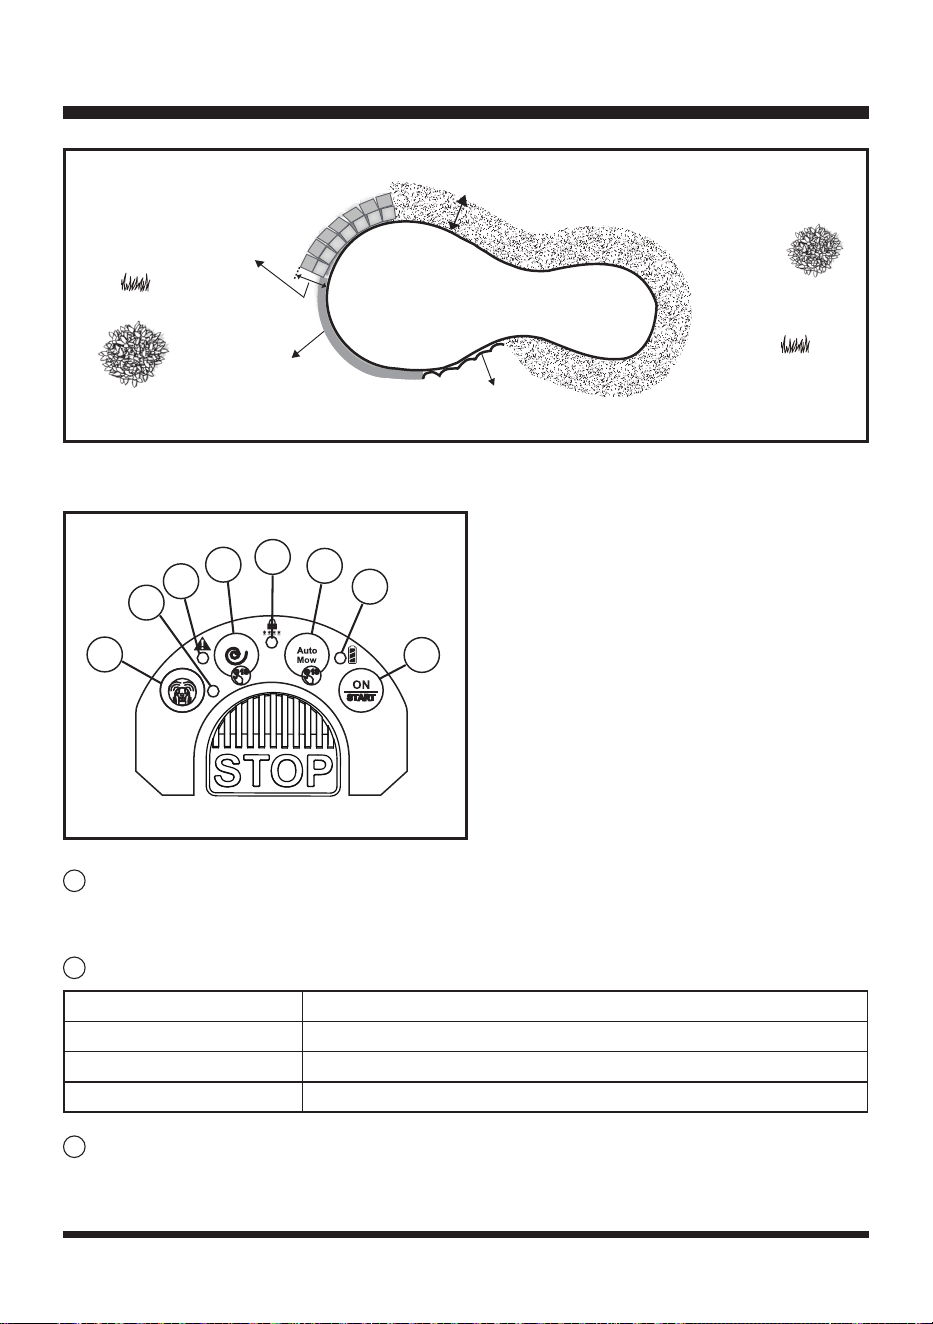
DEFINING THE MOWING AREA
Lawn edges must be clearly dened by at edging or raised barriers in order for this mower to function
properly.
1. Visual boundaries need to look different from lawn, therefore changes in color and texture are very
effective.
2. Physical boundaries help stop the mower, when a visual boundary is not possible.
3. Temporary physical boundaries can be used while the lawn boundary denition is improved.
The robotic mower is equipped with the following devices which allow it to detect the edges and know
where to mow:
• The lawn detection camera: for recognizing changes in surface type, e.g., from lawn to paving.
• Two ultrasonic object sensors: for detecting the obstacles higher than 9.84'' (25 cm). They are
turned on by default setting and will sense plants, shrubs and other obstacles in and around
the edges of the lawn. For a consistent cut, long grass must be cut down before mowing, or the
ultrasonic sensors must be turned off.
The ultrasonic sensors can be turned off when the lawn to be mowed is clear of obstacles. In this case,
hedges, walls, or other similar barriers in the lawn can be used as the border of the working area.
When the robotic mower detects that there is no lawn or encounters an obstacle, it changes route in
a random manner and starts mowing again in a new direction. To allow the robotic mower to move
freely inside the lawn, the lawn must be properly checked and adjusted so that the robotic mower has
enough space for recognizing when there is no grass. Carefully follow instructions listed as below for
types of borders/protections that can/cannot be used for dening the working area.
OPERATION
Fig. 5
Fig. 6
21
OPERATION
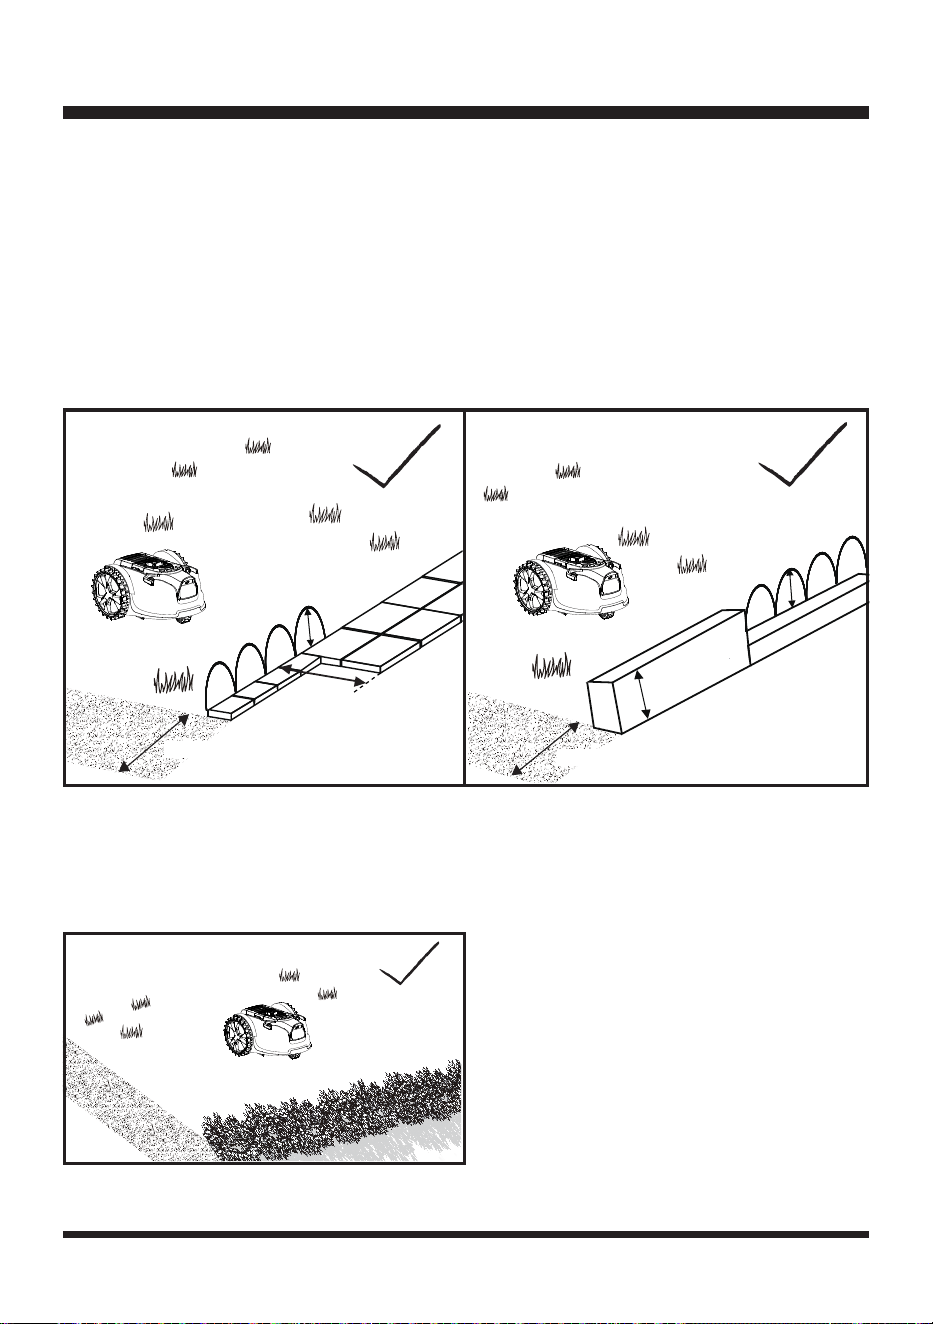
Paving
The lawn requires a paved or wooden edge of at least 13.78'' (35 cm) wide for it to stop safely and
change direction.
Paving or wooden edge less than 13.78'' (35 cm) wide must be widened, or can be used in conjunction
with a barrier. See Raised Barrier section below (Fig. 7).
Raised Barrier
With the ultrasonic sensors on, a perimeter barrier at a height above 9.84'' (25 cm) can be used to
dene the border of the working area.
If an existing barrier is shorter than 9.84'' (25 cm), replace or raise the barrier or add additional paving
(Fig. 8).
Hedging
With the ultrasonic sensors on, hedges can be used to dene working area (Fig. 9).
NOTE:
Foliage is usually recognized as grass by the robotic mower. Therefore, ultrasonic sensors
must be always kept on when using hedges as the border of the working area.
Fig. 9
> 9.84''
>13.78''
>13.78''
Fig. 7
> 9.84''
> 9.84''
>13.78''
Fig. 8
22
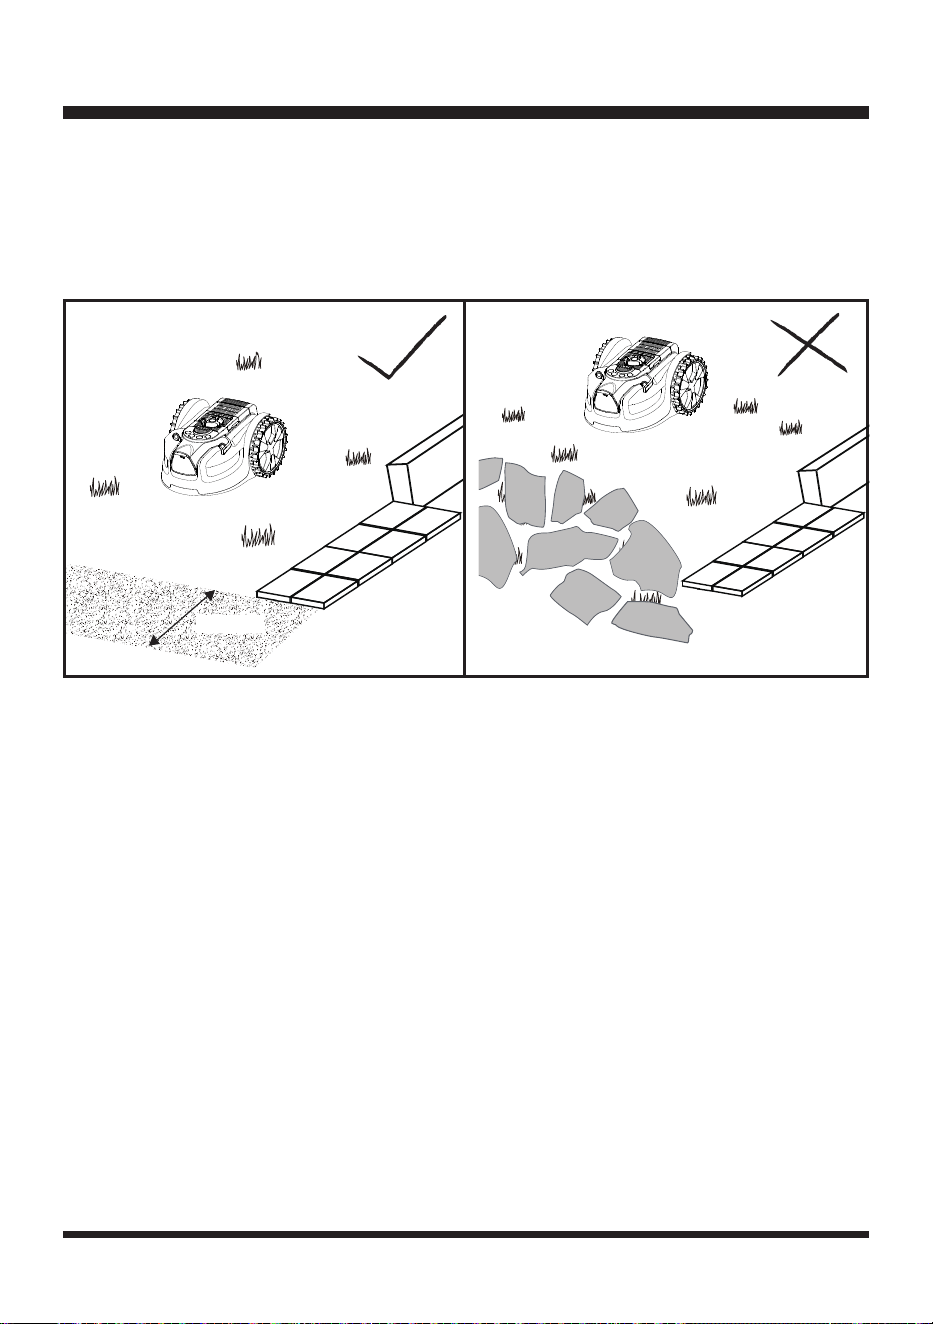
Fine gravel
If ne gravel or small stones are used to border the lawn, make sure the width of the border is more
than 13.78'' (35 cm) wide and has clear edges (Fig. 10).
NOTE:
Never use gravel, stones or similar materials with irregular edges for dening the working area
(Fig. 11). Failure to provide clear edges will result in the mower leaving the mowing area and blade
damage.
Physical Bump Barriers
A border that physically obstructs the movement of the mower can also be used. This boundary could
be lower than 9.84'' (25 cm) so undetectable by the ultrasonic object sensors, and also narrower than
13.78'' (35 cm). When the robot meets this physical barrier, it will bump off, reverse and turn. This type
of boundary may suit your lawn in some areas.
Temporary Physical Bump Barriers
During rst use, while lawn patches are being seeded or with seasonal lawn owers, it may be
desirable to use a temporary method to protect or dene the lawn area for the mower to cut. In this
case, garden canes are particularly effective and do not detract from the look of the lawn. In spring,
you can protect ower bulbs in the lawn from the mower by sinking short canes vertically into the lawn
around the area spaced at 7.87'' (20 cm). The mower will be physically prevented from entering any
protected areas.
Magnetic Strip
The magnetic strip serves as a mobile and temporary boundary for creating areas where the robotic
mower is not allowed to mow.
The robotic mower is equipped with a magnetic strip sensor for recognizing a magnetic strip lying on
the ground. When the robotic mower comes across a magnetic strip, it will stop and begin to mow
again in a random direction.
1. Lay the magnetic strip a few centimeters away from the area or object in question.
2. Keep a distance of at least 47.24’’ (120 cm) between two independent boundary areas made up of
OPERATION
>13.78''
Fig. 10
Fig. 11
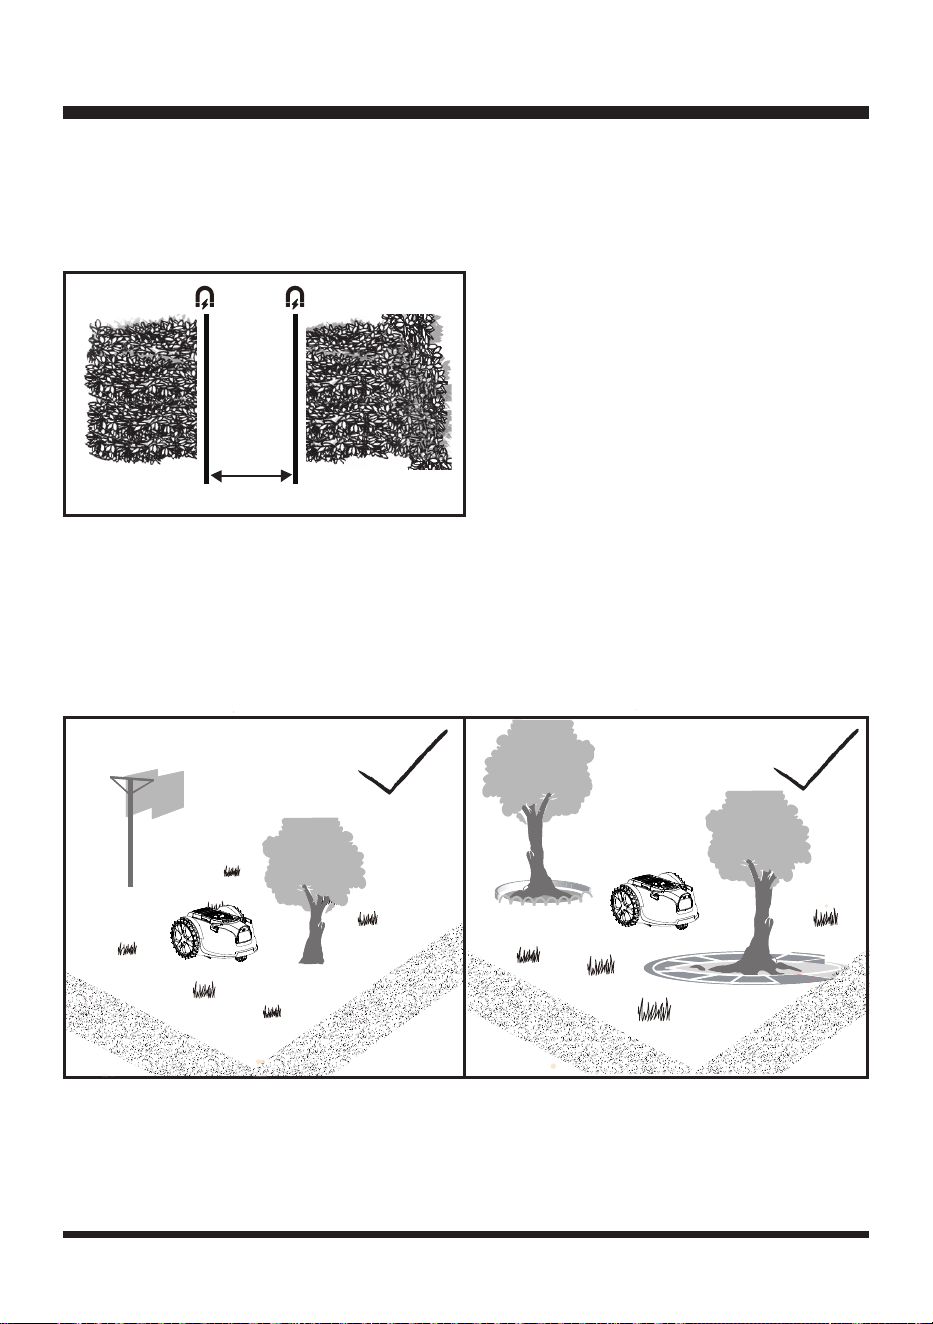
23
magnetic strips, so that the robotic mower can travel through without difculty (Fig. 12).
3. Make sure that the outer boundary of the mowing area is dened by an optical or physical
separation.
4. Fasten the magnetic strip to the ground with the supplied magnetic strip pegs spaced 39.37'' (1 m)
apart.
Obstacles in the Mowing Area
With the ultrasonic sensors on, objects which do not impede the robotic mower’s normal functioning,
such as trees (without raised roots), vertical poles, etc., do not require excluding from the mowing area
(Fig. 13).
When objects, such as exposed tree roots, exposed wires, irrigation systems, drains, etc., are present
on the surface of the lawn, it is required to protect these objects with paving, walls or barriers to
prevent the damage to them and to the robotic mower (Fig. 14).
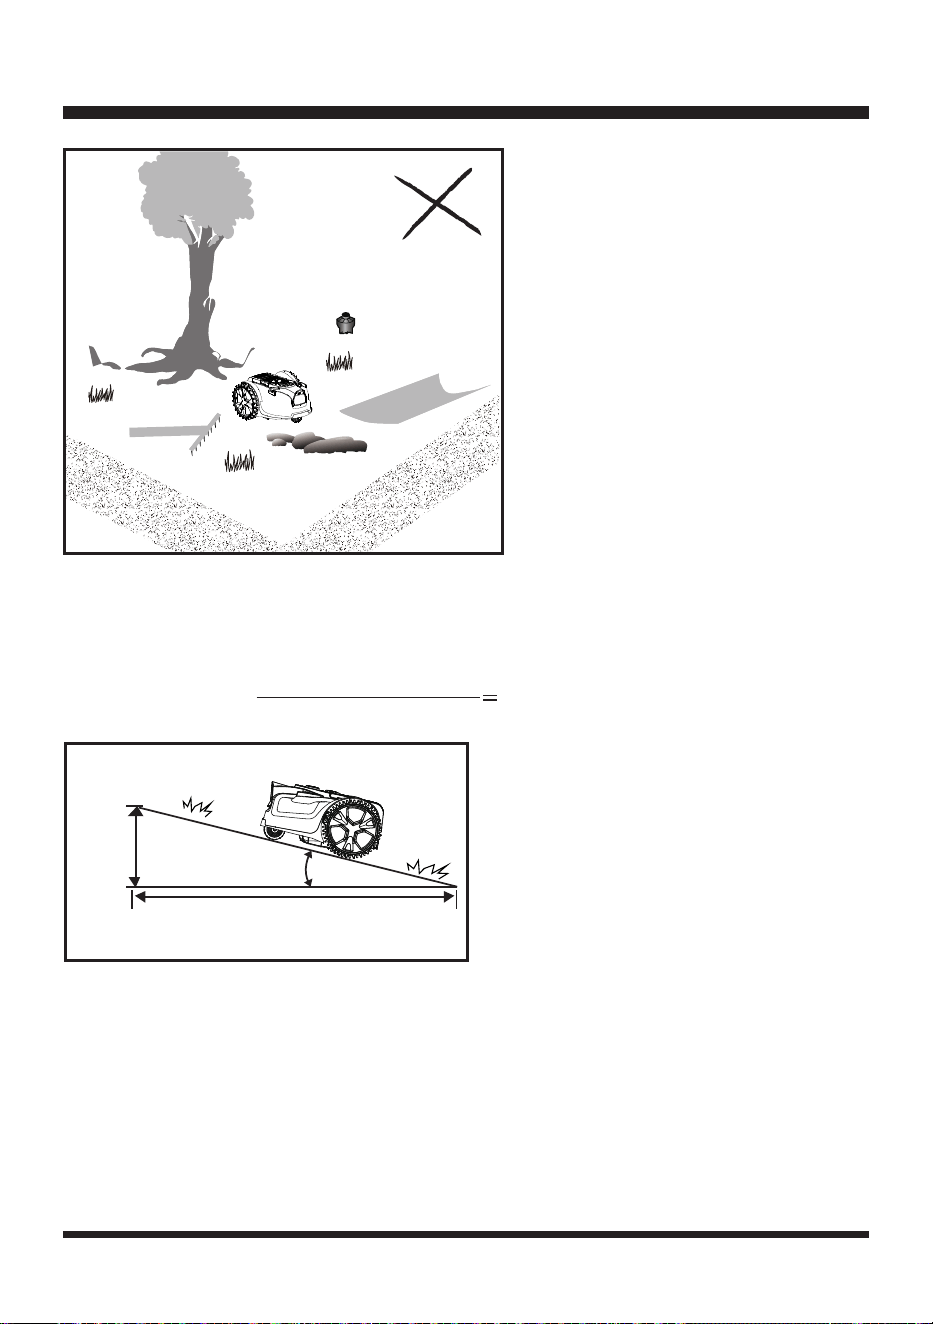
The working area cannot be dened by holes or ditches. Ensure that there are no objects such as
toys, work tools, small stones, branches, or sprinklers, etc., on the lawn or protruding from the ground
which could impede the mower or cause damage to the blade (Fig. 15).
NOTE:
Avoid leaves accumulating on the lawn, as they may not be detected correctly by the robotic
mower. Remove leaves at regular intervals.
OPERATION
Fig. 13
Fig. 14
>47.24
''
Fig. 12
24
Slopes
The robotic mower has the ability to safely climb slopes of 35% or 20º inclines, and areas that are
steeper than this should be excluded (Fig. 16).
To calculate the slope of your lawn, see Fig. 16. The slope would be:
Pools and Ponds
If there is a pool or pond in the mowing area, create appropriate borders to protect it.
- Raised barriers higher than 7.87'' (20 cm).
- Flat edging (paving, gravel or wooden boards wider than 27.56'' (70 cm)).
The illustration shows a correctly dened working area for the correct functioning of the mower (Fig. 17).
It is very important to make visual boundaries around ponds wide and obvious for the mower.
Pond plants and algae could be interpreted as grass. Physical boundaries around ponds are
highly recommended and will prevent any accidental water damage to your mower which is not
covered by the manufacturers warranty.
13.78''
(35 cm)
39.37'' (100 cm)
Max. 35% slope
(20º incline)
Fig. 16
13.78'' (35 cm) (Elevation)
39.37'' (100cm) (Length)
35% (slope)
OPERATION
Fig. 15
25
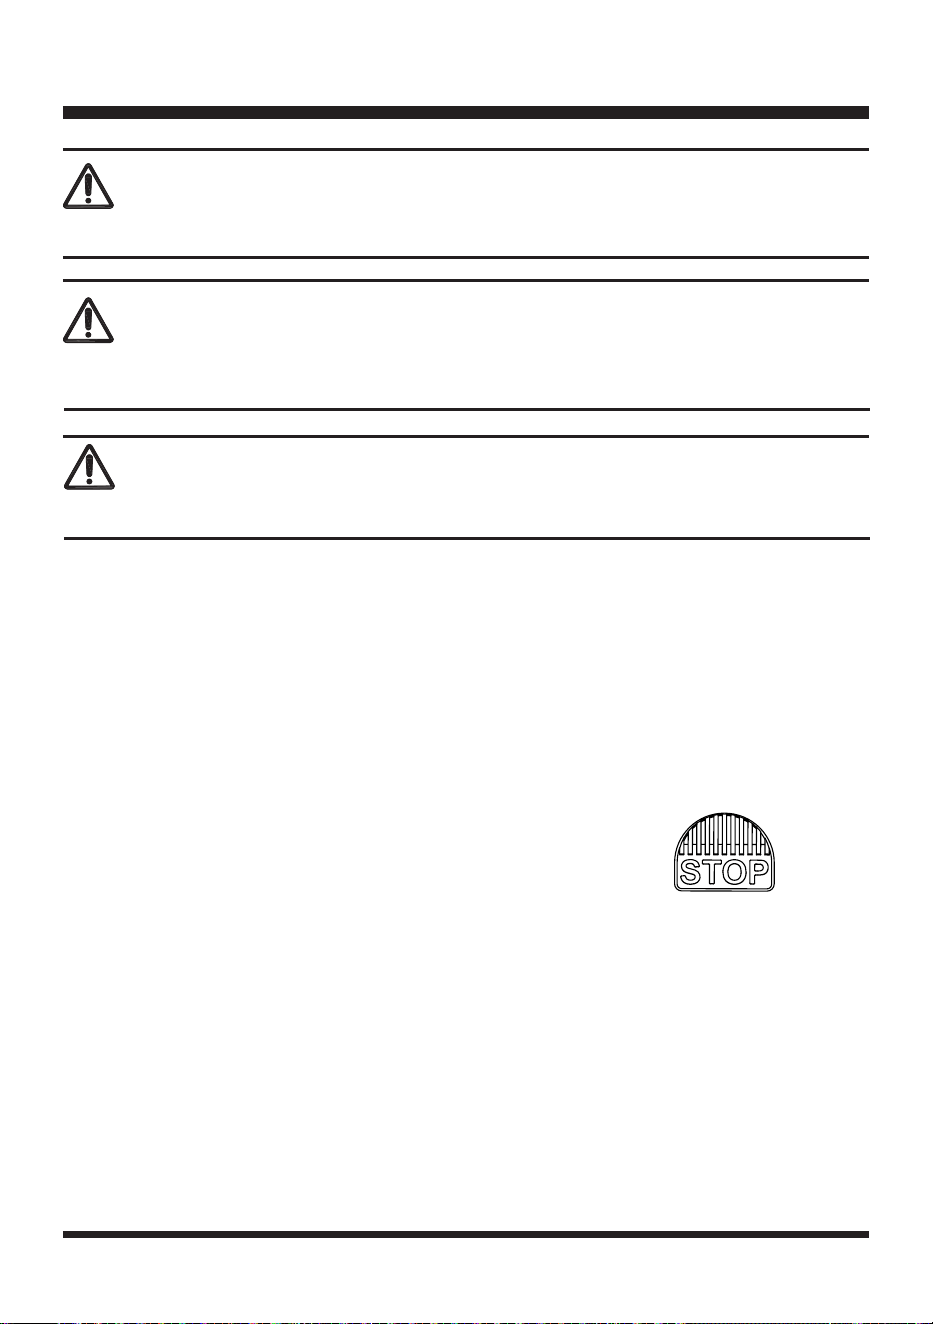
CONTROL PANEL (FIG. 18)
START/ON (Security Setting Button 4)
Press and hold down the START/ON button for 3 seconds to power the mower. Select the
preferred cut mode (Auto or Spiral) and press the START/ON button again to start moving.
Battery Indicator
Auto Mow Button(Security Setting Button 3)
Press the Auto mow button for 1 second to select random auto cutting mode followed by the
START/ON button.
OPERATION
Width > 27.56''
Height > 7.87''
Height > 7.87''
Width of non-grassy ground > 39.37''
Fig. 17
3
4
5
6
1
2
7
2 3
4
1
8
Fig. 18
2
1
3
Battery Indicator Status
Green, Continuous Sufcient power for mowing/ ready for mowing.
Red, Continuous Recharge required.
Red, Flashing The temperature of battery pack is abnormal, or the electric core fault.

26
UNLOCK Indicator
Spiral Mow Button (Security Setting Button 2)
Press the Spiral mow button for 1 second to select spiral cutting mode followed by the START/ON
button.
Error Indicator
Ultrasonic Indicator
Ultrasonic On/Off Button (Security Setting Button 1)
Single press to turn off/turn on the ultrasonic function.
LOCKING THE MOWER WITH A SECURITY CODE
This mower is allowed to be locked with a security code. Once the security code is set, the mower
will be locked in the following two situations: 1) the mower is powered off; 2) the mower is in the error
state. You are required to enter the correct security code to re-start the mower.
NOTE: The mower is not set with a security code by default.
To set a security code:
1. Press and hold down the Spiral Mow Button (Security Setting Button 2) and START/ON button
(Security Setting Button 4) simultaneously for 3 seconds. You will hear two beeps and the UNLOCK
Indicator is red continuous.
OPERATION
Error Indicator Status
Off The mower is in normal operation.
Yellow, Continuous
The lift sensor is activated. / The obstruction sensor is activated. /
The mower is tilted. / The rear wheels are lifted (slipping) due to an
obstacle. / The mower has fallen over. / STOP button is pressed. /
The mower cannot see grass.
Red, Continuous Sensor error. / Motor fault. / Operation system error.
4
5
6
Ultrasonic Indicator Status
Green, Continuous The ultrasonic function is on.
Off The ultrasonic function is turned off.
Yellow, Flashing The mower has a communication issue with camera.
7
UNLOCK Indicator Status
Off The mower hasn’t been set with a security code.
Green, Continuous The mower is unlocked. The mower can be manually operated.
Red, Continuous The mower is locked.
Red, Flashing The mower is locked. Input the 4-digit security code to operate.
8

27
2. Within 10 seconds, enter a four-digit number of your choice with the 1-4 Buttons to use as your
personal security code. Press the STOP button to conrm. The UNLOCK Indicator is green
ashing.
3. Within 10 seconds, enter the four-digit number of your security code again. Press the STOP button
to conrm. The UNLOCK Indicator is green continuous. The security code is set successfully.
NOTE:
If more than four digits are entered, you will hear ve beeps. The mower returns to the no
security code state. The UNLOCK Indicator is turned off. Re-start from the rst step to set the security
code.
NOTE:
When the control panel is not operated for 10 seconds during the security code setting, the
mower will return to the no security code state automatically.
To turn off the security code function:
1. Unlock the mower by entering the correct security code and pressing the STOP button to conrm.
You will hear two beeps and the UNLOCK Indicator is green continuous.
2. Press and hold down the Spiral Mow Button (Security Setting Button 2) and START/ON button
(Security Setting Button 4) simultaneously for 3 seconds. The UNLOCK Indicator is turned off. The
security code function is turned off successfully.
To change the security code:
1. Unlock the mower by entering the correct security code and pressing the STOP button to conrm.
2. Press and hold down the Auto Mow Button (Security Setting Button 3) and START/ON button
(Security Setting Button 4) simultaneously for 3 seconds. You will hear two beeps and the UNLOCK
Indicator is red continuous. The mower is ready for changing the security code.
3. Within 10 seconds, enter a new security code. Press the STOP button to conrm. The UNLOCK
Indicator is green ashing.
4. Within 10 seconds, enter the new security code again. Press the STOP button to conrm. The
UNLOCK Indicator is green continuous. The new security code is set successfully.
NOTE:
If more than four digits are entered, you will hear ve beeps. The mower returns to the locked
state. The UNLOCK Indicator is red ashing. Re-start from the rst step to change the security code.
SWITCHING ON/OFF
1. To switch on, press the START/ON button for 1 second. The battery indicator,
error indicator, ultrasonic indicator will ash consecutively. The camera system
will take approximately 15 seconds to start up.
NOTE:
Please wait while the mower starts up, attempting to start the mower in this time will cause an
error warning and the start-up process will need to be repeated.
2. The mower is ready to mow when the battery indicator is illuminated green continuously and the
mower beeps.
3. To switch off the mower, lift the battery compartment cover and remove the safety key.
STARTING/STOPPING THE MOWER
OPERATION
WARNING
Do not allow familiarity with products to make you careless. Remember that a careless fraction of a
second is sufcient to inict serious injury.
28
1. Make sure the fully charged battery pack and the safety key are installed into the robotic mower
properly.
2. Put the robotic mower in the dened mowing area.
3. Unlock the mower if the mower is locked. Enter the correct security code and press the STOP
button to conrm. You will hear two beeps and the UNLOCK Indicator is green continuous. The
mower is unlocked.
4. Press the START/ON button for 1 second. The battery indicator, error indicator, ultrasonic indicator
will ash consecutively. The camera system will take approximately 15 seconds to start up. The
mower is ready to mow when the battery indicator is illuminated green continuously and the mower
beeps.
5. Select the desired cutting mode by pressing either the Auto or Spiral mode buttons for 1 second to
select the cut mode, then press the START/ON button to start mowing.
6. To stop the mower during operation, press the STOP button.
7. To turn off the mower, lift the battery compartment cover and remove the
safety key.
NOTE:
If the mower is temporarily stopped by pressing the STOP button, to re-start the mower, it is
not required to enter the security code.
NOTE:
If the mower is stuck or has been stopped for more than 20-25 minutes, it will automatically go
into Stand By (power off). To turn on the mower again, follow the instructions above.
CUTTING MODES
1. Auto Cutting
In Auto cutting mode, the robotic mower will mow the lawn in a random pattern.
After the robotic mower is powered on, press the Auto button for 1 second, followed by the START/ON
button. After 5 seconds of continuous running, you will hear beeps to indicate the blades have started to spin.
The robotic mower will automatically search for a suitable working area. If the robotic mower does not
nd grass within 5 seconds, it will change direction and start running again in a new direction. The blades
will not spin until the mower can run for continuously for at least 5 seconds.
OPERATION
Read the safety instructions carefully before you start your robotic lawn mower.
Keep your hands and feet away from the rotating blades. Never put your hands or feet close to or
under the mower when the motor is running.
Never use the robotic lawn mower when people, especially children, or pets, are in the cutting area.
WARNING
WARNING
WARNING
29
2. Spiral Cutting
In Spiral cutting mode, the robotic mower will mow in a spiral outwards from where it is placed on the
lawn. This is best used to tidy up any areas that may not have been mowed during a random mowing
session.
After the robotic mower is powered on, press the Spiral button for 1 second followed by the START/ON
button. The mower will rst move forward about 3.94'' (10 cm) to 7.87'' (20 cm), then start Spiral cutting
covering approximately 21.53 sq. ft (2 m
2
). After the Spiral cut is nished, the robotic mower will start to
mow in a random pattern automatically.
If the area to be mowed is too narrow for the robotic mower to carry out the spiral cut, after continuous
searching, the mower will mow in a random pattern automatically.
NOTE:
Spiral cutting is also a great feature to use before random mowing to systematically and
efciently cut the main areas of the lawn, by doing this it reduces the amount of random cutting time
needed to complete the lawn. You also get a better lawn nish.
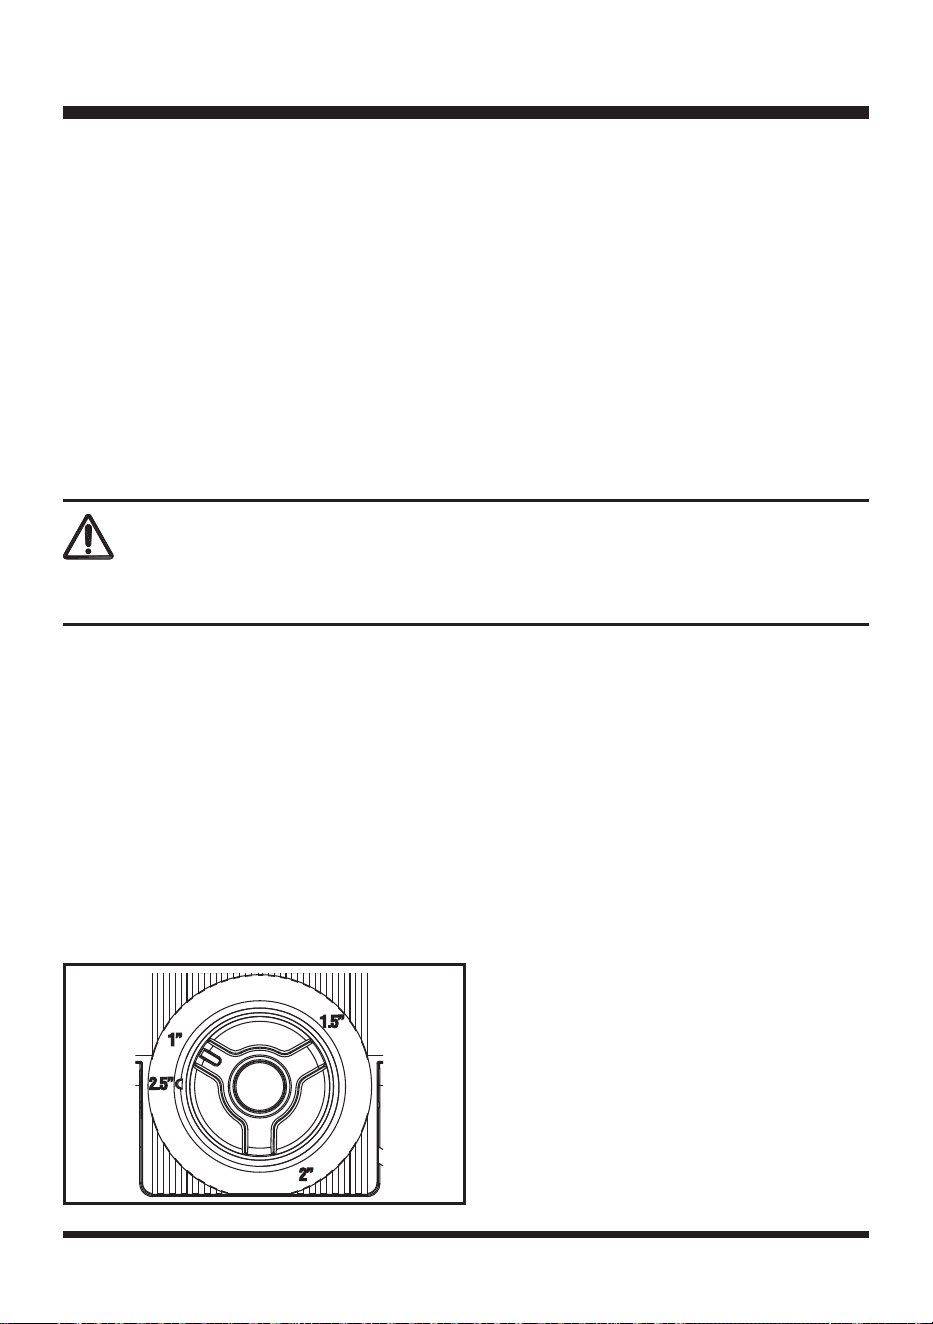
SETTING THE CUTTING HEIGHT
Do not make any adjustment to the robotic mower without rst stopping the motor. Keep your feet
away from the blade disc when adjusting its height.
The cutting height of the mower can be adjusted from MIN 1'' (25 mm) to MAX 2.5'' (65 mm) (Fig. 19).
During the rst weeks of mowing, always select the higher cutting height 1.5'' (40 mm). After this, the
cutting height can be lowered step by step every week until the desired cutting height has been reached.
1. Press the STOP button to stop the robotic mower.
2. Turn the cutting height adjustment knob to set the cutting height.
- Turn clockwise to raise the cutting height.
- Turn counter clockwise to lower the cutting height.
3. For the rst cut each season, a higher cutting setting should be selected.
USING A CUTTING
HEIGHT THAT IS TOO LOW IN LONGER GRASS WILL USE MORE POWER AND REDUCE
BATTERY RUN TIME.
4. Before you begin to mow, check to ensure that the blade is not blunt and that none of the fasteners
are damaged. To prevent any imbalance, replace blunt and/or damaged blades. To carry out this
check, rst switch off the mower by removing the safety key.
OPERATION
Fig. 19
WARNING
30
MAINTENANCE
GENERAL MAINTENANCE
1. Keep all safety devices and the motor housing free of dirt and dust. Avoid using solvents when
cleaning plastic parts. Most plastics are susceptible to damage from various types of commercial
solvents and may be damaged by their use. Use clean, dry cloths to remove dirt, dust, oil, grease,
etc.
2. Periodically check all nuts and bolts for proper tightness to ensure safe operation of the mower.
3. Remove any buildup of grass and leaves on or around the mower. Wipe the mower clean with a dry
cloth occasionally. Do not use water.
WARNING
WARNING
Always switch the product off, remove the safety key and the battery pack and let the product cool down
before performing inspection, maintenance and cleaning work.
If a part becomes worn or damaged, use manufacturers recommended replacement parts. Use of any
other parts may create a hazard or cause product damage.
WARNING
REPLACING THE MOWER BLADES
Do not use any attachments or accessories not recommended by the manufacturer of this product. The
use of attachments or accessories not recommended can result in serious personal injury.
WARNING
Before performing any maintenance, make sure the safety key and the battery have been removed.
Failure to heed this warning could result in serious personal injury.
WARNING
Always wear protective, heavy gloves when performing blade maintenance. Failure to heed this warning
could result in serious personal injury.
31
Always check to see if the blades are in good condition. If the blades are blunt, damaged or showing
signs of imbalance, they must be replaced. Only use recommended replacement blades. Make
certain
ALL
3 blades and screws are replaced at the same time to keep a balanced cutting system.
Replacement blades can be purchased by contacting Customer Service.
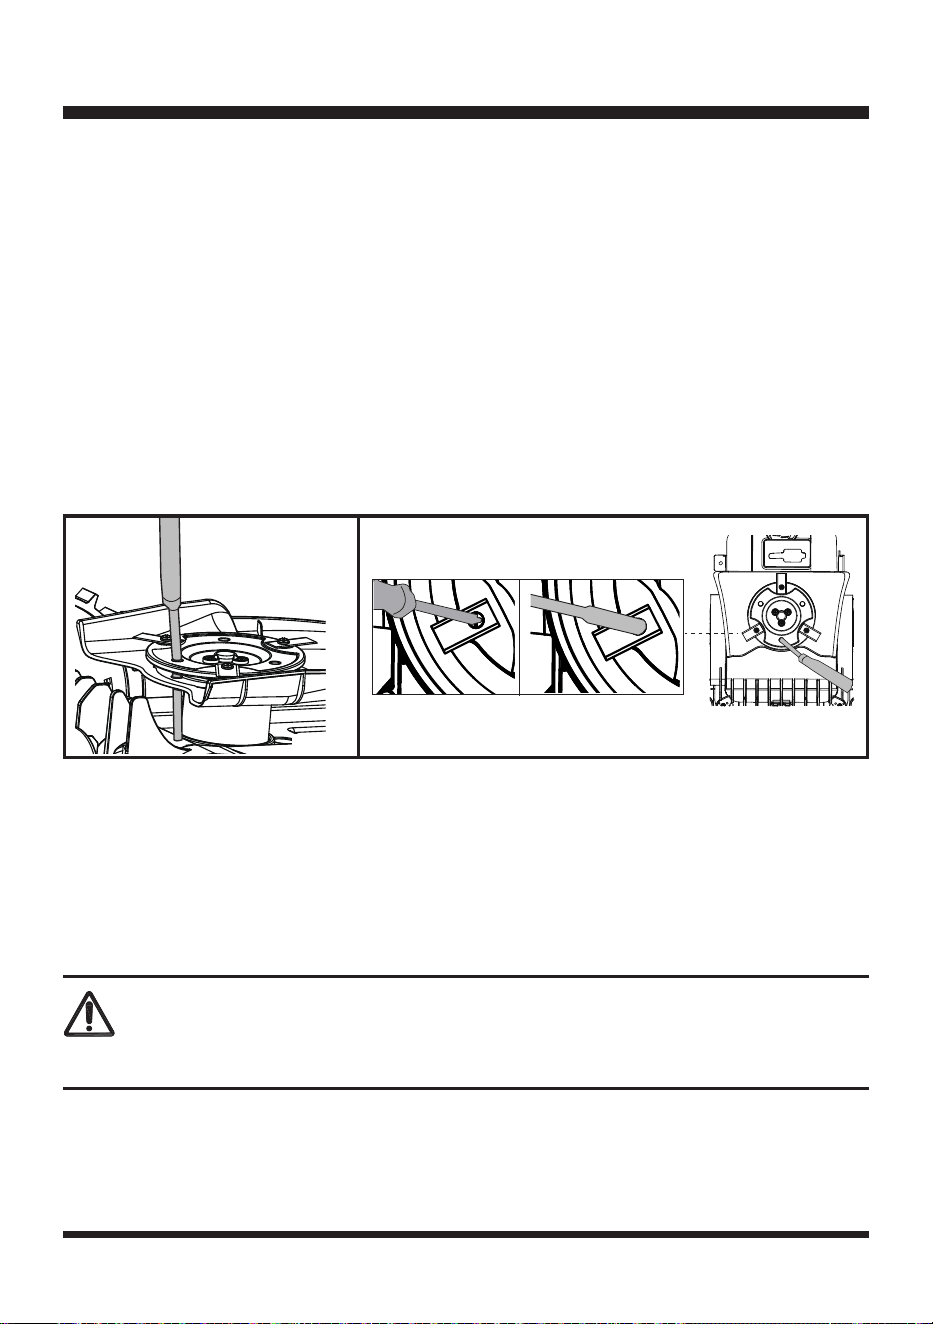
Replacing the Blades:
1. Press the STOP button and allow the blade to come to a complete stop.
2. Lift the battery compartment cover. Remove the safety key and the battery.
3. Slowly turn the mower over. Place it on a soft and clean surface.
4. Use a suitable tool (e.g., a screwdriver) to insert into one of three holes in the blade disc to x it
in place (Fig. 20). This ensures the blade disc is not turning when replacing the blades to avoid
personal injury.
5. Wear protective gloves and use a screwdriver or hexagonal socket wrench to remove all three
screws and blades (Fig. 21).
6. Secure the new blades with new screws.
7. Make sure all blades can spin freely.
CLEANING THE UNDERSIDE THE BLADE
It is recommended to check and clean the underside of the robotic mower regularly.
1. Press the STOP button and allow the blade to come to a complete stop.
2. Lift the battery compartment cover. Remove the safety key and the battery.
3. Slowly turn the mower over. Place it on a soft and clean surface.
4. Use a soft brush or damp cloth to remove dirt, dust, oil, grease, etc. from the underside of the
mower.
5. Wear safety gloves to clean the blade disc, the chassis, and the front and rear wheels thoroughly
with a soft brush or damp cloth. Remove any lodged debris around them.
6. Make sure the blade disc can rotate freely and all blades can spin freely.
MAINTENANCE
CAUTION
Do not wash the mower with running water.
Fig. 20 Fig. 21
32
MAINTENANCE
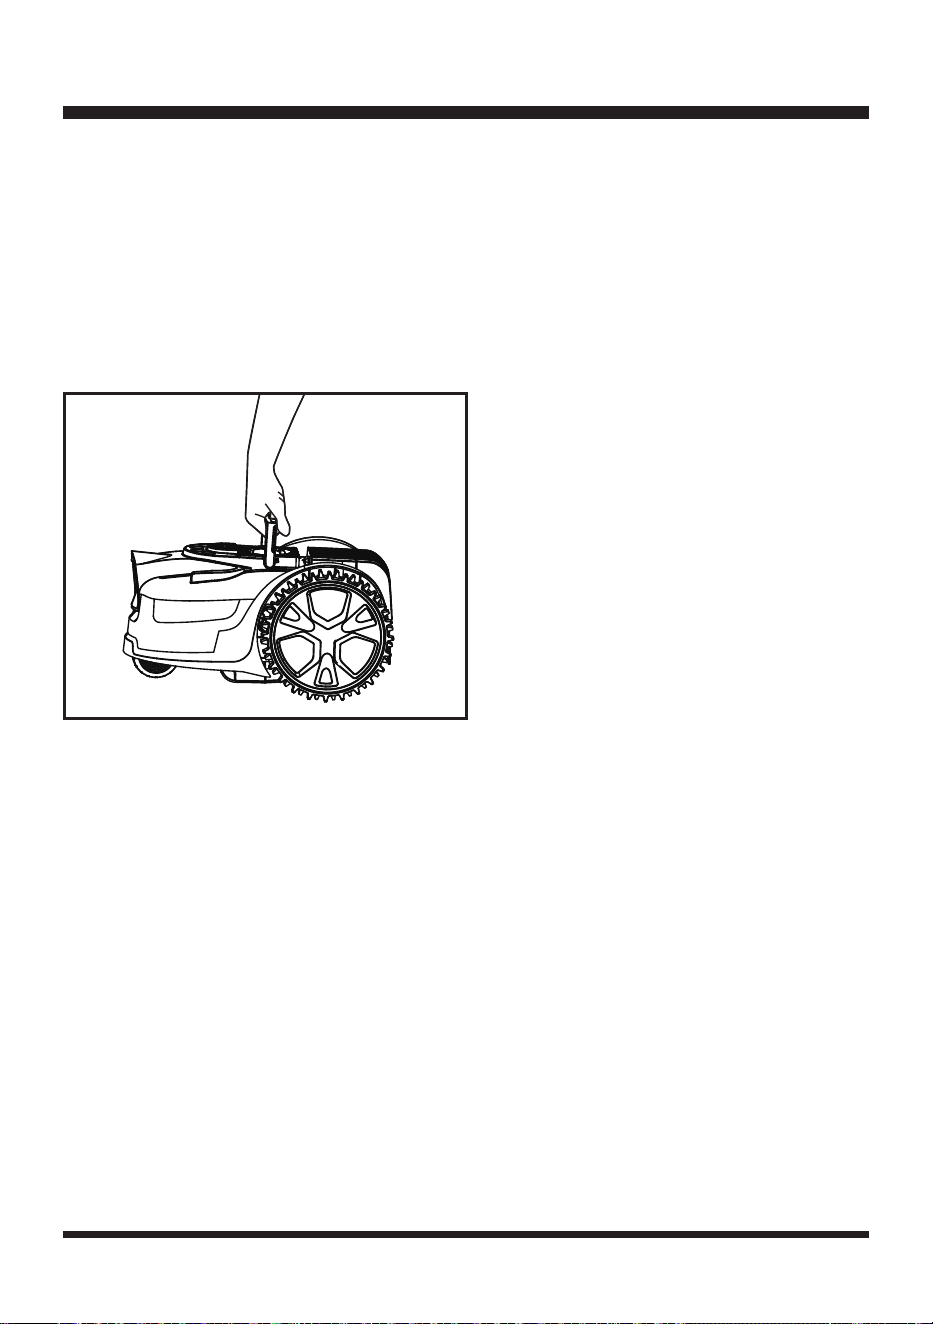
STORING THE MOWER
It is recommended to store the robotic mower indoors between uses.
1. Before storing your mower, remove the safety key and the battery pack.
2. Clean the mower thoroughly.
3. Use the carry handle to carry the mower. Carry the mower with the blade disc away from the body
(Fig. 22).
4. Store the mower indoors in a clean, dry place out of the reach of children.
IMPORTANT:
Protect the underside of mower from standing water. NEVER store the mower upside
down outdoors.
BATTERY PACK MAINTENANCE
1. Fully charge the battery before placing in storage.
2. Recharge the battery pack whenever there is a noticeable reduction in the performance. Do not
allow the battery pack to become completely discharged.
3. Do not recharge a battery pack that is already fully charged. Overcharging shortens battery life.
4. Once the battery pack is fully charged, remove the battery from the charger and disconnect charger
from the outlet.
5. Do not store the battery pack on the tool or on the charger.
6. If the battery pack is hot, allow it to cool down before recharging.
CHARGER MAINTENANCE
1. Keep the charger clean and clear of debris. Do not allow foreign material into the recessed cavity or
on the contacts. Wipe with a dry cloth. Do not use solvents, water, or place in wet conditions.
2. Always unplug the charger when the battery pack is not installed on the charger.
3. Do not store the charger in excessive heat. Do not use in direct sunlight.
4. Disconnect the charger from the AC power outlet when not in use and once battery has reached a
full charge.
Fig. 22
33
MAINTENANCE
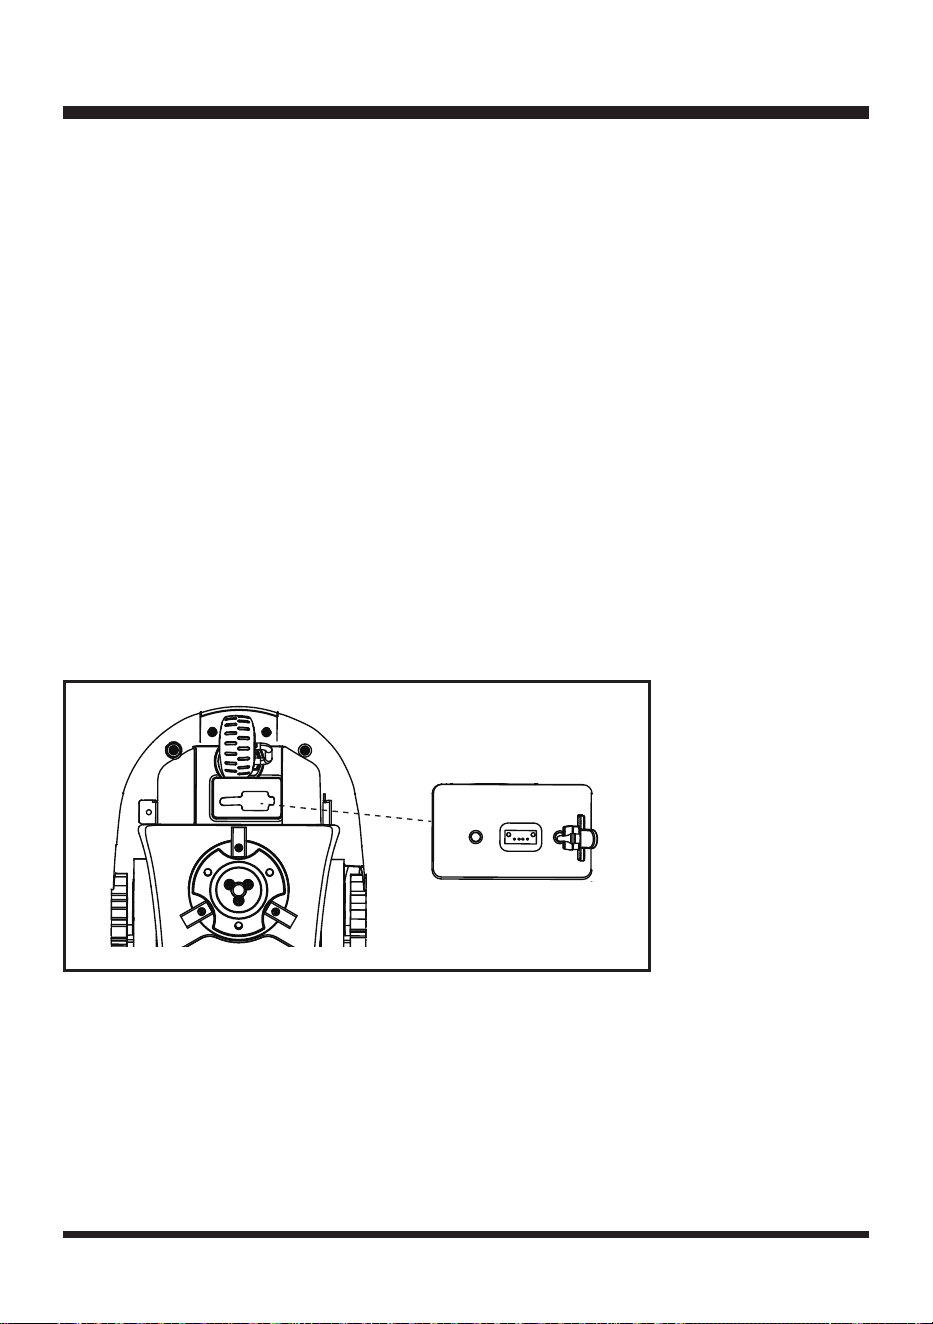
UPDATING THE SOFTWARE
The mower may require periodic software updates to improve functionality. Check our website every
few months to see if a new software is available to download.
NOTE:
Make sure the USB ash drive works normally and the robotic mower is switched on by
pressing the START/ON button for 1 second before updating.
NOTE:
Make sure the battery indicator is green and the mower has sufcient power for updating the
software.
1. Download the robotic mower’s latest software from our support website onto a blank USB ash
drive device.
2. Stop the mower and remove the safety key.
3. Turn the mower upside-down. Wear protective gloves and open the USB port rubber cap to reveal
the USB port (Fig. 23).
4. Insert the safety key. Unlock the mower if the mower is locked.
5. Press the START/ON Button for 1 second, and wait for 15 seconds until the robotic mower is
powered on completely indicated by a green battery light and beep. Insert the USB ash drive into
the USB port, then you will hear four beeps. The software is updating when three indicators (battery
indicator, unlock indicator and error indicator) are ashing.
6. After the software update is complete, you will hear continuous beeping and the battery indicator
will be green continuous.
7. Remove the USB ash drive. Replace the USB port rubber cap. To complete the software update,
restart the machine by removing and reinserting the safety key.
Fig. 23
34
ENVIRONMENTAL SAFE BATTERY DISPOSAL
The following toxic and corrosive materials are in the batteries used in this battery pack:
lithium-ion, a toxic material.
WARNING
All toxic materials must be disposed of in a specic manner to prevent contamination of the
environment. Before disposing of damaged or worn-out lithium-ion battery packs, contact your local
waste disposal agency, or the local Environment Protection Agency for information and specic
instructions.
WARNING
If the battery pack cracks or breaks, with or without leaks, do not recharge it and do not use it. Dispose
of it and replace with a new battery pack.
DO NOT ATTEMPT TO REPAIR IT!
To avoid injury and risk of re, explosion, or electric shock, and to avoid
damage to the environment:
• Cover the battery terminals with heavy-duty adhesive tape.
•
DO NOT
attempt to remove or destroy any of the battery pack components.
•
DO NOT
attempt to open the battery pack.
• If a leak develops, the released electrolytes are corrosive and toxic. DO NOT get the solution in
eyes or on skin, and do not swallow it.
•
DO NOT
place damaged or defective batteries in your regular household trash.
•
DO NOT
incinerate.
•
DO NOT
place batteries where they will become part of any waste landll or municipal solid waste
stream.
• Take batteries to a certied recycling or disposal center.

35
TROUBLESHOOTING
Suspected malfunctions are often due to causes that the user can x themselves.
Therefore, check the product using this section. In most cases the problem can be solved quickly.
WARNING
Only perform the steps described within these instructions!
All further inspection, maintenance and repair work must be performed by an authorized service center
or a similarly qualied specialist if you cannot solve the problem yourself!
Gloves and appropriate protective clothing must be worn when performing these instructions. Always
turn off the mower before making any adjustment.
PROBLEM POSSIBLE CAUSE SOLUTION
The robotic lawn
mower is stuck
during mowing.
Grass or other debris is wrapped
around the wheels.
Check wheels and remove the grass or
objects.
Grass or other debris is wrapped
around the blade disc.
Check the blade disc and remove the
grass or objects (always wear gloves).
The blade disc is submerged in
water.
Move the robotic mower and prevent the
collection of water in the working area.
The robotic mower has got
caught in something.
Free the mower and remove the obstacle.
The robotic mower is stuck
behind a number of obstacles.
Check if there are any obstacles which
make it hard for the robotic mower to
move on from this location. Remove the
obstacles.
The mower is stuck in an uneven
dip or hole in the lawn.
Ensure that dips and holes in the lawn are
leveled with topsoil and over-seeded with
grass seed.
The lift sensor has been activated
as the mower has become
trapped.
Free the mower.
The robotic lawn
mower fails to start.
The safety key is not installed
correctly/fully.
Install the safety key correctly.
The battery is not installed
correctly.
Ensure the battery is correctly installed.
The battery is not fully charged. Charge the battery.
Possible clogging.
Remove the safety key and battery.
Check underneath the mower and clear
as necessary (always wear gloves).

36
TROUBLESHOOTING
The grass is too long.
Set a higher cutting height. If
grass length is taller than highest
cutting height, trim grass down to a
manageable height.
The battery is defective. Replace the battery.
Defective START/ON Button. Contact Customer Service.
The robotic lawn
mower runs outside
working area.
Incorrect barriers are used for
dening the working area.
Check the borders/barriers for correct
setting for dening the working area.
Make improvements or temporary
barriers if necessary. Refer to the
Dening the Mowing Area on page
20-25.
The ultrasonic sensors are turned
off.
Turn on the ultrasonic sensors.
The working area is steeper than
20º.
Reduce mower access to areas that
are steeper than 20º.
The robotic lawn
mower is upside
down.
The robotic mower is leaning too
much or has turned over.
Turn the robotic mower the right way
up and rectify the reason for it getting
turned over.
Unknown problem
with control or
function.
Temporary electronic or software
related issue in the mower.
Remove and re-insert the safety key.
Restart the mower. Download and
install the latest software update.
If the problem remains, contact
Customer Service.
The robotic lawn
mower runs on the
lawn, but the blade
disc does not rotate.
The robotic mower searches for
correct working area.
This is normal. The mower needs
to work in a suitably wide area. The
blade disc does not rotate while it is
searching for the proper working area
automatically.
The robotic lawn
mower vibrates.
Cutting blades are damaged.
Replace the blades. Refer to
Replacing the Mower Blade section
on page 30-31. Replacement blades
can be purchased by contacting
Customer Service.
Too many blades in the same
position lead to imbalance in the
cutting system.
Check that only one blade is tted at
each screw and that blades are not
stuck.
Different versions (thickness) of
blades are used.
Check if the blades are of different
versions (thickness).
The blade screw is loose. Tighten the blade screws.

37
TROUBLESHOOTING
Grass is being cut
unevenly.
Working area is too big.
Adjust the borders/protections to decrease
the size of the mowing area. Recharge
the battery to mow the area twice or
purchase an additional battery to increase
the size of the cut area.
Blades are dull.
Replace all the blades and screws. Refer
to Replacing the Mower Blade section
on page 30-31. Replacement blades can
be purchased by contacting Customer
Service.
Height of cut is too low, or the
grass is too high.
Increase the height of cut.
There is grass wrapped around
the blade disc.
Check underneath the mower and clear
as necessary (always wear gloves).
Area of cut (battery
duration) is not large
enough.
Height of cut is too low, or the
grass is too high.
Increase the height of cut.
The grass is wet or damp. Wait until the grass is dry.
The grass is dense.
Increase the height of cut and cut more
frequently.
The battery is not fully charged. Charge the battery.
The lawn area is too large.
Recharge the battery and mow again
or purchase an additional battery for
extended mowing of larger areas.
The cutting blade is
not rotating while the
mower is switched
on.
The cutting blade is obstructed.
Remove the safety key and the battery
pack. Clear obstruction (always wear
gloves).
The blade screw is loose. Tighten the blade screws.
Error indicator is
yellow continuous.
The lift sensor is activated for 10
seconds.
Remove and re-insert the safety key.
Check the working area for obstacles
taller than 3.94'' (10 cm) and remove
them. Restart the mower.
The obstruction sensor has
tripped 10 times within one
minute.
Remove and re-insert the safety key.
Remove any obstacles. Check whether
the grass is too tall. If necessary, mow
the grass to below 2.36'' (60 mm) with
a conventional lawn mower. Restart the
mower.

38
TROUBLESHOOTING
Error indicator is
yellow continuous.
The robotic mower has been
tilted for a prolonged time in one
direction.
Remove and re-insert the safety key.
Remove any obstacles. Restart the
mower.
The rear wheels have been lifted
due to an obstacle.
The mower has fallen over.
STOP button is pressed.
Remove and re-insert the safety key.
Restart the mower.
The robotic mower cannot see
grass.
Move the robotic mower to the lawn and
restart it.
Error indicator is red
continuous.
Sensor error.
Remove and re-insert the safety key.
Restart the mower. If the problem
remains, contact Customer Service.
Overcurrent in the motor or motor
fault.
Remove and re-insert the safety key.
Check for and remove any obstacles
around the rear wheels and the blade
disc. Increase the cutting height. Check
whether the grass is too tall. If necessary,
mow the grass to below 2.36'' (60 mm)
with a conventional lawn mower. Restart
the mower. If the problem remains,
contact Customer Service.
Operation system error.
Remove and re-insert the safety key.
Restart the mower. If the problem
remains, contact Customer Service.
Ultrasonic indicator
is yellow ashing.
The mower has a communication
issue with camera.
It is too dark for camera to work. Operate
the mower during daylight hours only.
Remove and re-insert the safety key.
Restart the mower.
The battery indicator
is red ashing.
The temperature of battery pack
is abnormal.
Allow the machine to cool down to reach
a normal temperature. Then restart the
mower. If the problem remains, contact
Customer Service.
Electric core fault. (The error
indicator is red continuous at the
same time.)
Remove and re-insert the safety key.
Restart the mower. If the problem
remains, contact Customer Service.

39
No charging
procedure possible.
The battery contacts are
contaminated.
Clean the battery contacts (e.g. by
inserting and removing the battery several
times) or replace the battery.
Socket outlet, mains cable or
battery charger are defective.
Check the mains voltage. If necessary,
contact Customer Service.
The battery has a fault. Replace the battery.
The charge control
LEDs do not light up
after inserting the
mains plug into the
socket.
Mains plug of the battery charger
is not plugged in properly.
Insert mains plug fully into the socket
outlet.
Socket outlet, mains cable or
battery charger are defective.
Check the mains voltage and if necessary,
contact Customer Service.
TROUBLESHOOTING
For more status of the indicator lights on battery & charger, refer to page 17 & 18.
40
LAWNMASTER
®
WARRANTY
41
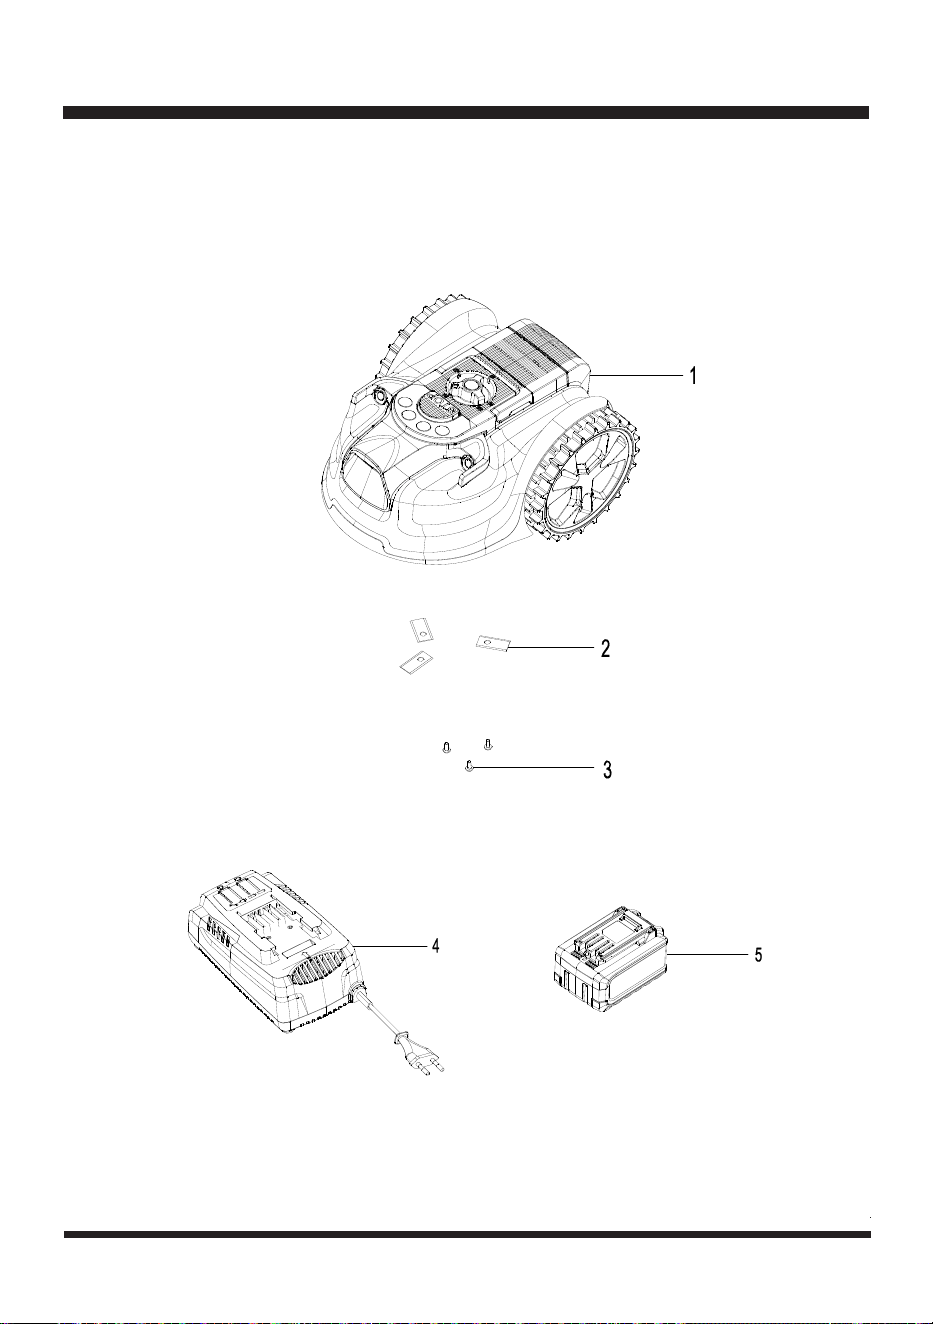
EXPLODED VIEW

42
Key Number Part Number Description Quantity
1 Mower Assembly 1
2 631001160 Blade 3
3 631018101 Screw for Blade 3
4 631007133 Charger 1
5 631007134 Battery 1
PARTS LIST
Replacement parts highlighted in grey are available for after sales purchase. Replacement of repair or
internal parts should only be done by a qualied service professional. Please contact your authorized
service dealer or Customer Service at 866-384-8432.

43
NOTES

44
NOTES
