
Due to regular upgrades of systems and products, ZKTeco could not guarantee exact consistency
betweenthe actual product and the written information in this manual.
Installation Guide
Guía de Instalación
Model : / Modelo TL800
Version / Versión: 3.0
En
Es
English / Español

Table of Contents / Tabla de Contenido
Important Notes / Notas Importantes
Please read this Installation Guide carefully and contact the Customer Care Service if
you have any questions about the installation./
para cualquier consulta sobre la instalación.
Por favor lea la guía de Instalación cuidadosamente o contacte a atención a clientes
To avoid any future service charges that can arise as a result of incorrect installation,
it is recommended that installation can be performed by a professional technician to
prevent any potential service charges that can occur due to incorrect installation./
Se recomienda que la instalación la realice un técnico profesional para evitar
posibles cargos por servicio que puedan ocurrir debido a una instalación incorrecta.
Se revisa constantemente el contenido de esta Guía de instalación y se hacen
cambios sin previo aviso, para mejorar el rendimiento de los productos.
We regularly revise the contents of this Installation Guide and update our products
to enhance quality and performance without prior notice./
1.
2.
3.
¡No inserte las baterías antes de instalar la cerradura!
Do not install the batteries until the lock is installed./
4.
What's in the Box / Contenidos de la Caja......................................................................1
Installation Procedure / Pasos de Instalación...............................................................2
Installation Diagram / Diagrama de Instalación...........................................................2
1. Door Properties / Propiedades de la Puerta......................................................................................2
2. Drill Holes on the Door / Taladre Agujeros en la Puerta................................................................4
3. Install Mortise and Cylinder / Instale Mortaja y Cilindro ..............................................................4
5. Install Studs and Outdoor Unit / Instale Taquetes y Unidad Exterior........................................5
4. Uninstall the OLED Screen and Mounting Plate / Desinstale la Pantalla OLED y Placa de
Montaje..............................................................................................................................................................5
6. Install Indoor Unit / Instale Unidad Interior......................................................................................6
8. Install Strike Plate and Box / Instale la Placa Metálica y Contrachapa......................................7
7. Install Batteries and Cover / Instale la Batería y Cubierta.............................................................6
9. Physical Test / Prueba Física....................................................................................................................7
1
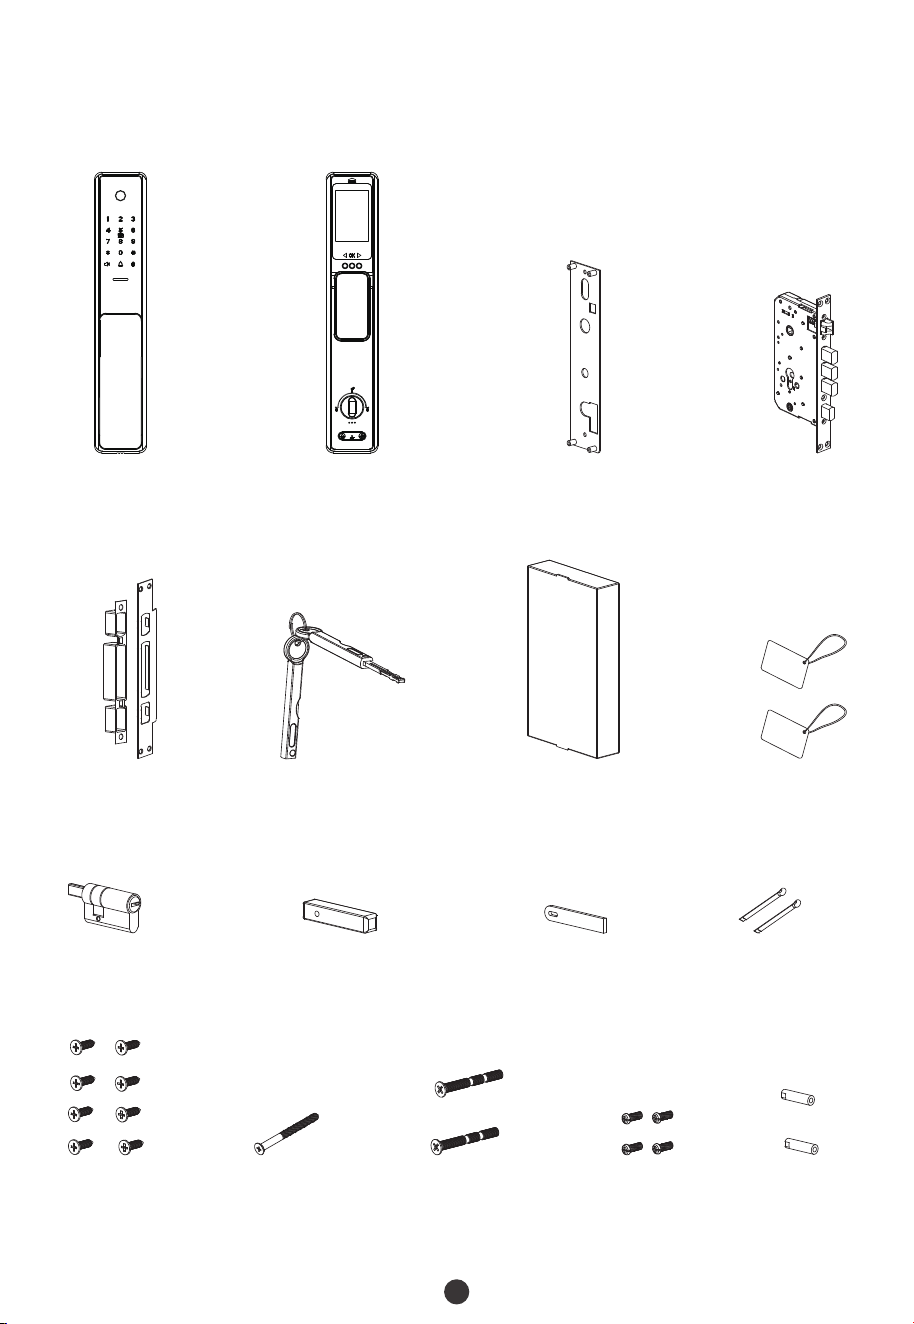
What's in the Box / Contenidos de la Caja
Outdoor Unit /
Unidad Exterior
Indoor Unit /
Unidad Interior
Mounting Plate /
Placa de Montaje
Mortise /
Mortaja
Cylinder /
Cilindro
Spindle B /
Perno A
Spindle A /
Perno A
Metal Pin /
Barra de Metal
Stud /
Taquetes
Screw A /
Tornillo A
Screw C /
Tornillo C
Screw B /
Tornillo B
Screw D /
Tornillo D
Strike Plate and Box /
Placa Metálica y
Contrachapa
Keys /
Llaves
Lithium Battery /
Batería de Litio
Cards /
Tarjetas
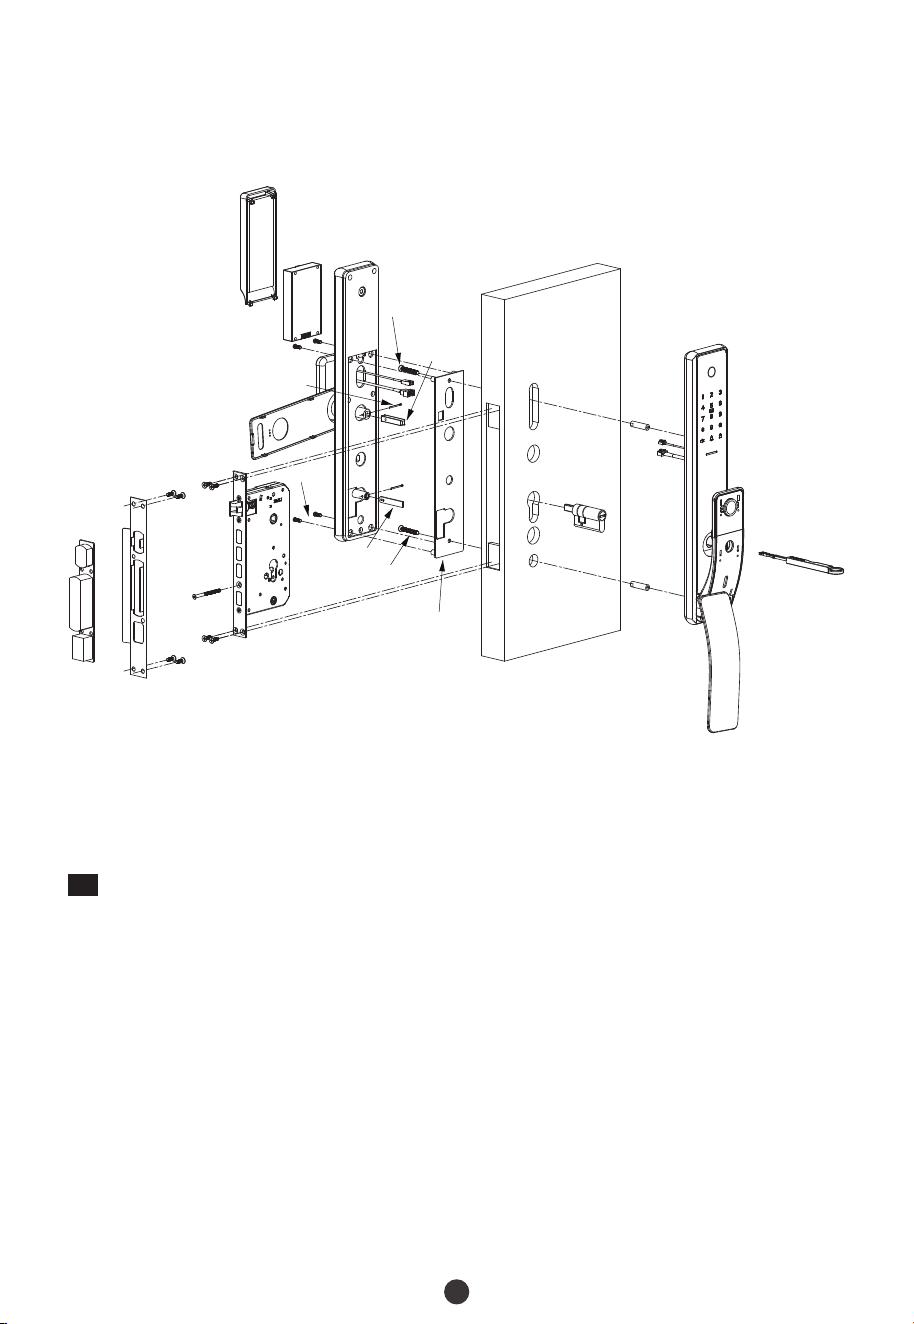
Installation Diagram / Diagrama de Instalación
2
Installation Procedure / Pasos de Instalación
1
Door Properties / Propiedades de la Puerta
Measure the Door Thickness / Mida el Grosor de la Puerta
A.
Measure the thickness of the door and select the appropriate Spindle length. For further
details, please refer the table on Page 1. /
Mida el grosor de su puerta y seleccione el perno adecuado. Para más detalles, consulte el
contenido de la tabla de la página 1.
Check the Door Opening Direction / Revise la Dirección de Apertura de la Puerta
B.
La posición de la manija es determinada por la dirección de apertura de la puerta. Debajo
se encuentra la representación gráfica de la apertura de la puerta, referencia a su
ubicación fuera de la habitación.
The position of the handle is determined by the opening direction of the door. Below is
the graphical representation of the door opening direction in reference to your position
outside the room. /
Metal Pin / Barra de Metal
Outdoor Unit /
Unidad Exterior
Stud /
Taquete
Keys /
Llave
Screw A /
Tornillo A
Strike Plate and Box /
Placa Metálica y Contrachapa
Mortise /
Mortaja
Screw D /
Tornillo D
Mounting Plate /
Placa de Montaje
Hidden Cover /
Cubierta Oculta
Metal
Pin / Barra
de Metal
Screw B /
Tornillo B
OLED Screen /
Pantalla OLED
Door /
Puerta
Indoor Unit /
Unidad Interior
Lithium Battery /
Batería de Litio
Cylinder /
Cilindro
Front Handle Cover /
Cubierta de la
manija delantera
Screw C /
Tornillo C
Screw C /
Tornillo C
Spindle A /
Perno A
Screw A /
Tornillo A
Screw D /
Tornillo D
Spindle B /
Perno B
3
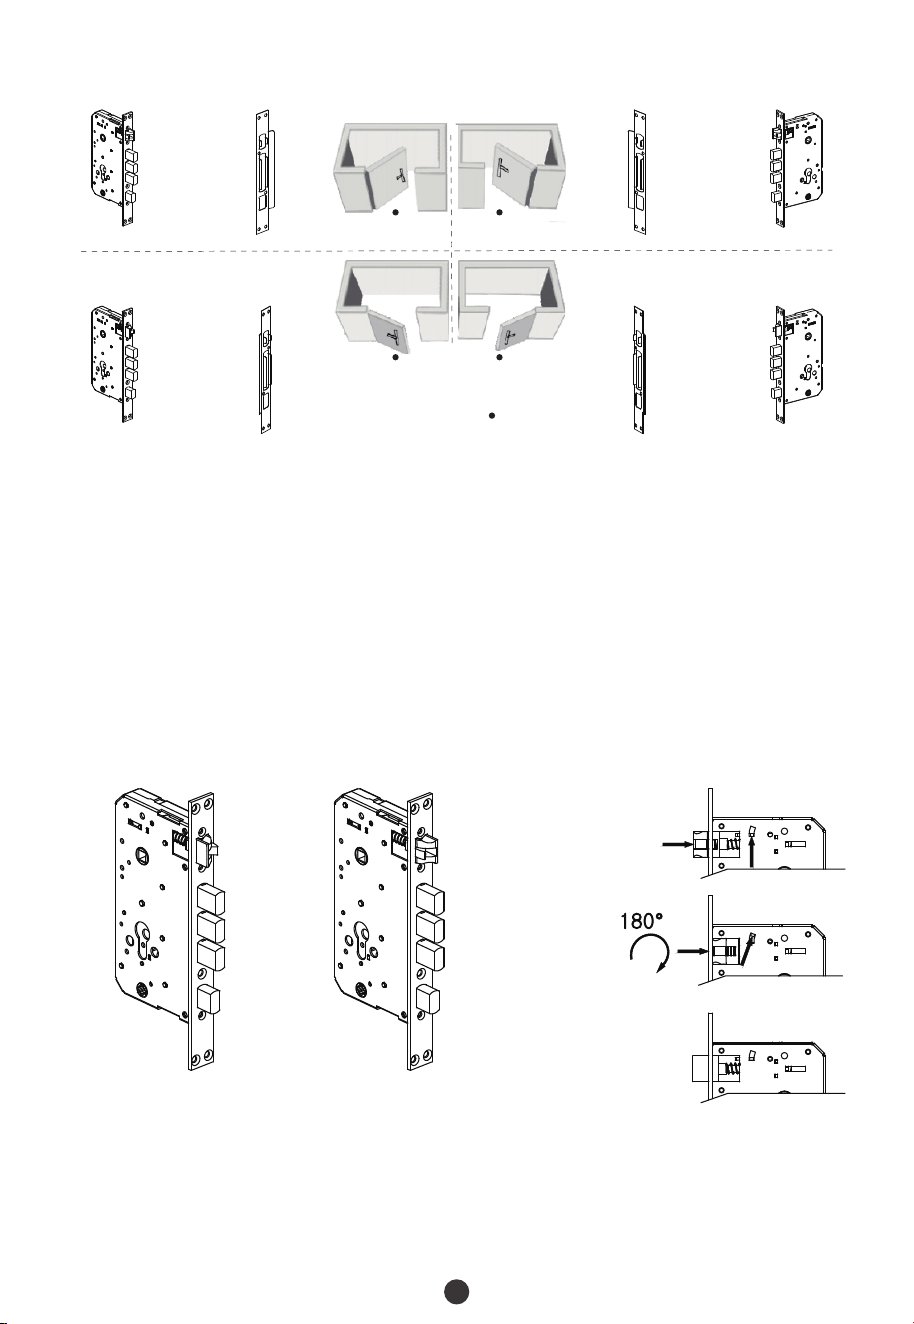
Adjust the Direction of Latch (if needed) / Ajuste la Dirección del
Pestillo (si es necesario)
Push the reverse block in upward direction./
Empuje el bloque de inversión hacía arriba.
Push the bolt of the latch into the mortise. / Empuje el pestillo hacia la mortaja.
1)
2)
Mortise /
Mortaja
StrikePlate /
Placa Metálica
User Location /
Ubicación del usuario
Left Inward /
Izquierda hacia adentro
Right Inward /
Derecha hacia adentro
Left Outward /
Izquierda hacia afuera
Right Outward /
Dereha hacia afuera
Rote el pestillo a 180° dentro de la mortaja y luego suéltalo.
Rotate the latch bolt to 180° inside the mortise, and release it./
3)
StrikePlate /
Placa Metálica
Mortise /
Mortaja
Mortise /
Mortaja
Mortise /
Mortaja
StrikePlate /
Placa Metálica
StrikePlate /
Placa Metálica
4
3
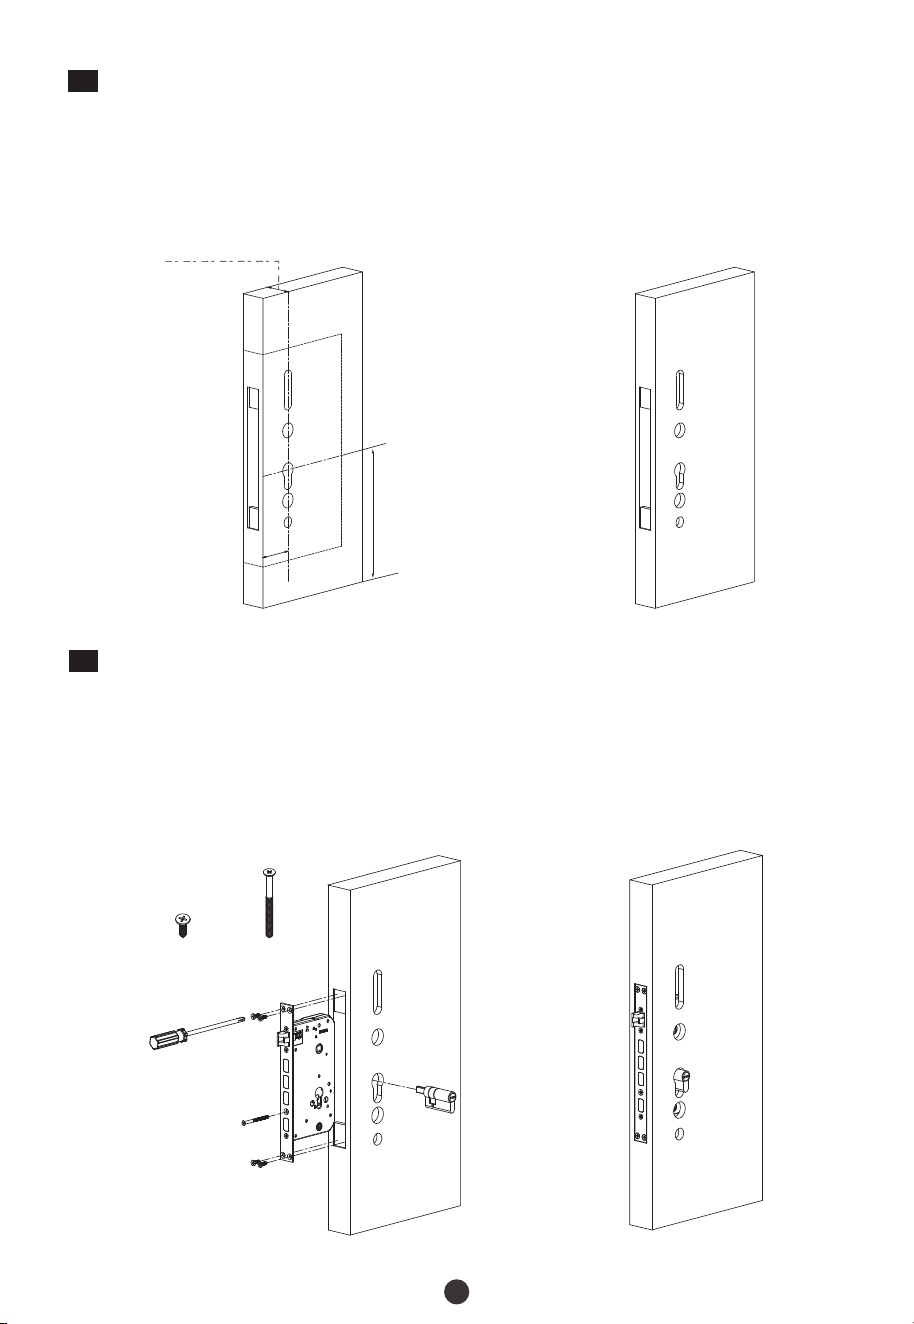
Install Mortise and Cylinder / Instale Mortaja y Cilindro
Coloque la mortaja en el orificio taladrado y asegúrela con el Tornillo A.
Put the Mortise into the hole that was drilled, and secure the Mortise with Screw A./
Insert the Cylinder into the Mortise ( the front sides and back sides) and secure it with
Screw B./
Inserte el cilindro en la mortaja (los lados frontal y posterior) y asegúrelo con el
Tornillo B.
1)
2)
Front / Frente
Screw A /
Tornillo A
Screw B /
Tornillo B
Front / Frente
Desired height /
Altura Deseada
Door thickness / Grosor de la Perta
45 to 60mm
Backse
t
60m
m
Coloque la plantilla de instalación a la altura deseada.
Place the installation template at the desired height./
Mark the holes to be drilled and drill the marked locations./
Marcque los agujeros que se perforarán y taladre los lugares marcados.
1)
2)
2
Drill Holes on the Door / Taladre Agujeros en la Puerta
5
5
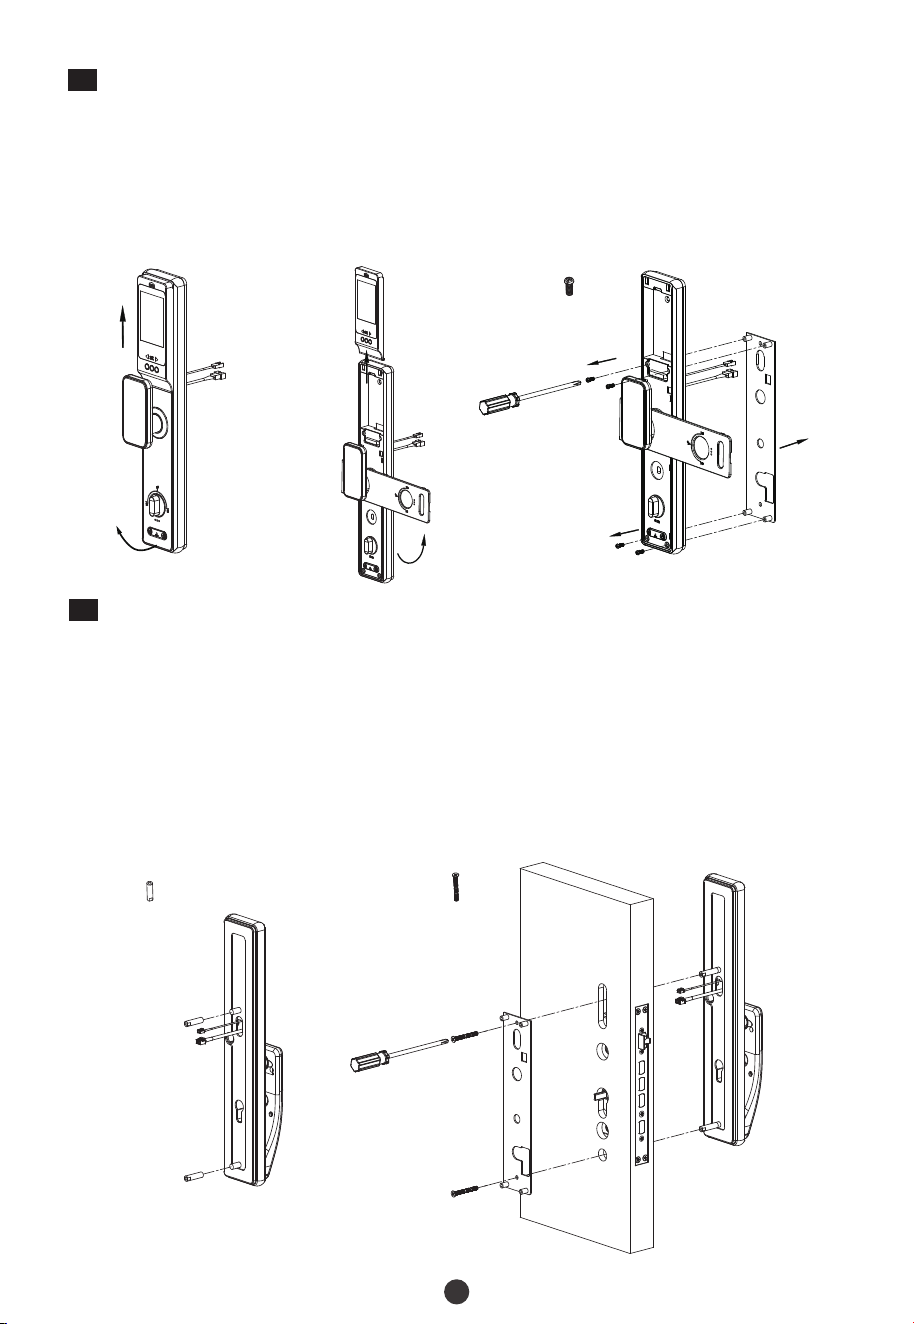
Install Studs and Outdoor Unit / Instale Taquetes y Unidad Exterior
Instale los taquetes en la parte posterior de la unidad exterior.
Install the studs on the back of outdoor unit./
Pass the outdoor unit cable through the upper most cable hole./
Pase el cable de la unidad exterior a través del orificio del cable superior.
1)
2)
Attach the Outdoor unit to the door by inserting the studs through the drilled holes./
Fije la unidad exterior a la puerta insertando los taquetes a través de los orificios
perforados.
3)
4
Uninstall the OLED Screen and Mounting Plate / Desinstale la
Pantalla OLED y Placa de Montaje
Uninstall the OLED screen by pushing up, then uncover the hidden cover from the
bottom of indoor unit./
Empuje hacia arriba para quitar la pantalla OLED, luego levante la cubierta oculta de
la parte inferior de la unidad interior.
Uninstall the screw D and take the Mounting Plate off the indoor unit./
Desinstale el Tornillo D y retire la placa de montaje de la unidad interior.
1)
2)
Screw D /
Tornillo D
Stud /
Taquete
Screw C /
Tornillo C
Coloque la placa de montaje en la puerta interior y use el Tornillo C para asegurarla.
Place the Mounting Plate on the inside door and use Screw C to secure them./
4)
6
7
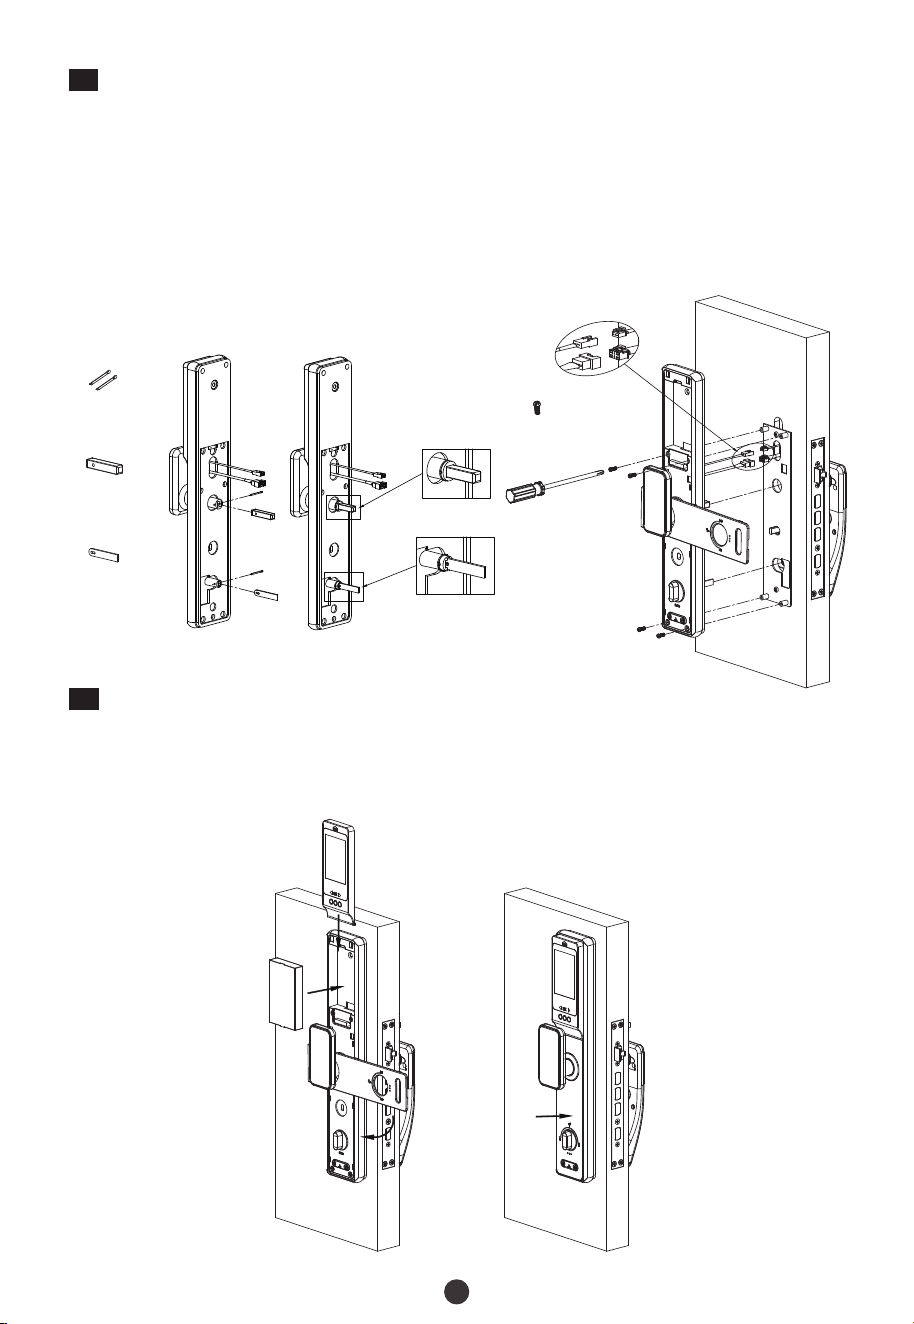
Install Batteries and Cover / Instale la Batería y Cubierta
Inserte la batería de litio y cúbrala con la pantalla OLED, luego empuje hacia atrás la
cubierta oculta.
Insert Lithium Battery and cover them with an OLED Screen model, then push back the
hidden cover./
6
Install Indoor Unit / Instale Unidad Interior
Install Spindle A and Spindle B with Metal Pin./
Instale el Perno A y Perno B con la Barra de Metal.
Connect the cable to the port on the Indoor Unit./
Conecte el cable al puerto de la Unidad Interior.
1)
2)
Place the Indoor Unit properly on the Mounting Plate. Then use Screw D to secure the
Indoor Unit./
Coloque la Unidad Interior correctamente en la placa de montaje. Luego use el
Tornillo D para asegurarla.
3)
Screw D /
Tornillo D
Spindle A /
Perno A
Spindle B /
Perno B
Metal Pin /
Barra de Metal
7
9
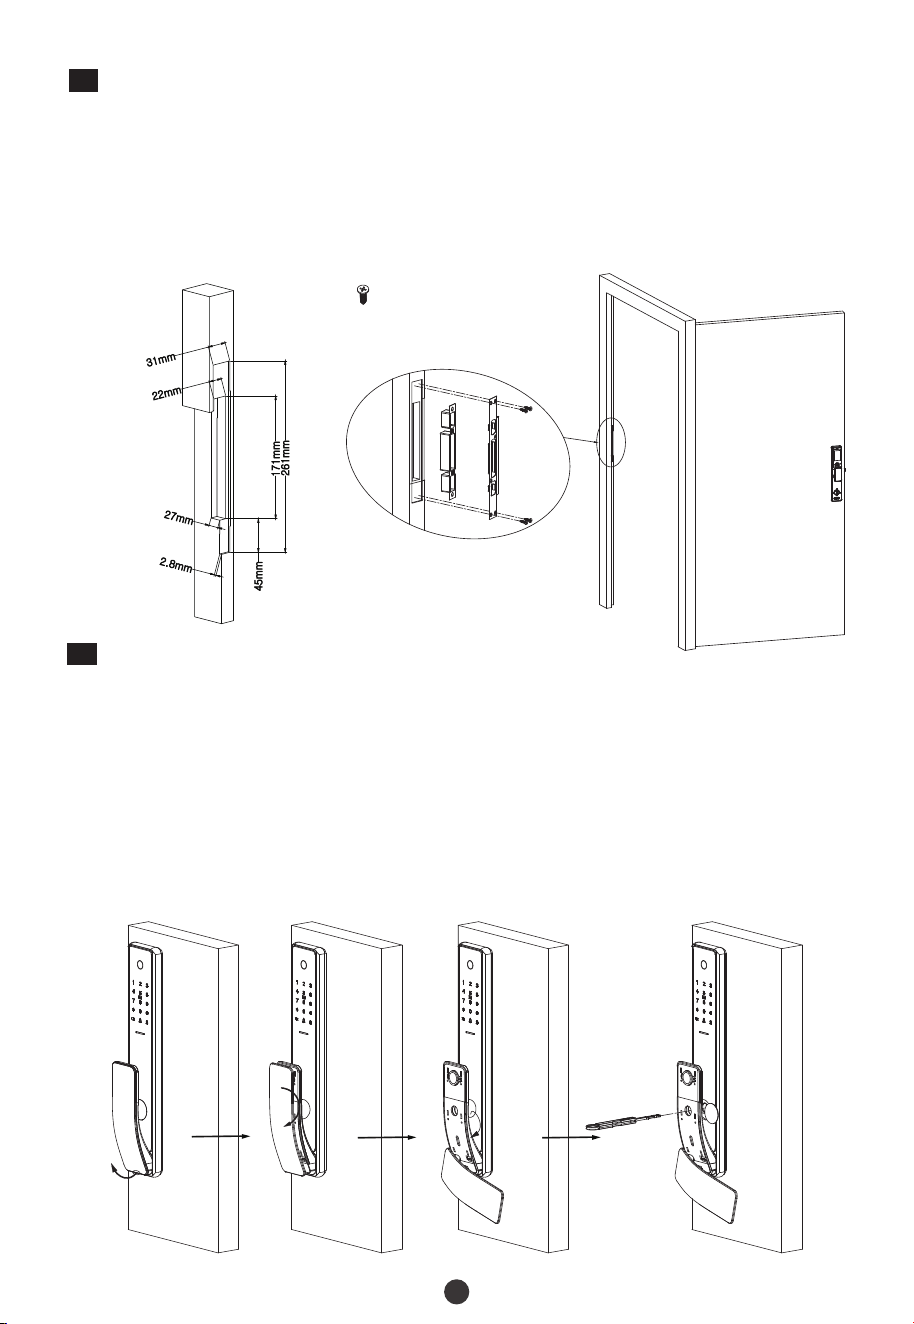
Physical Test / Prueba Física
Uncover the front handle cover from the bottom of outdoor unit, then rotate the
cover 90°./
Destape la cubierta de la manija delantera desde la parte inferior de la unidad
exterior, luego gire la cubierta 90°.
1)
Press the bottom of key hole cover and rotate it 180°./
Presione la parte inferior de la cubierta del orificio de la llave y gírela 180°.
2)
Test the lock by using the mechanical key. / Pruebe la cerradura usando la llave mecánica.
Insert the Key into key hole and rotate 90°, then the latches will be retracted./
Inserte la llave en el orificio de la llave y gírela 90°, luego los pestillos se retraerán.
3)
Make sure that the Strike Box is aligned with the latch bolt. Then, use the installation
template to drill the holes./
Asegúrese de que la Contrachapa esté alineada con el pestillo. Luego, use la plantilla
de instalación para perforar los agujeros.
1)
Align the Strike Plate and Box with the holes drilled and protect them with Screw A./
Alinee la placa metálica y contrachapa con los orificios perforados y asegúrelas con el
Tornillo A.
2)
8
Install Strike Plate and Box / Instale la Placa Metálica y Contrachapa
Screw A /
Tornillo A
Indoor /
Interior
Due to regular upgrades of systems and products, ZKTeco could not guarantee exact consistency
betweenthe actual product and the written information in this manual.
User Manual
Manual de Usuario
Model : / Modelo TL800
Version / Versión: 3.0
En
Es
English / Español

Important Notes / Notas Importantes
TL800 is a Smart Lock. If the lock is not installed properly, it may affect the lifetime of
the lock. We suggest you to install the lock after furnishing. Please prefer a
professional technician to install the lock as per our installation standard./
TL800 es una cerradura inteligente. Si la cerradura no está instalada correctamente,
puede afectar su vida útil. Le recomendamos que instale la cerradura después de
amueblar. se recomienda que la instalación la realice un técnico profesional de
acuerdo con nuestros estándares de instalación.
Para garantizar su seguridad, revise la caja de llave al abrir el paquete del producto.
To ensure your security, please check the box of keys when opening the product
package./
1.
Please initialize the lock after installation and set the Administrator immediately to
avoid others opening the door illegally./
Reinicie la cerradura después de la instalación y registre un Administrador de
inmediato para evitar que otras personas abran la puerta ilegalmente.
2.
3.
Mantenga la información de su administrador confidencial.
Please keep your Administrator’s information confidential. /
4.
Guarde las llaves mecánicas en un lugar seguro para evitar cualquier peligro.
Please keep the mechanical keys in a separate place to avoid any criticality./
5.
Para usar la cerradura de manera más eficiente, consulte el Manual del usuario antes
de utilizarla. Si tiene alguna consulta, no dude en comunicarse con el Centro de
Servicio al Cliente de la Compañía o comuníquese con la sede del Centro de Servicio.
To use the lock more efficiently, please refer the User Manual before using the lock. If
you have any queries, please feel free to contact the Company's Client Service Center
from any place or contact the Service Center headquarters./
6.
Please visit our company's website at anytime for our service information and regular
updates on products./
Visite el sitio web de nuestra empresa en cualquier momento para obtener
información sobre nuestros servicios y actualizaciones periódicas sobre los
productos.
7.
Recommended fingers: Use your index, middle, or ring fingers instead of your thumb
or pinky, which are more challenging to press precisely against the fingerprint
reader. When registering, change fingerprint area as prompt./
Fingerprint Positioning / Consejos de posicionamiento de huellas dactilares:
Dedos recomendados: Índice, medio o anular; evite usar el pulgar o el meñique, ya
que es difícil presionar con precisión sobre el lector de huellas digitales con estos. Al
registrarse, siga las indicaciones para cambiar el área de la huella dactilar.
8.
Too low /
Demasiado baja
Too close to the edge /
Demasiado cerca del borde
OK /
OK
OK /
OK
Vertical /
Verticalmente

Table of Contents / Tabla de Contenido
How to use OLED Screen Model? / ¿Cómo Usar el Módulo de Pantalla OLED?..............7
Unlocking Door with Password / Desbloquee la Cerradura con Contraseña.............................6
5. Programming the Features through Menu Mode / Programación de las Funciones a
Definitions / Def iniciones...............................................................................................1
4. Register the First Administrator / Registrar el Primer Administrador.......................................3
How to Use / Cómo Utilizar.............................................................................................3
2. Activate the Lock / Active la Cerradura...............................................................................................3
Product Overview / Vista del Producto..........................................................................1
3. Mechanical Adjustment / Ajustes Mecánicos..................................................................................3
través del Menú...............................................................................................................................................4
Quick Start / Inicio Rápido..............................................................................................6
Unlocking Door with Card / Desbloquee la cerradura con Tarjeta.................................................6
Unlocking Door with Smart Phone / Desbloquee la Cerradura con Smartphone.....................6
Programming the Features through Menu Mode / Programación de las funciones a través
de Menú.............................................................................................................................................................7
Unlocking Door with Fingerprint / Desblouqee la Cerradura con Huella....................................6
1. Reset the Lock / Reinicie la Cerradura.................................................................................................3
How to connect to ZSmart APP? / ¿Cómo Conectarse a la App ZSmart?.......................9
Overview / Visión General............................................................................................................................7
1
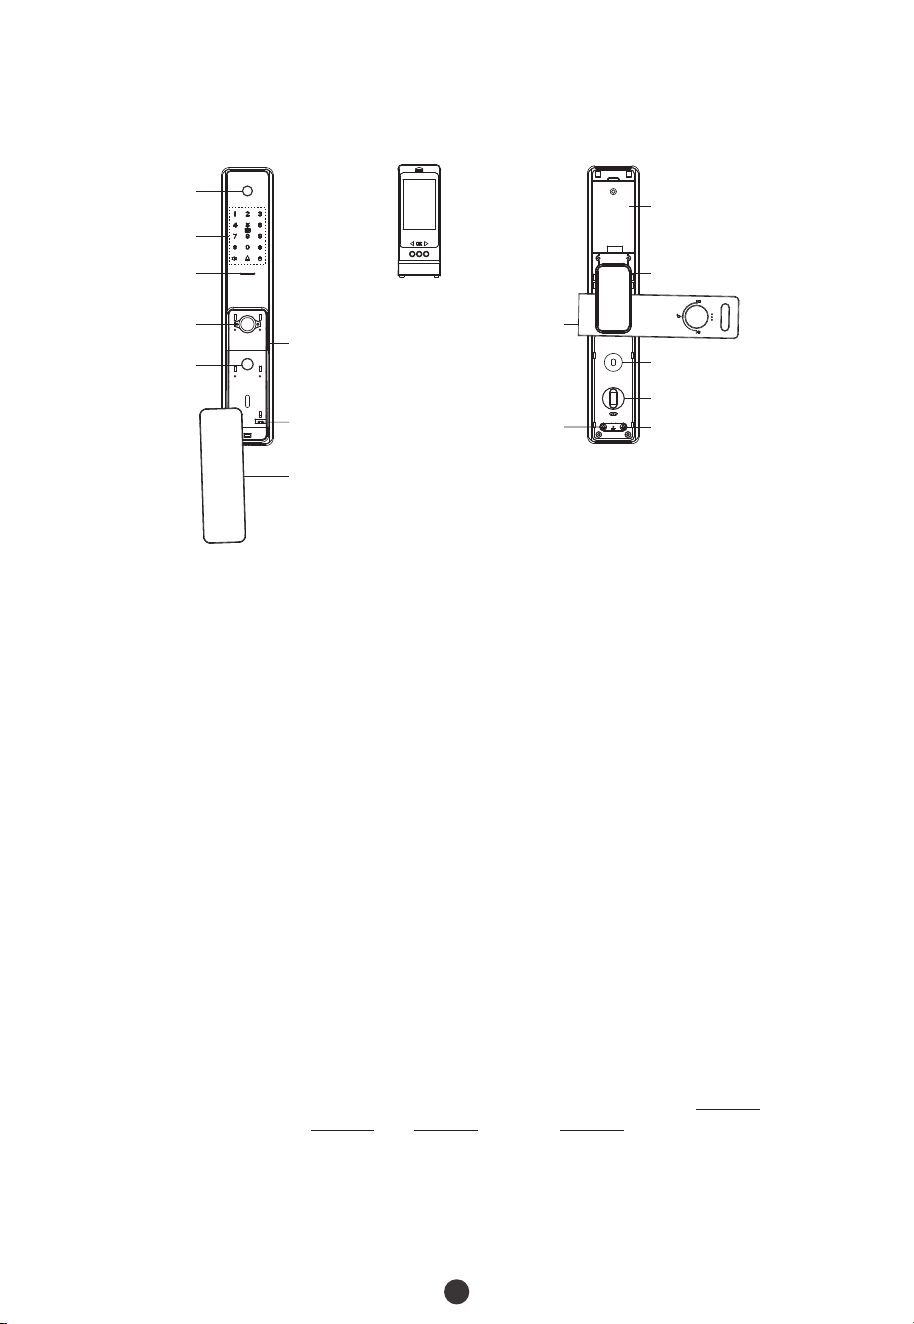
Product Overview / Vista del Producto
Note: The first administrator must be password, all other users can register fingerprints,
password, or card./
Nota: El método de verificación del primer administrador debe ser una contraseña, y otros
usuarios pueden registrar huellas digitales, contraseña o tarjeta.
Inicialización: Todos los datos de usuario registrados serán eliminados y restaurados a
valores de fábrica.
Initialization: All the registered user data will be deleted and it will be restored to the
factory settings./
Roles de usuario: La cerradura está diseñada para dos roles de usuario: Administrador y
Usuario. El grupo de administradores tiene permiso para ingresar al menú y abrir la puerta,
pero el grupo de usuarios solo tiene permiso para abrir la puerta.
User Roles: The lock can be handled by two user roles namely Administrator and User. The
Administrator has the privilege to access the menu and also to open the door. The user has
the only privilege to open the door./
Contraseña Aleatoria: Para proteger la contraseña, los usuarios pueden ingresar su
contraseña con dígitos aleatorios antes o después de la contraseña real. Se puede ingresar
un máximo de 30 números. Por ejemplo: si la contraseña correcta es 123456, entonces la
contraseña aleatoria puede ser 89123456807, 1234562363, 389123456, etc.
Random Password: To protect the password, users may enter their password with
random digits before or after the actual password. The maximum number of entered digits
must be less than or equal to 30. For example: If the correct password is 123456, then the
random password can be 89123456807, 1234562363, 389123456, etc./
Definitions / Def iniciones
Lithium Battery /
Batería de Litio
Hidden Cover /
Cubierta Oculta
Front Handle Cover /
Cubierta de la Manija
Delantera
Handle / Manija
Clutch / Embrague
Double Locking Knob /
Perilla de Cerrojo Doble
Quick Close Button /
Botón de Bloqueo Rápido
Camera / Cámera
Keypad & Card
Detection Area /
Teclado y Área de
Detección de la
Tarjeta
Indicator Light /
Luz del Indicador
Fingerprint Sensor
(Hidden) /
Sensor de Huella
Digital (Oculto)
Quick Unlock
Button /
Botón de
Desbloqueo
Rápido
OLED Screen Model /
Módulo de Pantalla OLED
Handle / Manija
Mechanical Key
Hole (Hidden) /
Orificio para la
Llave Mecánica
(Oculto)
Emergency Power
Interface (Micro USB) /
Interfaz para Carga de
Emergencia (Micro USB)

Double Locking: Double locking prevents the lock from being unlocked from the
outside. Users can enable it by rotating the double locking knob./
Bloqueo Doble: El bloqueo doble evita que la cerradura se desbloquee desde el exterior.
Puede habilitarlo girando la perilla de cerrojo doble.
Debug Mode: Se utiliza para cambiar la dirección de apertura, la potencia del motor y la
demostración en estado de fábrica. Después de agregar cualquier usuario, este modo será
inválido.
Debug Mode: It is used to change open direction, the power of motor and demonstration
under factory status. After adding any one user, this mode will be invalid./
Emergency Mechanical Key: The mechanical key is used to open the door when the lock
has electronic malfunction./
Llave Mecánica de Emergencia: La llave mecánica se utiliza para abrir la puerta cuando
la cerradura tiene un mal funcionamiento electrónico.
22
Carga de Emergencia: La parte inferior de la cerradura tiene un puerto Micro-USB. Use un
cargador portátil para cargar la cerradura cuando se quede sin energía.
Emergency Charging: The bottom of the outdoor unit is provided with a Micro-USB
interface. Use a power bank to charge the lock when it is out of power./
Quick Close Function: Press Quick Close Key on keypad or Quick Close Button on the
bottom of indoor unit, the latches will pop-up to lock./
Función de Bloqueo Rápido: Presione la tecla Bloqueo Rápido en el teclado o el botón de
Bloqueo Rápido en la parte inferior de la unidad interior, los pestillos saldrán para
desbloquear.
Backup Enrollment: After the first registration, users can change to register password
and card, or continue to register the remaining fingerprints./
Registro de Respaldo: Después de su primer registro, podrá cambiar su registro de
contraseña y tarjeta, o continúe registrando las huellas digitales restantes.
Modo Normalmente Abierto: Esta función es para mantener la puerta siempre abierta, lo
que es adecuado para salas de reuniones y lugares sin restricciones de acceso.
Always Open Mode: This function is to keep the door always unlocked, which is suitable
for meeting rooms and places with no access restriction./
Low Battery Warning: When the battery power is low, the lock will prompt “Low battery,
please change!” after being turned on. If lower, the lock will prompt ”Low battery, shut
down soon!”, users cannot access the Main Menu./
Advertencia de Batería Baja: Cuando la energía de la batería es baja, la cerradura
indicará "¡Batería baja, reemplace las baterías! " después de ser encendida. Si es más
baja, la cerradura indicará, ”Batería se está agotando, apagándose pronto!”, y en este
caso, no puede acceder al Menú.
3
How to Use / Cómo Utilizar
Press and hold the Reset button for 5 seconds. The lock will beep for 5 times. Keep
holding the Reset button until you hear the audio prompt, please press # key to
confirm./
Mantenga presionado el Botón de Reinicio durante 5 segundos, la cerradura emitirá un
pitido 5 veces. Mantenga presionado el Botón de Reinicio hasta que escuche un mensaje
de audio, presione la tecla # para confirmar.
1
Reset the Lock / Reinicie la Cerradura
2
Activate the Lock / Active la Cerradura
Toque el teclado con el dorso de la mano o los dedos para activar la cerradura.
Touch the keypad with the back of your hand or fingers to activate the lock./
Before using formally, need to make some mechanical adjustment to eliminate something
wrong. The programming is as below:/
Antes del uso, se requieren algunos ajustes mecánicos para eliminar algún error. La
programación es la siguiente:
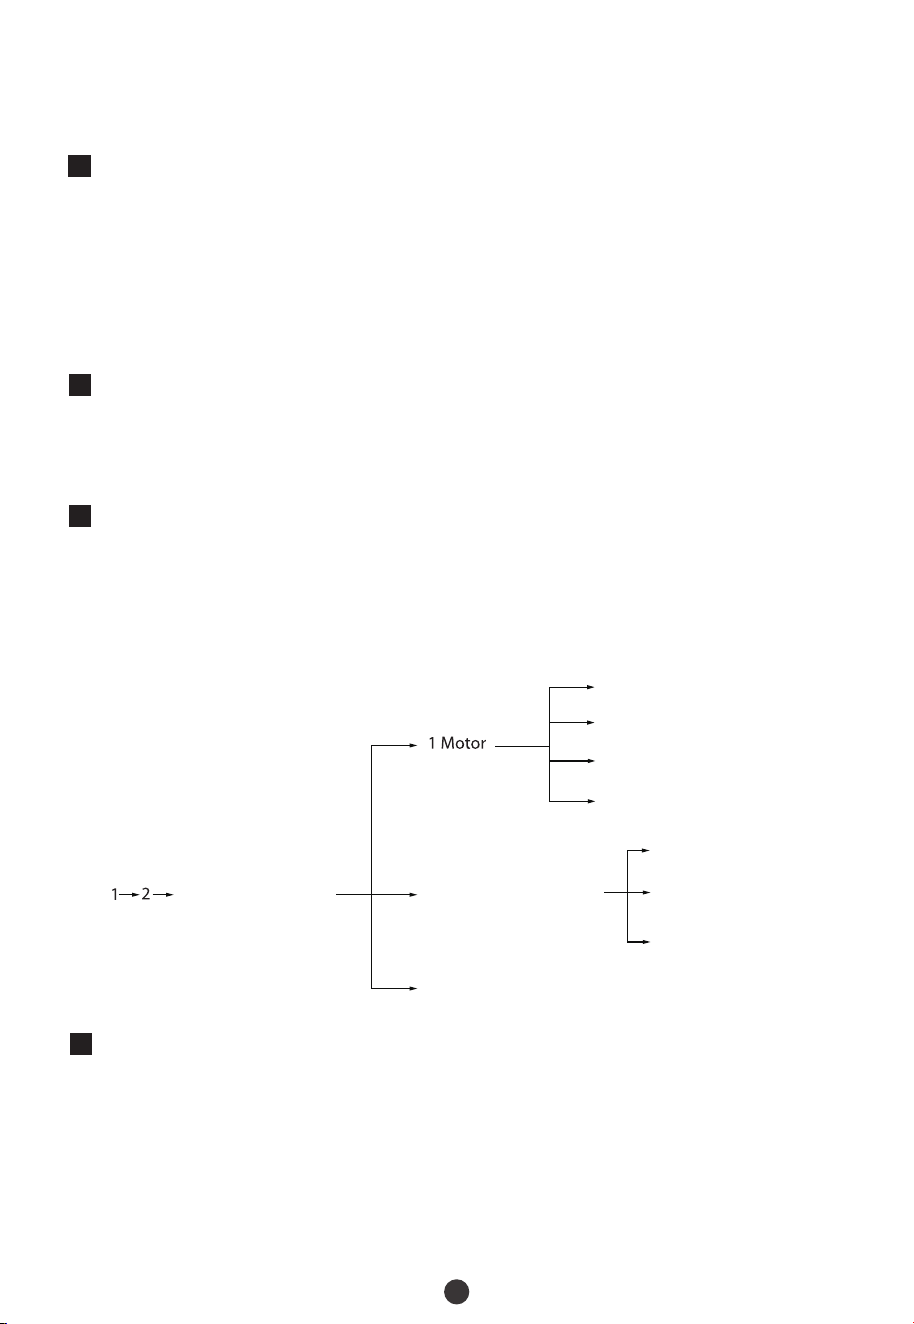
3
Mechanical Adjustment / Ajustes Mecánicos
Press and hold the Reset button for 5 seconds. The lock will beep for 5 times. Keep
holding the Reset button until you hear the audio prompt, please press # key to
confirm./
Mantenga presionado el Botón de Reinicio durante 5 segundos. La cerradura emitirá un
pitido 5 veces. Mantenga presionado el Botón de Reinicio hasta que escuche el mensaje
de audio, presione la tecla # para confirmar.
4
Register the First Administrator / Registrar el Primer Administrador
1 Direction / Dirección
2 Motor Torque /
Par de Torsión del Motor
3 Latch Bolt Drive Time /
Tiempo de Rotación del Pestillo
* Exit / Salir
2 Unlock Setting /
Ajustes de Desbloqueo
1 Auto Lock /
Bloqueo Automático
2 Latch Bolt Delay /
Retardo del Pestillo
* Exit / Salir
3 Demo Mode / Modo de Demostración
Input / Ingrese 888#

5
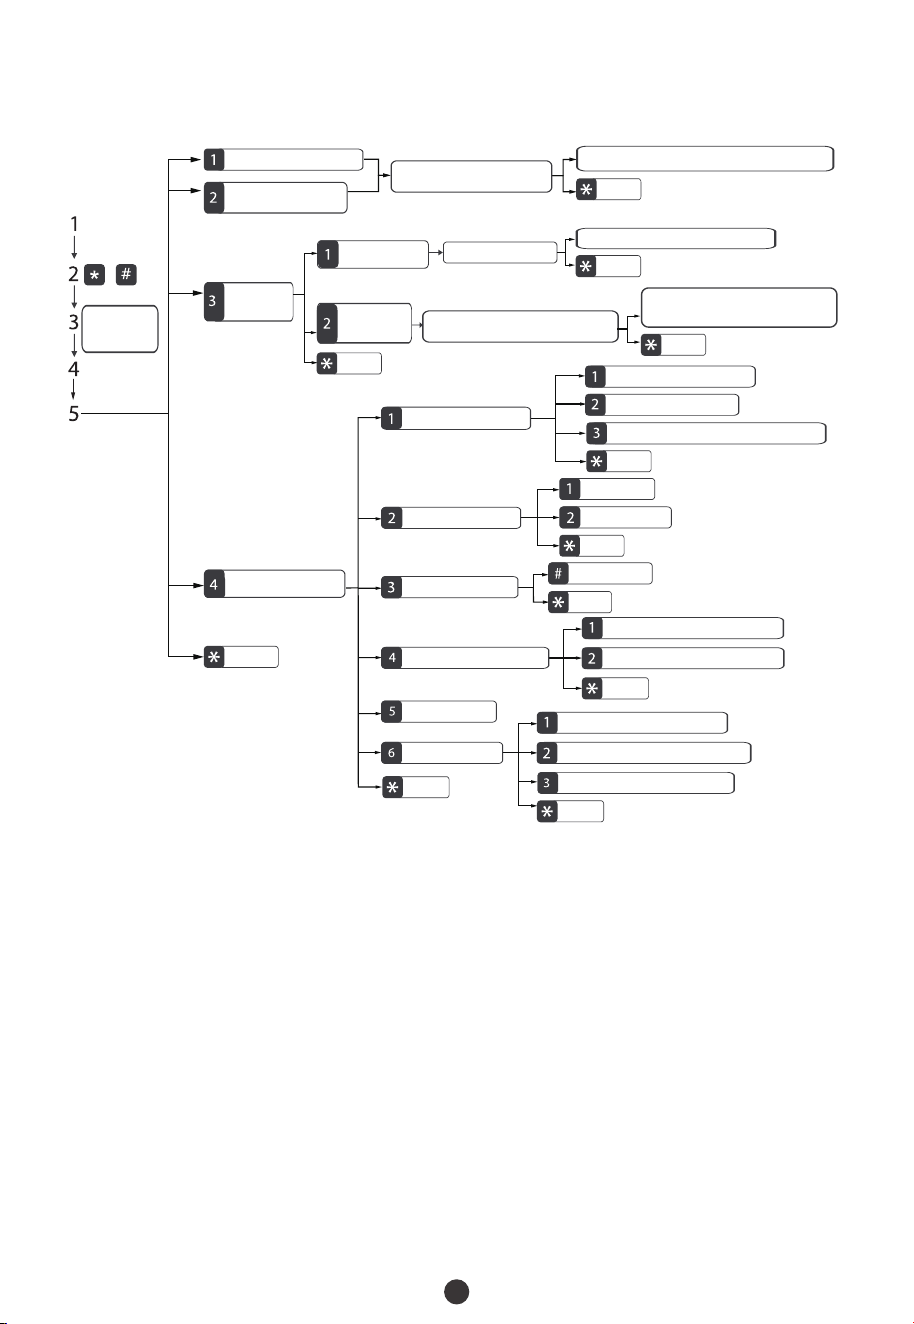
Programming the Features through Menu Mode / Programación
de las Funciones a través del Menú
Touch the keypad to activate the lock. / Toque el teclado para activar la cerradura.
1)
Presione las teclas * y # para acceder al menú.
Press the * + # key to access the menu./
2)
Verifique el administrador con su huella digital o tarjeta, o ingresando la contraseña y
Verify the administrator's identity with his/her fingerprint or card, or by entering the
password then press the # key to confirm./
luego presione la tecla # para confirmar.
3)
Enter the digit corresponding to the function to be performed by following the audio
guide./
Ingrese el dígito correspondiente a la función que desea realizar siguiendo la
indicación.
4)
Touch the keypad to activate the lock. / Toque el teclado para activar la cerradura.
1)
Press the * # key to start the registration process. The user will hear a prompt “Please
register administrator password, press star to exit”./
Presione las teclas * y # para iniciar el proceso de registro. El usuario escuchará el
mensaje "Por favor, registre un administrador, ingrese contraseña y, presione la tecla
asterisco para salir".
2)
Enter the group password. / Ingrese la contraseña.
3)
Proceed further according to prompts./
Continúe la operación de acuerdo con las indicaciones.
4)
Note / a: Not
The registered password can be of 6 to 12 digits./
El administrador que ha iniciado sesión actualmente no puede eliminar sus datos de
administrador.
La contraseña registrada puede ser de 6 a 12 dígitos.
The currently logged-in administrator cannot delete his/her admin data./
1)
2)
4
Note: Please choose Accesspoint Config to configure network./
Nota: Elija la Configuración de Hotspot para configurar la red.
Press Fingerprint/Enter Password/Swipe Card to
Continue /
Presione Huella/Ingrese Contraseña/Deslice
Tarjeta para Continuar
Press Fingerprint/Enter Password/Swipe Card /
Presione Huella/Ingrese Contraseña/Deslice
Tarjeta
Add User / Agregar Usuario
Add Administrator /
Agregar Administrador
Register Fingerprint/Password/Card /
Registre una Nueva Huella/Contraseña/
Tarjeta para Continuar
Register a New Fingerprint/Password/Card to Continue/
Registre una Nueva Huella/Contraseña/Tarjeta para Continuar
Exit / Salir
Exit / Salir
Exit / Salir
Exit / Salir
Exit / Salir
Exit / Salir
Exit / Salir
Exit / Salir
Exit / Salir
Exit / Salir
Exit / Salir
Administrator
Verification /
Verificar como
Admin
Delete User /
Eliminar
Usuario
Delete by Number /
Eliminar por Número
Enter User Number /
Ingrese Número de Usuario
Enter Another User Number to Continue /
Ingrese Otro Número de Usuario para Continuar
Verify to Delete /
Comprobar para
Eliminar
System Management /
Gestión del Sistema
Unlock Setting /
Configuración de Desbloqueo
Latch Bolt Delay Time / Tiempo de Retardo del Pestillo
Passageway / Normalmente Abierto
Auto Lock / Bloqueo Automático
Anti-prying Detection /
Detección de Puerta Forzada
Enable / Habilitar
Disable / Deshabilitar
Restore Factory Setting /
Restaurar Ajustes de Fábrica
Confirm / Confirmar
Language&VolumeSetting /
Configuración de Idioma y Volumen
Volume Setting / Configuración de Volumen
Language Setting / Configuración de Idioma
Time Setting /
Configuración de Hora
Network Configuration /
Configuración de Red
Verison Upgrade / Actualización de Versión
Smart Config / Configuración Inteligente
Accesspoint Config / Configuración de Hotspot
5
Quick Start / Inicio Rápido
Atención: Si la verificación ha fallado tres veces consecutivas, la cerradura generará una
alarma. Si la verificación ha fallado cinco veces consecutivas, el dispositivo se bloqueará
durante 95 segundos y no se podrá realizar ninguna operación durante este período.
Attention: If the verification has failed for three times consecutively, the lock will
generate an alarm. If the verification has failed for five times consecutively, the device
will freeze for 95 seconds and no operation can be performed during this period./
Unlocking Door with Fingerprint / Desblouqee la Cerradura con Huella
Hold the handle of the outdoor unit /
Sujete la manija de la unidad exterior
Press the registered fingerprint on the fingerprint
sensor /
Presiona la huella registrada en elsensor de
huella digital
Unlocking Door with Password / Desbloquee la Cerradura con Contraseña
Touch the keypad to activate the lock /
Toque el tecladopara activar la cerradura
Enter the registered password and press the #
key to confirm /
Ingrese la contraseña registrada y presione la
tecla # para confirmar
Nota: Los usuarios puede ingresar unna contraseña aleatoria para evitar que cualquier
persona observa la contraseña. la longitud máxima de la contraseña aleatoria es de 30
dígitos.
Note: Users may enter a random password to prevent any person from observing the
password. The maximum length of random password is upto 30 digits./
Unlocking Door with Card / Desbloquee la cerradura con Tarjeta
Swipe the registered card on the
detection area /
Deslice la tarjeta resgistrada en el área
de detección
Unlocking Door with Smart Phone / Desbloquee la Cerradura con
Smartphone
Press the # key to ask Remote Unlock /
Presione la tecla # para solicitar un
Desbloqueo remoto
Master's smart phone receives the Remote
Unlock requirement, and allow to unlock on APP /
El Smartphone del maestro recibe el requisito de
desbloqueo remoto y lo permite en la aplicación
6
7
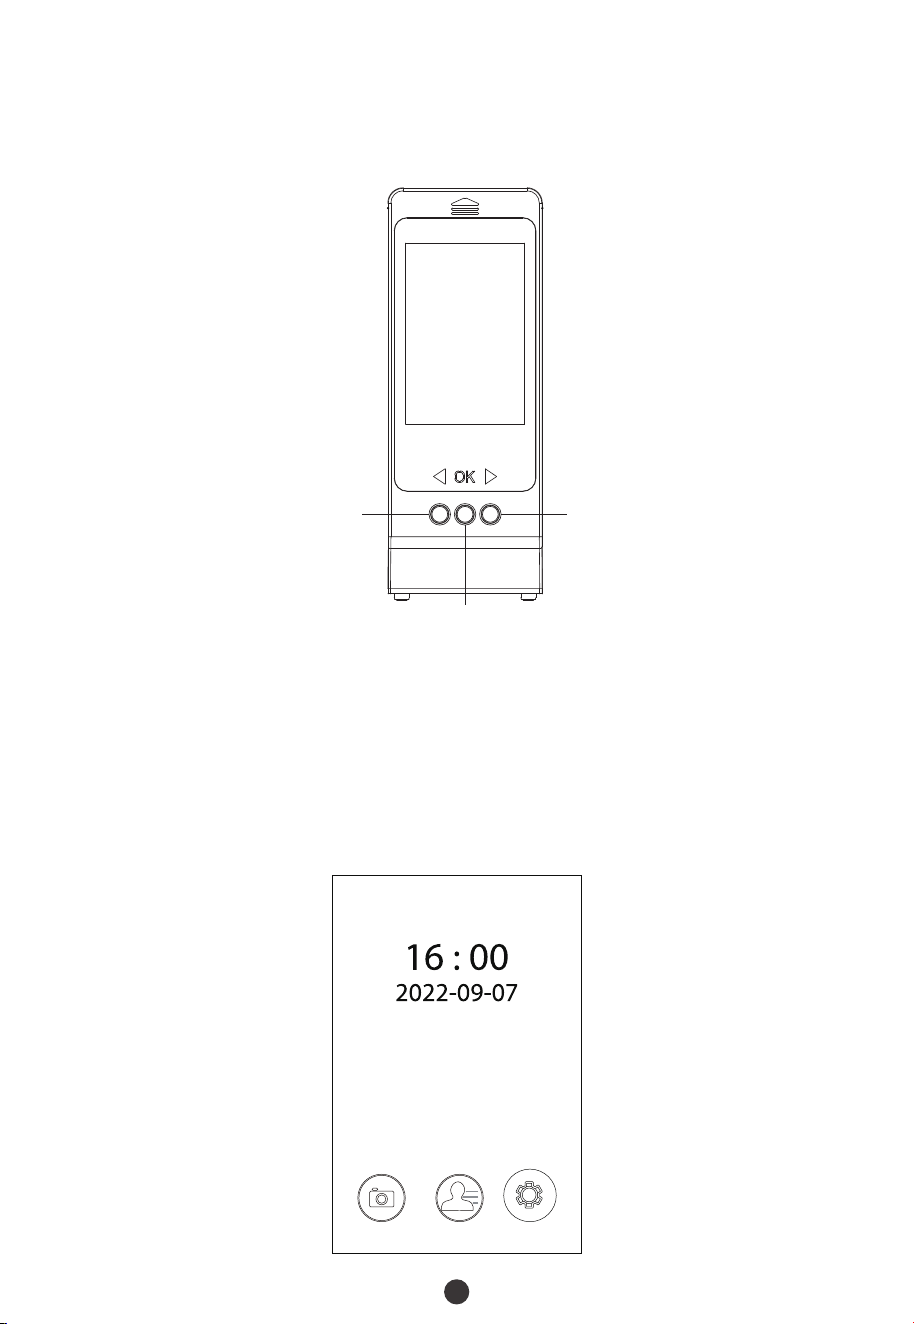
How to use OLED Screen Model? /
¿Cómo Usar el Módulo de Pantalla OLED?
Overview / Visión General
Programming the Features through Menu Mode / Programación de
las funciones a través de Menú
Press Down button to enter menu, choose Camera, Files or Set mode freely through
buttons./
Presione el botón de Ir Abajo para acceder al menú, y luego elija libremente el modo
de Cámara, Archivos o Ajuste a través de los butones.
Press Power On button to activate the model (camera mode)./
Presione el botón Encendido para activar el módulo(modo de cámara).
1)
2)
Up/Power Off /
Ir Arriba/Apagado
Down/Back /
Ir Abajo/Volver Atrás
OK/Power On /
OK/Encendido
Camera /
Cámara
Files /
Archivos
Set /
Ajuste

8
Camera: Go to camera mode, customer can watch outside through the camera on
outdoor unit./
Cámara: Al acceder al modo de cámara, se pueden ver la situación del exterior a través de
la cámara en la unidad exterior.
Ajustes: Se utiliza para configurar las siguientes funciones de este módulo:
Set: It is used to set functions of this model. As below: /
Files: All of photographs and videos are saved at here, before using this function, please
insert a TF on this model./
Archivos: Todas las fotografías y videos se guardan aquí, antes de usar esta función,
inserte una tarjeta TF en este módulo.
Record: Choose Photograph or Record (video) as records saving mode./
Registro: Elija ograph Fotografía o Grabación(video) como modo de guardado de
registros.
1)
2)
Continuous: Set the number of pictures one shooting, two or five, press OK button
to shoot at camera mode./
Disparo Continuo(Modo Ráfaga): Modifique el número de fotos para tomar una,
dos o cinco fotos, presione el botón OK para tomar fotos en el modo de cámara.
3)
Modo de Respuesta del Timbre: Elija Handmovement, cuando presione la tecla del
Bell Answer Mode: Choose Handmovement, when press doorbell key, the model
will not power on until press power on button inside; choose Auto, when press
doorbell key, the model will power on automatically./
timbre, el módulo no se encenderá hasta que presione el botón de encendido en el
interior; elija Auto, cuando presione la tecla del timbre, el módulo se encenderá
automáticamente.
4)
Camera Angle: Choose All Angle, customer can watch 360° scenario, but the shape
of objects will distort, choose Undeformed, will not./
Ángulo de Cámara: Elija Ángulo Completo, se puede ver escenas en 360° , si
selecciona Sin Deformar, la forma del objeto será normal.
5)
6)
Apagado Automático: Programe el tiempo de apagado.
Auto Shutdown: Schedule the power off timing./
Language: Change the language of this model./
Idioma: Cambie el idioma de este módulo.
7)
8)
Date: Set the date and time of this model./
Fecha: Ajuste la fecha y hora de este módulo.
Formato: Tenga en cuenta que se eliminarán todos los registros guardados en la
tarjeta TF.
Format: Please considerate, all of records in TF will be deleted./
9)
Restaurar Ajustes de Fábrica: Tenga en cuenta que se eliminarán todos los registros
guardados en la tarjeta TF.
Restore Setting: Please considerate, all of records in TF will be deleted./
10)
Software Version: To check the firmware version of this model./
Versión de Software: Para confirmar la versión de firmware del módulo.
11)
WIFI Quality: Set the clarity of pictures and video under WIFI configuration./
Calidad de Wi-Fi: Ajuste la claridad de las imágenes y el video en la configuración de
Wi-Fi.
12)
Quit: Exit the menu. / Salir: Salir del menú.
USB Adapter Requirement / Requisito del Adaptador USB: DC 5V, 2A

How to connect to ZSmart APP? /
¿Cómo Conectarse a la App Zsmart?
9
Para configurar el dispositivo, conecte su teléfono inteligente a una red Wi-Fi segura,
luego configure la Configuración de Hotspot en la cerradura.
To pair the device, connect your smartphone to a secure Wi-Fi network, then set
Access Point Config on the smart lock./
Search for the ZSmart App in Apple App Store or Google Play Store and download the
App to your smartphone. /
Busque la aplicación ZSmart en Apple App Store o Google Play Store y descárguela
en su teléfono inteligente.
1)
3)
Elija Agregar Dispositivo en la esquina superior derecha de la aplicación ZSmart y
haga clic en el ícono Cerradura Inteligente para elegir TL800, luego ingrese la cuenta
y la contraseña de Wi-Fi.
Choose Add Device in the upper right corner of the ZSmart APP, and click the Smart
Lock icon to choose TL800, then enter the account and Wi-Fi password./
4)
Cambie al Modo AP en la esquina superior derecha de esta página, luego continúe
conectándose al Wi-Fi de la cerradura inteligente; el formato es SmartLife-XXXX.
Change to AP Mode in the upper right corner of this page, then proceed to connect
the Wi-Fi of the smart lock; the format is SmartLife-XXXX./
5)
You will see that the device is configuring when you return to the ZSmart APP. Wait a
moment for success./
Cuando regrese a la aplicación ZSmart, verá que el dispositivo se está configurando.
Espere un momento y la conexión será exitosa.
6)
Abra la aplicación ZSmart e inicie sesión con su cuenta. Si no tiene una cuenta, creéla
con su número de teléfono o correo electrónico.
Open the ZSmart App and log in with your account. If you do not have an account,
create an account with your phone number or Email ID./
2)

This device complies with Part 15 of the FCC Rules. Operation is subject to the following
two conditions: (1) This device may not cause harmful interference, and (2) this device
must accept any interference received, including interference that may cause undesired
operation.
This equipment has been tested and found to comply with the limits for a Class B digital
device, pursuant to Part 15 of the FCC Rules. These limits are designed to provide
reasonable protection against harmful interference in a residential installation. This
equipment generates, uses, and can radiate radio frequency energy and, if not installed
and used in accordance with the instructions, may cause harmful interference to radio
communications. However, there is no guarantee that interference will not occur in a
particular installation. If this equipment does cause harmful interference to radio or
television reception, which can be determined by turning the equipment off and on, the
user is encouraged to try to correct the interference by one or more of the following
measures:
IMPORTANT! Any changes or modifications not expressly approved by the party
responsible for compliance could void the user's authority to operate the equipment.
Reorient or relocate the receiving antenna.
Increase the separation between the equipment and receiver.
Connect the equipment into an outlet on a circuit different from that to which the
receiver is connected.
Consult the dealer or an experienced radio/TV technician for help.
Warning:
FCC RF Radiation Exposure Statement:
This Transmitter must not be co-located or operating in conjunction with any other
antenna or transmitter.
This equipment complies with RF radiation exposure limits set forth for an
uncontrolled environment.
