EN
Owner's manual
THANK YOU FOR BUYING A HOTPOINT-ARISTON
PRODUCT
In order to receive a more complete assistance, please
register your product on www . register10 . eu
PLEASE SCAN THE QR CODE ON
YOUR APPLIANCE IN ORDER TO
REACH MORE INFORMATION
Before using the appliance carefully read the Safety
Instruction.
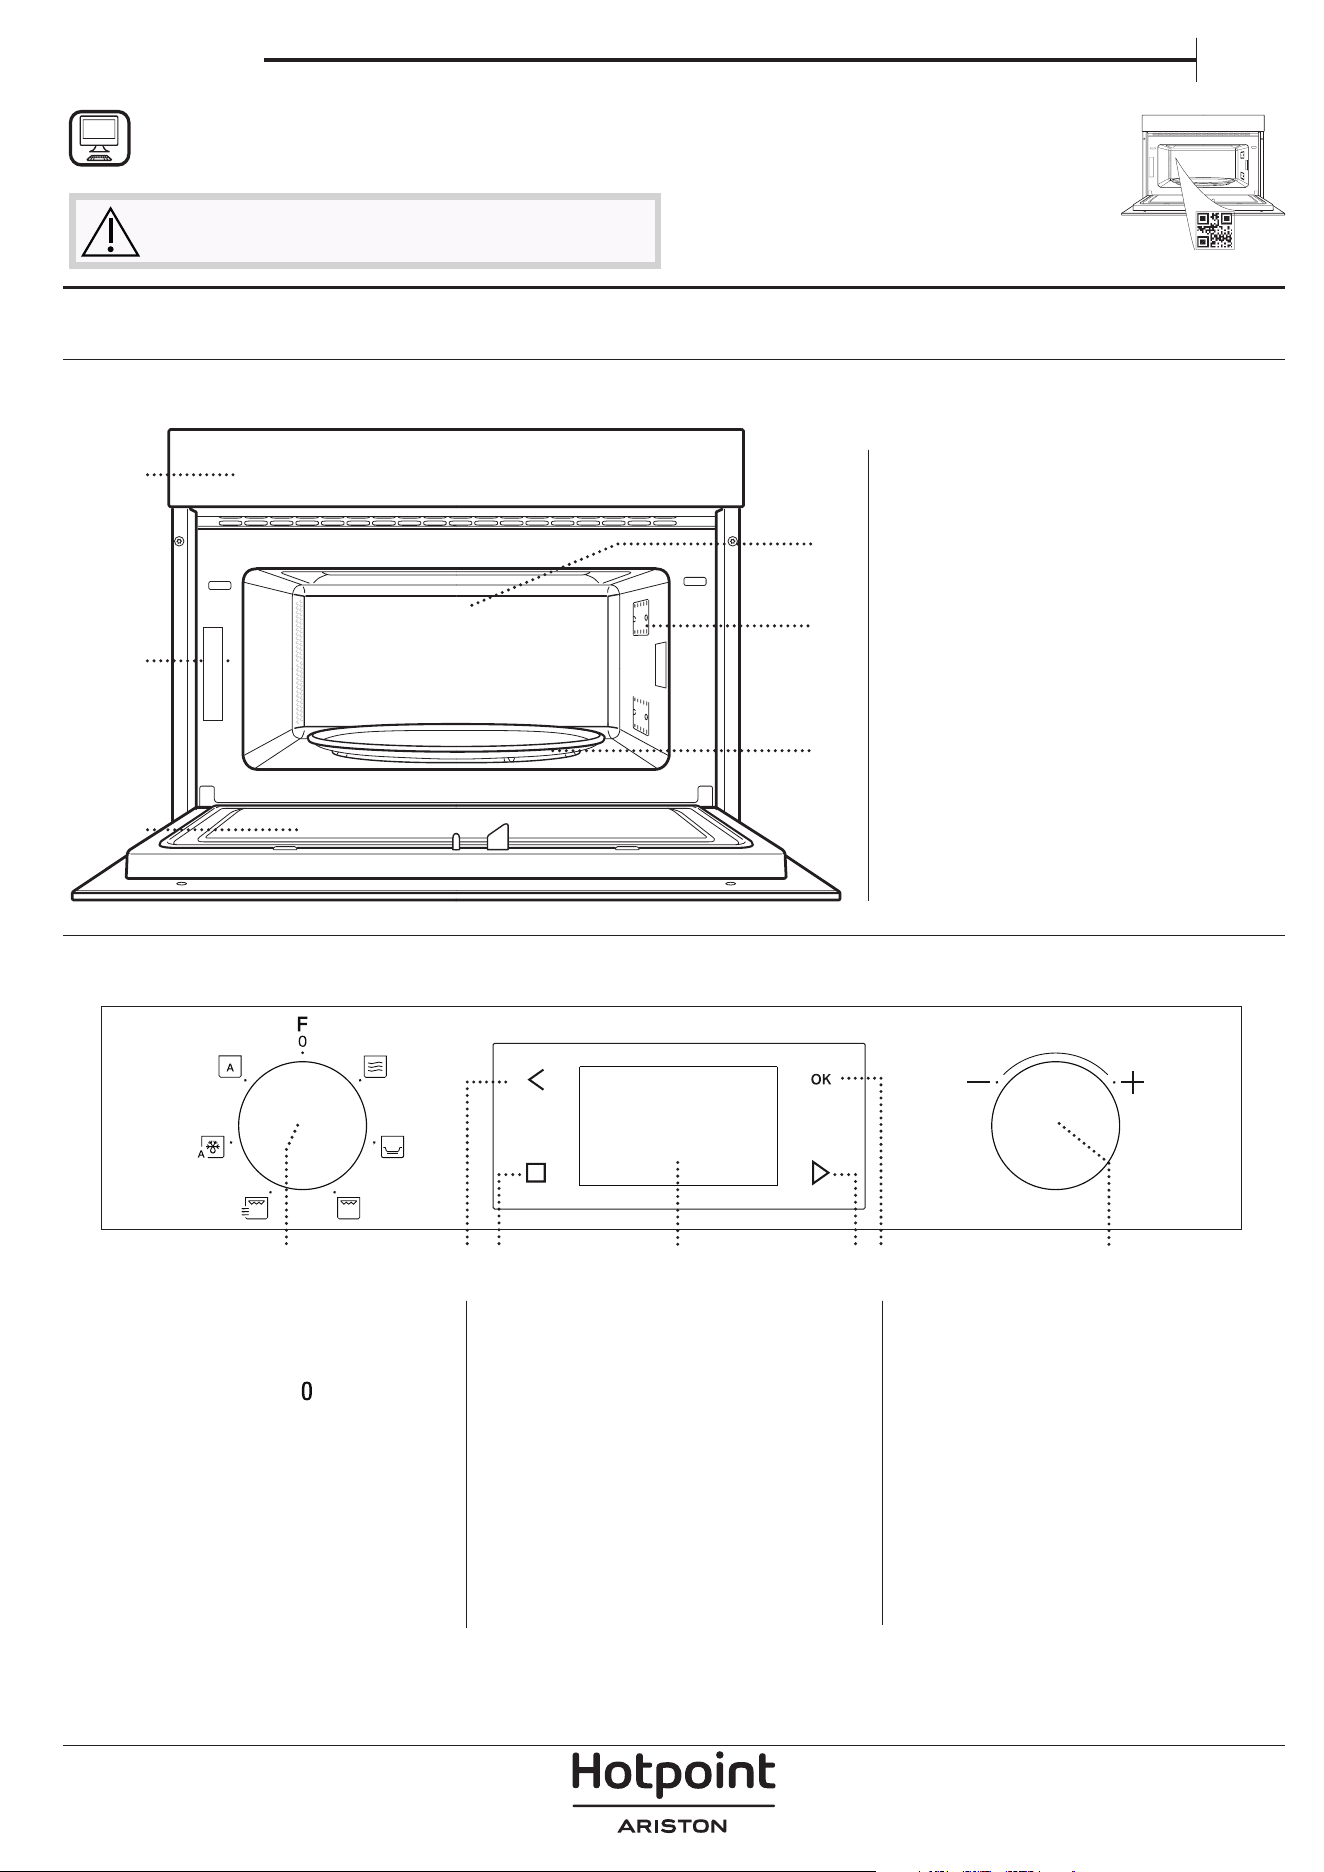
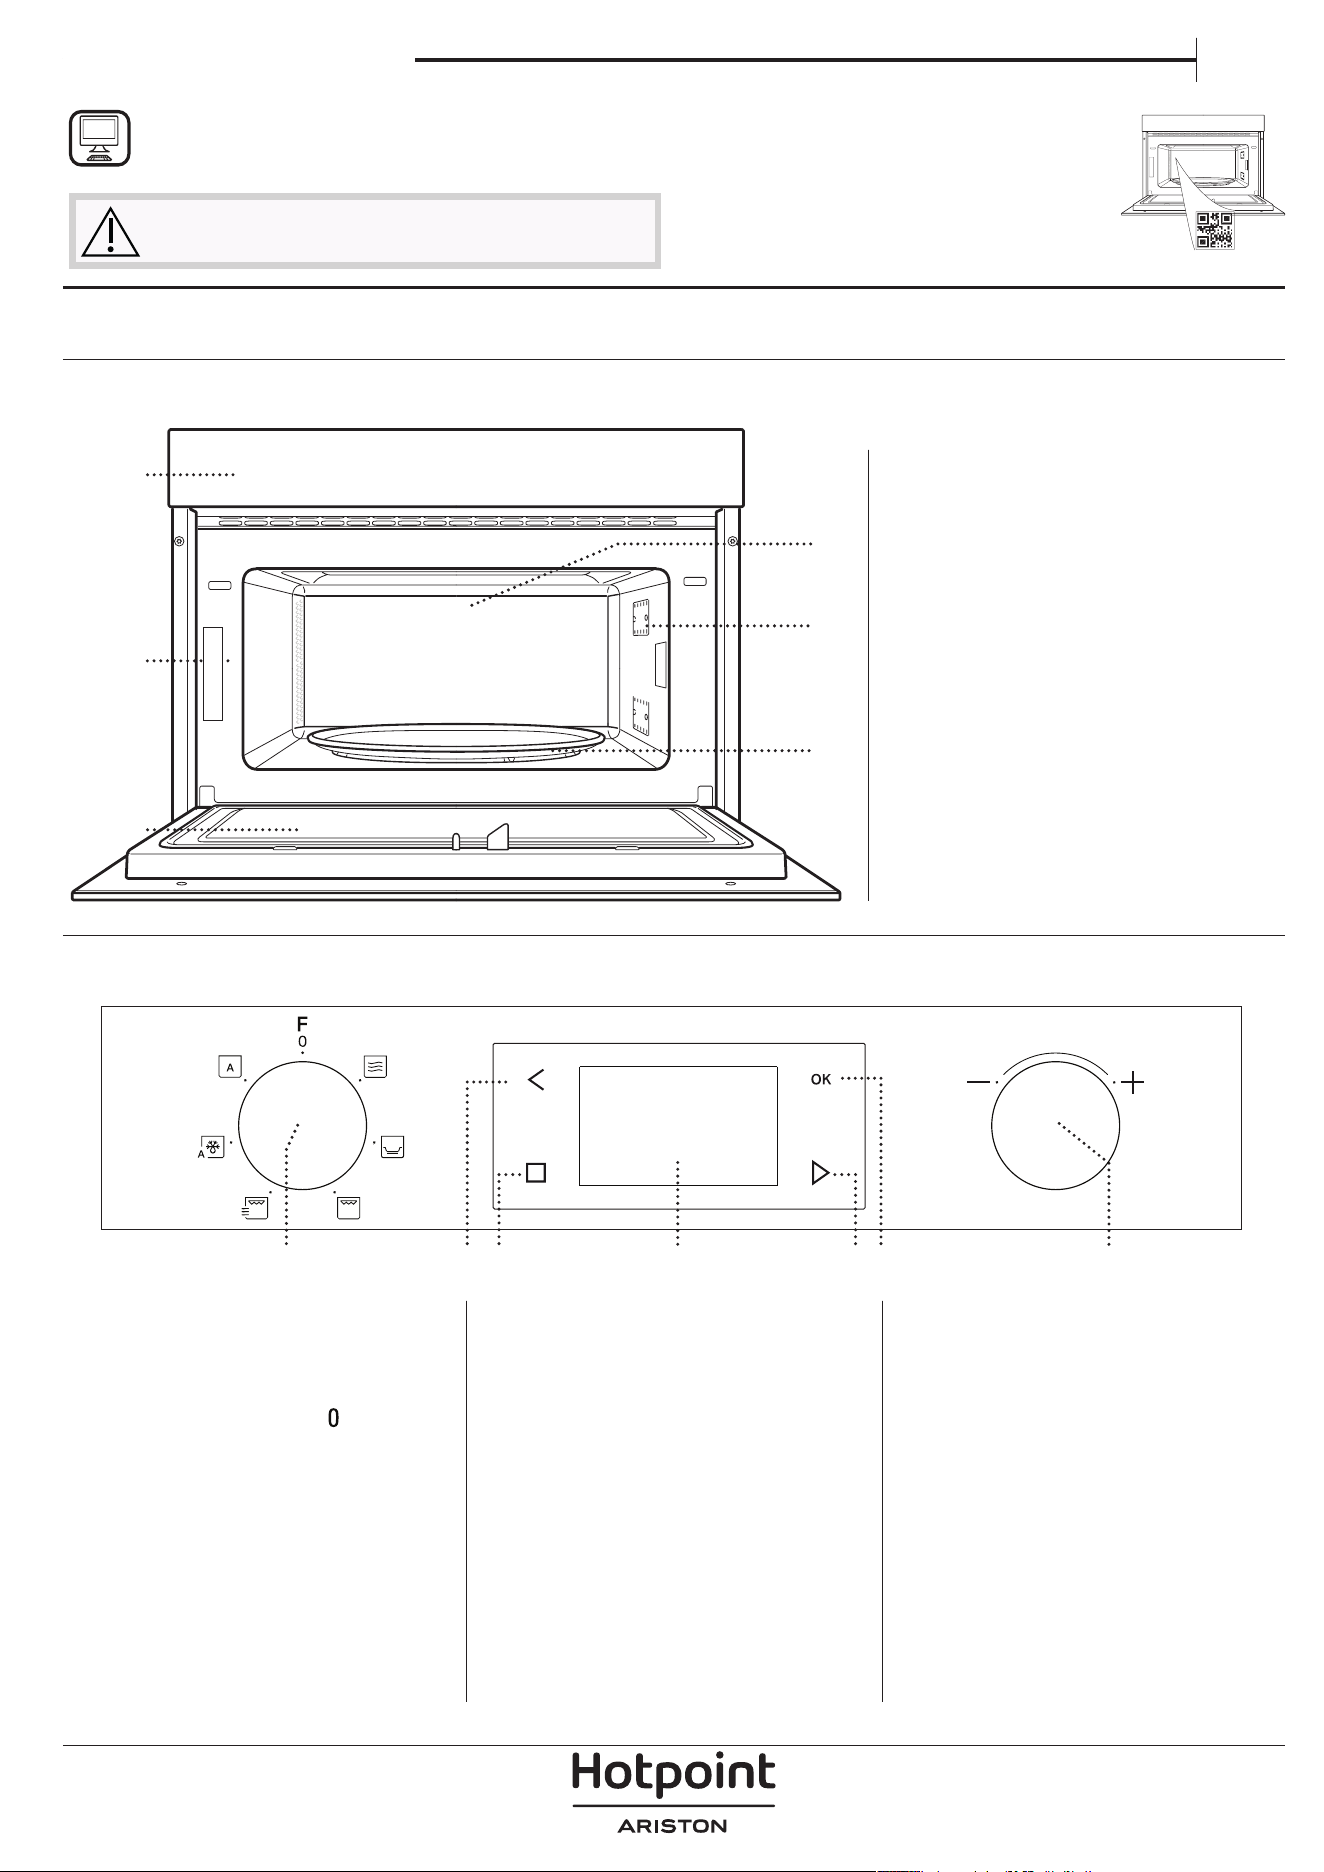
PRODUCT DESCRIPTION
CONTROL PANEL
1. Control panel
2. Identification plate
(do not remove)
3. Door
4. Upper heating element / grill
5. Light
6. Turntable
1. SELECTION KNOB
For switching the oven on by
selecting a function.
Turn to the
position to switch
the oven off.
2. BACK
For returning to the previous
settings menu.
3. STOP
For interrupting an active function
at any time. Press twice to stop
the function and put the oven on
stand-by.
4. DISPLAY
5. START
For starting functions and
confirming settings. When the
oven is switched off, it activates
the “Jet Start” microwave function.
6. CONFIRM
For confirming a function selection
or a set value.
7. ADJUSTMENT KNOB
For scrolling through the menus
and applying or changing settings.
1
3
6
5
4
2
1 32 4 765
ACCESSORIES
Download the Use and Care Guide from
docs.hotpoint.eu for more information
WWW
The number of accessories may vary according to which model is purchased.
Other accessories that are not supplied can be purchased separately from the After-sales Service.
HANDLE FOR THE CRISP PLATE
Useful for removing the hot crisp
plate from the oven.
WIRE RACK
This allows you to place food
closer to the grill, for perfectly
browning your dish. Place the
wire rack on the turntable,
making sure that it does not
come into contact with other surfaces.
COVER (IF SUPPLIED)
Useful for covering containers
during microwave cooking and
heating.
The cover reduces splashes, keeps
foods moist and can also be used
to create two cooking levels.
Not suitable for use with any of the grill functions
(including “Crisp”)
.
TURNTABLE
Placed on its support, the
glass turntable can be used
with all cooking methods.
The turntable must always
be used as a base for other
containers or accessories, with the exception of the
rectangular baking tray.
TURNTABLE SUPPORT
Only use the support for the glass
turntable. Do not rest other
accessories on the support.
CRISP PLATE
Only for use with the designated
function.
The Crisp plate must always be
placed in the centre of the glass
turntable and can be pre-heated when empty,
using the special function for this purpose only.
Place the food directly on the crisp plate.
There are a number of accessories available on the
market. Before you buy, ensure they are suitable for
microwave use and resistant to oven temperatures.
Metallic containers for food or beverages should
never be used during microwave cooking.
Always ensure that foods and accessories do not
come into contact with the inside walls of the oven.
Always ensure that the turntable is able to turn
freely before starting the oven. Take care not to
unseat the turntable whilst inserting or removing
other accessories.
FUNCTIONS
Download the Use and Care Guide from
docs.hotpoint.eu for more information
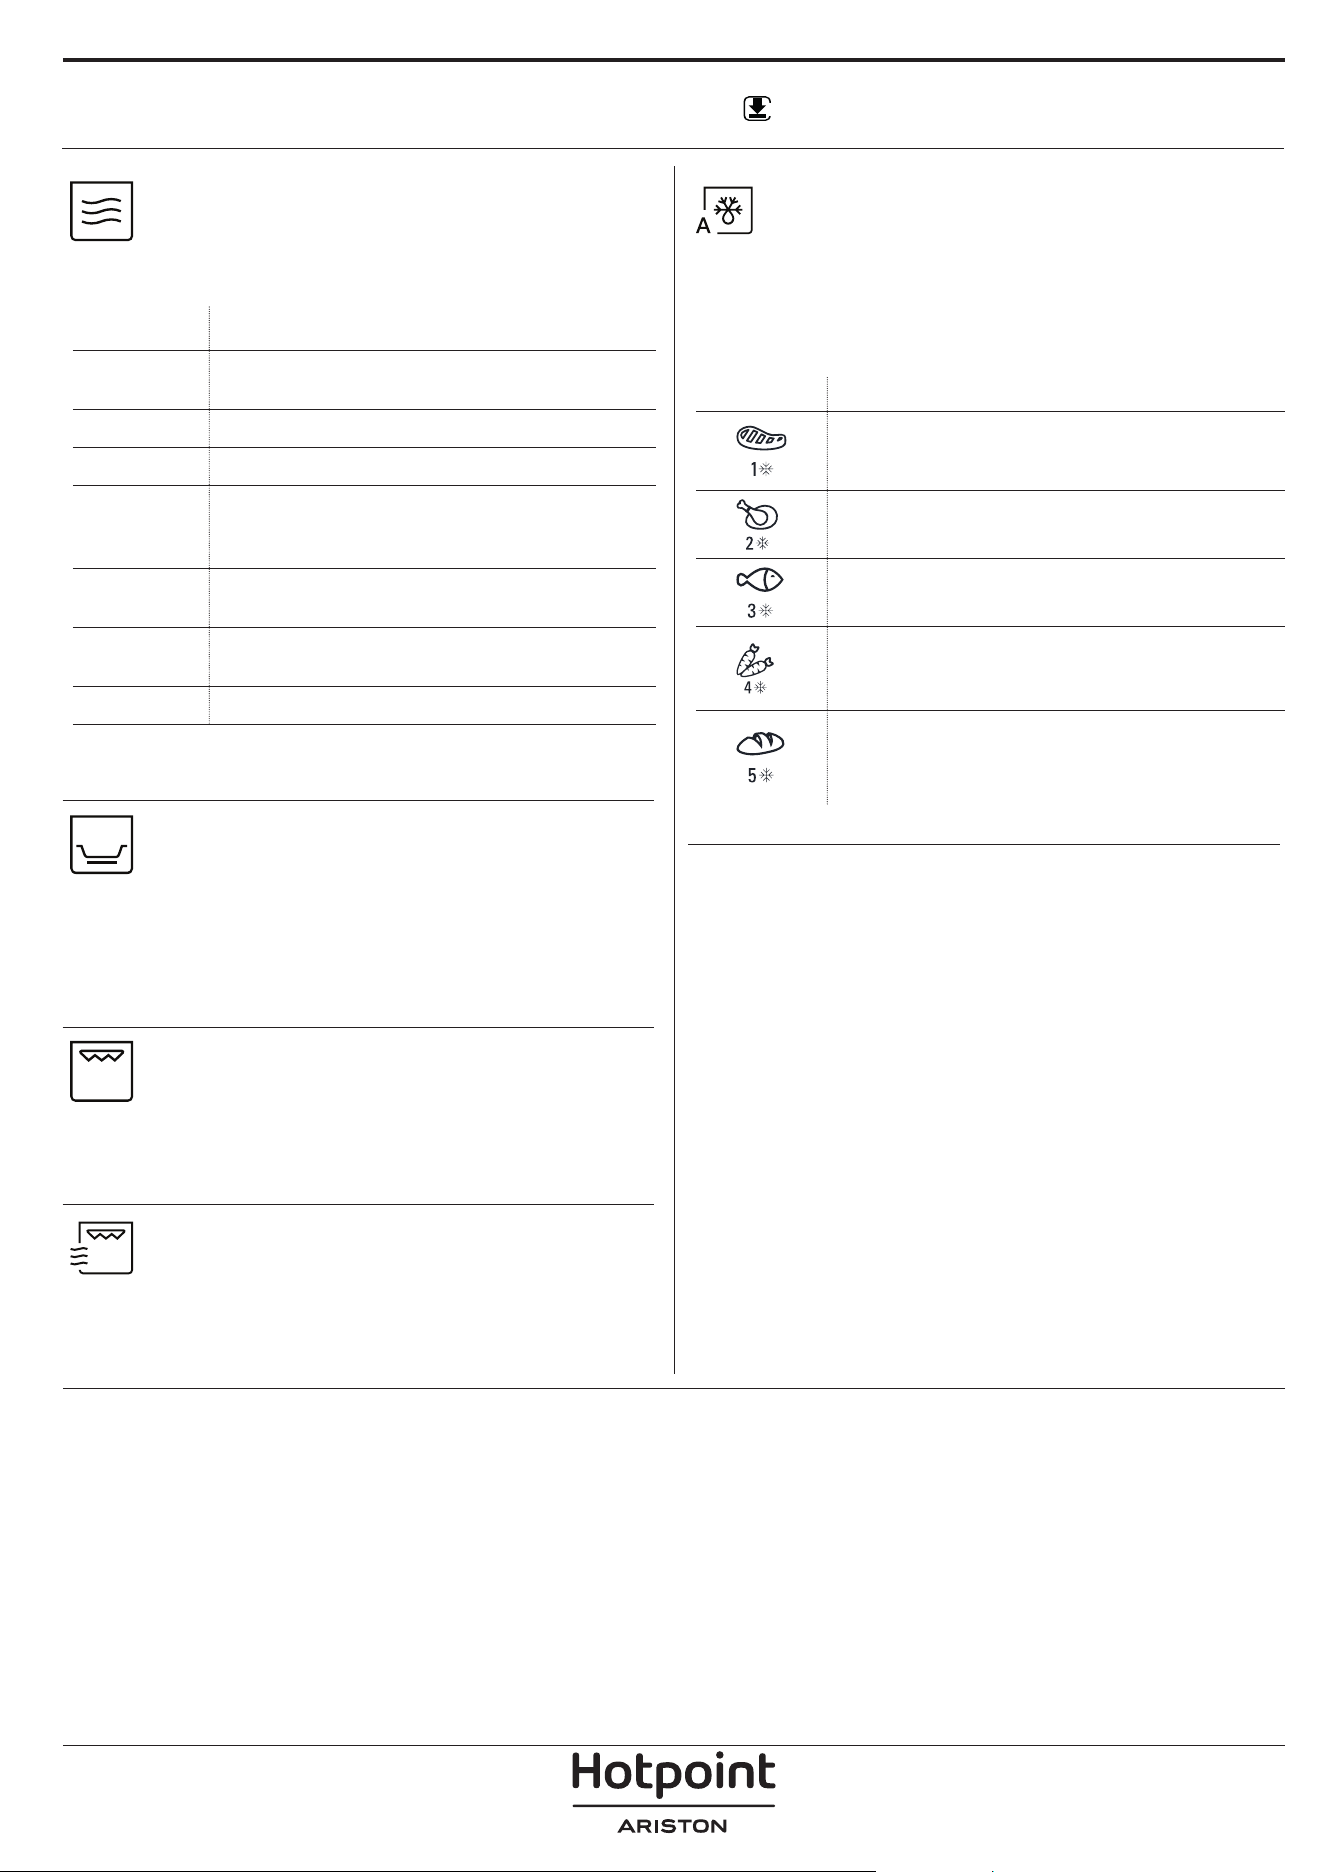
MICROWAVES
For quickly cooking and reheating food or
beverages.
POWER RECOMMENDED FOR
1000 W
Quickly reheating beverages or other foods
with a high water content
800 W
Cooking vegetables
650 W
Cooking meat and fish
500 W
Cooking meaty sauces, or sauces containing
cheese or egg. Finishing off meat pies or
pasta bakes
350 W
Slow, gently cooking. Perfect for melting
butter or chocolate
160 W
Defrosting frozen foods or softening butter
and cheese
90 W
Softening ice cream
Recommended accessory: cover
CRISP
For perfectly browning a dish, both on the
top and bottom of the food. This function must only
be used with the special Crisp plate.
Required accessories: Crisp plate, handle for the Crisp
plate
GRILL
For browning, grilling and gratins. We
recommend turning the food during cooking.
For best results, preheat the grill for 3-5 minutes.
Recommended accessory: wire rack
GRILL + MW
For quickly cooking and gratinating dishes,
combining the microwave and grill functions.
Recommended accessory: wire rack
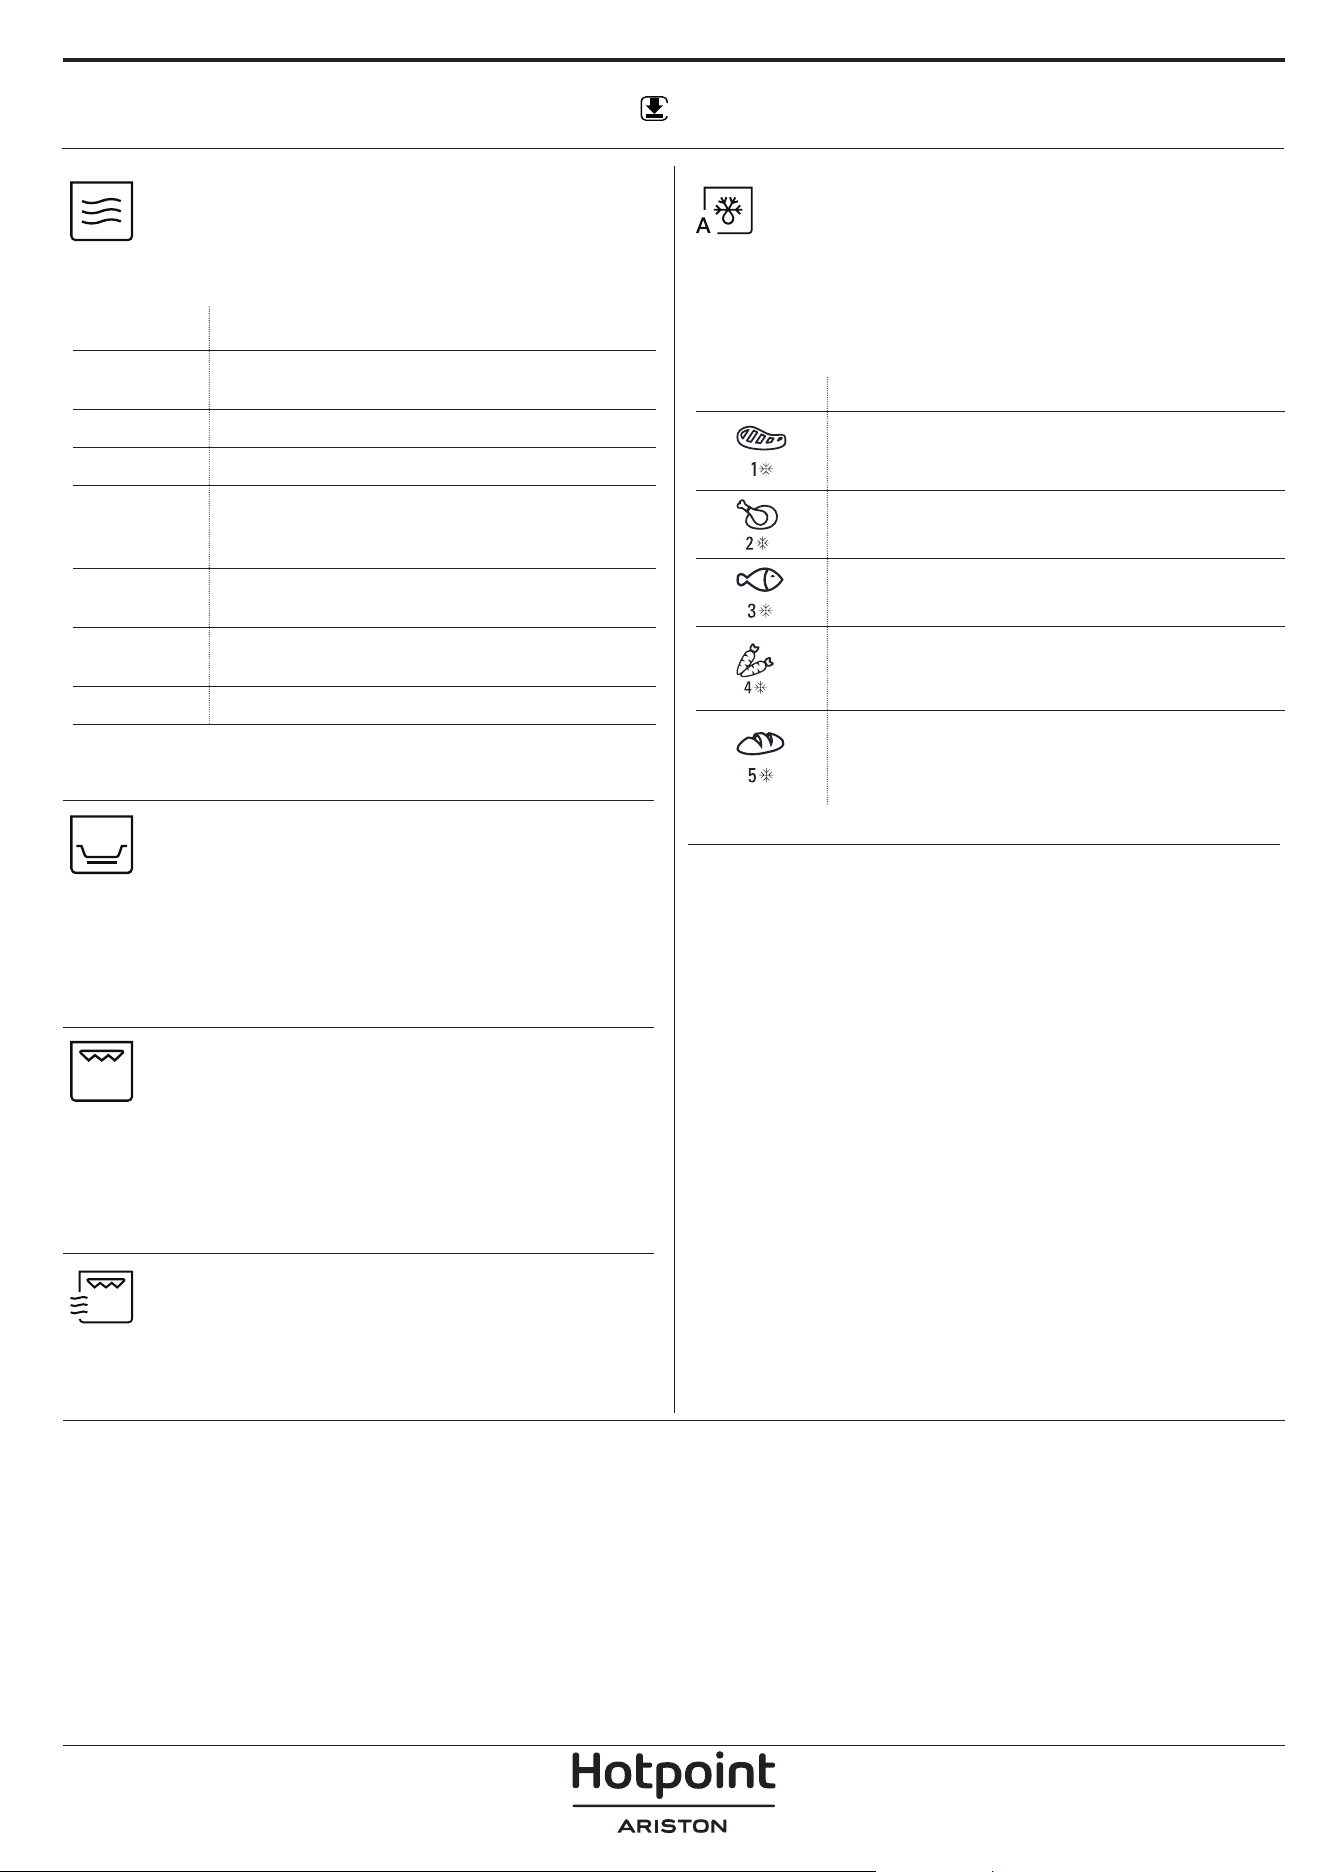
AUTO DEFROST
For quickly defrosting various different types
of food simply by specifying their weight. Food
should be placed directly onto the glass turntable.
Turn the food when prompted
CATEGORY RECOMMENDED FOODS WEIGHT
MEAT
(mince, cutlets, steaks,
roasting joints)
100 g - 2 kg
POULTRY
(whole chicken, pieces, fillets)
100 g - 2.5
kg
FISH
(whole, steaks, fillets)
100 g - 1.5
kg
VEGETABLES
(mixed vegetables, peas,
broccoli, etc.)
100 g - 1.5
kg
BREAD
(loaves, scones, rolls)
100 g - 1 kg
WWW
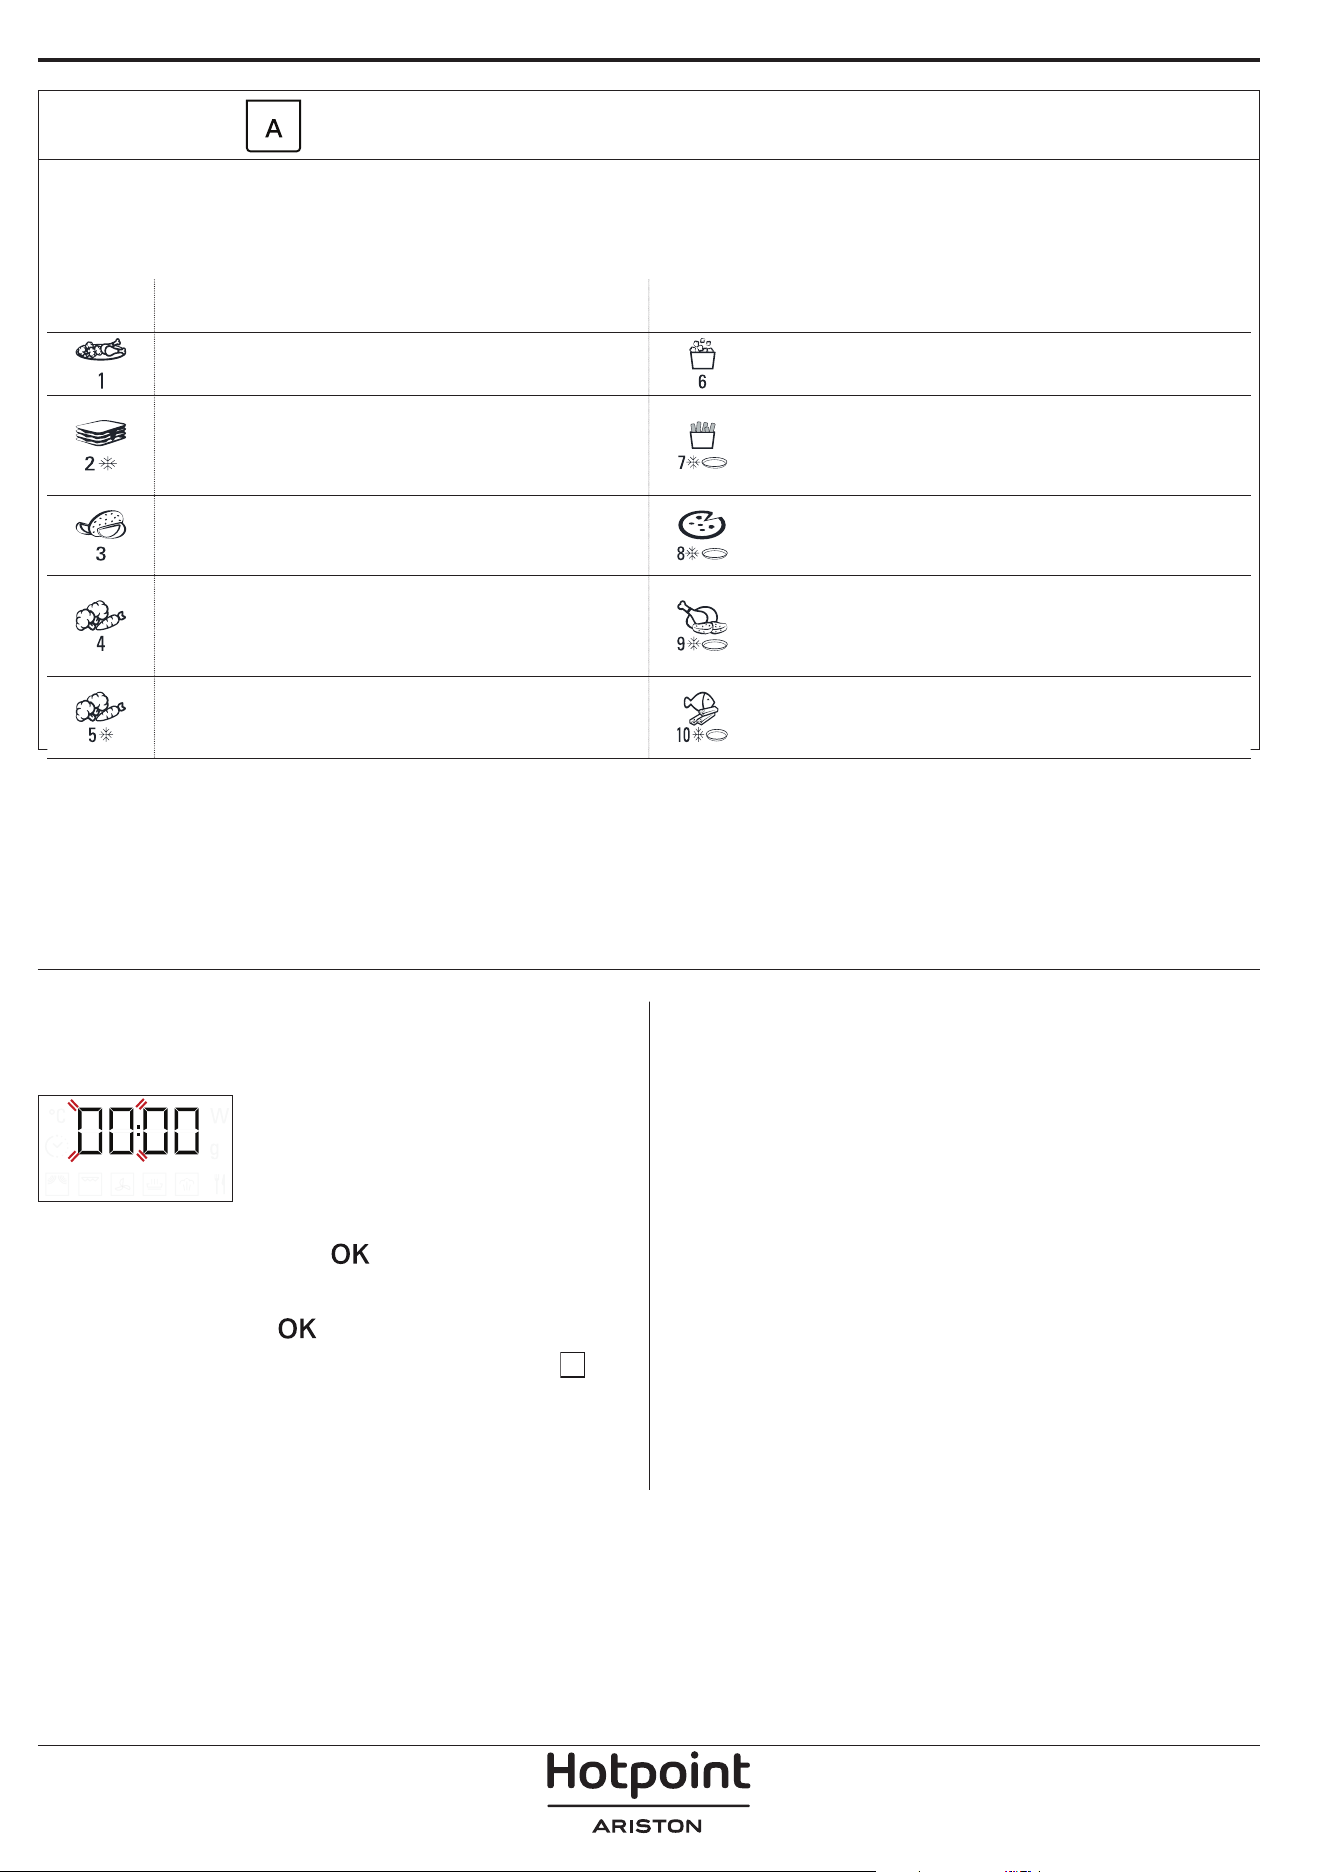
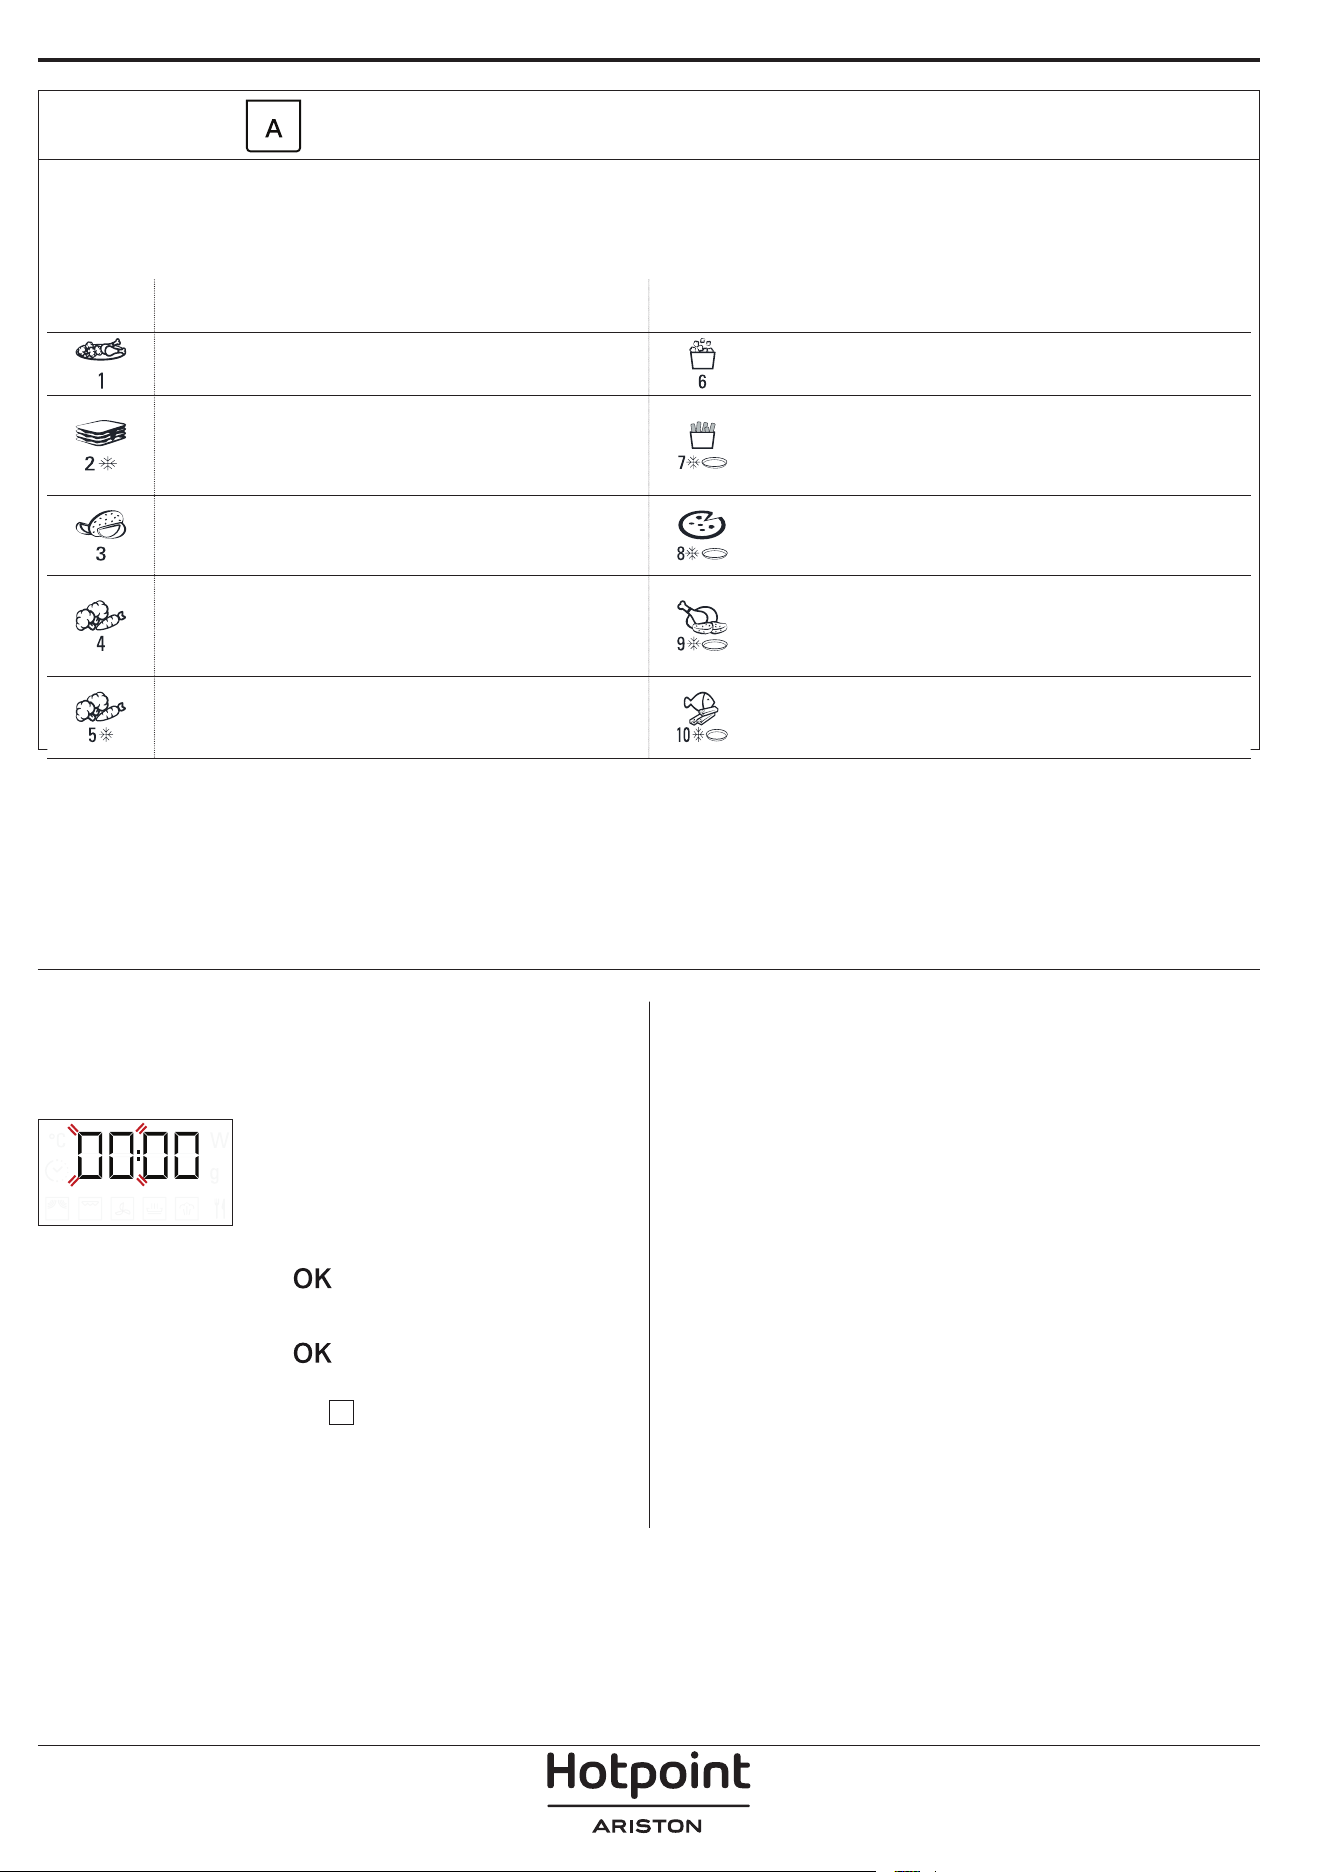
AUTOMATIC FUNCTIONS
With the automatic functions, simply select the type and weight or the quantity of the food items to obtain the best results.
The oven will automatically calculate the ideal settings. Where indicated, the function can only be used in combination with
the Crisp plate provided. Turn or stir the food when prompted.
CATEGO -
RY
FOOD WEIGHT
CATEGO -
RY
FOOD WEIGHT
DINNER PLATES 250 - 500g POPCORN 100 g
FROZEN LASAGNA 250 - 500 g
FRENCH FRIES
(spread out in a single layer on the
Crisp plate and sprinkle with salt
before cooking)
200 - 500 g
BAKED POTATOES
(turn when prompted)
200 g - 1 kg
PIZZA
(use the Crisp plate)
300 - 800 g
FRESH VEGETABLES
(cut uniformly and add 2 to 4
tablespoons of water. Cover)
200 - 800 g
CHICKEN WINGS, CHICKEN PIECES
(lightly oil the Crisp plate.)
200 - 500 g
FROZEN VEGETABLES
(turn when prompted, cover)
200 - 800 g
FRIED CUTLETS
(Crisp plate must be preheated)
200 - 500 g
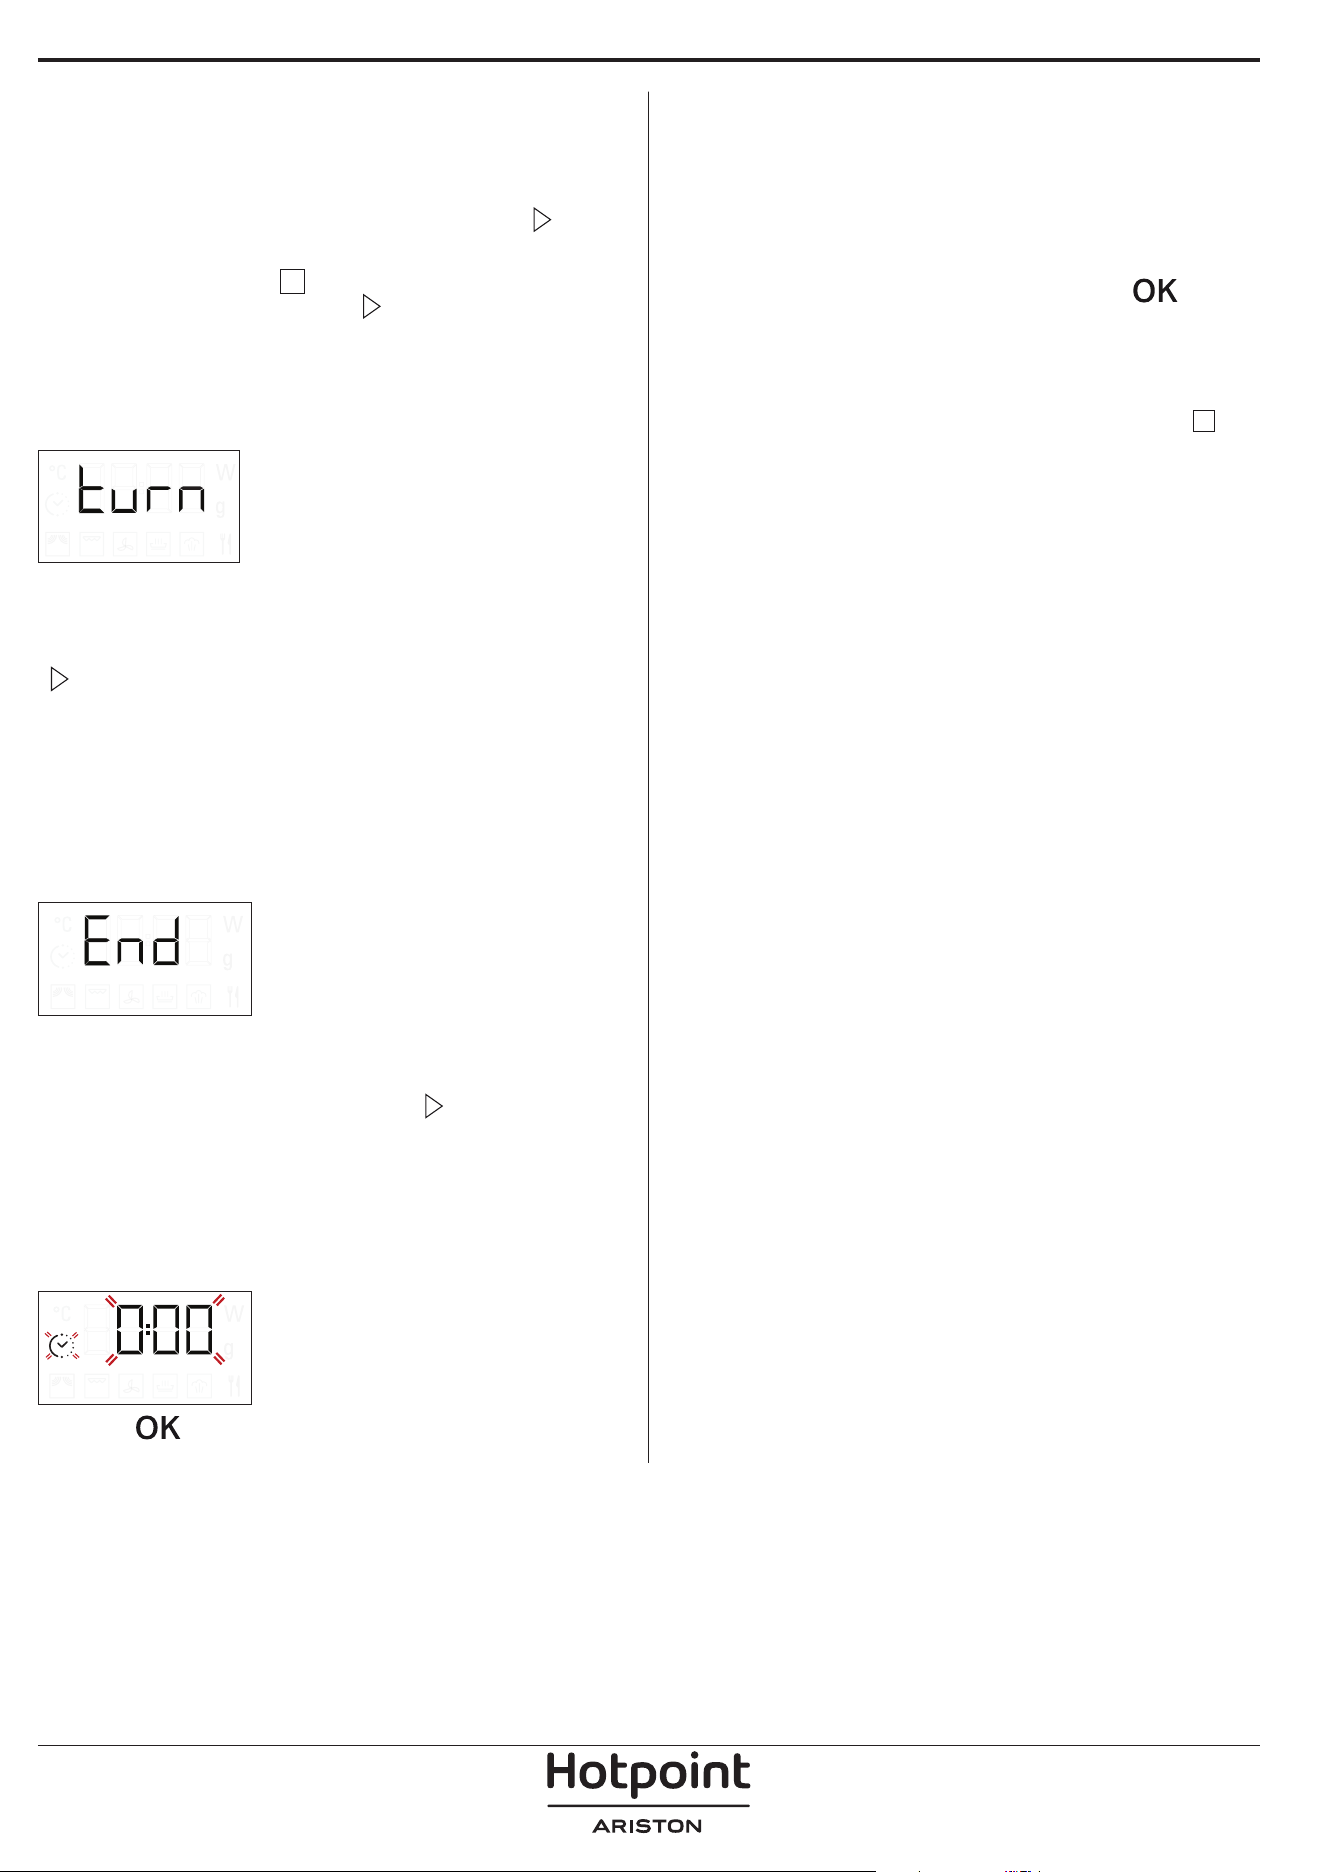
. SET THE TIME
You will need to set the time when you switch on
the appliance for the first time: The two digits for the
hour will flash on the display.
Turn the adjustment knob to set the correct hour and
press
to confirm. The two digits for the minutes
will start flashing. Turn the adjustment knob to set the
correct hour and press
to confirm.
Please note: to change the time at a later point, press and
hold for at least 3 seconds while the oven is o and
repeat the steps above.
You may need to set the time again following lengthy power
outages.
USING THE APPLIANCE FOR THE FIRST TIME
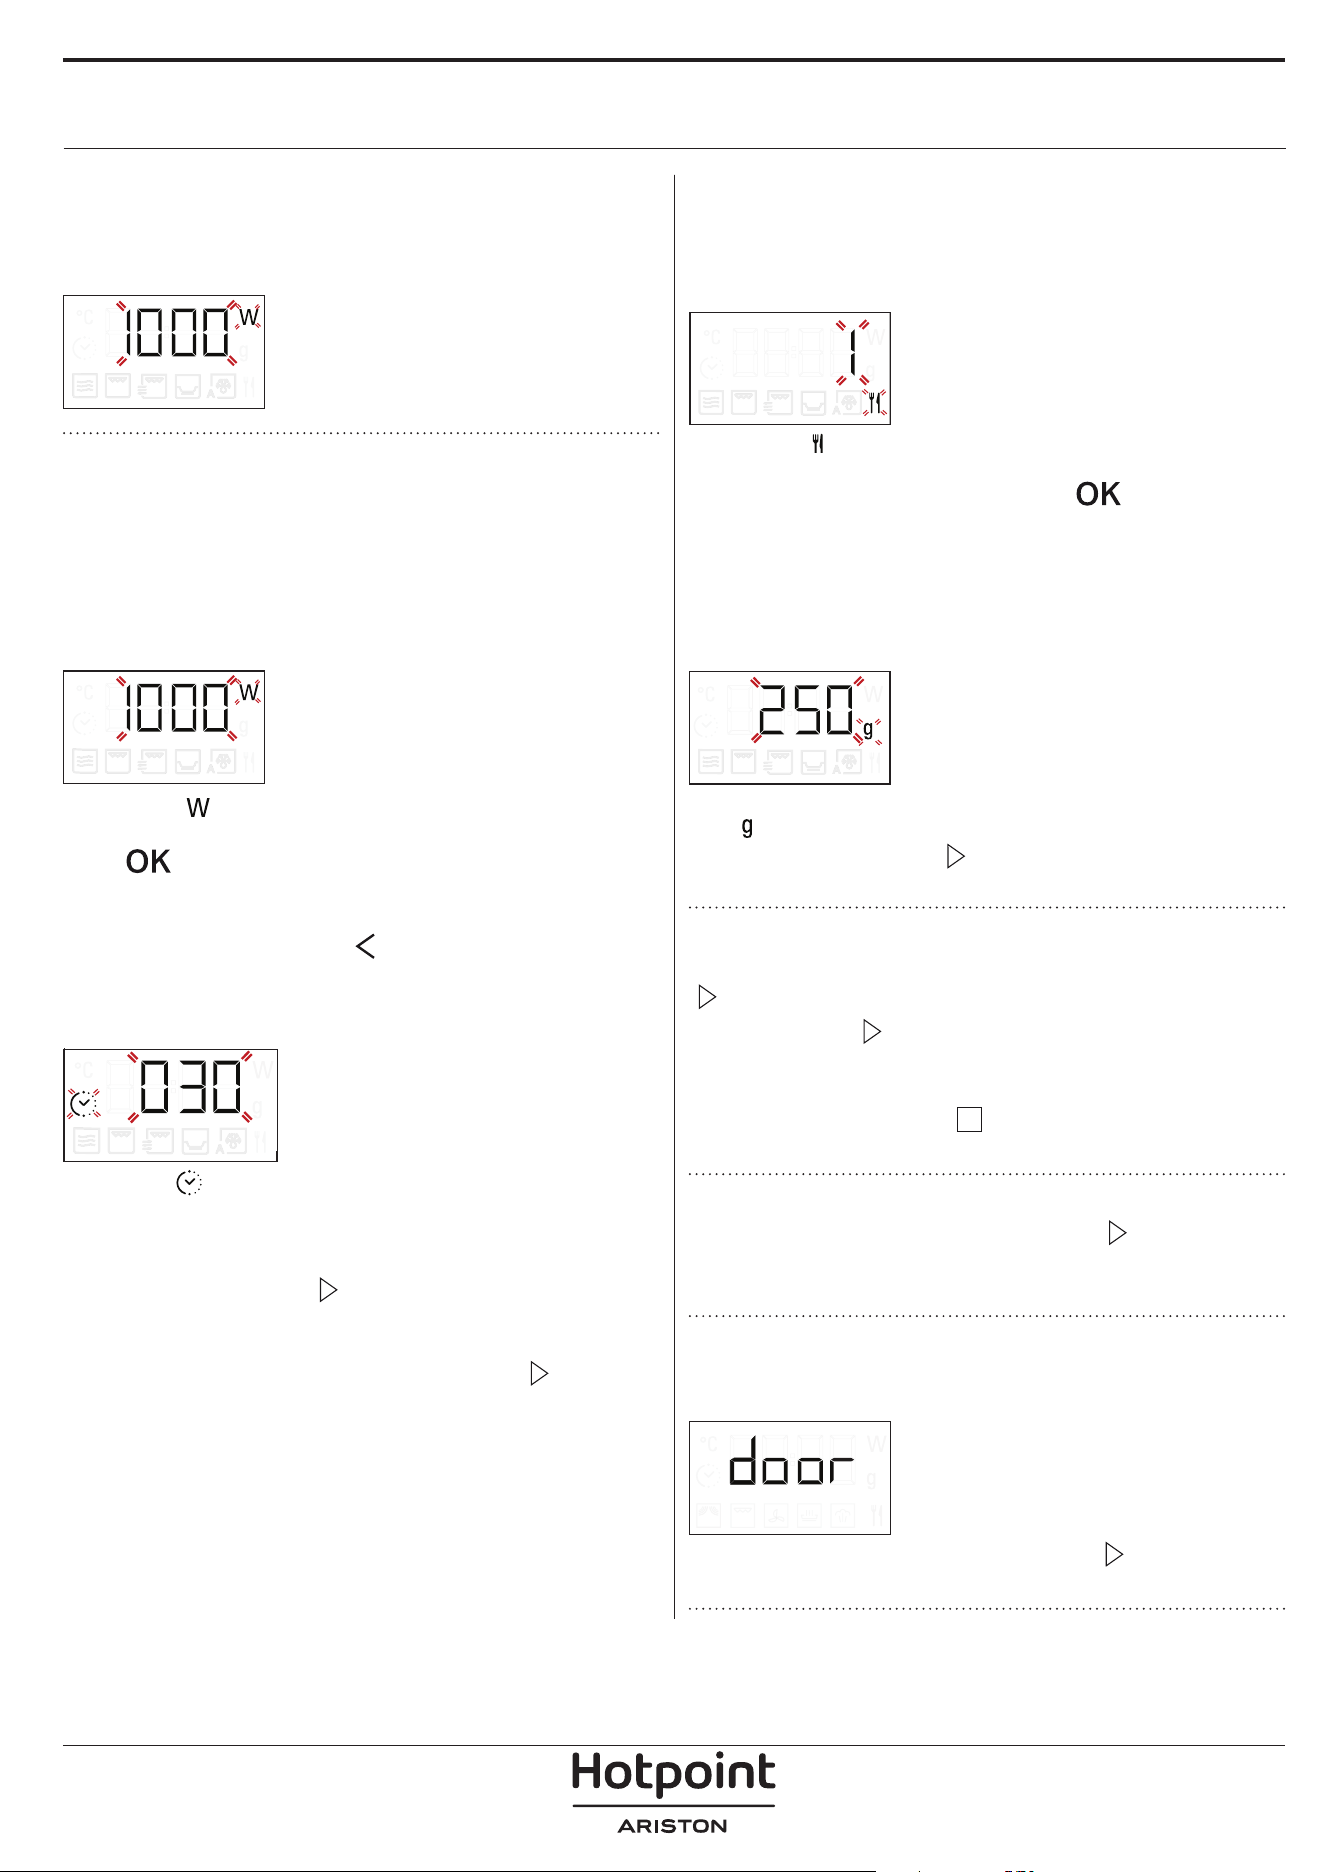
1. SELECT A FUNCTION
When the oven is off, only the time is shown on the
display. Turn the selection knob to select one of the
available functions.
.
2. SET A FUNCTION
. MANUAL FUNCTIONS
After having selected the function you require, you
can change its settings.
The display will show the settings that can be
changed in sequence.
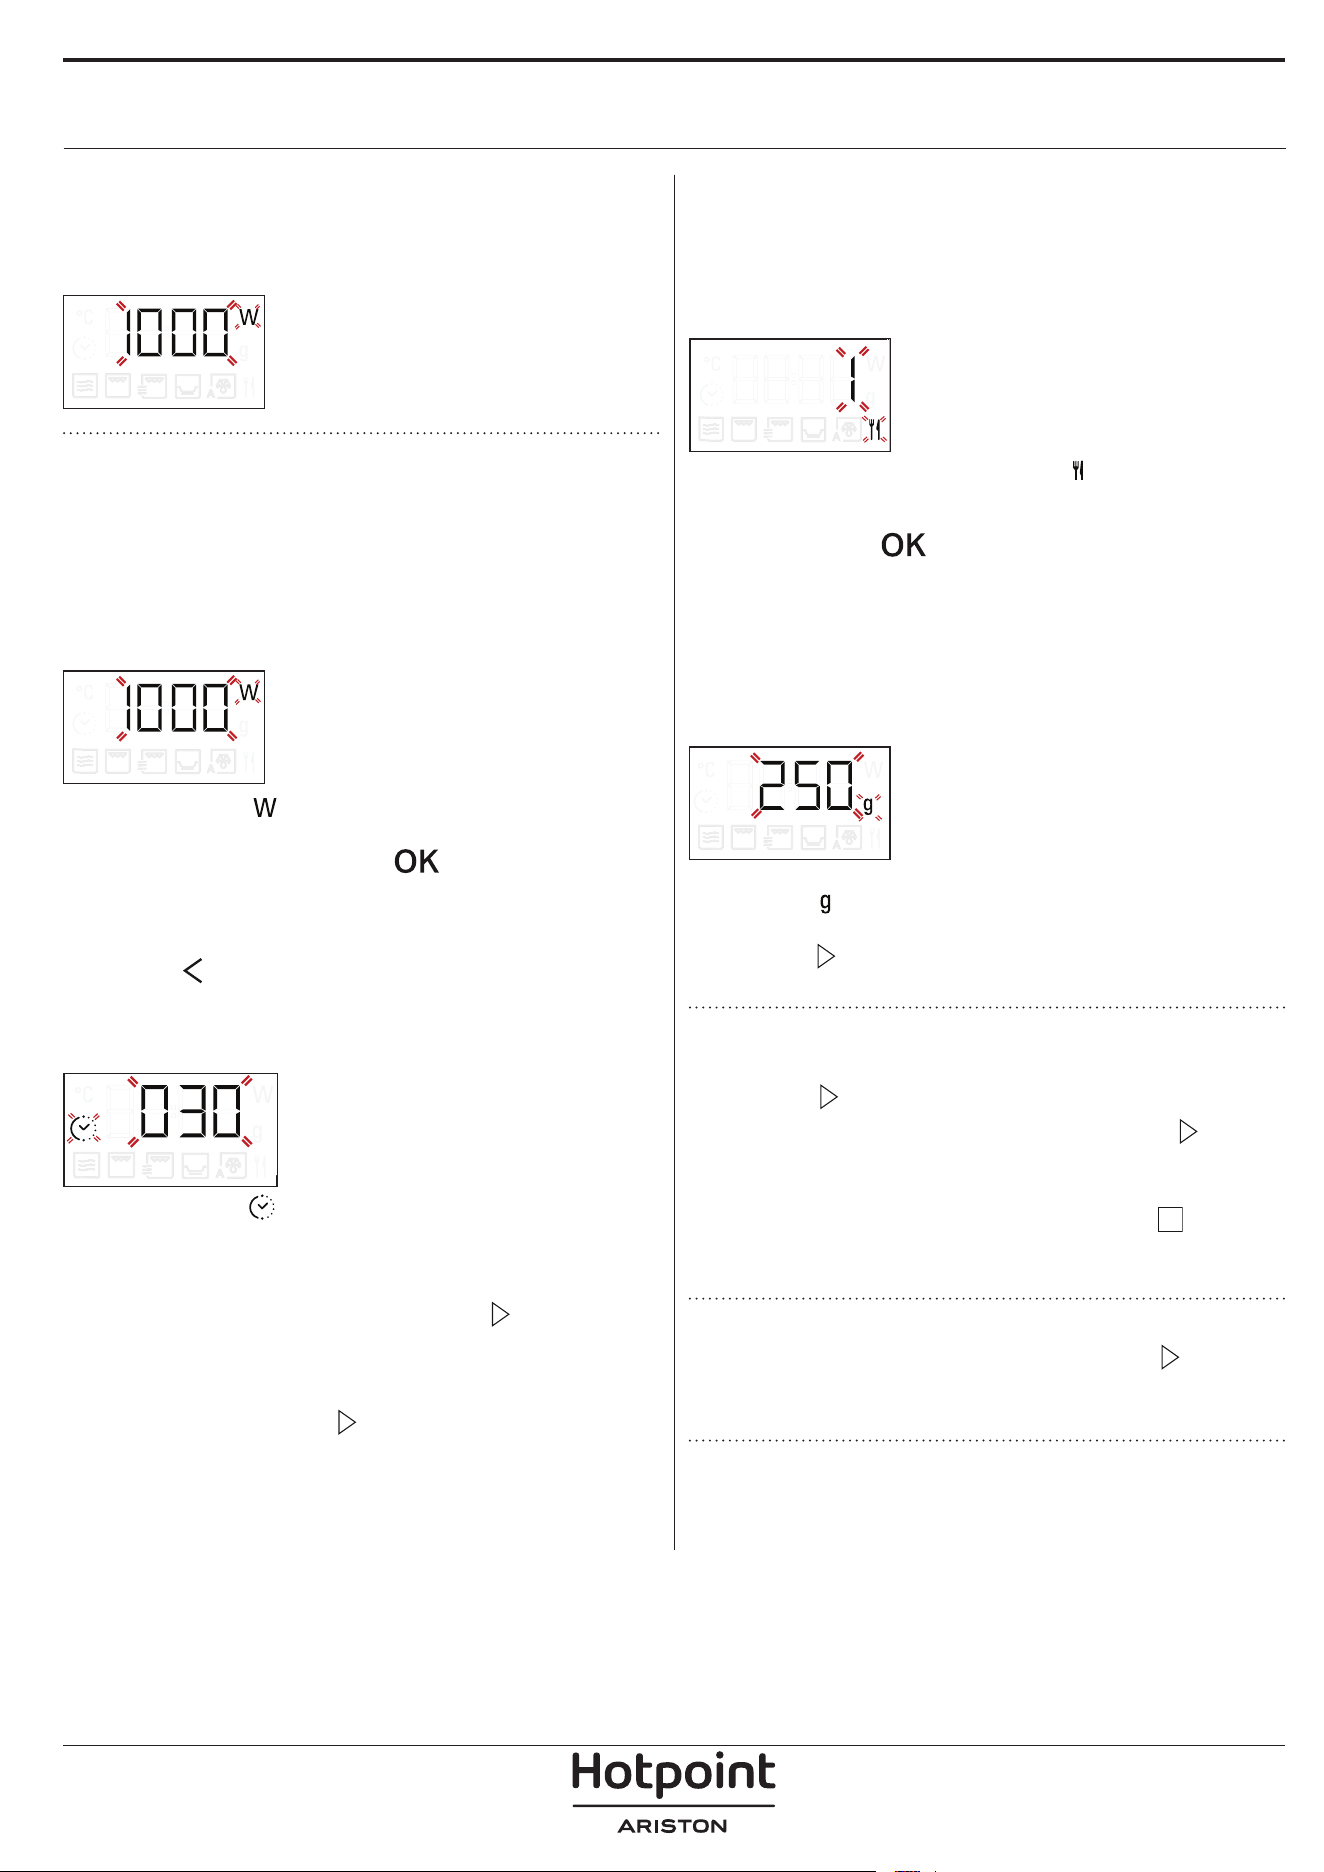
MICROWAVE LEVEL
When the icon flashes on the display,
turn the adjustment knob to change the selected item,
press
to confirm, and proceed with the following
settings.
Please note: once the function has been activated, the power
can be changed by pressing two times to access the
power settings menu, then turning the adjustment knob to
change the setting.
DURATION
When the icon flashes on the display,
turn the adjustment knob to set the desired cooking
time.
Once the displayed cooking time corresponds with
what you desire, press
to confirm and start the
function.
Please note: During cooking, you can adjust the cooking
time by turning the knob; each time you press , the
cooking time increases by 30 seconds.
. AUTOMATIC FUNCTIONS / AUTO DEFROST
CATEGORIES
Once you have chosen one of the automatic
functions, you will need to select a category for the
food you are cooking.
When the icon flashes on the display, turn the
adjustment knob to select the digit that corresponds
to the desired category, then press
to confirm.
WEIGHT
To achieve the best results, the automatic functions
require you to enter the weight of the food, selecting
from amongst the default settings: the oven will
calculate the ideal length of time for the function to
run for each category of food.
When the default setting appears on the display and
the
icon flashes, turn the adjustment knob to enter
the weight, then press
to confirm and start the
function.
3. ACTIVATE THE FUNCTION
Once you have applied the settings you require, press
to activate the function.
Every time the
button is pressed again, the
cooking time will be increased by an additional 30
seconds (only for the manual functions).
Please note: You can press at any time to pause the
function that is currently active.
JET START
When the oven is switched off, press to activate
cooking with the microwave function set at full power
(1000 W) for 30 seconds.
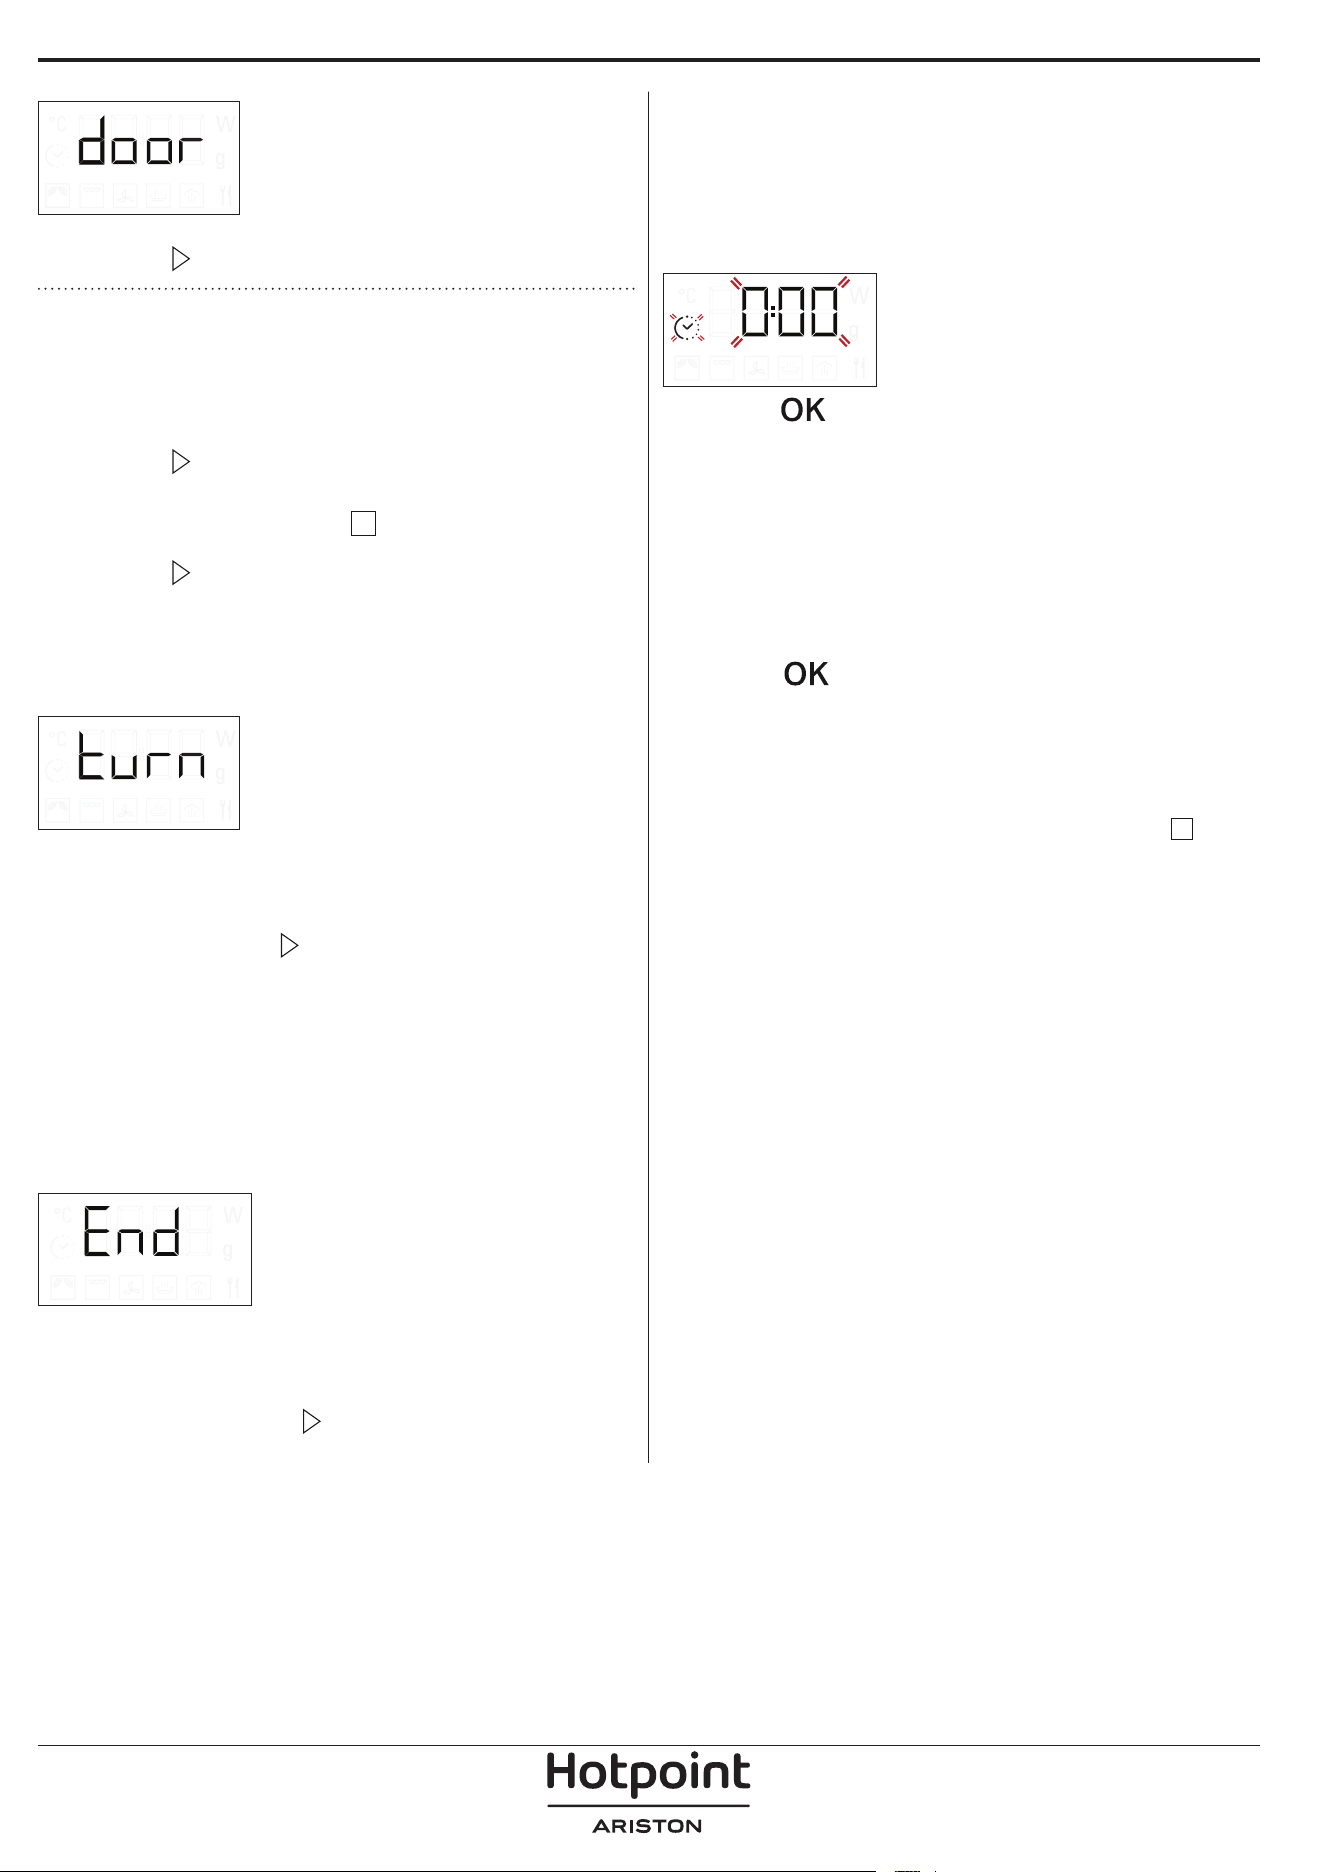
. SAFETY LOCK
This function is automatically activated to prevent the
oven from being switched on accidentally.
Open and close the door, then press to start the
function.
DAILY USE
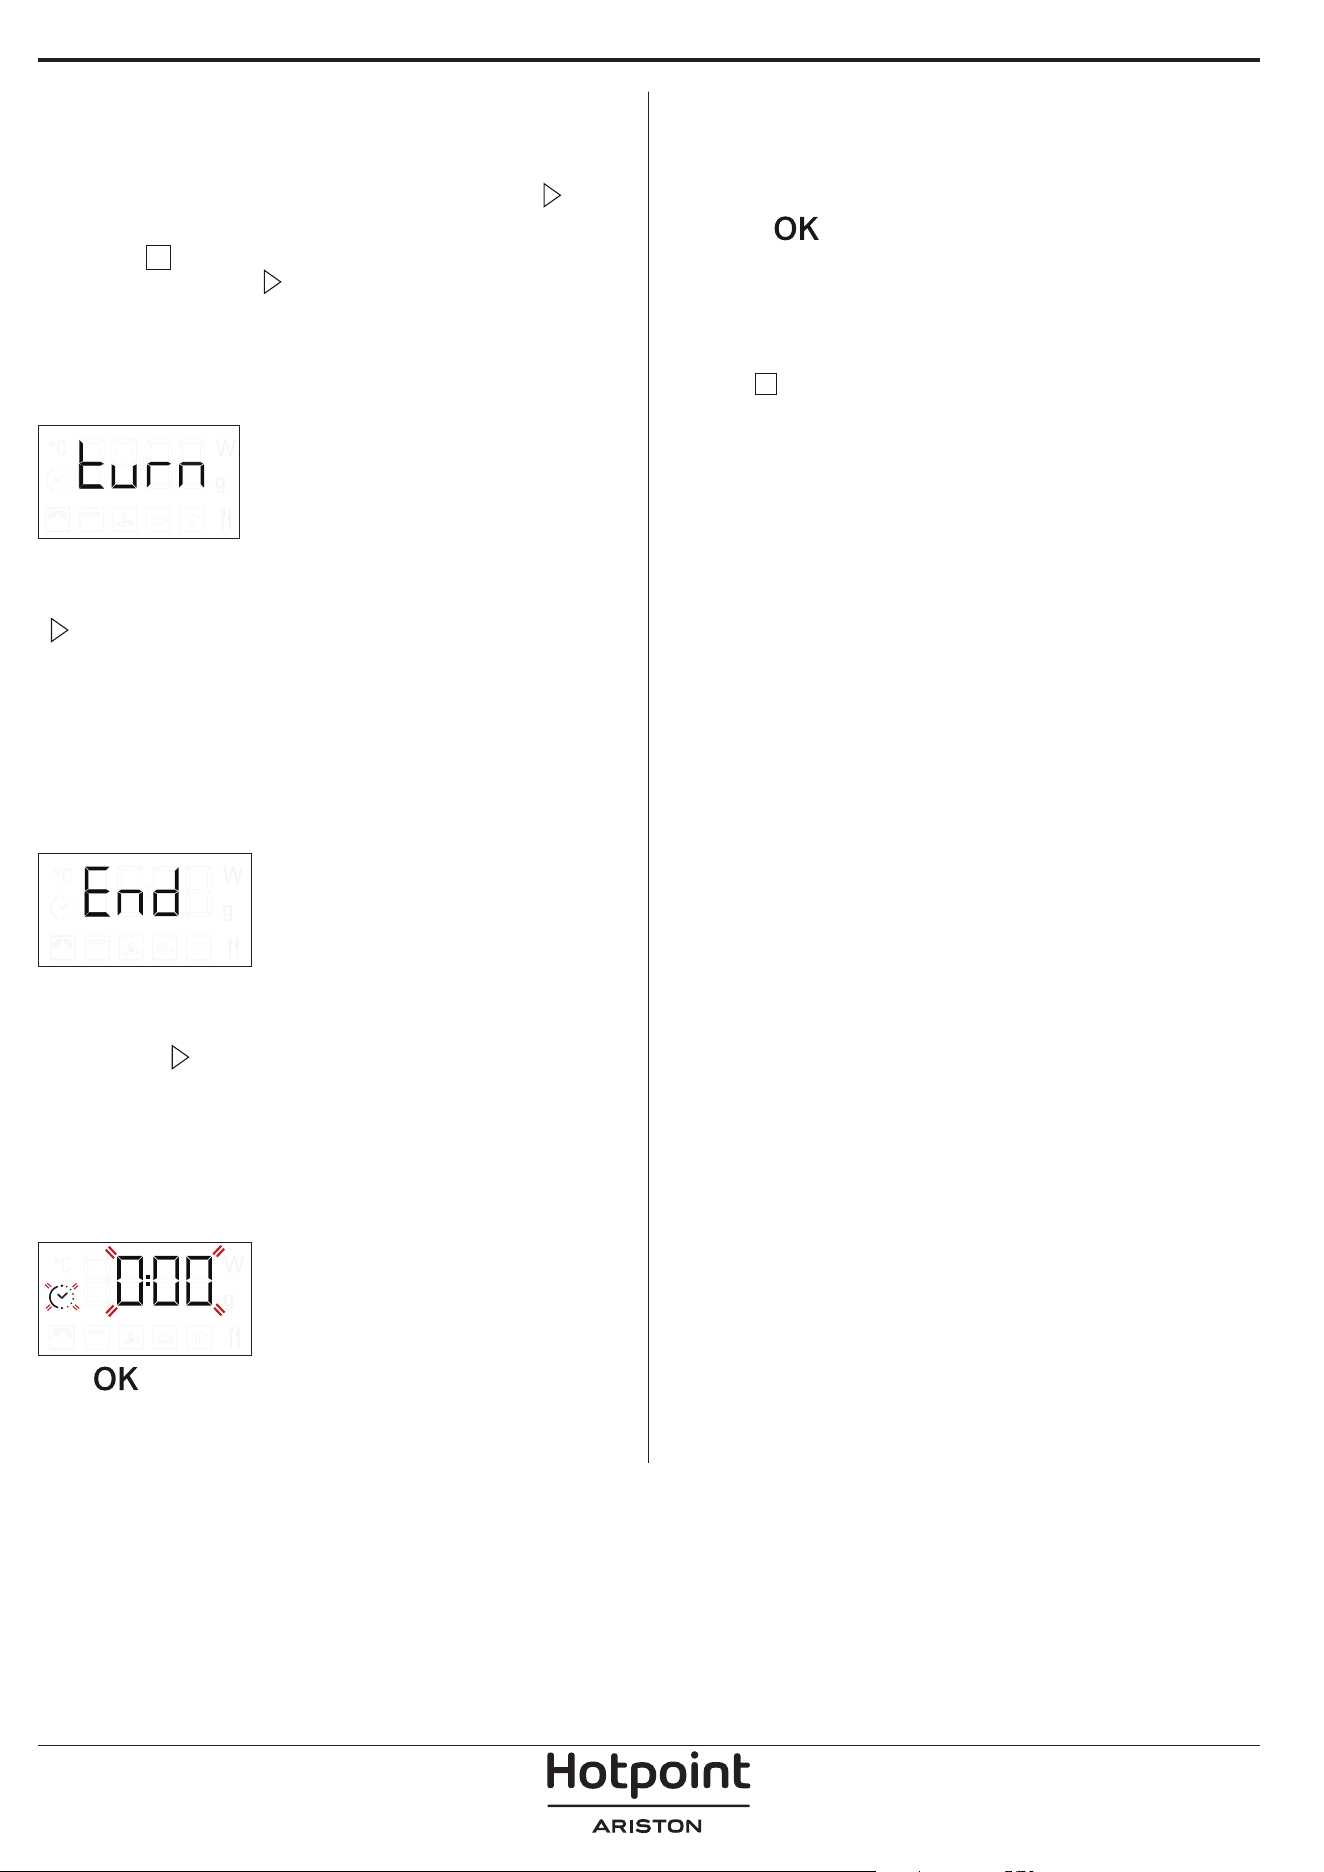
4. PAUSE
For pausing an active function, for example to stir or
turn the food, simply open the door.
To start it up again, close the door and press
It is also possible to temporarily pause cooking by
pressing
. To resume the cooking process, close
the door and press
.
AUTOMATIC PAUSE
(STIR OR TURN THE FOOD)
Certain functions will pause to allow you to turn or
stir the food.
When the oven pauses the cooking and “Turn food”
or “Stir Food” appear on the display, open the door
to turn or stir the food, then close the door and press
to start cooking again.
Please note: after 2 minutes, even if the food has not
been turned or stirred, the function will start again
automatically.
5. END OF COOKING
An audible signal will sound and "End" will appear
on the display to indicate that a cooking function is
complete.
For some functions, it is possible to delay cooking
while maintaining previously established settings:
turn the adjustment knob to set a new cooking time,
then press
.
. TIMER
When the oven is switched off, the display can be
used as a timer. The timer does not activate any of the
cooking cycles.
To activate the function and set the cooking time you
require, turn the adjustment knob.
Press to activate the timer. An audible signal will
sound and the display will indicate once the timer has
finished counting down the selected time.
To make a change to the timer once it has been
activated, turn the adjustment knob, then press OK to
confirm.
To interrupt it or return to the current time display,
turn the adjustment knob until 0:00 is on the display
and press
Please note: Once the timer has been activated, you can
activate a function as well: The timer will continue to count
down the selected time automatically without having any
eect on the function. To go back to viewing the timer,
wait for the function to nish or stop the oven function by
pressing two times.
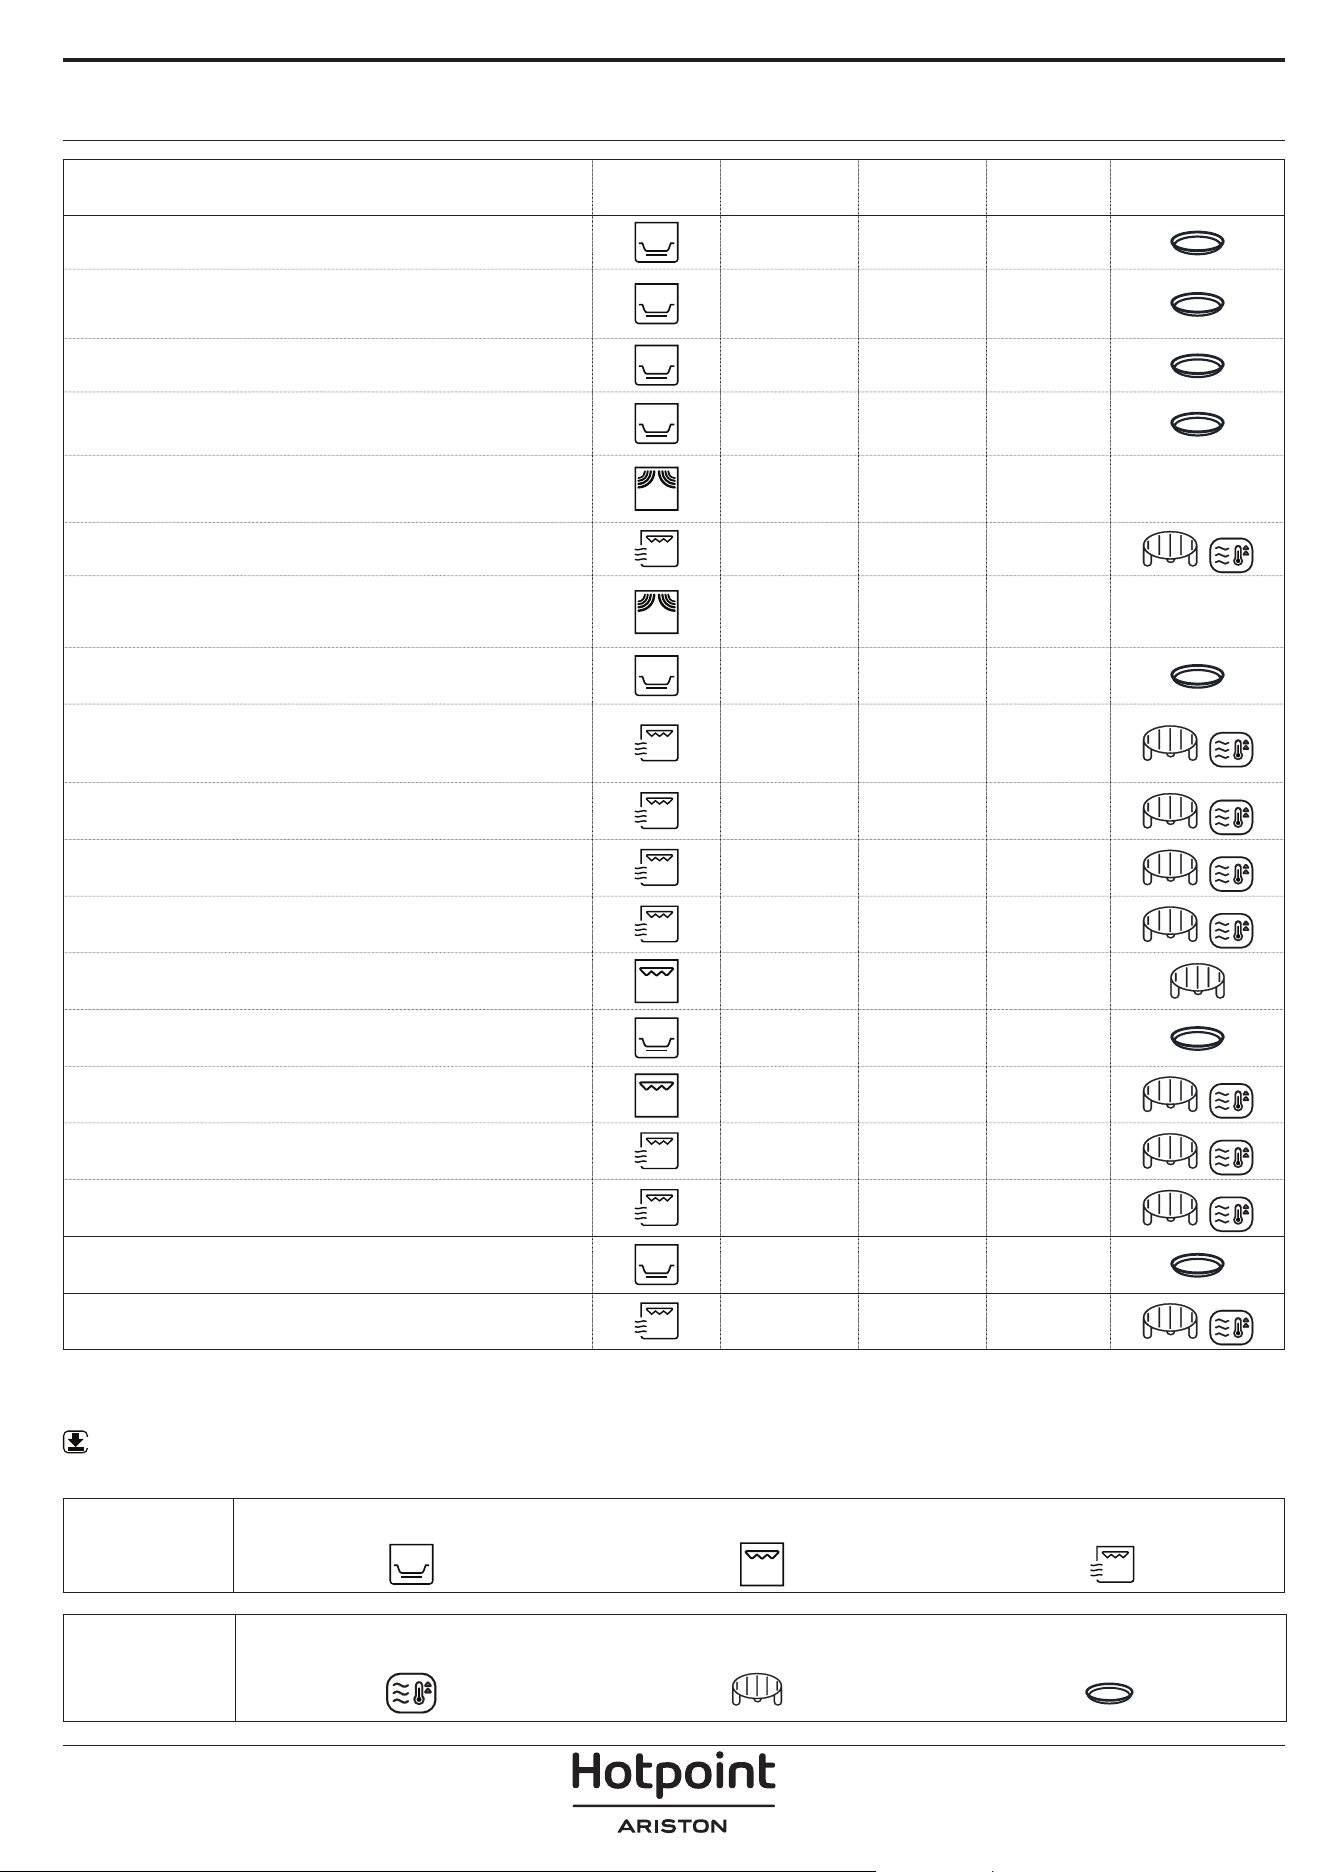
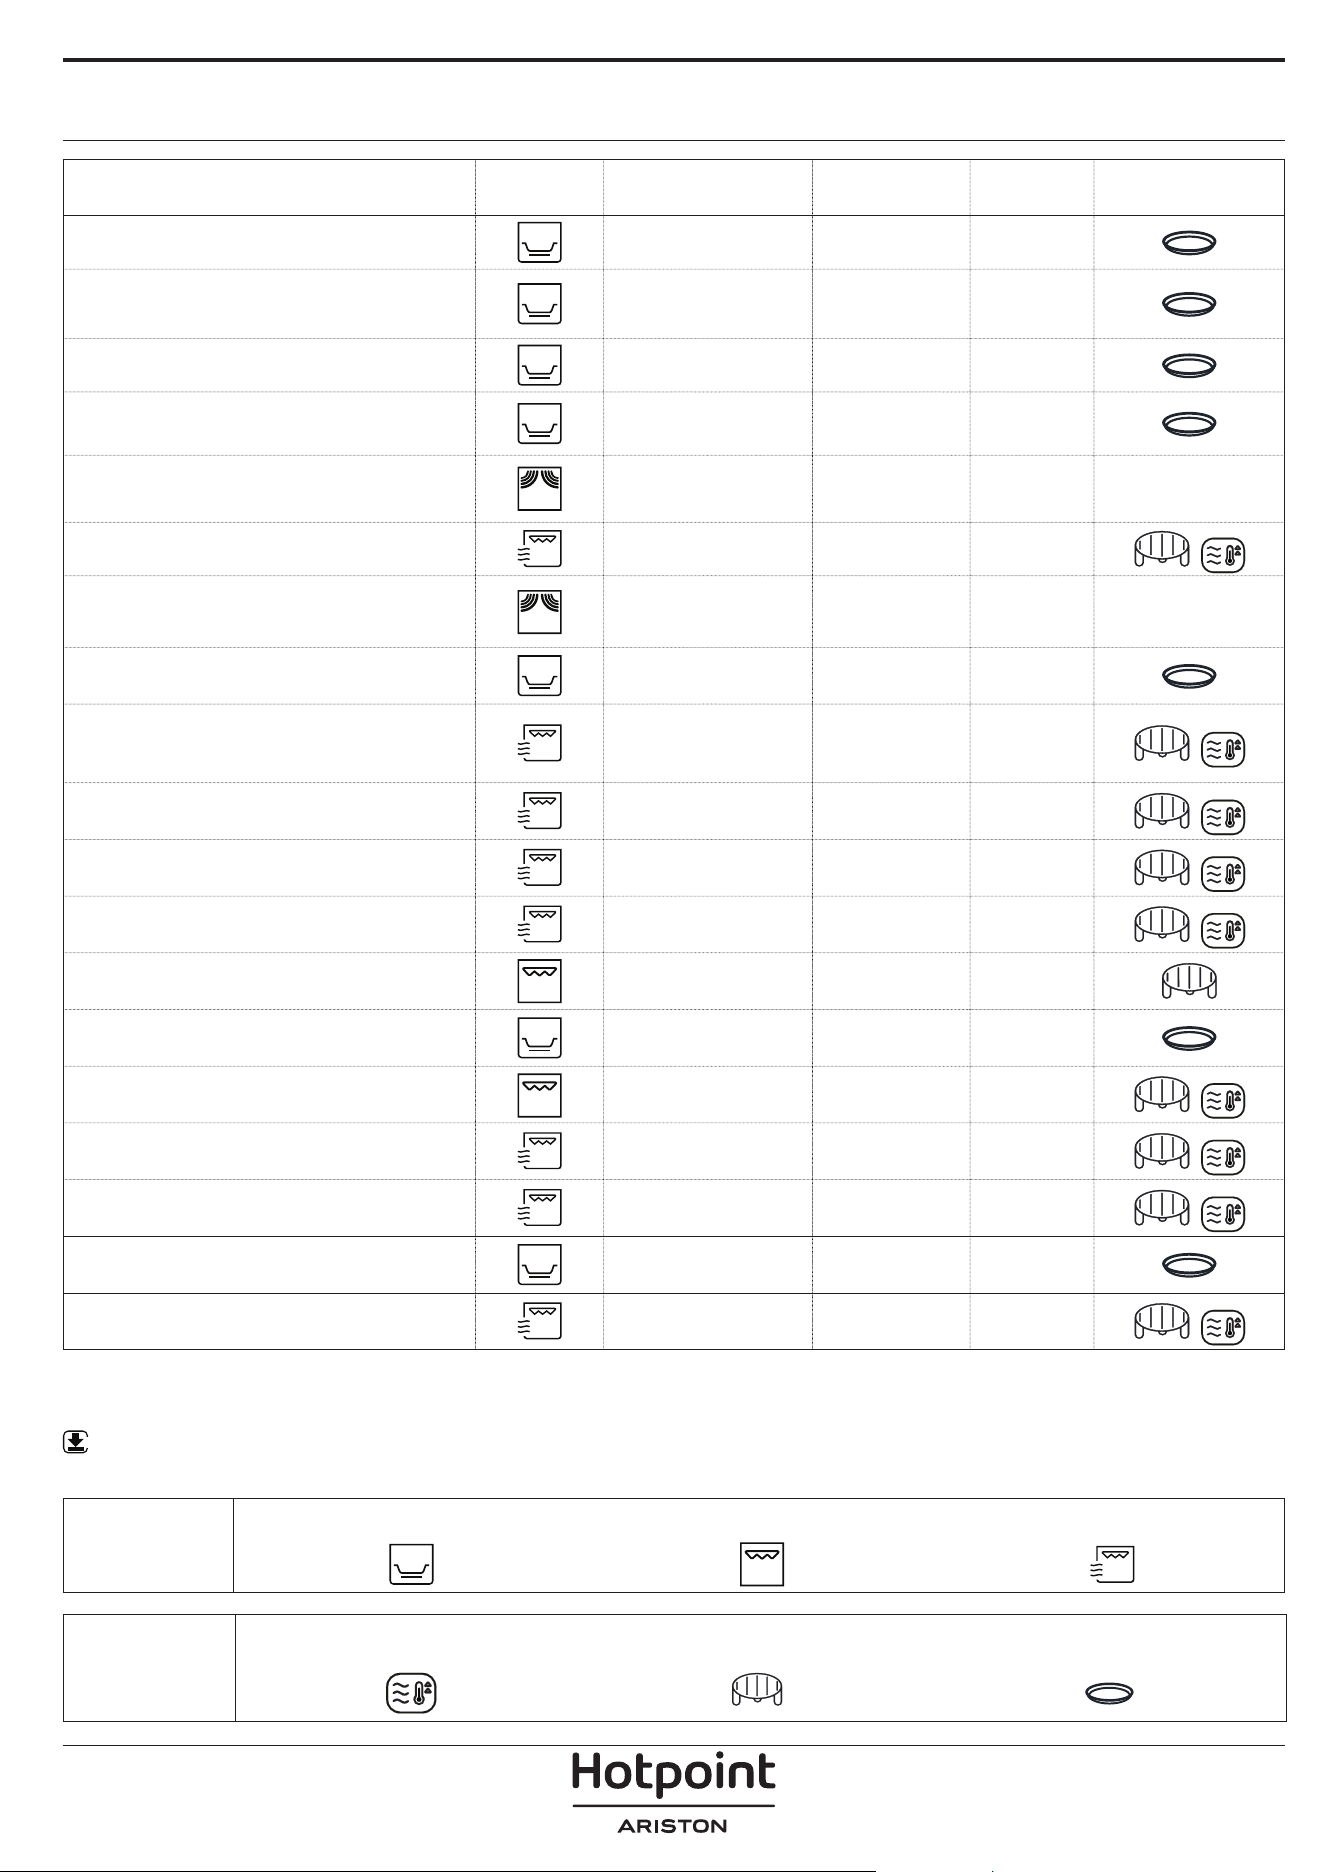
COOKING TABLE
* Turn the food halfway through cooking ** Preheat the Crisp plate for 3-5 minutes
WWW
Download the Use and Care Guide from docs.hotpoint.eu to consult the table of tested recipes, which has been
compiled for the certification authorities in accordance with the IEC 60350 standard.
FOOD FUNCTION
PRE
HEATING
POWER
(W)
TIME
(MIN)
ACCESSORIES
Sponge cake
- - 7 - 15
Fruit pie
- - 12 - 20
Cookies
- - 5 - 10
Savoury tarts and quiche Lorraine
(1 - 1.2 kg)
- - 18 - 25
Dinner Plates
(250 - 500 g)
- 750 4 - 7 -
Lasagna / baked pasta
- 350 - 500 15 - 40
Frozen lasagna
(500 - 700 g)
- 500 - 750 14 - 20 -
Pizza (300 g)
- - 14 - 16
Meat (chops, steak)
- 500 10 - 15
Poultry (whole, 800 g - 1.5 kg)
- 350 - 500 30 - 45 *
Chicken llets or pieces
- 350 - 500 10 -17
Roasts
- 350 - 500 25 - 40 *
Sausages / skewers
- - 20 - 40 *
Sausages/hamburgers
Yes ** - 6 - 16 *
Fish (steaks or llets)
Yes 160 - 350 15 - 30 *
Whole sh
- 160 - 350 20 - 40 *
Baked potatoes
- 350 - 500 30 - 50 *
Potato wedges
- - 25 - 30
Baked apples
- 160 -350 15 -25
FUNCTIONS
Crisp Grill Grill + MW
ACCESSORIES
Heatproof plate/container suitable for use
in microwaves
Wire rack
Crisp plate
TROUBLESHOOTING
Download the Use and Care Guide from
docs.hotpoint.eu for more information
WWW
CLEANING
Make sure that the oven has cooled down before
carrying out any maintenance or cleaning.
Do not use steam cleaners.
Do not use wire wool, abrasive scourers or
abrasive/corrosive cleaning agents, as these
could damage the surfaces of the appliance.
INTERIOR AND EXTERIOR SURFACES
• Clean the surfaces with a damp cloth. If they are
very dirty, add a few drops of pH-neutral detergent.
Finish off with a dry cloth.
• Clean the door glass with a suitable liquid
detergent.
• At regular intervals or in case of spills, remove the
turntable and its support to clean the bottom of the
oven, removing all food residue.
• The grill does not need to be cleaned as the intense
heat burns away any dirt: Use this function on a
regular basis.
ACCESSORIES
All accessories are dishwasher safe with the exception
of the crisp plate.
The crisp plate should be cleaned using water and a
mild detergent. For stubborn dirt, rub gently with a
cloth. Always leave the crisp plate to cool down before
cleaning.
Problem Possible cause Solution
The oven is not working. Power cut.
Disconnection from the mains.
Check for the presence of mains electrical
power and whether the oven is connected to
the electricity supply.
Turn off the oven and restart it to see if the
fault persists.
The oven makes noises, even
when it is switched off.
Cooling fan active.
Press
two times or open the door and
wait until the food has cooled down.
The display shows the letter “F”
followed by a letter or number.
Software fault. Contact you nearest After-sales Service
Centre and state the letter or number that
follows the letter “F”.
Policies, standard documentation and additional product information can be found by:
• Using the QR code in your appliance
• Visiting our website docs . hotpoint . eu
• Alternatively, contact our After-sales Service (See phone number in the warranty booklet). When contacting our After-
sales Service, please state the codes provided on your product's identication plate.
400020013791
IT
Manuale d’uso
GRAZIE PER AVERE ACQUISTATO UN PRODOTTO
HOTPOINT‑ARISTON
Per ricevere un'assistenza più completa, registrare il
prodotto su www . register10 . eu
SCANSIONARE IL CODICE QR
SUL PROPRIO APPARECCHIO
PER OTTENERE MAGGIORI
INFORMAZIONI
Prima di utilizzare l'apparecchio leggere attentamente
le istruzioni di sicurezza.
DESCRIZIONE DEL PRODOTTO
PANNELLO COMANDI
1. Pannello comandi
2. Targhetta matricola
(da non rimuovere)
3. Porta
4. Resistenza superiore / Grill
5. Luce
6. Piatto rotante
1. MANOPOLA DI SELEZIONE
Per accendere il forno
selezionando una funzione.
Ruotare in posizione
per
spegnere il forno.
2. INDIETRO
Per tornare alla schermata di
impostazione precedente.
3. STOP
Per interrompere una funzione in
qualsiasi momento. Premere due
volte per interrompere la funzione
e mettere il forno in standby.
4. DISPLAY
5. AVVIO
Per avviare le funzioni,
confermando i valori impostati.
A forno spento, avvia la funzione
microonde “Jet Start”.
6. CONFERMA
Per confermare la selezione di una
funzione o un valore impostato.
7. MANOPOLA DI
REGOLAZIONE
Per scorrere i menu, impostare o
modificare i valori.
1
3
6
5
4
2
1 32 4 765

ACCESSORI
Scaricare le istruzioni per l’uso da
docs . hotpoint . eu per maggiori informazioni
WWW
Il numero di accessori può variare a seconda del modello acquistato.
Gli altri accessori non in dotazione possono essere acquistati separatamente presso il Servizio Assistenza Tecnica.
MANIGLIA PER PIATTO CRISP
Utile per rimuovere il piatto Crisp
caldo dal forno.
GRIGLIA
Permette di avvicinare il cibo al
grill, assicurandone una
piacevole doratura.
Appoggiare la griglia sul piatto
rotante, evitando che venga a
contatto con altre superfici.
COPERCHIO (SE PRESENTE)
Utile per coprire i recipienti
durante la cottura e il
riscaldamento a microonde.
Il coperchio permette di ridurre gli
schizzi, trattenere l’umidità degli
alimenti e può essere utilizzato
anche per creare due livelli di cottura.
Non è adatto per le funzioni che attivano il grill
(inclusa la funzione “Crisp”)
.
PIATTO ROTANTE
Appoggiato sull’apposito
supporto, il piatto rotante in
vetro può essere utilizzato in
tutte le modalità di cottura.
Il piatto rotante va sempre
usato come base per altri contenitori o accessori ad
eccezione della teglia rettangolare.
SUPPORTO PER PIATTO ROTANTE
Utilizzare il supporto soltanto per il
piatto rotante in vetro. Non
appoggiare altri accessori sul
supporto.
PIATTO CRISP
Da utilizzare solo con la funzione
designata .
Il piatto Crisp deve essere sempre
appoggiato al centro del piatto
rotante in vetro e può essere preriscaldato a vuoto,
utilizzando solo la speciale funzione dedicata.
Disporre gli alimenti direttamente sul piatto Crisp.
In commercio sono disponibili diversi accessori.
Prima di acquistarli, accertarsi che siano idonei alla
cottura a microonde e in forno.
I contenitori metallici per cibi o bevande non vanno
mai usati per la cottura a microonde.
Vericare che alimenti e accessori non tocchino le
pareti interne del forno.
Prima di avviare il forno, assicurarsi sempre che
il piatto rotante possa ruotare liberamente. Fare
attenzione a non spostare il piatto rotante dalla
sua sede mentre si inseriscono o rimuovono altri
accessori.
FUNZIONI
Scaricare le istruzioni per l’uso da
docs.hotpoint.eu per maggiori informazioni
MICROONDE
Per cuocere e riscaldare rapidamente alimenti
o bevande.
POTENZA CONSIGLIATA PER
1000 W
Riscaldamento rapido di bevande o altri
alimenti ad alto contenuto di acqua
800 W
Cottura di vegetali
650 W
Cottura di carne e pesce
500 W
Cottura di sughi di carne, salse con
formaggio o uova. Finitura di sformati di
carne o paste al forno
350 W
Cotture lente e delicate. Per sciogliere burro
o cioccolato
160 W
Scongelare alimenti surgelati o ammorbidire
burro e formaggi
90 W
Ammorbidire il gelato
Accessorio suggerito: coperchio
CRISP
Per ottenere una doratura perfetta sia sulla
superficie superiore che su quella inferiore del
cibo. Questa funzione deve essere usata solo con lo
speciale piatto Crisp.
Accessori necessari: piatto crisp, maniglia per piatto
crisp
GRILL
Per dorare, grigliare o gratinare le pietanze. Si
consiglia di girare gli alimenti durante la cottura.
Si raccomanda di preriscaldare il grill per 3-5 minuti.
Accessorio consigliato: griglia
GRILL+MICROONDE
Per cuocere e gratinare rapidamente le
pietanze combinando le microonde con il grill.
Accessorio consigliato: griglia
AUTO DEFROST
Per scongelare rapidamente diverse categorie
di alimenti specificandone solamente il peso. Si
consiglia di disporre gli alimenti direttamente sul
piatto rotante in vetro.
Girare gli alimenti quando viene richiesto
CATEGORIA ALIMENTI CONSIGLIATI PESO
CARNE
(macinato, cotolette,
bistecche, arrosti)
100 g - 2 kg
POLLAME
(pollo intero, a pezzi, filetti)
100 g - 2,5
kg
PESCE
(Intero, tranci, filetti)
100 g - 1,5
kg
VERDURE
(Verdure miste, piselli,
broccoli...)
100 g - 1,5
kg
PANE
(pane a cassetta, focaccine,
panini)
100 g - 1 kg
WWW
FUNZIONI AUTOMATICHE
Con le funzioni automatiche è suciente selezionare il tipo e il peso o la quantità degli alimenti per ottenere un risultato
ottimale. Il forno calcolerà automaticamente le impostazioni ideali. Dove indicato, la funzione può essere usata solo con il
piatto Crisp in dotazione. Girare o mescolare gli alimenti quando viene richiesto.
CATEGO-
RIA
ALIMENTO PESO
CATEGO-
RIA
ALIMENTO PESO
PIATTI PRONTI 250 g - 500 g POPCORN 100 g
LASAGNE SURGELATE 250 - 500 g
PATATINE FRITTE
(disporre in un unico strato sul
piatto Crisp e salare prima della
cottura)
200 - 500 g
PATATE AL FORNO
(girare quando viene richiesto)
200 g - 1 kg
PIZZA
(usare il piatto Crisp)
300 - 800 g
VERDURE FRESCHE
(tagliare a pezzi uniformi e
aggiungere 2-4 cucchiai d'acqua.
Coprire)
200 - 800 g
ALETTE DI POLLO, PEZZI DI POLLO
(Ungere leggermente il piatto
Crisp)
200 - 500 g
VERDURE SURGELATE
(girare quando viene richiesto,
coprire)
200 - 800 g
BASTONCINI DI PESCE
(preriscaldare il piatto Crisp)
200 - 500 g
. IMPOSTARE L’ORA
Alla prima accensione, è necessario impostare l'ora:
sul display lampeggiano le due cifre relative all'ora.
Ruotare la manopola di regolazione per impostare
l’ora desiderata e premere
per confermare. Le
due cifre dei minuti iniziano a lampeggiare. Ruotare
la manopola di regolazione per impostare l’ora
desiderata e premere
per confermare.
Note: per modicare successivamente l’ora, premere
per almeno 3 secondi a forno spento e ripetere le operazioni
sopra descritte.
dopo una prolungata interruzione di corrente potrebbe
essere necessario impostare nuovamente l'ora.
PRIMO UTILIZZO
1. SELEZIONARE UNA FUNZIONE
Quando il forno è spento, è visualizzato solo l’orologio
Ruotare la manopola di selezione per selezionare una
delle funzioni disponibili.
.
2. SELEZIONARE UNA FUNZIONE
. FUNZIONI MANUALI
Dopo avere selezionato la funzione desiderata è
possibile modificarne le impostazioni.
Il display mostra in sequenza le impostazioni che è
possibile modificare.
POTENZA DELLE MICROONDE
Quando l’icona lampeggia sul display,
ruotare la manopola di regolazione per modificare il
valore impostato, quindi premere
per confermare
e procedere con le impostazioni seguenti.
Note: dopo avere attivato la funzione, la potenza può essere
modicata premendo due volte per accedere al menu
delle impostazioni di potenza e ruotando la manopola di
regolazione per cambiare il valore impostato.
DURATA
Quando l’icona lampeggia sul display,
ruotare la manopola di regolazione per impostare il
tempo di cottura desiderato.
Quando il tempo di cottura visualizzato è quello
desiderato, premere
per confermare e avviare la
funzione.
Note: dopo l'avvio del forno, il tempo di cottura può essere
modicato ruotando la manopola; ad ogni pressione di
il tempo di cottura aumenta di 30 secondi.
. FUNZIONI AUTOMATICHE / AUTO DEFROST
CATEGORIE
Dopo avere selezionato una funzione automatica,
occorre selezionare la categoria di alimenti
appropriata.
Quando l'icona lampeggia sul display, ruotare la
manopola di regolazione per selezionare il numero
corrispondente alla categoria desiderata, quindi
premere
per confermare.
PESO
Per ottenere risultati ottimali con le funzioni
automatiche, è necessario inserire il peso degli
alimenti scegliendo tra le impostazioni predefinite: il
forno calcolerà la durata ideale della funzione per la
categoria di alimenti selezionata.
Quando il display mostra l'impostazione predefinita
e l'icona
lampeggia, ruotare la manopola di
regolazione per inserire il peso, quindi premere
per confermare e avviare la funzione.
3. AVVIARE LA FUNZIONE
Una volta che i valori corrispondono a quelli
desiderati, premere
per avviare la funzione.
Ad ogni pressione del tasto
il tempo di cottura
viene prolungato di 30 secondi (solo per le funzioni
manuali).
Note: Premere per interrompere in ogni momento la
funzione attivata.
JET START
A forno spento, premere per avviare la cottura
con la funzione microonde impostata alla potenza
massima (1000 W) per 30 secondi.
. BLOCCO DI SICUREZZA
Questa funzione si attiva automaticamente per
prevenire un avvio involontario del forno.
Aprire e chiudere la porta, poi premere per
avviare la funzione.
USO QUOTIDIANO
4. PAUSA
Per sospendere una funzione attiva, ad esempio per
mescolare o girare gli alimenti, è sufficiente aprire lo
sportello.
Per riprendere, chiudere la porta e premere
È anche possibile mettere in pausa temporaneamente
la cottura premendo
. Per riprendere la cottura,
chiudere sportello, premere
.
PAUSA AUTOMATICA
(MESCOLARE O GIRARE GLI ALIMENTI)
Alcune funzioni prevedono una pausa per consentire
di girare o mescolare gli alimenti.
Quando la cottura si interrompe e sul display compare
il messaggio “Turn food” (girare) o “Stir Food”
(mescolare), aprire lo sportello per girare o mescolare
gli alimenti, quindi chiudere lo sportello e premere
per riprendere la cottura.
Note: dopo 2 minuti, il forno si riavvia
automaticamente anche se gli alimenti non sono stati
girati o mescolati.
5. FINE COTTURA
Per indicare la fine di una funzione di cottura viene
emesso un segnale acustico e sul display compare
l'indicazione "End" (Fine).
Con alcune funzioni è possibile prolungare la cottura
mantenendo le impostazioni originarie: ruotare la
manopola di regolazione per impostare un nuovo
tempo di cottura, quindi premere
.
. TIMER
Quando il forno è spento, il display può essere
utilizzato come contaminuti. il timer non attiva
nessun ciclo di cottura.
Per attivare la funzione e impostare il tempo di
cottura desiderato, ruotare la manopola di regolazione.
Premere per attivare il timer. Un segnale acustico
e il display avviseranno del termine del conto alla
rovescia.
Per modificare il valore impostato sul timer dopo
averlo attivato, ruotare la manopola di regolazione e
premere OK per confermare.
Per interrompere l'operazione o tornare a visualizzare
l'ora corrente, ruotare la manopola di regolazione
finché sul display compare 0:00 e premere
Note: Una volta attivato il timer, è possibile attivare una
funzione: il timer continuerà autonomamente il conto
alla rovescia senza interferire sulla funzione. Per tornare a
visualizzare il timer, attendere il termine della funzione o
interromperla prima del termine premendo due volte .
TABELLA DI COTTURA
* Girare gli alimenti a metà cottura ** Preriscaldare il piatto crisp per 3-5 minuti
WWW
Scaricare le Istruzioni per l’uso dal sito docs.hotpoint.eu per consultare la tabella delle ricette testate, compilata
per gli istituti di valutazione secondo la norma CEI 60350.
ALIMENTO FUNZIONE
PRE
RISCALDAMENTO
POTENZA
(W)
TEMPO
(MIN)
ACCESSORI
Pan di spagna
- - 7 - 15
Torta di frutta
- - 12 - 20
Biscotti
- - 5 - 10
Torte salate e Quiche Lorraine
(1 - 1,2 kg)
- - 18 - 25
Piatti pronti
(250 - 500 g)
- 750 4 - 7 -
Lasagne / Pasta al forno
- 350 - 500 15 - 40
Lasagne surgelate
(500 - 700 g)
- 500 - 750 14 - 20 -
Pizza (300 g)
- - 14 - 16
Carne (braciole, bistecche)
- 500 10 - 15
Pollame (intero, 800 g - 1,5 kg)
- 350 - 500 30 - 45 *
Pezzi o letti di pollo
- 350 - 500 10 -17
Roasts (Arrosto)
- 350 - 500 25 - 40 *
Salsicce / spiedini
- - 20 - 40 *
Salsicce / Hamburger
Sì ** - 6 - 16 *
Pesce (tranci o letti)
Sì 160 - 350 15 - 30 *
Pesce intero
- 160 - 350 20 - 40 *
Patate al forno
- 350 - 500 30 - 50 *
Patate a fette
- - 25 - 30
Mele cotte
- 160 -350 15 -25
FUNZIONI
Crisp Grill Grill + Microonde
ACCESSORI
Piatto / contenitore adatto alle microonde
e al calore
Griglia
Piatto Crisp

RISOLUZIONE DEI PROBLEMI
Scaricare le istruzioni per l’uso da
docs . hotpoint . eu per maggiori informazioni
WWW
PULIZIA
Assicurarsi che il forno si sia rareddato prima di
eettuare qualsiasi intervento di manutenzione
o pulizia.
Non utilizzare apparecchi a vapore.
Non usare pagliette metalliche, panni abrasivi
e detergenti abrasivi o corrosivi che possano
danneggiare le superci.
SUPERFICI INTERNE ED ESTERNE
• Pulire le superfici con un panno umido. Se molto
sporche, aggiungere qualche goccia di detergente
con pH neutro. Asciugare con un panno.
• Pulire il vetro della porta con detergenti liquidi
specifici.
• A intervalli regolari o in caso di traboccamenti,
togliere il piatto rotante e il suo supporto per pulire
la base del forno, rimuovendo tutti i residui di cibo.
• Il grill non necessita di alcuna pulizia perché il calore
intenso brucia direttamente lo sporco: attivare la
funzione a intervalli regolari.
ACCESSORI
È possibile lavare in lavastoviglie tutti gli accessori ad
eccezione del piatto Crisp.
Il piatto Crisp deve essere pulito con acqua e un
detergente neutro. Per lo sporco più tenace, strofinare
delicatamente con un panno. Far raffreddare il piatto
Crisp prima di lavarlo.
Problema Possibile causa Soluzione
Il forno non funziona. Interruzione di corrente
elettrica.
Disconnessione dalla rete
principale.
Verificare che ci sia tensione in rete e che il
forno sia collegato all'alimentazione elettrica.
Spegnere e riaccendere il forno e verificare se
l'inconveniente persiste.
Il forno fa rumore anche se
spento.
Ventola di raffreddamento
attiva.
Premere due volte
o aprire lo sportello e
attendere che gli alimenti si raffreddino.
Il display mostra la lettera “F”
seguita da una lettera o un
numero.
Guasto software. Contattare il Servizio Assistenza Tecnica di
zona e comunicare la lettera o il numero che
segue la lettera “F”.
Per le linee guida, la documentazione standard e altre informazioni sui prodotti:
• Utilizzare il codice QR sul proprio apparecchio
• Visitare il sito web docs . hotpoint . eu
• Oppure, contattare il Servizio Assistenza Tecnica (al numero di telefono riportato sul libretto di garanzia). Prima di
contattare il Servizio Assistenza Clienti, prepararsi a fornire i codici riportati sulla targhetta matricola del prodotto.
400020013791
BG
Наръчник на собственика
БЛАГОДАРИМ ВИ, ЧЕ ЗАКУПИХТЕ ПРОДУКТ НА
HOTPOINT-ARISTON
За да получите по-пълно съдействие, регистрирайте
Вашия уред на www.register10.eu
МОЛЯ, СКАНИРАЙТЕ QR КОДА НА
ВАШИЯ УРЕД, ЗА ДА ПОЛУЧИТЕ
ПОВЕЧЕ ИНФОРМАЦИЯ
Преди да използвате уреда, прочетете внимателно
инструкциите за безопасност.
ОПИСАНИЕ НА УРЕДА
ПАНЕЛ ЗА УПРАВЛЕНИЕ
1. Панел за управление
2. Заводска табелка
(не премахвайте)
3. Вратичка
4. Горен нагревател/грил
5. Осветление
6. Въртяща се поставка
1. ВЪРТЯЩ СЕ БУТОН ЗА
ИЗБИРАНЕ
За включване на фурната с
избиране на функция.
Завъртете на позиция
, за да
изключите фурната.
2. НАЗАД
За връщане към предходното
меню с настройки.
3. СТОП
За прекъсване на активна
функция по всяко време.
Натиснете два пъти, за да спрете
функцията и да поставите
фурната в режим на готовност.
4. ДИСПЛЕЙ
5. START
За включване на функции и
потвърждаване на стойностите
на параметрите. Когато фурната
е изключена, тя активира
микровълновата функция „Jet
Start“.
6. ПОТВЪРДИ
За потвърждаване на избор на
функция или зададена стойност.
7. ВЪРТЯЩ СЕ БУТОН ЗА
РЕГУЛИРАНЕ
За придвижване през менютата и
потвърждаване или промяна на
настройките.
1
3
6
5
4
2
1 32 4 765
ПРИНАДЛЕЖНОСТИ
За допълнителна информация изтеглете ръководството
за употреба и поддръжка от docs.hotpoint.eu
WWW
Броят на принадлежностите може да е различен в зависимост от закупения модел.
Други принадлежности, които не са включени в доставката, могат да бъдат закупени отделно от отдела за
следпродажбено обслужване.
ДРЪЖКА ЗА ТАВИЧКАТА CRISP
Удобна за изваждане на горещата
тавичка Crisp от фурната.
РЕШЕТЪЧЕН РАФТ
Това Ви позволява да
поставите храната по-близо
до грила, за перфектно
препичане на Вашите ястия.
Поставете решетъчния рафт
на въртящата се поставка, като се уверите, че не
влиза в контакт с други повърхности.
КАПАК (АКО Е ПРЕДОСТАВЕН)
Подходящ за покриване на
съдовете при готвене и
претопляне.
Капакът намалява пръските,
запазва влагата в ястията и
може също да се използва за
получаване на две нива за готвене.
Не е съвместим с никоя от грил функциите (вкл.
“Crisp”)
.
ВЪРТЯЩА СЕ ПОСТАВКА
Поставена върху стойката
си, стъклената въртяща се
поставка може да се
използва при всички методи
на готвене.
Въртящата се поставка трябва винаги да
се използва като основа за други съдове
или принадлежности, с изключение на
правоъгълната тавичка за печене.
СТОЙКА НА ВЪРТЯЩАТА СЕ ПОСТАВКА
Използвайте стойката само за
стъклената въртяща се поставка.
Не поставяйте други
принадлежности върху стойката.
ТАВИЧКА CRISP
Използва се само за посочената
функция.
Тавичката за запичане трябва
винаги да се поставя в центъра
на стъклената въртяща се поставка и може да
се подгрява предварително, когато е празна,
със специалната функция само за тази цел.
Поставяйте храната направо върху тавичката
crisp.
В търговската мрежа са налични голям брой
принадлежности. Преди покупка се уверете,
че са подходящи за употреба в микровълнова
фурна и устойчиви на температурите във
фурната.
Никога не използвайте метални съдове за храна
или напитки при микровълново готвене.
Винаги проверявайте ястията и
принадлежностите да не влизат в контакт с
вътрешните стени на фурната.
Винаги проверявайте дали въртящата се
поставка се върти свободно, преди да включите
фурната. Внимавайте да не отместите въртящата
се поставка, докато поставяте или премахвате
други принадлежности.
ФУНКЦИИ
За допълнителна информация изтеглете ръководството
за употреба и поддръжка от docs.hotpoint.eu
МИКРОВЪЛНИ
За бързо приготвяне и претопляне на
храни и напитки.
МОЩНОСТ ПРЕПОРЪЧАНА ЗА
1000 W
Бързо претопляне на напитки или други
храни с високо съдържание на вода
800 W
Готвене на зеленчуци
650 W
Готвене на месо и риба
500 W
Готвене на месни сосове или сосове със
сирене или яйца. Финална фаза за месни
пайове или печена паста
350 W
Бавно, щадящо готвене. Идеално за
разтапяне на масло или шоколад
160 W
Размразяване на замразени храни или
размекване на масло и сирене
90 W
Разтопяване на сладолед
Препоръчителна принадлежност: капак
ЗАПИЧАНЕ
За перфектно запичане на ястие от горната
и долната страна на храната. Тази функция трябва
да се използва само със специалната тавичка
Crisp.
Необходими принадлежности: Тавичка Crisp, дръжка
за тавичка Crisp
ГРИЛ
За запичане, гриловане и гратиниране.
Препоръчваме да обръщате храната по време на
готвенето.
За най-добри резултати загрейте предварително
грила за 3-5 минути.
Препоръчителна принадлежност: решетъчен рафт
ГРИЛ + МИКРОВЪЛНИ
За бързо приготвяне на ястия,
комбинирайки микровълновата функция с грил.
Препоръчителна принадлежност: решетъчен рафт
АВТОМАТИЧНО РАЗМРАЗЯВАНЕ
За бързо размразяване на различни видове
продукти само с посочване на теглото им.
Продуктите следва да се поставят направо върху
стъклената въртяща се поставка.
Обърнете храната, когато бъдете подканени
КАТЕГОРИЯ ПРЕПОРЪЧИТЕЛНИ ХРАНИ ТЕГЛО
MEСО
(кайма, котлети, пържоли,
парчета за печено)
100 g - 2 kg
ПТИЧЕ МЕСО
(цяло пиле, части, филета)
100g –
2,5kg
РИБА
(цяла, стекове, филета)
100g –
1,5kg
ЗЕЛЕНЧУЦИ
(смес от зеленчуци, грах,
броколи и др.)
100g –
1,5kg
ХЛЯБ
(самуни, кифлички, рула)
100 g - 1 kg
WWW
АВТОМАТИЧНИ ФУНКЦИИ
С автоматичните функции просто изберете типа и количеството на хранителните продукти за постигане на най-добри
резултати. Фурната автоматично ще изчисли идеалните настройки. Където е посочено, функцията може да се използва
само в комбинация с предоставената плоча Crisp. Обърнете храната, когато бъдете подканени.
КАТЕГО-
РИЯ
ХРАНА ТЕГЛО
КАТЕГО-
РИЯ
ХРАНА ТЕГЛО
ЯСТИЯ ЗА ВЕЧЕРЯ 250 g - 500 g ПУКАНКИ 100 g
ЗАМРАЗЕНА ЛАЗАНЯ 250 - 500 g
ПЪРЖЕНИ КАРТОФИ
(разстелете на единичен слой
върху тавичката за запичане и
поръсете със сол преди готвене)
200 - 500 g
ПЕЧЕНИ КАРТОФИ
(Обърнете, когато е готово)
200 g - 1 kg
ПИЦА
(използвайте тавичката за
запичане)
300 - 800 g
ПРЕСНИ ЗЕЛЕНЧУЦИ
(Нарежете на равни парчета и
добавете от 2 до 4 супени лъжици
вода. Покрийте)
200 - 800 g
ПИЛЕШКИ КРИЛА, ПАРЧЕТА ПИЛЕ
(леко намаслете тавичката за
запичане.)
200 - 500 g
ЗАМРАЗЕНИ ЗЕЛЕНЧУЦИ
(завъртете при подсещане,
покрийте)
200 - 800 g
ПЪРЖЕНИ КЮФТЕТА
(Тавичката crisp трябва да се
подгрее)
200 - 500 g
. СВЕРЯВАНЕ НА ЧАСОВНИКА
Когато включите уреда за първи път, трябва да
сверите часовника: Двете цифри за часа ще мигат
на дисплея.
Завъртете копчето за регулиране, за да зададете
часовете, и натиснете
за потвърждение.
Двете цифри за минутите ще започнат да мигат.
Завъртете копчето за регулиране, за да зададете
часовете, и натиснете
за потвърждение.
Моля, имайте предвид: за да промените часа на по-късен
етап, натиснете и задръжте за поне 3 секунди, докато
фурната е изключена, и повторете горните стъпки.
След продължително прекъсване на
електрозахранването може да се наложи да сверите
часовника отново.
ИЗПОЛЗВАНЕ НА УРЕДА ЗА ПРЪВ ПЪТ
1. ИЗБИРАНЕ НА ФУНКЦИЯ
Когато фурната е изключена, да дисплея се показва
само часовникът. Натиснете копчето за избор, за да
изберете една наличните функции.
.
2. ЗАДАВАНЕ НА ФУНКЦИЯ
. РЪЧНИ ФУНКЦИИ
След като сте избрали желаната функция, можете
да променяте настройките ѝ.
Дисплеят показва последователно настройките,
които могат да се променят.
НИВО НА МИКРОВЪЛНИТЕ
Когато иконата мига на дисплея,
завъртете ключа за настройка, за да промените
желания елемент, натиснете
, за да потвърдите,
и продължете със следните настройки.
Моля, имайте предвид: след като функцията бъде
активирана, можете да променяте мощността, като
натиснете за достъп до менюто с настройки, а след
това завъртите копчето за регулиране, за да промените
настройката.
ПРОДЪЛЖИТЕЛНОСТ
Когато иконата мига на дисплея,
завъртете копчето за регулиране за настройка на
желаното време на готвене.
След като показаното време за готвене
съответства на желаното, натиснете
, за да
потвърдите и стартирате функцията.
Моля, имайте предвид: По време на готвене можете да
настроите времето за готвене, като завъртите бутона;
всеки път, щом натиснете , времето за готвене се
увеличава с 30 секунди.
. АВТОМАТИЧНИ ФУНКЦИИ / АВТОМАТИЧНО
РАЗМРАЗЯВАНЕ
КАТЕГОРИИ
След като сте избрали някоя от автоматичните
функции, трябва да изберете категорията храна,
която ще приготвяте.
Когато на дисплея мига иконата завъртете
копчето за регулиране, за да изберете цифрата,
която съответства на желаната категория, след
което натиснете
, за да потвърдите.
ТЕГЛО
За да постигнете най-добри резултати,
автоматичните функции изискват да въведете
теглото на храната, като изберете една от
настройките по подразбиране: фурната ще изчисли
идеалното времетраене на функцията за всяка
категория храна.
Когато настройката по подразбиране се появи на
дисплея и
иконата мига, завъртете копчето за
регулиране за въвеждане на теглото, след това
натиснете
за потвърждаване и стартирайте
функцията.
3. АКТИВИРАНЕ НА ФУНКЦИЯТА
След като приложите необходимите настройки,
натиснете
, за да активирате функцията.
При всяко повторно натискане на бутона
времето за готвене се увеличава с още 30 секунди
(само за ръчните функции).
Моля, имайте предвид: Можете да натиснете по
всяко време, за да поставите текущо активната функция на
пауза.
JET START
Когато фурната е изключена, натиснете , за да
активирате готвенето с микровълнова функция,
зададена на пълна мощност (1000 W) за 30 секунди.
. ЗАЩИТНО ЗАКЛЮЧВАНЕ
Тази функция се активира автоматично с цел
защита от случайно включване на фурната.
ВСЕКИДНЕВНА УПОТРЕБА
Отворете и затворете вратичката, след което
натиснете
, за да стартирате функцията.
4. ПАУЗА
За да поставите на пауза активна функция,
например за да разбъркате или обърнете храната,
просто отворете вратичката.
За да стартирате отново, затворете вратичката и
натиснете
Възможно е също така временно да спрете
готвенето, като натиснете
. За да подновите
процеса на готвене, затворете вратичката и
натиснете
.
АВТОМАТИЧНА ПАУЗА
(РАЗБЪРКАЙТЕ ИЛИ ОБЪРНЕТЕ ХРАНАТА)
Някои автоматични функции ще спрат на пауза, за
да можете да обърнете или разбъркате храната.
Когато фурната спре на пауза готвенето и "Завърти
храната" или "Разбъркай храната" се появи на
дисплея, отворете вратата за завъртане или
разбъркване на храната, след това затворете
вратата и натиснете
за стартиране отново на
готвенето.
Моля, имайте предвид: след 2 минути, дори ако
храната не е била обръщана или разбърквана,
функцията ще започне отново автоматично.
5. КРАЙ НА ГОТВЕНЕТО
Ще се чуе звуков сигнал и на дисплея ще се появи
„End“ (Край), за да се покаже, че функцията за
готвене е завършена..
За някои функции е възможно да се отложи
готвенето, като се запазят предварително
установените настройки: завъртете копчето за
регулиране, за да зададете ново време за готвене,
след което натиснете
.
. ТАЙМЕР
Когато фурната е изключена, дисплеят може да се
използва като таймер. Таймерът не активира никоя
от програмите за готвене.
За да активирате функцията и зададете
продължителността на необходимото време,
завъртете бутона за регулиране.
Натиснете за активиране на таймера. Ще се
чуе звуков сигнал и ще се изведе индикация на
дисплея след като таймерът завърши обратното
отброяване на избраното време.
За да направите промяна на таймера, след като е
активиран, завъртете копчето за регулиране, след
което натиснете OK, за да потвърдите.
За да го прекъснете или да се върнете към
показване на текущото време, завъртете копчето
за регулиране, докато на дисплея се появи 0:00, и
натиснете
Моля, имайте предвид: След като таймерът е активиран,
можете да активирате и функцията: Таймерът ще
продължи да отброява избраното време автоматично, без
това да се отразява върху функцията. За да се върнете към
прегледа на таймера, изчакайте функцията да приключи
или спрете функцията на фурната като натиснете два
пъти.
ГОТВАРСКА ТАБЛИЦА
* Обърнете храната при изтичане на половината от
времето за готвене
** Загрейте предварително тавичката за запичнае за 3-5
минути
WWW
Изтеглете Наръчника за употреба и грижа от docs.hotpoint.eu за консултиране с таблицата на тествани
рецепти, която е съставена за сертификационните органи в съответствие със стандарт IEC 60350.
ХРАНА ФУНКЦИЯ
ПРЕДВАРИТЕЛНО
ЗАГРЯВАНЕ
МОЩНОСТ
(W)
ВРЕМЕ
(МИН.)
ПРИНАДЛЕЖ-
НОСТИ
Пандишпанов кейк
- - 7 - 15
Плодов пай
- - 12 - 20
Бисквитки
- - 5 - 10
Вкусни тартове и киш "Лорен"
(1 - 1.2 kg)
- - 18 - 25
Ястия за вечеря
(250 - 500 g)
- 750 4 - 7 -
Лазаня/печена паста
- 350 - 500 15 - 40
Замразена лазаня
(500 - 700 g)
- 500 - 750 14 - 20 -
Пица (300 g)
- - 14 - 16
Месо (кюфтета, пържоли)
- 500 10 - 15
Птици (цели, 800 g - 1.5 kg)
- 350 - 500 30 - 45 *
Пилешки филета или парчета
- 350 - 500 10 -17
Печено месо
- 350 - 500 25 - 40 *
Колбаси / шишчета
- - 20 - 40 *
Наденици/хамбургери
Да** - 6 - 16 *
Риба (стекове или филе)
Да 160 - 350 15 - 30 *
Цяла риба
- 160 - 350 20 - 40 *
Печени картофи
- 350 - 500 30 - 50 *
Уеджис картофи
- - 25 - 30
Печени ябълки
- 160 -350 15 -25
ФУНКЦИИ
Crisp Грил Грил + микровълни
ПРИНАДЛЕЖ-
НОСТИ
Топлоустойчива плоча/съд, подходящ за
микровълнови фурни
Решетъчен рафт
Тавичка Crisp
ОТКРИВАНЕ И ОТСТРАНЯВАНЕ
НА НЕИЗПРАВНОСТИ
За допълнителна информация изтеглете ръководството
за употреба и поддръжка от docs.hotpoint.eu
WWW
ПОЧИСТВАНЕ
Уверете се, че фурната е студена, преди да
извършвате каквато и да е поддръжка или
почистване.
Не използвайте паропочистващи машини.
Не използвайте стоманена вълна, стъргалки
или абразивни/разяждащи почистващи
препарати, тъй като те могат да повредят
повърхностите на уреда.
ВЪТРЕШНИ И ВЪНШНИ ПОВЪРХНОСТИ
• Почистете повърхностите с влажна кърпа. Ако
са много замърсени, добавете няколко капки
почистващ препарат с неутрално pH. Накрая
забършете със суха кърпа.
• Почистете стъклото на вратичката с подходящ
течен препарат за почистване.
• На равни интервали или в случай на разливане
отстранявайте въртящата се поставка и стойката ѝ,
за да почистите дъното на фурната, премахвайки
всички остатъци от храна.
• Грилът няма нужда от почистване, тъй като
силната топлина изгаря замърсяванията:
Използвайте тази функция редовно.
ПРИНАДЛЕЖНОСТИ
Всички аксесоари с изключение на тавичката Crisp
са подходящи за почистване в съдомиялна машина.
Тавичката Crisp трябва да се почиства с вода и
слаб препарат. За упорити замърсявания търкайте
внимателно с кърпа. Винаги оставяйте тавичката
Crisp да се охлади преди почистване.
Проблем Възможна причина Решение
Фурната не работи. Няма захранване с
електроенергия.
Уредът е изключен от
мрежата.
Проверете дали има напрежение в мрежата
и дали фурната е включена към мрежата.
Изключете и включете уреда отново, за да
видите дали проблемът не е отстранен.
Фурната шуми дори когато е
изключена.
Вентилаторът за охлаждане
работи.
Натиснете
два пъти или отворете
вратата и изчакайте докато храната не се
охлади.
На дисплея се извежда буквата
“F”, последвана от буква или
цифра.
Софтуерна неизправност. Свържете се с най-близкия център за
следпродажбено обслужване и съобщете
буквата или цифрата след "F".
Правилата, стандартната документация и допълнителна информация за продукта можете да намерите, като:
• Използване на QR кода на вашето устройство
• Посетите нашия уебсайт docs . hotpoint . eu
• Или като се свържете с отдела за следпродажбено обслужване (вижте телефонния номер в гаранционната
книжка). При контакт с отдела за следпродажбено обслужване съобщавайте кодовете, посочени на
идентификационната табелка на вашия уред.
400020013791