Drip Irrigation
Installation Guide
The best way to water plants, trees,
shrubs, hanging baskets, and gardens
UP TO 70%
WATER SAVINGS
PN 61100-01 rI

Installation Guide
2
Installation Guide
3
A drip–irrigation system is a watering system
designed to apply water to designated areas, such
as gardens, flower beds, container plants, trees,
and ground cover.
Why Install a Drip–Irrigation System?
n
Saves water—water is delivered directly to the roots
n
Saves money—up to a 70% reduction in water waste,
resulting in lower water bills
n
Saves time—replaces hand watering
n
Healthier plants—plants flourish when receiving the
precise amount of water
n
Less yard maintenance—delivers water to the plants,
not to weeds
Table of ContentsWhat Is Drip Irrigation?
Section 1
Before You Begin ................................................................. 4
Section 2
Water Sources ..........................................................5
Section 3
Connecting to a Hose Faucet .......................................... 6
Section 4
Common Hose Faucet Projects
Potted/Hanging Plants ...................................................... 8
Ground Cover & Flower Beds ....................................... 10
Small Trees & Shrubs ..................................................... 12
Section 5
Retrofit—Connecting to an Underground
Sprinkler System ............................................................... 14
Section 6
Common Retrofit Projects
Container Plants and Shrubs ........................................ 16
Flower Beds, Ground Cover, Shrubs,
and Large Plants ............................................................... 19
Section 7
Direct Connection to an Irrigation Valve ................... 22
Section 8
Common Direct Connection Projects
Gardens ................................................................................. 23
Desert Landscaping .......................................................... 25
Section 9
Orbit
®
Parts List ................................................................. 29
Printers are responsible
for meeting print
production requirements.
Any changes must be
approved by Orbit
®
.
Printed piece must meet
designated specifications
on this form.
© 2014 Orbit Inc.
This work is the property
of Orbit
®
, and cannot be
used, reproduced or
distributed in any way
without their express
permission.
Dieline
PMS
0000
Fold
PMS
0000
Product
Coverage
PMS
0000
Dims./
Callout
PMS
0000
∙
∙
∙
∙
Orbit
®
1.801.299.5555
orbitonline.com
M
Y
K
Glue
Folded Flat Additional Information
PRINTERS ARE
REQUIRED TO MATCH
ALL SPECIFIED
PMS COLORS.
C
DATE: 08/24/2020
DESIGNER: SM MARKETING: AY
SOFTWARE: Adobe Indesign CC
ARTWORK №: 61100-01 RI
L:
W:
H:
0" W:
H:3.75"
8.0"
7.5"
8.0"
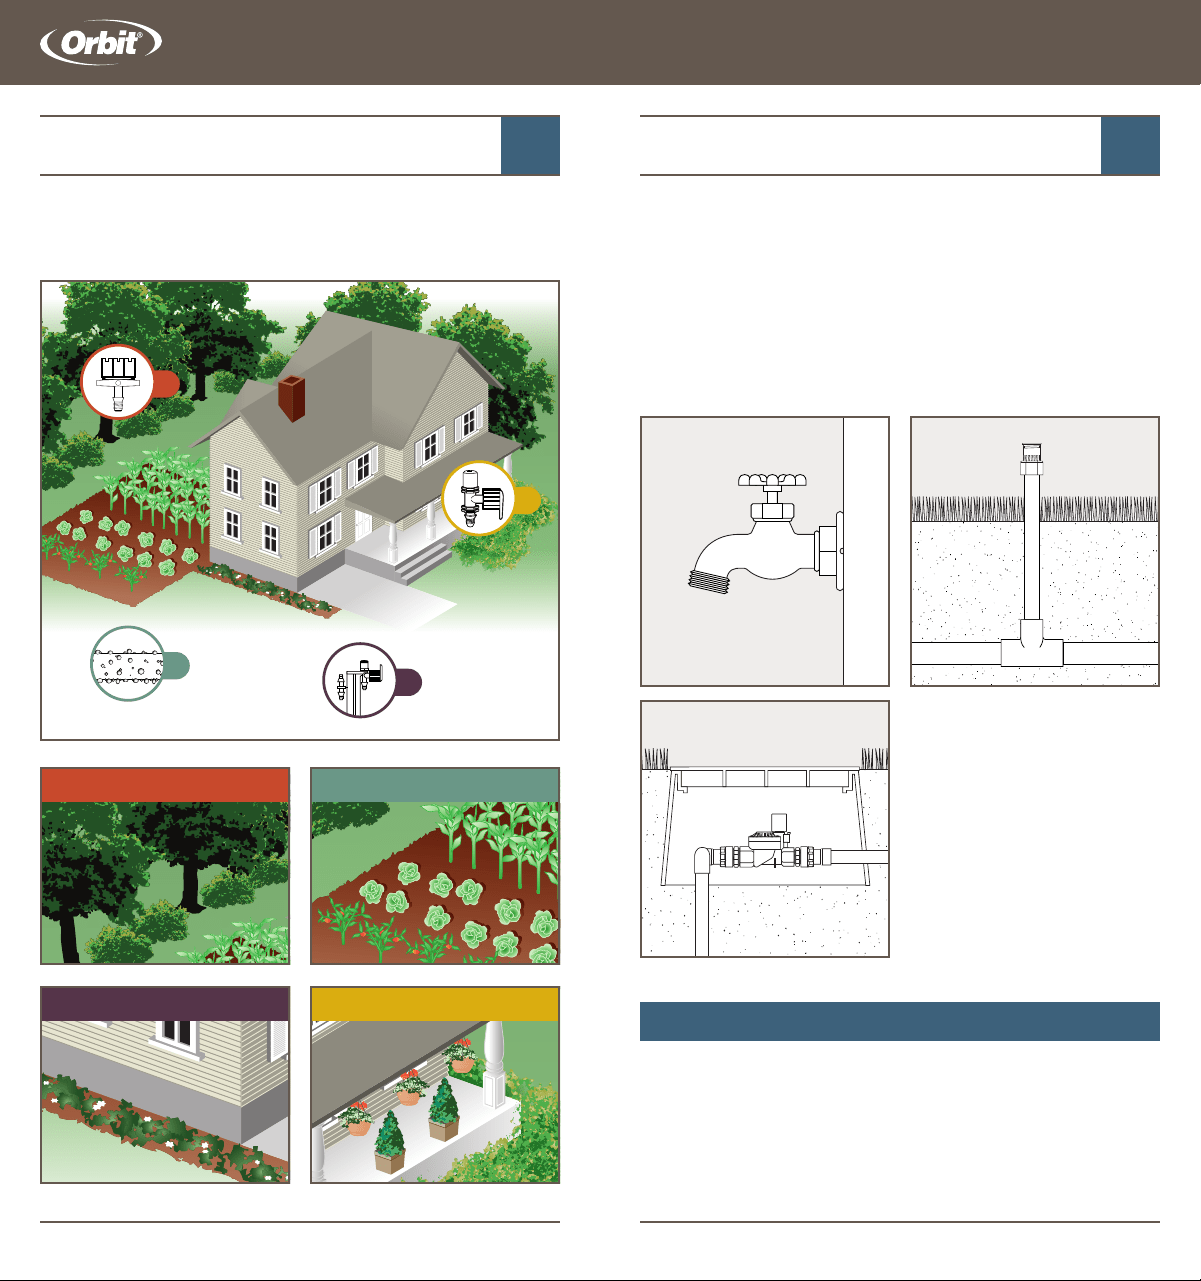
Water Source and Pressure
Water Source—Drip-irrigation systems can be connected to any
of the following water sources. Select the best option for you.
1. Outside Hose Faucet
2. Existing Underground Sprinkler System
3. Direct Connection to an Irrigation Valve
Water Pressure—Obtain
a water pressure gauge
(available at most home
improvement stores) and
attach it to your source of
water. Drip-irrigation systems
are designed to operate
between 15–35 PSI (high water
pressure may cause system
failure).
PROCEED TO THE APPROPRIATE SECTION
1. For Hose Faucet Connection—proceed to the next page.
2. For Connection to Existing Underground Sprinkler
System (Retrofit)—proceed to page 14.
3. For Connection to a Designated Irrigation Valve—
proceed to page 22.
Identify Plants with Similar
Watering Requirements
4 5
.
.
.
.
.
.
.
.
.
.
.
.
..
.
.
.
.
.
.
.
.
.
.
.
.
.
.
.
.
.
.
.
.
.
.
.
.
.
.
.
.
.
.
.
.
..
.
.
.
.
.
.
.
.
.
.
.
.
.
.
.
.
.
.
.
.
1 2
3
SECTION
2
Water Sources
SECTION
1
Before You Begin
1–TREES & SHRUBS 2–GARDEN
3–GROUND COVER 4–POTTED PLANTS
1
2
3
4
Installation Guide Installation Guide
3.
Distribution/Supply Tube
The main supply line that feeds
water to the drip-irrigation
system. Distribution tube may
be installed either above or
below ground. (part # 67345 or 67346)
TIP—To make installation easier, allow the ½" distribution/supply
tube to sit in the sun and soften prior to installation.
4.
Tube End Cap
Plugs the end of the ½"
distribution/supply tube and
serves as a drain for the
drip-irrigation system. (part #
67498)
Important: Check local code requirements prior to installing any
watering system.
COMMON HOSE FAUCET PROJECTS
1. Potted/Hanging Plants—page 8
2. Ground Cover and Flower Beds—page 10
3. Large Plants, Small Trees & Shrubs—page 12
Select the application that best matches your needs.
6 7
SECTION
3
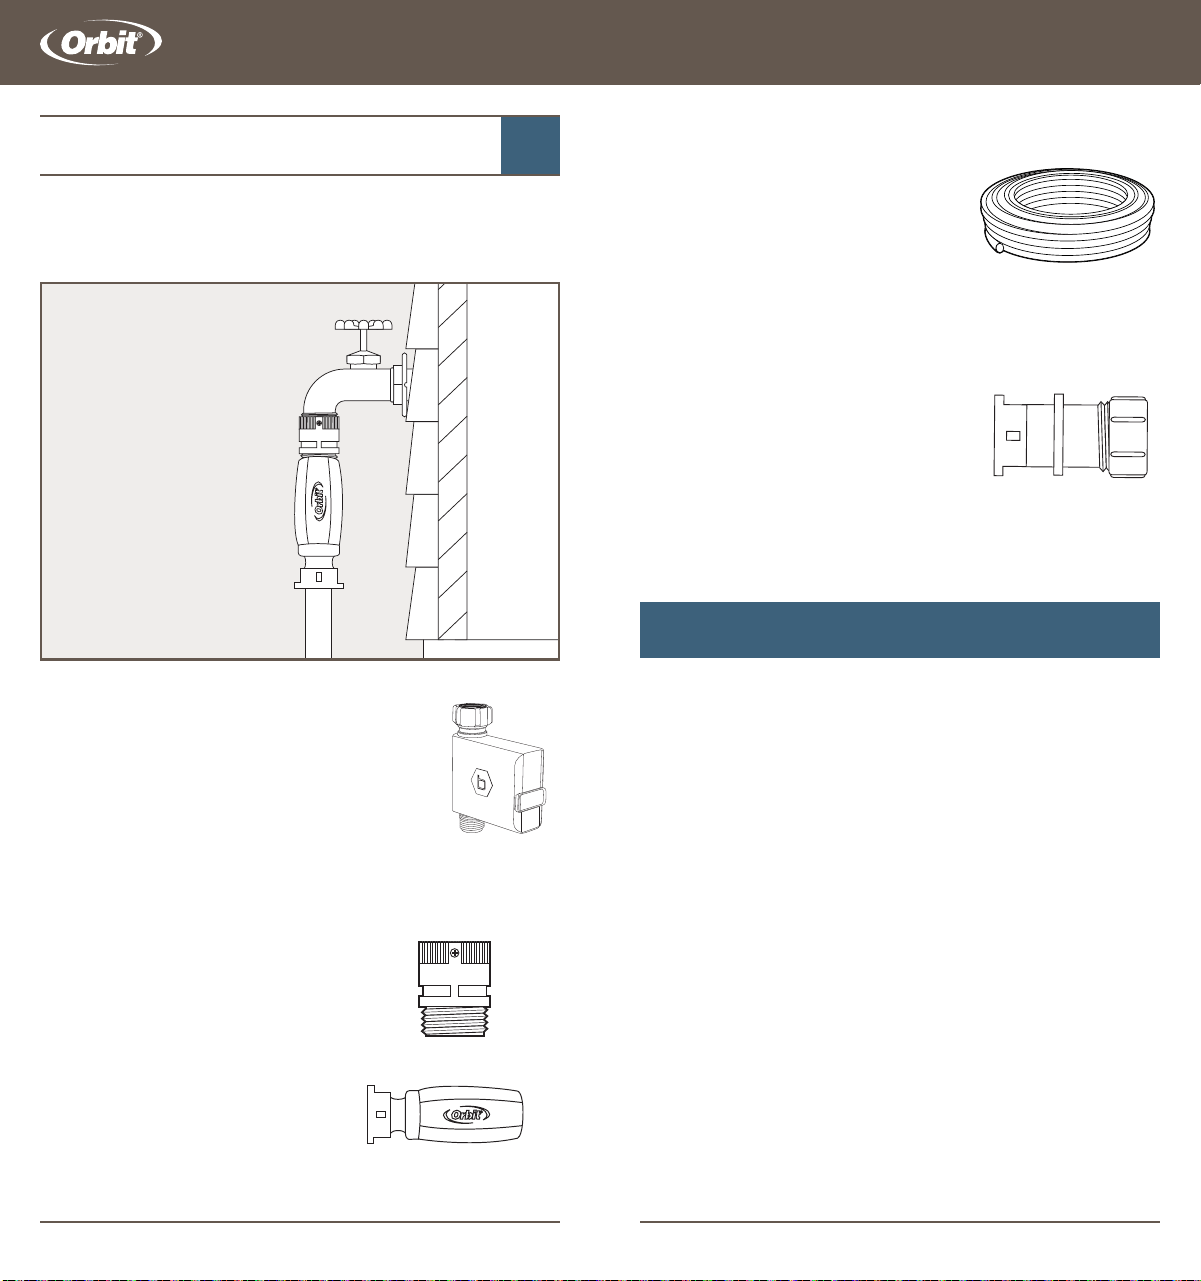
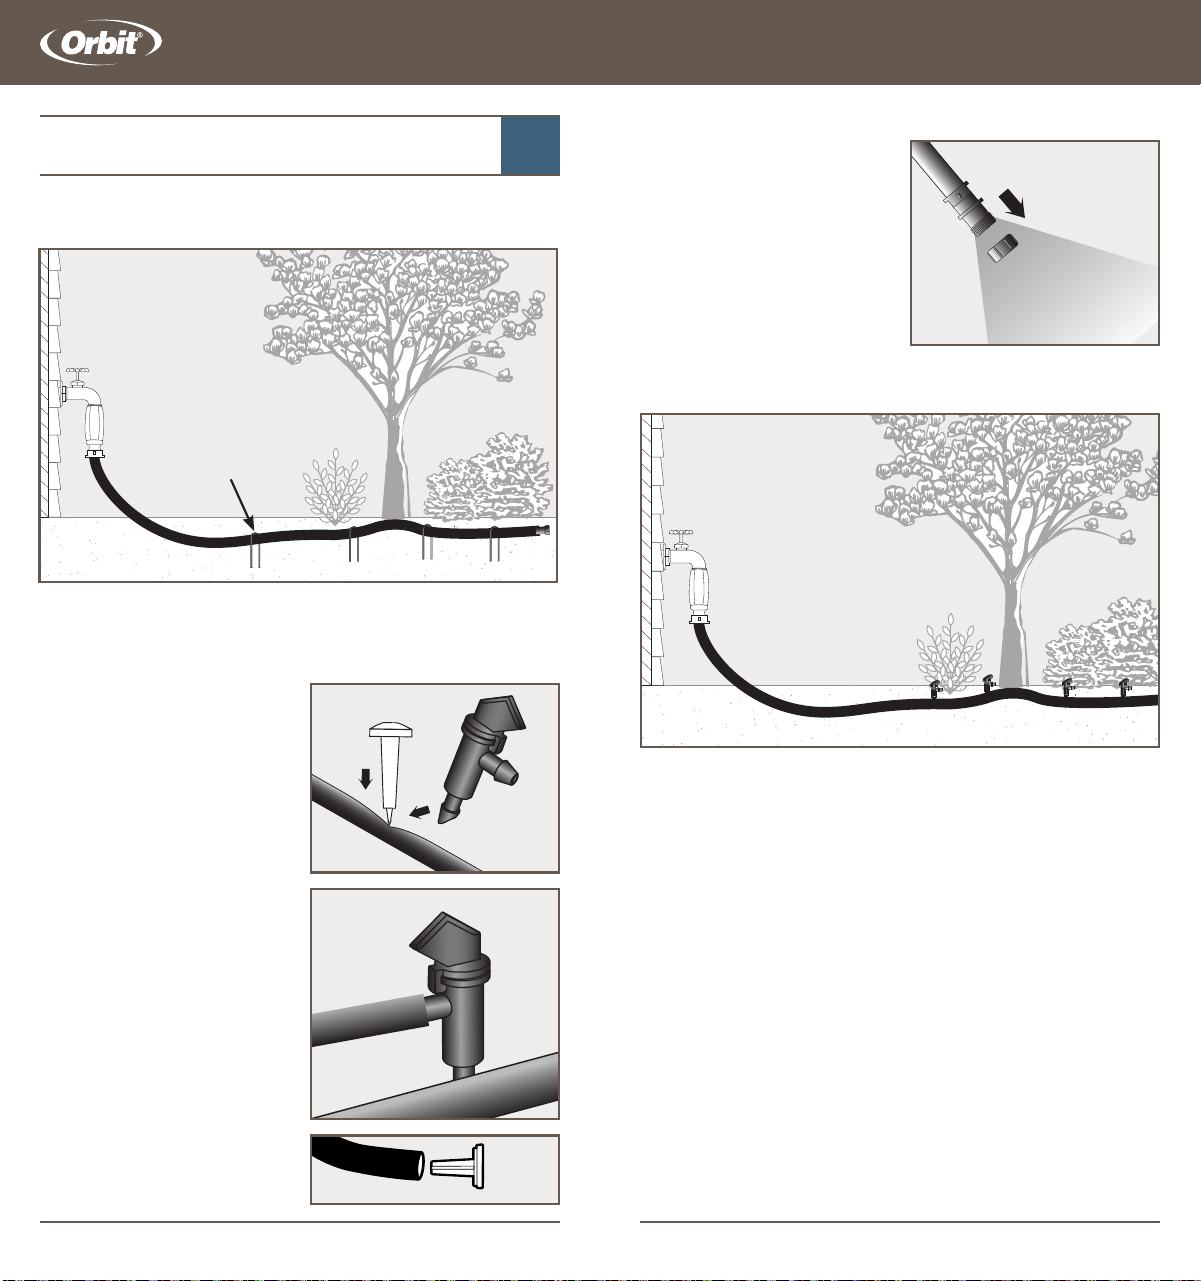
Connecting to a Hose Faucet
Connecting to a Hose Faucet
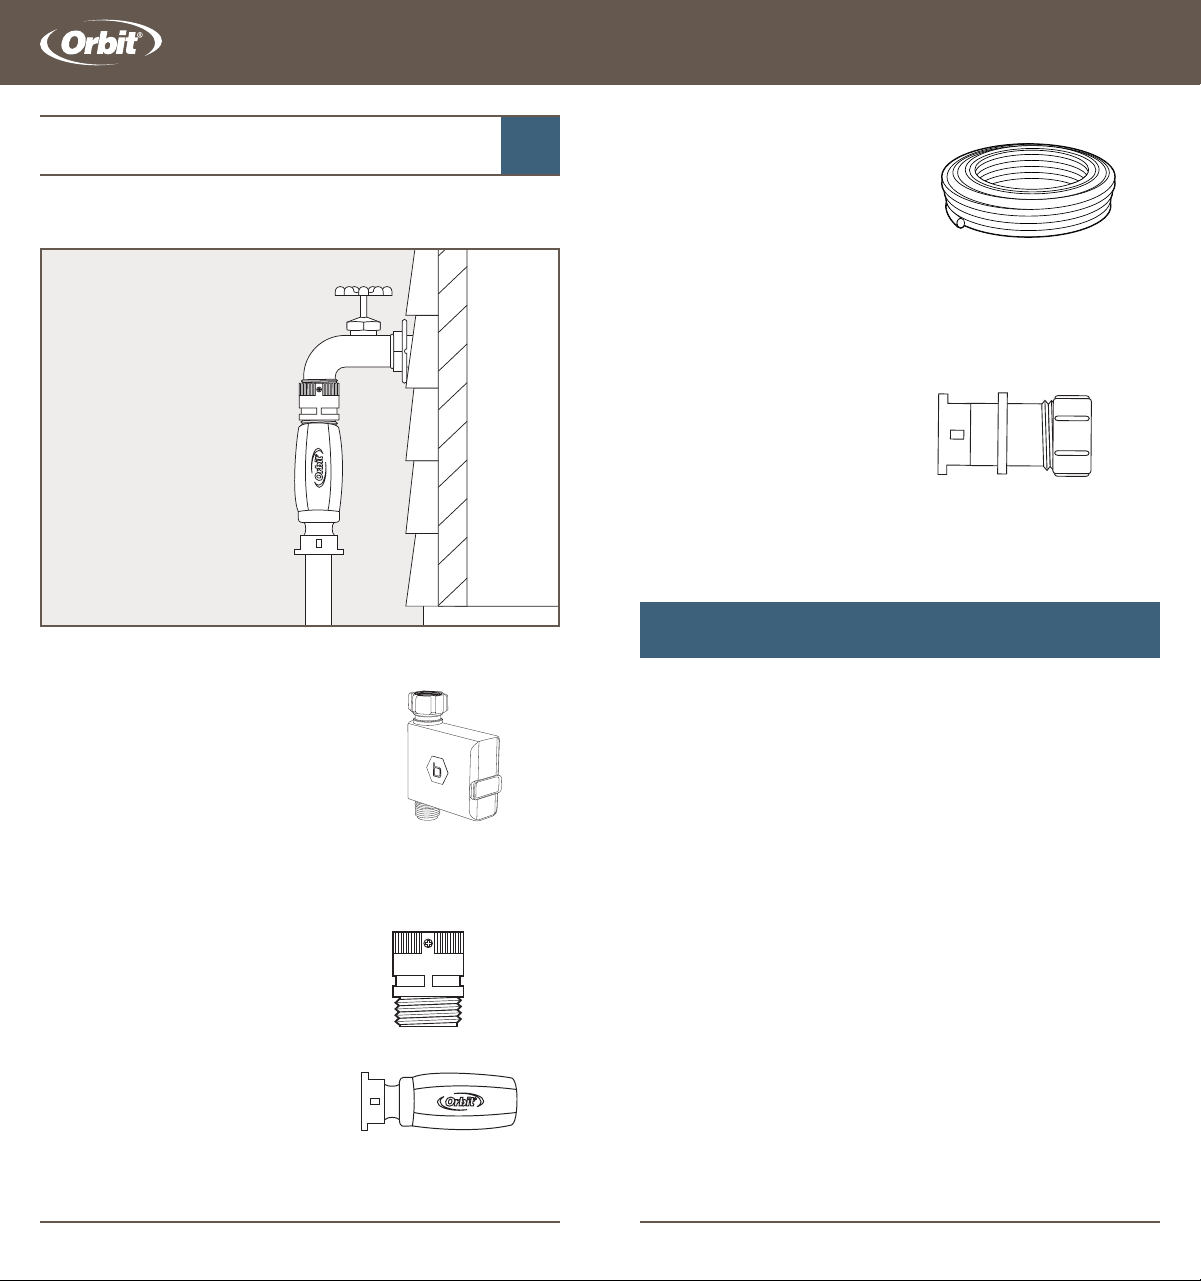
An outside hose faucet is one of the simplest ways to
connect your drip-irrigation system.
TIP—For complete hands-free watering,
install an Orbit
Electronic Hose Timer
to the hose faucet prior to connecting
your drip-irrigation system.
The following items are recommended for your
hose faucet drip-irrigation system:
1.
Anti-Siphon
Prevents contaminants from
entering your drinking water
supply. (Required in most
areas). (part # 67750)
2.
3-in-1 Drip Faucet Connection
A pressure regulator (20 PSI), filter,
and ½" drip tubing adapter in one.
(part # 67739)
2
3
1
Installation Guide Installation Guide
8 9
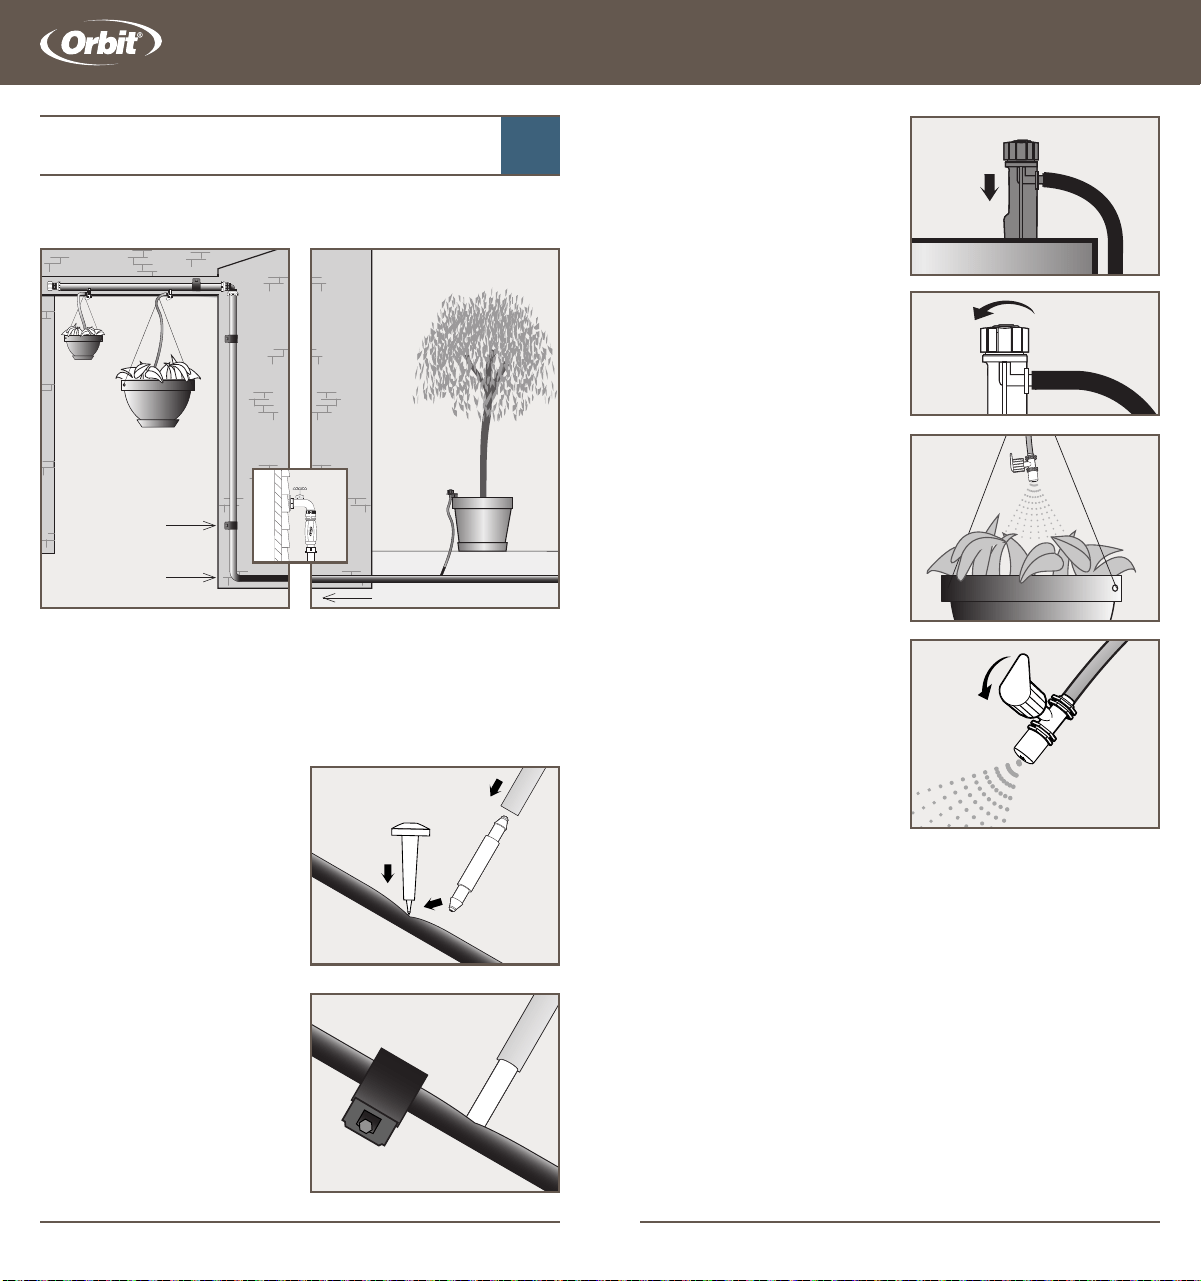
For Potted Plants
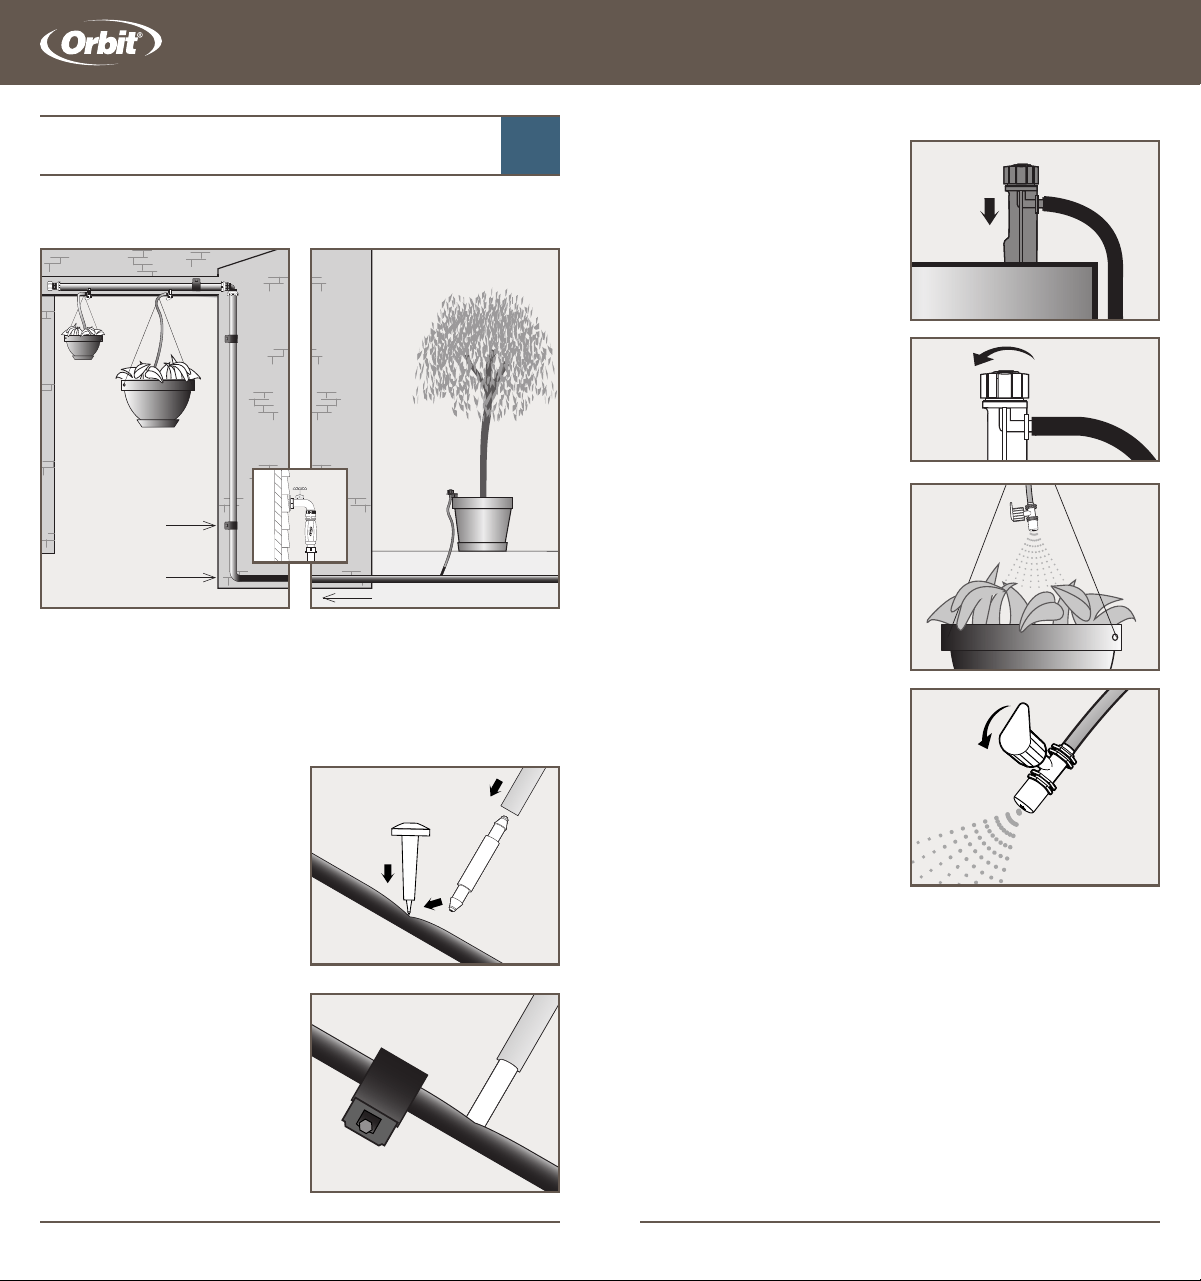
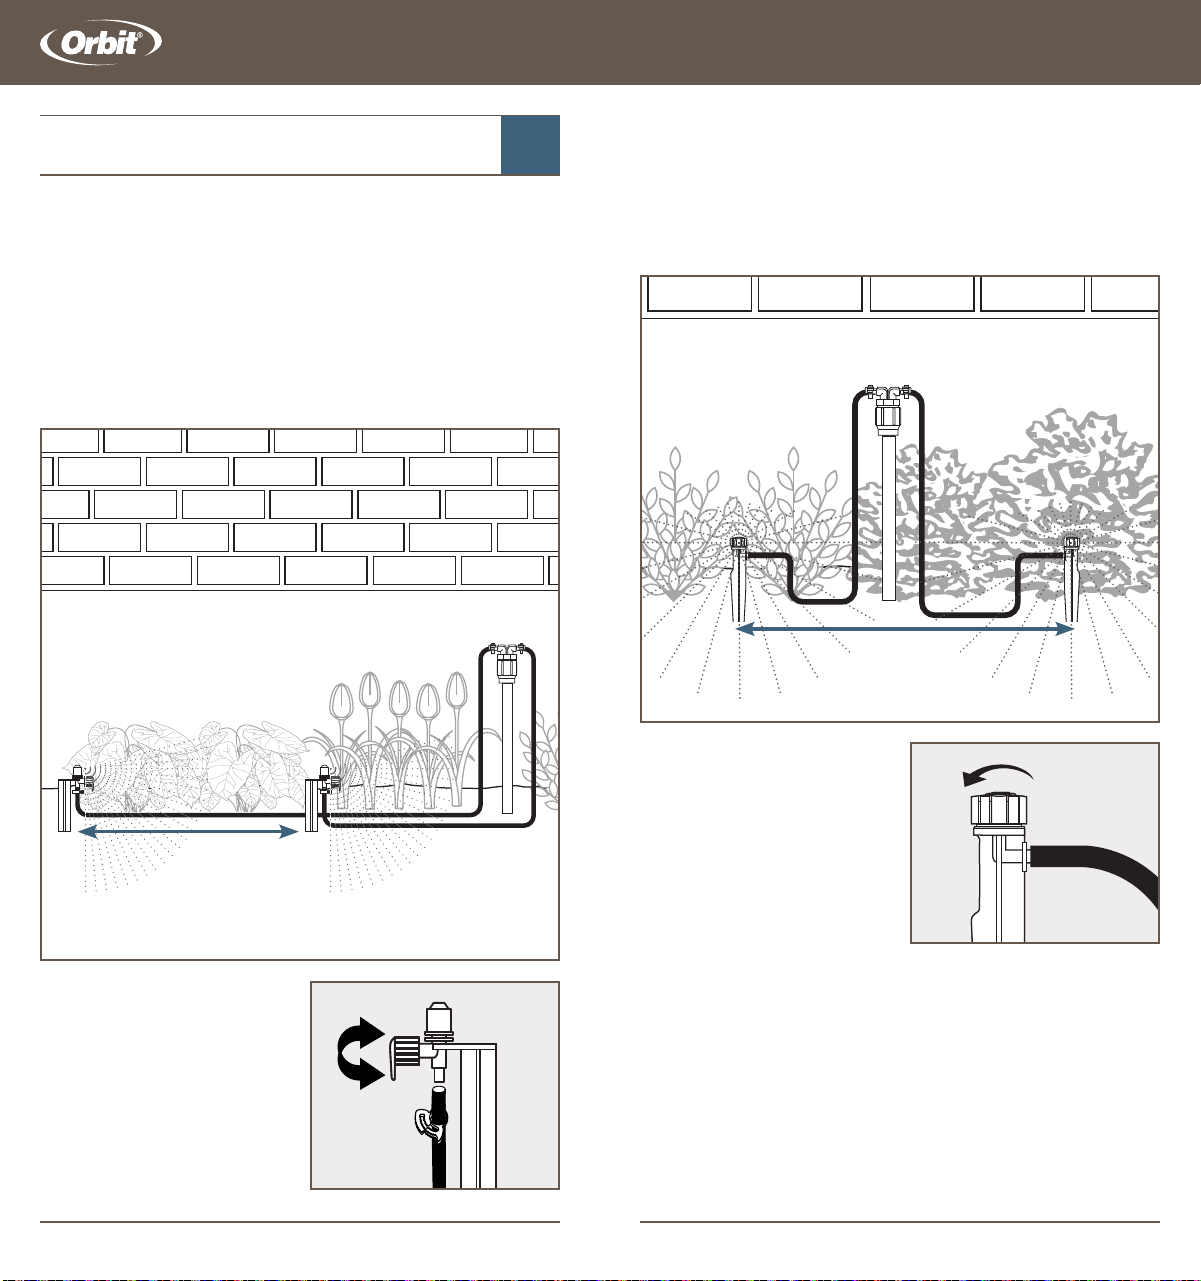
4. Attach multi-stream drippers
to each ¼" distribution/supply
line and insert stake next to
each plant.
5. Remove the ½" end cap and
turn on water to flush system;
replace cap.
6. Adjust water flow by twisting
the top of the multi-stream
dripper.
For Hanging Plants
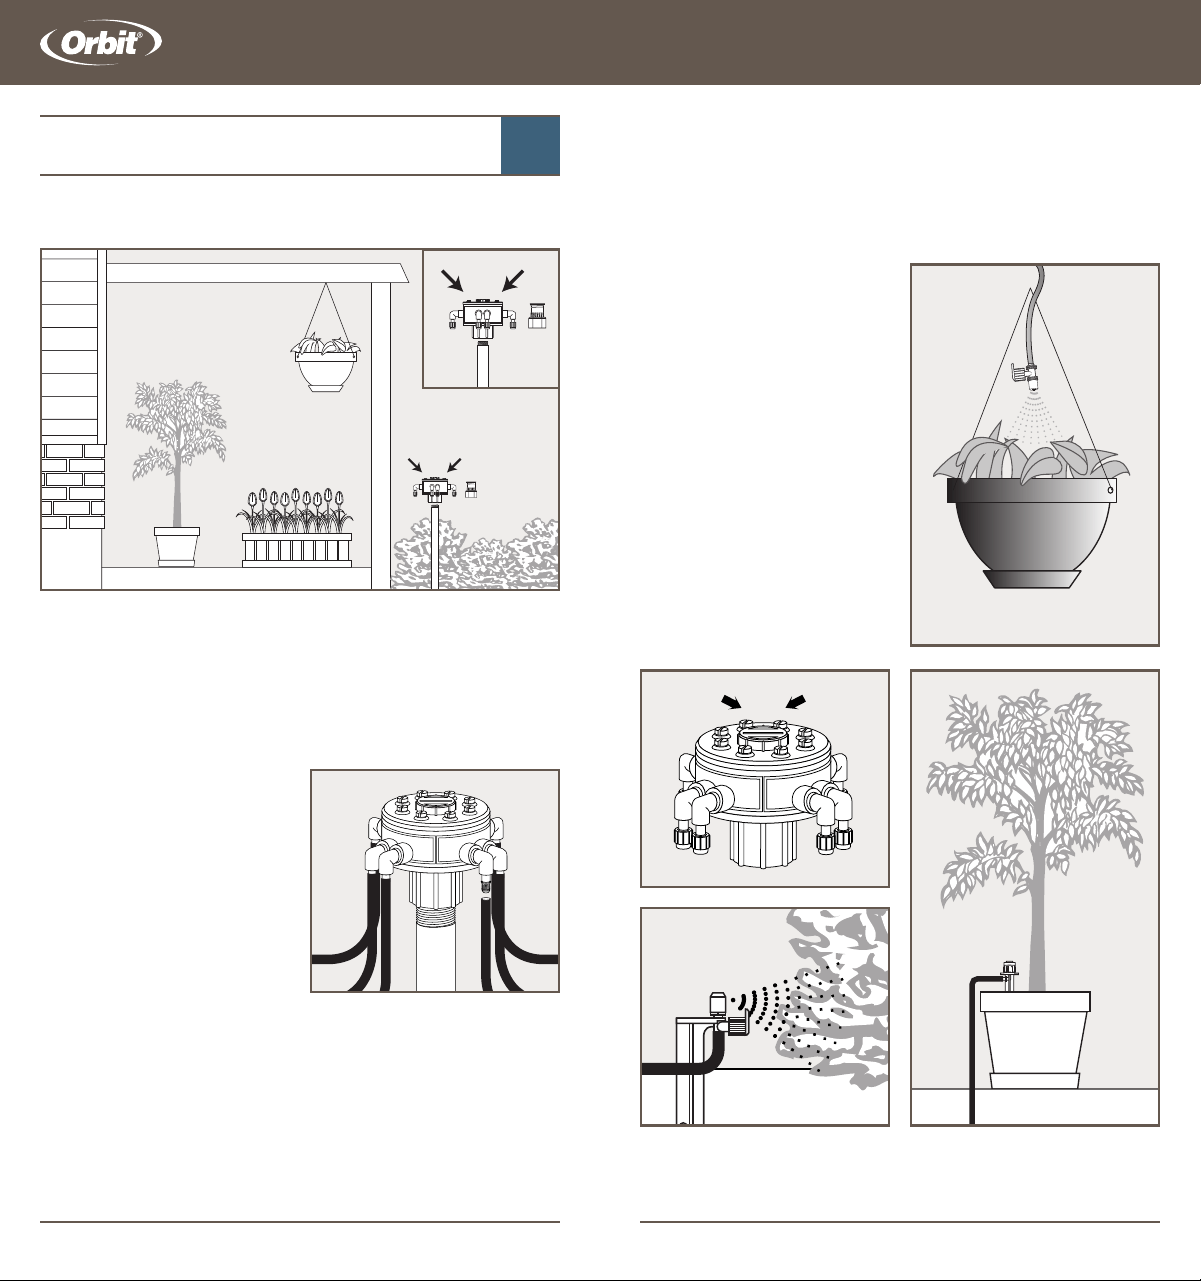
4.
Attach adjustable flow
mist sprayers to each ¼"
distribution/supply line and aim
sprayer into the hanging basket.
5.
Continue running lines to
each hanging basket until the
system is completed.
6.
Remove the ½" end cap and
turn on water to flush system;
replace cap.
7.
Rotate the flow control knob
on the mist sprayer to adjust
flow rate.
IMPORTANT: The maximum
recommended number of
multi-stream drippers and mist
sprayers per ½" supply line is 15.
Supplies Needed
- ½" Tube Straps (part # 65716)
- ¼" Tube Straps (part # 65715)
- ¼" Distribution/Supply Tube (part # 67300, 67301, or 67303)
- ¼" Barbed Couplers (part # 67402) or
¼" Barbed Assortment Pack (part # 67431)
- Stake with Multi-Stream Dripper (part # 67105)
- Adjustable Flow Mist Sprayer (part # 67191)
- Punch Tool (part # 67756 )
SECTION
4
Potted / Hanging Plants
Note: Steps 1–3 apply to both potted & hanging plants
1.
Place the ½" distribution/supply line close to your potted or
hanging plants. Use ½" tube straps to secure the tube and install a
½" end cap.
2.
Punch holes in the ½"
distribution/supply line for
each container or hanging
basket. Next, insert ¼" barbed
couplers into each hole.
3.
Connect ¼" distribution/
supply line to each exposed
barbed coupler and run the
distribution/supply line to each
container/basket. Use ¼" tube
straps to hold in place.
IMPORTANT: A single ¼"
distribution/supply line should
not exceed 30'.
Common Hose Faucet Projects
2
3
4
6
4
7
Installation Guide Installation Guide
½" Tubing
Straps
To Hose
Faucet
To Hose Faucet
10 11
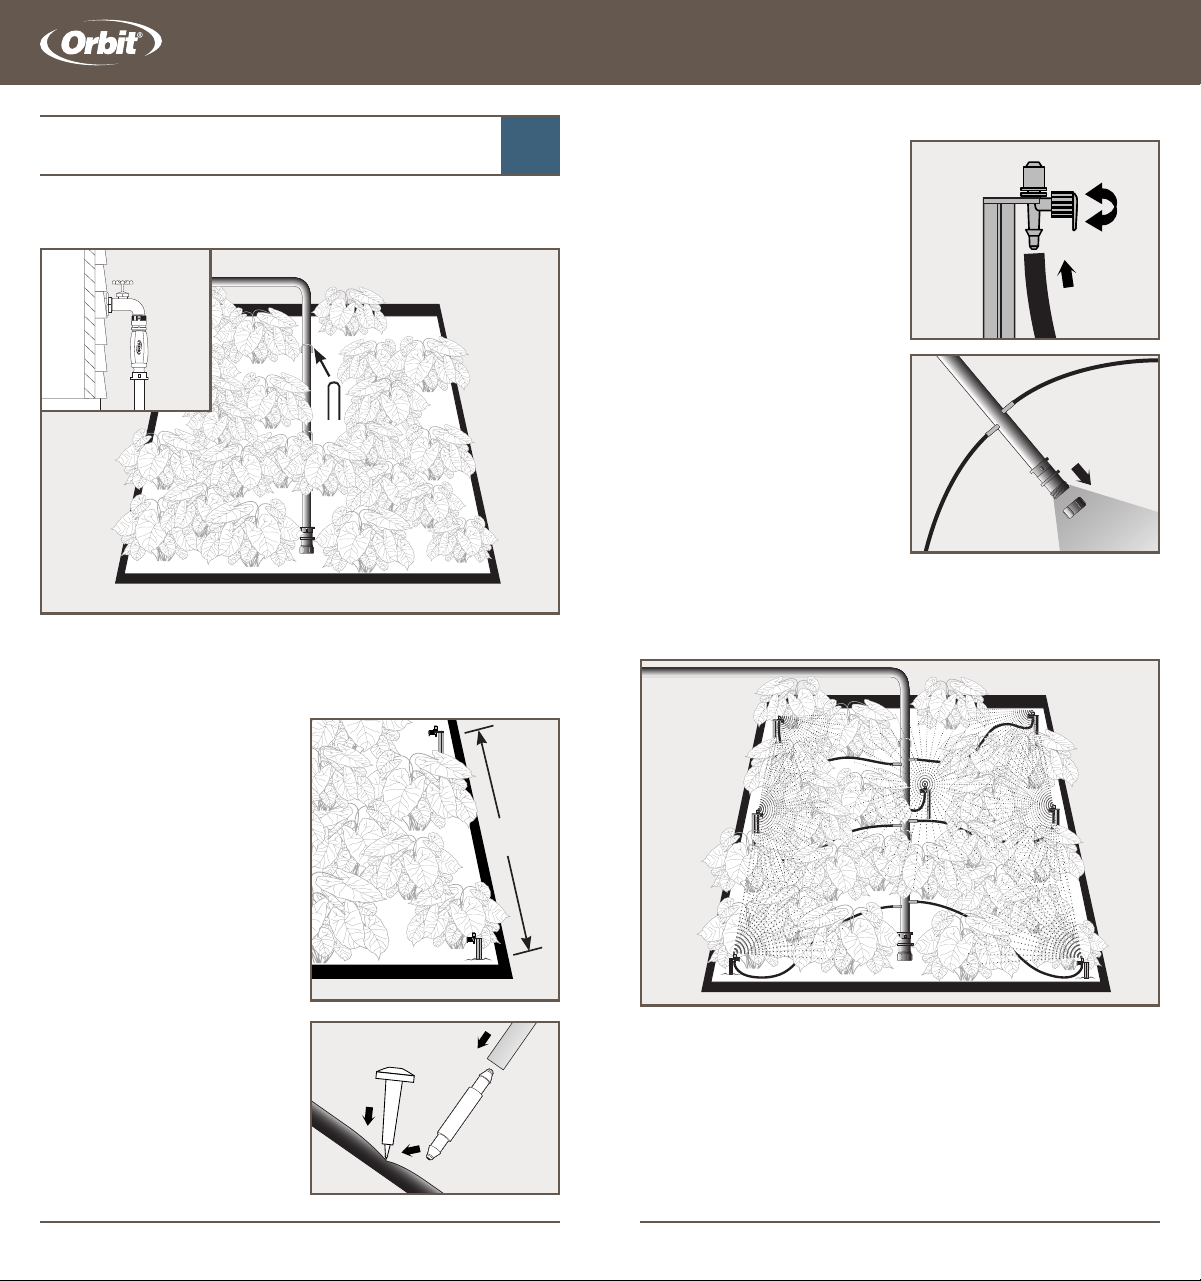
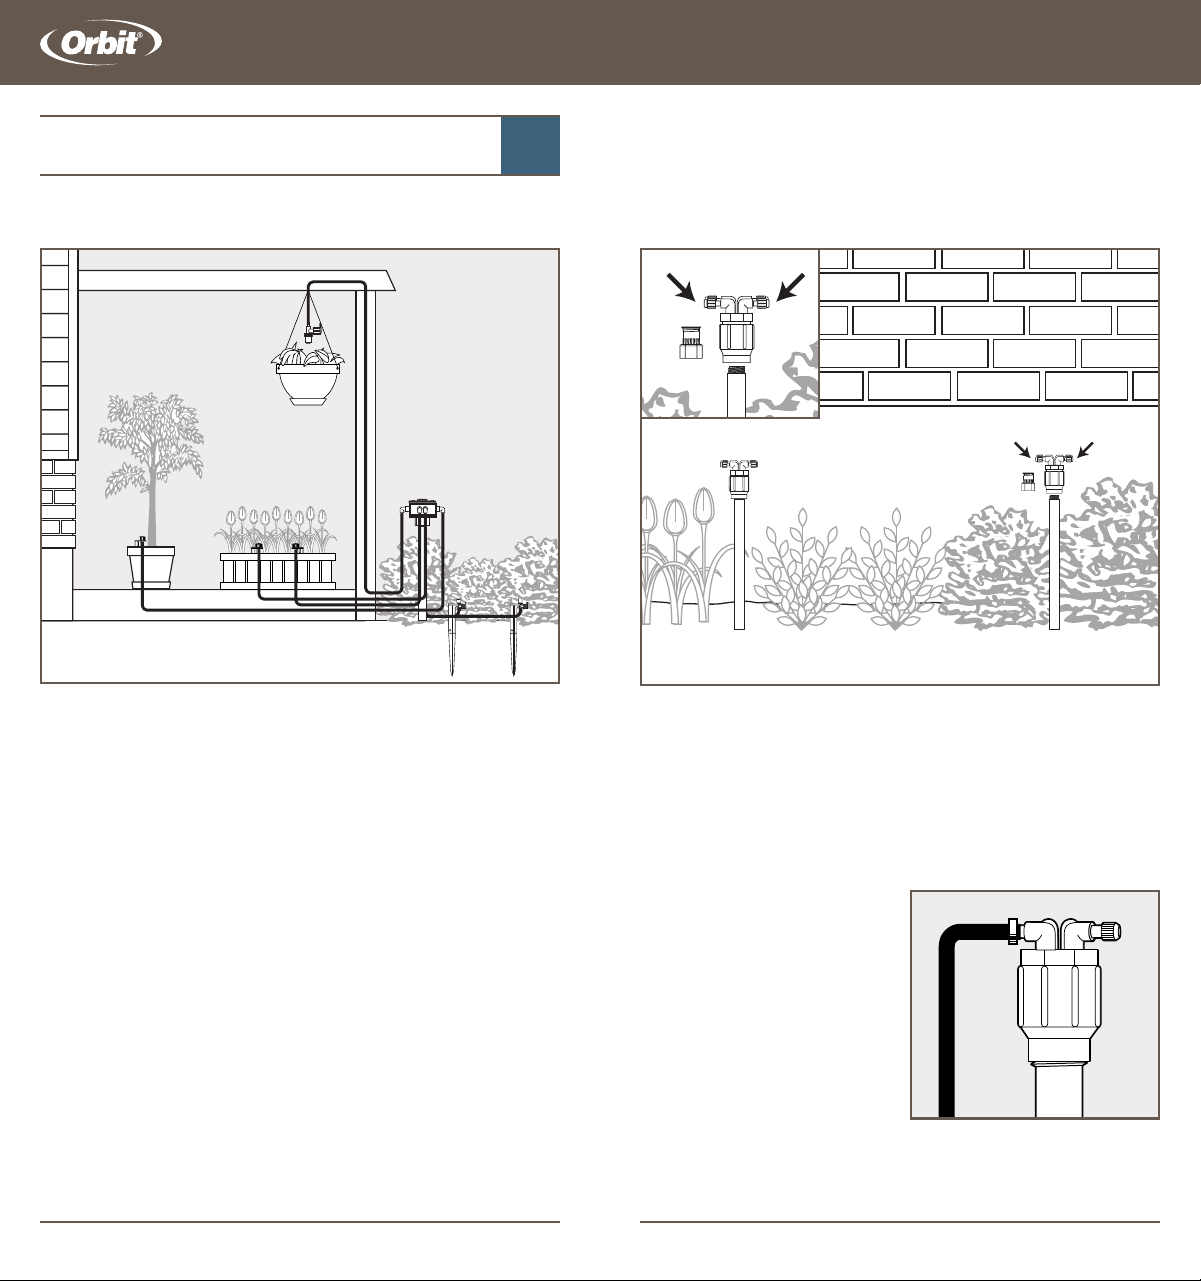
4. Connect the ¼" distribution/
supply line to each of the
exposed barbed couplers and
run the distribution/supply line
to each sprinkler location. Cut
tubing to desired length.
IMPORTANT: Keep drip tubing
lengths to less than 30’.
5. Attach the low-volume
sprinkler to each ¼"
distribution/supply line.
6. Remove the ½" end cap and
turn on water to flush system;
replace cap.
7. Rotate the flow control knob
to adjust flow rate.
IMPORTANT: The maximum recommended number of low-volume
sprinklers per ½" supply line is 16 at medium flow setting (8 at the
maximum setting)
Supplies needed
- ¼" Distribution/Supply Tube (part # 67300, 67301 or 67303)
- ¼" Barbed Couplers (part # 67402) or
¼" Barbed Assortment Pack (part # 67431)
- Low-Volume Sprinkler on Stake
(part # 67135, 67136W, 67137W or 67138W)
- ½" Loop Stake (part # 65731)
- Punch Tool (part # 67756)
SECTION
4
Ground Cover & Flower Beds
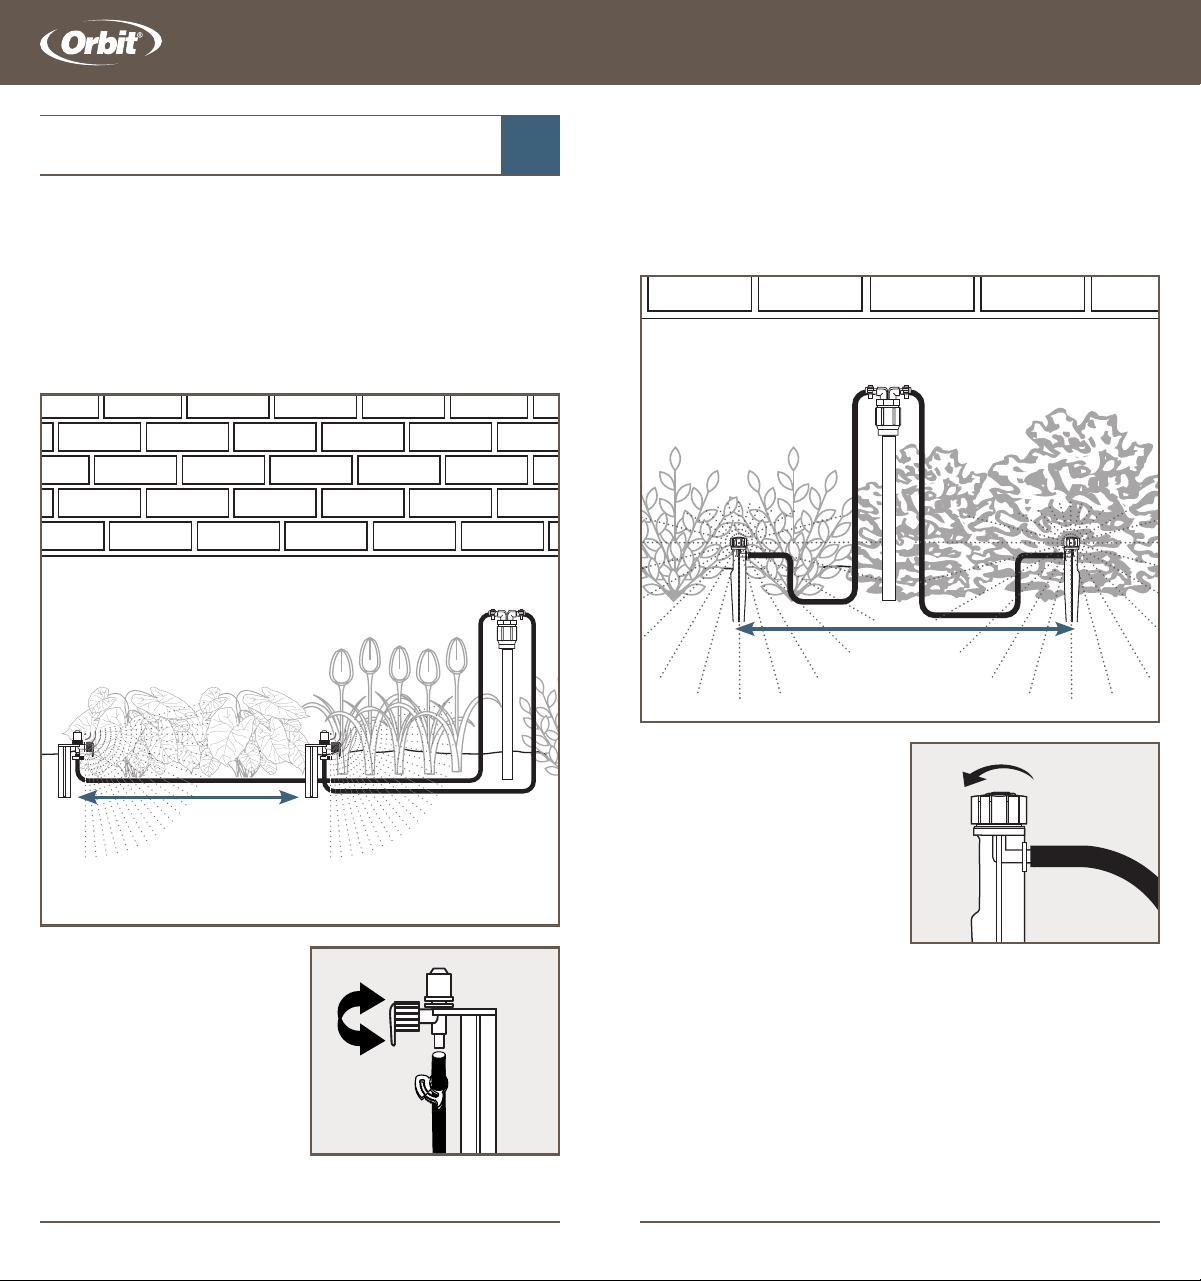
1. Lay the ½" distribution/supply line down the center of the
flower bed or ground cover and install a ½" end cap. Use loop
stakes to hold in place.
2. Following the illustrated
example, place quarter pattern
low-volume sprinkler heads in
the corners, half pattern low-
volume sprinkler heads along
the sides, and full pattern low-
volume sprinkler heads in the
center of your ground cover.
IMPORTANT: Spacing should
be no more than 10’ from one
sprinkler to the next.
3. Punch a hole on top of the ½"
distribution/supply line for each
low-volume sprinkler. Next
insert a ¼" barbed
coupler into each hole.
Common Hose Faucet Projects
2
3
4
5
6
7
1
No more
than 10'
Loop Stake
Installation Guide Installation Guide
12 13
5. Remove the ½" end cap and
turn on water to flush system;
replace cap.
Note: If your drip-irrigation system
is being installed on non-level
ground, replace all 4 GPH flag
drippers with 1 or 2 GPH pressure
compensating drippers to ensure
consistent water flow across the
entire system.
IMPORTANT: The total number of 4 GPH (Gallons per Hour) flag
drippers attached to a single ½" Supply Line should not exceed 45.
Supplies needed:
- Flag Drippers (part # 65201)
- ½" Loop Stake (part # 65731)
- ¼" Insect Plug (part # 67405)
- Punch Tool (part # 67756)
SECTION
4
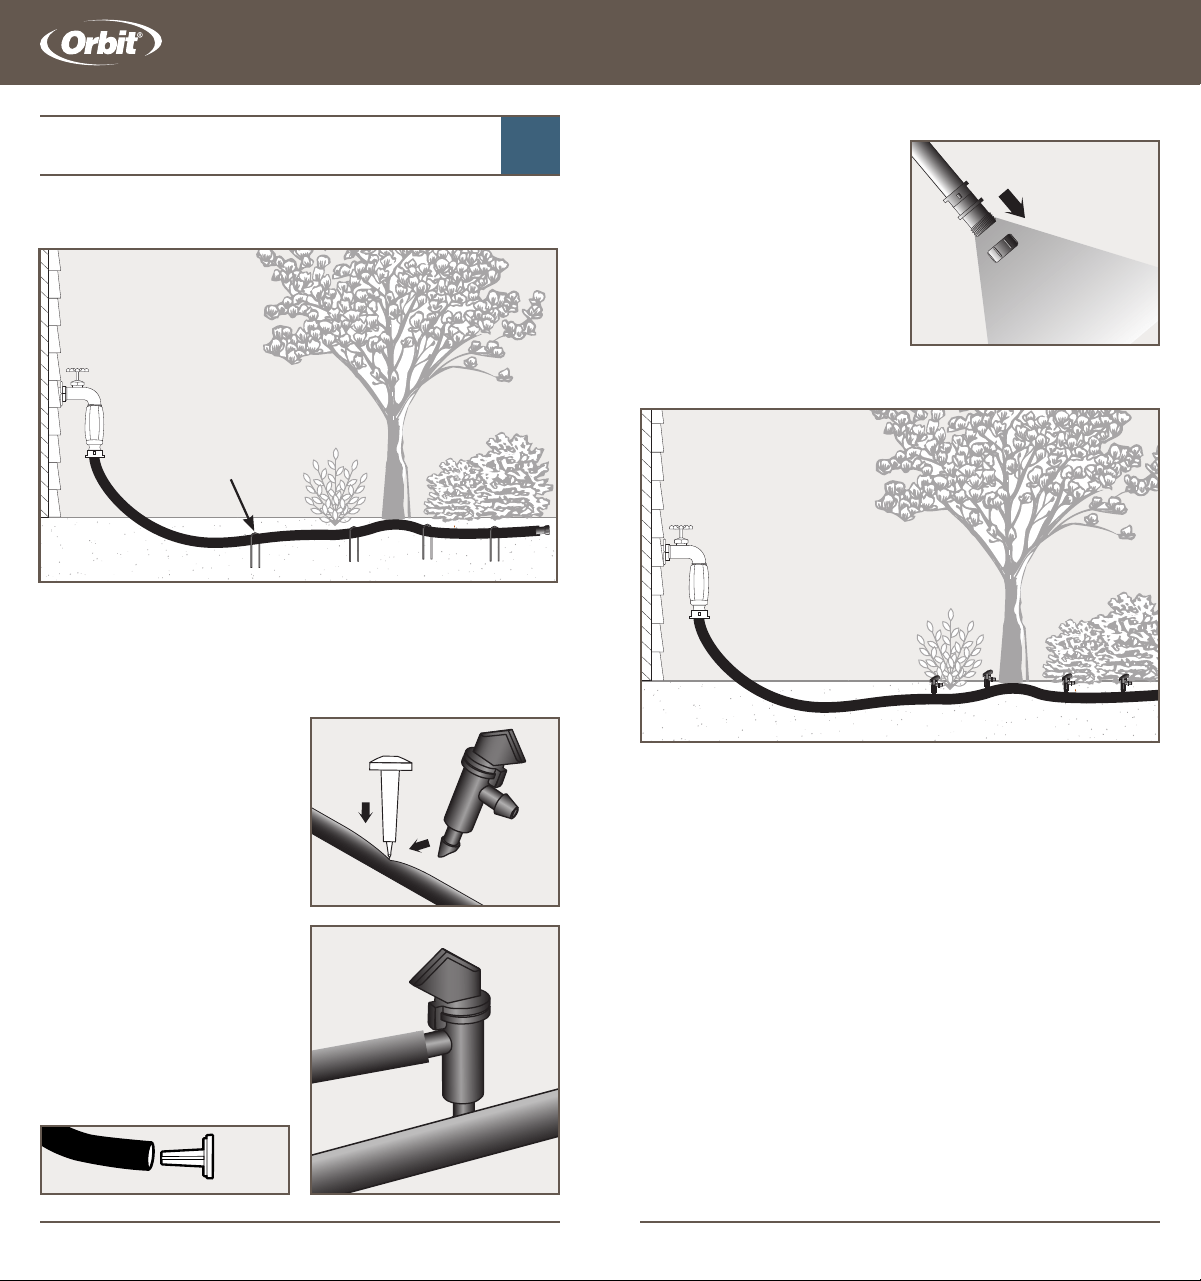
Small Trees & Shrubs
1. Lay the ½" distribution/supply line next to the base of your
plants, shrubs, and trees. Install a ½" end cap at the end of the
tubing. Use loop stakes to hold in place.
2. Punch holes on top of the ½"
distribution/supply line next to
the base of each plant, shrub
or tree. Insert the barbed end
of a 4 GPH flag dripper into the
hole.
3. If needed, attach ¼"
distribution/supply line to the
end of the flag dripper and run
the ¼" distribution/supply line
to the plant location.
4. Install an insect plug into
the end of the ¼" distribution/
supply line.
Common Hose Faucet Projects
2
3
5
4
Loop Stake
Installation Guide Installation Guide
6
3
4
14 15
SECTION
5
Connecting to an Existing
Underground Sprinkler System
Connecting to an existing underground sprinkler system (retrofit)
is a simple way to supply water to your drip-irrigation system.
Retrofits are commonly used to conserve water by replacing
inefficient shrub sprinklers and bubblers.
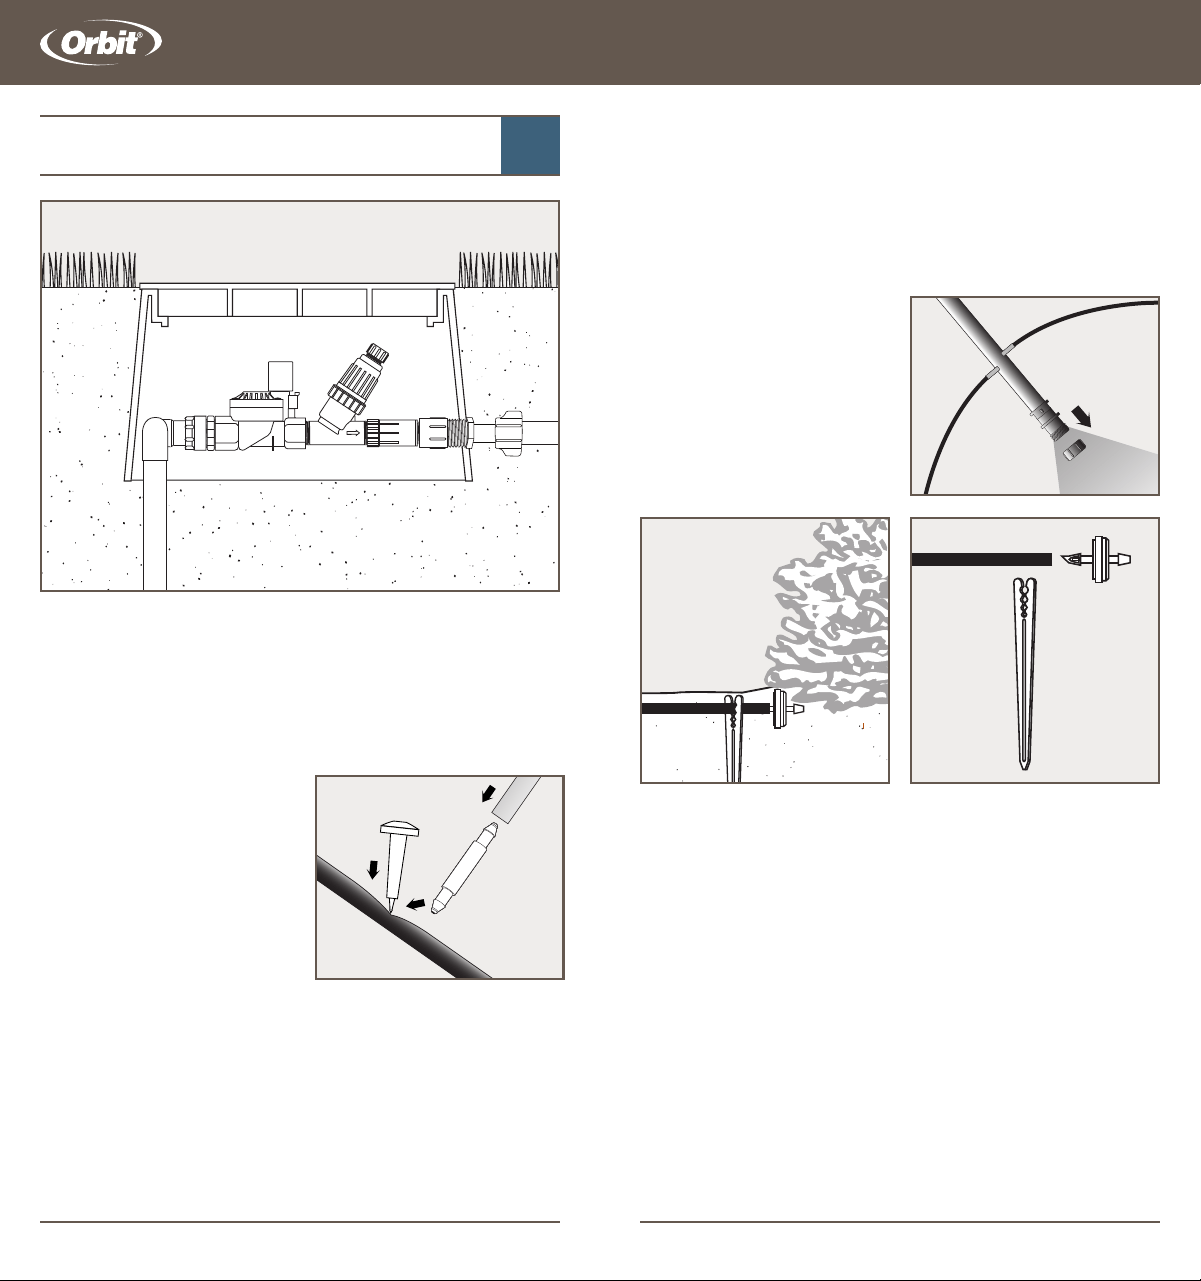
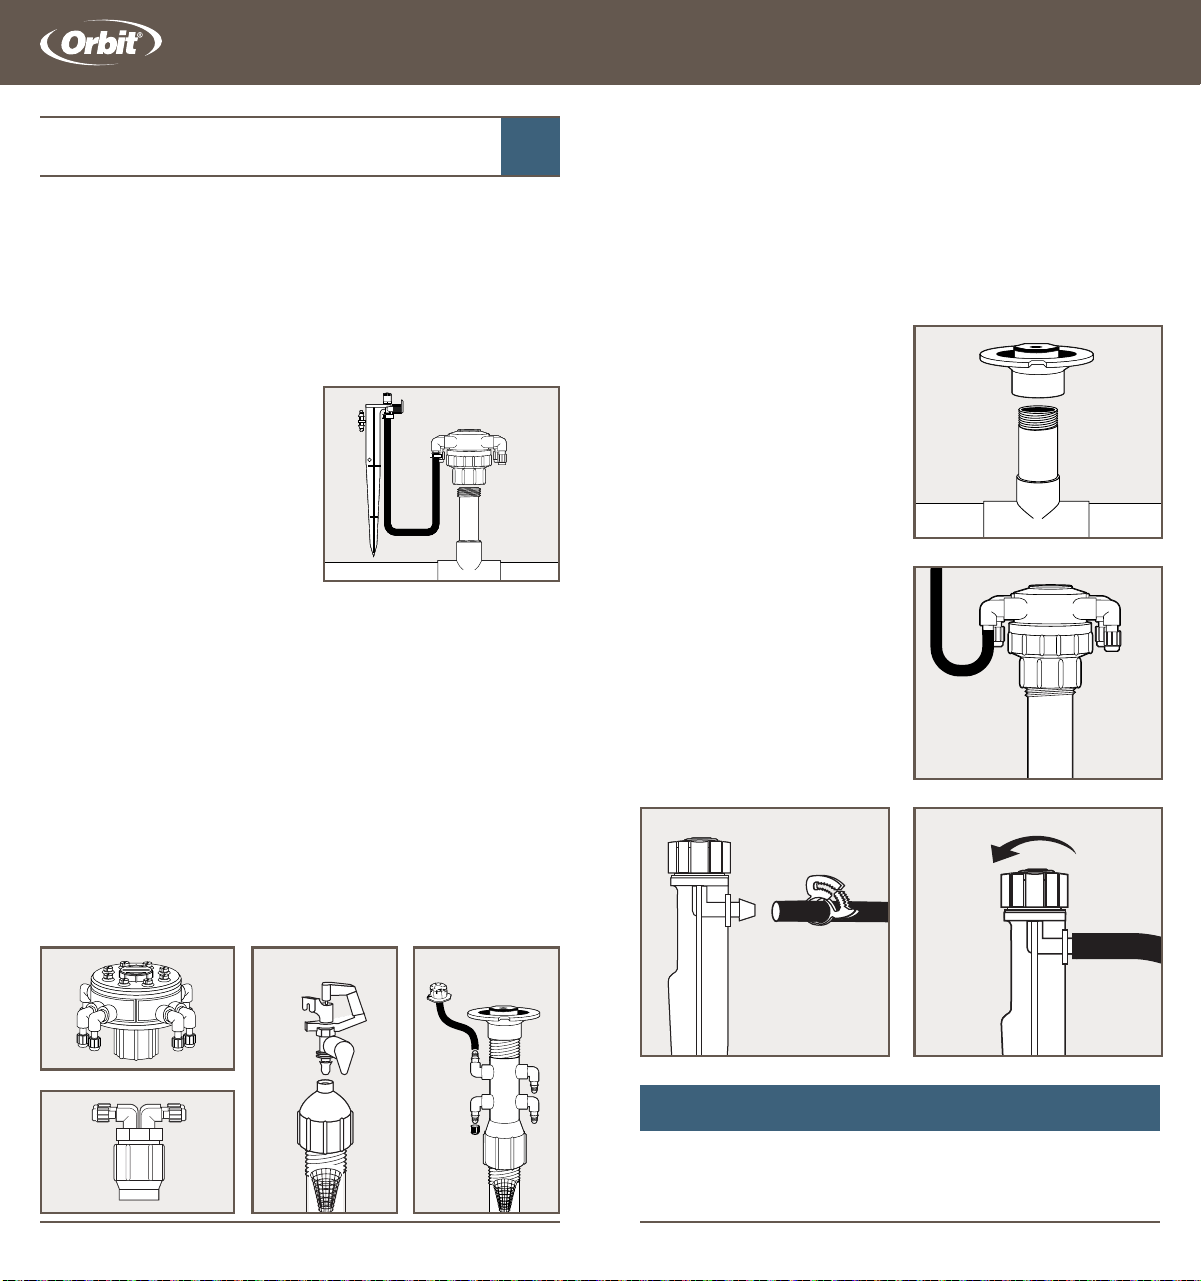
Retrofit drip-irrigation
systems consist mainly of
1. Manifold—attaches to a ½"
riser and consists of 1 to 8
outlets.
2. ¼" distribution/supply line
3. Low-volume sprinkler,
dripper, or soaker tube
Manifolds
The main function of a manifold is to distribute water through ¼"
outlets.
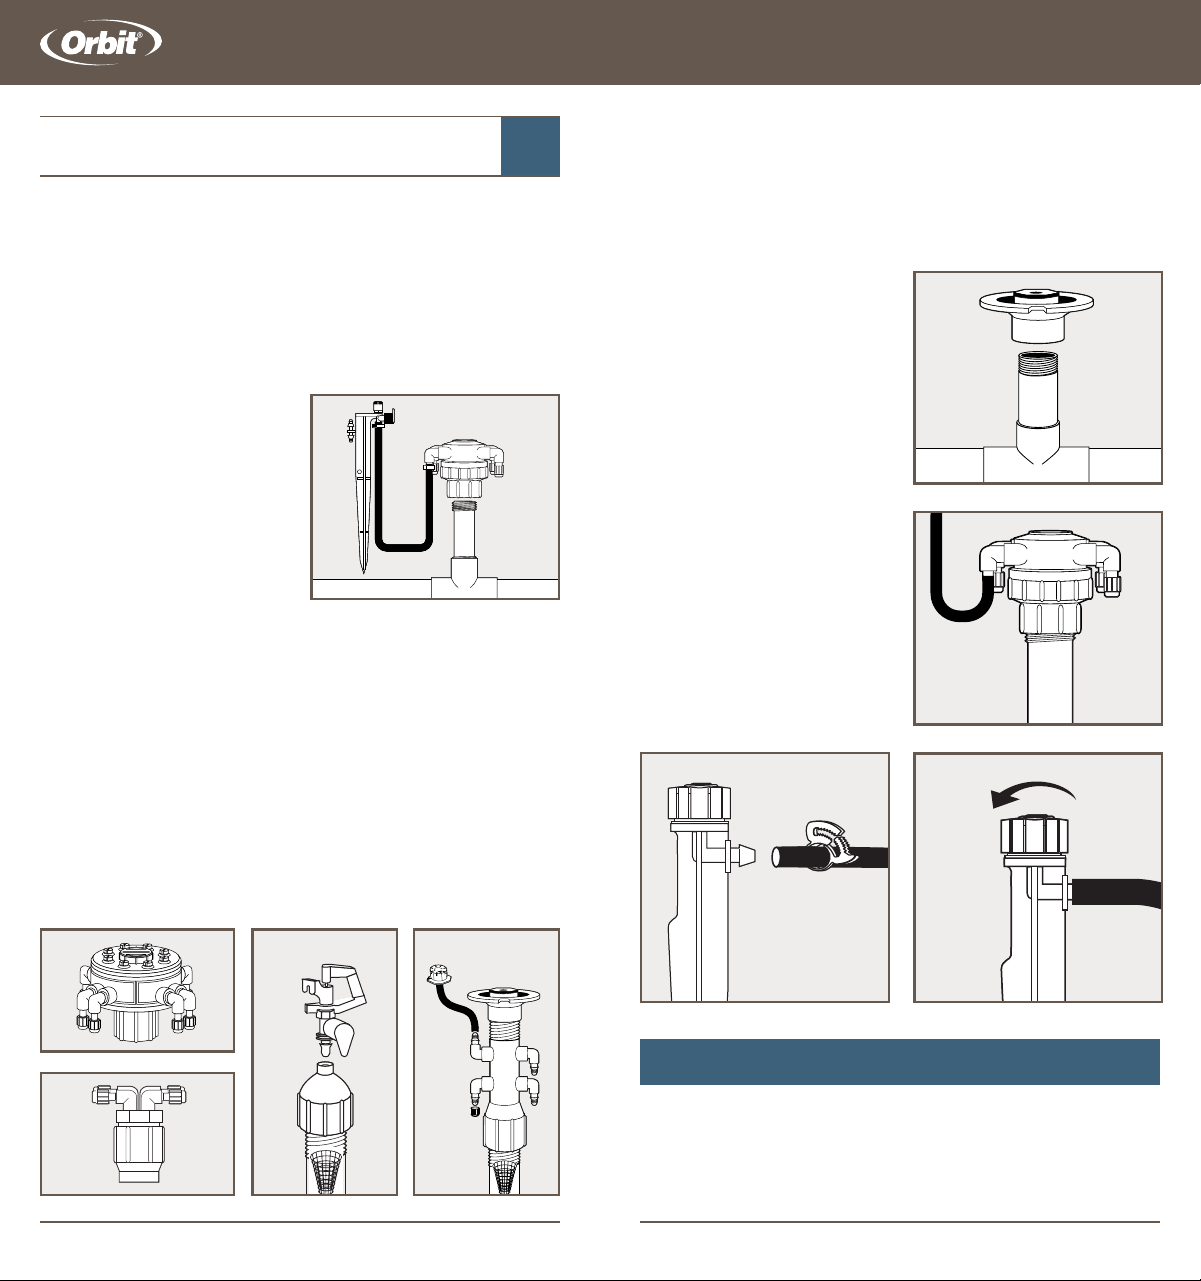
There are 4 types of manifolds
1. Adjustable Flow Manifolds—Ideal when water system
pressures exceed 40 PSI and where flow control is desired.
2. Full Flow Manifolds—Ideal for replacing inefficient shrub
heads and bubblers.
3. Shrub Adapter—Ideal for micro-sprinklers.
4. Riser Adapter Manifolds—Permits drip irrigation without
eliminating a sprinkler head.
Retrofit
3
2
1
1 3
2
4
Installation for Adjustable-Flow,
Full-Flow, and Riser Adapter
Manifolds
1. Remove sprinkler head from a
½" riser and attach the manifold.
(For riser adapter manifold,
reattach sprinkler head).
2. Remove caps from the ¼" barb
outlets and insert ¼" distribution/
supply line.
3. Attach a low-volume sprinkler
or drip irrigation dripper to the
end of the distribution/supply line.
4. To avoid high water pressure
failure, install a ¼" high pressure
clamp on all tube connections.
5. Position drip irrigation dripper
next to plant.
6. If applicable, adjust flow-
control knob for desired flow
rate.
1
2
COMMON RETROFIT PROJECTS
1. Container Plants and Shrubs—page 16
2. Shrubs and Large Plants—page 19
Installation Guide Installation Guide
16 17
SECTION
6
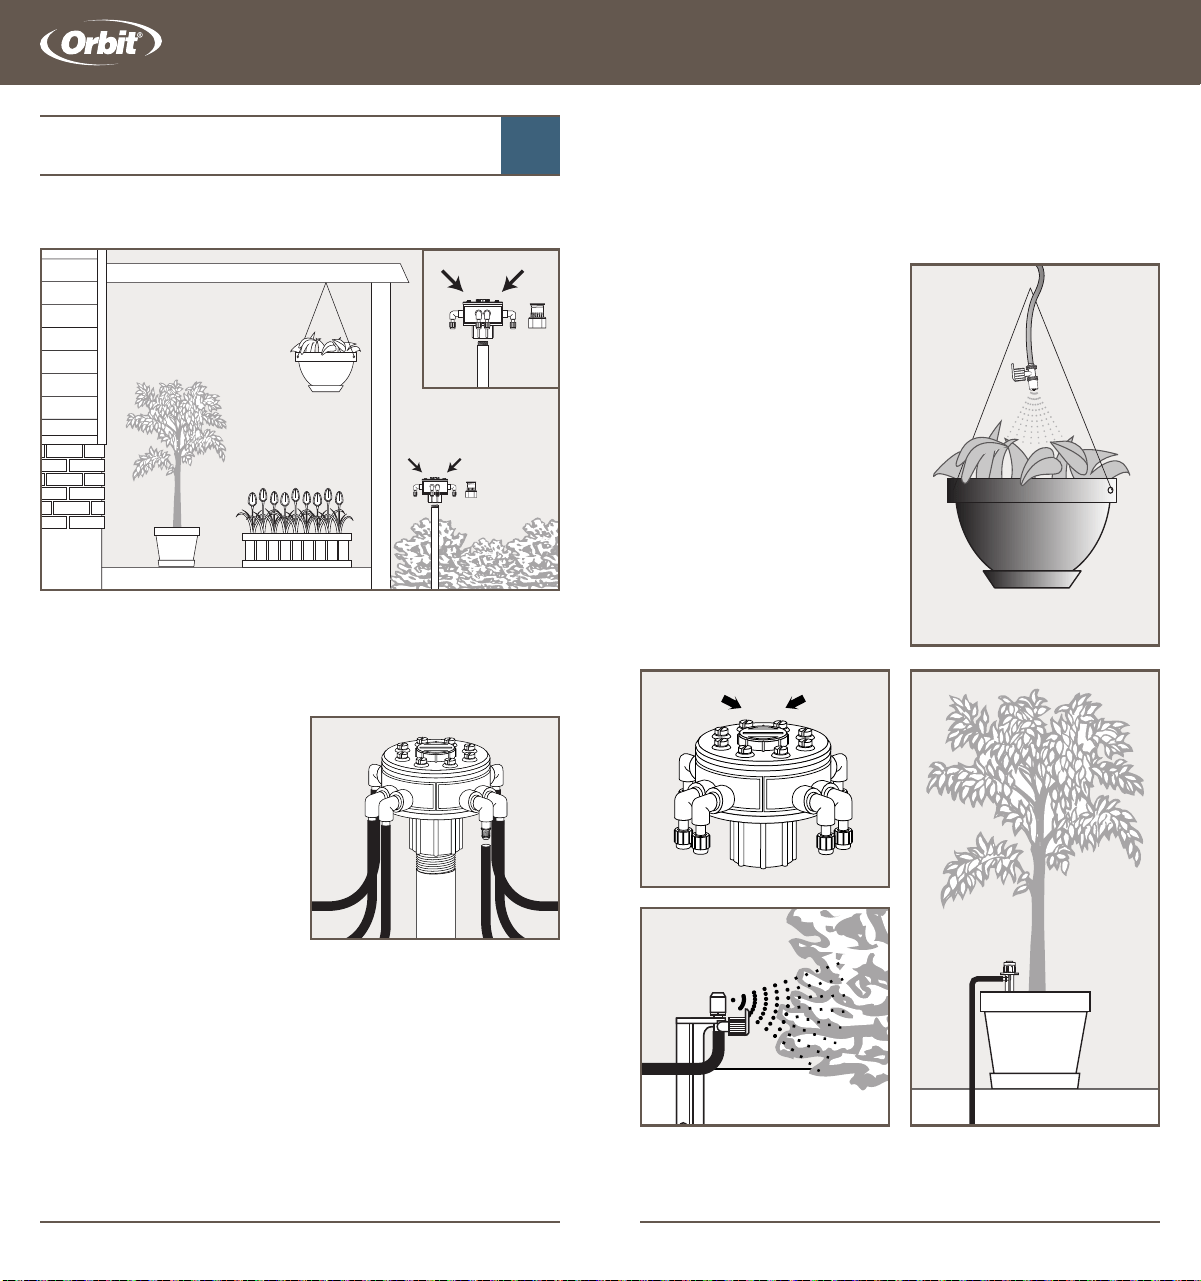
Container Plants and Shrubs
1. Connect an 8-port or a 4-port adjustable manifold to an
exposed shrub riser. If a vacant riser is not available, use a
saddle adapter to connect to the sprinkler line.
2. Remove caps and attach ¼" distribution/supply line to each
¼" barb.
3. Run each ¼" distribution/supply line to each container. Use
¼" tube straps to hold tube in
place. (Window boxes and large
containers may require more
than one line.)
IMPORTANT: A single ¼"
distribution/supply line should
not exceed 30'.
4. Flush lines to clear any
debris.
5. Select the appropriate drip irrigation dripper for each
container and plant.
Common Retrofit Projects
1
2
HANGING BASKETS AND WINDOW BOXES
Use FlexMist
™
(part # 66190) or Adjustable Flow Mist Sprayer
(part # 67191).
POTTED PLANTS
Use Stake with Multi-Stream
Dripper (part # 67105) or
Stake with a Micro-Bubbler
(part # 67110).
SHRUBS
Use Low-Volume Sprinkler on
Stake (part # 67135, 67136w,
67137w or 67138w).
6.
Adjust the flow rate by
turning the flow control screw.
Continued on next page
Flow
Control
6
Installation Guide
Installation Guide
18 19
SECTION
6
Supplies Needed
- 8-Port Adjustable Manifold (part # 67000)
Or
- 4-Port Adjustable Manifold (part # 67005)
- The appropriate drip irrigation sprinkler listed above
- ¼" Tube Straps (part # 65715)
- ¼" Distribution/Supply Tube (part # 67300, 67301 or 67303)
Common Retrofit Projects
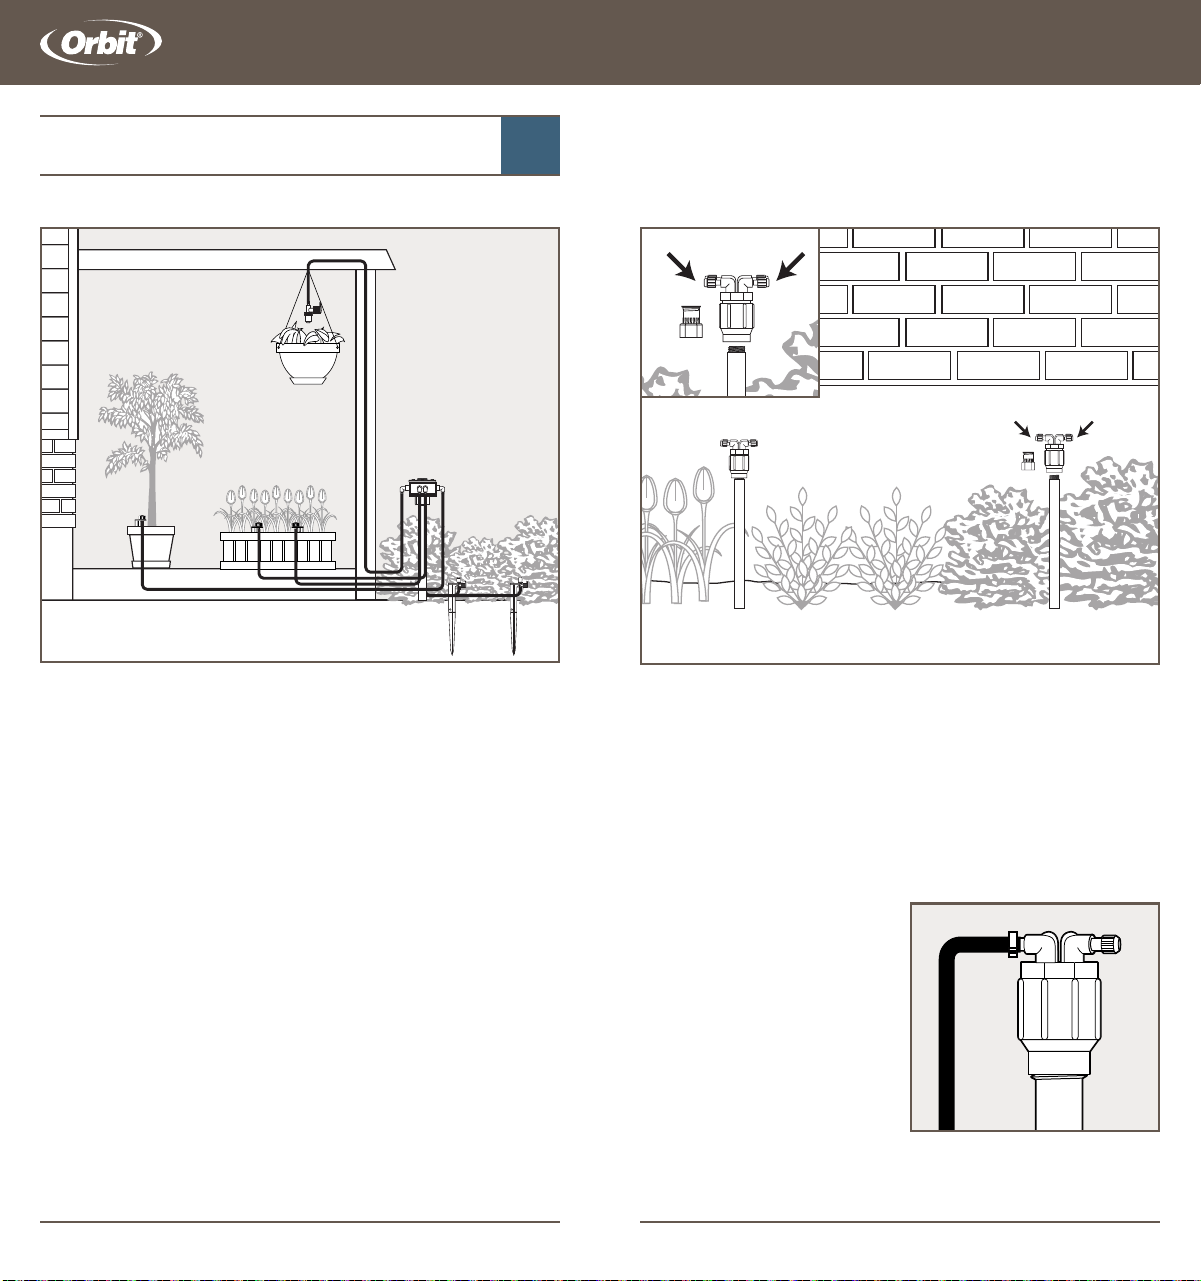
Flower Beds, Ground Cover,
Shrubs, and Large Plants
1. Remove shrub heads from risers and replace with 4-port full
flow manifolds.
2. Remove barb caps from the manifolds and attach ¼"
distribution/supply lines to each exposed ¼" barb. Run individual
¼" distribution/supply line to each low-volume sprinkler head.
Flush lines to clear any debris.
IMPORTANT: Full flow manifolds
do not have an internal pressure
regulator. To avoid high pressure
failures install ¼" high pressure
clamps on all ¼" connections.
IMPORTANT: A single ¼"
distribution/supply line should
not exceed 30’.
Continued on next page
1
2
Installation Guide
Installation Guide
20 21
SECTION
6
FLOWER BEDS AND GROUND COVER
Attach a low-volume sprinkler head on stake, spaced no more
than 10' apart. (See parts list for spray pattern options)
or
Multi-stream dripper on stake, spaced no more than 3' apart.
(part # 67105)
Note: Adjust the flow rate by
turning the flow control on each
drip irrigation sprinkler head.
Common Retrofit Projects
SHRUBS AND LARGE PLANTS
Use a multi-stream dripper on stake next to each shrub or large
plant. (part # 67105)
Note: Adjust the flow rate by
turning the flow control on each
drip irrigation sprinkler head.
Supplies needed:
- 4-Port Full-Flow Manifold (part # 67025)
- The appropriate drip irrigation sprinkler head listed above
- ¼" Distribution/Supply Tube (part # 67300, 67301 or 67303)
- ¼" High Pressure Clamps (part # 67710)
No more than 10' apart
No more than 3' apart
Installation Guide Installation Guide
22 23
SECTION
7
Connection to a Designated
Irrigation Valve
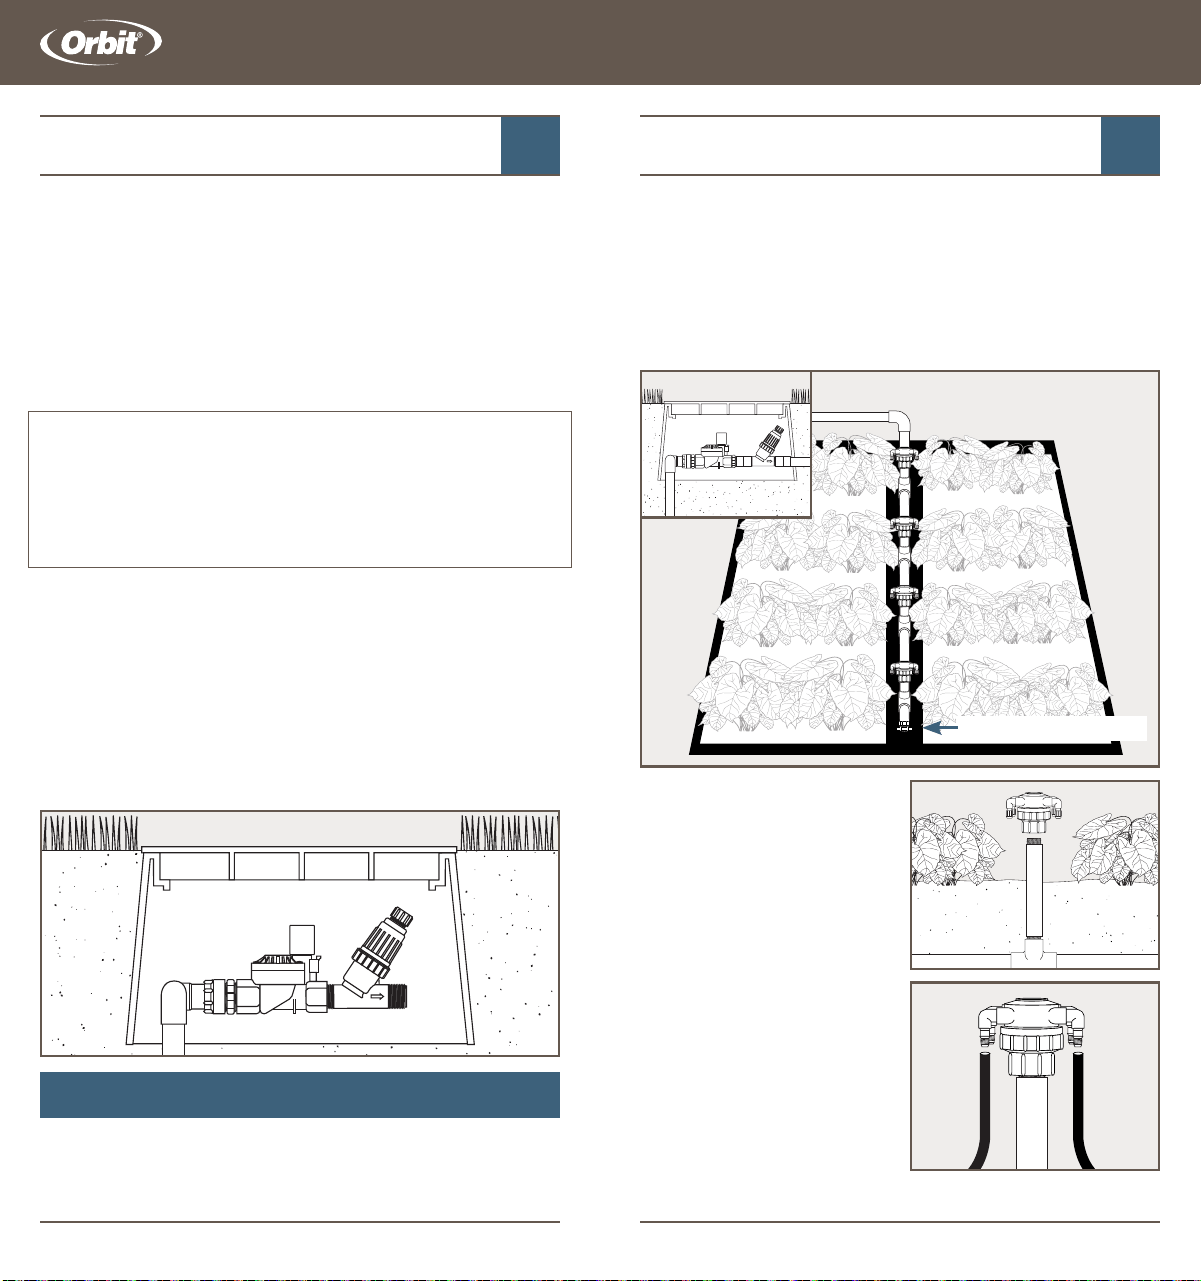
Direct connection to an underground irrigation valve is ideal for
medium to large drip irrigation projects. This application is most
commonly used for gardens, large flower beds, shrubs, trees,
and desert landscaping.
IMPORTANT:
• Contact the local water district for code requirements.
• Before digging, contact utility companies to mark utility lines.
Connection to a designated valve consists of
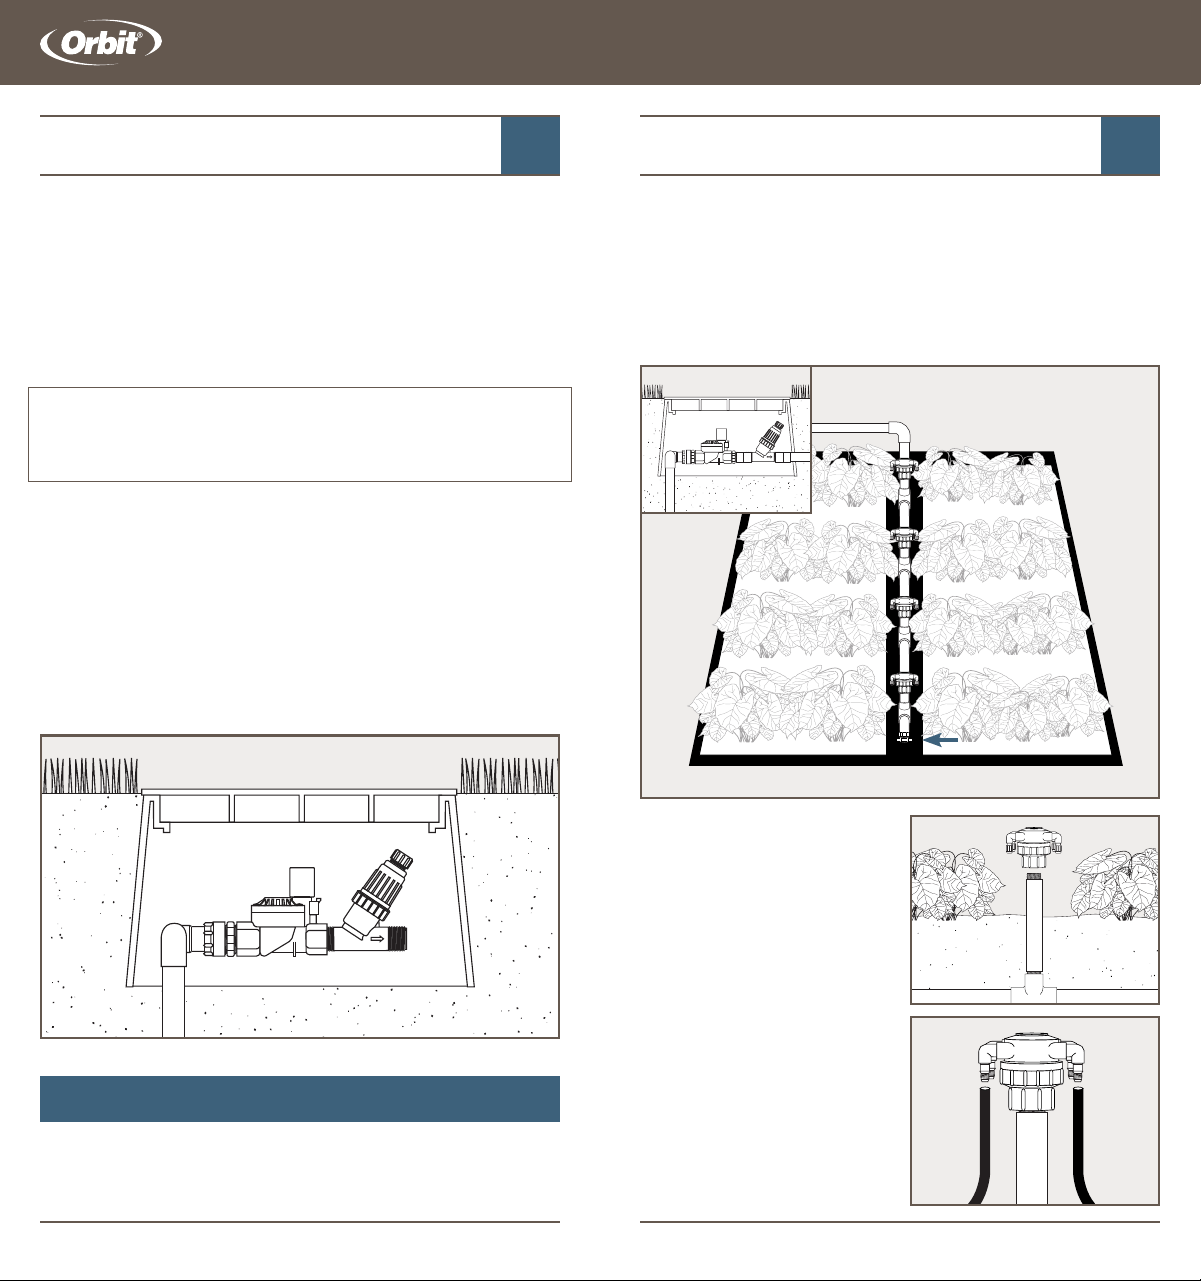
1. ¾" Irrigation valve (manual or automatic)
2. Y-filter (model 67736)
Note: Using a filter not designed for drip irrigation, may cause damage.
3. ½" Distribution/supply tubing (part 67345 or 67346) or ¾" PVC pipe
Note: For an easy set up, use Orbit’s 67790 4-in-1 drip valve that
contains all the necessary components for an in ground installation.
Direct Connection to an
Irrigation Valve
.
.
.
.
.
.
.
.
.
.
.
.
..
.
.
.
.
.
.
.
.
.
.
.
.
.
.
.
.
.
.
.
.
.
.
.
.
.
.
COMMON APPLICATIONS
1. Gardens—page 23
2. Desert Landscaping—page 25
SECTION
8
Gardens
1. Water supply—Connect ¾" PVC to the end of the Y-filter and
run the PVC pipe down the center of the garden. Attach a ¾" slip
x ½" threaded tee for each row. Use an automatic drain valve on
the end of the pipe and on any low sections of the PVC pipe.
2. Screw in ½" risers on each
tee (extending 6" to 8" above
ground). Attach a 4-port
adjustable manifold on each
riser.
3. Remove manifold caps and
attach ¼" soaker tubing to each
¼" barb. Run soaker tubing
along the base of each plant.
Tip—Use metal loop stakes
to hold the ¼" soaker tubing
in place.
Common Direct Connection Projects
To Automatic Irrigation Valve
.
.
.
.
.
.
.
.
.
.
.
.
..
.
.
.
.
.
.
.
.
.
.
.
.
.
.
.
.
.
.
.
.
.
.
.
.
.
.
2
3
1
1
2
Automatic Drain
Installation Guide Installation Guide

24 25
SECTION
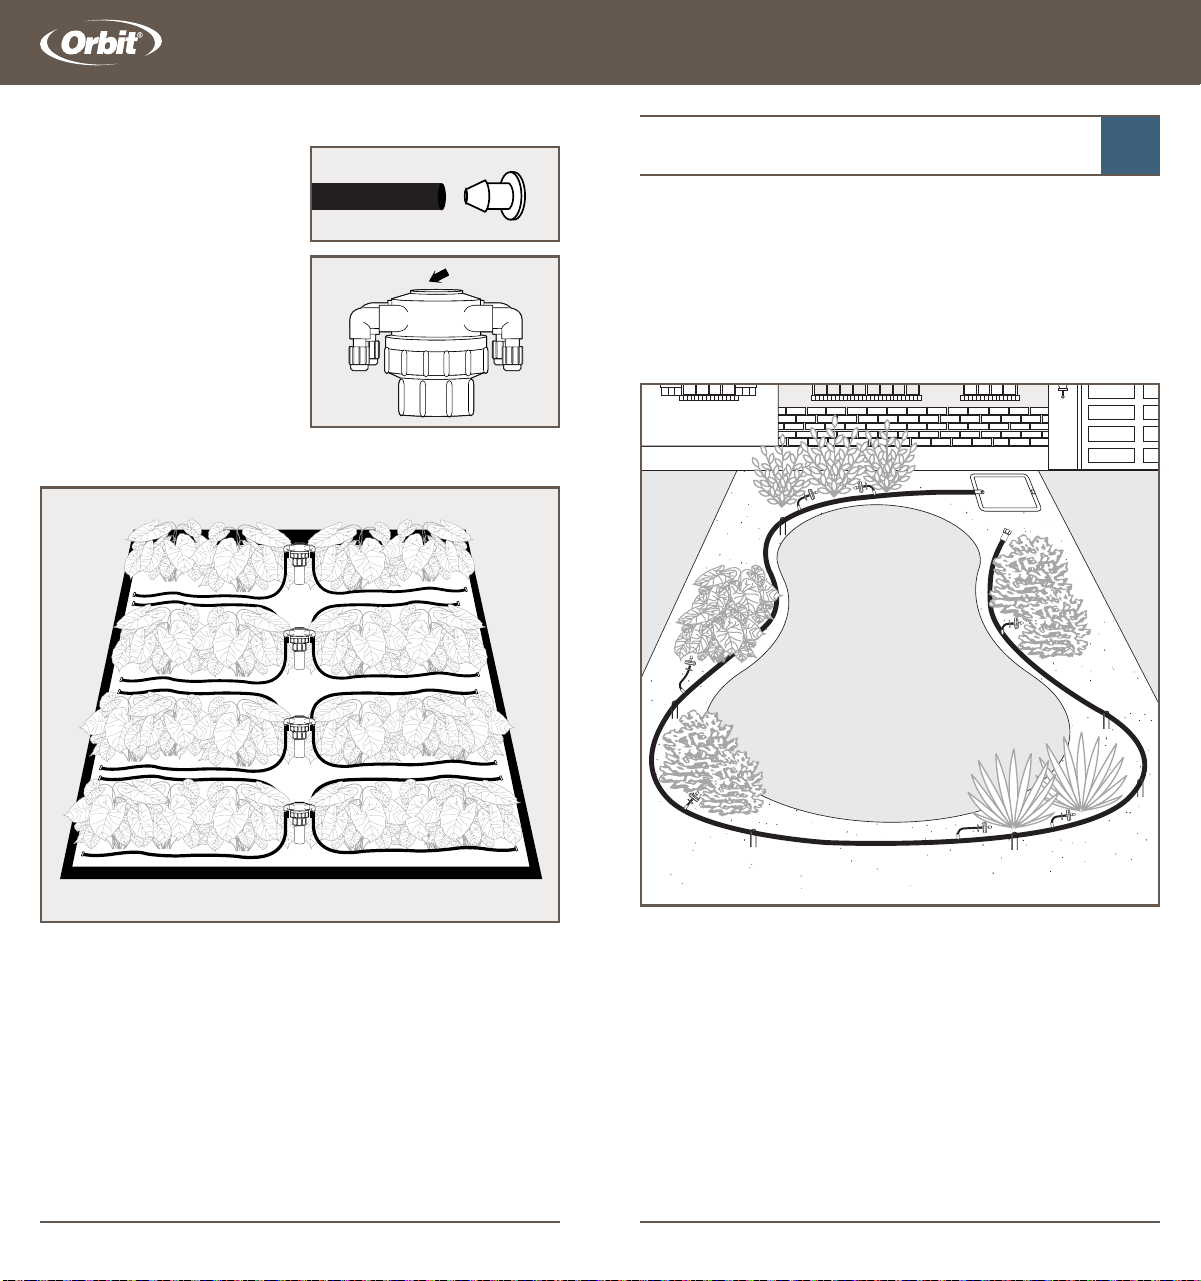
8
Desert Landscaping
A
Irrigation Valve
B
Pressure Compensating Dripper and Tubing Stake
C
Loop Stake
D
End Cap
1. Water Supply—Connect a pressure regulator (part # 67740) to
the Y-filter and attach a universal male adapter (part # 67470).
Next attach ½" distribution/supply line to the exposed end. (See
the top of page 26)
IMPORTANT: Use a pressure regulator to avoid damage to the drip
irrigation system.
Common Direct Connection Projects
4. Cut soaker tubing to desired
length and insert a ¼" end plug.
Note: Keep each ¼" soaker
tubing length to less than 15'.
5. Remove the automatic drain
valve, attached to the end of the
PVC pipe and flush the line to
remove any debris.
6. Adjust the flow rate by
turning the flow control screw.
IMPORTANT: Do not attach more
than 14 4-port manifolds
Supplies Needed
- ¾" Automatic Drain Valve (part # 51241M)
- 4-Port Adjustable Manifold (part # 67005)
- ¼" Loop Stakes (part # 66730)
- ¼" Soaker Tubing (part # 67321 or 67330)
- ¼" End Plugs (part # 67403 or
¼" Barbed Assortment Pack (part # 67431)
- ¾" Slip x ½" Threaded Tees
- ½" Risers
Flow Control
4
6
A
B
D
C
Installation Guide
Installation Guide
26 27
SECTION
8
A
Pressure Regulator
B
Y-Filter
C
Universal Male Adapter
D
½" Distribution/Supply Line
E
Threaded Coupler (sold separately)
2. Run distribution/supply line
next to plants, shrubs and trees
you intend to water. Next install
a ½" end cap. Use ½" loop
stakes to hold the line in place.
3. Punch a hole in the ½"
distribution/supply line for each
shrub or tree. Next insert a ¼"
barbed coupler into each hole.
4. Connect the ¼" distribution/supply line to each of the exposed
barbed couplers and run it to the base of each shrub or tree. Cut
tubing to desired length.
IMPORTANT: A single ¼" distribution/supply line should not
exceed 30'.
Common Direct Connection Projects
.
.
.
.
.
.
.
.
.
.
.
.
.
.
.
.
.
.
.
A
B
C D
E
3
4
5. Remove the ½" end cap and turn on water to flush
½" distribution/supply line, then replace cap to flush ¼"
distribution/supply lines.
6. Attach a pressure compensating dripper to each ¼"
distribution/supply line. To hold dripper in place, next to the base
of the shrub or tree, use a tubing stake.
Note: More than one
¼"distribution/supply line (with
pressure compensating dripper)
may be required for large trees
or shrubs.
IMPORTANT: Do not attach
more than 57 2-GPH pressure
compensating drippers to a
single ½" distribution/supply line
A
Tube Stake
B
Pressure Compensating Dripper
C
¼" Distribution/Supply Line
Supplies Needed:
- ½" Universal Male Adapter (part # 67470)
- ½" Distribution/Supply Tubing (part #67345 or 67346)
- ½" End Cap (part # 67498)
- ½" Loop Stake (part # 65731)
- Punch Tool (part # 67756)
- ¼" Barbed Couplers (part # 67402) or
¼" Barbed Assortment Pack (part # 67431)
- ¼" Distribution/Supply Tube (part # 67300, 67301 or 67303)
- Tube Stakes (part # 65721)
- Pressure Compensating Dripper (part # 67225, 67226)
5
6
6
A
B
C
Installation Guide
Installation Guide

FAUCET
3-in-1 Faucet
Adapter,
Filter, Pressure
Reducer, ½"
Tubing Adapter
67739, 69739D
Faucet
Adapter for ½"
Distribution Tube
67495
Faucet
Adapter for ¼"
Distribution Tube
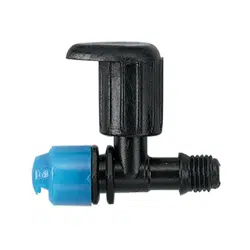
67432
Hose Thread
Swivel x ½"
Tubing Tee
67496
Hose/Tap Filter
67735
Pressure
Regulators
25 PSI—Hose
Thread
67741
Hose Bib Anti-
Siphon Valve
67750
Plastic Hose-Y
67745
28 29
SECTION
9
Orbit Parts List
Notes
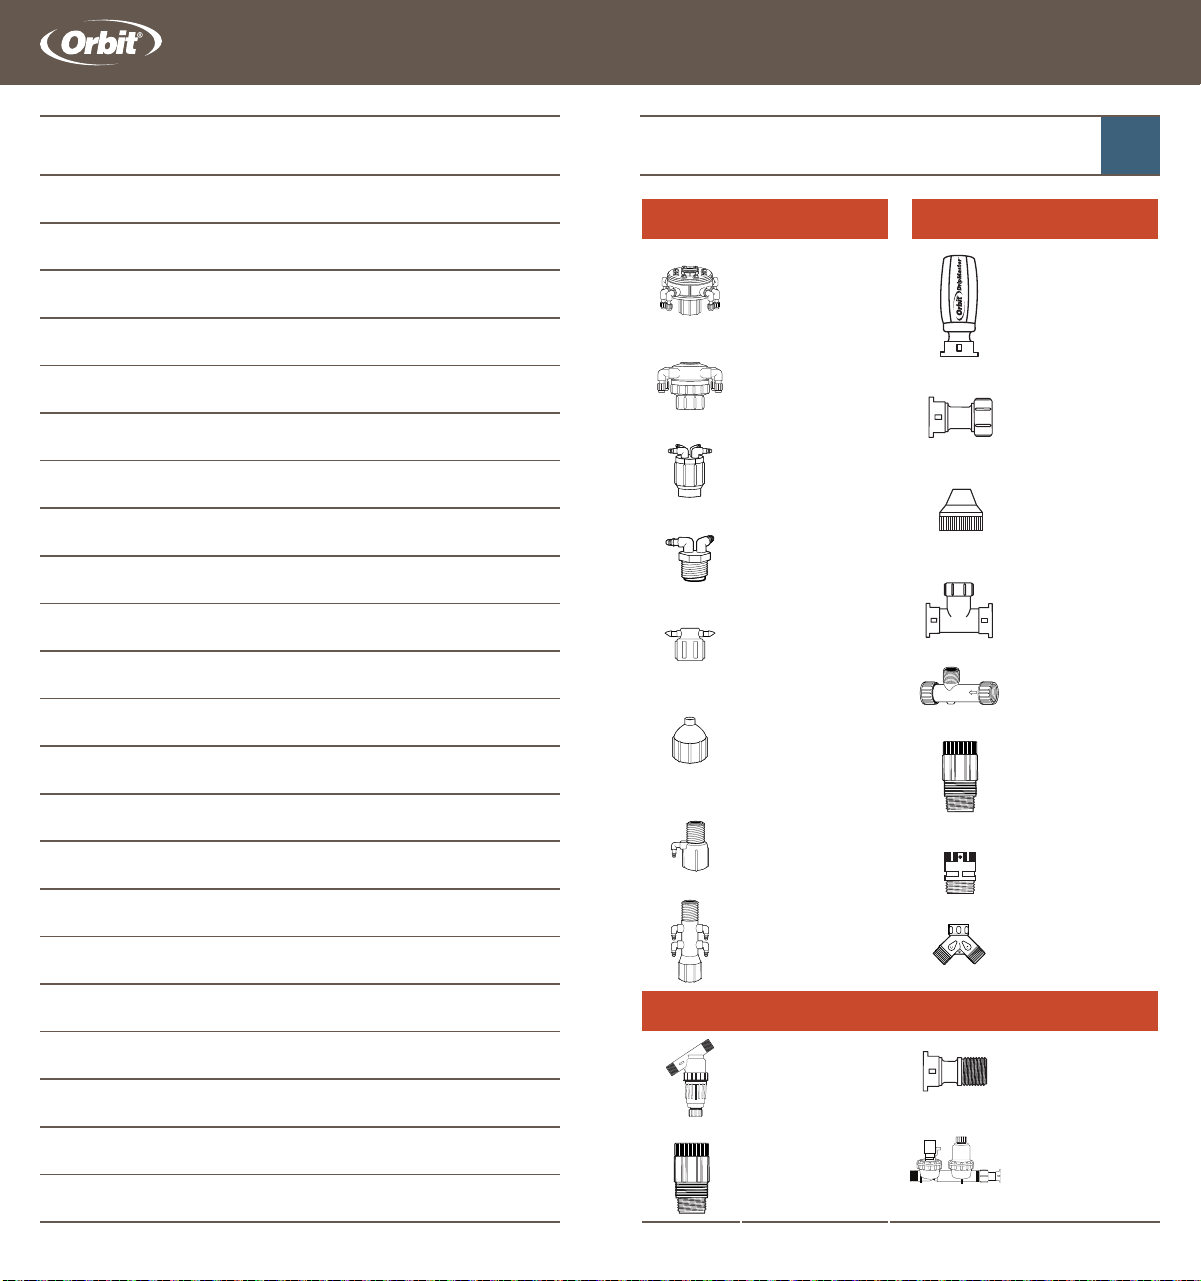
MANIFOLDS
8-Port
Adjustable Flow
Manifold
67000, 69000D
4-Port
Adjustable Flow
Manifold
67005, 69005D
4-Port Full Flow
Manifold
67025, 69025D
½" MPT 2-Port
Full Flow
Manifold
67035, 69035D
2-Port Full Flow
Manifold
67030
½" Female Pipe
Thread Shrub
Adapter with
Threaded Outlet
67056
½" Riser
Adapter with
½" Barb
67035
4-Port Riser
Adapter
Manifold
67060, 69060D
Y-Filter
¾" Male Pipe
Thread
67736
25 PSI Pressure
Regulators
¾" Pipe Thread
67740
½" Pipe Thread
Adapter
67494
4-in-1 Drip
Valve 1" Male
Pipe Thread
67790
Installation Guide Installation Guide
PIPE THREAD
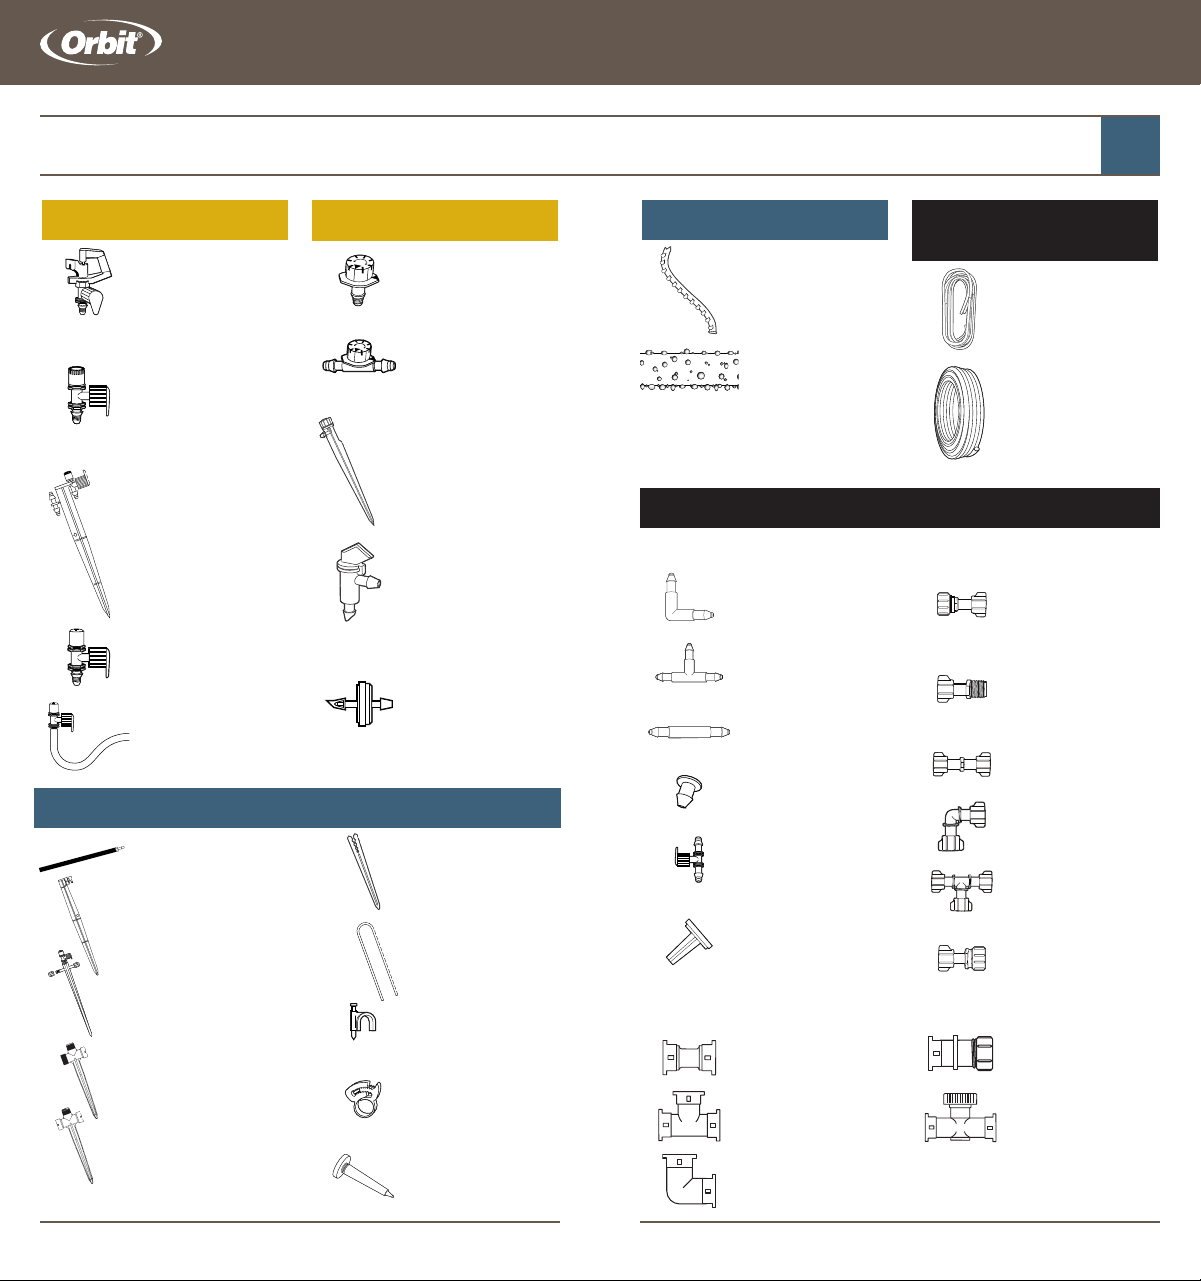
DRIPPERS AND BUBBLERS
Multi-Stream
Dripper
67100, 69100D
Inline Dripper/
Emitter
67101, 69101D
Multi-Stream
on a Stake
67105, 69105D
Flag Dripper
2 GPH 65200
4 GPH 65201
Pressure
Compensating
Dripper
1 GPH 67225
2 GPH 67226
DISTRIBUTION/SUPPLY
TUBE
¼" Distribution
Tube
50' 67300, 67303
100' 67301
½" Distribution
Tube
50' 67345
100' 67346
500' 67347
¼" SOAKER TUBE
Drilled Soaker
Tubing 60'
67321
¼" Porous
Soaker Tube
50' 67330
100' 67331
6" Extension
Riser 66760
12" Tubing
Stake (with 12"
Extension Riser)
67722
¼" Inline Stake
67720
½" MPT x ½"
Drip-Lock
®
Stake
67991
½" Drip-Lock
®
x
End Cap Stake
67992
Tubing Holder
Stake
65721
Loop Stake
½" 65731
¼" 65730
Tubing Strap
¼” 65715
½” 65716
¼" High
Pressure Clamp
67710
Tube
Punch Tool
67756
30 31
SECTION
9
Orbit Parts List
LOW VOLUME SPRINKLER
Mini Rotating
Sprinkler
67113
Low-Volume
Sprinkler
Full Pattern
67116, 69116D
½ 67117, 69117D
¼ 67118, 69118D
Strip 67115
Low-Volume
Sprinkler Head
on 12' Stake
Full 67136
½ 67137
¼ 67138
Strip 67135
Adjustable Mist
Sprayer
67191, 69191D
Adjustable
FlexMist™
66190
DISTRIBUTION TUBE FITTINGS
Barb Elbow
67400, 69400D
Barb Tee
67401, 69401D
Barb Coupling
67402, 69402D
Barb End Plug
67403
Barb Shut-Off
Valve
67404
Insect/Water
Distribution Plug
67405
Coupler
67491
Tee
67492
Elbow
67490
Hose/Faucet
Adapter
67469
Male Pipe
Threaded Adapter
67470
Coupler
67466
Elbow
67465
Tee
67467
End Cap
67468
End Cap
67498
Shut-Off Valve
67497
¼" Distribution Tube Connectors
½" Distribution Tube Connectors, fits .630 to .710 drip tubing
Universal ½" Distribution/Supply Line
Connectors
Installation Guide Installation Guide
ACCESSORIES

Guía de
Instalación
La mejor opción para regar
plantas, árboles, arbustos, cestas
colgantes y jardines

2 3
Guía de instalación Guía de instalación
Un sistema de irrigación por goteo es un sistema
de riego diseñado para regar áreas determinadas,
como jardines, macizos de flores, plantas en
macetas, árboles y cubierta de suelo.
¿Por qué instalar un sistema de irrigación por goteo?
n
Ahorra agua: El agua llega directamente a las raíces
n
Ahorra dinero: Hasta un 70% de reducción en el
desperdicio de agua, obteniendo como resultado
cuentas de agua menos costosas
n
Ahorra tiempo: Reemplaza el riego manual
n
Plantas más sanas: Las plantas crecen bien cuando
reciben la cantidad precisa de agua
n
Menos mantenimiento del jardín: Lleva el agua
directamente a las plantas, no a malezas
Índice
¿Qué es la irrigación por goteo?
Sección 1
Antes de comenzar ............................................................. 4
Sección 2
Fuentes de agua .......................................................5
Sección 3
Conexión a un grifo para manguera ............................. 6
Sección 4
Proyectos de grifos para mangueras comunes
Plantas en macetas/colgantes ....................................... 8
Cubierta de suelo y macizos de flores ...................... 10
Pequeños árboles y arbustos ....................................... 12
Sección 5
Renovación: Cómo convertir un aspersor
para arbustos a irrigación por goteo ......................... 14
Sección 6
Proyectos de renovación comunes
Plantas en macetas y arbustos .................................... 16
Macizos de flores, cubiertas de suelo,
arbustos y plantas grandes ........................................... 19
Sección 7
Conexión directa a un
sistema de riego automático ......................................... 22
Sección 8
Proyectos comunes
Jardines ................................................................................ 23
Jardines en zonas desérticas ....................................... 25
Sección 9
Lista de piezas de Orbit
®
................................................ 29

Fuente y Presión de Agua
Fuente de agua:—Los sistemas de irrigación por goteo pueden
conectarse a cualquiera de las siguientes fuentes de agua.
Seleccione la mejor opción para usted.
1. Grifo para manguera exterior
2. Cómo convertir un aspersor para arbustos a goteo (renovación)
3. Direct Connection to an Irrigation Valve
Presión de agua:—Obtenga un
indicador de presión de agua
(disponible en la mayoría de las
tiendas de productos de mejora
del hogar) y acóplelo a la fuente de
agua. Los sistemas de irrigación
por goteo están diseñados para
funcionar entre 15-35 PSI (la
presión de agua alta puede causar
una falla en el sistema).
CONTINÚE CON LA SECCIÓN CORRESPONDIENTE
1. Para la conexión al grifo para manguera: Continúe en la página
siguiente
2. Convertir un aspersor para arbustos a irrigación por goteo:
Continúe en la página 14
3. Sistema de irrigación automática: Continúe en la página 22
Identificación de Plantas con
Requisitos de Riego Similares
4 5
.
.
.
.
.
.
.
.
.
.
.
.
..
.
.
.
.
.
.
.
.
.
.
.
.
.
.
.
.
.
.
.
.
.
.
.
.
.
.
.
.
.
.
.
.
..
.
.
.
.
.
.
.
.
.
.
.
.
.
.
.
.
.
.
.
.
1 2
3
SECCIÓN
2
Fuentes de agua
SECCIÓN
1
Antes de comenzar
1–ÁRBOLES Y ARBUSTOS 2–JARDÍN
3–CUBIERTA DE SUELO 4–PLANTAS EN MACETA
1
2
3
4
Guía de instalación Guía de instalación
3.
Tuberías de distribución/ suministro
La línea de suministro principal que
lleva el agua al sistema de irrigación por
goteo. La tubería de distribución puede
instalarse tanto sobre el suelo como
debajo de éste. (pieza # 67345 or 67346)
CONSEJO— Para que la instalación sea más fácil, permita que la
tubería de distribución/suministro de ½" permanezca bajo el sol y
se ablande antes de instalarla.
4.
Tapa de extremo para tubos
Conecta el extremo de la tubería
de distribución/suministro de ½" y
funciona como drenaje para el sistema
de riego por goteo. (pieza # 67498)
Importante: Verifique los requerimientos del código local antes de
instalar cualquier sistema de riego.
USOS COMUNES DE LA IRRIGACIÓN POR GOTEO
1. Plantas en macetas/colgantes: Página 8
2. Cubierta de suelo y macizos de flores: Página 10
3. Plantas grandes, árboles pequeños y arbustos:
Página 12
Seleccione la aplicación que mejor satisfaga sus
necesidades.
6 7
SECCIÓN
3
Conexión a un grifo
para manguera
Conexión a un Grifo para
Manguera Exterior
Un grifo para manguera exterior es una de las formas más
simples de conectar el sistema de irrigación por
goteo.
CONSEJO: Para un riego sin ningún trabajo manual,
coloque un temporizador eléctrico de manguera
Orbit en el grifo para manguera antes de conectar el
sistema de irrigación por goteo.
Se recomiendan los siguientes artículos para su
sistema de irrigación por goteo con grifo para
manguera:
1.
Antisifón
Evita que los contaminantes ingresen
al suministro de agua potable.
(Requerido en la mayoría de las
zonas). (pieza # 67750)
2.
Conexión del grifo de goteo 3 en 1
Un regulador de presión (20 PSI), un
filtro y un adaptador de tubería de goteo
de 1/2” todo en uno. (pieza # 67739)
2
3
1
Guía de instalación Guía de instalación
8 9
Para Plantas en Maceta
4. Conecte goteros de chorro
múltiple a cada línea de
distribución/ suministro de ¼"
y coloque la estaca junto a cada
planta.
5. Retire la tapa de extremo de
½" y abra el paso de agua para
descargar el sistema; coloque
nuevamente la tapa.
6. Ajuste el flujo de agua
girando la parte superior del
gotero de chorro múltiple.
Para Plantas Colgantes
4.
Conecte atomizadores de
flujo regulable para cada línea
de distribución/suministro de
¼" y apunte el atomizador a la
cesta colgante.
5.
Continúe llevando líneas a
cada cesta colgante hasta que el
sistema esté completo.
6.
Retire la tapa de extremo de
½" y abra el paso de agua para
descargar el sistema; coloque
nuevamente la tapa.
7.
Gire la perilla de control de
flujo en el atomizador para ajustar el caudal de agua.
IMPORTANTE: El número máximo recomendado de goteros de
chorro múltiple atomizadores por línea de suministro de ½" es 15.
Accesorios necesarios:
- Abrazaderas para tubos de ½" (pieza # 65716)
- Abrazaderas para tubos de ¼" (pieza # 65715)
- Tubería de distribución/suministro de 1/4” (pieza # 67300,
67301, or 67303)
- Acopladores dentados de ¼" (pieza # 67402) or
¼" Paquete de surtido de púas (pieza # 67431)
- Estaca con gotero de chorro múltiple (pieza # 67105)
- Atomizador de flujo regulable (pieza # 67191)
- Perforador (pieza # 67756 )
SECCIÓN
4
Plantas en Macetas/Colgantes
Nota: Los pasos 1 a 3 se aplican tanto a plantas en macetas como a
las colgantes
1.
Coloque la línea de distribución/ suministro de ½" cerca de sus
plantas en macetas o colgantes. Utilice abrazaderas para tubos de
½" para asegurar la tubería e instalar una tapa de extremo de ½".
2.
Haga orificios en la línea
de distribución/suministro de
½" para cada maceta o cesta
colgante. Luego introduzca
acopladores dentados de ½" en
cada orificio.
3.
Conecte la línea de
distribución/ suministro de ½" a
cada acoplador dentado y lleve la
línea de distribución/ suministro
a cada maceta/cesta. Utilice
abrazaderas para tubos de ¼"
para que se sostenga en su sitio.
IMPORTANTE: Una sola línea de
distribución/suministro de ¼" no
debe ser superior a 9 m.
Proyectos de grifos para
mangueras comunes
2
3
4
6
4
7
Guía de instalación Guía de instalación
Abrazaderas para
tubos de ½"
Hacia el grifo para
manguera
Hacia el grifo para manguera

10
11
4. Conecte la línea de distribución/
suministro de ¼" a cada acoplador
dentado y lleve la línea de
distribución/ suministro a cada
lugar donde se encuentre un
regador. Corte las tuberías a la
longitud deseada.
IMPORTANTE: La tubería por goteo no debe superar los 9 m.
5. Conecte el regador de bajo
volumen en estaca a cada línea de
distribución/ suministro de ¼".
6. Retire la tapa de extremo de
½" y abra el paso de agua para
descargar el sistema; coloque
nuevamente la tapa.
7. Gire la perilla de control de flujo para ajustar el caudal de agua.
IMPORTANTE: El número máximo recomendado de regadores de
bajo volumen por línea de suministro de ½" es de 16 con un ajuste
de flujo medio (8 con un ajuste máximo)
Accesorios necesarios:
- Tubería de distribución/suministro de ¼"
(pieza # 67300, 67301 or 67303)
- Acopladores dentados de ¼" (pieza # 67402) or
¼" Paquete de surtido de púas (pieza # 67431)
- Regador de bajo volumen en estaca
(pieza # 67135, 67136W, 67137W or 67138W)
- Estaca en “U” de ½" (pieza # 65731)
- Perforador (pieza # 67756)
SECCIÓN
4
Cubierta de Suelo y Macizos de Flores
1. Coloque la línea de distribución/suministro de ½" en el centro
del macizo de flores o la cubierta de suelo y coloque la tapa de
extremo de ½". Utilice estacas en “U” para sostenerla en su sitio.
2. De acuerdo con la imagen ilustrativa, coloque los cabezales
del regador con patrón de atomización de un cuarto de giro en
las esquinas, los cabezales
del regador con patrón de
atomización de medio giro junto
a los laterales y los cabezales
del regador con patrón de
atomización de giro completo
en el centro de la cubierta de
suelo.
IMPORTANTE: La distancia entre
un regador y el que sigue no debe
ser mayor a 3 m.
3. Haga un orificio en la
parte superior de la línea de
distribución/suministro de
½" para cada regador de bajo
volumen. Luego introduzca un
acoplador dentado de ¼" en
cada orificio.
Proyectos de grifos para
mangueras comunes
2
3
4
5
6
7
1
Espacio
no mayor
a 3 m
Estaca
en “U”
Guía de instalación Guía de instalación
12 13
5. Retire la tapa de extremo de
½" y abra el paso de agua para
descargar el sistema; coloque
nuevamente la tapa.
Nota: Si su sistema de irrigación
por goteo no se coloca al nivel del
suelo, reemplace todos los goteros
fijos de 15 LPH con goteros de
compensación de presión de 3,8 ó
7,6 LPH para asegurar un flujo de agua parejo en todo el sistema.
IMPORTANTE: El número total de goteros fijos de 15 LPH (litros
por hora) conectados a una sola línea de suministro de ½" no debe
superar los 45.
Accesorios necesarios:
- Goteros fijos (pieza # 65201)
- Estaca en “U” de ½" (pieza # 65731)
- Enchufe para insectos de ¼" (pieza # 67405)
- Perforador (pieza # 67756)
SECCIÓN
4
Árboles Pequeños y Arbustos
1. Coloque la línea de distribución/suministro de ½" junto a la
base de sus plantas, arbustos y árboles. Coloque una tapa de
extremo de ½" al extremo de la tubería. Utilice estacas en “U”
para sostenerla en su sitio.
2. Haga orificios en la parte
superior de la línea de
distribución/suministro de ½"
que se encuentra junto a la
base de cada planta, arbusto
o árbol. Introduzca el extremo
dentado del gotero fijo de 15
LPH en el orificio.
3. Si es necesario, conecte la
línea de distribución/suministro
de ¼" al extremo del gotero fijo
y lleve la línea de distribución/
suministro de ¼" hasta la
ubicación de la planta.
4. Coloque un tapón contra
insectos en el extremo de la
línea de distribución/suministro
de ¼".
Proyectos de grifos para
mangueras comunes
2
3
5
4
Estaca en “U”
Guía de instalación Guía de instalación
6
3
4
14 15
SECCIÓN
5
Cómo Convertir un Aspersor para
Arbustos a Goteo
Convertir un aspersor para arbustos a goteo con un tubo colector
por goteo es una manera simple de suministrar agua a su sistema
de irrigación por goteo. Las renovaciones se utilizan comúnmente
para conservar el agua mediante el reemplazo de burbujeadores y
regadores para arbustos que ya no son eficaces.
Los sistemas de irrigación por
goteo renovados se componen
principalmente de:
1. Tubo colector: Se acopla a un
tubo ascendente de ½" y posee de
1 a 8 orificios de salida.
2. Línea de distribución/suministro
de ¼"
3. Regador, gotero y tubo irrigador de bajo volumen
Tubos Colectores
La función principal del tubo colector es distribuir el agua a través
de los orificios de escape de ¼".
Existen 4 tipos de tubos colectores
1. Tubos colectores regulables:—
Ideales para cuando la presión
del sistema de agua supera los 40 PSI y se desea un control del flujo.
2. Tubos colectores de flujo completo—Ideales para el
reemplazo de cabezales con boquilla y burbujeadores que ya no
son eficaces.
3. Adaptador para arbustos—Ideal para microaspersores.
4. Tubos colectores con adaptador para tubo ascendente:—
Permiten la irrigación por goteo sin eliminar el cabezal del
regador.
Renovación
3
2
1
1 3
2
4
Instalación de Tubos Colectores de
Flujo Regulable, Flujo Completo y
Con Adaptador para Tubo Ascendente
1. Retire el cabezal del regador del tubo ascendente de ½" y conecte
el tubo colector. (Para el tubo colector con adaptador para tubo
ascendente, vuelva a conectar el cabezal del regador).
2. Retire las tapas de los
acopladores dentados de
¼" e introduzca la línea de
distribución/suministro de ¼".
3. Acople un regador de bajo
volumen o gotero de irrigación
en el extremo de la línea de
distribución/suministro de ¼".
4. Para evitar una falla por alta
presión de agua, coloque una
abrazadera de alta presión de
¼" en todas las conexiones de la
tubería.
5. Coloque el gotero de irrigación
junto a la planta.
6. Si corresponde, ajuste la perilla
de control de flujo en el caudal de
flujo deseado.
1
2
PROYECTOS DE RENOVACIÓN COMUNES
1. Plantas en macetas y arbustos—página 16
2. Arbustos y plantas grandes—página 19
Guía de instalación Guía de instalación
16 17
SECCIÓN
6
Plantas en Macetas y Arbustos
1. Conecte un tubo colector de 8 puertos o 4 puertos regulable a
un tubo ascendente para arbustos expuesto. Si no se encuentra
disponible un tubo ascendente, utilice un adaptador de soporte
para conectar a la línea del regador.
2. Retire las tapas y conecte la
línea de distribución/suministro
de ¼" a cada acoplador dentado
de ¼".
3. Lleve cada línea de
distribución/ suministro de
1/4” a cada maceta. Utilice
abrazaderas para tubos de ¼"
para que el tubo se mantenga
en su sitio. (Las jardineras y las
macetas grandes pueden necesitar más de una línea).
IMPORTANTE: Una sola línea de distribución/suministro de ¼" no
debe ser superior a 9 m.
4. Descargue las líneas para eliminar cualquier desecho.
5. Seleccione el gotero de irrigación apropiado para cada maceta
y planta
Proyectos de grifos para
mangueras comunes
1
2
CESTAS COLGANTES Y JARDINERAS
Utilice FlexMist
™
(pieza # 66190) or o pulverizador de niebla de
flujo ajustable (pieza # 67191).
PLANTAS EN MACETAS
Utilice chorros múltiples en
una estaca (pieza # 67105) o
un microburbujeador en una
estaca (pieza # 67110).
ARBUSTOS
Utilice un cabezal de regador
de bajo volumen en una estaca
de 30 cm. (pieza # 67135,
67136w, 67137w or 67138w).
6.
Ajuste el caudal de flujo
girando el tornillo de control
de flujo.
Continúa en la página siguiente
Flow
Control
6
Guía de instalación
Guía de instalación
18 19
SECCIÓN
6
Accesorios necesarios:
- Tubo colector de 8 puertos regulable (pieza # 67000)
O
- Tubo colector de 4 puertos regulable (pieza # 67005)
- El aspersor de irrigación por goteo apropiado
detallado anteriormente
- Abrazaderas para tubos de ¼" (pieza # 65715)
- Tubería de distribución/suministro de ¼"
(pieza # 67300, 67301 or 67303)
Proyectos de
renovación comunes
Macizos de Flores, Cubiertas de
Suelo, Arbustos y Plantas Grandes
1. Retire los cabezales con boquilla de los tubos ascendentes
y reemplácelos con tubos colectores de flujo completo de 4
puertos.
2. Retire las tapas dentadas de los tubos colectores y conecte
las líneas de distribución/suministro de ¼" a cada acoplador
dentado de ¼". Agregue una línea de distribución/suministro de
¼" a cada cabezal del regador de bajo volumen. Descargue las
líneas para eliminar cualquier desechos.
IMPORTANTE: Los tubos
colectores de flujo completo no
tienen un regulador de presión
interno. Para evitar una falla por
alta presión de agua, coloque una
abrazadera de alta presión de ¼"
en todas las conexiones de ¼".
IMPORTANTE: Una sola línea de
distribución/suministro de ¼" no
debe ser superior a 9 m.
Continúa en la página siguiente
1
2
Guía de instalación Guía de instalación
20 21
SECCIÓN
6
MACIZOS DE FLORES Y CUBIERTAS DE SUELO
Conecte un cabezal de regador de bajo volumen en una estaca
de 30 cm, con un espacio no mayor a 3 m. (Consulte la lista de
piezas para las opciones de diseño de atomizador)
o
Gotero de chorro múltiple en una estaca, con un espacio no
mayor a 91 cm. (pieza # 67105)
Nota: Ajuste el caudal de flujo
girando el control de flujo en
cada cabezal del regador de
irrigación por goteo.
Proyectos de
renovación comunes
ARBUSTOS Y PLANTAS GRANDES
Utilice un gotero de chorro múltiple en una estaca junto a cada
arbusto y planta grande. (pieza # 67105)
Nota: Ajuste el caudal de flujo
girando el control de flujo en cada
cabezal del regador de irrigación
por goteo.
Accesorios necesarios:
- Tubo colector de flujo completo de 4 puertos (pieza # 67025)
- El cabezal del regador de irrigación por goteo
apropiado detallado anteriormente
- Tubería de distribución/suministro de ¼"
(pieza # 67300, 67301 or 67303)
- Abrazaderas de alta presión de ¼" (pieza # 67710)
Espacio no mayor a 3 m
Espacio no mayor a 91 cm
Guía de instalación Guía de instalación
22 23
SECCIÓN
7
Connection to a Designated
Irrigation Valve
La conexión directa a un sistema de válvulas de irrigación
subterránea es ideal para proyectos de irrigación por goteo de
medianos a grandes. Esta aplicación se utiliza principalmente en
jardines, macizos de flores grandes, arbustos, árboles y jardines
en zonas desérticas
IMPORTANTE:
• Póngase en contacto con la autoridad local del distrito que se
ocupa del agua para los requerimientos del código.
• Antes de cavar, póngase en contacto con las compañías de
servicios públicos para demarcar las líneas de los servicios
públicos.
Conexiones a la tubería de agua del regador principal:
1. ¾" Válvula de irrigación (manual o automática)
2. Filtro en Y (modelo 67736)
Nota: Para una configuración fácil, use la válvula de goteo 4 en 1 67790
de Orbit que contiene todos los componentes necesarios para una
instalación en tierra.
3. Tubería de distribución/suministro de ½” (pieza 67345 or 67346) o
tubo de PVC de ¾".
Conexión a un sistema de
riego automático actual
.
.
.
.
.
.
.
.
.
.
.
.
..
.
.
.
.
.
.
.
.
.
.
.
.
.
.
.
.
.
.
.
.
.
.
.
.
.
.
COMMON APPLICATIONS
1. Jardines—Página 23
2. Jardines en zonas desérticas—Página 25
SECCIÓN
8
Jardines
1. Suministro de agua: Conecte PVC de ¾" al extremo del filtro
en Y y haga correr el tubo de PVC por el centro del jardín. Fije
un conector en T con rosca de ½" x anillo de deslizamiento de
¾" para cada fila. Utilice una válvula de drenaje automática en el
extremo de la tubería y en cualquier sección baja del tubo de PVC.
2. Atornille los tubos
ascendentes de ½" en cada
conector en T (con una
extensión de 15 a 20 cm por
encima del suelo). Conecte un
tubo colector regulable de 4
puertos a cada elevador.
3. Retire las tapas del tubo
colector y conecte un tubo
irrigador de ¼" a cada
acoplador dentado de ¼". Lleve
el tubo irrigador hasta la base
de cada planta.
Consejo: Utilice estacas en
“U” de metal para que el tubo
irrigador de ¼" se sostenga en
su sitio.
Proyectos comunes
de conexión directa
Hacia la válvula de irrigación automática
.
.
.
.
.
.
.
.
.
.
.
.
..
.
.
.
.
.
.
.
.
.
.
.
.
.
.
.
.
.
.
.
.
.
.
.
.
.
.
2
3
1
1
2
Desagüe automático
Guía de instalación Guía de instalación
24 25
SECCIÓN
8
Jardines en Zonas Desérticas
A
Válvula de irrigación
B
Gotero compensador de presión con una estaca de tubo
C
Estaca en “U”
D
Tapa de extremo
1. Suministro de agua: Conecte un regulador de presión (pieza
# 67740) al filtro en Y y conecte un adaptador macho universal
(pieza # 67470). A continuación, conecte una línea de distribución
de ½"al extremo expuesto (consulte la parte superior de la
página 26).
IMPORTANTE: use un regulador de presión para evitar daños en el
sistema de riego por goteo.
Proyectos comunes
de conexión directa
4. Corte el tubo irrigador de la longitud deseada e introduzca un
tapón terminal de ¼".
Nota: La longitud de cada tubo
irrigador de ¼" no debe superar
los 4,5 m.
5. Retire la válvula de drenaje
automática del extremo tubo de
PVC y descargue la línea para
eliminar cualquier desecho.
6. Ajuste el caudal de flujo
girando el tornillo de control
de flujo.
IMPORTANTE: No conecte más
de 14 tubos colectores de 4 puertos
Accesorios necesarios:
- Válvula de desagüe automático de ¾" (pieza # 51241M)
- Tubo colector de 4 puertos regulable (pieza # 67005)
- Estacas en “U” de ¼" (pieza # 66730)
- Tuberías para irrigador de ¼" (pieza # 67321 or 67330)
- Tapa de extremo de ¼" (pieza # 67403 o
¼" paquete de surtido de púas (pieza # 67431)
- Conectores en T deslizantes de ¾" y ½" roscados
- Elevadores de ½"
Control de flujo
4
6
A
B
D
C
Guía de instalación Guía de instalación

26 27
SECCIÓN
8
A
Regulador de presión
B
Filtro Y
C
Adaptador universal macho
D
Línea de distribución/
suministro de ½"
E
Acoplador roscado (se vende
por separado)
2. Lleve la línea de distribución/suministro junto a las plantas,
los arbustos y los árboles que desea regar. Luego coloque una
tapa de extremo de ½". Utilice
estacas en “U” de ½" para que
la línea se sostenga en su sitio.
3. Haga un orificio en la línea
de distribución/suministro de
½" para cada arbusto o árbol.
Luego introduzca un acoplador
dentado de ¼" en cada orificio.
4. Conecte la línea de distribu-
ción/suministro de ¼" a cada acoplador dentado y llévela hasta
la base de cada arbusto o árbol. Corte las tuberías a la longitud
deseada.
IMPORTANTE: Una sola línea de distribución/suministro de ¼" no
debe ser superior a 9 m.
5. Retire la tapa de extremo de ½" y abra el paso de agua
para descargar la línea de distribución/suministro de ½",
Proyectos comunes
de conexión directa
.
.
.
.
.
.
.
.
.
.
.
.
.
.
.
.
.
.
.
A
B
C D
E
3
4
luego coloque nuevamente la tapa para descargar las líneas de
distribución/suministro de ¼".
6. Agregue un gotero compensador de presión a cada línea de
distribución/ suministro de ¼". Utilice una estaca de tubo para
sostener el gotero en su lugar, junto a la base del arbusto o árbol.
Nota: Pueden ser necesarias más de una línea de distribución/
suministro de ¼" (con gotero
compensador de presión) para
árboles grandes y arbustos.
IMPORTANTE: No agregue más
de 57 goteros compensadores
de presión de 7,5 LPH a una sola
línea de distribución/ suministro
de ½".
A
Estaca de tubo
B
Gotero compensador de
presión
C
Línea de distribución/
suministro de ¼"
Accesorios necesarios:
- Adaptador universal macho de ½" (pieza # 67470)
- Tubería de distribución/suministro de ½"
(pieza #67345 or 67346)
- Tapa de extremo de ½" (pieza # 67498)
- Estaca en “U” de ½" (pieza # 65731)
- Perforador (pieza # 67756)
- Acopladores dentados de ¼" (pieza # 67402) or
¼" paquete de surtido de púas (pieza # 67431)
- Tubería de distribución/suministro de ¼"
(pieza # 67300, 67301 or 67303)
- Estacas de tubo (pieza # 65721)
- Gotero compensador de presión (pieza # 67225, 67226)
5
6
6
A
B
C
Guía de instalación
Guía de instalación
28 29
SECCIÓN
9
Lista de piezas del Orbit
Notas
Guía de instalación Guía de instalación
FAUCET
3-in-1 Faucet
Adapter,
Filter, Pressure
Reducer, ½"
Tubing Adapter
67739, 69739D
Faucet
Adapter for ½"
Distribution Tube
67495
Faucet
Adapter for ¼"
Distribution Tube
67432
Hose Thread
Swivel x ½"
Tubing Tee
67496
Hose/Tap Filter
67735
Pressure
Regulators
25 PSI—Hose
Thread
67741
Hose Bib Anti-
Siphon Valve
67750
Plastic Hose-Y
67745
MANIFOLDS
8-Port
Adjustable Flow
Manifold
67000, 69000D
4-Port
Adjustable Flow
Manifold
67005, 69005D
4-Port Full Flow
Manifold
67025, 69025D
½" MPT 2-Port
Full Flow
Manifold
67035, 69035D
2-Port Full Flow
Manifold
67030
½" Female Pipe
Thread Shrub
Adapter with
Threaded Outlet
67056
½" Riser
Adapter with
½" Barb
67035
4-Port Riser
Adapter
Manifold
67060, 69060D
Y-Filter
¾" Male Pipe
Thread
67736
25 PSI Pressure
Regulators
¾" Pipe Thread
67740
½" Pipe Thread
Adapter
67494
4-in-1 Drip
Valve 1" Male
Pipe Thread
67790
PIPE THREAD
30 31
SECCIÓN
9
Lista de piezas del Orbit
Guía de instalación Guía de instalación
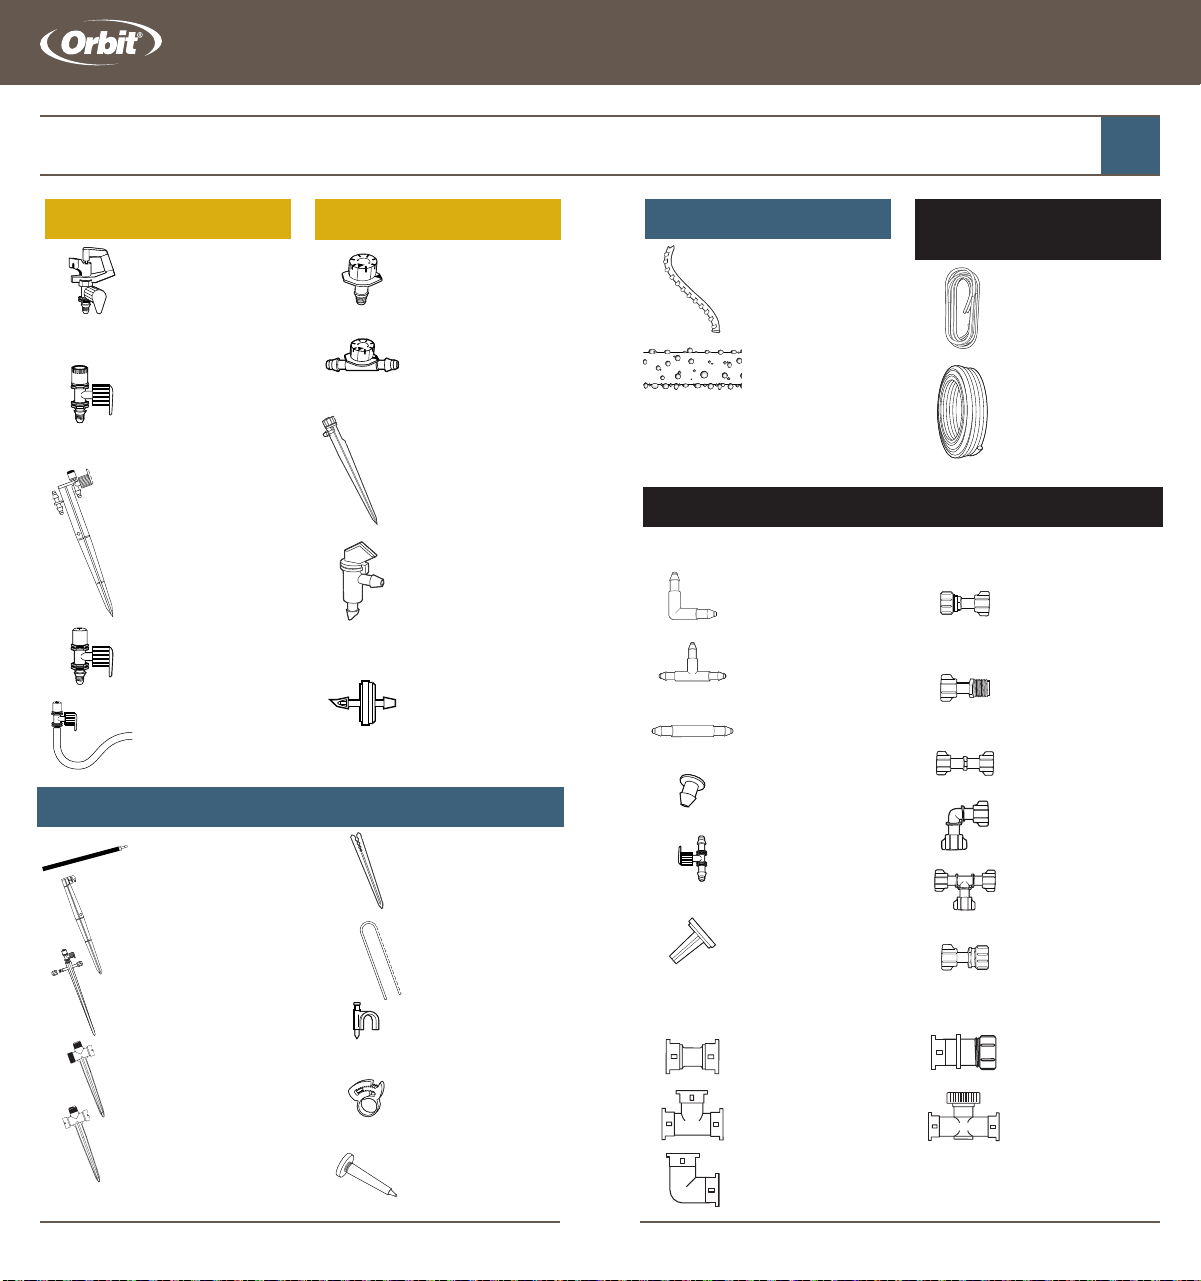
DRIPPERS AND BUBBLERS
Multi-Stream
Dripper
67100, 69100D
Inline Dripper/
Emitter
67101, 69101D
Multi-Stream
on a Stake
67105, 69105D
Flag Dripper
2 GPH 65200
4 GPH 65201
Pressure
Compensating
Dripper
1 GPH 67225
2 GPH 67226
DISTRIBUTION/SUPPLY
TUBE
¼" Distribution
Tube
50' 67300, 67303
100' 67301
½" Distribution
Tube
50' 67345
100' 67346
500' 67347
¼" SOAKER TUBE
Drilled Soaker
Tubing 60'
67321
¼" Porous
Soaker Tube
50' 67330
100' 67331
6" Extension
Riser 66760
12" Tubing
Stake (with 12"
Extension Riser)
67722
¼" Inline Stake
67720
½" MPT x ½"
Drip-Lock
®
Stake
67991
½" Drip-Lock
®
x
End Cap Stake
67992
Tubing Holder
Stake
65721
Loop Stake
½" 65731
¼" 65730
Tubing Strap
¼” 65715
½” 65716
¼" High
Pressure Clamp
67710
Tube
Punch Tool
67756
LOW VOLUME SPRINKLER
Mini Rotating
Sprinkler
67113
Low-Volume
Sprinkler
Full Pattern
67116, 69116D
½ 67117, 69117D
¼ 67118, 69118D
Strip 67115
Low-Volume
Sprinkler Head
on 12' Stake
Full 67136
½ 67137
¼ 67138
Strip 67135
Adjustable Mist
Sprayer
67191, 69191D
Adjustable
FlexMist™
66190
DISTRIBUTION TUBE FITTINGS
Barb Elbow
67400, 69400D
Barb Tee
67401, 69401D
Barb Coupling
67402, 69402D
Barb End Plug
67403
Barb Shut-Off
Valve
67404
Insect/Water
Distribution Plug
67405
Coupler
67491
Tee
67492
Elbow
67490
Hose/Faucet
Adapter
67469
Male Pipe
Threaded Adapter
67470
Coupler
67466
Elbow
67465
Tee
67467
End Cap
67468
End Cap
67498
Shut-Off Valve
67497
¼" Distribution Tube Connectors
½" Distribution Tube Connectors, fits .630 to .710 drip tubing
Universal ½" Distribution/Supply Line
Connectors
ACCESSORIES
