
Technical Support and E-Warranty Certificate www.vevor.com/support
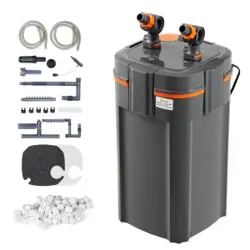
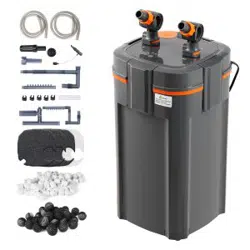
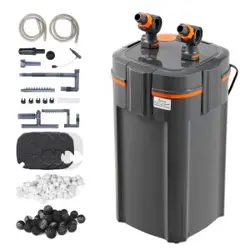
AQUARIUM FILTER
MODEL:SF-650F-UV 8W
We continue to be committed to provide you tools with competitive price.
"Save Half", "Half Price" or any other similar expressions used by us only represents an
estimate of savings you might benefit from buying certain tools with us compared to the major
top brands and does not necessarily mean to cover all categories of tools offered by us. You
are kindly reminded to verify carefully when you are placing an order with us if you are
actually saving half in comparison with the top major brands.


- 1 -
MODEL:SF-650F-UV 8W
Have product questions? Need technical support? Please feel free to
contact us:
Technical Support and E-Warranty Certificate
www.vevor.com/support
NEED HELP? CONTACT US!
This is the original instruction, please read all manual instructions
carefully before operating. VEVOR reserves a clear interpretation of our
user manual. The appearance of the product shall be subject to the
product you received. Please forgive us that we won't inform you again if
there are any technology or software updates on our product.
AQUARIUM FILTER
Black
Grey
- 2 -
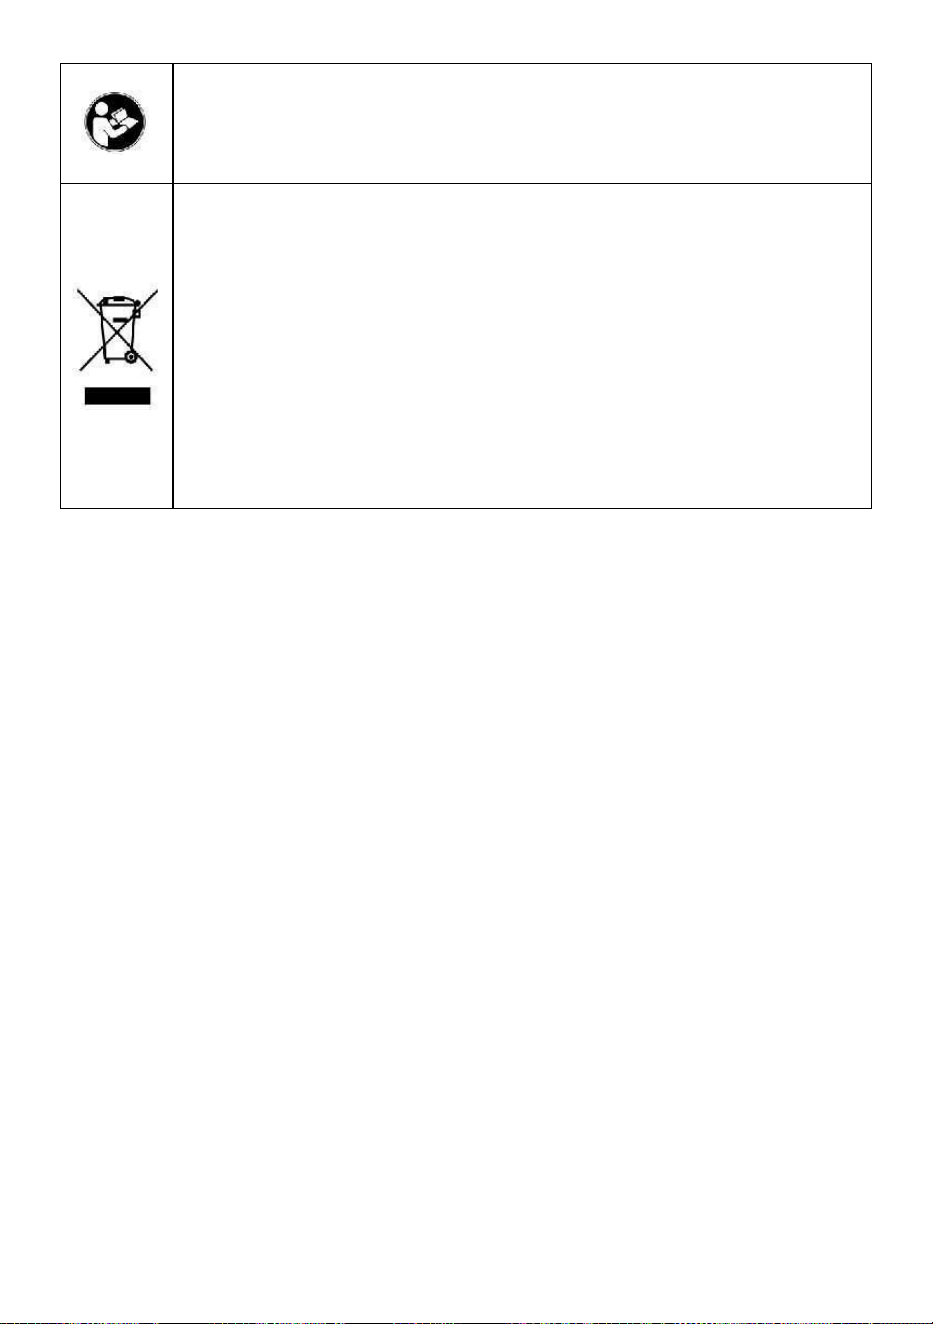
Warning-To reduce the risk of injury, user must read
instructions manual carefully.
This product is subject to the provision of European Directive
2012/19/EC. The symbol showing a wheelie bin crossed
through indicates that the product requires separate refuse
collection in the European Union. This applies to the product
and all accessories marked with this symbol. Products marked
as such may not be discarded with normal domestic waste, but
must be taken to a collection point for recycling electrical and
electronic devices
READ AND FOLLOW ALL SAFETY INSTRUCTIONS.
DANGER- To avoid possible electric shock, special care should be taken
since water is employed in the use of aquarium equipment For each of the
following situations, do not attempt repairs by yourself, return the appliance
to an authorized Service facility for Service or discard the appliance.
1.This appliance can be used by children aged from 8 year and above and
persons with reduced physical, sensory or mental capabilities or lack of
experience and knowledge if they have been given supervision or
instruction conceming use of the appliance in a safe way and understand
the hazards involved. Children shall not play with the appliance Cleaning
and user maintenance shall not be made by children without supervision.
2.The supply cord cannot be replaced. If the cord is damaged the
appliance should be scrapped.
3.The maximum inlet water pressure, in pascals:0.03MPa
4.The minimum inlet water pressure, in pascals:O.O1MPa, if this is
necessary for the correct operation of the appliance.
5.The supply cord cannot be replaced, if the cord is damaged, the
appliance should be scrapped.
WARNING - This appliance contains a UV emitter. Do not stare at the light
source.
- 3 -
Hereby we sincerely thank you for purchasing our product..To operate the
product safely, please do read this manual carefully.
Warning:
1.Before using the product, please check if there is any damage on the
power cord.If yes, please do not use the product.
2.To avoid default, please use the product under the regulated voltage and
frequency.
3.Please do not plug or pull the power cord if your hands are wet.
4.when maintaining or moving the product or when there is any abnormal
situation, please turn off the power first.
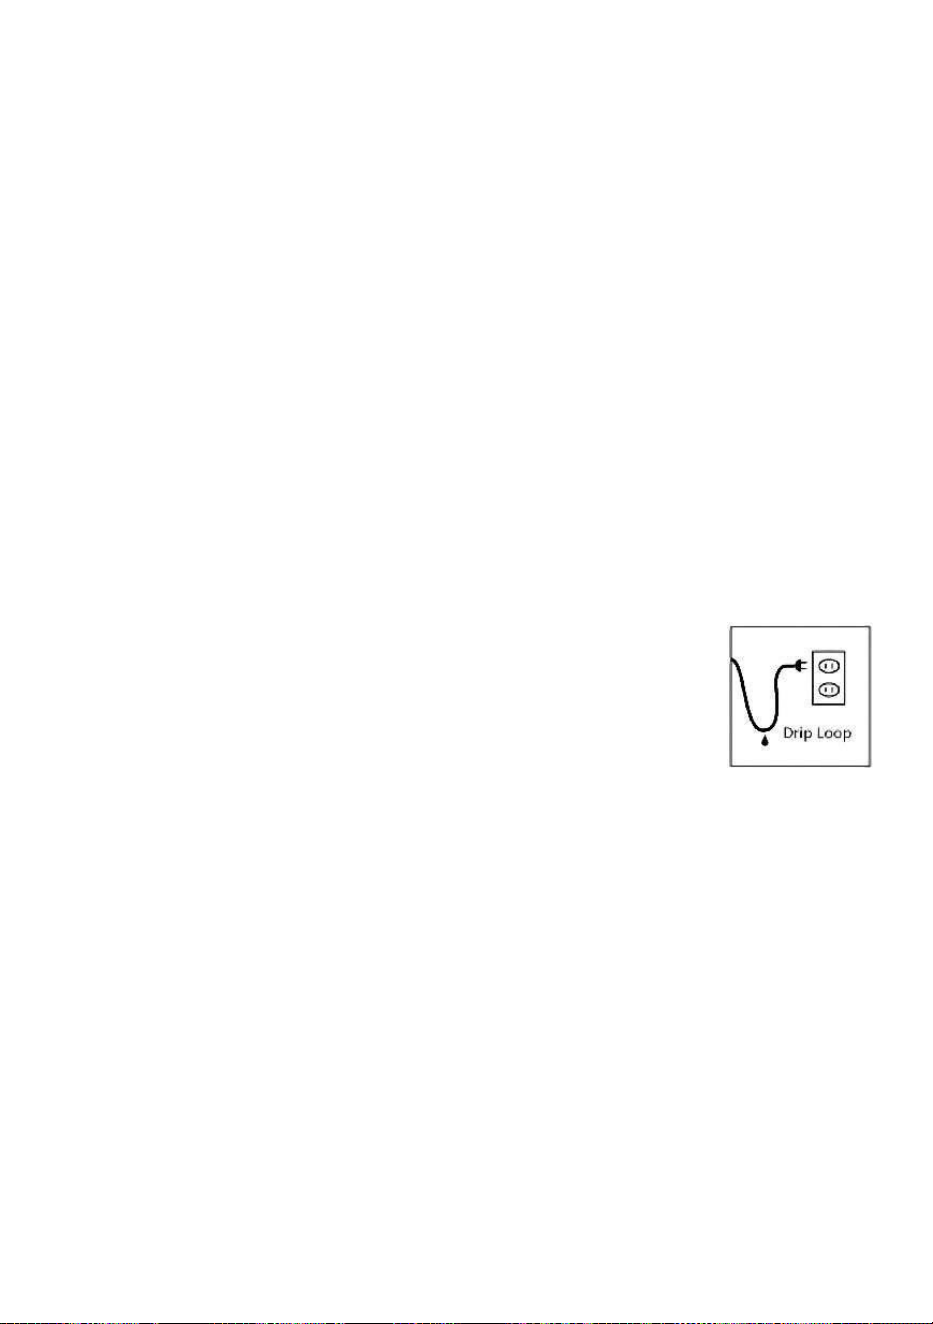
5.Please make sure the plug and socket are protected away from water.
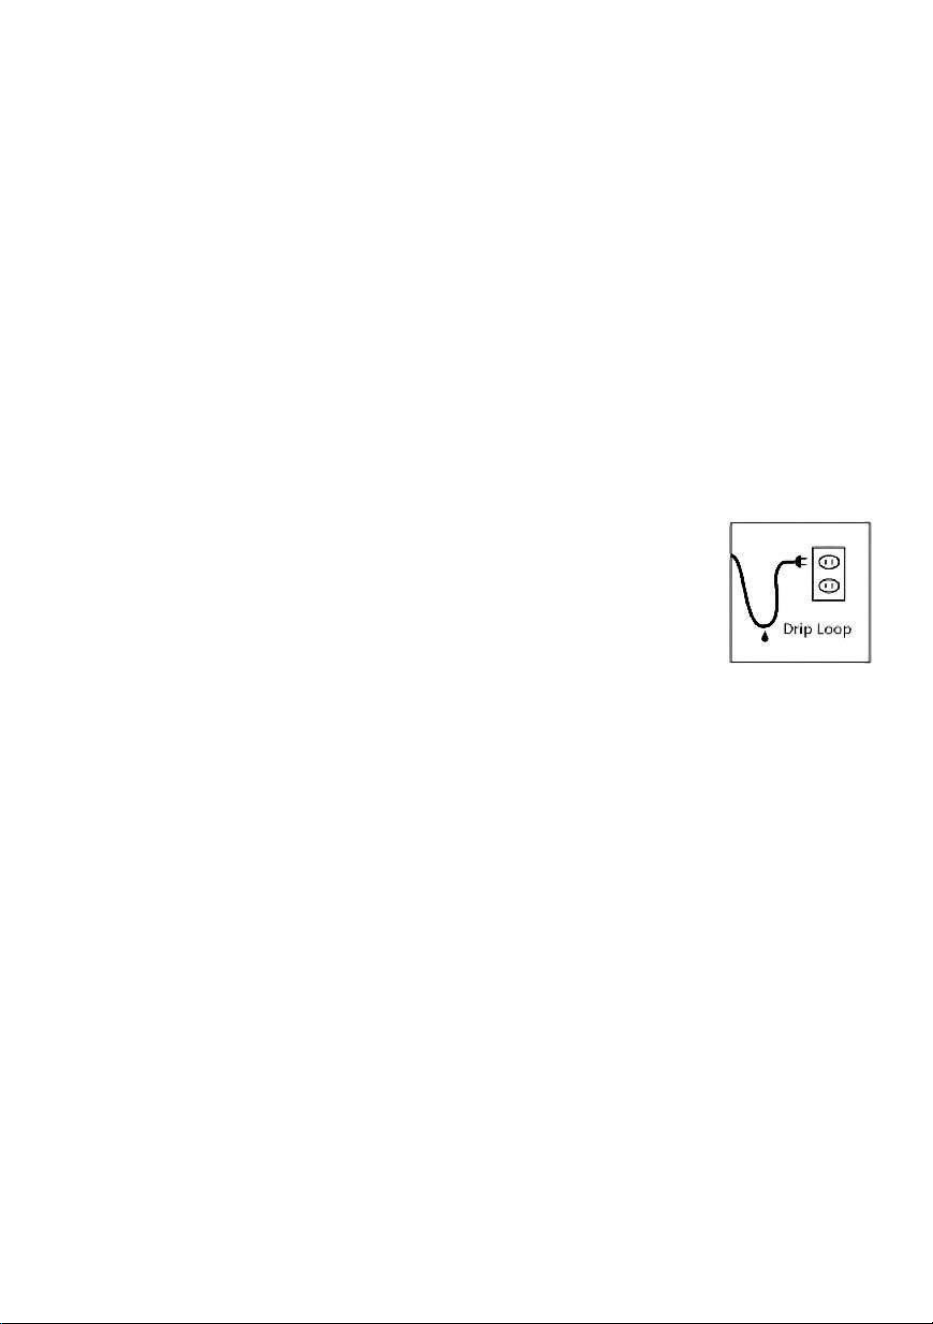
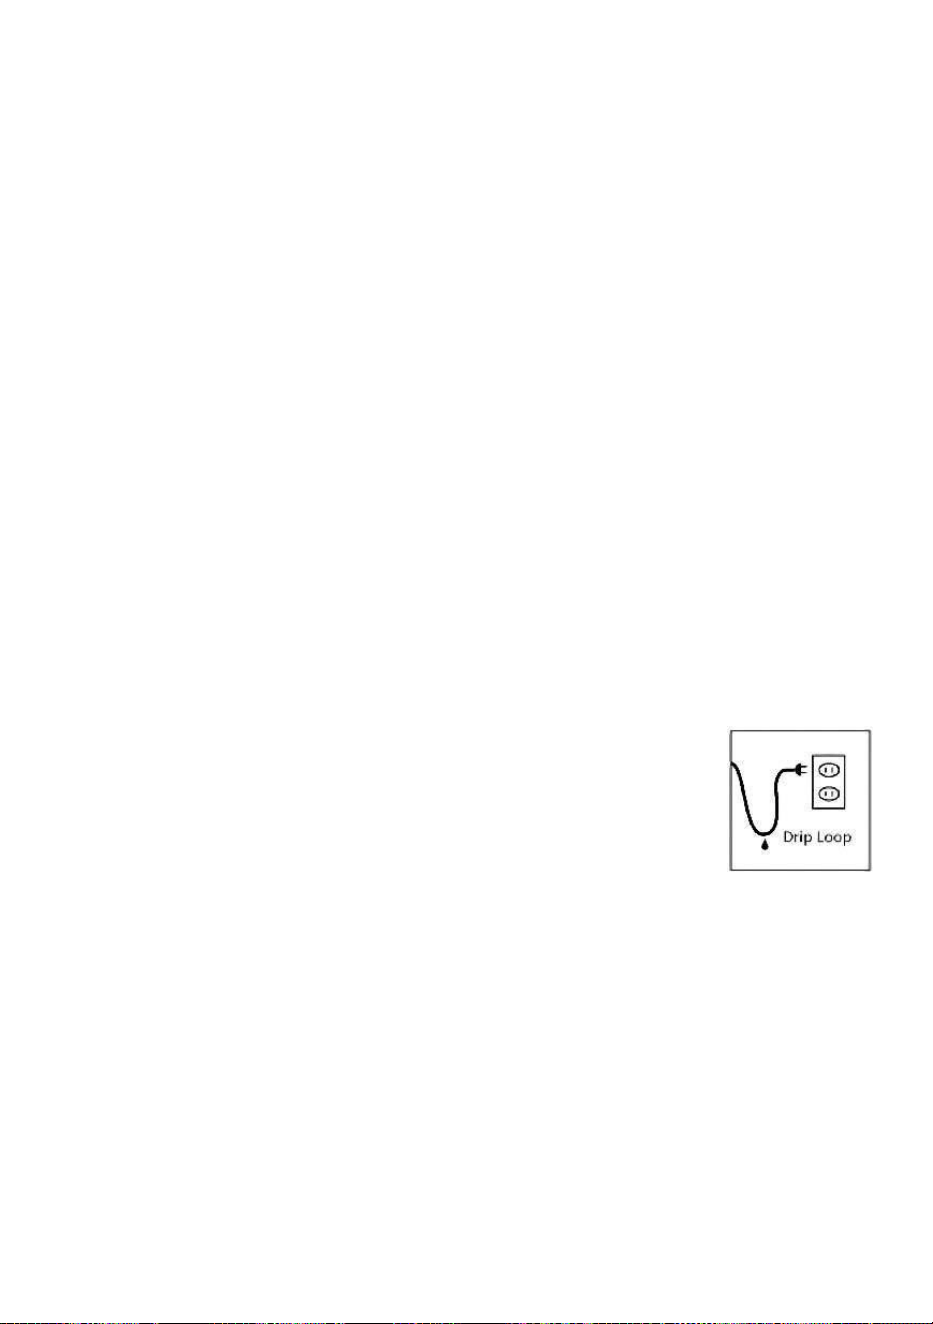
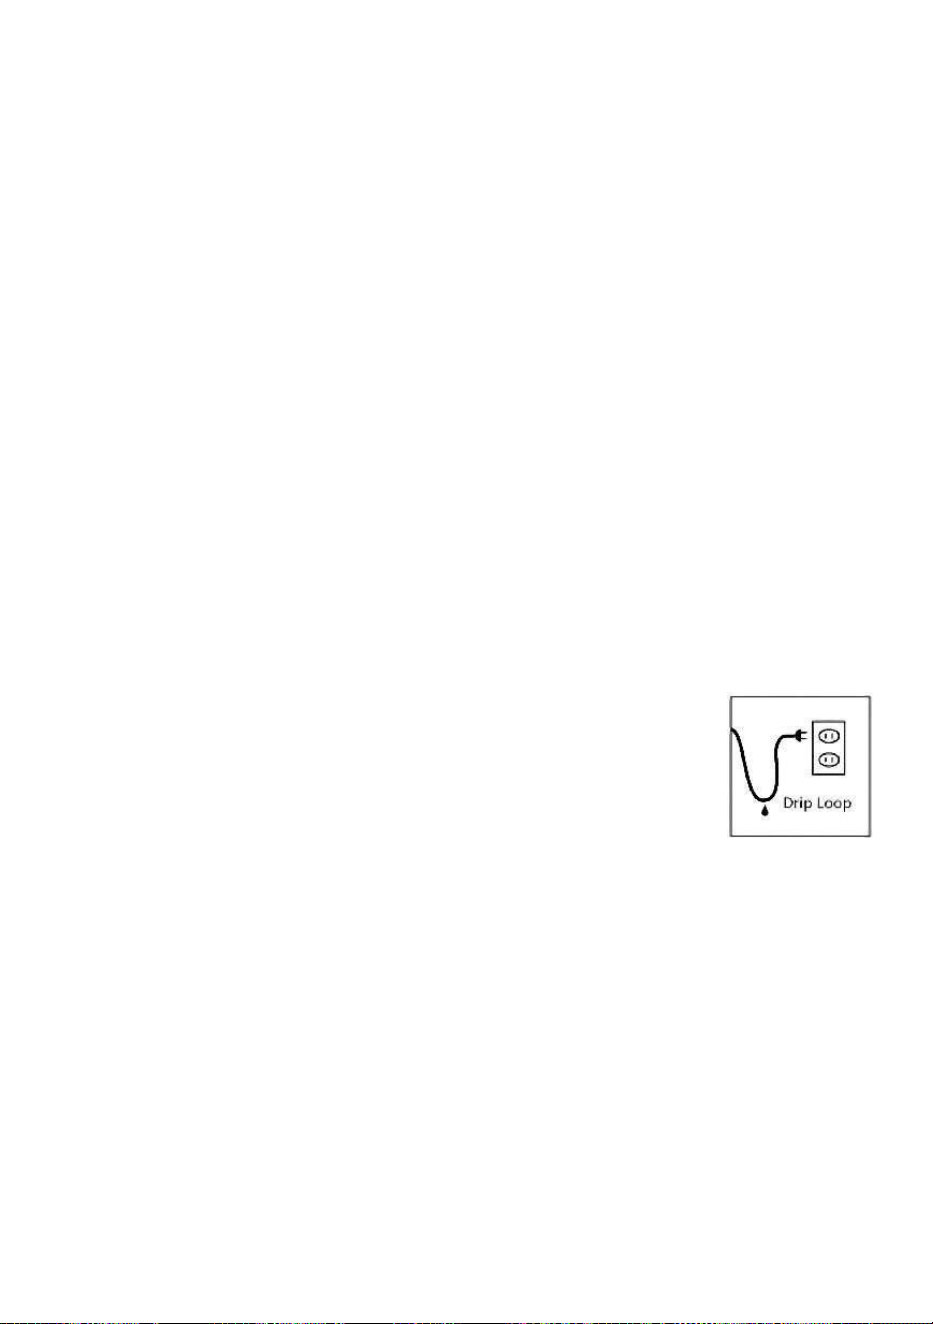
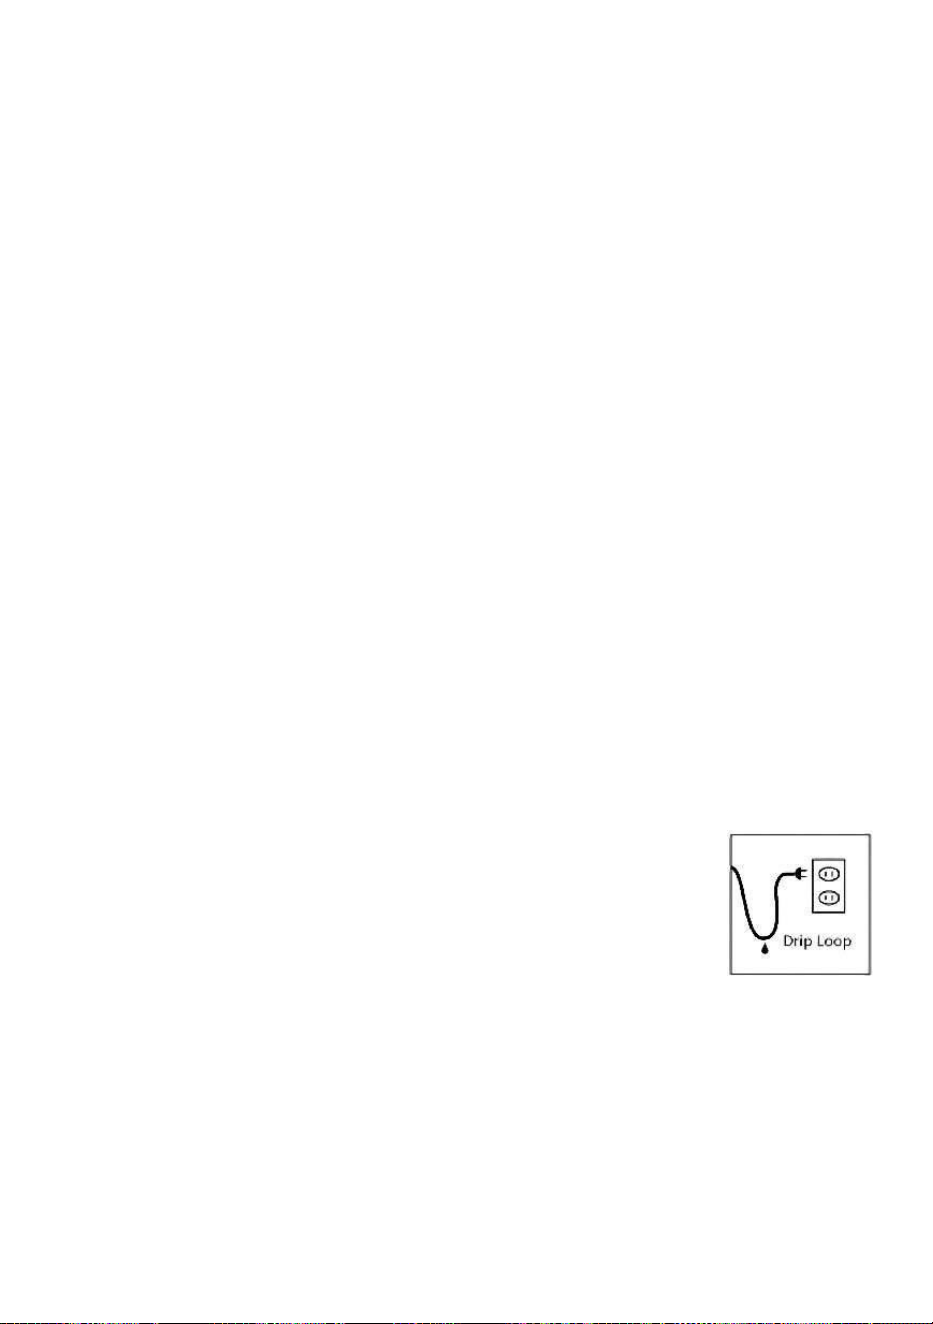
6.Please do not pull the power cord straightly when using. Please keep the
power cord to be "U" shape(see below picture)to avoid the water go inside
the socket along the power cord.
7.Please do not use the product near the flammable items.
8.Please use the professional technician for maintenance.
9.Please do not reinstall the product to avoid any default.
Notice:
1.After purchasing, please check if there is any dam age or any missing
parts to the product.
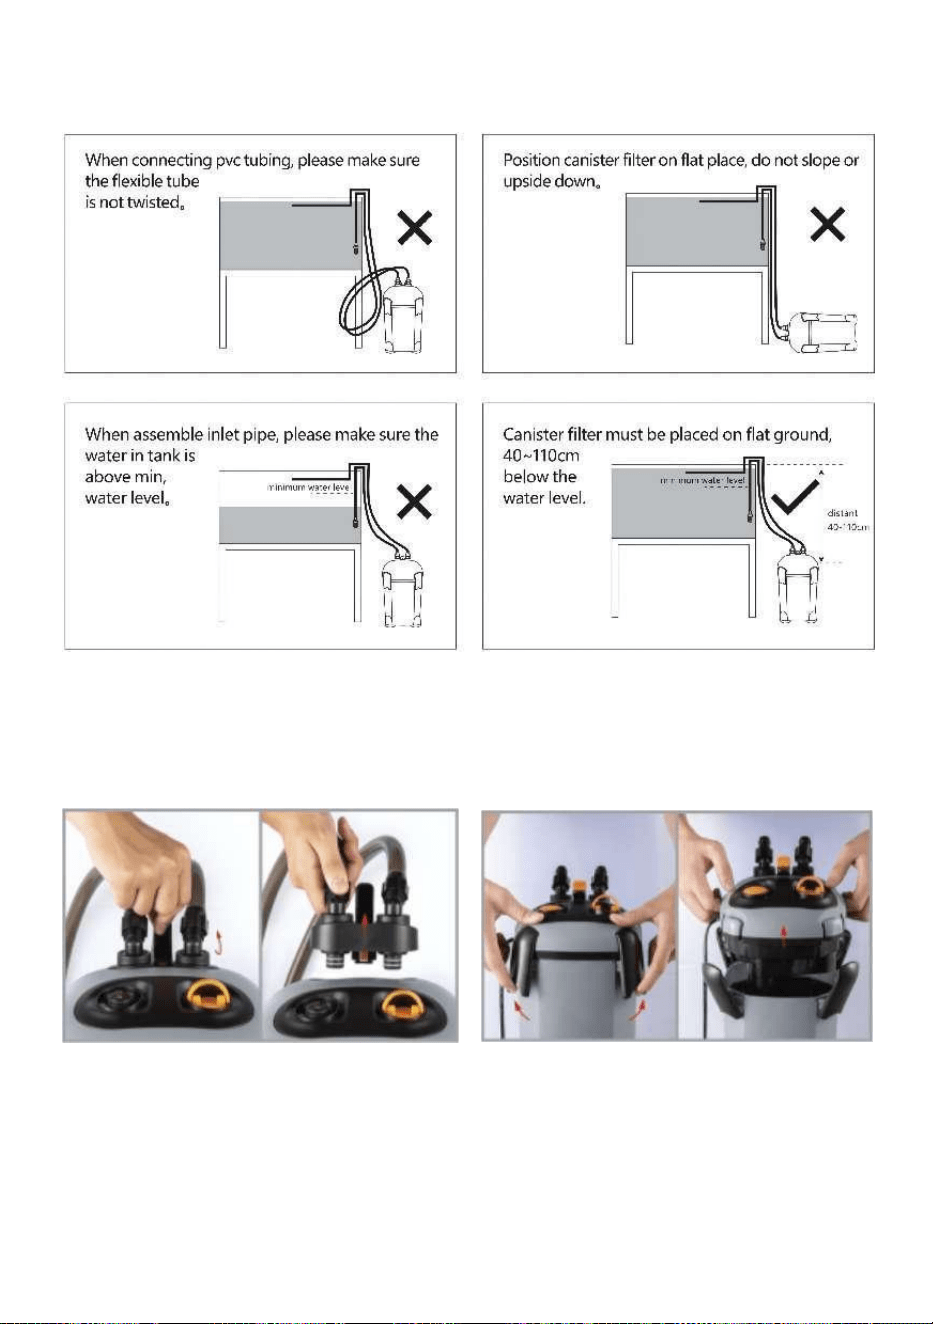
2.Please operate the product underneath the waterline of tank.
3.Please install the product on the flat surface.
4. When move the product, please do not take it by holding the valve, as
that way may cause breakage on the valve and further cause water
leakage.
5.It is suggested to clean the impeller and propeller once per month, as the
dirt will affect the lifetime of impeller.
6.Impeller is easily wornout item, it is suggested to replace once per year
7.To reach the best UV effect,it is suggested to replace the UV light once
per half year.
8.This product should work with water.
9.Please periodically(15-20days) clean the filter material to remove the
dirty stuff which will results in low water flow.
- 4 -
10. If use in marine water, please periodically remove the salt on the
product or power cord in order to avoid electric leakage.
INSTRUCTIONS
- 5 -
SAVE THESE INSTRUCTIONS
Model
SF-650F-UV 8W
Voltage
AC110-120 V 60 Hz or AC220-240V 50/60Hz
Pump Power
8 W
UV Power
9 W
Flow Max
650 L/H
Noise
<50dB
Filter Number
1
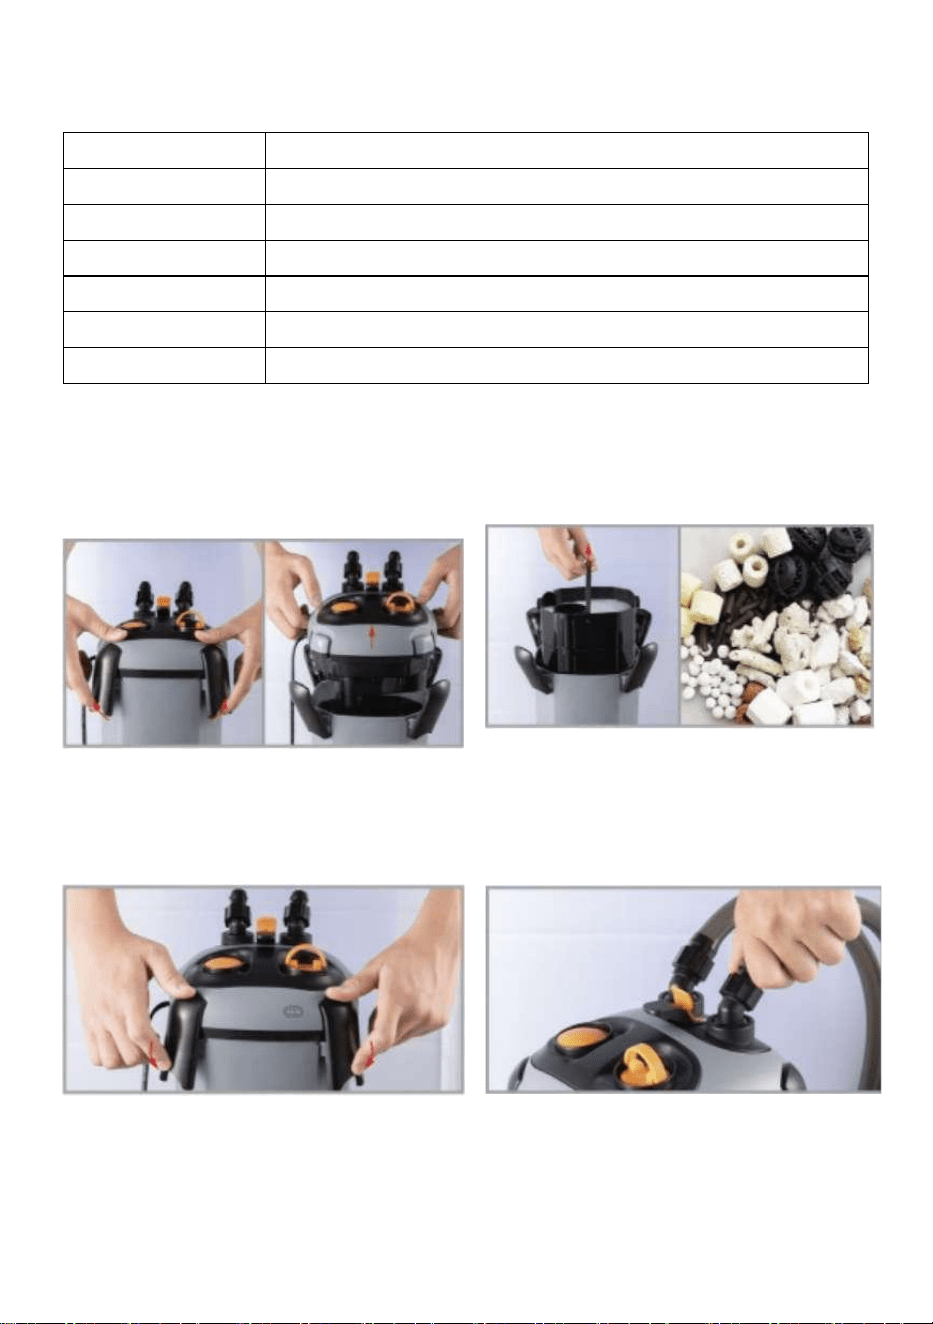
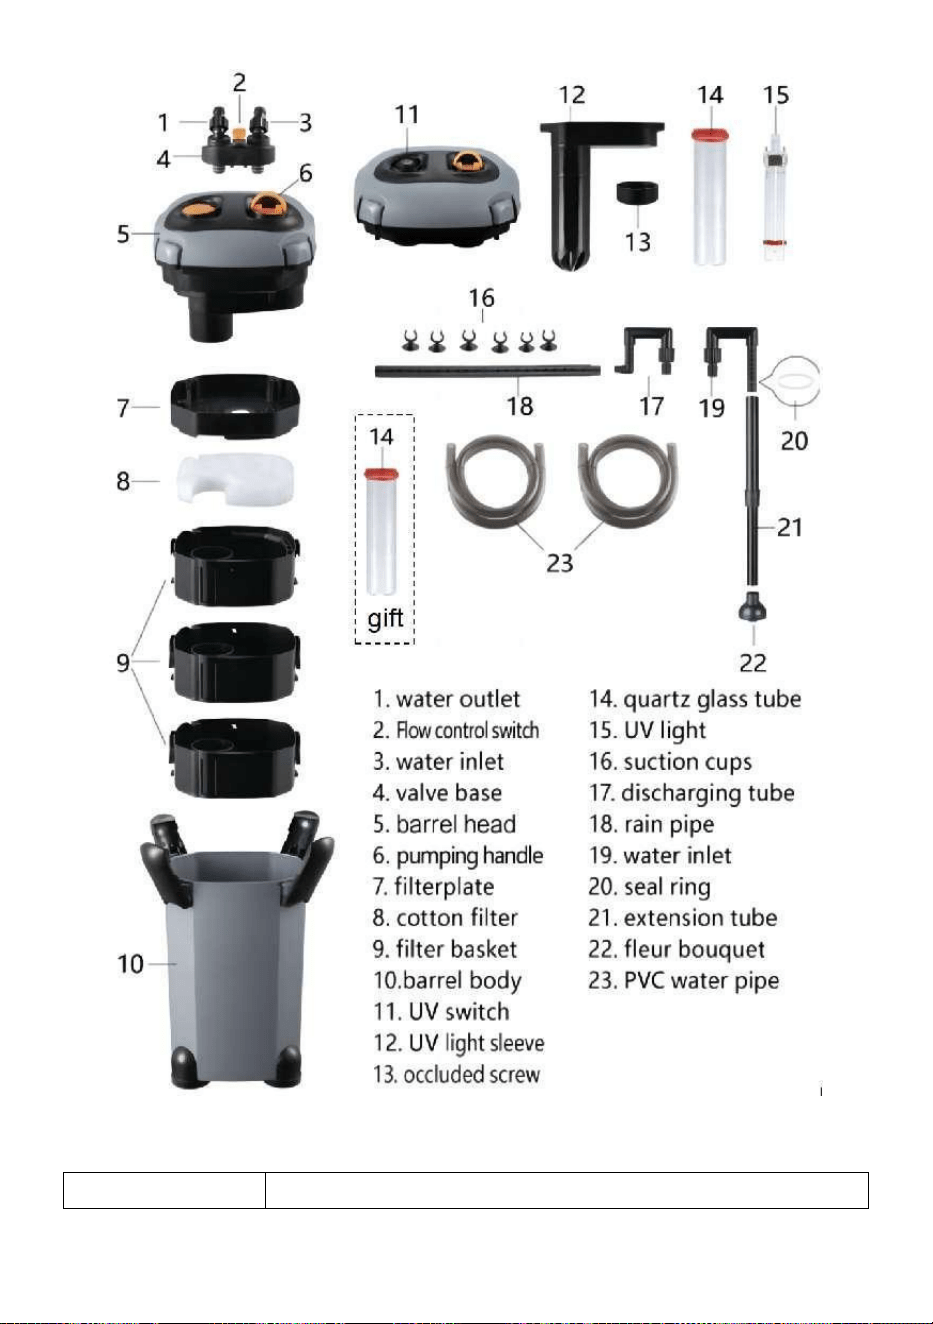
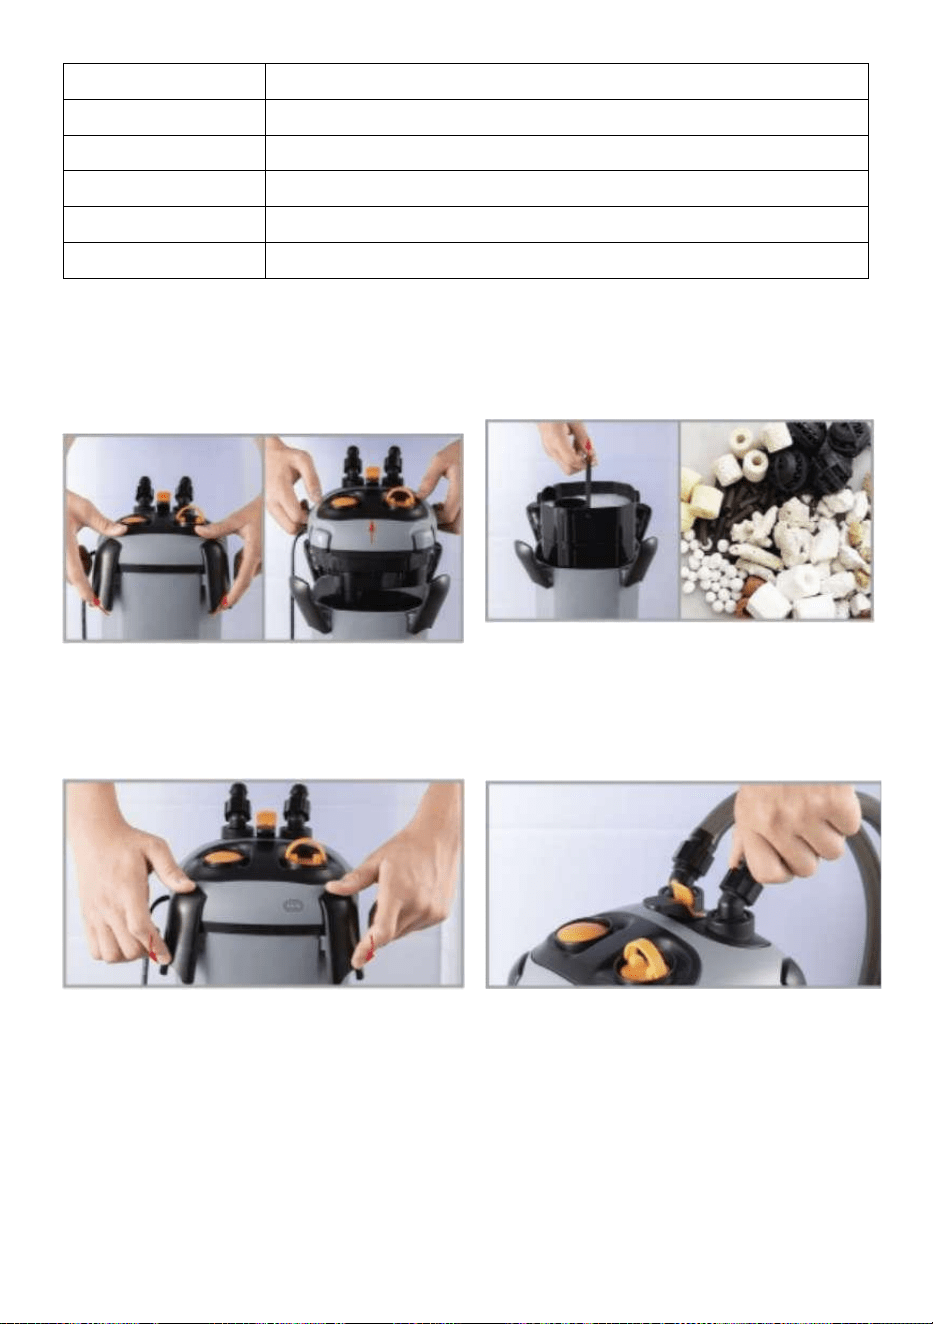
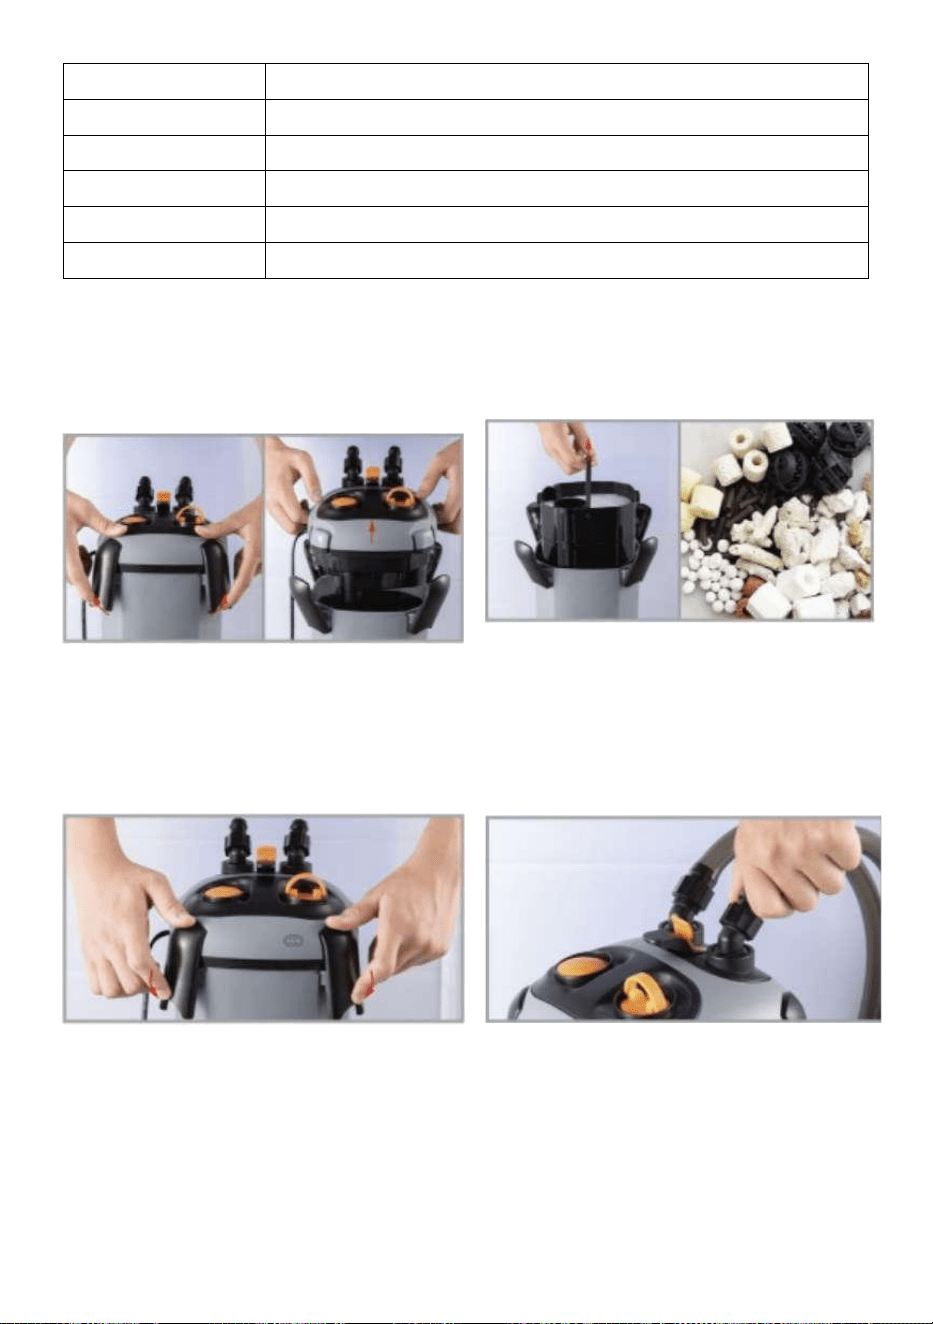
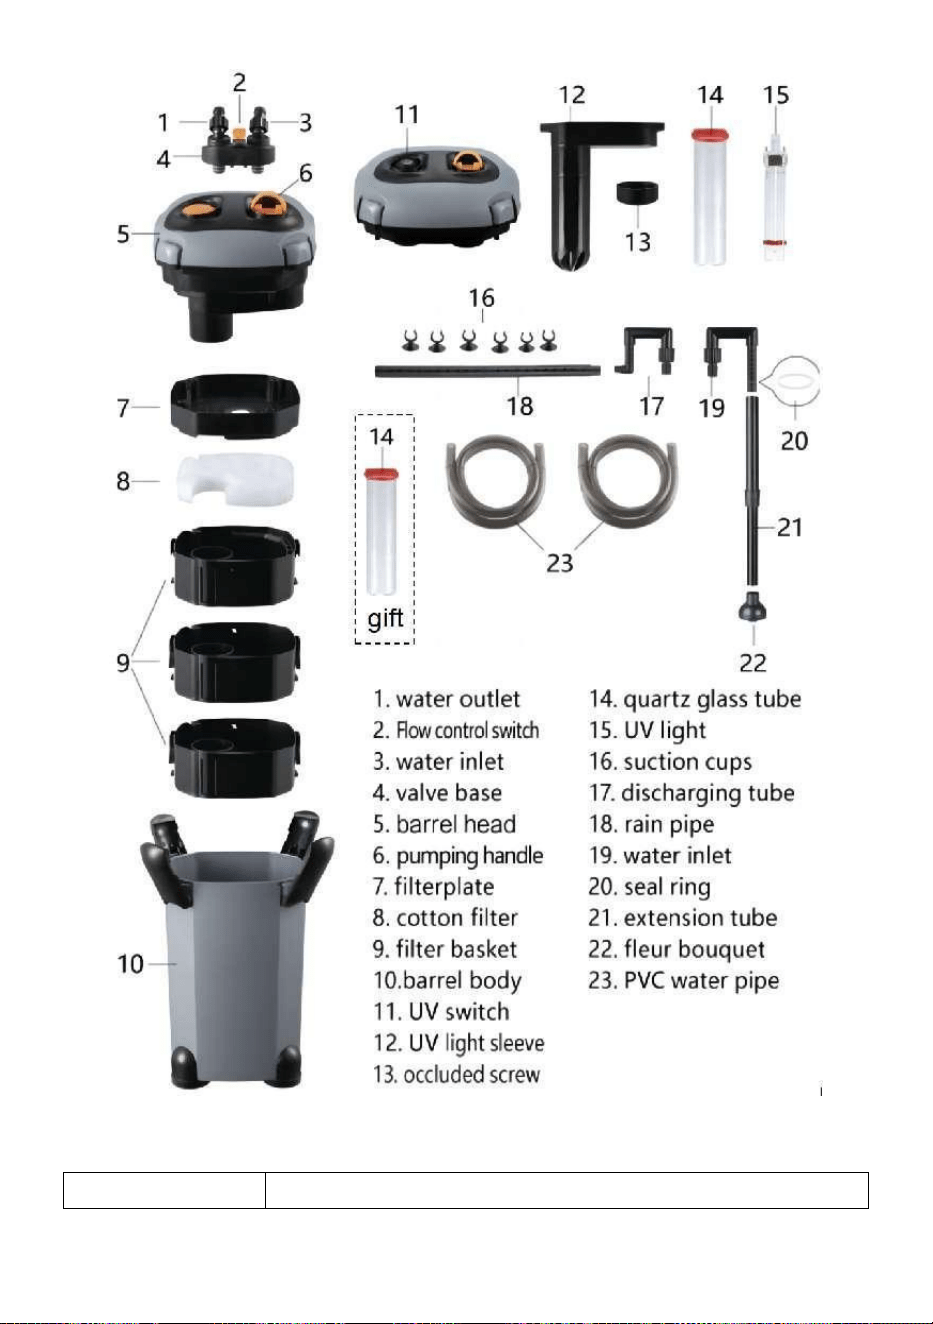
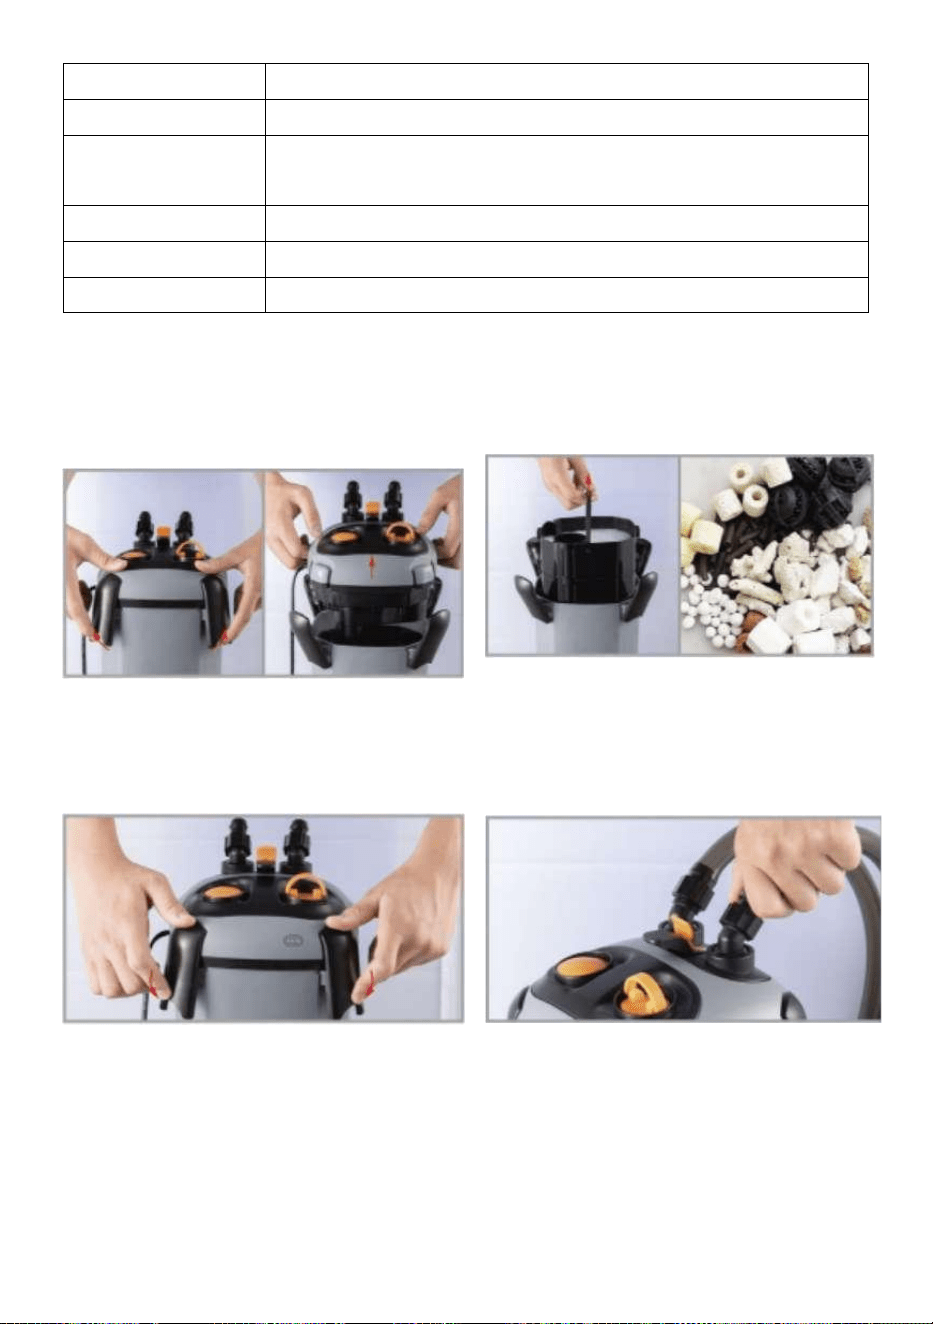
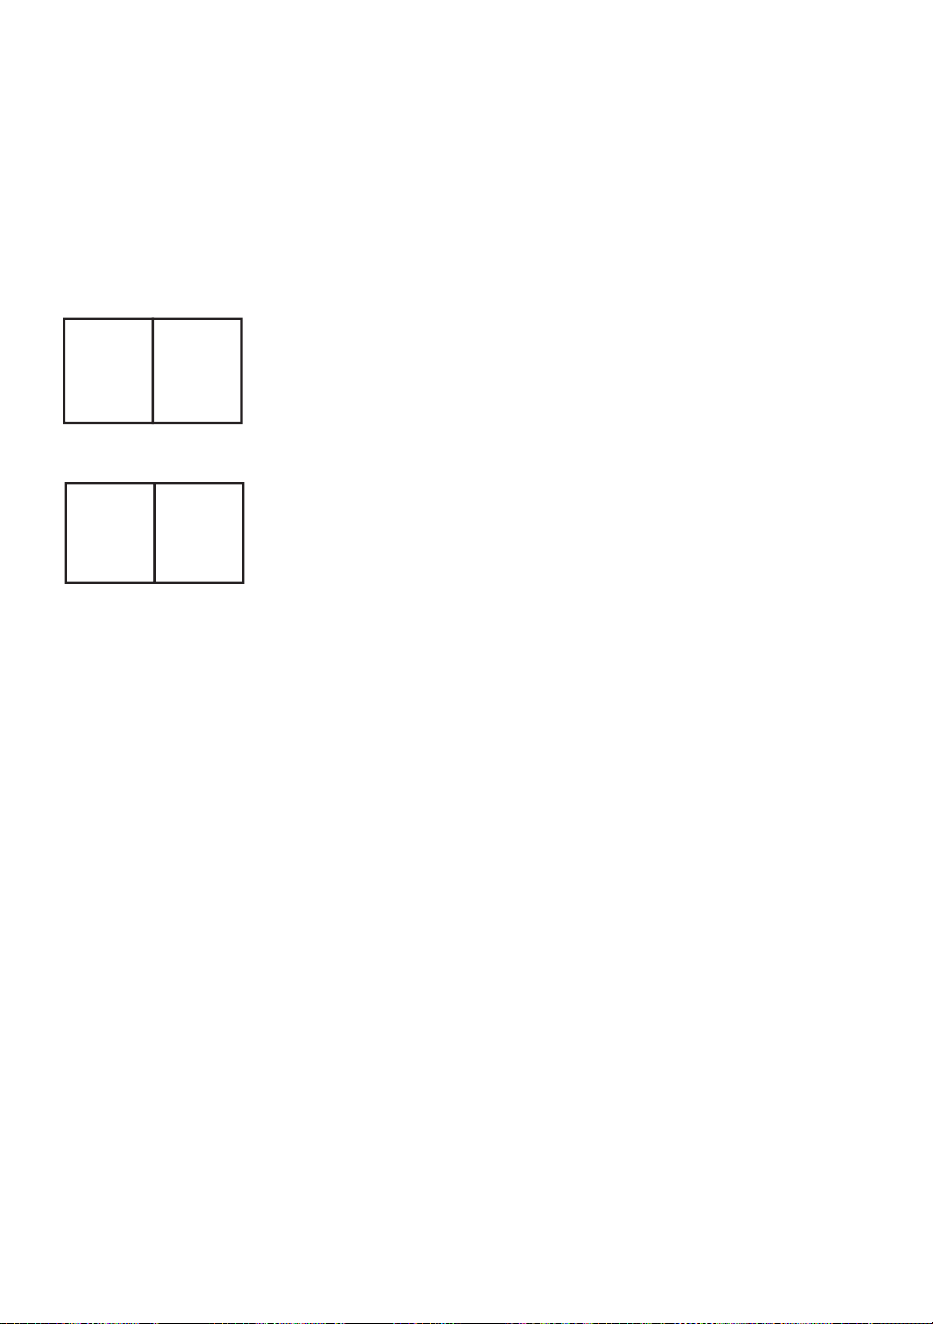
INSTALLATION INSTRUCTION
1. Open the fixing buckle of the
bucket cover and pick up the bucket
cover.
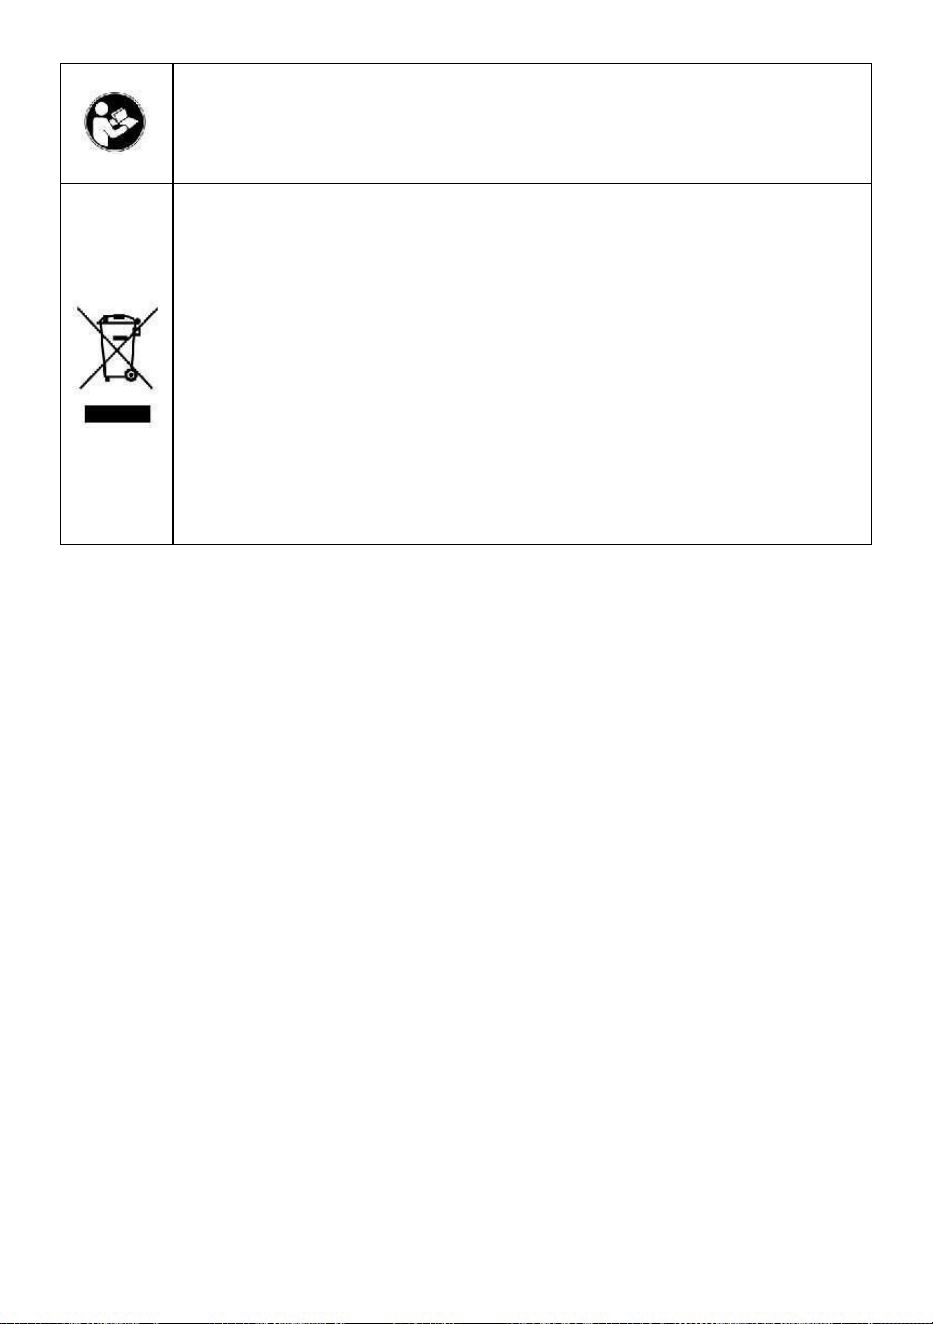
2. Take out the filter basket and add
the cleaned filter.
3. Put back the filter basket, cover
the barrel head and fasten the fixing
buckle.
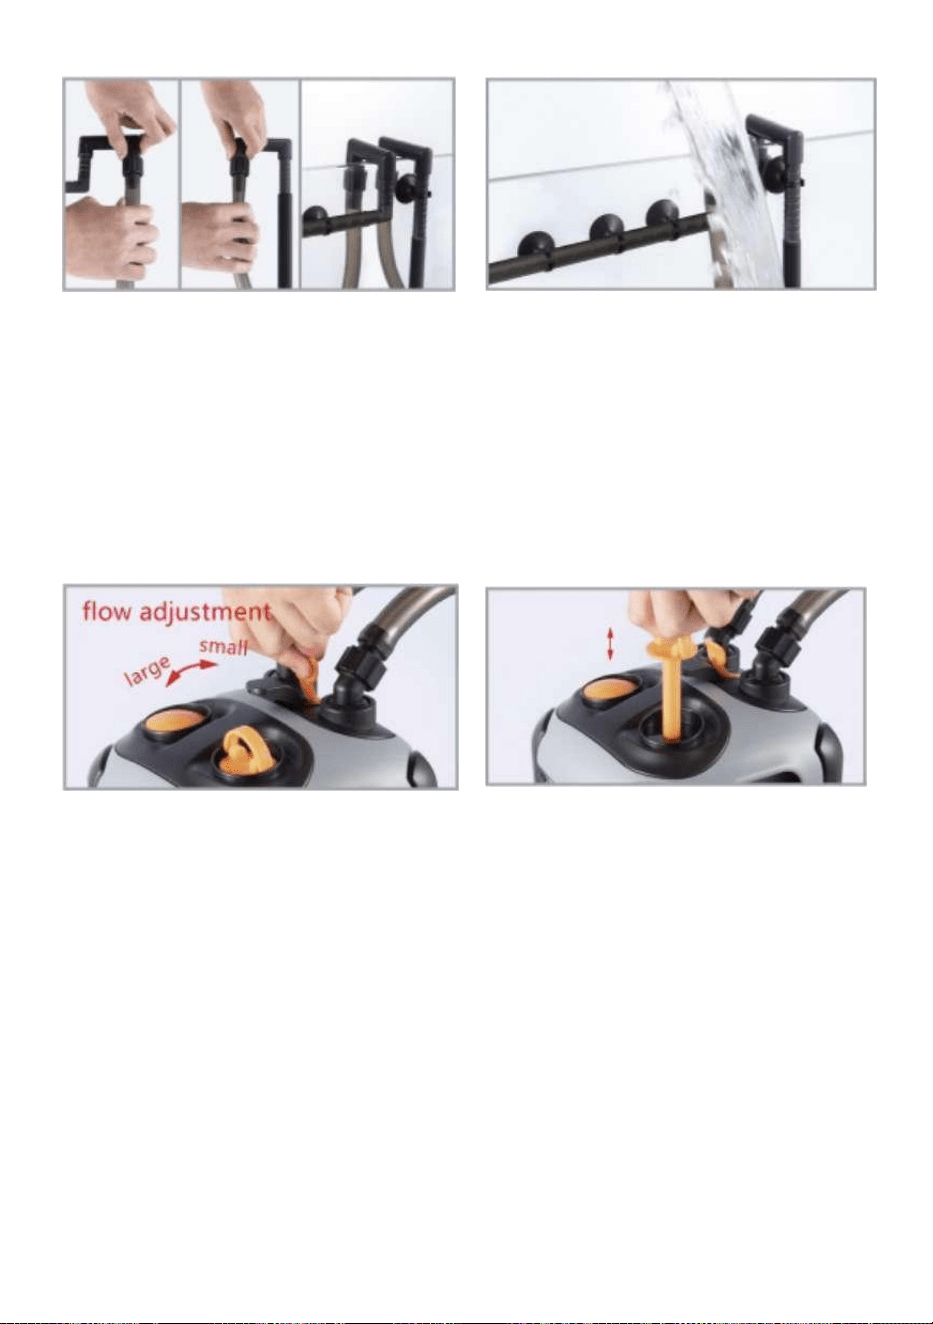
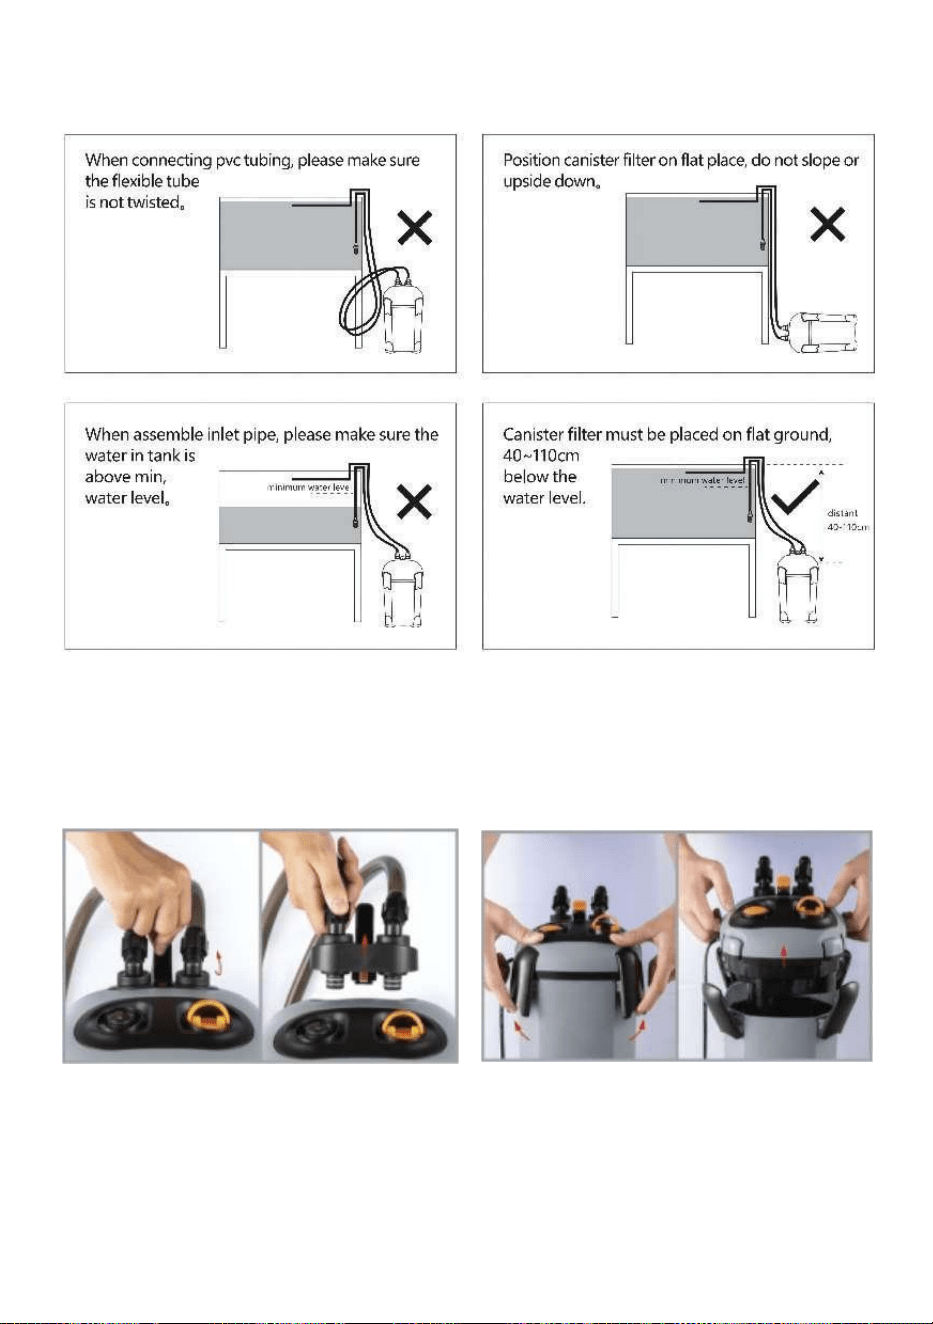
4. Connect the hose between the
water outlet and the water inlet, and
then fix the screw.
- 6 -
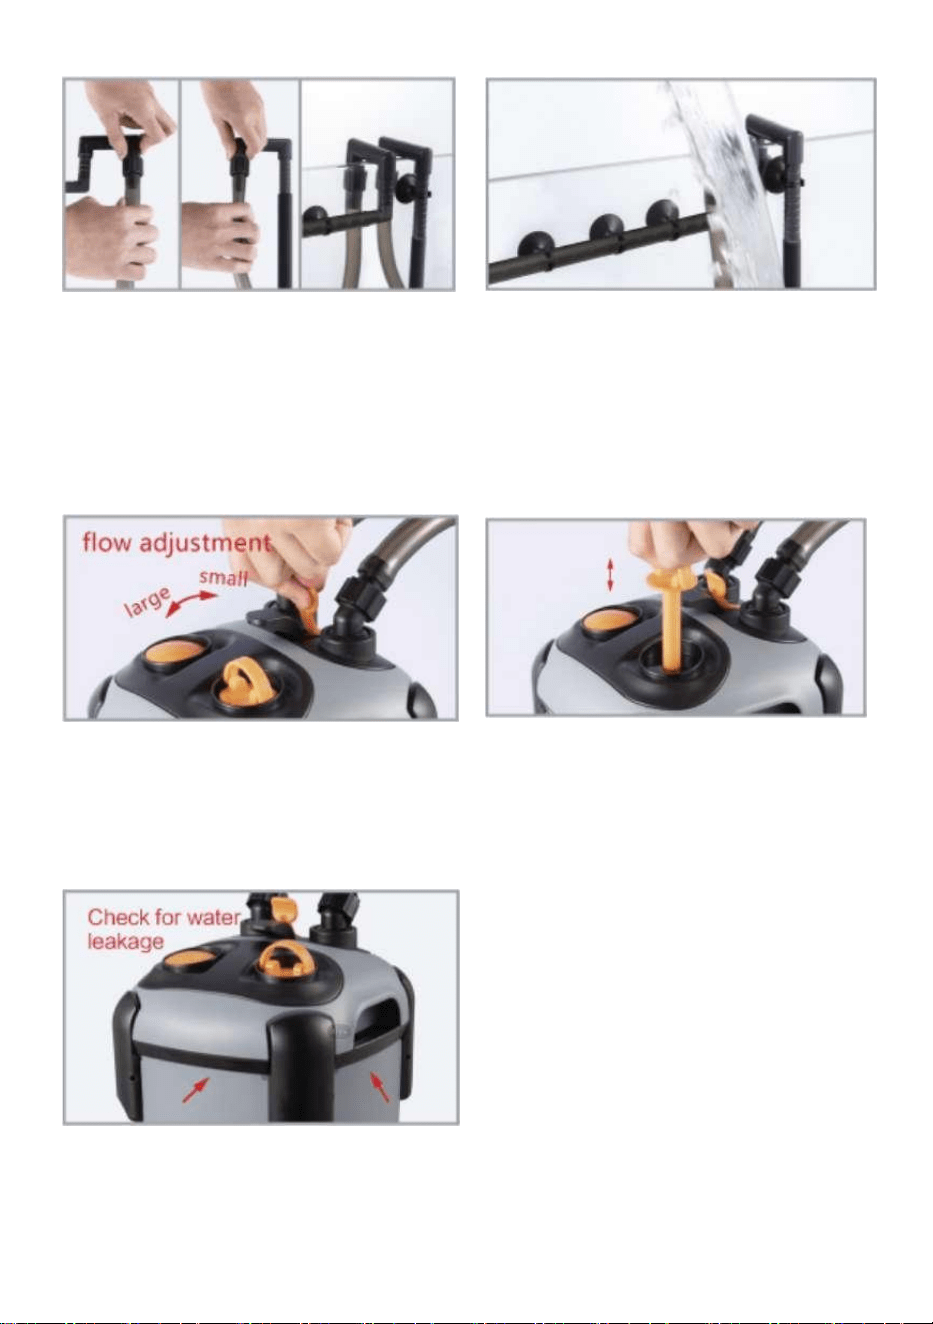
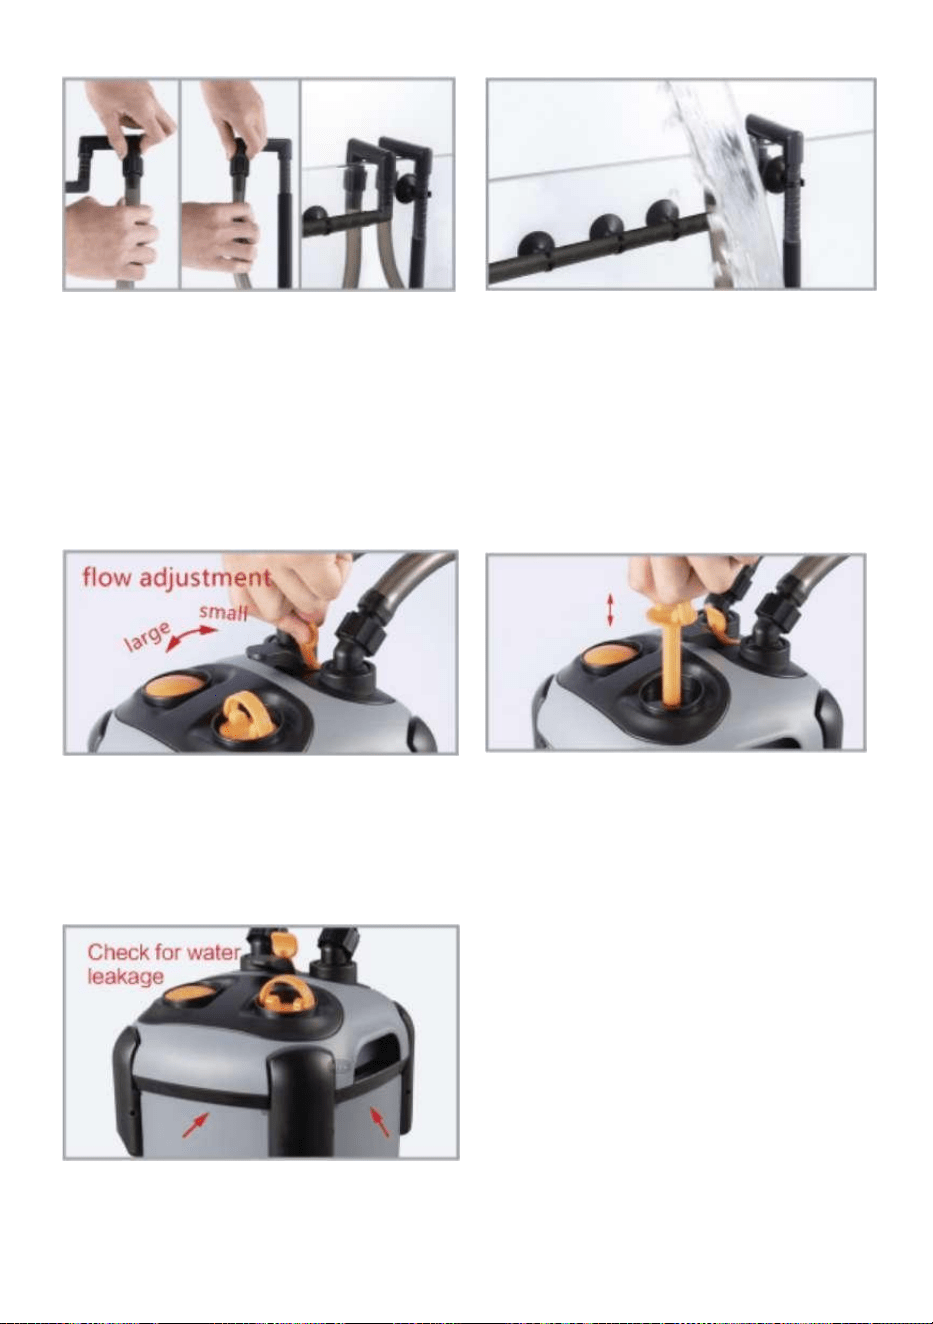
5. The other end of the hose is
connected with the water outlet pipe
and the water inlet pipe, and the
water outlet pipe and the water inlet
pipe are fixed in the fish tank.
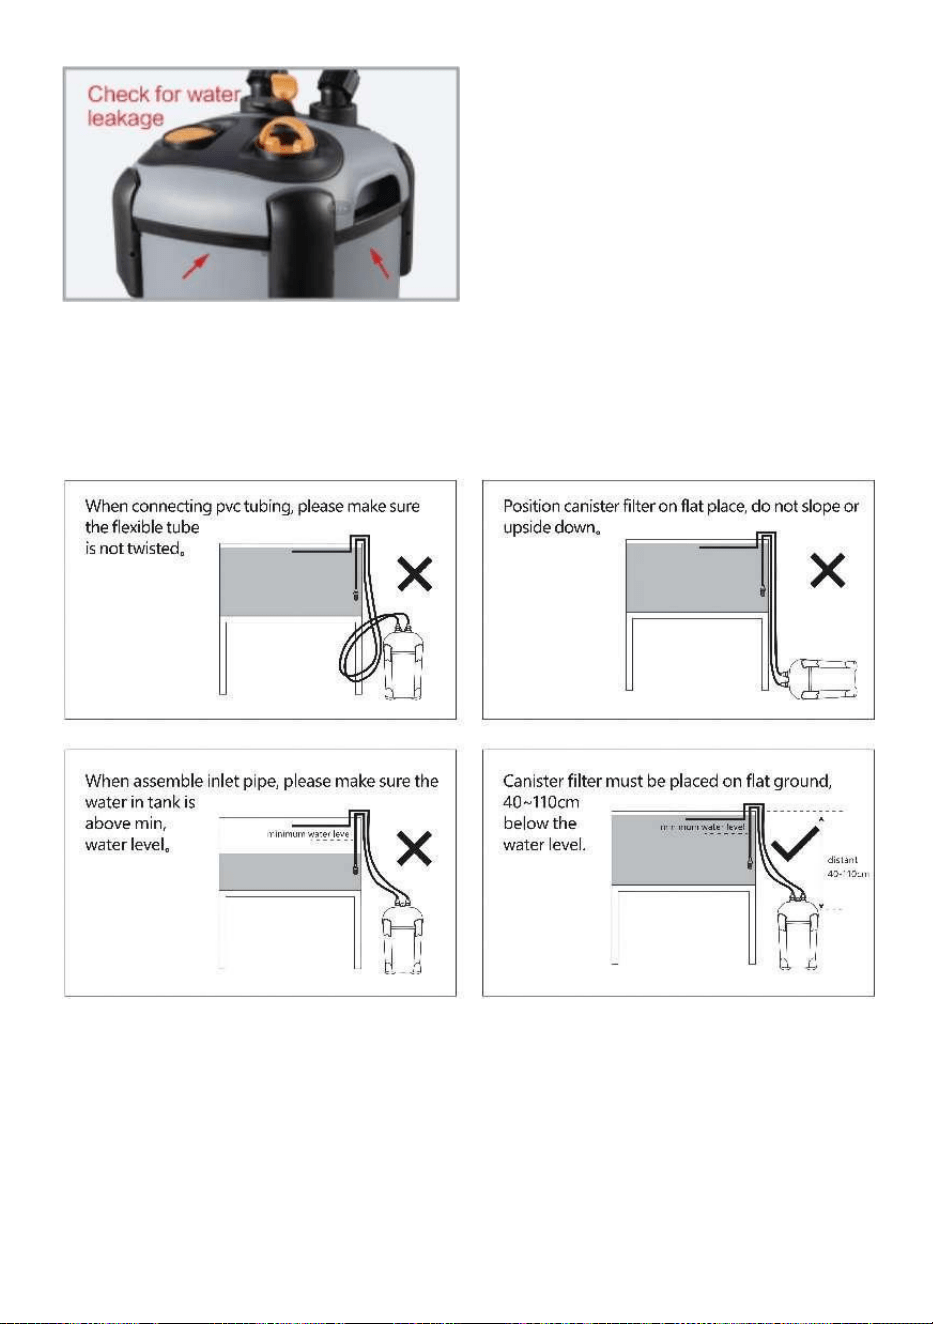
6. Add water to the fish tank until
the distance between the water
surface and the edge of the fish
tank is less than 12cm,and the
outer barrel of the fish tank is
40cmbelow the water surface.
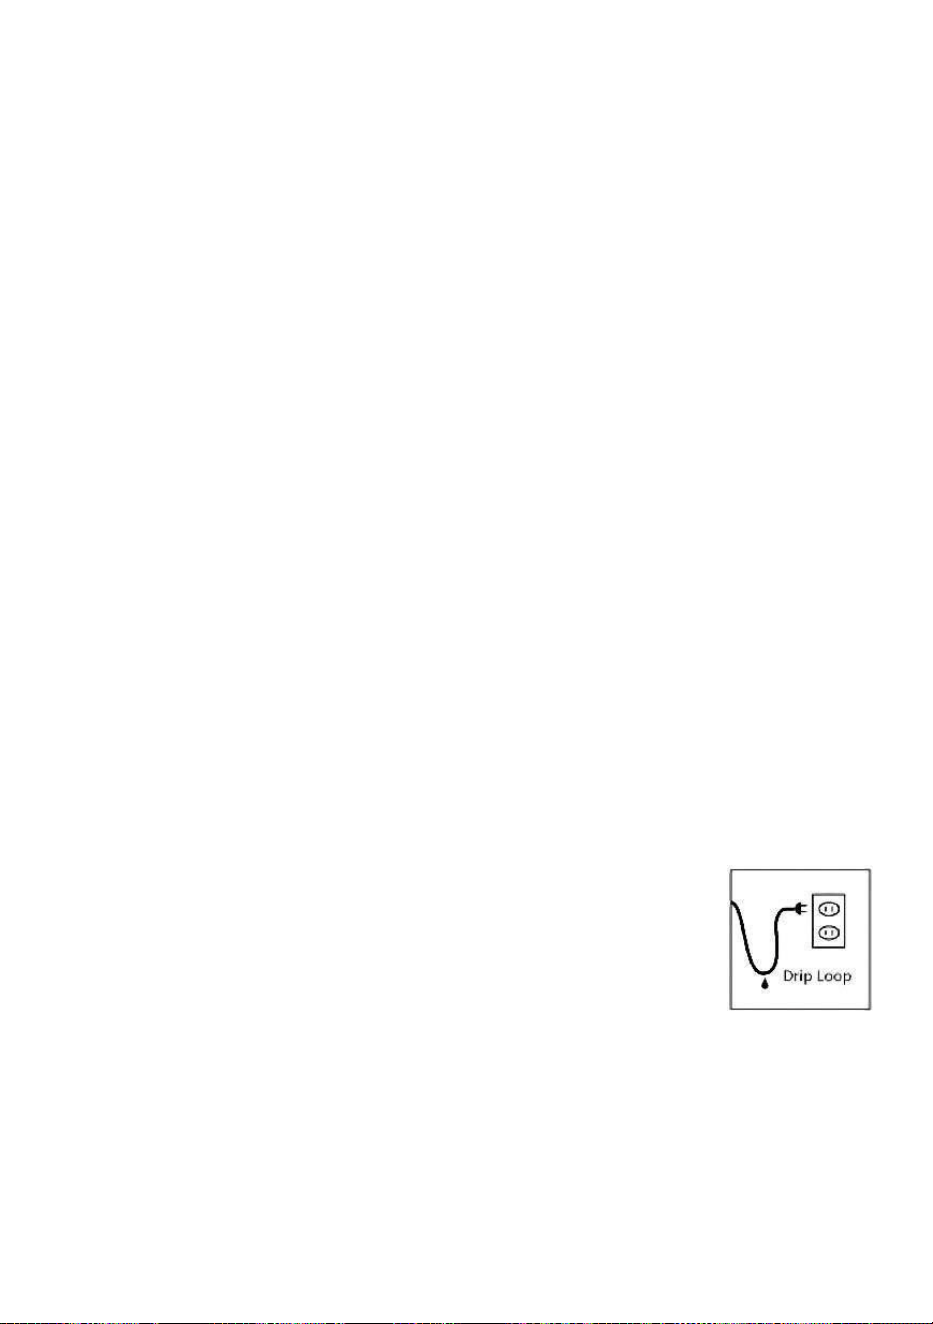
7. Ensure that the flow rate is
adjusted to the maximum.
8. Pull the inflating handle up and
down for2~4 times to suck water
into the barrel.
9.After it is connected to the power
supply, check whether there is
water leakage around the filter
barrel, and check again 30-60
minutes later after it starts properly.
If there is no problem.it can be
used normally.

- 7 -
TIP:
CLEANING AND RELACEMENT INSTRUCTION
Power must be disconnected during cleaning and maintenance.
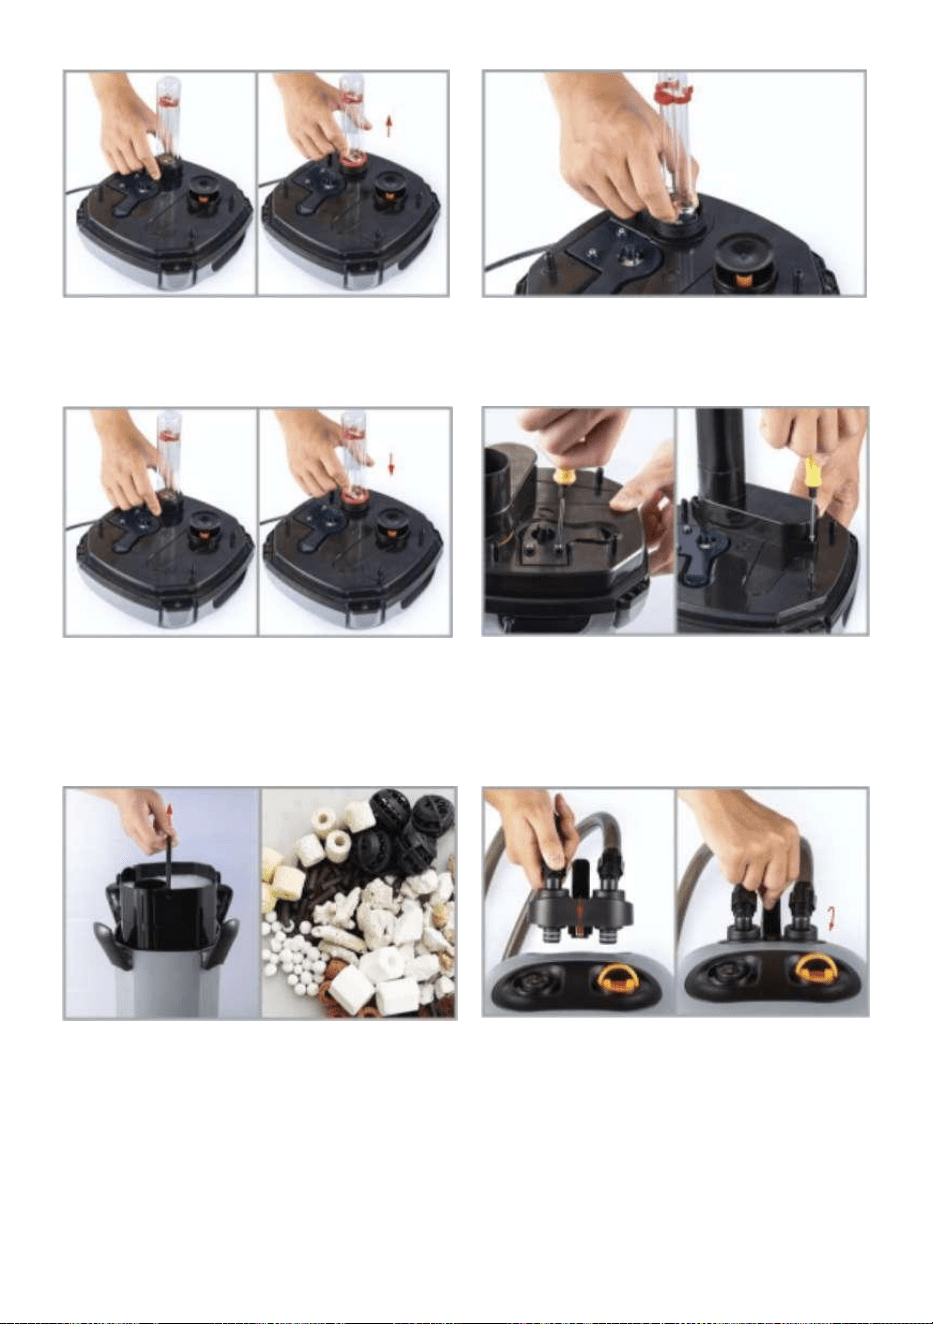
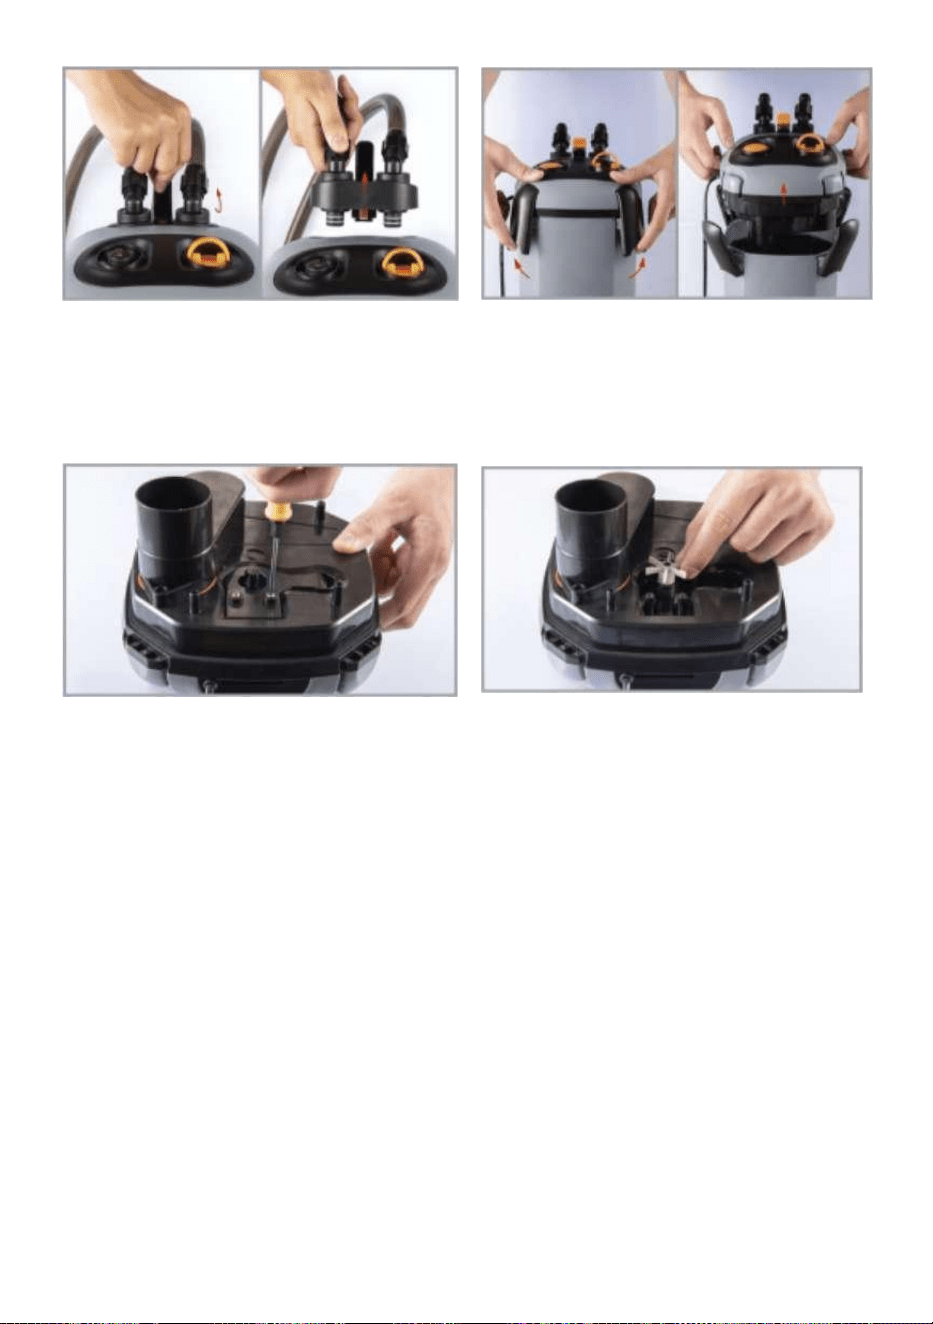
1. Turn on the switch of the fixed
seat and then pull the switch seat
upward.
2. Open the fixing buckle of the
barrel cover and pick up the barrel
cover.

- 8 -
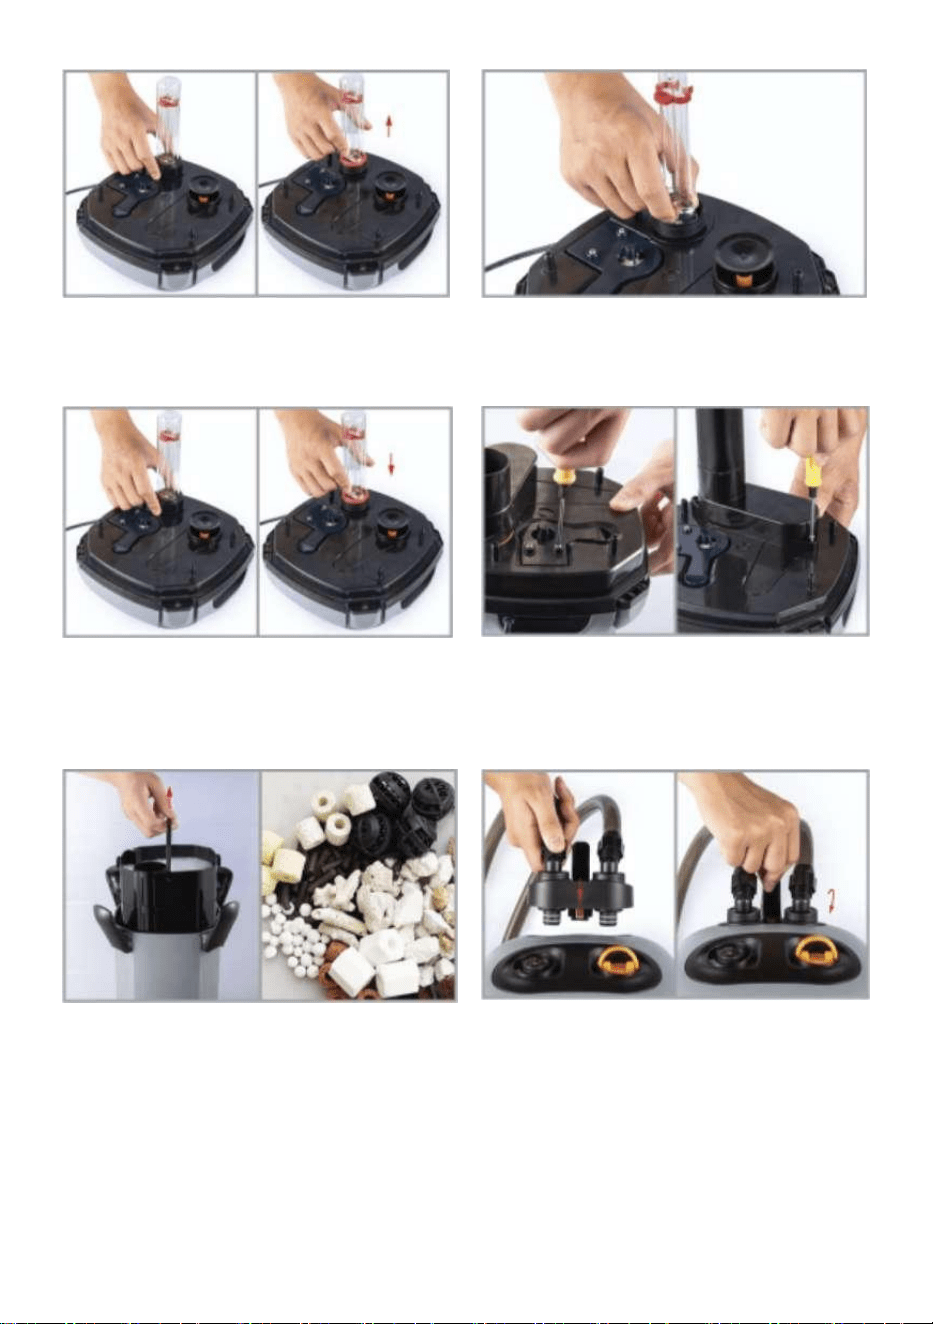
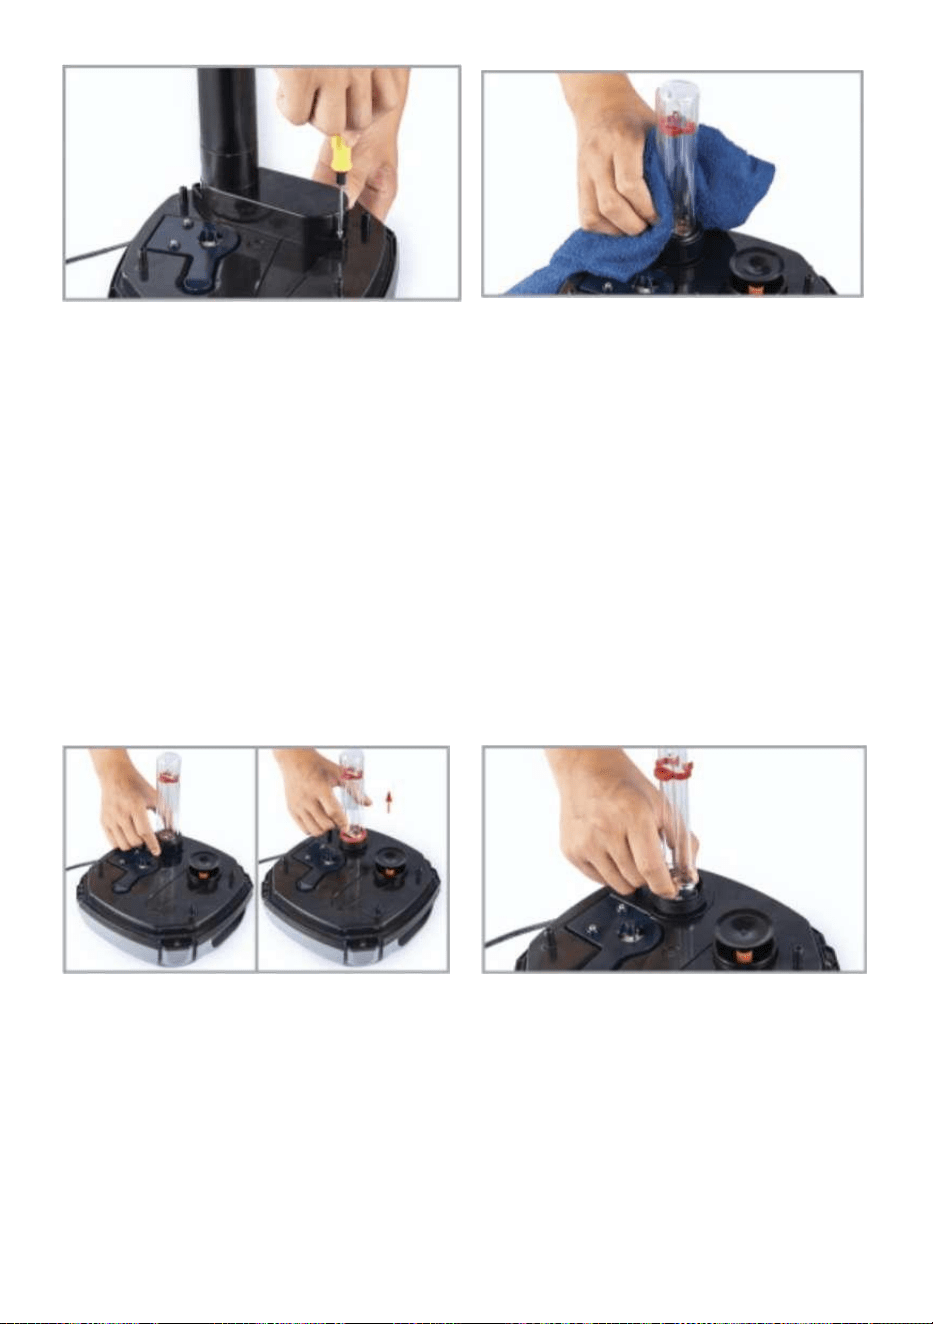
3.Use a Phillips screwdriver to
unscrew the screw at the edge of
the water drum cover and take out
the water drum cover.
4. Remove the rotor and clean or
replace the new rotor as required.
The rotor holes can be cleaned with
brushes.
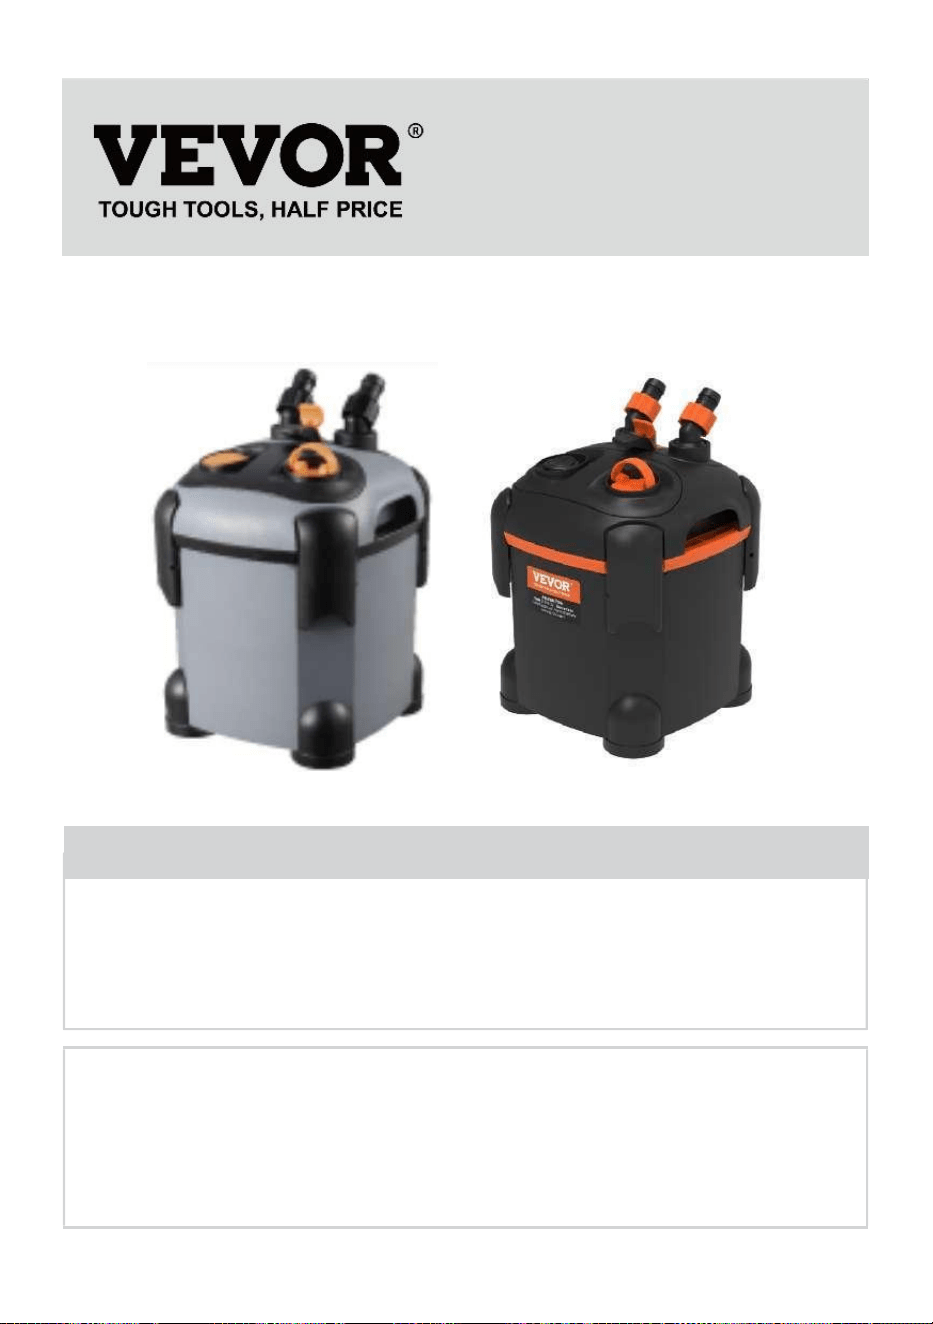
5. Use a Phillips screwdriver to
unscrew the screws and remove the
lamp cover for cleaning.
6.After removing the germicidal
lamp cover, clean the dirt on the
quartz tube with wet towel or clean
water. Do not remove the quartz
tube during cleaning to prevent
short circuit caused by water
flowing into the lamp cap line.
If you do not need to replace the UV lamp, please skip step 7 to step 9.
- 9 -
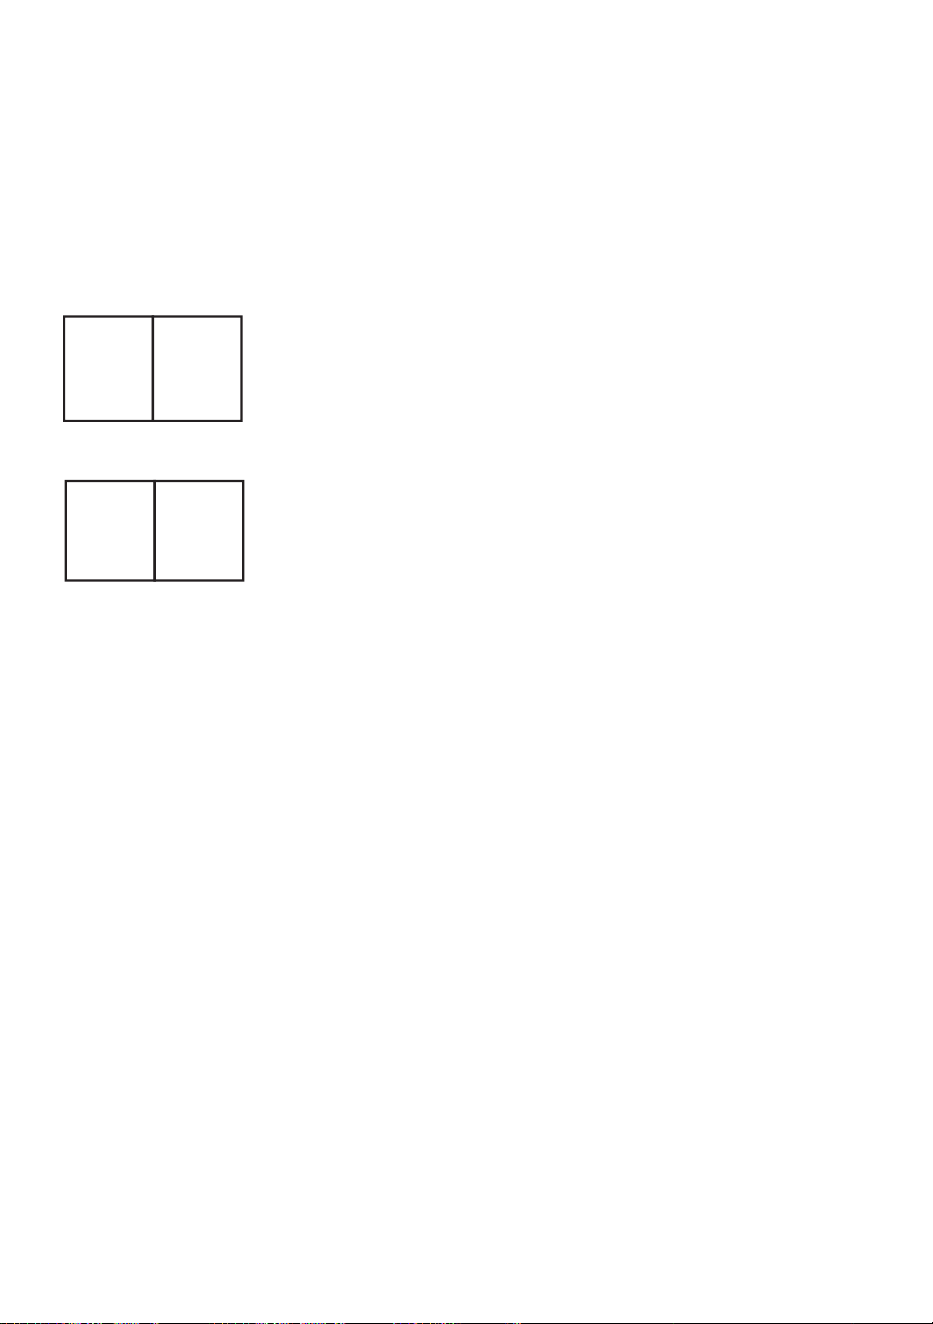
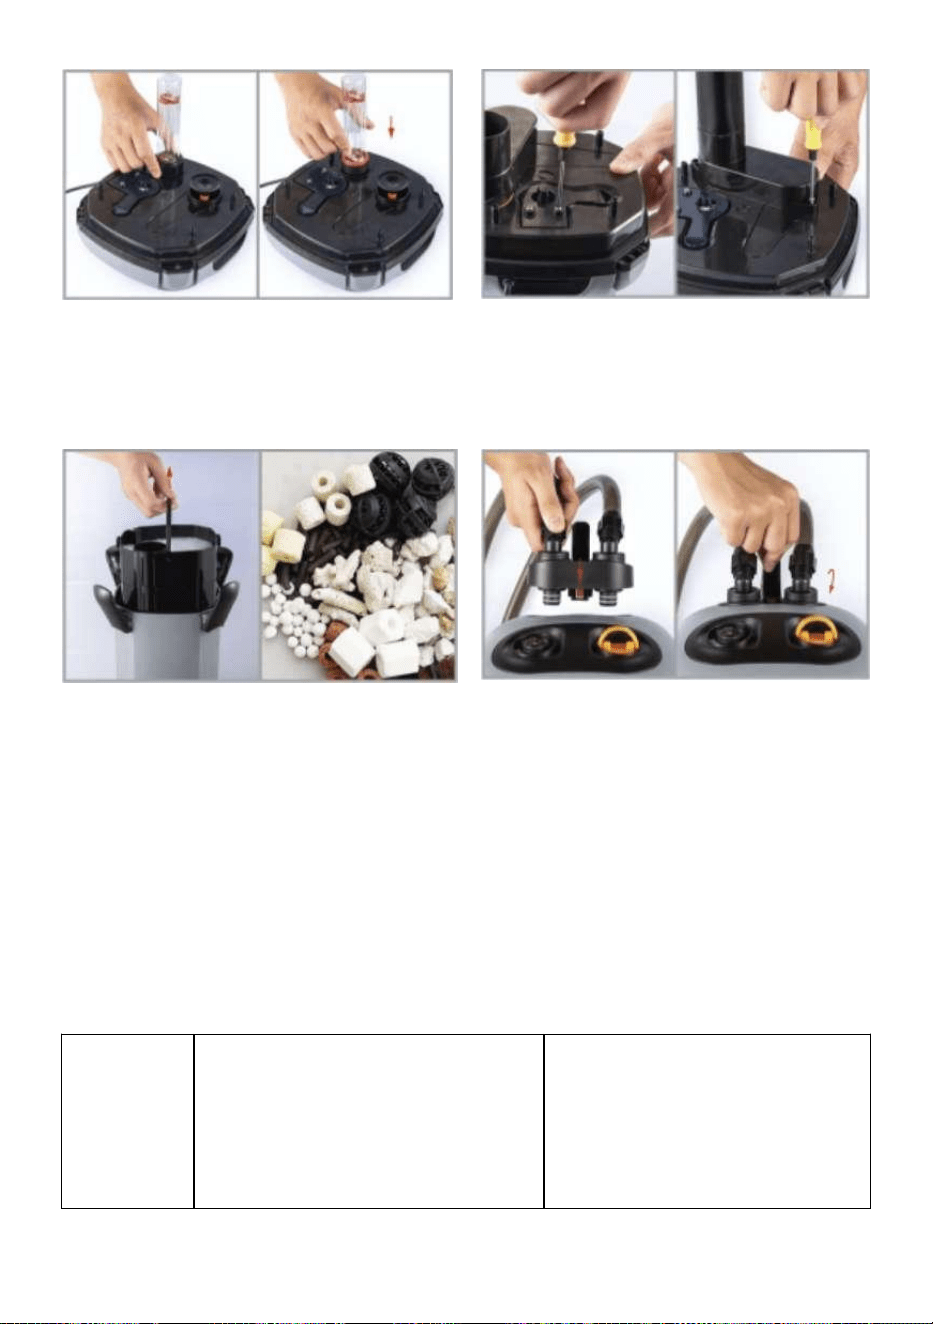
7. Twist off the occluded screw and
remove the quartz tube.
8. Remove the UV lamp tube and
replace it.
9. Install the quartz tube and tighten
the occluded screw.
10. Install the lamp tube and the
water drum cover with a Phillips
screwdriver.
11. Take out the filter basket to clean
or replace the filter.
12 Put back the filter basket, cover
the barrel cover, fasten the fixing
buckle insert the switch seat
back,and lock the fixing switch.

- 10 -
FAILURE SHOT
Probable
Situations
Reasons
Treatment method
Cannot
start
• Power supply is unplug
• Pump head damage.
• The impeller stuck by foreign
matters.
• The impeller is not fixed well.
• Connect to power supply.
• Change a new pump
head.
• Take out the foreign
matters.
• Fix impeller well.
Water
leaking
• Water valve tap is damaged.
• Water valve o-ring is
damaged or with foreign
matter.
• Power head o-ring is
damaged or with foreign
matters.
• Power head and canister is
not locked well.
• PVC tubing and water valve
is not connected well.
• Impeller cover o-ring is
damaged or with foreign
matters.
• Change new water valve
taps
• Change a new water valve
o-ring or remove foreign
matters.
• Change a new power
head o-ring or remove
foreign matters.
• Re-fix well.
• Re-fix well.
• Change a new impeller
cover o-ring or remove
foreign matters.

- 11 -
Noisy
• Impeller is damaged.
• The impeller stuck by foreign
matters or not fixed correctly.
• Inlet tap is closed.
• Air exists in canister filter .
• Change a new impeller.
• Remove foreign matters or
re-fix impeller.
• Open inlet valve taps.
• Shake canister filter body
and let air out completely.
Abnormal
start
• The canister is not filled with
water.
• The water in aquarium is too
low.
• Water valve taps are not
open.
• Fully fill canister filter
casing with water.
• The water in aquarium
must be above the min.
water level.
• Open water valve taps.
Little
water
output
• Inlet and outlet valve are not
• fully open.
• Inlet and outlet pipes are too
dirty.
• PVC tubing is too dirty.
• Open Inlet and outlet
valve
• fully.
• Clean the inlet and outlet
pipes.
• Clean the PVC tubing.
- 12 -
Address:Baoshanqu Shuangchenglu 803long 11hao 1602A-1609shi
Shanghai
Imported to AUS: SIHAO PTY LTD.1 ROKEVA STREETEASTWOOD
NSW 2122 Australia
Imported to USA: Sanven Technology Ltd.Suite 250, 9166 Anaheim Place,
Rancho Cucamonga, CA 91730
REP
UK
Pooledas Group Ltd
Unit 5 Albert Edward House, The Pavilions
Preston, United Kingdom
REP
EC
SHUNSHUN GmbH
Römeräcker 9 Z2021, 76351
Linkenheim-Hochstetten, Germany
Made In China


Technique Assistance et certificat de garantie électronique
www.vevor.com/support
FILTRE D'AQUARIUM
MODÈLE : SF-650F-UV 8 W.
We continue to be committed to provide you tools with competitive price.
"Save Half", "Half Price" or any other similar expressions used by us only represents an
estimate of savings you might benefit from buying certain tools with us compared to the major
top brands and does not necessarily mean to cover all categories of tools offered by us. You
are kindly reminded to verify carefully when you are placing an order with us if you are
actually saving half in comparison with the top major brands.


- 1 -
MODÈLE : SF-650F-UV 8 W.
Have product questions? Need technical support? Please feel free to
contact us:
Technical Support and E-Warranty Certificate
www.vevor.com/support
NEED HELP? CONTACT US!
This is the original instruction, please read all manual instructions
carefully before operating. VEVOR reserves a clear interpretation of our
user manual. The appearance of the product shall be subject to the
product you received. Please forgive us that we won't inform you again if
there are any technology or software updates on our product.
AQUARIUM FILTER
Black
Grey

- 2 -
Avertissement : Pour réduire le risque de blessure, l'utilisateur
doit lire attentivement le manuel d'instructions.
Ce produit est soumis aux dispositions de la directive
européenne 2012/19/CE. Le symbole représentant une
poubelle barrée indique que le produit nécessite une collecte
sélective des déchets dans l'Union européenne. Ceci
s'applique au produit et à tous les accessoires marqués de ce
symbole. Les produits marqués comme tels ne peuvent pas
être jetés avec les ordures ménagères normales, mais doivent
être déposés dans un point de collecte pour le recyclage des
appareils électriques et électroniques.
LISEZ ET SUIVEZ TOUTES LES INSTRUCTIONS DE SÉCURITÉ.
DANGER- Pour éviter tout risque de choc électrique, des précautions
particulières doivent être prises puisque l'eau est utilisée dans l'utilisation
des équipements d'aquarium. Pour chacun des Dans les situations
suivantes, ne tentez pas de réparation par vous-même, renvoyez l'appareil
à un centre de service agréé pour l'entretien ou jetez l'appareil.
1.Cet appareil peut être utilisé par des enfants âgés de 8 ans et plus et les
personnes ayant des capacités physiques, sensorielles ou mentales
réduites ou un manque de expérience et connaissance si ils avoir a été
donné surveillance ou instructions concernant l'utilisation de l'appareil en
toute sécurité et comprendre les dangers encourus. Les enfants ne doivent
pas jouer avec l'appareil. Nettoyage et la maintenance par l'utilisateur ne
doit pas être effectuée par des enfants sans surveillance.
2. Le cordon d'alimentation ne peut pas être remplacé. Si le cordon est
endommagé, l'appareil devrait être mis au rebut.
3. La pression maximale de l'eau d'entrée, en pascals : 0,03 MPa.
4. La pression minimale d'entrée d'eau, en pascals : O,O1MPa, si cela est
nécessaire pour le bon fonctionnement de l'appareil.
- 3 -
5. Le cordon d'alimentation ne peut pas être remplacé. Si le cordon est
endommagé , l'appareil devrait être mis au rebut.
AVERTISSEMENT - Cet appareil contient un émetteur UV. Ne regardez
pas le Source de lumière.
Par la présente, nous vous remercions sincèrement d'avoir acheté notre
produit. Pour faire fonctionner le produit en toute sécurité, veuillez lire
attentivement ce manuel.
Avertissement:
1. Avant d'utiliser le produit, veuillez vérifier s'il y a des dommages sur le
cordon d'alimentation. Si oui, veuillez ne pas utiliser le produit.
2. Pour éviter les défauts, veuillez utiliser le produit sous la tension régulée
et la fréquence.
3. Veuillez ne pas brancher ou tirer sur le cordon d'alimentation si vos
mains sont mouillées.
4. lors de l'entretien ou du déplacement du produit ou en cas de
phénomène anormal situation, veuillez d’abord éteindre l’alimentation.
5. Veuillez vous assurer que la fiche et la prise sont protégées de l'eau.
6. Veuillez ne pas tirer directement sur le cordon d'alimentation lors de
l'utilisation. S'il vous plaît garder le cordon d'alimentation doit être en forme
de "U" (voir l'image ci-dessous) pour éviter que l'eau ne
coule à l'intérieur de la prise le long du cordon
d'alimentation.
7. Veuillez ne pas utiliser le produit à proximité d' objets
inflammables .
8. Veuillez utiliser un technicien professionnel pour la maintenance.
9. Veuillez ne pas réinstaller le produit pour éviter tout défaut .
Avis:
1. Après l'achat, veuillez vérifier s'il y a des dommages ou des éléments
manquants. pièces au produit .
2. Veuillez faire fonctionner le produit sous la ligne de flottaison du
réservoir.
3. Veuillez installer le produit sur une surface plane.
4 . Lorsque vous déplacez le produit, veuillez ne pas le prendre en tenant

- 4 -
la valve, car que manière peut provoquer une rupture de la valve et
provoquer en outre de l'eau fuite.
5 . Il est suggéré de nettoyer la turbine et l'hélice une fois par mois, car la
saleté affectera la durée de vie de la turbine.
6 . L' impeller est un article facilement usé, il est suggéré de le remplacer
une fois par an.
7 . Pour obtenir le meilleur effet UV, il est suggéré de remplacer la lumière
UV une fois par semestre.
8 . Ce produit devrait fonctionner avec de l'eau.
9 . Veuillez nettoyer périodiquement (15 à 20 jours) le matériau du filtre
pour l'enlever. le des choses sales qui entraîneront un faible débit d'eau.
10 . Si vous utilisez de l'eau de mer, veuillez retirer périodiquement le sel
sur le produit ou le cordon d’alimentation afin d’éviter les fuites
électriques.
INSTRUCTIONS
- 5 -
ENREGISTREZ CES INSTRUCTIONS
Modèle
SF-650F-UV 8W
- 6 -
Tension
AC1 1 0 -120 V 60 Hz ou AC220-240 V 50/60 Hz
Pompe Pouvoir
8 W
Puissance UV
9 W
Débit maximum
650 L/heure
Bruit
<50dB
Numéro de filtre
1
INSTRUCTIONS D'INSTALLATION
1. Ouvrez la boucle de fixation du
seau couvrir et ramasser le
couvercle du seau.
2. Retirez le panier-filtre et ajoutez
le filtre nettoyé.
3. Remettez le panier-filtre, couvrez
le tête de canon et fixez la boucle de
fixation.
4. Connectez le tuyau entre la
sortie d'eau et l'entrée d'eau, puis
fixez la vis.
- 7 -
5. L'autre extrémité de le tuyau est
branché avec le tuyau de sortie d'
eau et le tuyau d'eau tuyau
d'admission et le tuyau de sortie
d'eau et le tuyau d'arrivée d'eau sont
fixés dans l'aquarium.
6. Ajoutez de l'eau dans l'aquarium
jusqu'à ce que le distance entre la
surface de l'eau et le bord du
poisson le réservoir mesure moins
de 12 cm et le canon extérieur de
l'aquarium est à 40 cm sous la
surface de l' eau .
7. Assurez-vous que le débit est
ajusté à le maximum.
8. Tirez la poignée de gonflage de
haut en bas 2 à 4 fois pour aspirer
l'eau dans le baril.
9. Une fois connecté à
l'alimentation approvisionnement,
vérifiez s'il y a de l'eau fuite autour
du corps du filtre, et vérifiez à
nouveau 30 à 60 minutes plus tard
ça démarre correctement. S'il n'y a
pas de problème, il peut être utilisé
normalement.

- 8 -
CONSEIL:
INSTRUCTIONS DE NETTOYAGE ET DE REMPLACEMENT
L'alimentation doit être coupée pendant le nettoyage et l'entretien .
1. Allumez l'interrupteur du siège
fixe puis tirez le siège de
l'interrupteur vers le haut.
2. Ouvrez la boucle de fixation du
canon couvrir et ramasser le
couvercle du canon.

- 9 -
3 . Utilisez un tournevis cruciforme
pour dévisser la vis au bord du
bidon d'eau couvercle et retirez le
couvercle du tambour d'eau .
4. Retirez le rotor et nettoyez ou
remplacez le nouveau rotor selon
les besoins. Les trous du rotor peut
être nettoyé avec des brosses.
5. Utilisez un tournevis cruciforme
dévisser les vis et retirez le
couvercle de l' ampoule pour le
nettoyage .
6. Après avoir retiré le produit
germicide lampe couvercle,
nettoyez la saleté sur le tube de
quartz avec une serviette humide
ou de l'eau propre. Ne pas retirer le
tube de quartz pendant le
nettoyage pour éviter les
courts-circuits causés par l'eau
s'écoulant dans la ligne du culot de
la lampe.
Si vous n'avez pas besoin de remplacer la lampe UV, veuillez passer
l'étape 7 à l'étape 9 .
- 10 -
7. Dévissez la vis obstruée et retirez
le tube de quartz.
8. Retirez le tube de la lampe UV et
remplacez-le .
9. Installez le tube de quartz et
serrez la vis obstruée.
10. Installez le tube de la lampe et
le réservoir d'eau couvercle du
tambour avec un tournevis
cruciforme .
11. Retirez le panier-filtre pour le
nettoyer ou remplacer le filtre.
12 Remettez le panier-filtre,
couvrez le couvercle du canon,
fixez la boucle de fixation insérez le
dossier du siège de l'interrupteur et
verrouillez l'interrupteur de fixation.

- 11 -
TIR D'ÉCHEC
Probable
_ _
Situations
Les raisons
Méthode de traitement
Ne peut
pas
commenc
er
• Source de courant est
débrancher
• Dommages à la tête de
pompe.
• La turbine est coincée
Affaires étrangères.
• La turbine n'est pas bien
fixée.
• Connectez-vous à
l’alimentation.
• Changez une nouvelle
tête de pompe.
• Retirez les matières
étrangères.
• Bien fixer la turbine.
Fuite d'
eau
• Le robinet de la vanne d’eau
est endommagé.
• Le joint torique de la vanne
d'eau est endommagé ou
avec des corps étrangers .
• Le joint torique de la tête
motrice est endommagé ou
avec des affaires étrangères.
• Tête motorisée et cartouche
n'est pas bien verrouillé.
• Tuyau en PVC et vanne
d'eau n'est pas bien connecté.
• Le joint torique du couvercle
de la turbine est endommagé
ou avec des affaires
étrangères.
• Changer les nouveaux
robinets de vanne d'eau
• Changez un nouveau joint
torique de vanne d'eau ou
retirez les corps étrangers.
• Changez un nouveau joint
torique de tête motrice ou
retirez les corps étrangers.
• Bien refixer.
• Bien refixer.
• Remplacez un nouveau
joint torique du couvercle
de la turbine ou retirez les
corps étrangers.

- 12 -
Bruyant
• La turbine est endommagée.
• La turbine est coincée par
des corps étrangers ou mal
fixée.
• Le robinet d'arrivée est
fermé.
• De l'air existe dans le filtre à
cartouche.
• Changez une nouvelle
roue.
• Retirez les corps
étrangers ou réinstallez la
turbine.
• Ouvrir les robinets des
soupapes d'admission.
• Secouez le corps du filtre
à cartouche et laissez l'air
s'échapper complètement.
Démarra
ge
anormal _
• Le bidon n'est pas rempli
d'eau.
• L'eau dans l'aquarium est
trop basse.
• Les robinets des vannes
d'eau ne sont pas ouverts.
• Remplissez complètement
le boîtier du filtre à
cartouche avec de l'eau.
• L'eau de l'aquarium doit
être supérieure au
minimum. niveau d'eau.
• Ouvrir les robinets d'eau.
Peu de
débit
d'eau
• Les vannes d'entrée et de
sortie ne sont pas
• entièrement ouvert.
• Les tuyaux d'entrée et de
sortie sont trop sales.
• Le tube en PVC est trop
sale.
• Ouvrir les vannes d'entrée
et de sortie
• pleinement.
• Nettoyer les tuyaux
d'entrée et de sortie.
• Nettoyez le tube en PVC.

- 13 -
Adresse : Baoshanqu Shuangchenglu 803long 11hao 1602A-1609shi
Shanghai
Importé en AUS : SIHAO PTY LTD.1 ROKEVA STREETESTWOOD NSW
2122 Australie
Importé aux États-Unis : Sanven Technology Ltd.Suite 250, 9166
Anaheim Place, Rancho Cucamonga, CA 91730
REP
UK
Pooledas Group Ltd
Unit 5 Albert Edward House, The Pavilions
Preston, United Kingdom
REP
EC
SHUNSHUN GmbH
Römeräcker 9 Z2021, 76351
Linkenheim-Hochstetten, Germany
Fabriqué en Chine


Technisch Support- und E-Garantie-Zertifikat www.vevor.com/support
AQUARIUMFILTER
MODELL:SF-650F-UV 8W
We continue to be committed to provide you tools with competitive price.
"Save Half", "Half Price" or any other similar expressions used by us only represents an
estimate of savings you might benefit from buying certain tools with us compared to the major
top brands and does not necessarily mean to cover all categories of tools offered by us. You
are kindly reminded to verify carefully when you are placing an order with us if you are
actually saving half in comparison with the top major brands.

- 1 -
MODELL:SF-650F-UV 8W
Have product questions? Need technical support? Please feel free to
contact us:
Technical Support and E-Warranty Certificate
www.vevor.com/support
NEED HELP? CONTACT US!
This is the original instruction, please read all manual instructions
carefully before operating. VEVOR reserves a clear interpretation of our
user manual. The appearance of the product shall be subject to the
product you received. Please forgive us that we won't inform you again if
there are any technology or software updates on our product.
AQUARIUM FILTER
Black
Grey
- 2 -
Warnung: Um das Verletzungsrisiko zu verringern, muss der
Benutzer die Bedienungsanleitung sorgfältig lesen.
Dieses Produkt unterliegt den Bestimmungen der
europäischen Richtlinie 2012/19/EG. Das Symbol einer
durchgestrichenen Mülltonne weist darauf hin, dass das
Produkt in der Europäischen Union einer getrennten
Müllsammlung bedarf. Dies gilt für das Produkt und alle
Zubehörteile, die mit diesem Symbol gekennzeichnet sind. Als
solche gekennzeichnete Produkte dürfen nicht über den
normalen Hausmüll entsorgt werden, sondern müssen an
einer Sammelstelle für das Recycling von Elektro- und
Elektronikgeräten abgegeben werden
LESEN UND BEFOLGEN SIE ALLE SICHERHEITSHINWEISE.
GEFAHR- Um einen möglichen Stromschlag zu vermeiden, ist besondere
Vorsicht geboten Da bei der Verwendung von Aquariengeräten für jedes
Wasser Wasser verwendet wird Führen Sie in folgenden Situationen keine
Reparaturversuche selbst durch, sondern schicken Sie das Gerät zurück
Wenden Sie sich zur Wartung an eine autorisierte Serviceeinrichtung oder
entsorgen Sie das Gerät.
1.Dieses Gerät kann von Kindern ab 8 Jahren verwendet werden
Personen mit eingeschränkten oder fehlenden körperlichen, sensorischen
oder geistigen Fähigkeiten Erfahrung Und Wissen Wenn Sie haben
gewesen gegeben Aufsicht oder Anweisungen zum sicheren Gebrauch
des Geräts aufmerksam durchlesen und verstehen welche Gefahren damit
verbunden sind. Kinder dürfen nicht mit dem Gerät spielen. Reinigung und
die Benutzerwartung darf nicht von Kindern ohne Aufsicht durchgeführt
werden.
2. Das Netzkabel kann nicht ausgetauscht werden. Wenn das Kabel
beschädigt ist, ist das Gerät beschädigt sollte verschrottet werden.
3.Der maximale Wassereinlassdruck in Pascal: 0,03 MPa
- 3 -
4.Der minimale Wassereinlassdruck in Pascal:0,01 MPa, falls erforderlich
für den ordnungsgemäßen Betrieb des Gerätes.
Das Netzkabel kann nicht ausgetauscht werden, wenn das Kabel
beschädigt ist sollen verschrottet werden.
WARNUNG – Dieses Gerät enthält einen UV-Strahler. Starren Sie nicht
darauf Lichtquelle.
Hiermit danken wir Ihnen herzlich für den Kauf unseres Produkts Bitte
lesen Sie dieses Handbuch sorgfältig durch, um das Produkt sicher zu
verwenden.
Warnung:
1. Bevor Sie das Produkt verwenden, überprüfen Sie bitte, ob es Schäden
aufweist Netzkabel. Wenn ja, verwenden Sie das Produkt bitte nicht.
2. Um einen Ausfall zu vermeiden, verwenden Sie das Produkt bitte unter
geregelter Spannung und Häufigkeit.
3. Bitte stecken Sie das Netzkabel nicht ein oder ziehen Sie nicht daran,
wenn Ihre Hände nass sind.
4. wenn das Produkt gewartet oder bewegt wird oder wenn es zu
Unregelmäßigkeiten kommt In einer solchen Situation schalten Sie bitte
zuerst den Strom aus.
5. Bitte stellen Sie sicher, dass Stecker und Steckdose vor Wasser
geschützt sind.
6. Bitte ziehen Sie bei der Verwendung nicht gerade am Netzkabel. Bitte
behalte Das Netzkabel muss U-förmig sein (siehe Bild unten), um zu
verhindern, dass Wasser austritt in der Steckdose entlang
des Netzkabels.
7. Bitte verwenden Sie das Produkt nicht in der Nähe von
brennbaren Gegenständen .
8. Bitte beauftragen Sie für die Wartung einen
professionellen Techniker .
9. Bitte installieren Sie das Produkt nicht neu, um Fehler zu vermeiden .
Beachten:
1. Bitte überprüfen Sie nach dem Kauf, ob Schäden vorliegen oder etwas
fehlt Teile zum Produkt .

- 4 -
2. Bitte betreiben Sie das Produkt unterhalb der Wasserlinie des Tanks.
3. Bitte installieren Sie das Produkt auf einer ebenen Fläche.
4 . Wenn Sie das Produkt bewegen, halten Sie es bitte nicht am Ventil fest
Das Andernfalls kann es zu einem Bruch des Ventils und weiterer
Wasserbildung kommen Leckage.
5 . Es wird empfohlen, das Laufrad und den Propeller einmal im Monat zu
reinigen Der Schmutz beeinträchtigt die Lebensdauer des Laufrads.
6 . Da der Propeller leicht abgenutzt ist, wird empfohlen, ihn einmal pro
Jahr auszutauschen
7 . Um den besten UV-Effekt zu erzielen, wird empfohlen, das UV-Licht
einmal auszutauschen pro Halbjahr.
8 . Dieses Produkt sollte mit Wasser funktionieren.
9 . Bitte reinigen Sie das Filtermaterial regelmäßig (15–20 Tage), um es
zu entfernen Die schmutziges Zeug, was zu einem geringen
Wasserdurchfluss führt.
10 . Bei Verwendung in Meerwasser entfernen Sie bitte regelmäßig das
Salz vom Wasser Produkt oder Netzkabel, um elektrische Kriechströme zu
vermeiden.
ANWEISUNGEN

- 5 -
ANLEITUNG AUFBEWAHREN
Modell
SF-650F-UV 8W
- 6 -
Stromspannung
AC1 1 0 -120 V 60 Hz oder AC220-240V 50/60 Hz
Pumpe Leistung
8 W
UV-Leistung
9 W
Durchfluss max
650 l/h
Lärm
<50dB
Filternummer _
1
INSTALLATIONSANWEISUNG
1. Öffnen Sie die
Befestigungsschnalle des Eimers
Abdeckung und nehmen Sie die
Eimerabdeckung auf.
2. Nehmen Sie den Filterkorb
heraus und fügen Sie ihn hinzu
gereinigter Filter.
3. Setzen Sie den Filterkorb wieder
ein und decken Sie ihn ab Fasskopf
und befestigen Sie die
Befestigungsschnalle.
4. Schließen Sie den Schlauch
zwischen dem Wasserauslass an
und den Wassereinlass und
befestigen Sie dann die Schraube.
- 7 -
5. Das andere Ende von Der
Schlauch ist angeschlossen mit dem
Wasserauslassrohr und dem Wasser
Einlassrohr und die
Wasserauslassrohr und das
Wasserzulaufrohr sind im Aquarium
befestigt.
6. Füllen Sie Wasser in das
Aquarium, bis es leer ist Abstand
zwischen die Wasseroberfläche
und der Rand des Fisches Tank ist
weniger als 12 cm und der äußere
Lauf Der Abstand des Aquariums
liegt 40 cm unter der
Wasseroberfläche .
7. Stellen Sie sicher, dass die
Durchflussrate angepasst ist das
Maximum.
8. Ziehen Sie den Aufblasgriff zwei
bis vier Mal nach oben und unten,
um Wasser in den Lauf zu saugen.
- 8 -
9.Nachdem es an die
Stromversorgung angeschlossen
ist Überprüfen Sie, ob Wasser
vorhanden ist Leckage rund um
den Filterzylinder und Überprüfen
Sie es 30-60 Minuten später noch
einmal es startet richtig. Wenn es
kein Problem gibt, kann es normal
verwendet werden.
TIPP:
REINIGUNGS- UND AUSTAUSCHANLEITUNG
Während der Reinigung und Wartung muss die Stromversorgung
unterbrochen sein .
- 9 -
1. Schalten Sie den Schalter des
festen Sitzes ein und ziehen Sie
dann den Schaltersitz nach oben.
2. Öffnen Sie die
Befestigungsschnalle des Laufs
Abdeckung und nehmen Sie die
Fassabdeckung auf.
3 . Verwenden Sie zum Lösen einen
Kreuzschlitzschraubendreher die
Schraube am Rand der
Wassertrommel Abdeckung und
nehmen Sie die
Wassertrommelabdeckung heraus .
4. Entfernen Sie den Rotor und
reinigen oder ersetzen Sie ihn den
neuen Rotor nach Bedarf einbauen.
Die Rotorlöcher kann mit Bürsten
gereinigt werden.
- 10 -
5. Verwenden Sie einen
Kreuzschlitzschraubendreher
abschrauben Lösen Sie die
Schrauben und entfernen Sie die
Lampenabdeckung zum Reinigen .
6. Nach dem Entfernen des
keimtötenden Mittels Lampe
Abdeckung, reinigen Sie den
Schmutz auf dem Quarzrohr mit
einem feuchten Handtuch oder
klarem Wasser. Nicht Entfernen Sie
das Quarzrohr während der
Reinigung um Kurzschlüsse durch
Wasser zu verhindern fließt in die
Lampensockelleitung.
Wenn Sie die UV-Lampe nicht austauschen müssen, überspringen Sie
bitte Schritt 7 bis Schritt 9 .
7. Drehen Sie die verschlossene
Schraube ab und Entfernen Sie das
Quarzrohr.
8. Entfernen Sie die
UV-Lampenröhre und ersetzen Sie
sie .
- 11 -
9. Installieren Sie das Quarzrohr
und ziehen Sie es fest die
verschlossene Schraube.
10. Installieren Sie die
Lampenröhre und das Wasser
Trommelabdeckung mit einem
Kreuzschlitzschraubendreher .
11. Nehmen Sie den Filterkorb zum
Reinigen heraus bzw Ersetzen Sie
den Filter.
12 Setzen Sie den Filterkorb wieder
ein und decken Sie ihn ab
Laufabdeckung, befestigen Sie die
Befestigungsschnalle Setzen Sie
die Schaltersitzlehne ein und
verriegeln Sie sie den
Fixierschalter.
FEHLSCHUSS
Wahrsch
einlich b
in der
Lage
Situation
Gründe dafür
Behandlungsmethode

- 12 -
en
Kann
nicht
Start
• Stromversorgung ist
ausstecken
• Beschädigung des
Pumpenkopfes.
• Das Laufrad blieb stehen
fremde Angelegenheiten.
• Das Laufrad ist nicht richtig
befestigt.
• An die Stromversorgung
anschließen.
• Tauschen Sie einen neuen
Pumpenkopf aus.
• Nehmen Sie die
Fremdkörper heraus.
• Laufrad gut befestigen.
Wasser
tritt aus
• Der Wasserhahn des
Wasserhahns ist beschädigt.
• Der O-Ring des
Wasserventils ist beschädigt
oder mit Fremdkörpern .
• Der O-Ring des
Antriebskopfs ist beschädigt
oder mit fremden
Angelegenheiten.
• Antriebskopf und Kanister ist
nicht gut verschlossen.
• PVC-Schlauch und
Wasserventil ist nicht gut
angeschlossen.
• Der O-Ring der
Laufradabdeckung ist
beschädigt oder mit fremden
Angelegenheiten.
• Tauschen Sie neue
Wasserhähne aus
• Tauschen Sie einen neuen
O-Ring des Wasserventils
aus oder entfernen Sie
Fremdkörper.
• Tauschen Sie einen neuen
O-Ring am Antriebskopf
aus oder entfernen Sie
Fremdkörper.
• Wieder gut befestigen.
• Wieder gut befestigen.
• Tauschen Sie einen neuen
O-Ring der
Laufradabdeckung aus
oder entfernen Sie
Fremdkörper.

- 13 -
Laut
• Laufrad ist beschädigt.
• Das Laufrad ist durch
Fremdkörper blockiert oder
nicht richtig befestigt.
• Zulaufhahn ist geschlossen.
• Im Kanisterfilter befindet
sich Luft.
• Tauschen Sie ein neues
Laufrad aus.
• Fremdkörper entfernen
oder Laufrad neu
befestigen.
• Einlasshähne öffnen.
• Schütteln Sie das
Filtergehäuse und lassen
Sie die Luft vollständig
entweichen.
Abnormal
er Anfang
_
• Der Kanister ist nicht mit
Wasser gefüllt.
• Der Wasserstand im
Aquarium ist zu niedrig.
• Wasserhähne sind nicht
geöffnet.
• Füllen Sie das Gehäuse
des Kanisterfilters
vollständig mit Wasser.
• Das Wasser im Aquarium
muss über dem
Mindestwert liegen.
Wasserstand.
• Wasserhähne öffnen.
Wenig
Wassera
usstoß
• Einlass- und Auslassventil
nicht
• vollständig geöffnet.
• Zu- und Ablaufrohre sind zu
stark verschmutzt.
• PVC-Schlauch ist zu
schmutzig.
• Einlass- und Auslassventil
öffnen
• vollständig.
• Reinigen Sie die Einlass-
und Auslassrohre.
• Reinigen Sie den
PVC-Schlauch.

- 14 -
Adresse: Baoshanqu Shuangchenglu 803long 11hao 1602A-1609shi
Shanghai
Importiert nach AUS: SIHAO PTY LTD.1 ROKEVA STREETEASTWOOD
NSW 2122 Australien
In die USA importiert: Sanven Technology Ltd. Suite 250, 9166 Anaheim
Place, Rancho Cucamonga, CA 91730
REP
UK
Pooledas Group Ltd
Unit 5 Albert Edward House, The Pavilions
Preston, United Kingdom
REP
EC
SHUNSHUN GmbH
Römeräcker 9 Z2021, 76351
Linkenheim-Hochstetten, Germany
In China hergestellt


Tecnico Supporto e certificato di garanzia elettronica www.vevor.com/support
FILTRO DELL'ACQUARIO
MODELLO:SF-650F-UV 8W
We continue to be committed to provide you tools with competitive price.
"Save Half", "Half Price" or any other similar expressions used by us only represents an
estimate of savings you might benefit from buying certain tools with us compared to the major
top brands and does not necessarily mean to cover all categories of tools offered by us. You
are kindly reminded to verify carefully when you are placing an order with us if you are
actually saving half in comparison with the top major brands.


- 1 -
MODELLO:SF-650F-UV 8W
Have product questions? Need technical support? Please feel free to
contact us:
Technical Support and E-Warranty Certificate
www.vevor.com/support
NEED HELP? CONTACT US!
This is the original instruction, please read all manual instructions
carefully before operating. VEVOR reserves a clear interpretation of our
user manual. The appearance of the product shall be subject to the
product you received. Please forgive us that we won't inform you again if
there are any technology or software updates on our product.
AQUARIUM FILTER
Black
Grey

- 2 -
Avvertenza: per ridurre il rischio di lesioni, l'utente deve
leggere attentamente il manuale di istruzioni.
Questo prodotto è soggetto alle disposizioni della Direttiva
Europea 2012/19/CE. Il simbolo del bidone della spazzatura
barrato indica che nell'Unione Europea il prodotto richiede la
raccolta differenziata dei rifiuti. Ciò vale per il prodotto e tutti gli
accessori contrassegnati da questo simbolo. I prodotti
contrassegnati come tali non possono essere smaltiti con i
normali rifiuti domestici, ma devono essere portati in un punto
di raccolta per il riciclaggio di dispositivi elettrici ed elettronici
LEGGERE E SEGUIRE TUTTE LE ISTRUZIONI DI SICUREZZA.
PERICOLO- Per evitare possibili scosse elettriche, è necessario prestare
particolare attenzione poiché l'acqua viene utilizzata nell'uso delle
attrezzature dell'acquario Per ciascuno dei seguenti situazioni, non tentare
di effettuare riparazioni da soli, restituire l'apparecchio a un centro di
assistenza autorizzato per l'assistenza o smaltire l'apparecchio.
1.Questo apparecchio può essere utilizzato da bambini di età pari o
superiore a 8 anni e persone con capacità fisiche, sensoriali o mentali
ridotte o prive di capacità esperienza E conoscenza Se Essi Avere stato
dato supervisione O istruzioni riguardanti l'uso dell'apparecchio in modo
sicuro e comprenderle i pericoli coinvolti. I bambini non devono giocare
con l'apparecchio Pulizia e la manutenzione da parte dell'utente non deve
essere eseguita da bambini senza supervisione.
2.Il cavo di alimentazione non può essere sostituito. Se il cavo è
danneggiato, l'apparecchio dovrebbe essere rottamato.
3.La pressione massima dell'acqua in ingresso, in pascal: 0,03 MPa
4.La pressione minima dell'acqua in ingresso, in pascal:O.O1MPa, se
necessario per il corretto funzionamento dell'apparecchio.
5.Il cavo di alimentazione non può essere sostituito se il cavo è
danneggiato dall'apparecchio Dovrebbe essere demolito.
- 3 -
ATTENZIONE - Questo apparecchio contiene un emettitore UV. Non
fissare il fonte di luce.
Con la presente ti ringraziamo sinceramente per aver acquistato il nostro
prodotto.. Per utilizzare il prodotto in modo sicuro, leggere attentamente
questo manuale.
Avvertimento:
1. Prima di utilizzare il prodotto, verificare se sono presenti danni cavo di
alimentazione. In caso affermativo, non utilizzare il prodotto.
2. Per evitare errori, utilizzare il prodotto con tensione regolamentata e
frequenza.
3. Non collegare né tirare il cavo di alimentazione con le mani bagnate.
4. durante la manutenzione o lo spostamento del prodotto o in caso di
anomalie situazione, spegnere prima l'alimentazione.
5. Assicurarsi che la spina e la presa siano protette dall'acqua.
6. Si prega di non tirare il cavo di alimentazione in modo rettilineo durante
l'utilizzo. Per favore, continua il cavo di alimentazione deve essere a forma
di "U" (vedi immagine sotto) per evitare che l'acqua vada
all'interno della presa lungo il cavo di alimentazione.
7. Si prega di non utilizzare il prodotto vicino ad oggetti
infiammabili .
8. Rivolgersi a un tecnico professionista per la
manutenzione.
9. Non reinstallare il prodotto per evitare eventuali impostazioni
predefinite .
Avviso:
1. Dopo l'acquisto, verificare se sono presenti danni o mancanze parti del
prodotto .
2. Utilizzare il prodotto sotto la linea di galleggiamento del serbatoio.
3. Installare il prodotto su una superficie piana.
4 . Quando si sposta il prodotto, non afferrarlo tenendolo per la valvola
Quello modo potrebbe causare la rottura della valvola e causare ulteriore
acqua perdita.
5 . Si consiglia di pulire la girante e l'elica una volta al mese, come lo

- 4 -
sporco influenzerà la durata della girante.
6 . La girante è un articolo facilmente usurabile, si consiglia di sostituirla
una volta all'anno
7 . Per ottenere il miglior effetto UV, si consiglia di sostituire la luce UV una
volta per semestre.
8 . Questo prodotto dovrebbe funzionare con l'acqua.
9 . Si prega di pulire periodicamente (15-20 giorni) il materiale del filtro per
rimuoverlo IL roba sporca che si tradurrà in un basso flusso d'acqua.
10 . Se si utilizza in acqua marina, rimuovere periodicamente il sale
dall'acqua prodotto o cavo di alimentazione per evitare dispersioni
elettriche.
ISTRUZIONI

- 5 -
SALVA QUESTE ISTRUZIONI
Modello
SF-650F-UV 8W

- 6 -
Voltaggio
AC1 1 0 -120 V 60 Hz o AC220-240 V 50/60 Hz
Pompa Energia
8 W
Potenza UV
9 W
Portata max
650 litri/ora
Rumore
<50dB
Numero filtro
1
ISTRUZIONI PER L'INSTALLAZIONE
1. Aprire la fibbia di fissaggio del
secchio coprire e raccogliere il
coperchio del secchio.
2. Estrarre il cestello del filtro e
aggiungere il filtro pulito.
3. Riposizionare il cestello del filtro,
coprire testa della canna e allacciare
la fibbia di fissaggio.
4. Collegare il tubo flessibile
all'uscita dell'acqua e l'ingresso
dell'acqua, quindi fissare la vite.

- 7 -
5. L'altra estremità di il tubo è
collegato con l'acqua in uscita lascia
il tubo e l'acqua tubo di ingresso e il
tubo di uscita dell'acqua e il tubo di
ingresso dell'acqua sono fissati
nell'acquario.
6. Aggiungere acqua all'acquario
fino al distanza tra la superficie
dell'acqua e il bordo del pesce il
serbatoio è inferiore a 12 cm e la
canna esterna dell'acquario è a 40
cm sotto la superficie dell'acqua .
7. Assicurarsi che la portata sia
adeguata il massimo.
8. Tirare la maniglia di gonfiaggio
su e giù per 2~4 volte per aspirare
l'acqua nella canna.
9.Dopo averlo collegato
all'alimentazione rifornimento,
controllare se c'è acqua perdite
attorno al cilindro del filtro e
ricontrollare 30-60 minuti dopo
inizia correttamente. Se non ci
sono problemi, può essere
utilizzato normalmente.
- 8 -
MANCIA:
ISTRUZIONI PER LA PULIZIA E LA SOSTITUZIONE
L'alimentazione deve essere scollegata durante la pulizia e la
manutenzione .
1. Accendere l'interruttore del sedile
fisso e poi tirare la sede
dell'interruttore verso l'alto.
2. Aprire la fibbia di fissaggio della
canna coprire e raccogliere il
coperchio della canna.

- 9 -
3 . Utilizzare un cacciavite Phillips
per svitare la vite sul bordo del
tamburo dell'acqua coprire ed
estrarre il coperchio del tamburo
dell'acqua .
4. Rimuovere il rotore e pulirlo o
sostituirlo il nuovo rotore come
richiesto. I fori del rotore può essere
pulito con spazzole.
5. Utilizzare un cacciavite Phillips
svitare le viti e rimuovere il
coperchio della lampada per la
pulizia .
6.Dopo aver rimosso il germicida
lampada coperchio, pulire lo sporco
sul tubo al quarzo con un
asciugamano bagnato o acqua
pulita. Non rimuovere il tubo al
quarzo durante la pulizia per evitare
cortocircuiti causati dall'acqua che
scorre nella linea del cappuccio
della lampada.
Se non è necessario sostituire la lampada UV, saltare dal passaggio 7 al
passaggio 9 .

- 10 -
7. Svitare la vite occlusa e
rimuovere il tubo di quarzo.
8. Rimuovere il tubo della lampada
UV e sostituirlo .
9. Installare il tubo al quarzo e
serrare la vite occlusa.
10. Installare il tubo della lampada e
l'acqua coperchio del tamburo con
un cacciavite Phillips .
11. Estrarre il cestello del filtro per
pulirlo o sostituire il filtro.
12 Riposizionare il cestello del filtro,
coprire coperchio della canna,
allacciare la fibbia di fissaggio
inserire l'interruttore dello schienale
e bloccarlo l'interruttore di fissaggio.

- 11 -
TIRO FALLITO
Probabile
_ _
Situazioni
Motivi
Metodo di trattamento
Non può
inizio
• Alimentazione elettrica è
scollegato
• Danni alla testa della
pompa.
• La girante si è bloccata
questioni estere.
• La girante non è fissata
bene.
• Collegare
all'alimentazione.
• Sostituire una nuova testa
della pompa.
• Elimina le questioni
estere.
• Fissare bene la girante.
Perdita d'
acqua
• Il rubinetto della valvola
dell'acqua è danneggiato.
• L'O-ring della valvola
dell'acqua è danneggiato o
con corpi estranei .
• L'o-ring della testata di
alimentazione è danneggiato
o con questioni estere.
• Testa di alimentazione e
contenitore non è chiuso
bene.
• Tubo in PVC e valvola
dell'acqua non è collegato
bene.
• L'anello di tenuta del
coperchio della girante è
danneggiato o con questioni
estere.
• Cambiare i nuovi rubinetti
della valvola dell'acqua
• Sostituire un nuovo o-ring
della valvola dell'acqua o
rimuovere corpi estranei.
• Sostituire un nuovo o-ring
della testata motore o
rimuovere corpi estranei.
• Rifissare bene.
• Rifissare bene.
• Sostituire un nuovo o-ring
del coperchio della girante
o rimuovere corpi estranei.

- 12 -
Rumoros
o
• La girante è danneggiata.
• La girante è bloccata da
corpi estranei o non fissata
correttamente.
• Il rubinetto di ingresso è
chiuso.
• È presente aria nel filtro a
canestro.
• Sostituire una nuova
girante.
• Rimuovere corpi estranei
o fissare nuovamente la
girante.
• Aprire i rubinetti delle
valvole di ingresso.
• Agitare il corpo del filtro e
far uscire completamente
l'aria.
Inizio
anomalo
_
• La tanica non è riempita
d'acqua.
• L'acqua nell'acquario è
troppo bassa.
• I rubinetti delle valvole
dell'acqua non sono aperti.
• Riempire completamente
la cassa del filtro con
acqua.
• L'acqua nell'acquario deve
essere superiore al livello
minimo. livello dell'acqua.
• Aprire i rubinetti delle
valvole dell'acqua.
Poca
produzion
e d'acqua
• Le valvole di ingresso e
uscita no
• completamente aperto.
• I tubi di ingresso e uscita
sono troppo sporchi.
• Il tubo in PVC è troppo
sporco.
• Aprire la valvola di
ingresso e uscita
• completamente.
• Pulire i tubi di ingresso e
uscita.
• Pulire il tubo in PVC.

- 13 -
Indirizzo: Baoshanqu Shuangchenglu 803long 11hao 1602A-1609shi
Shanghai
Importato in AUS: SIHAO PTY LTD.1 ROKEVA STREETEASTWOOD
NSW 2122 Australia
Importato negli Stati Uniti: Sanven Technology Ltd.Suite 250, 9166
Anaheim Place, Rancho Cucamonga, CA 91730
REP
UK
Pooledas Group Ltd
Unit 5 Albert Edward House, The Pavilions
Preston, United Kingdom
REP
EC
SHUNSHUN GmbH
Römeräcker 9 Z2021, 76351
Linkenheim-Hochstetten, Germany
Made in China


Técnico Soporte y certificado de garantía electrónica www.vevor.com/support
FILTRO DE ACUARIO
MODELO:SF-650F-UV 8W
We continue to be committed to provide you tools with competitive price.
"Save Half", "Half Price" or any other similar expressions used by us only represents an
estimate of savings you might benefit from buying certain tools with us compared to the major
top brands and does not necessarily mean to cover all categories of tools offered by us. You
are kindly reminded to verify carefully when you are placing an order with us if you are
actually saving half in comparison with the top major brands.


- 1 -
MODELO:SF-650F-UV 8W
Have product questions? Need technical support? Please feel free to
contact us:
Technical Support and E-Warranty Certificate
www.vevor.com/support
NEED HELP? CONTACT US!
This is the original instruction, please read all manual instructions
carefully before operating. VEVOR reserves a clear interpretation of our
user manual. The appearance of the product shall be subject to the
product you received. Please forgive us that we won't inform you again if
there are any technology or software updates on our product.
AQUARIUM FILTER
Black
Grey

- 2 -
Advertencia: para reducir el riesgo de lesiones, el usuario
debe leer atentamente el manual de instrucciones.
Este producto está sujeto a las disposiciones de la Directiva
Europea 2012/19/CE. El símbolo que muestra un contenedor
con ruedas tachado indica que el producto requiere recogida
selectiva de basura en la Unión Europea. Esto se aplica al
producto y a todos los accesorios marcados con este símbolo.
Los productos marcados como tales no podrán desecharse
con la basura doméstica normal, sino que deberán llevarse a
un punto de recogida para el reciclaje de aparatos eléctricos y
electrónicos.
LEA Y SIGA TODAS LAS INSTRUCCIONES DE SEGURIDAD.
PELIGRO- Para evitar posibles descargas eléctricas, se debe tener
especial cuidado. ya que el agua se emplea en el uso de equipos de
acuario. Para cada uno de los siguientes situaciones, no intente repararlo
usted mismo, devuelva el aparato Lleve el aparato a un centro de servicio
autorizado o deséchelo.
1. Este aparato puede ser utilizado por niños a partir de 8 años y personas
con capacidades físicas, sensoriales o mentales reducidas o con falta de
experiencia y conocimiento si ellos tener estado dado supervisión o
instrucciones sobre el uso del aparato de forma segura y comprender los
peligros involucrados. Los niños no deben jugar con el aparato Limpieza y
el mantenimiento del usuario no debe ser realizado por niños sin
supervisión.
2.El cable de alimentación no se puede reemplazar. Si el cable está
dañado, el aparato debería ser desechado.
3.La presión máxima de entrada de agua, en pascales: 0,03 MPa
4.La presión mínima de entrada de agua, en pascales: O.O1MPa, si es
necesario para el correcto funcionamiento del aparato.
- 3 -
5. El cable de alimentación no se puede reemplazar; si el cable está
dañado , el aparato debería ser desechado.
ADVERTENCIA : este aparato contiene un emisor de rayos UV. No mires
fijamente al fuente de luz.
Por la presente le agradecemos sinceramente la compra de nuestro
producto. Para operar el producto de forma segura, lea atentamente este
manual.
Advertencia:
1. Antes de usar el producto, verifique si hay algún daño en el cable de
alimentación. En caso afirmativo, no utilice el producto.
2. Para evitar fallos, utilice el producto bajo el voltaje regulado. y
frecuencia.
3. No enchufe ni tire del cable de alimentación si tiene las manos mojadas.
4. al mantener o mover el producto o cuando hay alguna anomalía
Situación, apague primero la alimentación.
5. Asegúrese de que el enchufe y el enchufe estén protegidos del agua.
6. No tire del cable de alimentación en línea recta cuando lo utilice. Por
favor sigue El cable de alimentación debe tener forma de "U" (ver imagen
a continuación) para evitar que el agua entre. dentro del
enchufe a lo largo del cable de alimentación.
7. No utilice el producto cerca de artículos inflamables .
8. Utilice un técnico profesional para el mantenimiento.
9. No reinstale el producto para evitar fallos .
Aviso:
1. Después de la compra, verifique si hay algún daño o falta partes del
producto .
2. Opere el producto debajo de la línea de agua del tanque.
3. Instale el producto en una superficie plana.
4 . Cuando mueva el producto, no lo tome sosteniendo la válvula, ya que
eso manera puede causar la rotura de la válvula y causar aún más agua
fuga.
5 . Se sugiere limpiar el impulsor y la hélice una vez al mes, ya que la
suciedad afectará la vida útil del impulsor.

- 4 -
6 . El impulsor es un elemento que se desgasta fácilmente; se sugiere
reemplazarlo una vez al año.
7 . Para alcanzar el mejor efecto UV, se sugiere reemplazar la luz UV una
vez por medio año.
8 . Este producto debería funcionar con agua.
9 . Limpie periódicamente (15-20 días) el material del filtro para eliminarlo.
el cosas sucias que resultarán en un bajo flujo de agua.
10 . Si lo usa en agua marina, retire periódicamente la sal del producto o
cable de alimentación para evitar fugas eléctricas.
INSTRUCCIONES
- 5 -
GUARDA ESTAS INSTRUCCIONES
Modelo
SF-650F-UV 8W
- 6 -
Voltaje
CA1 1 0 -120 V 60 Hz o CA 220-240 V 50/60 Hz
Bomba Fuerza
8W _
Energía
ultravioleta
9W _
Flujo máximo
650 l/h
Ruido
<50dB
Número de filtro
1
INSTRUCCIONES DE INSTALACIÓN
1. Abra la hebilla de fijación del
cubo. cubra y levante la tapa del
cubo.
2. Saque la cesta del filtro y
agregue el filtro limpio.
3. Vuelva a colocar la cesta del filtro,
cubra la cabeza del barril y apriete la
hebilla de fijación.
4. Conecte la manguera entre la
salida de agua y la entrada de
agua, y luego fije el tornillo.

- 7 -
5. El otro extremo de la manguera
está conectada con el agua fuera l et
tubería y el agua tubo de entrada y
el tubo de salida de agua y el tubo
de entrada de agua Se fijan en la
pecera.
6. Agregue agua a la pecera hasta
que distancia entre la superficie del
agua y el borde del pescado El
tanque mide menos de 12 cm y el
cañón exterior de la pecera está a
40 cm por debajo de la superficie
del agua .
7. Asegúrese de que el caudal se
ajuste a el maximo.
8. Tire de la manija de inflado hacia
arriba y hacia abajo de 2 a 4 veces
para aspirar agua hacia el barril.
9.Después de conectarlo a la
corriente. suministro, compruebe si
hay agua fugas alrededor del
cilindro del filtro, y verifique
nuevamente 30-60 minutos
después arranca correctamente. Si
no hay ningún problema, se puede
utilizar normalmente.

- 8 -
CONSEJO:
INSTRUCCIÓN DE LIMPIEZA Y REUBICACIÓN
La energía debe desconectarse durante la limpieza y el mantenimiento .
1. Enciende el interruptor del
asiento fijo. y luego tire del asiento
del interruptor hacia arriba.
2. Abra la hebilla de fijación del
cañón. cubra y levante la tapa del
cañón.

- 9 -
3 . Utilice un destornillador Phillips
para desatornillar El tornillo en el
borde del tambor de agua. Tapa y
retira la tapa del tambor de agua .
4. Retire el rotor y límpielo o
reemplácelo. el nuevo rotor según
sea necesario. Los agujeros del
rotor Se puede limpiar con cepillos.
5. Utilice un destornillador Phillips
desenroscar los tornillos y retire la
tapa de la lámpara para limpieza .
6.Después de retirar el germicida
lámpara tapa, limpie la suciedad en
el tubo de cuarzo con una toalla
mojada o agua limpia. No Retire el
tubo de cuarzo durante la limpieza.
Para evitar cortocircuitos causados
por el agua. fluyendo hacia la línea
de la tapa de la lámpara.
Si no necesita reemplazar la lámpara UV, omita del paso 7 al paso 9 .

- 10 -
7. Desenrosque el tornillo ocluido y
Retire el tubo de cuarzo.
8. Retire el tubo de la lámpara UV y
reemplácelo .
9. Instale el tubo de cuarzo y
apriételo. el tornillo ocluido.
10. Instale el tubo de la lámpara y el
agua. cubierta del tambor con un
destornillador Phillips .
11. Saque la cesta del filtro para
limpiarla o reemplace el filtro.
12 Vuelva a colocar la cesta del
filtro, cubra la cubierta del cañón,
ajuste la hebilla de fijación Inserte
el respaldo del asiento del
interruptor y bloquee el interruptor
de fijación.

- 11 -
TIRO FALLIDO
Probable
_ _
Situacion
es
Razones
Método de tratamiento
No puedo
comenzar
• Fuente de alimentación es
desconectar
• Daños en el cabezal de la
bomba.
• El impulsor se quedó
atascado asuntos extranjeros.
• El impulsor no está bien
fijado.
• Conecte a la fuente de
alimentación.
• Cambie un cabezal de
bomba nuevo.
• Saca las materias
extrañas.
• Arregle bien el impulsor.
Fugas de
agua
• El grifo de la válvula de agua
está dañado.
• La junta tórica de la válvula
de agua está dañada o con
materia extraña .
• La junta tórica del cabezal
de potencia está dañada o
con materias ajenas.
• Cabezal de potencia y
recipiente no es bien cerrado.
• Tubería de PVC y válvula de
agua. no está bien conectado.
• La junta tórica de la cubierta
del impulsor está dañada o
con materias ajenas.
• Cambiar grifos de válvulas
de agua nuevos
• Cambie una nueva junta
tórica de la válvula de agua
o elimine materias
extrañas.
• Cambie una nueva junta
tórica del cabezal de
potencia o elimine materias
extrañas.
• Vuelva a fijar bien.
• Vuelva a fijar bien.
• Cambie una nueva junta
tórica de la cubierta del
impulsor o elimine materias
extrañas.

- 12 -
Ruidoso
• El impulsor está dañado.
• El impulsor atascado por
materias extrañas o no fijado
correctamente.
• El grifo de entrada está
cerrado.
• Hay aire en el filtro del
recipiente.
• Cambiar un impulsor
nuevo.
• Retire las materias
extrañas o vuelva a arreglar
el impulsor.
• Abrir los grifos de las
válvulas de entrada.
• Agite el cuerpo del filtro
del recipiente y deje salir el
aire por completo.
Inicio
anormal _
• El recipiente no está lleno de
agua.
• El nivel de agua en el
acuario es demasiado bajo.
• Los grifos de las válvulas de
agua no están abiertos.
• Llene completamente la
carcasa del filtro del
recipiente con agua.
• El agua del acuario debe
estar por encima del
mínimo. nivel de agua.
• Abrir grifos de válvulas de
agua.
Poca
salida de
agua
• Las válvulas de entrada y
salida no están
• completamente abierto.
• Las tuberías de entrada y
salida están demasiado
sucias.
• El tubo de PVC está
demasiado sucio.
• Abrir la válvula de entrada
y salida.
• completamente.
• Limpiar los tubos de
entrada y salida.
• Limpiar el tubo de PVC.

- 13 -
Dirección: Baoshanqu Shuangchenglu 803long 11hao 1602A-1609shi
Shanghai
Importado a AUS: SIHAO PTY LTD.1 ROKEVA STREETEASTWOOD
NSW 2122 Australia
Importado a EE. UU.: Sanven Technology Ltd.Suite 250, 9166 Anaheim
Place, Rancho Cucamonga, CA 91730
REP
UK
Pooledas Group Ltd
Unit 5 Albert Edward House, The Pavilions
Preston, United Kingdom
REP
EC
SHUNSHUN GmbH
Römeräcker 9 Z2021, 76351
Linkenheim-Hochstetten, Germany
Hecho en china


Techniczny Certyfikat wsparcia i e-gwarancji www.vevor.com/support
FILTR AKWARIOWY
MODEL:SF-650F-UV 8W
We continue to be committed to provide you tools with competitive price.
"Save Half", "Half Price" or any other similar expressions used by us only represents an
estimate of savings you might benefit from buying certain tools with us compared to the major
top brands and does not necessarily mean to cover all categories of tools offered by us. You
are kindly reminded to verify carefully when you are placing an order with us if you are
actually saving half in comparison with the top major brands.


- 1 -
MODEL:SF-650F-UV 8W
Have product questions? Need technical support? Please feel free to
contact us:
Technical Support and E-Warranty Certificate
www.vevor.com/support
NEED HELP? CONTACT US!
This is the original instruction, please read all manual instructions
carefully before operating. VEVOR reserves a clear interpretation of our
user manual. The appearance of the product shall be subject to the
product you received. Please forgive us that we won't inform you again if
there are any technology or software updates on our product.
AQUARIUM FILTER
Black
Grey

- 2 -
Ostrzeżenie — aby zmniejszyć ryzyko obrażeń, użytkownik
musi uważnie przeczytać instrukcję obsługi.
Ten produkt podlega przepisom Dyrektywy Europejskiej
2012/19/EC. Symbol przekreślonego kosza na śmieci
oznacza, że produkt wymaga selektywnej zbiórki śmieci na
terenie Unii Europejskiej. Dotyczy to produktu i wszystkich
akcesoriów oznaczonych tym symbolem. Produktów
oznaczonych jako takie nie można wyrzucać razem ze
zwykłymi odpadami domowymi, lecz należy je oddać do
punktu zbiórki w celu recyklingu urządzeń elektrycznych i
elektronicznych
PRZECZYTAJ I PRZESTRZEGAJ WSZYSTKICH INSTRUKCJI
BEZPIECZEŃSTWA.
NIEBEZPIECZEŃSTWO- Aby uniknąć możliwego porażenia prądem
elektrycznym, należy zachować szczególną ostrożność ponieważ woda
jest wykorzystywana w sprzęcie akwariowym. Dla każdego z nich w
następujących sytuacjach nie próbuj samodzielnie naprawiać urządzenia,
zwróć urządzenie do autoryzowanego punktu serwisowego w celu
wykonania naprawy lub wyrzucić urządzenie.
1. To urządzenie może być używane przez dzieci w wieku od 8 lat i starsze
osoby o ograniczonych zdolnościach fizycznych, sensorycznych lub
umysłowych lub ich braku doświadczenie I wiedza Jeśli Oni Posiadać
został dany nadzór Lub instrukcję dotyczącą bezpiecznego i zrozumiałego
użytkowania urządzenia związane z tym zagrożenia. Dzieciom nie wolno
bawić się urządzeniem. Czyszczenie i konserwacja użytkownika nie mogą
być wykonywane przez dzieci bez nadzoru.
2. Nie można wymienić przewodu zasilającego. Jeśli przewód jest
uszkodzony, urządzenie należy złomować.
3. Maksymalne ciśnienie wody na wlocie w paskalach: 0,03 MPa
- 3 -
4. Minimalne ciśnienie wody na wlocie, w paskalach: O,O1 MPa, jeśli jest
to konieczne dla prawidłowego działania urządzenia.
uszkodzenia przewodu zasilającego nie można wymieniać urządzenia
powinien zostać złomowany.
OSTRZEŻENIE – To urządzenie zawiera emiter UV. Nie gap się na źródło
światła.
Niniejszym serdecznie dziękujemy za zakup naszego produktu. Aby móc
obsługiwać produkt bezpiecznie, prosimy o dokładne zapoznanie się z
niniejszą instrukcją.
Ostrzeżenie:
1. Przed użyciem produktu sprawdź, czy nie ma uszkodzeń przewód
zasilający. Jeśli tak, nie używaj produktu.
2. Aby uniknąć domyślnych ustawień, używaj produktu pod regulowanym
napięciem i częstotliwość.
3. Nie podłączaj ani nie ciągnij za przewód zasilający, jeśli masz mokre
ręce.
4. podczas konserwacji lub przenoszenia produktu lub w przypadku
wystąpienia jakichkolwiek nieprawidłowości sytuacji, najpierw wyłącz
zasilanie.
5. Upewnij się, że wtyczka i gniazdko są zabezpieczone przed wodą.
6. Podczas używania nie należy ciągnąć przewodu zasilającego prosto.
Proszę zachować przewód zasilający powinien mieć kształt litery „U”
(patrz rysunek poniżej), aby uniknąć wycieku wody
wewnątrz gniazdka wzdłuż przewodu zasilającego.
7. Nie używaj produktu w pobliżu przedmiotów
łatwopalnych .
8. Do konserwacji należy zwrócić się do profesjonalnego
technika .
9. Nie instaluj ponownie produktu, aby uniknąć domyślnych ustawień .
Ogłoszenie:
1. Po zakupie sprawdź, czy nie ma uszkodzeń lub czy czegoś nie brakuje
części produktu .
2. Proszę używać produktu poniżej linii wodnej zbiornika.

- 4 -
3. Zainstaluj produkt na płaskiej powierzchni.
4 . Podczas przenoszenia produktu nie należy go chwytać za zawór, gdyż
To sposób może spowodować uszkodzenie zaworu i dalsze przedostanie
się wody przeciek.
5 . Sugeruje się czyszczenie wirnika i śmigła raz w miesiącu, ponieważ
brud będzie miał wpływ na żywotność wirnika.
6 . Wirnik jest elementem łatwo ulegającym zużyciu, dlatego zaleca się
jego wymianę raz w roku
7 . Aby uzyskać najlepszy efekt UV, zaleca się jednorazową wymianę
światła UV na pół roku.
8 . Produkt powinien współpracować z wodą.
9 . Proszę okresowo (15-20 dni) czyścić materiał filtrujący w celu usunięcia
the brudne rzeczy, co spowoduje niski przepływ wody.
10 . W przypadku stosowania w wodzie morskiej należy okresowo usuwać
sól z powierzchni produktu lub przewodu zasilającego, aby uniknąć upływu
prądu.
INSTRUKCJE

- 5 -
ZAPISZ TE INSTRUKCJE
Model
SF-650F-UV 8W

- 6 -
Napięcie
AC1 1 0 -120 V 60 Hz lub AC220-240 V 50/60 Hz
Pompa Moc
8 W
Moc UV
9 W
Przepływ maks
650 l/godz
Hałas
<50dB
Numer filtra
1
INSTRUKCJA INSTALACJI
1. Otwórz klamrę mocującą wiadro
przykryj i podnieś pokrywę wiadra.
2. Wyjmij koszyk filtra i dodaj
oczyszczony filtr.
3. Załóż koszyk filtra, przykryj
główkę lufy i zapnij klamrę
mocującą.
4. Podłącz wąż pomiędzy wylotem
wody i dopływem wody, a
następnie przykręć śrubę.

- 7 -
5. Drugi koniec wąż jest podłączony
z rurą wylotową wody i wodą rura
wlotowa i rura odprowadzająca wodę
i rurę dopływową wody są
zamocowane w akwarium.
6. Dodawaj wodę do akwarium aż
do momentu odległość pomiędzy
powierzchnię wody i brzeg ryby
zbiornik ma niecałe 12 cm, a lufa
zewnętrzna akwarium znajduje się
40 cm poniżej powierzchni wody .
7. Upewnij się, że natężenie
przepływu jest dostosowane do
maksymalny.
8. Pociągnij uchwyt do
pompowania w górę i w dół 2 – 4
razy, aby zassać wodę do beczki.
9. Po podłączeniu do zasilania
zasilania, sprawdź, czy jest woda
wyciek wokół cylindra filtra oraz
sprawdź ponownie po 30 – 60
minutach zaczyna się prawidłowo.
Jeśli nie ma problemu, można go
normalnie używać.
- 8 -
WSKAZÓWKA:
INSTRUKCJA CZYSZCZENIA I WYMIANY
Podczas czyszczenia i konserwacji należy odłączyć zasilanie .
1. Włącz przełącznik stałego
siedzenia a następnie pociągnij
gniazdo przełącznika do góry.
2. Otwórz klamrę mocującą lufę
przykryj i podnieś osłonę lufy.

- 9 -
3 . Do odkręcenia użyj śrubokręta
krzyżakowego śrubę na krawędzi
bębna na wodę pokrywę i wyjmij
pokrywę bębna na wodę .
4. Wyjmij rotor i wyczyść go lub
wymie ń nowy rotor zgodnie z
wymaganiami. Otwory rotora
można czyścić szczotkami.
5. Użyj śrubokręta krzyżakowego
odkręcić śruby i zdejmij pokrywę
wzmacniacza lampy do
czyszczenia .
6.Po usunięciu środka
bakteriobójczego lampa pokrywę,
oczyść rurkę kwarcową z brudu
mokrym ręcznikiem lub czystą
wodą. Nie rób podczas czyszczenia
wyjmij rurkę kwarcową aby
zapobiec zwarciu spowodowanemu
przez wodę wpływając do linii
trzonka lampy.
Jeśli nie musisz wymieniać lampy UV, pomiń kroki od 7 do 9 .

- 10 -
7. Odkręć zablokowaną śrubę i usuń
rurkę kwarcową.
8. Wyjmij rurkę lampy UV i wymień
ją .
9. Zamontuj rurkę kwarcową i
dokręć zatkana śruba.
10. Zamontuj rurkę lampy i wodę
pokrywę bębna za pomocą
śrubokręta krzyżakowego .
11. Wyjmij koszyk filtra do
czyszczenia lub wymienić filtr.
12 Odłożyć koszyk filtra, przykryć
pokrywę lufy, zapnij klamrę
mocującą włóż oparcie siedzenia
przełącznika i zablokuj wyłącznik
mocujący.

- 11 -
NIEUDANY STRZAŁ
Pro w
stanie
Sytuacje
Powody
Metoda leczenia
Nie mogę
początek
• Zasilacz jest odłączony
• Uszkodzenie głowicy pompy.
• Wirnik utknął sprawy
zagraniczne.
• Wirnik nie jest dobrze
zamocowany.
• Podłącz do źródła
zasilania.
• Zmień nową głowicę
pompy.
• Wyjmij sprawy obce.
• Dobrze zamocuj wirnik.
Pobieram
wodę _
• Kran zaworu wody jest
uszkodzony.
• Uszkodzony pierścień
uszczelniający zaworu wody
lub z ciałami obcymi .
• Uszkodzony pierścień
uszczelniający głowicy
napędowej lub z sprawami
zagranicznymi.
• Głowica zasilająca i
pojemnik nie jest dobrze
zamknięte.
• Wąż PCV i zawór wodny nie
jest dobrze podłączony.
• Uszkodzony pierścień
uszczelniający pokrywy
wirnika lub z sprawami
zagranicznymi.
• Wymień nowe krany
zaworów wodnych
• Wymienić nowy pierścień
uszczelniający zaworu
wody lub usunąć ciała
obce.
• Wymienić nowy pierścień
uszczelniający głowicy
napędowej lub usunąć ciała
obce.
• Dobrze napraw.
• Dobrze napraw.
• Wymienić nowy pierścień
uszczelniający pokrywy
wirnika lub usunąć ciała
obce.

- 12 -
Hałaśliwy
• Wirnik jest uszkodzony.
• Wirnik zablokowany przez
ciała obce lub nieprawidłowo
zamocowany.
• Zawór dopływowy jest
zamknięty.
• W filtrze kanistrowym
znajduje się powietrze.
• Zmień nowy wirnik.
• Usunąć ciała obce lub
ponownie zamocować
wirnik.
• Otworzyć kurki zaworów
wlotowych.
• Wstrząśnij korpusem filtra
kanistrowego i całkowicie
wypuść powietrze.
Nienorma
lnie
zaczyna
m _
• Zbiornik nie jest napełniony
wodą.
• Poziom wody w akwarium
jest zbyt niski.
• Krany zaworów wodnych nie
są otwarte.
• Całkowicie napełnij
obudowę filtra kanistrowego
wodą.
• Woda w akwarium musi
znajdować się powyżej min.
Poziom wody.
• Otworzyć kurki zaworów
wodnych.
Mały
uzysk
wody
• Zawór wlotowy i wylotowy
nie są
• całkowicie otwarty.
• Rury wlotowe i wylotowe są
zbyt brudne.
• Rury PCV są zbyt brudne.
• Otwórz zawór wlotowy i
wylotowy
• całkowicie.
• Oczyścić rury wlotowe i
wylotowe.
• Oczyść rurkę PCV.
- 13 -
Adres: Baoshanqu Shuangchenglu 803long 11hao 1602A-1609shi
Szanghaj
Import do AUS: SIHAO PTY LTD.1 ROKEVA STREETEASTWOOD NSW
2122 Australia
Import do USA: Sanven Technology Ltd.Suite 250, 9166 Anaheim Place,
Rancho Cucamonga, CA 91730
REP
UK
Pooledas Group Ltd
Unit 5 Albert Edward House, The Pavilions
Preston, United Kingdom
REP
EC
SHUNSHUN GmbH
Römeräcker 9 Z2021, 76351
Linkenheim-Hochstetten, Germany
Wyprodukowano w Chinach


Technisch Ondersteuning en e-garantiecertificaat www.vevor.com/support
AQUARIUMFILTER
MODEL:SF-650F-UV 8W
We continue to be committed to provide you tools with competitive price.
"Save Half", "Half Price" or any other similar expressions used by us only represents an
estimate of savings you might benefit from buying certain tools with us compared to the major
top brands and does not necessarily mean to cover all categories of tools offered by us. You
are kindly reminded to verify carefully when you are placing an order with us if you are
actually saving half in comparison with the top major brands.


- 1 -
MODEL:SF-650F-UV 8W
Have product questions? Need technical support? Please feel free to
contact us:
Technical Support and E-Warranty Certificate
www.vevor.com/support
NEED HELP? CONTACT US!
This is the original instruction, please read all manual instructions
carefully before operating. VEVOR reserves a clear interpretation of our
user manual. The appearance of the product shall be subject to the
product you received. Please forgive us that we won't inform you again if
there are any technology or software updates on our product.
AQUARIUM FILTER
Black
Grey
- 2 -
Waarschuwing-Om het risico op letsel te verminderen, moet
de gebruiker de handleiding zorgvuldig lezen.
Dit product valt onder de bepalingen van de Europese richtlijn
2012/19/EG. Het symbool met een doorgestreepte
afvalcontainer geeft aan dat het product in de Europese Unie
een aparte afvalinzameling vereist. Dit geldt voor het product
en alle accessoires die met dit symbool zijn gemarkeerd.
Producten die als zodanig gemarkeerd zijn, mogen niet met
het normale huisvuil worden weggegooid, maar moeten naar
een inzamelpunt voor recycling van elektrische en
elektronische apparaten worden gebracht
LEES EN VOLG ALLE VEILIGHEIDSINSTRUCTIES.
GEVAAR- Om mogelijke elektrische schokken te voorkomen, moet
bijzondere voorzichtigheid in acht worden genomen aangezien water wordt
gebruikt bij het gebruik van aquariumuitrusting. Voor elk van de in de
volgende situaties, probeer het apparaat niet zelf te repareren, maar stuur
het apparaat terug naar een erkend servicecentrum voor onderhoud of
gooi het apparaat weg.
1. Dit apparaat kan worden gebruikt door kinderen vanaf 8 jaar en ouder
personen met verminderde lichamelijke, zintuiglijke of geestelijke
vermogens of een gebrek daaraan ervaring En kennis als zij hebben
geweest gegeven overzicht of instructies over het veilige gebruik van het
apparaat en dat u deze begrijpt de gevaren die daarmee gepaard gaan.
Kinderen mogen niet met het apparaat spelen. Reinigen en
gebruikersonderhoud mag niet door kinderen zonder toezicht worden
uitgevoerd.
2. Het netsnoer kan niet worden vervangen. Als het snoer beschadigd is,
kan het apparaat beschadigd raken moet worden gesloopt.
3.De maximale waterinlaatdruk, in pascal: 0,03 MPa
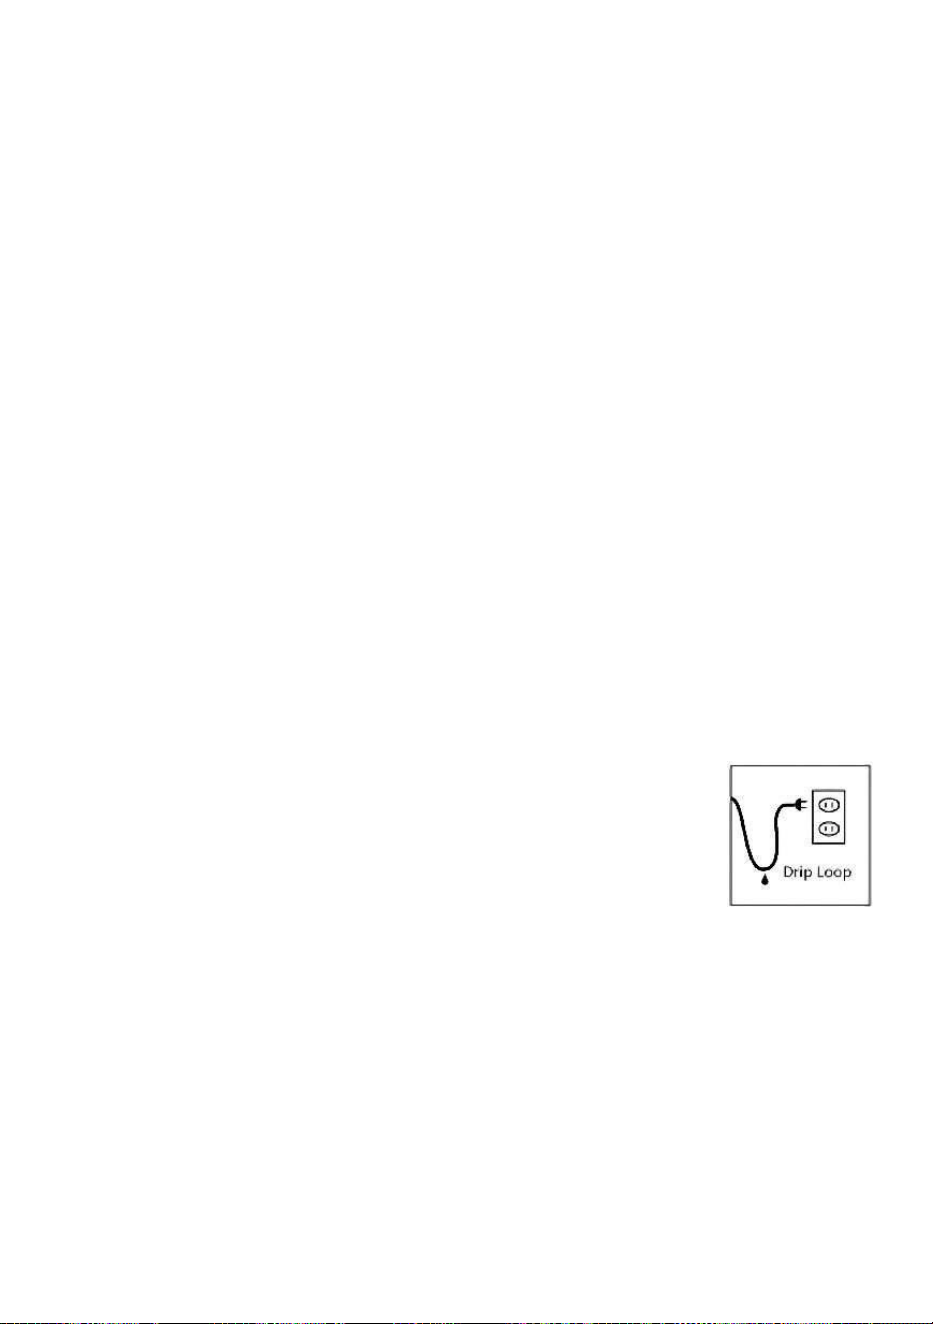
- 3 -
4.De minimale waterinlaatdruk, in pascal: O.O1MPa, als dit nodig is voor
de juiste werking van het apparaat.
5. Als het snoer beschadigd is, kan het netsnoer niet worden vervangen
zou moeten worden gesloopt.
WAARSCHUWING - Dit apparaat bevat een UV-zender. Kijk niet naar de
lichtbron.
Hierbij danken wij u hartelijk voor de aankoop van ons product veilig
product, lees deze handleiding aandachtig door.
Waarschuwing:
1. Controleer voordat u het product gebruikt of er schade aan het product
zit netsnoer. Zo ja, gebruik het product dan niet.
2. Om standaard te voorkomen, gebruik het product onder de
gereguleerde spanning en frequentie.
3. Sluit het netsnoer niet aan en trek er niet aan als uw handen nat zijn.
4. bij het onderhouden of verplaatsen van het product of wanneer er iets
abnormaals is situatie, schakel dan eerst de stroom uit.
5. Zorg ervoor dat de stekker en het stopcontact beschermd zijn tegen
water.
6. Trek tijdens gebruik niet recht aan het netsnoer. Houd alsjeblieft Het
netsnoer moet een "U"-vorm hebben (zie onderstaande afbeelding) om te
voorkomen dat er water in komt in het stopcontact langs het
netsnoer.
7. Gebruik het product niet in de buurt van brandbare
voorwerpen .
8. Gebruik een professionele technicus voor onderhoud.
9. Installeer het product niet opnieuw om fouten te voorkomen .
Kennisgeving:
1. Controleer na aankoop of er schade is of dat er iets ontbreekt
onderdelen van het product .
2. Gebruik het product onder de waterlijn van de tank.
3. Installeer het product op een vlakke ondergrond.
4 . Wanneer u het product verplaatst, neem het dan niet vast door het
ventiel vast te houden, zoals Dat manier kan breuk van de klep

- 4 -
veroorzaken en verder water veroorzaken lekkage.
5 . Het wordt aanbevolen om de waaier en de propeller één keer per
maand schoon te maken het vuil zal de levensduur van de waaier
beïnvloeden.
6 . De mpeller is een snel versleten item, het wordt aanbevolen om deze
één keer per jaar te vervangen
7 . Om het beste UV-effect te bereiken, wordt voorgesteld om het UV-licht
één keer te vervangen per halfjaar.
8 . Dit product zou met water moeten werken.
9 . Maak het filtermateriaal regelmatig (15-20 dagen) schoon om het te
verwijderen de vuil spul, wat resulteert in een lage waterstroom.
10 . Als u het apparaat in zeewater gebruikt, verwijder dan regelmatig het
zout op het water product of netsnoer om elektrische lekkage te
voorkomen.
INSTRUCTIES

- 5 -
BEWAAR DEZE INSTRUCTIES
Model
SF-650F-UV 8W

- 6 -
Spanning
AC1 1 0 -120 V 60 Hz of AC220-240V 50/60 Hz
Pomp Stroom
8 W
UV-kracht
9 W
Stroom Max
650 l/u
Lawaai
<50dB
Filternummer _
1
INSTALLATIE INSTRUCTIE
1. Open de bevestigingsgesp van de
emmer dek af en pak de
emmerafdekking op.
2. Haal de filtermand eruit en voeg
de filtermand toe gereinigd filter.
3. Plaats de filtermand terug en dek
deze af loopkop en maak de
bevestigingsgesp vast.
4. Sluit de slang aan op de
wateruitlaat en de waterinlaat, en
bevestig vervolgens de schroef.
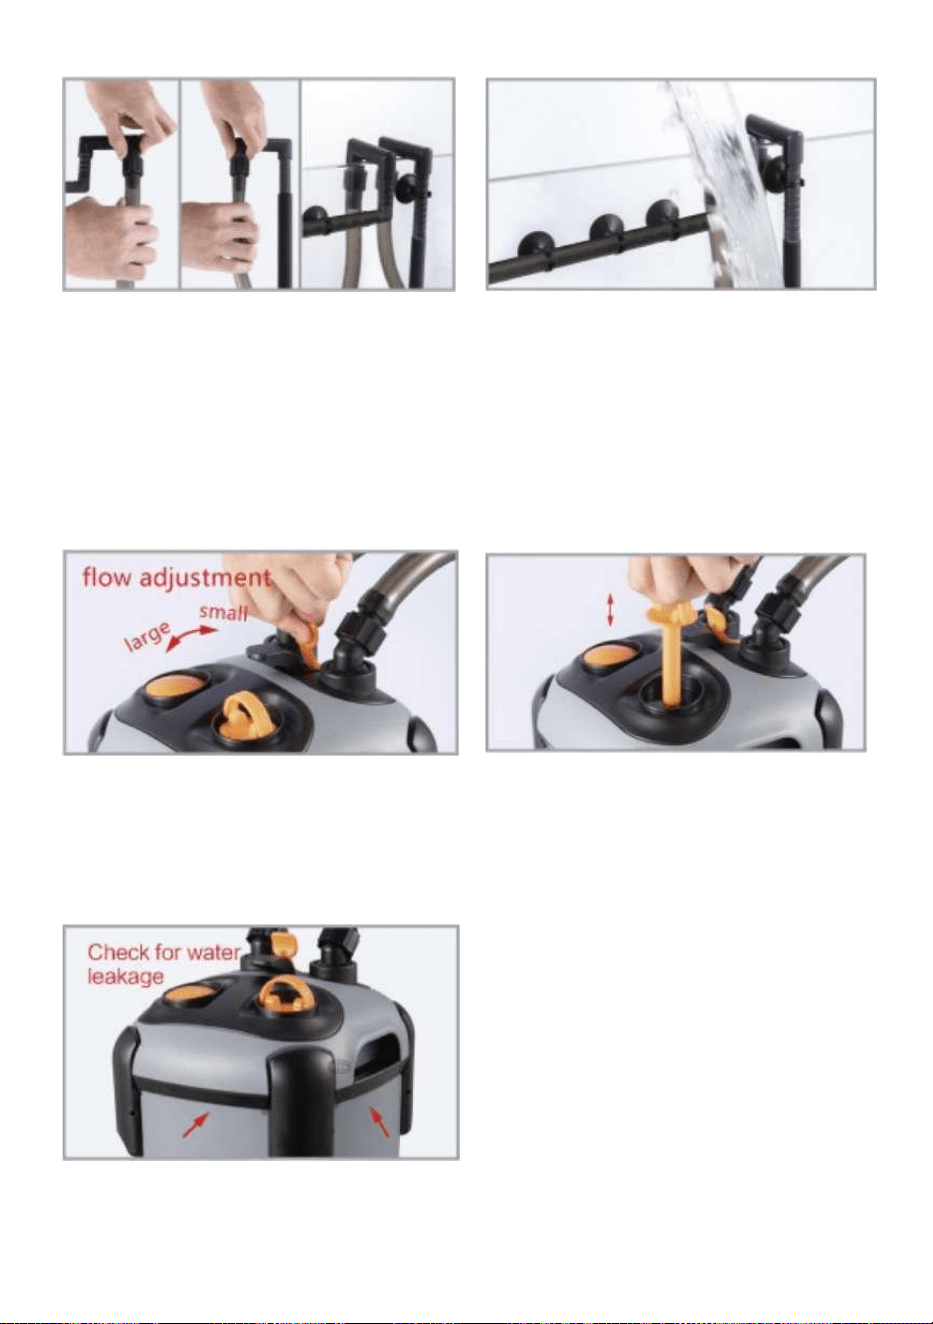
- 7 -
5. Het andere uiteinde van de slang
is aangesloten met het water uit de
leiding en het water inlaatleiding, en
de waterafvoerleiding en de
watertoevoerleiding zijn bevestigd in
het aquarium.
6. Voeg water toe aan het aquarium
totdat het afstand tussen het
wateroppervlak en de rand van de
vis tank is minder dan 12 cm, en de
buitenste vat van het aquarium
bevindt zich 40 cm onder het
wateroppervlak .
7. Zorg ervoor dat het debiet is
aangepast het maximum.
8. Trek de opblaashendel 2 tot 4
keer op en neer om water in het vat
te zuigen.
9. Nadat het op de stroom is
aangesloten toevoer, controleer of
er water is lekkage rond het
filtervat, en controleer het 30-60
minuten later opnieuw het start
naar behoren. Als er geen
probleem is, kan het normaal
worden gebruikt.

- 8 -
TIP:
REINIGINGS- EN VERVANGINGSINSTRUCTIE
Tijdens reiniging en onderhoud moet de stroom worden uitgeschakeld .
1. Zet de schakelaar van de vaste
stoel aan en trek vervolgens de
schakelaarzitting omhoog.
2. Open de bevestigingsgesp van
de loop bedek en pak het vatdeksel
op.

- 9 -
3 . Gebruik een
kruiskopschroevendraaier om los te
schroeven de schroef aan de rand
van het watervat deksel en verwijder
het deksel van het watervat .
4. Verwijder de rotor en reinig of
vervang deze indien nodig de
nieuwe rotor. De rotorgaten kan
worden schoongemaakt met
borstels.
5. Gebruik een
kruiskopschroevendraaier
losschroeven de schroeven en
verwijder de lampenkap voor het
schoonmaken .
6.Na het verwijderen van het
kiemdodende middel lamp deksel,
verwijder het vuil van de kwartsbuis
met een natte handdoek of schoon
water. Niet doen verwijder de
kwartsbuis tijdens het reinigen om
kortsluiting veroorzaakt door water
te voorkomen stroomt in de
lampvoetlijn.
Als u de UV-lamp niet hoeft te vervangen, sla dan stap 7 over naar stap 9 .

- 10 -
7. Draai de afgesloten schroef los en
verwijder de kwartsbuis.
8. Verwijder de UV-lampbuis en
vervang deze .
9. Installeer de kwartsbuis en draai
deze vast de afgesloten schroef.
10. Installeer de lampbuis en het
water drumdeksel met een
kruiskopschroevendraaier .
11. Haal de filtermand eruit om deze
schoon te maken of vervang het
filter.
12 Plaats de filtermand terug en
dek deze af vatdeksel, maak de
bevestigingsgesp vast plaats de
rugleuning van de schakelaar en
vergrendel de
bevestigingsschakelaar.

- 11 -
MISLUKKINGSSCHOT
Waarschij
nlijk _ _
Situaties
Redenen
Behandelmethode
Kan niet
begin
• Stroomvoorziening is de
stekker uit het stopcontact
• Schade aan de pompkop.
• De waaier bleef hangen
buitenlandse zaken.
• De waaier is niet goed
bevestigd.
• Sluit aan op de voeding.
• Vervang een nieuwe
pompkop.
• Haal de buitenlandse
zaken eruit.
• Waaier goed vastzetten.
Er lekt
water
• Waterkraan kraan is
beschadigd.
• O-ring van de waterklep is
beschadigd of met
buitenlandse materie .
• O-ring van de aandrijfkop is
beschadigd of met
buitenlandse zaken.
• Krachtkop en bus is niet
goed op slot.
• PVC-buizen en waterklep is
niet goed aangesloten.
• O-ring van waaierdeksel is
beschadigd of met
buitenlandse zaken.
• Vervang nieuwe
waterkraankranen
• Vervang een nieuwe
O-ring van de waterklep of
verwijder vreemde
voorwerpen.
• Vervang een nieuwe
O-ring van de aandrijfkop of
verwijder vreemde
voorwerpen.
• Opnieuw goed fixeren.
• Opnieuw goed fixeren.
• Vervang een nieuwe
O-ring van het rotordeksel
of verwijder vreemde
voorwerpen.

- 12 -
Luidruchti
g
• Waaier is beschadigd.
• De waaier zit vast door
vreemde voorwerpen of is niet
correct bevestigd.
• Inlaatkraan is gesloten.
• Er zit lucht in het filterbusje.
• Vervang een nieuwe
waaier.
• Verwijder vreemde
voorwerpen of bevestig de
waaier opnieuw.
• Open de kranen van de
inlaatkleppen.
• Schud het filterhuis en laat
de lucht volledig
ontsnappen.
Abnorma
al, ik
begin
• De bus is niet gevuld met
water.
• Het water in het aquarium is
te laag.
• Waterkraankranen zijn niet
open.
• Vul het filterhuis volledig
met water.
• Het water in het aquarium
moet boven de min.
temperatuur staan. water
niveau.
• Open de waterkranen.
Weinig
wateropb
rengst
• Inlaat- en uitlaatklep niet
• volledig geopend.
• Inlaat- en uitlaatleidingen
zijn te vuil.
• PVC-buizen zijn te vuil.
• Open de inlaat- en
uitlaatklep
• volledig.
• Reinig de inlaat- en
uitlaatleidingen.
• Reinig de PVC-buis.

- 13 -
Adres: Baoshanqu Shuangchenglu 803long 11hao 1602A-1609shi
Shanghai
Geïmporteerd naar AUS: SIHAO PTY LTD.1 ROKEVA
STREETEASTWOOD NSW 2122 Australië
Geïmporteerd naar de VS: Sanven Technology Ltd.Suite 250, 9166
Anaheim Place, Rancho Cucamonga, CA 91730
REP
UK
Pooledas Group Ltd
Unit 5 Albert Edward House, The Pavilions
Preston, United Kingdom
REP
EC
SHUNSHUN GmbH
Römeräcker 9 Z2021, 76351
Linkenheim-Hochstetten, Germany
Gemaakt in China


Teknisk Support och e-garanticertifikat www.vevor.com/support
AKVARIUM FILTER
MODELL: SF-650F-UV 8W
We continue to be committed to provide you tools with competitive price.
"Save Half", "Half Price" or any other similar expressions used by us only represents an
estimate of savings you might benefit from buying certain tools with us compared to the major
top brands and does not necessarily mean to cover all categories of tools offered by us. You
are kindly reminded to verify carefully when you are placing an order with us if you are
actually saving half in comparison with the top major brands.


- 1 -
MODELL: SF-650F-UV 8W
Have product questions? Need technical support? Please feel free to
contact us:
Technical Support and E-Warranty Certificate
www.vevor.com/support
NEED HELP? CONTACT US!
This is the original instruction, please read all manual instructions
carefully before operating. VEVOR reserves a clear interpretation of our
user manual. The appearance of the product shall be subject to the
product you received. Please forgive us that we won't inform you again if
there are any technology or software updates on our product.
AQUARIUM FILTER
Black
Grey
- 2 -
Varning - För att minska risken för skada måste användaren
läsa instruktionerna noggrant.
Denna produkt omfattas av bestämmelserna i det europeiska
direktivet 2012/19/EC. Symbolen som visar en soptunna
korsad anger att produkten kräver separat sophämtning i EU.
Detta gäller för produkten och alla tillbehör märkta med denna
symbol. Produkter märkta som sådana får inte slängas
tillsammans med vanligt hushållsavfall, utan måste lämnas till
en insamlingsplats för återvinning av elektriska och
elektroniska apparater
LÄS OCH FÖLJ ALLA SÄKERHETSINSTRUKTIONER.
FARA- För att undvika eventuell elektrisk stöt bör särskild försiktighet
iakttas eftersom vatten används vid användningen av akvarieutrustning
För var och en av de följande situationer, försök inte reparera själv,
returnera apparaten till en auktoriserad serviceverkstad för service eller
kassera apparaten.
1.Denna apparat kan användas av barn från 8 år och uppåt och personer
med nedsatt fysisk, sensorisk eller mental förmåga eller brist på erfarenhet
och kunskap om de ha varit given övervakning eller instruktioner om
användning av apparaten på ett säkert sätt och förstå de inblandade
farorna. Barn får inte leka med apparaten Rengöring och
användarunderhåll får inte utföras av barn utan tillsyn.
2. Nätsladden kan inte bytas ut. Om sladden är skadad apparaten bör
skrotas.
3. Det maximala inloppsvattentrycket, i pascal: 0,03 MPa
4.Minsta inloppsvattentryck, i pascal:O.O1MPa, om detta är nödvändigt för
att apparaten ska fungera korrekt.
5. Nätsladden kan inte bytas ut, om sladden är skadad , apparaten skall
skrotas.
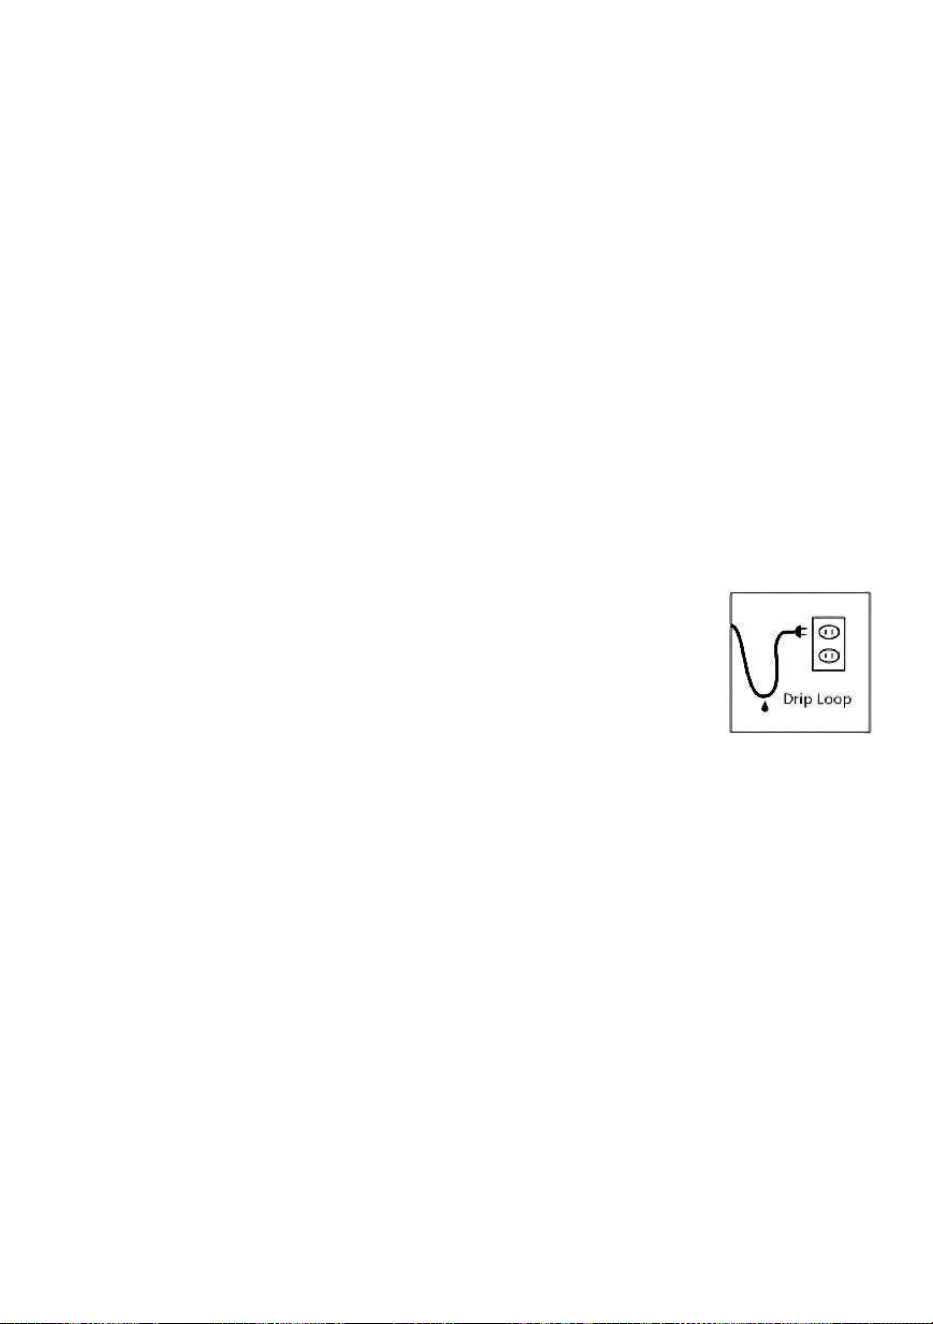
- 3 -
VARNING - Denna apparat innehåller en UV-strålare. Stirra inte på
ljuskälla.
Härmed tackar vi uppriktigt för att du köpt vår produkt..För att driva
produkten på ett säkert sätt, läs denna manual noggrant.
Varning:
1. Innan du använder produkten, kontrollera om det finns några skador på
produkten nätsladd. Om ja, använd inte produkten.
2. För att undvika standard, använd produkten under den reglerade
spänningen och frekvens.
3. Sätt inte i eller dra i nätsladden om dina händer är blöta.
4. vid underhåll eller flyttning av produkten eller när det är något onormalt
situation, vänligen stäng av strömmen först.
5. Se till att kontakten och uttaget är skyddade från vatten.
6. Dra inte rakt i nätsladden när du använder den. Snälla behåll nätsladden
ska vara "U"-form (se bilden nedan) för att undvika att vattnet rinner inuti
uttaget längs nätsladden.
7. Vänligen använd inte produkten i närheten av flambara
föremål .
8. Använd en professionell tekniker för underhåll.
9. Installera inte om produkten för att undvika
standardinställningar .
Lägga märke till:
1. Efter köpet, kontrollera om det finns någon skada eller saknas delar till
produkten .
2. Använd produkten under tankens vattenlinje.
3. Installera produkten på den plana ytan.
4 . När du flyttar produkten, ta den inte genom att hålla i ventilen, som den
där sätt kan orsaka brott på ventilen och ytterligare orsaka vatten läckage.
5 . Det rekommenderas att rengöra pumphjulet och propellern en gång i
månaden, som smutsen kommer att påverka pumphjulets livslängd.
6 . En impeller är lätt utsliten vara, den rekommenderas att bytas ut en
gång per år
7 . För att uppnå bästa UV-effekt föreslås det att UV-ljuset byts ut en gång

- 4 -
per halvår.
8 . Denna produkt bör fungera med vatten.
9 . Vänligen rengör filtermaterialet regelbundet (15-20 dagar) för att ta bort
det de smutsiga grejer som kommer att resultera i lågt vattenflöde.
10 . Om du använder det i marint vatten, vänligen ta bort saltet på vattnet
med jämna mellanrum produkt eller nätsladd för att undvika elektriskt
läckage.
INSTRUKTIONER

- 5 -
SPARA DESSA INSTRUKTIONER
Modell
SF-650F-UV 8W
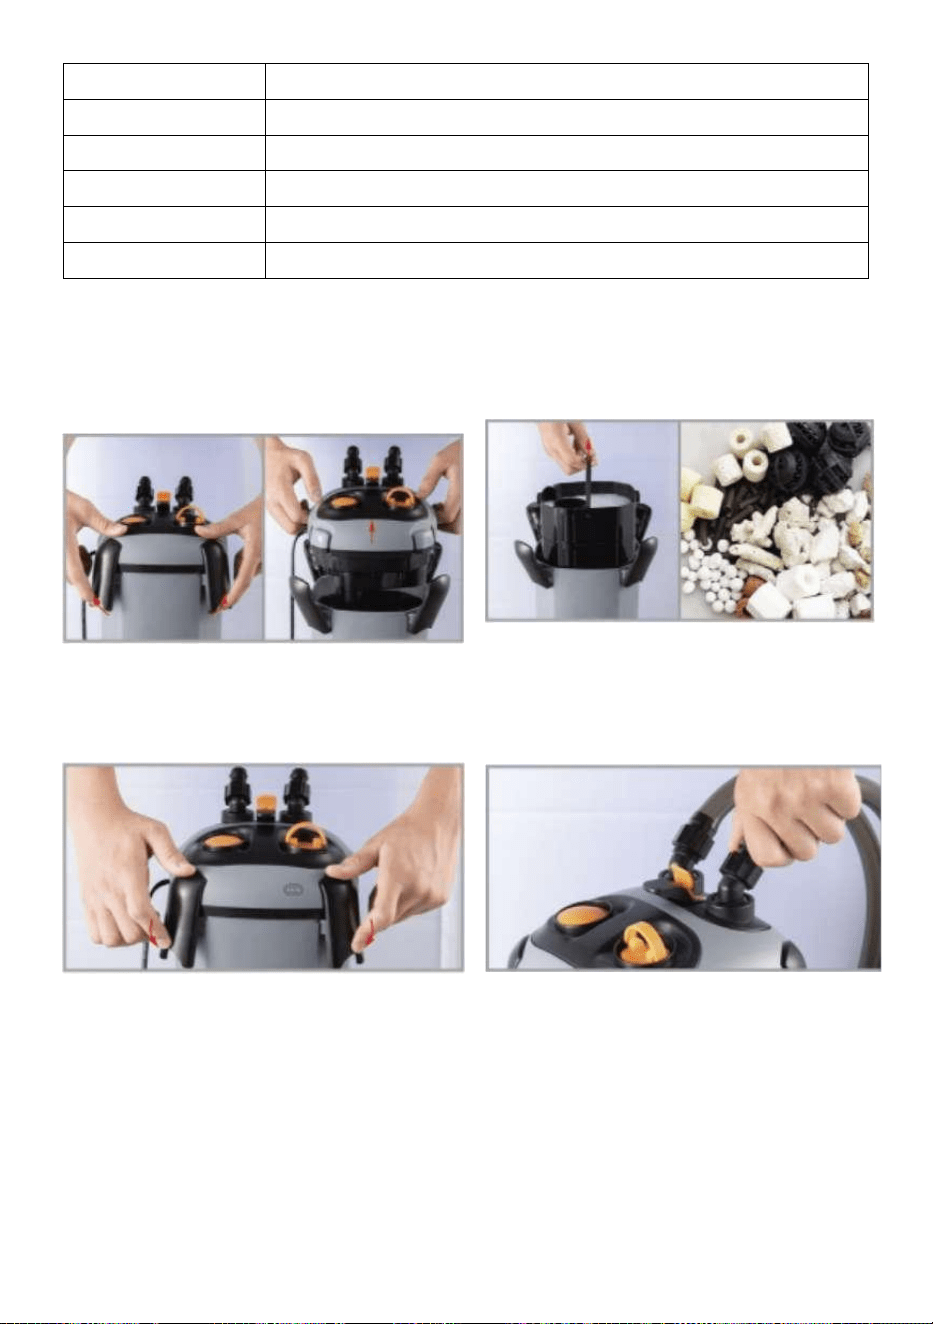
- 6 -
Spänning
AC1 1 0 -120 V 60 Hz eller AC220-240 V 50/60 Hz
Pump Kraft
8 W
UV-kraft
9 W
Flöde Max
650 L/H
Ljud
<50dB
Filternummer _
1
INSTALLATIONSINSTRUKTION
1. Öppna skopans fästspänne täcka
och plocka upp hinkskyddet.
2. Ta ut filterkorgen och lägg till
rengjort filter.
3. Sätt tillbaka filterkorgen, täck över
piphuvudet och fäst fästspännet.
4. Anslut slangen mellan
vattenutloppet och vatteninloppet,
och fäst sedan skruven.

- 7 -
5. Den andra änden av slangen är
ansluten med vattnet ut l et röret och
vattnet inloppsröret och
vattenutloppsrör och
vatteninloppsröret är fixerade i
akvariet.
6. Tillsätt vatten i akvariet tills
avstånd mellan vattenytan och
kanten på fisken tanken är mindre
än 12 cm, och den yttre pipan av
akvariet är 40 cm under vattnets
yta .
7. Se till att flödet är justerat till
maximalt.
8. Dra uppblåsningshandtaget upp
och ned 2~4 gånger för att suga in
vatten i trumman.
9. Efter att den är ansluten till
strömmen försörjning, kontrollera
om det finns vatten läckage runt
filterröret, och kolla igen 30-60
minuter senare efter den startar
ordentligt. Om det inte är några
problem kan den användas
normalt.

- 8 -
DRICKS:
RENGÖRINGS- OCH BYTESINSTRUKTION
Strömmen måste kopplas bort under rengöring och underhåll .
1. Slå på strömbrytaren på det fasta
sätet och dra sedan omkopplarsätet
uppåt.
2. Öppna pipans fästspänne täck
och plocka upp tunnlocket.
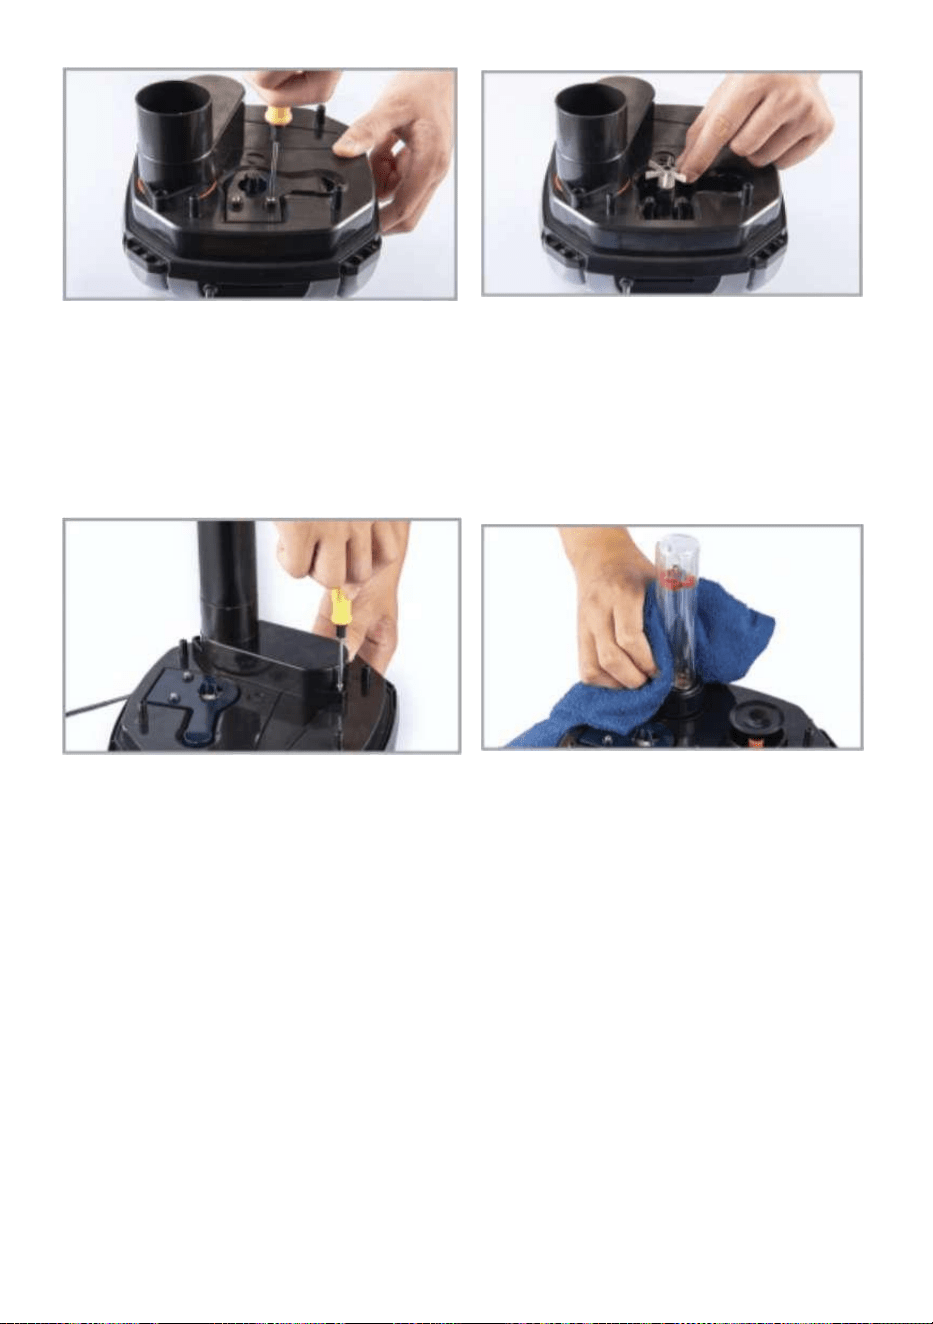
- 9 -
3 . Använd en stjärnskruvmejsel för
att skruva loss skruven i kanten av
vattentrumman täck och ta ut
vattentrummans lock .
4. Ta bort rotorn och rengör eller byt
ut den nya rotorn efter behov.
Rotorhålen kan rengöras med
borstar.
5. Använd en stjärnskruvmejsel att
skruva loss skruvarna och ta bort l
amp locket för rengöring .
6. Efter att ha tagit bort det
bakteriedödande medlet lampa
täck, rengör smutsen på kvartsröret
med våt handduk eller rent vatten.
Låt bli ta bort kvartsröret under
rengöring för att förhindra
kortslutning orsakad av vatten flyter
in i lamplockslinjen.
Om du inte behöver byta ut UV-lampan, hoppa över steg 7 till steg 9 .

- 10 -
7. Vrid loss den tilltäppta skruven
och ta bort kvartsröret.
8. Ta bort UV-lampröret och sätt
tillbaka det .
9. Montera kvartsröret och dra åt
den tilltäppta skruven.
10. Installera lampröret och vattnet
trumskydd med en
stjärnskruvmejsel .
11. Ta ut filterkorgen för att rengöra
eller byt ut filtret.
12 Sätt tillbaka filterkorgen, täck
över trumlocket, fäst fästspännet
sätt i ryggstödet och lås
fixeringsbrytaren.

- 11 -
FAILURE SHOT
För att
kunna
Situation
er
Skäl
Behandlingsmetod
Kan inte
Start
• Strömförsörjning är kopplad
ur
• Skada på pumphuvudet.
• Fläkthjulet fastnade
utländska frågor.
• Fläkthjulet sitter inte bra fast.
• Anslut till strömförsörjning.
• Byt ett nytt pumphuvud.
• Ta ut utländska saker.
• Fixera pumphjulet väl.
Vatten jag
läcker
• Vattenventilkranen är
skadad.
• Vattenventilens o-ring är
skadad eller med främmande
föremål .
• Krafthuvudets o-ring är
skadad eller med utländska
frågor.
• Krafthuvud och kapsel är
inte låst väl.
• PVC-rör och vattenventil är
inte bra ansluten.
• Impellerkåpans o-ring är
skadad eller med utländska
frågor.
• Byt nya vattenventilkranar
• Byt en ny vattenventils
o-ring eller ta bort
främmande föremål.
• Byt ut en ny o-ring eller ta
bort främmande föremål.
• Återfixa väl.
• Återfixa väl.
• Byt en ny o-ring av
impellerkåpan eller ta bort
främmande föremål.

- 12 -
Högljudd
• Impellern är skadad.
• Fläkthjulet har fastnat av
främmande föremål eller inte
fixerats korrekt.
• Inloppskranen är stängd.
• Luft finns i kapselfiltret.
• Byt ett nytt pumphjul.
• Ta bort främmande
föremål eller fixera
pumphjulet igen.
• Öppna inloppsventilens
kranar.
• Skaka kanisterns filterhus
och släpp ut luften helt.
Onormal
start _
• Behållaren är inte fylld med
vatten.
• Vattnet i akvariet är för lågt.
• Vattenventilens kranar är
inte öppna.
• Fyll behållarens filterhölje
helt med vatten.
• Vattnet i akvariet måste
vara över min. vattennivå.
• Öppna vattenventilens
kranar.
Lite
vattenutta
g
• Inlopps- och utloppsventiler
är det inte
• helt öppen.
• Inlopps- och utloppsrören är
för smutsiga.
• PVC-slangarna är för
smutsiga.
• Öppna inlopps- och
utloppsventilen
• helt.
• Rengör inlopps- och
utloppsrören.
• Rengör PVC-slangen.

- 13 -
Adress: Baoshanqu Shuangchenglu 803long 11hao 1602A-1609shi
Shanghai
Importerad till AUS: SIHAO PTY LTD.1 ROKEVA STREETEASTWOOD
NSW 2122 Australien
Importerad till USA: Sanven Technology Ltd.Suite 250, 9166 Anaheim
Place, Rancho Cucamonga, CA 91730
REP
UK
Pooledas Group Ltd
Unit 5 Albert Edward House, The Pavilions
Preston, United Kingdom
REP
EC
SHUNSHUN GmbH
Römeräcker 9 Z2021, 76351
Linkenheim-Hochstetten, Germany
Tillverkad i Kina