Product Introduction
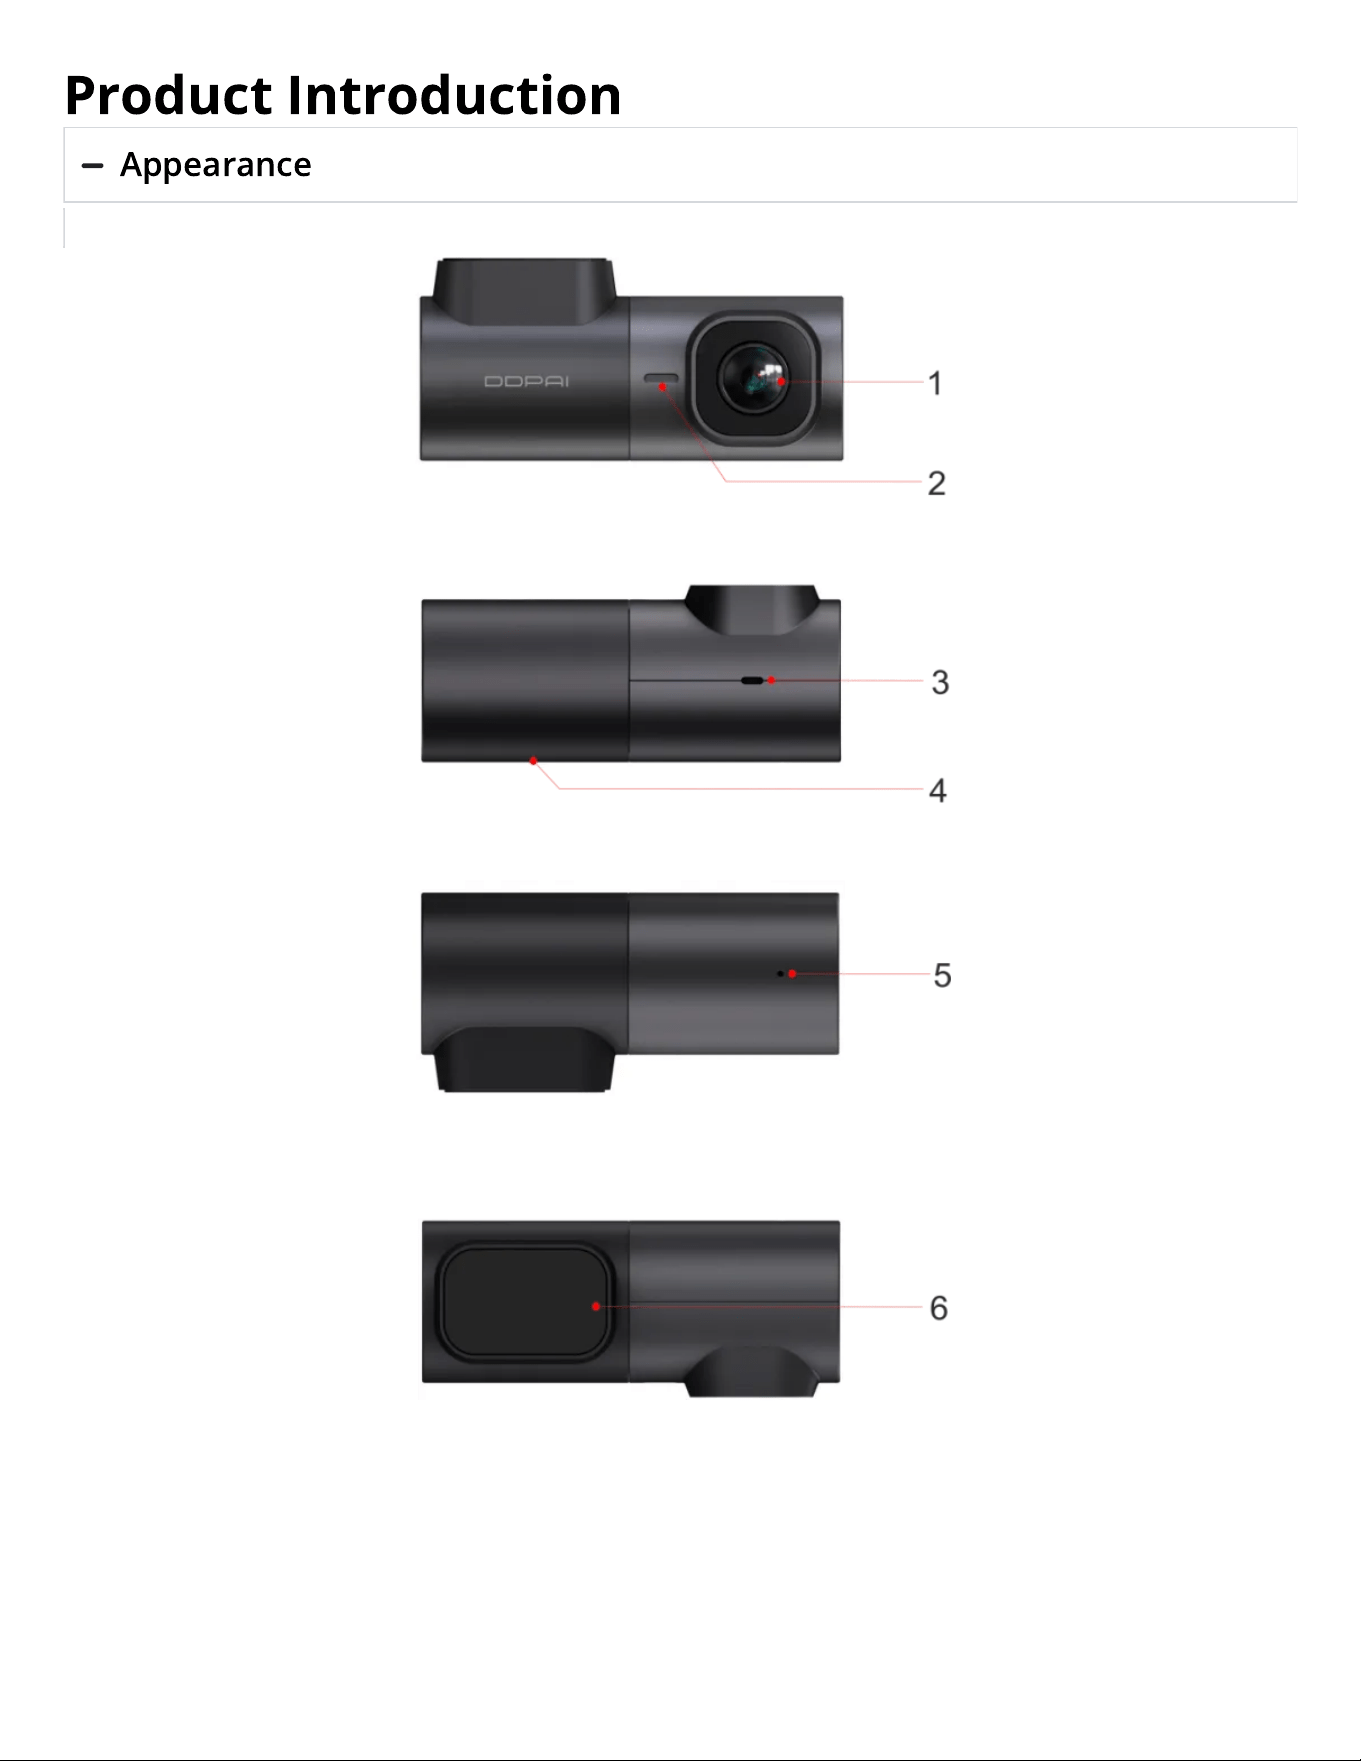
Appearance
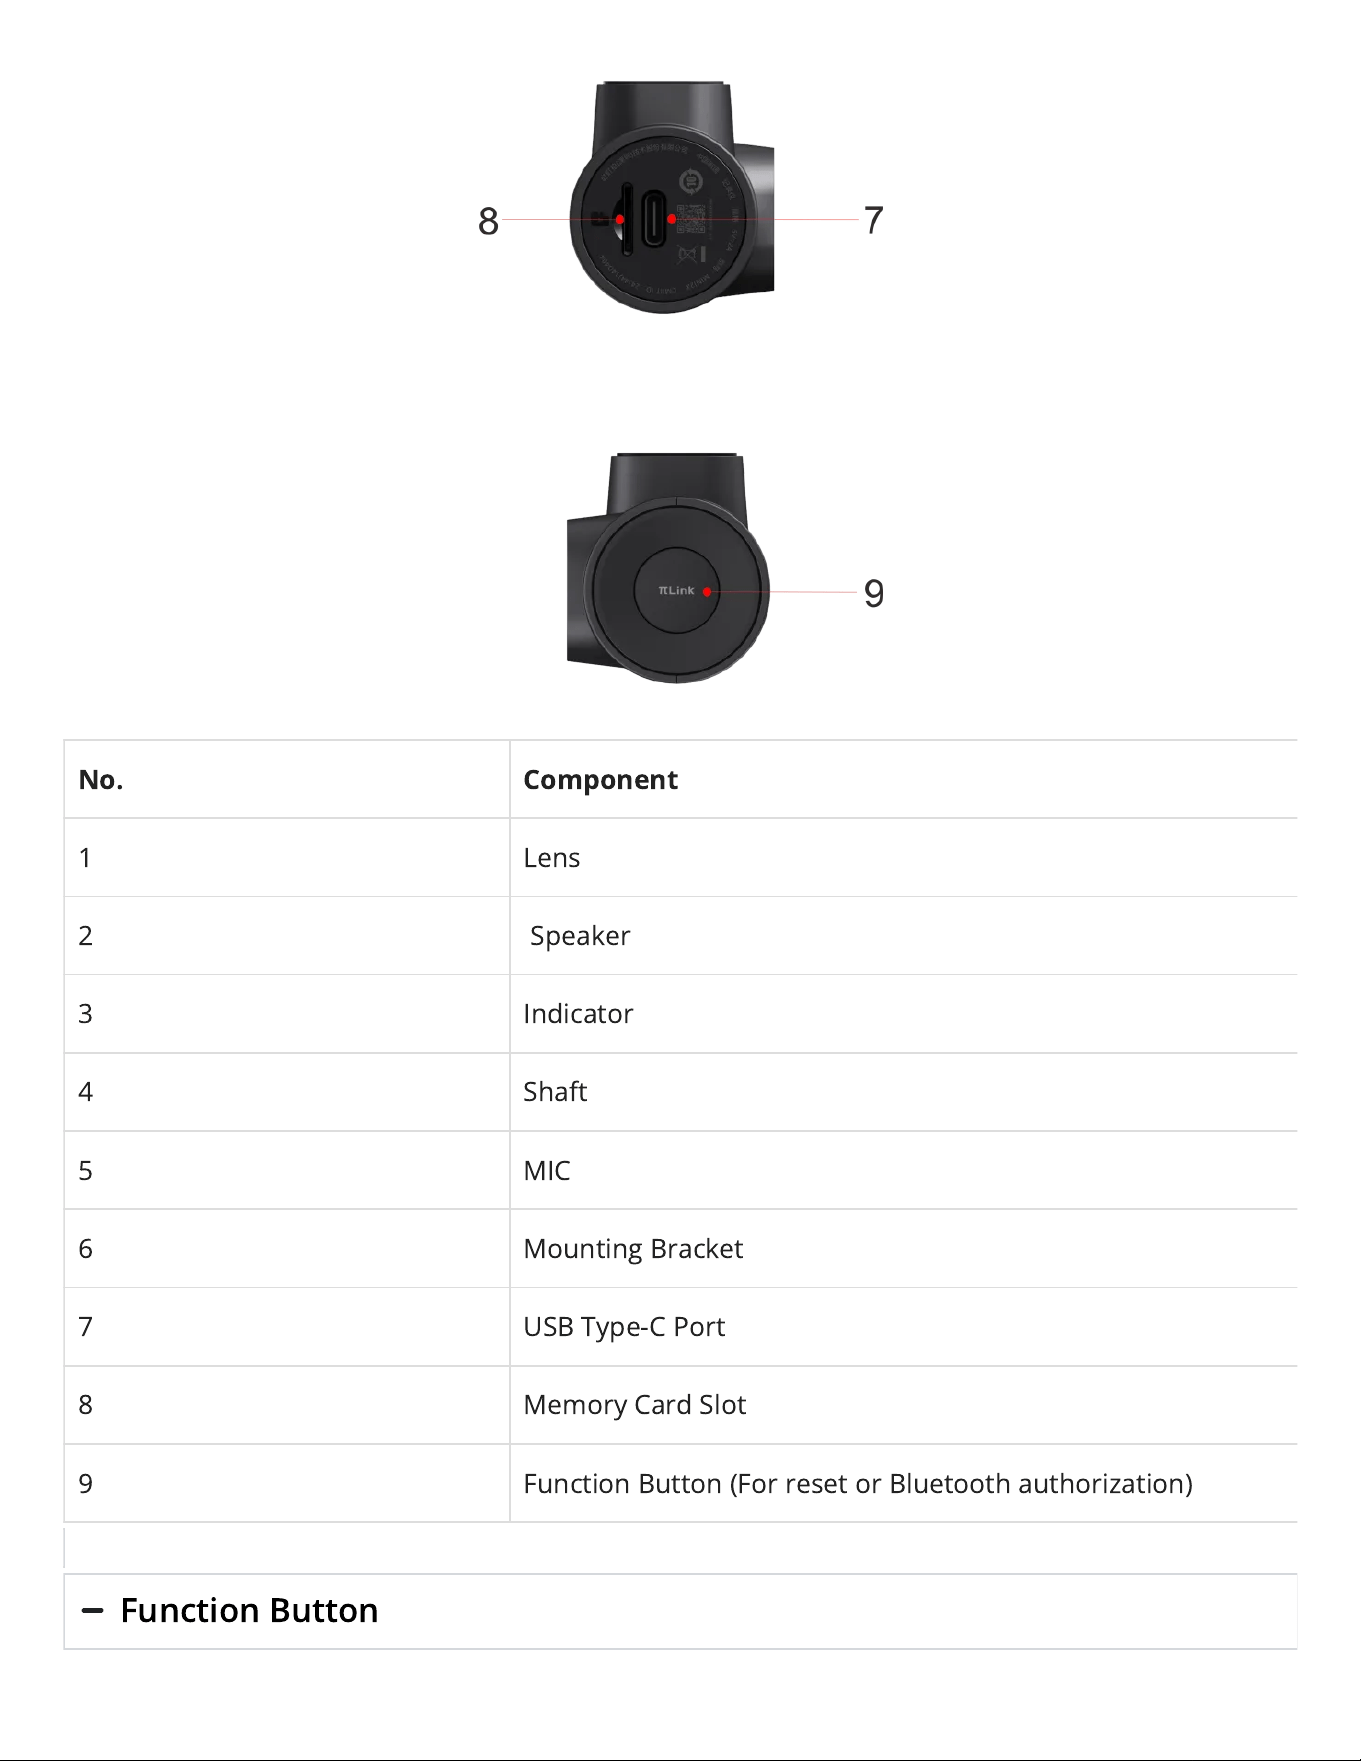
No. Component
1 Lens
2 Speaker
3 Indicator
4 Shaft
5 MIC
6 Mounting Bracket
7 USB Type-C Port
8 Memory Card Slot
9 Function Button (For reset or Bluetooth authorization)
Function Button
Function Operation
Bluetooth authorization Quick press
Reset Press and hold for 6 seconds
Indicator Guide
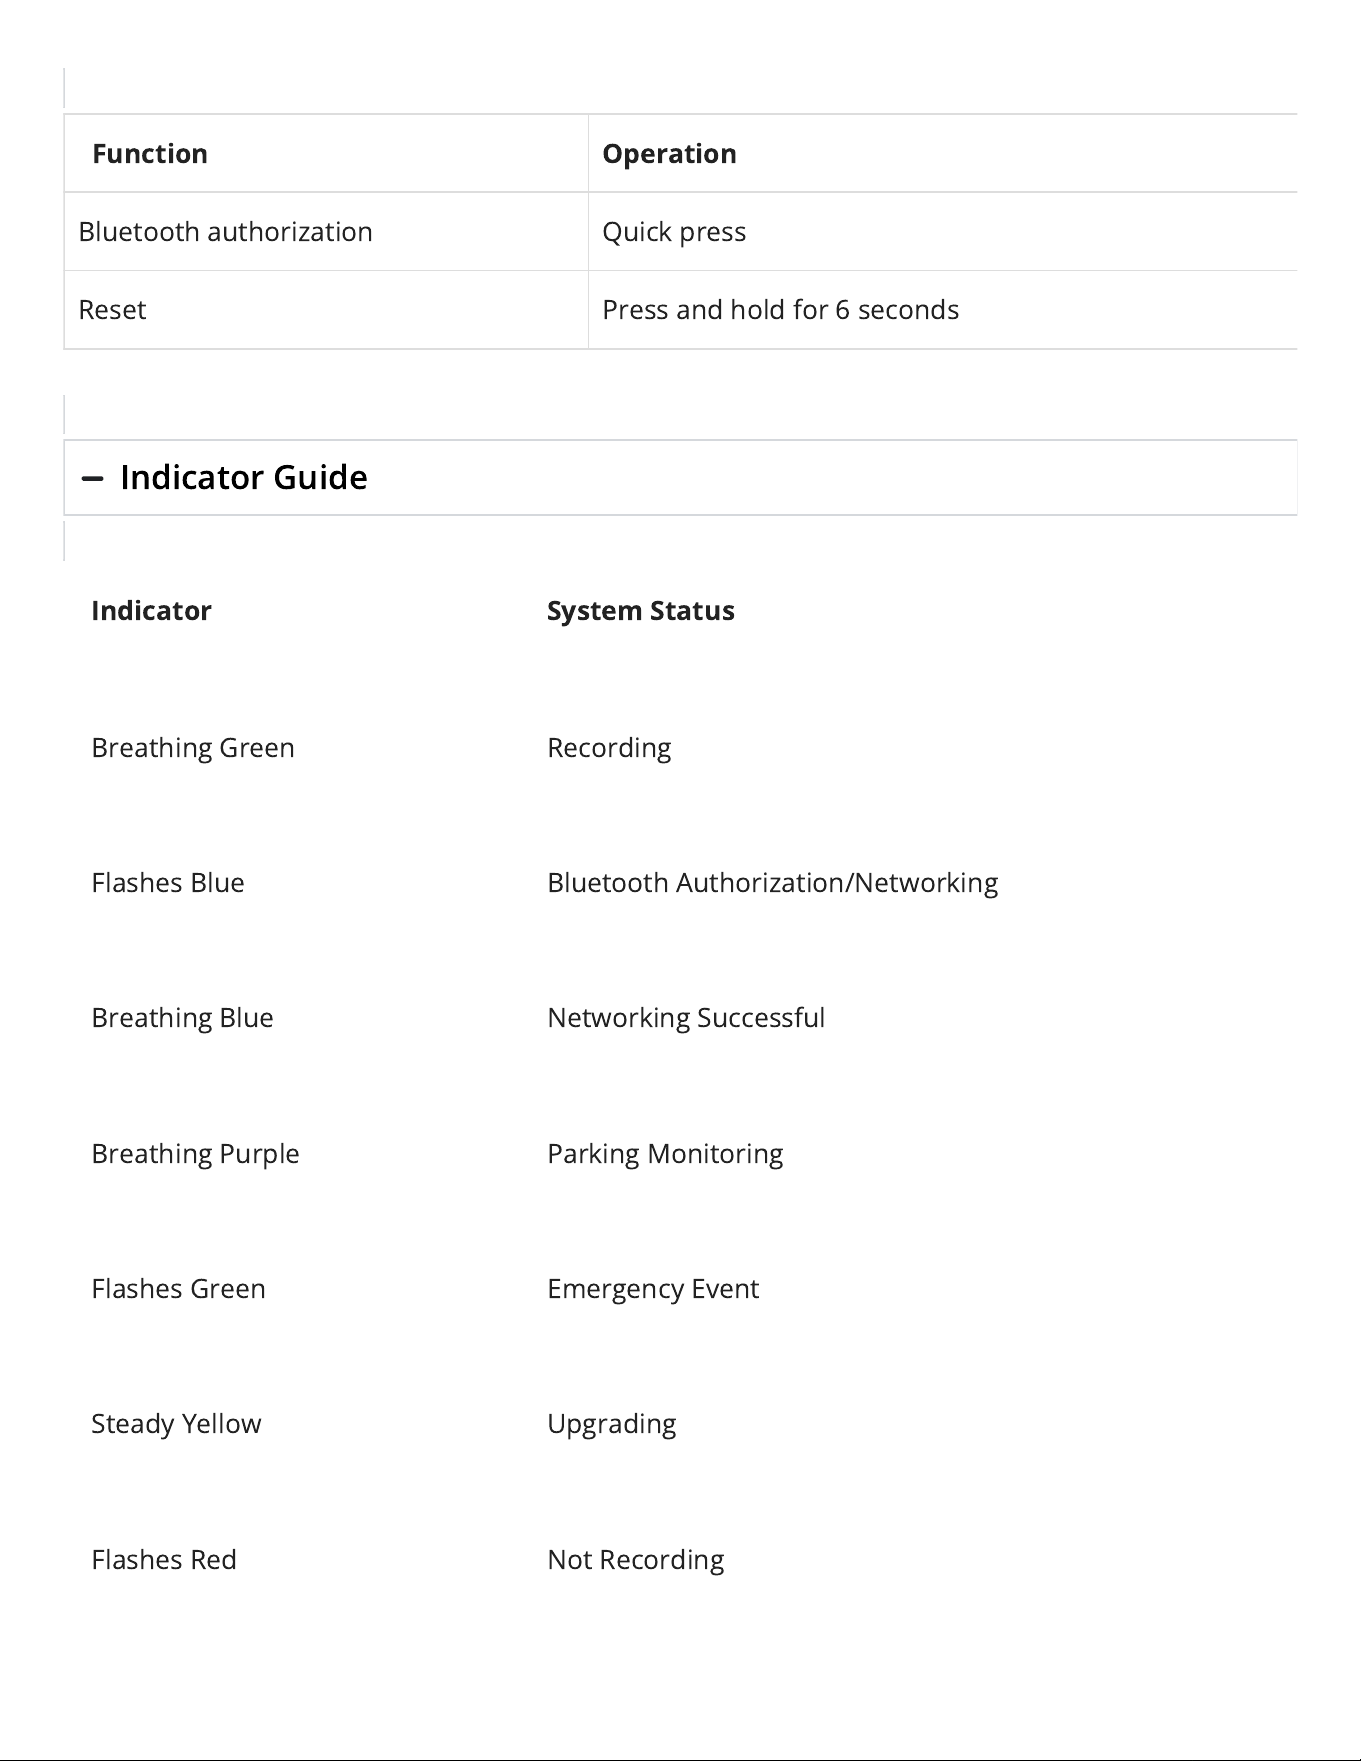
Indicator System Status
BreathingGreen Recording
Flashes Blue Bluetooth Authorization/Networking
BreathingBlue Networking Successful
Breathing Purple Parking Monitoring
Flashes Green Emergency Event
Steady Yellow Upgrading
FlashesRed Not Recording
Specications
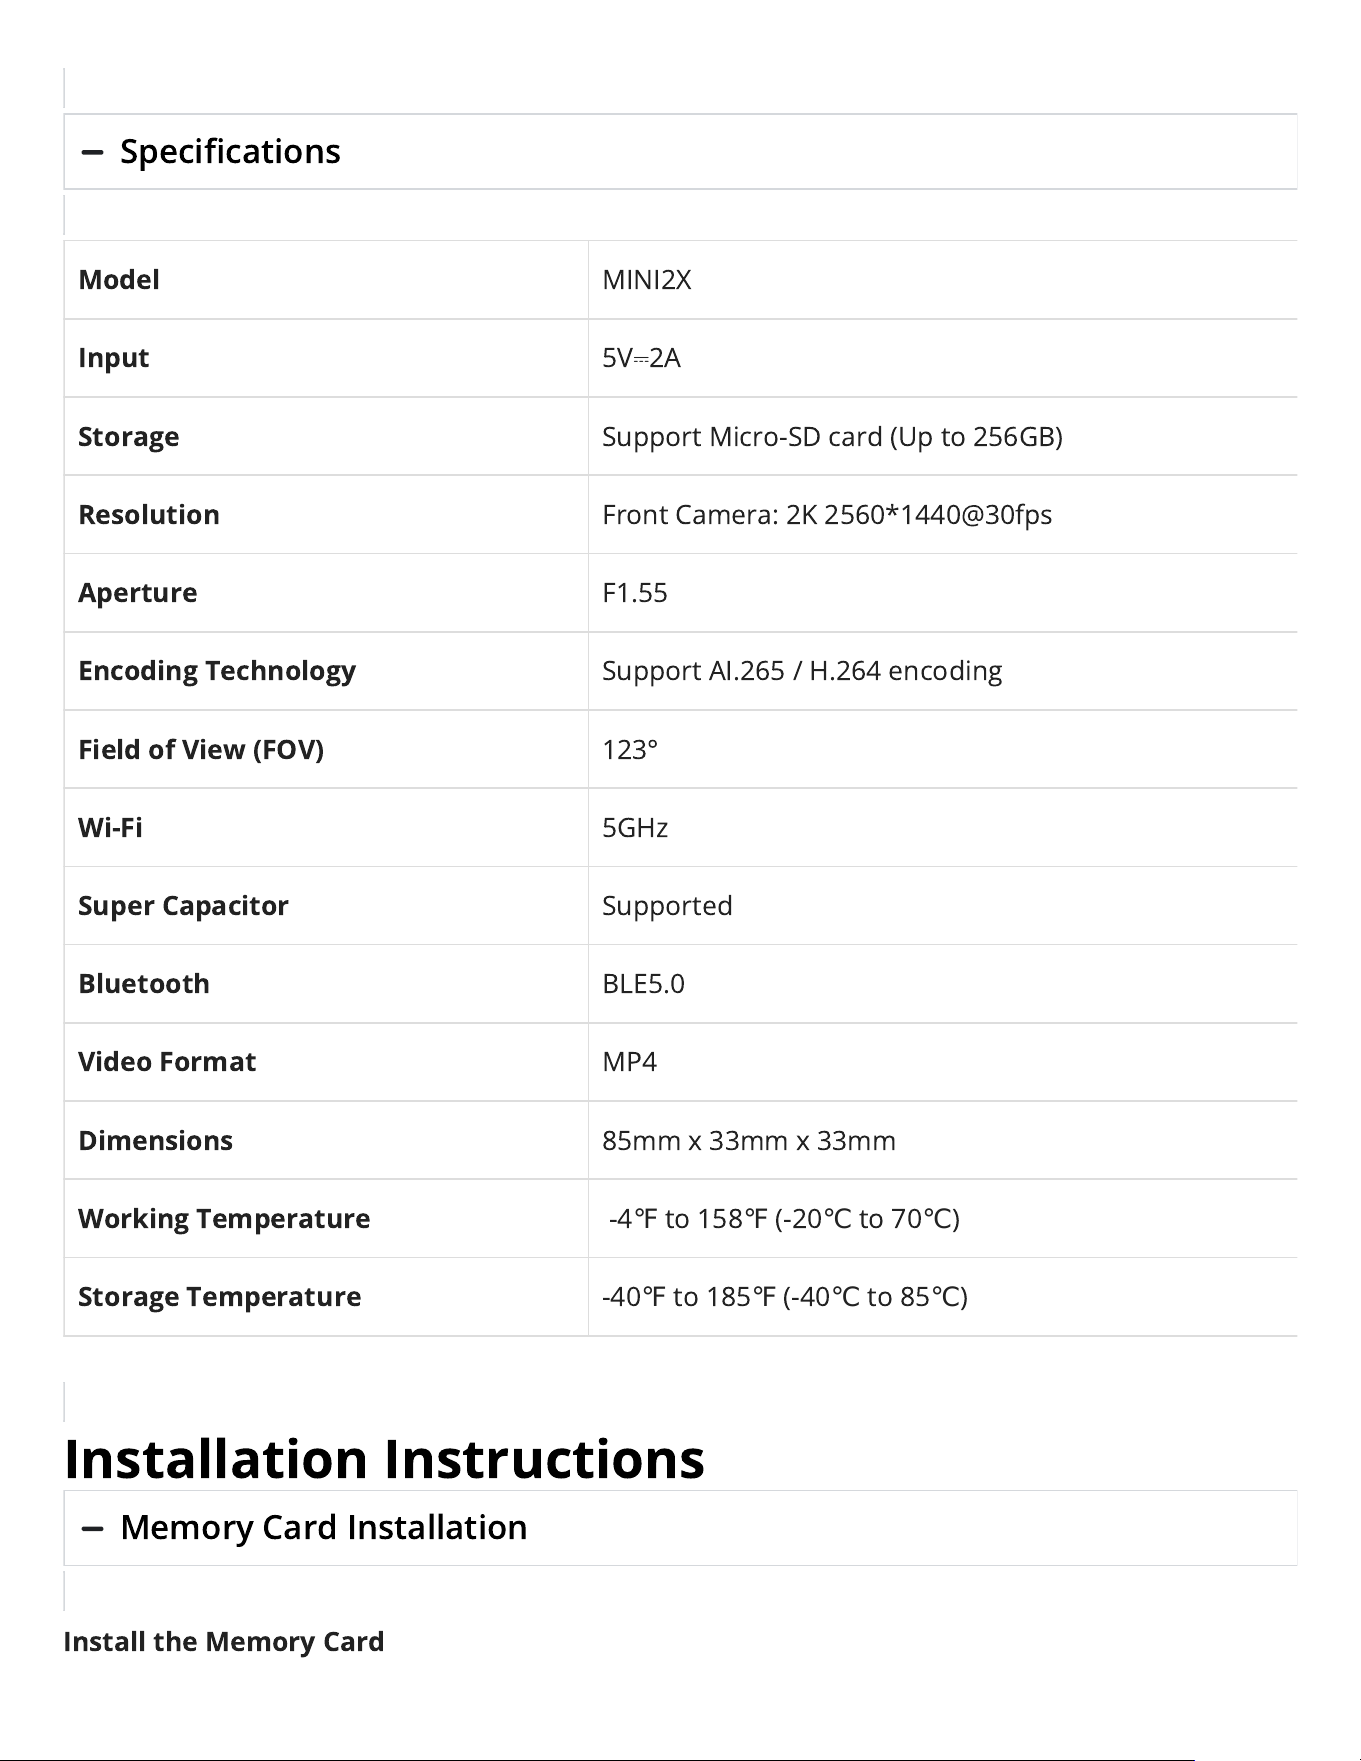
Model
MINI2X
Input
5V
⎓
2A
Storage
SupportMicro-SD card (Up to 256GB)
Resolution
Front Camera:2K 2560*1440@30fps
Aperture
F1.55
Encoding Technology
Support AI.265/H.264 encoding
Field of View (FOV)
123°
Wi-Fi
5GHz
Super Capacitor
Supported
Bluetooth
BLE5.0
Video Format
MP4
Dimensions
85mm x33mm x33mm
Working Temperature
-4
℉
to 158
℉
(-20
℃
to 70
℃
)
Storage Temperature
-40
℉
to 185
℉
(-40
℃
to 85
℃
)
Installation Instructions
Memory Card Installation
Install the Memory Card
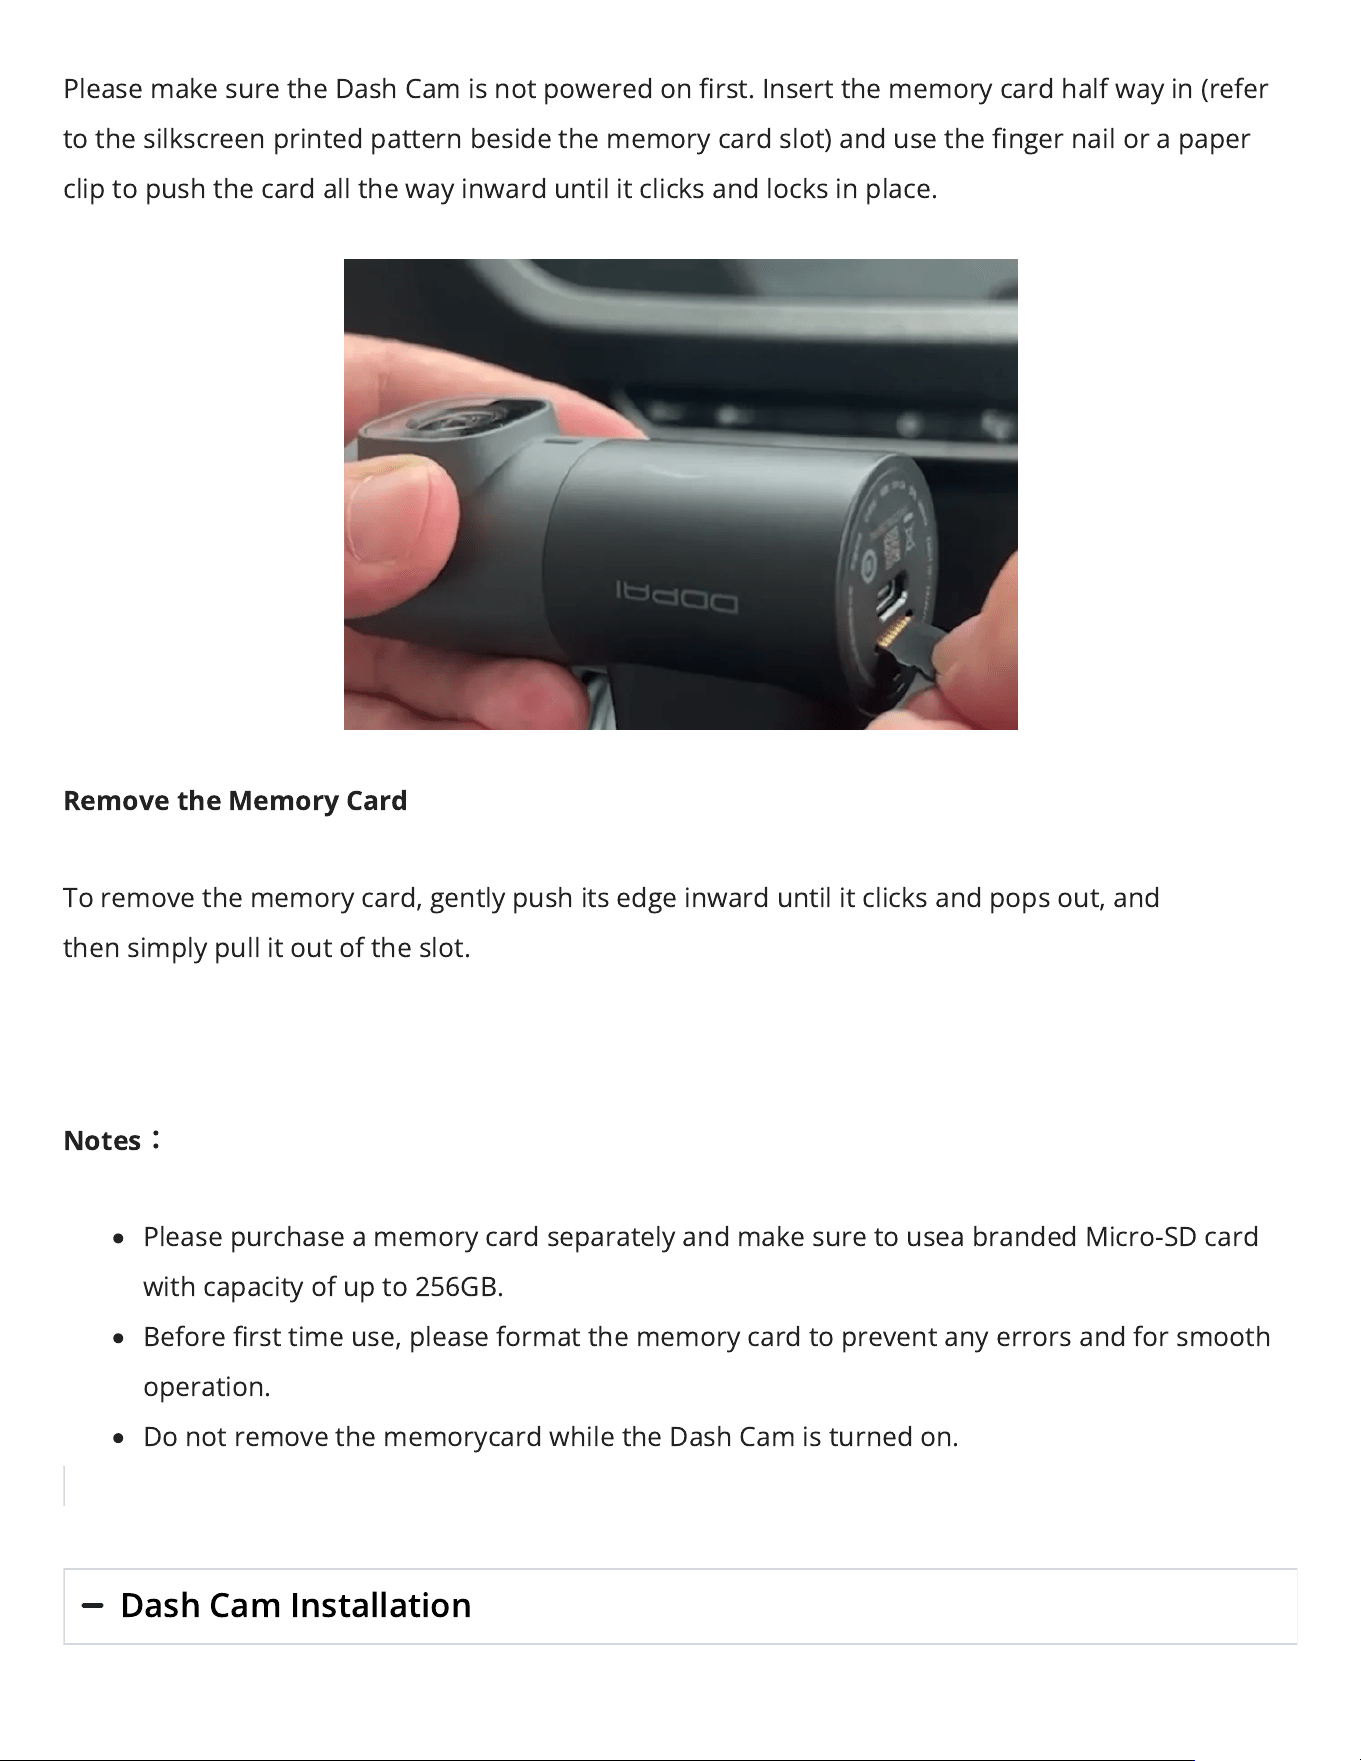
Please make sure the Dash Cam is not powered on rst. Insert the memory card half way in (refer
to the silkscreen printed pattern beside the memory cardslot) and use the nger nail or a paper
clip to push the card all the way inward until it clicks and locks in place.
Remove the Memory Card
To remove the memory card, gently push its edge inward until it clicks and pops out, and
thensimply pull it out of the slot.
Notes
:
Please purchase a memory card separately and make sure to usea branded Micro-SD card
with capacity of up to 256GB.
Before rst time use, please format the memory card to prevent any errors and for smooth
operation.
Do not remove the memorycard while the Dash Camis turned on.
Dash Cam Installation
The wiring and power-taking installation method of the Dash Cam include the following three
types.
Cigarette Lighter Power Supply
Insert the car charger into the cigarette lighter, and connect the car charger and the Dash
Camthrough the power cord. Most of the power cord will be embedded in the plastic guard plate
of the car, and a small part will be exposed in the car. This wiring method is simple and easy to
operate.
Step 1: Wipe the front windshield
Wipe the front windshield with a clean soft cloth to ensure that the bracket can stick rmly.
Step 2: Power on the Dash Cam
After inserting the car charger into the cigarette lighter, connect the Dash Camto the car charger
using theincludedType-C power cord.
After the car starts, the Dash Camwill automatically start when it is powered on, and the start-up
prompt tone “Hello, DDPAI” will be issued, and the Dash Camwill start recording at this time.
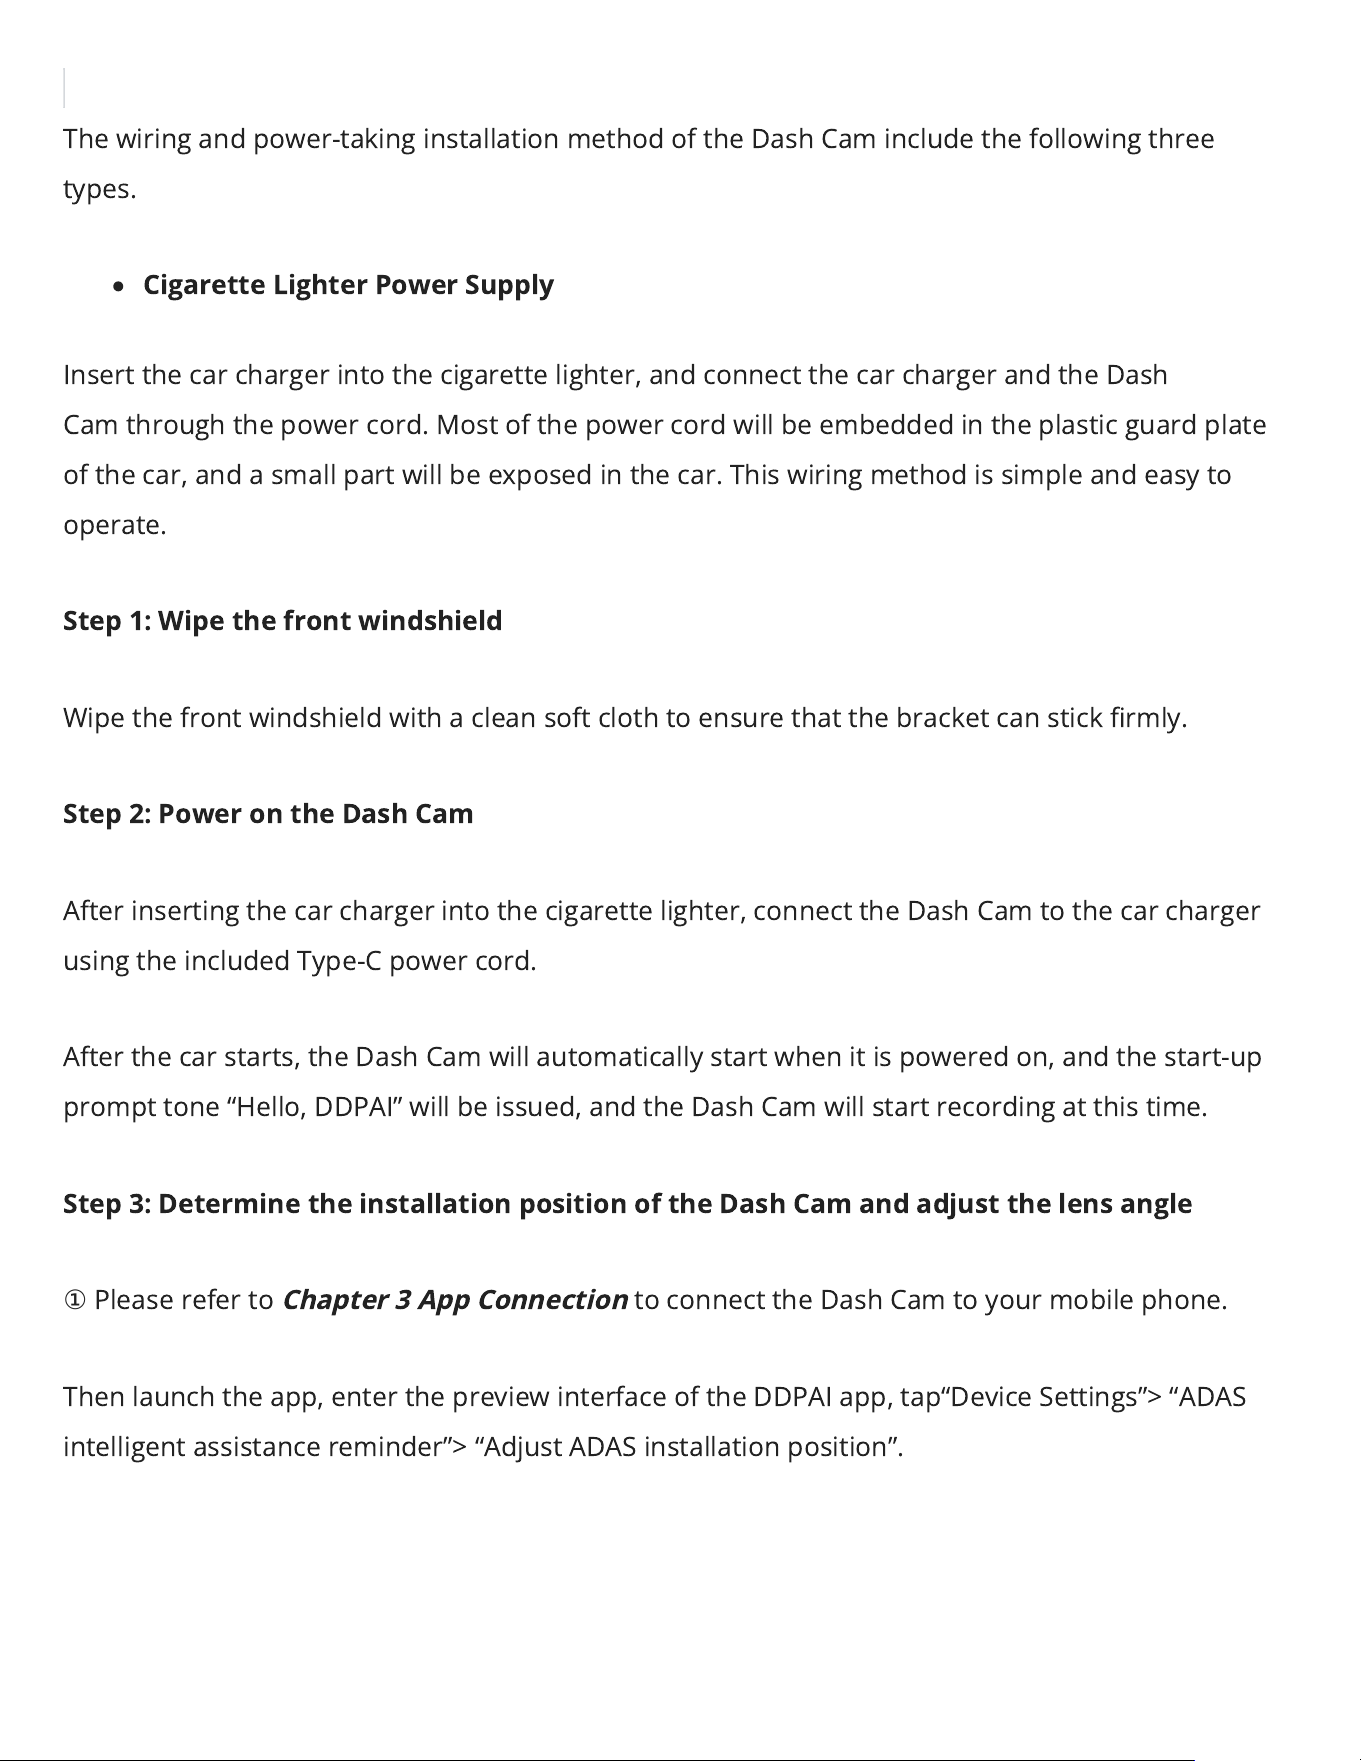
Step 3: Determine the installation position of the Dash Camand adjust the lens angle
①
Please refer to
Chapter 3 AppConnection
toconnect the Dash Cam to your mobile phone.
Then launch the app, enter the preview interface of the DDPAI app, tap“Device Settings”> “ADAS
intelligent assistance reminder”> “Adjust ADAS installation position”.
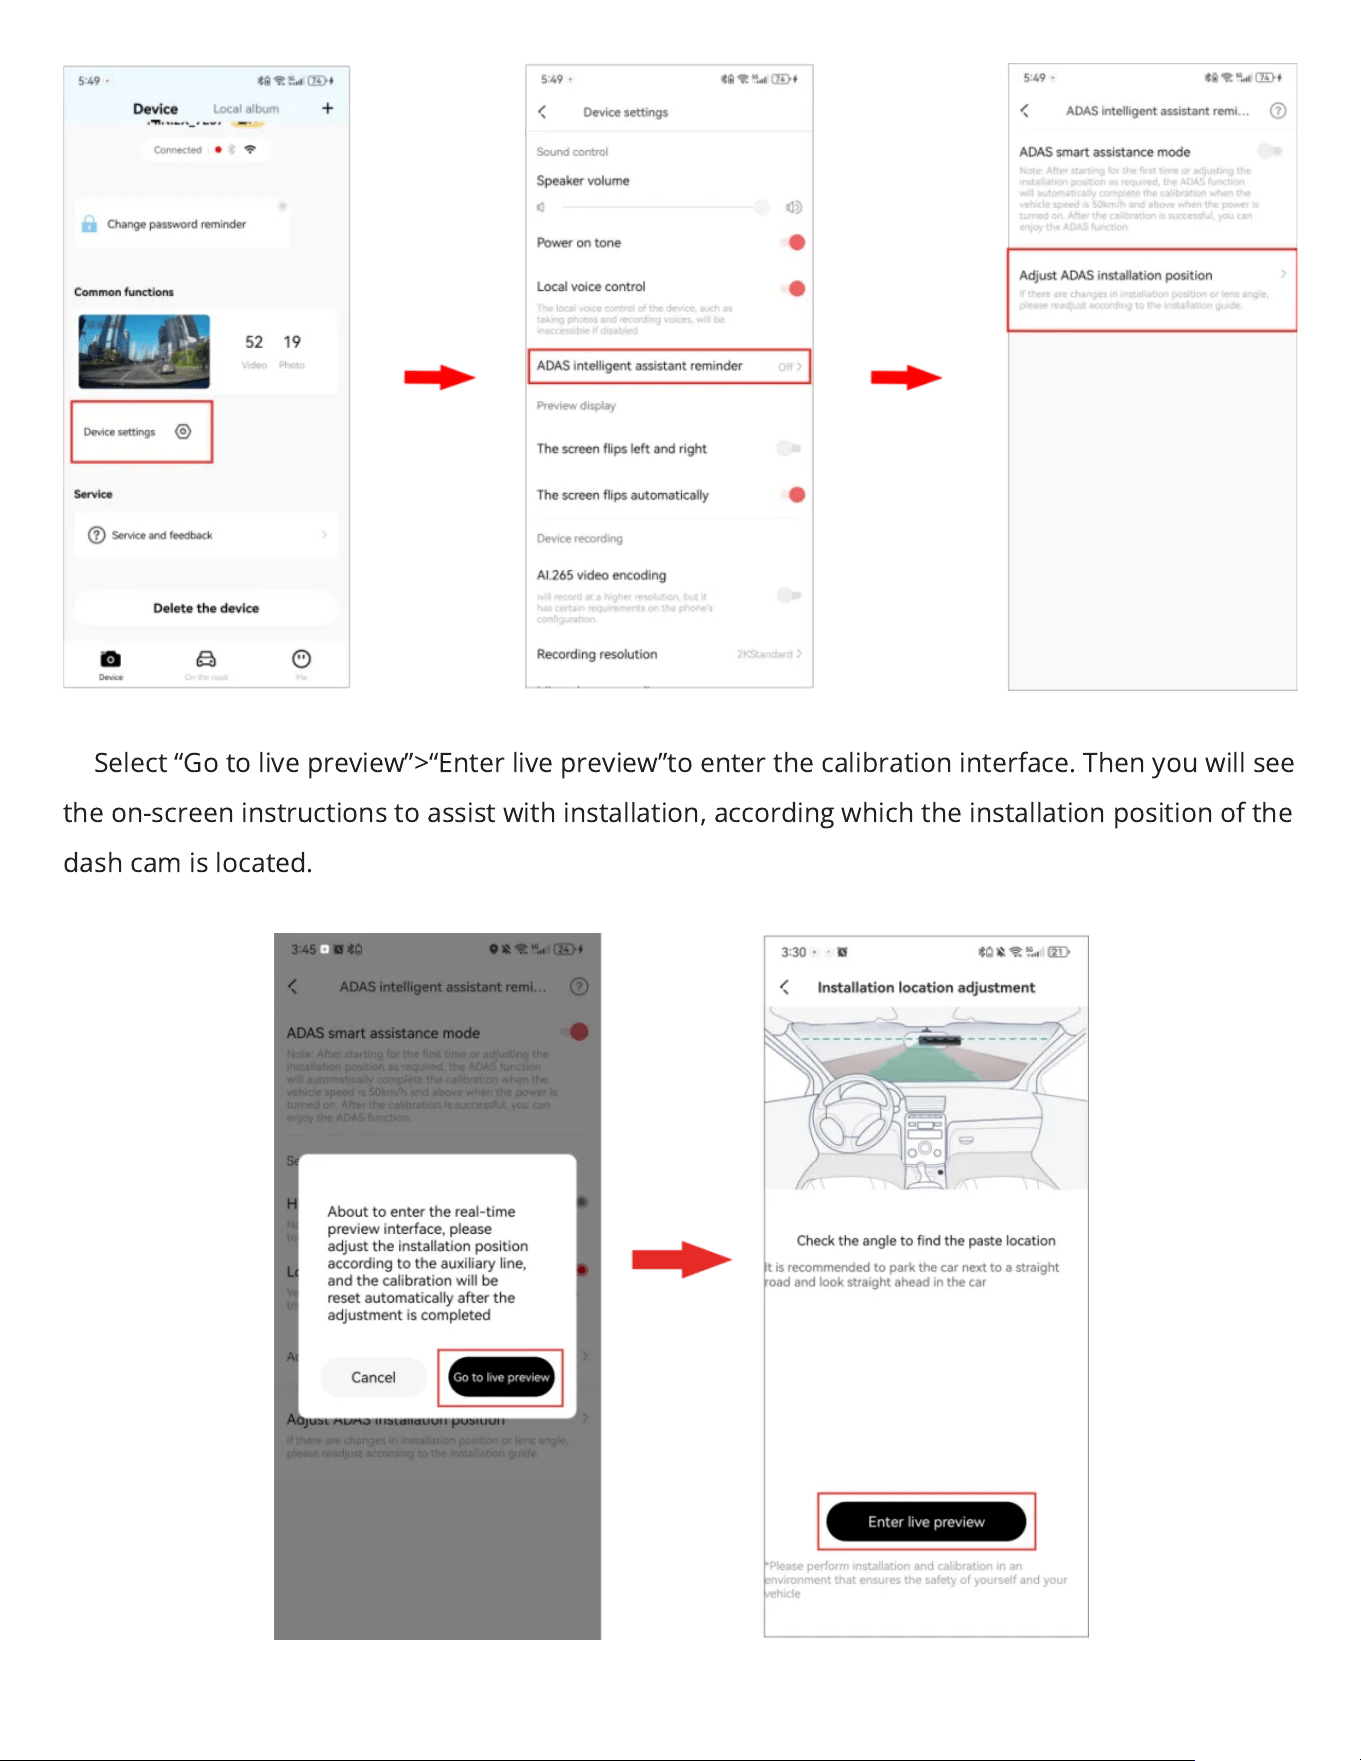
②
Select “Go to live preview”>“Enter live preview”to enter the calibration interface. Then you will see
the on-screen instructions to assist with installation, according which the installation position of the
dash cam is located.
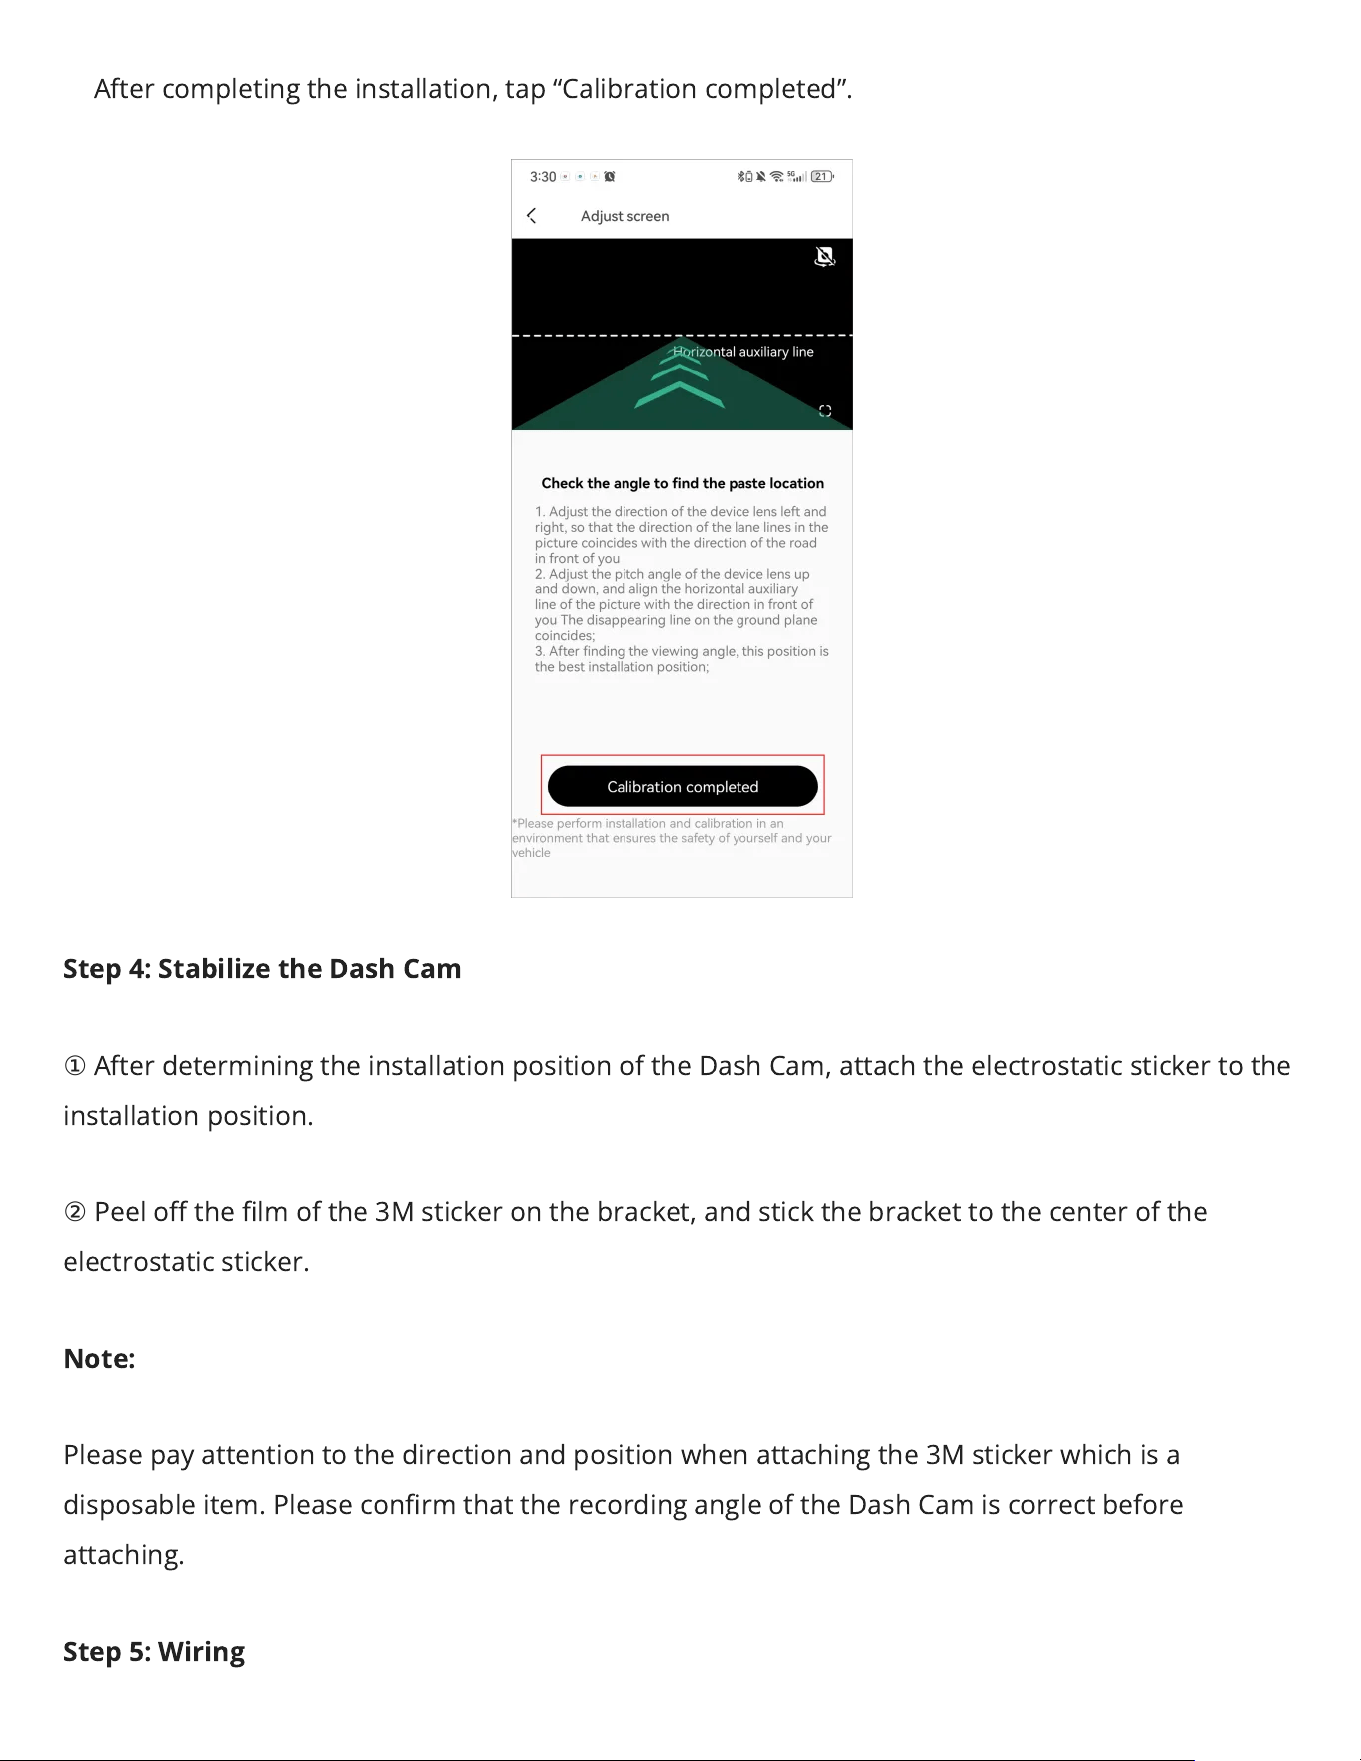
③
After completing the installation, tap “Calibration completed”.
Step 4: Stabilize the Dash Cam
①
After determining the installation position of the Dash Cam, attach the electrostatic sticker to the
installation position.
②
Peel o the lm of the 3M sticker on the bracket, and stick the bracket to the center of the
electrostatic sticker.
Note:
Please pay attention to the direction and position when attaching the 3M sticker which is a
disposable item. Please conrm that the recording angle of the Dash Cam is correct before
attaching.
Step 5: Wiring
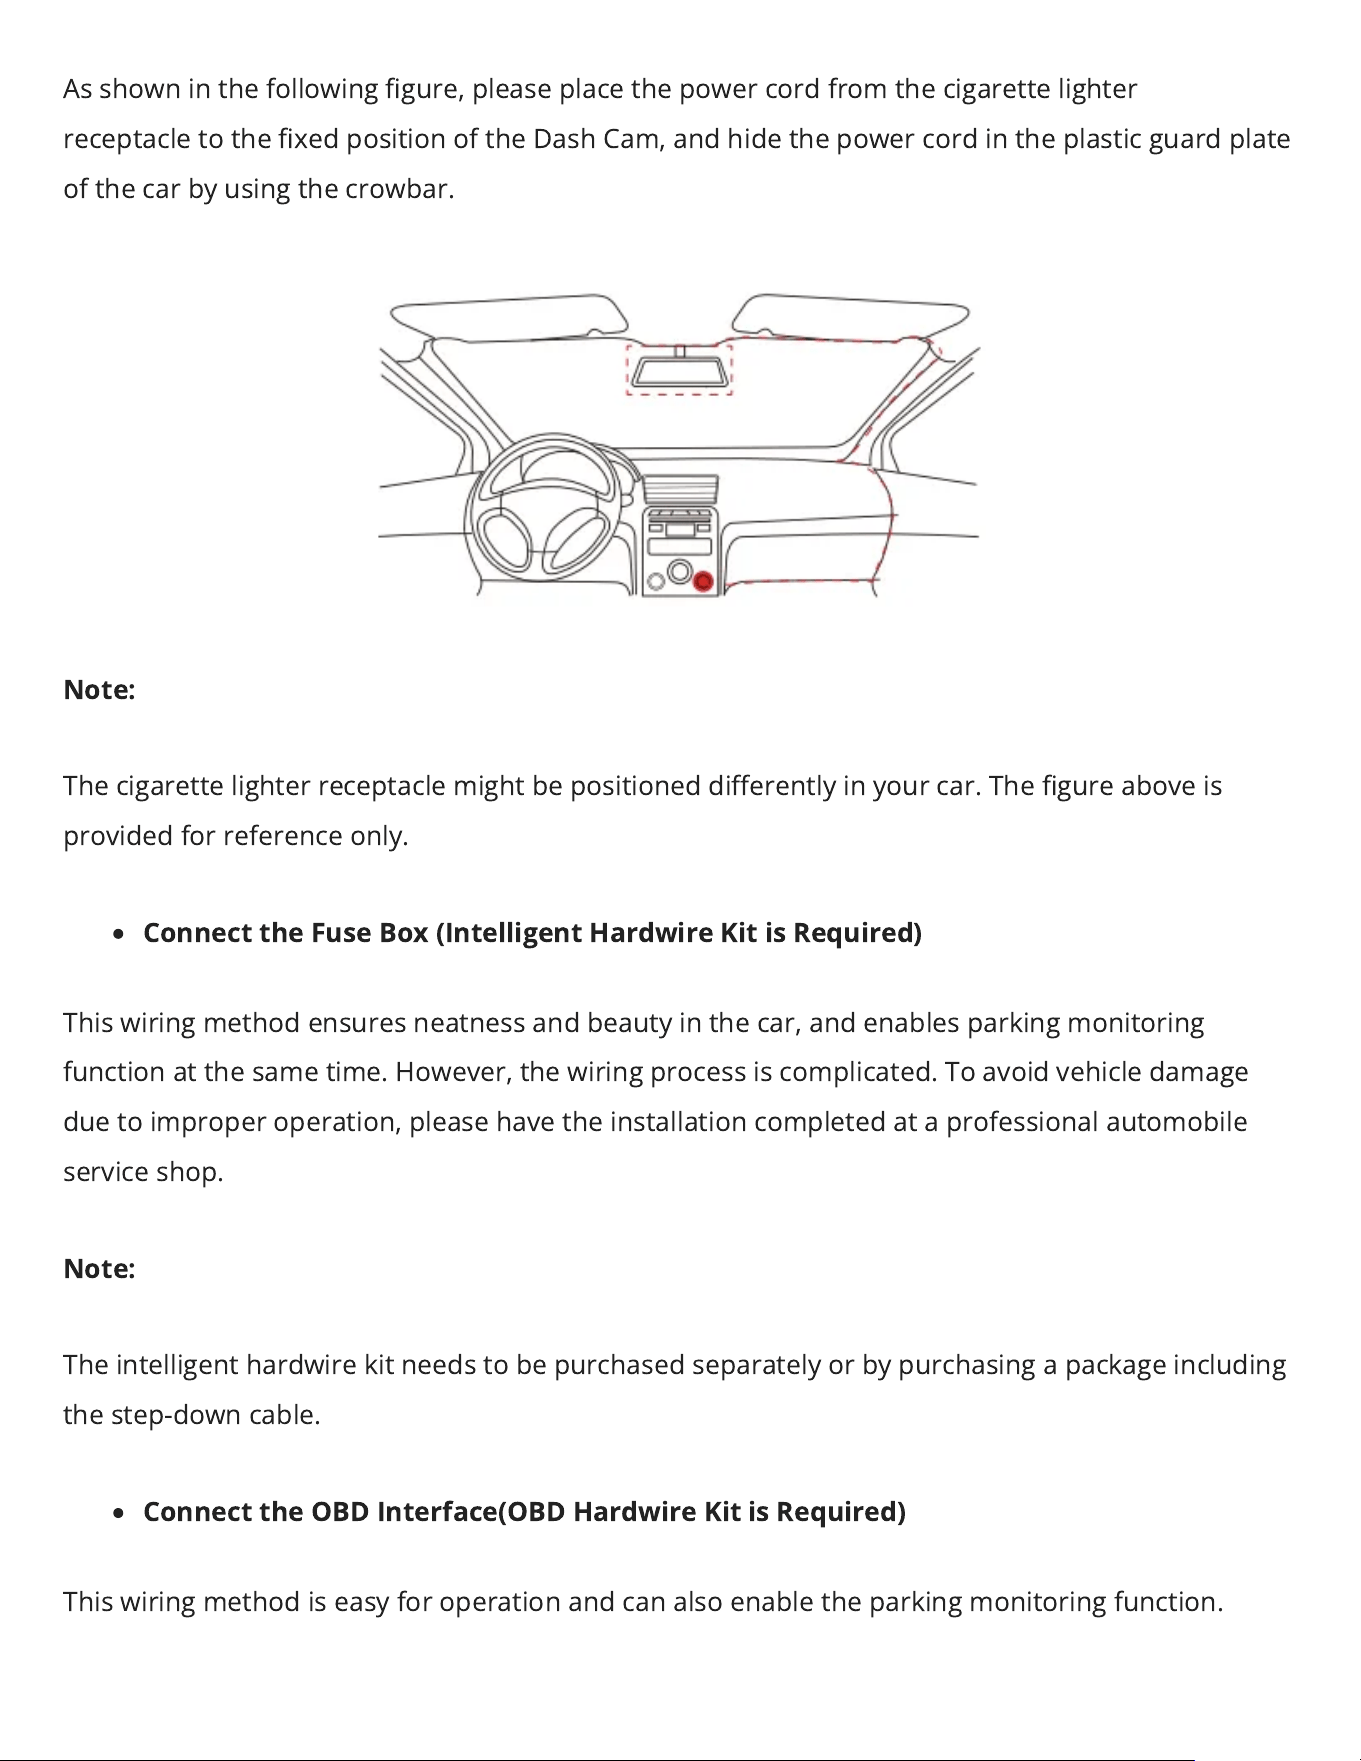
As shown in the following gure, please place the power cord from the cigarette lighter
receptacleto the xed position of the Dash Cam, and hide the power cord in the plastic guard plate
of the car by using thecrowbar.
Note:
The cigarette lighter receptacle might be positioned dierently in your car. The gure aboveis
provided for reference only.
Connect the Fuse Box (Intelligent Hardwire Kit is Required)
This wiring method ensures neatness and beauty in the car, andenables parking monitoring
function at the same time. However, the wiring process is complicated. To avoid vehicle damage
due to improper operation, please have the installation completed at a professional automobile
service shop.
Note:
The intelligent hardwire kitneeds to be purchased separately or by purchasing a package including
the step-down cable.
Connect the OBD Interface(OBD Hardwire Kit is Required)
This wiring methodis easy for operation and can also enablethe parking monitoring function.
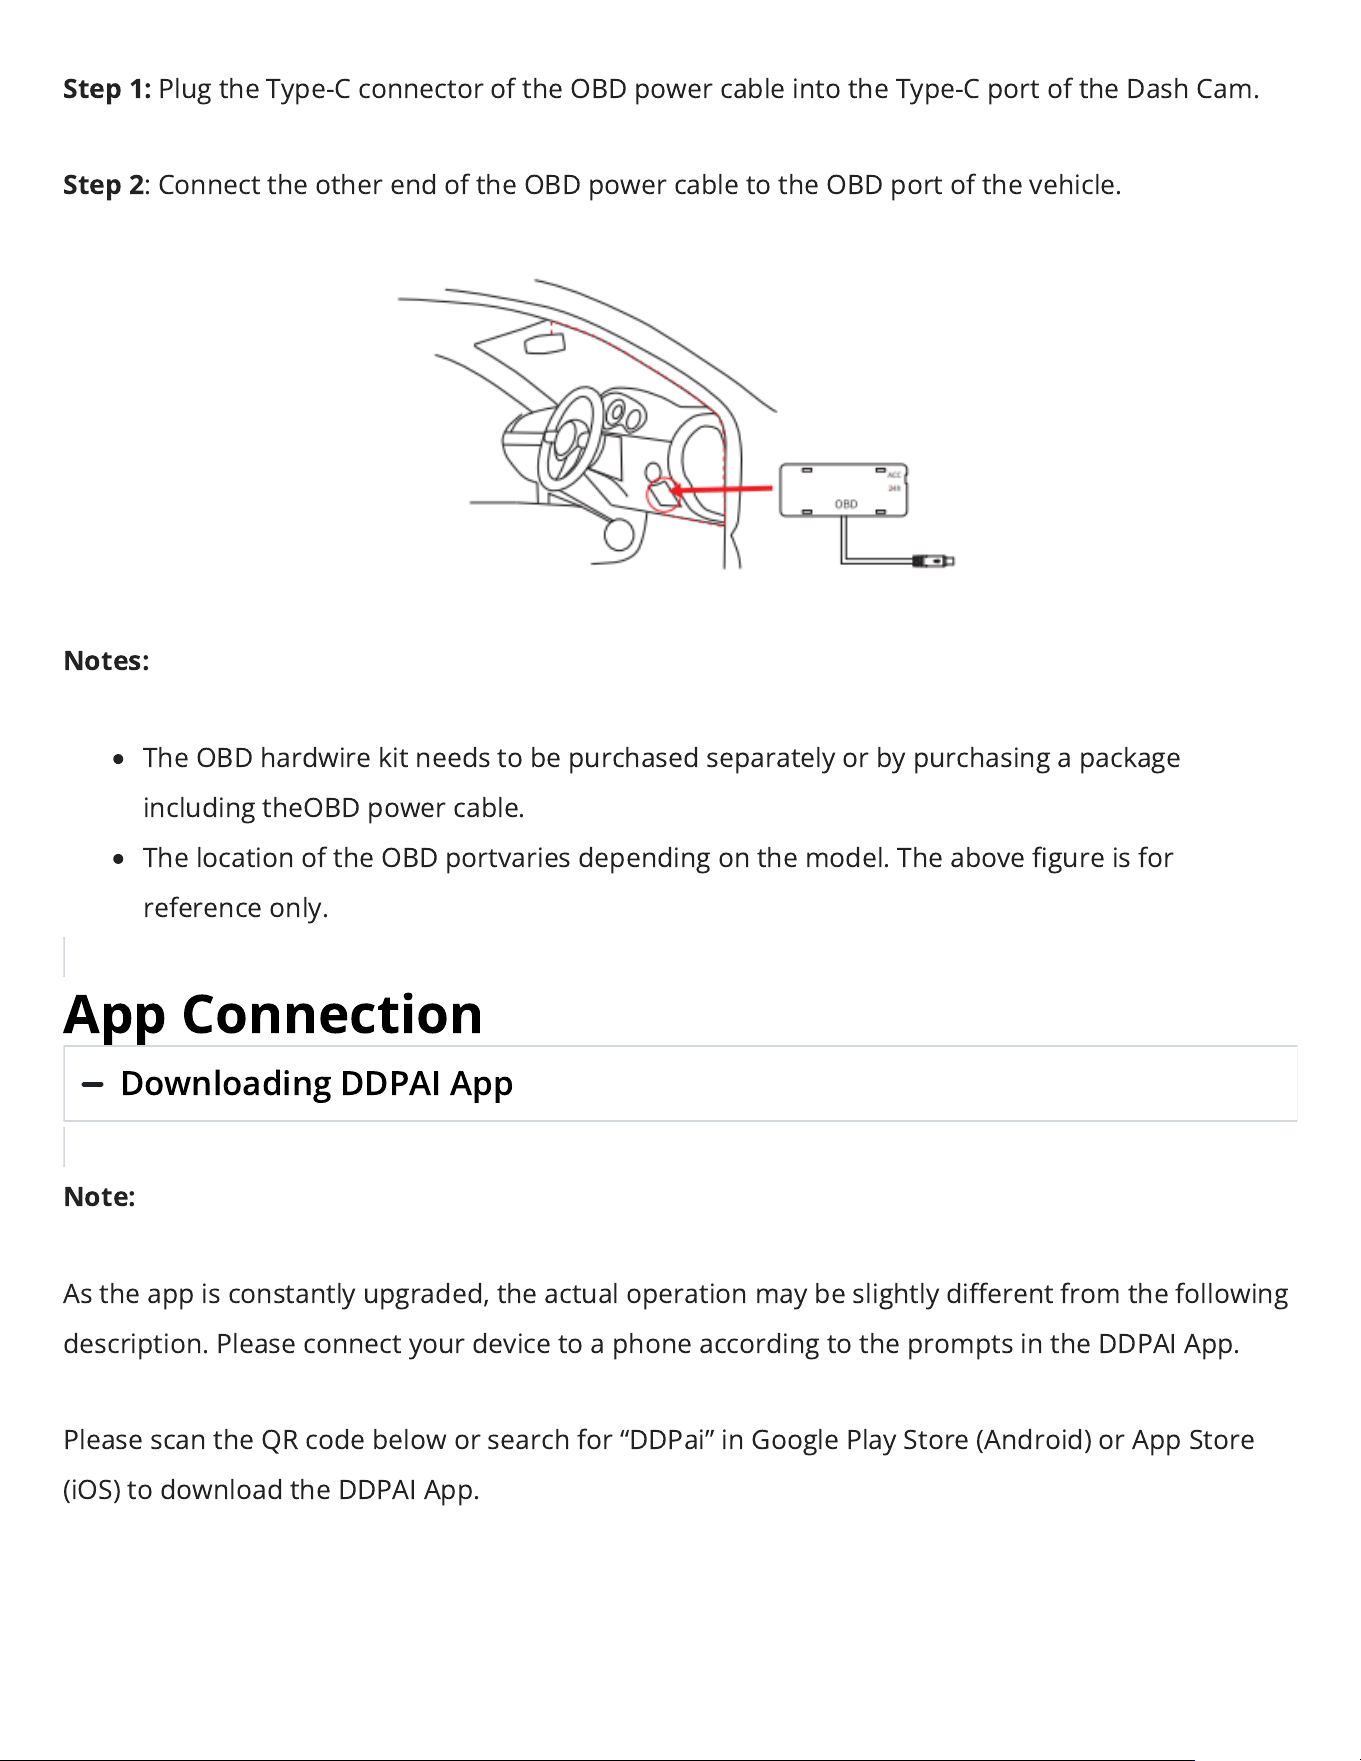
Step 1:
Plug theType-C connector of the OBDpower cable into the Type-C port of the Dash Cam.
Step 2
: Connect the other end of the OBDpower cable to the OBD port of the vehicle.
Notes:
The OBD hardwire kit needs to be purchased separately or by purchasing a package
including theOBD power cable.
The location of the OBD portvaries depending on the model. The above gureis for
reference only.
App Connection
Downloading DDPAI App
Note:
As the app is constantly upgraded, the actual operation may be slightly dierent from the following
description. Pleaseconnect your device to a phone according to the prompts in the DDPAI App.
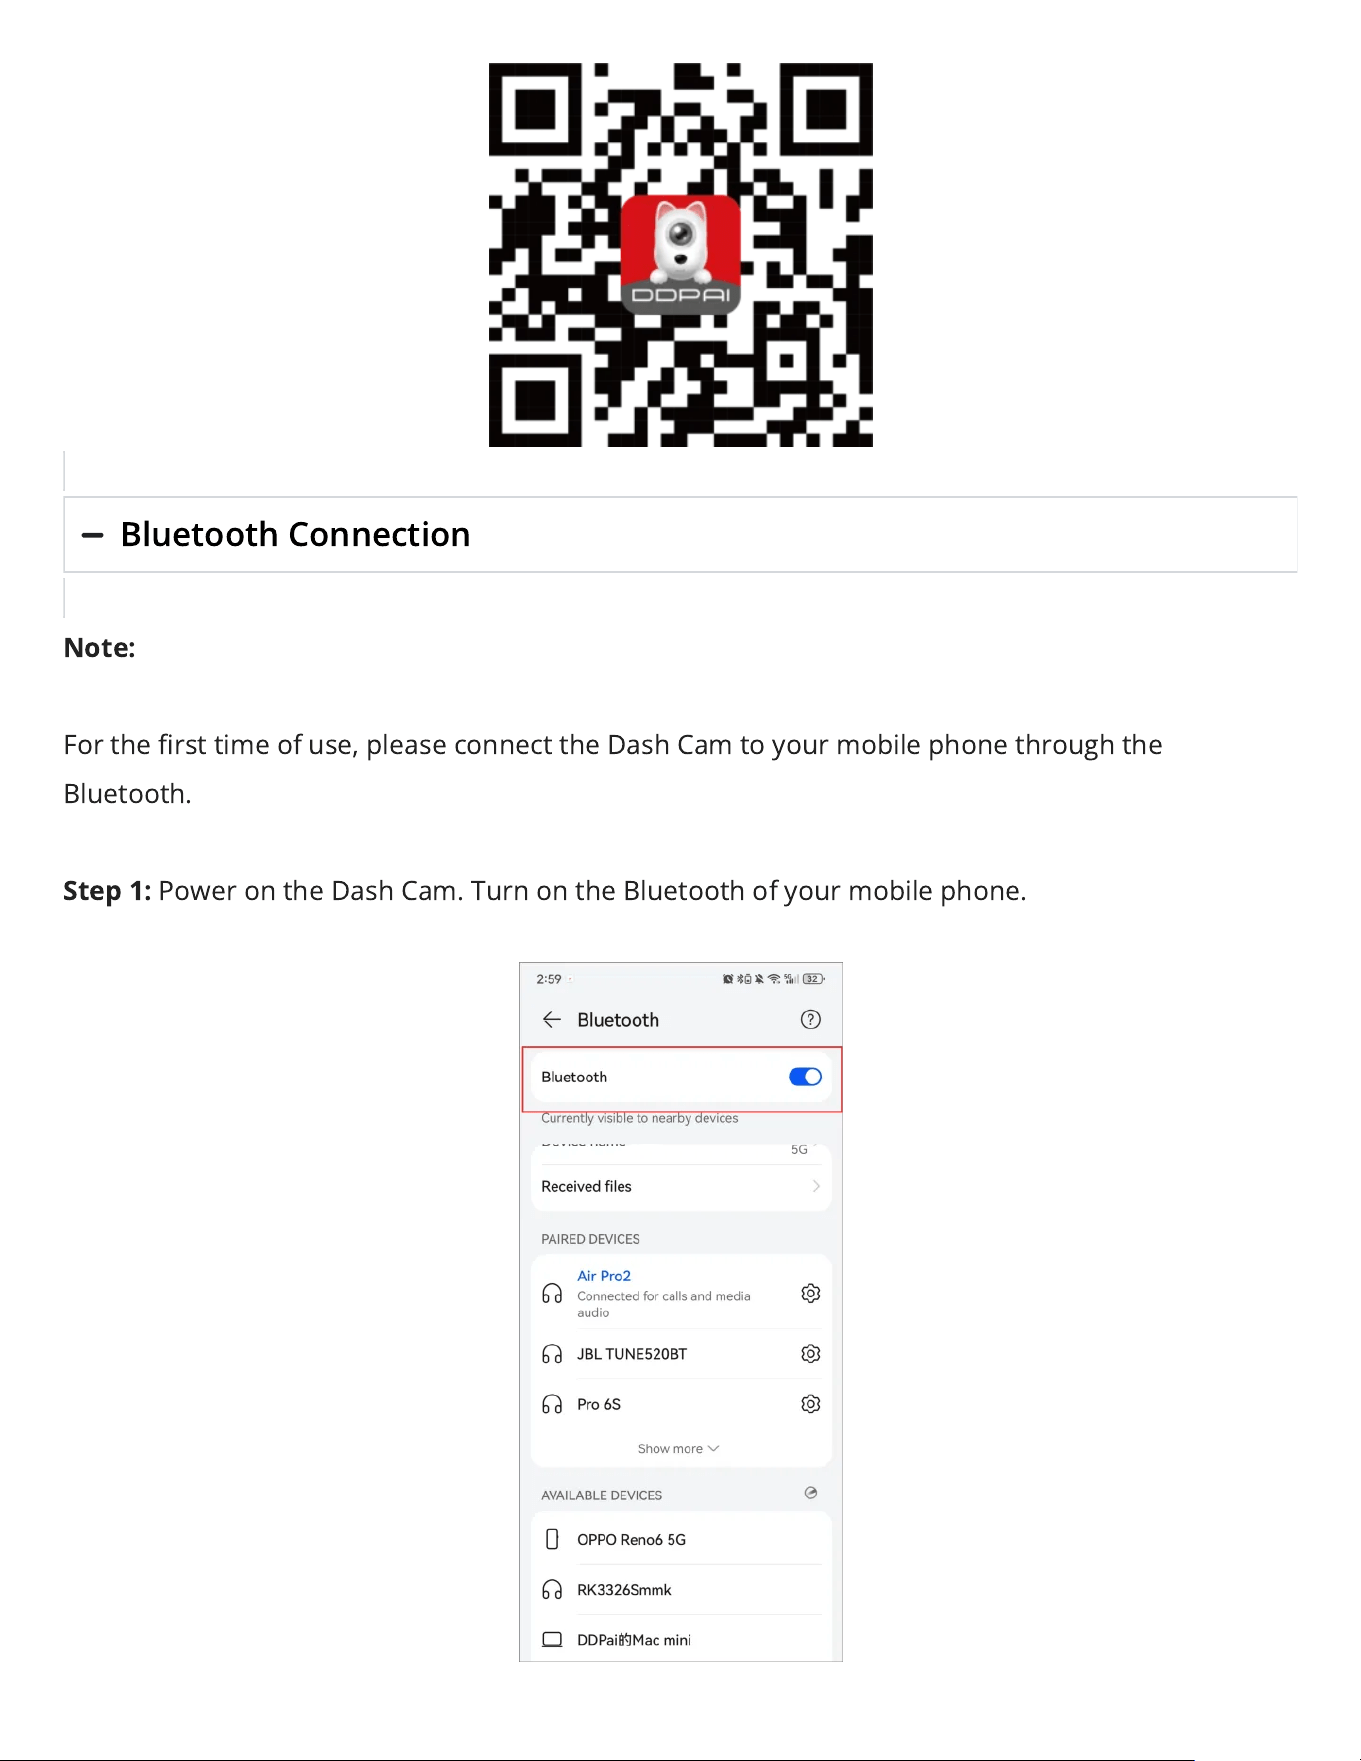
Please scan the QR code below or search for “DDPai” in Google Play Store (Android) or App Store
(iOS) to download the DDPAI App.
Bluetooth Connection
Note:
For the rst time of use, please connect the Dash Cam to your mobile phone through the
Bluetooth.
Step 1:
Power on the Dash Cam. Turn on the Bluetooth of your mobile phone.
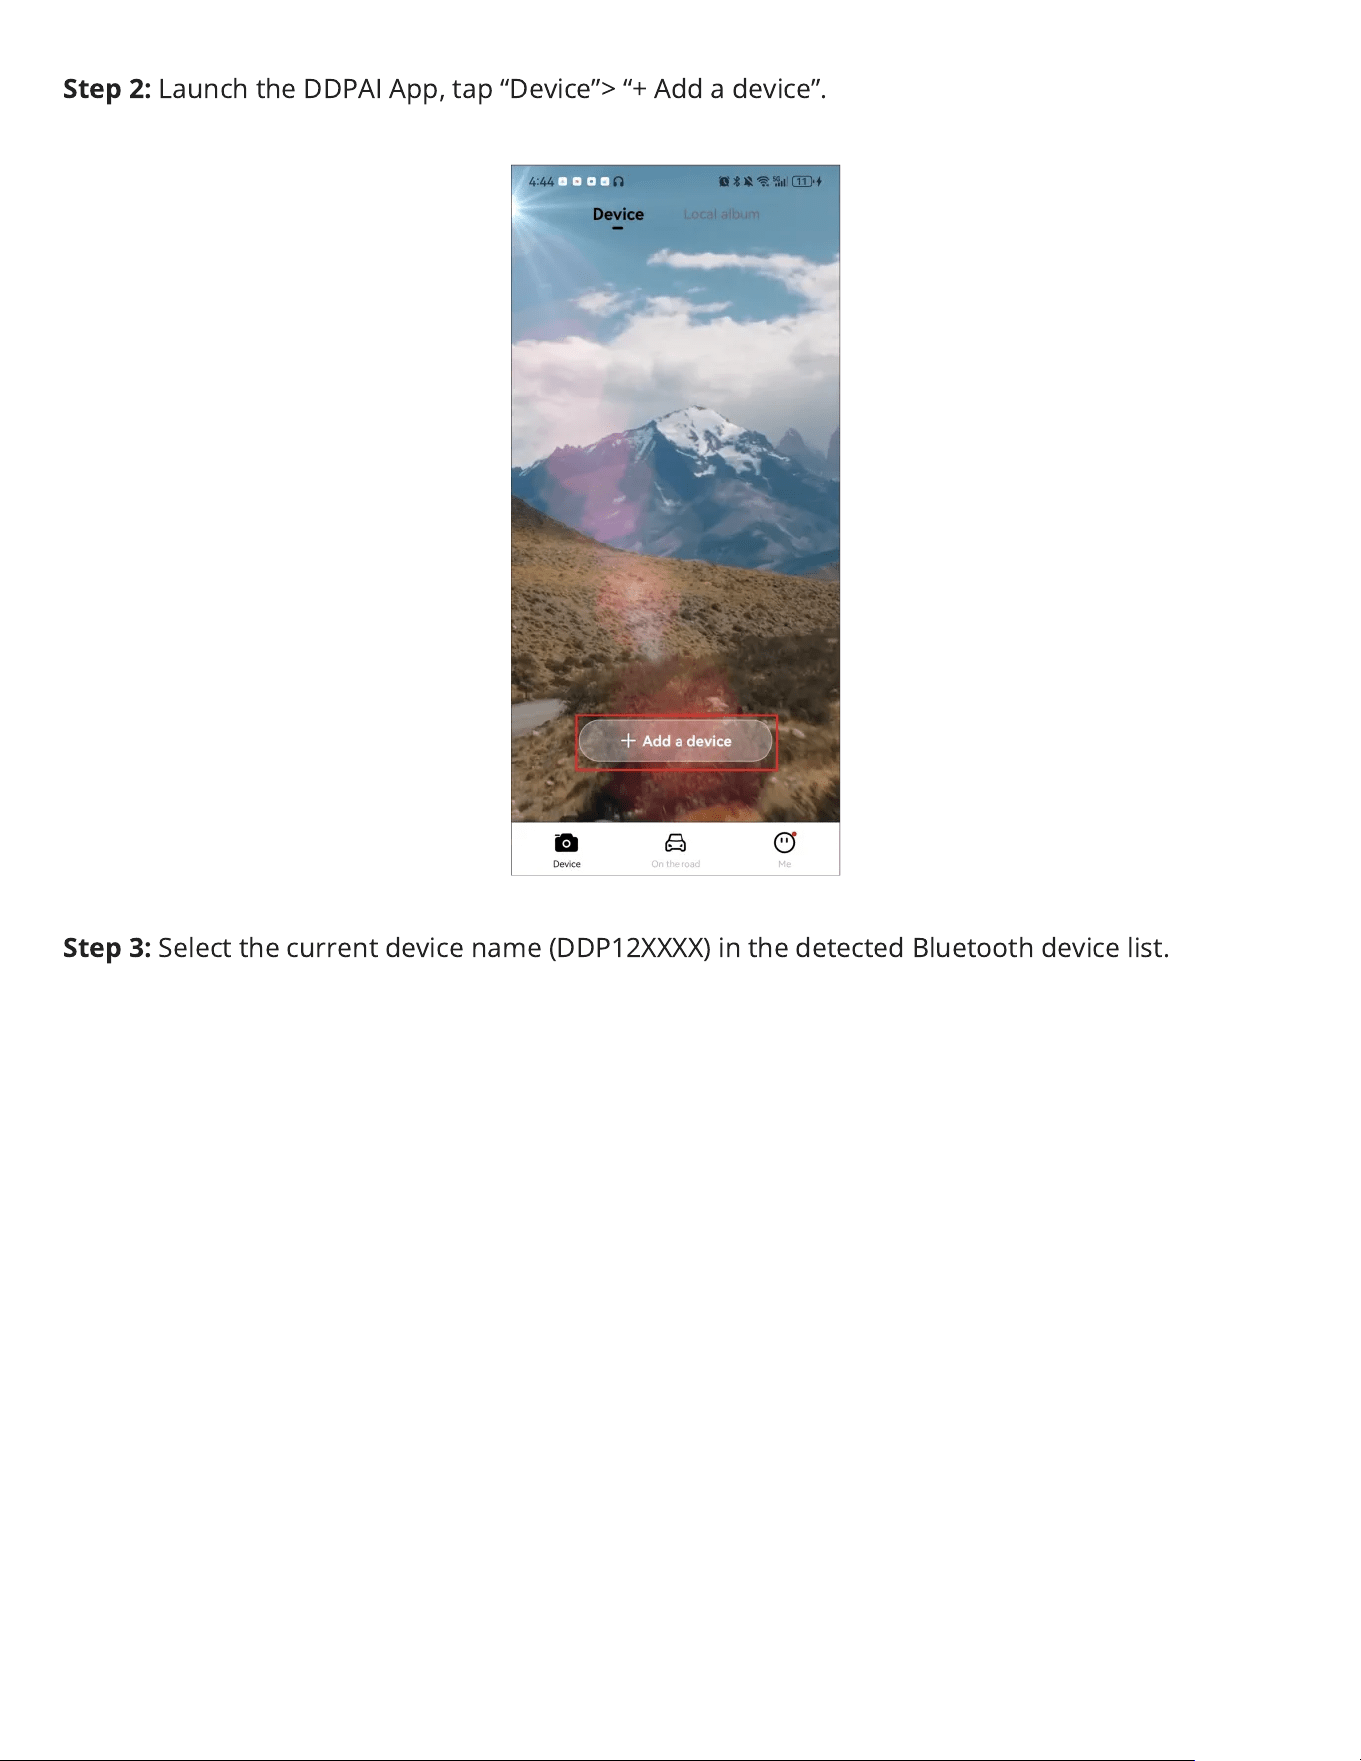
Step 2:
Launch the DDPAI App, tap “Device”> “+ Add a device”.
Step 3:
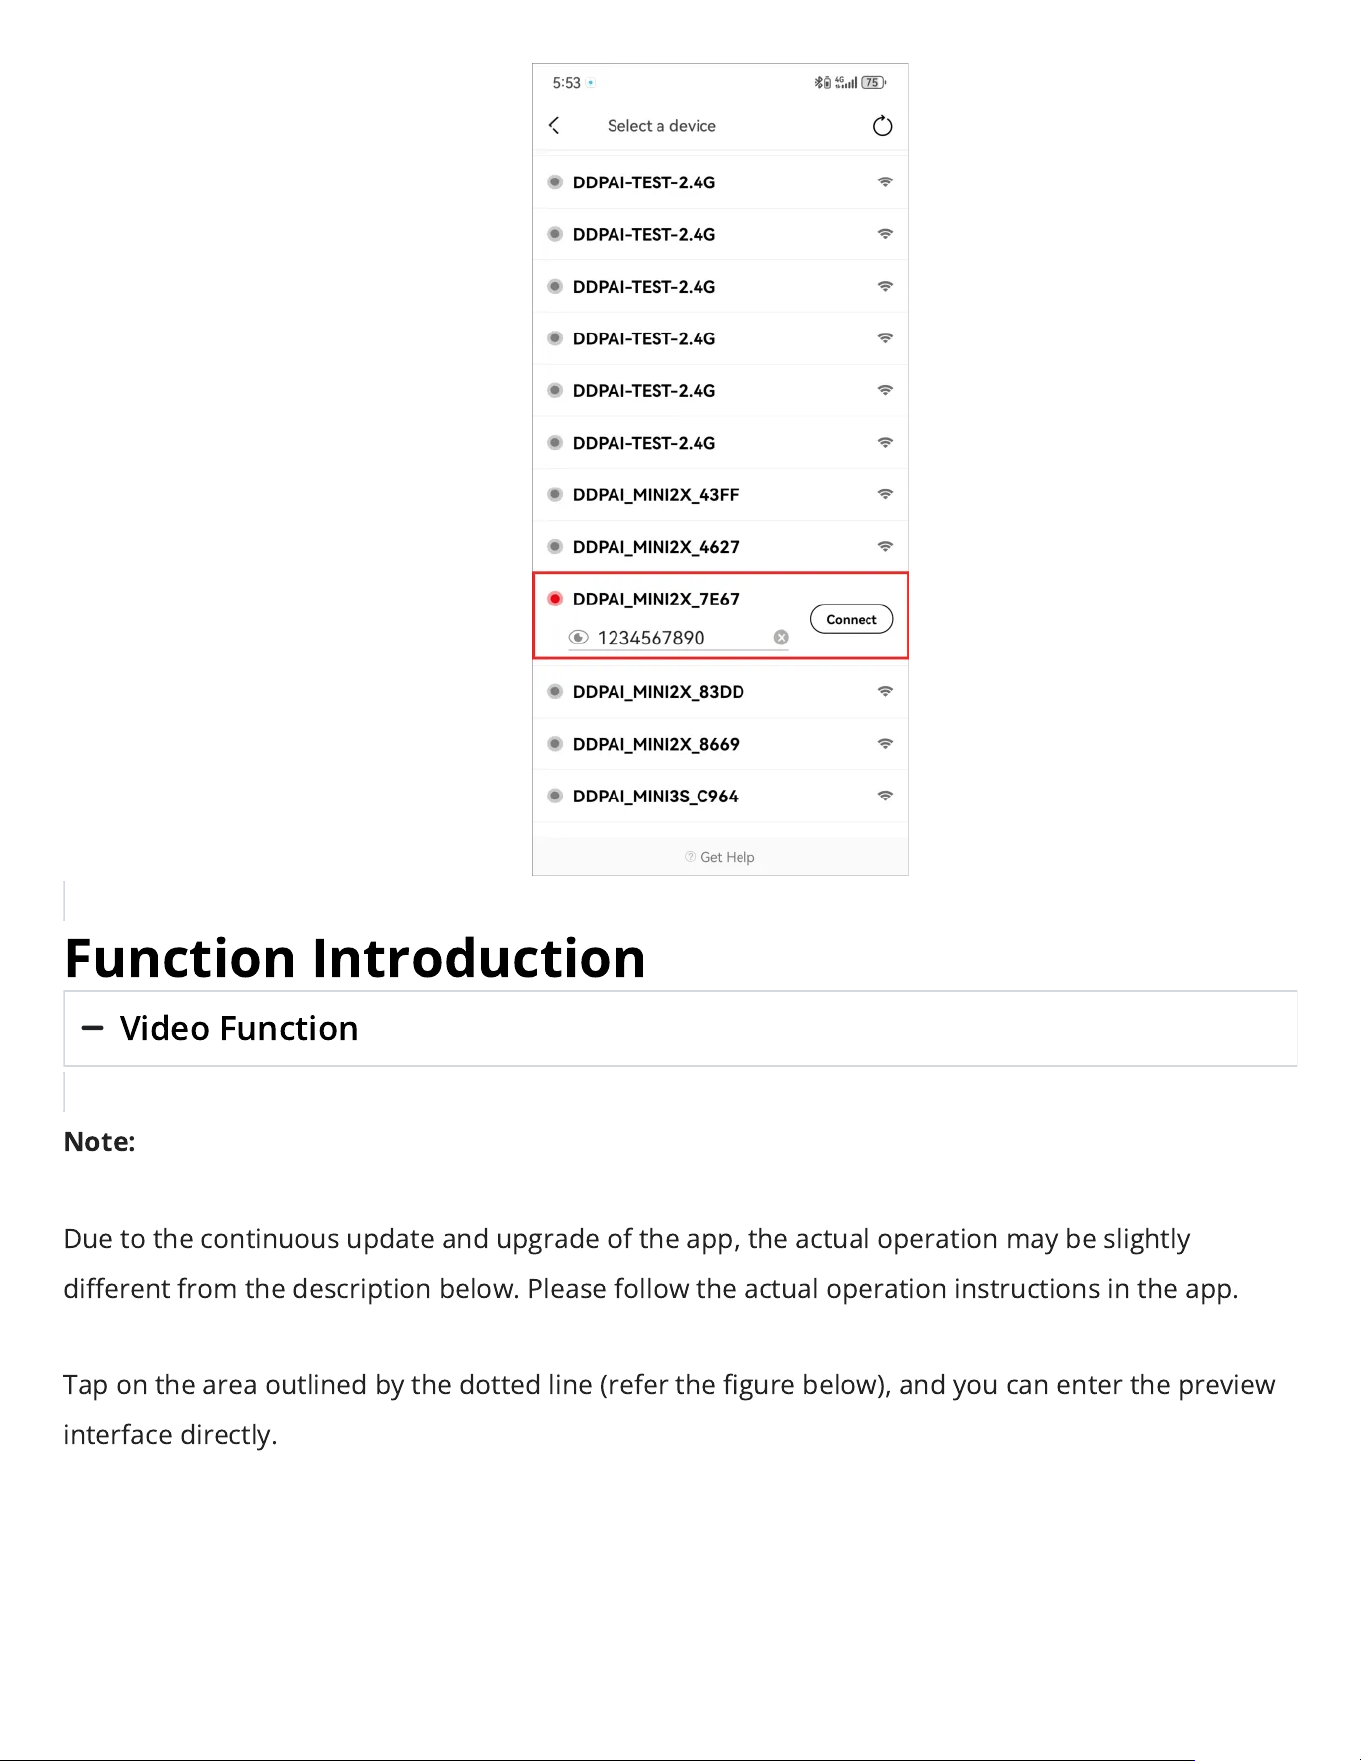
Select the current device name (DDP12XXXX) in the detected Bluetooth device list.
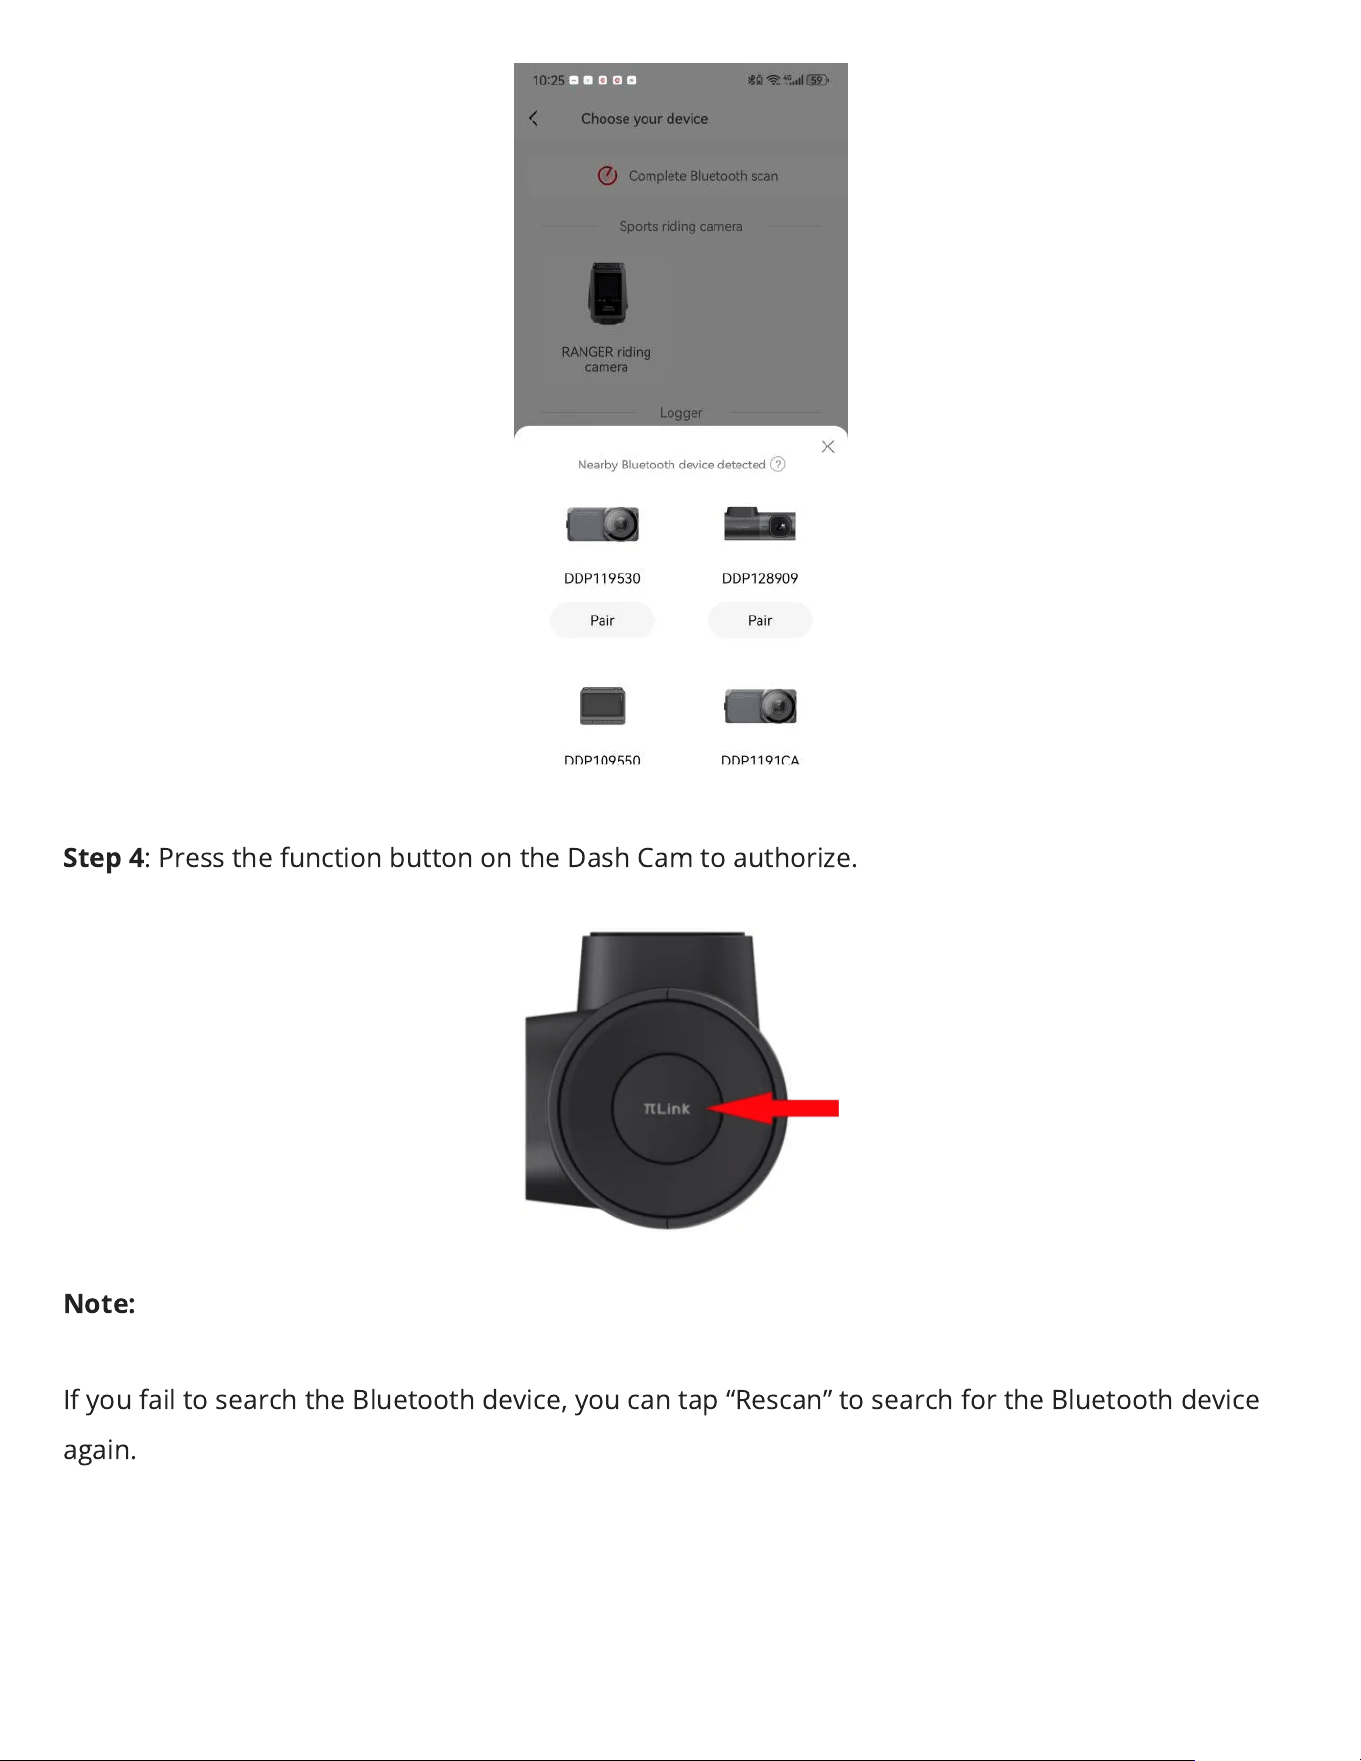
Step 4
: Press the function button on the Dash Cam to authorize.
Note:
Ifyou fail to search the Bluetooth device, you can tap “Rescan” to search for the Bluetooth device
again.
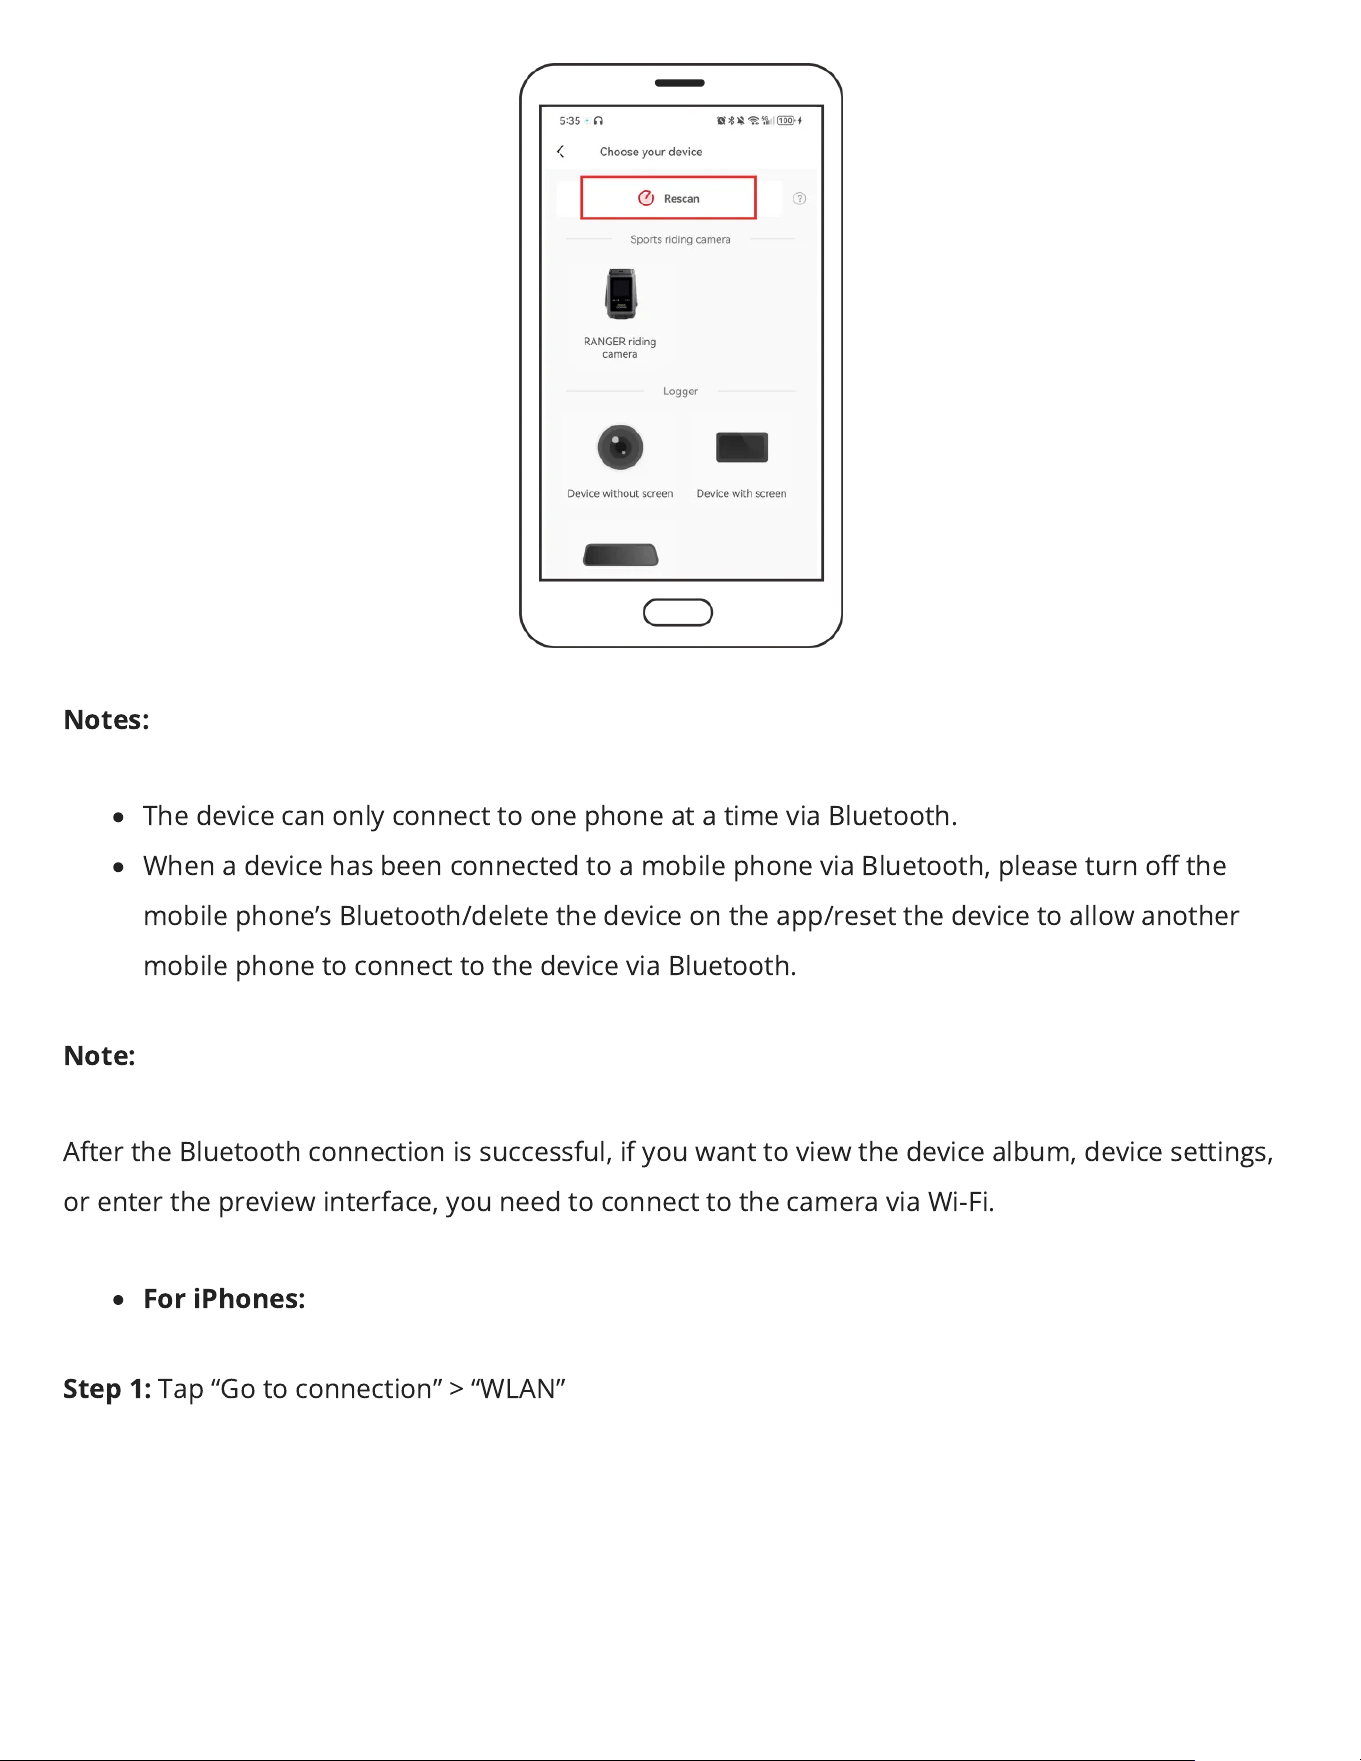
Notes:
The device can only connect to one phone at a time via Bluetooth.
When a device has been connected to a mobile phone via Bluetooth, please turn o the
mobile phone’s Bluetooth/delete the device on the app/reset the device to allow another
mobile phone to connect to the device via Bluetooth.
Note:
After the Bluetooth connection is successful, ifyou want to view the device album, device settings,
or enter the preview interface, you need to connect to the camera via Wi-Fi.
For iPhones:
Step 1:
Tap “Go to connection” > “WLAN”
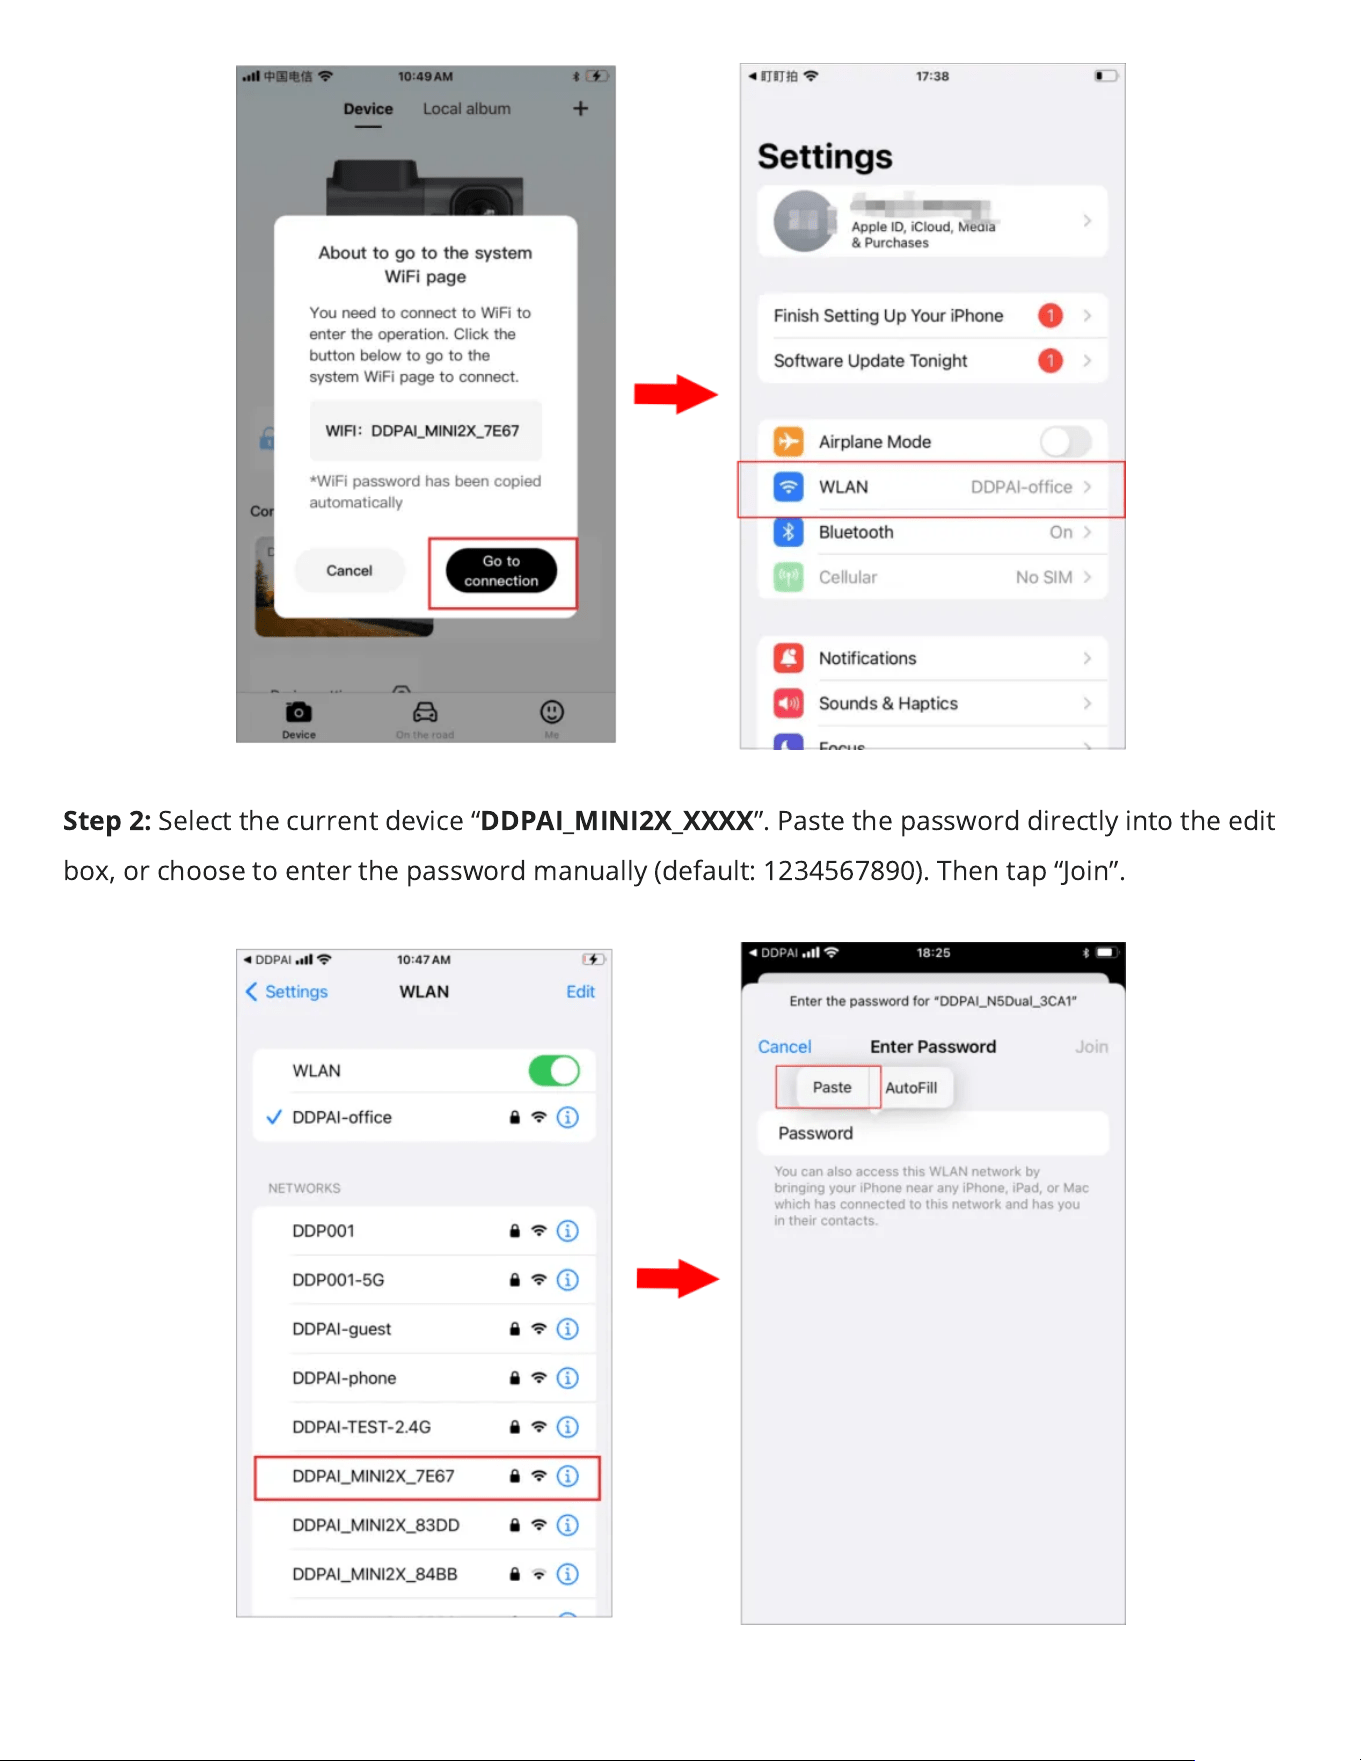
Step 2:
Select the current device “
DDPAI_MINI2X_XXXX
”. Paste the password directly into the edit
box, or choose to enter the password manually (default: 1234567890). Then tap “Join”.
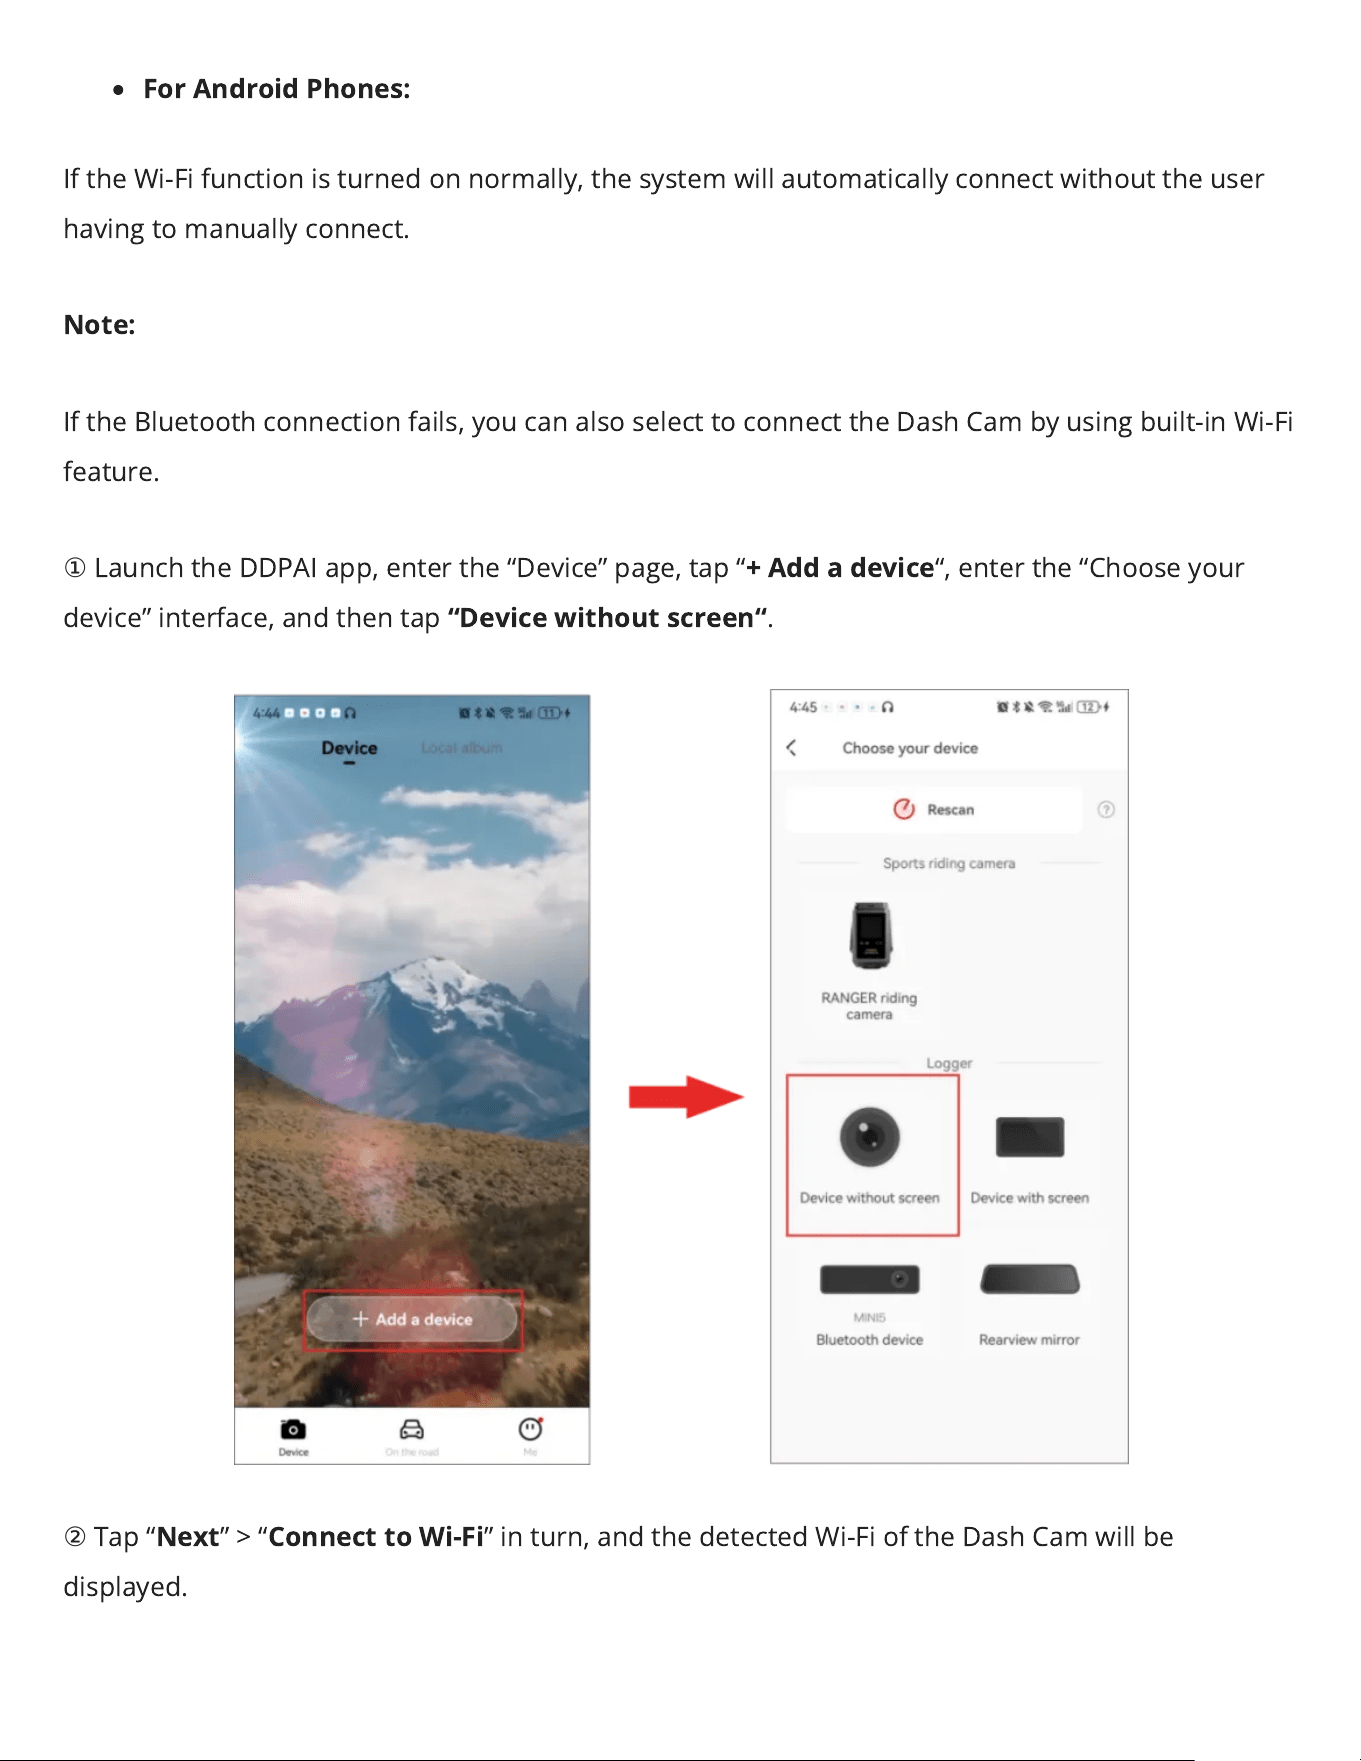
For Android Phones:
If the Wi-Fi function is turned on normally, the system will automatically connect without the user
having to manually connect.
Note:
If the Bluetooth connection fails, you can also select to connect the Dash Cam by using built-in Wi-Fi
feature.
①
Launchthe DDPAI app, enter the “Device” page, tap “
+ Add a device
“, enter the “Choose your
device” interface, and then tap
“Device without screen“
.
②
Tap “
Next
” > “
Connect to Wi-Fi
” in turn, and the detected Wi-Fi of the Dash Camwill be
displayed.
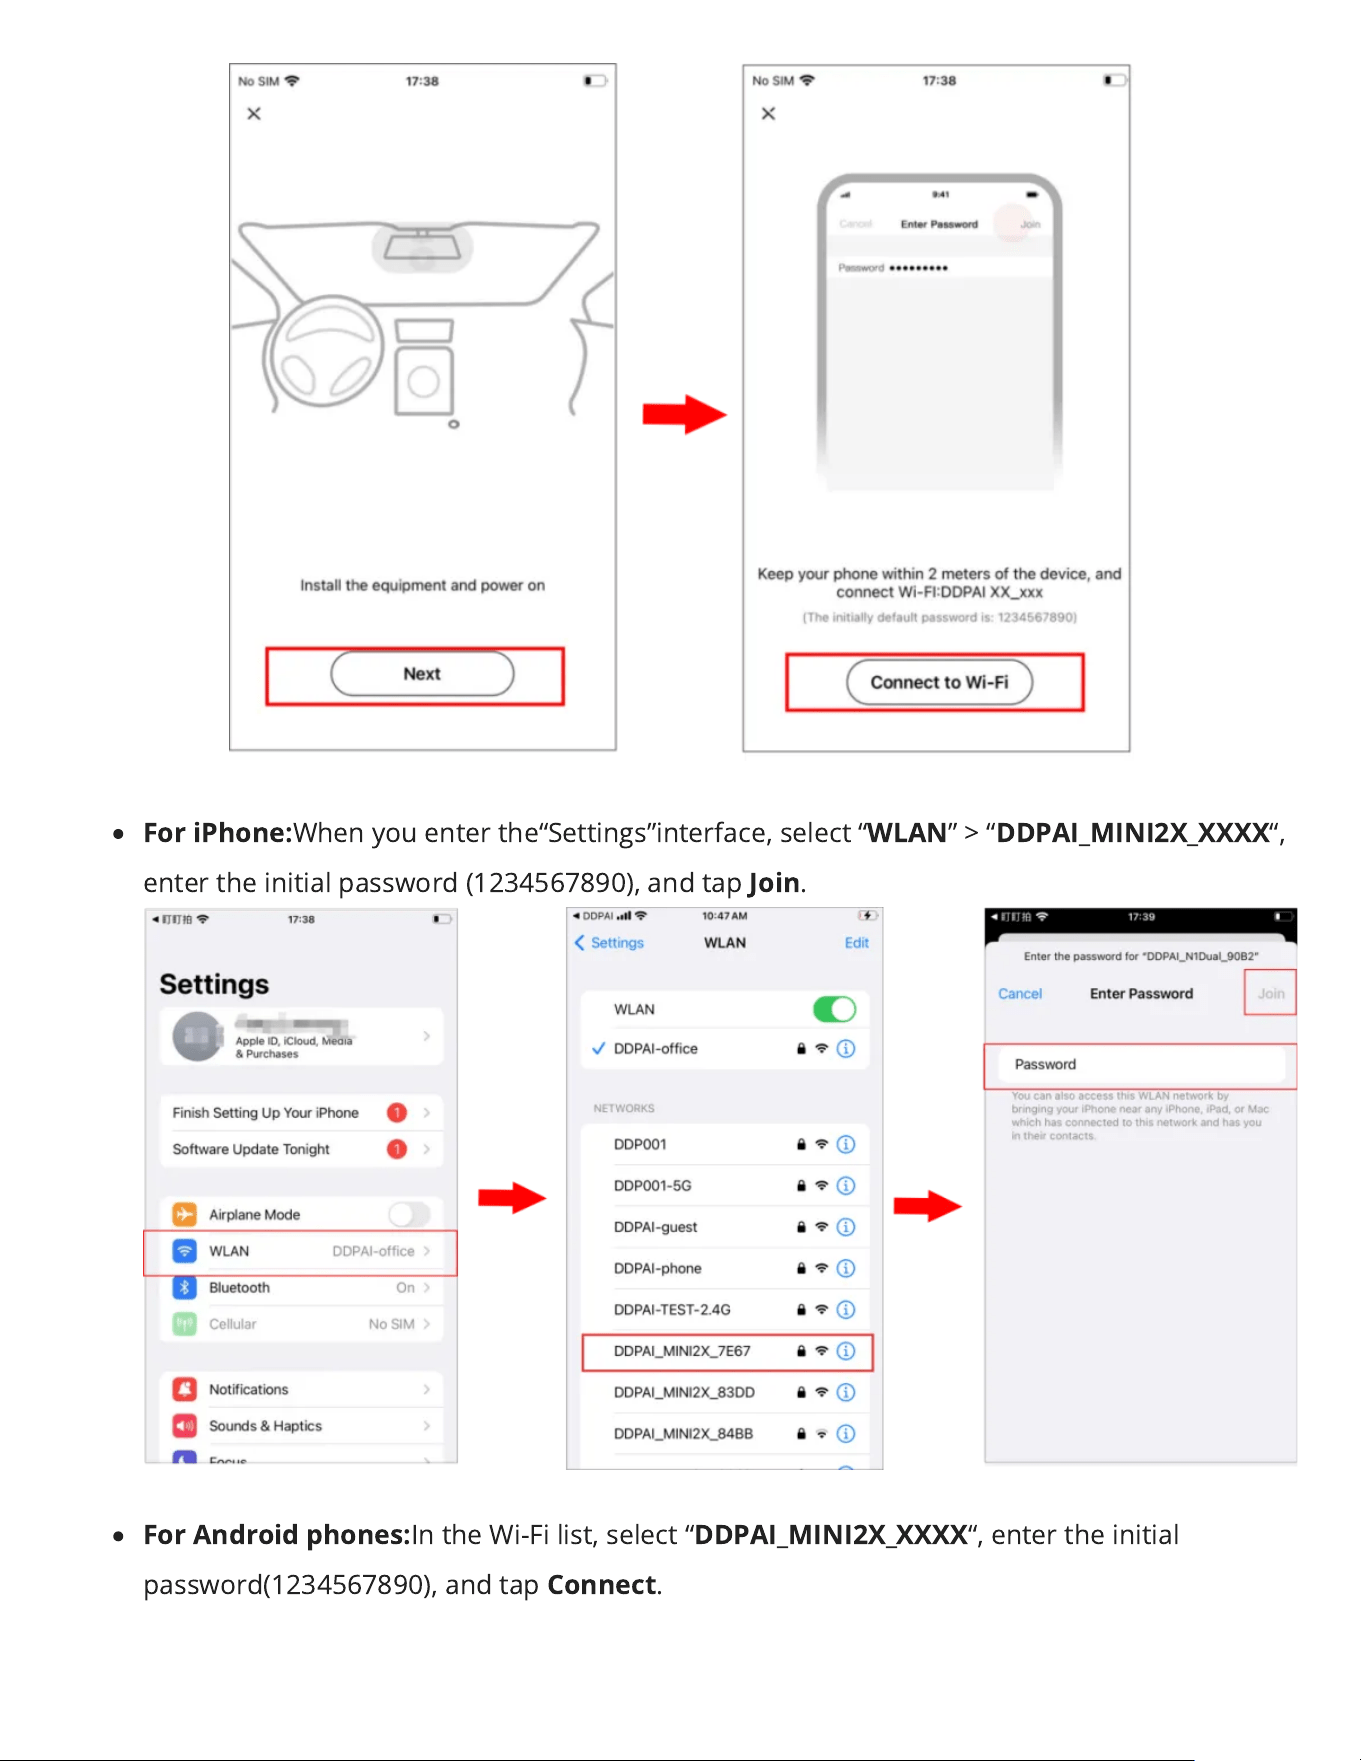
For iPhone:
When you enter the“Settings”interface, select “
WLAN
” > “
DDPAI_MINI2X_XXXX
“,
enter the initial password (1234567890), and tap
Join
.
For Android phones:
In the Wi-Fi list, select “
DDPAI_MINI2X_XXXX
“, enter the initial
password(1234567890), and tap
Connect
.
Function Introduction
Video Function
Note:
Due to the continuous update and upgrade of the app, the actual operation may be slightly
dierent from the description below. Please follow the actual operation instructions in the app.
Tap on the area outlined by the dotted line (refer the gure below), and you can enter the preview
interface directly.
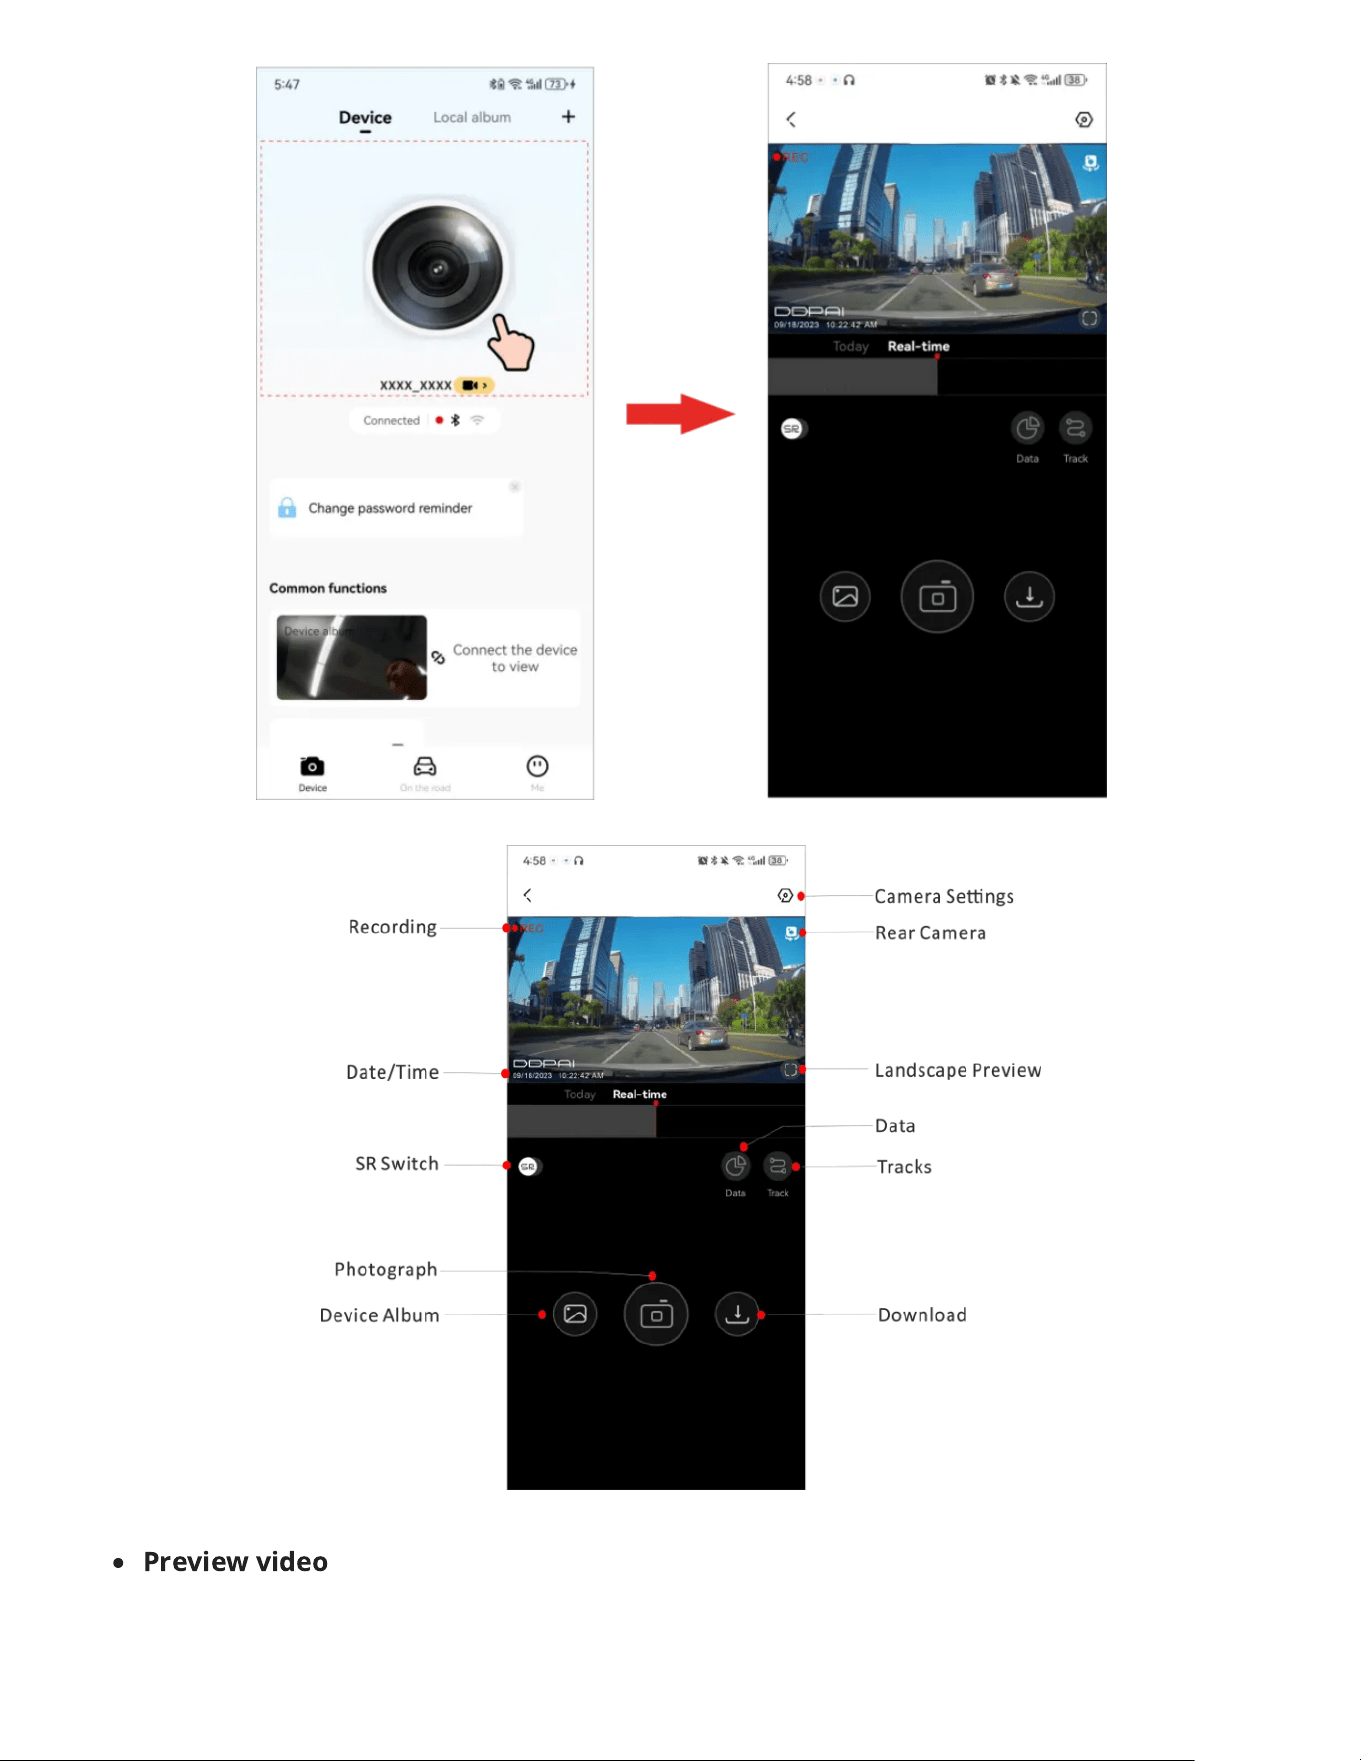
Preview video
After the app is successfully connected to the Dash Cam, enter the real-time preview interface, tap
(Landscape Preview) or rotate your mobile phone horizontally (Your phone’s auto-rotate function
needs to be turned on), and the real-time screenwill automatically switch to the full-screen preview
mode.
Note:
It is currently in preview quality and can be viewed in HD quality by downloading.
Playback video
1. Drag the progress bar to select the time starting point to view.
2. Tap the thumbnail or wait for 5 seconds to start playing the previously recorded video.
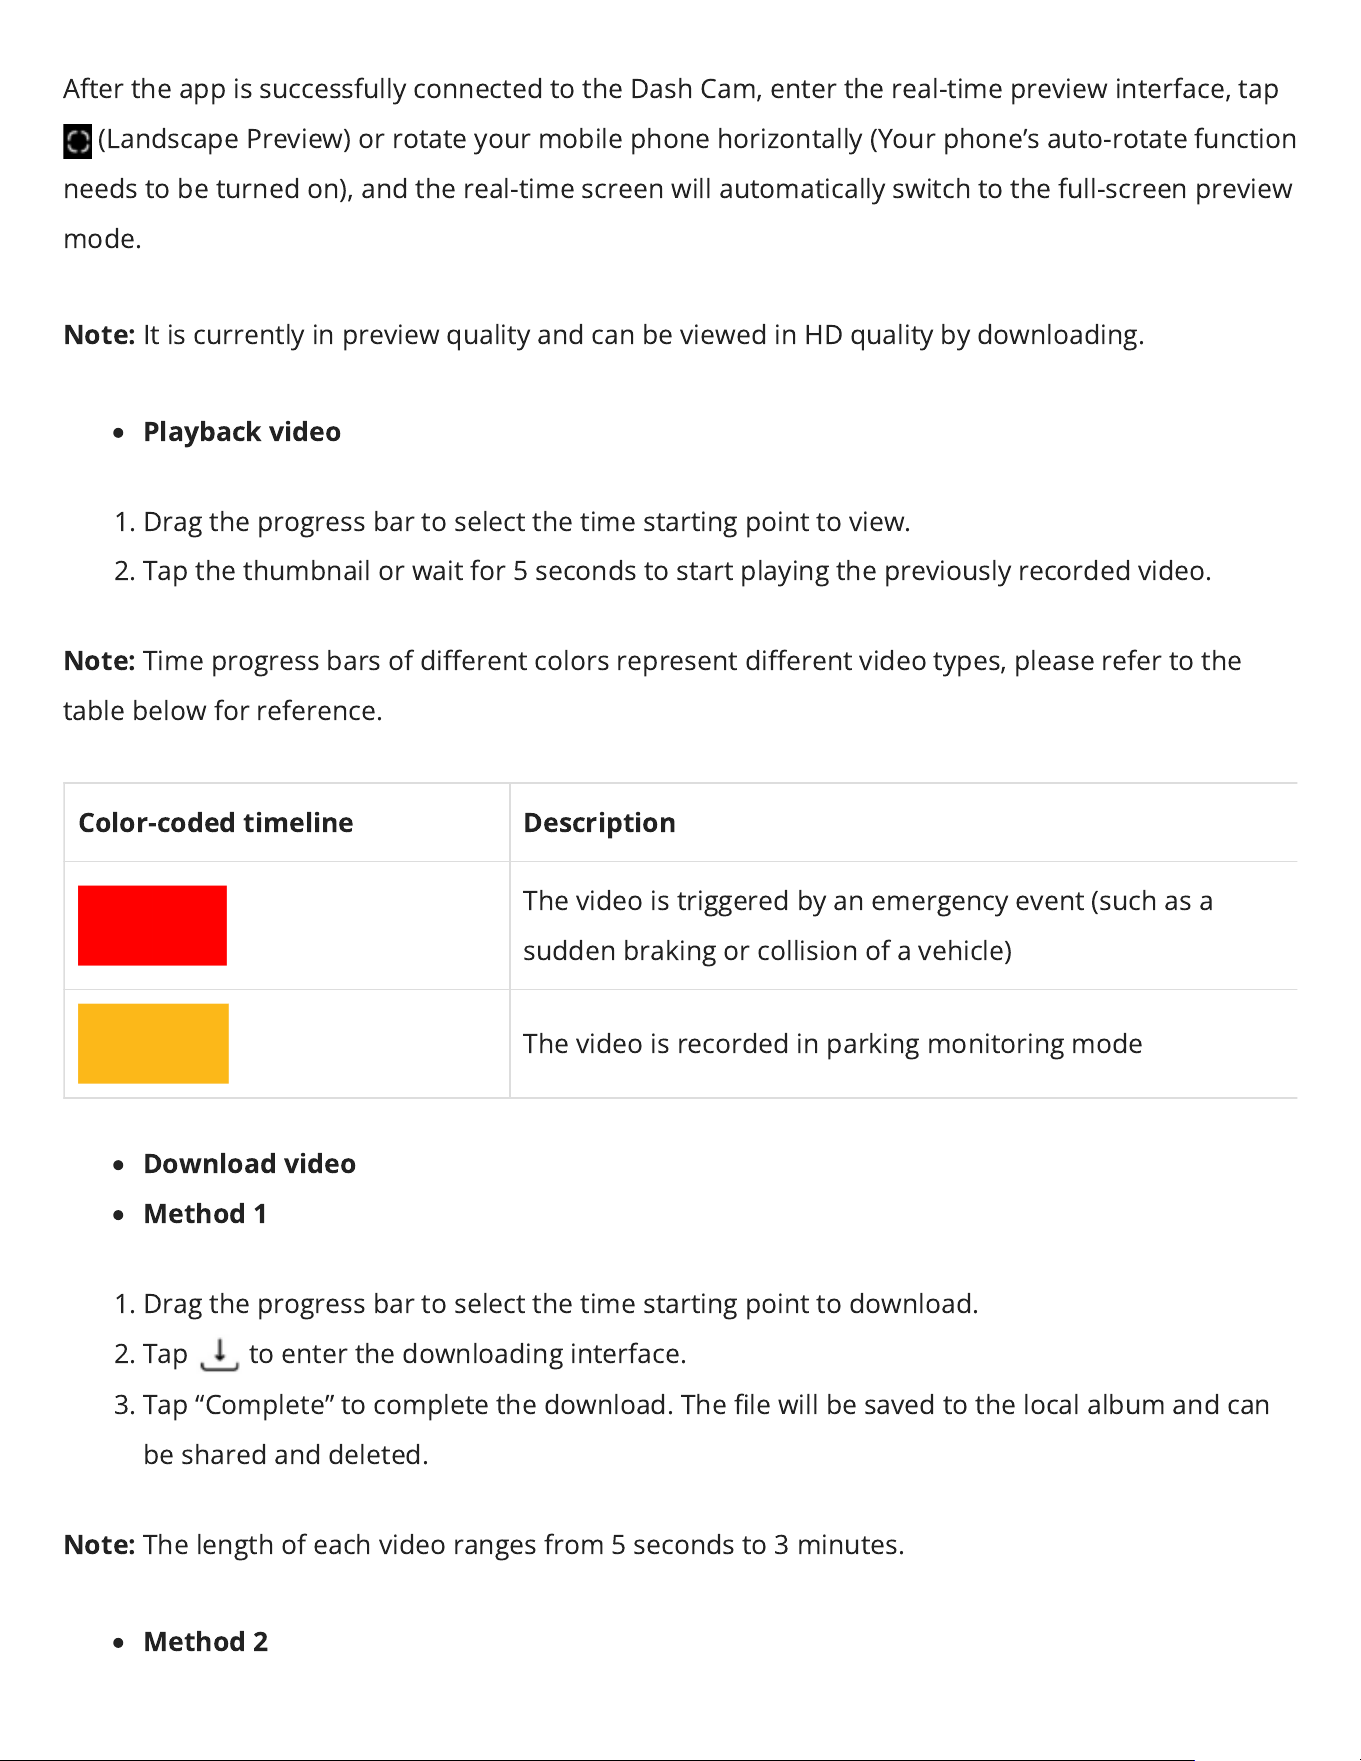
Note:
Time progress bars of dierent colors represent dierent video types, please refer to the
table below for reference.
Color-coded timeline Description
The video is triggered by an emergency event (such as a
sudden braking or collision of a vehicle)
The video is recorded in parking monitoring mode
Download video
Method 1
1. Drag the progress bar to select the time starting point to download.
2. Tap toenter the downloading interface.
3. Tap “Complete” to complete the download. The le will be saved to the local album and can
be shared and deleted.
Note:
The length of each video ranges from 5 seconds to 3 minutes.
Method 2
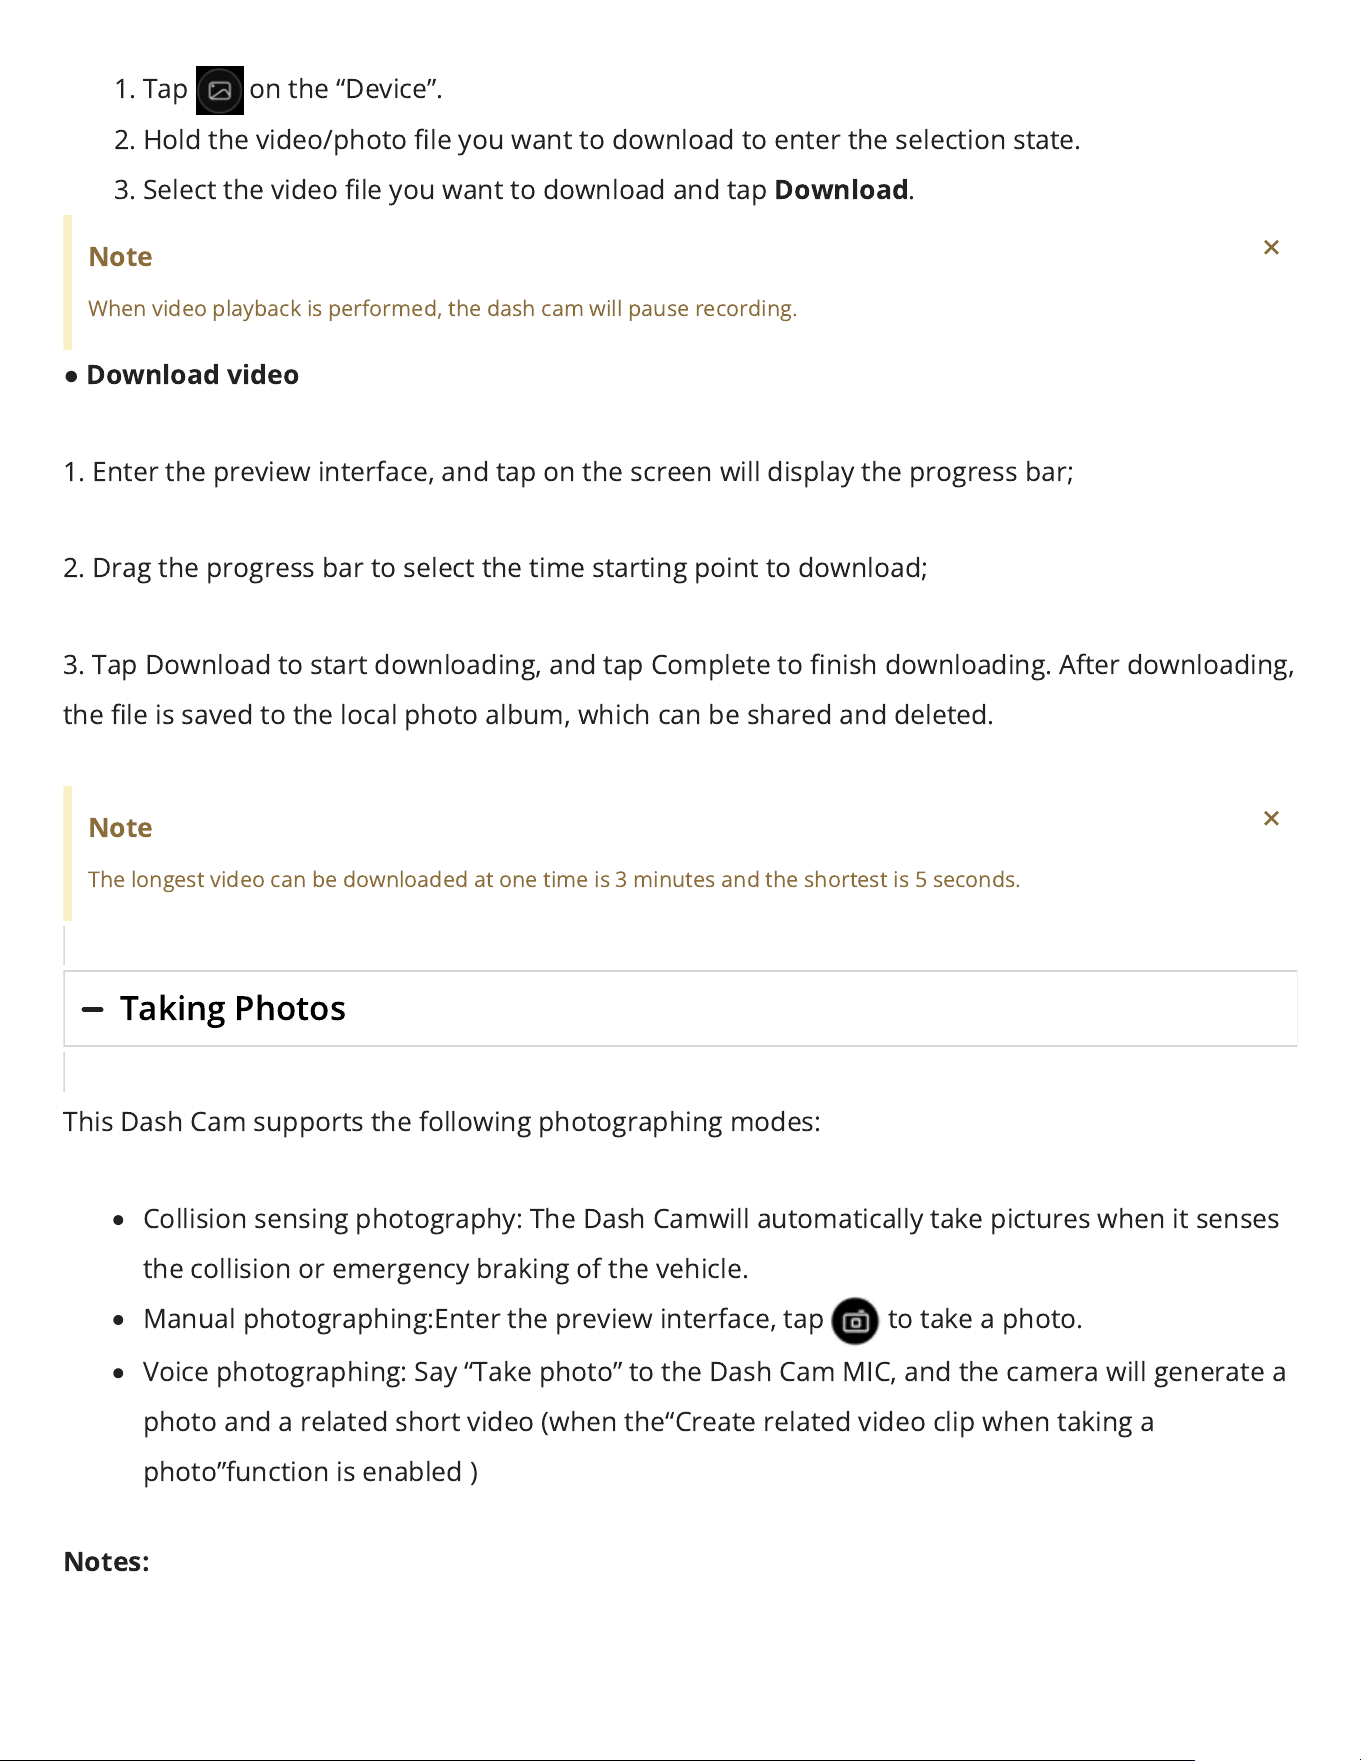
1. Tap on the “Device”.
2. Hold the video/photo le you want to download to enter the selection state.
3. Select the video le you want to download and tap
Download
.
Note
When video playback is performed, the dash cam will pause recording.
×
●
Download video
1. Enter the preview interface, and tap on the screen will display the progress bar;
2. Drag the progress bar to select the time starting point to download;
3. Tap Download to start downloading, and tap Complete to nish downloading. After downloading,
the le is saved to the local photo album, which can be shared and deleted.
Note
The longest video can be downloaded at one time is 3 minutes and the shortest is 5 seconds.
×
Taking Photos
This Dash Camsupports the followingphotographing modes:
Collision sensing photography: The Dash Camwill automatically take pictures when it senses
the collision or emergency braking of the vehicle.
Manual photographing:Enter thepreview interface, tap to take a photo.
Voice photographing: Say “Take photo” to the Dash Cam MIC, and the camera will generate a
photo and a related short video (when the“Create related video clip when taking a
photo”function is enabled )
Notes:
Collision sensing photographyand voicephotographywill generate associated videos (default
duration 10 seconds) at the same time as taking photos. The photos and associated videos
will be saved in the “Snap”/”Emergency” tab in the “Device Album” interface.
Before using the voice photographing function, please make sure the “Local Voice Control” is
enabled on the settings interface.
▶
View photos or videos on the device
After connecting the Dash Camto the mobile phone, launchthe DDPAI App. Tap“Device Album”on
the “Device” interface,and you can view the captured photos and videos on the Dash Cam.
Note:
Thevideo and photo lesare stored in the recorder’s storage memory and are not downloaded to
yourmobile phone.Please connect to theDash Cam to your mobile phone through the DDPAI App
to view or download these lesto the local album.
▶
View photos or videos on your phone
When the captured photos/videos on the device are downloaded to the local album of your phone,
they will be moved to the mobile phone for storage, and can be viewed without connecting the
mobile phone to the Dash Cam. Launch the app and tap the “Local Album”tab of the
“Device”interface. Then you can view photos or videos downloaded to your phone.
Automatically download snapshot/emergency les:
You can choose to automatically download snapshot/emergency les to the local album after
connecting the device.Open theapp, tap“Me”>“APP Settings”, and enable “Automatically
download snapshot les”/ “Automatically download emergency les”function.
▶
Share/delete photos or videos
After entering the“Local Album”interface, hold the le to enter the selection state, then you can
delete videos, photos, and emergency les downloaded to your phone or share them to social
media accounts.
Parking Monitoring
When you select theintelligent hardwire kit to take power, the parking monitoring function can be
realized. After the vehicle is turned o, the Dash Camwill automatically enter the parking
monitoring mode. If an emergency occurs, the Dash Camwill automaticallytake a photo and
generate a related video.You can set the parking modeand vehicle battery protection voltage
value.
①
After the mobile phone is connected to the Dash Cam, launchthe app,and tap “Device
Settings”> “Enter after the vehicle has stalled”.
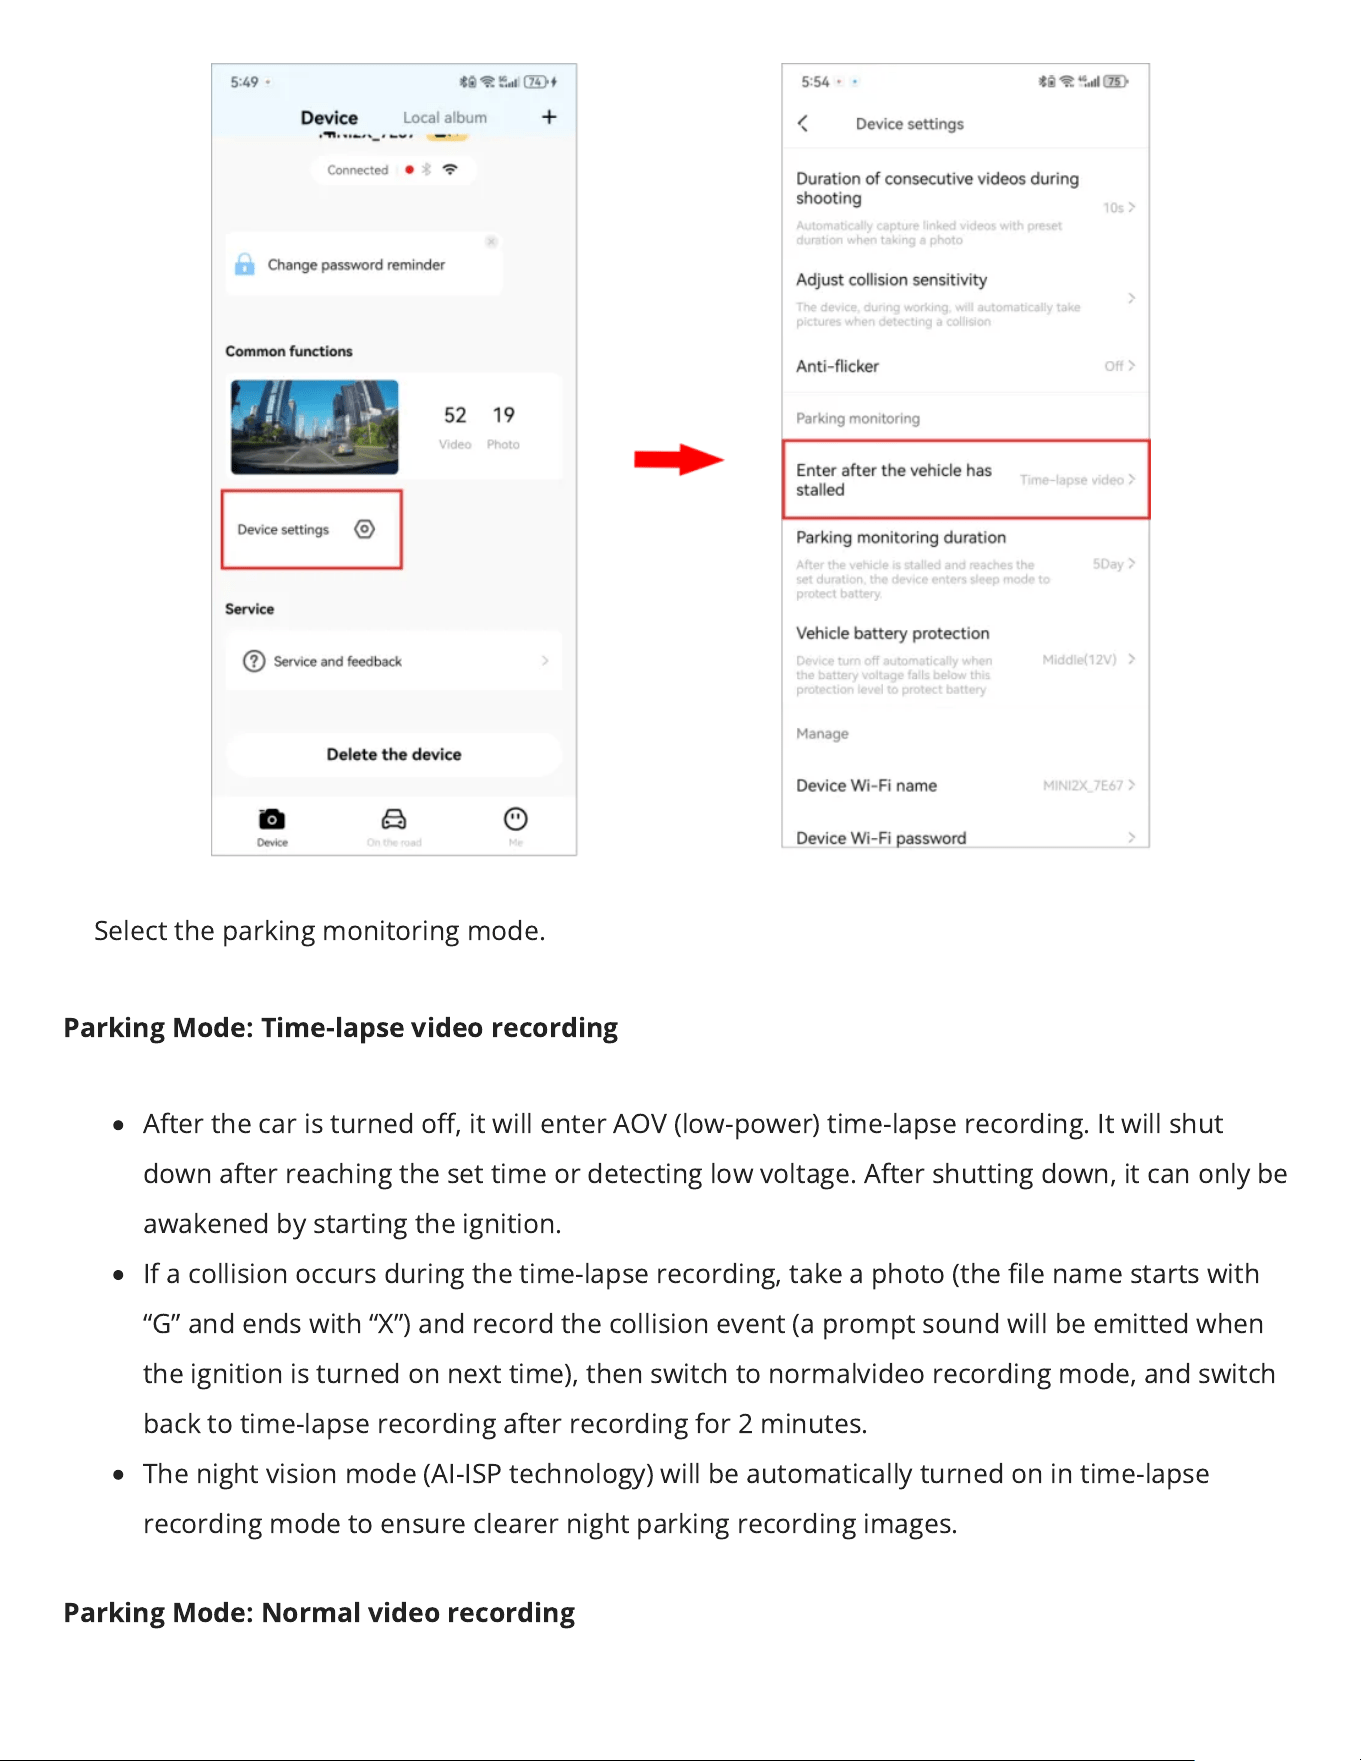
②
Select the parking monitoring mode.
Parking Mode: Time-lapse video recording
After the car is turned o, it will enter AOV (low-power) time-lapse recording. It will shut
down after reaching the set time or detecting low voltage. After shutting down, it can only be
awakened by starting the ignition.
If a collision occurs during the time-lapse recording, take a photo (the le name starts with
“G” and ends with “X”) and record the collision event (a prompt sound will be emitted when
the ignition is turned on next time), then switch to normalvideo recordingmode, and switch
back to time-lapse recording after recording for 2 minutes.
The night visionmode(AI-ISPtechnology) will be automatically turned on in time-lapse
recording mode to ensure clearer night parking recording images.
Parking Mode: Normal video recording

Normal recording will be maintained after the car is turned o. It will shut down after
reaching the set time or detecting low voltage. After shutting down, it can only be woken up
by the ignition.
During normal video recording, if a collision occurs, a photo (the le name starts with “G” and
ends with “L”) and an associated short video will be taken.
Parking Mode: Sleep
After the car is turned o, it enters the AOV sleep state. If a collision occurs, it enters the
wake-up recording mode, performs 30 seconds of normal recording, and then continues to
sleep. It shuts down after detecting low voltage. After shutting down, it can only be woken up
by ignition.
If a collision occurs again during normal recording, photos (the le name startswith “G” and
endswith “L”) and related short videos are taken, and the collision event is recorded at the
same time (a prompt sound is issued when the ignition is turned on next time); if collisions
continue to occur, when the normal recording lasts for 2 minutes, it switches to time-lapse
recording; during time-lapse recording, if there is no collision within 30 seconds, it will re-
enter sleepmode. If there are continuous events triggered, time-lapse recording will
continue, and there is no limit on the working time. The low-voltage protection of the step-
down line is used to ensure that the battery is not fed.
Notes:
The parking monitoring mode needs to be realized bythe intelligent hardwire kit (optional).
If you use the app to keep the connection with the dash cam, the device will not enter the
parking monitoring mode. You need to disconnect from the App before the device can enter
the parking monitoring mode.
Collision Detection & Locked Videos
When the Dash Camis in working mode, when a collision is detected (such as a sudden braking or
collision of a vehicle), it will generate an emergency photo and an emergency-related video, and
store them separately. These les will not get deleted by loop recording function.
▶
Setting camera sensitivity
The higher thesensitivityof the Dash Cam, the easier it is to trigger photographing/taking videos;
The lower the sensitivity of the Dash Cam, the less likely it is to trigger photographing/taking videos.
The default collision sensitivity of the Dash Camis “Medium”, and it supports the selection of
collision sensitivity in seven levels: “High”, “Medium-high”, “Medium”, “Medium-low”, “Low”, “O” and
“Custom”.
Select the appropriate collision sensor sensitivity. In emergencies such as vehicle collision or
sudden braking, the Dash Cam will be triggered to take pictures and generate an emergency photo
and video. If you select “O”, in emergency situations such as vehicle collision or sudden braking,
there will be no photos and videos. You can switch the collision sensing sensitivity of the Dash Cam
through the following steps.
①
After the mobile phone is connected to the Dash Cam, open the app, enter the “Device” interface,
tap “DeviceSettings”> “Adjust collision sensitivity”.
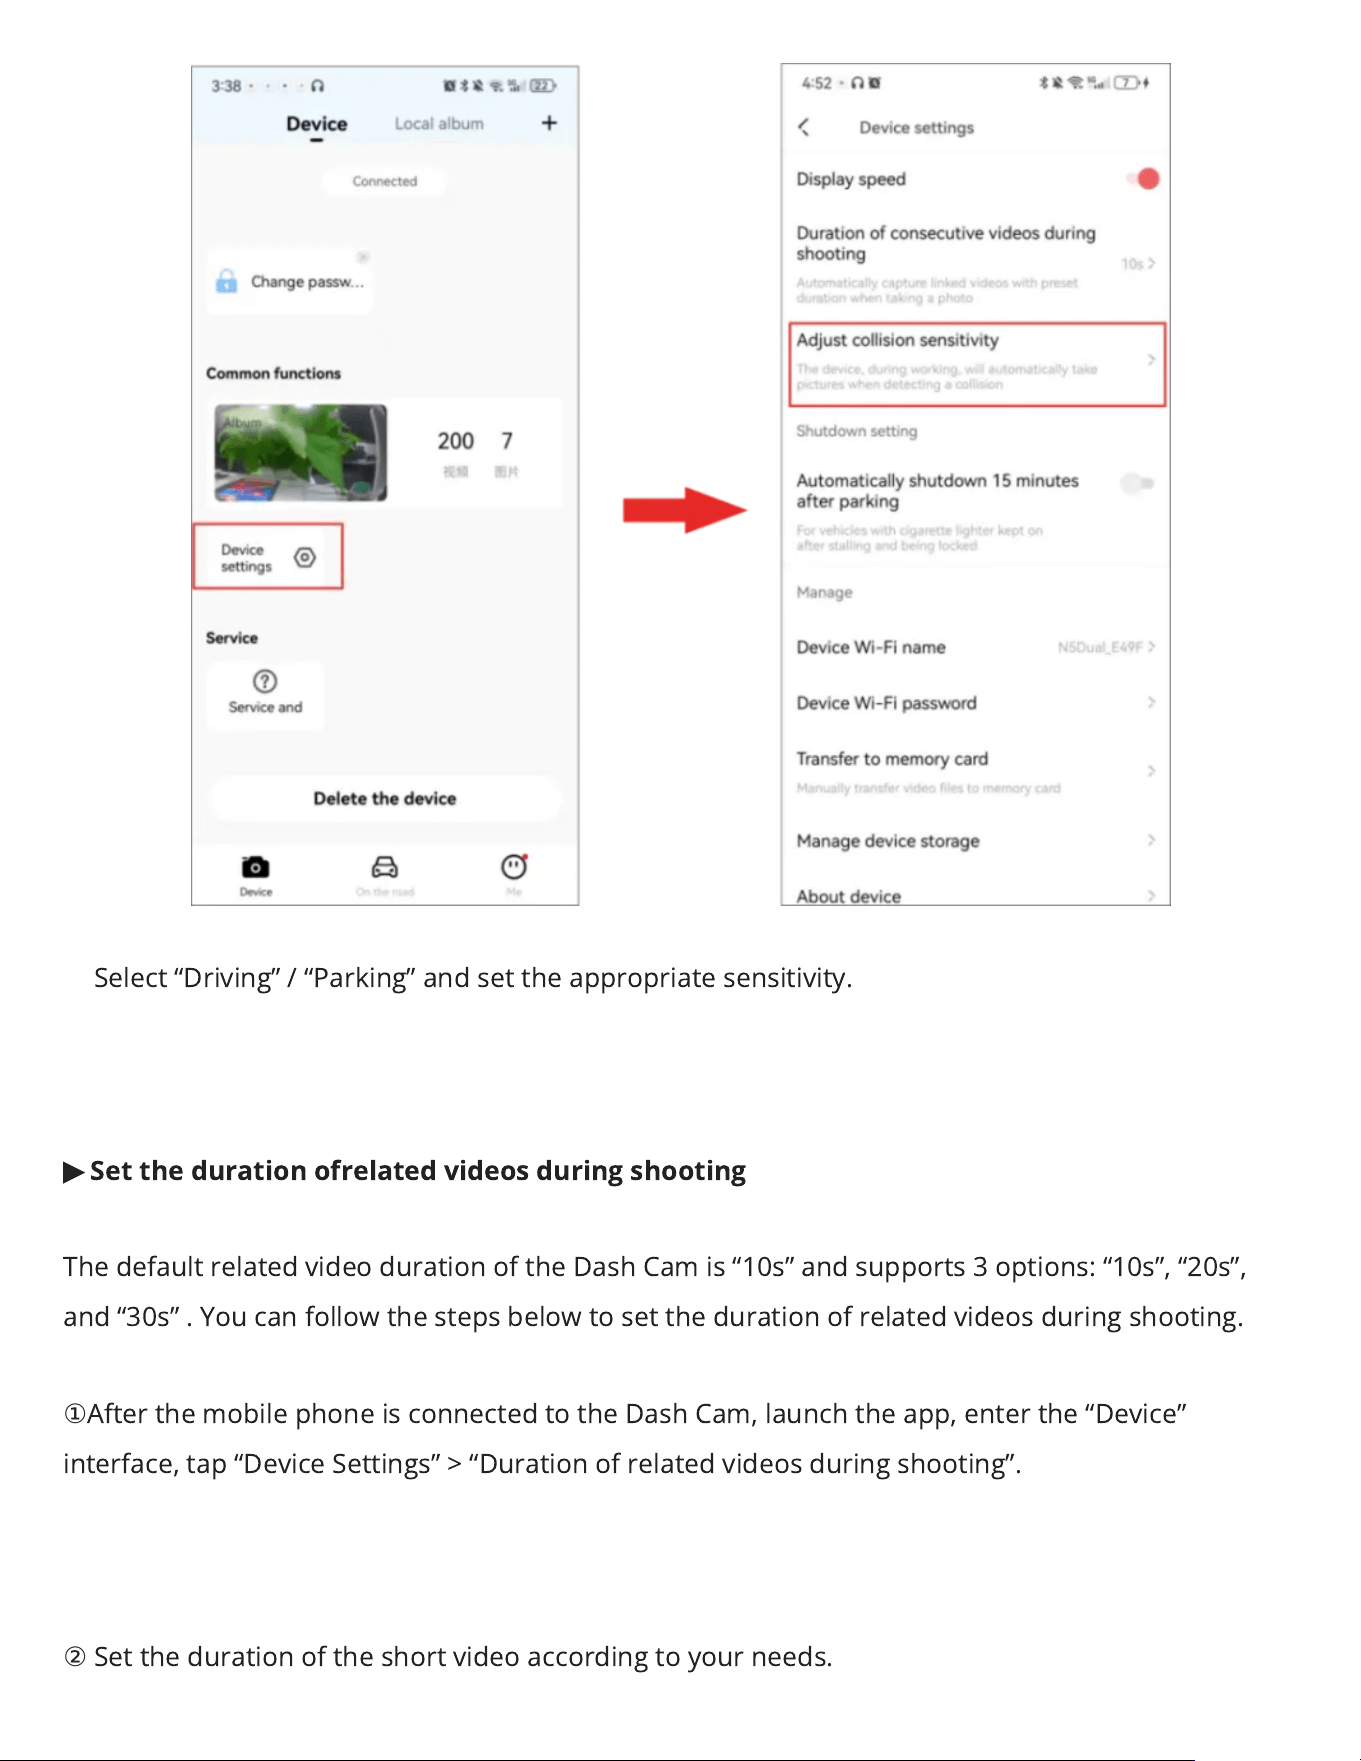
②
Select “Driving”/“Parking”and set the appropriatesensitivity.
▶
Set the duration ofrelated videos during shooting
The defaultrelated video duration of the Dash Camis “10s” and supports3 options: “10s”, “20s”,
and “30s”.You can follow the steps below to set the duration of related videos during shooting.
①
After the mobile phone is connected to the Dash Cam, launchthe app, enter the “Device”
interface, tap “DeviceSettings”> “Duration of related videos during shooting”.
②
Set the duration of the short video according to your needs.
10s: After the Dash Cam detects a collision, it will generate an emergency related video of 5
seconds before and after the shooting time.
20s: After the Dash Cam detects a collision, it will generate an emergency related video of 10
seconds before and after the shooting time.
30s: After the Dash Cam detects a collision, it will generate an emergency related video of 15
seconds before and after the shooting time.
O: After the Dash Cam detects a collision, it will still generate an emergency related video of
5 seconds before and after the shooting time.
Advanced Driver Assistance System (ADAS)
Advanced Driver Assistance System (ADAS) supports the detection of changes in road conditions
and provides you with driving reminders, including the voice reminder for the vehicle in front
startingand the fatigue driving.
▶
Set the Sensitivity of ADAS
You can select to turn on/o the ADAS intelligent driving assistance, or set the ADAS intelligent
driving assistance sensitivity.
When the Dash Cam is connected to the DDPAI App, tap “Device Settings”> “ADAS Intelligent
Assistance Reminder”.
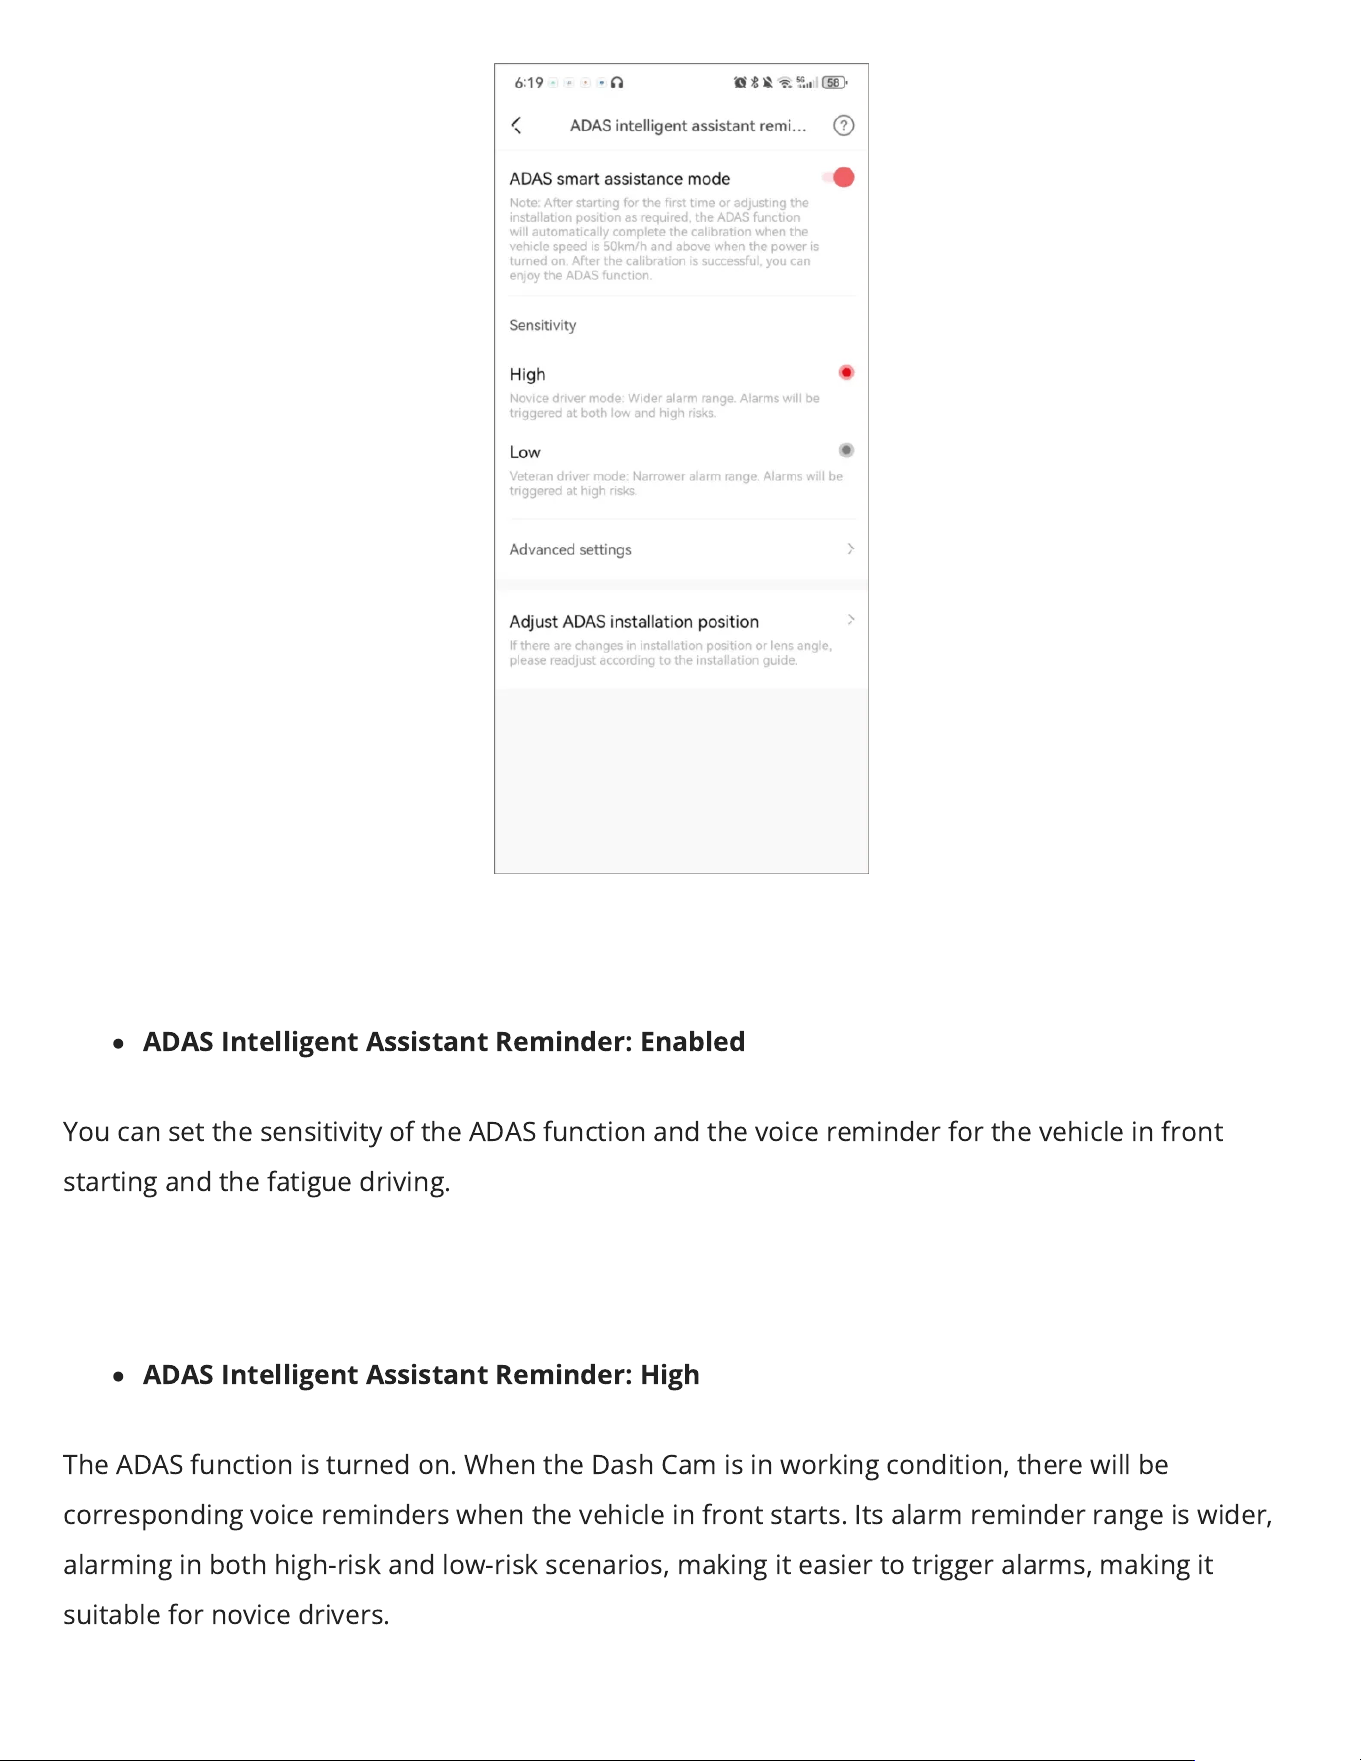
ADAS Intelligent Assistant Reminder: Enabled
You can set the sensitivity of the ADAS function and the voice reminder for the vehicle in front
startingand the fatigue driving.
ADAS Intelligent Assistant Reminder: High
The ADAS function is turned on. When the Dash Cam is in working condition, there will be
corresponding voice reminders when the vehicle in front starts.Its alarm reminder range is wider,
alarming in both high-risk and low-risk scenarios, making it easier to trigger alarms, making it
suitable for novice drivers.

ADAS Intelligent Assistant Reminder: Low
The ADAS function is turned on. When the Dash Cam is in working condition, there will be
corresponding voice reminders when the vehicle in front starts.Its alarm range is smaller and only
warns in high-risk scenarios, making it suitable for experienced drivers.
▶
Set the Voice Reminder
Tap “Advanced settings”and choose to enable/disable the voice reminder for the vehicle in front
startingand the fatigue driving.
Voice Reminder for Front Car Starts: Enabled
When the vehicle is stopped and waiting for a trac light or in a trac jam, if the car in front starts
to move, it will give a voice alert.
Voice Reminder for Fatigue Driving: Enabled
When the user is driving, a smart voice prompt for fatigue driving will be givento remind the user
to take a break or be more vigilant.
Data Transmission
Gently remove the memory card from the card slot of the dash cam, insert it into the card reader,
then plug it in the computer, open the”DCIM”folder, and browse or edit the photos or video les
saved in the dash cam.
200 video: This folder contains normal recorded videos and time-lapse recorded videos in
parking monitoring mode. The le name oftime-lapse recorded video begins with “S”.
201 photo: This folder contains photos generated by collision sensors. The le name
ofnormal photographs begin with “N”; Collision-sensing pictures begin with “G”.
Maintenance
Firmware Upgrade
Open the DDPAI App, connect the dash cam Wi-Fi, and tap “Me”>”About DDPAI”>”Detect New
Version” and the app will automatically detect whether the App version and the rmware version
are the latest versions. If there is a new version of the rmware of App or device, upgrade the
version according to the operation displayed on the screen.
Note
During the upgrade process of the dash cam, please do not cut o the power, otherwise the upgrade will be
unsuccessful or the device will be damaged. If a sudden power outage causes the upgrade to fail, please consult
customer service, download the latest upgrade package, and copy the upgrade package to the DCIM folder of the
device.
Safety Precautions
Before using this product, please read all precautions and operating instructions to ensure correct
and safe use.
1. Please do not debug theDash Camor watch the video on your mobile phone while driving,
and pay attention to driving safety.
2. Please do not installthe Dash Camin a location that may block the driving view.
3. Make sure to use the power cord included in the product package. Other power cords may
cause re or short circuit and electric shock due to defective products.
4. Make sure to usea branded Micro-SD card with capacity of up to 256GB.When using the
device, please do not insert or remove the memory card. Please format it through the App
before use, otherwise it will not be recognized. It is recommended to format the Dash
Camregularly through the app to ensure better maintenance of this product.
5. Please do not open the Dash Camshell or repair it yourself. If this product fails, please call
the ocial customer service for relevant consultation.
6. The Dash Camis not only suitable for vehicles, but can also be used in other places and can
be powered by an adapter.
7. If a power adapter is used for power supply, an adapter that meets standard requirements
should be purchased for use.
8. The pictures in this operating guide are for reference only, please refer to the actual product.
FAQ
FAQ
1. How do I format a memory card?
Format the memory card (Method 1):
After the mobile phone successfully connects to the device,
enter the “Camera Settings” interface, tap“Storage Management”and you can select to format the
memory card.
Format the memory card (Method 2):
Remove the memory card, insert it into the card reader,
and connect it to the computer. Find the memory card drive, Right-click and select “Format”.
2. How to export the driving video in the memory card?
Use the card reader to connect the memory cardwith the computer, and you can export the driving
video.
3. What is the Wi-Fi password of the Dash Cam?
The default Wi-Fi password of the device is “1234567890”. You can change the password, go
to“Camera Settings” > “Set WIFI Password” after connecting the APP with your mobile phone.
4. Can I change the Wi-Fi password of the Dash Cam?
It can be modied. The specic modication method is to enter “DeviceSettings” interface after the
Dash Camis connected to the mobile phone, select “DeviceWi-Fi Password” after entering, enter a
new password, conrm it, and save it.
5. How do I reset the Dash Cam?
In case of abnormal state, press the functionbuttonfor approximately 6 seconds to reset the
device. After successful reset, the device will automatically restart.
6. What if I forget the Wi-Fi password?
Press the function button for approximately 6 seconds to reset the device, and then connect the
Dash Camagain (default password: 1234567890).

7. Can I turn o this function if the voice is often triggered by mistake?
Yes, after the mobile phoneis successfully connected to the Dash Cam, enter the “Device” page,
tap“Device Settings”, and disable“Local Voice Control”function.
8. Why does the product feel very hot during use?
It is normal for electronic products to heat up during use. All DDPAI products have undergone high
temperature testing. During normal use, the surface of the product heats up due to the heat
dissipation of the machine, which will not aect the normal operation of the machine or cause
safety issues.