

USER MANUAL
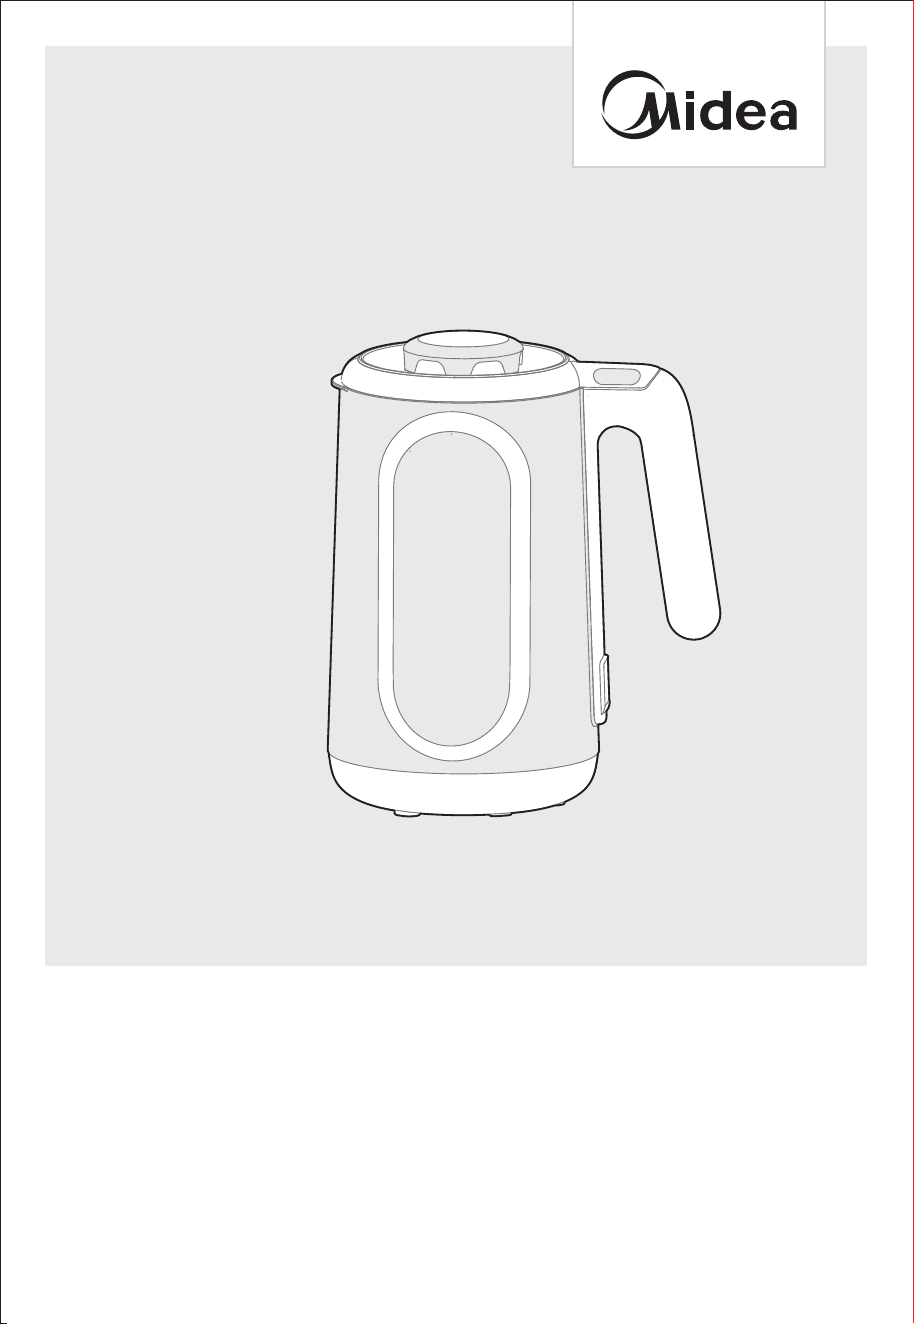
1 L/1,06 QT 8 IN 1 HEATING NUT MILK MAKER
Warning notices: Before using this product, please read this manual carefully and keep it for future reference.
The design and specifications are subject to change without prior notice for product improvement.
Consult with your dealer or manufacturer for details.
The diagram above is just for reference. Please take the appearance of the actual product as the standard.
MNM802TSBPH
ITM. / ART.1871877

01
THANK YOU LETTER
Thank you for choosing Midea! Before using your new Midea product, please read
this manual thoroughly to ensure that you know how to operate the features and
functions that your new appliance offers in a safe way.
CONTENTS
0
02
1
05
06
07
1 6
1 3
1 7
1 2
THANK YOU LETTER
SAFETY INSTRUCTIONS
SPECIFICATIONS
PRODUCT OVERVIEW
OPERATION INSTRUCTIONS
CLEANING AND MAINTENANCE
TROUBLESHOOTING
TRADEMARKS, COPYRIGHTS AND LEGAL STATEMENT
DATA PROTECTION NOTICE
1 YEAR LIMITED WARRANTY
1 8
02
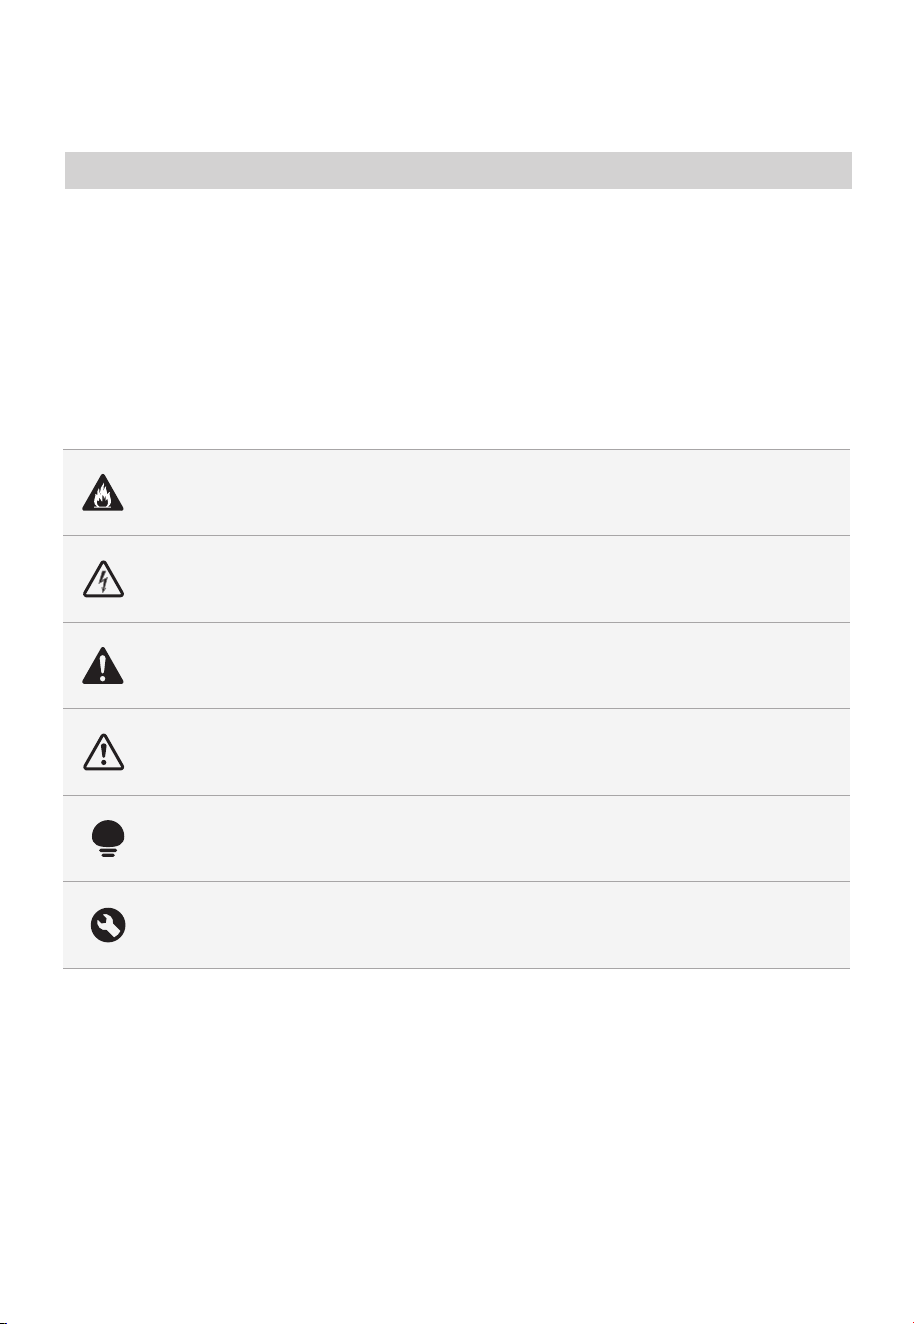
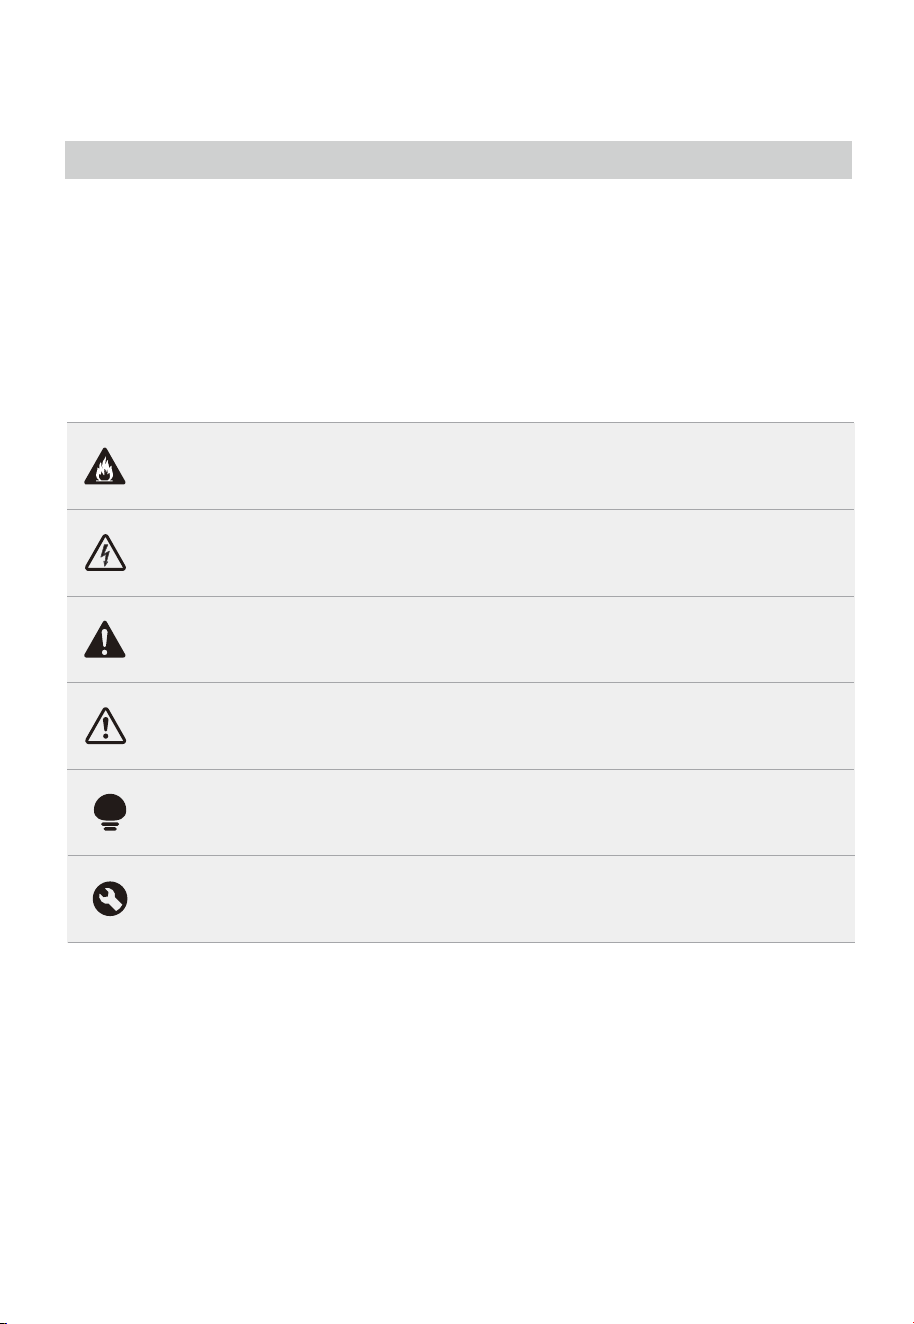
Danger
This symbol indicates that there are dangers to the life and health of
persons due to extremely flammable gas.
Warning of electrical voltage
This symbol indicates that there is a danger to life and health of
persons due to voltage.
Warning
The signal word indicates a hazard with a medium level of risk which, if
not avoided, may result in death or serious injury.
Caution
The signal word indicates a hazard with a low degree of risk which, if
not avoided, may result in minor or moderate injury.
Attention
The signal word indicates important information (e.g. damage to
property), but not danger.
Observe instructions
This symbol indicates that a service technician should only operate and
maintain this appliance in accordance with the operating instructions.
The following safety guidelines are intended to prevent unforeseen risks or damage from
unsafe or incorrect operation of the appliance. Please check the packaging and appliance
on arrival to make sure everything is intact to ensure safe operation. If you find any
damage, please contact the retailer or dealer. Please note modifications or alterations to
the appliance are not allowed for your safety concern. Unintended use may cause
hazards and loss of warranty claims.
Read these operating instructions carefully and attentively before using/commissioning the
unit and keep them in the immediate vicinity of the installation site or unit for later use!
Intended Use
Explanation of Symbols
SAFETY INSTRUCTIONS

03
When using electrical appliances, basic safety
precautions should always be followed, including the
following:
1. Read all Instructions.
2. Do not touch hot surfaces. Use handles or knobs.
3.
4.
5.
To protect against fire, electric shock and injury to
persons do not immerse cord, plugs, or appliance in
water or other liquid.
This appliance is not intended for use by persons
(including children) with reduced physical, sensory or
mental capabilities, or lack of experience and
knowledge, unless they have been given supervision
or instruction concerning use of the appliance by a
person responsible for their safety. Children should be
supervised to ensure that they do not play with the
appliance.
Turn the appliance OFF, then unplug from the outlet
when not in use, before assembling or disassembling
parts and before cleaning. To unplug, grasp the plug
and pull from the outlet. Never pull from the power
cord.
6. Do not operate any appliance with a damaged cord or
plug or after the appliance malfunctions, or has been
damaged in any manner. Return appliance to the
nearest authorized service facility for examination,
repair or adjustment.
7. The use of attachments, including canning jars, not
recommended by the manufacturer may cause a risk
of injury to persons.
8. Household use only. Do not use outdoors.
9. Do not let cord hang over edge of table or counter, or
touch hot surfaces.
10. Do not place on or near a hot gas or electric burner, or
in a heated oven.
11. Always attach plug to appliance first, then plug cord
into the wall outlet. To disconnect, turn any control to
"off," then remove plug from wall outlet.

04
12. Do not use appliance for other than intended use.
13. Avoid contacting moving parts. Do not attempt to
defeat any safety interlock mechanisms.
14. Do not operate any appliance with a damaged cord or
plug or after the appliance malfunctions, or is dropped
or damaged in any manner. Contact the manufacturer
at their customer service telephone number for
information on examination, repair, or adjustment.
Customer service: [email protected]
1-866-646-4332
15. Keep hands and utensils out of container while
blending to reduce the risk of severe injury to persons
or damage to the blender. A scraper may be used but
must be used only when the blender is not running.
16. Blades are sharp. Handle carefully.
17. Always operate blender with cup lid in place.
18. Keep vented lid in place when blending hot liquids.
19.
Scalding may occur if the lid is removed during the
brewing cycles.
20.
Allow to cool before assembling or disassembling parts
and before cleaning the appliance.
21. A short detachable power-supply cord is provided to
reduce risks resulting from becoming entangled in or
tripping over a longer cord.
22. Longer detachable power-supply cords are available
and may be used if care is exercised in their use.
23. If a long detachable power-supply cord is used:
1) The marked electrical rating of the detachable
power-supply cord or extension cord should be at
least as great as the electrical rating of the
appliance;
2) The extension cord should be a grounding-type 3-
wire cord;
3) The longer cord should be arranged so that it will
not drape over the counter top or table top where it
can be pulled on by children or tripped over.

05
MNM802TSBPHProduct Model
Power Supply
Capacity
Stirring Power
120V~ 60Hz
1.0L/1,06QT
180W
Heating Power
Rated Power
800W
800W
SPECIFICATIONS
06
NOTE
• The illustrations provided are for reference only and may vary in appearance. Please
refer to the actual product inside the packaging box for accurate representation.
• Due to differences in appearance and functionality among different models, please
refer to the actual product for accurate information.
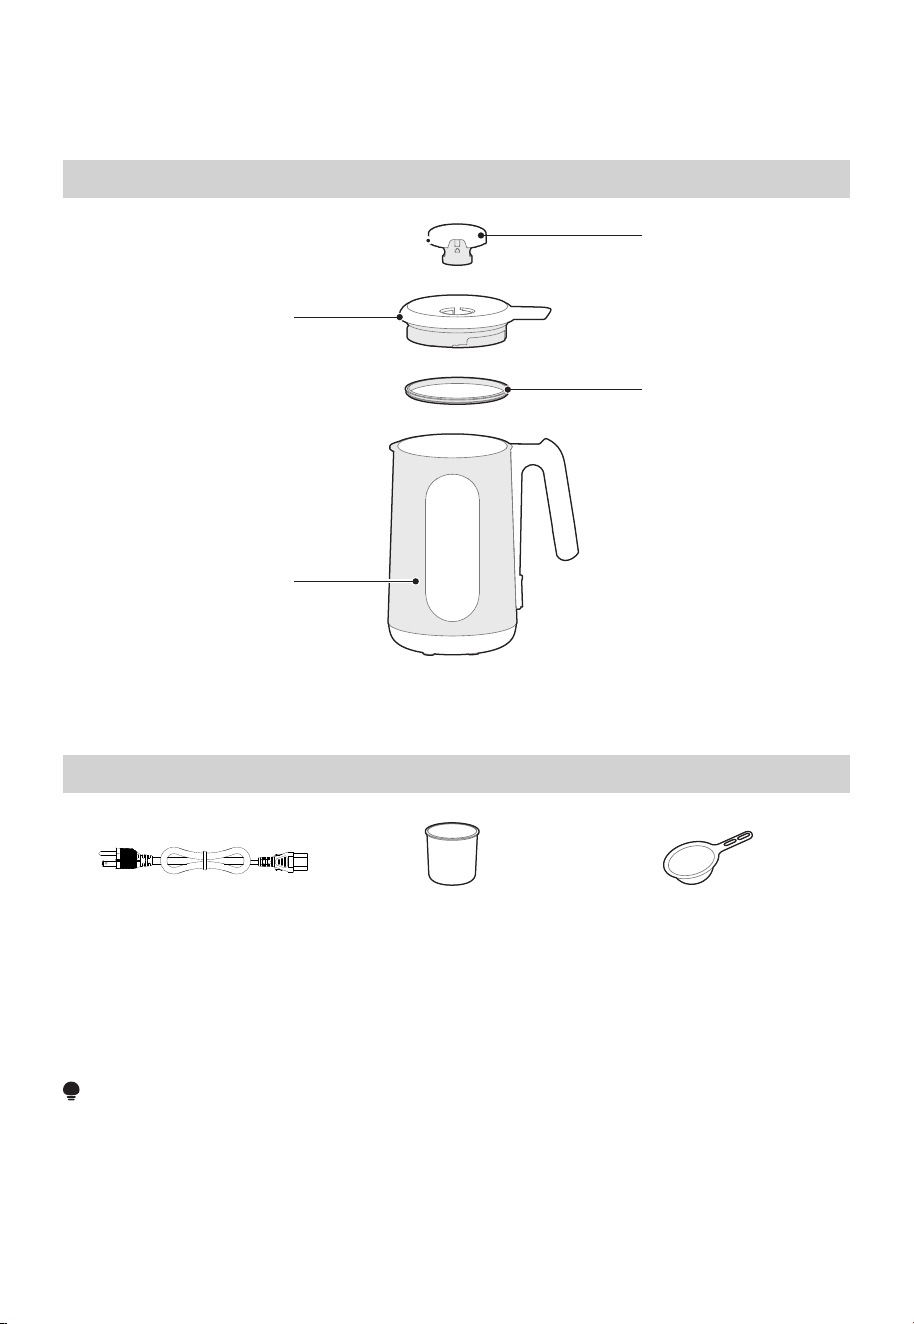
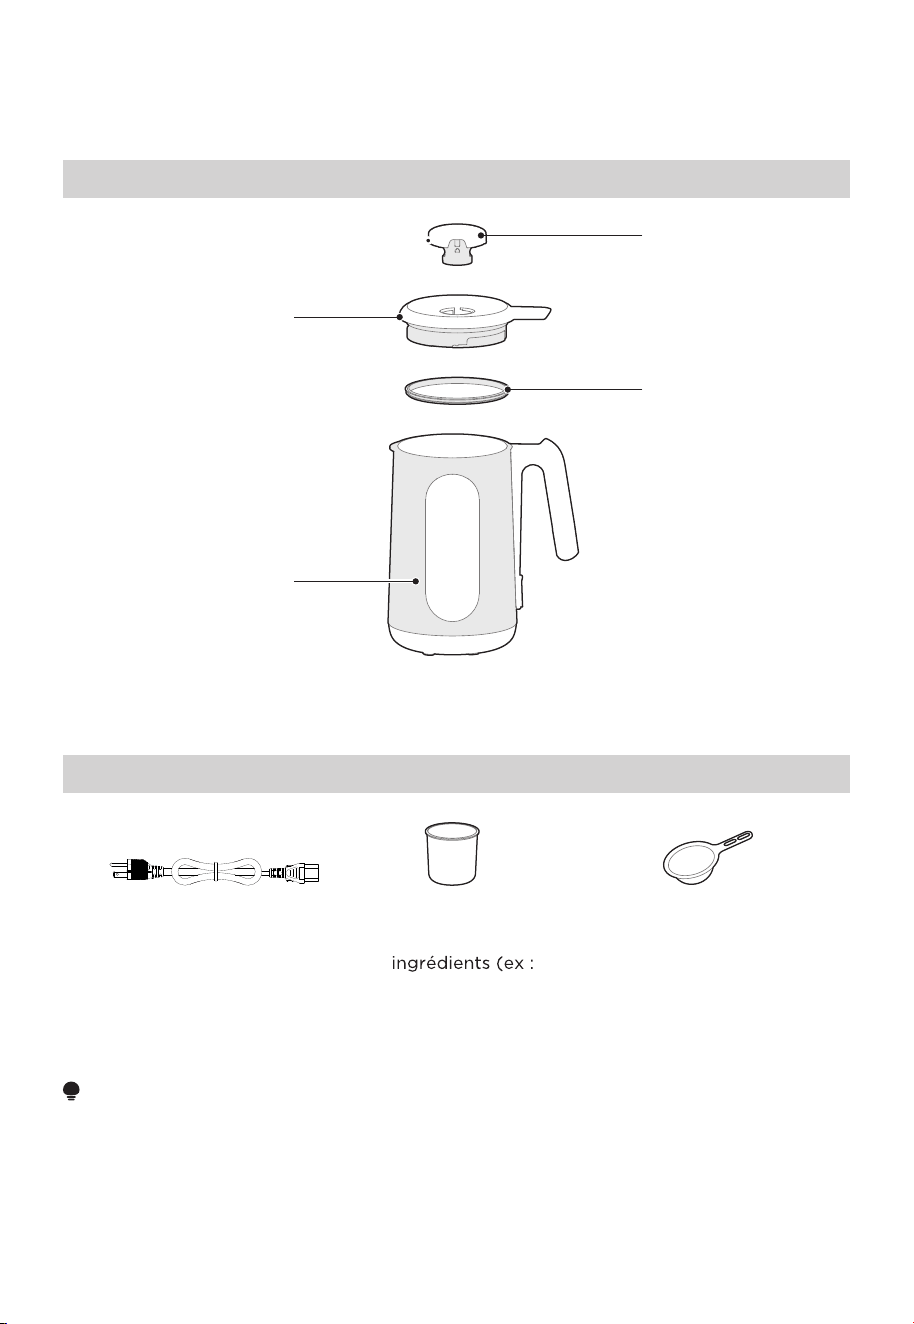
PRODUCT OVERVIEW
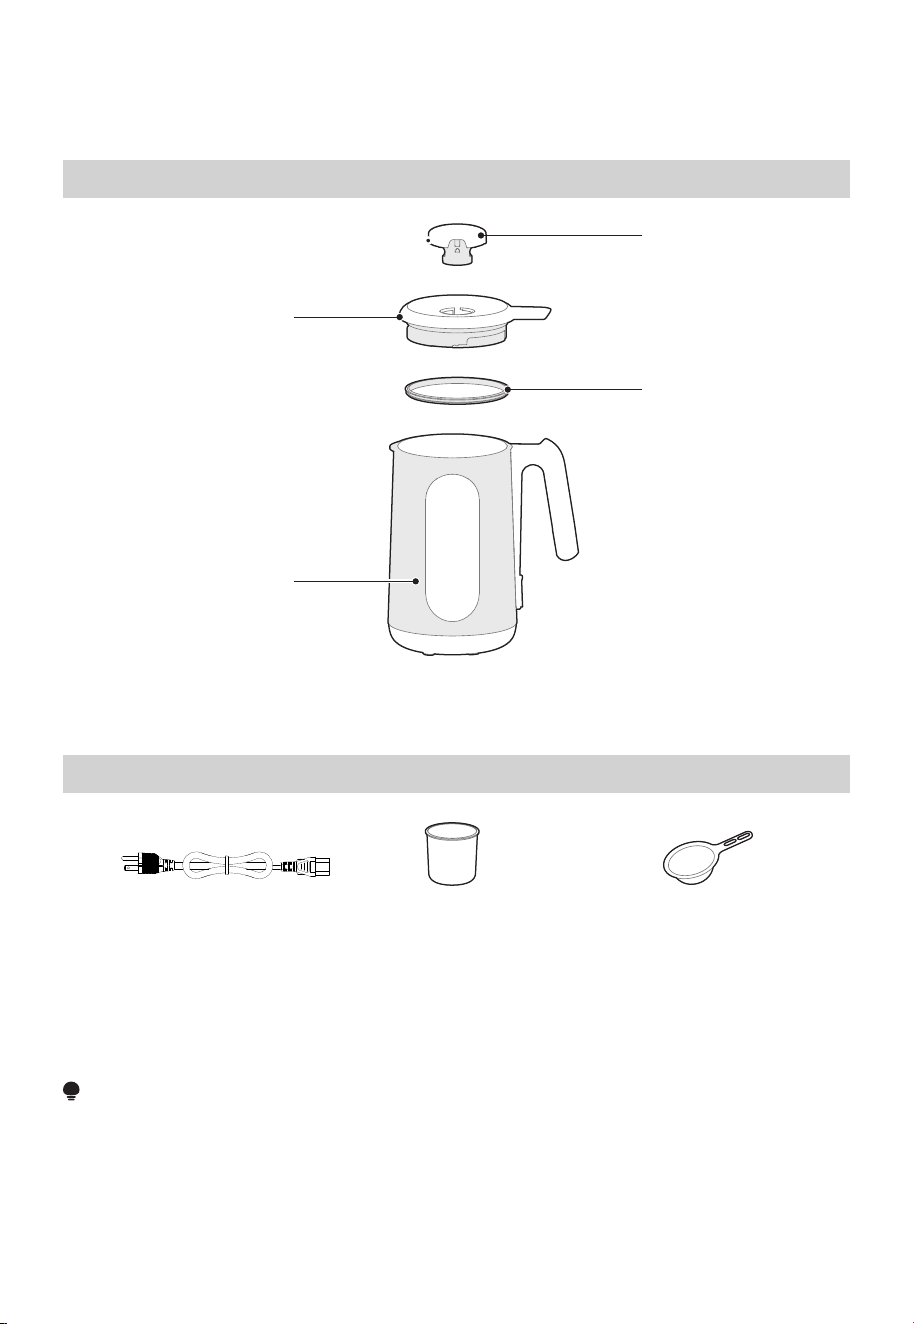
Part Name
Part List
Seal Ring
Power Cord x 1 Measure Cup x 1 Screen assembly x 1
Vented Lid
Cup Lid
Soybean
Milk Container
For adding ingredients
(e.g. beans, etc.)
For filtering soybean
milk after making

07
NOTE
All information has been carefully checked and any typographical errors or misunder-
standings are subject to consultation with the company. Any technical improvements to
the products will be included in the new version of the manual without prior notice. If
there are any changes to the appearance or color of the product, the actual product
shall prevail.
• The Midea Soybean Milk Maker utilizes dry bean pulping technology, and there is no
need to soak the ingredients beforehand.
• Before operating the product, please ensure that the cup lid is placed vertically into the
soy milk container in the correct direction and pressed downward. Failure to do so
may result in poor contact and the product not functioning properly.
• If the power is accidentally cut off or if the product is restarted during operation, the
following phenomena may occur:
1. Impact on pulping effectiveness;
2. Juice splattering and continuous alarm sound from the product;
3. If making baby food, there may be sticking at the bottom of the container.
• During the operation of the product, it is strictly prohibited to add any more ingredients
or lift the cup lid as it may cause harm to individuals and result in product malfunctions.
• It is recommended not to use ingredients that are not specified in the instruction
manual, as it may result in staining the machine or causing the bottom to stick or
failure to pulverize.
• Do not reheat or re-stir the soybean milk after it has been prepared, as this may cause
it to stick to the bottom of the cup or overflow.
• Soybean milk must be boiled before consumption. Fresh soy milk is recommended to
be consumed within 6 hours at room temperature.
• Do not use the machine to heat cold milk, cold paste, or boil water.
• If sticking occurs, normal use is possible after cleaning.
• Discoloration at the bottom of the soybean milk maker after prolonged use is a normal
phenomenon and does not affect its normal operation.
• Operate the product strictly according to its functions, and avoid using the function
buttons incorrectly, as it may result in sticking, overflow, failure to pulverize, or
undercooked outcomes.
• When using the product, strictly follow the instructions regarding the amount of food
and water to ensure a good taste and prevent sticking. Use the provided measuring
cup to measure the ingredients accurately during operation.
• During use, steam is emitted from the exhaust vents, and the surface temperature is
high. Take caution when lifting the cup lid to avoid scalding.
• Ingredients other than those specified in the recipes may pose a risk of failure to
pulverize, and it is not recommended to use them.
• It is strictly prohibited to pulp without installing the cup lid seal ring.
Precautions Before Use
OPERATION INSTRUCTIONS
08
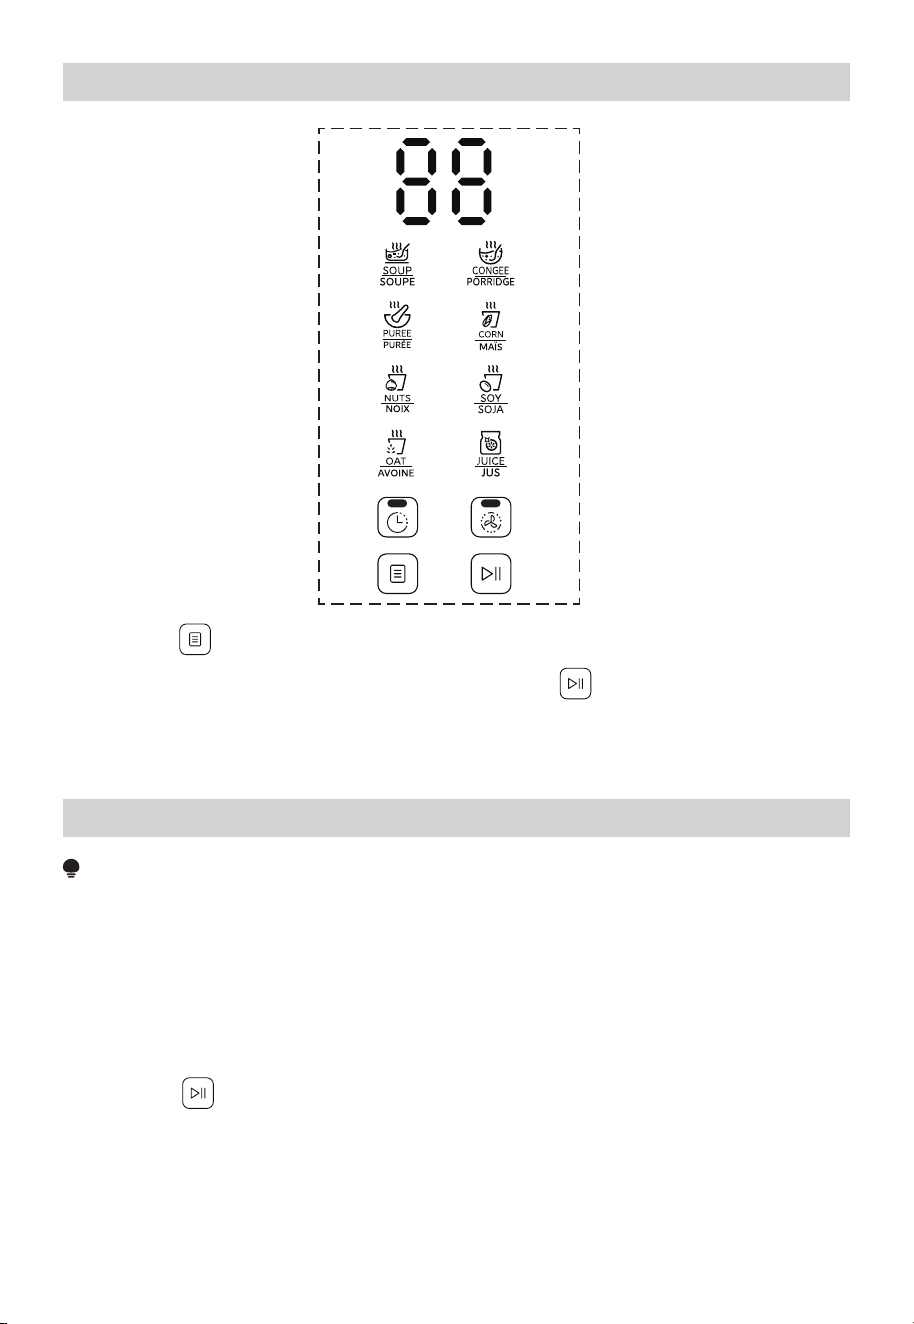
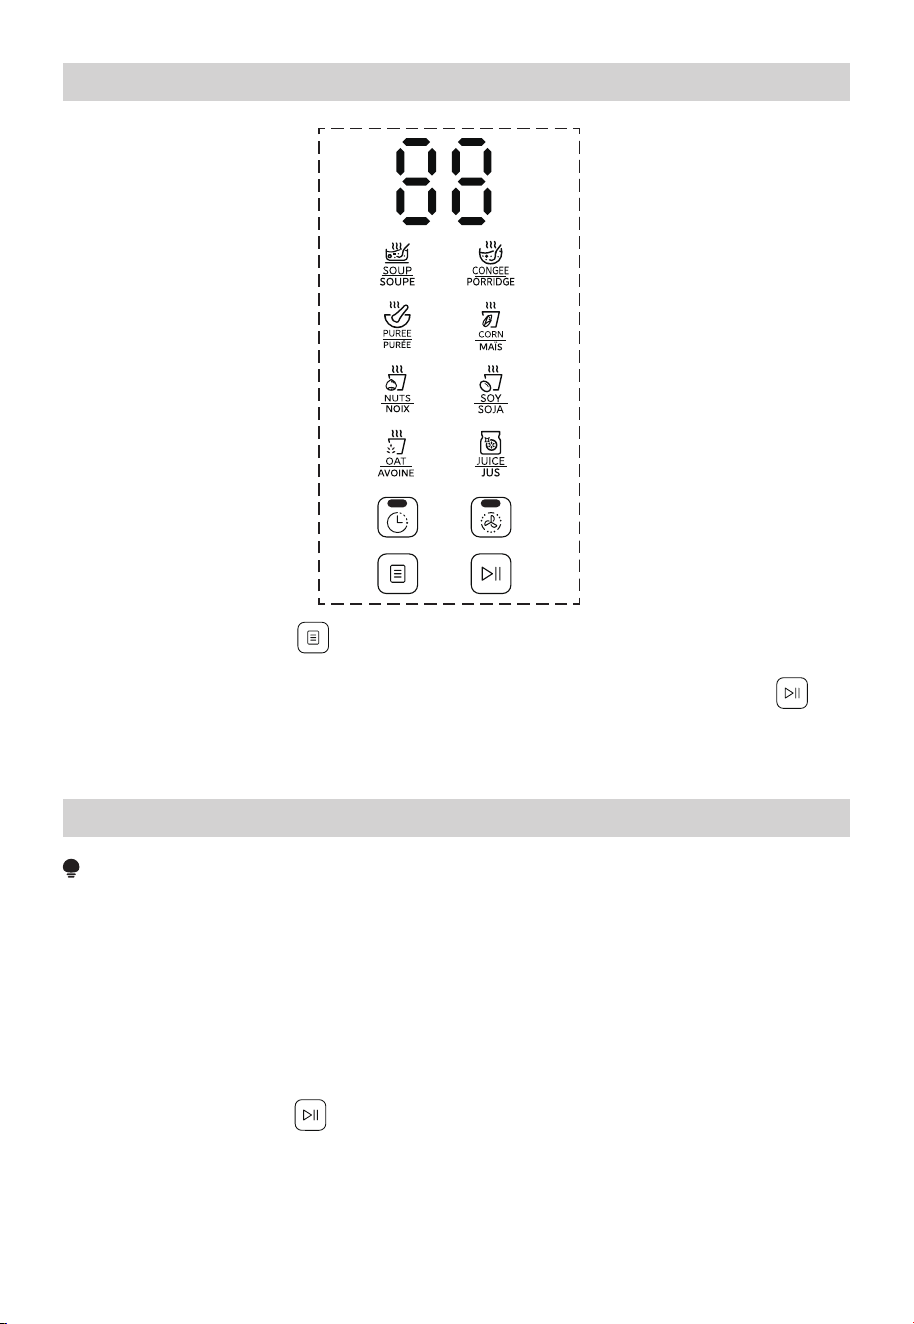
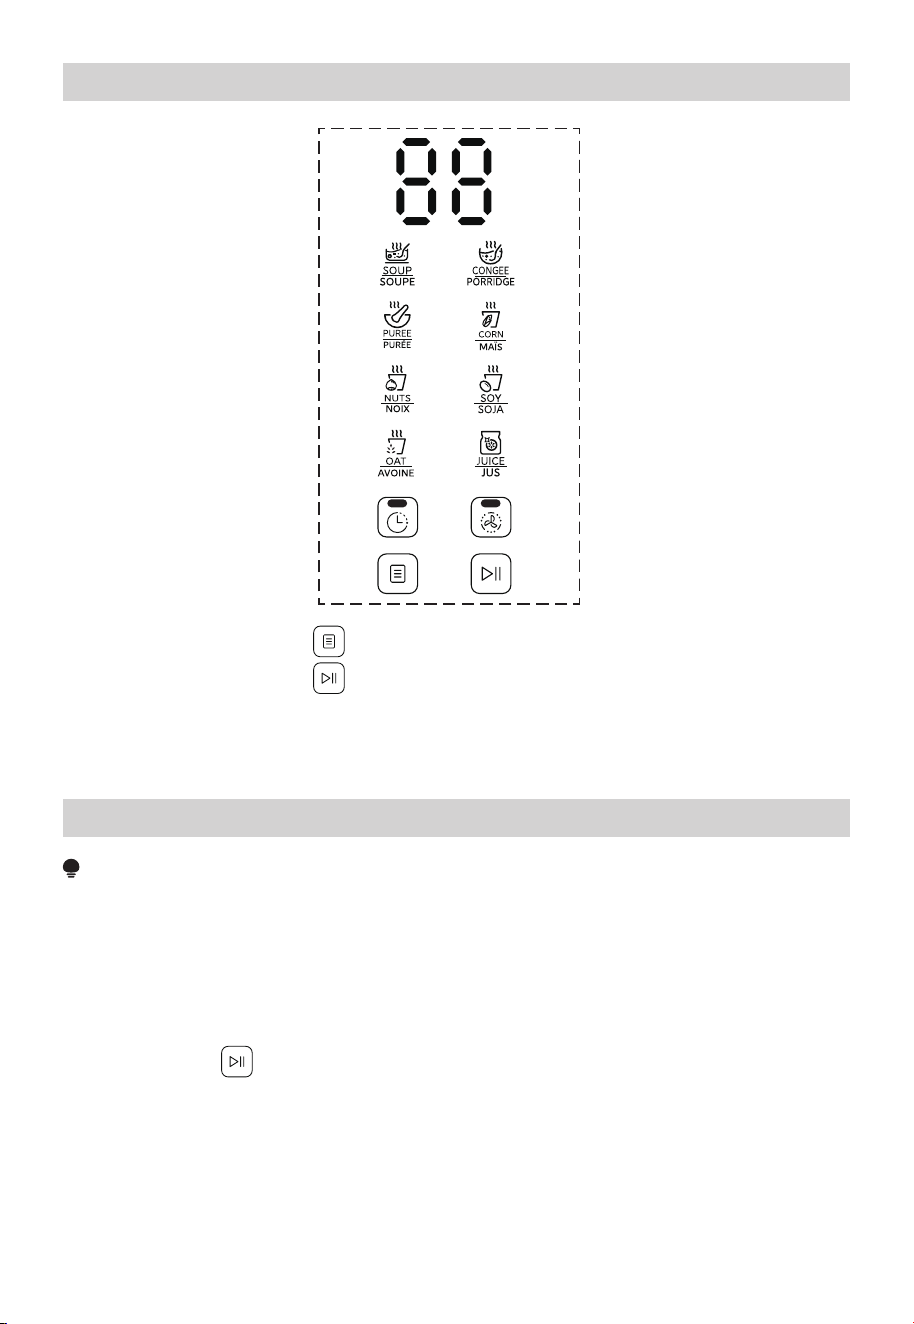
• Press the “ ” button while the machine is in standby mode to cycle through the
available functions.
• The corresponding function LED will flash. Press the “ ” button to begin operation.
• After the work is finished, the buzzer will sound for approximately 1 minute, and the
LED will continue to flash.
NOTE
• When adding water to the soy milk container, the water temperature should not
exceed 50°C.
• When making fruit and vegetable juice, ensure that the ingredients are washed, pitted,
and cut into small pieces (about the size of peanuts), following the recipe provided.
Use yogurt according to the recipe when making yogurt-based juice.
• Please allow an interval of 8 minutes before using the machine again.
• Use the Recipe button for ingredient suggestions.
• When selecting a function, the corresponding LED will flash. During operation, the
corresponding LED will stay on.
• Press the “ ” button to interrupt the operation if needed.
• Make sure the cup lid’s sealing ring is properly installed before use.
• Make sure the cup lid is securely closed before starting.
• Please don't add ice.
Control Panel
Operating Instructions
09
NOTE
When the power is turned on, you will
hear a “beep” sound, and the machine
will enter standby mode.
NOTE
Be cautious of the steam released to
avoid burns. Do not open the cup lid
during operation.
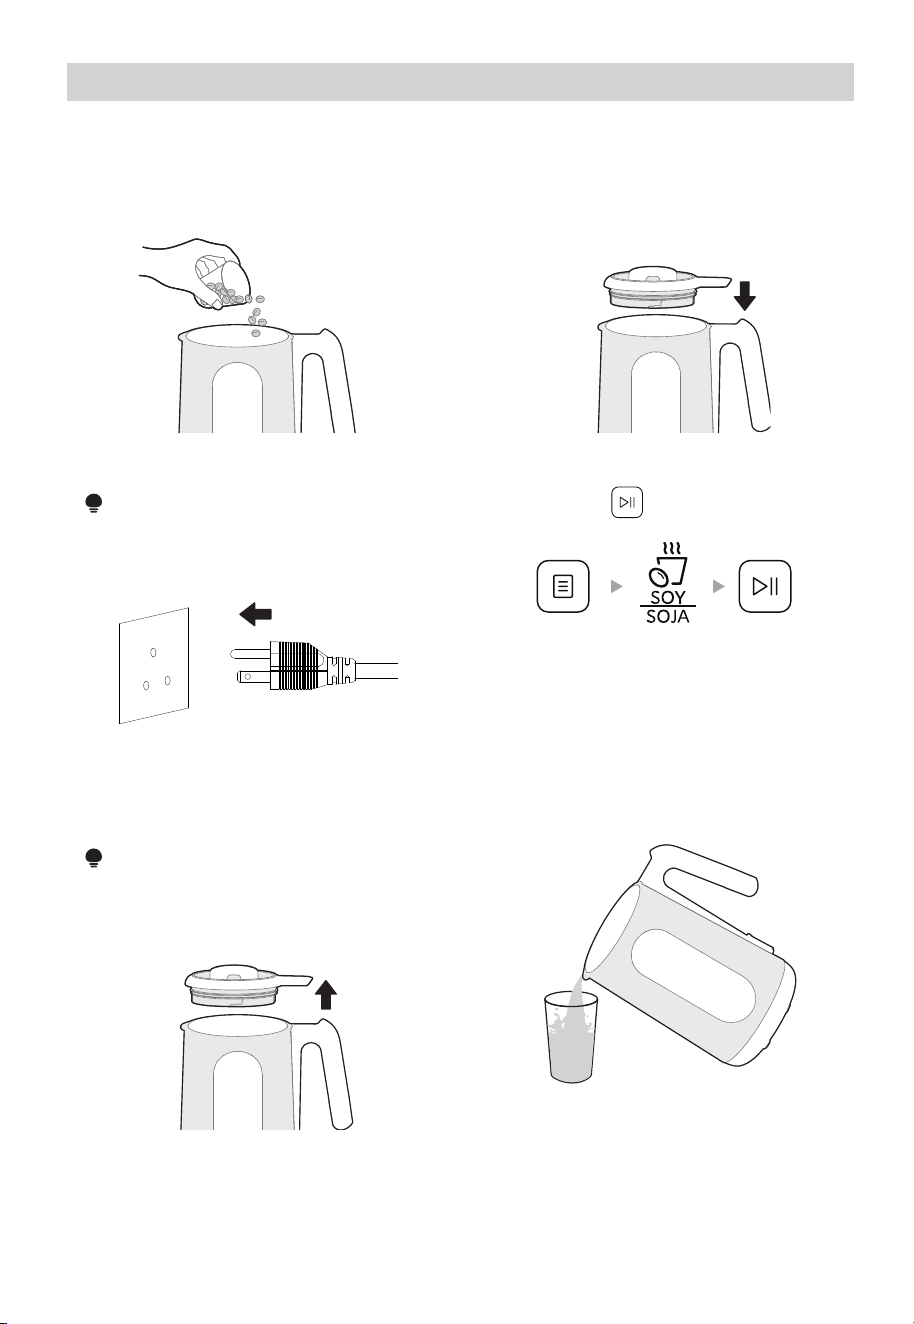
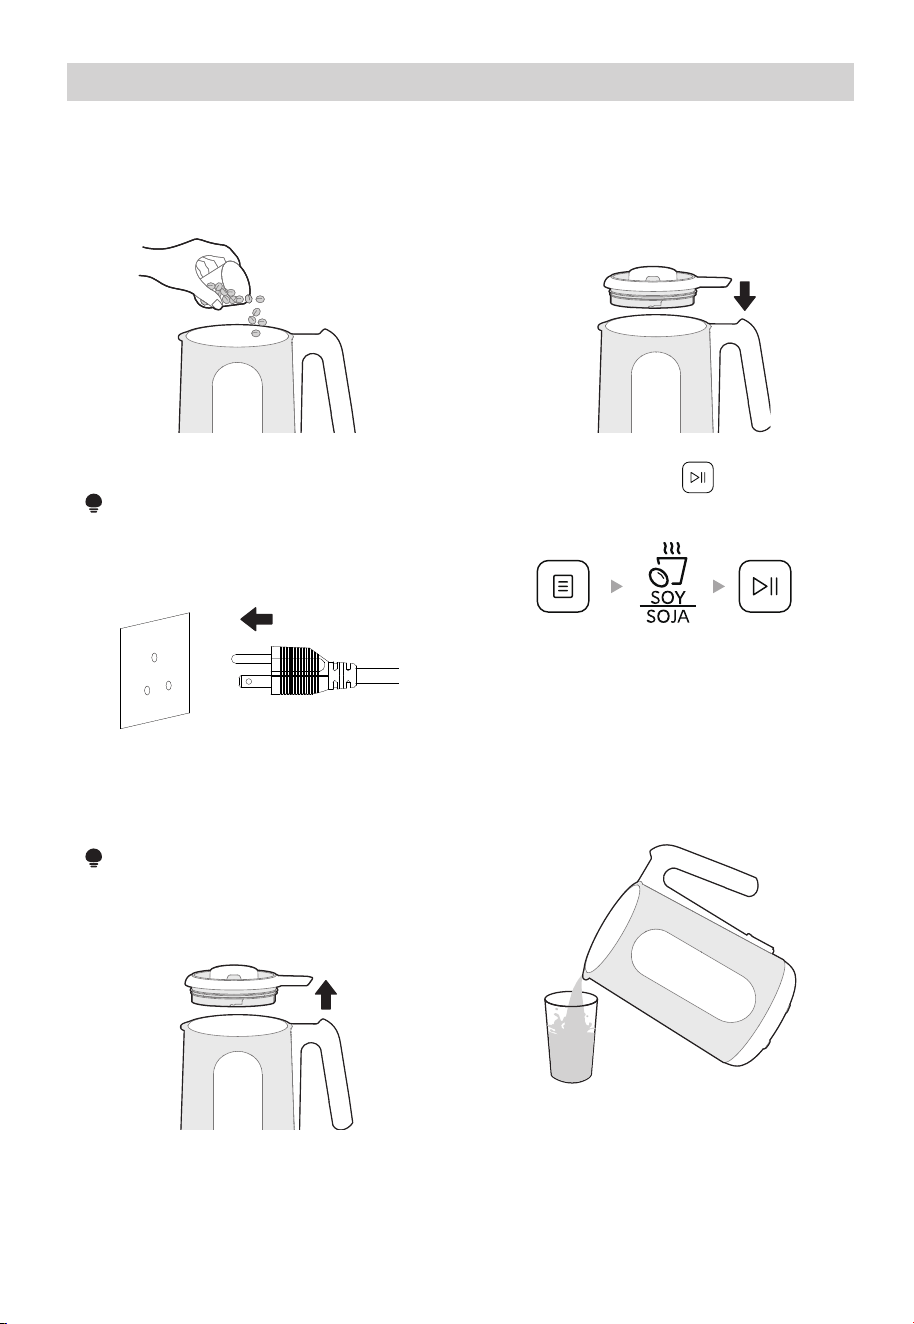
Soy Operation Steps
Wash the ingredients and pour them
into the soy milk container. Add water
according to the recommended
quantity in the recipe.
1
Screw on the cup lid, ensuring that the
handle aligns with the handle recess
and that the corresponding time for
the selected function is displayed,
indicating proper installation.
2
Once the process is complete, unplug
the power cord and unscrew the cup
lid.
5
Pour the prepared soy milk into a
separate container.
6
Plug in the power cord.
3
After selecting the desired function,
press the “ ” button to begin
operation.
4
Taking the “SOY ”
function as an example
Walnut Rice
Paste
Quick Soybean
Milk
50g c
rushed roasted walnuts (about 1 cup), 3/4
cup of rice, add water up to the 1.0L/1,06QT mark.
1 c
up + 1/3 cup of soybeans, add water up to the
1.0L/1,06QT mark.
Rice Fragrance
Soy Milk
2/3 cup of
soybeans, 1/3 cup of rice, add water
up to the 1.0L/1,06QT mark.
Millet Wolfberry
Soybean Milk
2/3 cup of
soybeans, 1/3 cup of millet, 10
wolfberries, add water up to the 1.0L/1,06QT mark.
Peanut, Walnut
and Soybean
Milk
1/3 cup
of soybeans, 1/3 cup of peanuts, 3 walnuts
(broken into size of peanuts), 1/3 cup of rice, add
water up to the 1.0L/1,06QT mark.
10
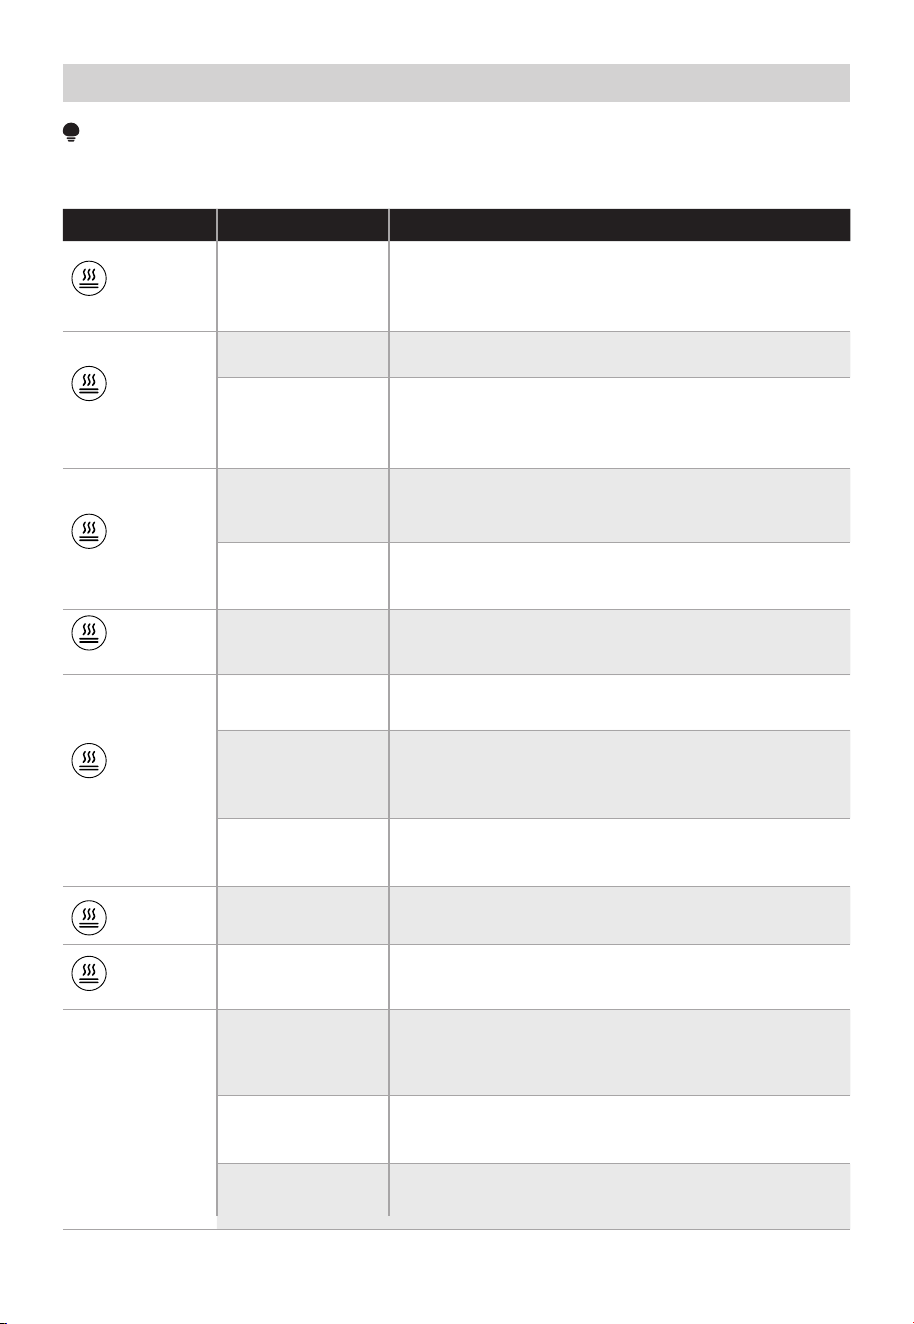
Recipe Ingredient Function
NOTE
• Please refer to the actual operating interface of the product for specific functions.
Recipe
PUREE
SOY
Oat Milk
30g
raw oats and 30g walnut kernels, add water
to the 1.0L/1,06QT mark.
OAT
NUTS
Sweet Potato
Rice Paste
4
cups of sweet potato (peeled and cut into
small pieces), 1/2 cup of rice, add water up to the
1.0L/1,06QT mark.
Thick Soup
100
g corn (cut into 6 pieces), 100g pork ribs, 100g
carrots (diced), 3 slices of ginger, salt to taste,
add water up to the 1.0L/1,06QT mark.
SOUP
Century Egg
Lean Meat
Congee
1 cup of
rice, 1 century egg (cut into small pieces),
50g lean meat (cut into small dice), salt, scallions,
and ginger to taste, add water up to the 1.0L/1,06QT
mark.
CONGEE
Rice Porridge
1
.5 cups of rice, add water up to the 1.0L/1,06QT mark.
Corn Juice
4
cups of fresh corn kernels, 1/4 cup of rice,
add water up to the 1.0L/1,06QT mark.
CORN
Mango Smoothie
300g
mango (peeled, pitted, and cut into small
pieces of peanut size), add yogurt up to the
1.0L/1,06QT mark. Please don't add ice.
Banana
Smoothie
2
bananas (peeled and sliced), add yogurt up to
the 1.0L/1,06QT mark. Please don't add ice.
Strawberry
Smoothie
8
strawberries (cut into small pieces of peanut
size), add yogurt up to the. 1.0L/1,06QT mark.
Please don't add ice.
JUICE

Intelligent altitude recognition
Tips
• The soybean milk machine automatically ADAPTS to the water temperature and the
altitude and voltage of the region in real time during the working process, and adjusts
the soybean milk production procedure to the best state to ensure the full release of
soybean milk nutrition, and prevent the problems such as uncooked soybean milk,
overflow and paste bottom caused by changes in altitude and voltage.
• In order to fully ensure the altitude adaptation effect, when the soybean milk machine
is moved to the area with a large altitude change (altitude difference of more than
1000 meters) after use, please follow the following steps.
• There is large steam in the process of boiling water, please pay attention to anti-hot.
• Long press the " " button for 2 seconds during the boiling process to cancel the
altitude adaptive program.
• After the intelligent altitude recognition is completed, the soy milk machine has been
adjusted to the optimal production procedure under the local environment, and has
been maintained in this state.
1. Add water to the maximum and minimum water level, do not add any ingredients, and
cover the cup.
2. Power on within 30 seconds, long press the " " button for 5 seconds to enter the
altitude adaptive program.
3. After the intelligent altitude recognition is completed, the first function light flashes,
and there is a "beep" and "beep" prompt tone.
11
CLEANING AND MAINTENANCE
12
NOTE
• Before cleaning, make sure to unplug the power.
• When cleaning the soybean milk container, please be careful of the sharp blades to
avoid any cuts.
• DO NOT use chemical substances such as alcohol for wiping.
• DO NOT directly rinse the outer shell of the cup with water to prevent water from
entering the interior.
• If there are stubborn residues inside the cup that are difficult to clean, you can first
soak them in cold water (not exceeding 50°C), then use the cleaning function or brush
counterclockwise (avoid brushing clockwise), and finally rinse with clean water. Do not
add detergent when using the high-temperature cleaning function.
• Please wait for the cup to cool down before cleaning to prevent scalding from residual
heat.
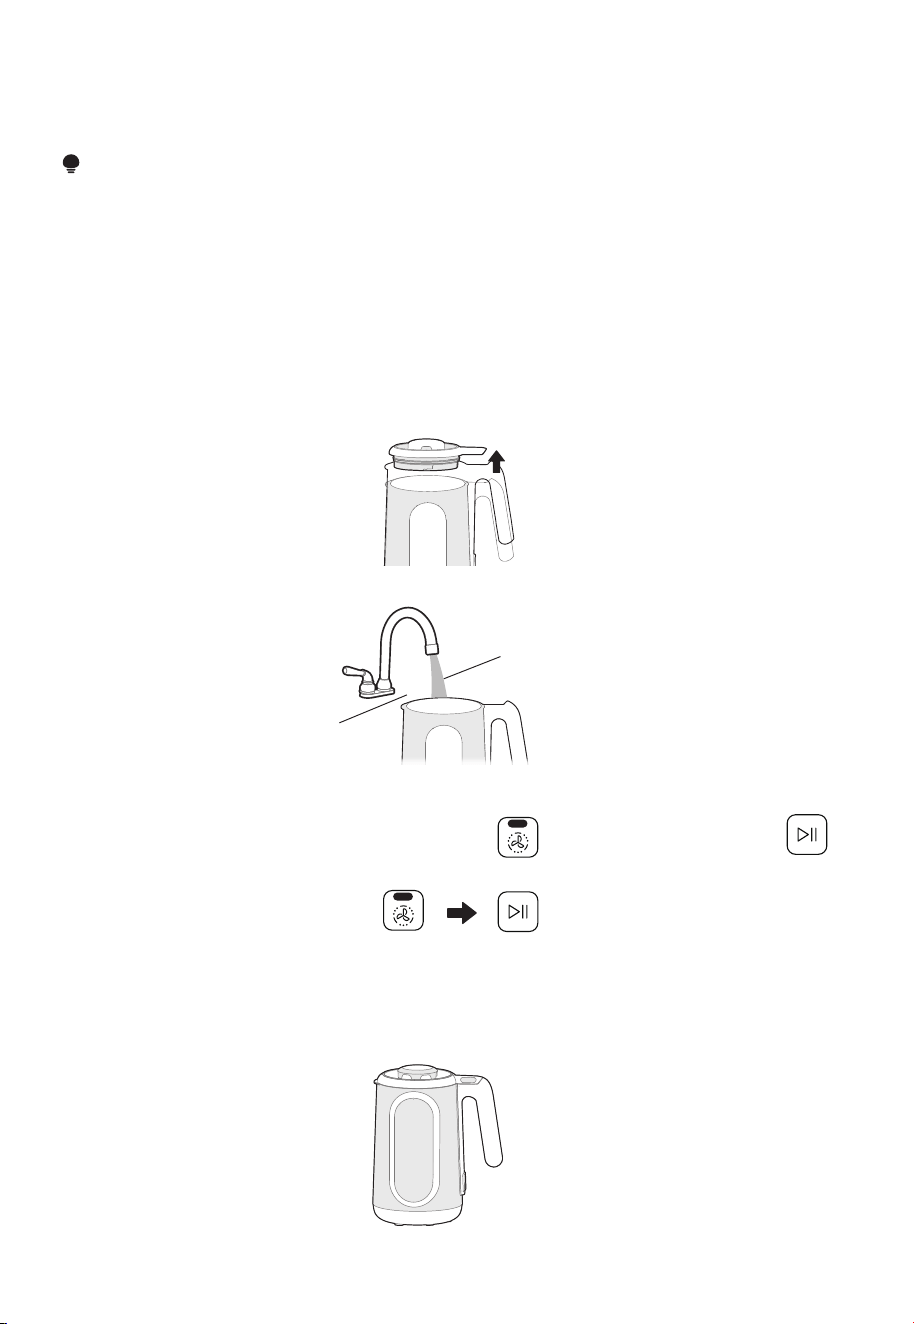
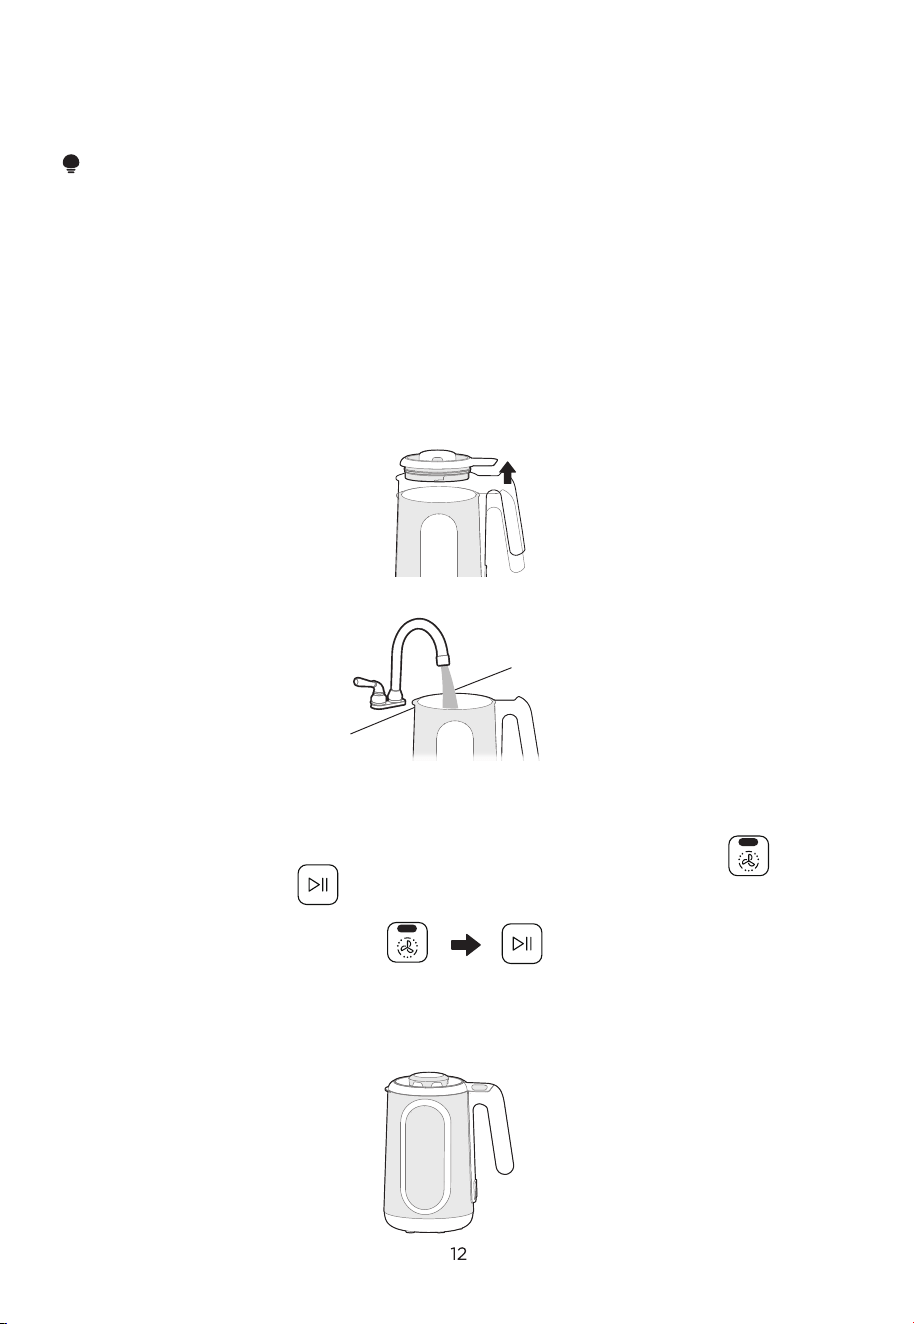
Open the cup lid.
1
Clean the interior of the cup.
2
3
After cleaning, dry it thoroughly and keep it for future use.
4
Add water to the scale of 0.8L-1L, select the " " function, and press the " "
button for high-temperature cleaning.
High-temperature
cleaning

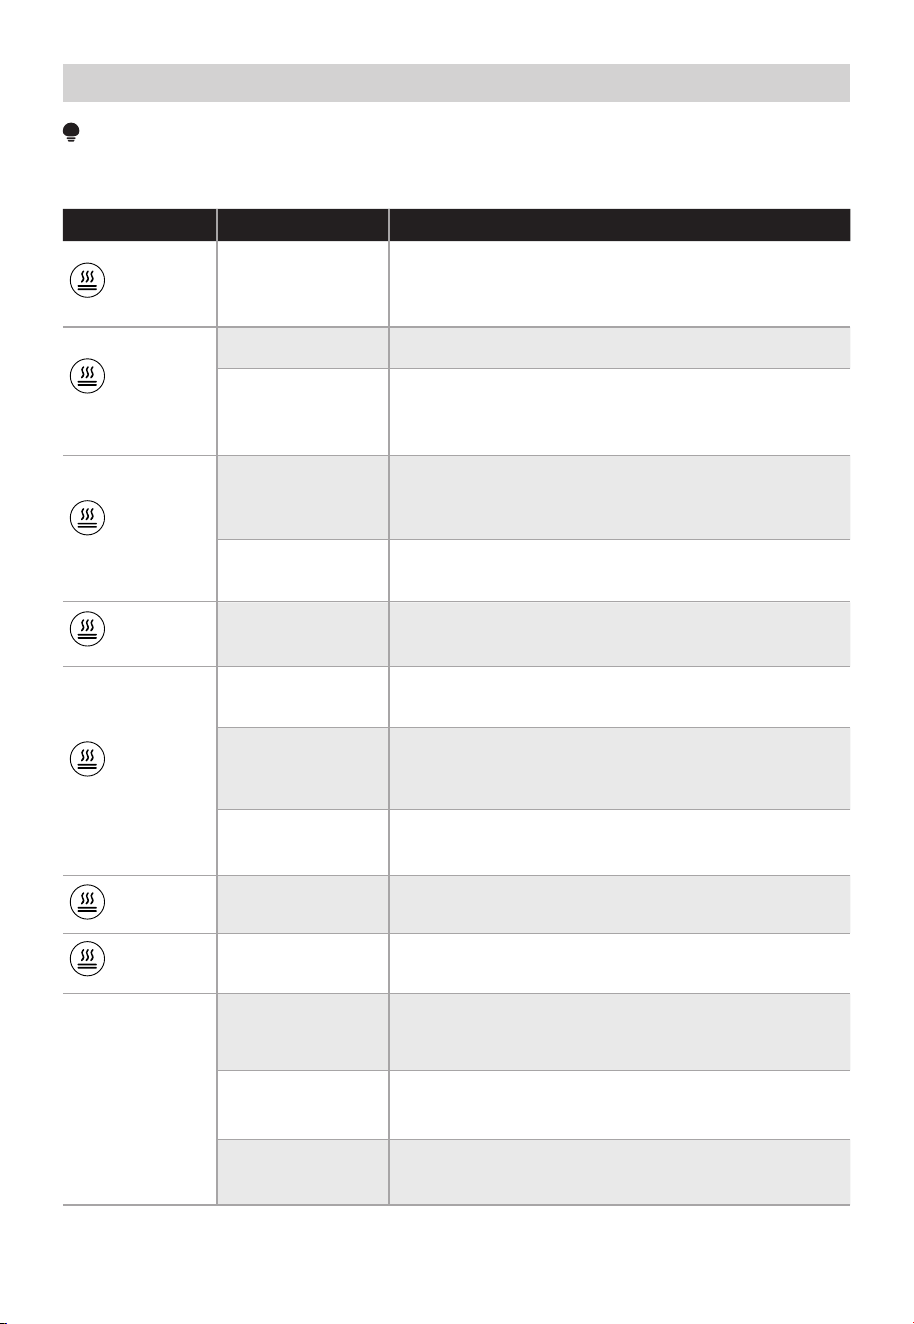
Display E0
Display “---” by
flicking
• Send for repair• Abnormal zero-crossing signal
TROUBLESHOOTING
Cause SolutionFault
13
Operation of your appliance can lead to errors and malfunctions. The following tables
contain possible causes and notes for resolving an error message or malfunction. It is
recommended to read the table below carefully in order to save your time and money
that may cost for calling to the service center.
Display E1
Display E2
• Send for repair• NTC open circuit
• Send for repair• Reed switch open circuit
• Close the cup lid and
reconnect the power.
• Cup cover not closed properly
• Send for repair
• NTC short circuit

• Normal phenomena.
• Motor noise during blending.
• Contact local customer
service for repairs.
• Unusual sounds or motor
abnormalities.
• Add water according to
instructions.
• Excessive amount of water.
• Select the appropriate
function according to the
instructions.
• Incorrect function selection.
This function only blends
without heating.
• Add ingredient based on
quantity specified by the
instructions.
• Excessive amount of
ingredients.
• Add ingredient based on
quantity specified by the
instructions.
• Excessive amount of
ingredients.
14
Cause SolutionFault
Overflow
Residue at the
bottom
Blending failure of
ingredients
Insufficient
cooking
Food not hot after
completion
Noise during
operation
• Add ingredient based on
quantity specified by the
instructions.
• Excessive or insufficient
amount of ingredients.
• Add ingredient based on
quantity specified by the
instructions.
• Excessive amount of
ingredients.
• Add water according to
instructions.
• Insufficient water level.
• Add water according to
instructions.
• Select the appropriate
function according to the
instructions.
• Insufficient water level.
• Incorrect function selection.
• Clean thoroughly before use.
• Cup not cleaned properly.
• Add water according to
instructions.
• Insufficient or excessive water
level.
• Select the appropriate
function according to the
instructions.
• Incorrect function selection.
EN

• Follow the instructions for
ingredient and water
quantity.
• Excessive amount of
ingredients and water.
• Use warm water.• Water temperature is too low.
LED does not
illuminate
Long working
time
• Ensure the power cord is
fully inserted.
• Power cord not fully inserted.
15
Cause SolutionFault
• Wait for a few minutes.
• Heating in progress, not yet in
the stirring stage.
No response from
the buttons
• This is a normal
phenomenon.
• The machine is working, but
cannot operate.
LED is ON, but the
machine is not
working
• Select the function again and
press the Start button.
• Not pressing the Start button.
Machine not
blending
• Select the appropriate
function according to the
instructions.
• Incorrect function selection.
This function is for heating
without blending.

16
logo, word marks, trade name, trade dress and all versions there of are
trademarks, copyrights and other intellectual property rights, and all goodwill derived
valuable assets of Midea Group and/or its affiliates (“Midea”), to which Midea owns
from using any part of an Midea trademark. Use of Midea trademark for commercial
purposes without the prior written consent of Midea may constitute trademark
infringement or unfair competition in violation of relevant laws.
This manual is created by Midea and Midea reserves all copyrights thereof. No entity or
individual may use, duplicate, modify, distribute in whole or in part this manual, or
bundle or sell with other products without the prior written consent of Midea.
All the described functions and instructions were up to date at the time of printing this
manual. However, the actual product may vary due to improved functions and designs.
TRADEMARKS, COPYRIGHTS
AND LEGAL STATEMENT

17
DATA PROTECTION NOTICE
For the provision of the services agreed with the customer,
we agree to comply without restriction with all stipulations of applicable data protection
law, in line with agreed countries within which services to the customer will be delivered,
as well as, where applicable, the EU General Data Protection Regulation (GDPR).
Generally, our data processing is to fulfil our obligation under contract with you and for
product safety reasons, to safeguard your rights in connection with warranty and
product registration questions. In some cases, but only if appropriate data protection is
ensured, personal data might be transferred to recipients located outside of the
European Economic Area.
Further information are provided on request. You can contact our Data Protection
Officer via [email protected]. To exercise your rights such as right to object your
personal date being processed for direct marketing purposes, please contact us via
[email protected]. To find further information, please follow the QR Code.

1 YEAR LIMITED WARRANTY
This is the only express warranty for this product and is in lieu of any other warranty or
condition. This product is warranted to be (1) year from the date of original purchase.
During this period, your exclusive remedy is repair or replacement of this product or any
component found to be defective, at our option; however, you are responsible for all
costs associated with returning the product to us and our returning the product or
component under this warranty to you. If the product or component is no longer
available, we will replace with a similar one of equal or greater value. This warranty does
not cover wear from normal use, and damages to the product resulting from accident,
alteration, abuse, or misuse. This warranty extends only to the original consumer
purchaser or gift recipient. Keep the original sales. This warranty is void if products is
used for other than single family household use or subjected to any voltage and
waveform. We exclude all claims for special, incidental, and consequential damages by
breach of express or implied warranty. All liability is limited to amount of the purchase
price. Every implied warranty, including any statutory warranty or condition of
merchantability prohibited by law, in which case such warranty or condition is limited to
the duration of this written warranty. Legal rights that vary depending on where you live.
Some states or provinces do not allow limitations on implied warranties or special,
incidental consequential damages, so the foregoing limitations may not apply to you.
Please note that failure to complete and submit this form does not diminish your
warranty.
In the event of a warranty period claim, question, comments or if service is required for
this product, please contact us at the following:
1-866-646-4332
18

MANUEL DE L’UTILISATEUR
Avertissements : Avant d'utiliser ce produit, merci de lire attentivement ce manuel et de le conserver pour
toute référence ultérieure. La conception et les spécifications sont susceptibles d'être modifiées sans préavis
afin d’améliorer le produit.
Consulter votre revendeur ou le fabricant pour plus de détails.
Le schéma ci-dessus n'est que pour référence. Merci de considérer l'apparence du produit réel comme la
norme.
MNM802TSBPH
MÉLANGEUR CHAUFFANT 8 EN 1 POUR CONCOCTER
DES BOISSONS DE NOIX 1 L/1,06 PTES
ITM. / ART.1871877

LETTRE DE REMERCIEMENT
Merci d'avoir choisi Midea ! Avant d'utiliser votre nouveau produit Midea, merci
de lire attentivement ce manuel afin de vous assurer d’être à même d’utiliser les
caractéristiques et fonctions de votre nouvel appareil en toute sécurité.
01
0
02
1
05
06
07
1 6
1 3
1 7
1 2
1 8
SOM
MAIRE
LETTRE DE REMERCIEMENT
--------------------------------------------- -
CONSIGNES DE SÉCURITÉ
------------------------------------------------- -
SPÉCIFICATIONS
------------------------------------------------------------------- -
VUE D’ENSEMBLE DE L'APPAREIL
---------------------------------- -
INSTRUCTIONS D’UTILISATION
--------------------------------------- -
NETTOYAGE ET ENTRETIEN
--------------------------------------------- -
DÉPANNAGE
--------------------------------------------------------------------------- -
MARQUES, DROIT D'AUTEUR ET MENTIONS LÉGALES
AVIS SUR LA PROTECTION DES DONNÉES
---------------- -
GARANTIE LIMITÉE À 1 AN
------------------------------------------------ -
Avertissement
Attention
Attention
Respecter les instructions
Usage prévu
CONSIGNES DE SÉCURITÉ
Les consignes de sécurité qui suivent ont pour but de prévenir les risques ou les
dommages imprévus résultant d'une utilisation dangereuse ou incorrecte de l'appareil.
Veuillez
vérifier l'emballage et l'appareil dès réception afin de vous assurer que tout est
intact, cela afin de garantir un fonctionnement sûr. Si vous constatez des dommages,
veuillez
contacter le détaillant ou le revendeur.
Veuillez
noter que les modifications ou
altérations de l'appareil ne sont pas autorisées pour votre sécurité. Une utilisation
inadéquate peut entraîner des risques et la perte des droits à la garantie.
Explication des symboles
Danger
Ce symbole signale la présence d’un risque potentiellement mortel et la santé des
personnes en raison de la présence d'un gaz extrêmement inflammable.
Avertissement sur la tension électrique
Ce symbole signale la présence d’un risque potentiellement mortel et la santé des
personnes en raison de la tension.
Ce symbole signale un danger avec un niveau de risque intermédiaire qui, s'il n'est
pas évité, peut entraîner la mort ou des blessures graves.
Ce symbole signale un danger avec un faible degré de risque qui, s'il n'est pas évité,
peut entraîner des blessures mineures ou modérées.
Ce symbole signale une information importante (par exemple, un dommage
matériel), mais pas un danger.
Ce symbole signale qu'un technicien de service ne doit utiliser et entretenir cet
appareil que conformément aux instructions d'utilisation.
Lire attentivement ce mode d'emploi avant d'utiliser/mettre en service l'appareil et le
conserver à proximité de l'appareil pour une consultation ultérieure !
02

C
ONSIGNES IMPORTANTES DE SÉCURITÉ
Lorsque vous utilisez des appareils électriques, vous devez
toujours respecter les mesures de sécurité de base,
notamment les suivantes :
1. Lire toutes les instructions.
2. Ne pas toucher les surfaces chaudes. Utiliser les poignées ou
les boutons.
3. Pour vous protéger contre les incendies, les décharges
électriques et les blessures, ne pas immerger le cordon, les
fiches ou le récipient dans l'eau ou dans un autre liquide.
4. Cet appareil n'est pas destiné à être utilisé par des
personnes (y compris des enfants) dont les capacités
physiques, sensorielles ou intellectuelles sont réduites, ou
qui manquent d'expérience et de connaissances, à moins
qu'une personne responsable de leur sécurité les surveille ou
leur donne des instructions concernant l'utilisation de
l'appareil. Les enfants doivent être surveillés afin de s'assurer
qu'ils ne jouent pas avec l'appareil.
5. Éteindre l'appareil ,puis le débrancher de la prise lorsqu'il
n'est pas utilisé, avant d'assembler ou de démonter des
pièces et avant de nettoyer l'appareil. . Pour débrancher
l'appareil, saisir la fiche et la retirer de la prise. Ne jamais tirer
sur le cordon d'alimentation.
6. Ne pas faire fonctionner un appareil dont la fiche ou le
cordon est endommagé, ou si l'appareil fonctionne mal ou a
été endommagé d'une manière ou d'une autre. Retourner
l'appareil au centre de service agréé le plus proche pour
vérification, réparation ou réglage.
7. L'utilisation d'accessoires, y compris de récipients de mise
en conserve, non recommandés par le fabricant peut
entraîner des risques de blessures.
8. Réservé à un usage domestique. Ne pas utiliser à lex't érieur.
9. Ne jamais laisser le cordon pendre sur le bord d'une table ou
d'un comptoir, ni toucher des surfaces chaudes.
10. Ne pas placer l'appareil sur ou à proximité d'un brûleur
électrique ou à gaz chaud, ni dans un four chaud.
11. Toujours brancher d 'abord la fiche sur l'appareil, puis
brancher le cordon sur la prise murale. Pour débrancher
l'appareil, mettre toutes les commandes sur « off », puis
retirer la fiche de la prise murale.
03

04
12. Ne pas utiliser l'appareil à d'autres fins que celles pour lesquelles
il a été conçu.
13. Éviter tout contact avec les pièces mobiles. Ne pas essayer de
neutraliser les mécanismes de verrouillage de sécurité.
14. Ne pas faire fonctionner un appareil dont la fiche ou le cordon
est endommagé, ou si l'appareil fonctionne mal, est tombé ou a
été endommagé d'une manière ou d'une autre. Contacter le
fabricant au numéro de téléphone de son service à la clientèle
pour obtenir des informations sur la vérification, la réparation ou
le réglage de l'appareil.
Service à la clientèle: [email protected]
1-866-646-4332
15. Tenir les mains et les ustensiles à l'écart du récipient pendant le
mélange afin de réduire les risques de blessures graves ou
d'endommagement du mélangeur. Un grattoir peut être utilisé,
mais uniquement lorsque le mélangeur n'est pas en marche.
16. Les lames sont tranchantes. Manipuler avec précaution.
17. Toujours faire fonctionner le mélangeur avec le couvercle du
récipient en place.
18. Maintenez le couvercle ventilé en place lorsque vous mélangez
des liquides chauds.
19.
Des brûlures peuvent se produire si le couvercle est retiré
pendant les cycles d'infusion.
20.
Laisser refroidir avant d'assembler ou de désassembler des
pièces et
avant
de nettoyer
l'appareil.
21. Un court cordon d'alimentation détachable est prévu pour
réduire les risques d'enchevêtrement ou de trébuchement sur
un cordon plus long.
22. Des cordons d'alimentation dét achables plus longs sont
disponibles et peuvent être utilisés à condition d'être utilisés
avec précaution.
23. Si un long cordon d'alimentation détachable est utilisé :
1) La puissance électrique indiquée du cordon d'alimentation
détachable ou de la rallonge doit être au moins égale à la
puissance électrique de l'appareil;
2) la rallonge doit être un cordon à trois fils avec mise à la terre;
3) la rallonge doit être disposée de manière à ne pas pendre sur
le plan de travail ou la table, où elle pourrait être tirée par des
enfants ou faire trébucher.
CONSERVER CES
INSTRUCTIONS

05
MNM802TSBPH
Modèle
120V~ 60Hz
1.0L/1,06Ptes
180W
800W
800W
SPÉCIFICATIONS
Alimentation é
lectrique
Capacité
Puissance de b
rassage
Puissance c
alorifique
Puissance n
ominale
06
REMARQUE
Noms des pièces
Liste des accessoires
• Les illustrations sont fournies à titre de référence uniquement et p
euvent varier par
rapport au produit réel. Veuillez vous référer au produit réel à l'intérieur de
l'emballage pour une représentation précise.
• En raison des différences d'apparence et de fonctionnalité entre les différents
modèles, veuillez vous référer au produit réel pour obtenir des informations précises.
VUE D’ENSEMBLE DE L'APPAREIL
Couvercle du
récipient
Récipient de
lait de soja
Couvercle ventilé
Joint
d'étanchéité
Cordon
d’alimentation x
1
Tasse à mesurer x 1
Pour ajouter des
haricots, etc.)
Assemblage du tamis x 1
Pour filtrer le lait de soja
après la fabrication

07
Précautions avant l'utilisation
• Le mélangeur à lait de noix Midea utilise la technologie de dépulpage des noix sèches,
et il n'est pas nécessaire de faire tremper les ingrédients au préalable.
• Avant d'utiliser le produit, vérifier que le couvercle du récipient est placé verticalement
dans le récipient de lait de soja, dans le bon sens, et qu'il est pressé vers le bas. Dans le
cas contraire, le contact risque d'être médiocre et le produit ne fonctionnera pas
correctement.
• Si l'alimentation est accidentellement coupée ou si le produit est redémarré en cours
de fonctionnement, les phénomènes suivants peuvent se produire :
1. Impact sur l'efficacité du dépulpage ;
2. Éclaboussures de jus et alarme sonore continue provenant du produit ;
3. Si vous préparez des aliments pour bébés, il se peut que le fond du récipient soit
collé.
• Pendant le fonctionnement du produit, il est strictement interdit d'ajouter des
ingrédients ou de soulever le couvercle du récipient, car cela pourrait blesser des
personnes et entraîner un dysfonctionnement du produit.
• Il est recommandé de ne pas utiliser d'ingrédients qui ne sont pas spécifiés dans le
manuel d'instructions, car ils risquent de tacher l'appareil, de coller au fond ou de ne
pas se pulvériser.
• Ne pas réchauffer ou remuer le lait de soja après sa préparation, car il pourrait coller au
fond du récipient ou déborder.
• Le lait de soja doit être bouilli avant d'être consommé. Il est recommandé de
consommer le lait de soja frais dans les 6 heures à température ambiante.
• Ne pas utiliser l'appareil pour chauffer du lait froid, de la pâte froide ou faire bouillir de
l'eau.
• Si le fond colle, une utilisation normale est possible après le nettoyage.
• La décoloration du fond de la machine à lait de soja après une utilisation prolongée est
un phénomène normal et n'affecte pas son fonctionnement normal.
• Utiliser l'appareil en respectant scrupuleusement ses fonctions et éviter d'utiliser les
boutons de fonction de manière incorrecte, car cela pourrait entraîner des collages,
des débordements, un échec de la pulvérisation ou des aliments insuffisamment cuits.
• Lors de l'utilisation du produit, suivre strictement les instructions concernant la
quantité d'aliments et d'eau afin de garantir un bon goût et d'éviter que le contenu ne
colle. Utiliser la tasse à mesurer fournie pour mesurer les ingrédients avec précision
pendant l'utilisation.
• Pendant l'utilisation, de la vapeur est émise par les orifices d'évacuation et la
température de la surface est élevée. Faire preuve de prudence en soulevant le
couvercle du récipient afin d'éviter les brûlures.
• Les ingrédients autres que ceux spécifiés dans les recettes peuvent présenter un risque
d'échec de la pulvérisation et il n'est pas recommandé de les utiliser.
• Il est strictement interdit de dépulper sans installer le joint d'étanchéité du couvercle
du récipient.
REMARQUE
Toutes les informations ont été soigneusement vérifiées et les éventuelles erreurs
typographiques ou incompréhensions doivent faire l'objet d'une consultation auprès
de la société. Toute amélioration technique des produits sera incluse dans la nouvelle
version du manuel sans préavis. En cas de modification de l'apparence ou de la couleur
du produit, c'est le produit réel qui prévaut.
INSTRUCTIONS D’UTILISATION
08
REMARQUE
Panneau de commandes
Instructions sur le fonctionnement
• Lors de l'ajout d'eau dans le récipient de lait de soja, la température de l'eau ne doit
pas dépasser 50°C.
• Lors de la préparation de jus de fruits et de légumes, veiller à ce que les ingrédients
soient lavés, dénoyautés et coupés en petits morceaux (de la taille d'une cacahuète),
en suivant la recette fournie.
Pour les jus à base de yogourt, utiliser du yogourt en suivant la recette.
• Il faut attendre 8 minutes avant de réutiliser l'appareil.
• Utiliser le bouton de Recette pour obtenir des suggestions d'ingrédients.
• Lors de la sélection d'une fonction, le voyant DEL correspondant clignote. Pendant le
fonctionnement, le voyant DEL correspondant reste allumé.
• Appuyer sur le bouton “ ” pour interrompre l'opération si nécessaire
• Appuyer sur le bouton “ ” lorsque l'appareil est en mode veille pour faire défiler
les fonctions disponibles.
• Le voyant DEL de la fonction correspondante clignote. Appuyer sur le bouton “ ”
pour commencer l'opération.
• Une fois le travail terminé, l'avertisseur sonore retentit pendant environ 1 minute et le
voyant DEL continue de clignoter.
• Vérifier que le joint d'étanchéité du couvercle du récipient est correctement
installé avant de l'utiliser.
• Vérifier que le couvercle du récipient est bien fermé avant de démarrer.
• Ne pas ajouter de glaçons.

09
REMARQUE
Étapes pour les graines de soja
1 2
5 6
3 4
Laver les ingrédients et les verser
dans le récipient de lait de soja.
Ajouter l'eau selon la quantité
recommandée dans la recette.
Brancher le cordon d'alimentation.
Lorsque vous mettez l'appareil sous
tension, vous entendez un "bip" et
l'appareil passe en mode veille.
Une fois le processus terminé,
débrancher le cordon d'alimentation et
dévisser le couvercle du récipient.
REMARQUE
Attention à la vapeur dégagée pour
éviter les brûlures. Ne pas ouvrir le
couvercle du récipient pendant le
fonctionnement.
Verser le lait de soja préparé dans
un récipient séparé.
Voici l'exemple
de
la fonction
"SOY"(SOJA)
.
Après avoir sélectionné la fonction
souhaitée, appuyer sur le bouton
" " pour débuter l’utilisation.
Visser le couvercle du récipient en
veillant à ce que la poignée s'aligne
dans son encoche et que le temps
correspondant à la fonction
sélectionnée s'affiche, ce qui indique
que l'installation est correcte.
10
REMARQUE
Recettes
• Veuillez vous
réf
érer
à l'int
erface d'utilisation réelle du produit pour
les fonctions spécifiques.
Fonctions
SOUPE
Potage
100 g de maïs (coupé en 6 morceaux), 100 g de
côtes de porc, 100 g de carottes (coupées en dés),
3 tranches de gingembre, sel à volonté, ajouter de
l'eau jusqu'à la marque de 1.0L/1,06Ptes.
1 tasse de riz, 1 œuf (coupé en petits morceaux),
50 g de viande maigre (coupée en petits dés),
sel, oignons verts et gingembre au goût, ajouter
de l'eau jusqu'à la marque de 1.0L/1,06Ptes.
4 tasses de patates douces (épluchées et coupées
en petits morceaux), 1/2 tasse de riz, ajouter de
l'eau jusqu'à la marque de 1.0L/1,06Ptes.
50 g de noix grillées concassées (environ 1
tasse), 3/4 de tasse de riz, ajouter de l'eau
jusqu'à la marque de 1.0L/1,06Ptes.
1,5 tasse de riz, ajouter de l'eau jusqu'à la
marque de 1.0L/1,06Ptes.
Riz en
bouillie
Œuf
Viande maigre
Congee
Patate douce
Pâte de riz
Riz aux noix
Pâte
Jus de m
aïs
Riz p
arfumé
au lait de soja
Lait de soja,
noix et
arachides
Millet aux baies
de Goji et lait de
soja
4 tasses de grains de maïs frais, 1/4 de tasse de
riz, ajouter de l'eau jusqu'à la marque de
1.0L/1,06Ptes.
2/3 de tasse de soja, 1/3 de tasse de riz, ajouter
de l'eau jusqu'à la marque de 1.0L/1,06Ptes.
1/3 de tasse de graines de soja, 1/3 de tasse de
cacahuètes, 3 noix (cassées en morceaux de la
taille des cacahuètes), 1/3 de tasse de riz, ajouter
de l'eau jusqu'à la marque de 1.0L/1,06Ptes.
2/3 de tasse de soja, 1/3 de tasse de millet, 10
baies de Goji, ajouter de l'eau jusqu'à la marque
de 1.0L/1,06Ptes.
Lait de soja en
p
oudre
Lait d’avoine
Smoothie à la
m
angue
Smoothie à la
f
raise
Smoothie à la
b
anane
1 tasse + 1/3 tasse de graines de soja, ajouter de
l'eau jusqu'à la marque de 1.0L/1,06Ptes.
30 g de flocons d'avoine crus et 30 g de cerneaux
de noix, ajouter de l'eau jusqu'à la marque de
1.0L/1,06Ptes.
300 g de mangue (pelée, dénoyautée et coupée
en petits morceaux de la taille d'une cacahuète),
ajouter du yogourt jusqu'à la marque de
1.0L/1,06Ptes. Ne pas ajouter de glaçons.
8 fraises (coupées en petits morceaux de la taille
d'une cacahuète), ajouter le yaourt jusqu'à la
marque de
1.0L/1,06Ptes. Ne pas ajouter de glaçons.
2 bananes (pelées et coupées en tranches),
ajouter du yogourt jusqu'à la marque de
1.0L/1,06Ptes. Ne pas ajouter de glaçons.
PORRIDGE
PURÉE
MAÏS
NOIX
SOJA
AVOINE
JUS
Recettes Ingrédients

Utilisation en altitude
Conseils
11
• Le mélangeur à lait de noix S’ADAPTE automatiquement à la température de l'eau, à
l'altitude et à la tension de la région en temps réel pendant le processus de
fonctionnement, et ajuste la procédure de production du lait de soja de manière
optimale afin de garantir la libération complète des éléments nutritifs du lait de soja et
d'éviter les problèmes tels que le lait de soja non cuit, le débordement et le fond
pâteux causés par les changements d'altitude et de tension.
• Afin de garantir pleinement l'effet d'adaptation à l'altitude, lorsque le mélangeur est
utilisé dans une région à forte variation d'altitude (différence d'altitude de plus de
1000 mètres) après son utilisation, veuillez suivre les étapes suivantes.
• Il y a beaucoup de vapeur dans le processus d'ébullition de l'eau, veuillez faire
attention à l’anti-chaleur.
• Maintenir appuyé le bouton " " pendant 2 secondes pendant le processus
d'ébullition pour annuler le programme d'adaptation de l'altitude.
• Une fois la reconnaissance intuitive de l'altitude terminée, le mélangeur a été réglé
sur la procédure de production optimale dans l'environnement local et a été
maintenu dans cet état.
1. Ajouter de l'eau jusqu'au niveau maximum et minimum, n'ajouter aucun ingrédient et
couvrir le récip
ient.
2. Mettre en marche dans les 30 secondes, maintenir appuyé le bouton " " pendant 5
secondes pour entrer dans le programme d'adaptation à l'altitude.
3. Une fois la reconnaissance intuitive de l'altitude terminée, le premier voyant de
fonction clignote, et un "bip" "bip" se fait entendre.
REMARQUE
1
2
3
• Avant le nettoyag
e, veiller à débrancher l'appareil.
• Lorsque vous nettoyez le récipient à lait de soja, faire attention aux lames tranchantes
afin d'éviter toute coupure.
• NE PAS utiliser de substances chimiques telles que l'alcool pour l'essuyage.
• NE PAS rincer directement l'enveloppe extérieure du récipient avec de l'eau pour
éviter que l'eau ne pénètre à l'intérieur.
• Si des résidus tenaces difficiles à nettoyer se trouvent à l'intérieur du récipient, vous
pouvez d'abord les tremper dans de l'eau froide (ne dépassant pas 50°C), puis utiliser la
fonction de nettoyage ou la brosse dans le sens anti-horaire (éviter de brosser dans le
sens horaire), et enfin les rincer à l'eau claire. Ne pas ajouter de détergent en utilisant la
fonction de nettoyage à haute température.
•
NETTOYAGE ET ENTRETIEN
Attendre q
ue le récipient refroidisse avant de le nettoyer pour éviter les brûlures dues
à la chaleur résiduelle.
Ouvrir le couvercle du récipient.
Nettoyer l’intérieur du récipient.
Après le nettoyage, le sécher soigneusement et le conserver pour un usage
ultérieur.
4
Ajouter de l'eau sur une échelle de 0,8 à 1 litre, sélectionner la fonction " " et
appuyer sur le bouton " " pour un nettoyage à haute température.
Nettoyage à haute
température

DÉPANNAGE
L'utilisation de votre appareil peut entraîner des erreurs et des dysfonctionnements.
Les tableaux suivants contiennent les causes possibles et des conseils pour résoudre
un message d'erreur ou un dysfonctionnement. Il est recommandé de lire
attentivement le tableau ci-dessous afin d'économiser le temps et l'argent que
pourrait coûter un appel au centre de service.
Affichage E1
• Circuit ouvert NTC.
• Court-circuit NTC.
• Signal de passage à zéro
anormal.
• Circuit ouvert du commutateur
Reed.
• Le couvercle du récipient
n'est pas correctement fermé.
• Renvoyer pour réparation.
• Renvoyer pour réparation.
• Renvoyer pour réparation.
• Renvoyer pour réparation.
• Fermer le couvercle du
récipient et reconnecter
l'alimentation.
Affichage E2
Affichage E0
Affichage “ ---” en
clignotant
Pannes Causes Solutions

• Quantité excessive ou
insuffisante d'ingrédients.
• Quantité d'eau insuffisante ou
excessive.
• Sélection incorrecte de la
fonction.
• Quantité excessive
d'ingrédients.
• Quantité d'eau insuffisante.
• Le récipient n'a pas été
nettoyé correctement.
• Quantité excessive
d'ingrédients.
• Quantité d'eau insuffisante.
• Sélection incorrecte de la
fonction.
• Quantité excessive
d'ingrédients.
• Quantité excessive d'eau.
• Sélection incorrecte de la
fonction. La fonction ne permet
que de mélanger sans chauffer.
• Bruit du moteur pendant le
mélange.
• Bruits inhabituels ou anomalies
motrices.
• Ajouter les ingrédients en
fonction de la quantité
spécifiée dans les instructions.
• Ajouter de l'eau selon les
instructions.
• Sélectionner la fonction
appropriée en fonction des
instructions.
• Ajouter les ingrédients en
fonction de la quantité
spécifiée dans les instructions.
• Ajouter de l'eau selon les
instructions.
• Nettoyer soigneusement
avant utilisation.
• Ajouter les ingrédients en
fonction de la quantité
spécifiée dans les instructions.
• Ajouter de l'eau selon les
instructions.
• Sélectionner la fonction
appropriée en suivant les
instructions.
• Ajouter les ingrédients en
fonction de la quantité
spécifiée dans les instructions.
• Ajouter de l'eau selon les
instructions.
• Sélectionner la fonction
appropriée en suivant les
instructions.
• Phénomène normal.
• Contacter le service à la
clientèle local pour les
réparations.
Débordement
Résidus dans le
fond
Échec du
mélange des
ingrédients
Cuisson
insuffisante
Les aliments ne
sont pas chauds à
la fin de
l'opération
Bruit durant le
fonctionnement
Pannes Causes Solutions

Aucune réponse
des boutons
La machine ne
mélange pas
Le voyant DEL est
allumé, mais la
machine ne
fonctionne pas
Le voyant DEL
ne s'allume pas
Longue durée de
fonctionnement
• L'appareil démarre, mais ne
fonctionne pas.
• Mauvaise sélection de la
fonction. Cette fonction permet
de chauffer sans mélanger.
• Chauffage en cours, pas
encore au stade du mélange.
• Le bouton de Démarrage
n’est pas pressé.
• Le cordon d'alimentation
n'est pas complètement
inséré.
• La température de l'eau est
trop basse.
• Quantité excessive
d'ingrédients et d'eau.
• Il s'agit d'un phénomène
normal.
• Sélectionner la fonction
appropriée en suivant les
instructions.
• Attendre quelques minutes.
• Sélectionner à nouveau la
fonction et appuyer sur le
bouton de Démarrage.
• Vérifier que le cordon
d'alimentation est
complètement inséré.
• Utiliser de l’eau chaude
• Suivre les instructions pour la
quantité d'ingrédients et
d'eau.
Pannes Causes Solutions

MARQU
ES, DROIT D'AUTEUR ET
MENTIONS LEGALES
Le logo , les marques verbales, le nom commercial, l'habillage commercial et
toutes les versions de ces éléments sont des actifs précieux de Midea Group et/ou de
ses filiales ("Midea"), auxquels Midea appartient en tant que marques commerciales,
droit d'auteur et autres droits de propriété intellectuelle, ainsi que l’intégralité du
fonds de commerce dérivé de l'utilisation d'une partie de la marque Midea. L'utilisation
de la marque Midea à des fins commerciales sans le consentement écrit préalable de
Midea peut constituer une contrefaçon de marque ou une concurrence déloyale en
violation des lois applicables.
Ce manuel est créé par Midea et Midea s’en réserve tous les droits de propriété
intellectuelle. Aucune entité ou individu ne peut utiliser, dupliquer, modifier, distribuer
en totalité ou en partie ce manuel, ni le regrouper ou le vendre avec d'autres produits
sans le consentement écrit préalable de Midea.
Toutes les fonctions et instructions décrites étaient à jour au moment de l'impression
de ce manuel. Toutefois, le produit réel peut varier en raison de fonctions et de
conceptions améliorées.

AVIS SUR LA PROTECT
ION DES
DONNÉES
Dans le cadre de la fourniture des services convenus avec le client, nous acceptons
de nous conformer sans restriction à toutes les stipulations de la loi sur la protection
des données applicable, conformément aux pays convenus dans lesquels les services
au client seront fournis, ainsi que, le cas échéant, au Règlement Général sur la
Protection des Données (RGPD) de l'UE.
En règle générale, notre traitement des données vise à remplir notre obligation
contractuelle envers vous et, pour des raisons de sécurité des produits, à préserver
vos droits dans le cadre des questions de garantie et d'enregistrement des produits.
Dans certains cas, mais uniquement si une protection appropriée des données est
assurée, les données à caractère personnel peuvent être transférées à des
destinataires situés en dehors de l'Espace Economique Européen.
De plus amples informations sont fournies sur demande. Vous pouvez contacter
notre Délégué à la Protection des Données à l'adresse [email protected]. Pour
exercer vos droits, tels que le droit d'opposition au traitement de vos données
personnelles à des fins de marketing direct, veuillez nous contacter via

GARANTIE LIMITÉE À 1 AN
Il s'agit de la seule garantie expresse pour ce produit et elle remplace toute autre
garantie ou condition. Ce produit est garanti pour une durée de (1) an à compter de la
date de l'achat initial.
Pendant cette période, votre seul recours est la réparation ou le remplacement de ce
produit ou de tout composant jugé défectueux, à notre discrétion ; toutefois, vous
êtes responsable de tous les coûts liés au renvoi du produit et au renvoi par nos soins
du produit ou du composant au titre de la présente garantie. Si le produit ou le
composant n'est plus disponible, nous le remplacerons par un produit similaire de
valeur égale ou supérieure. Cette garantie ne couvre pas l'usure due à une utilisation
normale, ni les dommages au produit résultant d'un accident, d'une modification, d'un
abus ou d'une mauvaise utilisation. Cette garantie ne s'applique qu'à l'acheteur initial
ou au destinataire du cadeau. Conserver la preuve d’achat d'origine. Cette garantie est
annulée si le produit est utilisé à des fins autres que domestiques ou s'il est soumis à
une tension ou à une forme d'onde quelconque. Nous excluons toute réclamation pour
des dommages spéciaux, accessoires et consécutifs à une violation de la garantie
expresse ou implicite. Toute responsabilité est limitée au montant du prix d'achat.
Toute garantie implicite, y compris toute garantie légale ou condition de qualité
marchande interdite par la loi, auquel cas cette garantie ou condition est limitée à la
durée de la présente garantie écrite. Les droits légaux varient en fonction de votre lieu
de résidence.
Certains pays ou provinces n'autorisent pas la limitation des garanties implicites ou
des dommages spéciaux ou indirects, de sorte que les limitations susmentionnées
peuvent ne pas s'appliquer à vous. Veuillez noter que le fait de ne pas remplir et
soumettre ce formulaire ne diminue pas votre garantie.
En cas de réclamation pendant la période de garantie, de question, de commentaire
ou si une révision est nécessaire pour ce produit, veuillez nous contacter à l'adresse
suivante :
1-866-646-4332

MNM802TSBPH
8合1加热式坚果制奶机
用户手册
警告:在使用本产品之前,请仔细阅读本手册,并妥善保存以供日后参考。因产品改进进行的设计和规格,如有变更,
恕不另行通知。
详情请咨询您的经销商或制造商。
上图仅供参考。请以实物外观为准。
ITM. / ART.1871877

数据保护声明
商标、版权和法律声明
重要安全说明
------------------------------------------------------------------------------------------
------------------------------------------------------------------------------
----------------------------------------------------------------------------------------------
--------------------------------------------------------------------------------------
--------------------------------------------------------------------------------------
----------------------------------------------------------------------------------
---------------------------------------------------------------------------------------
---------------------------------------------------------------
-------------------------------------------------------------------------------
------------------------------------------------------------------------------
01
0
02
1
05
06
07
1 6
1 3
1 7
1 2
1 8
规格
目录表
感谢信
感谢信
感谢您选用美的产品! 在使用新的美的产品之前,请充分阅读本手册,确保知晓如何以安全
的方式来操作您的电器所附带的特性和功能。
产品概述
清洁与保养
故障排除
操作说明
一年有限保修

危险
电器电压警告
警告
小心
注意
遵守说明
预期用途
符号说明
重要安全说明
以下安全指南旨在防止因不安全或不当操作本设备而造成不可预见的风险或损害。请在收货时仔细
检查包装和设备情况,确保一切完好,保证操作安全。若发现任何损坏,请联系零售商或经销商。
请注意,为了您的安全考虑,不允许对设备进行改装或改动。将本设备用于其他用途可能会造成危
险,并造成设备不满足保修要求。
此符号表示极度易燃气体对人员的生命和健康造成危险。
此符号表示电器电压对人的生命和健康造成危险。
此符号表示中度危险,如不加以避免,可能导致死亡或严重人身伤害。
此符号表示低度危险,如不加以避免,可能导致轻度或中度人身伤害。
此符号表示重要信息(如财产损失),但不表示一定存在危险。
此符号表示维修技术人员只能根据操作说明操作和维护本设备。
在使用/调试本设备之前,请仔细认真地阅读这些操作说明,并将其保存在安装现场或设备附近处,
以备日后使用!
02

03
重要安全措施
使用电器时,应始终遵循基本安全预防措施,包括以下内容:
1. 阅读所有说明。
2. 不要触摸热表面。使用手柄或旋钮。
3. 为防止火灾、电击和人身伤害,请勿浸入电缆、插头或容
器在水或其他液体中。
4. 本电器不适合由身体、感官能力减弱的人员(包括儿童)
使用或心理能力,或缺乏经验和知识,除非他们得到了监
督或关于由负责其安全的人使用该设备的说明。儿童应该
监督以确保他们不玩弄该设备。
5. 在不使用时、组装前或清洁前,请将电器关闭,然后从插
座拔掉电源。拆卸部件和清洁之前。 拔掉插头时,握住插
头并从插座拔出。切勿拉扯电线来自电源线。
6. 请勿在电源线或插头损坏,或在电器故障后操作任何电
器,或有已被以任何方式损坏。 将电器送回最近的授权服
务中心进行检查、修理或调整。
7. 使用制造商未推荐的附件,包括罐装瓶,可能会导致对人
身
的伤害风险。
8. 仅限家庭使用。请勿在户外使用。
9. 不要让电线悬挂在桌子或台面的边缘,或接触热表面。
10. 不要放置在热气体或电炉旁,或放入加热的烤箱中。
11. 始终先将插头连接到电器上,然后将电线插入墙壁插
座。要断开连接,请先关闭任何将控制器设置为"关闭",
然后从墙壁插座中拔出插头。
12. 请勿将电器用于非预期用途。
13. 避免接触运动部件。 请勿尝试破坏任何安全联锁机制。
14. 请勿在电源线或插头损坏,或在电器故障后,或电器以
任何方式掉落或损坏后操作任何电器。

04
请妥善保管本说明
如需检查、维修或调整,请联系制造商的客户服务电话。 请联
系制造商的客户服务电话
如需信息,请拨打制造商的客户服务电话。
客户服务:[email protected]
1-866-646-4332
15. 在搅拌时,请将手和器具保持在容器外,以减少对人员或
搅拌机造成严重伤害的风险。 可以使用刮刀,但必须仅在
搅拌机不运行时使用。
16. 刀片很锋利。请小心处理。
17. 始终在搅拌机盖子放置的情况下操作搅拌机。
18. 在搅拌热液体或在加热模式下操作时,请移除两件式
盖子的中心部分。
19.
如果在热饮工作过程中取下盖子,可能会发生烫伤。
20.
在组装或拆卸部件以及清洁设备之前,请允许其冷却。
21. 提供短的可拆卸电源线,以减少因缠绕或绊倒较长电源线
而导致的风险。
22. 可用较长的可拆卸电源线,但在使用时需谨慎。
23. 如果使用长的可拆卸电源线:
1) 可拆卸电源线或延长线的标记电气额定值应至少与设
备的电气额定值相同;
2) 延长线应为接地型三线电缆;
3) 较长的电缆应安排好,以免悬挂在台面或桌面上,以
免被儿童拉扯或绊倒。

05
MNM802TSBPH型号
120V~ 60Hz
1.0L/1,06QT
180W
800W
800W
规格
电源
容量
搅拌功率
加热功率
额定功率
06
注意
部件名称
部件清单
• 提供的插图仅供参考,外观可能有所不同。请参考包装盒内的实际产品以获得准确的描述。
• 不同型号外观及功能存在差异,请以实物为准。
产品概述
杯盖
豆浆容器
排气
盖
密封圈
电源线x 1 量杯x 1
用于添加食材(例
如豆类等)
筛网组件x 1
用于制作后过滤豆浆

07
注意
使用前注意事项
• 美的豆浆机采用干豆制浆技术,无需事先浸泡原料。
• 操作电器前,请确保杯盖以正确方向垂直放入豆浆容器并向下按压,否则可能造成接触不良,导
致电器无法正常运作。
• 意外断电或电器在运行过程中重新启动,可能出现以下现象:
1. 影响制浆效果;
2. 浆液飞溅,并发出连续的报警声;
3.如果制作婴儿食品,容器底部可能会粘连。
• 电器运行过程中,严禁添加任何食材或掀起杯盖,否则可能对人身造成伤害并导致产品故障。
• 建议不要使用说明书中未指定的食材,因为这可能会导致机器染色或导致底部粘住或无法粉碎。
• 豆浆冲好后,请勿重新加热或搅拌,否则可能粘底或溢出。
• 豆浆必须煮沸后方可饮用,鲜豆浆建议常温6小时内饮用。
• 请勿用机器加热冷牛奶、冷糊或烧水。
• 如发生粘底,清洁后可正常使用。
• 豆浆机长时间使用后底部变色属正常现象,不影响正常使用。
• 请严格按照电器功能操作,避免错误使用功能按钮,否则可能造成粘底、溢出、无法粉碎或煮不
熟。
• 使用电器时,请严格按照食物和水的量来确保口感良好,防止粘底。操作时请使用随附的量杯准
确称量食材。
• 使用过程中,排气口会冒出蒸汽,表面温度较高。提起杯盖时请小心,以免烫伤。
• 食谱中未指定的食材可能有无法粉碎的风险,不建议使用。
• 未安装杯盖密封圈时,严禁打碎。
所有信息均经过仔细检查,任何印刷错误或误解均以公司为准。产品的任何技术改进都将包含在新
版本的手册中,恕不另行通知。如果产品的外观或颜色有任何变化,以实际产品为准。
操作说明
08
注意
控制面板
操作说明
• 向豆浆容器中加水时,水温不应超过50°C。
• 制作果蔬汁时,请确保按照提供的食谱将食材洗净、去核并切成小块(大约花生大小)。
制作酸奶汁时,请按照食谱使用酸奶。
• 再次使用机器前请等待 8 分钟。
• 使用食谱按钮获取食材建议。
• 选择功能时,相应的LED将闪烁。操作过程中,相应的LED将保持亮起。
• 如果需要,请按“ ”按钮中断操作。
• 使用前确保杯盖的密封圈已正确安装。
• 开始前确保杯盖已牢固关闭。
• 不要加冰块。
• 在机器处于待机模式时按下“ ”按钮,循环显示可用的功能。
• 相应功能的LED将闪烁。按“ ”按钮开始操作。
• 工作完成后,蜂鸣器将响起约1分钟,LED将继续闪烁。
09
注意
注意
豆浆操作步骤
1 2
5 6
3 4
将食材洗净并倒入豆浆容器中。根据食
谱中的建议量加水。
插上电源线。
打开电源后,您会听到“嘟”的一声,
机器将进入待机模式。
小心释放的蒸汽,以免烫伤。操作过程
中请勿打开杯盖。
完成操作后,拔下电源线,拧开杯盖。 将准备好的豆浆倒入单独的容器中。
以“豆浆”
功能为例
选择所需功能后,按“ ”按钮开始
操作。
拧上杯盖,确保手柄与手柄凹槽对齐,
并显示所选功能的相应时间,表示安装
正确。

10
注意
食谱
• 具体功能请以实际操作界面为准。
功能
汤 浓汤
玉米100克(切6块),排骨100克,胡萝卜100克(切
丁),姜3片,适量盐,加水至1.0L刻度。
米1杯,皮蛋1个(切小块),瘦肉50克(切小丁),适
量盐、葱、姜,加水至1.0L刻度。
红薯4杯(去皮切小块),米1/2杯,加水至1.0L刻度。
50克碎炒核桃(约1杯),3/4杯米,加水至1.0L刻度。
米1.5杯,加水至1.0L刻度。
米粥
皮蛋瘦肉粥
红薯米糊
核桃米糊
玉米汁
米香豆浆
花生核桃豆浆
小米枸杞豆浆
4杯新鲜玉米粒,1/4杯米,加水至1.0L刻度。
2/3杯大豆,1/3杯米,加水至1.0L刻度。
1/3杯大豆,1/3杯花生,3个核桃(打碎成花生大小),
1/3杯米,加水至1.0L刻度。
2/3杯大豆,1/3杯小米,10颗枸杞,加水至1.0L刻度。
快速豆浆
燕麦奶
芒果
奶昔
草莓
奶昔
香蕉
奶昔
1+1/3杯大豆,加水至1.0L刻度。
生燕麦30克、核桃仁30克,加水至 1.0L 刻度。
芒果300克(去皮、去核,切成花生大小的小
块),加酸奶至1L刻度。不要加冰块。
8 个草莓(切成花生大小的小块),加酸奶至1L刻度。不要
加冰块。
2根香蕉(去皮切片),加酸奶至1L刻度。不要加冰块。
粥
果泥
玉米
坚果
豆浆
燕麦
果汁
食谱 食材

智能海拔识别
提示
11
• 豆浆机在工作过程中,自动实时适应水温和所在地区的海拔、电压,将豆浆制作程序调整到最佳
状态,确保豆浆营养充分释放,防止因海拔、电压变化引起的豆浆不熟、溢流、糊底等问题。
• 为充分保证海拔适应效果,当豆浆机使用后移至海拔变化较大(海拔差1000米以上)地区时,请
按以下步骤操作。
• 烧水过程中有较大蒸汽,请注意防烫。
• 烧水过程中长按“ ”键2秒可取消海拔自适应程序。
• 智能海拔识别完成后,豆浆机已调整到当地环境下的最佳生产程序,并一直保持此状态。
1. 加水至最高、最低水位,不加任何食材,盖上杯盖。
2. 开机30秒内,长按“ ”键5秒,进入海拔自适应程序。
3. 智能海拔识别完成后,第一个功能灯闪烁,并有“嘟”“嘟”提示音。

注意
1
2
3
• 清洁前请务必拔掉电源。
• 清洁豆浆容器时,请小心锋利的刀片,避免割伤。
• 请勿使用酒精等化学物质擦拭。
• 请勿用水直接冲洗杯子外壳,防止水进入内部。
• 如果杯子内部有难以清洗的顽固残留物,可以先将其浸泡在冷水中(不超过50°C),然后使用清
洁功能或逆时针刷洗(避免顺时针刷洗),最后用清水冲洗。使用高温清洁功能时请勿添加洗涤
剂。
• 请等待杯子冷却后再进行清洁,以防止余热烫伤。
清洁与保养
打开杯盖。
清洁杯子内部。
清洁后,请彻底擦干并保存以备日后使用。
CN
4
加
水到0.8L-1L刻度之间,选择“ “功能后,按” “按键进行高温清洁。
高
温清
洁

故障排除
电器的操作可能会导致错误和故障。下表包含可能的原因以及解决错误信息或故障的注意事项。
建议仔细阅读下表,以节省致电服务中心所需的时间和金钱。
显示E1
• NTC开路
• NTC短路
• 过零信号异常
• 簧片开关开路
• 杯盖未正确关闭
• 送修
• 送修
• 送修
• 送修
• 合上杯盖并重新连接电源。
显示E2
显示E0
闪烁显示“ ---”
故障 原因 解决方案
• 食材量过多或不足。
• 水位过低或过高。
• 功能选择不正确。
• 食材过多。
• 水位不足。
• 杯子清洁不当。
• 食材过多。
• 水位不足。
• 功能选择不正确。
• 食材过多。
• 水量过多。
• 功能选择不正确。此功能仅搅拌而
不加热。
• 搅拌过程中的电机噪音。
• 异常声音或电机异常。
• 根据说明添加食材。
• 根据说明加水。
• 根据说明选择适当的功能。
• 根据说明指定的数量添加食材。
• 根据说明加水。
• 使用前彻底清洁。
• 根据说明指定的数量添加食材。
• 根据说明加水。
• 根据说明选择适当的功能。
• 根据说明指定的数量添加食材。
• 根据说明加水。
• 根据说明选择适当的功能。
• 正常现象。
• 联系当地客服进行维修。
溢出
底部有残留物
食材搅拌失败
烹饪不足
完成后食物不热
操作过程中的噪音
故障 原因 解决方案

按钮无响应
机器不搅拌
LED亮起,但机器
不工作
LED不亮
工作时间长
• 机器正在工作,但无法操作。
• 功能选择不正确。此功能用于加
热而不搅拌。
• 正在加热,尚未进入搅拌阶段。
• 未按下“开始”按钮。
• 电源线未完全插入。
• 水温太低。
• 食材和水量过大。
• 正常现象。
• 根据说明选择适当的功能。
• 等待几分钟。
• 再次选择该功能并按下“开始”
按钮。
• 确保电源线已完全插入。
• 使用温水。
• 按照食材和水量的说明操作。
故障 原因 解决方案

商标、版权和法律声明
美的集团和/或其附属公司(下称“美的”)的 标识、字词商标、商品名、商业包装及
其所有版本均系美的的宝贵财产,美的拥有商标、版权和其他知识产权,以及因使用美的商标的
任何部分而产生的所有商誉。未经美的事先书面同意,将美的商标用于商业用途可能构成商标侵权
或违反相关法律的不正当竞争。
本手册由美的公司制作,美的公司保留其所有版权。未经美的公司事先书面同意,任何单位或个人
不得使用、复制、修改、分发本手册的全部或部分内容,或与其他产品捆绑销售。
打印本手册时,手册中所述的功能和说明均是最新的。但由于功能和设计方面的改进,实物可能会
有所不同。

数据保护声明
为了提供与客户约定的服务,我们同意不受限制地遵守将向客户提供服务涉及的国家的适用数据
保护法的一切规定,同时在适用情况下,还须遵守欧盟《通用数据保护条例》(GDPR)的规定
要求。
我们的数据处理旨在履行我们对您订立的合同义务,并出于产品安全原因,维护您在保修和产品
注册问题方面的权利。某些情况下,但只有在确保充分的数据保护的情况下,我们才会向欧洲经
济区以外的接收方披露您的个人信息。
如有需要,您可以索取相关更多信息。您可以通过[email protected]联系我们的数据保
护官。要行使您的权利,例如反对出于直接营销目的处理您的个人资料,请通过MideaDPO@
midea.com与我们联系。更多信息,请扫描二维码。

这是本产品的唯一明示保修,代替任何其他保修或条件。本产品自原始购买之日起保修一年。
在此期间,如发现本产品或任何组件有缺陷,由本公司选择维修或更换;但是,您需要承担产品或
组件邮寄往返相关的所有费用。如果产品或组件不再可用,本公司将用同等或更高价值的类似产品
替换。本保修不涵盖正常使用造成的磨损,以及因意外、改造、滥用或误用导致的产品损坏。本保
修仅适用于原始购买者或礼品接收者。请保留原始销售。如果产品用于单户家庭以外的用途或受到
任何电压和波形的影响,则本保修无效。本公司拒绝因违反明示或暗示保证而导致的特殊、偶然和
间接损失的所有索赔。所有责任仅限于购买价格的金额。所有默示担保,包括法律禁止的任何法定
担保或适销性条件,在这种情况下,此类担保或条件仅限于本书面担保的期限。合法权利因您居住
地而异。
某些州或省不允许限制暗示保证或特殊、偶然的间接损失,因此上述限制可能不适用于您。请注
意,未填写并提交此表格不会减少您的保修。
如果有保修期索赔、问题、评论或需要服务,请通过以下方式联系我们:
[email protected] 1-866-646-4332
一年有限保修