INSTRUCTION MANUAL
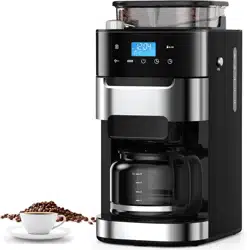
2-IN-1 GRIND & BREW
COFFEE MACHINE
Model No.:CM1025AO-UL
Item No.:ʶˀʫʣʥʨʠʵʿʴʶʾʠʶˆ
Thank you for purchasing this product! If you have questions aboutthe
product such as missing parts, damaged products, productassembling
and operation etc., please contact us via AmazonMessage or customer
service phone: 213-4467172 or 661-4358826.
.",&3
*/(3*/%#3&8
$0''&&.",&3
Thank you for purchasing this product! If you have any question about the
product such as missing parts, damaged products, product assembling
and operation, etc., please contact us via customer
service phone: 213-4467172 or 661-4358826.
.",&3
*/(3*/%#3&8
$0''&&.",&3
Thank you for purchasing this product! If you have any question about the
product such as missing parts, damaged products, product assembling
and operation, etc., please contact us via customer
service phone: 213-4467172 or 661-4358826.
.",&3
*/(3*/%#3&8
$0''&&.",&3
Thank you for purchasing this product! If you have any question about the
product such as missing parts, damaged products, product assembling
and operation, etc., please contact us via customer
service phone: 213-4467172 or 661-4358826.
MAKER
�-IN-� GRIND & BREW
COFFEE MAKER
Thank you for purchasing this product! If you have any question about the
product such as missing parts, damaged products, product assembling
and operation, etc., please contact us via customer
service phone: 213-4467172 or 661-4358826.

1
When using electrical appliances, basic precautions should always be followed,
including the following:
1. Read all instructions.
2. Check voltage to be sure that the voltage indicated on the name plate agrees
with your voltage.
3. Do not touch hot surfaces. Use handles or knobs.
4. To protect against fire, electric shock and injury to persons, do not immerse cord or
plug in water or other liquid.
5. Not allow children to use without supervision.
6. Unplug before cleaning and when not in use. Allow appliance cool down completely
before taking off, attaching components or cleaning.
7. Do not operate any appliance with a damaged cord or plug or after the appliance
malfunctions, or has been damaged in any manner. Return appliance to the nearest
authorized service facility for examination, repair or adjustment.
8. The use of accessory attachments not recommended by the appliance
manufacturer may result in fire, electric shock or injury to persons.
9. Overfilling can also cause scalding.
10. Only ever use the coffee maker for grinding roasted coffee beans. Never use it for
other granular food.
11. Do not let cord hang over edge of table or counter, or touch hot surface.
12. Do not place on or near a hot gas or electric burner, or in a heated oven.
13. Do not use a cracked container or a container having a loose or weakened handle.
14. This appliance is not intended for persons (including children) with
reduced physical, sensory or mental capabilities, or lack of experience and
knowledge, unless with supervision or instruction concerning use of the
appliances by aperson responsible for their safety.
IMPORTANT SAFEGUARDS

2
15. Children should be supervised to ensure that they do not play with
the appliance.
16. Do not use appliance for other use instead of intended use
17. Avoid touching moving parts, as the blade is sharp.
18. Never use warm or hot water to fill the water tank. Use cold water only.
19. Do not use outdoors.
20. This appliance is intended to be used in household and similar application
scenarios such as:
– Staff kitchen areas in shops, offices and other working environments;
– Farm houses;
–By clients in hotels, motels and other residential type environments;
–Bed and breakfast type environments.
21. Save this instruction manual
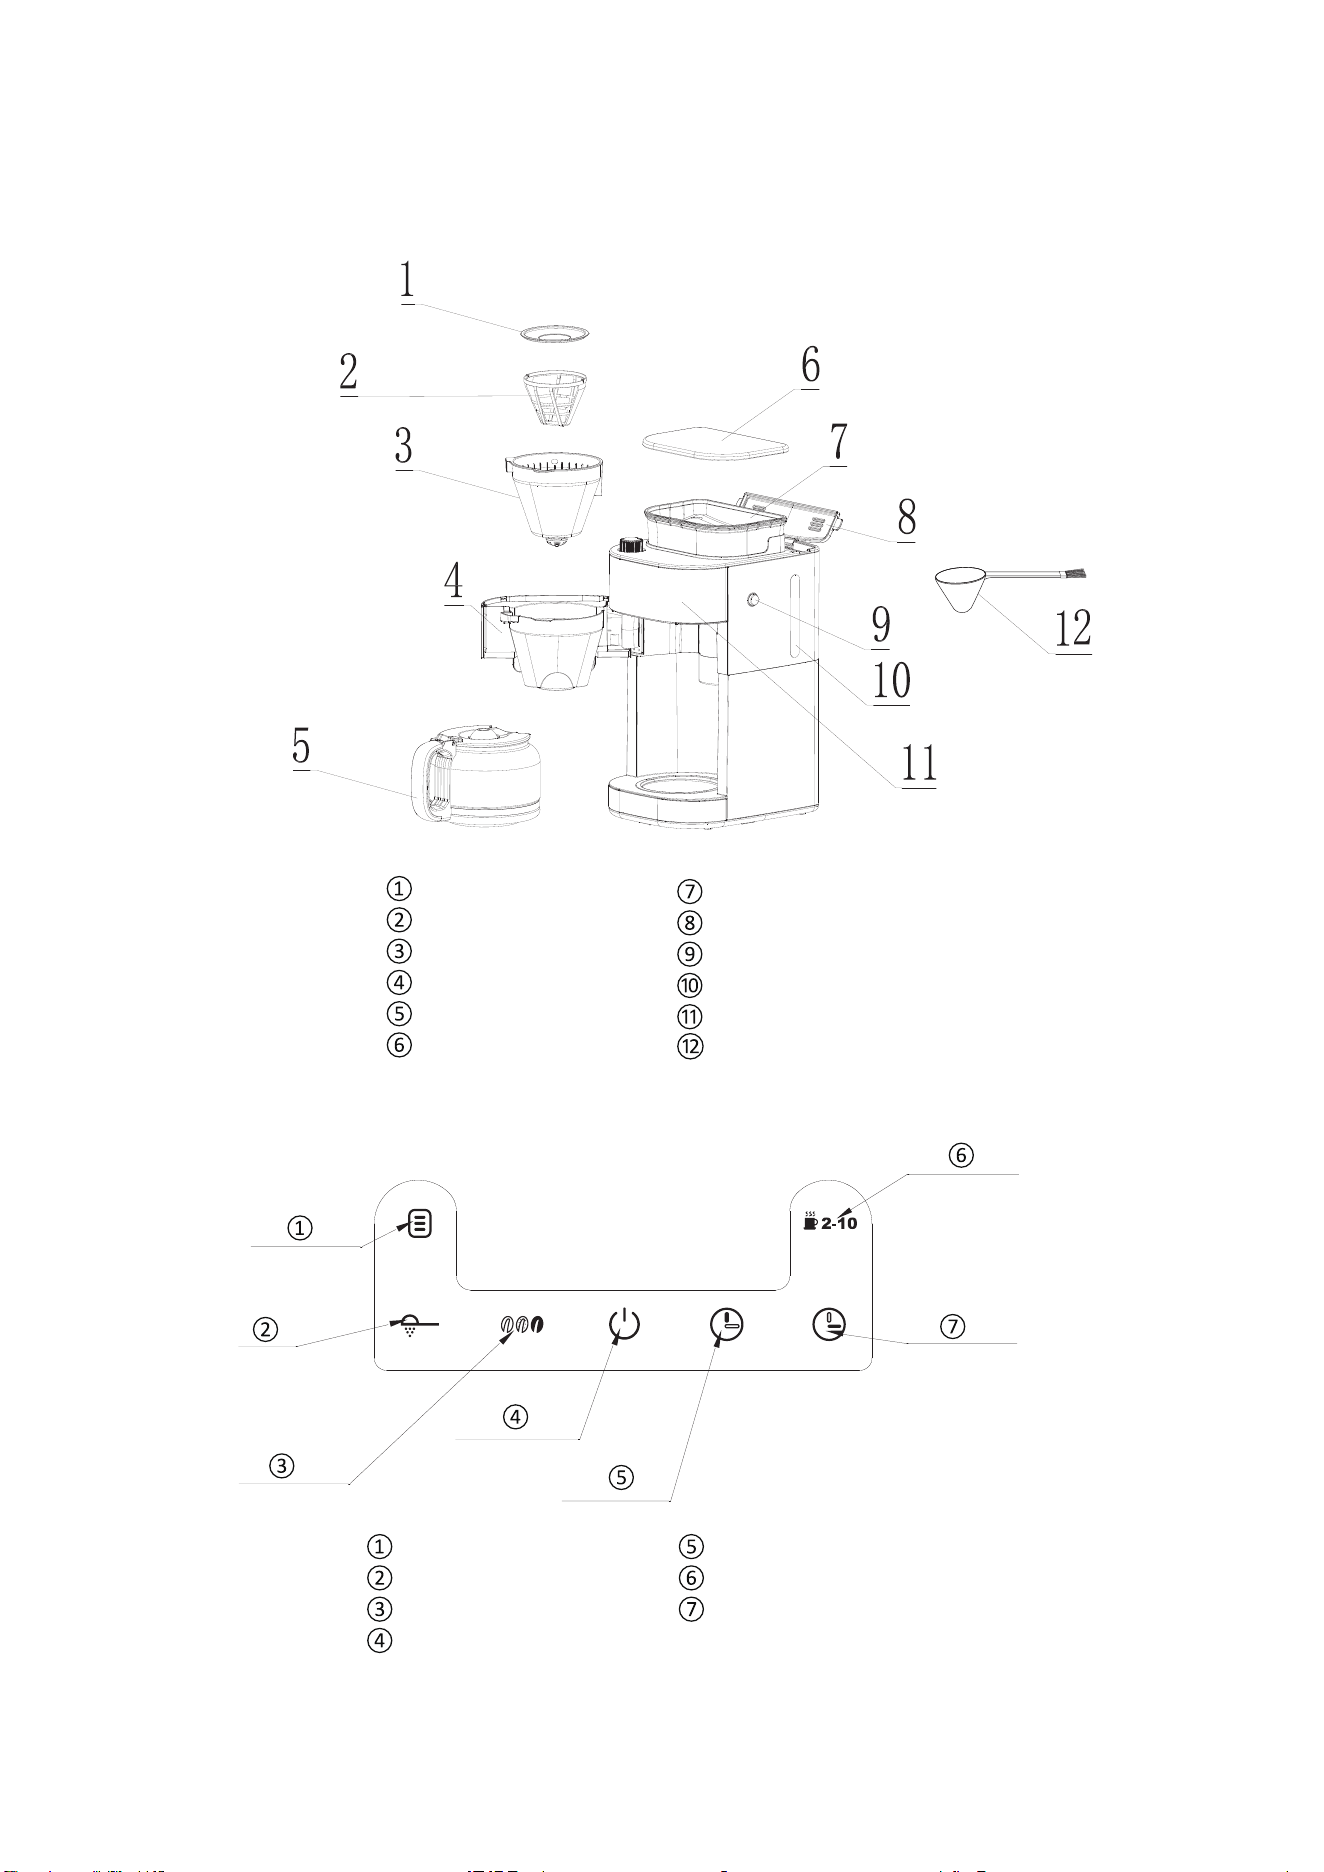
Unit Constructions
Funnel cover
Filter
Funnel ASM
Funnel support
Carafe
Bean box cover
Bean box
Water tank cover
Funnel press key
Water gauge
Control panel
spoon
CONTROL PANEL
Appointment Setting
Ground coffee
Concentration setting
ON/OFF
Hour Setting
Selection of cups
Minute Setting
3

BEFORE THE FIRST USE
OPERATION INSTRUCTION
MAKE DRIP COFFEE WITH COFFEE BEANS
Tips for Perfect Coffee
A great coffee is about achieving the perfect balance between sweetness,
acidity, and bitterness. The flavor of your coffee will depend on many factors,
such as bean
4
requirement, roast degree of coffee beans, and so on.
1. Remove Packaging
Ensure all packaging has been removed.
2. Inspect whether all the accessories are complete and the product is damaged.
3. Position Machine
Ensure the machine is always positioned on a dry, stable, flat and horizontal counter
top.
4. Wash the accessories in warm water.
5. Prime the Machine
Note: These priming steps must be completed prior to first use.
A. Fill Water Tank
Open the water tank cover and fill enough pure water(recommended) in advance
then close it.
Note: Do not fill the water tank past the 10 cup mark of water level indicatoras shown
on water gauge. Doing so could cause carafe to overflow.
B. Place the Coffee Carafe on the Warming Plate.
Do not place coffee and filter paper, insert the Power Plug into a 120V AC power
outlet & switch the power on.
C. Press the " " button to start, after all of the water has passed through, press
the " " button to exit the Keep Warm Function.
D. Empty the carafe. Repeat the above steps for 2-3 times.

Bean Requirements
a. Add an appropriate amount of coffee beans, no more than 200g
each time, because the coffee beans will become wet overnight. After
adding the coffee beans, close the bean box cover and press down hard to
prevent water from entering the bean box.
b. We recommend quality beans with a ‘Roasted On’ date stamped
on the packaging, rather than a ‘Best Before’ or ‘Use By’ date. Buy in small
batches to reduce the storage time. Coffee beans are best consumed between
�‒20 days after the ‘Roasted On’ date. Stale coffee may pour too
qui
ckly and taste bitter and watery.
c. Do not fill the bean container with frozen or covered beans, moisture
will seep into the burr and feed through.
d. Do not add any liquid flavorings or syrups to the beans.
Roast Degree of Coffee Beans
We recommend medium-roast coffee beans as this machine is not
suitable for deep-roasted beans. Dark, greasy beans can leave some
greasy residue in the burrs and feeder channels. The oil residue can
cause the ground coffee to stick in the feeder passage and clog.
Over time, this slows down the flow of
ground coffee. The amount of
ground coffee beans is controlled by the selection of coffee cups for
5
Experiment by adjusting these 8 factors just at a time to achieve the taste
of your preference.

grinding time. Therefore, it will not grind all the beans at one time. Ifit
continues to develop, the ground beans will not reach the required
fineness, and eventually, the motor will get stuck and cannot rotate,
resulting in burnout.
Grind Size
The built-in grinder comes with different grinding degree settings of
powder sizes. Set the grind size that you need. Turn the regulator
anticlockwise to go coarser and clockwise to go finer. If you want to
adjust the grind size setting, there are some notes listed below you
need to be aware of:
a. When you want t
o adjust to a coarser setting, just
rotate the Grind
b. When you want to adjust to a finer setting.
Situation 1 : If there are no coffee beans inside the grinder, you can
rotate the Grind Regulator directly to achieve your setting.
Situation 2 : If there are coffee beans inside the grinder, you cannot
rotate the Grind Regulator forcibly, otherwise, grinder damage may
occur. In this case, you can grind all the coffee beans inside the
grinder and then adjust the grind setting.
Suitable Ground Coffee Capacity
6
Regulator directly before grinding.
or 10 cups) by pressing th
The maximum capacity for ground coffee is 70g of coffee powder.
Exceeding that amount may cause overflow if the coffee is too finely
ground.
Powder Dose
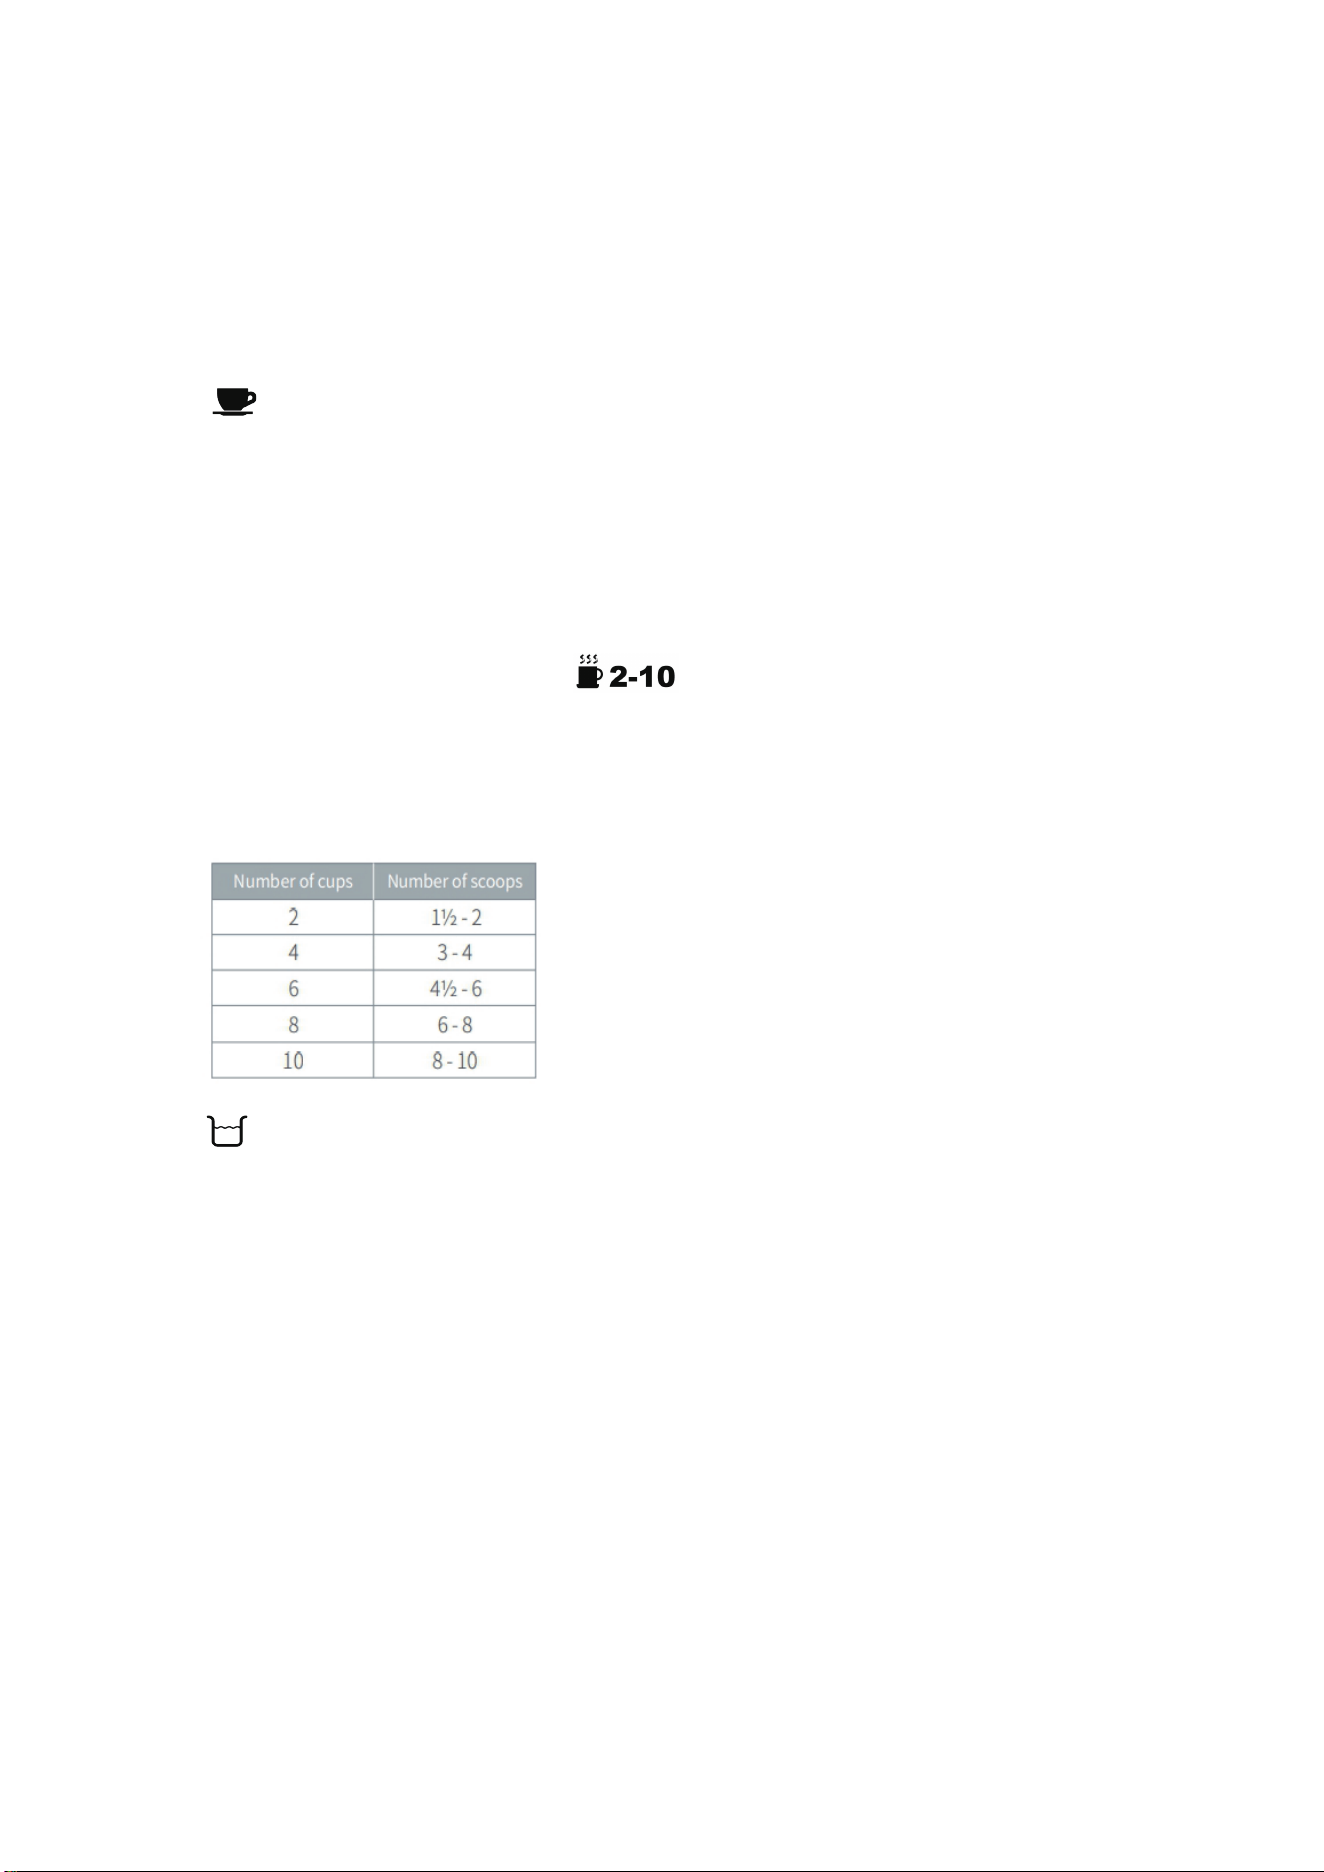
a. 7g or 1 spoon of powder for 1 cup of coffee is recommended, but
you may adjust according to personal taste.
b. Can brew up to 10 cups of coffee. Set the powder amount (2, 4, 6, 8,
e button according to your
need(The default value is 10 cups). Use the supplied Measuring Spoon
for this purpose. Refer to the following table for the required amount:
Water Amount
a. The cup markings on the carafe are the same as that on the water
tank. The amount of water added should be the same as the amount
of powder cup you choose, such as you added 2 cups of water if
you add2spoons of powder. If you pour more water than the
number of cups you choose, it will cause the coffee to become
weak(because the machine will brew all the water in the tank)
b. If you have set a strong flavor but the coffee tastes weak. We
suggest you add less amount of water and more powder. (e.g. select
7

Button for 4 cups but add 2 cups of water, the flavor will be
stronger).
c. The coffee you get would be less than the water you pour in as
some water had been absorbed by the coffee powder.
Notice:
1) Never pour hot water, milk, coffee powder or tea into water tank.
2) Please don’t fill the water tank exceed “MAX” indicated on water
gauge.
Use Carafe
Always make sure that the carafe is transported in an upright position.
If you turn the carafe on its side or upside down with its lid closed, hot
coffee may escape. When the water content of the coffee carafe is
large, be sure to press the edge of the lid with your thumb and pour
the water at the correct angle.
Enjoy Your Coffee
For a better taste, please enjoy the coffee within 1 hour.
8

OPERATION INSTRUCTION
1. Put your desired amount of water into the carafe according to its
marking, then open the water tank cover and pour the water in.
2. Open the bean box cover and wipe the box with a dry cloth to
make sure it is dry inside.
3. Put proper coffee beans (not more than 200g) into Coffee Bean
Box, then cover its lid. To avoid the coffee beans turning moist, we
suggest not placing too many coffee beans in Coffee Bean Box.
4. Replace and firmly press down the lid to prevent beans from
spilling out from the bean box.
5. Press Funnel Press Key on
ce and rotate the funnel support to the
left, ensuring the filter is inside of the Funnel Support.
6.Turn the funnel support to the right until it is locked.
7.Insert the Power Plug into a 120V AC power outlet.
8.According to added water volume, press the
select the required amount of coffee cups.
9.Set the grind regulator to the required grind size.
- Turn the regulator anticlockwise to grind the coffee coarser.
Button to
- Turn the regulator clockwise to grind the coffee finer.
9
MAKE DRIP COFFEE WITH COFFEE BEANS

10. Press the " button to select coffee
concentration
. There are 3 levels
of strength, and the default level is
the display will show the
photo of
“
11. Place the coffee carafe on the warming plate.
12. Press the " " Button to start making coffee,
Wait for about 3seconds, the
”
the brewing process begins.
13. Buzzer will sound 3 times to notice you when the coffee is done.
brewing, if you do not unplug the power cord from th14. When finished e
power outlet, coffee in the carafe can be warmed on the warming
plate for up to1 20 minutes.
MAKE DRIP COFFEE WITH COFFEE POWDER DIRECTLY
1. Put your desired amount of water into the carafe according to its
marking
, then open the water tank cover and pour the water in.
2. Don't exceed the
“
MAX” line of the water tank, and also do not add
too little water.
3. Take out the Coffee Cara
fe.
4. Press Funnel Press Key once and rotate the funnel support to the
left, ensuring the filter is inside of the Funnel Support.
5. Make sure the tube of the filter assembly aligns with groove of the
swing-out filter basket.
h
10
when
grinder will start grinding.

6. Add your desired coffee powder into the filter but not past the max
line.
7. Turn the Funnel Support to the right until it is locked.
8. Insert the Power Plug into a 120V AC power outlet.
9. Place the coffee carafe on the warming plate.
10. Press the button once, the red
indicator will be
illuminated, then press the "
" button once, the display will show the
11. Buzzer will sound 3 times to notice you when the coffee is done.
12. Press the edge of the lid with your thumb and pour the coffee at
the correct angle.
13. When finished brewing, if you do not unplug the power cord from the
power outlet, coffee in the carafe can be warmed on the warming
plate for up to 120 minutes.
Notice: Cleaning after every use guarantees the flavors of your coffee,
refer to "CLEANING AND MAINTENANCE " as shown on Page 13.
Notice:
1 - Do not place parts of the body under the drip stop whi
le the
machine is in operation.
2 - Do not open the Swing-out Filter Basket while the machine is
brewing coffee, otherwise, the steam will wet the powder at the
powder outlet which possibly damages the grinding system
then the coffee maker will brew directly.
.
11
AUTOMATIC START FUNCTION
3 - While the coffee is brewing you can remove the carafe to pour a
cup or two. The drip stop will close automatically. To avoid any
overflow, replace the carafe within 30 seconds.
4 - If the coffee drips onto the warming plate, it should be used a
clean cloth to wipe off the coffee stain in time to avoid oxidation of the
coffee erosion layer.
1. Insert the Power Plug into a
1
20V AC power outlet.
2. The display only indicates
at first, press once, all the buttons
illuminate.The display will show"12:00"on the control panel, at the
(Hour)andsame time, the number will flash, then press
(Minute) button to set current time.
Note: Number will flash until Pressing
(Hour)and (Minute)
button to set time, Automatic function cannot be available when
number is flashing.
3.
Long press
through pressing
button until the time into timer mode(the number
flashes again), setting the time of AUTOMATIC START you want
(Hour) and (Minute) button.
4. Press
button again, the will show on the display, the
red
indicator will be illuminated, the appliance
enters
into automatic
mode.
12

Note: the time cycle is 12 hours.
5. The coffee maker will start to brew at the preset time, the red indicator of
will go out and the indicator will turn to red. If you want it to operate
immediately, you just need to press button, then the appliance will start
lf the coffee maker is at the state of presetting ( the red indicator of is
on),but you want to cancel the automatic mode, you just need to press
button once,then the red indicator will go out, the automatic mode will be
canceled.
13
CLEANING AND MAINTENANCE
CAUTION: Be sure to unplug this appliance before cleaning. To protect
against electrical shock, do not immerse cord, plug or unit in water or
any other liquid.
Before Use
A. It is recommended to use pure water; Do not let other objects enter
the water tank, and cover the lid in time after adding water;
B. Please fill enough water in the water tank but do not past the 10 cup
marking. Doing so can cause coffee to overflow from the carafe.
to work automatically.
CANCEL THE PRESETTING PROGRA

14
In use
A. Do not place parts of the body under the drip stop while the
machine is in operation;
B. Do not open the Swing-out Filter Basket, otherwise, the steam will
wet the powder at the powder outlet and damage the grinding
system;
C. While the coffee is brewing you can remove the carafe to pour a
cup or two. The drip stop will close automatically. To avoid any
overflow, replace the carafe within 30 seconds.
After Use
Please strictly follow the instructions and requirements below to clean
the machine, otherwise, the flavors of your coffee will be affected or
the lifespan of the machine will be shortened. Cleaning after every use
guarantees the flavors of your coffee, for a cleaning guide, refer to the
operation below.
At the End of the Day
To make sure your machine operates efficiently, you must clean the
machine after your last brew every day.
Step 1:Open the lid of the bean box.
Step 2:Empty the coffee beans as much as possible from the bean
container with a spoon and put them into a jar.

15
Tips:If there are too many coffee beans, you can tilt the machine and
use a spoon to empty the coffee beans in the bean container as
much as possible, but remember to remove the Coffee Carafe, otherwise,
it could be easily damaged.
Step 3:Press the Button to grind the remaining coffee beans, then
press it again to stop when you hear the motor idling sound.
Step 4:Unplug the power cord or power off completely.
Step 5:Press the Funnel press key
Step 6:Open the Swing-out Filter Basket.
Step 7:Wipe the top of the Swing-out Filter Basket with a clean dry
cloth and wipe the inside around. (Be careful not to touch the
Warming Plate)
Step 8:Wipe the inside around.
Step 9:Take out the filter insert with drip stop together with the
permanent filter and filter ring.
Step 10:Empty the coffee grounds out of the permanent filter into the
household waste.
Step 11:Wash the accessories with clean water.
Step 12:Dry the filter insert with drip stop, permanent filter and filter ring
Step 13:Clean the Coffee Carafe and wipe it with a cloth.

Step 14:Install them back after cleaning
Step 15:Close the Swing-out Filter Basket lightly.
Step 16:Put the Coffee Carafe back in place. Notice: If the brewing time
increases or the machine becomes noisier, this is a sure sign that the coffee
machine needs to be descaled. CLEANING MINERAL DEPOSITS
1. Fill the tank with water and descaler to the MAX level (the scale of water
and descaler is 4:1.
a. One coffee machine descaling tablet.
(coffee machine descaling tablets are available for purchase online or through
major retailers.)
b. Liquid descaler.
c. White vinegar & warm water.
You can also use powder descalers or others to clean your machine as you like.
Descaling Solution for specific cleaning methods, please refer to the
instructions provided by your descaler provider.
2. Press button, the red indicator will be illuminated, then
press the button once, the appliance will start to brew directly.
3. Rinse by operating the appliance with clean water at least 3 times
16

17
TROUBLE SHOOTING
phenomenon Cause analysis resolution
Coffee maker
not working
The power plug is not
connected
Please check the power
plug connection
Damaged power cord
Please go to the relevant
after-sales service center
for replacement before
use
When the motor
continues to grind coffee
beans for a long time, the
motor temperature rises,
the motor protection
device will automatically
shut down the motor and
stop the motor work
Unplug the power cord,
stop working and wait until
the temperature of the
m
otor is reduced to the
normal temperature point
before operation and use
Odor in the
water
This will happen when you
use it for the first time
Fill the coffee machine
with the right amount of
water, not more than the
water tank labeled
"maximum" scale line
position, boil all the water
after pouring, the cycle of
operation should be 3
times
Scale formation
in the coffee
machine
Caused by hard local
water or calcium and
magnesium carbonate in
the water
Scale can be cleaned with
acetic acid, citric acid and
warm water
Won't grind
Becaus
e the coffee
beans are
damp or have
been ground with other
objects
This coffee maker is only
suitable for grinding
coffee beans, not for
grinding other objects, it is
recommended not to
grind too damp coffee
beans
Thank you for purchasing this product! If you have any questions about
the product, such as missing parts, damaged products, product
assembling, and operation, please contact us via:
���-������� or ���-�������
IMPORTANT
Please call our customer service department for any consulting:
213-4467172
661-4358826
(8:30am - 5:30pm P.S.T.)
DATED PROOF OF PURCHASE IS REQUIRED FOR WARRANTY SERVICE.
AVIS
Veuillez appeler le service à la clientèle pour toutes questions au:
213-4467172
661-4358826
(8:30am - 5:30pm P.S.T.)
PREUVE D’ACHAT ORIGINALE REQUISE POUR SERVICE DE GARANTIE.
IMPORTANTE
Sólo hay que llamar nuestro departamento de servicio
al cliente en caso de tener preguntas o inquietudes:
213-4467172
661-4358826
(8:30am - 5:30pm P.S.T.)
SE REQUIERE PRUEBA DE COMPRA CON FECHA PARA SERVICIO BAJO
GARANTÍA.
Address: ROWAN ELECTRIC APPLIANCE LLC
���S. Valley View Avenue, San Bernardino, CA �����
Phone: ���-������� or ���-�������
18
8:30am-5:30pm P.S.T. Monday to Friday