USER MANUAL
NORTH AMERICA
alfaforni.com
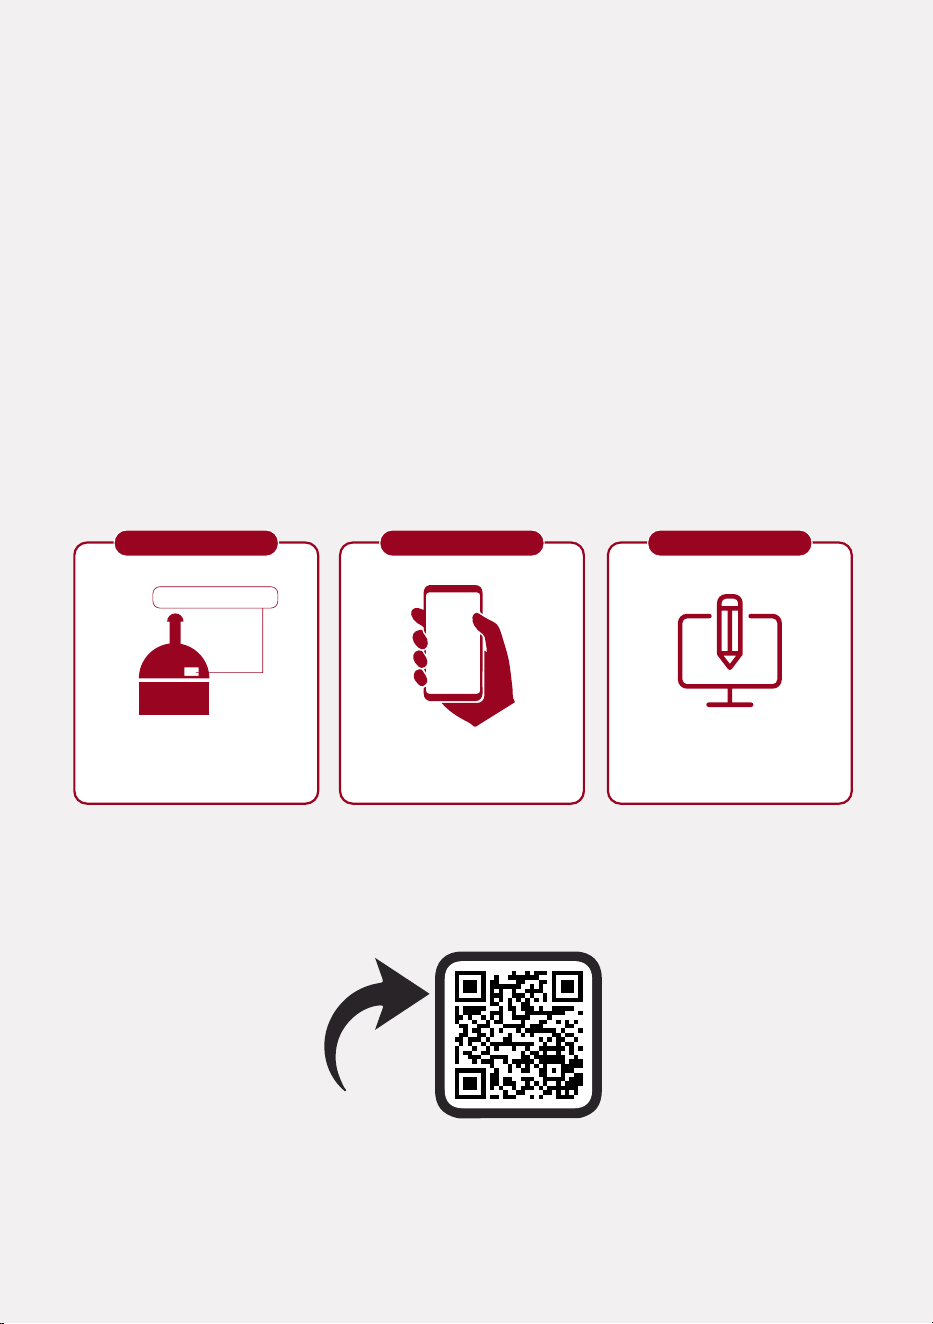
STEP 2
Alfa Forni participates in the SAVE THE PLANET initiative;
that’s why the manual has been printed only in English.
To download the other languages, scan the QR code or click the link below.
Alfa Forni partecipa all’iniziativa SAVE THE PLANET,
per questo il manuale è stato stampato esclusivamente il lingua inglese.
Per scaricare le altre lingue scansionare il QRcode oppure digita il link qui sotto.
Alfa Forni nimmt an der SAVE THE PLANET-Initiative teil. Die gedruckte Anleitung ist
deswegen nur auf Englisch verfügbar. Um die anderen Sprachen herunterzuladen,
scannen Sie den QR-Code oder geben Sie den Link hier unten ein
Alfa Forni participe à l’inititiative SAUVER LA PLANÈTE
et pour cela le manuel à été imprimé seulement en anglais.
Pour télécharger les autres langues, ashez le code QR ou cliquez sur ce lien.
Alfa Forni participa en la iniciativa SALVAR EL PLANETA,
por eso el manual fue publicado solo en inglés.
Para descargar los otros idiomas escanea el código QR o haz clic aquí.
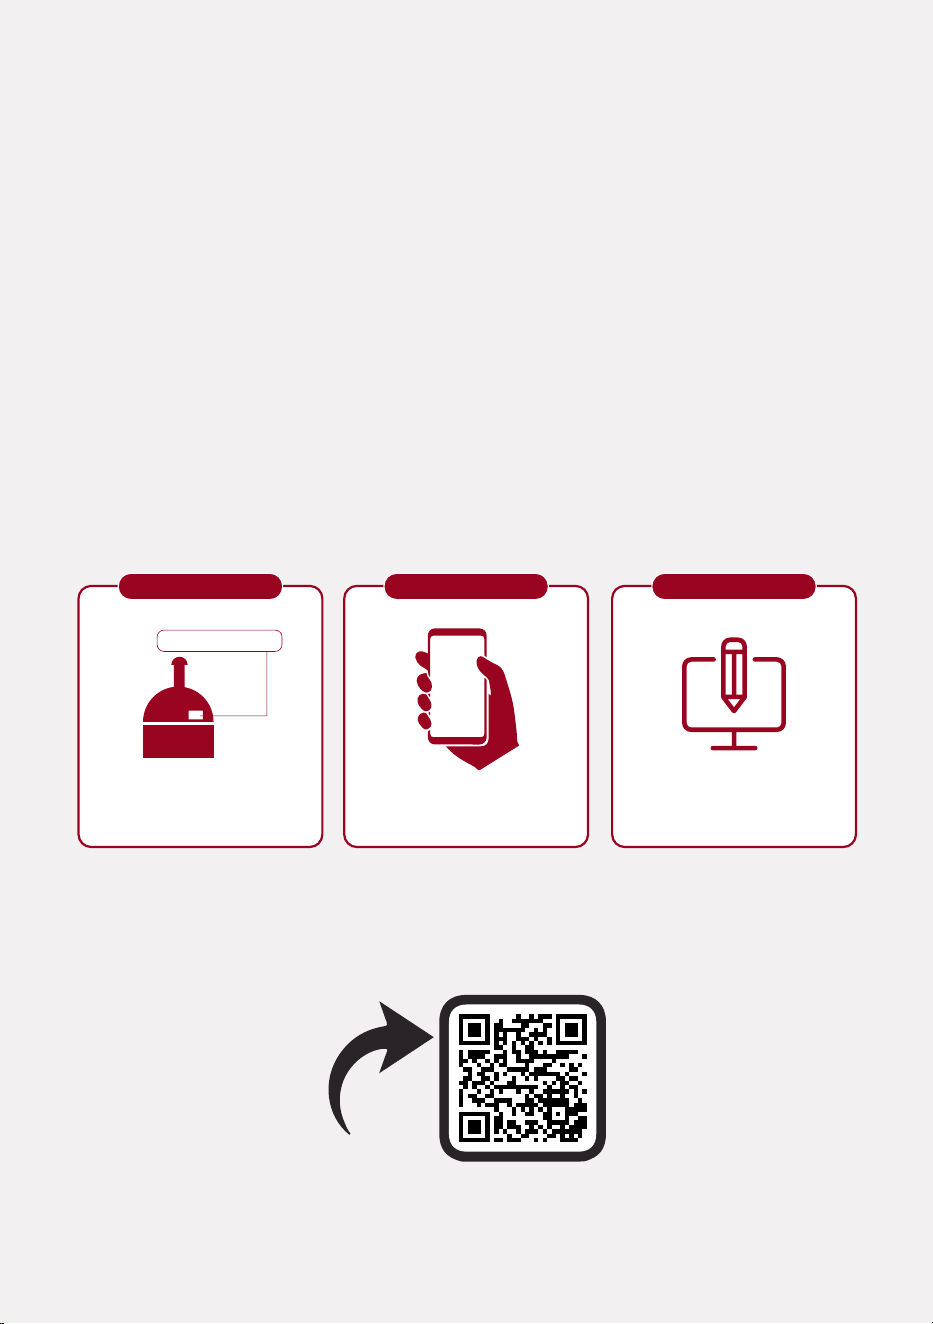
REGISTER YOUR PRODUCT
www.alfaforni.com/user-manual-23.php
SCAN
ME
REGISTER YOUR PRODUCT
www.alfaforni.com/registration.php
SCAN
ME
Identifies the
serial number
12345678901234
Enter your
information
Scan the QRcode
or type the link below
STEP 1 STEP 3
SCAN
ME
JOIN ALFA
Register your oven product
USER MANUAL
Download the complete user manual
If you are here, it means that you have purchased an Alfa product
and we would like to thank you for this. By choosing our product
you are supporting the search and desire to bring good and
healthy ame cooking in everybody’s life.
Register your purchase and you can download
a collection of must-see tips for the best use of your oven.

STEP 2
Alfa Forni participates in the SAVE THE PLANET initiative;
that’s why the manual has been printed only in English.
To download the other languages, scan the QR code or click the link below.
Alfa Forni partecipa all’iniziativa SAVE THE PLANET,
per questo il manuale è stato stampato esclusivamente il lingua inglese.
Per scaricare le altre lingue scansionare il QRcode oppure digita il link qui sotto.
Alfa Forni nimmt an der SAVE THE PLANET-Initiative teil. Die gedruckte Anleitung ist
deswegen nur auf Englisch verfügbar. Um die anderen Sprachen herunterzuladen,
scannen Sie den QR-Code oder geben Sie den Link hier unten ein
Alfa Forni participe à l’inititiative SAUVER LA PLANÈTE
et pour cela le manuel à été imprimé seulement en anglais.
Pour télécharger les autres langues, ashez le code QR ou cliquez sur ce lien.
Alfa Forni participa en la iniciativa SALVAR EL PLANETA,
por eso el manual fue publicado solo en inglés.
Para descargar los otros idiomas escanea el código QR o haz clic aquí.
REGISTER YOUR PRODUCT
www.alfaforni.com/user-manual-23.php
SCAN
ME
REGISTER YOUR PRODUCT
www.alfaforni.com/registration.php
SCAN
ME
Identifies the
serial number
12345678901234
Enter your
information
Scan the QRcode
or type the link below
STEP 1 STEP 3
SCAN
ME
JOIN ALFA
Register your oven product
USER MANUAL
Download the complete user manual
If you are here, it means that you have purchased an Alfa product
and we would like to thank you for this. By choosing our product
you are supporting the search and desire to bring good and
healthy ame cooking in everybody’s life.
Register your purchase and you can download
a collection of must-see tips for the best use of your oven.

1
Index
02 GENERAL WARNINGS
04 SAFETY WARNINGS
06 ASSEMBLY
08 POSITIONING
10 EXHAUST VENTILATION
14 IGNITION - WOOD
16 IGNITION - GAS
18 GPL-NATURAL GAS CONVERSION
20 MAINTENANCE AND CLEANING
EXTRACTION OF THE BURNER
22 MODERNO 2 & 3 PIZZE - CLASSICO 2 & 4 PIZZE
26 MODERNO 1 & 5 PIZZE - FUTURO 2 & 4 PIZZE
30 TROUBLESHOOTING
32 PRESSURE REGULATORS
34 WARRANTY
2 3
PLEASE READ THE FOLLOWING INFORMATION FOR
PROPER INSTALLATION AND OPTIMUM PERFORMANCE
OF THE OVEN.
- The identication plate, with technical data, lot number and brand
name is visibly applied on the device. Do not remove this label.
- Remove all protective lm before putting the unit into operation.
- Never use steel sponges or sharp scrapers, it can damage the surfaces. Use
ordinary non-abrasive products. If necessary, use wood or plastic tools.
Rinse thoroughly and dry with a soft cloth or microber cloth.
- Do not use dishes or containers made of plastic material. The high temperatures inside
the oven could melt the plastic, damaging the appliance.
- Use tools and utensils that are resistant to high temperatures.
- Position the oven on a at and level surface.
- Due to the temperature, the color of the surfaces may vary in time.
- Do not paint or apply objects to the oven.
- Installation of the product must allow for easy access for cleaning.
- Never place ammable objects inside the oven: if it is accidentally turned on, it could
start a re.
- Alfa stainless steel ready-to-use ovens can become hot on the outside even with a
layer of high quality insulation.
- Always remove the oven door by gripping the handle and using gloves when hot.
- Do not touch the surfaces of the chimney ue during use.
- Keep any electrical wiring and fuel lines away from hot surfaces.
- Do not use the oven if it’s not working properly or you suspect a fault in operation.
- Do not move the oven during use or when it is hot.
- Do not lean on or rest objects on the oven, this may compromise its stability.
- Never extinguish the ame with water.
- In the event that a grease re occurs, turn o the gas and leave the door closed until
the re is extinguished.
GENERAL WARNINGS
WARNING: improper installation, adjustment, alteration, service or
maintenance can cause property damage, injury or death.
Read the installation, operating and maintenance instructions thoroughly before
installing or servicing this equipment.
IMPORTANT: Your ALFA oven is designed for domestic use. Commercial or
professional use of the oven may impair its proper functioning and reduces
the warranty period to 60 days.
- When using the oven wear heat resistant oven gloves.
- The parts that are sealed by the manufacturer should not be modied by the user.
- Do not block the openings and slots provided for ventilation and heat dissipation.
- When using charcoal, only use high quality natural lump wood charcoal. Do not use
briquettes, lava rock, liquid fuels, accelerants or anything other than that expressly
indicated.
- Do not lift the oven from the sill or shelf
- The measurements of the refractory cooking oor may vary by a few millimeters, this
tolerance is due to the craftsmanship of the product.
Continue on the next page >>>
ALWAYS READ THE COMPLETE USER MANUAL.
Additional copies of this manual are available on the website www.alfaforni.com.
4 5
NEVER USE TOO MUCH WOOD THAT CAUSES FLAMES TO EXIT
THE CHIMNEY CAP. THIS CAN CAUSE PROPERTY DAMAGE,
INJURY OR DEATH AND VOID WARRANTY.
SAFETY WARNINGS
FOR YOUR SAFETY
• Do not install in prohibited areas.
• Never touch the door or the chimney during use, as
they are not insulated and become very hot during
operation.
• Do not store or use gasoline or other ammable vapors
or liquids near this or any other appliance.
• Keep the area beneath and around the appliance free of
combustible materials.
• Do not use the wood-burning oven indoors unless the
space is adequately ventilated and complies with all
building codes and local approvals.
IF YOU SMELL GAS:
1. Turn the gas o.
2. Put out any live re or ames.
3. Open the door to the oven.
4. Consult a licensed gas professional
ATTENTION: The gas oven may be converted from LPG to natural gas and viceversa
using the Alfa Forni supplied conversion kit. Follow the supplied instructions or contact
a qualied and licensed gas professional.
WARNING: If the gas oven is not used close the gas supply valve.
WARNING: Do not store unused gas cylinders near the oven.
GAS LEAKS MAY RESULT IN FIRE OR EXPLOSION AND CAUSE SERIOUS
PERSONAL INJURY OR DEATH, OR PROPERTY DAMAGE.
SAFETY WARNINGS
FOR GAS-BURNING OVENS ONLY
6 7
UNPACKING AND ASSEMBLY
A
C
E
H
F
G
When you unbox the oven for
the rst time, due to shipping,
you may notice the presence
of red refractory powder on
the cooking oor.
If this is the case, you should brush
the powder o. We also recommend
to cook and discard 2 or 3 pizza
dough balls to ensure you remove
the refractory powder before
cooking and eating your rst pizza.
If your are using the oven
for the rst time or after a
prolonged period of inactivity
we recommend to extend
your pre-heating of the oven
by an extra 30 minutes to
allow the dispersion of any
humidity possibly collected by
the refractory bricks during
shipping or after prolonged
inactivity.
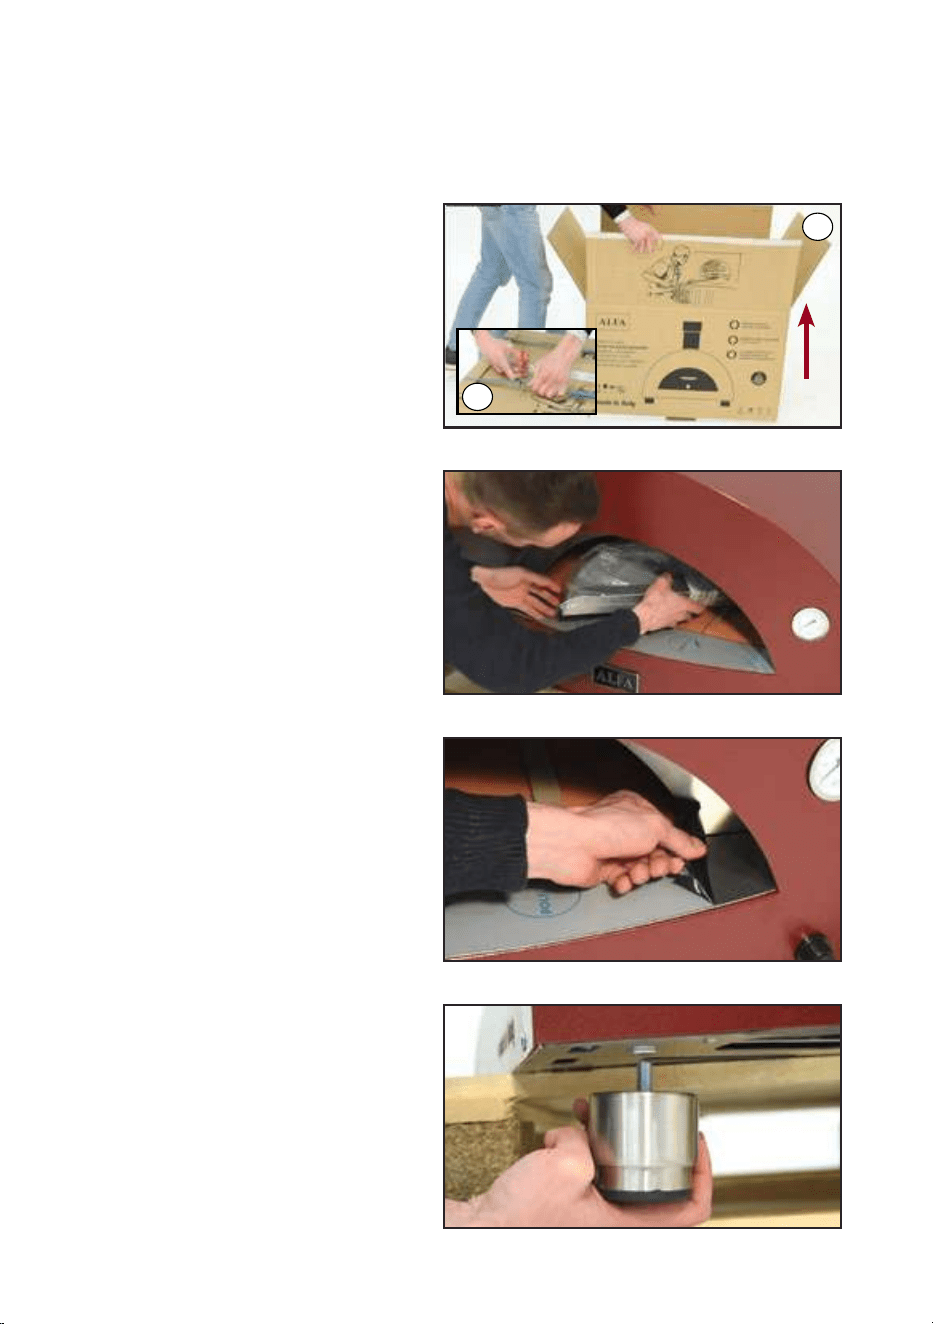
2 - Empty the combustion chamber
by removing the oven parts and
documentation from inside the
chamber.
1 - Remove the oven packaging.
Simply remove the plastic straps (A)
and lift o the top cap (C).
3 - Remove the laser protective
lm from all stainless steel parts,
such as: sill, door, ue and chimney.
Use a hair dryer to speed up the
procedure and easily remove the
laser lm.
4 - Install the 4 feet.
Install the feet by screwing them
into the special housings in the
lower part of the oven.
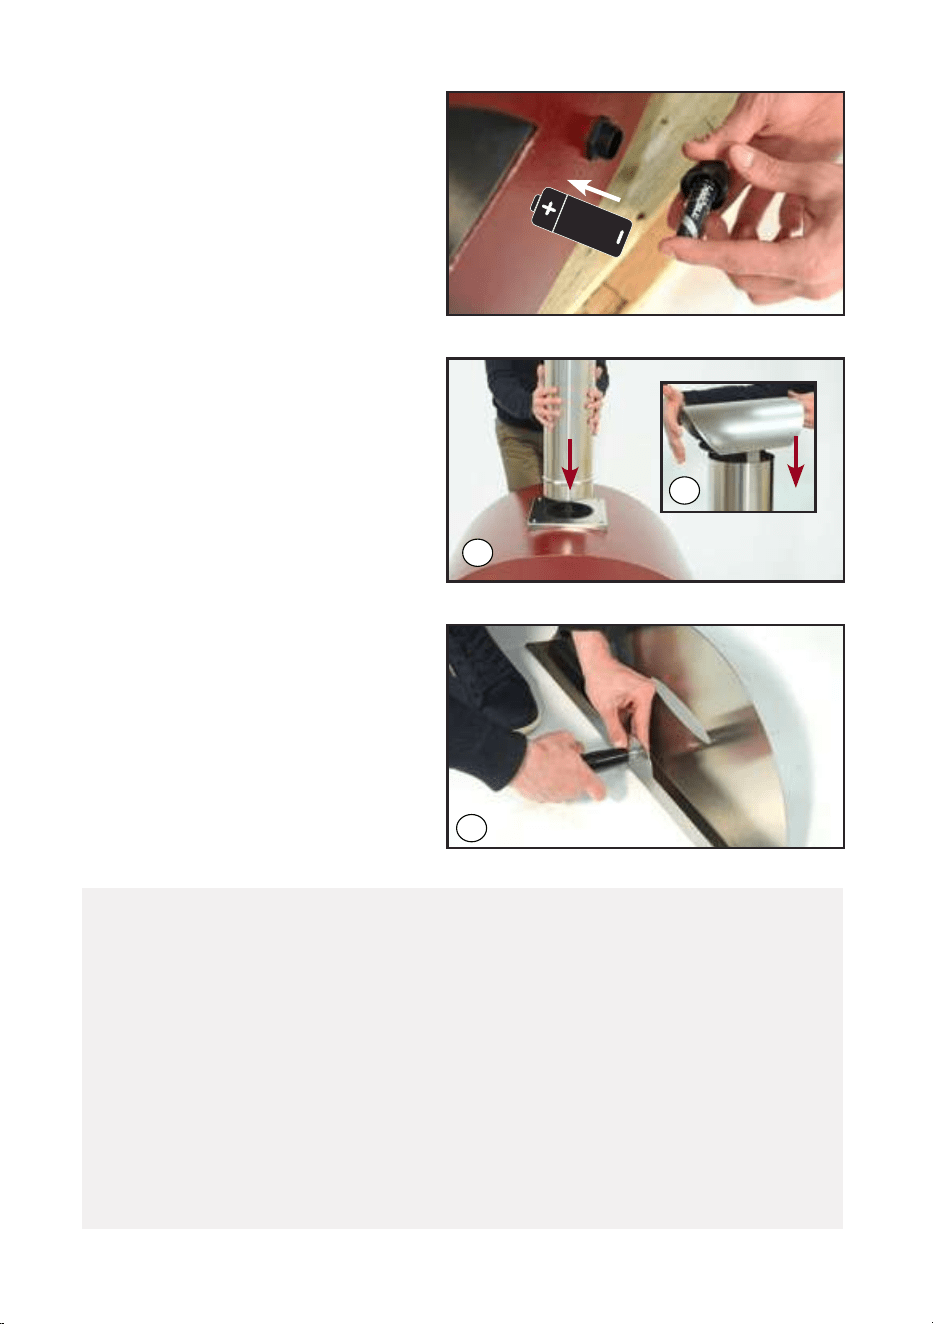
5 - Insert the supplied battery
into the igniter.
Unscrew the igniter button, insert the
battery (E), then screw back the
ignition button. Now when pressing
the button you will see and hear a
small spark.
• Check the indicated polarity.
• Battery type: AA supplied
6 - Install the ue and chimney.
Insert the ue (F) in the appropriate
housing (ange) and then insert the
chimney (G).
7 - Assemble the door.
It will be sucient to screw the
black duroplast handle (H) locking it
with the appropriate bolt
contained in the packaging.
6 7
UNPACKING AND ASSEMBLY
A
C
E
H
F
G
When you unbox the oven for
the rst time, due to shipping,
you may notice the presence
of red refractory powder on
the cooking oor.
If this is the case, you should brush
the powder o. We also recommend
to cook and discard 2 or 3 pizza
dough balls to ensure you remove
the refractory powder before
cooking and eating your rst pizza.
If your are using the oven
for the rst time or after a
prolonged period of inactivity
we recommend to extend
your pre-heating of the oven
by an extra 30 minutes to
allow the dispersion of any
humidity possibly collected by
the refractory bricks during
shipping or after prolonged
inactivity.
2 - Empty the combustion chamber
by removing the oven parts and
documentation from inside the
chamber.
1 - Remove the oven packaging.
Simply remove the plastic straps (A)
and lift o the top cap (C).
3 - Remove the laser protective
lm from all stainless steel parts,
such as: sill, door, ue and chimney.
Use a hair dryer to speed up the
procedure and easily remove the
laser lm.
4 - Install the 4 feet.
Install the feet by screwing them
into the special housings in the
lower part of the oven.
5 - Insert the supplied battery
into the igniter.
Unscrew the igniter button, insert the
battery (E), then screw back the
ignition button. Now when pressing
the button you will see and hear a
small spark.
• Check the indicated polarity.
• Battery type: AA supplied
6 - Install the ue and chimney.
Insert the ue (F) in the appropriate
housing (ange) and then insert the
chimney (G).
7 - Assemble the door.
It will be sucient to screw the
black duroplast handle (H) locking it
with the appropriate bolt
contained in the packaging.

8 9
WARNING
The external walls of the oven can reach temperatures exceeding 80°C; any ammable
materials must not be within 1 meter of the oven.
It is recommended to position the oven at a sucient distance from ammable
materials or materials that could be damaged by heat during use.
Place the oven at a minimum distance of 20 cm from walls and any other appliances.
Increase the minimum distance to 50 cm around the chimney and 1 meter above the
oven. Position the oven in a location protected from wind or strong air currents.
FOR YOUR SAFETY
Place the oven on a at surface and ensure it is perfectly stable.
Ovens should be positioned on tables, bases, or reproof surfaces with adequate
load capacity. Refer to the product data sheet attached to the manual. If applicable,
use the adjustable feet to level the oven on the support surface.
Unintentional movements during use can be very dangerous for both people and
property.
IMPORTANT
THE MAXIMUM LOAD CAPACITY OF THE COOKING STATION SURFACE IS 200 KG.
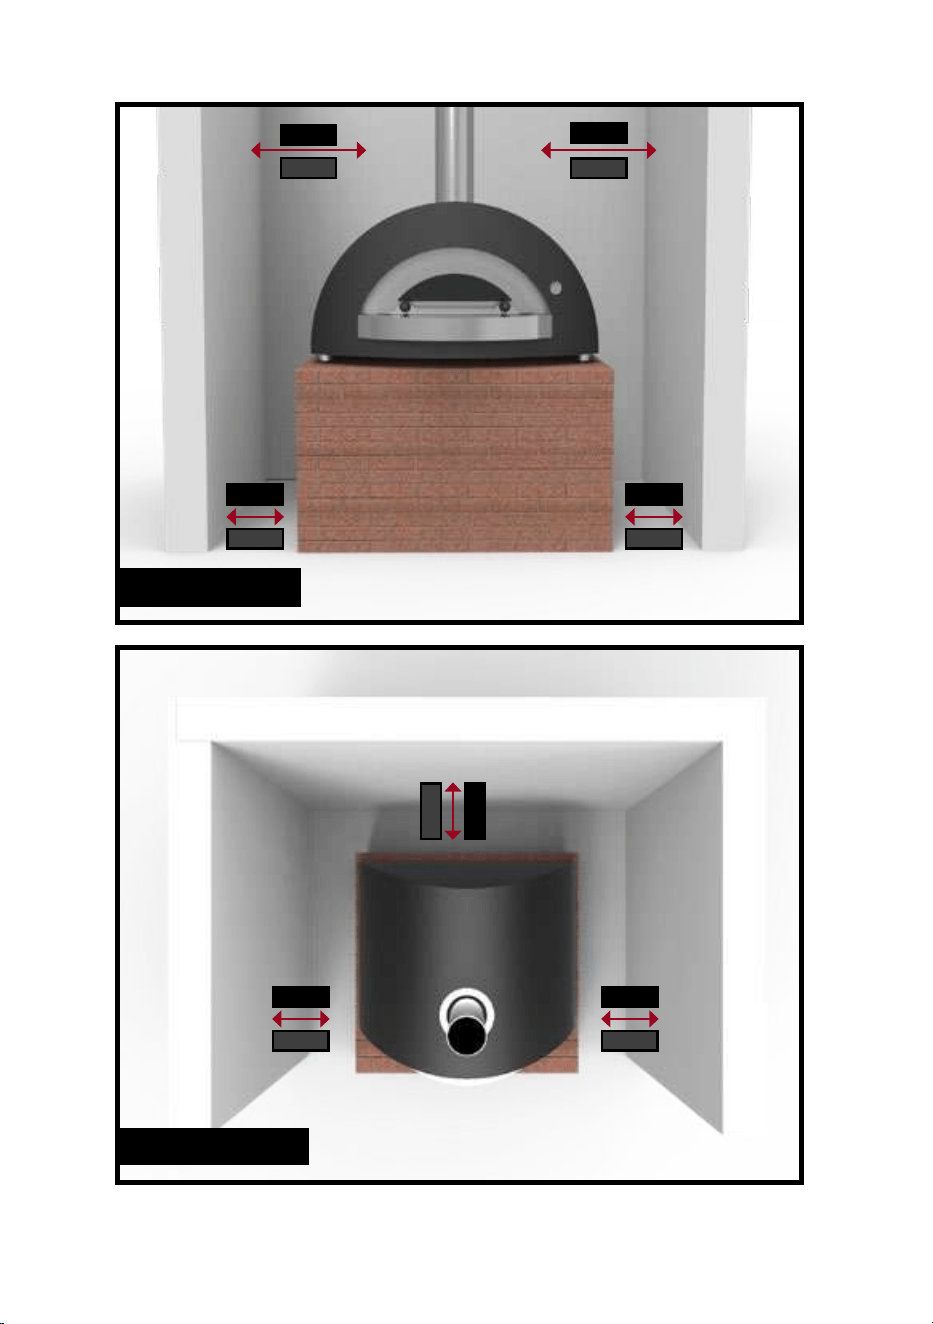
POSITIONING
Front view
View from above
8 in 8 in
8 in8 in
8 in
50 cm
50 cm
20 cm
20 cm20 cm
20 cm 20 cm
20 in
20 in
For installations under a roof, see next page.
8 9
WARNING
The external walls of the oven can reach temperatures exceeding 80°C; any ammable
materials must not be within 1 meter of the oven.
It is recommended to position the oven at a sucient distance from ammable
materials or materials that could be damaged by heat during use.
Place the oven at a minimum distance of 20 cm from walls and any other appliances.
Increase the minimum distance to 50 cm around the chimney and 1 meter above the
oven. Position the oven in a location protected from wind or strong air currents.
FOR YOUR SAFETY
Place the oven on a at surface and ensure it is perfectly stable.
Ovens should be positioned on tables, bases, or reproof surfaces with adequate
load capacity. Refer to the product data sheet attached to the manual. If applicable,
use the adjustable feet to level the oven on the support surface.
Unintentional movements during use can be very dangerous for both people and
property.
IMPORTANT
THE MAXIMUM LOAD CAPACITY OF THE COOKING STATION SURFACE IS 200 KG.
POSITIONING
Front view
View from above
8 in 8 in
8 in8 in
8 in
50 cm
50 cm
20 cm
20 cm20 cm
20 cm 20 cm
20 in
20 in
For installations under a roof, see next page.
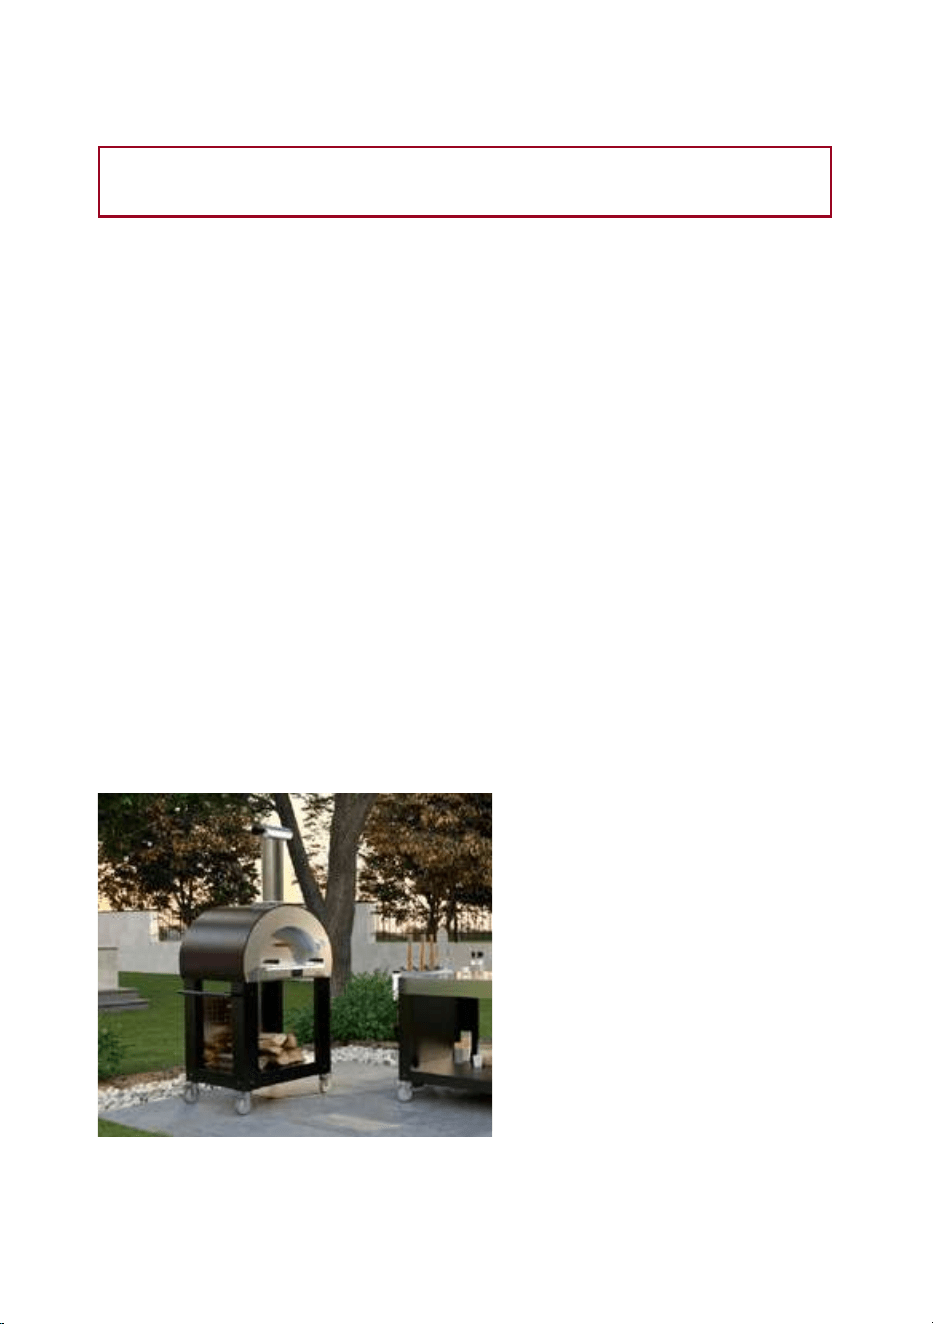
10 11
FLUE EXHAUST
IN THE GARDEN
When installing the ALFA Oven
in your outdoor cooking area
with the venting away from any
structures or low ceilings, the ALFA
supplied high quality stainless steel
pipe and cap are sucient and
no additional piping is necessary.
You can customize these systems
vertically to assist draw or to help
with your install design. ALFA do
not oer custom pipe or chimney.
Supplied single wall wood stove
ue pipe can always be upgraded to double wall chimney.
DO NOT CONNECT THIS TO A CHIMNEY FLUE
SERVING ANOTHER APPLIANCE
One of the most common questions for ALFA Oven owners revolves around
venting. Many owners nd the need to customize the basic vent pipe and cap
that comes supplied with your oven. We hope the following information will
help whether you’re looking to extend your supplied pipe, add a bend to your
supplied pipe or more complex projects that need converted to double wall
chimney as well as penetrating overhead objects and roong).
PROJECTS REVIEWED
• Outdoor installation with no overhead obstructions
• Outdoor installation with overhead obstructions
• Indoor installation–Vertical direct vent approved–MUST use UL103HT double
wall chimney
• Any customized installation beyond the supplied single wall pipe and cap,
ALFA highly recommends that you contact your planning, building and
zoning ocials to ensure all local building codes are followed along with
necessary permits, where needed.
• DO NOT CONNECT THIS TO A CHIMNEY FLUE SERVING ANOTHER APPLIANCE
VENTING GUIDE
Continue on the next page >>>
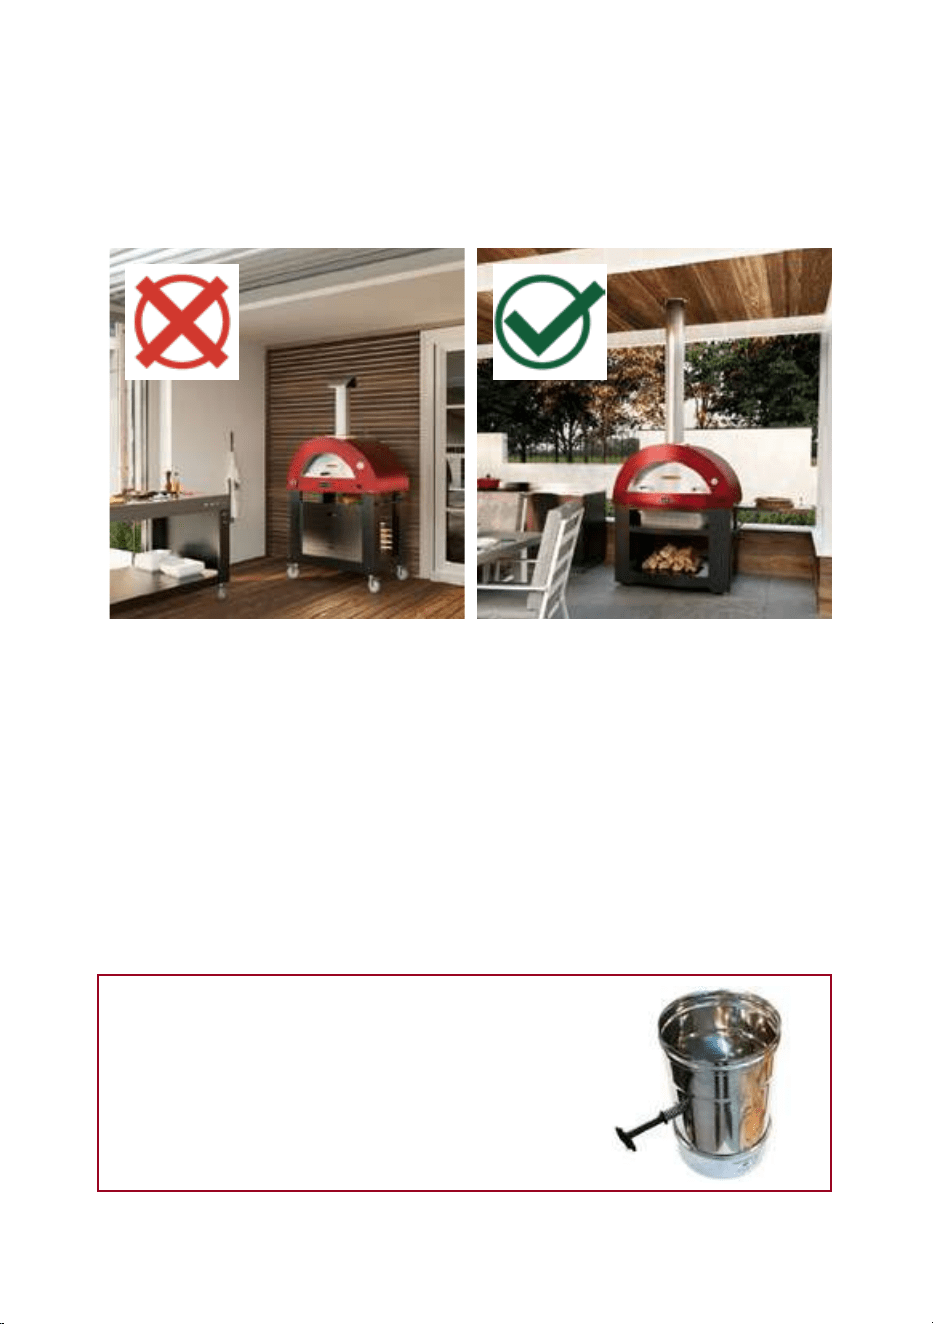
DIRECT VENT, DOUBLE WALL CHIMNEY ON THE TERRACE OR
UNDER A PERGOLA
• For indoor ALFA Oven venting installations, or outdoor settings where your
wood red oven will be under a roof structures, pergolas, or any type of
ceiling/roof.
• Double wall chimney can be installed up to 60 feet (18 meters) vertically
and must be a minimum of 3 feet (1 meter) above the roof or structure it is
penetrating.
• Do not install the oven under a roof or pergola. If you are penetrating
through an overhead object OR A ROOF you must remove supplied
single wall pipe and start WITH PIPE AND CHIMNEY MANUFACTURED BY
SPECIALIZED COMPANIES
If you plan to extend the chimney more
than 1 meter (39 inchs), we recommend
installing a buttery valve to regulate
the air ow.
Continue on the next page >>>
WARNING: Major causes of vent related res is failure to maintain
required clearances (air spaces) to combustible materials.
Note: The outer walls of oven may reach high temperatures, more than 80°C
(176°F). Position the oven so it is not in contact with the wall or other furniture
and make sure there is a gap of at least, at least 8 inches (20cm).
10 11
FLUE EXHAUST
IN THE GARDEN
When installing the ALFA Oven
in your outdoor cooking area
with the venting away from any
structures or low ceilings, the ALFA
supplied high quality stainless steel
pipe and cap are sucient and
no additional piping is necessary.
You can customize these systems
vertically to assist draw or to help
with your install design. ALFA do
not oer custom pipe or chimney.
Supplied single wall wood stove
ue pipe can always be upgraded to double wall chimney.
DO NOT CONNECT THIS TO A CHIMNEY FLUE
SERVING ANOTHER APPLIANCE
One of the most common questions for ALFA Oven owners revolves around
venting. Many owners nd the need to customize the basic vent pipe and cap
that comes supplied with your oven. We hope the following information will
help whether you’re looking to extend your supplied pipe, add a bend to your
supplied pipe or more complex projects that need converted to double wall
chimney as well as penetrating overhead objects and roong).
PROJECTS REVIEWED
• Outdoor installation with no overhead obstructions
• Outdoor installation with overhead obstructions
• Indoor installation–Vertical direct vent approved–MUST use UL103HT double
wall chimney
• Any customized installation beyond the supplied single wall pipe and cap,
ALFA highly recommends that you contact your planning, building and
zoning ocials to ensure all local building codes are followed along with
necessary permits, where needed.
• DO NOT CONNECT THIS TO A CHIMNEY FLUE SERVING ANOTHER APPLIANCE
VENTING GUIDE
Continue on the next page >>>
DIRECT VENT, DOUBLE WALL CHIMNEY ON THE TERRACE OR
UNDER A PERGOLA
• For indoor ALFA Oven venting installations, or outdoor settings where your
wood red oven will be under a roof structures, pergolas, or any type of
ceiling/roof.
• Double wall chimney can be installed up to 60 feet (18 meters) vertically
and must be a minimum of 3 feet (1 meter) above the roof or structure it is
penetrating.
• Do not install the oven under a roof or pergola. If you are penetrating
through an overhead object OR A ROOF you must remove supplied
single wall pipe and start WITH PIPE AND CHIMNEY MANUFACTURED BY
SPECIALIZED COMPANIES
If you plan to extend the chimney more
than 1 meter (39 inchs), we recommend
installing a buttery valve to regulate
the air ow.
Continue on the next page >>>
WARNING: Major causes of vent related res is failure to maintain
required clearances (air spaces) to combustible materials.
Note: The outer walls of oven may reach high temperatures, more than 80°C
(176°F). Position the oven so it is not in contact with the wall or other furniture
and make sure there is a gap of at least, at least 8 inches (20cm).
12 13
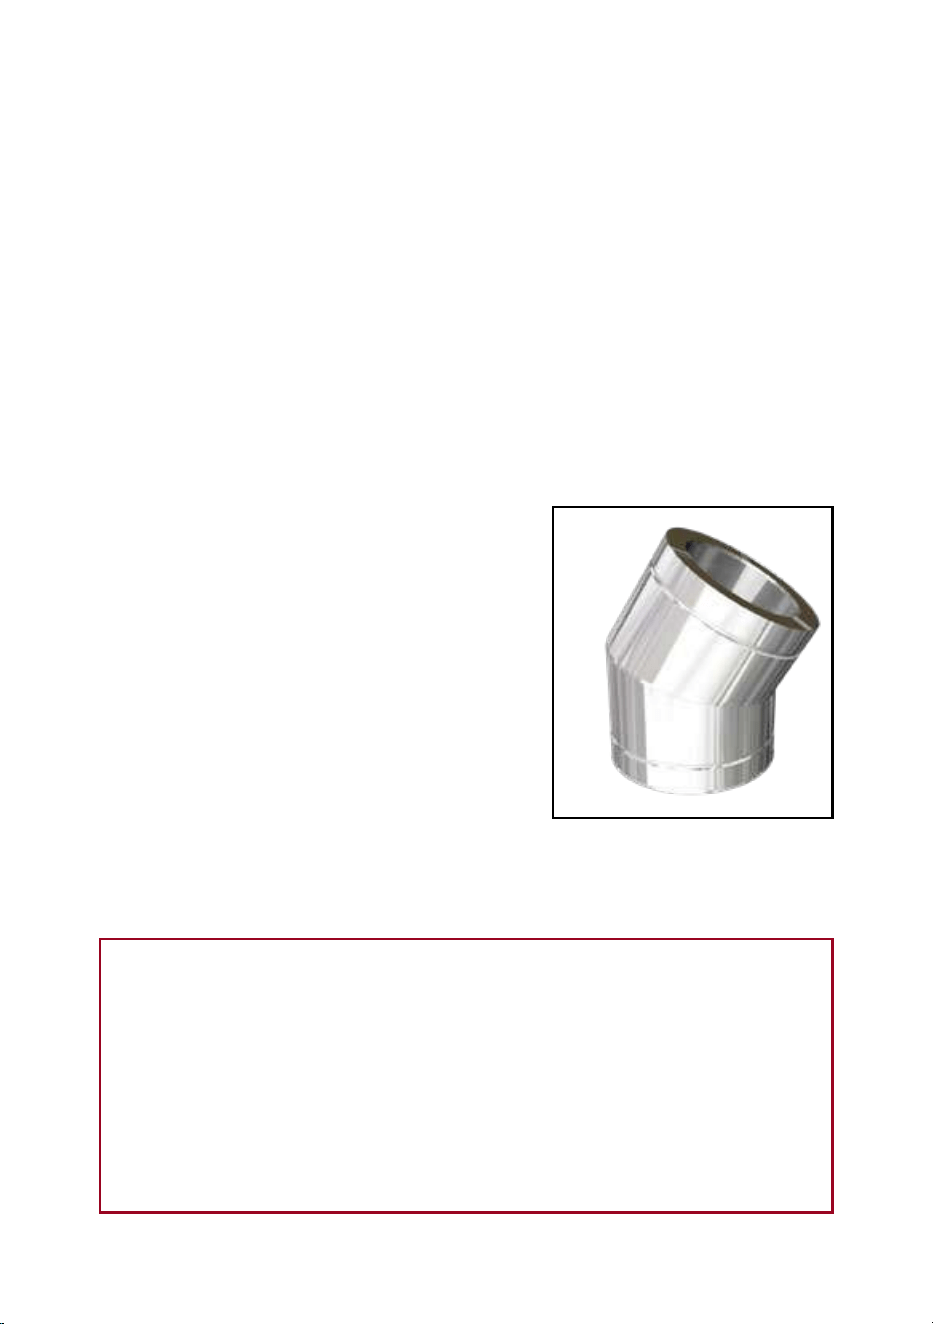
OFFSET ELBOW INSTALLATION
• Avoid elbows if at all possible, as a vertical
pipe or chimney is the most ecient
• Pipe or chimney systems may have a
maximum of 2 osets (two elbows total) of
30-degrees from vertical
• Do not combine elbows to create steeper
angles and never exceed 2 elbows in one
pipe or chimney system
• For Example: You could have a 30-degree
bend with a 0-48” (0-122 cm) horizontal
pipe or chimney and then another
30-degree bend back to the vertical position
• Do not use with forced-draft, positive-
pressure appliances.
OFFSET ELBOW
WARNING: DO NOT USE (2) 30-DEGREE ELBOWS
TO CREATE A 60-DEGREE ANGLE!
THIS VOIDS ALL WARRANTIES AND PRESENTS A FIRE HAZZARD
WITHIN THE PIPE OR CHIMNEY SYSTEM.
If your installation requirement cannot meet the basic standards be sure
to consult a professional and obtain necessary permits in advance.
ALFA OVENS VENTING GUIDE FOR WOOD FIRED OVENS
Basic guideline for ALFA Forni ue and obstruction clearances:
• Single-wall ue pipe: allow 50 cm of clearance around the pipe.
• Non-combustible clearance: a minimum of 100 cm is required below the
ceiling.
• Double-wall chimney: leave 8 cm of clearance around the chimney.
• Chimneys must extend at least 100 cm above the highest point where they
pass through a roof and at least 50 cm higher than any part of a building
within 3 meters.
• Never ll the required clearance space with any insulating material or other
substances.
AREA CONTACTS
NORTH AMERICA
Stati Uniti & Canada
PHONE: +1 570 350 7939
E-MAIL: [email protected]
VENTING SUPPORT
AND ASSISTANCE

12 13
OFFSET ELBOW INSTALLATION
• Avoid elbows if at all possible, as a vertical
pipe or chimney is the most ecient
• Pipe or chimney systems may have a
maximum of 2 osets (two elbows total) of
30-degrees from vertical
• Do not combine elbows to create steeper
angles and never exceed 2 elbows in one
pipe or chimney system
• For Example: You could have a 30-degree
bend with a 0-48” (0-122 cm) horizontal
pipe or chimney and then another
30-degree bend back to the vertical position
• Do not use with forced-draft, positive-
pressure appliances.
OFFSET ELBOW
WARNING: DO NOT USE (2) 30-DEGREE ELBOWS
TO CREATE A 60-DEGREE ANGLE!
THIS VOIDS ALL WARRANTIES AND PRESENTS A FIRE HAZZARD
WITHIN THE PIPE OR CHIMNEY SYSTEM.
If your installation requirement cannot meet the basic standards be sure
to consult a professional and obtain necessary permits in advance.
ALFA OVENS VENTING GUIDE FOR WOOD FIRED OVENS
Basic guideline for ALFA Forni ue and obstruction clearances:
• Single-wall ue pipe: allow 50 cm of clearance around the pipe.
• Non-combustible clearance: a minimum of 100 cm is required below the
ceiling.
• Double-wall chimney: leave 8 cm of clearance around the chimney.
• Chimneys must extend at least 100 cm above the highest point where they
pass through a roof and at least 50 cm higher than any part of a building
within 3 meters.
• Never ll the required clearance space with any insulating material or other
substances.
AREA CONTACTS
NORTH AMERICA
Stati Uniti & Canada
PHONE: +1 570 350 7939
E-MAIL: [email protected]
VENTING SUPPORT
AND ASSISTANCE

14 15
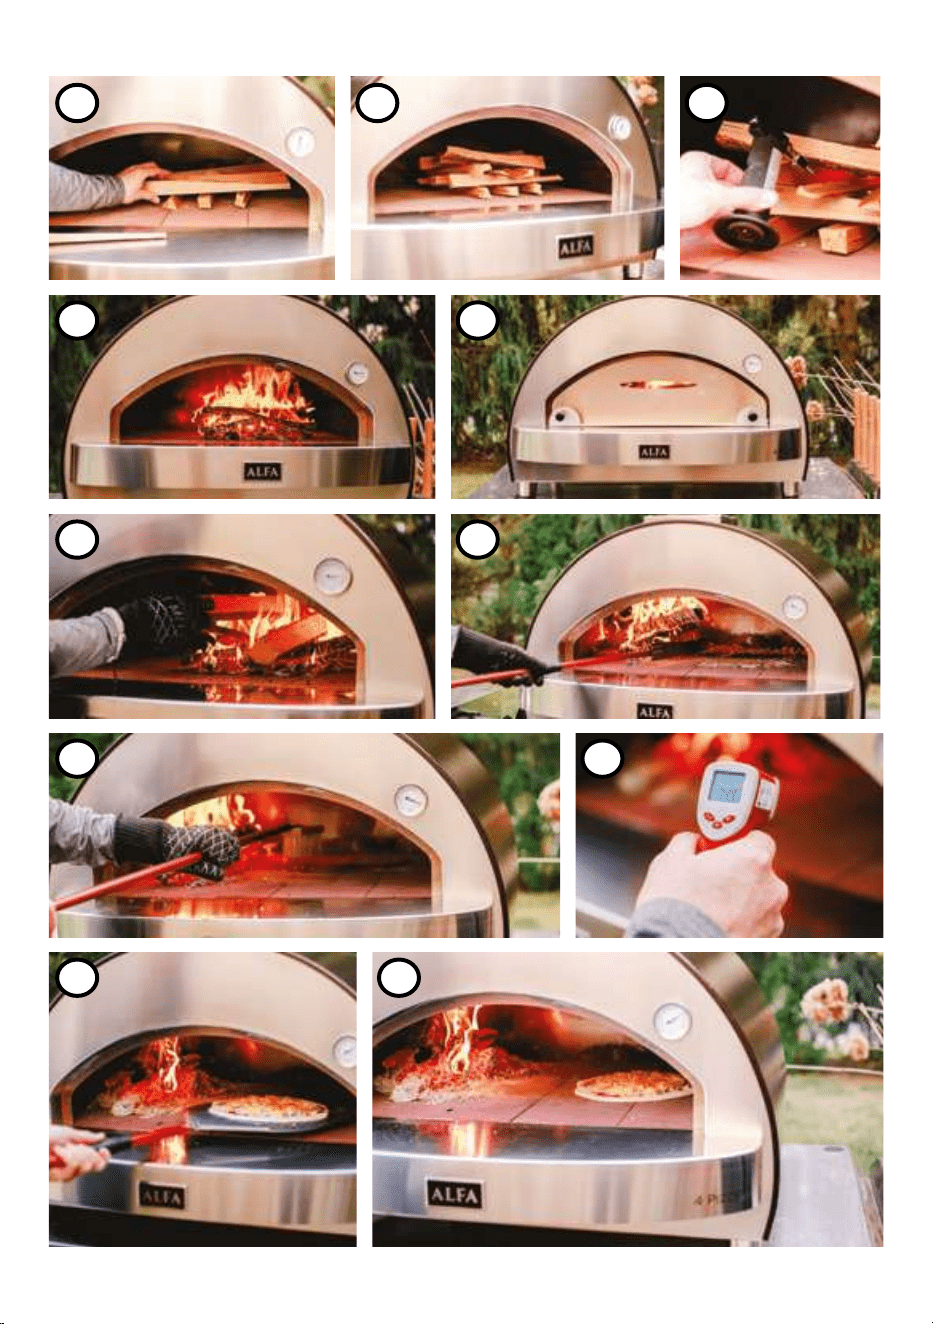
LIGHTING THE OVEN
ONLY FOR WOOD VERSION
1 - In the center of the oven or slightly to the right, build a small
stack of wood using small logs. To optimize ignition, you can use some
re-starting wads.
2 - Light the re. To make ignition more ecient, you can use an
electric or gas lighter.
3 - After lighting the re and achieving a lively ame, close the
door, leaving a few centimeters open to allow air circulation and
facilitate combustion. This helps keep the re alive and heats the oven
to the desired temperature more quickly.
4 - Slowly add larger wood logs to create a larger re. Do this for
about 15-20 minutes depending on the size of your oven. Larger ovens
can take longer to heat up. Do not put too much wood in at one time
and replace the door as noted in section 3 to help keep the ame inside
the oven.
5 - After burning some of the wood and creating a hot bed of coals,
move them to the left side of the oven using the ALFA re mover.
The re should be positioned on the opposite side of the thermometer
to accurately measure the chamber temperature. If using the oven in
wood mode with the Hybrid Kit, the re must be placed on the refractory
surface on the side opposite the burner.
NEVER place the re above the burner.
6 - Clean the refractory cooking surface with the ALFA brush.
7 - Use a laser thermometer (not included) to check that the
cooking surface temperature is at the desired level.
The optimal temperature is around 370°- 430°C (700°- 800°F).
8 - When the refractory surface temperature is correct, you’re
ready to start baking your pizzas! Bake the pizzas without using the
door, but feel free to slightly open the oven’s mouth, leaving about 5 cm
for ventilation.
WARNING: follow the instructions before lighting the oven:
- Do not use ammable liquids or other fuels to ignite the oven.
- Ensure there are no ammable materials near the oven and
that the minimum safety distance is maintained.
1a 1b 2
3a
3b
4 5
6 7
8a 8b
14 15
LIGHTING THE OVEN
ONLY FOR WOOD VERSION
1 - In the center of the oven or slightly to the right, build a small
stack of wood using small logs. To optimize ignition, you can use some
re-starting wads.
2 - Light the re. To make ignition more ecient, you can use an
electric or gas lighter.
3 - After lighting the re and achieving a lively ame, close the
door, leaving a few centimeters open to allow air circulation and
facilitate combustion. This helps keep the re alive and heats the oven
to the desired temperature more quickly.
4 - Slowly add larger wood logs to create a larger re. Do this for
about 15-20 minutes depending on the size of your oven. Larger ovens
can take longer to heat up. Do not put too much wood in at one time
and replace the door as noted in section 3 to help keep the ame inside
the oven.
5 - After burning some of the wood and creating a hot bed of coals,
move them to the left side of the oven using the ALFA re mover.
The re should be positioned on the opposite side of the thermometer
to accurately measure the chamber temperature. If using the oven in
wood mode with the Hybrid Kit, the re must be placed on the refractory
surface on the side opposite the burner.
NEVER place the re above the burner.
6 - Clean the refractory cooking surface with the ALFA brush.
7 - Use a laser thermometer (not included) to check that the
cooking surface temperature is at the desired level.
The optimal temperature is around 370°- 430°C (700°- 800°F).
8 - When the refractory surface temperature is correct, you’re
ready to start baking your pizzas! Bake the pizzas without using the
door, but feel free to slightly open the oven’s mouth, leaving about 5 cm
for ventilation.
WARNING: follow the instructions before lighting the oven:
- Do not use ammable liquids or other fuels to ignite the oven.
- Ensure there are no ammable materials near the oven and
that the minimum safety distance is maintained.
1a 1b 2
3a
3b
4 5
6 7
8a 8b
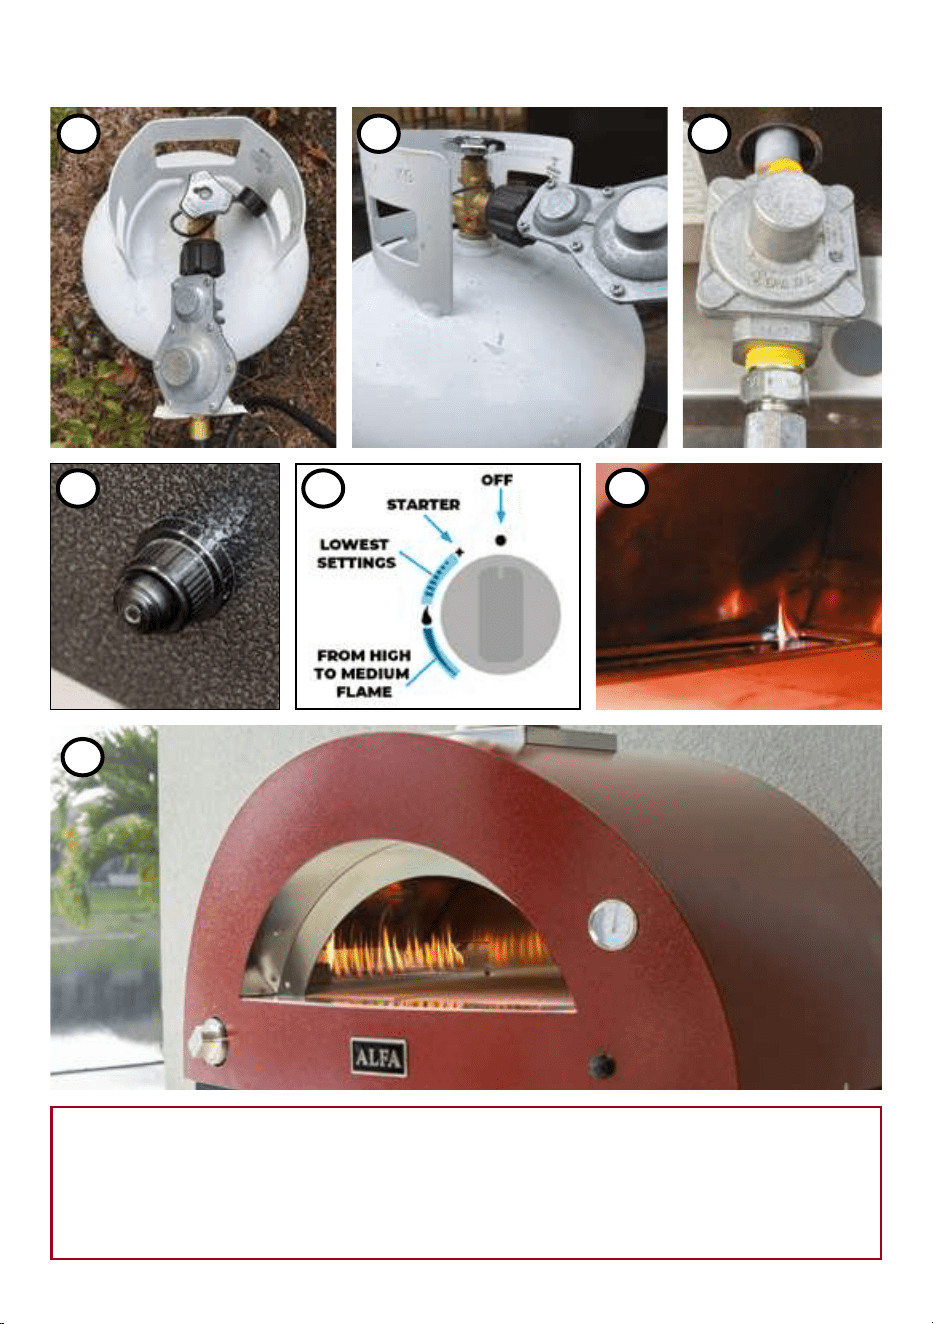
16 17
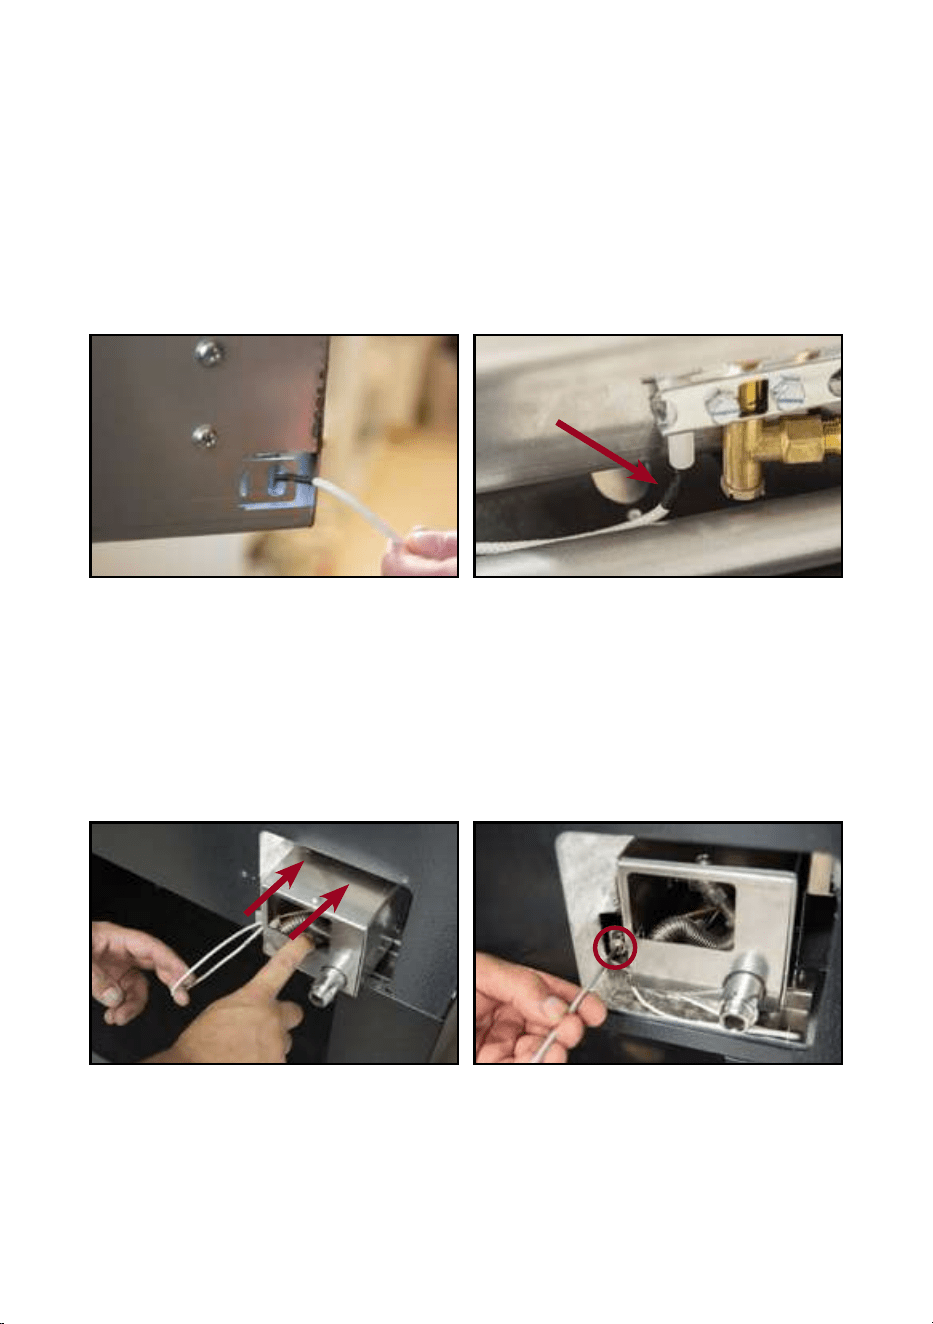
1 - Connect the oven to the gas supply. If the oven is powered by LPG, use a cylinder
of at least 20 pounds with the regulator hose provided. If the oven uses NATURAL GAS,
connect it directly to a natural gas source. Complete the installation by connecting the
stabilizer to the burner in the correct direction.
2 - Press the ignition button to create a spark.
3 - Press the burner control knob and turn it counterclockwise to the high ame
symbol on the control panel.
NOTE: Igniting the burner for the rst time or after it has cooled down may take some
time and possibly several attempts due to air in the gas line. Be patient as the gas lls
the burner completely.
4 - Once the burner is fully ignited, you will see a large ame inside the oven.
Now you can release the ignition button, BUT you must KEEP the burner control knob
pressed for 10 seconds. This will ensure that the thermocouple is hot enough to keep
the burner on. The oven burner is now at maximum, and you can begin preheating the
oven.
5 - Release the burner control knob and turn it counterclockwise to the larger
ame symbol. The oven burner is now on high ame, and you can begin preheating
the oven.
Note: Wind can extinguish the ame if it is set too low.
6 - Reposition the oven door and allow the cooking surface to heat up, leaving a
gap of 4/5 cm so that air can enter the oven. Lack of air may cause the oven to go
out. Preheat the oven for at least 30 minutes to allow the refractory bricks to reach
the pizza cooking temperature. Use a laser thermometer to check the cooking surface
temperature. For a true Neapolitan pizza, the cooking surface should reach around
370°- 430°C (700°- 800°F).
LIGHTING THE OVEN
ONLY FOR GAS VERSION
WARNING: Follow the instructions before turning on the oven.
• Check all gas connections before starting the oven.
• For all threaded connections, use an appropriate PTFE gas pipe tape.
• Do not lean over the oven when igniting it. Keep your face and body at a safe
distance from the oven door.
• When lighting the oven, the oven door must be open.
• The burner control knob must be in the OFF position before opening the LPG
cylinder.
FOR YOUR SAFETY
If the burner does not ignite or there is no spark, turn o the gas supply by setting
the control knob to the OFF position and contact customer support.
1a 1b
4
1c
5
FOR YOUR SAFETY:
• Do not exceed the temperature limit of 500°C / 950°F.
• Never disconnect the gas pipe or other ttings when using the oven.
PUSH
2 3
16 17
1 - Connect the oven to the gas supply. If the oven is powered by LPG, use a cylinder
of at least 20 pounds with the regulator hose provided. If the oven uses NATURAL GAS,
connect it directly to a natural gas source. Complete the installation by connecting the
stabilizer to the burner in the correct direction.
2 - Press the ignition button to create a spark.
3 - Press the burner control knob and turn it counterclockwise to the high ame
symbol on the control panel.
NOTE: Igniting the burner for the rst time or after it has cooled down may take some
time and possibly several attempts due to air in the gas line. Be patient as the gas lls
the burner completely.
4 - Once the burner is fully ignited, you will see a large ame inside the oven.
Now you can release the ignition button, BUT you must KEEP the burner control knob
pressed for 10 seconds. This will ensure that the thermocouple is hot enough to keep
the burner on. The oven burner is now at maximum, and you can begin preheating the
oven.
5 - Release the burner control knob and turn it counterclockwise to the larger
ame symbol. The oven burner is now on high ame, and you can begin preheating
the oven.
Note: Wind can extinguish the ame if it is set too low.
6 - Reposition the oven door and allow the cooking surface to heat up, leaving a
gap of 4/5 cm so that air can enter the oven. Lack of air may cause the oven to go
out. Preheat the oven for at least 30 minutes to allow the refractory bricks to reach
the pizza cooking temperature. Use a laser thermometer to check the cooking surface
temperature. For a true Neapolitan pizza, the cooking surface should reach around
370°- 430°C (700°- 800°F).
LIGHTING THE OVEN
ONLY FOR GAS VERSION
WARNING: Follow the instructions before turning on the oven.
• Check all gas connections before starting the oven.
• For all threaded connections, use an appropriate PTFE gas pipe tape.
• Do not lean over the oven when igniting it. Keep your face and body at a safe
distance from the oven door.
• When lighting the oven, the oven door must be open.
• The burner control knob must be in the OFF position before opening the LPG
cylinder.
FOR YOUR SAFETY
If the burner does not ignite or there is no spark, turn o the gas supply by setting
the control knob to the OFF position and contact customer support.
1a 1b
4
1c
5
FOR YOUR SAFETY:
• Do not exceed the temperature limit of 500°C / 950°F.
• Never disconnect the gas pipe or other ttings when using the oven.
PUSH
2 3
18 19
LPG - NATURAL GAS CONVERSION
FOR GAS MODELS ONLY
THE ALFA OVEN CAN BE CONVERTED FROM LPG TO
NATURAL GAS AND VICE VERSA, ACCORDING TO THE
OVEN’S INITIAL CONFIGURATION.
REQUEST THE SPECIFIC CONVERSION KIT FOR YOUR
OVEN FROM YOUR RETAILER/DISTRIBUTOR.
WARNING
The conversion operation must be carried out by a qualified technician
when the oven is turned off and completely cold. Improper connections,
alterations, or inadequate maintenance can cause material damage to
property and injury to people.
IMPORTANT
USE ONLY COMPONENTS PROVIDED BY ALFA TO AVOID INVALIDATING THE
OVEN’S WARRANTY.
20 21
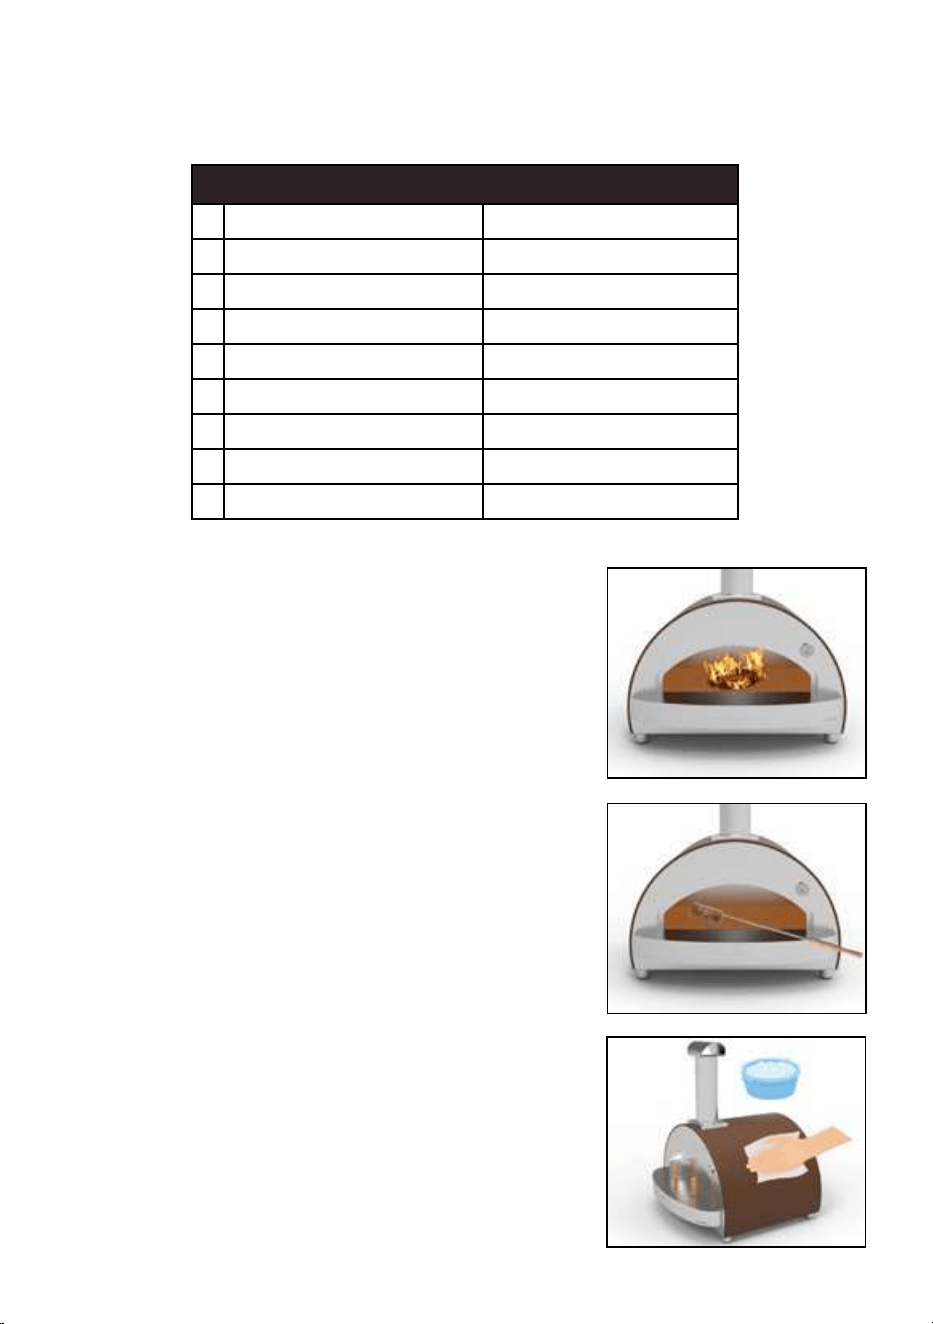
Clean the combustion chamber.
Pyrolysis at 500°C (1,000°F). Alfa Forni ovens clean
themselves through pyrolysis (Pyro-fire Lysis-Separation).
This process uses very high heat to decompose organic
materials, carbonizing them into volatile compounds. To
activate the pyrolysis, it is recommended to maintain a
temperature of 500°C (1,000°F) for 2-3 minutes.
Clean the cooking surface. Once pyrolysis is complete,
wait for the oven to cool down before removing any
remaining residues from the surface using the brush. After
each use, gently wipe the surface with a damp cloth.
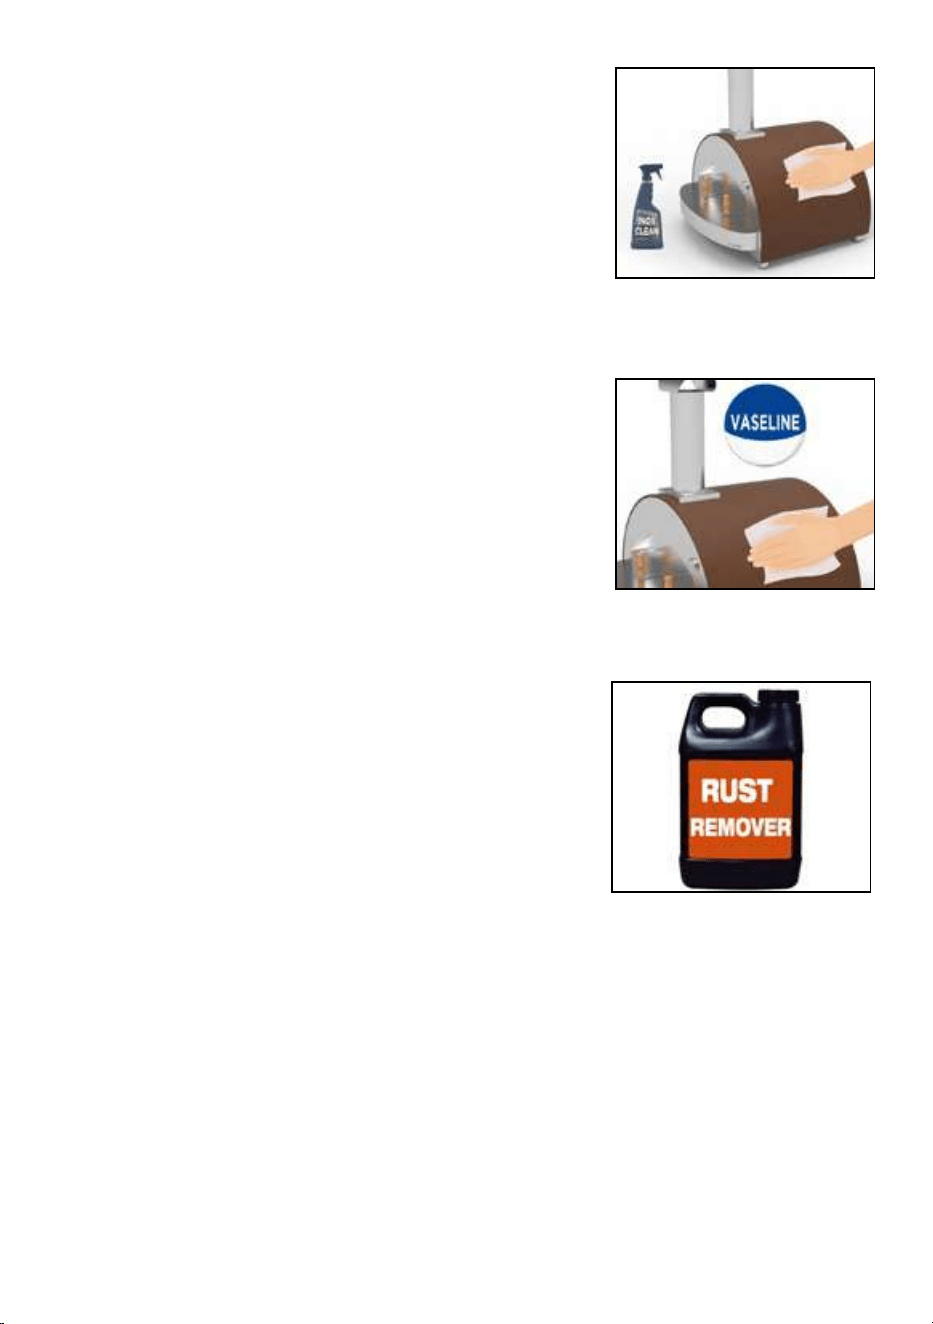
Clean the exterior of the oven. Like all powder-coated
stainless steel products, these ovens are designed to
withstand various environmental conditions, including
salt air, as long as regular and effective maintenance
is ensured. To clean the stainless steel, use a soft cloth
soaked in a solution of water and soap or, alternatively,
baking soda and dish detergent. Gently scrub while the
oven is completely cold.
IMPORTANT: Always check the certification of the product
you are using and ensure that the components are those
specified.
WARNING: Steels exposed to high temperatures and direct
flames tend to change color on the surface. This is an
inherent characteristic of the material.
CARE AND MAINTENANCE
Clean the stainless steel parts.
Alfa Forni ovens are made with stainless steel both inside
and outside. To clean these parts, we recommend using a
stainless steel cleaner. It is also advisable to carefully read
the warnings and instructions on the detergent packaging.
Do not use detergents containing acids, turpentine, or
xylene. Rinse thoroughly after cleaning the oven.
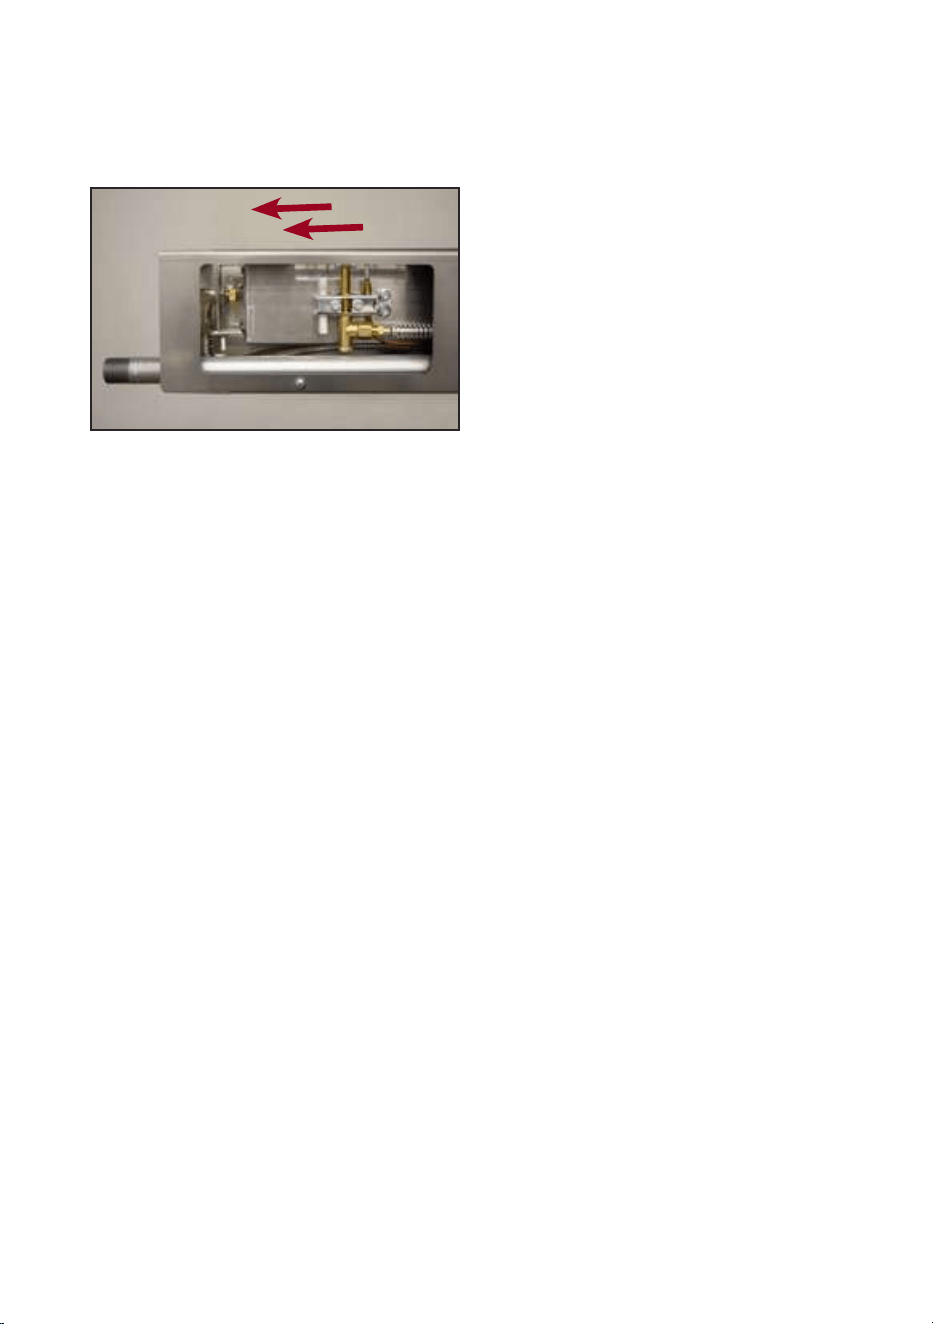
Protect the stainless steel. To best protect the stainless
steel parts, it is recommended to use petroleum jelly or other
neutral cleaning solutions (pH 7) that do not contain acids,
mineral spirits, or xylene. Use a soft, non-abrasive cloth for
application.
In the case of installation in coastal areas, to prevent
corrosion and buildup, it is advised to clean the oven
frequently with fresh water.
Protection from Oxidation. Stainless steel is resistant
to oxidation, but occasionally, due to humidity, salt, etc.,
rust spots may appear on the surface. In this case, use a
rust remover product to restore the oven to its original
condition.
Gas Burner Cleaning. The gas burner should be cleaned
periodically. We recommend thorough cleaning after
using the Hybrid kit or intensive use, by vacuuming
cooking residues with a soft brush, possibly removing the
burner from the oven. After a long period of non-use, for
a more thorough cleaning of all components, it is advised
to remove the burner from the oven. For instructions on
disassembling the burner, refer to the dedicated pages.
Do not attempt to remove carbonized residues using
inappropriate products or tools that could damage parts of
the burner.
Cleaning of the Nozzles. The nozzles should be cleaned at
least once a year to prevent clogging, which can restrict the
gas flow. This requires disassembling the burner. If in doubt,
contact specialized personnel.
MAINTENANCE DIARY
CLEANING TIME SCHEDULE
1 Combustion chamber Every use
2 Cooking floor Every use
3 Oven outside Weekly
4 Stainless-steel parts Weekly
5 Steel protection Monthly
6 Burner Monthly
7 Nozzles Yearly
8 Rust spots Biennially
20 21
Clean the combustion chamber.
Pyrolysis at 500°C (1,000°F). Alfa Forni ovens clean
themselves through pyrolysis (Pyro-fire Lysis-Separation).
This process uses very high heat to decompose organic
materials, carbonizing them into volatile compounds. To
activate the pyrolysis, it is recommended to maintain a
temperature of 500°C (1,000°F) for 2-3 minutes.
Clean the cooking surface. Once pyrolysis is complete,
wait for the oven to cool down before removing any
remaining residues from the surface using the brush. After
each use, gently wipe the surface with a damp cloth.
Clean the exterior of the oven. Like all powder-coated
stainless steel products, these ovens are designed to
withstand various environmental conditions, including
salt air, as long as regular and effective maintenance
is ensured. To clean the stainless steel, use a soft cloth
soaked in a solution of water and soap or, alternatively,
baking soda and dish detergent. Gently scrub while the
oven is completely cold.
IMPORTANT: Always check the certification of the product
you are using and ensure that the components are those
specified.
WARNING: Steels exposed to high temperatures and direct
flames tend to change color on the surface. This is an
inherent characteristic of the material.
CARE AND MAINTENANCE
Clean the stainless steel parts.
Alfa Forni ovens are made with stainless steel both inside
and outside. To clean these parts, we recommend using a
stainless steel cleaner. It is also advisable to carefully read
the warnings and instructions on the detergent packaging.
Do not use detergents containing acids, turpentine, or
xylene. Rinse thoroughly after cleaning the oven.
Protect the stainless steel. To best protect the stainless
steel parts, it is recommended to use petroleum jelly or other
neutral cleaning solutions (pH 7) that do not contain acids,
mineral spirits, or xylene. Use a soft, non-abrasive cloth for
application.
In the case of installation in coastal areas, to prevent
corrosion and buildup, it is advised to clean the oven
frequently with fresh water.
Protection from Oxidation. Stainless steel is resistant
to oxidation, but occasionally, due to humidity, salt, etc.,
rust spots may appear on the surface. In this case, use a
rust remover product to restore the oven to its original
condition.
Gas Burner Cleaning. The gas burner should be cleaned
periodically. We recommend thorough cleaning after
using the Hybrid kit or intensive use, by vacuuming
cooking residues with a soft brush, possibly removing the
burner from the oven. After a long period of non-use, for
a more thorough cleaning of all components, it is advised
to remove the burner from the oven. For instructions on
disassembling the burner, refer to the dedicated pages.
Do not attempt to remove carbonized residues using
inappropriate products or tools that could damage parts of
the burner.
Cleaning of the Nozzles. The nozzles should be cleaned at
least once a year to prevent clogging, which can restrict the
gas flow. This requires disassembling the burner. If in doubt,
contact specialized personnel.
MAINTENANCE DIARY
CLEANING TIME SCHEDULE
1 Combustion chamber Every use
2 Cooking floor Every use
3 Oven outside Weekly
4 Stainless-steel parts Weekly
5 Steel protection Monthly
6 Burner Monthly
7 Nozzles Yearly
8 Rust spots Biennially

22 23
EXTRACTION OF THE BURNER
MODERNO 2 AND 3 PIZZE AND CLASSICO 2 AND 4 PIZZE
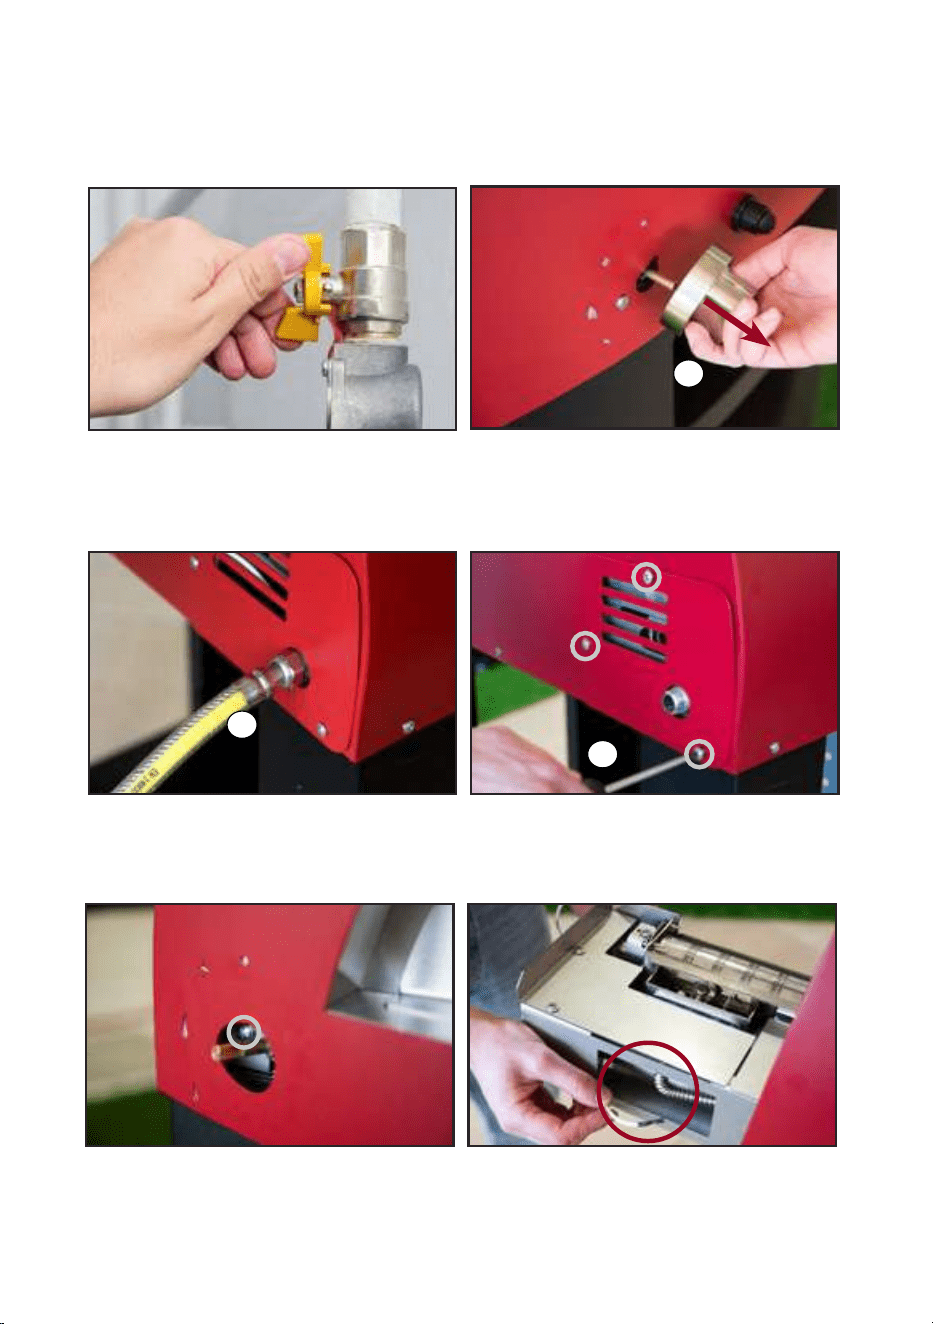
1 - Shut off the gas
Before starting, make sure the gas flow is
interrupted. Then, close the gas network valve
or the LPG cylinder valve.
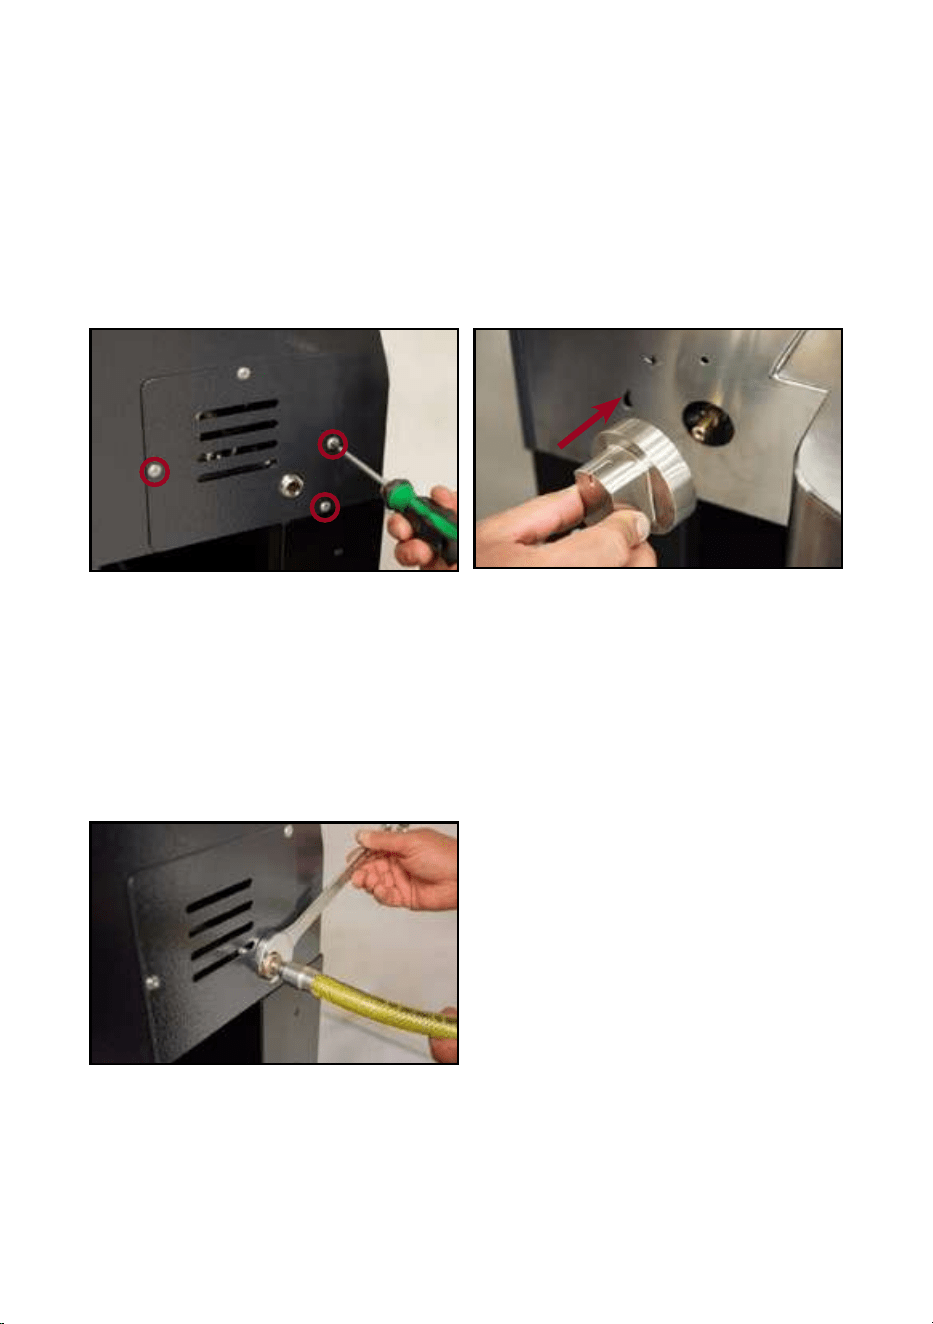
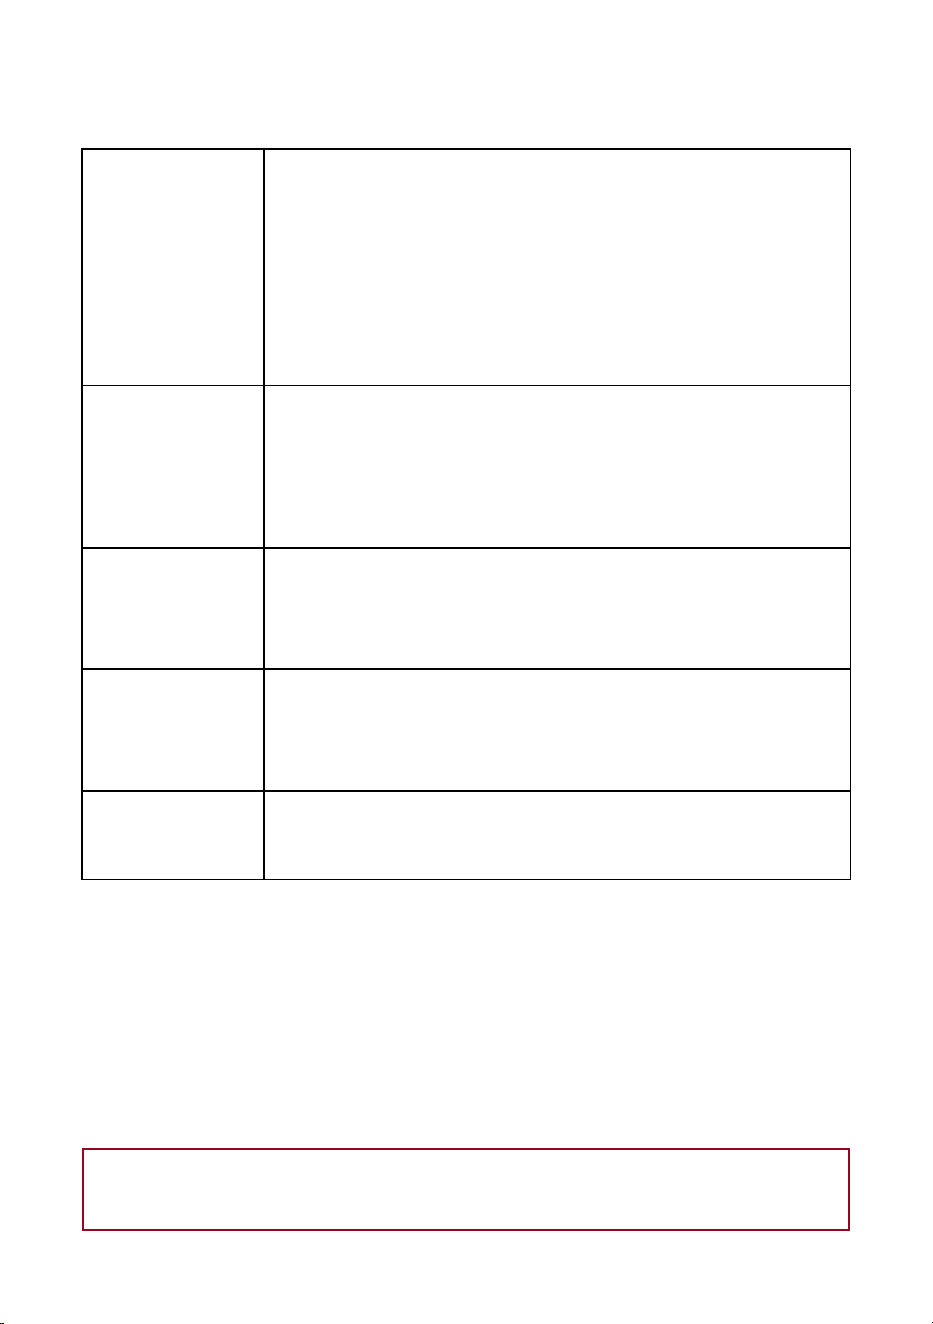
2 - Remove the gas knob
To remove the gas knob (A), simply pull it by
applying light force. Follow the direction of the
arrow.
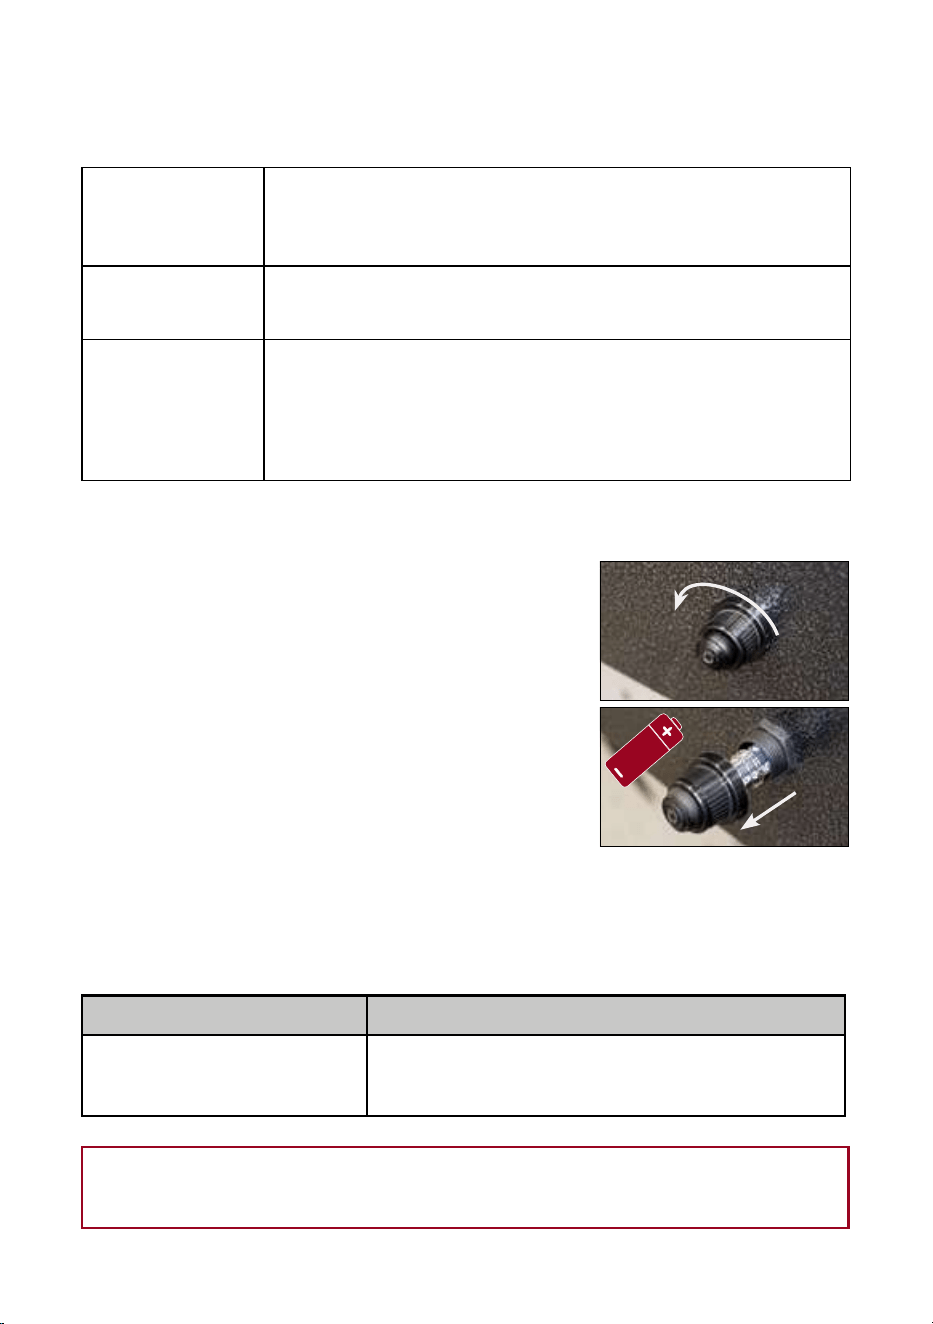
3 - Remove the gas hose
To disconnect the gas hose (B), you can use a
24mm wrench or an appropriate pliers.
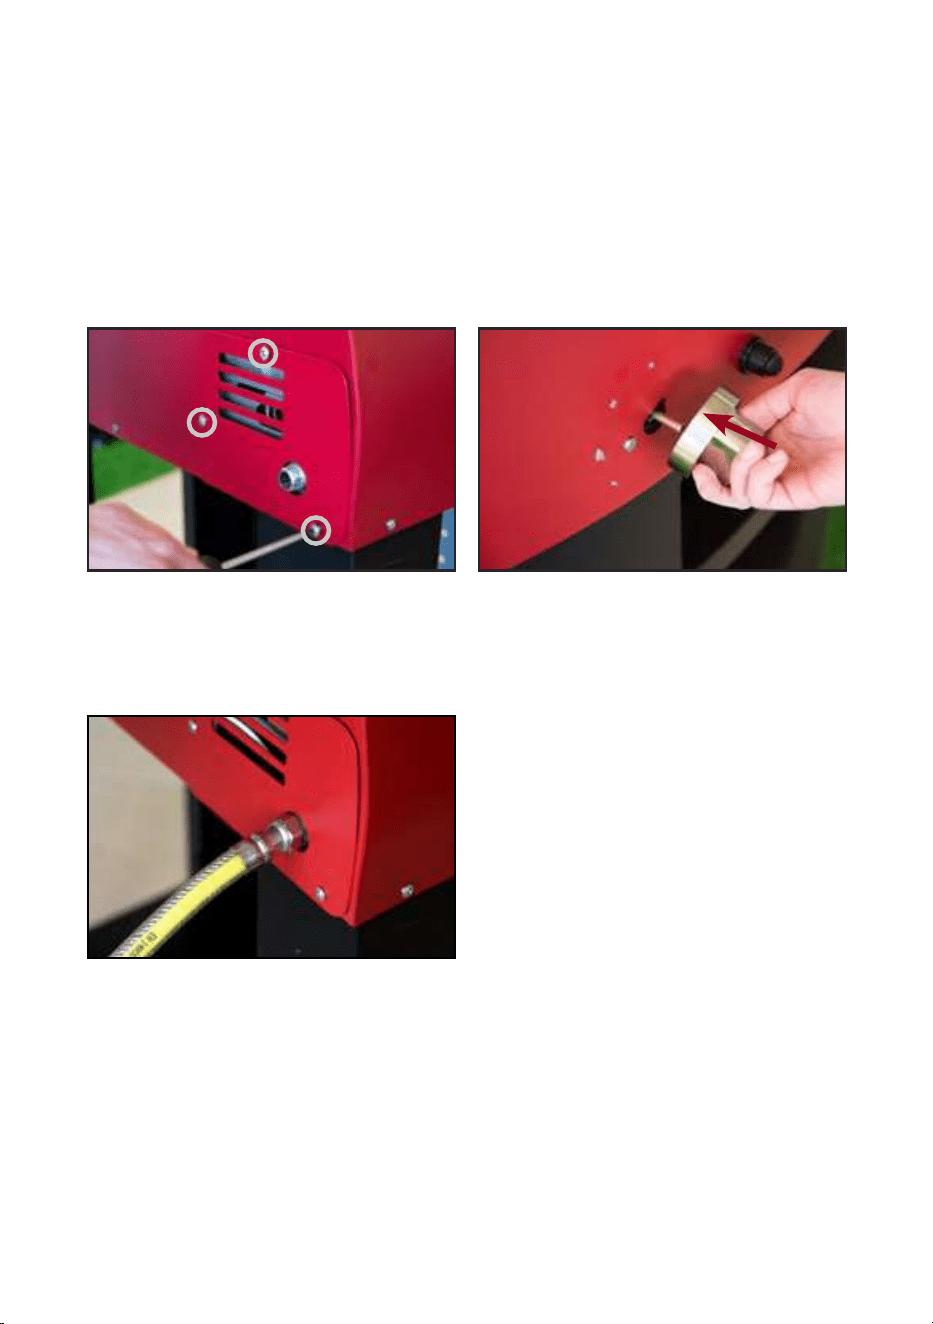
4 - Remove the protective cover
To remove the protective cover (C), simply
remove the screws shown in the photo that
secure it to the oven.
A
B
C
5. Remove the burner fixing screw
Using a cross screwdriver, unscrew the screw
at the bottom left that secures the burner to
the oven.
6 - Disconnect the ignition cable
Partially remove the burner to disconnect the
ignition cable from the electrode WITHOUT
pulling it.
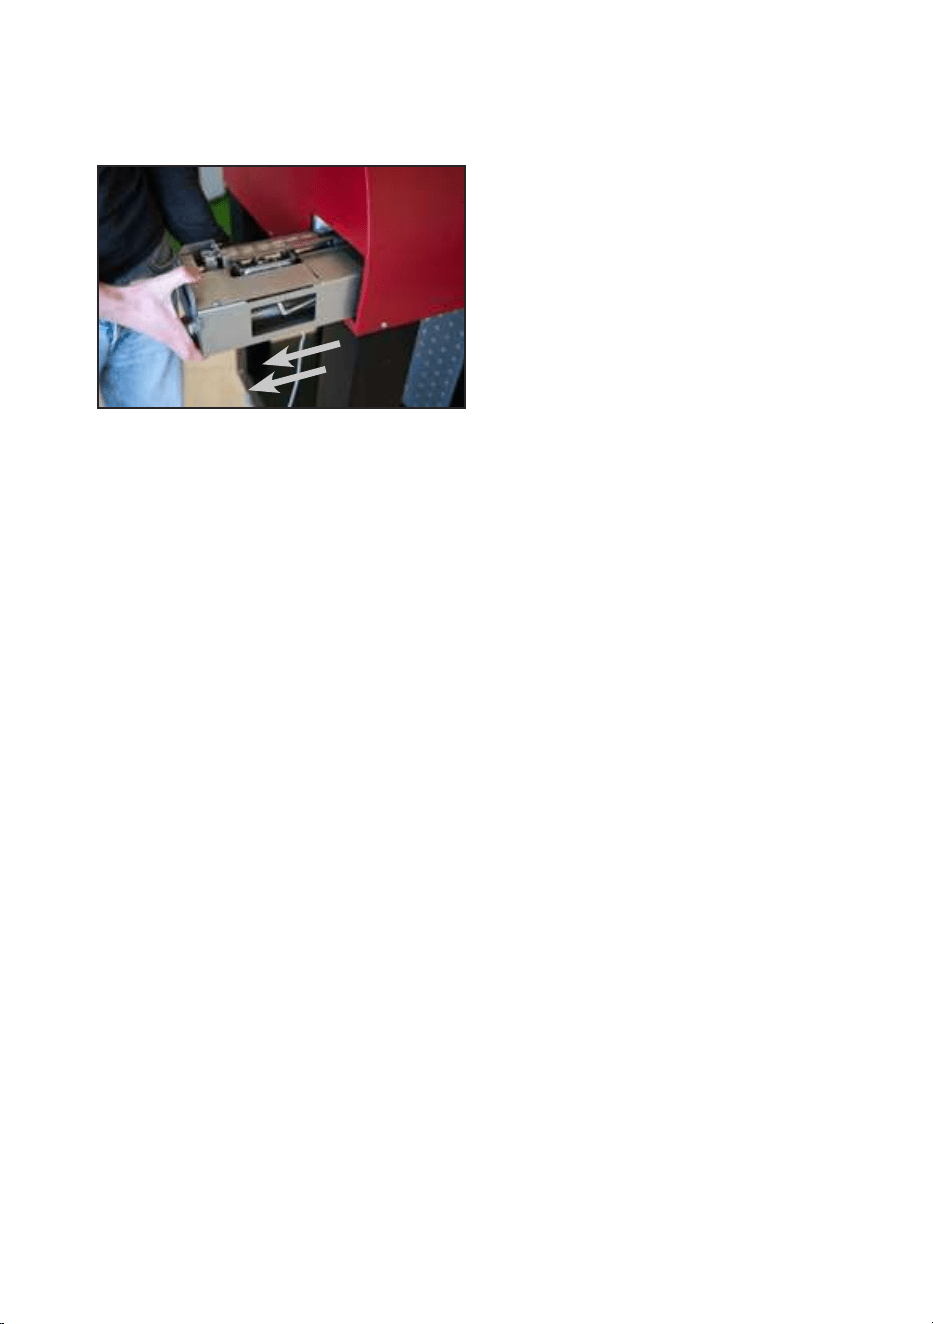
7. Remove the burner
Complete the removal of the burner by pulling
it out completely.
22 23
EXTRACTION OF THE BURNER
MODERNO 2 AND 3 PIZZE AND CLASSICO 2 AND 4 PIZZE
1 - Shut off the gas
Before starting, make sure the gas flow is
interrupted. Then, close the gas network valve
or the LPG cylinder valve.
2 - Remove the gas knob
To remove the gas knob (A), simply pull it by
applying light force. Follow the direction of the
arrow.
3 - Remove the gas hose
To disconnect the gas hose (B), you can use a
24mm wrench or an appropriate pliers.
4 - Remove the protective cover
To remove the protective cover (C), simply
remove the screws shown in the photo that
secure it to the oven.
A
B
C
5. Remove the burner fixing screw
Using a cross screwdriver, unscrew the screw
at the bottom left that secures the burner to
the oven.
6 - Disconnect the ignition cable
Partially remove the burner to disconnect the
ignition cable from the electrode WITHOUT
pulling it.
7. Remove the burner
Complete the removal of the burner by pulling
it out completely.
24 25
7 - Reconnect the gas supply hose
Reconnect the supply hose to the rear burner
manifold. You can now reopen the natural gas
circuit or the LPG cylinder.
6 - Reassemble the gas knob
Reinsert the knob, ensuring it aligns properly
with the valve pin. Apply light pressure to fully
seat the knob. Ensure the knob is in the “off”
position.
5 - Attach the protective cover
Reposition the rear burner cover and tighten
the fixing screws using a Phillips screwdriver.
TIP: Before reassembling the burner and all its parts, ensure that the power cable is
correctly connected by activating the button located at the front.
NOTE: Reinsert the knob, paying attention to the valve pin. Apply slight pressure to
push the knob into place.
RESTORATION OF THE BURNER
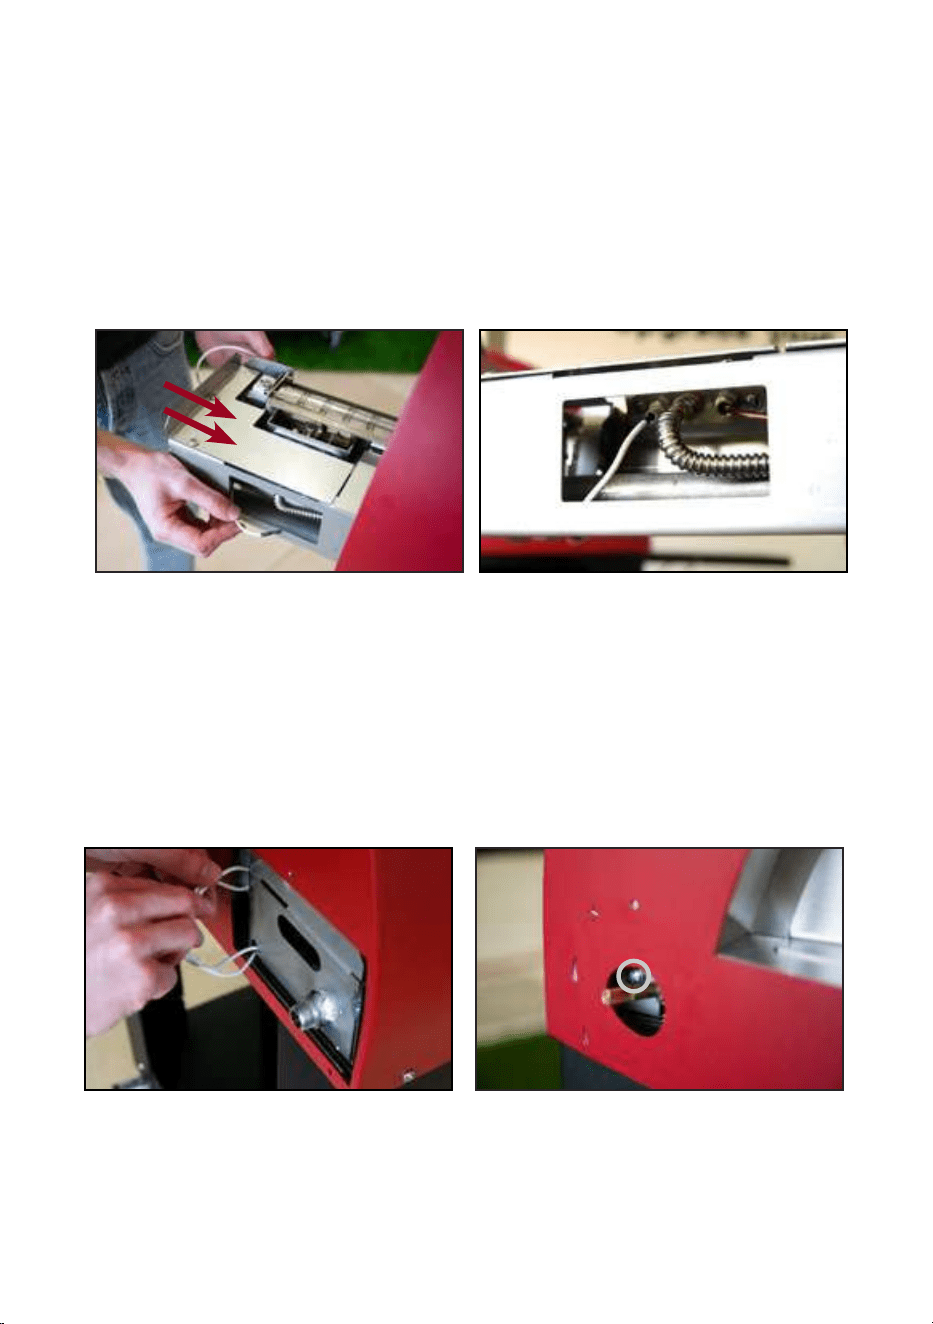
1 - Partially reinsert the burner
Position the burner to slide it into the guide
and, through the front lower opening, insert
the igniter cable. PARTIALLY insert the burner
while guiding the igniter cable into place.
3 - Fully insert the burner
Slide the burner into the guide rail until it
reaches the front stop position. Ensure the
igniter cable does not become tangled.
2 - Reconnect the igniter cable
Insert the igniter cable into the igniter,
taking care not to damage the cable or the
connection.
TIP: Before reassembling the burner and its
components, verify that the power cable is
correctly connected by pressing the front
button.
4 - Secure the burner fixing screw
Tighten the rear screw to hold the burner
firmly in place.
24 25
7 - Reconnect the gas supply hose
Reconnect the supply hose to the rear burner
manifold. You can now reopen the natural gas
circuit or the LPG cylinder.
6 - Reassemble the gas knob
Reinsert the knob, ensuring it aligns properly
with the valve pin. Apply light pressure to fully
seat the knob. Ensure the knob is in the “off”
position.
5 - Attach the protective cover
Reposition the rear burner cover and tighten
the fixing screws using a Phillips screwdriver.
TIP: Before reassembling the burner and all its parts, ensure that the power cable is
correctly connected by activating the button located at the front.
NOTE: Reinsert the knob, paying attention to the valve pin. Apply slight pressure to
push the knob into place.
RESTORATION OF THE BURNER
1 - Partially reinsert the burner
Position the burner to slide it into the guide
and, through the front lower opening, insert
the igniter cable. PARTIALLY insert the burner
while guiding the igniter cable into place.
3 - Fully insert the burner
Slide the burner into the guide rail until it
reaches the front stop position. Ensure the
igniter cable does not become tangled.
2 - Reconnect the igniter cable
Insert the igniter cable into the igniter,
taking care not to damage the cable or the
connection.
TIP: Before reassembling the burner and its
components, verify that the power cable is
correctly connected by pressing the front
button.
4 - Secure the burner fixing screw
Tighten the rear screw to hold the burner
firmly in place.
26 27
EXTRACTION OF THE BURNER
MODERNO 1 AND 5 PIZZE - FUTURO 2 AND 4 PIZZE
B
5. Remove the burner fixing screw
Use a screwdriver to unscrew the front fixing
screw of the burner. The position and shape
of the screw may vary depending on the oven
model.
1 - Shut off the gas
Before starting, make sure the gas flow is
interrupted. Then, close the gas network valve
or the LPG cylinder valve.
2 - Remove the gas knob
To remove the gas knob (A), simply pull it by
applying light force. Follow the direction of the
arrow.
3 - Remove the gas hose
To disconnect the gas hose (B), you can use a
24mm wrench or an appropriate pliers.
4 - Remove the protective cover
To remove the protective cover (C), simply
remove the screws shown in the photo that
secure it to the oven.
A
C
6 - Disconnect the ignition cable
Partially remove the burner to disconnect the
ignition cable from the electrode WITHOUT
PULLING IT.
7. Remove the burner
Complete the removal of the burner by pulling
it out completely.
28 29
7 - Reconnect the gas supply hose
Reconnect the supply hose to the rear burner
manifold. You can now reopen the natural gas
circuit or the LPG cylinder.
6 - Reassemble the gas knob
Reinsert the knob, ensuring it aligns with the
valve pin. Apply gentle pressure to fully seat the
knob. Ensure the knob is in the “off” position.
5 - Attach the protective cover
Reposition the rear burner cover and tighten
the fixing screws using a Phillips screwdriver.
TIP: Before reassembling the burner and all its parts, ensure that the power cable is
correctly connected by activating the button located at the front.
NOTE: Reinsert the knob, paying attention to the valve pin. Apply slight pressure to
push the knob into place.
RESTORATION OF THE BURNER
1 - Partially reinsert the burner
From the lower front opening, insert the igniter
cable. PARTIALLY insert the burner, guiding it
to allow the igniter cable to slide smoothly.
2 - Reconnect the igniter cable
Connect the ignition cable to the igniter,
taking care not to damage the cable or the
connection.
TIP: Before reassembling the burner and all
its components, check that the power cable
is properly connected by pressing the front
button.
4 - Secure the burner fixing screw
At the front, near the knob position, tighten
the screw to hold the burner securely in place.
3 - Fully insert the burner
Slide the burner into the guide until it reaches
the front stop position. Ensure the igniter cable
does not become tangled.
30 31
GASBETON OR
FRACTURED
REFRACTORY BRICK
TROUBLESHOOTING
- Refractory bricks may break, but this does not affect the oven’s
performance or cause issues during cooking in your ALFA oven.
- The insulating gasbeton brick is inherently fragile and is often
broken by large pieces when being inserted into the oven’s opening
to position it beneath the refractory brick during assembly. This is
completely normal.
- If you find a cavity in one of your bricks, you can simply turn it
around and use the other side, or replace it. All ovens come with an
additional refractory brick in case one needs to be replaced.
- If you believe one of the bricks is too damaged for use, please contact
customer service.
THE OVEN SMOKES
- Check that the wood is not excessively damp and that there are no
unburnt embers.
- Ensure that a fire with a steady, gradual flame has been started to
avoid incomplete combustion.
- In case of indoor installation, verify that the flue is not clogged, that
the pipe is not constricted (with an angle greater than 45°), and
check the operation of the air vents inside the room.
- It is recommended to slightly close the door.
THE OVEN DOES
NOT HEAT
- Make sure the fire is started on one side of the oven, not near the
mouth.
- Build a fire for 20 minutes with a steady flame.
- Do not pile the wood on top of the embers.
- Gradually add wood to the fire.
THE OVEN YES
COOL SOON
- Check that no moisture or water has entered the oven.
- This could occur during the first ignition or after a long period of
inactivity.
- Avoid making a sudden fire shortly, as it would not thoroughly heat
the oven.
THE FLAMES COME
OUT FROM THE
MOUTH OR FROM
THE CHIMNEY
- Avoid making an excessive fire and immediately dampen the flame
that comes out by placing the door over the oven opening, leaving
only a small gap of 2 or 3 cm open.
TROUBLESHOOTING
WOOD-FIRED OVENS
Contact us directly for expert advice at
www.alfaforni.com
I AM NOT ABLE
TO TURN ON
- Check if pressing the knob hits the exterior of the oven. If so, it is
possible that the gas valve is not opening properly.
THE IGNITER DOES
NOT WORK
- Make sure the battery is new and the circuit is powered.
CAN YOU PLACE
THE OVENS
DIRECTLY ON
THE WORKTOP
WITHOUT USING
THE SUPPLIED
FEET?
- No, the feet should be used to allow air to flow between the base of
the oven and the surface it’s resting on.
TROUBLESHOOTING
GAS OVENS
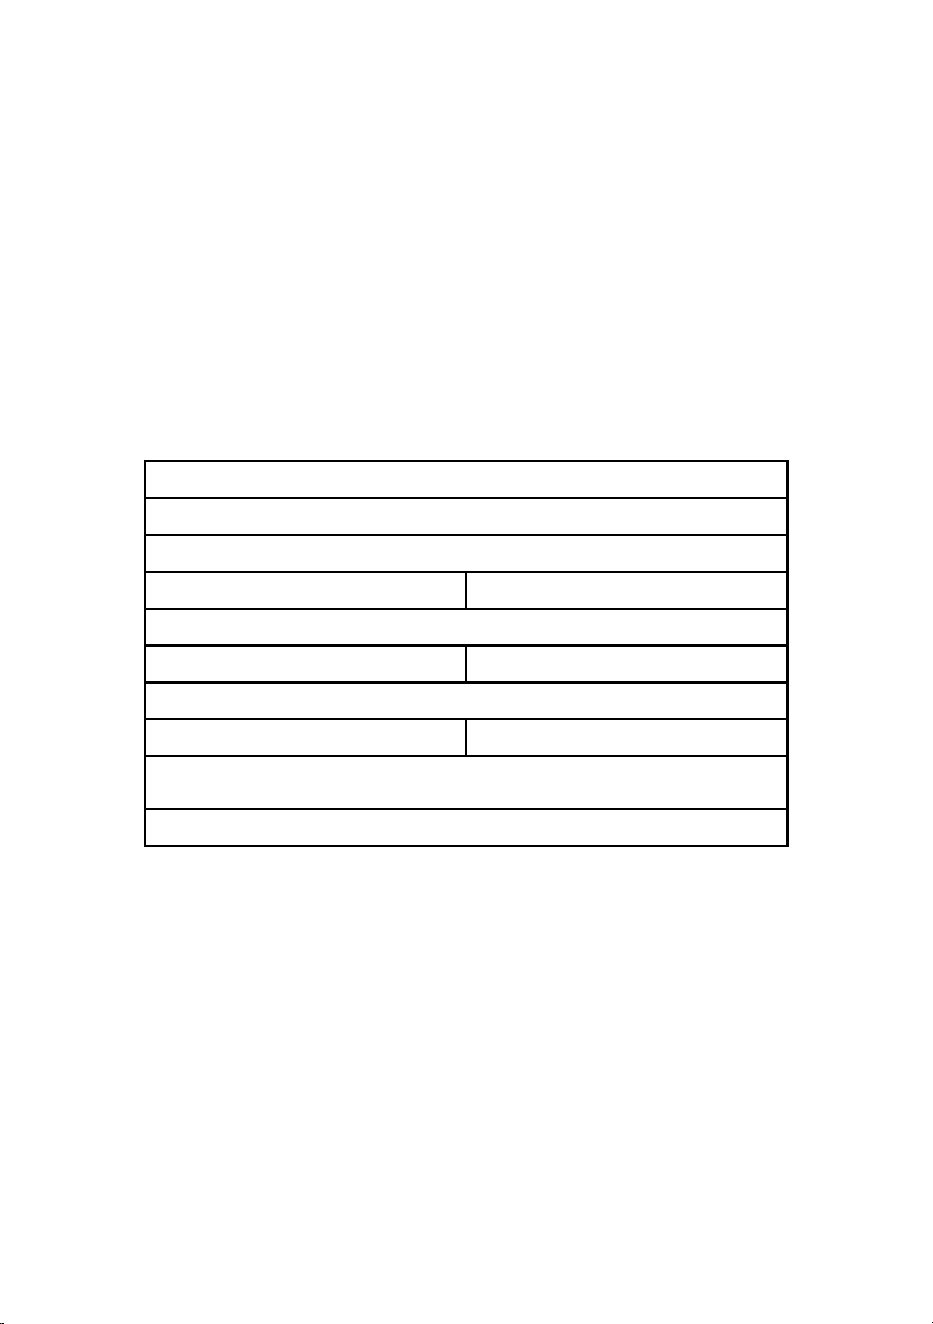
ELECTRONIC BUTTON
The ignition button contains an AA battery. To insert
it, follow this procedure:
1. Unscrew the head of the button
2. Insert the battery
3. Screw the head of the button back on
Perform this procedure when the oven is off.
For long periods of inactivity, remove the battery.
Contact us directly for expert advice at
www.alfaforni.com
AREA SUPPORT CONTACTS
NORD AMERICA
United States & Canada
PHONE
: +1 630-238-1280
E-MAIL: [email protected]
30 31
GASBETON OR
FRACTURED
REFRACTORY BRICK
TROUBLESHOOTING
- Refractory bricks may break, but this does not affect the oven’s
performance or cause issues during cooking in your ALFA oven.
- The insulating gasbeton brick is inherently fragile and is often
broken by large pieces when being inserted into the oven’s opening
to position it beneath the refractory brick during assembly. This is
completely normal.
- If you find a cavity in one of your bricks, you can simply turn it
around and use the other side, or replace it. All ovens come with an
additional refractory brick in case one needs to be replaced.
- If you believe one of the bricks is too damaged for use, please contact
customer service.
THE OVEN SMOKES
- Check that the wood is not excessively damp and that there are no
unburnt embers.
- Ensure that a fire with a steady, gradual flame has been started to
avoid incomplete combustion.
- In case of indoor installation, verify that the flue is not clogged, that
the pipe is not constricted (with an angle greater than 45°), and
check the operation of the air vents inside the room.
- It is recommended to slightly close the door.
THE OVEN DOES
NOT HEAT
- Make sure the fire is started on one side of the oven, not near the
mouth.
- Build a fire for 20 minutes with a steady flame.
- Do not pile the wood on top of the embers.
- Gradually add wood to the fire.
THE OVEN YES
COOL SOON
- Check that no moisture or water has entered the oven.
- This could occur during the first ignition or after a long period of
inactivity.
- Avoid making a sudden fire shortly, as it would not thoroughly heat
the oven.
THE FLAMES COME
OUT FROM THE
MOUTH OR FROM
THE CHIMNEY
- Avoid making an excessive fire and immediately dampen the flame
that comes out by placing the door over the oven opening, leaving
only a small gap of 2 or 3 cm open.
TROUBLESHOOTING
WOOD-FIRED OVENS
Contact us directly for expert advice at
www.alfaforni.com
I AM NOT ABLE
TO TURN ON
- Check if pressing the knob hits the exterior of the oven. If so, it is
possible that the gas valve is not opening properly.
THE IGNITER DOES
NOT WORK
- Make sure the battery is new and the circuit is powered.
CAN YOU PLACE
THE OVENS
DIRECTLY ON
THE WORKTOP
WITHOUT USING
THE SUPPLIED
FEET?
- No, the feet should be used to allow air to flow between the base of
the oven and the surface it’s resting on.
TROUBLESHOOTING
GAS OVENS
ELECTRONIC BUTTON
The ignition button contains an AA battery. To insert
it, follow this procedure:
1. Unscrew the head of the button
2. Insert the battery
3. Screw the head of the button back on
Perform this procedure when the oven is off.
For long periods of inactivity, remove the battery.
Contact us directly for expert advice at
www.alfaforni.com
AREA SUPPORT CONTACTS
NORD AMERICA
United States & Canada
PHONE
: +1 630-238-1280
E-MAIL: [email protected]
32 33
PRESSURE REGULATORS
ONLY FOR GAS MODELS
In case it is necessary to replace the pressure regulator connected to the oven, to choose the
most suitable model, refer to the table below, which provides the required ow rate and the
permissible pressure for the appliance.
The pressure regulator can be either xed or adjustable. If you choose to use an adjustable
pressure regulator, consult a technician to verify the correct adjustment.
RECOMMENDED FLOW RATE OF THE REGULATOR
250 MJ/h
GAS FAMILY
2° 3°
GAS GROUP
NATURAL GAS LPG
SUPPLY PRESSURE AT THE DEVICE INLET (in w.c.)
4 11
LPG CYLINDER CONNECTION
PRESSURE REGULATOR
QCC

ALFA ovens are covered by a 24-month legal warranty
against defects in conformity, at the expense of the
retailer. Proper maintenance and correct use of the
product can contribute to its longer lifespan.
For the legal warranty terms, please refer to the specific
national regulations in force.
IT IS REQUIRED TO KEEP THE RECEIPT OR INVOICE AS PROOF OF PURCHASE TO SHOW TO
THE RETAILER. WE RECOMMEND NOTING THE SERIAL NUMBER BELOW, WHICH CAN BE
FOUND ON THE IDENTIFICATION LABEL LOCATED ON THE BACK OF THE PRODUCT.
Damage caused by the transporter if it is not
immediately reported on the shipping document
by noting “acceptance with reservation” at the
time of receiving the product and contacting the
seller for further clarification;
If the oven is not properly used and installed as
described in this manual. If the oven has been
tampered with in any way, whether intentionally
or unintentionally, or altered from the condition
it was in at the time of delivery;
If there is damage to the product due to
obstruction of all smoke exit holes;
Failure to follow the instructions for proper
maintenance and cleaning of the product as
outlined in the manual;
Damage to the burner caused by cooking
residues or damage in cases where the
recommended fuel has not been used, such
as not using liquid charcoal for barbecues,
chemicals, or other fuels;
If components not produced or recommended
by Alfa are used;
If the damage results from the use of chemicals
inside or outside the oven. If the label located on
the back of the product is removed, altered, or
erased;
If there is normal wear and tear of the product
due to consumer use;
Damage caused by exceeding the temperature
indicated by the supplied pyrometer, beyond
500°C (950°F), due to improper use of wood fuel;
Possible oxidation points on the steel due to
exposure to saline environments or proximity
to the sea. Alfa specifies that possible oxidation
is not due to quality defects in the product,
but rather to the intrinsic chemical-physical
characteristics of the steels when exposed for
prolonged periods near saline environments;
Possible deterioration of the paint due to
prolonged contact with flames;
Small imperfections on the surface of painted or
aesthetic parts that do not affect the normal use
of the product;
Accessory parts provided with the product, such
as doors and glass;
The tiles and the underfloor insulation are not
covered by the warranty, but Alfa ovens are
supplied with a replacement tile.
For any warranty claims, please always contact your retailer.
It is recommended to use only ALFA branded spare parts.
WARRANTY
Conditions for warranty exclusion:
STEP 2
REGISTER YOUR PRODUCT
www.alfaforni.com/registration.php
SCAN
ME
Identifies the
serial number
12345678901234
Enter your
information
Scan the QRcode
or type the link below
STEP 1 STEP 3
SCAN
ME
JOIN ALFA
Register your oven product
If you are here, it means that you have purchased an Alfa product
and we would like to thank you for this. By choosing our product
you are supporting the search and desire to bring good and
healthy ame cooking in everybody’s life.
Register your purchase and you can download
a collection of must-see tips for the best use of your oven.

V.20241121
alfaforni.com
