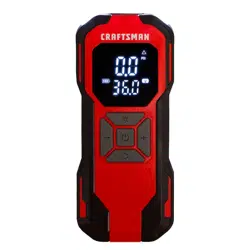
INSTRUCTION MANUAL CRAFTSMAN GMXPTXA1201 USB GORDLESS INFLATORAND POWER SOURCE
Definitions: Safety Alert Symbols and Words
This instruction manual uses the following safety alert symbols and words to alert you to hazardous situations and your risk of personal injury or property damage.
DANGER: Indicates an imminently hazardous situation which, if not avoided, will result in death or serious injury.
WARNING: Indicates a potentially hazardous situation which, if not avoided, could result in death or serious injury.
CAUTION: Indicates a potentially hazardous situation which, if not avoided, may result in minor or moderate injury.
(Used without word) Indicates a safety related message.
NOTICE: Indicates a practice not related to personal injury which, if not avoided, may result in property damage.

- Digital display
- Operation buttons
- Valve adapter storage
- LED light
- USB output
- Type-C charging port
- Air hose port
- 12V DC port
- Bag
- 0.95ft. Air hose
- 3.2ft. USB Type C charging cord
- 10ft. cigarette lighter cord
- Extra fusse
- Extra valve adapter x3
WARNING: Read all safety warnings and all instructions. Failure to follow the warnings and instructions may result in electric shock, fire and/or serious injury.
WARNING: Never modify the product or any part of it. Damage or personal injury could result.
WARNING: To reduce the risk of injury, read the instruction manual.
If you have any questions or comments about this or any product, call toll free at: 1-888-899-0146.
If you would like more information about other Craftsman products, call CRAFTSMAN toll free at: 1-888-331-4569.
IMPORTANT SAFETY INSTRUCTIONS
SAVE ALL WARNINGS AND INSTRUCTIONS FOR FUTURE REFERENCE
WARNING: This product can expose you to chemicals known to the State of California to cause cancer and birth defects or other reproductive harm. Wash hands thoroughly after handling. For more information: www.P65Warnings.ca.gov
Work Area Safety
- Keep work area clean and well lit. Cluttered or dark areas invite accidents.
- Do not operate inflator in explosive atmospheres, such as in the presence of flammable liquids, gases or dust. Inflator create sparks which may ignite the dust or fumes.
- Keep children and bystanders away while operating an inflator. Distractions can cause you to lose control.
Electrical Safety
- Inflator plugs must match the outlet. Never modify the plug in any way. Do not use any adapter plugs with earthed (grounded) inflator. Unmodified plugs and matching outlets will reduce risk of electric shock.
- Avoid body contact with earthed or grounded surfaces such as pipes, radiators, ranges and refrigerators. There is an increased risk of electric shock if your body is earthed or grounded.
- Do not expose inflator to rain or wet conditions. Water entering an inflator will increase the risk of electric shock.
- Do not abuse the cord. Never use the cord for carrying, pulling or unplugging the inflator. Keep cord away from heat, oil, sharp edges or moving parts. Damaged or entangled cords increase the risk of electric shock.
- When operating an inflator outdoors, use an extension cord suitable for outdoor use. Use of a cord suitable for outdoor use reduces the risk of electric shock.
Personal Safety
- Stay alert, watch what you are doing and use common sense when operating an inflator. Do not use an inflator while you are tired or under the influence of drugs, alcohol or medication. A moment of inattention while operating inflator may result in serious personal injury.
- Use personal protective equipment. Always wear eye protection. Protective equipment such as dust mask, non-skid safety shoes, hard hat, or hearing protection used for appropriate conditions will reduce personal injuries.
- Prevent unintentional starting. Ensure the switch is in the off position before connecting to power source and/or battery pack, picking up or carrying the tool. Carrying inflator with your finger on the switch or energizing inflator that have the switch on invites accidents.
- Do not overreach. Keep proper footing and balance at all times. This enables better control of the inflator in unexpected situations.
- Dress properly. Do not wear loose clothing or jewelry. Keep your hair, clothing and gloves away from moving parts. Loose clothes, jewelry or long hair can be caught in moving parts.
Inflator Use and Care
- Do not force the inflator. Use the correct inflator for your application. The correct inflator will do the job better and safer at the rate for which it was designed.
- Do not use the inflator if the switch does not turn it on and off. Any inflator that cannot be controlled with the switch is dangerous and must be repaired.
- Disconnect the plug and turn it off from the power source from the inflator before making any adjustments, changing accessories, or storing inflator. Such preventive safety measures reduce the risk of starting the inflator accidentally.
- Store idle inflator out of the reach of children and do not allow persons unfamiliar with the inflator or these instructions to operate the inflator. Inflator are dangerous in the hands of untrained users.
- Maintain inflator. Check for misalignment or binding of moving parts, breakage of parts and any other condition that may affect the inflator operation. If damaged, have the inflator repaired before use. Many accidents are caused by poorly maintained inflator.
Battery Tool Use and Care
- Recharge only with the charger specified by the manufacturer. A charger that is suitable for one type of battery pack may create a risk of fire when used with another battery pack.
- Use inflator only with specifically designated battery packs. Use of any other battery packs may create a risk of injury and fire.
- When battery pack is not in use, keep it away from other metal objects, like paper clips, coins, keys, nails, screws, or other small metal objects, that can make a connection from one terminal to another. Shorting the battery terminals together may cause burns or a fire.
- Under abusive conditions, liquid may be ejected from the battery; avoid contact. If contact accidentally occurs, flush with water. If liquid contacts eyes, additionally seek medical help. Liquid ejected from the battery may cause irritation or burns.
Service
Have the inflator serviced by a qualified repair person using only identical replacement parts. This will ensure that the safety of the inflator is maintained.
WARNING: The compressed air from your inflator is not safe for breathing. Never inhale air from your inflator or from a breathing device connected to the inflator.
- Too much air pressure causes a hazardous risk of bursting. Check the manufacturer's maximum pressure rating for objects being inflated.
- Do not leave inflator running unattended. It could burst tires or other items.
- Use a tire gauge to check the tires' pressure before each use and while inflating tires; see the tire sidewall and the vehicle manual for the correct tire pressure.
- Do not modify or attempt to repair. Never drill into, weld, or make any modifications to the inflator or its attachments.
- Operate only with the accessories included or air handling parts acceptable for not less than 150 psi. The use of any accessory not recommended for use with this tool could be hazardous.
- Never "horseplay." High pressure air is dangerous. Don't direct air-flow at yourself or others.
WARNING: Inflator can become hot during use. Allow inflator to cool 30 minutes before storing away.
WARNING: Your air inflator is powered by electricity. Like any other electrically powered device, if it is not used properly it may cause electric shock.
WARNING: Stay alert, watch what you are doing and use common sense when operating a power tool. Do not use a inflator while you are tired or under the influence of drugs, alcohol or medication. A moment of inattention while operating inflator may result in serious personal injury.
Always wear certified safety equipment: ANSI Z87.1 eye protection (CAN/CSA Z94.3) with side shields when using the inflator.
Never point any nozzle or sprayer toward any part of the body or at other people or animals.
FCC Compliance
This device complies with Part 15 of the FCC Rules. Operation is subject to the following two conditions: (1) This device may not cause harmful interference, and (2) this device must accept any interference received, including interference that may cause undesired operation.
FCC Statement
This equipment has been tested and found to comply with the limits for a Class B digital device, pursuant to part 15 of the FCC rules. These limits are designed to provide reasonable protection against harmful interference in a residential installation. This equipment generates, uses, and can radiate radio frequency energy and, if not installed and used in accordance with the instructions, may cause harmful interference to radio communications. However, there is no guarantee that interference will not occur in a particular installation.
If this equipment does cause harmful interference to radio or television reception, which can be determined by turning the equipment off and on, the user is encouraged to try to correct the interference by one or more of the following measures:
- Reorient or relocate the receiving antenna.
- Increase the separation between the equipment and the receiver.
- Connect the equipment into an outlet on a different circuit (not the circuit to which the receiver is connected).
- Consult the dealer or an experienced radio/TV technician for help.
Disposal and recycling information
The symbol on the product or packaging indicates that the product must not be treated as domestic refuse. Instead, it should be handed in to a collection point for the recycling of electrical and electronic components.
By ensuring the product is treated in the correct manner, you will help prevent any negative impact on the environment and health that might arise were the product to be discarded as ordinary refuse. For further information about recycling, you should contact your local authorities, refuse collection service or the sales outlet where you bought the goods.
Additional Safety Information
WARNING: ALWAYS use safety glasses. Everyday eyeglasses are NOT safety glasses. Also use face or dust mask if cutting operation is dusty. ALWAYS WEAR CERTIFIED SAFETY EQUIPMENT:
- ANSI Z87.1 eye protection (CAN/CSA Z94.3).
- NIOSH/OSHA/MSHA respiratory protection.
CAUTION: When not in use, place tool on its side on a stable surface where it will not cause a tripping or falling hazard. Some tools with large battery packs will stand upright on the battery pack but may be easily knocked over.
Specifications
Product Model: CMXPTXA1201
Battery Capacity: 11.1V/2Ah (22.2Wh)
Voltage: 12V DC
Rated Input: 5V 1A
Rated Output: 5V 1A
Rated Power: 72W
Max Pressure: 150PSI
Product Size: 3x2.1x7 in
Operating Temperature: 14.7-113 °F (0°C to 45°C)
ASSEMBLY AND ADJUSTMENTS
WARNING: To reduce the risk of serious personal injury, turn unit off and disconnect it from power source before making any adjustments or removing/installing attachments or accessories. An accidental start-up can cause injury.
WARNING: Risk of unsafe operation. Unit cycles automatically when power is on. When performing maintenance, you may be exposed to voltage sources, compressed air, or moving parts. Personal injuries can occur. Before performing any maintenance or repair, disconnect power source from the compressor and bleed off all air pressure.
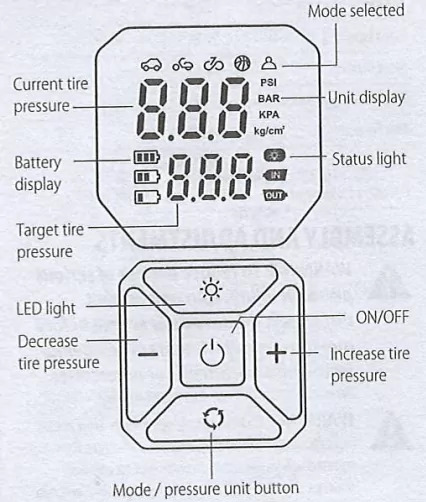
Know the mini inflator
READ THIS OWNER'S MANUAL AND SAFETY RULES BEFORE OPERATING THE UNIT. Compare the illustrations with this unit to familiarize yourself with the location of various controls and adjustments. Save this manual for future reference.
Battery level indicator & charging
Battery level indicator
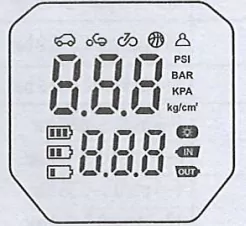
- Battery level ≥ 100%:

- 75% > Battery level ≥ 75%:

- Battery level ≤ 25%: Needs to be charged:

Charging
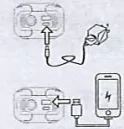
Please fully charge the mini inflator before first use. Connect the charging cable to a compatible 5V USB power adapter to charge the mini inflator.
Power bank for electronic devices.
- Please charge the unit indoors.
- Please use the matching charger only.
- A safe and compliant power adapter must be purchased separately.
Charging status:
- 25% > Battery level : blinking
- 75% > Battery level ≥ 25% : blinking
- 99% > Battery level ≥ 75% : blinking
- Battery level = 100% : remains on for 20 seconds and then go off.
Notes:
- The mini inflator cannot be used while charging.
- A safe and compliant power adapter must be purchased separately.
Fitting/Changing the Adapter
Select the adapter best suited to the intended application:
| INTENDED APPLICATION |
ADAPTER |

Car |

Motorcycle |
 |
| |

Bicycle |
 |
| |

Ball |
 |
| |

Custom |
 |
Slide the lid off the adapter storage compartment and remove the adapter.
Screw the adapter fully into the pressure hose.
NOTE: For standard car tire valves (sometimes also used on bikes), no adapter is required.
Operation
Starting Operation
1. Powering with integrated battery.
NOTE: For best practices, please fully charge the inflator before each use. Prolonged non-use may make it run out power.
2. Powering with the 12V DC Vehicle Connector (found in the lower storage compartment), connect it to your vehicle's 12V DC accessory socket. Always fully extend the 12V DC cord before each use. Your vehicle's accessory socket must be rated for at least 10A.
Switching On and Off
Long press the button "  " to switch this unit on or off.
When no button on the inflator is pressed for approx. 2 minutes, the inflator automatically switches off to preserve battery life.
Switching the worklight on and off
Press the light on/off button "  " to cycle through white light on, red light flashing slowly, red light flashing fast and light off.
NOTE: Do not look directly into the work light; it can blind you.
Preset the pressure and the unit of measurement. ⚙️💡
Long press " " to select the target unit from psi, bar, kpa and kg/cm², short press "+" or "-" button to preset the pressure value, and wait for a few seconds when the setting is completed.
Inflation
Fit the appropriate adapter to the pressure hose if required. If present, remove the valve cap on the item to be inflated.
Tighten the pressure hose with or without the adapter on or in the valve. Short press " " to start inflating and the unit will stop inflating automatically once the preset pressure is reached. The current pressure in the connected item appears in the measured value indicator.
Mode selection and air pressure reference table

| Category |
Type |
Recommended Pressure Range |
| Bicycle |
12", 14" and 16" bicycle tires |
30-50 psi / 2.0-3.4 bar |
| 20", 22" and 24" bicycle tires |
40-50 psi / 2.7-3.4 bar |
| 26", 27.5" and 29" mountain bike tires / electric scooter tires |
45-65 psi / 3.1-4.5 bar |
| 700c road bike clincher tires |
100-130 psi / 6.9-9.0 bar |
| 700c road bike tubular tires |
120-145 psi / 8.3-10 bar |
| Motorcycle |
Motorcycle or electric scooter tires |
26-43.5 psi / 1.8-3.0 bar |
| Car |
Car tires |
32-40.5 psi / 2.2-2.8 bar |
| Balls |
Basketball |
7-9 psi / 0.5-0.60 bar |
| Football |
8-16 psi / 0.55-1.1 bar |
| Volleyball |
4-5 psi / 0.3-0.35 bar |
| Rugby ball |
12-14 psi / 0.8-1.0 bar |
NOTE: The pressure range values are for reference only. Please refer to the instructions or manual of the item being inflated.
TROUBLESHOOTING
WARNING: Risk of Unsafe Operation. Unit cycles automatically when power is on. Before servicing unit disconnect electrical supply to the mini inflator, and allow the mini inflator to cool.
| PROBLEM |
CORRECTION |
| The mini inflator does not turn on. |
1. Check whether the air hose is removed from its compartment. The mini inflator can be turned on only when the air hose is removed from its compartment.
2. Fully charge the mini inflator and turn it on. |
| The inflation speed is slow. |
1. Check whether the battery power is sufficient.
2. Check whether the air hose is leaking.
3. Check whether both ends of the air hose are securely connected.
4. Check whether the inflated item is leaking. |
| The mini inflator turns on but does not inflate. |
1. Check whether the battery power is sufficient.
2. Check whether the current air pressure is higher than the preset value. |
| The preset pressure cannot be increased or decreased. |
Make sure the air compressor is set to the correct inflation mode. Manual mode allows you to adjust the preset value within a range of 3-150 psi. |
| The mini inflator inflates normally but the displayed pressure is zero. |
The pressure of low-pressure inflatables including balloons is too low to measure. |
| The mini inflator has already turned off after connecting the air hose to a valve. |
Press and hold the start/stop button to turn the mini inflator on again. |
| The air leaks out when connecting the air hose. |
Make sure the air hose is securely connected. |
| The battery level indicator on the display does not light up while charging. |
Replace the charging cable and adapter with safe and compliant ones, and charge again. |
Warranty
This warranty covers any defects in materials or workmanship of the enclosed product. Alton Industry Ltd. Group will repair or replace any defective materials due to craftsmanship of the product. This warranty does not cover any problem caused by misuse, abuse, accidents or acts of God, such as floods or hurricanes. Consequential and incidental damages are not covered under this warranty. Coverage terminates if you sell or otherwise transfer the ownership. If you feel you have a defective product, please submit a copy of your receipt to the address below and call 1-888-899-0146 for instructions prior returning this item to the store or sending back to:
Alton Industry Ltd. Group
643 Innovation Drive West Chicago, IL 60185
We will inspect the product and contact you within 72 hours to give you the results of our inspection. We reserve the right to repair or replace the product at our discretion. However, we may replace the product with one of similar but not exact features. Parts and Service Information available call Alton Industry at 1-888-899-0146. This warranty gives you specific legal rights. You may have other rights which vary from state to state.