
Technical Support and E-Warranty Certificate www.vevor.com/support
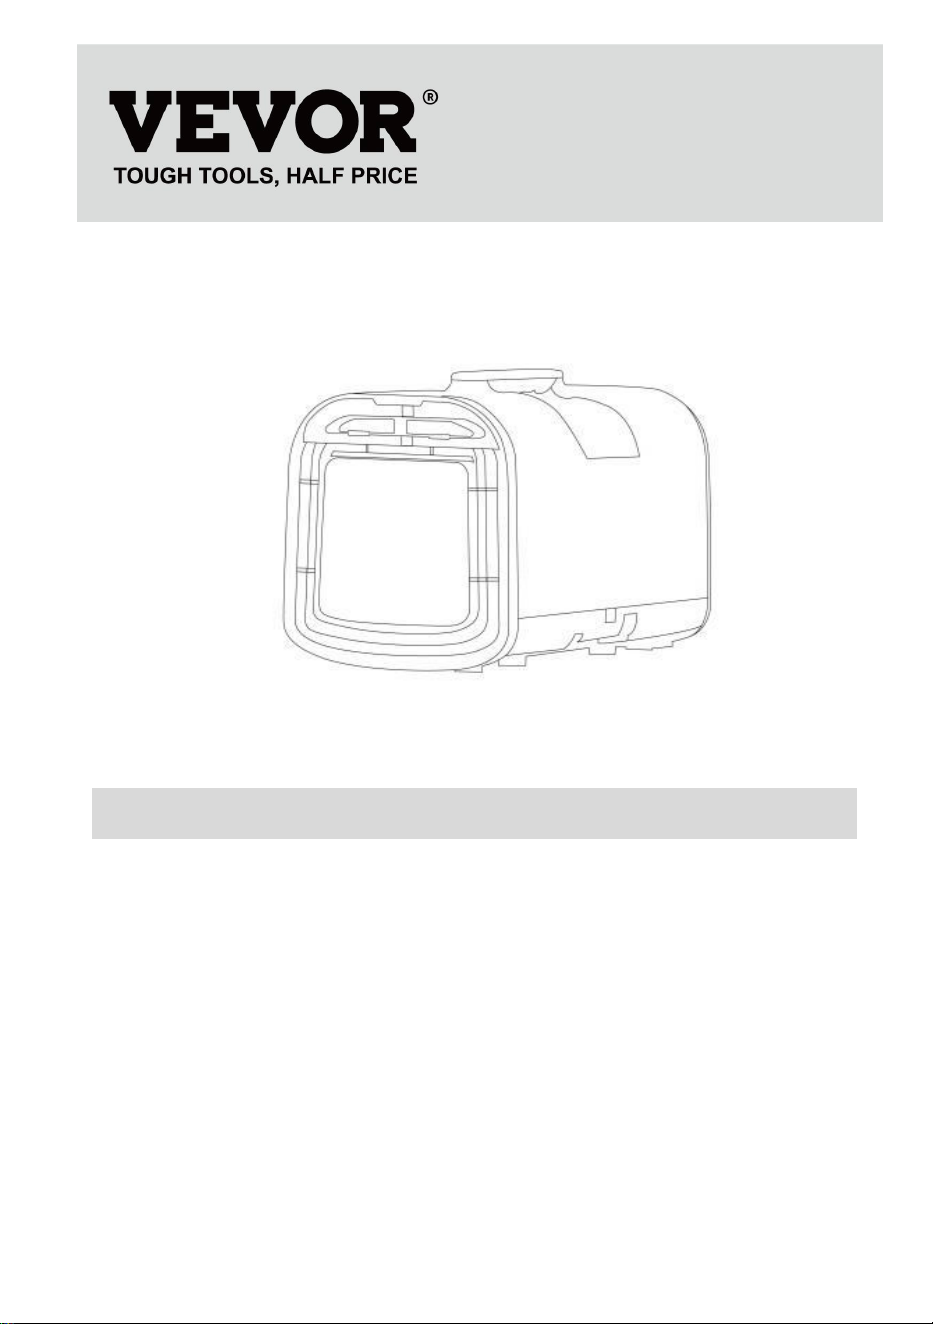
PORTABLE AIR CONDITIONER
MODEL:S02/S03 Pro
We continue to be committed to provide you tools with competitive price.
"Save Half", "Half Price" or any other similar expressions used by us only
represents an estimate of savings you might benefit from buying certain tools
with us compared to the major top brands and does not necessarily mean to cover
all categories of tools offered by us. You are kindly reminded to verify carefully
when you are placing an order with us if you are actually Saving
Half in comparison with the top major brands.
MODEL:S02/S03 Pro
NEED HELP? CONTACT US!
Have product questions? Need technical support? Please feel free to
contact us:
Technical Support and E-Warranty Certificate
www.vevor.com/support
This is the original instruction, please read all manual instructions
carefully before operating. VEVOR reserves a clear interpretation of our
user manual. The appearance of the product shall be subject to the
product you received. Please forgive us that we won't inform you again if
there are any technology or software updates on our product.
Portable Air
Conditioner

SAFETY GUIDELINES
Thank you for purchasing this portable air conditioner. Please read the
entire manual carefully before use.This manual serves as a general guide
for operation of your portable air conditioner. Please note that some
details may differ slightly from your specific model. However, the basic
functions and safety guidelines outlined here will apply to your unit.While
your machine may vary in certain aspects such as available modes or
control panel layout, the fundamental operation and use should be
consistent with what is described.Please take a few minutes to read
through the manual fully and familiarize yourself with the features of your
portable air conditioner before use. Refer closely to your unit itself to
identify any variations from what is shown. Enjoy your new portable air
conditioner!
1. Do not use a broken or unsuitable outlet.
2. Do not use the machine in the following situations.
A: Close to the source of the fire B: Sites at risk of oil splashing
C: Avoid direct sunlight exposure D: Sites at risk of water splashing
E: close to bathroom, shower room, pool.
3. Do not put fingers, or other slender objects, etc. into the air outlet,
and be sure to tell children about these dangers.
4. In order to make the compressor place correctly, the machine should
be placed in the direction indicated by the carton during
transportation.
5. When cleaning the machine, be sure to cut off the power in advance.
6. Turn off the computer and disconnect the power supply before
moving slowly when moving.
7. Do not cover the machine, otherwise there is a risk of fire.
8. Unplug the power plug when thunder rumbles.
9. Do not directly turn off the air conditioner with the power switch.
10. In case of abnormal phenomena such as burning smell, operation
must be stopped and power cut off.
11. Children should be used under adult supervision and should not be
used as toys.
12. This product is not suitable for the following groups: children,
disabled people, mentally ill people, people with intellectual
disabilities. Unless used under the supervision of a normal person.

R290 refrigerant warning language
1. Please read this manual before installation, use and maintenance.
2. Do not use any method to accelerate the defrosting process or clean
the frosting part except as specifically recommended by the
manufacturer.
3. Do not puncture or ignite the air conditioner.
4. The air conditioner shall be stored in rooms without continuous fire
sources (e.g.gas appliances ignited by open flame, electric heaters,
etc.).
5. In case of maintenance, please contact the nearest after-sales
service center. Strictly follow the operation manual provided by the
manufacturer, and prohibit maintenance by non-professionals.
6. Should comply with the relevant national gas laws and regulations.
7. Remove the refrigerant from the cleaning system for maintenance or
scrapping.
The air conditioner uses an environmentally friendly R290 refrigerant.
This is a slightly combustible refrigerant, although it can burn and explode
under certain conditions, but as long as you follow the table below, install
it in the room with the right area, and use it correctly, there is no risk of
combustion and explosion.
Compared with ordinary refrigerant, R290 is an environmentally-friendly
refrigerant that does not destroy the ozone layer, and its greenhouse
effect value is also very low
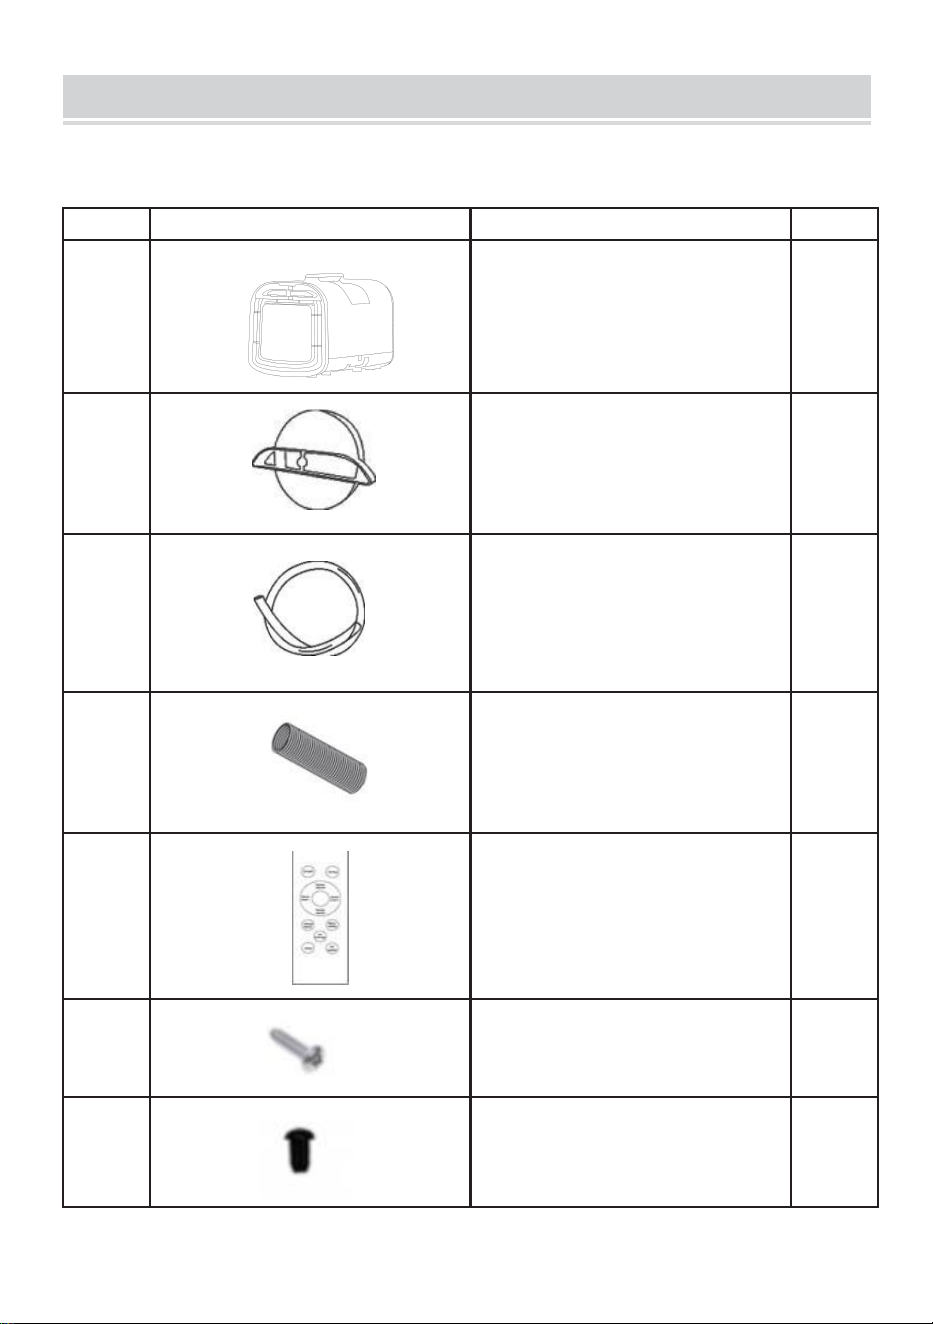
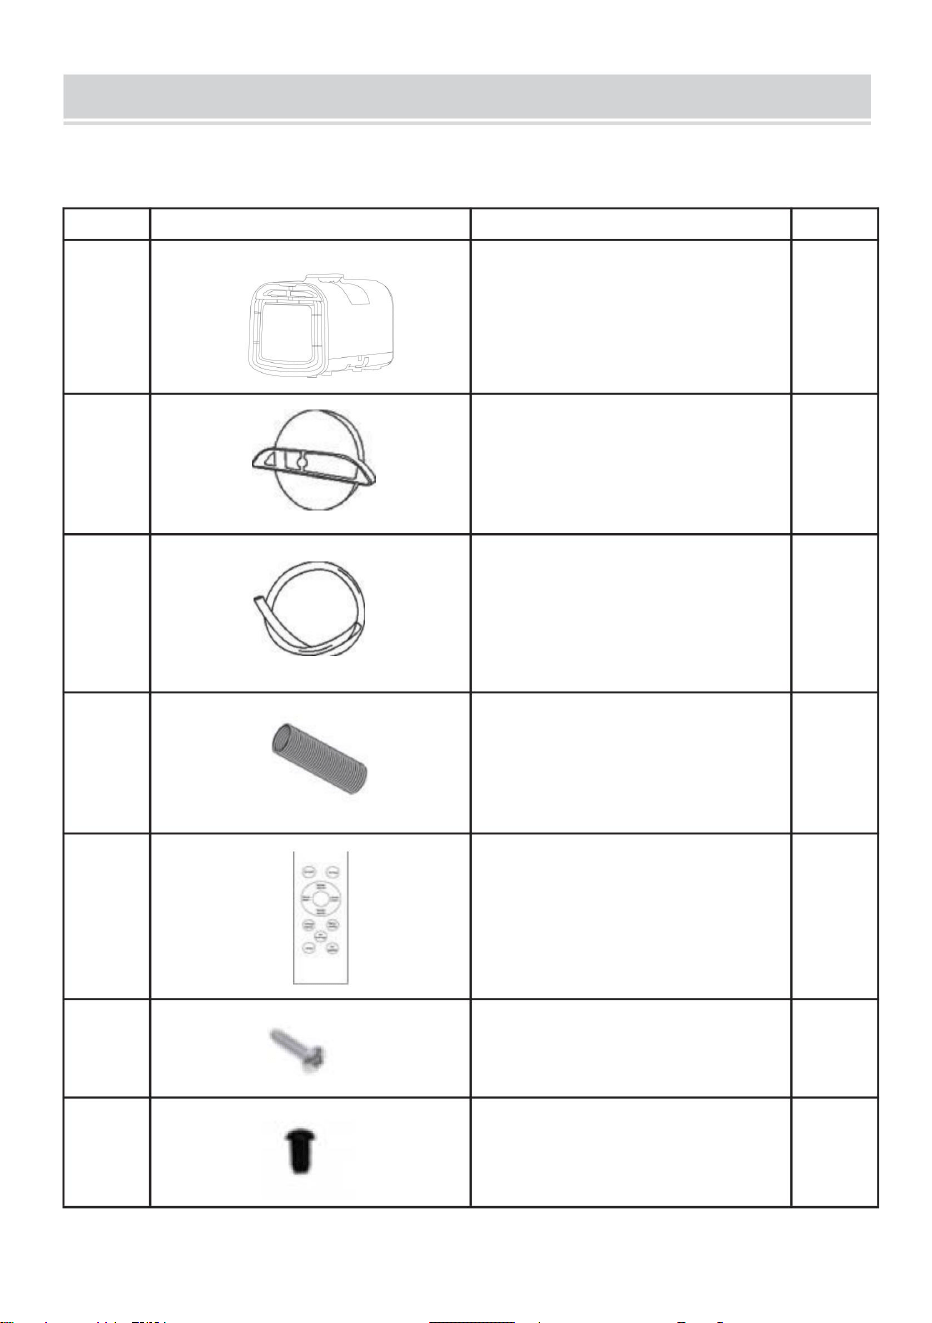
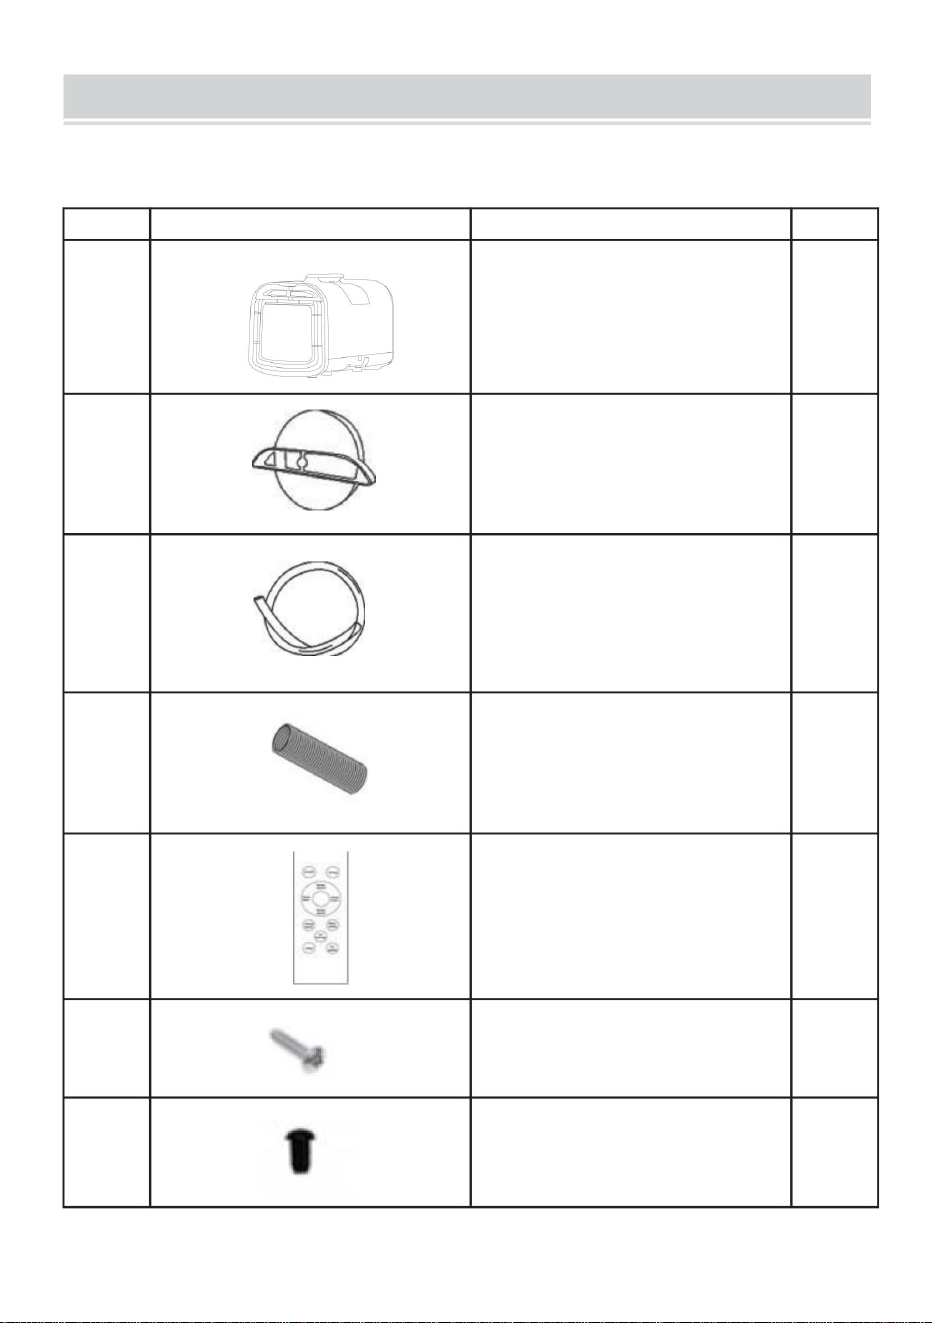
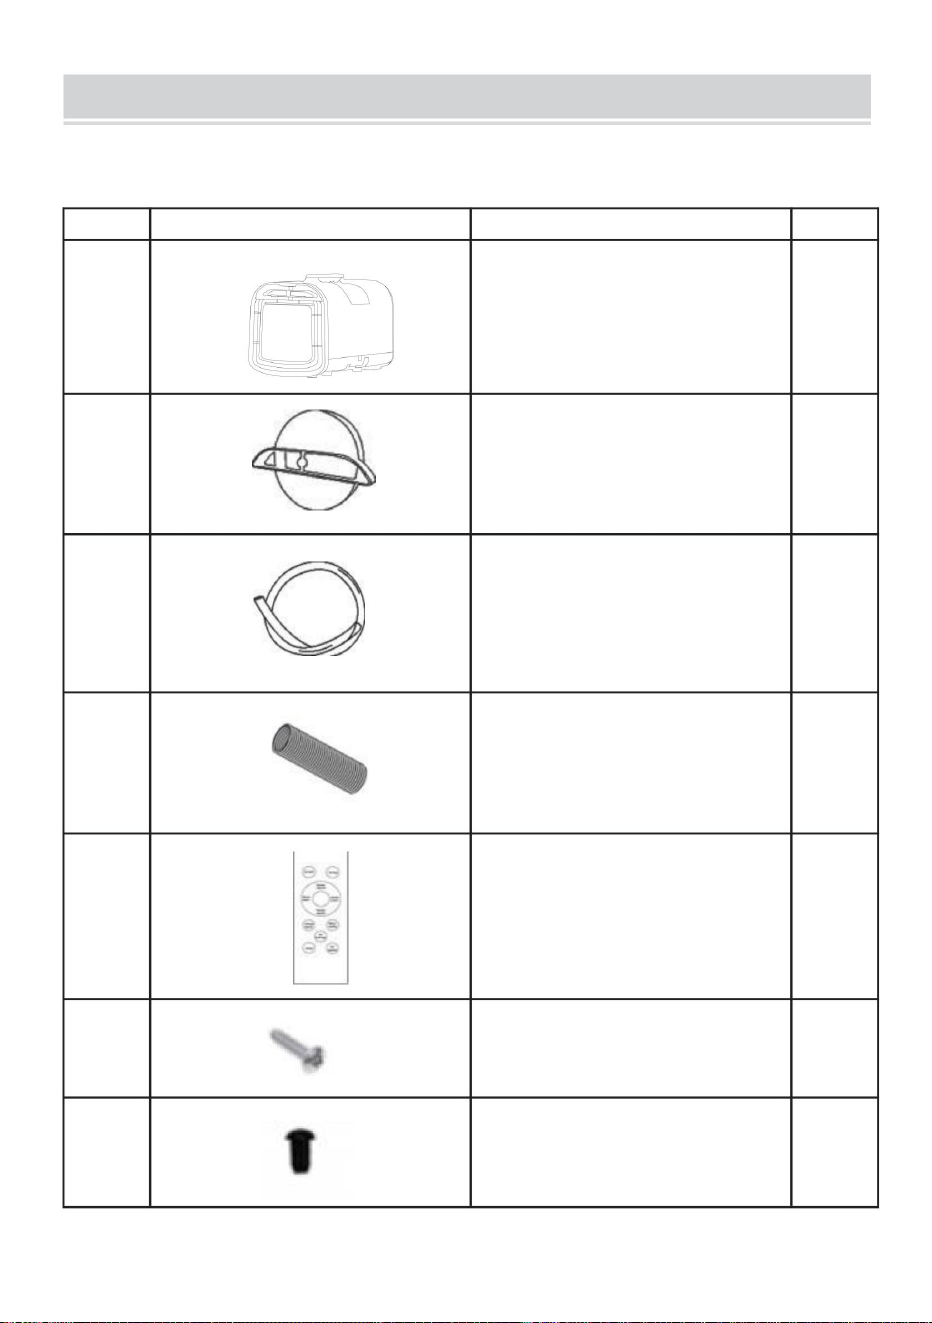
PART LIST
NO.
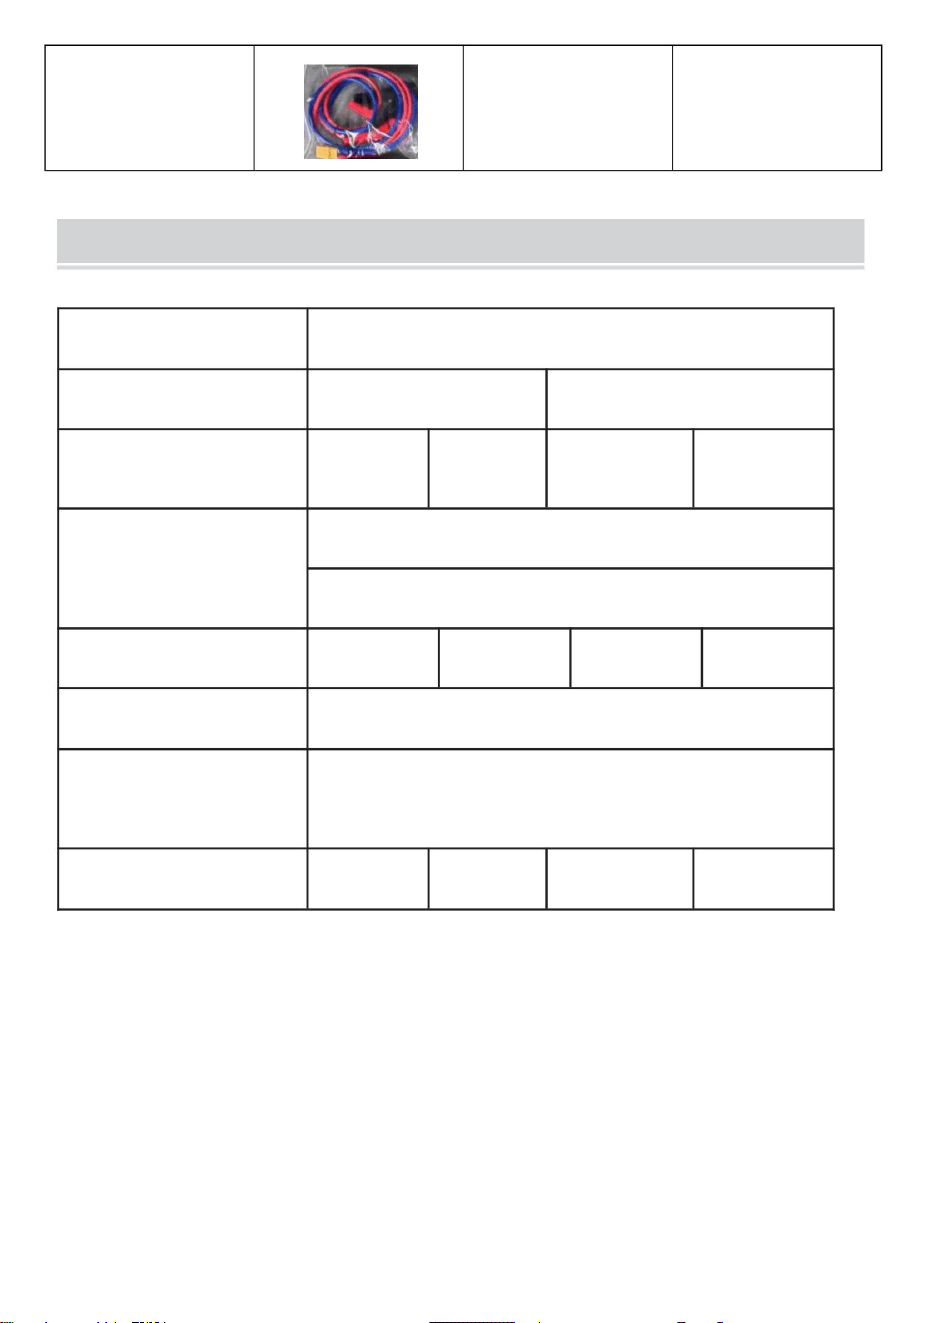
PICTURE
S02 / S03 Pro
QTY
1
air conditioner
1
2
Adapters
1
3
Drainpipe
1
4
Exhaust ducts
1
5
Remote control
1
6
Screw
2
7
Drain protection plugs
1
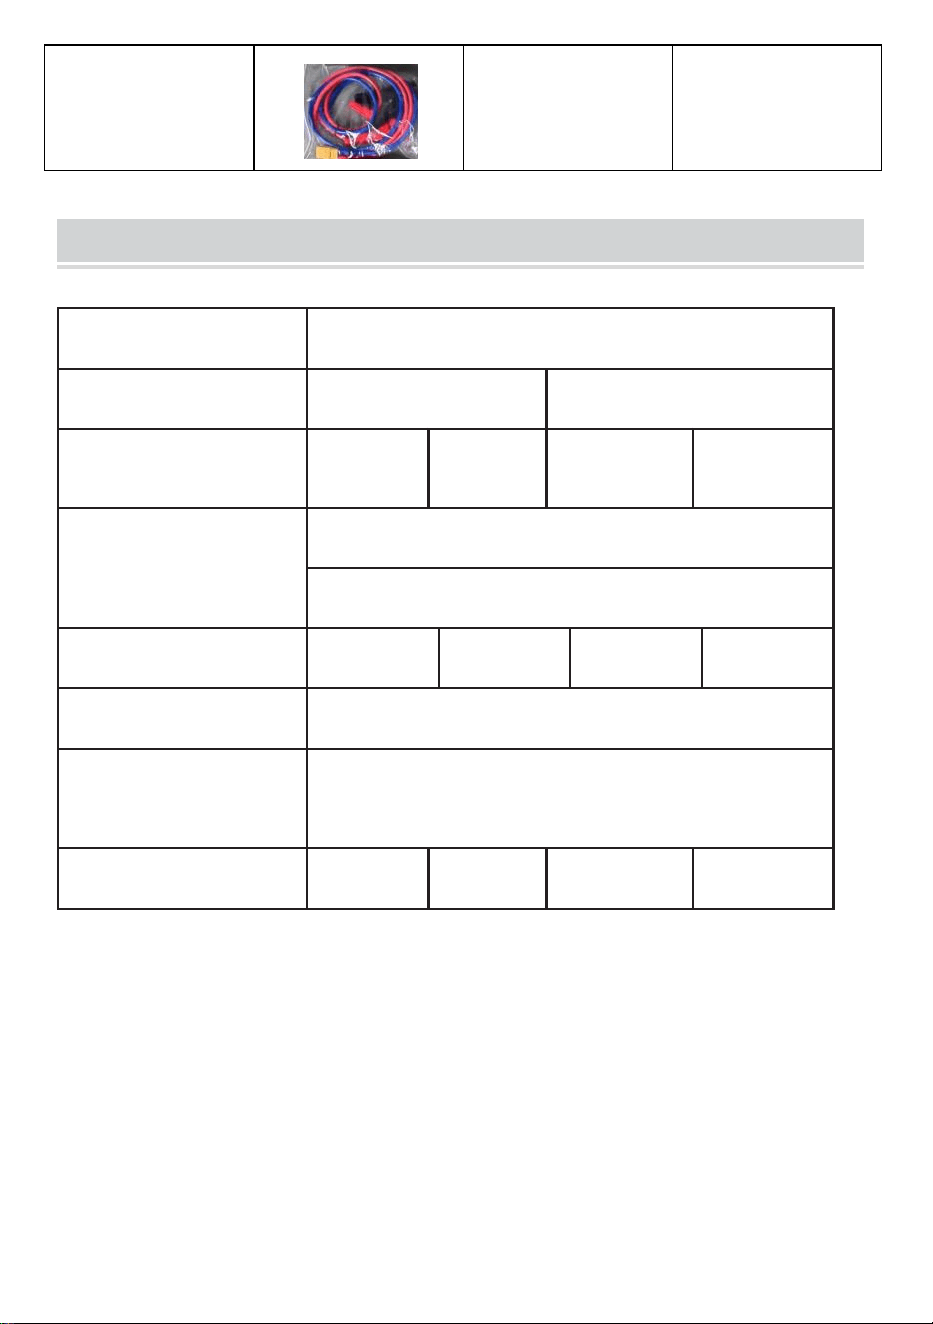
8
Car clamp
S03 Pro has one
more Car clamp
PARAMETER LIST
Product name
Portable air conditioner
Product model
S02
S03 Pro
Rated voltage/frequency
120V~60Hz
220V~50Hz
24V/120V~
60Hz
24V/220V~
50Hz
Cooling capacity
4000 BTU
Rated power
530W
Refrigerants
R290/90g
R290/140g
R290/90g
R290/140g
Noise
<62dB(A)
Body dimensions
510x270x315m
Unit net weight
15.5kg
12.6 kg
16.9kg
14.1kg
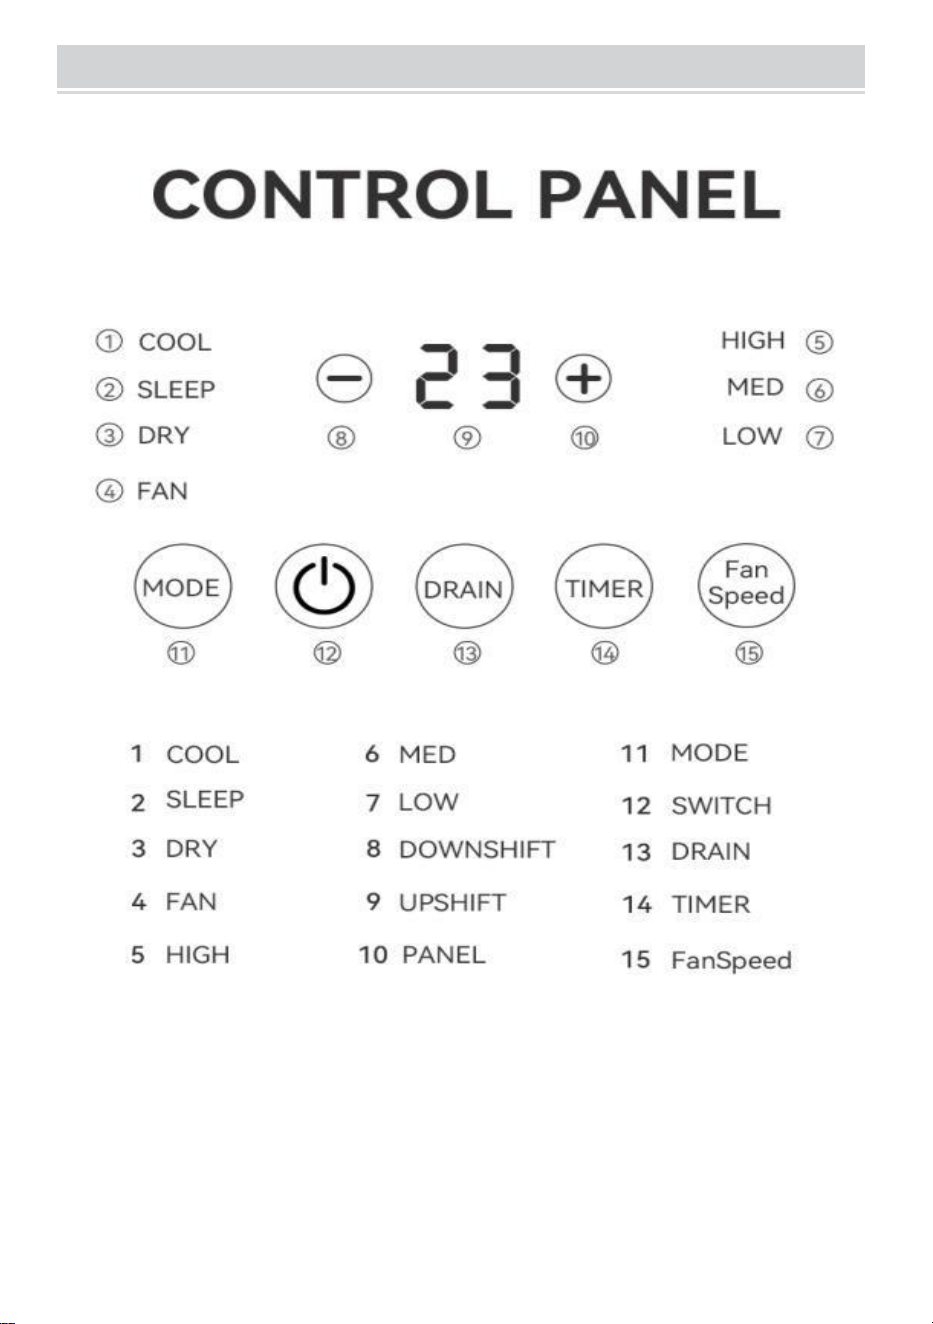
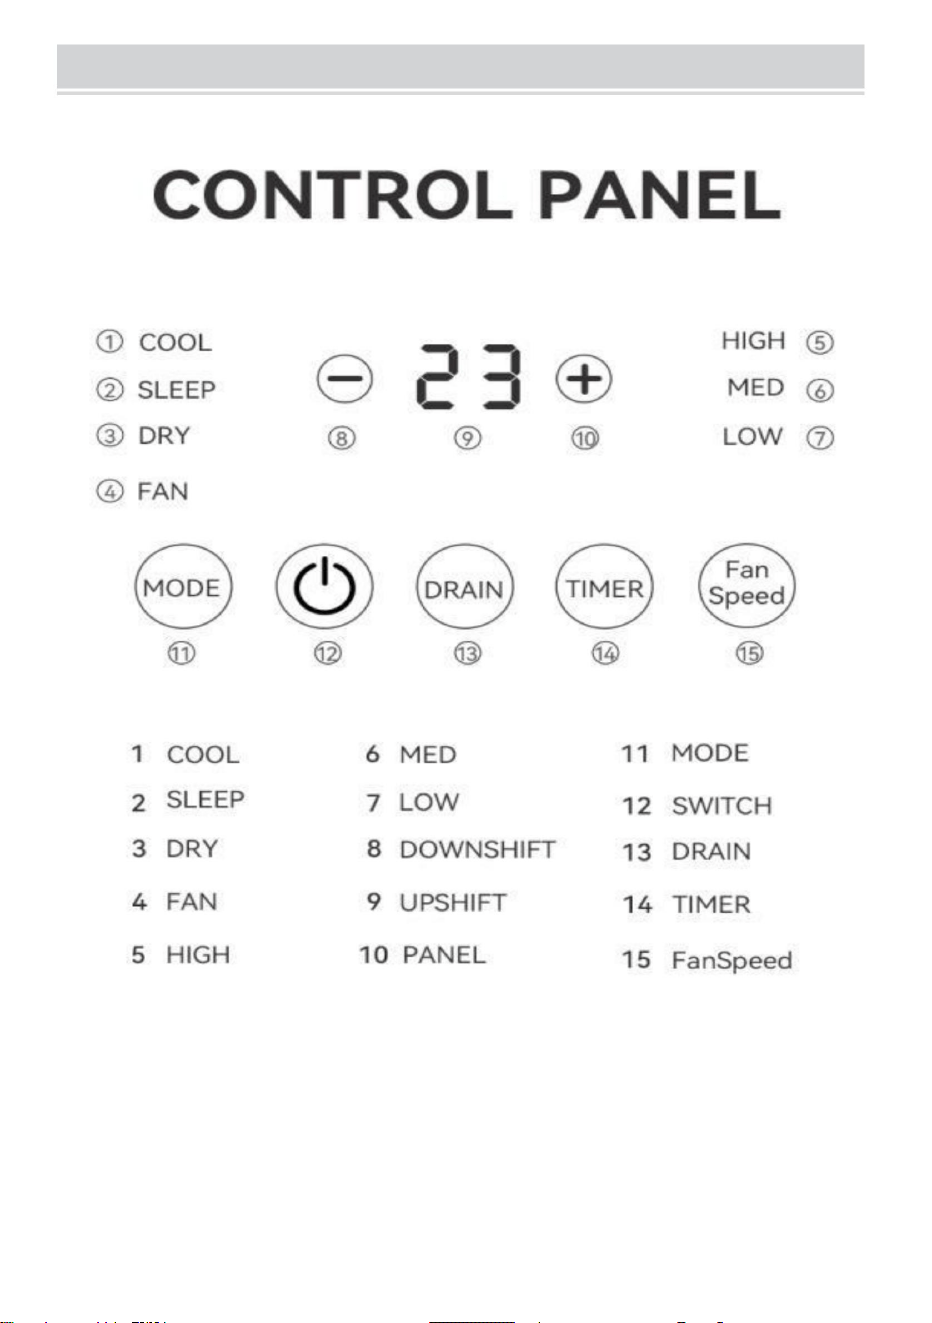
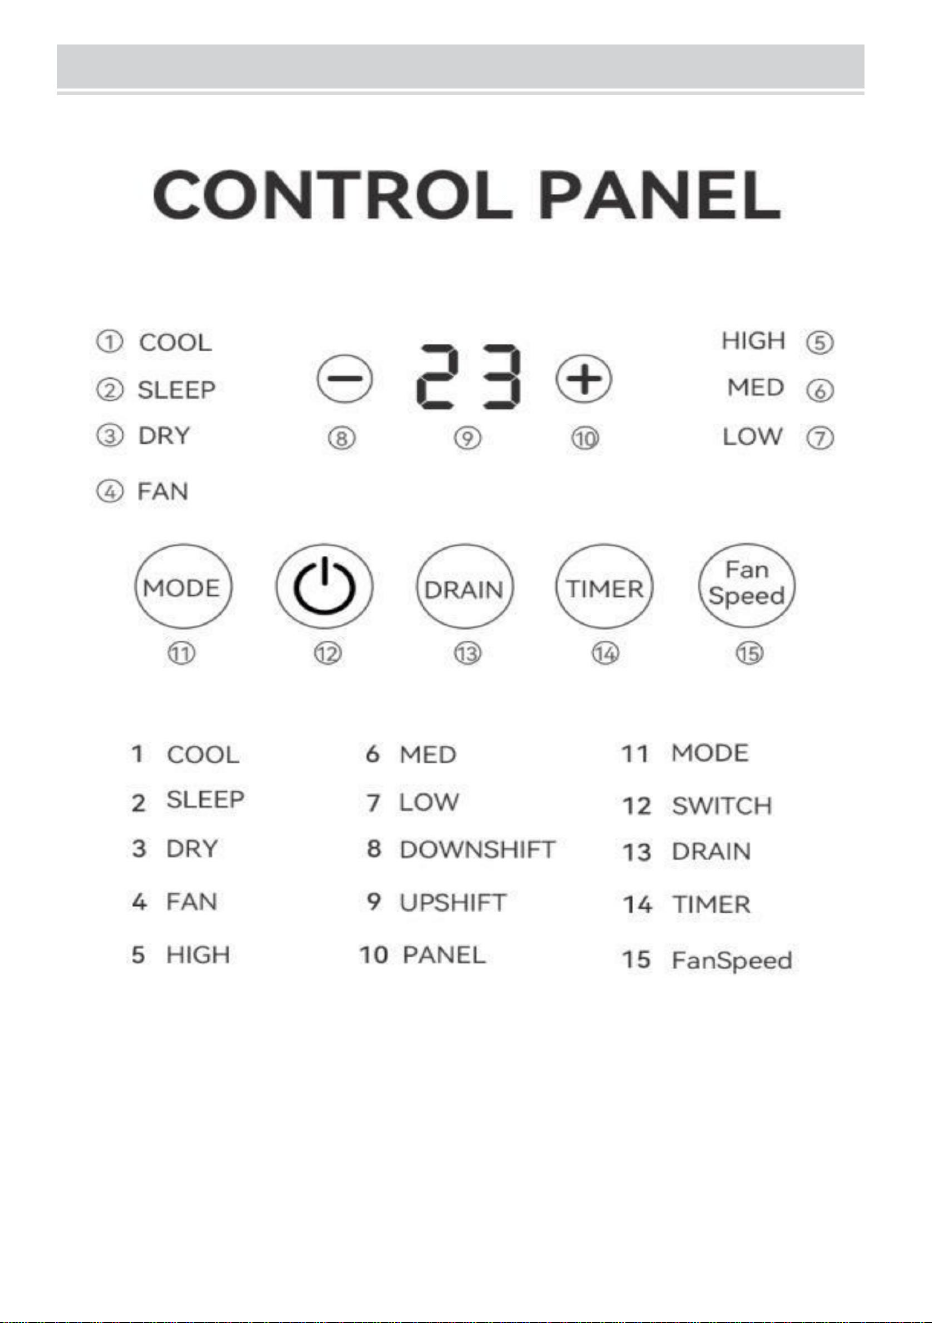
CONTROL PANEL

2 Key instructions
1. " " Key
Press the " " key to turn on the air conditioner from standby mode. Press it again
to enter standby mode when it is running.
2. "Mode" Key
Press the "Mode" key to switch between "Cooling", "Sleep",
"Dehumidification", and "Air Supply" modes.
3. "fan Speed" Key
In cooling and air supply modes, press the "Fan Speed" key to change the fan
speed between high, medium, and low. This key is invalid in sleep and
dehumidification modes.
4. "+/-" Keys
In cooling and sleep modes, press the "+/-" keys to adjust the set temperature.
Press and hold both keys for 3 seconds to switch the temperature unit between
Celsius and Fahrenheit.
5. "Drain" Button
When the water pump is running, press the "Drain" button to turn off the water
pump. Press it again to restart the water pump and resume operation. Note:
When turning off the water pump, connect the drainpipe to drain water to avoid
overflow. Notice when opening the "Drain" button, please ask the machine to
prevent horizontal position, do not tilt, so as to avoid water leakage in the sink.
6. "Timer" Key
This key is only available on the remote control, not the display panel. Press the
"Timer" key to set a timer to turn off when turning on. Use the "+/-" keys to adjust
the timer-off duration. Press the "Timer" key to set a timer to turn on during
standby. Use the "+/-" keys to adjust the timer - on duration.

3 Protection instructions
3.1 Compressor Protection
The minimum time before the compressor can restart after stopping is 3 minutes.
This 3 minute wait period is not required for:
- The first power on
- Within 3 minutes of powering off
- Within 3 minutes of powering back on after powering off
The only exception is within the 3 minutes before powering off.
After turning on, the compressorwill run for at least 3 minutes. Even if conditions
for shut off are met, it will not shut off within the first 3 minutes unless the unit is
powering off. This protection ensures the compressor operates for a minimum
run time before each start/stop cycle.
3.2 Fail safe
Serial
number
The name of
the fault
Failure
code
Static
display
Fault description
Troubleshooting
Illustrate
Indoor ambient
temperature
failure
E1
The sensor is
open or shorted
Stoppage
The query
displays
Note 1: To query faults, long press the wind speed key and - key for 2 seconds.
To exit fault query and resume normal display, long press the wind speed and -
keys again for 2 seconds. Fault information will be lost after a power failure and
need to be regenerated. Long pressing the wind speed and - keys for 2 seconds
will query and display any faults, showing multiple faults simultaneously in order
of priority if present.
3.3 Memory Function
1.,Enter standby mode before powering off, or set a timer-based shutdown
when powering on, then enter standby after powering on.
2. If power is turned on before powering off, it will resume operating in the
original mode, with the previously set temperature, wind speed, temperature
unit, water motor switch status etc. After powering off.

4 User Notice:
1. Upon purchasing the machine, please place it facing the direction indicated by
the arrow on the packaging for 2 hours before powering on. Each time after
powering off, you must wait at least 5 minutes before powering on again.
2. Before using the machine, please identify the cold air outlet and hot air outlet
based on the markings on the unit. The upper outlets on both ends are air outlets,
and the lower ones are air inlets. Strictly do not obstruct the air outlets. In front of
the hot air outlet, leave an unobstructed space of at least 60cm. Leave a
clearance of at least 10cm or more on both sides of the machine.
SECURITY & WARNINGS
WARNING MATTERS
Use the appliance as described in the Instructions for Use Guide.
●Like other electrical appliances,this instruction manual aims to include
the warning of events as much as possible and the usual practices you
need to use in the operation and installation of the electrical appliance.
●Children or people without self-care ability are prohibited to use this
product when unsupervised.
●The electrical appliance is designed for household indoor use,and
cannot be used for other purposes.
●If the power cord is damaged,it must be replaced by the
manufacturer,service agent or equivalent organization to avoid danger.
●Any change or replacement of the appliance characteristics is very
dangerous.
●If the appliance needs to be repaired,please contact the technical
service center authorized by the manufacturer,adhere to the use of the
original vulnerable parts,repair by unauthorized individuals are
dangerous,and the warranty is invalid.
●The electrical appliance must be installed with grounding,and the
internal circuit must be tested by the technical personnel with electrical
qualification.
●Do not use the electrical appliance outdoors.
●Do not plug the air outlet and air inlet.
●No epitaxial cable lines shall be used.
●Pull out the power plug before cleaning or maintaining the appliance.Do
not pull the cable to move the appliance.
●Please do not install the electrical appliance in a room with natural
gas,gasoline and sulfur,and it can not be installed close to the heat source.
●Do not use the electrical appliance on the slope ground.
●Be sure to maintain a distance of at least 45cm from flammable
materials(such as alcohol)or durable containers(e.g.aerosol tanks).
●Do not place heavy objects or hot objects on the top of the machine.
●Clean the filter screen regularly.
●In the process of transporting the electrical appliance,please keep it
vertical and place it on one side.When moving the electrical
appliance,please empty the water in the water tank first.After the
transportation,if you need to start it,please wait for half an hour.
●R290 It is a refrigerant that complies with the relevant environmental
standards.The cycle of the refrigerant in the electrical appliances is
closed.After the end of the service life,please submit the electrical
appliances to a special recycling center.
● Packages are recyclable,so it is recommended to place them in the
corresponding waste sorting recycling bins.
●The installation of the electrical appliance must be consistent with the
relevant national laws and regulations.
OPERATION
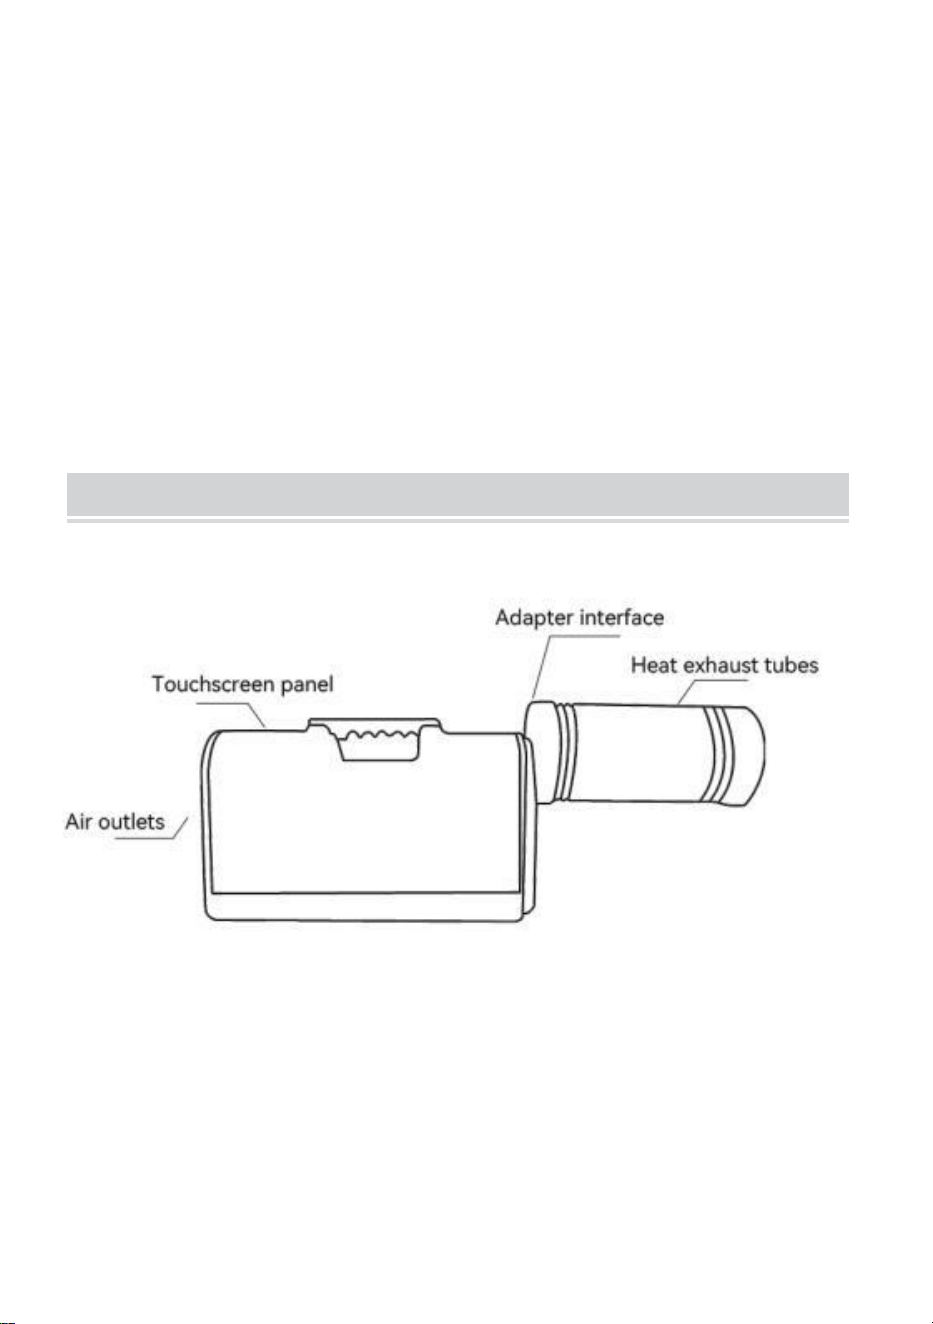
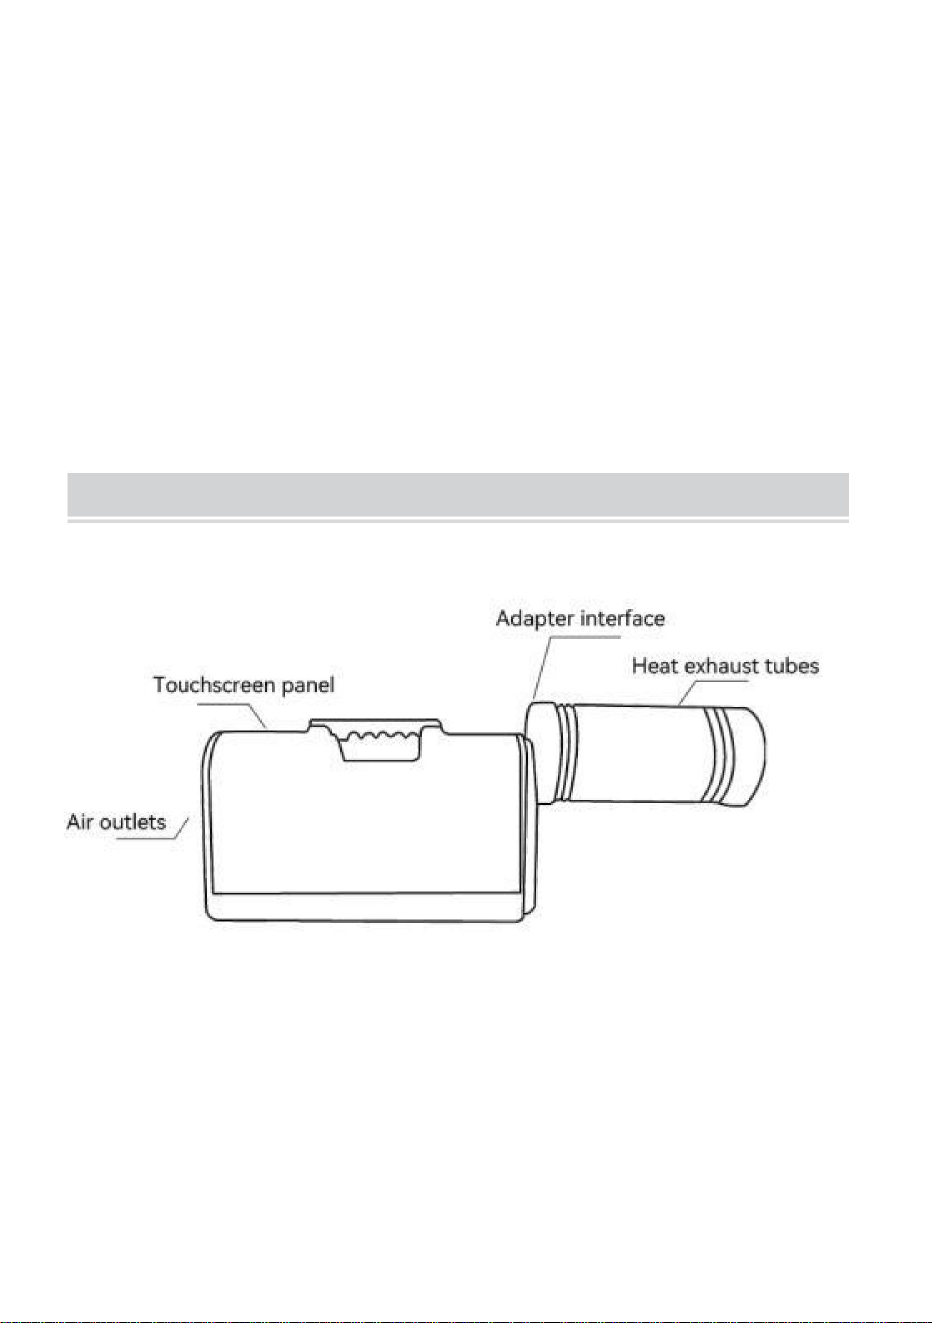
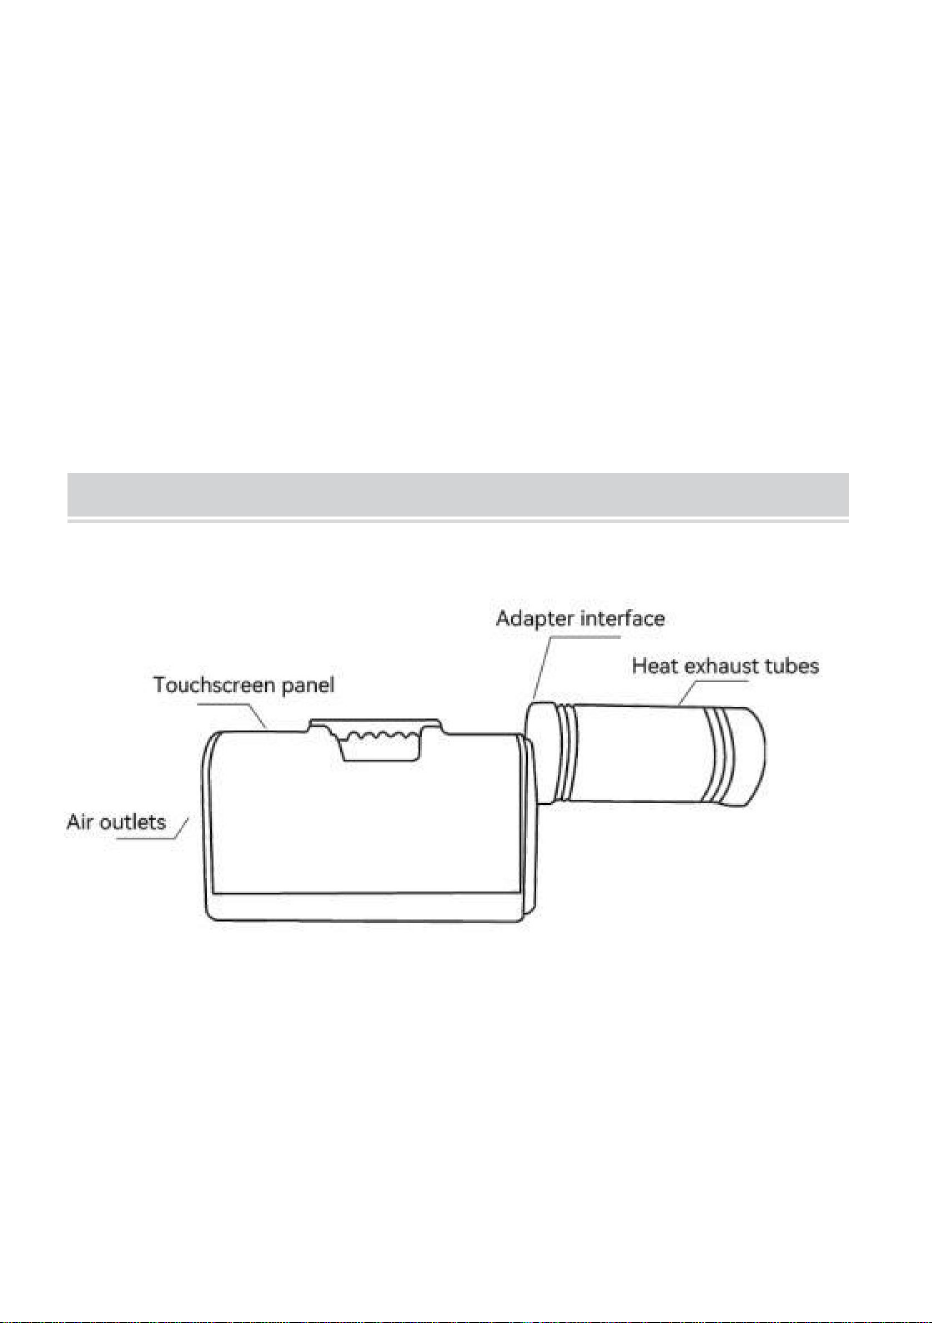
Installing ventilation ducts.
Installing the hot-end fan shroud and duct.
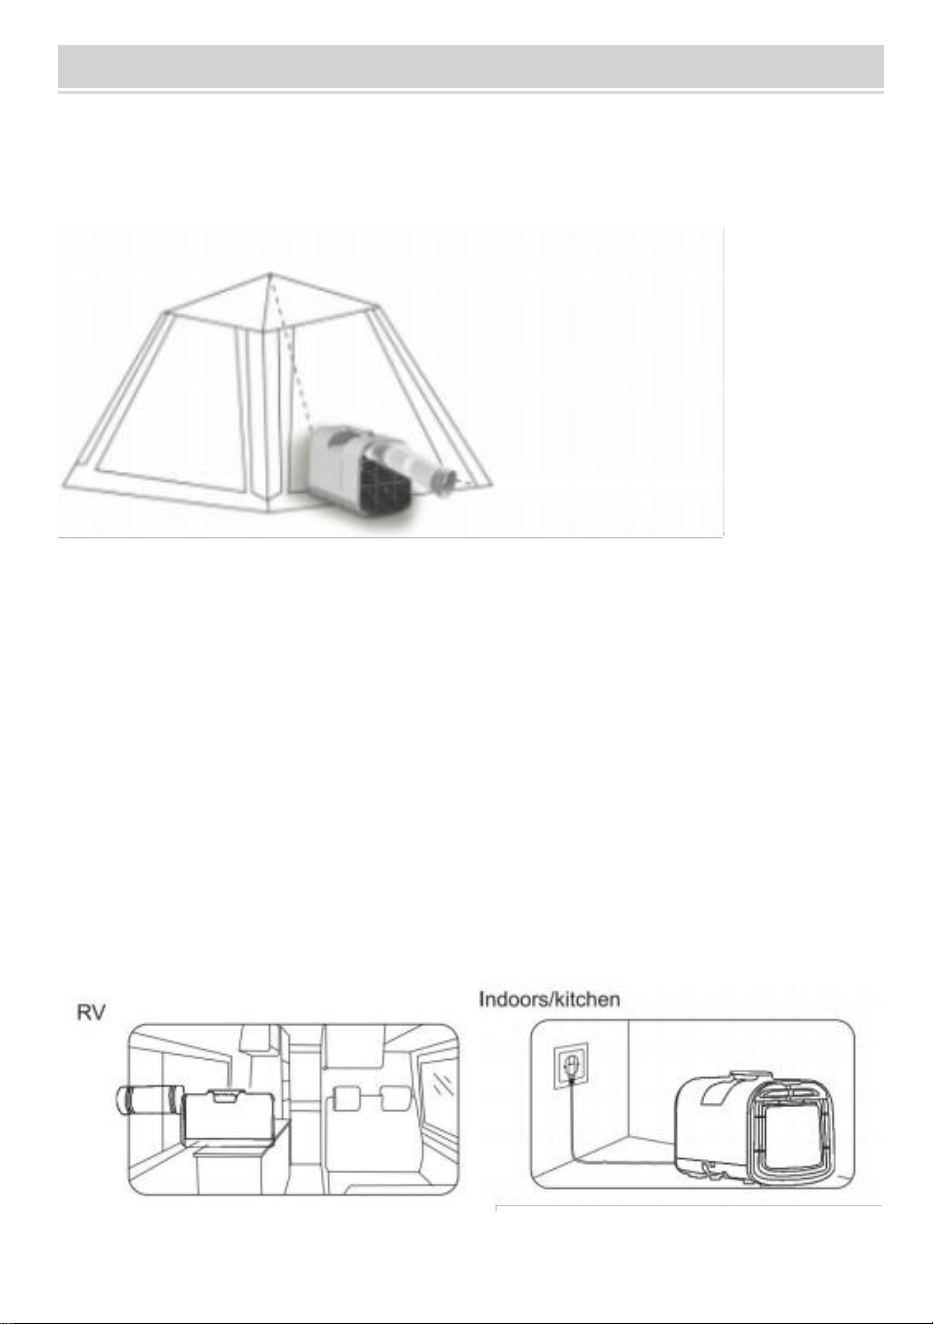
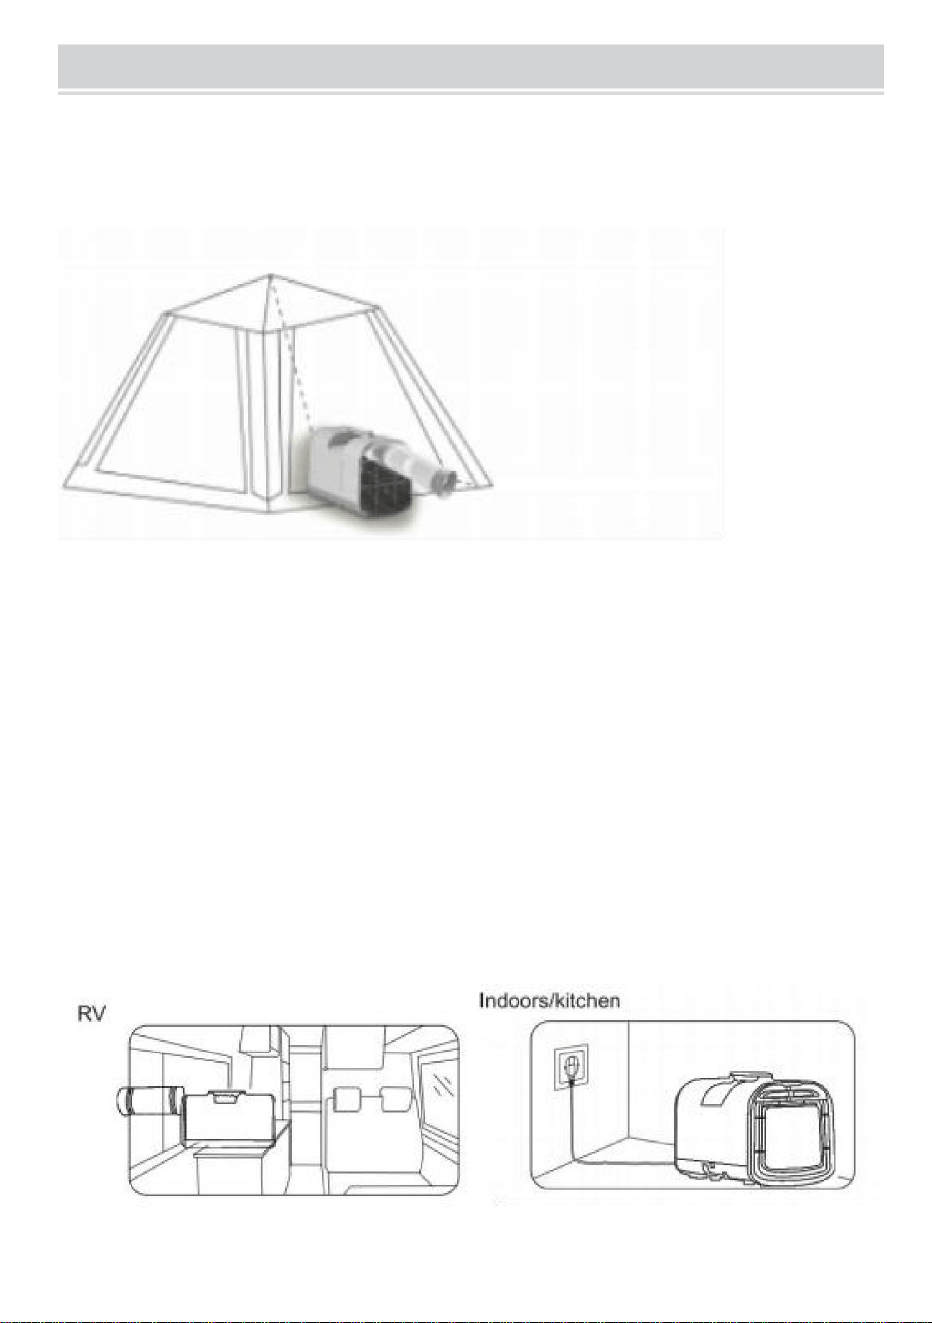
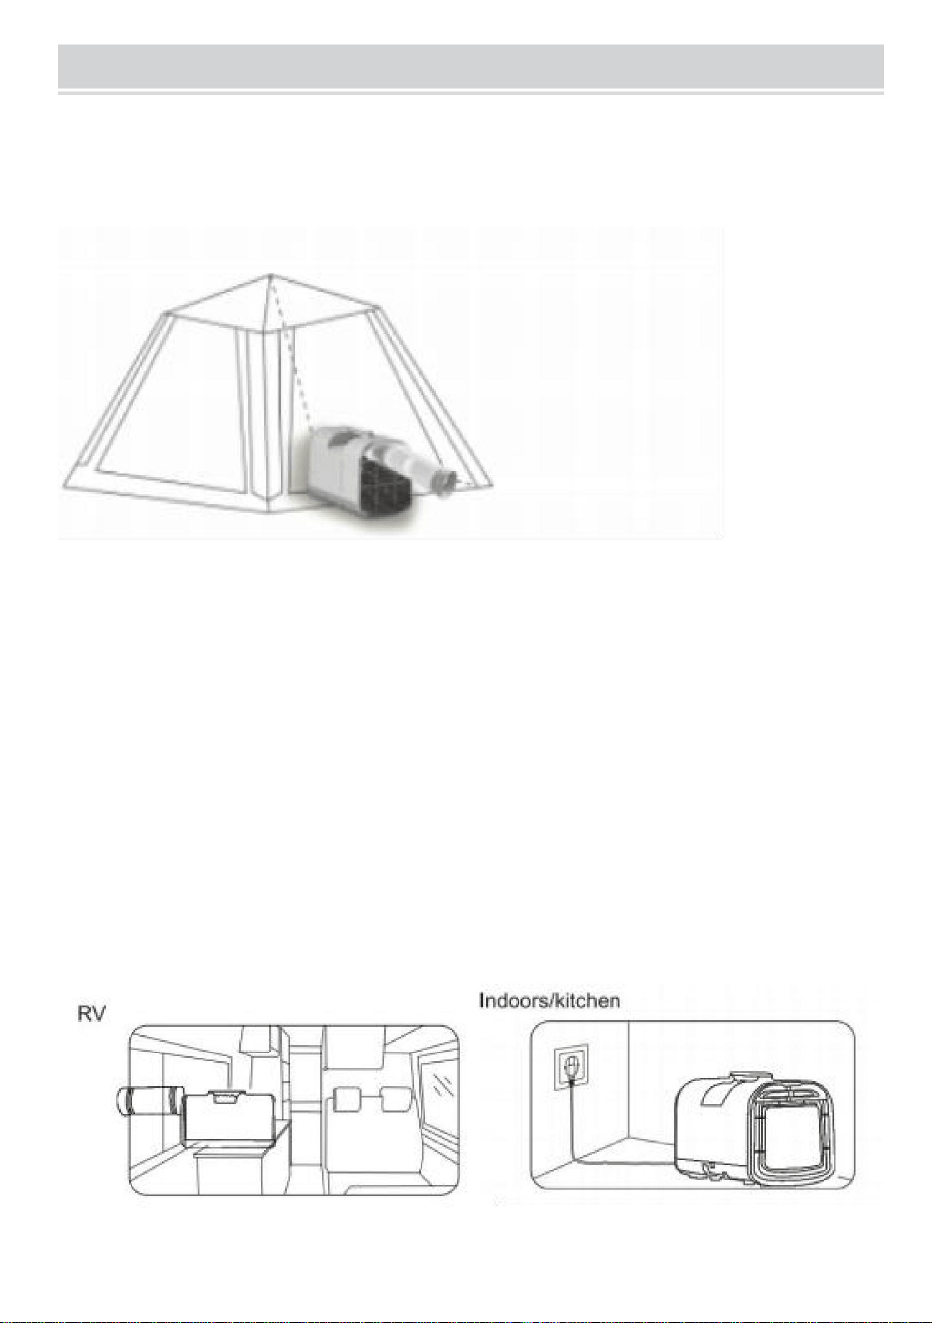
USE SCENARIOS
Tent
1.Place outside the tent with the cold air vent directed into the tent.
Recommendations:
Pay attention to the insulation of the tent. If the tent has poor insulation, please
cover the tent with a heat-insulating mat.
Pay attention to sealing, tents with ventilation holes, so please close or cover the
ventilation holes.
Pay attention to sunshade, you can use awnings to cover tents.
If the tent is large which exceeds the space cooling of air conditioner, please add
another air conditioner, or create a small cooling space inside the tent with a cloth
partition.
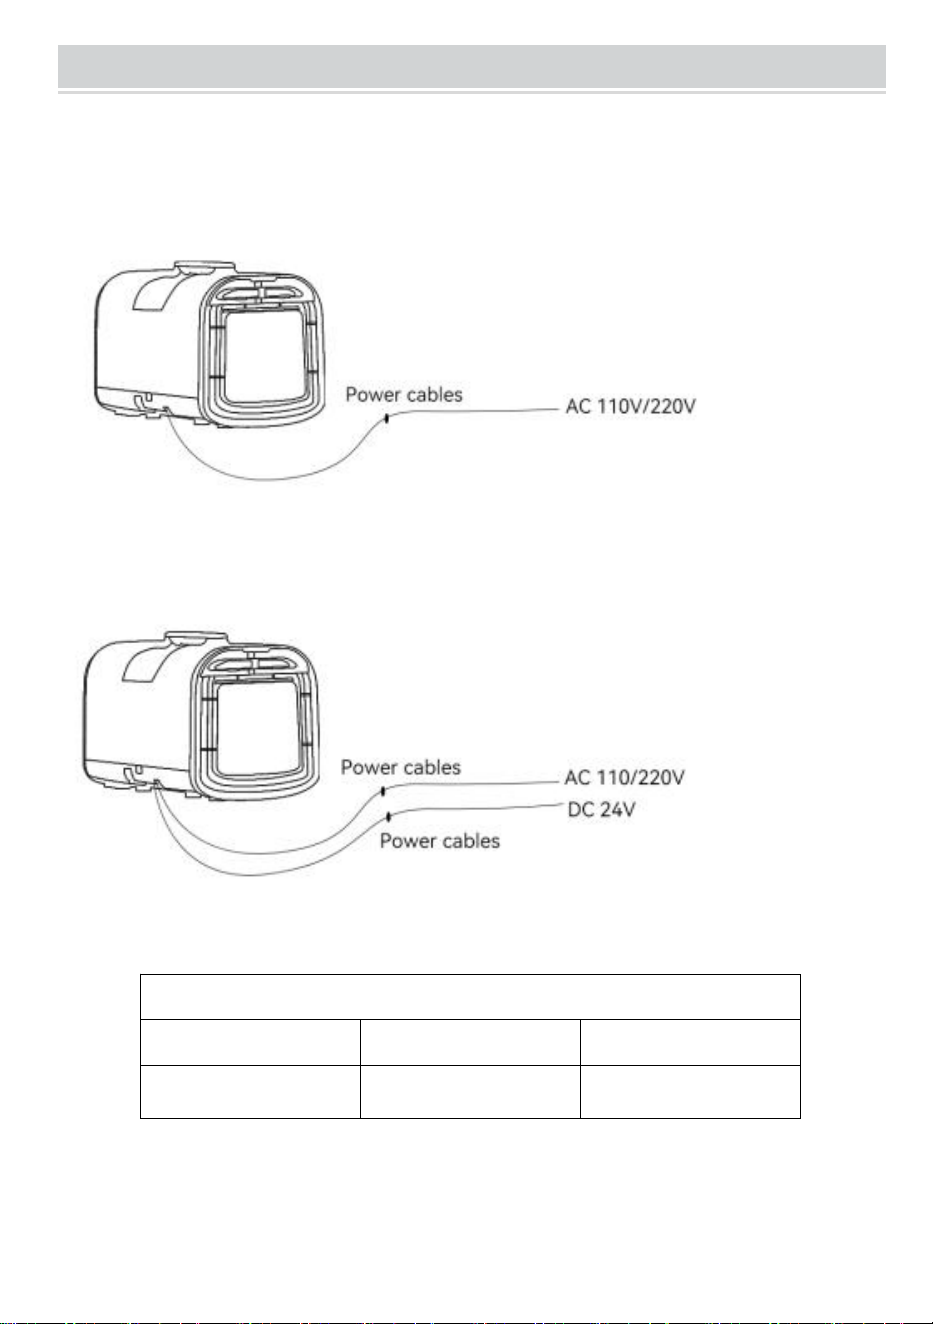
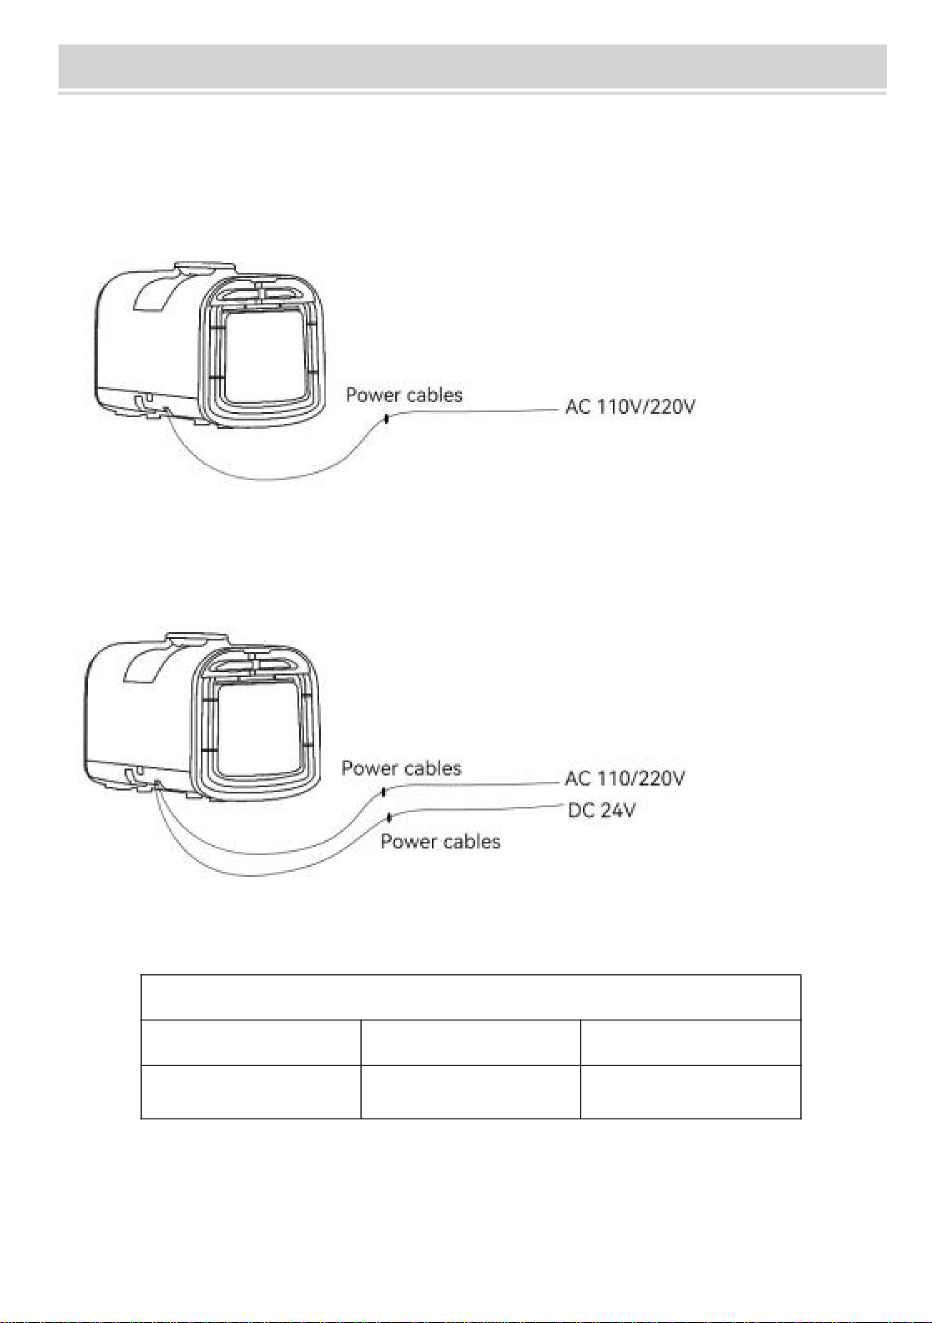
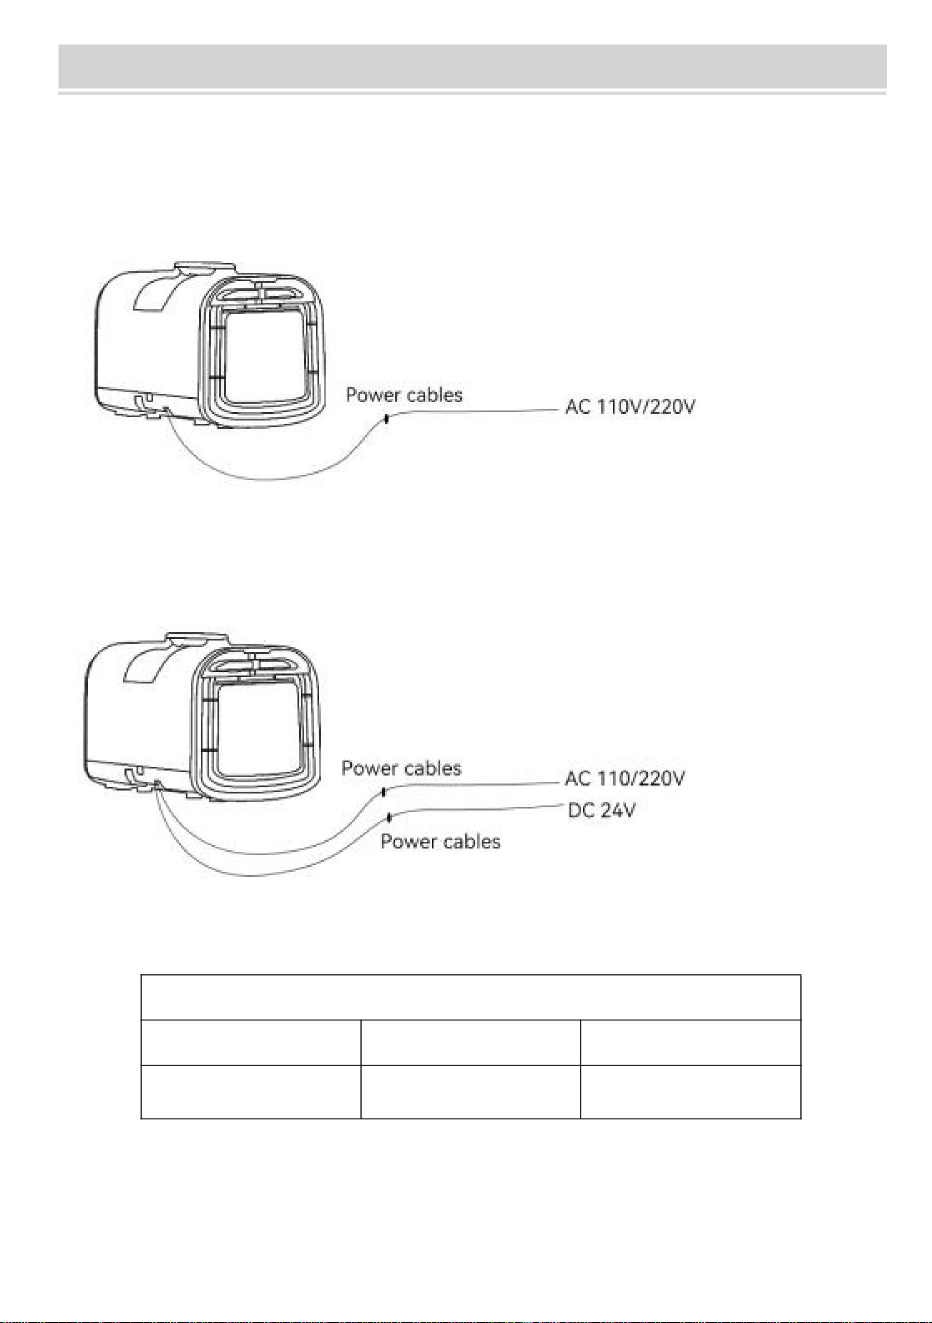
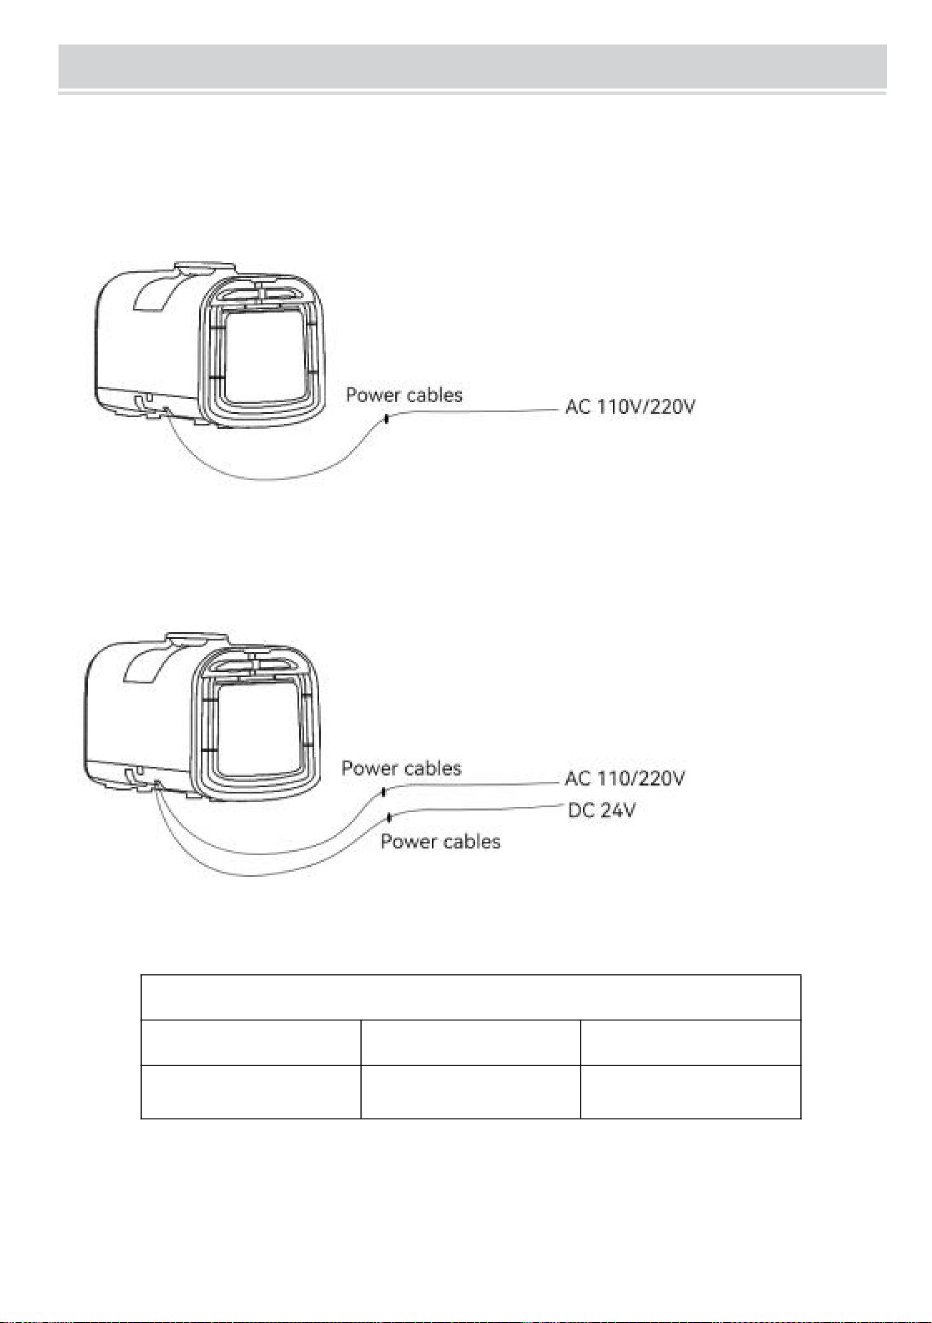
POWER SUPPLY
● S02: Input voltage AC 110V-60Hz (North America)
AC 220V-50Hz (European Union, Australia)
● S03-Pro: Input voltage :AC 110V-60Hz/DC24V (North America)
AC 220V-50Hz/DC24V ( European Union,Australia)
(S03-Pro) DC24V mobile power recommendation
voltage
capacity
Output power
DC 24V
≥150AH
≥3500W

CARE INSTRUCTIONS
● Before cleaning or maintenance, turn the appliance off. Wait for a few
minutes then unplug from the electrical outlet.
● Clean the appliance with a slightly damp cloth then dry with a
dry cloth. Plastic parts maintenance:
● To protect the air conditioner, it must be kept clean, and try to avoid oil stain
and deformation. If the oil is attached to the plastic parts for a long time, the plastic
parts will be aging, cracking and smell. Therefore, we should clean it regularly.
● Never wash the air conditioner with water to prevent the electrical insulation
from reducing and rusting.
● Never use petrol, alcohol or solvents to clean the appliance.
● Never spray insecticide liquids or similar.
TROUBLESHOOTING
● The unit does not cool, please check whether the air inlet and outlet are blocked.
When using the air duct, check whether the duct is excessively bent or blocked,
which will cause the compressor overheat and stop for protection. We
recommend turnoff the air conditioner and switch on the device after 15 minutes.
● The remote control does not work:
1. Do not exceed the remote control distance (32Feet/10m).
2. Check whether the remote control is damaged.
3. Replace the battery of the remote control.
4. Pairing the remote control.
MAINTENANCE SERVICE
Cleaning Instructions
1. Ensure the machine is unplugged before cleaning.
2. Do not use chemical solvents like gasoline for cleaning.
3. Do not rinse directly with water.
● Filter
Clean the filter once a month. Use a small Phillips screwdriver to loosen the fixing
screws as shown. Pull out the filter and soak it in lukewarm water mixed with a
neutral detergent at 40°C. Use a brush to clean any dirt on the filter, then air dry in
a shaded area. Reload and secure with screws.
● Surface Cleaning
Wipe with a neutral detergent or alcohol on a damp cloth, then dry with a dry cloth.
Storage:
Off-Season Storage
1. Power off the machine and unplug the power cord.
2. Wipe down the machine surface with a damp cloth and dry with a dry cloth.
3. Coil the power cord tightly.
4. Tilt the machine gently with the drain outlet facing down for 30 minutes to drain
any remaining condensed water inside.
5. Seal the machine in a plastic bag and store in a dry place.
Customer Service Department Important Notice:
1. The warranty period is 1 year (12 months) from the date of purchase.
2. Product specifications are subject to change without notice.
3. The product maybe discontinued due to electronic component unavailability.
CORRECT DISPOSAL
This product is subject to the provision of European Directive
2012/19/EU.The symbol showing a wheelie bin crossed through
indicates that the product requires separate refuse collection in
the European Union.This applies to the product and all accessories
marked with this symbol. Products marked as such may not be discarded
with normal domestic waste, but must be taken to a collection point for
recycling electrical and electronic device.


Modèle:S02/S03Pro.
CLIMATISEURPORTABLE
Assistancetechniqueetcertificatdegarantieélectroniquewww.vevor.com/support
"Économisezlamoitié","Moitiéprix"outouteautreexpressionsimilairequenous
utilisonsnereprésentequ'uneestimationdeséconomiesdontvouspourriezbénéficieren
achetantcertainsoutilscheznousparrapportauxgrandesmarquesetnesignifiepas
nécessairementcouvrirtouteslescatégoriesd'outilsproposés.parnous.Nousvousrappelons
devérifierattentivementlorsquevouspassezunecommandecheznoussi
vouséconomisezréellementlamoitiéparrapportauxgrandesmarques.
Nouscontinuonsànousengageràvousfournirdesoutilsàdesprixcompétitifs.
Machine Translated by Google
BESOIND'AIDE?CONTACTEZNOUS!
Vousavezdesquestionssurlesproduits?Besoind'uneassistancetechnique?N'hésitezpasà
nouscontacter:
Modèle:S02/S03Pro.
Ils'agitdesinstructionsoriginales,veuillezlireattentivementtoutesles
instructionsdumanuelavantdel'utiliser.VEVORseréserveuneinterprétation
clairedenotremanueld'utilisation.L'apparenceduproduitdépenddu
produitquevousavezreçu.s'ilyadesmisesàjourtechnologiquesou
logiciellessurnotreproduit.
Airportatif
Aprèsshampooing
Assistancetechniqueetcertificatdegarantie
électroniquewww.vevor.com/support
Machine Translated by Google

CONSIGNESDESÉCURITÉ
1.N'utilisezpasdeprisecasséeouinadaptée.
5.Lorsdunettoyagedelamachine,assurezvousdecouperl'alimentationélectriqueàl'avance.
12.Ceproduitneconvientpasauxgroupessuivants:enfants,personneshandicapées,
personnessouffrantdemaladiesmentales,personnesayantdesdéficiencesintellectuelles.
lesdétailspeuventdifférerlégèrementdevotremodèlespécifique.Cependant,labase.
soigneusementl’intégralitédumanuelavantutilisation.Cemanuelsertdeguidegénéral
identifieztoutevariationparrapportàcequiestaffiché.Profitezdevotrenouvelairportable.
êtreplacédansladirectionindiquéeparlecartonpendant
11.Lesenfantsdoiventêtreutiliséssouslasurveillanced'unadulteetnedoiventpasêtre
climatiseurportableavantutilisation.Référezvousattentivementàvotreappareilluimême.
Mercid'avoirachetéceclimatiseurportable.Veuillezlirelesinstructions.
4.Afindeplacercorrectementlecompresseur,lamachinedoit
conformeàcequiestdécrit.Veuillezprendrequelquesminutespourlire
E:prochesalledebain,salled'eau,piscine.
8.Débranchezlafiched'alimentationlorsqueletonnerregronde.
doitêtrearrêtéetlecourantcoupé.
votremachinepeutvariersurcertainsaspectstelsquelesmodesdisponiblesou
6.Éteignezl'ordinateuretdébranchezl'alimentationavant
A:Prochedelasourcedel'incendieB:
Sitesàrisquedeprojectiond'hydrocarbures
sedéplaçantlentementlorsdudéplacement.
Lesfonctionsetlesdirectivesdesécuritédécritesicis'appliquerontàvotreappareil.
2.N'utilisezpaslamachinedanslessituationssuivantes.
handicapés.Saufutilisationsouslasurveillanced’unepersonnenormale.
pourlefonctionnementdevotreclimatiseurportatif.Veuilleznoterquecertains
conditionneur!
transport.
utiliséscommejouets.
10.Encasdephénomènesanormauxtelsqu'uneodeurdebrûlé,lefonctionnement
3.Nemettezpaslesdoigts,nid'autresobjetsfins,etc.danslasortied'airetveillezàinformer
lesenfantsdecesdangers.
9.N'éteignezpasdirectementleclimatiseuravecl'interrupteurd'alimentation.
parcourezentièrementlemanueletfamiliarisezvousaveclesfonctionnalitésdevotre
Dispositiondupanneaudecommande,lefonctionnementetl'utilisationfondamentauxdoiventêtre
C:Éviterl'expositiondirecteausoleil.D:Sitesprésentantunrisqued'éclaboussuresd'eau.
7.Necouvrezpaslamachine,sinonilyaunrisqued'incendie.
Machine Translated by Google

Langued'avertissementduréfrigérantR290
miseaurebut.
souscertainesconditions,maistantquevoussuivezletableaucidessous,installez
fabricant.
3.Nepercezpasetn'allumezpasleclimatiseur.
2.N'utilisezaucuneméthodepouraccélérerleprocessusdedégivrageounettoyer
6.Doitêtreconformeauxloisetréglementationsnationalesapplicablesenmatièredegaz.
LeclimatiseurutiliseunréfrigérantR290respectueuxdel'environnement.
réfrigérantquinedétruitpaslacouched'ozone,etsoneffetdeserre
lapartieglaçage,saufsispécifiquementrecommandéparle
7.Retirezleréfrigérantdusystèmedenettoyagepourl'entretienou
lavaleurdel'effetestégalementtrèsfaible
centredeservice.Suivezstrictementlemanueld’utilisationfourniparle
5.Encasdemaintenance,veuillezcontacterleserviceaprèsventeleplusproche
danslapièceayantlabonnesurface,etutilisezlecorrectement,iln'yaaucunrisquede
fabricant,etinterdirelamaintenancepardesnonprofessionnels.
1.Veuillezlirecemanuelavantl'installation,l'utilisationetl'entretien.
combustionetexplosion.
Comparéauréfrigérantordinaire,leR290estunproduitrespectueuxdel'environnement.
4.Leclimatiseurdoitêtrestockédansdespiècessansfeucontinu
Ils'agitd'unréfrigérantlégèrementcombustible,bienqu'ilpuissebrûleretexploser.
sources(parexempleappareilsàgazallumésparuneflammenue,radiateursélectriques,
etc.).
Machine Translated by Google
LISTEDESPIÈCES
1
1
6
QTÉ
7
1
1
IMAGE
Tuyaud'évacuation
Conduitsd'échappement
Vis
S02/S03Pro
3
2
2
Adaptateurs
5
NON.
1
Télécommande
1
climatiseur
4
Bouchonsdeprotectiondevidange
1
Machine Translated by Google
50Hz
Réfrigérateurs
510x270x315m
15,5kg
Dimensionsducorps
Nomduproduit
8
60Hz
Capacitéderefroidissement
<62dB(A)
24V/220V~
Pincedevoiture
Bruit
14,1kg
S03Proenaun
S02
S03Pro
4000BTU
plusdepincesdevoiture
Tension/fréquencenominale120V~60Hz220V~50Hz24V/120V~
530W
290rands/90g290rands/140g290rands/90g290rands/140g
12,6kg 16,9kg
Climatiseurportatif
Puissancenominale
Poidsnetunitaire
Modèledeproduit
LISTEDESPARAMÈTRES
Machine Translated by Google
PANNEAUDECONTRÔLE
Machine Translated by Google

2Instructionsclés
CelsiusetFahrenheit.
pompe.Appuyezànouveaudessuspourredémarrerlapompeàeauetreprendrelefonctionnement.
Touche«minuterie»pourrégleruneminuteriepourl'éteindrelorsdelamisesoustension.Utilisezlestouches«+/»pourrégler.
2.Touche«Mode»
laduréed'arrêtdelaminuterie.Appuyezsurlatouche«Minuterie»pourrégleruneminuterieàallumerpendant.
Appuyezsurlatouche«Mode»pourbasculerentrelesmodes«Refroidissement»,
«Veille»,«Déshumidification»et«Alimentationenair».
Appuyezsurlatouche«»pourallumerleclimatiseuràpartirdumodeveille.Appuyezànouveaudessus.
Enmodesrefroidissementetveille,appuyezsurlestouches«+/»pourréglerlatempératureréglée.
5.Bouton«Vidanger»
6.Touche«Minuterie»
Appuyezetmaintenezlesdeuxtouchespendant3secondespourbasculerl'unitédetempératureentre
pourpasserenmodeveillelorsqu'ilestencoursd'exécution.
Cettetoucheestuniquementdisponiblesurlatélécommande,passurlepanneaud'affichage.Appuyezsurlatouche.
modesdedéshumidification.
vitesseentrehaute,moyenneetbasse.Cettetouchen'estpasvalideenmodeveilleet.
Lorsquevouséteignezlapompeàeau,connectezletuyaud'évacuationpourévacuerl'eauafind'éviter
1.Clé""
4.Touches"+/"
débordement.Remarquezquelorsdel'ouverturedubouton«Vidange»,veuillezdemanderàlamachinedelefaire.
empêcherlapositionhorizontale,nepasincliner,afind'éviterlesfuitesd'eaudansl'évier.
3.Touche«Vitesseduventilateur»
Lorsquelapompeàeaufonctionne,appuyezsurlebouton«Drain»pourcouperl'eau.
veilleUtilisezlestouches"+/"pourréglerladuréedemiseenmarcheduminuteur.
Enmodesrefroidissementetalimentationenair,appuyezsurlatouche«FanSpeed»pourchangerleventilateur
Machine Translated by Google

afficher
Échec
Lecapteurest
Lenomde
lafaute
codeEnsérie
affiche
E1
nombre
Arrêt
Ambianceintérieure
ouvertoucourtcircuité
échec
température
Larequête
Statique
DescriptiondudéfautDépannageIllustrer
3.3Fonctionmémoire
3Consignesdeprotection
3.2Sécuritéintégrée
interrogeraetafficheratouslesdéfauts,affichantplusieursdéfautssimultanémentdansl'ordre
Remarque1:Pourinterrogerlesdéfauts,appuyezlonguementsurlatouchedevitesseduventetsurlatouchependant2secondes.
modeoriginal,aveclatempérature,lavitesseduventetlatempératureprécédemmentréglées
Lapremièremisesoustension
Pourquitterlarequêtededéfautetreprendrel'affichagenormal,appuyezlonguementsurlestouchesdevitesseduventet
pendant2secondes.Lesinformationsdedéfautserontperduesaprèsunepannedecourantet.
Unité,étatdel'interrupteurdumoteuràeau,etc.Aprèslamisehorstension.
Dansles3minutessuivantlamisehorstension
Letempsminimumavantquelecompresseurpuisseredémarreraprèsunarrêtestde3minutes.
tempsd'exécutionavantchaquecyclededémarrage/arrêt.
1.Entrezenmodeveilleavantdemettrehorstensionoudéfinissezunarrêtbasésuruneminuterie.
Cettepérioded'attentede3minutesn'estpasrequisepour:
2.Sil'alimentationestalluméeavantlamisehorstension,ellereprendrasonfonctionnementdansle
Lorsdelamisesoustension,puisentrezenveilleaprèslamisesoustension.
pourl'arrêtsontrespectés,ilnes'éteindrapasdansles3premièresminutesàmoinsquel'appareilnesoit
Aprèslamiseenmarche,lecompresseurfonctionnerapendantaumoins3minutes,mêmedanslesconditions.
deprioritésiprésent.
3.1Protectionducompresseur
misehorstension.Cetteprotectiongarantitlefonctionnementducompresseurpendantunminimum.
besoind'êtrerégénéré.Appuyezlonguementsurlestouchesdevitesseduventetpendant2secondes.
Dansles3minutessuivantlaremisesoustensionaprèslamisehorstension
Laseuleexceptionconcerneles3minutesprécédantlamisehorstension.
Machine Translated by Google

SÉCURITÉETAVERTISSEMENTS
AVERTISSEMENTSIMPORTANTS
4Avisutilisateur:
produitsanssurveillance.•L'appareil
électriqueestconçupourunusagedomestiqueàl'intérieuret
dangereux.•Si
l'appareildoitêtreréparé,veuillezcontacterleservicetechnique.
netirezpassurlecâblepourdéplacerl'appareil.
•Veuilleznepasinstallerl'appareilélectriquedansunepièceavecdessourcesnaturelles.
2.Avantd'utiliserlamachine,veuillezidentifierlasortied'airfroidetlasortied'airchaud
gaz,essenceetsoufre,etilnepeutpasêtreinstalléàproximitédelasourcedechaleur.•N'utilisezpas
l'appareilélectriquesurunsolenpente.•Assurezvousdemaintenirune
distanced'aumoins45cmdesproduitsinflammables.
enfonctiondesmarquagessurl'appareil.Lessortiessupérieuresauxdeuxextrémitéssontdessorties
d'airetlessortiesinférieuressontdesentréesd'air.N'obstruezstrictementpaslessortiesd'airdevant.
laflèchesurl'emballagependant2heuresavantlamisesoustension.Chaquefoisaprès.
l'avertissementdesévénementsautantquepossibleetlespratiqueshabituellesquevous
nepeutpasêtreutiliséàd'autresfins.•Sile
cordond'alimentationestendommagé,ildoitêtreremplacéparlefabricant.
Lecircuitinternedoitêtretestéparlepersonneltechniqueavecdeséquipementsélectriques.
misehorstension,vousdevezattendreaumoins5minutesavantderallumer.
besoind'utiliserdanslefonctionnementetl'installationdel'appareilélectrique•Ilestinterditaux
enfantsouauxpersonnessanscapacitédeprendresoind'euxmêmesdel'utiliser.
qualification.
•N'utilisezpasl'appareilélectriqueàl'extérieur.•Nebranchez
paslasortied'airetl'entréed'air.•Aucunelignede
câbleépitaxialnedoitêtreutilisée.•Retirezlafiche
d'alimentationavantdenettoyeroud'entretenirl'appareil.
centredeserviceagrééparlefabricant,respectezl'utilisationdu
Utilisezl'appareilcommedécritdansleguided'utilisation.Commepourlesautresappareils
électriques,cemanueld'instructionsviseàinclure.
1.Lorsdel'achatdelamachine,veuillezlaplacerdansladirectionindiquéepar
Piècesvulnérablesd'origine,lesréparationspardespersonnesnonautoriséessont
dangereuxetlagarantien'estpasvalide.•L'appareil
électriquedoitêtreinstalléavecunemiseàlaterreetle
lasortied'airchaud,laissezunespacedégagéd'aumoins60cm.
fabricant,agentdeserviceouorganisationéquivalentepourévitertoutdanger.•Toutchangement
ouremplacementdescaractéristiquesdel'appareilesttrèsdangereux.
matériaux(commel'alcool)oudescontenantsdurables(réservoirségaérosol).
espacelibred'aumoins10cmouplusdesdeuxcôtésdelamachine.
Machine Translated by Google
OPÉRATION
normes.Lecycleduréfrigérantdanslesappareilsélectriquesest
Fermé.Aprèslafindeladuréedevie,veuillezsoumettrele
appareilsélectroménagersdansuncentrederecyclage
spécial.•Lesemballagessontrecyclables,ilestdoncrecommandédelesdéposerdansle
poubellesdetridesdéchetscorrespondantes.•L'installation
del'appareilélectriquedoitêtreconformeaux
Appareil,veuillezd'abordviderl'eauduréservoird'eau.Aprèsle
transport,sivousdevezledémarrer,veuillezattendreunedemiheure.•R290C'estun
réfrigérantconformeauxnormesenvironnementalespertinentes.
verticaletplacezlesuruncôté.Lorsdudéplacementdel'appareilélectrique
•Neplacezpasd'objetslourdsoud'objetschaudssurledessusdelamachine.•Nettoyez
régulièrementletamisdufiltre.•Lorsdu
transportdel'appareilélectrique,veuillezleconserver.
Installationducarénageetduconduitduventilateurdel'extrémitéchaude.
Installationdeconduitsdeventilation.
loisetréglementationsnationalespertinentes.
Machine Translated by Google
Recommandations:
Tente
UTILISERDESSCÉNARIOS
Faitesattentionàl'étanchéitédestentesavecdestrousdeventilation,veuillezdoncfermeroucouvrirles
trousdeventilation.
Faitesattentionauparasol,vouspouvezutiliserdesauventspourcouvrirlestentes.
Faitesattentionàl'isolationdelatente.Silatenteestmalisolée,veuillezrecouvrirlatented'untapis
isolantthermique.
1.Placezleàl'extérieurdelatenteaveclabouched'aérationfroidedirigéeverslatente.
Silatenteestgrandeetdépassel'espacederefroidissementduclimatiseur,veuillezajouterunautre
climatiseuroucréerunpetitespacederefroidissementàl'intérieurdelatenteavecunecloisonentissu.
Machine Translated by Google
•S03Pro:Tensiond'entrée:AC110V60Hz/DC24V(AmériqueduNord)
AC220V50Hz/DC24V(Unioneuropéenne,Australie)
AC220V50Hz(Unioneuropéenne,Australie)
•S02:tensiond'entréeAC110V60Hz(AmériqueduNord)
ALIMENTATION
Puissancedesortie
capacitétension
(S03Pro)Recommandationd'alimentationmobileDC24V
DC24V
≥3500W
≥150AH
Machine Translated by Google

1.Nedépassezpasladistancedelatélécommande(32pieds/10m).
4.Appairagedelatélécommande.
détergentneutreà40°C.Utilisezunebrossepournettoyerleséventuellessaletésprésentessurlefiltre,puisséchezàl'airlibre.
•Pourprotégerleclimatiseur,ildoitêtremaintenupropreetessayerd'éviterlestachesd'huile
Nettoyezlefiltreunefoisparmois.Utilisezunpetittourneviscruciformepourdesserrerlafixation.
etdéformation.Sil'huileresteattachéeauxpiècesenplastiquependantunelonguepériode,leplastique
minutespuisdébranchezledelapriseélectrique.•Nettoyez
l'appareilavecunchiffonlégèrementhumidepuisséchezleavecunchiffon.
Ilestrecommandéd'éteindreleclimatiseuretd'allumerl'appareilaprès15minutes.
2.Vérifiezsilatélécommandeestendommagée.
2.N'utilisezpasdesolvantschimiquescommel'essencepourlenettoyage.
•Latélécommandenefonctionnepas:
chiffonsec.Entretiendespiècesenplastique:
3.Nepasrincerdirectementàl'eau.
•L'appareilnerefroiditpas,veuillezvérifiersil'entréeetlasortied'airsontbloquées.
unezoneombragée.Rechargezetfixezavecdesvis.
•Avantlenettoyageoul'entretien,éteignezl'appareil.Attendezquelquesinstants.
Lorsquevousutilisezleconduitd'air,vérifiezsileconduitestexcessivementpliéoubloqué,cequi
entraîneraitunesurchauffeetunarrêtducompresseurpourprotection.
Instructionsdenettoyage
1.Assurezvousquelamachineestdébranchéeavantdelanettoyer.
lespiècesvieilliront,sefissurerontetaurontuneodeur.Parconséquent,nousdevonslenettoyer
régulièrement.•Nelavezjamaisleclimatiseuravecdel'eaupouréviterl'isolationélectrique.
3.Remplacezlapiledelatélécommande.
viscommeindiqué.Retirezlefiltreettrempezledansdel'eautièdemélangéeàun
delaréductionetdelarouille.•
N'utilisezjamaisd'essence,d'alcooloudesolvantspournettoyerl'appareil.•Ne
vaporisezjamaisdeliquidesinsecticidesousimilaires.
DÉPANNAGE
INSTRUCTIONSD'ENTRETIEN
SERVICED'ENTRETIEN
•Filtrer
Machine Translated by Google
3.Leproduitpeutêtreinterrompuenraisondel'indisponibilitédescomposantsélectroniques.
2012/19/UE.Lesymbolereprésentantunepoubellesurroulettesbarrée
1.Éteignezlamachineetdébranchezlecordond'alimentation.
2.Essuyezlasurfacedelamachineavecunchiffonhumideetséchezavecunchiffonsec.
Stockage:
1.Lapériodedegarantieestde1an(12mois)àcompterdeladated'achat.
ÉLIMINATIONCORRECTE
aveclesorduresménagèresnormales,maisdoitêtredéposédansunpointdecollectepour
Stockagehorssaison
2.Lesspécificationsduproduitsontsujettesàchangementsanspréavis.
recyclagedesappareilsélectriquesetélectroniques.
5.Scellezlamachinedansunsacenplastiqueetrangezladansunendroitsec.
touteeaucondenséerestanteàl’intérieur.
indiquequeleproduitnécessiteunecollecteséparéedesdéchets
Essuyezavecundétergentneutreoudel'alcoolsurunchiffonhumide,puisséchezavecunchiffonsec.
ServiceclientAvisimportant:
l'Unioneuropéenne.Celas'appliqueauproduitetàtouslesaccessoires
Lesproduitsmarquésdecesymbolenepeuventpasêtrejetés.
3.Enroulezfermementlecordond’alimentation.
Ceproduitestsoumisauxdispositionsdeladirectiveeuropéenne
4.Inclinezdoucementlamachineaveclasortiedevidangeverslebaspendant30minutespourlavidanger.
•Nettoyagedessurfaces
Machine Translated by Google


TRAGBARE KLIMAANLAGE
MODELL:S02/S03 Pro
Technischer Support und E-Garantiezertifikat www.vevor.com/support
„Sparen Sie die Hälfte“, „Halber Preis“ oder andere ähnliche von uns verwendete Ausdrücke
stellen nur eine Schätzung der Einsparungen dar, die Sie durch den Kauf bestimmter Werkzeuge
bei uns im Vergleich zu den großen Top-Marken erzielen könnten, und bedeuten nicht unbedingt, dass
alle angebotenen Werkzeugkategorien abgedeckt werden Wir möchten Sie bitten, bei Ihrer
Bestellung sorgfältig zu prüfen, ob Sie im Vergleich zu den Top-Marken
tatsächlich die Hälfte sparen.
Wir sind weiterhin bestrebt, Ihnen Werkzeuge zu wettbewerbsfähigen Preisen anzubieten.
Machine Translated by Google
BRAUCHEN SIE HILFE? KONTAKTIEREN SIE UNS!
Haben Sie Fragen zum Produkt? Nehmen Sie gerne Kontakt zu uns auf:
MODELL:S02/S03 Pro
Dies ist die Originalanleitung. Bitte lesen Sie alle Bedienungsanleitungen sorgfältig
durch, bevor Sie sie in Betrieb nehmen. Das Aussehen des Produkts unterliegt dem, was Sie
erhalten haben ob es Technologie- oder Software-Updates für unser Produkt gibt.
Spülung
Tragbare Luft
Technischer Support und E-Garantiezertifikat
www.vevor.com/support
Machine Translated by Google

Details können jedoch geringfügig von Ihrem spezifischen Modell abweichen
1. Verwenden Sie keine defekte oder ungeeignete Steckdose.
5. Achten Sie beim Reinigen der Maschine darauf, vorher den Strom abzuschalten.
12. Dieses Produkt ist nicht für folgende Gruppen geeignet: Kinder, behinderte Menschen,
psychisch kranke Menschen, Menschen mit geistiger Behinderung
Lesen Sie das gesamte Handbuch vor der Verwendung sorgfältig durch. Dieses Handbuch dient als allgemeiner Leitfaden
Identifizieren Sie alle Abweichungen von dem, was gezeigt wird. Genießen Sie Ihr neues tragbares Air
in der auf dem Karton angegebenen Richtung platziert werden
11. Kinder sollten unter Aufsicht von Erwachsenen verwendet werden und sollten dies nicht tun
stimmt mit dem überein, was beschrieben wird. Bitte nehmen Sie sich ein paar Minuten Zeit zum Lesen
E: in der Nähe von Badezimmer, Duschbad, Pool.
8. Ziehen Sie bei Donnergrollen den Netzstecker.
Vielen Dank für den Kauf dieser tragbaren Klimaanlage. Bitte lesen Sie die
Überprüfen Sie Ihr Gerät vor der Verwendung genau
Ihr Gerät kann in bestimmten Aspekten variieren, z. B. in den verfügbaren Modi oder
A: In der Nähe des Brandherdes. B: Orte, an
denen die Gefahr von Ölspritzern besteht
4. Um den Kompressor richtig zu platzieren, sollte die Maschine
Bewegen Sie sich langsam, wenn Sie sich bewegen.
muss angehalten und der Strom abgeschaltet werden.
Die hier beschriebenen Funktionen und Sicherheitsrichtlinien gelten für Ihr Gerät
2. Benutzen Sie die Maschine nicht in den folgenden Situationen.
6. Schalten Sie den Computer aus und trennen Sie ihn vorher von der Stromversorgung
10. Im Falle ungewöhnlicher Phänomene wie Brandgeruch, Betrieb
Behinderungen. Es sei denn, die Verwendung erfolgt unter der Aufsicht einer normalen Person.
Für den Betrieb Ihrer mobilen Klimaanlage beachten Sie bitte, dass einige
Conditioner!
Transport.
als Spielzeug verwendet.
Lesen Sie die Bedienungsanleitung vollständig durch und machen Sie sich mit den Funktionen Ihres Geräts vertraut
3. Stecken Sie keine Finger oder andere dünne Gegenstände usw. in den Luftauslass und informieren
Sie Kinder unbedingt über diese Gefahren.
9. Schalten Sie die Klimaanlage nicht direkt mit dem Netzschalter aus.
Das Layout des Bedienfelds, die grundlegende Bedienung und Verwendung sollten sein
7. Decken Sie die Maschine nicht ab, da sonst Brandgefahr besteht.
C: Direkte Sonneneinstrahlung vermeiden. D: Orte, an denen die Gefahr von Spritzwasser besteht
SICHERHEITSRICHTLINIEN
Machine Translated by Google

Hersteller.
Verschrottung.
3. Die Klimaanlage nicht beschädigen oder entzünden.
Die Klimaanlage verwendet ein umweltfreundliches R290-Kältemittel.
2. Benutzen Sie keine Methoden, um den Abtauvorgang zu beschleunigen oder zu reinigen
6. Sollte die relevanten nationalen Gasgesetze und -vorschriften einhalten.
Kältemittel, das die Ozonschicht und ihr Treibhaus nicht zerstört
der Zuckergussteil, es sei denn, dies wird ausdrücklich von der empfohlen
7. Entfernen Sie das Kältemittel aus dem Reinigungssystem zur Wartung oder
5. Im Wartungsfall wenden Sie sich bitte an den nächstgelegenen Kundendienst
Wenn Sie es im Raum mit der richtigen Fläche aufstellen und es richtig verwenden, besteht keine Gefahr
Der Effektwert ist ebenfalls sehr gering
Befolgen Sie strikt die Bedienungsanleitung des Kundendienstzentrums
Verbrennung und Explosion.
1. Bitte lesen Sie dieses Handbuch vor der Installation, Verwendung und Wartung.
Hersteller und verbieten die Wartung durch Laien.
4. Die Klimaanlage muss in Räumen ohne Dauerfeuer gelagert werden
Dies ist ein leicht brennbares Kältemittel, das jedoch brennen und explodieren kann
Im Vergleich zu herkömmlichem Kältemittel ist R290 umweltfreundlicher
Quellen (z. B. durch offenes Feuer entzündete Gasgeräte, elektrische Heizgeräte
usw.).
unter bestimmten Bedingungen, aber solange Sie die folgende Tabelle befolgen, installieren
Warnsprache für das Kältemittel R290
Machine Translated by Google
1
MENGE
1
6
1
Abluftkanäle
7
BILD
Abflussrohr
Schrauben
S02/S03 Pro
3
Adapter
5
2
2
Fernbedienung
NEIN.
1
Klimaanlage
4
1
1
1
Ablaufschutzstopfen
TEILELISTE
Machine Translated by Google
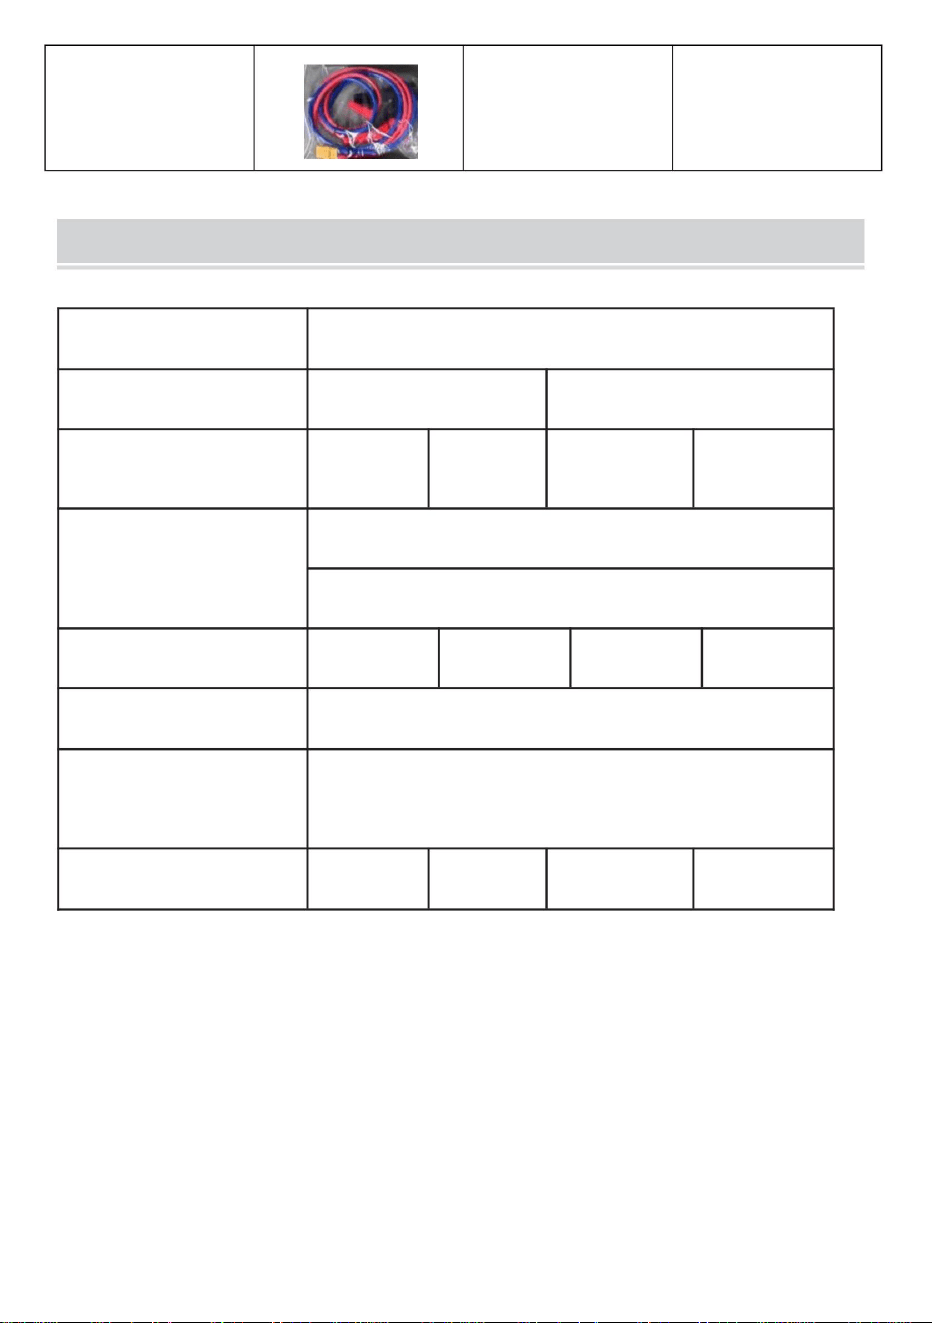
PARAMETERLISTE
15,5 kg 16,9 kg
50Hz
510x270x315m
Produktname
Kühlleistung
Körpermaße
14,1 kg
8
60Hz
<62dB(A)
Autoklemme
24V/220V~
S02
4000 BTU
Lärm
S03 Pro hat einen
S03 Pro
530W
12,6 kg
mehr Autoklemmen
Nennspannung/Frequenz 120V~60Hz 220V~50Hz 24V/120V~
Tragbare Klimaanlage
Nennleistung
R290/90g R290/140g R290/90g R290/140g
Produktmodell
Kühlschränke
Nettogewicht der Einheit
Machine Translated by Google
BEDIENFELD
Machine Translated by Google

2. „Modus“-Taste
Celsius und Fahrenheit.
„Timer“-Taste zum Einstellen eines Timers zum Ausschalten beim Einschalten. Verwenden Sie zum Einstellen die „+/-“-Tasten
Drücken Sie die „Mode“-Taste, um zwischen den Modi „Kühlung“, „Schlaf“,
„Entfeuchtung“ und „Luftzufuhr“ zu wechseln.
5. Schaltfläche „Entleeren“.
die Timer-Aus-Dauer. Drücken Sie die „Timer“-Taste, um einen Timer einzustellen, der eingeschaltet werden soll
Drücken Sie die Taste „ “, um die Klimaanlage aus dem Standby-Modus einzuschalten. Drücken Sie sie erneut
Drücken Sie im Kühl- und Schlafmodus die Tasten „+/-“, um die eingestellte Temperatur anzupassen.
6. „Timer“-Taste
Halten Sie beide Tasten 3 Sekunden lang gedrückt, um die Temperatureinheit umzuschalten
um in den Standby-Modus zu wechseln, wenn es läuft.
Geschwindigkeit zwischen hoch, mittel und niedrig. Diese Taste ist im Ruhezustand ungültig
Wenn Sie die Wasserpumpe ausschalten, schließen Sie das Abflussrohr an, um Wasserabfluss zu vermeiden
Diese Taste ist nur auf der Fernbedienung verfügbar, nicht auf dem Anzeigefeld
Entfeuchtungsmodi.
Bitte beachten Sie, dass beim Öffnen der „Ablassen“-Taste die Maschine überläuft
1. Taste „ “
4. „+/-“-Tasten
3. Taste „Lüftergeschwindigkeit“.
Wenn die Wasserpumpe läuft, drücken Sie die Taste „Ablassen“, um das Wasser abzustellen
Vermeiden Sie eine horizontale Position und neigen Sie nicht, um ein Austreten von Wasser in die Spüle zu vermeiden.
Drücken Sie im Kühl- und Luftzufuhrmodus die Taste „FanSpeed“, um den Lüfter zu ändern
Drücken Sie die Taste erneut, um die Wasserpumpe neu zu starten und den Betrieb fortzusetzen.
Mit den Tasten „+/-“ stellen Sie die Einschaltdauer des Timers ein.
2 Schlüsselanweisungen
Machine Translated by Google

-Das erste Einschalten
Hinweis 1: Um Störungen abzufragen, halten Sie die Windgeschwindigkeitstaste und die - Taste 2 Sekunden lang gedrückt.
Originalmodus, mit der zuvor eingestellten Temperatur, Windgeschwindigkeit, Temperatur
- Innerhalb von 3 Minuten nach dem Ausschalten
Um die Fehlerabfrage zu verlassen und zur normalen Anzeige zurückzukehren, drücken Sie die Tasten „Windgeschwindigkeit“
und „-“ erneut 2 Sekunden lang. Nach einem Stromausfall gehen die Fehlerinformationen verloren
Gerät, Status des Wassermotorschalters usw. Nach dem Ausschalten.
1. Wechseln Sie vor dem Ausschalten in den Standby-Modus oder stellen Sie eine timerbasierte Abschaltung ein
Die Mindestzeit, bevor der Kompressor nach dem Stoppen wieder starten kann, beträgt 3 Minuten.
Laufzeit vor jedem Start-/Stopp-Zyklus.
beim Einschalten, dann nach dem Einschalten in den Standby-Modus wechseln.
Diese 3-minütige Wartezeit ist nicht erforderlich für:
2. Wenn das Gerät vor dem Ausschalten wieder eingeschaltet wird, wird der Betrieb wieder aufgenommen
Nach dem Einschalten läuft der Kompressor unter bestimmten Bedingungen noch mindestens 3 Minuten
Vorrang haben, falls vorhanden.
Wenn die Abschaltvoraussetzungen erfüllt sind, wird das Gerät innerhalb der ersten 3 Minuten nicht abgeschaltet, es sei denn, das Gerät ist dies
3.1 Kompressorschutz
Dieser Schutz stellt sicher, dass der Kompressor mindestens eine Minute lang läuft
- Innerhalb von 3 Minuten nach dem erneuten Einschalten nach dem Ausschalten
müssen regeneriert werden. Halten Sie die Windgeschwindigkeits- und --Tasten 2 Sekunden lang gedrückt
Die einzige Ausnahme besteht innerhalb der 3 Minuten vor dem Ausschalten.
fragt alle Fehler ab und zeigt sie an, wobei mehrere Fehler gleichzeitig der Reihe nach angezeigt werden
3.2 Ausfallsicher
3 Schutzhinweise
3.3 Speicherfunktion
Versagen
Der Name von Code
der Fehler
zeigt an
Seriell
E1
Nummer
Innenatmosphäre
offen oder kurzgeschlossen
Stillstand
Temperatur
Die Abfrage
Versagen
Statisch
Fehlerbeschreibung Fehlerbehebung Veranschaulichen
Anzeige
Der Sensor ist
Machine Translated by Google

2. Bevor Sie das Gerät verwenden, identifizieren Sie bitte den Kaltluftauslass und den Heißluftauslass
Benutzen Sie das Gerät nicht, wenn
es unbeaufsichtigt ist
Ziehen Sie nicht am Kabel, um das Gerät zu bewegen.
• Bitte installieren Sie das Elektrogerät nicht in einem Raum mit natürlichem Sonnenlicht
Basierend auf den Markierungen am Gerät sind die oberen Auslässe an beiden Enden Luftauslässe,
und die unteren sind Lufteinlässe
kann nicht für andere Zwecke verwendet
werden. •Wenn das Netzkabel beschädigt ist, muss es durch das ersetzt werden
Gas, Benzin und Schwefel, und es darf nicht in der Nähe der Wärmequelle installiert werden.
•Benutzen Sie das Elektrogerät nicht auf dem Boden. •Achten Sie
darauf, einen Abstand von mindestens 45 cm zu brennbaren Stoffen einzuhalten
Halten Sie den Pfeil auf der Verpackung jeweils zwei Stunden lang gedrückt, bevor Sie das Gerät einschalten
die Warnung vor Ereignissen so weit wie möglich und die üblichen Praktiken Sie
Der interne Stromkreis muss vom technischen Personal mit elektrischen Geräten getestet werden
Nach dem Ausschalten müssen Sie mindestens 5 Minuten warten, bevor Sie das Gerät wieder einschalten.
•Kindern oder Personen, die nicht in der Lage sind, sich selbst zu versorgen, ist die Verwendung
dieses Geräts untersagt
Wenden Sie sich an ein vom Hersteller autorisiertes Servicecenter. Halten Sie sich an die Verwendung des
Qualifikation.
•Verwenden Sie das Elektrogerät nicht im Freien. •Verwenden
Sie keine Epitaxiekabel, bevor Sie das Gerät reinigen
oder warten
Original gefährdete Teile, Reparatur durch Unbefugte sind ausgeschlossen
1. Stellen Sie die Maschine beim Kauf bitte in der durch angezeigten Richtung auf
Benutzen Sie das Gerät wie in der Gebrauchsanweisung beschrieben. Wie andere
Elektrogeräte soll auch diese Bedienungsanleitung enthalten
Lassen Sie zum Heißluftauslass einen freien Raum von mindestens 60 cm
Wenden Sie sich bitte an den Hersteller, den Kundendienst oder eine gleichwertige Organisation, um
Gefahren zu vermeiden. •Jede Änderung oder Ersetzung der Geräteeigenschaften ist sehr wichtig
gefährlich und die Garantie erlischt. •Das Elektrogerät
muss geerdet installiert werden
Auf beiden Seiten der Maschine muss ein Freiraum von mindestens 10 cm oder mehr vorhanden sein.
gefährlich.
•Wenn das Gerät repariert werden muss, wenden Sie sich bitte an den Techniker
Materialien (z. B. Alkohol) oder haltbare Behälter (Egaerosoltanks).
WARNHINWEISE
4 Benutzerhinweis:
SICHERHEIT & WARNHINWEISE
Machine Translated by Google
BETRIEB
Standards.Der Kreislauf des Kältemittels in den Elektrogeräten ist
Beim Transport müssen Sie bitte eine halbe Stunde warten. •R290 Es handelt
sich um ein Kältemittel, das den geltenden Umweltvorschriften entspricht
geschlossen. Nach Ablauf der Lebensdauer bitte die Elektrik einreichen
entsprechende Abfallsortierbehälter •Die Installation
des Elektrogeräts muss mit der übereinstimmen
Bitte entleeren Sie zuerst das Wasser im Wassertank
Bringen Sie Ihre Geräte zu einem speziellen
Recyclinghof. • Verpackungen sind recycelbar, es wird daher empfohlen, sie in den Recyclinghof zu geben
vertikal und legen Sie es auf eine Seite. Beim Bewegen der elektrischen
•Stellen Sie keine schweren oder heißen Gegenstände auf die Oberseite der Maschine.
•Reinigen Sie das Filtersieb regelmäßig.
•Bewahren Sie es beim Transport auf
Installieren der Hot-End-Lüfterverkleidung und des Kanals.
relevanten nationalen Gesetzen und Vorschriften.
Installation von Lüftungskanälen.
Machine Translated by Google
Empfehlungen:
Zelt
SZENARIEN NUTZEN
Achten Sie bei Zelten mit Belüftungslöchern auf die Abdichtung. Bitte schließen oder decken Sie die Belüftungslöcher ab.
Achten Sie auf Sonnenschutz, Markisen können Sie zum Abdecken von Zelten verwenden.
Achten Sie auf die Isolierung des Zeltes. Wenn das Zelt schlecht isoliert ist, decken Sie das Zelt bitte mit einer
wärmeisolierenden Matte ab.
1.Stellen Sie es außerhalb des Zeltes auf, wobei die Kaltluftöffnung in das Zelt gerichtet sein muss.
Wenn das Zelt groß ist und die Raumkühlung der Klimaanlage übersteigt, fügen Sie bitte eine weitere Klimaanlage hinzu
oder schaffen Sie mit einer Stofftrennwand einen kleinen Kühlraum im Zelt.
Machine Translated by Google
• S03-Pro: Eingangsspannung: AC 110 V-60 Hz/DC 24 V (Nordamerika)
AC 220V-50Hz/DC24V (Europäische Union, Australien)
AC 220V-50Hz (Europäische Union, Australien)
• S02: Eingangsspannung AC 110 V-60 Hz (Nordamerika)
STROMVERSORGUNG
Stromspannung Kapazität
Ausgangsleistung
(S03-Pro) Empfehlung für mobile DC24V-Stromversorgung
DC24V
ÿ150AH
ÿ3500W
Machine Translated by Google

Reinigen Sie den Filter mit einem neutralen Reinigungsmittel bei 40 °C und trocknen Sie ihn anschließend an der Luft
• Um die Klimaanlage zu schützen, muss sie sauber gehalten werden und Ölflecken vermieden werden
1. Überschreiten Sie nicht den Fernbedienungsabstand (32 Fuß/10 m).
und Verformung. Wenn das Öl längere Zeit an den Kunststoffteilen haftet, wird der Kunststoff beschädigt
2. Überprüfen Sie, ob die Fernbedienung beschädigt ist.
Reinigen Sie den Filter einmal im Monat. Lösen Sie die Befestigung mit einem kleinen Kreuzschlitzschraubendreher
Minuten ziehen und dann den Stecker aus der Steckdose ziehen. •
Reinigen Sie das Gerät mit einem leicht feuchten Tuch und trocknen Sie es anschließend mit einem Tuch ab
Wir empfehlen, die Klimaanlage auszuschalten und das Gerät nach 15 Minuten wieder einzuschalten.
2. Verwenden Sie zum Reinigen keine chemischen Lösungsmittel wie Benzin.
Pflege von Kunststoffteilen:
• Die Fernbedienung funktioniert nicht:
3. Nicht direkt mit Wasser abspülen.
einen schattierten Bereich neu laden und mit Schrauben befestigen.
• Das Gerät kühlt nicht. Bitte prüfen Sie, ob der Lufteinlass und -auslass blockiert ist.
Reinigungshinweise
• Schalten Sie das Gerät vor der Reinigung oder Wartung einige Zeit aus
Überprüfen Sie bei Verwendung des Luftkanals, ob der Kanal übermäßig gebogen oder verstopft ist, was zu einer
Überhitzung des Kompressors führt und zum Schutz anhält
Teile werden altern, reißen und riechen. Daher sollten wir die Klimaanlage regelmäßig reinigen. • Waschen Sie
die Klimaanlage niemals mit Wasser
3. Ersetzen Sie die Batterie der Fernbedienung.
1. Stellen Sie sicher, dass die Maschine vor der Reinigung vom Stromnetz getrennt ist.
• Verwenden Sie niemals Benzin,
Alkohol oder Lösungsmittel, um das Gerät zu reinigen. • Sprühen Sie niemals
Insektizidflüssigkeiten oder ähnliches.
4. Koppeln der Fernbedienung.
Schrauben wie abgebildet. Ziehen Sie den Filter heraus und legen Sie ihn in lauwarmes Wasser, gemischt mit a
WARTUNGSDIENST
PFLEGEHINWEISE
FEHLERBEHEBUNG
• Filtern
Machine Translated by Google
1. Schalten Sie die Maschine aus und ziehen Sie den Netzstecker.
3. Das Produkt wird möglicherweise aufgrund der Nichtverfügbarkeit elektronischer Komponenten eingestellt.
2. Wischen Sie die Maschinenoberfläche mit einem feuchten Tuch ab und trocknen Sie sie mit einem trockenen Tuch ab.
RICHTIGE ENTSORGUNG
Lagerung:
1. Die Garantiezeit beträgt 1 Jahr (12 Monate) ab Kaufdatum.
Entsorgen Sie es mit dem normalen Hausmüll, müssen es aber einer Sammelstelle zuführen
Lagerung außerhalb der Saison
2. Produktspezifikationen können ohne vorherige Ankündigung geändert werden.
verbleibendes Kondenswasser im Inneren.
weist darauf hin, dass das Produkt einer getrennten Müllabfuhr bedarf
Recycling elektrischer und elektronischer Geräte.
5. Verschließen Sie die Maschine in einer Plastiktüte und lagern Sie sie an einem trockenen Ort.
der Europäischen Union. Dies gilt für das Produkt und sämtliches Zubehör
Wischen Sie es mit einem neutralen Reinigungsmittel oder Alkohol auf einem feuchten Tuch ab und trocknen Sie es anschließend mit einem trockenen Tuch ab.
Wichtiger Hinweis der Kundendienstabteilung:
3. Wickeln Sie das Netzkabel fest auf.
Dieses Produkt unterliegt den Bestimmungen der europäischen Richtlinie
Mit diesem Symbol gekennzeichnete Produkte dürfen nicht entsorgt werden
4. Kippen Sie die Maschine vorsichtig mit der Ablauföffnung nach unten und lassen Sie sie 30 Minuten lang abtropfen
2012/19/EU. Das Symbol einer durchgestrichenen Mülltonne
• Oberflächenreinigung
Machine Translated by Google


CONDIZIONATORE PORTATILE
"Risparmia la metà", "Metà prezzo" o qualsiasi altra espressione simile da noi
utilizzata rappresenta solo una stima del risparmio che potresti trarre dall'acquistare
determinati strumenti con noi rispetto ai principali marchi più importanti e non significa
necessariamente coprire tutte le categorie di strumenti offerti da noi. Ti ricordiamo di
verificare attentamente quando effettui un ordine con noi se stai
effettivamente risparmiando la metà rispetto ai migliori marchi principali.
Continuiamo a impegnarci per fornirvi strumenti a prezzi competitivi.
MODELLO:S02/S03 Pro
Supporto tecnico e certificato di garanzia elettronica www.vevor.com/support
Machine Translated by Google
HAI BISOGNO DI AIUTO?
Supporto tecnico e certificato di garanzia
elettronica www.vevor.com/support
Hai domande sul prodotto? Hai bisogno di supporto tecnico? Non esitare a contattarci:
MODELLO:S02/S03 Pro
Questa è l'istruzione originale, si prega di leggere attentamente tutte le istruzioni del
manuale prima di utilizzare. VEVOR si riserva una chiara interpretazione del nostro manuale
utente. L'aspetto del prodotto sarà soggetto al prodotto ricevuto se sono presenti
aggiornamenti tecnologici o software sul nostro prodotto.
Condizionatore
Aria portatile
Machine Translated by Google

attraverso il manuale completamente e familiarizzare con le caratteristiche del tuo
attentamente l'intero manuale prima dell'uso. Questo manuale funge da guida generale
identifica eventuali variazioni rispetto a quanto mostrato. Goditi la tua nuova aria portatile
essere posizionato nella direzione indicata dal cartone durante
11. I bambini dovrebbero essere utilizzati sotto la supervisione di un adulto e non dovrebbero esserlo
i dettagli potrebbero differire leggermente dal modello specifico. Tuttavia, i dettagli di base
1. Non utilizzare una presa rotta o inadatta.
5. Quando si pulisce la macchina, assicurarsi di interrompere preventivamente l'alimentazione.
12. Questo prodotto non è adatto ai seguenti gruppi: bambini, disabili, malati di mente,
persone con problemi intellettivi
muoversi lentamente durante lo spostamento.
la macchina può variare in alcuni aspetti come le modalità disponibili o
A: Vicino alla fonte dell'incendio B: Siti a
rischio di spruzzi d'olio
deve essere fermato e tolta l'alimentazione.
Grazie per aver acquistato questo condizionatore portatile. Si prega di leggere il
E: vicino al bagno, alla doccia, alla piscina.
8. Scollegare la spina di alimentazione quando rimbomba il tuono.
condizionatore d'aria portatile prima dell'uso. Consultare attentamente l'unità stessa
4. Per posizionare correttamente il compressore, la macchina dovrebbe
coerente con quanto descritto. Si prega di dedicare qualche minuto alla lettura
per il funzionamento del condizionatore portatile. Tieni presente che alcuni
condizionatore!
trasporto.
10. In caso di fenomeni anomali come odore di bruciato, procedere al funzionamento
usati come giocattoli.
le funzioni e le linee guida sulla sicurezza qui descritte si applicheranno alla tua unità
6. Spegnere prima il computer e scollegare l'alimentazione
2. Non utilizzare la macchina nelle seguenti situazioni.
disabilità. A meno che non venga utilizzato sotto la supervisione di una persona normale.
layout del pannello di controllo, dovrebbero essere il funzionamento e l'uso fondamentali
C: Evitare l'esposizione diretta alla luce solare D: Siti a rischio di spruzzi d'acqua
7. Non coprire la macchina, altrimenti pericolo di incendio.
9. Non spegnere direttamente il condizionatore d'aria con l'interruttore di alimentazione.
3. Non inserire le dita o altri oggetti sottili, ecc. nell'uscita dell'aria e assicurarsi di informare i
bambini di questi pericoli.
LINEE GUIDA PER LA SICUREZZA
Machine Translated by Google

la parte glassata ad eccezione di quanto specificamente raccomandato dal
7. Rimuovere il refrigerante dal sistema di pulizia per la manutenzione o
posizionarlo nella stanza con l'area giusta e usarlo correttamente, non c'è rischio di
anche il valore dell'effetto è molto basso
2. Non utilizzare alcun metodo per accelerare il processo di sbrinamento o pulire
6. Dovrebbe rispettare le leggi e i regolamenti nazionali in materia di gas.
refrigerante che non distrugge lo strato di ozono e la sua serra
3. Non forare né accendere il condizionatore d'aria.
rottamazione.
Il condizionatore d'aria utilizza un refrigerante ecologico R290.
produttore.
fonti di calore (apparecchi a gas accesi da fiamme libere, riscaldatori elettrici, ecc.).
in determinate condizioni, ma purché si segua la tabella seguente, installare
4. Il condizionatore d'aria deve essere conservato in stanze senza fuoco continuo
Si tratta di un refrigerante leggermente combustibile, sebbene possa bruciare ed esplodere
1. Leggere questo manuale prima dell'installazione, dell'uso e della manutenzione.
produttore e vietare la manutenzione da parte di non professionisti.
combustione ed esplosione.
Rispetto al refrigerante ordinario, l'R290 è ecologico
centro di assistenza Seguire rigorosamente il manuale operativo fornito dal
5. In caso di manutenzione rivolgersi al centro assistenza più vicino
Lingua di avvertenza per il refrigerante R290
Machine Translated by Google
S02/S03 Pro
3
5
2
IMMAGINE
Tubo di scarico
Vite
Tappi di protezione dello scarico
7
1
Condotti di scarico
1
6
QUANTITÀ
1
1
1
condizionatore d'aria
4
NO.
1
Telecomando
1
2
Adattatori
ELENCO PARTI
Machine Translated by Google
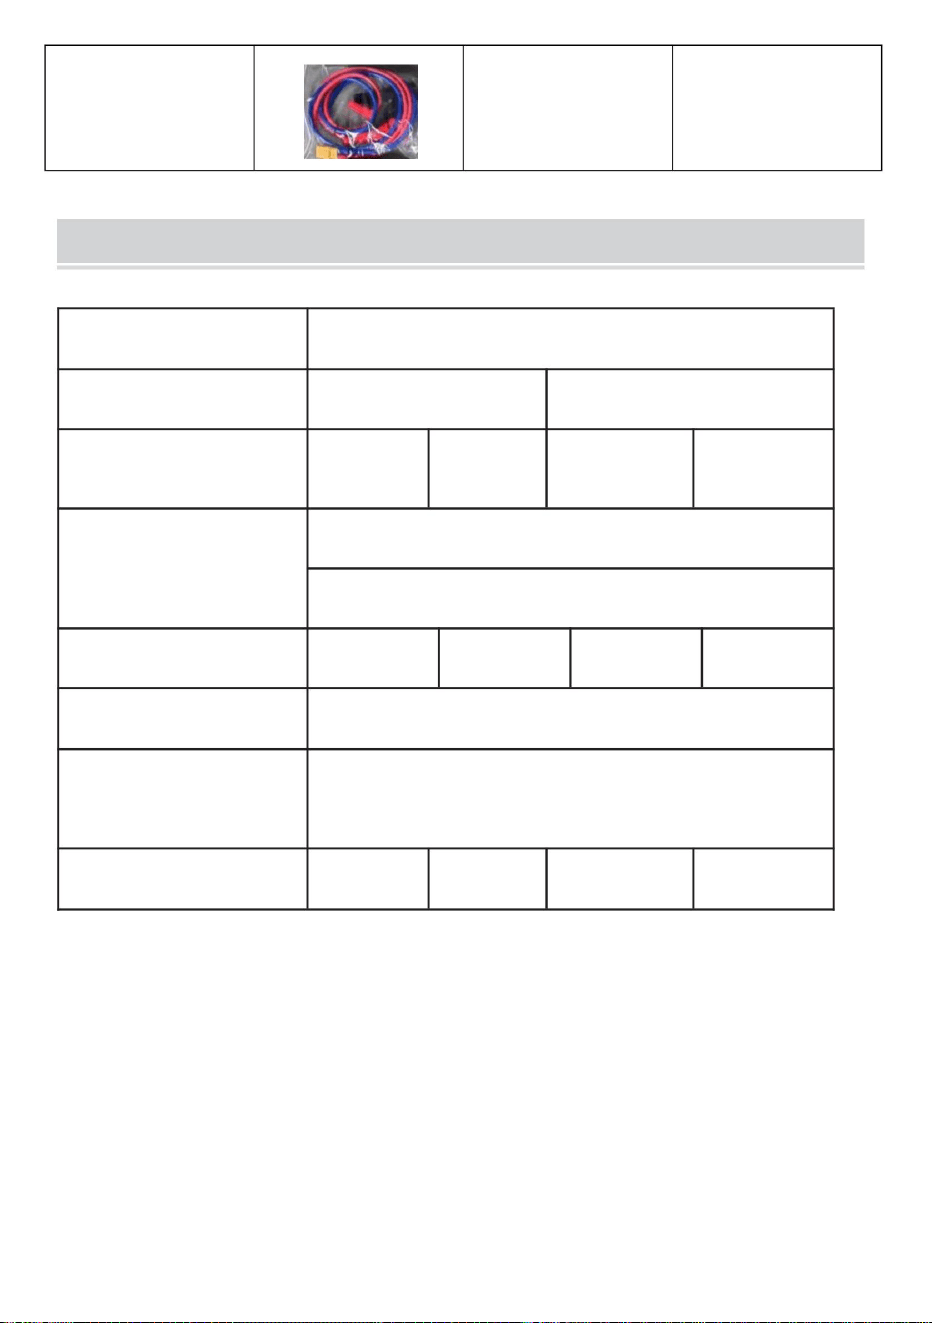
ELENCO PARAMETRI
Morsetto per auto
24V/220V~
S02
4000 BTU
8
60Hz
<62dB(A)
Rumore
Dimensioni del corpo
Peso netto unitario 12,6 kg
Nome del prodotto
Capacità di raffreddamento
50Hz
510x270x315m
16,9 kg 14,1 kg
Modello del prodotto
Frigoriferi
15,5 kg
Condizionatore portatile
Potenza nominale
più morsetti per auto
Tensione/frequenza nominale 120 V~60 Hz 220 V ~ 50 Hz 24 V/120 V ~
530 W
R290/90g R290/140g R290/90g R290/140g
S03 Pro ne ha uno
S03 Pro
Machine Translated by Google
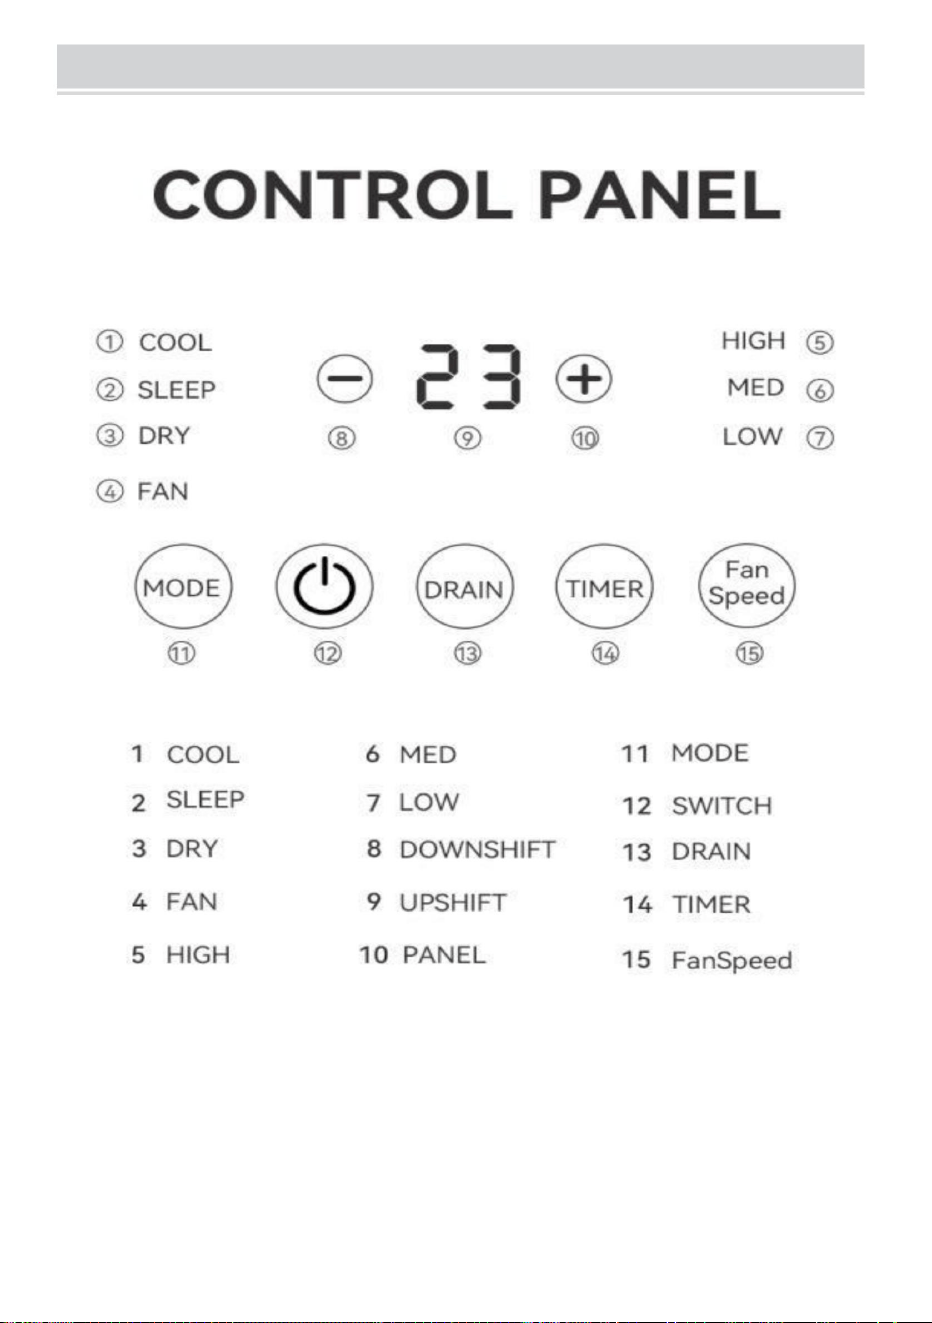
PANNELLO DI CONTROLLO
Machine Translated by Google

per entrare in modalità standby quando è in esecuzione.
Tenere premuti entrambi i tasti per 3 secondi per alternare l'unità di temperatura
Quando si spegne la pompa dell'acqua, collegare il tubo di scarico per drenare l'acqua per evitare
Questo tasto è disponibile solo sul telecomando, non sul display. Premere il
Premere il tasto " " per accendere il condizionatore d'aria dalla modalità standby. Premere di nuovo
Nelle modalità raffreddamento e sospensione, premere i tasti "+/-" per regolare la temperatura impostata.
6. Tasto "Timer".
standby Utilizzare i tasti "+/-" per regolare la durata di accensione del timer.
la durata dello spegnimento del timer Premere il tasto "Timer" per impostare un timer per l'accensione
Premere il tasto "Modalità" per alternare tra le modalità "Raffreddamento",
"Sonno", "Deumidificazione" e "Alimentazione aria".
Celsius e Fahrenheit.
5. Pulsante "Scarico".
Tasto "Timer" per impostare un timer da spegnere all'accensione. Utilizzare i tasti "+/-" per regolare
2. Tasto "Modalità".
Nelle modalità di raffreddamento e di alimentazione dell'aria, premere il tasto "FanSpeed" per cambiare la ventola
pompa Premerlo nuovamente per riavviare la pompa dell'acqua e riprendere il funzionamento.
3. Tasto "Velocità ventola".
Quando la pompa dell'acqua è in funzione, premere il pulsante "Scarico" per chiudere l'acqua
4. Tasti "+/-".
1. " " Chiave
troppopieno. Quando si apre il pulsante "Scarico", chiedere alla macchina di farlo
impedire la posizione orizzontale, non inclinare, in modo da evitare perdite d'acqua nel lavandino.
modalità di deumidificazione.
velocità tra alta, media e bassa. Questo tasto non è valido in modalità sospensione e
2 Istruzioni chiave
Machine Translated by Google

Questo periodo di attesa di 3 minuti non è richiesto per:
di priorità se presente.
all'accensione, quindi entra in standby dopo l'accensione.
2. Se l'alimentazione viene accesa prima dello spegnimento, riprenderà a funzionare
Il tempo minimo prima che il compressore possa riavviarsi dopo l'arresto è di 3 minuti.
tempo di esecuzione prima di ogni ciclo di avvio/arresto.
1., Accedere alla modalità standby prima di spegnere o impostare uno spegnimento basato su timer
Per uscire dalla richiesta di guasto e riprendere la visualizzazione normale, premere nuovamente a lungo i tasti
velocità del vento e - per 2 secondi. Le informazioni sul guasto andranno perse dopo un'interruzione di corrente e
unità, stato dell'interruttore della campana idraulica, ecc. Dopo lo spegnimento.
-Entro 3 minuti dallo spegnimento
Nota 1: per interrogare i guasti, premere a lungo il tasto velocità del vento e il tasto - per 2 secondi.
modalità originale, con la temperatura, la velocità del vento, la temperatura precedentemente impostate
-La prima accensione
L'unica eccezione è entro i 3 minuti prima dello spegnimento.
interrogherà e visualizzerà eventuali errori, mostrando più errori contemporaneamente in ordine
devono essere rigenerati Premendo a lungo i tasti velocità del vento e - per 2 secondi
- Entro 3 minuti dalla riaccensione dopo lo spegnimento
3.1 Protezione del compressore
spegnimento. Questa protezione garantisce il funzionamento del compressore al minimo
per lo spegnimento sono soddisfatti, non si spegnerà entro i primi 3 minuti a meno che l'unità non lo sia
Dopo l'accensione, il compressore funzionerà per almeno 3 minuti
3.2 A prova di guasto
3 Istruzioni di protezione
3.3 Funzione di memoria
aperto o in corto
numero
Arresto
Seriale
visualizza
E1
la colpa
codiceIl nome di
Fallimento
display
Il sensore è
Statico
Descrizione del guasto Risoluzione dei problemi Illustrare
fallimento
temperatura
La domanda
Ambiente interno
Machine Translated by Google

dopo lo spegnimento è necessario attendere almeno 5 minuti prima di riaccendere.
necessario per il funzionamento e l'installazione dell'apparecchio elettrico. • È vietato l'uso
ai bambini o alle persone senza capacità di auto-cura
qualificazione
•Non utilizzare l'apparecchio elettrico all'aperto. •Non
collegare l'uscita e l'ingresso dell'aria. •Non
utilizzare cavi epitassiali. •Estrarre la spina di
alimentazione prima di pulire o eseguire la manutenzione dell'apparecchio
la freccia sulla confezione per 2 ore prima di accendere ogni volta
l'avviso degli eventi il più possibile e le solite pratiche
il circuito interno deve essere testato dal personale tecnico con l'impianto elettrico
gas, benzina e zolfo e non può essere installato vicino a una fonte di calore. •Non utilizzare
l'apparecchio elettrico su un terreno in pendenza. •Assicurarsi di mantenere
una distanza di almeno 45 cm da sostanze infiammabili
in base ai contrassegni sull'unità. Le uscite superiori su entrambe le estremità sono uscite
dell'aria, mentre quelle inferiori sono prese d'aria. Non ostruire rigorosamente le uscite dell'aria davanti
prodotto senza supervisione.
•L'apparecchio elettrico è progettato per uso domestico in interni e
non può essere utilizzato per altri scopi. •Se
il cavo di alimentazione è danneggiato, deve essere sostituito da
non tirare il cavo per spostare l'apparecchio. •Non
installare l'apparecchio elettrico in una stanza con esposizione naturale
2. Prima di utilizzare la macchina, identificare l'uscita dell'aria fredda e l'uscita dell'aria calda
Spazio libero di almeno 10 cm o più su entrambi i lati della macchina.
pericoloso.
•Se è necessario riparare l'apparecchio, contattare il tecnico
dall'uscita dell'aria calda, lasciare uno spazio libero di almeno 60 cm. Lasciare a
produttore, agente di assistenza o organizzazione equivalente per evitare pericoli. • Qualsiasi
modifica o sostituzione delle caratteristiche dell'apparecchio è molto pericolosa
Utilizzare l'apparecchio come descritto nella Guida alle istruzioni per l'uso. Come altri
apparecchi elettrici, questo manuale di istruzioni mira a includere
1. Al momento dell'acquisto della macchina, posizionarla rivolta nella direzione indicata da
parti vulnerabili originali, riparazione da parte di persone non autorizzate
pericoloso e la garanzia non è valida.
•L'apparecchio elettrico deve essere installato con messa a terra e il
materiali (come l'alcol) o contenitori durevoli (serbatoi di gaserosol).
centro di assistenza autorizzato dal produttore, aderire all'uso del
L'AVVERTIMENTO È IMPORTANTE
4 Avviso per l'utente:
SICUREZZA E AVVERTENZE
Machine Translated by Google
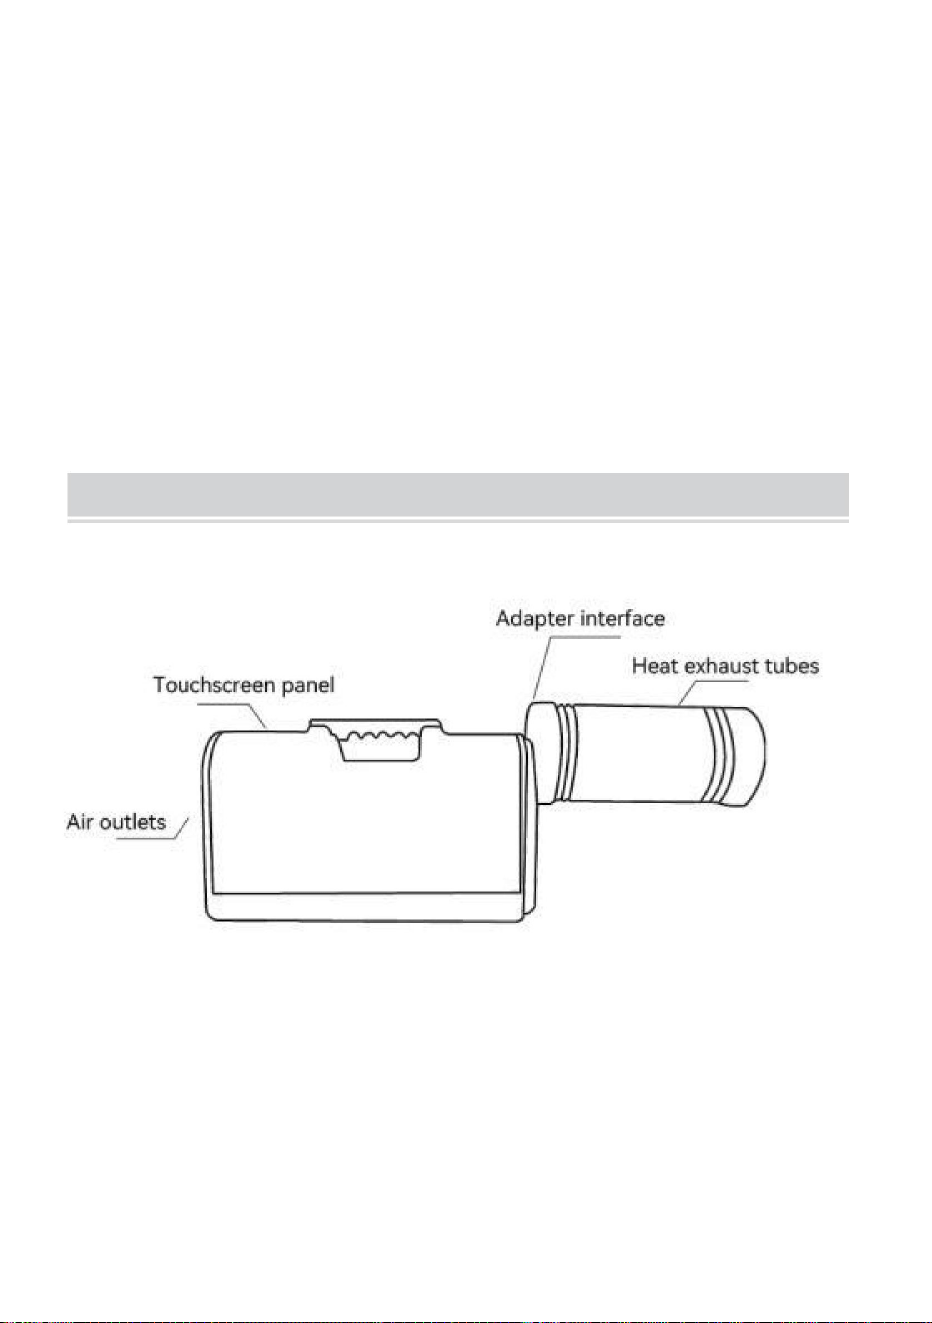
OPERAZIONE
norme.Il ciclo del refrigerante negli apparecchi elettrici è
trasporto, se è necessario avviarlo, attendere mezz'ora •R290 È un
refrigerante conforme alle normative ambientali pertinenti
chiuso. Al termine della vita utile, inviare i componenti elettrici
contenitori per il riciclaggio della raccolta differenziata
corrispondenti. •L'installazione dell'apparecchio elettrico deve essere coerente con
verticale e posizionarlo su un lato. Quando si sposta l'impianto elettrico
elettrodomestici in un centro di riciclaggio
speciale. • Gli imballaggi sono riciclabili, quindi si consiglia di collocarli nel
dell'apparecchio, svuotare prima l'acqua nel serbatoio. Dopo
•Non posizionare oggetti pesanti o caldi sulla parte superiore della macchina.
•Pulire regolarmente lo schermo del
filtro. •Durante il trasporto dell'apparecchio elettrico, conservarlo
Installazione della copertura e del condotto della ventola dell'hot-end.
Installazione di condotti di ventilazione.
leggi e regolamenti nazionali pertinenti.
Machine Translated by Google
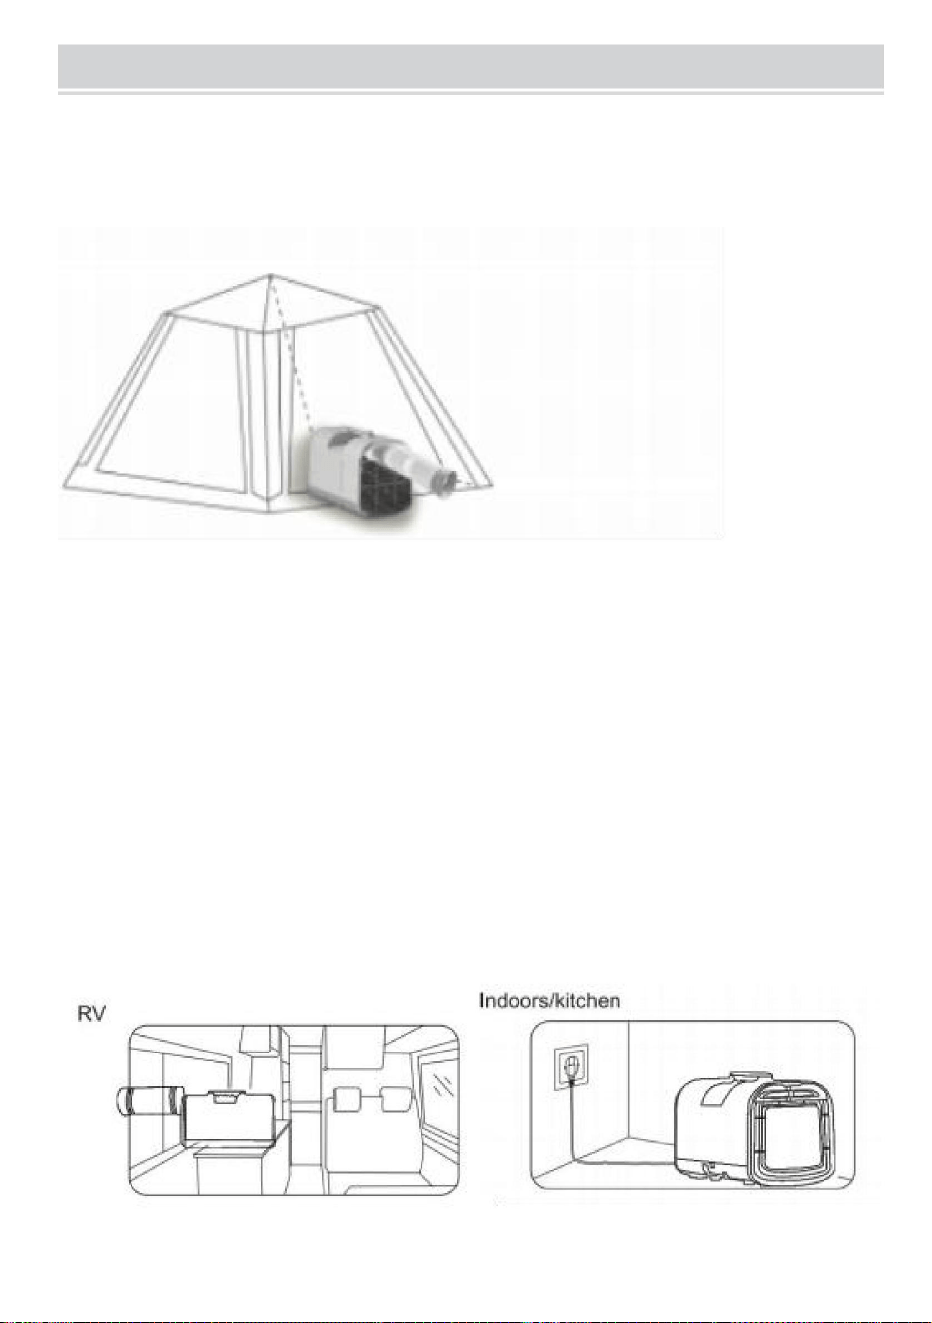
Tenda
Raccomandazioni:
USA SCENARI
Prestare attenzione all'isolamento della tenda. Se la tenda ha uno scarso isolamento, coprire la tenda con un
tappetino termoisolante.
Fate attenzione agli ombrelloni, potete utilizzare dei tendalini per coprire le tende.
Prestare attenzione alla sigillatura, alle tende con fori di ventilazione, quindi chiudere o coprire i fori di ventilazione.
1. Posizionare all'esterno della tenda con la presa d'aria fredda diretta all'interno della tenda.
Se la tenda è grande e supera lo spazio di raffreddamento del condizionatore d'aria, aggiungere un altro
condizionatore d'aria o creare un piccolo spazio di raffreddamento all'interno della tenda con un divisorio in tessuto.
Machine Translated by Google
• S03-Pro: tensione in ingresso: CA 110 V-60 Hz/CC 24 V (Nord America)
CA 220 V-50 Hz/CC 24 V (Unione Europea, Australia)
CA 220 V-50 Hz (Unione Europea, Australia)
• S02: tensione in ingresso CA 110 V-60 Hz (Nord America)
ALIMENTAZIONE ELETTRICA
Potenza in uscita
capacitàvoltaggio
(S03-Pro) Alimentazione mobile DC24V consigliata
DC24V
ÿ150 Ah
ÿ3500W
Machine Translated by Google

• Il telecomando non funziona:
panno asciutto. Manutenzione delle parti in plastica:
3. Non risciacquare direttamente con acqua.
un'area ombreggiata Ricaricare e fissare con le viti.
minuti, quindi scollegarlo dalla presa elettrica. • Pulire
l'apparecchio con un panno leggermente umido, quindi asciugarlo con un panno
si consiglia di spegnere il condizionatore e riaccendere il dispositivo dopo 15 minuti.
2. Non utilizzare solventi chimici come la benzina per la pulizia.
Pulire il filtro una volta al mese Utilizzare un piccolo cacciavite Phillips per allentare il fissaggio
e deformazione. Se l'olio rimane attaccato alle parti in plastica per lungo tempo, la plastica
2. Controllare se il telecomando è danneggiato.
1. Non superare la distanza del telecomando (32 piedi/10 m).
• Per proteggere il condizionatore d'aria, è necessario mantenerlo pulito e cercare di evitare macchie d'olio
da ridurre e arrugginire. • Non
utilizzare mai benzina, alcool o solventi per pulire l'apparecchio. • Non spruzzare mai
liquidi insetticidi o simili.
4. Associazione del telecomando.
detergente neutro a 40°C Utilizzare una spazzola per pulire lo sporco sul filtro, quindi asciugare all'aria
le parti invecchiano, si screpolano e emanano cattivi odori. Pertanto, è necessario pulirlo regolarmente. •
Non lavare mai il condizionatore d'aria con acqua per evitare l'isolamento elettrico
3. Sostituire la batteria del telecomando.
• Prima della pulizia o della manutenzione, spegnere l'apparecchio
Quando si utilizza il condotto dell'aria, verificare se il condotto è eccessivamente piegato o bloccato,
causando il surriscaldamento e l'arresto del compressore
Istruzioni per la pulizia
1. Assicurarsi che la macchina sia scollegata prima della pulizia.
• L'unità non si raffredda, controllare se l'ingresso e l'uscita dell'aria sono bloccati.
viti come mostrato Estrarre il filtro e immergerlo in acqua tiepida mescolata con a
RISOLUZIONE DEI PROBLEMI
ISTRUZIONI PER LA CURA
SERVIZIO DI MANUTENZIONE
• Filtra
Machine Translated by Google
Deposito fuori stagione
2. Le specifiche del prodotto sono soggette a modifiche senza preavviso.
indica che il prodotto necessita della raccolta differenziata dei rifiuti
riciclaggio di dispositivi elettrici ed elettronici.
Magazzinaggio:
1. Il periodo di garanzia è di 1 anno (12 mesi) dalla data di acquisto.
con i normali rifiuti domestici, ma devono essere portati in un punto di raccolta
2. Pulisci la superficie della macchina con un panno umido e asciugala con un panno asciutto.
3. La produzione del prodotto potrebbe essere interrotta a causa dell'indisponibilità dei componenti elettronici.
CORRETTO SMALTIMENTO
1. Spegnere la macchina e scollegare il cavo di alimentazione.
4. Inclinare delicatamente la macchina con l'uscita di scarico rivolta verso il basso per 30 minuti per scaricare
2012/19/UE.Il simbolo raffigurante un bidone della spazzatura barrato
3. Avvolgere saldamente il cavo di alimentazione.
Questo prodotto è soggetto alle disposizioni della Direttiva Europea
Pulisci con un detergente neutro o alcol su un panno umido, quindi asciuga con un panno asciutto.
Avviso importante del servizio clienti:
dell'Unione Europea. Ciò vale per il prodotto e tutti gli accessori
I prodotti contrassegnati con questo simbolo non possono essere eliminati
5. Sigillare la macchina in un sacchetto di plastica e conservarla in un luogo asciutto.
l'eventuale acqua di condensa rimasta all'interno.
• Pulizia della superficie
Machine Translated by Google


MODELO:S02/S03Pro
AIREACONDICIONADOPORTÁTIL
Soportetécnicoycertificadodegarantíaelectrónicawww.vevor.com/support
"Ahorreamitaddeprecio","Amitaddeprecio"ocualquierotraexpresiónsimilarutilizadapor
nosotrossolorepresentaunaestimacióndelosahorrosquepodríabeneficiarsealcomprarciertas
herramientasconnosotrosencomparaciónconlasprincipalesmarcasprincipalesynonecesariamente
significacubrirtodaslascategoríasdeherramientasofrecidas.pornosotros.Lerecordamosque
verifiquecuidadosamentecuandorealiceunpedidoconnosotrossirealmente
estáahorrandolamitadencomparaciónconlasprincipalesmarcas.
Seguimoscomprometidosaproporcionarleherramientasaprecioscompetitivos.
Machine Translated by Google
¿NECESITASAYUDA?
¿Tienepreguntassobreelproducto?¿Necesitasoportetécnico?Nodudeencontactarnos:
MODELO:S02/S03Pro
Estassonlasinstruccionesoriginales,leaatentamentetodaslasinstruccionesdel
manualantesdeoperar.VEVORsereservaunainterpretaciónclaradenuestromanualde
usuario.Laaparienciadelproductoestarásujetaalproductoquerecibió.sihayalguna
actualizacióndetecnologíaosoftwareennuestroproducto.
Acondicionador
Aireportátil
Soportetécnicoycertificadodegarantía
electrónicawww.vevor.com/support
Machine Translated by Google

identifiquecualquiervariacióndeloquesemuestra.Disfrutedesunuevoaireportátil.
todoelmanualcuidadosamenteantesdeusarlo.Estemanualsirvecomoguíageneral
colocarseenladirecciónindicadaenlacajadurante
3.Nointroduzcalosdedosniotrosobjetosdelgados,etc.enlasalidadeaireyasegúresede
informaralosniñossobreestospeligros.
11.Losniñosdebenusarsebajolasupervisióndeunadultoynodeben
1.Noutiliceuntomacorrienterotooinadecuado.
Losdetallespuedendiferirligeramentedesumodeloespecífico.Sinembargo,losbásicos.
5.Allimpiarlamáquina,asegúresedecortarlaenergíaconanticipación.
12.Esteproductonoesadecuadoparalossiguientesgrupos:niños,personas
discapacitadas,personasconenfermedadesmentales,personascondiscapacidadintelectual.
debedetenerseycortarseelsuministroeléctrico.
sumáquinapuedevariarenciertosaspectoscomolosmodosdisponibleso
A:CercadelfocodelincendioB:Lugares
conriesgodesalpicadurasdepetróleo
moviéndoselentamentealmoverse.
consistenteconloquesedescribe.Tómeseunosminutosparaleer
Graciasporcompraresteaireacondicionadoportátil.Lealasinstrucciones.
aireacondicionadoportátilantesdeusarloConsultedecercasuunidadpara
4.Paraqueelcompresorsecoloquecorrectamente,lamáquinadebe
E:cercadelbaño,aseoconducha,piscina.
8.Desenchufeelenchufecuandoretumbeeltrueno.
10.Encasodefenómenosanormalescomooloraquemado,operación
transporte.
¡acondicionador!
paraelfuncionamientodesuaireacondicionadoportátil.Tengaencuentaquealgunos.
usadoscomojuguetes.
discapacidades,amenosqueseutilicenbajolasupervisióndeunapersonanormal.
6.Apaguelacomputadoraydesconectelafuentedealimentaciónantes
Lasfuncionesypautasdeseguridaddescritasaquíseaplicaránasuunidad.
2.Noutilicelamáquinaenlassiguientessituaciones.
C:EvitelaexposicióndirectaalaluzsolarD:Sitiosconriesgodesalpicadurasdeagua
disposicióndelpaneldecontrol,laoperaciónyelusofundamentalesdebenser
7.Nocubralamáquina,delocontrarioexisteriesgodeincendio.
Leacompletamenteelmanualyfamiliaríceseconlascaracterísticasdesu
9.Noapagueelaireacondicionadodirectamenteconelinterruptordeencendido.
DIRECTRICESDESEGURIDAD
Machine Translated by Google

1.Leaestemanualantesdelainstalación,usoymantenimiento.
fabricanteyprohíbeelmantenimientoporpartedepersonasnoprofesionales.
2.Noutiliceningúnmétodoparaacelerarelprocesodedescongelaciónolimpiar
6.Debecumplirconlasleyesyregulacionesnacionalesdegaspertinentes.
Comparadoconelrefrigerantecomún,elR290esunrefrigeranteecológico.
refrigerantequenodestruyelacapadeozonoysuefectoinvernadero
7.Retireelrefrigerantedelsistemadelimpiezaparamantenimientoo
lapartedelglaseado,exceptosegúnlorecomiendeespecíficamenteel
Elvalordelefectotambiénesmuybajo.
fabricante.
desguace.
3.Noperforenienciendaelaireacondicionado.
ElaireacondicionadoutilizaunrefrigeranteR290respetuosoconelmedioambiente.
4.Elaireacondicionadosealmacenaráenhabitacionessinfuegocontinuo.
Esteesunrefrigeranteligeramentecombustible,aunquepuedequemarseyexplotar.
fuentes(aparatosdegasencendidosporllamaabierta,calentadoreseléctricos,etc.).
bajociertascondiciones,perosiemprequesigalasiguientetabla,instale
5.Encasodemantenimiento,póngaseencontactoconelserviciopostventamáscercano.
Colóqueloenlahabitaciónconeláreacorrectayúselocorrectamente,nohayriesgode
centrodeservicio.Sigaestrictamenteelmanualdeoperaciónproporcionadoporel
combustiónyexplosión.
LenguajedeadvertenciadelrefrigeranteR290
Machine Translated by Google
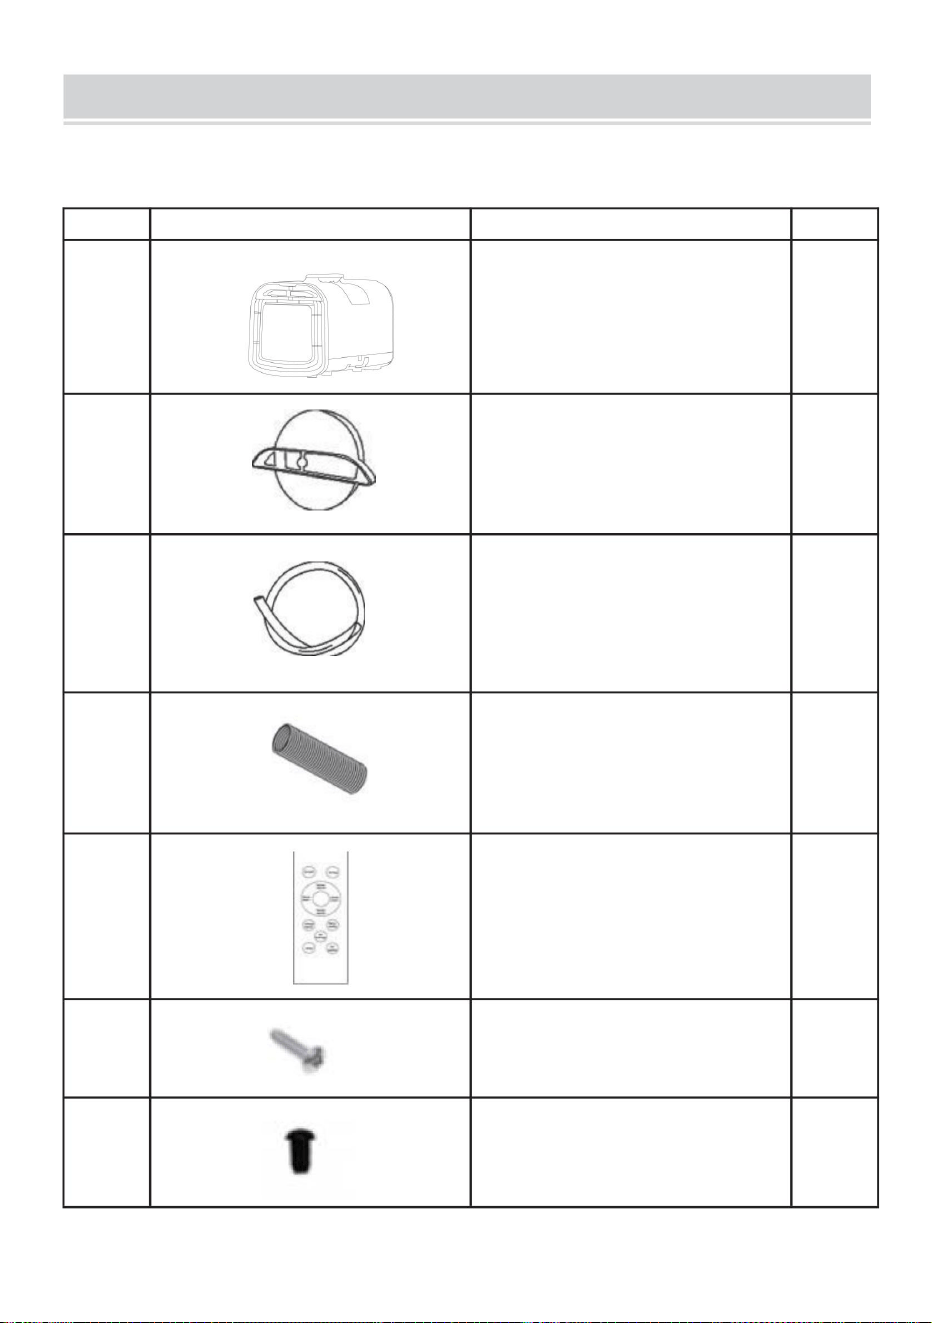
NO.
1
IMAGEN
Tubodedesagüe
1
Tornillo
T02/T03Pro
3
2
CANTIDAD
1
6
1
Conductosdeescape
7
acondicionadordeaire
4
Taponesdeproteccióndedrenaje
1
1
1
Adaptadores
5
2
Mandoadistancia
LISTADEPIEZAS
Machine Translated by Google
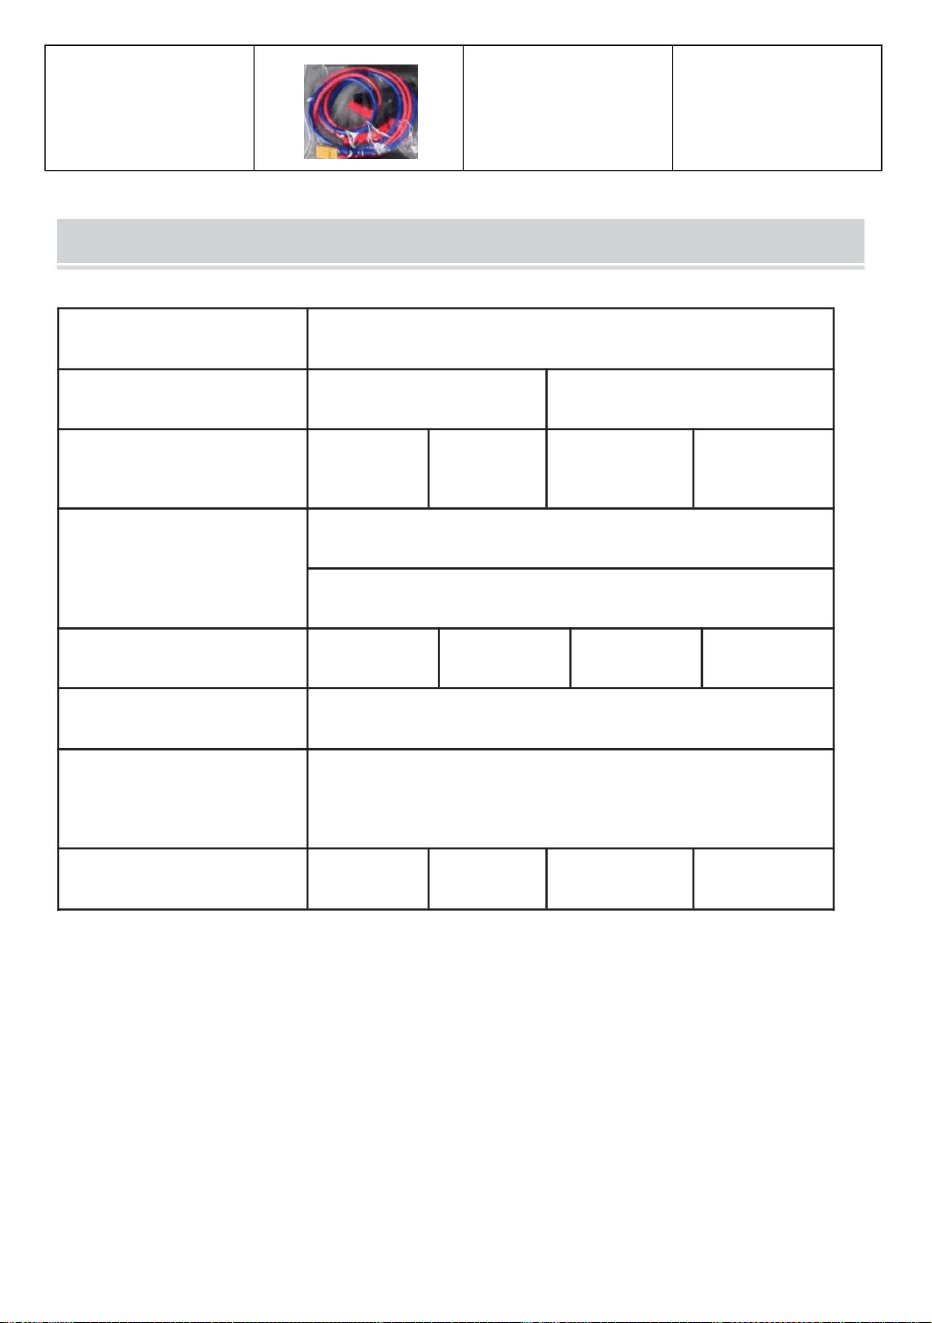
LISTADEPARÁMETROS
másabrazaderasdecoche
Tensión/frecuencianominal120V~60Hz220V~50Hz24V/120V~
8
60Hz
R290/90gR290/140gR290/90gR290/140g
<62dB(A)
Abrazaderadecoche
24V/220V~
Ruido
14,1kilos
50Hz
510x270x315m
Nombredelproducto
Capacidaddeenfriamiento
Dimensionesdelcuerpo
aireacondicionadoportatil
potencianominal
Pesonetounitario
Modelodeproducto
Refrigeradores
15,5kilos
S02
4000BTU
12,6kilos
S03Protieneuno
T03Pro
530W
16,9kilos
Machine Translated by Google
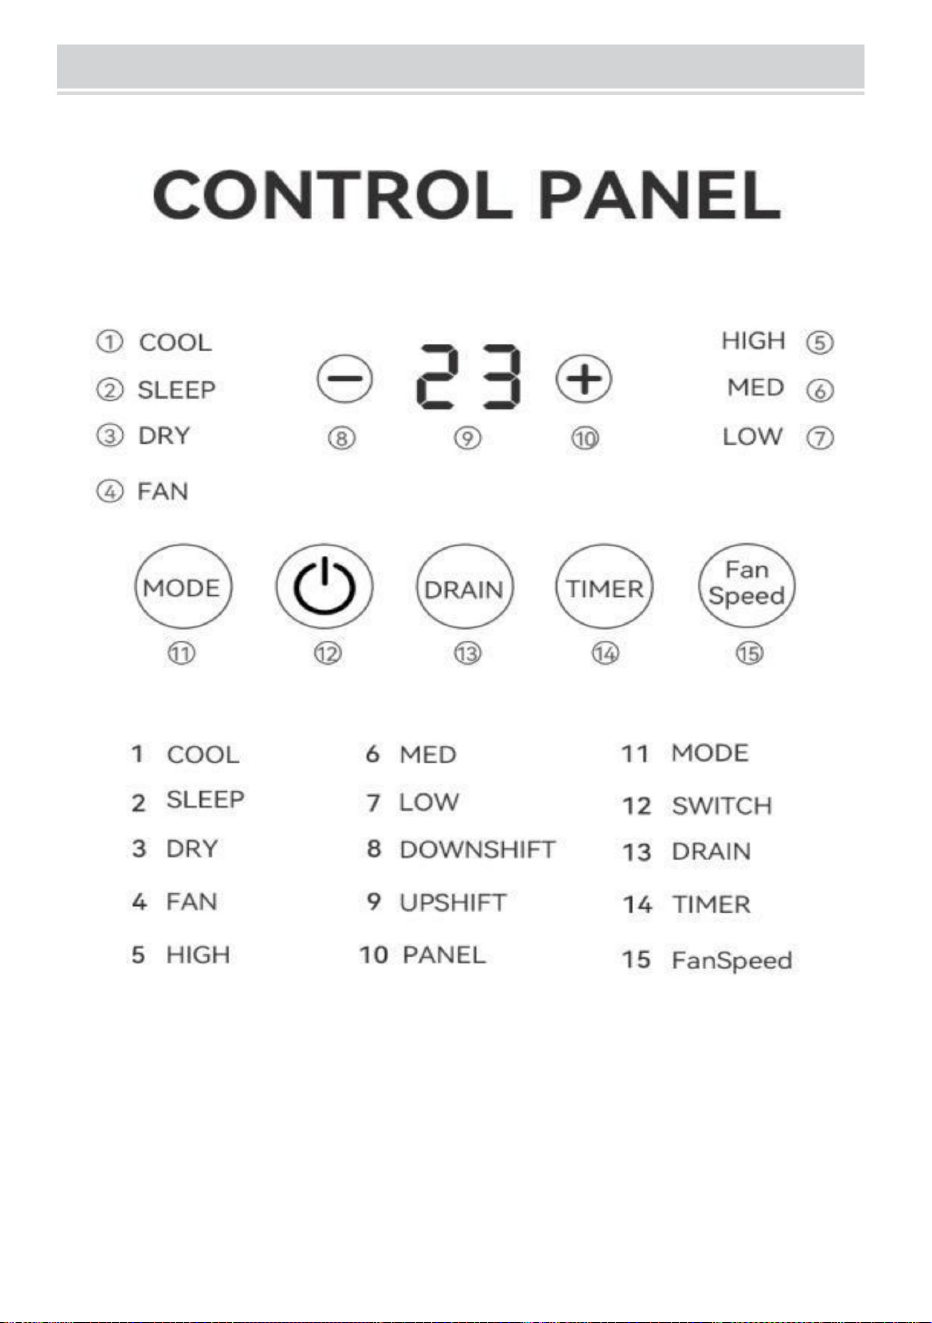
PANELDECONTROL
Machine Translated by Google

2instruccionesclave
1.""Tecla
4.Teclas"+/"
Presionelatecla""paraencenderelaireacondicionadodesdeelmododeespera.Presionenuevamente.
Enlosmodosdeenfriamientoysuspensión,presionelasteclas"+/"paraajustarlatemperaturaestablecida.
Evitelaposiciónhorizontal,noloincline,paraevitarfugasdeaguaenelfregadero.
6.Tecla"Temporizador"
paraentrarenmododeesperacuandoestáenfuncionamiento.
Mantengapresionadasambasteclasdurante3segundosparacambiarlaunidaddetemperaturaentre
Estateclasoloestádisponibleenelcontrolremoto,noenelpaneldevisualización.
2.Tecla"Modo"
CelsiusyFahrenheit.
Tecla"Temporizador"paraconfiguraruntemporizadorqueseapagaráalencender.Utilicelasteclas"+/"paraajustar.
Presionelatecla"Modo"paracambiarentrelosmodos"Refrigeración","Suspensión",
"Deshumidificación"y"Suministrodeaire".
5.Botón"Drenar"
laduracióndeltemporizadordeapagado.Presionelatecla"Temporizador"paraconfiguraruntemporizadorqueseenciendadurante.
3.Tecla"Velocidaddelventilador"
Cuandolabombadeaguaestéfuncionando,presioneelbotón"Drenar"paracerrarelagua.
mododeesperaUtilicelasteclas"+/"paraajustarladuracióndeltemporizador.
Enlosmodosderefrigeraciónysuministrodeaire,presionelatecla"FanSpeed"paracambiarelventilador.
Presionenuevamenteparareiniciarlabombadeaguayreanudarelfuncionamiento.
velocidadentrealta,mediaybaja.Estaclavenoesválidaenmododesuspensión.
Cuandoapaguelabombadeagua,conectelatuberíadedrenajeparadrenarelaguaparaevitar
Modosdedeshumidificación.
desbordamiento.Avisoalabrirelbotón"Drenaje",solicitealamáquinaque
Machine Translated by Google

falla
muestra
E1
Deserie
Paro
número
Falla
elnombrede código
laculpa Estático
DescripcióndelfalloSolucióndeproblemasIlustrar
Elsensores
mostrar
Ambienteinterior
abiertooencorto
temperatura
laconsulta
3.3Funcióndememoria
3Instruccionesdeprotección
3.2Apruebadefallos
3.1Proteccióndelcompresor
apagado.Estaproteccióngarantizaqueelcompresorfuncioneduranteuntiempomínimo.
Eltiempomínimoantesdequeelcompresorpuedareiniciarsedespuésdepararseesde3minutos.
tiempodeejecuciónantesdecadaciclodeinicio/parada.
1.Ingresealmododeesperaantesdeapagaroconfigureunapagadobasadoentemporizador
cuandoseenciende,luegoingresaalmododeesperadespuésdeencender.
Esteperíododeesperade3minutosnoesnecesariopara:
2.Siseenciendelaalimentaciónantesdeapagarla,volveráafuncionarenel
Elprimerencendido
Nota1:Paraconsultarfallas,mantengapresionadalatecladevelocidaddelvientoylatecladurante2segundos.
Modooriginal,conlatemperatura,velocidaddelvientoytemperaturapreviamenteestablecidas
Alos3minutosdeapagarse
unidad,estadodelinterruptordelmotordeagua,etc.Despuésdeapagar.
Parasalirdelaconsultadefallasyreanudarlavisualizaciónnormal,mantengapresionadaslasteclasdevelocidaddel
vientoynuevamentedurante2segundos.Lainformacióndefallasseperderádespuésdeuncortedeenergía.
Dentrodelos3minutosposterioresalreiniciodespuésdelapagado
Esnecesarioregenerarlomanteniendopresionadaslasteclasdevelocidaddelvientoydurante2segundos.
Laúnicaexcepciónseproducedentrodelos3minutosanterioresalapagado.
consultaráymostrarácualquierfalla,mostrandomúltiplesfallassimultáneamenteenorden
Despuésdeencenderlo,elcompresorfuncionarádurantealmenos3minutosinclusoenestascondiciones.
deprioridadsiestápresente.
paraelapagado,noseapagarádentrodelosprimeros3minutosamenosquelaunidadesté
Machine Translated by Google

SEGURIDADYADVERTENCIAS
CUESTIONESDEADVERTENCIA
4Avisoalusuario:
UtiliceelaparatocomosedescribeenlaGuíadeInstruccionesdeUso.Aligualque
otrosaparatoseléctricos,estemanualdeinstruccionespretendeincluir.
1.Alcomprarlamáquina,colóquelamirandoenladirecciónindicadapor
laflechaenelpaquetedurante2horasantesdeencenderlo.Cadavezdespués.
laadvertenciadelosacontecimientosenlamedidadeloposibleylasprácticashabitualesque
peligrosoylagarantíanoesválida.•Elaparato
eléctricodebeinstalarseconconexiónatierrayel
Elcircuitointernodebeserprobadoporpersonaltécnicoconequiposeléctricos.
Alapagarlo,debeesperaralmenos5minutosantesdevolveraencenderlo.
necesarioutilizarenelfuncionamientoeinstalacióndelaparatoeléctrico.•Estáprohibidoeluso
deesteproductoaniñosopersonassincapacidaddeautocuidado.
calificación•No
utiliceelaparatoeléctricoalairelibre.•Notapelasalidayla
entradadeaire.•Nosedebenutilizarlíneasde
cablesepitaxiales.•Desconecteelenchufeantesde
limpiarorealizarelmantenimientodelaparato.
2.Antesdeusarlamáquina,identifiquelasalidadeairefríoylasalidadeairecaliente.
productosinsupervisión.•Elaparato
eléctricoestádiseñadoparausodomésticoeninteriores.
Notiredelcableparamoverelaparato.•Noinstaleel
aparatoeléctricoenunahabitaciónconluznatural.
segúnlasmarcasdelaunidad.Lassalidassuperioresenambosextremossonsalidasdeaireylas
inferioressonentradasdeaire.Noobstruyaestrictamentelassalidasdeaire.
nosepuedeutilizarparaotrosfines.•Siel
cabledealimentaciónestádañado,debeserreemplazadoporelfabricante.
gas,gasolinayazufre,ynosepuedeinstalarcercadefuentesdecalor.•Noutiliceelaparatoeléctrico
enterrenosinclinados.•Asegúresedemantenerunadistanciadealmenos
45cmdeobjetosinflamables.
lasalidadeairecaliente,dejeunespaciolibredealmenos60cm.
fabricante,agentedeserviciouorganizaciónequivalenteparaevitarpeligros.•Cualquiercambio
oreemplazodelascaracterísticasdelaparatoesmuyimportante.
materiales(comoalcohol)ocontenedoresduraderos(tanquesdeegaerosol).
Espaciolibredealmenos10cmomásenambosladosdelamáquina.
peligroso.•Si
esnecesariorepararelaparato,póngaseencontactoconeltécnico.
centrodeservicioautorizadoporelfabricante,respeteelusodel
Piezasvulnerablesoriginales,lareparaciónporpartedepersonasnoautorizadases
Machine Translated by Google
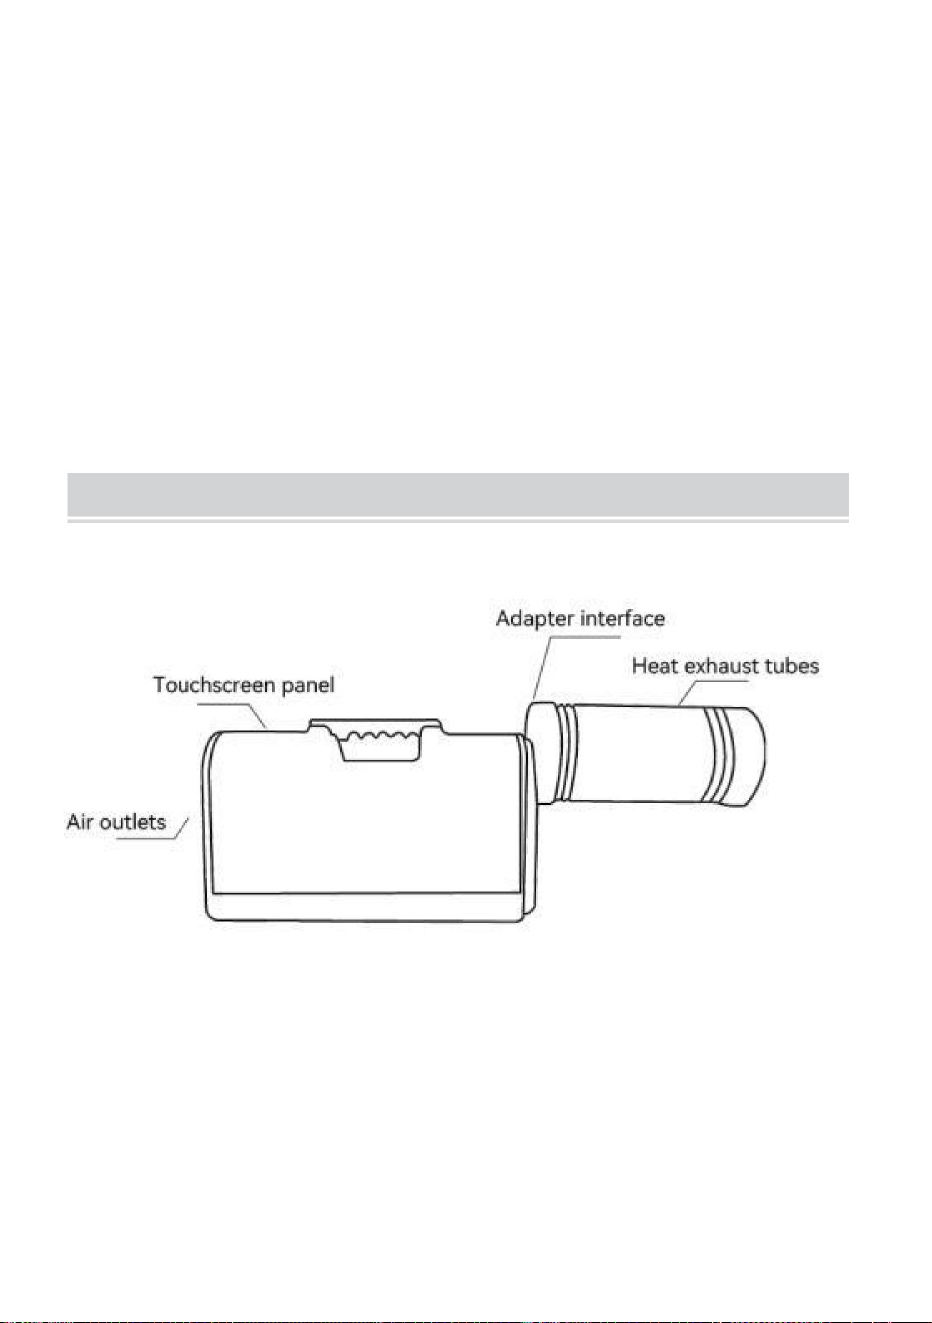
electrodomésticosauncentrodereciclaje
especial.•Lospaquetessonreciclables,porloqueserecomiendacolocarlosenel
Cerrado.Despuésdelfinaldelavidaútil,envíelainformacióneléctrica.
transporte,sinecesitainiciarlo,esperemediahora.•R290Esunrefrigerante
quecumpleconlasnormasmedioambientalespertinentes.
Instalacióndeconductosdeventilación.
aparato,primerovacíeelaguadeltanquedeagua.Despuésde
Estándares.Elciclodelrefrigeranteenlosaparatoseléctricoses
verticalycolóqueloaunlado.Almoverelaparatoeléctrico
•Nocoloqueobjetospesadosuobjetoscalientesenlapartesuperiordelamáquina.
•Limpielapantalladelfiltroregularmente.
•Duranteelprocesodetransportedelaparatoeléctrico,consérvelo.
leyesyreglamentosnacionalespertinentes.
contenedoresdereciclajedeclasificaciónderesiduos
correspondientes.•Lainstalacióndelaparatoeléctricodebeseracordeconlasnormas.
Instalacióndelacubiertayelconductodelventiladordelhotend.
OPERACIÓN
Machine Translated by Google
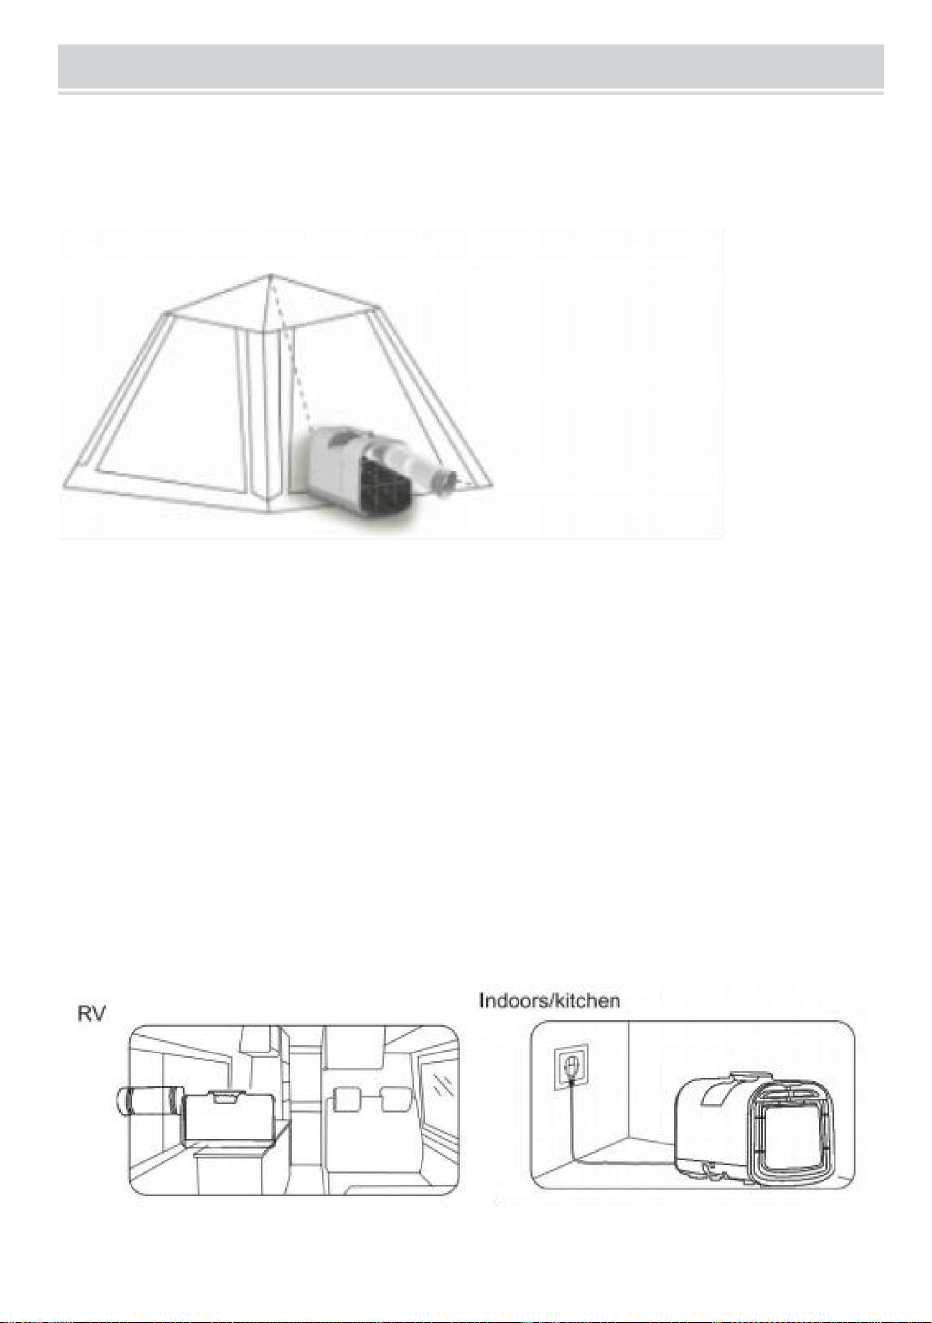
Presteatenciónalselladodelastiendasdecampañaconorificiosdeventilación,asíquecierreocubralos
orificiosdeventilación.
Prestaatenciónalasombrilla,puedesutilizartoldosparacubrirlastiendasdecampaña.
Presteatenciónalaislamientodelatienda.Silatiendatieneunaislamientodeficiente,cúbralaconunaestera
aislantedelcalor.
1.Colóquelofueradelatiendaconlaventilacióndeairefríodirigidahacialatienda.
Silatiendaesgrandeyexcedeelespaciodeenfriamientodelaireacondicionado,agregueotroaire
acondicionadoocreeunpequeñoespaciodeenfriamientodentrodelatiendaconunaparticióndetela.
ESCENARIOSDEUSO
Recomendaciones:
Carpa
Machine Translated by Google
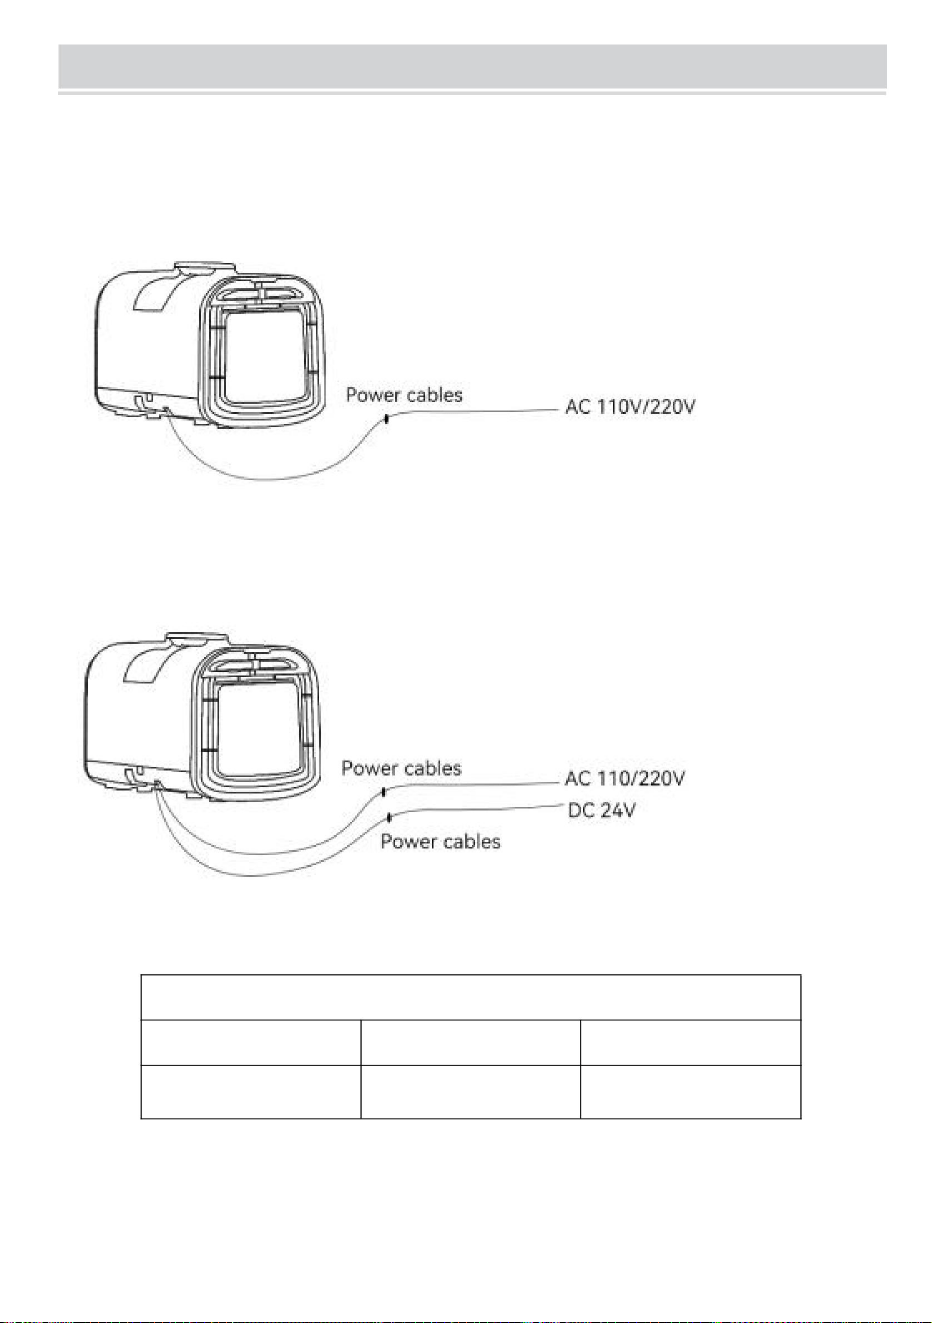
Voltaje capacidad
Potenciadesalida
(S03Pro)RecomendacióndeenergíamóvilDC24V
CC24V
≥150AH
≥3500W
FUENTEDEENERGÍA
CA220V50Hz(UniónEuropea,Australia)
CA220V50Hz/CC24V(UniónEuropea,Australia)
•S03Pro:Voltajedeentrada:CA110V60Hz/CC24V(Norteamérica)
•S02:VoltajedeentradaCA110V60Hz(Norteamérica)
Machine Translated by Google

•Filtrar
SOLUCIÓNDEPROBLEMAS
INSTRUCCIONESDECUIDADO
SERVICIODEMANTENIMIENTO
•Antesderealizartareasdelimpiezaomantenimiento,apagueelaparato.Espereunosminutos.
Cuandoutiliceelconductodeaire,verifiquesielconductoestáexcesivamentedobladoobloqueado,lo
queprovocaráqueelcompresorsesobrecalienteysedetengaparaprotegerlo.
minutosyluegodesconéctelodeltomacorriente.•Limpieel
aparatoconunpañoligeramentehúmedoyluegoséqueloconunpaño.
Serecomiendaapagarelaireacondicionadoyencendereldispositivodespuésde15minutos.
1.Asegúresedequelamáquinaestédesenchufadaantesdelimpiarla.
2.Noutilicedisolventesquímicoscomogasolinaparalalimpieza.
•Elcontrolremotonofunciona:
Pañoseco.Mantenimientodepiezasdeplástico:
3.Noenjuagardirectamenteconagua.
•Paraprotegerelaireacondicionado,debemantenerselimpioytratardeevitarmanchasdeaceite.
1.Noexcedaladistanciadelcontrolremoto(32pies/10m).
ydeformaciónsielaceitepermaneceadheridoalaspiezasdeplásticodurantemuchotiempo,elplástico.
2.Compruebesielcontrolremotoestádañado.
Limpieelfiltrounavezalmes.UtiliceundestornilladorPhillipspequeñoparaaflojarlafijación.
Laspiezasenvejecerán,seagrietarányhuelenmal.Porlotanto,debemoslimpiarloregularmente.•
Nuncalaveelaireacondicionadoconaguaparaevitarelaislamientoeléctrico.
3.Reemplacelabateríadelcontrolremoto.
tornilloscomosemuestra.Saqueelfiltroysumérjaloenaguatibiamezcladaconun
dereducciónyoxidación.•Nunca
utilicegasolina,alcoholodisolventesparalimpiarelaparato.•Nuncarocíelíquidos
insecticidasosimilares.
4.Emparejamientodelmandoadistancia.
Detergenteneutroa40°C.Utiliceuncepilloparalimpiarlasuciedaddelfiltroyluegoséqueloalaire.
unáreasombreada.Vuelvaacargaryasegúrelocontornillos.
•Launidadnoenfría;verifiquesilaentradaysalidadeaireestánbloqueadas.
Instruccionesdelimpieza
Machine Translated by Google
•Limpiezadesuperficies
Limpiarconundetergenteneutrooalcoholsobreunpañohúmedoyluegosecarconunpañoseco.
AvisoimportantedelDepartamentodeAtenciónalCliente:
Almacenamiento:
1.Elperíododegarantíaesde1año(12meses)apartirdelafechadecompra.
Losproductosmarcadosconestesímbolonopodránserdesechados.
conlabasuradomésticanormal,perodebellevarseaunpuntoderecogidaparasu
Almacenamientofueradetemporada
2.Lasespecificacionesdelproductoestánsujetasacambiossinprevioaviso.
Reciclajedeaparatoseléctricosyelectrónicos.
1.Apaguelamáquinaydesenchufeelcabledealimentación.
3.Esposiblequeelproductoestédescontinuadodebidoalafaltadedisponibilidaddecomponenteselectrónicos.
2.Limpielasuperficiedelamáquinaconunpañohúmedoyséquelaconunpañoseco.
ELIMINACIÓNCORRECTA
3.Enrollefirmementeelcabledealimentación.
Esteproductoestásujetoalasdisposicionesdeladirectivaeuropea.
4.Inclinelamáquinasuavementeconlasalidadedrenajehaciaabajodurante30minutosparadrenar.
2012/19/UE.Elsímboloquemuestrauncontenedorconruedastachado
cualquierrestodeaguacondensadaenelinterior.
indicaqueelproductorequiererecogidaselectivaderesiduosen
5.Sellelamáquinaenunabolsadeplásticoyguárdelaenunlugarseco.
laUniónEuropea.Estoseaplicaalproductoyatodoslosaccesorios
Machine Translated by Google


PRZENOŚNY KLIMATYZATOR
„Zaoszczędź o połowę”, „o połowę ceny” lub inne podobne wyrażenia używane przez nas
przedstawiają jedynie szacunkową oszczędność, jaką możesz zyskać kupując u nas określone
narzędzia w porównaniu z głównymi najlepszymi markami i niekoniecznie oznaczają uwzględnienie
wszystkich kategorii oferowanych narzędzi przez nas Uprzejmie przypominamy, aby podczas
składania zamówienia u nas dokładnie sprawdzić, czy faktycznie oszczędzasz
połowę w porównaniu z czołowymi markami.
Nadal dokładamy wszelkich starań, aby zapewnić Państwu narzędzia w konkurencyjnej cenie.
MODEL: S02/S03 Pro
Wsparcie techniczne i certyfikat e-gwarancji www.vevor.com/support
Machine Translated by Google
POTRZEBUJESZ POMOCY?
Wsparcie techniczne i certyfikat e-gwarancji
www.vevor.com/support
Masz pytania dotyczące produktu? Potrzebujesz wsparcia technicznego? Skontaktuj się z
nami:
MODEL: S02/S03 Pro
To jest oryginalna instrukcja. Przed przystąpieniem do obsługi prosimy o dokładne
zapoznanie się ze wszystkimi instrukcjami. Firma VEVOR zastrzega sobie jasną interpretację
naszej instrukcji obsługi. Wygląd produktu zależy od produktu, który otrzymałeś. Proszę
wybaczyć, że nie będziemy Cię ponownie informować jeśli są jakieś aktualizacje technologii lub
oprogramowania naszego produktu.
Odżywka
Przenośne powietrze
Machine Translated by Google

szczegóły mogą się nieznacznie różnić od konkretnego modelu. Jednakże są to podstawowe
1. Nie używaj uszkodzonego lub nieodpowiedniego gniazdka.
5. Podczas czyszczenia urządzenia pamiętaj o wcześniejszym odłączeniu zasilania.
12. Ten produkt nie jest odpowiedni dla następujących grup: dzieci, osoby
niepełnosprawne, osoby chore psychicznie, osoby z niepełnosprawnością intelektualną
przed użyciem dokładnie całą instrukcję. Niniejsza instrukcja służy jako ogólny przewodnik
znajdź różnice w stosunku do pokazanego urządzenia i ciesz się nowym przenośnym powietrzem
należy umieścić w kierunku wskazanym na kartonie
11. Dzieci powinny być używane pod nadzorem osoby dorosłej i nie powinny
zgodne z opisem. Prosimy o poświęcenie kilku minut na przeczytanie
E: blisko łazienki, prysznica, basenu.
8. Odłącz wtyczkę zasilania, gdy zagrzmi.
Dziękujemy za zakup tego przenośnego klimatyzatora. Prosimy o zapoznanie się z
Przed użyciem przenośnego klimatyzatora zapoznaj się dokładnie z instrukcją obsługi urządzenia
Twoje urządzenie może się różnić pod pewnymi względami, takimi jak dostępne tryby lub
A: Blisko źródła pożaru. B: Miejsca
zagrożone rozpryskami oleju
poruszać się powoli podczas ruchu.
4. Aby kompresor był prawidłowo ustawiony, maszyna powinna
należy zatrzymać i odłączyć zasilanie.
funkcje i wytyczne dotyczące bezpieczeństwa opisane tutaj będą miały zastosowanie do Twojego urządzenia
6. Wcześniej wyłącz komputer i odłącz zasilanie
2. Nie używaj urządzenia w następujących sytuacjach.
10. W przypadku wystąpienia nietypowych zjawisk jak zapach spalenizny, działanie
niepełnosprawnością, chyba że jest używany pod nadzorem normalnej osoby.
do działania przenośnego klimatyzatora. Należy pamiętać, że niektóre
odżywka!
transport.
używane jako zabawki.
dokładnie zapoznaj się z instrukcją i zapoznaj się z funkcjami swojego urządzenia
3. Nie wkładaj palców ani innych smukłych przedmiotów itp. do wylotu powietrza i pamiętaj,
aby poinformować dzieci o tych zagrożeniach.
9. Nie wyłączaj bezpośrednio klimatyzatora za pomocą wyłącznika zasilania.
układ panelu sterowania, powinna być podstawowa obsługa i użytkowanie
C: Unikaj bezpośredniego nasłonecznienia. D: Miejsca narażone na zachlapania wodą
7. Nie zakrywaj maszyny, w przeciwnym razie istnieje ryzyko pożaru.
WYTYCZNE BEZPIECZEŃSTWA
Machine Translated by Google

4. Klimatyzator należy przechowywać w pomieszczeniach pozbawionych ciągłego ognia
Jest to lekko palny czynnik chłodniczy, chociaż może się zapalić i eksplodować
3. Nie przebijaj ani nie zapalaj klimatyzatora.
złomowanie.
W klimatyzatorze zastosowano przyjazny dla środowiska czynnik chłodniczy R290.
producent.
część lukierową, z wyjątkiem przypadków wyraźnie zalecanych przez
7. Usuń czynnik chłodniczy z układu czyszczącego w celu konserwacji lub
Wartość efektu jest również bardzo niska
2. Nie stosować żadnych metod przyspieszających proces rozmrażania lub czyszczenia
6. Powinien być zgodny z odpowiednimi krajowymi przepisami i regulacjami dotyczącymi gazu.
czynnik chłodniczy nieniszczący warstwy ozonowej i jej szklarni
1. Prosimy o zapoznanie się z niniejszą instrukcją przed instalacją, użytkowaniem i konserwacją.
producenta i zabraniać konserwacji przez osoby nieprofesjonalne.
spalanie i eksplozja.
W porównaniu ze zwykłym czynnikiem chłodniczym, R290 jest czynnikiem przyjaznym dla środowiska
centrum serwisowym. Należy ściśle przestrzegać instrukcji obsługi dostarczonej przez firmę
5. W przypadku konserwacji prosimy o kontakt z najbliższym punktem sprzedaży
go w pomieszczeniu o odpowiedniej powierzchni i używaj go prawidłowo, nie ma ryzyka
źródeł (np. urządzenia gazowe zapalane otwartym płomieniem, grzejniki elektryczne itp.).
pod pewnymi warunkami, ale jeśli postępujesz zgodnie z poniższą tabelą, zainstaluj
Język ostrzeżeń dotyczących czynnika chłodniczego R290
Machine Translated by Google
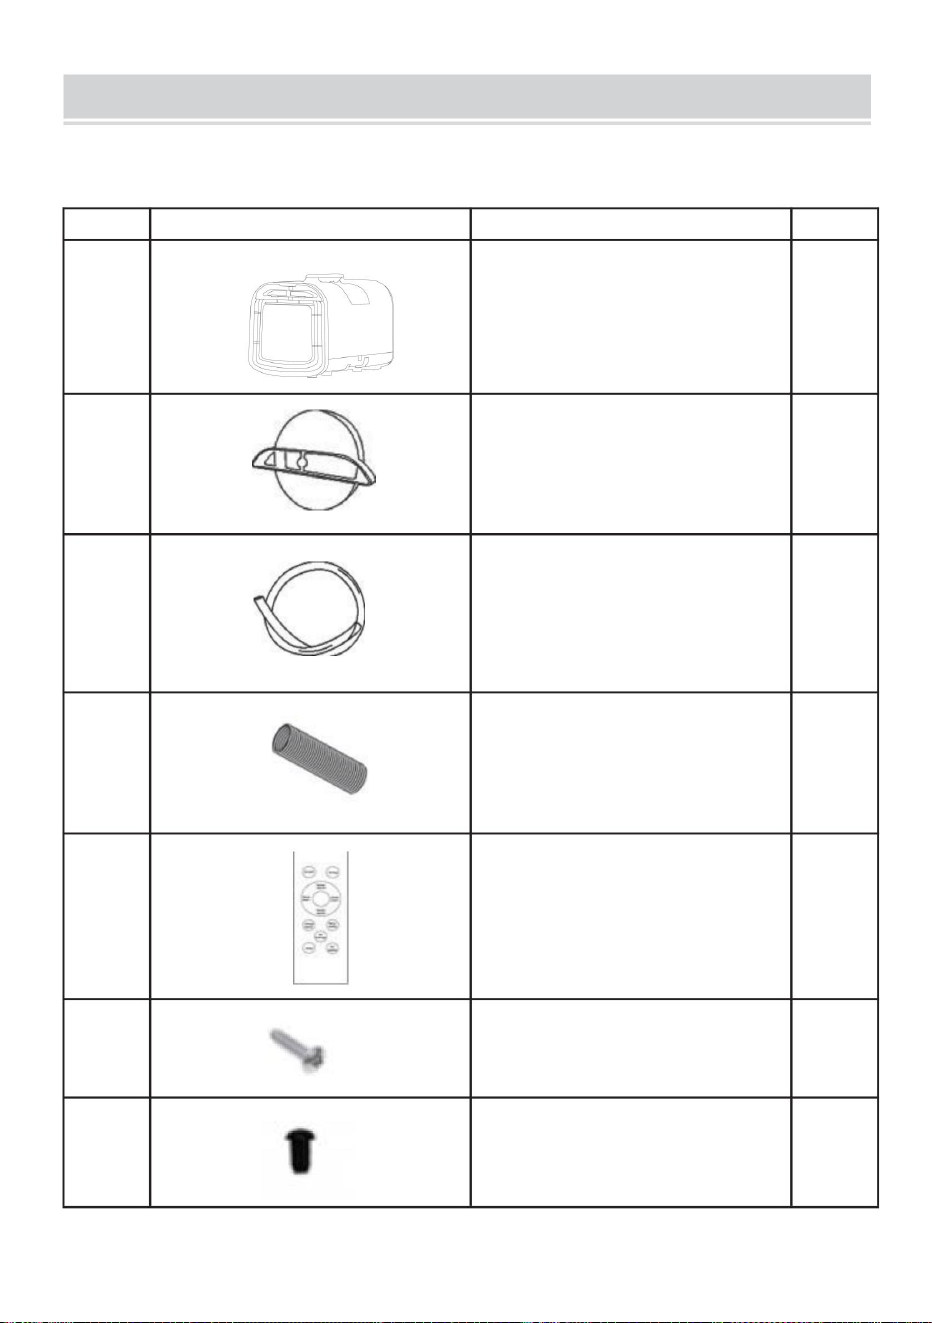
klimatyzator
4
7
1
1
Kanały wydechowe
6
ILOŚĆ
3
S02/S03 Pro
2
Korki zabezpieczające spust
ZDJĘCIE
Rura odpływowa
Śruba
NIE.
1
Zdalne sterowanie
1
2
Adaptery
5
1
1
1
LISTA CZĘŚCI
Machine Translated by Google
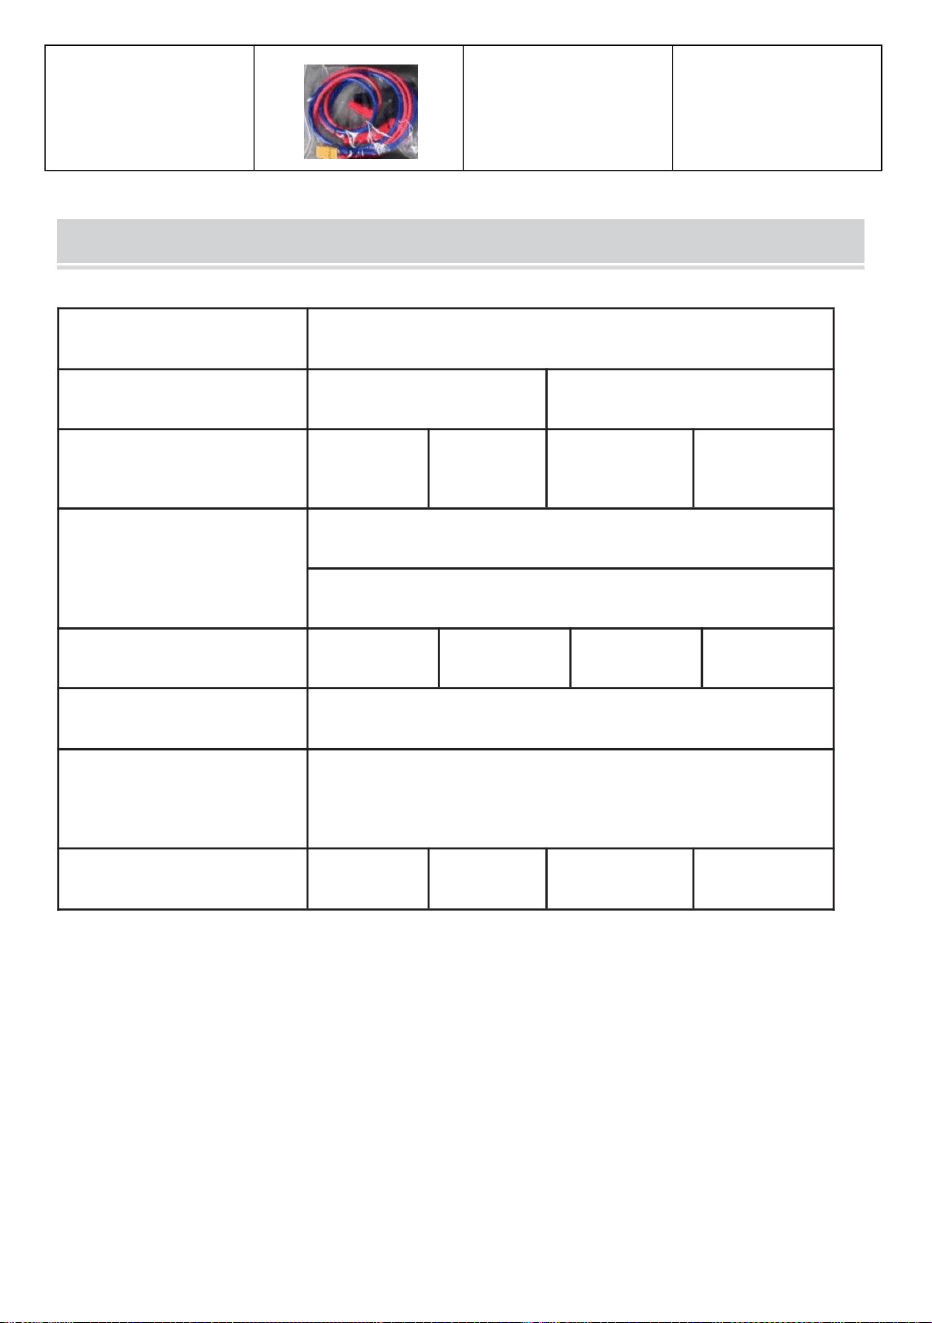
LISTA PARAMETRÓW
Moc znamionowa
Wymiary ciała
Nazwa produktu
Wydajność chłodzenia
Jednostkowa masa netto
50 Hz
510x270x315m
Hałas
Zacisk samochodowy
24V/220V~
60 Hz
8
<62dB(A)
14,1 kg
Napięcie/częstotliwość znamionowa 120 V~60 Hz 220 V~50 Hz 24 V/120 V~
więcej zacisków samochodowych
R290/90g R290/140g R290/90g R290/140g
530 W
S03 Pro ma taki
S03 Pro
12,6 kg
S02
4000 BTU
16,9 kg
Lodówki
Model produktu
15,5 kg
Przenośny klimatyzator
Machine Translated by Google
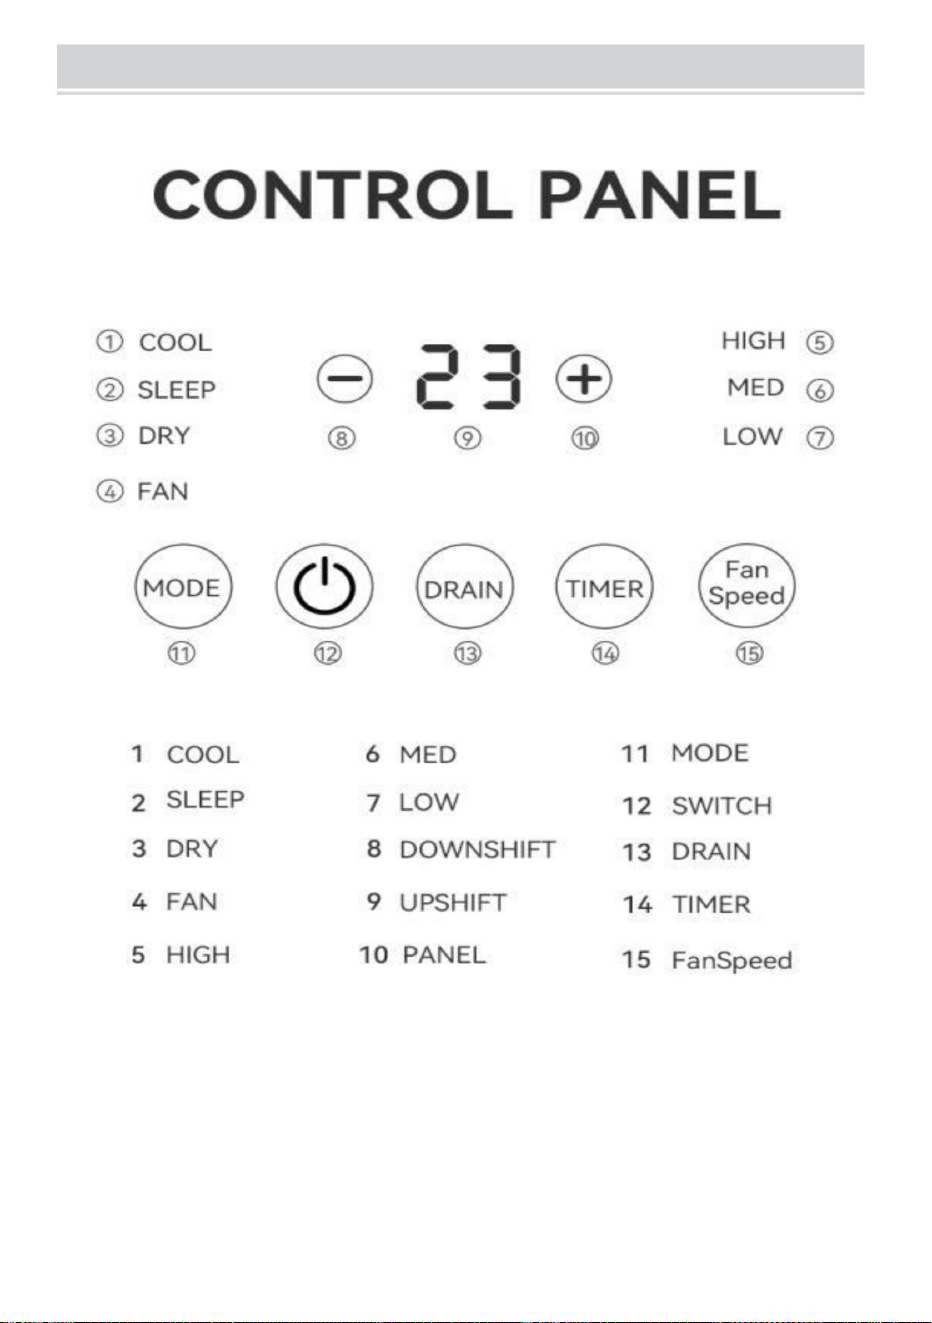
PANEL STEROWANIA
Machine Translated by Google

Gdy pompa wodna pracuje, naciśnij przycisk „Odpompowanie”, aby wyłączyć dopływ wody
czas wyłączenia timera. Naciśnij przycisk „Timer”, aby ustawić timer, który ma się włączyć
Naciśnij przycisk „Tryb”, aby przełączać pomiędzy trybami „Chłodzenie”, „Uśpienie”,
„Osuszanie” i „Dopływ powietrza”.
5. Przycisk „Odpompowanie”.
tryb gotowości Użyj klawiszy „+/-”, aby ustawić czas włączenia timera.
Celsjusza i Fahrenheita.
2. Klawisz „Tryb”.
Przycisk „Timer” do ustawiania timera wyłączającego się po włączeniu. Do regulacji służą klawisze „+/-”.
Ten przycisk jest dostępny tylko na pilocie, a nie na panelu wyświetlacza. Naciśnij
aby przejść w tryb gotowości podczas działania.
Naciśnij i przytrzymaj oba klawisze przez 3 sekundy, aby przełączyć jednostkę temperatury pomiędzy
W trybach chłodzenia i uśpienia naciśnij klawisze „+/-”, aby dostosować ustawioną temperaturę.
Naciśnij przycisk „ ”, aby włączyć klimatyzator z trybu czuwania. Naciśnij go ponownie
6. Klawisz „Timer”.
1. „” Klucz
4. Klawisze „+/-”.
zapobiec położeniu poziomemu, nie przechylać, aby uniknąć wycieku wody do zlewu.
przepełnienia. Podczas otwierania przycisku „Odpompowanie” poproś o to maszynę
tryby osuszania.
prędkość pomiędzy wysoką, średnią i niską. Ten klawisz jest nieprawidłowy w trybie uśpienia i
Podczas wyłączania pompy wodnej należy podłączyć rurę spustową do odprowadzania wody, aby tego uniknąć
pompy Naciśnij go ponownie, aby ponownie uruchomić pompę wodną i wznowić pracę.
W trybach chłodzenia i nawiewu naciśnij przycisk „FanSpeed”, aby zmienić wentylator
3. Klawisz „Prędkość wentylatora”.
2 Kluczowe instrukcje
Machine Translated by Google

urządzenia, stan wyłącznika silnika wodnego itp. Po wyłączeniu zasilania.
Aby wyjść z zapytania o usterkę i wznowić normalne wyświetlanie, ponownie naciśnij długo przyciski prędkości
wiatru i - na 2 sekundy. Informacje o usterce zostaną utracone po awarii zasilania
-W ciągu 3 minut od wyłączenia
Uwaga 1: Aby sprawdzić usterki, naciśnij i przytrzymaj klawisz prędkości wiatru i klawisz - przez 2 sekundy.
tryb oryginalny, z wcześniej ustawioną temperaturą, prędkością wiatru, temperaturą
-Pierwsze włączenie
2. Jeśli zasilanie zostanie włączone przed wyłączeniem, wznowi ono pracę w trybie
Ten 3-minutowy okres oczekiwania nie jest wymagany w przypadku:
po włączeniu zasilania, a następnie przejdź w tryb gotowości po włączeniu.
czas pracy przed każdym cyklem start/stop.
Minimalny czas, po którym sprężarka będzie mogła zostać ponownie uruchomiona po zatrzymaniu, wynosi 3 minuty.
1.,Przejdź do trybu gotowości przed wyłączeniem lub ustaw wyłączenie na podstawie timera
3.1 Ochrona sprężarki
wyłączenie. Zabezpieczenie to zapewnia minimalną pracę sprężarki
jeśli spełnione są warunki wyłączenia, nie wyłączy się w ciągu pierwszych 3 minut, chyba że urządzenie tak będzie
priorytetowy, jeśli jest obecny.
Po włączeniu sprężarka będzie działać przez co najmniej 3 minuty, nawet w przypadku wystąpienia warunków
będzie wysyłać zapytania i wyświetlać wszelkie usterki, pokazując jednocześnie wiele usterek w odpowiedniej kolejności
Jedynym wyjątkiem są te 3 minuty przed wyłączeniem zasilania.
wymagają regeneracji. Długie naciśnięcie klawiszy prędkości wiatru i - przez 2 sekundy
- W ciągu 3 minut od ponownego włączenia po wyłączeniu
3.2 Bezpieczeństwo w przypadku awarii
3 Instrukcje dotyczące ochrony
3.3 Funkcja pamięci
Opis usterki Rozwiązywanie problemów Ilustracja
wina
kodImię
Awaria
numer
Zatrzymanie
Seryjny
E1
wyświetla
awaria
temperatura
Zapytanie
otwarty lub zwarty
Otoczenie wewnętrzne
wyświetlacz
Czujnik jest
Statyczny
Machine Translated by Google

producenta, agenta serwisowego lub równoważnej organizacji, aby uniknąć niebezpieczeństwa.
•Wszelkie zmiany lub wymiany właściwości urządzenia są bardzo niebezpieczne
gazem, benzyną i siarką i nie można go instalować w pobliżu źródła ciepła. •Nie używaj urządzenia
elektrycznego na zboczu. •Należy zachować odległość co najmniej 45 cm od
materiałów łatwopalnych
zgodnie z oznaczeniami na urządzeniu. Górne wyloty na obu końcach są wylotami powietrza, a dolne
wlotami powietrza. Nie zasłaniaj wylotów powietrza z przodu
nie można używać do innych celów. •Jeżeli
przewód zasilający jest uszkodzony, należy go wymienić
materiałów (takich jak alkohol) lub trwałych pojemników (np. zbiorników na aerozol).
produktu bez nadzoru. •Urządzenie
elektryczne jest przeznaczone do użytku domowego w pomieszczeniach zamkniętych oraz
2. Przed użyciem urządzenia sprawdź wylot zimnego i gorącego powietrza
nie ciągnij za kabel, aby przenieść urządzenie. •Nie
instaluj urządzenia elektrycznego w pomieszczeniu z naturalnym światłem
kwalifikacji. •Nie
należy używać urządzenia elektrycznego na zewnątrz. •Nie
należy zatykać wylotu i wlotu powietrza. •Nie wolno
używać kabli epitaksjalnych. Przed czyszczeniem lub
konserwacją urządzenia należy wyjąć wtyczkę z gniazdka
należy używać podczas obsługi i instalacji urządzenia elektrycznego. •Zabrania się używania
tego urządzenia dzieciom i osobom niezdolnym do samodzielnej opieki
wyłączania, należy odczekać co najmniej 5 minut przed ponownym włączeniem.
ostrzegając o wydarzeniach w miarę możliwości i zwykłych praktykach
strzałkę na opakowaniu przez 2 godziny przed każdym ponownym włączeniem
obwód wewnętrzny musi zostać sprawdzony przez personel techniczny pod kątem elektrycznym
1. Po zakupie maszyny proszę ustawić ją przodem do kierunku wskazanego przez
Używaj urządzenia zgodnie z instrukcją obsługi. Podobnie jak inne urządzenia elektryczne,
które niniejsza instrukcja obsługi ma na celu uwzględnić
niebezpieczne i gwarancja jest nieważna. •Urządzenie
elektryczne musi być zainstalowane z uziemieniem i
oryginalne wrażliwe części, naprawy przez osoby nieupoważnione
centrum serwisowe autoryzowane przez producenta, przestrzegaj zasad stosowania
niebezpieczne.
•Jeżeli urządzenie wymaga naprawy, należy skontaktować się z serwisem
odstęp co najmniej 10 cm po obu stronach maszyny.
wylotu gorącego powietrza, pozostaw wolną przestrzeń o długości co najmniej 60 cm
OSTRZEŻENIE MA ZNACZENIE
4 Uwaga dla użytkownika:
BEZPIECZEŃSTWO I OSTRZEŻENIA
Machine Translated by Google
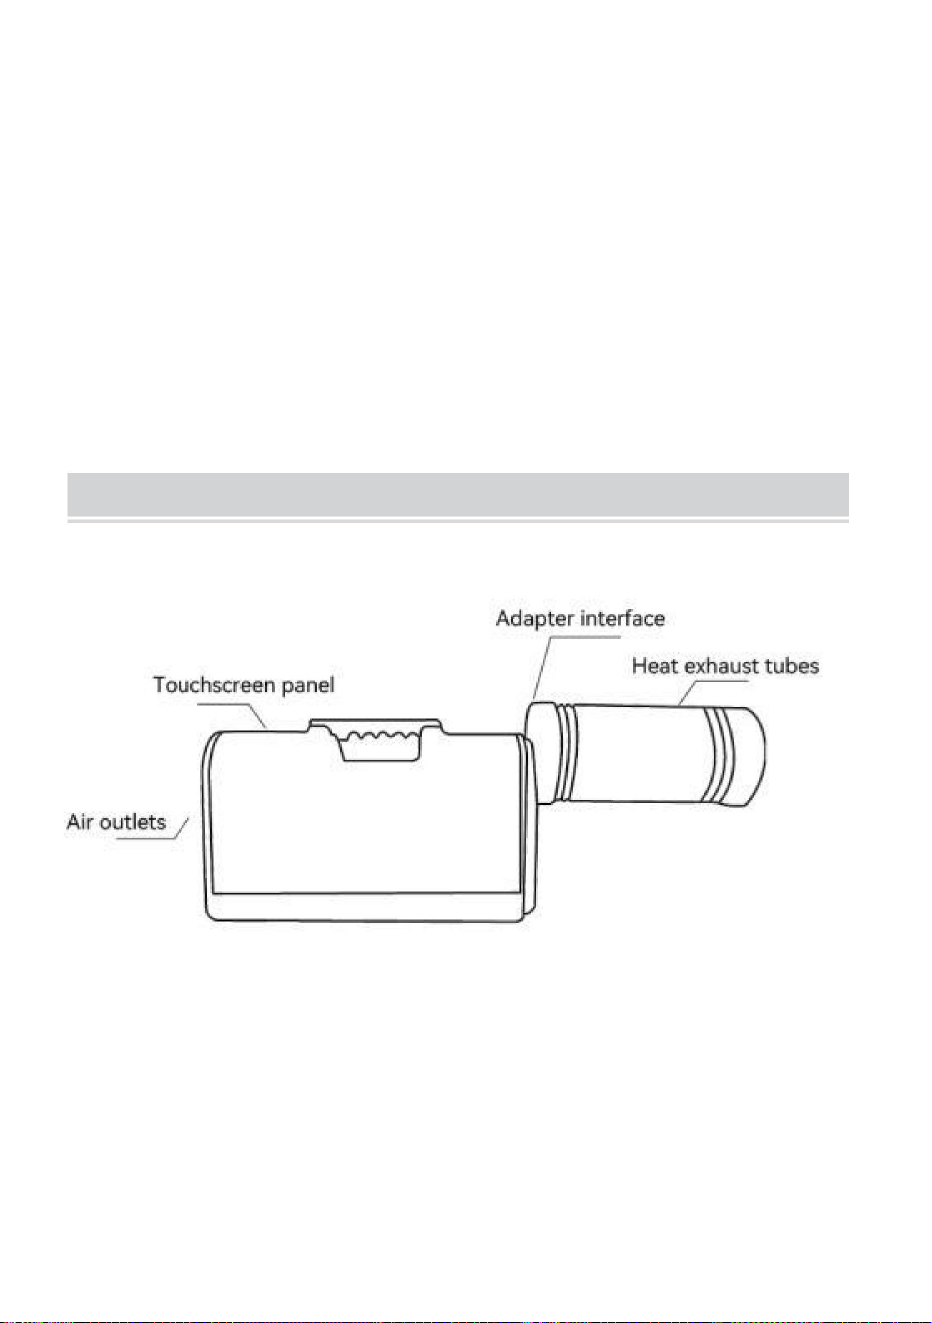
DZIAŁANIE
standardy.Obieg czynnika chłodniczego w urządzeniach elektrycznych
transportu, jeśli chcesz go uruchomić, odczekaj pół godziny. •R290 Jest to czynnik
chłodniczy spełniający odpowiednie wymagania środowiskowe
zamknięte. Po zakończeniu okresu użytkowania prosimy o przedstawienie instalacji elektrycznej
odpowiednie pojemniki do segregacji śmieci. •Instalacja
urządzenia elektrycznego musi być zgodna z
urządzenia, należy najpierw opróżnić zbiornik na wodę
urządzenia do specjalnego centrum recyklingu. •
Opakowania nadają się do recyklingu, dlatego zaleca się umieszczanie ich w pojemniku
pionowo i umieść go na jednej stronie. Podczas przenoszenia instalacji elektrycznej
•Nie umieszczaj ciężkich ani gorących przedmiotów na górze urządzenia. •Regularnie czyść sitko
filtra.Na czas transportu urządzenia
elektrycznego należy je zachować
odpowiednie krajowe przepisy ustawowe i wykonawcze.
Montaż kanałów wentylacyjnych.
Instalowanie osłony i kanału wentylatora hot-endu.
Machine Translated by Google
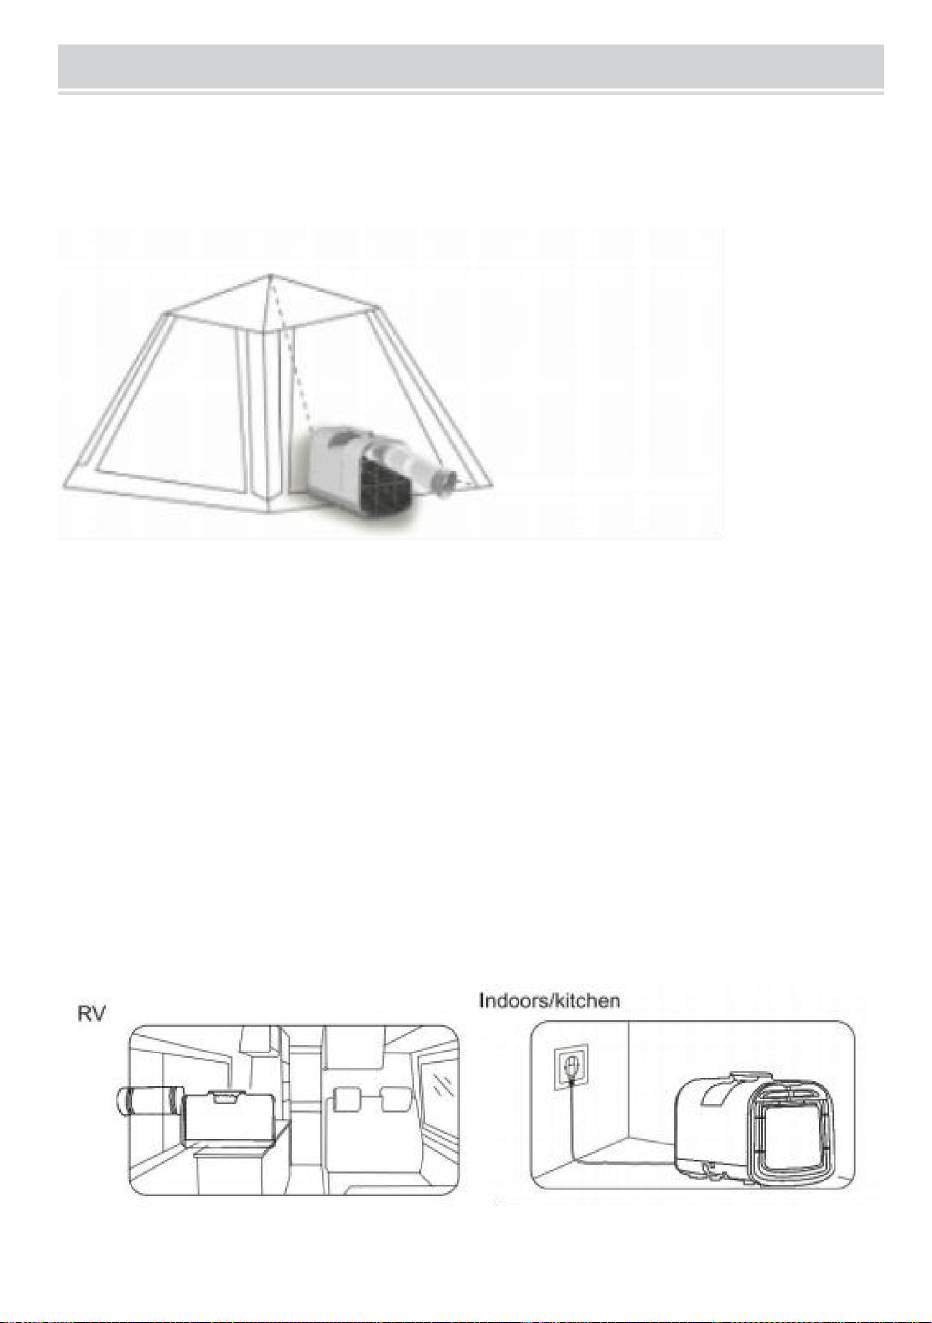
Zalecenia:
Namiot
WYKORZYSTAJ SCENARIUSZE
Zwróć uwagę na izolację namiotu. Jeśli namiot ma słabą izolację, przykryj go matą termoizolacyjną.
Zwróć uwagę na osłonę przeciwsłoneczną, możesz użyć markiz do przykrycia namiotów.
Zwróć uwagę na uszczelnienie namiotów z otworami wentylacyjnymi, dlatego prosimy o zamknięcie lub zakrycie
otworów wentylacyjnych.
1. Umieść na zewnątrz namiotu z otworem wentylacyjnym skierowanym w stronę namiotu.
Jeśli namiot jest duży i przekracza możliwości chłodzenia klimatyzatora, dodaj kolejny klimatyzator lub utwórz małą
przestrzeń chłodzącą wewnątrz namiotu za pomocą przegrody z tkaniny.
Machine Translated by Google
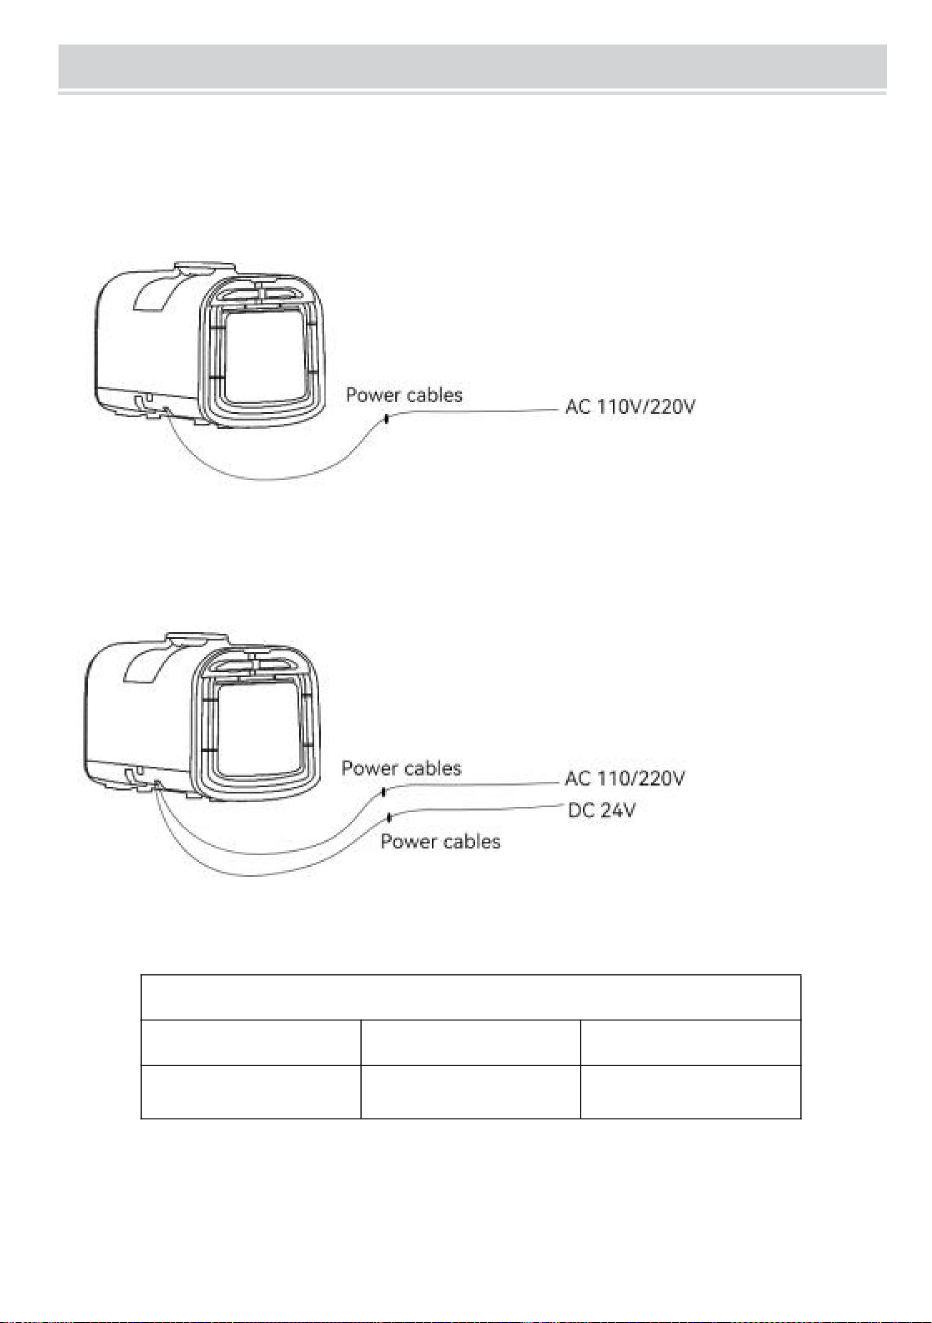
Moc wyjściowa
pojemnośćwoltaż
(S03-Pro) Zalecenia dotyczące zasilania mobilnego DC24V
DC24V
150AH
3500 W
ZASILANIE
• S03-Pro: Napięcie wejściowe: AC 110 V-60 Hz/DC 24 V (Ameryka Północna)
AC 220 V-50 Hz/DC 24 V (Unia Europejska, Australia)
AC 220 V-50 Hz (Unia Europejska, Australia)
• S02: Napięcie wejściowe AC 110 V-60 Hz (Ameryka Północna)
Machine Translated by Google

• Filtruj
ROZWIĄZYWANIE PROBLEMÓW
INSTRUKCJE PIELĘGNACJI
SERWIS KONSERWACYJNY
części będą się starzeć, pękać i wydzielać nieprzyjemny zapach. Dlatego należy go
regularnie czyścić. • Nigdy nie myj klimatyzatora wodą, aby nie uszkodzić izolacji elektrycznej
3. Wymień baterię pilota.
Czyść filtr raz w miesiącu Za pomocą małego śrubokręta krzyżakowego poluzuj mocowanie
i odkształcenia, jeśli olej jest osadzony na plastikowych częściach przez dłuższy czas, plastik ulega uszkodzeniu
1. Nie przekraczaj odległości pilota (32 stopy/10 m).
2. Sprawdź czy pilot nie jest uszkodzony.
śruby, jak pokazano na rysunku. Wyciągnij filtr i zanurz go w letniej wodzie zmieszanej z a
• Aby chronić klimatyzator, należy go utrzymywać w czystości i unikać plam olejowych
sucha szmatka Konserwacja części plastikowych:
• Pilot nie działa:
3. Nie spłukiwać bezpośrednio wodą.
minut, a następnie odłącz urządzenie od gniazdka
elektrycznego. • Wyczyść urządzenie lekko zwilżoną szmatką, a następnie wytrzyj do sucha
zalecamy wyłączenie klimatyzatora i włączenie urządzenia po 15 minutach.
2. Do czyszczenia nie używaj rozpuszczalników chemicznych, takich jak benzyna.
• Przed czyszczeniem lub konserwacją wyłącz urządzenie
Podczas korzystania z kanału powietrznego należy sprawdzić, czy kanał nie jest nadmiernie wygięty lub
zablokowany, co spowoduje przegrzanie sprężarki i zatrzymanie się w celu zabezpieczenia
Instrukcje czyszczenia
1. Przed czyszczeniem upewnij się, że urządzenie jest odłączone od prądu.
• Urządzenie nie chłodzi. Sprawdź, czy wlot i wylot powietrza nie są zablokowane.
zacienionym miejscu. Załaduj ponownie i zabezpiecz śrubami.
przed redukcją i rdzą. • Do
czyszczenia urządzenia nigdy nie używaj benzyny, alkoholu ani rozpuszczalników.
• Nigdy nie używaj środków owadobójczych ani podobnych.
4. Parowanie pilota.
neutralny detergent w temperaturze 40°C Za pomocą szczotki usuń zabrudzenia z filtra, a następnie wysusz na powietrzu
Machine Translated by Google
• Czyszczenie powierzchni
3. Zwiń mocno przewód zasilający.
Ten produkt podlega przepisom Dyrektywy Europejskiej
2. Przetrzyj powierzchnię maszyny wilgotną szmatką i osusz suchą szmatką.
3. Produkt może zostać wycofany ze sprzedaży ze względu na niedostępność elementów elektronicznych.
PRAWIDŁOWA UTYLIZACJA
1. Wyłącz urządzenie i odłącz przewód zasilający.
Przechowywanie poza sezonem
2. Specyfikacje produktów mogą ulec zmianie bez powiadomienia.
recykling urządzeń elektrycznych i elektronicznych.
Składowanie:
1. Okres gwarancji wynosi 1 rok (12 miesięcy) od daty zakupu.
ze zwykłymi odpadami domowymi, ale należy je oddać do punktu zbiórki
Przetrzyj neutralnym detergentem lub alkoholem wilgotną szmatką, a następnie osusz suchą szmatką.
Dział Obsługi Klienta Ważna uwaga:
Unii Europejskiej. Dotyczy to produktu i wszystkich akcesoriów
Produktów oznaczonych tym symbolem Produktów oznaczonych w ten sposób nie można wyrzucać
5. Zamknąć maszynę w plastikową torebkę i przechowywać w suchym miejscu.
jakakolwiek pozostała w środku skroplona woda.
wskazuje, że produkt wymaga selektywnej zbiórki śmieci
4. Delikatnie przechyl urządzenie z wylotem spustowym skierowanym w dół na 30 minut, aby spuścić wodę
2012/19/UE. Symbol przedstawiający przekreślony kosz na śmieci na kółkach
Machine Translated by Google


MODEL:S02/S03 Pro
DRAAGBARE AIRCONDITIONER
Technische ondersteuning en e-garantiecertificaat www.vevor.com/support
'Bespaar de helft', 'Halve prijs' of andere soortgelijke uitdrukkingen die door ons worden gebruikt
vertegenwoordigen slechts een schatting van de besparingen die u zou kunnen profiteren als u
bepaalde gereedschappen bij ons koopt in vergelijking met de grote topmerken en betekenen niet
noodzakelijkerwijs dat ze alle aangeboden categorieën gereedschappen dekken. door ons U wordt er
vriendelijk aan herinnerd om zorgvuldig te controleren wanneer u bij ons een bestelling
plaatst of u daadwerkelijk de helft bespaart in vergelijking met de grote topmerken.
We blijven ons inzetten om u gereedschap tegen een concurrerende prijs te bieden.
Machine Translated by Google
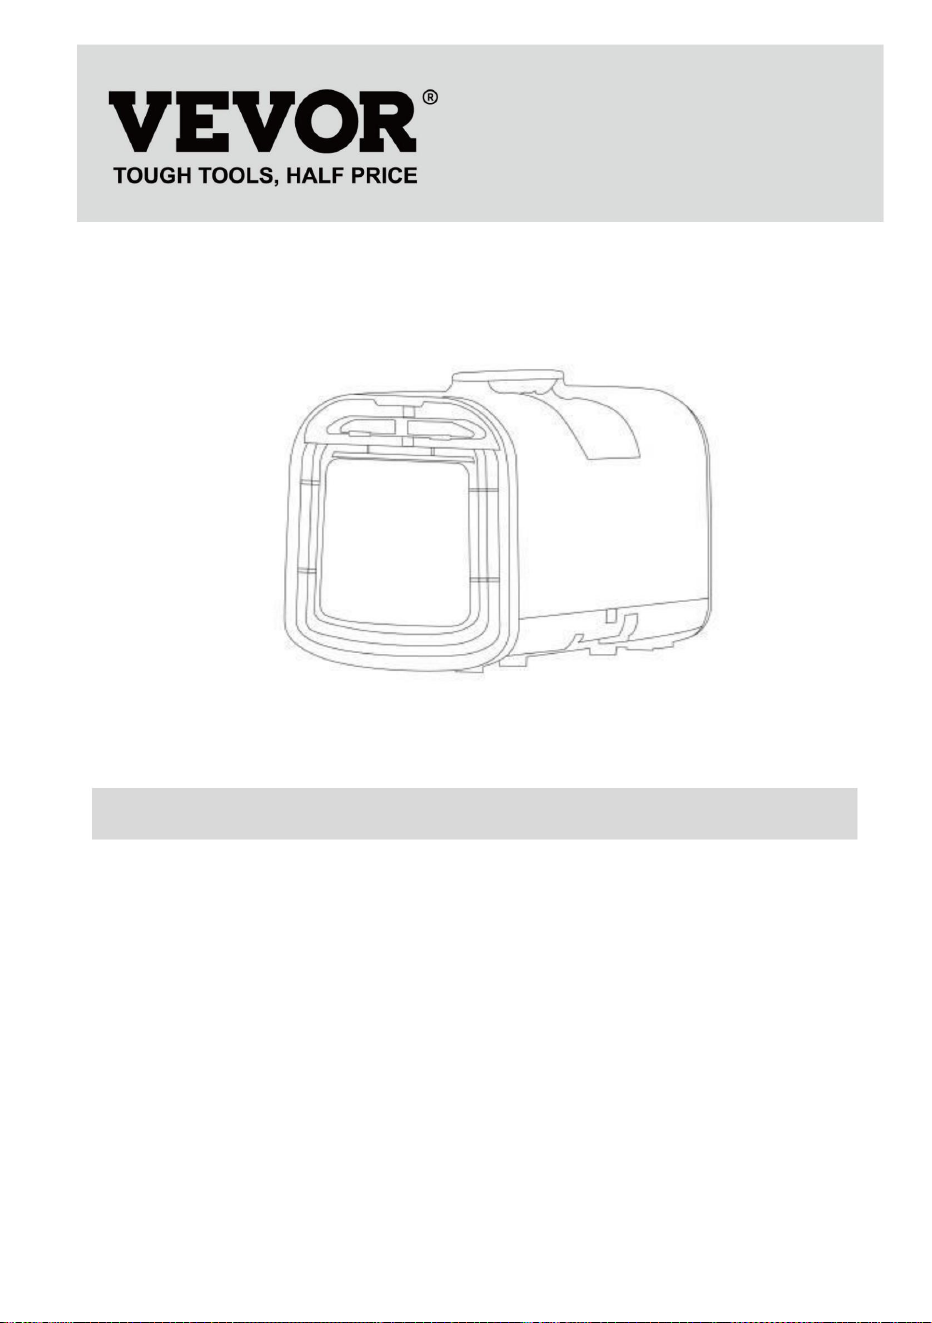
HULP NODIG?
Heeft u productvragen nodig? Neem gerust contact met ons op:
MODEL:S02/S03 Pro
Dit is de originele instructie. Lees alle instructies in de handleiding zorgvuldig door
voordat u het apparaat gebruikt. VEVOR behoudt zich een duidelijke interpretatie van onze
gebruikershandleiding voor. Het uiterlijk van het product is afhankelijk van het product
dat u heeft ontvangen als er technologie- of software-updates zijn voor ons product.
Conditioner
Draagbare lucht
Technische ondersteuning en e-
garantiecertificaat www.vevor.com/support
Machine Translated by Google

de handleiding volledig door en maak uzelf vertrouwd met de functies van uw
3. Steek geen vingers of andere dunne voorwerpen enz. in de luchtuitlaat en vertel kinderen
over deze gevaren.
9. Schakel de airconditioner niet rechtstreeks uit met de aan/uit-schakelaar.
de lay-out van het bedieningspaneel, de fundamentele werking en het gebruik zouden moeten zijn
C: Vermijd directe blootstelling aan zonlicht. D: Locaties waar risico bestaat op opspattend water
7. Dek de machine niet af, anders bestaat er brandgevaar.
functies en veiligheidsrichtlijnen die hier worden beschreven, zijn van toepassing op uw apparaat
6. Schakel eerst de computer uit en koppel de voeding los
2. Gebruik de machine niet in de volgende situaties.
10. Bij abnormale verschijnselen zoals brandgeur, werking
handicap Tenzij gebruikt onder toezicht van een normaal persoon.
voor de bediening van uw draagbare airconditioner Houd er rekening mee dat sommige
conditioner!
komt overeen met wat wordt beschreven. Neem een paar minuten de tijd om het te lezen
E: dichtbij badkamer, doucheruimte, zwembad.
8. Trek de stekker uit het stopcontact als het onweert.
vervoer.
gebruikt als speelgoed.
Bedankt voor uw aankoop van deze draagbare airconditioner. Lees de
draagbare airconditioner vóór gebruik
4. Om de compressor correct te kunnen plaatsen, moet de machine dat doen
uw machine kan op bepaalde aspecten variëren, zoals beschikbare modi of
A: Dicht bij de bron van de brand B:
Locaties waar risico bestaat op oliespatten
langzaam bewegen tijdens het bewegen.
moet worden gestopt en de stroom moet worden afgesloten.
details kunnen enigszins afwijken van uw specifieke model. De basis is echter
1. Gebruik geen kapot of ongeschikt stopcontact.
5. Zorg ervoor dat u bij het schoonmaken van de machine vooraf de stroom uitschakelt.
12. Dit product is niet geschikt voor de volgende groepen: kinderen, gehandicapten,
geesteszieken, mensen met een verstandelijke beperking
Lees de handleiding aandachtig door voordat u deze gebruikt. Deze handleiding dient als algemene leidraad
identificeer eventuele afwijkingen van wat wordt weergegeven. Geniet van uw nieuwe draagbare lucht
tijdens het transport in de door de doos aangegeven richting worden geplaatst
11. Kinderen moeten worden gebruikt onder toezicht van volwassenen en dat mag niet
VEILIGHEIDSRICHTLIJNEN
Machine Translated by Google

servicecentrum. Volg strikt de gebruiksaanwijzing van het servicecentrum
5. Neem bij onderhoud contact op met de dichtstbijzijnde klantenservice
plaats het in de kamer met de juiste ruimte en gebruik het op de juiste manier, er is geen risico
1. Lees deze handleiding vóór installatie, gebruik en onderhoud.
fabrikant en verbiedt onderhoud door niet-professionals.
verbranding en explosie.
Vergeleken met gewoon koelmiddel is R290 een milieuvriendelijk middel
4. De airconditioner moet worden opgeslagen in ruimtes zonder continu vuur
Dit is een licht brandbaar koelmiddel, hoewel het kan verbranden en exploderen
bronnen (egastoestellen die door open vuur worden ontstoken, elektrische verwarmingstoestellen,
enz.).
onder bepaalde omstandigheden, maar zolang u de onderstaande tabel volgt, installeren
sloop.
fabrikant.
3. De airconditioner niet doorboren of ontsteken.
2. Gebruik geen enkele methode om het ontdooiproces te versnellen of schoon te maken
6. Moet voldoen aan de relevante nationale gaswetten en -regelgeving.
De airconditioner maakt gebruik van het milieuvriendelijke koudemiddel R290.
koelmiddel dat de ozonlaag en de broeikasgassen ervan niet vernietigt
het glazuurgedeelte, behalve zoals specifiek aanbevolen door de
7. Verwijder het koelmiddel uit het reinigingssysteem voor onderhoud of
De effectwaarde is ook erg laag
R290 waarschuwingstaal voor koelmiddel
Machine Translated by Google
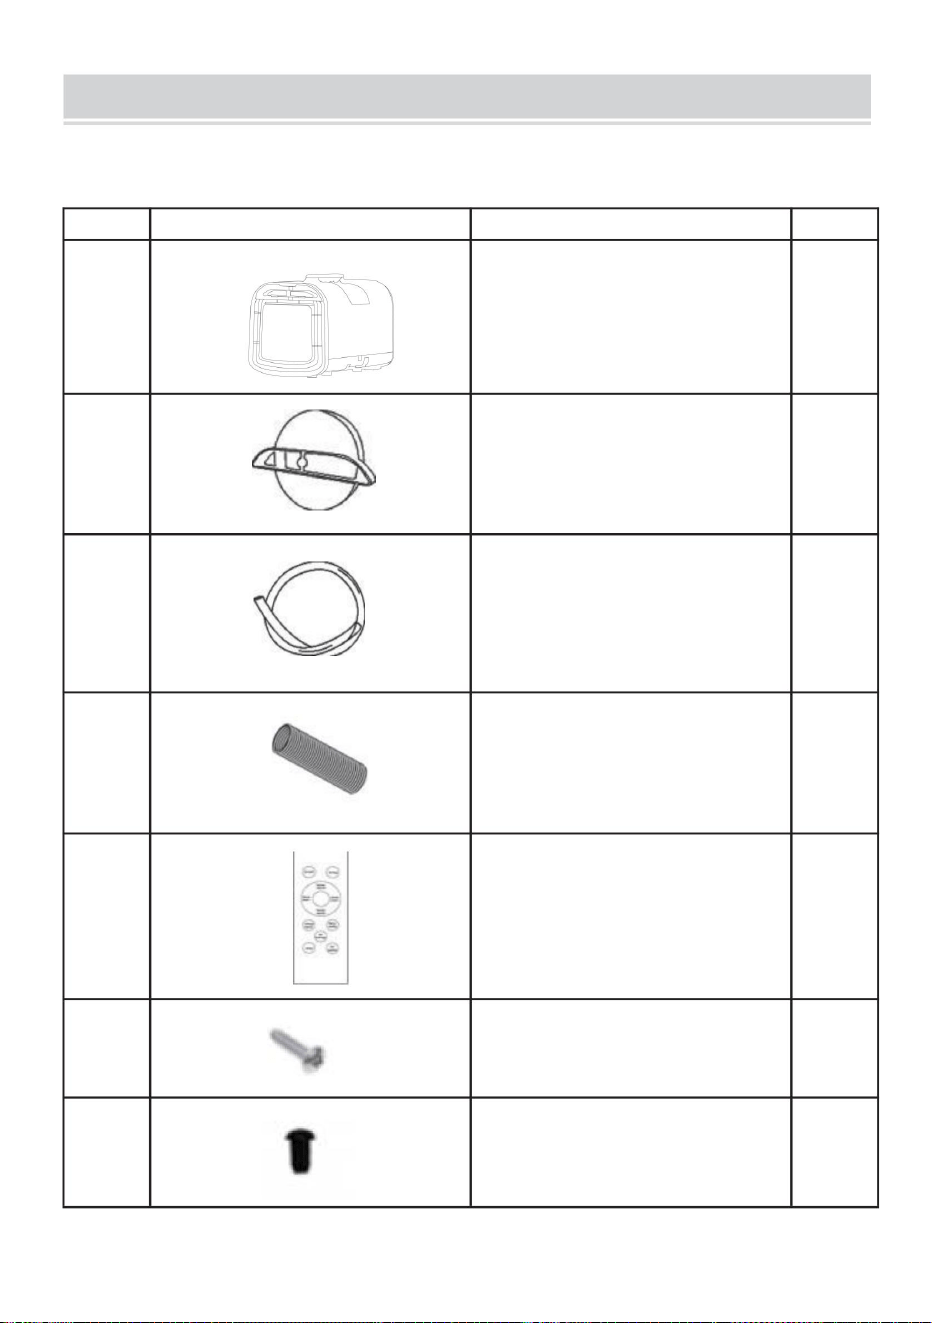
2
Adapters
5
NEE.
1
Afstandsbediening
1
airconditioner
4
Afvoerbeschermingspluggen
1
1
1
6
1
AANTAL
7
1
AFBEELDING
Afvoerpijp
Uitlaatkanalen
Schroef
S02/S03Pro
3
2
ONDERDEELLIJST
Machine Translated by Google
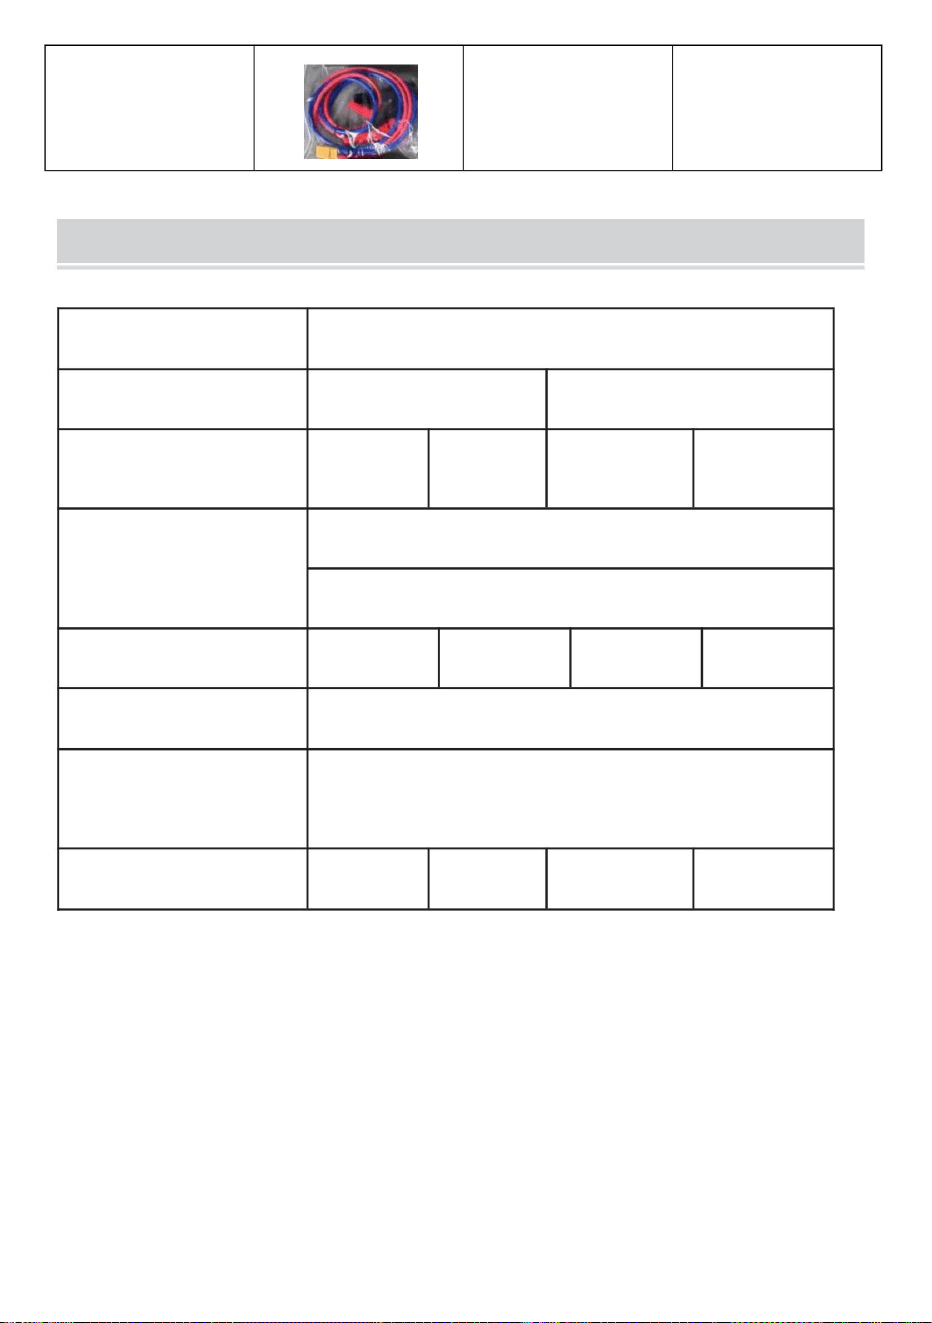
PARAMETERLIJST
14,1 kg
S03 Pro heeft er een
S03 Pro
S02
4000 BTU
meer autoklemmen
Nominale spanning/frequentie 120V~60Hz 220V~50Hz 24V/120V~
530W
R290/90g R290/140g R290/90g R290/140g
12,6 kg 16,9 kg
Draagbare airconditioner
Nominaal vermogen
Eenheid netto gewicht
Productmodel
Koelkasten
50 Hz
510x270x315m
15,5 kg
Lichaamsafmetingen
Productnaam
8
60 Hz
Koelcapaciteit
<62dB(A)
Auto klem
24V/220V~
Lawaai
Machine Translated by Google
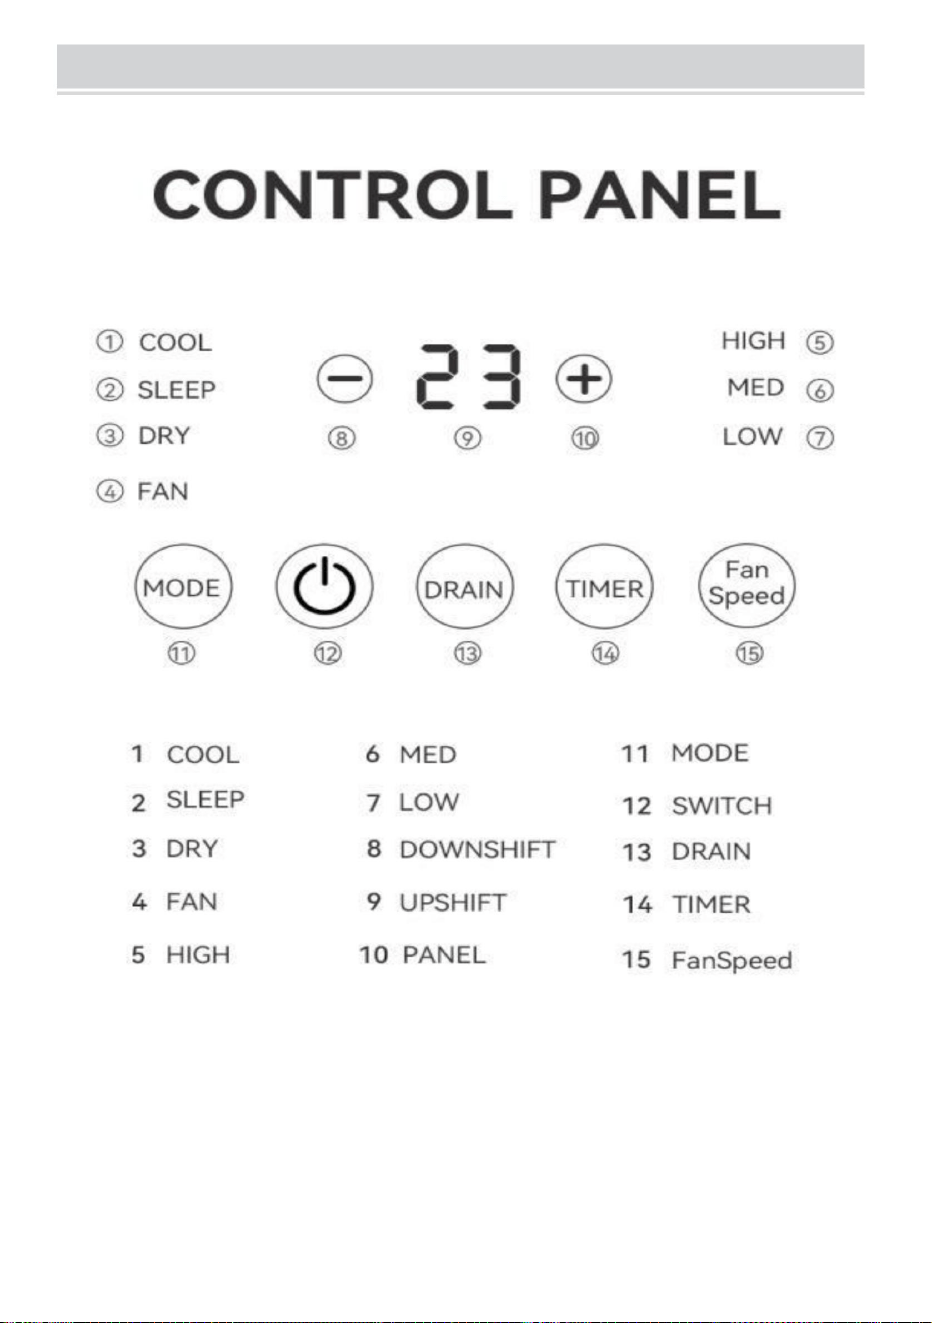
CONTROLEPANEEL
Machine Translated by Google

ontvochtigingsmodi.
snelheid tussen hoog, gemiddeld en laag. Deze sleutel is ongeldig in slaap- en
Wanneer u de waterpomp uitschakelt, sluit u de afvoerleiding aan om waterafvoer te voorkomen
1. " " Toets
4. "+/-"-toetsen
overloop. Let op: vraag de machine ernaar als u de knop "Afpompen" opent
vermijd horizontale positie, kantel niet, om waterlekkage in de gootsteen te voorkomen.
3. Toets "Ventilatorsnelheid".
Wanneer de waterpomp draait, drukt u op de knop "Afvoer" om het water uit te zetten
stand-by Gebruik de toetsen "+/-" om de timer-aan-duur aan te passen.
In de koel- en luchttoevoermodi drukt u op de "FanSpeed"-toets om de ventilator te wijzigen
pomp. Druk er nogmaals op om de waterpomp opnieuw te starten en de werking te hervatten.
Celsius en Fahrenheit.
"Timer"-toets om een timer in te stellen die wordt uitgeschakeld bij het inschakelen. Gebruik de "+/-"-toetsen om aan te passen
2. Toets "Modus".
de uitschakelduur van de timer. Druk op de toets "Timer" om een timer in te stellen die tijdens de timer wordt ingeschakeld
Druk op de toets "Modus" om te schakelen tussen de modi "Koelen", "Slaap",
"Ontvochtigen" en "Luchttoevoer".
Druk op de toets " " om de airconditioner vanuit de stand-bymodus in te schakelen. Druk nogmaals op de toets
In de koel- en slaapmodus drukt u op de toetsen "+/-" om de ingestelde temperatuur aan te passen.
5. Knop "Afpompen".
6. Toets "Timer".
om naar de stand-bymodus te gaan wanneer deze actief is.
Houd beide toetsen 3 seconden ingedrukt om tussen de temperatuureenheden te schakelen
Deze toets is alleen beschikbaar op de afstandsbediening, niet op het display. Druk op
2 Belangrijke instructies
Machine Translated by Google

aan de vereisten voor uitschakeling wordt voldaan, wordt de unit niet binnen de eerste 3 minuten uitgeschakeld, tenzij dit wel het geval is
Na het inschakelen blijft de compressor nog minimaal 3 minuten draaien, ook als er omstandigheden zijn
van prioriteit indien aanwezig.
3.1 Compressorbescherming
uitschakelen. Deze beveiliging zorgt ervoor dat de compressor minimaal werkt
moeten worden geregenereerd. Houd de toetsen voor windsnelheid en - gedurende 2 seconden ingedrukt
- Binnen 3 minuten na het opnieuw inschakelen na het uitschakelen
De enige uitzondering is binnen de 3 minuten vóór het uitschakelen.
zal eventuele fouten opvragen en weergeven, waarbij meerdere fouten tegelijkertijd in volgorde worden weergegeven
Opmerking 1: Om fouten op te vragen, drukt u lang op de windsnelheidstoets en de -toets gedurende 2 seconden.
originele modus, met de eerder ingestelde temperatuur, windsnelheid, temperatuur
-De eerste stroom aan
Om de foutzoekopdracht te verlaten en de normale weergave te hervatten, drukt u opnieuw lang op de windsnelheid-
en -toetsen gedurende 2 seconden. Foutinformatie gaat verloren na een stroomstoring en
unit, status watermotorschakelaar enz. Na het uitschakelen.
-Binnen 3 minuten na het uitschakelen
De minimale tijd voordat de compressor kan herstarten na het stoppen is 3 minuten.
looptijd vóór elke start/stop-cyclus.
1. Ga naar de stand-bymodus voordat u het apparaat uitschakelt, of stel een op timer gebaseerde uitschakeling in
Deze wachttijd van 3 minuten is niet vereist voor:
2. Als de stroom wordt ingeschakeld voordat deze wordt uitgeschakeld, wordt de werking ervan hervat
bij het inschakelen, en na het inschakelen naar stand-by gaan.
3.2 Faalveilig
3 Beschermingsinstructies
3.3 Geheugenfunctie
Binnenomgeving
open of kortgesloten
mislukking
temperatuur
De vraag
Statisch
Beschrijving van de fout Probleemoplossing Illustr
weergave
Mislukking
De naam van
De sensor is
de fout
codeSerieel
displays
E1
nummer
Stopzetting
Machine Translated by Google

door de fabrikant geautoriseerd servicecentrum, houd u aan het gebruik van de
Gebruik het apparaat zoals beschreven in de gebruiksaanwijzing, zoals beschreven in
deze handleiding
1. Wanneer u de machine aanschaft, plaatst u deze in de richting aangegeven door
originele kwetsbare onderdelen, reparatie door onbevoegde personen zijn
gevaarlijk en de garantie is ongeldig. •Het
elektrische apparaat moet geaard worden geïnstalleerd, en de
de warmeluchtuitlaat, laat een vrije ruimte van minimaal 60 cm vrij
fabrikant, serviceagent of gelijkwaardige organisatie om gevaar te voorkomen. •Elke
verandering of vervanging van de kenmerken van het apparaat is zeer gevaarlijk
materialen (zoals alcohol) of duurzame containers (egaerosoltanks).
een vrije ruimte van minimaal 10 cm of meer aan beide zijden van de machine.
gevaarlijk •Als
het apparaat gerepareerd moet worden, neem dan contact op met de technische dienst
product wanneer er geen toezicht is.
•Het elektrische apparaat is ontworpen voor huishoudelijk gebruik binnenshuis,en
Trek niet aan de kabel om het apparaat te verplaatsen.
•Installeer het elektrische apparaat niet in een kamer met veel natuur
2. Voordat u de machine gebruikt, identificeert u de uitlaat voor koude lucht en uitlaat voor warme lucht
gas, benzine en zwavel, en het mag niet in de buurt van een warmtebron worden geïnstalleerd.
•Gebruik het elektrische apparaat niet op een helling. •Zorg ervoor dat u een
afstand van minimaal 45 cm tot brandbare materialen aanhoudt
gebaseerd op de markeringen op de unit. De bovenste uitlaten aan beide uiteinden zijn luchtuitlaten,
en de onderste zijn luchtinlaten
de pijl op de verpakking gedurende 2 uur voordat u het apparaat inschakelt
het zoveel mogelijk waarschuwen voor gebeurtenissen en de gebruikelijke praktijken
kan niet voor andere doeleinden worden
gebruikt. •Als het netsnoer beschadigd is, moet het worden vervangen door de
interne circuit moet worden getest door het technisch personeel met elektrische
uitschakelt, moet u minimaal 5 minuten wachten voordat u het apparaat weer inschakelt.
die u moet gebruiken bij de bediening en installatie van het elektrische apparaat. •Kinderen of
mensen zonder zelfzorgvermogen mogen dit niet gebruiken
kwalificatie
•Gebruik het elektrische apparaat niet buitenshuis. •Sluit de
luchtuitlaat en luchtinlaat niet aan. •Er mogen geen
epitaxiale kabelleidingen worden gebruikt. •Trek de
stekker uit het stopcontact voordat u het apparaat schoonmaakt of onderhoudt
WAARSCHUWING IS BELANGRIJK
4 Gebruikersmededeling:
VEILIGHEID & WAARSCHUWINGEN
Machine Translated by Google
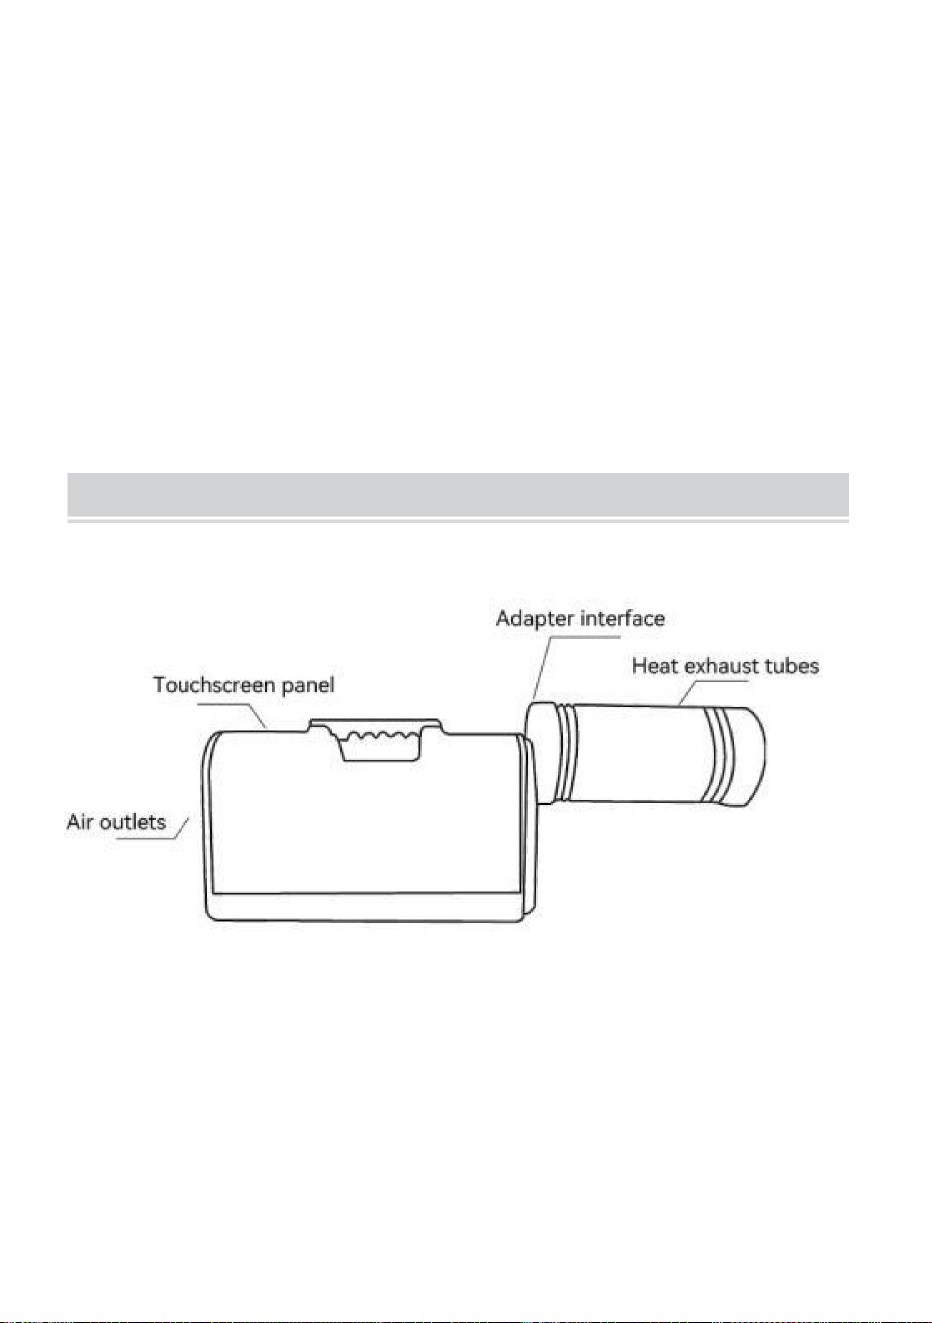
BEDIENING
normen. De cyclus van het koelmiddel in de elektrische apparaten is
transport, als u het moet starten, wacht dan een half uur. •R290 Het
is een koelmiddel dat voldoet aan de relevante milieuvoorschriften
gesloten. Na het einde van de levensduur dient u de elektrische installatie in te dienen
overeenkomstige recyclingbakken voor het sorteren
van afval. •De installatie van het elektrische apparaat moet in overeenstemming zijn met de
verticaal en plaats deze op één kant. Bij het verplaatsen van de elektriciteit
apparaten naar een speciaal recyclingcentrum
brengen
apparaat, leeg dan eerst het water in het waterreservoir
•Plaats geen zware voorwerpen of hete voorwerpen op de bovenkant van
de machine. •Reinig het filterscherm
regelmatig. •Bewaar dit tijdens het transporteren van het elektrische apparaat
De hot-end ventilatorbehuizing en het kanaal installeren.
relevante nationale wet- en regelgeving.
Ventilatiekanalen installeren.
Machine Translated by Google
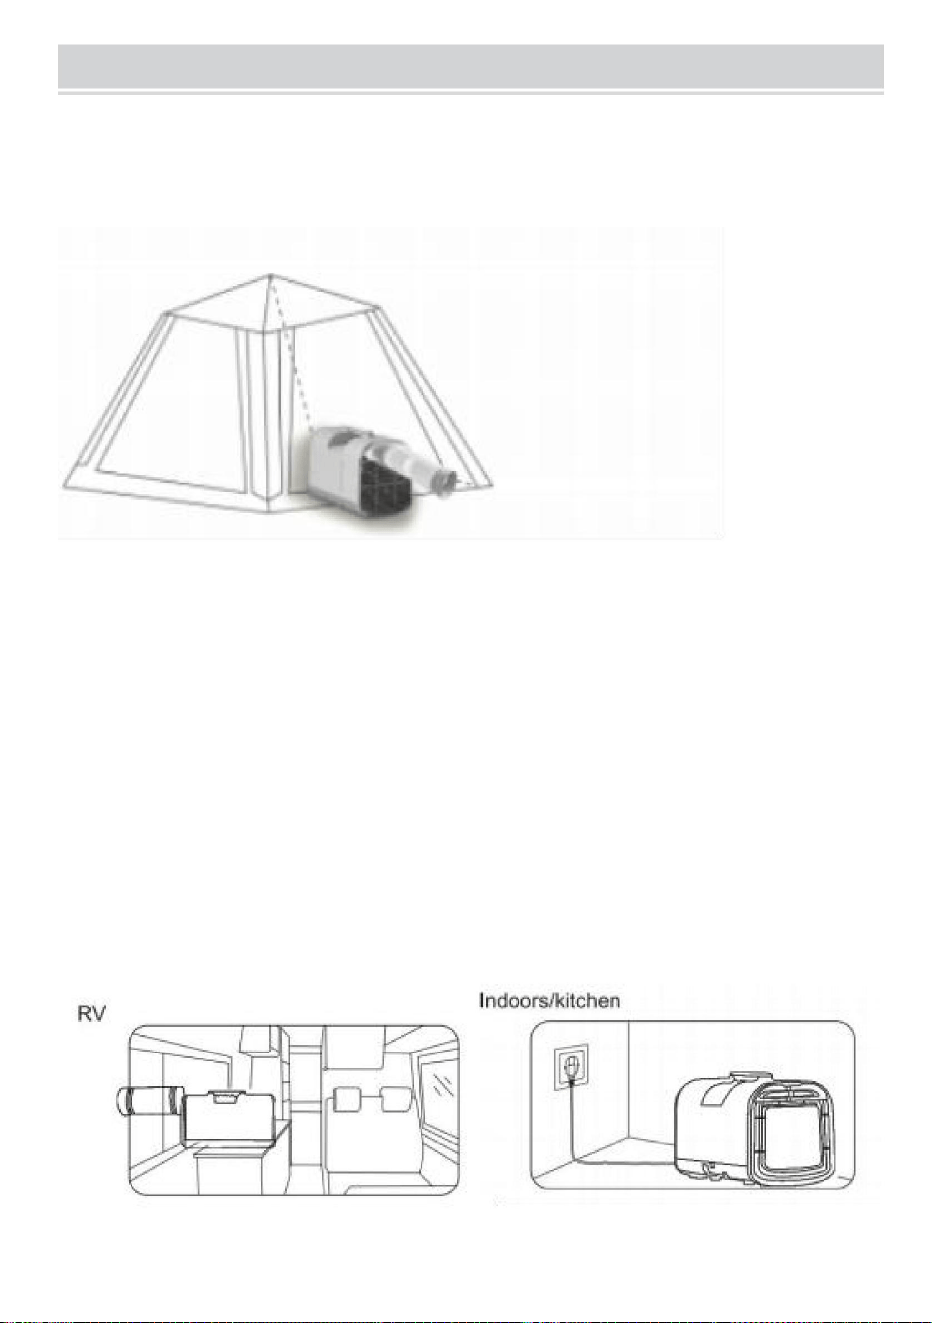
Aanbevelingen:
Tent
GEBRUIK SCENARIO'S
Let op afdichting bij tenten met ventilatiegaten, sluit of bedek daarom de ventilatiegaten.
Let op zonneschermen, voor het afdekken van tenten kunt u luifels gebruiken.
Let op de isolatie van de tent. Indien de tent slecht geïsoleerd is, bedek de tent dan met een warmte-
isolerende mat.
1.Plaats buiten de tent, met de ventilatieopening voor koude lucht in de tent gericht.
Als de tent groot is en de ruimtekoeling van de airconditioner overschrijdt, voeg dan een andere
airconditioner toe, of creëer een kleine koelruimte in de tent met een stoffen scheidingswand.
Machine Translated by Google
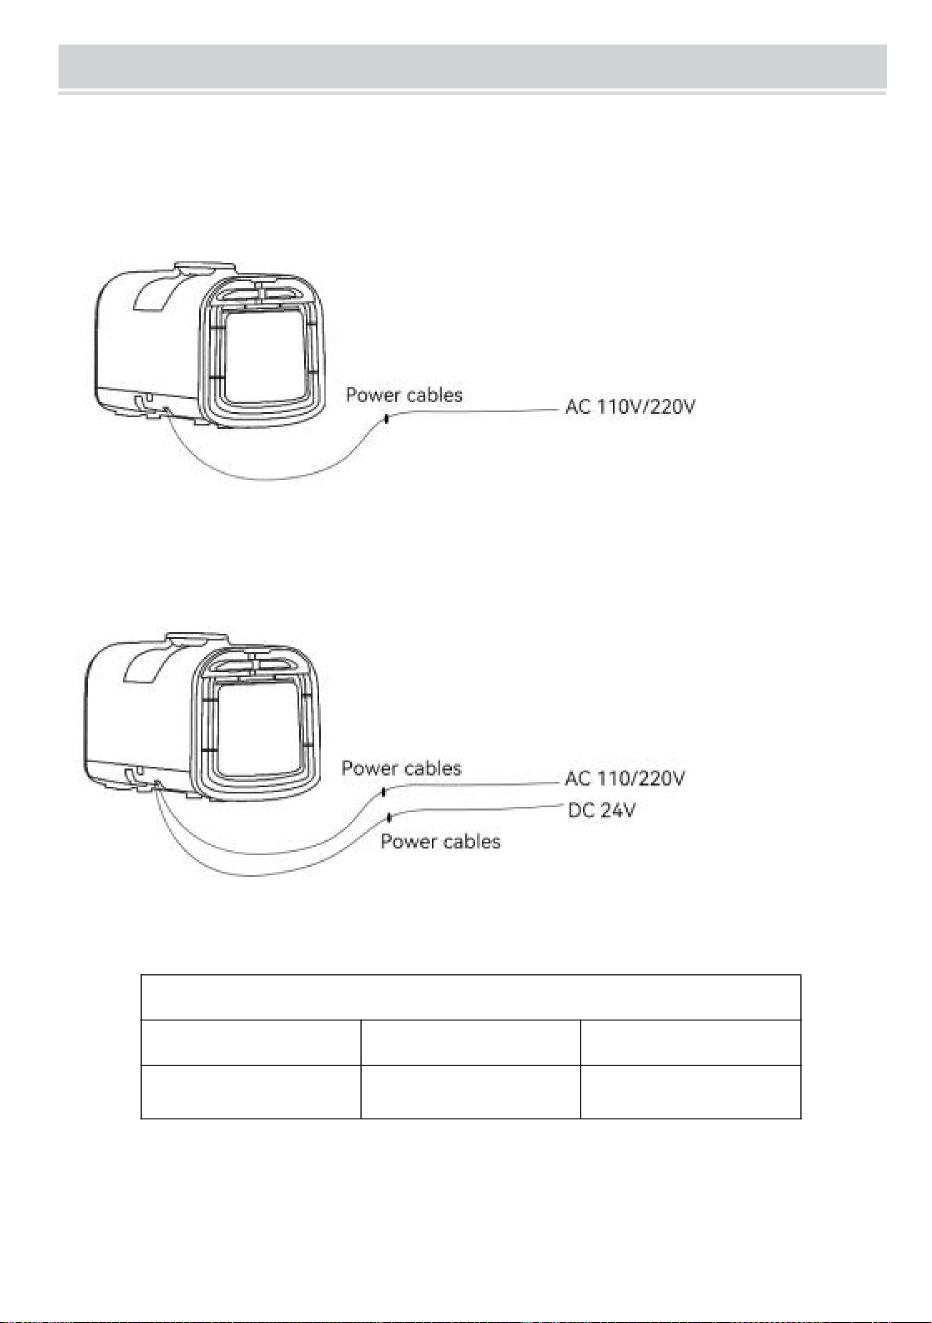
AC 220V-50Hz (Europese Unie, Australië)
AC 220V-50Hz/DC24V (Europese Unie, Australië)
• S03-Pro: Ingangsspanning: AC 110V-60Hz/DC24V (Noord-Amerika)
• S02: Ingangsspanning AC 110V-60Hz (Noord-Amerika)
STROOMVOORZIENING
spanning capaciteit
Uitgangsvermogen
(S03-Pro) Aanbevolen DC24V mobiele voeding
DC24V
ÿ150AH
ÿ3500W
Machine Translated by Google

• Het apparaat koelt niet. Controleer of de luchtinlaat en -uitlaat geblokkeerd zijn.
een gearceerd gebied. Herlaad en zet vast met schroeven.
• Schakel het apparaat uit voordat u het schoonmaakt of onderhoudt
Wanneer u het luchtkanaal gebruikt, controleer dan of het kanaal overmatig gebogen of geblokkeerd is, waardoor
de compressor oververhit raakt en ter bescherming stopt
Reinigingsinstructies
1. Zorg ervoor dat de stekker van de machine uit het stopcontact is voordat u deze schoonmaakt.
onderdelen zullen verouderen, barsten en gaan stinken. Daarom moeten we de airconditioner regelmatig
schoonmaken. Was de airconditioner nooit met water om de elektrische isolatie te voorkomen
3. Vervang de batterij van de afstandsbediening.
schroeven zoals afgebeeld. Trek het filter eruit en laat het weken in lauw water gemengd met a
tegen roesten en roesten. • Gebruik
nooit benzine, alcohol of oplosmiddelen om het apparaat schoon te maken. • Spuit nooit
insecticiden of iets dergelijks.
4. De afstandsbediening koppelen.
1. Overschrijd de afstand van de afstandsbediening (32 voet/10 m) niet.
neutraal reinigingsmiddel op 40°C Gebruik een borstel om eventueel vuil van het filter te verwijderen en laat het vervolgens aan de lucht drogen
• Om de airconditioner te beschermen, moet deze schoon worden gehouden en olievlekken worden vermeden
Maak het filter één keer per maand schoon. Gebruik een kleine kruiskopschroevendraaier om de bevestiging los te maken
en vervorming. Als de olie lange tijd aan de plastic onderdelen blijft zitten, ontstaat er plastic
minuten en haal vervolgens de stekker uit het stopcontact. •
Maak het apparaat schoon met een licht vochtige doek en droog het vervolgens af met een
Wij adviseren u de airconditioner uit te schakelen en het apparaat na 15 minuten weer in te schakelen.
2. Controleer of de afstandsbediening beschadigd is.
2. Gebruik voor het reinigen geen chemische oplosmiddelen zoals benzine.
droge doek. Onderhoud van kunststof onderdelen:
• De afstandsbediening werkt niet:
3. Niet direct met water afspoelen.
PROBLEMEN OPLOSSEN
VERZORGINGSINSTRUCTIES
ONDERHOUDSSERVICE
• Filteren
Machine Translated by Google
5. Sluit de machine af in een plastic zak en bewaar deze op een droge plaats.
eventueel achtergebleven condenswater binnenin.
geeft aan dat het product een aparte afvalinzameling vereist
Veeg af met een neutraal reinigingsmiddel of alcohol op een vochtige doek en droog vervolgens af met een droge doek.
Klantenservice Belangrijke mededeling:
de Europese Unie. Dit geldt voor het product en alle accessoires
Producten gemarkeerd met dit symbool mogen niet worden weggegooid
3. Rol het netsnoer strak op.
Dit product valt onder de bepalingen van de Europese richtlijn
4. Kantel de machine voorzichtig met de afvoeruitlaat naar beneden gedurende 30 minuten om af te tappen
2012/19/EU. Het symbool toont een doorgestreepte afvalcontainer
3. Het product kan worden stopgezet omdat elektronische componenten niet beschikbaar zijn.
1. Schakel de machine uit en haal de stekker uit het stopcontact.
2. Veeg het oppervlak van de machine af met een vochtige doek en droog het af met een droge doek.
Opslag:
1. De garantieperiode bedraagt 1 jaar (12 maanden) vanaf de aankoopdatum.
CORRECTE VERWIJDERING
bij het normale huisvuil, maar moet naar een inzamelpunt worden gebracht
Opslag buiten het seizoen
2. Productspecificaties kunnen zonder voorafgaande kennisgeving worden gewijzigd.
recycling van elektrische en elektronische apparaten.
• Oppervlaktereiniging
Machine Translated by Google


MODELL:S02/S03 Pro
"Spara hälften", "halva priset" eller andra liknande uttryck som används av oss
representerar bara en uppskattning av besparingar du kan dra nytta av att köpa vissa
verktyg hos oss jämfört med de stora toppmärkena och betyder inte nödvändigtvis att täcka
alla kategorier av verktyg som erbjuds av oss Du påminns om att noggrant kontrollera
när du gör en beställning hos oss om du verkligen sparar hälften i
jämförelse med de främsta varumärkena.
Vi fortsätter att vara engagerade i att ge dig verktyg till konkurrenskraftiga priser.
BÄRBAR LUFTKONDITIONERING
Teknisk support och e-garanticertifikat www.vevor.com/support
Machine Translated by Google
BEHÖVER HJÄLP?
Teknisk support och e-garanticertifikat
www.vevor.com/support
Detta är den ursprungliga instruktionen, vänligen läs alla bruksanvisningar noggrant
innan du använder VEVOR förbehåller sig en tydlig tolkning av produktens utseende om det
finns någon teknik eller mjukvaruuppdateringar på vår produkt.
MODELL:S02/S03 Pro
Har du produktfrågor. Behöver du teknisk support?
Balsam
Bärbar Air
Machine Translated by Google

Tack för att du köpte denna bärbara luftkonditionering
bärbar luftkonditionering före användning Se noga till din enhet
4. För att få kompressorn att placeras korrekt bör maskinen
överensstämmer med vad som beskrivs. Ta några minuter att läsa
E: nära badrum, duschrum, pool.
8. Koppla ur strömkontakten när åskan mullrar.
din maskin kan variera i vissa aspekter såsom tillgängliga lägen eller
A: Nära brandkällan B: Platser med risk
för oljestänk
rör sig långsamt när man rör sig.
måste stoppas och strömmen slås av.
Detaljerna kan skilja sig något från din specifika modell
1. Använd inte ett trasigt eller olämpligt uttag.
5. När du rengör maskinen, se till att stänga av strömmen i förväg.
12. Denna produkt är inte lämplig för följande grupper: barn, funktionshindrade,
psykiskt sjuka, personer med intellektuell
hela bruksanvisningen noggrant före användning. Den här bruksanvisningen fungerar som en allmän vägledning
identifiera eventuella variationer från det som visas Njut av din nya bärbara luft
3. För inte in fingrar, eller andra smala föremål etc. i luftutloppet, och var noga med att
berätta för barn om dessa faror.
9. Stäng inte av luftkonditioneringen direkt med strömbrytaren.
placeras i den riktning som anges av kartongen under
11. Barn ska användas under uppsikt av vuxen och bör inte vara det
genom manualen helt och hållet och bekanta dig med funktionerna i din
kontrollpanelens layout, bör den grundläggande driften och användningen vara
C: Undvik exponering för direkt solljus D: Platser med risk för vattenstänk
7. Täck inte över maskinen, annars finns det risk för brand.
funktioner och säkerhetsriktlinjer som beskrivs här kommer att gälla för din enhet
6. Stäng av datorn och koppla ur strömförsörjningen innan
2. Använd inte maskinen i följande situationer.
funktionshinder. Om det inte används under överinseende av en normal person.
balsam!
för drift av din bärbara luftkonditionering Observera att vissa
10. Vid onormala fenomen som brännlukt, drift
transport.
används som leksaker.
RIKTLINJER FÖR SÄKERHET
Machine Translated by Google

1. Läs denna manual före installation, användning och underhåll.
tillverkare och förbjuder underhåll av icke-professionella personer.
förbränning och explosion.
Jämfört med vanligt köldmedium är R290 ett miljövänligt
servicecenter Följ strikt bruksanvisningen som tillhandahålls av
5. Vid underhåll, kontakta närmaste efterförsäljning
den i rummet med rätt område, och använda den på rätt sätt, finns det ingen risk för
källor (ägggasapparater som antänds av öppen låga, elvärmare etc.).
under vissa förhållanden, men så länge du följer tabellen nedan, installera
4. Luftkonditioneringen ska förvaras i rum utan kontinuerlig eld
Detta är ett lätt brännbart köldmedium, även om det kan brinna och explodera
3. Punktera eller antänd inte luftkonditioneringsapparaten.
Luftkonditioneringen använder ett miljövänligt R290-köldmedium.
skrotning.
tillverkare.
glasyrdelen förutom vad som specifikt rekommenderas av
7. Ta bort köldmediet från rengöringssystemet för underhåll eller
effektvärdet är också mycket lågt
2. Använd inte någon metod för att påskynda avfrostningsprocessen eller rengöra
6. Bör följa relevanta nationella gaslagar och förordningar.
köldmedium som inte förstör ozonskiktet, och dess växthus
R290 varningsspråk för kylmedel
Machine Translated by Google
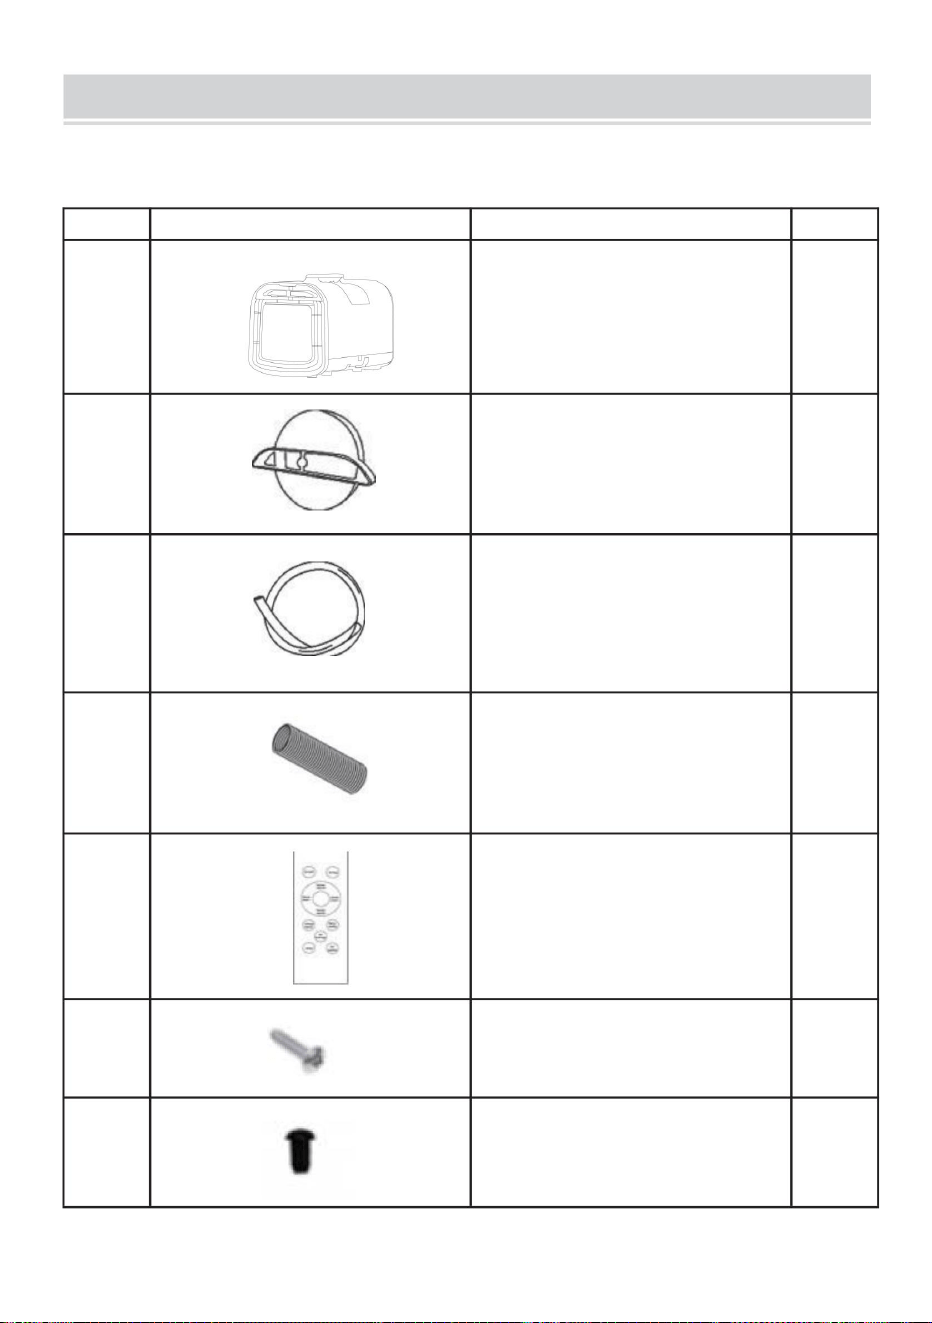
INGA.
1
Fjärrkontroll
1
2
Adaptrar
5
1
1
1
luftkonditionering
4
7
Avloppsskyddspluggar
1
1
Avgaskanaler
6
ANTAL
S02/S03 Pro
3
2
BILD
Avloppsrör
Skruva
DELLISTA
Machine Translated by Google
PARAMETERLISTA
fler bilklämmor
Märkspänning/frekvens 120V~60Hz 220V~50Hz 24V/120V~
R290/90g R290/140g R290/90g R290/140g
530W
S03 Pro har en
S03 Pro
12,6 kg
S02
4000 BTU
16,9 kg
Kylskåp
Produktmodell
15,5 kg 14,1 kg
Bärbar luftkonditionering
Märkeffekt
Enhet nettovikt
Kroppsmått
Produktnamn
Kylkapacitet
50 Hz
510x270x315m
Buller
Bilklämma
24V/220V~
60 Hz
8
<62dB(A)
Machine Translated by Google
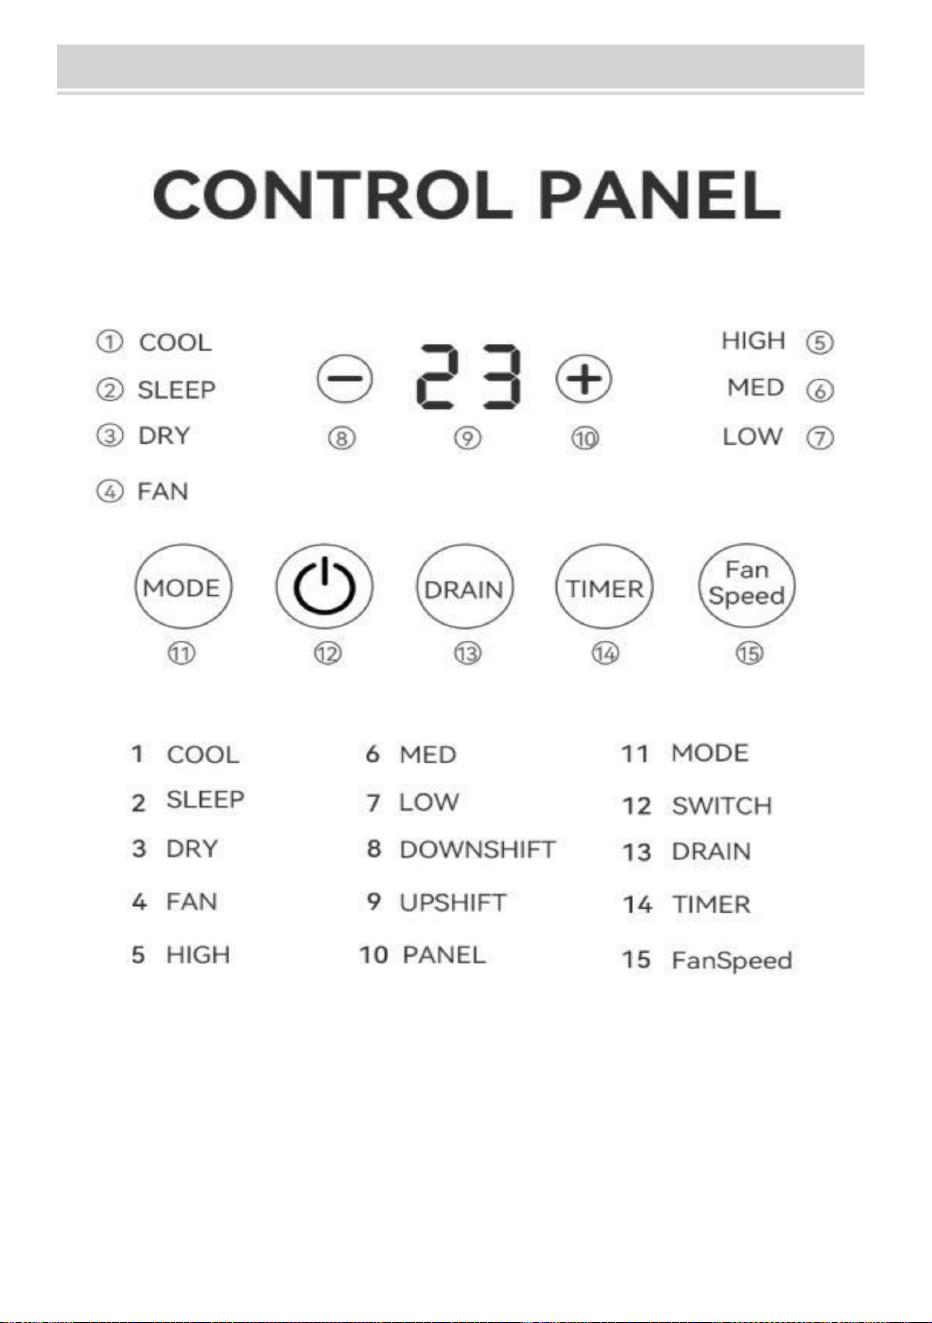
KONTROLLPANEL
Machine Translated by Google

1. " " Tangent
4. "+/-"-tangenter
förhindra horisontell position, luta inte, för att undvika vattenläckage i diskhon.
översvämning Observera när du öppnar "Töm"-knappen, vänligen be maskinen att
avfuktningslägen.
hastighet mellan hög, medel och låg Denna nyckel är ogiltig i viloläge och
När du stänger av vattenpumpen, anslut avloppsröret till dräneringsvatten för att undvika
pumpen Tryck på den igen för att starta om vattenpumpen och återuppta driften.
I kylnings- och lufttillförsellägen, tryck på knappen "FanSpeed" för att byta fläkt
3. Knappen "Fläkthastighet".
När vattenpumpen är igång, tryck på "Töm"-knappen för att stänga av vattnet
standby Använd "+/-"-knapparna för att justera timerns varaktighet.
varaktigheten för avstängning Tryck på "Timer"-knappen för att ställa in en timer för att slås på under
Tryck på knappen "Läge" för att växla mellan lägena "Kylning", "Sömn",
"Avfuktning" och "Lufttillförsel".
5. "Töm"-knapp
Celsius och Fahrenheit.
2. "Läge"-tangent
"Timer"-knapp för att ställa in en timer för att stängas av när den slås på Använd "+/-"-knapparna för att justera
Denna knapp är endast tillgänglig på fjärrkontrollen, inte på displayen
för att gå in i standbyläge när den är igång.
Tryck och håll båda knapparna i 3 sekunder för att växla temperaturenheten mellan
I kyl- och viloläge, tryck på "+/-"-knapparna för att justera den inställda temperaturen.
Tryck på knappen " " för att slå på luftkonditioneringen från standbyläge. Tryck på den igen
6. "Timer"-knapp
2 Viktiga instruktioner
Machine Translated by Google

3.1 Kompressorskydd
avstängning Detta skydd säkerställer att kompressorn fungerar till ett minimum
1. Gå in i vänteläge innan du stängs av, eller ställ in en timerbaserad avstängning
för avstängning uppfylls, kommer den inte att stängas av inom de första 3 minuterna om inte enheten är det
prioriteras om det finns.
Efter påslagning kommer kompressorn att gå i minst 3 minuter, även under förhållanden
kommer att fråga och visa eventuella fel och visa flera fel samtidigt i ordning
Det enda undantaget är inom 3 minuter före avstängning.
måste regenereras genom att trycka länge på tangenterna vindhastighet och - i 2 sekunder
- Inom 3 minuter efter att ha slagits på igen efter att ha stängts av
enhet, status för vattenmotorbrytare etc. Efter avstängning.
För att avsluta felsökningen och återuppta normal visning, tryck länge på vindhastighets- och
-knapparna igen i 2 sekunder. Felinformation kommer att gå förlorad efter ett strömavbrott och
-Inom 3 minuter efter avstängning
Obs 1: För att söka fel, tryck länge på vindhastighetsknappen och -knappen i 2 sekunder.
originalläge, med tidigare inställd temperatur, vindhastighet, temperatur
-Första strömmen på
2. Om strömmen slås på innan den stängs av, kommer den att återuppta driften i
Denna 3 minuters vänteperiod krävs inte för:
när du slår på, gå sedan in i standby-läge efter påslagning.
körtid före varje start/stopp-cykel.
Minsta tid innan kompressorn kan starta om efter stopp är 3 minuter.
3.2 Felsäker
3 Skyddsinstruktioner
3.3 Minnesfunktion
fel
visas
temperatur
Frågan
öppen eller kortsluten
Inomhusmiljö
visa
Sensorn är
Statisk
Felbeskrivning Felsökning Illustrera
felet
koda
Fel
Namnet på
antal
Stopp
Serie
E1
Machine Translated by Google

1. När du köper maskinen, vänligen placera den i den riktning som anges av
Använd apparaten enligt beskrivningen i bruksanvisningen Liksom andra elektriska
apparater syftar denna bruksanvisning till
farligt,och garantin är ogiltig •Den elektriska
apparaten måste installeras med jordning
ursprungliga sårbara delar, reparation av obehöriga personer är
servicecenter auktoriserat av tillverkaren, följ användningen av
farligt •Om
apparaten behöver repareras, vänligen kontakta den tekniska
fritt utrymme på minst 10 cm eller mer på båda sidor av maskinen.
varmluftsutloppet, lämna ett fritt utrymme på minst 60 cm
tillverkare, serviceombud eller motsvarande organisation för att undvika fara •All ändring
eller utbyte av apparatens egenskaper är mycket
material (som alkohol) eller hållbara behållare (egaerosoltankar).
gas, bensin och svavel, och det kan inte installeras nära värmekällan. •Använd inte den elektriska
apparaten på sluttningen
baserad på markeringarna på enheten
kan inte användas för andra ändamål •Om
nätsladden är skadad måste den bytas ut
produkt utan tillsyn •Den elektriska
apparaten är avsedd för hushållsbruk inomhus, och
2. Innan du använder maskinen, identifiera kallluftsutloppet och varmluftsutloppet
Dra inte i kabeln för att flytta apparaten • Installera
inte den elektriska apparaten i ett rum med naturligt
Kvalifikation
•Använd inte den elektriska apparaten utomhus •Sätt inte i
luftuttaget och luftintaget
när du stängs av måste du vänta minst 5 minuter innan du slår på den igen.
behöver användas vid drift och installation av den elektriska apparaten
•Barn eller personer utan egenvårdsförmåga är förbjudna att använda denna
varningen för händelser så mycket som möjligt och den vanliga praxis du
pilen på förpackningen i 2 timmar innan du slår på varje gång efter
intern krets måste testas av teknisk personal med el
VARNINGAR
4 Användarmeddelande:
SÄKERHET OCH VARNINGAR
Machine Translated by Google
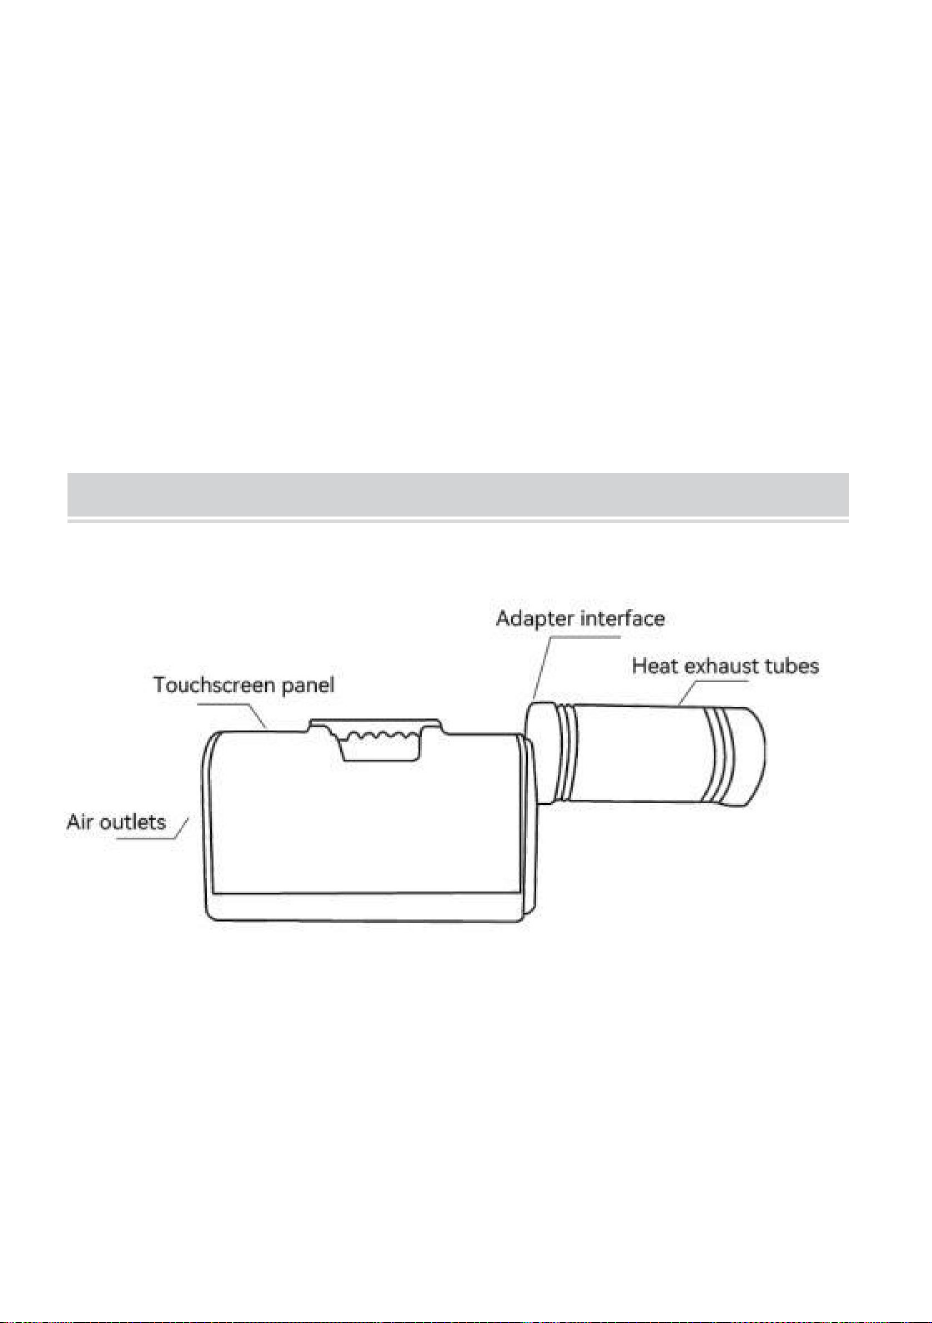
DRIFT
standarder.Kylmediets kretslopp i de elektriska apparaterna är
transport, om du behöver starta den, vänligen vänta en halvtimme
•R290 Det är ett köldmedium som överensstämmer med relevant miljö
stängd. Efter slutet av livslängden, vänligen lämna in den elektriska
Installation av ventilationskanaler.
apparaten, töm först vattnet i vattentanken
apparater till en särskild återvinningscentral
• Förpackningar är återvinningsbara, så det rekommenderas att placera dem i
vertikalt och placera den på ena sidan. När du flyttar den elektriska
•Placera inte tunga föremål eller heta föremål ovanpå maskinen. •Rengör
filterskärmen regelbundet
relevanta nationella lagar och förordningar.
motsvarande avfallssorteringskärl •Installationen
av den elektriska apparaten måste vara förenlig med
Installation av hot-end fläktkåpa och kanal.
Machine Translated by Google
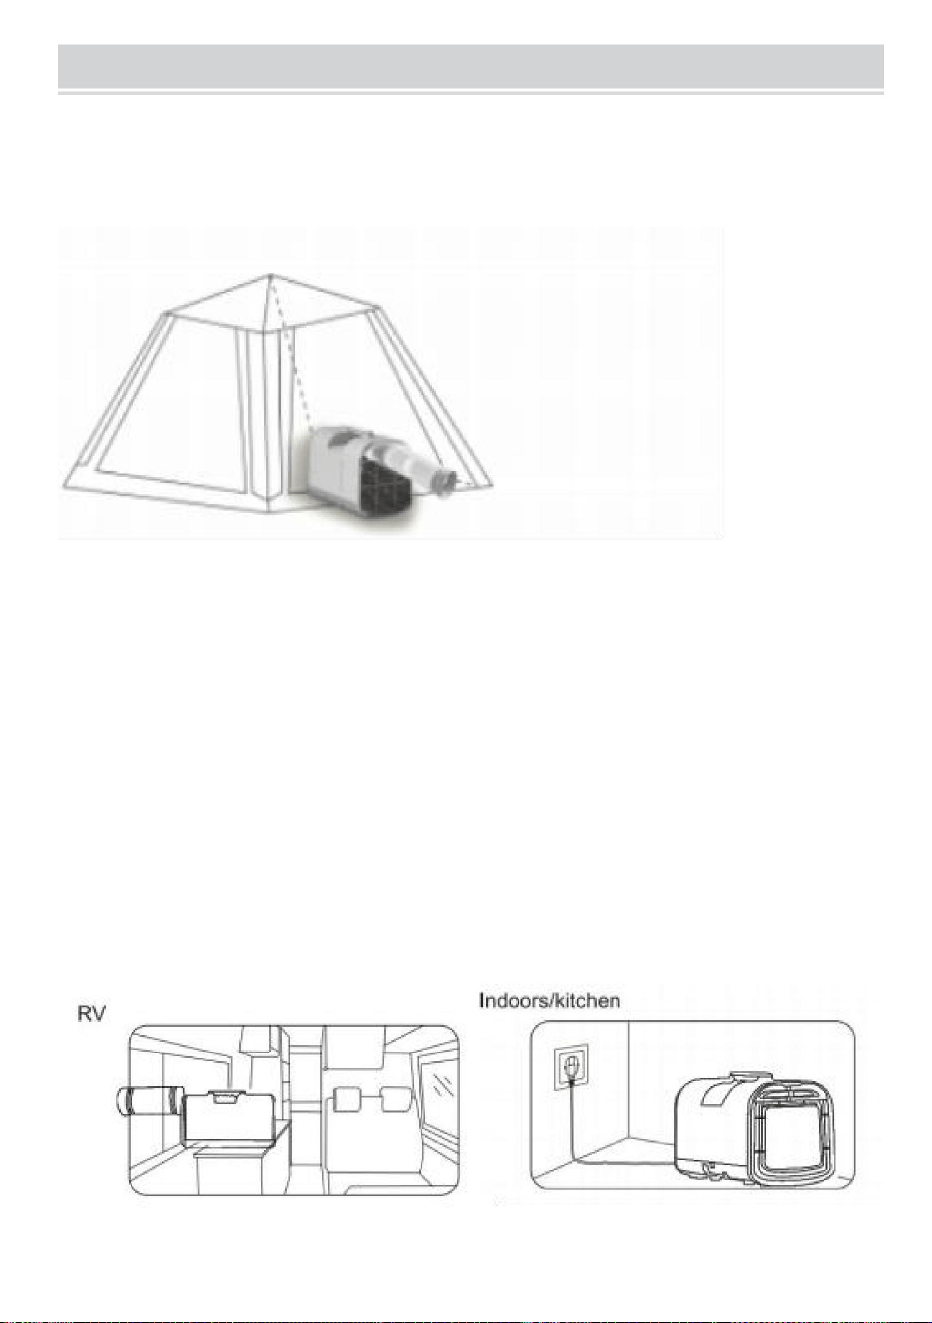
Rekommendationer:
Tält
ANVÄND SCENARIER
Var uppmärksam på tätning, tält med ventilationshål, så stäng eller täck över ventilationshålen.
Var uppmärksam på solskydd, du kan använda markiser för att täcka tält.
Var uppmärksam på tältets isolering Om tältet har dålig isolering, täck över tältet med en
värmeisolerande matta.
1. Placera utanför tältet med kallluftsventilen riktad in i tältet.
Om tältet är stort vilket överskrider utrymmeskylningen för luftkonditioneringen, lägg till en annan
luftkonditionering eller skapa ett litet kylutrymme inuti tältet med en tygvägg.
Machine Translated by Google
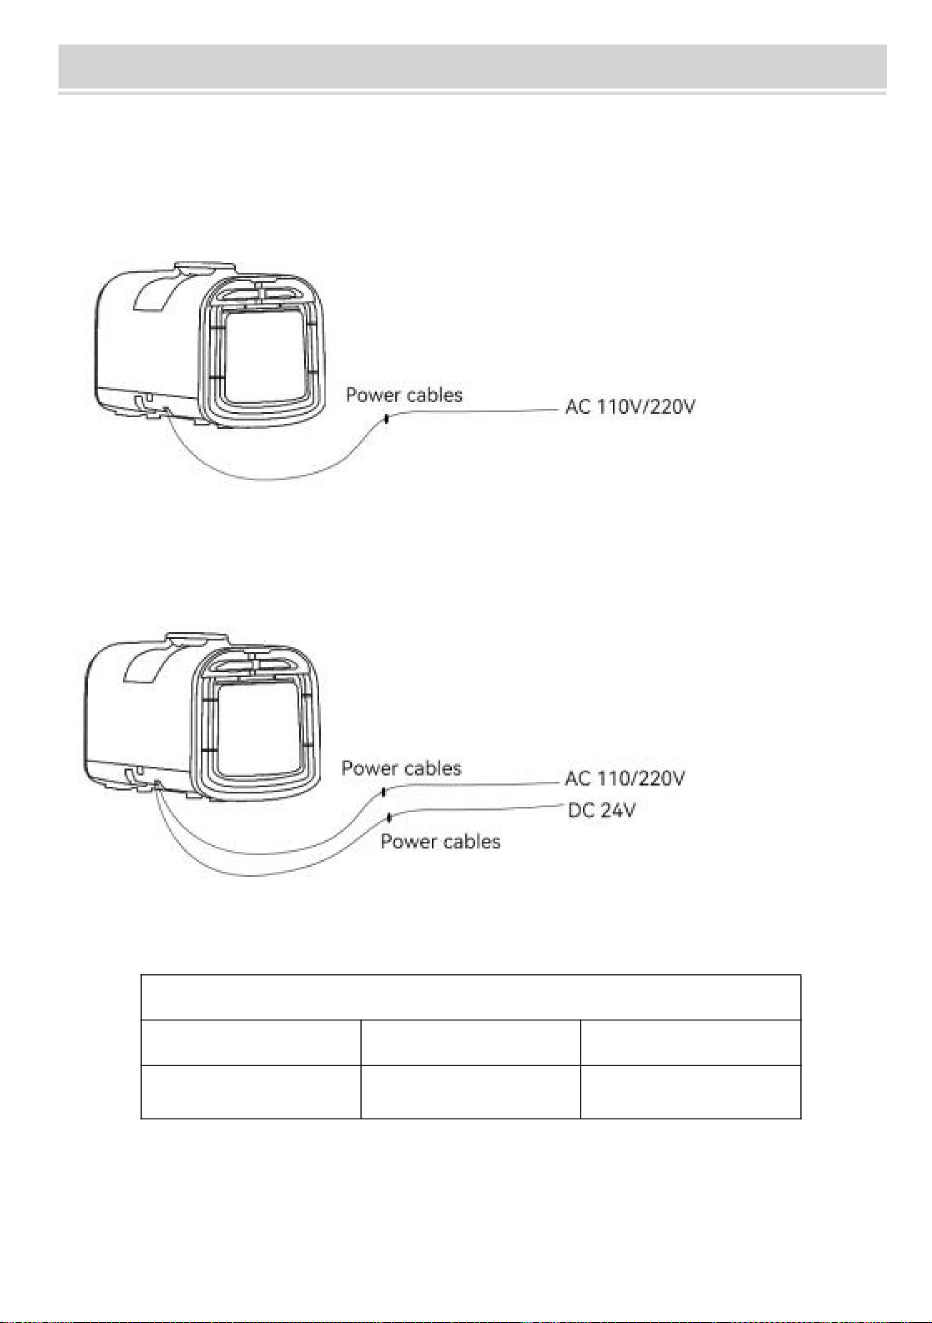
• S03-Pro: Ingångsspänning: AC 110V-60Hz/DC24V (Nordamerika)
AC 220V-50Hz/DC24V (Europeiska unionen, Australien)
AC 220V-50Hz (Europeiska unionen, Australien)
• S02: Ingångsspänning AC 110V-60Hz (Nordamerika)
STRÖMFÖRSÖRJNING
spänning kapacitet
Uteffekt
(S03-Pro) DC24V mobil strömrekommendation
DC24V
ÿ150AH
ÿ3500W
Machine Translated by Google

• Stäng av apparaten innan rengöring eller underhåll
När du använder luftkanalen, kontrollera om kanalen är överdrivet böjd eller blockerad, vilket
kommer att orsaka överhettning av kompressorn och stoppa för skydd
Rengöringsinstruktioner
1. Se till att maskinen är urkopplad innan rengöring.
• Enheten kyls inte, kontrollera om luftintaget och luftutloppet är blockerade.
ett skuggat område Ladda om och fäst med skruvar.
från att minska och rosta •
Använd aldrig bensin, alkohol eller lösningsmedel för att rengöra apparaten.
• Spraya aldrig insektsmedel eller liknande.
4. Para ihop fjärrkontrollen.
neutralt rengöringsmedel vid 40°C Använd en borste för att rengöra eventuell smuts på filtret och lufttorka sedan in
delar kommer att åldras, spricka och lukta. Därför bör vi rengöra den regelbundet. • Tvätta
aldrig luftkonditioneringen med vatten för att förhindra elektrisk isolering
3. Byt ut batteriet i fjärrkontrollen.
Rengör filtret en gång i månaden Använd en liten stjärnskruvmejsel för att lossa fästet
skruvar som visas Dra ut filtret och blötlägg det i ljummet vatten blandat med en
och deformation Om oljan är fäst vid plastdelarna under lång tid, plasten
1. Överskrid inte fjärrkontrollens avstånd (32 fot/10 m).
2. Kontrollera om fjärrkontrollen är skadad.
• För att skydda luftkonditioneringen måste den hållas ren och försök undvika oljefläckar
torr trasa underhåll av plastdelar:
• Fjärrkontrollen fungerar inte:
3. Skölj inte direkt med vatten.
minuter och dra sedan ur kontakten från eluttaget •
Rengör apparaten med en lätt fuktad trasa och torka sedan med en
rekommenderar att du stänger av luftkonditioneringen och sätter på enheten efter 15 minuter.
2. Använd inte kemiska lösningsmedel som bensin för rengöring.
FELSÖKNING
SKÖTSELINSTRUKTIONER
UNDERHÅLLSSERVICE
• Filtrera
Machine Translated by Google
Torka av med ett neutralt rengöringsmedel eller alkohol på en fuktig trasa och torka sedan med en torr trasa.
Kundtjänstavdelning Viktigt meddelande:
Europeiska unionen. Detta gäller produkten och alla tillbehör
Produkter märkta med denna symbol Produkter märkta som sådana får inte kasseras
5. Förslut maskinen i en plastpåse och förvara på en torr plats.
eventuellt kvarvarande kondensvatten inuti.
indikerar att produkten kräver separat sophämtning
4. Luta maskinen försiktigt med avloppsutloppet nedåt i 30 minuter för att tömma
2012/19/EU. Symbolen som visar en soptunna på hjul korsad
3. Rulla upp nätsladden hårt.
Denna produkt omfattas av bestämmelserna i det europeiska direktivet
2. Torka av maskinens yta med en fuktig trasa och torka med en torr trasa.
3. Produkten kan ha utgått på grund av att elektroniska komponenter inte är tillgängliga.
KORREKT AVFALLSHANTERING
1. Stäng av maskinen och dra ur nätsladden.
Lagring under lågsäsong
2. Produktspecifikationerna kan ändras utan föregående meddelande.
återvinning av elektriska och elektroniska apparater.
Lagring:
1. Garantiperioden är 1 år (12 månader) från inköpsdatum.
med vanligt hushållsavfall, men måste lämnas till ett insamlingsställe för
• Ytrengöring
Machine Translated by Google