Please read this manualcarefully before operating
your set and retain ist for future reference
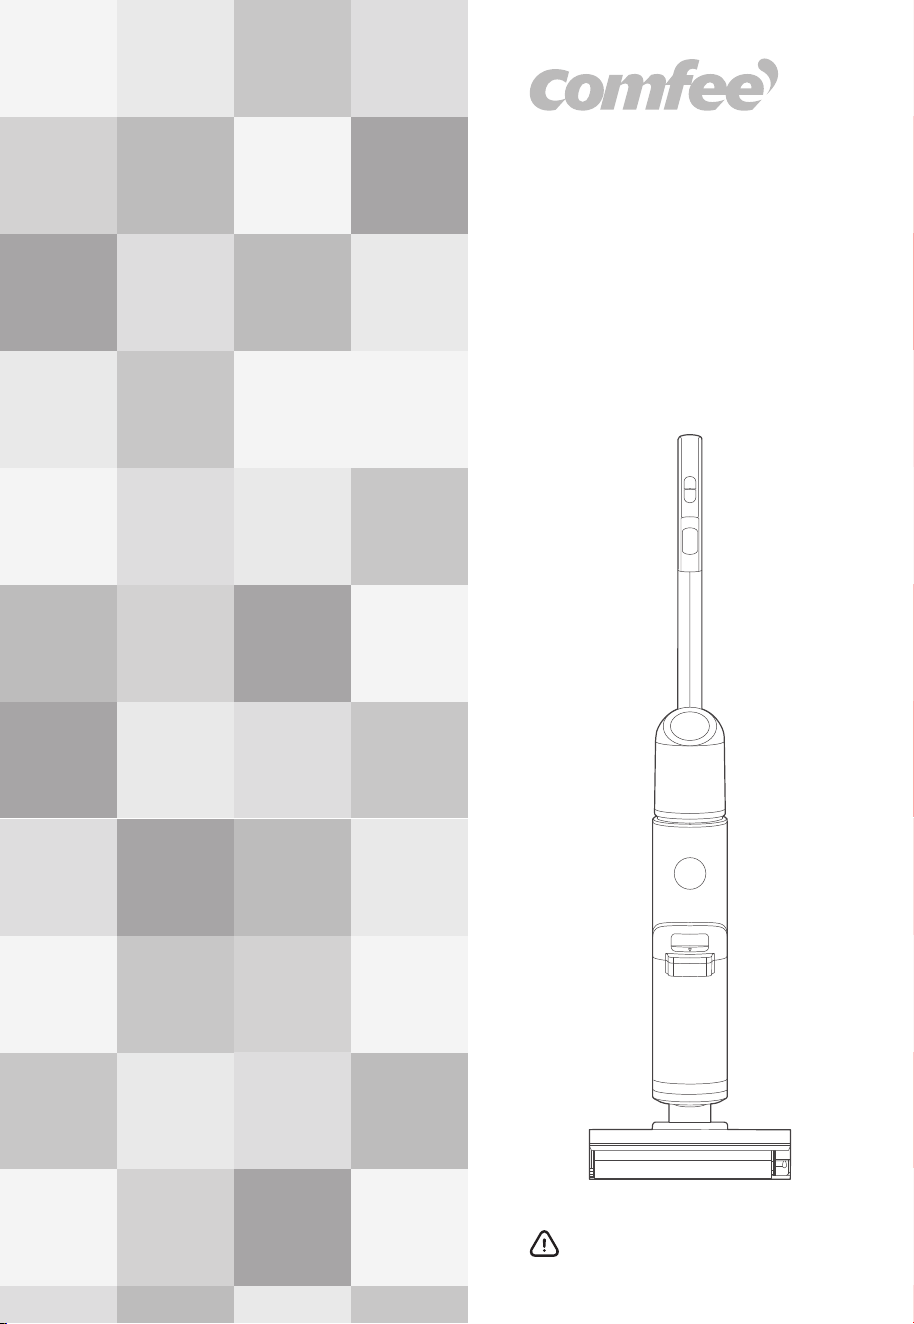
FLOOR
CLEANER
Instruction Manual
CXC05APGY

0101
01
06
07
09
13
16
02
11
CONTENTS
SAFETY INSTRUCTIONS
PRODUCT OVERVIEW
OPERATION INSTRUCTIONS
CLEANING AND MAINTENANCE
TROUBLE SHOOTING
---------------------------------------------------------
----------------------------------------
SPECIFICATIONS
-------------------------------------------------
-------------------------------------------
-----------------------------------
------------------------------
--------------------------------------------
--------------------------------------
PRODUCT INSTALLATION
CONTENTS
SAFETY INSTRUCTIONS
Intended Use
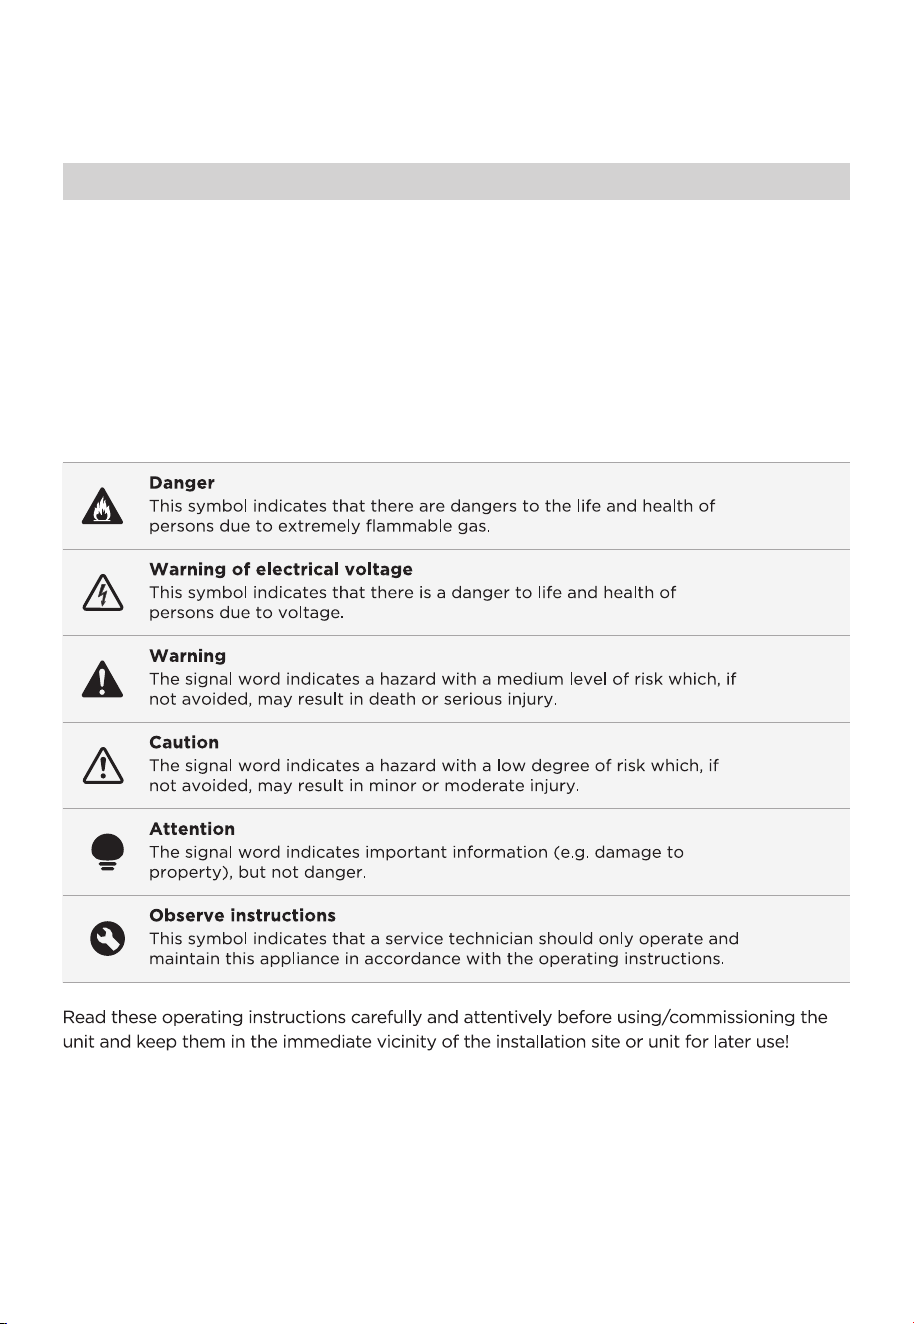
Explanation of symbols
The following safety guidelines are intended to prevent unforeseen risks or damage from
unsafe or incorrect operation of the appliance. Please check the packaging and appliance
on arrival to make sure everything is intact to ensure safe operation. If you find any
damage, please contact the retailer or dealer. Please note modifications or alterations to
the appliance are not allowed for your safety concern. Unintended use may cause
hazards and loss of warranty claims.
02

•
0303
• This product is suitable for hard floors in the indoor environment, including waxed
floors, stone floors, rubber floors, marble floors, granite floors, terrazzo floors, solid
wood floors, composite floors, bamboo floors, as well as glazed tiles, ceramic facing tiles
and other flat ground. It may not achieve the best results if the product is used on
uneven ground surface.
• Do not use this product near or on the surface of flammable and explosive objects,
which may cause fire and explosion.
• Do not use this product near a working fireplace or heater to prevent deformation of
the machine casing.
• Do not use it to clean high-temperature substances (unextinguished cigarette butts,
matches or hot ash, etc.), ultra-fine substances (such as lime, cement, wood chips,
gypsum powder, ashes, charcoal, etc.), dangerous substances (such as solvents,
descaling agents, etc.), chemical substances (such as acidic substances, detergents,
etc.) and other substances with uncertain physical properties.
• Do not use this floor cleaner to absorb detergent, kerosene, gasoline, alcohol, paint or
perfume, or else it may cause short-circuit, fire or explosion.
• Do not use this floor cleaner to absorb toner used in laser printers and copiers, or else
it may cause fire or explosion.
• Do not use this floor cleaner to absorb sharp or large objects, such as glass shards,
small toys, pins, paper clips, stones, plaster and large pieces of paper, or else it may
block up and damage the machine.
•
•
Do not use this floor cleaner to absorb any burning or smoking objects, such as soot
from the unextinguished heat source, burning cigarette butts or matches.
This product can’ t be used to clean stains of strong grease, strong viscosity, or strong
dyeing properties such as shoe polish, paint, and pigments.
• Do not touch the plug or any live part of the product with wet hands to avoid the risk
of electric shock.
•
•
•
•
•
•
Stop using it if the plug is damaged. Please call our service personnel for replacement
in order to avoid hazards.
Please keep the airflow channels and moving parts of this product away from long hair,
loose clothing, fingers and other parts of the body. Do not point the suction tube,
accessory tip or tool to the eyes or ears, or put them in the mouth.
Please use the cleaning agent produced by our company and the manufacturer
approved by us.
Do not add other solutions to avoid generating toxic and harmful gases.
If electric leakage, motor over-temperature, abnormal noise, peculiar smell or weak
suction is found during use, stop using it immediately and call our service personnel.
After using the machine, please clean the wastewater tank in time to avoid peculiar
smell, and keep the ventilation path unobstructed, so as to avoid obstruction, or else it
will cause the suction power to drop, the motor to heat up, and will affect the service life
of the floor cleaner
.
After using the machine, please store it in a dry place. A humid place will affect the
insulation and service life of the appliance.
Do not soak or rinse the floor cleaner or floor brush in water.
Important Safety Instructions

• This appliance can be used by children aged from 8 years and above and persons with
reduced physical, sensory or mental capabilities or lack of experience and knowledge if
they have been given supervision or instruction concerning use of the appliance in a safe
way and understand the hazards involved.
• Cleaning and user maintenance shall not be made by children without supervision.
• Children should not play with the appliance.
• Please check the suction nozzle regularly. If there is a blockage, please clear it in time
to avoid decrease in suction and affecting the performance of the machine.
Turn off the power before replacing the brush.
• In the following situations, do not use the machine, contact to our customer service
center for inspection and repair in time:
1.Obvious damage or abnormal operation caused by drop;
2.Power cord is damaged.
• Do not disassemble the enclosed machine without permission. There are no user
serviceable parts. Do not try to change the performance of the machine, or else it will
cause danger.
• Using a voltage that does not match the specifications will cause damage to the
product and more likely to cause harm to the user. The correct rated voltage is marked
on the nameplate.
• When cleaning the stairs, be extra cautious to prevent falling.
• Do not shake or impact the machine up and down to prevent wastewater from flowing
into the motor.
•
•
When the motor is working, do not lift or carry the appliance up and down, and do not
put the machine on its side to prevent the wastewater from entering the motor.
To prevent tip-over, place the machine against the wall after use.
• Do not use the floor cleaner before the clean water tank and wastewater tank are
installed properly.
• Do not place any small objects in the outlet or block the outlet. Remove any small
objects that may interfere with the flow of air through the outlet to prevent overheating
of the machine.
• Do not wet the machine body, or it may cause damage and fire due to short circuit.
• This is only allow to use the docking station for charge the battery.
• The plug must be removed from the socket-outlet before cleaning or maintaining the
appliance.
• All the te
chnologies and other data in this manual are obtained by our company or the
designated third party testing company, and we reserve the right of final interpretation.
Important Safety Instructions
04

Use and Precautions of Washer Detergent
05
• Mix and clean according to instructions. It is recommended to use cleaning liquid
produced by our company or manufacturers approved by our company, which do not
contain acid, alkali solutions or substances harmful to the environment.
• If a large amount of cleaning liquid is added, more foam will be generated when used,
which may infiltrate into the motor and cause danger.
• The cleaning liquid should be kept out of reach of children. If the cleaning liquid
accidentally gets into eyes, rinse thoroughly with clean water; in case of accidental
ingestion, seek medical treatment immediately. Follow local environmental protection
regulations when handling wastewater and cleaning liquid.

Product Model
Charging rated input
Charging output
Power
Voltage
Net Weight
Product Size
Clean water tank volume
Dirty water tank MAX line volume
06
CXC05APGY
100-240V~50/60Hz
27V 0.8A
200W
22.2V
3.7kg
1120*270*282mm
740mL
400mL
SPECIFICATIONS
07
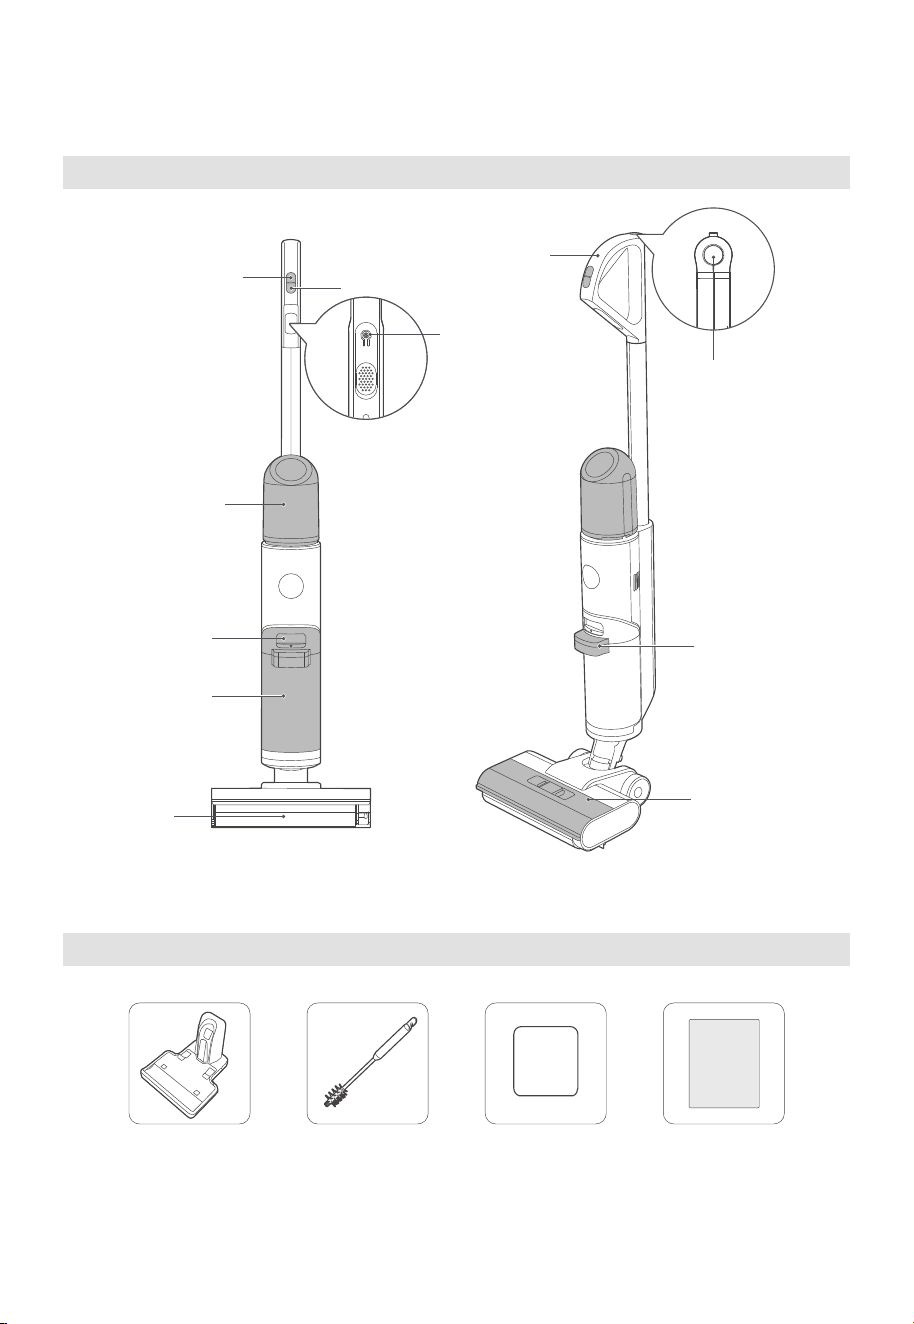
PRODUCT OVERVIEW
Product introduction
List of Accessories
Switch power mode
Handle
Power on/off
Clean water tank
Wastewater tank
release button
Dirty water tank
Brush-roll
Docking station Cleaning brush Filter User’s Manual
User’s
Manual
Self-clean button
Waste water lifting
Brush-roll cover
Voice
navigation
08
Parts
Auto mode
• the water from the machine wets the brush-roll to clean the floor;
Quick suction mode
• the machine stops discharging water, and sucks dry garbage or residual water;
Electrolyzed Water
• Cleaning and disinfecting agent obtained by means of electrolysis with a dilute sodium
chloride solution and it is no harm to the human body and friendly to the human body
and friendly to the environment.
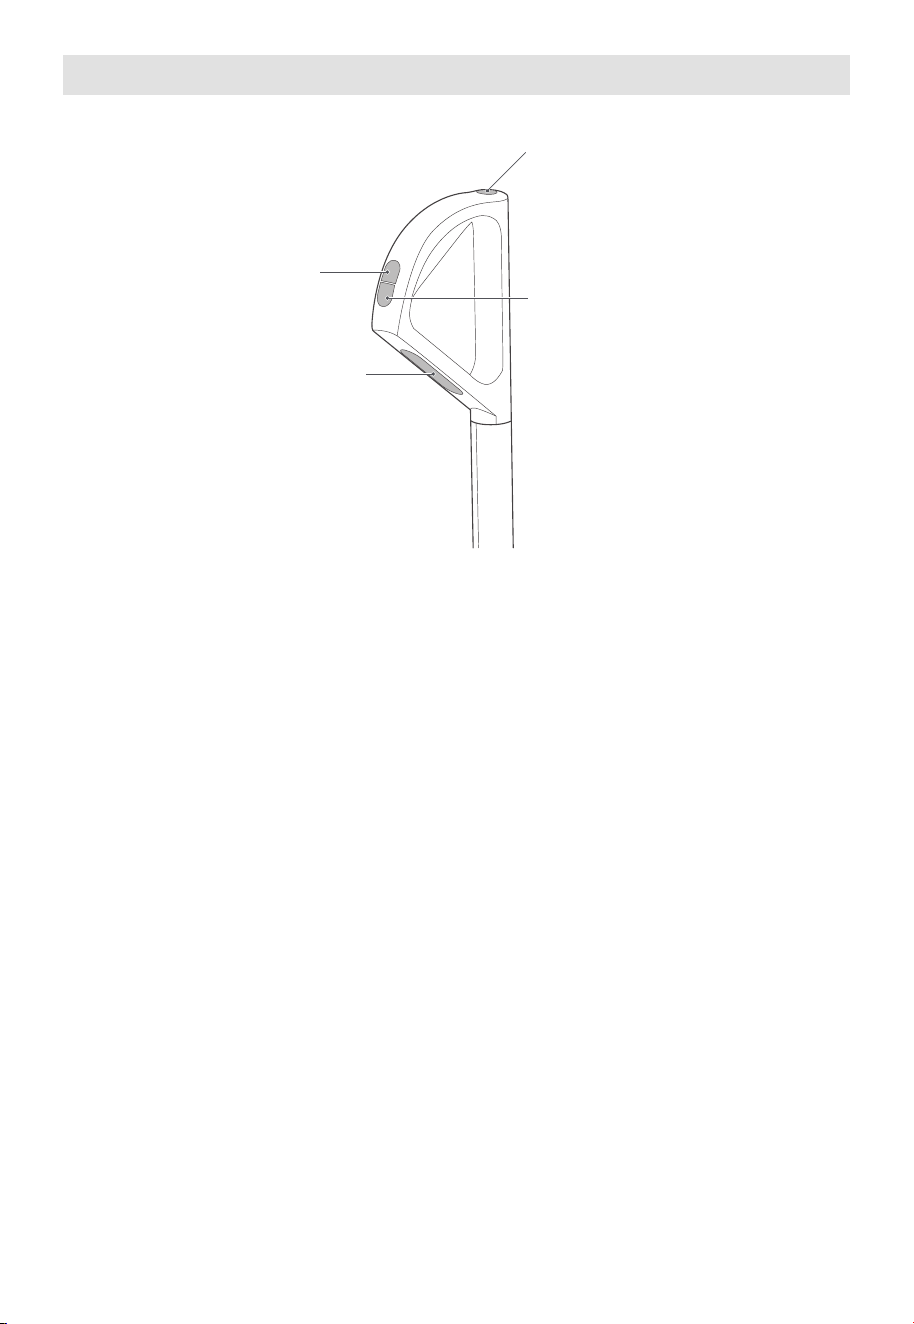
Self-clean button
Switch power
mode
Power on/off
Voice
navigation
PRODUCT INSTALLATION
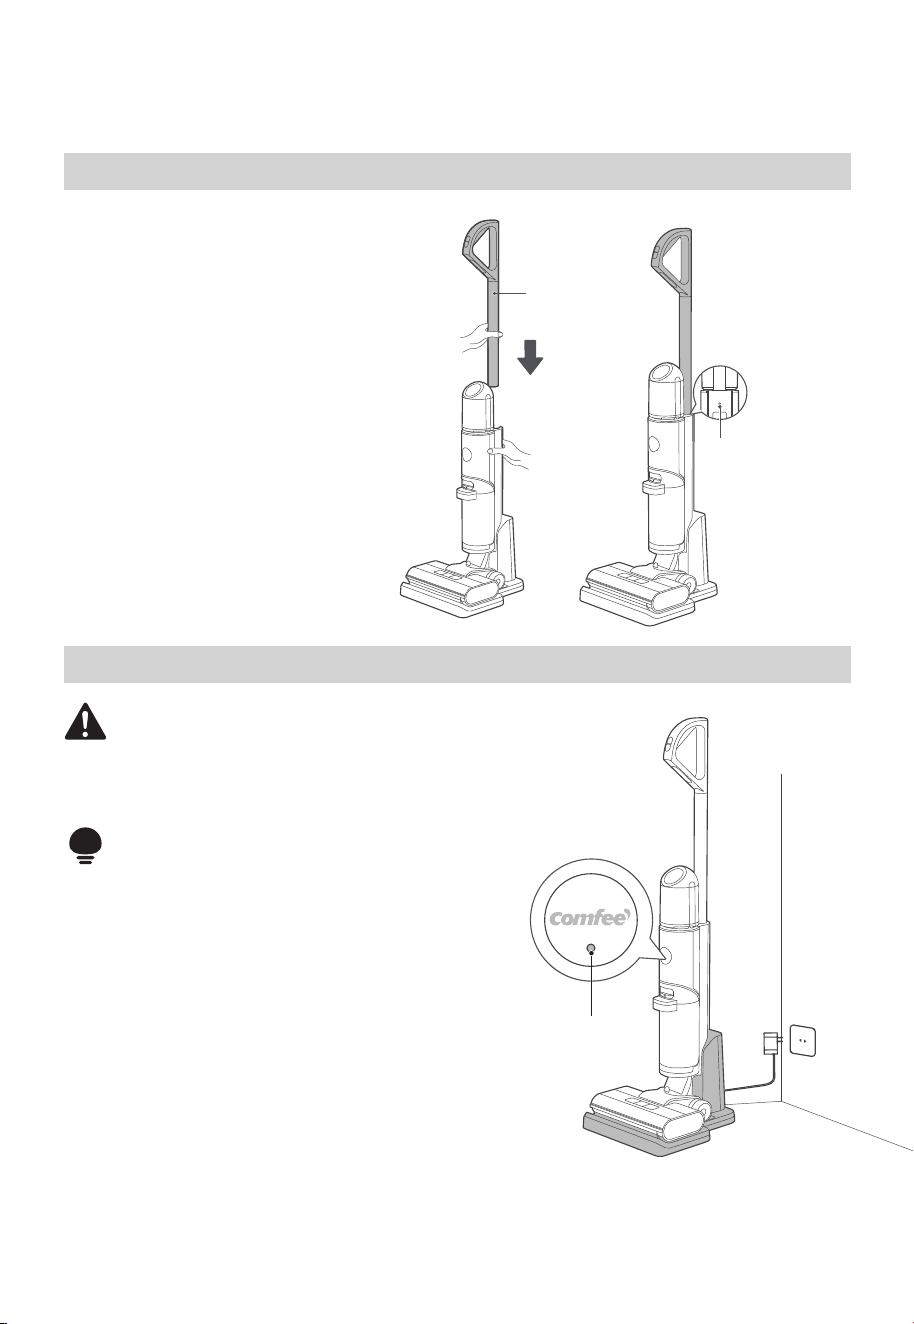
Handle Installation and Removal
Charging Battery
Insert
Handle
Disassembly
hole
Attention
• Charge the product before the first use.
WARNING
• For the purposes of recharging the battery,
only use the detachable supply unit
provided with this appliance.
1. Insert the charging end of the charger into the
rear port of the charging dock, and connect the
plug to a 100V-240V power
2. Put the machine upright into the charging base,
and make sure that the bottom of the body
completely falls into the charging base. At this
moment, a voice will prompt “start charging”,
and the indicator light flashes.
3. It takes about 3-4 hours to fully charge the
machine.When the battery is fully charged, the
indicator will turn off and the machine will
automatically power off.
09
Installation
Insert the end of the handle into the
port of the main unit along the
vertical direction until there is a click,
which indicates the installation is
successful;
Removal
Insert a screwdriver or other tools
into the hole, and pull out the handle
upward.
Guiding lights
10
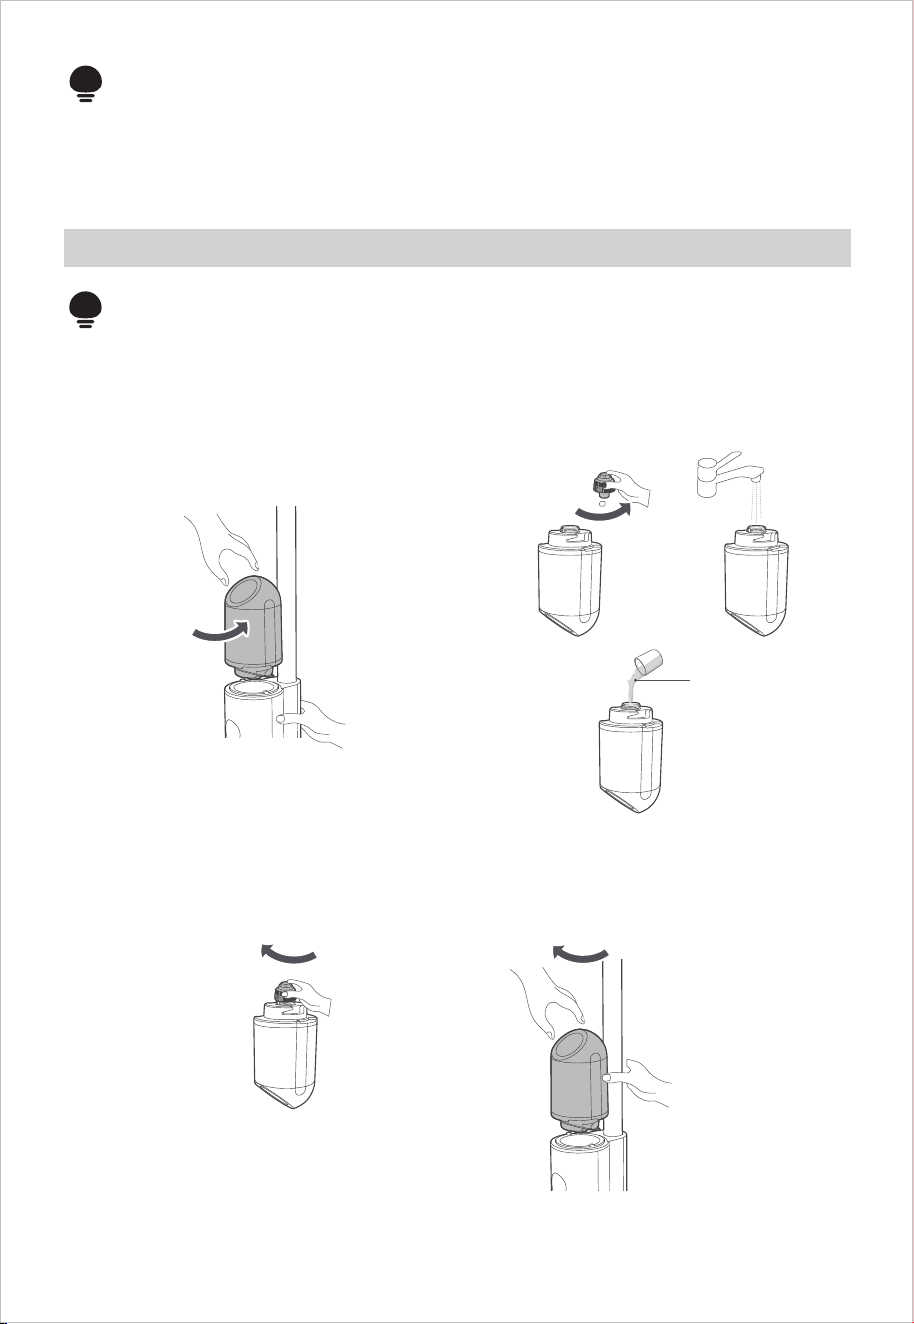
Filling Clean Water Tank
1. Hold the machine with one hand, grab
the water tank with the other hand,
rotate and remove the water tank;
3. Screw the water tank back into place on the machine, and when you hear a click sound,
it means the installation is successful.
2. Unscrew the water tank cover, pour
tap water into the water tank, and add
an appropriate amount of cleaning
solution if desired;
Unscrew
Screw back into Screw back into
Unscrew
Cleaning Solution
Attention
• Fill water only to the clean water tank.
Attention
• Voice cannot be triggered when turned off
4. When the machine is first turned on, the voice function is enabled by default. While in
the on or pause state, you can press the voice button to turn off the voice function.
Pressing the same button again will re-enable the voice function.
OPERATION INSTRUCTIONS
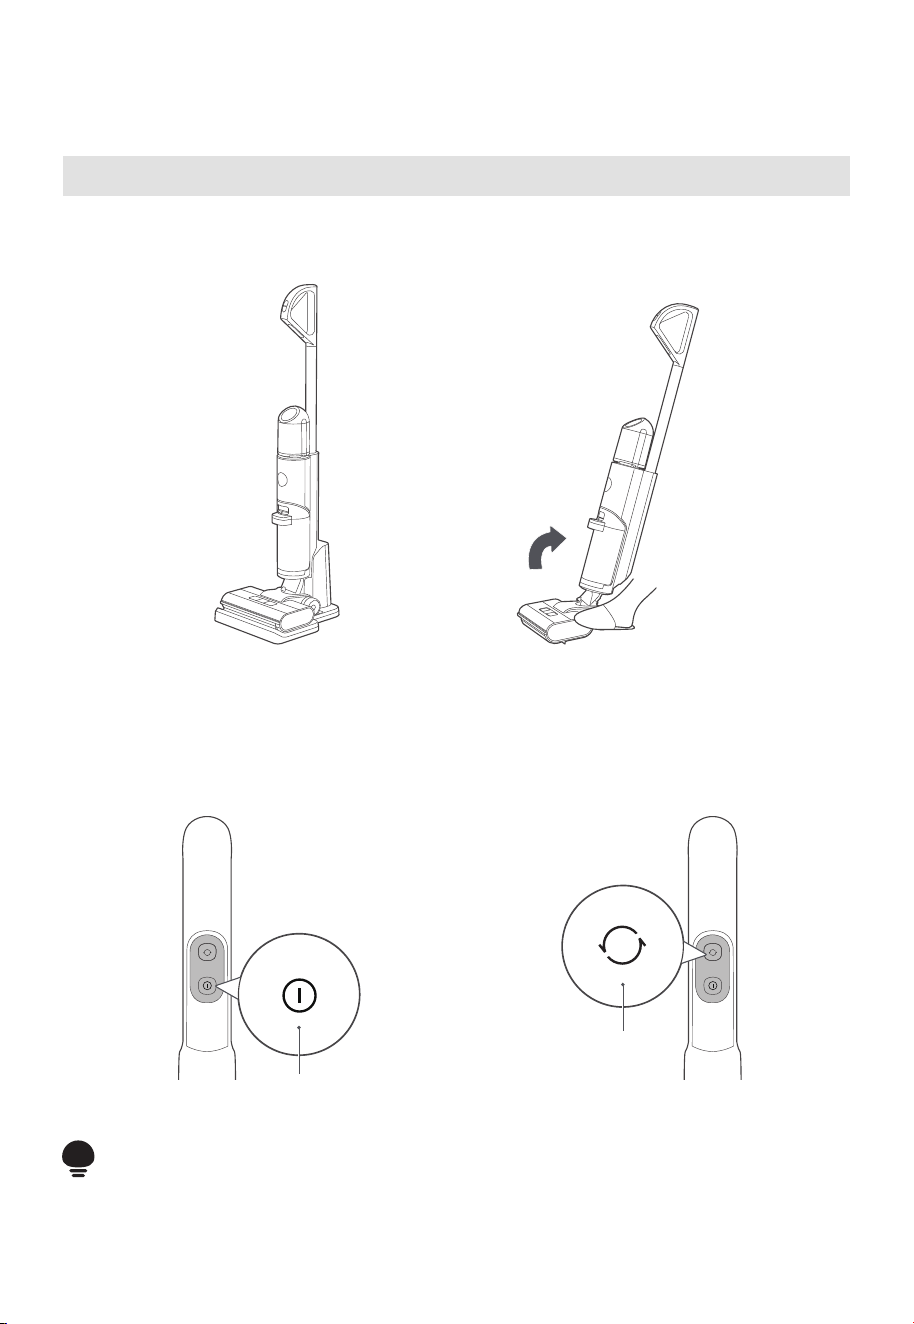
Turning On and Cleaning
11
Power button
Mode switch
button
Step 1
Step on the floor brush and pull the handle diagonally until you hear a click. The machine is
now in standby mode.
Step 2
To start working, press the power
button. Press this button again to stop
the machine.
Attention
• After using the machine, it is recommended to place it vertically on the specially
designed charging base.
Step 3
The machine defaults to automatic
mode when it starts. To switch to the
sterilization mode, press the mode
switch button. Press this button again to
switch to the suction mode.

Upright Pause Function
Self-cleaning + Drying Function
1. When the machine is in charging state, short press the
self-cleaning button to activate the self-cleaning and
self-drying mode. During the self-drying process, the
roller brush rotates for 30 seconds for centrifugal
drying, followed by the low-speed operation of the fan
for 90 minutes to properly dry the roller brush and
pipeline.
2. When the machine is in charging state, long press the
mode switch button for 3 seconds to directly enter the
self-drying mode.
3. To stop the self-cleaning or self-drying, press the
self-cleaning button again.
4. After the self-cleaning is completed, please clean the
wastewater tank in time. If there are residual stains on
the base, please clean them in time.
In working state, you can step on the floor brush to erect the body, the machine will stop
working and enter standby state; it will automatically turn off after 2 minutes of standby.
Caution
• During the air-drying process, the machine does not charge. After the air-drying is complete, it
automatically enters the charging state. It is normal for the machine to indicate low battery after
air-drying in a low battery state.
• In the air-drying mode, to improve the drying effect, the rolling brush will rotate every 2 minutes
with a "drip" sound, which is a normal phenomenon.
12
Mode switch
button
13
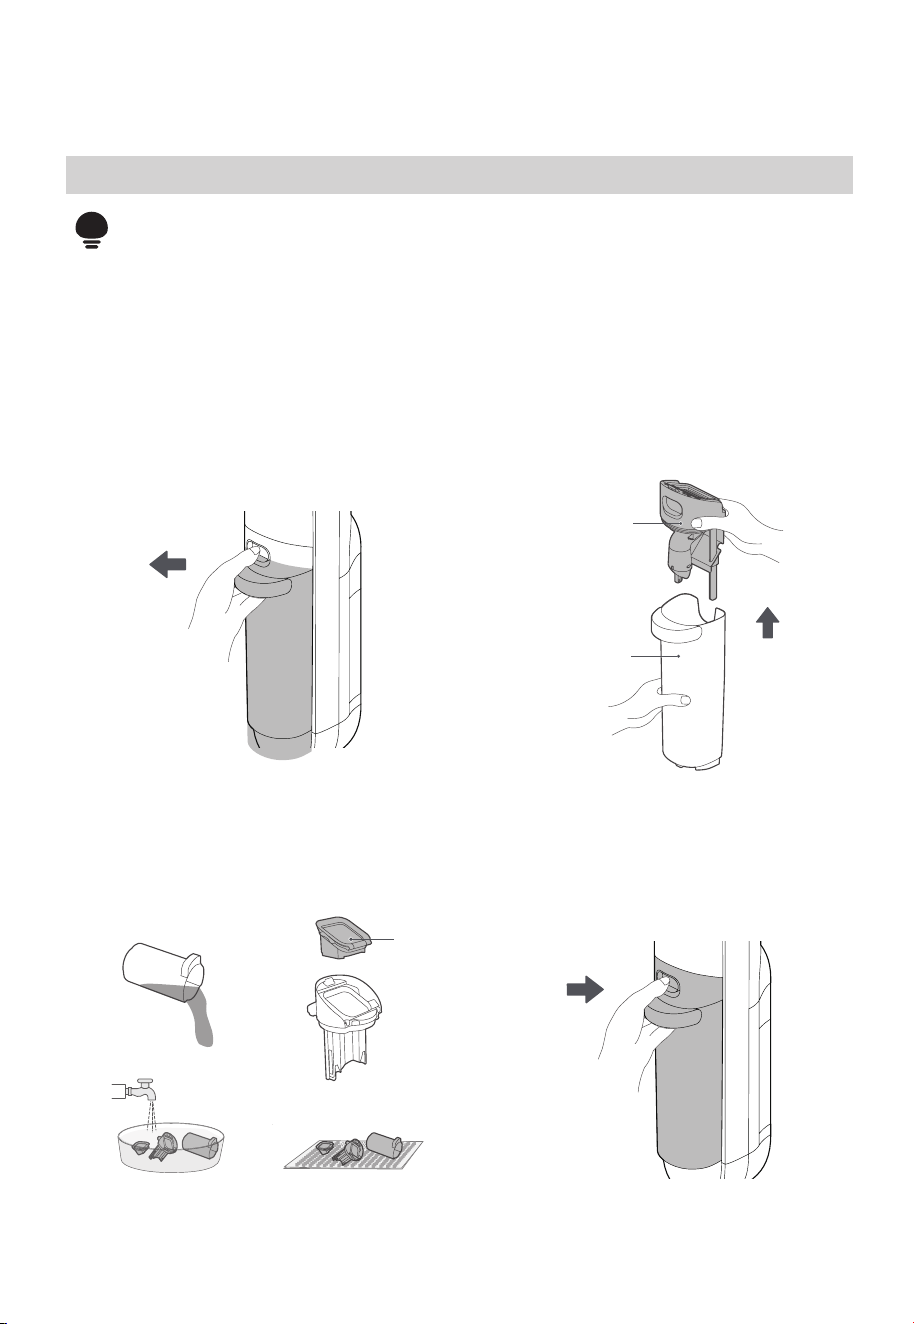
CLEANING AND MAINTENANCE
Waste Water Detect Alarm
4. Install the wastewater tank back to the
machine until there is a click sound; (when
installing wastewater tank, it is
recommended to hold the body with
another hand to avoid tipping over).
Filter
Cleaning Air-dry
Top cover of
wastewater tank
Waste
water tank
Upwards
Attention
• After cleaning, it is recommended to place the machine upright in the charging
base; do not place the machine in places with direct sunlight or moisture;
• In order not to affect the performance of the machine, it is recommended that
you regularly maintain its parts;
• Before cleaning, please disconnect the power supply to stop the machine;
• Scrub with water or neutral detergent, wring out the cleaning cloth before
scrubbing to avoid water leaking into the electrical components.
1. Press the button of wastewater tank
with your thumb and pull outward to
remove the tank.
3. Dump the sewage from the side of the
sewage tank and rinse it clean; remove
the filter from the top cover of the
sewage tank, rinse it clean, and air-dry it.
2. Hold the tank with one hand and pull
out the top cover of the tank with the
other hand.
Install it back
Pull
outwards

14
Press extraction
Brush-roll and Cover Cleaning
Attention
• It is recommended that after each use, the roller brush and cover should be
cleaned and dried in time;
• If residual stains are found on the suction surface of the floor brush, wipe it with
a wet cloth. Do not rinse it with water.
1. press the buckle as shown in the diagram
to remove the floor brush cover;
2. Rotate the end cap knob as shown in the
diagram and pull out the roller brush
sideways;
3. If there is still hair or other debris tangled
on the roller brush after self-cleaning,
remove the tangled debris from the roller
brush; for heavy-duty cleaning (such as
tomato sauce, soy sauce, etc.), if there is
still dirt residue on the roller brush after
self-cleaning, it can be self-cleaned again
or the roller brush can be removed and
cleaned with water;
4. If there is residual dirt on the roller brush
cover after self-cleaning, rinse the roller
brush cover with water.
a. Rotate the end
cap knob
b. Pull out the roller
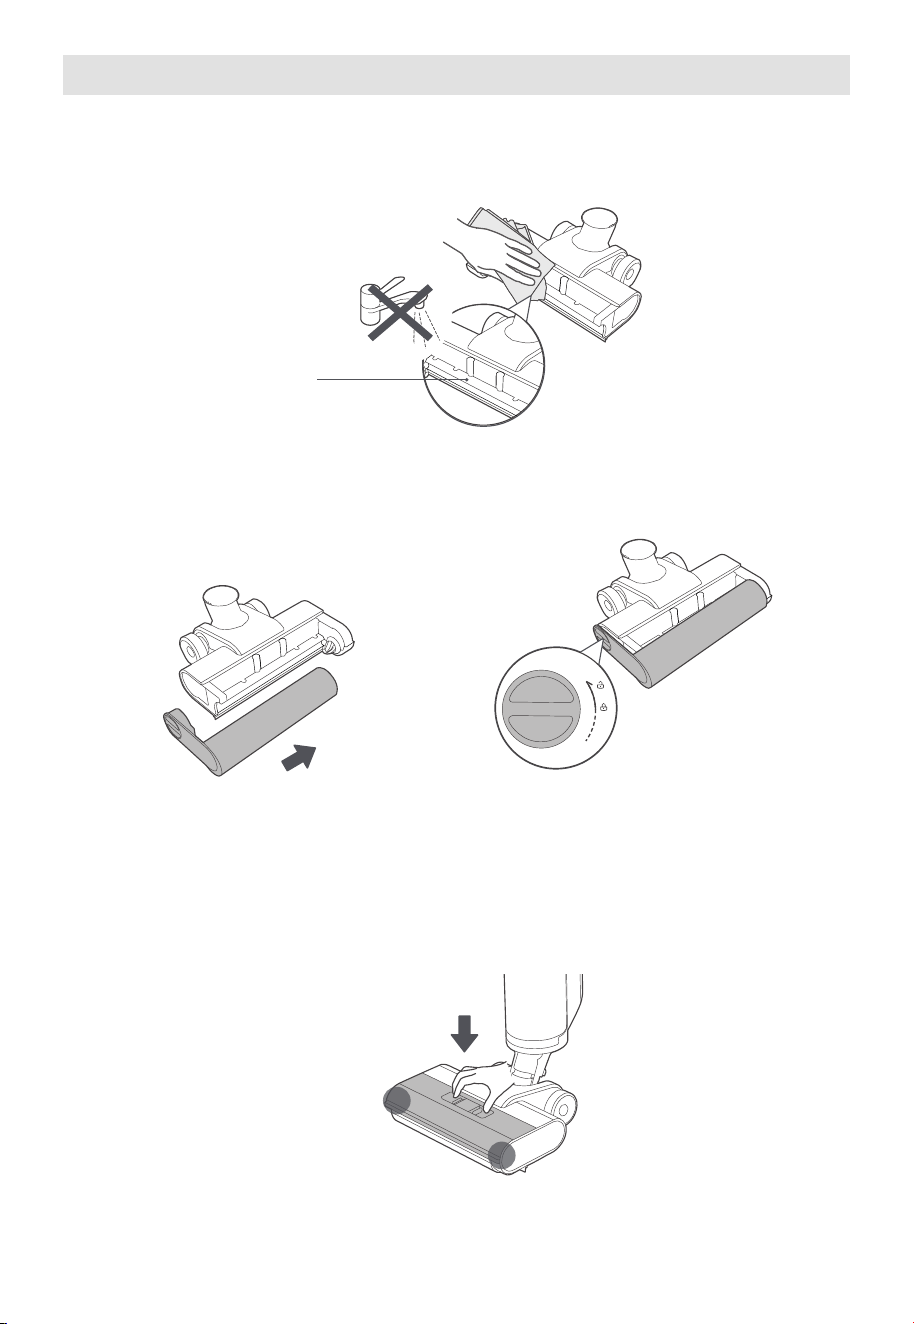
Brush-roll and Cover Cleaning
15
a. Reinstall the roller
suction nozzle
5. If there are any residual stains on the suction nozzle (the part exposed after removing
the roller brush) after self-cleaning, please wipe it with a damp cloth instead of washing
it with water.
6. After cleaning, reinstall the roller brush. If not in immediate use, you can place the roller
brush in a ventilated area to dry before installation.
b. Screw the end cover
button
7. After cleaning, cover the floor brush, align it with the installation hole, press it down, and
you will hear a click when it is successfully installed.
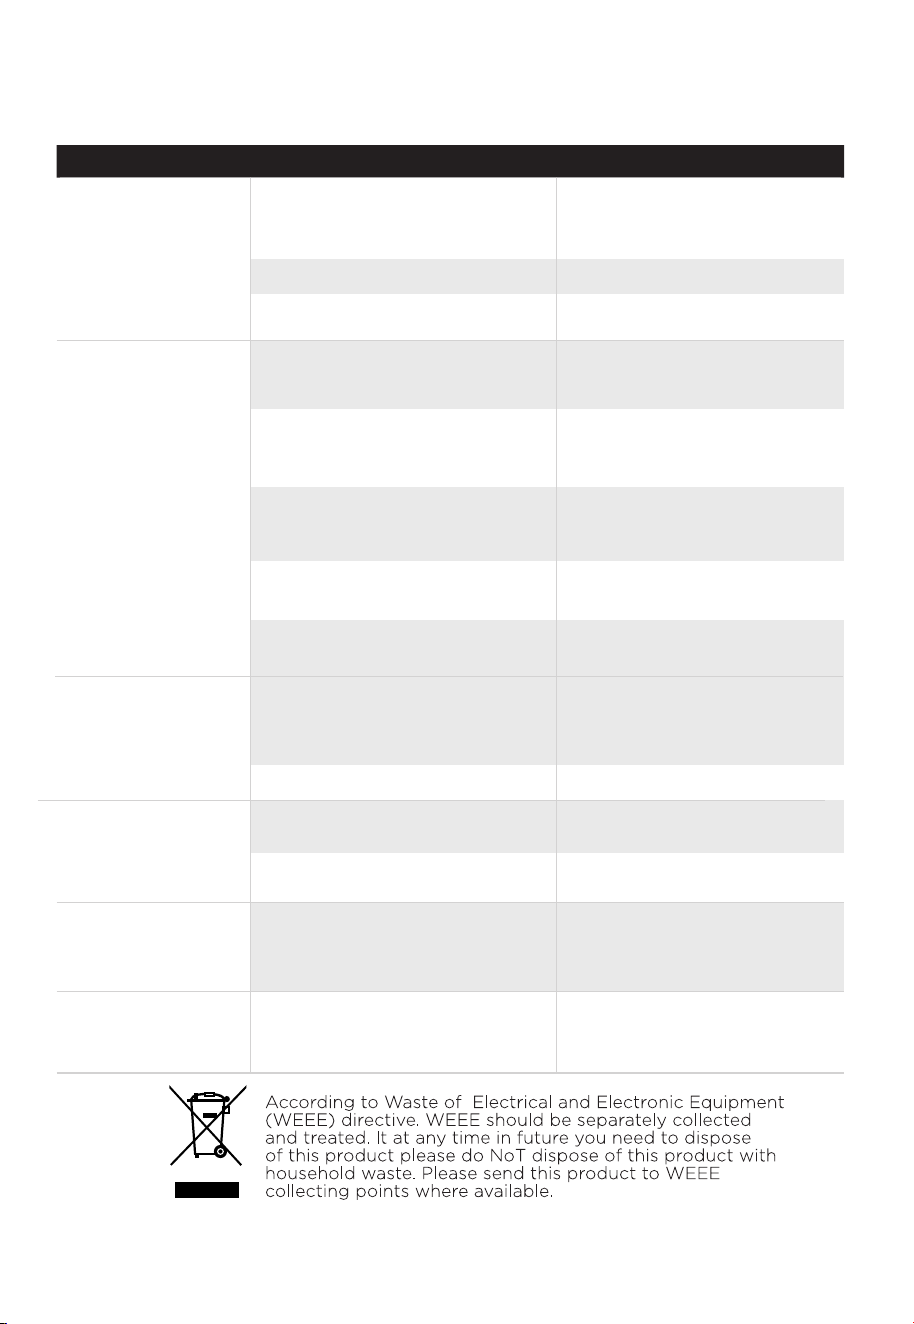
TROUBLESHOOTING
Please check the following table in case of any abnormal conditions when using the product.
Possible cause SolutionProblem
The floor cleaner
does not work
Suction power is
weakened
Noise when the fan
is running
The roller brush is entangled
by hair or stuck by foreign
objects
Remove the roller brush to
clean and reinstall
●
Foreign matter in the suction
port of the floor brush or in
the pipe
●
Wipe the suction port and
clean the pipe under the air
duct
Wastewater tank is full Clean the Wastewater tank
●
Wastewater tank is full Clean the wastewater tank
●
Low battery voltage Charge
●
Roller brush, roller brush
cover, or wastewater tank is
not installed in place
Remove all components
and reinstall them
●
Use after cleaning the filter
screen
Roller brush is entangled by
hair
Clean the roller brush
●
Floor brush suction or pipe
blockage
Wipe the floor brush suction
and clean the pipe under the
air duct
●
Wastewater tank filter is
dirty
Clean the filter and dry
thoroughly before installation
●
●
The filter screen above
theinside of the sewage tank
is dirty
16
Floor brush
doesn’t spray water
Air outlet leaks
water
Wastewater tank filter is
cleaned and not dried after
use
Clean the filter and dry
thoroughly before installation
●
Clean water tank is not
installed properly
Reinstall the clean water
tank
●
Water leakage at
the bottom of
floor brush
Wastewater tank or filter isn’t
installed
Install wastewater tank and
filter
●
Water shortage in clean water
tank
Add water to the clean water
tank
●