Please read these instructions carefully
before using this product Use this product and store it properly.
User manual
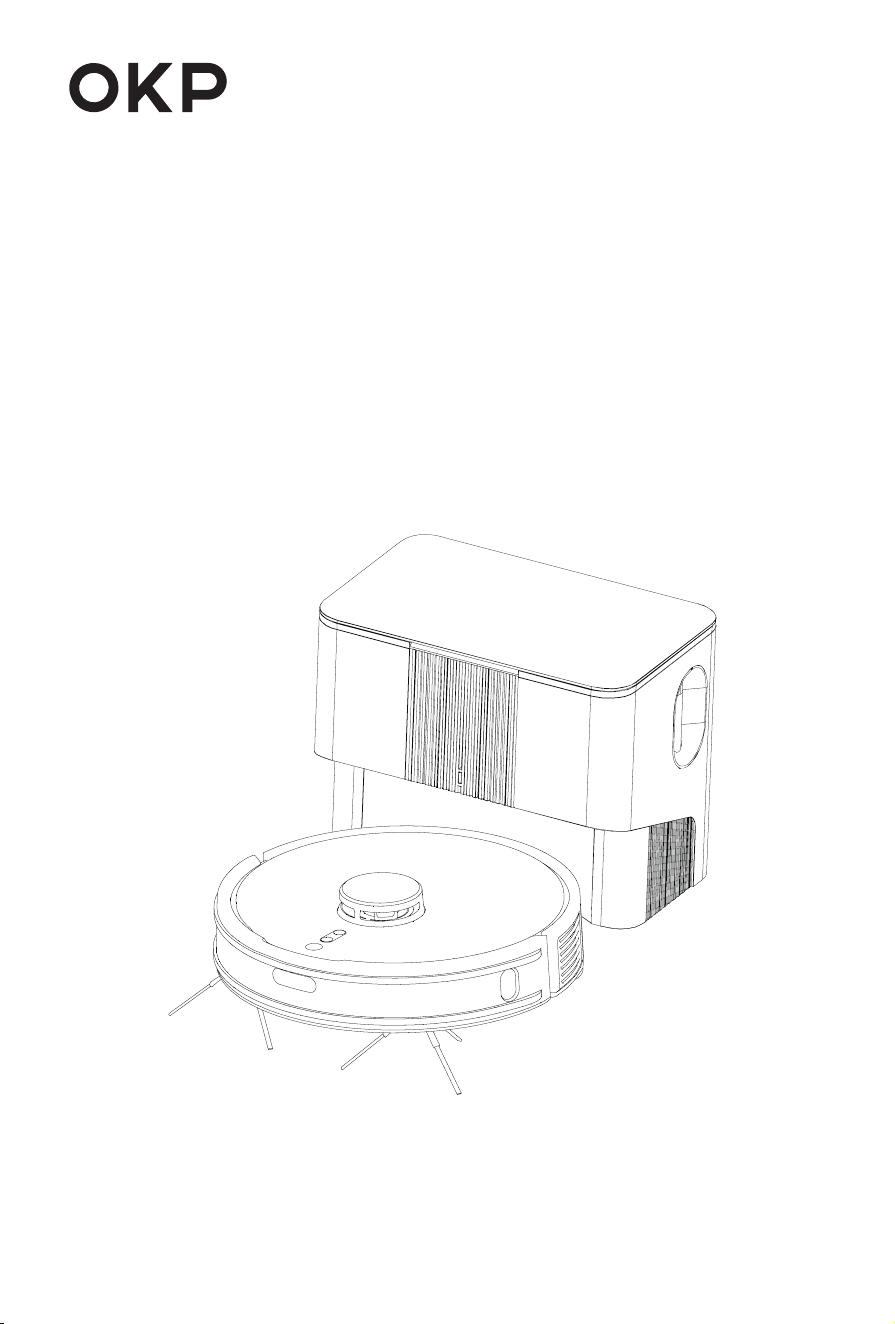
OKP L3 Robot Vacuum Cleaner

01
Catalogue
2.1 Packing List
2.2 Part name
1. Important safety instructions
2. Product introduction
3. Product Use
3.1 Attentions
3.2 Preparation
3.3 Robot Charge
3.4 Robot Operation
3.5 Collecting dust
4. Use of APP
4.1 Connect to the APP
4.2 APP Operation and Functions
5.1 Big dust box
5.2 Roller Brush, Side Brush, Driving Wheel & Universal Wheel
7.1 Robot
7.2 Self-empty Base
5.3 Charging Contacts, Anti-drop Sensors & TOF sensor
5.4 Self-empty Base
6. Troubleshooting
7. Fault Elimination
5. Regular Care & Maintenance
8. Product Parameter
9. Factory Default Reset
10. Environmental Protection Instructions
02
05
08
························
····························
·······························
12
································
15
························
18
····························
22
····························
24
····························
24
····························
24
···················

02
1. If you don't use it for one month, please turn off the power.
2. After the cleaning is finished, it should be connected with the self-empty base
correctly.
3. In view of the problems that may happen during cleaning, please ensure the
following is done ahead of time: ➀Remove the power cord and small objects on the
ground to avoid Robot being blocked or items damaged; ➁Fold the carpet tassels
under the carpet and keep the hanging curtains and tablecloths away from the
ground; ➂Remove low and light objects on the ground, such as slippers and small
toys, to avoid pushing to the edge corner.
4. If there is a suspended environment such as stairs, please test the Robot first to
see if it can detect the edge of the hanging area without falling. Protective fence
shall be set at the edge of the suspended area to prevent Robot from falling. Make
sure that the protection does not cause tripping.
5. Please place the self-empty base on level ground, and keep it away from open
flames, heat sources, water, narrow areas or suspended areas.
6. Please make sure that the robot you use matches the self-empty base, otherwise
you will not be able to charge or collect dust.
7. Make sure the supply voltage is in accordance with the voltage marked on the
self-empty base.
8. Make sure dust box and filter are installed in place before using the Robot.
9. Before cleaning and maintaining the Robot, please turn it off and pull the plug out
of the power socket.
10. Before discarding the product, please turn it off and take out the battery. Please
discard the product battery in accordance with local laws and regulations.
11. Robot can’t be used by children under 8 years old, or persons with reduced
physical, sensory or mental capabilities or lack of experience and knowledge.
Children shall not play with the Robot. Cleaning and user maintenance shall not be
made by children without supervision.
12. Use only in household environment. Do not use in outdoor, commercial and
industrial areas.
13. Do not use the product in the room where infants sleep.
14. To avoid danger, please use accessories recommended or sold by the manufac-
turerit; and accessories must be replaced by the professional personnel of the
manufacturer, its maintenance department or similar departments.
15. Please use product according to the user manual. The company shall not be
responsible for any loss or injury caused by improper use.
READ THESE INSTRUCTIONS BEFORE USING THIS ROBOT VACUUM CLEAER. IT IS INTEND-
ED FOR HOUSEHOLD USE ONLY. PLEASE KEEP ALERT WHEN USE THIS PRODUCT, AND
RESPECT BELOW INSTRUCTIONS.
1. Important safety instructions

03
WARNINGS
1. Only applicable to the original self-empty base specially provided by the manu-
facturer. Users are not allowed to replace the battery without permission. If you
suspect that the battery is damaged, please contact the manufacturer, authorized
dealer or professionals of similar departments for replacement.
2. It is forbidden to use the damaged self-empty base. When damaged, it must be
repaired or replaced by the manufacturer, authorized dealer or professionals from
similar departments in order to avoid danger. Do not disassemble, repair or refit the
self-empty base yourself.
3. It is forbidden to use the product in the environment with open fire or fragile
articles.
4. It is forbidden to use the product in extremely hot (above 40°C) or extremely cold
(below 0°C) environment.
5. It is forbidden to use the product on wet ground or ground with accumulated
water.
6. It is forbidden to sit or stand on self-empty base; Do not place any object (includ-
ing children, pets, etc.) or cover any object (including dust cover, sundries, etc.) on
the static or working self-empty base.
7. While the Robot is working, keep hair, clothes, fingers and other parts of the human
body away from the opening and operating parts of the product.
8. It is forbidden for the product to vacuum anything that may clog the product, such
as stones, waste paper, etc.
9. It is forbidden for the product to vacuum any flammable materials, such as
gasoline, and toner for printer or copier.
10. It is forbidden to use products in areas with flammables.
11. It is forbidden to pick up anything that is burning or smoking, such as cigarettes,
matches, or hot ashesIt.
12. It is forbidden to place objects near roller brush. Do not use the product when
roller brush is blocked. Clean the dust, cotton wadding, hair, etc. at the roller brush
mouth to ensure air circulation.
13. Use the power cord carefully to avoid damage. It is forbidden to use the power
cord to drag or lift the product and its self-empty base, to use the power cord as a
handle, to clamp the power cord in the crack of the door, and to pull the power cord
at sharp corners. It is forbidden to run the product on the power cord, and the power
cord should be away from the heat source.
14. It is forbidden to burn the product even if the product has been seriously dam-
aged, or the product battery may cause explosion.
15. Do not use the mop holder module in a carpet environment.
16. Do not wipe or clean the charging contacts with wet cloth or wet hands.
17. It is forbidden to upgrade the software of the Robot under 15% battery capacity if
not in charging.
04
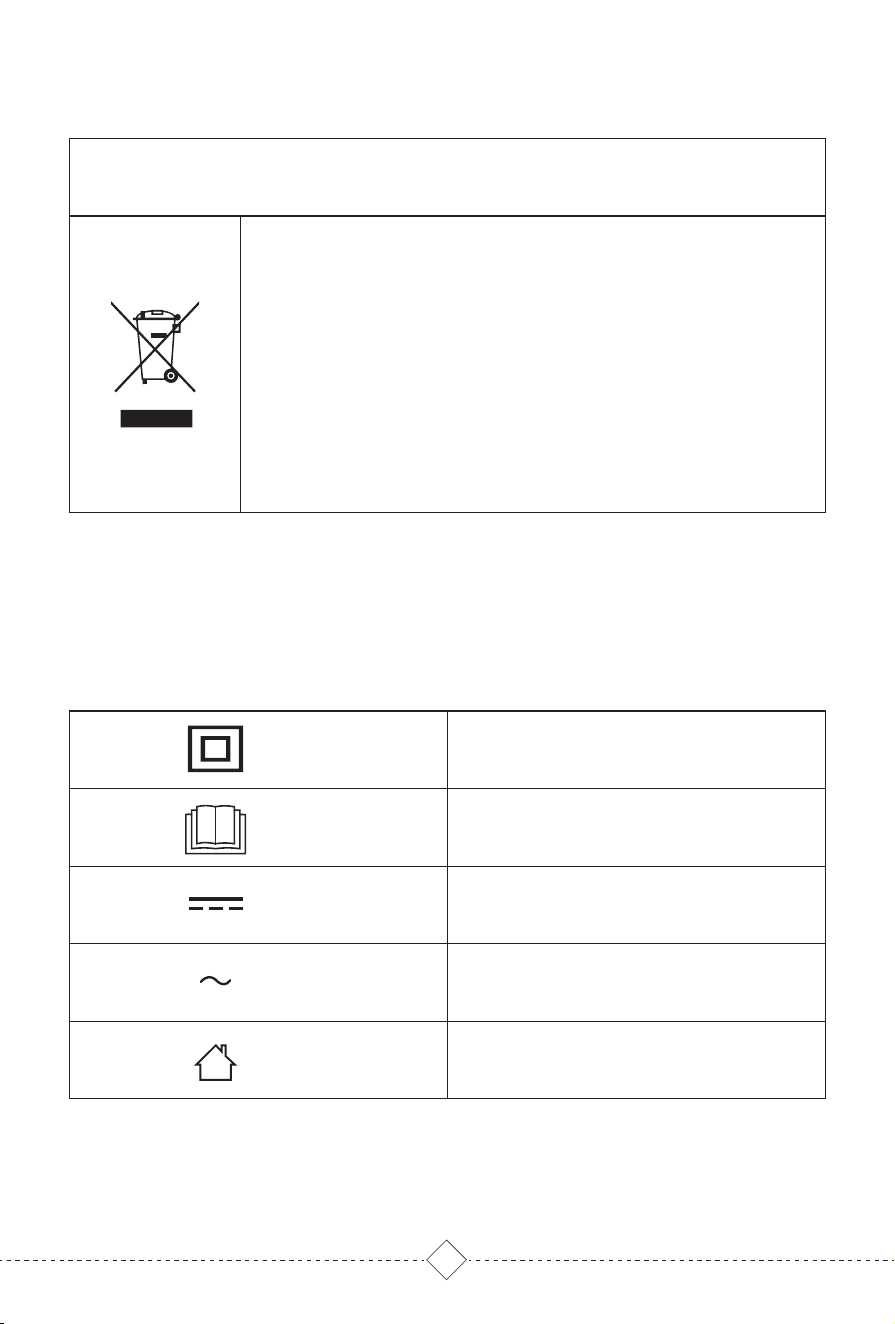
This marking indicates that this product should not be
disposed with other household wastes throughout the
EU. To prevent possible harm to the environment or
human health from uncontrolled waste disposal,
recycle it responsibly to promote the sustainable reuse
of material resources. To return your used device,
please use the return and collection systems or
contact the retailer where the product was purchased.
They can take this product for environmental safe
recycling.
SAVE THESE INSTRUCTIONS
Environment friendly disposal
Symbol description
Class II equipment
Read operator's manual
Direct current
Alternating current
For indoor use only
05
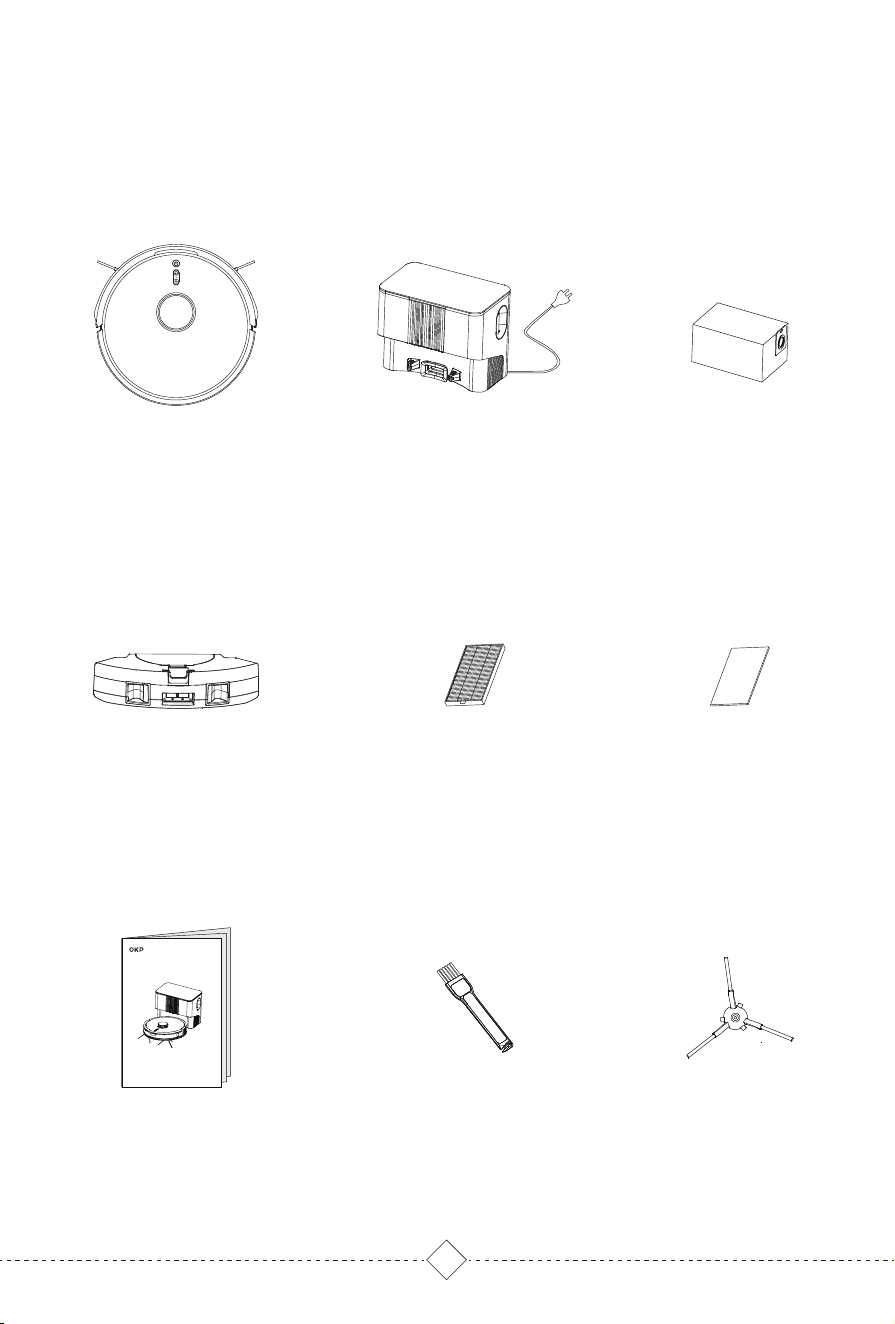
2. Product introduction / 2.1 Packing List
Will differ per different configurations
Robot Vacuum Cleaner Self-empty Base
High Efficiency Filter
Big Dust Box
Side Brush*2
(L & R)
User Manual
Cleaning Tool Brush
User manual
OKP L3 Robot Vacuum Cleaner
Dust bag
Sponge
06
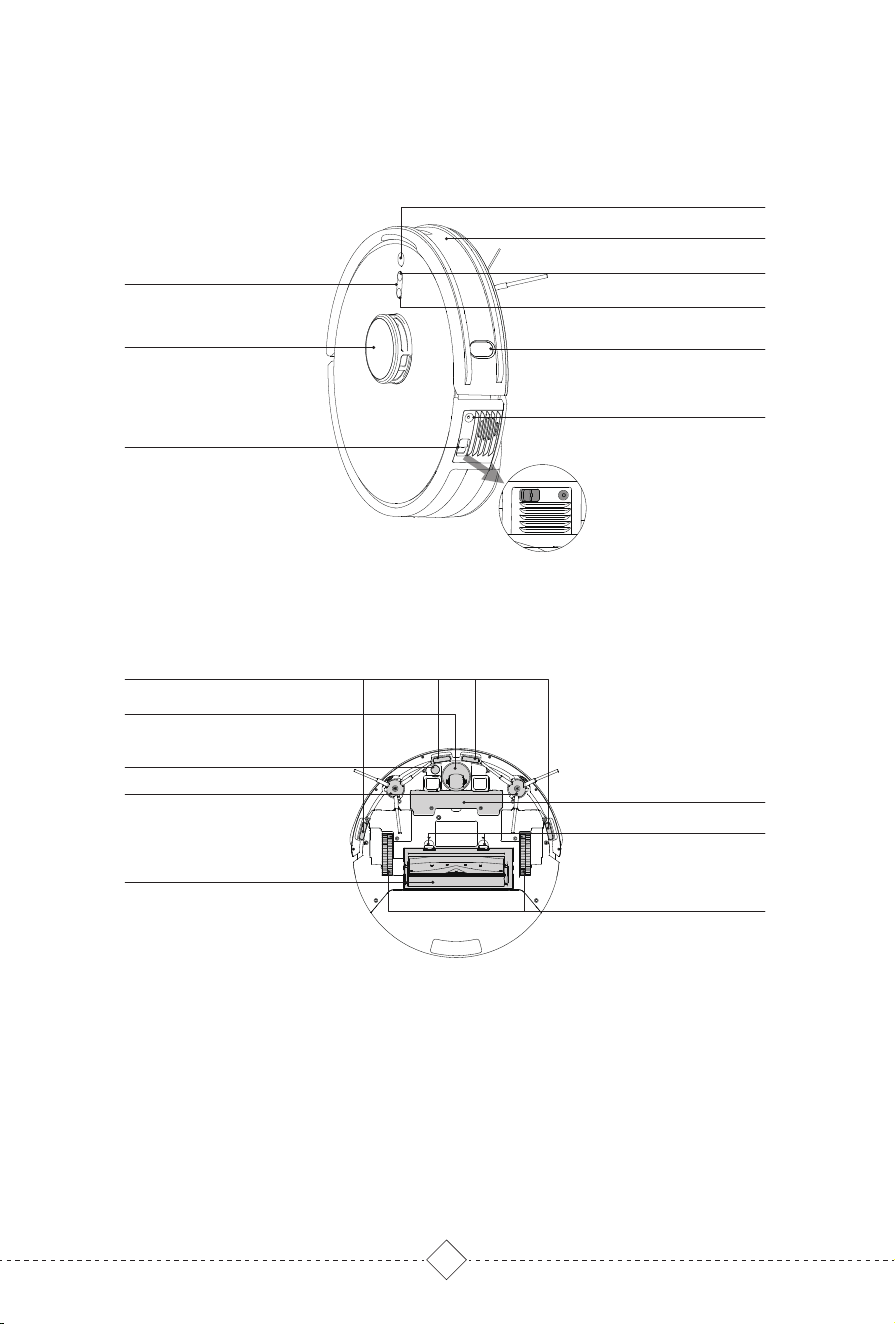
Main Unit
WIFI Indicator
LDS LiDAR Sensor
Start / Pause
Bumper
Partial Clean / Child Lock
Recharge
TOF Sensor
RESET
Power Switch
Rear View
Anti-drop Sensors
Universal Wheel
Side Brushes
Carpet Sensor
Battery Pack
Roller Brush Release Button
Driving Wheel
Roller Brush (main brush)
2. Product introduction / 2.2 Parts Name
07
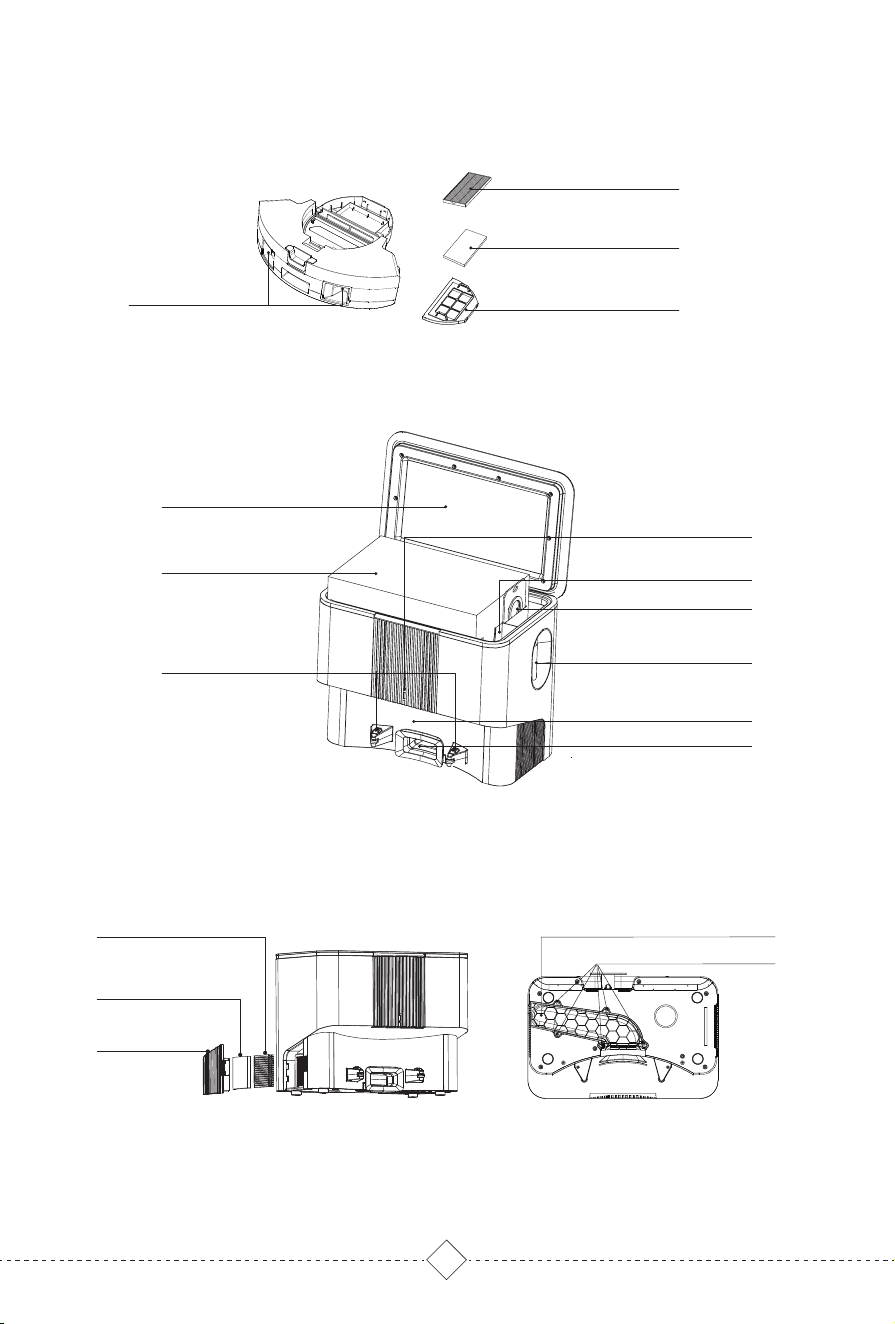
Charging Contacts
Big Dust Box
High Efficiency Filter
Sponge Filter
Primary Filter
Self-empty Base
Air outlet cover
Sponge
Filter
Air Duct Cover
Screw Hole
Charging Contacts
LED Indicator
Dust Suction Inlet
Upper cover
Signal Transmission Area
Deodorant Placement
Dust Bag Buckle
Visual air duct
Dust Bag
08
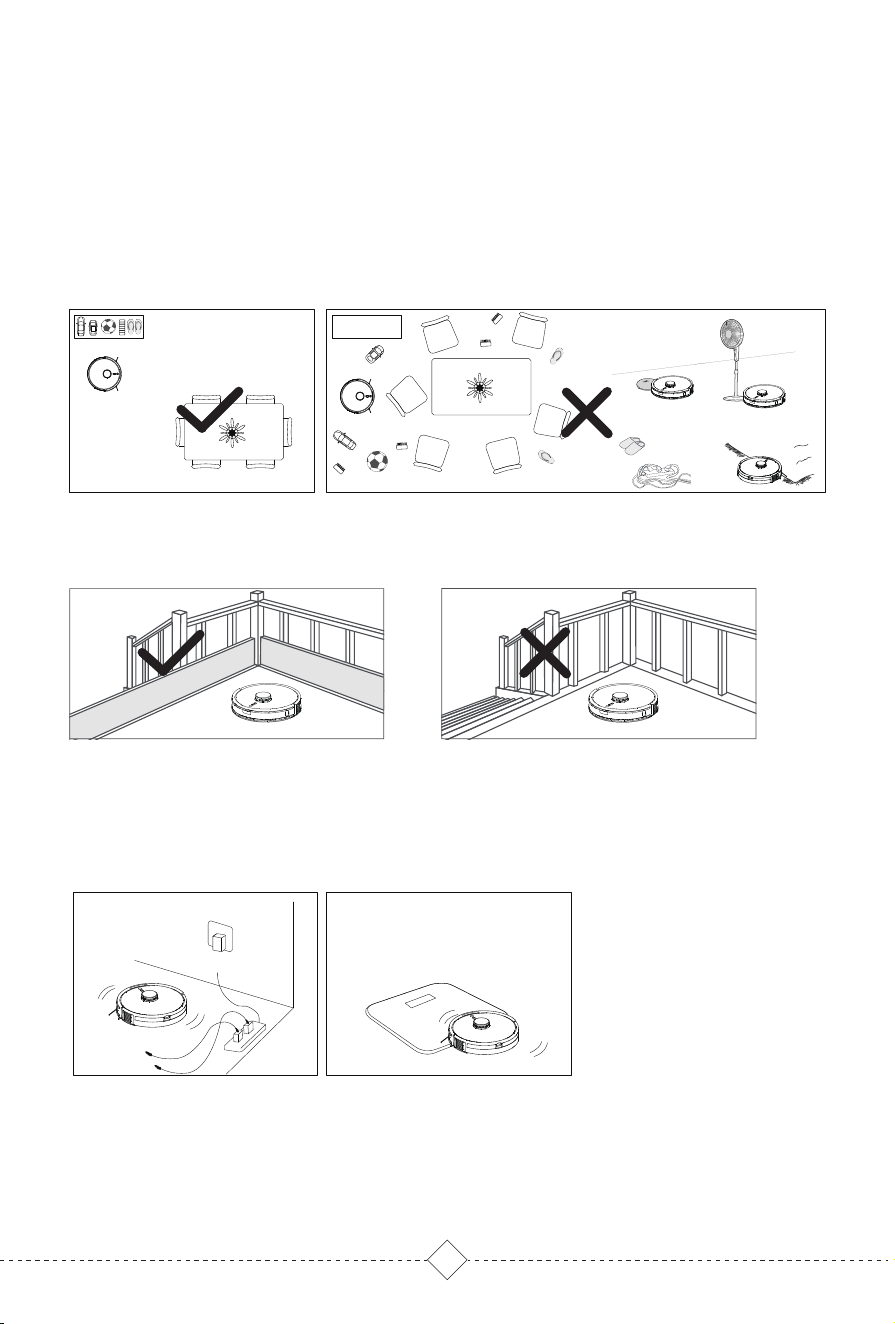
3. Product Use / 3.1 Attentions
If the Robot is cleaning at the entrance of compound stairs and the edge of steps,
please place protective fence to ensure its safety and smooth operation.
Remove all objects that may entangle the Robot, such as power cord,rope, etc. In
addition, if the step is too high, it may get stuck.
Warm tips:
For the first time use, please follow the Robot during whole cleaning process to help solve some small problems,
so that it can clean smoothly. When follow the Robot, please be careful not to stand in front of it.
Check and arrange the area to be cleaned to keep safe. Put furnitures well and
remove the obstacles.
Remove or cover the low objects on the ground that may affect the Robot working,
such as the scale and the base of the floor fan.
If there are carpet tassels, please put it under the carpet in advance.
09
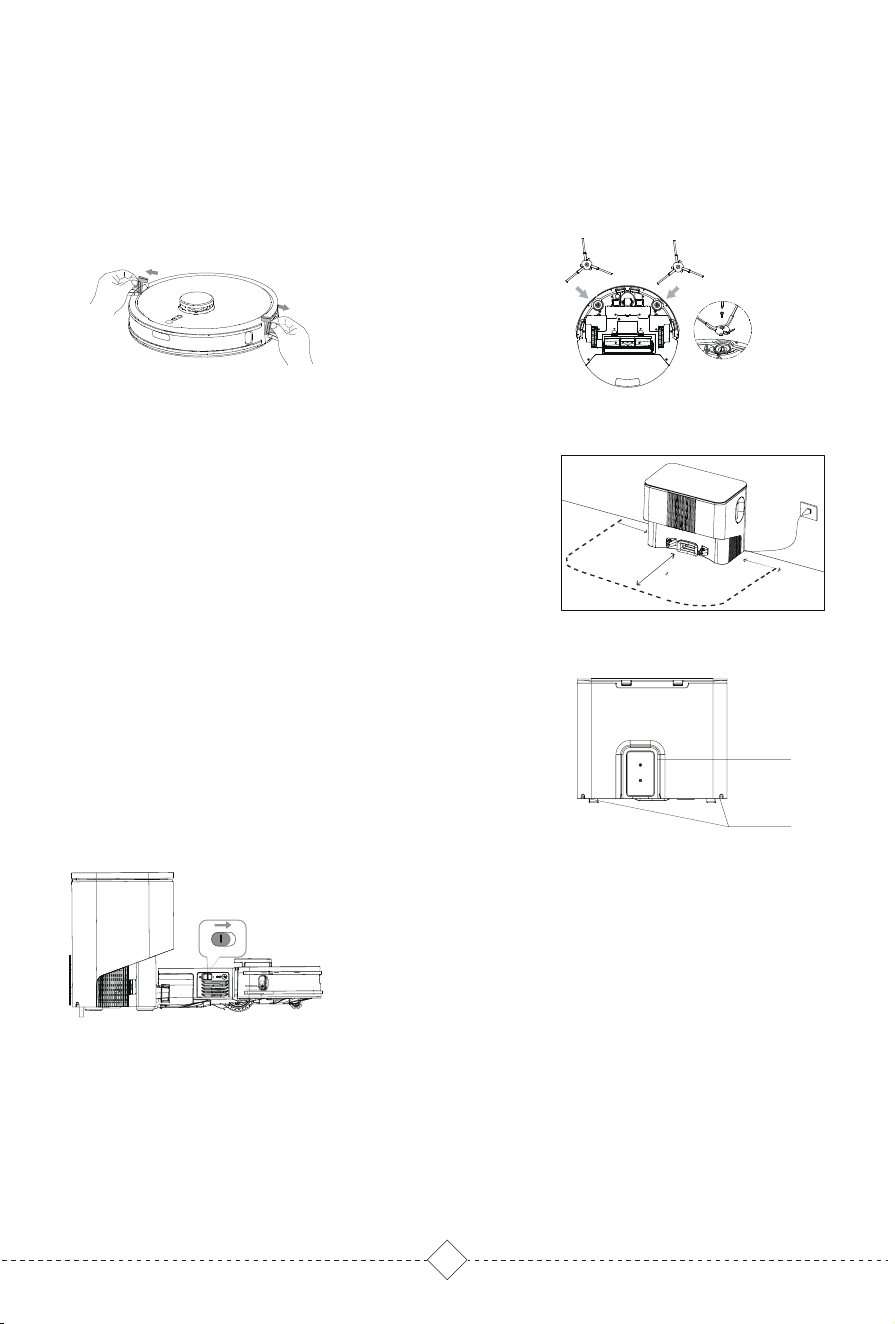
3. Product Use / 3.2 Preparation
3. Product Use / 3.3 Robot Charging
R
L
1. Remove the protective strip
2. Install side brushes and lock screw
(L for L, R for R)
1.Put the self-empty base in ground against the wall.
There should be no cliffs/stairs or objects in the area
1m to the left and right and 2m in front; connect to
supply power.
2.Turn on the power switch of the Robot and put it
into self-empty base, and connect the charging
contacts of them.
3.For first time use, please fully charge it. During the
charging, the start button flashes breathing light in
white, and it will be off when charging finished.
Charging time is about 4-5 hours.
Warm Reminder:
1.During daily use, please put the Robot into the self-empty base. Also ensure self-empty base is connected to
the power supply and the Robot power is on.
2.During daily use, pay attention to clean the charging contacts for better charging.
3.If you do not use the Robot for a long time, please fully charge it before turn it off, then store it in a ventilated
and dry place. And it is necessary to charge it once a month to protect battery.
4.If the battery is over discharged or not used for a long time, Robot may not be rechargeable. Please contact our
after-sales service for maintenance. Do not disassemble it by yourself
Before using the product, please remove the protective strip and protective film.
storage slot
Cable Outlet
OFF ON
O I
>1M
>1M
>
M
Tips:
1.Robot cannot be charged when it’s power off.
2.Please put the excess wire into storage slot, power cable can be pulled
out at both sides.
*keep objects with strong reflecting surface such as mirror or glass away
*Keep self-empty base away from direct sunlight.
10
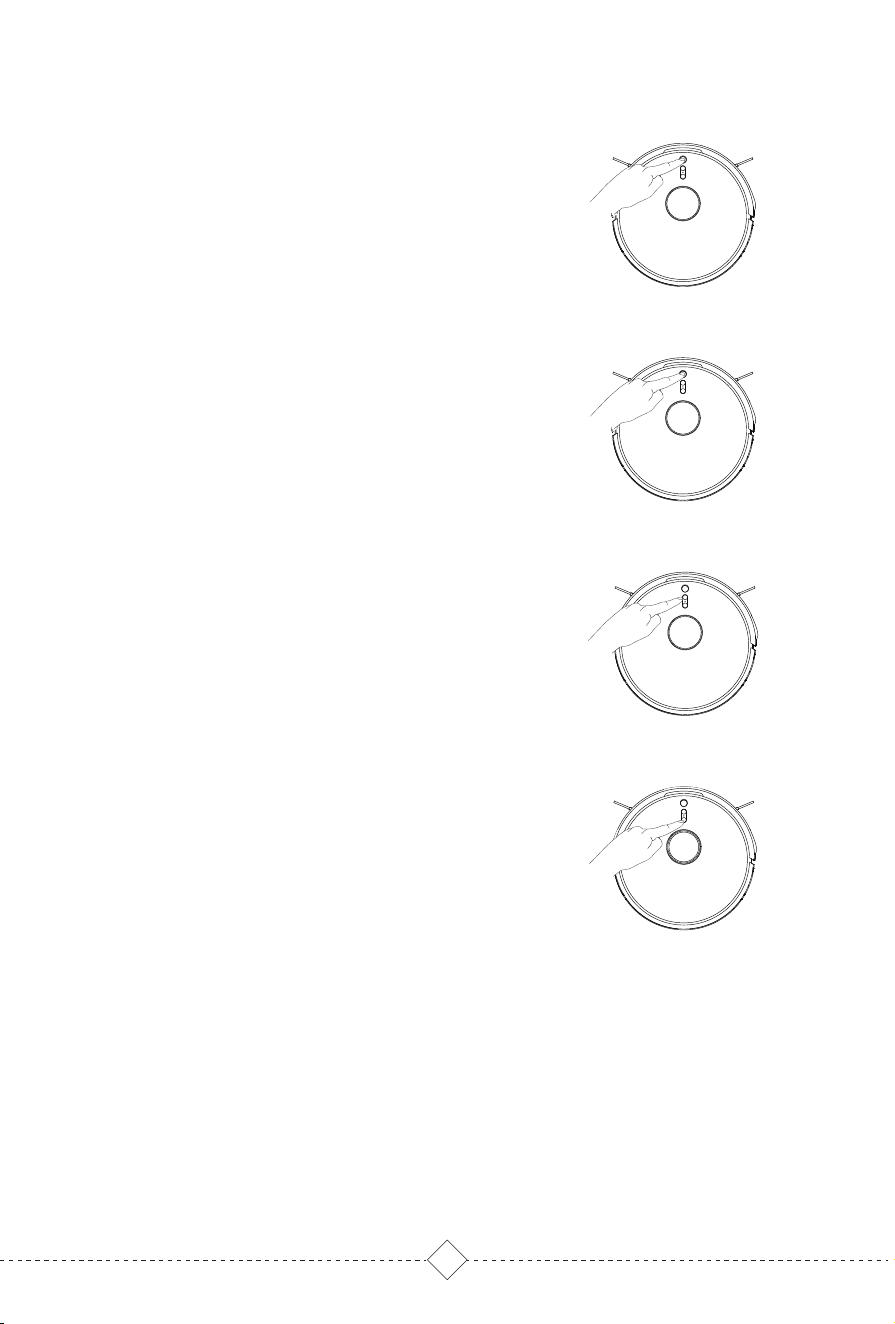
3. Product Use / 3.4 Robot Operation
1.Start
Press the start button of Robot , Robot will build a
map based on its scan of the room, then splits
each room into squares, cleaning the edges of the
square first before covering the inside in a zigzag
pattern, finally complete cleaning of all areas.
2.Pause
When Robot is working, press the pause button of
Robot to pause the robot.
3.Partial Clean
Press partial cleaning button of Robot, Robot will clean
a 1.5m*1.5m square area centered on itself.
4.Recharge
Press recharging button of Robot, Robot will return to
Self-empty Base.
5.Sleep and wake up
Robot will sleep after full charged or without operated for 10 minutes.
When Robot is not in self-empty base and sleep for more than 4 hours, it will
automatically shutdown.
When Robot sleep, Press the start button of Robot or App to wake it up.
11
1. Robot will automatically return to self-empty base for
charging and collecting dust after finishing cleaning.
2. Press Recharge button and Robot will return to self-empty
base for charging and collecting dust.
3. During dust collection, press any button to stop.
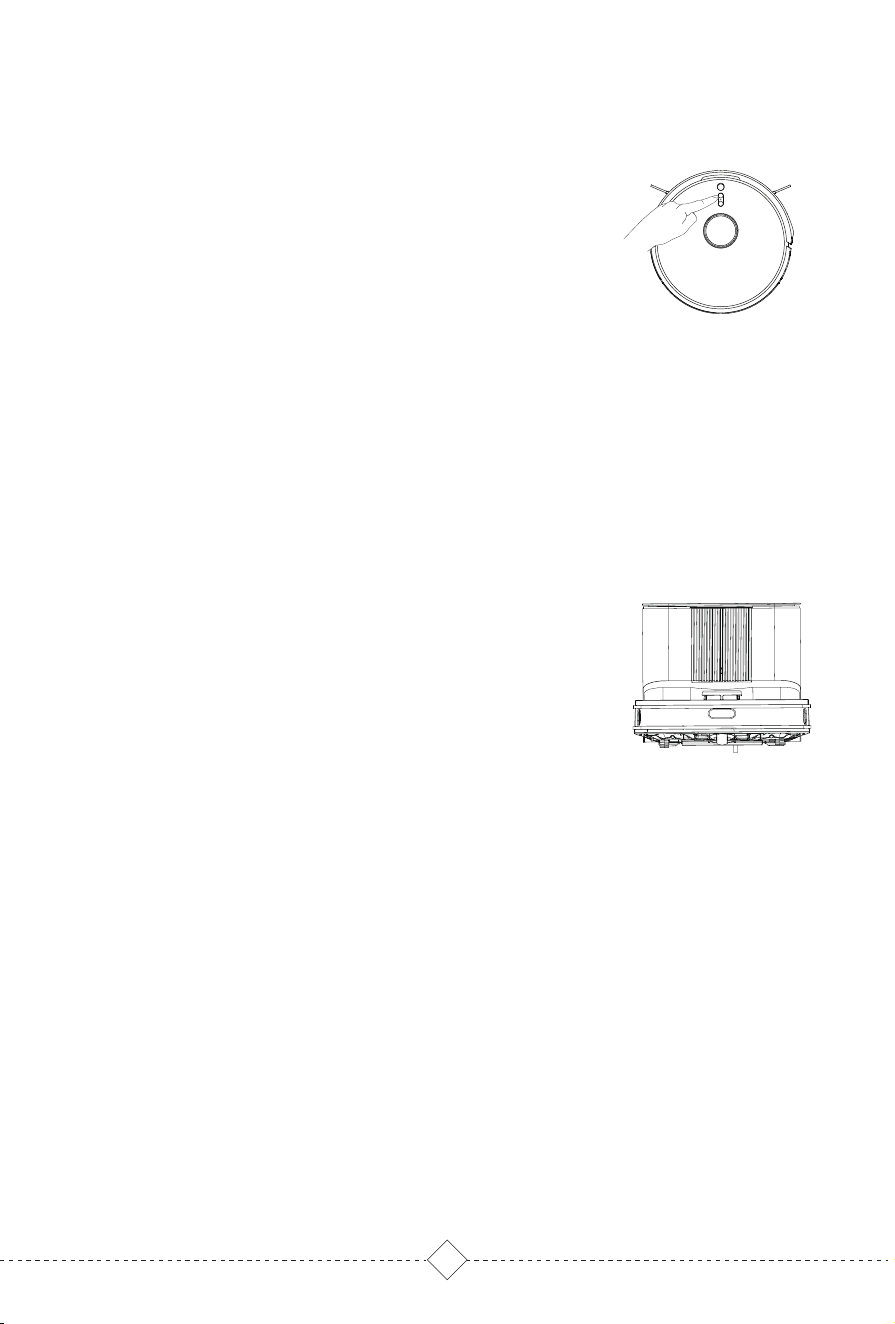
3. Product Use / 3.5 Collecting dust
6.Child lock
Press partial cleaning button of Robot for five seconds,
and the robot will enter the child lock mode. Robot Button
and smart speaker cannot work at this time.Press for 5S
again to exit child lock mode.
Note: App can still operate Robot when in child lock mode.
12
4. Use of APP / 4.1 Connect to the APP
Before use, it is recommended to switch on Map Save Mode to get advanced
experience.
1.Map building: selecting Full Cleaning mode, Robot starts cleaning from self-empty
base, and returns to self-empty base after finished. It will build a map of partitions
according to the layout of your house. You can save the map in APP. It is up to save
4 maps.
2.Map editing: You can split, merge or rename partitions of the map.
4. Use of APP / 4.2 APP Operation and Functions
Robot will build a map based on its scan of the room,
then splits each room into squares, cleaning the edges
of the square first before covering the inside in a zigzag
pattern, finally complete cleaning of all areas.
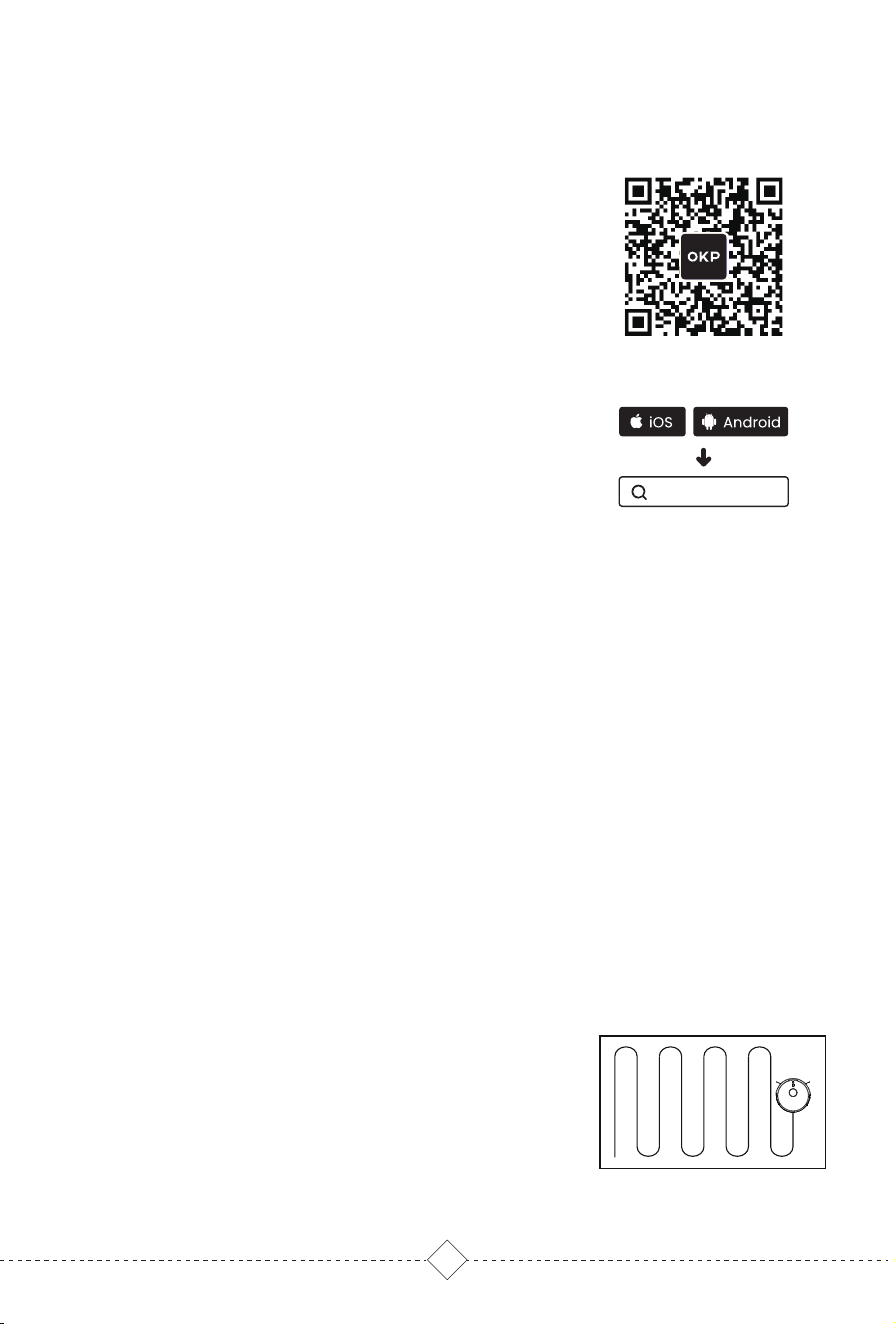
Method II : Search "OKP" in the App store, download and
install the OKP app.
Downloading and installation of the “OKP” app
Method I : Scan the following QR code, and then download
and install App as prompted.
OKP
Tips:
* The robot works with 2.4GHz Wi-Fi networks only.
* Follow the guidance in the OKP app to register, login, and pair the robot.
* Please make sure that the mobile phone is connected to your Wi-Fi network before paring the robot vacuum
cleaner.
Map management
Full Cleaning
13
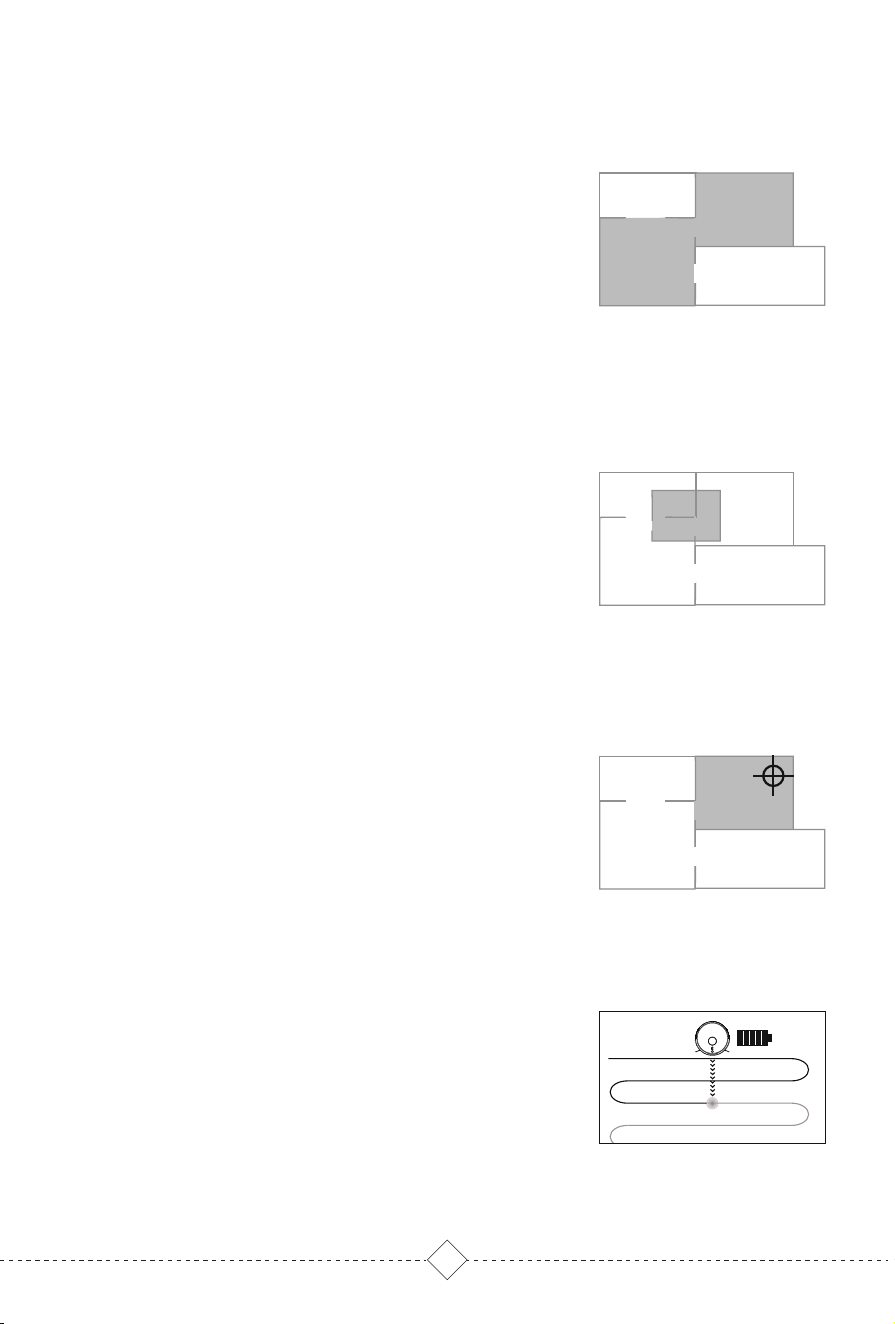
Robot will clean the Rooms selected in App.
Robot will clean the Zones drawn in App.
Specify a point on the map, and Robot will get there
automatically.
A
B
C
D
A
B
C
D
Pin n go
Zone Cleaning
Room Cleaning
Tips:
1.It’s necessary to switch on Map Save Mode in APP and save a map before
Room Cleaning.
2.Room Cleaning can only be used to customize the cleaning area and not
to isolate hazards. Please clear obstacles around the selected rooms.
Tips:
Zone cleaning can only be used to customize the cleaning area and not to
isolate hazards. Please clear obstacles around the drawn zones.
When the battery is low during the cleaning, Robot will
automatically return to Self-empty Base for charging;
After charging to 80%, it will continue cleaning from
where it left off.
Breakpoint resume
Tips:
1. The robot will not resume cleaning in Do Not Disturb mode;
2. Recharging manually or moving Robot, it will not resume cleaning.
A
B
C
D
14
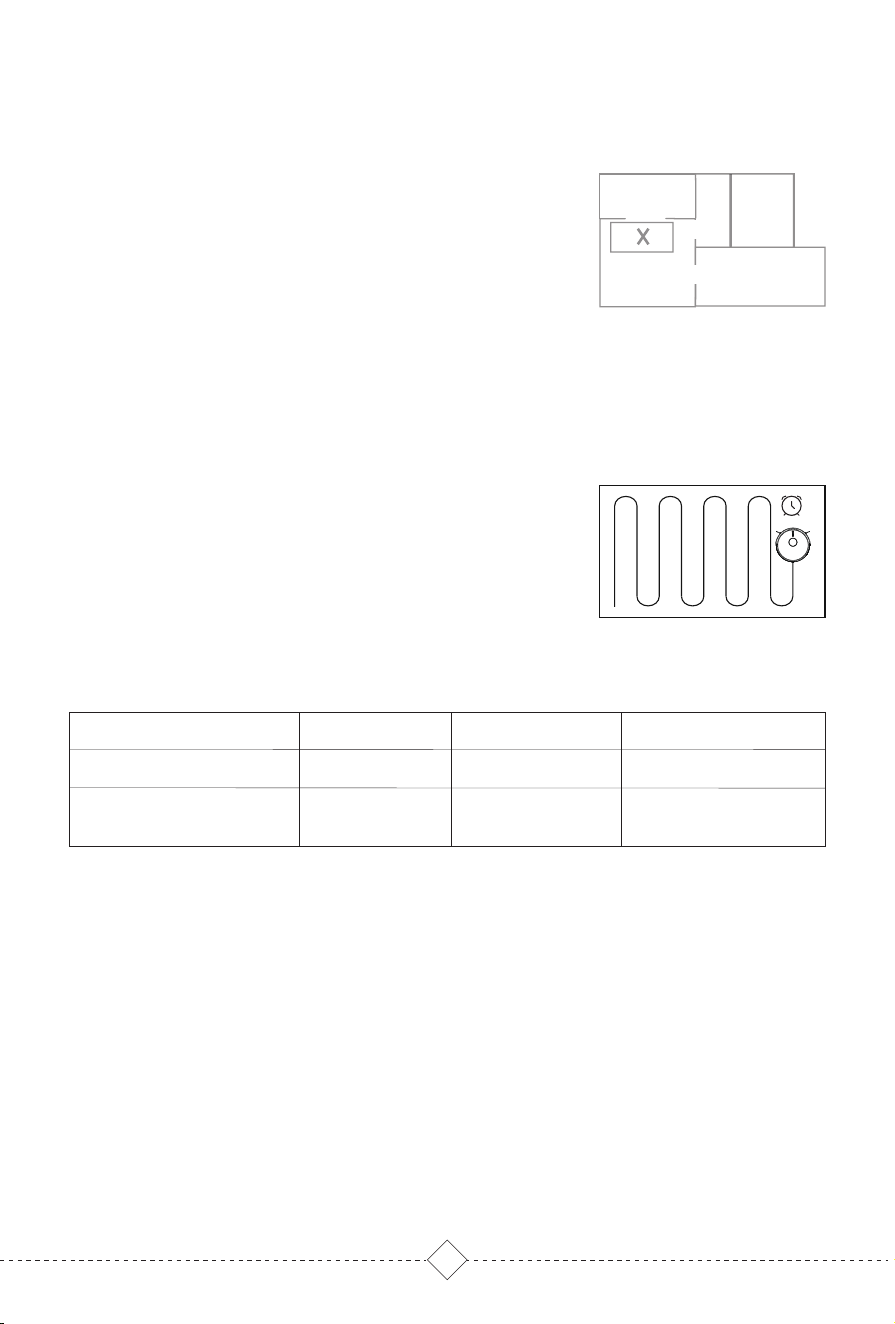
No-Go Zones, No-Mop Zones and virtual Wall are to
prevent robot from access certain areas and rooms.
By default, No-Mop Zones will be activate only when
Mop holder is in place.
A
B
C
D
Set cleaning schedules in App. Robot will clean at
defined times and return to self-empty Base when
finished.
Tips:
Robot will not clean as scheduled when in low battery.
Real-Time Map View
Cleaning mode settings
Maintenance Schedule
Carpet Mode
Cleaning History
Remote Mode
Remaining Power
Voice settings
................
Positioning Robot
Firmware Updates
Do Not Disturb
(DND) mode
Restricted Area
Scheduled cleaning
More Functions.
Tips:
1.Restricted areas can be created on a saved or build-ing map.
2.Restricted Areas can only be used to customize cleaning area and not
to isolate hazards.
3.Moving the robot or obvious changes of house environment may
cause the map to become invalid, and the restricted area may be lost.
15
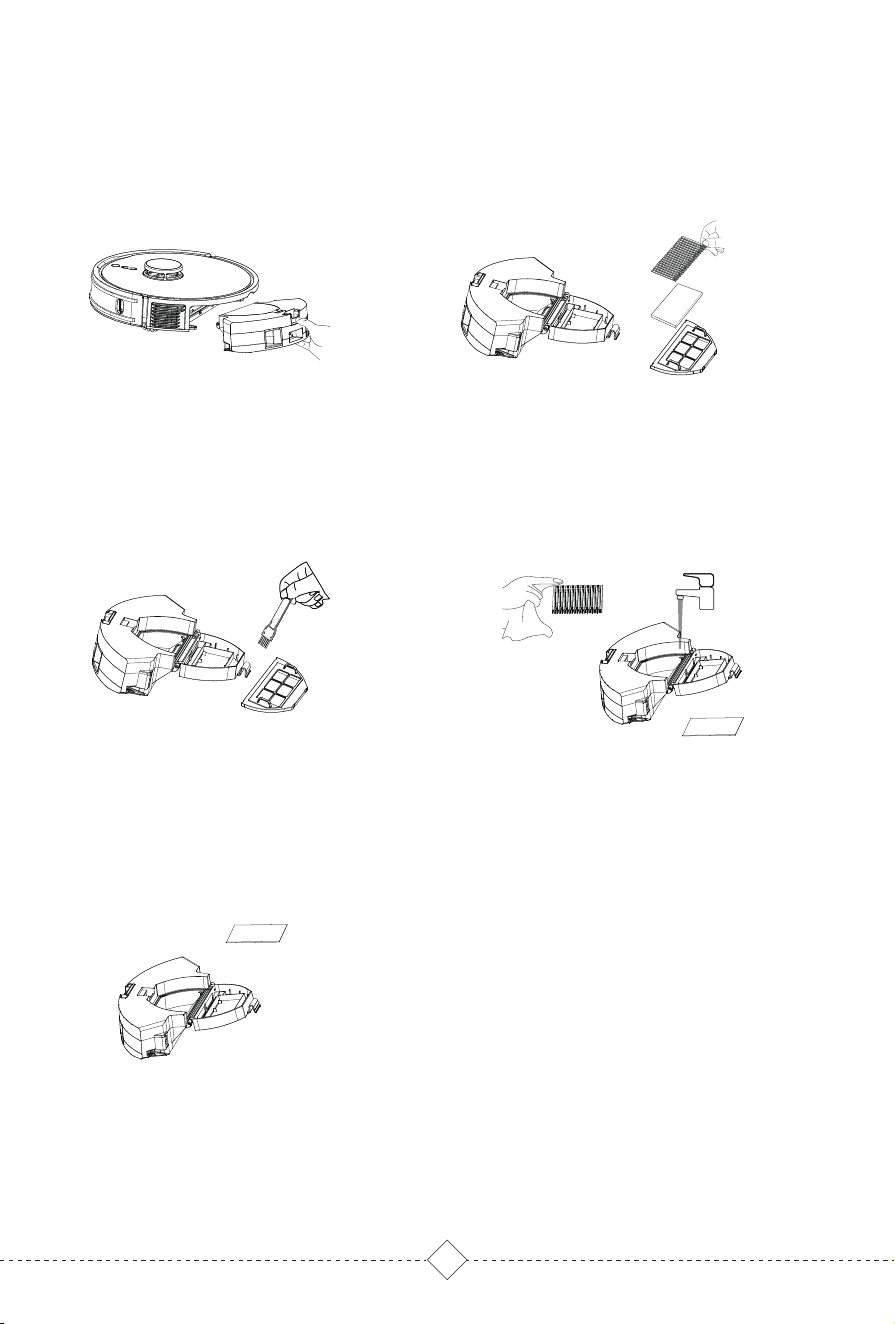
5. Regular Care & Maintenance / 5.1 Big dust box
1. Press & hold the release
key to pull the big dust box.
2. Open the dust box lock, take out the
primary filter, High efficiency filter and filter
sponge.
3. Clean the dust on the primary
filter with cleaning tool brush. Tap
the High efficiency filter to remove
dust.
5. Air-dry the dust box and
filter sponge in shade.
4. Wash the dust box and filter sponge with
water. High efficiency filter can’t be
washed. If it is accidentally soaked in
water, please air-dry before use.
16
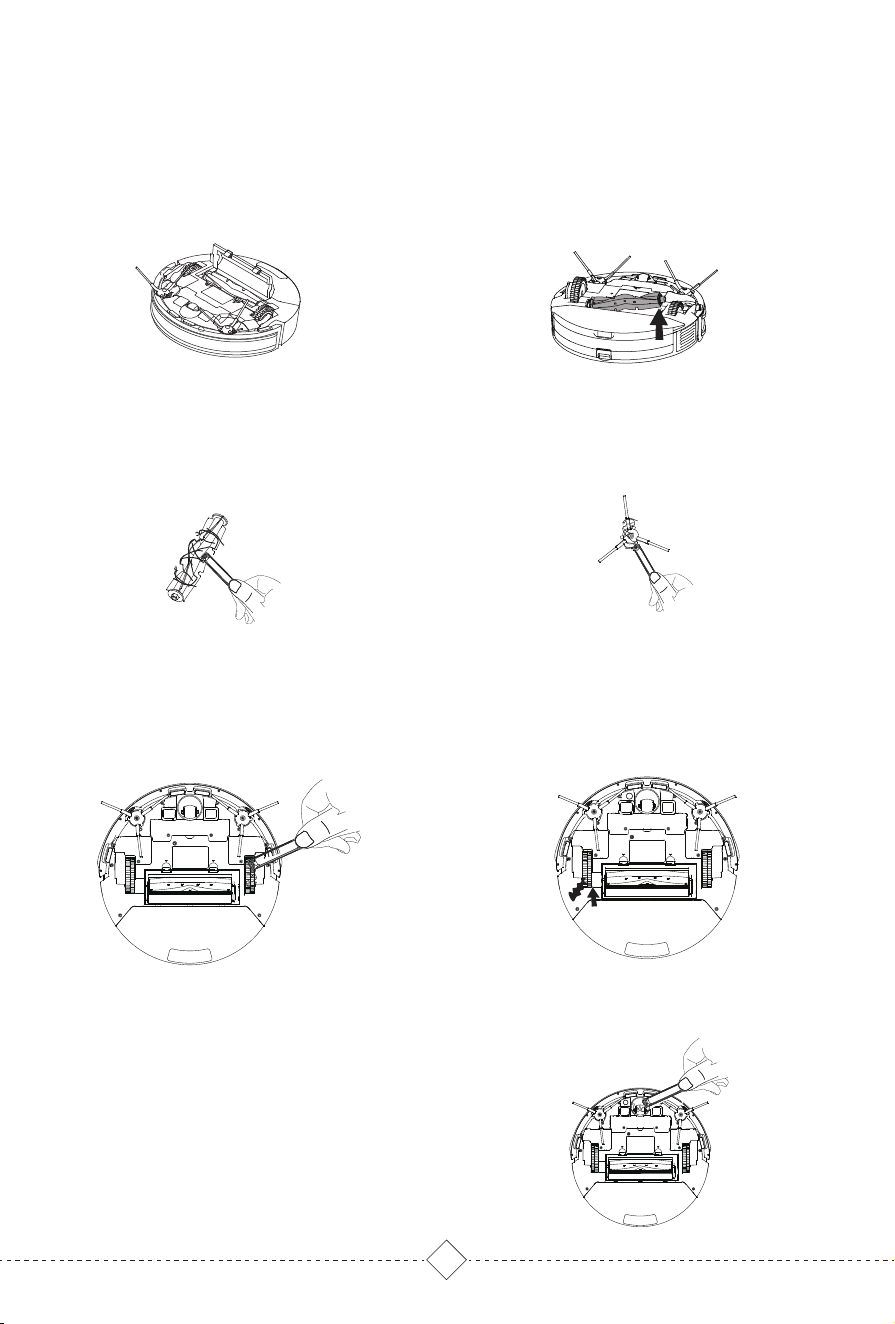
5. Regular Care & Maintenance /
5.2 Roller Brush, Side Brush, Driving Wheel & Universal Wheel
1. Pull on the release tabs to unlock
the brush guard as shown.
2. Lift the roller brush to remove it.
3. Clean the roller brush with the
cleaning tool brush.
4. Clean the side brush with the cleaning
tool brush.
1. Use the cleaning tool brush to
remove the hair and garbage on
the driving wheel.
Clean the driving wheel
Use the cleaning tool brush to clean the hair and
garbage on the universal wheel.
2.When the driving wheel is stuck, flip its
gear in the opposite direction, trash will
fall from the gap.
Cleaning Roller Brush and Side Brush
Clean the universal wheel

Replace the dust bag and clean the filter
Clean air duct
To ensure the dust collection effect, it is recommended to replace the dust bag in time and clean the filter and air
duct regularly.
1. Open the upper cover of Base. 2. Take out the full dust bag.
4. Install filter and new dust bag
3. Take out the filter screen and clean it.
1. Unscrew the air duct lower housing
screws.
2. Remove the air duct shell and clean
the air duct.
5. Regular Care & Maintenance /
5.4 Cleaning Self-empty Base
17
Warm tips:
5. Regular Care & Maintenance /
5.3 Charging Contacts, Anti-drop Sensors&TOF sensor
Clean the Robot Charging contactsClean the Charging contacts of
Self-empty Base.
Clean the Anti-drop Sensors Clean TOF sensor
Charging contacts, Anti-drop sensors and TOF sensors all contain sensitive electronic components. Please use a
dry rag when cleaning them, not a wet rag to prevent water damage.
18
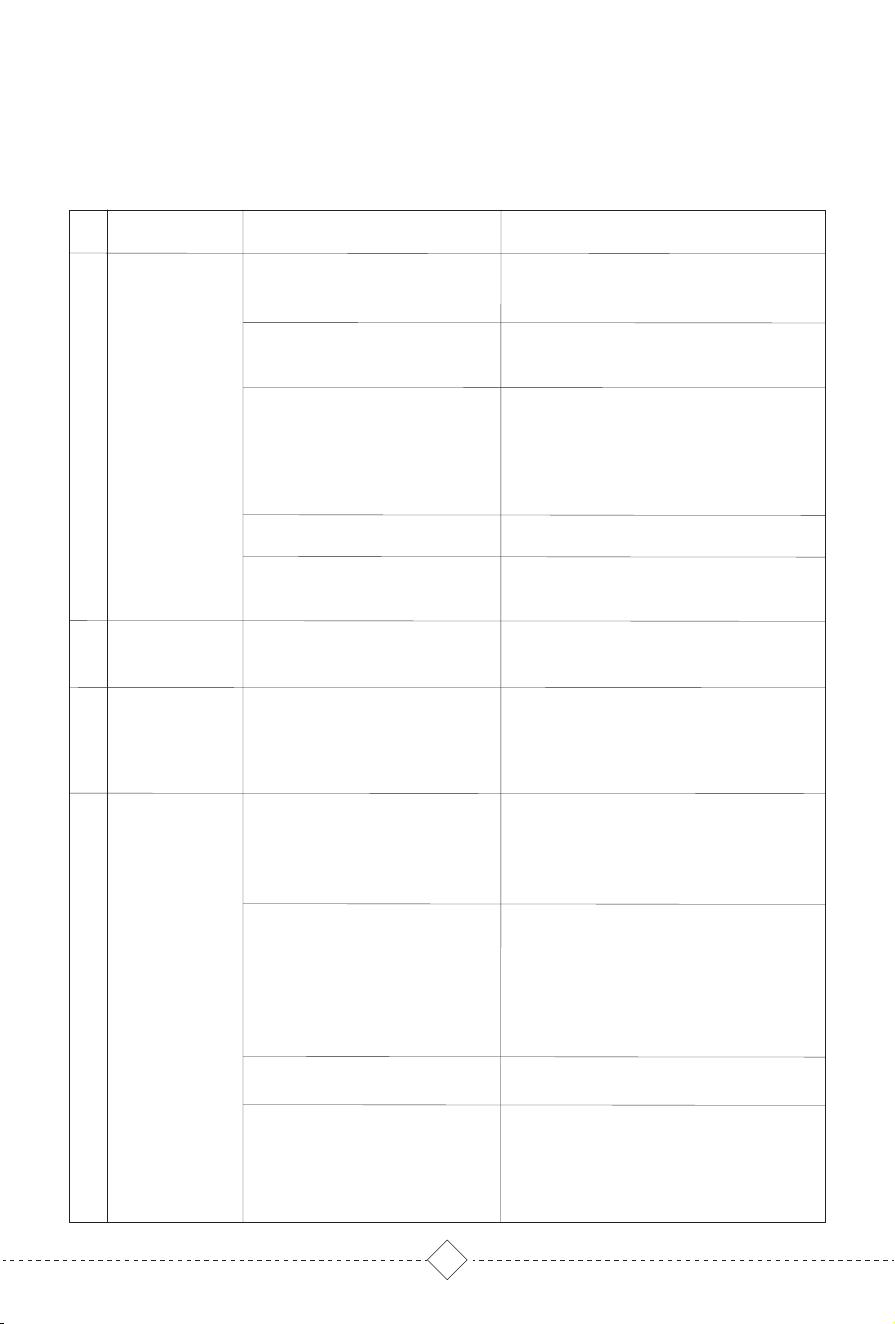
6. Troubleshooting
During the use of the product, in case of the following conditions. It can be checked
and solved independently by users.
01
02
03
04
No Likely cause What to do
Configure the router network and make sure
that the "user name" and "password" of the
router are correct
Ensure that the robot is within the network
signal coverage of the router
The robot does not support 5G network at
present. Please choose 2.4G
Only when the robot is in the state to
connect WIFI, it can connect properly. When
the robot is power on, press RECHARGE &
PARTIAL Cleaning 5S until hearing 'Resetting
WIFI'. WIFI LED flashes blue, indicating that
the robot is in the state to connect WIFI.
Please check the specific supported models
according to the APP prompts
For mobile phones with IOS 9.0 or above and
Android 5.0 or above, you can download
and use the APP.
Please turn the power switch on the side of
the robot to "I" state.
Please charging the robot.
Please use the robot in an environment of
0-40°C.
Fault condition
Robot can’t
connect to APP
Unable to install
app
The robot cannot
be turned on
The robot can’t
charge
Please turn the power switch on the side of
the robot to "I"
Make sure the power supply and the
self-empty base is connected and base
indicator lights up
Ensure that the charging contacts of the
robot and self-empty base is fully
connected, and the START key is flashing.
Check whether the charging contacts of the
robot and self-empty base are dirty, and
refer to the part of [regular maintenance] in
the manual for cleaning.
Please charge the robot in an environment
of 0-40°C
It is recommended to use this product
frequently. If it is not used for a long time
and cannot be charged, please contact the
aftersales service personnel
The router user name
and password are incorrect
The robot is not within the
network signal coverage of
the router
Is the robot in the state to
connect WIFI?
Not using 2.4G network
APP doesn’t support the
current router model device
The version of mobile
operating system is too low
The power switch is turned off.
Low power.
Temperature is not suitable.
The charging contacts of
the robot and the
self-empty base is not fully
connected or the charging
contacts are dirty.
Temperature is not suitable
If the battery is not used for
a long time, it will lead to
over discharge
The power switch is turned off.
Self-empty base not
connected to power supply.
19
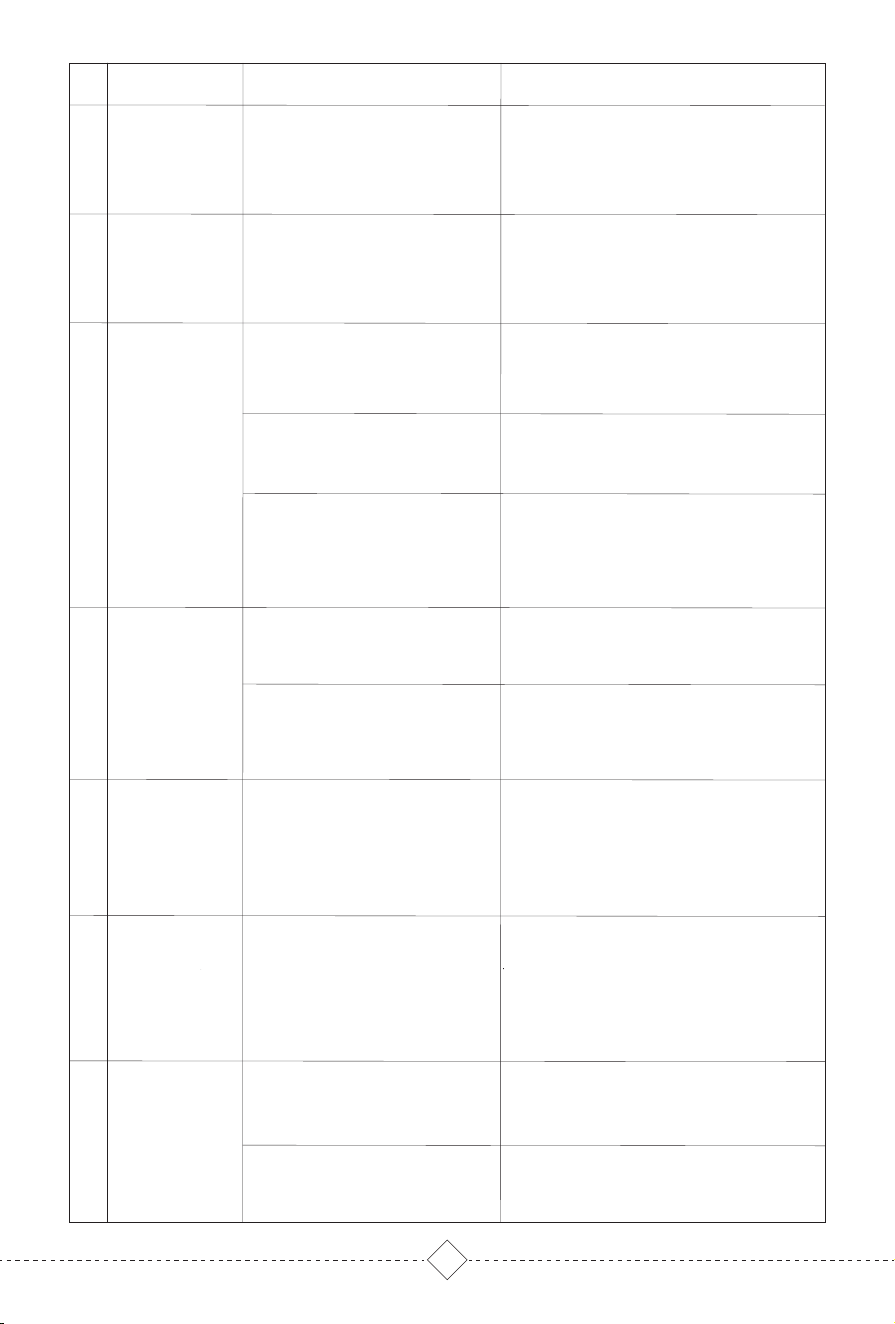
12
Likely cause What to do
The robot will automatically return to
charging, and then performs a breakpoint
resume
Arrange the furniture environment to make it
easy to clean.
Clear the obstacles ahead
Tap the bumper plate to check whether
there is something stuck
Clean the surface area of anti-drop sensor
lens
Please check whether the self-empty base is
connected to the power. Do not move the
self-empty base manually.
The recharge route is block-
ed or too many obstacles are
near the self-empty base
Please place the self-empty base in an open
area and keep the recharge route smooth.
Please manually put the robot into the
self-empty base to charge
The robot is in
trouble when
working
The robot will try all kinds of ways to get rid
of the trouble, if not, it is recommended to
help it manually
The robot will try all kinds of ways to get rid
of the trouble, if not, it is recommended to
help it manually
08
10
07
11
09
No
06
Charging the robot.
Check whether the robot has abnormal
alarm. It is recommended to clean and
maintain the side brush, roller brush, dust
box and filter material regularly
Please clean it after power off.
It is recommended to take them out and
clean. Refer to regular maintenance
Fault condition
Robot
walking back
Unable to return
to the self-empty
base automati-
cally
If the cleaning is
not finished, the
robot returns to
charge
Robot is not
working
Abnormal noise
during cleaning
Noisy operation
There are obstacles ahead
Bumper plate stuck
The surface area of anti-drop
sensor lens has dust
The self-empty base is powerd
off or moved manually.
It will regenerate the map in
partial cleaning and may una-
ble to automatically recharge
if the self-empty base is far
away
Low power
The side brush & roller brush
are entangled, and the dust
box and filter material are
blocked
The robot feels that the power
is low
Complex furniture environment
will reduce cleaning efficiency,
so it may not finish cleaning.
The roller brush, side brush or
driving wheel may be
entangled, and the universal
wheel may be entangled during
the cleaning
The dust baffle at the air inlet
of the dust box is stuck
The suction is at high level
Take out the dust box and adjust the dust
baffle to ensure its flexible movement.
It is suggested that users can choose lower
or mute suction power for cleaning when
they are at home and use high-grade
suction power when they go out
The robot is entangled or
obstructed by scattered wires,
drooping curtain cloth or
carpet tassels on the ground
The main engine may be
jammed by furniture of similar
height to the robot
20
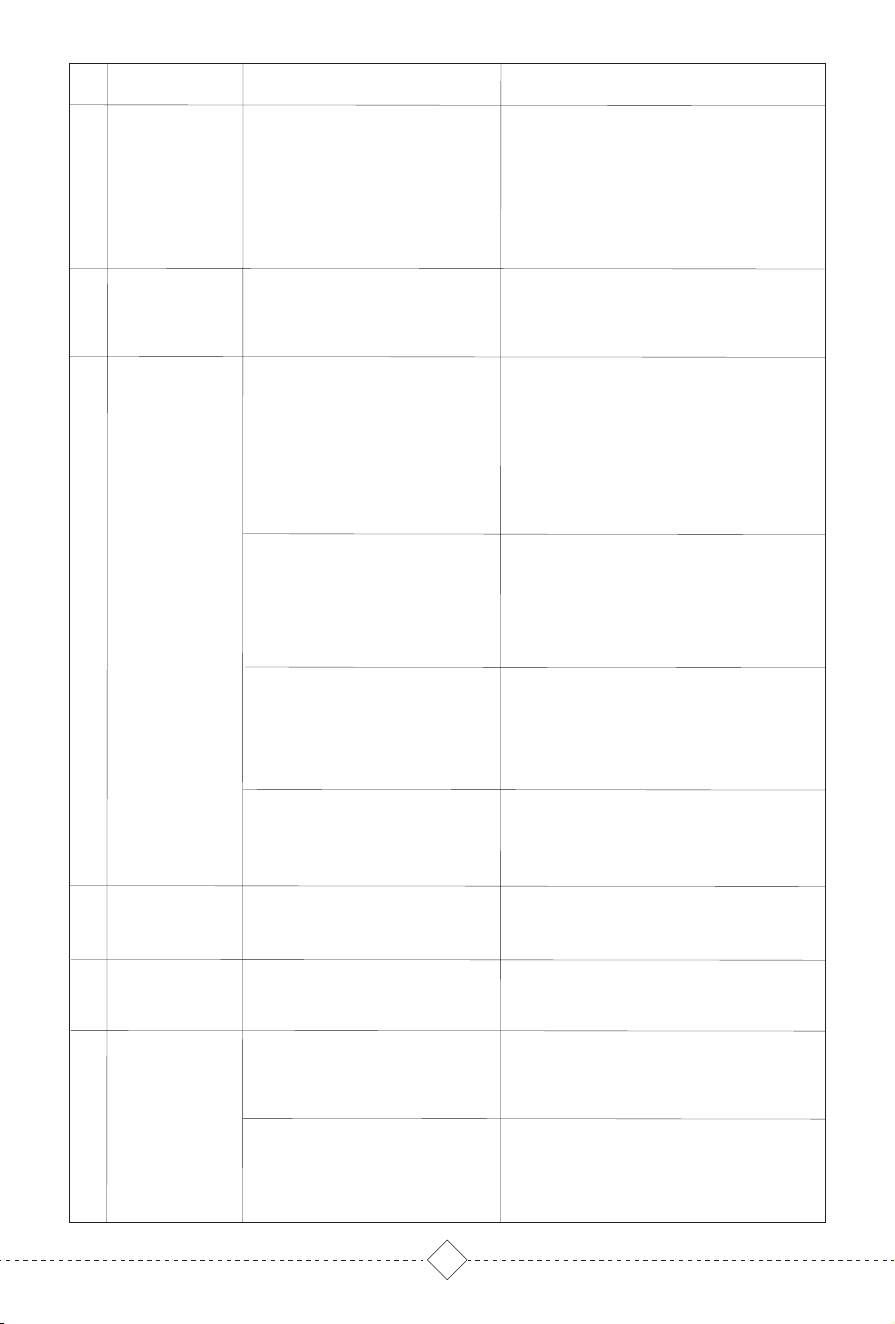
15
16
17
18
20
No Fault condition Likely cause What to do
Clean the filter net
Clean the roller brush
Driving wheel
alarms
Not breakpoint
resume cleaning
The cleaning ability
is reduced or the
ash dropped
Reset appointment Charge the robot
Not cleaning as
scheduled
Turn off the robot and put the bottom up; first
turn the wheel counterclockwise and then
clockwise to turn out the debris and garbage
stuck in it; then press and slide the driving
wheels on both sides at the same time to
check whether it can rotate and whether it
can rebound after releasing
The robot is in Do Not Disturb mode It will not follow scheduled cleaning in Do Not
Disturb mode, you can adjust the Do Not
Disturb mode time in the APP or clean at other
times
The robot didn’t automatically
return to the self-empty base last
time.
Recharging or putting the robot to self-empty
base manually, the robot will not follow
breakpoint resume cleaning.
Before the robot works, please tidy up the
scattered wires, slippers and other objects on
the ground, and reduce the scattered objects
on the ground as much as possible. If there is
uncleaned area, the robot will clean the area
independently. Please do not interfere (such
as moving the robot or blocking its route)
When the robot is
working, there are
some problems,
such as route
disorder,devia-
tion, repeated
cleaning and
small area not
cleaned
It is recommended to close the door of the
area and clean the area separately. After
cleaning, it will return to the starting point.
Please rest assured to use it
It is recommended that you wait for the floor
wax to dry before using
It is suggested to tidy up the home
environment to ensure that the Robot can
enter for cleaning
19
The filter net is blocked
The roller brush is entangled
Scheduled appointment cancelled
Low power
The driving wheel is entangled with
something and stuck
The wires, slippers and other
objects placed on the ground
affect the normal work of the
Robot
When the robot climbs the steps,
threshold and door strip, the
driving wheel slipped with the
ground, which will affect the
judgment on the environment of
the whole house
Working on a newly waxed, polished
floor or smooth tile reduces the
friction between the driving wheel
and the ground
Due to the different house
environment, the robot can not enter
some areas
The laser sensor is blocked or stuck
by something
Please turn off and clean it.
LDS Laser sensor
abnormal
21
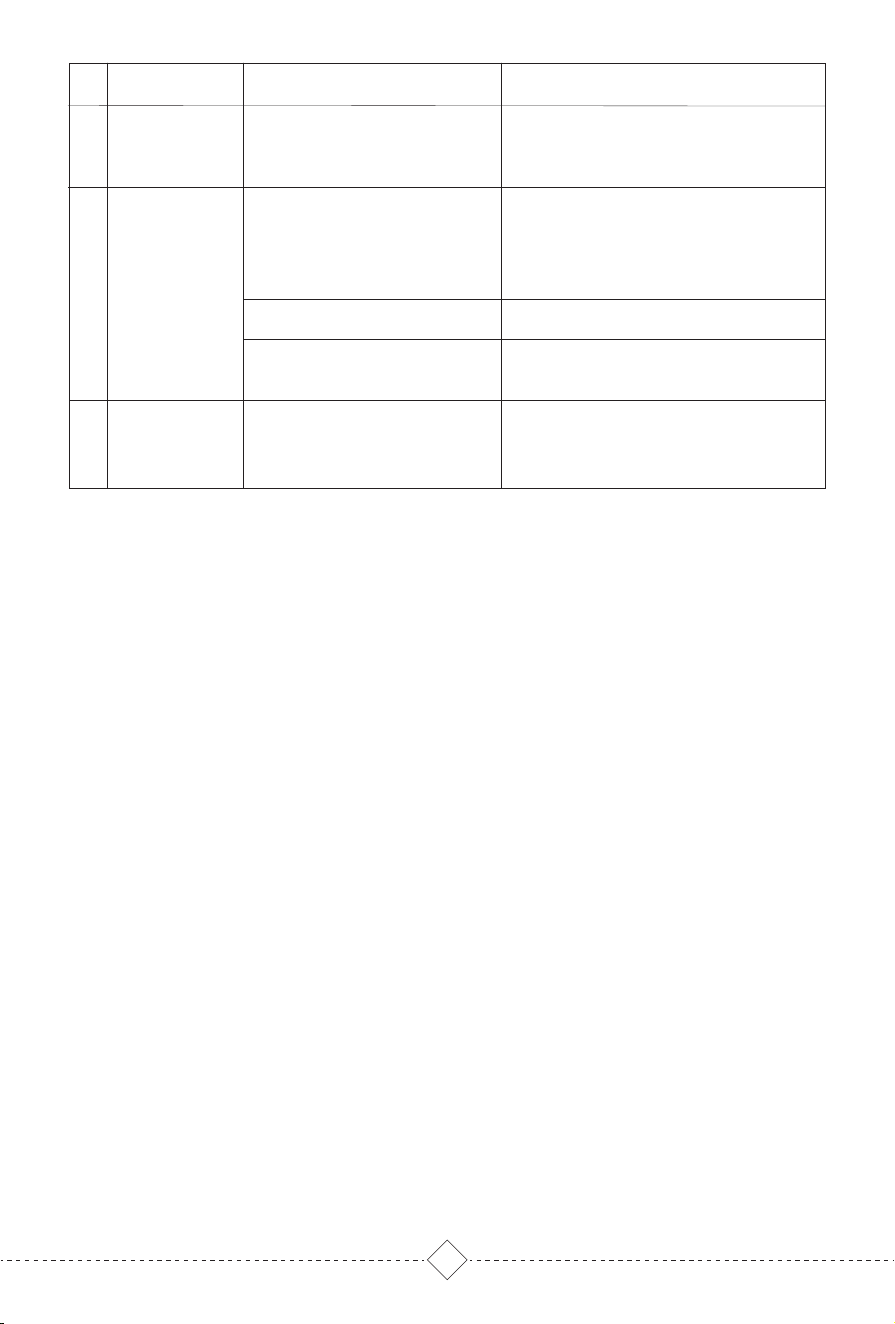
21
22
23
No Fault condition Likely cause What to do
TOF sensor
abnormal
The surface area of TOF sensor
has dust
Please wipe with a soft towel
If troubles can't be solved by above guides, plesae contact the after-sales person.
Self-empty base
abnormal dust
collection
The Base upper cover is not
closed, and the filter of the base,
the air inlet of the base or the air
outlet of the Robot dust box are
blocked.
Please the self-empty base and Robot
dust box.
Dust bag is uninstalled.
Please install a dust bag.
Abnormal air pressure threshold of
dust bag.
Please replace a dust bag.
Fan abnormal
Fan is entangled or blocked by
something.
Please turn off the Robot and send it to the
after-sales service point for professional
maintenance.
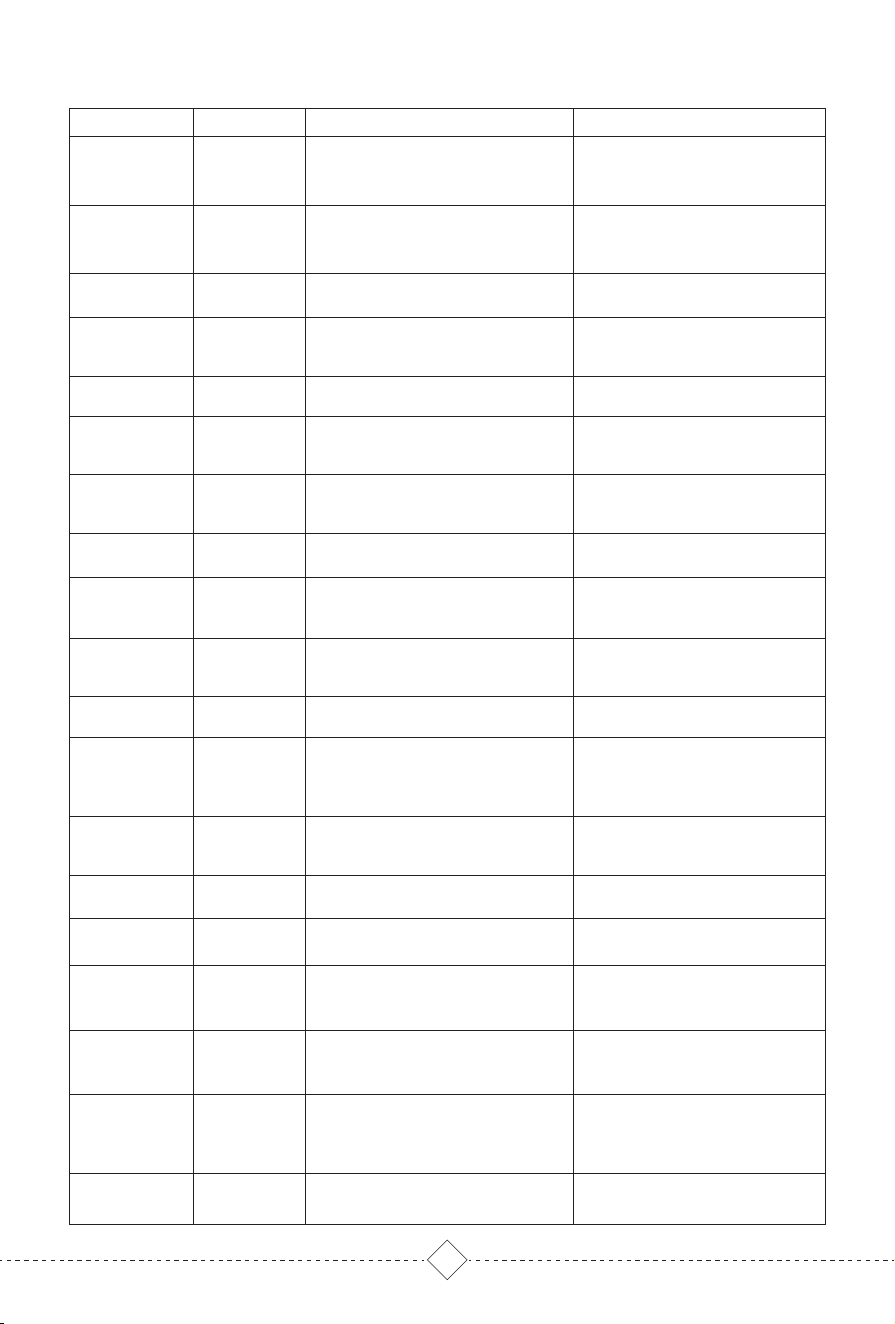
22
Robot Status
Fall (Anti-drop
sensor alarm)
LDS abnormal
Wheel electricity
abnormal
Wheel speed
abnorma
Main bumper
abnormal
LDS LiDAR
bumper
abnormal
Fall (Wheel
abnormal)
Robot stuck
Robot leans
Power off
charging alarm
Side brush
abnormal
Roller brush
abnormal
Charge
abnormal
Anti-drop
sensor
abnormal
Fall (wheel
abnormal)
Magnetic field
interruption
Start on the
carpet with
mop holder
Start at
forbidden area
and alarm
Low battery
alarm
Light Indication
RED Light On
RED Light On
RED Light On
RED Light On
RED Light On
RED Light On
RED Light On
RED Light On
RED Light On
RED Light On
RED Light On
RED Light On
RED Light On
RED Light On
RED Light On
RED Light On
RED Light On
RED Light On
RED Light On
Voice Alarm
Error 1, Anti-drop sensors error,
pls put the robot on the ground
to start it
Error 2, please make sure the
LDS LiDAR head is not blocked
or stuck
Error 3, please check whether the
driving wheel is stuck
Error 4, please check whether
the driving wheel is normal
Error 5, please check and tap
the robot main bumper
Error 8, please help the robot
to get out of trouble
Error 14, please put the robot
on a level ground to start
Error 15, please turn the
power on and charge
Error 9, please check the side
brush whether it is entangled
Error 6, please check whether the
laser bumper is stuck
Error 7, wheel suspended, please
put the robot on the ground to
start it
Error 10, please check the roller
brush whether it is entangled
Error 11, please use the specified
adapter for charging
Error 12, please clean the anti-drop
sensors, and start the robot away
from the cliff
Error 13, wheel suspended, please
put the robot on the ground to
start it
Error 16, please move the robot
away from the strong magnetic
field to start
Error 17, please move the robot
away from the carpet to start
Error 18, Forbidden area or virtual
wall detected, please move the
robot away and restart
Error 19, Low battery, please
recharge and start
7. Fault Elimination / 7.1 Robot
APP Indication
LDS Error, please check LDS and
move robot to new location and
start
Wheel Error, please turn the wheels
and clear by hand
Wheel decoder Error, please
turn the wheels and clear by hand
Bumper Error, please clean the
bumper and tap it
Robot Stuck, please help Robot to
get out of trouble
Robot tilt, please put robot on the
ground and start
Side brush Error, please check side
brush and clean up
LDS Bumper Error, please move
robot and tap the LDS bumper
Wheel Suspended, please put the
robot on the ground and start
Roll brush Error, please check roll
brush and clean up
Cliff Sensor Error, please clean the
cliff sensor and start the robot
away from the cliff
Wheel Suspended, please put robot
on the ground and start
Magnetic induction Error, please put
the robot away from magnetic area
and start
Mopping Error, please put the robot
away from carpet and start
Forbidden Zone Error, please put
robot away from the forbidden area
and start
Low Battery, please recharge
Power Off, please turn the power on
and recharge
Adapter Error, please use the
specified adapter
Cliff Sensor Error, please clean the
cliff sensor and start the robot
away from the cliff
The robot is
trapped
The robot is trapped, please remove
obstacles around the robot or move
robot to a new location to start
Error 21, please start after factory
default reset
Error 22, please put the robot in the
area to be cleaned and then start
partial cleaning
Error 23, please remove obstacles
around the robot or move robot to
a new location to start
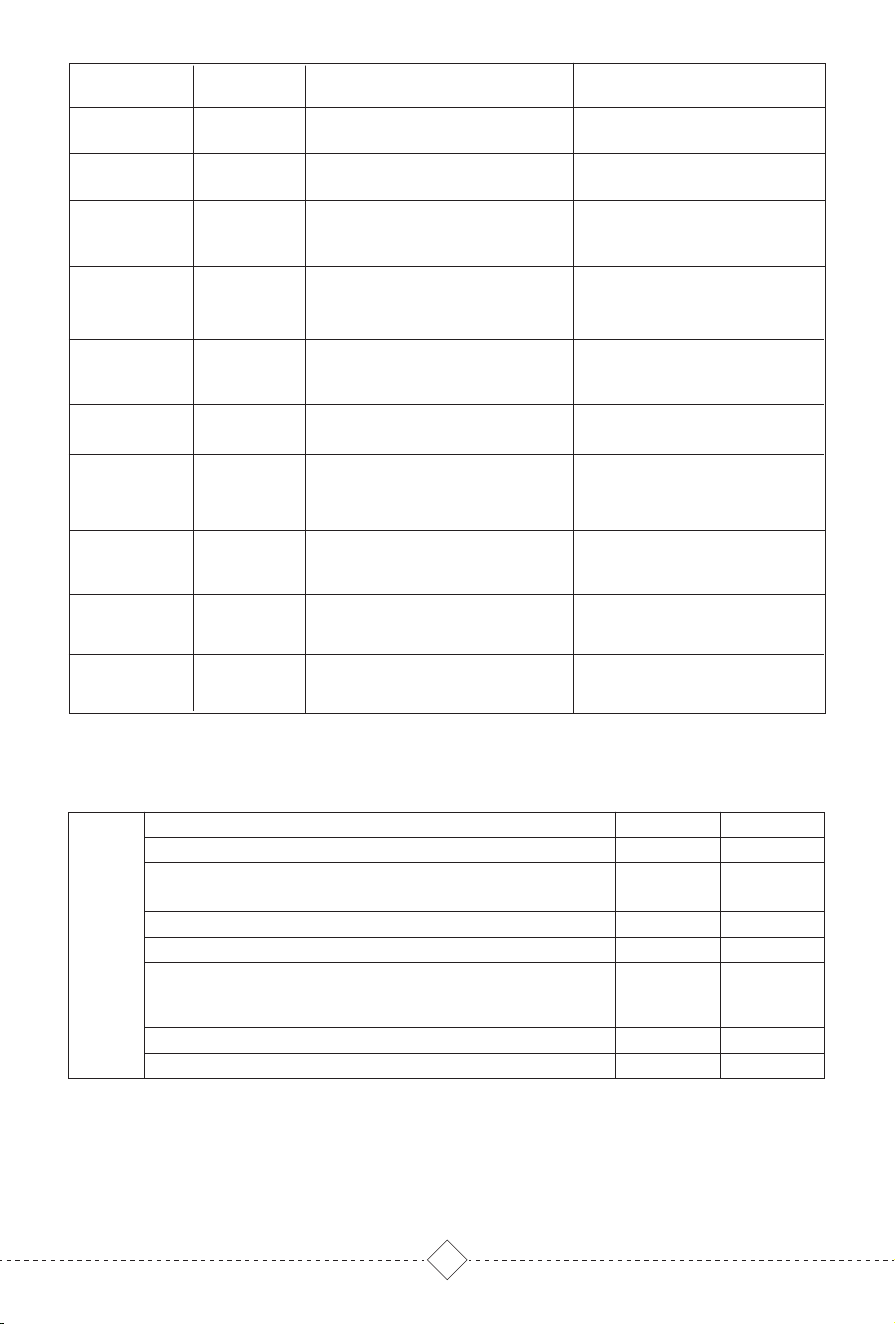
Robot Status Light Indication APP Indication Voice Alarm
Reset factory
default
Partical cleaning
Error
RED Light On
RED Light On
RED Light On
Partial cleaning Error, please put the
robot in the area to be cleaned and
then start partial cleaning
Light
Indication
Scene White light
On
On
Breathing
On
Off
Off
Off
Red light
Off
Off
Off
Off
On
Flashing
Flashing
Not charging(Robot not stand in Self Emptying base)
Not charging(Robot stands in Self Emptying base with full power,
and it enters sleep mode)
Charging
Collecting dust
Air pressure inspection abnormal (Self Emptying base not closed
/Self Emptying base Filter blocked / Self Emptying base Air inlet
blocked / Dust outlet of Robot dust box blocked)
Collecting dust without a Dust bag
Collecting dust with a full dust bag
TOF sensor
abnormal
RED Light On
Wall Sensor Error, please
clean the wall sensor
Error 20, please clean the
along wall TOF sensors
7. Fault Elimination / 7.2 Self-empty Base
23
No Dust Box
Dust box detection Error, please
install the dust box and start
Error 24, Please install the dust box
in time and start
RED Light On
Fan Error
Fan Error, please check the fan parts
Error 25, Please check the Fan parts
in time
RED Light On
Collect Press
Error
Air Pressure Abnormal, please close
the self Empty base, or check if filter,
air inlet & dust box are blocked
Error 26, Please close the Self Empty
base, or check if filter, air inlet &
dust box are blocked
RED Light On
Collect Dust
Error
Dust Bag Abnormal, please check if
the dust bag is installed
Error 27, Please check if the dust
bag is installed
RED Light On
Dust Full
Abnormal
Dust Full Abnormal, please replace
the dust bag immediately
Please replace the dust bag
immediately
RED Light On
Dust Full
Dust Full, please clean the dust box
and start
Please clean the dust box and start
RED Light On
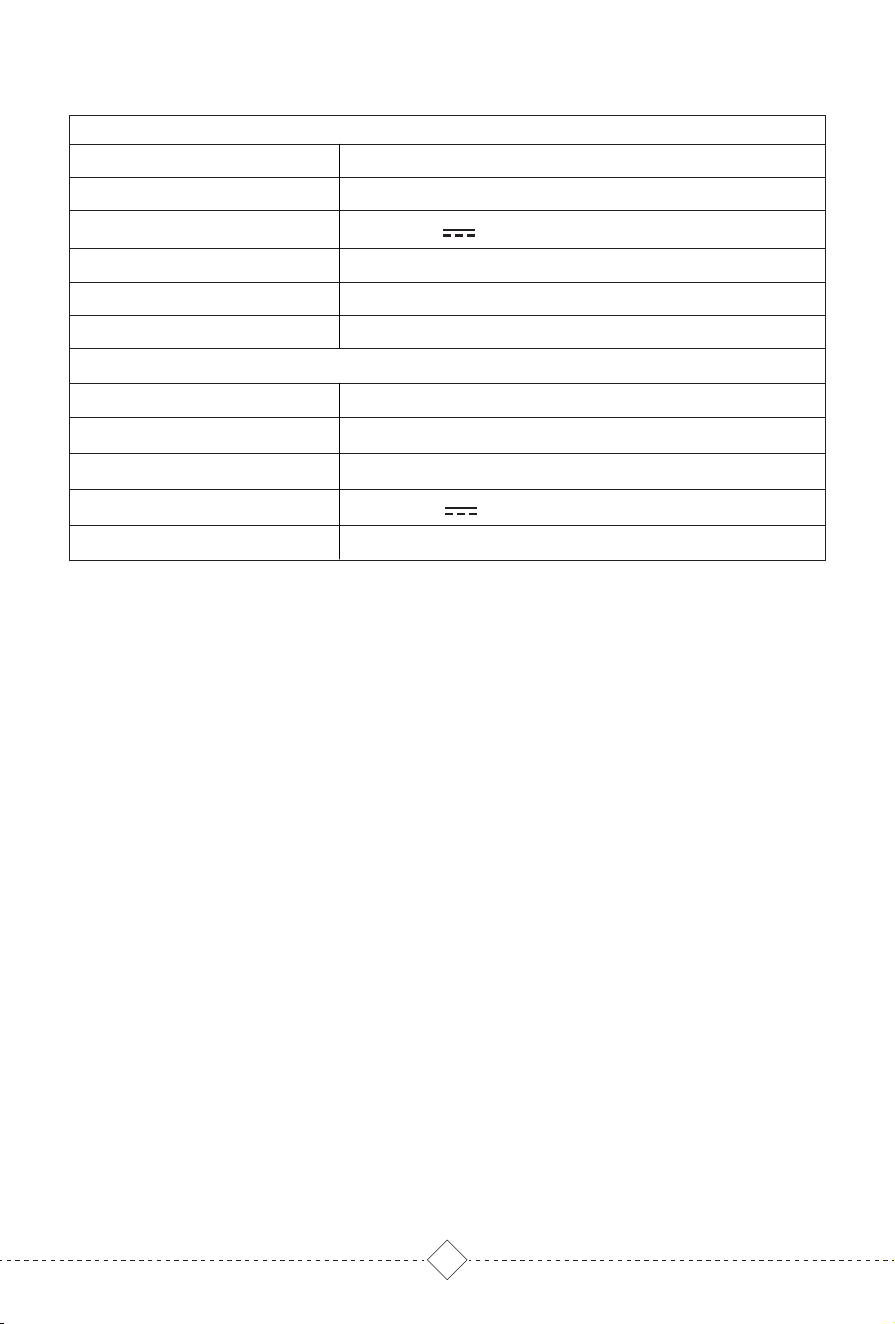
8. Product Parameter
Robot Vacuum Cleaner
14.8V/3200mAh Li-ion battery
4-5 Hours
19V 0.6A 11.4W
33*32.5*10CM
L3
3.0KG
9. Factory Default Reset
10. Environmental Protection Instructions
This equipment should be operated with a minimum distance of 20cm between the
radiator and your body.
Long press RESET button on the side of the Robot for 10 seconds until hearing "Start
factory default reset" and power on music, Robot will automatically restart, and
related settings such as regular cleaning, map and WIFI will be restored to the
default.
Due to chemical substances contained in the built-in lithium-ion battery of the robot
may pollute the environment, please take out the battery before discarding product,
and discard the lithiumion battery in accordance with relevant local laws and
regulations.
1. Remove the product from self-empty base and turn off the power switch.
2. Remove the battery cover screw and remove the battery cover.
3. Press the buckle to pull out the battery cable plug and remove the battery.
Warm Tips:
*Please make sure to remove the battery when the power switch is turned off.
*Please disassemble the entire battery pack together, do not damage the battery
pack shell, so as to avoid short circuit or material leakage. If accidentally contact
with battery exudate, please rinse with plenty of water and seek medical advice in
time.
30*20*26.2CM
19V 0.6A
24
3.65KG
1000W
Model No
Robot Size
Robot Rated Input
Battery
Charging Time
Net Weight
Self-empty Base
Size
Output
Net Weight
Power
Dust Bag
5L

THANK YOU
FOR YOUR TRUST AND
SUPPORT
AFTER SALES
WARRANTY CARD
CONTINUOUS ATTENTION TO WEBSITE, FIRST TO KNOW THE STORE ACTIVITY
MORE SURPRISE WAITING FOR YOU!

THANK YOU
FOR YOUR TRUST AND
SUPPORT
CONTINUOUS ATTENTION TO WEBSITE, FIRST TO KNOW THE STORE ACTIVITY
MORE SURPRISE WAITING FOR YOU!
After-sales warranty card
In order to maintain your warranty rights , please be sure
to fill in the following information truthfully
Model:
Name: Telephone:
Address:
illustrate:
Suggest:

EU- Supplier’s Declaration of Conformity
Hereby declare that the following equipment complies with EC Technical Specifications:
Supplier’s Declaration of conformity FCC
Hereby declare that the following equipment complies with EC Technical Specifications:
EC Regulations or Directives:
Standards the product is in conformity with:
Product Description: Robot Vacuum Cleaner
Model Number: L3
Importer: XXX
ADD: XXX
TEL: XXX
Responsible Party: Foxiot LLC
ADD: Broadway Street STE 314C Boulder,CO 80302
TEL: +844-316-6178
It’s herewith comfirmed to comply with the requirements of FCC Part 15 Rules. Operation is subject to the
following two conditions:
(1) This device may not cause harmful interference, and
(2) This device must accept any interference received, including interference that may
cause undesired operation.
RED Directive 2014/53/EU
RoHS Directive 2011/65/EU
WEEE Directive 2012/19/EU
EN 55014-1: 2017
EN 61000-3-2:2019
EN 300 328 V2.2.2(2019-07)
Draft EN 301 489-17 V3.2.4(2020-09)
EN 50564: 2011
EN 62368-1:2014+A11:2017
EN 60335-1:2012+A11:2014 +A13:2017+A1/ A2 /A14:2019+A15:2021
EN 60335-2-2:2010+A11:2012+A1:2013
EN 62233:2008
EN 55014-2:2015
EN 61000-3-3:2013+A1:2019
EN 301 489-1 V2.2.3(2019-11)
EN IEC 62311:2020
Signature of Authorised Officer:
Signature of Authorised Officer:

Building 2, Fashion Brand Industrial Park, E'Bu Town,
Shenzhen-Shanwei Special Cooperation Zone, Shenzhen, Guangdong, China.
L3-LH20220702-V01
OKP Technologies Corp
Website: www.okplife.com
Email: [email protected]
Facebook: @okplifeofficial