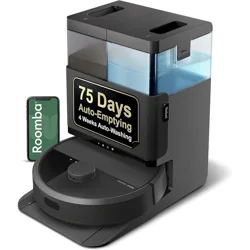

Robot Vacuum Cleaner
K 8
Instruction Manual

1
Making Life Happier.
Should you encounter situations that have not been properly addressed in this Instruction Manual, please contact
our Customer Service Center where a technician will be able to help you with your specifi c problem or question.
For more information, please visit the OKP ROBOTICS offi cial website: www. okplife. com
The company reserves the right to make technological and/ or design changes to this product for continuous
improvement.
Thank you for choosing OKP!

2
Important Safety Instructions
IMPORTANT SAFETY INSTRUCTIONS
READ ALL INSTRUCTIONS BEFORE
USING THIS APPLIANCE.
For Household use only
When using an electrical appliance, basic
precautions should always be followed,
including the following:
WARNING: Read all safety warnings and
instructions. Failure to follow the warnings
and instructions may result in electric
shock, fire or serious injury.
1. Do not allow to be used as a toy. Close
attention is necessary when used by or near
children.
2.
Clear the area to be cleaned. Remove power
cords and small objects from the fl oor that
could entangle the Appliance. Tuck rug fringe
under the rug base, and lift items such as
curtains and tablecloths off the fl oor.
3.
If there is a drop off in the cleaning area due to
a step or stairs, you should operate the
Appliance to ensure that it can detect the step
without falling over the edge. It may become
necessary to place a physical barrier at the
edge to keep the unit from falling. Make sure
the physical barrier is not a trip hazard.
4. Only use as described in this manual. Only use
attachments recommended or sold by the
manufacturer.
5. Please make sure your power supply voltage
matches the power voltage marked on the
Docking Station.
6. Do not handle plug or appliance with wet
hands.
7.
Non-rechargeable batteries are prohibited.
8. Do not use without Dustbin and/or filters in
place.
9. Do not operate the vacuum in an area where
there are lit candles or fragile objects on the
floor to be cleaned.
10.
Do not use and store in extremely hot or cold
environments (below -5°C /23°F or above
40°C/104°F). Please charge the robot in
tempera ture above 0°C/32°F and below
40°C/104°F

3
11. Keep hair, loose clothing, fingers, and all parts
of body away from any openings and moving
parts.
12.
Do not operate the Appliance in a room where
an infant or child is sleeping.
13.
For INDOOR use ONLY Do not use the
Appliance in outdoor, commercial or industrial
environments. Do not use Appliance on wet
surfaces or surfaces with standing water.
14. Do not allow the Appliance to pick up large
objects like stones, large pieces of paper or any
item that may clog the Appliance.
15.
Do not use Appliance to pick up flammable or
combustible materials such as gasoline, printer
or copier toner, or use in areas where they may
be present.
16.
Do not use Appliance to pick up anything that
is burning or smoking, such as cigarettes,
matches, hot ashes, or anything that could
cause a fire.
17. Do not put any object into openings. Do not
use with any opening blocked; keep free of
dust, lint, hair, and anything that may reduce
air flow.
18.
Take care not to damage the power cord. Do
not pull on or carry the Appliance or Docking
Station by the power cord, use the power cord
as a handle, close a door on the power cord, or
pull power cord around sharp edges or corners.
Do not run Appliance over the power cord.
Keep power cord away from hot surfaces. Do
not unplug by pulling on cord, To unplug, grasp
the plug, not the cord.
19.
If the power cord is damaged, it must be
replaced by the manufacturer or its service
agent in order to avoid a hazard.
20. Do not use the Docking Station if it is damaged.
21.
Do not use the Appliance or Docking Station if
it is not working properly, has been dropped,
damaged, left outdoors, or come in contact
with water. It must be repaired by the manufac-
turer or its service agent in order to avoid a
hazard.
22.
Turn OFF the power switch before cleaning or
maintaining the Appliance. Turn off all controls
before unplugging.

4
23. The plug must be removed from the receptacle
before cleaning or maintaining the Docking
Station.
24.
Remove the Appliance from the Docking Station,
and turn OFF the power switch to the Appliance
before removing the battery for disposal of the
Appliance.
2 5 . The battery must be removed and discarded
according to local laws and regulations before
disposal of the Appliance.
2 6 .
Please dispose of used batteries according to
local laws and regulations.
2 7.
Do not incinerate the Appliance even if it is
severely damaged. The batteries can explode in a
fi re.
28 .
When not using the Docking Station for a long
period of time, please unplug it.
2 9 .
The Appliance must be used in accordance with
the directions in this Instruction Manual. Our
company cannot be held liable or responsible
for any damages or injuries caused by improper
use.
30. Prevent unintentional starting. Ensure the switch
is in the off position before connecting to battery
pack, picking up or carrying the appliance.
Carrying the appliance with your fi nger on the
switch or energizing appliance that have the
switch on invites accidents.
31.
When battery pack is not in use, keep it away
from other metal objects, like paper clips, coins,
keys, nails, screws or other small metal objects,
that can make a connection from one terminal to
another. Shorting the battery terminals together
may cause burns or a fire.
3 2 .
Under abusive conditions, liquid may be ejected
from the battery; avoid contact. If contact
accidentally occurs, fl ush with water. If liquid
contacts eyes, additionally seek medical help.
Liquid ejected from the battery may cause
irritation or burns.
3 3.
Do not use a battery pack or appliance that is
damaged or modifi ed. Damaged or modifi ed
batteries may exhibit unpredictable behavior
resulting in fi re, explosion or risk of injury.
34.
Do not expose a battery pack or appliance to fire
or excessive temperature. Exposure to fi re or
temperature above 1 3 0 ° C may cause explosion.
The temperature of 13 0 ° C can be replaced by the
temperature of 26 5 °F.
5
3 5.
Follow all charging instructions and do not charge the
battery pack or appliance outside of the
temperature range specifi ed in the instructions.
Charging improperly or at temperatures outside of
the specified range may damage the battery and
increase the risk of fire.
36.
Have servicing performed by a qualified repair person
using only identical replacement parts. This will
ensure that the safety of the product is
maintained.
37. Do not modify or attempt to repair the appliance or
the battery pack (as applicable) except as
indicated in the instructions for use and care.
Place the cords from other appliances out of the area
to be cleaned.
38.
Place the cords from other appliances out of the area
to be cleaned.
39.
Do not operate the vacuum in a room that has lit
candles on furniture that the vacuum may
accidentally hit or bump into.
40. Do not allow children to sit on the vacuum.
41.
42.
43.
44.
Recharge only with the charger specified by the
manufacturer. A charger that is suitable for one
type of battery pack may create a risk of fire when
used with another battery pack.42.Use appliances
only with specifi cally designated battery packs.
Use of any other battery packs may create a risk
of injury and fire.
The robot contains batteries that are only
replaceable by skilled persons, To replace the
robot' s battery, please contact Customer Service.
If the robot will not be used for a long time, fully
charge the robot and power OFF for storage and
unplug the Docking Station.
SAVE THESE INSTRUCTIONS
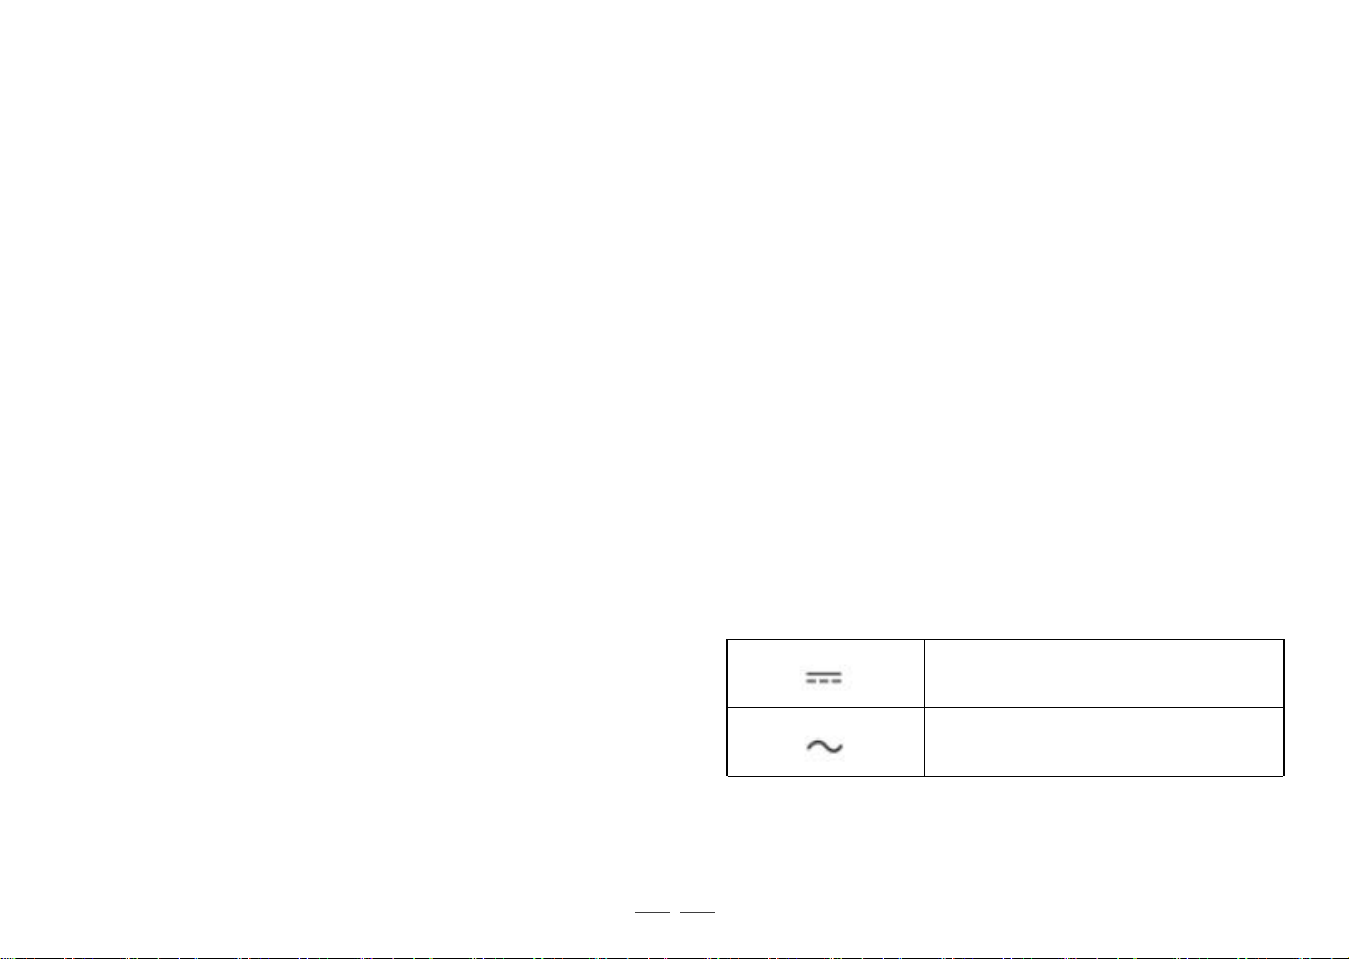
Direct current
Alternating current

6
Federal Communications Commission (FCC)
Interference Statement
This equipment has been tested and found to comply
with the limits for a Class B digital device, pursuant to
Part 15 of the FCC Rules.
These limits are designed to provide reasonable
protection against harmful interference in a residential
installation. This equipment generate, uses and can
radiate radio frequency energy and, if not installed and
used in accordance with the instructions, may cause
harmful interference to radio communications.
However, there is no guarantee that interference will
not occur in a particular installation. If this equipment
does cause harmful interference to radio or television
reception, which can be determined by turning the
equipment off and on, the user is encouraged to try to
correct the interference by one of the following mea-
sures:
• Reorient or relocate the receiving antenna.
• Increase the separation between the equipment and
receiver.
• Connect the equipment into an outlet on a circuit
diff erent from that to which the receiver is connected.
• Consult the dealer or an experienced radio/TV
technician for help.
This device complies with Part 15 of the FCC Rules.
Operation is subject to the following two conditions:
(1) This device may not cause harmful interference,
and (2) this device must accept any interference
received, including interference that may cause
undesired operation.
FCC Caution: Any changes or modifications not
expressly approved by the party responsible for
compliance could void the user5 s authority to oper-
ate this equipment.
RF exposure warning
This equipment complies with FCC radiation expo-
sure limits set forth for an uncontrolled environment.
This equipment must be installed and operated in
accordance with provided instructions and the
antenna( s) used for this transmitter must be installed
to provide a separation distance of at least 20 cm
from all persons and must not be collocated or
operating in conjunction with any other antenna or
transmitter.

7
Contents
1.Package Contents ...........................................................................................................................
8
2.Operating and Programming
.........................................................................................................
11
3.Maintenance
....................................................................................................................................
20
4 . Indicator Light
.................................................................................................................................
24
5. Troubleshooting
...............................................................................................................................
26
6. Product Specifications
...................................................................................................................
29
8
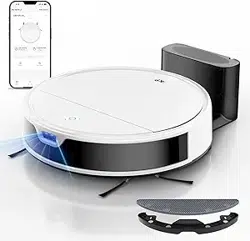
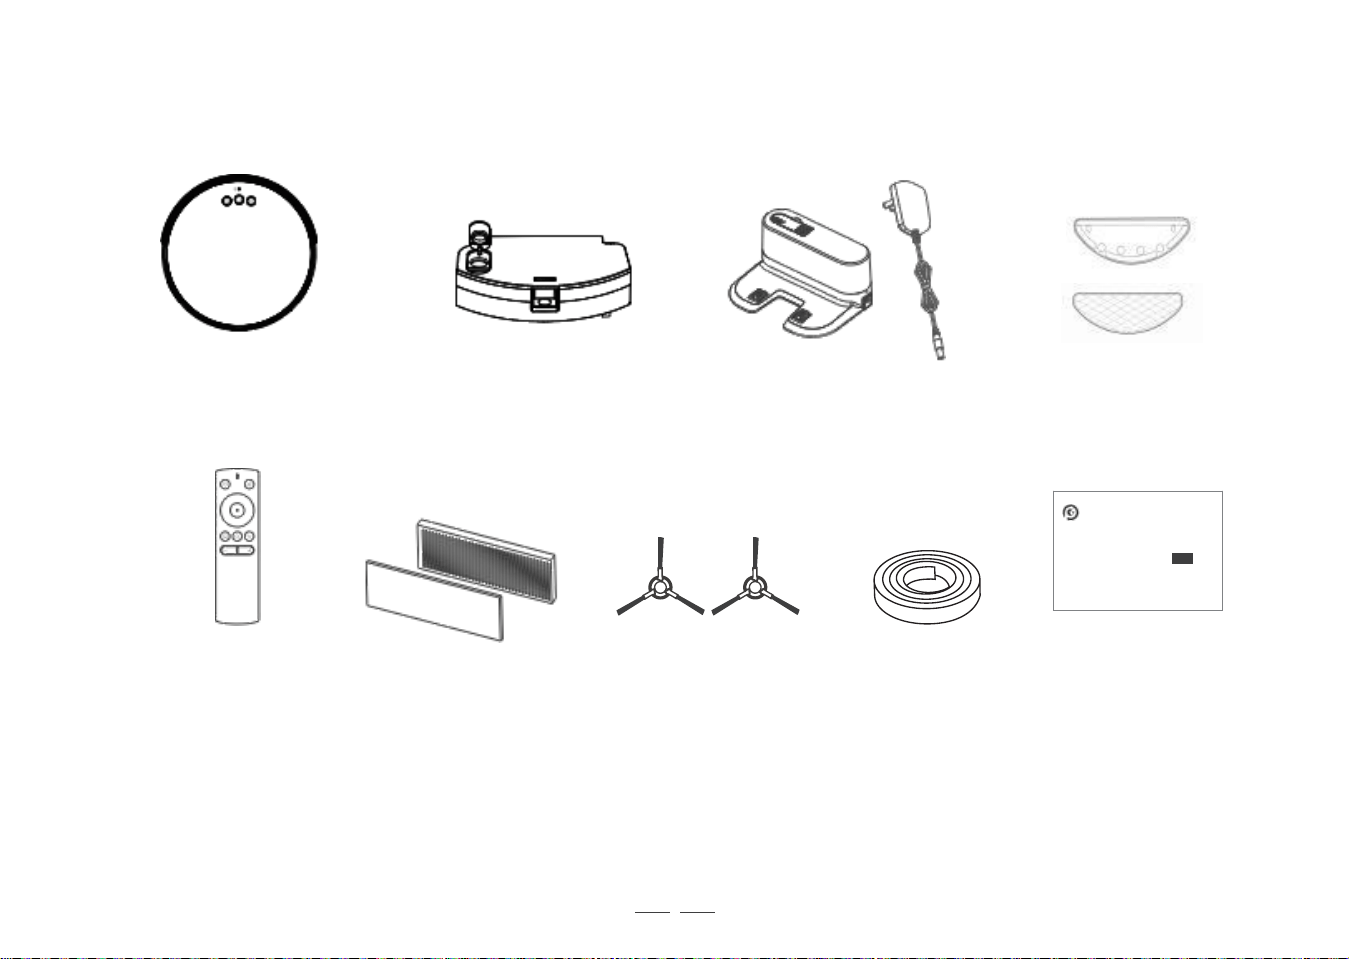
1. Package Contents /1.1 Package Contents
Cleaning Cloth Plate
& Cleaning Cloth
Robot Vacuum Cleaner K 8
Instruction Manual
Remote Control High Efficiency Filter Kit Side Brushes Boundary Strip Instruction Manual
with Batteries
Note:
Figures and illustrations are for reference only and may diff er from actual product appearance. Product
design and specifi cations are subject to changes without notice.
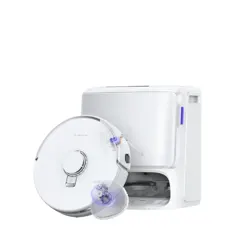
Docking Station
& Power Adapter
Dustbin & Water Tank
Robot
9
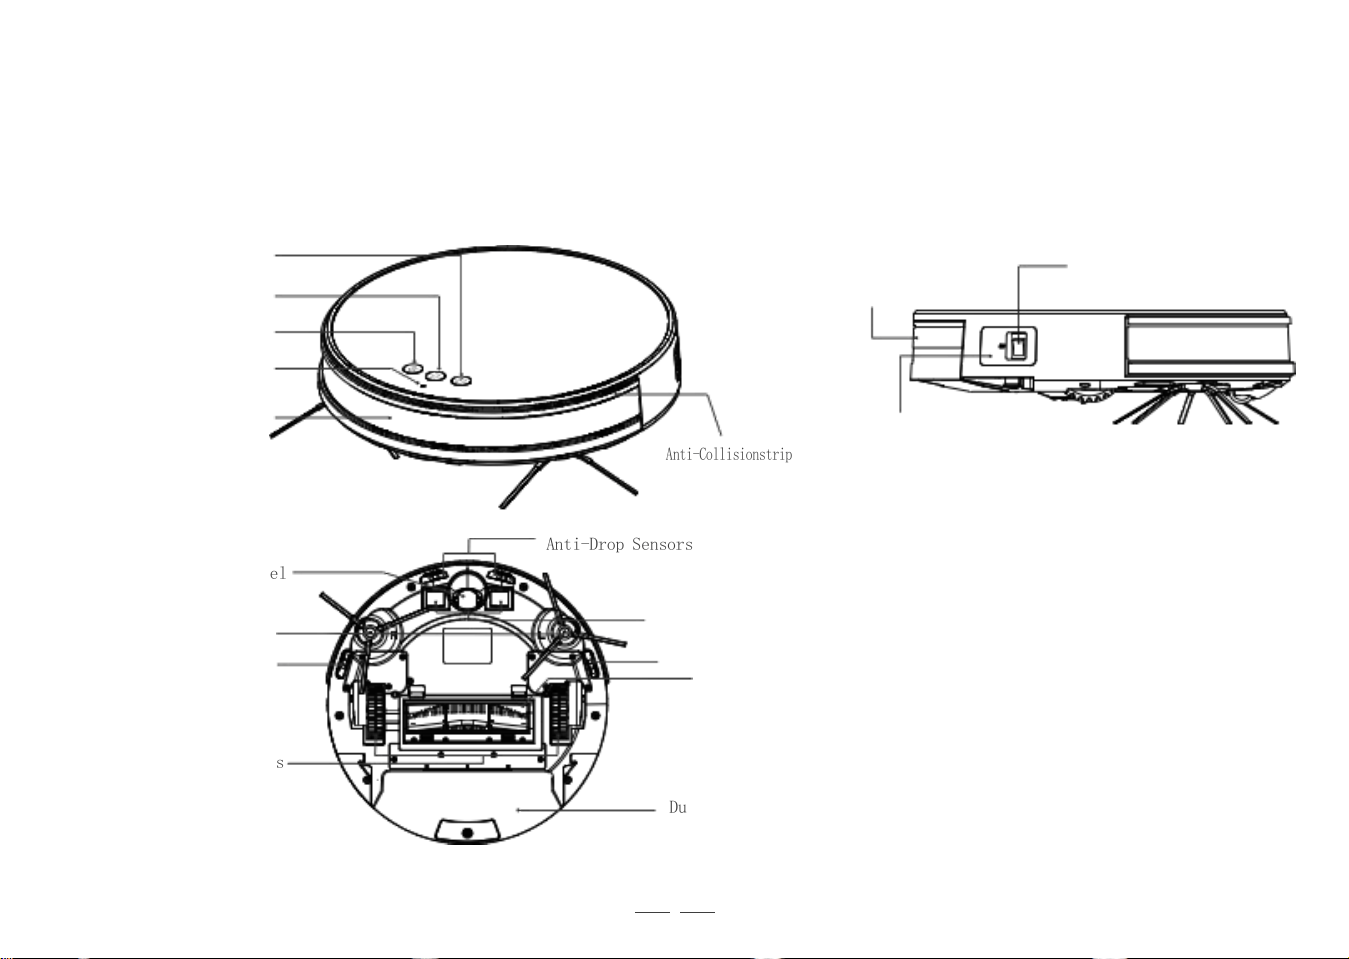
1. Package Contents /1. 2 Product Diagram
Robot
Spot Clean Mode Button
Start /Pause Button
Returnto Charge Dock Button
Wi-Fi indicator
InfraredAnti-Collision
Sensors
Anti-Collisionstrip
Bottom
Anti-Drop Sensors
Universal Wheel
Side Brushes
Anti-Drop Sensor
Driving Wheels
Dustbin & Water Tank
(2-in-1)
Charging Contacts
Anti-Drop Sensor
Roller Brush
Power Switch
(I=ON.O=OFF)
Dustbin
Release Button
Infrared Receiver
10
Docking Station
Power Indicator Light
Multi-function
Cleaning Tool
START/ PAUSE Button
Charging Contacts
PowerAdapter Port
Dustbin & Water Tank (2-in-1)
Water Tank
Dustbin
Cleaning Cloth Plate
Cleaning Cloth
Dustbin Water Tank
Filter Net
Filter Sponge
High Efficiency Filter
(HEPA)
Spot Cleaning
Mode Button
Suction- power
Down Button
Programmed
Cleaning Mode
Button
Suction- power
Up Button
Direction Control
Buttons
Edge Cleaning
Button
Return to Charger
Mode Button
Remote Control
AUTO Mode Button
Indicator Light
PowerAdapter
Infrared Signal
Emitter
11
2 . Operating and Programming / 2 . 1 Notes Before Cleaning
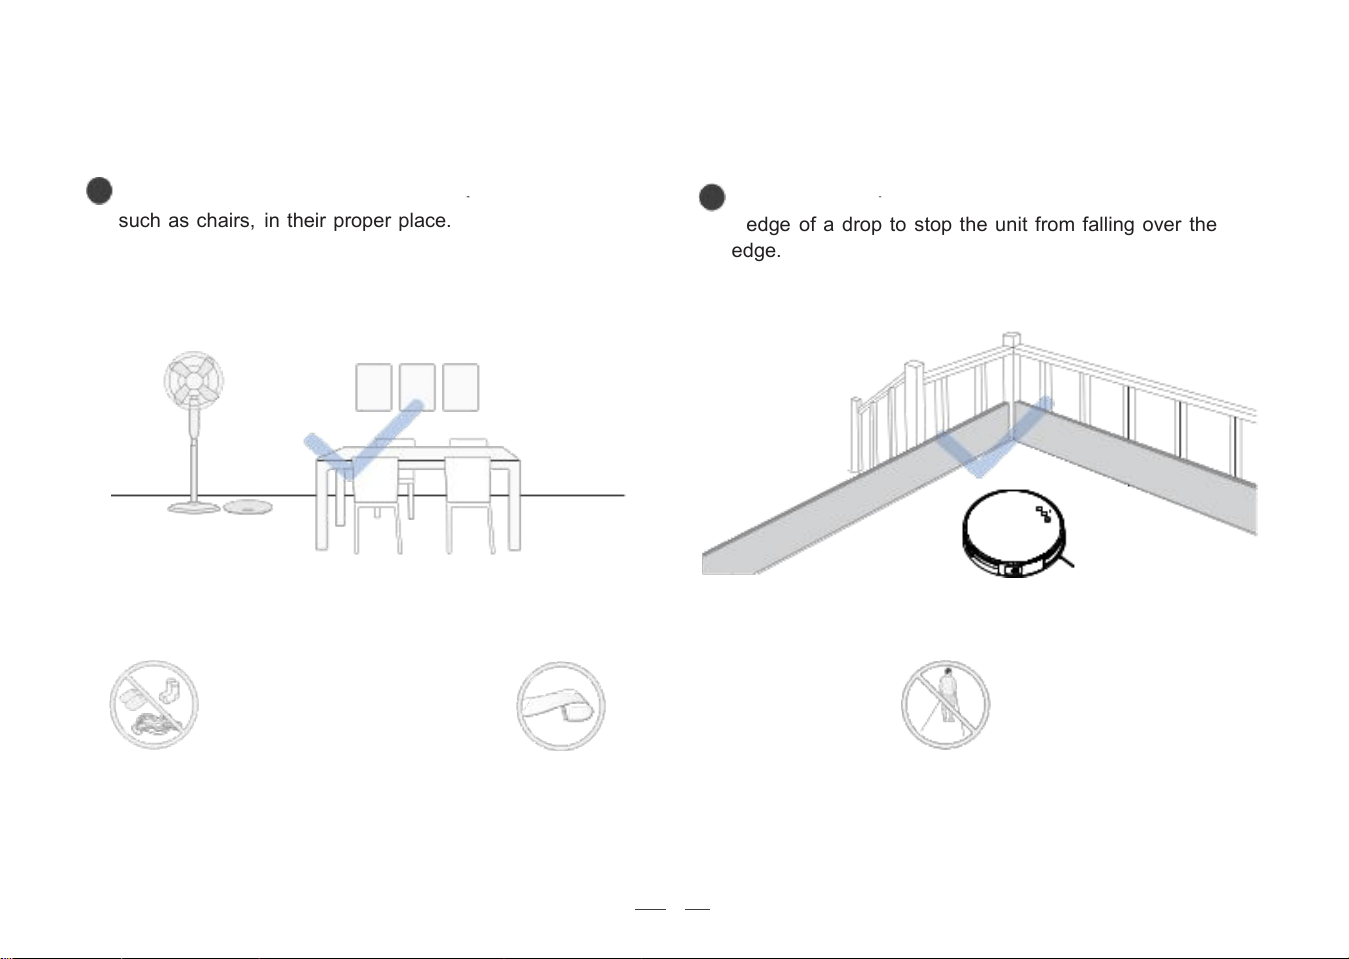
1
Put away objects including wires,
clothes and slippers, etc. on the
fl oor to improve the cleaning
effi ciency.
Before using the product on a rug
with tasseled edges, please fold
the rug edges under.
Please do not stand in narrow
spaces, such as hallways, and
make sure not to block Robot.
2
It may be necessary to place a physical barrier at the
edge of a drop to stop the unit from falling over the
edge.
Tidy up the area to be cleaned by putting furniture,
such as chairs, in their proper place.

12
2 . Operating and Programming
/ 2 . 2 Quick Start
1
Remove Protective Materials
Install Side Brushes
2
13
2 . Operating and Programming / 2 . 3 Charging Robot
3
≥
4-5h
Power ON
Note: I = ON, O = OFF
Robot cannot be charged when being powered OFF.
*It is suggested to avoid picking up or moving Robot during
the cleaning for Robot to return to charge successfully.
Charge Robot
Indicators flash when Robot is charging.
Indicators go out when Robot is fully charged.
Docking Station Placement
2
1

14
2 . Operating and Programming / 2 . 4 App Download
To enjoy all available features , it is recommended to control your Robot via the OKP Life App.
Before you start, make sure that:
• Your mobile phone is connected to a Wi-Fi network.
• The 2.4GHz band wireless signal is enabled on your router.
Method 2: Search for "OKP Life", download and install.
Download and Install App
Method 1: Scan the QR code, download and install the App
according to the prompts.
ontheside ofthis product
Add device & Pair the network through the app
Open the“OKP Life”APP and log in (new users need to register first).
Select <Add device> on home page.
Then pair the network following the detailed instructions in the app.
OKP Life
Android4.0 or later
Notes:
- This device only supports 2.4GHz Wi-Fi network (not compatible with 5GHz Wi-Fi).
- If you experience with network pairing failure, please restart the robot and start over again.
Point).
Or try the other network pairing method instead (touch on the upper right corner).
IOS 9.0 or later
- This product supports two different network pairing mode:EZ (Quick Connection) and AP (Access
15
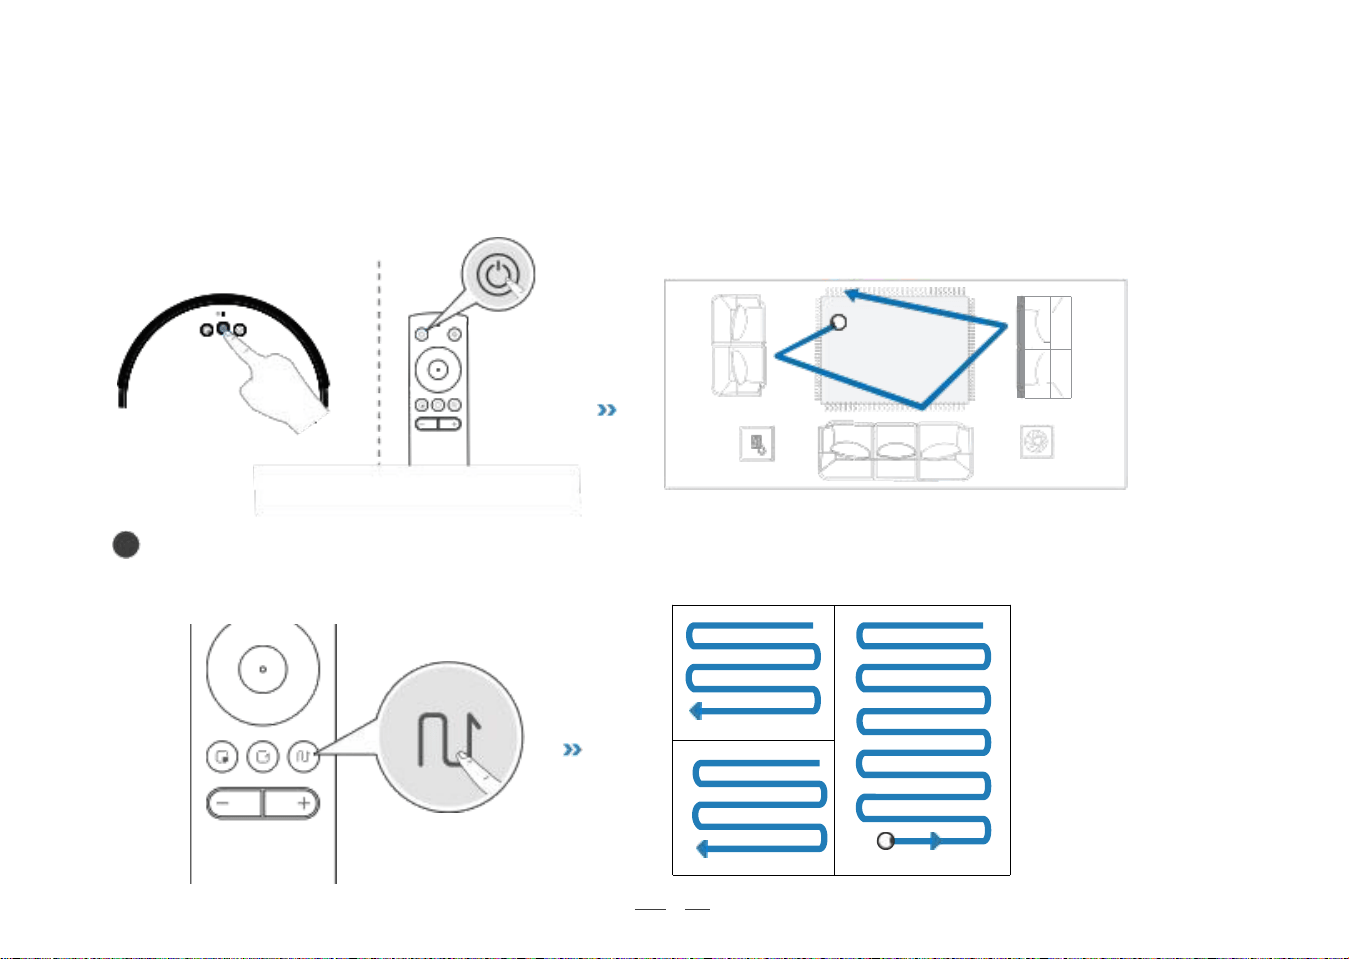
2 . Operating and Programming
/ 2 . 5 Selecting Cleaning Mode
During the first cleaning, please supervise Robot and assist it should there be a problem.
1
Auto Cleaning Mode
Robot will clean in Random Cleaning Pattern designed for carpet cleaning by default.
Programmed Cleaning Mode
Robot will clean in Programmed Cleaning Pattern optimized for hard floors.
2
16
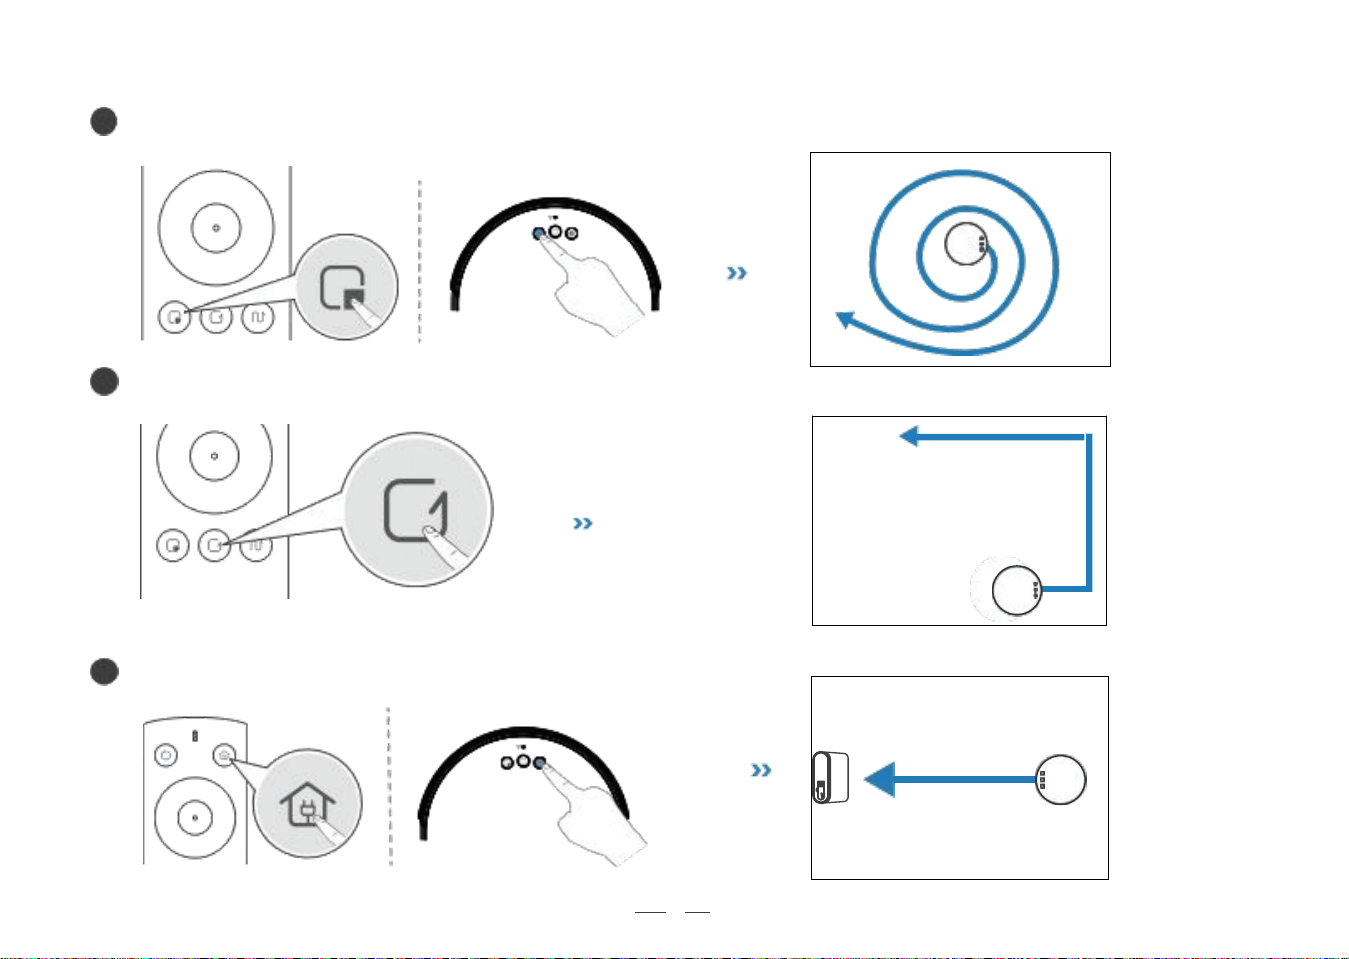
Spot Cleaning Mode (Less than 3 minutes)
Edge Cleaning Mode
Return to Charging Dock
5
3
4
17
6
Start/ Pause
Note: I = ON, O = OFF
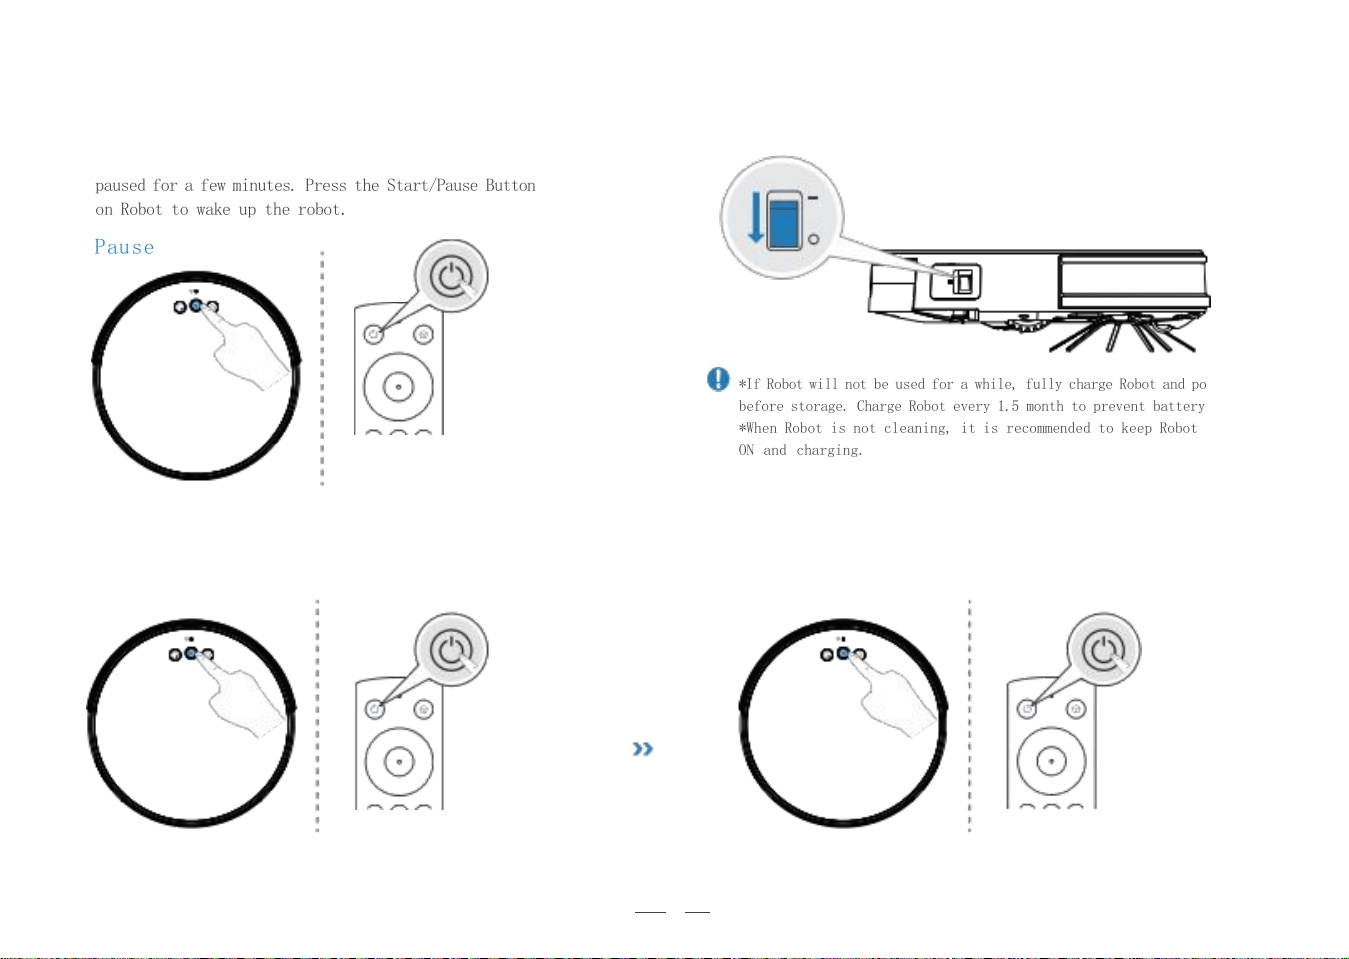
*If Robot will not be used for a while, fully charge Robot and power OFF
before storage. Charge Robot every 1.5 month to prevent battery drain.
*When Robot is not cleaning, it is recommended to keep Robot powered
ON and charging.
The robot’s Control Panel stops glowing after the robot is
paused for a few minutes. Press the Start/Pause Button
on Robot to wake up the robot.
Pause
7 Power OFF
Wake Up
Start
18
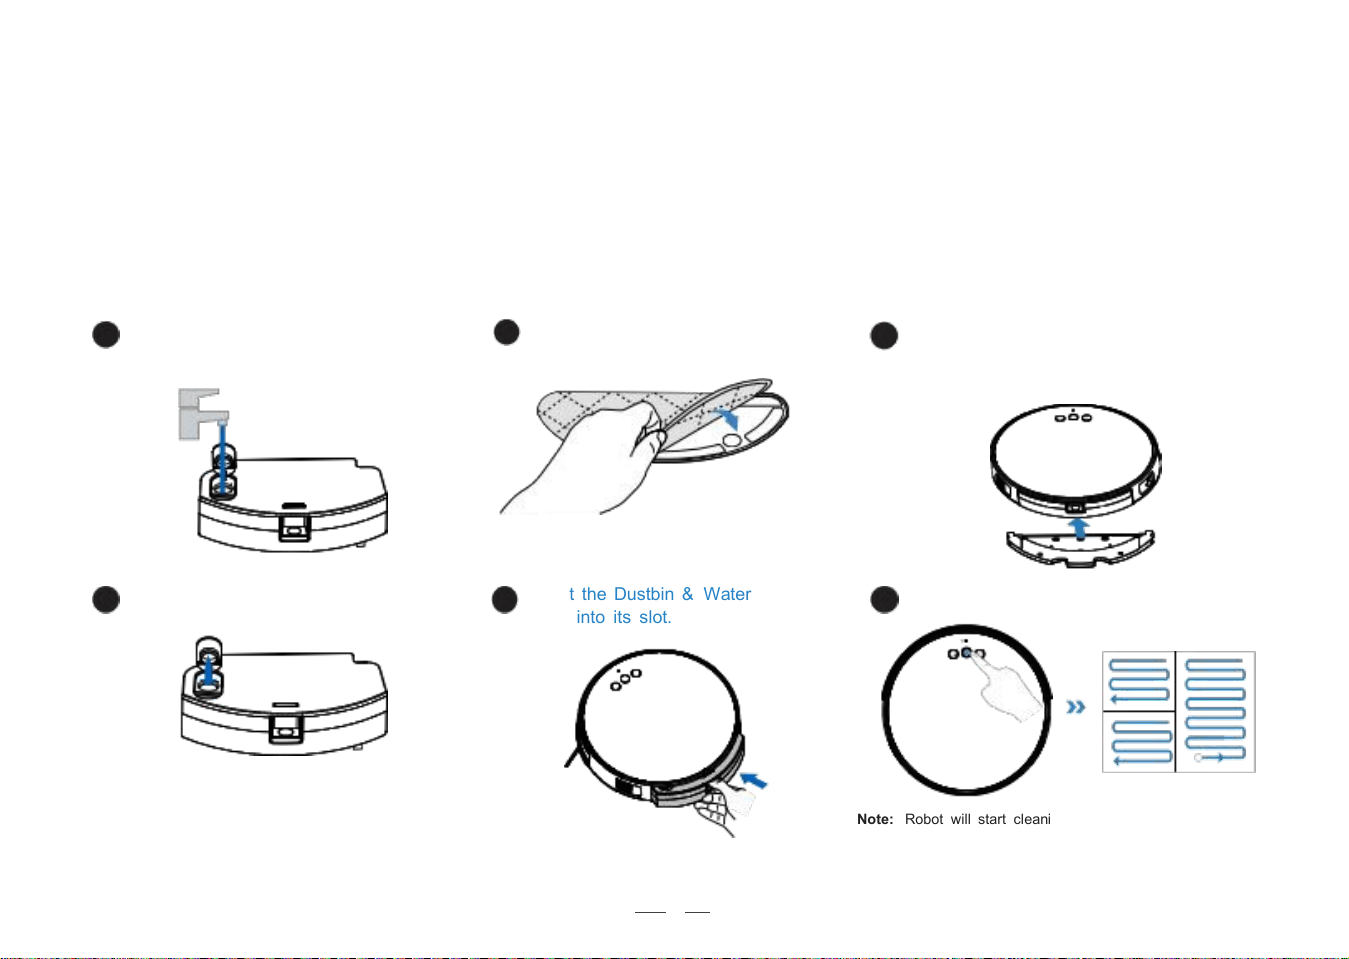
2 . Operating and Programming / 2. 6 Mopping function
Tips
1 . In order to extend the life of the water tank, we recommend you to use purifi ed water or softened water.
2 . Do not use mopping function on the carpet.
3 . Empty the water tank immediately after fi nishing mopping.
4 . When using the mopping function to clean, please fold up the edge of the carpet to avoid the foreign matters on the mop
contaminating the carpet.
5. During cleaning, please pay attention to it, add water or clean it in time, and remove the water
tank components when adding water.
3
Insert the Dustbin & Water
Tank into its slot.
Note: Robot will start cleaning in Programmed Cleaning Mode
optimized for hard fl oors when cleaning Cloth Plate is installed.
5
Align the center of Cleaning Cloth Plate and
the bottom of Dustbin & Water Tank.
Then push it until it clicks.
Open the water inlet cover and
take enough water.
Stick the Cleaning Cloth onto
the Cleaning Cloth Plate.
Close the inlet cover.
Start Mopping.
1
2
4
6
19
2 . Operating and Programming / 2. 7 Use the Boundary Strip
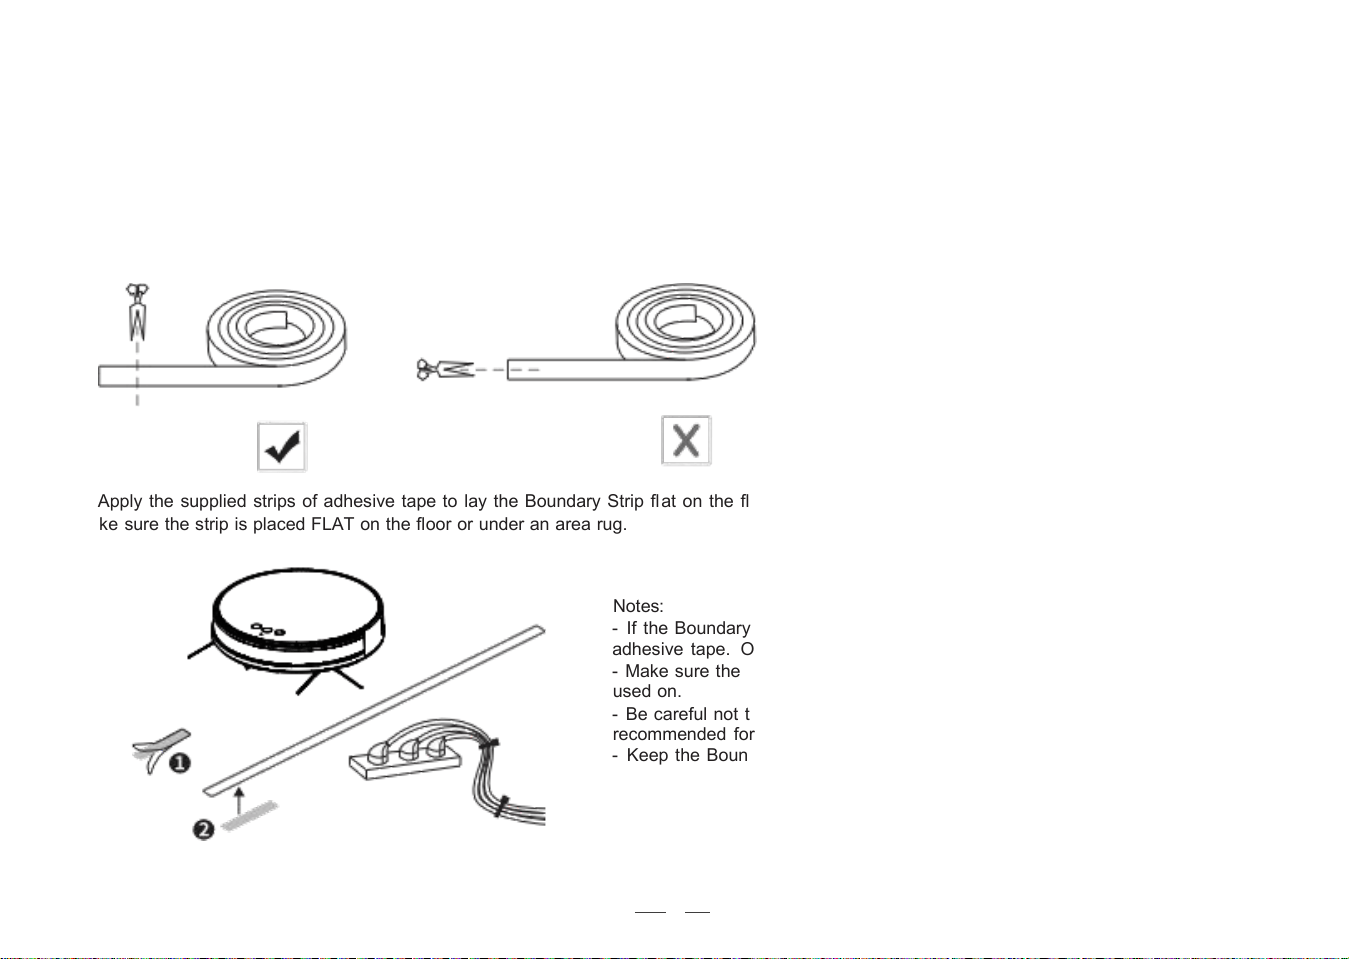
With the Boundary Strip, you can keep Robot away from any area or item you do not want Robot to clean.
Robot will recognize the Boundary Strip and will not cross into the blocked- off area.
1. Identify the area or item you do not want Robot to get close to.
2. If necessary, use scissors to cut the Boundary Strip to a shorter length. Be sure to correctly measure the length before cutting.
3. Apply the supplied strips of adhesive tape to lay the Boundary Strip flat on the floor.
Make sure the strip is placed FLAT on the floor or under an area rug.
Notes:
- If the Boundary Strip is rolled up, remove and then re- apply on the fl oor with
adhesive tape. Otherwise the Boundary Strip may not work well.
- Make sure the Boundary Strip is placed on the same surface plane Robot is
used on.
- Be careful not to damage the floor when using adhesive tape. It is not
recommended for use on carpets.
- Keep the Boundary Strip away from objects that emit excessive heat.

Okp Technologies Corp
www.okplife.com
K8-20210123-V01