设 计
DESIGN
林芳芳
2023.12.29
校 对
CO.BY
吴贻绵
图号/物料编码 PART NO.
标准化
STANDARD
图纸名称 PART NAME
Midea(英国)MDRF632FIE46(CE-BCD470WE-JT)
说明书
业务
seller
杨 名
图样标记
REL
版本号
REV.NO.
重量(g)
WEIGHT
比例
scale
材料 MATERIAL
80g双胶纸
批 准
AUTHORI
ZE
共 页
TOTAL SHEETS
第 页
NO. OF SHEETS
美的冰箱事业部
MIDEA REFRIGERATION
DIVISION
标记
M
ARKER
0
1:1
变更内容 修改日期 签名
技术要求
16131000A49026
1.尺寸:145*210mm
2.印刷颜色:单色(灰度印刷)
3.制件必须符合QMB-J036.1008 产品说明书及其它类似印刷件技术规范;
4.除客户特别要求外均参照美的冰箱最新版相关企业标准执行;
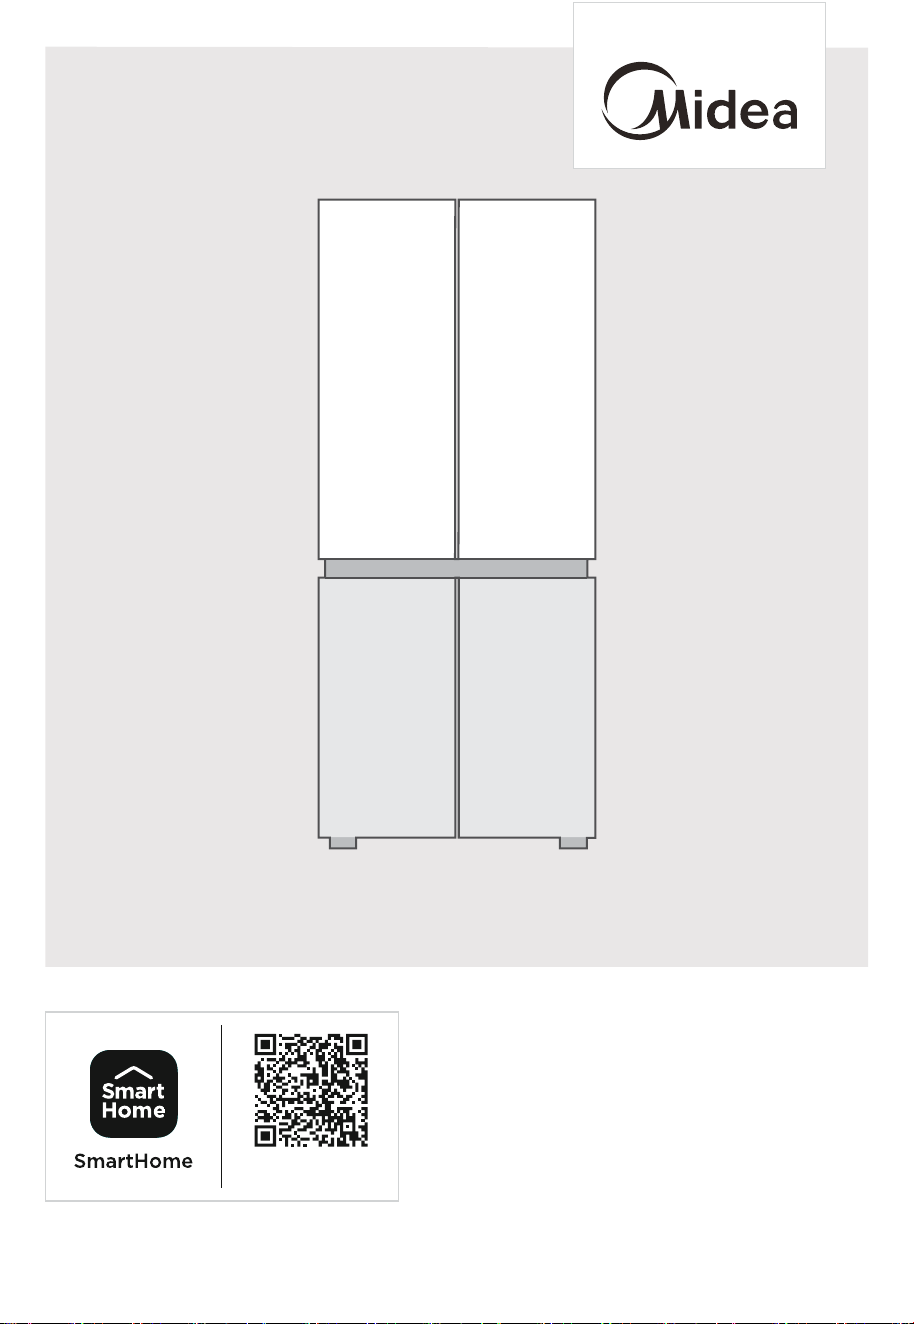
Refrigerator
FOUR DOOR SERIES
MDRF632FIE*
USER MANUAL
Warning notices: Before using this product, please read this manual carefully and keep it for future reference.
The design and specifications are subject to change without prior notice for product improvement.
Consult with your dealer or manufacturer for details.
The diagram above is just for reference. Please take the appearance of the actual product as the standard.
Download the app
& activate product


01
THANK YOU LETTER
Thank you for choosing Midea! Before using your new Midea product, please read
this manual thoroughly to ensure that you know how to operate the features and
functions that your new appliance offers in a safe way.
CONTENTS
THANK YOU LETTER
------------------------------------------- 01
SPECIFICATIONS
------------------------------------------------ 02
PRODUCT OVERVIEW
----------------------------------------- 03
PRODUCT INSTALLATION
------------------------------------ 04
OPERATION INSTRUCTIONS
--------------------------------- 08
APP SETUP AND OPERATION
------------------------------- 14
CLEANING AND MAINTENANCE
---------------------------- 16
TROUBLESHOOTING
------------------------------------------- 17
APPENDIX
---------------------------------------------------------- 21
02
SPECIFICATIONS
Wireless Network module model MWB-S-WB01
Standard IEEE 802. 11b/g/n
Antenna Type Printed PCB antenna
Frequency Band 2400-2483.5 MHz
Operating Temperature
0
℃
~ 85
℃
Operation humidity: 10%~85%
Power Input
DC5V/500mA Maximum
Transmission power: <20dBm
Importer / Address: MIDEA HOME APPLIANCES UK LTD
Conavon Court Ground Floor, 12 Blackfriars Street, Salford,
Manchester M3 5BQ UK
Product model MDRF632FIE
Rated Voltage / Frequency 220-240V~/50Hz
Rated Current 1.8A
Rated Lamp Power 6W
Fresh Food Storage Compartment Volume 305L
Four-star Compartment Volume 169L
Temperature Rise Time 10h
Freezing Capacity 13kg/24h
Overall Dimension (WxDxH) 833x653x1775mm
03
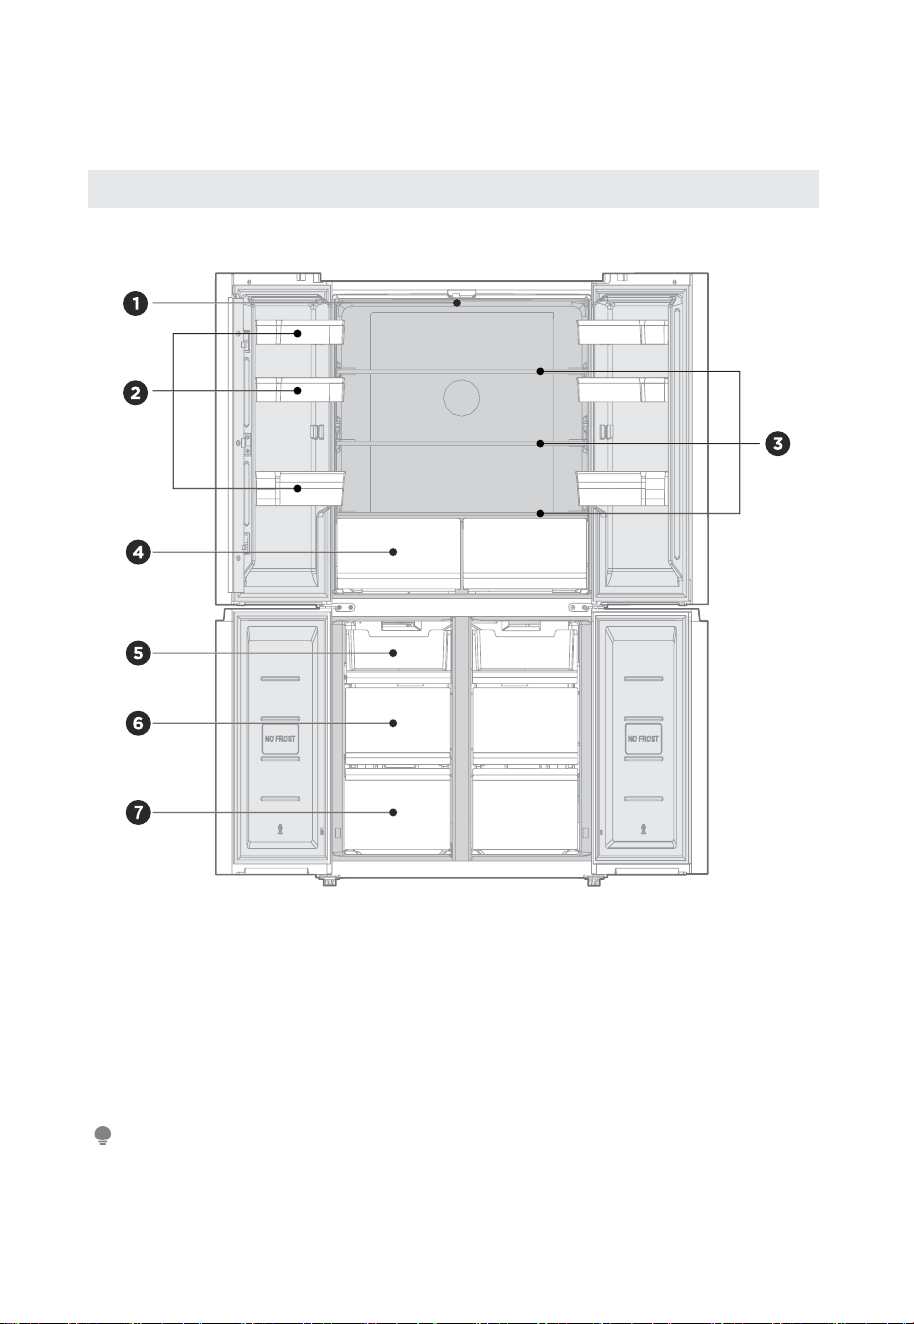
PRODUCT OVERVIEW
Names of components
Normal type
1
LED lighting
5
Up drawer
2
Door tray
6
Middle drawer
3
Glass Shelf
7
Down drawer
4
Big drawer
ATTENTION
The picture above is only for reference. The actual configuration will depend on the physical
product or statement by the distributor.
04
PRODUCT INSTALLATION
Install Instruction
For refrigerating appliances with climate class
• Depending on the climate class, this refrigerating appliance is intended to be
• The climate class can be found on the rating plate. The product may not
•
Effective temperature range
• The product is designed to operate normally in the temperature range
Class Symbol
Ambient temperature range °C
IEC 62552 (ISO 15502) ISO 8561
Extended temperate SN + 10 to + 32 + 10 to + 32
Temperate N + 16 to + 32 + 16 to + 32
Subtropical ST + 16 to + 38 + 18 to + 38
Tropical T + 16 to + 43 + 18 to + 43
Dimensions and Clearances
• Too small of a distance from adjacent items may result in the degradation
of freezing capability and increased electricity costs. Allow over 100 mm of
clearance from each adjacent wall when installing the appliance.
>100mm
>100mm
>100mm
>100mm
>100mm
>100mm
Top View
Required space
for air circulation
ATTENTION
on the physical
product or statement by the distributor
05
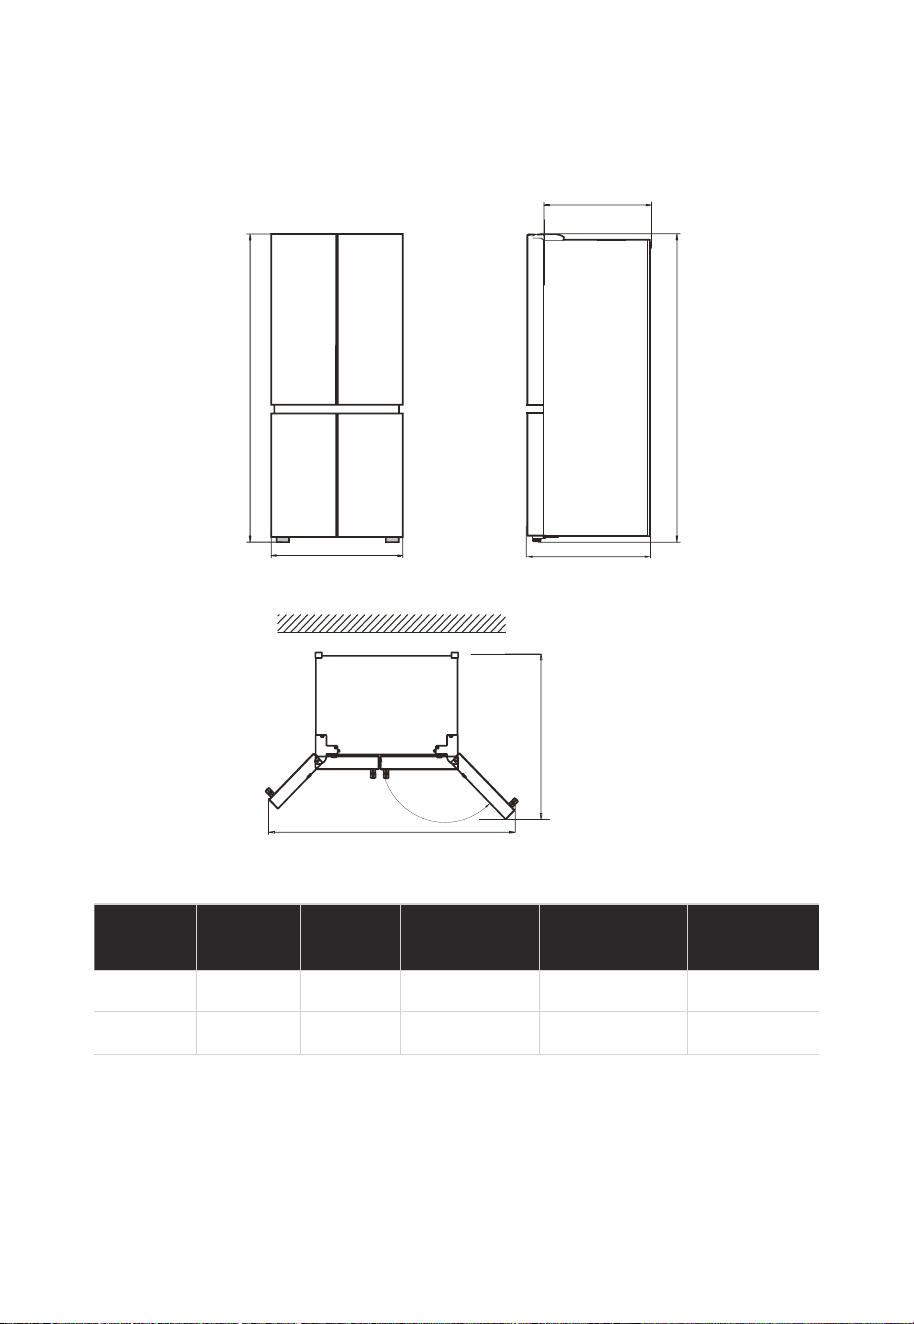
Space requirement diagram (when the door is open and when the door is closed)
C1
C
E
B
135 °
D
B
A
Width
Overall
Height
Depth Without door
Depth
doors open
135
o
Width
doors open
135
o
A B C C1 D E
833 1775 653 570 1000 1400
Notice: All dimensions in mm
06
Leveling feet
To avoid vibration, the unit must be leveled.
The front should be slightly higher than the rear to aid in door closing.
Leveling screws can be turned easily by tipping the cabinet slightly.
Turn the leveling screws counterclockwise
to raise the unit, clockwise to
lower it.
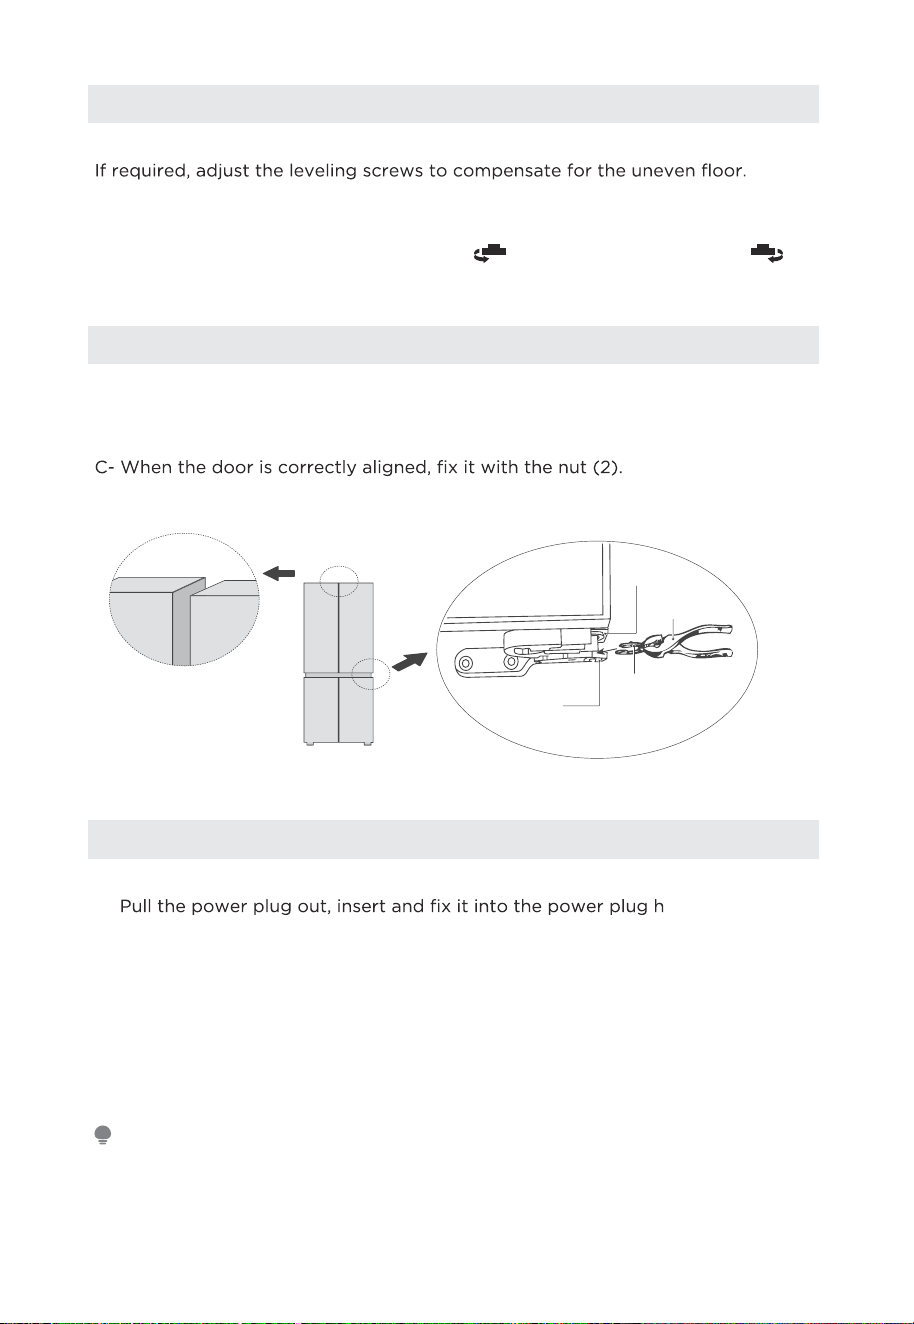
Leveling doors
If the doors are not at the same height, the door can be adjusted with a spanner.
A- To raise the door, turn the nut (1) anticlockwise.
B- To lower the door, turn the nut (1) clockwise.
Moving the appliance
1. Remove all food from inside the appliance.
2.
ook at the rear or
on top of the appliance.
3. Tape parts such as shelves and the door handle to prevent from falling off
while moving the appliance.
4. Move the appliance with more than two people carefully. When transporting
the appliance over a long distance, keep the appliance upright.
5. After installing the appliance, connect the power plug into a socket out to
switch on the appliance.
ATTENTION
Precautions before operation:
Before making changes the refrigerator must be disconnected from power.
precautions should be taken to prevent any personal injury.
Lower hinge
Hinge
grommet
Fastener-ring
Pliers

07
Changing the light
• Any replacement or maintenance of the LED lamps is intended to be made by
ATTENTION
(G).
Connecting the appliance
After installing the appliance, connect the power plug into a socket outlet.
ATTENTION
After connecting the power supply cord (or plug) to the outlet, wait 2 or 3 hours before you
put food into the appliance. If you add food before the appliance has cooled completely, your
food may spoil.
Tips for energy saving
• Do not place the appliance near cookers, radiators or other heat sources. If the
ambient temperature is high, the compressor will run more frequently and for
longer, resulting in increased energy consumption.
•
ppliance, on the sides
of the appliance and at the back of the appliance. Never cover ventilation openings.
• Please also observe the spacing dimensions in the chapter „Installation“.
• The arrangement of drawers, shelves and racks as shown in the illustration offers the
s far as possible. All
drawers and shelves should remain in the appliance to keep the temperature stable
and save energy.
• To obtain a larger storage space (e.g. for large refrigerated/frozen goods), the
middle drawers can be removed. The top and bottom drawers and shelves should
be removed last if necessary.
• s to optimal energy
use. Therefore, avoid empty or half-empty compartments.
• Allow warm food to cool before placing it in the refrigerator/freezer. Food that has
• Allow frozen food to defrost in the refrigerator. The coldness of the frozen food
reduces the energy consumption in the refrigerator compartment and thus increases
• oss. Opening the door
• The door seals of your appliance must be perfectly intact so that the doors close
properly and energy consumption is not increased unnecessarily.
08
OPERATION INSTRUCTIONS
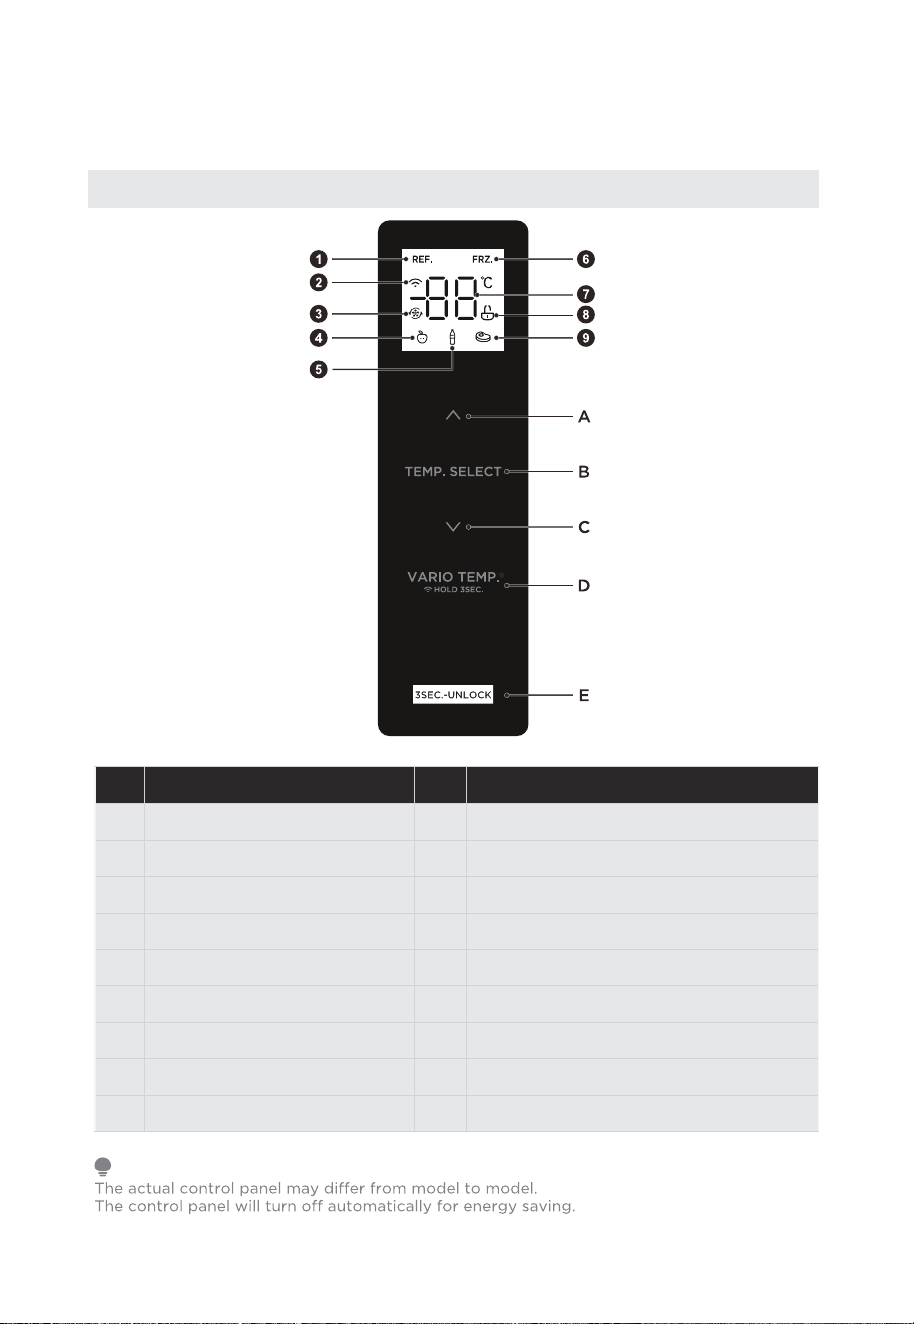
Control panel
Display Button
1
Refrigerating icon
A
Temperature up button
2
Wireless Connection icon
B
Temperature zone selection button
3
Super cool / freezing icon
C
Temperature down button
4
Fruit/vegetable icon
D
Vario temp select/ Wireless Connection
5
Drink icon
E
Lock/Unlock button
6
Freezer icon
7
Temperature display icon
8
Lock icon
9
Meat icon
ATTENTION
09
Display
• When electrify the refrigerator,the display screen will total display for 3
seconds. Meanwhile the starting up bell rings and then the screen enters the
normal display of the operation.
•
refrigerating chamber and freezing chamber is 4° C/-18 °C respectively.
• When the error occurs, the display shows the error code (see next page);
during normal running, the display shows the set temperature of the
refrigerating chamber or freezing chamber.
• Under normal circumstances, if there is no operation on display panel or door
opening action within 30s, then the display is lock, and the sate goes out.
Lock /unlock
• In the unlocked state, long press the lock button “ ” for 3 seconds,
enter the lock state, the logo goes outand buzzer sounds, it means the
display panel is locked, at this time, button operation cannot be implemented;
• In the locked state, long press the lock
button for 3 seconds,
enter the unlocked state, the logo lights up and buzzer sounds, it
means the display panel is unlocked, at this time, button operation can be
implemented;
Temperature setting of refrigerating chamber
• Press temperature zone selection button “TEMP . SELECT” to choose the setting
temperature zone of refrigerating chamber, and then press or to adjust
the setting temperature of refrigerating chamber. The temperature setting
range for refrigerating chamber is 2°C ~ 8°C.
Temperature setting of freezing chamber
• Press temperature zone selection button “TEMP . SELECT” to choose the setting
temperature zone of freezing chamber, and then press or to adjust the
setting temperature of freezing chamber. The temperature setting range for
freezing chamber is -24°C~ -16°C.
Temperature setting of variable temperature chamber
• Press Variable temperature button “VARIO TEMP” to adjust the setting
temperature of the chamber, the adjusting range is Fruit/vegetable, drink and
meat.
• Fruit/vegetable Suitable for storing all kinds of fruits and vegetables;
• Drink Suitable for storing dry goods and drinks;
• Meat: Suitable for a small amount of meat stored for 1-2 days;
ATTENTION
Recommended setting: Refrigerated chamber 4°C, freezing chamber -18°C.
The quick-freezing function is designed to maintain the nutritional value of the food in the
freezer. It can freeze the food in the shortest time. If a large amount of food is frozen at one
time, it is recommended that the user turn on the quick-freezing function and put the food in.
At this time, the freezing speed of the freezer compartment is increased, which can quickly
“ ”

10
Mode setting
• Mode setting Set the Super cooling mode: after the temperature of the
refrigeration room is adjusted to 2°C, press the temperature down button “
” to enter the super cooling mode In the super cooling mode, the temperature
of the refrigerating chamber is automatically set to 2°C.
• Exit the Super cooling mode: press the temperature up button “ ” to exit
the super cooling mode or automatically exit the super cooling mode after 6h.
After exiting the super cooling mode, the temperature of the refrigerator will
automatically return to the temperature set before the super cooling mode.
• Set the super freezing mode: after the temperature of the freezing chamber
is adjusted to -24°C, press the temperature down button “ ” to enter the
super freezing mode. In the super freezing mode, the temperature of the
freezing chamber is automatically set to -24°C.
• Exit the super freezing mode: press the temperature up button “ ” to exit
the super freezing mode or automatically exit the super freezing mode after
43h. After exiting the super freezing mode, the freezing chamber temperature
will automatically return to the temperature set before the super freezing
mode.
Wireless Connection
• When electrify the refrigerator, press and hold the “VARIO TEMP” key for 3s to
enter the distribution network mode. When the display shows AP, that means
the hotspot is on, login SmartHome app with mobile phone, link the hotspot,
complete the setup according to the instructions in the app. After setting the
“ ”indicator will be on all the time.
Sabbath mode
• Unlock the fridge, and then press the “ ” and the lock button at the same
time for 4 seconds, into the Sabbath mode. Press any key to exit.In this mode
the fridge status:
• a. Display control board and lights remainoff, and no alarm.
• b. The refrigerator cools normally.
•
not change.
Storage upon power failure
• In case of power failure, the instant working state will be locked and
ATTENTION
Disable the door opening tone: Press and hold both the Refrigerate and Freeze keys for 3
seconds to disable or set the door opening tone.
Disable the door opening alarm sound: Not possible.

11
Fault indication
• The following warnings appearing on the display indicate corresponding faults
of the refrigerator. Though the refrigerator may still have cold storage function
with the following faults, the user shall contact a maintenance specialist for
maintenance, so as to ensure optimized operation of the appliance.
Error code
• The following warnings appearing on the display indicate corresponding faults
of the refrigerator. Though the refrigerator may still have cold storage function
with the following faults, the user shall contact a maintenance specialist for
maintenance, so as to ensure optimized operation of the appliance.
Fault Code Fault Description
E1 Temperature sensor failure of refrigerating chamber
E2 Temperature sensor failure of freezing chamber
E3 Temperature sensor failure of variable temperature chambe
E4 Failure of defrosting sensor in refrigerating chamber
E5 Freezing defrost sensor detection circuit error
E6 Communication error
E7 Circulation of temperature detection circuit error
EH Moisture sensor error

12
Tips on storing food
Freezer compartment
• The freezer is designated for the storage of food frozen at very low temperature,
long-term storage of frozen food, and for the production of ice.
• Only use the shelves in the door of the freezer to store frozen food, not for storing
hot food designated for freezing.
• Do not put fresh and frozen food next to each other. The frozen food may thaw.
• ut them into parts
that can be used at the same time.
• Storing frozen food: instructions are usually stated on the packages, which must be
followed. If there is no information on the packaging, food should not be stored for
longer than three months from the date of purchase.
• When purchasing frozen food, make sure that it was frozen at a suitable
temperature and that the packaging is not damaged.
• Frozen food should be kept in suitable packages to retain the quality and should be
returned to the freezer compartment as soon as possible.
• If a package of frozen food shows moisture or abnormal bulging, it is probable that
it was stored at the wrong temperature and the content is spoiled.
• The storage period for frozen food depends on the room temperature, the
thermostat setting, the frequency of opening the door of the freezer, the type of
food and the time of transporting the product from the shop to the household.
Always follow the instructions printed on the packaging and never exceed the
maximum storage time stated on the package.
Cooling compartment
• To reduce moisture and subsequent ice build-up, never put liquid into the
refrigerator in unsealed containers. Frost tends to concentrate in the coolest parts
of the evaporator. Storing uncovered liquids results in a more frequent need for
defrosting.
•
ool down at room
temperature and then be placed so as to ensure adequate air circulation in the
refrigerator.
• Foods or food containers should not touch the back wall of the refrigerator because
they could freeze to the wall. Do not keep regularly opening the door of the
refrigerator.
•
e placed in the
refrigerator, which can be used in 1–2 days.
• Fruit and vegetables without packaging can be placed in the part designated for
fresh fruit and vegetables.
ATTENTION
The optimal temperature setting of each compartment depends on the ambient temperature.
Above optimal temperature is based on the ambient temperature of 25 °C.
13
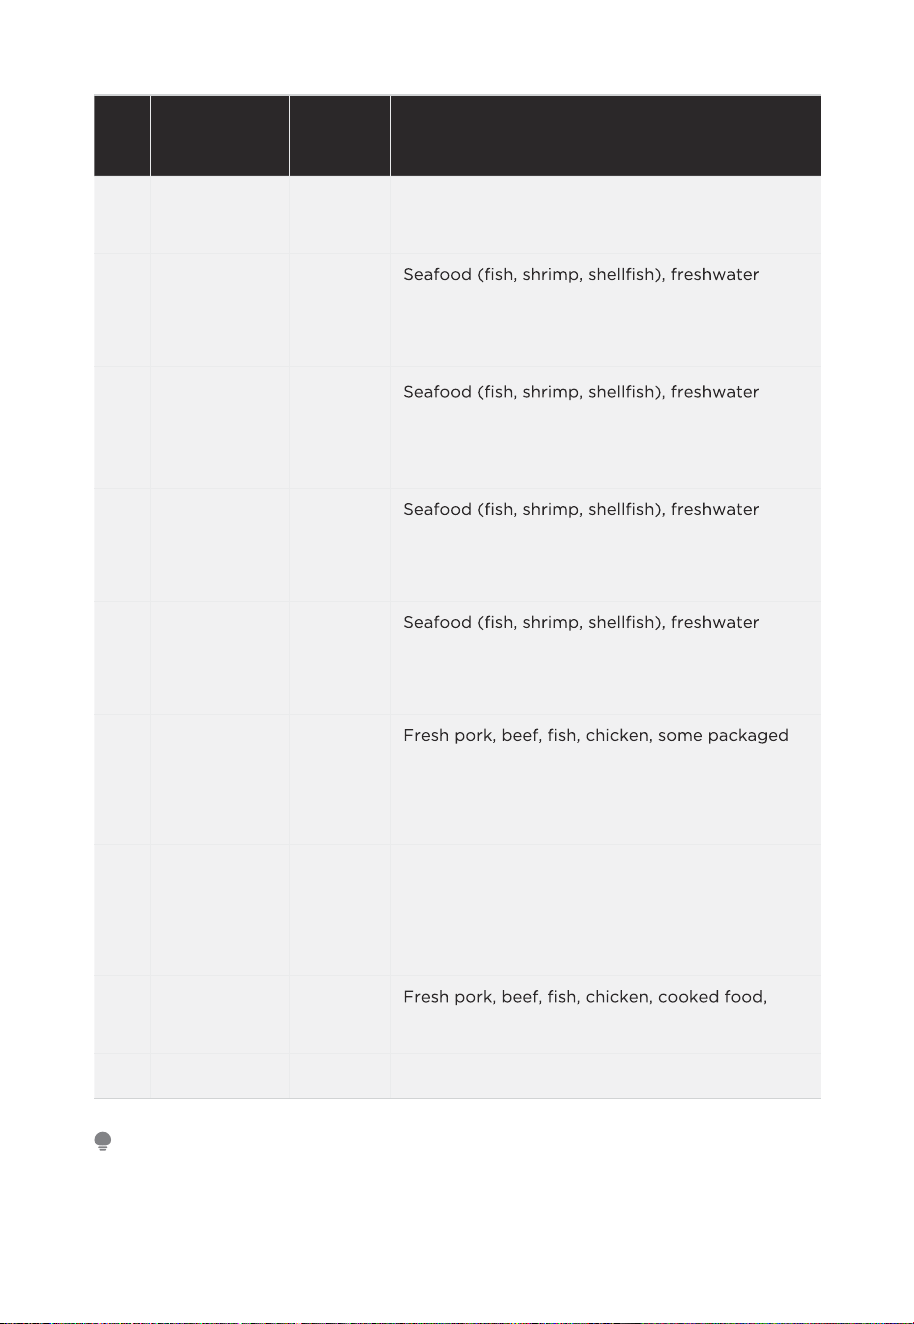
Order
Compartments
TYPE
Target
storage
temp. [°C]
Appropriate food
1 Fridge +2
∼
+8
Eggs, cooked food, packaged food, fruits and
vegetables, dairy products, cakes, drinks and
other foods are not suitable for freezing.
2 (***)*-Freezer
≤
-18
aquatic products and meat products
(recommended for 3 months, the longer the
storage time, the worse the taste and nutrition),
suitable for frozen fresh food.
3 ***-Freezer
≤
-18
aquatic products and meat products
(recommended for 3 months, the longer the
storage time, the worse the taste and nutrition),
suitable for frozen fresh food.
4 **-Freezer
≤
-12
aquatic products and meat products
(recommended for 3 months, the longer the
storage time, the worse the taste and nutrition),
suitable for frozen fresh food.
5 *-Freezer
≤
-6
aquatic products and meat products
(recommended for 3 months, the longer the
storage time, the worse the taste and nutrition),
suitable for frozen fresh food.
6 0-star -6
∼
0
processed foods, etc. (Recommended to eat
within the same day, preferably no more than 3
days).
Partially encapsulated processed foods (non-
freezable foods).
7 Chill -2
∼
+3
Fresh/ frozen pork, beef, chicken, freshwater
aquatic products, etc. (7 days below 0°C and
above 0°C is recommended for consumption
within that day, preferably no more than 2
days).Seafood (less than 0 for 15 days, it is not
recommended to store above 0°C.
8 Fresh food 0
∼
+4
etc.(Recommended to eat within the same day,
preferably no more than 3 days)
9 Wine +5
∼
+20 Red wine, white wine, sparkling wine, etc.
ATTENTION
please store different foods according to the compartments or target storage temperature of
your purchased
14
APP SETUP AND OPERATION
Download the SmartHome App
On an app market (Google Play Store, Apple App
SmartHome app. Download and install it on your
SmartHome
phone. You can also download the app by scanning the
QR code below.
Register and log in
Open the SmartHome app, and create a new account
to start (you can also register through a third-party
account). If you already have an existing account, use
the account to log in.
Connect your devices to SmartHome
1. Please make sure your mobile phone is connected
to a wireless network. If it is not, go to Settings
and enable wireless networks and Bluetooth.
2. Please power on your devices.
3. Open SmartHome App on your phone.
4. If a message of "Smart devices discovered
nearby" appears, click to add.
Washing machine
...
5. If no message appears, select “+” on the page and
select your device in the list of nearby devices
available. If your device is not listed, please add
your device manually by the device category and
device model.
6. Connect your device to the wireless network
according to instructions on app. If the
connection fails, please follow the instructions
provided by the app to continue with the
operation.
Add device
8:88
Download the app
& activate product

15
NOTE
1. Make sure your devices are powered on.
2. Keep your mobile phone close enough to your device when you are connecting
your device to the network.
3. Connect your mobile phone to the wireless network at home, and make sure
you know the password of the wireless network.
4. Check if your wireless router supports 2.4 GHz band and turn it on. If you are
not sure whether the router supports 2.4 GHz band, please contact the router
manufacturer.
5. The device cannot connect to the wireless network that requires authentication,
and it usually appears in public areas such as hotels, restaurants, etc. Please
connect to a wireless network that does not require authentication.
6. Turn off the WLAN+ (Android) or WLAN Assistant (iOS) function of your
mobile phone when connecting your device to the network.
7. In the case that your device connected to a wireless network before but it
needs to reconnect, please click “+” on the app Home page, and add your
device again by the device category and model according to the instructions
on app.

16
CLEANING AND MAINTENANCE
Defrosting
• The refrigerator is made based on the air-cooling principle and thus has
automatic defrosting function. Frost formed due to change of season or
temperature may also be manually removed by disconnection of the appliance
from power supply or by wiping with a dry towel.
Cleaning of door tray
• According to the direction arrow in the gure
below, use both hands to squeeze the tray, and
push it upward, then you can take it out.
• After washing the tray having been taken
out, you can adjust its installing height in
accordance with your requirement.
Cleaning of glass shelf
• As the innermost part of the refrigerator liner
where contacting the shelves has a backstop,
you shall raise the shelves upward, then you
can be able to take it out.
• Adjust or clean the shelves according to your
requirement.
Cleaning the vegetable drawer
1. Remove the contents of the drawer. Hold the
handle of the vegetable drawer and pull it out
completely until it stops.
2. Lift the vegetable drawer up and remove it by
pulling it out.
ATTENTION
Soft towels or sponge dipped in water and non-corrosive neutral detergents are suggested
for cleaning. The freezer of shall be nally cleaned with clean water and dry cloth. Open the
door for natural drying before the power is turned on. Do not use hard brushes, clean steel
balls, wire brushes, abrasives, such as toothpastes, organic solvents (such as alcohol, acetone,
banana oil, etc.), boiling water, acid or alkaline items clean refrigerator considering that this
may damage the fridge surface and interior.
17
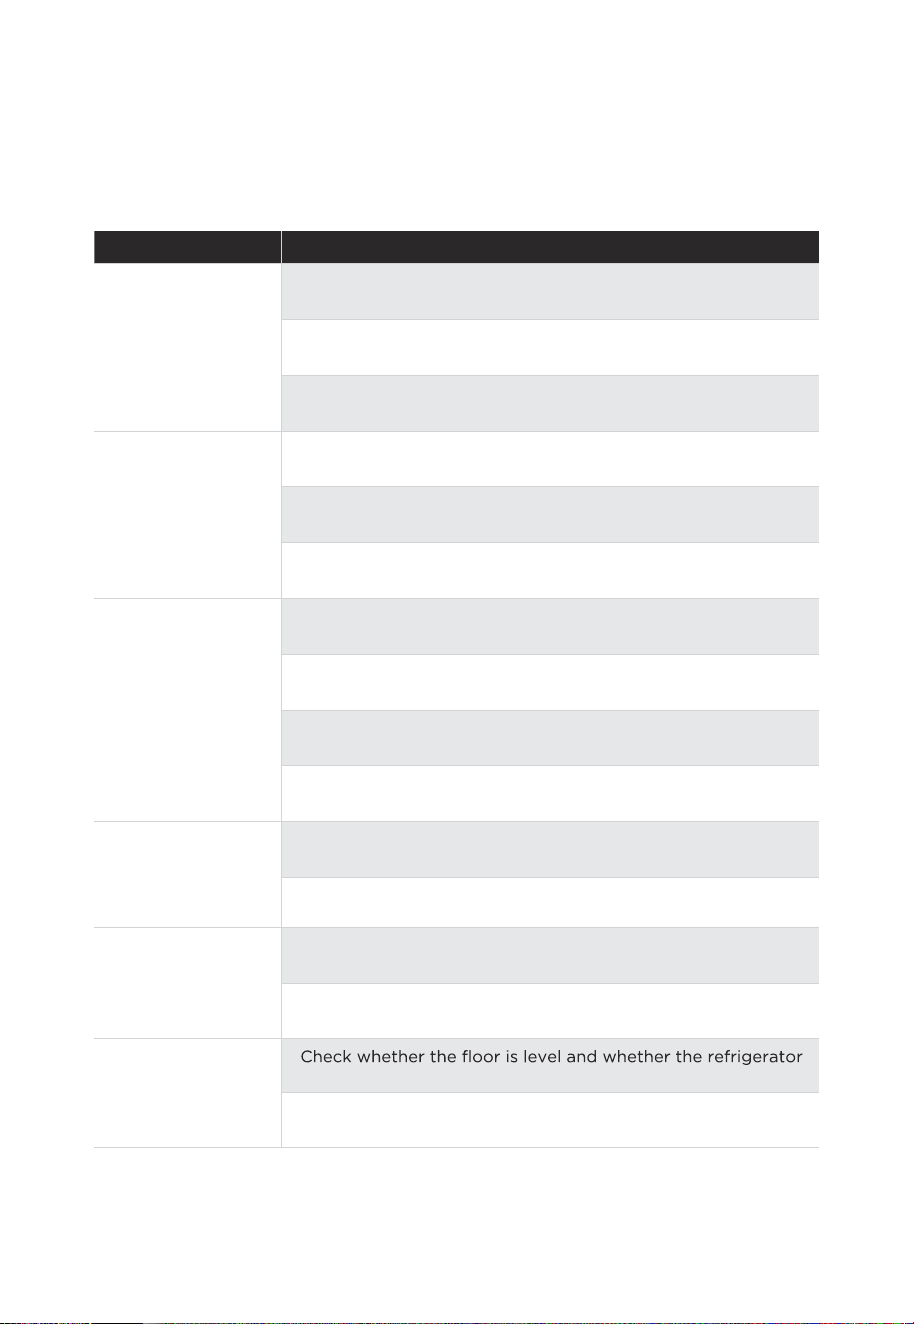
TROUBLESHOOTING
The following simple issues can be handled by the user. Please call the after-sale
service department if the issues are not solved.
Problem Possible reason
Failed operation
• Check whether the appliance is connected to power or
whether the plug is in well contact
• Check whether the voltage is too low
• Check whether there is a power failure or partial circuits have
tripped
Odor
• Odorous foods shall be tightly wrapped
• Check whether there is any rotten food
• Clean the inside of the refrigerator
Long-time operation
of the compressor
• Long operation of the refrigerator is normal in summer
• when the ambient temperature is high it is not suggestible
having too much food in the appliance at the same time
• Food shall get cool before being put into the appliance
• The doors are opened too frequently
Light fails to get lit
• Check whether the refrigerator is connected to power supply
and whether the illuminating light is damaged
• Have the light replaced by a specialist
Door can not be
properly closed
• The door is stuck by food packages too much food is placed
• The refrigerator is tiltedr.
Loud noises
•
is placed stably
• Check whether accessories are placed at proper locations
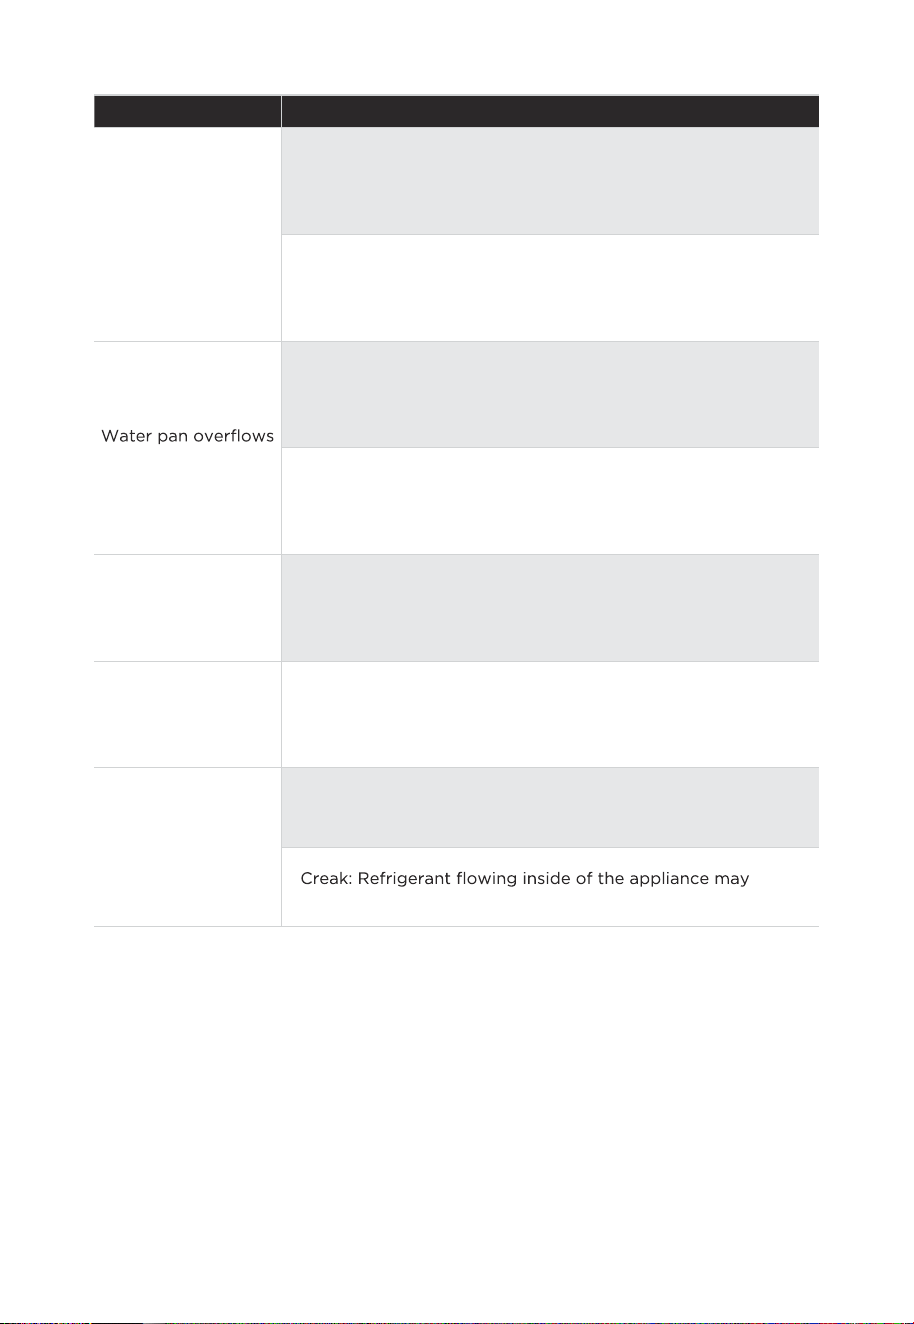
18
Problem Possible reason
Door seal fails to be
tight
• Remove foreign matters on the door seal.
• Heat the door seal and then cool it for restoration (or blow it
with an electrical drier or use a hot towel for heating).
• There is too much food in the chamber or food stored
contains too much water, resulting in heavy defrosting.
• The doors are not closed properly, resulting in frosting due to
entry of air and increased water due to defrosting.
Hot housing
• Heat dissipation of the built-in condenser via the housing,
which is normal when housing becomes hot due to high
ambient temperature, storage of too much food or shutdown
of the compressor is shut down, provide sound ventilation to
facilitate heat dissipation.
Surface
condensation
• Condensation on the exterior surface and door seals of the
refrigerator is normal when the ambient humidity is too high.
Just wipe the condensate with a clean towel.
Abnormal noise
• Buzz: The compressor may produce buzzes during operation,
and the buzzes are loud particularly upon start or stop. This is
normal.
•
produce creak, which is normal.
19
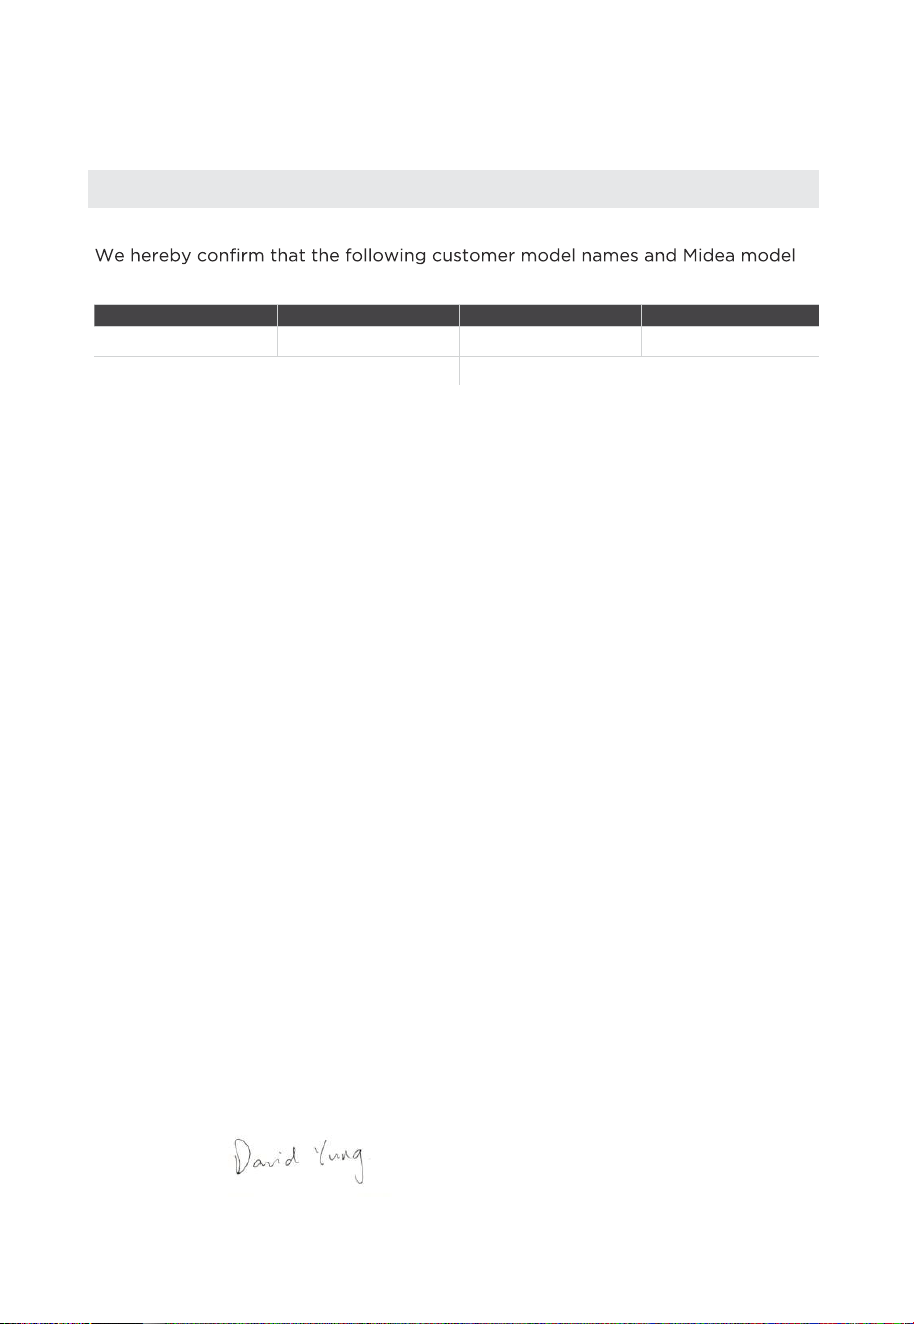
DOC AND CERTIFICATIONS
Declaration of Conformity
names match each other respectively.
Brand Midea Model Marketing Model Factory Model
Midea HQ-611RWEN MDRF632FIE46 CE-BCD470WE-JT
Application of Council Directives
Standards, to which Conformity Is Declared
Manufacturer’s Name: Hefei Hualing Co., Ltd
Manufacturer’s Address: No. 176 Jinxiu road, hefei economic and technical
development area, hefei, china, 230601.
We, Hefei Hualing Co., Ltd
hereby declare that the above-mentioned products comply with the above-mentioned
currently valid regulations and standards.
SIGNATURE: Date: January 10, 2024
EN IEC 55014-1:2021
EN IEC 61000-3-2:2019/A1:2021
EN IEC 61000-3-3:2013/A1:2019/A2:2021
EN IEC 55014-2:2021

20
CE
Midea hereby declares that the appliance with
SmartHome functionality meets the essential
requirements and other relevant provisions of the
Directive 2014/53/EU. A detailed RED Declaration
of Conformity can be found online at www.midea.
com among the additional documents on the
product page for your appliance.
2.4 GHz band:100mW max.
5 GHz band: 100mW max.

21
APPENDIX
Special for new European standard
The ordered parts in the following table can be acquired from Service provider
channel
Ordered part Provided by
Minimum time required for Provision
Thermostats Professional maintenance
personnel
At least 7 years after the last model is
launched on the market
Temperature
sensors
Professional maintenance
personnel
At least 7 years after the last model is
launched on the market
Printed circuit
boards
Professional maintenance
personnel
At least 7 years after the last model is
launched on the market
Light sources Professional maintenance
personnel
At least 7 years after the last model is
launched on the market
Door handles Professional repairers and
nal users
At least 7 years after the last model is
launched on the market
Door hinges Professional repairers and
nal users
At least 7 years after the last model is
launched on the market
Trays Professional repairers and
nal users
At least 7 years after the last model is
launched on the market
Baskets Professional repairers and
nal users
At least 7 years after the last model is
launched on the market
Door gaskets Professional repairers and
nal users
At least 10 years after the last model is
launched on the market
Dear customer
1. If you want to return or replace the product, please contact the store where you
buy.
(Remember to bring the purchase invoice)
2. If your product breaks down which needs to repair, please contact after-sales
service provider.
ATTENTION
The model information inthe product database, as well as the model identier, can be
obtained througha weblink scanned by a QR code, if any, on the energy efciency label of the
product.
For more information about the energy efciency of the appliance, visit https://ec.europa.eu
and search using the model name
.
The model name can be found on the rating label of the appliance.
.
