SteamXpress
™
Iron
Plancha
Fer
Accessories/Parts
(USA/Canada)
-800-738-0245
?
USA/Canada -800-23-9786
Mexico 0-800-74-2503
www.prodprotect.com/applica
Register your product online and enter
for a chance to win up to $50,000.
Complete rules at
www.prodprotect.com/applica.
No purchase necessary. Open to US
residents 8 and older only.
Void where prohibited.
Sweepstakes ends December 3, 2009.
Model
Modelo
Modèle
❍
AS20

2
3
ENGLISH
POLARIZED PLUG
Thisappliancehasapolarizedplug(onebladeiswiderthantheother).To
reducetheriskofelectricshock,thisplugisintendedtofitintoapolarized
outletonlyoneway.Iftheplugdoesnotfitfullyintotheoutlet,reversethe
plug.Ifitstilldoesnotfit,contactaqualifiedelectrician.Donotattemptto
modifythepluginanyway.
TAMPER-RESISTANT SCREW
Warning: This appliance is equipped with a tamper-resistant screw to
prevent removal of the outer cover. To reduce the risk of fire or electric
shock, do not attempt to remove the outer cover. There are no user-
serviceable parts inside. Repair should be done only by authorized service
personnel.
Note: Ifthepowersupplycordisdamaged,itshouldbereplacedbyqualified
personnel;inLatinAmerica,byanauthorizedservicecenter.
Please Read and Save this Use and Care Book.
IMPORTANT SAFEGUARDS
Whenusingyouriron,basicsafetyprecautionsshouldalwaysbefollowed,
includingthefollowing:
❍Readallinstructionsbeforeusing.
❍Useirononlyforitsintendeduse.
❍Toprotectagainstariskofelectricshock,donotimmersetheironin
waterorotherliquid.
❍Theironshouldalwaysbeturnedoff(0)(refertoHoWToUsesection)
beforepluggingintoorunpluggingfromanoutlet.Neveryankcordto
disconnectfromoutlet;insteadgraspplugandpulltodisconnect.
❍Donotallowcordtotouchhotsurfaces.Letironcoolcompletelybefore
puttingaway.Loopcordlooselyaroundcordwrapwhenstoring.
❍Alwaysdisconnectironfromelectricaloutletwhenfillingwithor
emptyingofwaterandwhennotinuse.
❍Donotoperateironwithadamagedcordoriftheironhasbeen
droppedordamaged.Toavoidtheriskofelectricshock,donot
disassembletheiron,takeittoaqualifiedservicemanforexamination
andrepair.Incorrectreassemblycancauseariskofelectricshock
whentheironisused.
❍Closesupervisionisnecessaryforanyappliancebeingusedbyornear
children.Donotleaveironunattendedwhileconnectedoronanironing
board.
❍Burnscanoccurfromtouchinghotmetalparts,hotwater,orsteam.
Usecautionwhenyouturnasteamironupsidedownorusethesurge
ofsteam—theremaybehotwaterinthewatertank.Avoidrapid
movementofirontominimizehotwaterspillage.
SPECIAL INSTRUCTIONS
❍Toavoidacircuitoverload,donotoperateanotherhigh-wattage
applianceonthesamecircuit.
❍Ifanextensioncordisabsolutelynecessary,a15-amperecordshould
beused.Cordsratedforlessamperagemayoverheat.Careshouldbe
takentoarrangethecordsothatitcannotbepulledortrippedover.
SAVE THESE INSTRUCTIONS.
This product is for household use only.
4
5
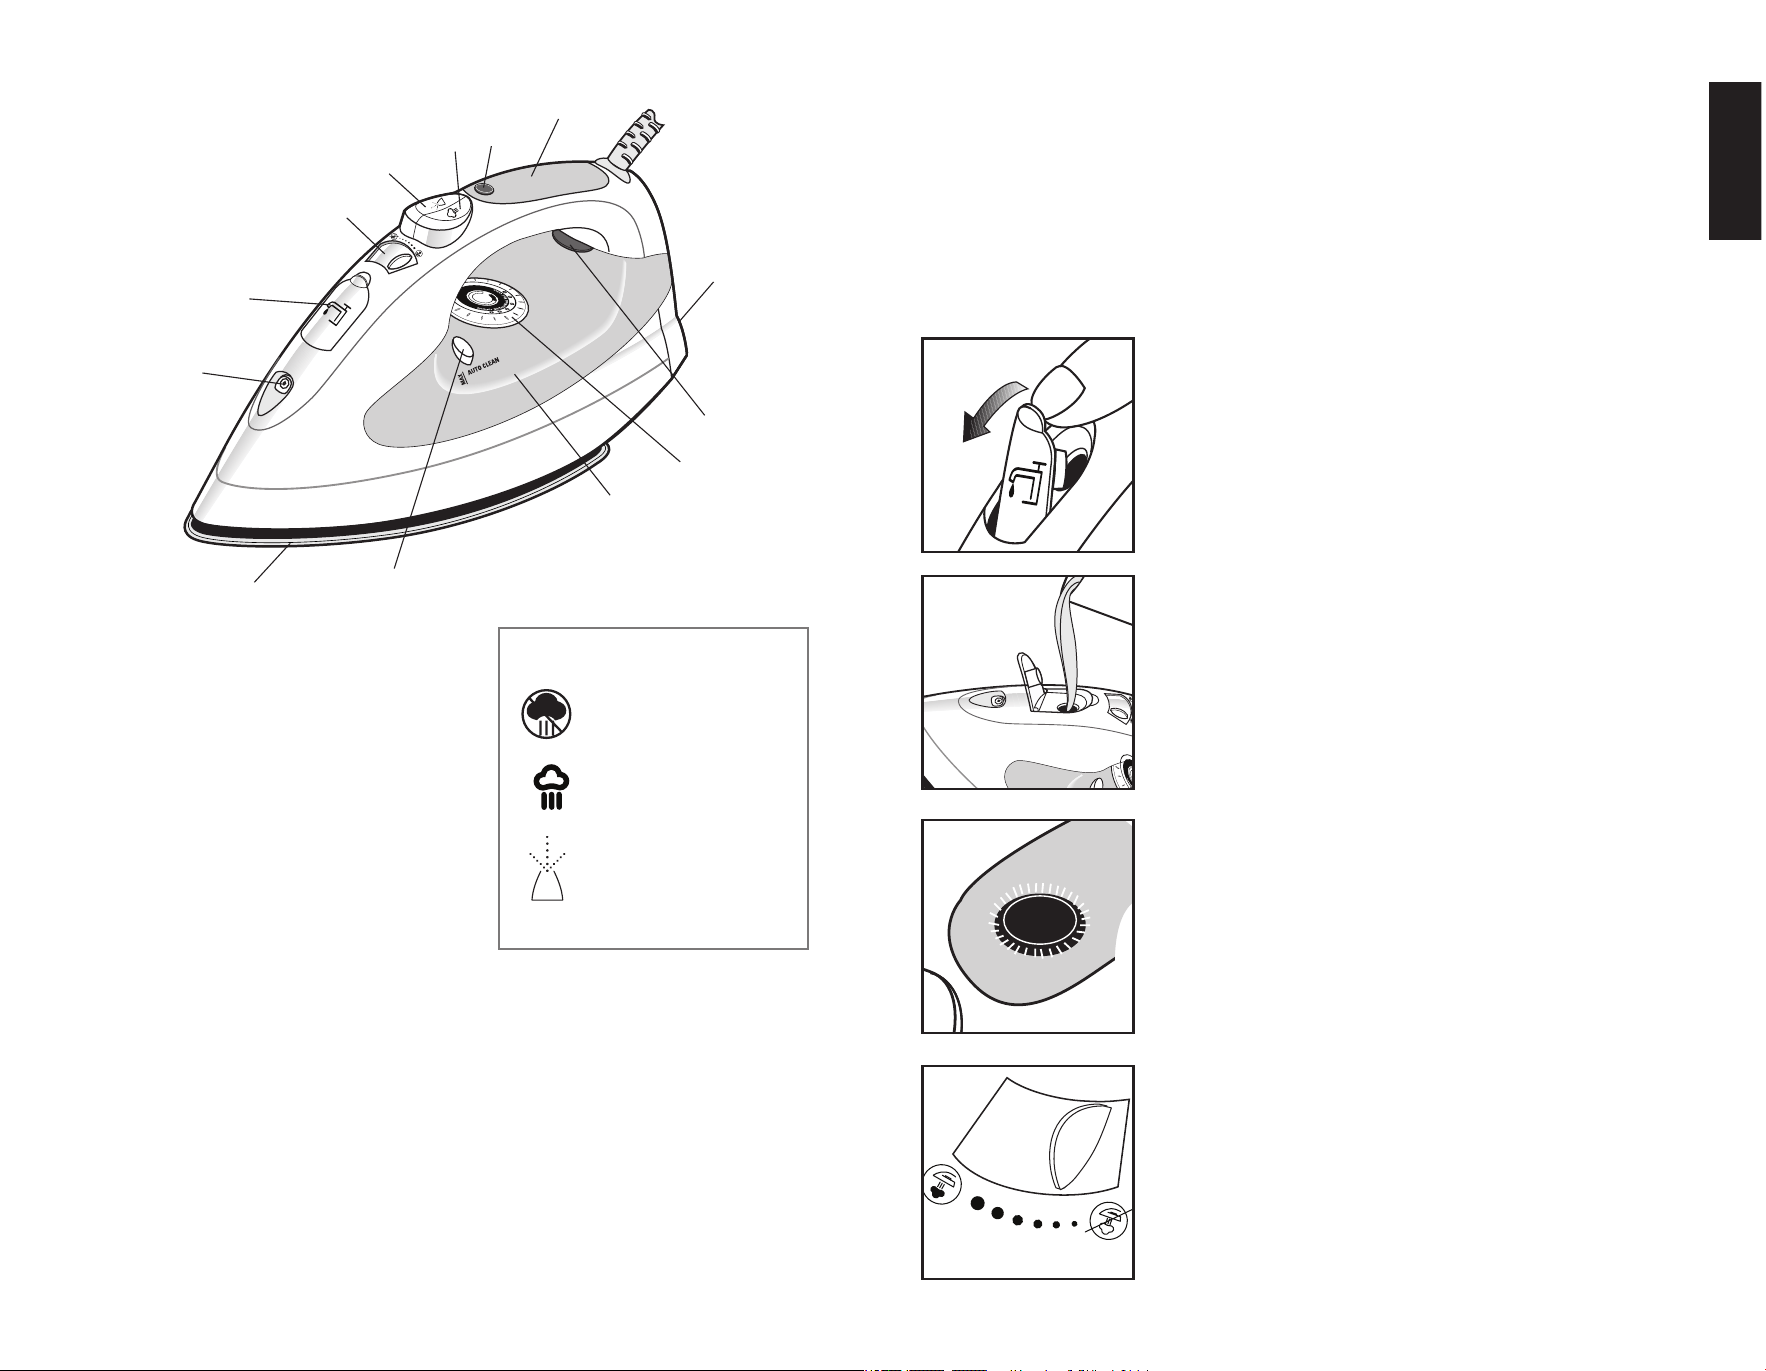
Product may vary slightly from what is illustrated.
How to Use
Thisapplianceisforhouseholduseonly.
GETTING STARTED
• Removeanylabels,stickersortagsattachedtothebodyorsoleplateof
theiron.
• Pleasegotowww.prodprotect.com/applicatoregisteryourwarranty.
Note:Useordinarytapwaterforironing.Donotusewaterprocessed
throughahomesofteningsystem.
FILLING THE WATER TANK
1. openthewater-fillcover(A).
2. Tilttheironandusingacleanmeasuringcup,pour
waterintoopeninguntilitreachestheMAXlevel
markonthesideofthewatertank(B).Donot
overfill.
3. Closethewater-fillcover.
4. Plugintheiron.ThePoweronindicatorlight
comeson(C).
5. FollowtheinstructionsforsTeAMIRoNINGorDRY
IRoNING.
STEAM IRONING
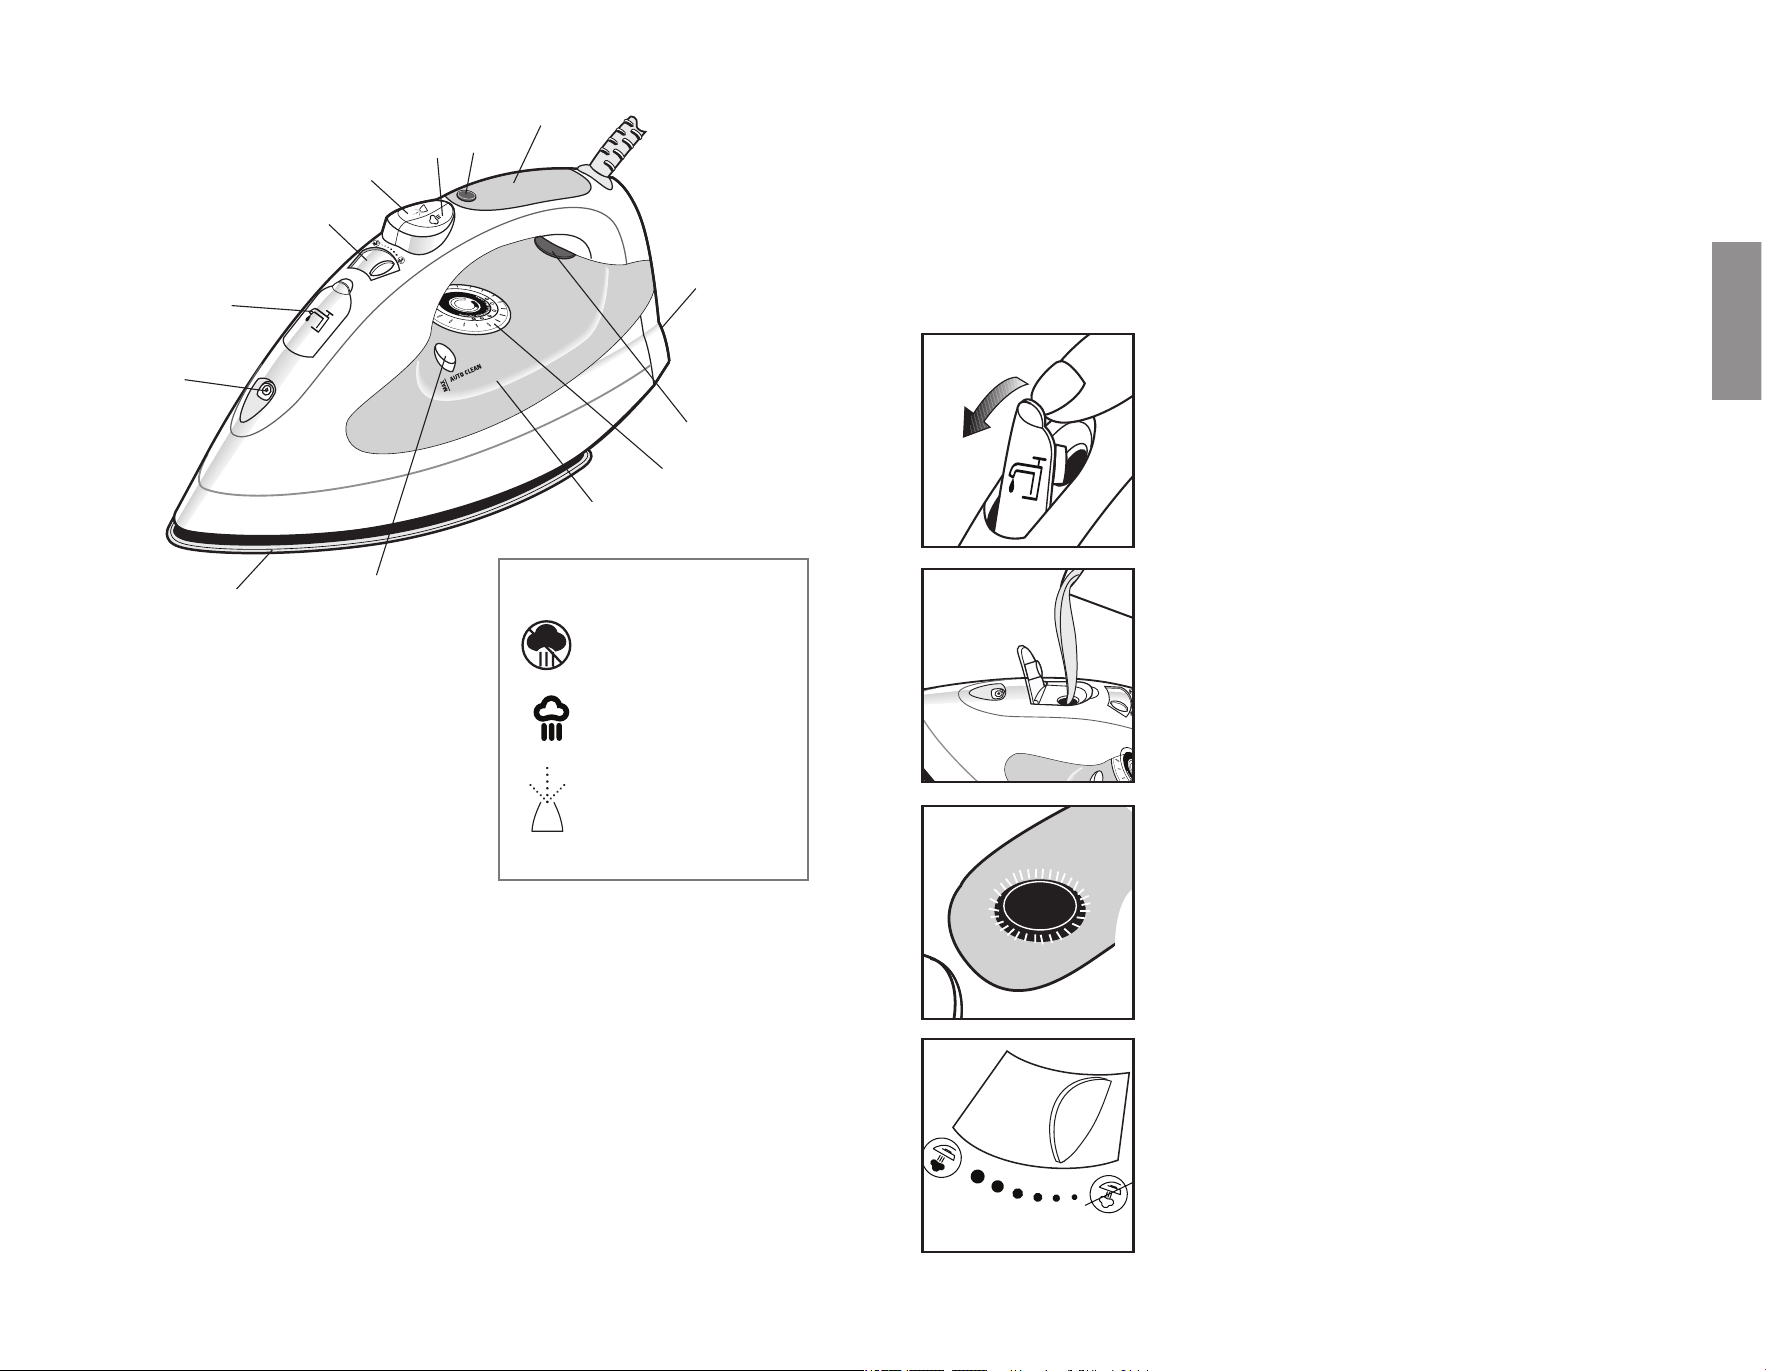
1. Movethevariablesteamtothedesiredsteamlevel
(D).
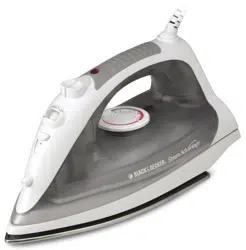
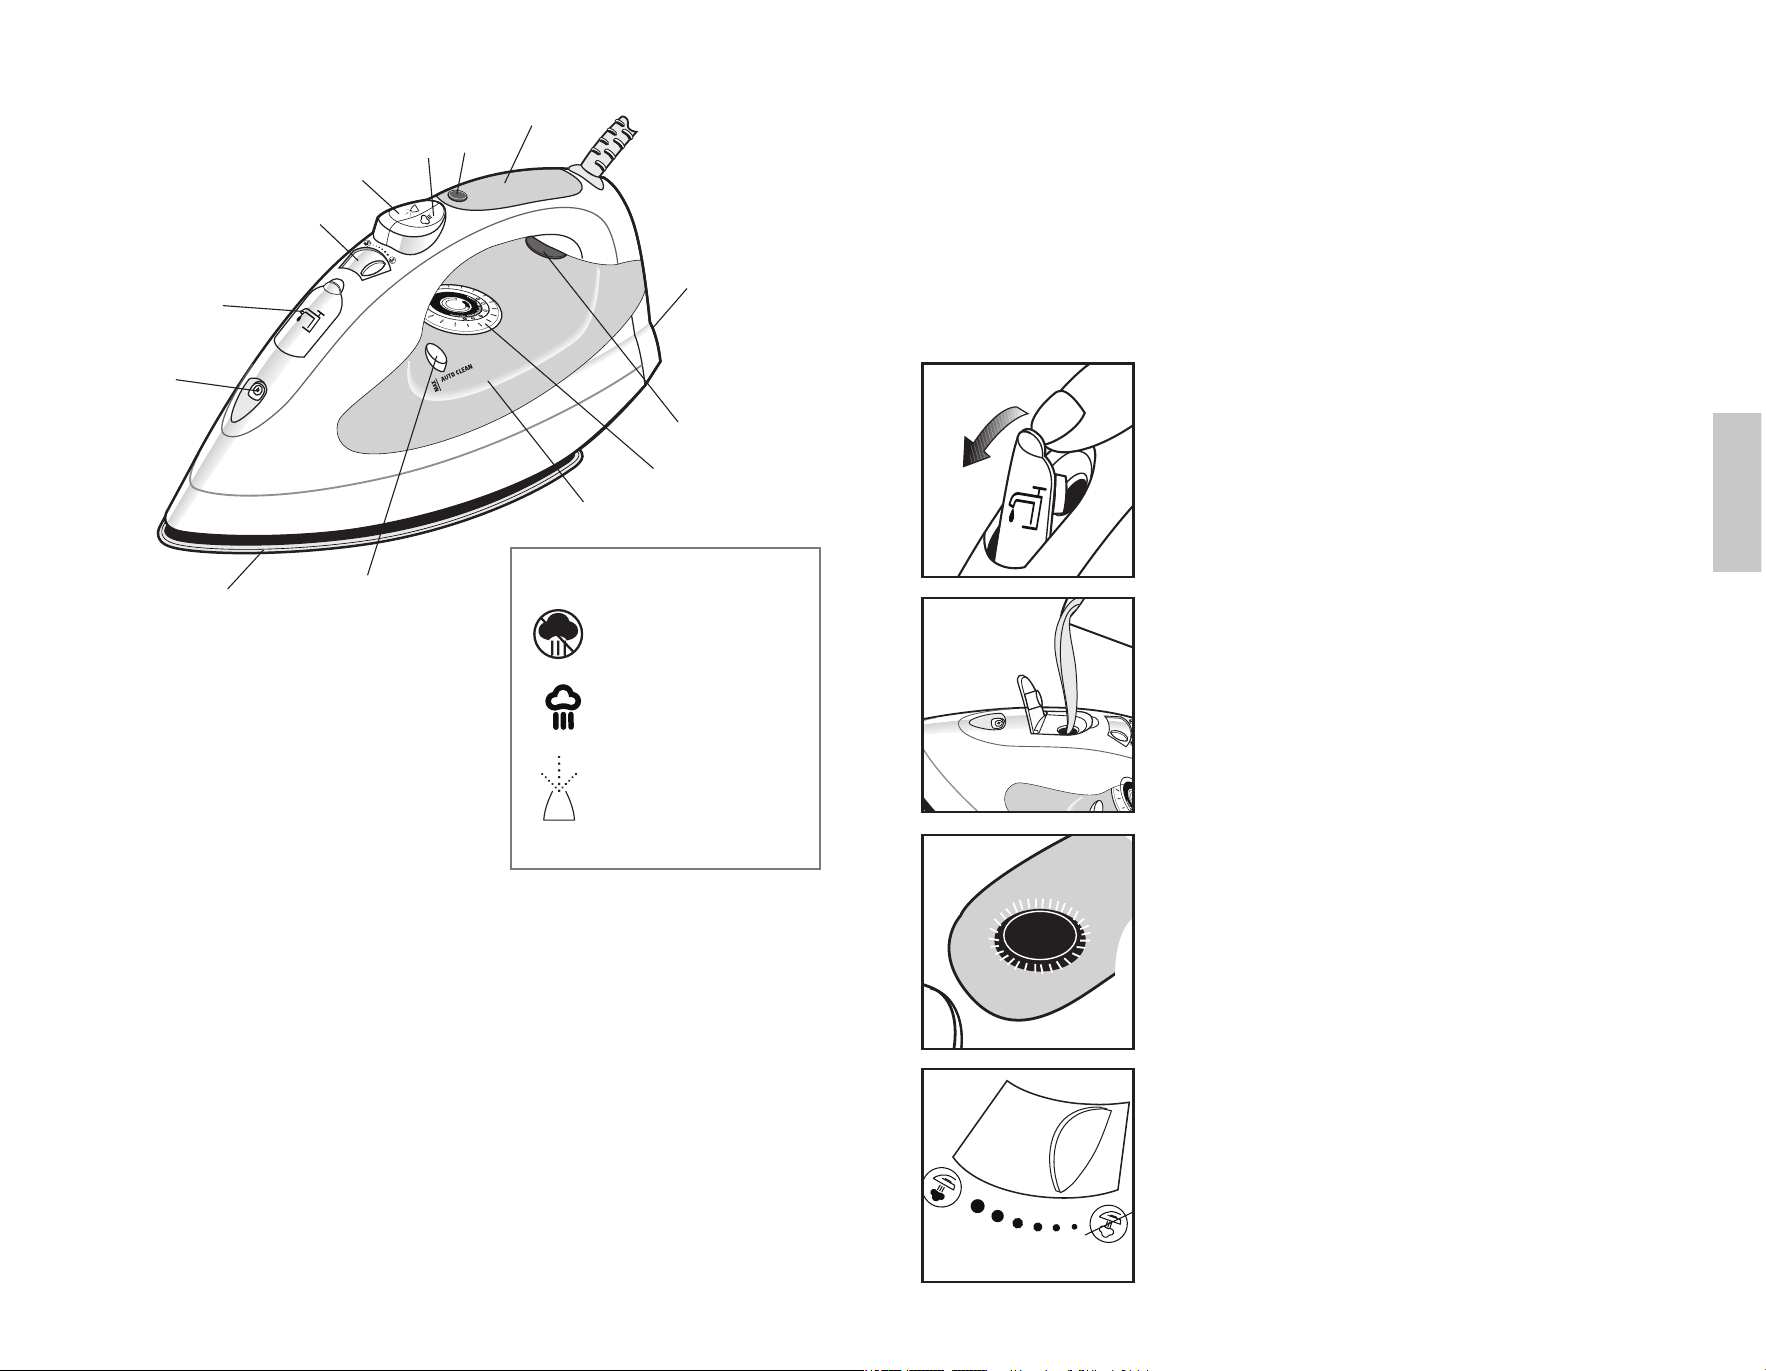
. Spray nozzle
2. Water-fill cover
3. Variable steam selector
4. Spray button
5. Steam button
6. Power On/Auto Off indicator light
7. Comfort Grip
®
handle
8. Heel rest
9. Temperature ready light
0. Fabric select dial
. Water tank
2. AUTO CLEAN
®
button
3. Soleplate
S
T
E
A
M
D
R
Y
M
I
N
M
A
X
ENGLISH
Dry
Surge of Steam
Spray
Symbols
A
M
A
X
S
T
E
A
M
D
R
Y
M
I
N
B
C
D
6
7
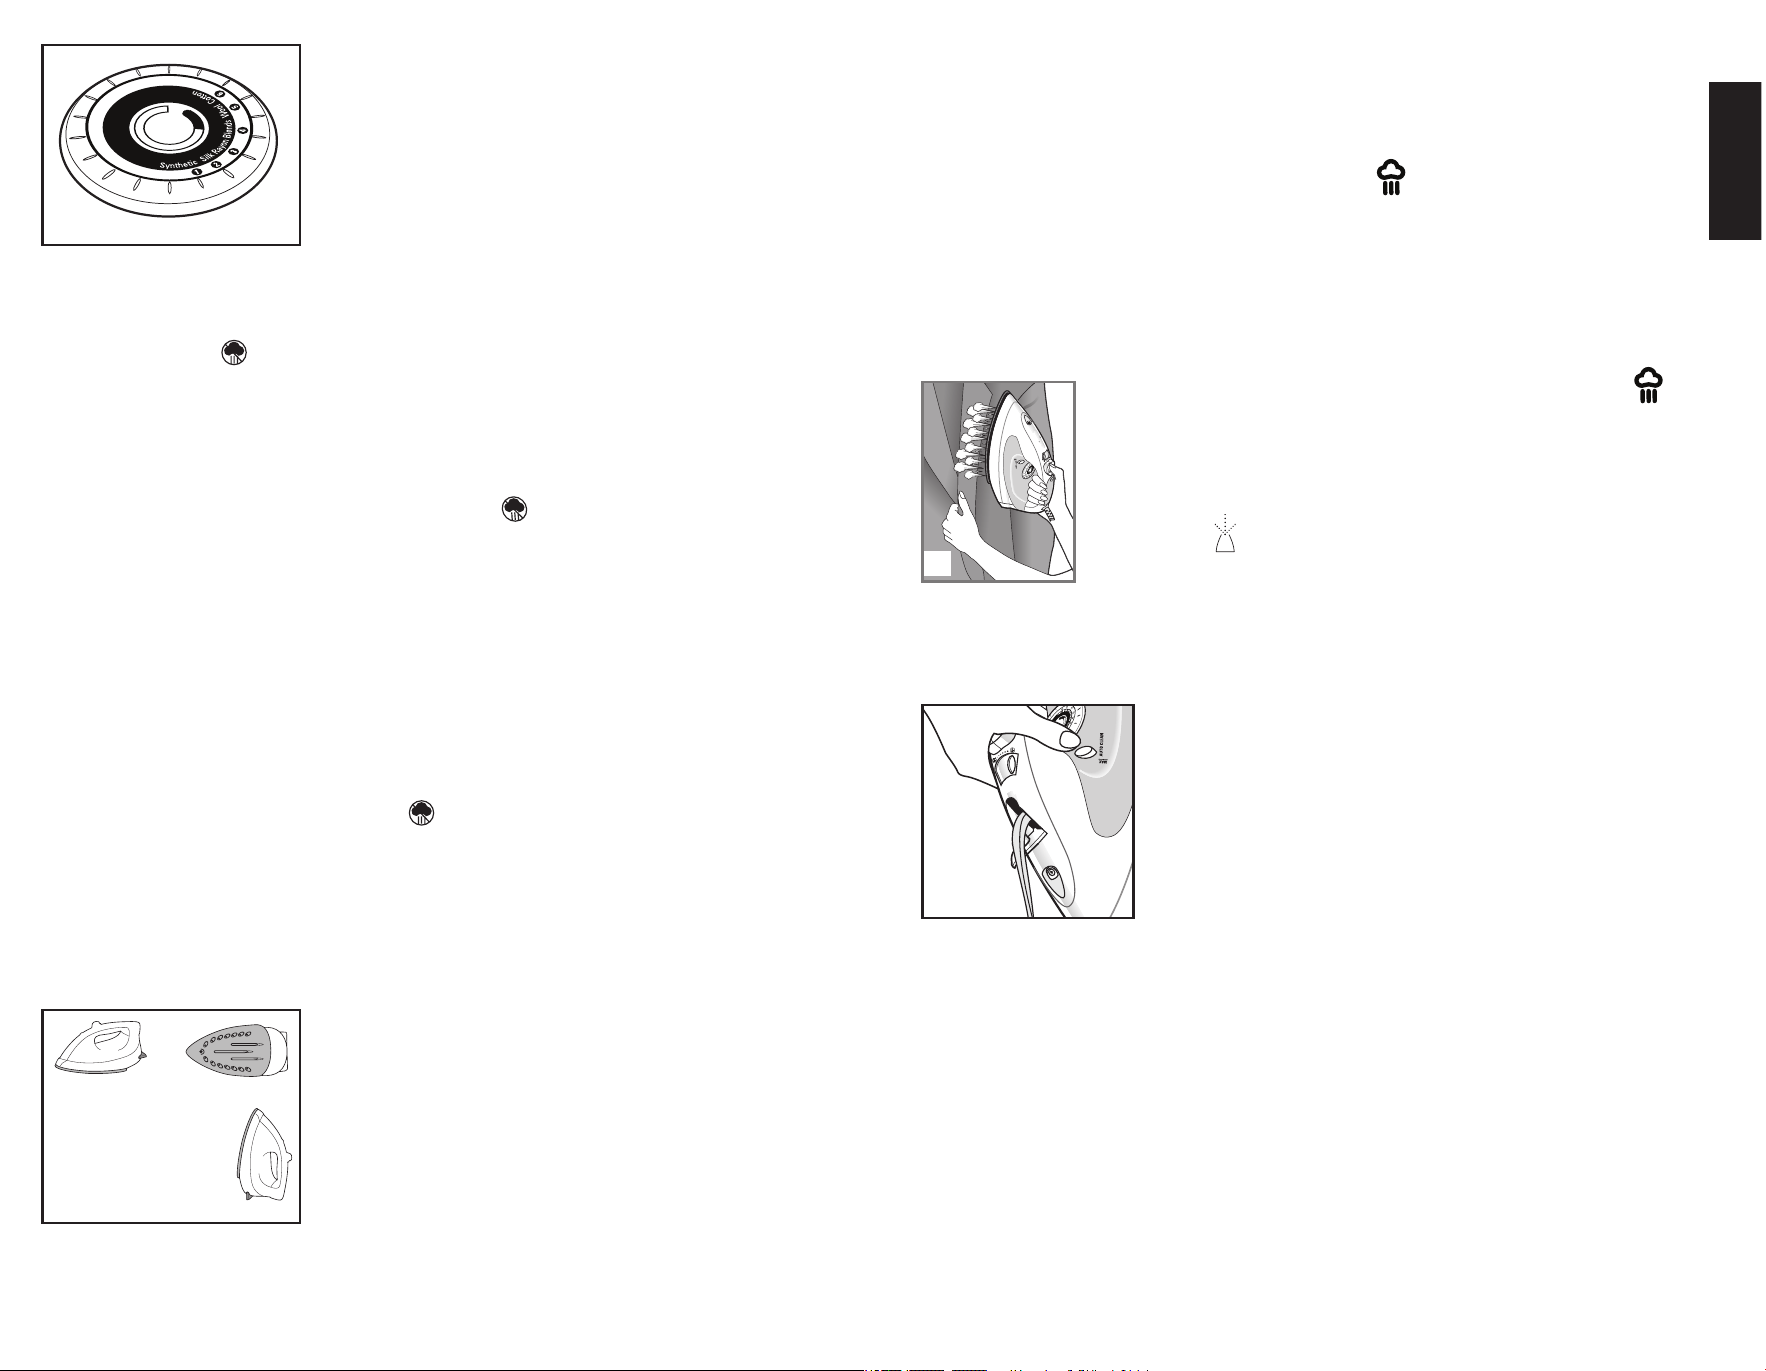
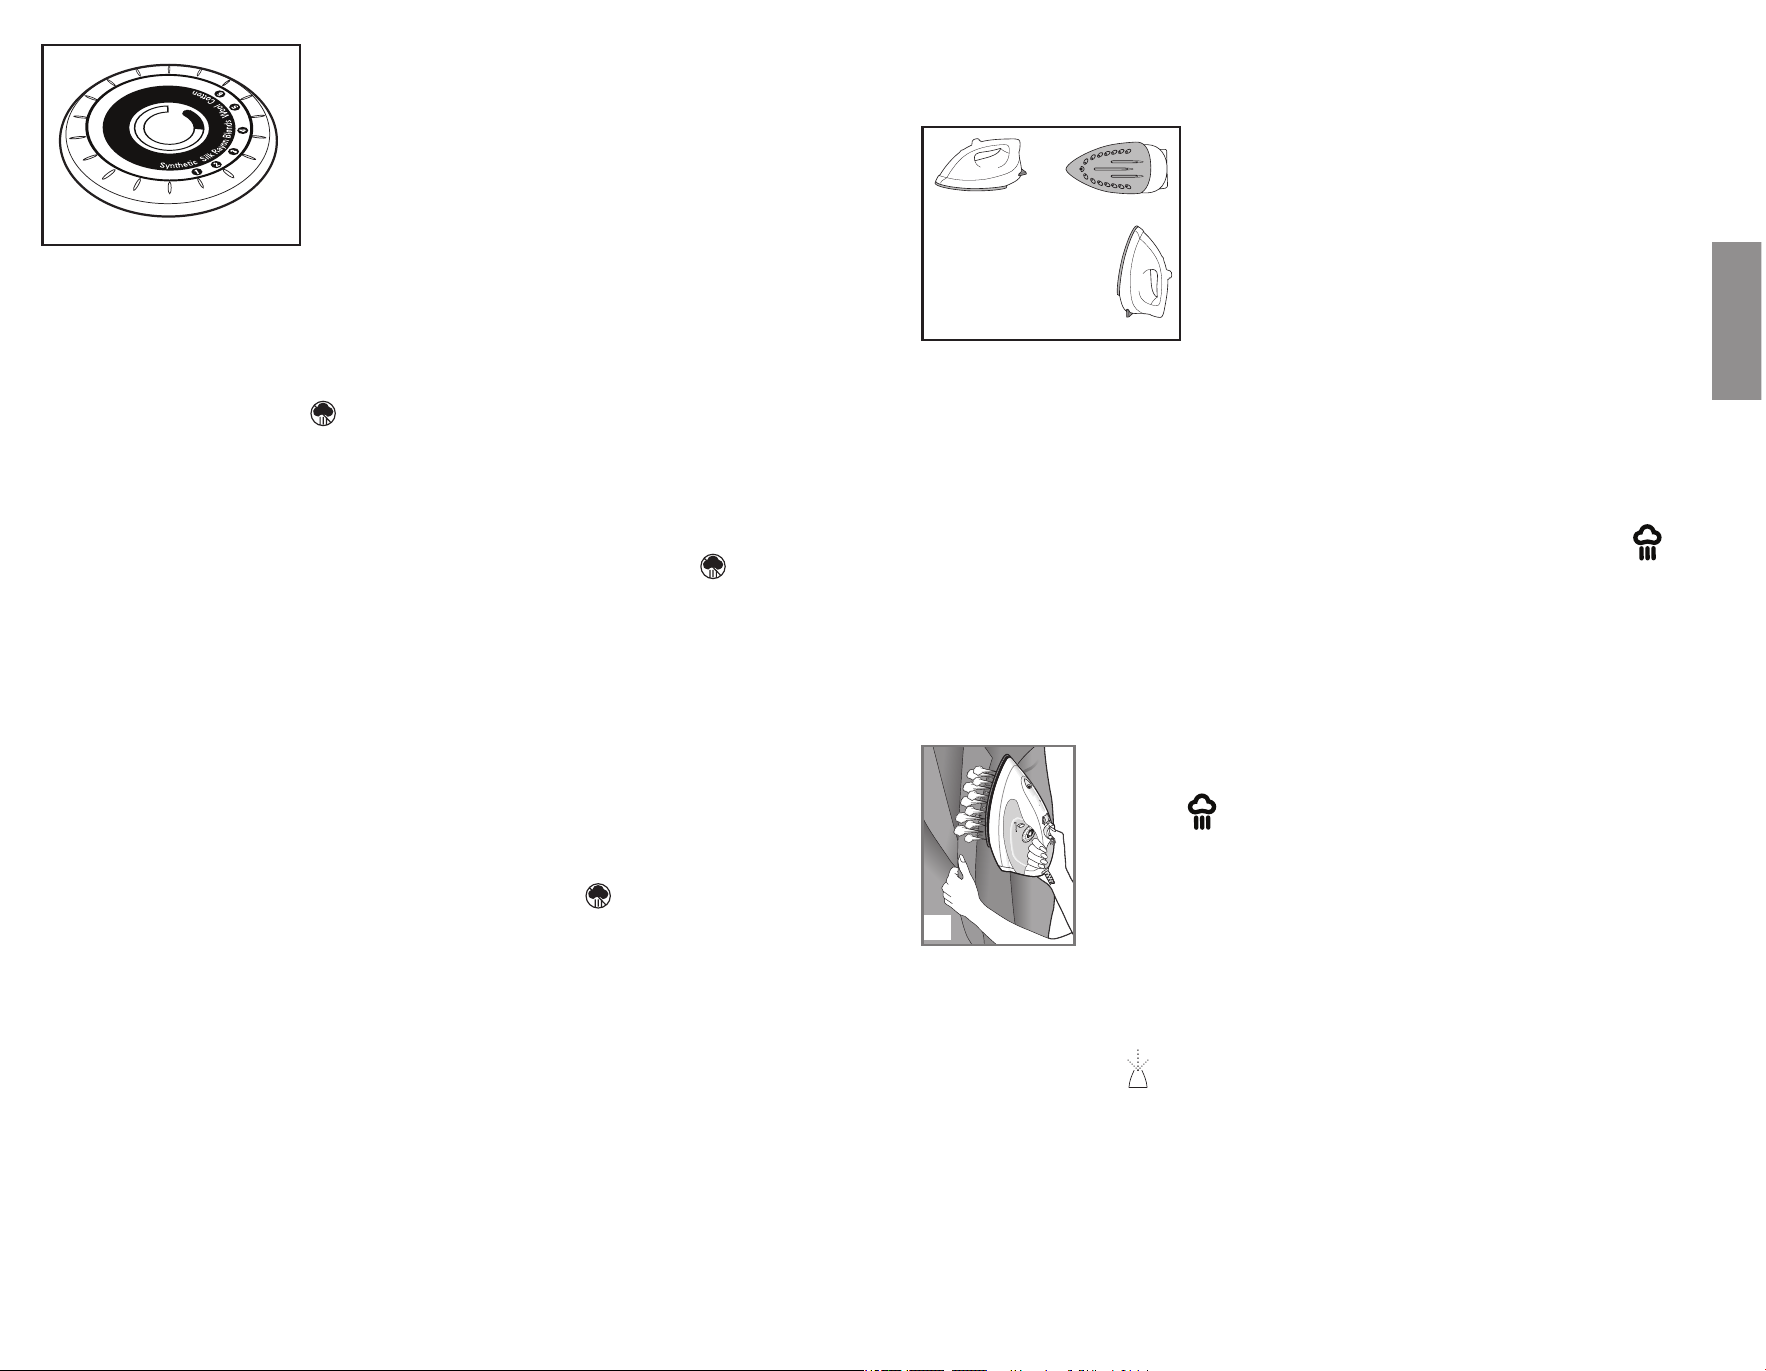
2. Readgarment’slabeltohelpyoudeterminefabric
type.Turnthefabricselectdialtoappropriate
setting(between4and6)foryourfabric(E).The
temperaturereadylightglowsuntilitreachesthe
appropriatetemperature.Itthencyclesonandoff
duringironing.
Tip: Ifunsureofagarment’sfiber,testasmallarea
(onaninsideseamorhem)beforeironing.
3. Foroptimumperformance,lettheironstandfor90secondsbeforebeginning
toiron.
4. Whenfinishedironing,turnthefabricselectdialtolowestheatsetting,move
theselectorto andunplugtheiron.
Note: Ifyouneedtoaddwaterwhileironing,unplugtheironandfollowabove
steps.
Important: Always stand the iron on its heel rest when powered on but not in
use.
DRY IRONING
1. Makesurevariablesteamselectorissetto .Youmaywanttoemptythe
water(seeeMPTYINGTHeWATeRTANK).
2. Turnthefabricselectdialtotheappropriatesettingforyourfabric.(Read
garment’slabeltohelpyoudeterminefabrictype.)Thetemperatureready
lightglowsuntilitreachestheappropriatetemperature.Itthencyclesonand
offduringironing.
Tip: Ifunsureofagarment’sfiber,testasmallarea(onaninsideseamorhem)
beforeironing.
3. Foroptimumperformance,lettheironstandfor90secondsbeforebeginning
toiron.
4. Whenfinishedironing,turnthefabricselectdialtolowestheatsetting,keep
thevariablesteamselectorsetto andunplugtheiron.
Note: Ifyouneedtoaddwaterwhileironing,unplugtheironandfollowabove
steps.
Important: Always stand the iron on its heel rest when powered on but not
in use.
3-WAY AUTOMATIC SHUTOFF
Theautomaticshutofffeatureinyourironworksasfollows:
• oncetheironreachesappropriatetemperature,
itwillturnoffafter30secondsofinactivityifleft
onitssoleplateortippedoveronitsside.Ifleft
verticallyonitsheelrest,itwillshutoffafter
8minutes(F).
• Assoonasyoupickuptheiron,itwillstart
heatingagain.Waitforirontoreheatcompletely
beforeresumingoperation.
6
5
SURGE OF STEAM
Horizontal
1. WiththewatertankfilledtotheMAXmark,setfabricselectdialtothe
appropriatetemperaturesetting(between4and6)andletironstandon
itsheelrestabout90seconds.
2. Forbestperformance,usesurgeofsteam at5-secondintervals.
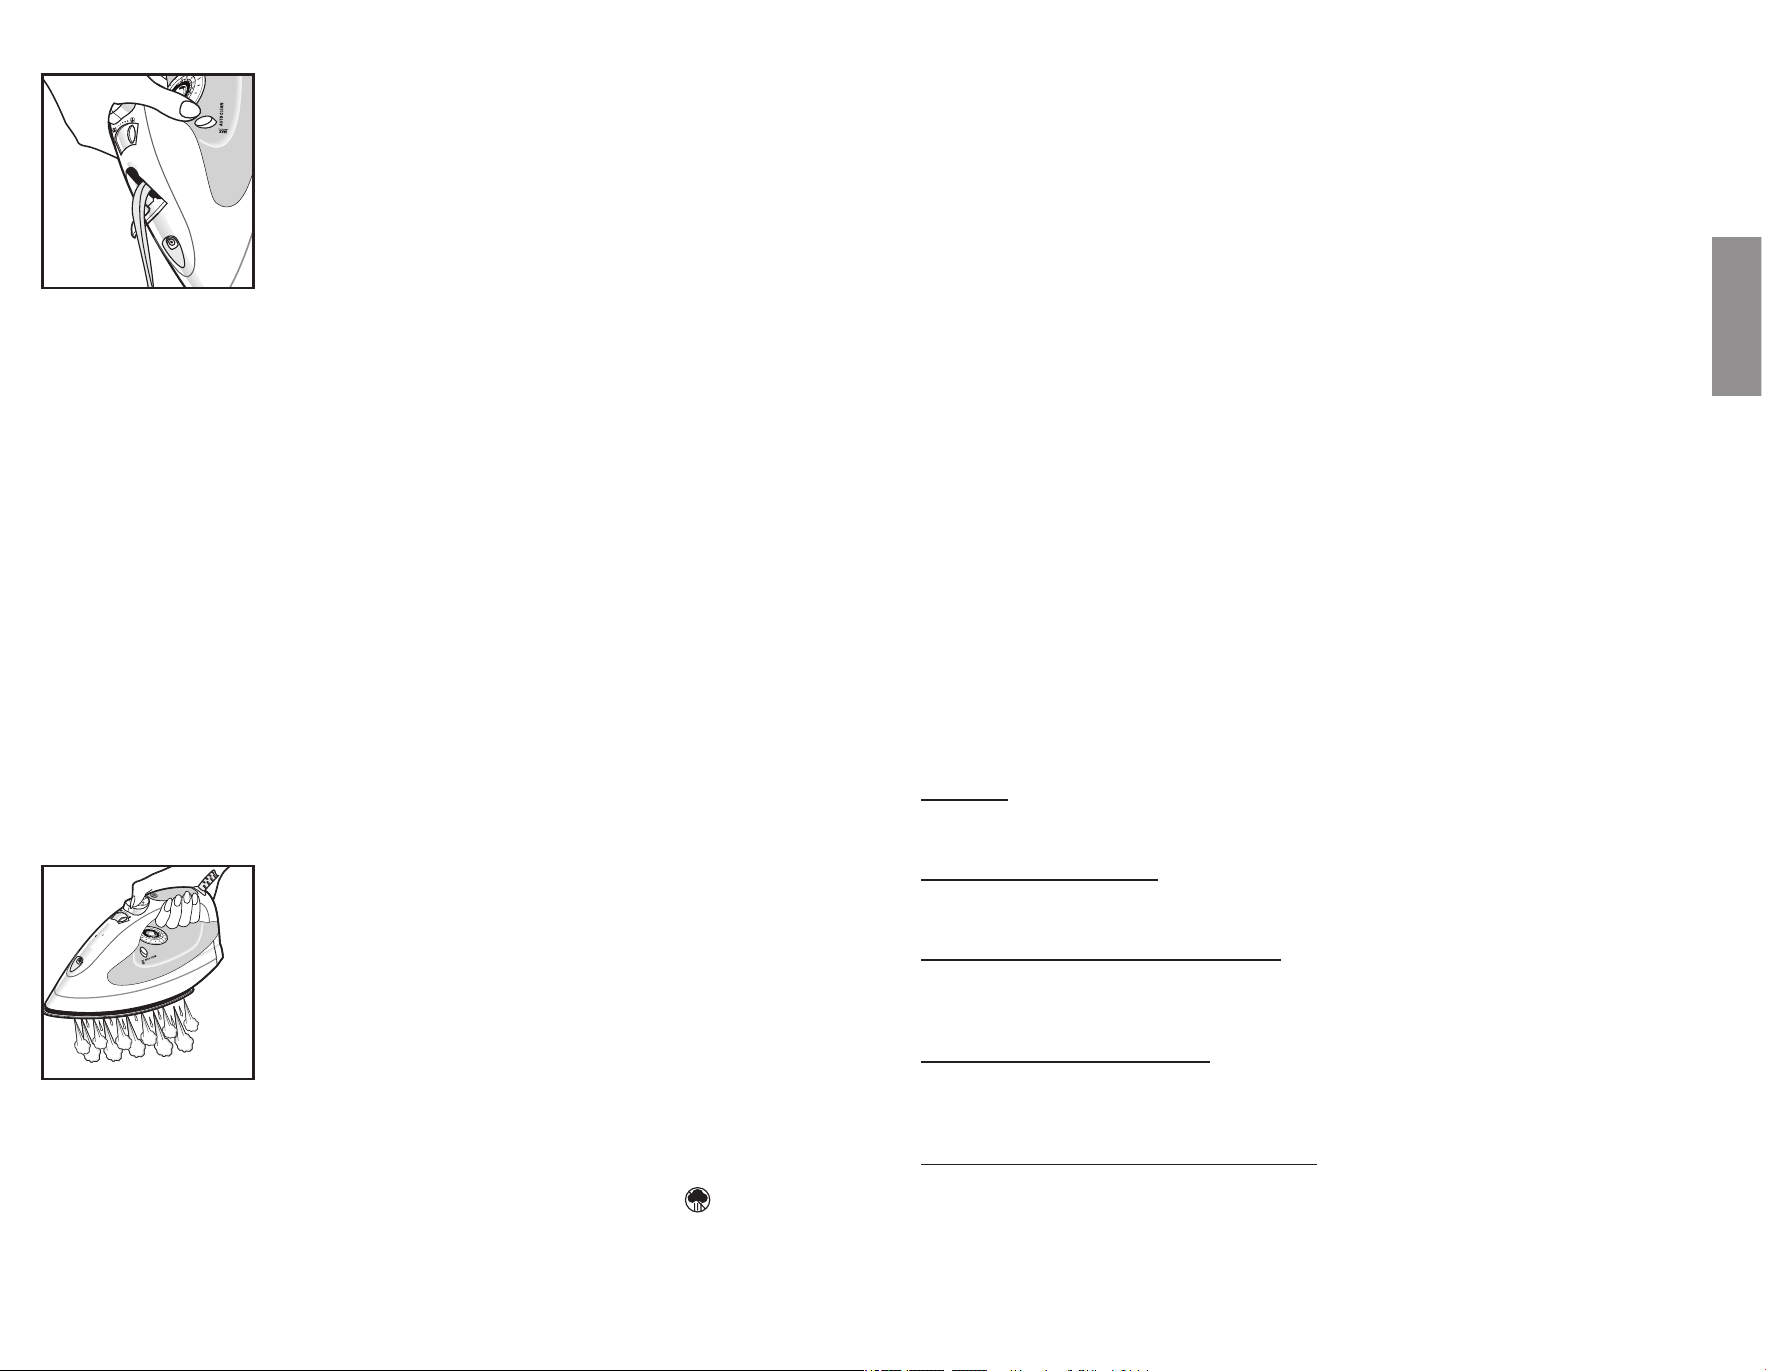
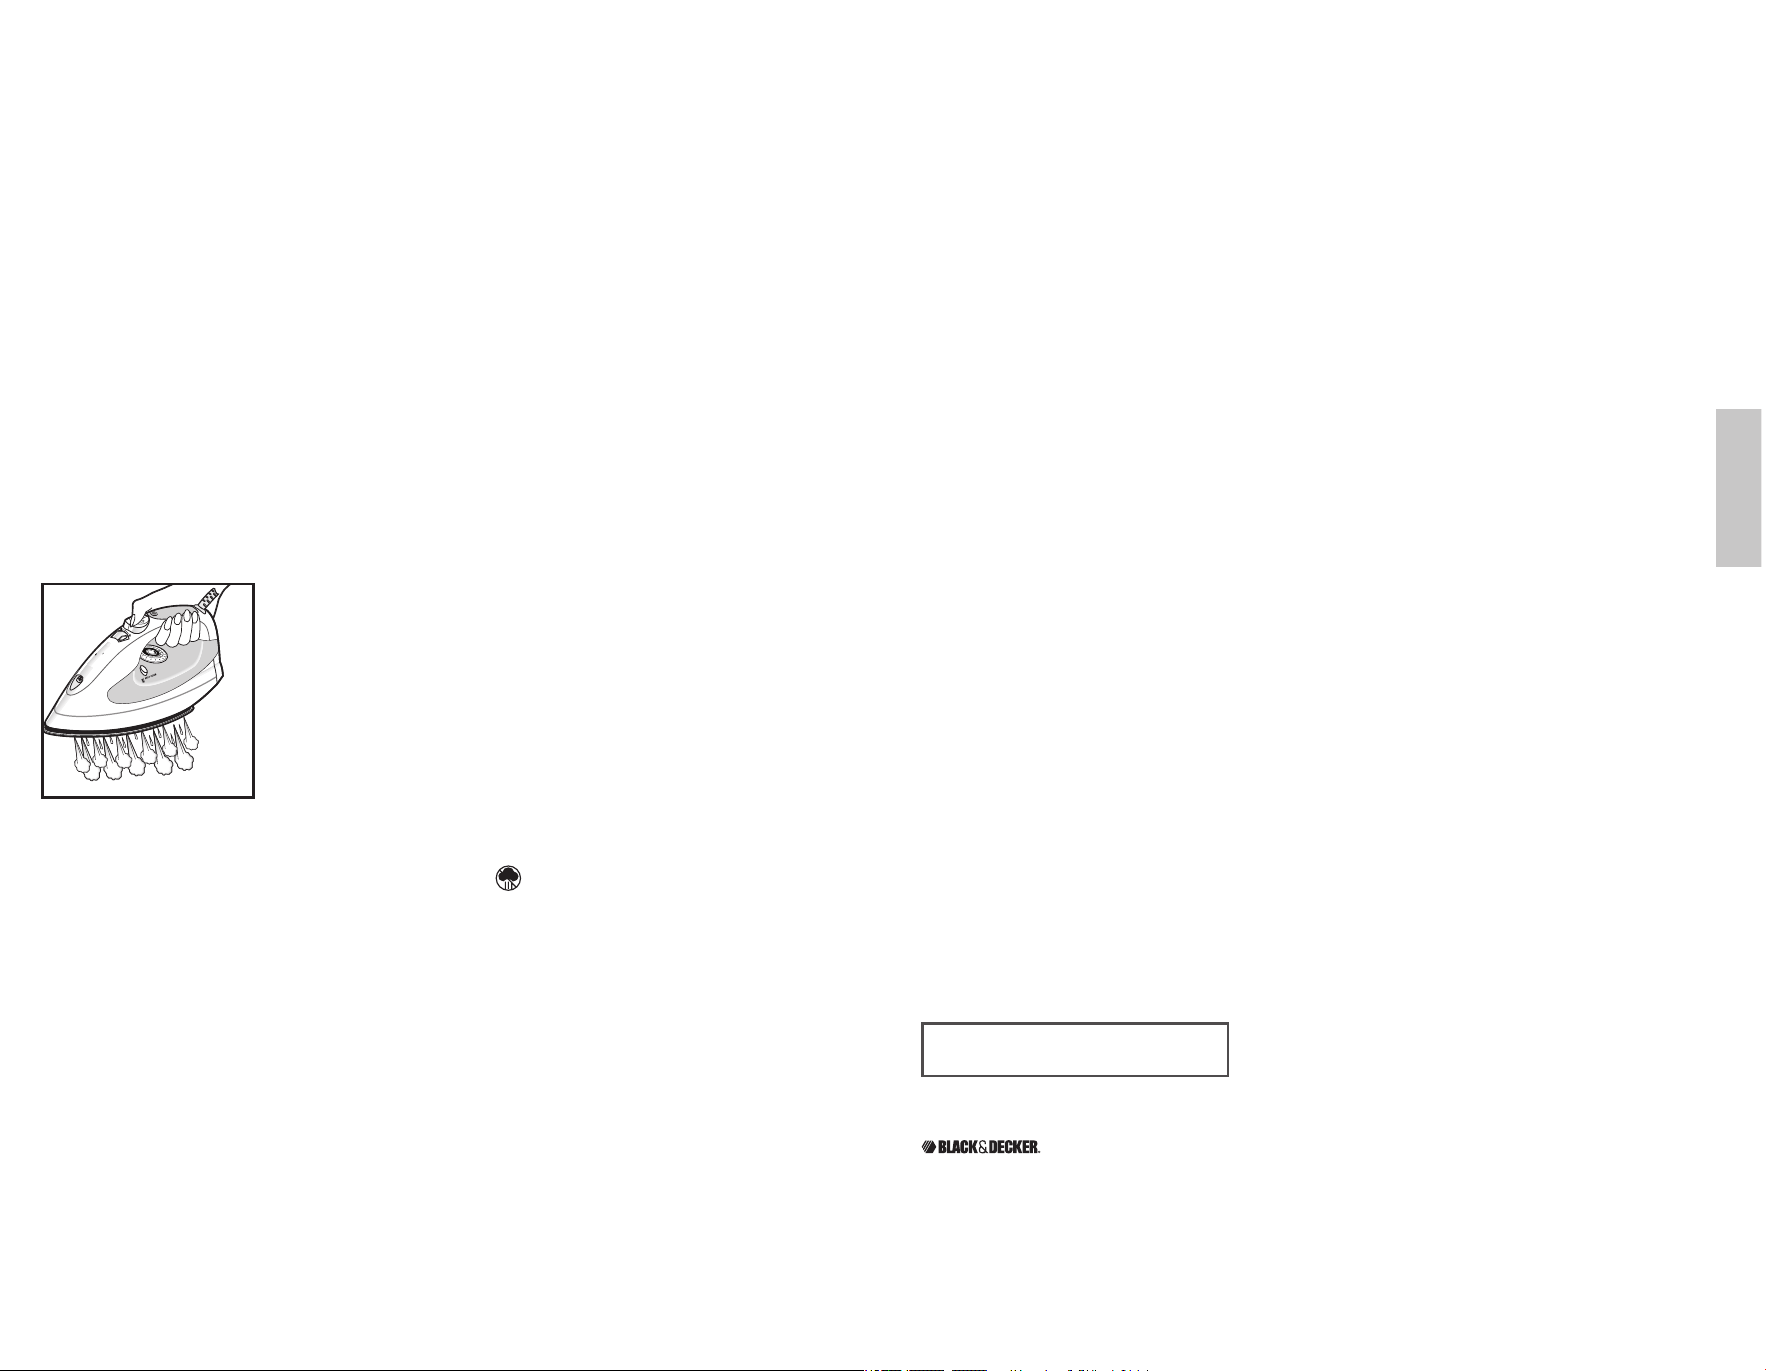
Vertical
1. BesurethewatertankisfilledtotheMAXmark.Hangthegarmenttobe
steamedonaclotheshanger.(Curtainsordrapescanbesteamedonce
theyarehung.)setthefabricselectdialtotheappropriatetemperature
setting(between4and6)andletironstandonitsheelrestforabout90
seconds.
2. Holdtheironcloseto,butnottouching,thefabric.
3.Pullthefabrictightinyourfreehandandpumpthe
buttonasyoumovetheironoverthefabric(G).
SPRAY
Usetodampentoughwrinklesatanysetting.
1.Checkthatthewatertankisfilledwithwater.
2.Pressthe button.
Note:Ifsprayisweak,pumpthebuttonafewtimes.
ANTI DRIP SYSTEM
Theantidripsystempreventswaterspottingatlowtemperatures.
EMPTYING THE WATER TANK (OPTIONAL)
1.TurnthefabricselectdialtoMin(0).Unplugtheiron
andletitcool.
2.openthewater-fillcover.
3.emptythewaterbyholdingtheironoverasinkwith
thetippointingdownandtooneside.Waterwill
emptyoutofwater-fillopening(H).
M
A
X
S
T
E
A
M
D
R
Y
M
I
N
G
ENGLISH
S
T
E
A
M
D
R
Y
M
I
N
M
A
X
E
8 minutes
30 seconds
F
M
A
X
S
T
E
A
M
D
R
Y
M
I
N
H
8
9
Care and Cleaning
Thisproductcontainsnouserserviceableparts.Referservicetoqualified
servicepersonnel.
CLEANING OUTSIDE SURFACES
1. Makesureironisunpluggedandhascooledcompletely.Wipethesoleplate
andoutersurfaceswithasoftclothdampenedwithwater.Addmildhousehold
detergent.Neveruseabrasives,heavy-dutycleansers,vinegarorscouring
padsthatmayscratchordiscolortheiron.
2. Aftercleaning,steamironoveranoldclothtoremoveanyresiduefromthe
steamvents.
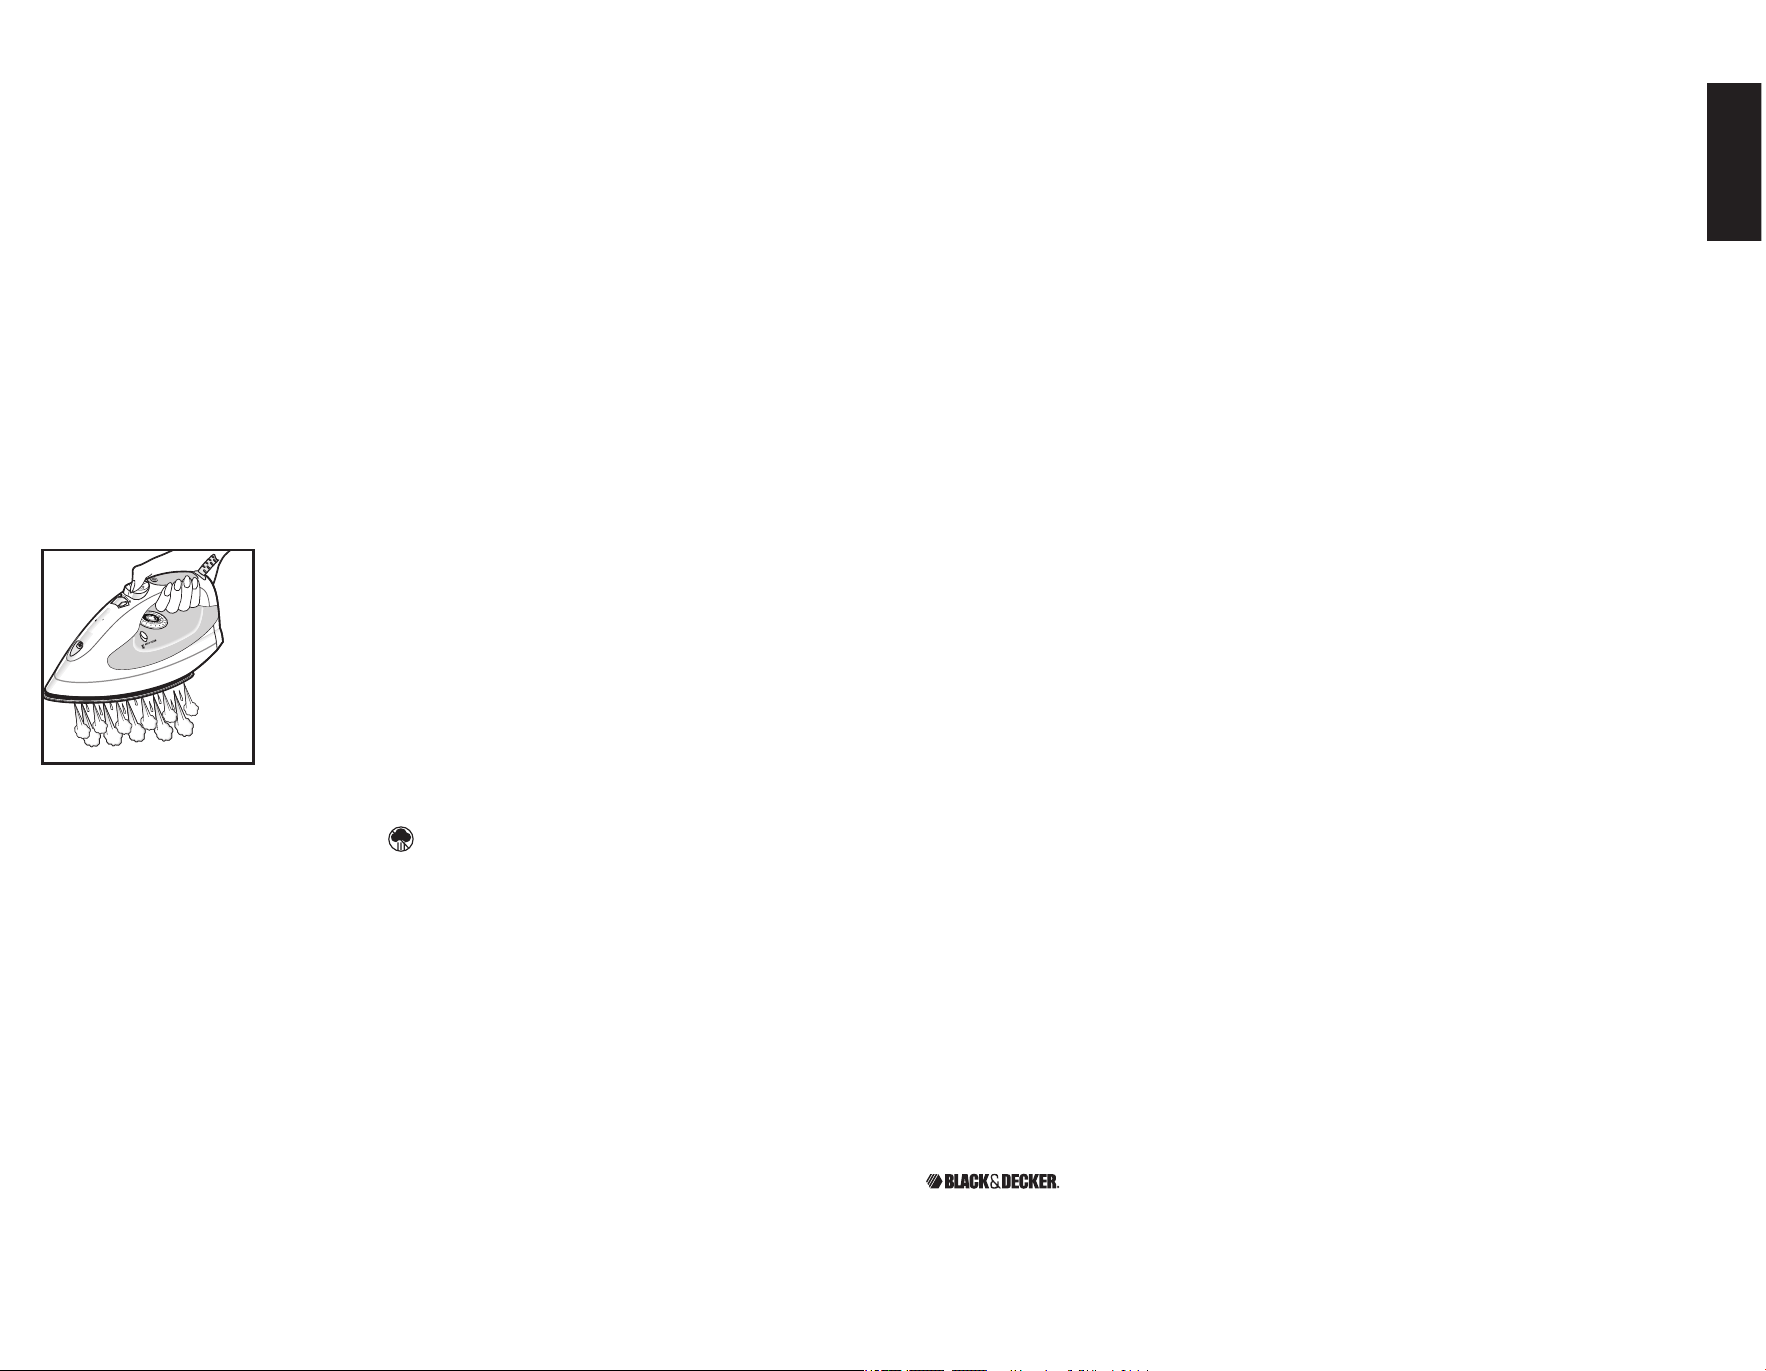
AUTO CLEAN
®
SYSTEM
Tokeepthesteamventsfreeofanybuildup,followtheseinstructionsaboutonce
amonth.
1. FillthewatertankwellbelowtheMAXline.Plugintheiron.
2. Turnthefabricselectdialto6andstandtheirononitsheelrest.Allowitto
heatuntilthetemperature-readylightgoesoutandcomesonagain.
3. TurnfabricselectdialtoMin(0),unplugtheironandholdoverasinkwiththe
soleplatefacingdown.
4.PressandholdtheAUToCLeAN
®
button.Becareful,as
hotwaterandsteamwillcomeoutofthesteamvents
(J).ContinuetoholdtheAUToCLeAN
®
buttonuntilall
thewaterhasemptied.Ifnecessary,rockironside-to-
sideandfront-to-back.
5.Whenfinished,releasethebutton,standtheirononits
heelrestandplugitin.Heatforabout2minutestodry
outanyremainingwater.
STORING YOUR IRON
1. Unplugtheironandallowittocool.
2. Checkthattheselectorissetto .
3. storeverticallyonitsheelresttopreventwaterleakingfromthesoleplate.
M
A
X
S
T
E
A
M
D
R
Y
M
I
N
J
ENGLISH
NEED HELP?
For service, repair or any questions regarding your appliance, call the appropriate
800 number on cover of this book. Please DO NOT return the product to the place
of purchase. Also, please DO NOT mail product back to manufacturer, nor bring it to
a service center. You may also want to consult the website listed on the cover of this
manual.
Two-Year Limited Warranty
(Applies only in the United States and Canada)
What does it cover?
• Any defect in material or workmanship provided; however, Applica’s liability will not
exceed the purchase price of product.
For how long?
• Two years after date of purchase.
What will we do to help you?
• Provide you with a reasonably similar replacement product that is either new or
factory refurbished.
How do you get service?
• Save your receipt as proof of date of sale.
• Visit the online service website at www.prodprotect.com/applica, or call toll-free
1-800-231-9786, for general warranty service.
• If you need parts or accessories, please call 1-800-738-0245.
What does your warranty not cover?
• Damage from commercial use
• Damage from misuse, abuse or neglect
• Products that have been modied in any way
• Products used or serviced outside the country of purchase
• Glass parts and other accessory items that are packed with the unit
• Shipping and handling costs associated with the replacement of the unit
• Consequential or incidental damages (Please note, however, that some states do not
allow the exclusion or limitation of consequential or incidental damages, so this
limitation may not apply to you.)
How does state law relate to this warranty?
• This warranty gives you specic legal rights. You may also have other rights that vary
from state to state or province to province.
is a registered trademark of The Black & Decker Corporation,
Towson, Maryland, USA
Made in People’s Republic of China
Printed in People’s Republic of China

0
Por favor lea este instructivo antes de usar el producto.
INSTRUCCIONES IMPORTANTES
DE SEGURIDAD
Cuandoseutilizanaparatoseléctricos,especialmenteenlapresencia
siemprequeutilicesuplancha,debeseguiralgunasprecaucionesbásicasde
seguridad,incluyendolassiguientes:
❍Leatodaslasinstruccionesantesdeutilizarelproducto.
❍Uselaplanchaúnicamenteparaplanchar.
❍Nosumerjalaplanchaenaguanienningúnotrolíquidoparaevitarel
riesgodeunchoqueeléctrico.
❍siempreapague(0)laplancha(vealasecciónCoMoUsAR)antesde
conectarlaodesconectarladeltomacorriente.Nuncatiredelcablepara
desconectarlo,sujeteelenchufeparahacerlo.
❍Nopermitaqueelcableentreencontactoconsuperficiescalientes.
Permitaquelaplanchaseenfríeantesdeguardarla.enrolleelcable
holgadamentealrededordeltalóndelaplancha.
❍siempredesconectelaplanchacuandolalleneolavacíeycuandono
estéenuso.
❍Nohagafuncionarlaplanchasiéstatienedañadoelcableosila
planchasehadejadocaerysehaestropeado.Afindereduciraun
mínimoelriesgodeunchoqueeléctrico,nodesarmelaplancha.
Acudaaunapersonadeservicio,calificadapararevisaryefectuarlas
reparacionesnecesarias.elarmarlaplanchaincorrectamentepuede
ocasionarelriesgodeunchoqueeléctricocuandolaplanchaestéen
funcionamiento.
❍serequieresupervisióncuandocualquierunidadelectrónicaestésiendo
usadacercadelosniñosoporellosmismos.Nodesatiendalaplancha
mientrasestéconectadaocuandoestésobrelatabladeplanchar.
❍Puedenocurrirquemadurassisetocanlaspartesmetálicas,elagua
caliente,oelvapor.Tomeprecauciónalinvertirunaplanchadevaporya
quepuedehaberaguacalientedentrodeltanque.evitelosmovimientos
bruscosparanoderramaraguacaliente.
INSTRUCCIONES ESPECIALES
❍Paraevitarsobrecargas,noopereningúnotroaparatodealto
consumodecorrienteenelmismocircuito.
❍Paraevitarsobrecargas,noopereningúnotroaparatodealto
consumodecorrienteenelmismocircuito.sielusodeuncable
deextensiónesabsolutamentenecesario,sedeberáutilizar
unode15amperios.Loscablesdemenoramperajesepueden
sobrecalentar.sedebetenercuidadodeacomodarelcablede
maneraquenadielohalenisetropiece.
CONSERVE ESTAS
INSTRUCCIONES.
Este aparato eléctrico es para uso doméstico
únicamente.
ENCHUFE POLARIZADO
esteaparatocuentaconunenchufepolarizado(uncontactoesmásanchoque
elotro).Afindereducirelriesgodeunchoqueeléctrico,esteenchufeencaja
enuntomacorrientepolarizadaenunsolosentido.sielenchufenoentraen
eltomacorriente,inviértaloysiaunasínoencaja,consulteconunelectricista.
Porfavornotratedealterarestamedidadeseguridad.
TORNILLO DE SEGURIDAD
Advertencia: Este aparato cuenta con un tornillo de seguridad para evitar
la remoción de la cubierta exterior del mismo. A fin de reducir el riesgo de
incendio o de choque eléctrico, por favor no trate de remover la cubierta
exterior. Este producto no contiene piezas reparables por el consumidor.
Toda reparación se debe llevar a cabo únicamente por personal de servicio
autorizado.
Nota: sielcordóndealimentaciónestadañado,enAméricaLatinadebe
sustituirseporpersonalcalificadooporelcentrodeservicioautorizado.
ESPAÑOL
2
3
Como usar
esteaparatoessolamenteparausodoméstico.
PASOS PRELIMINARES
• Retiretodaetiquetaocalcomaníaadheridaalcuerpooalasueladela
plancha.
• Porfavor,visitewww.prodprotect.com/applicapararegistrarsugarantía.
Nota:Utiliceaguadelallaveparallenareltanquedelaplancha.Nosedebe
deutilizaraguaprocesadaporsistemasdeablandamiento.
LLENADO DEL TANQUE DE AGUA
1. Abralatapadeltanque(A).
2. Inclinelaplanchayconlaayudadeunatazade
medir,viertaaguaatravésdelorificiodellenado
hastaalcanzarlamarcadellenadoMAXenel
costadodeltanque(B).Noexcedaelnivelde
llenado.
3. Cierrelatapadeltanque.
4. enchufelaplancha.observequeseiluminalaluz
indicadoradefuncionamiento(C).
5. sigalasinstruccionesqueaparecenenlasección
PLANCHADoAVAPoRoPLANCHADoeNseCo.
PLANCHADO A VAPOR
1. Ajusteelselectordevaporvariablealniveldevapor
deseado(D).
Este producto puede variar ligeramente del que aparece ilustrado.
. Rociador
2. Tapa del tanque
3. Selector de vapor variable
4. Botón de rociar
5. Botón de vapor
6. Luz indicadora de funcionamiento-apagado automático
7. Mango Comfort Grip
®
8. Talón de descanso
9. Luz indicadora de temperatura
0. Selector de tejidos
. Tanque de agua
2. Botón de auto limpieza (AUTO CLEAN
®
)
3. Suela
S
T
E
A
M
D
R
Y
M
I
N
M
A
X
Seco
Emisión de vapor
Rocío
Símbolos
ESPAÑOL
A
M
A
X
S
T
E
A
M
D
R
Y
M
I
N
B
C
D
4
5
2. Lealaetiquetadelaprendaquedeseaplanchar
paradeterminareltipodetejido.Gireelselector
detejidosalajusteapropiado(entreel4y
el6),segúneltejidodelaprenda(E).Laluz
indicadoradetemperaturabrillahastaalcanzar
latemperaturaqueunohaprogramado.estaluz
seiluminayseapagaaintervalosduranteelciclo
delplanchado.
Consejo:sinoconoceeltipodetejidodelaprenda,ensaye(sobreunruedoo
costurainterior)antesdeplanchar.
3. Paraóptimorendimiento,dejelaplanchareposarpor90segundosantesde
comenzaraplanchar.
4. Alterminardeplanchar,ajusteelselectordetejidosalnivelmásbajo,pase
elselectoralaposición ydesconectelaplancha.
Nota:sitienequeagregaraguaaltanqueduranteelplanchado,desconectela
planchaysigalospasoscitadosanteriormente.
Importante: Siempre coloque la plancha sobre el talón de descanso cuando
esté encendida o no en uso.
PLANCHADO EN SECO
1. Asegúresedeajustarelselectordevaporvariablealaposición .se
recomiendavaciarelagua(consultelasecciónVACIADoDeLTANQUe).
2. Gireelselectordetejidosalajusteapropiadosegúneltejidodelaprenda.
(Lealaetiquetadelaprendaquedeseaplancharparadeterminareltipode
tejido.)Laluzindicadoradetemperaturabrillahastaalcanzarlatemperatura
queunohaprogramado.estaluzseiluminayseapagaaintervalosdurante
elciclodelplanchado.
Consejo:sinoconoceeltipodetejidodelaprenda,ensayesobreunruedo
ocosturainterior)antesdeplanchar.
3. Paraóptimorendimiento,dejelaplanchareposarpor90segundosantes
decomenzaraplanchar.
4. Alterminardeplanchar,ajusteelselectordetejidosalnivelmásbajo,
mantieneelselectordevaporvariablealaposición ydesconectela
plancha.
Nota: sitienequeagregaraguaaltanqueduranteelplanchado,desconectela
planchaysigalospasoscitadosanteriormente.
Importante: Siempre coloque la plancha sobre el talón de descanso cuando
esté encendida o no en uso.
APAGADO AUTOMáTICO DE 3 POSICIONES
eldispositivodeapagadoautomáticodeestaplanchafuncionadela
siguientemanera:
• Laplanchaseapagaautomáticamentesi
permaneceinactivasobrelasuelaodelado
durante30segundosdespuésdealcanzarla
temperaturaprogramada.Igualmentesucede
silaplanchapermaneceinactivaverticalmente
sobreeltalóndedescansodurante8minutos
(F).
• Laplanchacomienzaacalentarnuevamenteencuantounolalevanta.
esperequelaplanchasecalientebienantesdeplanchar.
EMISIÓN DE VAPOR
Horizontal
1.LleneeltanquedeaguahastalamarcadelnivelMAX.Ajusteelcontrolde
tejidosalatemperaturamásalta(entreelnivel4y6)ycoloquelaplancha
sobreeltalóndedescansoduranteaproximadamente90segundos.
2.Paramejoresresultados,serecomiendautilizarlaemisióndevapor
enintervalosdecincosegundos.
Vertical
1. AsegúresequeelniveldeaguadelaplanchaindiqueMAX.Cuelguela
prendaquedeseavaporizar.(Lascortinassepuedenvaporizarunavez
colgadas.)Ajusteelcontroldetejidosalatemperaturamásalta(entreel
nivel4y6)ycoloquelaplanchasobreeltalóndedescansodurantepor90
segundos.
2. sujetelaplanchacerca,perosintocareltejido.
3. Tireconfirmezadeltejidoconlaotramanoybombeeel
botón amedidaquepaselaplanchasobrelatela
(G).
ROCIADOR
Utiliceacualquierniveldetemperaturaparahumedecerlasarrugas
persistentes.
1. Asegúresequeeltanqueseencuentrellenodeagua.
2. Presioneelbotón .
Nota:silaemisiónderocíoesdébil,bombeeelbotónvariasveces.
SISTEMA ANTIGOTEO
elsistemaantigoteoevitalasmanchasdeaguaatemperaturasbajas.
ESPAÑOL
S
T
E
A
M
D
R
Y
M
I
N
M
A
X
E
8 minutos
30 segundos
F
M
A
X
S
T
E
A
M
D
R
Y
M
I
N
G
6
7
VACIADO DEL TANQUE
1.GireelselectordetejidosalaposiciónMin(0),
desconectelaplanchaypermitaqueseenfríe.
2.Abralatapadeltanque.
3.Paravaciarelagua,sujetelaplanchaconlapunta
haciaabajoyhaciaunlado.elaguasaleatravésdela
tapadeltanque(H).
Cuidado y limpieza
esteaparatonocontienepiezasreparablesporelconsumidor.Paraservicio,
acudaapersonaldeasistenciacalificado.
LIMPIEZA DE LAS SUPERFICIES EXTERIORES
1. Asegúresequelaplanchaseencuentredesconectadayquesehayaenfriado
completamente.Limpielasuelaydemássuperficiesexterioresconun
pañosuavehumedecidoconaguayconundetergentesuave.Nuncautilice
abrasivos,limpiadoresfuertes,vinagreniesponjasabrasivasquepudiesen
rallarodescolorarlaplancha.
2. Despuésdelimpiarlaplancha,paselaplancheavaporsobreunpañoviejo
paraeliminarcualquierresiduoacumulado.
LIMPIEZA AUTOMáTICA (AUTO CLEAN
®
)
Paramantenerlimpioslosorificiosdelvapor,serecomiendaseguirlos
siguientespasosunavezalmes:
1. LleneeltanquedelaguapordebajodelnivelMAX.enchufelaplancha.
2. Ajusteelselectordetejidosalnúmero6ycoloquelaplanchasobreeltalón
dedescanso.Permitaquelaplanchasecalientehastaquelaluzindicadora
detemperaturaseapagueyaparezcanuevamente.
3. GireelselectordetejidosalaposiciónMin(0),desconecteysujetelaplancha
sobreunlavaderoconlasuelahaciaabajo.
4.Presioneelbotóndelimpiezaautomática(AUTo
CLeAN
®
).Tengacuidado,yaquelosorificiosdevapor
delaplanchaemitenaguacalienteyvapor(J).Continúe
presionandoelbotóndelimpiezaautomática(AUTo
CLeAN
®
)hastavaciarelaguacompletamente.sies
necesario,puedemecerlaplanchadeladoaladoode
atrásparaadelante.
5.Cuandotermine,suelteelbotón,coloquelaplancha
sobreeltalóndedescansoyenchufe.Permitaquela
planchasecalienteunos2minutosparaasegurarsede
quetodaelaguasehayasecado.
ALMACENAJE DE LA PLANCHA
1. Desconecteypermitaquelaplanchaseenfríebien.
2. Asegúresequeelselectorseencuentreajustadoalaposición .
3. Coloquelaplanchaverticalmentesobreeltalóndedescansoparaevitarque
lasuelagotee.
M
A
X
S
T
E
A
M
D
R
Y
M
I
N
J
ESPAÑOL
¿NECESITA AYUDA?
Paraservicio,reparacionesopreguntasrelacionadasalproducto,porfavorllameal
númerodelcentrodeservicioenelpaísdondeustedcomprósuproducto.Nodevuelva
elproductoalfabricante.Llameolleveelproductoauncentrodeservicioautorizado.
DOS AÑOS DE GARANTÍA LIMITADA
(No aplica en México, Estados Unidos o Canadá)
¿Qué cubre la garantía?
• Lagarantíacubrecualquierdefectodematerialesodemanodeobra.Applicanose
responsabilizaporningúncostoqueexcedaelvalordecompradelproducto.
¿Por cuánto tiempo es válida la garantía?
• Pordosañosapartirdelafechaoriginaldecompra.
¿Cómo se puede obtener servicio?
• Conserveelrecibooriginaldecompra.
• Porfavorllamealnúmerodelcentrodeservicioautorizado.
Esta garantía no cubre:
• Losproductosquehansidoutilizadosencondicionesdistintasalasnormales
• Losdañosocasionadosporelmaluso,elabusoonegligencia.
• Losproductosquehansidoalteradosdealgunamanera
• Losdañosocasionadosporelusocomercialdelproducto
• Losproductosutilizadosoreparadosfueradelpaísoriginaldecompra
• Laspiezasdevidrioydemásaccesoriosempacadosconelaparato
• Losgastosdetramitaciónyembarqueasociadosalreemplazodelproducto
• Losdañosyperjuiciosindirectosoincidentales
Póliza de Garantía
(Válida sólo para México)
Duración
ApplicaManufacturing,s.deR.L.deC.V.garantizaesteproductopor2añosapartir
delafechaoriginaldecompra.
¿Qué cubre esta garantía?
estaGarantíacubrecualquierdefectoquepresentenlaspiezas,componentesyla
manodeobracontenidasenesteproducto.
Requisitos para hacer válida la garantía
ParareclamarsuGarantíadeberápresentaralCentrodeservicioAutorizadolapóliza
selladaporelestablecimientoendondeadquirióelproducto.sinolatiene,podrá
presentarelcomprobantedecompraoriginal.
¿Donde hago válida la garantía?
Llamesincostoalteléfono018007142503,paraubicarelCentrodeservicio
Autorizadomáscercanoasudomicilioendondeustedpodráencontrarpartes,
componentes,consumiblesyaccesorios.
Procedimiento para hacer válida la garantía
AcudaalCentrodeservicioAutorizadoconelproductoconlapólizadeGarantía
selladaoelcomprobantedecompraoriginal,ahísereemplazarácualquierpiezao
componentedefectuososincargoalgunoparaelusuarional.estaGarantíaincluye
losgastosdetransportaciónquesederivendesucumplimiento.
M
A
X
S
T
E
A
M
D
R
Y
M
I
N
H
8
9
Argentina
servicioTécnicoCentral
Attendance
AtenciónalCliente
Ave.Monroe3351
BuenosAires,Argentina
Tel.:0810-999-8999
Chile
servicioMáquinasy
HerramientasLtda.
Av.ApoquindoNo.4867-
LasCondes
santiago,Chile
Tel.:(562)263-2490
Colombia
PLINARes
AvenidaQuito#88A-09
Bogotá,Colombia
Tel.sincosto
018007001870
Costa Rica
Aplicaciones
electromecanicas,s.A.
Calle26BisyAve.3
sanJose,CostaRica
Tel.:(506)257-5716
223-0136
Ecuador
servicioMasterecuador
Av.6deDiciembre9276
yLosAlamos
Tel.(593)2281-3882
El Salvador
sedeblack
CallesanAntonioAbad
2936
sansalvador,elsalvador
Tel.(503)2284-8374
Guatemala
MacPartessA
3ªCalle414Zona9
FrenteaTecun
Tel.(502)2331-5020
2332-2101
Honduras
serviTotal
ContiguaaTelecentro
Tegucigalpa,Honduras,
Tel.(504)235-6271
México
Art.123No.95
Col.Centro,C.P.06050
Deleg.Cuauhtemoc
Tel:01800714-2503
Nicaragua
serviTotal
Desemáforodeportezuelo
500metrosalsur.
Managua,Nicaragua,
Tel.(505)248-7001
Panamá
serviciosTécnicosCAPRI
TumbamuertoBoulevard
elDorado
Panamá.
Tel.(507)2360236
(507)2360159
Perú
servicioTécnicoCentral
Fastservice
CalleJorgeMuelle121
sanBorja
LimaPerú
Tel.
(0511)2257391-2230221
Puerto Rico
Buckeyeservice
JesúsP.Piñero#1013
PuertoNuevo,sJPR
00920
Tel.:(787)782-6175
Republica Dominicana
PlazaLama,s.A.
Av,Duarte#94
santoDomingo,
RepúblicaDominicana
Tel.:(809)687-9171
Trinidad and Tobago
A.s.Bryden&sons
(Trinidad)Limited
33Independencesquare,
Portofspain
Trinidad,W.I.
Tel.:(868)623-4696
Venezuela
InversionesBDRCA
Av.CasanovaC.C.
CityMarket
NivelPlazaLocal153,
DiagonalHotelMelia.
Caracas
Tel.(582)3240969
Porfavorllamealnúmerocorrespondientequeapareceenlalistaacontinuación
parasolicitarquesehagaefectivalagarantíaydondeUd.puedesolicitarservicio,
reparacionesopartesenelpaísdondeelproductofuécomprado.Tambiénpuede
consultarnosenele-mail.“servicio@applicamail.com.mx
Excepciones
estaGarantíanoseráválidacuandoelproducto:
A) sehubieseutilizadoencondicionesdistintasalasnormales.
B)Nohubiesesidooperadodeacuerdoconelinstructivodeusoqueleacompaña.
C) Cuandoelproductohubiesesidoalteradooreparadoporpersonasnoautorizadas
porApplicaManufacturing,s.deR.L.deC.V.
Nota:Ustedpodraencontrarpartes,componentes,consumiblesyaccesoriosenlos
centrosdeserviciosautorizados.estagarantíaincluyenlosgastosdetransportaciónque
sederivendesuscumplimientodentrodesusreddeservicio.
ESPAÑOL
sellodelDistribuidor:
Fechadecompra:
Modelo:
Comercializado por:
ApplicaManufacturing,s.deR.L.deC.V.
PresidenteMazarikNo111,1erPiso
Col.ChapultepecMorales,MexicoD.F
Deleg.MiguelHidalgo
CP11570
MeXICo
Servicio y Reparación
Art.123No.95
Col.Centro,C.P.06050
Deleg.Cuauhtemoc
Servicio al Consumidor,
VentadeRefaccionesyAccesorios
018007142503
Código de fecha / Date Code
esunamarcaregistradadeTheBlack&DeckerCorporation,
Towson,Maryland,e.U.
Accesorios/Partes (EE.UU/Canadá)
-800-738-0245
FabricadoenlaRepúblicaPopulardeChina
ImpresoenlaRepúblicaPopulardeChina
Importado por / Imported by:
APPLICA AMERICAS, INC.
Av.JuanBJusto637Piso10
(C1425FsA)CiudadAutonomadeBuenosAires
Argentina
C.U.I.T No. 30-69729892-0
Importado por / Imported by:
APPLICA MANUFACTURING, S. DE R. L. DE C. V.
PresidenteMazarikNo111,1erPiso
Col.ChapultepecMorales,MexicoD.F
Deleg.MiguelHidalgo
CP11570
MeXICo
Teléfono:(55)5263-9900
Del interior marque sin costo
01(800)7142503
500 W 20 V
CAT . NO. E HB500
TYP E 1 160 W 120 V
AC O NLY 60 Hz
60 Hz

20
2
Veuillez lire et conserver ce guide d’entretien et d’utilisation
IMPORTANTES MISES EN GARDE
enutilisantvotreferàrepasser,ilfauttoujoursobserverdesprécautions
debase,ycompriscequisuit:
❍LIseZToUTesLesINsTRUCTIoNsAVANTUsAGe.
❍Utilisezleferàrepasserseulementpourl'usageauquelilestdestiné.
❍Pourvousprotégerdesrisquesdechocélectrique,neplongezpaslefer
àrepasserdansl'eauniaucunautreliquide.
❍Leferàrepasserdoittoujoursêtreàlaposition«0»avantdele
brancheroudeledébrancherdelaprise.Netirezjamaislacorde
d'alimentationpourdébrancherdelaprise,agrippezplutôtlaficheet
tirez-la.
❍Nelaissezpaslacorded'alimentationtoucherlessurfaceschaudes.
Laissezleferàrepasserrefroidircomplètementavantdeleranger.
enroulezlacorded'alimentationsansserrerautourduferàrepasser
pourleranger.
❍Débrancheztoujoursleferàrepasserdelaprisemuralelorsquevousle
remplissezd'eauoulevidezetlorsqu'iln'estpasutilisé.
❍Nefaitespasfonctionnerleferàrepasseravecunecorded'alimentation
endommagéeousileferàrepasseresttombéouestendommagé.Pour
éviterlerisquedechocélectrique,neledémontezpasetn'essayezpas
deleréparer.Apportez-leàunréparateurqualifiépoursonexamenet
saréparation.Unmauvaisassemblagepourraitprovoquerunrisquede
chocélectriquelorsquevousutilisezleferàrepasser.
❍Ilfautunesupervisionétroitelorsquetoutappareilélectroménagerest
utiliséparouàproximitéd'enfants.Nelaissezpasleferàrepasser
sanssurveillancelorsqu'ilestbranchéousuruneplancheàrepasser.
❍Ilyarisquedebrûluresentouchantlespiècesmétalliqueschaudes,
l'eauchaudeoulavapeur.Attentioneninversantunferàrepasserà
vapeur-ilpourraityavoirdel'eauchaudedansleréservoir.
INSTRUCTIONS SPÉCIALES
❍Pouréviterunesurchargeducircuit,nefaitespasfonctionner
d'autresappareilsélectroménagersàhautwattagesurlemême
circuit.
❍s'ilfautabsolumentunerallonge,choisissezunmodèlede15
ampères.Unecorded'alimentationd'unevaleurnominaleinférieure
entermesd'ampèrespourraitsurchauffer.Placezlacorde
d'alimentationdefaçonàcequepersonnenepuisselatirerou
trébucheraccidentellement.
CONSERVER CES MESURES.
L'appareil est conçu pour une utilisation domestique.
FICHE POLARISÉE (Modèles de 20 V seulement)
L'appareilestmunid'unefichepolarisée(unelamepluslargequel'autre).
Afindeminimiserlesrisquesdesecoussesélectriques,cegenredefiche
n'entrequed'unefaçondansuneprisepolarisée.Lorsqu'onnepeutinsérerla
ficheàfonddanslaprise,ilfauttenterdelefaireaprèsavoirinverséleslames
decôté.silafichen'entretoujourspasdanslaprise,ilfautcommuniqueravec
unélectriciencertifié.Ilnefautpastenterdemodifierlafiche.
VIS INDESSERRABLE
Avertissement : L’appareil est doté d’une vis indesserrable empêchant
l’enlèvement du couvercle extérieur. Pour réduire les risques d’incendie ou
de secousses électriques, ne pas tenter de retirer le couvercle extérieur.
L’utilisateur ne peut pas remplacer les pièces de l’appareil. En confier la
réparation seulement au personnel des centres de service autorisés.
Note :Lorsquelecordond’alimentationestendommagé,ilfautlefaire
remplacerpardupersonnelqualifiéou,enAmériquelatine,parlepersonnel
d’uncentredeserviceautorisé.
FRANÇAIS
22
23
Le produit peut différer légèrement de celui illustré.
Utilisation
L’appareilestconçupouruneutilisationdomestiqueseulement.
Préparatifs
• enlevertouslesautocollantsetétiquettesfixésaucorpsouàlasemelle
del’appareil.
• Veuillezalleràl’adressewww.prodprotect.com/applicapourenregistrer
votregarantie.
Note : Utiliserdel’eaudurobinetpourrepasser.Nepasutiliserdel’eau
traitéedansunsystèmed’adoucissementdel’eau.
REMPLISSAGE DU RÉSERVOIR
1. ouvrirlecouverclederemplissage(A).
2. Inclinerleferetutiliserunetasseàmesurerpropre
pourverserdel’eaudansl’orificejusqu’àcequele
niveaud’eauatteignelamentionMAXduréservoir
(B).Éviterdetropremplir.
3. Refermerlecouverclederemplissage.
4. Brancherlefer.Letémoindefonctionnement
s’allume(C).
5. suivrelesinstructionsrelativesauRePAssAGeÀLA
VAPeURouauRePAssAGeÀseC.
REPASSAGE À LA VAPEUR
1. Déplacerlesélecteursec/vapeurauniveaude
vapeurvoulu(D).
. Bec pulvériseur
2. Couvercle de remplissage
3. Sélecteur sec/vapeur
4. Bouton de pulvérisation
5. Bouton de vapeur
6. Témoin de fonctionnement/d’arrêt automatique
7. Poignée Comfort Grip
MD
8. Talon d’appui
9. Indicateur lumineux de température
0. Sélecteur de tissu
. Réservoir d’eau
2. Bouton de autonettoyage (AUTO CLEAN
MD
)
3. Semelle
Jet de vapeur
Pulvérisation
Symboles
Sec
FRANÇAIS
A
M
A
X
S
T
E
A
M
D
R
Y
M
I
N
B
C
D
S
T
E
A
M
D
R
Y
M
I
N
M
A
X

24
25
8
7
2. Lirel’étiquetteduvêtementafindedéterminer
letypedetissu.Réglerlesélecteurdetissuau
niveauapproprié(entre4et6)autissu(E).Le
témoind’atteintedelatempératurebrillejusqu’à
l’obtentiondelatempératurevoulue.Parlasuite,
ils’allumeets’éteintpendantlerepassage.
Conseil pratique :Lorsqu’onneconnaîtpasletype
detissuduvêtementàrepasser,faireunessaisur
unboutdetissu(commesurunecoutureàl’intérieuroulebord).
3. Afind'optimerlerendement,laisserleferreposerpendant90secondes
avantdecommenceràrepasser.
4. Àlafindurepassage,tournerlesélecteurdetissuauréglageminimal,
remettrelesélecteur a,etdébrancherlefer.
Note : sivousavezbesoind'ajouterdel'eauenrepassant,débranchezleferà
repasseretsuivezlesétapesprécédentes.
Important : Mettez toujours le fer à repasser en marche sur son talon d'appui
lorsqu'il est sous tension, mais non utilisé.
REPASSAGE À SEC
1. s’assurerquelesélecteursec/vapeurestrégléà .onpeutviderlefer
(consulterVIDeRLeRÉseRVoIRD'eAU).
2. Réglerlesélecteurdetissuauniveauappropriéautissu.(Lirel’étiquette
duvêtementafindedéterminerletypedetissu.)Letémoind’atteintedela
températurebrillejusqu’àl’obtentiondelatempératurevoulue.Parlasuite,
ils’allumeets’éteintpendantlerepassage.
Conseil pratique :Lorsqu’onneconnaîtpasletypedetissuduvêtement
àrepasser,faireunessaisurunboutdetissu(commesurunecoutureà
l’intérieuroulebord).
3. Afind'optimerlerendement,laisserleferreposerpendant90secondes
avantdecommenceràrepasser.
4. Àlafindurepassage,tournerlesélecteurdetissuauréglageminimal,
remettrelesélecteura ,etdébrancherlefer.
Note : sivousavezbesoind'ajouterdel'eauenrepassant,débranchezleferà
repasseretsuivezlesétapesprécédentes.
Important : Mettez toujours le fer à repasser en marche sur son talon d'appui
lorsqu'il est sous tension, mais non utilisé.
3 MODES D'ARRêT AUTOMATIQUE
Lafonctiond'arrêtautomatiquedevotreferà
repasserfonctionnedelamanièresuivante:
•
Lorsqueleferàrepasseratteintlatempérature
appropriée,s'ilresteenmarchesurlasemelle
ous'iltombesurlecôté,ils'éteindraaprès
30secondesd'inactivité.sileferàrepasserreste
verticalsursontalond'appui,ils'éteindraaprès
8minutes(F).
• Dèsquevousprenezleferàrepasser,ilrecommenceraàchaufferà
repasser.Attendezqueleferàrepassersoitbienréchaufféavantde
recommenceràrepasser.
JET DE VAPEUR
Horizontal
1. Réglerlecadransurlahautetemperature(entre4et6).s'assurerque
leniveaud'eauestaumaximum«MAX»etdéposerlefersursontalon
d’appuipendantenviron90secondes.
2. Afind'optimiserlesrésultats,utiliserlejetdevapeur àintervallesde
cinqsecondes.
Vertical
1. s'assurerqueleniveaud'eauestaumaximum(MAX).
suspendrelevêtementsuruncintre.onpeutégalement
vaporiserdelasortedesrideauxdéjàsuspendus.
Réglerlecadransurlahautetemperature(entre4et6)
etdéposerlefersursontalond’appuipendantenviron
90secondes.
2. Tenirleferprèsdutissu,sansytoucher.
3. Tirerletissudelamainlibreetpomperlebouton en
déplaçantlefersurletissu(G).
PULVÉRISATION
Utilisezcettefonctionpourhumidifierlesplisrebellesàtoutréglage.
1. s’assurerqueleréservoirestplein.
2. enfoncerlebouton .
Note :Lorsquelapulvérisationestfaible,pomperleboutonàquelques
reprises.
SYSTÈME ANTIGOUTTES
Lesystèmeantigouttesprévientlaproductiondegouttesd'eauàbasses
températures.
VIDER LE RÉSERVOIR D'EAU (OPTIONNEL)
1. RéglerlecadranàMin(0).Débrancherleferetle
laisserrefroidir.
2. souleverlebouchondel’orificederemplissage.
3. Viderleferenletenantau-dessusd’unévieravecle
boutpointantverslebasetàunecôté.L’eausortde
l’orifice(H).
FRANÇAIS
S
T
E
A
M
D
R
Y
M
I
N
M
A
X
E
8 minutes
30 secondes
F
M
A
X
S
T
E
A
M
D
R
Y
M
I
N
G
M
A
X
S
T
E
A
M
D
R
Y
M
I
N
H
26
27
Entretien et nettoyage
L’utilisateurnepeutentreteniraucunecomposanteduproduit.enconfier
l’entretienàdupersonnelqualifié.
NETTOYAGE DES SURFACES EXTÉRIEURES
1.s’assurerqueleferestdébranchéetqu’ilestcomplètementrefroidi.essuyer
lasemelleetlessurfacesextérieuresavecunchiffondouxethumideavecun
détergentdoux.Nejamaisutiliserdeproduitsnettoyantsabrasifs,devinaigre
nidetamponsàrécurerquipeuventégratigneroudécolorerlefer.
2.Aprèslenettoyage,repasseràvapeurunvieuxchiffonafind’enlevertoute
tracederésidudesévents.
AUTONETTOYAGE (AUTO CLEAN
MD
)
Afind’éviterlesaccumulationsdedébrisdanslesévents,fairecequisuit
environunefoisparmois.
1. RemplirleréservoirsouslamentionMAX.Brancherlefer.
2. Réglerlecadranà6etdéposerlefersursontalond’appui.Lelaisser
réchaufferjusqu’àcequeletémoind’atteintedelatempératures’éteigneet
serallume.
3. RéglerlecadranàMin(0),débrancherleferetletenirau-dessusd’unévier
aveclasemelleverslebas.
4.enfoncerleboutond’autonettoyage(AUToCLeAN
MD
).
Prendregarde,del’eaubrûlanteetdelavapeur
s’échapperontdesévents(J).Maintenirlebouton
enfoncéjusqu’àcequeleréservoirsoitvide.Aubesoin,
basculerleferd’uncôtéetdel’autreainsiquede
l’avantversl’arrière.
5.Lorsquec’estterminé,relâcherlebouton,déposerle
fersursontalond’appuietlebrancher.Leréchauffer
pendantenvirondeuxminutespourbienl’assécher.
RANGEMENT DU FER
1. Débrancherleferetlelaisserrefroidir.
2. s’assurerquelesélecteurestàlaposition .
3. Rangerleferàlaverticalesursontalond’appuiafind’éviterlesfuitesd’eau
parlasemelle.
M
A
X
S
T
E
A
M
D
R
Y
M
I
N
J
BESOIN D’AIDE?
Pour communiquer avec les services d’entretien ou de réparation, ou pour adresser toute
question relative au produit, composer le numéro sans frais approprié indiqué sur la page
couverture. Ne pas retourner le produit où il a été acheté. Ne pas poster le produit au
fabricant ni le porter dans un centre de service. On peut également consulter le site web
indiqué sur la page couverture.
Garantie limitée de deux ans
(Valable seulement aux États-Unis et au Canada)
Quelle est la couverture?
• Tout défaut de main-d’oeuvre ou de matériau; toutefois, la responsabilité de la société
Applica se limite au prix d’achat du produit.
Quelle est la durée?
• Deux ans après l’achat original.
Quelle aide offrons nous?
• Remplacement par un produit raisonnablement semblable nouveau ou réusiné.
Comment se prévaut-on du service?
• Conserver son reçu de caisse comme preuve de la date d’achat.
• Visiter notre site web au www.prodprotect.com/applica, ou composer sans frais le
1 800 231-9786, pour obtenir des renseignements généraux relatifs à la garantie.
• On peut également communiquer avec le service des pièces et des accessoires
au 1 800 738-0245.
Qu’est-ce que la garantie ne couvre pas?
• Des dommages dus à une utilisation commerciale.
• Des dommages causés par une mauvaise utilisation ou de la négligence.
• Des produits qui ont été modiés.
• Des produits utilisés ou entretenus hors du pays où ils ont été achetés.
• Des pièces en verre et tout autre accessoire emballés avec le produit.
• Les frais de transport et de manutention reliés au remplacement du produit.
• Des dommages indirects (il faut toutefois prendre note que certains états ne permettent
pas l’exclusion ni la limitation des dommages indirects).
Quelles lois régissent la garantie?
• Les modalités de la présente garantie donnent des droits légaux spéciques.
L’utilisateur peut également se prévaloir d’autres droits selon l’état ou la province qu’il
habite.
FRANÇAIS
MarquedecommercedéposéedelasociétéTheBlack&DeckerCorporation,
Towson,Maryland,É.-U.
Accessoires/Pièces (É.-U./Canada)
1-800-738-0245
FabriquéenRépubliquepopulairedeChine
ImpriméenRépubliquepopulairedeChine

28
2009/4-7-52e/s/F
Printedonrecycledpaper.
Impresoenpapelreciclado.
Imprimésurdupapierrecyclé.