
8180074
User Instructions
EN
Maytronics Dolphin robotic pool cleaner

Wave 90i
Robotic Pool Cleaner
User Instructions
EN
Contents
1. Introduction ............................................................................................................................................................................2
2. Specifications .........................................................................................................................................................................2
3. Warnin
g
s and cautions ......................................................................................................................................................2
3.1 Water conditions .........................................................................................................................................................3
4. Robotic pool cleaner Parts .............................................................................................................................................. 4
5. Using the robotic pool cleaner .......................................................................................................................................5
5.1 Setup.................................................................................................................................................................................5
5.2 Placing the robotic pool cleaner into the pool .............................................................................................. 6
5.3 Plug in the power supply ........................................................................................................................................ 6
5.4 Operating the robotic pool cleaner without using your smart device ................................................7
5.5 Using the power supply ...........................................................................................................................................7
5.6 Robotic pool cleaner indicator lights ..................................................................................................................7
5.7
Removing the
robotic pool cleaner
from the pool
...................................................................................... 8
6. C
are
and Ma
inten
a
nce
...................................................................................................................................................... 9
6.1
Cleaning after use - Removing and cleaning the dual filter baske
t ...........................................................9
6.2
Periodic filter cleaning
..............................................................................................................................................10
6.3
Cleaning the impeller
................................................................................................................................................. 11
6.4
Periodic general maintenance - Recommended at least once a week
..................................................12
7. O
-S
e
ason
S
torage
.............................................................................................................................................................12
8.
How to use the
r
emote control
......................................................................................................................................13
8.1 G
etting
s
tarted
w
ith
the
r
emote
control
...........................................................................................................14
8.2
Programmable
m
ode
................................................................................................................................................ 14
8.3
Manual drive
m
ode
...................................................................................................................................................14
9.
Advanced features
.............................................................................................................................................................15
10.
MyDolphin™ Plus a
pp operation
..................................................................................................................................16
10.1 Getting started with the MyDolphin™ Plus app ..........................................................................................16
10.2
Prepare the pool cleaner for connection
..........................................................................................................16
10.3
Activate the pool cleaner using your mobile smart device
........................................................................ 16
11.
Power supply LED lights
....................................................................................................................................................17
12.
Power supply - Troubleshooting
.................................................................................................................................... 18
13. MyDolphin™ Plus - T
ro
u
bleshooting
..........................................................................................................................19
14. Robotic pool cleaner - Troubleshooting ..................................................................................................................20
2
Wave 90i | User Instructions
1. INTRODUCTION
Thank you for purchasing a Maytronics robotic pool cleaner.
We are sure that your Maytronics robotic pool cleaner will provide you with reliable, convenient and
cost effective pool cleaning. Its reliable filtration in all pool conditions and all-surface climbing brush
enhance maximum pool hygiene.
The robotic pool cleaners by Maytronics deliver advanced cleaning technology, long lasting performance
and easy maintenance.
2. SPECIFICATIONS
Robot
Motor protection: IP68
Minimum depth: 0.4 m (1.33 ft)
Maximum depth: 5 m (16.4 ft)
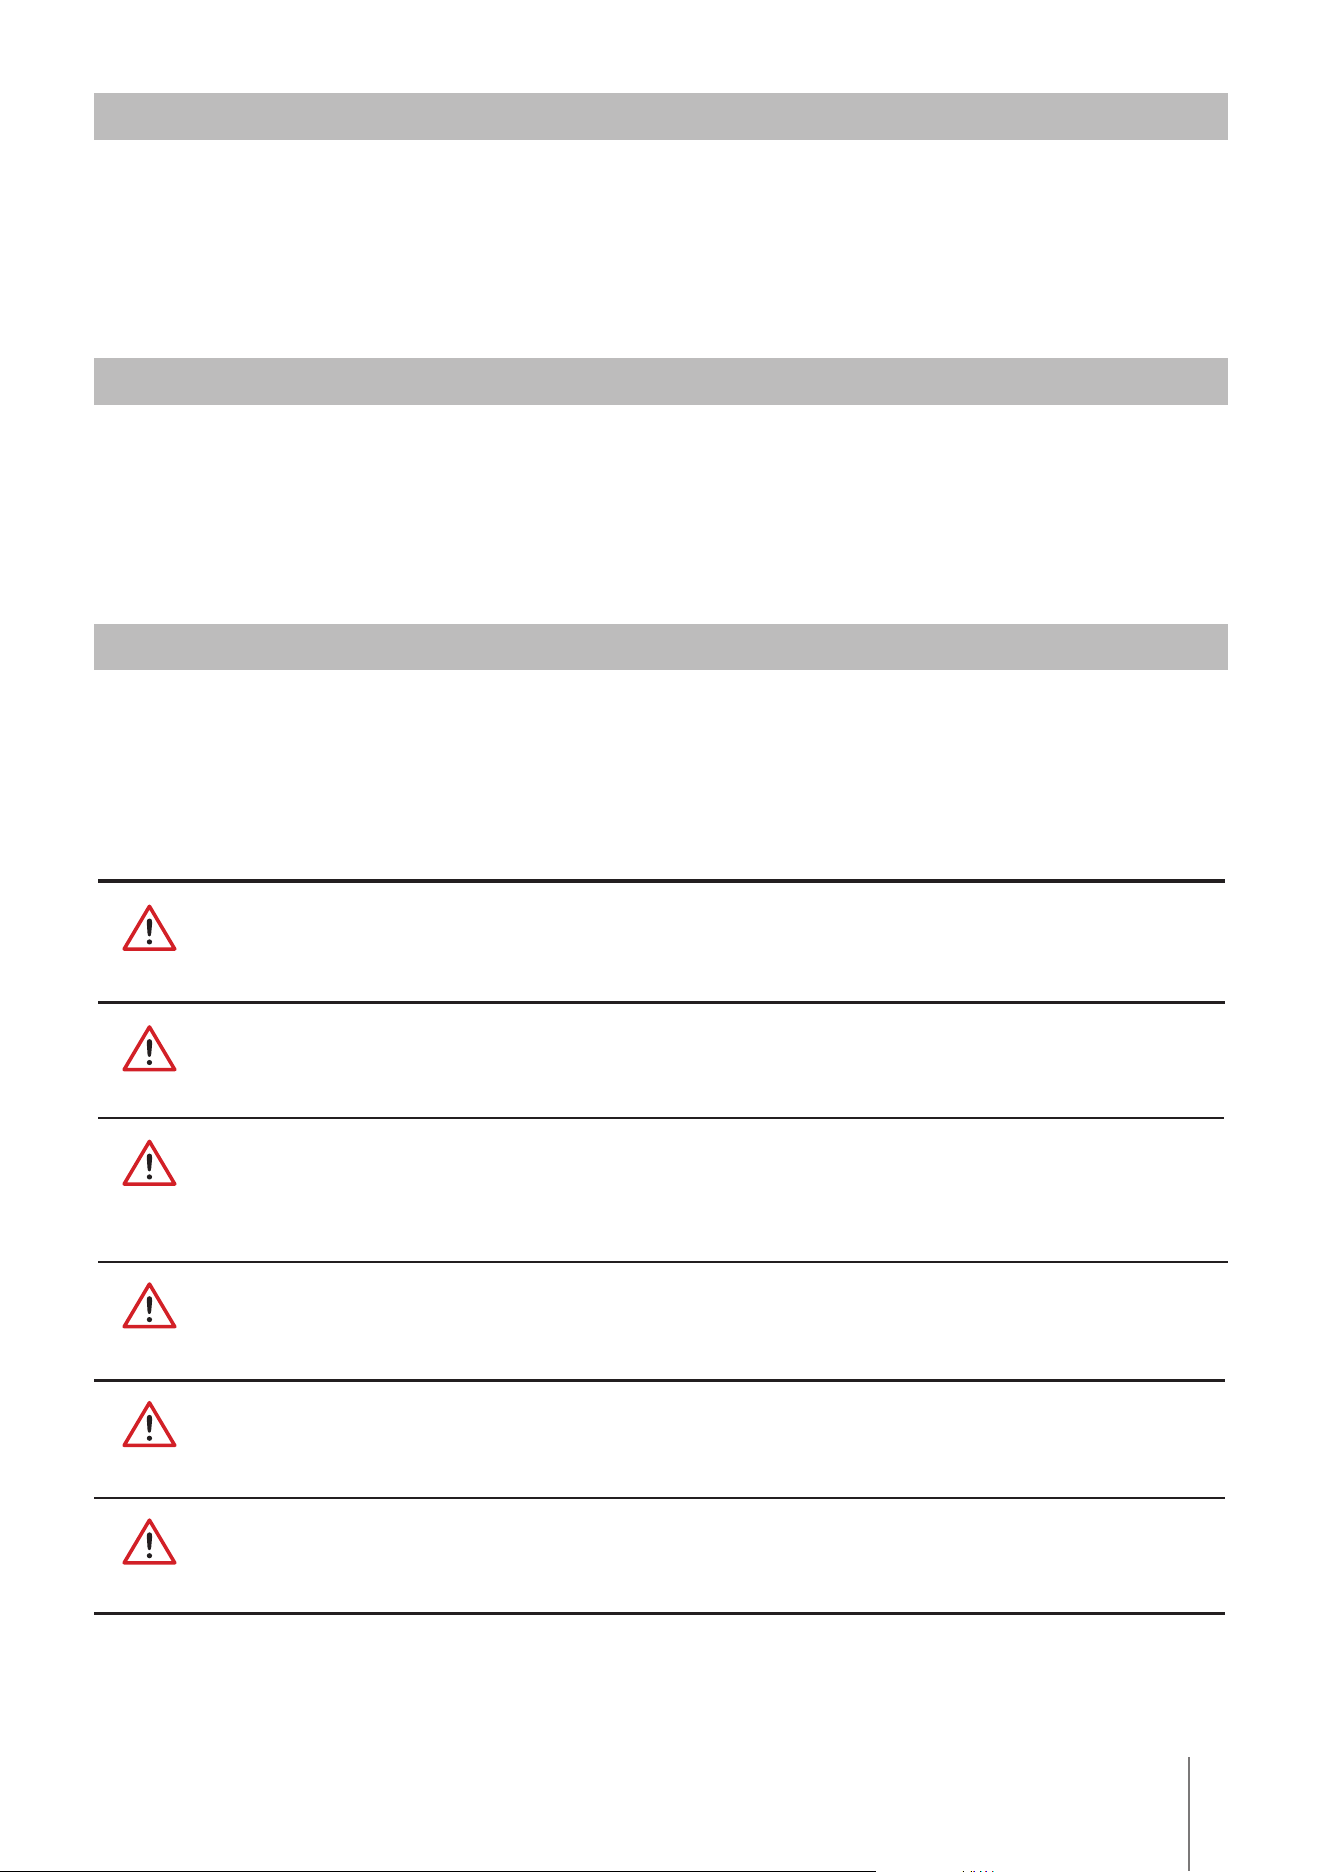
3. WARNINGS AND CAUTIONS
IMPORTANT SAFETY INSTRUCTIONS
READ AND FOLLOW ALL INSTRUCTIONS
Please adhere strictly to the following WARNINGS:
Take the robotic pool cleaner out of the pool before allowing people to enter the pool.
When examining the robotic pool cleaner, disconnect the main power supply.
Ensure that children do not attempt to access the robotic pool cleaner while it is operating.
Keep the robotic pool cleaner out of the reach of children or persons with reduced physical,
sensory or mental capabilities, or lack of experience and knowledge, unless they have been
given supervision or instruction.
Only an original power cord must be used, at all times. If damaged, it must be replaced by a robotic
pool cleaner certified technician to avoid hazards. certified technician, in case of need to avoid
hazard.
To reduce the risk of electric shock replace damaged cord immedietely.
Do not use an extension cord to connect the robot to the outlet; provide a properly located outlet.
Digital switch-mode power supply
IP54
Input: 100 VAC to 250 VAC, 50 Hz to 60 Hz, 180 W
Output: <30 VDC
Bluetooth® max output < 5.8mW
Wi-Fi® max output < 76mW - Frequency 2.4MHz
WARNING
WARNING
WARNING
WARNING
WARNING
WARNING
3
Wave 90i | User Instructions
The power supply must be supplied through a residual current device (RCD) having a rated residual
operating current not exceeding 30mA.
For USA/Canada installations:
The power supply must be connected only to a supply circuit that is protected by a ground fault
circuit interrupter (GFCI). This GFCI should be tested on a routine basis.
To test the GFCI, push the test button. The GFCI should interrupt power. Push the reset button.
Power should be restored. If the GFCI fails to operate in this manner, the GFCI is defective.
If the GFCI interrupts power to the power supply without the test button being pushed, a ground
current may be flowing, indicating the possibility of an electric shock. Do not use the power supply.
Disconnect the power supply and contact the manufacturer for assistance.
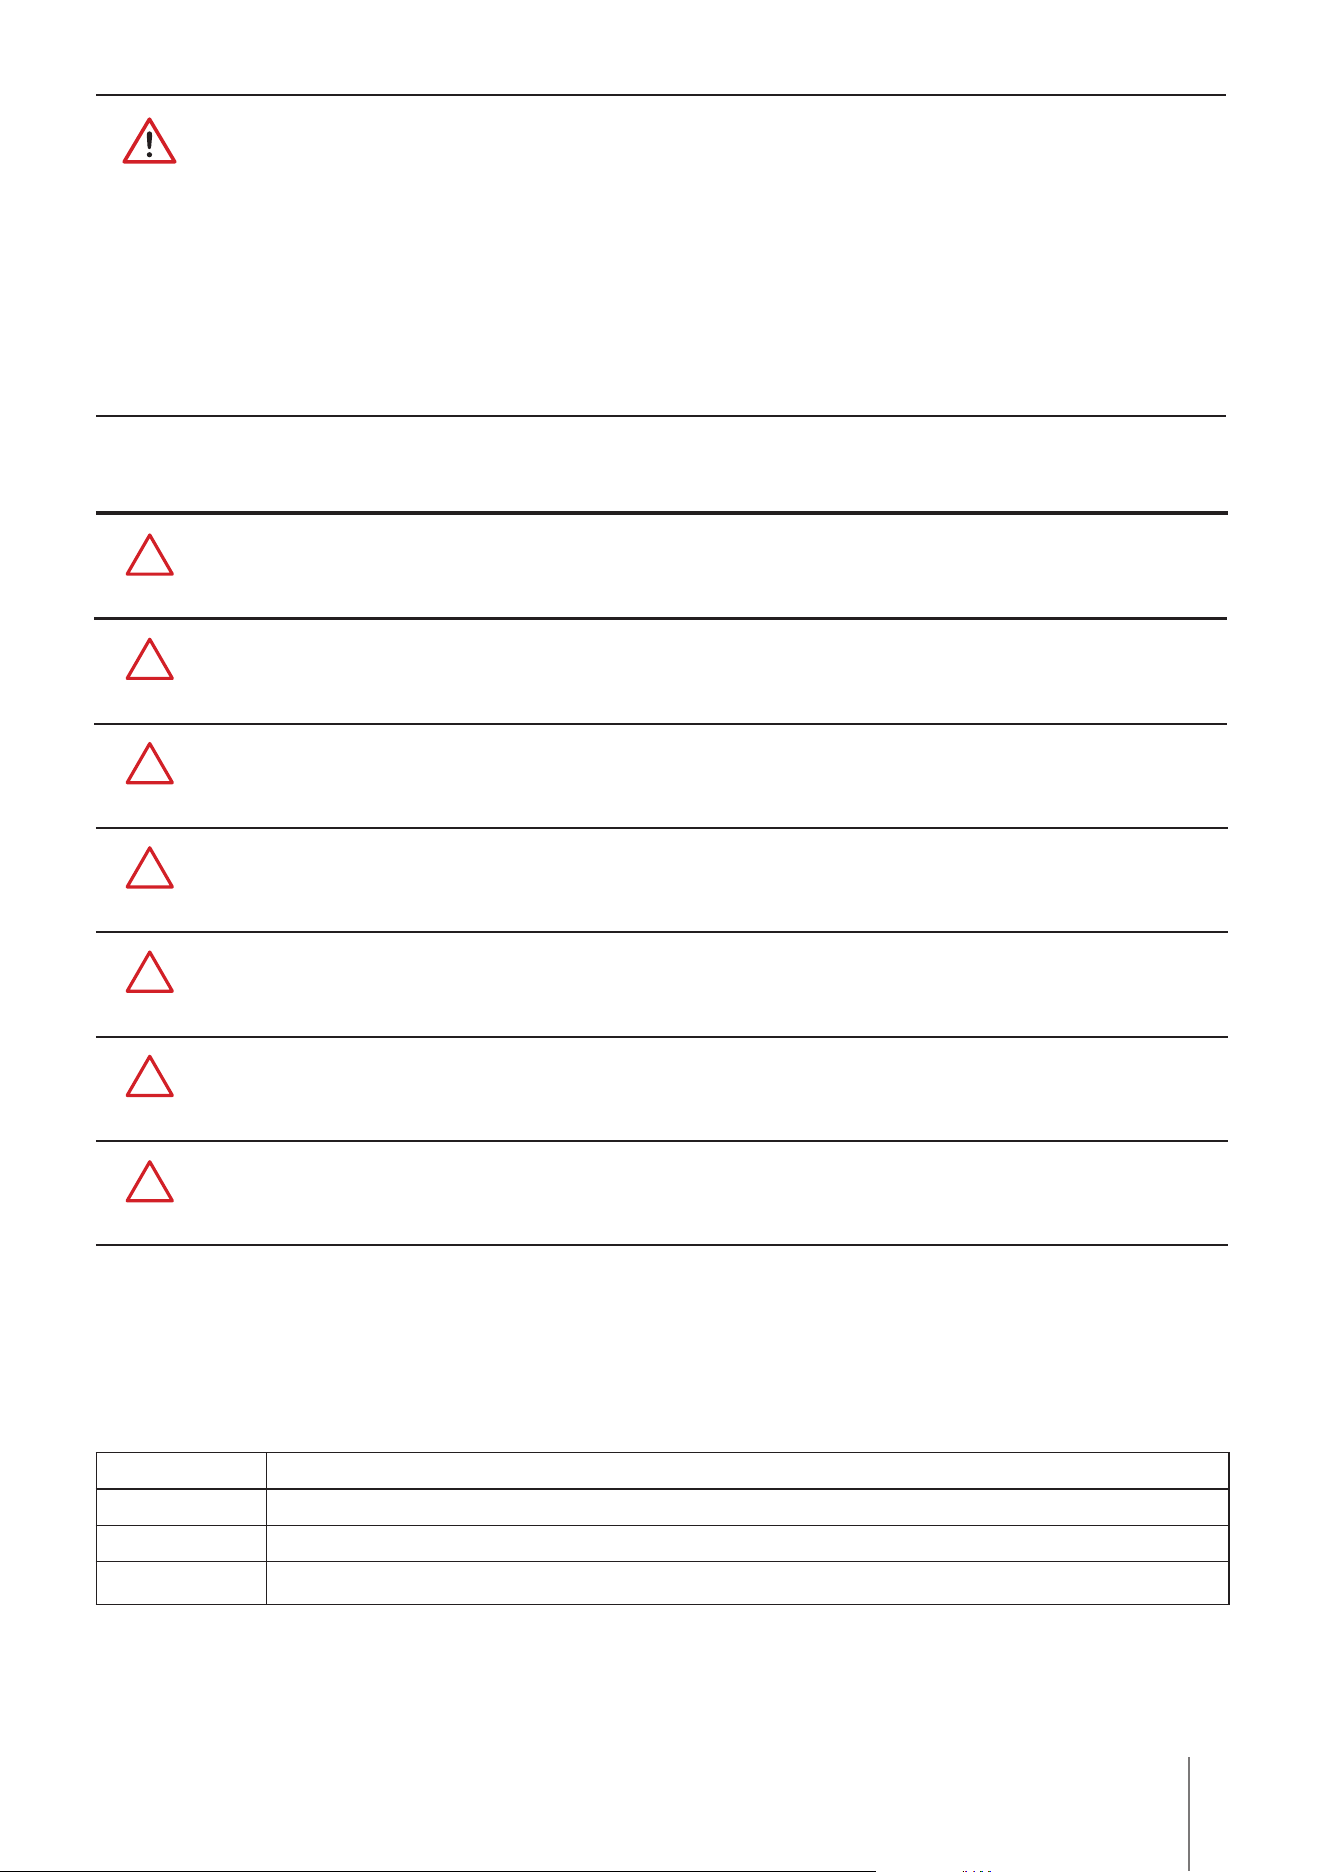
Please ensure that the following PRECAUTIONS are implemented:
Operator should keep hands away from driving belt mechanism.
Unplug the power unit before maintaining.
Only a trained operator should operate the robotic pool cleaner.
Position the Caddy and power supply at least 3.5 m (12 ft) from pool’s edge – during operation.
For continued protection against possible electric shock, the power supply unit should be placed
at least 11 cm (4 in) above ground.
When lifting the robotic pool cleaner, take care to prevent back injury.
Do not bury cord - locate cord to minimize damage from lawn mowers, hedge trimmers and other
equipment.
Do not use the robotic pool cleaner if you have added liquid flocculant or any other clarifier to the
pool water. These substances obstruct and damage the robot's filters.
3.1 Water Conditions
Use the robotic pool cleaner in the following water conditions:
Chlorine 4 ppm max
pH 7.0 - 7.8
Temperature 6 °C to 35 °C (43 °F to 95 °F). Below 15 °C (59 °F), climbing performance may be affected
NaCl 5000 ppm max
CAUTION
CAUTION
CAUTION
CAUTION
CAUTION
CAUTION
CAUTION
WARNING
4
Wave 90i | User Instructions
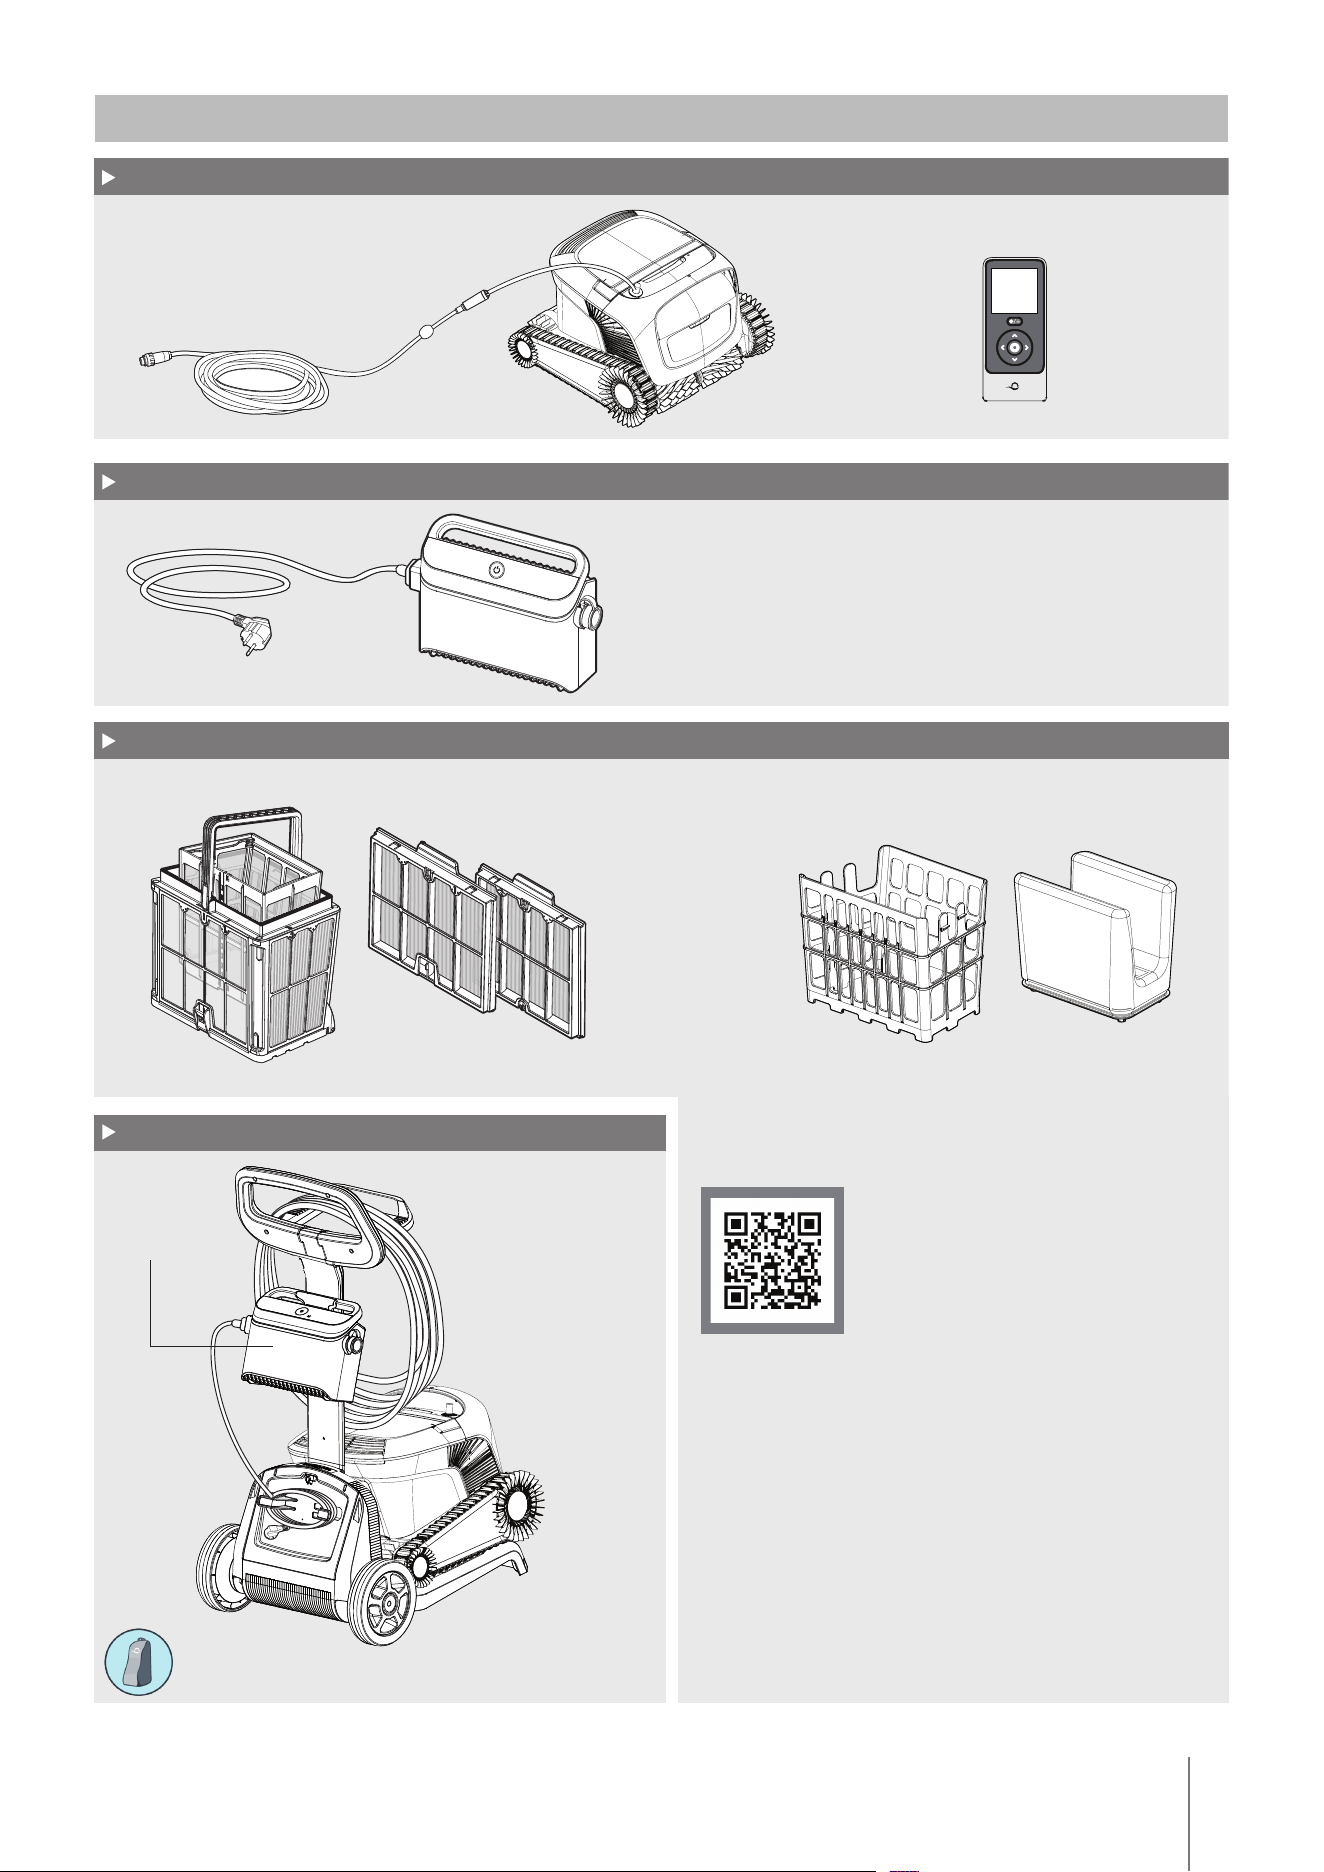
4. ROBOTIC POOL CLEANER PARTS
Robotic Pool Cleaner
Filtration
Power supply
Caddy
Start the season with the net filters for large debris then use ultra-fine filters for daily use.
Remote Control unit
The power supply unit is designed to be resistant to rain
but it is not sealed from moisture. Like any other electrical
device, we recommend covering it during wet seasons.
* The filter panels are assembled on the filter basket. * The filter bag fits inside the basket.
Power supply
If you have a filter bag, scan the QR code to see how
to clean it.
If you have filter basket panels:
When the pool is very dirty, it is best to use the fine
panels because ultra-fine panels tend to get clogged
more quickly. After the first cleaning, we recommend
using a combination of fine and ultra-fine panels.
Be sure to rinse the filter immediately after removing
the robot from the pool. Once debris dries on the
filter, it tends to be very hard to remove.
Filter options are available online or from your local
distributer.
Caddy Cover protects the robot from the sun
5
Wave 90i | User Instructions
3.5m/12 ft.
5.1.25.1.1
5.1.3
It is crucial that the power supply doesn't fall into the water and is kept 11cm/4"
above the ground.
WARNING
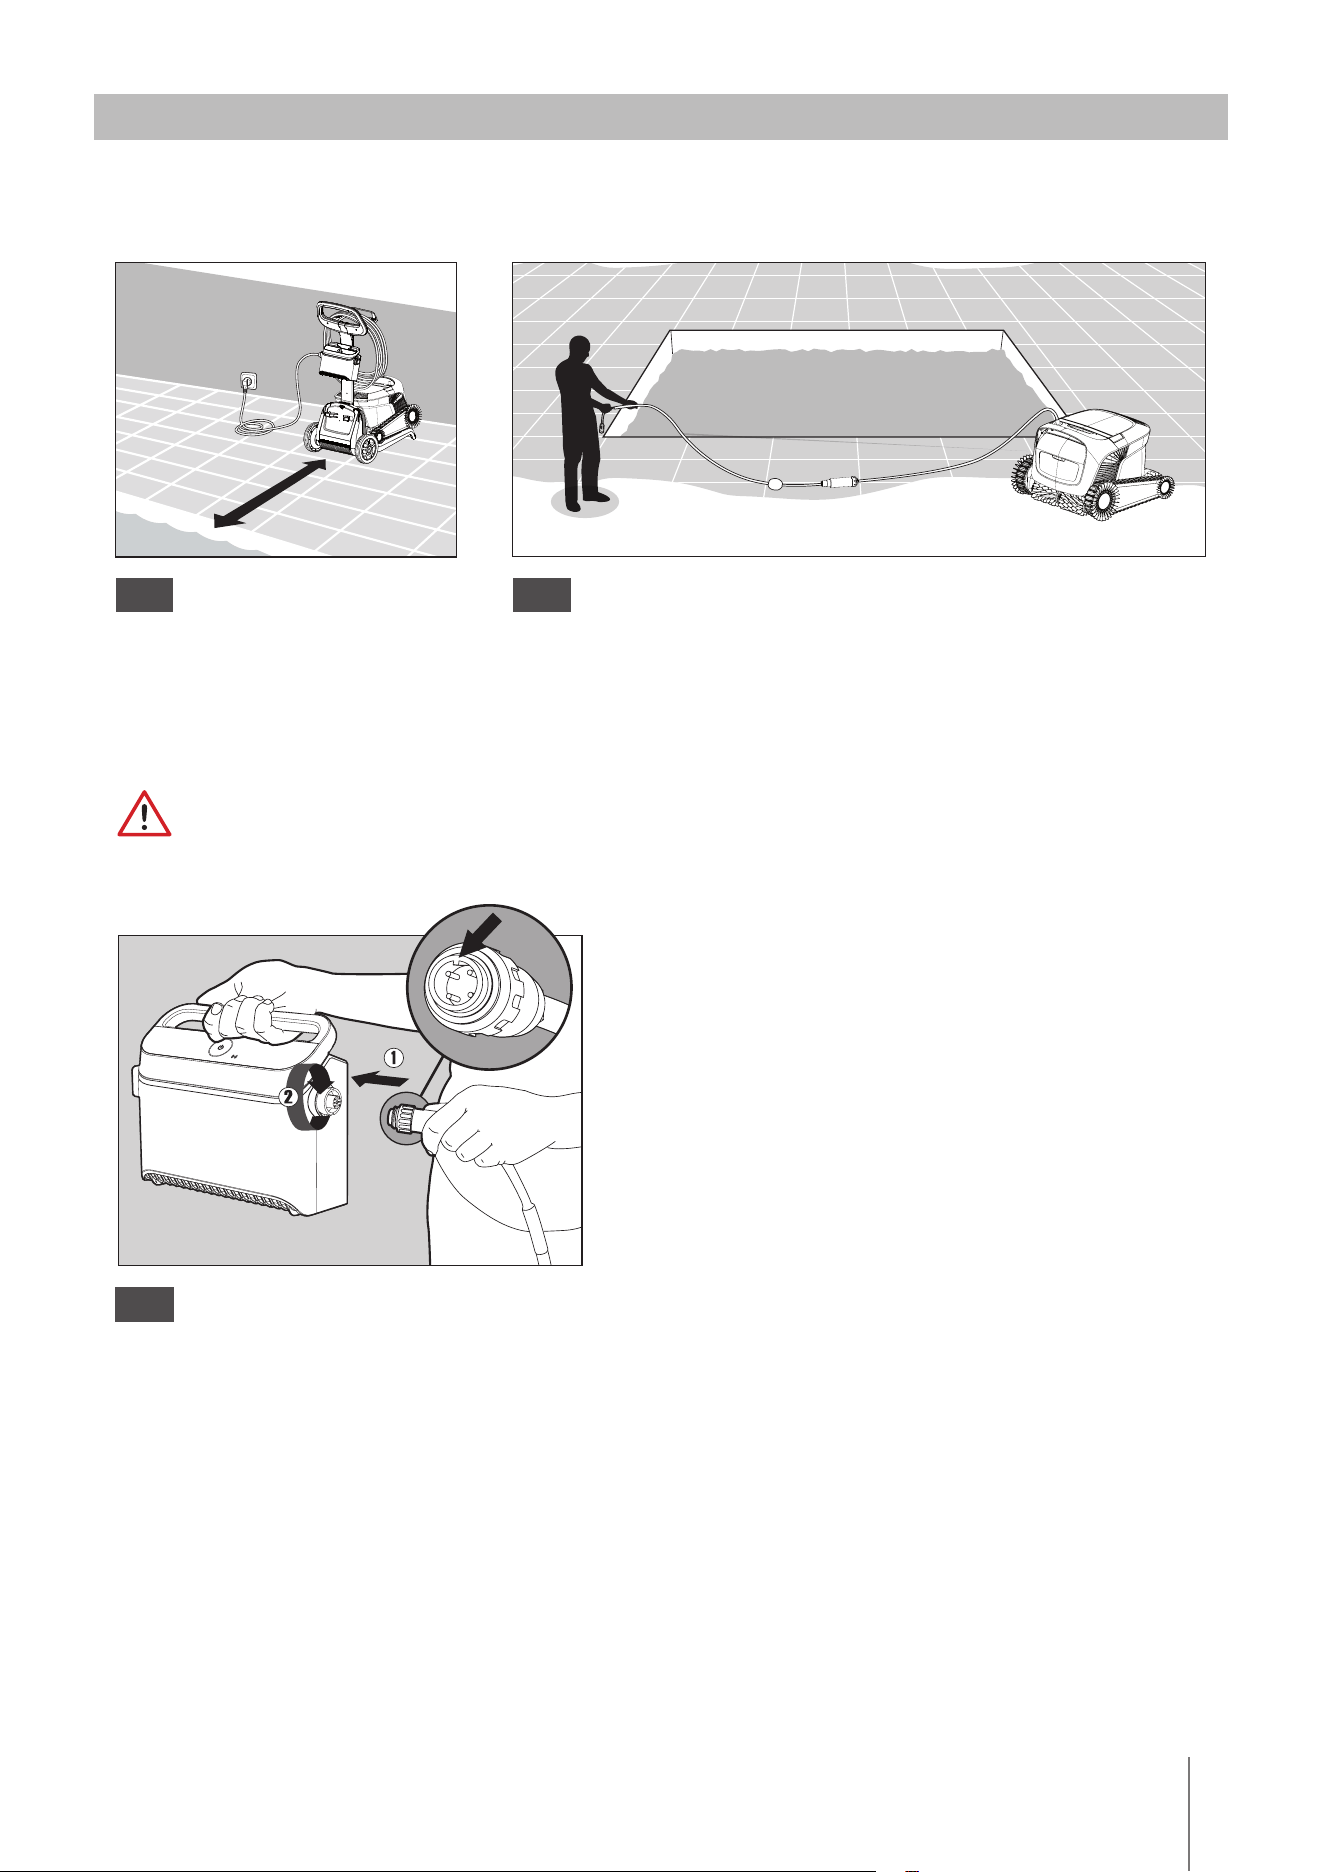
5. USING THE ROBOTIC POOL CLEANER
Position the power
supply at approximately the
middle of the long side of the
pool, at least at a distance
of 3.5 m (12 ft).
Attach the blue cable to the power
supply: Insert the cable with the notch on
the connector (1), lined up with the groove
in the socket on the power supply, and turn
clockwise (2).
Unwind the cable to ensure that it has no kinks.
5.1 Setup
6
Wave 90i | User Instructions
5.2.1
5.3.1
Place the
robotic pool cleaner
in the pool.
Release it and let it sink to the floor of the pool.
Make sure that the blue cable is free of any
obstacles.
5.2 Placing the robotic pool cleaner into the pool
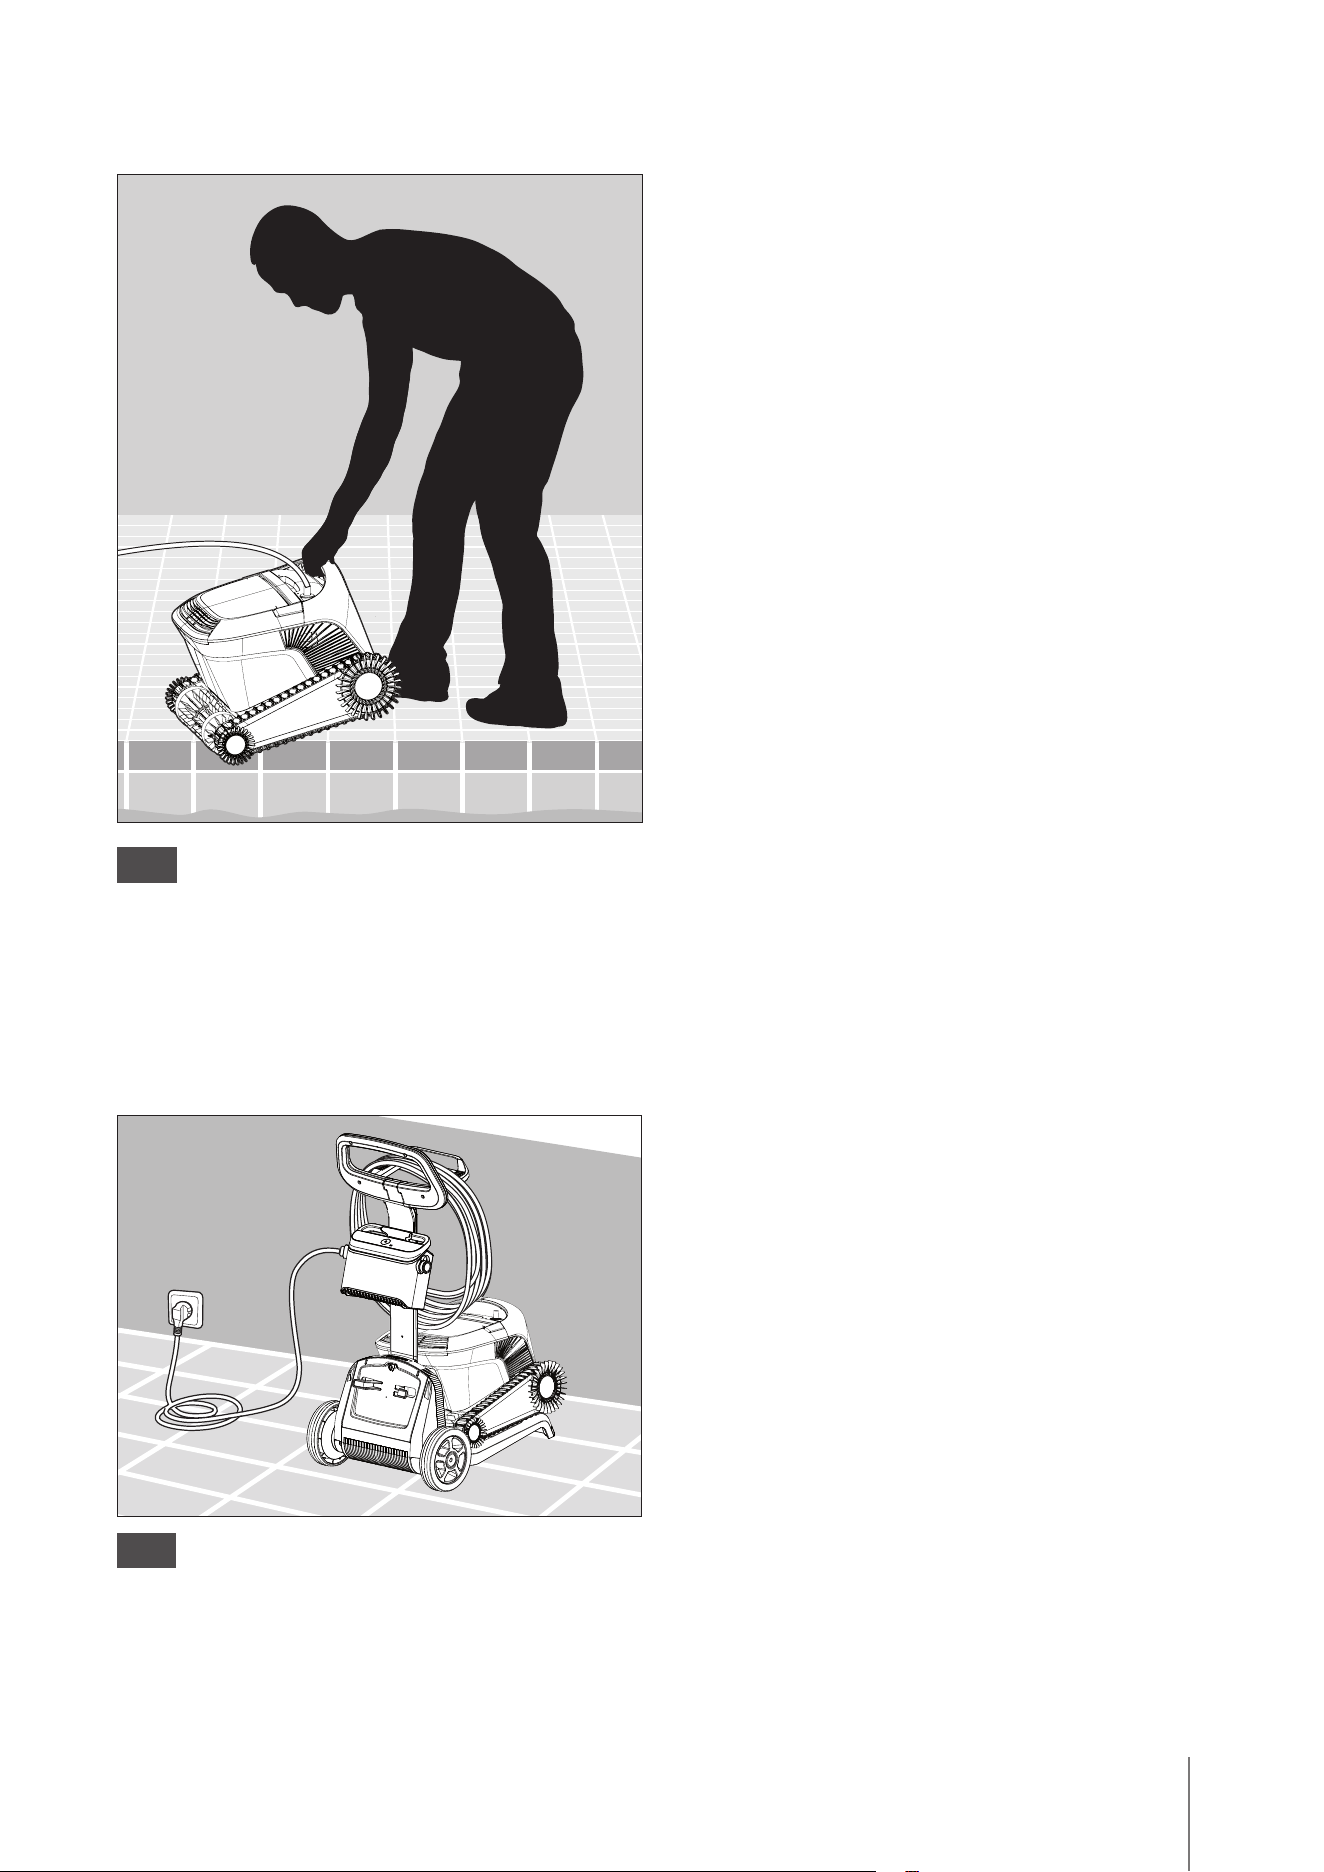
Hang the power supply on the Caddy adaptor for
power supply and plug it into the wall outlet.
5.3 Plug in the power supply

7
Wave 90i | User Instructions
Lights display Meaning
Blue circle Blinks 4 times Occurs after connecting the power-supply to the
power outlet
Blue connectivity light is consistent Bluetooth® connected
Green and Blue connectivity lights
blink alternately
Pairing process is ongoing
Green connectivity light is on Wi-Fi® connected to home network
Light Indication
Blue blinking
Normal operation of the
robotic pool cleaner
Green blinking
Remote control or Smartphone communicate
with the
robotic pool cleaner
Red constant
Robot error. Check the Troubleshooting section
for solutions
If none of the solutions solve the issue,
contact your dealer to check the
robotic pool
cleaner
5.6.1
Indicator lights
Indicator lights
5.4 Operating the robotic pool cleaner without using your smart device
5.5 Using the power supply
5.6 Robotic pool cleaner indicator lights
LED indications table:
Press the power button to turn the robot ON.
If the robotic pool cleaner is in the water, it will now operate
until it has reached the end of the cleaning cycle.
Your power supply is designed to provide you with the most advanced
features to improve your experience.
• A single ON/OFF button for an easy operation.
• LED indicators for the advanced features.
NOTE: Pressing the power button for more than 5 seconds
will trigger the weekly timer every 2nd day. You can use this
to allow debris enough time to settle to the pool floor before
the robot starts its cleaning cycle.
8
Wave 90i | User Instructions
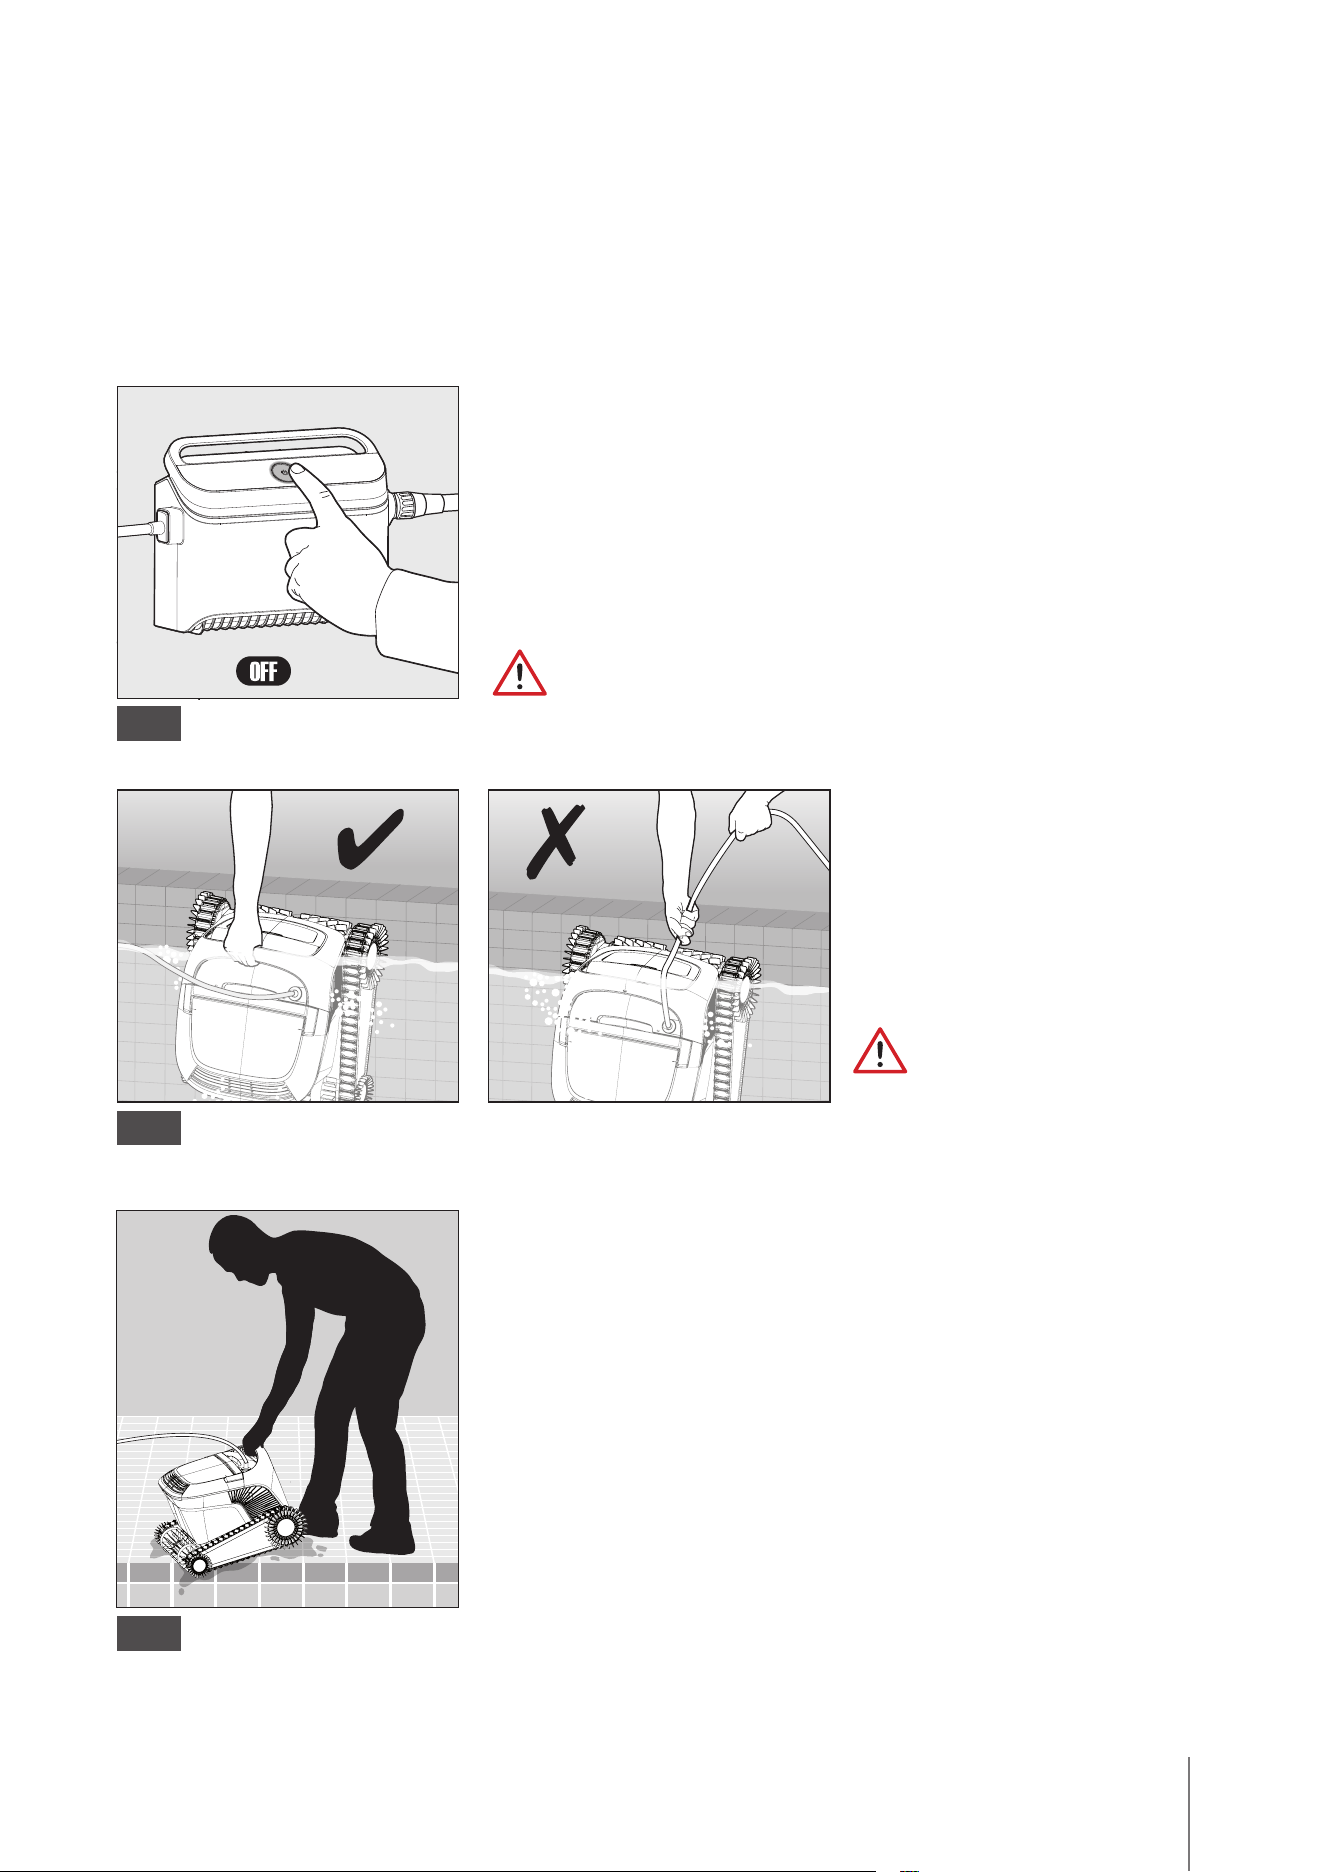
Turn OFF the power supply.
Please use the cable to pull
the robot to the surface,
then use the handle.
5.7.1
5.7. 2
5.7. 3
WARNING
WARNING
Option A
The easiest and most fun way to get the robot out of the water:
1. Log into the MyDolphin™ Plus app and click "Pick-up mode".
2. The robot will reach the wall closest to it and will climb to the water surface.
3. Grab the robot by the handle and pull it out the water.
Place the
robotic pool cleaner
on the edge of the pool
and let the water drain out before lifting.
Use the cable to pull the robotic
pool cleaner to the side of the pool.
Use the handle to remove the robot
from the pool.
Option B
5.7 Removing the robotic pool cleaner from the pool

9
Wave 90i | User Instructions
Make sure the power supply is switched o.
WARNING
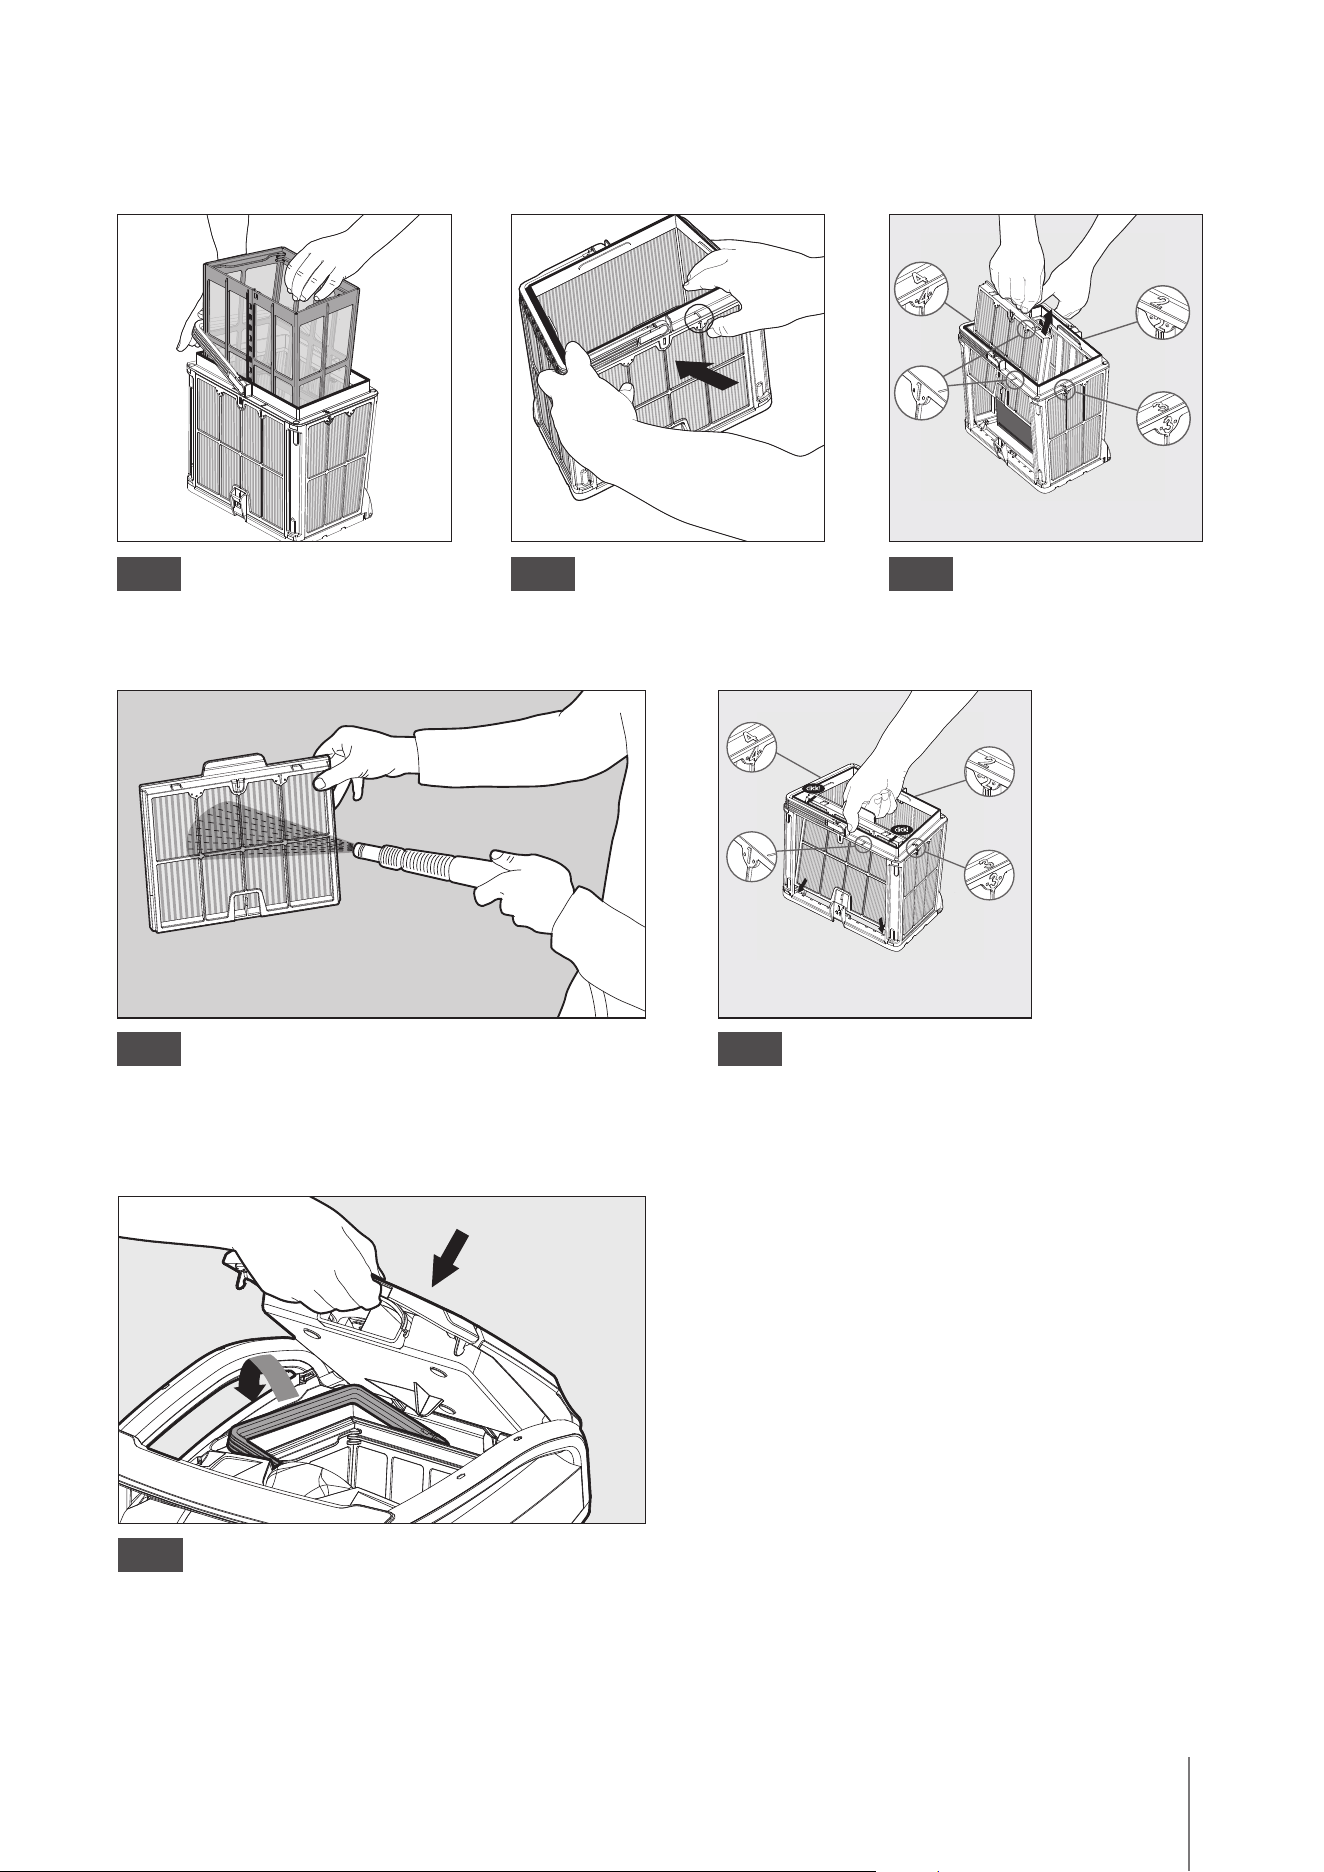
Upon opening the filter cover,
the handle will lift independently.
Open the filter cover.
Lift the basket. Open the latch to
release the bottom lid.
Clean the filter basket
with a hose.
click!
6.1.1
6.1.3 6.1.4 6.1.5
6.1.2
1
2
After rinsing the filter, quickly rinse the robotic pool cleaner with fresh water, to minimize damage
caused by the chemicals in the pool water.
Filter bag - If the robot came with a filter bag:
1. Open the filter lid.
2. Lift the basket.
3. Open the zipper.
4. Turn upside down, shake loose debris and rinse with a hose.
5. For a quick how-to video, please scan the QR code.
6. CARE AND MAINTENANCE
To prevent debris permanently hardening on the filter, we highly recommend quick-rinsing the
filter immediately after removing the robot from the pool.
Note: Do not let the filter panels dry out before cleaning.
6.1 Cleaning After Use
Filter basket - If the robot came with a filter basket:
How to clean
the filter bag
10
Wave 90i | User Instructions
Hold down the handle
to remove the inner net basket.
Clean the filter panels with a hose.
Reposition the inner net basket, check that
each filter was placed well, and insert the clean filter
basket. Close the filter cover.
Assemble the filter
panels in the
following order:
Panel 4 —> 3 —> 2 —> 1.
Dismantle the panels;
start by pressing on panel 1,
using your thumbs.
Continue to dismantle
in the panels in order:
2 —> 3 —> 4.
6.2.1
6.2.4
6.2.6
6.2.5
6.2.2 6.2.3
6.2 Periodic Filter Cleaning
Dismantle the 4 ultra-fine filter panels of the outer basket, according to the following steps:

11
Wave 90i | User Instructions
2
1
3
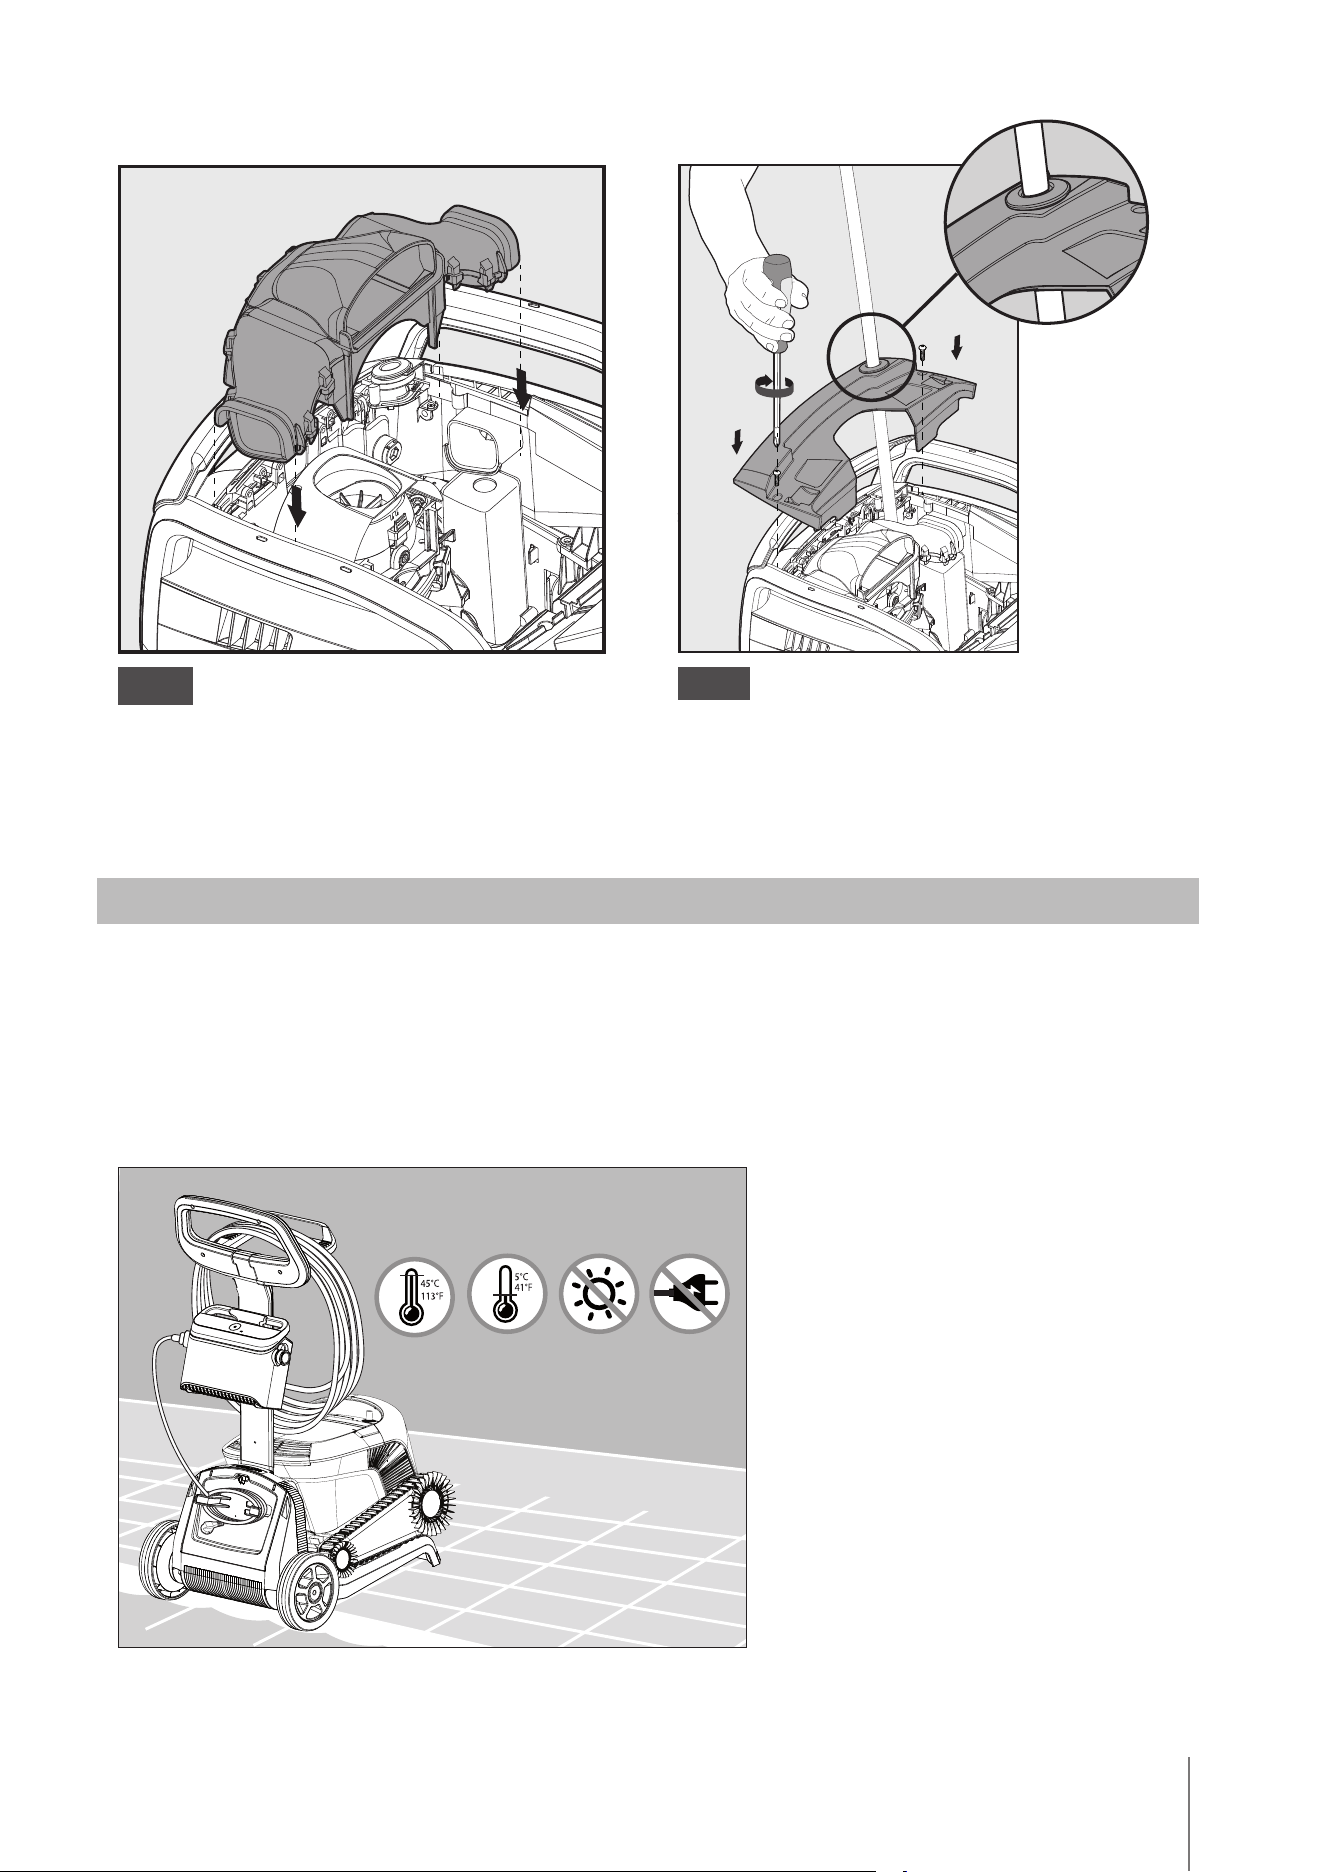
6.3.1
6.3.3 6.3.4
6.3.2
Make sure the power supply is switched o and unplugged.
WARNING
6.3 Cleaning the impeller
If you notice debris trapped in the impeller:
Clean the debris trapped in the impeller opening, according to the following steps:
12
Wave 90i | User Instructions
6.3.5
6.3.6
7. OFF-SEASON STORAGE
6.4 Periodic general maintenance - Recommended at least once a week
When the cable is wet, spread it flat and straight in the yard, to release any twists in the cable.
Allow the cable to dry before winding it again to prevent mildew.
• Make sure that no water is left in the
robotic pool cleaner
.
• Thoroughly clean the filter basket and panels and insert them back in place.
• Roll up the blue cable so that it has no kinks and place it on the Caddy mount.
• Store the
robotic pool cleaner
in a protected area out of direct sun/rain/frost, at a temperature
range of 5 °C to 45 °C (41 °F to 113 °F).
Assemble the impeller compartment according to the next steps:
13
Wave 90i | User Instructions
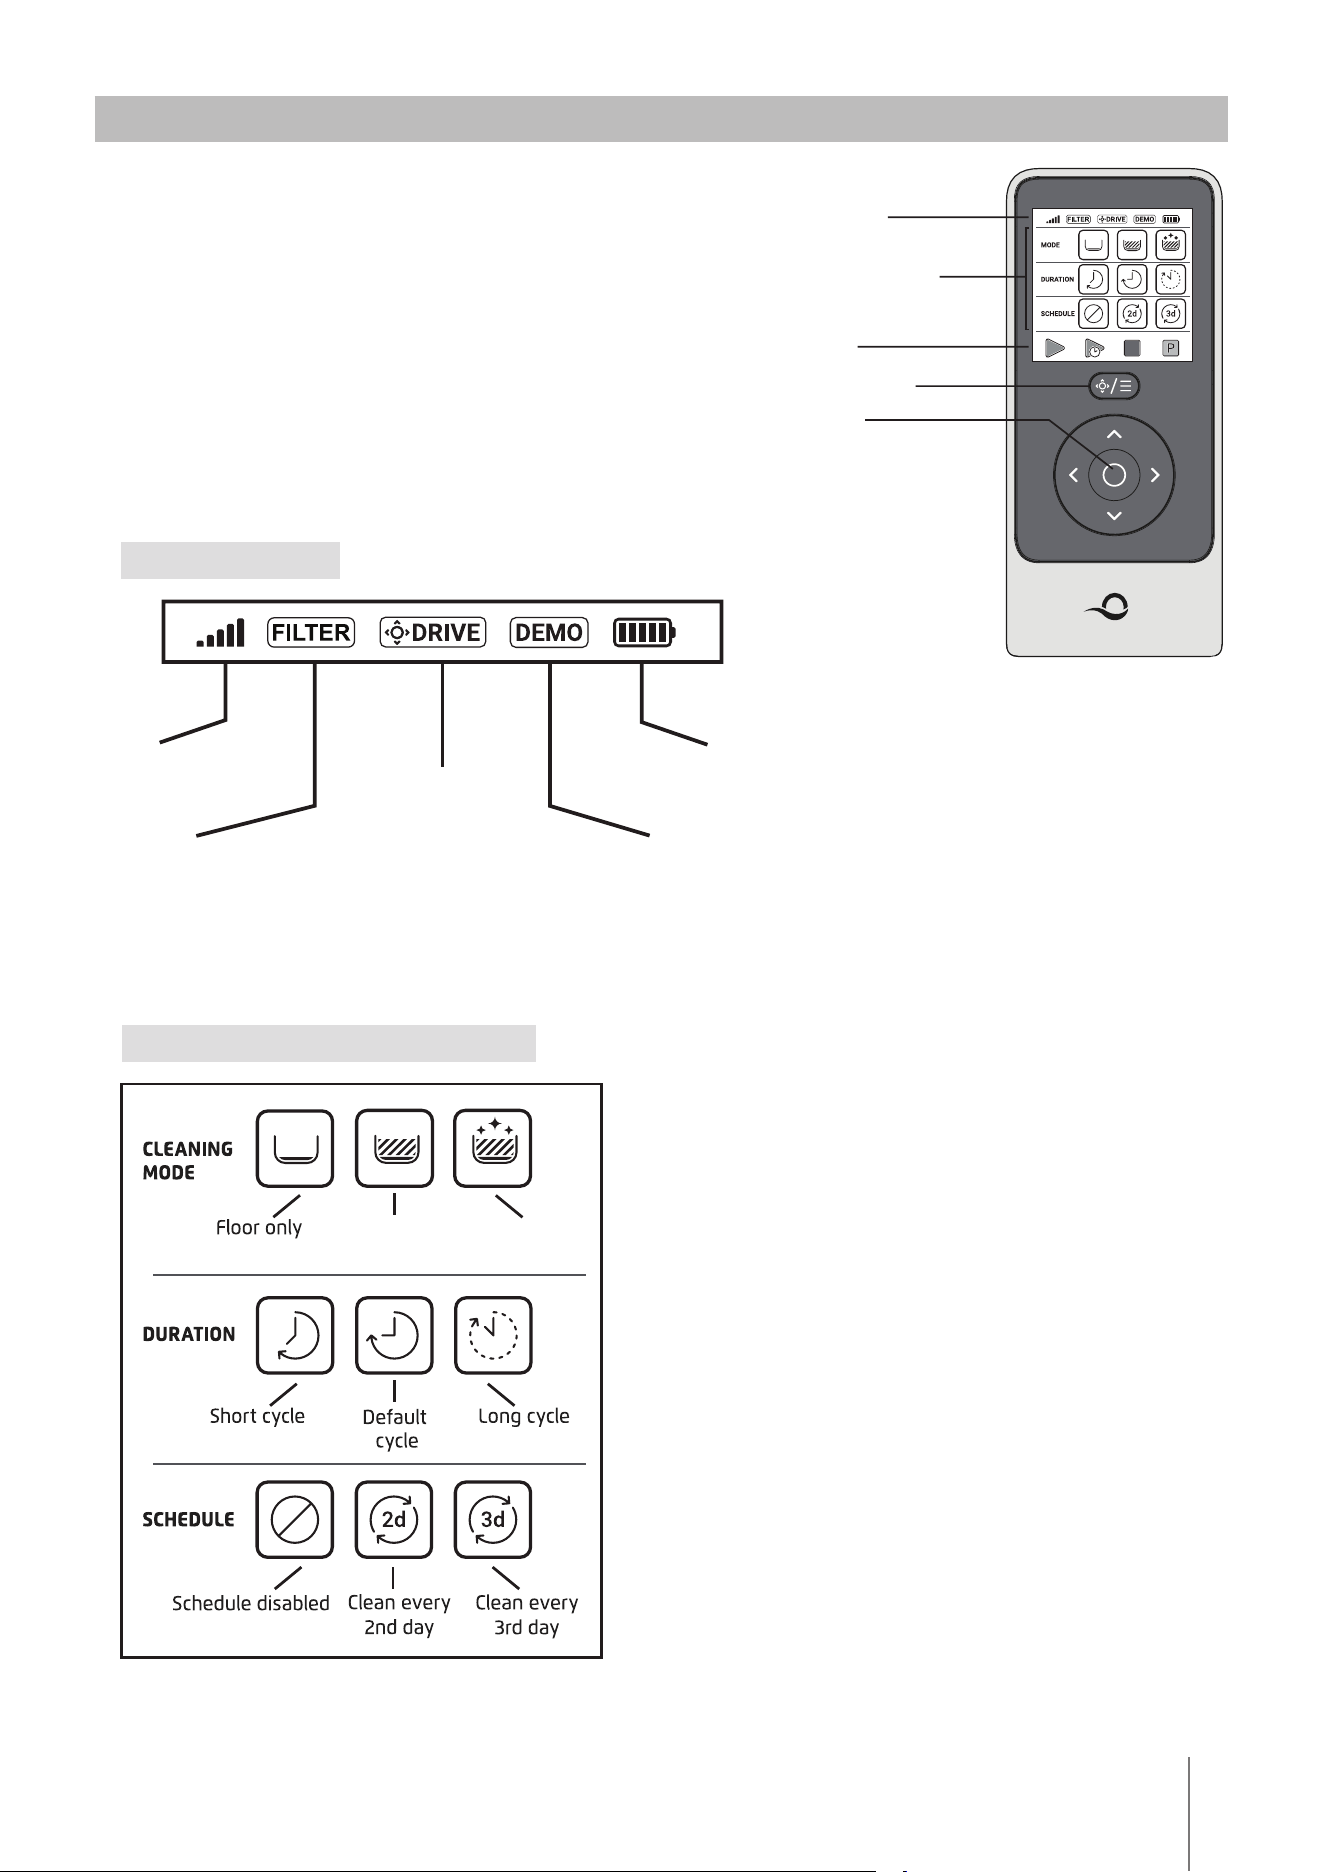
8. HOW TO USE THE REMOTE CONTROL
STATUS BAR
Battery level indicator
The remote control unit oers two
operation modes:
• Programmable mode - cleaning parameters can
be changed
• Manual Drive mode - motion can be
controlled manually
Floor
and walls
Floor
and walls
Technician mode
Manual drive mode
Filter indicator blinks
when you need to clean
the filter
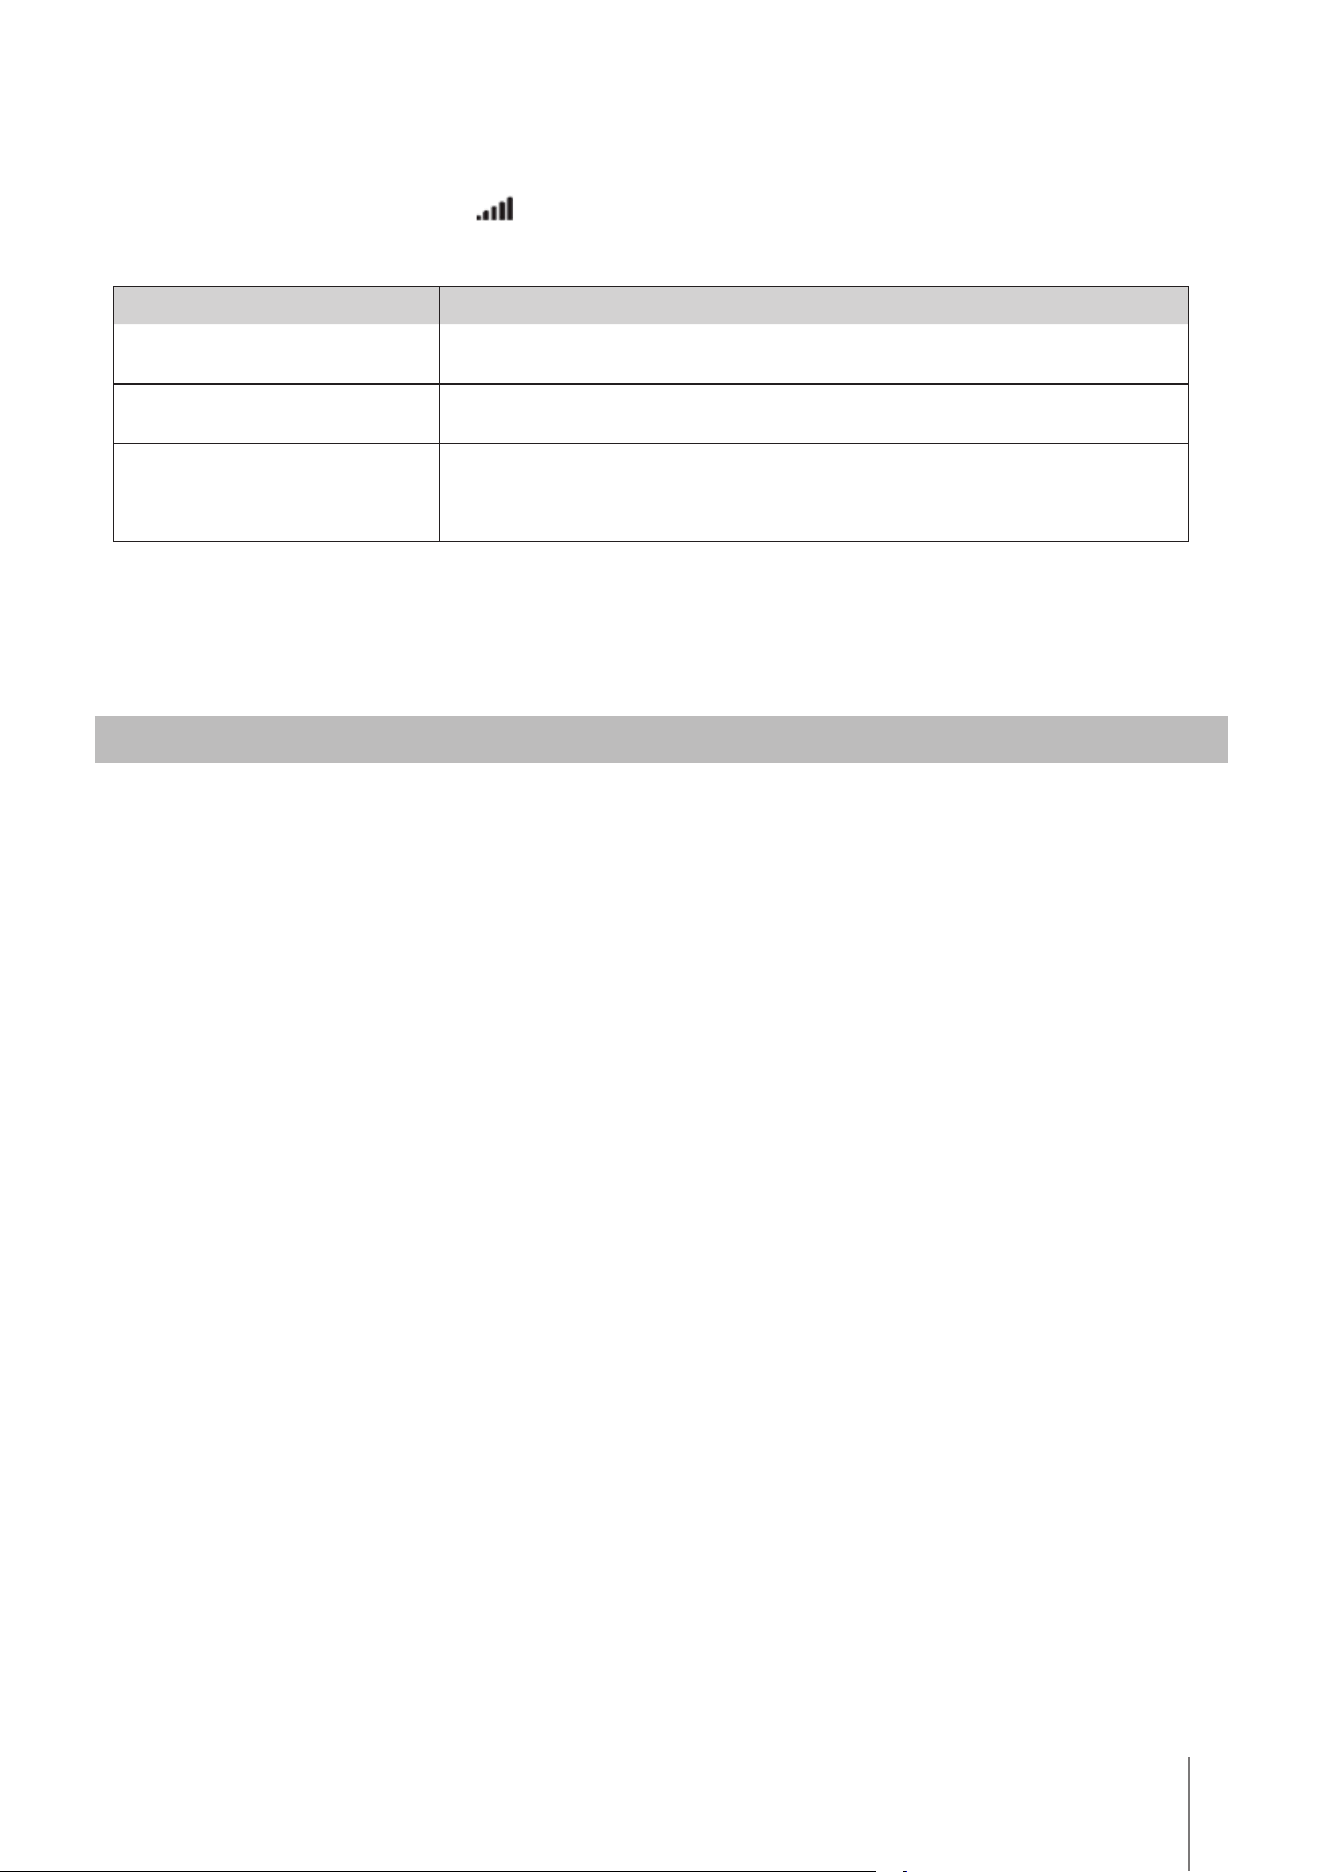
Signal strength
indicator
CLEANING SETTINGS
ACTION
MODE SELECTOR
ON / OFF
STATUS BAR
CLEANING SETTINGS

14
Wave 90i | User Instructions
8.1 Getting started with the remote control
1. Download the MyDolphin
TM
Plus moblie app, and complete the registration process, in order to
activate the features.
2. Make sure the remote control is OFF.
3. Plug in the power supply.
4. Attach the remote control to the power supply.
5. Press simultaneously on both right and left direction control arrows until you hear two beep
sounds and you have a clear view of the remote control screen.
8.2 Programmable mode
The remote control unit oers the following programmable operation modes:
1. Cleaning mode - floor or floor and walls (see page 14)
2. Duration - 2h/3h/4h (see page 14)
3. Delay - 1 hour delay - available if connected to MyDolphin
TM
Plus app
4. Schedule - every second day or every third day
5. Pick up (see page 9)
6. On / O
In Delayed Operation mode, you can set the Pool Cleaner to clean the pool after the debris has
settled to the floor, by pressing START LATER.
The power supply will start blinking green. After one hour, the Pool Cleaner will start working.
If you wish to cancel the START LATER program, press again on the START LATER icon.
When the power supply stops blinking, the program is canceled.
In the Weekly Scheduling mode, you can set your own cleaning program. You can choose if you want
to clean your pool every two days or every three days.
This feature requires leaving the robot in the water for the whole week. To minimize wear and tear,
we recommend taking the robotic pool cleaner out after each use to rinse the robot and filter.
Using the weekly scheduler will accelerate wear and tear because the robot remains in the pool with
its chemicals. Also, if the filter isn't rinsed the robot cleaning eciency is reduced.
• To clean your pool every 2 days, press
• To clean your pool every 3 days, press
• The scheduling program is valid for one week only. If you program the weekly timer in the
MyDolphin
TM
Plus app, you can set it to 'repeat' and the scheduling program will continue week after
week. Again, leaving the robot in the water increases its wear and tear while reducing its cleaning
eciency.
8.3 Manual drive mode
You can use the Manual Drive mode to control how your Dolphin pool cleaner navigates around the pool.
Note: Due to its wireless functionality, there might be a delay between your command and when the
robot is able to follow. If you want to turn, hold the left or right key for 2-4 seconds and wait to see if
the robot is facing the desired direction.
• If the robot is ON - Turn on the remote, press the mode selector, and use the direction control
arrows to control the movement of the robot around the pool.
15
Wave 90i | User Instructions
What's wrong What to do
The power supply isn't working Make sure the power supply is plugged in
The remote control is not in range Move closer to your power supply
The remote control isn't paired with
your robot
Make sure the remote control is OFF. Attach the remote control unit to the power supply.
Press simultaneously on both right and left direction control arrows until you hear two
beeps, and the power supply shows a steady BLUE connectivity LED
In case of diculties operating the remote control unit, try to repeat the above steps or contact our Customer
Care team.
*see details in the end of this document
9. ADVANCED FEATURES
• If the robot is OFF - Turn on the remote and wait for 60 seconds until the self-test is completed.
Press the mode selector and use the direction control arrows to control the movement of the robot
around the pool.
NOTE: If the signal bar is blinking
or you have lost connection with the power supply, it could
be due to one of the following reasons.
In order to activate the advanced features, please download the MyDolphin
TM
Plus app.
Temperature Sensor
This Dolphin
robotic pool cleaner
has a unique sensor that lets you know the water temperature.
The sensor shows the temperature in Celsius and Fahrenheit.
Degree range: 6°C to 38°C (42.8°F to 100.4°F).
Filter gauge
This feature shows you two levels of filter mode, and how clogged the filter is, due to a load of dirt
or a certain element getting stuck inside the filter.
This is very important for the ecient operation of the filter and its preservation over time.
The feature can be activated through the MyDolphin™ Plus app.
In / Out of water sensor
This feature enables you to know whether the
robotic pool cleaner
is inside or outside the
pool water.
Before activating this feature, a calibration is needed. To calibrate, please follow the steps as
shown in the app.
Delay start
This feature allows you to start the operation in 1h , 2h or 3h.
You can use this to let the debris sink in, and settle to the pool floor before the robot starts its
cleaning cycle.

16
Wave 90i | User Instructions
10.
MyDolphin™ Plus App OPERATION
5. Android users - please make sure your GPS / Location Services are ON.
6. For iOS 13 only - while the app is working, enable Bluetooth® & location.
10.2 Prepare the pool cleaner for connection
1. Connect the blue cable to the power supply and the power cable from the power supply
to the electrical outlet.
2. The connectivity LED light indicator on your power supply will start flashing blue.
3. Place the pool cleaner in the water.
4. Press the ON button on your IoT power supply, to start the pool cleaner.
10.3 Activate the pool cleaner using your mobile smart device
1. Activate the MyDolphin™ Plus app.
2. Sign up by creating an account or use your Gmail/Facebook accounts.
3. Allow all required permissions.
4.
Wait for the steady blue connectivity LED light and a success message in the app.
The app will start pairing with your power supply. Follow the app instructions to connect with the robot.
5 Connect to your home/pool Wi-Fi® network.
6. Enter the password of your home Wi-Fi® network, and press CONTINUE.
After a short while, your power supply will flash green and blue.
7. Wait for the steady green connectivity LED light and a success message in the app.
NOTE: Next time you open the app, you will be able to fill in the warranty via the app.
TIPS:
• If the app is stuck on the same screen for over 2 minutes, close the app and re-open it.
• To test your Wi-Fi® signal strength and quality, stand next to the power supply and play a video
via your smart phone browser.
10.1 Getting started with the MyDolphin™ Plus app
The app is compatible with the following smart devices:
• Apple (iOS) - version 10 and up - iPhone, iPad, iPod
• Android – version 5 and up operating system
1. Make sure your mobile smart device (phone/tablet) is connected to the internet.
2. Make sure you have your Wi-Fi® network name and password in reach.
3. The power supply connects to WiFi® 2.4GHz only. If you have a dual-band router, separate the 2.4 and
5GHz networks and give them unique names. You can find instructions for your router brand online or
consult your internet provider.
4. Ensure Bluetooth® is enabled on your smartphone.

17
Wave 90i | User Instructions
11.
POWER SUPPLY - LED LIGHTS
Connectivity LEDs
The connectivity LED light on the power supply has several modes:
1. Flashing blue light - waiting for Bluetooth® connection.
2. Steady blue light - connected via Bluetooth®.
3. Flashing green light - power supply is connected to your home/pool Wi-Fi® network and
trying to connect to the cloud.
4. Steady green light - power supply is now connected to the Wi-Fi® network and to the cloud.
5. Alternating blue and green light - power supply is connected via Bluetooth® and to the cloud.
Appear also while using the remote control.
ON/OFF LEDs
1. Steady blue light - Power supply is ON, and the pool cleaner is working.
2. Flashing green light - waiting for the next operation (delay mode or weekly timer).
3. Alternate blue/green/red lights – program updating remotely.
Please wait until process is completed.
4. Steady red light - error. Refer to troubleshooting.
5. Orange light - Filter is clogged up. Please clean the filter.
Power supply ON/OFF button features:
1. Operating - Press the ON/OFF button for up to 5 sec.
2. Quick start - This feature activates the option to set a weekly timer every 2nd day.
To activate the quick start feature, press and hold the ON/OFF button for 5 sec. The blue led light
will blink three times.
3. Automation mode - This feature allows you to connect to your smart-home.
To activate the automation mode, press and hold the ON/OFF button for 15 sec.
The blue led light will blink 3 times.
18
Wave 90i | User Instructions
Symptom Possible reason Corrective action
The power supply
or its ON/OFF LED
are not working.
• No voltage in the power socket in the wall.
• The power supply is not ON.
• The power cord is not properly connected
to the power supply inlet.
• The Ground Fault Interrupter is OFF.
• Make sure that there is voltage in the power socket in the wall.
• Make sure that the power supply is plugged in and turned ON.
• Make sure that the power cord is securely connected all the
way into the power supply.
• Turn OFF the power supply. Wait 30 seconds, then turn ON.
Can not connect
to your Wi-Fi®,
and the
communication
LED is blinking
Green.
The power supply is too far from the router
(weak signal) or your router is not working
properly.
• Reset the power supply (disconnect the power cord),
and wait 1 min.
• Check that your smartphone has a strong Wi-Fi® connectivity
near the power supply (stand next to the power supply and try
to play any online video streaming application).
• Check if the home router is working properly.
• Locate the power supply as close as possible to the
home router.
• Consider installing a Wi-Fi® extender 2.4 GHz to ensure that
you have a sufficient signal strength.
• Note: In case the communication LED is still blinking Green, you
have the option to connect via Bluetooth®.
Cannot connect
to your robotic
pool cleaner via
Bluetooth®,
and the
communication
LED is blinking Blue.
The power supply is too far from the smart
device, or your Bluetooth® is disabled, or not
working properly.
• Try to turn your smartphone Bluetooth® Off and then On.
• Get closer to the power supply.
• Ensure that you don’t have any obstructions or obstacles
between you and the power supply.
• Turn the power supply OFF and then ON.
• If none of the above troubleshooting helps, contact the dealer
for further support.
Steady Orange
light on the power
supply unit.
* In selected
models only
Filter is clogged. • Please clean the filter.
• We highly recommend cleaning the filter basket after each
cleaning cycle. The robot works more effectively when the
filter is clean.
12.
POWER SUPPLY - TROUBLESHOOTING
19
Wave 90i | User Instructions
Symptom What to do
Pool cleaner does not connect to Wi-Fi®, and
the power supply is flashing green light.
The power supply is trying to connect to your home/pool Wi-Fi® network and cloud.
1. Get the power supply closer to the Wi-Fi® source.
2. Restart your power supply (PWS) and router by disconnecting each of them from
the electric outlet, wait a few seconds and re-connect.
3. If you have a dual-band router, separate the 2.4 and 5GHz networks and give them unique
names. You can find instructions for your router brand online or contact your internet provider.
If the robot does not manage to connect to
WiFi®:
How to change to Bluetooth® after previous
WiFi® connection.
App screen reads: "Connection error"
1. Click "What else can I do".
2. Click on "Continue with Bluetooth®" and follow the instructions in the app.
How to reconnect to the Wi-Fi® once communication is back:
1. Open the app.
2. Go to the settings tab.
3. Click on Wi-Fi® settings.
4. Follow the instructions .
Initial connection.
How to connect with Bluetooth® only.
You must be close to the power supply to establish a Bluetooth® connection.
1. Plug in the power supply.
2. Connect the robot to the power supply.
3. Download the new MyDolphin™ Plus app.
4. Register to the app and allow all the required permissions.
5. Find your robot and connect to it by following app instructions.
6. During the Wi-Fi® configuration process click on the "Skip" button, this will allow you to
proceed directly to the Bluetooth® connection interface.
How to change to Wi-Fi® after initial
Bluetooth® connection.
1. Make sure your Bluetooth® and Wi-Fi® are enabled.
2. Open the MyDolphin™ Plus app and connect to the robot via Bluetooth®.
3. Go to Settings and click “Wi-Fi® Settings”.
4. Follow the app instructions to go online.
Changing your Wi-Fi® network.
Router was replaced
1. Open the app.
2. The app will show the "Connection error" screen.
3. Click "What else can I do".
4. Click on "Change Wi-Fi®" and follow and instructions.
Power supply replacement.
Connecting to new power supply
1. Connect the power supply to the robot.
2. Activate the robot for 30 sec.
3. Turn on the app. It will show "Connection error" or "Can't connect to robot".
4. Click "What else can I do".
5. Choose "Do you have a new robot or a power supply".
6. Search for your robot and follow the instructions.
App doesn't work after motor unit
replacement.
1. Open the MyDolphin™ Plus app. You will see a connection error.
2. Tap "What else can I do" to fix this? Then, under "Do you have a new robot or power
supply?", tap "Disconnect" and search for robots. The Welcome screen is displayed.
3. Tap "Let's get started". Be sure that the app has the required permissions.
4. It should now search for and try to connect with the robot. This pairs the robot's serial
number with the app. If it doesn't work, be sure that your Bluetooth® is on and connected
to the power supply and that your power supply is on while the robot is in the water (if it is
out of the water while on, it will give an out of water error message which derails the pairing
process). There are detailed pairing instructions in the box that the power supply came in.
Note: How do I check what is my robot serial number?
The number appears inside the robot, behind the filter
13.
MyDolphin™ Plus
- TROUBLESHOOTING
Before using the app, make sure you have:
• Cellular connection 3G/4G/5G or Wi-Fi®, with strong signal strength
• Power supply supports 2.4 GHz ONLY. If you have a dual-band router, separate and rename the 2.4
and 5 MHz networks so that the robot can connect to the 2.4.
• Bluetooth® enabled
20
Wave 90i | User Instructions
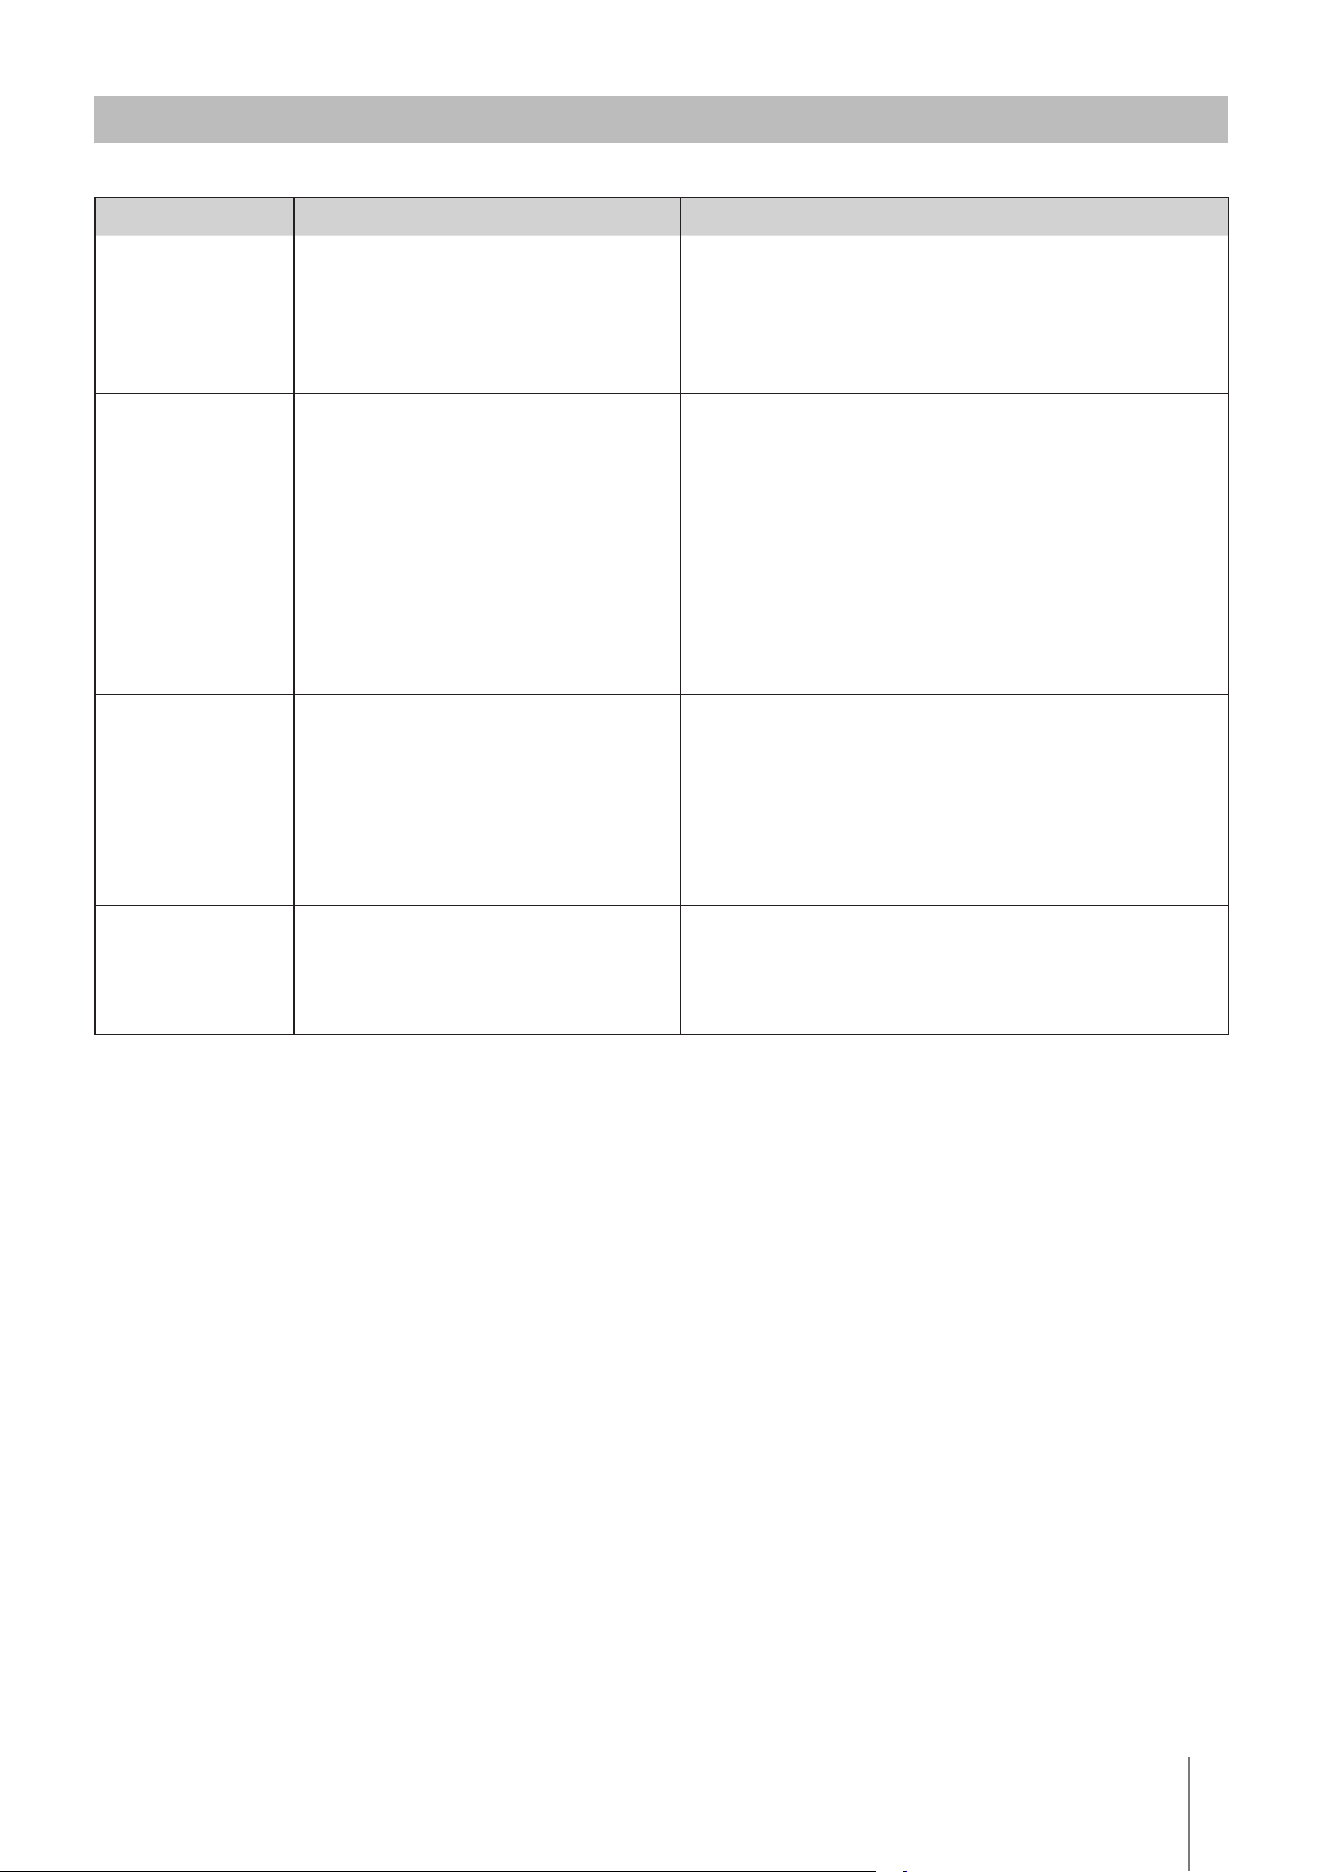
Issue Suggested action
Robot does not turn ON. • Make sure the power supply is ON.
• Make sure the AC outlet is OK.
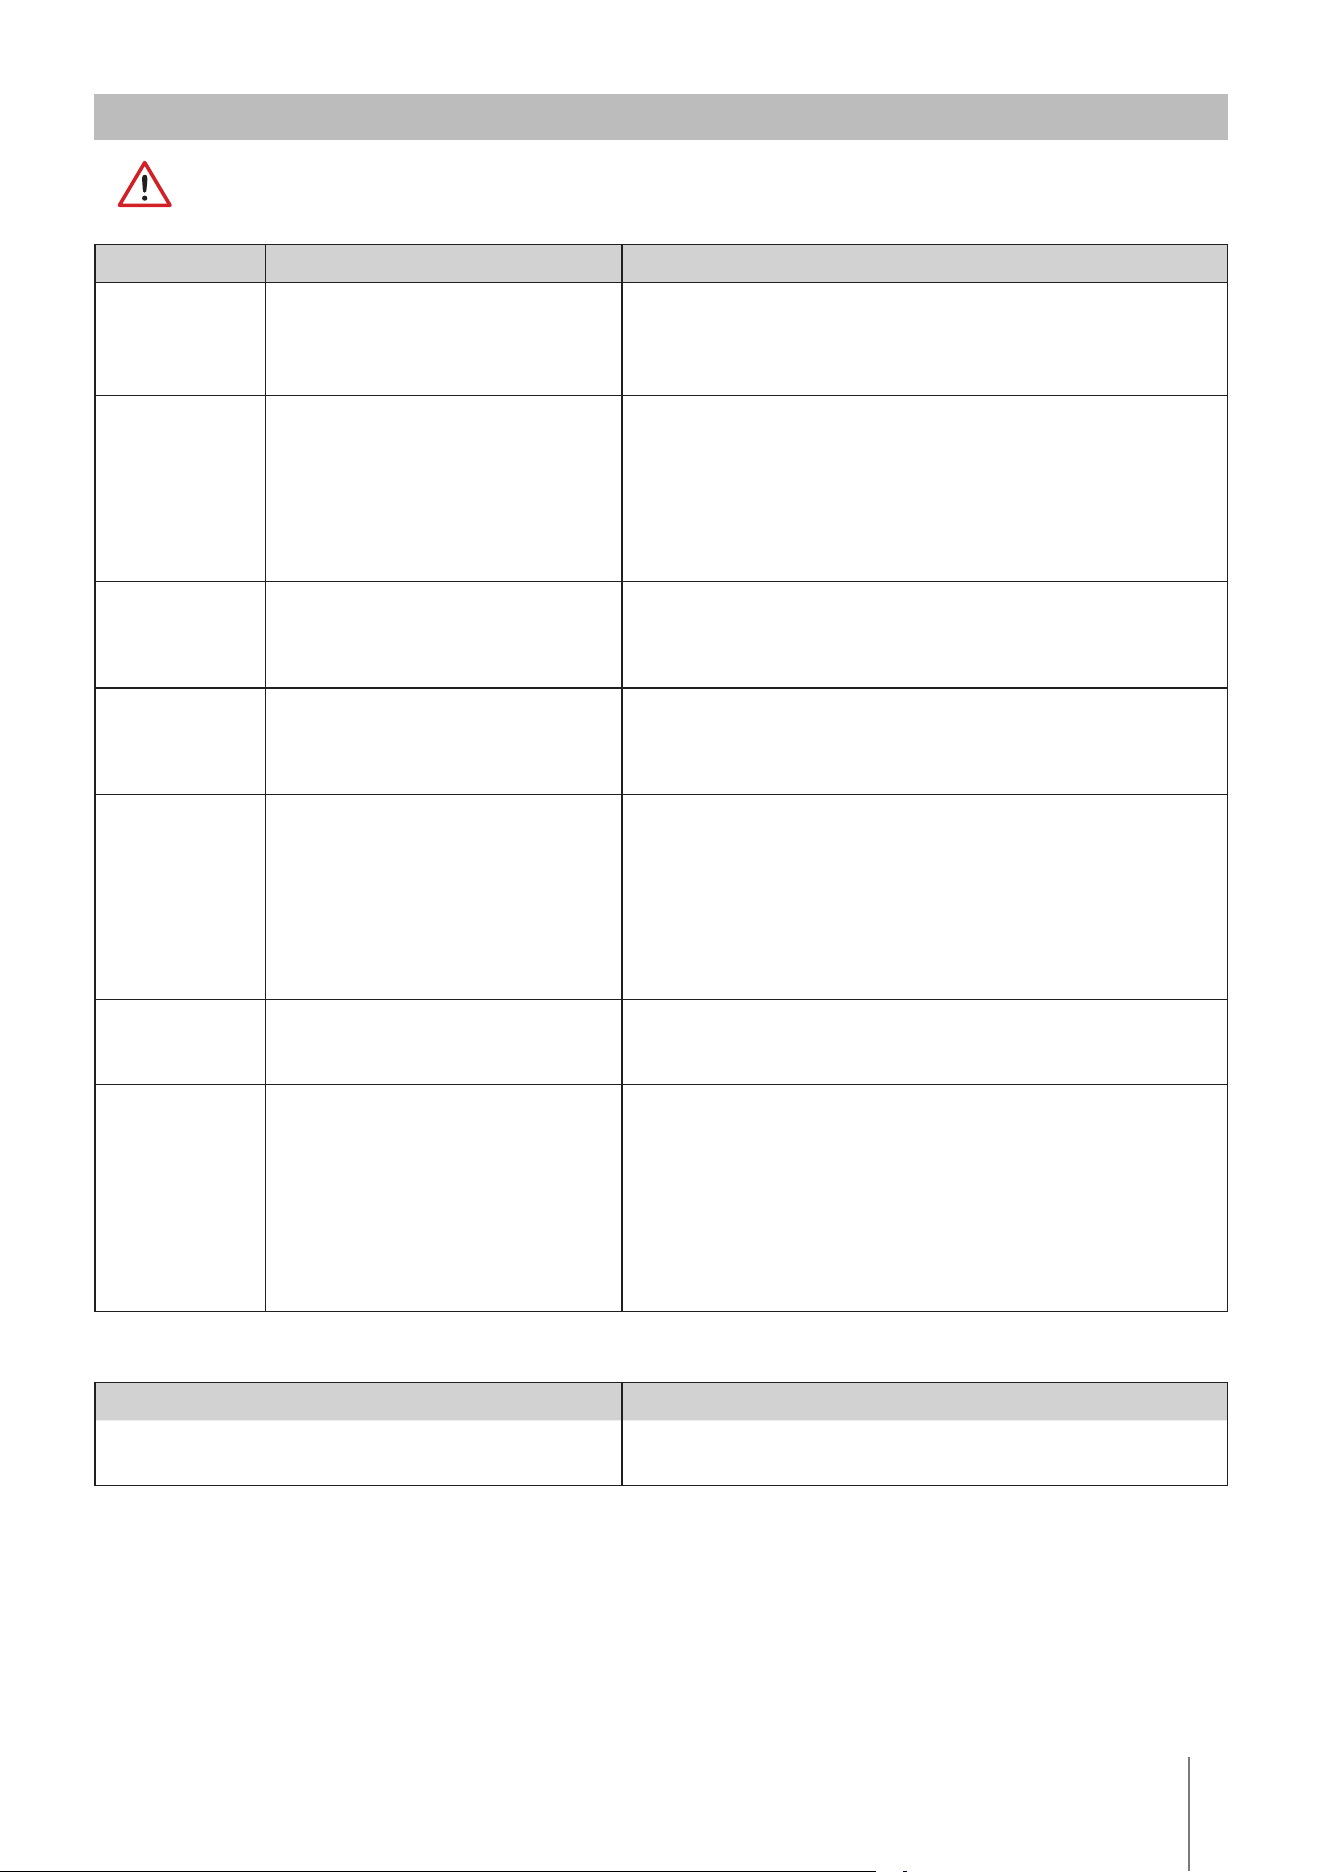
Symptom Possible reason Corrective action
The robotic pool
cleaner does NOT
move.
• An obstacle is blocking the impeller,
tracks, or wheels.
• Unplug the power supply. Open the impeller cover and check that
nothing is trapped in the impeller.
• Verify that nothing blocks the tracks or wheels.
The robotic pool
cleaner is moving
in circles.
• Clogged filter basket.
• Debris stuck in the impeller housing or
impeller cover.
• Power supply incorrectly positioned.
• Algae buildup or pool water does not
meet specifications.
• Clean the filter basket.
• Remove debris stuck in the impeller housing or impeller cover (see
illustrations 6.3.1 to 6.3.4).
• Place power supply in a position that enables the robotic pool cleaner
to freely reach the entire pool area.
• Correct pool and water conditions.
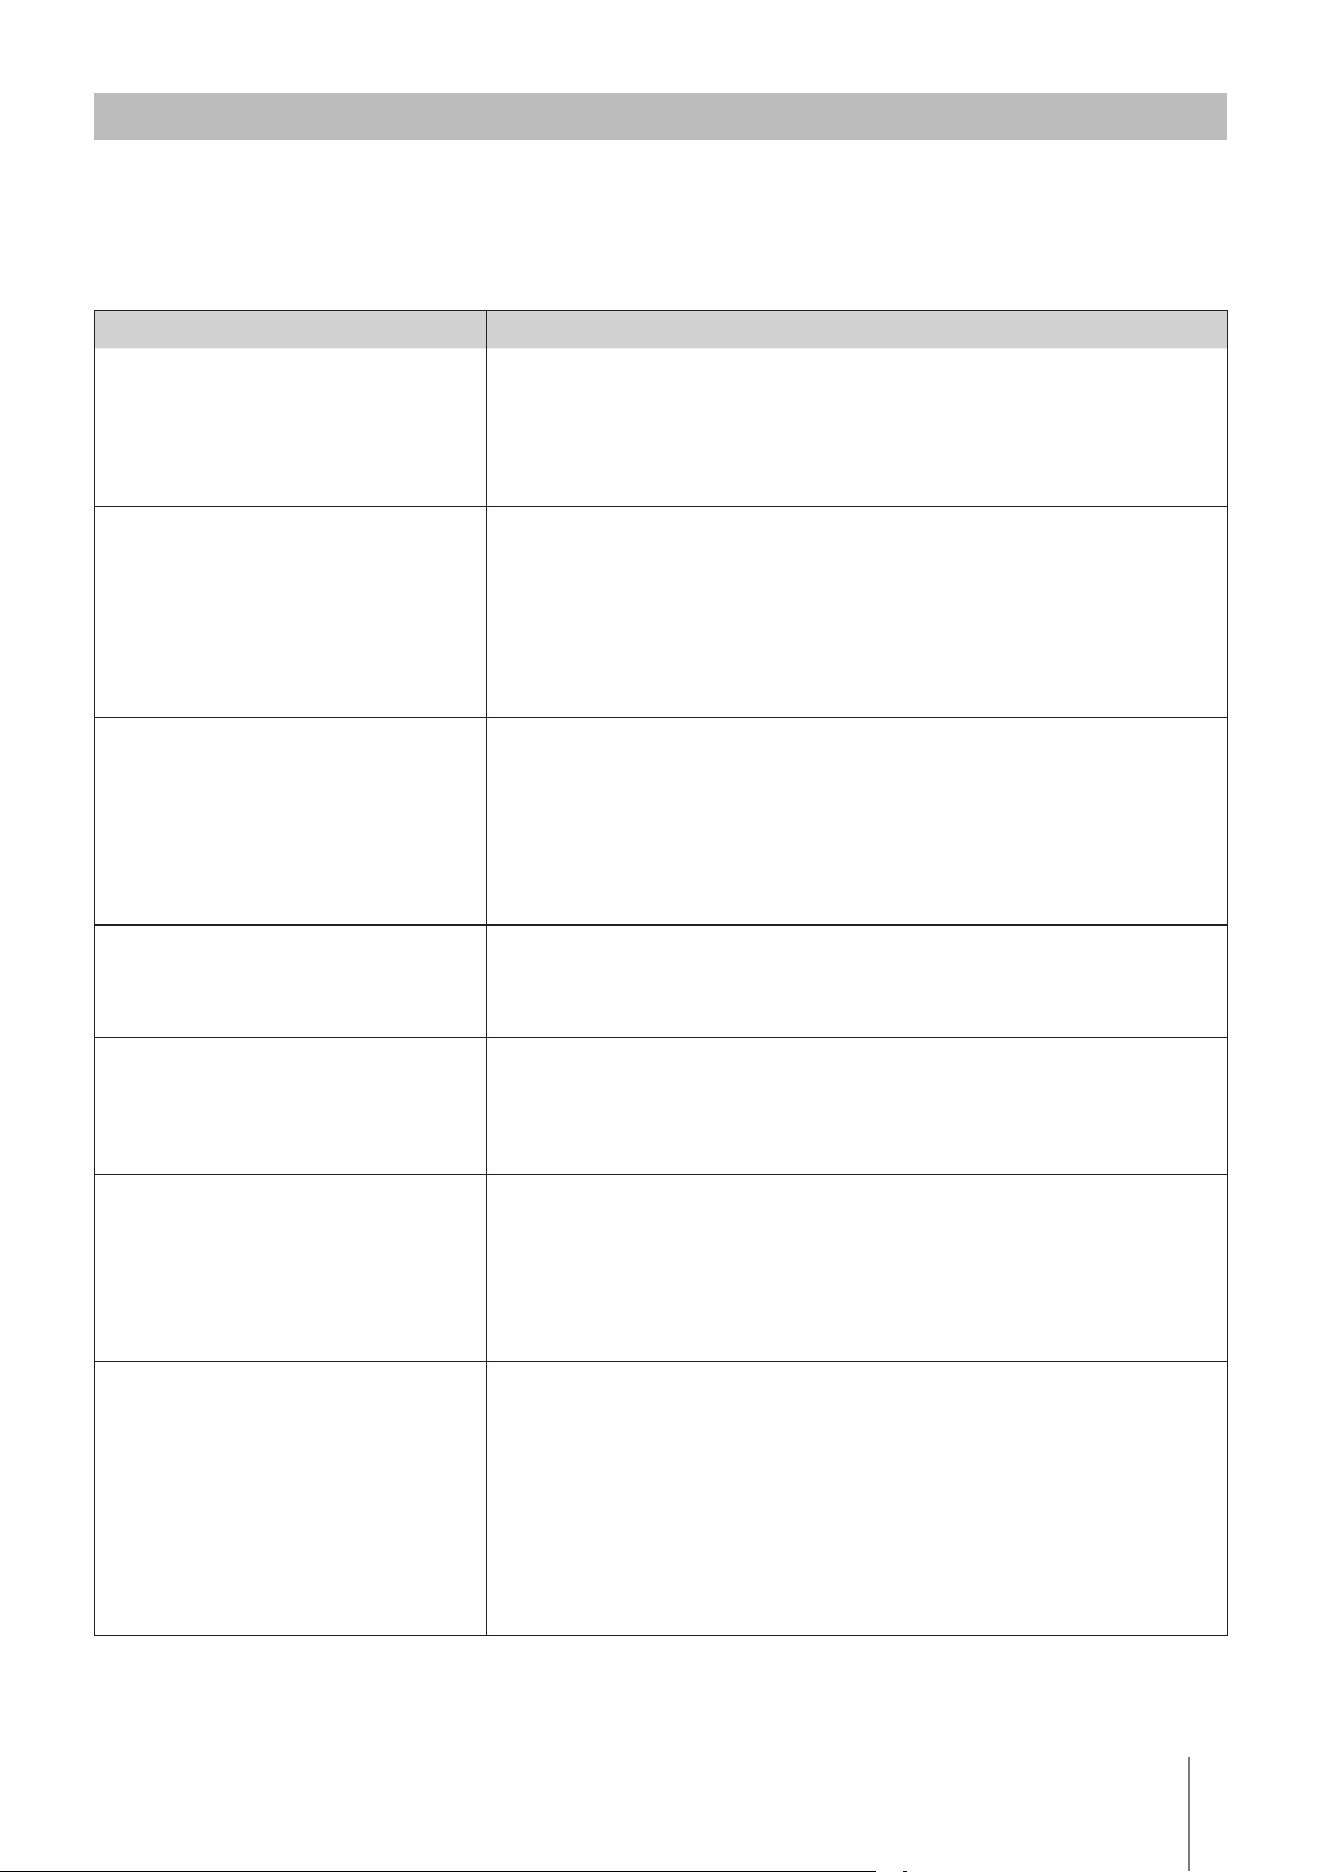
The robotic pool
cleaner does not
turn or moves in
one direction only.
• Debris stuck in the impeller housing or
impeller cover.
• Remove debris stuck in the impeller housing or impeller cover (see
illustrations 6.3.1 to 6.3.4).
The robotic pool
cleaner moves but
does not clean the
pool.
• Clogged filter basket.
• Debris stuck in the impeller housing or
impeller cover.
• Clean the filter basket.
• Remove debris stuck in the impeller housing or impeller cover (see
illustrations 6.3.1 to 6.3.4).
The robotic pool
cleaner cleans
only part of the
pool.
• Power supply incorrectly positioned.
• Not enough blue cable is released for
the correct operation of the robotic
pool cleaner.
• Place the power supply in a position that enables the robotic pool
cleaner to freely reach the entire pool area, while verifying a minimal
distance from the pool of 3.5m / 12ft and minimal height above the
ground of 11cm / 4in.
• Check that there is enough slack in the blue cable for the robotic pool
cleaner to reach the entire pool.
• Clean the filter basket.
The blue cable has
kinks.
• Cable has kinks, possibly from using it
without unfurling it first to remove any
twists.
• To remove the kinks, stretch the blue cable out completely and after it
dries, wind it carefully to avoid twists.
The robotic pool
cleaner doesn’t
climb the walls.
• Clogged filter basket prevents rear jet
from pushing robot onto walls.
• Algae on walls.
• Unsuitable pH level.
• Debris stuck in the impeller housing or
impeller cover.
• Surface is too slippery for your rear
brush type.
• Clean the filter basket.
• Check the level of chemicals in the water. Improper levels may allow
the growth of algae, making the walls slippery.
If so, adjust the levels and scrub the walls.
• Remove debris stuck in the impeller housing or impeller cover (see
illustrations 6.3.1 to 6.3.4).
• Contact your distributer to switch your rear brush to a Wonder brush
according to the surface smoothness of your pool walls.
14. ROBOTIC POOL CLEANER - TROUBLESHOOTING
Unplug the power supply before performing any action.
WARNING

21
Wave 90i | User Instructions
FCC STATEMENT
This device complies with Part 15 of the FCC Rules. Operation is subject to the following two conditions:
(1) This device may not cause harmful interference.
(2) This device must accept any interference received, including interference that may cause undesired operation.
Changes or modifications not expressly approved by the party responsible for compliance could void the
user’s authority to operate this equipment.
Note: This equipment has been tested and found to comply with the limits for a Class B digital device,
pursuant to part 15 of the FCC Rules. These limits are designed to provide reasonable protection against
harmful interference in a residential installation. This equipment generates, uses and can radiate
radio frequency energy and, if not installed and used in accordance with the instructions, may cause
harmful interference to radio communications. However, there is no guarantee that interference will not
occur in a particular installation. If this equipment does cause harmful interference to radio or television
reception, which can be determined by turning the equipment off and on, the user is encouraged to try to
correct the interference by one or more of the following measures:
• Reorient or relocate the receiving antenna.
• Increase the separation between the equipment and receiver.
• Connect the equipment into an outlet on a circuit different from that to which the receiver is connected.
• Consult the dealer or an experienced radio/TV technician for help.
WARNING - RF EXPOSURE COMPLIANCE: This equipment should be installed and operated with a minimum
distance of 10 cm between the radiator and your body.
IC STATEMENT
• This Class B digital apparatus complies with Canadian ICES-003.
• Cet appareil numerique de la classe B est conforme a la norme NMB-003 du Canada.
This device contains licence-exempt transmitter(s)/receiver(s) that complies with Innovation,
Science and Economic Development Canada’s licence-exempt RSS(s). Operation is subject to the following
two conditions:
(1) This device may not cause interference.
(2) This device must accept any interference, including interference that may cause undesired operation
of the device.
L'émetteur/récepteur exempt de licence contenu dans le présent appareil est conforme aux CNR d'Innovation,
Sciences et Développement économique Canada applicables aux appareils radio exempts de licence.
L'exploitation est autorisée aux deux conditions suivantes:
(1) L'appareil ne doit pas produire de brouillage.
(2) L'appareil doit accepter tout brouillage radioélectrique subi, même si le brouillage est susceptible d'en
compromettre le fonctionnement.
AVERTISSEMENT - CONFORMITÉ AUX NORMES D'EXPOSITION AUX RF: Cet équipement doit être installé et utilisé
à une distance minimale de 10 cm entre le radiateur et votre corps.
This product is in accordance with EU Radio Equipment Directive 2014/53/EU.
For more information, please contact us at www.maytronics.com/contact-us-en and ask for the
CE declaration of conformity.
Wave 90i is supplied with power supply IoT, in which embedded Wi-Fi® and Bluetooth® radio transceivers.
Each one of the radio modules operates independently and never operates simultaneously with
another radio.
Description Frequency range
Maximum transmit
power
Wi-Fi
®
IEEE 802.11b/g/n 2412 – 2472 MHz 76 mW
Bluetooth
®
, 4.1 2402 – 2480 MHz 1.8 mW
Wave 90i is equipped with remote control unit transceiver.
Description Frequency range
Maximum transmit
power
Bluetooth
®
, 4.1 2402 – 2480 MHz 5.7 mW

22
Wave 90i | User Instructions
DÉCLARATION FCC
Ce dispositif est conforme à l’alinéa 15 de la Réglementation FCC.
Le fonctionnement est soumis aux deux conditions suivantes:
(1) Ce dispositif ne doit pas causer d'interférences nuisibles.
(2) Ce dispositif doit accepter toute interférence reçue, notamment les interférences susceptibles de provoquer
des anomalies de fonctionnement. Les changements ou modifications non expressément approuvés par la
partie responsable de la conformité pourraient annuler
l'autorité de l'utilisateur à utiliser cet équipement.
Remarque: Cet équipement a été testé et déclaré conforme aux limites d'un Dispositif numérique de classe
B, conformément à l’alinéa 15 de la Réglementation FCC. Ces limites sont conçues pour fournir une protection
raisonnable contre l'énergie de radiofréquence et, si elles ne sont pas installées et utilisées conformément
aux instructions, elles peuvent causer des interférences nuisibles aux communications radio. Cependant, il
n'existe aucune garantie que des interférences ne se produiront pas dans une installation particulière. Si cet
équipement cause des interférences nuisibles à la réception radio ou télévision, ce qui peut être déterminé en
éteignant et en rallumant l'équipement, l'utilisateur est encouragé à essayer de corriger l'interférence par une
ou plusieurs des mesures suivantes :
interférences nuisibles dans une installation résidentielle. Cet équipement génère, utilise et peut émettre
réception radio ou télévision, ce qui peut être déterminé en éteignant et en rallumant l'équipement,
l'utilisateur est encouragé à essayer de corriger l'interférence par une ou plusieurs des mesures suivantes:
• Réorientez ou déplacez l'antenne de réception.
• Augmentez la distance entre l'équipement et le récepteur.
• Branchez l'équipement à une prise sur un circuit différent de celui auquel est connecté le récepteur.
• Consultez le revendeur ou un technicien radio/TV expérimenté pour obtenir de l'aide.
AVERTISSEMENT - CONFORMITÉ AUX EXPOSITIONS RF: Cet équipement doit être installé et utilisé avec une
distance minimale de 10 cm entre le radiateur et votre corps.
DÉCLARATION CI
• Cet appareil numérique de classe B est conforme à la norme canadienne ICES-003.
• Cet appareil numérique de la classe B est conforme à la norme NMB-003 du Canada.
Ce dispositif contient un ou des émetteurs/récepteurs exempts de licence conformes aux RSS exempts de
licence d'Innovation, Sciences et Développement économique Canada.
Le fonctionnement est soumis aux deux conditions suivantes:
(1) Ce dispositif ne doit pas causer d'interférences.
(2) Ce dispositif doit accepter toute interférence, notamment les interférences susceptibles de provoquer des
anomalies de fonctionnement du dispositif.
L'émetteur/récepteur exempt de licence contenu dans le présent appareil est conforme aux CNR d'Innovation,
Sciences et Développement économique Canada applicables aux appareils radio exempts de licence.
L'exploitation est autorisée aux deux conditions suivantes:
(1) L'appareil ne doit pas produire de brouillage.
(2) L'appareil doit accepter tout brouillage radioélectrique subi, même si le brouillage est susceptible d'en
compromettre le fonctionnement.
AVERTISSEMENT - CONFORMITÉ AUX NORMES D'EXPOSITION AUX RF: Cet équipement doit être installé et utilisé
à une distance minimale de 10 cm entre le radiateur et votre corps.
Ce produit est conforme à la Directive européenne 2014/53/EU sur les équipements radioélectriques.
Pour plus d'informations, veuillez nous contacter sur www.maytronics.com/contact-us-en et sollicitez la déclaration
de conformité CE.
Wave 90i est livré avec une alimentation IoT, dans laquelle sont intégrés des émetteurs-récepteurs radio Wi-Fi®
et Bluetooth®. Chacun des modules radio fonctionne indépendamment et ne fonctionne jamais simultanément
avec une autre radio.
Description
Gamme de fréquences
Puissance d'émission
maximale
Wi-Fi
®
IEEE 802.11b/g/n 2 412-2 472 MHz 76 mW
Bluetooth
®
, 4.1 2 402-2 480 MHz 1,8 mW
Wave 90i est équipé d'un émetteur-récepteur de télécommande.
Description
Gamme de fréquences
Puissance d'émission
maximale
Bluetooth
®
, 4.1 2 402-2 480 MHz 5,7 mW

23
Wave 90i | User Instructions
Still have questions?
We are here for you!
Contact Maytronics Customer Care:
North America
1-888-365-7446 ext. 1002
customersupport@maytronicsus.com
France
+33 (0)4 42 98 14 90
support@maytronics.fr
Australia, NZ, South Africa
1 300 693 657
infoau@maytronics.com
Rest of the world / Maytronics HQ
00 800 69694141 (toll free number)
00 972 77 96 14 204 (international call)
wecare@maytronics.com
For full information and additional troubleshooting
please visit us at:
www.maytronics.com