

LPRC300 User Manual
Page | 1 Copyright©2021 ZKTECO. CO., LTD. All rights reserved.
User Manual
LPRC300
Date: May 2021
Doc Version: 1.0
English
Thank you for choosing our product. Please read the instructions carefully
before operation. Follow these instructions to ensure that the product is
functioning properly. The images shown in this manual are for illustrative
purposes only.
For further details, please visit our Company’s website
www.zkteco.com.

LPRC300 User Manual
Page | 1 Copyright©2021 ZKTECO. CO., LTD. All rights reserved.
Copyright © 2021 ZKTECO CO., LTD. All rights reserved.
Without the prior written consent of ZKTeco, no portion of this manual can be copied or forwarded in any
way or form. All parts of this manual belong to ZKTeco and its subsidiaries (hereinafter the "Company" or
"ZKTeco").
Trademark
is a registered trademark of ZKTeco. Other trademarks involved in this manual are owned by
their respective owners.
Disclaimer
This manual contains information on the operation and maintenance of the ZKTeco equipment. The
copyright in all the documents, drawings, etc. in relation to the ZKTeco supplied equipment vests in and is
the property of ZKTeco. The contents hereof should not be used or shared by the receiver with any third
party without express written permission of ZKTeco.
The contents of this manual must be read as a whole before starting the operation and maintenance of the
supplied equipment. If any of the content(s) of the manual seems unclear or incomplete, please contact
ZKTeco before starting the operation and maintenance of the said equipment.
It is an essential pre-requisite for the satisfactory operation and maintenance that the operating and
maintenance personnel are fully familiar with the design and that the said personnel have received
thorough training in operating and maintaining the machine/unit/equipment. It is further essential for the
safe operation of the machine/unit/equipment that personnel have read, understood and followed the
safety instructions contained in the manual.
In case of any conflict between terms and conditions of this manual and the contract specifications,
drawings, instruction sheets or any other contract-related documents, the contract conditions/documents
shall prevail. The contract specific conditions/documents shall apply in priority.
ZKTeco offers no warranty, guarantee or representation regarding the completeness of any information
contained in this manual or any of the amendments made thereto. ZKTeco does not extend the warranty
of any kind, including, without limitation, any warranty of design, merchantability or fitness for a particular
purpose.
ZKTeco does not assume responsibility for any errors or omissions in the information or documents which
are referenced by or linked to this manual. The entire risk as to the results and performance obtained from
using the information is assumed by the user.
ZKTeco in no event shall be liable to the user or any third party for any incidental, consequential, indirect,
special, or exemplary damages, including, without limitation, loss of business, loss of profits, business
interruption, loss of business information or any pecuniary loss, arising out of, in connection with, or

LPRC300 User Manual
Page | 2 Copyright©2021 ZKTECO. CO., LTD. All rights reserved.
relating to the use of the information contained in or referenced by this manual, even if ZKTeco has, of the
possibility of such damages.
This manual and the information contained therein may include technical, other inaccuracies or
typographical errors. ZKTeco periodically changes the information herein which will be incorporated into
new additions/amendments to the manual. ZKTeco reserves the right to add, delete, amend or modify the
information contained in the manual from time to time in the form of circulars, letters, notes, etc. for better
operation and safety of the machine/unit/equipment. The said additions or amendments are meant for
improvement /better operations of the machine/unit/equipment and such amendments shall not give any
right to claim any compensation or damages under any circumstances.
ZKTeco shall in no way be responsible (i) in case the machine/unit/equipment malfunctions due to any
non-compliance of the instructions contained in this manual (ii) in case of operation of the
machine/unit/equipment beyond the rate limits (iii) in case of operation of the machine and equipment in
conditions different from the prescribed conditions of the manual.
The product will be updated from time to time without prior notice. The latest operation procedures and
relevant documents are available on http://www.zkteco.com
.
If there is any issue related to the product, please contact us.
ZKTeco Headquarters
Address ZKTeco Industrial Park, No. 32, Industrial Road,
Tangxia Town, Dongguan, China.
Phone +86 769 - 82109991
Fax +86 755 - 89602394
For business-related queries, please write to us at [email protected]m
.
To know more about our global branches, visit www.zkteco.com.

LPRC300 User Manual
Page | 3 Copyright©2021 ZKTECO. CO., LTD. All rights reserved.
About the Company
ZKTeco is one of the world’s largest manufacturer of RFID and Biometric (Fingerprint, Facial, Finger-vein)
readers. Product offerings include Access Control readers and panels, Near & Far-range Facial Recognition
Cameras, Elevator/floor access controllers, Turnstiles, License Plate Recognition (LPR) gate controllers and
Consumer products including battery-operated fingerprint and face-reader Door Locks. Our security
solutions are multi-lingual and localized in over 18 different languages. At the ZKTeco state-of-the-art
700,000 square foot ISO9001-certified manufacturing facility, we control manufacturing, product design,
component assembly, and logistics/shipping, all under one roof.
The founders of ZKTeco have been determined for independent research and development of biometric
verification procedures and the productization of biometric verification SDK, which was initially widely
applied in PC security and identity authentication fields. With the continuous enhancement of the
development and plenty of market applications, the team has gradually constructed an identity
authentication ecosystem and smart security ecosystem, which are based on biometric verification
techniques. With years of experience in the industrialization of biometric verifications, ZKTeco was
officially established in 2007 and now has been one of the globally leading enterprises in the biometric
verification industry owning various patents and being selected as the National High-tech Enterprise for 6
consecutive years. Its products are protected by intellectual property rights.
About the Manual
This manual introduces the operations of LPRC300.
All figures displayed are for illustration purposes only. Figures in this manual may not be exactly consistent
with the actual products.

LPRC300 User Manual
Page | 4 Copyright©2021 ZKTECO. CO., LTD. All rights reserved.
Document Conventions
Conventions used in this manual are listed below:
GUI Conventions
For Software
Convention
Description
Bold font Used to identify software interface names e.g. OK, Confirm, Cancel.
>
Multi-level menus are separated by these brackets. For example, File > Create >
Folder.
For Device
Convention
Description
< >
Button or key names for devices. For example, press <OK>.
[ ]
Window names, menu items, data table, and field names are inside square brackets.
For example, pop up the [New User] window.
/
Multi-level menus are separated by forwarding slashes. For example,
[File/Create/Folder].
Symbols
Convention Description
This implies about the notice or pays attention to, in the manual.
The general information which helps in performing the operations faster.
The information which is significant.
Care taken to avoid danger or mistakes.
The statement or event that warns of something or that serves as a
cautionary example.

LPRC300 User Manual
Page | 5 Copyright©2021 ZKTECO. CO., LTD. All rights reserved.
Table of Contents
SAFETY PRECAUTIONS ............................................................................................................................... 6
1 OVERVIEW ............................................................................................................................................ 7
1.1 FEATURES ................................................................................................................................................. 7
1.2 APPEARANCE ............................................................................................................................................ 8
1.3 PORT DEFINITION ..................................................................................................................................... 8
2 SYSTEM CONFIGURATION .................................................................................................................. 9
2.1 SOFTWARE ENVIRONMENT ........................................................................................................................ 9
2.2 NETWORK AND IP ADDRESS CONFIGURATION ......................................................................................... 10
2.2.1 DEFAULT PARAMETER SETTINGS .................................................................................................................................................. 10
2.2.2 CONNECTIVITY TEST ......................................................................................................................................................................... 10
3 CAMERA ACCESS OVER A WEB BROWSER ........................................................................................ 11
3.1 LOGIN .................................................................................................................................................... 11
3.2 LIVE ....................................................................................................................................................... 14
3.3 FILE ........................................................................................................................................................ 16
3.4 SETUP .................................................................................................................................................... 16
3.4.1 DEVICE INFORMATION..................................................................................................................................................................... 17
3.4.2 TIME SETTINGS .................................................................................................................................................................................. 17
3.4.3 DISPLAY SETTINGS............................................................................................................................................................................ 18
3.4.4 STREAMS ............................................................................................................................................................................................. 19
3.4.5 VIDEO PARAMETERS......................................................................................................................................................................... 20
3.4.6 LIST MANAGEMENT ......................................................................................................................................................................... 22
3.4.7 INTELLIGENT ANALYSIS ................................................................................................................................................................... 23
3.4.8 DATA MANAGEMENT ...................................................................................................................................................................... 27
3.4.9 COMM CONFIGURATION ................................................................................................................................................................ 27
3.4.10 P2P CONFIGURATION ..................................................................................................................................................................... 28
3.4.11 ON-SCREEN VOICE ........................................................................................................................................................................... 28
3.4.12 NETWORK SETTINGS ........................................................................................................................................................................ 29
3.4.13 FTP SETTINGS .................................................................................................................................................................................... 30
3.4.14 USER MANAGEMENT ....................................................................................................................................................................... 31
3.4.15 FIRMWARE UPGRADE ...................................................................................................................................................................... 32
3.4.16 SYSTEM UPDATE ............................................................................................................................................................................... 32
3.4.17 AUTO REBOOT ................................................................................................................................................................................... 33
3.4.18 RESTORE .............................................................................................................................................................................................. 34
3.4.19 LOCAL SETTINGS ............................................................................................................................................................................... 35
3.5 LOG........................................................................................................................................................ 35
FAQ’S ......................................................................................................................................................... 37

LPRC300 User Manual
Page | 6 Copyright©2021 ZKTECO. CO., LTD. All rights reserved.
Safety Precautions
Electrical safety
Complete the grounding properly and set up surge protection before connecting an external cable
to the device; otherwise, static electricity can damage the Mainboard.
Make sure to use the standard voltage applicable in your country or region (the rated voltage of the
device is 220V). Power mismatch may cause a short circuit or damage the device.
Operational safety
Transportation and other issues may damage the device’s hardware. Check if the device has
significant damage before installation. If the device has major defects, contact your dealer as soon
as possible.
Do not connect or disconnect cables to/from the device when it is working.
Do not keep the device in an unstable place. Handle the device with care. Do not place heavy
objects on top of the device.
Do not use rosin, alcohol, benzene, pesticides, and other volatile substances to clean the device,
because they may damage the device enclosure. Clean the enclosure with a piece of soft cloth or a
small amount of cleaning agent.
Unauthorized persons are not allowed to open the unit. For any queries regarding the usage of the
product, contact an authorized technician.

LPRC300 User Manual
Page | 7 Copyright©2021 ZKTECO. CO., LTD. All rights reserved.
1 Overview
The LPRC300 is a high-performance H.264/H.265-based license plate recognition camera. The
prominent features of LPRC300 include:
Integrated HD imaging
Image collection
License plate recognition
Image decompression
Storage of data on an embedded intelligent platform
It automatically identifies numbers, letters, and characters on the license plate and displays the
identified results. It is mainly used in parking management.
1.1 Features
The high-performance and stable architecture of dual-core processors, powerful computing
capacity, embedded capture, analysis, and recognition features.
Adopts modular structure design to ensure efficient working even in hard environments.
Complete SDK can support secondary development docking, and the system integration is simple.
The algorithm is stable, reliable, strong scene adaptability, and supports the recognition of
ordinary blue, black, yellow, double-layer yellow, and multiple national license plates.
1/2.8" 3MP CMOS sensor, high-quality images, and resolution up to 2304*1296.
License plate recognition accuracy reaches more than 99% in the daytime and more than 98% at
night, with a wide range of recognition angles.
LPRC300 User Manual
Page | 8 Copyright©2021 ZKTECO. CO., LTD. All rights reserved.
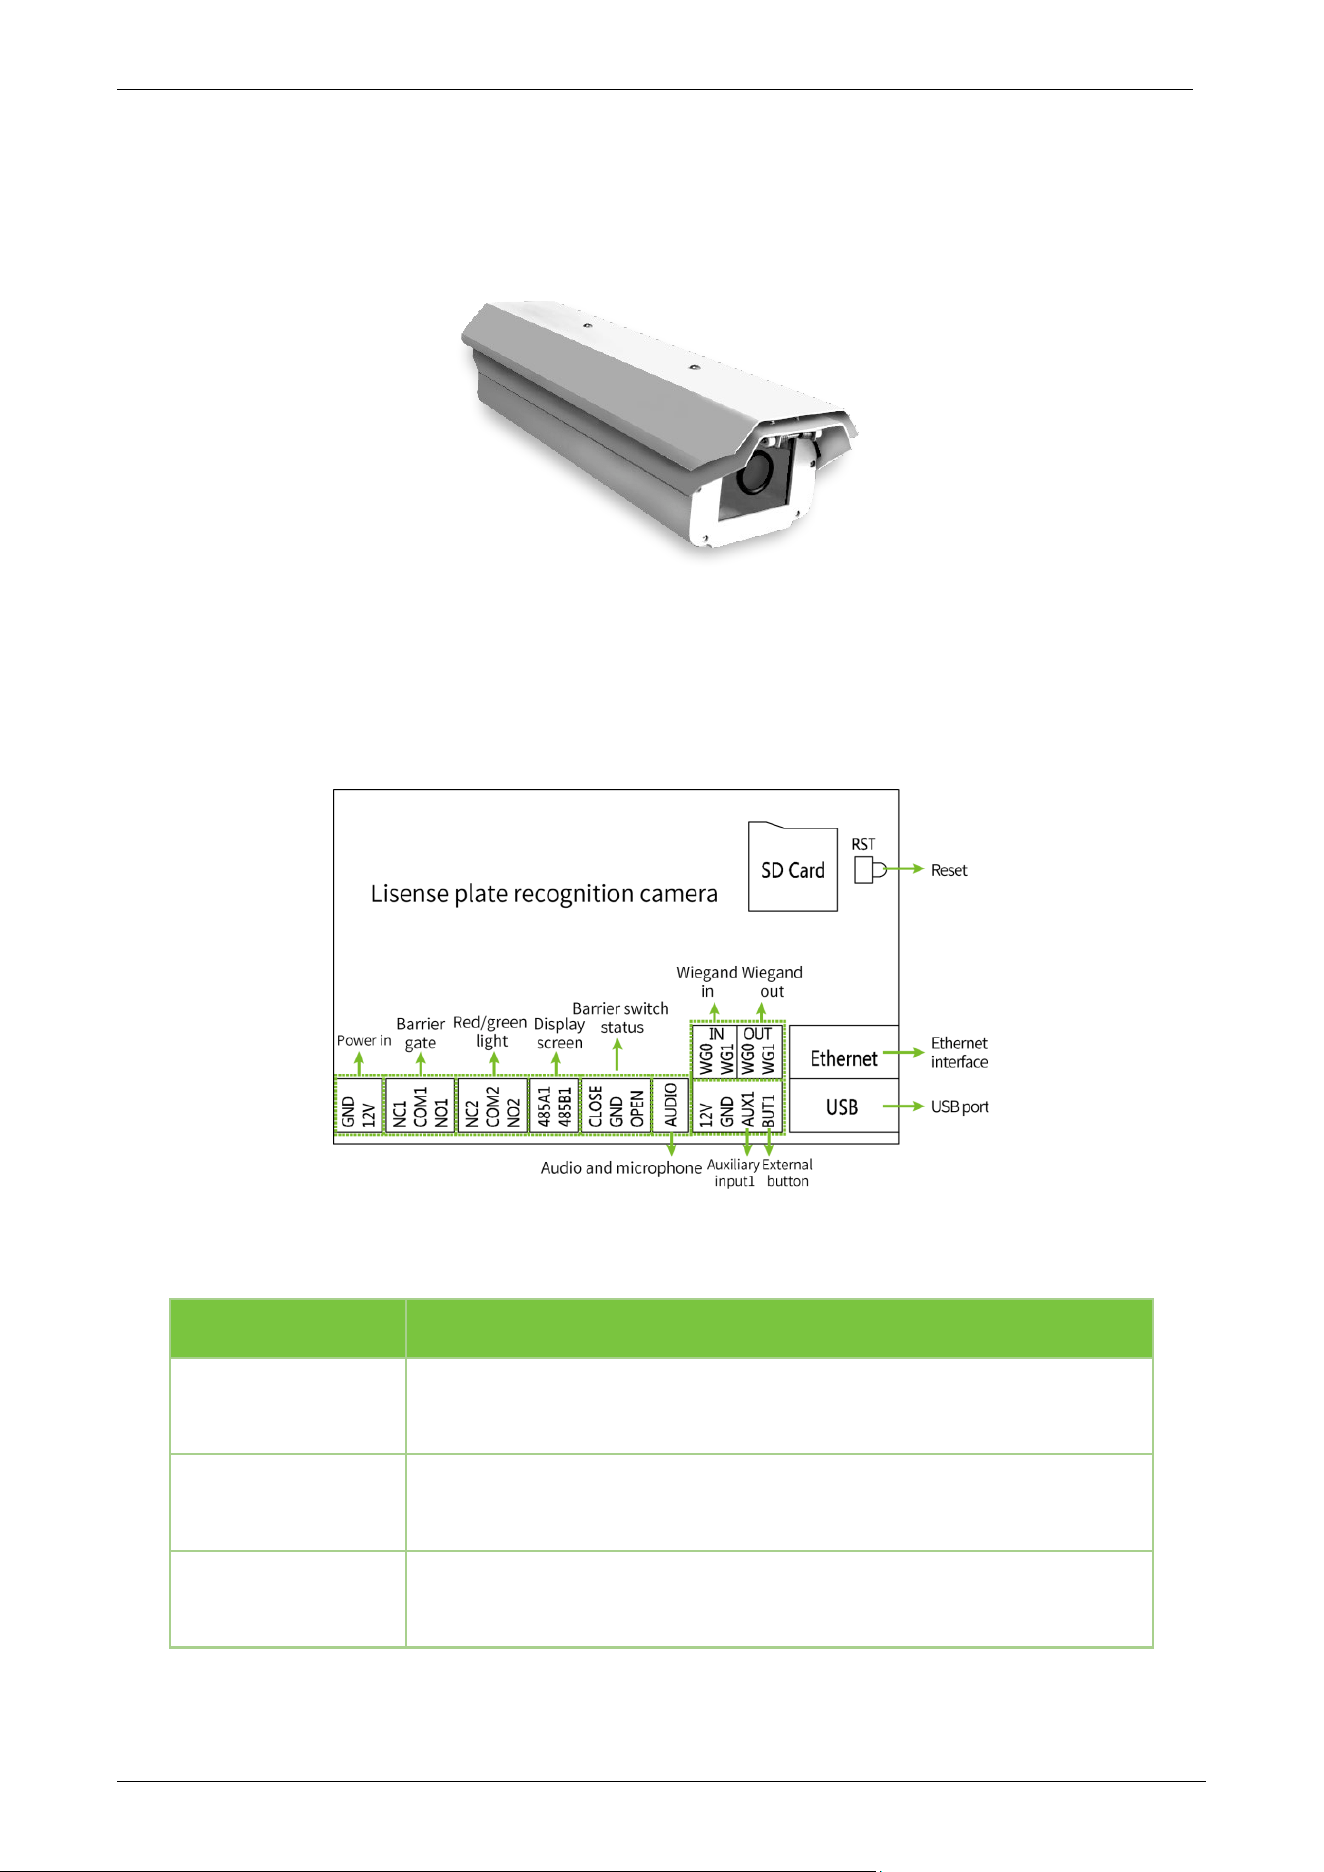
1.2 Appearance
1.3 Port Definition
Wiring Diagram
Port Description
Pin Description
Reset Restores the actual camera parameters
Ethernet
Standard Ethernet RJ45 socket, 10M/100M self-adaptive, and can be
connected with various network devices, such as Switches, Routers,
Hubs, etc.
USB USB connection

LPRC300 User Manual
Page | 9 Copyright©2021 ZKTECO. CO., LTD. All rights reserved.
GND
+12V
Connects to the Power adapter. The camera's power supply voltage is
12V/3A DC. Do not use other power sources to avoid damage to the
camera.
NC1
COM1
NO1
Used for connecting the Barrier gate
NC2
COM2
NO2
Indicator light connection (Red and Green)
485A1
485B1
RS485 transmission function used to connect the display screen and
voice module of the parking system
CLOSE
GND
OPEN
Barrier Switch status
Audio Used to connect audio and microphone of the parking system
WG0
WG1 IN
Wiegand In
WG0
WG1 OUT
Wiegand Out (Only support the output of alphanumeric license plates)
12V
GND
AUX1
BUT1
Auxiliary input and external button connections
2 System Configuration
2.1 Software Environment
Connect the camera to a switch or a PC over the standard Ethernet port. The PC that displays the
images and controls the camera must meet the following requirements:
CPU: Intel Dual-core CPU A7@900MHz 0.5 TOPS
RAM: 1GB or above
Network Port: 100M Ethernet port
Operating System: 32-bit or 64-bit operating system, such as Windows 7, Windows 8, Windows 10
Internet Explorer: Microsoft Internet Explorer 11.0 or later, and Firefox ESR.
LPRC300 User Manual
Page | 10 Copyright©2021 ZKTECO. CO., LTD. All rights reserved.
2.2 Network and IP Address Configuration
Set the IP address of the camera such that it remains in the same network segment as the PC.
Note: In the same LAN environment, the IP address cannot be the same. Otherwise, IP address
conflict can lead to device malfunction.
2.2.1 Default Parameter Settings
Before using the camera, set the IP address, Gateway address, and other information of the camera
without any fault. The user can modify the default parameter settings according to requirements.
IP Address: 192.168.1.88
Subnet Mask: 255.255.255.0
Gateway: 192.168.1.1
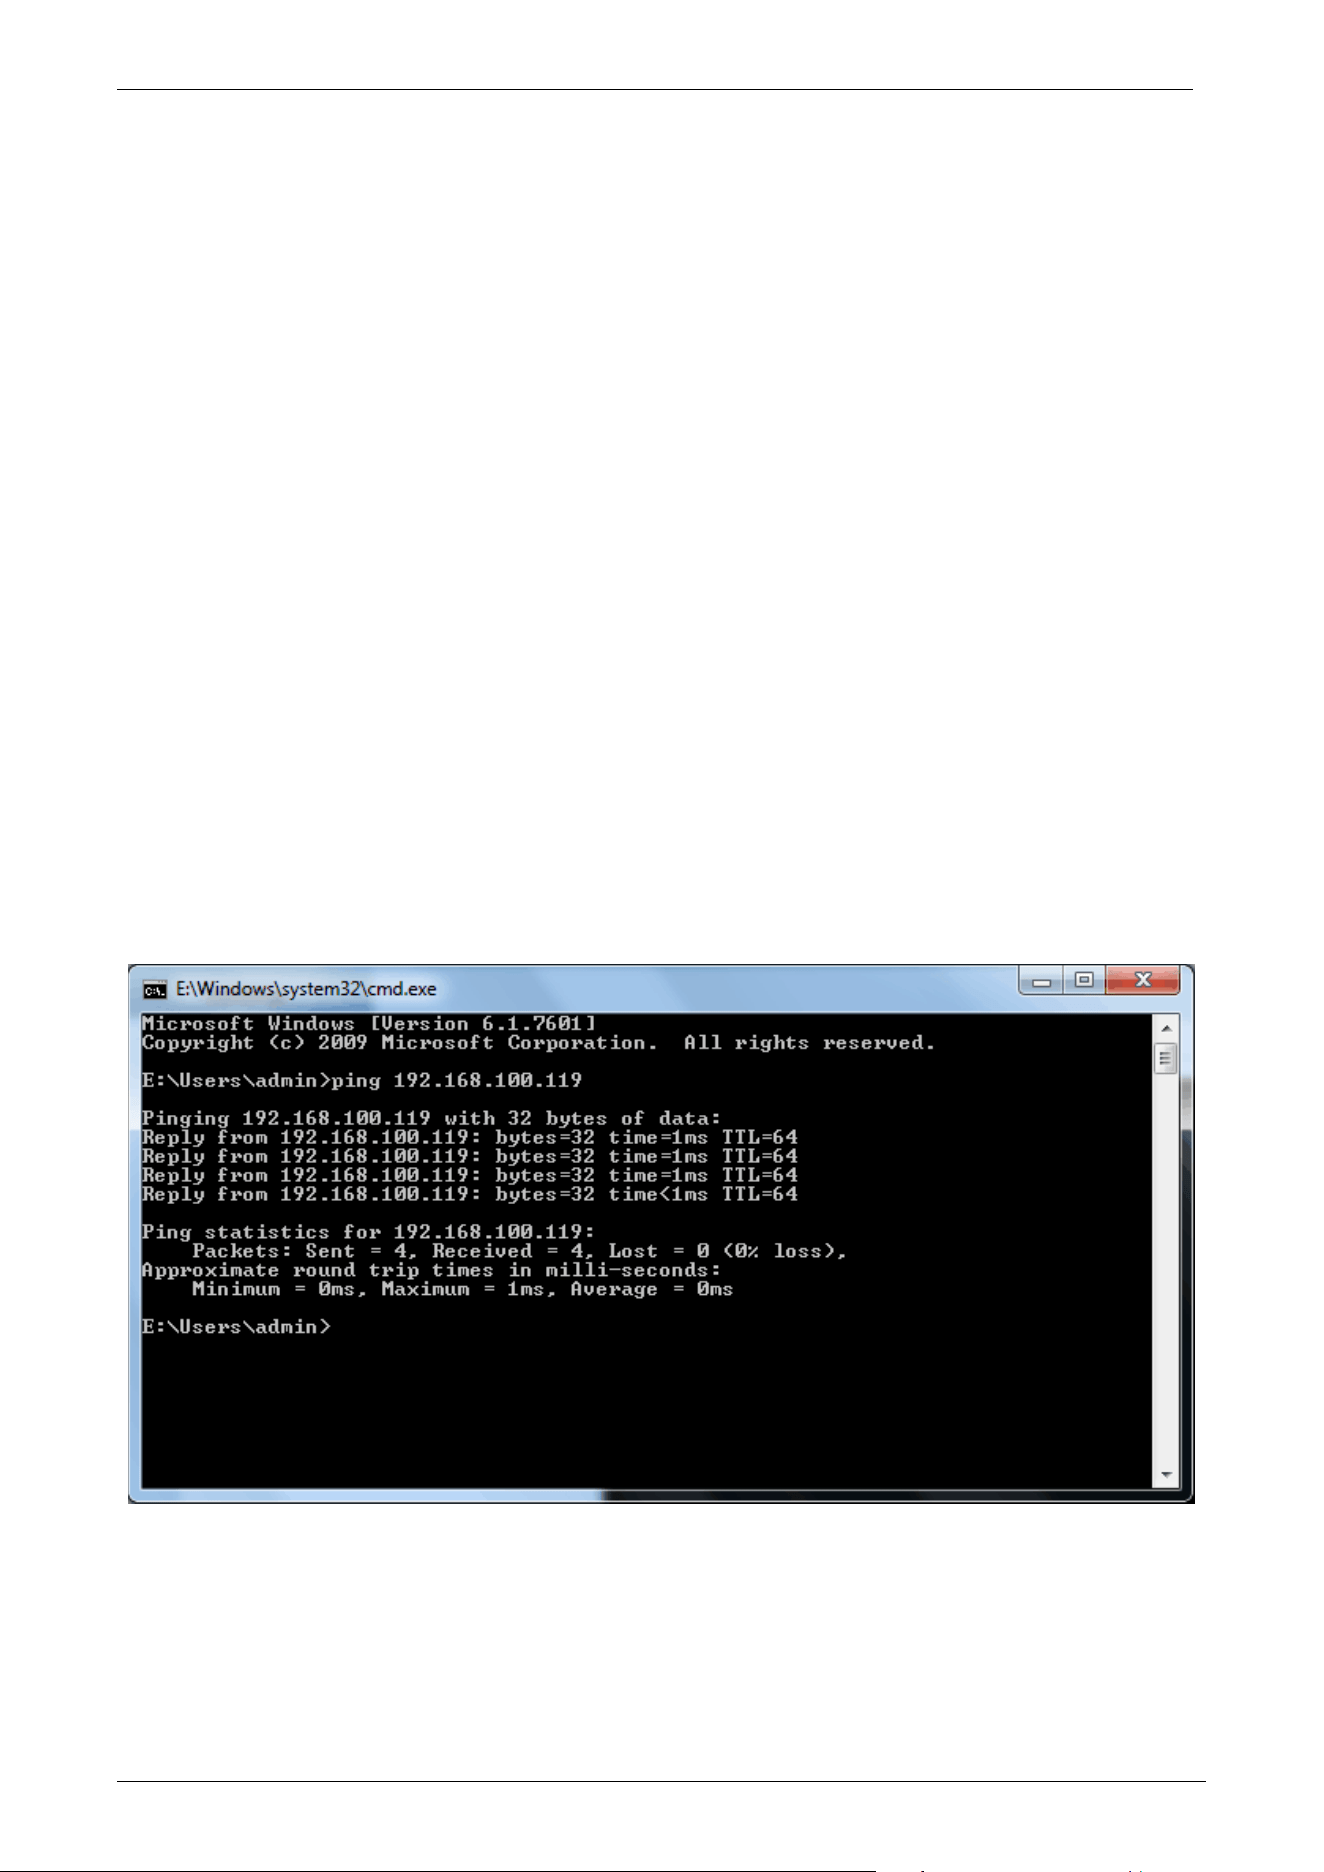
2.2.2 Connectivity Test
Open the Start menu on the PC and type cmd in the search box once the camera IP Address is set.
In the command prompt window, type ping and the camera IP Address (e.g., Ping 192.168.0.18) to
test the connectivity between the PC and camera.
If the message is "Request timed out" or "Destination host unreachable", it means the PC and the
camera are not connected properly. Perform the following steps:
Check whether the hardware connection is correct.
Check whether the TCP/IP Addresses of the PC and the camera are in the same network segment.

LPRC300 User Manual
Page | 11 Copyright©2021 ZKTECO. CO., LTD. All rights reserved.
Check whether the ping command is disabled.
3 Camera Access over a Web Browser
3.1 Login
1. Type the IP Address (default: 192.168.1.88) of the camera in the address bar of a web browser.
Then enter the Username (default: admin) and password (default: 123456), as displayed in the below
figure.
2. Installation of Control Plugin upon initial login
If the user is accessing the device for the first time, the user needs to install the control plugin.
Please manually download and install the control. The control name is WebLPRActiveXPlus.exe.
Click [Download Plugin] at the top left corner of the screen to download the
WebLPRActiveXPlus.exe control. Select the download path and click [Download]. After
downloading, access WebVideoActiveXPlus.exe to install it. A security prompt may be displayed
during the installation. Click [Run] to continue the installation.

LPRC300 User Manual
Page | 12 Copyright©2021 ZKTECO. CO., LTD. All rights reserved.
Note: Install the WebVideoActiveXPlus.exe control to view the videos over a web browser. When
the control is updated, it needs to be downloaded again.
3. After the installation is completed, return to the Web browsing page, enter the camera's default IP
Address (192.168.1.88) in the address bar, enter the default username and password and click
[Login].
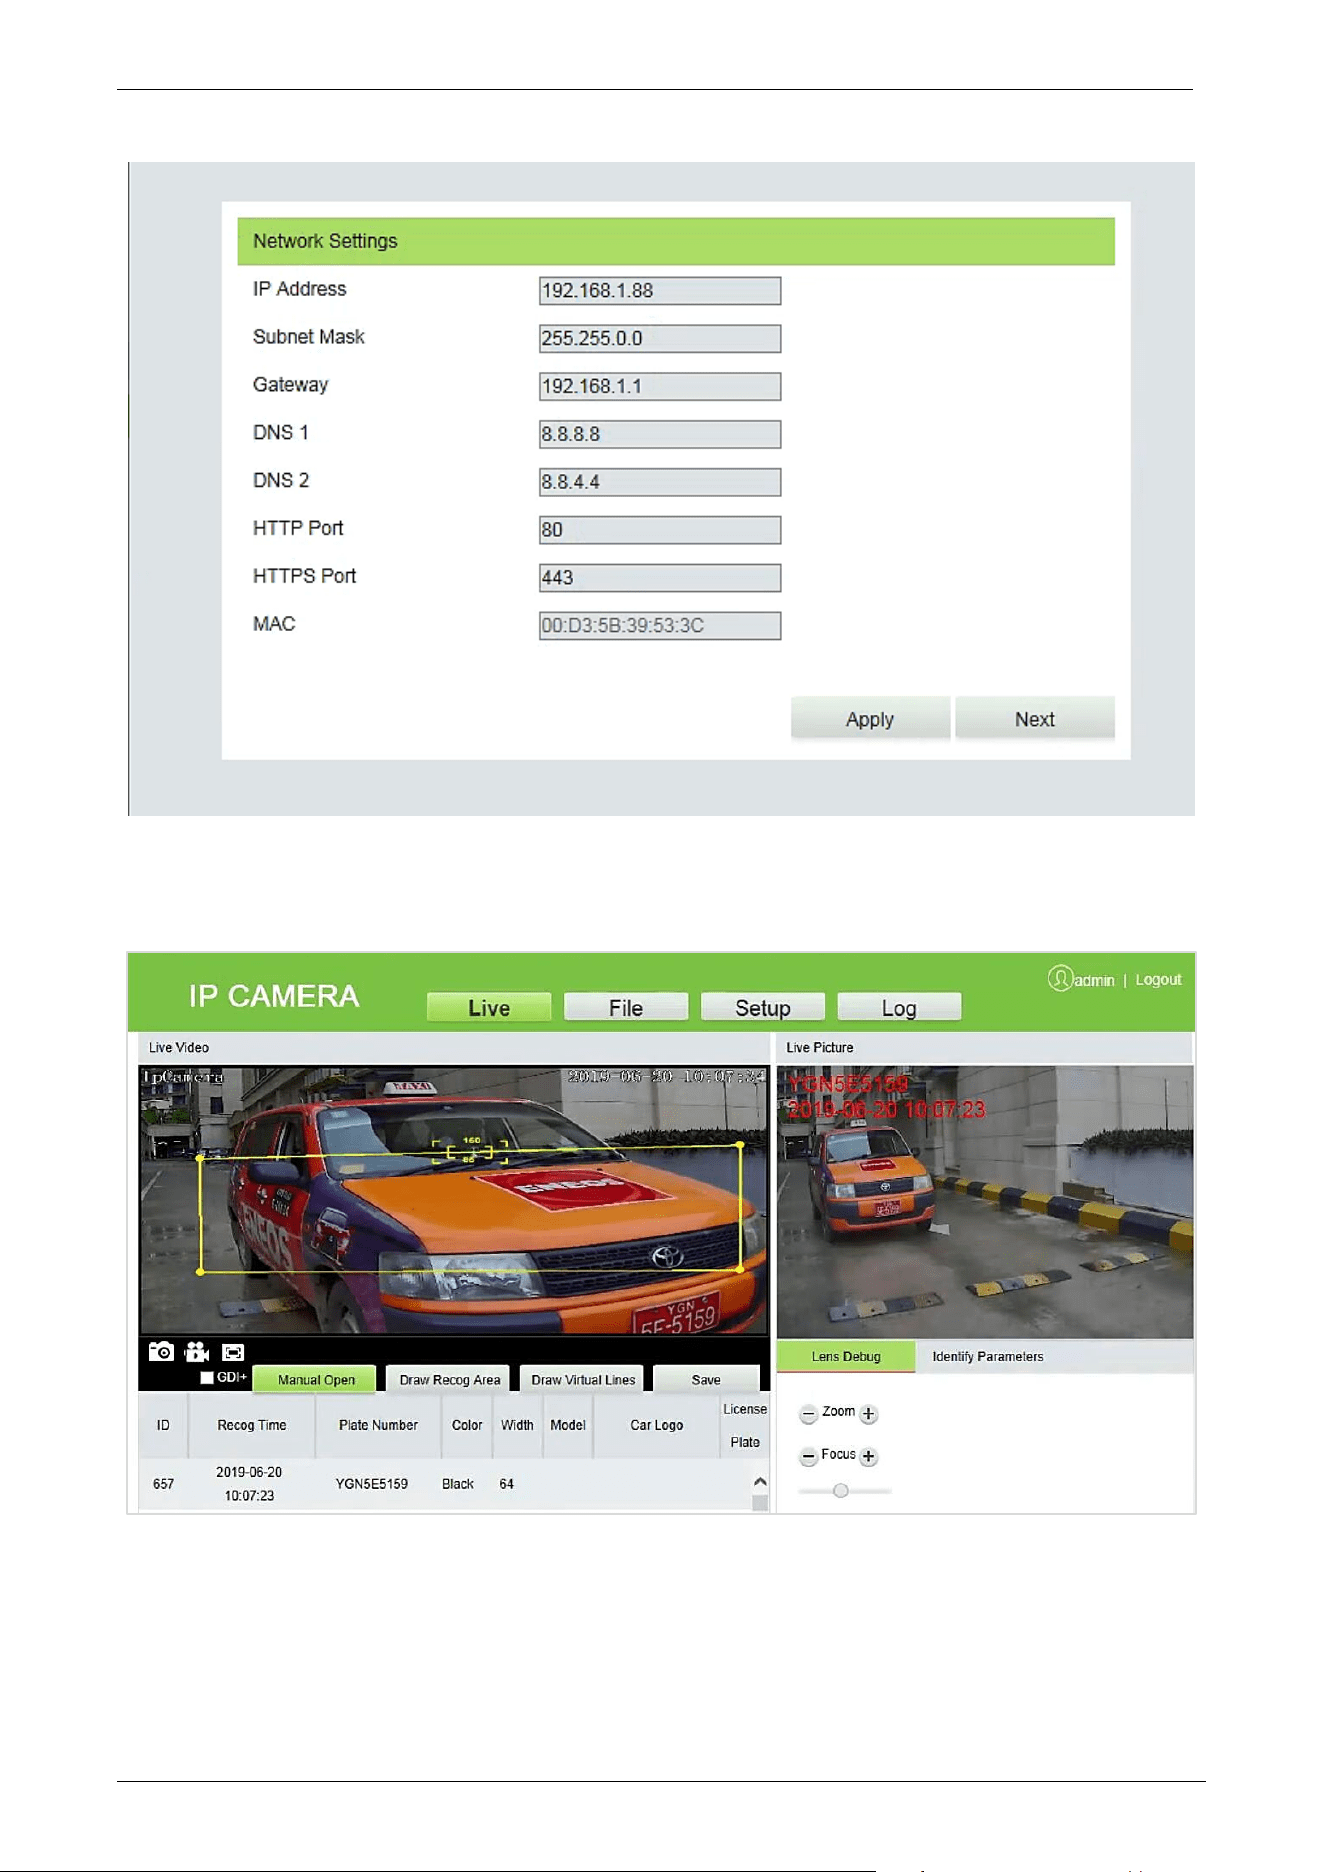
Note: When logging in with the default IP address, the setup wizard screen as displayed below will pop
up each time. If default parameters are used, click [Apply] directly. If the user needs to modify the
parameters, select [Next] to modify them. After changing the IP Address, this wizard screen will no
longer appear.
LPRC300 User Manual
Page | 13 Copyright©2021 ZKTECO. CO., LTD. All rights reserved.
4. After setting the parameters successfully, the user can preview the video, as displayed in the figure
below:
Live: Click to access the live preview page to view the live videos and pictures. In a live video, the
user can capture live pictures, record live video, and play live in full screen. Meanwhile, you can
manually open the barrier gate, draw the recognition area, and virtual line on the live video panel.
In live pictures, the user can set lens debug, identify parameters, and other features.
LPRC300 User Manual
Page | 14 Copyright©2021 ZKTECO. CO., LTD. All rights reserved.
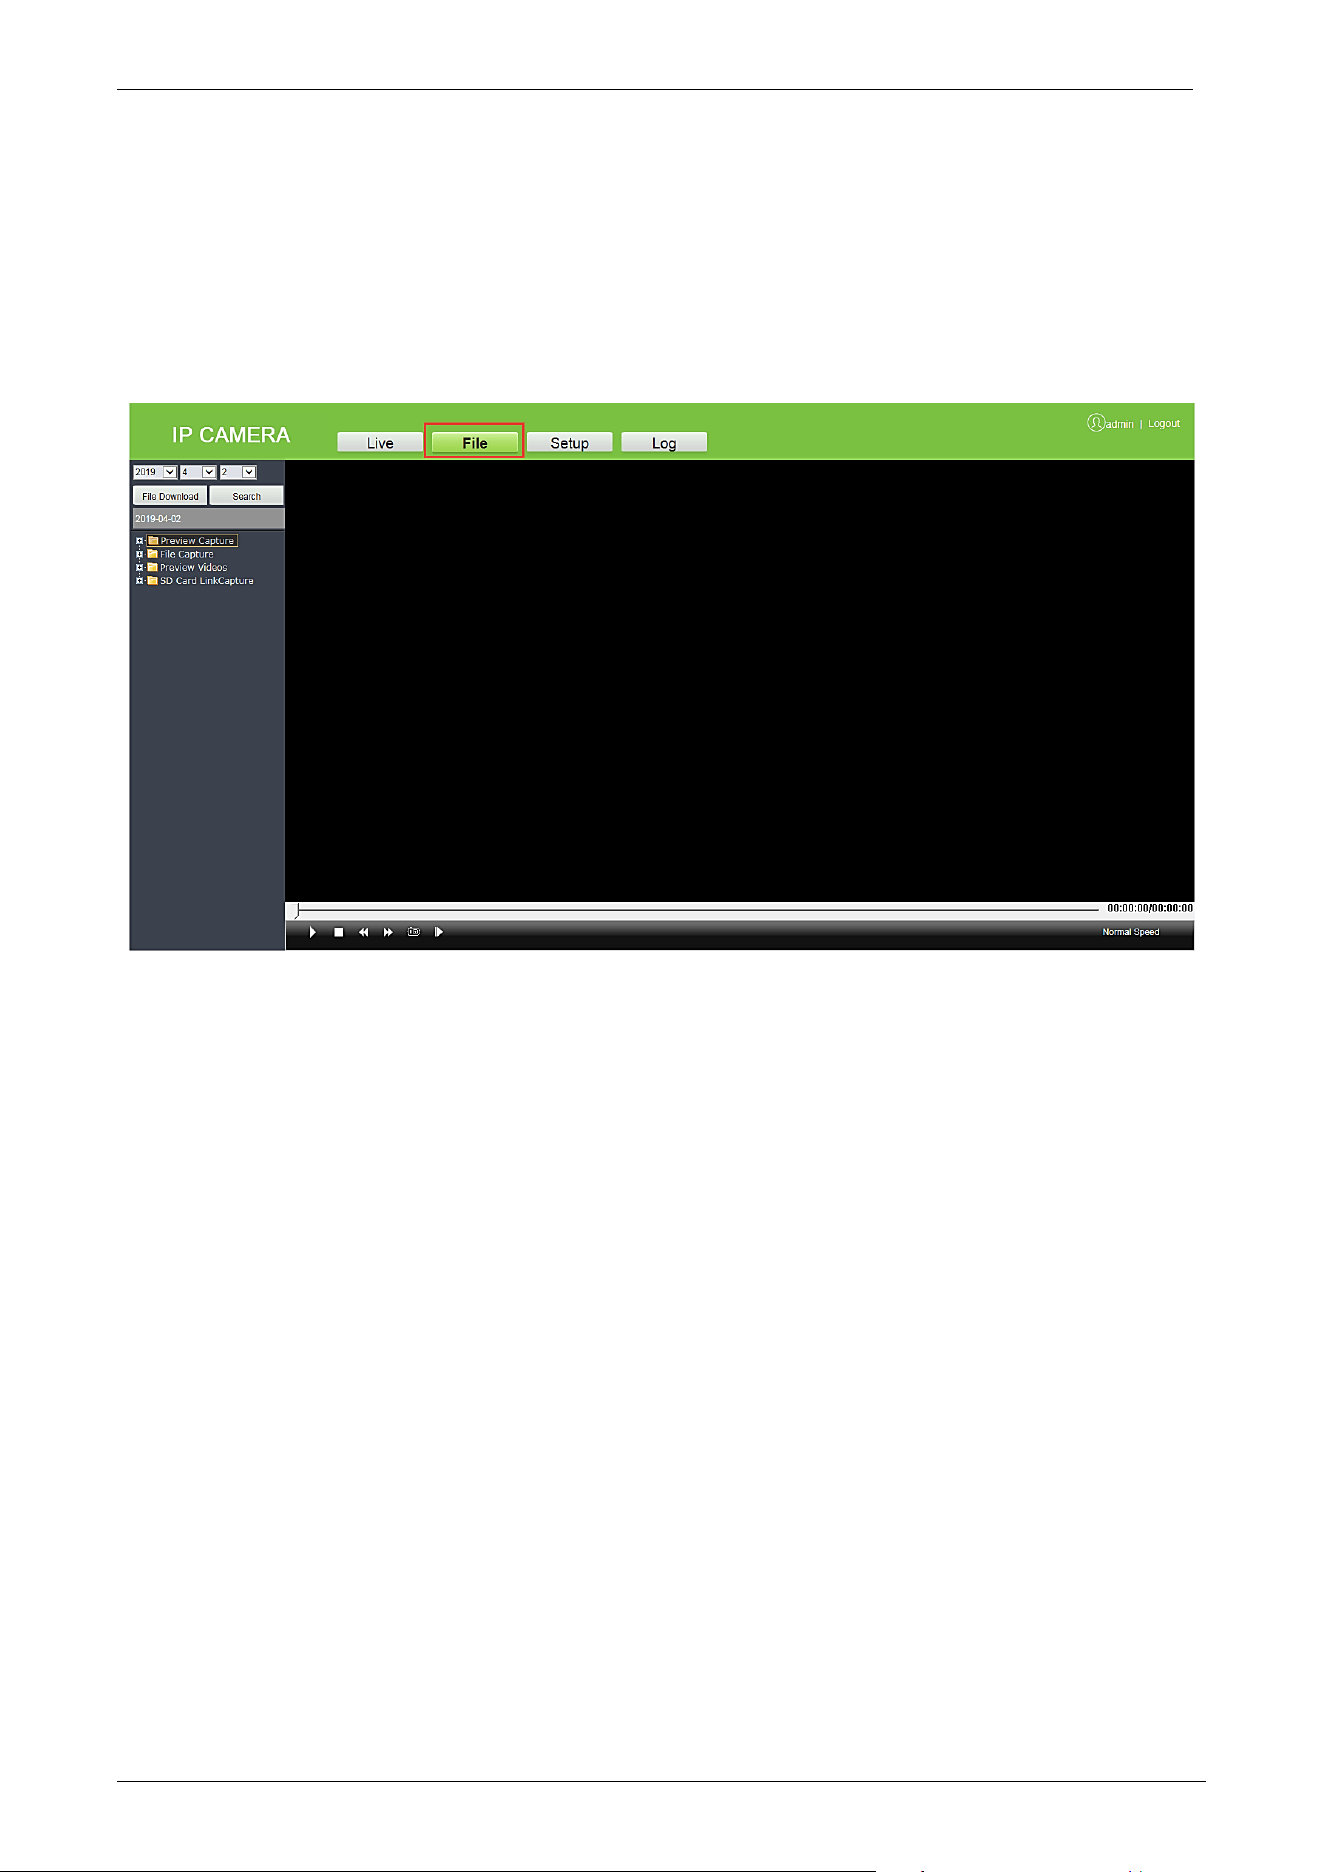
File: Click to access the location where the required video clips or pictures can be viewed or
downloaded based on the live video recorded.
Setup: Click to access the Parameter Configuration page. On this page, the user can view or modify
the camera parameters, including Device Information, Time Settings, Display Settings, Streams,
Video Parameters, List Management, Intelligent Analysis, Date Management, Comm Configuration,
P2P Configuration, On-screen Voice, Network Settings, FTP Settings, User Management, Firmware
Upgrade, System Update, Auto Reboot, Restore and Local Settings.
Log: Click to access the page to view and search the operation logs.
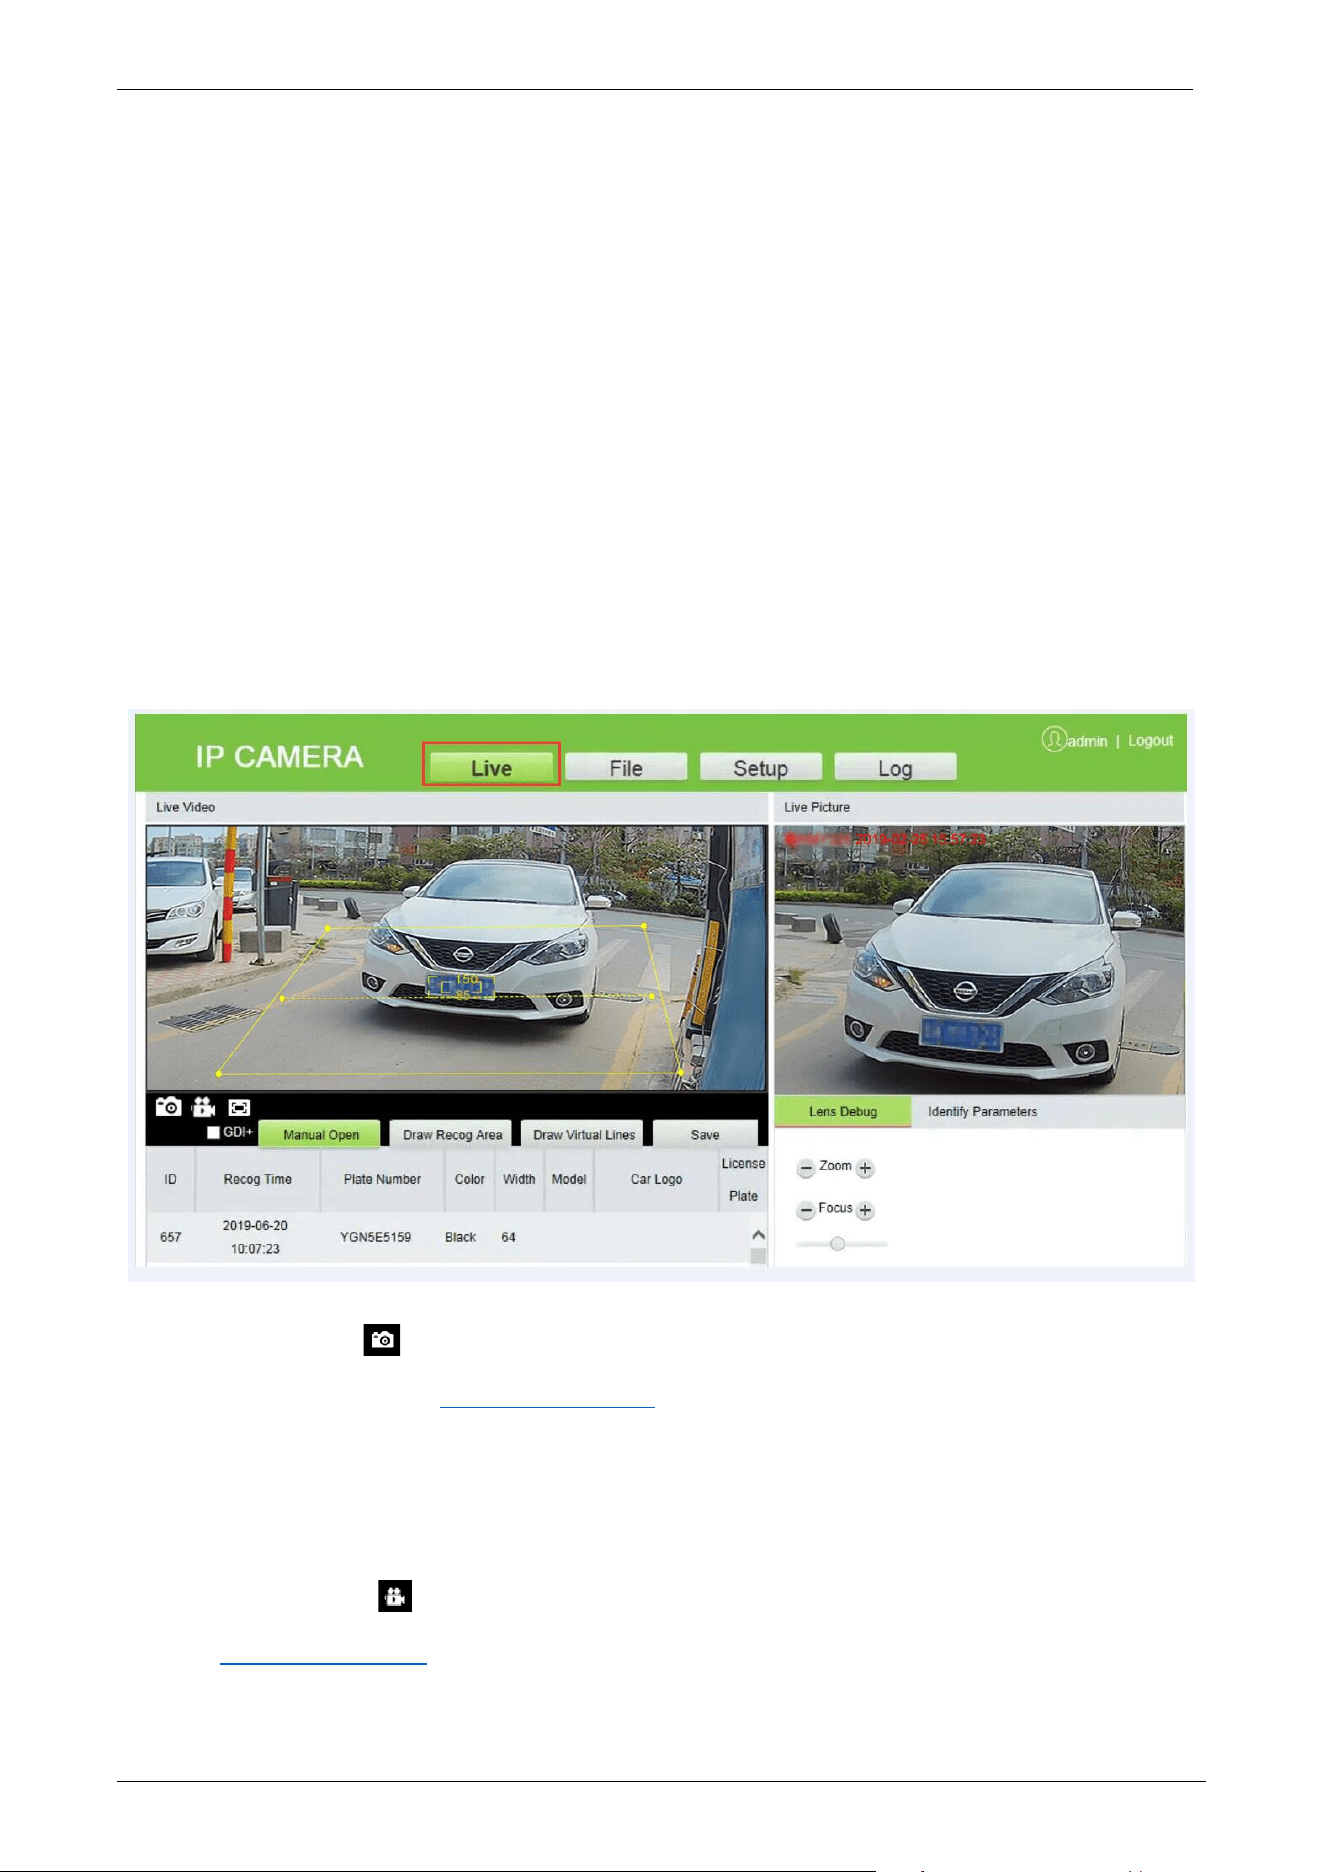
3.2 Live
Click [Live] to access the live preview page. The user can preview the live video and set relevant
parameters.
Snap: Click the icon to capture and save a photo from a live preview video, and the storage
location can be set in 3.4.19 Local Settings
. The captured photos are stored automatically in a
folder named after the current date and the photo is named after the captured time. For example,
the file name of a photo is CH01_20180703_142004.jpg, and it is saved in the 20180703 folder. It
indicates that the snapshot date is 2018-07-03, the snapshot time is 14:20:04, and the sub-folder
named after the IP address of the device will be automatically generated locally.
Record: Click the icon to organize real-time recording, and the storage location can be viewed
in 3.4.19 Local Settings
. The video is saved in a folder named after the year, month and day, and the
video is named after the recording time. For example, a video file titled
LPRC300 User Manual
Page | 15 Copyright©2021 ZKTECO. CO., LTD. All rights reserved.
CH01_main_20180703_142004. avi, and saved in the 20180703 folder. It indicates that the
recording date is 2018-07-03, the recording time is 14:20:04, while the system will automatically
generate a subfolder named after the device's IP address.
Full: Click the icon to switch to full-screen mode and click Esc on the keyboard to exit the full
screen.
GDI+: Select [GDI+] to make the smooth image lines in the recognition area.
Note: This function has certain requirements for PC Graphics Card (required to support DirectX
function and acceleration function), otherwise the video will be delayed. However, this feature can
be used as per the requirements.
Manual Open: Click [Manual Open] to manually open the barrier gate.
Draw Recognition Area: The user can set the recognition area to avoid unnecessary interference
and focus on the required area. Click [Draw Recog Area], then drag the four dots viewed in the
screen to the desired area and click [Save].
Note: Complex background (such as dropdown of barrier gate or pillar) should be avoided inside
the recognition area.
Draw Virtual Lines: Draw virtual lines to trigger the recognition of the license plate. Click [Draw
Virtual Lines], then drag the yellow line to two points within the recognition area displayed on the
screen and click [Save].
Note: The virtual line should be drawn inside the recognition area.
Lens Debug: Adjust the lens parameters, including Zoom and Focus.
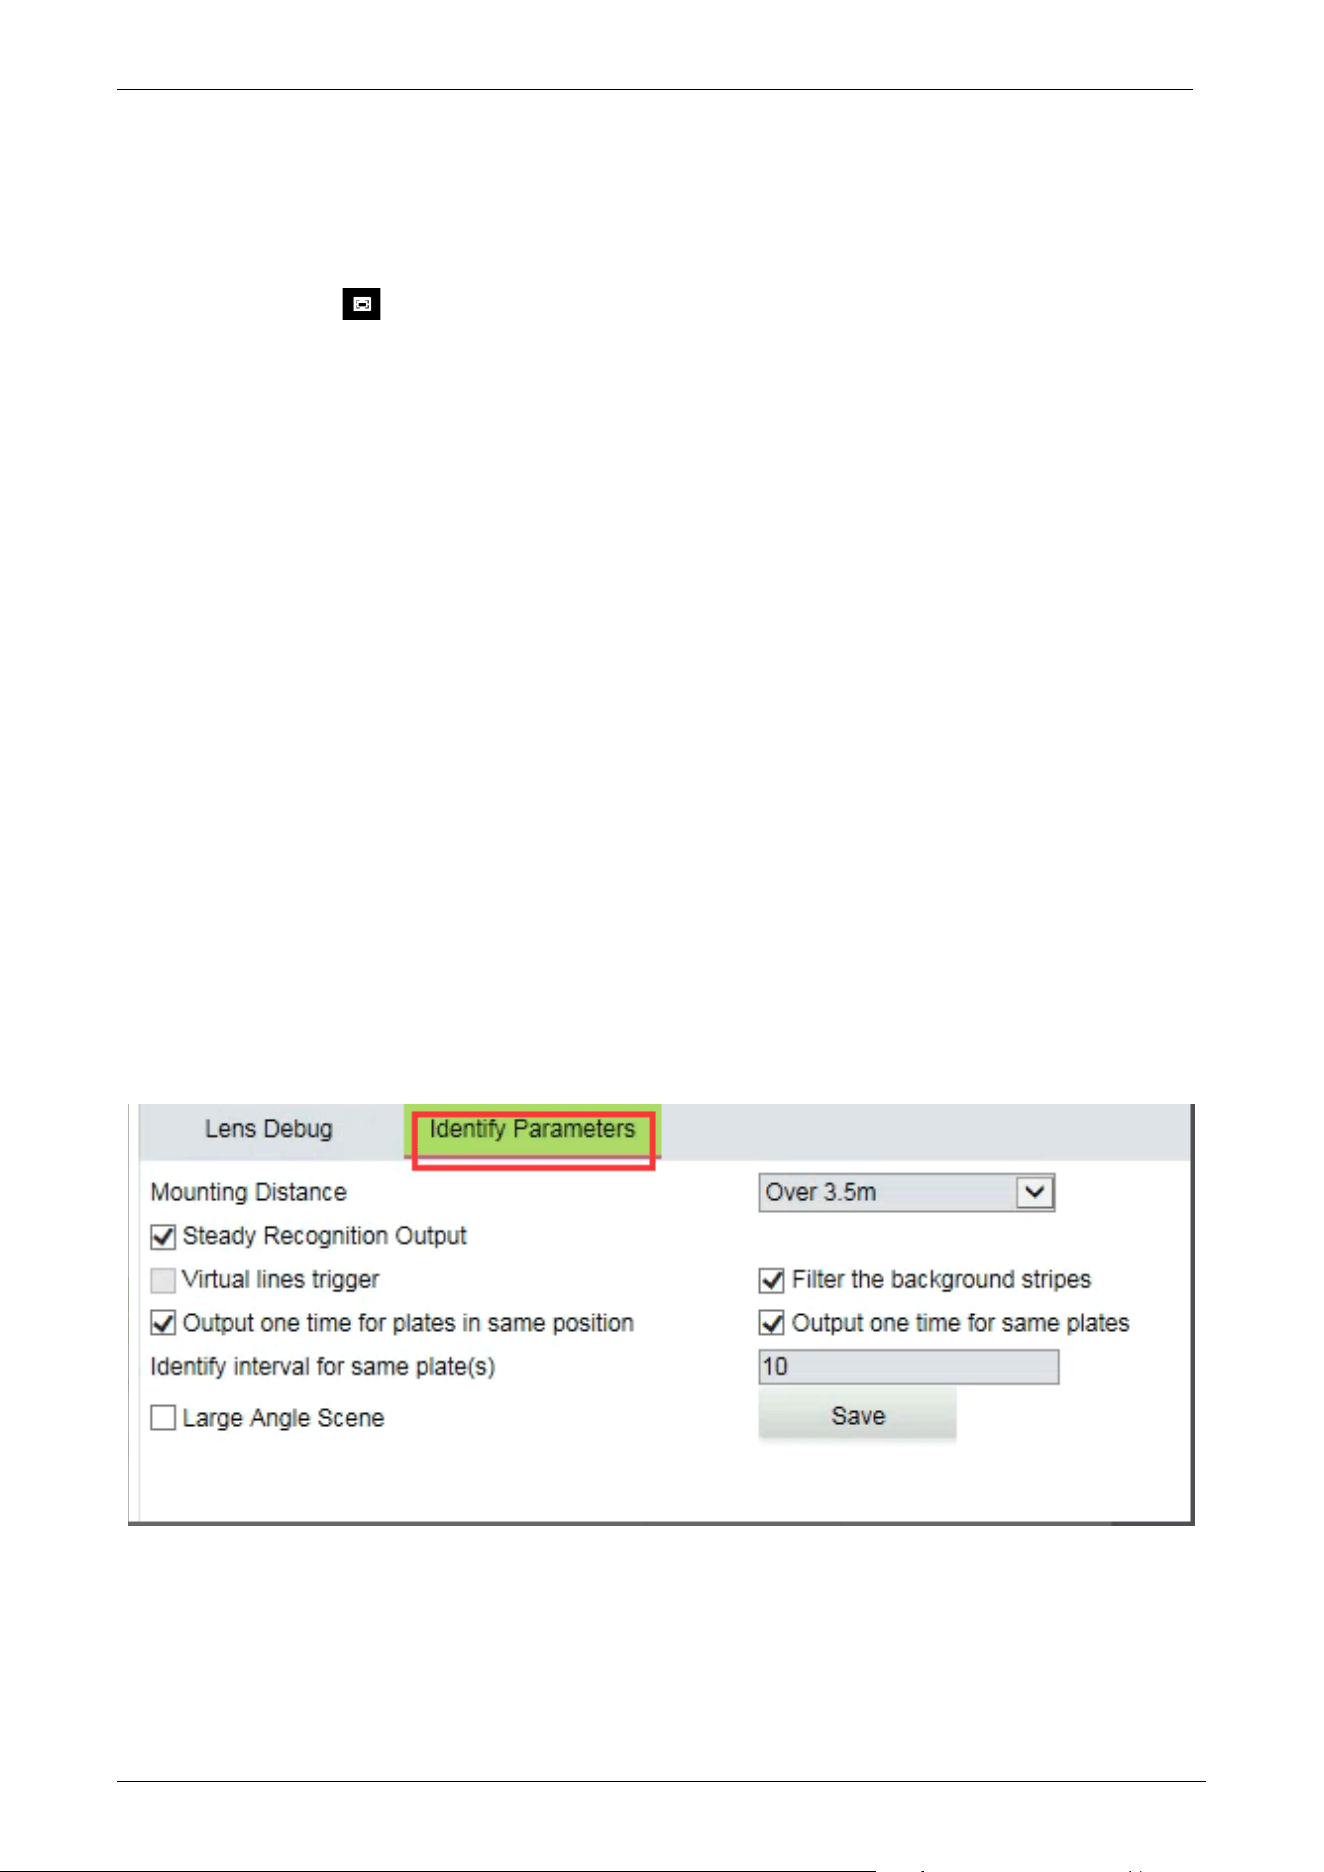
Identify Parameters: Set the parameters of identification, including Mounting Distance, Virtual
line to trigger recognition, Filter the background bar, One-time output for license plates in the
same position, One-time output for the same license plates, Identification interval for the same
plate(s), Large angle scene and so on.
LPRC300 User Manual
Page | 16 Copyright©2021 ZKTECO. CO., LTD. All rights reserved.
3.3 File
The user can enter the year, month, and day to search the required picture or videos, depending on
requirements. Similarly, the user can view the videos, open images, and download the recorded images
from the SD card to the laptop.
3.4 Setup
The user can view or modify the camera parameters, including Device Information, Time Settings,
Display Settings, Streams, Video Parameters, List Management, Intelligent Analysis, Date Management,
Comm Configuration, P2P Configuration, On-screen Voice, Network Settings, FTP Settings, User
Management, Firmware Upgrade, System Update, Auto Reboot, Restore and Local Settings.
LPRC300 User Manual
Page | 17 Copyright©2021 ZKTECO. CO., LTD. All rights reserved.
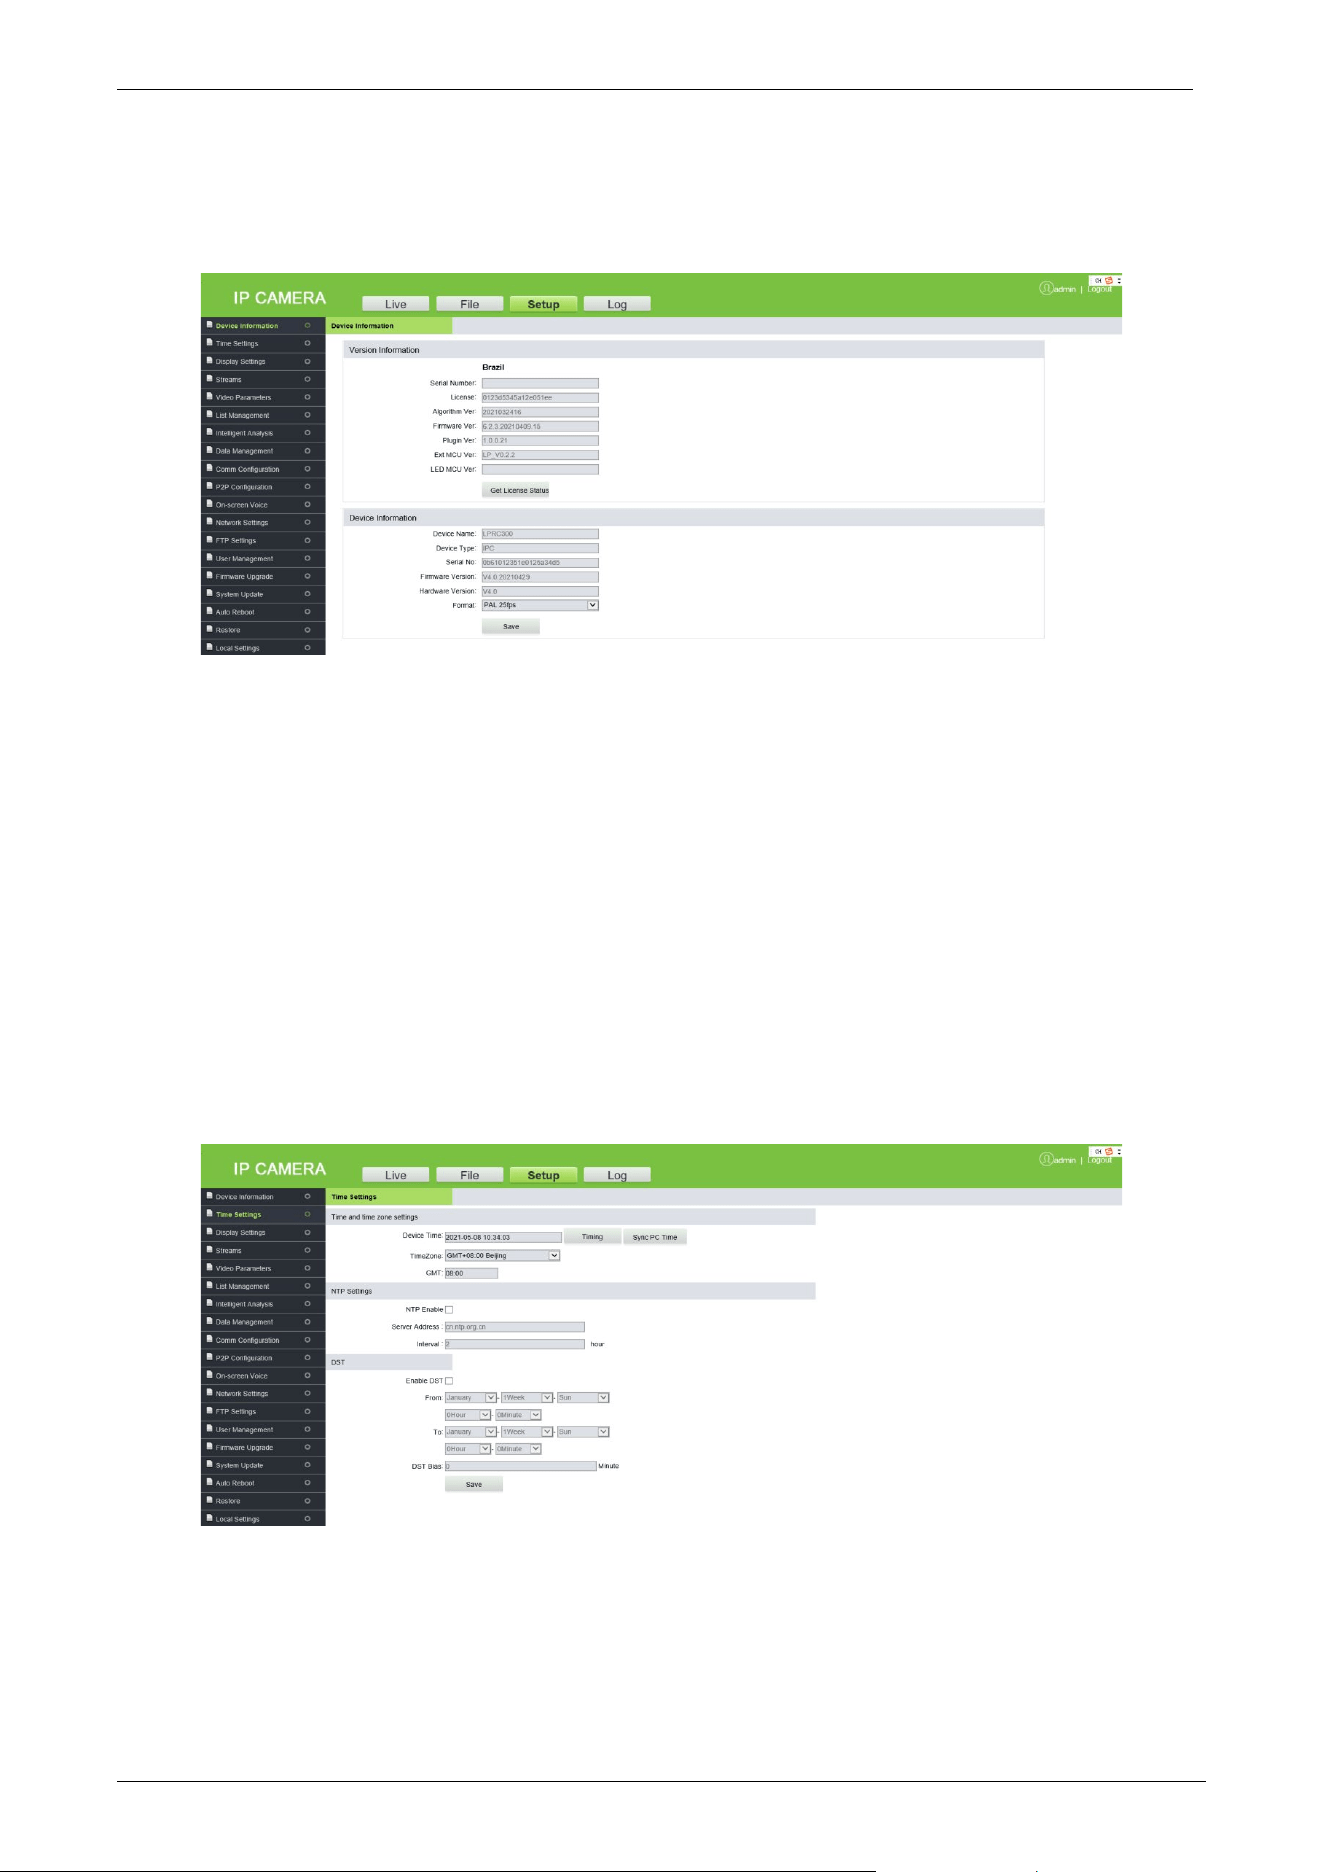
3.4.1 Device Information
Device Information: Displays the basic parameters of the device, including Device name, Device
type, Serial number, Firmware version, Hardware version, and format.
Format: Displays the analog output format, PAL, or NTSC.
Click [Save] after setting the parameters.
Note: Re-login is required to apply all the modified parameters.
3.4.2 Time Settings
Time Settings is used to set the system date and time. The user can choose NTP Server, synchronize
with the local system, or set the time manually. The user can set the time as needed and click [Save].
• Time Zone (38 in total): The default time zone is GMT+08:00 Beijing.
• NTP Server: Select the [NTP Enable] check box, enter the Server address and interval (0-24 hours),
and click [Save].
LPRC300 User Manual
Page | 18 Copyright©2021 ZKTECO. CO., LTD. All rights reserved.
• Synchronize with Local System: Click , and the time will be consistent with the local
computer.
• Set the time manually: Enter the date and time manually and click to save the changes.
• DST: Select the [Enable DST] check box and set the start and end time.
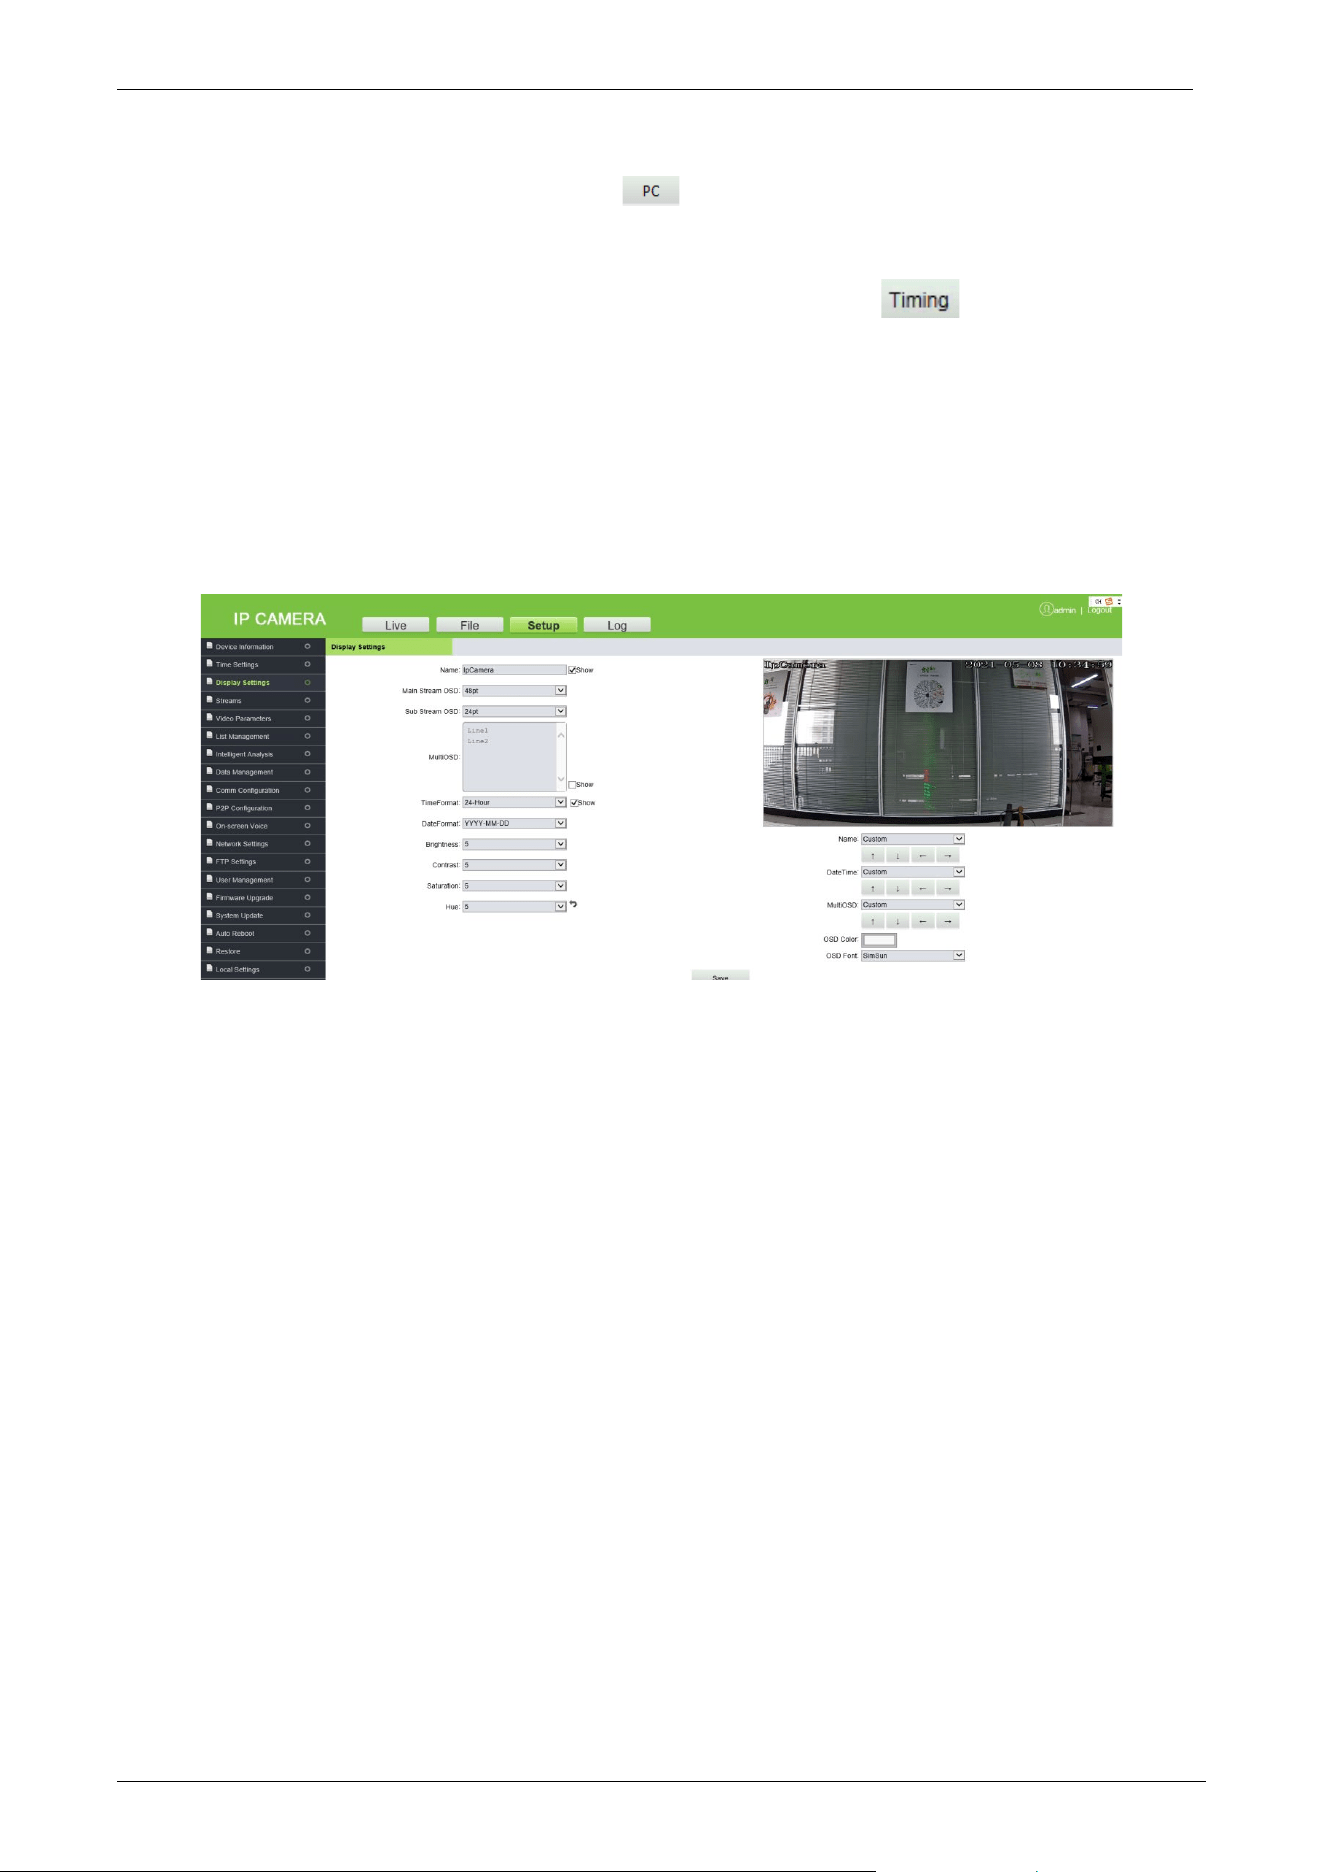
3.4.3 Display Settings
Here, the user can set the text, date, time, and color of the video displayed in preview. Click [Save]
to view the effect of the settings on the right side of the interface, based on actual requirements.
Name: The user can change the name of the specific channel to a maximum of 31 bytes in length.
Upon selecting the ‘Show’ check box, it will appear on the preview screen.
Main/Sub Stream OSD: Select the OSD text size of the mainstream/sub-stream preview window,
and the range is from 12pt to 96pt.
Multi OSD: Enter the text to be displayed and select the [Show] check box so that it can be
displayed in the preview window.
Time Format: Choose 24 hours or 12 hours. Select the [Show] check box to display the appropriate
time on the screen.
Date Format: The user can choose YYYY-MM-DD, MM-DD-YYYY, or DD-MM-YYYY.
Brightness: It indicates the lighting intensity at a unit projecting area. Increasing the brightness
helps in improving the general image effect; however, high brightness may cause insufficient
transparency of images. The setting range is 1 to 10.
LPRC300 User Manual
Page | 19 Copyright©2021 ZKTECO. CO., LTD. All rights reserved.
Contrast: It is the key factor to the visual effect. In general, the higher the contrast, the clearer the
images, and the more distinct the color. A lower contrast makes the entire image dim. The setting
range is 1 to 10.
Saturation: It indicates the brilliance of color and is also called the purity of a color. The higher
content of coloration, the higher the saturation. The higher content of discoloration, the lower the
saturation. The setting range is 1 to 10.
Hue: The color is presented by brightness and hue. Hue indicates the color properties excluding the
brightness and shows the tone of colors. The setting range is 1 to 10.
In the lower right corner of the interface, the display position of the title text, date, and time can be
adjusted, and the color and font of the text can also be set.
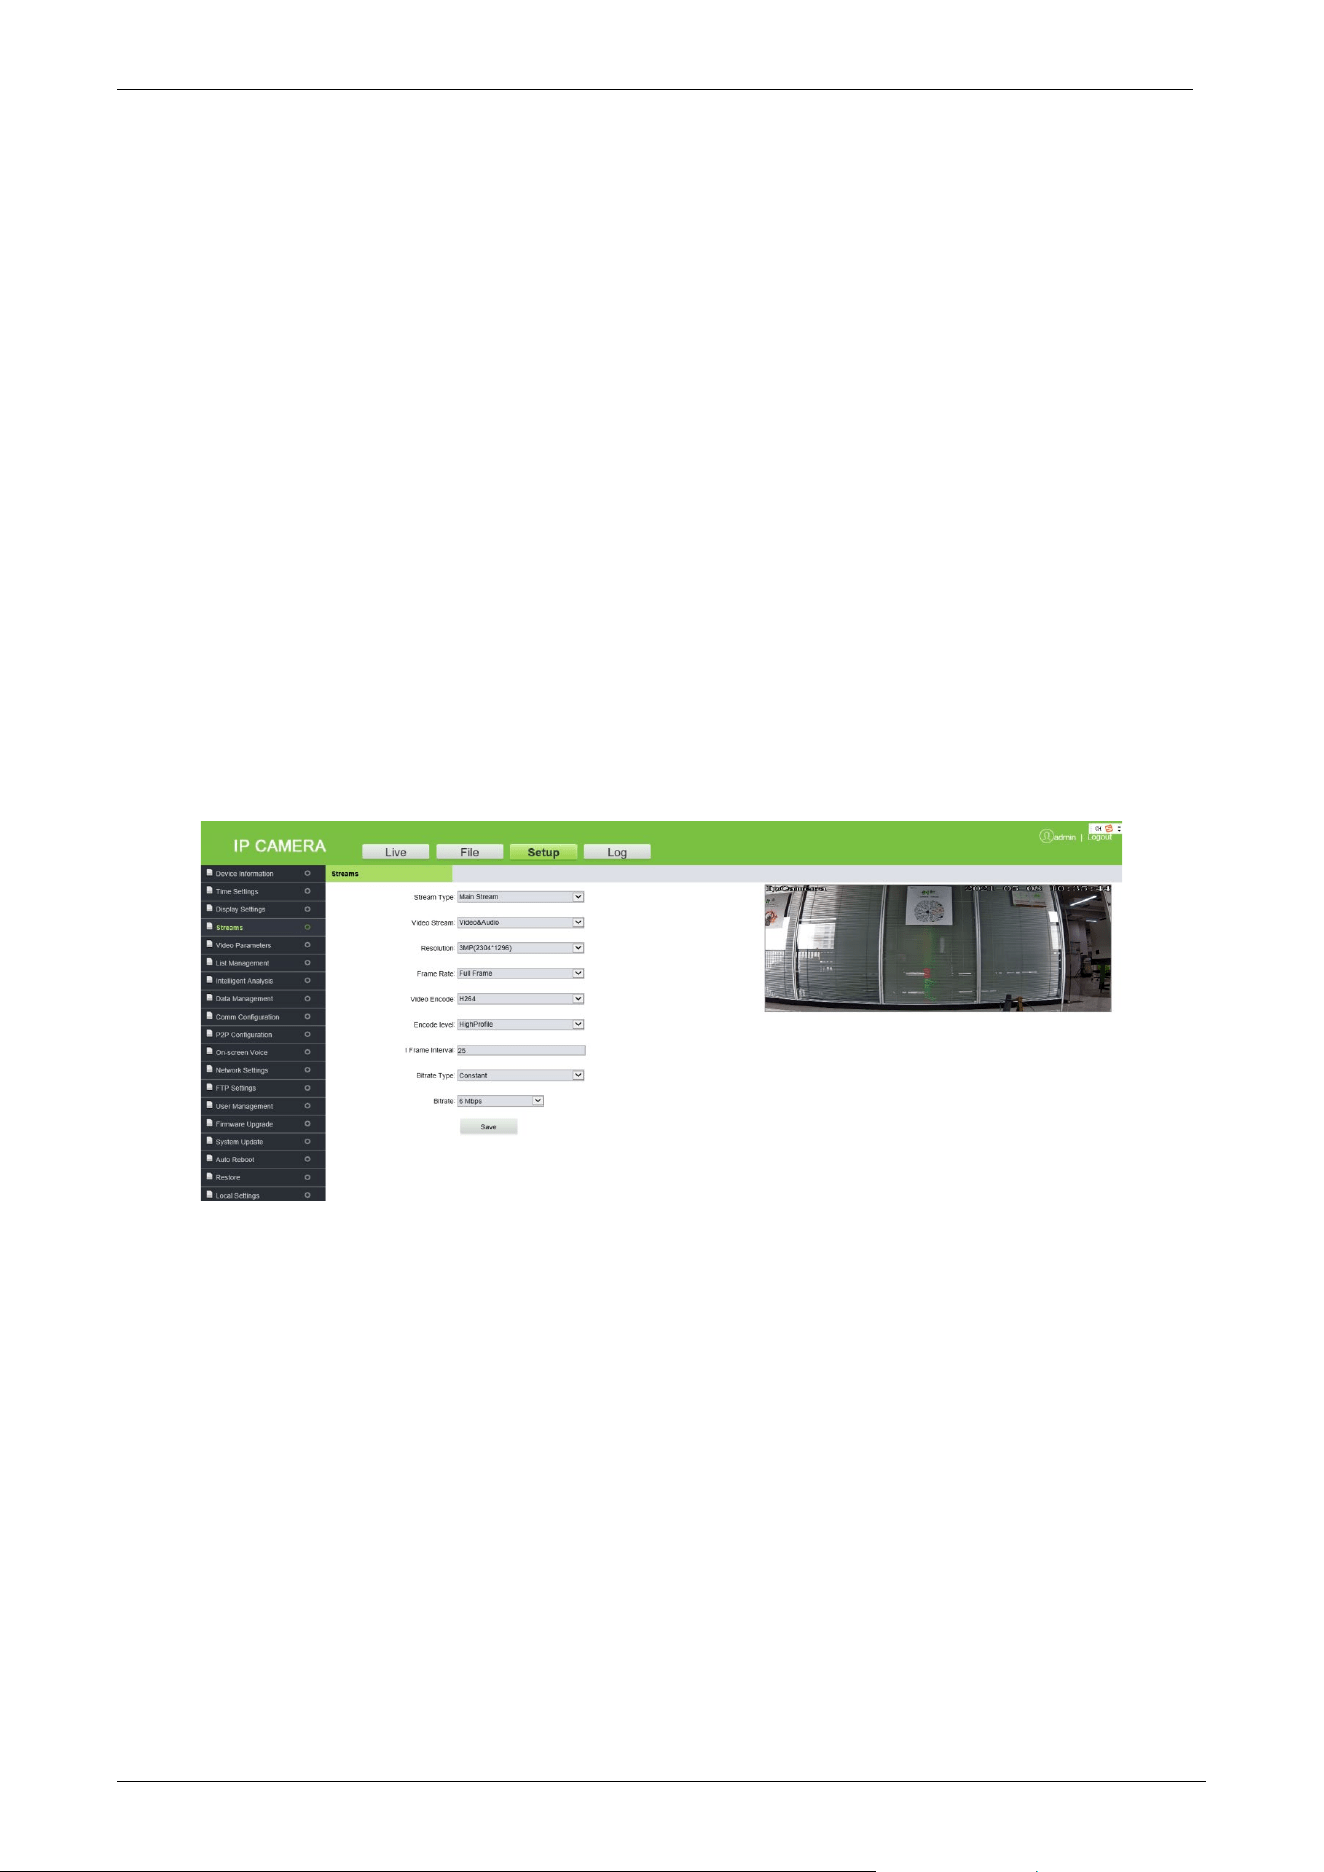
3.4.4 Streams
Stream is used to view or set the video code. It includes the parameters of Main Stream and Sub
Stream. The user can set this feature based on requirements and click [Save].
Stream Type: "Mainstream", "Sub Stream" and "Third Stream" are available. The mainstream is
generally larger, with high definition and large bandwidth. The sub-stream and the third stream
has a reduced image format under the image environment of the mainstream, and the definition is
lower than that of the mainstream, occupying less bandwidth.
Video Stream: The Mainstream has two options: "Video & Audio" and "Video". The Sub-stream
supports only Video & Audio.
Resolution: The user can choose 1080P (1920 x 1080), 720P (1280 x 720), D1 (720 x 576), VGA (640
x 480) and CIF (352 x 288). (Note: The default resolution shall prevail.)
Frame Rate (F/S): It indicates the number of compressed frames transmitted in every second by
the network module. The greater number of frames, the more coherent images, and also it lowers
the performance of the CPU in processing other events. The setting range is 1 to 25 or full. The
default is full.
Video Encode: It indicates the video coding format. The user can choose H264 or H265.
LPRC300 User Manual
Page | 20 Copyright©2021 ZKTECO. CO., LTD. All rights reserved.
Encode Level: It indicates the level of video coding. The user can choose the Baseline, Main Profile,
or High Profile.
I-Frame Interval: An I-frame (Intraframe) is a complete keyframe used in compressed code
between frames, where the interval variation between I-frames will also modify the duration of the
GOP (Group of Pictures). The number of frames between two I-frames may affect the speed of the
GOP reading. If the interval between I-frames is too large, B and P frames will be used automatically
to reduce the consumption of total bandwidth. In this case, the image quality will be reduced.
Therefore, it is recommended to avoid large interval between I-frames. The setting range is 2 to 255.
Bitrate Type: The bitrate type can be Variable or Constant.
Variable: It is used when the image quality is constant, and the network bandwidth is
sufficient.
Constant: The images are transmitted over a fixed bandwidth.
Bitrate: It shows the maximum limit of the bit rate, which can be individually entered. The larger
the bit rate, the larger the energy use, and the greater the picture quality. The range is 16 Kbps to
16 Mbps. (Note: The standard bitrate shall prevail).
Note: The coding level is related to the coding algorithm. The coding levels comprise
Baseline, Main Profile, and High Profile when the coding algorithm is H264. The coding level
cannot be edited when the coding algorithm is H265.
Quality: The user can choose from the Highest, Higher, High, Bad, Worse, or Worst. When the
image quality is set high, the images are clearer with better effect, and the higher the occupation
of resources.
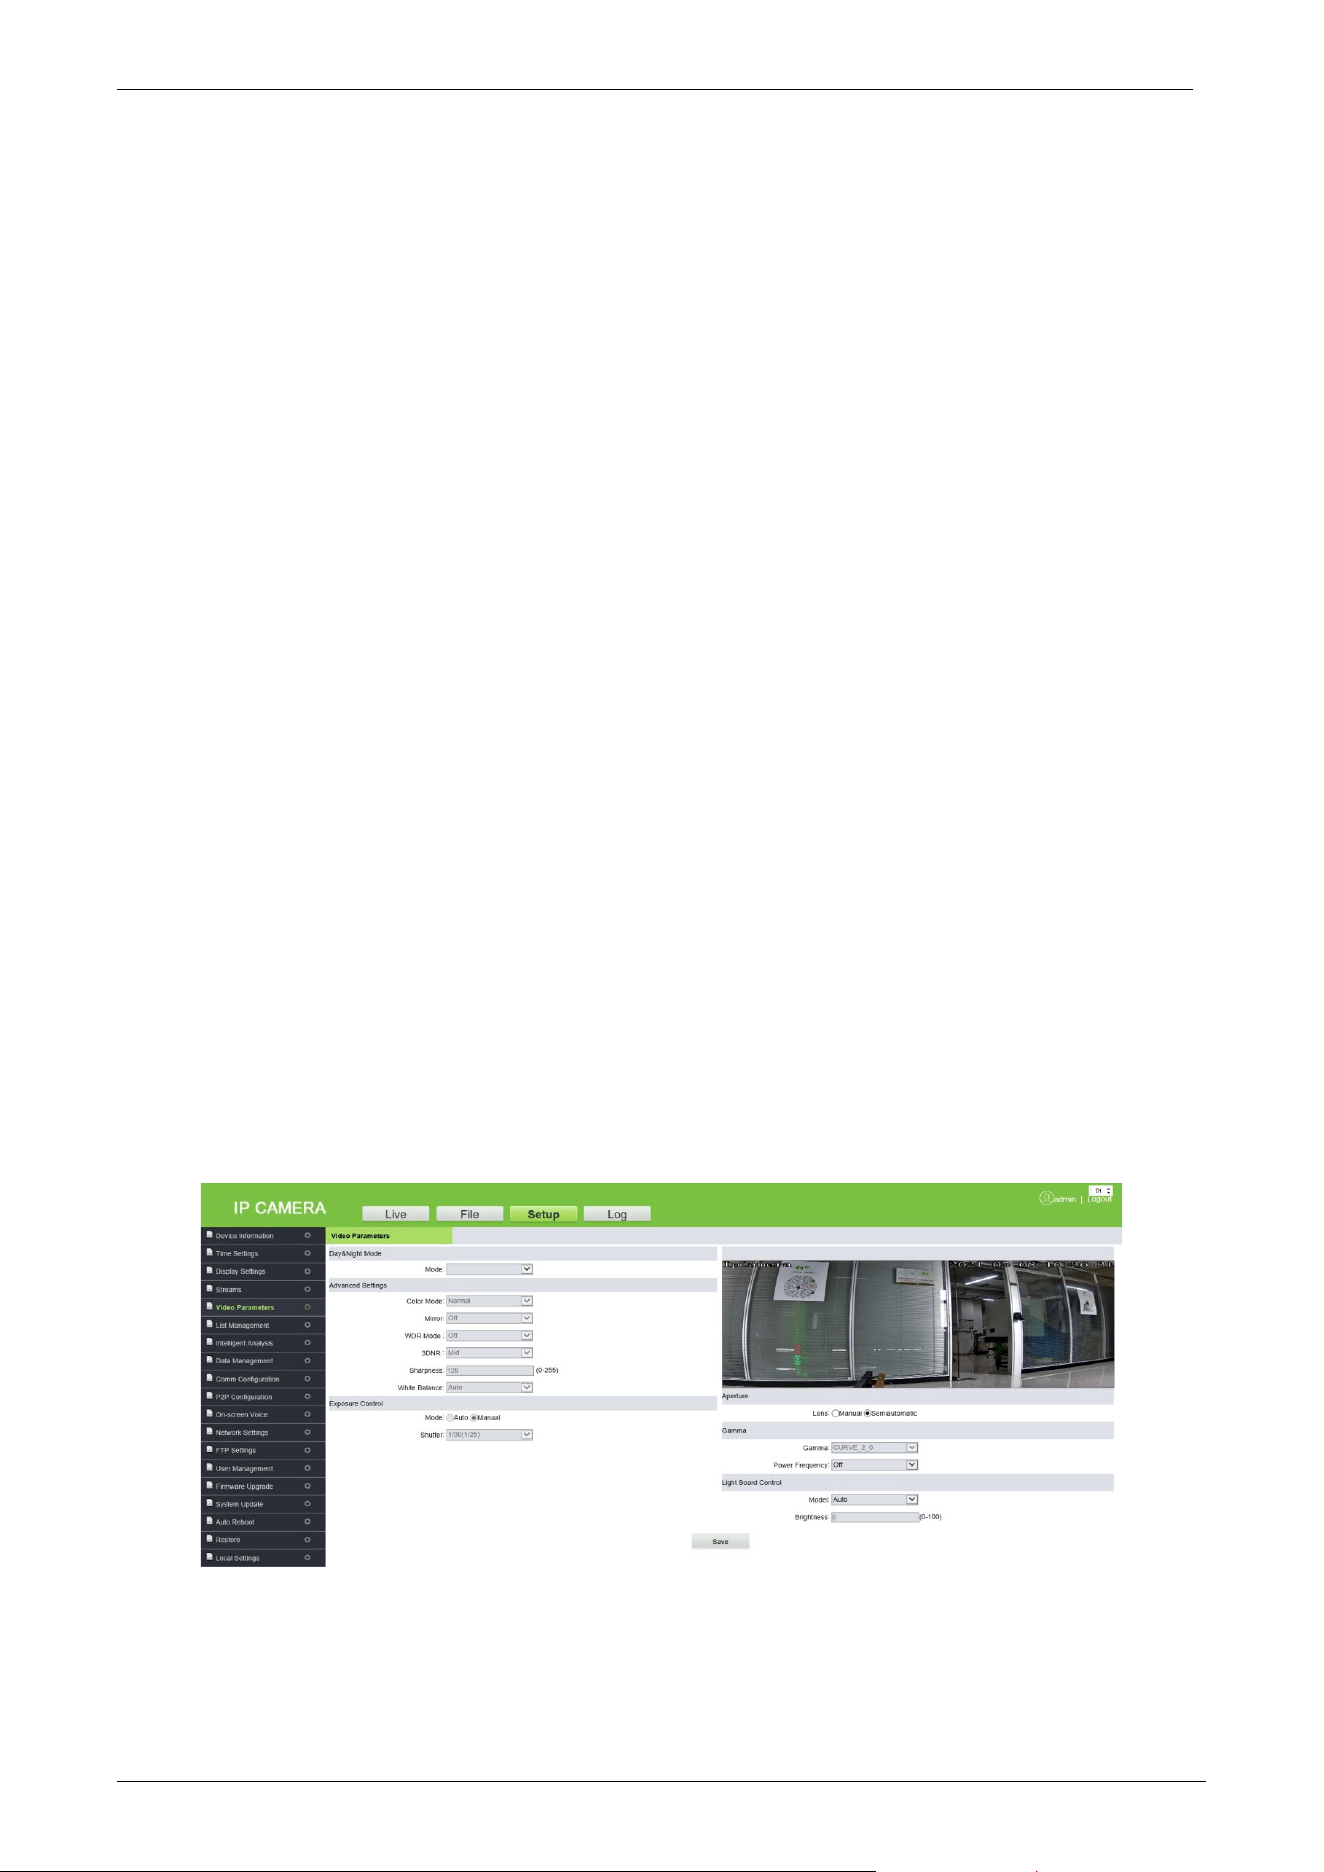
3.4.5 Video Parameters
Here, the user can set the video parameters (do not randomly change the default parameters),
including Day & Night mode, Advanced Settings, Exposure Control, Aperture, Gamma, and Light
Board Control.
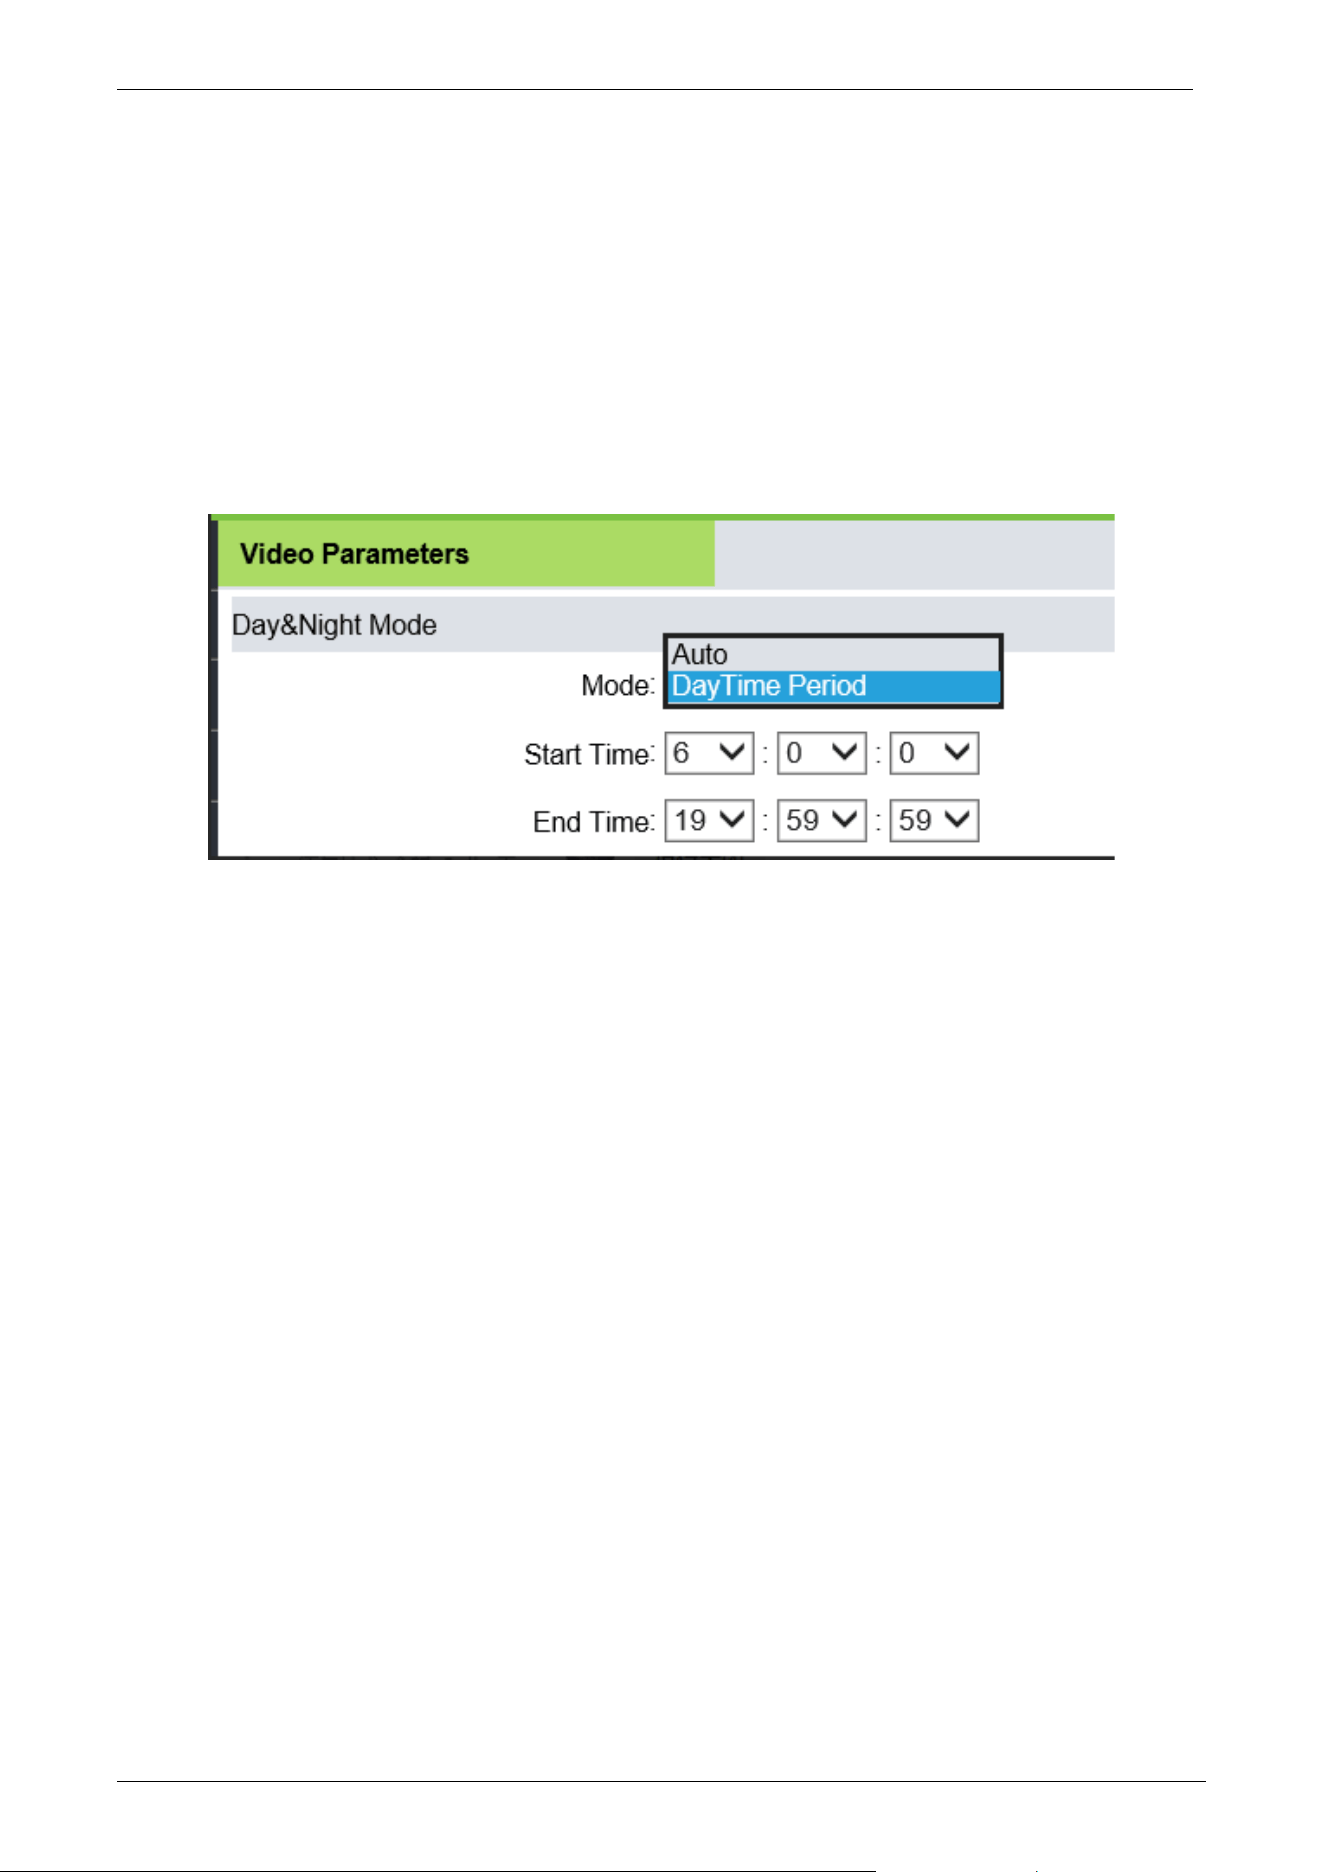
Day & Night Mode: The Day & Night mode of the camera can be set using any one of the mode
Auto, or DayTime Period. The default mode is Auto.
LPRC300 User Manual
Page | 21 Copyright©2021 ZKTECO. CO., LTD. All rights reserved.
Auto: In this format, the Day & Night format can be tuned automatically based on the
camera's visibility and color of the video images. Meanwhile, the camera fill light (i.e.,
photographic lighting of the camera) brightness can be adapted or switched off
automatically depending on the environment's requirements.
DayTime Period: In this format, set the parameters with the same number of intervals for
the start and end period of the daytime so that the fill light will automatically be switched on
during night-time. For example, if the start time is set as 06:00:00 and the end time is set as
18:00:00, then the camera's fill light does not work between 06:00:00 and 18:00:00, and the
camera's fill light stays on from 18:00:01 to 05:59:59 of the next day.
Advanced Settings: It is used to set the Color, Mirror, WDR (Wide Dynamic Range Imaging) mode
and its level, 3DNA (3-Dimensional Noise Reduction), Sharpness, and WB (White Balance) of the
camera. It cannot be modified by default.
Color Mode: It is Normal by default.
Mirror: Mirror mode is off by default.
WDR Mode: It is WDR by default.
WDR Level: It is Low by default.
3DNR: It is Low by default.
Sharpness: It is also referred to as clarity and is an indicator of uniform image clarity and
edge sharpness. If the sharpness is increased, the detailed contrast on the image plane is
higher, and the images are clearer. However, if the sharpness is too high, block lines can be
lined with white lines, and the images look shaded and glaring. The default value is 128.
White Balance: It is used to set the white balance where colors are adapted to make the
images more natural. It is Auto by default.
Exposure Control: The default mode cannot be modified.
Shutter: The faster the shutter speed, the higher the brightness sensitivity, as well as the clarity
that the sound would be. The automatic shutter speed defaults to Higher.
Aperture: The user can choose Manual or semi-automatic.
Gamma: Gamma defaults to CURVE_2_0 and cannot be modified.
Power Frequency: "Off", "50HZ" and "60HZ", the default is Off.
Light Board Control: Set the light board mode and brightness.
Mode: There are three modes, "Off", "Manual" and "Auto", the default is Auto.
LPRC300 User Manual
Page | 22 Copyright©2021 ZKTECO. CO., LTD. All rights reserved.
Off: The light board is not controllable, and the light board is normally closed.
Manual: The brightness of the light board can be adjusted by manually changing the
parameters, where the adjustable range is 1 to 100. The more the parameter value is, the
brighter the fill light will be, and the darker the image will become.
Auto: The camera dynamically adjusts the light-board brightness by obtaining the current
image brightness, exposure, and gain, to achieve the optimal image accuracy with minimum
power.
Brightness: When the light board mode is Manual, the brightness of the light board can be
controlled, and the adjustable range is 0 to 100.
Click [Save], after setting the parameters.
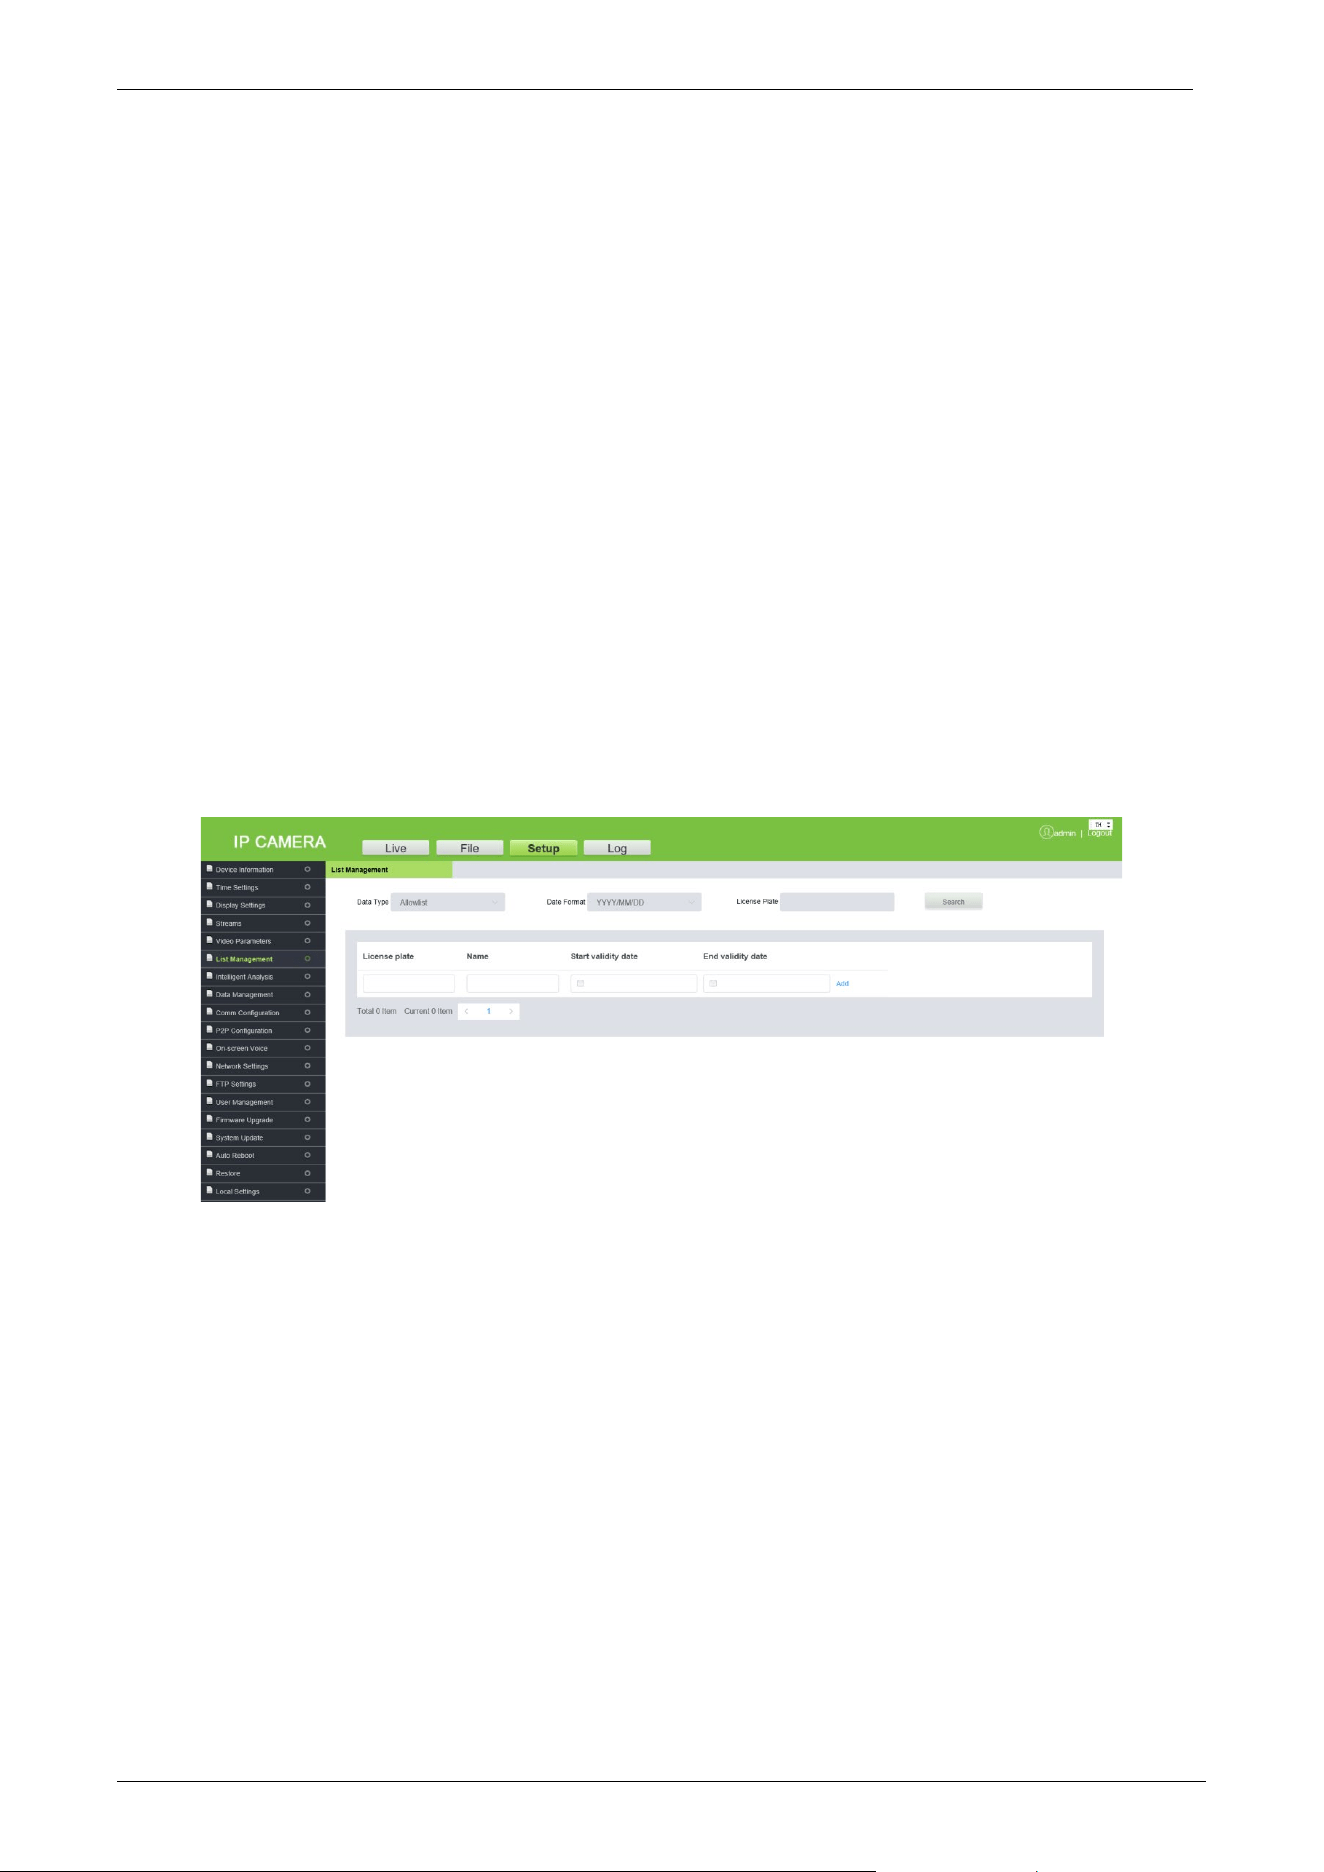
3.4.6 List Management
Only regional host devices have synchronization capabilities. The user can add, modify, query,
delete, synchronize block, and allow list, and fixed car vehicles.
•
Data Type: Please select the data type as per requirements, allowlist, blocklist, and fixed
vehicle list.
•
Date Format: Set the date format.
•
License Plate: The user can enter the license plate number for an exact search, or search for a
license plate number by selecting the data type and date format. The corresponding license
plate number will be displayed in the table below.
•
Search: Click to search as per the data type, date format, and license plate number.
•
Sync: Click the button to synchronize the block and whitelist of the vehicles.

LPRC300 User Manual
Page | 23 Copyright©2021 ZKTECO. CO., LTD. All rights reserved.
3.4.7 Intelligent Analysis
The recognizable license plate types are ordinary blue plate, block plate, yellow plate, and double
yellow plate.
1. Identify Parameters
License Plate Recognition Parameters
Mounting Distance: It indicates the identification distance of a license plate. The default value is
3.5m to 4.5m.
Identify Times: It indicates the number of verifications that are processed internally before
displaying the actual output where the default verification options are 2, 3, or 4.
Identify Threshold Value: The default value is 100.
Identify interval for same plate(s): It indicates the difference between periods to re-identify
the same license plate which must be entered manually. The unit is “second”.
Trigger Mode: The default is Video Trigger.
Recognition Mode: The default is Multiple Frames Priority.
Upload Mode: The default is Upload by SDK.
Output Filter: The default is Filter vehicle far away.
Min/Max License Plate: The default is 60 to 500 pixels.
Virtual line to trigger recognition: When a vehicle enters the virtual line, the recognized area
of the license plate is displayed.
LPRC300 User Manual
Page | 24 Copyright©2021 ZKTECO. CO., LTD. All rights reserved.
Steady Recognition Output: When selecting this option, the camera begins verifying the
license plate from the identification zone entry, where distinct pictures are captured for the
same license plate but provides a single clear image. Select the check box to use this feature.
(Note: This function cannot be used at the same time when the virtual line to trigger recognition
is selected. When selected, the virtual line in the live preview screen will no longer be displayed.)
Filter the background stripes: Automatically filters stripes or pillars in the background.
Output one time for same plates: It ensures that the identification results for the same license
plate are displayed only once.
Output one time for plates in same position: It ensures that the identification results for
license plates in the same position (still) are displayed only once.
Double Plate: Select the checkbox to support double plate recognition.
Large Angel Scene: It is suitable for a wide-angle range of access.
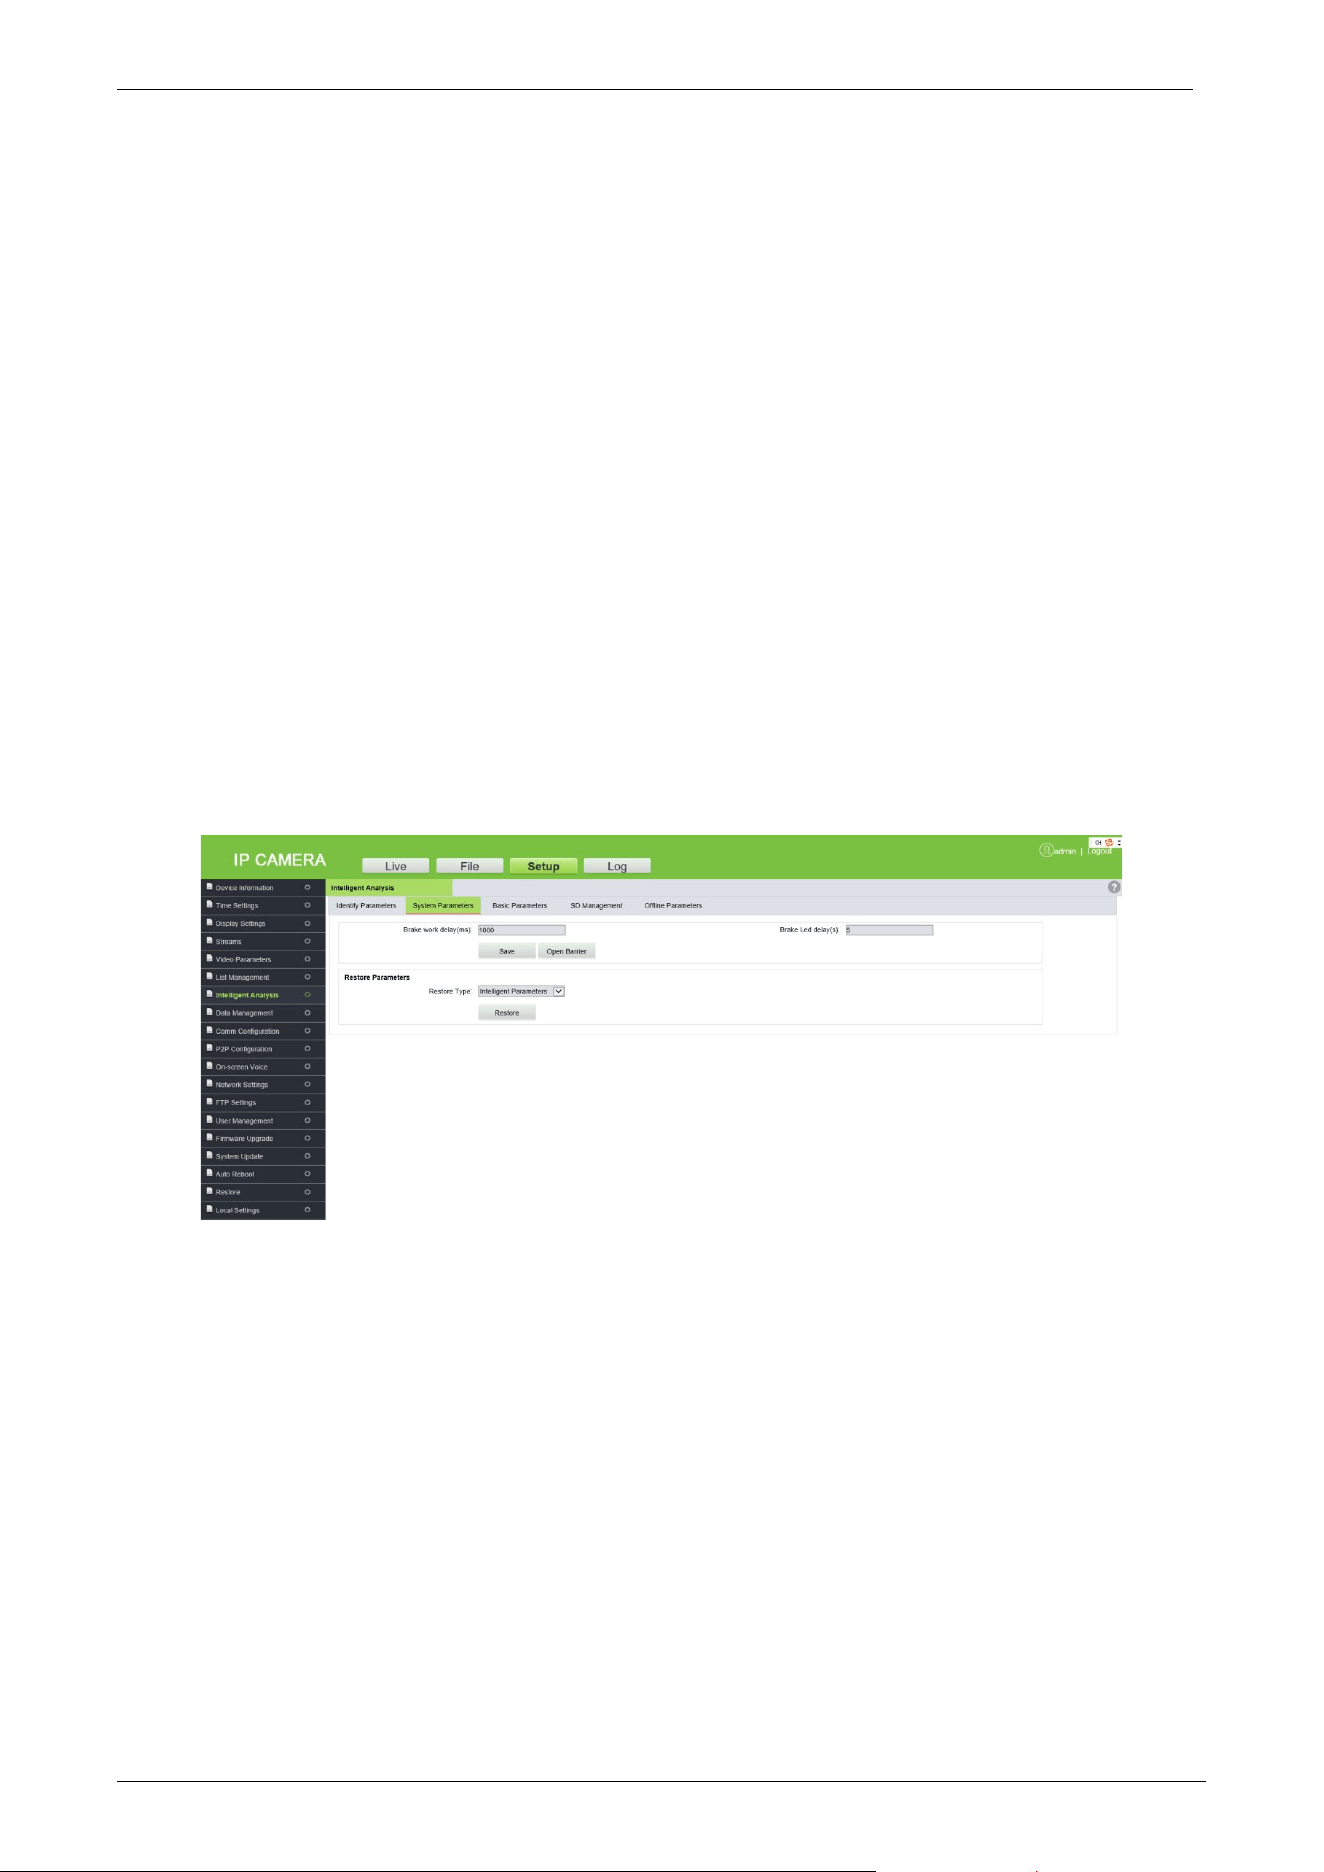
2. System Parameters
•
Barrier Open Duration (ms): It indicates the open duration of brake signals, which need to
be entered manually in milliseconds (ms).
•
LED Indication Duration(s): It is the lighting duration of the Red or Green signal.
•
Manual Verification: After successful identification, manual confirmation is required before
opening the barrier.
•
Restore Parameters: Click [Restore] to restore the identify parameters, network parameters,
and all parameters (including all the data records such as admission records, fixed vehicles,
allowlist list, and charging rules).
Note: Make sure to use this feature carefully.
LPRC300 User Manual
Page | 25 Copyright©2021 ZKTECO. CO., LTD. All rights reserved.
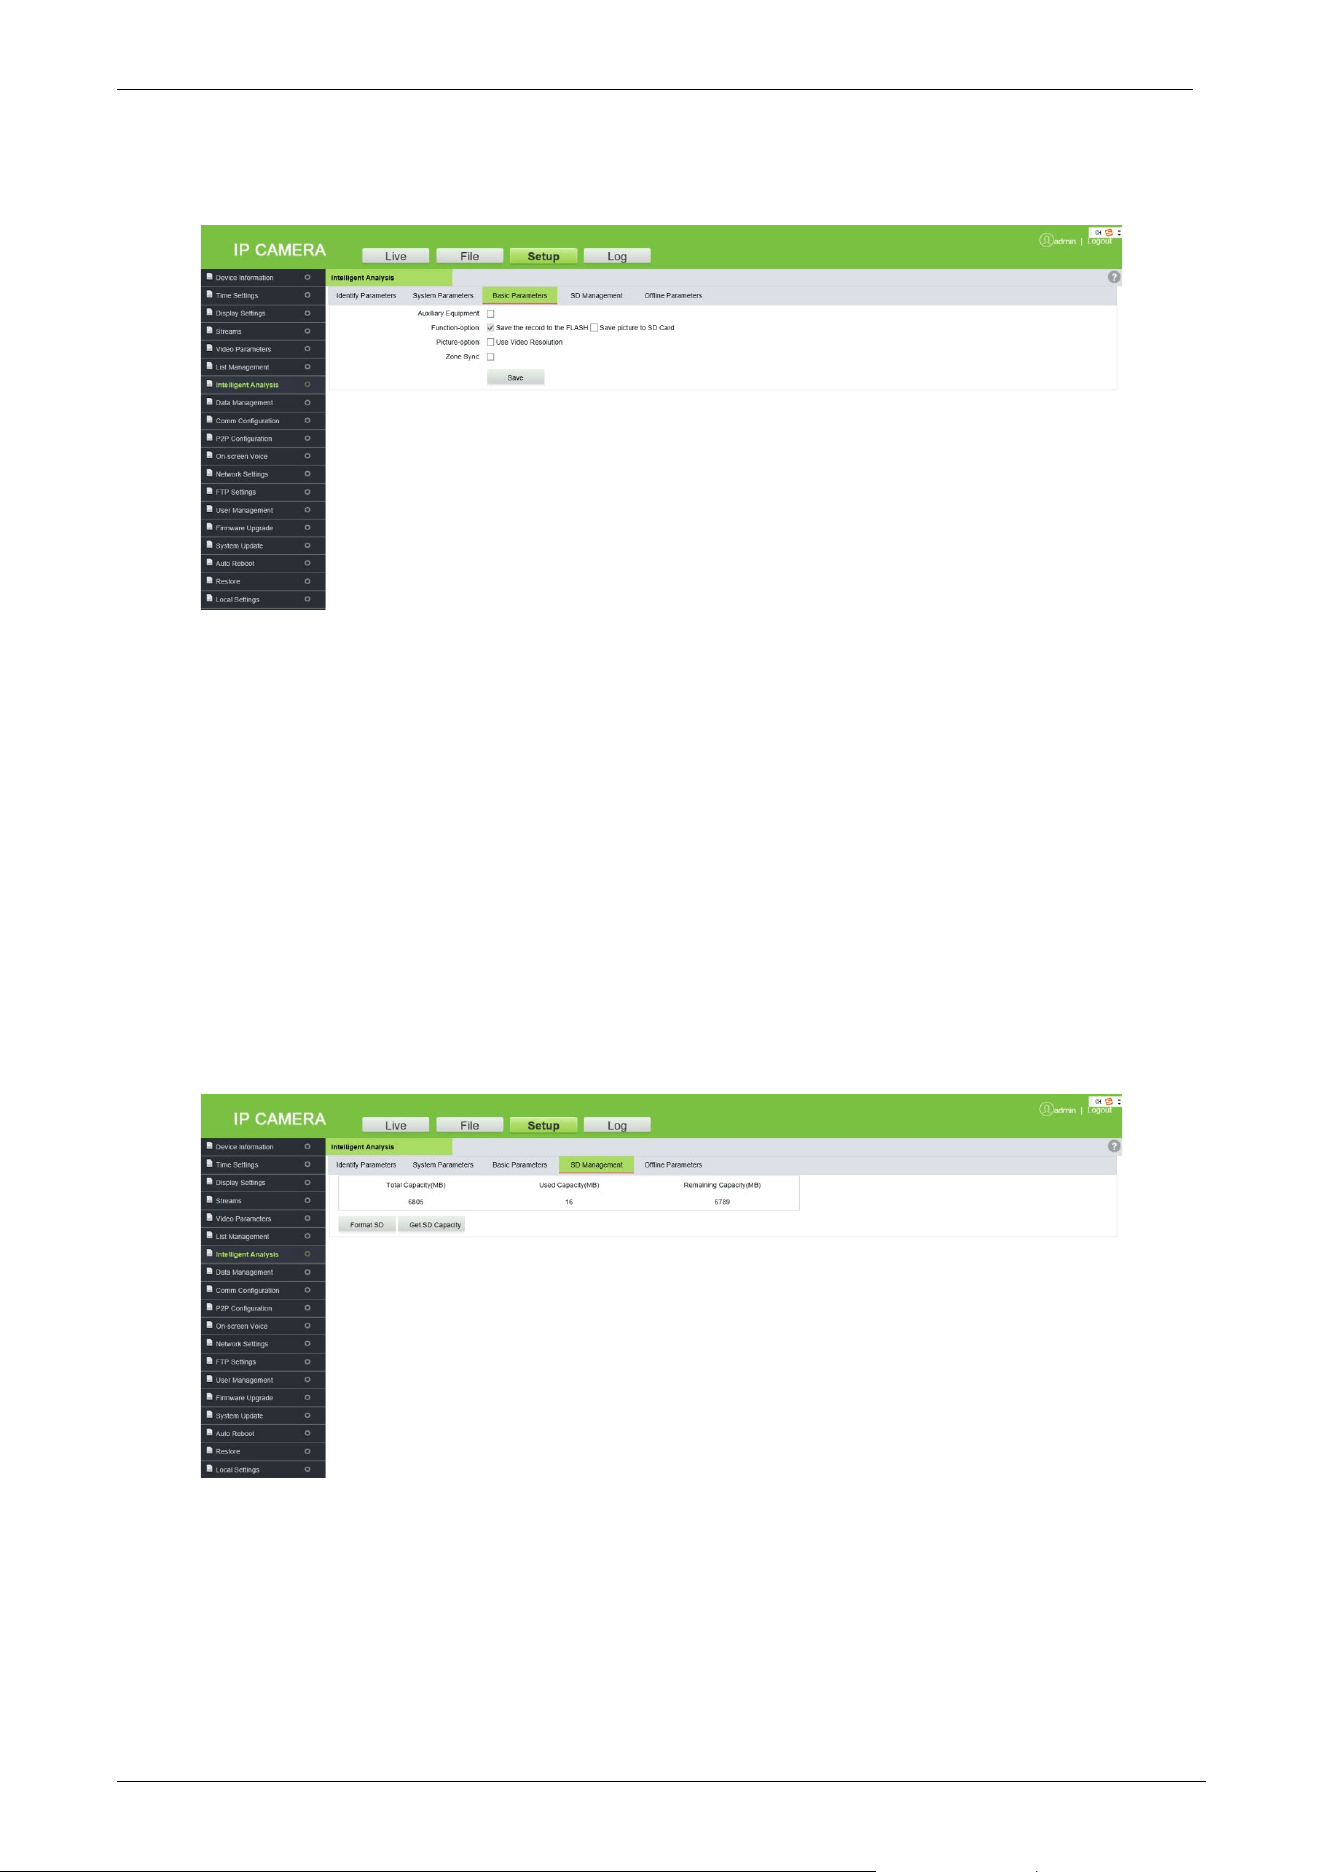
3. Basic Parameters
• Auxiliary Equipment: The master-auxiliary mode recognizes the license plate number and
sends the recognition result to the main camera.
• Function-option: Choose whether to save the picture to an SD card (This feature can be
selected only when using the SD card).
• Zone Sync: Select whether to synchronize the basic parameters of the zone.
• Zone Master LPR: When this feature is selected, the main camera device in the zone network
synchronizes the block and allow list fixed car data to other zone network devices, and there
can be only one zone master.
• Zone IP List: Displays the IP Addresses of all the LPR devices in the zone.
4. SD Management
When the camera uses an SD card, this tab shows the total space, used space and remaining
space of the SD card. You can format and re-use the SD card.

LPRC300 User Manual
Page | 26 Copyright©2021 ZKTECO. CO., LTD. All rights reserved.
5. Offline Parameters
• Channel Name: Define the name of the channel.
• Fixed Car Match Accuracy: It is the matching accuracy of the license plate recognition. The
default is Exact Match.
• Fixed Car Open Gate: The user can choose “Manual” or “Auto” to open the barrier gate for
registered vehicles.
• Fixed alarm day: Whenever the vehicle enters and exits, this broadcasts the remaining
validity period of the registered vehicle through an automated voice.
• Temp Car Forbidden: When selected, the entry of temporary vehicles is prohibited.
• Fixed car to temp: When the validity of a fixed vehicle is expired, this option changes the
same registered vehicle into a temporary vehicle in the database.
• Record Loop Coverage: It allows the continuity of the previous access records to the new
record once it becomes full.
• Online mode: The device handles the charging and opening of the gate in offline mode if
the interface does not display the real-time monitoring screen. It is a default option and
cannot be modified.
• Display Type: The default is Two-tone LED.
• Display Default Content: It is the default content displayed on the display screen, which is
not more than 31 bytes in length.
• Record Match Accuracy: It is the matching accuracy of the license plate recognition. The
default is Exact Match.
• Temp Car Open Gate: The user can choose “Manual” or “Auto” to open the barrier gate for
the temporary vehicle. The user can even select the "Fast Exit" option when the temporary
vehicle charge is 0 and the barrier opens automatically.
• In/Out: The location can be set as an exit or entrance.
• Slave auto-synchronization time: It is the time duration taken by the main camera to
synchronize with the secondary camera.
• Repeated Plate Processing Interval (s): It is the processing time interval for the same
license plate.

LPRC300 User Manual
Page | 27 Copyright©2021 ZKTECO. CO., LTD. All rights reserved.
• Single Channel Repeat Plate Processing Interval (s): In the single-channel mode, it is the
processing time interval taken to recognize the license plate by the entrance device and the
exit device.
• Display Default Content Refresh Interval (s): The time interval between the software and
firmware to update the content in the display.
3.4.8 Data Management
This option is used for the management of specific data such as allowlist, blocklist, and fixed car
management. The user can import, export, and clear the data as per the requirements.
3.4.9 Comm Configuration
Push protocol allows to communicate with various software platforms. To use this feature, set the
corresponding parameters here.
• Push Enable: Select the check box to enable this feature.
• Server Address: Enter the Server Address of the push configuration.
LPRC300 User Manual
Page | 28 Copyright©2021 ZKTECO. CO., LTD. All rights reserved.
• Alternate Server Address: When the push configuration main Server Address is invalid, the
system automatically considers the alternative Server Address.
• Server HTTP Port: Enter the corresponding port (the default port number is 8080).
• SSL: That is the encryption mode, if selected, the server address will be encrypted. It is
available when the server supports the feature.
• SSL Authentication Method: The default is Anonymous.
• Server HTTPS Port: Enter the corresponding port (the default port number is 443).
• Timeout Time(s): The default value is 5 seconds.
• Function-option: The user can choose to send the license plate number or license plate
picture.
Click [Save], after setting the parameters.
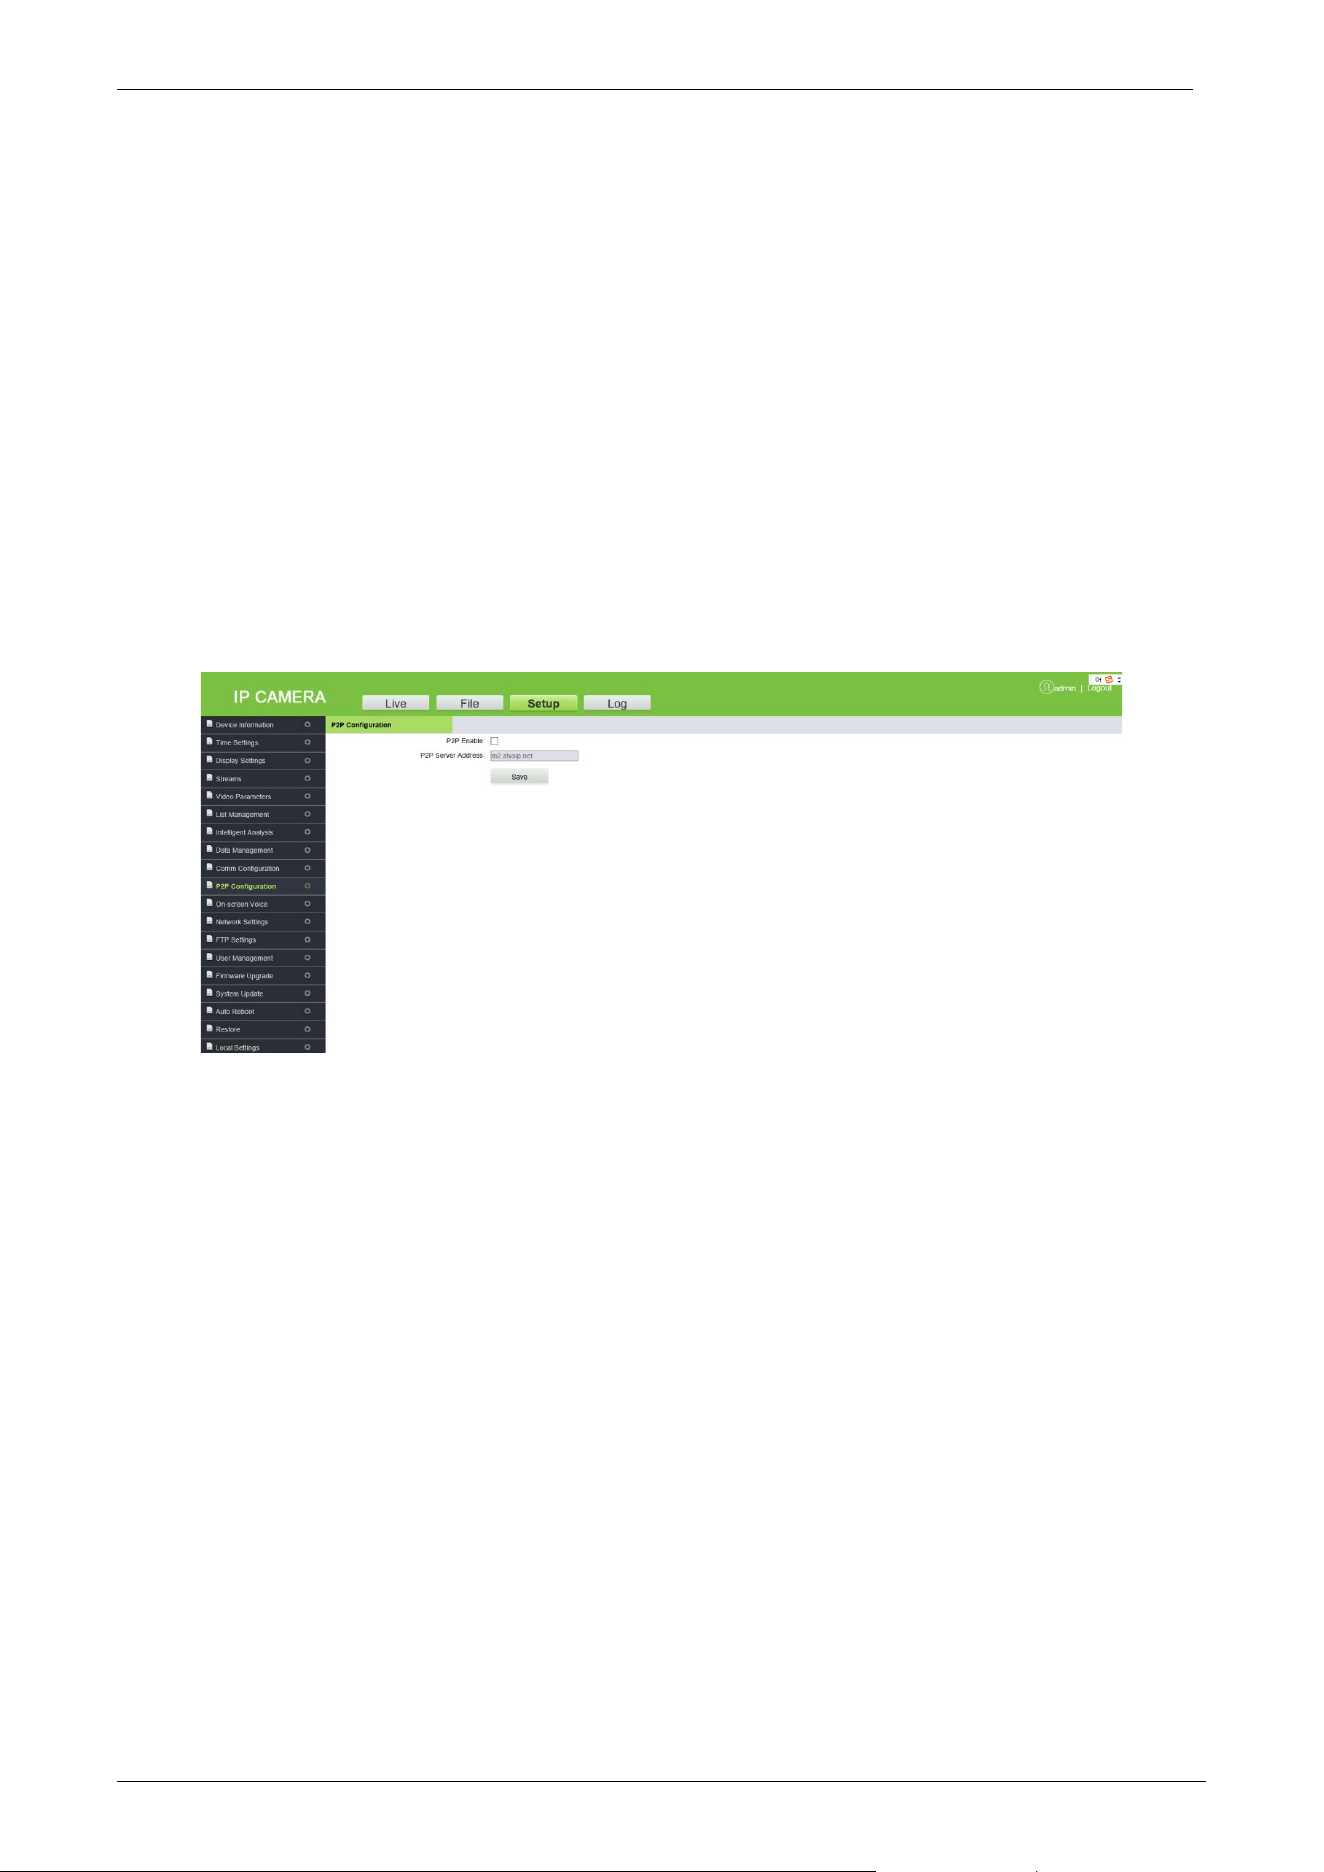
3.4.10 P2P Configuration
• P2P Enable: Select the check box to enable P2P.
• P2P Server Address: Enter the P2P Server address.
Click [Save] after setting the parameters.
3.4.11 On-screen Voice
When the camera recognizes the license plate, it can broadcast a voice message.

LPRC300 User Manual
Page | 29 Copyright©2021 ZKTECO. CO., LTD. All rights reserved.
Enable Voice: Select the check box to enable the voice broadcast feature.
The time period and volume for working in loud mode can be set.
Click [Save] after setting the parameters.
3.4.12 Network Settings
Here, the user can view or set the camera network parameters, including LAN parameters, PPPOE
parameters, RTSP parameters, etc.
LAN: Set the related parameters of the Local Area Network, including IP Address, Subnet Mask,
Gateway, DNS, and MAC according to the actual situation, click [Save].
DHCP: Dynamic Host Configuration Protocol, is one of the Open Transport protocols in the
TCP/IP protocol family. It is used to allocate dynamic IP addresses for network clients. After this
feature is selected, the IP address, subnet mask, and gateway of the camera are automatically
configured by the host. Otherwise, you need to set network parameters and ensure that the IP
address and the gateway address are in the same network segment.

LPRC300 User Manual
Page | 30 Copyright©2021 ZKTECO. CO., LTD. All rights reserved.
SNMP: To monitor devices connected to the network for any conditions that cause
administrative concern.
Manager IP: Enter the corresponding SNMP host address.
Send Count: The total number of times the monitoring system sends the tracking messages to
the camera at each interval.
Send Interval: It is to set the interval time (unit: seconds) for the monitoring system to send
tracking messages to the camera. The time range is 2 to 250, and the value can be adjusted
according to requirements.
HTTP Port: Enter the corresponding port (the default port number is 80).
HTTPS Port: Enter the corresponding port (the default port number is 443).
RTSP Port: Domain access login needs to be mapped to the RTSP (default port number is 554).
RTSP Validation: Select the RTSP validation mode, "HTTP-Base64" and "HTTP-Digest". When the
RTSP validation mode is enabled, the username and password need to be verified when
activating the real-time RTSP stream.
RTMP Port: Domain access login needs to be mapped to the RTMP (the default port number is
1935).
UPNP: It is used to set the automatic mapping of the port.
Enable PPPoE: Select the check box to enable PPPoE.
Username: Enter the PPPoE Username.
Password: Enter the PPPoE password.
Confirm Pwd: Re-enter the PPPoE password.
PPPoE IP: Enter the dynamic address of the device.
Click [Save], after setting the parameters.
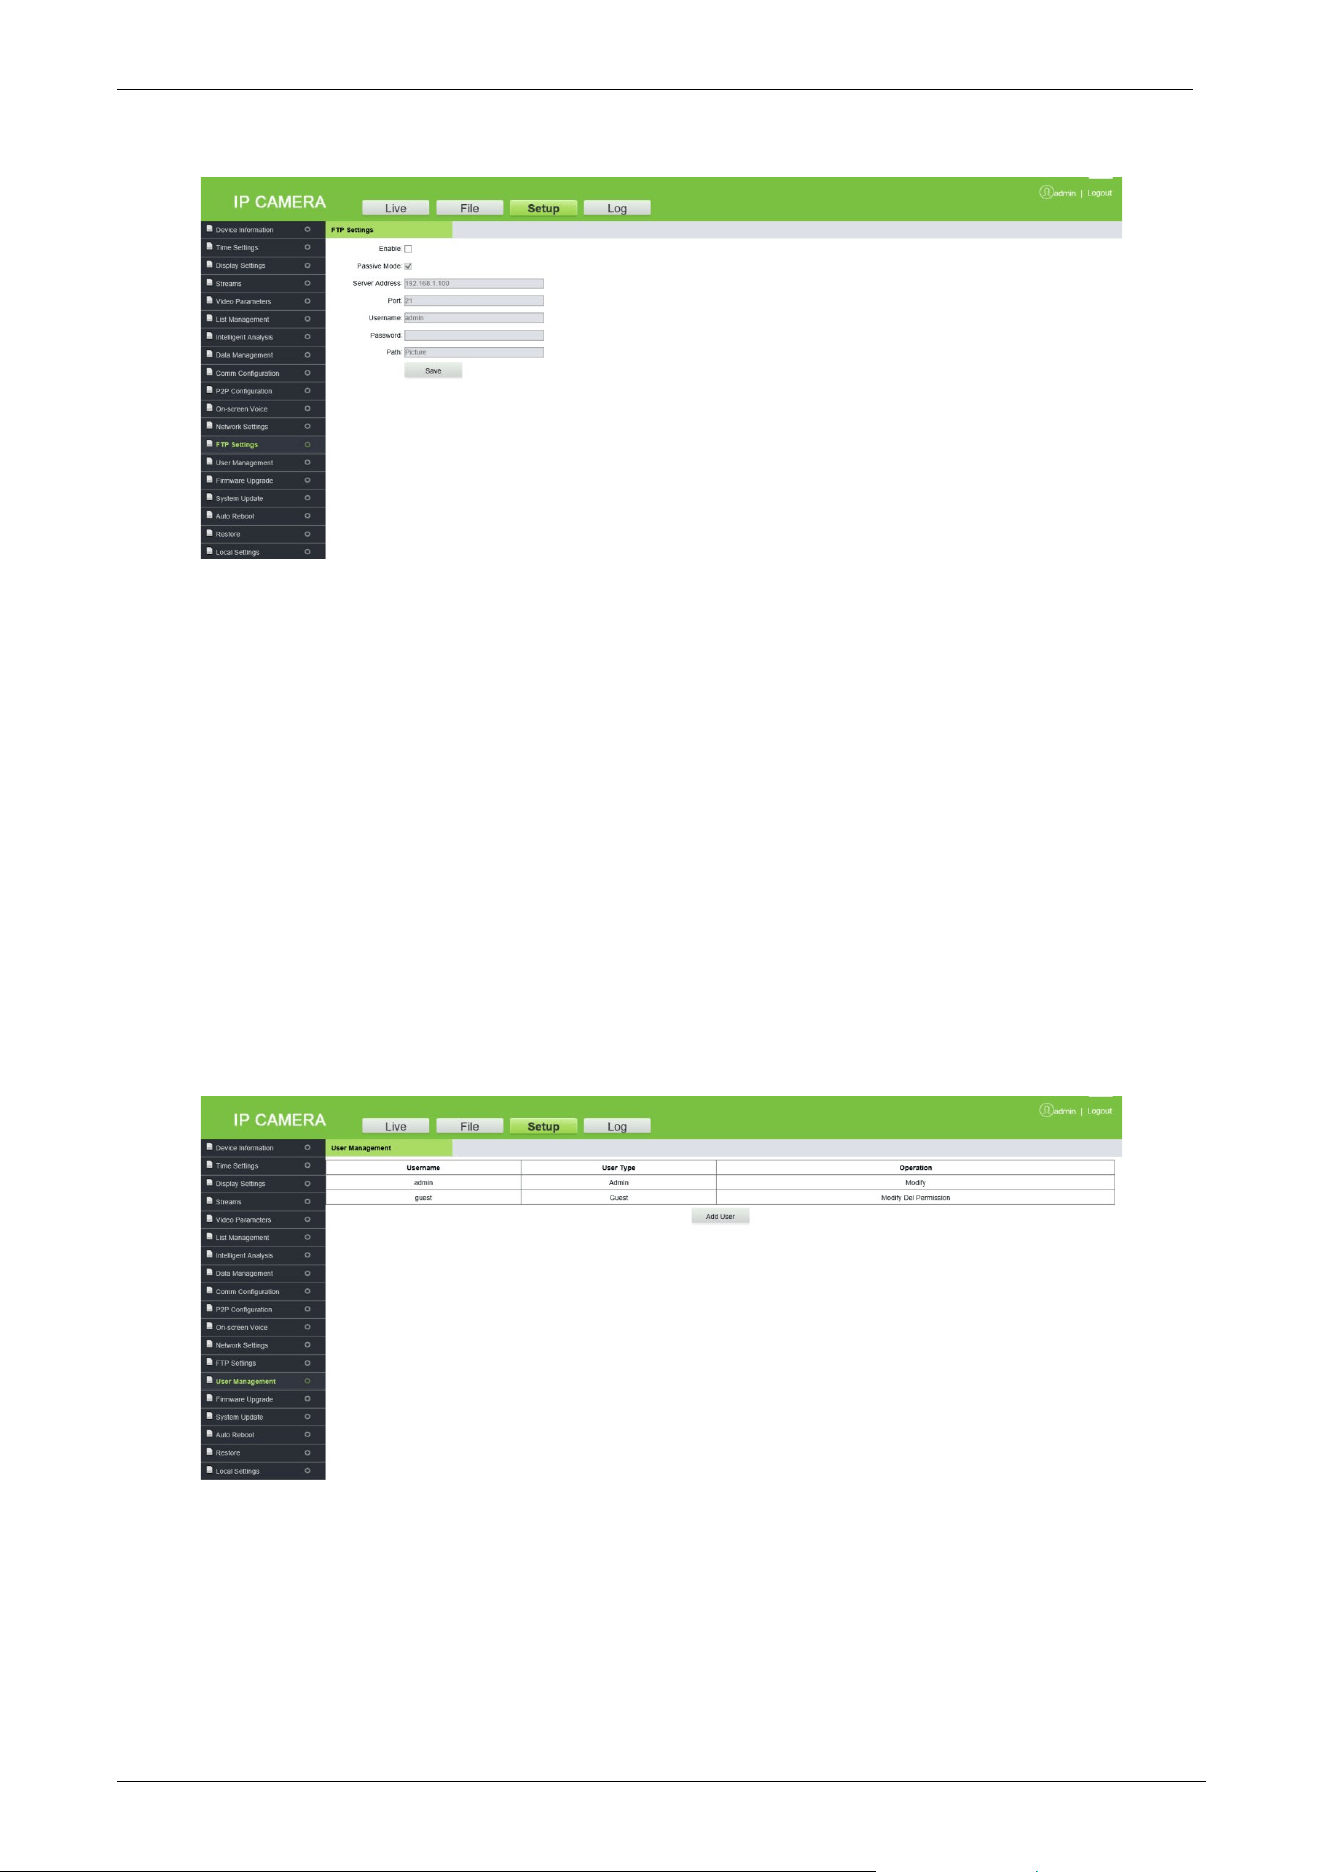
3.4.13 FTP Settings
FTP allows transferring files and images where the user can configure this parameter to transfer
the license plate recognition images to a specified server.
LPRC300 User Manual
Page | 31 Copyright©2021 ZKTECO. CO., LTD. All rights reserved.
• Enable: Select the check box to enable FTP.
• Passive Mode: It is used for data transfer security. It is a default option when FTP is not selected.
• Server Address: Enter the FTP Server Address.
• Port: Enter the corresponding port.
• Username/Password: Enter the FTP Username and Password.
• Path: Select the storage path/ location to transfer/save the image of the captured license plate.
Click [Save], after setting parameters
3.4.14 User Management
It is used by the administrator to add or manage operators and normal users and to modify
usernames, passwords, and permissions.
Modify: Modification preferences vary with different stages of users, where passwords can be
modified only for administrators, and user type can be modified for normal users. The Username,
Password, and user type can be modified for a new user by the administrator. New users can be set
as a normal user or operator. Different permissions can be assigned in "Permissions".
LPRC300 User Manual
Page | 32 Copyright©2021 ZKTECO. CO., LTD. All rights reserved.
Del: New users can be deleted.
Permission: Permissions can be assigned to normal users.
Add User: New users can be added on demand.
Note:
A normal user can preview the videos only after login and cannot view or modify parameters.
Username, Password may consist of a to z, 0 to 9, underscores, and a single dot (.), 1 to 15
characters. Password is case-sensitive.
When the username or password is modified, it is required to log in again to update the
change.
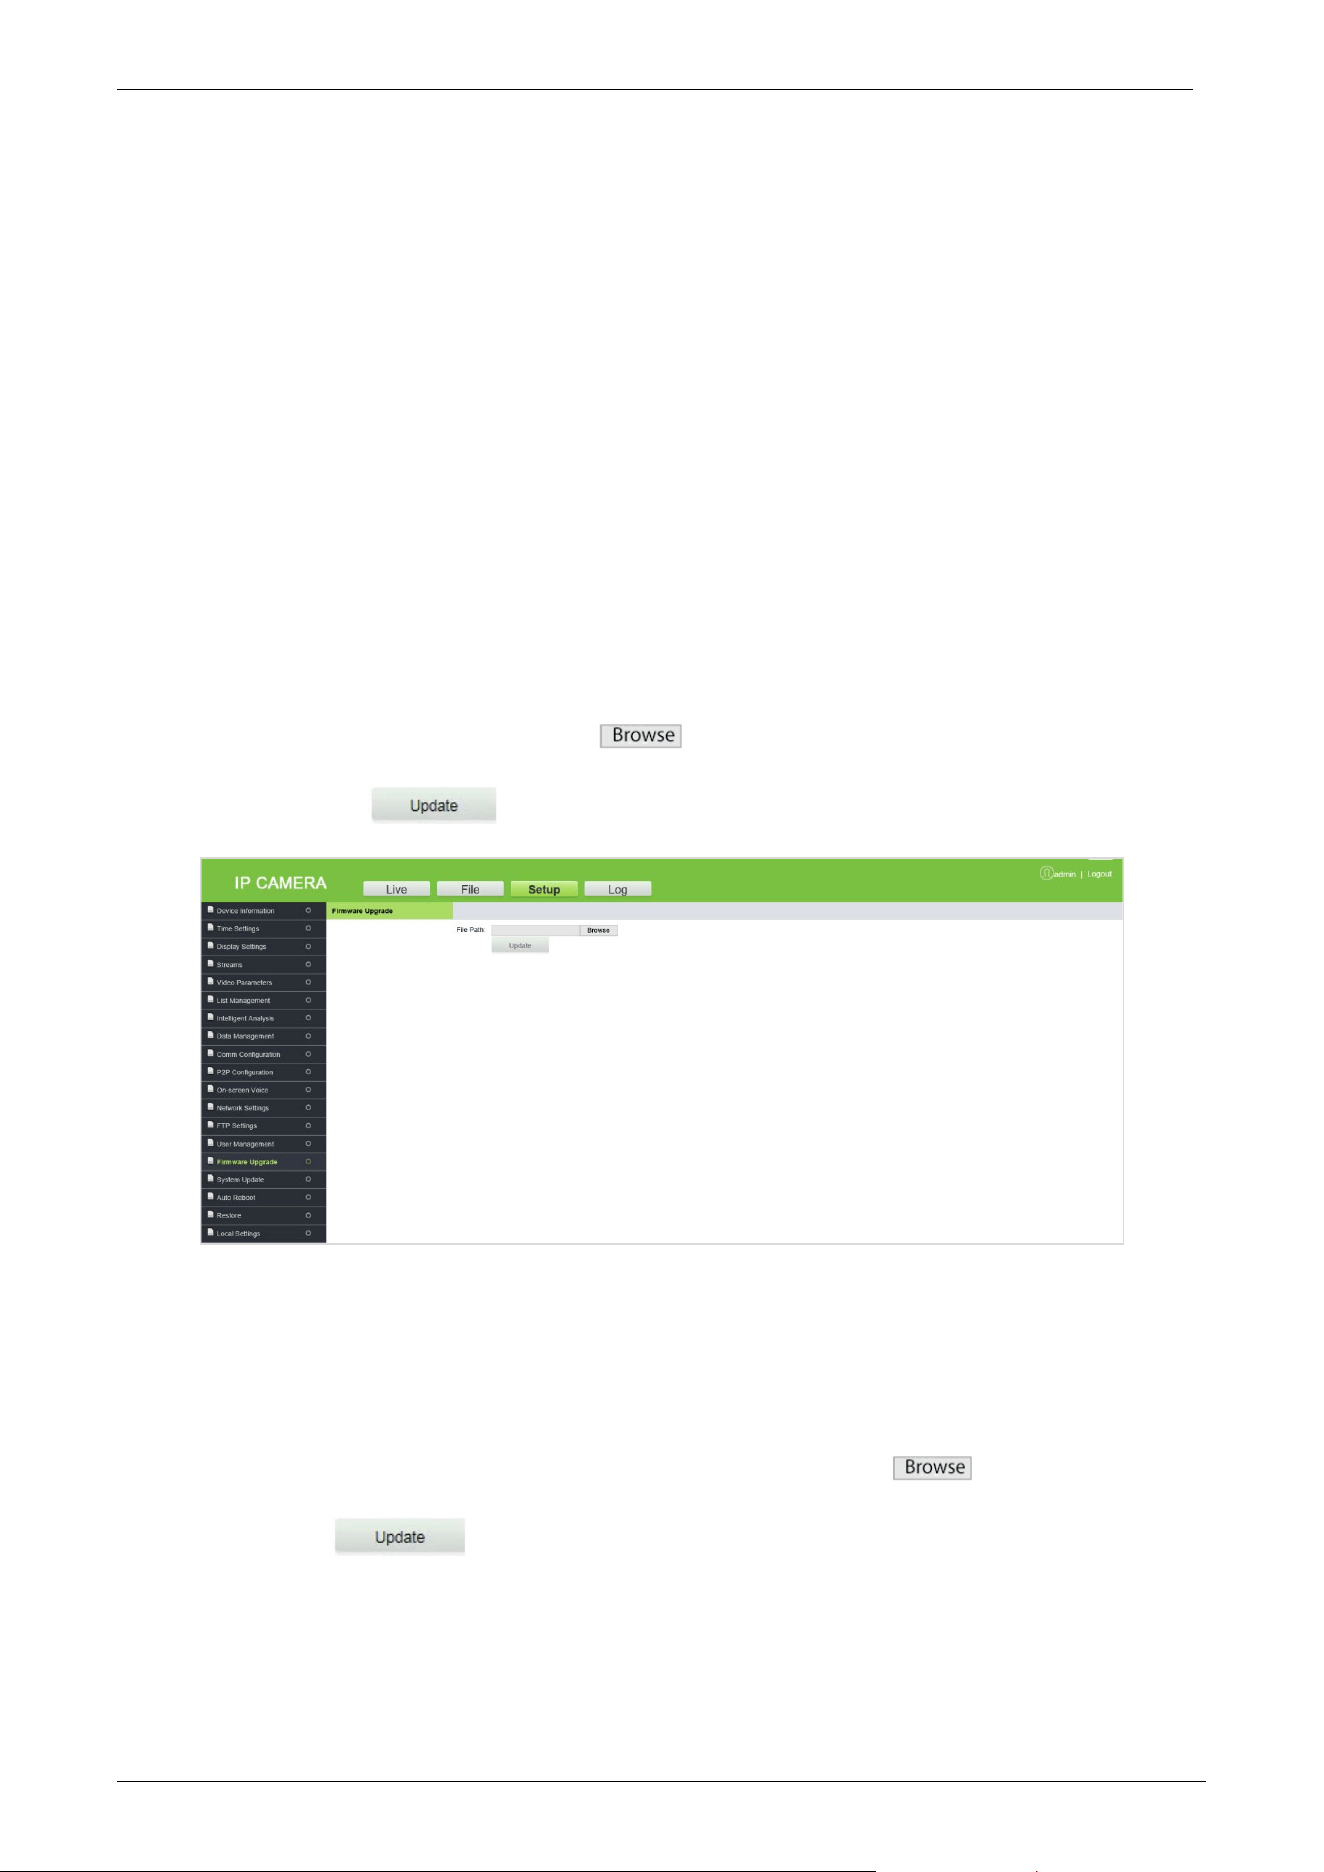
3.4.15 Firmware Upgrade
To upgrade the camera firmware, click and select the firmware upgrade file in the format
of .tgz, and click . After upgrading the firmware, restart the camera.
Note: Contact the corresponding technician for an upgrade package or remote upgrade support.
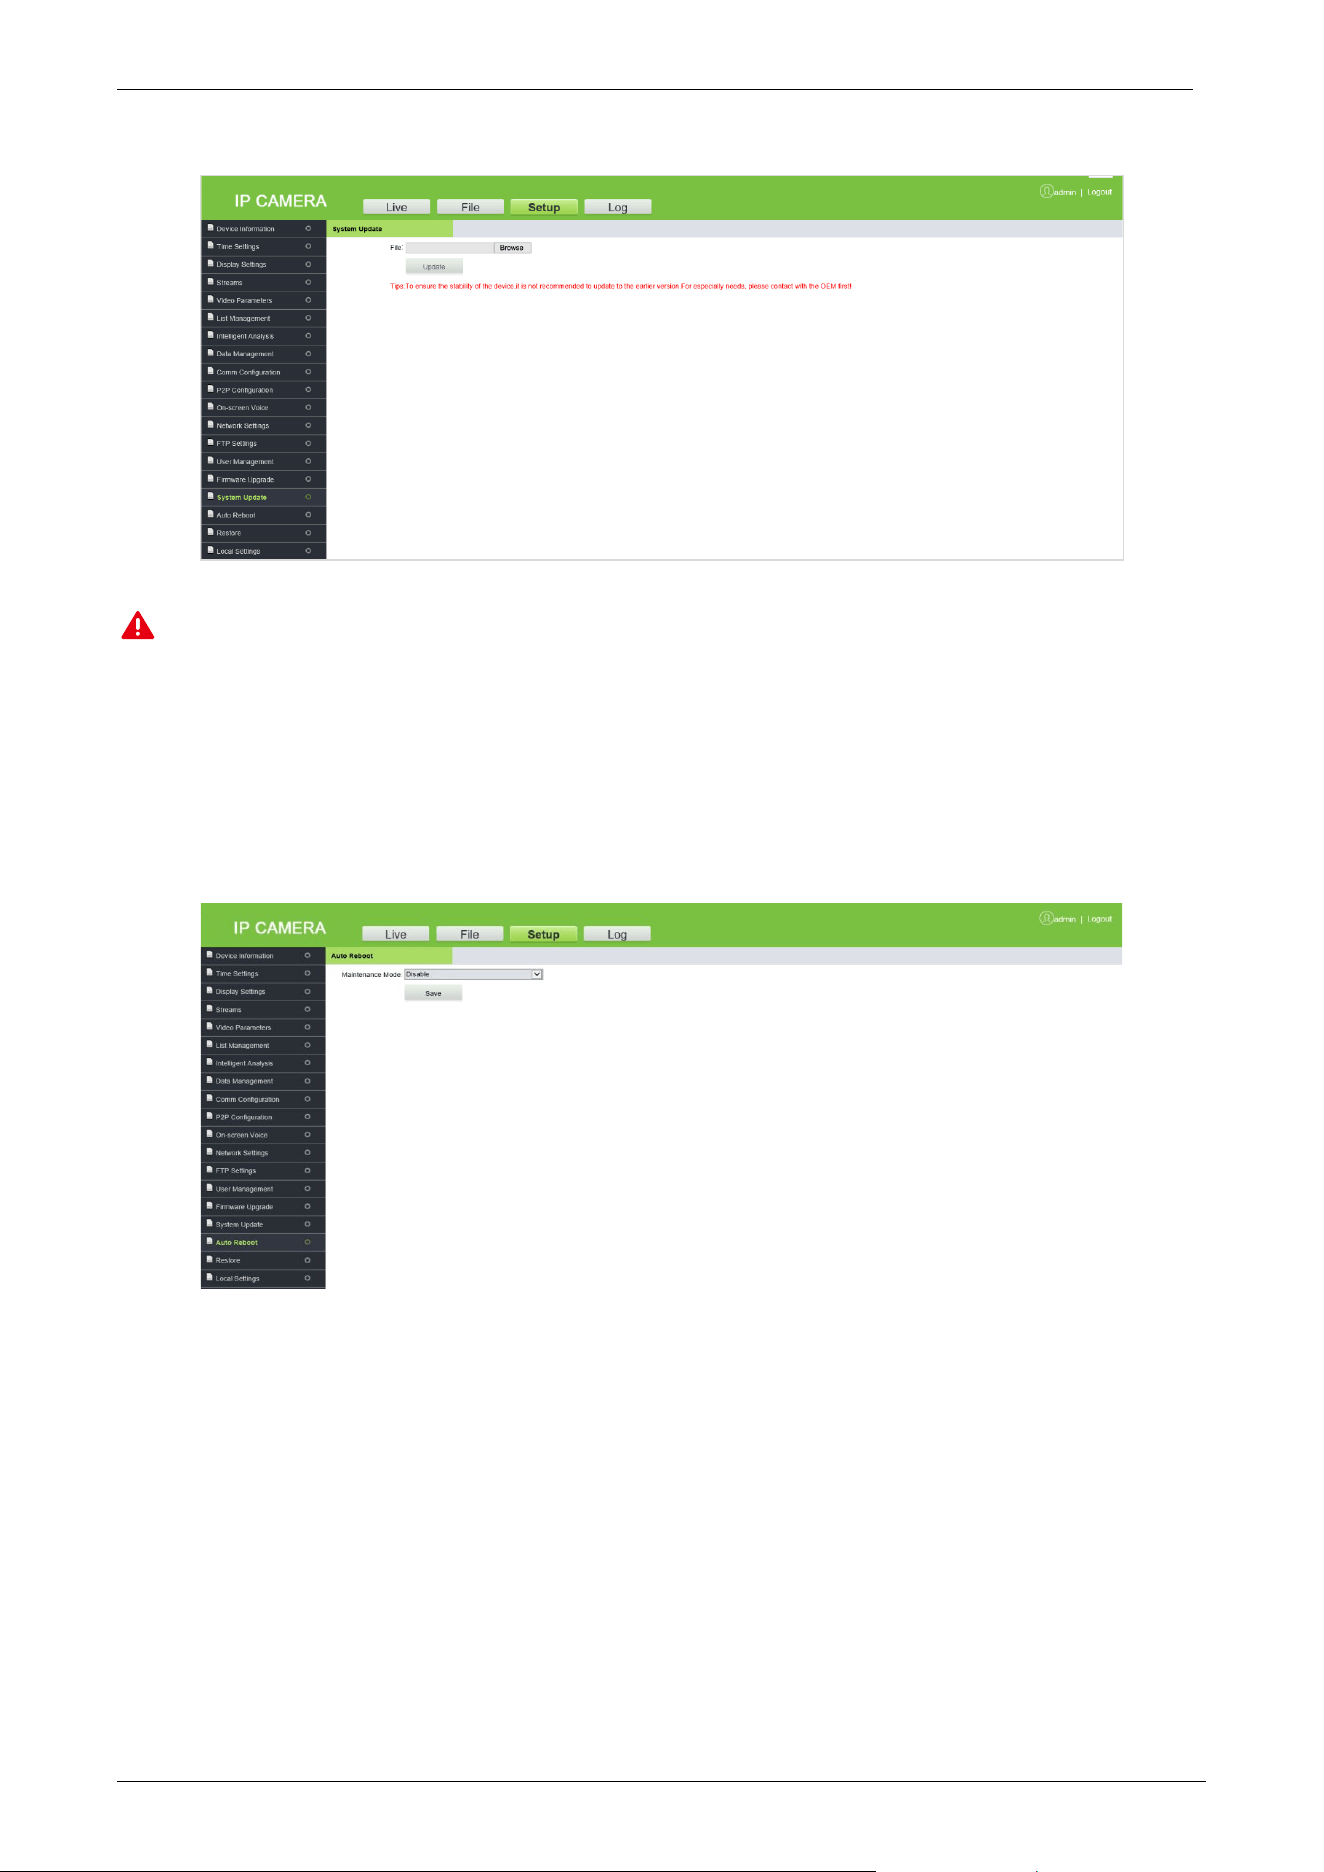
3.4.16 System Update
System Update is used for network module program updates. Click and select the update
file and click . After the system update, restart the camera.
LPRC300 User Manual
Page | 33 Copyright©2021 ZKTECO. CO., LTD. All rights reserved.
Note: Avoid performing the System Update feature in the absence of qualified professionals. Ensure
that the device is ON while performing this operation.
3.4.17 Auto Reboot
The automatic maintenance has five modes: "Disable", "Daily", "Weekly", "Single" and "Monthly".
Select any one mode, and the device will restart as per the selected mode.
LPRC300 User Manual
Page | 34 Copyright©2021 ZKTECO. CO., LTD. All rights reserved.
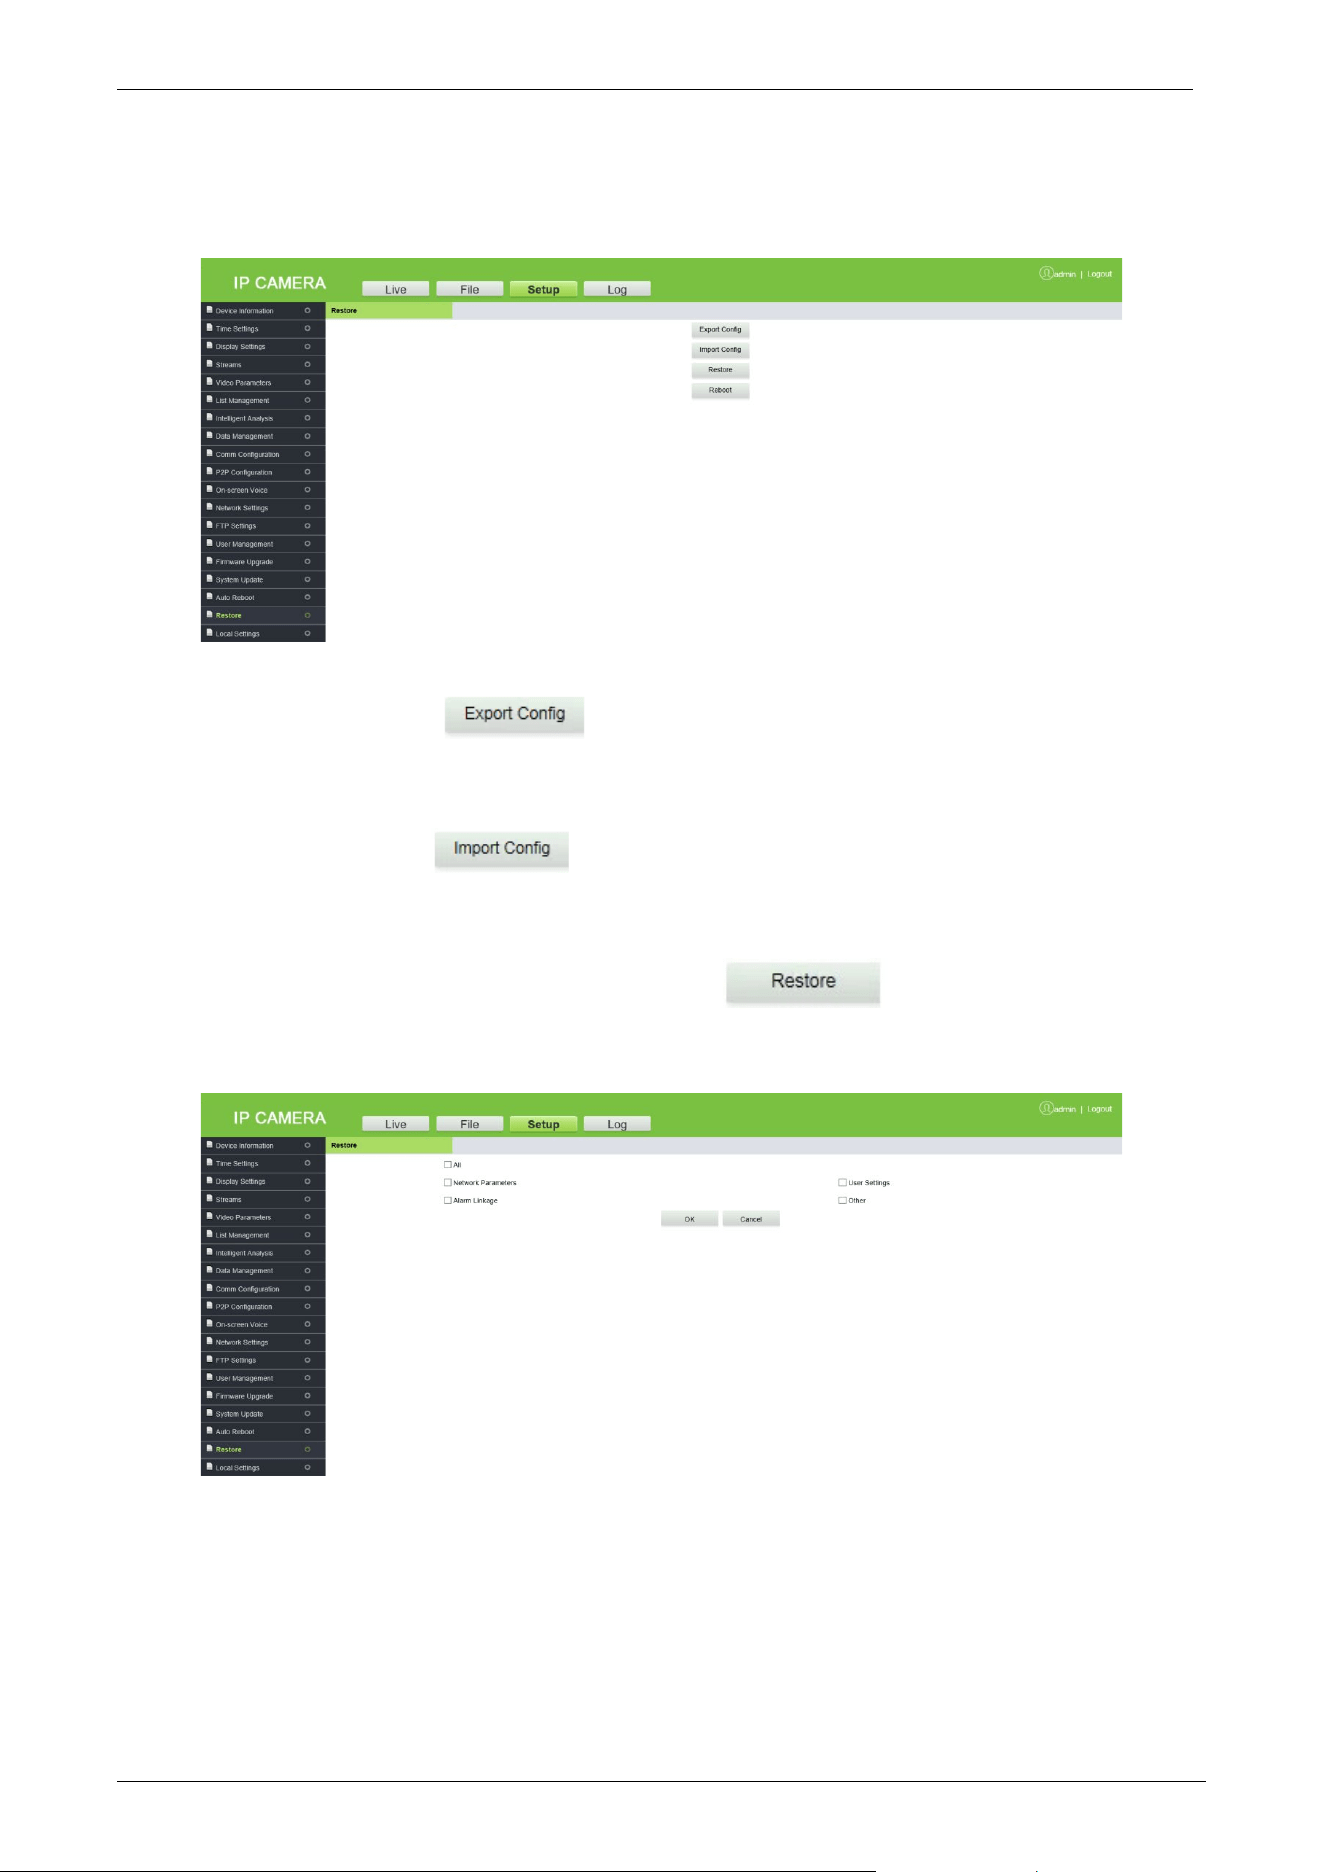
3.4.18 Restore
Export Config: Click , select the file name, and then click "Directly Open " or
"Download".
Import Config: Click , select the file to be imported, and then click "Open".
Restore: Restores the camera parameter settings. With this function, all the settings of the device
can be restored to factory default values. Click , select the parameters to be
restored, and click "OK".
Reboot: It restarts the system.

LPRC300 User Manual
Page | 35 Copyright©2021 ZKTECO. CO., LTD. All rights reserved.
3.4.19 Local Settings
It is used to view or set the local configuration according to the requirements. Click [Save], after
setting the parameters.
• Window Mode: Set the display ratio of preview window based on the four modes: "Full",
"4:3", "16:9" and "original".
• Preview Capture/Video: Set the storage path of image/video in the camera.
• File Capture: Set the storage path of snapshots in file management.
• Record File Type: "I8" and "AVI" are available.
• Live View Mode: There are two options "Realtime" and "Fluency" (the default is Real-time
mode, where if the fluency mode is selected, the video will be slightly delayed).
Click [Save] after setting parameters.
3.5 Log
The log is used to search the recording history. The user can filter the search list with options such as
search type, start time, end time, and the number of log results per page. After selecting the criteria,
click [Search] to related logs.

LPRC300 User Manual
Page | 36 Copyright©2021 ZKTECO. CO., LTD. All rights reserved.

LPRC300 User Manual
Page | 37 Copyright©2021 ZKTECO. CO., LTD. All rights reserved.
FAQ’s
Q: After entering the IP address of the Camera in Internet Explorer, the Login interface is not
displayed.
A: To install the plugin and turn on the ActiveX control permissions, click Internet options Security
Custom level Enable all ActiveX controls and plugins in the IE toolbar.
Q: The license plate recognition device has been installed, but it neither recognizes the vehicle
entering the recognition area nor broadcasts the voice.
A: Check the type of display screen chosen. Please check the serial port configuration information which is
115200. If it is still unresolved after replacement, then please check the RS485 connection and reconnect it
to try again.
Q: How to set the name of the camera, such as entry, exit, etc.?
A: Login to the camera webpage, set the name in Setup Display Settings Name or Multi OSD and
click Save.
Q: Why does the image suddenly appear color cast?
A: Please check whether the camera video parameters, encoding settings, and other relevant parameters
have been modified. If you are not sure about which parameters should be modified, you can restore the
factory settings.
Q: How to view the firmware version of the camera?
A: Log in the camera with the browser, click Setup Intelligent Analysis, click the question mark icon on
the upper right corner of the interface to query the version information.

ZKTeco Industrial Park, No. 32, Industrial Road,
Tangxia Town, Dongguan, China.
Phone : +86 769 - 82109991
Fax : +86 755 – 89602394
www.zkteco.com
Copyright © 2021 ZKTECO CO., LTD. All Rights Reserved.


