69 VIBE
Vintage ’69 Vibe Pedal with Footswitchable Modes,
Onboard Speed Control and Dual Inputs
Quick Start Guide
V 1.0
2 3Quick Start Guide69 VIBE
(EN)
Safety Instruction
1. Please read and follow
all instructions.
2. Keep the apparatus
away from water, except for
outdoor products.
3. Clean only with a dry cloth.
4. Do not block any ventilation
openings. Install in accordance
with the manufacturer’s
instructions.
5. Do not install near any
heat sources such as radiators,
heat registers, stoves or other
apparatus (including ampli ers)
that produce heat.
6. Use only attachments/
accessories speci ed by
the manufacturer.
7. Use only
speci ed carts,
stands, tripods,
brackets, or tables. Use caution
to prevent tip-over when
moving the cart/apparatus
combination.
8. Avoid installing in con ned
spaces like bookcases.
9. Do not place near naked
ame sources, such as
lighted candles.
10. Operating temperature
range 5° to 45°C (41° to 113°F).
LEGAL DISCLAIMER
Music Tribe accepts no liability
for any loss which may be
su ered by any person who
relies either wholly or in
part upon any description,
photograph, or statement
contained herein. Technical
speci cations, appearances and
other information are subject
to change without notice.
All trademarks are the property
of their respective owners.
Midas, Klark Teknik, Lab
Gruppen, Lake, Tannoy,
Turbosound, TC Electronic,
TC Helicon, Behringer, Bugera,
Aston Microphones and
Coolaudio are trademarks or
registered trademarks of Music
Tribe Global Brands Ltd. © Music
Tribe Global Brands Ltd. 2024 All
rights reserved.
LIMITED WARRANTY
For the applicable warranty
terms and conditions and
additional information
regarding Music Tribe’s Limited
Warranty, please see complete
details online at community.
musictribe.com/support.
(ES)
Instrucción de
seguridad
1. Por favor, lea y siga todas
las instrucciones.
2. Mantenga el aparato
alejado del agua, excepto para
productos destinados al uso
en exteriores.
3. Limpie solo con un
paño seco.
4. No bloquee ninguna
abertura de ventilación. Instale
de acuerdo con las instrucciones
del fabricante.
5. No instale cerca de fuentes
de calor como radiadores,
registros de calor, estufas u
otros aparatos (incluyendo
ampli cadores) que generen
calor.
6. Utilice solo accesorios
especi cados por el fabricante.
7. Use solo carros,
soportes, trípodes,
soportes o mesas
especi cados. Tenga precaución
para evitar el vuelco al mover la
combinación carro/aparato.
8. Evite la instalación
en espacios con nados
como estanterías.
9. No colocar cerca de
fuentes de llama desnuda,
como velas encendidas.
10. Rango de temperatura de
funcionamiento de 5° a 45° C
(41° a 113° F).
NEGACIÓN LEGAL
Music Tribe no admite ningún
tipo de responsabilidad por
cualquier daño o pérdida que
pudiera sufrir cualquier persona
por con ar total o parcialmente
en la descripciones, fotografías o
a rmaciones contenidas en este
documento. Las especi caciones
técnicas, imágenes y otras
informaciones contenidas
en este documento están
sujetas a modi caciones sin
previo aviso. Todas las marcas
comerciales que aparecen aquí
son propiedad de sus respectivos
dueños. Midas, Klark Teknik,
Lab Gruppen, Lake, Tannoy,
Turbosound, TC Electronic,
TC Helicon, Behringer, Bugera,
Aston Microphones y Coolaudio
son marcas comerciales o marcas
registradas de Music Tribe Global
Brands Ltd. © Music Tribe Global
Brands Ltd. 2024 Reservados
todos los derechos.
GARANTÍA LIMITADA
Si quiere conocer los detalles
y condiciones aplicables de la
garantía así como información
adicional sobre la Garantía
limitada de Music Tribe, consulte
online toda la información en
la web community.musictribe.
com/support.
(FR)
Consignes de
sécurité
1. Veuillez lire et suivre toutes
les instructions.
2. Gardez l'appareil éloigné
de l'eau, sauf pour les produits
destinés à une utilisation
en extérieur.
3. Nettoyez uniquement avec
un chi on sec.
4. Ne bloquez aucune
ouverture de ventilation.
Installez conformément aux
instructions du fabricant.
5. N'installez pas près de
sources de chaleur telles que
radiateurs, grilles de chaleur,
cuisinières ou autres appareils
(y compris les ampli cateurs)
qui produisent de la chaleur.
6. Utilisez uniquement
les accessoires spéci és par
le fabricant.
7. Utilisez
uniquement des
chariots, des
supports, des trépieds, des
supports ou des tables spéci és.
Faites attention pour éviter le
renversement lors du
déplacement de la combinaison
chariot/appareil.
8. Évitez l'installation dans
des espaces con nés comme
les bibliothèques.
9. Ne pas placer près de sources
de amme nue, telles que
des bougies allumées.
10. Plage de température de
fonctionnement de 5° à 45°C
(41° à 113°F).
DÉNI LÉGAL
Music Tribe ne peut être tenu
pour responsable pour toute
perte pouvant être subie par
toute personne se ant en
partie ou en totalité à toute
description, photographie ou
a rmation contenue dans ce
document. Les caractéristiques,
l’apparence et d’autres
informations peuvent faire
l’objet de modi cations
sans noti cation. Toutes les
marques appartiennent à leurs
propriétaires respectifs. Midas,
Klark Teknik, Lab Gruppen,
Lake, Tannoy, Turbosound,
TC Electronic, TC Helicon,
Behringer, Bugera, Aston
Microphones et Coolaudio
sont des marques ou marques
déposées de Music Tribe Global
Brands Ltd. © Music Tribe
Global Brands Ltd. 2024 Tous
droits réservés.
GARANTIE LIMITÉE
Pour connaître les termes
et conditions de garantie
applicables, ainsi que les
informations supplémentaires et
détaillées sur la Garantie Limitée
de Music Tribe, consultez le site
Internet community.musictribe.
com/support.
(DE)
Wichtige
Sicherheitshinweise
1. Bitte lesen Sie alle
Anweisungen sorgfältig durch
und befolgen Sie diese.
2. Halten Sie das Gerät von
Wasser fern, außer für Produkte,
die für den Außeneinsatz
vorgesehen sind.
3. Reinigen Sie es nur mit
einem trockenen Tuch.
4. Blockieren Sie keine
Belüftungsö nungen.
Installieren Sie gemäß den
Anweisungen des Herstellers.
5. Installieren Sie nicht in der
Nähe von Wärmequellen wie
Heizkörpern, Heizregistern,
Öfen oder anderen Geräten
(einschließlich Verstärkern),
die Wärme erzeugen.
6. Verwenden Sie nur
Zubehörteile, die vom Hersteller
angegeben sind.
7. Verwenden Sie
nur spezi zierte
Wagen, Ständer,
Stative, Halterungen oder
Tische. Achten Sie darauf, beim
Bewegen der Wagen-Geräte-
Kombination ein Umkippen zu
vermeiden.
8. Vermeiden Sie die
Installation in beengten Räumen
wie Bücherregalen.
4 5Quick Start Guide69 VIBE
9. Nicht in der
Nähe von o enen
Flammenquellen platzieren,
wie brennende Kerzen.
10. Betriebstemperaturbereich
von 5° bis 45°C (41° bis 113°F).
HAFTUNGSAUSSCHLUSS
Music Tribe übernimmt keine
Haftung für Verluste, die
Personen entstanden sind, die
sich ganz oder teilweise auf hier
enthaltene Beschreibungen,
Fotos oder Aussagen verlassen
haben. Technische Daten,
Erscheinungsbild und andere
Informationen können ohne
vorherige Ankündigung
geändert werden. Alle
Warenzeichen sind Eigentum
der jeweiligen Inhaber. Midas,
Klark Teknik, Lab Gruppen,
Lake, Tannoy, Turbosound,
TC Electronic, TC Helicon,
Behringer, Bugera, Aston
Microphones und Coolaudio
sind Warenzeichen oder
eingetragene Warenzeichen der
Music Tribe Global Brands Ltd.
© Music Tribe Global Brands Ltd.
2024 Alle Rechte vorbehalten.
BESCHRÄNKTE GARANTIE
Die geltenden
Garantiebedingungen und
zusätzliche Informationen
bezüglich der von Music Tribe
gewährten beschränkten
Garantie nden Sie online
unter community.musictribe.
com/support.
(PT)
Instruções de
Seguranç Importantes
1. Por favor, leia e siga todas
as instruções.
2. Mantenha o aparelho longe
da água, exceto para produtos
destinados ao uso externo.
3. Limpe apenas com um
pano seco.
4. Não bloqueie nenhuma
abertura de ventilação. Instale
de acordo com as instruções
do fabricante.
5. Não instale próximo a fontes
de calor, como radiadores,
grelhas de calor, fogões ou
outros aparelhos (incluindo
ampli cadores) que gerem calor.
6. Use apenas acessórios
especi cados pelo fabricante.
7. Use apenas
carrinhos, suportes,
tripés, suportes ou
mesas especi cados. Tenha
cuidado para evitar
tombamentos ao mover a
combinação carrinho/aparelho.
8. Evite instalar em espaços
con nados, como estantes.
9. Não coloque perto de
fontes de chama nua, como
velas acesas.
10. Intervalo de temperatura
de operação de 5° a 45°C
(41° a 113° F).
LEGAL RENUNCIANTE
O Music Tribe não se
responsabiliza por perda alguma
que possa ser sofrida por
qualquer pessoa que dependa,
seja de maneira completa ou
parcial, de qualquer descrição,
fotogra a, ou declaração aqui
contidas. Dados técnicos,
aparências e outras informações
estão sujeitas a modi cações
sem aviso prévio. Todas as
marcas são propriedade de
seus respectivos donos. Midas,
Klark Teknik, Lab Gruppen,
Lake, Tannoy, Turbosound,
TC Electronic, TC Helicon,
Behringer, Bugera, Aston
Microphones e Coolaudio são
marcas ou marcas registradas do
Music Tribe Global Brands Ltd.
© Music Tribe Global Brands Ltd.
2024 Todos direitos reservados.
GARANTIA LIMITADA
Para obter os termos de
garantia aplicáveis e condições
e informações adicionais a
respeito da garantia limitada
do Music Tribe, favor veri car
detalhes na íntegra através do
website community.musictribe.
com/support.
(IT)
Istruzioni di
sicurezza importanti
1. Per favore, leggere e seguire
tutte le istruzioni.
2. Mantenere l'apparecchio
lontano dall'acqua, tranne
per i prodotti destinati all'uso
all'aperto.
3. Pulire solo con un
panno asciutto.
4.
Non ostruire alcuna apertura
di ventilazione. Installare
in conformità alle istruzioni
del produttore.
5. Non installare vicino a fonti
di calore come termosifoni,
bocchette di calore, fornelli
o altri apparecchi (compresi
gli ampli catori) che
producono calore.
6. Utilizzare solo accessori
speci cati dal produttore.
7. Usare solo
carrelli, supporti,
treppiedi, sta e o
tavoli speci cati. Prestare
attenzione per evitare il
ribaltamento durante lo
spostamento della
combinazione carrello/
apparecchio.
8. Evitare l'installazione in
spazi con nati come librerie.
9. Non posizionare vicino a
fonti di amma nude, come
candele accese.
10. Intervallo di temperatura
di funzionamento da 5° a 45°C
(41° a 113°F)
DISCLAIMER LEGALE
Music Tribe non si assume
alcuna responsabilità per
eventuali danni che possono
essere subiti da chiunque
si a di in tutto o in parte a
qualsiasi descrizione, fotogra a
o dichiarazione contenuta qui.
Speci che tecniche, aspetti e
altre informazioni sono soggette
a modi che senza preavviso.
Tutti i marchi sono di proprietà
dei rispettivi titolari. Midas,
Klark Teknik, Lab Gruppen,
Lake, Tannoy, Turbosound,
TC Electronic, TC Helicon,
Behringer, Bugera, Aston
Microphones e Coolaudio sono
marchi o marchi registrati di
Music Tribe Global Brands Ltd.
© Music Tribe Global Brands Ltd.
2024 Tutti i diritti riservati.
GARANZIA LIMITATA
Per i termini e le condizioni
di garanzia applicabili e le
informazioni aggiuntive relative
alla garanzia limitata di Music
Tribe, consultare online i
dettagli completi su community.
musictribe.com/support.
(NL)
Belangrijke
veiligheidsvoorschriften
1. Lees alsjeblieft alle
instructies en volg deze op.
2. Houd het apparaat uit de
buurt van water, behalve voor
producten die bedoeld zijn
voor buitengebruik.
3. Reinig alleen met een
droge doek.
4. Blokker geen
ventilatieopeningen. Installeer
volgens de instructies van
de fabrikant.
5. Installeer niet in de buurt
van warmtebronnen zoals
radiatoren, warmte registers,
fornuizen of andere apparaten
(inclusief versterkers) die
warmte produceren.
6. Gebruik alleen accessoires
die door de fabrikant zijn
gespeci ceerd.
7. Gebruik alleen
gespeci ceerde
karren, standaards,
statieven, beugels of tafels.
Wees voorzichtig om kantelen te
voorkomen bij het verplaatsen
van de kar/apparaatcombinatie.
8. Vermijd installatie in
afgesloten ruimtes zoals
boekenkasten.
9. Plaats niet in de buurt
van naakte vlambronnen,
zoals brandende kaarsen.
10. Bedrijfstemperatuurbereik
van 5° tot 45°C (41° tot 113°F).
WETTELIJKE ONTKENNING
Music Tribe aanvaardt geen
aansprakelijkheid voor enig
verlies dat kan worden geleden
door een persoon die geheel of
gedeeltelijk vertrouwt op enige
beschrijving, foto of verklaring
hierin. Technische speci caties,
verschijningen en andere
informatie kunnen zonder
voorafgaande kennisgeving
worden gewijzigd. Alle
handelsmerken zijn eigendom
van hun respectievelijke
eigenaren. Midas, Klark Teknik,
Lab Gruppen, Lake, Tannoy,
Turbosound, TC Electronic,
TC Helicon, Behringer, Bugera,
Aston Microphones en
Coolaudio zijn handelsmerken of
gedeponeerde handelsmerken
van Music Tribe Global Brands
Ltd. © Music Tribe Global
Brands Ltd. 2024 Alle rechten
voorbehouden.
BEPERKTE GARANTIE
Voor de toepasselijke
garantievoorwaarden en
aanvullende informatie met
betrekking tot de beperkte
garantie van Music Tribe, zie
6 7Quick Start Guide69 VIBE
de volledige details online
op community.musictribe.
com/support.
(SE)
Viktiga
säkerhetsanvisningar
1. Vänligen läs och följ alla
instruktioner noggrant.
2. Håll apparaten borta
från vatten, förutom för
utomhusprodukter.
3. Rengör endast med en
torr trasa.
4. Blockera inte några
ventilationsöppningar. Installera
enligt tillverkarens anvisningar.
5. Installera inte nära några
värmekällor som element,
värmeregistrar, spisar eller
andra apparater (inklusive
förstärkare) som genererar
värme.
6. Använd endast tillbehör som
anges av tillverkaren.
7. Använd endast
speci cerade vagnar,
ställ, stativ, fästen
eller bord. Var försiktig för att
undvika att vagnen/
apparatkombinationen tippar
när den yttas.
8. Undvik installation i trånga
utrymmen som bokhyllor.
9. Placera inte nära öppen
låga, såsom tända ljus.
10. Driftstemperaturområde
5° till 45°C (41° till 113°F).
FRISKRIVNINGSKLAUSUL
Music Tribe tar inget ansvar
för någon förlust som kan
drabbas av någon person som
helt eller delvis förlitar sig på
någon beskrivning, fotogra
eller uttalande som nns
här. Tekniska speci kationer,
utseenden och annan
information kan ändras utan
föregående meddelande. Alla
varumärken tillhör respektive
ägare. Midas, Klark Teknik,
Lab Gruppen, Lake, Tannoy,
Turbosound, TC Electronic,
TC Helicon, Behringer, Bugera,
Aston Microphones och
Coolaudio är varumärken
eller registrerade varumärken
som tillhör Music Tribe Global
Brands Ltd. © Music Tribe
Global Brands Ltd. 2024 Alla
Rättigheter reserverade.
BEGRÄNSAD GARANTI
För tillämpliga garantivillkor
och ytterligare information om
Music Tribes begränsade garanti,
se fullständig information online
på community.musictribe.
com/support.
(PL)
Ważne informacje o
bezpieczeństwie
1. Proszę przeczytać i ścisłe
przestrzegać wszystkich
instrukcji.
2. Trzymaj urządzenie z dala od
wody, z wyjątkiem produktów
przeznaczonych do użytku
na zewnątrz.
3. Czyść tylko suchą szmatką.
4. Nie blokuj żadnych otworów
wentylacyjnych. Instaluj zgodnie
z instrukcjami producenta.
5. Nie instaluj w pobliżu
źródeł ciepła, takich jak
grzejniki, rejestratory ciepła,
kuchenki lub inne urządzenia
(w tym wzmacniacze), które
generują ciepło.
6. Używaj tylko akcesoriów
określonych przez producenta.
7. Używaj tylko
określonych wózków,
stojaków, statywów,
uchwytów lub stołów. Uważaj,
aby zapobiec przewróceniu się
wózka/aparatu podczas
przemieszczania.
8. Unikaj instalacji w ciasnych
miejscach, takich jak regały
na książki.
9. Nie umieszczaj w pobliżu
źródeł otwartego ognia, takich
jak zapalone świeczki.
10. Zakres temperatury pracy od
5° do 45°C (41° do 113°F).
ZASTRZEŻENIA PRAWNE
Music Tribe nie ponosi
odpowiedzialności za
jakiekolwiek straty, które mogą
ponieść osoby, które polegają
w całości lub w części na
jakimkolwiek opisie, fotogra i
lub oświadczeniu zawartym
w niniejszym dokumencie.
Specy kacje techniczne, wygląd
i inne informacje mogą ulec
zmianie bez powiadomienia.
Wszystkie znaki towarowe są
własnością ich odpowiednich
właścicieli. Midas, Klark Teknik,
Lab Gruppen, Lake, Tannoy,
Turbosound, TC Electronic,
TC Helicon, Behringer, Bugera,
Aston Microphones i Coolaudio
są znakami towarowymi
lub zastrzeżonymi znakami
towarowymi rmy Music Tribe
Global Brands Ltd. © Music
Tribe Global Brands Ltd. 2024
Wszystkie prawa zastrzeżone.
OGRANICZONA
GWARANCJA
Aby zapoznać się z
obowiązującymi warunkami
gwarancji i dodatkowymi
informacjami dotyczącymi
ograniczonej gwarancji Music
Tribe, zapoznaj się ze wszystkimi
szczegółami w trybie online pod
adresem community.musictribe.
com/support.
(JP) 安全指示
1. すべての指 示を読んで、
従ってください 。
2. 屋 外 の 製 品 を 除 き 、機
器 を 水 から遠 ざ けてくだ
さい。
3. 乾いた布 での み 清 掃して
ください。
4. 通気口を塞がないでく
だ さ い 。メ ー カ ー の 指 示 に
従ってインストールしてく
ださい。
5. 暖 房 器 、ヒ ー ト レ ジ ス
タ ー 、ス ト ー ブ な ど の 発 熱
機 器( ア ン プ を 含 む )の 近
くには 取り付け ないでく
ださい。
6. メーカーが指定したアタ
ッチメント/ アクセサリーの
み 使 用してください 。
7. 指定されたカ
ート、スタンド、
三 脚 、ブ ラ ケ ッ
ト 、ま た は テ ー ブ ル の み 使
用 し てく だ さ い 。カ ー ト / 機
器の組み合わせを移動する
際 に は 、転 倒 を 防 ぐ よ う 注
意してください 。
8. 書棚などの密閉された
空間には設 置しないでく
ださい。
9. 裸火のような火の元の近
くに置 かないでください 。
10. 動作温度範囲は摂
氏
5 度から 45 度 (華氏 41
度から
113 度) です。
法的放棄
ここに含まれる記述、
写真、 意見の全体または
一部に依拠して、いかな
る人が損害を生じさせた
場合にも、Music Tribe は一
切の賠償責任を負いませ
ん。技術仕様、外観およ
びその他の情報は予告な
く変更になる場合があり
ます。商標はすべて、そ
れぞれの所有者に帰属し
ます。
Midas、Klark Teknik、
Lab Gruppen
、Lake、 Tannoy、
Turbosound
、 TC Electronic、
TC Helicon、 Behringer、Bugera、
Aston Microphones
および Coolaudio は
Music Tribe Global Brands Ltd.
の商標または-登録商標
です。
© Music Tribe Global Brands
Ltd. 2024 無断転用禁止。
限定保証
適用される保証条件と
Music Tribe
の限定保証に
関する概要については、
オンライン上
community.
musictribe.com/support
にて詳細をご確認くだ
さい。
(CN) 安全须知
1. 请阅读,保存,遵守所有
的说明,注意所有的警示。
2. 请勿在靠近水的地方使
用本产品。
3. 请用干布清洁本产品。
4. 请只使用厂家指定的附属
设备和配件。不要堵塞任何
通风口。按照制造商的说明
进行安装。
5. 请只使用厂家
指定的或随货销
售的手推车,架子,
三角架,支架和桌子等。若使
用手推车来搬运设备,请注

8 9Quick Start Guide69 VIBE
意安全放置设备,以避免手
推车和设备倾倒而受伤。
6. 请勿安装在密闭空间,
如书柜或类似装置。
7. 请勿将本产品安装在热
源附近,如暖气片,炉子或其
它产生热量的设备(包括功
放器)。产品上不要放置裸露
的火焰源,如点燃的蜡烛。
8. 如果液体流入或异物落
入设备内,设备遭雨淋或受
潮,设备不能正常运作或被
摔坏等,设备受损需进行维
修时,所有维修均须由合格
的维修人员进行维修。
法律声明
对于任何因在此说明书
提到的全部或部份描述、
图片或声明而造成的损
失,
Music Tribe 不负任何责
任。技术参数和外观若有
更改,恕不另行通知。所有
的商标均为其各自所有者
的财产。
Midas, Klark Teknik,
Lab Gruppen, Lake, Tannoy,
Turbosound, TC Electronic,
TC Helicon, Behringer, Bugera,
Aston Microphones
和 Coolaudio
是 Music Tribe Global Brands Ltd.
公司的商标或注册商标。
© Music Tribe Global Brands
Ltd. 2024 版权所有。
保修条款
有关音乐集团保修的适用
条款及其它相关信息,请登
陆
community.musictribe.com/
support 网站查看完整的详
细信息。
10 11Quick Start Guide69 VIBE
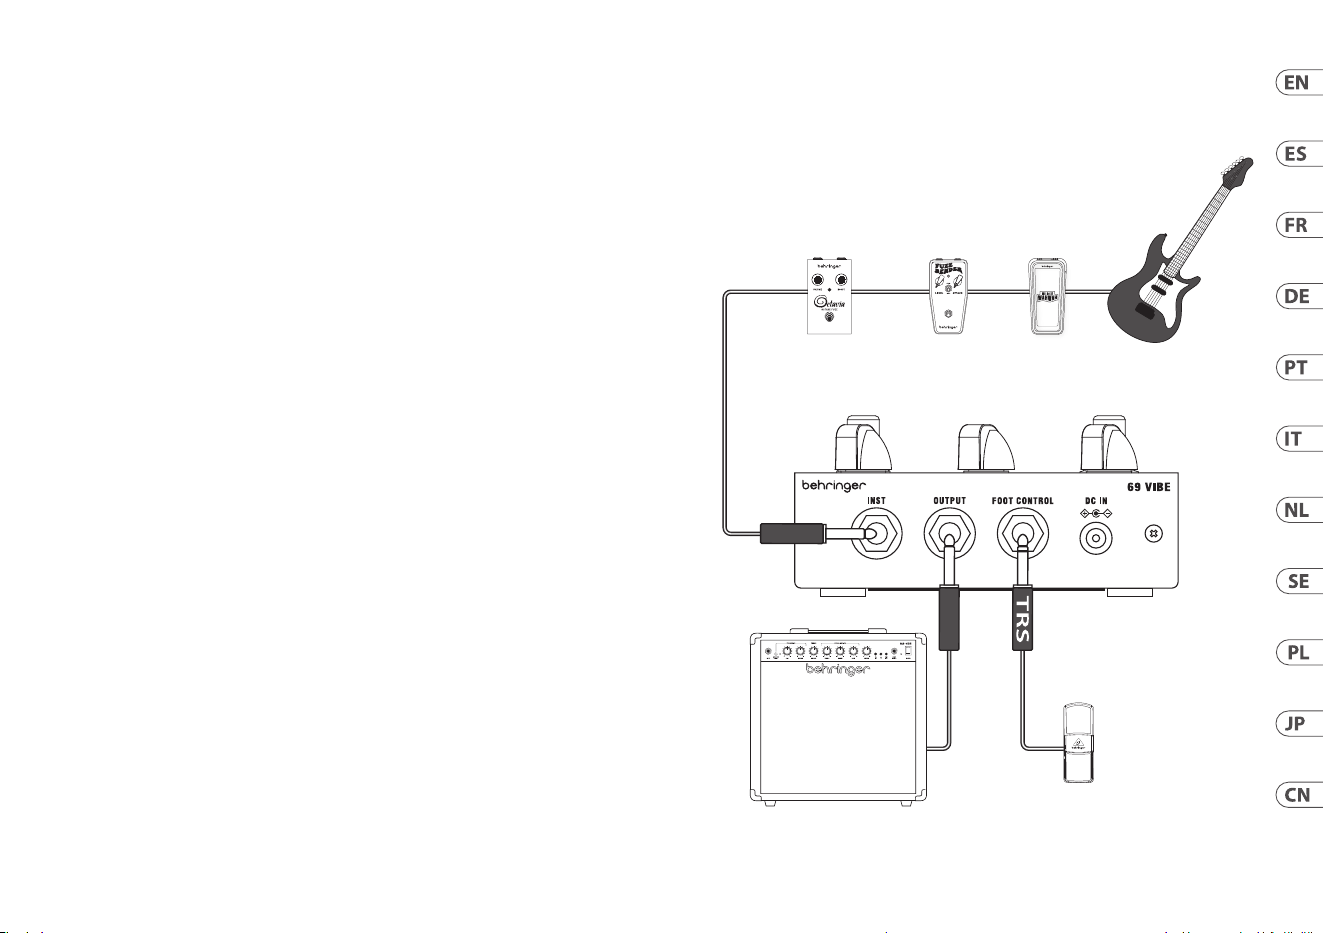
69 VIBE Hook-up
(EN) Step 1: Hook-Up
(ES) Paso 1: Conexión
(FR) Etape 1 : Connexions
(DE) Schritt 1: Verkabelung
(PT) Passo 1: Conexões
(IT) Passo 1: Allacciare
(NL) Stap 1: Aansluiten
(SE) Steg 1: Anslutning
(PL) Krok 1: Podłączeni
(JP) ステップ 1: フックアップ
(CN) 第一步: 连接应用
Guitar
WAHWAHFUZZ BENDER
FC600 Expression Pedal
OCTAVIA OCTAVE FUZZ
HA-40R Amplier
Classic rock hook-up
Conexión clásica de rock
Branchement classique rock
Klassischer Rock-Anschluss
Conexão de rock clássico
Connessione rock classica
Klassieke rockaansluiting
Klassisk rockanslutning
Klasyczne połączenie
rockowe
经典摇滚音乐约会配乐
经典摇滚连接
12 13Quick Start Guide69 VIBE
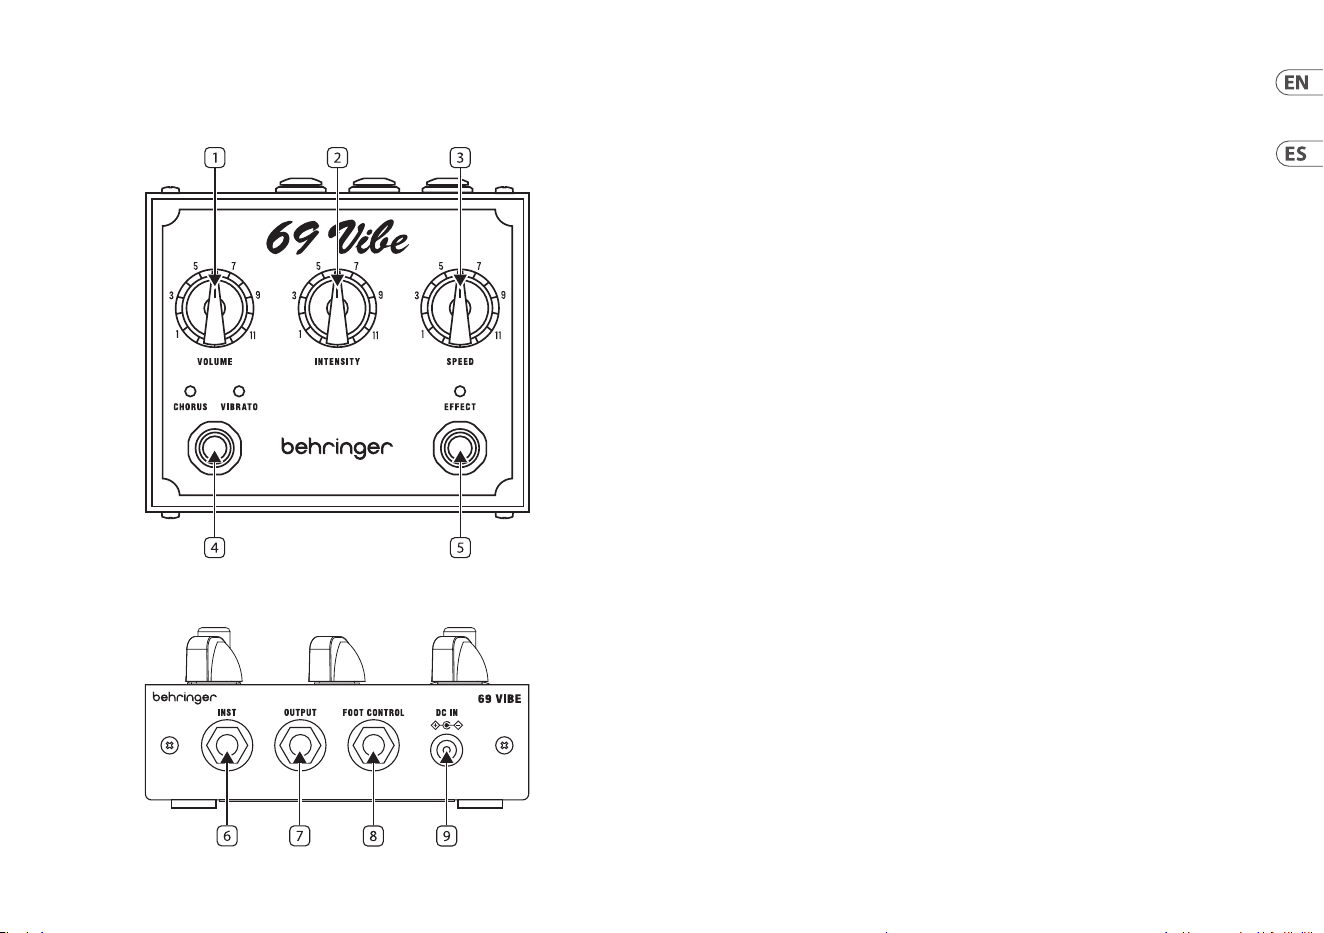
69 VIBE Controls
(EN) Step 2: Controls (ES) Paso 2: Controles
1. VOLUME – Controls the overall level of
the eect.
2. INTENSITY – Controls the depth of the eect.
3. SPEED – Controls the sweep rate of the eect.
4. CHORUS / VIBRATO FOOTSWITCH – Press to
switch between CHORUS and VIBRATO modes.
The matching LEDs will light to show which
mode is active. CHORUS mode splits the
signal to create a phasing eect similar to a
rotating speaker. VIBRATO mode bends the
pitch up and down to create a pulsating texture.
5. EFFECT FOOTSWITCH – Press to activate
the eect. The LED just above the switch will
light up when the eect is active.
6. INST – Plug your instrument into this jack using
instrument cables with ¼" TS connectors.
7. OUTPUT – Send the signal to your amplier or
to other pedals via instrument cables with
¼" TS connectors.
8. FOOT CONTROL – Plug an expression pedal
into this jack to control the SPEED parameter in
real time. Connect the expression pedal with a
cable using ¼" TRS connectors.
9. DC IN – Connect a standard 9 V / 300 mA power
supply to this jack. Power supply not included.
Battery Operation
69 VIBE can also be powered using a single
9 V battery. Loosen the rear screws until the
backplate swings open, and install the battery by
pressing the battery terminals into the battery clip.
1. VOLUME – Controla el nivel general del efecto.
2. INTENSITY – Controla la profundidad
del efecto.
3. SPEED – Controla la velocidad del barrido
del efecto.
4. CHORUS / VIBRATO FOOTSWITCH –
Presiona para alternar entre los modos
CHORUS y VIBRATO. Los LED correspondientes se
iluminarán para mostrar qué modo está activo.
El modo CHORUS divide la señal para crear un
efecto de fase similar a un altavoz giratorio.
El modo VIBRATO modula el tono hacia arriba y
abajo para crear una textura pulsante.
5. EFFECT FOOTSWITCH – Presiona para activar
el efecto. El LED justo encima del interruptor se
iluminará cuando el efecto esté activo.
6. INST – Conecta tu instrumento a esta toma
usando cables de instrumento con conectores
TS de ¼".
7. OUTPUT – Envía la señal a tu amplicador o a
otros pedales mediante cables de instrumento
con conectores TS de ¼".
8. FOOT CONTROL – Conecta un pedal de
expresión a esta toma para controlar el
parámetro SPEED en tiempo real. Conecta el
pedal de expresión con un cable que utilice
conectores TRS de ¼".
9. DC IN – Conecta una fuente de alimentación
estándar de 9 V / 300 mA a esta toma. Fuente de
alimentación no incluida.
Funcionamiento con batería
69 VIBE también puede funcionar con una sola
batería de 9 V. Aoja los tornillos traseros hasta
que la placa trasera se abra y coloca la batería
presionando los terminales de la batería en el clip
de la batería.

14 15Quick Start Guide69 VIBE
(DE) Schritt 2: Bedienelemente(FR) Etape 2 : Réglages
1. VOLUME – Steuert das Gesamtniveau
des Eekts.
2. INTENSITY – Steuert die Tiefe des Eekts.
3. SPEED – Steuert die Sweep-Rate des Eekts.
4. CHORUS / VIBRATO FOOTSWITCH –
Drücken Sie, um zwischen den CHORUS- und
VIBRATO-Modi zu wechseln. Die passenden
LEDs leuchten auf, um anzuzeigen, welcher
Modus aktiv ist. Der CHORUS-Modus teilt das
Signal, um einen Phasing-Eekt ähnlich einem
rotierenden Lautsprecher zu erzeugen. Der
VIBRATO-Modus ändert die Tonhöhe nach
oben und unten, um eine pulsierende Textur
zu erzeugen.
5. EFFECT FOOTSWITCH – Drücken Sie, um den
Eekt zu aktivieren. Die LED direkt über dem
Schalter leuchtet auf, wenn der Eekt aktiv ist.
6. INST – Schließen Sie Ihr Instrument über
diese Buchse mit Instrumentenkabeln und
¼"-TS-Steckern an.
7. OUTPUT – Leiten Sie das Signal über
Instrumentenkabel mit ¼"-TS-Steckern zu
Ihrem Verstärker oder anderen Pedalen.
8. FOOT CONTROL – Schließen Sie ein
Expression-Pedal an diese Buchse an, um
den SPEED-Parameter in Echtzeit zu steuern.
Verbinden Sie das Expression-Pedal mit
einem Kabel, das ¼"-TRS-Stecker verwendet.
9. DC IN – Schließen Sie eine Standard-9 V /
300 mA-Stromversorgung über diese Buchse
an. Netzteil nicht im Lieferumfang enthalten.
Batteriebetrieb
69 VIBE kann auch mit einer einzelnen
9 V-Batterie betrieben werden. Lockern Sie die
hinteren Schrauben, bis sich die Rückplatte önet,
und installieren Sie die Batterie, indem Sie die
Batterieklemmen in den Batterieclip drücken.
1. VOLUME – Contrôle le niveau global de l'eet.
2. INTENSITY – Contrôle la profondeur de l'eet.
3. SPEED – Contrôle la vitesse de balayage
de l'eet.
4. CHORUS / VIBRATO FOOTSWITCH –
Appuyez pour basculer entre les modes
CHORUS et VIBRATO. Les LEDs correspondantes
s'allumeront pour indiquer le mode actif.
Le mode CHORUS divise le signal pour créer
un eet de phase similaire à un haut-
parleur rotatif. Le mode VIBRATO modie la
hauteur du son vers le haut et vers le bas pour
créer une texture pulsante.
5. EFFECT FOOTSWITCH – Appuyez pour
activer l'eet. La LED juste au-dessus de
l'interrupteur s'allumera lorsque l'eet est actif.
6. INST – Branchez votre instrument dans cette
prise à l'aide de câbles d'instrument avec des
connecteurs TS de ¼".
7. OUTPUT – Envoyez le signal vers votre
amplicateur ou vers d'autres pédales via des
câbles d'instrument avec des connecteurs
TS de ¼".
8. FOOT CONTROL – Branchez une pédale
d'expression dans cette prise pour contrôler le
paramètre SPEED en temps réel. Connectez la
pédale d'expression avec un câble utilisant des
connecteurs TRS de ¼".
9. DC IN – Connectez une alimentation
standard de 9 V / 300 mA à cette prise.
Alimentation non incluse.
Fonctionnement sur batterie
69 VIBE peut également fonctionner avec une seule
batterie de 9 V. Desserrez les vis arrière jusqu'à ce
que la plaque arrière s'ouvre, et installez la batterie
en enfonçant les bornes de la batterie dans le clip
de la batterie.
(PT) Passo 2: Controles
1. VOLUME – Controla o nível geral do efeito.
2. INTENSITY – Controla a profundidade
do efeito.
3. SPEED – Controla a taxa de varredura do efeito.
4. CHORUS / VIBRATO FOOTSWITCH –
Pressione para alternar entre os modos CHORUS
e VIBRATO. Os LEDs correspondentes acenderão
para mostrar qual modo está ativo. O modo
CHORUS divide o sinal para criar um efeito de
fase semelhante a um alto-falante rotativo.
O modo VIBRATO dobra o tom para cima e para
baixo para criar uma textura pulsante.
5. EFFECT FOOTSWITCH – Pressione para ativar
o efeito. O LED logo acima do interruptor se
acenderá quando o efeito estiver ativo.
6. INST – Conecte seu instrumento a esta entrada
usando cabos de instrumento com conectores
TS de ¼".
7. OUTPUT – Envie o sinal para o seu amplicador
ou para outros pedais usando cabos de
instrumento com conectores TS de ¼".
8. FOOT CONTROL – Conecte um pedal de
expressão a esta entrada para controlar o
parâmetro VELOCIDADE em tempo real.
Conecte o pedal de expressão com um cabo
usando conectores TRS de ¼".
9. DC IN – Conecte uma fonte de alimentação
padrão de 9 V / 300 mA a esta entrada. Fonte de
alimentação não incluída.
Funcionamento com Bateria
69 VIBE também pode ser alimentado com uma
única bateria de 9 V. Afrouxe os parafusos traseiros
até que a tampa traseira se abra e instale a bateria
pressionando os terminais da bateria no suporte
da bateria.
(IT) Passo 2: Controlli
1. VOLUME – Controlla il livello complessivo
dell'eetto.
2. INTENSITY – Controlla la profondità
dell'eetto.
3. SPEED– Controlla la velocità di
sweeping dell'eetto.
4. CHORUS / VIBRATO FOOTSWITCH –
Premi per passare tra le modalità CHORUS
e VIBRATO. I LED corrispondenti si
accenderanno per mostrare quale modalità
è attiva. La modalità CHORUS divide il
segnale per creare un eetto di fase simile a
un altoparlante rotante. La modalità VIBRATO
piega il tono su e giù per creare una
texture pulsante.
5. EFFECT FOOTSWITCH – Premi per
attivare l'eetto. Il LED appena sopra
l'interruttore si accenderà quando l'eetto
è attivo.
6. INST – Collega il tuo strumento a questa presa
usando cavi per strumenti con connettori TS
da ¼".
7. OUTPUT – Invia il segnale al tuo amplicatore
o ad altri pedali tramite cavi per strumenti con
connettori TS da ¼".
8. FOOT CONTROL – Collega un pedale di
espressione a questa presa per controllare il
parametro VELOCITÀ in tempo reale.
Collega il pedale di espressione con un cavo
usando connettori TRS da ¼".
9. DC IN – Collega una fonte di alimentazione
standard da 9 V / 300 mA a questa presa.
Alimentatore non incluso.
Funzionamento a batteria
69 VIBE può anche essere alimentato con una
singola batteria da 9 V. Allenta le viti posteriori
nché il pannello posteriore si apre e installa la
batteria premendo i terminali della batteria nel
supporto della batteria.
69 VIBE Controls

16 17Quick Start Guide69 VIBE
(NL) Stap 2: Bediening
1. VOLUME – Regelt het algehele niveau van
het eect.
2. INTENSITY – Regelt de diepte van het eect.
3. SPEED – Regelt de sweepsnelheid van
het eect.
4. CHORUS / VIBRATO FOOTSWITCH –
Druk om te schakelen tussen de CHORUS- en
VIBRATO-modi. De overeenkomstige LED's
zullen branden om aan te geven welke modus
actief is. CHORUS-modus splitst het signaal
om een faseverschuivingseect te creëren,
vergelijkbaar met een roterende luidspreker.
VIBRATO-modus buigt de toonhoogte
omhoog en omlaag om een pulserende
textuur te creëren.
5. EFFECT FOOTSWITCH – Druk om het eect
te activeren. De LED net boven de schakelaar
licht op wanneer het eect actief is.
6. INST – Sluit je instrument aan op deze
aansluiting met instrumentkabels met
¼" TS-connectoren.
7. OUTPUT – Stuur het signaal naar je versterker
of naar andere pedalen via instrumentkabels
met ¼" TS-connectoren.
8. FOOT CONTROL – Sluit een expressiepedaal
aan op deze aansluiting om de parameter
SPEED in realtime te regelen. Verbind het
expressiepedaal met een kabel met ¼"
TRS-connectoren.
9. DC IN – Sluit een standaard 9 V / 300 mA
voeding aan op deze aansluiting.
Voeding niet inbegrepen.
Batterijbediening
69 VIBE kan ook worden gevoed met een enkele
9 V-batterij. Maak de achterste schroeven los totdat
het achterpaneel openzwaait, en installeer de
batterij door de batterijterminals in de batterijklem
te drukken.
(SE) Steg 2: Kontroller
1. VOLUME – Kontrollerar eektens totala nivå.
2. INTENSITY – Kontrollerar eektens djup.
3. SPEED – Kontrollerar eektens svephastighet.
4. CHORUS / VIBRATO FOOTSWITCH – Tryck för
att växla mellan CHORUS- och VIBRATO-lägen.
De matchande LED-lamporna kommer att
lysa för att visa vilket läge som är aktivt.
CHORUS-läget delar signalen för att skapa
en fasningseekt som liknar en roterande
högtalare. VIBRATO-läget böjer tonhöjden upp
och ner för att skapa en pulserande textur.
5. EFFECT FOOTSWITCH – Tryck för att
aktivera eekten. LED-lampan strax ovanför
knappen kommer att lysa när eekten är aktiv.
6. INST – Anslut ditt instrument till denna
kontakt med instrumentkablar med
¼" TS-kontakter.
7. OUTPUT – Skicka signalen till din förstärkare
eller till andra pedaler via instrumentkablar
med ¼" TS-kontakter.
8. FOOT CONTROL – Anslut en
expressionspedal till denna kontakt för att
kontrollera SPEED-parametern i realtid.
Anslut expressionspedalen med en kabel med
¼" TRS-kontakter.
9. DC IN – Anslut en standard 9 V /
300 mA strömförsörjning till denna kontakt.
Strömförsörjning ingår ej.
Batteridrift
69 VIBE kan även drivas med ett enda 9 V batteri.
Lossa de bakre skruvarna tills bottenplattan
svänger upp, och installera batteriet genom att
trycka på batterikontakterna i batteriklippet.
(PL) Krok 2: Sterowanica
(JP) ステップ 2: コントロール
1. VOLUME – Kontroluje ogólny poziom efektu.
2. INTENSITY – Kontroluje głębokość efektu.
3. SPEED – Kontroluje szybkość
przetwarzania efektu.
4. CHORUS / VIBRATO FOOTSWITCH –
Naciśnij, aby przełączyć się między trybami
CHORUS i VIBRATO. Pasujące diody LED zostaną
włączone, aby pokazać, który tryb
jest aktywny. Tryb CHORUS dzieli sygnał,
tworząc efekt fazowy podobny do obrotowej
kolumny głośnikowej. Tryb VIBRATO
wygina dźwięk w górę i w dół, tworząc
pulsującą teksturę.
5. EFFECT FOOTSWITCH – Naciśnij, aby
aktywować efekt. Dioda LED tuż nad
przełącznikiem zostanie włączona, gdy efekt
będzie aktywny.
6. INST – Podłącz swoje instrumenty do tego
gniazda za pomocą kabli instrumentowych z
wtyczkami ¼" TS.
7. OUTPUT – Wyślij sygnał do swojego
wzmacniacza lub innych pedałów za pomocą
kabli instrumentowych z wtyczkami ¼" TS.
8. FOOT CONTROL – Podłącz pedał ekspresyjny
do tego gniazda, aby w czasie rzeczywistym
kontrolować parametr SPEED. Podłącz pedał
ekspresyjny za pomocą kabla z wtyczkami
¼" TRS.
9. DC IN – Podłącz standardowe źródło zasilania
9 V / 300 mA do tego gniazda. Źródło zasilania
nie jest dołączone.
Zasilanie bateryjne
69 VIBE można również zasilać za pomocą
pojedynczej baterii 9 V. Poluzuj tylne śruby,
aż tylna pokrywa się otworzy, a następnie
zainstaluj baterię, naciskając terminale baterii do
zacisku baterii.
1. VOLUME – エフェクトの 全 体 的なレ ベル
を制 御します。
2. INTENSITY – エフェクトの 深さを 制 御
しま す。
3. SPEED – エ フェクト の スウィープ 速 度 を
制 御しま す。
4. CHORUS / VIBRATO FOOTSWITCH –
コーラスモードとビブラートモードを切
り替えるために押します。一致する LED
が 点 灯 し 、ア ク テ ィ ブ な モ ー ド を 示 し
ます。コーラスモードは信号を分割して
回転するスピーカーに似た位相効果を
作り出します。ビブラートモードは音高
を上下に曲げて脈 動的なテクスチャを 作
り出します。
5. EFFECT FOOTSWITCH – エフェクトをアクテ
ィ ブ に す る た め に 押 し ま す 。ス イッ チ の 上
部にある LED がエフェクトが アクティブ
であることを示します。
6. INST – ¼" インチ TS コネクタを 使 用して
楽器ケーブルで楽器をこのジャックに接
続します。
7. OUTPUT – ¼" インチ TS コネクタを使用
した 楽 器 ケーブルで 信 号 をアンプ または
他のペダルに送ります。
8. FOOT CONTROL – エクスプレッションペ
ダ ル を こ の ジ ャ ッ ク に 接 続 し て 、リ ア ル
タイムでスピードパ ラメー タを 制 御 しま
す。¼" インチ TRS コネクタを使用した
ケーブルでエクスプレッションペダルを
接 続しま す。
9. DC IN – 標準の 9 V / 300 mA 電 源をこの
ジ ャ ッ ク に 接 続 し ま す 。電 源 は 含 ま れ て
いません。
69 VIBE Controls
18 19Quick Start Guide69 VIBE
(CN) 第二步: 控制
バッテリー の動 作
69 VIBE は単一の 9 V 電池で も動 作すること
が で き ま す 。後 部 の ネ ジ を 緩 め 、
バックプレートが 開くま で 後ろに スイン グ
させ、バッテリーターミナルをバッテリーク
リップに押し込 んでバッテリー を取り付 け
てください 。
1. VOLUME – 控制效果的整体级别。
2. INTENSITY – 控制效果的深度。
3. SPEED – 控制效果的扫描速率。
4. CHORUS / VIBRATO FOOTSWITCH –
按下切换合唱和颤音模式。匹配的 LED
指示灯会亮起, 显示当前的模式。合唱模
式将信号分割,创建类似旋转音箱的相位
效果。颤音模式会使音高上下弯曲, 创造
出脉动的音质。
5. EFFECT FOOTSWITCH – 按下以启动效果。
当效果处于激活状态时, 开关上方的LED
指示灯将亮起。
6. INST – 使用带有 ¼" 英寸 TS 连接器的乐器
电缆将乐器插入此插孔。
7. OUTPUT – 通过带有 ¼" 英寸TS
连接器的乐器电缆将信号发送至放大器
或其他效果器。
8. FOOT CONTROL – 将表达踏板插入此插孔,
以实时控制速度参数。使用带有 ¼" 英寸
TRS 连接器的电缆连接表达踏板。
9. DC IN – 将标准 9 V / 300 mA 电源适配器连
接到此插孔。 电源适配器不包含在内。
电池供电
69 VIBE 也可以使用一节 9 V 电池供电。
松开后部螺丝, 使后盖摆开, 然后将电池端
子插入电池夹即可安装电池。
Specications
Connections
Inst
Connector 1 x ¼" TS, unbalanced
Impedance 47 kΩ
Output
Connector 1 x ¼" TS, unbalanced
Impedance 100 kΩ
Maximum output level +2.0 dBu
Foot control 1 x ¼" TRS jack, 1 V / oct.
Control voltage range 0 V to +5 V
Controls
Volume 1 x rotary knob
Intensity 1 x rotary knob
Speed 1 x rotary knob
Eect on/ o 1 x footswitch
Chorus/ vibrato switch 1 x footswitch
System
Frequency response 20 Hz to 20 kHz (+0 / -0.3 dB)
Signal-to-noise ratio >66 dB
Overall gain +2.8 dBu
Power Supply/ Voltage
Power input
Standard 9 V DC, centre negative,
>300 mA (not included)
Power consumption 0.9 W
Dimensions/ Weight
Dimensions (H x W x D)
56.5 x 120.0 x 106.2 mm
(2.2 x 4.7 x 4.2")
Weight 0.56 kg (1.23 lbs)
*Due to continuous development, these specications are subject to change without notice.
69 VIBE Controls
20 21Quick Start Guide69 VIBE
技术参数
连接方式
乐器
连接器
1 x ¼" TS, 不平衡
阻抗
47 kΩ
输出
连接器
1 x ¼" TS, 不平衡
阻抗
100 kΩ
最大输出电平
+2.0 dBu
脚控
1 x ¼" TRS 插孔, 1 V / oct.
控制电压范围
0 V 至 +5 V
控制项
音量
1 x 旋钮
强度
1 x旋钮
速度
1 x旋钮
效果开/关
1 x 脚踏开关
合唱/颤音开关
1 x 脚踏开关
系统
频率响应
20 Hz 至 20 kHz (+0 / -0.3 dB)
信噪比
>66 dB
整体增益
+2.8 dBu
电源 / 电压
电源输入
标准 9 V DC, 中心负极,
>300 mA (不包括电源)
功耗
0.9 W
尺寸 / 重量
尺寸(H x W x D)
56.5 x 120.0 x 106.2 mm
(2.2 x 4.7 x 4.2")
重量
0.56 kg (1.23 lbs)
*由于持续发展,这些规格可能会随时更改,恕不另行通知。
Other important information
1. Register online.
Pleaseregister your new Music
Tribe equipment right after
you purchase it by visiting
musictribe.com. Registeringyour
purchase using our simple online
form helps us to process your repair
claims more quickly and eciently.
Also, read the terms and conditions
of our warranty, ifapplicable.
2. Malfunction. Should your
Music Tribe Authorized Reseller not
be located in your vicinity, you may
contact the Music Tribe Authorized
Fulller for your country listed
under “Support” at musictribe.com.
Shouldyour country not be listed,
pleasecheck if your problem can be
dealt with by our “OnlineSupport”
which may also be found under
“Support” at musictribe.com.
Alternatively, please submit
an online warranty claim at
musictribe.com BEFORE returning
theproduct.
3. Power Connections.
Beforeplugging the unit into a
power socket, please make sure
you are using the correct mains
voltage for your particular model.
Faulty fuses must be replaced with
fuses of the same type and rating
withoutexception.
1. Registro online.
Lerecomendamos que registre su
nuevo aparato Music Tribe justo
después de su compra accediendo
a la página web musictribe.com.
Elregistro de su compra a través
de nuestro sencillo sistema online
nos ayudará a resolver cualquier
incidencia que se presente a
la mayor brevedad posible.
Además,aproveche para leer los
términos y condiciones de nuestra
garantía, siesaplicable en sucaso.
2. Averías. En el caso de
que no exista un distribuidor
Music Tribe en las inmediaciones,
puede ponerse en contacto con el
distribuidor Music Tribe de su país,
queencontrará dentro del apartado
“Support” de nuestra página
web musictribe.com. En caso de
que su país no aparezca en ese
listado, acceda a la sección “Online
Support” (quetambiénencontrará
dentro del apartado “Support” de
nuestra páginaweb) y compruebe
si su problema aparece descrito
y solucionado allí. Deforma
alternativa, envíenos a través de
la página web una solicitud online
de soporte en periodo de garantía
ANTES de devolvernoselaparato.
3. Conexiones de
corriente. Antes de enchufar
este aparato a una salida de
corriente, asegúrese de que dicha
salida sea del voltaje adecuado
para su modelo concreto. En caso
de que deba sustituir un fusible
quemado, deberáhacerlo por
otro de idénticas especicaciones,
sinexcepción.
1. Enregistrez-vous
enligne. Prenezle temps
d’enregistrer votre produit
Music Tribe aussi vite que possible
sur le site Internet musictribe.com.
Lefait d’enregistrer le produit en
ligne nous permet de gérer les
réparations plus rapidement et plus
ecacement. Prenezégalement
le temps de lire les termes et
conditions de notregarantie.
2. Dysfonctionnement.
Si vous n’avez pas de revendeur
Music Tribe près de chez vous,
contactez le distributeur Music
Tribe de votre pays: consultez la
liste des distributeurs de votre pays
dans la page “Support” de notre
site Internet musictribe.com. Si
votre pays n’est pas dans la liste,
essayez de résoudre votre problème
avec notre “aideen ligne” que
vous trouverez également dans
la section “Support” du site
musictribe.com. Vouspouvez
également nous faire parvenir
directement votre demande de
réparation sous garantie par
Internet sur le site musictribe.com
AVANT de nous renvoyer leproduit.
3. Raccordement au
secteur. Avant de relier cet
équipement au secteur, assurez-
vous que la tension secteur de
votre région soit compatible avec
l’appareil. Veillez à remplacer
les fusibles uniquement par des
modèles exactement de même
taille et de même valeur électrique
— sans aucuneexception.
Important information
Aspectos importantes
Informations
importantes
22 23Quick Start Guide69 VIBE
1. Online registrieren.
Bitteregistrieren Sie Ihr
neues Music Tribe-Gerät
direkt nach dem Kauf auf
der website musictribe.com.
WennSie Ihren Kauf mit unserem
einfachen online Formular
registrieren, könnenwir Ihre
Reparaturansprüche schneller
und ezienter bearbeiten.
Lesen Sie bitte auch unsere
Garantiebedingungen,
fallszutreend.
2. Funktionsfehler. Sollte
sich kein Music Tribe Händler in
Ihrer Nähe benden, können Sie
den Music Tribe Vertrieb Ihres
Landes kontaktieren, der auf
musictribe.com unter „Support“
aufgeführt ist. Sollte Ihr Land
nicht aufgelistet sein, prüfen
Sie bitte, ob Ihr Problem von
unserem „Online Support“ gelöst
werden kann, den Sie ebenfalls
auf musictribe.com unter „Support“
nden. Alternativ reichen Sie bitte
Ihren Garantieanspruch online auf
musictribe.com ein, BEVOR Sie das
Produktzurücksenden.
3. Stromanschluss. Bevor
Sie das Gerät an eine Netzsteckdose
anschließen, prüfen Sie bitte, obSie
die korrekte Netzspannung für
Ihr spezielles Modell verwenden.
Fehlerhafte Sicherungen müssen
ausnahmslos durch Sicherungen
des gleichen Typs und Nennwerts
ersetztwerden.
1. Registre-se online.
Porfavor, registreseu novo
equipamento Music Tribe logo
após a compra visitando o site
musictribe.com Registrar sua
compra usando nosso simples
formulário online nos ajuda
a processar seus pedidos de
reparos com maior rapidez e
eciência. Além disso, leia nossos
termos e condições de garantia,
caso sejanecessário.
2. Funcionamento
Defeituoso.
Casoseufornecedor Music
Tribe não esteja localizado nas
proximidades, vocêpode contatar
um distribuidor Music Tribe para o
seu país listado abaixo de “Suporte”
emmusictribe.com. Se seu país
não estiver na lista, favor checar se
seu problema pode ser resolvido
com o nosso “SuporteOnline” que
também pode ser achado abaixo
de “Suporte”em musictribe.com.
Alternativamente, favorenviar
uma solicitação de garantia online
em musictribe.com ANTES da
devolução doproduto.
3. Ligações. Antes de ligar
a unidade à tomada, assegure-se
de que está a utilizar a voltagem
correcta para o modelo em questão.
Osfusíveis com defeito terão de
ser substituídos, sem qualquer
excepção, porfusíveis do mesmo
tipo e correntenominal.
Informazioni importanti
1. Registratevi online.
Vi invitiamo a registrare il nuovo
apparecchio Music Tribe subito
dopo averlo acquistato visitando
musictribe.com. La registrazione
dell'acquisto tramite il nostro
semplice modulo online ci
consente di elaborare le richieste
di riparazione in modo più rapido
ed eciente. Leggete anche i
termini e le condizioni della nostra
garanzia, qualora applicabile.
2. Malfunzionamento.
Nel caso in cui il rivenditore
autorizzato Music Tribe non si
trovi nelle vostre vicinanze, potete
contattare il Music Tribe Authorized
Fulller per il vostro paese, elencato
in “Support” @ musictribe.com. Se
la vostra nazione non è elencata,
controllate se il problema può
essere risolto tramite il nostro
“Online Support”che può anche
essere trovato sotto “Support”
@ musictribe.com. In alternativa,
inviate una richiesta di garanzia
online su musictribe.com PRIMA di
restituire il prodotto.
3. Collegamento
all'alimentazione.
Prima di collegare l'unità a una
presa di corrente, assicuratevi
di utilizzare la tensione di rete
corretta per il modello specico.
I fusibili guasti devono essere
sostituiti, senza eccezioni, con
fusibili dello stesso tipo e valore
nominale.
Weitere wichtige
Informationen
Outras Informações
Importantes
Other important information
1. Registreer online.
Registreer uw nieuwe Music Tribe-
apparatuur direct nadat u deze
hebt gekocht door naar musictribe.
com te gaan. Door uw aankoop
te registreren via ons eenvoudige
online formulier, kunnen wij
uw reparatieclaims sneller en
eciënter verwerken. Lees ook de
voorwaarden van onze garantie,
indien van toepassing.
2. Storing. Mocht uw door
Music Tribe geautoriseerde
wederverkoper niet bij u in de
buurt zijn gevestigd, dan kunt u
contact opnemen met de door
Music Tribe Authorized Fulller
voor uw land vermeld onder
“Support” op musictribe.com.
Als uw land niet in de lijst staat,
controleer dan of uw probleem
kan worden opgelost door onze
"Online Support", die u ook
kunt vinden onder "Support" op
musictribe.com. U kunt ook een
online garantieclaim indienen op
musictribe.com VOORDAT u het
product retourneert.
3. Stroomaansluitingen.
Voordat u het apparaat op een
stopcontact aansluit, moet u ervoor
zorgen dat u de juiste netspanning
voor uw specieke model gebruikt.
Defecte zekeringen moeten zonder
uitzondering worden vervangen
door zekeringen van hetzelfde
type en dezelfde waarde.
1. Registrera online.
Registrera din nya Music Tribe-
utrustning direkt efter att du köpt
den genom att besöka musictribe.
com. Att registrera ditt köp
med vårt enkla onlineformulär
hjälper oss att behandla dina
reparationsanspråk snabbare och
mer eektivt. Läs också villkoren i
vår garanti, om tillämpligt.
2. Fel. Om din Music Tribe-
auktoriserade återförsäljare inte
nns i din närhet kan du kontakta
Music Tribe Authorized Fulller
för ditt land listat under “Support”
på musictribe.com. Om ditt land
inte är listat, kontrollera om ditt
problem kan hanteras av vår
“Onlinesupport” som också nns
under “Support” på musictribe.
com. Alternativt kan du skicka
in ett online-garantianspråk
på musictribe.com INNAN du
returnerar produkten.
3. Strömanslutningar.
Innan du ansluter enheten till ett
eluttag, se till att du använder rätt
nätspänning för just din modell.
Felaktiga säkringar måste bytas ut
mot säkringar av samma typ och
märkning utan undantag.
1. Zarejestrować online.
Zarejestruj swój nowy sprzęt
Music Tribe zaraz po zakupie
na stronie musictribe.com.
Zarejestrowanie zakupu za pomocą
naszego prostego formularza
online pomaga nam szybciej i
efektywniej rozpatrywać roszczenia
dotyczące naprawy. Przeczytaj
również warunki naszej gwarancji,
jeśli dotyczy.
2. Awaria. Jeśli Twój
autoryzowany sprzedawca
Music Tribe nie znajduje się w
pobliżu, możesz skontaktować
się z autoryzowanym dostawcą
Music Tribe dla swojego kraju,
wymienionym w sekcji „Wsparcie”
na stronie musictribe.com. Jeśli
Twojego kraju nie ma na liście,
sprawdź, czy Twój problem
może zostać rozwiązany przez
nasze „Wsparcie online”, które
można również znaleźć w sekcji
„Wsparcie” na stronie musictribe.
com. Alternatywnie, prześlij
zgłoszenie gwarancyjne online na
musictribe.com PRZED zwrotem
produktu.
3. Połączenia zasilania.
Przed podłączeniem urządzenia
do gniazdka sieciowego upewnij
się, że używasz odpowiedniego
napięcia sieciowego dla danego
modelu. Wadliwe bezpieczniki
należy bez wyjątku wymienić na
bezpieczniki tego samego typu i
wartości.
Belangrijke informatie Viktig information Ważna informacja
24 25Quick Start Guide69 VIBE
1. ヒューズの格納部 /
電圧の選択: ユニットをパ
ワーソケットに接続する
前に、各モデルに対応し
た正しい主電源を使用し
ていることを確認してくだ
さい。ユ ニットによって
は、230 V と 120 V の 2つの
違うポジションを切り替え
て使う、ヒューズの格納部
を備えているものがあり
ます。正しくない値のヒュ
ーズは、絶対に適切な値の
ヒューズに交換されている
必要がありま す。
2. 故障: Music Tribe ディー
ラーがお客様のお近くにな
いときは、musictribe.com の
“Support” 内に列記されてい
る、お客様の国の Music Tribe
ディストリビューターにコ
ンタクトすることができま
す。お 客様の国がリストに
ない場合は、同じ musictribe.
com の “Support” 内にある
“OnlineSupport” でお客様の
問題が処理できないか、
チェックしてみてくださ
い。あるいは、商品を返
送する前に、musictribe.com
で、オンラインの保証請求
を要請してください。
3. 電源接続: 電源ソケット
に電源コードを接続する前
に、本製品に適切な電圧を
使用していることをご確認
ください。不具合が発生
したヒューズは必ず電圧
および電流、種類が同じヒ
ューズに交換する必要があ
ります。
1. 在线注册。购买后,请访
问我们的网站立即注册新的
MusicTribe设备。使用我们简
单的在线表格注册您的购买
信息有助于我们更快,更有效
地处理您的维修索赔。另外,
请阅读我们保修的条款和条
件(如适用)。
2. 无法正常工作。如果您
所在地区没有MusicTribe授
权的经销商,您可以联系您
所在国家/地区的MusicTribe
授权履行者,其联系方式在
behringer.com的“支持”部分
列出。如果您的国家/地区未
列出,请检查您的问题是否可
以通过我们的“在线支持”解
决,该选项也可以在behringer.
com的“支持”部分找到。或
者,您也可以在退回产品之
前在behringer.com提交在线
保修索赔。
3. 电源连接。将本设备连
接电源前,请确保使用的电
压正确。保险丝需要更换时,
必须使用相同型号及定额的
保险丝。
その他の重要な情報
其他的重要信息
Other important information
26 27Quick Start Guide69 VIBE26 27Quick Start Guide
FEDERAL COMMUNICATIONS
COMMISSION COMPLIANCE
INFORMATION
Responsible Party Name: Music Tribe
Commercial NV Inc.
Address: 122 E. 42nd St.1,
8th Floor NY, NY
10168, United States
Email Address:
69 VIBE
This equipment has been tested and found to
comply with the limits for a Class B digital device,
pursuant to part 15 of the FCC Rules. These limits are
designed to provide reasonable protection against
harmful interference in a residential installation.
This equipment generates, uses and can radiate
radio frequency energy and, if not installed and
used in accordance with the instructions, may cause
harmful interference to radio communications.
However, there is no guarantee that interference
will not occur in a particular installation. If this
equipment does cause harmful interference to radio
or television reception, which can be determined
by turning the equipment o and on, the user is
encouraged to try to correct the interference by one
or more of the following measures:
• •
Reorient or relocate the receiving antenna.
• •
Increase the separation between the equipment
and receiver.
• •
Connect the equipment into an outlet on a
circuit dierent from that to which the receiver
is connected.
• •
Consult the dealer or an experienced radio/TV
technician for help.
This equipment complies with Part 15 of the FCC
rules. Operation is subject to the following two
conditions:
(1) this device may not cause harmful
interference, and
(2) this device must accept any interference
received, including interference that may cause
undesired operation.
Important information:
Changes or modications to the equipment not
expressly approved by Music Tribe can void the
user’s authority to use the equipment.
Hereby, Music Tribe declares that this product is in
compliance with General Product Safety Regulation
(EU) 2023/988, Directive 2014/30/EU, Directive
2011/65/EU and Amendment 2015/863/EU, Directive
2012/19/EU, Regulation 519/2012 REACH SVHC and
Directive 1907/2006/EC.
Full text of EU DoC is available at https://community.
musictribe.com/
EU Representative: Music Tribe Brands DK A/S
Address: Gammel Strand 44, DK-1202 København K,
Denmark
UK Representative: Music Tribe Brands UK Ltd.
Address: 8
th
Floor, 20 Farringdon Street London
EC4A 4AB, United Kingdom
Behringer
69 VIBE
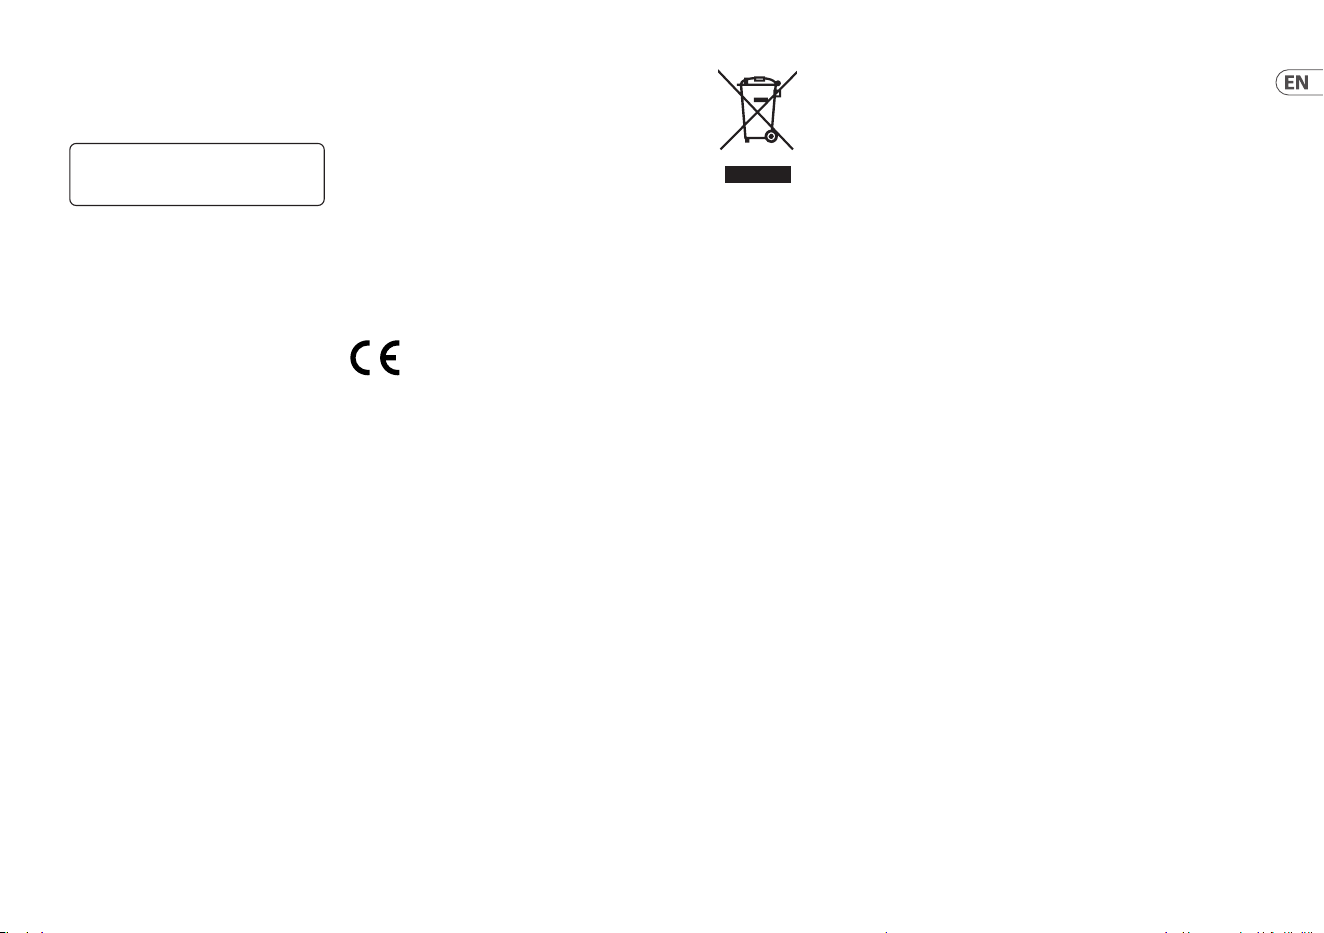
Correct disposal of this product:
This symbol indicates that this
product must not be disposed of
with household waste, according
to the WEEE Directive (2012/19/
EU) and your national law.
This product should be taken to a
collection center licensed for the recycling of waste
electrical and electronic equipment (EEE).
The mishandling of this type of waste could have a
possible negative impact on the environment and
human health due to potentially hazardous
substances that are generally associated with EEE.
At the same time, your cooperation in the correct
disposal of this product will contribute to the
ecient use of natural resources. For more
information about where you can take your waste
equipment for recycling, please contact your local
city oce, or your household waste
collection service.

We Hear You