
Due to the regular upgrades of systems and products, ZKTeco could not guarantee exact consistency between
the actual product and the written information in this manual.
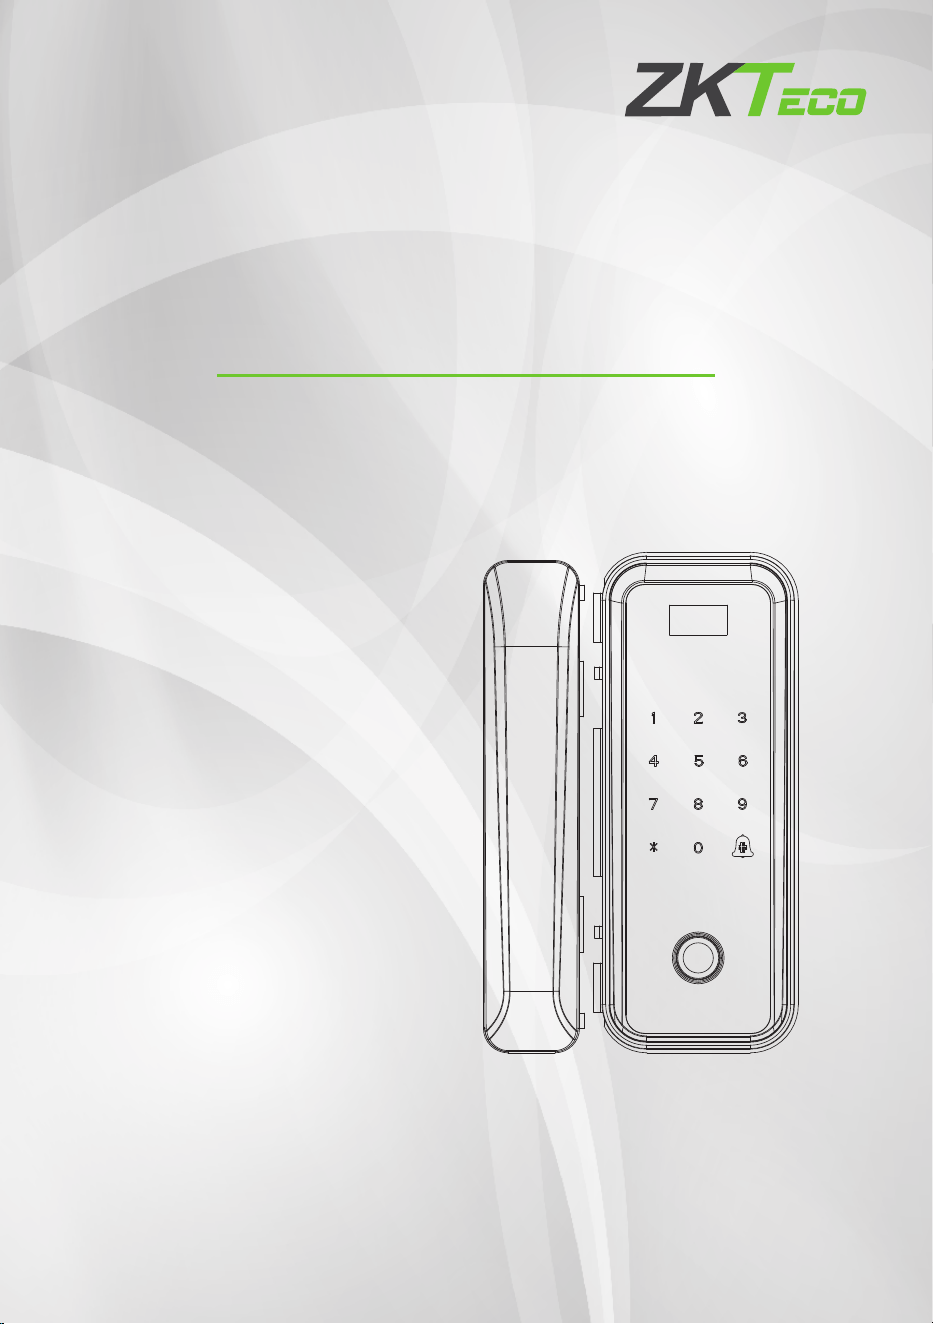
Installation Guide
Version: 2.0
English
Model: GL300 Series

Important Notes
Table of Contents
Please read this Installation Guide carefully and contact the Customer Care for any installation
queries.
It is recommended that installation be carried out by a professional technician to prevent any
potential service charges that can occur due to incorrect installation.
Four alkaline AA batteries (not included) are required to power on the device. Non-alkaline and
rechargeable batteries are “NOT RECOMMENDED”.
Do not remove the batteries from the lock when it is working.
1.
2.
3.
4.
What’s in the Box...................................................................................................................1
Installation Procedure..........................................................................................................1
1. Door Properties.........................................................................................................................................................................................1
2. Installation of the Sticky Board....................................................................................................................................................2
3. Installation of Part A.............................................................................................................................................................................3
4. Installation of Part B.............................................................................................................................................................................4
5. Installation of the Batteries..............................................................................................................................................................5
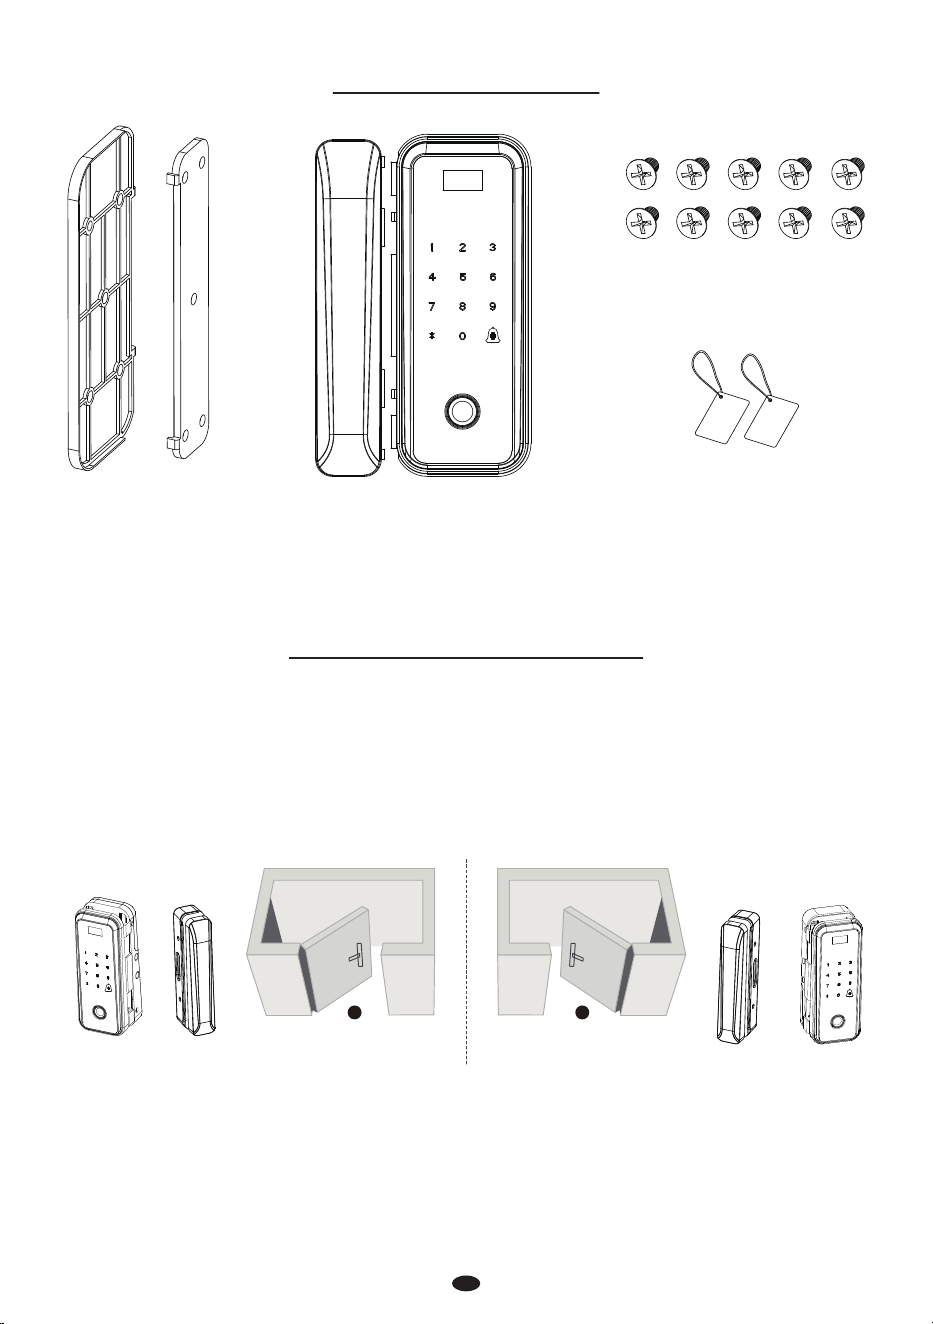
What’s in the Box
Installation Procedure
Cards
Screw
Sticky Board Part B Part A
A B
1. Door Properties
Measure the glass door thickness
Measure the door thickness is between 10 to 12 mm.
Check the door opening direction
This smart lock is suitable for left and right opening directions, just as below.
A.
B.
Left
Right
1
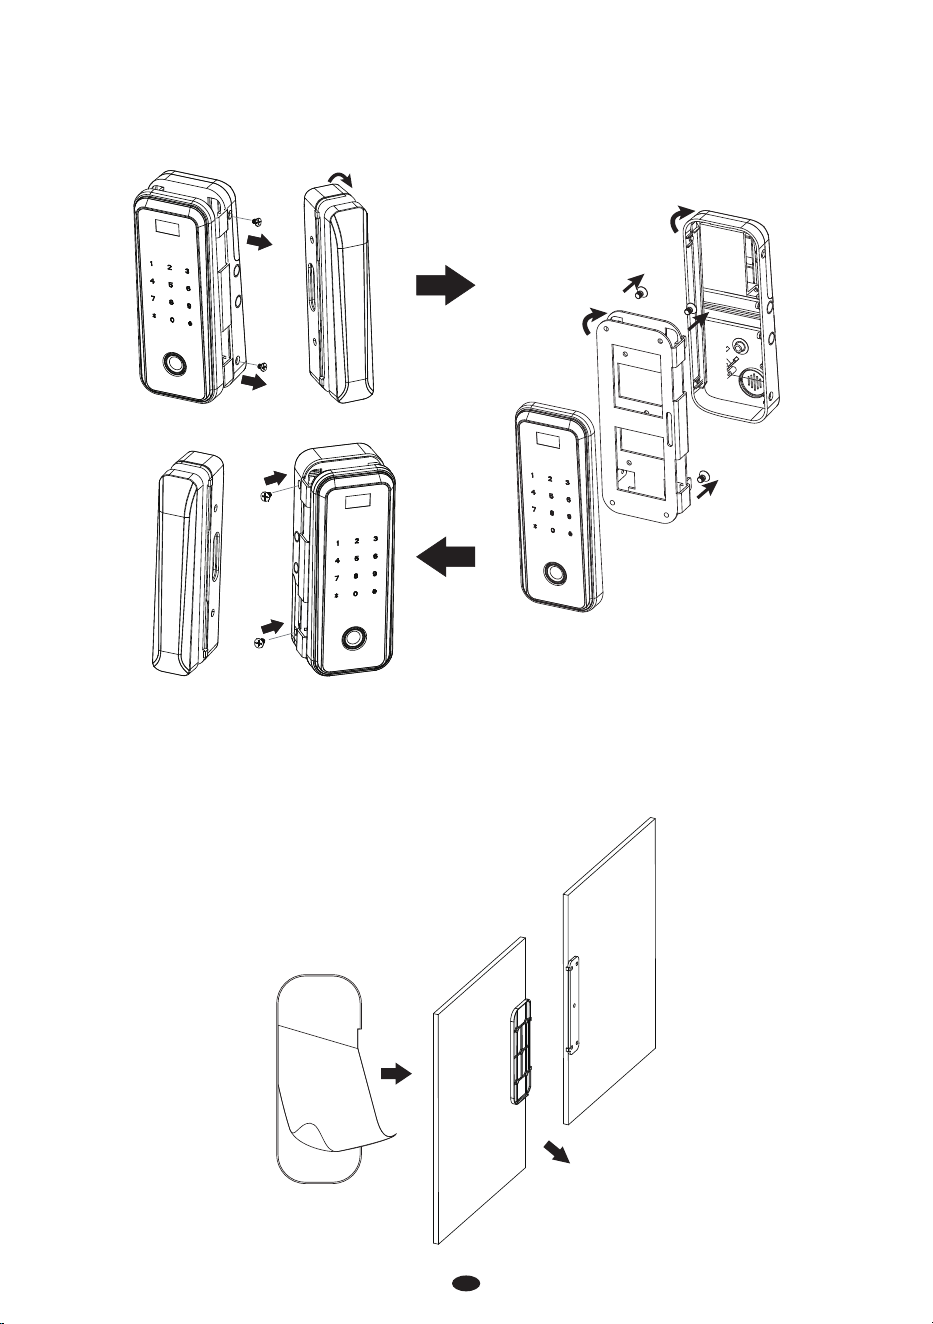
Adjust the opening direction (if needed)
Rotate the Part B to 180°.
Remove the screws from Part A, rotate the Fixed Mount and Indoor Unit to 180°, then install and
tighten the screws again.
1)
2)
Fixed Mount
Indoor Unit
2. Installation of the Sticky Board
Indoor
Peel the sticker o the Sticky Board A and stick it at appropriate height.
Peel the sticker o the Sticky Board B and stick it at the height equaling to Sticky Board A.
1)
2)
2
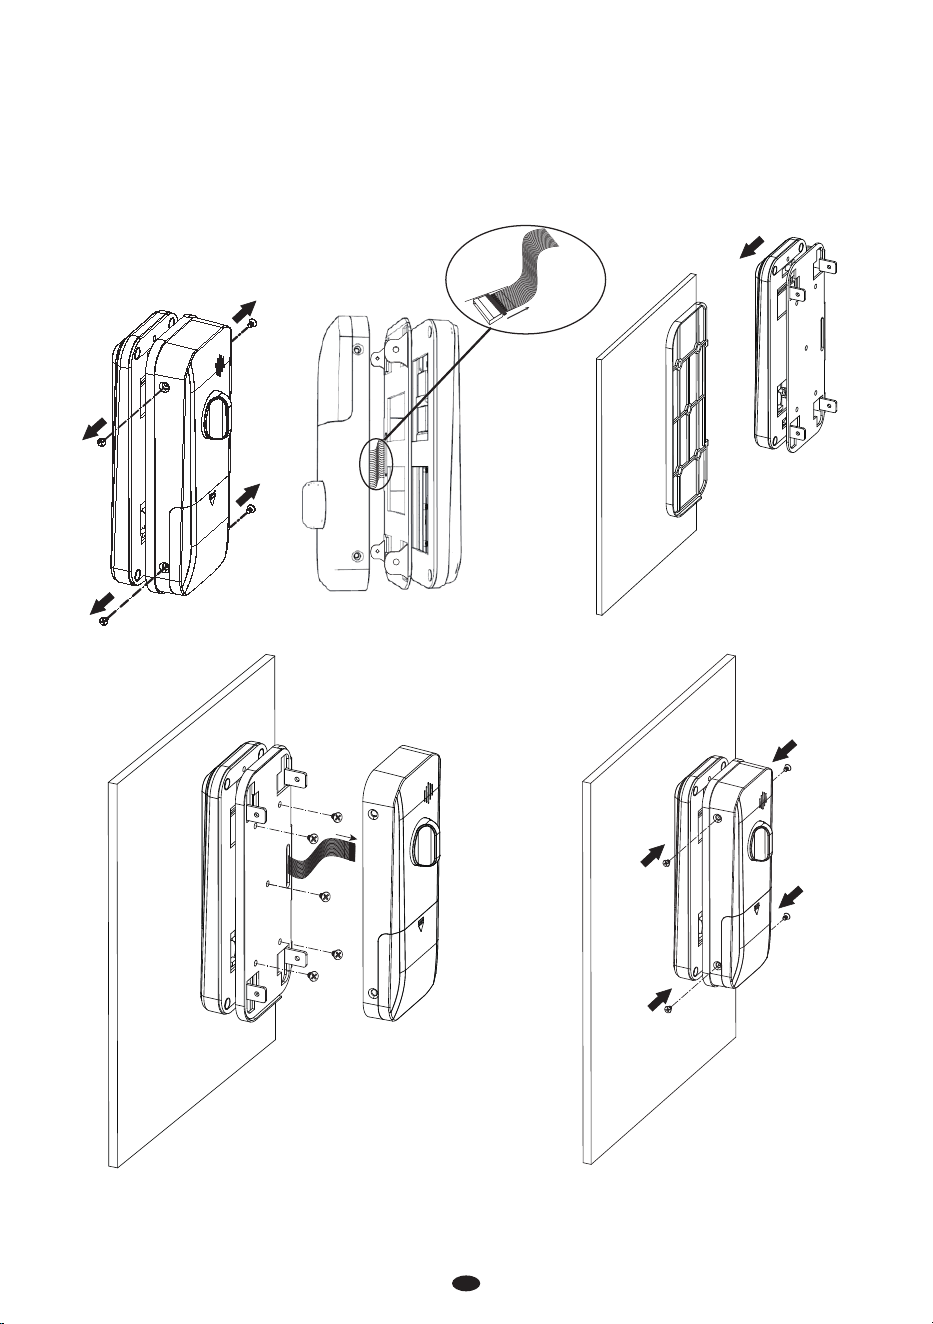
Remove screws from Part A.
Disconnect the cable, then insert the Sticky Board into the xed mount.
Install the xed mount and outdoor unit with 5 screws on the Sticky Board.
Connect the cable to the indoor unit, then install and tighten the screws.
3. Installation of Part A
1)
2)
3)
4)
Pull out
the buckle
3
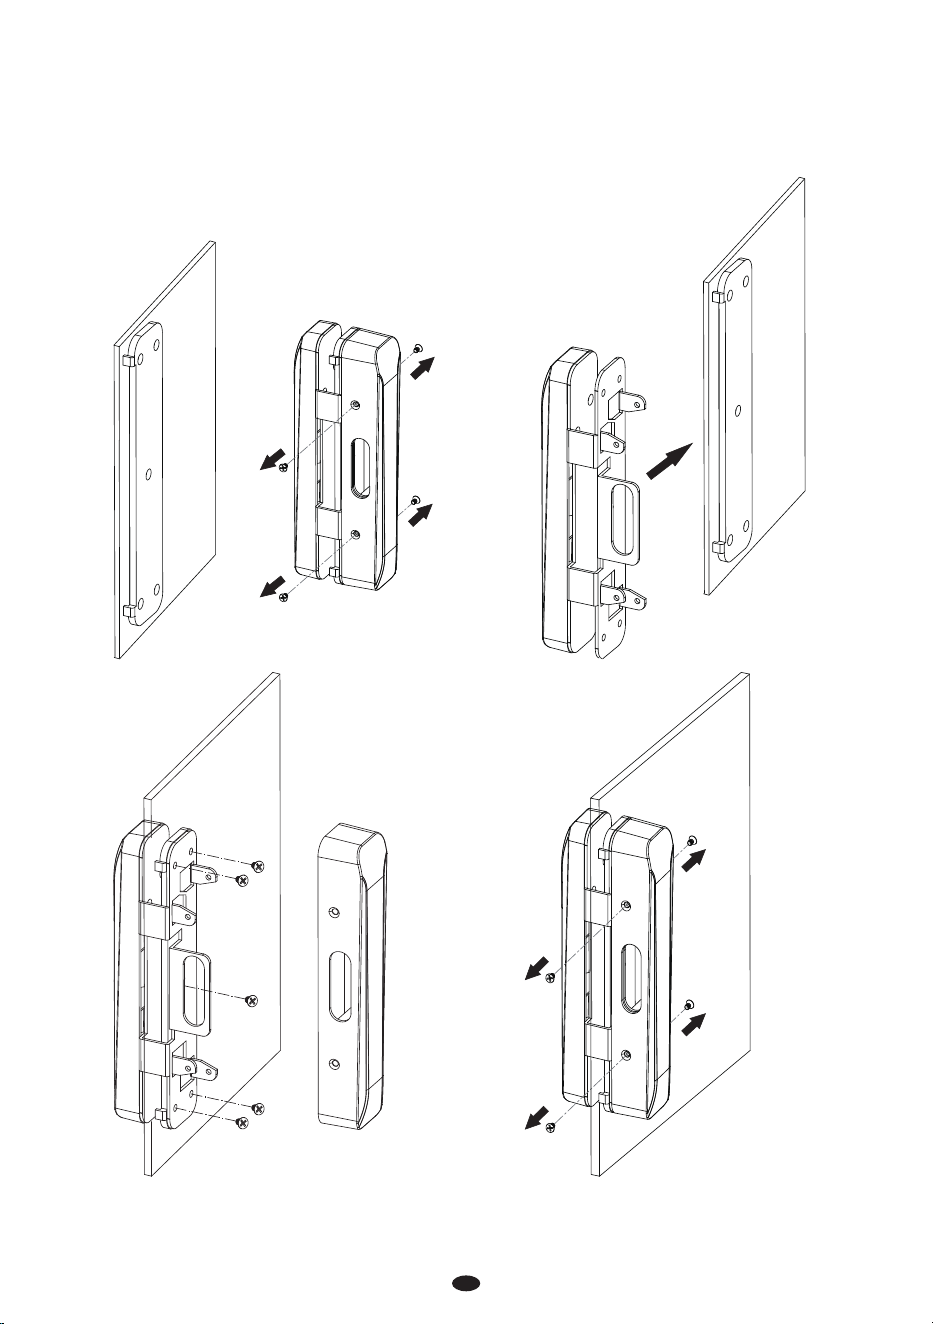
Remove the screws from the Part B to separate the Part B Outdoor Unit and Part B Indoor Unit, and
then insert the Sticky Board B into Part B.
Install and tighten the Part B Outdoor Unit with 5 screws, then install Part B Indoor Unit back.
4. Installation of Part B
1)
2)
Part B Outdoor Unit
Part B Indoor Unit
4
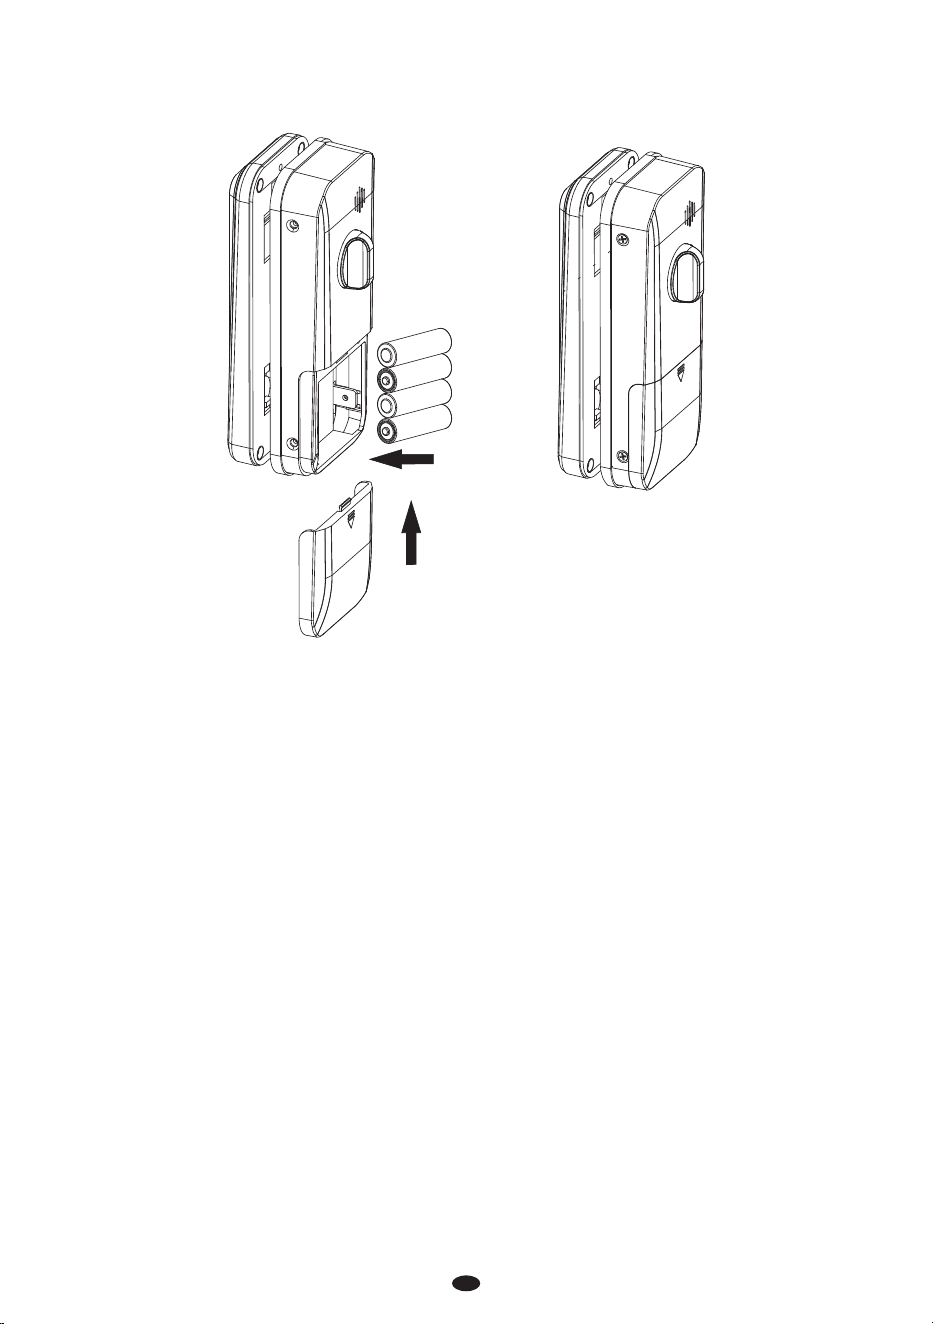
5
Remove the Battery Cover, then insert 4 AA alkaline batteries, and re-install the Battery Cover back.
5. Installation of the Batteries
Due to the regular upgrades of systems and products, ZKTeco could not guarantee exact consistency between
the actual product and the written information in this manual.
User Manual
Version: 2.0
English
Model: GL300 Series

Important Notes
Batteries must be replaced immediately when the lock prompts the “The battery is dead.”
Please use the correct method when pressing your ngers onto the ngerprint reader for
registration and identication. Our company will assume no liability for recognition issues
that may result from incorrect usage of the product. We reserve the right of nal
interpretation and modication concerning to this point.
Note: Based on the ngerprint algorithm which is commonly used in the industry, each
ngerprint can be re-registered, but one-time ngerprint registration is suecient for daily
use. The more times the same gerprint is registered, the more accurate it becomes.
1.
2.
Too low Too close to the edge
Vertical
OK
OK
Table of Contents
Product Overview.................................................................................................................1
Denitions............................................................................................................................1
Menu Operation Guide on Keypad.......................................................................................2
How to Use.............................................................................................................................2
1. Reset the Lock...................................................................................................................................................2
2. Activate the Lock............................................................................................................................................2
3. Register the First Administrator................................................................................................................2
4. Programming the Features through Menu Mode.............................................................................2
5. Pair the Lock with APP...................................................................................................................................3
Quick Start............................................................................................................................4
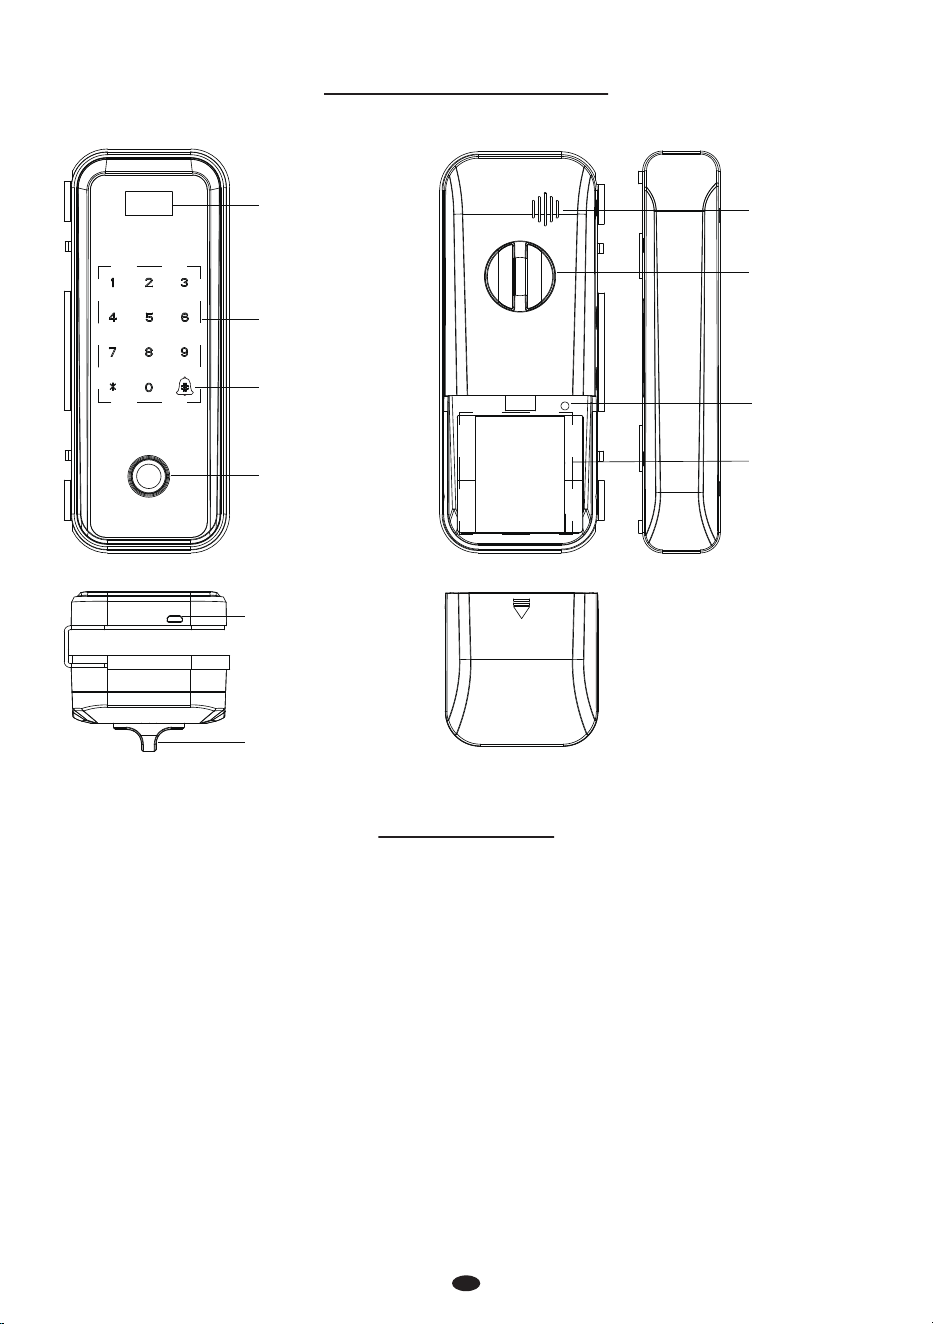
Keypad & Card
Detection Area
Conrm/Doorbell
OLED Screen
Emergence Power
Interface
Speaker
Knob
Fingerprint Sensor
Knob
Battery
Compartments
Reset Button
Battery Cover
Denitions
Product Overview
Initialization: All the registered user data will be deleted and restored to the factory settings.
Note: After initializing, Wi-Fi will disconnect, and only default administrator password (0123456789) is valid.
User Roles: The lock can be handled by two user roles namely Administrator and User. The Administrator
has the privilege to access the menu and open the door. The user has the privilege to only open the door.
Random Password: Users can input their password with random digits before or after the actual
password to protect it. The maximum number of digits submitted (including the password) must be less
than or equal to 30. For example: If the correct password is 123456, then the random password
can be 89123456807, 1234562363, 389123456, etc.
Passage Mode: This function is to keep the door always unlocked, which is suitable for meeting rooms
and places with no access restriction.
Low Battery Warning: When the battery power is low, the lock will prompt " The battery is dead” after
being turned on. If lower, will aect work.
Double Verication Mode: It requires dierent verication (password+card, password+ngerprint or
card+ngerprint) to unlock the lock.
1
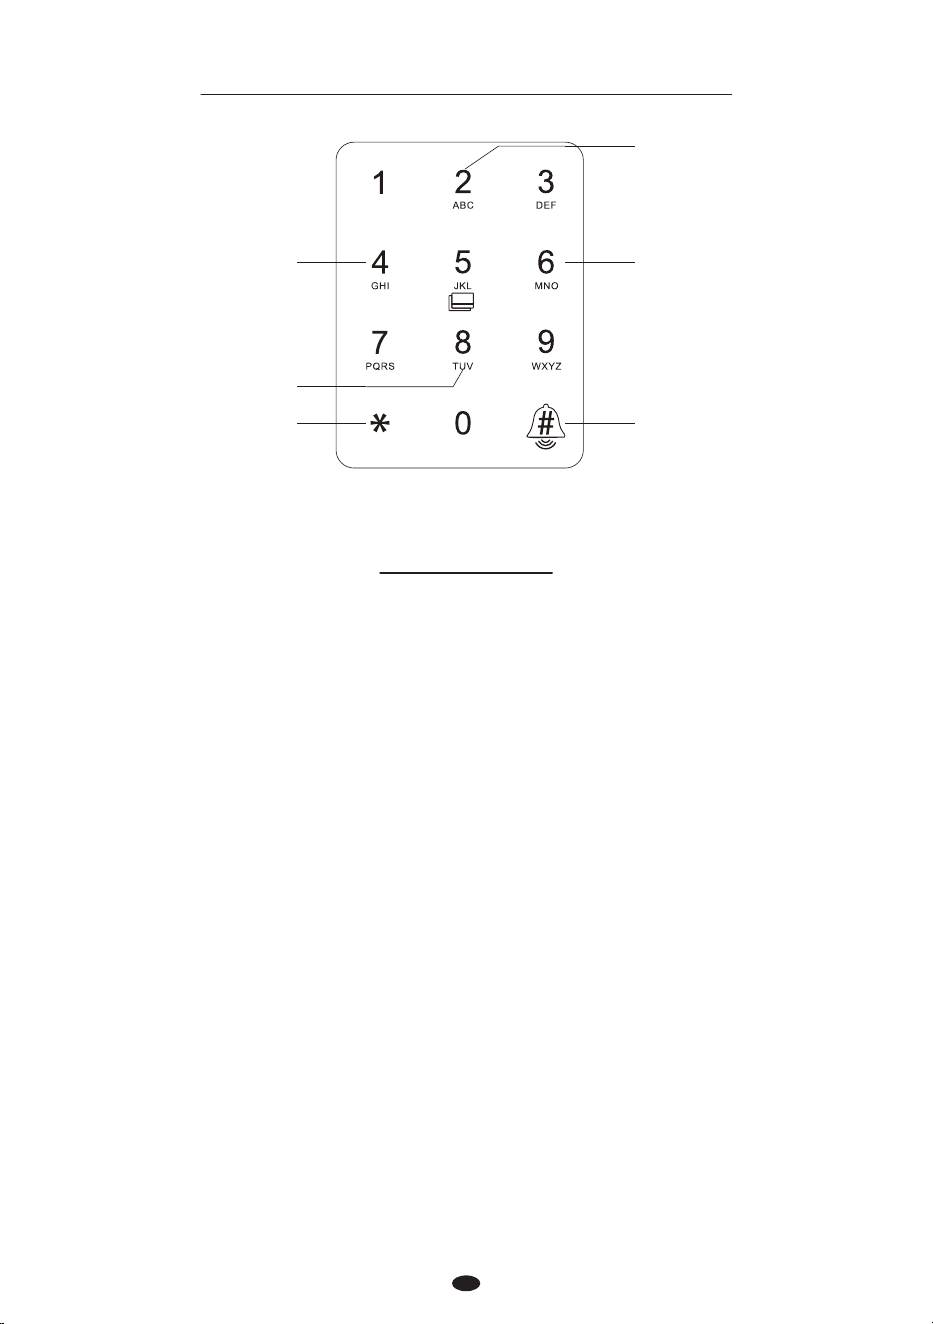
Menu Operation Guide on Keypad
Up
Right
Conrm/Doorbell Backspace
Down
Left
How to Use
1. Reset the Lock
Press and hold the Reset button for 5 seconds, until you hear the audio prompt “Initializing, Succeed”.
2. Activate the Lock
Touch the keypad with the back of your hand or ngers to activate the lock.
Note: After the rst administrator registered, the default administrator password(0987654321) will be
invalid.
Activate the Lock.
Press the 0 and the # key, enter the default administrator password “0123456789” to access menu.
The screen display “Users”, press the # key, then press the 8 key, choose administrator to register
ngerprint or password.
3. Register the First Administrator
1)
2)
3)
Touch the keypad to activate the lock.
Press the 0 and # key to access the menu.
Verify the administrator's identity with his/her ngerprint, or by entering the password then press
the # key to conrm.
Enter the digit corresponding to the function to be performed by following the audio guide.
4. Programming the Features through Menu Mode
1)
2)
3)
4)
2
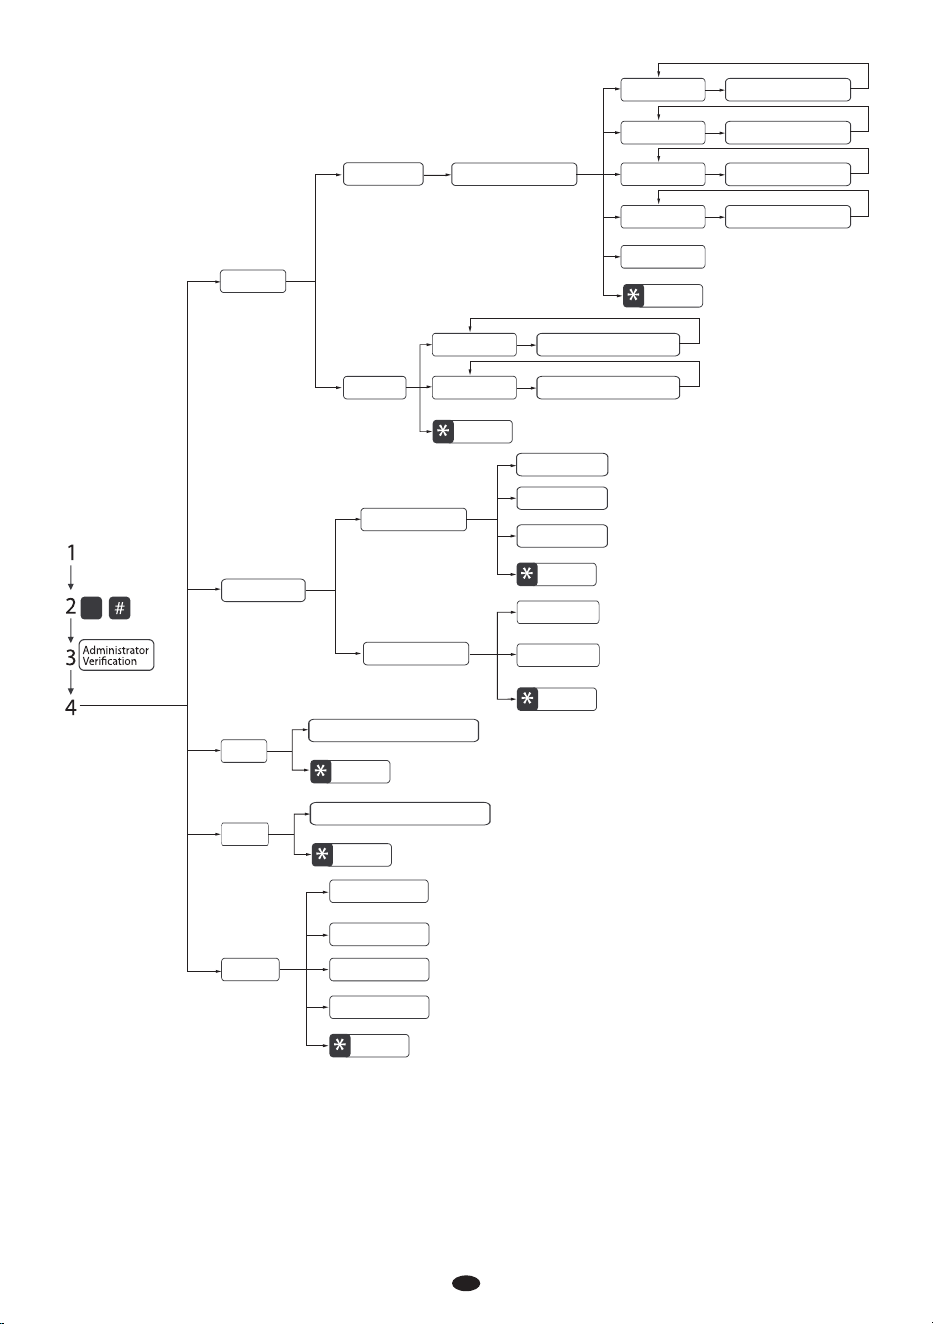
0
Log
Return
About
Return
Go to check unlock records
Go to check rmware version
System
Users
Add User
Enter the User’s Name
Return
Delete User
Password
Enter a New Password
Fingerprint Input Fingerprint
Card
Read a Card
*Telecontroller Append a Telecontroller
Return
Admin
Password Enter a New Password
Fingerprint Input Fingerprint
Lock Mode
Return
Chinese
English
Language
Return
Single Key
Double Keys
Double Users
Unlock Method
Return
*Network
Volume
Time
Factory Setting
Note: Telecontroller function is available for GL300 model, and network function is available for
GL300[WiFi] model.
Search the “ZSmart” App in Apple App Store or Google Play Store and download the App to
your mobile phone. Open the “ZSmart” App and log in with your account. If you do not have
an account, create an account with your phone number or Email ID.
1)
3
5. Pair the Lock with APP
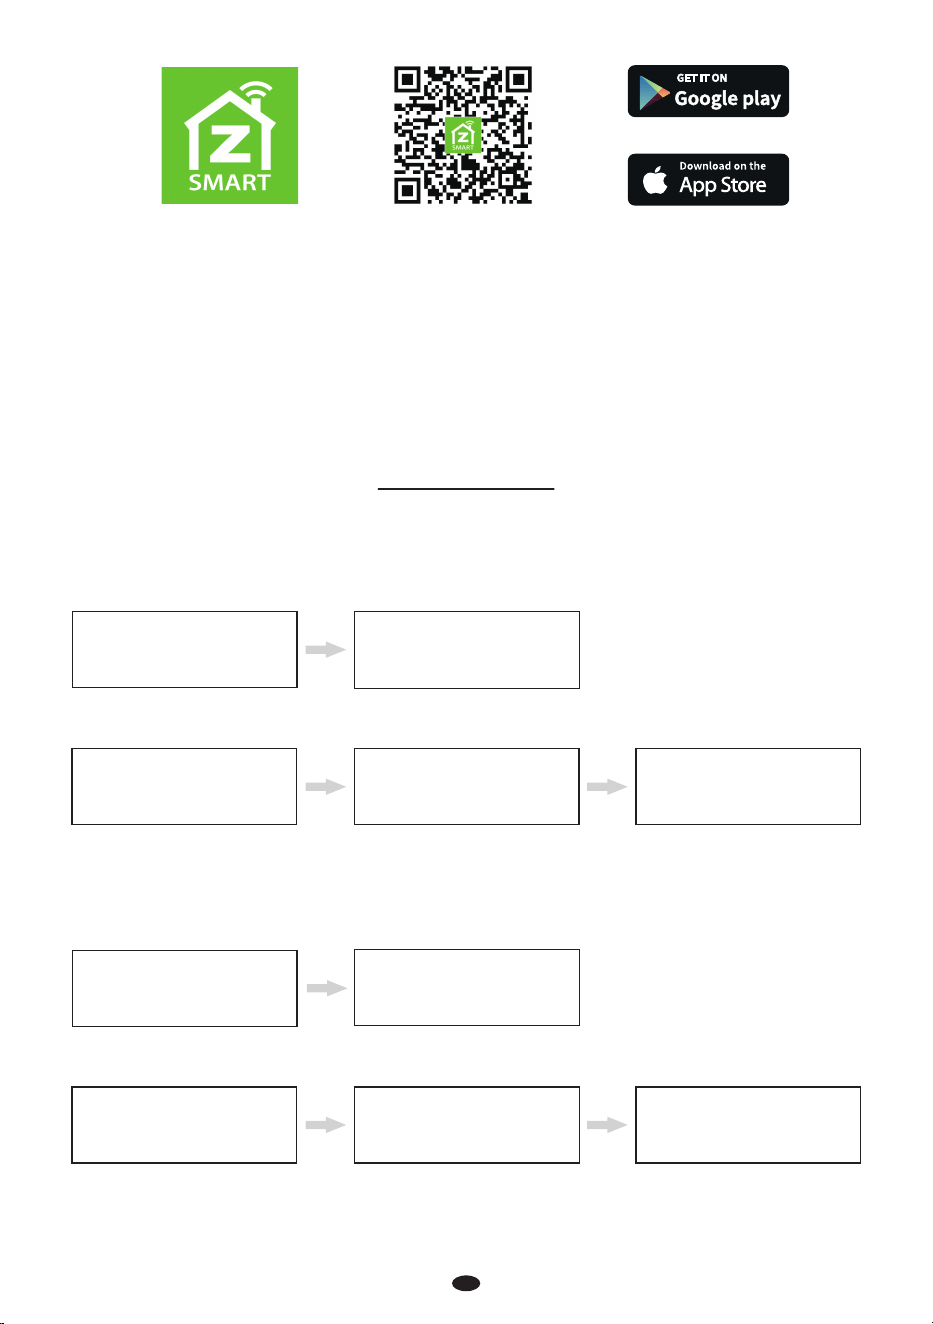
On your smartphone, enable Bluetooth and Wi-Fi permissions.
Open the app, tap the + button on the top right corner of the interface, and then select the
"Add Device" option.
Once you see the device pop-up, tap the Add button. To automatically pair the device,
follow the on-screen instructions.
You can manually change the name of the device once you see the message "Added
successfully" on the mobile app. To nish the setting, tap the Done button.
2)
3)
4)
5)
Quick Start
Attention: If the verication is failed for ve times, the lock will generate an alarm.
Unlock the Door with Fingerprint
Press the registered
ngerprint on the
ngerprint sensor.
Push the door to open.
Note: Users may enter random password to prevent any person from observing the password.
The maximum length of random password is 30 digits.
Unlock the Door with Password
Touch the keypad to
activate the lock.
Enter the registered
password and press the
# key to conrm.
Push the door to open.
Push the door to open.
Push the door to open.
Unlock the Door with Card
Swipe the registered
card on the
detection area.
Unlock the Door with Smart Phone
Press the # key to ask
Remote Unlock.
Master's smart phone
receives the Remote
Unlock requirement.
4

This device complies with Part 15 of the FCC Rules. Operation is subject to the following two
conditions: (1) This device may not cause harmful interference, and (2) this device must accept
any interference received, including interference that may cause undesired operation.
This equipment has been tested and found to comply with the limits for a Class B digital device,
pursuant to Part 15 of the FCC Rules. These limits are designed to provide reasonable protection
against harmful interference in a residential installation. This equipment generates, uses, and
can radiate radio frequency energy and, if not installed and used in accordance with the
instructions, may cause harmful interference to radio communications. However, there is no
guarantee that interference will not occur in a particular installation. If this equipment does
cause harmful interference to radio or television reception, which can be determined by
turning the equipment o and on, the user is encouraged to try to correct the interference by
one or more of the following measures:
Reorient or relocate the receiving antenna.
Increase the separation between the equipment and receiver.
Connect the equipment into an outlet on a circuit dierent from that to which the receiver
is connected.
Consult the dealer or an experienced radio/TV technician for help.
FCC RF Radiation Exposure Statement:
This Transmitter must not be co-located or operating in conjunction with any other
antenna or transmitter.
This equipment complies with RF radiation exposure limits set forth for an uncontrolled
environment.
IMPORTANT! Any changes or modications not expressly approved by the party responsible
for compliance could void the user's authority to operate the equipment.
Warning:


