

Quick Start Guide
Model: WD10
Version: 1.0
English
Due to the regular upgrades of systems and products, ZKTeco could not guarantee exact consistency between the
actual product and the written information in this manual.

1
If you have any problems, please read this manual carefully or contact
Customer Care.
1.
2.
The device can only connect to 2.4GHz Wi-Fi networks. Make sure
your phone is linked to the 2.4GHz network if you have a dual-band
router with distinct 2.4GHz and 5GHz networks.
3.
Make sure the entered Wi-Fi password is correct when adding a new
device.
4.
Please make sure the device is closed to the router for a stable
network connection.
5.
Do not install the device in an environment with corrosivity or
intense magnetic fields.
6.
Important Notes
Do not place the device on the metal surface.
7.
Due to the frequent app and product upgrades, we couldn't
guarantee exact consistency between the actual product and the
stated information in this manual.

2
Table of Contents
What's in the Box.....................................................................3
Product Overview.... ........................................ ........................3
Setup.............................................. ..........................................4
Produ ct Features.....................................................................7
Connec t i n g the D e vice t o Z S m a r t A p p . . . . . . . . . . . . . . . . . . . . . . . . . . . . . . . . . . . . 4
Ins tallation.... ... ................... ...................... ...................... ........6
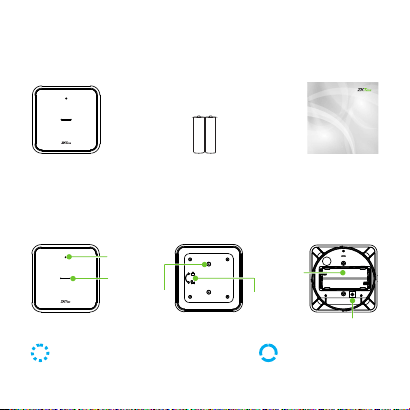
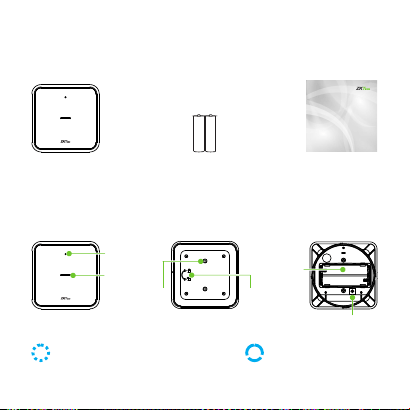
What's in the Box
3
Quick Start Guide
Product Overview
LR03 (AAA)
Battery * 2
Water Leak
Sensor
Inductive
Probe
Reset Button
Battery
Slot
Quick Start Guide
Mode l: WD10
Version: 1.0
English
Due to the regular upgrades of systems and products, ZKTeco could not guarantee exact consistency between the
actual product and the written information in this manual.
Status LED
Indicator
Front Rear
Blinking Blue (once)Blinking Blue
In Pairing Mode
Water Leakage Detected
Status LED Description:
Buzzer
Rotation
Direction
Mark
Interior

Connecting the Device to ZSmart App
Step 1: Download the App and Register Your Account
Setup
Search for the ZSmart in Apple App Store or Google Play Store and
download the App to your mobile phone.
Open the ZSmart and log in with your account. If you do not have an
account, create an account with your phone number or Email ID.
4
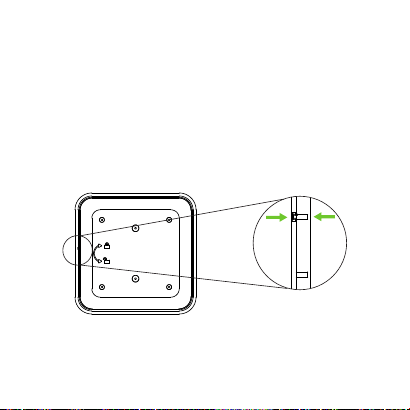
Step 2: Power on the Device
5
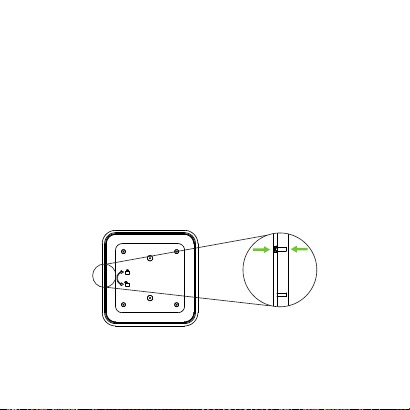
Remove the rear cover of the device by rotating it counterclockwise.
1.
Insert two provided LR03(AAA) batteries to power on the device.
2.
Press and hold the Reset Button for 5 seconds until the blue LED
begins to blink rapidly, indicating that Pairing Mode is active.
3.
Tighten the rear cover by rotating it clockwise. Make sure the mark
on the rear cover is aligned with the mark on the front unit.
4.
Important Notes: In order to ensure the dustproof and waterproof
performance of the product, the rear cover of the battery must be
tightened before use.

6
Step 3: Add the Device to the App
Enable Bluetooth and Wi-Fi permissions on your smartphone.
1.
Open the app, tap the "+" button on the top right corner of the
interface, and then select the ”Add Device” option.
2.
Tap the "Add" button once the device has appeared. Follow the on-
screen prompts to pair the device automatically.
3.
You can manually change the name of the device once the
notification “Added successfully" displayed on the mobile app. To
finish the process, tap the "Done" button.
4.
Note: If you have failed to connect your device to Wi-Fi, press and hold
the Reset Button for 5 seconds until the LED light begins to flash blue,
then repeat the above steps.
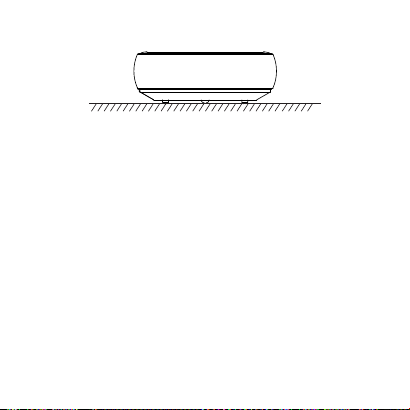
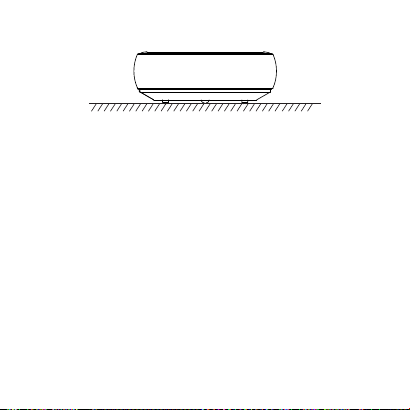
After the confirmation of a successful Wi-Fi connection and normal
working status, you can select the required plane surfaces to place the
device.
Installation
7
Current Status: Display the real-time flooding and normal status of the
device.
Record: Check the log of specific time and device's status.
Scene: Manage the smart automation settings associated with the
device.
Instant App Alerts: Receive the instant push notifications from your
phone when the device detects the water leakage.
Remove Device: Remember to REMOVE the device from the current
account when the owner of the device changes.
Product Features

Guía Rápida
Debido a las actualizaciones periódicas de los sistemas y productos, ZKTeco no puede garantizar la consistencia
exacta entre el producto real y la información escrita en este manual.
Modelo: WD10
Versión: 1.0
Español

1
Notas Importantes
Lea atentamente este manual o comuníquese con atención al cliente
para cualquier consulta.
1.
2.
Este dispositivo sólo trabaja con redes Wi-Fi de 2.4GHz. Si tiene un
enrutador doble banda con redes de 2.4 GHz y 5 GHz, asegúrese de
que su teléfono esté conectado a la de 2.4 GHz.
3.
Asegúrese de que la contraseña Wi-Fi ingresada sea correcta al
agregar un nuevo dispositivo.
4.
Para una conexión de red estable, asegúrese de que el dispositivo
esté colocado cerca del enrutador.
5.
No instale el dispositivo en un entorno corrosivo o con campos
magnéticos intensos.
6.
No coloque el dispositivo sobre la superficie metálica.
7.
Debido a las actualizaciones periódicas de la aplicación y los
productos, no podemos garantizar la coherencia exacta entre el
producto real y la información escrita en este manual.

2
Tabla de Contenidos
Carac terísticas del Producto...................................................7
I n s t a l a c i ó n . . . . . . . . . . . . . . . . . . . . . . . . . . . . . . . . . . . . . . . . . . . . . . . . . . . . . . . . . . . 6
Conte nido.................... ... ................... ...................... ................3
Descripción del Producto........................................................3
Configuración.................................................................... ... ... 4
Cone x i ó n del E q u i p o con l a App Z S m a r t. . . . . . . . . . . . . . ........ . . . . . . . . . . . 4
Contenido
3
Descripción del Producto
Guía Rápida
Batería LR03
(AAA) * 2
Detector de
Fugas de Agua
Guía Rápida
Debido a las actualizaciones periódicas de los sistemas y productos, ZKTeco no puede garantizar la consistencia
exacta entre el producto real y la información escrita en este manual.
Mode lo: WD1 0
Versión: 1.0
Español
Sensor
Inductivo
Botón de
Reinicio
Ranura
para
Batería
LED de
Estado
Parte Delantera Parte Trasera
Azul intermitente (una vez)Azul intermitente
En Modo de Emparejamiento
Fuga de Agua Detectada
LED Indicador de Estado:
Zumbador
Marca de
Dirección
de Rotación
Parte Interior

Conexión del Equipo con la App ZSmart
Paso 1: Descargue la App y Registre su Cuenta
Configuración
Busque la aplicación ZSmart en Apple App Store o Google Play Store y
descargue la aplicación en su teléfono móvil.
Abra la aplicación ZSmart e inicie sesión con su cuenta. Si no tiene una
cuenta, cree una cuenta con su número de teléfono o correo electrónico.
4
5
Paso 2: Encienda el Equipo
Retire la tapa trasera del dispositivo girándola en sentido contrario a
las agujas del reloj.
1.
Inserte las dos baterías LR03 (AAA) provistas para encender el
dispositivo.
2.
Presione y mantenga presionado el Botón de Reinicio por 5
segundos h a s t a que e l LE D a z u l c o m i e n ce a parp a d e a r
rápidamente, lo que indica que el Modo de Emparejamiento está
activo.
3.
Apriete la cubierta trasera girándola en el sentido de las agujas del
reloj. Asegúrese de que la marca de la cubierta trasera esté
alineada con la marca de la unidad frontal.
4.
Notas Importantes: Para garantizar el rendimiento a prueba de
polvo e impermeable del producto, la cubierta trasera de la batería
debe apretarse antes de su uso.

6
Paso 3: Añada el Equipo a la App
Active los permisos de Bluetooth y Wi-Fi en el teléfono inteligente.
1.
Abra la aplicación, toque el botón "+" en la esquina superior derecha
de la interfaz y luego seleccione la opción "Agregar dispositivo".
2.
Toque el botón "Agregar" una vez que vea la ventana emergente del
dispositivo. Siga las instrucciones en pantalla para emparejar el
dispositivo automáticamente.
3.
Una vez que vea el mensaje “Se agregó con éxito" en la aplicación,
puede editar el nombre del dispositivo manualmente. Toque el botón
“Finalizado" para completar la configuración.
4.
Nota: Si no pudo conectar su dispositivo a Wi-Fi, mantenga presionado
el botón de reinicio durante 5 segundos hasta que el LED comience a
parpadear en azul, luego repita los pasos anteriores.
Después de la confirmación de una conexión Wi-Fi exitosa y un estado
de funcionamiento normal, puede seleccionar las superficies planas
requeridas para colocar el dispositivo.
Instalación
7
Características del Producto
Estado Actual: Muestre el estado de inundación y el estado normal en
tiempo real del dispositivo.
Registro del Dispositivo: Verifique el registro de tiempo específico y el
estado del dispositivo.
Escena: Administre la configuración de automatización inteligente
relacionada.
Alertas Instantáneas de APP: Reciba notificaciones automáticas
instantáneas desde su teléfono móvil cuando el dispositivo detecte una
fuga de agua.
Eliminar Dispositivo: Recuerde ELIMINAR el dispositivo de la cuenta
actual cuando cambie el propietario del dispositivo.
Warning:
This device complies with Part 15 of the FCC Rules. Operation is subject to the following two conditions:
(1) This device may not cause harmful interference, and (2) this device must accept any interference
received, including interference that may cause undesired operation.
This equipment has been tested and found to comply with the limits for a Class B digital device,
pursuant to Part 15 of the FCC Rules. These limits are designed to provide reasonable protection against
harmful interference in a residential installation. This equipment generates, uses, and can radiate radio
frequency energy and, if not installed and used in accordance with the instructions, may cause harmful
interference to radio communications. However, there is no guarantee that interference will not occur
in a particular installation. If this equipment does cause harmful interference to radio or television
reception, which can be determined by turning the equipment off and on, the user is encouraged to tr y
to correct the interference by one or more of the following measures:
FCC RF Radiation Exposure Statement:
Connect the equipment into an outlet on a circuit different from that to which the receiver is
connected.
Consult the dealer or an experienced radio/T V technician for help.
Reorient or relocate the receiving antenna.
Increase the separation between the equipment and receiver.
This Transmitter must not be co-located or operating in conjunction with any other antenna or
transmitter.
IMPORTANT! Any changes or modifications not expressly approved by the party responsible for
compliance could void the user's authority to operate the equipment.
This equipment complies with RF radiation exposure limits set forth for an uncontrolled
environment.

ZKTeco Industrial Park, No. 32, Industrial Road,
Tangxia Town, Dongguan, China.
Phone : +86 769 - 82109991
Fax : +86 755 - 89602394
www.zkteco.com
Copyright © 2022 ZKTECO CO., LTD. All Rights Reserved.
