
FaceKiosk-H13 User Manual
I
Thank you for choosing our product. Please read the instructions carefully
before operation. Follow these instructions to ensure that the product is
functioning properly. The images shown in this manual are for illustrative
purposes only.
For further details, please visit our Company’s website
www.zkteco.com.
User Manual
FaceKiosk-H13 Series
Date: March 2022
Doc Version: 2.3
English

FaceKiosk-H13 User Manual
P a g e | 1 Copyright©2022 ZKTECO CO., LTD. All rights reserved.
Copyright © 2022 ZKTECO CO., LTD. All rights reserved.
Without the prior written consent of ZKTeco, no portion of this manual can be copied or forwarded in any
way or form. All parts of this manual belong to ZKTeco and its subsidiaries (hereinafter the "Company" or
"ZKTeco").
Trademark
is a registered trademark of ZKTeco. Other trademarks involved in this manual are owned by
their respective owners.
Disclaimer
This manual contains information on the operation and maintenance of the ZKTeco equipment. The
copyright in all the documents, drawings, etc. in relation to the ZKTeco supplied equipment vests in and is
the property of ZKTeco. The contents hereof should not be used or shared by the receiver with any third
party without express written permission of ZKTeco.
The contents of this manual must be read as a whole before starting the operation and maintenance of the
supplied equipment. If any of the content(s) of the manual seems unclear or incomplete, please contact
ZKTeco before starting the operation and maintenance of the said equipment.
It is an essential pre-requisite for the satisfactory operation and maintenance that the operating and
maintenance personnel are fully familiar with the design and that the said personnel have received
thorough training in operating and maintaining the machine/unit/equipment. It is further essential for the
safe operation of the machine/unit/equipment that personnel has read, understood and followed the
safety instructions contained in the manual.
In case of any conflict between terms and conditions of this manual and the contract specifications,
drawings, instruction sheets or any other contract-related documents, the contract conditions/documents
shall prevail. The contract specific conditions/documents shall apply in priority.
ZKTeco offers no warranty, guarantee or representation regarding the completeness of any information
contained in this manual or any of the amendments made thereto. ZKTeco does not extend the warranty
of any kind, including, without limitation, any warranty of design, merchantability or fitness for a particular
purpose.
ZKTeco does not assume responsibility for any errors or omissions in the information or documents which
are referenced by or linked to this manual. The entire risk as to the results and performance obtained from
using the information is assumed by the user.
ZKTeco in no event shall be liable to the user or any third party for any incidental, consequential, indirect,
special, or exemplary damages, including, without limitation, loss of business, loss of profits, business
interruption, loss of business information or any pecuniary loss, arising out of, in connection with, or

FaceKiosk-H13 User Manual
P a g e | 2 Copyright©2022 ZKTECO CO., LTD. All rights reserved.
relating to the use of the information contained in or referenced by this manual, even if ZKTeco has been
advised of the possibility of such damages.
This manual and the information contained therein may include technical, other inaccuracies or
typographical errors. ZKTeco periodically changes the information herein which will be incorporated into
new additions/amendments to the manual. ZKTeco reserves the right to add, delete, amend or modify the
information contained in the manual from time to time in the form of circulars, letters, notes, etc. for better
operation and safety of the machine/unit/equipment. The said additions or amendments are meant for
improvement /better operations of the machine/unit/equipment and such amendments shall not give any
right to claim any compensation or damages under any circumstances.
ZKTeco shall in no way be responsible (i) in case the machine/unit/equipment malfunctions due to any
non-compliance of the instructions contained in this manual (ii) in case of operation of the
machine/unit/equipment beyond the rate limits (iii) in case of operation of the machine and equipment in
conditions different from the prescribed conditions of the manual.
The product will be updated from time to time without prior notice. The latest operation procedures and
relevant documents are available on http://www.zkteco.com
If there is any issue related to the product, please contact us.
ZKTeco Headquarters
Address ZKTeco Industrial Park, No. 32, Industrial Road,
Tangxia Town, Dongguan, China.
Phone +86 769 - 82109991
Fax +86 755 - 89602394
For business-related queries, please write to us at sales@zkteco.com.
To know more about our global branches, visit www.zkteco.com.

FaceKiosk-H13 User Manual
P a g e | 3 Copyright©2022 ZKTECO CO., LTD. All rights reserved.
About the Company
ZKTeco is one of the world’s largest manufacturer of RFID and Biometric (Fingerprint, Facial, Finger-vein)
readers. Product offerings include Access Control readers and panels, Near & Far-range Facial Recognition
Cameras, Elevator/floor access controllers, Turnstiles, License Plate Recognition (LPR) gate controllers and
Consumer products including battery-operated fingerprint and face-reader Door Locks. Our security
solutions are multi-lingual and localized in over 18 different languages. At the ZKTeco state-of-the-art
700,000 square foot ISO9001-certified manufacturing facility, we control manufacturing, product design,
component assembly, and logistics/shipping, all under one roof.
The founders of ZKTeco have been determined for independent research and development of biometric
verification procedures and the productization of biometric verification SDK, which was initially widely
applied in PC security and identity authentication fields. With the continuous enhancement of the
development and plenty of market applications, the team has gradually constructed an identity
authentication ecosystem and smart security ecosystem, which are based on biometric verification
techniques. With years of experience in the industrialization of biometric verifications, ZKTeco was
officially established in 2007 and now has been one of the globally leading enterprises in the biometric
verification industry owning various patents and being selected as the National High-tech Enterprise for 6
consecutive years. Its products are protected by intellectual property rights.
About the Manual
This manual introduces the operations of the FaceKiosk-H13 Series.
All figures displayed are for illustration purposes only. Figures in this manual may not be exactly consistent
with the actual products.
Features and parameters with
★ are not available in all devices.

FaceKiosk-H13 User Manual
P a g e | 4 Copyright©2022 ZKTECO CO., LTD. All rights reserved.
Document Conventions
Conventions used in this manual are listed below:
GUI Conventions
For Software
Convention Description
Bold font Used to identify software interface names e.g. OK, Confirm, Cancel.
>
Multi-level menus are separated by these brackets. For example, File > Create >
Folder.
For Device
Convention Description
< >
Button or key names for devices. For example, press <OK>.
[ ]
Window names, menu items, data table, and field names are inside square
brackets. For example, pop up the [New User] window.
/
Multi-
level menus are separated by forwarding slashes. For example,
[File/Create/Folder].
Symbols
Convention Description
This implies about the notice or pays attention to, in the manual.
The general information which helps in performing the operations faster.
The information which is significant.
Care taken to avoid danger or mistakes.
The statement or event that warns of something or that serves as a cautionary
example.

FaceKiosk-H13 User Manual
P a g e | 5 Copyright©2022 ZKTECO CO., LTD. All rights reserved.
Table of Contents
1 OVERVIEW .............................................................................................................................................. 7
1.1 SPECIFICATIONS...................................................................................................................................... 7
1.2 INSTALLATION SET-UP ............................................................................................................................ 8
1.2.1 SAFETY PRECAUTIONS ....................................................................................................................................................................... 8
1.2.2 INSTALLATION ENVIRONMENT ........................................................................................................................................................ 8
1.2.3 INSTALLATION PROCEDURE ............................................................................................................................................................. 8
1.3 PRODUCT APPEARANCE ........................................................................................................................ 13
1.4 PRODUCT INTERFACE ............................................................................................................................ 15
1.5 DEVICE CONNECTION ............................................................................................................................ 15
2 HOME SCREEN AND MAIN MENU ........................................................................................................ 17
3 VISITOR REGISTRATION PROCESS ....................................................................................................... 19
3.1 VISITOR SIGN IN .................................................................................................................................... 19
3.1.1 PRIVACY PROTECTION POLICY ..................................................................................................................................................... 19
3.1.2 FACE REGISTRATION ....................................................................................................................................................................... 20
3.1.3 DECLARATION OF HEALTH INFORMATION ............................................................................................................................... 21
3.1.4 VISITOR INFORMATION ................................................................................................................................................................... 21
3.1.5 HOST INFORMATION ....................................................................................................................................................................... 22
3.1.6 VOLUNTEER AUDIT .......................................................................................................................................................................... 23
3.1.7 COMPLETE REGISTRATION ............................................................................................................................................................ 23
3.2 VISITOR QUERY .................................................................................................................................... 24
3.3 VISITOR CHECK-IN ................................................................................................................................ 25
3.4 VISITOR CHECK OUT ............................................................................................................................. 26
4 MAIN MENU ......................................................................................................................................... 27
5 USER MANAGEMENT ........................................................................................................................... 28
5.1 ADD AN EMPLOYEE ............................................................................................................................... 29
5.2 DELETE AN EMPLOYEE .......................................................................................................................... 34
6 AD SETTINGS ........................................................................................................................................ 35
7 RECORD SEARCH .................................................................................................................................. 37
7.1 VISITOR RECORD .................................................................................................................................. 37
7.2 OPERATION RECORD ............................................................................................................................. 37
8 DATA MANAGEMENT .......................................................................................................................... 39
9 SYSTEM SETTINGS ............................................................................................................................... 42
9.1 COMMUNICATION SETTINGS ................................................................................................................. 42
9.1.1 WIFI SETTING .................................................................................................................................................................................... 43
9.1.2 ETHERNET SETTINGS ....................................................................................................................................................................... 44
9.1.3 SERVER SETTINGS ............................................................................................................................................................................. 45
9.2 COMMON SETTINGS .............................................................................................................................. 46

FaceKiosk-H13 User Manual
P a g e | 6 Copyright©2022 ZKTECO CO., LTD. All rights reserved.
9.2.1 DATE AND TIME ............................................................................................................................................................................... 46
9.2.2 RESTORE ALL THE SETTINGS ......................................................................................................................................................... 48
9.2.3 EXIT ...................................................................................................................................................................................................... 48
9.3 DETECTION SETTINGS
★
........................................................................................................................ 49
9.4 BIOMETRIC SETTINGS ............................................................................................................................ 51
9.4.1 FACE RECOGNITION PARAMETER ................................................................................................................................................ 51
9.4.2 FINGERPRINT PARAMETER ............................................................................................................................................................. 52
9.5 ACCESS CONTROL SETTINGS ................................................................................................................. 53
9.6 VISITOR SETTINGS ................................................................................................................................. 53
9.6.1 QR CODE SETTINGS ........................................................................................................................................................................ 54
9.6.2 VISITOR INFORMATION CUSTOMIZATION ................................................................................................................................. 55
9.6.3 VISITOR REGISTRATION PROCESS SETTINGS ............................................................................................................................. 56
9.6.4 PRINT SETTINGS ................................................................................................................................................................................ 58
9.6.5 RESET THE CONFIGURATION PROCESS ...................................................................................................................................... 59
9.7 PERSONALITY SETTINGS ........................................................................................................................ 60
9.8 SECURITY PRIVACY SETTINGS ................................................................................................................ 60
10 SYSTEM INFORMATION ................................................................................................................ 62
11 ZKBIOSECURITY CONNECTION .................................................................................................... 63
11.1 ADDING A DEVICE................................................................................................................................. 63
11.2 VISITOR MANAGEMENT......................................................................................................................... 63
11.2.1 SET THE FACEKIOSK AS AN ENTRY POINT ................................................................................................................................. 63
11.2.2 HOST SETTINGS ................................................................................................................................................................................ 64
11.2.3 VISIT REASON SETTINGS ................................................................................................................................................................. 64
11.2.4 RESERVATION AUDIT SETTINGS ................................................................................................................................................... 65
11.2.5 EMAIL NOTIFICATION SETTINGS .................................................................................................................................................. 65
11.2.6 INVITATION......................................................................................................................................................................................... 67
11.2.7 VISITOR REGISTRATION QR CODE SETTINGS ........................................................................................................................... 67
11.2.8 DECLARATION OF HEALTH INFORMATION ............................................................................................................................... 69

FaceKiosk-H13 User Manual
P a g e | 7 Copyright©2022 ZKTECO CO., LTD. All rights reserved.
1 Overview
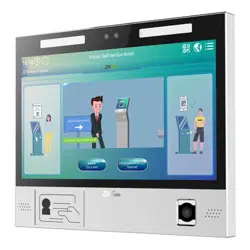
FaceKiosk-H13 Series is a multi-purpose smart face recognition device with an Android operating
system. It provides the best solution for various enterprise requirements such as Visitor self-service,
Conference display, e-learning classes, and so on. The installation is very simple, and its compact
structure makes it best-fit in any working environment.
1.1 Specifications
FaceKiosk-H13
Feature
FaceKiosk-H13A FaceKiosk-H13C FaceKiosk-H13C [TD]
Visitor Records
Capacity
100000 100000 100000
Facial Templates
Capacity
10000 10000 10000
Waterproof IP Rating
IP65 - -
Dimensions
323*268*25mm
(L*W*H)
354*50*1420mm
(L*W*H)
354*50*1420mm
(L*W*H)
Hardware Modules
IC Card, Fingerprint
Scanner, Ticket
Printer, QR Code
Scanner
IC Card, Fingerprint
Scanner, Ticket Printer,
QR Code Scanner
IC Card, Fingerprint
Scanner, Ticket Printer,
QR Code Scanner,
Temperature Detection
module
CPU
ARM Cortex-A53 64-bit eight-core processor
Operating Frequency
1.8GHz
Operating System
Android 9.0
RAM
2GB DDR3
ROM
16GB
Ports
1*RJ45, TF card slot, 1*Video Out Port, RS232/485, USB
Images

FaceKiosk-H13 User Manual
P a g e | 8 Copyright©2022 ZKTECO CO., LTD. All rights reserved.
1.2 Installation Set-up
1.2.1 Safety Precautions
Keep the device away from water or dampness. Prevent the entry of water or moisture into the
kiosk's chassis.
Make sure the device room is well ventilated and keep the kiosk's ventilation vents clear of
obstruction.
Make sure that the operating voltage is the same as labeled on the kiosk.
Do not open the chassis when the kiosk is operating or when electrical hazards are present to
avoid electrical shocks.
1.2.2 Installation Environment
The device shall be installed indoors, and adequate clearance shall be reserved for heat dissipation at
the inlet/exhaust air vents.
Feature Description
Operating Temperature
0ºC to 50ºC
Operating Humidity
<90% RH
Storage Humidity
20% to 90% RH
Body Temperature Detection Specifications (FaceKiosk-H13C [TD] only)
Feature Description
Detection Aspects
Mask Detection
Body Temperature Detection
Temperature Measurement Distance
30 to 50cm (1 to 1.64ft)
Temperature Measurement Accuracy
±0.3°C (±0.56°F)
Temperature Measurement Range
34°C to 45°C (93.2°F to 113°F)
1.2.3 Installation Procedure
Please make sure that the Kiosk is installed as per the installation instructions. You should contact the
agent for permission if you would like to open the chassis. Otherwise, you will bear any consequences
of your actions.
Wall Mounted
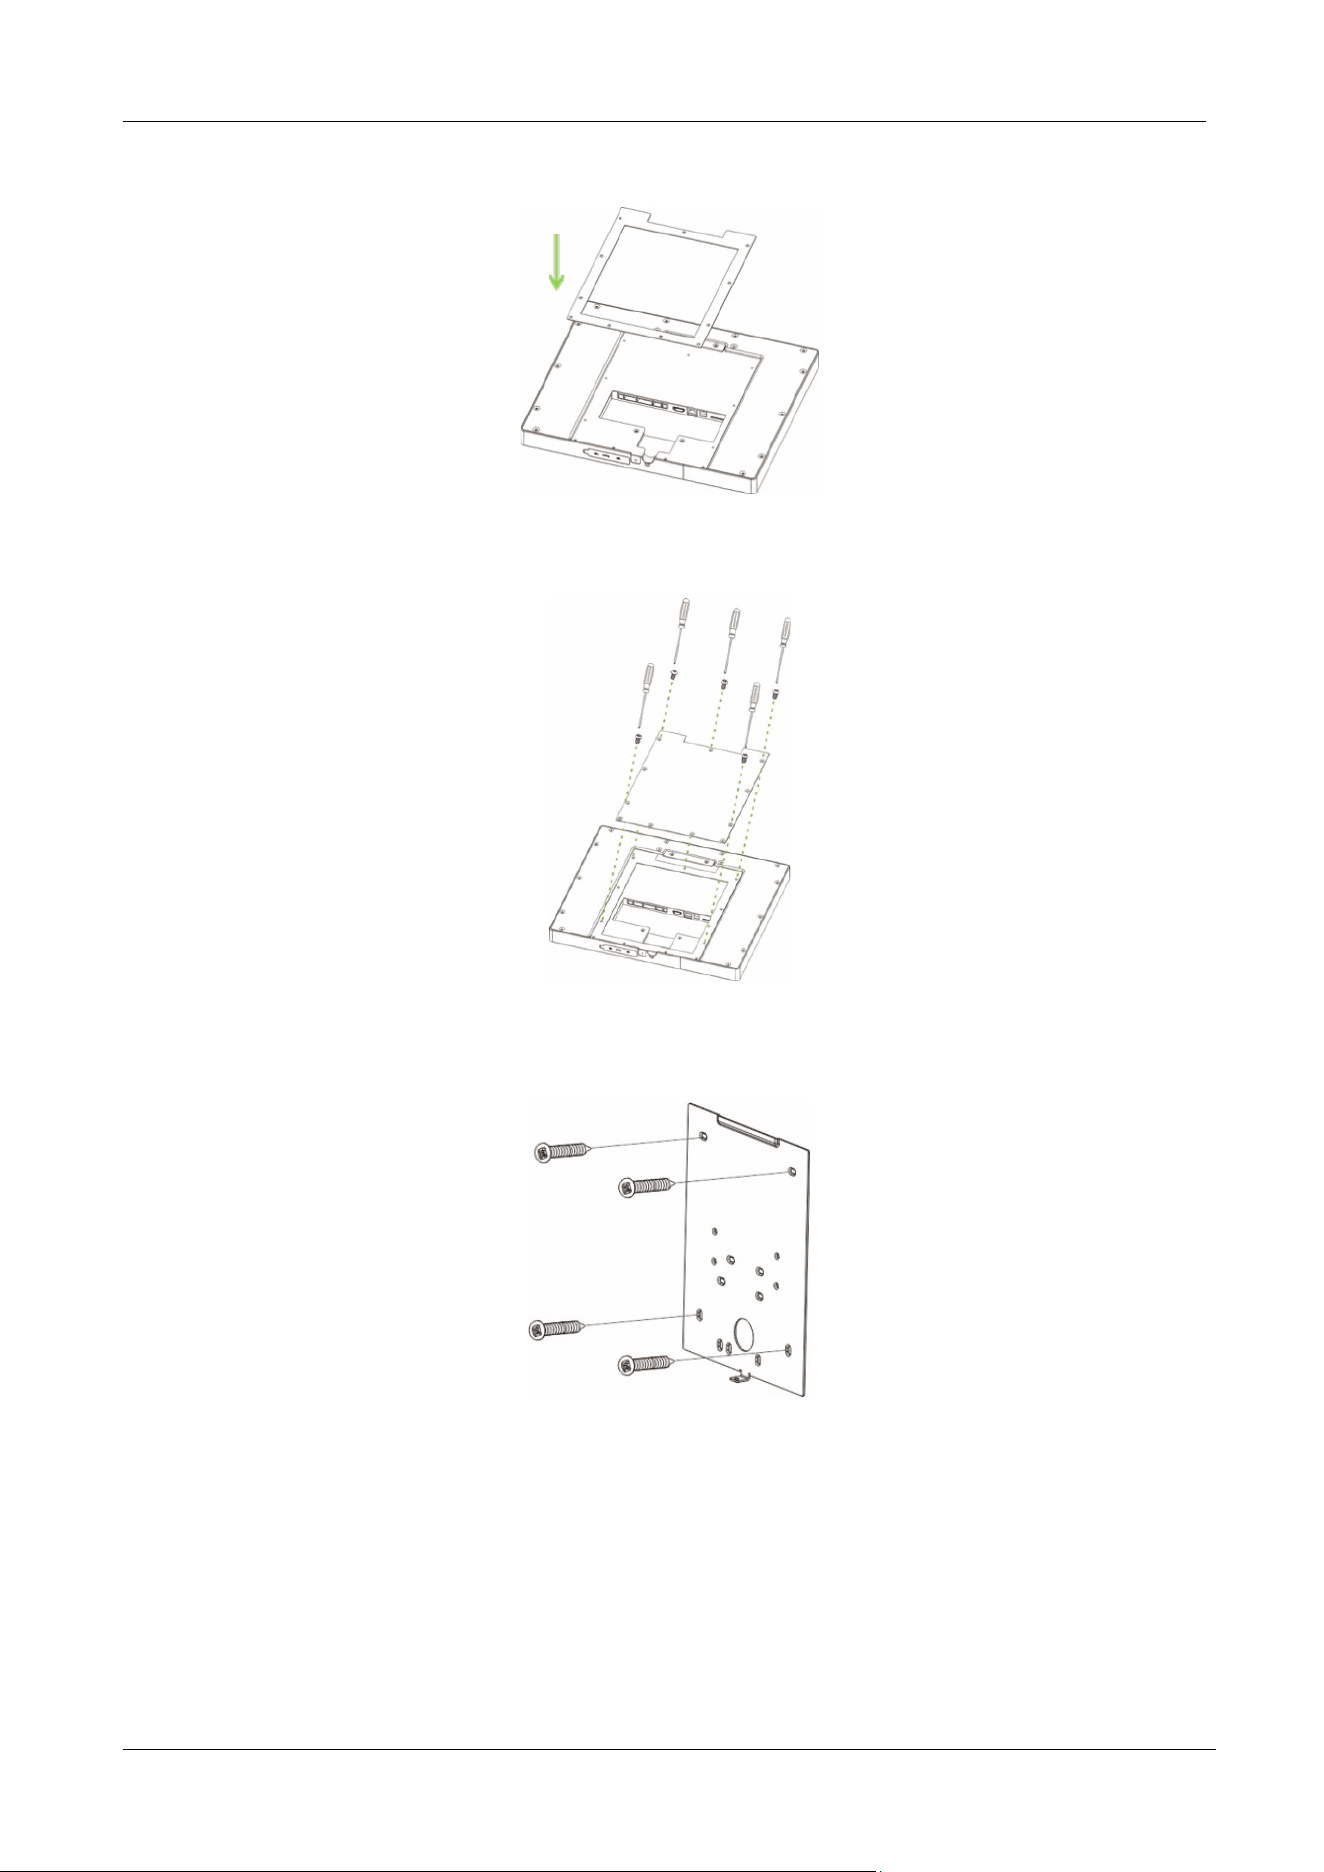
FaceKiosk-H13A:
Before installation, connect the wire to the device and pass it on through the lower opening of the
device.
FaceKiosk-H13 User Manual
P a g e | 9 Copyright©2022 ZKTECO CO., LTD. All rights reserved.
1. Align the back plate with respect to the screw holes on the back of the device.
2. Secure the plate with screws (11 pcs) to the back of the device
3. Ensure that the rear panel is mounted on the wall at a desirable height. Drill the holes on the wall
and fix the rear panel with screws.
FaceKiosk-H13 User Manual
P a g e | 10 Copyright©2022 ZKTECO CO., LTD. All rights reserved.
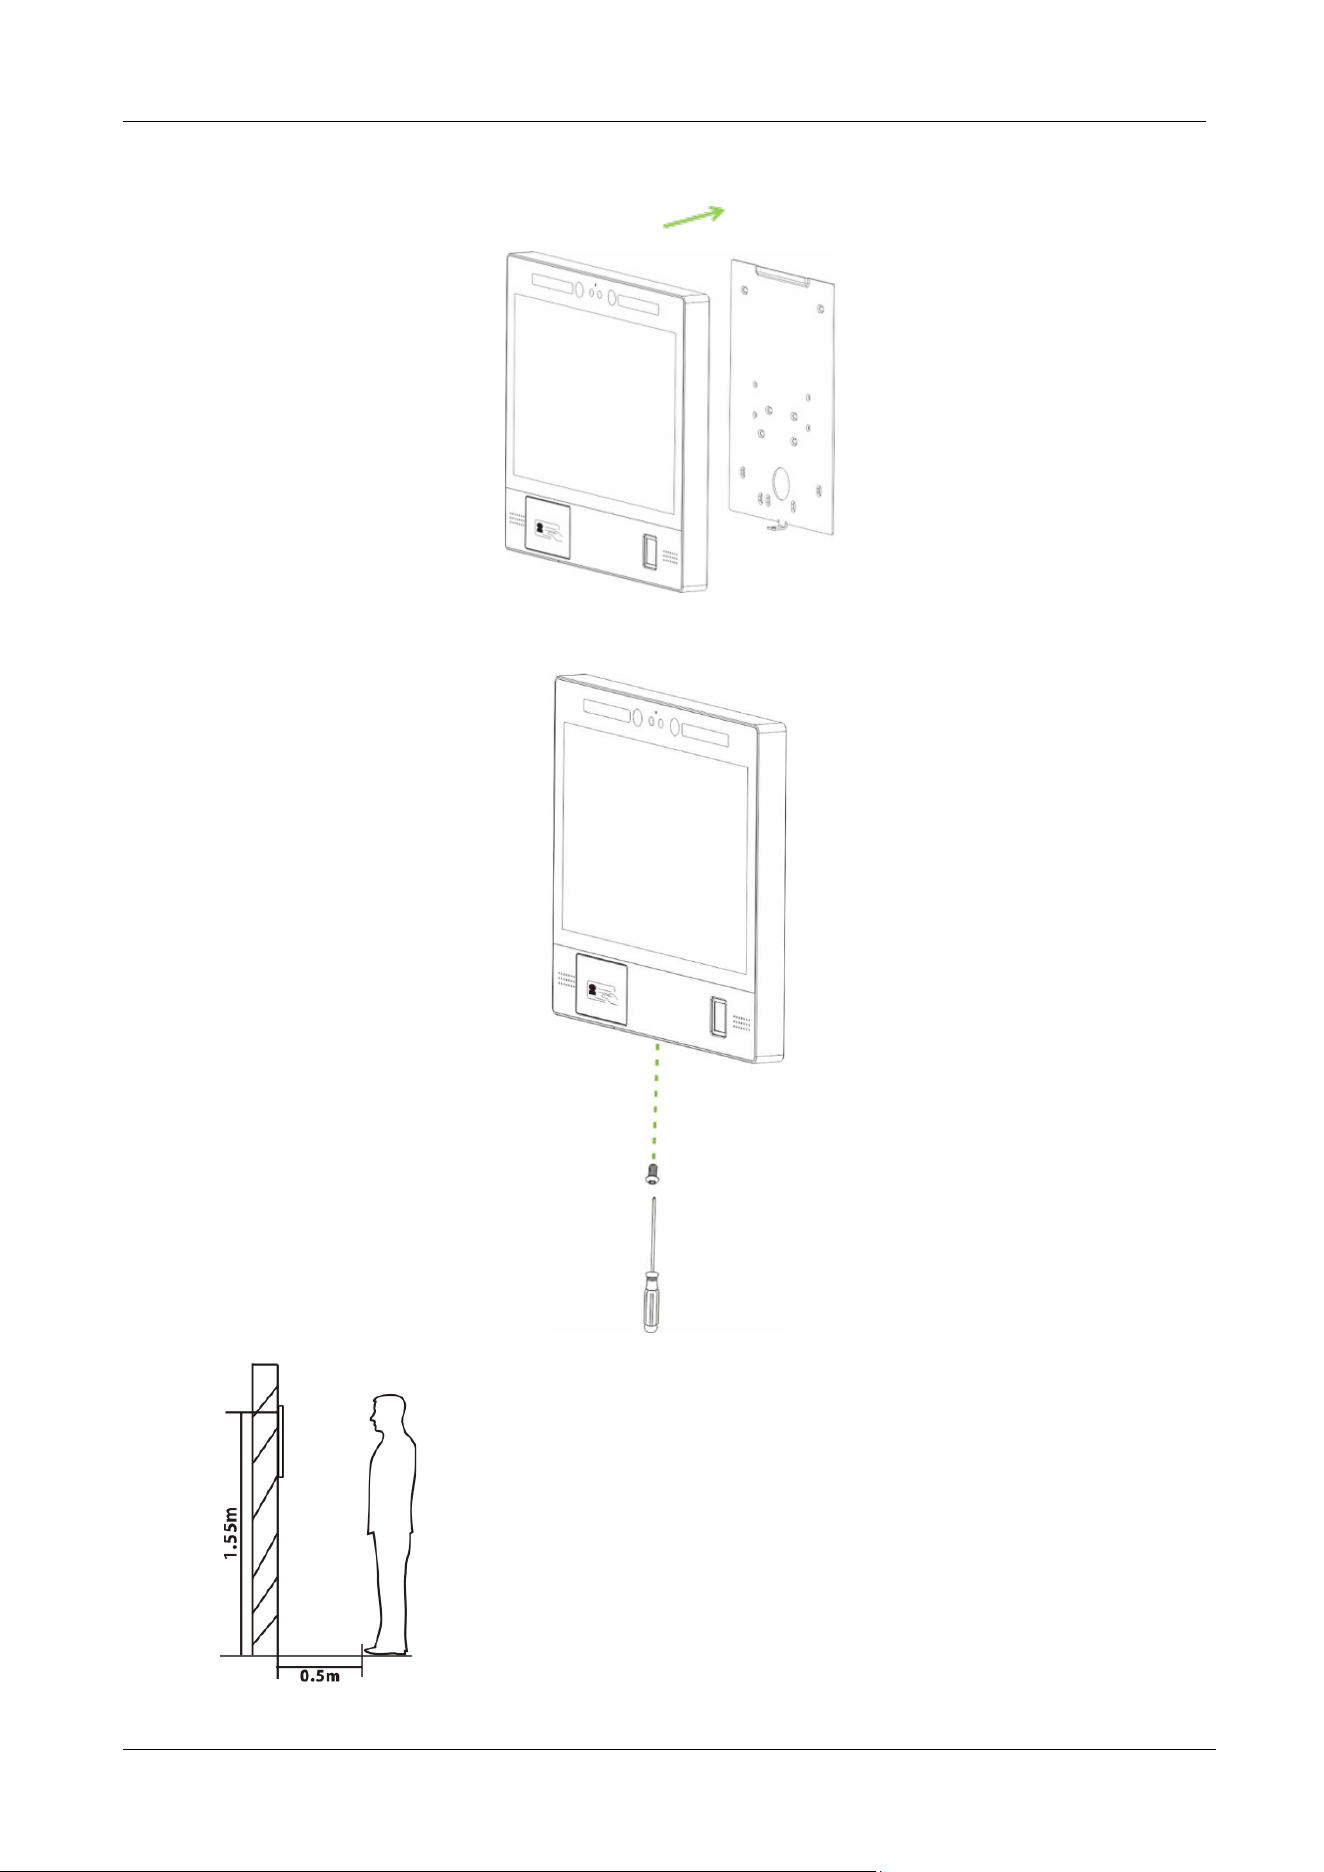
4. Affix the device to the rear panel.
5. Secure the device and the rear panel with a screw at the bottom.
The recommended distance from the camera to the ground is
155cm. The recommended distance from the person to the
device is 50cm (applicable height range is 150cm to 180cm). If
the person’s height is not within this range, it is possible to
move the front and rear positions accordingly.
FaceKiosk-H13 User Manual
P a g e | 11 Copyright©2022 ZKTECO CO., LTD. All rights reserved.
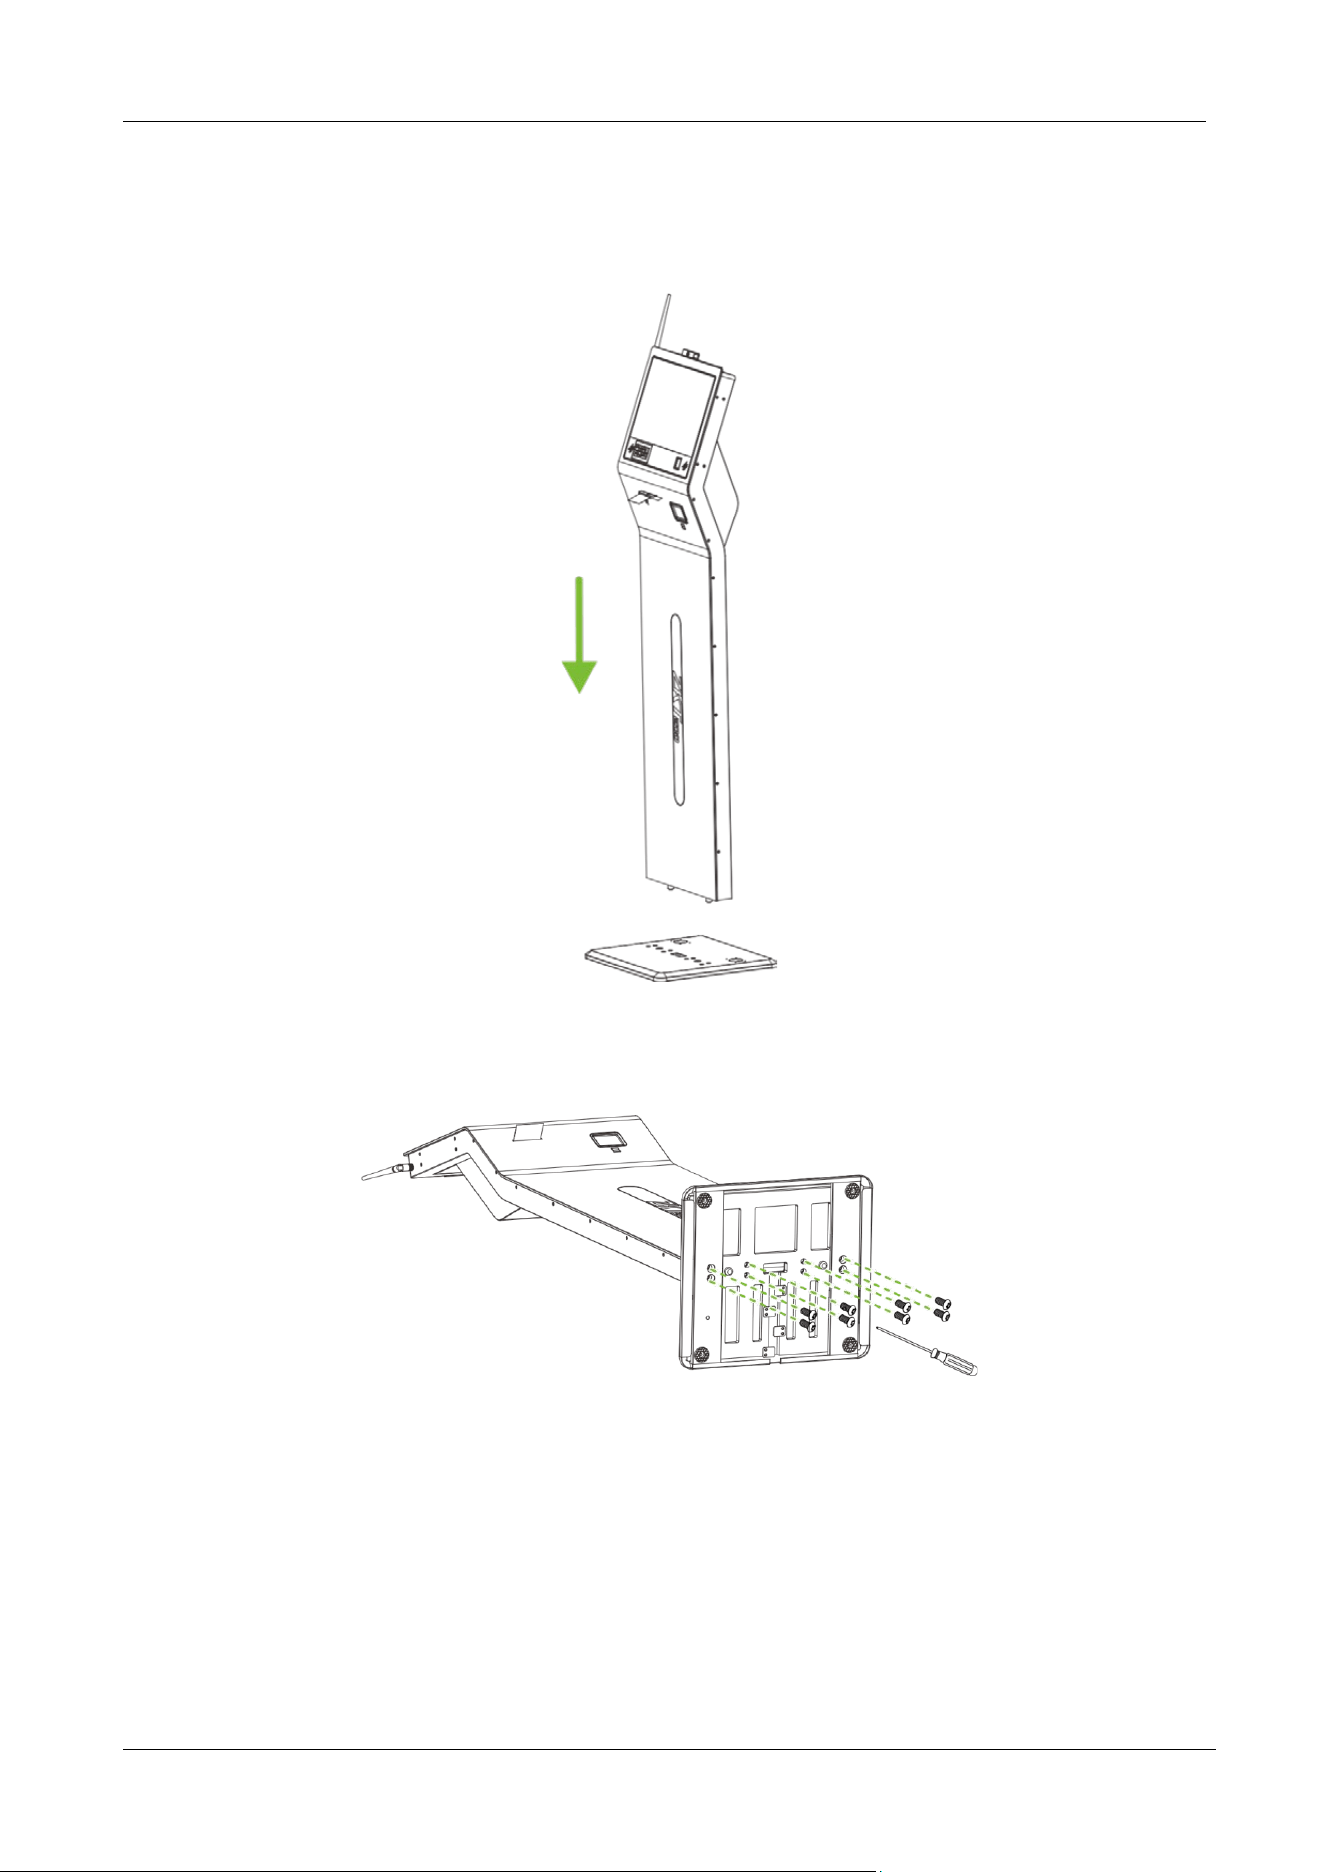
Floor Mounted FaceKiosk-H13C[TD]:
1. Open the device box, remove the Device and the base. Insert the device into the corresponding
base slot.
2. Gently recline the device horizontally and secure the device to the base with the screws (8 pcs)
from the bottom of the base.
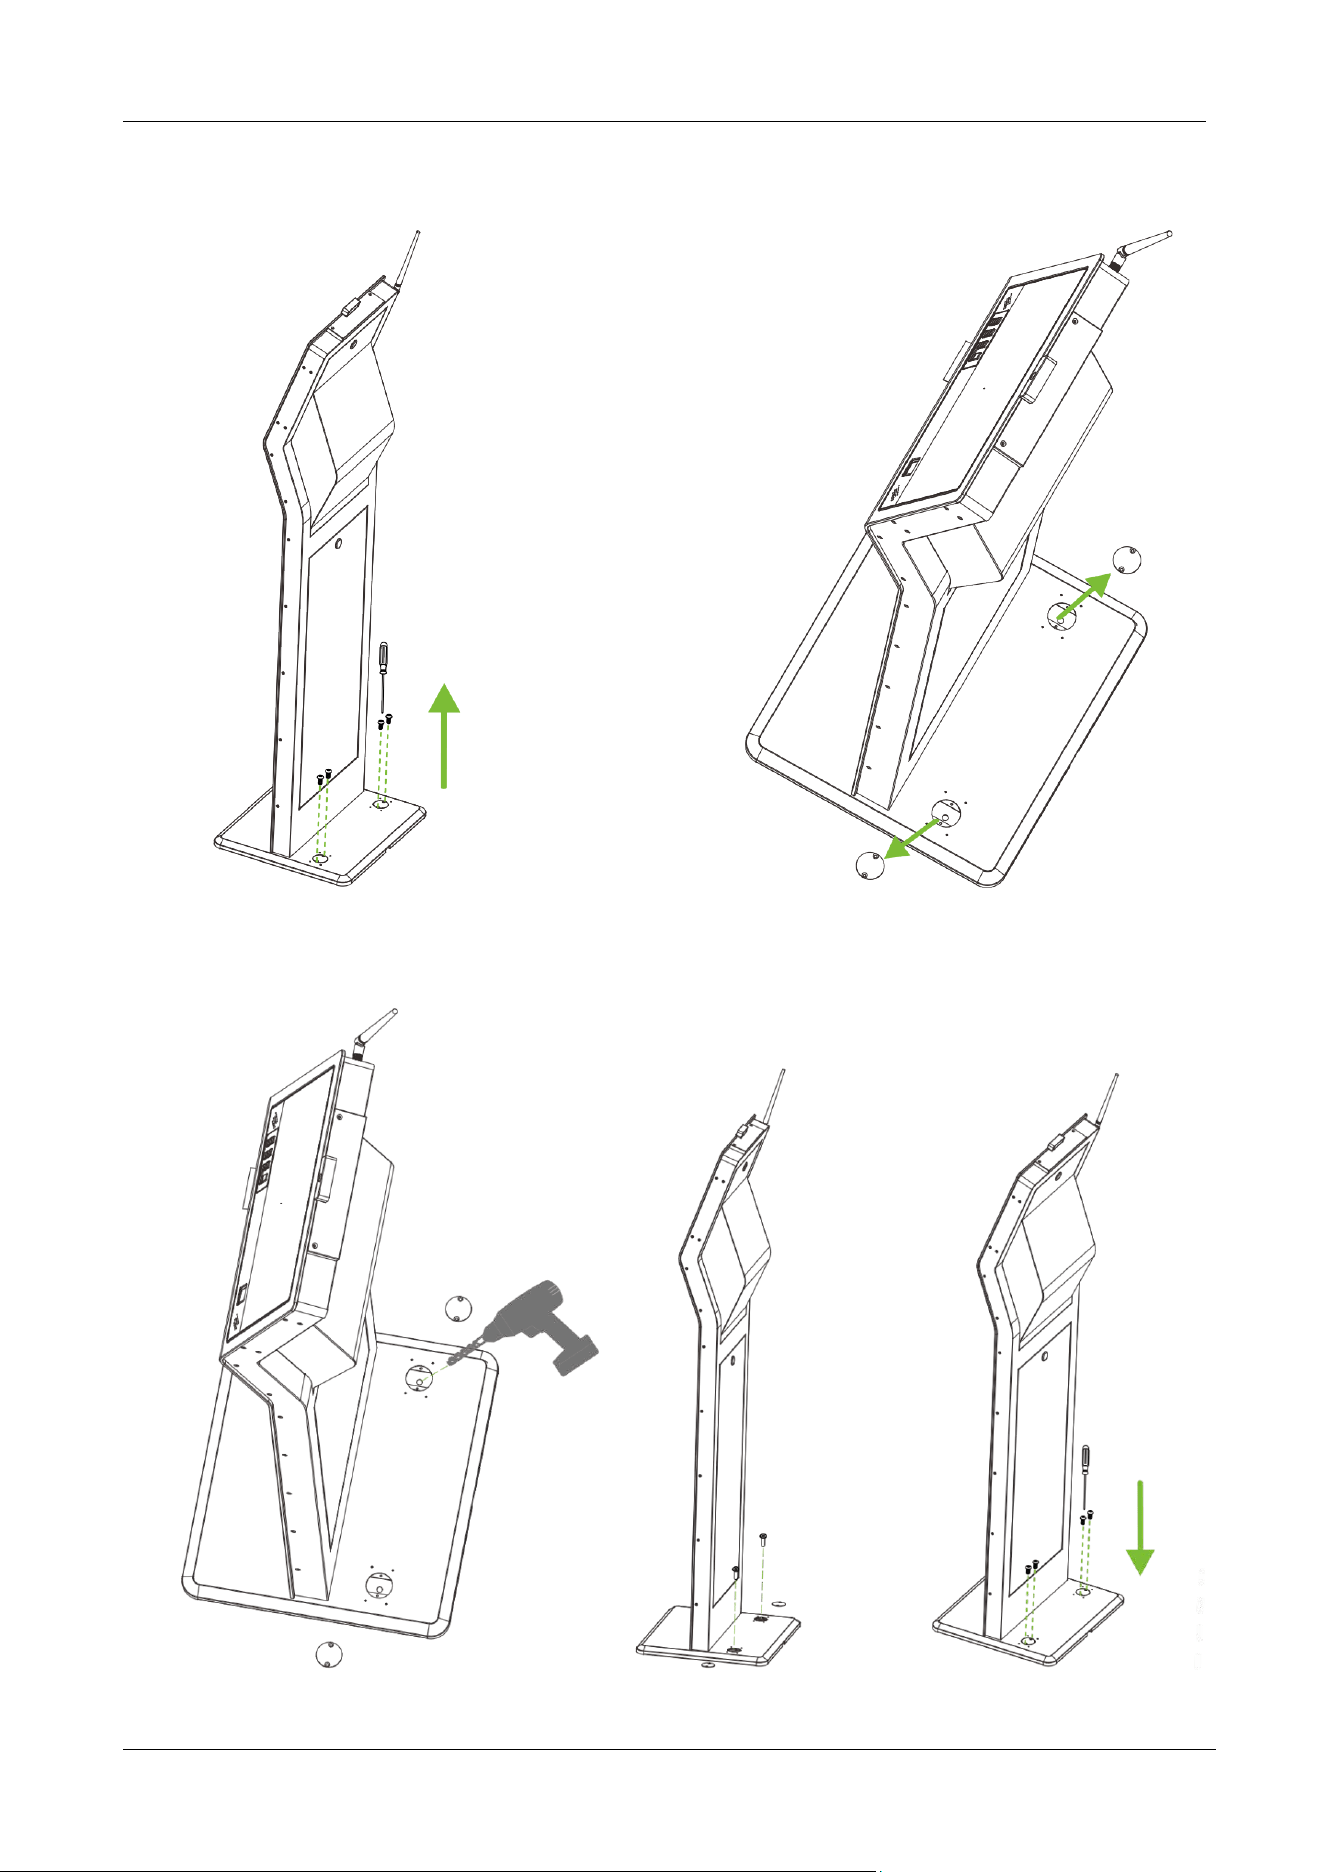
FaceKiosk-H13 User Manual
P a g e | 12 Copyright©2022 ZKTECO CO., LTD. All rights reserved.
3. Place the device in the right position and remove the four screws that secure it to the base,
remove the metal cover.
4. Drill holes with an electric drill, implant two screws into the ground to fix the device, then cover
back the metal cover, and finally tighten the four screws.
FaceKiosk-H13 User Manual
P a g e | 13 Copyright©2022 ZKTECO CO., LTD. All rights reserved.
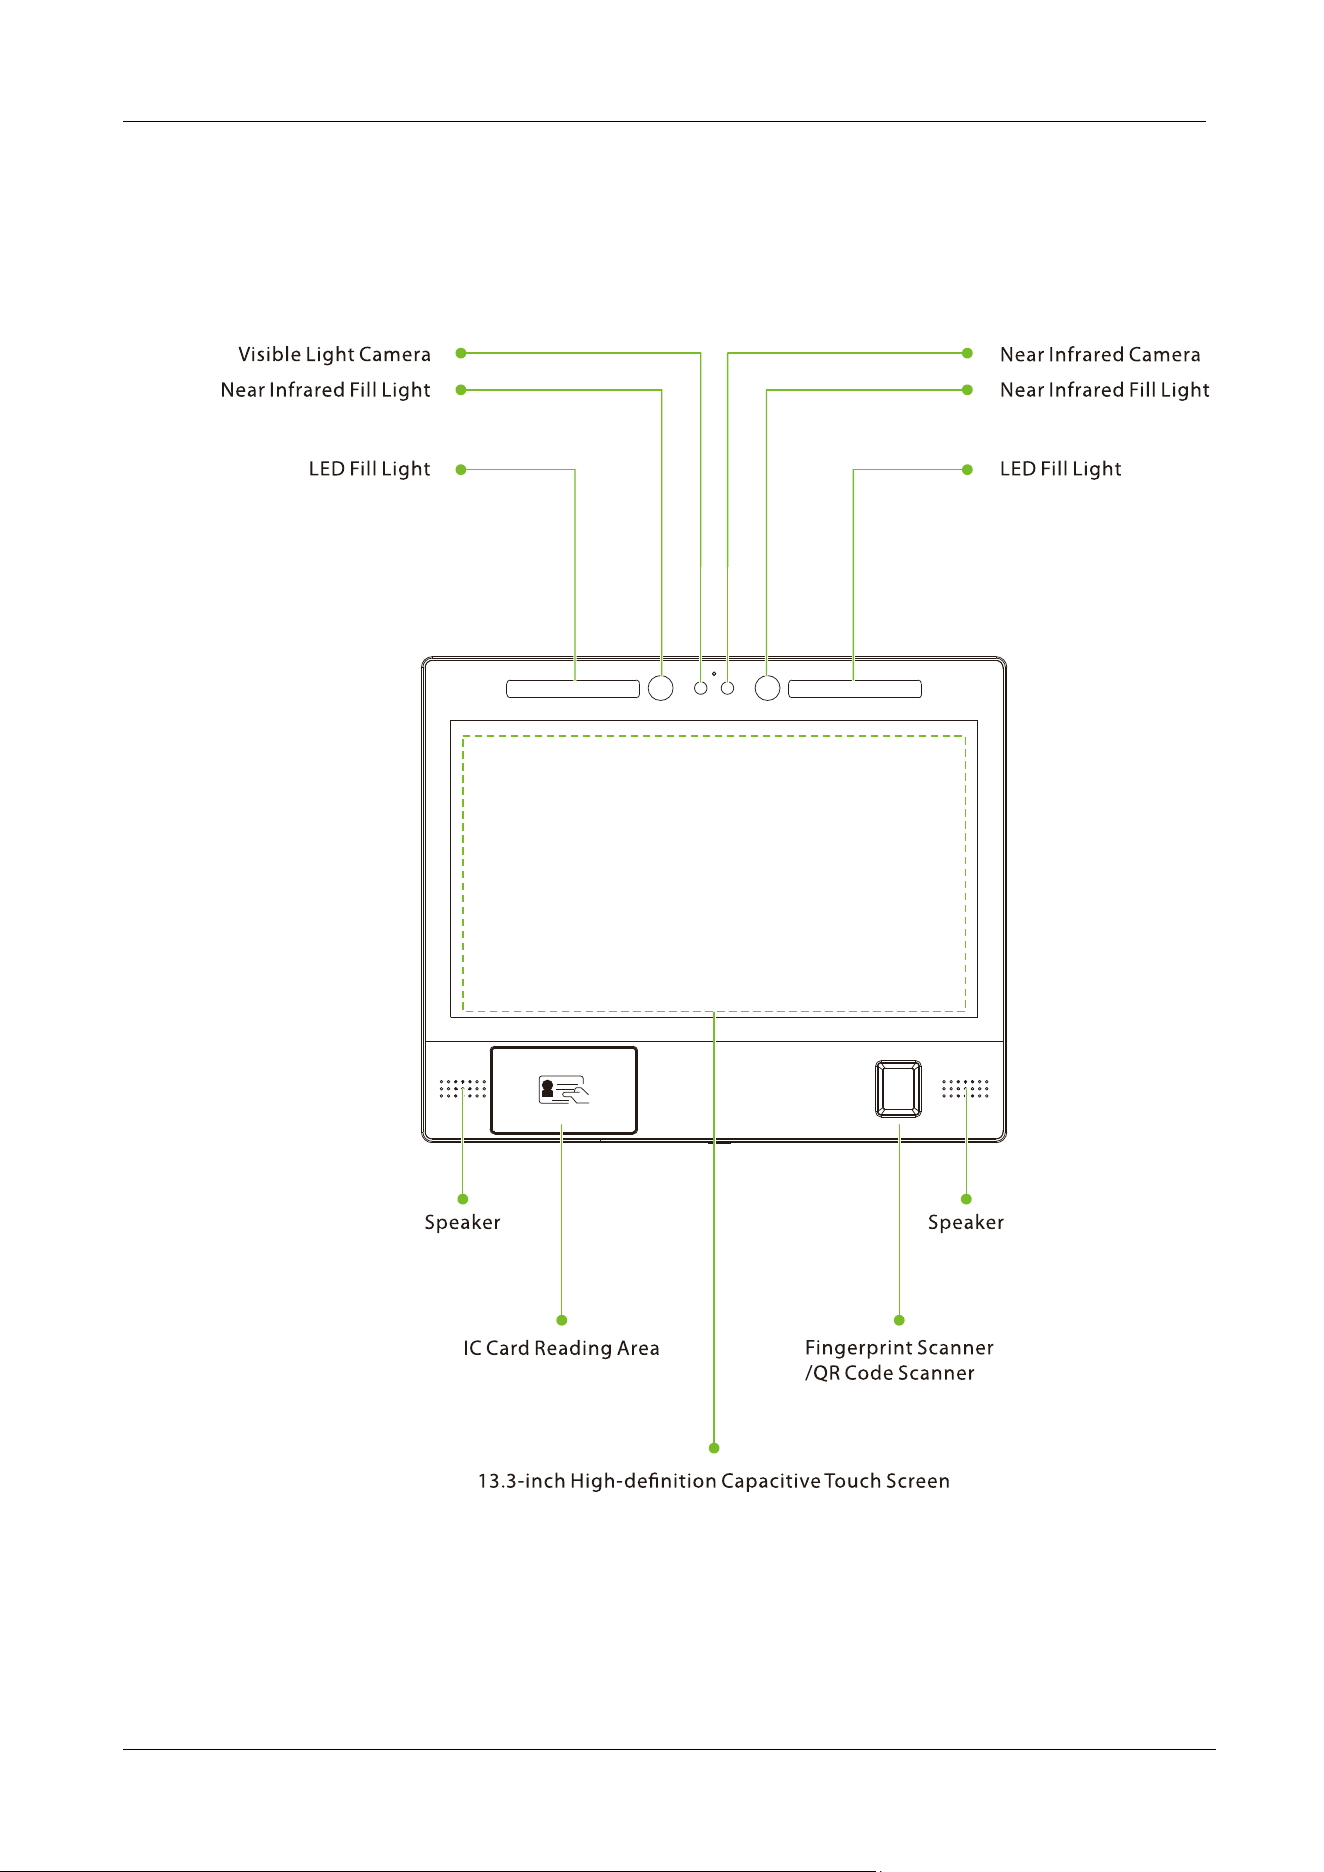
1.3 Product Appearance
FaceKiosk-H13A
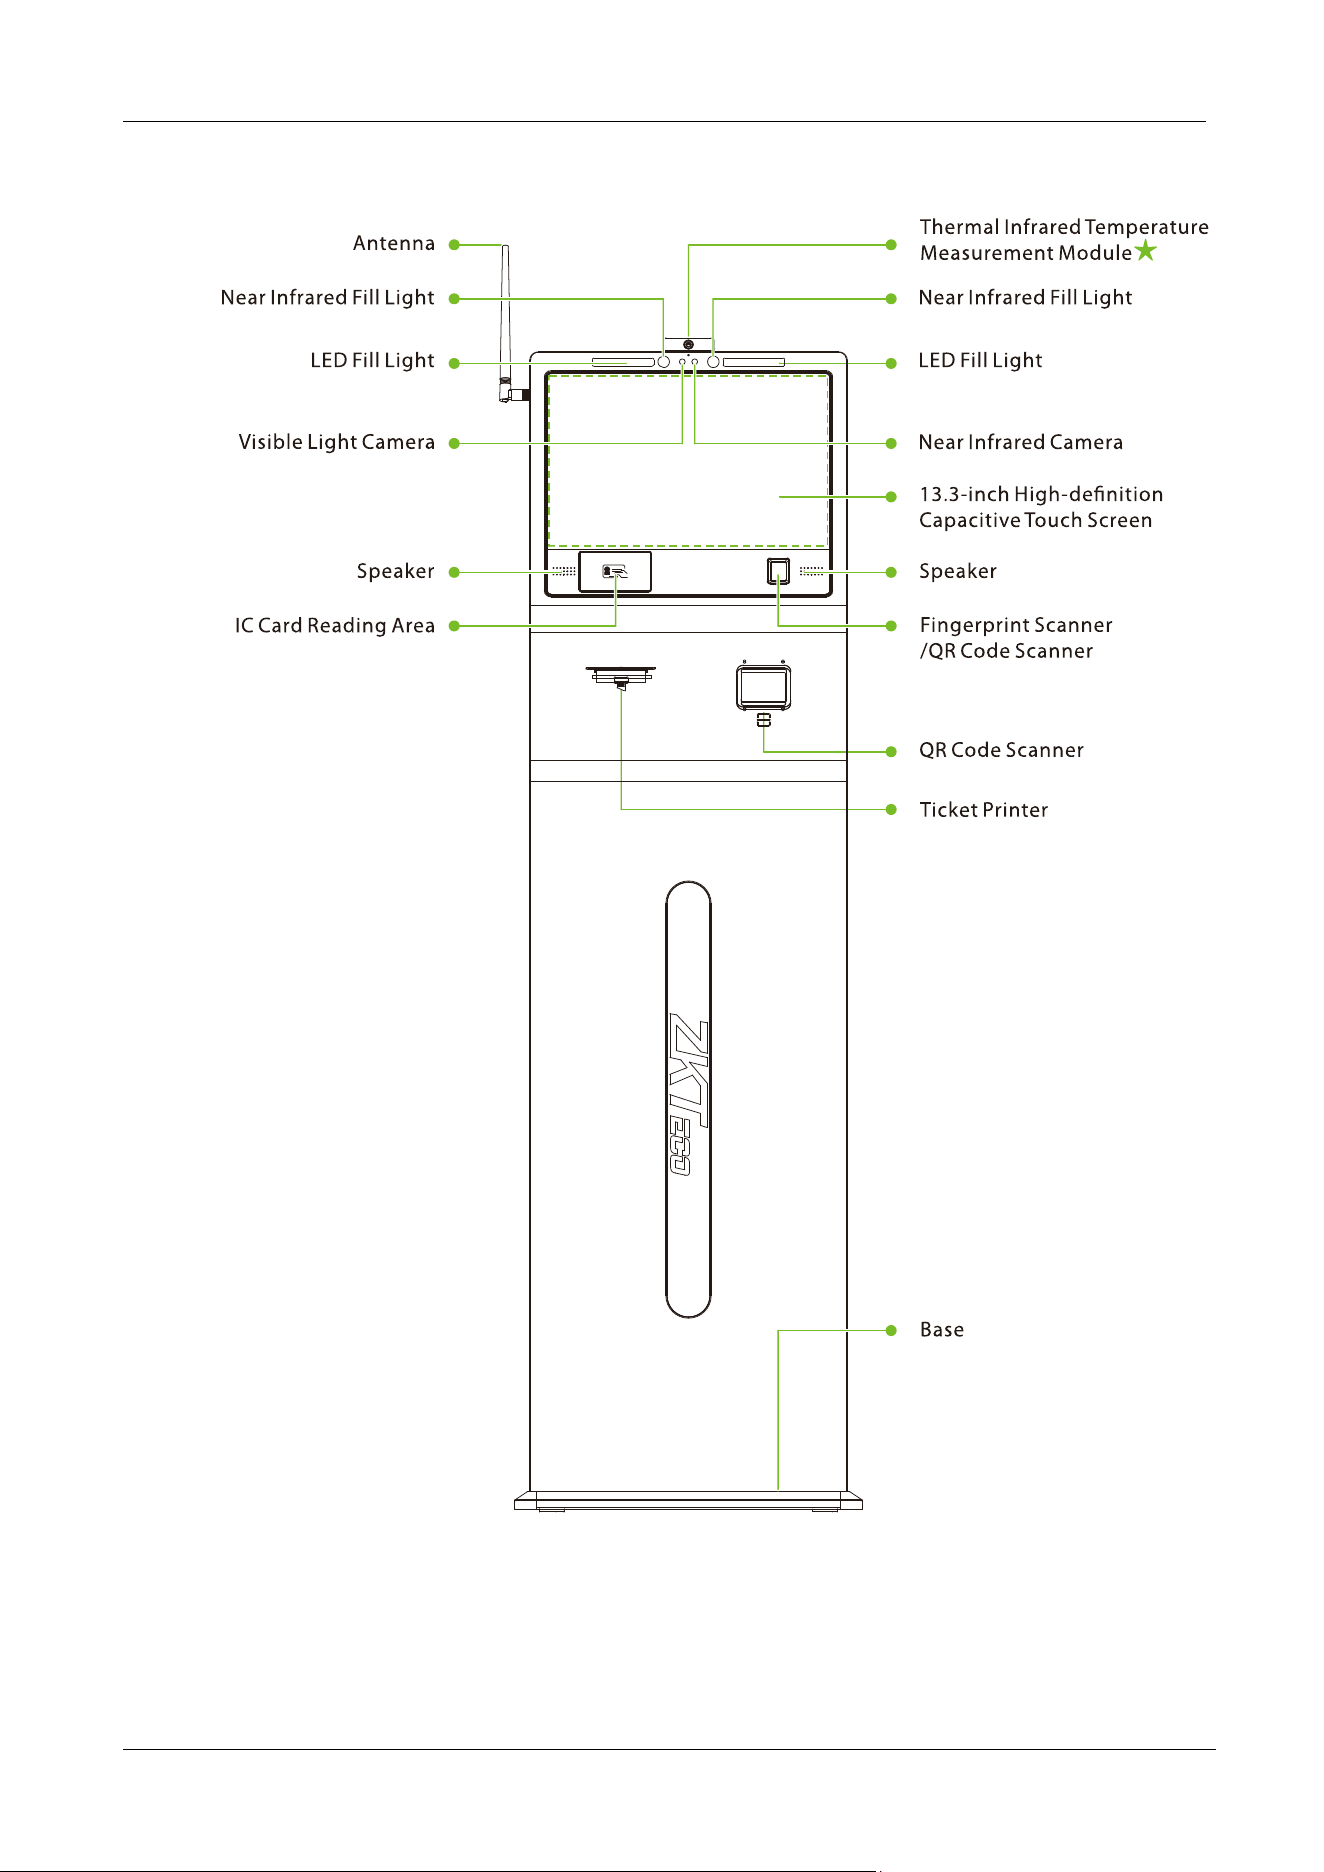
FaceKiosk-H13 User Manual
P a g e | 14 Copyright©2022 ZKTECO CO., LTD. All rights reserved.
FaceKiosk-H13C/ FaceKiosk-H13C[TD]
FaceKiosk-H13 User Manual
P a g e | 15 Copyright©2022 ZKTECO CO., LTD. All rights reserved.
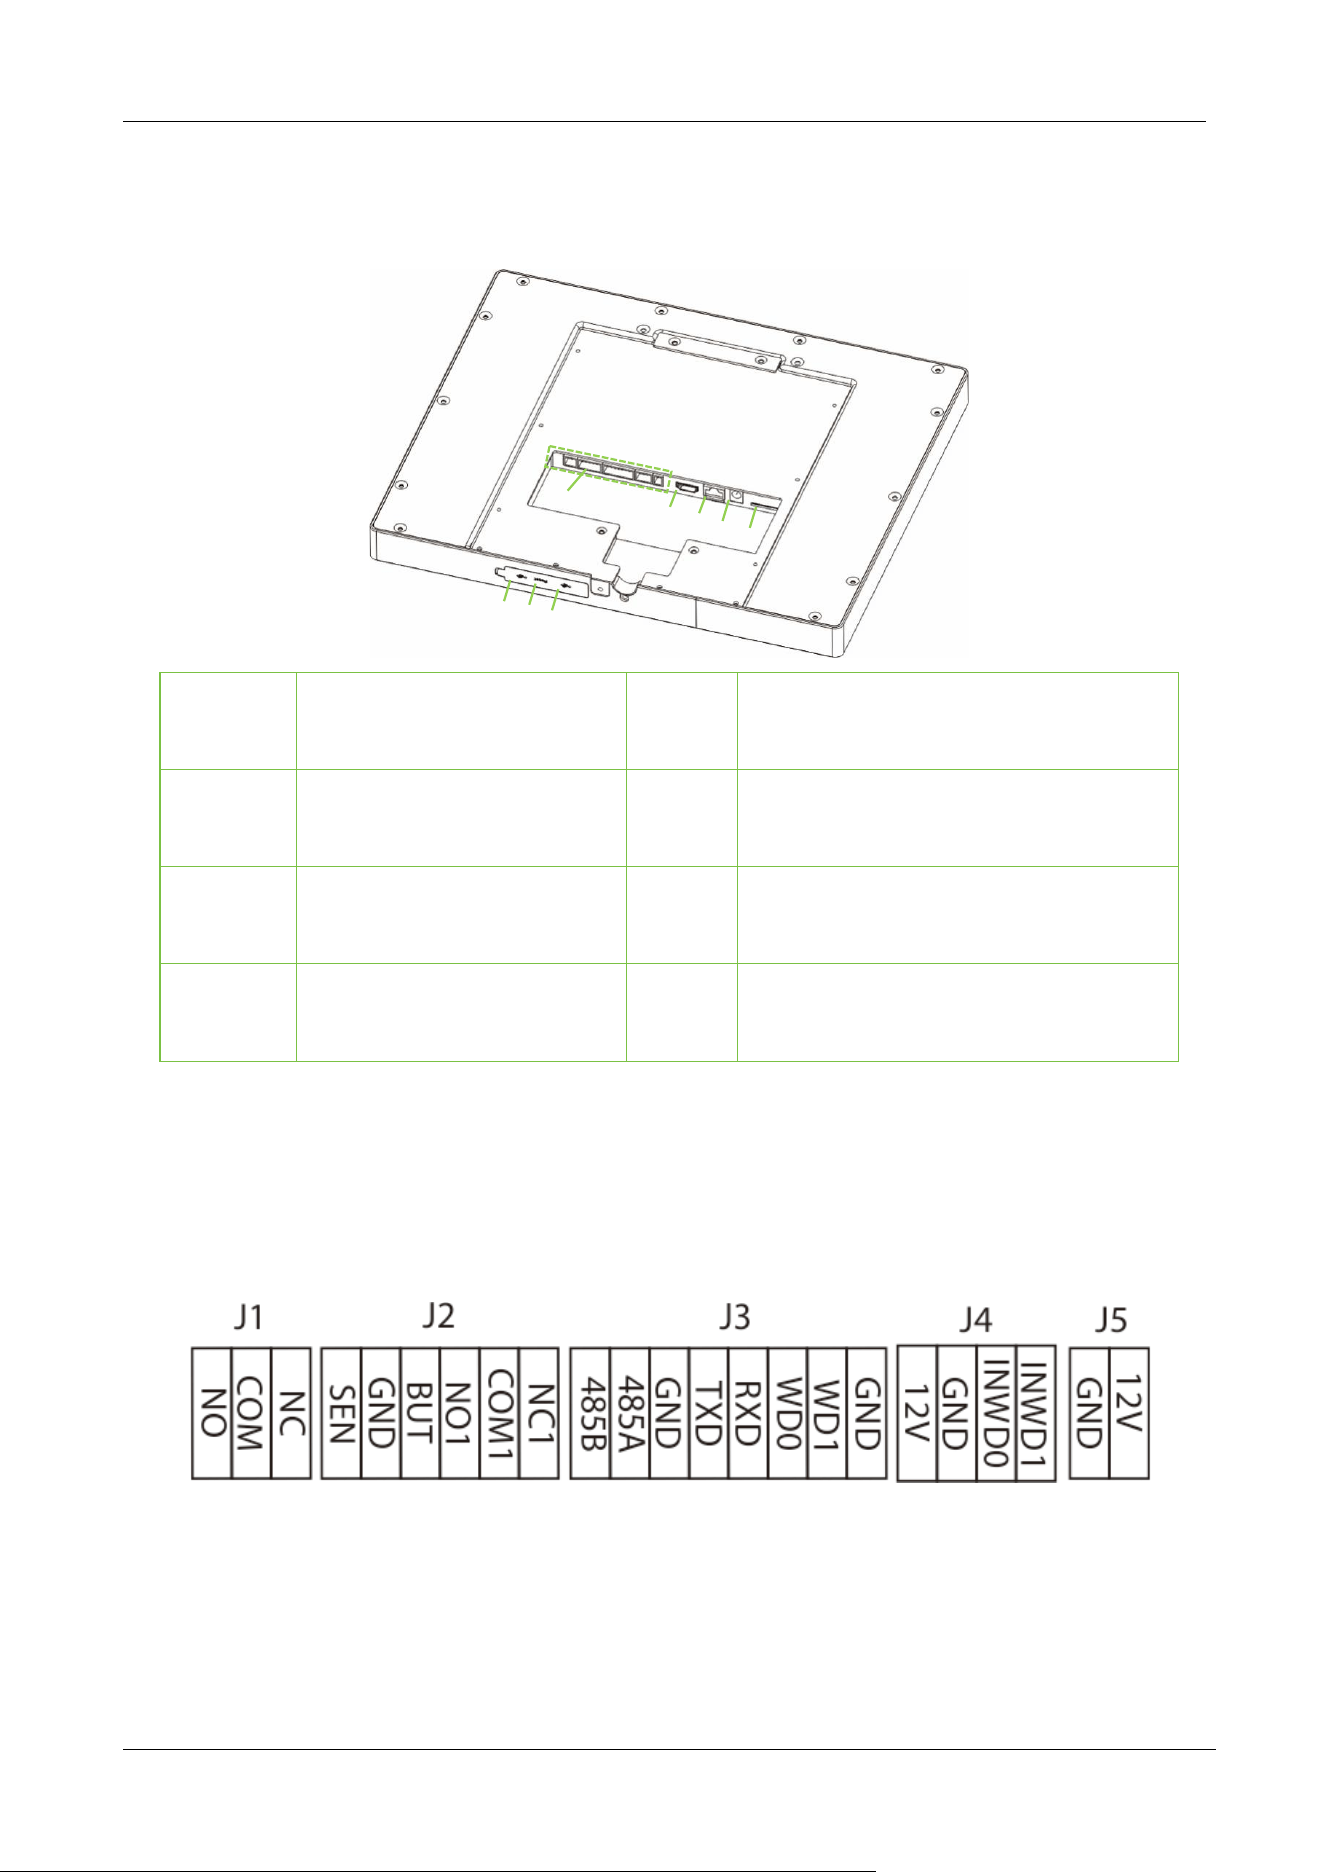
1.4 Product Interface
①
Connecting Terminal
⑤
SIM Card Slot
②
Video Out Port
⑥
USB Port
③
Network Port
⑦
Reset Button
④
Power Interface
⑧
USB Port
1.5 Device Connection
On the back of the device, there are five rows of slots, which are J1, J2, J3, J4, and J5 from left to right.
J1 is connected to the alarm, J2 is connected to the door, J3 is connected to the external device, J4 is
connected to the Wiegand input, and the J5 is the power output port reserved for a Printer.
①
②
③
④
⑤
⑥
⑦
⑧
FaceKiosk-H13 User Manual
P a g e | 16 Copyright©2022 ZKTECO CO., LTD. All rights reserved.
Diagram
FaceKiosk-H13 User Manual
P a g e | 17 Copyright©2022 ZKTECO CO., LTD. All rights reserved.
2 Home Screen and Main Menu
The home screen is divided into the following sections:
Title bar: Displays Date and Time, Software status, the Name of the device, QR Code, Language switch,
and the Main menu button.
Description of Icons in Home screen:
Software Server: The status of the connection between the device and the server, if the
connection is not successful, a red flag will be displayed.
Device Information: Tap on to view the device information and the hardware module
connection status.
QR Code: Tap on to open the QR Code self-registration .
Language: Tap on to change the software language. The device supports English, Thai,
Latin Spanish, Russian, Japanese, Portuguese and Chinese.
Main Menu: Tap on to open the Main menu.
Sign in: Tap on to register visitors operation.
Check in/Check out: Tap on to check in or check out a visitor.
FaceKiosk-H13 User Manual
P a g e | 18 Copyright©2022 ZKTECO CO., LTD. All rights reserved.
FaceKiosk-H13 User Manual
P a g e | 19 Copyright©2022 ZKTECO CO., LTD. All rights reserved.
3 Visitor Registration Process
3.1 Visitor Sign In
Tap SIGN IN to start the visitor registration process.
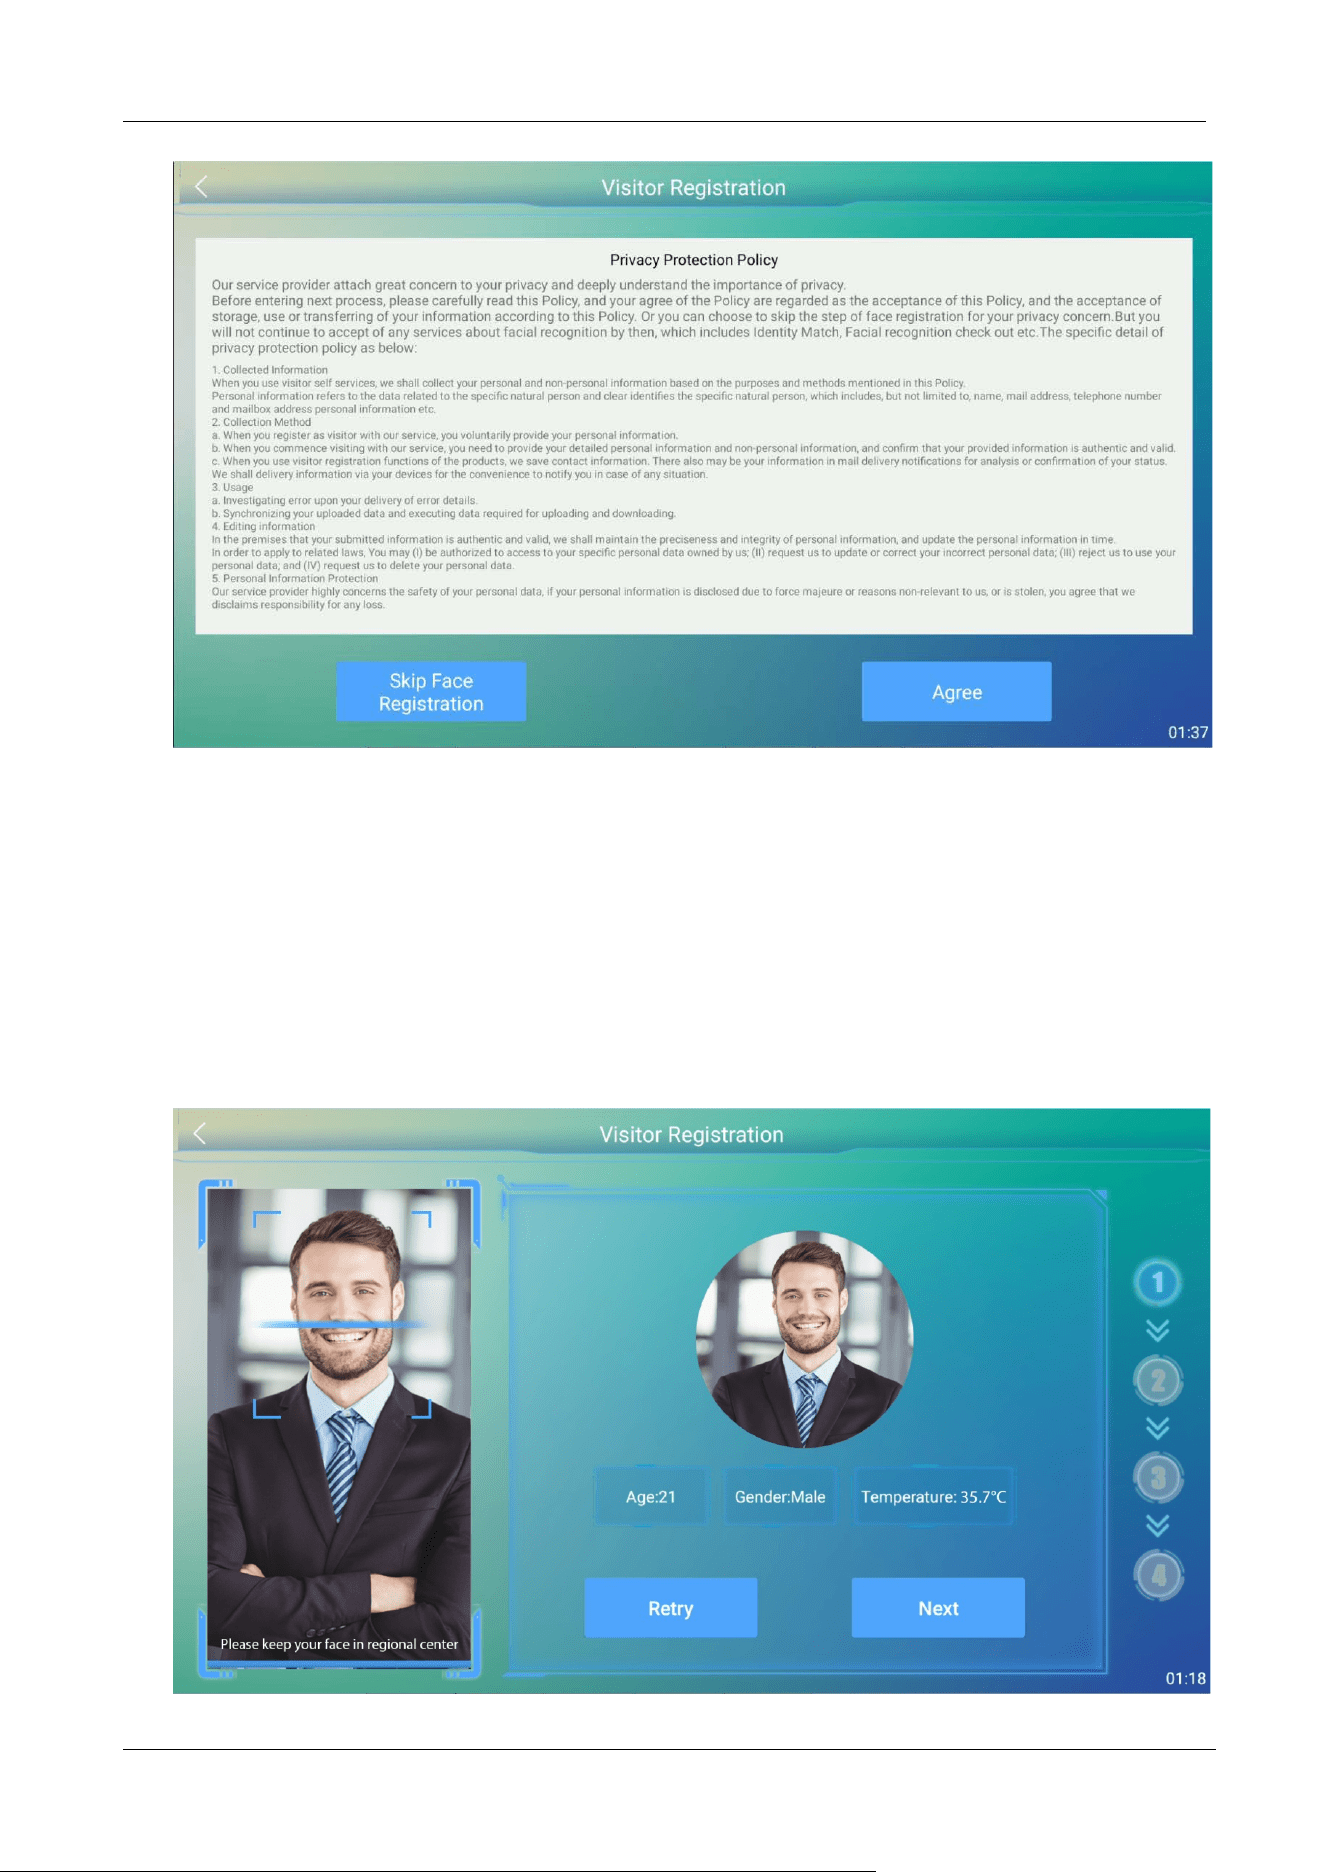
3.1.1 Privacy Protection Policy
Before starting the registration process, the user may choose to skip the face registration process for
privacy purposes. But by then, the user will not continue to use any facial recognition services,
including Identity Match, Facial recognition check out, etc.
FaceKiosk-H13 User Manual
P a g e | 20 Copyright©2022 ZKTECO CO., LTD. All rights reserved.
3.1.2 Face Registration
Visitors will register their faces and the recognized gender will be displayed. If the temperature★
screening function is turned on, the body temperature
★ will be detected at the same time. After the
registration process is successful, Tap Next. If the registration fails or you need to re-register, tap the
Retry button.

FaceKiosk-H13 User Manual
P a g e | 21 Copyright©2022 ZKTECO CO., LTD. All rights reserved.
3.1.3 Declaration of Health Information
Visitors must complete the health information declaration. If the visitor has had a temperature★ test,
the temperature
★ value will be returned automatically. The next step can only be processed after the
agreement is acknowledged. This function can be turned on or off in the Visitor Parameter.
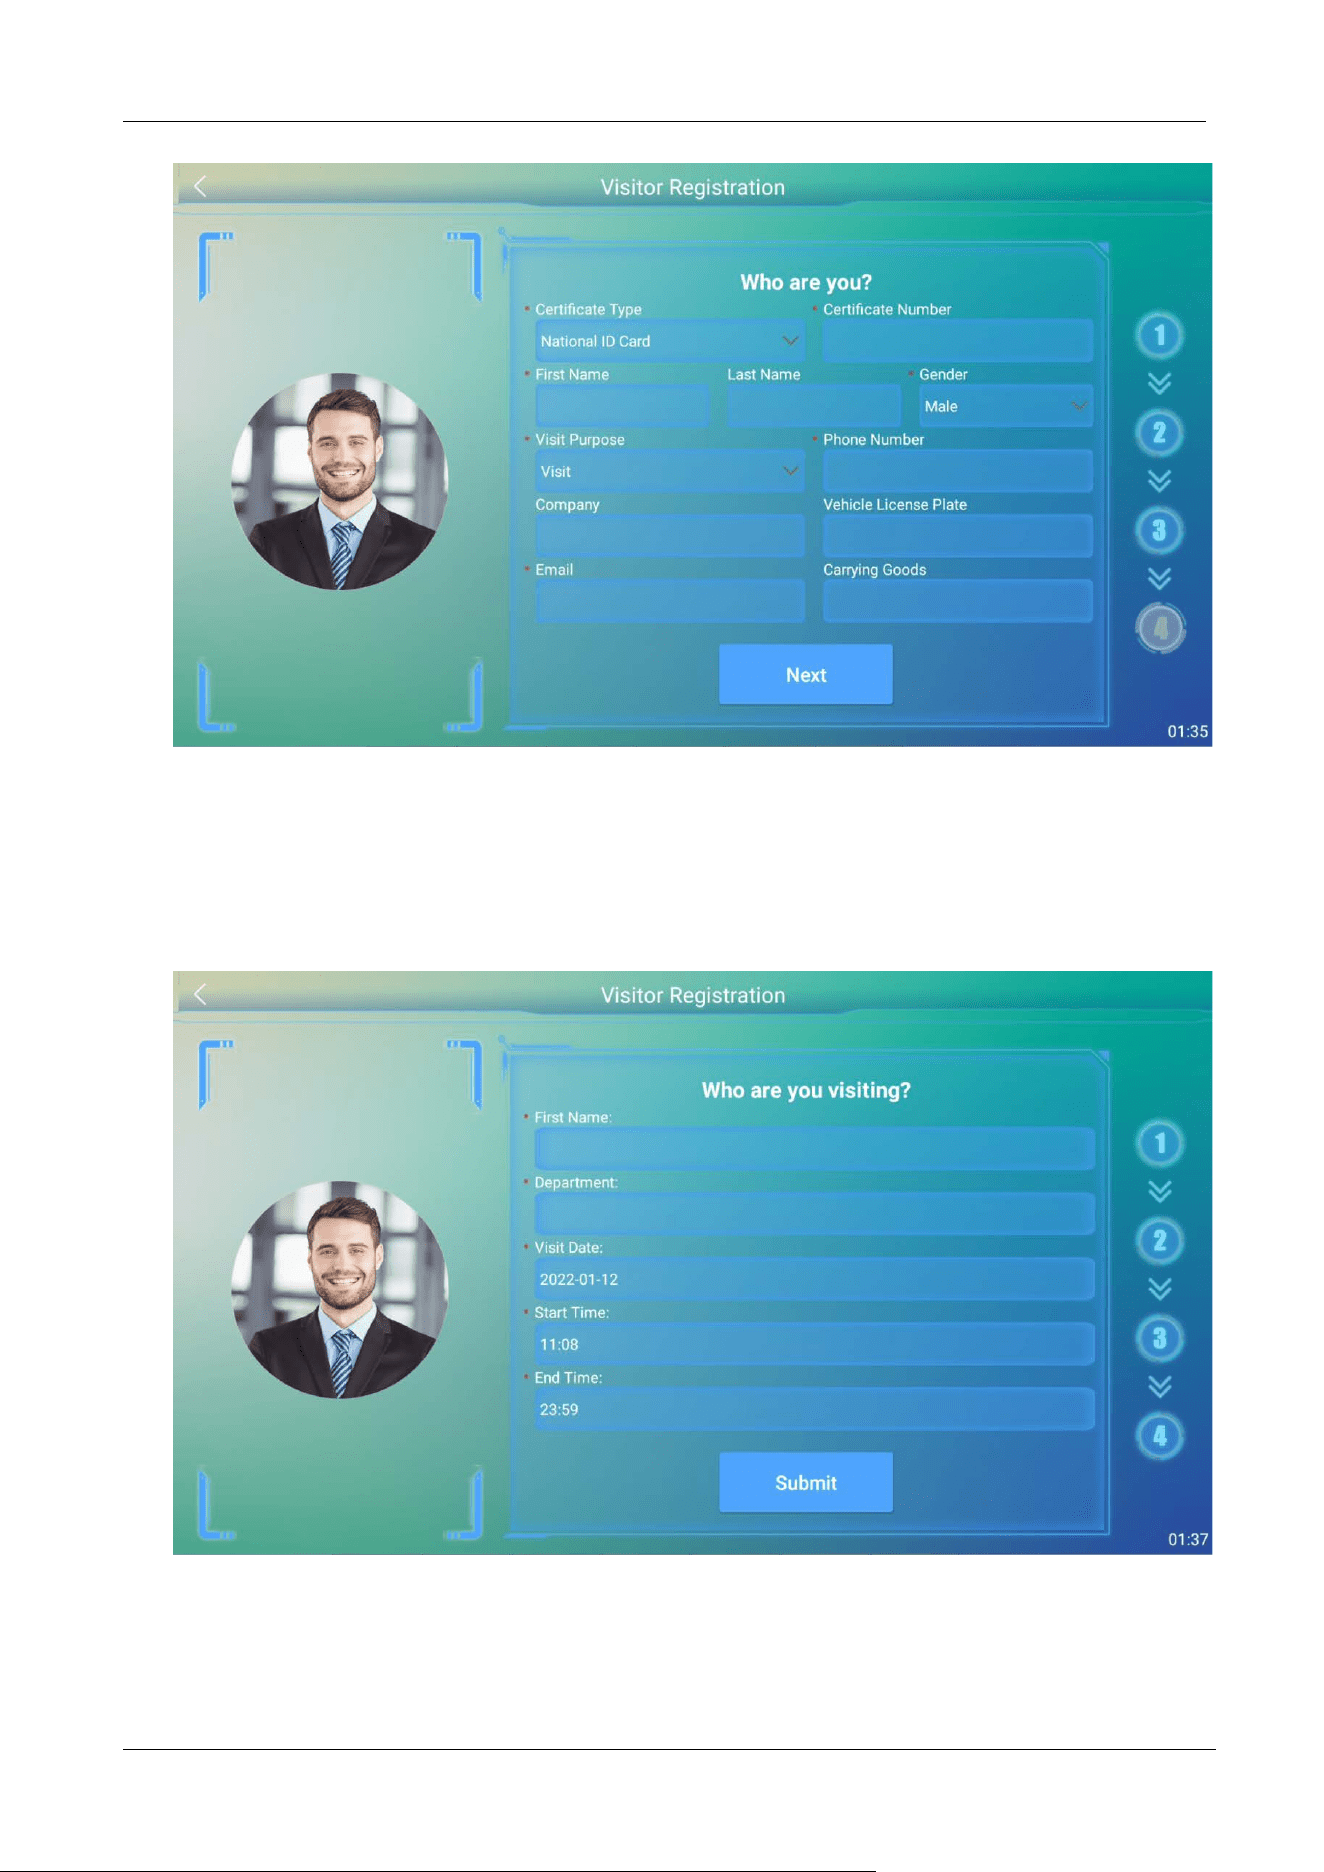
3.1.4 Visitor Information
The visitor must register the detailed information including Certificate Type (required), Certificate
Number (required), First Name (required), Last Name, Phone Number (required), Company, Gender
(required), Visit Purpose (required, issued by the software), Vehicle License Plate, E-mail address
(required), and Carrying goods. Tap Next to proceed further.
FaceKiosk-H13 User Manual
P a g e | 22 Copyright©2022 ZKTECO CO., LTD. All rights reserved.
3.1.5 Host Information
The visitors may enter the First Name of the host to get the complete information automatically. Set
the Visit Date, Start Time, and End Time (default is 23:59:59 of the day).
FaceKiosk-H13 User Manual
P a g e | 23 Copyright©2022 ZKTECO CO., LTD. All rights reserved.
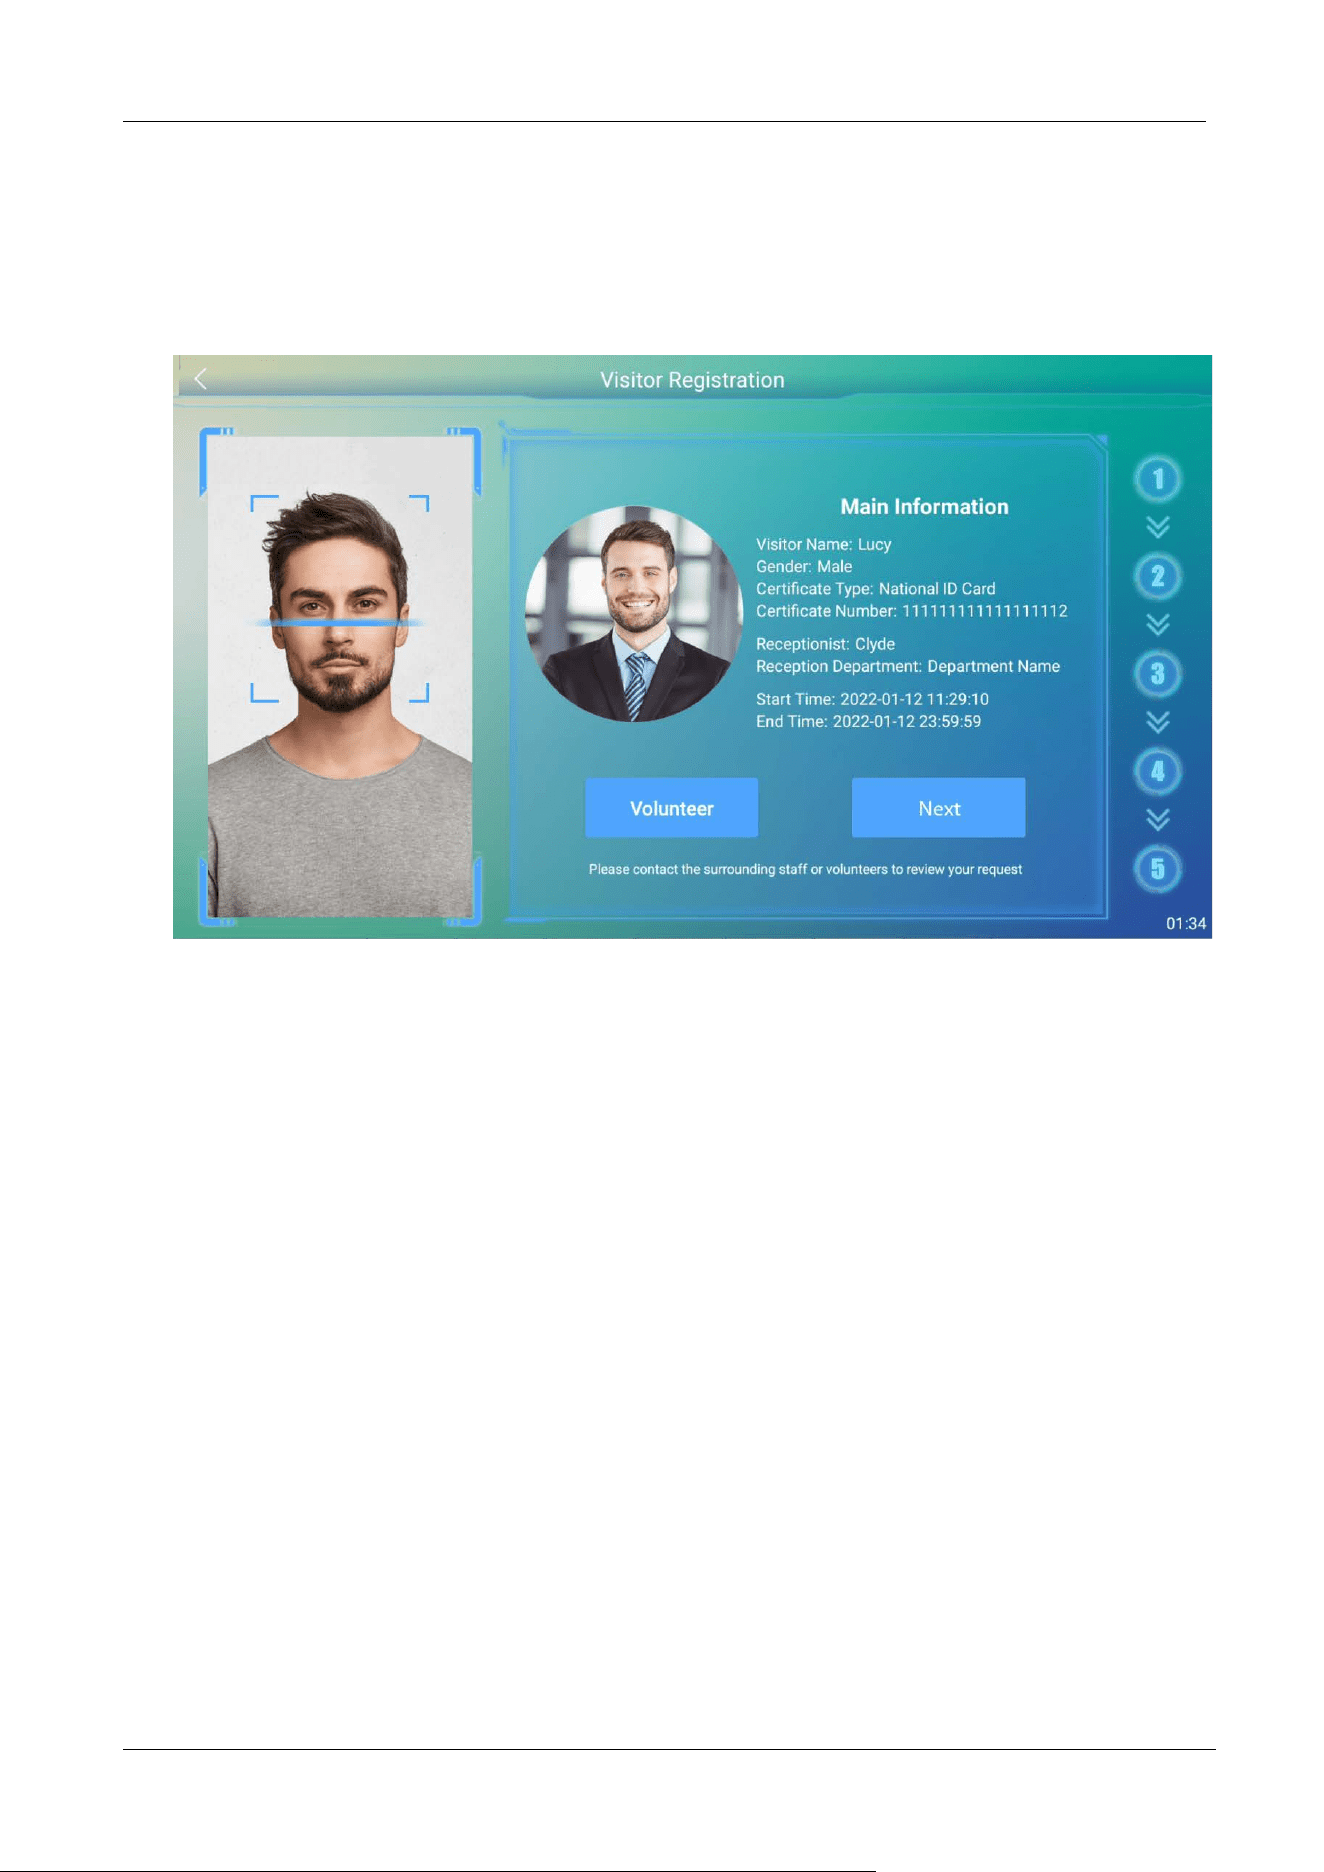
3.1.6 Volunteer Audit
The visitor should contact a volunteer to review the visitor registration information. Once the
volunteer tap VOLUNTEER and the verification is successful, tap NEXT.
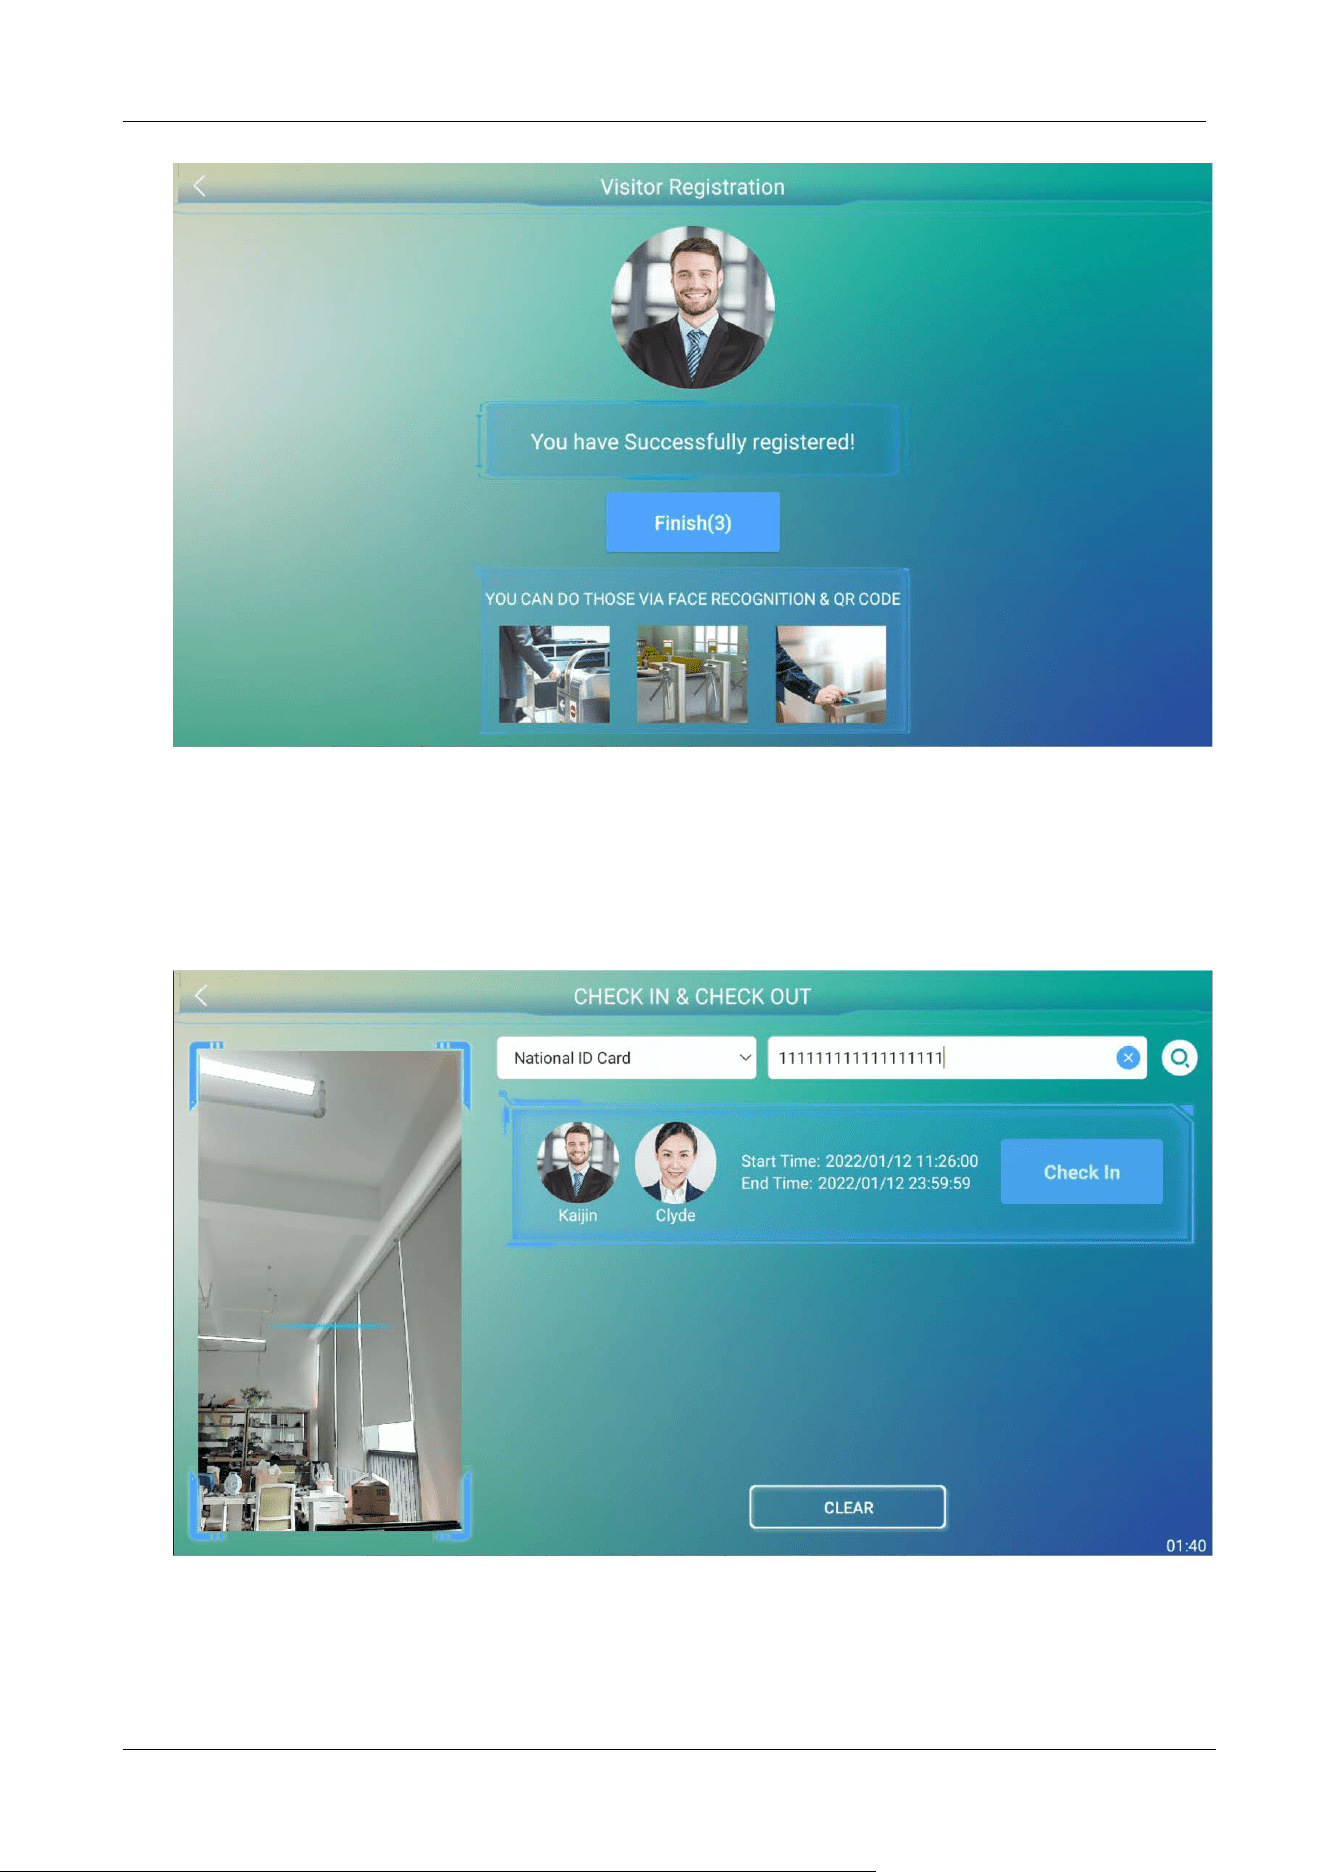
3.1.7 Complete Registration
After the Volunteer approves the registration, the visitor will enter the last interface. Tap Finish to
check the status of the review on the home screen. If no software review is required, the device will
enter the CHECK IN&OUT interface directly for the visitor to check-in.
FaceKiosk-H13 User Manual
P a g e | 24 Copyright©2022 ZKTECO CO., LTD. All rights reserved.
3.2 Visitor Query
The CHECK-IN &CHECK-OUT interface supports 4 methods for querying visitor records including
Certificate number, driver license, passport and others.
FaceKiosk-H13 User Manual
P a g e | 25 Copyright©2022 ZKTECO CO., LTD. All rights reserved.
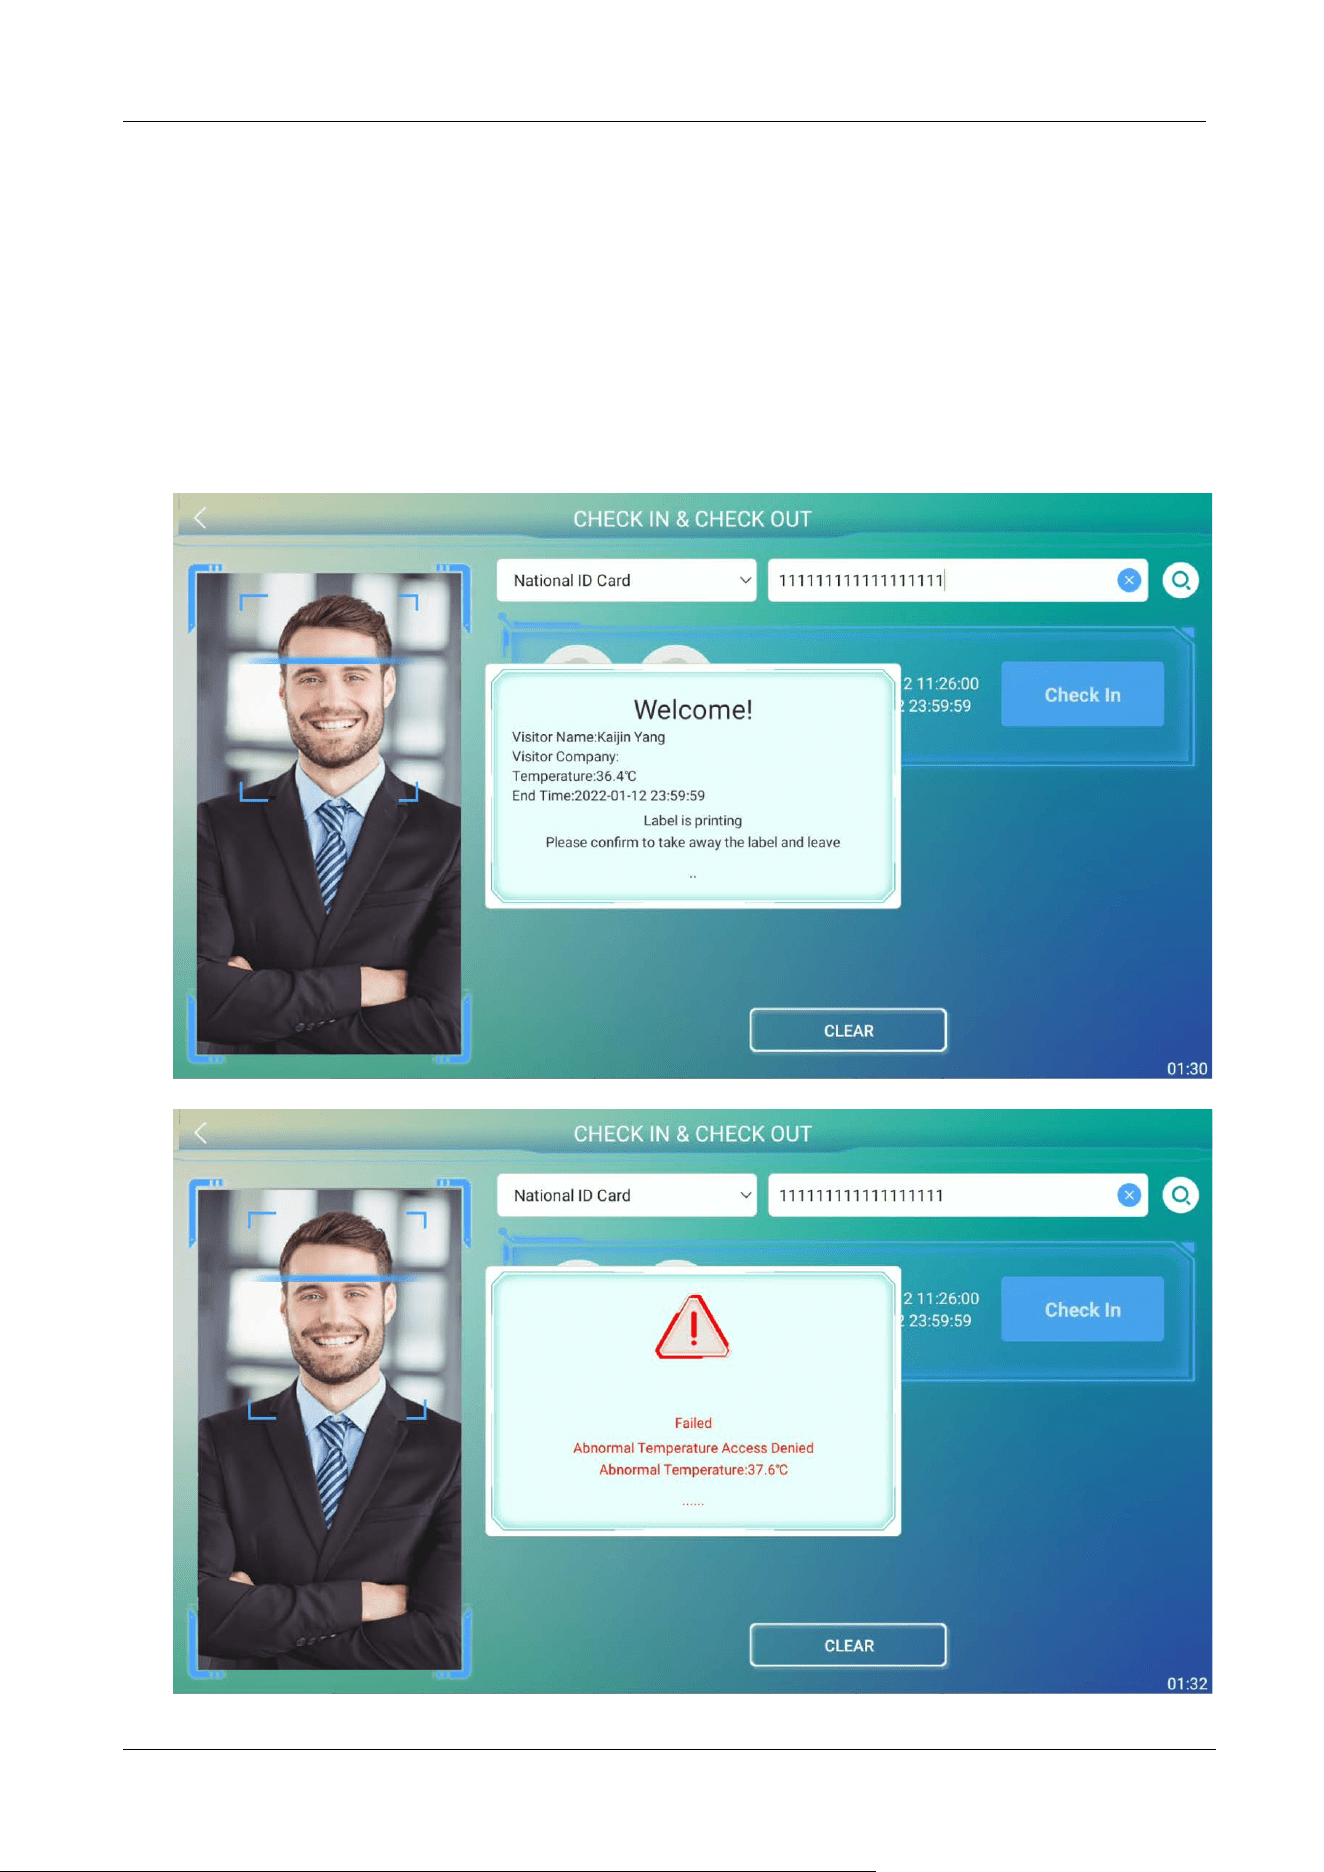
3.3 Visitor Check-In
Tap Check-In on the CHECK-IN & CHECK-OUT interface after successfully registering the visitor
information. If the device supports body temperature detection
★, it will detect the temperature★.
Only if the detected temperature
★ is lesser than the threshold temperature★ check-in will be
successful. Otherwise, the visitor cannot check-in, and an alarm will be triggered.
FaceKiosk-H13 User Manual
P a g e | 26 Copyright©2022 ZKTECO CO., LTD. All rights reserved.
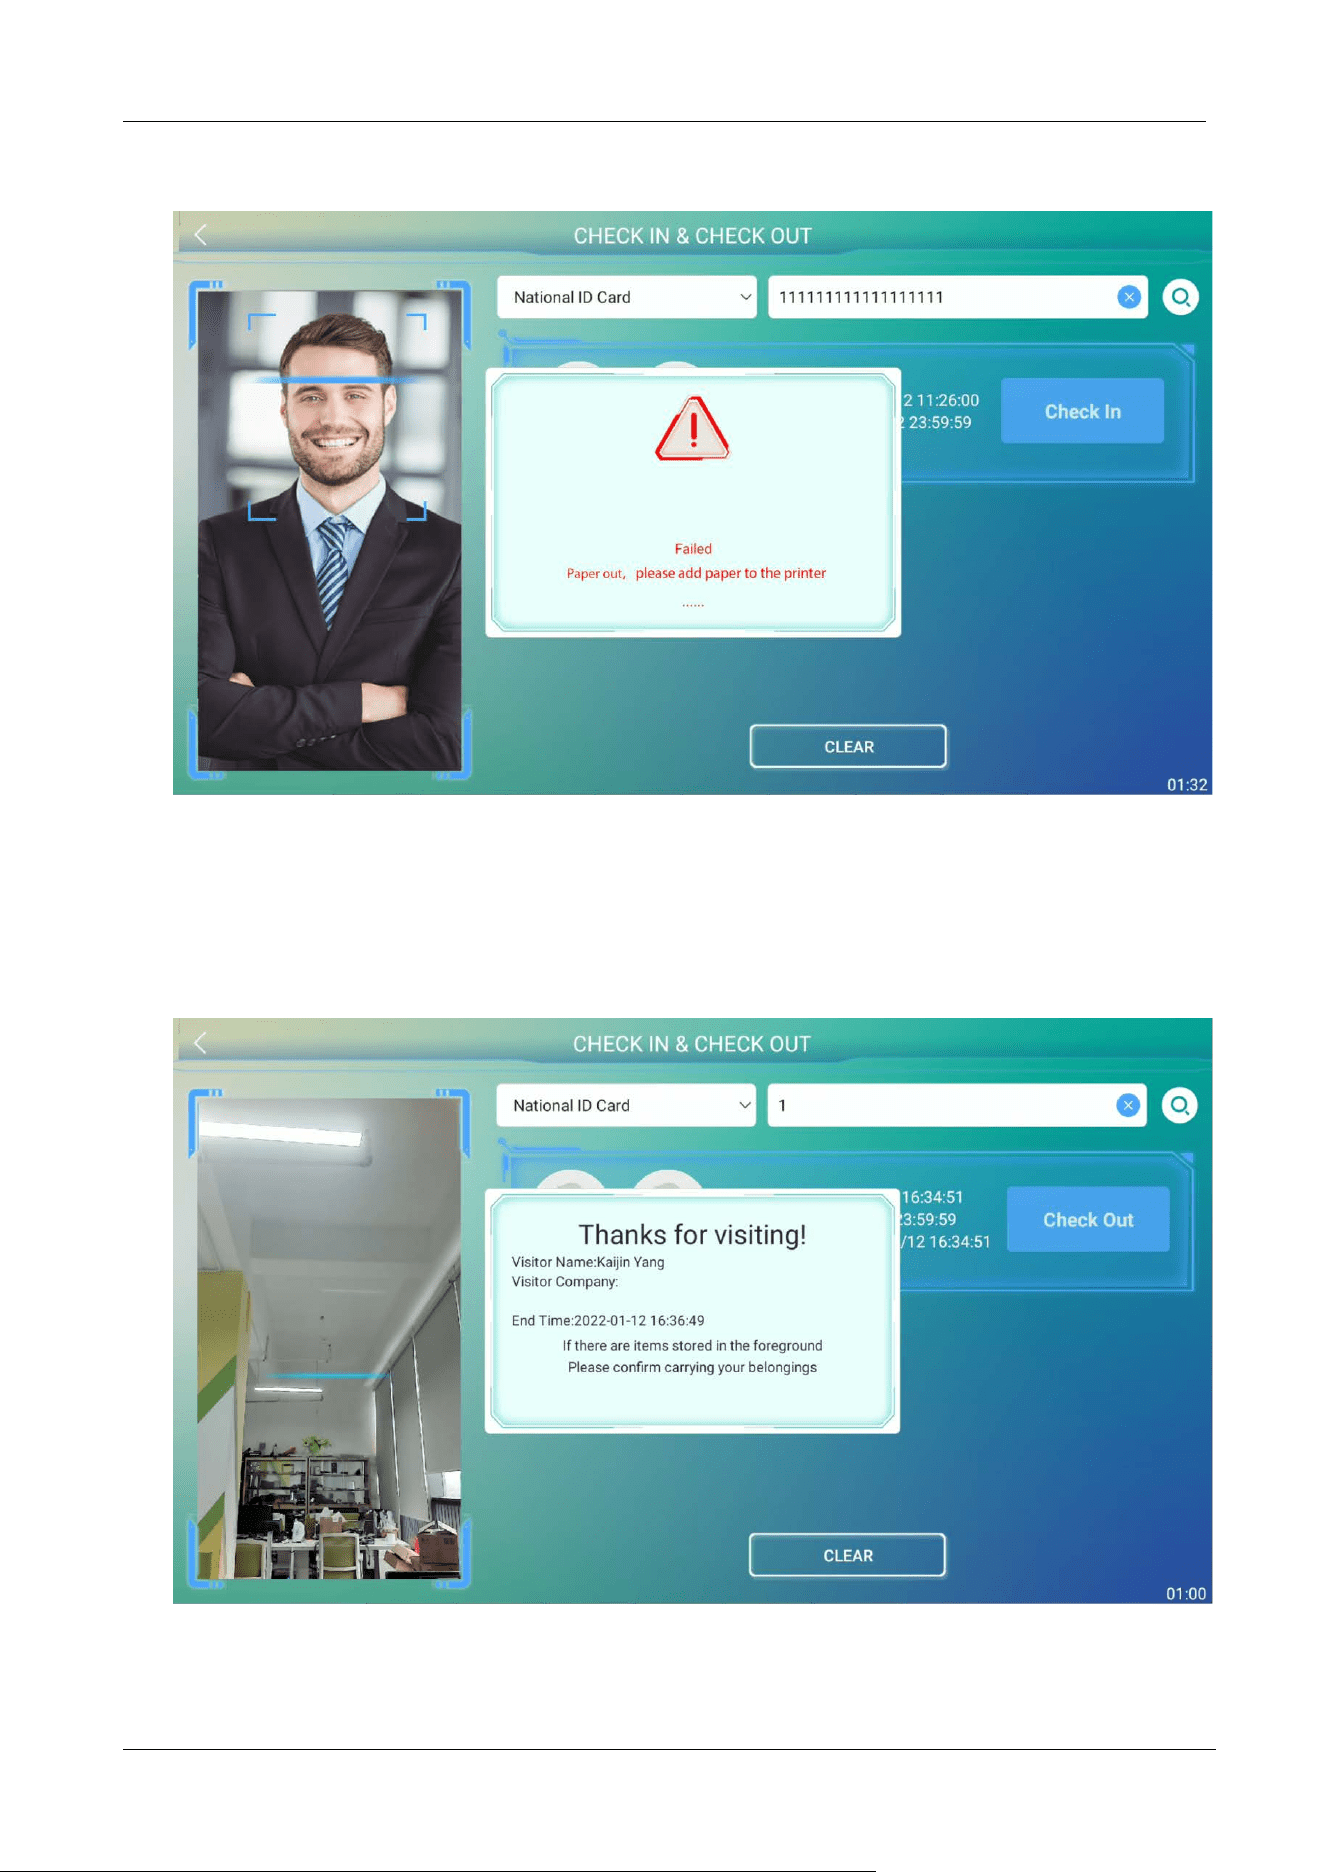
The visitor check-in will also fail when the printer runs out of paper while printing a visitor ticket.
3.4 Visitor Check Out
Tap Check-Out on the CHECK-IN &CHECK-OUT interface and the access privilege of the visitor will be
deleted after check-out.
FaceKiosk-H13 User Manual
P a g e | 27 Copyright©2022 ZKTECO CO., LTD. All rights reserved.
4 Main Menu
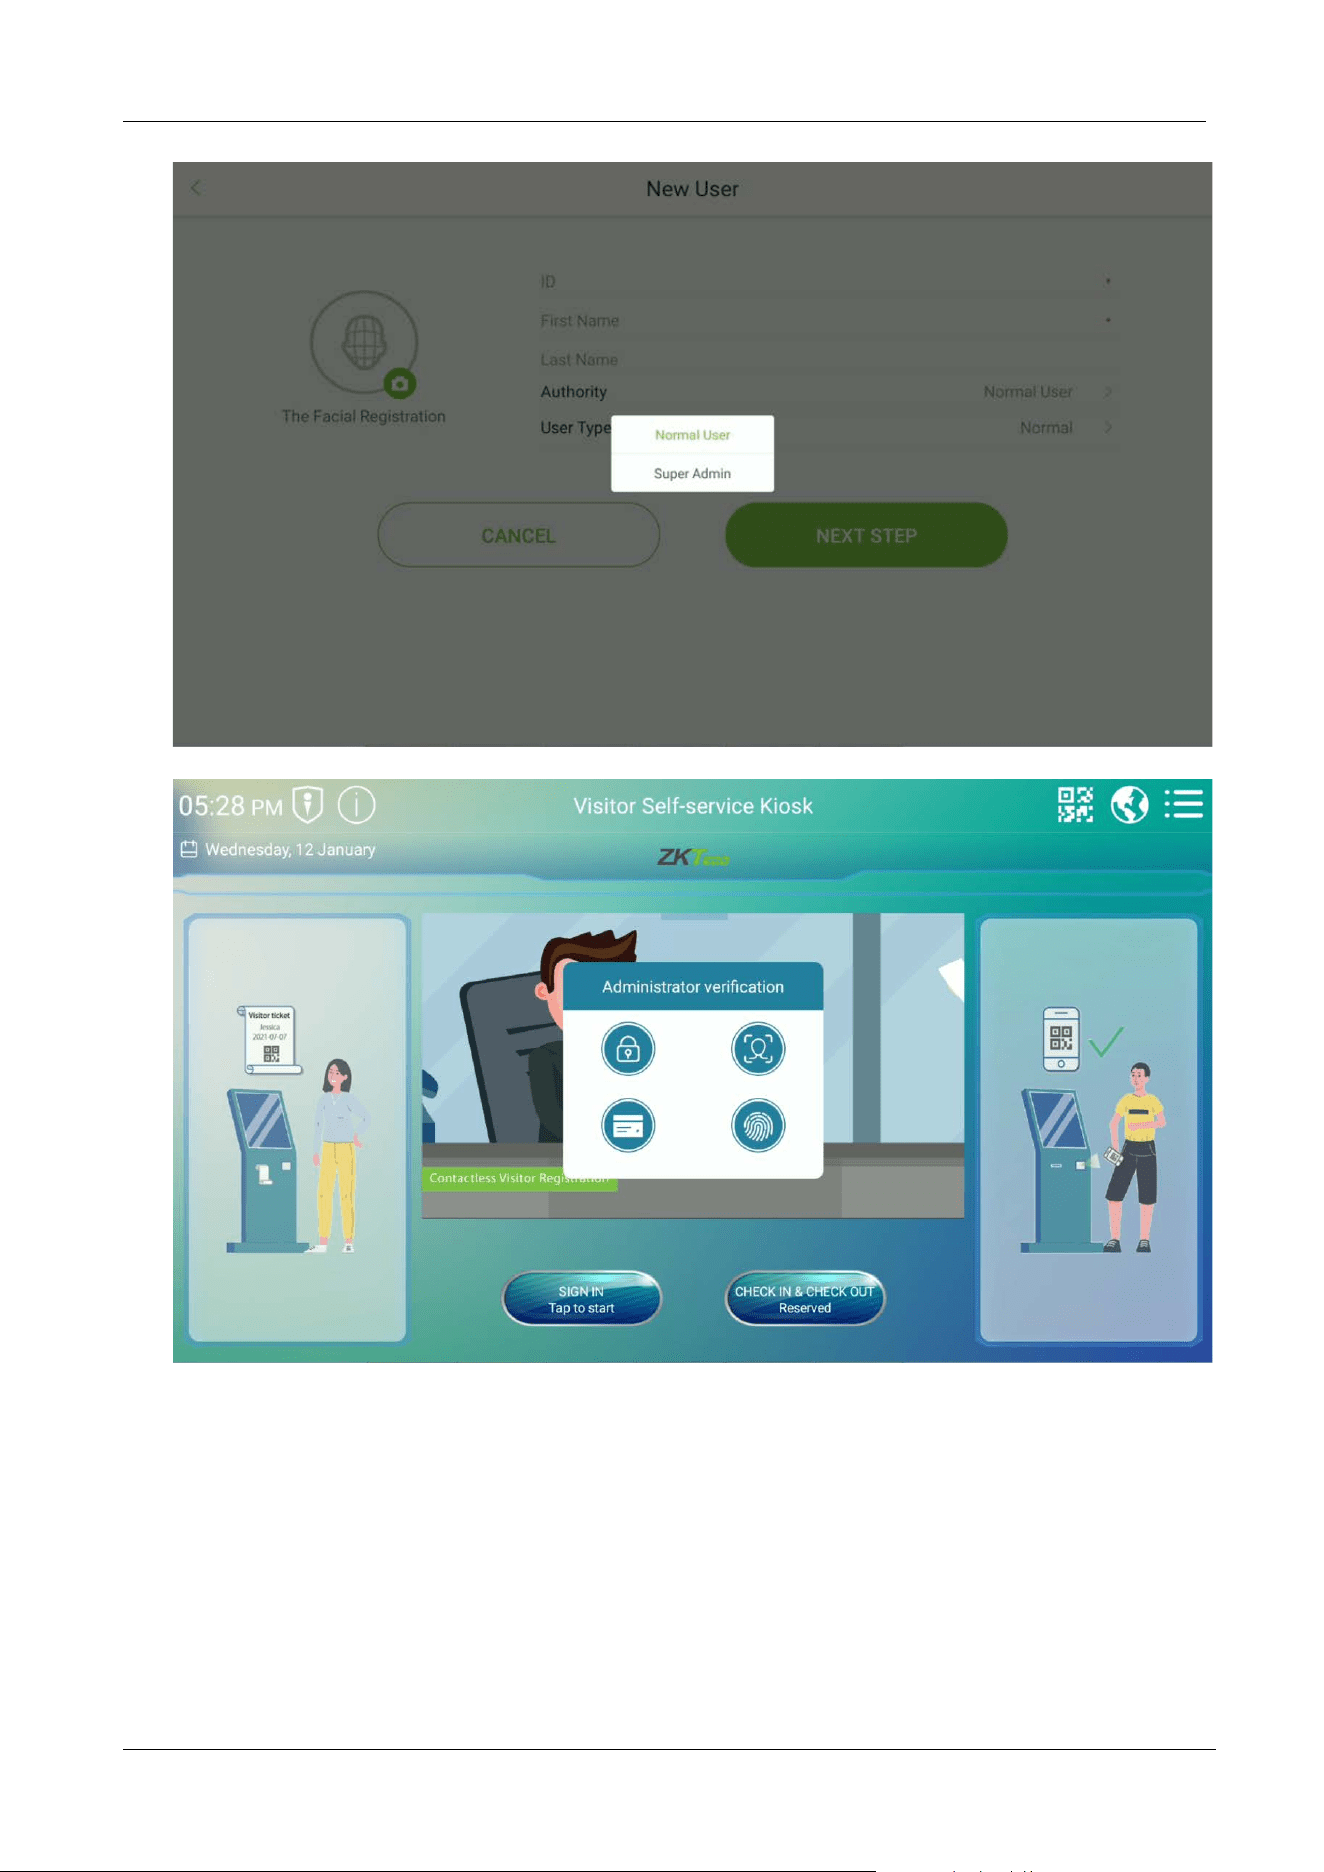
Tap on to open the Main menu.
Note: If the Super Administrator is not registered for the device, then tap to access the main
menu. If the device has a Super Administrator, then his/her verification is required to access the main
menu. For security purposes, it is advisable to register the Administrator while using the device for the
first time.
Menu Function
User Management
Enables to view, add, edit, search and delete the basic user or search and
view visitor details.
AD Settings
Plays the Advertisement, sets the advertising pictures, video resolution and
advertising server, etc.
Record Search
Displays visitor and operation records.
Data Management
Data management includes
cycling delete visitor, cycling delete visitor
record, cycling delete operation record, clear data, backup and restore, U
disk management.
System Settings
To set the parameters related to the system, including communication,
common, detection, biometric, access control, visitor, personality and
security privacy, etc.
Syetem Information
To view Data Capacity and Device and Firmware information of the current
device.
FaceKiosk-H13 User Manual
P a g e | 28 Copyright©2022 ZKTECO CO., LTD. All rights reserved.
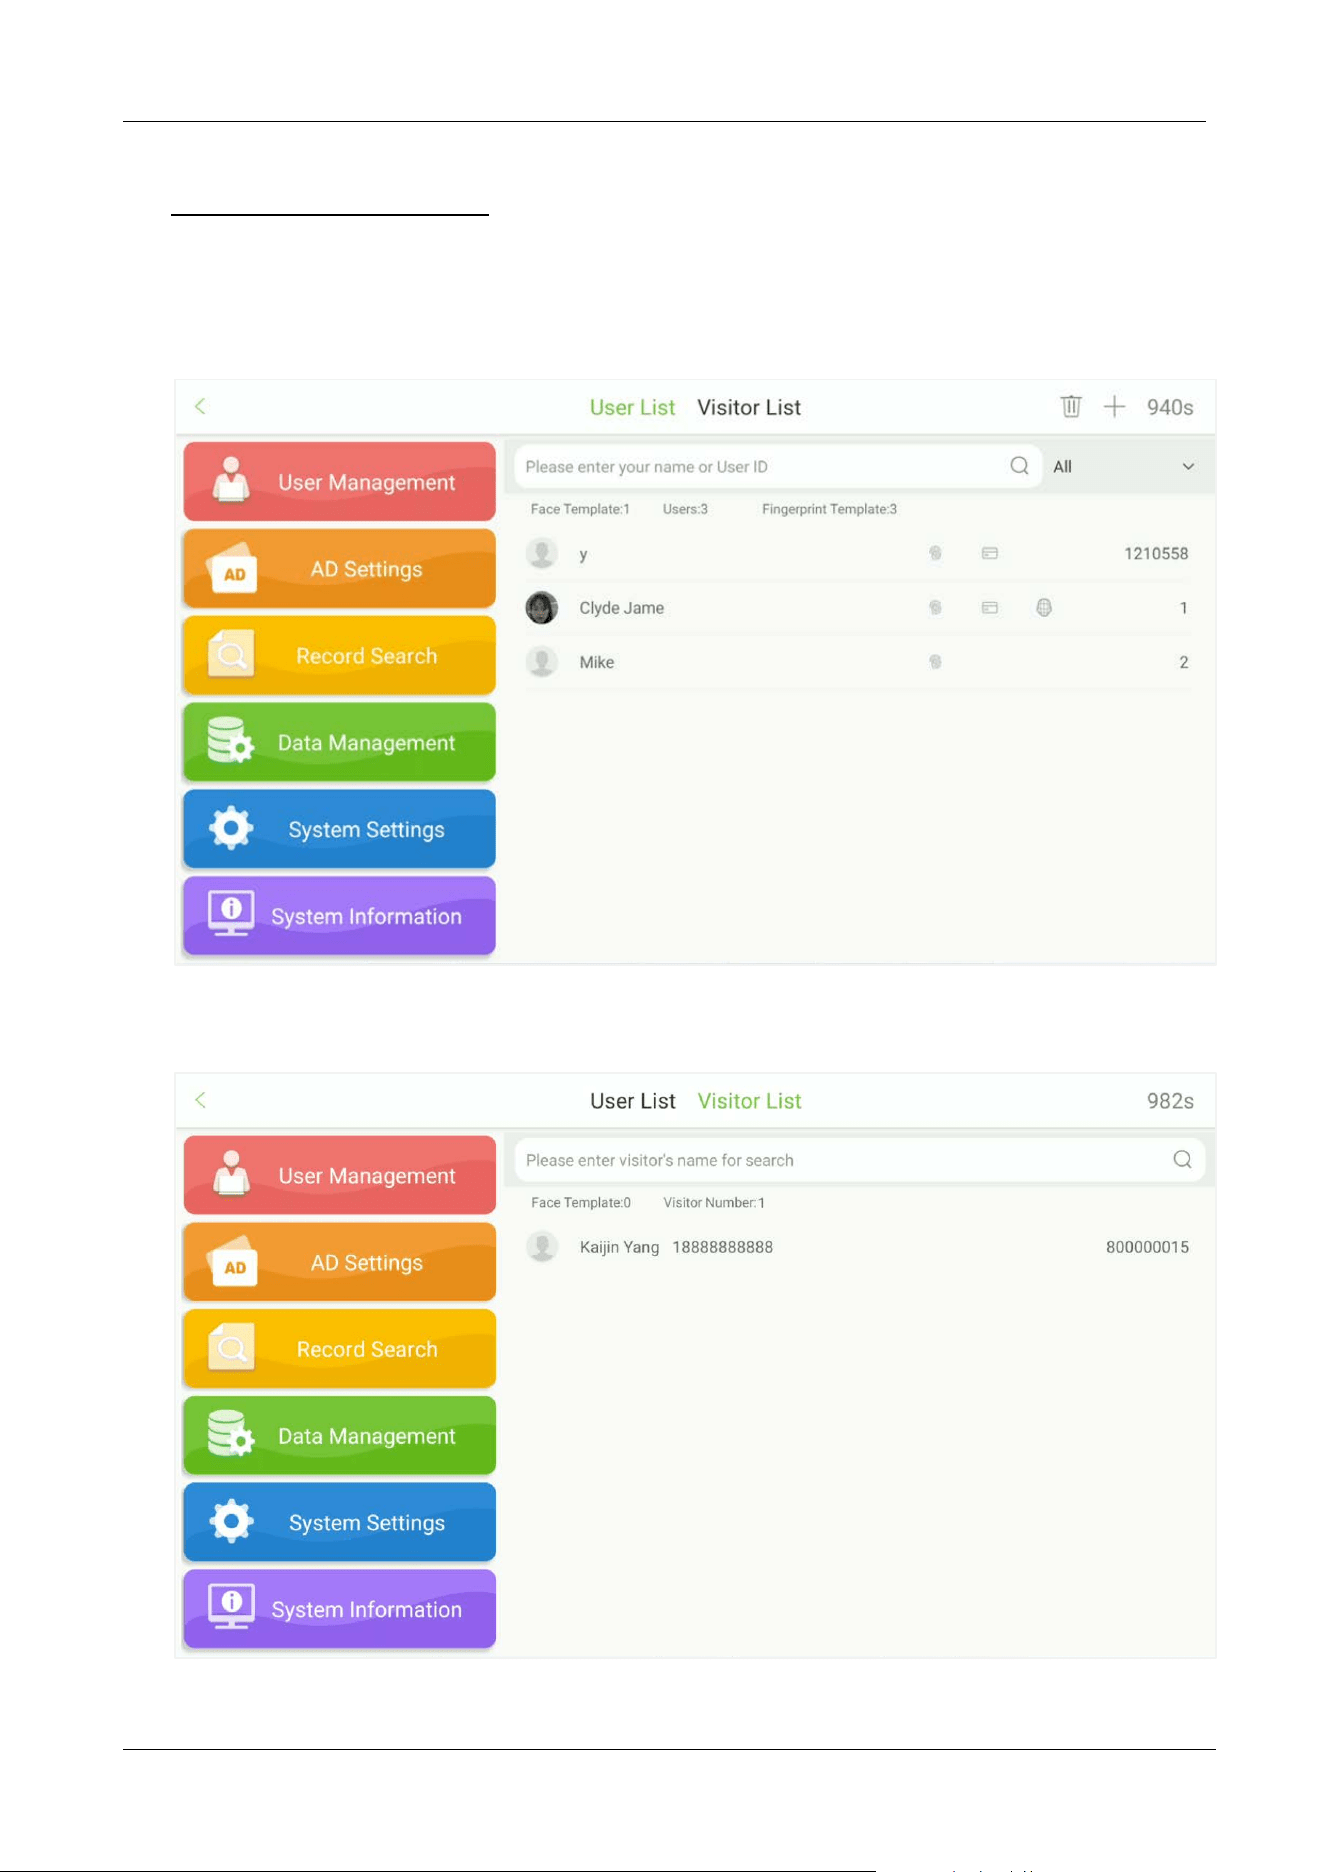
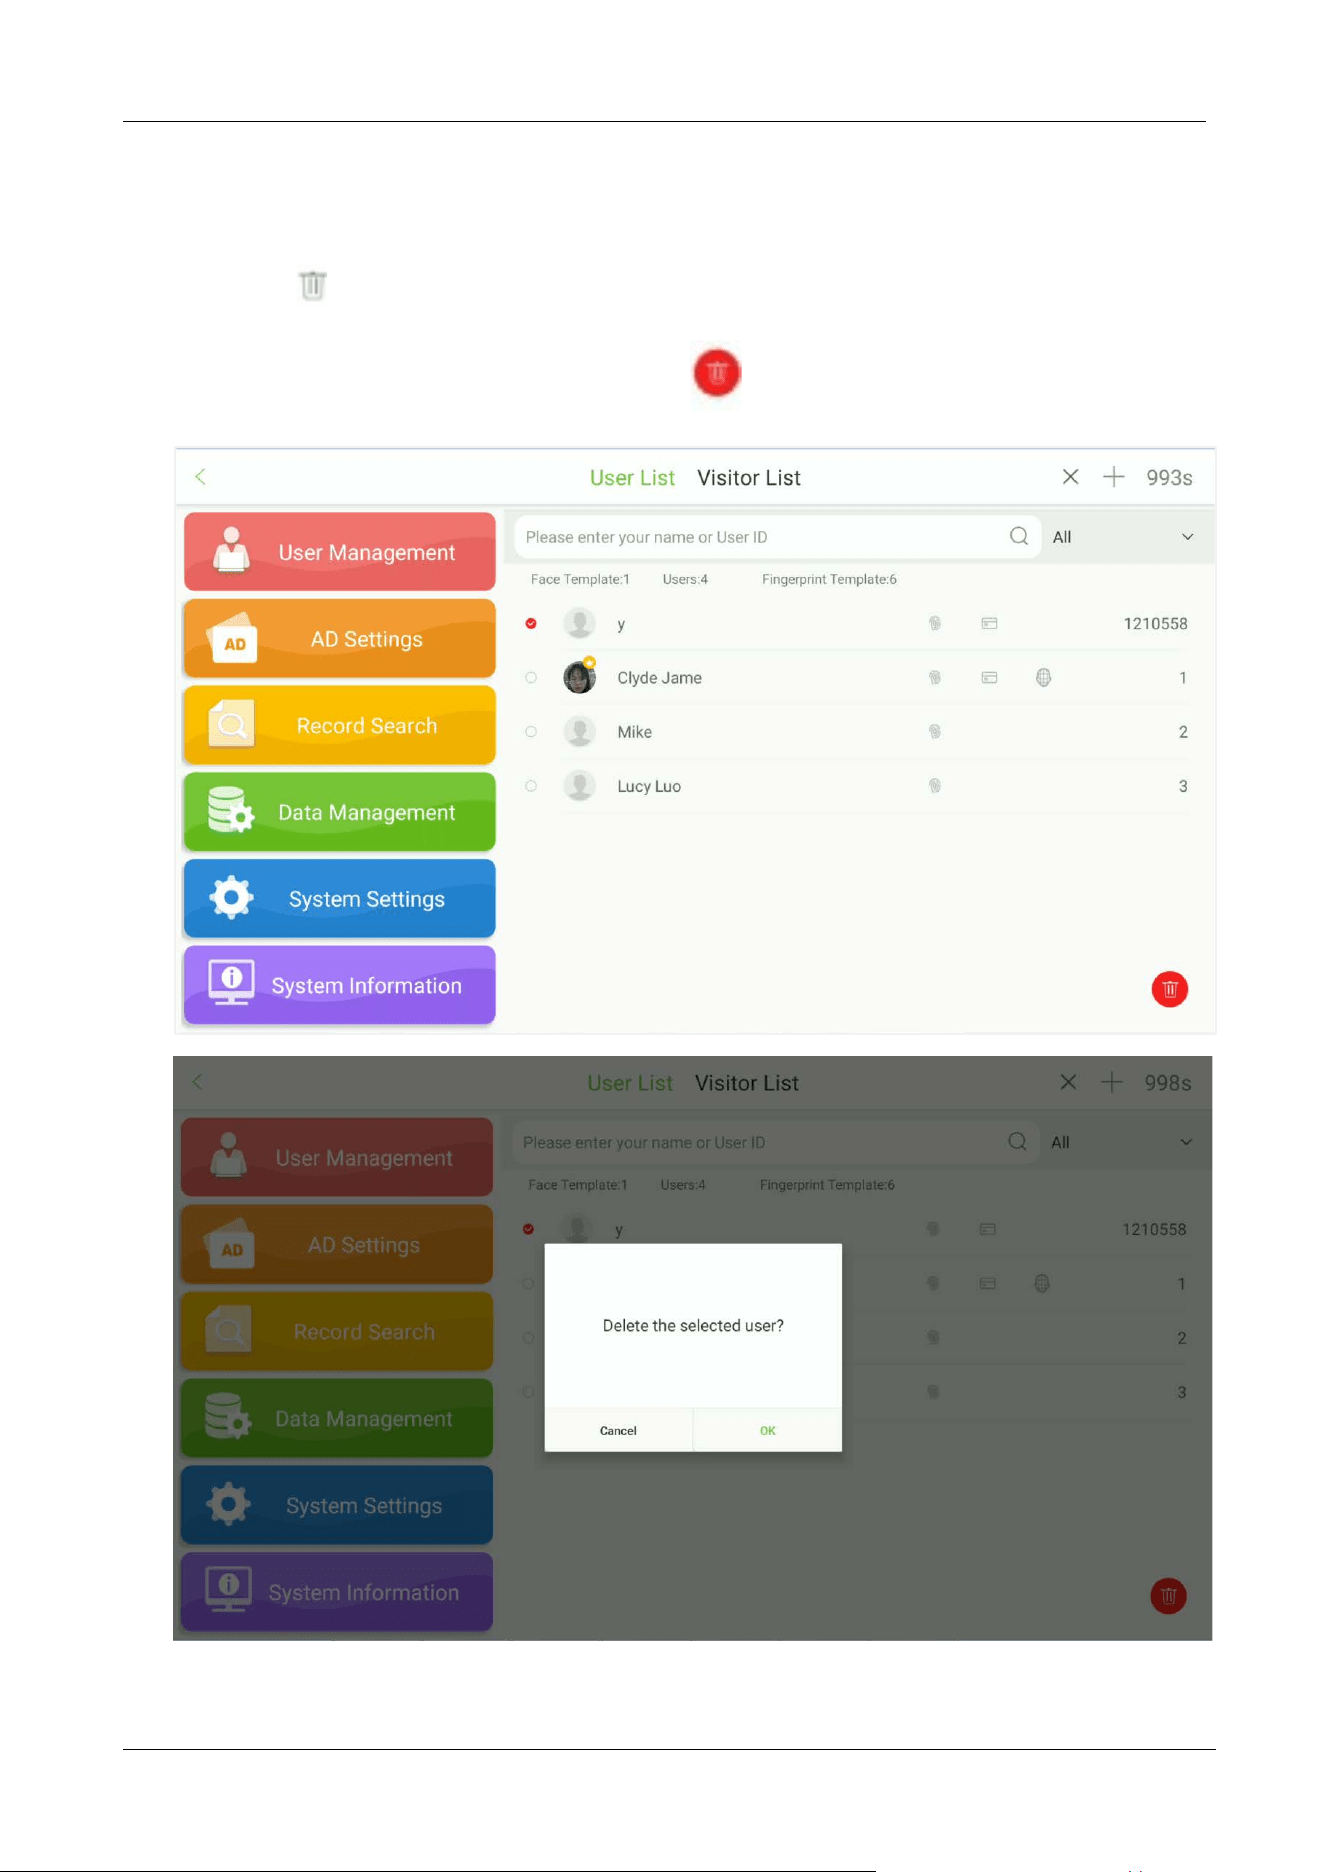
5 User Management
Open the main menu and select User Management. The user list displays the basic information of all
the users, including their names, user ID’s, user photo and verification mode as shown in the below
image:
Tap Visitor List. The visitor list displays the basic information of all the visitors, including their names,
user ID’s, and images, as shown in the below image:
FaceKiosk-H13 User Manual
P a g e | 29 Copyright©2022 ZKTECO CO., LTD. All rights reserved.
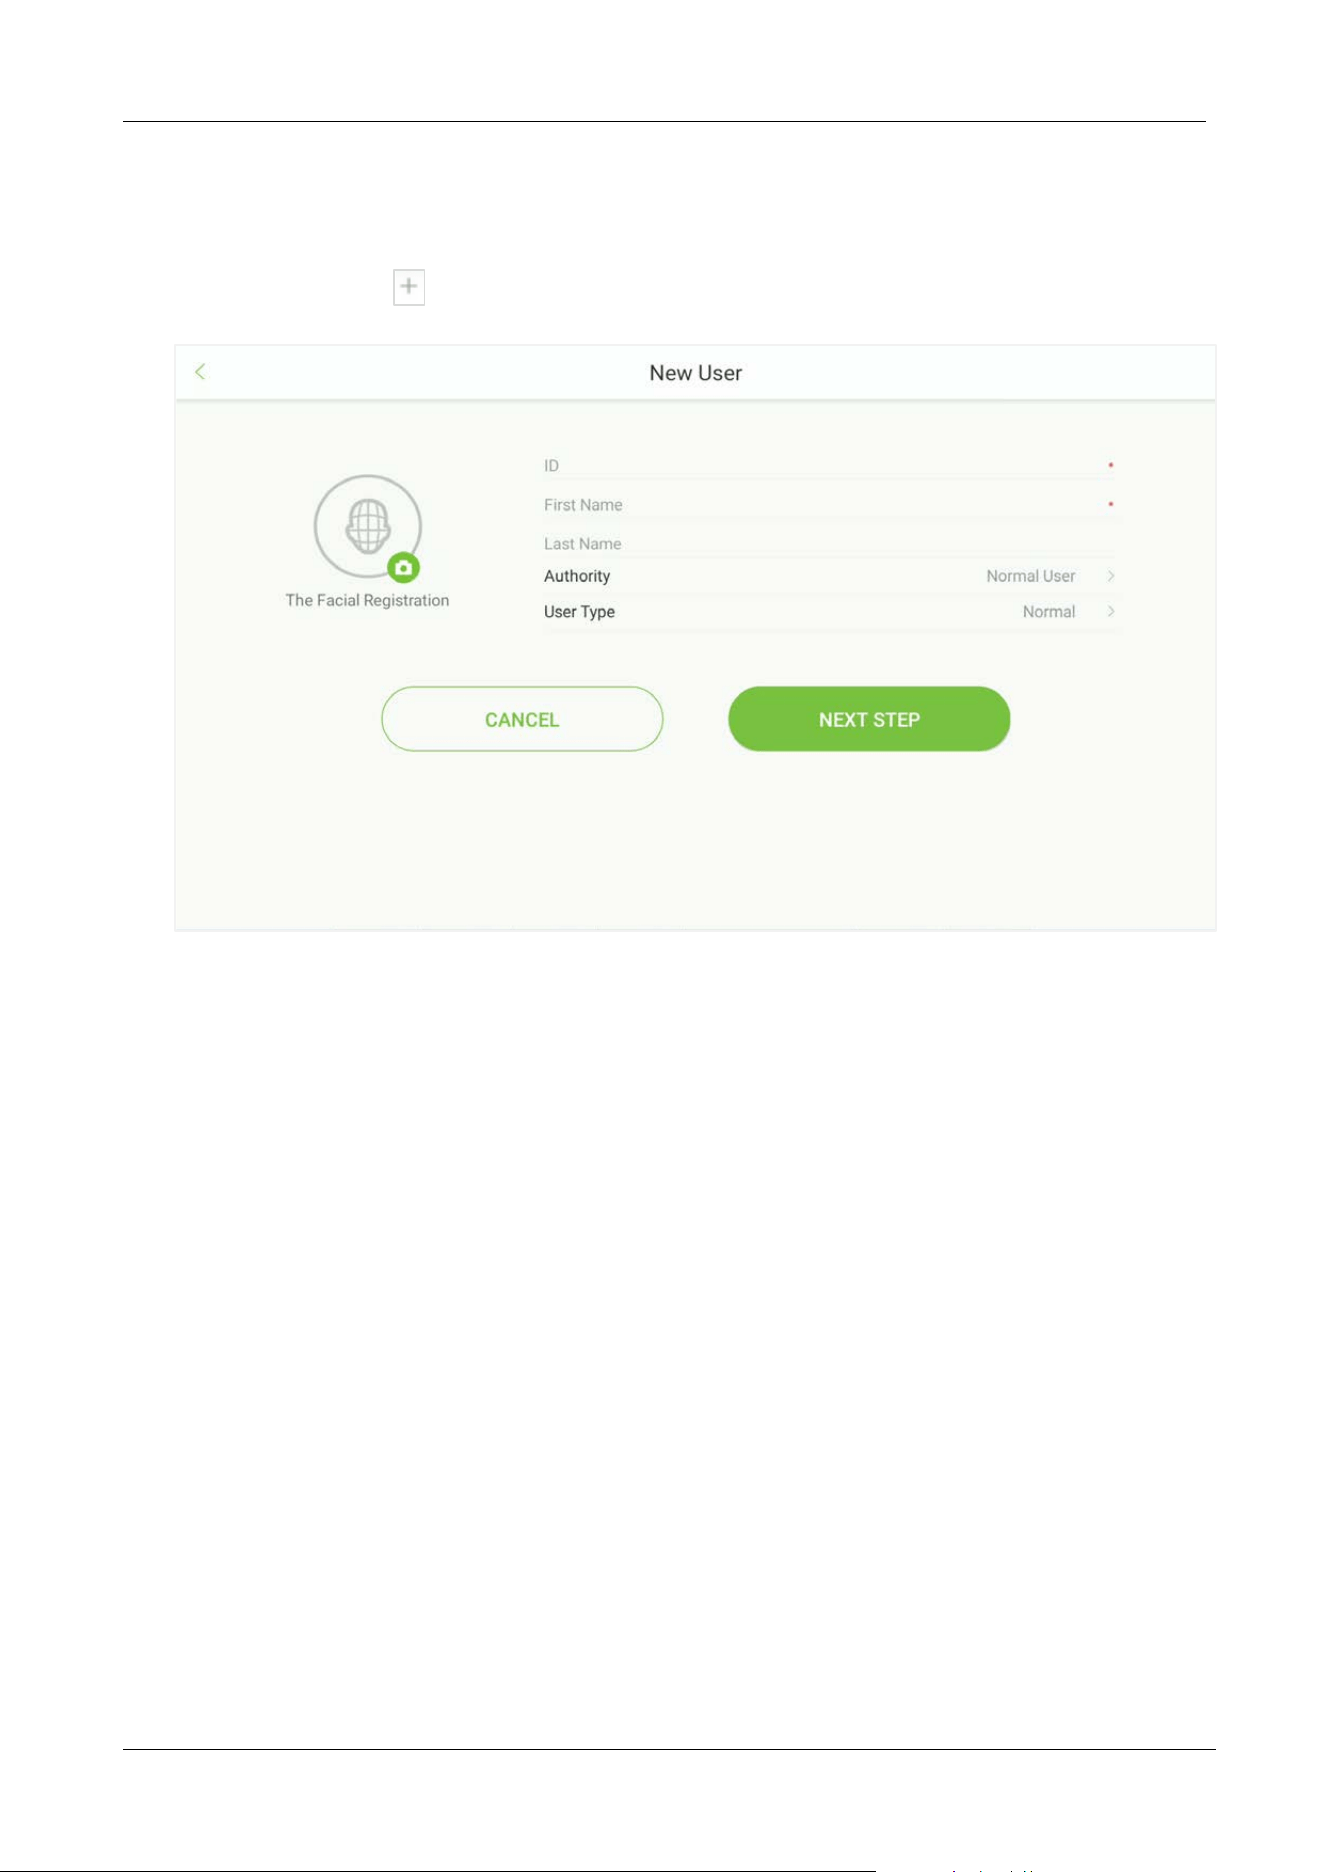
5.1 Add an Employee
Tap Visitor List. Tap on the top right corner to add a new user as shown in the below image:
ID: Enter the Employee ID. It supports 1 to 10 digits by default. The message "Duplicated ID,
please enter again." indicates that the ID number you have entered is already being used. Please
enter a different ID.
Username: The username refers to the Employee's Name, please enter your first name and last
name.
Authority: It includes the Normal User and Super Admin. After configuring a Super Admin, super
admin verification is required to access the main menu. Super Admin can set up a password
maximum of 6 digits.
FaceKiosk-H13 User Manual
P a g e | 30 Copyright©2022 ZKTECO CO., LTD. All rights reserved.
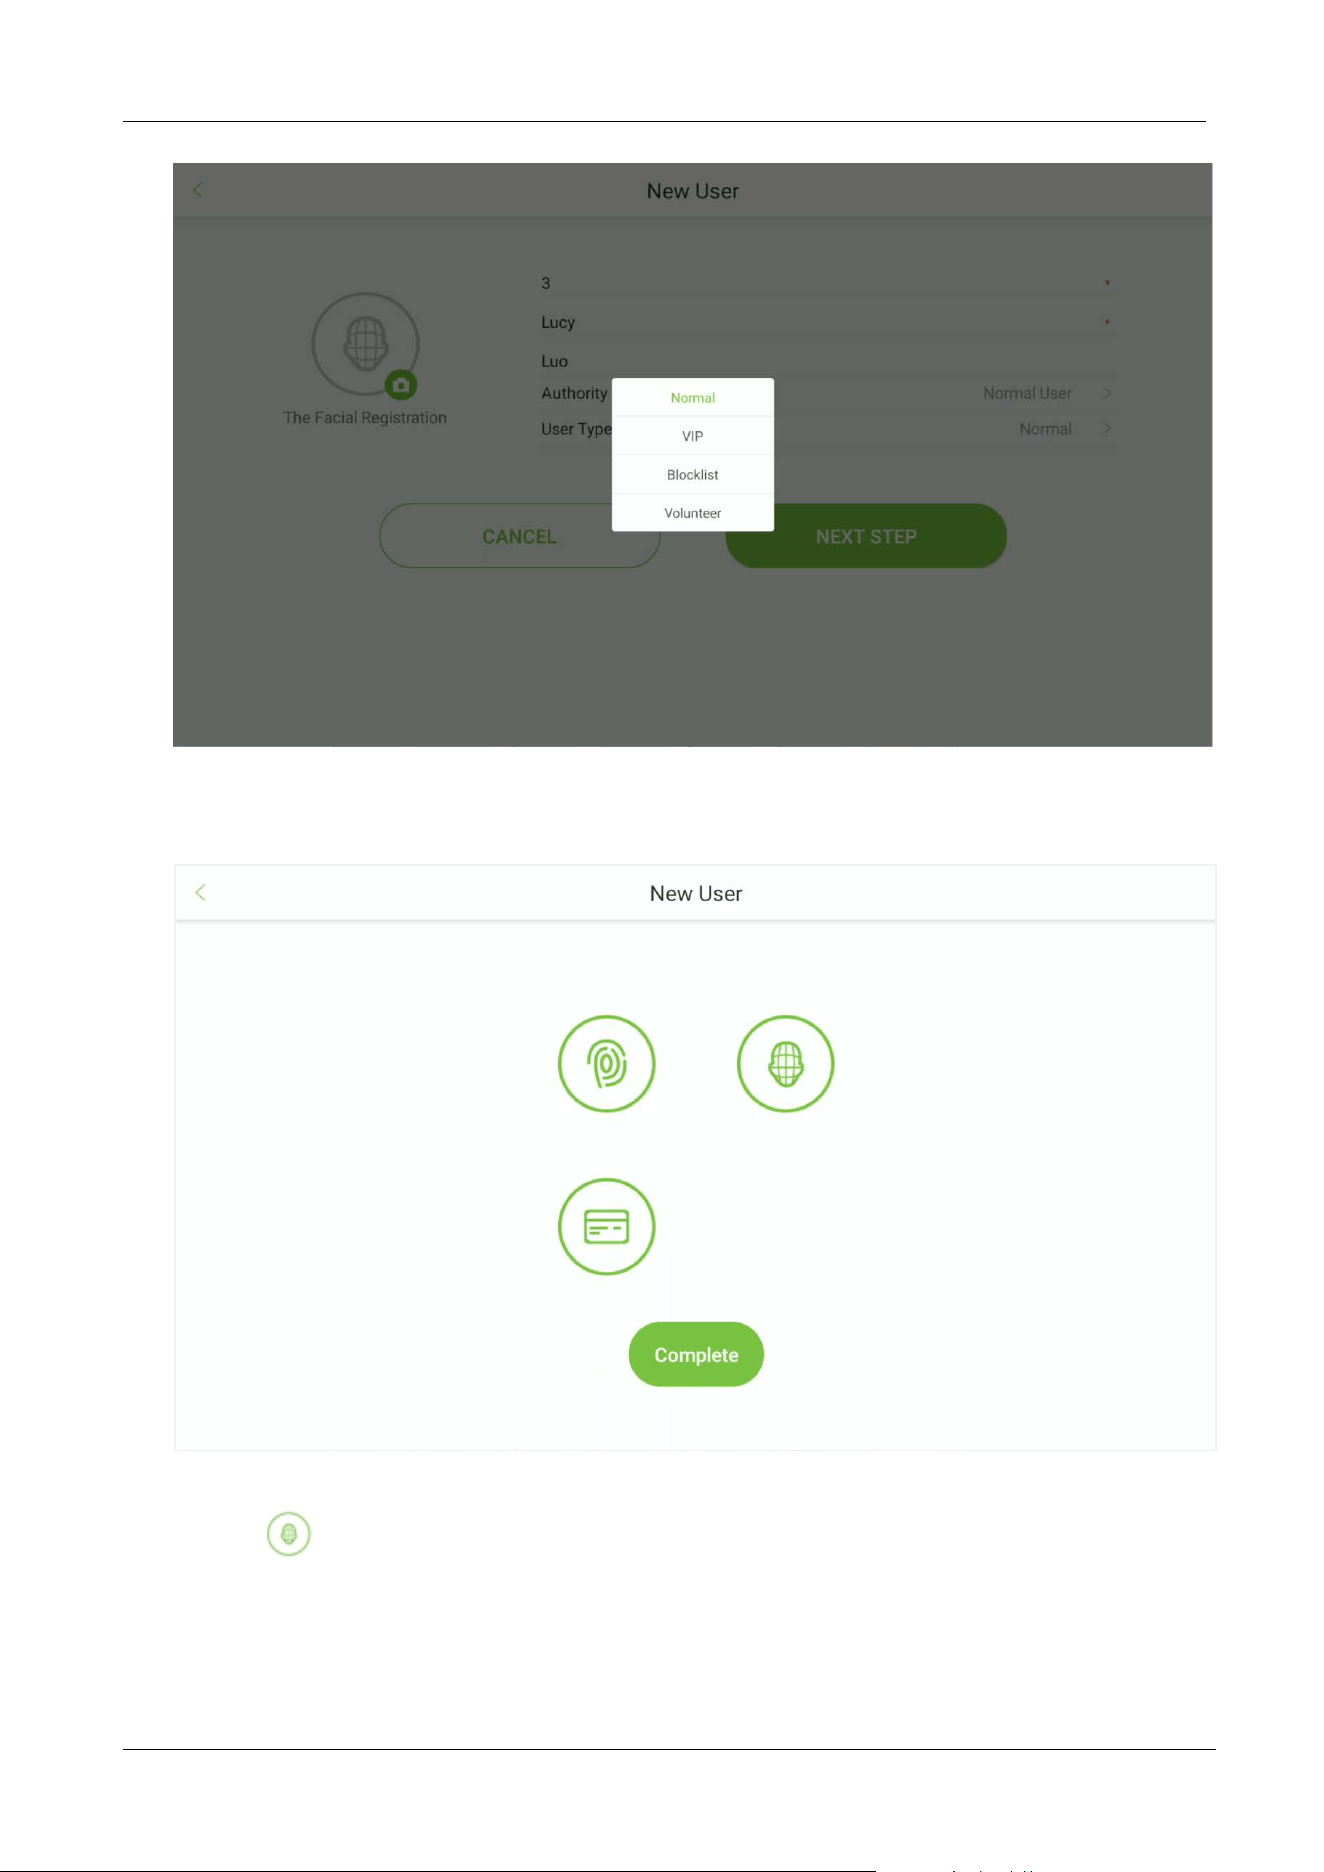
User Type: It includes normal User, VIP, Blocklist and Volunteer. The Volunteers will assist the
approval process for visitor registration.
FaceKiosk-H13 User Manual
P a g e | 31 Copyright©2022 ZKTECO CO., LTD. All rights reserved.
Verification Method: After entering the employee's basic information, tap Next to select the
verification method.
Facial Registration:
Tap the icon and then stand in the monitoring area. The registration is successful when the
user’s face is identified, and the photo will be saved.
FaceKiosk-H13 User Manual
P a g e | 32 Copyright©2022 ZKTECO CO., LTD. All rights reserved.
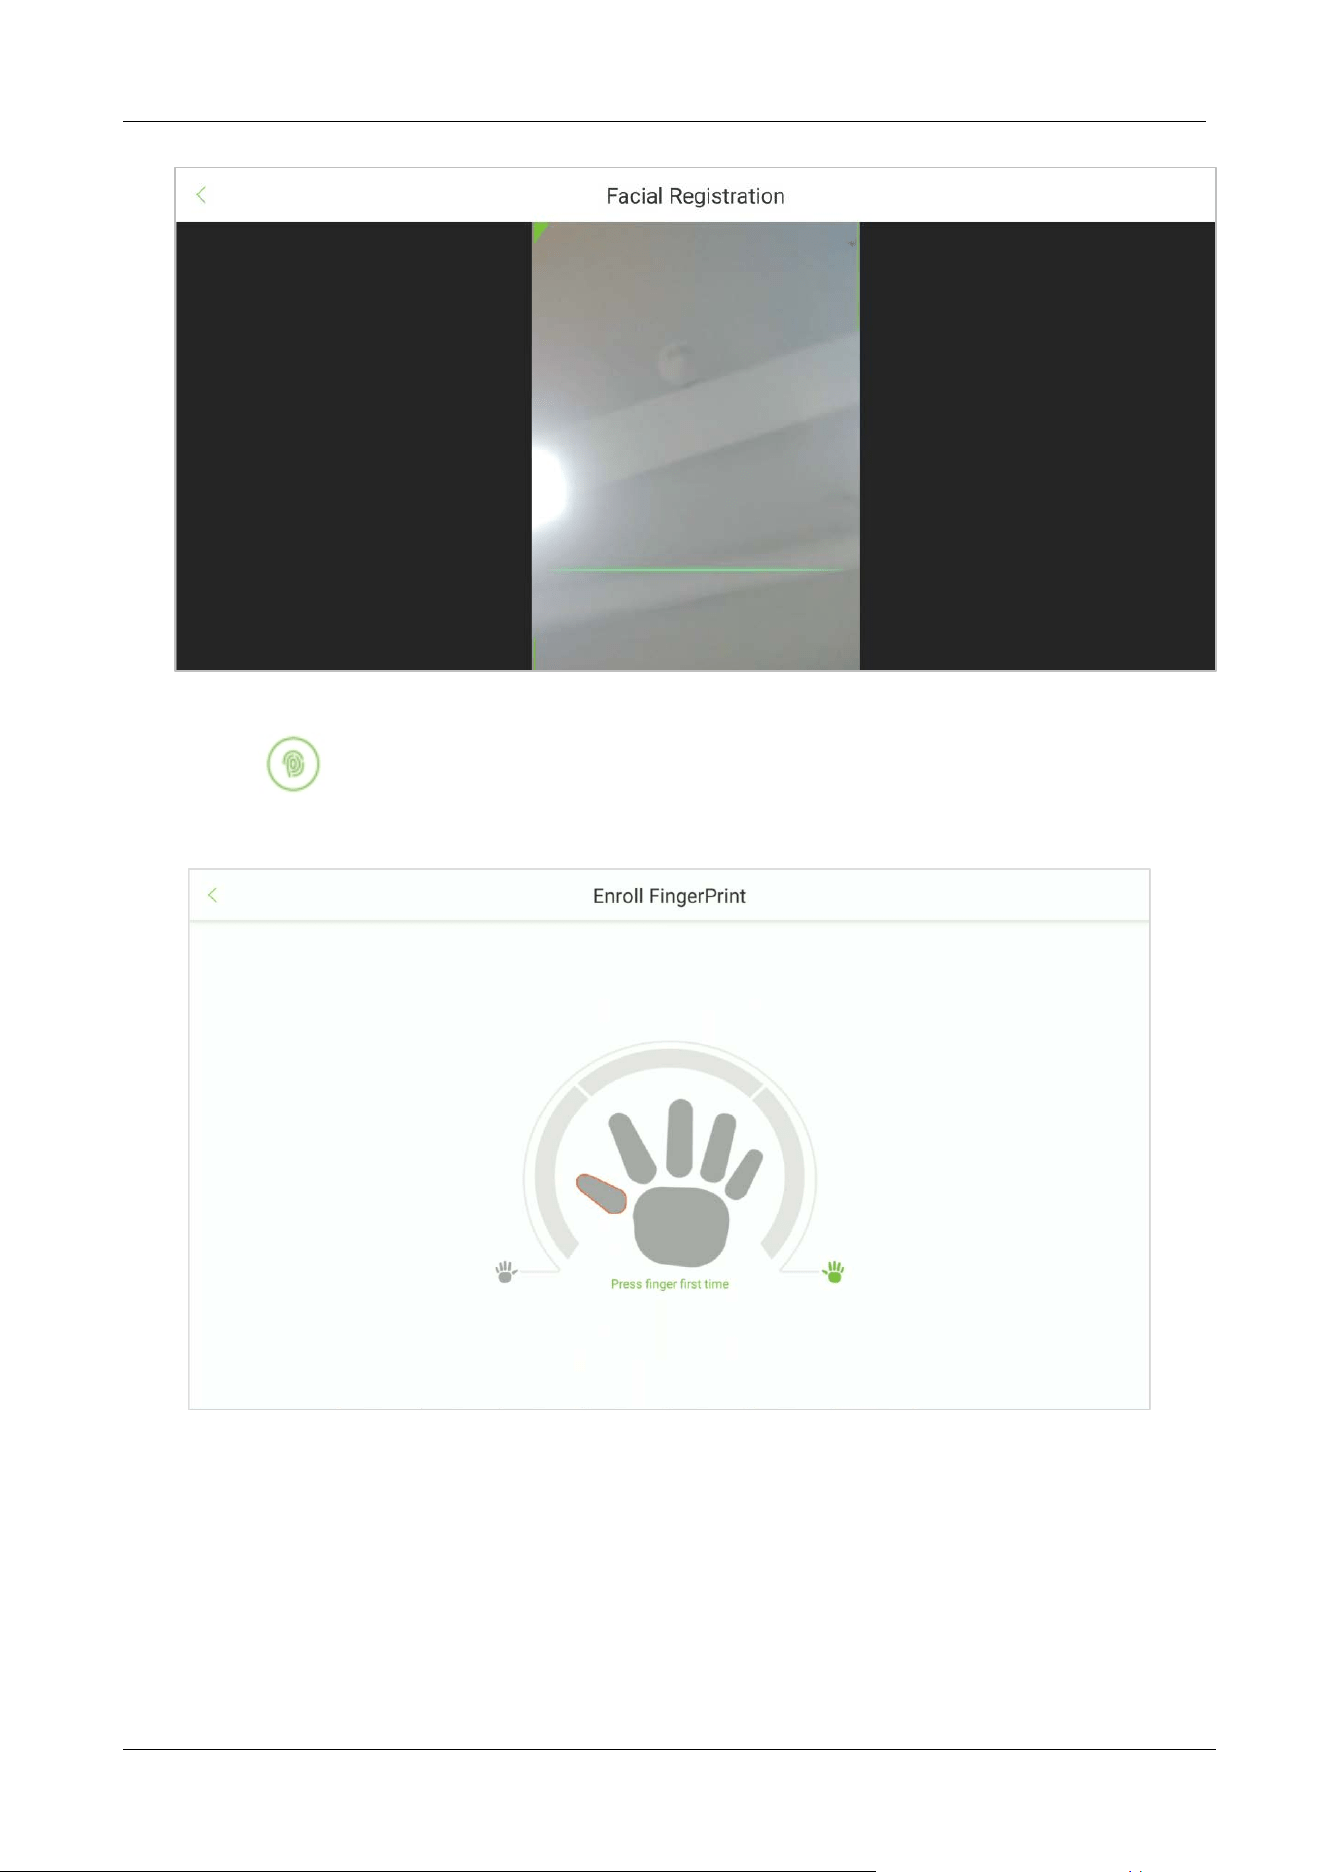
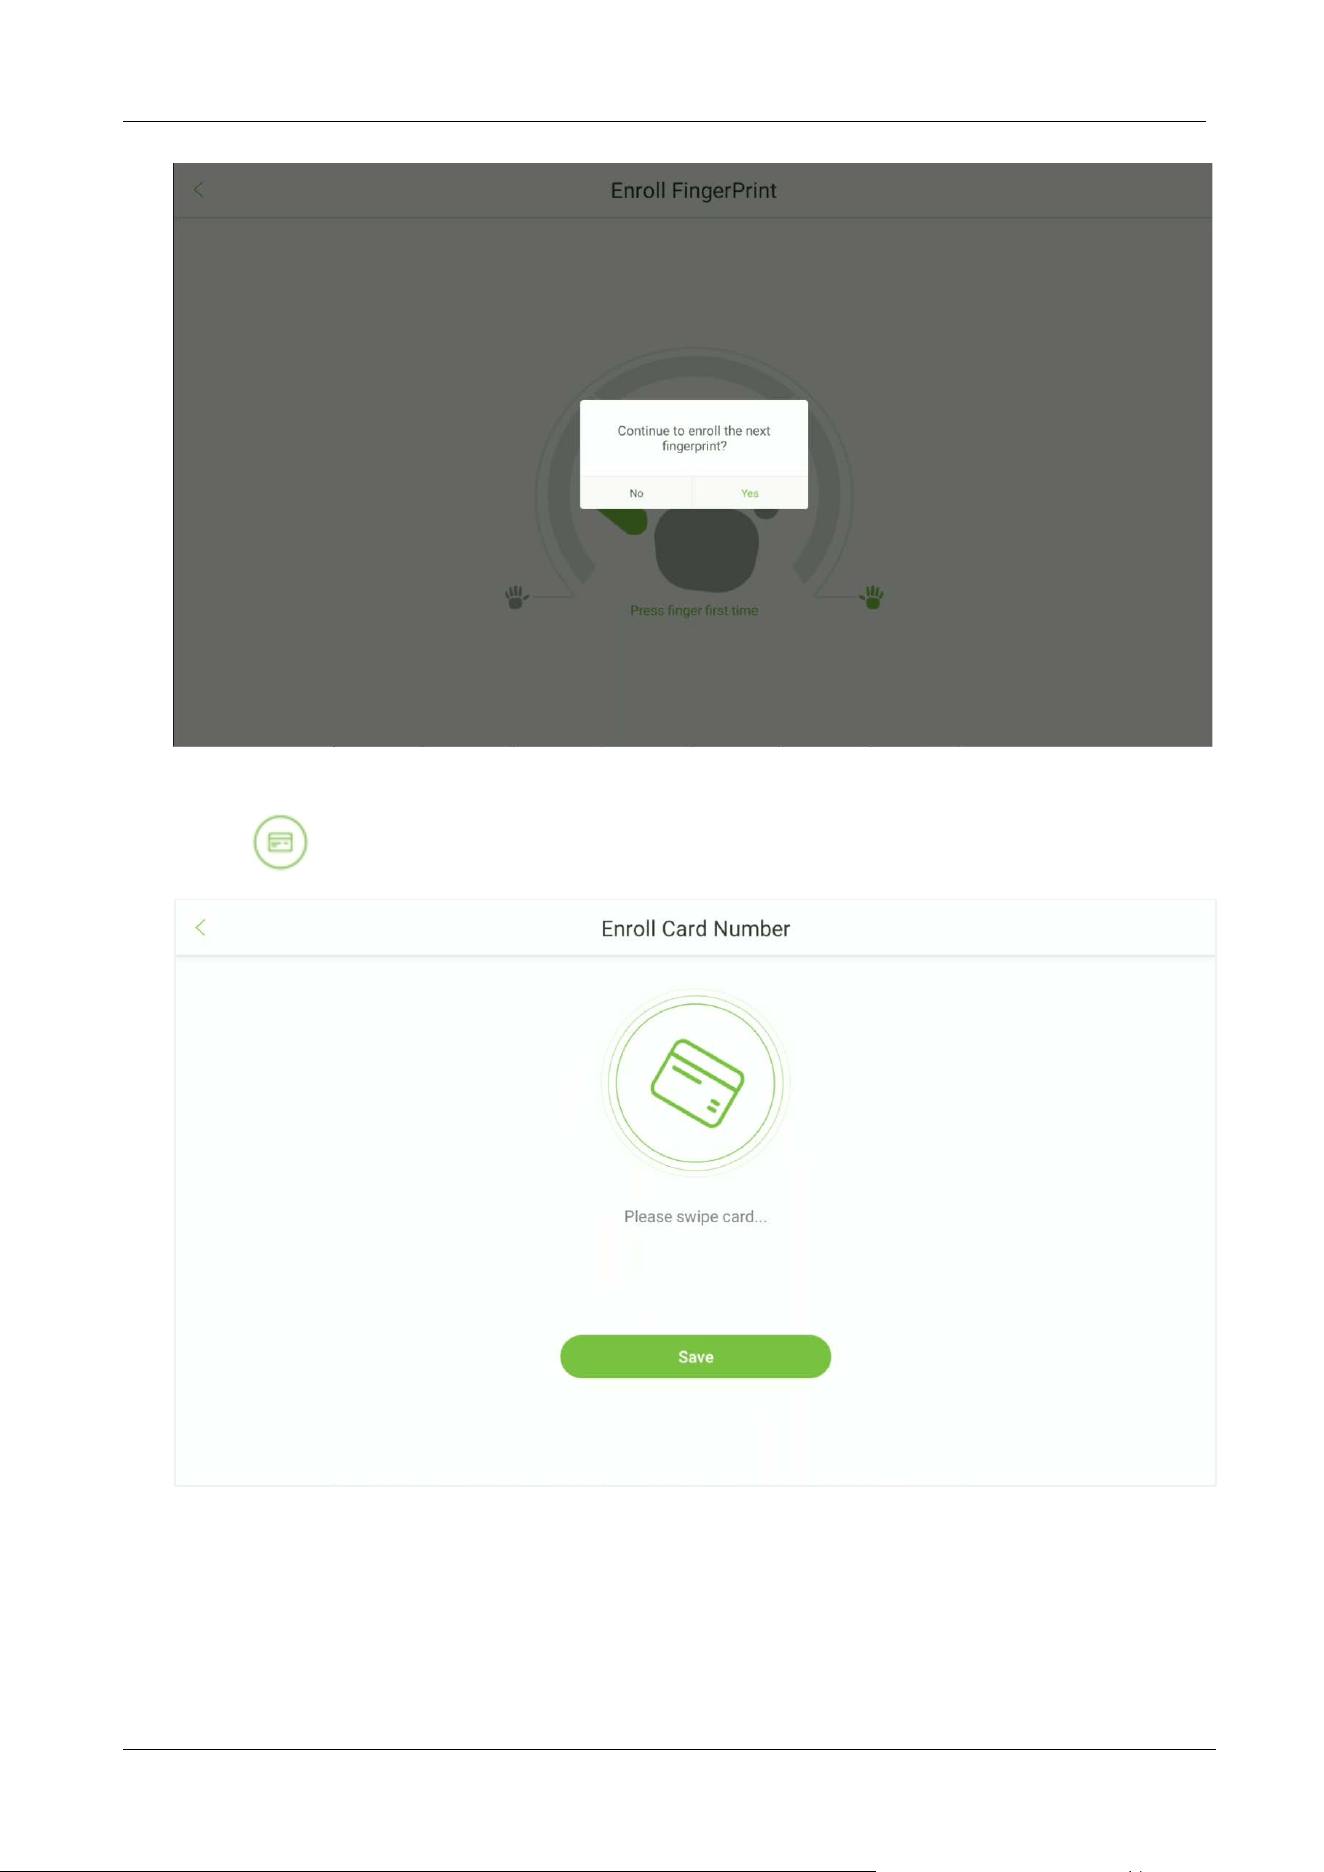
Fingerprint Registration:
Tap the icon to open the fingerprint registration page. Press your finger to register the
fingerprint.
Press your finger repeatedly until you see a green indicator that indicates a successful
registration. If you press different fingers on the fingerprint scanner on successive verifications,
the prompt "Please enroll same finger" appears on the screen.
Once the fingerprint has been registered successfully, a dialog box appears as "Continue to
enroll the next fingerprint?”. Tap Yes to register the next fingerprint, or No to return to the
fingerprint registration page.
FaceKiosk-H13 User Manual
P a g e | 33 Copyright©2022 ZKTECO CO., LTD. All rights reserved.
Card Registration:
Tap the icon to open the card registration page. Place your card close to the card swiping area.
FaceKiosk-H13 User Manual
P a g e | 34 Copyright©2022 ZKTECO CO., LTD. All rights reserved.
5.2 Delete an Employee
Tap the icon on the top right corner to initiate the deletion process.
Select the employee to be deleted and tap the icon.
FaceKiosk-H13 User Manual
P a g e | 35 Copyright©2022 ZKTECO CO., LTD. All rights reserved.
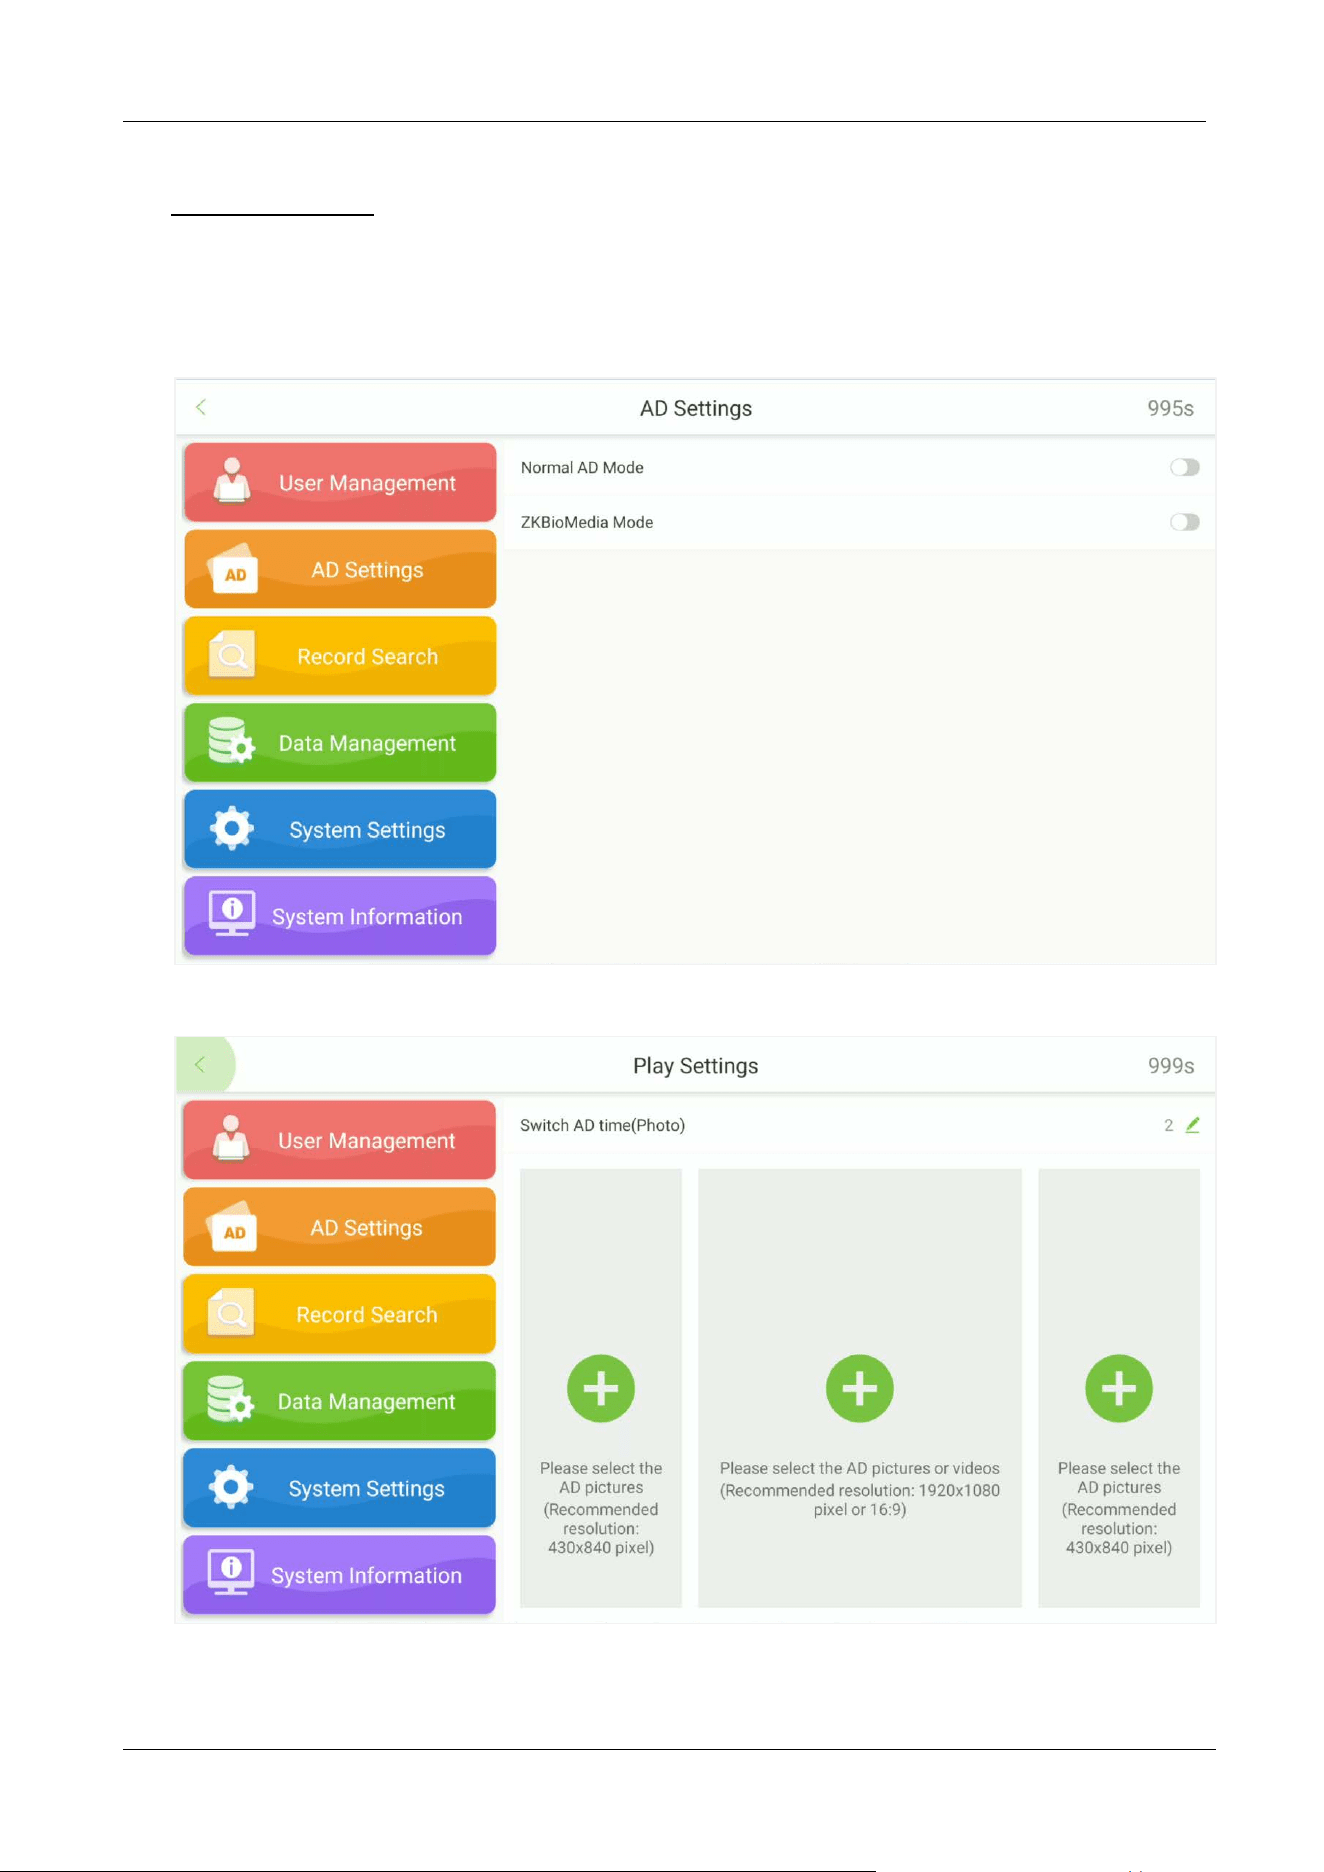
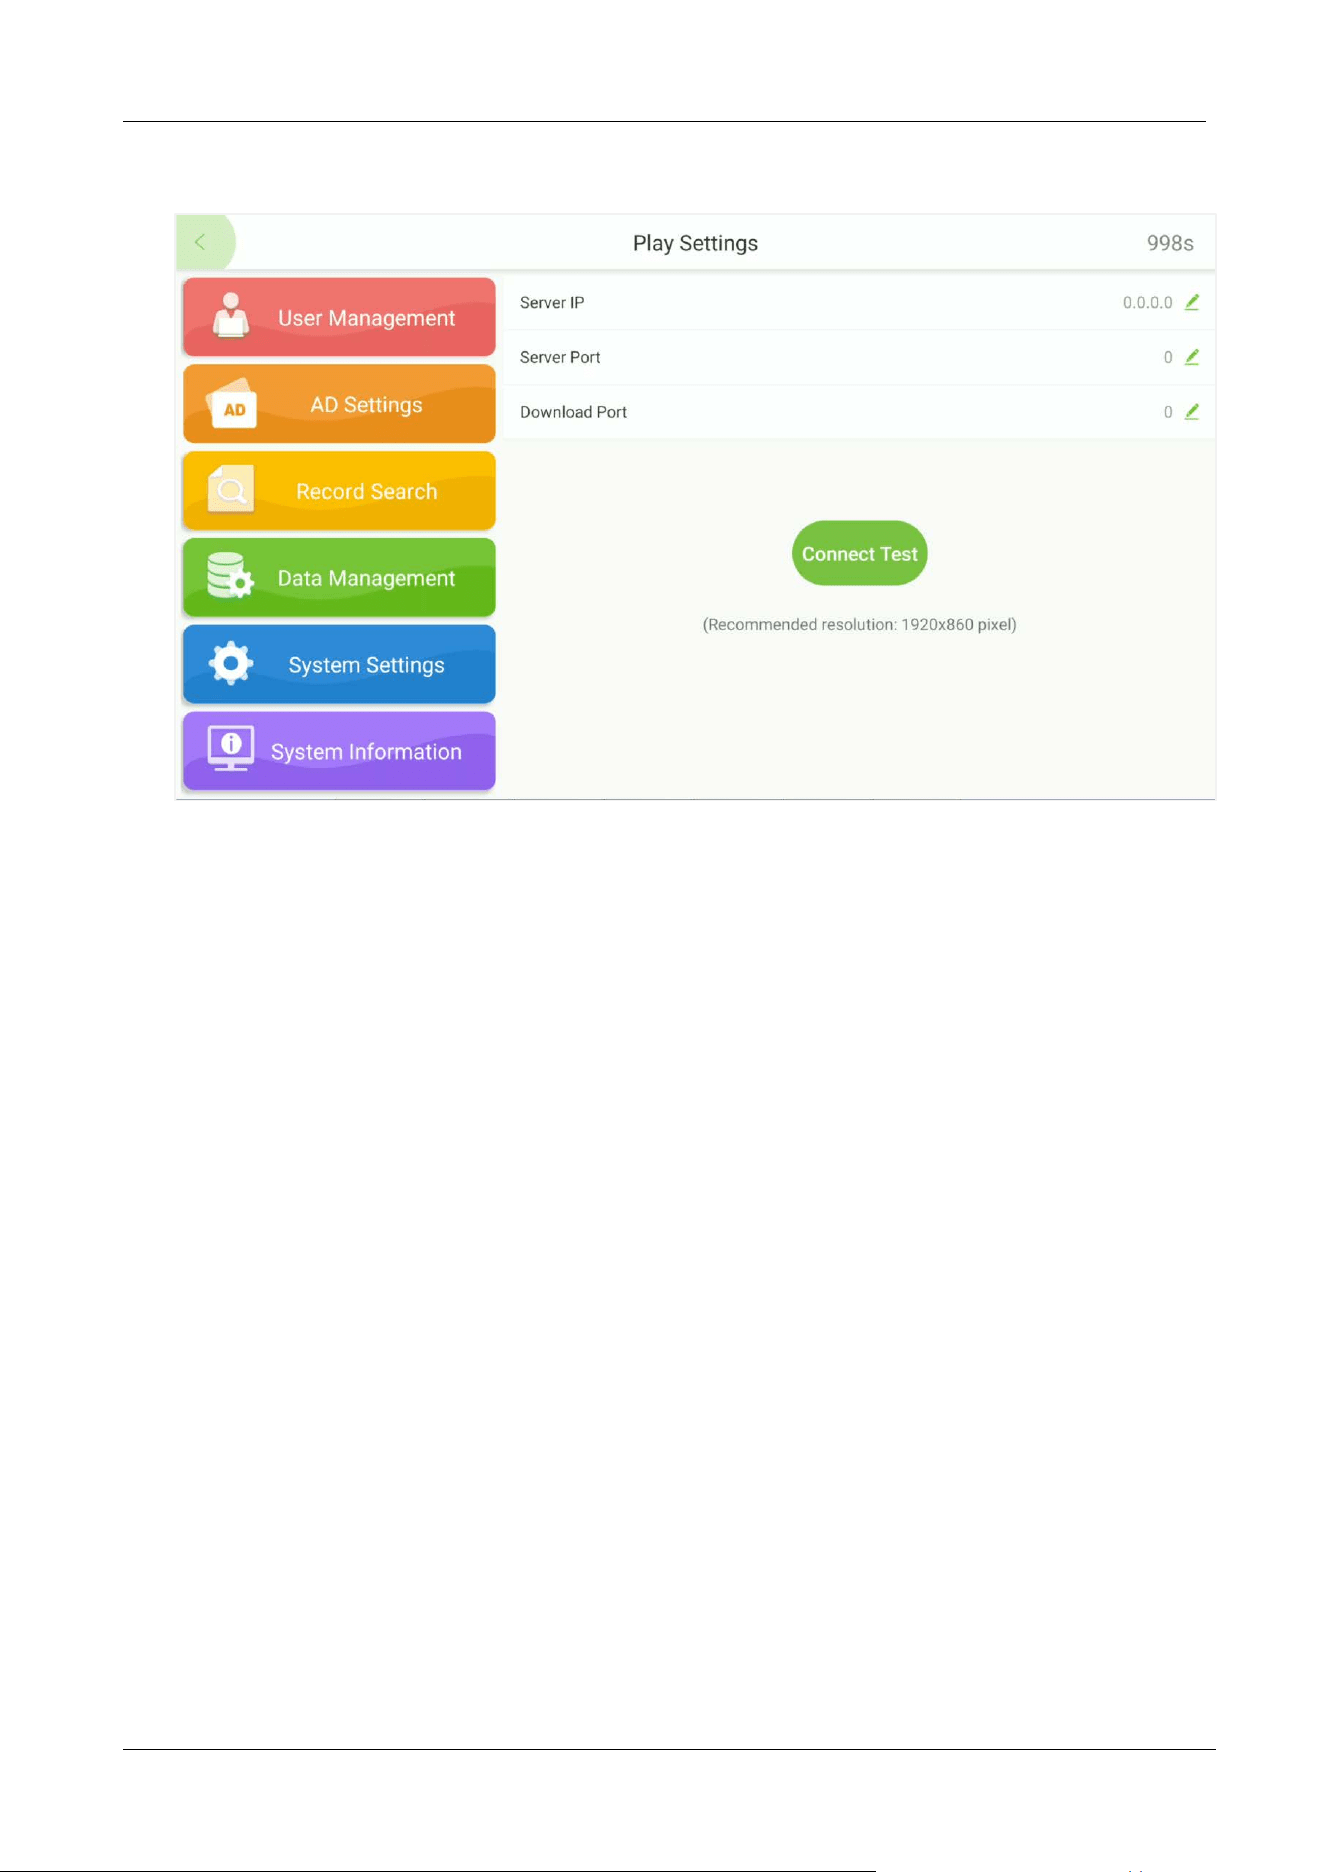
6 AD Settings
Open the main menu and select AD Settings. There are Normal AD mode and ZKBioMedia mode,
please choose one of them. Once selected, open the Play Settings under this mode to set the
ad-related parameters.
Normal Mode:
FaceKiosk-H13 User Manual
P a g e | 36 Copyright©2022 ZKTECO CO., LTD. All rights reserved.
ZKBioMedia Mode:
FaceKiosk-H13 User Manual
P a g e | 37 Copyright©2022 ZKTECO CO., LTD. All rights reserved.
7 Record Search
Open the main menu and select Record Search. Search the required records in the Facekiosk device.
7.1 Visitor Record
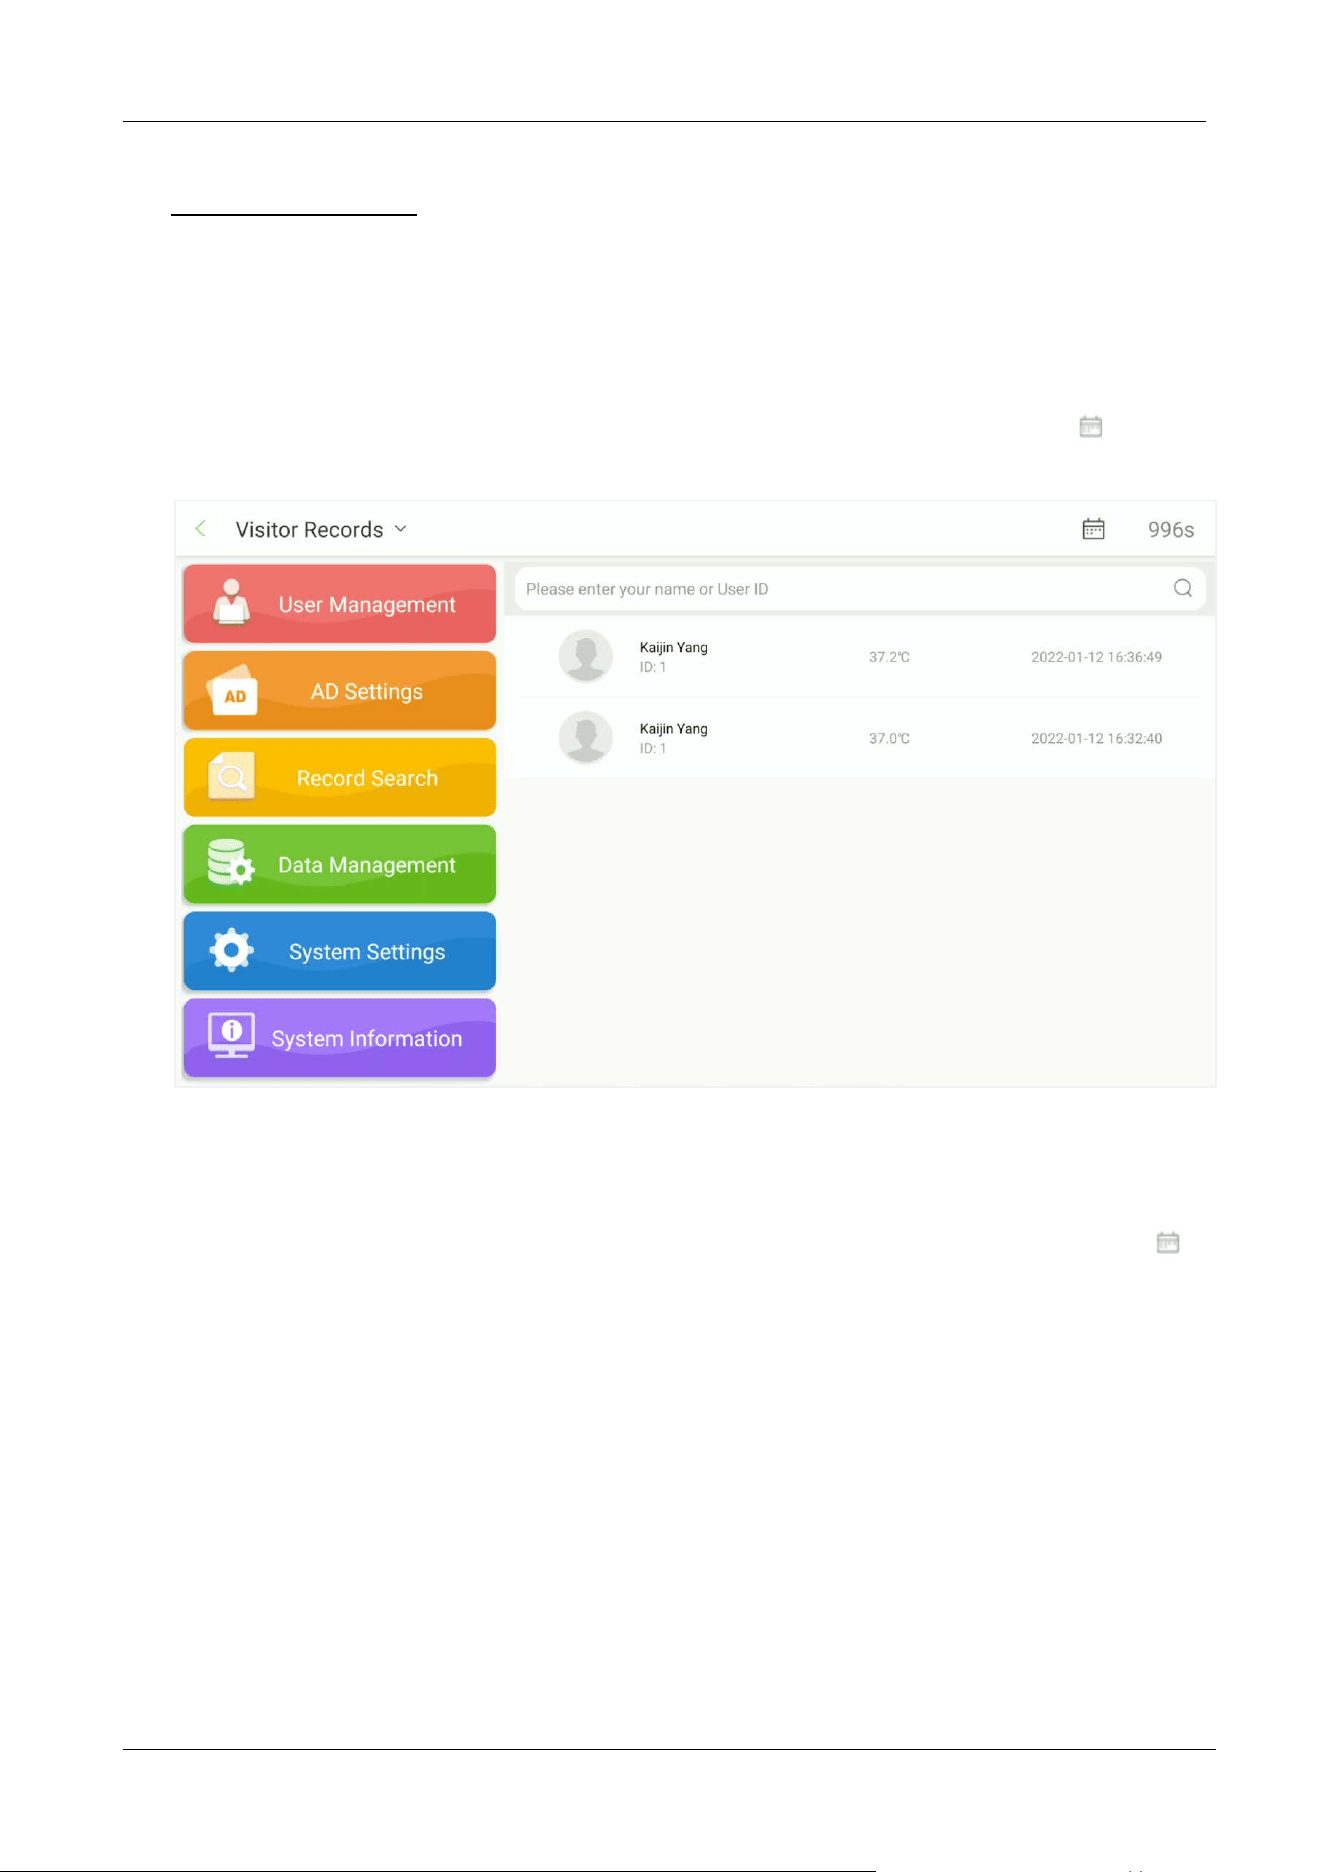
Select Record Search Visitor Records to view all the visitor records in the device. Tap to filter
the records accordingly as shown below:
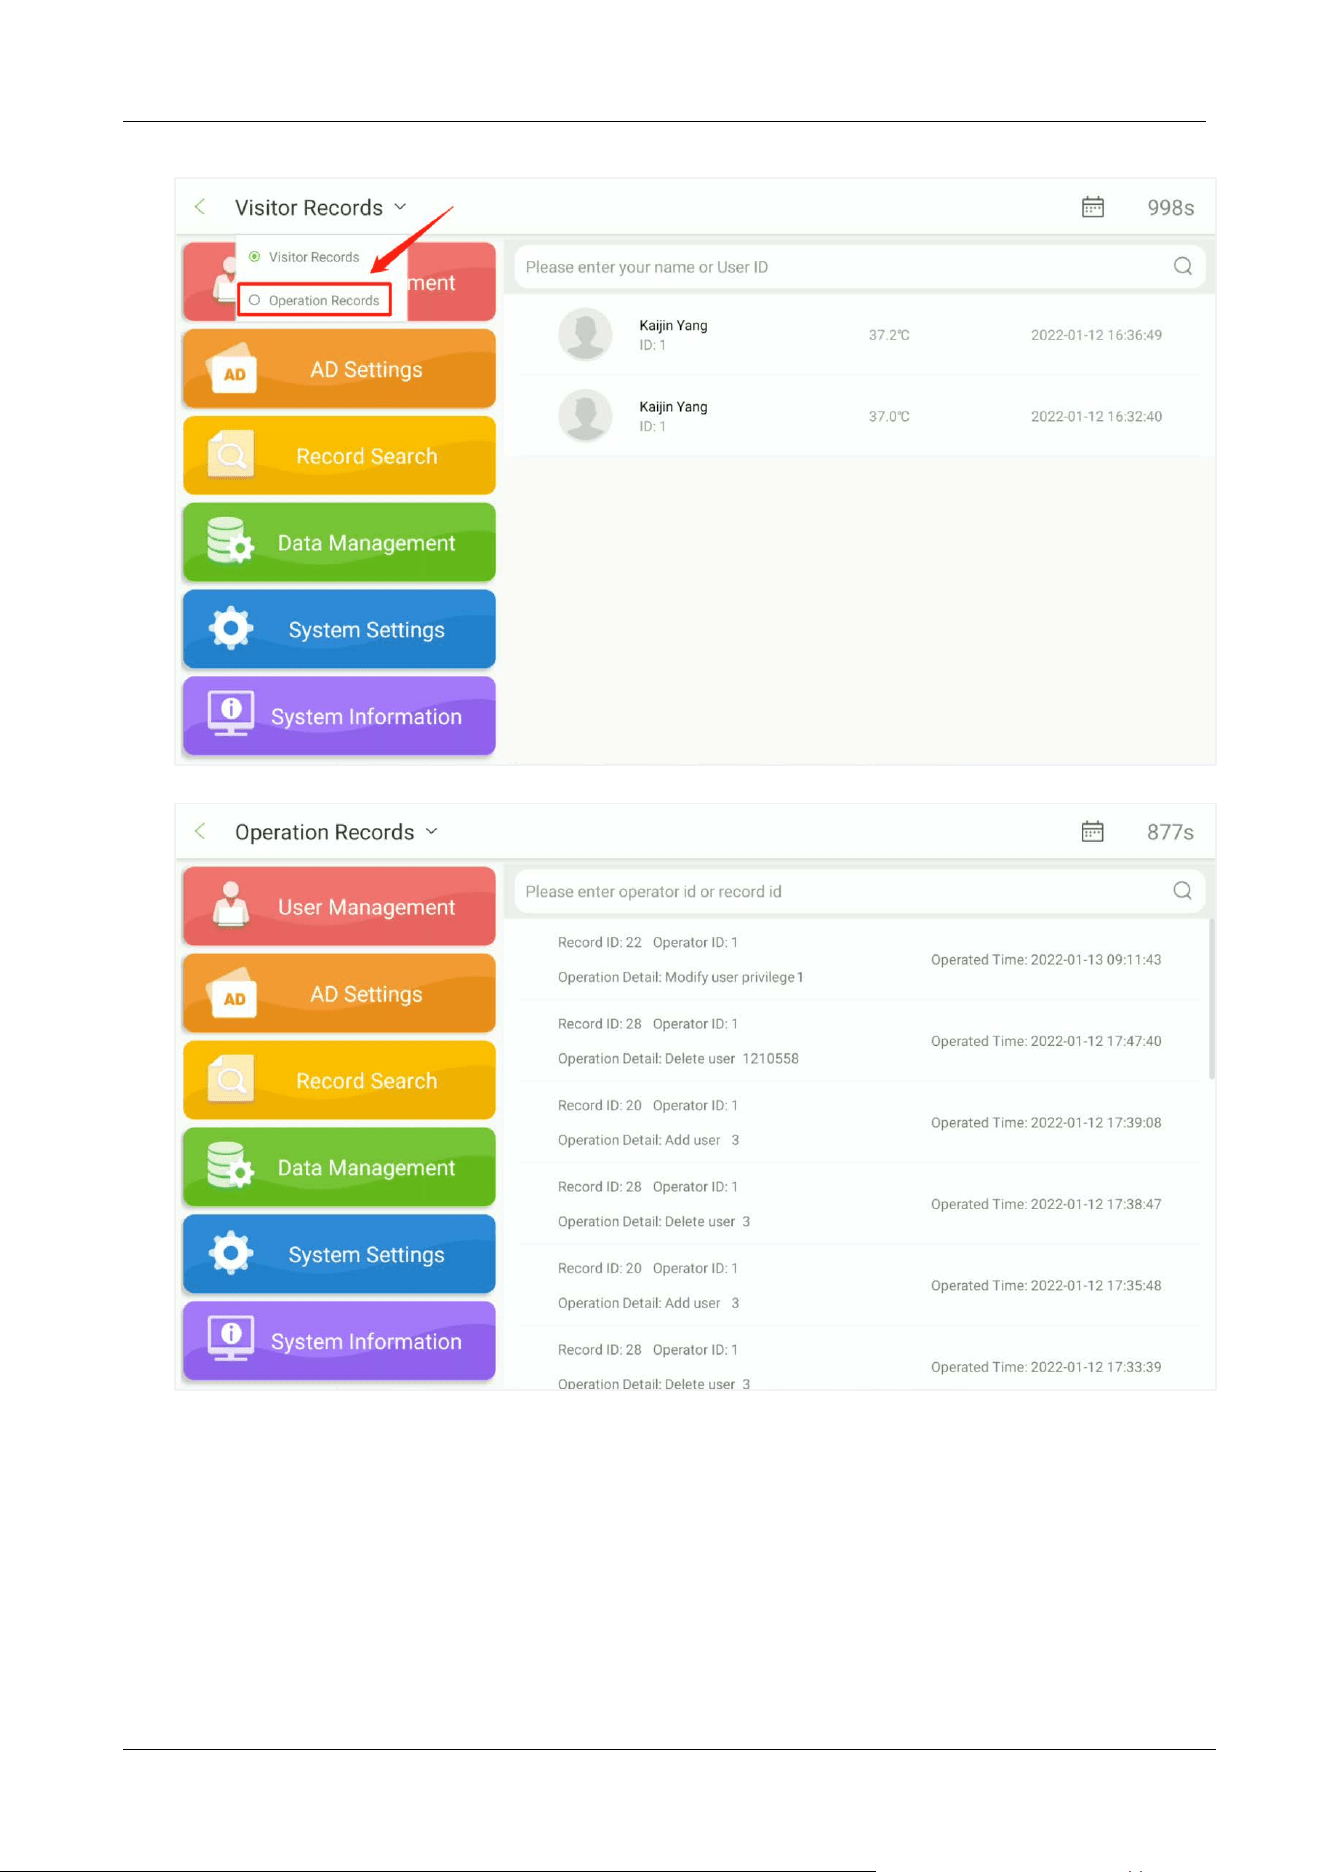
7.2 Operation Record
Select Record Search Operation Records to view all the operation records in the device. Tap
to filter the records accordingly as shown below:
FaceKiosk-H13 User Manual
P a g e | 38 Copyright©2022 ZKTECO CO., LTD. All rights reserved.
FaceKiosk-H13 User Manual
P a g e | 39 Copyright©2022 ZKTECO CO., LTD. All rights reserved.
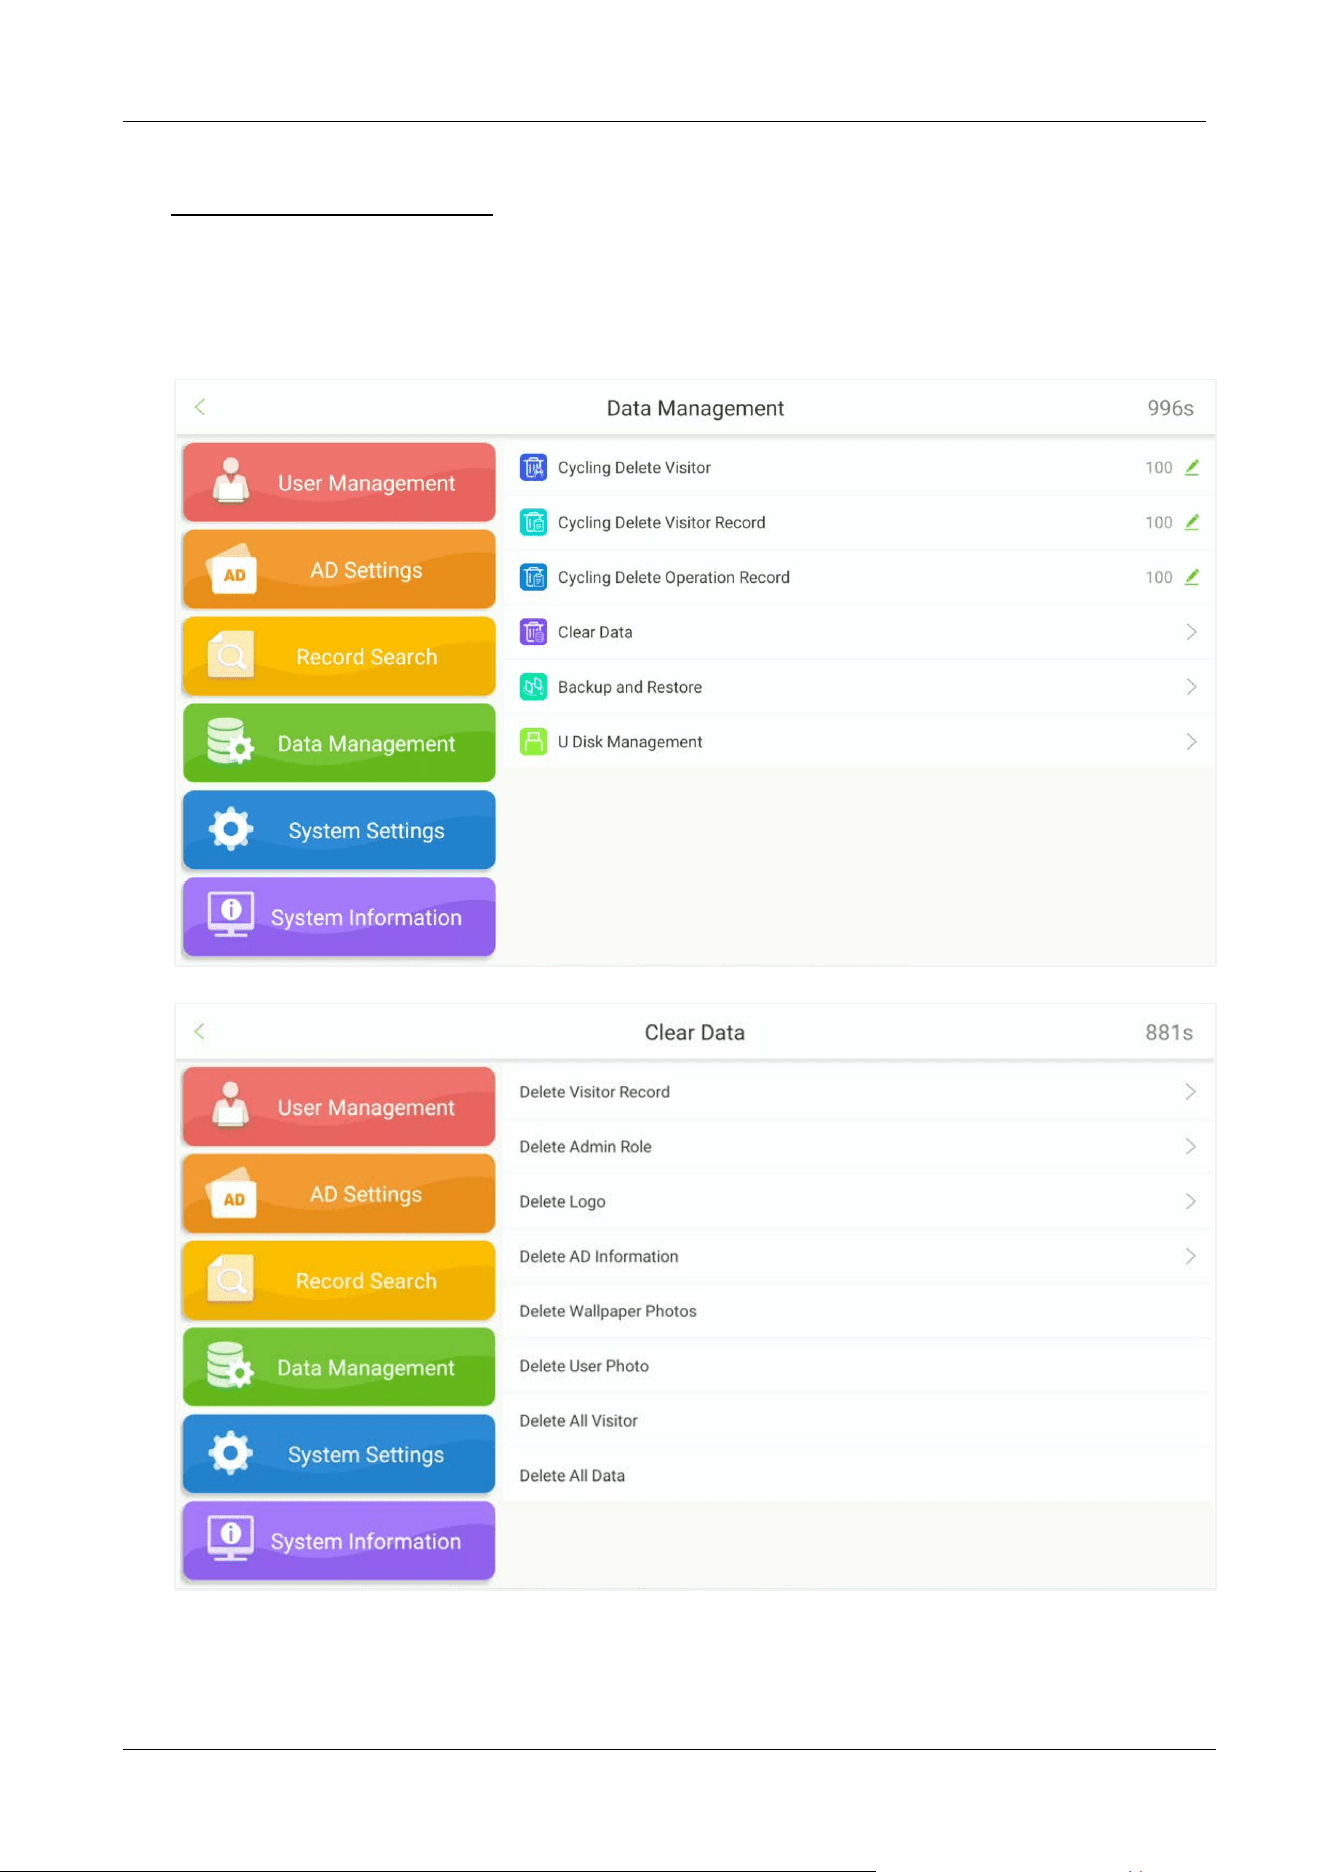
8 Data Management
Open the main menu and select Data Management. Data management includes cycling delete visitor,
cycling delete visitor record, cycling delete operation record, clear data, backup and restore, U disk
management.
FaceKiosk-H13 User Manual
P a g e | 40 Copyright©2022 ZKTECO CO., LTD. All rights reserved.
Menu Function
Cycling Delete
Visitor
Here, the user can set to delete the visitor details in the system when the
memory is full. The default value is 0 which means the details must not be
deleted. The range is 0 to 100.

FaceKiosk-H13 User Manual
P a g e | 41 Copyright©2022 ZKTECO CO., LTD. All rights reserved.
Cyclic Delete Visitor
Record
When the visitor
record memory is full, the user can set it to delete the
oldest records. The default value is 0 which means the records must not be
deleted. The range is 0 to 100.
Cycling Delete
Operation Record
In order to retain sufficient memory of the device, set the threshold value
of cyclic deletion of visitor records, when the visitor records reach the value
will automatically delete all the visitor records in the device, valid values
0~100.
Clear Data
Select to delete relevant data on the device as needed.
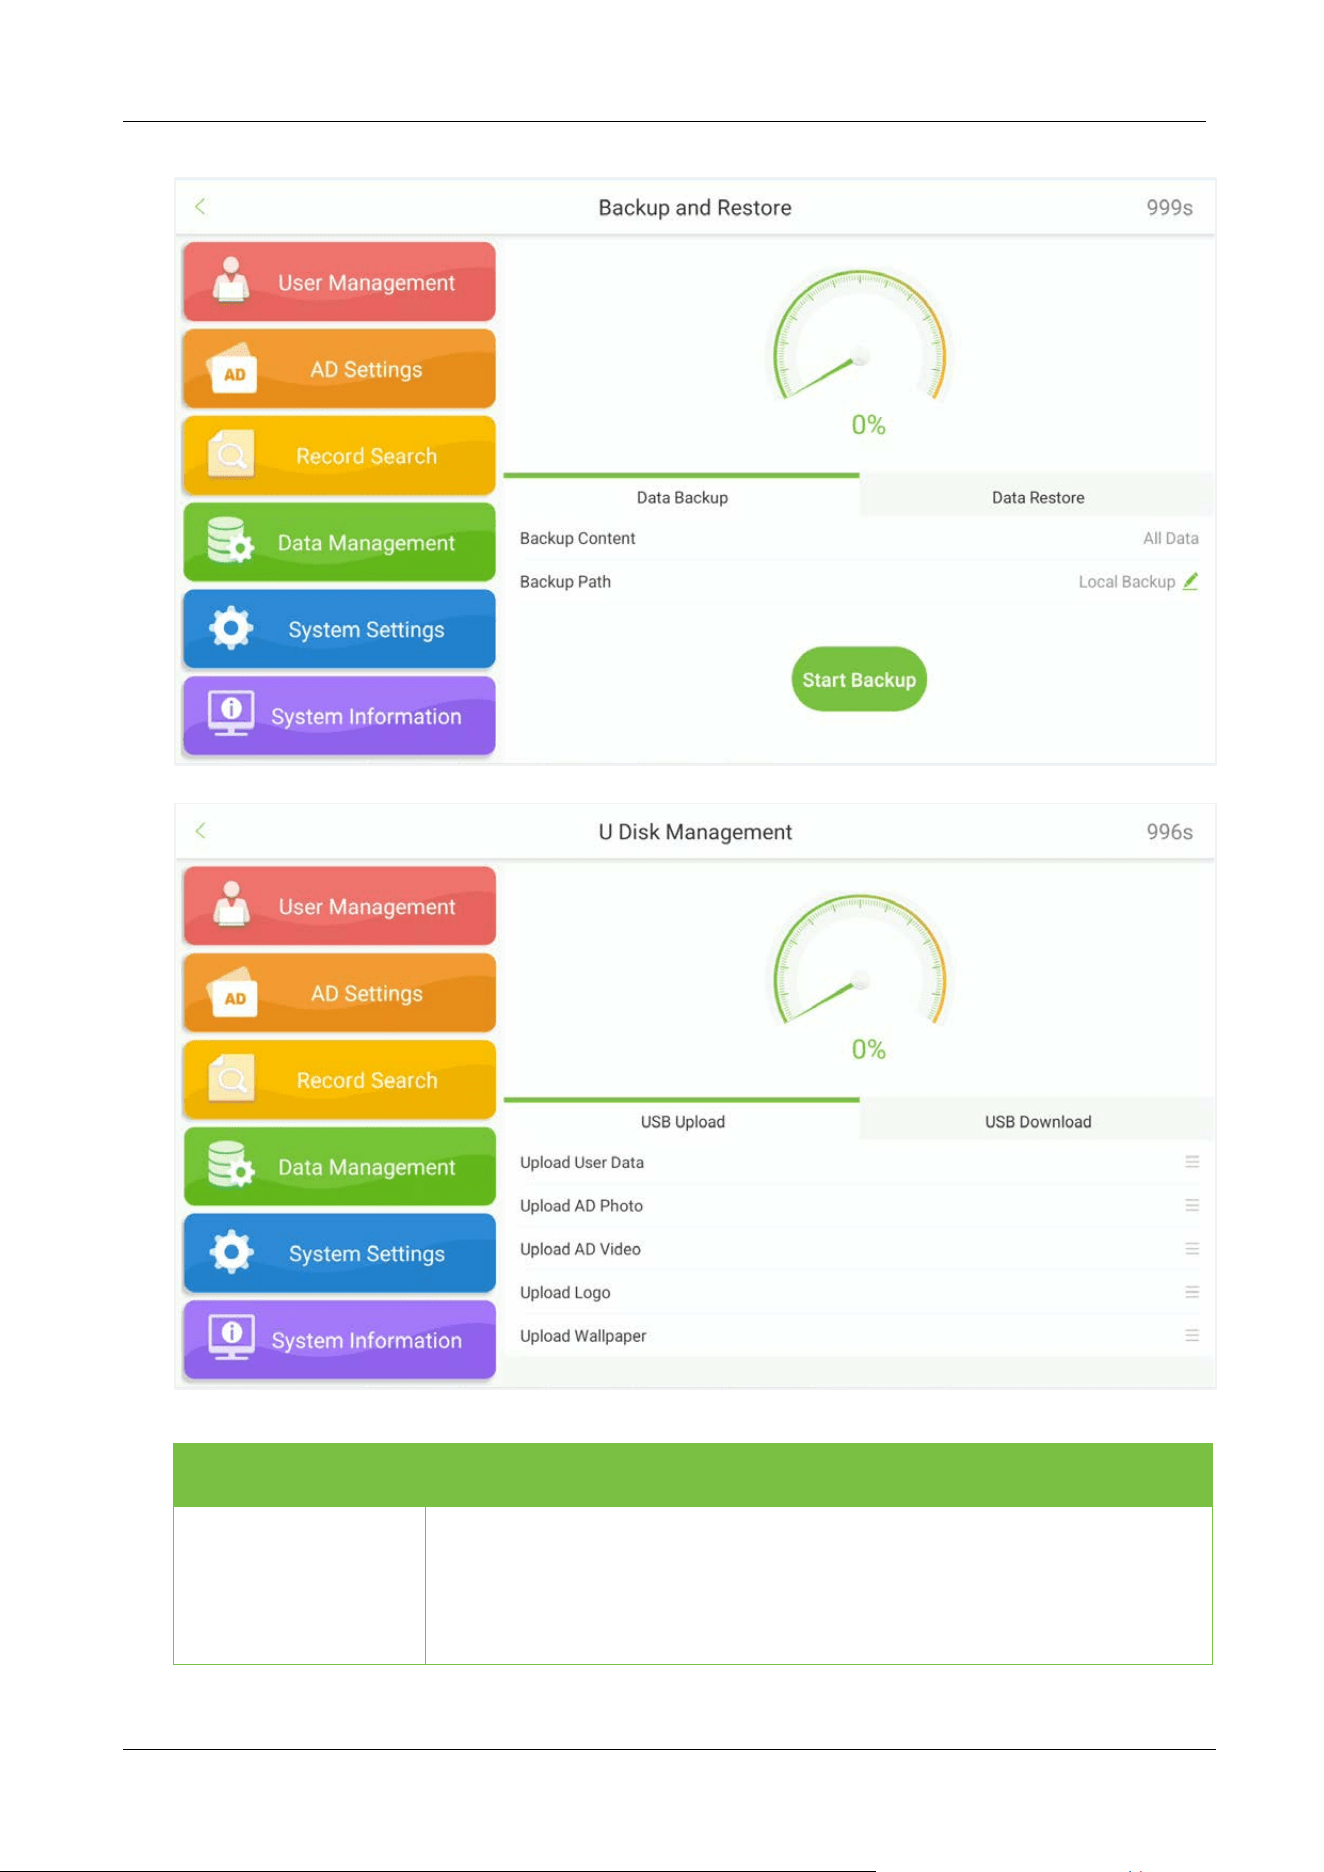
Backup and Restore
Select to backup all data from the device or restore data to the device.
U Disk Management
Choose to upload USB your user data, AD photo, AD
video, logo and
wallpaper, etc. You can also download user data to USB.
FaceKiosk-H13 User Manual
P a g e | 42 Copyright©2022 ZKTECO CO., LTD. All rights reserved.
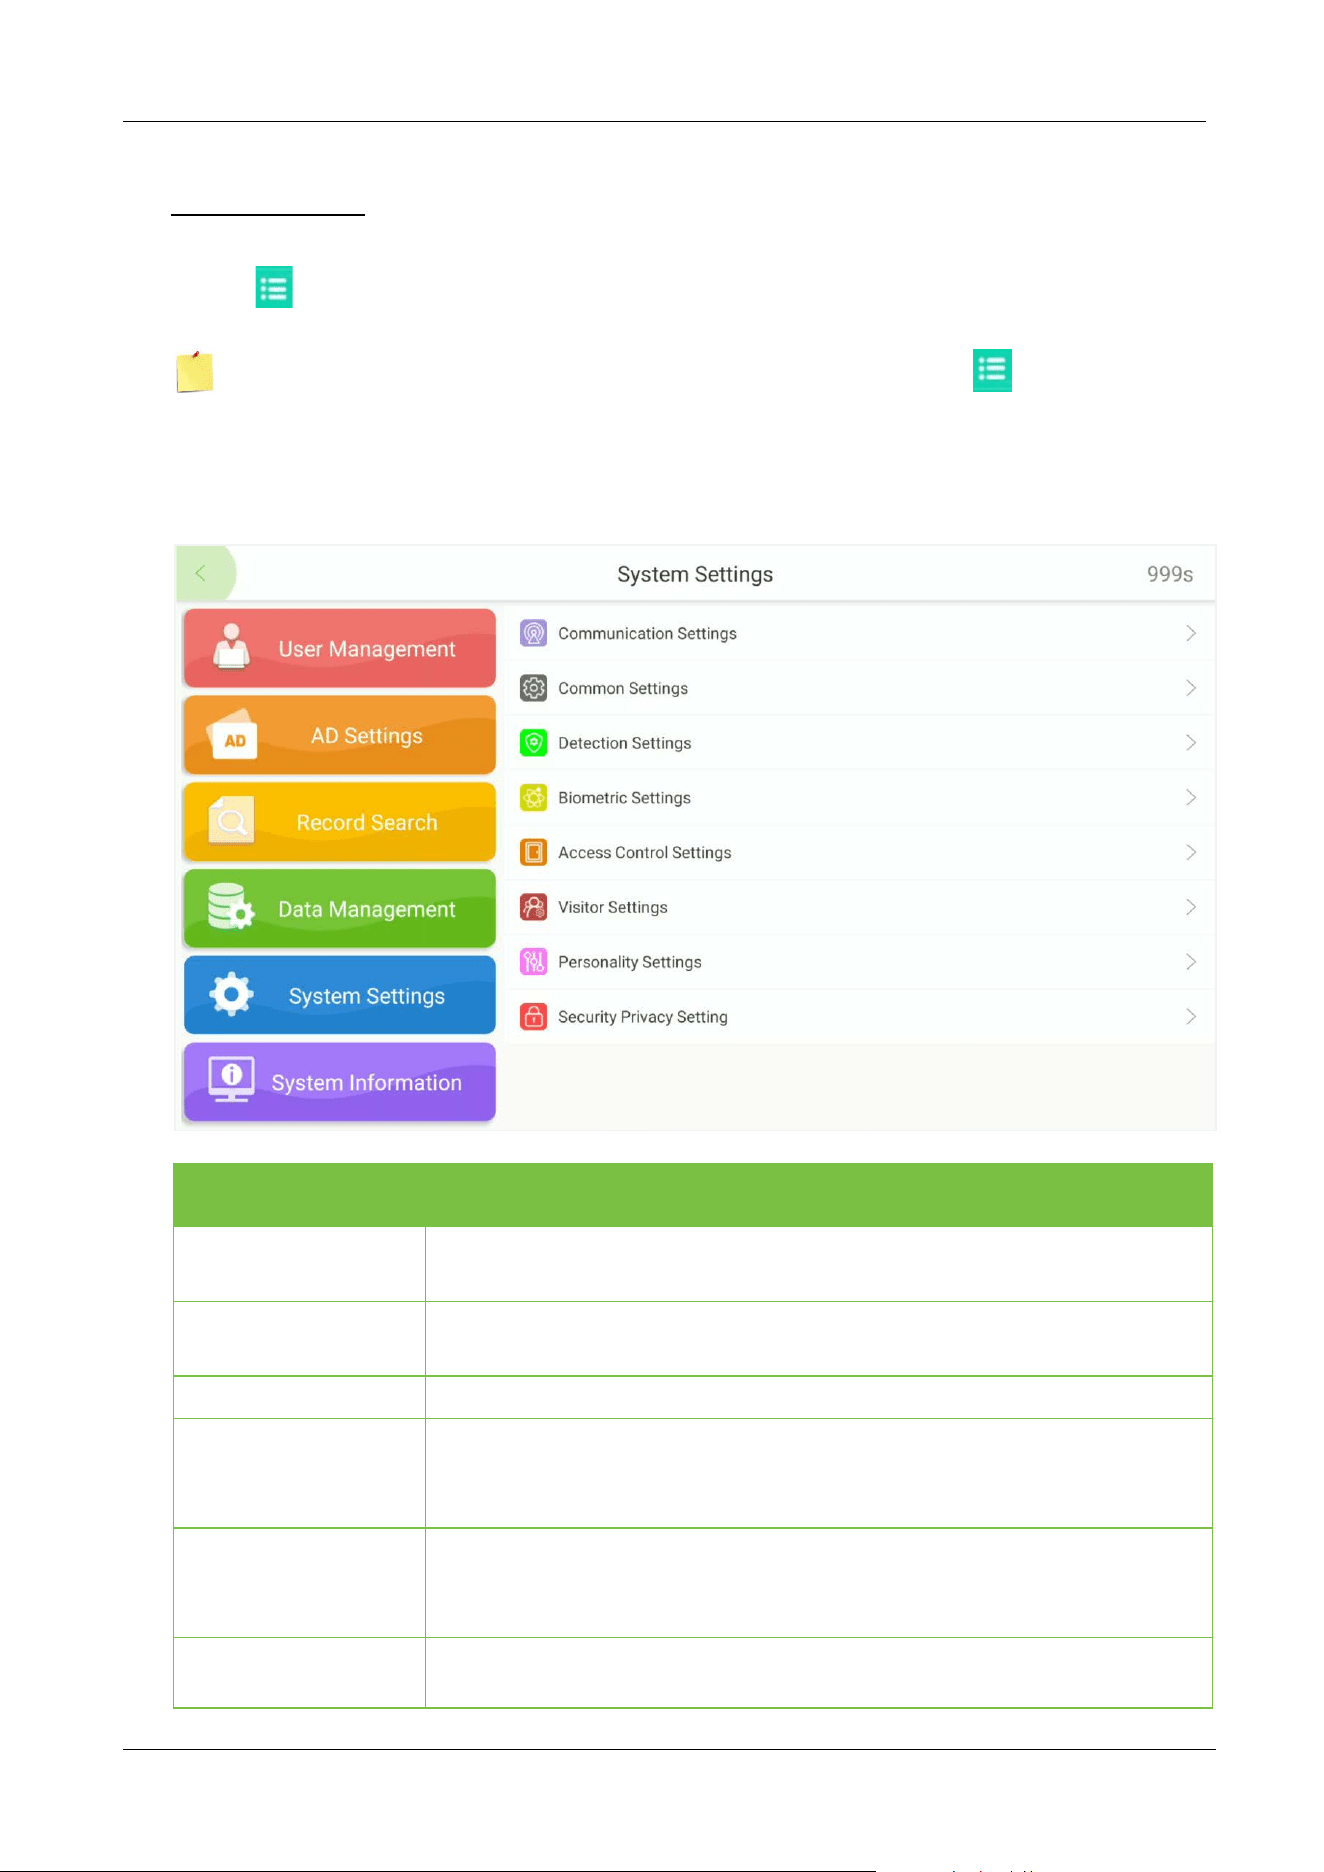
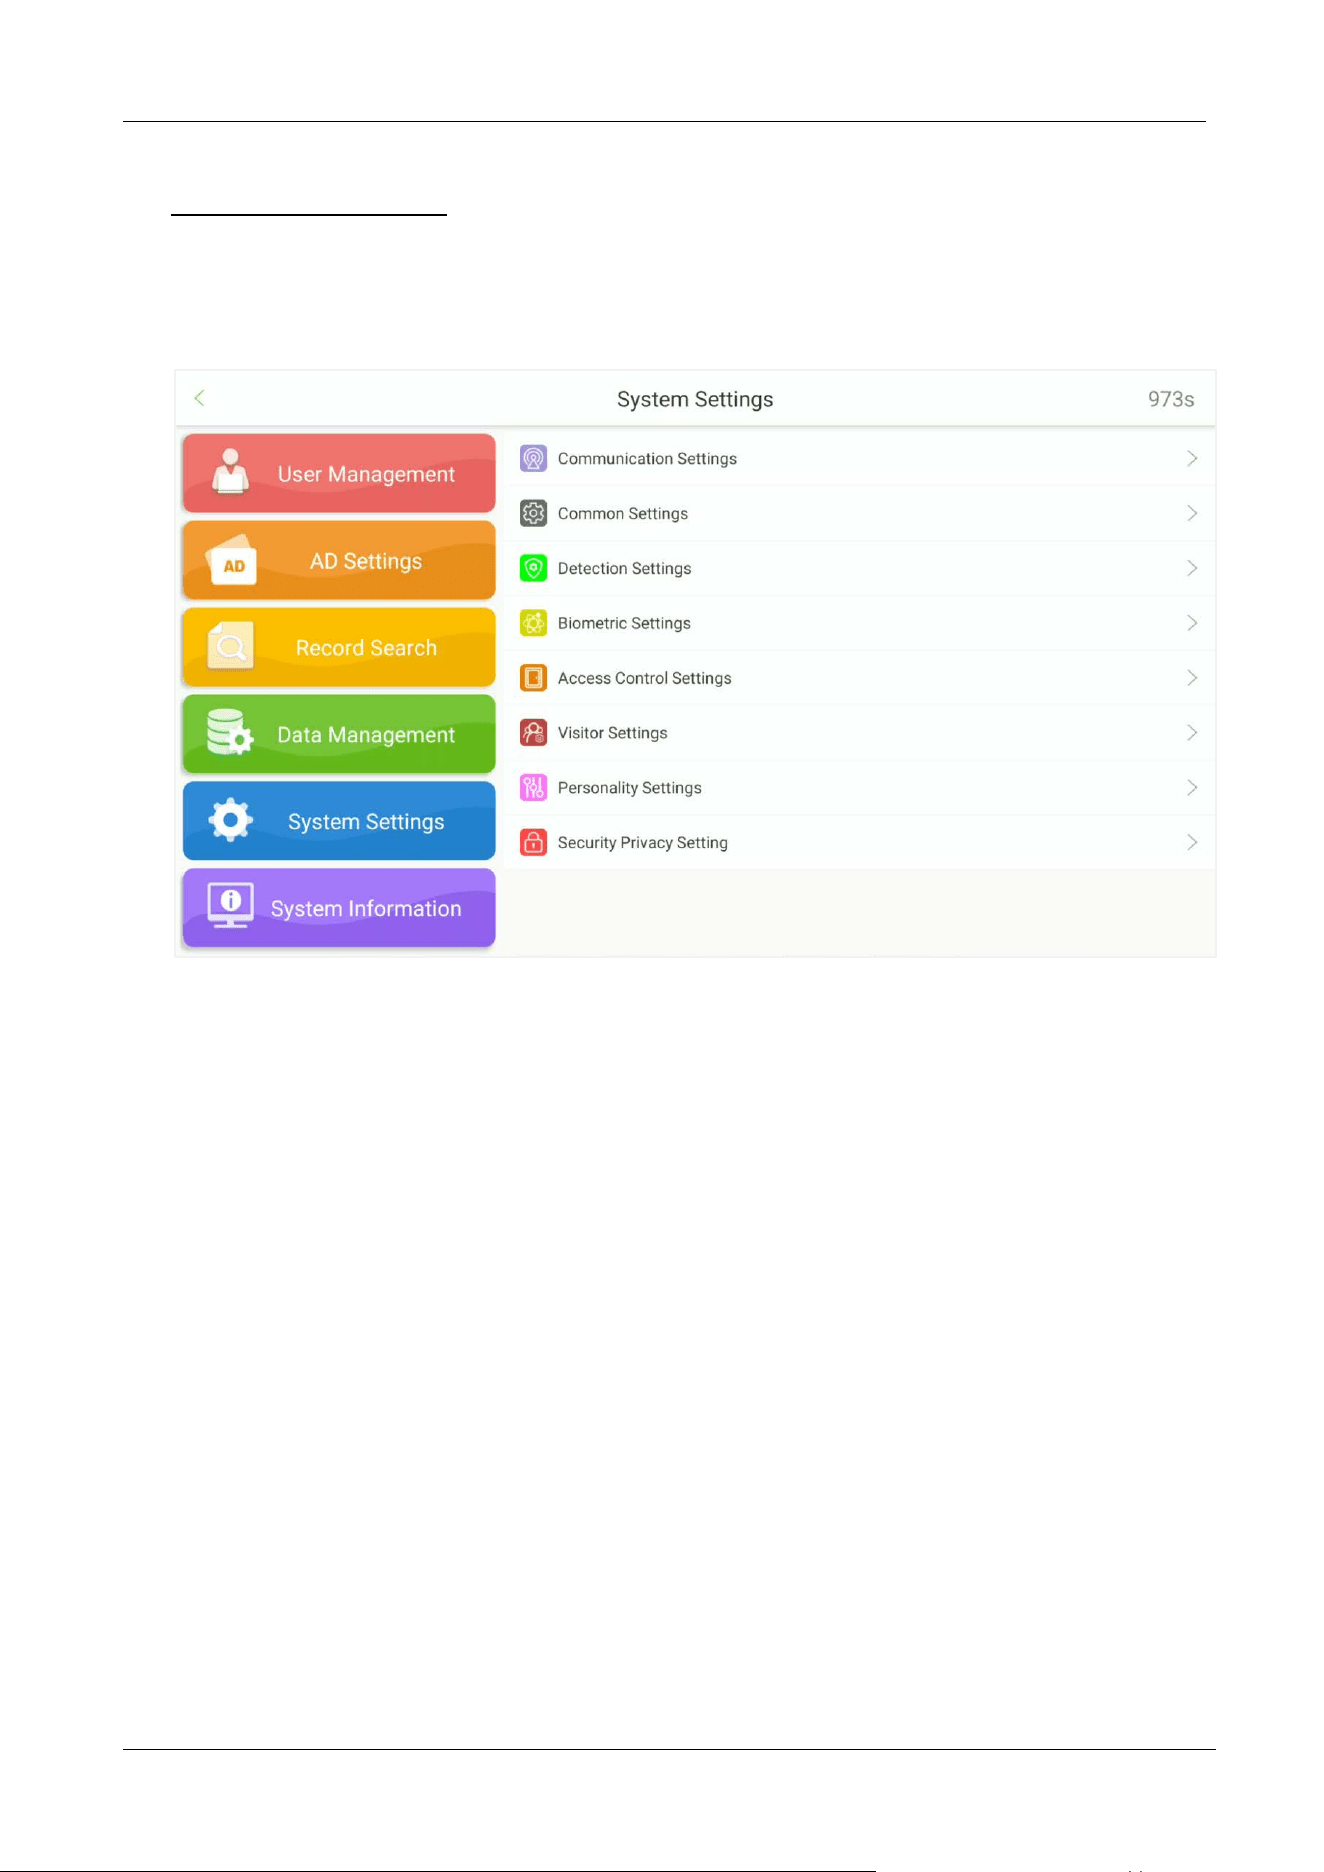
9 System Settings
Open the main menu and select System Settings. System settings facilitate setting the system
parameters based on the requirements.
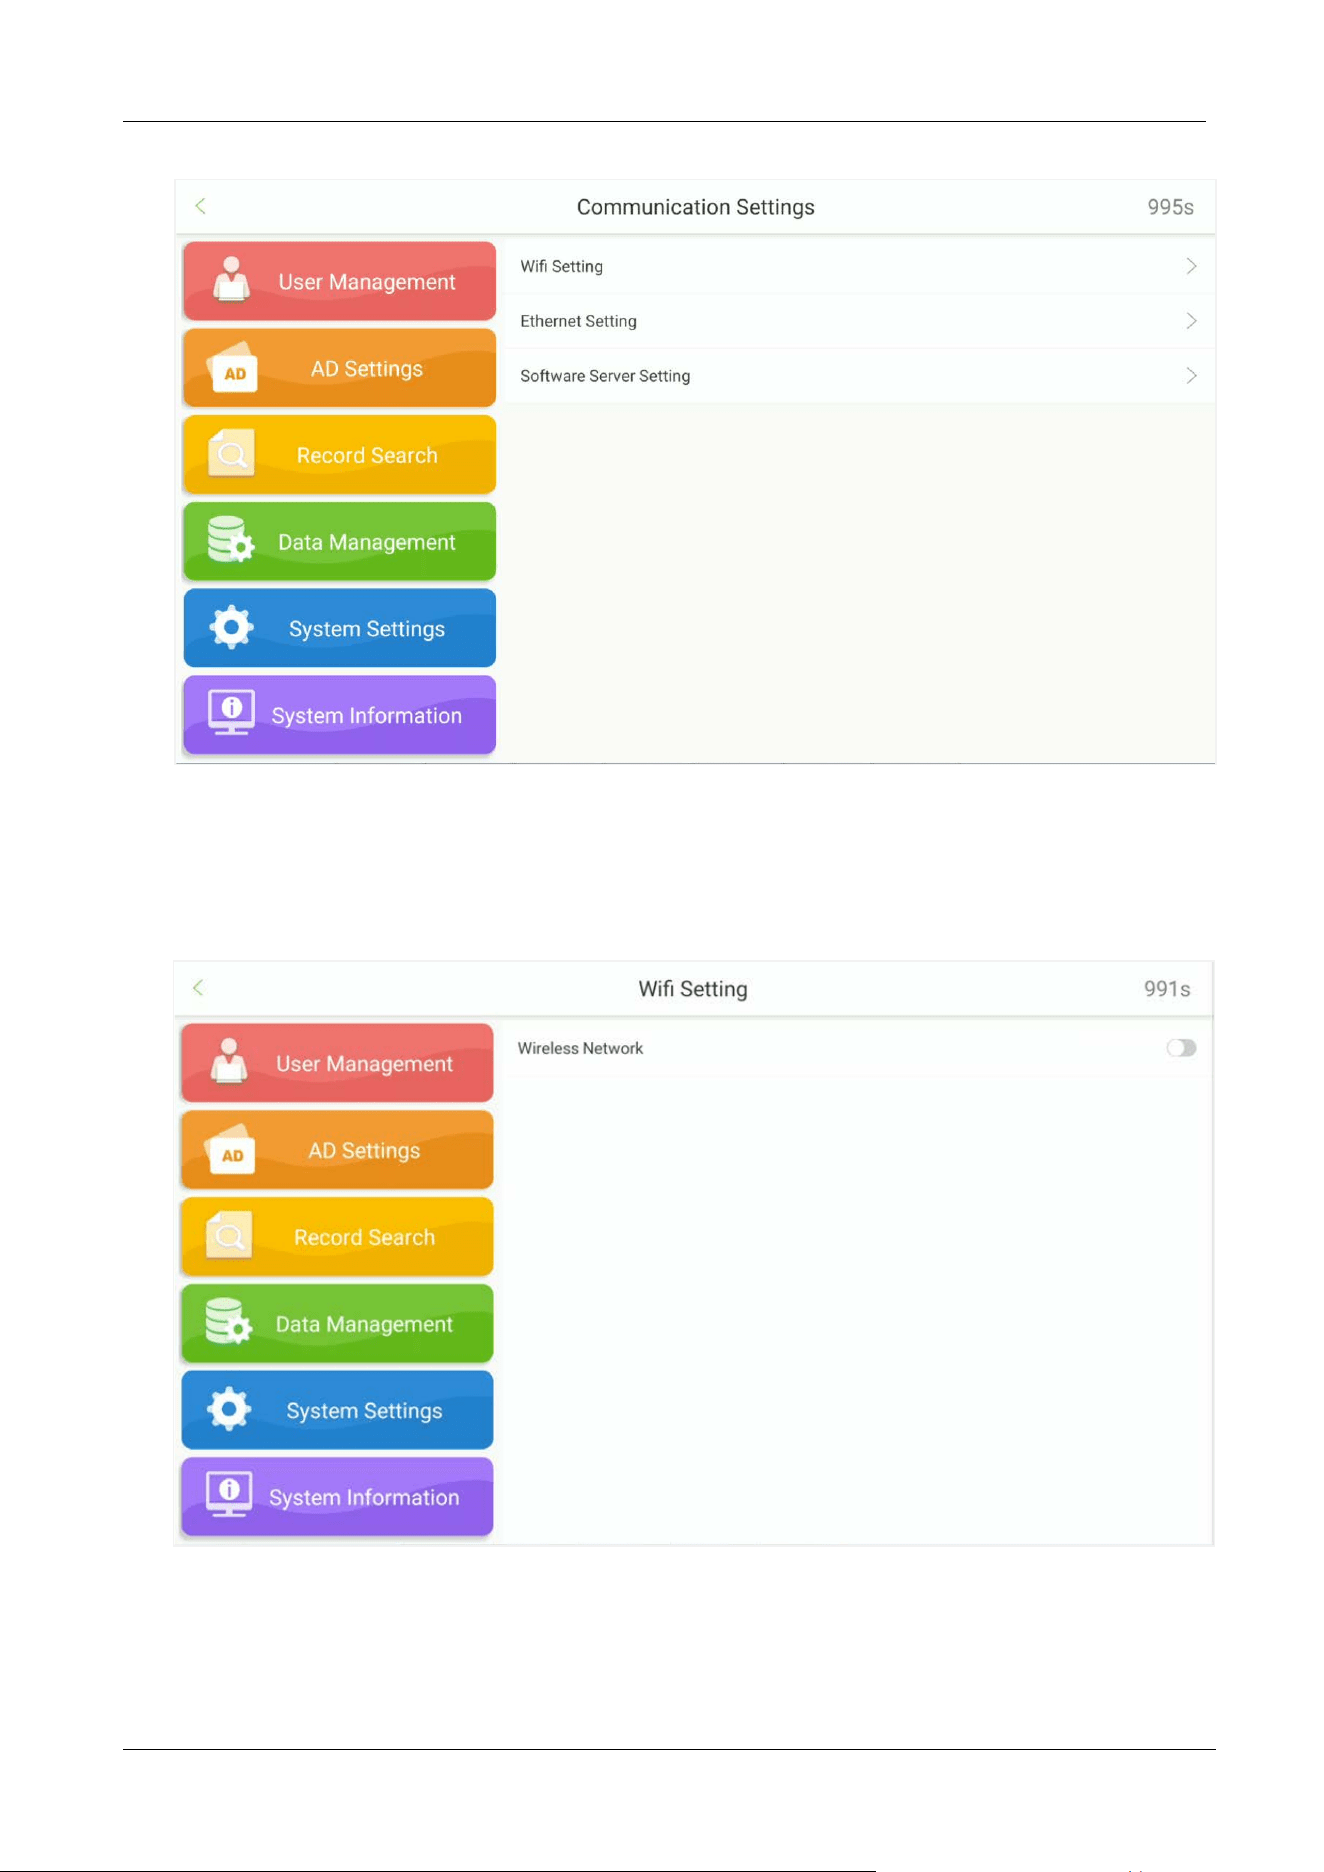
9.1 Communication Settings
To enable the communication between the device and the PC over a network, it is necessary to set the
communication parameters on the device.
Tap Communication Settings on the System Settings interface to set the communication.
FaceKiosk-H13 User Manual
P a g e | 43 Copyright©2022 ZKTECO CO., LTD. All rights reserved.
9.1.1 Wifi Setting
Open Communication Settings Wifi to set the Wifi parameters.
FaceKiosk-H13 User Manual
P a g e | 44 Copyright©2022 ZKTECO CO., LTD. All rights reserved.
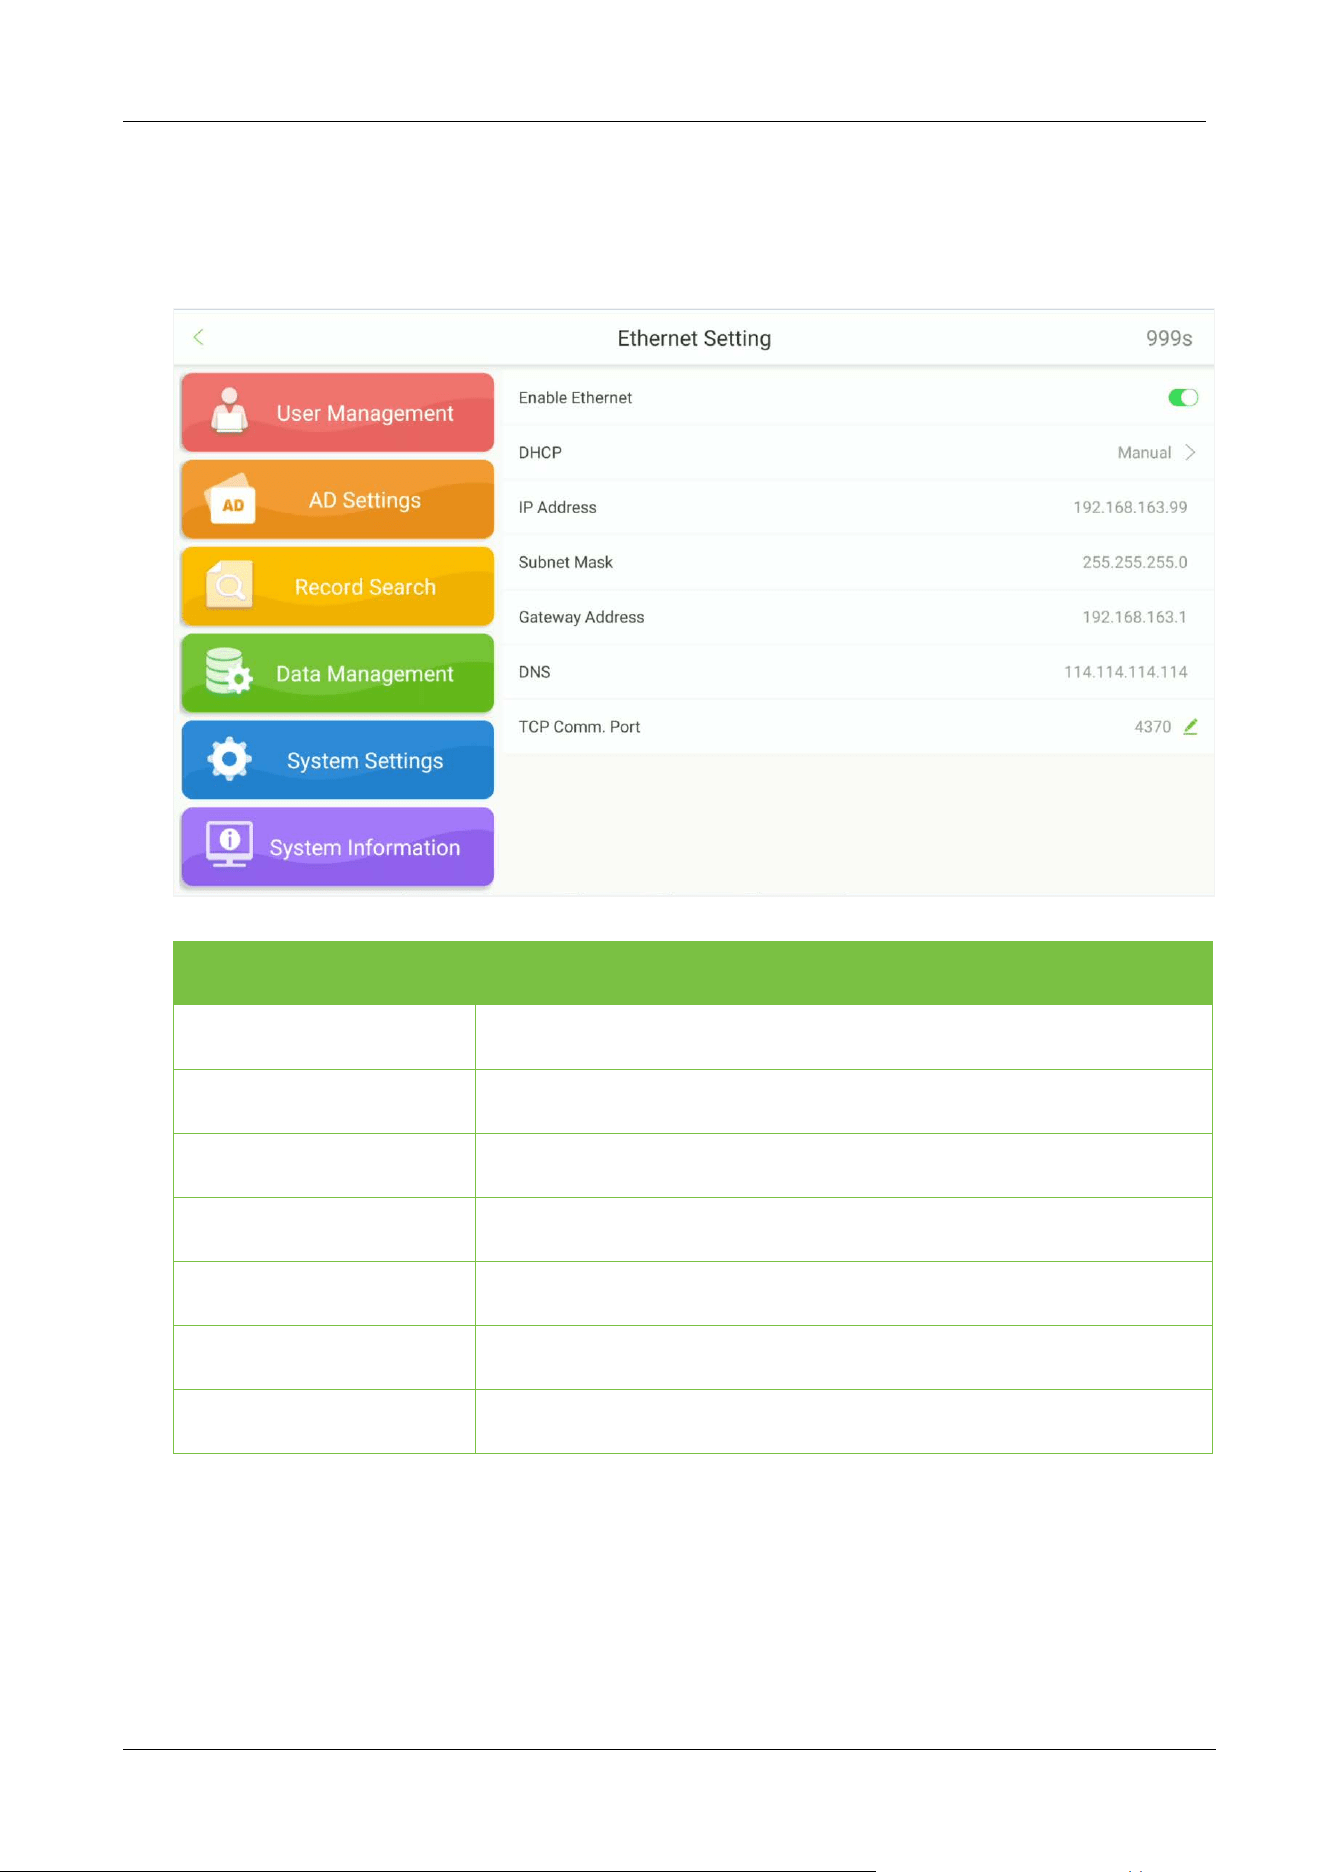
9.1.2 Ethernet Settings
Open Communication Settings Ethernet to set the LAN parameters.
Field Description
Ethernet
Enable/Disable the Ethernet connection.
DHCP
Assigns dynamic IP Addresses to the network clients over a Server.
IP Address
The default IP Address is 192.168.1.201.
Subnet Mask
The default Subnet Mask is 255.255.255.0.
Gateway Address
The default Gateway Address is 0.0.0.0.
DNS
The default DNS Address is 0.0.0.0.
TCP Comm. Port
Enter the TCP communication port.
FaceKiosk-H13 User Manual
P a g e | 45 Copyright©2022 ZKTECO CO., LTD. All rights reserved.
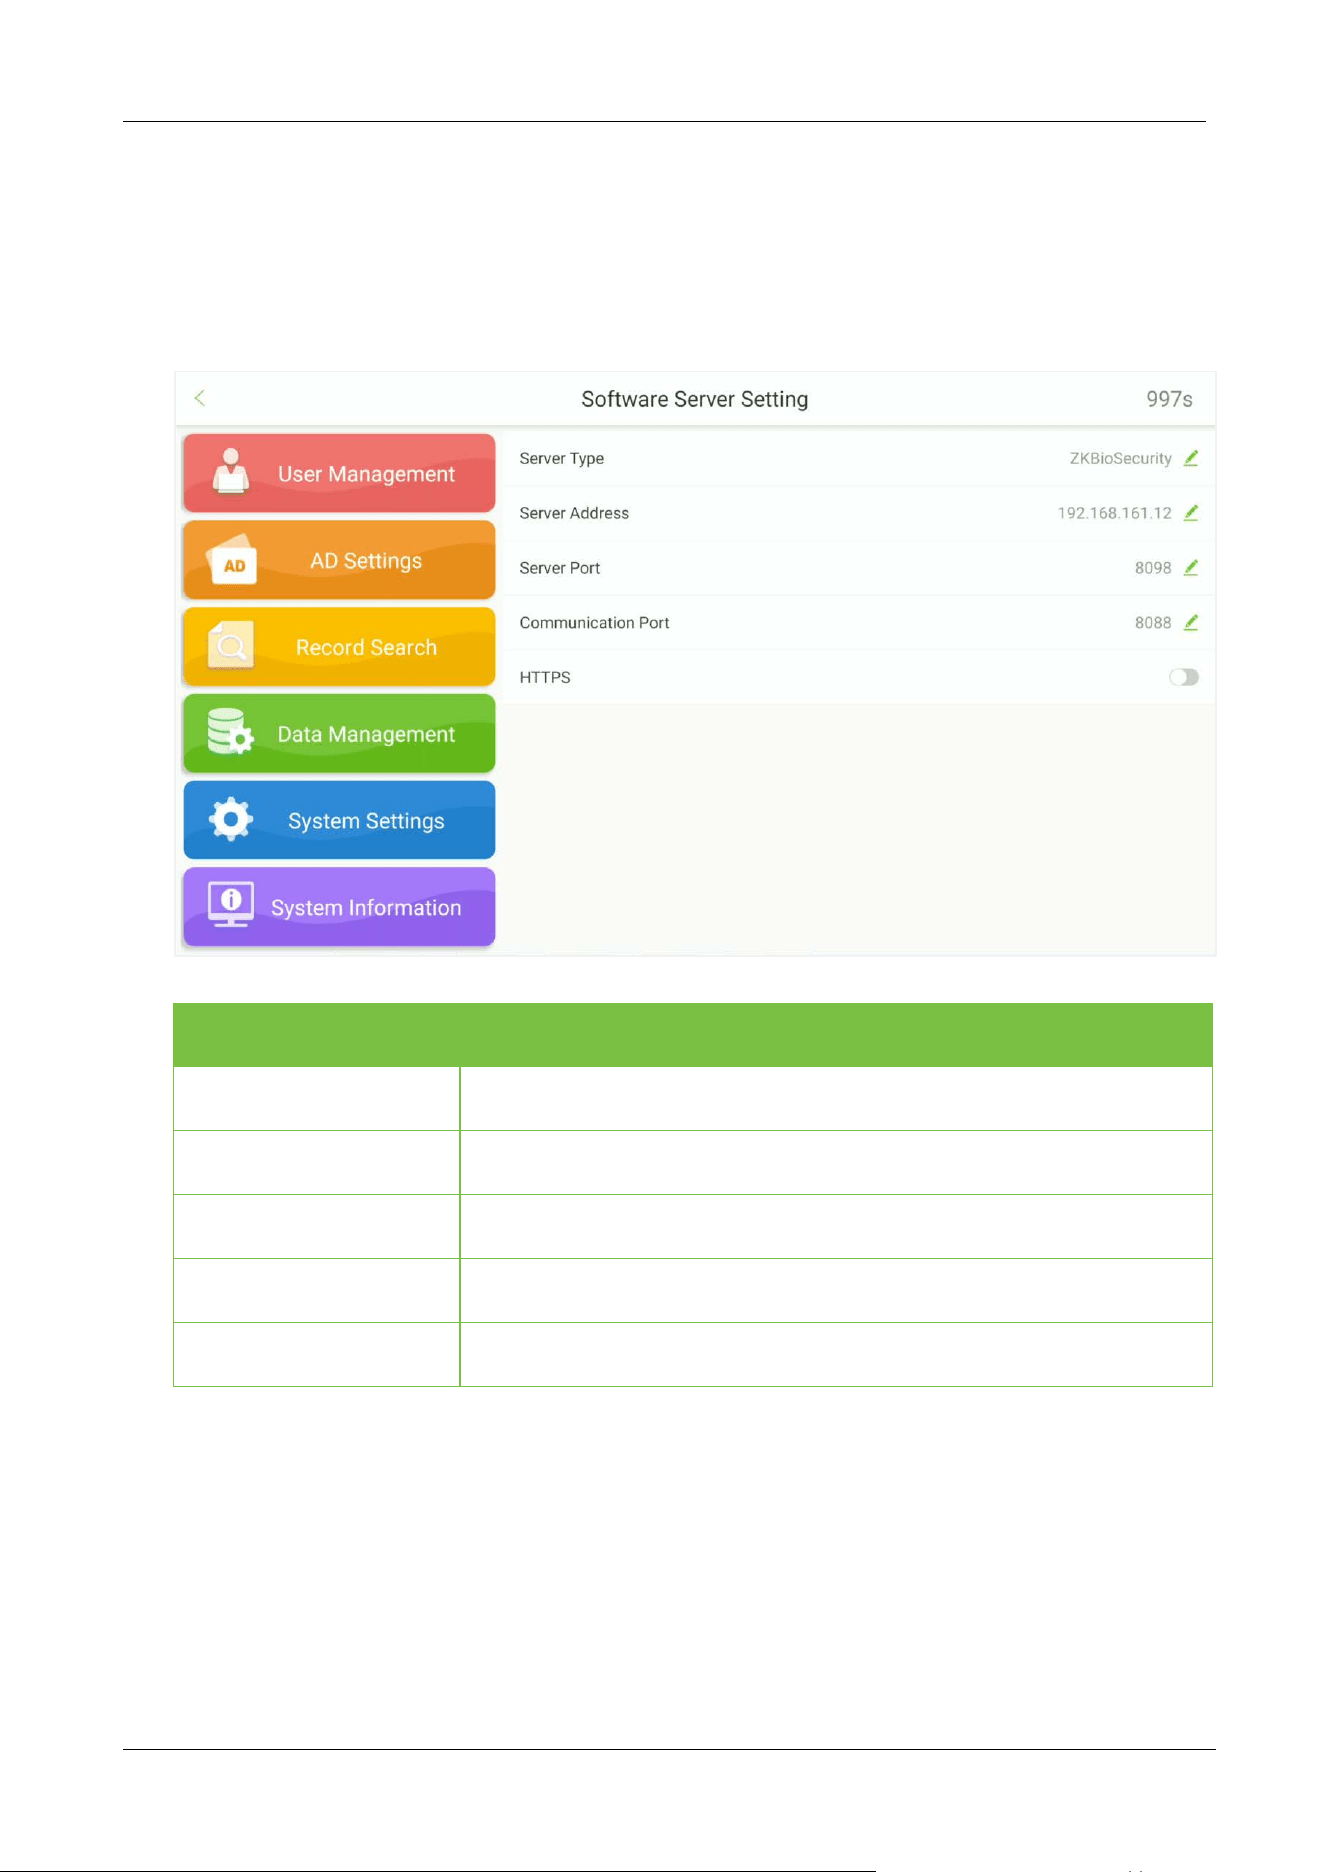
9.1.3 Server Settings
Open Communication Settings Software Server Setting to set the parameters for connecting the
PUSH Server.
Field Description
Server type
Select the software you want to connect: ZKBioSecurity.
Server Address
Set the IP Address of the software.
Server Port
Set the Server Port of the software.
Communication Port
Set the Communication Port of the software.
HTTPS
Support HTTPS Server connection.
FaceKiosk-H13 User Manual
P a g e | 46 Copyright©2022 ZKTECO CO., LTD. All rights reserved.
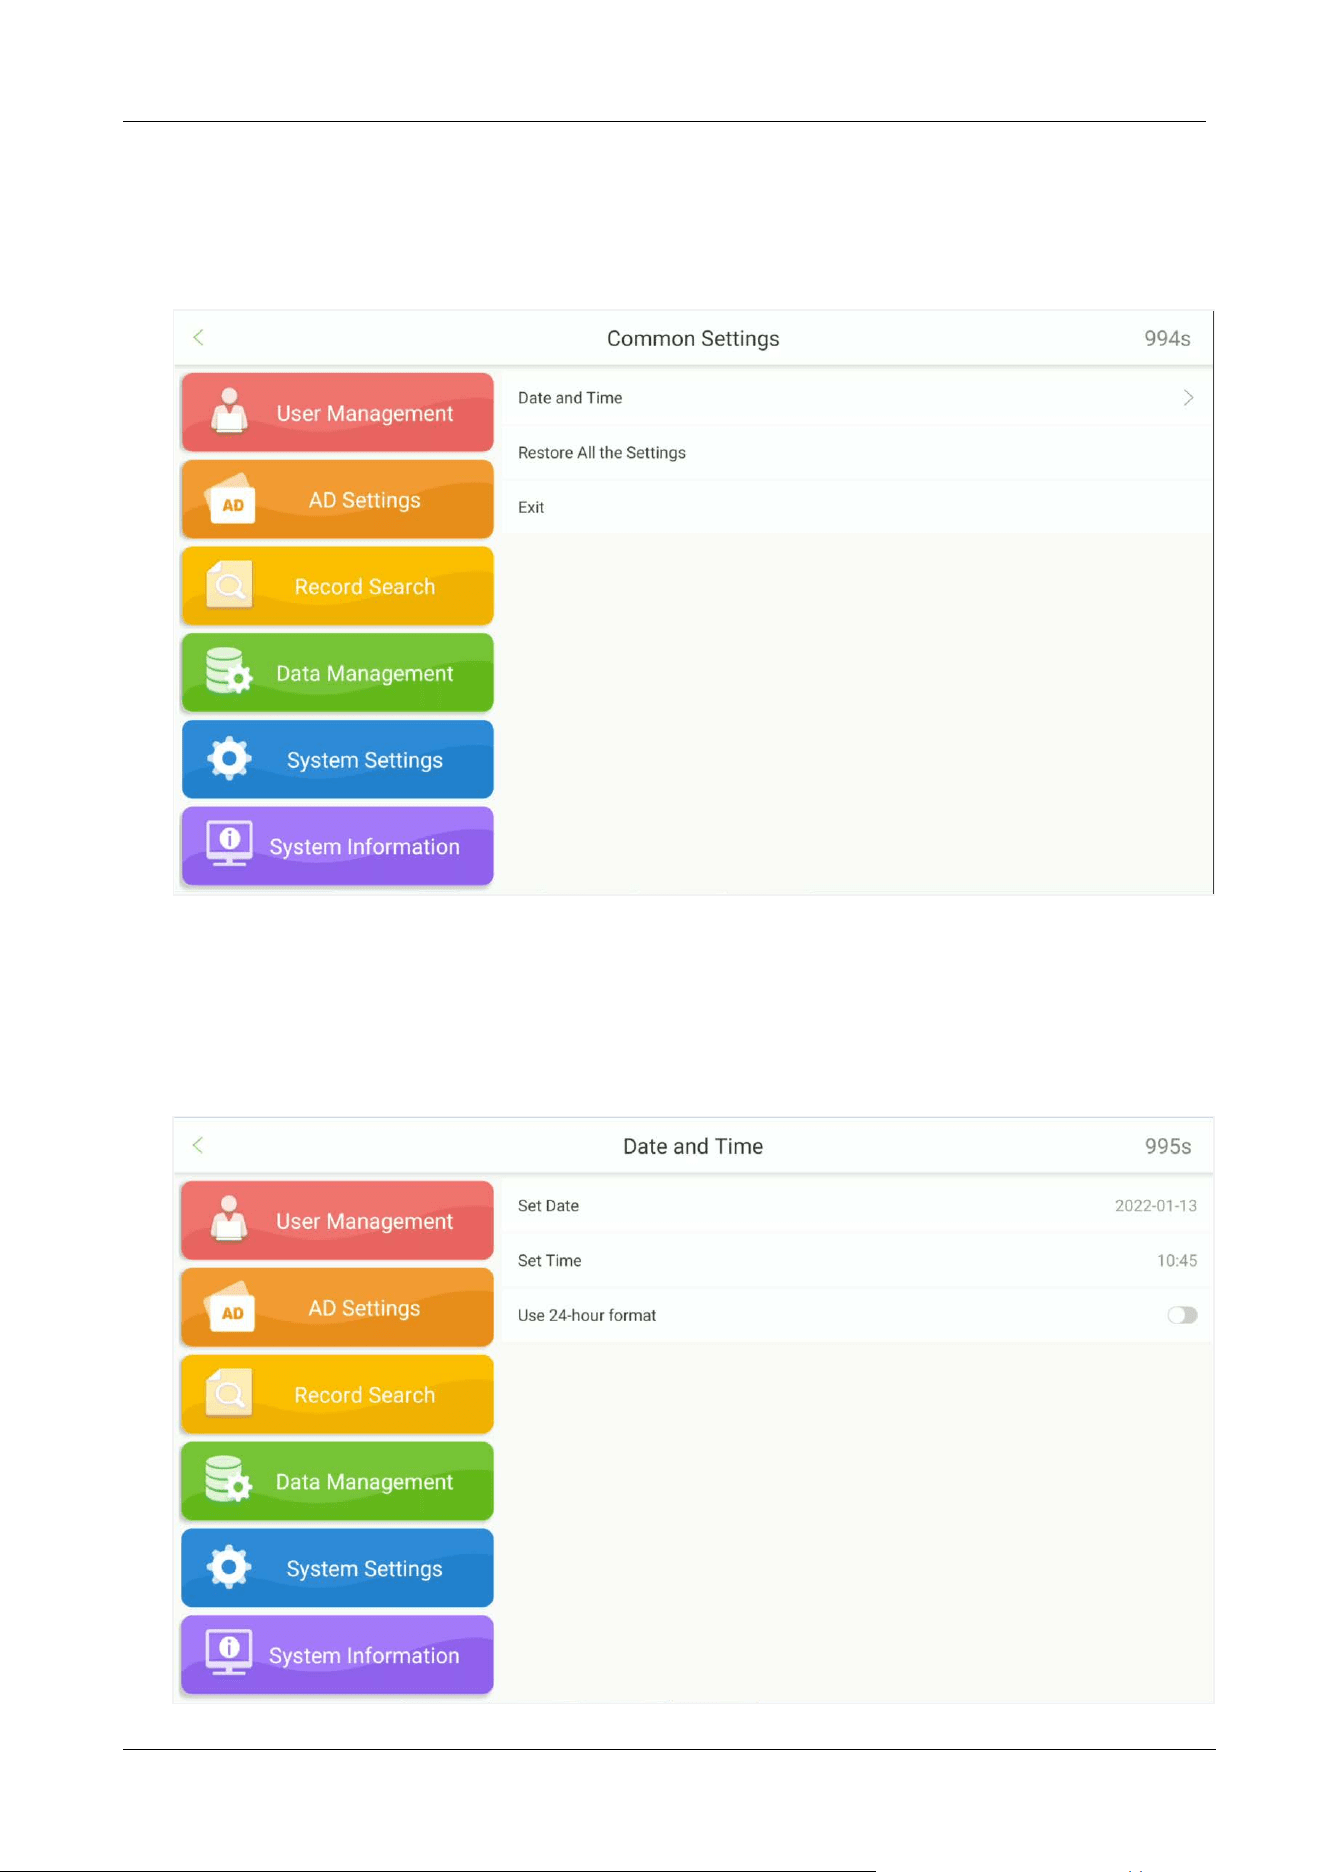
9.2 Common Settings
Tap Common Settings on the System Settings interface to set the common setting.
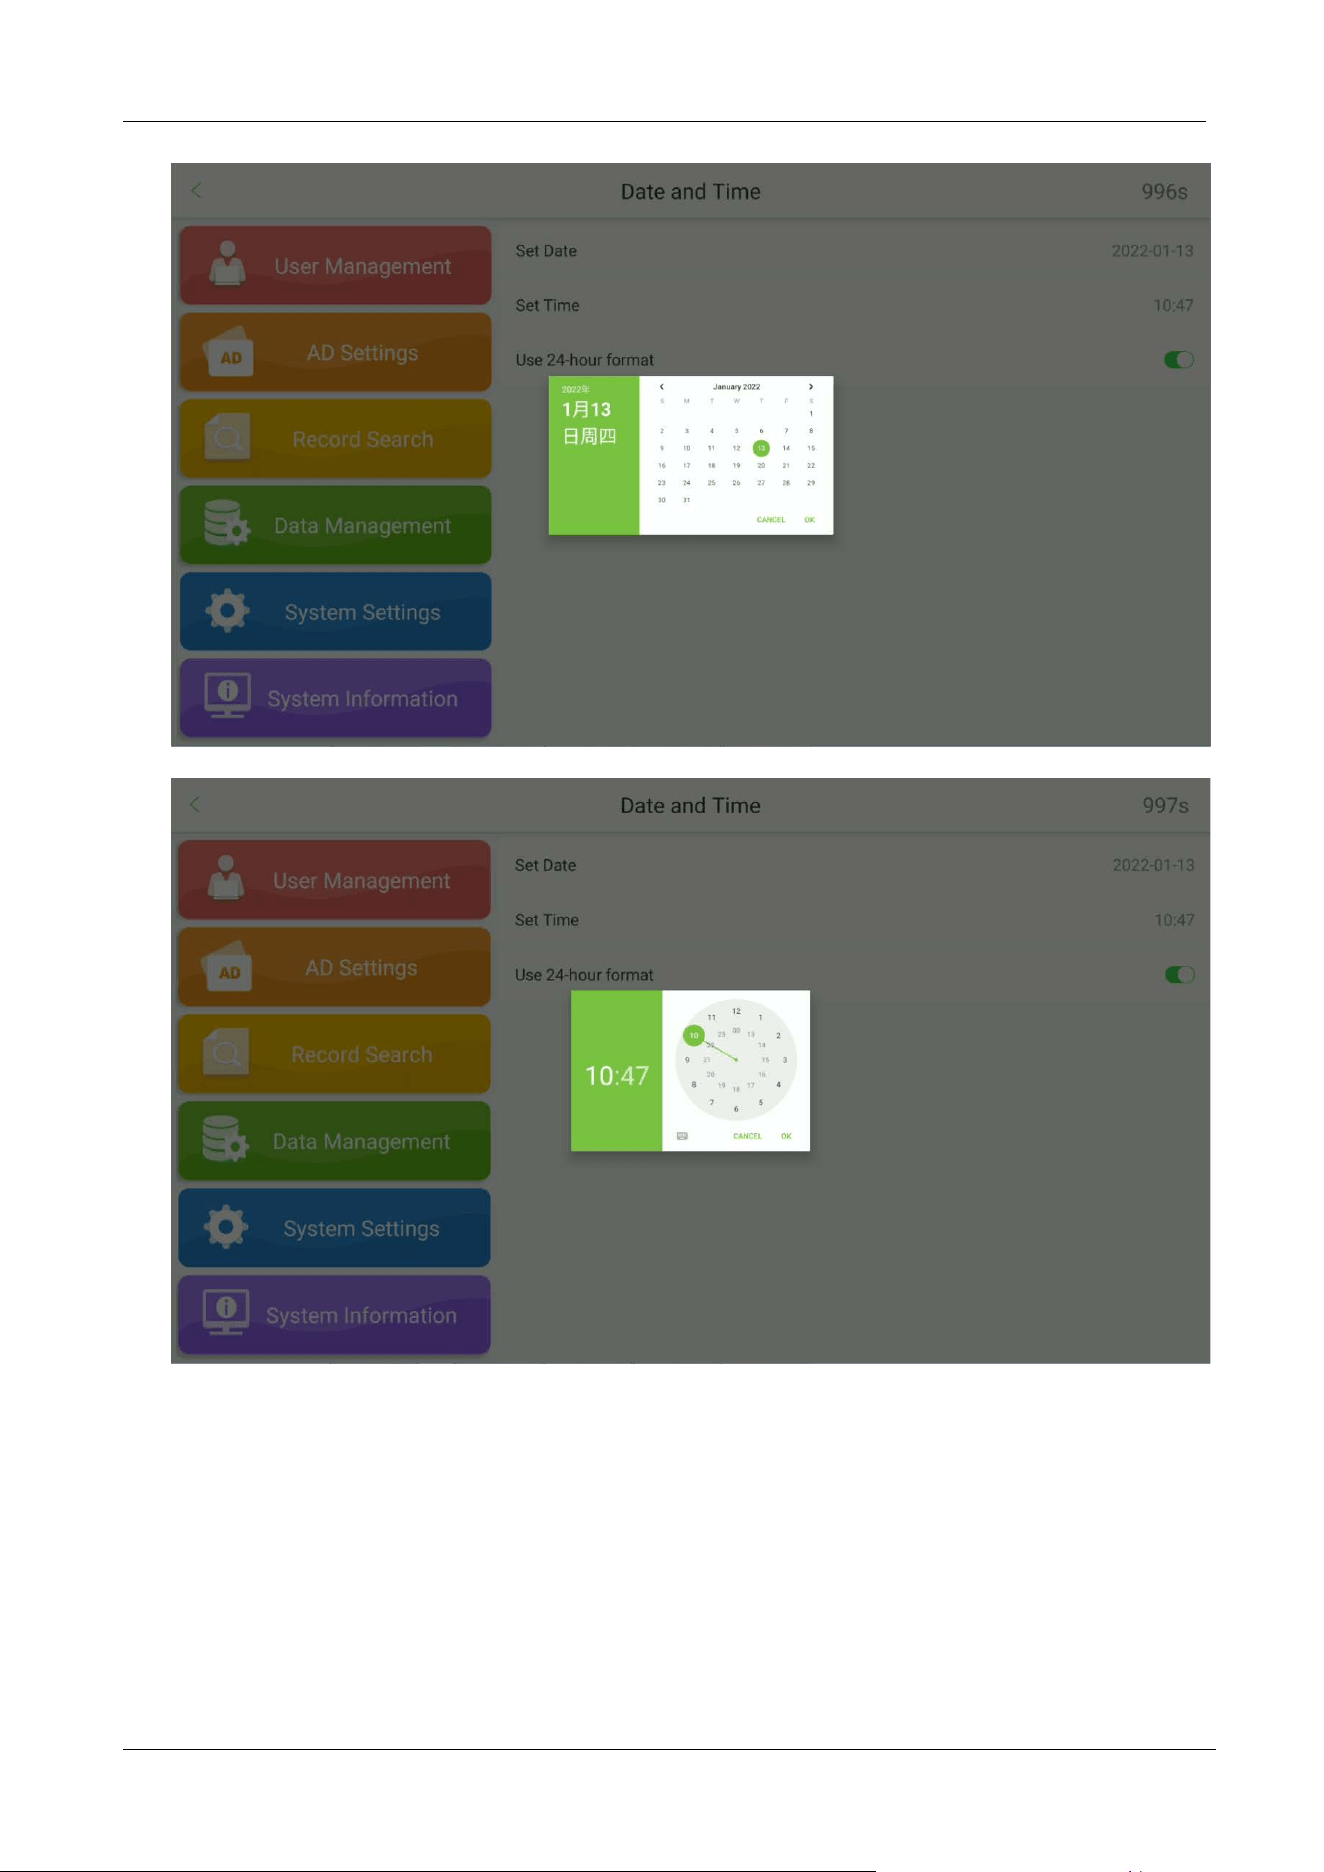
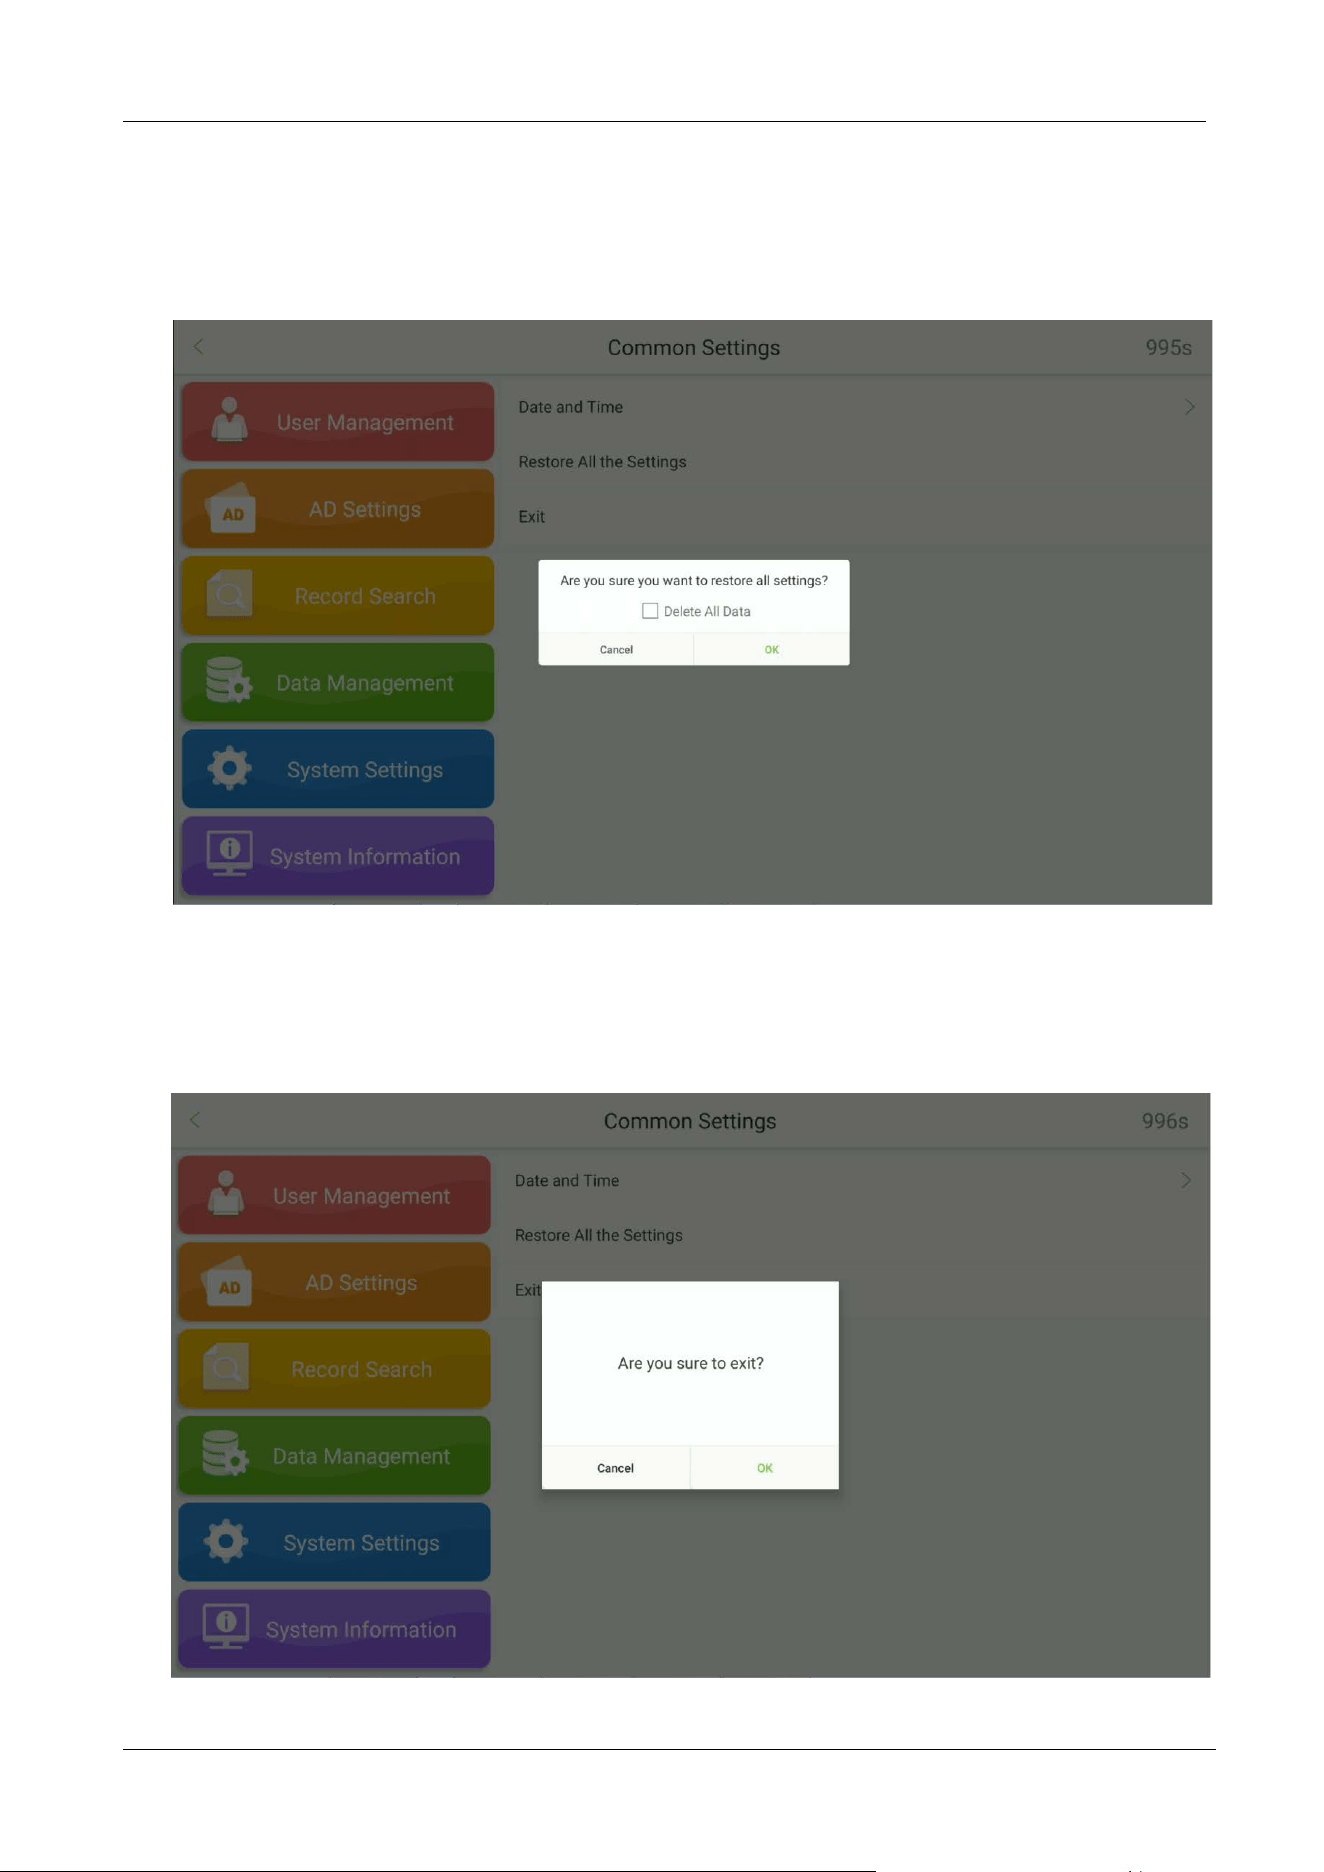
9.2.1 Date and Time
Open Common Settings Date and Time.
FaceKiosk-H13 User Manual
P a g e | 47 Copyright©2022 ZKTECO CO., LTD. All rights reserved.
Set the Date, Month, and Year on the calendar and tap OK.
Move the Hour and Minute hands to set the time and tap OK.
FaceKiosk-H13 User Manual
P a g e | 48 Copyright©2022 ZKTECO CO., LTD. All rights reserved.
9.2.2 Restore All the Settings
Tap Restore All the Settings to restore all settings.
9.2.3 Exit
Tap Exit will exit the software.
FaceKiosk-H13 User Manual
P a g e | 49 Copyright©2022 ZKTECO CO., LTD. All rights reserved.
After exiting the software, Tap on ZKBioLobby and the program will re-enter.
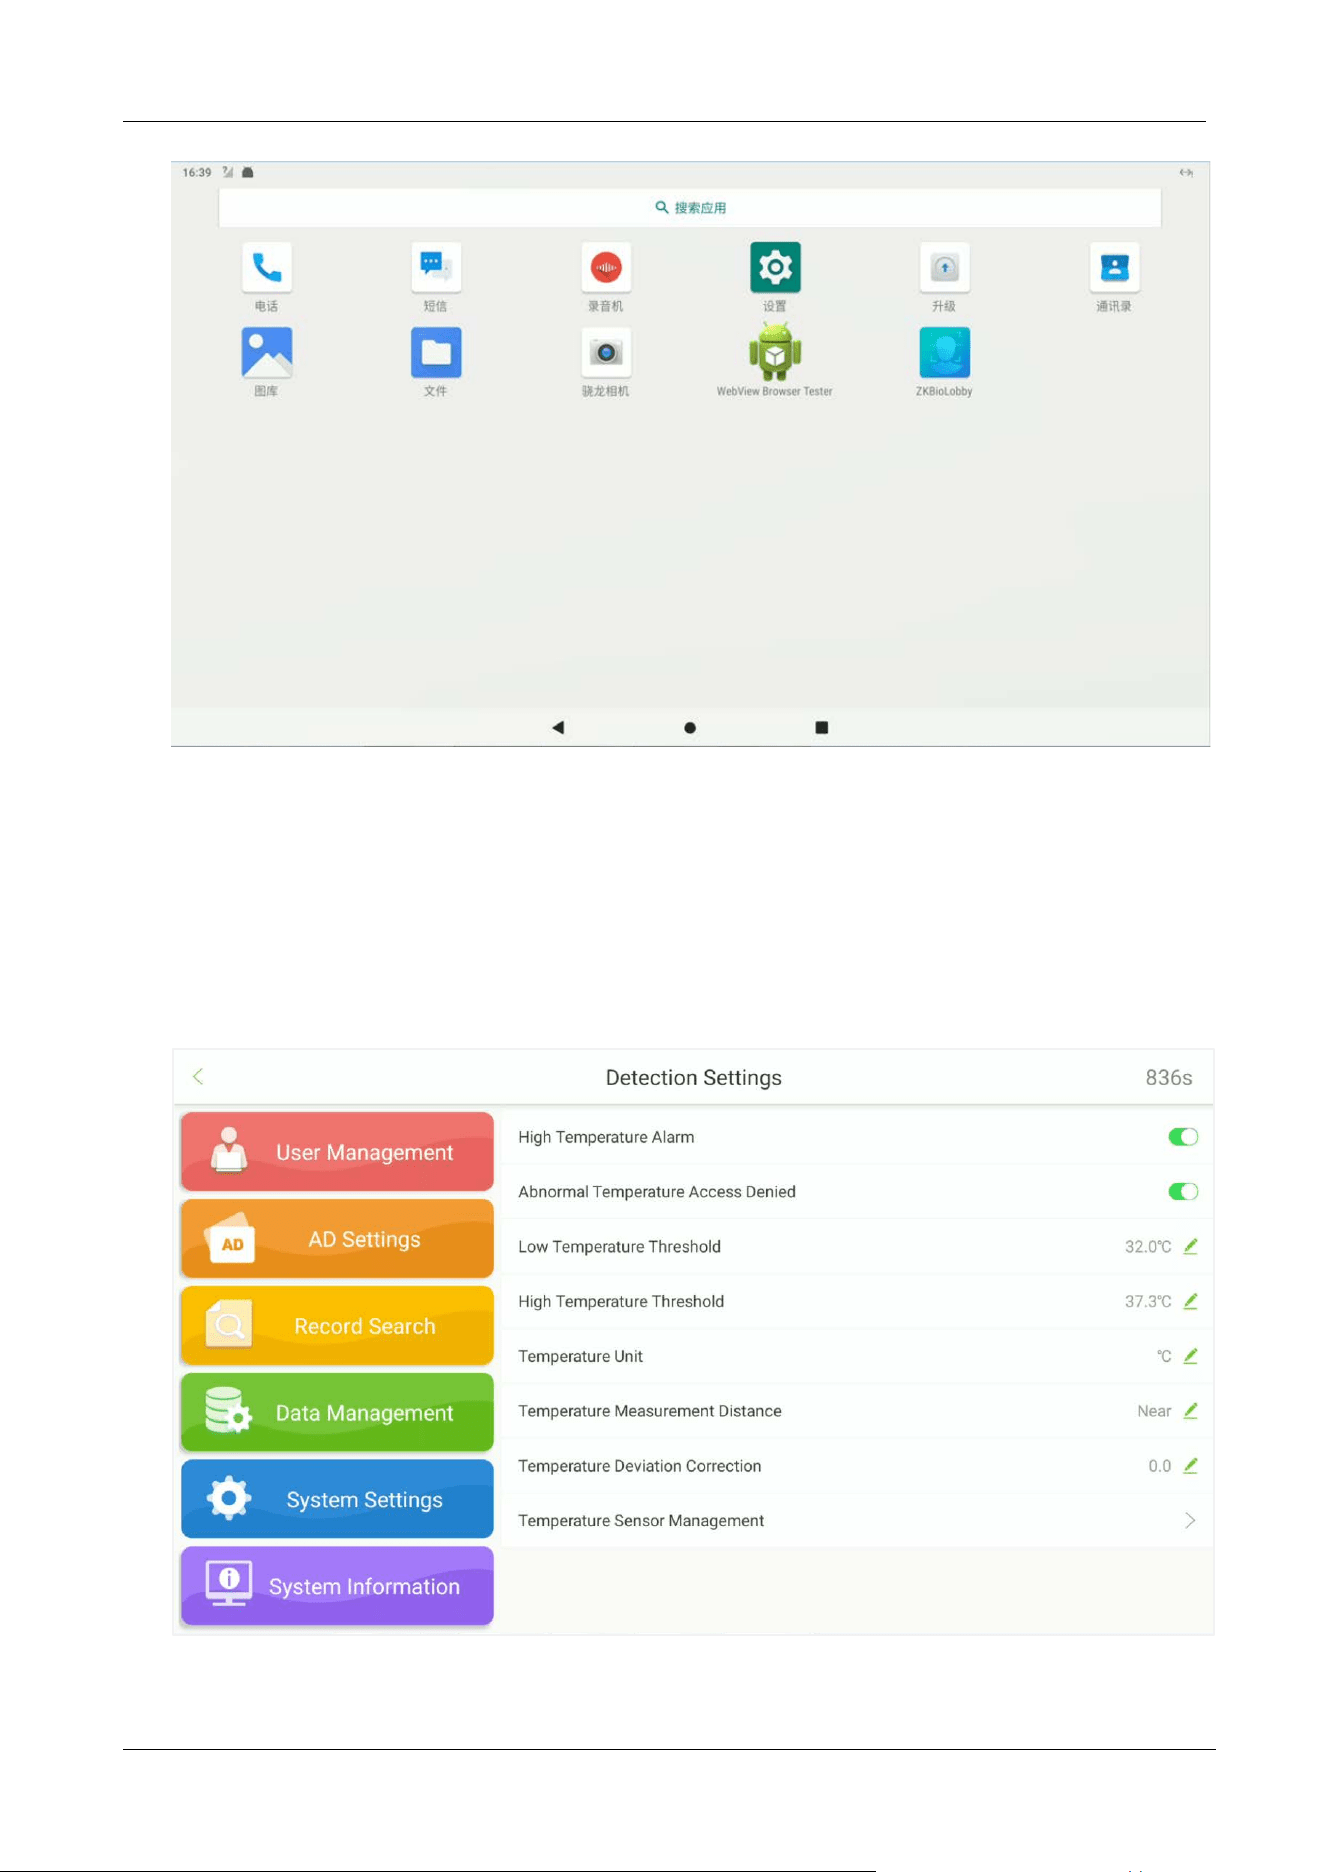
9.3 Detection Settings
★
Tap Detection Settings on the System Settings interface to enter into detection management
interface.

FaceKiosk-H13 User Manual
P a g e | 50 Copyright©2022 ZKTECO CO., LTD. All rights reserved.
Menu Function
High Temperature
Alarm
Based on the set high body temperature alarm threshold. When the
temperature measured during verification is higher than the set value, the
device will give a prompt and audio alarm.
Abnormal
Temperature Access
Denied
When the temperature detected is higher than the threshold value, the
device will deny visitor check-in.
Low Temperature
Threshold
If the temperature detected is lower than the set value, the data will be
considered invalid and will not be included in the final temperature value.
High Temperature
Threshold
When the temperature detected is higher than the set value, the device
will trigger an alarm when the visitor checks-in, and the temperature result
will be displayed in red.
Temperature Unit
Set the temperature unit as Celsius or Fahrenheit.
Temperature
Measurement
Distance
Set the temperature measurement distance as Close / Near / Far.
Temperature
Deviation Correction
Set the compensation value of the temperature detection data
. The
deviation value can be positive or negative.
Temperature Sensor
Management
Displays the MCU version of the temperature detection module.
FaceKiosk-H13 User Manual
P a g e | 51 Copyright©2022 ZKTECO CO., LTD. All rights reserved.
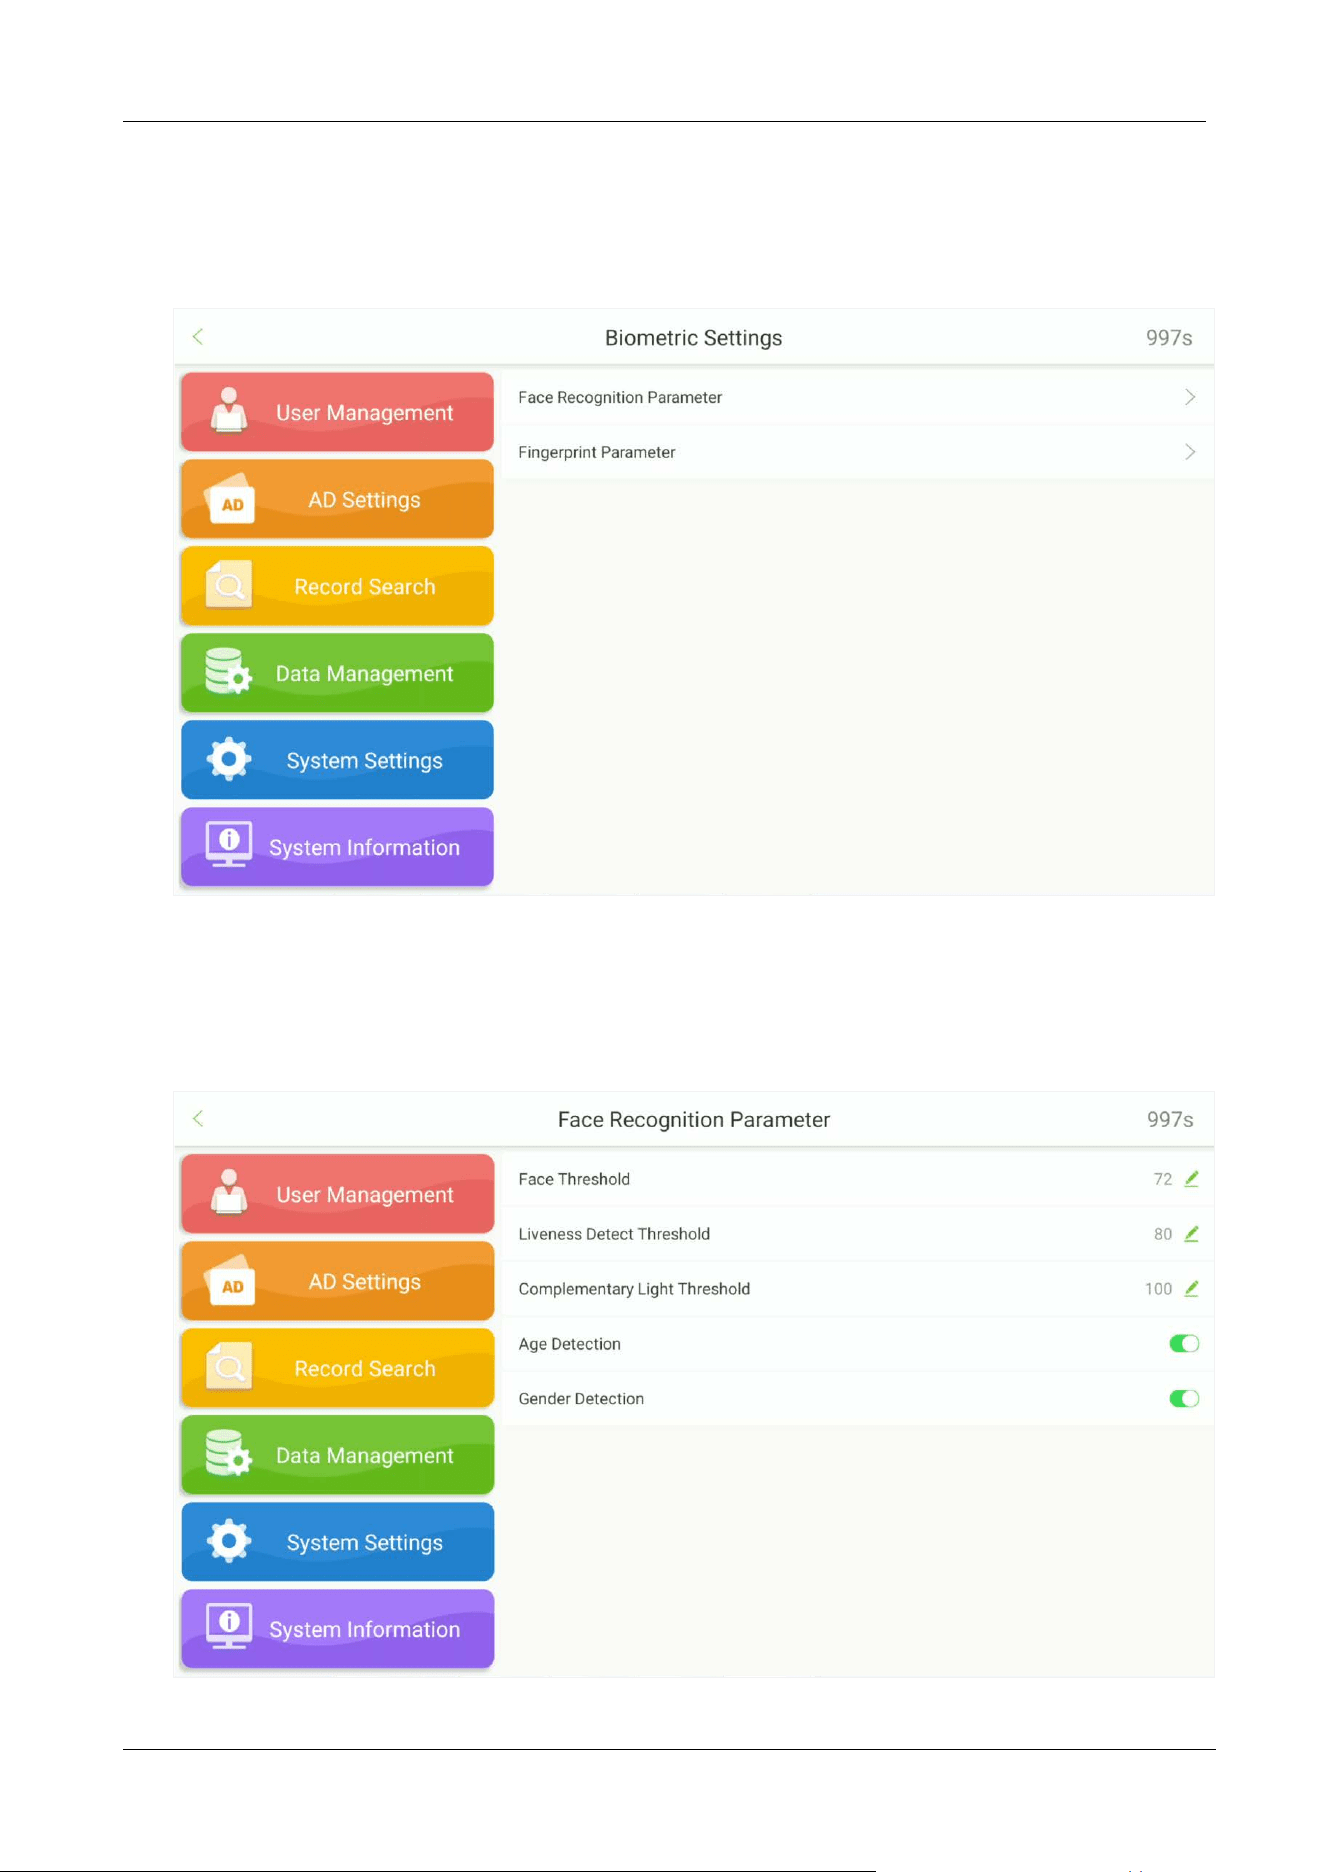
9.4 Biometric Settings
Tap Biometric Settings on the System Settings interface to enter into biometric settings interface.
9.4.1 Face Recognition Parameter
Open Biometric Settings Face Recognition Parameter.
FaceKiosk-H13 User Manual
P a g e | 52 Copyright©2022 ZKTECO CO., LTD. All rights reserved.
Menu Function
Face Threshold
Set the level of similarity between the registered face templates and the
verified one in the device. The default value is 72, and it ranges from 72 to
99.
Liveness Detection
Threshold
A lower value leads to higher accuracy with a higher rejection rate. But the
recognition speed will be influenced. The recommended value is 80, and it
ranges from 0 to 99.
Complementary
Light Threshold
It detects the ambient light brightness. W
hen the brightness of the
surrounding environment is less than the threshold, the complementary
light is turned on. When the brightness is greater than the threshold, the
complementary light is turned off. The default value is 100.
Age Detection
When this feature is turned on, the age of the face currently in front of the
camera is display.
Gender Detection
When this feature is turned on, the gender of the face currently in front of
the camera is display.
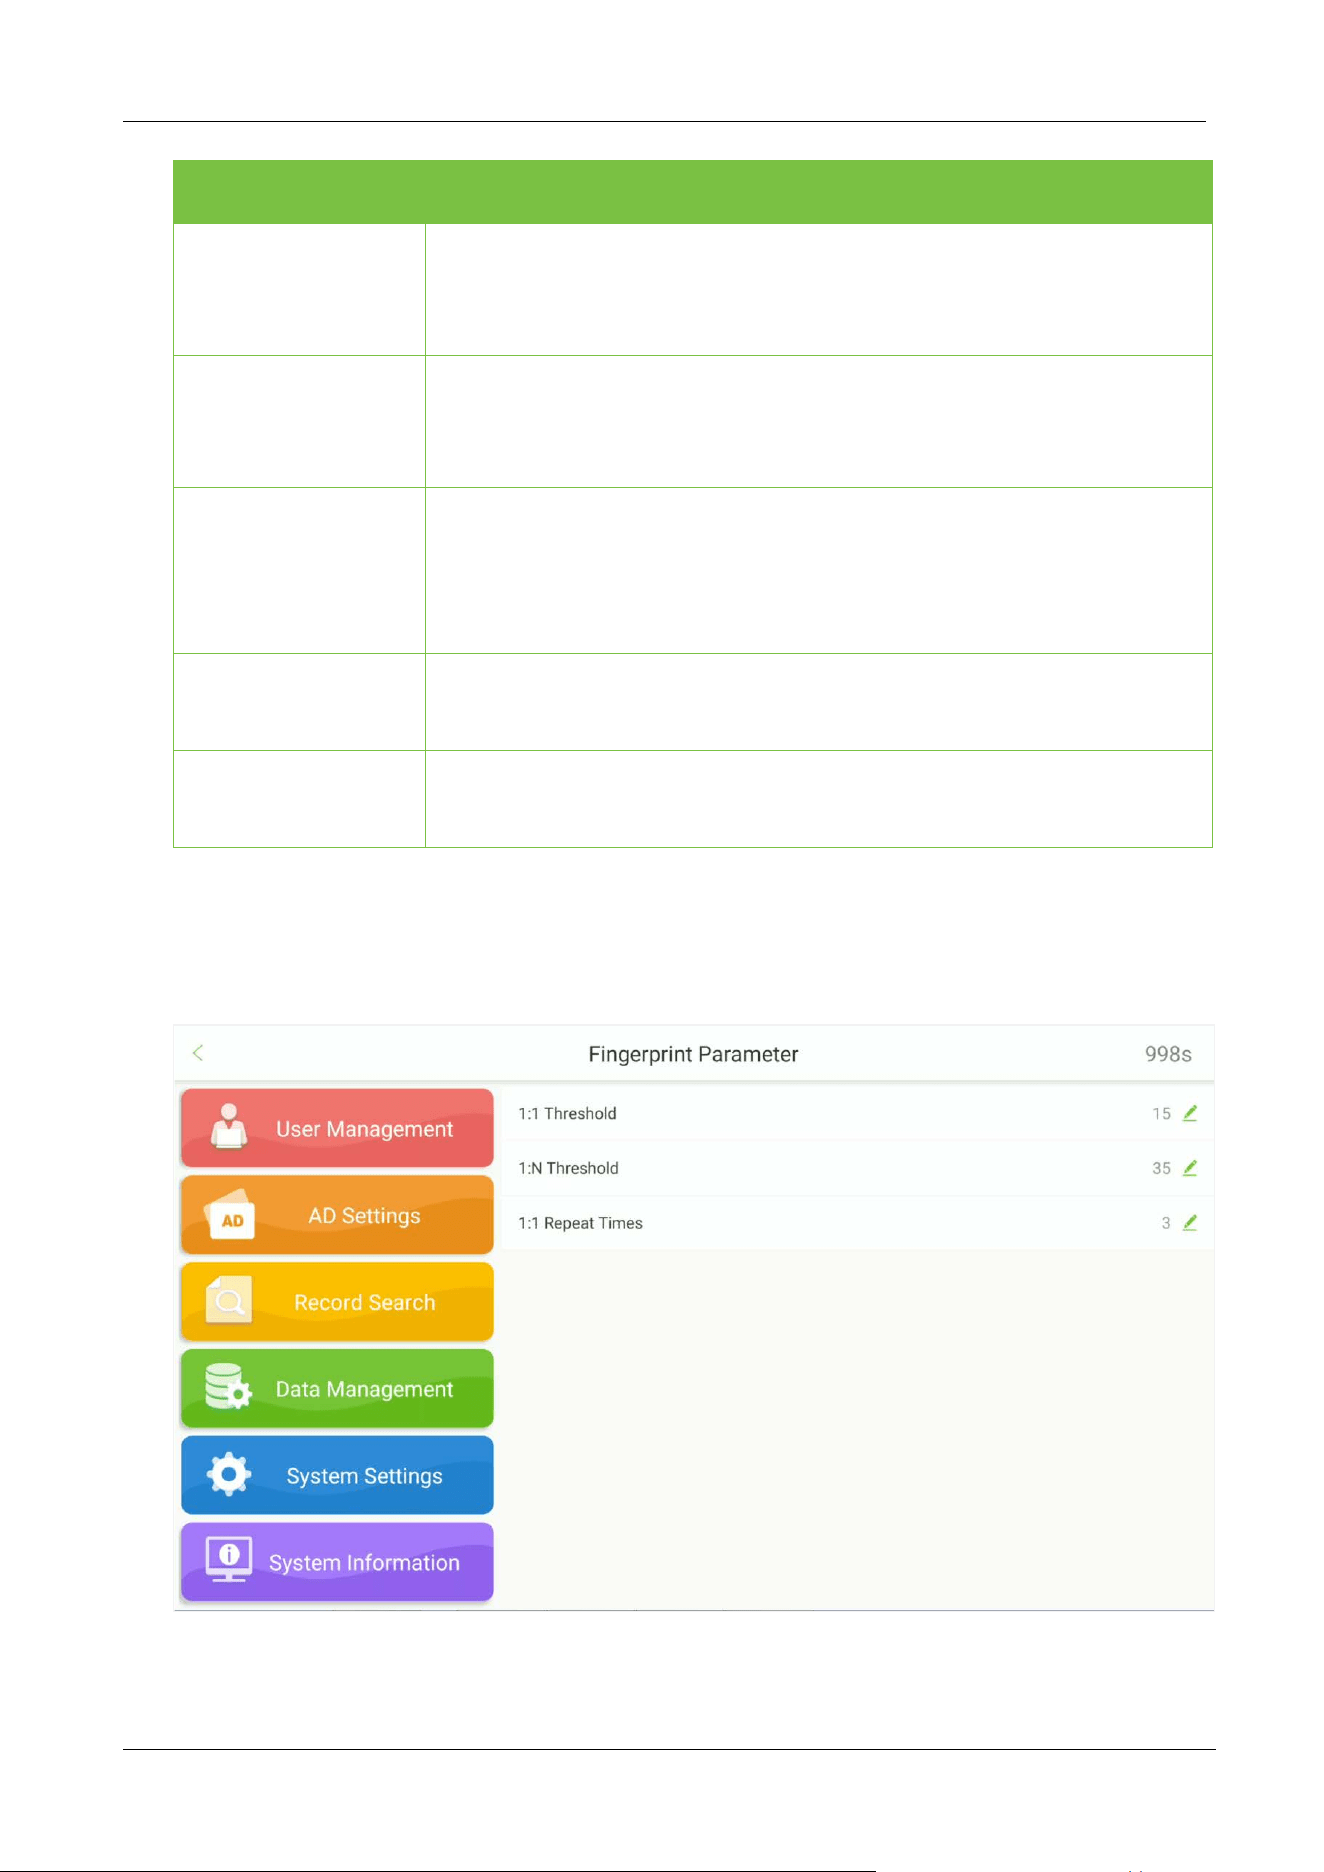
9.4.2 Fingerprint Parameter
Open Biometric Settings Fingerprint Parameter.
FaceKiosk-H13 User Manual
P a g e | 53 Copyright©2022 ZKTECO CO., LTD. All rights reserved.
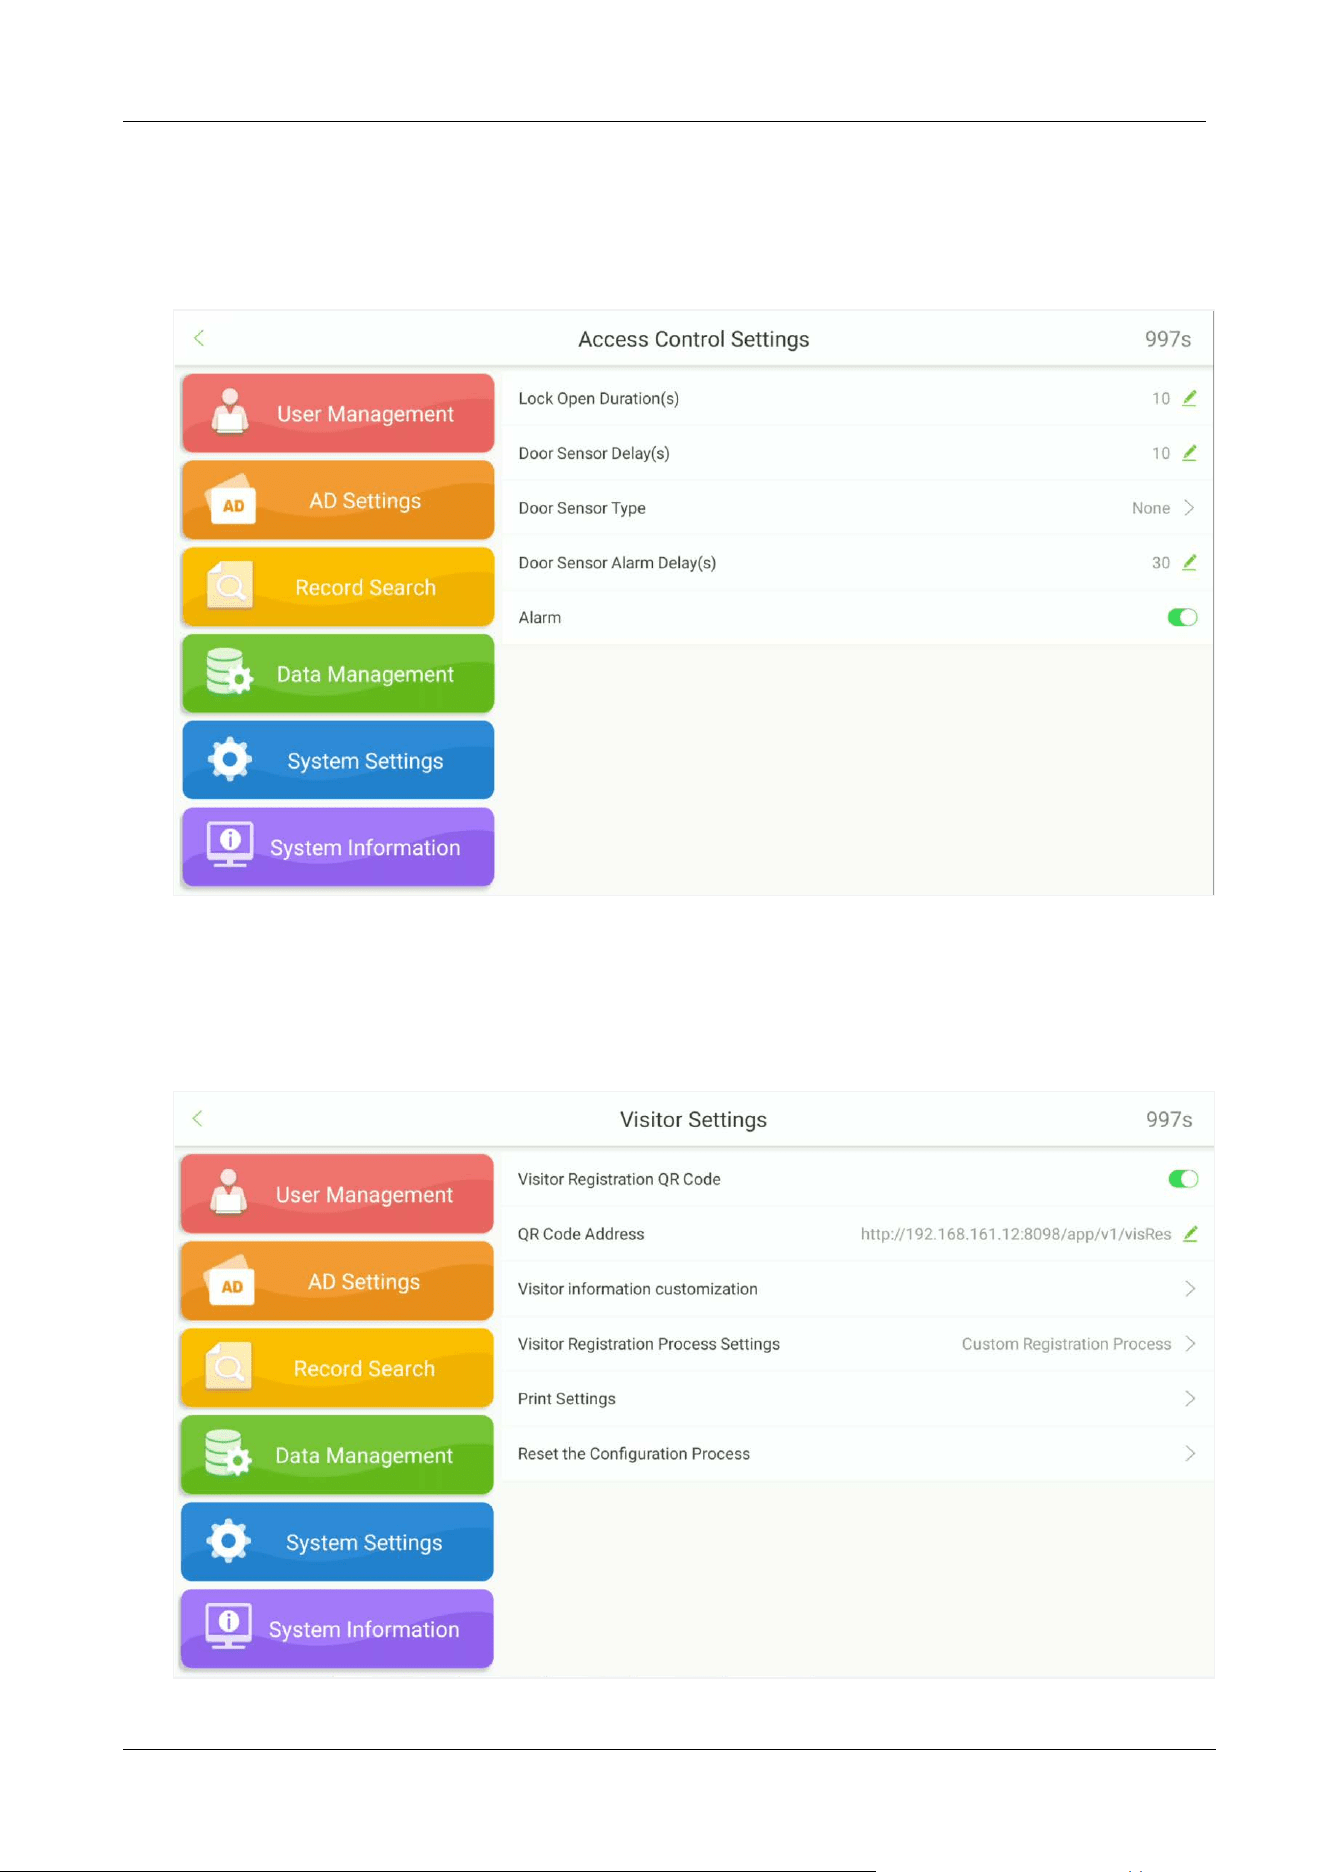
9.5 Access Control Settings
Tap Access Control Settings on the System Settings interface to set the access control.
9.6 Visitor Settings
Tap Visitor Settings on the System Settings interface to set the visitor registration.

FaceKiosk-H13 User Manual
P a g e | 54 Copyright©2022 ZKTECO CO., LTD. All rights reserved.
9.6.1 QR Code Settings
Tap enable or disable QR Code visitor registration.
The users can set the URL address in two ways:
Synchronize from Cloud Server
When you choose to synchronize from the Cloud Server, the QR code address will be retrieved from
the background Server. After setting the Server, use your phone to scan the QR code on the home
screen. The visitor registration screen will be displayed on the phone. The QR code displayed on the
device will automatically obtain the device’s serial number information.
Custom Address
While choosing the Custom Address mode, the user can enter a valid URL address as the QR code
address. E.g.: http://www.zkteco.com/en
.
FaceKiosk-H13 User Manual
P a g e | 55 Copyright©2022 ZKTECO CO., LTD. All rights reserved.
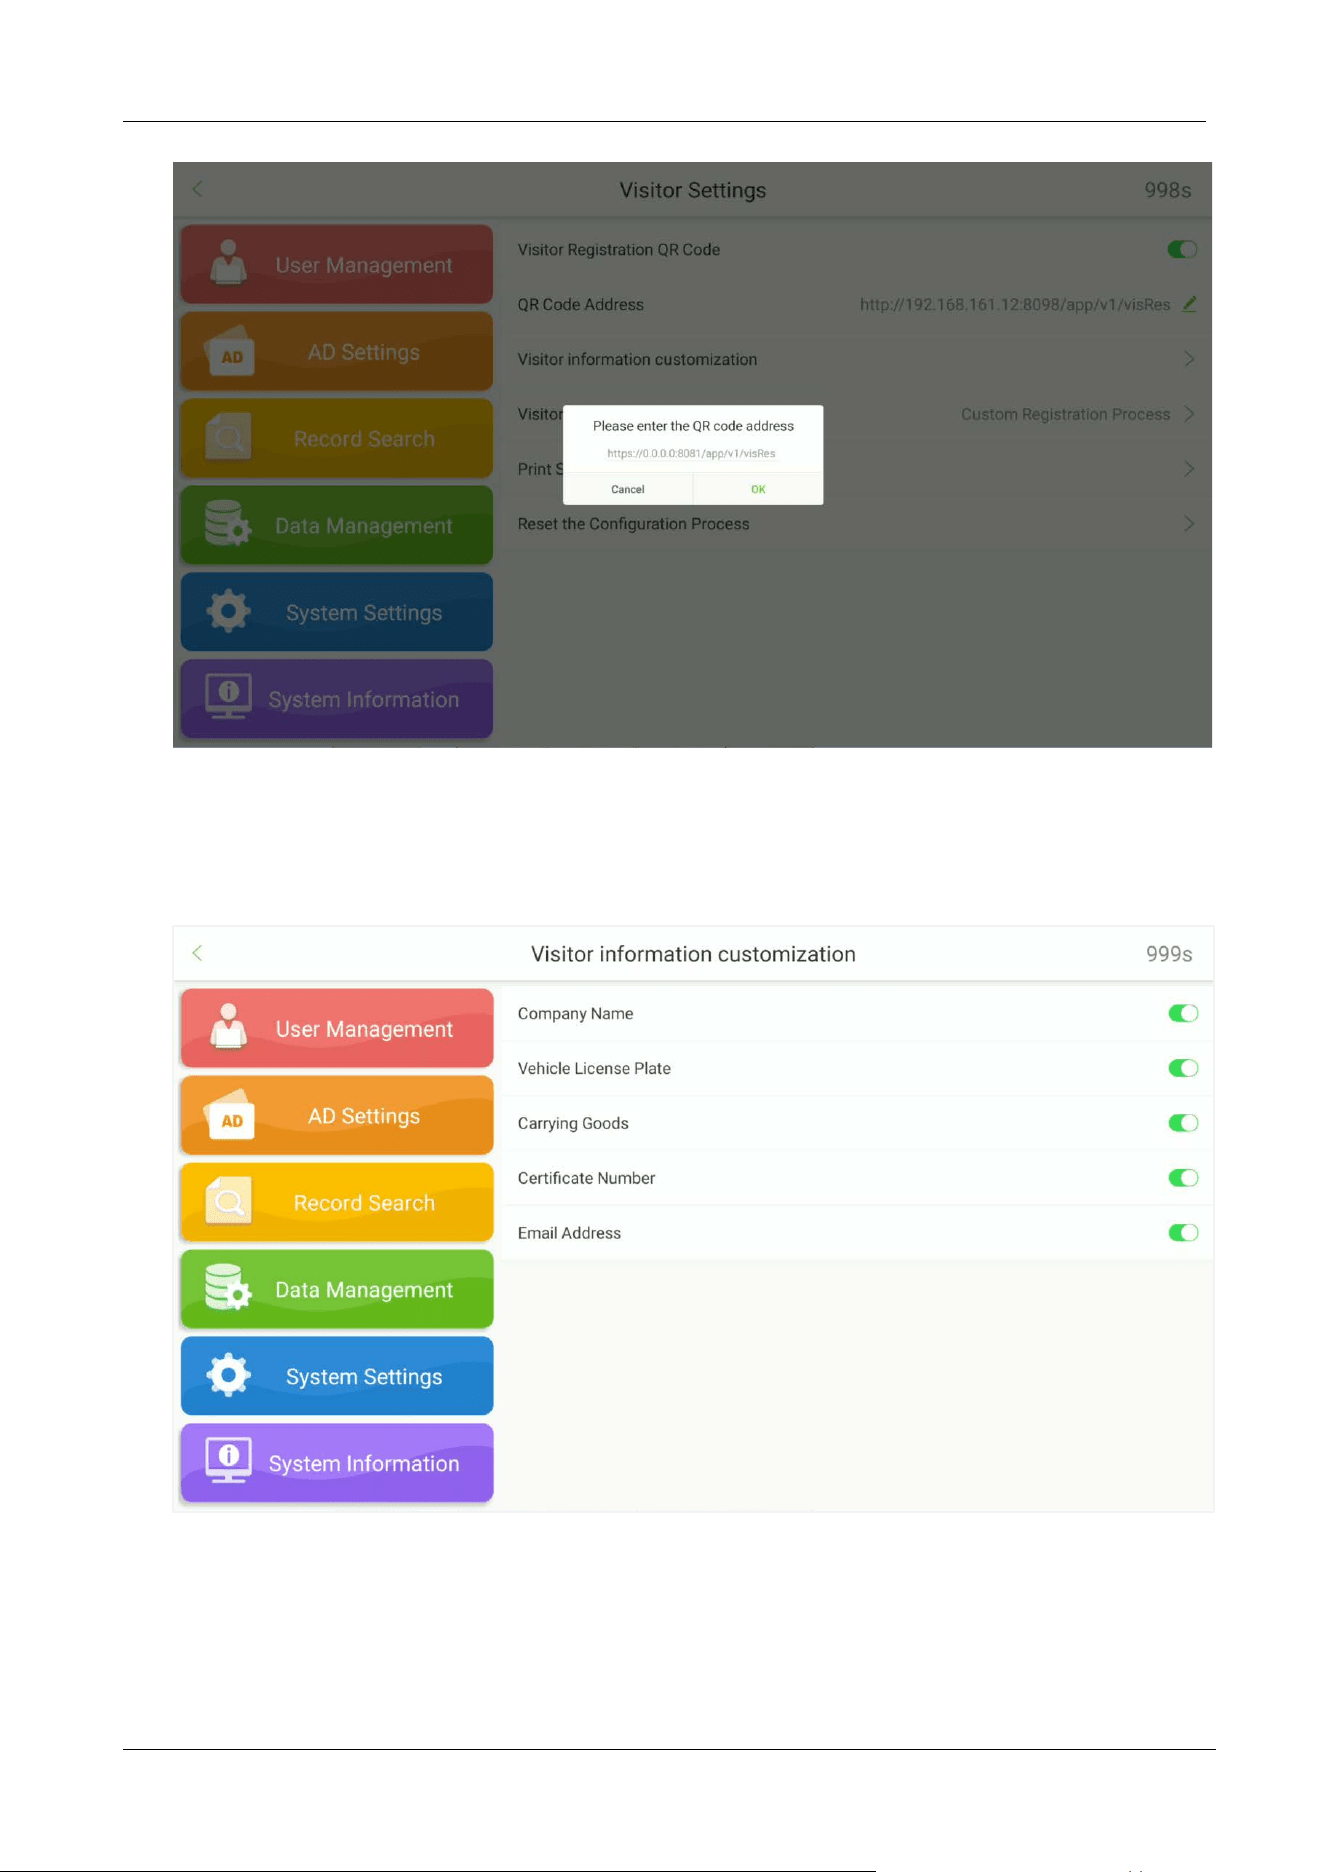
9.6.2 Visitor Information Customization
Open System SettingsVisitor SettingsVisitor Information Customization.
FaceKiosk-H13 User Manual
P a g e | 56 Copyright©2022 ZKTECO CO., LTD. All rights reserved.
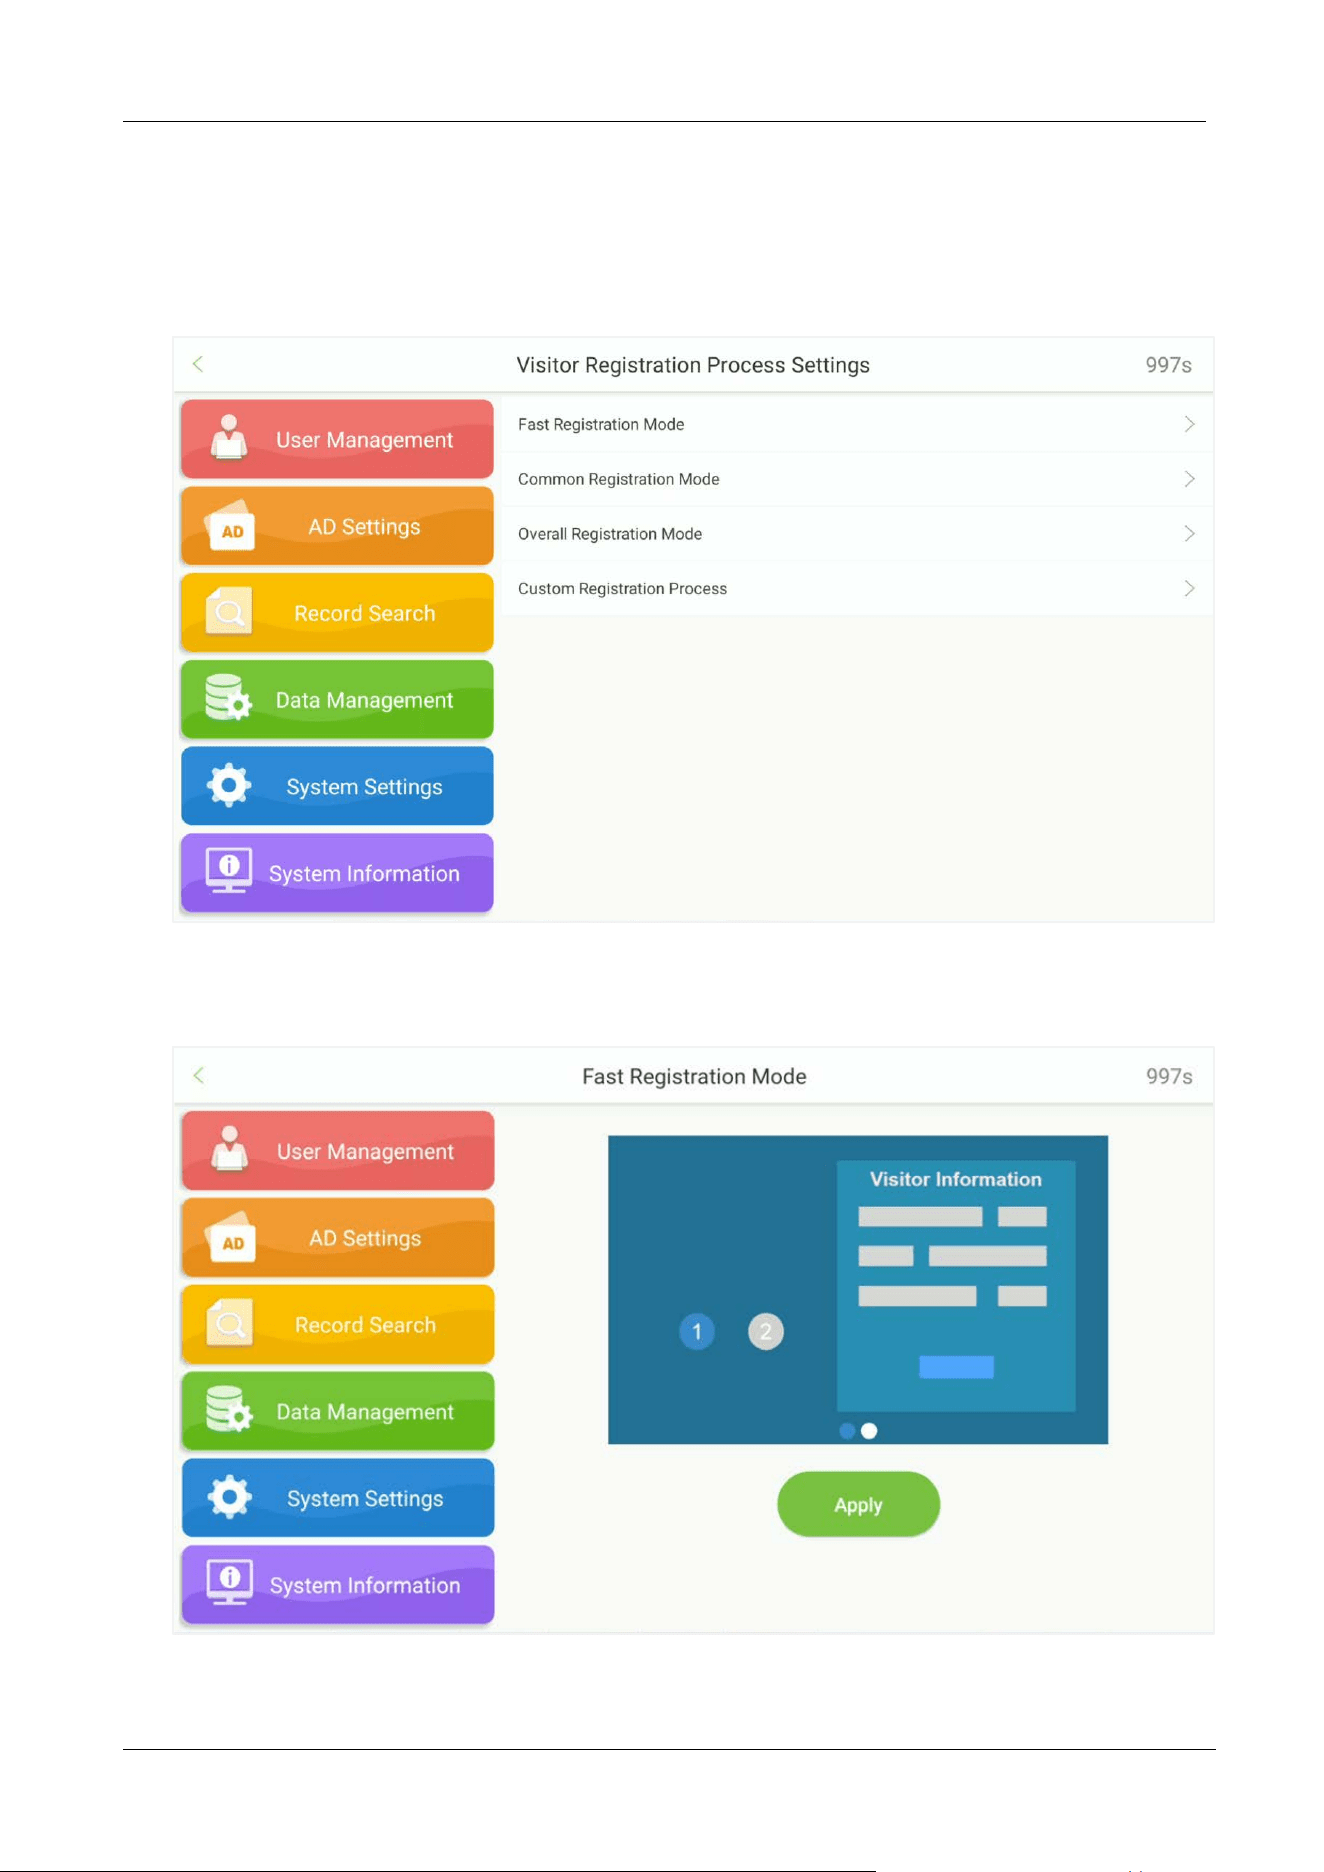
9.6.3 Visitor Registration Process Settings
Open System SettingsVisitor SettingsVisitor Registration Process Settings.
Fast registration mode:
FaceKiosk-H13 User Manual
P a g e | 57 Copyright©2022 ZKTECO CO., LTD. All rights reserved.
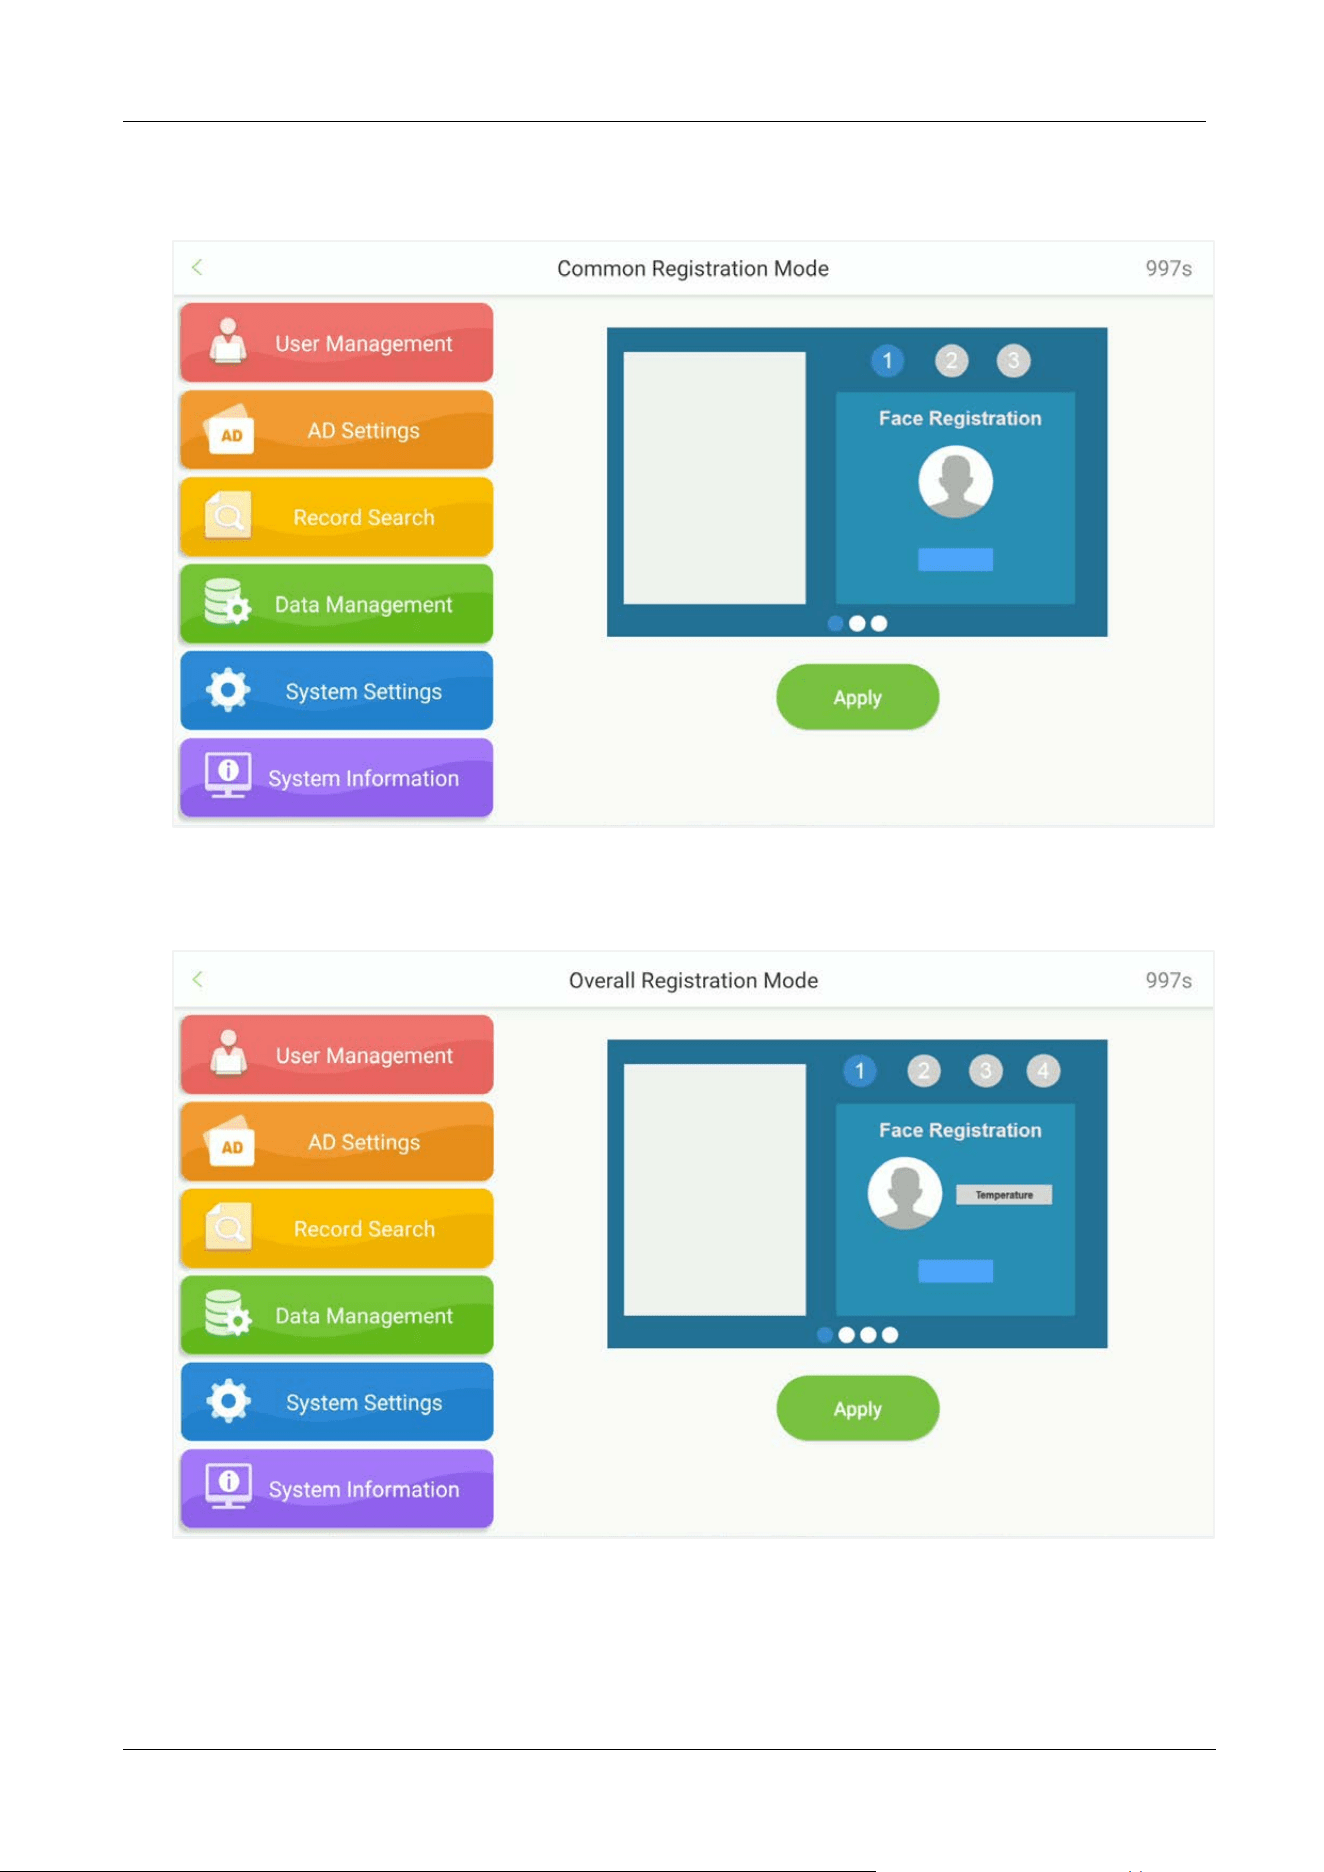
Common registration mode:
Overall registration mode:
FaceKiosk-H13 User Manual
P a g e | 58 Copyright©2022 ZKTECO CO., LTD. All rights reserved.
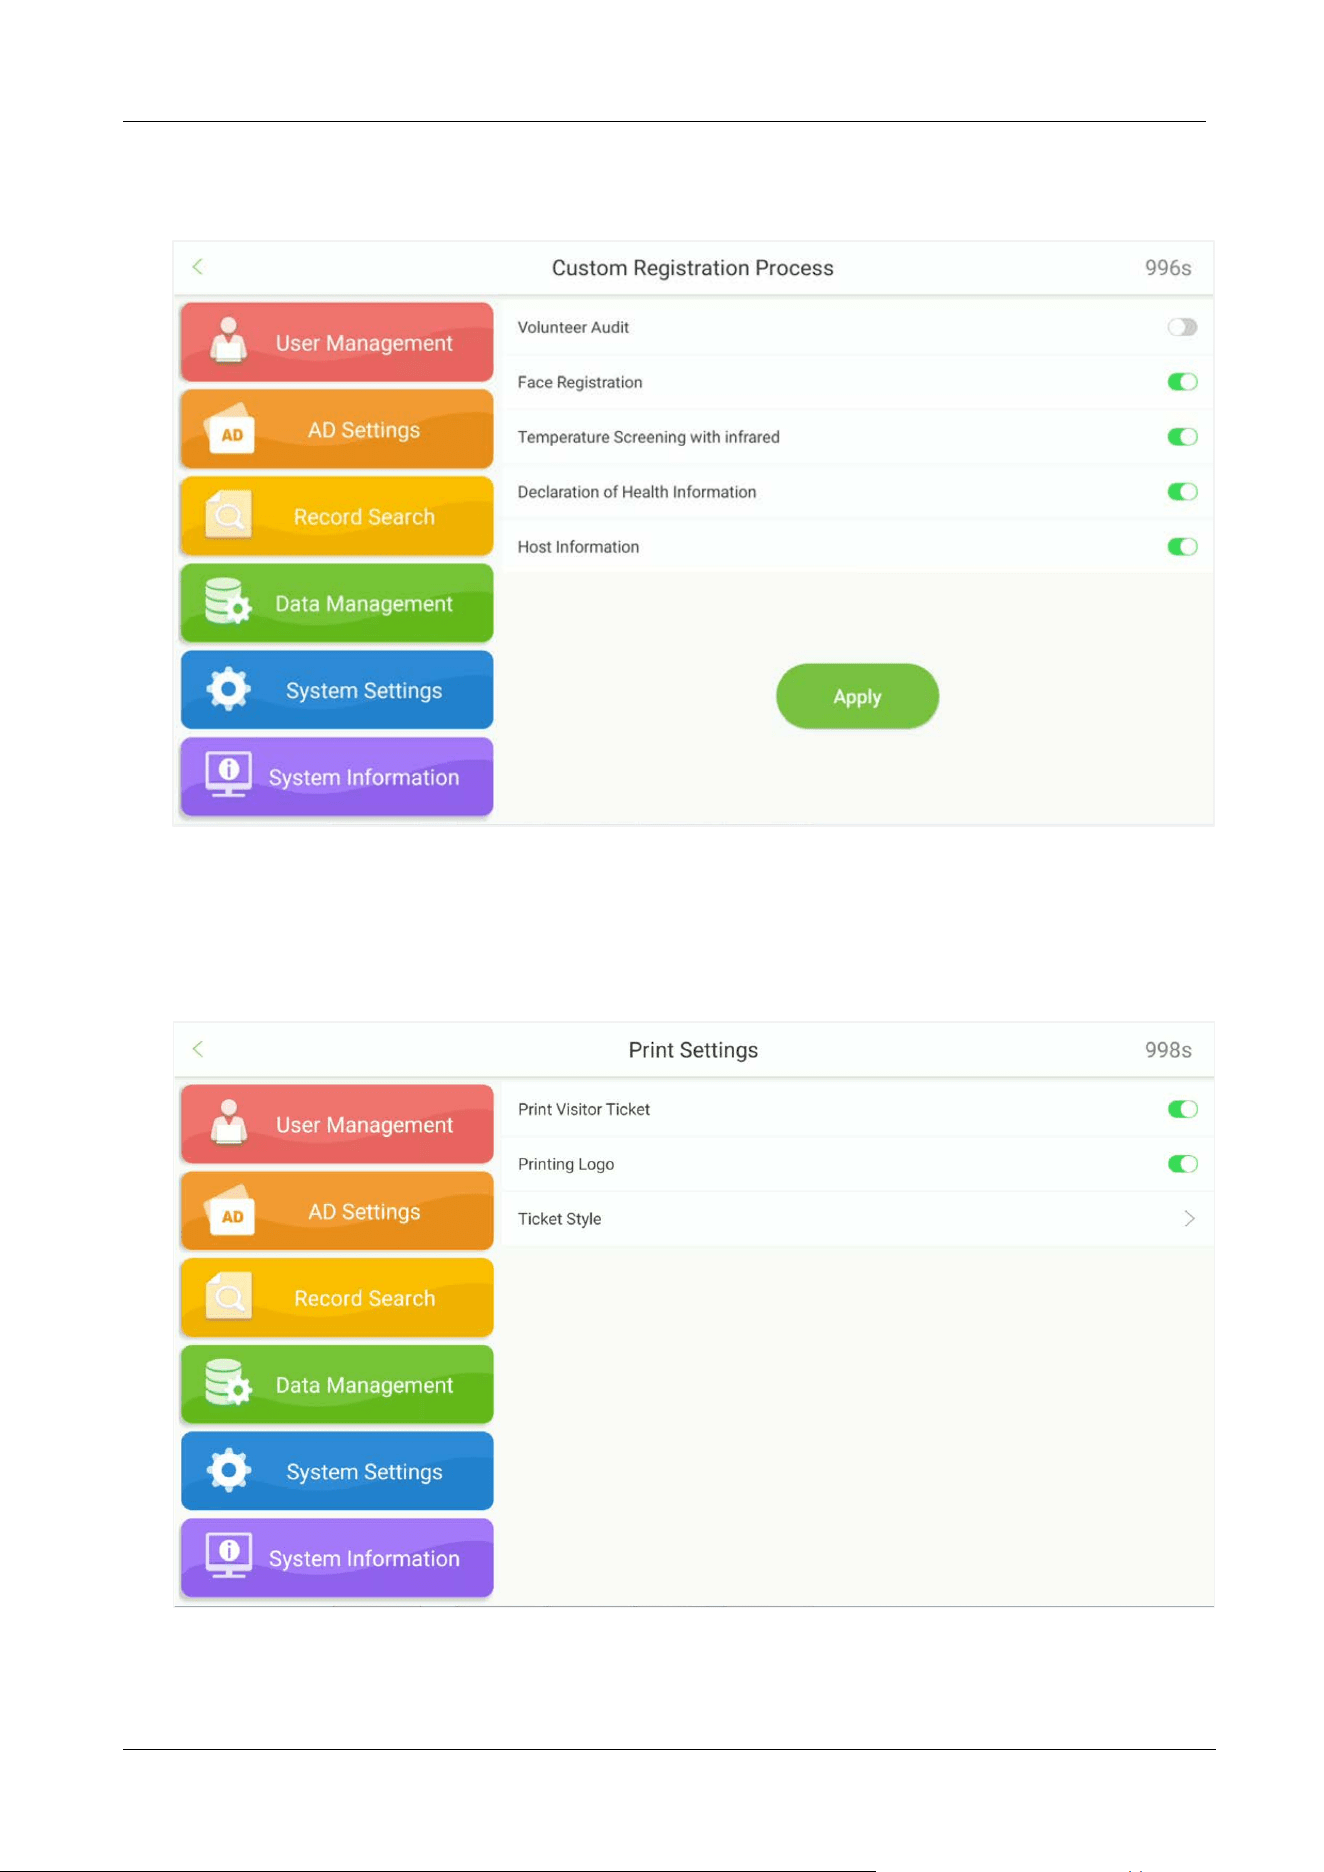
Custom registration Process:
9.6.4 Print Settings
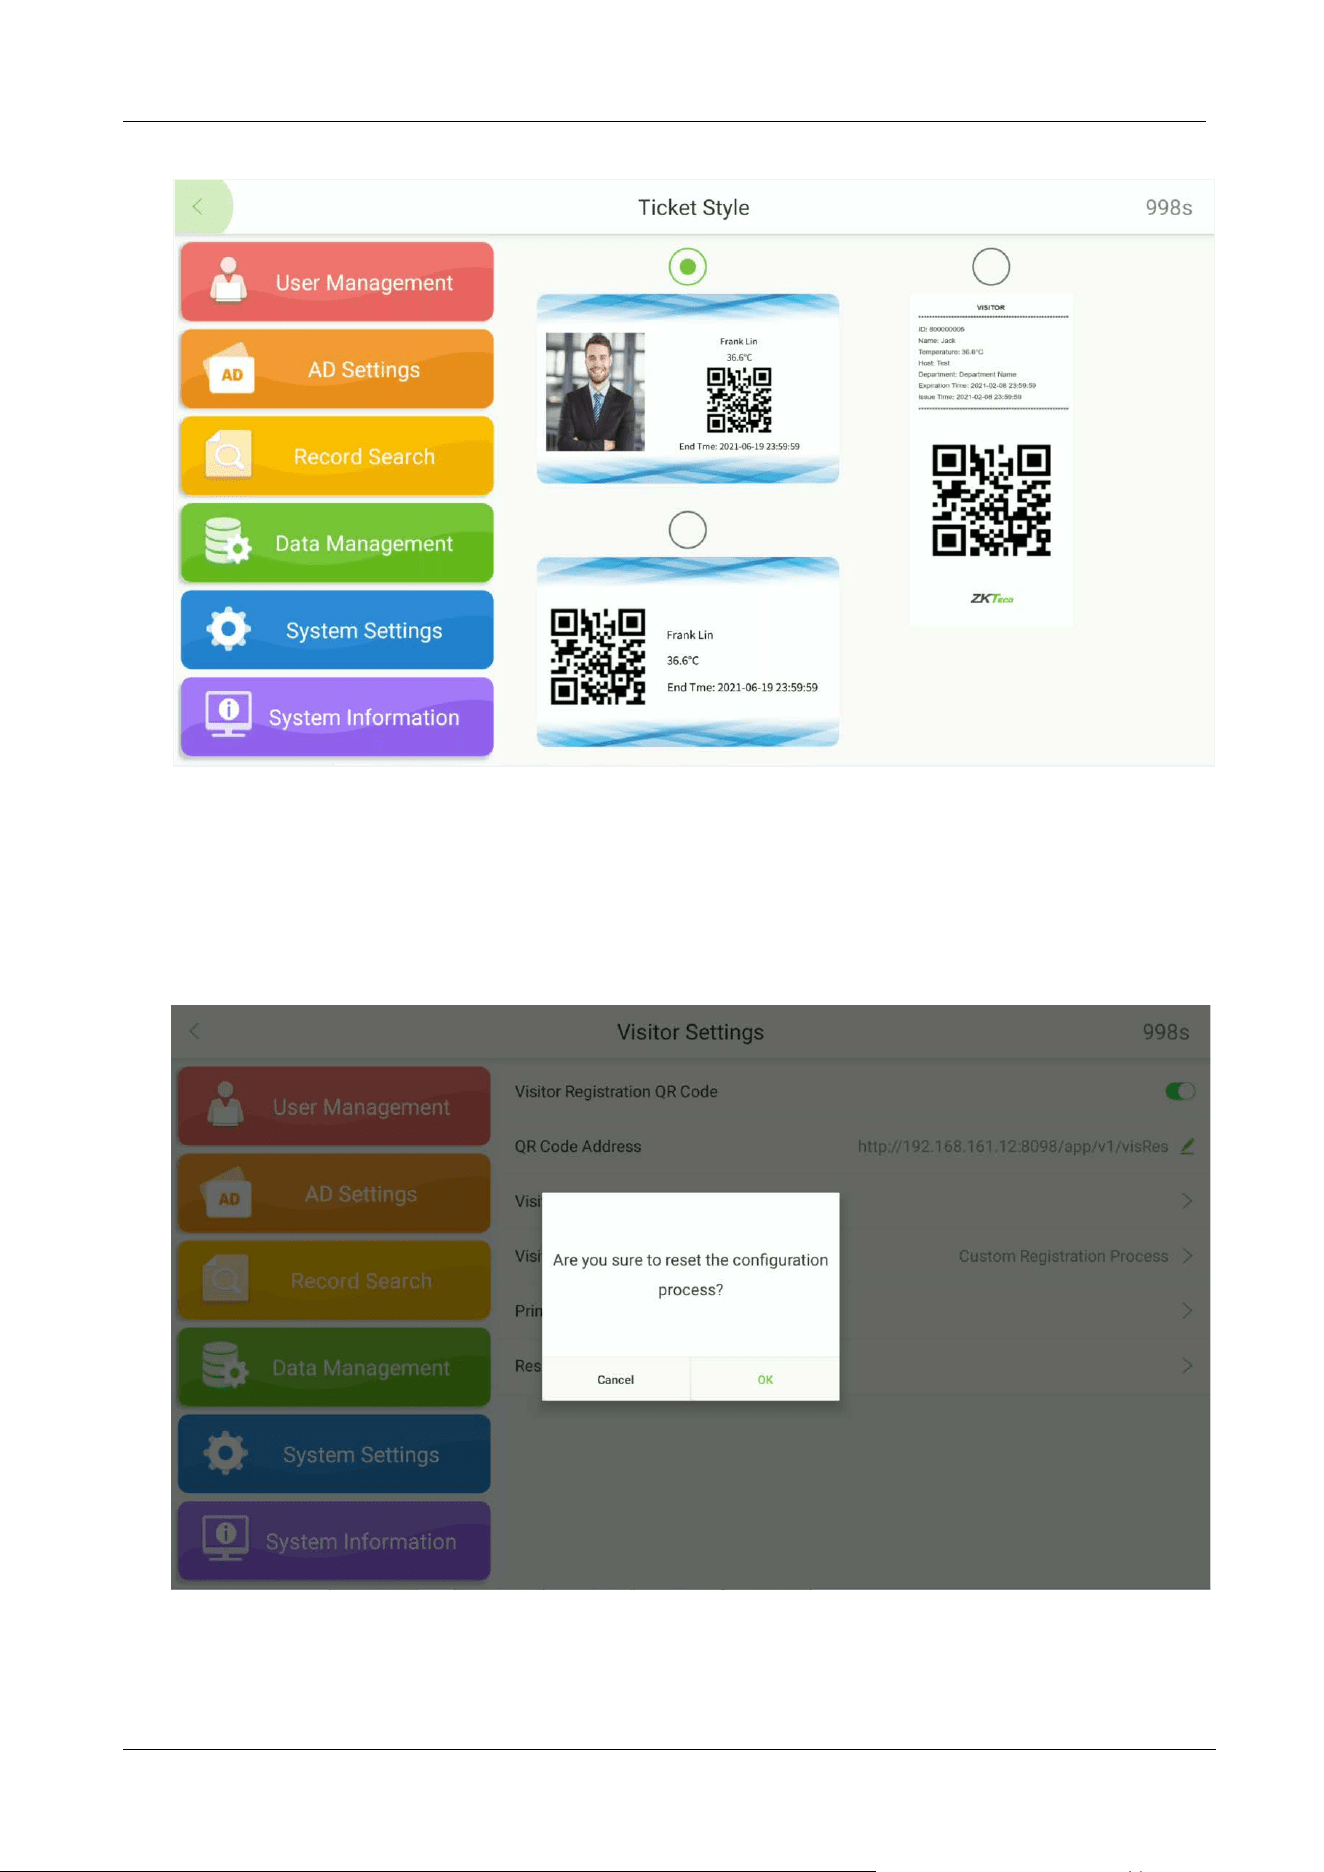
Open System SettingsVisitor Settings Print Settings.
FaceKiosk-H13 User Manual
P a g e | 59 Copyright©2022 ZKTECO CO., LTD. All rights reserved.
9.6.5 Reset the Configuration Process
Open System SettingsVisitor Settings Reset the Configuration Process to reset the
configuration.
FaceKiosk-H13 User Manual
P a g e | 60 Copyright©2022 ZKTECO CO., LTD. All rights reserved.
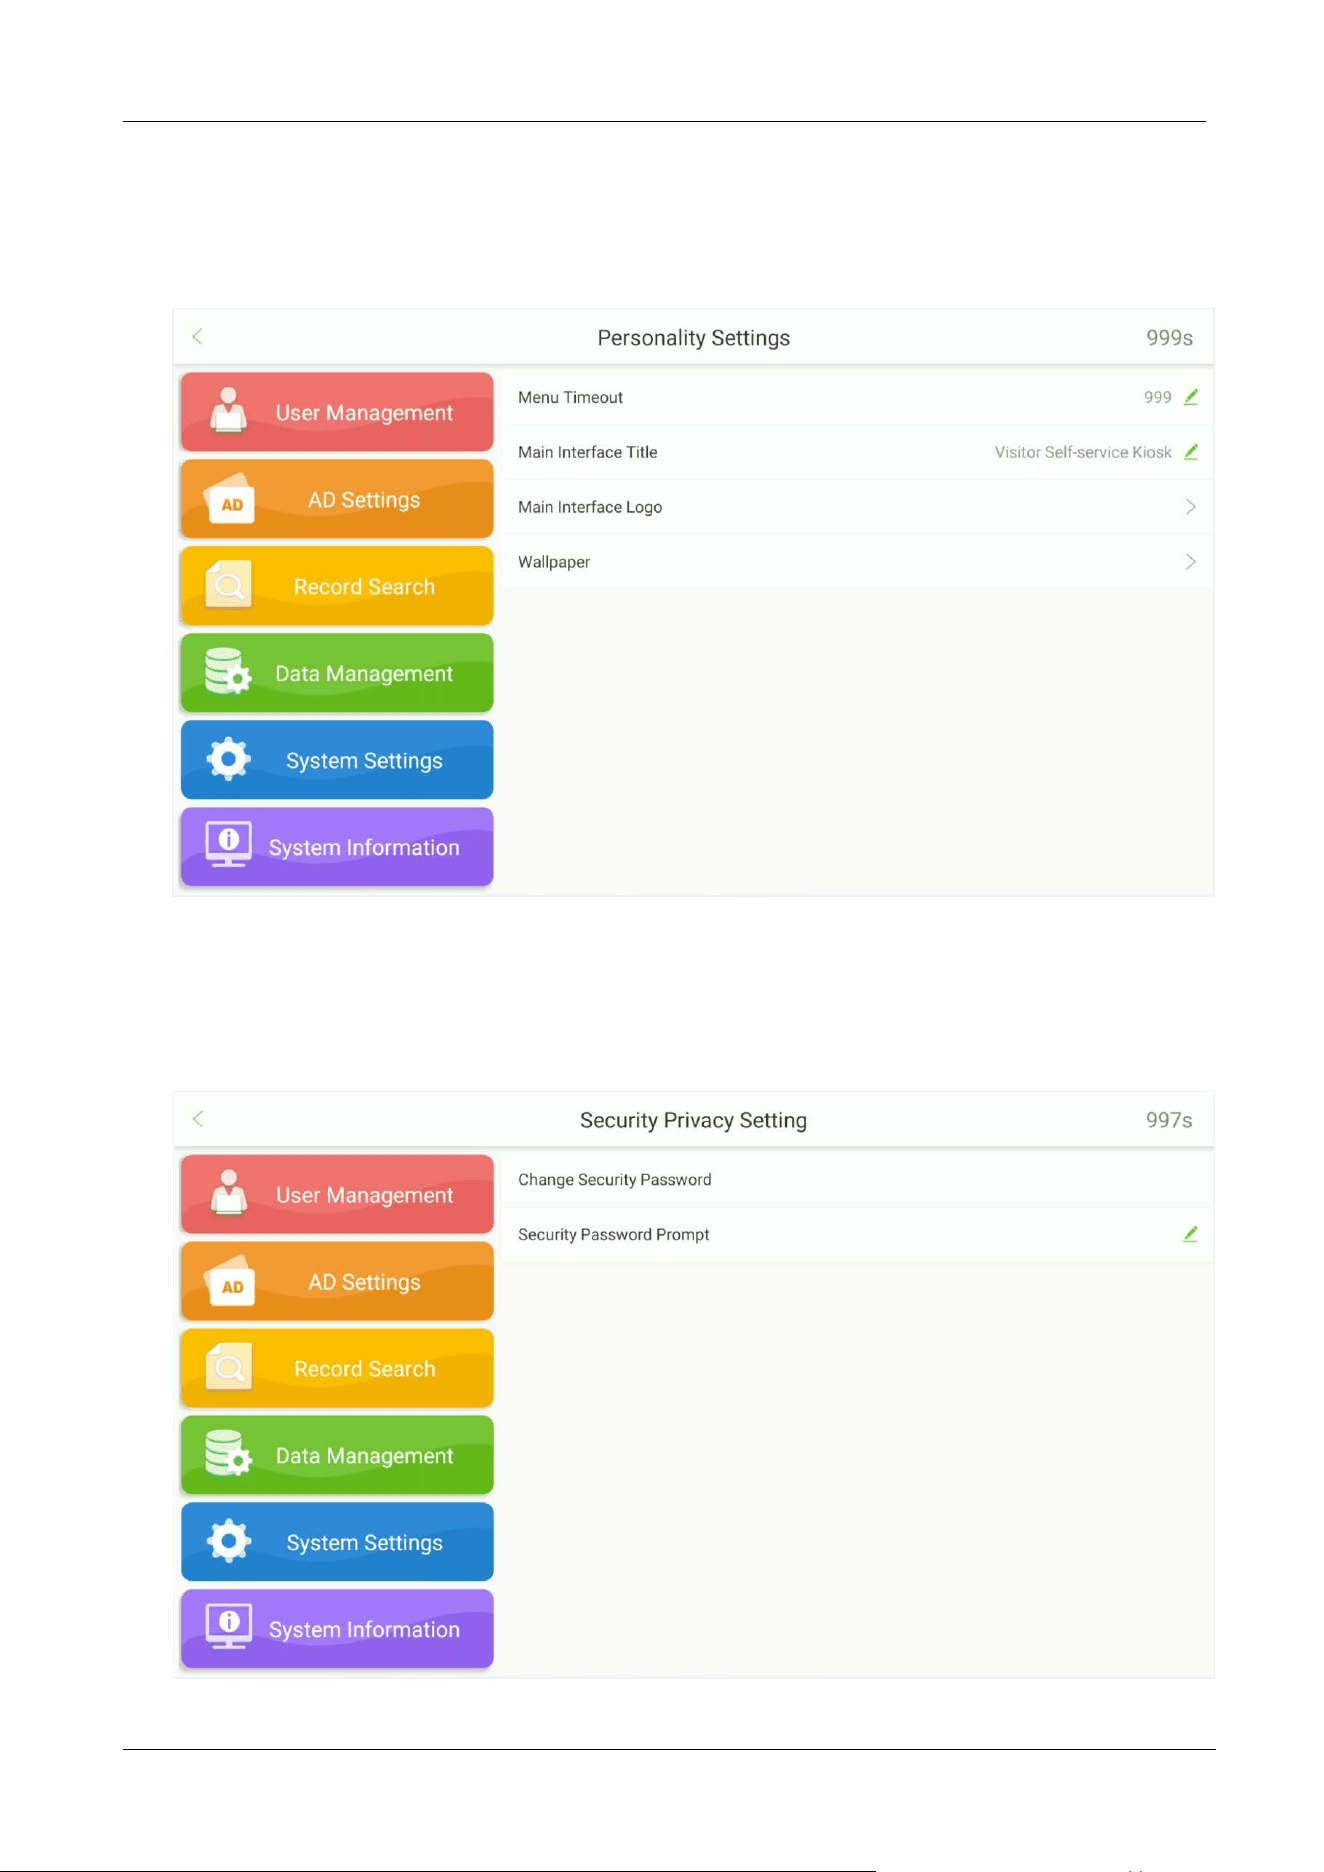
9.7 Personality Settings
Tap Personality Settings on the System Settings interface to set the personality.
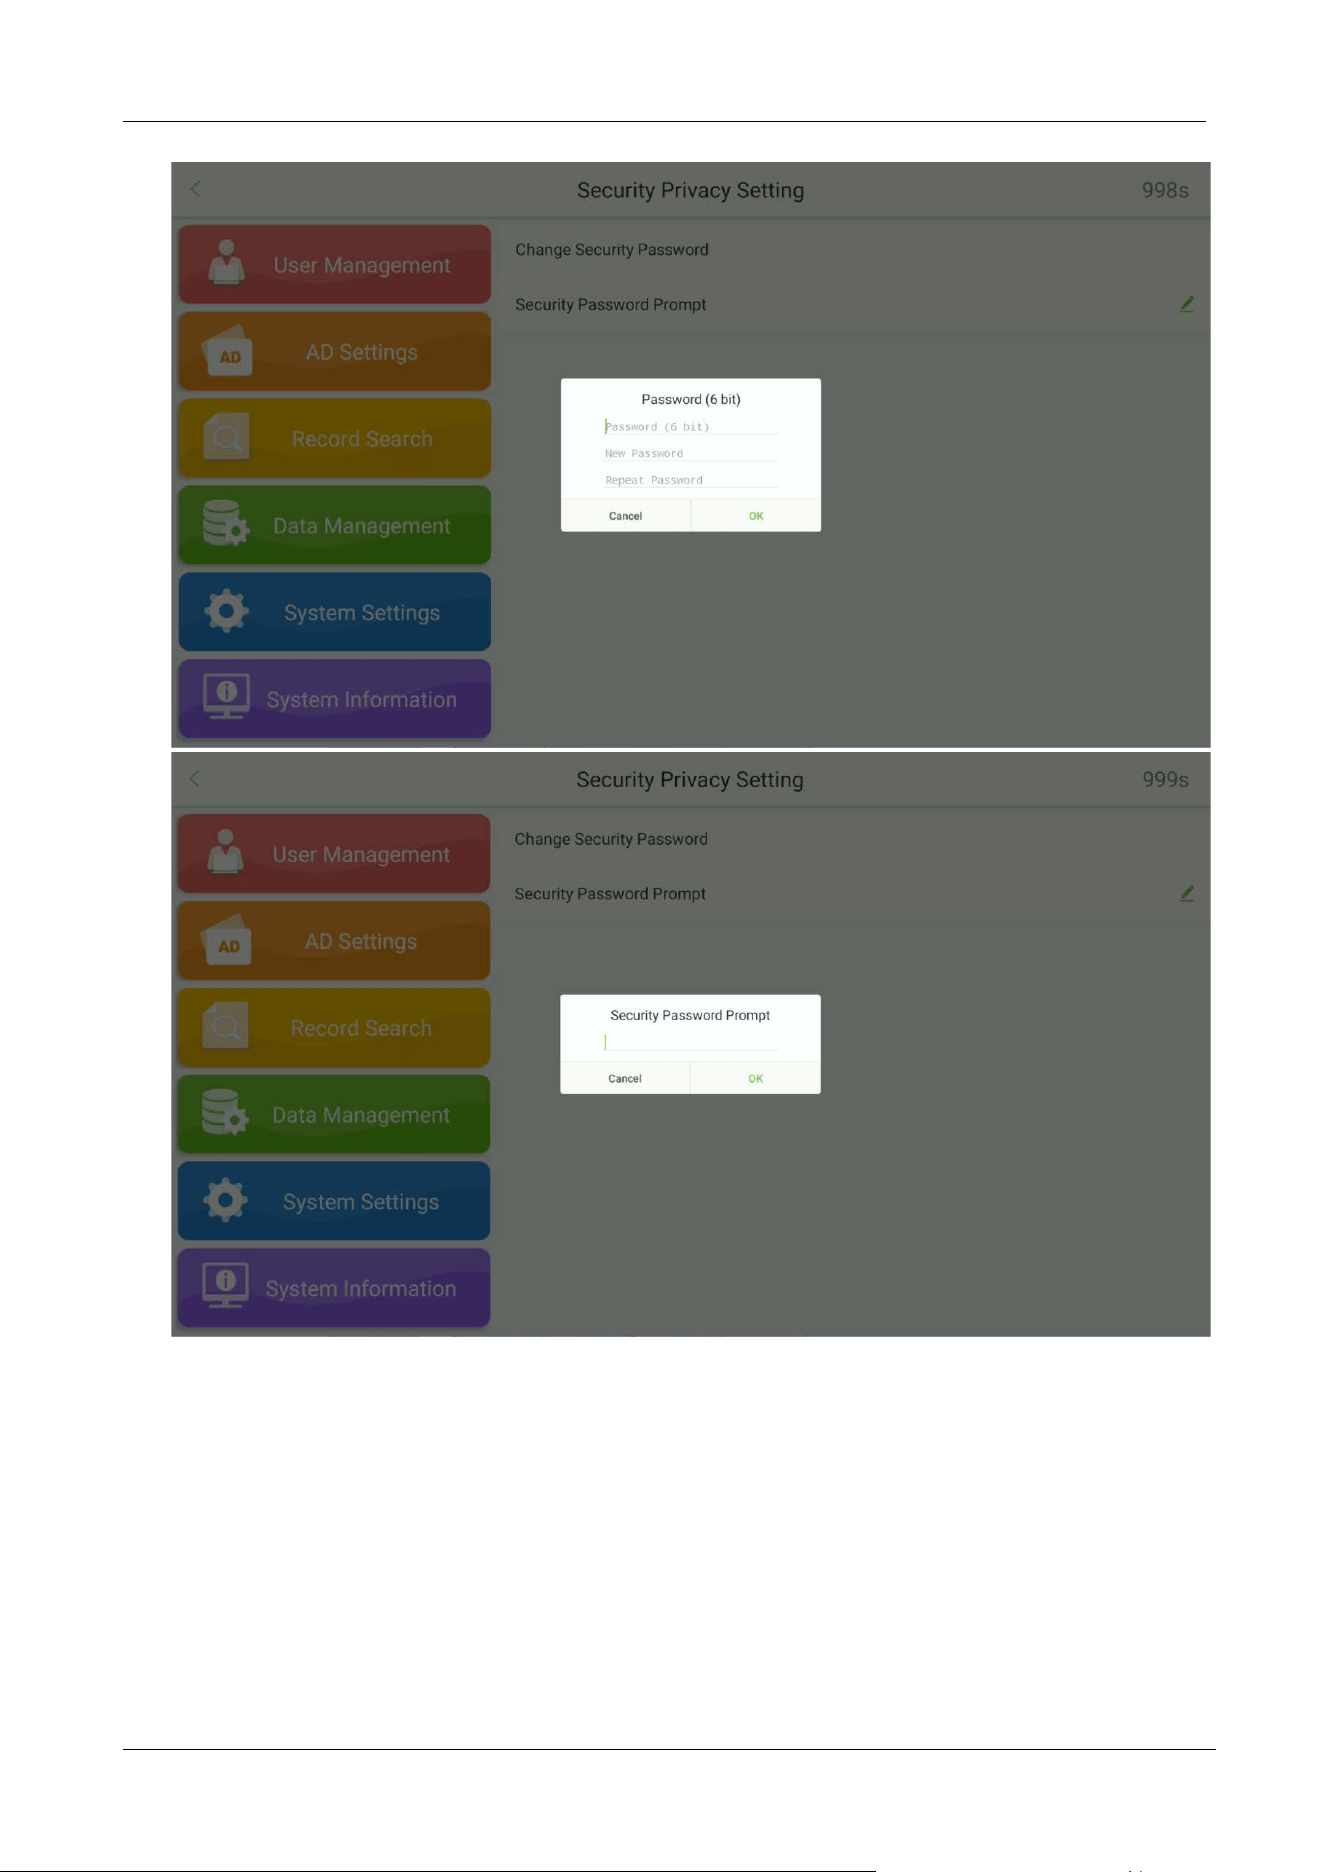
9.8 Security Privacy Settings
Tap Security Privacy Settings on the System Settings interface to set the personality.
FaceKiosk-H13 User Manual
P a g e | 61 Copyright©2022 ZKTECO CO., LTD. All rights reserved.
FaceKiosk-H13 User Manual
P a g e | 62 Copyright©2022 ZKTECO CO., LTD. All rights reserved.
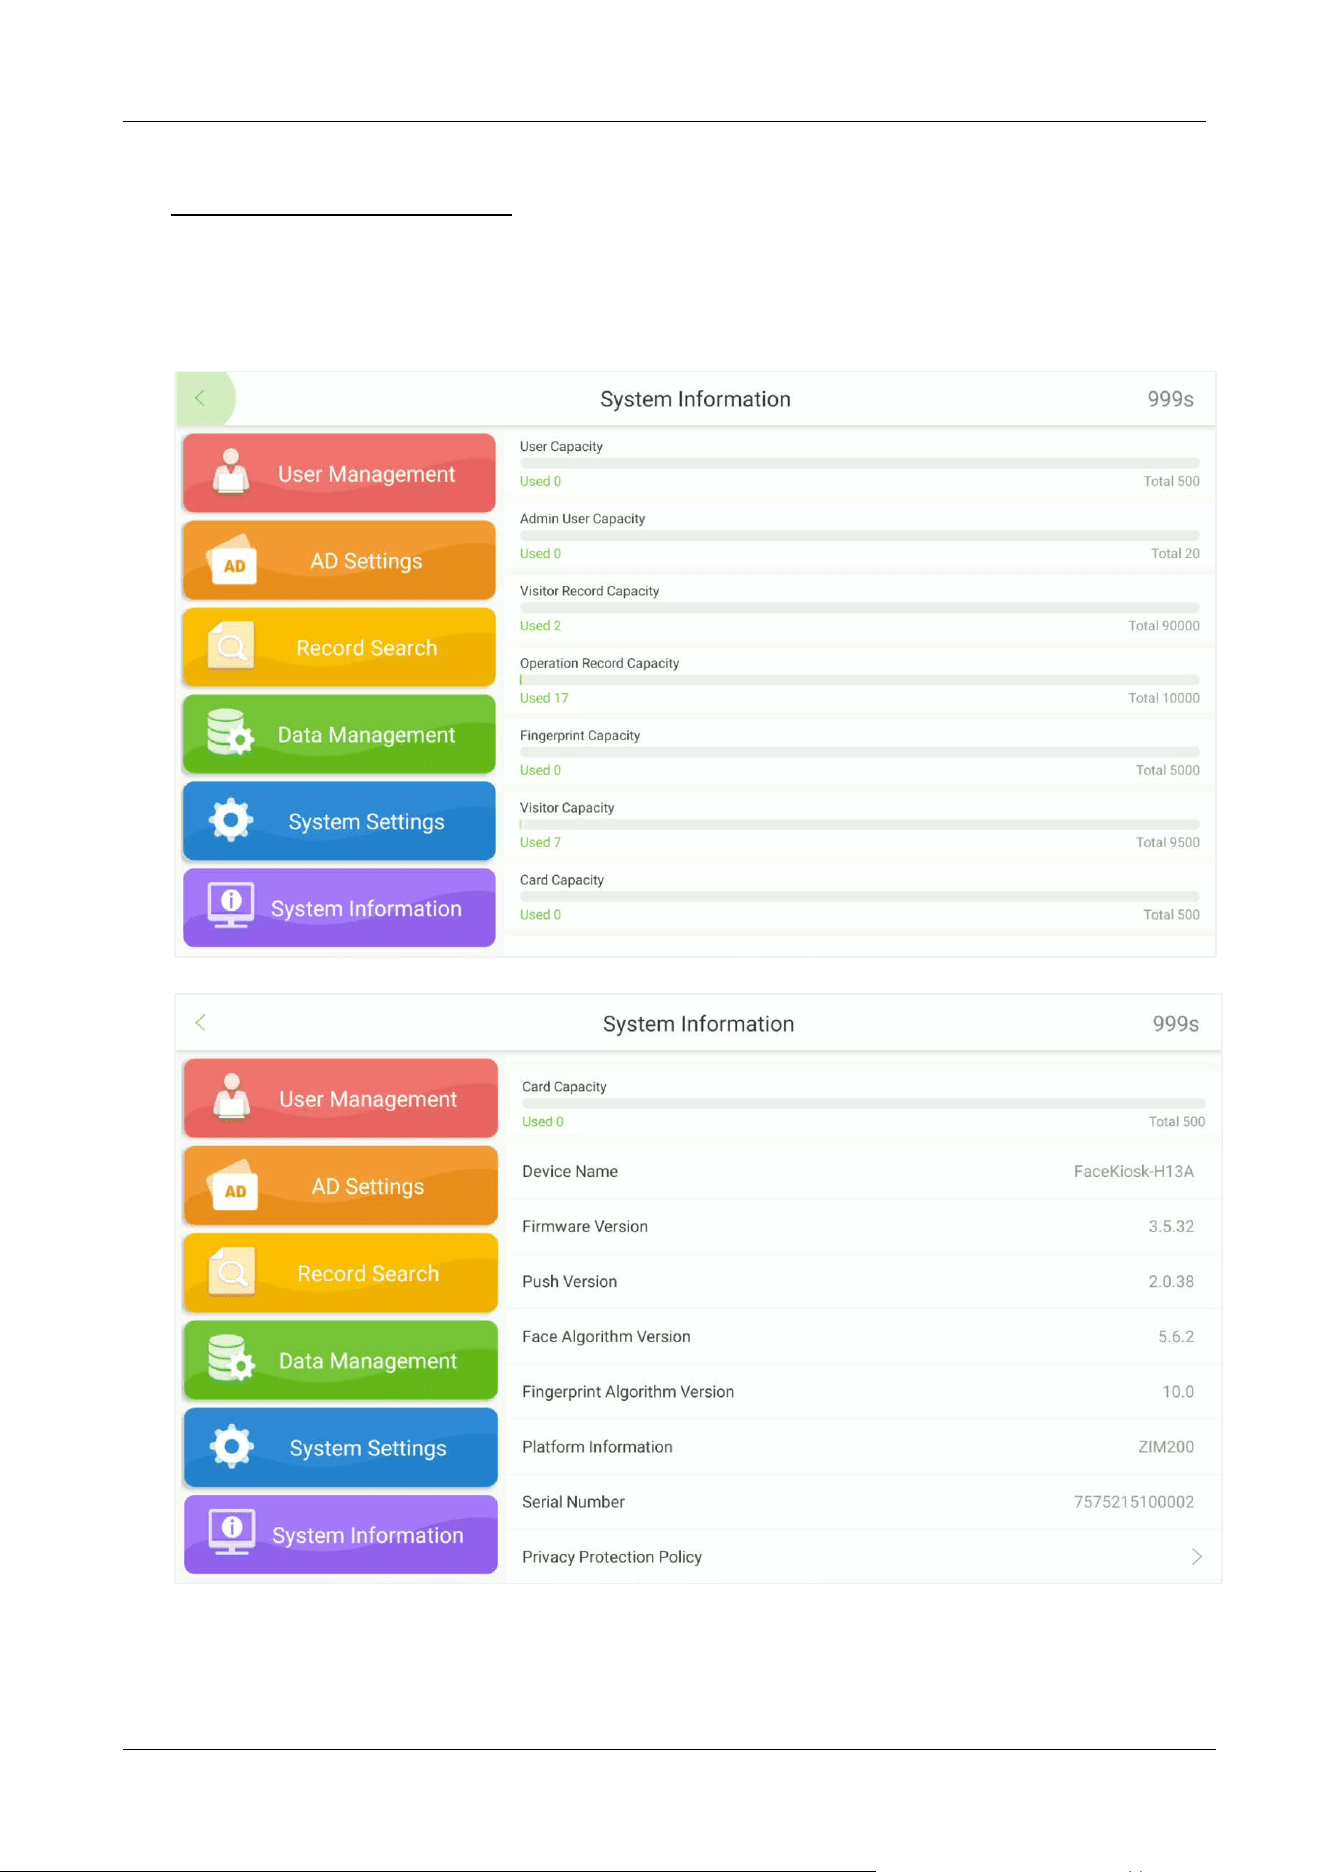
10 System Information
Open the main menu and select System Information to view Data Capacity and Device and Firmware
information of the current device.
FaceKiosk-H13 User Manual
P a g e | 63 Copyright©2022 ZKTECO CO., LTD. All rights reserved.
11 ZKBiosecurity Connection
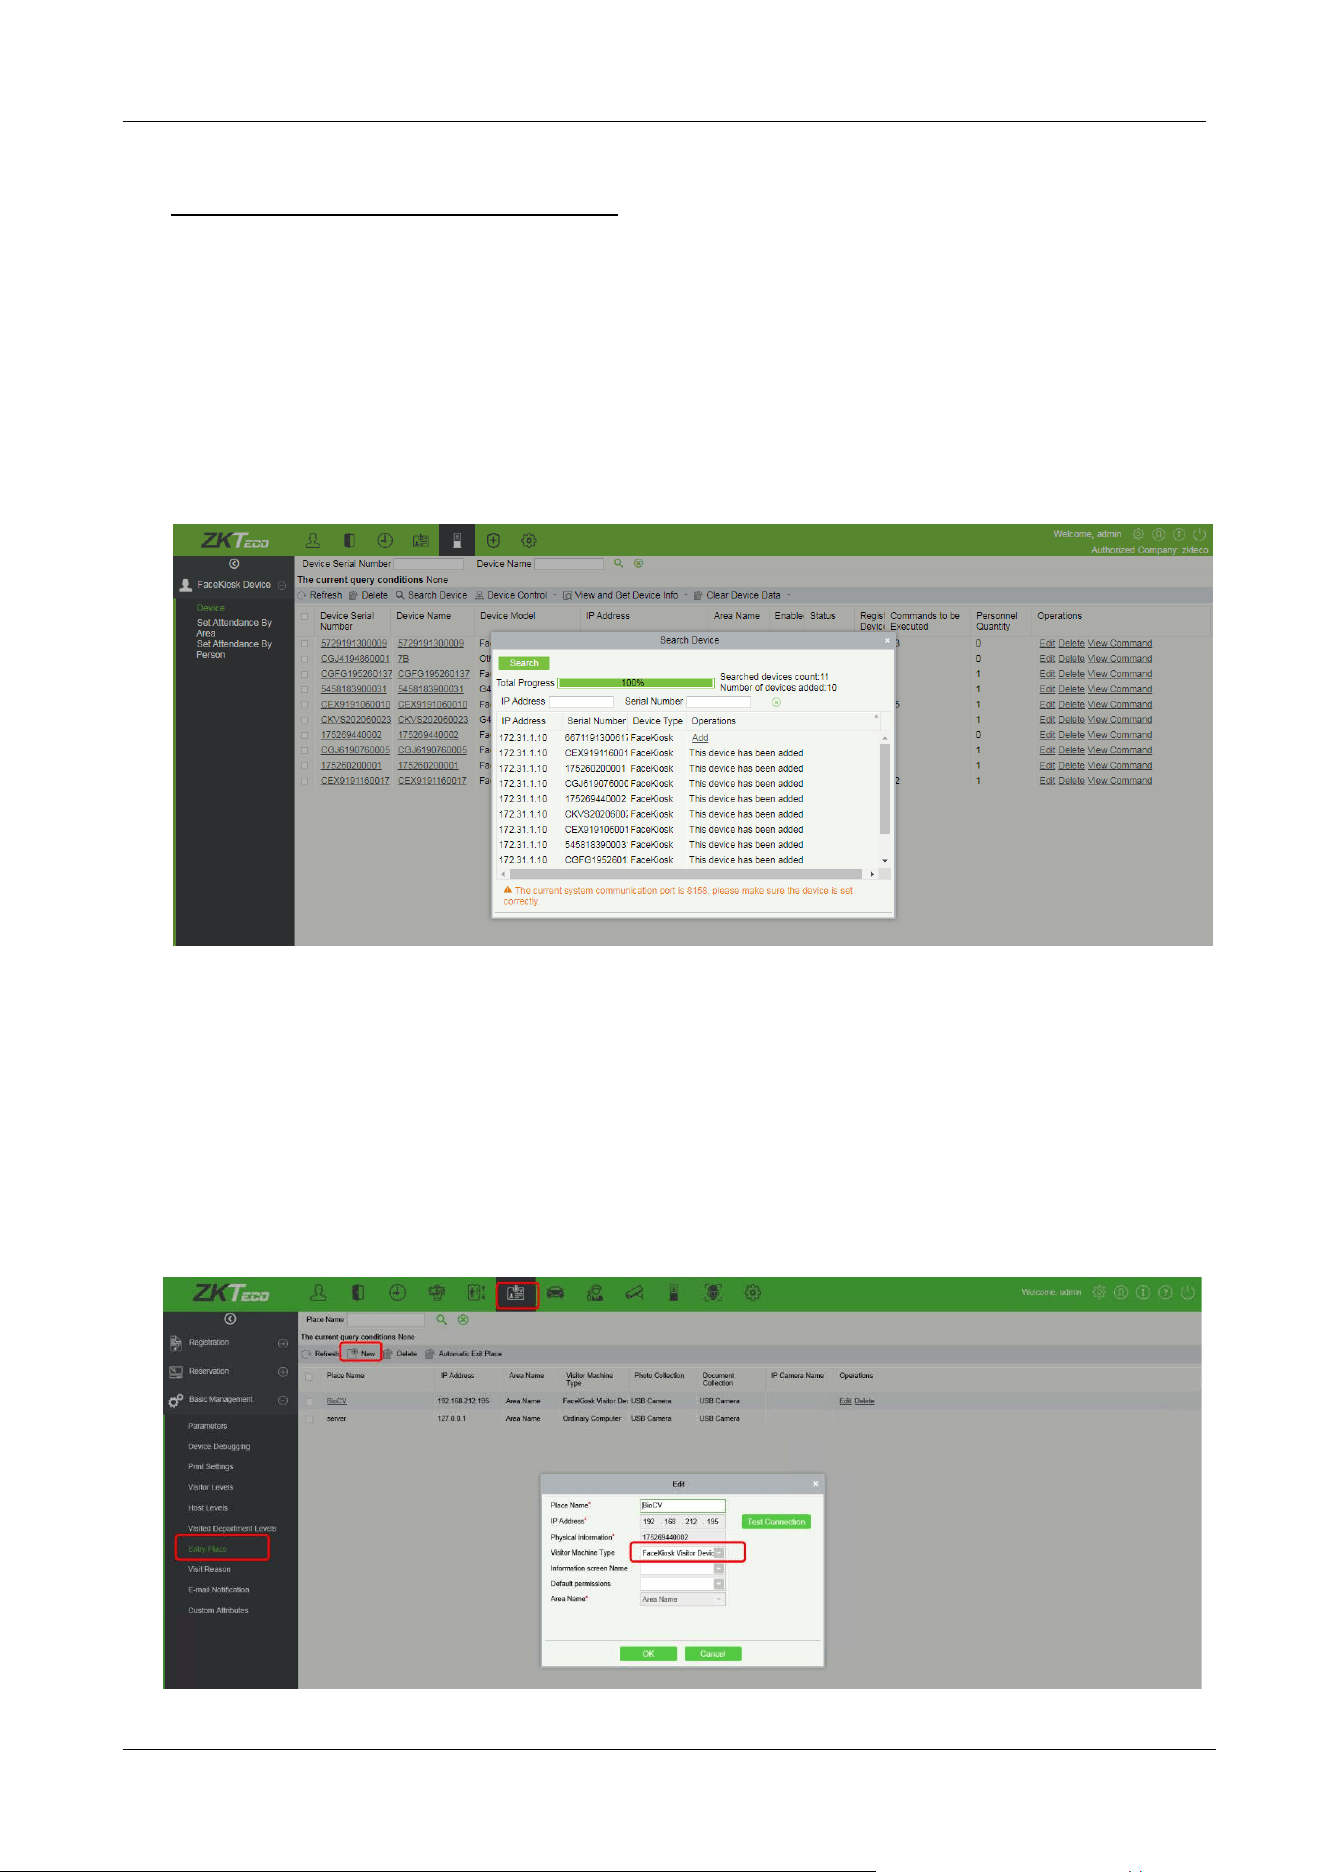
The device is designed to connect with the FaceKiosk module of the ZKBioSecurity Software.
11.1 Adding a Device
Perform the following steps to add the device to ZKBioSecurity software.
1. Open the ZKBioSecurity software then select FaceKiosk Device Search Device Add.
11.2 Visitor Management
11.2.1 Set the FaceKiosk as an Entry Point
In the Visitor module, select the FaceKiosk device that has been added in the FaceKiosk module as an
entry place.
FaceKiosk-H13 User Manual
P a g e | 64 Copyright©2022 ZKTECO CO., LTD. All rights reserved.
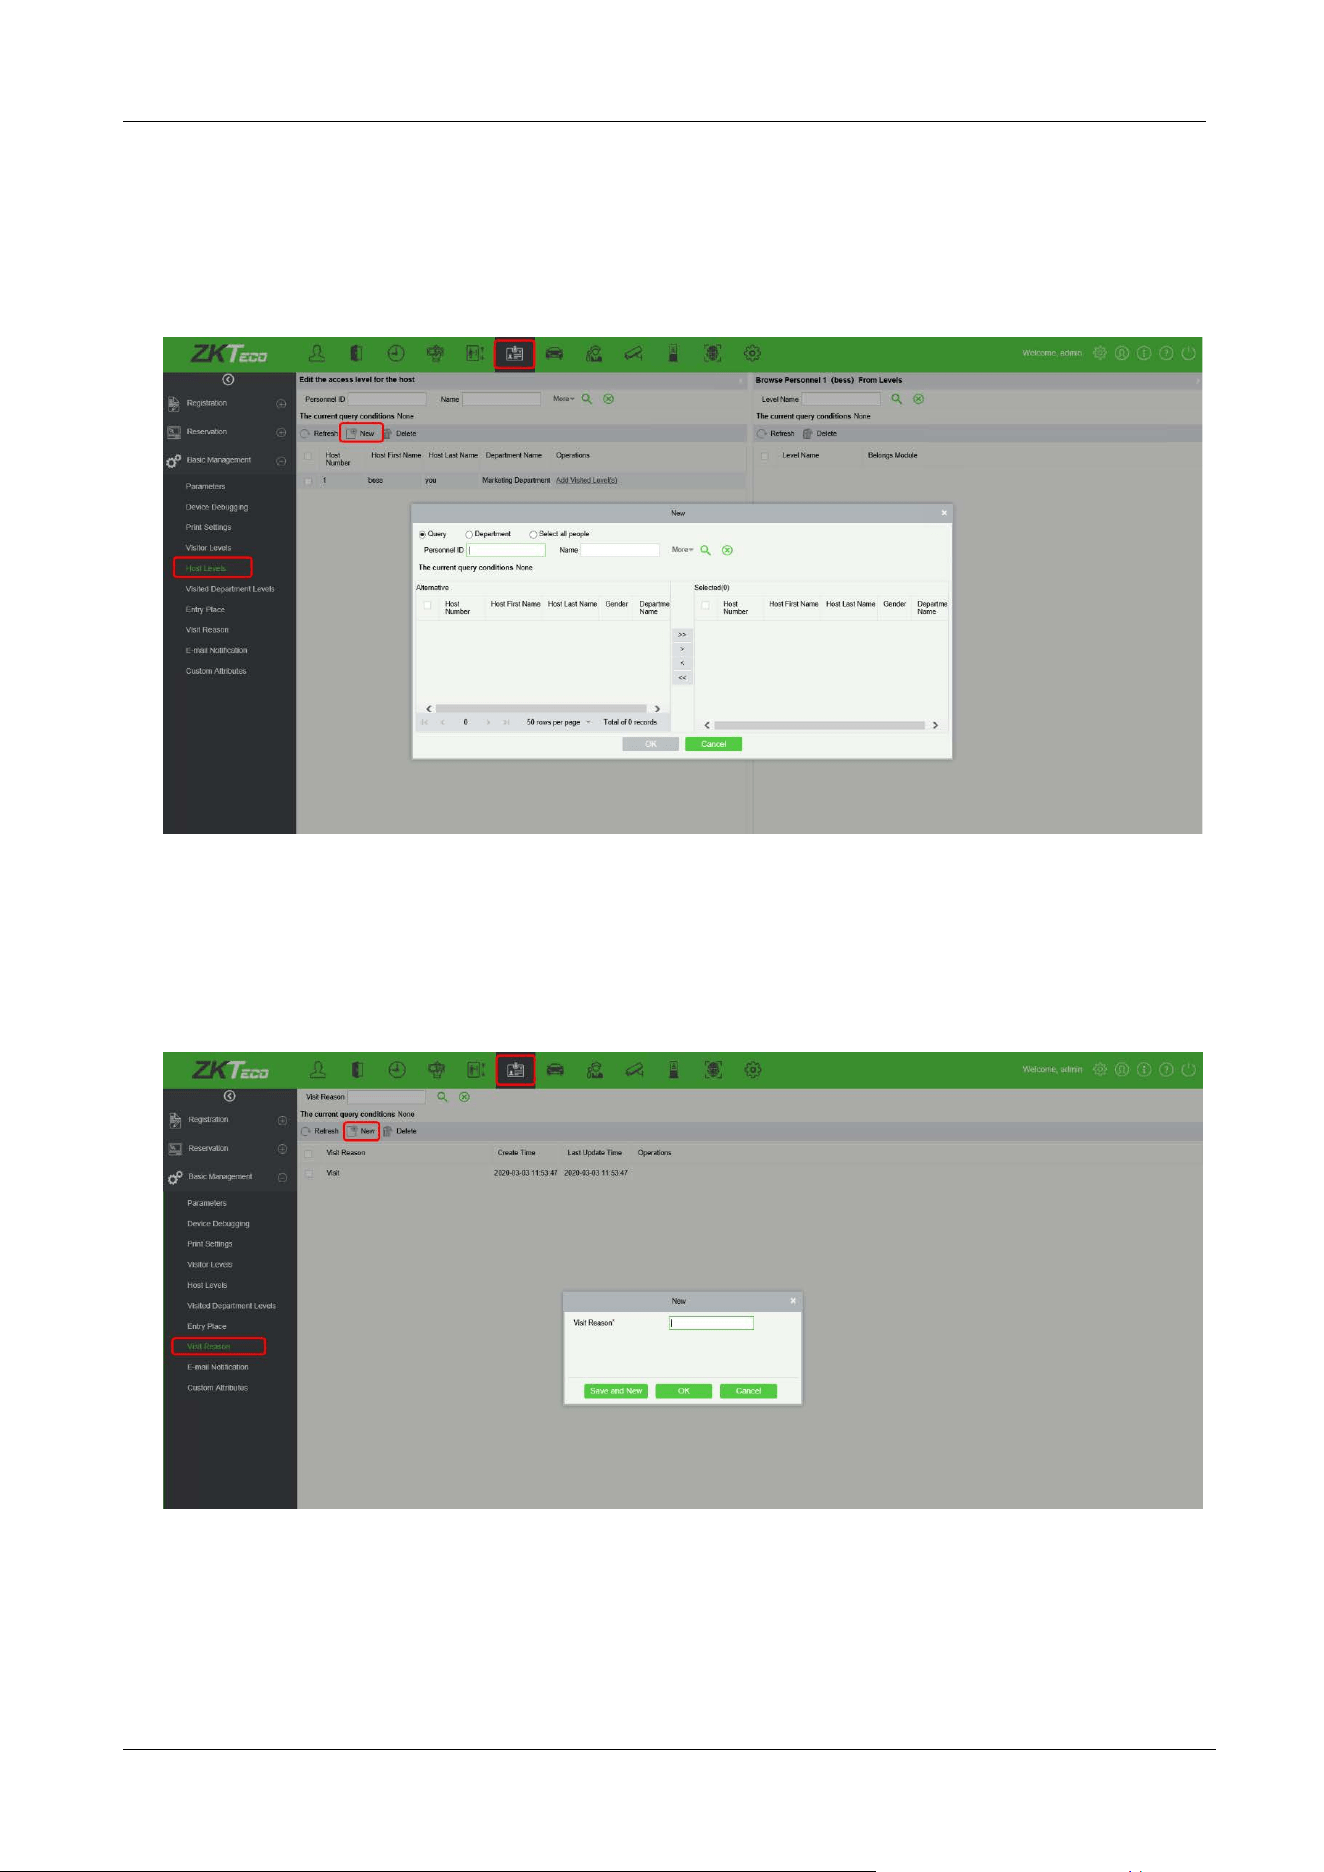
11.2.2 Host Settings
Add the person in the Personnel module, and then select the person who needs to be set as the host in
the [Visitor Module]
[Host Level].
11.2.3 Visit Reason Settings
Add the purpose of visit in [Visitor Module]
[Visit Reason]. It will synchronize to the device
automatically.
FaceKiosk-H13 User Manual
P a g e | 65 Copyright©2022 ZKTECO CO., LTD. All rights reserved.
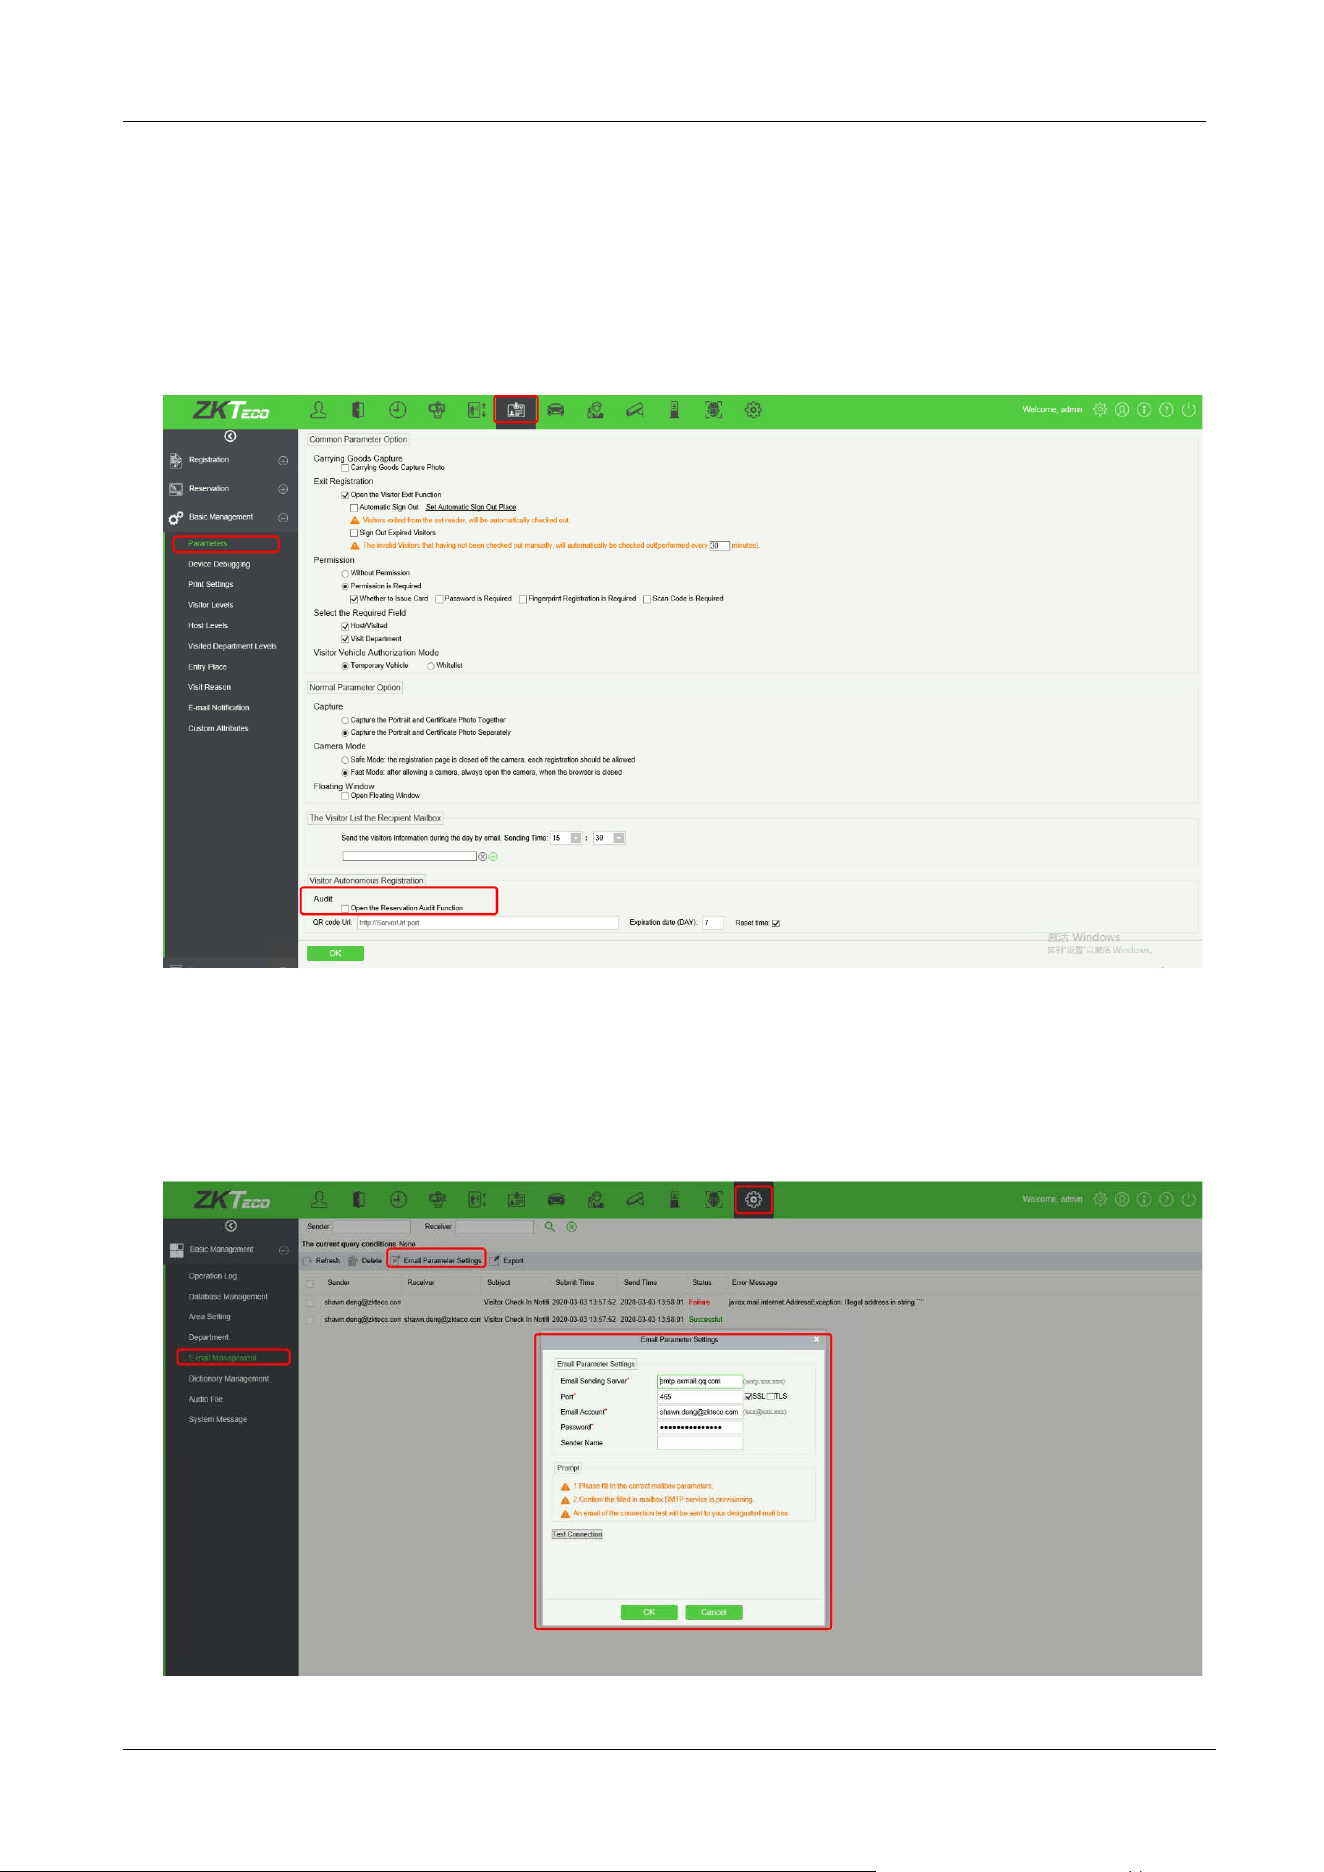
11.2.4 Reservation Audit Settings
Turn on the audit function in [Visitor Module]
[Basic Management]
[Parameters]. The visitor
reservation will need to be approved before check-in & check-out. If this feature is turned off, the visitor
will be able to check-in directly after completing registration on the FaceKiosk self-service device.
11.2.5 Email Notification Settings
Before using the visitor Email notification function, the user needs to configure the Email Parameter
settings in the System settings module of the software.
FaceKiosk-H13 User Manual
P a g e | 66 Copyright©2022 ZKTECO CO., LTD. All rights reserved.
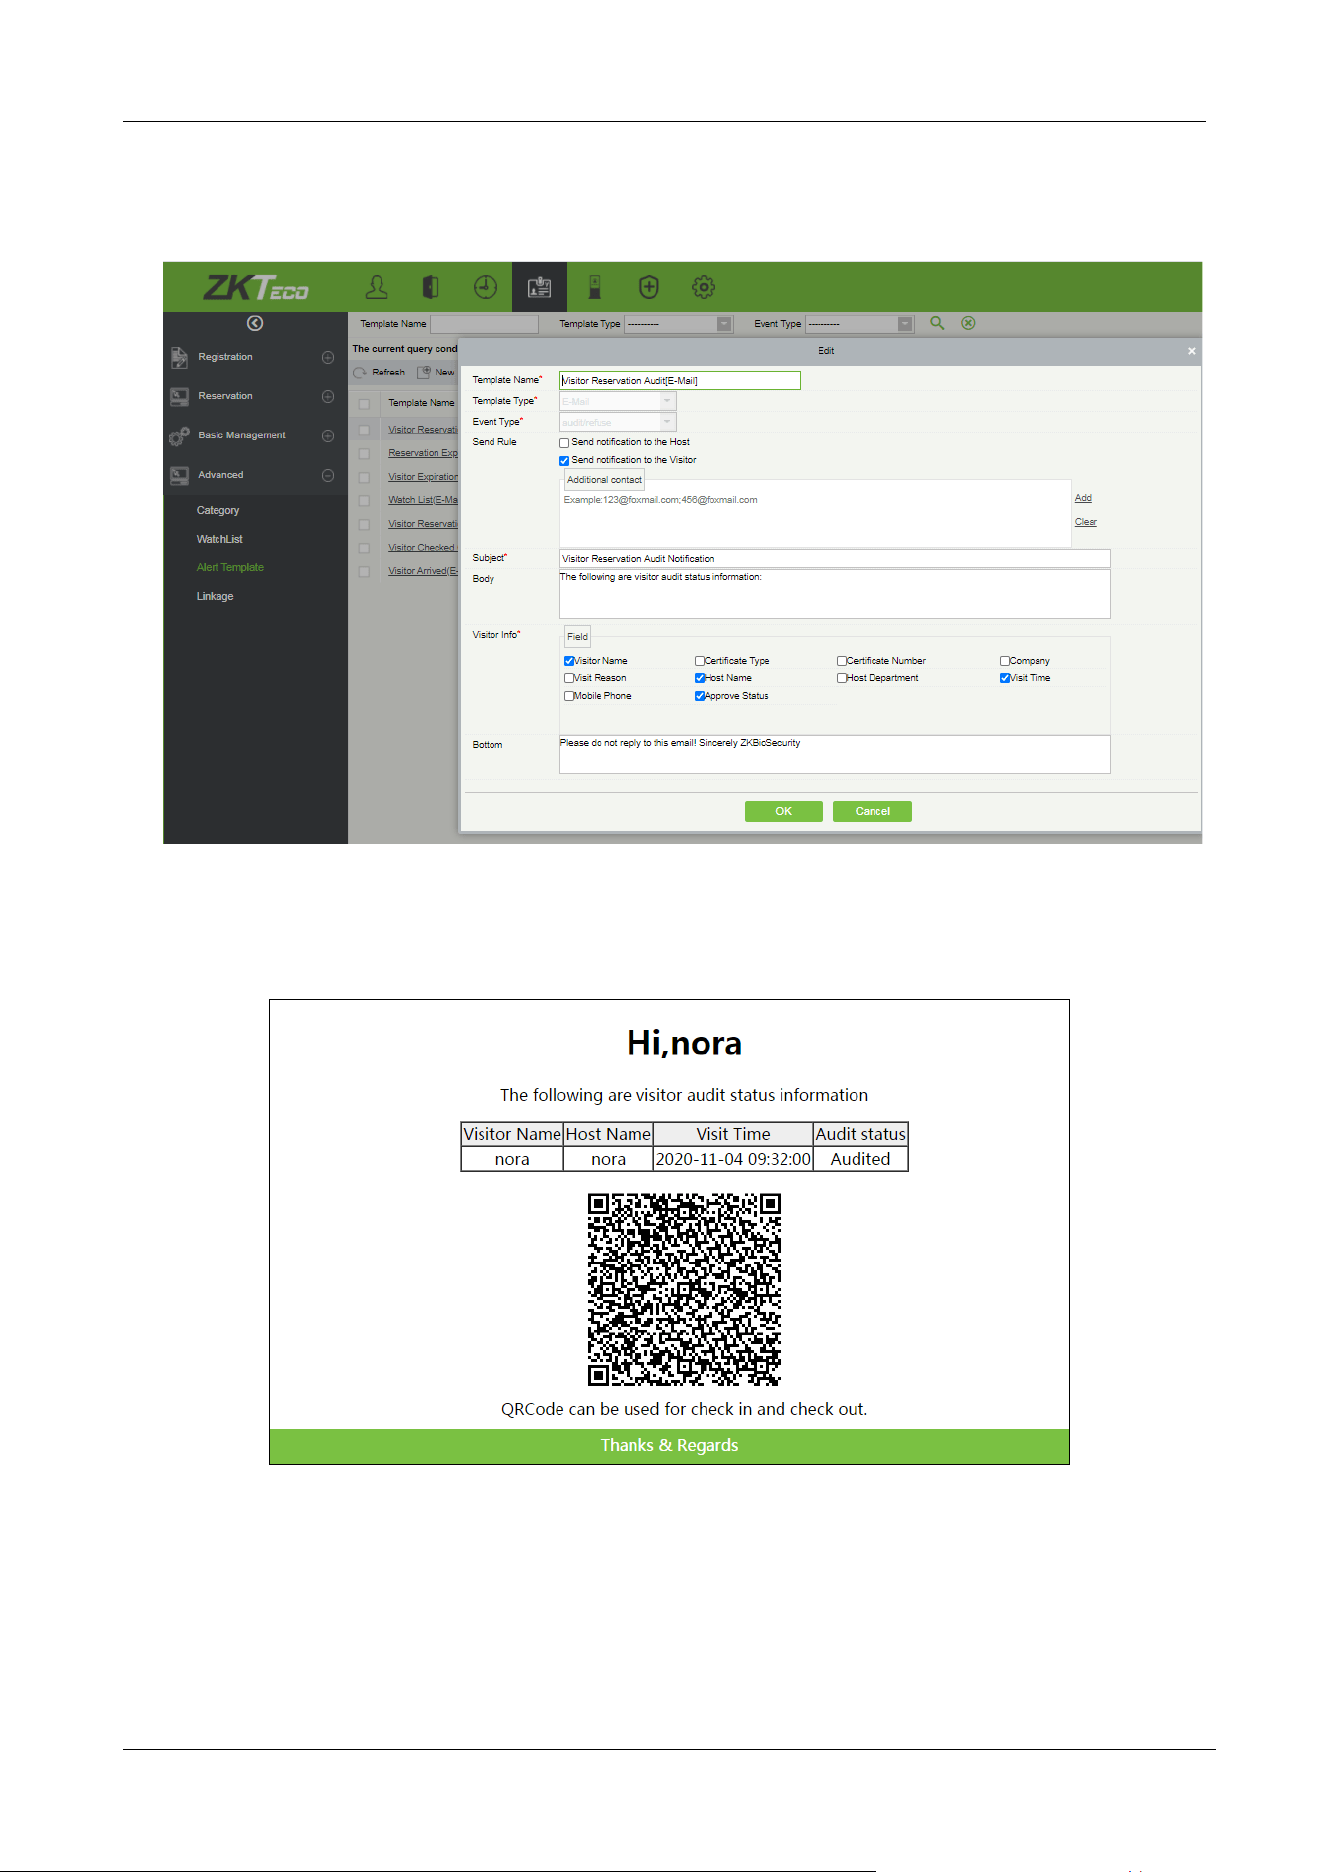
The user can also edit the Email notification template in [Visitor Module]
[Advanced]
[Alert
Template].
The visitor will receive an email with a QR code after the reservation is approved, which can be used for
check-in and check-out on the FaceKiosk self-service visitor device.
FaceKiosk-H13 User Manual
P a g e | 67 Copyright©2022 ZKTECO CO., LTD. All rights reserved.
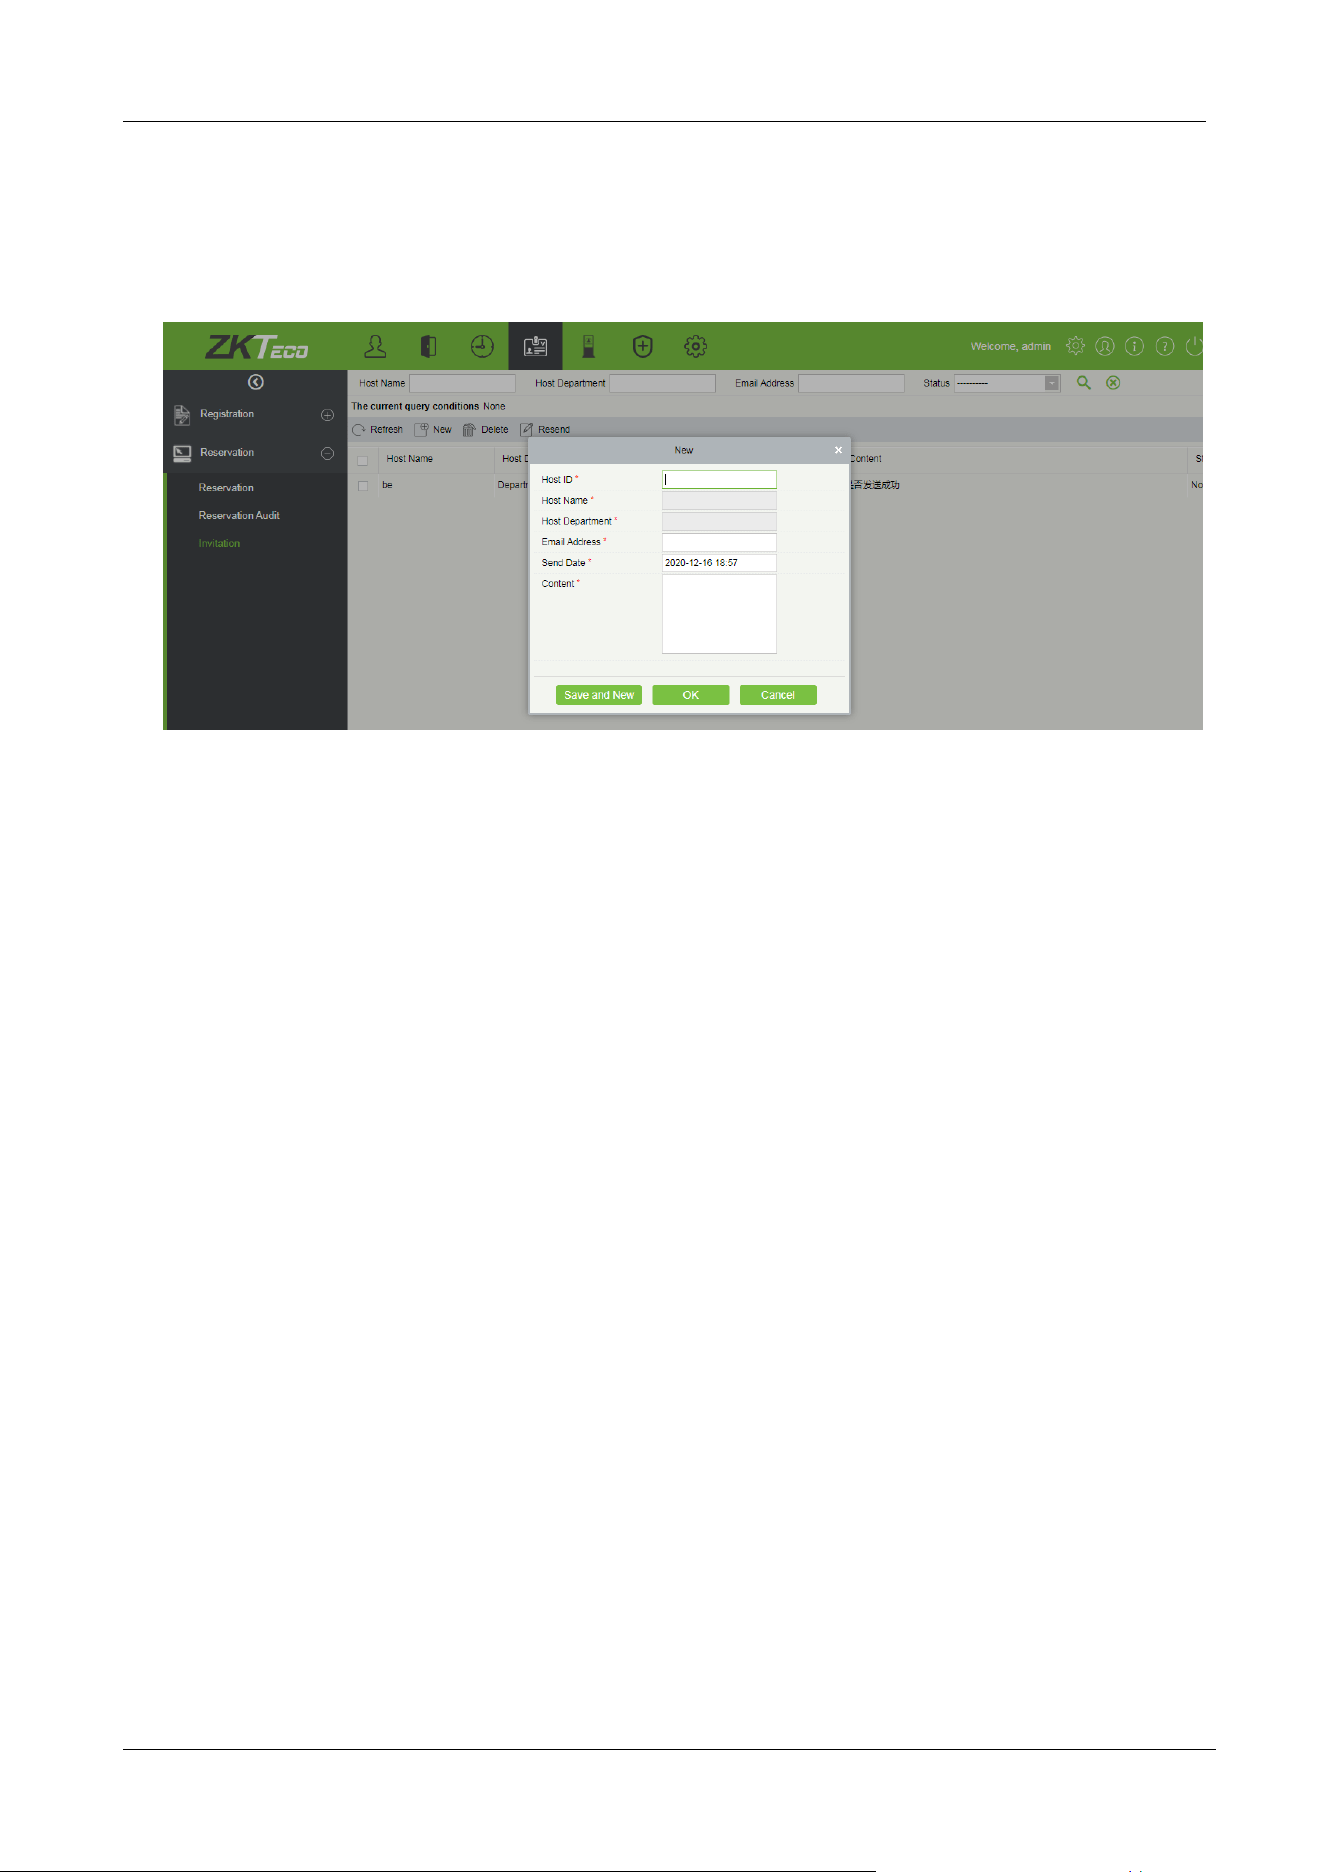
11.2.6 Invitation
The user can send the invitation Email through [Visitor Module]
[Reservation]
[Invitation].
Description of fields:
Host ID: Enter the Host ID.
Host Name: Automatically fills the name of the host.
Host Department: Automatically fills the host's department.
Email Address: Enter the Email address of the guest who needs to be invited.
Send Date: Select the date and time to send the Email.
Content: Enter the invitation content.
11.2.7 Visitor Registration QR Code Settings
In [Visitor Module]
[Basic Management]
[Parameters], enter the Server Address and Port number
to generate the reservation QR code, and set the validity time of the QR code.
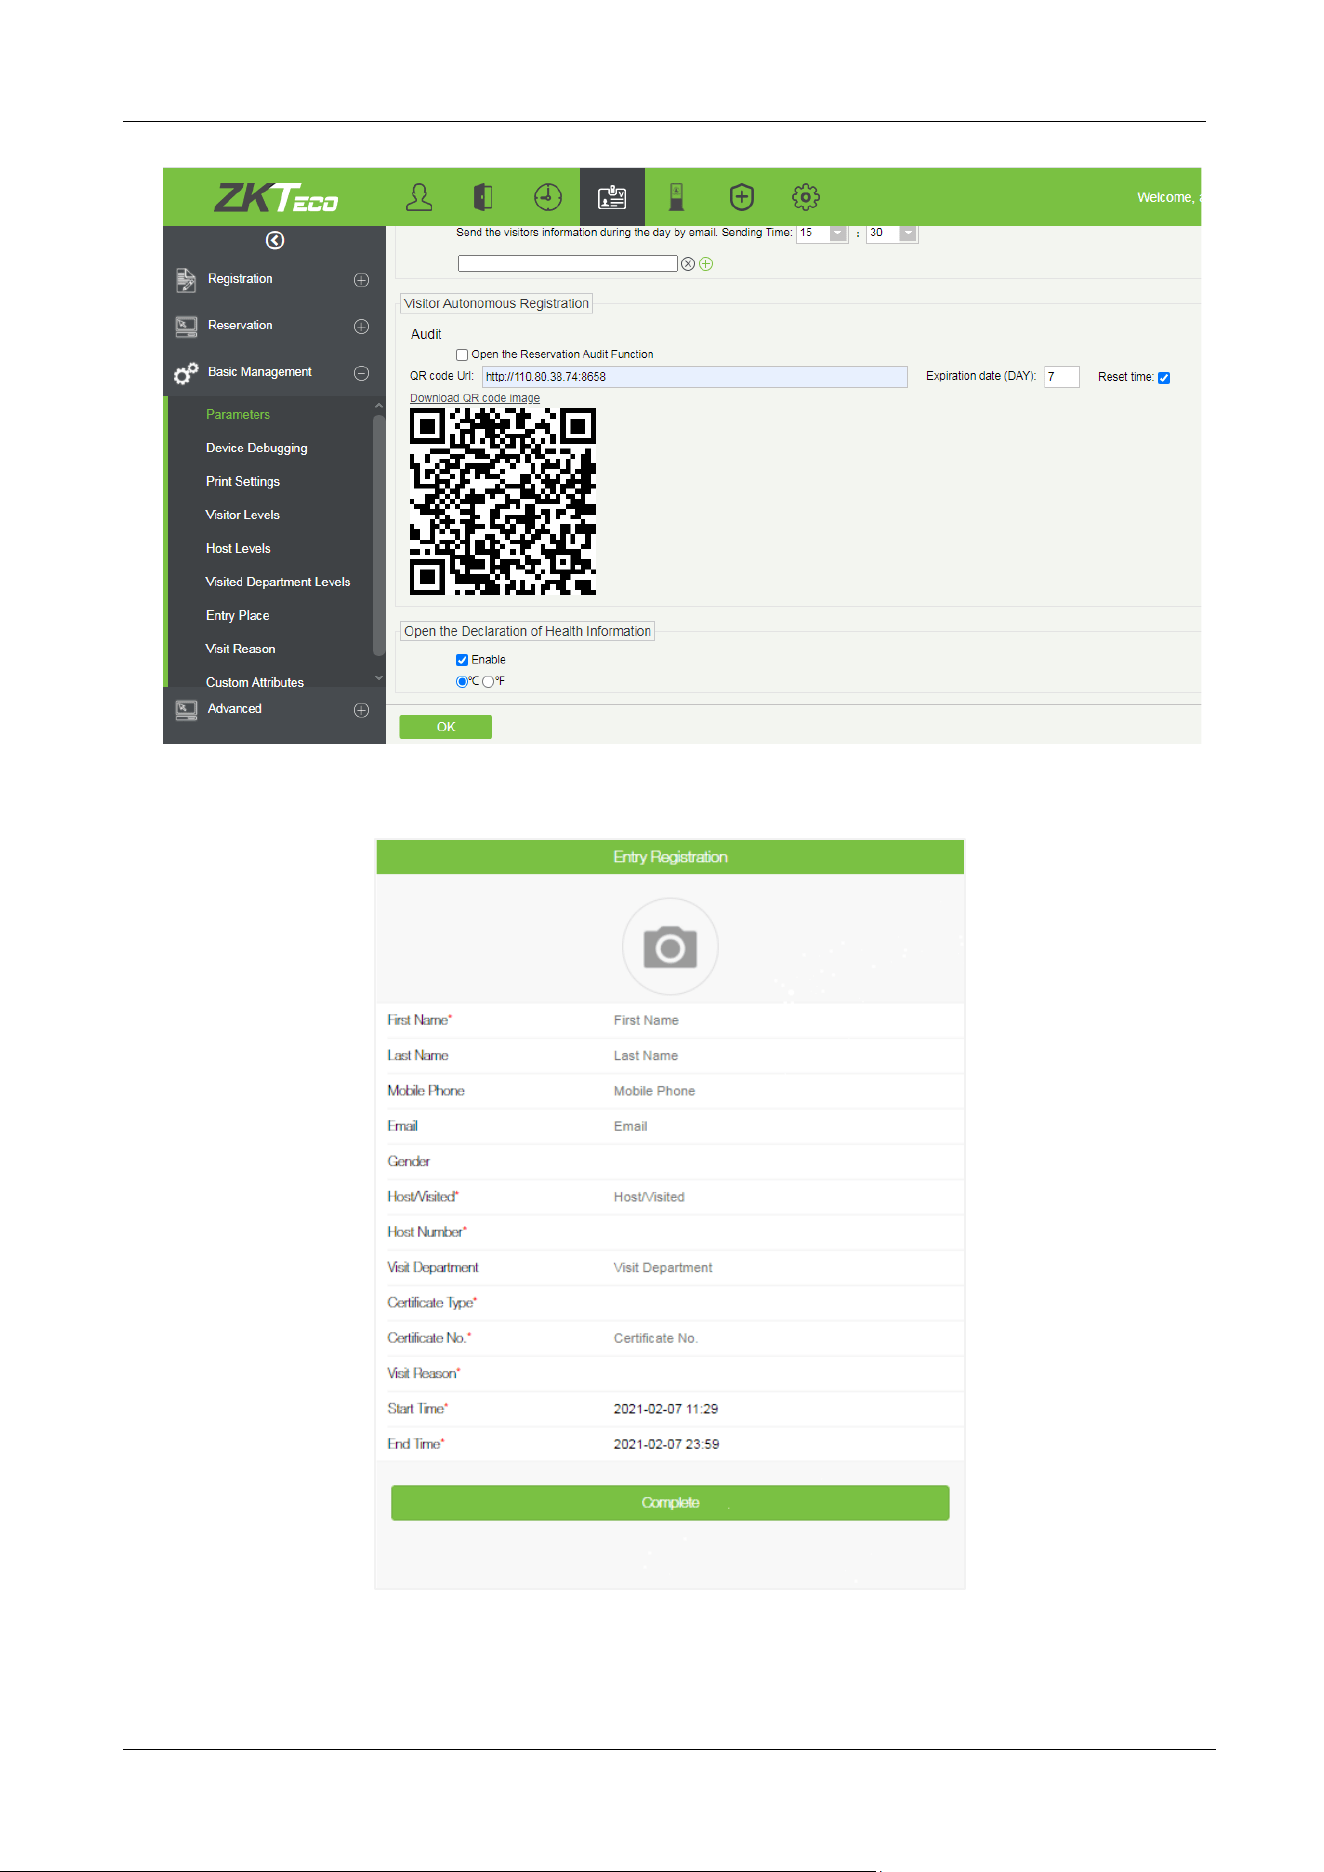
FaceKiosk-H13 User Manual
P a g e | 68 Copyright©2022 ZKTECO CO., LTD. All rights reserved.
Scan the QR code to open the mobile registration interface. Fill in the required information to complete
the registration process as below.
FaceKiosk-H13 User Manual
P a g e | 69 Copyright©2022 ZKTECO CO., LTD. All rights reserved.
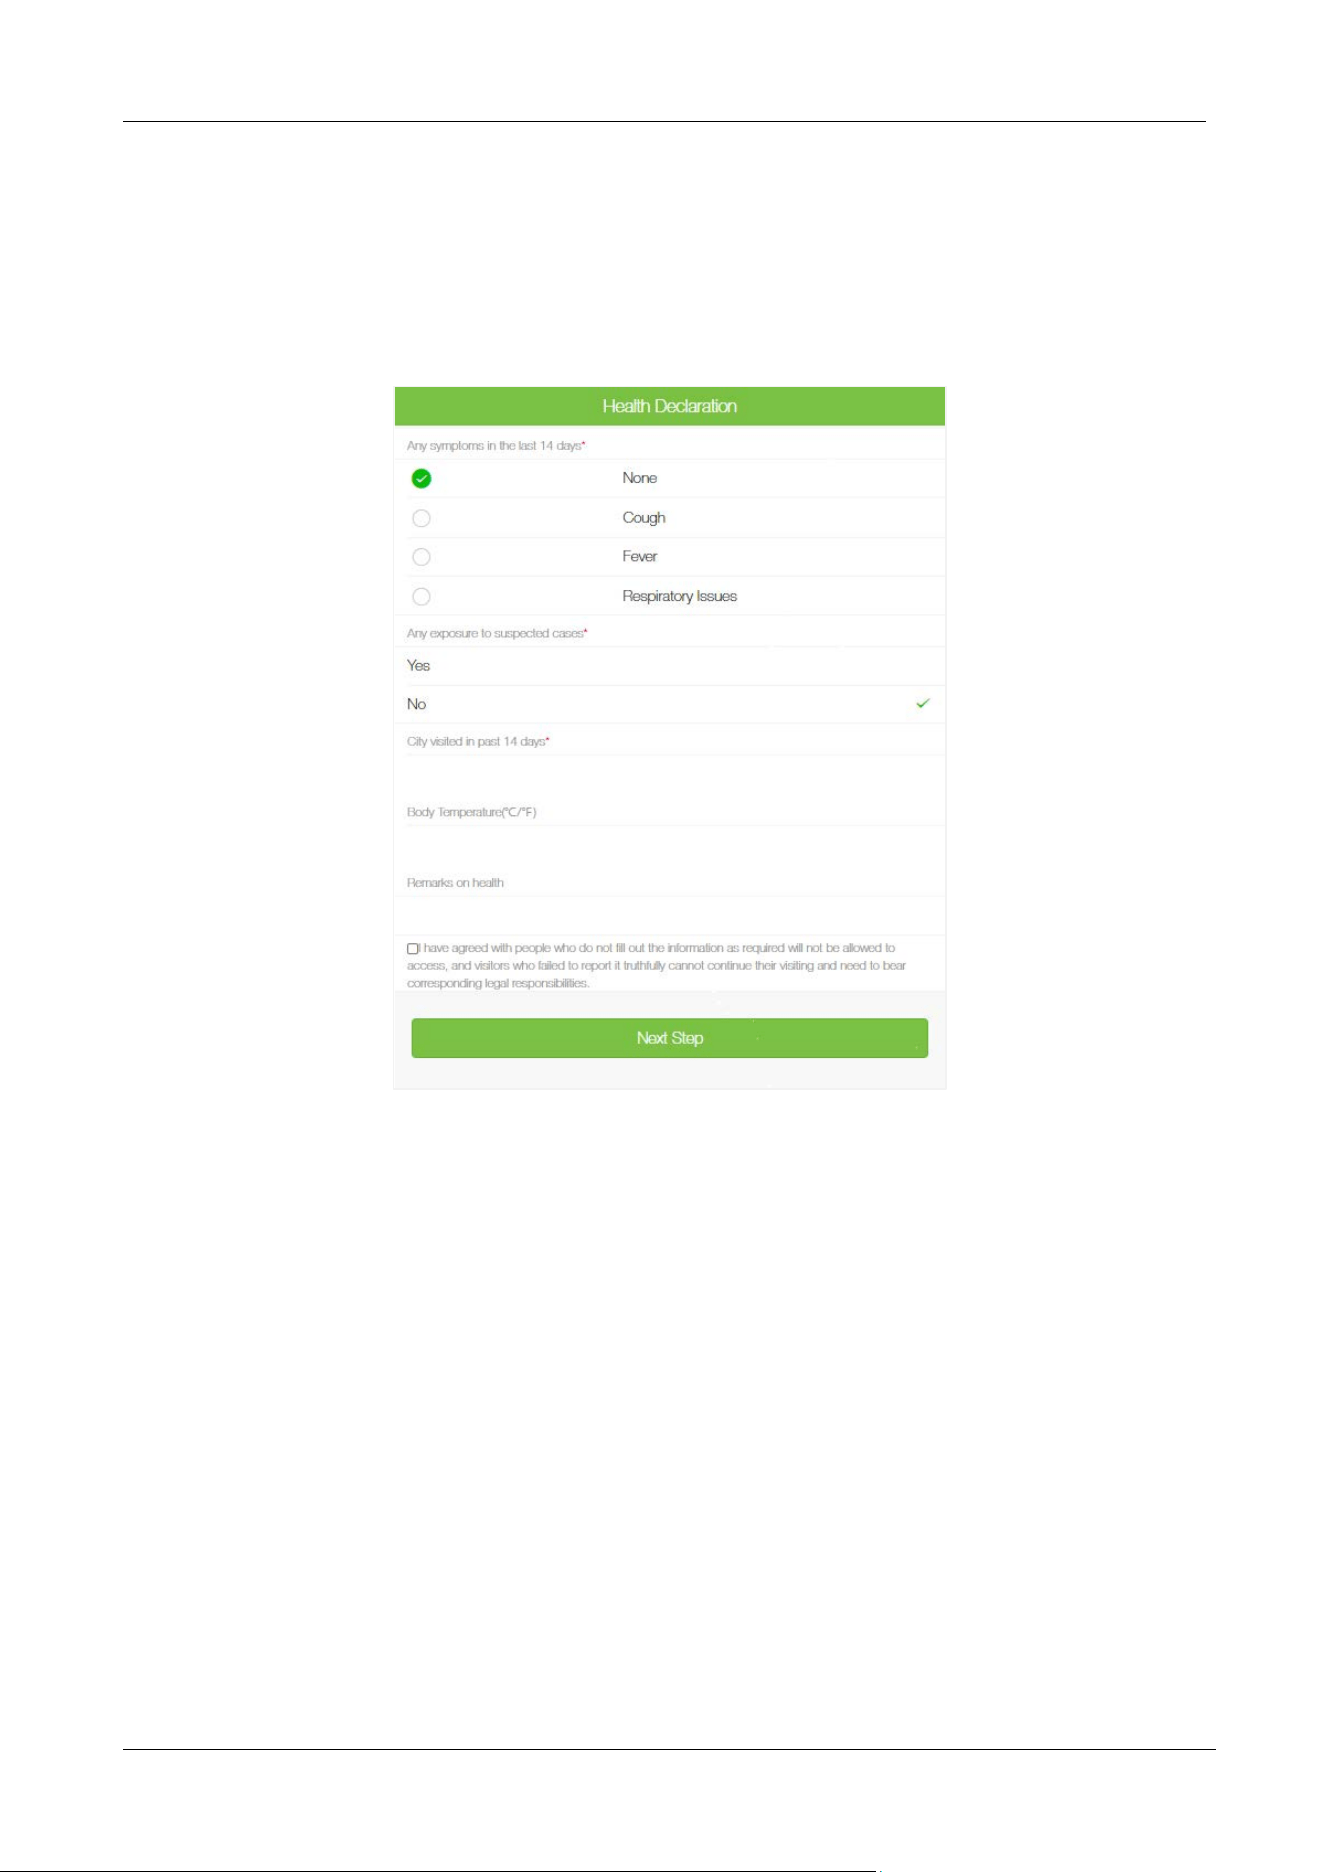
11.2.8 Declaration of Health Information
Open [Visitor Module]
[Basic Management]
[Parameters] to enable the health information
declaration function, to register the epidemic prevention information, and enter the temperature of
visitors in the mobile visitor registration interface.

ZKTeco Industrial Park, No. 32, Industrial Road,
Tangxia Town, Dongguan, China.
Phone : +86 769 - 82109991
Fax : +86 755 - 89602394
www.zkteco.com
Copyright © 2022 ZKTECO CO., LTD. All Rights Reserved.


