1 1
1:1
K
A
1
2
4
6
3
5
1
2
4
6
3
5
B
C
D
E
F
G
H
A
B
C
D
E
F
G
H
技术要求(版本号:B,2023-06)
2.该说明书的幅面大小为: A5 ,未注直线尺寸公差应符合GB/T1804-v;
4.说明书警语及认证标志应满足CE/UL标准,CE:警语部分大写字母高度不低于3mm,CE标志不低于5mm,WEEE标志不低于7mm;
UL:大写字母字高不小于1/12”(2.11mm),小写字母字高不小于1/16”(1.6mm),“IMPORTANT SAFEGUARDS”,“SAVE
THESE INSTRUCTIONS”等词,其字高不小于3/16”(4.8mm),IMPORTANT SAFEGUARDS 必须在最前面。
5.产品应符合QMG-J53.021《产品说明书技术条件》的有关要求。
6.有ROHS指令要求的物料应符合美的企业标准QML-J11.006《产品中限制使用有害物质的技术标准》。
1.文字图案印刷颜色为: 黑色 ,印刷字体需清晰可见,文字不能粘到一起;
广东美的生活电器制造有限公司
会 签
郭迁强 李艳
古广君
古广君
2024-01-19
制 图
设 计
校 对
审 核
标准化
审 定
日 期
标记
处数 更改文件号 签 字 日 期
电风扇
说明书
重点
校对项
1.物料编码
2.版面尺寸
3.材质标注
4.颜色标注
5.客户型号
6.产品名称
7.产品参数
8.电压功率
-----
-----
-----
9.单位符号
10.认证标志
16.商标LOGO
11.回型标志
15.目录及
页码
12.ROHS标志
13.警语警语
及字高
14.控制面板
及功能
3.该说明书的装订方式为: 钉装 ;[70P以下为钉装,70P以上为胶装(特殊要求除外)]
PELONIS-FZ10-18TR (PSFT40R5BB)-0501
16161000A25061
材料: 80g双胶纸
认证图标
单位表述
产地表述
变更要求
000000
0000000
UL只有C+US或无ETL有C或US或C+US大于5mm
说明书、保修卡类
交流电: 频率: 功率: 容量: 电流: 压强:V~
MADE IN CHINA Made in China Made in P.R.C
Hz W mL/L A Pa/kPa/MPa 长度:mm/cm/m 时间:s/min/h重量:kg直流电:
大于5mm 大于5mm 大于5mm 大于7mm GS图标无高度要求,印刷可见即可
标准元素核对表(此表仅用于印刷品制作过程核对标准内容,非印刷内容)
PAP
22
图纸变更需要核实变更内容点以及涉及的物料和MO单,尤其关注92的在途MO单
A/1/修改商标/郭迁强/2024-01-22

TOWER FAN
PSFT40R5BB
pelonis.com
OWNER’S MANUAL
EN
PSFT40R5BB
Warning Notice: Before using
this product, please read this
manual carefully and keep it for
future reference. For additional
support, please call customer
service at 1-866-646-4332.
The design and specifications are
subject to change without prior
notice for product improvement.
Consult with your dealer or
the manufacturer for details.

Read This Manual
Inside you’ll find many helpful hints on how to use and maintain your
appliance properly. Just a little preventive care on your part can save you
a great deal of time and money over the life of your appliance. You’ll find
many answers to common problems in the troubleshooting tips - you should
be able to fix most of them quickly before calling service. These instructions
may not cover every possible condition of use, so attention to safety details
is required when operating and maintain
ing this product.
SAFETY PRECAUTIONS
OWNER’S MANUAL
To prevent injury to the user or other people and property damage, the
instructions shown here must be followed. Incorrect operation due to
ignoring of instructions may cause harm or damage. The different levels of
risk are shown by the following indications.
WARNING
This symbol indicates a hazardous situation which, if
not avoided, could result in death or serious injury.
CAUTION
This symbol indicates a hazardous situation, which, if
not avoided, could result in minor or moderate injury.
This symbol addresses practices not related to
physical injury.
NOTICE
SAFETY PRECAUTIONS
IMPORTANT INSTRUCTIONS
PART NAMES
OPERATING INSTRUCTIONS
REMOTE CONTROL
SPECIFICATIONS
TROUBLESHOOTING
CLEANING
SERVICE AND SUPPORT
ONE (1) YEAR LIMITED WARRANTY
............................................................................................. 2
.................................................................................... 3
................................................................................................................ 4
ASSEMBLY INSTRUCTIONS
....................................................................................... 6
.......................................................................................7
..................................................................................................... 8
.......................................................................................................... 10
................................................................................................... 10
...................................................................................................................... 10
USER SERVICING INSTRUCTIONS
......................................................................... 11
............................................................................................ 12
...................................................................... 13
Page 2

Page 3
IMPORTANT INSTRUCTIONS
CAUTION
Read Rules for Safe Operation and Instructions Carefully.
WARNING
1. This appliance has a polarized plug (one blade is wider than the other). To
reduce the risk of electric shock, this plug is intended to fit in a polarized
outlet only one way. If plug does not fit fully in the outlet, reverse the plug.
If it still does not fit, contact a qualified electrician. Do not attempt to
defeat this safely feature.
2. To reduce the risk of fire or electric shock, DO NOT use this fan with any
solidstate speed control devices.
3. To Reduce The Risk Of Fire, Electric Shock Or Injury To Persons, Do Not
Use Replacement Parts That Have Not Been Recommended By The
Manufacturer (e.g.Parts Made At Home Using A 3D Printer).
RULES FOR SAFE OPERATION
1. Never insert fingers, pencils, or any other object through the grille when fan
is running.
2. Disconnect fan when moving from one location to another.
3. Disconnect fan when removing grilles for cleaning.
4. Be sure fan is on a stable surface when operating to avoid overturning.
5. Do not use fan in window. Rain may create electrical hazard.
6. Ensure that the fan is switched off from the supply mains before
removing the grille.
THE RULES ABOUT CORD AND PLUG AS BELOW:
1. This product employs overload protection (fuse). A blown fuse indicates an
overload or short-circuit situation. If the fuse blows, unplug the product
from the outlet. Replace the fuse as per the user servicing instructions
(follow product marking for proper fuse rating) and check the products. If
the replacement fuse blows, a short-circuit may be present and the
product should be discarded or returned to an authorized service facility
for examination and/or repair.
2. Do not operate any fan with a damaged cord or plug. Discard fan or return
to an authorized service facility for examination and/or repair.
3. Do not run cord under carpeting. Do not cover cord with throw rugs,
runners, or similar coverings. Do not route cord under furniture or
appliances. Arrange cord away from traffic area and where it will not be
tripped over.
READ AND SAVE THESE INSTRUCTIONS
Page 4
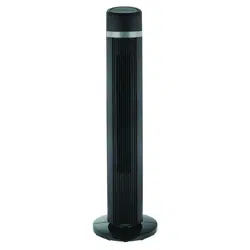
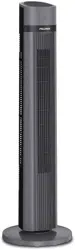
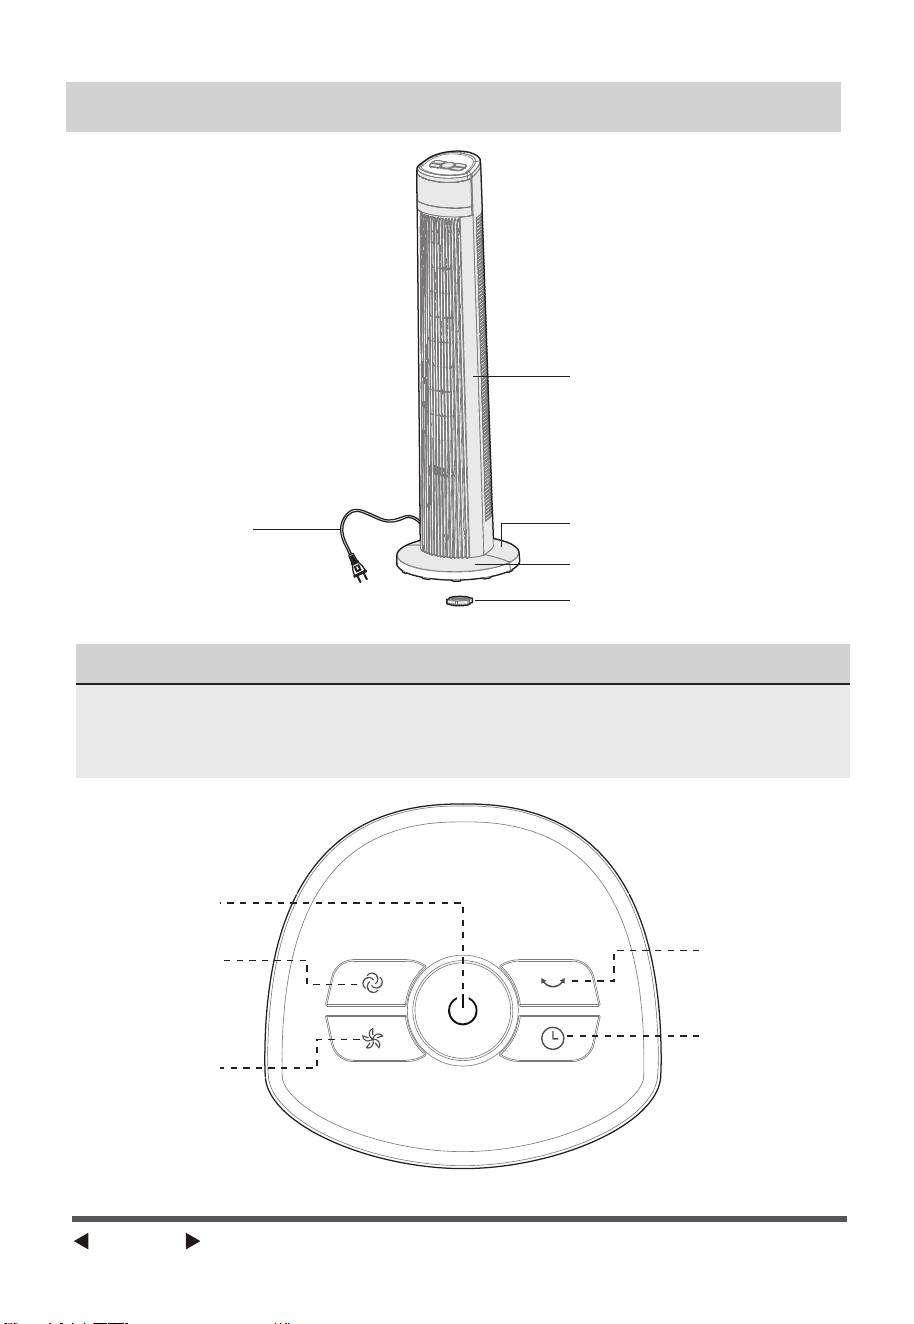
PART NAMES
Body
Power Cord
Rear Base
Front Base
Plastic Nut
NOTE
Oscillation
Speed
Timer
Mode
ON/OFF
All the pictures in this manual are for explanation purpose only. Any
discrepancy between the real object and the illustration in the drawing shall
be subject to the real subject.
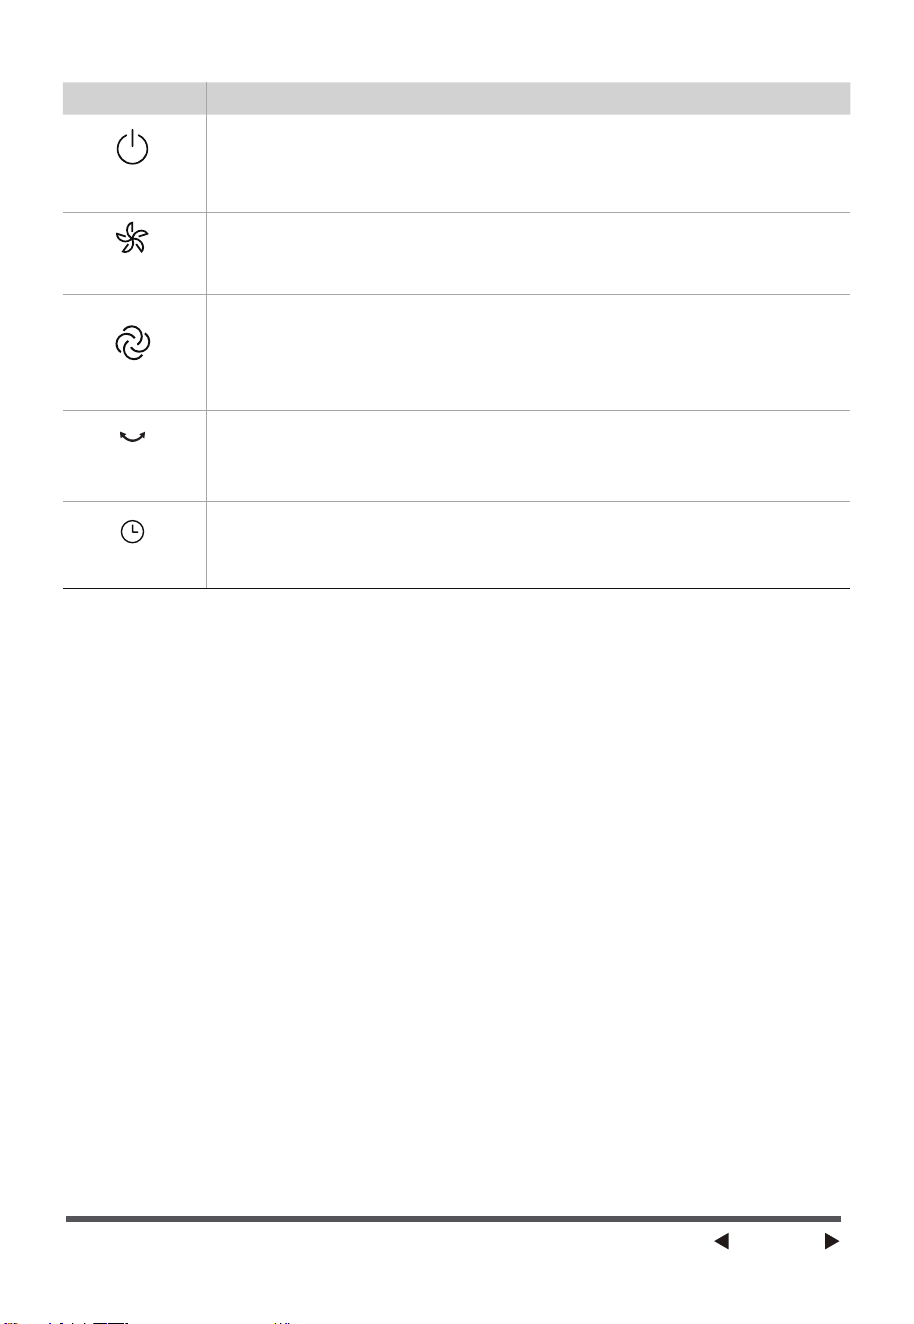
Function descriptionButton
ON/OFF
• The “ON” key is for switching on the fan .The fan will be started at
breeze step. Press the “OFF” key if the fan needs to switch off.
• When the fan started, press this key repeated, the fan will work
with “1-2-3” circulatory.
SPEED
OSCILLATION
MODE
•
Press this key to select mode. The sequence is normal, natural, and sleep
when this key being touched repeatedly or continuously. The light indicate
mode.
•
After the fan has started, press this key to select oscillation mode. The lights
on the display can indicate fan oscillation mode.
TIMER
•
Press this timer key repeatedly to set the time for air delivery. Increase in
increments up to “1-2-3-4-5-6-7” hours.
Page 5
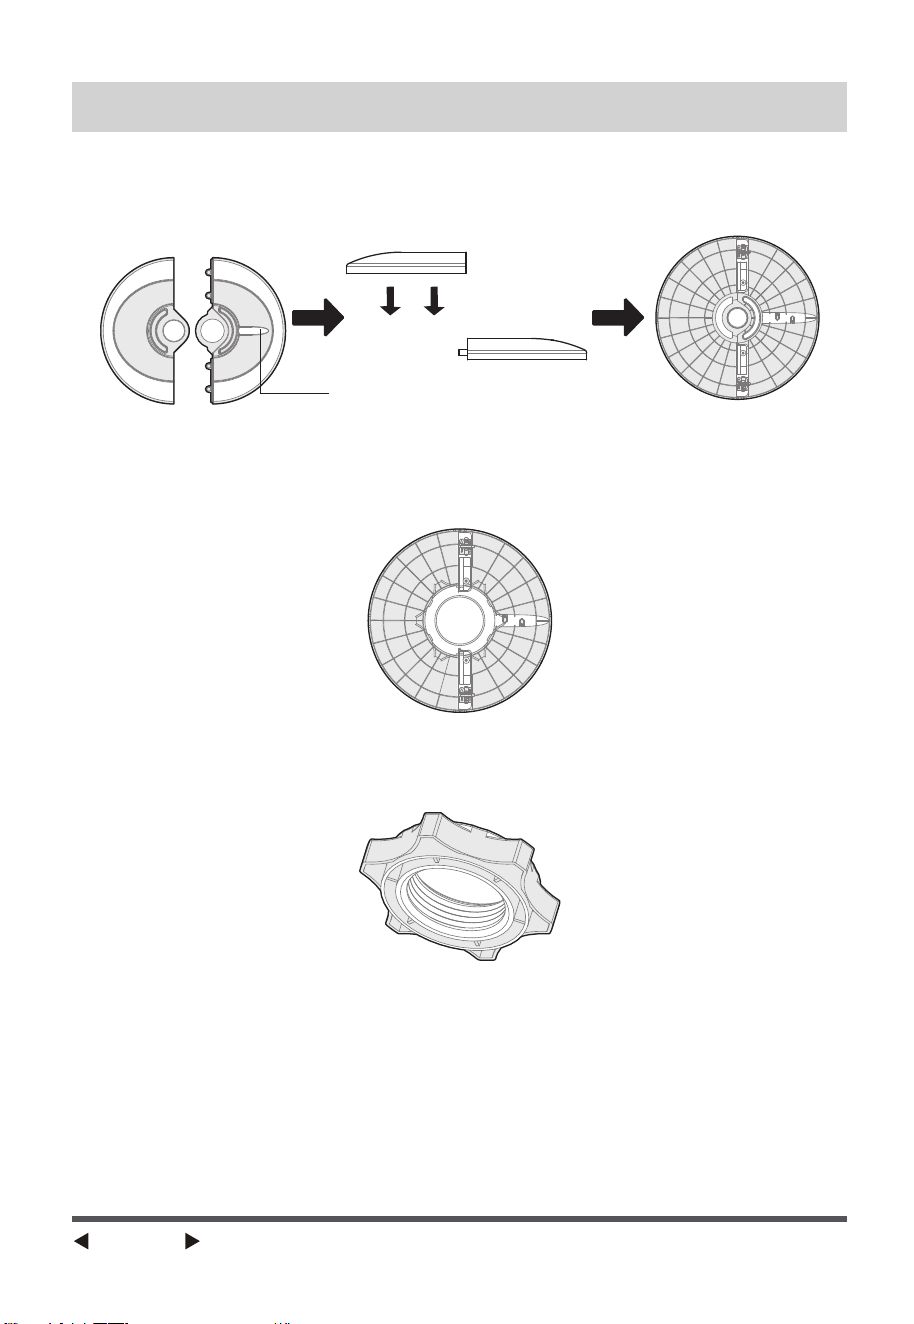
The outlet through
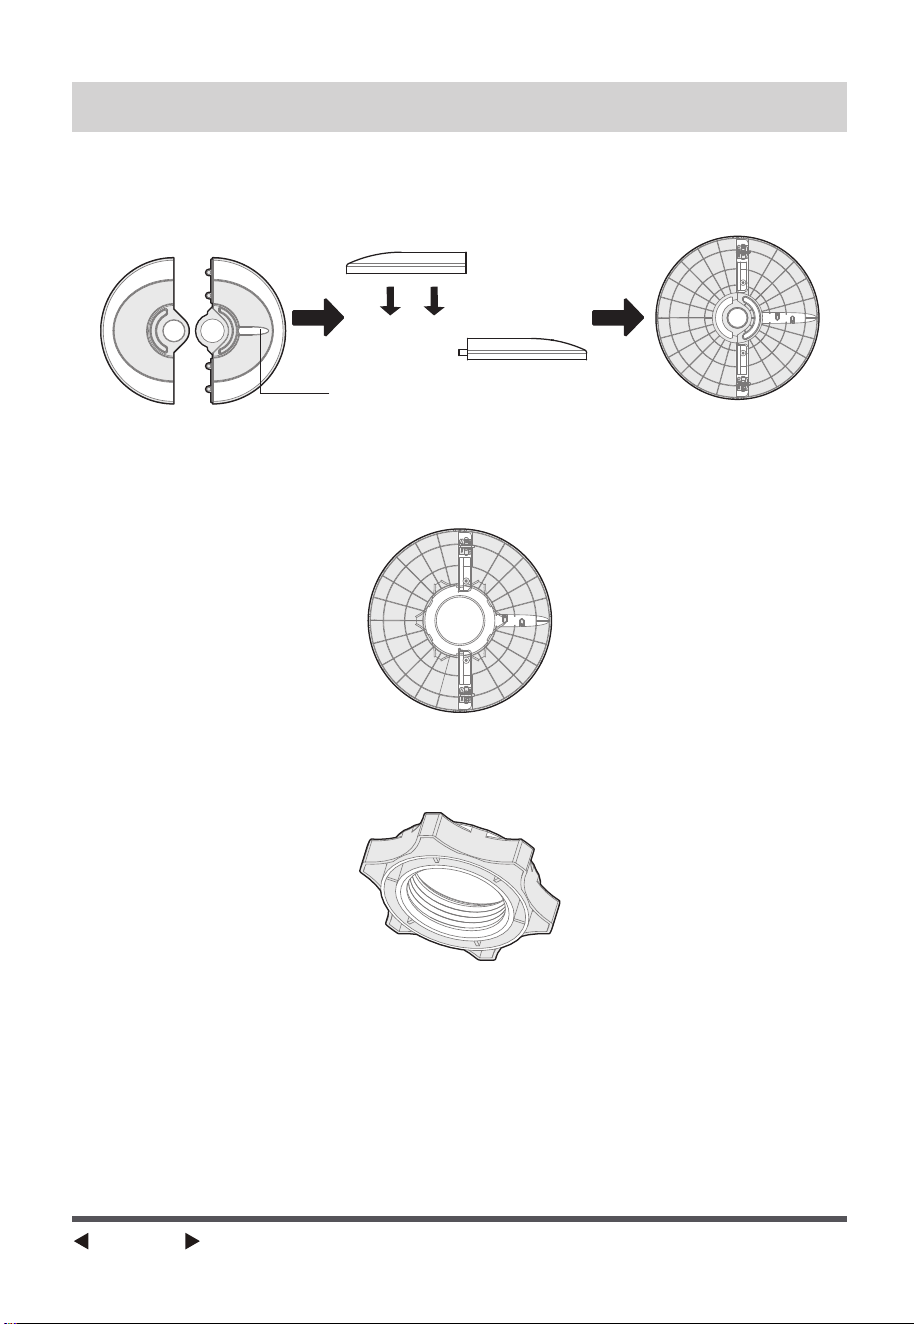
ASSEMBLY INSTRUCTIONS
1. Take out the fan body and the spare parts from the box. Put the front base
onto rear base and join them together. (See Fig. 1)
2. Unlock the plastic nut from the fan body.
4. Fix the fan body on the base with the plastic nut. (See Fig. 3)
3. Pass the power cord through the flute, then insert the fan body into the
base. (See Fig. 2)
Fig.1
Fig.3
Fig.2
Page 6
OVERHEAT PROTECTION OF THE MOTOR
OPERATING INSTRUCTIONS
The windings of the motor have a thermal-fuse that burns out and the fan
switches off and temperature of the motor is no longer going up so that
plastic parts of the fan don’t subject to deformation so far so to be burned
by the overheat if the motor is overheat for any unexpected reason.
Buttons on fan body / Panel indication
The buttons on the body such as ON/OFF,SPEED, MODE,TIMER,
OSCILLATION have the same functions as those of the corresponding keys
on the remote controller.
Page 7
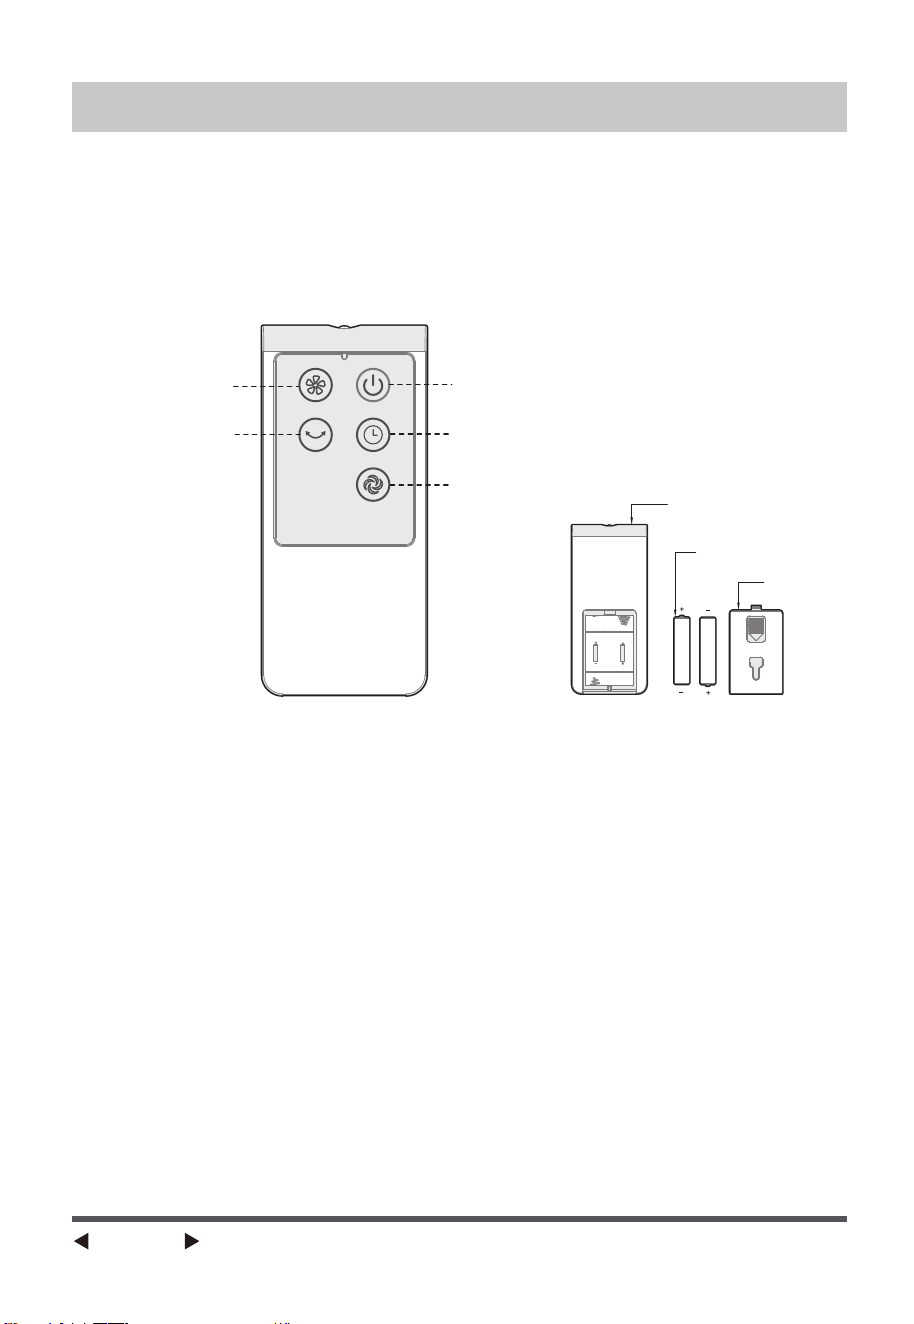
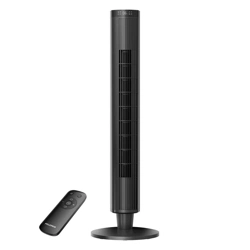
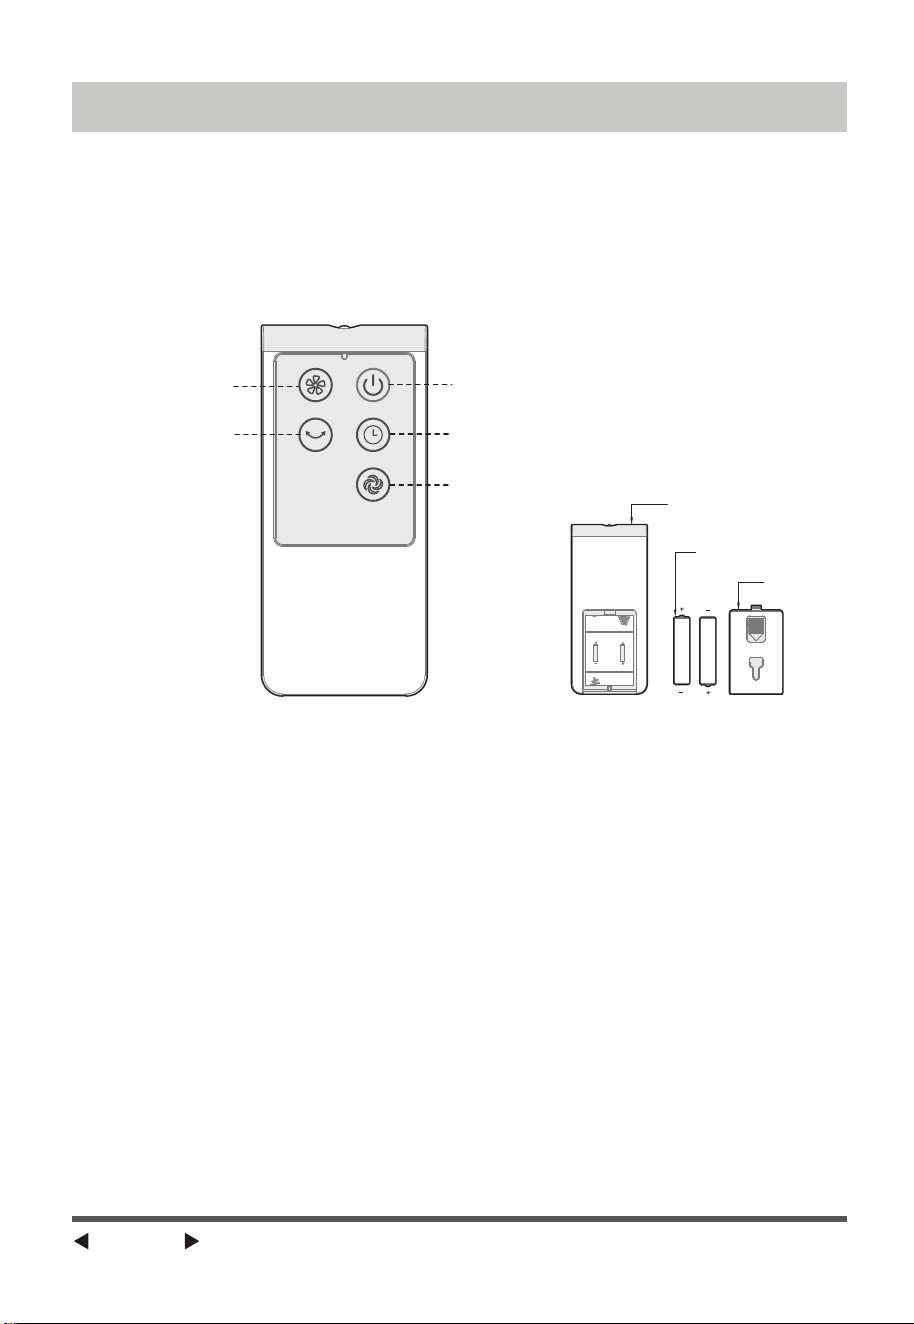
Remote controller
AAA Battery, 1.5V
Battery cover
Speed
ON/OFF
Timer
Mode
Oscillation
REMOTE CONTROLLER
REMOTE CONTROLLER OPERATION
Point the remote controller at the receptor on body of the fan and press the
desired button. The remote controller will work at distances of up to roughly
five meters and the angle of 30 degree included between right and left from
the receptor. The batteries must be removed from the remote controller
before it is scrapped and that they are disposed of safely.
Page 8
(Batteries not included)
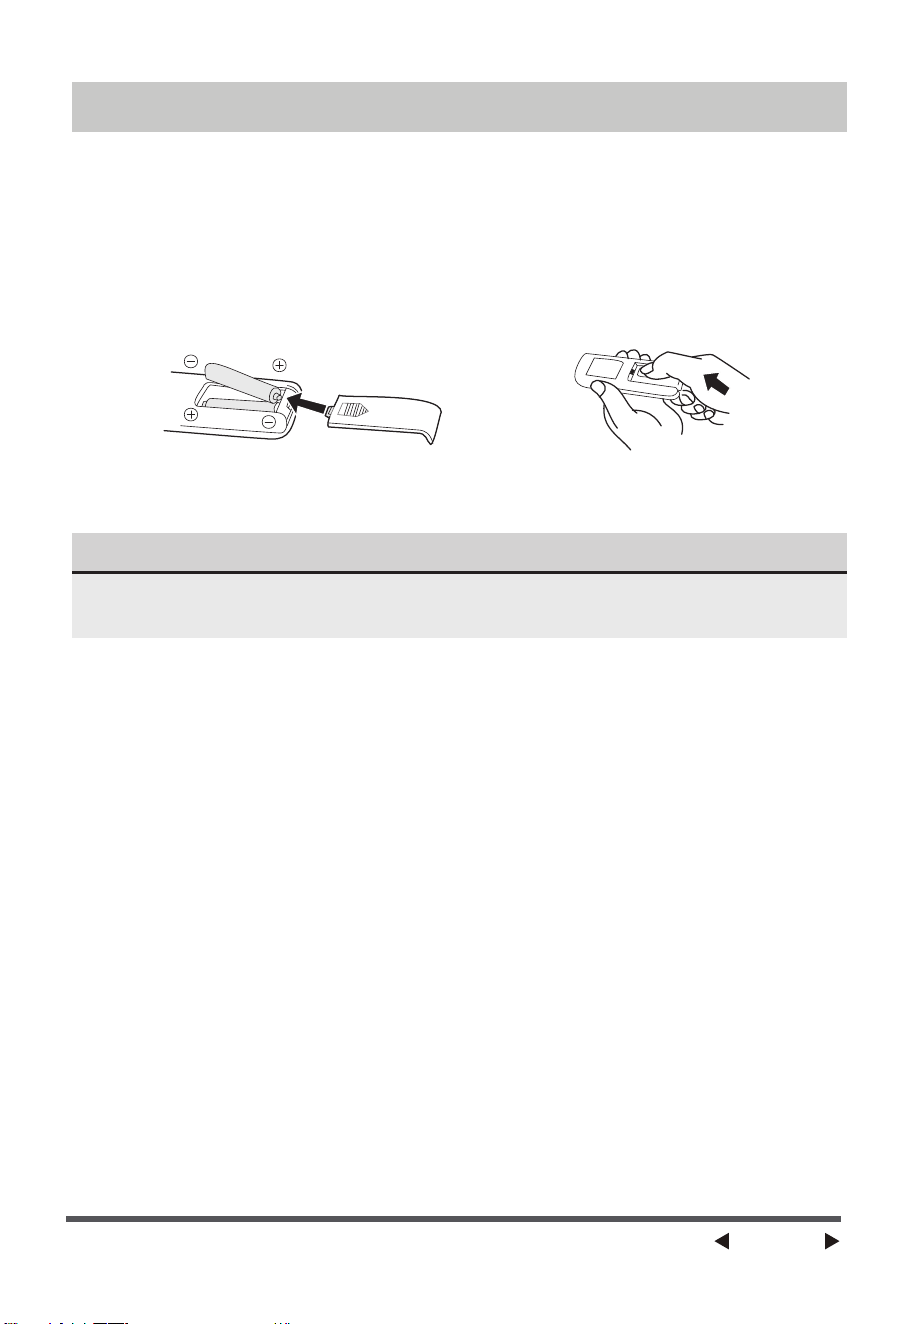
REMOTE CONTROLLER
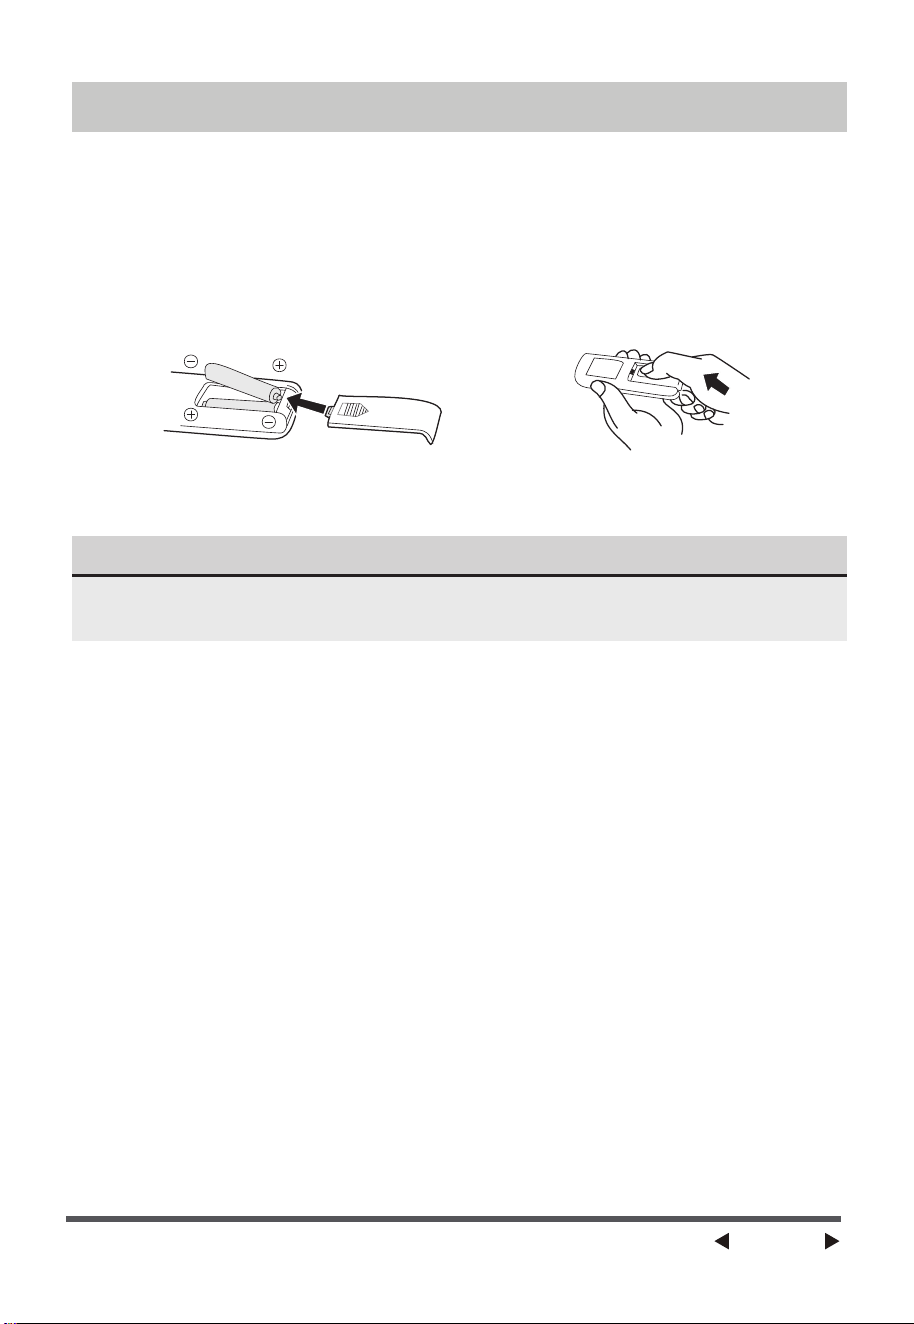
NOTE
Use manganese or alkaline batteries of type “AAA”.
Do not use rechargeable batteries.
BATTERIES
(battery not included in the packaging)
(1) Slide the battery compartment Cover.
(2) Insert the batteries, and make sure that the batteries are placed as
shown in the Fig.4.
(3) Slide back the battery cover Fig.5.
BATTERY WARNING AS BELOW
1. Do not dispose of batteries in fire, batteries may explode or leak.
2. Do not mix old and new batteries.
3. Do not mix alkaline, standard (carbon-zinc) or rechargeable
(nickel-cadmium) batteries.
Page 9
Fig.4 Fig.5
If the product does not operate or does not operate properly, first check
according to the following list. If the reason the product does not operate or
does not operate properly is not included in the following list, the product
may have failed. At this time, it is recommended to send the product to the
dealer for repair.
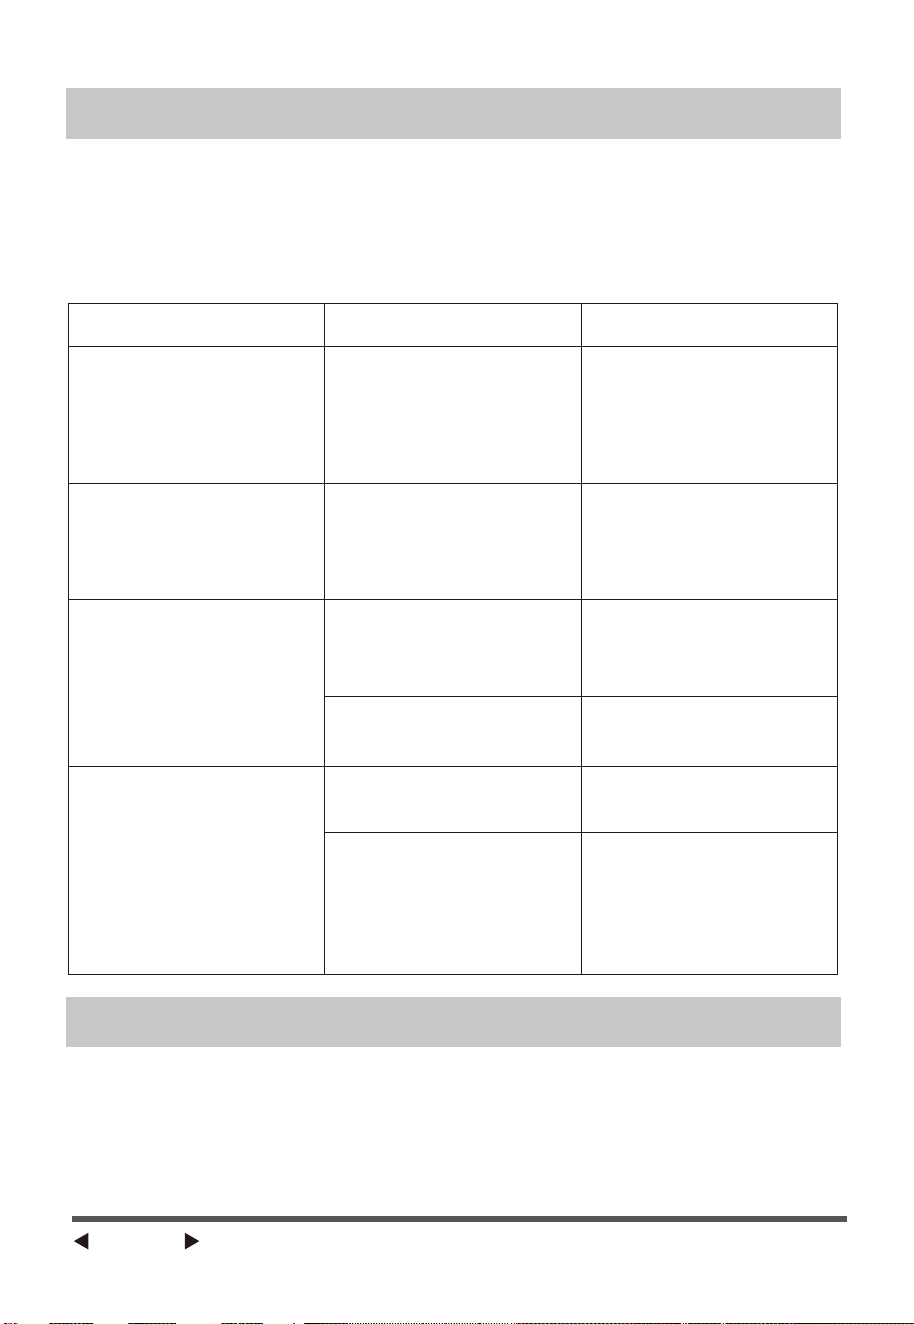
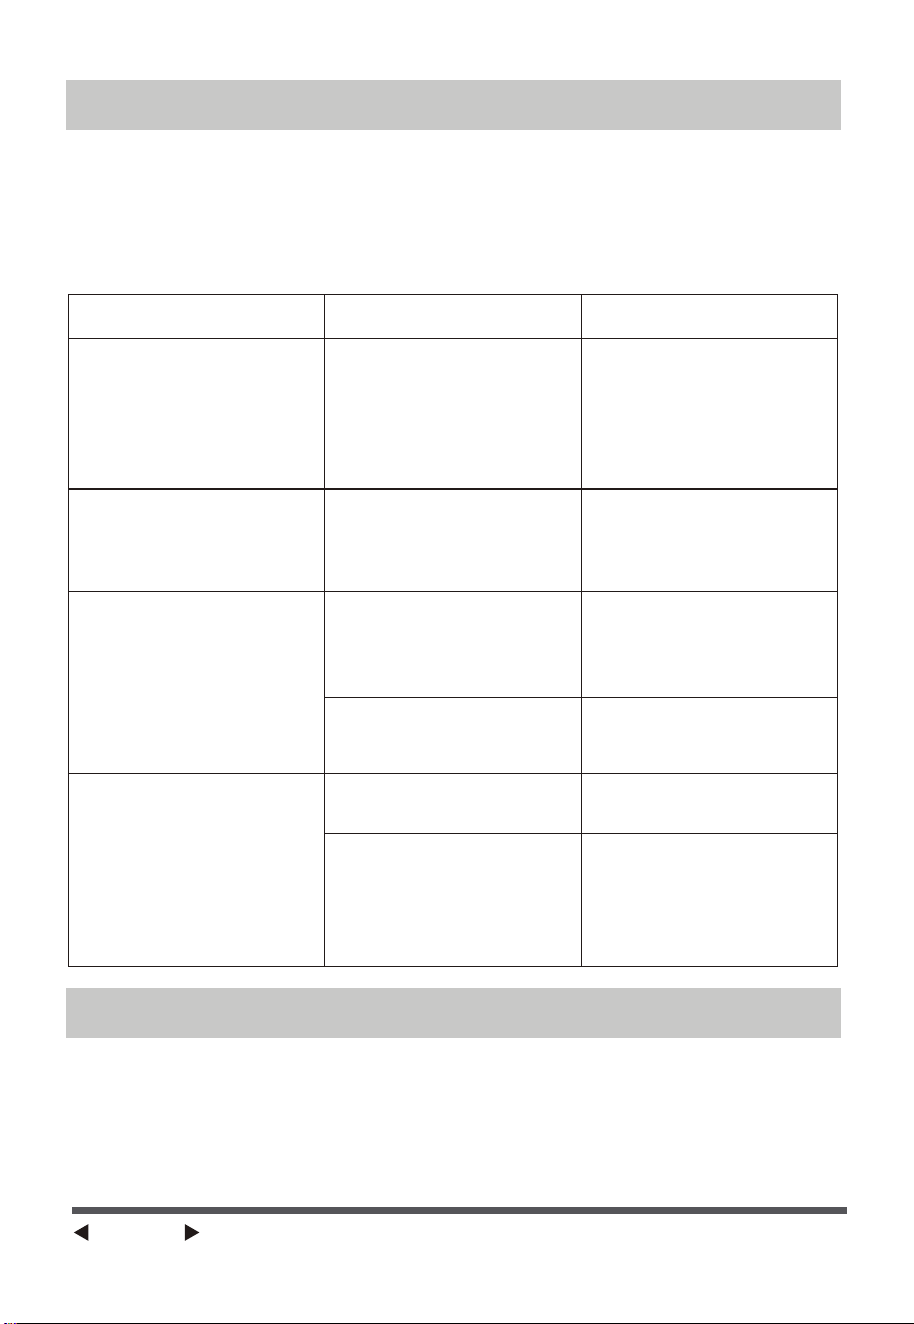
TROUBLESHOOTING
Problem Possible Cause Solution
Please send to
after-sales
maintenance.
The machine plugged
in but NOT powering
ON.
The machine suddenly
shuts-off during
working.
Plug improperly
inserted into power
outlet.
The temperature
exceeds the threshold
of the motor thermal
cut-off.
Check that the power
plug is fully and
properly inserted into
the power outlet, and
re-insert if needed.
CLEANING
1. Be sure to unplug from the electrical supply source before cleaning.
2. Plastic parts should be cleaned with mild soap and a damp cloth or
sponge.
Thoroughly to remove soap film with clean water.
3. Be sure not to make water or other liquid enter inside of motor.
Replace the battery.
The machine does not
work properly
The remote does not
work
The power cable is not
plugged in or has poor
contact.
The switch on the
body is not turned on.
The battery needs
replacing.
Use the remote closer
to the fan and make
sure it is pointing
directly at the display
panel.
The remote is being
used more than 16ft
away from the fan.
Make sure the plug is
properly inserted into
the socket.
Turn on the switch on
the body.
Page 10
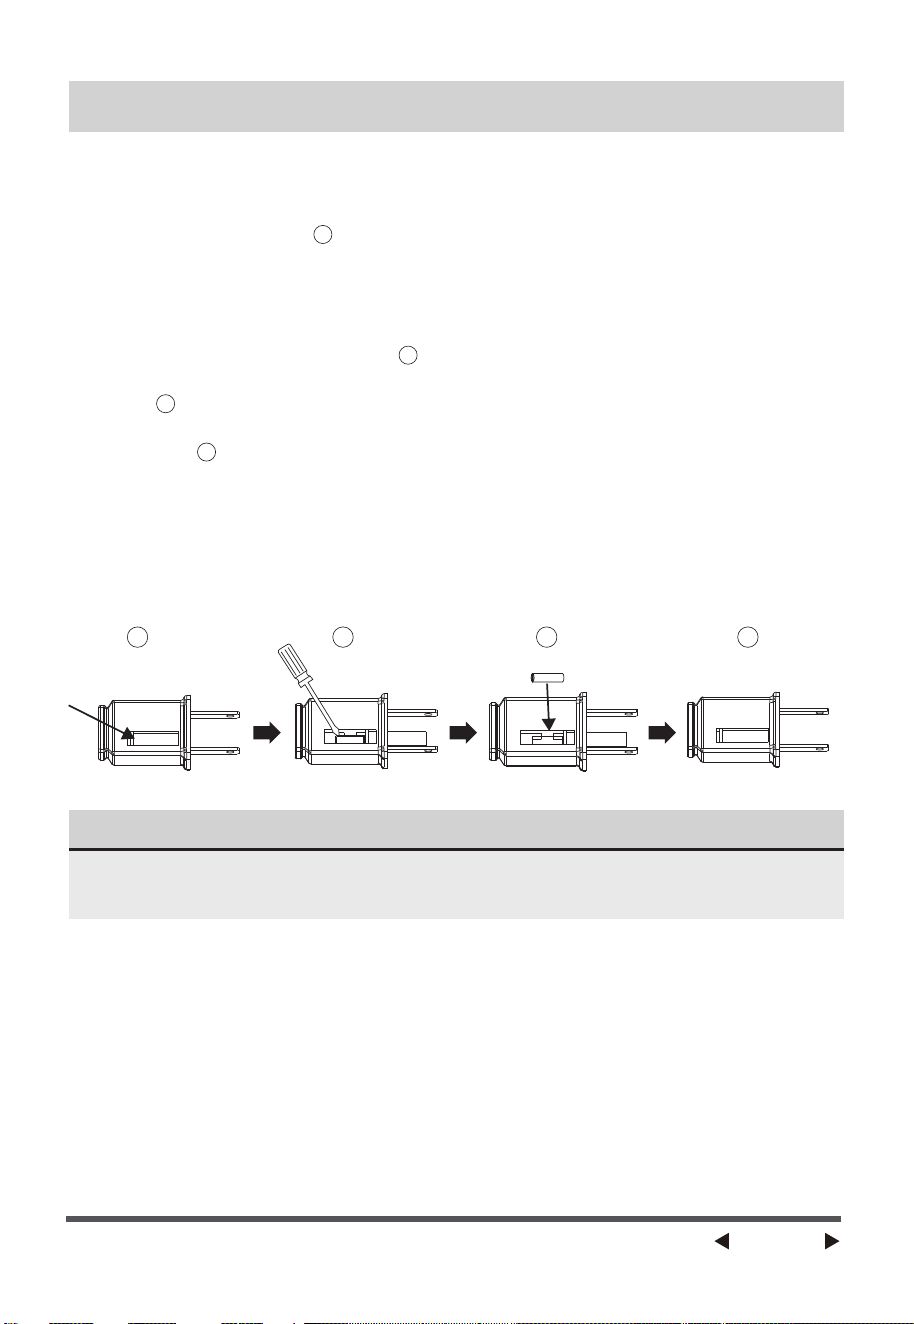
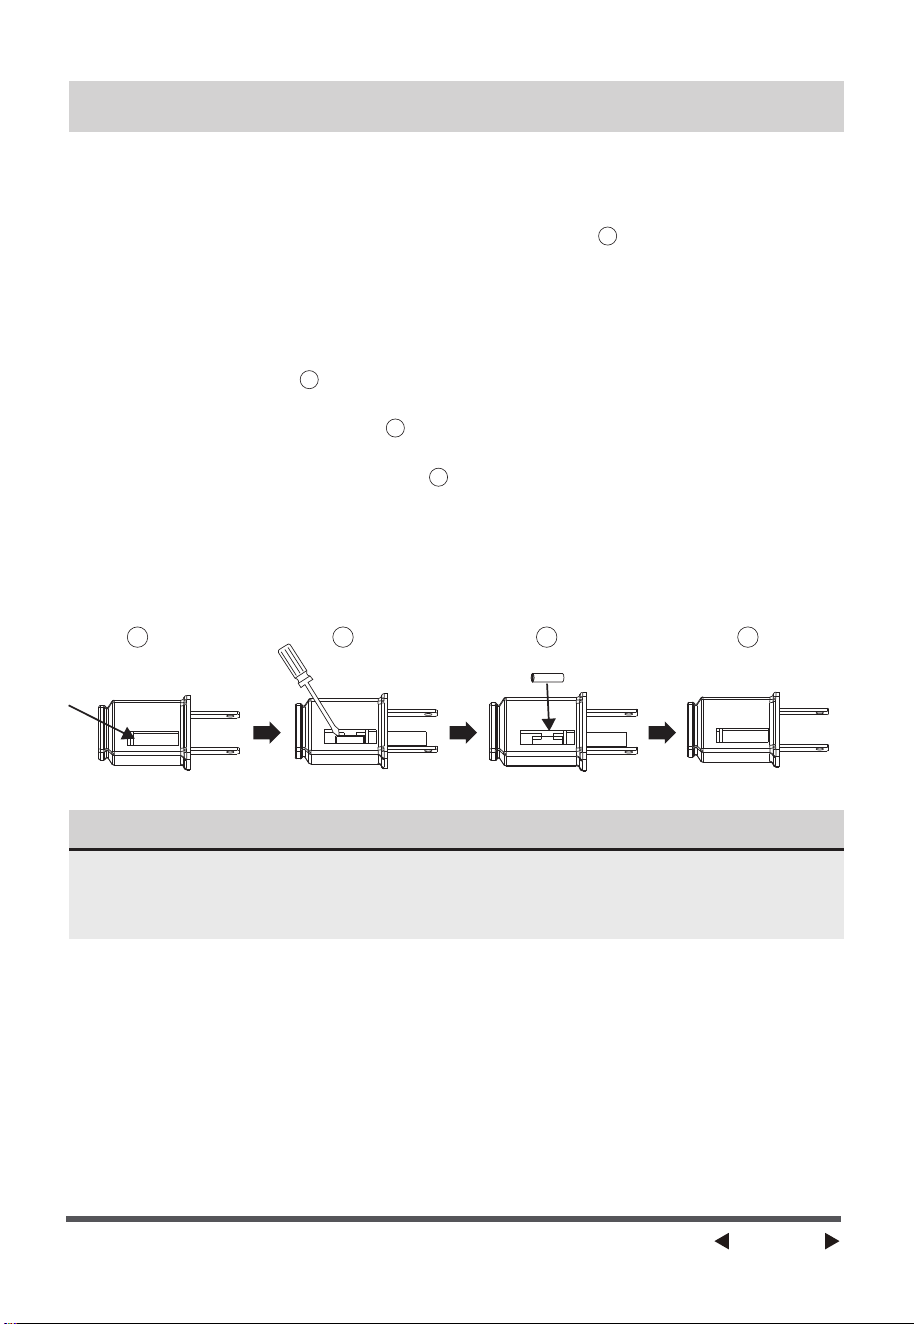
a)Grasp plug and remove from the receptacle or other outlet device. Do not
unplug by pulling on cord.
b)Open fuse cover. Slide open fuse access cover on top of attachment plug
towards blades.(Fig. )
c)Remove fuse carefully. Insert the tip of your tool into fuse slot(close with
the terminal), then pry the fuse gradually and slowly, but do not overex-
ert. If you feel resistance, you can try it at several times and pry the fuse
little by little. When one side of the fuse has been released, then you can
get the fuse out entirely.(Fig. )
d)Risk of fire (fix spacing). Replace fuse only with 2.5 Amp, 125 Volt fuse.
(Fig. )
e)Close fuse cover. Slide closed the fuse access cover on top of attachment
plug.(Fig. )
f )Risk of fire (fix spacing). Do not replace attachment plug. Contains a
safety device
(fuse)that should not be removed. Discard product if the attachment
plug is damaged.
g)If the fan suddenly does not work during normal operation, please check
whether it is a problem with the fuse.
2
3
41
1
2
3
4
USER SERVICING INSTRUCTIONS
NOTE
When you replace the fuse, please do not operate suddenly or overexert, or
else the product may become damaged.
Page 11
300 Kimball Drive,
Parsippany NJ 07054
Page 12
This is the only express warranty for this product and is in lieu of any other warranty
or condition.
This product is warranted to be free from defects in material and workmanship for a
period of one (1) year from the date of original purchase. During this period, your
exclusive remedy is repair or replacement of this product or any component found
to be defective, at our option; however, you are responsible for all costs associated
with returning the product to us and our returning the product or component under
this warranty to you. If the product or component is no longer available, we will
replace with a similar one of equal or greater value.
This warranty does not cover wear from normal use, and operation doesn't conformi-
ty with the instruction manuals, or damages to the product resulting from accident,
alteration, abuse, or misuse. This warrant
y extends only to the original consumer
purchaser or gift recipient. Keep the original sales receipt, as proof of purchase is
required to make a warranty claim.
This warranty is void if products is used for other than single-family household use or
subjected to any voltage and waveform other than as specified on the label.
We exclude all claims for special, incidental, and consequential damages by breach
of express or implied warranty. All liability is limited to amount of the purchase price.
Every implied warranty, including any statutory warranty or condition of
merchant-ability or fitness for particular purpose, is disclaimed except to the extent
prohibited by law, in which case such warranty or condition is limited to the duration
of this written warranty.
This warranty gives you specific legal rights. You may have other legal rights that
vary depending on where you live. Some states or provinces do not allow limita
tions
on implied warranties or special, incidental consequential damages, so the foregoing
limitations may not apply to you.
Please note that failure to complete and submit this form does not diminish your
warranty rights.
Page 13
PSFT40R5BB
pelonis.com
ES
PSFT40R5BB
VENTILADOR DE
TORRE
MANUAL DEL USUARIO
Aviso de advertencia: Antes de
utilizar este producto, lea atenta-
mente este manual y consérvelo
para futuras consultas. Para
obtener ayuda adicional, llame al
servicio de atención al cliente al
1-866-646-4332.
El diseño y las especificaciones
están sujetos a cambios sin previo
aviso para mejorar el producto.
Consulte con su distribuidor o con
el fabricante para más detalles.
Lea este manual
PRECAUCIONES DE SEGURIDAD
CONTENIDO
ADVERTENCIA
PRECAUCIÓN
AVISO
PRECAUCIONES DE SEGURIDAD
INSTRUCCIONES DE SEGURIDAD IMPORTANTES
NOMBRE DE LAS PIEZAS
INSTRUCCIONES DE FUNCIONAMIENTO
CONTROL REMOTO
ESPECIFICACIONES
SOLUCIÓN DE PROBLEMAS
LIMPIEZA
SERVICIO Y ASISTENCIA TÉCNICA
GARANTÍA LIMITADA DE UN (1) AÑO
.............................................................................. 2
............................................... 3
........................................................................................... 4
INSTRUCCIONES DE ENSAMBLAJE
......................................................................... 6
................................................................7
..................................................................................................... 8
......................................................................................................... 10
.................................................................................... 10
...................................................................................................................... 10
INSTRUCCIONES DE MANTENIMIENTO PARA EL USUARIO
............................ 11
........................................................................ 12
.................................................................... 13
Página 2
En él encontrará muchos consejos útiles sobre cómo utilizar y conservar correct-
amente su electrodoméstico. Un simple cuidado preventivo puede ahorrarle
mucho tiempo y dinero a lo largo de la vida útil del mismo. Encontrará muchas
respuestas a problemas comunes en los consejos para la solución de problemas;
debería poder resolver la mayoría de ellos rápidamente antes de llamar al
servicio técnico. Es posible que estas instrucciones no cubran todas las condi-
ciones de uso posibles, por lo que es necesario prestar atención a los detalles de
seguridad al utilizar y mantener este producto.
Para evitar lesiones al usuario o a otras personas y daños materiales, deben
seguirse las instrucciones aquí indicadas. Un funcionamiento incorrecto
debido al incumplimiento de las instrucciones puede causar daños personales
o materiales. Los diferentes niveles de riesgo se muestran mediante las
siguientes indicaciones.
Este símbolo indica una situación peligrosa que,
de no evitarse, podría provocar la muerte o
lesiones graves.
Este símbolo indica una situación peligrosa que,
de no evitarse, podría provocar lesiones leves o
moderadas.
Este símbolo se refiere a prácticas no relacionadas
con lesiones físicas.
Página 3
INSTRUCCIONES DE SEGURIDAD IMPORTANTES
PRECAUCIÓN
Lea las Reglas para un funcionamiento seguro y las Instrucciones con atención.
ADVERTENCIA
REGLAS PARA UN USO SEGURO
LAS NORMAS SOBRE EL CABLE Y EL ENCHUFE SON LAS SIGUIENTES:
1. Este dispositivo posee un enchufe polarizado (una de las clavijas es más ancha que
la otra). Para reducir el riesgo de choque eléctrico, este enchufe fue diseñado
para encajar de una sola manera en un tomacorriente polarizado. Si la clavija
no entra completamente en el tomacorriente, inviértala. Si aun así no encaja, contáctese
con un eléctrico calificado. No intente deshacerse de esta medida de seguridad.
2. Para reducir el riesgo de incendio o choque eléctrico, no use este ventilador
con ningún tipo de dispositivo de control de velocidad en estado sólido.
3. Para reducir el riesgo de incendio, electrocución o lesiones personales, no
utilice piezas de repuesto que no hayan sido recomendadas por el
fabricante (por ejemplo, piezas fabricadas en casa con una impresora 3D).
1. Nunca inserte los dedos, lápices o ningún otro tipo de objeto a través de
la rejilla cuando el ventilador esté funcionando.
2. Desconecte el ventilador cuando lo traslade de un lugar a otro.
3. Desconecte el ventilador cuando desmonte las rejillas para su limpieza.
4. Asegúrese de que el ventilador se encuentre sobre una superficie estable
cuando esté en funcionamiento para evitar que pueda volcarse y caer.
5. No use el ventilador en una ventana. Esto debido a que se podría produ-
cir un riesgo eléctrico a causa de, por ejemplo, la lluvia.
6. Asegúrese de que el ventilador esté desconectado de la red eléctrica
antes de retirar la rejilla.
1. Este producto posee protección contra sobrecargas eléctricas (fusible). Un
fusible quemado indica que se produjo una sobrecarga o cortocircuito. Si el
fusible se quema, desenchufe el producto del tomacorriente. Remplace el
fusible de acuerdo a las instrucciones de mantenimiento del usuario (siga la
clasificación del producto para seleccionar un fusible adecuado) y revise los
productos. Si el fusible de remplazo se quema, esto puede deberse a la presen-
cia de un cortocircuito y el producto deberá ser eliminado o regresado a un
centro de servicio técnico autorizado para ser revisado y/o reparado.
2. No utilice el aparato si alguna de las aspas o el cable o el enchufe están
dañados. Deseche el ventilador o envíelo a un centro de servicio técnico
autorizado para que sea revisado y/o reparado.
3. No extienda el cable de la unidad por debajo de alfombras. No lo cubra con
ningún tipo de cubierta. No extienda el cable de la unidad por debajo de
muebles u otros dispositivos. Disponga el cable de tal manera de que quede
lejos de áreas transitadas y en donde no represente peligro de tropiezos.
LEA Y CONSERVE ESTAS INSTRUCCIONES

Página 4
NOMBRE DE LAS PIEZAS
Cuerpo
Base trasera
Base frontal
Tuerca plástica
NOTA
Cable de
alimentación
Todas las ilustraciones de este manual son meramente explicativas.
Cualquier discrepancia entre el objeto real y la ilustración del dibujo estará
sujeta al objeto real.
ENCENDIDO/
APAGADO
Modalidad
Velocidad
Oscilación
Temporizador

Descripción de las funcionesBotón
Página 5
ENCENDIDO/
APAGADO
VELOCIDAD
MODALIDAD
OSCILACIÓN
TEMPORIZADOR
• El botón de encendido (On) sirve para activar el ventilador. El
ventilador se iniciará en modo brisa. Pulse el botón de apagado (Off)
si desea apagar el ventilador.
• Cuando el ventilador arranque, pulse esta tecla repetidamente; el
ventilador funcionará con el interruptor circulatorio «1-2-3».
• Pulse este botón para elegir la modalidad de funcionamiento. Al
presionar este botón de forma repetida o continua, las modalidades
cambiarán secuencialmente entre normal, natural y reposo. Una luz
indicará el modo seleccionado.
• Después de que el ventilador se haya iniciado, presione este botón
para seleccionar la modalidad de oscilación. Las luces en la pantalla
pueden indicar el modo de oscilación del ventilador.
• Pulse varias veces el botón del temporizador para ajustar el tiempo
de funcionamiento del ventilador. El tiempo se incrementará en
etapas de "1-2-3-4-5-6-7" horas con cada pulsación.
Salida a través de esta ranura
INSTRUCCIONES DE ENSAMBLAJE
Fig.1
Fig.3
Fig.2
Página 6
1. Saque el cuerpo del ventilador y las piezas de repuesto de la caja. Coloque
la base delantera sobre la trasera y únalas. (Ver Fig. 1)
2. Desenrosque la tuerca plástica del cuerpo del ventilador.
3. Pase el cable de alimentación a través de la ranura e inserte el cuerpo del
ventilador en la base. (Ver Fig. 2)
4. Fije el cuerpo del ventilador en la base con la tuerca plástica. (Ver Fig. 3)

PROTECCIÓN CONTRA SOBRECALENTAMIENTO DEL MOTOR
INSTRUCCIONES DE FUNCIONAMIENTO
Botones en el ventilador y sus indicadores en el panel:
Página 7
El motor del ventilador está equipado con un fusible térmico que, en caso
de sobrecalentamiento inesperado, se funde, apagando así el ventilador.
Esta medida evita que la temperatura del motor siga aumentando, prote-
giendo las piezas de plástico del ventilador de deformarse o quemarse
debido al exceso de calor.
Los botones ubicados en el cuerpo del ventilador, como ENCENDIDO/
APAGADO, VELOCIDAD, MODALIDAD, TEMPORIZADOR y OSCILACIÓN,
desempeñan las mismas funciones que las teclas correspondientes del
control remoto.
Control remoto
Batería AAA de 1,5V
Tapa
Velocidad
ENCENDIDO/APAGADO
Temporizador
Modalidad
Oscilación
CONTROL REMOTO
FUNCIONAMIENTO DEL CONTROL REMOTO
Página 8
(Baterías no incluidas)
Dirija el control remoto hacia el receptor localizado en el cuerpo del
ventilador y presione el botón que desee utilizar. El control remoto es
efectivo a una distancia de hasta cinco metros y dentro de un ángulo de
30 grados a ambos lados del receptor. Antes de desechar el control, es
importante extraer y desechar de manera segura las baterías.
CONTROL REMOTO
NOTA
BATERÍAS
ADVERTENCIA SOBRE LAS BATERÍAS
Página 9
(baterías no incluidas en el embalaje)
(1) Retire la tapa del compartimento de las baterías.
(2) Inserte las baterías, y asegúrese de que estén colocadas como se
muestra en la Fig.4.
(3) Vuelva a colocar la tapa del compartimento de las baterías Fig.5.
1. No arroje las baterías al fuego, podrían explotar o tener fugas.
2. No mezcle baterías viejas y nuevas.
3. No mezcle baterías alcalinas, estándar (carbono-zinc) o recargables
(níquel-cadmio).
Utilice baterías de manganeso o alcalinas del tipo "AAA" .
No utilice baterías recargables.
Fig.4 Fig.5
SOLUCIÓN DE PROBLEMAS
LIMPIEZA
Página 10
Si el producto no funciona o presenta problemas en su funcionamiento,
revise primero siguiendo la lista a continuación. Si la causa de la falla o
mal funcionamiento no se encuentra en esta lista, podría ser que el
producto esté defectuoso. En tal caso, se aconseja enviar el producto al
distribuidor para su reparación.
1. Asegúrese de desconectar la unidad del suministro eléctrico antes de
limpiarla.
2. Las piezas plásticas deben ser limpiadas con un paño suave humedeci-
do con detergente suave. La capa de jabón debe ser eliminada por
completo con un trapo seco.
3. Asegúrese de que no entre agua u otro líquido en el interior del motor.
Problema Causa Solución
El dispositivo está
enchufado, pero NO
enciende.
El dispositivo se apaga
repentinamente
durante el
funcionamiento.
El dispositivo no
funciona correcta-
mente
El control remoto no
funciona
El enchufe no está bien
conectado en el
tomacorriente.
La temperatura supera
el umbral de
desconexión térmica
del motor.
El cable de
alimentación no está
enchufado o tiene mal
contacto.
El interruptor del
aparato no está
encendido.
Hay que cambiar las
baterías.
El control remoto se
está utilizando a más
de 5 metros del
ventilador.
Compruebe que el enchufe
de alimentación esté
completa y correctamente
insertado en la toma de
corriente, y vuelva a
insertarlo si es necesario.
Envíe el dispositivo al
servicio de
mantenimiento
postventa.
Compruebe que el
enchufe esté bien
insertado en la toma de
corriente.
Encienda el interruptor
del cuerpo de la
unidad.
Sustituya las baterías.
Acerque el control
remoto al ventilador y
asegúrese de que
apunte directamente a
la pantalla.
2
3
41
INSTRUCCIONES DE MANTENIMIENTO PARA EL USUARIO
NOTA
Página 11
a) Sujete el enchufe y retírelo del receptáculo o de otro dispositivo de
salida. No desenchufe tirando del cable.
b) Abra la tapa del fusible. Deslice la tapa de acceso a los fusibles en la
parte superior del enchufe hacia las clavijas. (Fig. )
c) Retire el fusible con cuidado. Inserte la punta de su herramienta en la
ranura del fusible (cierre con el terminal), y luego apriete el fusible de
forma gradual y lenta, pero sin excederse. Si siente que está apretado,
puede intentarlo varias veces y premiar el fusible poco a poco. Cuando
un lado del fusible haya sido premiado, entonces podrá sacar el fusible
por completo. (Fig. )
d) Riesgo de incendio. Sustituya el fusible sólo por un fusible de 2,5
amperios y 125 voltios. (Fig. )
e) Cierre la tapa del fusible. Deslice la tapa de acceso a los fusibles en la
parte superior del enchufe. (Fig. )
f ) Riesgo de incendio. No sustituya el enchufe del accesorio. Contiene un
dispositivo de seguridad (fusible) que no debe retirarse. Deseche el
producto si el enchufe está dañado.
g) Si el ventilador no funciona repentinamente durante el funcionamiento
normal, compruebe si se trata de un problema con el fusible.
1
2
3
4
Cuando cambie el fusible, por favor, no lo accione de forma repentina ni
haga un esfuerzo excesivo, o de lo contrario el producto se dañará o
causará un accidente.

Página 12
En el caso de una reclamación de garantía o si se requiere mantenimiento
para esta unidad, por favor póngase en contacto con nosotros a través de
lo siguiente:
Llamada gratuita: 866-646-4332
Para preguntas o comentarios, escriba a
Midea America Corp.
Para sus registros, engrape su recibo de venta a este manual y registre lo
siguiente:
FECHA DE COMPRA:
LUGAR DE COMPRA:
SERVICIO Y ASISTENCIA TÉCNICA
(ENGRAPE EL RECIBO DE VENTA AQUÍ)
NOTA: SE REQUIERE UNA PRUEBA DE COMPRA
PARA TODAS LAS RECLAMACIONES DE GARANTÍA
IMPRESO EN CHINA
300 Kimball Drive,
Parsippany NJ 07054
Página 13
GARANTÍA LIMITADA DE UN (1) AÑO
Lea todas las instrucciones antes de utilizar el producto.
Esta garantía exclusiva reemplaza cualquier otra garantía o condición para este
producto. Se asegura que el producto estará libre de defectos en materiales y mano
de obra durante un período de un (1) año desde la fecha de compra original.
Durante este tiempo, la única solución será la reparación o reemplazo del producto
o de sus componentes defectuosos, a nuestra discreción. Sin embargo, el cliente
será responsable de todos los costos asociados con el envío del producto a
nosotros y con el retorno del producto o componente reparado o reemplazado bajo
esta garantía. En caso de que el producto o componente no esté disponible, lo
reemplazaremos por otro de valor igual o superior.
Esta garantía no incluye el desgaste habitual, el uso que no se ajuste a las instruc-
ciones del manual, ni los daños causados por accidentes, modificaciones, abuso o
mal uso del producto. Esta garantía es válida solo para el comprador inicial o el
receptor del producto como regalo. Es imprescindible conservar el recibo original
de compra, ya que se necesitará como prueba para realizar cualquier reclamación
bajo esta garantía.
Esta garantía no será válida si los productos se usan para propósitos diferentes al
uso doméstico en una sola familia o si se exponen a voltajes y formas de onda
distintos a los indicados en su etiqueta.
Declinamos cualquier responsabilidad por daños especiales, incidentales o conse-
cuentes derivados de la violación de cualquier garantía expresa o implícita. Nuestra
responsabilidad se limita exclusivamente al valor de compra del producto. Se
descartan todas las garantías implícitas, incluidas las de comerciabilidad o
adecuación para un propósito específico, excepto en los casos donde la ley lo
prohíba, y en ese caso, dicha garantía o condición estará limitada al periodo de esta
garantía escrita.
Esta garantía confiere derechos legales específicos, pero puede que usted tenga
otros derechos que varíen según su lugar de residencia. Algunas jurisdicciones no
permiten la limitación en la duración de una garantía implícita ni la exclusión o
limitación de daños especiales, incidentales o consecuentes, por lo que las restric-
ciones mencionadas anteriormente pueden no aplicarse en su caso. Es importante
destacar que no enviar este formulario no reduce sus derechos bajo esta garantía.