DO NOT DISCARD – GIVE TO USER
Caution: To help prevent personal injury
Made in China
to Matco specifications
• Use of this product can expose you to chemicals
including ethylene glycol, gasoline vapors and engine
exhaust, which are known to the State of California to
cause cancer, birth defects, or reproductive harm. For
more information, visit www.P65Warnings.ca.gov.
Always wear ANSI approved safety equipment, safety
glasses and clothing when using this product. Study,
understand, and follow all instructions provided with
this product. Failure to read and follow all warnings and
operating instructions may result in damages and
serious injury or death.
• Always wear ANSI approved goggles when using this
product (users and bystanders).
• Never use this tool for any application other than for
which it was designed.
• Only use accessories designed for this tool.
• Never alter or modify this tool in any way.
• Improper operation and/or maintenance of the tool,
modification of the tool, or use of the tool with
accessories not designed for it could result in serious
injury or death.
• Always select the correct accessories of the correct size
and design for the job that you are attempting to
perform.
• Always work in a clean, safe, well-lit, organized and
adequately equipped area.
• Do not begin repairs without assurance that vehicle is in
secure position, and will not move during repair.
WARNING
INTENDED USE OF THE TOOL
Study, understand and follow all instructions provided
with this product. Read these instructions carefully
before installing, operating, servicing or repairing this
tool. Keep these instructions in a safe, accessible place.
WEAR WORK GLOVES (RUBBER COATED PREFERRED)
FOR GRIPPING THE ADAPTER, ESPECIALLY FOR
LARGEST SIZES. This tool is designed to be used with a
cordless drill that uses a clutch to limit torque to
different settings. Use tool to set aluminum, steel and
stainless rivet nuts up to 3/8" (10mm) in sheet metal.
Do not use this tool outside of the designed intent.
Never modify the tool for any other purpose or use.
PRODUCT INFORMATION:
1 YEAR LIMITED WARRANTY
The manufacturer warrants this product to the original user
against defective material or workmanship for a period of 1 year
from the date of purchase.
The manufacturer reserves the right to determine whether the
part or parts failed because of defective material, workmanship
or other causes. Failures caused by accident, alteration, or
misuse are not covered by this warranty.
The manufacturer, at its discretion, will repair or replace products
covered under this warranty free of charge. Repairs or
replacements of products covered under this warranty are
warrantied for the remainder of the original warranty period.
The manufacturer or its authorized service representatives must
perform all warranty repairs. Any repair to the product by
unauthorized service representatives voids this warranty. The
rights under this warranty are limited to the original user and
may not be transferred to subsequent owners.
This warranty is in lieu of all other warranties, expressed or
implied, including warranties of merchantability and fitness for a
particular purpose. Some states do not allow the exclusion or
limitations of incidental or consequential damages, so the above
limitations may not apply to you.
When unpacking, check the parts diagram and part number
listing on page 4 to make sure all parts are included. If any
parts are missing or damaged, please call your distributor.
BEFORE USE
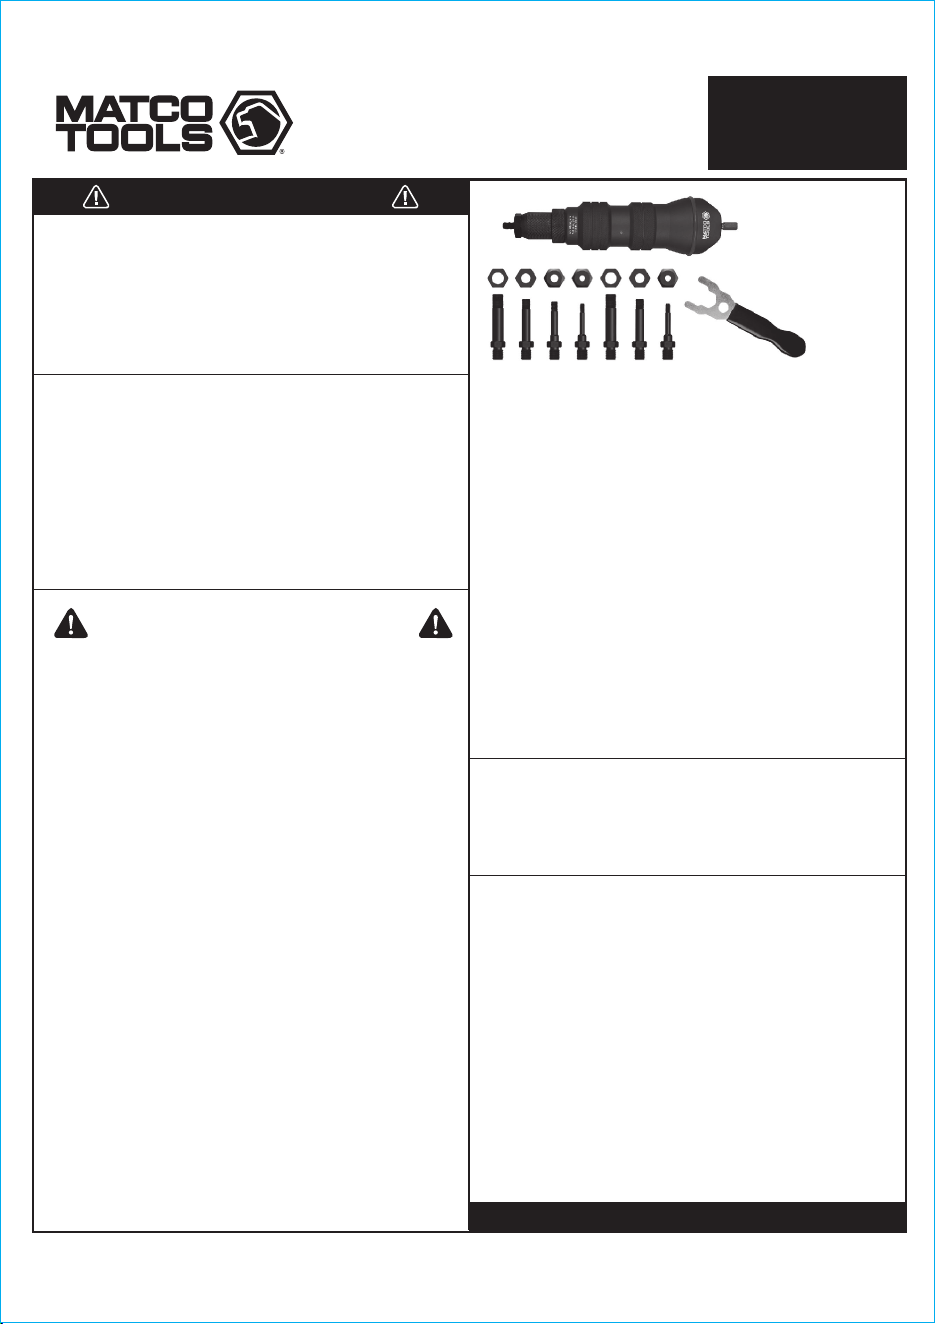
• Adaptability. Easily convert cordless,
pneumatic or corded drills into a power rivet
nut setter for sizes 10-24, 1/4-20, 5/16-18,
3/8-16, M5, M6, M8 and M10.
• Versatility. Use 12V and up cordless drills
for aluminum and steel rivet nuts, or 18V+
for larger sizes like M10 and 3/8" and/or
stainless (driver must feature torque limiting
clutch).
• Durability. Constructed with shielded
bearings, CRO-MO mandrels and machined
billet aluminum body.
RIVET NUT
ADAPTER KIT
RN9
Page 1
1802030-14
WARNING

ll. SAFETY GUIDE:
1. Wear adequate protective gear including ANSI
approved goggles and THICK WORK GLOVES
(RUBBER COATED)
2. Only use the nut riveting adapter with driving tool
that matches with requirements specified on
Product Technical Data.
3. Switch off the driving tool before installing or
uninstalling the nut riveting adapter.
Dimensions:
Weight:
Hex Shank Size:
Riveting Capability:
Rivet Type:
Stroke Limit:
Working Torque:
Recommended RPM:
Requirements of Driving Tools:
Requirements of electric
or pneumatic Driving Tool:
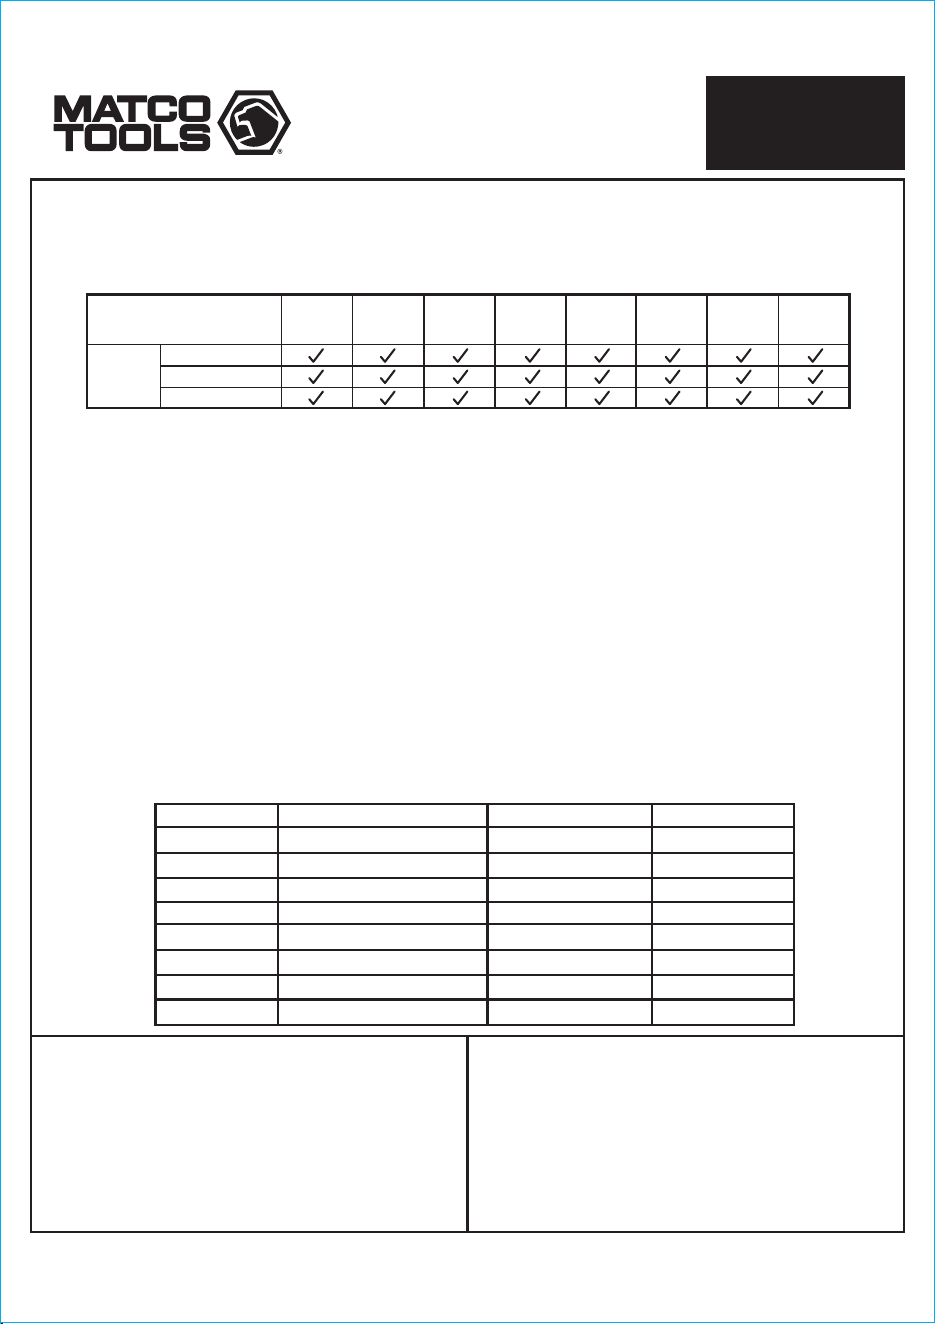
Common Sizes Chart:
*
Tool is capable but may require very high grip strength
8.5" x 5.5" x 2.4"
2.5 lbs.
6.35mm (1/4")
Rivet Nut
Maximum 0.7"
Refer to section III. Operation Guide
Low speed, driver setting (<240 RPM)
• Adjustable torque setting
• Chuck capacity of 6.35mm (1/4") shank
• Minimum 12V for aluminum, or M5 and 10-24 steel rivet nuts
• Minimum 14.4V for steel rivet nuts in M6, M8, 1/4" and 5/16" or stainless in M5
or 10-24
•
Minimum full-size 18V+ for M10 and 3/8" rivet nuts and all other sizes in stainless
steel
(WEAR GLOVES)
• Clutch provides a felt and/or audible indication of reaching max setting
• Adjustable torque setting
• Chuck capacity of 6.35mm (1/4") shank
•
With maximum torque > 190 in. lbs. for aluminum and steel rivet nuts in smaller sizes
• With maximum torque > 400 in. lbs. for stainless steel rivet nuts
Rivet Nut Size
Nut
Material
SAE
10-24
SAE
1/4-20
SAE
5/16-18
SAE
3/8-16
M5 M6 M8 M10
Aluminum
Steel/Copper
Stainless Steel
4. The objects to be riveted MUST BE SECURED
BEFORE riveting in order to avoid possible injury.
Unsecured objects may rotate with the driving tool
if not secured.
5. The driving tool MUST be stopped if user releases
the adapters body during riveting.
6. During disassembly for mandrel changing or
Maintenance, take care as there are pre-loaded
springs within the tool.
Rivet Nut
M5
M6
M8
M10
10-24
1/4-20
5/16-18
3/18-16
Rivet Nut Diameter
6.9mm OD
8.9mm OD
10.9mm OD
12.9mm OD
6.9mm OD
8.9mm OD
10.9mm OD
12.9mm OD
Drill Hole Size
7mm (9/32")
9mm (3/8")
11mm (7/16")
13mm (17/32")
7mm (9/32")
9mm (3/8")
11mm (7/16")
13mm (17/36")
Grip Range
26 – 16ga
26 – 13ga
26 – 11ga
26 – 11ga
26 – 16ga
26 – 13ga
26 – 11ga
26 – 11ga
*
*
I. PRODUCT TECHNICAL DATA:
Page 2
RIVET NUT
ADAPTER KIT
RN9
1802030-14
lll. OPERATION GUIDE:
lV. MAINTENANCE:
1. The nut riveting adapter is
lubricated before shipping.
Recommended: cleaning
the components of plunger
tube, and using lubricant
grease to re-lubricate its
parts on at least a yearly
basis.
2. Threaded mandrel
replacement:
life span of threaded mandrel varies with usage
frequency and the uses of different rivet nut
sizes/types. Recommended: replacing the threaded
mandrel with new spare and its nosepiece before it
is worn-out.
WARNING: WEAR WORK GLOVES (RUBBER COATED
PREFERRED) FOR GRIPPING THE ADAPTER
IMPORTANT
: Ensure the threads on mandrels are clean
and the loaded rivet nut has full thread engagement with
threaded mandrel during riveting. It is strongly
recommended to clean and lubricate (ex. silicone spray,
dry lube) the threads on mandrels before and after use.
CRITICAL: Before using the tool on your intended work
piece, it is REQUIRED that you test the tool with a rivet nut
on a test piece to determine the adequate torque needed
for your rivet nut size, rivet nut material, and sheet metal
thickness and material.
• Ensure drill is in "driver" mode and not drill mode.
Different drills will require different torque, limiting
settings for the same material.
• On the test piece, set your drill to a low clutch setting and
work up to higher settings until the torque level is enough
to fully set the rivet nut but not over set. WARNING: Over
setting rivet nuts may permanently damage the mandrel
or tool.
• Once the torque level is determined, test again on a new
hole at your intended setting to confirm. The knurled part
of the rivet nut should look mushroomed, starting to
become flat on the other side of the work piece and
should not rotate when you install a bolt.
2.4 Ensure the rivet nut has adequate engaged thread
and that there is no cross threading. Check and
confirm the objects to be riveted are SECURE.
2.5 Some small amount of clearance between nose
piece and the flange of rivet nut may be beneficial to
operation, but keep adequate thread engagement on
the nut.
2.6 Refer to Section III. for determining the proper drill
torque settings (REQUIRED).
2.7 Put the fully threaded rivet nut onto the tools
mandrel into the proper size hole (see Sizing Chart
on page 2).
2.8 Align the adapter with the hole angle as best you
can. While gripping the adapter firmly with one
hand (wear work gloves), operate the drill in the
FWD direction until you feel or hear the drills torque
clutch catching. The adapter should not rotate while
the drill is working. Release your grip on the adapter
and reverse the drill out of the rivet nut. Depending
on the material, you may need to manually help the
adapter thread out of the rivet nut with your off
hand.
Tip 1: If setting M10 or 3/8" and especially on stainless,
high grip strength is required. Not all rivet nuts are the
same--some require more force.
Tip 2: Make a note of the torque setting of your
application for future use.
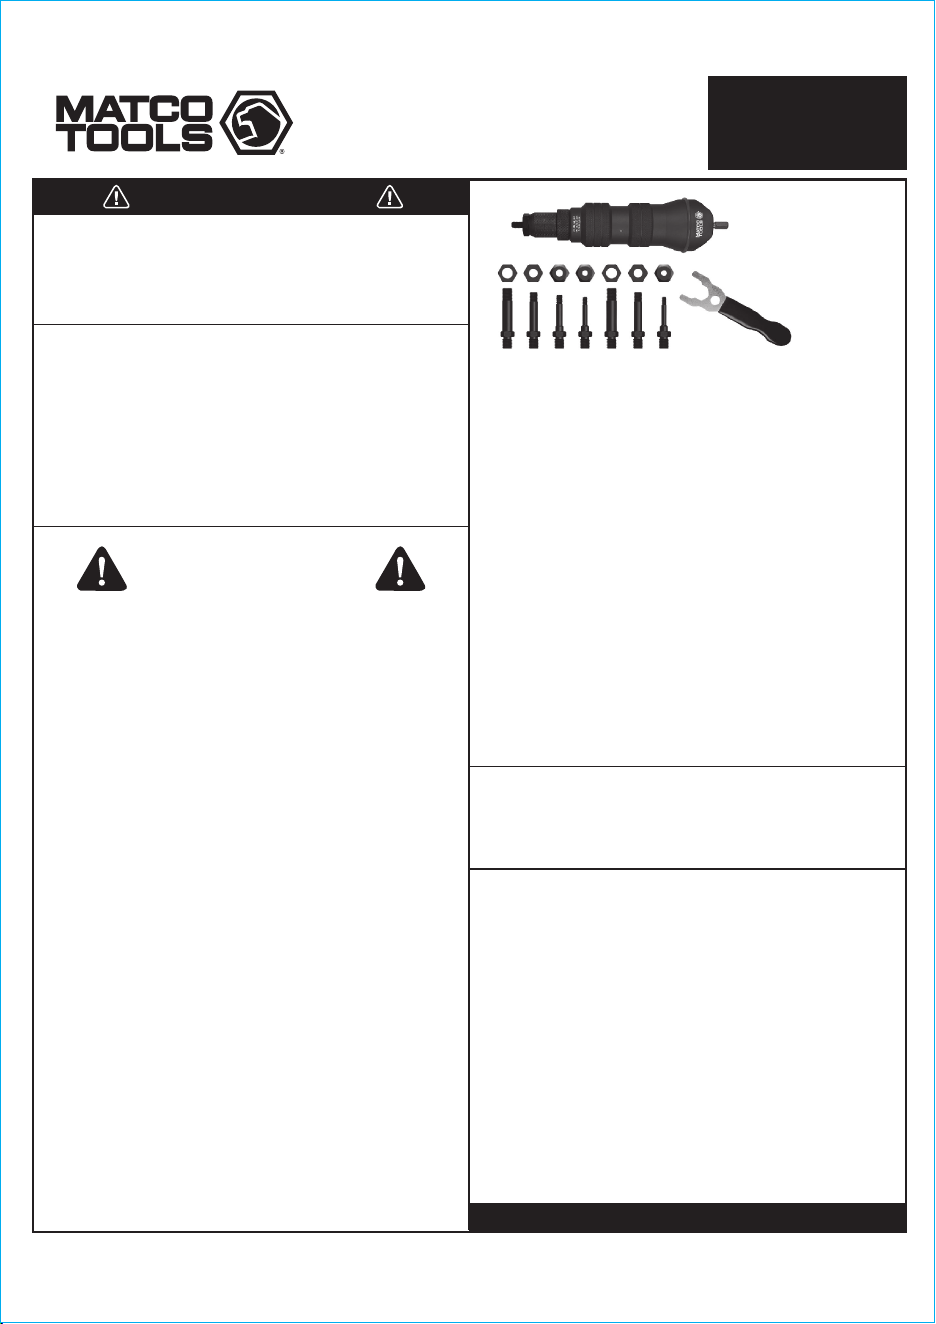
1. Tool Installation:
Install a new mandrel and nosepiece to match your
intended rivet nut thread size. Use the included wrench to
install the new mandrel into the #2 Plunger Tube. Ensure
that the mandrel and other components are tightly fixed in
position. After installing the front bushing cover and lock
bushing, lightly tighten the new nosepiece onto the end of
the tool. Install the hex shank drive end of the tool into
your drill and affix tightly into its chuck.
2. Riveting:
2.1 While holding the adapter with your hand (WEAR
GLOVES
), operate the drill in the REV direction until
you hear the adapter start to click. This means it has
fully exposed the mandrel.
2.2 Switch the drill to the FWD setting.
2.3 Manually thread the selected rivet nut onto threaded
mandrel or hold the rivet nut in one hand and use
another hand to pull the drill trigger slightly to have the
nut threaded on by the tool.
Page 3
RIVET NUT
ADAPTER KIT
RN9
1802030-14
Estudie, entienda y siga todas las instrucciones
que se proveen con este producto. Lea las
instrucciones detenidamente antes de instalar,
operar, dar servicio o reparar esta herramienta.
Guarde estas instrucciones en un lugar seguro
y accesible.
HECHO en China
para Matco especificaciones
ADVERTENCIA
• El uso de este producto puede exponerlo a productos
químicos que incluyen etilenglicol, vapores de gasolina y
gases de escape del motor, que en el estado de California
son causantes de cáncer, defectos de nacimiento o daños
reproductivos. Para obtener más información, visite
www.P65Warnings.ca.gov . Siempre use equipo de
seguridad aprobado por ANSI, gafas de seguridad y ropa
cuando use este producto. Estudie, comprenda y siga
todas las instrucciones proporcionadas con este
producto. Si no lee y sigue todas las advertencias e
instrucciones de funcionamiento puede ocasionar daños
y lesiones graves o la muerte.
• Siempre use guantes del tipo aprobado por la ANSI para
trabajar con esta herramienta. (tanto usuarios como
espectadores).
• Nunca utilice esta herramienta para cualquier otra cosa
que no sean las aplicaciones para lo que fue diseñada.
• Sólo utilice los accesorios diseñados para esta
herramienta.
• No modifique o altere esta herramienta de ninguna
manera.
• El funcionamiento y/o mantenimiento inadecuado de la
herramienta, la modificación, o la utilización de la
herramienta con accesorios inadecuados podrían causar
lesiones graves o la muerte.
• Siempre usar los correctos accesorios para el trabajo que
Ud. está realizando.
• Trabaje siempre en un área limpia, segura, bien iluminada,
organizada y equipada adecuadamente.
INTENDED USE OF THE TOOL
WEAR WORK GLOVES (RUBBER COATED PREFERRED)
FOR GRIPPING THE ADAPTER, ESPECIALLY FOR
LARGEST SIZES. This tool is designed to be used with a
cordless drill that uses a clutch to limit torque to
different settings. Use tool to set aluminum, steel and
stainless rivet nuts up to 3/8" (10mm) in sheet metal.
Do not use this tool outside of the designed intent.
Never modify the tool for any other purpose or use.
INFORMACIÓN DEL PRODUCTO:
El fabricante garantiza este producto al usuario original contra defectos
de materiales o de mano de obra durante un periodo de un año a partir
de la fecha de compra.
El fabricante se reserva el derecho a determinar si una pieza o piezas
fallaron debido a material defectuoso, mano de obra, o por otras causas.
Esta garantía no cubre fallas causadas por accidentes, alteraciones o
uso indebido.
El fabricante, a su entera discreción, reparará o reemplazará los
productos cubiertos por esta garantía sin costo alguno. Las reparaciones
o reemplazos de productos cubiertos por esta garantía quedan
garantizados durante el resto del periodo original de garantía.
El fabricante o sus representantes autorizados de servicio deben llevar
a cabo todas las reparaciones de garantía. Toda reparación hecha al
producto por representantes de servicio no autorizados invalida la
presente garantía. Los derechos que ampara esta garantía están
limitados al usuario original y no se pueden transferir a dueños
posteriores.
Esta garantía reemplaza a todas las demás garantías expresas o
implícitas, incluyendo garantías de comercialización e idoneidad para
un propósito particular. Algunos estados no permiten la exclusión o
limitaciones de daños incidentales o imprevistos, de manera que las
limitaciones mencionadas anteriormente pueden no ser aplicables en
su caso.
GARANTÍA LIMITADA DE UN AÑO
DESEMPACADO
Cuando desempaque el producto, revise el diagrama y la
lista de piezas en página 4 para verificar que se hayan
enviado todas las piezas. De perder piezas o tener piezas
dañadas, favor llamar a su distribuidor inmediatamente.
• Adaptability. Easily convert cordless,
pneumatic or corded drills into a power rivet
nut setter for sizes 10-24, 1/4-20, 5/16-18,
3/8-16, M5, M6, M8 and M10.
• Versatility. Use 12V and up cordless drills
for aluminum and steel rivet nuts, or 18V+
for larger sizes like M10 and 3/8" and/or
stainless (driver must feature torque limiting
clutch).
• Durability. Constructed with shielded
bearings, CRO-MO mandrels and machined
billet aluminum body.
RIVET NUT
ADAPTER KIT
RN9
ADVERTENCIA
NO LO DESCARTE O DESECHE, ENTREGESELO AL USUARIO
Página 1
1802030-14

ll. SAFETY GUIDE:
Dimensions:
Weight:
Hex Shank Size:
Riveting Capability:
Common Sizes Chart:
*
Tool is capable but may require very high grip strength
8.5" x 5.5" x 2.4"
2.5 lbs.
6.35mm (1/4")
Rivet Nut Size
Nut
Material
SAE
10-24
SAE
1/4-20
SAE
5/16-18
SAE
3/8-16
M5 M6 M8 M10
Aluminum
Steel/Copper
Stainless Steel
Rivet Nut
M5
M6
M8
M10
10-24
1/4-20
5/16-18
3/18-16
Rivet Nut Diameter
6.9mm OD
8.9mm OD
10.9mm OD
12.9mm OD
6.9mm OD
8.9mm OD
10.9mm OD
12.9mm OD
Drill Hole Size
7mm (9/32")
9mm (3/8")
11mm (7/16")
13mm (17/32")
7mm (9/32")
9mm (3/8")
11mm (7/16")
13mm (17/36")
Grip Range
26 – 16ga
26 – 13ga
26 – 11ga
26 – 11ga
26 – 16ga
26 – 13ga
26 – 11ga
26 – 11ga
*
*
I. PRODUCT TECHNICAL DATA:
Rivet Type:
Stroke Limit:
Working Torque:
Recommended RPM:
Requirements of Driving Tools:
Requirements of electric
or pneumatic Driving Tool:
Rivet Nut
Maximum 0.7"
Refer to section III. Operation Guide
Low speed, driver setting (<240 RPM)
• Adjustable torque setting
• Chuck capacity of 6.35mm (1/4") shank
• Minimum 12V for aluminum, or M5 and 10-24 steel rivet nuts
• Minimum 14.4V for steel rivet nuts in M6, M8, 1/4" and 5/16" or stainless in M5
or 10-24
•
Minimum full-size 18V+ for M10 and 3/8" rivet nuts and all other sizes in stainless
steel
(WEAR GLOVES)
• Clutch provides a felt and/or audible indication of reaching max setting
• Adjustable torque setting
• Chuck capacity of 6.35mm (1/4") shank
•
With maximum torque > 190 in. lbs. for aluminum and steel rivet nuts in smaller sizes
• With maximum torque > 400 in. lbs. for stainless steel rivet nuts
1. Wear adequate protective gear including ANSI
approved goggles and THICK WORK GLOVES
(RUBBER COATED)
2. Only use the nut riveting adapter with driving tool
that matches with requirements specified on
Product Technical Data.
3. Switch off the driving tool before installing or
uninstalling the nut riveting adapter.
4. The objects to be riveted MUST BE SECURED
BEFORE riveting in order to avoid possible injury.
Unsecured objects may rotate with the driving tool
if not secured.
5. The driving tool MUST be stopped if user releases
the adapters body during riveting.
6. During disassembly for mandrel changing or
Maintenance, take care as there are pre-loaded
springs within the tool.
RIVET NUT
ADAPTER KIT
RN9
Página 2
1802030-14

lll. OPERATION GUIDE:
lV. MAINTENANCE:
1. The nut riveting adapter is
lubricated before shipping.
Recommended: cleaning
the components of plunger
tube, and using lubricant
grease to re-lubricate its
parts on at least a yearly
basis.
2. Threaded mandrel
replacement:
life span of threaded mandrel varies with usage
frequency and the uses of different rivet nut
sizes/types. Recommended: replacing the threaded
mandrel with new spare and its nosepiece before it
is worn-out.
WARNING: WEAR WORK GLOVES (RUBBER COATED
PREFERRED) FOR GRIPPING THE ADAPTER
IMPORTANT
: Ensure the threads on mandrels are clean
and the loaded rivet nut has full thread engagement with
threaded mandrel during riveting. It is strongly
recommended to clean and lubricate (ex. silicone spray,
dry lube) the threads on mandrels before and after use.
CRITICAL: Before using the tool on your intended work
piece, it is REQUIRED that you test the tool with a rivet nut
on a test piece to determine the adequate torque needed
for your rivet nut size, rivet nut material, and sheet metal
thickness and material.
• Ensure drill is in "driver" mode and not drill mode.
Different drills will require different torque, limiting
settings for the same material.
• On the test piece, set your drill to a low clutch setting and
work up to higher settings until the torque level is enough
to fully set the rivet nut but not over set. WARNING: Over
setting rivet nuts may permanently damage the mandrel
or tool.
• Once the torque level is determined, test again on a new
hole at your intended setting to confirm. The knurled part
of the rivet nut should look mushroomed, starting to
become flat on the other side of the work piece and
should not rotate when you install a bolt.
2.4 Ensure the rivet nut has adequate engaged thread
and that there is no cross threading. Check and
confirm the objects to be riveted are SECURE.
2.5 Some small amount of clearance between nose
piece and the flange of rivet nut may be beneficial to
operation, but keep adequate thread engagement on
the nut.
2.6 Refer to Section III. for determining the proper drill
torque settings (REQUIRED).
2.7 Put the fully threaded rivet nut onto the tools
mandrel into the proper size hole (see Sizing Chart
on page 2).
2.8 Align the adapter with the hole angle as best you
can. While gripping the adapter firmly with one
hand (wear work gloves), operate the drill in the
FWD direction until you feel or hear the drills torque
clutch catching. The adapter should not rotate while
the drill is working. Release your grip on the adapter
and reverse the drill out of the rivet nut. Depending
on the material, you may need to manually help the
adapter thread out of the rivet nut with your off
hand.
Tip 1: If setting M10 or 3/8" and especially on stainless,
high grip strength is required. Not all rivet nuts are the
same--some require more force.
Tip 2: Make a note of the torque setting of your
application for future use.
1. Tool Installation:
Install a new mandrel and nosepiece to match your
intended rivet nut thread size. Use the included wrench to
install the new mandrel into the #2 Plunger Tube. Ensure
that the mandrel and other components are tightly fixed in
position. After installing the front bushing cover and lock
bushing, lightly tighten the new nosepiece onto the end of
the tool. Install the hex shank drive end of the tool into
your drill and affix tightly into its chuck.
2. Riveting:
2.1 While holding the adapter with your hand (WEAR
GLOVES
), operate the drill in the REV direction until
you hear the adapter start to click. This means it has
fully exposed the mandrel.
2.2 Switch the drill to the FWD setting.
2.3 Manually thread the selected rivet nut onto threaded
mandrel or hold the rivet nut in one hand and use
another hand to pull the drill trigger slightly to have the
nut threaded on by the tool.
RIVET NUT
ADAPTER KIT
RN9
Página 3
1802030-14
INTENDED USE OF THE TOOL
WEAR WORK GLOVES (RUBBER COATED PREFERRED)
FOR GRIPPING THE ADAPTER, ESPECIALLY FOR
LARGEST SIZES. This tool is designed to be used with a
cordless drill that uses a clutch to limit torque to
different settings. Use tool to set aluminum, steel and
stainless rivet nuts up to 3/8" (10mm) in sheet metal.
Do not use this tool outside of the designed intent.
Never modify the tool for any other purpose or use.
Fabriqué à Chine
les spécifications de Matco
Mesure de sécurité
Mise en garde : Pour aider à prévenir les
blessures
• L'utilisation de ce produit peut vous exposer à des
produits chimiques, notamment l'éthylène glycol, les
vapeurs d'essence et les gaz d'échappement des
moteurs, qui sont reconnus par l'État de Californie
pour causer le cancer, des anomalies congénitales ou
des problèmes de reproduction. Pour plus
d'informations, visitez www.P65Warnings.ca.gov.
Toujours porter un équipement de sécurité, des
lunettes de sécurité et des vêtements homologués
ANSI lors de l'utilisation de ce produit. Étudier,
comprendre et suivre toutes les instructions fournies
avec ce produit. Ne pas lire et suivre tous les
avertissements et instructions d'utilisation peut
entraîner des dommages et des blessures graves ou
la mort.
• Toujours porter des lunettes à coques approuvées
par l’ANSI lorsque vous utilisez ce produit.
• Toujours utiliser les accessoires adéquats pour le
travail que vous effectuez.
• Toujours travailler dans un environnement propre,
sécuritaire, bien éclairé, organisé et suffisamment
équipé.
Etudier, comprendre et suivre toutes les instructions
fournies avec ce produit. Lire ces instructions
attentivement avant d’installer, d’utiliser, d’entretenir
et de réparer cet outil. Conserver ces instructions dans
un endroit sécuritaire et accessible.
INFORMATIONS PRODUIT:
Le manufacturier garantit à l’acheteur initial que ce produit
est exempt de tout vice de matériau et de fabrication
pendant une période de une année suivant la date de l’achat.
Le fabricant se réserve le droit de déterminer si la pièce ou
les pièces ont échoué en raison d'un défaut de matériau, de
fabrication ou d'autres causes.
Les défauts causés par un accident, une altération ou un
mauvais usage ne sont pas couverts par cette garantie.
Les remplacements sous garantie comportent également
une garantie à vie. Les droits sous cette garantie sont limités
à l'utilisateur original et ne peuvent être transférés aux
propriétaires suivants.
La garantie remplace toutes les autres garanties, explicites
ou implicites, y compris les garanties de qualité marchande
et d'adéquation à un usage particulier. Certains états ne
permettent pas l'exclusion ou les limitations De dommages
accessoires ou consécutifs, de sorte que les limitations
ci-dessus peuvent ne pas s'appliquer à vous.
GARANTIE À VIE
Lors du déballage, vérifier que les pièces contenues dans le
schéma et la liste des numéros de pièces de la page 4 sont
toutes incluses. Si une pièce est manquante ou abîmée,
veuillez appeler immédiatement votre distributeur.
DÉBALLAGE
• Adaptability. Easily convert cordless,
pneumatic or corded drills into a power rivet
nut setter for sizes 10-24, 1/4-20, 5/16-18,
3/8-16, M5, M6, M8 and M10.
• Versatility. Use 12V and up cordless drills
for aluminum and steel rivet nuts, or 18V+
for larger sizes like M10 and 3/8" and/or
stainless (driver must feature torque limiting
clutch).
• Durability. Constructed with shielded
bearings, CRO-MO mandrels and machined
billet aluminum body.
RIVET NUT
ADAPTER KIT
RN9
Page 1
AVERTISSEMENT
NE PAS JETER-DONNER À L'UTILISATEUR
1802030-14
ll. SAFETY GUIDE:
Dimensions:
Weight:
Hex Shank Size:
Riveting Capability:
Common Sizes Chart:
*
Tool is capable but may require very high grip strength
8.5" x 5.5" x 2.4"
2.5 lbs.
6.35mm (1/4")
Rivet Nut Size
Nut
Material
SAE
10-24
SAE
1/4-20
SAE
5/16-18
SAE
3/8-16
M5 M6 M8 M10
Aluminum
Steel/Copper
Stainless Steel
Rivet Nut
M5
M6
M8
M10
10-24
1/4-20
5/16-18
3/18-16
Rivet Nut Diameter
6.9mm OD
8.9mm OD
10.9mm OD
12.9mm OD
6.9mm OD
8.9mm OD
10.9mm OD
12.9mm OD
Drill Hole Size
7mm (9/32")
9mm (3/8")
11mm (7/16")
13mm (17/32")
7mm (9/32")
9mm (3/8")
11mm (7/16")
13mm (17/36")
Grip Range
26 – 16ga
26 – 13ga
26 – 11ga
26 – 11ga
26 – 16ga
26 – 13ga
26 – 11ga
26 – 11ga
I. PRODUCT TECHNICAL DATA:
1. Wear adequate protective gear including ANSI
approved goggles and THICK WORK GLOVES
(RUBBER COATED)
2. Only use the nut riveting adapter with driving tool
that matches with requirements specified on
Product Technical Data.
3. Switch off the driving tool before installing or
uninstalling the nut riveting adapter.
4. The objects to be riveted MUST BE SECURED
BEFORE riveting in order to avoid possible injury.
Unsecured objects may rotate with the driving tool
if not secured.
5. The driving tool MUST be stopped if user releases
the adapters body during riveting.
6. During disassembly for mandrel changing or
Maintenance, take care as there are pre-loaded
springs within the tool.
Rivet Type:
Stroke Limit:
Working Torque:
Recommended RPM:
Requirements of Driving Tools:
Requirements of electric
or pneumatic Driving Tool:
Rivet Nut
Maximum 0.7"
Refer to section III. Operation Guide
Low speed, driver setting (<240 RPM)
• Adjustable torque setting
• Chuck capacity of 6.35mm (1/4") shank
• Minimum 12V for aluminum, or M5 and 10-24 steel rivet nuts
• Minimum 14.4V for steel rivet nuts in M6, M8, 1/4" and 5/16" or stainless in M5
or 10-24
•
Minimum full-size 18V+ for M10 and 3/8" rivet nuts and all other sizes in stainless
steel
(WEAR GLOVES)
• Clutch provides a felt and/or audible indication of reaching max setting
• Adjustable torque setting
• Chuck capacity of 6.35mm (1/4") shank
•
With maximum torque > 190 in. lbs. for aluminum and steel rivet nuts in smaller sizes
• With maximum torque > 400 in. lbs. for stainless steel rivet nuts
Page 2
RIVET NUT
ADAPTER KIT
RN9
1802030-14

lll. OPERATION GUIDE:
lV. MAINTENANCE:
1. The nut riveting adapter is
lubricated before shipping.
Recommended: cleaning
the components of plunger
tube, and using lubricant
grease to re-lubricate its
parts on at least a yearly
basis.
2. Threaded mandrel
replacement:
life span of threaded mandrel varies with usage
frequency and the uses of different rivet nut
sizes/types. Recommended: replacing the threaded
mandrel with new spare and its nosepiece before it
is worn-out.
WARNING: WEAR WORK GLOVES (RUBBER COATED
PREFERRED) FOR GRIPPING THE ADAPTER
IMPORTANT
: Ensure the threads on mandrels are clean
and the loaded rivet nut has full thread engagement with
threaded mandrel during riveting. It is strongly
recommended to clean and lubricate (ex. silicone spray,
dry lube) the threads on mandrels before and after use.
CRITICAL: Before using the tool on your intended work
piece, it is REQUIRED that you test the tool with a rivet nut
on a test piece to determine the adequate torque needed
for your rivet nut size, rivet nut material, and sheet metal
thickness and material.
• Ensure drill is in "driver" mode and not drill mode.
Different drills will require different torque, limiting
settings for the same material.
• On the test piece, set your drill to a low clutch setting and
work up to higher settings until the torque level is enough
to fully set the rivet nut but not over set. WARNING: Over
setting rivet nuts may permanently damage the mandrel
or tool.
• Once the torque level is determined, test again on a new
hole at your intended setting to confirm. The knurled part
of the rivet nut should look mushroomed, starting to
become flat on the other side of the work piece and
should not rotate when you install a bolt.
2.4 Ensure the rivet nut has adequate engaged thread
and that there is no cross threading. Check and
confirm the objects to be riveted are SECURE.
2.5 Some small amount of clearance between nose
piece and the flange of rivet nut may be beneficial to
operation, but keep adequate thread engagement on
the nut.
2.6 Refer to Section III. for determining the proper drill
torque settings (REQUIRED).
2.7 Put the fully threaded rivet nut onto the tools
mandrel into the proper size hole (see Sizing Chart
on page 2).
2.8 Align the adapter with the hole angle as best you
can. While gripping the adapter firmly with one
hand (wear work gloves), operate the drill in the
FWD direction until you feel or hear the drills torque
clutch catching. The adapter should not rotate while
the drill is working. Release your grip on the adapter
and reverse the drill out of the rivet nut. Depending
on the material, you may need to manually help the
adapter thread out of the rivet nut with your off
hand.
Tip 1: If setting M10 or 3/8" and especially on stainless,
high grip strength is required. Not all rivet nuts are the
same--some require more force.
Tip 2: Make a note of the torque setting of your
application for future use.
1. Tool Installation:
Install a new mandrel and nosepiece to match your
intended rivet nut thread size. Use the included wrench to
install the new mandrel into the #2 Plunger Tube. Ensure
that the mandrel and other components are tightly fixed in
position. After installing the front bushing cover and lock
bushing, lightly tighten the new nosepiece onto the end of
the tool. Install the hex shank drive end of the tool into
your drill and affix tightly into its chuck.
2. Riveting:
2.1 While holding the adapter with your hand (WEAR
GLOVES
), operate the drill in the REV direction until
you hear the adapter start to click. This means it has
fully exposed the mandrel.
2.2 Switch the drill to the FWD setting.
2.3 Manually thread the selected rivet nut onto threaded
mandrel or hold the rivet nut in one hand and use
another hand to pull the drill trigger slightly to have the
nut threaded on by the tool.
Page 3
RIVET NUT
ADAPTER KIT
RN9
1802030-14
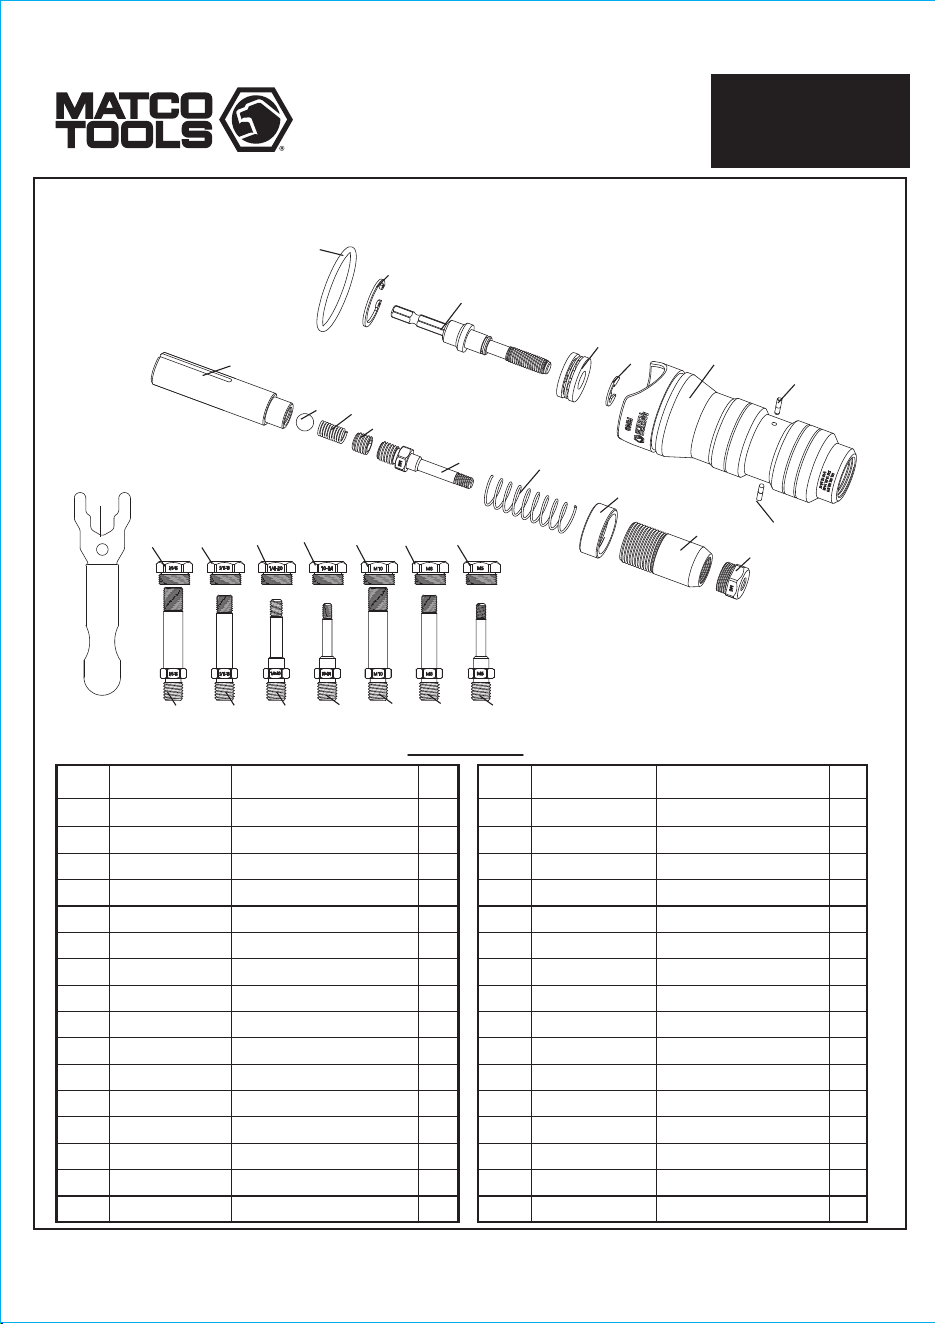
ADN14-01
ADN14-02
ADN14-03
ADN14-04
ADN14-05
ADN38-3/18-16N
ADN38-5/16-18N
ADN14-1/4-20N
ADN14-10-24N
ADN38-M10N
ADN38-M8N
ADN14-M6N
ADN14-M5N
ADN38-3/8-16M
ADN38-5/16-18M
ADN14-1/4-20M
ADN14-10-24M
ADN38-M10M
ADN38-M8M
ADN14-M5M
ADN14-M6M
RN9-22
ADN14-23
ADN14-24
RN9-25
ADN14-26
ADN14-27
ADN14-28
ADN14-29
RN9-30
ADN14-31
1
2
3
4
5
6
7
8
9
10
11
12
13
14
15
16
Hex Shank Driving Shaft
Plunger Tube
Front Bushing w/Knurling
Locking Bushing
Set Screw
SAE 3/18-16 Nosepiece
SAE 5/16-18 Nosepiece
SAE 1/4-20 Nosepiece
SAE 10-24 Nosepiece
M10 Nosepiece
M8 Nosepiece
M6 Nosepiece
M5 Nosepiece
SAE 3/8-16 Mandrel
SAE 5/16-18 Mandrel
SAE 1/4-20 Mandrel
1
1
1
1
1
1
1
1
1
1
1
1
1
1
1
1
1
1
1
1
1
1
1
1
1
1
1
1
2
1
1
Index Part No. Description Qty
17
18
19
20
21
22
23
24
25
26
27
28
29
30
31
SAE 10-24 Mandrel
M10 Mandrel
M8 Mandrel
M5 Mandrel
M6 Mandrel
Aluminum Handle
Front Spring
Inner Spring
Thrust Ball Bearing
C-Clip
E-Clip
Steel Ball
Pins
O-Ring
Wrench Kit
Index Part No. Description
Qty
6 7
8 10 11 139
14 15 16 18 19 2017
31
12
3
4
23
21
5
24
28
2
Parts List
29
29
1
25
26
30
27
22
PARTS BREAKDOWN
RIVET NUT
ADAPTER KIT
Page 4
RN9
1802030-14
