

LT5005, LT6005
EN Operator's manual 2-21
Contents
Introduction..................................................................... 2
Safety..............................................................................4
Operation........................................................................ 8
Maintenance................................................................. 10
Transportation, storage and disposal........................... 14
Technical data.............................................................. 17
Declaration of Conformity............................................. 21
Introduction
Product description
The product is a walk-behind rammer for compaction
of granular soil, fine-grained soil and soil that has high
contents of clay.
Intended use
The product is for professional operation only. The
product is used for compaction in trenches, around
pipes or other small spaces. Examples of such work
are house foundations and parking lots. Do not use the
product for other tasks.
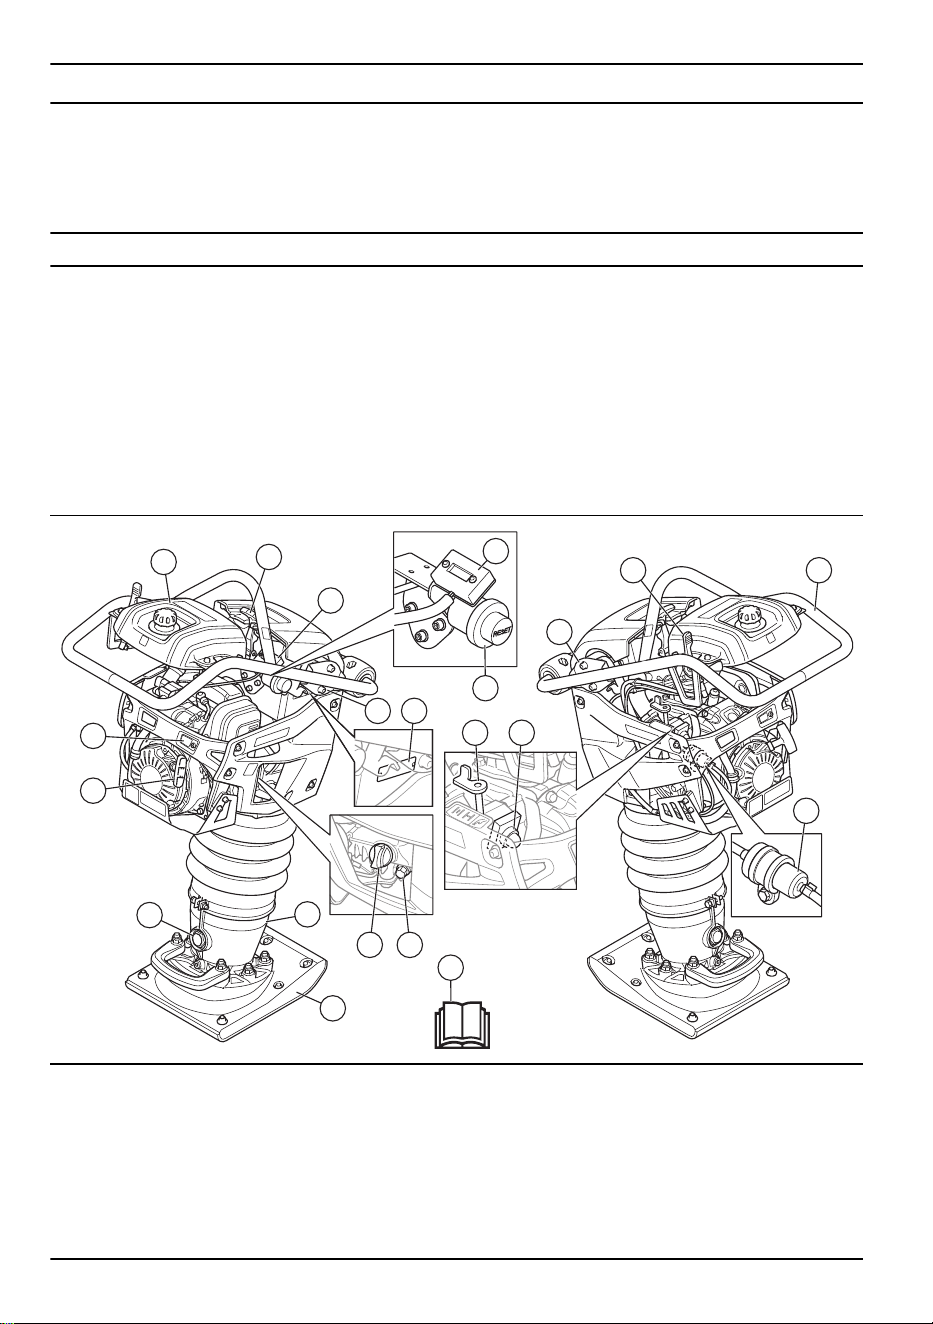
Product overview
1
2
3
13
12
16
17
18
14
15
19
3
6
109
4
4
87
11
5
1. Fuel tank
2. Air filter latch
3. Hour meter
4. Vibration damping units
5. Type plate
6. Air filter indicator
7. Choke control
8. Primer bulb
9. Throttle control
10. Handle / Safety frame
11. Fuel filter
12. Drain plug for engine oil
13. Oil tank / dipstick
14. Rammer leg
2 957 - 006 - 22.03.2024
15. Rammer shoe
16. Sight glass for the oil in the spring-loaded rammer
leg
17. Starter rope handle
18. Engine oil indicator
19. Operator's manual
Hour meter
When the engine is on, the hour meter shows the engine
speed in rpm. When the engine is off, the hour meter
shows the total operation time of the product in hours.
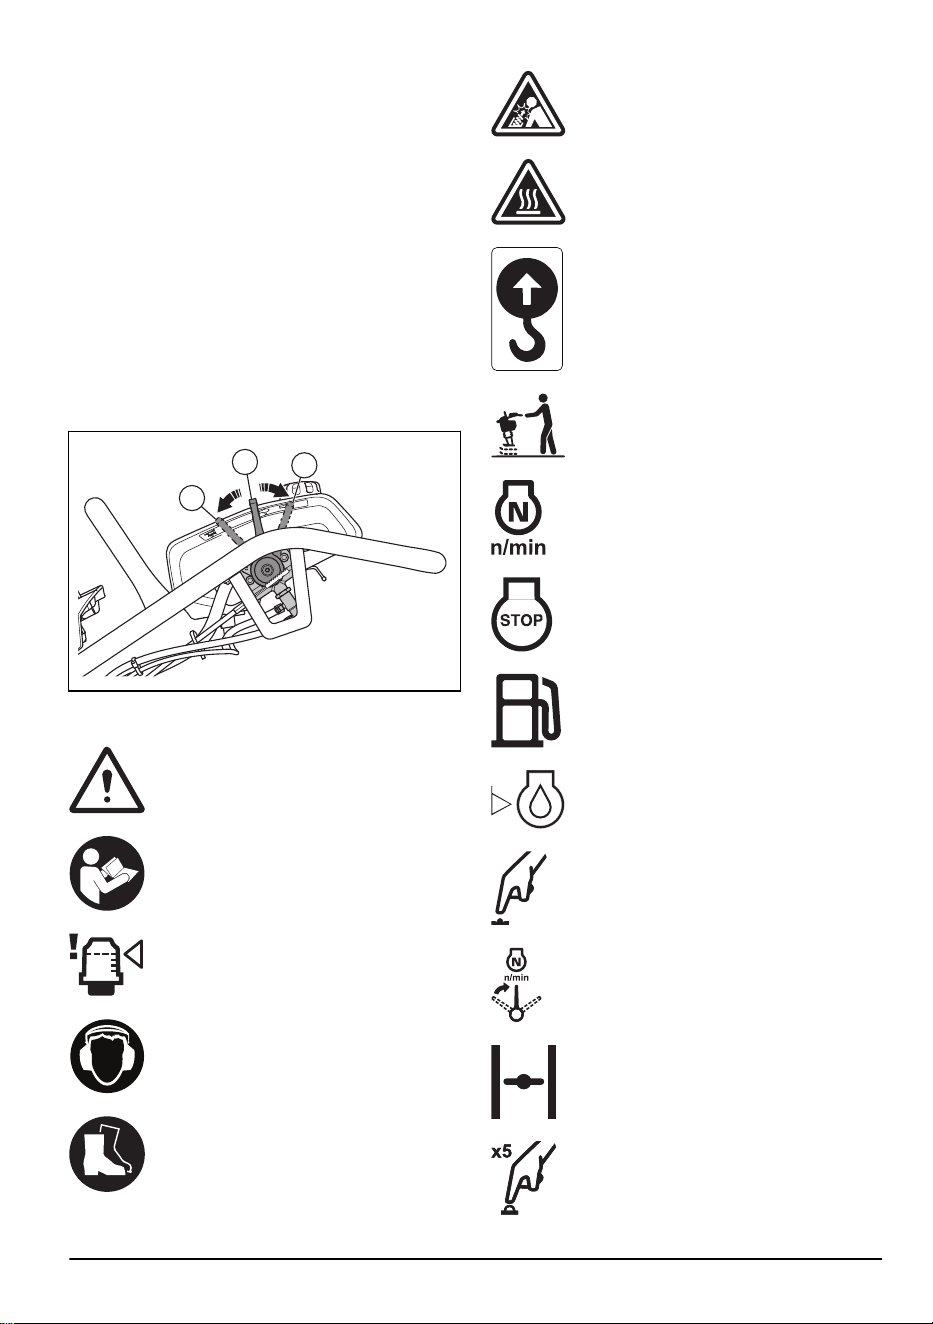
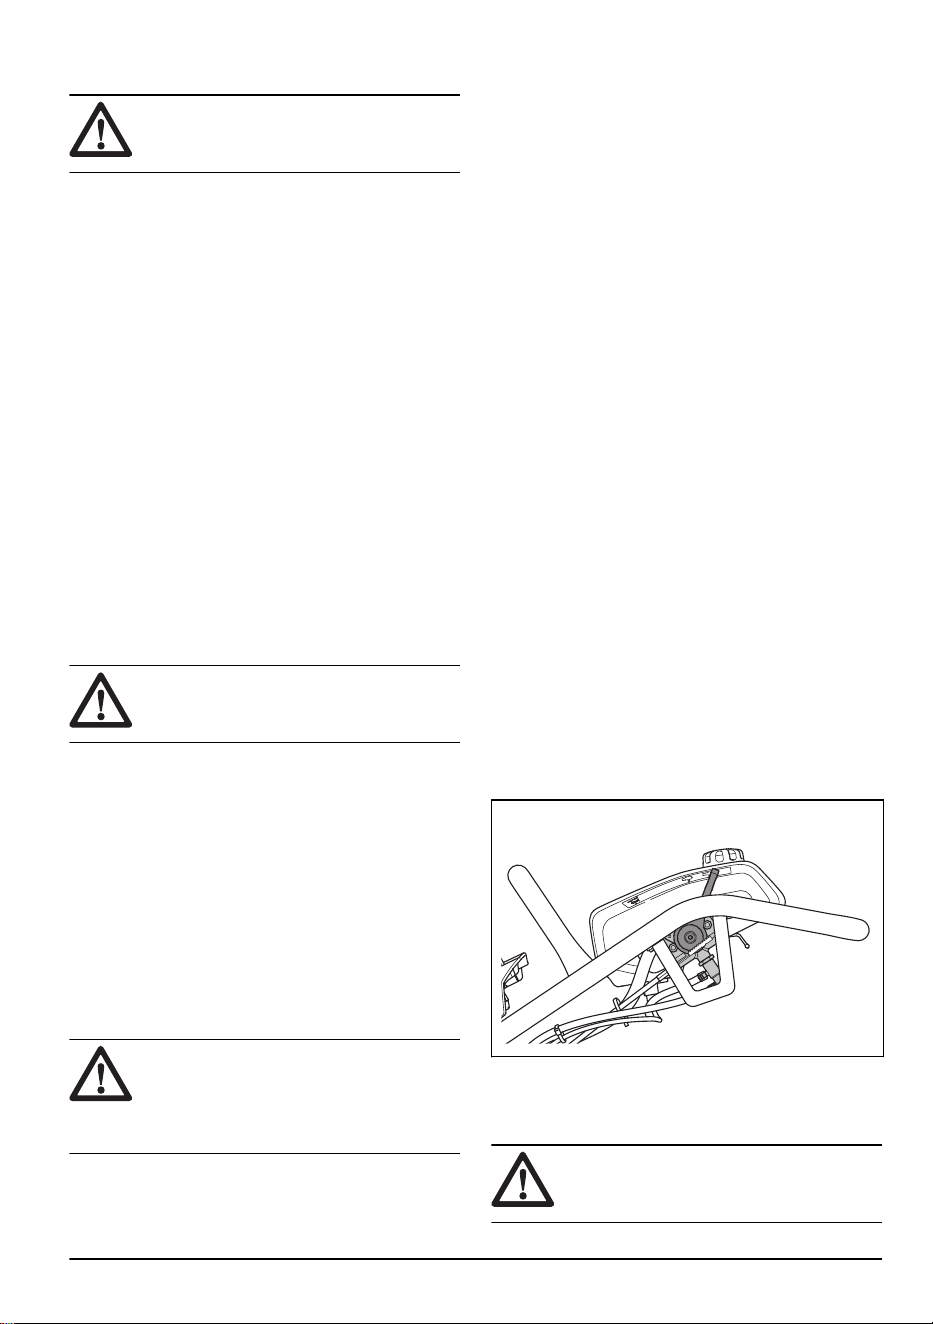
Throttle control
The throttle control has 3 available positions:
• Operation mode position (A)
• Start position / idle speed position (B)
• Stop position (C)
A
B
C
Symbols on the product
Be careful and use the product correctly.
This product can cause serious injury or
death to the operator or others.
Read the manual carefully and make
sure that you understand the instructions
before you use the product.
Air filter indicator.
Use hearing protection.
Use protective boots.
The spring can eject and cause injury.
Hot surface.
Lift the product at this position on the
safety frame.
Operation position.
Start position / idle speed position.
Engine stop position.
Fuel: Unleaded gasoline with a maximum
of 10% ethanol.
Engine oil level.
Primer bulb.
Set throttle control in start position.
Choke closed.
Push the primer bulb 5 times.
957 - 006 - 22.03.2024 3
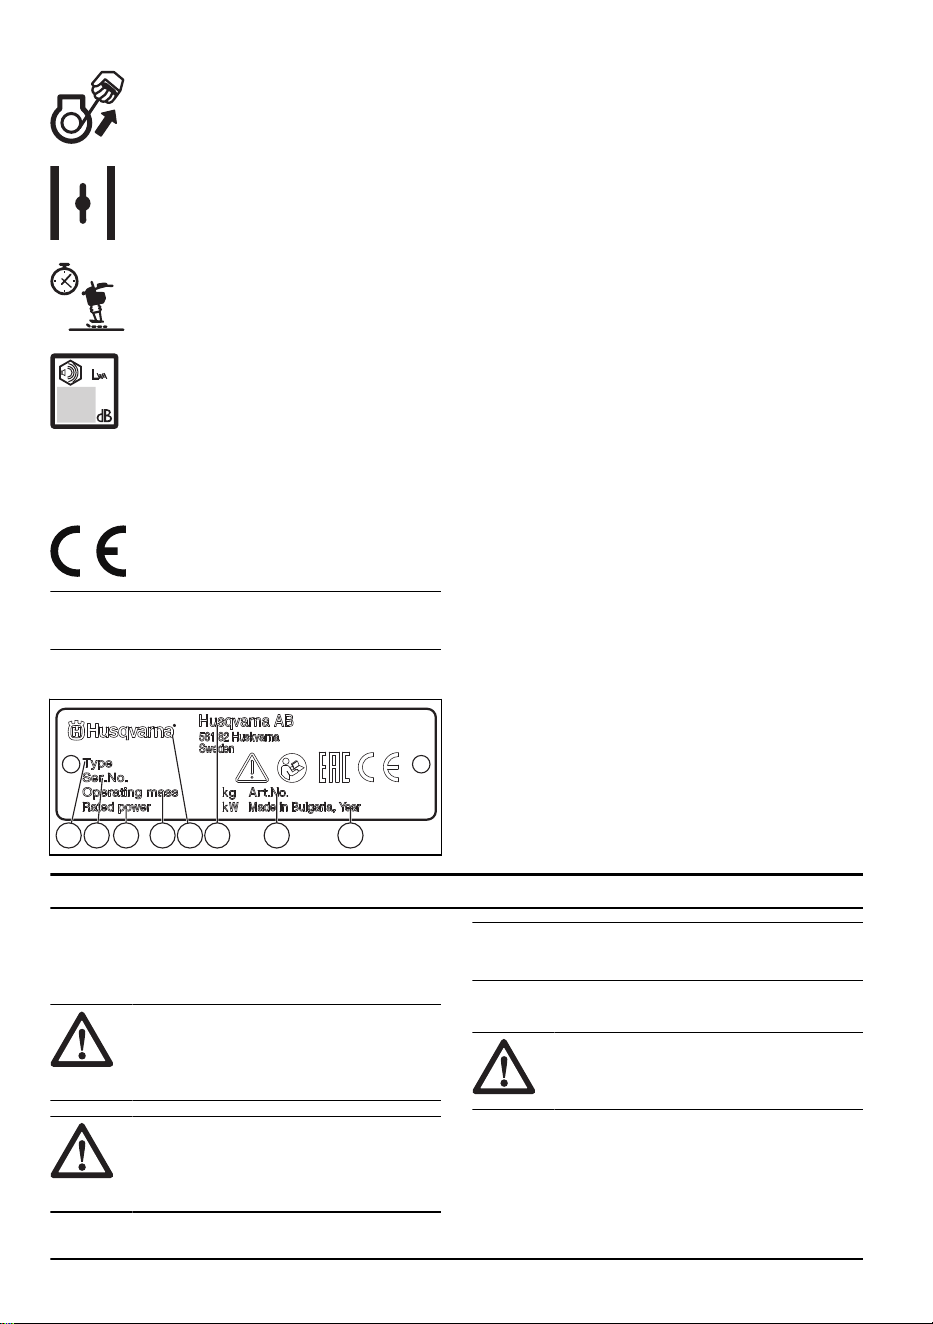
Pull the starter rope handle.
Choke open.
Let the engine operate at idle speed.
Noise emission to the environment
label as per EU and UK directives
and regulations, and New South Wales
legislation Protection of the Environment
Operations (Noise Control) Regulation
2017. The guaranteed sound power level
of the product is specified in
Technical
data on page 17
and on the label.
This product is in compliance with
applicable EC directives.
Note: Other symbols/decals on the product refer to
special certification requirements for some markets.
Type plate
1 2 3 84 65 7
1. Product type
2. Serial number with production date, year, week and
sequence number
3. Rated power
4. Product weight
5. Brand
6. Manufacturer and manufacturer address
7. Product number
8. Production year
Product damage
We are not responsible for damages to our product if:
• the product is incorrectly repaired.
• the product is repaired with parts that are not
from the manufacturer or not approved by the
manufacturer.
• the product has an accessory that is not from the
manufacturer or not approved by the manufacturer.
• the product is not repaired at an approved service
center or by an approved authority.
Safety
Safety definitions
Warnings, cautions and notes are used to point out
specially important parts of the manual.
WARNING: Used if there is a risk of
injury or death for the operator or bystanders
if the instructions in the manual are not
obeyed.
CAUTION: Used if there is a risk of
damage to the product, other materials or
the adjacent area if the instructions in the
manual are not obeyed.
Note: Used to give more information that is necessary
in a given situation.
General safety instructions
WARNING: Read the warning
instructions that follow before you use the
product.
• This product is a dangerous tool if you are not
careful or if you use the product incorrectly. This
product can cause serious injury or death to the
operator or others. Before you use the product,
4 957 - 006 - 22.03.2024

you must read and understand the contents of this
operator’s manual.
• This product is not intended for use by persons
(including children) with reduced physical, sensory
or mental capabilities, or lack of experience and
knowledge.
• Save all warnings and instructions.
• Comply with all applicable laws and regulations.
• The operator and the employer of the operator must
know and prevent the risks during operation of the
product.
• Do not let a person operate the product unless they
read and understand the contents of the operator's
manual.
• Do not operate the product unless you receive
training before use. Make sure that all operators
receive training.
• Do not let a child operate the product.
• Only let approved persons operate the product.
• The operator is responsible for accidents that occur
to other persons or their property.
• Do not use the product if you are tired, ill, or under
the influence of alcohol, drugs or medicine.
• Always be careful and use your common sense.
• This product produces an electromagnetic field
during operation. This field can under some
circumstances interfere with active or passive
medical implants. To decrease the risk of serious
injury or death, we recommend persons with medical
implants to speak to their physician and the medical
implant manufacturer before operating this product.
• Keep the product clean. Make sure that you can
clearly read signs and decals.
• Do not use the product if it is damaged.
• Do not make modifications to this product.
• Do not operate the product if it is possible that other
persons have made modifications to the product.
Safety instructions for operation
WARNING:
Read the warning
instructions that follow before you use the
product.
• Make sure that you know how to stop the engine
quickly in an emergency.
• The operator must have the physical strength that is
necessary to operate the product safely.
• Do not operate the product without all protective
covers installed.
• Use personal protective equipment. Refer to
Personal protective equipment on page 7
.
• Make sure that only approved persons are in the
work area.
• Keep the work area clean and bright.
• Make sure that you are in a safe and stable position
during operation.
• Make sure that there is no grease or oil on the
handles, the safety frame and other surfaces on the
product. Slippery surfaces can cause the product to
fall and there is a risk of injury and damage to the
product.
• Do not use the product in areas where fire or
explosions can occur.
• The product can cause objects to eject at high
speed. Make sure that all persons in the work
area use approved personal protective equipment.
Remove loose objects from the work area.
• Before you go away from the product, stop the
engine and make sure that there is no risk of
accidental start.
• Make sure that clothes, long hair and jewelry do not
get caught in moving parts.
• Do not hit the product.
• Always operate the product from behind with your
two hands on the handle. Do not touch the rammer
shoe when the product is on.
• Do not operate the product near electrical cables.
The product does not have electrical insulation and
injury or death can occur.
• Before you operate the product, find out if there are
hidden wires, cables and pipes in the work area.
If the product hits a hidden object, stop the engine
immediately and examine the product and the object.
Do not start to operate the product again until you
know that it is safe to continue.
• Put the product in an upright position before you
start it.
• Do not sit on the product.
• Keep your feet away from the rammer shoe.
• Do not operate the product with your leg on the
handle.
• Do not operate the product on solid rock, hard
concrete or other hard surfaces. There is a risk of
injury and damage to the product.
• Do not operate the product on a slope.
• When you operate the product in a trench or other
small space, make sure that the rammer shoe can
move freely. If the space is too small for the rammer
shoe, there is a risk of damage to the product. There
is also a risk of injury from sudden movements in the
product.
• If the product falls on its side during operation, stop
the engine before you lift the product to upright
position.
Vibration safety
WARNING:
Read the warning
instructions that follow before you use the
product.
• During operation of the product, vibrations go from
the product to the operator. Regular and frequent
operation of the product can cause or increase the
degree of injuries to the operator. Injuries can occur
957 - 006 - 22.03.2024
5
in fingers, hands, wrists, arms, shoulders, and/or
nerves and blood supply or other body parts. The
injuries can be debilitating and/or permanent, and
can increase gradually during weeks, months or
years. Possible injuries include damage to the blood
circulation system, the nervous system, joints, and
other body structures.
• Symptoms can occur during operation of the product
or at other times. If you have symptoms and
continue to operate the product, the symptoms can
increase or become permanent. If these or other
symptoms occur, get medical aid:
• Numbness, loss of feeling, tingling, pricking,
pain, burning, throbbing, stiffness, clumsiness,
loss of strength, changes in skin color or
condition.
• Symptoms can increase in cold temperatures. Use
warm clothing and keep your hands warm and dry
when you operate the product in cold environments.
• Do maintenance on and operate the product as
given in the operator's manual, to keep a correct
vibration level.
• The product has a vibration damping system that
decreases the vibrations from the handles to the
operator. Let the product do the work. Do not
push the product with force. Hold the product at
the handles lightly, but make sure that you control
the product and operate it safely. Do not push the
handles into the end stops more than necessary.
• Keep your hands on the handle or handles only.
Keep all other body parts away from the product.
• Stop the product immediately if strong vibrations
suddenly occurs. Do not continue the operation
before the cause of the increased vibrations is
removed.
Dust safety
WARNING:
Read the warning
instructions that follow before you use the
product.
• Operation of the product can cause dust in the
air. Dust can cause serious injury and permanent
health problems. Silica dust is regulated as harmful
by several authorities. These are examples of such
health problems:
• The fatal lung diseases chronic bronchitis,
silicosis and pulmonary fibrosis
• Cancer
• Birth defects
• Skin inflammation
• Use correct equipment to decrease the quantity of
dust and fumes in the air and to decrease dust on
work equipment, surfaces, clothing and body parts.
Examples of controls are dust collection systems
and water sprays to bind dust. Decrease dust at
the source where possible. Make sure that the
equipment is correctly installed and used and that
regular maintenance is done.
• Use approved respiratory protection. Make sure
that the respiratory protection is applicable for the
dangerous materials in the work area.
• Make sure that the airflow is sufficient in the work
area.
• If it is possible, point the exhaust of the product
where it cannot cause dust to go into the air.
Exhaust fumes safety
WARNING: Read the warning
instructions that follow before you use the
product.
• The exhaust fumes from the engine contain carbon
monoxide which is an odourless, poisonous and very
dangerous gas. To breathe carbon monoxide can
cause death. Because carbon monoxide is odourless
and cannot be seen, it is not possible to sense it. A
symptom of carbon monoxide poisoning is dizziness,
but it is possible that a person becomes unconscious
without warning if the quantity or concentration of
carbon monoxide is sufficient.
• Exhaust fumes also contain unburned hydrocarbons
including benzene. Long-term inhalation can cause
health problems.
• Exhaust fumes that you can see or smell also
contain carbon monoxide.
• Do not use a combustion engine product indoors or
in areas that do not have sufficient airflow.
• Do not breathe the exhaust fumes.
• Make sure that the airflow in the work area is
sufficient. This is very important when you operate
the product in trenches or other small work areas
where exhaust fumes can easily collect.
Noise safety
WARNING:
Read the warning
instructions that follow before you use the
product.
• High noise levels and long-term exposure to noise
can cause noise-induced hearing loss.
• To keep the noise level to a minimum, do
maintenance on and operate the product as given
in the operator's manual.
• Examine the muffler for damages. Make sure that
the muffler is correctly attached to the product.
• Use approved hearing protection while you operate
the product.
• Listen for warning signals and voices when you use
hearing protection. Remove the hearing protection
when the product is stopped, unless hearing
protection is necessary for the noise level in the work
area.
6
957 - 006 - 22.03.2024
Personal protective equipment
WARNING: Read the warning
instructions that follow before you use the
product.
• Always use approved personal protective equipment
when you operate the product. Personal protective
equipment cannot fully prevent injury but it
decreases the degree of injury if an accident does
occur. Let your dealer help you select the correct
personal protective equipment.
• Regularly do a check of the condition of the personal
protective equipment.
• Use an approved protective helmet.
• Use approved hearing protection.
• Use approved respiratory protection.
• Use approved eye protection with side protection.
• Use protective gloves.
• Use boots with steel toe-cap and non-slip sole.
• Use approved work clothing or equivalent close-
fitting clothing that has long sleeves and long legs.
Fire extinguisher
• Keep a fire extinguisher near during operation.
• Use a powder fire extinguisher of "ABE" class or a
carbon dioxide fire extinguisher of "BE" type.
Safety devices on the product
WARNING: Read the warning
instructions that follow before you use the
product.
• Do not use a product with safety devices that are
damaged or do not operate correctly.
• Do a check of the safety devices regularly. If the
safety devices are damaged or do not operate
correctly, speak to your Husqvarna service agent.
• Do not make modifications to safety devices.
Muffler
The muffler keeps the noise levels to a minimum and
sends the exhaust fumes away from the operator.
Do not use the product if the muffler is missing or
damaged. A damaged muffler increases the noise level
and the risk of fire.
WARNING:
The muffler becomes very
hot during and after use and when the
engine operates at idle speed. Be careful
near flammable materials and/or fumes to
prevent fire.
To do a check of the muffler
• Examine the muffler regularly to make sure that it is
attached correctly and not damaged.
Safety frame
The safety frame prevents damage to the product if it
falls. The handle and the lifting point are parts of the
safety frame.
To do a check of the safety frame
• Make sure that there are no cracks or other
damages on the safety frame.
• Make sure that the safety frame is correctly installed
on the product.
Vibration damping units
The vibration damping units decrease vibration in the
product. The vibration damping units decrease harmful
vibrations to prevent injury to the operator and damage
to the product.
To do a check of the vibration damping system
1. Make sure that there are no cracks or deformation
on the vibration damping units.
2. Make sure that the vibration damping units are
correctly attached to the engine unit and handle unit.
Refer to
Product overview on page 2
for information
about where the vibration damping system is on your
product.
To do a check of the stop function
1. Start the product. Refer to
To start the product on
page 9
.
2. Set the throttle control in the stop position.
3. If the engine does not stop, let an approved service
center do servicing on the product.
Fuel safety
WARNING:
Read the warning
instructions that follow before you use the
product.
957 - 006 - 22.03.2024 7

• Fuel is flammable and the fumes are explosive. Be
careful with fuel to prevent injury, fire and explosion.
• Do not breathe in the fuel fumes. The fuel fumes are
poisonous and can cause injury. Make sure that the
airflow is sufficient.
• Do not remove the fuel tank cap or fill the fuel tank
when the engine is on.
• Make sure that the engine is cool before you refuel.
• Do not fill fuel in an indoor area. Insufficient airflow
can cause injury or death because of asphyxiation or
carbon monoxide poisoning.
• Do not smoke near the fuel or the engine.
• Do not put hot objects near the fuel or the engine.
• Do not fill fuel near sparks or flames.
• Before you refuel, open the fuel tank cap slowly and
release the pressure carefully.
• Fuel on your skin can cause injury. If you get fuel on
your skin, use soap and water to remove the fuel.
• If you spill fuel on your clothing, change clothing
immediately.
• Do not fill the fuel tank fully. Heat causes the fuel to
expand. Keep a space at the top of the fuel tank.
• Tighten the fuel tank cap fully. If the fuel tank cap is
not tightened, there is a risk of fire.
• Before you start the product, move the product to a
minimum of 3 m/10 ft from where you refueled.
• Do not start the product if there is fuel or engine
oil on the product. Remove the unwanted fuel and
engine oil and let the product dry before you start the
engine.
• Examine the engine for leaks regularly. If there are
leaks in the fuel system, do not start the engine until
the leaks are repaired.
• Do not use your fingers to examine the engine for
leaks.
• Keep fuel in approved containers only.
• When the product and fuel is in storage, make sure
that fuel and fuel fumes cannot cause damage.
• Drain the fuel in an approved container outdoors and
away from sparks and flames.
Safety instructions for maintenance
WARNING: Read the warning
instructions that follow before you use the
product.
• If the maintenance is not done correctly and
regularly, the risk of injury and damage to the
product increases.
• Use personal protective equipment. Refer to
Personal protective equipment on page 7
.
• Stop the engine and make sure that all parts of the
product are cool before you do the maintenance.
• Clean the product to remove dangerous material
before you do the maintenance.
• Disconnect the spark plug cap before you do the
maintenance.
• The exhaust fumes from the engine are hot and can
contain sparks. Do not operate the product in indoor
areas or near flammable material.
• Do not change the product. Modifications that
are not approved by the manufacturer, can cause
serious injury or death.
• Always use original accessories and spare parts.
Accessories and spare parts that are not approved
by the manufacturer, can cause serious injury or
death.
• Replace damaged, worn or broken parts.
• Only do the maintenance as given in this operator's
manual. Let an approved service center do all other
servicing.
• Remove all tools from the product before you start
the engine after maintenance. Loose tools or tools
attached to rotating parts can eject and cause injury.
• After maintenance, do a check of the vibration level
in the product. If it is not correct, speak to an
approved service center.
• Let an approved service center do servicing on the
product regularly.
Operation
Introduction
WARNING: Read and understand the
safety chapter before you use the product.
To do before you operate the product
• Read the operator's manual carefully and make sure
that you understand the instructions.
• Read the engine manual that is supplied by the
engine manufacturer.
• Do the daily maintenance. Refer to
Maintenance
schedule on page 10
.
8 957 - 006 - 22.03.2024
• Make sure that the rubber latch of the air filter cover
is correctly attached and not damaged.
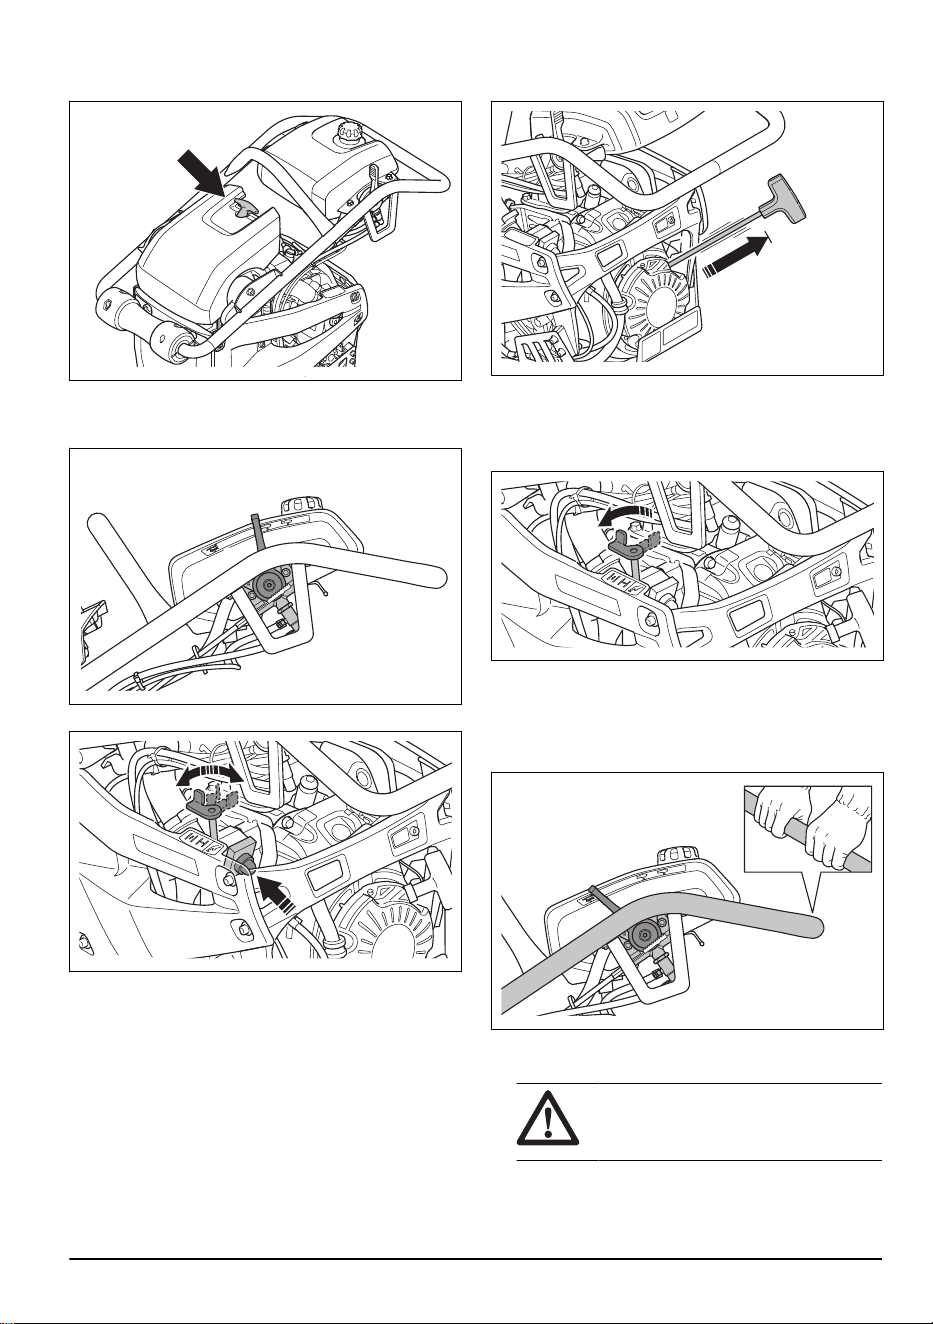
To start the product
1. Set the throttle control in the start position.
2. If the engine is cold, push the primer bulb 5 times.
3. Set the choke control in the correct position.
a) If the engine is cold, close the choke.
b) If the engine is warm or the ambient temperature
is high, open the choke.
4. Pull the starter rope handle slowly until you feel
resistance.
5. Release the starter rope handle to let the starter
rope go back.
6. Pull the starter rope handle until the engine starts.
7. Open the choke control gradually until it is fully open.
8. Let the engine operate at idle speed for 2–3 minutes
before you apply full throttle.
To operate the product
1. Set the throttle control in the operation position.
2. Hold the handle and move the product in the
necessary direction.
CAUTION:
Do not push the product
down. Too much pressure can cause
unsatisfactory result.
957 - 006 - 22.03.2024 9
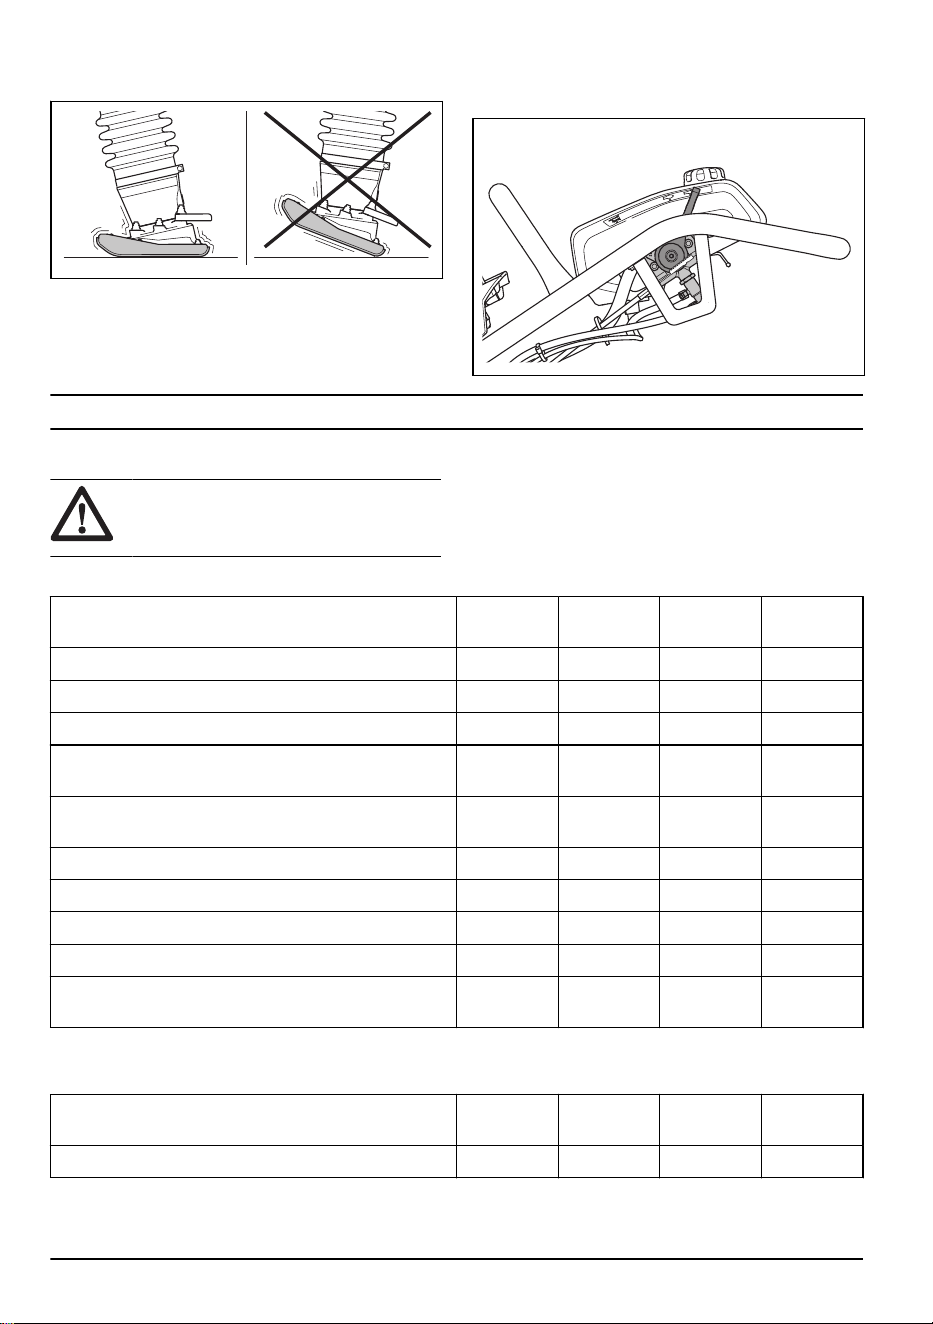
3. Make sure that the rammer shoe is parallel to the
ground during the operation.
To stop the product
• Set the throttle control in the stop position.
Maintenance
Introduction
WARNING: Read and understand the
safety chapter before you do maintenance
on the product.
Maintenance schedule
* = General maintenance done by the operator. The
instructions are not given in this operator's manual.
X = The instructions are given in this operator's manual.
O = Refer to the engine manual for instructions.
General product maintenance Before use,
each 10 h
After the
first 20 h
Weekly,
each 100 h
Yearly, each
500 h
Make sure that there are no fuel or oil leaks. *
Clean the product. X
Make sure that nuts and screws are tightened. *
Examine the throttle control and choke control for dam-
age.
*
Make sure that the throttle control and the choke control
can move smoothly.
*
Do a check of the oil level in the rammer leg. X
Replace the oil in the rammer leg. X X
Tighten the bolts on the rammer shoe. X
Examine the vibration damping units for damage. X X
Examine the air filter cover rubber latch for wear and
damage.
X
Engine maintenance Before use,
each 10 h
After the
first 20 h
Weekly,
each 100 h
Yearly, each
300 h
Do a check of the fuel level and the engine oil level. X
10 957 - 006 - 22.03.2024
Engine maintenance Before use,
each 10 h
After the
first 20 h
Weekly,
each 100 h
Yearly, each
300 h
Do a check of the air filter indicator. Clean or replace the
air filter.
X X
Clean the cooling fins of the engine. O
Replace the engine oil. X X X
Replace the air filter. X X X
Do a check of the engine speed. O O O
Examine and clean the spark plug. Replace the spark
plug if it is necessary.
O O
Clean the spark arrester screen on the muffler. O O
Adjust the valve head clearance for the air intake and the
exhaust valves.
O
Drain the fuel and clean the fuel tank and the fuel filter. O
Drain water from the fuel system. O
Replace the fuel filter. O
To clean the product
CAUTION: Before you clean the
product, attach a plastic bag tightly around
the fuel tank cap. This is to make sure that
water does not go into the venthole in the
fuel tank cap.
• Use running water from a hose or a high-pressure
washer to clean the product.
CAUTION: Do not point the water
directly at the fuel tank cap, electrical
components or the engine.
• Remove grease and oil from the handle.
To do a general inspection
• Make sure that all nuts and screws on the product
are tightened correctly.
To do a check of the engine oil level
1. Put the product in an upright position.
2. Remove the oil tank cap and dipstick.
3. Clean the oil from the dipstick.
4. Put the dipstick back fully into the oil tank.
5. Remove the dipstick.
6. Examine the oil level on the dipstick.
7. If the oil level is low, fill with engine oil and do a
check of the oil level again. Refer to
Technical data
on page 17
for the correct type of oil.
To replace the engine oil
If the engine is cold, start the engine for 1–2 minutes
before you drain the engine oil. This makes the engine
oil warm and easier to drain.
WARNING: Engine oil is very hot
directly after the engine stops. Let the
engine become cool before you drain the
engine oil. If you spill engine oil on your skin,
clean with soap and water.
957 - 006 - 22.03.2024 11
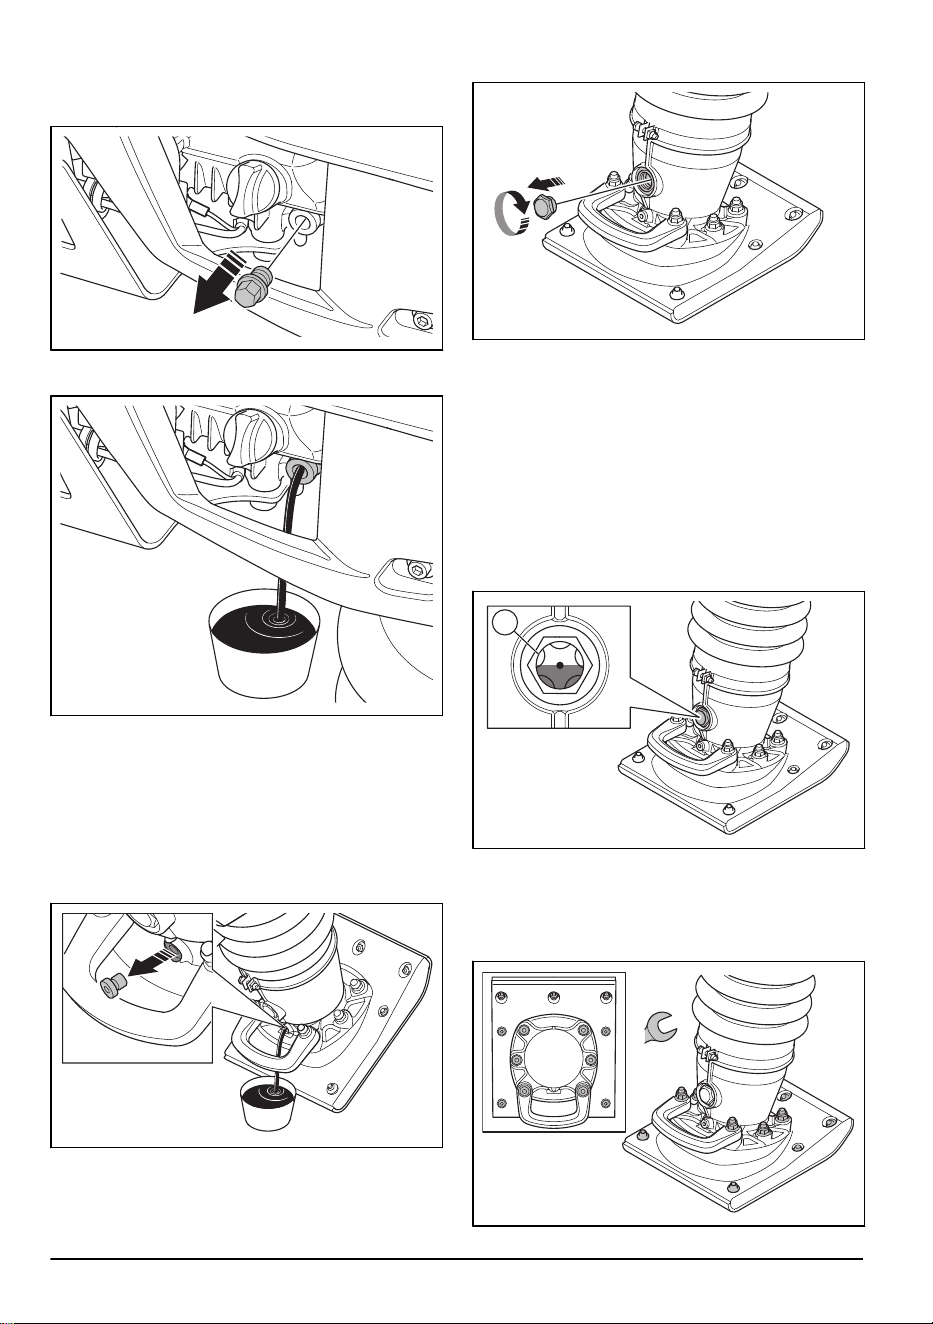
1. Put a container below the drain plug for the engine
oil.
2. Remove the oil drain plug.
3. Tilt the product and let the oil run out into the
container.
4. Install the oil drain plug and tighten it.
5. Fill with new engine oil. Refer to
Technical data on
page 17
for the correct type of oil.
6. Do a check of the engine oil level.
To replace the oil in the rammer leg
1. Put a container below the oil drain plug.
2. Remove the oil drain plug.
3. Let the oil run out into the container.
4. Install the oil drain plug and tighten it. Make sure that
the sealing washer is not damaged.
5. Remove the sight glass.
6. Fill with new oil through the hole for the sight glass.
Refer to
Technical data on page 17
for the correct
type of oil.
7. Install the sight glass and tighten it fully.
8. Do a check of the oil level.
To do a check of the oil level in the
rammer leg
1. Put the product in upright position.
2. Look at the sight glass (A). The oil level is correct
when it is at the middle of the sight glass.
A
To tighten the bolts on the rammer
shoe
• Tighten the 13 bolts on the rammer shoe with a
wrench.
13x
12
957 - 006 - 22.03.2024
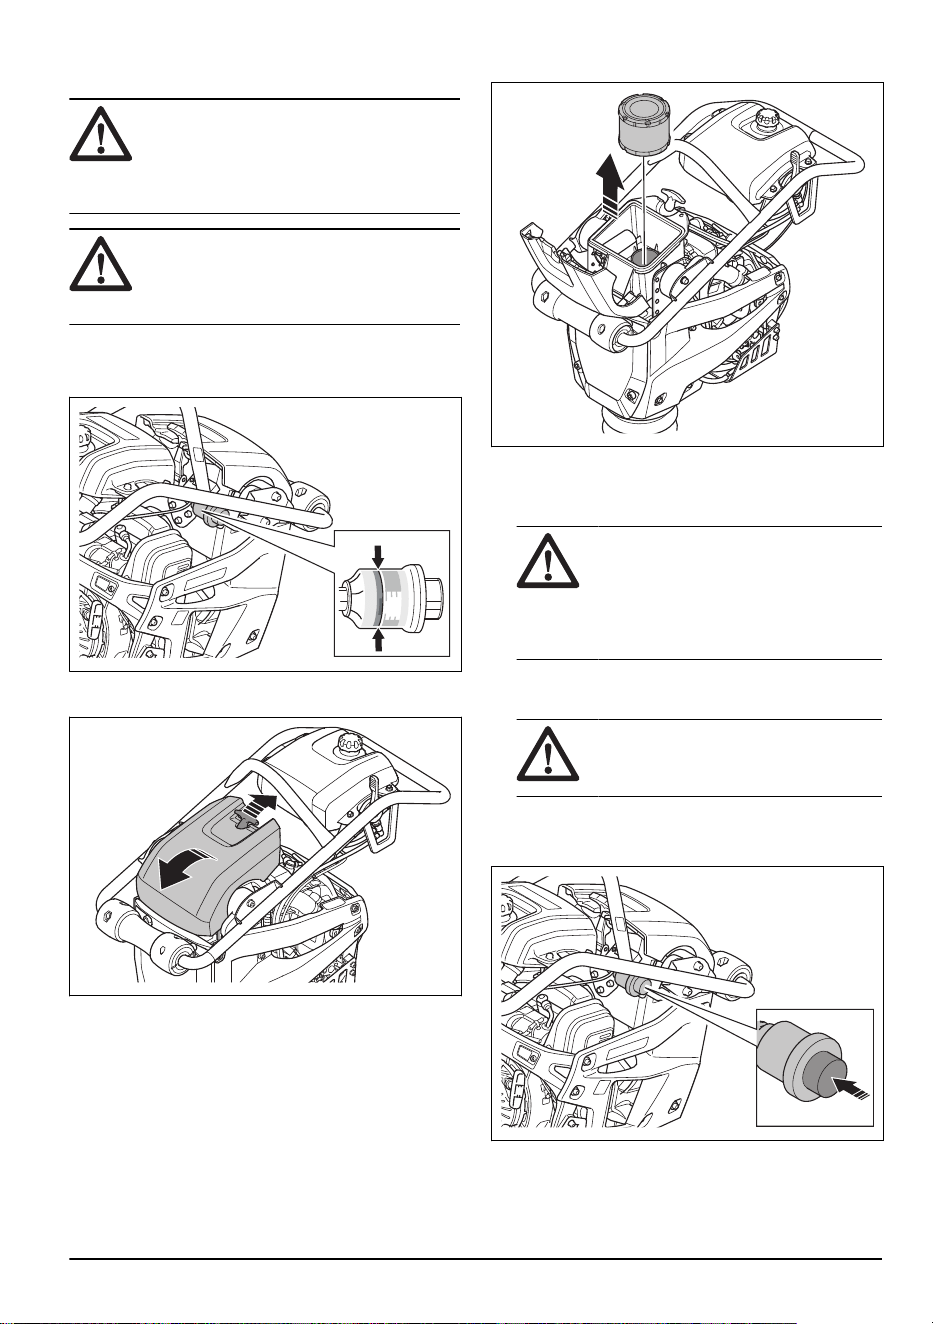
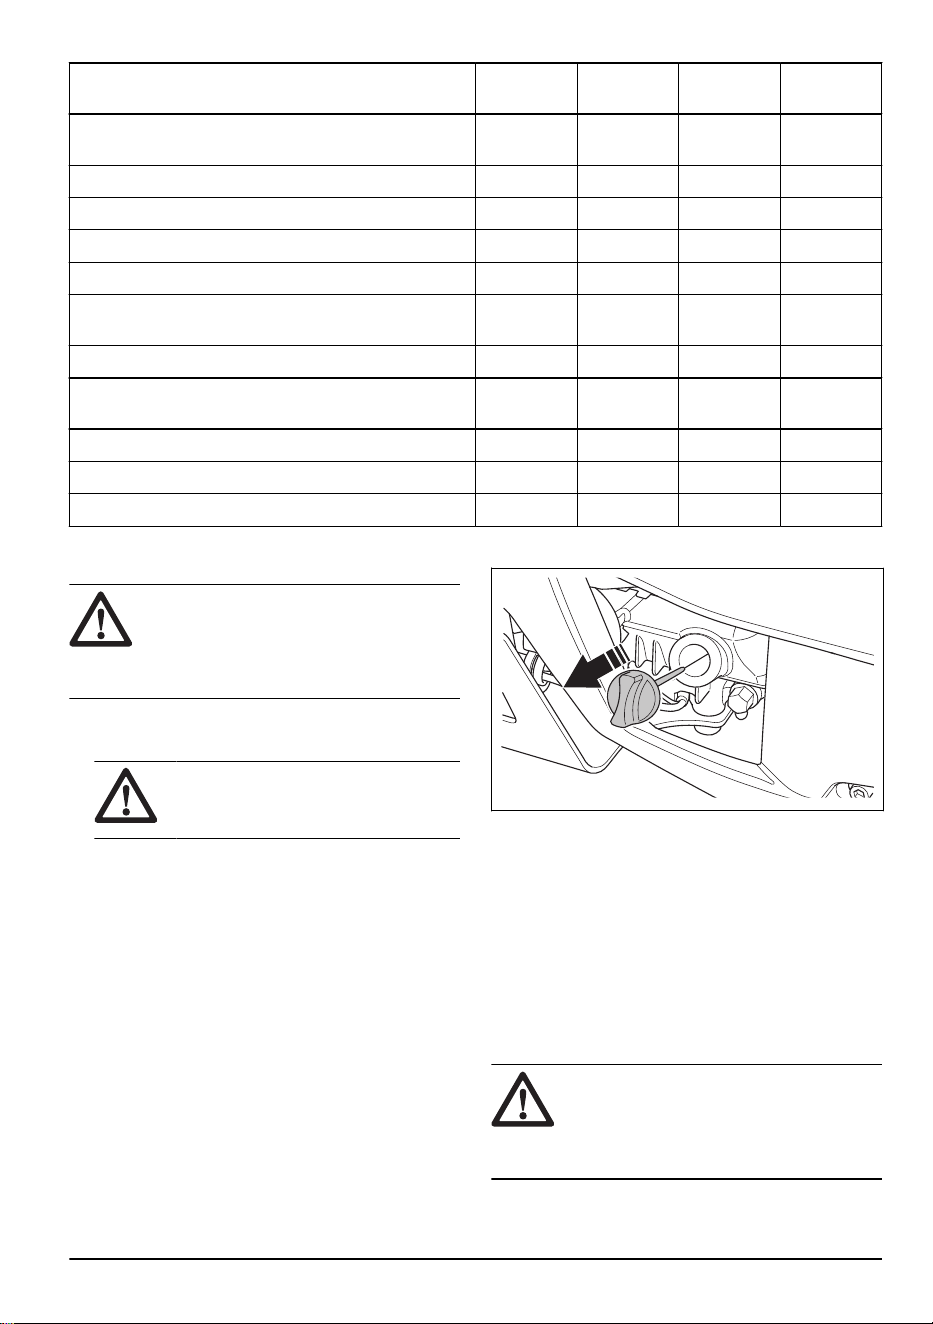
To clean or replace the air filter
WARNING: Use approved respiratory
protection when you clean or replace the air
filter. Discard used air filters correctly. The
dust in the air filter is dangerous to your
health.
WARNING: Do not clean the air filter
with compressed air. This causes damage to
the air filter and the risk increases that you
breathe the dangerous dust.
1. Examine the air filter indicator. If the air filter
indicator is on red, it is necessary to replace the air
filter.
7
5%
5
0%
2
5%
2. Lift the rubber latch carefully and pull it away from
the air filter cover. Fold the air filter cover forward.
3. Remove the air filter from the air filter housing.
4. Clean the air filter housing with a brush.
5. Tap the air filter against a hard surface or use a
vacuum cleaner to remove the particles.
CAUTION: Do not let the nozzle of
the vacuum cleaner touch the surface of
the paper filter element. Keep a small
distance. The sensitive surface of the
paper filter element becomes damaged
if objects touch it.
6. Examine the air filter for damage.
7. Discard the air filter if it is damaged.
CAUTION:
Always replace a
damaged air filter, or the dust will go into
the engine and cause engine damage.
8. Put the clean air filter or a new air filter into the air
filter housing.
9. Push the reset button for the air filter indicator.
10. Fold the air filter cover down and put the rubber latch
back to the locked position of the air filter cover.
957 - 006 - 22.03.2024
13
Note: Make sure that the rubber latch of the air
filter cover is correctly attached.
Transportation, storage and disposal
Transportation
WARNING: Be careful during
transportation. The product is heavy and can
cause injury or damage if it falls or moves
during transportation.
Transport wheels let you move the product manually for
shorter distances. For longer distances, lift the product
to move it or put the product on a vehicle.
CAUTION: Do not tow the product
behind a vehicle.
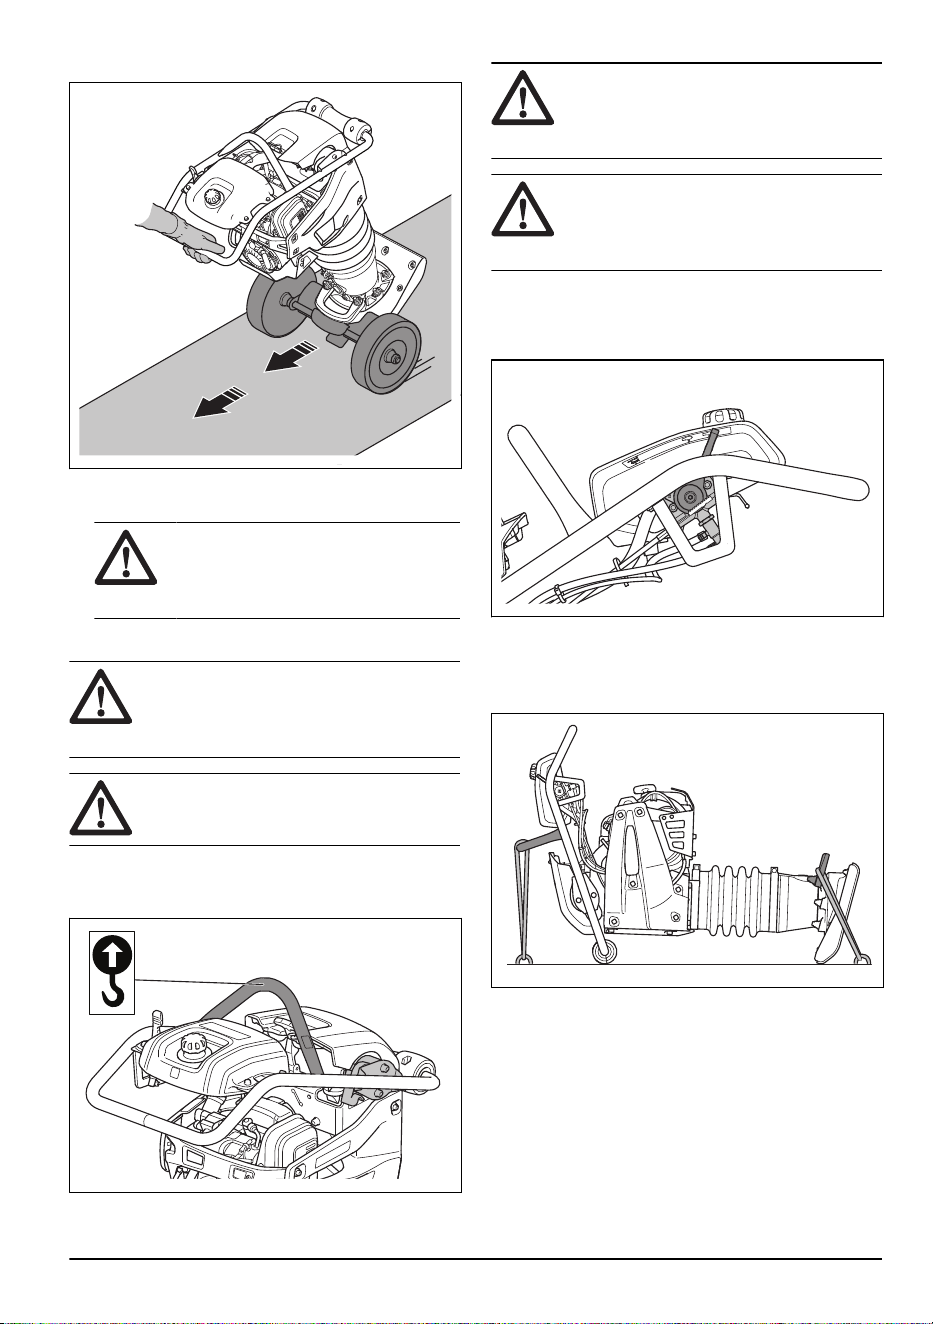
To move the product on the transport wheels
1. Set the throttle control in the stop position.
2. Tilt the product forward until the wheels on the
handle are on the ground.
3. Lift the product at the lift handle and move it forward
and rearward on the wheels.
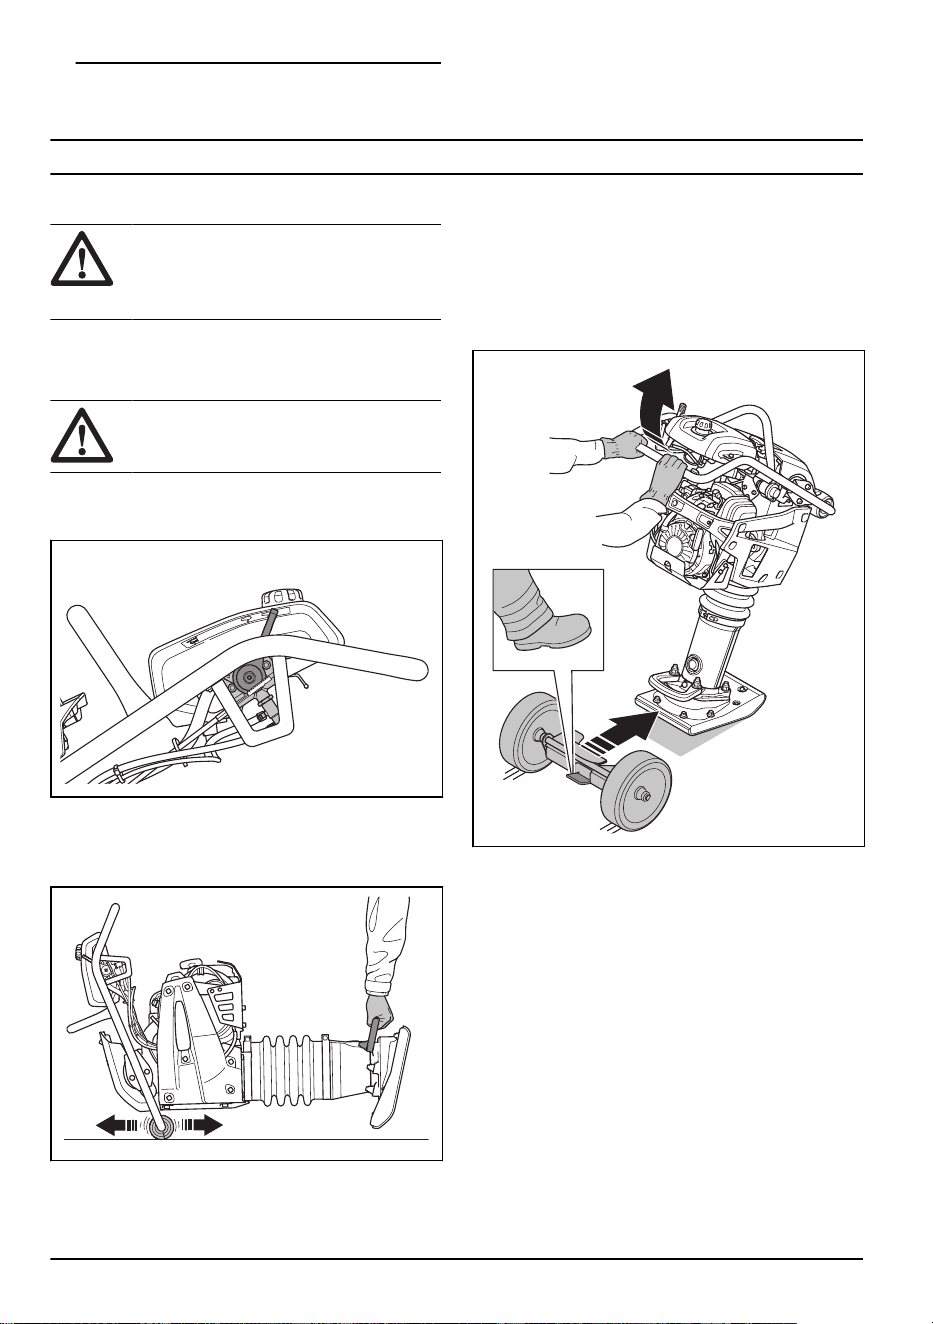
To install and remove the transport device
(LT5005)
1. Set the throttle control in the stop position.
2. Lift the handle to tilt the product away from you.
3. Use your foot to put the transport device between
the rammer shoe and the lift handle on the rammer
leg.
14 957 - 006 - 22.03.2024
4. Push the handle down to tilt the product rearward.
5. Remove the transport device in the opposite
sequence.
WARNING: Do not use your hands
to install or remove the transport device.
Push it in and pull it away from the
product with your foot.
To lift the product
WARNING: Make sure that the lifting
equipment has the correct specification to
lift the product safely. The type plate on the
product shows the product weight.
WARNING: Do not walk or stay below
or near a lifted product.
• Attach the lifting equipment at the lifting point of the
safety frame. A label on the product identifies the
correct position.
WARNING:
Do not use metal hooks,
chains or other lifting equipment with rough
edges that can cause damage to the lifting
eye.
WARNING: Do not lift a damaged
product. Make sure that the safety frame
and the vibration damping units are correctly
installed and not damaged.
To safety the product to a transportation
vehicle with tie-down straps
1. Set the throttle control in the stop position.
2. Tilt the product forward until the wheels on the
handle are on the ground.
3. Attach a strap to the lifting eye and to the vehicle.
4. Attach a strap to the lift handle and to the vehicle.
Storage
• Remove all fuel from the fuel tank before you put the
product in storage for a long period of time. Discard
the fuel at an applicable disposal location.
• Clean the product before storage. Remove clay and
sand from the rammer shoe. Remove oil and dust
from the rubber parts.
• Apply a thin layer of oil on the rammer shoe to
prevent corrosion.
• Clean the air filter before storage.
957 - 006 - 22.03.2024
15

• Carefully pull the starter rope handle until there is a
small resistance.
• Put a protective cover on the product.
• Keep the product in a dry and frost free area.
• Keep the product in a locked area to prevent access
for children or persons that are not approved.
Disposal
• Obey the local recycling requirements and applicable
regulations.
• Discard all chemicals, such as engine oil or fuel, at a
service center or at an applicable disposal location.
• When the product is no longer in use, send it to
a Husqvarna dealer or discard it at a recycling
location.
16 957 - 006 - 22.03.2024

Technical data
Technical data
LT5005 LT6005
Rammer leg
width 153 mm/6
in.
Rammer leg
width 230 mm/9
in.
Rammer leg
width 230 mm/9
in.
Rammer leg
width 280
mm/11 in.
Weight with empty tanks, kg/lb 60/132.3 61/134 68/149 69/151
Operation weight (EN500, incl. oil, ½
fuel), kg/lb
61/134 62/136.7 69/151 70/154
Engine brand, type
Honda, GXR
120
Honda, GXR
120
Honda, GXR
120
Honda, GXR
120
Engine power, kW/hp @rpm
1
2.7/3.6 @3600 2.7/3.6 @3600 2.7/3.6 @3600 2.7/3.6 @3600
Vibration frequency, Hz/rpm 11.9/714 11.9/714 11.9/714 11.9/714
Amplitude, mm/in. 54/2.1 54/2.1 67.7/2.7 67.7/2.7
Operation speed, m/min or ft./min 15–18 or 49–59 15–18 or 49–59 15–18 or 49–59 15–18 or 49–59
Fuel tank capacity, l/qts 3.0/3.2 3.0/3.2 3.0/3.2 3.0/3.2
Engine oil capacity *, l/qts 0.3/0.31 0.3/0.31 0.3/0.31 0.3/0.31
Fuel consumption, l/h or qts/h 0.9 0.9 0.8 0.8
Rammer leg oil capacity, l/qts 0.6/0.63 0.6/0.63 0.9/0.95 0.9/0.95
Fuel *
Unleaded gaso-
line, max. 10%
ethanol
Unleaded gaso-
line, max. 10%
ethanol
Unleaded gaso-
line, max. 10%
ethanol
Unleaded gaso-
line, max. 10%
ethanol
Engine oil *
SAE 10W-30,
API Class SJ
SAE 10W-30,
API Class SJ
SAE 10W-30,
API Class SJ
SAE 10W-30,
API Class SJ
Rammer leg oil
SAE 10W-30,
API Class SJ
SAE 10W-30,
API Class SJ
SAE 10W-30,
API Class SJ
SAE 10W-30,
API Class SJ
Exhaust emission (CO2 EU V), g/kWh
2
674 674 674 674
* = For further information and questions about this
specific engine, refer to the engine manual or the web
site of the engine manufacturer.
Noise and vibration emissions LT5005 LT6005
Sound power level, measured dB (A) 104 104
1
As specified by the engine manufacturer. The power rating of the engine indicated is the average net output
(at specified rpm) of a typical production engine for the engine model measured to SAE standard J1349/
ISO1585. Mass production engines may differ from this value. Actual power output for the engine installed on
the final product will depend on the operating speed, environmental conditions and other values.
2
This CO2 measurement results from testing over a fixed test cycle under laboratory conditions a(n) (parent)
engine representative of the engine type (engine family) and shall not imply or express any guarantee of the
performance of a particular engine.
957 - 006 - 22.03.2024 17

Noise and vibration emissions LT5005 LT6005
Sound power level, guaranteed L
WA
dB (A)
3
106 106
Sound pressure level at the operator's ear, L
P
, dB (A)
4
92 92
Vibration level, a
hv
, m/s
2
5
6.4 6.4
Noise and vibration declaration
statement
These declared values were obtained by laboratory
type testing in accordance with the stated directive or
standards and are suitable for comparison with the
declared values of other products tested in accordance
with the same directive or standards. These declared
values are not suitable for use in risk assessments
and values measured in individual work places may
be higher. The actual exposure values and risk of
harm experienced by an individual user are unique and
depend upon the way the user works, in what material
the product is used, as well as upon the exposure time
and the physical condition of the user, and the condition
of the product.
3
Noise emissions in the environment measured as sound power (L
WA
) as per EN ISO 3744 in conformity
with EC directive 2000/14/EC. The difference between guaranteed and measured sound power is that the
guaranteed sound power also includes dispersion in the measurement result and the variations between
different machines of the same model according to Directive 2000/14/EC.
4
Sound pressure level L
P
according to EN ISO 11201, EN 500-4. Uncertainty K
PA
3.5 dB (A).
5
Vibration value according to EN 500-4. Reported data for vibration level has a typical statistical dispersion
(standard deviation) of 1.5 m/s
2
.
18 957 - 006 - 22.03.2024
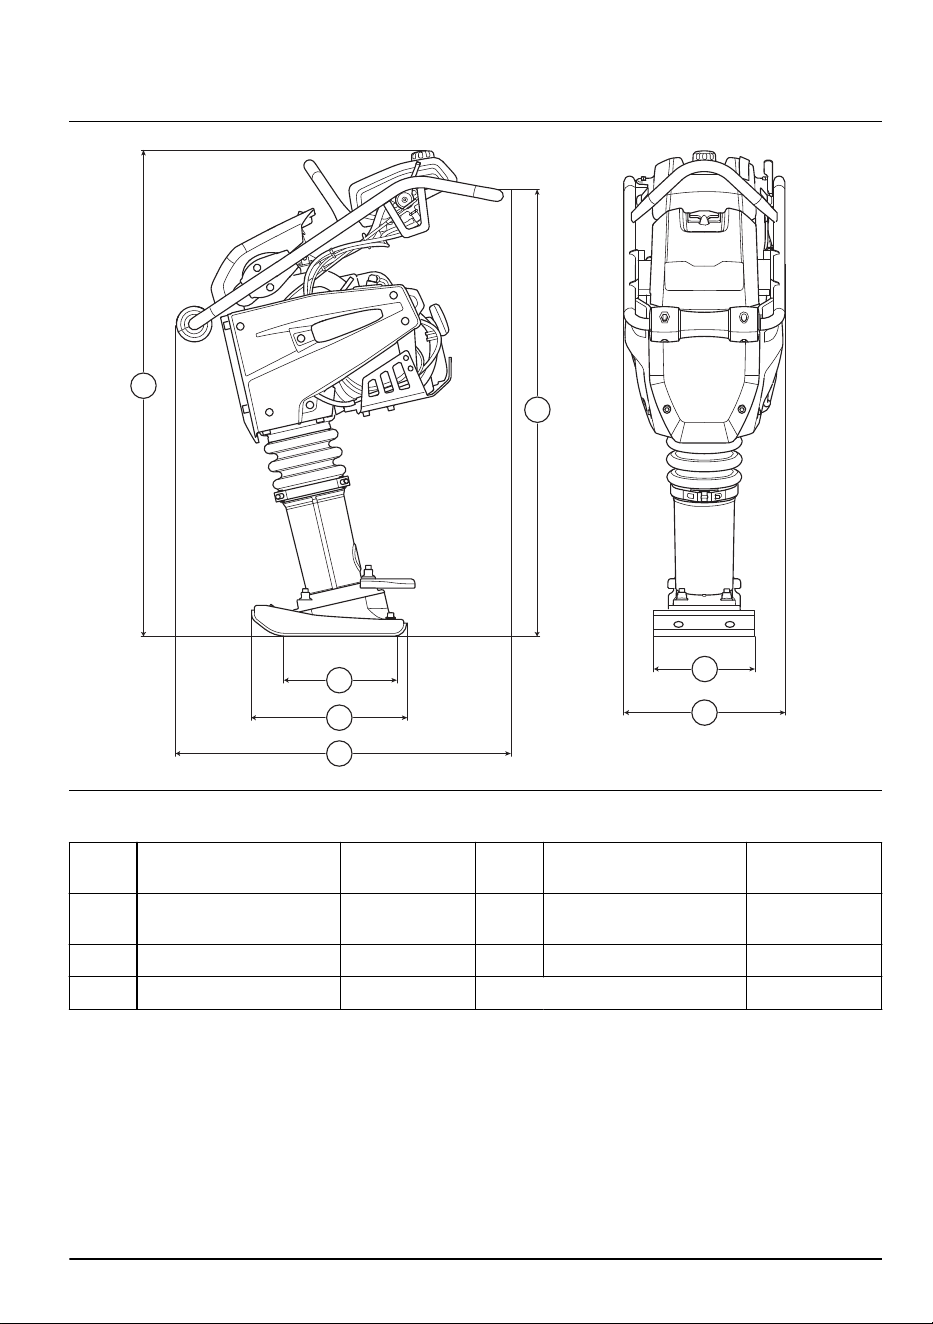
Product dimensions LT5005
A
D
F
G
E
B
C
A
Rammer shoe contact
area, m
2
/sq. ft.
0.034/0.36 /
0.053/0.57
E
Height, mm/in.
1030/40.6
B
Rammer shoe length,
mm/in.
330/13 F
Rammer shoe width,
mm/in.
153/6 / 230/9
C Length, mm/in. 726/28.6 G Width, mm/in. 345/13.6
D Handle height, mm/in. 910/35.8
957 - 006 - 22.03.2024 19
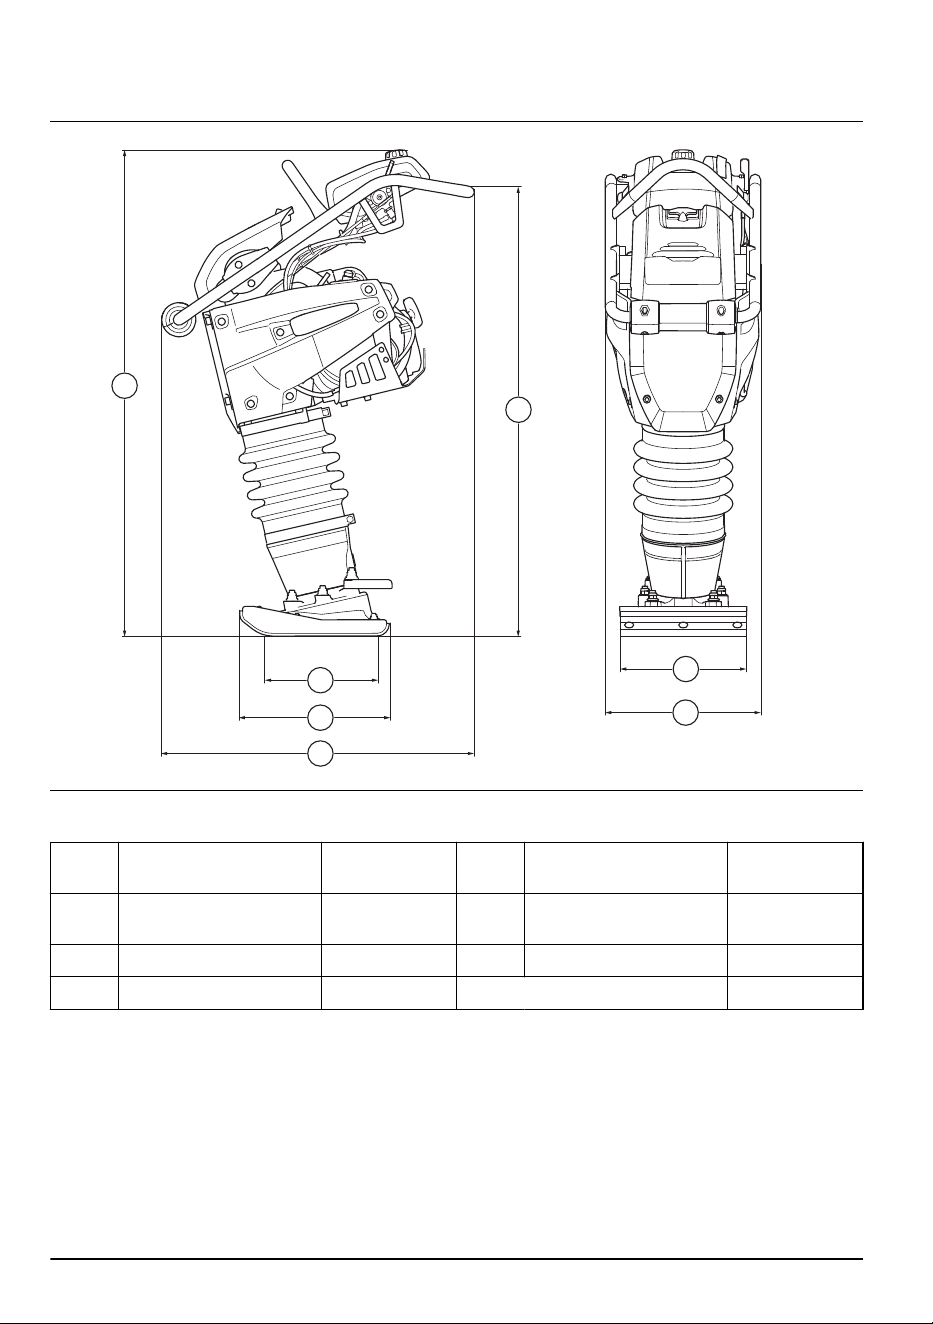
Product dimensions LT6005
A
D
F
G
E
B
C
A
Rammer shoe contact
area, m
2
/sq. ft.
0.053/0.57 /
0.065/0.70
E
Height, mm/in.
1084/42.7
B
Rammer shoe length,
mm/in.
330/13 F
Rammer shoe width,
mm/in.
230/9 / 280/11
C Length, mm/in. 726/28.6 G Width, mm/in. 345/13.6
D Handle height, mm/in. 935/36.8
20 957 - 006 - 22.03.2024

Declaration of Conformity
EC Declaration of Conformity
We, Husqvarna AB, SE-561 82 Huskvarna, Sweden, tel:
+46-36-146500, declare on our sole responsibility that
the product:
Description Rammer Compaction Machine
Brand Husqvarna
Type/Model LT5005, LT6005
Identification Serial numbers dating from 2021 and onwards
complies fully with the following EU directives and
regulations:
Directive/Regulation Description
2006/42/EC "relating to machinery"
2014/30/EU "relating to electromagnetic compatibility"
2000/14/EC "relating to outdoor noise"
and that the following harmonized standards and/or
technical specifications are applied;
EN ISO 12100:210, EN 500-1:2006+A1:2009, EN
500-4:2011
Notified Body: 0404, RISE SMP Svensk Maskinprovning
AB, Box 7035, SE-750 07 Uppsala, Sweden
has certified conformity with the council's directive
2000/14/EC, conformity assessment procedure: Annex
VI.
For information relating to noise emissions, refer to the
chapter
Technical data on page 17
.
Partille, 2021-08-18
Martin Huber
R&D Director, Concrete Surfaces & Floors
Husqvarna AB, Construction Division
Responsibe for technical documentation
957 - 006 - 22.03.2024 21

22 957 - 006 - 22.03.2024

957 - 006 - 22.03.2024 23

www.husqvarnaconstruction.com
Original instructions
1142800-26
Rev. B
2024-04-04