
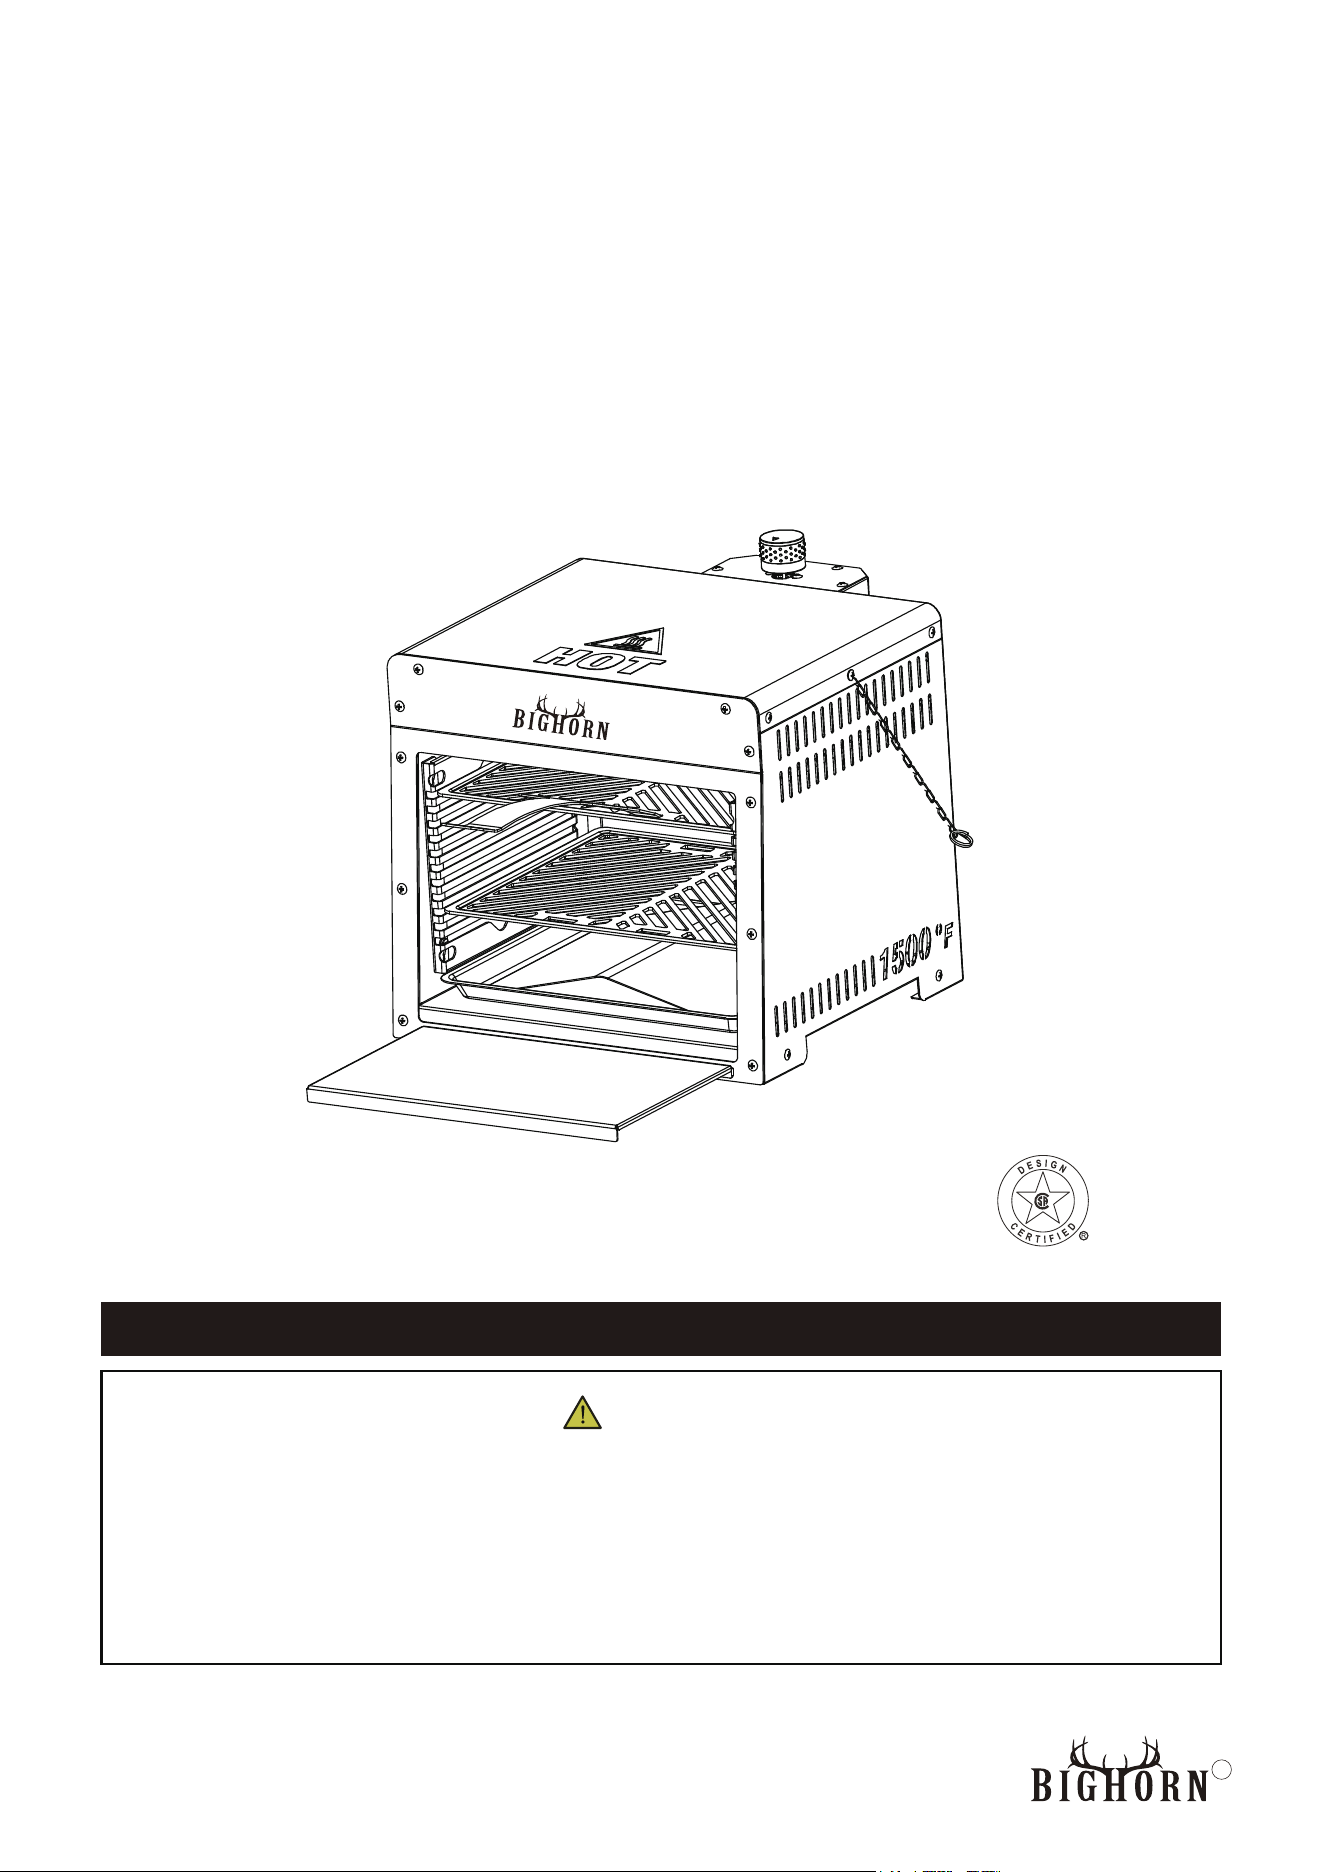
Assembly Instructions & User’s Manual
Infra-red Gas Grill
Model# SRGG21708
Keep this manual for future reference
READ INSTRUCTION MANUAL BEFORE ATTEMPTING TO ASSEMBLE OR
OPERATE THIS PRODUCT.
Adult assembly required.
Keep screws and parts out of reach of children.
E-mial:
(Made in China)
Warning:
R
WARNINGS
DANGER
• NEVER operate this appliance unattended.
• NEVER operate this appliance within 3 ft (1.0 m) of any structure, combustible material or
other gas cylinder.
•
le liquid.
•
department. Do not attempt to extinguish an oil or a grease fire with water.
fire, explosion or burn hazard which
could cause property damage, personal injury or death.
When using this appliance, basic safety precautions should always be observed. Read and
understand the meaning of these symbols before assembling and using this appliance.
SAFETY SYMBOLS:
DANGER
Indicates a hazardous situation, which if not avoided, will result in death or serious injury.
WARNING
Be alert to the possibility of serious personal injury if the instructions are not followed.
CAUTION
Indicates a potentially hazardous situation, which if not avoided, could result in moderate injury.
CAUTION
This instruction manual contains important information necessary for the proper assembly and
saf
using the appliance. Follow all warnings and instructions when using the appliance.
e use of the appliance. Read and follow all warnings and instructions before assembling and
DANGER
If you smell gas:
• Shut off gas to the appliance.
•
•
If odor continues, keep away from the appliance and immediately department.
losion which could cause
property damage, personal injury or death.
5
2
R

TABLE OF CONTENTS
Warnings...............................................................................................2, 4-9
Parts List................................................................................................12-13
Assembly Instructions............................................................................14-15
Care and Maintenance...........................................................................16-17
Product Dimension.....................................................................................10
Trouble Shooting.........................................................................................18
Warranty Information...................................................................................18
NOTE: Before beginning assembly of product, make sure all parts are present.
Compare parts with package content list and hardware contents.
If any part is missing or damaged do not attempt to assemble the unit.
Contact customer service for replacement parts.
Exploded View............................................................................................11
3
R
WARNINGS
DANGER
Failure to follow these instructions and warnings could result
cause property damage, personal injury or even death. Using an LP appliance has a degree of risk that
you are assuming. Properly following these instructions and warnings will help minimize that risk.
• DO NOT USE ON SURFACES such as wood, asphalt or plastic. These surfaces are combustible
• Allow the cooking vessel to cool to 115˚F (45˚C) before moving or storing.
Equipped for use on: Propane. Rated Heat Input: 19000 BTU/H
Outdoor Cooking Specialty Gas Appliance
WARNING: FOR OUTDOOR USE ONLY. If stored indoors, detach and leave cylinder outdoors.
This appliance must be at least ten (3’) feet (1m) from any wall, railing or other object.
The appliance shall not be located or used under overhead unprotected combustible construction.
WARNING: This appliance comes with a supplied CSA approved regulator which must
be used with this appliance. Replace only with regulator Model No. JY70-011 or RY0952C.
CAUTION: The instruction manual contains important information necessary for the proper
assembly and safe use of the appliance. Read and follow all warnings and instructions before
assembling and using the appliance. Follow all warnings and instructions when using the appliance.
If instructions or parts are missing contact customer service.
.esu laicremmoc rof dednetni ron dengised ton si ecnailppa sihT
SAVE THESE INSTRUCTIONS
Read and understand all instructions before assembling and using this appliance.
Follow all warnings while using this appliance. Failure to follow these instructions could result
DANGER
If you smell gas: If possible, immediately turn off gas supply to the appliance by turning the LP tank
valve clockwise (right). If this cannot be accomplished safely, immediately get away from the appliance
(Always have an approved extinguisher on hand when using this product. A Class “B” dry chemical OR
CO2 extinguisher or preferably a Class “K” extinguisher. Special care must be taken to understand the
manufacturers instructions and be prepared to operate the appropriate extinguisher prior to using this
appliance.) If you continue to smell gas, immediately contact t
go near the appliance.
4
R

WARNINGS
• DO NOT move the appliance when in use.
• This appliance will be hot during and after use.Use insulated oven mitts or gloves to protect from hot surfaces
or splatter from cooking liquids. Closed toed shoes should always be worn during operation of this appliance.
• Keep children and pets away from the cooking appliance at all times.
• The use of alcohol, prescription drugs or non-prescription drugs may impair the consumer's ability to
properly assemble or safely operate the appliance. Do not operate when u
•
The minimum outside operating temperature of this appliance is 32˚F (0˚C). NEVER use this
appliance when temperature is below this minimum.
• Take CAUTION when in close proximity to appliance. Falling or tripping near the gas appliance may
result in the splashing or igniting of hot cooking liquids and potentially cause personal injury or
property damage.
• This appliance is NOT intended for commercial use.
• The installation must conform with local codes or, in the absence of local codes, with the National Fuel
Gas Code, ANSI Z223.1/NFPA 54, Storage and Handling of Liquefied Petroleum Gases, ANSI/NFPA 58; or
Natural Gas and Propane Installation Code, CSA B149.1; Propane Storage and Handling, CSA B149.2.
• NEVER operate this appliance ON or UNDER any overhead roof covering, awning, overhang,
apartment, condominium, balcony or deck.
• NEVER operate this appliance indoors or any enclosed area. This appliance should ONLY be used
outdoors. The appliance shall not be used in a building, garage or any other enclosed area.
• NEVER install or use this appliance on a boat or other recreational vehicles.
• This product is NOT designed to be used as a heater. NEVER use this appliance as a source of
heat.
• When cooking, the appliance must always be on a level, stable, non-combustible surface such as
brick, concrete, or dirt. NEVER use this appliance around surfaces such as asphalt, wood, dry grass
or leaves, vinyl or plastic.
• Keep the cooking area
combustible.
• Keep the fuel supply hose away from any heated surfaces.
• Use caution when removing food from the appliance to avoid burns or serious injury.
• NEVER attempt to attach this appliance to the self-contained LP gas system of a camper, trailer or
motor home. The pressure regulator and hose assembly supplied with the appliance MUST BE THE
5
ONE USED. Replacement pressure regulator and hose assemblies must be those supplied by the
manufacturer.
R
WARNINGS
• Avoid bumping of or impact with the appliance to prevent spillage or splashing of hot cooking liquid.
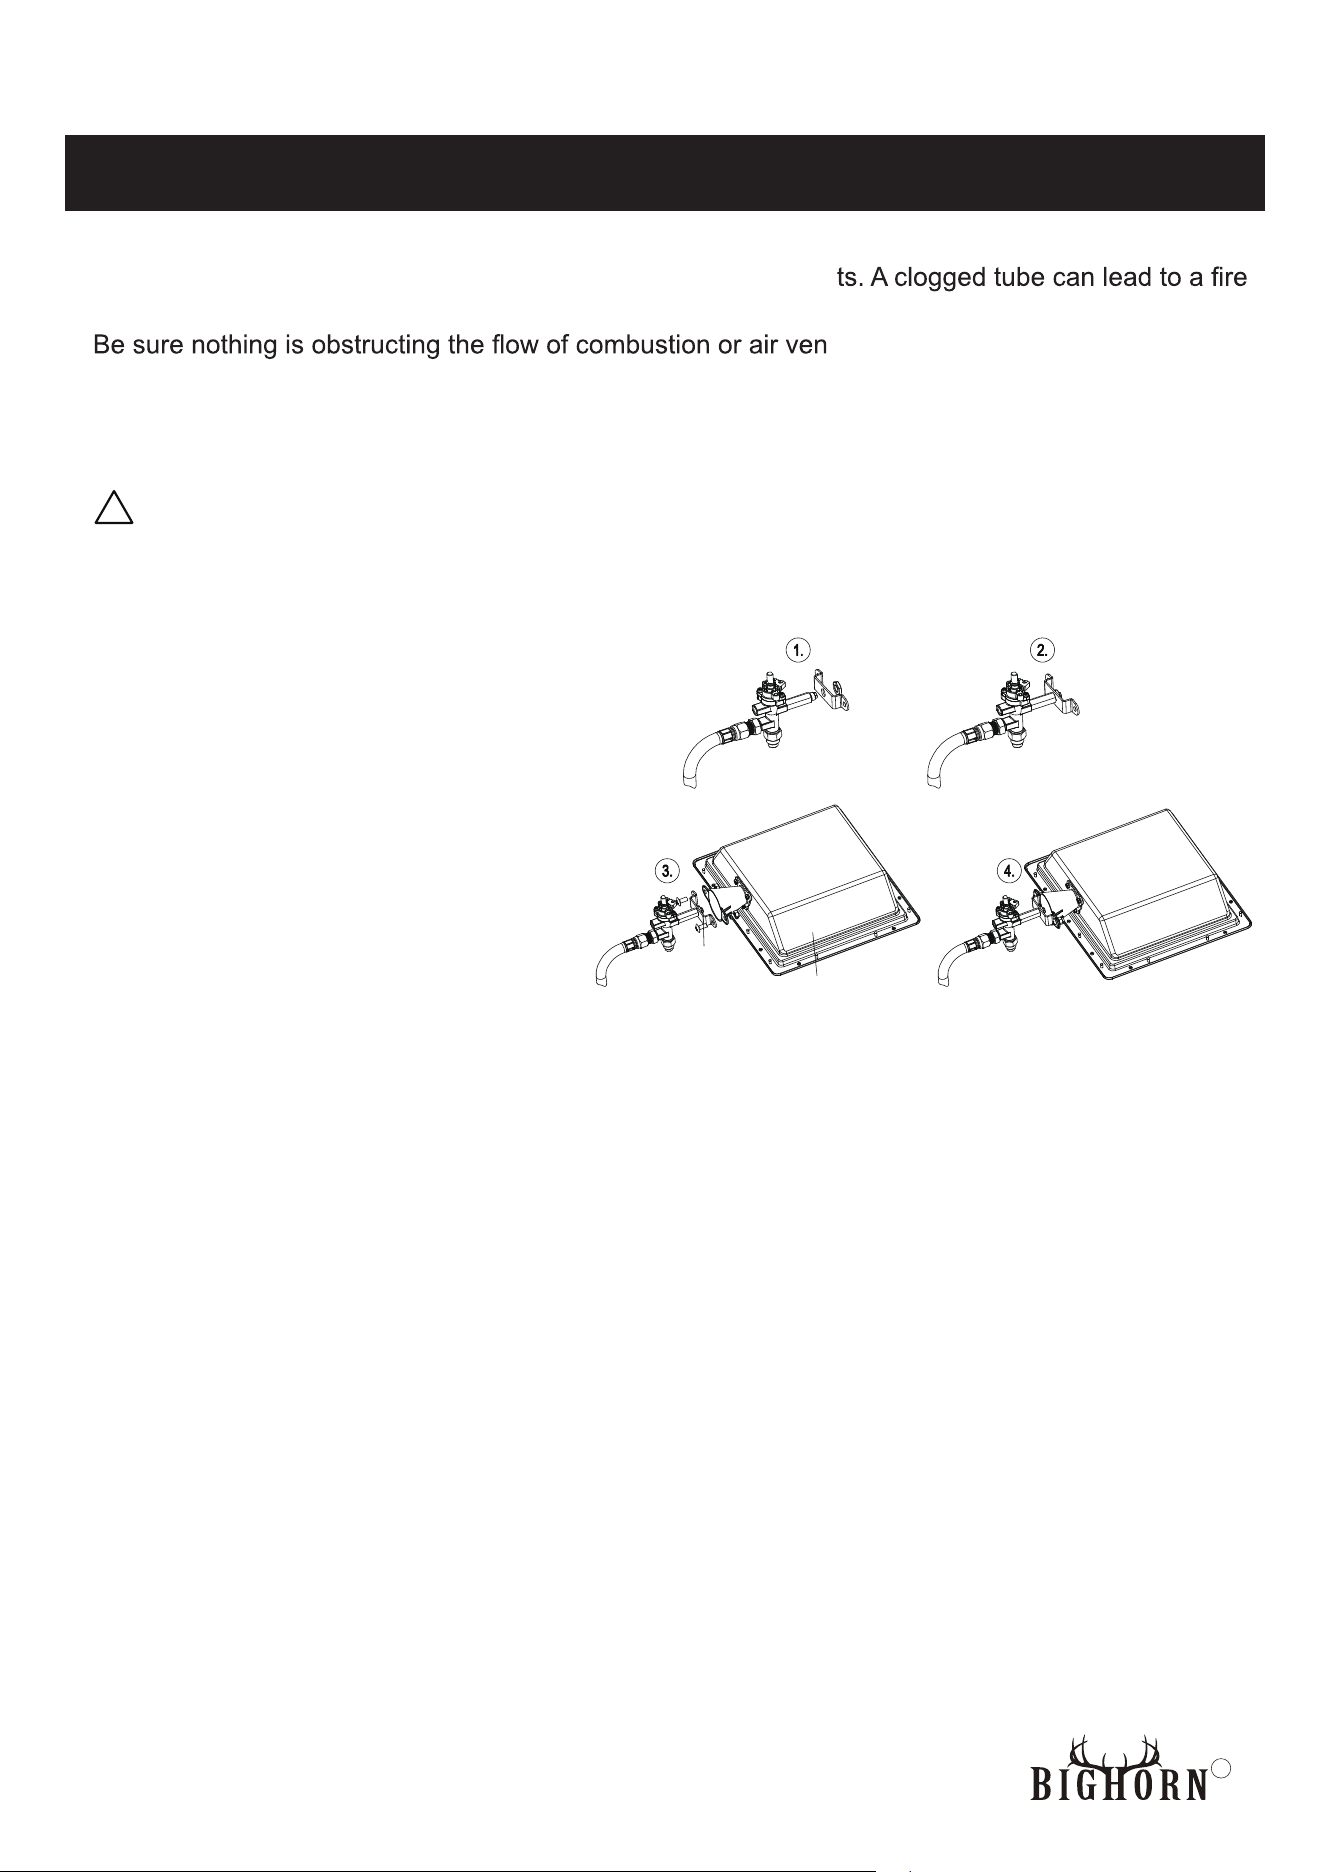
• Check and clean burner/venturi tubes for insects and insect nes
beneath the appliance.
•
• Maintain proper clearances from combustible construction, the minimum clearance shall be at least
3 ft (1 m) from any structure or combustible material.
• Do not leave the appliance unattended. Keep children and pet
WARNING: This product can expose you to chemicals including lead, which is known to the State
of California to cause cancer, and carbon monoxide, which is known to the State of California to cause
birth defects or other reproductive harm. For more information, go to www.P65Warnings.ca.gov.
s away from the appliance at all times.
tilation.
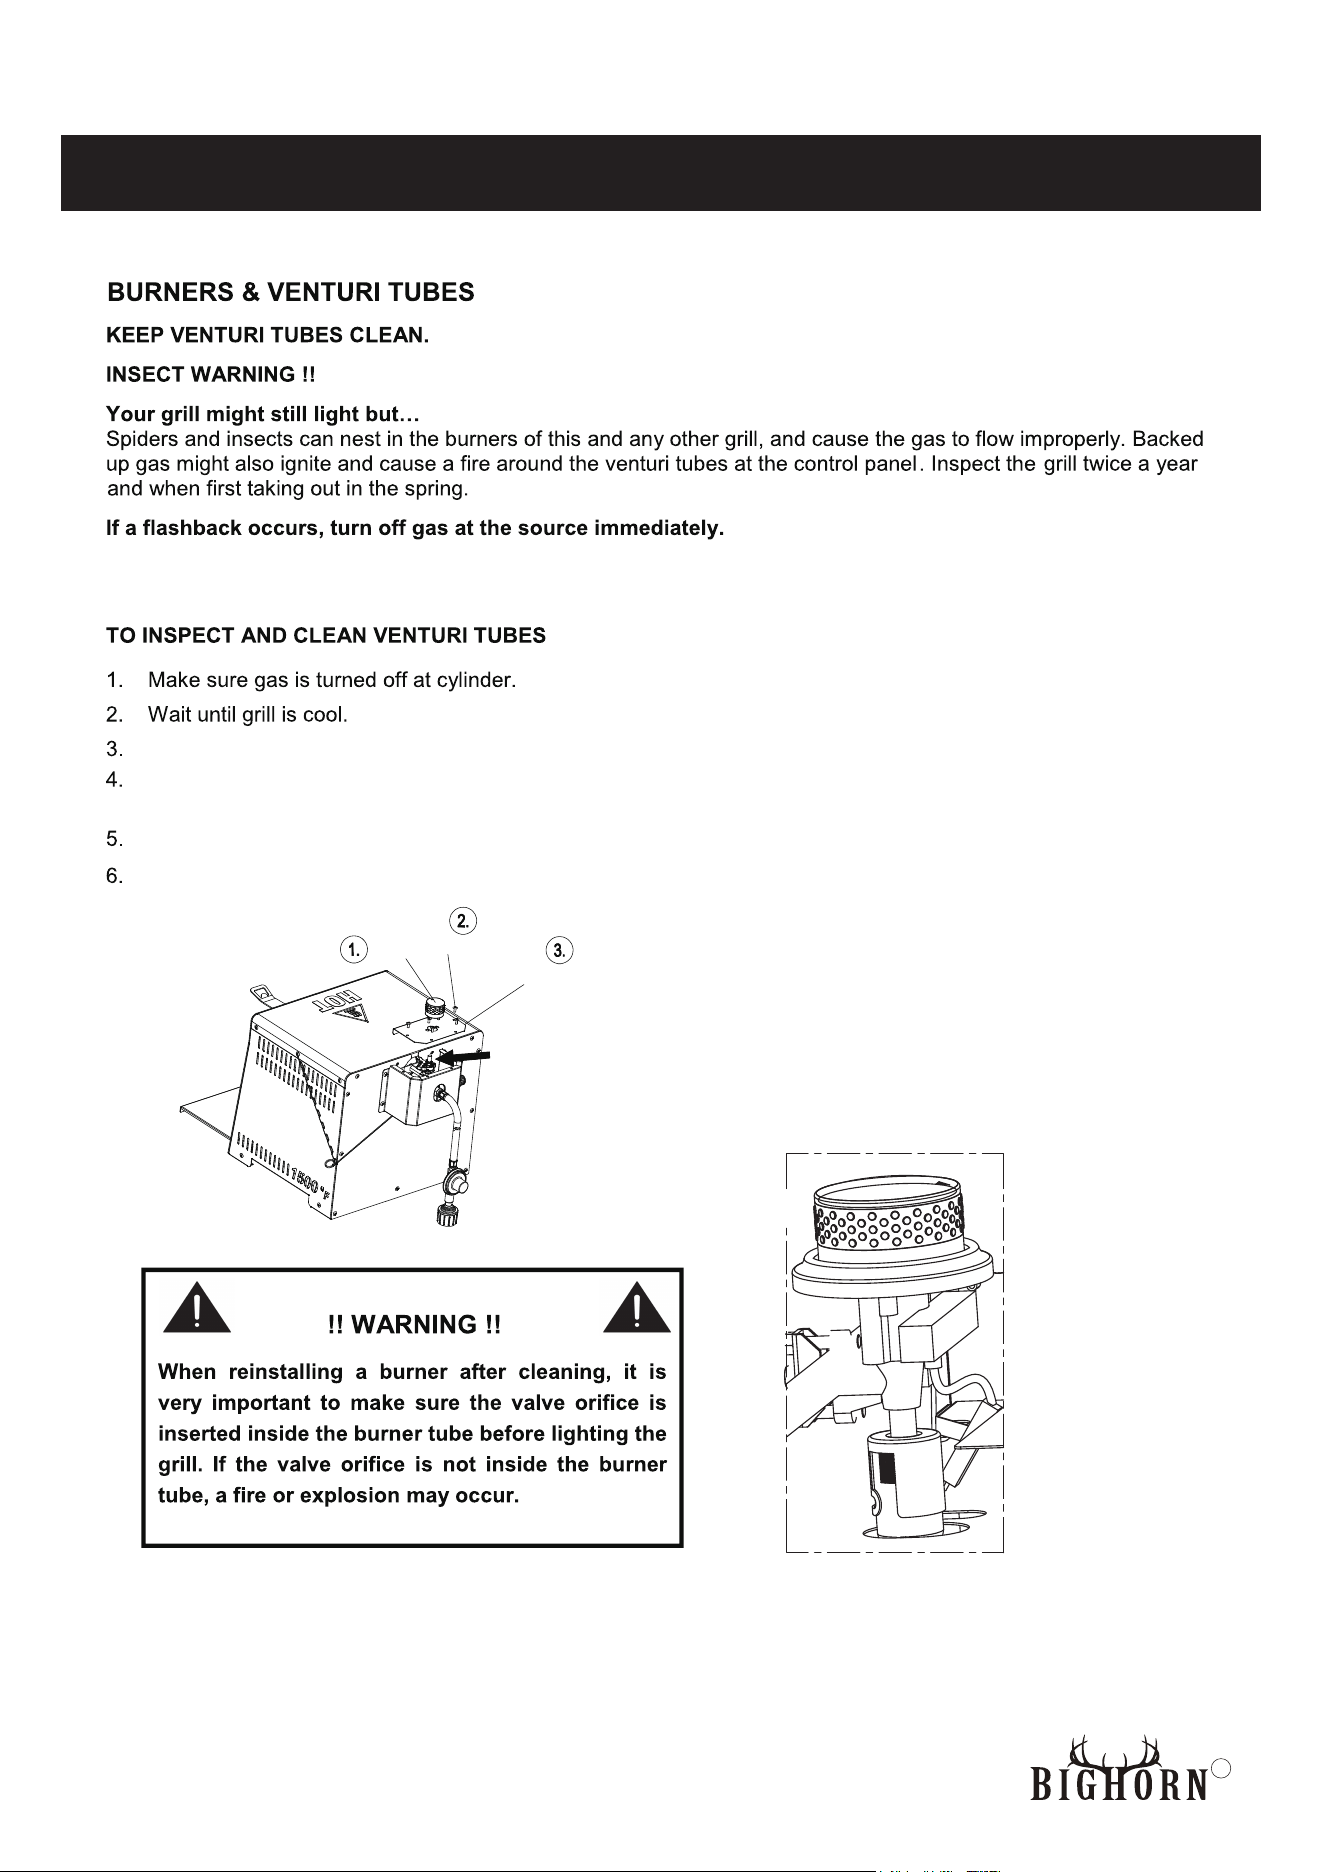
!
Manufacturer already properly located the
burner with respect to the orifice. It will make
the appliance burn sufficiently. Please do
not attempt to adjust the burner. It is pre-set
to the factory specifications.
The burner will be removed to clean after
using a period. When reassemble the
burner, align the center line of thread on
the safety valve to the center line of
burner, then tighten the burner. Whether
the center line of the orifice is aligned
with the center line of the burner will
directly affect the burner combustion
effect.
Burner
Nozzle
6
R
WARNINGS: LP TANK
LP TANK REMOVAL, TRANSPORT AND STORAGE:
1. Turn control knobs OFF and L
NEVER use tools to disconnect.
1. Do not store a spare LP gas cylinder under or near this appliance.
2. NEVER fill the cylinder beyond 80 percent full.
3. If the instructions in 1 and 2 are not followed exactly, a fire causing death or serious injury may occur.
4. The safety release valve on the LP tank could activate the leaking of gas and cause a severe fire
and increase the risk of serious injury or death.
5. If you smell, see or hear leaking gas IMMEDIATELY get away from the LP tank and contact your
FIRE DEPARTMENT.
P tank valve. Turn coupling nut counterclockwise by hand only.
2. Place dust cap on cylinder valve outlet whenever the cylinder is not in use. Only install the type
of dust cap on the cylinder valve outlet that is provided with the cylinder valve. Other types of
caps or plugs may result in leakage of propane.
3. A disconnected LP tank in storage or being transported must have a safety cap installed.
NEVER leave an LP tank in a car that can become overheated by the sun.
4. The cylinder must be stored outdoors out of the reach of children. NEVER store the cylinder in
enclosed spaces such as a garage, carport, covered porch or any other structure.
5.
6. Storage of an appliance indoors is permissible only if the cylinder is disconnected and removed
from the appliance.
When the appliance is not in use, the gas must be turned off at the supply cylinder.
LP TANK:
The LP tank must meet the following requirements in order to be used with your appliance:
• Measurements must be 12” (30.5cm) in diameter by 18” (45.7cm) high with 20lb. (9.1kg)
maximum capacity.
• The LP gas supply cylinder must be constructed and marked in accordance with the
National Standard of Canada (CAN/CSA-B339), Cylinders, Spheres and Tubes for the
Transportation of Dangerous Goods.
The LP tank must include the following:
• QCC Type 1 outlet compatible with regulator or appliance.
• Safety relief valve.
•
hand wheel. Only use tanks equipped with this type of valve.
• LP tank must be arranged for vapor withdrawal and include collar that protects LP tank valve.
• LP gas is odorless, non-toxic, and colorless when produced. For your safety, LP gas has been
given an odor (similar to rotten eggs) so you can smell if there is any leaking.
•
DANGER
Indicates a hazardous situation, which if not avoided, will result in death or serious injury.
7
R
WARNINGS: LP TANK
CONNECTING REGULATOR TO LP TANK:
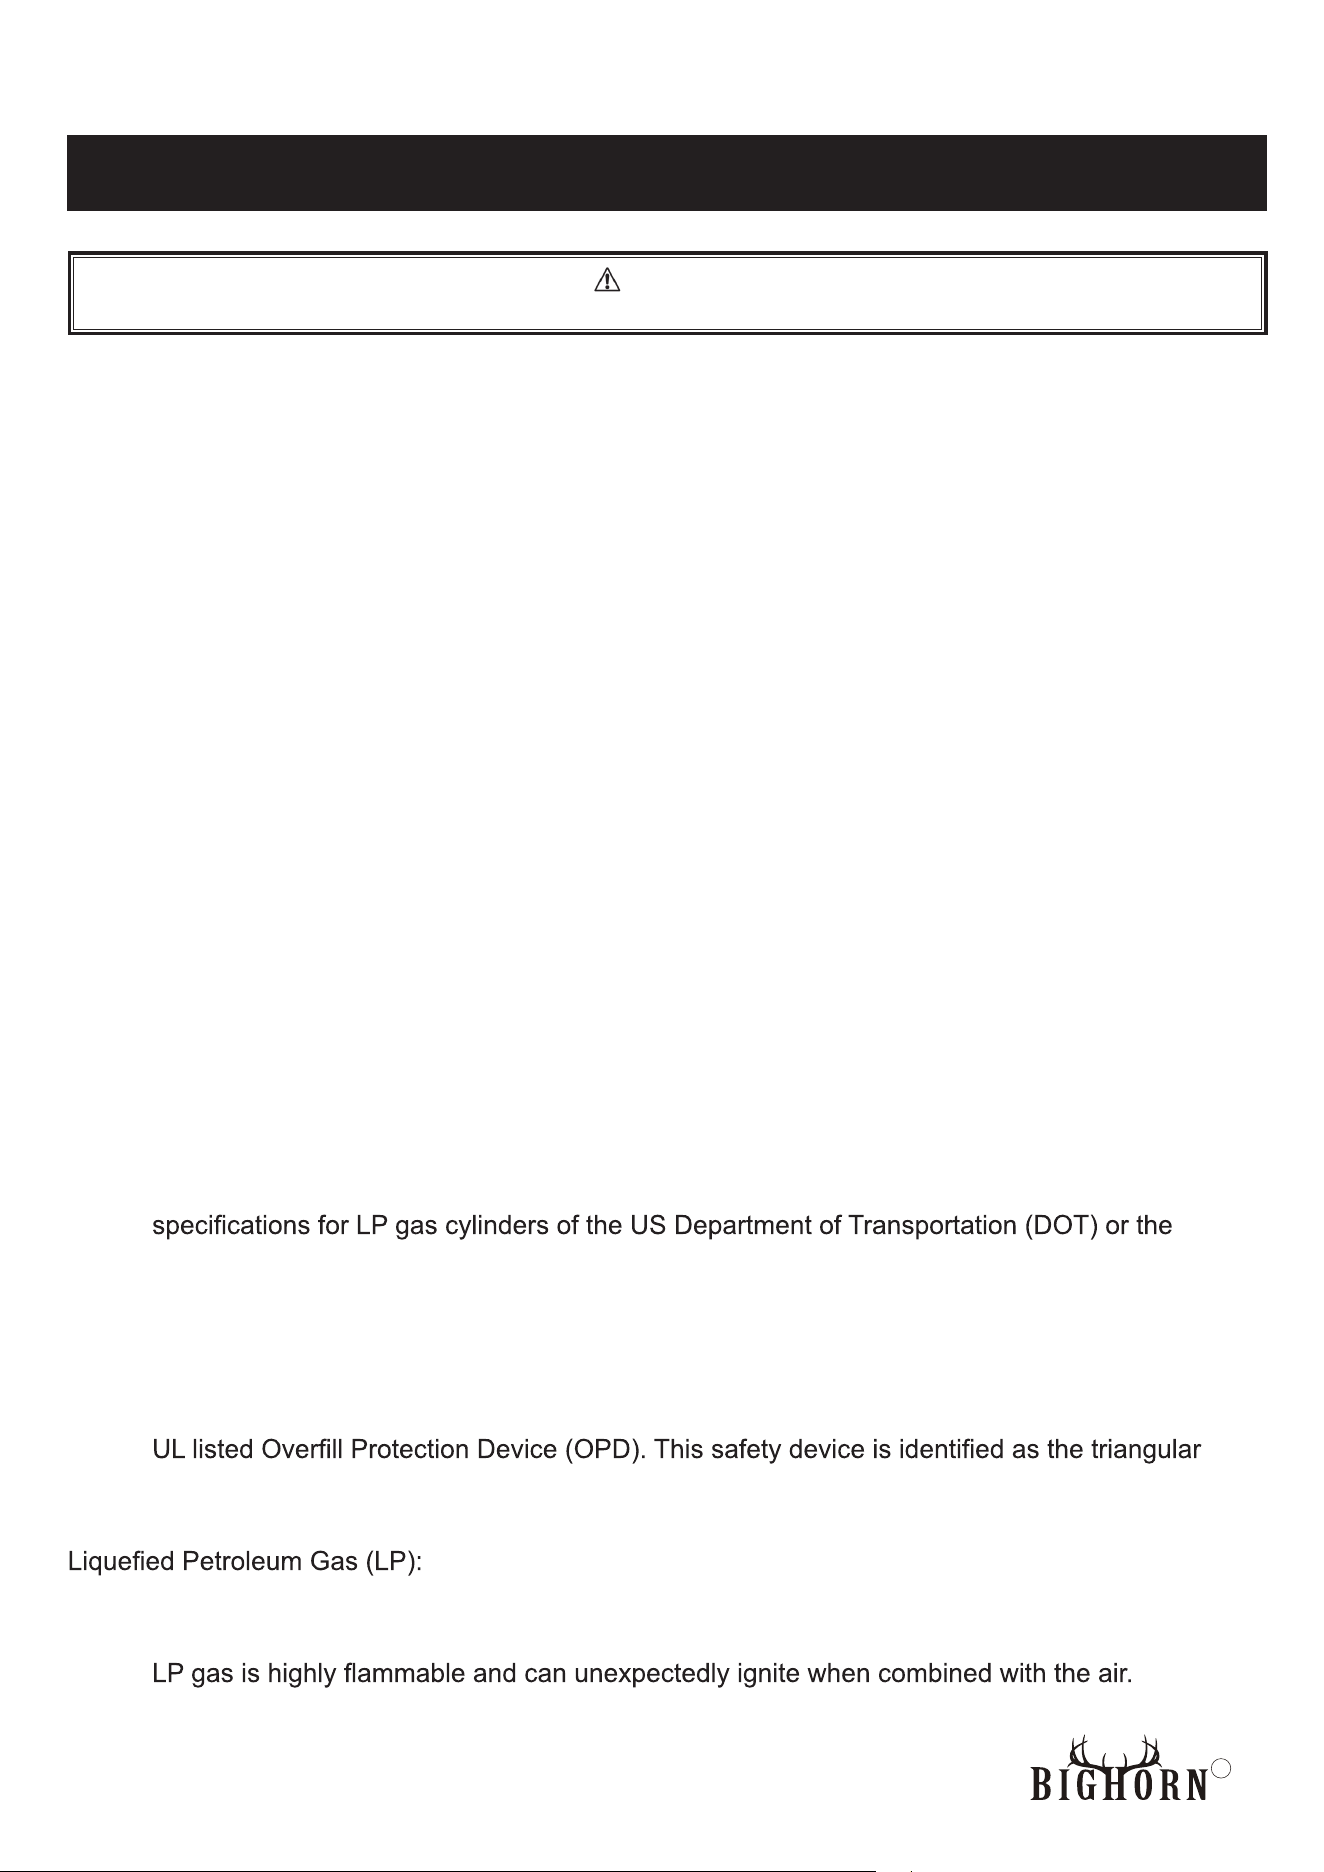
1. Make sure cylinder valve is turned OFF
(turning clockwise).
2. Check cylinder valve to ensure it has proper external
male threads as illustration(type 1 ANSI Z21.81).
3. Make sure all burner valves are in the OFF positions.
4. Inspect valve connections, port and regulator
assembly. Look for any damage or debris. Remove any debris. Inspect hose for damage.
Never attempt to use damaged or obstructed equipment. See your local LP gas dealer for repair.
5. When connecting hose regulator assembly to the cylinder valve, do so manually, do not use a
tool. Tighten firmly clockwise by hand only. The use
of a tool will damage the seal and cause a serious
risk of gas leak.
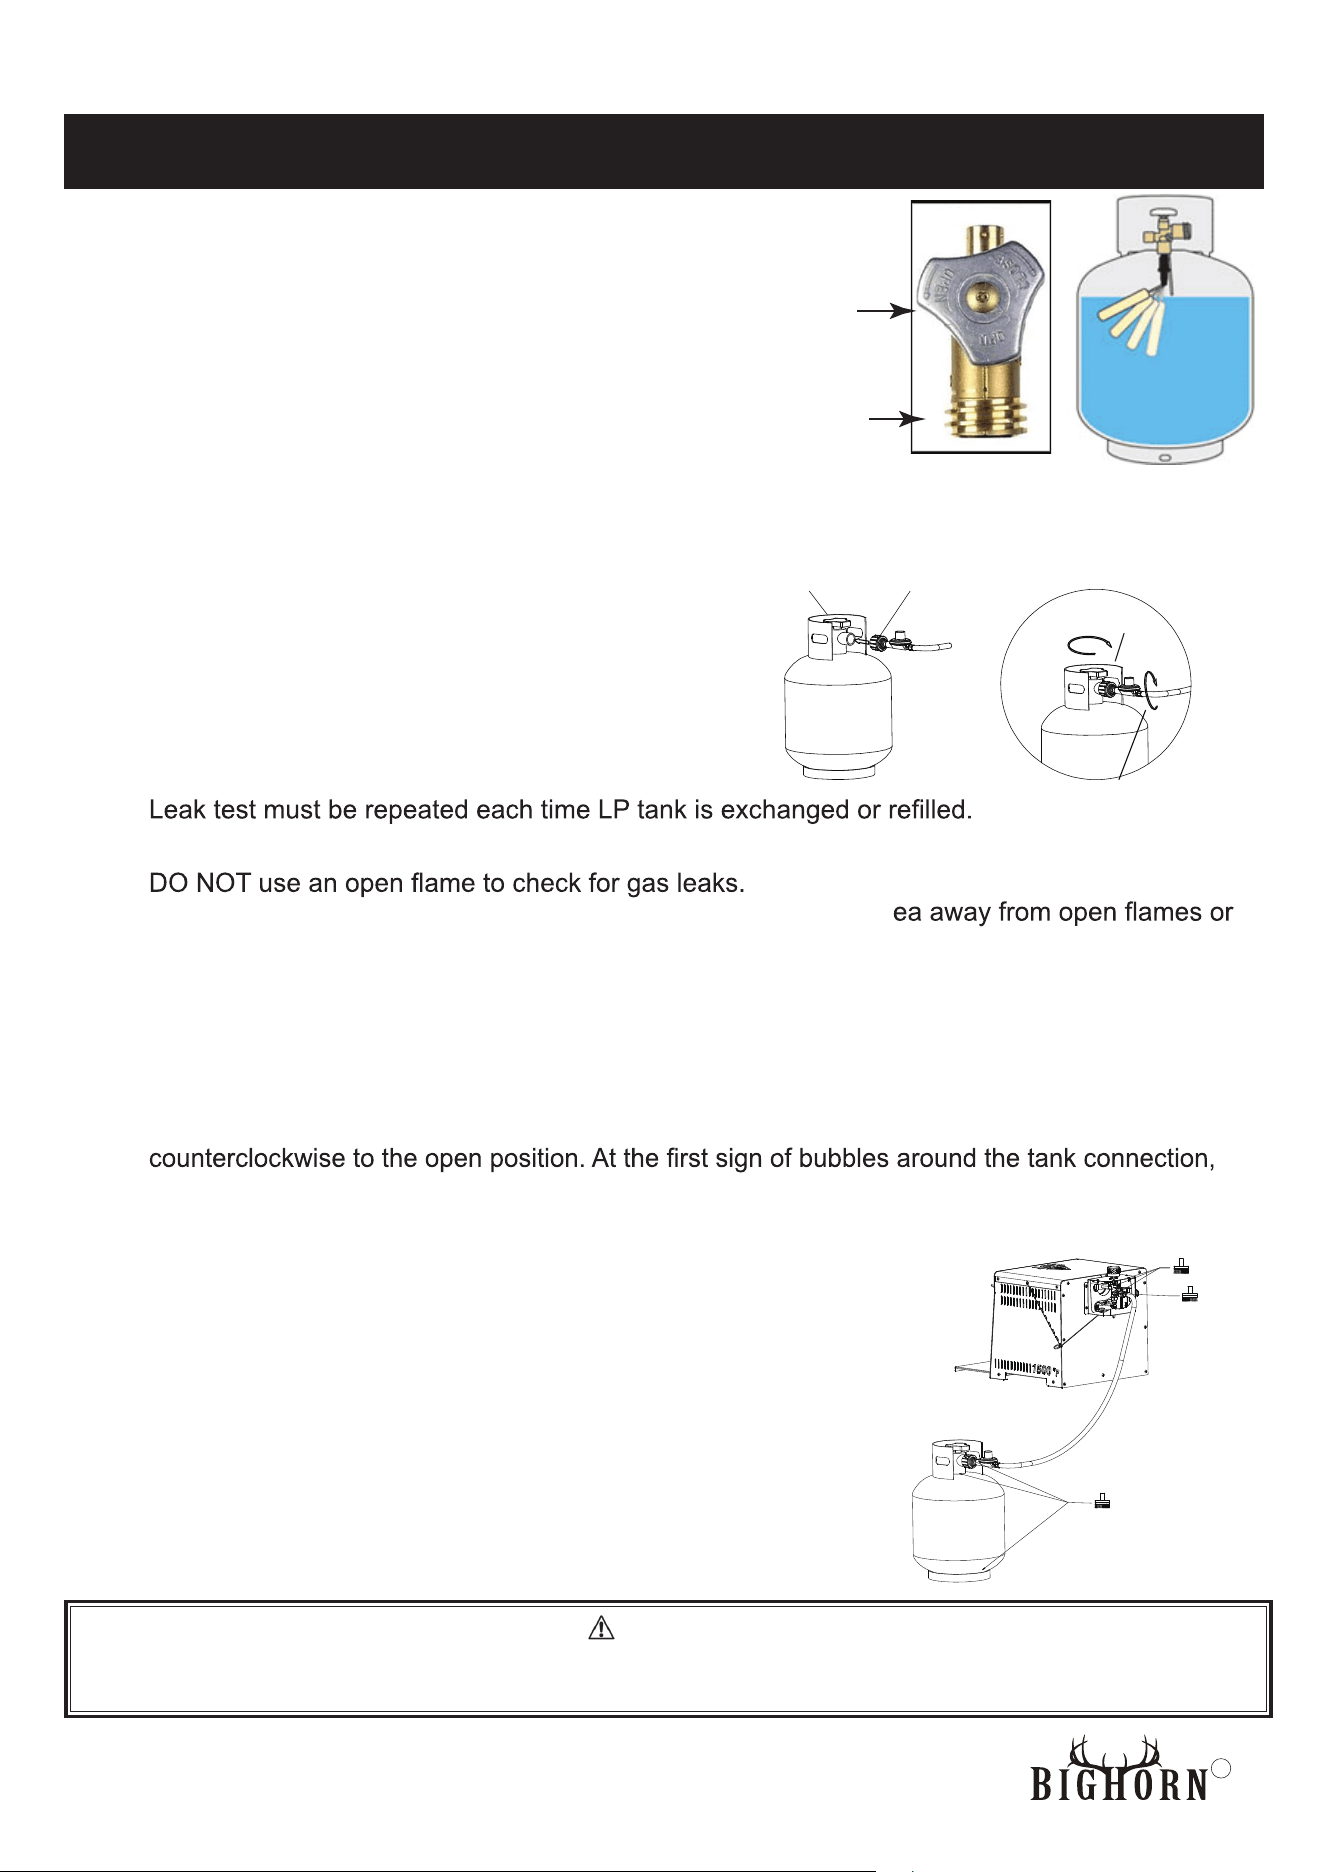
6. SLOWLY - Open the cylinder valve fully. Proceed
to a leak test (see LEAK TESTING section).
LEAK TESTING VALVES, HOSE AND REGULATOR
•
• DO NOT smoke or have anything nearby that can easily ignite, such as lighters or matches.
•
• Appliance must be leak checked outdoors in a well-ventilated ar
sparks.
STEPS TO LEAK TEST:
1. Use a clean paint brush and 50/50 soap and water solution.
NOTE: Use a mild soap and water. DO NOT use household cleaning agents. Damage to gas
train components could result.
2. Brush soapy solution onto all metal seams and entire valve area. Slowly turn the LP tank valve
immediately turn the valve off by turning clockwise. After 10 seconds, turn the LP tank to the off
position and continue to watch for any bubbles. UNDER NO CIRCUMSTANCE SHOULD THE
VALVE REMAIN IN THE ON POSITION FOR MORE THAN 12 SECONDS.
3. If bubbles are observed at the valve attachment, you may
attempt to tighten the valve, and repeat the test from the
beginning after waiting 5 minutes.
4. Brush soapy solution onto indicated connections as shown.
5. If "growing" bubbles appear, there is a leak. Close LP tank
valve immediately and retighten connections. If leaks cannot
be stopped, do not try to repair. Call for replacement parts.
6. For assistance with any malfunction related to the LP tank,
regulator or hose, contact your propane dealer or customer
service.
WARNING
If growing bubbles begin to appear there is a leak. IMMEDIATELY turn off LP tank valve. If bubbles
continue, IMMEDIATELY get away from the LP tank and contact your FIRE DEPARTMENT (e.g. 911)
External threads
(type 1 ANSI Z21.81)
OPD triangular
handle
Gas cylinder
Regulator
Shut off gas supply
by rotating valve of
gas cylinder clockwise.
Fix regulator
by rotating it
clockwise
8
R
WARNINGS: LP TANK
INSTRUCTIONS FOR LIGHTING BURNER:
OPERATING INSTRUCTIONS
1. Read all instructions before lighting.
2. Make sure control knob is in the " OFF" position.
3. Turn LPG cylinder gas valve to fully open position.
4. Press down control knob and turn it counter-clockwise to
"IGNITE/HIGH" position.
5. If the burner is lit, keep pressing down the control knob for
15 seconds before releasing it.
6. If ignition does not occur in 5 seconds, turn the burner
control(s) OFF, wait 5 minutes, and repeat the lighting procedure.
7. When burner is lit, press down the control knob and turn it to
desired heat output position between "LOW" and "IGNITE/HIGH".
SHUT DOWN INSTRUCTIONS
2. Turn LP cylinder gas valve clockwise to OFF position when the appliance is not in use.
1. Push and turn control knob clockwise to OFF position.
WHEN THE BURNER FLAME IS ACCIDENTALLY EXTINGUISHED
1. Close the LP tank valve.
2. Push and turn control knob clockwise to OFF position.
3. Inspect if the hose etc. connections are good, wait 5 minutes. After waiting 5 minutes, re-start the
appliance following the lighting instructions.
REGULATOR HOSE ASSEMBLY CHECK:
WARNING
Before each use, check to see if there is evidence of abrasion, wear, cuts or leaks on the hose. If
damage is evident, the hose must be replaced prior to appliance use.
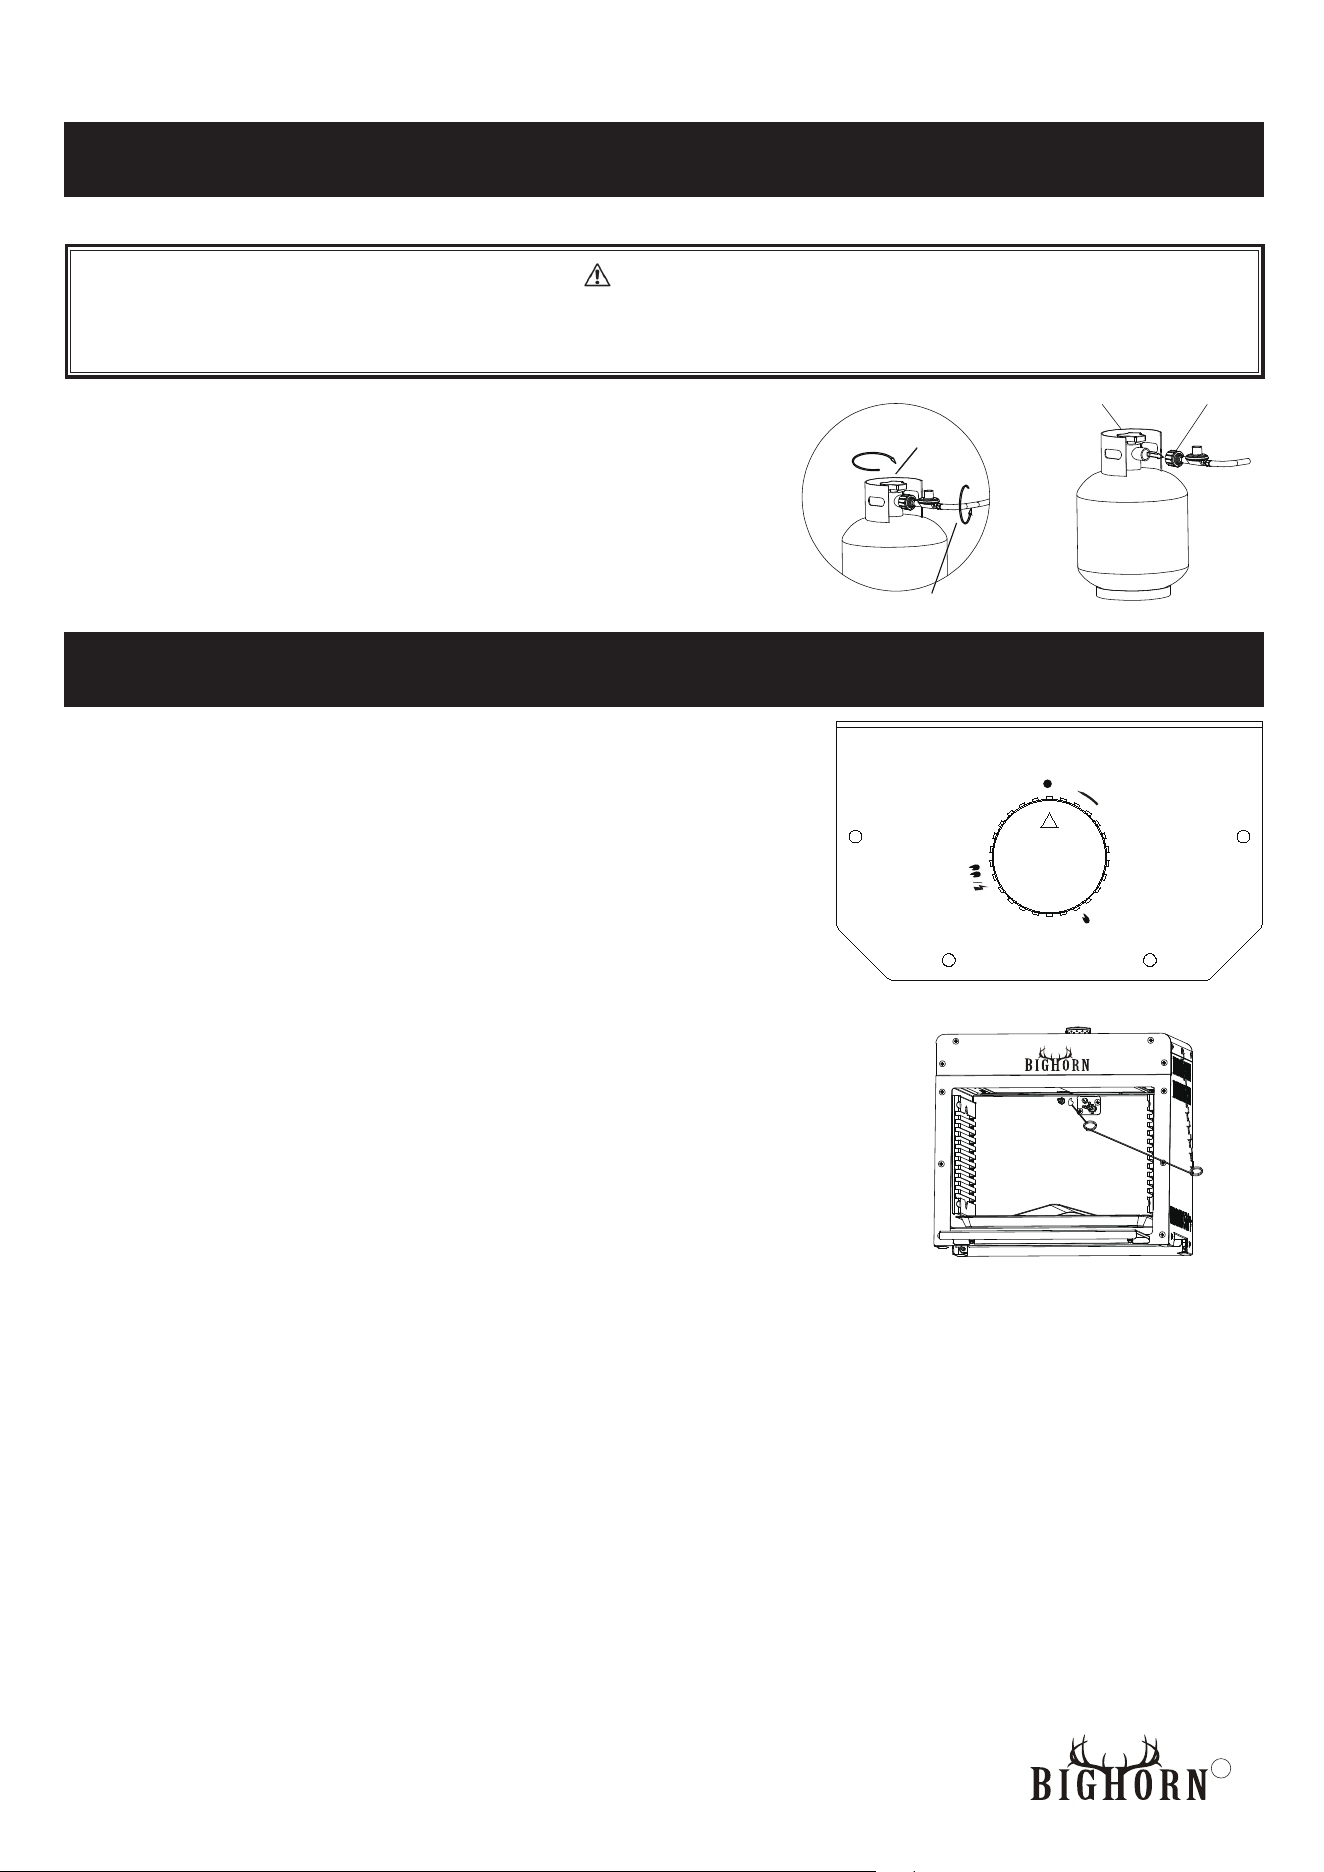
DISCONNECTING REGULATOR FROM THE LP TANK:
1. Turn control knob to the OFF position.
2. Turn the cylinder valve off fully (turn clockwise to stop).
Detach the regulator assembly from the cylinder valve
by turning the quick coupling nut counterclockwise.
NOTE: Loosen by hand only. DO NOT use tools.
G Regulatoras cylinder
Detach regulator
by rotating it
counterclockwise
Shut off gas supply
by rotating valve of
gas cylinder clockwise.
I
G
N
I
T
E
/
H
I
G
H
O
F
F
P
u
s
h
t
o
t
u
r
n
L
O
W
9
MANUAL LIGHTING:
1. Make sure control knob is in the OFF position.
2. Turn LPG cylinder gas valve to fully open position.
3. Remove the grill handle and cooking grid. Insert a match into the
match lighter, strike the match and allow flame to be placed directly
below the burner. Push and turn the control knob counter-clockwise
to IGNITE/HIGH position.
4. If the burner is lit, keep pressing down the control knob for 15 seconds before releasing it.
5.If ignition does not occur in 5 seconds, turn the burner control(s) OFF, wait 5 minutes, and repeat
the lighting procedure.
6. When burner is lit, press down the control knob and turn it to desired heat output position between
"LOW" and "IGNITE/HIGH"
7. Place the cooking grid back onto the grill body.
R
DANGER
NEVER allow this appliance to operate unattended. Failure to fo
or burn hazard that could cause property damage, personal injur
the appliance, move everyone to safety and immediately contact
CO2 extinguisher or preferably a Class “K” extinguisher. Special care must be taken to understand the manufacturers
instructions and be prepared to operate the appropriate extinguisher prior to using this appliance.
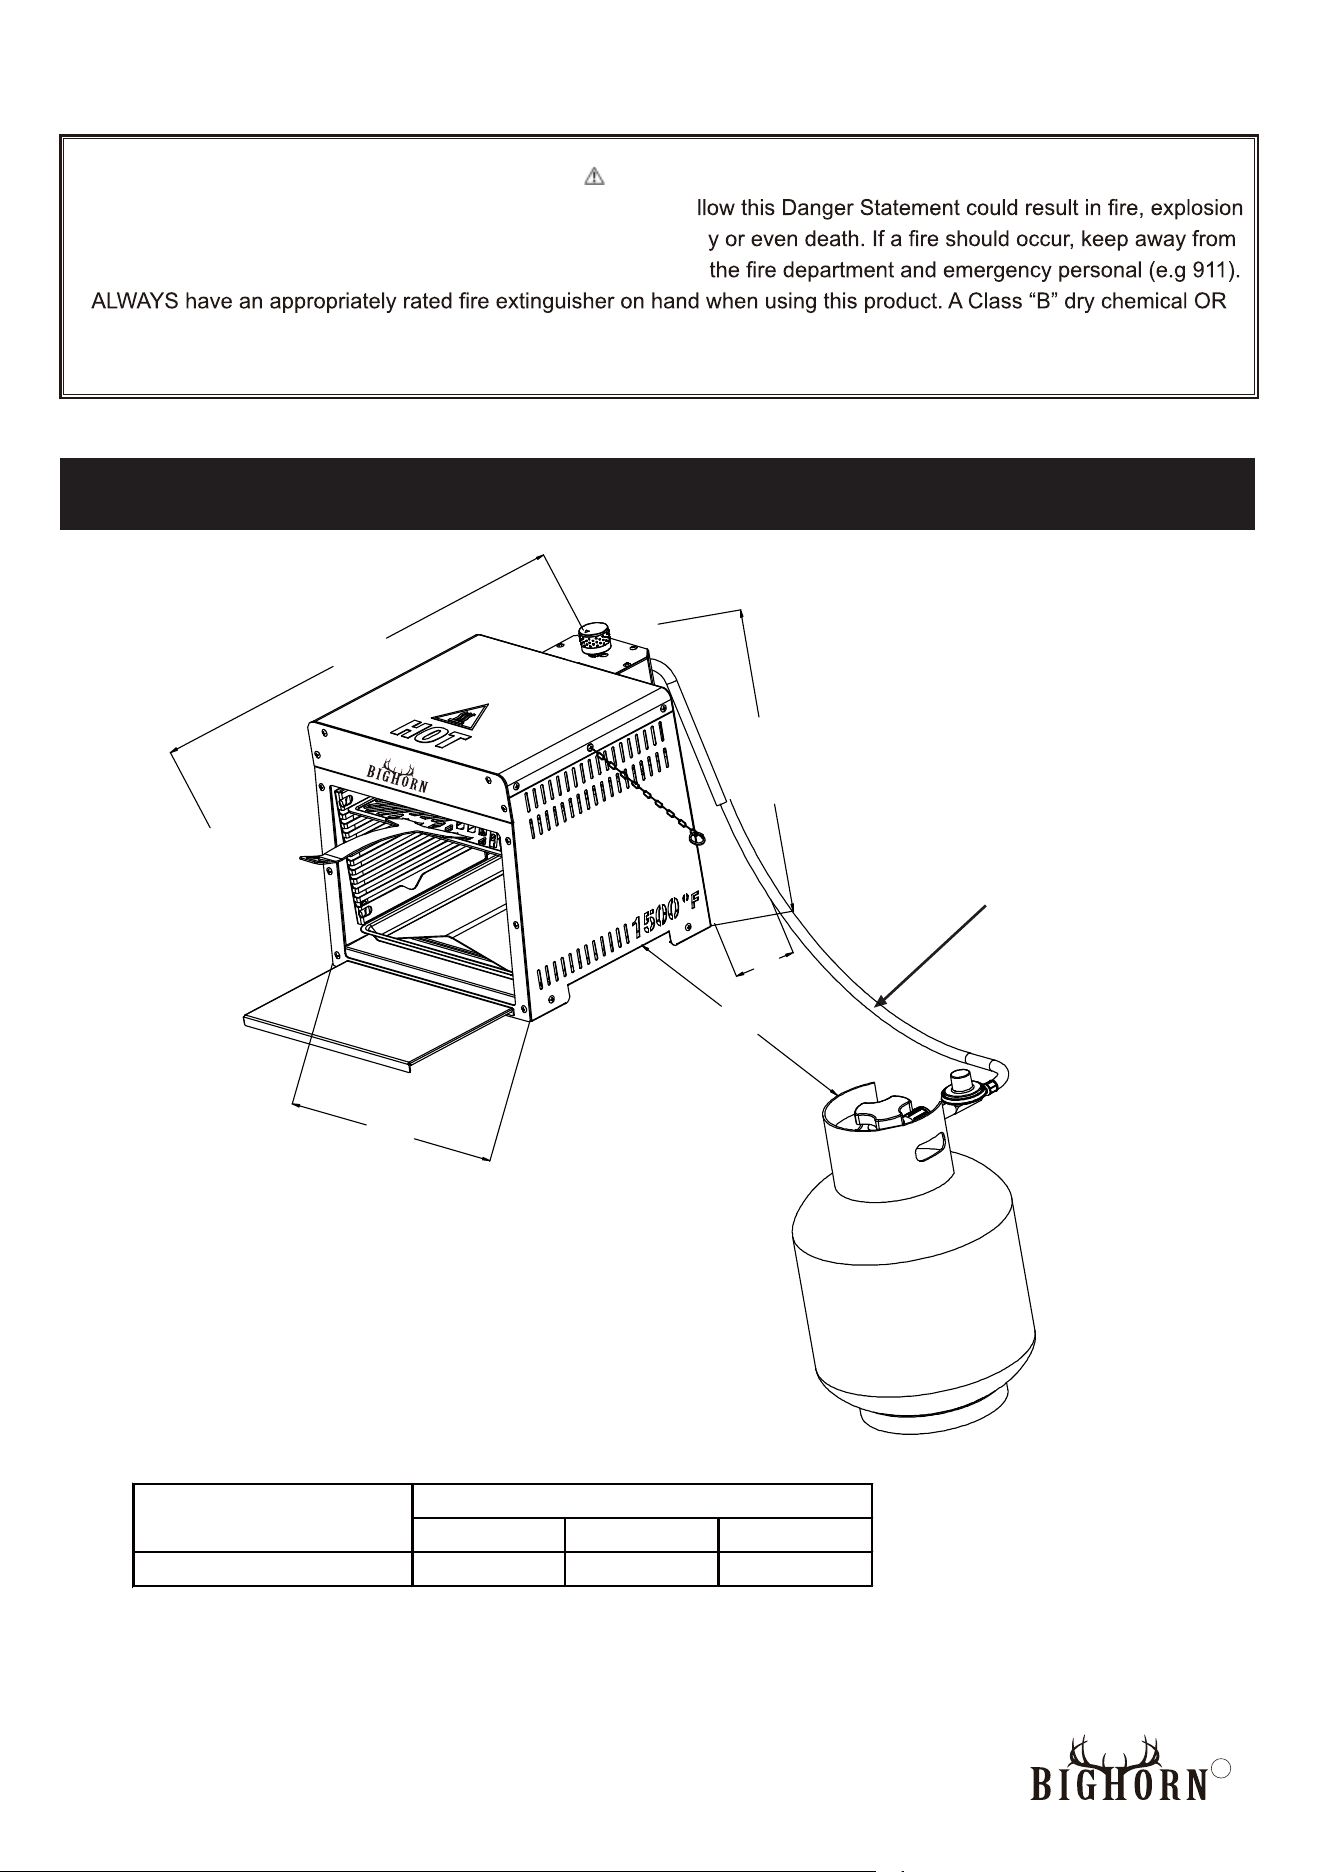
PRODUCT DIMENSION
Length Width Height
SRGG21708 16" 28" 15.35"
Dimension
Model
WARNING
Hose is a trip hazard
W=28"
H=15.35"
L=16"
24"
6"
10
R
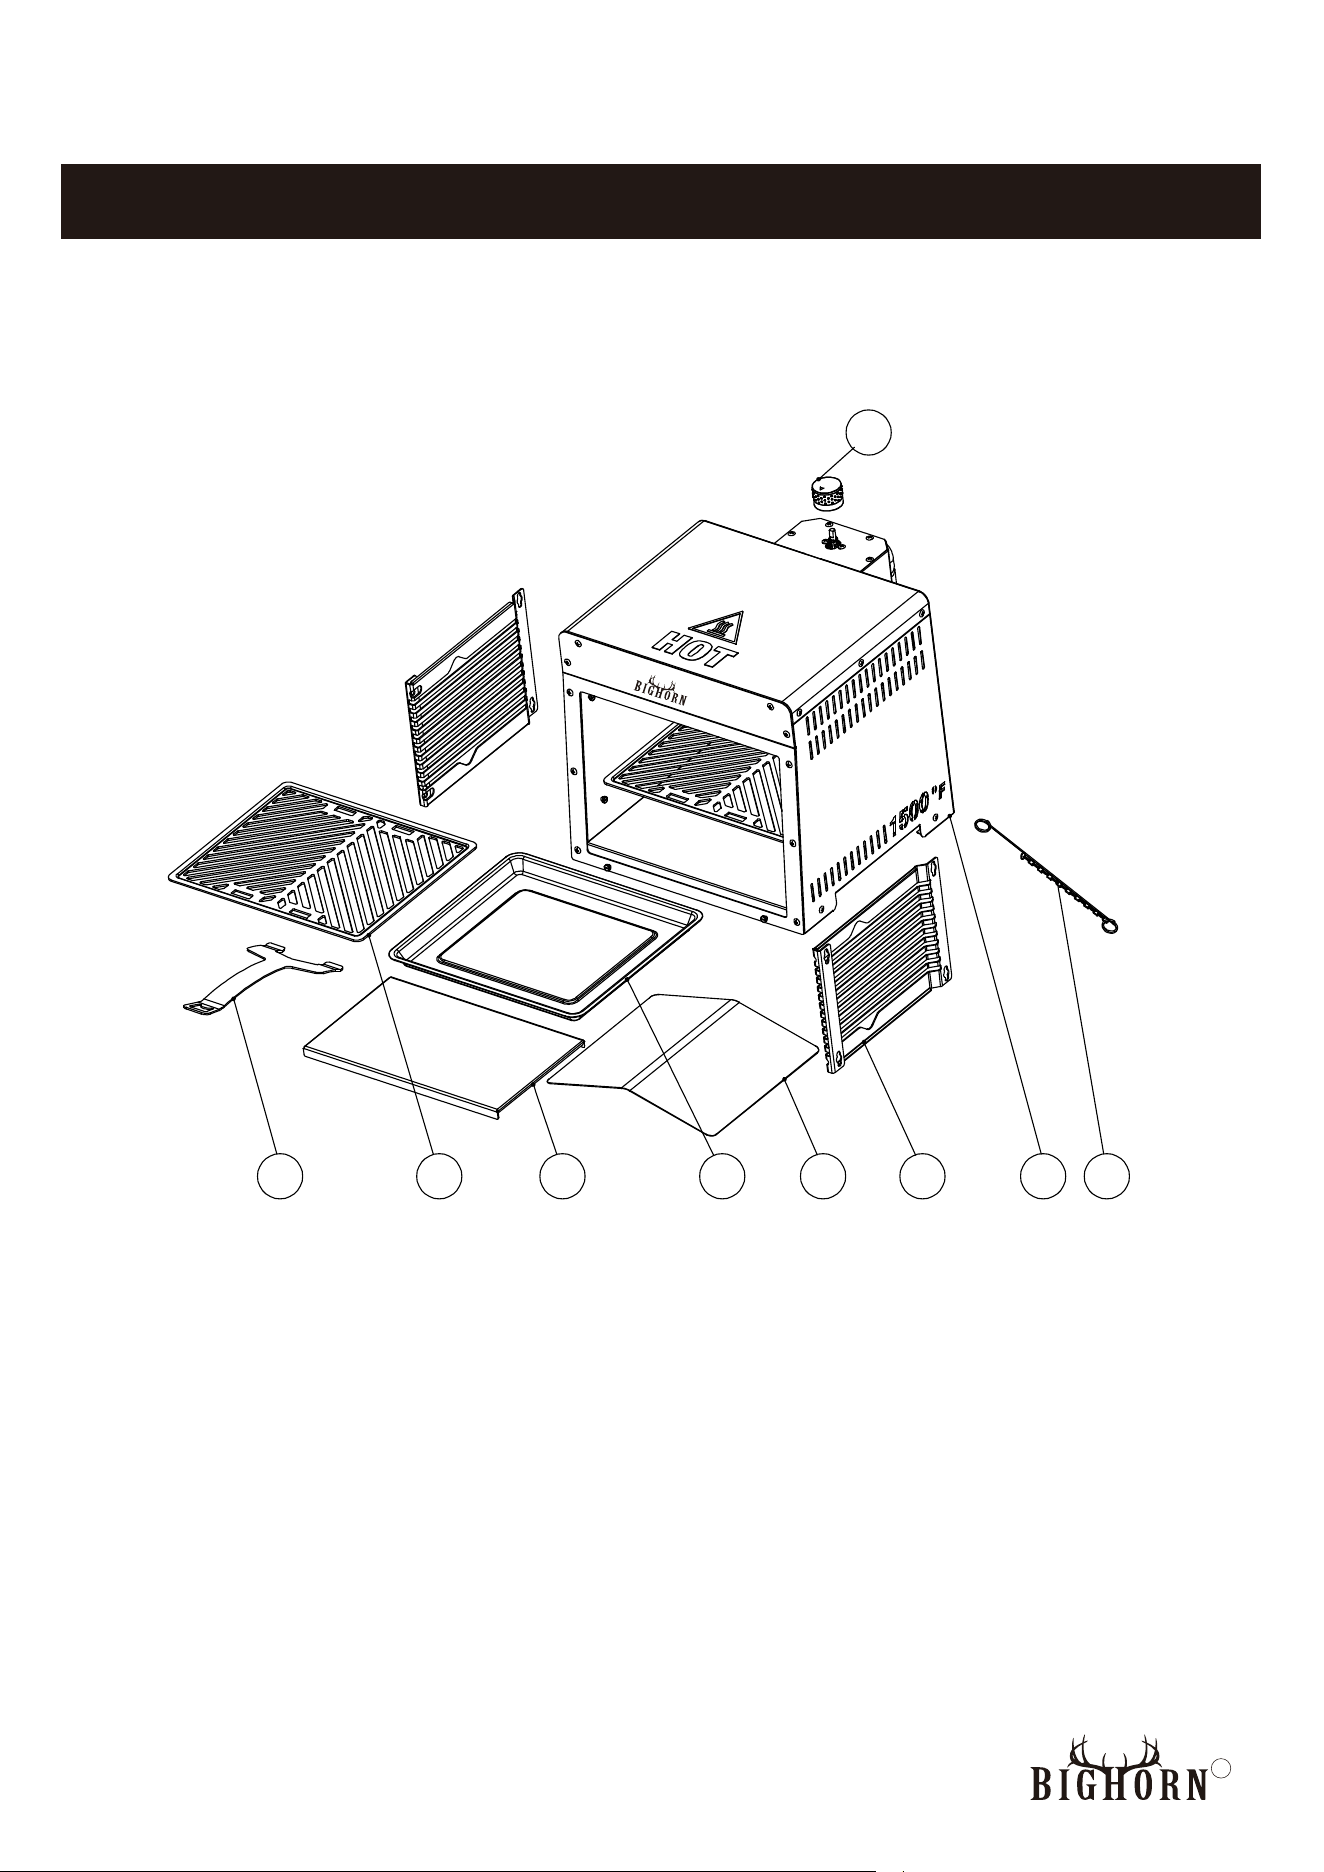
EXPLODED VIEW
A
G
BHDCEF I
11
R
PARTS LIST
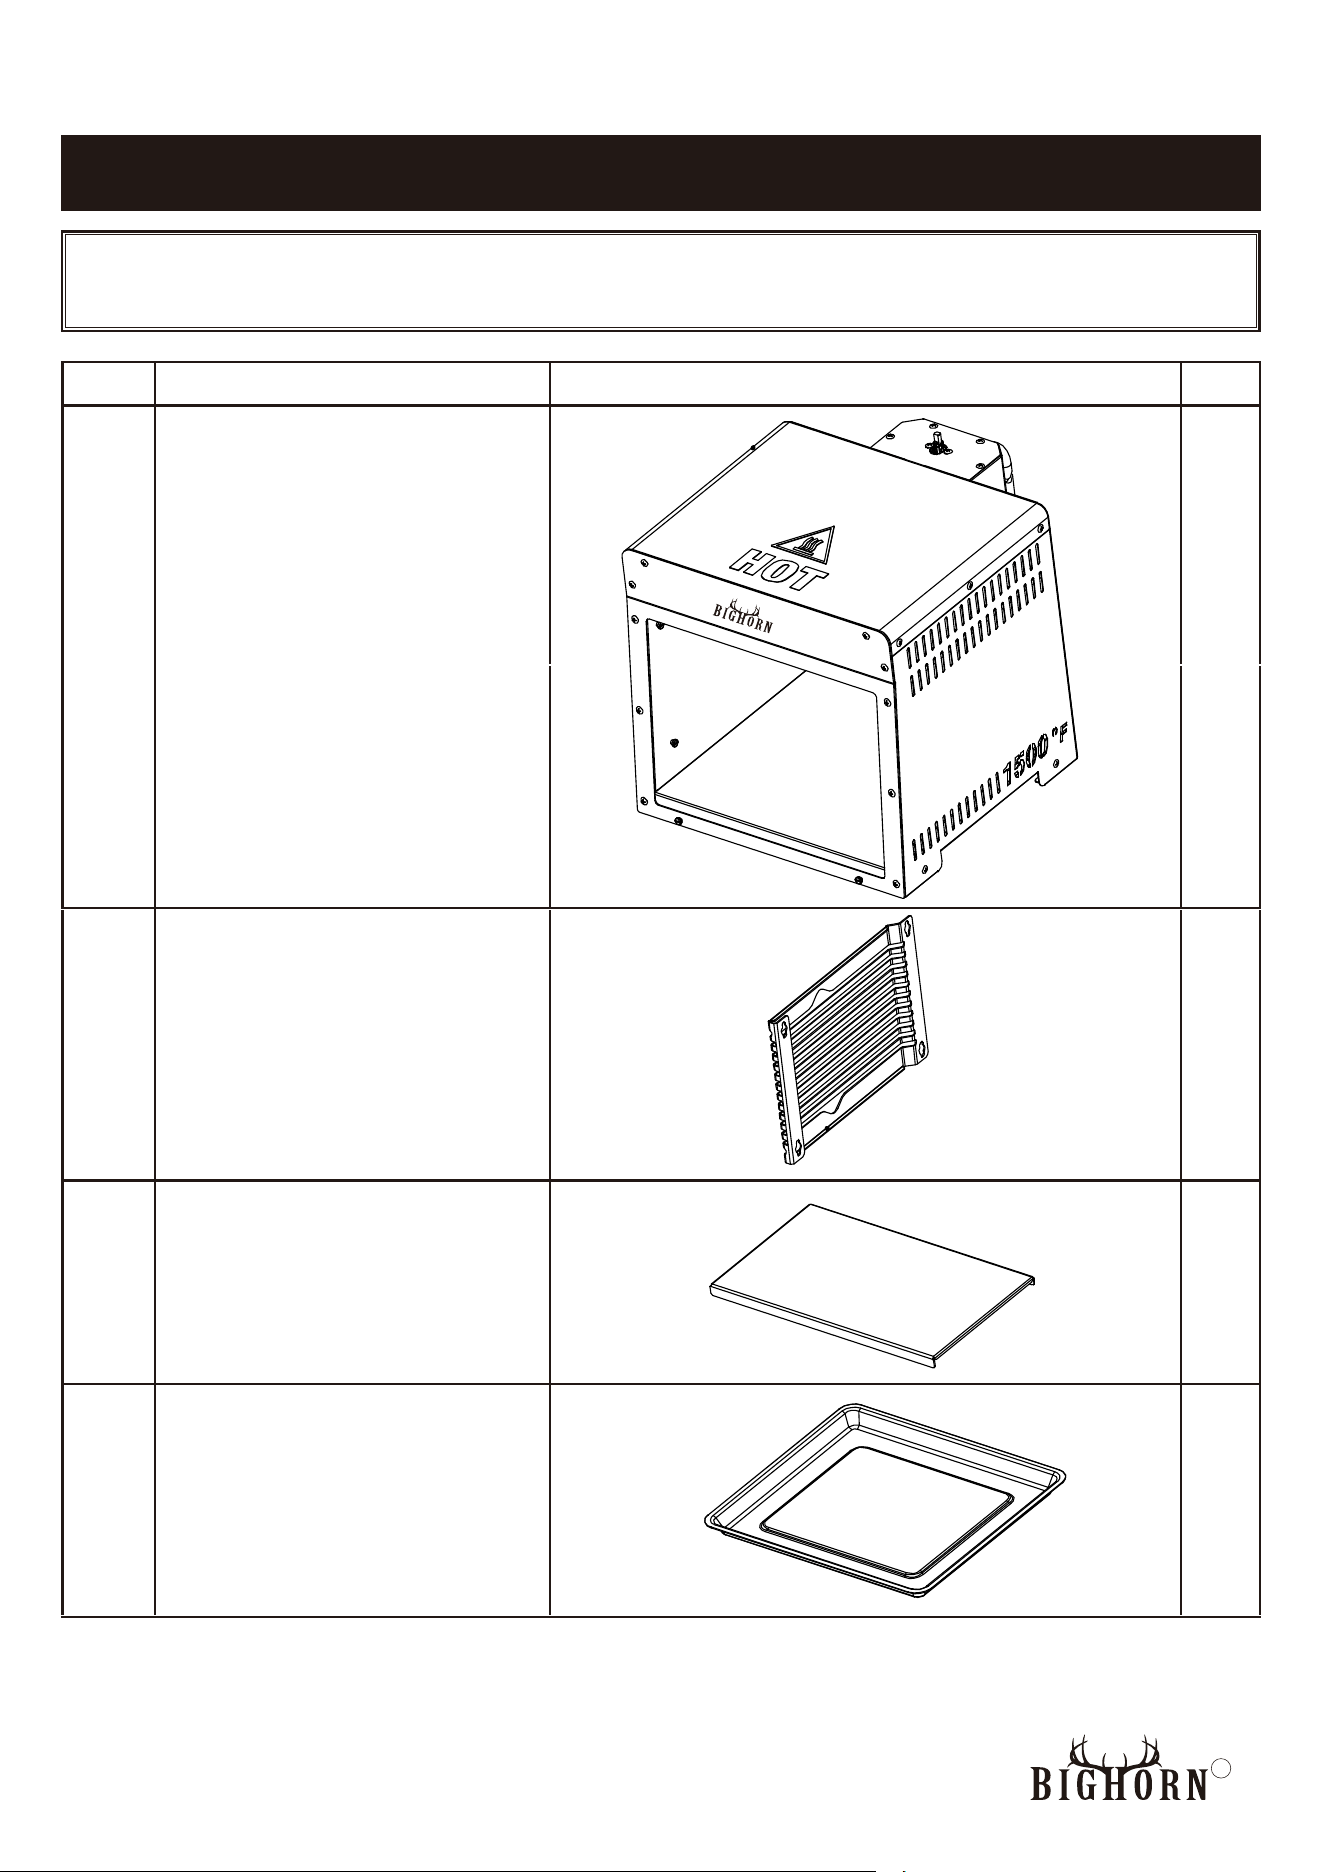
Part # Description Image Qty
A Grill Body 1
2B
C
Grill Support
NOTE: Wash all parts that will come in contact with food or water with
warm soapy water, rinse and towel dry.
D Grease Tray 1
Front Table 1
12
R
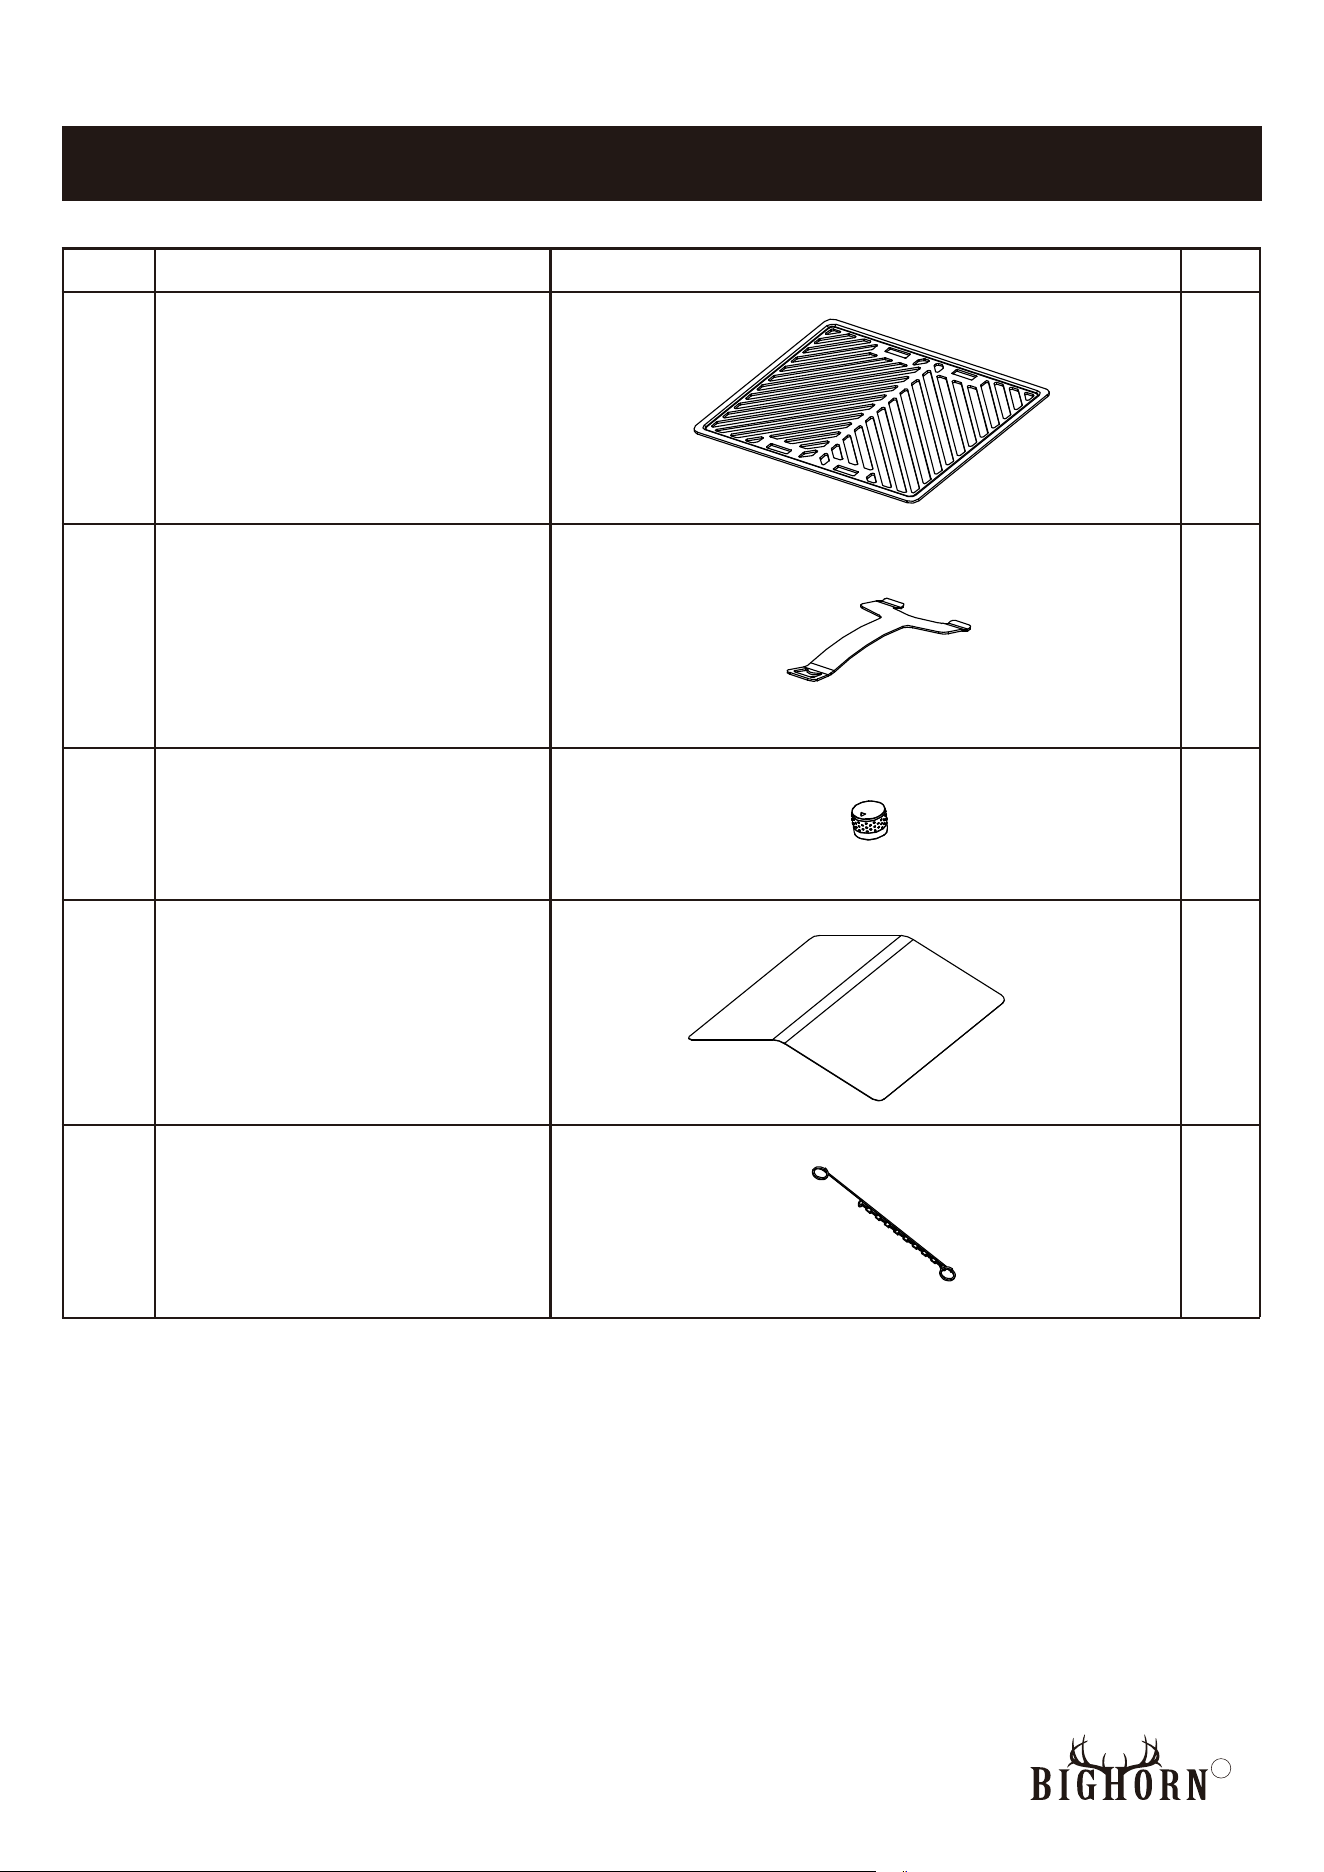
Part # Description Image Qty
Cooking Grid
Grill Handle
Control Knob
Heat Shield
Match Lighter
E
F
G
H
I
2
1
1
1
1
PARTS LIST
13
R
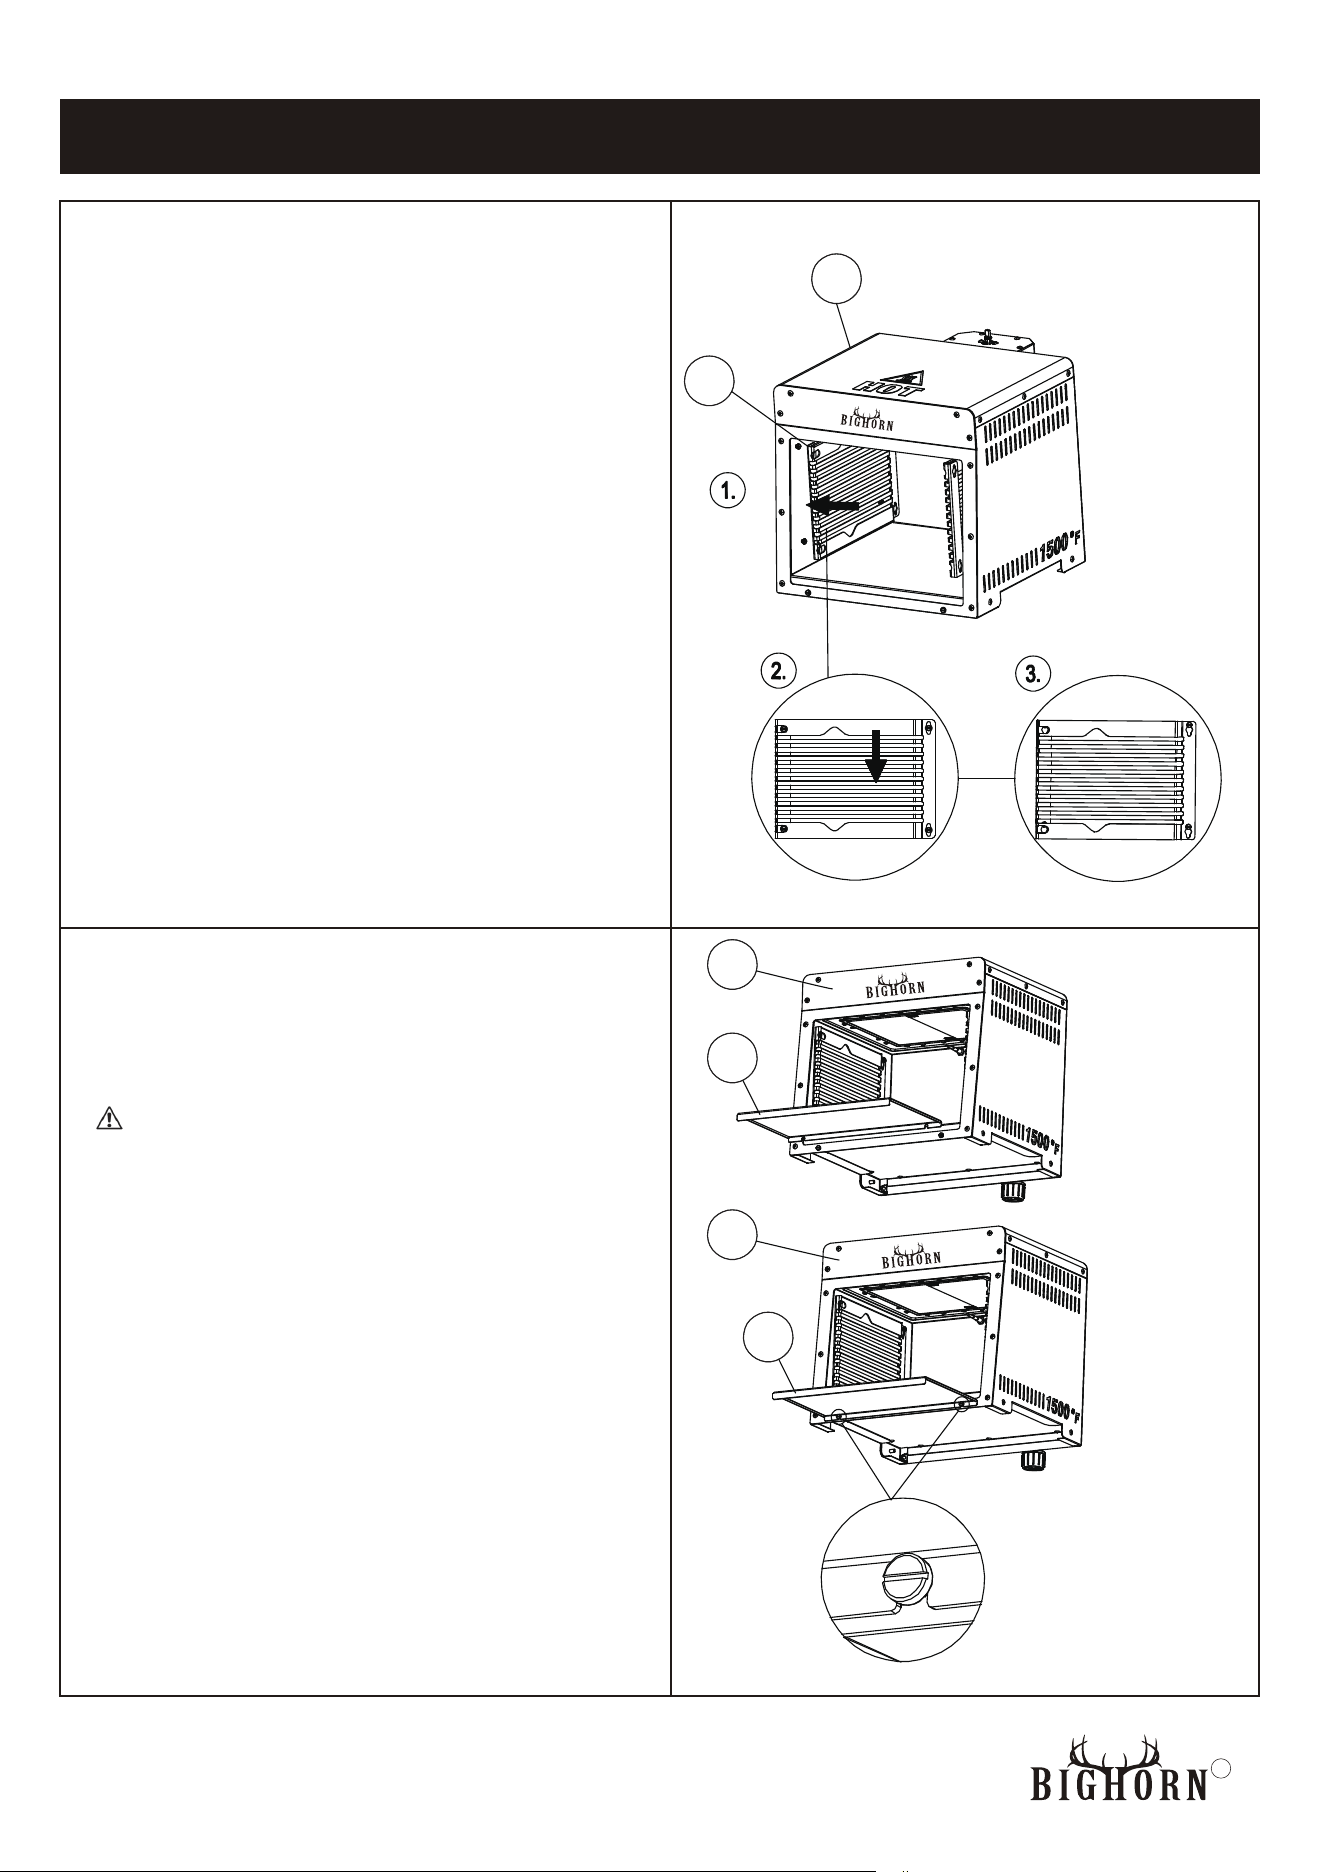
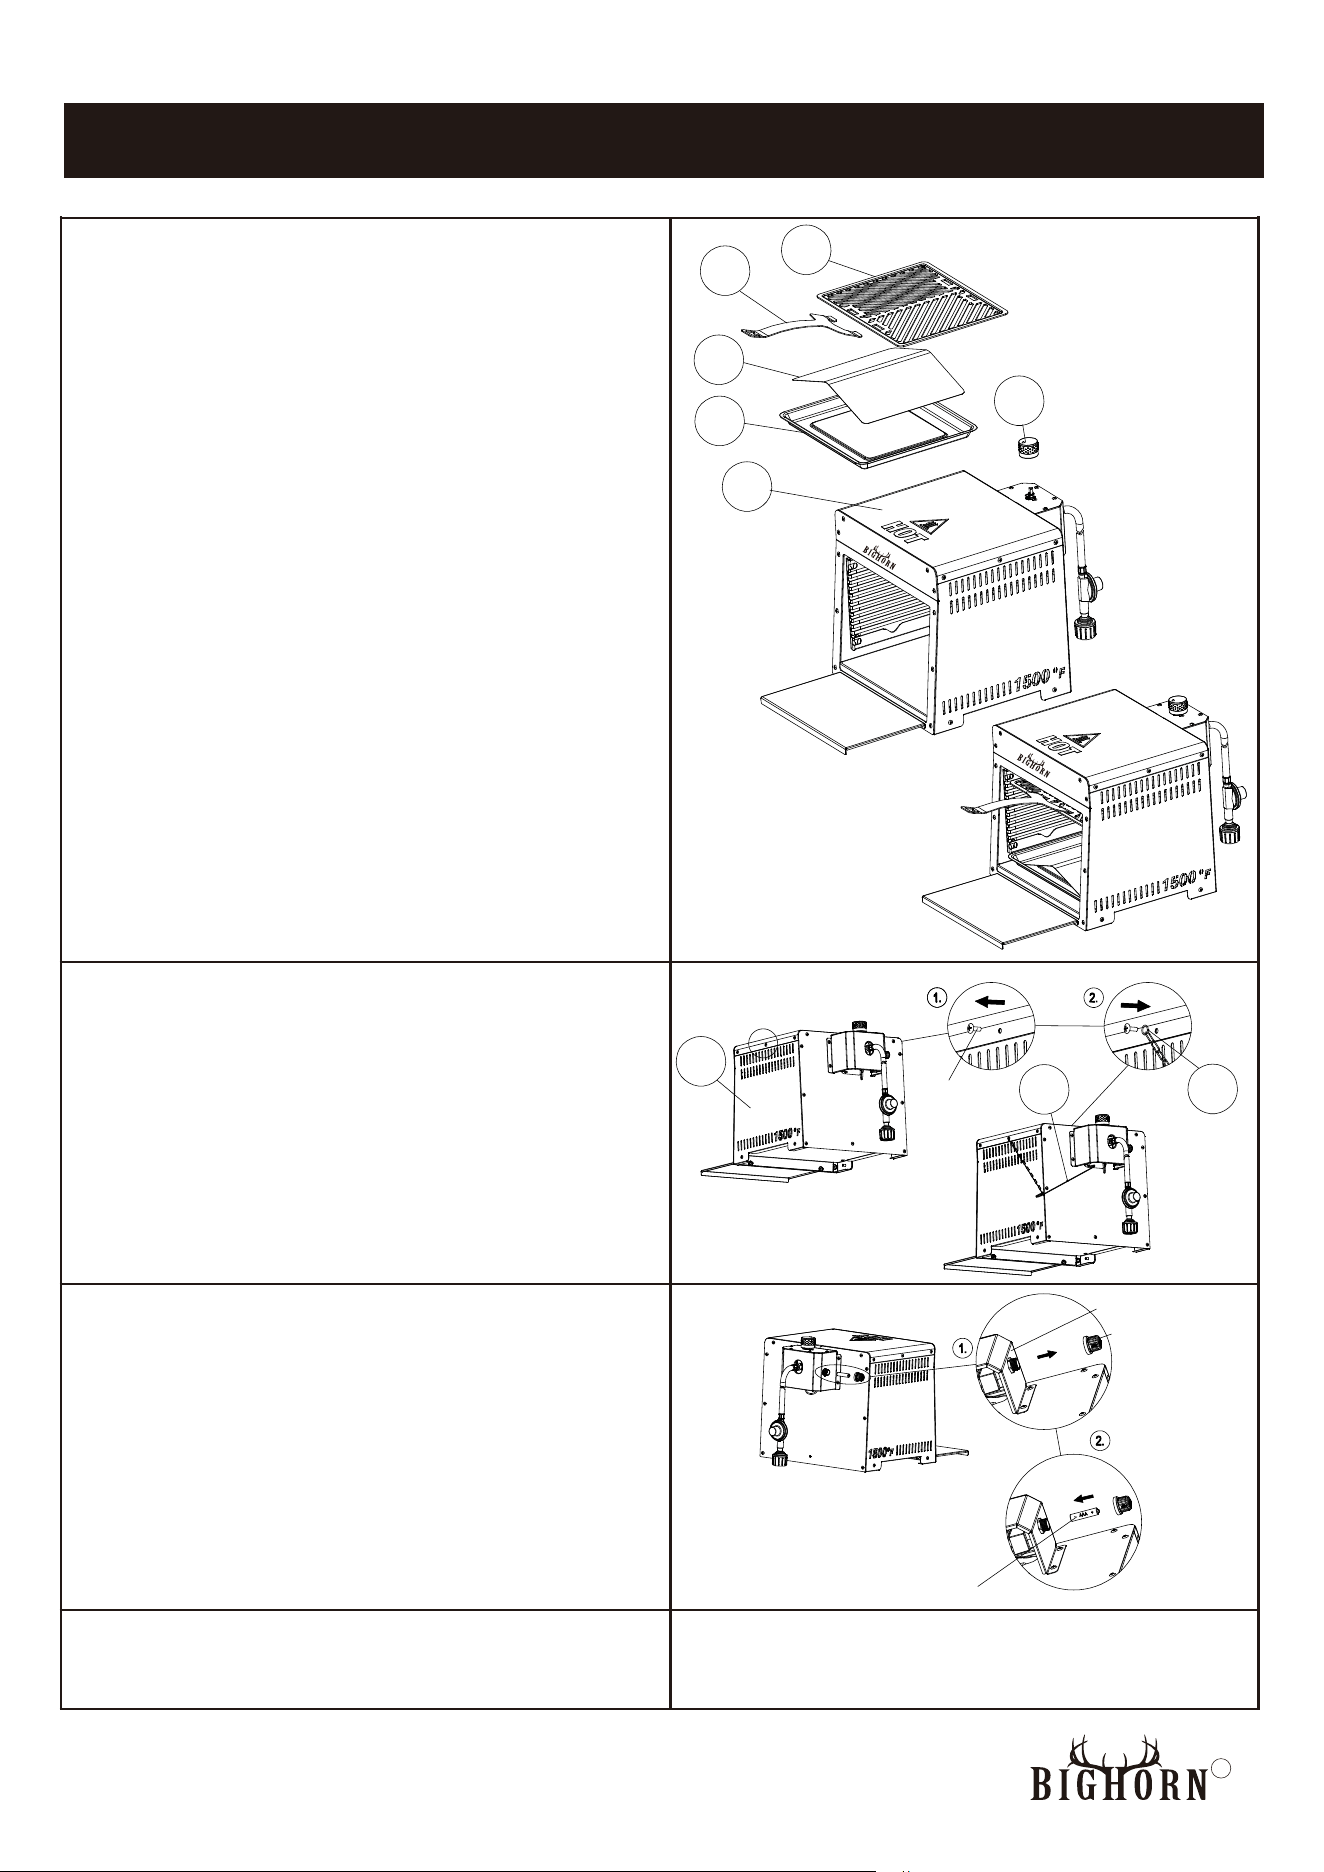
ASSEMBLY INSTRUCTIONS
STEP 1
Attach one grill support (B) to one inner side
of grill body (A), and repeat the step with the
other grill support (B) to the other side of grill
body (A).
STEP 2
Attach front table (C) to grill body (A).
Front table (C) is set to prevent
grill from overheating. Once attached, do not
remove it when using the grill. Failure to
follow this will cause table in front of grill
overheat which will result in damage to the table.
A
C
A
C
B
14
A
ATTENTION:
R
ASSEMBLY INSTRUCTIONS
3 PETS
6 PETS
Refer to instructions on PAGE 8 of
Connect to LP tank. this guide.
Connect to LP tank.
STEP 5
Turn and open the pulse igniter cap. Insert one
STEP 4
Unscrew a M4 x 12 bolt on grill body (A) as
shown, and attach the match lighter (I) to the
grill body (A) with the M4 x 12 bolt.
AAA battery (not included) into the pulse igniter.
Make sure the (+) end is facing you. Screw back
on the pulse igniter cap.
Pulse Igniter
Igniter Cap
M4 x 12 Bolt
AAA Battery 1 pc
(not included)
Place grease tray (D) and heat shield (H) in grill
body (A), then place cooking grid (E) on grill
support (B) and insert grill handle (F) into
cooking grid (E).
Attach control knob (G) to grill body (A).
Note: As grill handle (F) is a tool, it will be
better to have it on hand for convenient use
when cooking.
E
F
H
D
A
G
I
A
I
15
R
HOW TO CLEAN:
Proper care and appliance maintenance will keep your product operating smoothl
Keep appliance area clear and free from combustible materials, gasoline, and other flammable vapors
and liquids.
Keep the ventilation opening(s) of the cylinder enclosure free and clear from debris.
NOT obstruct the flow of combustion and ventilation air.
Check for proper burner flame characteristics.
Visually check the burner flames prior to each use.
There should be no obvious flames, and length of flames should not be more than 0.39 inch. if flames
is not, call our customer service line.
BURNER FLAME CHECK
y.
CLEAN THOROUGHLY AFTER EVERY USE.
NOTE: Clean the entire appliance each year and tighten all hardware on a regular basis (1-2 times
a year or more depending on amount of use).
1. Before cleaning turn off the appliance at the gas cylinder. Check that there is no flame, gas smell
and the valves are in off position. Next, make sure unit is properly disconnected from propane tank
prior to any cleaning.
2. Everything that was in contact with the food must be hand washed with warm soapy water and
nylon pad. DO NOT spray oven cleaner on cooking grid to remove grease or soot. It will cause
the finish to become dull. If food remains stuck to the cooking grid, add hot water and let it soak,
after cooling, scrub with steel wool.
3.
lacing in storage.
4. We recommend that the unit be thoroughly cleaned prior to every use.
5. Store all components in a dry location when not in use.
For replacement parts, please send an e-mail to [email protected].
CAUTION
Allow unit to fully cool (115˚F or 45˚C) before performing any cleaning.
CARE AND MAINTENANCE
16
SUGGESTED CLEANING MATERIALS:
• Hot water
• Mild dishwashing liquid detergent
• Soft, nylon cleaning pad
R
CARE AND MAINTENANCE
CLEANING BURNERS
As insects nest will result in insufficient gas, you must inspect and clean the venturi tubes of burner if
flame is much longer than 0.39 inch.
17
Unscrew the control knob, M4 screws and control panel as shown.
Observe through position A to check if there are any insect or
insect net in venturi tube, if any, clean up with a hook.
Reattach control panel to grill body (A) with the M4 screws.
Reattach control knob (G) to control panel.
Position A
Control panel
M4 Screw
G
R
WARRANTY INFORMATION
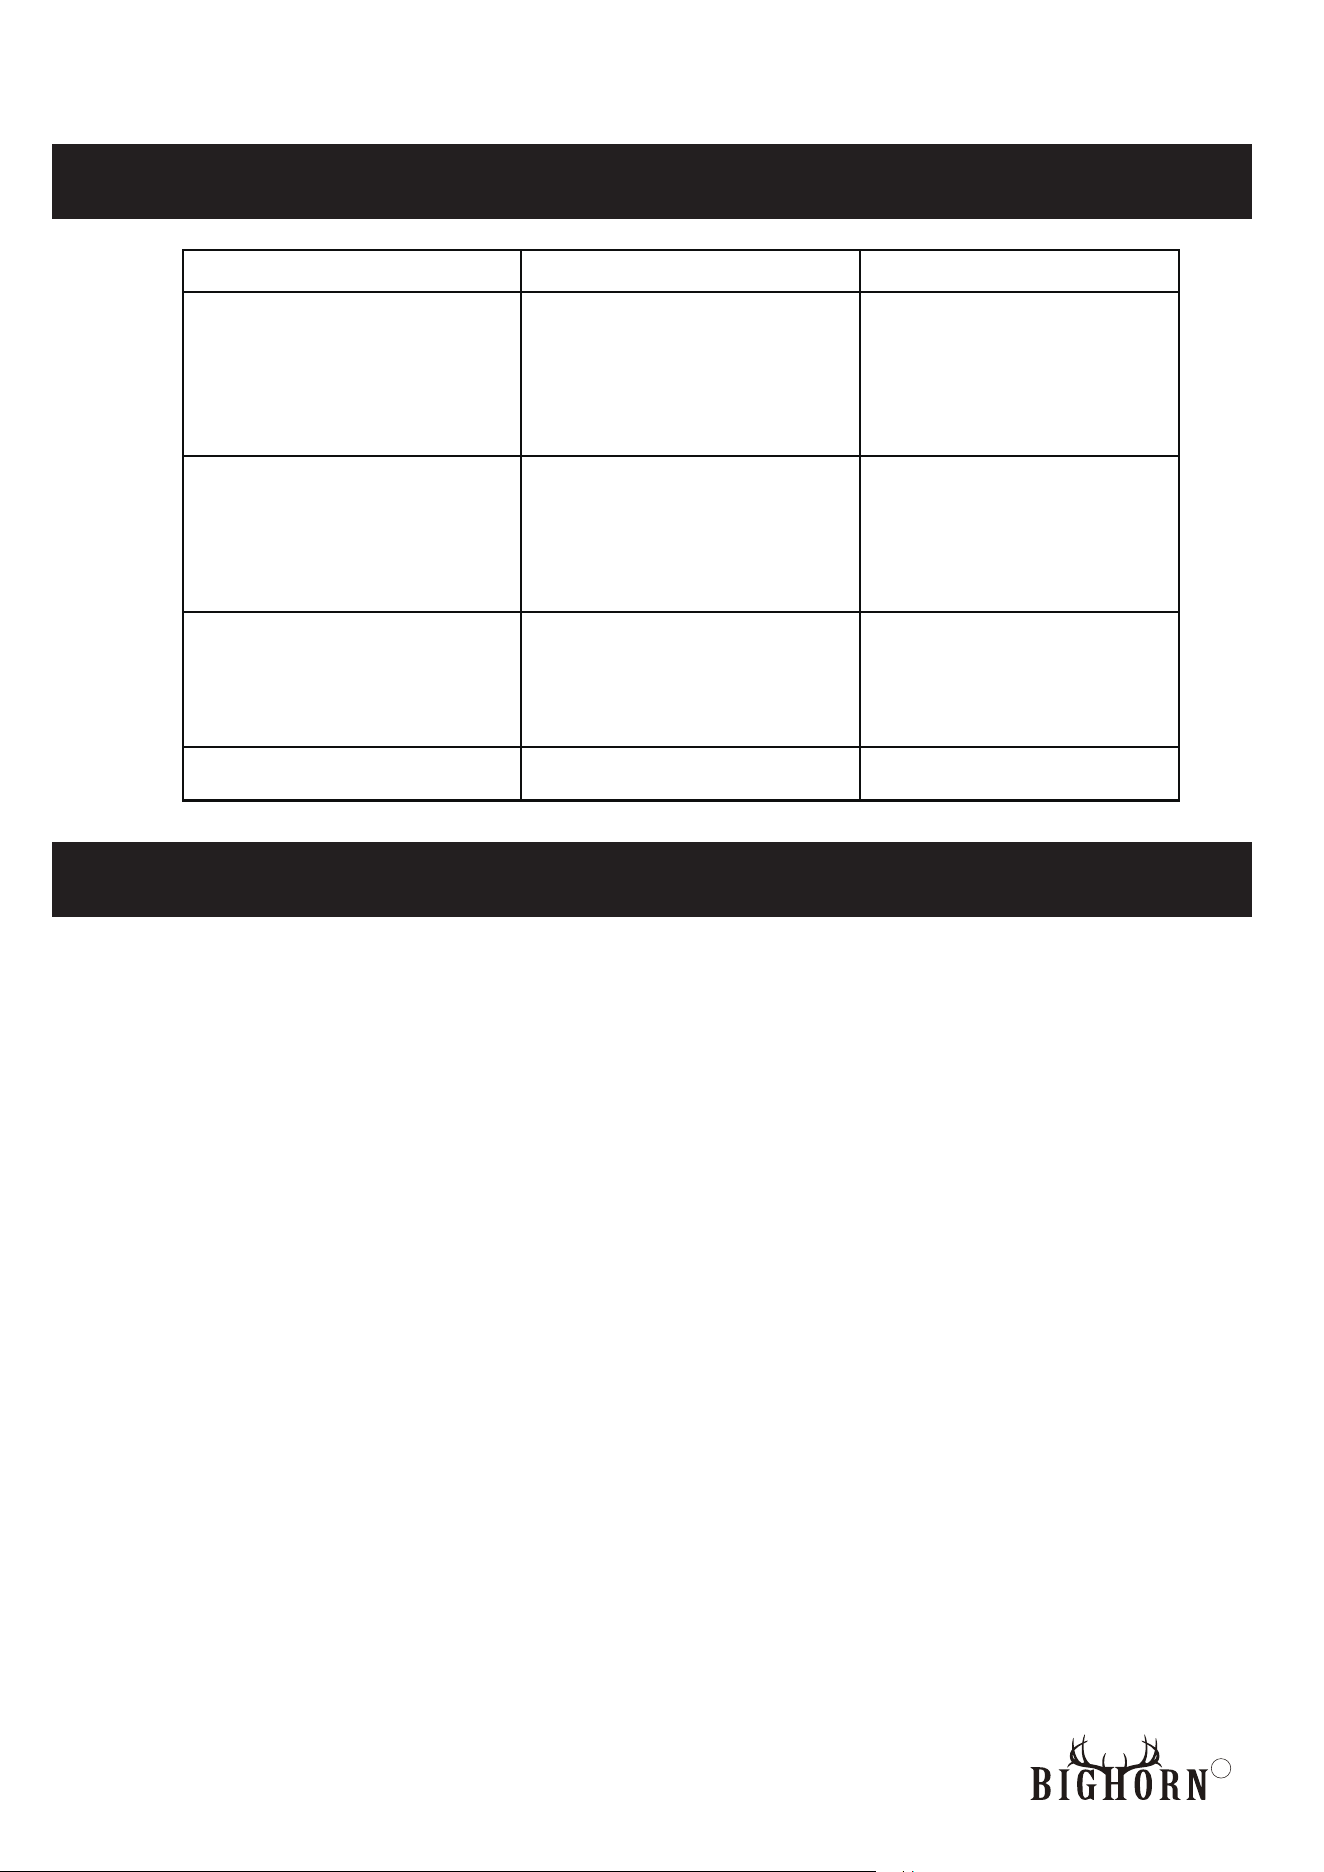
TROUBIESHOOTING
The appliance has been manufactured under the highest standards of quality and workmanship.
We warrant to the original consumer/purchaser that all aspects of this product will be free of defects
in material and workmanship for one (1) year from the date of purchase. A replacement for any
defective part will be supplied free of charge for installation by the consumer. Defects or damage
caused by the use of other than genuine parts are not covered by this warranty. This warranty shall
be effective from the date of purchase as shown in the purchaser’s receipt.
This warranty is valid for the original consumer/purchaser only and excludes industrial, commercial
or business use of the product, product damage due to shipment or failure which results from
alteration, product abuse, or product misuse, whether performed by a contractor, service company,
or consumer. We will not be responsible for labor charges and/or damage incurred in installation,
repair or replacement, nor for incidental or consequential damage.
SHINERICH INDUSTRIAL LTD.
E-mail: [email protected].
Addr.:8/F, Noble Center, 1006 Fuzhong 3rd.Rd,
Futian District, Shenzhen, China
Problems
Possible causes
Solutions
Burners can’t be lit by the
existing ignition system
1/ LPG gas bottle is empty
2/ Faulty regulator
3/ Obstructions in gas pipe or
hose
4/ Battery is not placed into the
pulse igniter or battery is dead.
1/ Replace with full bottle
2/ Check or replace the
regulator
3/ C
4/ Place battery into the pulse
igniter or replace battery
lean gas pipe or hose
Burners can’t be lit by a match
1/ LPG gas bottle is empty
2/ Faulty regulator
3/ Obstructions in gas pipe or
hose
1/ Replace with full bottle
2/ Check or replace the
regulator
3/ Clean gas pipe or hose
Weak flame or backfire (Fire
near the orifice)
1/ LPG gas bottle is too small
2/ Obstructions in gas pipe or
hose
3/ Windy weather
1/
Use a bigger bottle
2/ Clean gas pipe or hose
3/ Place the appliance in a
more protected place
Control knob is difficult to turn
1/ The gas valve is defective
R
eplace the gas valve
18
R
