NINJA ARTISAN™ OUTDOOR PIZZA OVEN
MO200 Series | Owner’s Guide
IMPORTANT SAFETY INSTRUCTIONS
FOR OUTDOOR USE ONLY • READ ALL INSTRUCTIONS BEFORE USE
WARNING
Failure to follow these instructions could result in electric shock, fire or burn hazard which could cause property damage, personal
injury, or death. When using electrical appliances, basic safety precautions should always be followed, including the following:
1 To eliminate a choking hazard for young children, discard all packaging materials immediately upon unpacking.
2 This appliance is for outdoor household use only.
3 DO NOT use this appliance for anything other than its intended use. Misuse may cause injury.
4 This appliance should be used on a flat, level surface. DO NOT use on glass tables.
5 DO NOT use in moving vehicles or boats.
6 This appliance can be used by persons with reduced physical, sensory, or mental capabilities or lack of experience and
knowledge if they have been given supervision or instruction concerning use of the appliance in a safe way and understand
the hazards involved.
7 To avoid property damage from flame or heat, maintain a minimum distance of 3 feet from rear, sides, and top to walls, rails,
or other combustible constructions.
8 DO NOT touch hot surfaces. Appliance surfaces are hot during and after operation. To prevent burns or personal injury,
ALWAYS use protective hot pads or insulated oven mitts and use available handles and knobs.
9 Use care when opening the oven to avoid burns. ALWAYS open door to detent before fully opening to check for any flare-up
as some foods may cause fats, oils, or grease to splash and create flare-up or flame.
10 DO NOT use oils/fats, such as butter, olive oil, and margarine, when cooking over 5000F to avoid the risk of smoke and
property damage due to smoke.
11 To prevent burns or personal injury ALWAYS use care when interfacing with product. Recommend use of long-handled
utensil and protective hot pads or insulated oven mitts.
12 Ensure the surface is level, stable, clean, and dry. DO NOT place the appliance near the edge of the surface the oven is placed
on during operation. DO NOT clean this product with a water spray or any spray like items.
13 Keep the appliance and its cord out of reach of children. DO NOT allow the appliance to be used near, cleaned, or maintained
by children. Close supervision is necessary when used near children.
14 A short power-supply cord is provided to reduce the risk of children less than 8 years grabbing the cord or becoming entangled
and to reduce the risk of people tripping over a longer cord. When using an extension cord it must be specific for use
outdoors and must have a “W” marking and tag stating: SUITABLE FOR USE WITH OUTDOOR APPLIANCES.
15 Use only on properly grounded outlet. Connect ONLY to GFCI grounded electrical outlet if using an extension cord. Longer
detachable power-supply cords or extension cords are available and may be used if care is exercised in their use. If longer
detachable power-supply cord or extension is used: The cord should be arranged so that it will not drape over the tabletop
where it can be pulled on by children or tripped over unintentionally.
Read and review instructions to understand operation and use of product.
Indicates the presence of a hazard that can cause personal injury, death or substantial
property damage if the warning included with this symbol is ignored.
Avoid contact with hot surface. Always use hand protection to avoid burns.
SharkNinja Operating LLC
US: Needham, MA 02494
1-855-427-5125
ninjakitchen.com
Illustrations may dier from actual product. We are constantly striving to improve our products, therefore
the specifications contained herein are subject to change without notice.
NINJA is a registered trademark of SharkNinja Operating LLC.
© 2024 SharkNinja Operating LLC.
This product may be covered by one or more U.S. patents. See sharkninja.com/patents for more information.
MO200Series_IB_MP_Mv8
THANK YOU
for purchasing the Ninja Artisan™ Outdoor Pizza Oven
SCAN HERE for
accessories and
how-to videos.
TECHNICAL SPECIFICATIONS
Voltage: 120V~, 60Hz
Watts: 1760W
RECORD THIS INFORMATION
Model Number: _________________
Serial Number: __________________
Date of Purchase: ________________
(Keep receipt)
Store of Purchase: _______________
REGISTER YOUR PURCHASE
registeryourninja.com
Scan QR code using mobile device
@ninjakitchen
TIP: You can find the model and serial numbers on the QR code label on the back of the unit.
2
ninjakitchen.com
16 To protect against electrical shock, keep the cord connection dry and off the ground. DO NOT immerse cord, plugs, or main
unit housing in water or other liquid.
17 Regularly inspect the appliance and power cord. DO NOT use the appliance if there is damage to the power cord or plug.
If the appliance malfunctions or has been damaged in any way, immediately stop use and call Customer Service.
18 NEVER use outlet below countertop surface.
19 ALWAYS ensure the appliance is properly assembled before use.
20 NEVER connect this appliance to an external timer switch or separate remote-control system.
21 DO NOT place appliance where the cord may hang over edges of tables or counters or touch hot surfaces.
22 Only use recommended accessories included with this appliance or authorized by SharkNinja. The use of accessories or
attachments not recommended by SharkNinja may cause a risk of fire or injury.
23 Before placing any accessory into the cooker, ensure they are clean and dry.
24 DO NOT move the appliance when in use.
25 DO NOT cover the air intake vent or air outlet vent while unit is operating. Doing so will prevent even cooking and may
damage the oven or cause it to overheat.
26 Ensure all accessories are correctly inserted and securely locked into position.
27 DO NOT use this appliance for deep frying.
28 Should a grease fire occur, or the oven emits black smoke, unplug immediately. Wait for smoking to stop before removing
any cooking accessories.
29 Socket voltages can vary, affecting the performance of the product. To prevent possible illness, ALWAYS use an external
food thermometer to check that the food is cooked to the recommended temperatures.
30 ALWAYS keep a fire extinguisher accessible while operating the oven.
31 To disconnect, press the power button to turn the oven off, then unplug from socket when not in use and before cleaning.
32 Please refer to the Cleaning & Maintenance section for regular maintenance of the appliance.
33 To avoid personal injury and burns, allow oven to cool before cleaning, disassembly, putting in or taking off parts, and storage.
34 DO NOT clean with metal scouring pads. Pieces can break off the pad and touch electrical parts, creating a risk of electric shock.
35 DO NOT place appliance on hot surfaces, near hot gas or electric burner, in a heated oven, or on a stovetop.
36 DO NOT store outdoors uncovered in severe weather conditions.
37 This oven has a tempered glass door and is more resistant to breakage. Avoid scratching door surface or nicking edges.
38 DO NOT touch hot surfaces. Oven surfaces and glass door are hot during and after operation. To prevent burns or personal
injury, ALWAYS use protective hot pads or insulated oven mitts and use available handles.
39 DO NOT rest anything on the door once open. Avoid dropping cold food onto the inside of the door.
40 DO NOT place the bake pan in the oven at temperatures above 500°F.
41 DO NOT attempt to remove the stone while hot. Wait until unit has cooled.
42 ALWAYS ensure the oven is completely cool before removing the cooking plates or moving the oven to avoid burns or personal
injury.
IMPORTANT SAFETY INSTRUCTIONS
FOR OUTDOOR USE ONLY • READ ALL INSTRUCTIONS BEFORE USE
ninjakitchen.com
SAVE THESE INSTRUCTIONS.
2
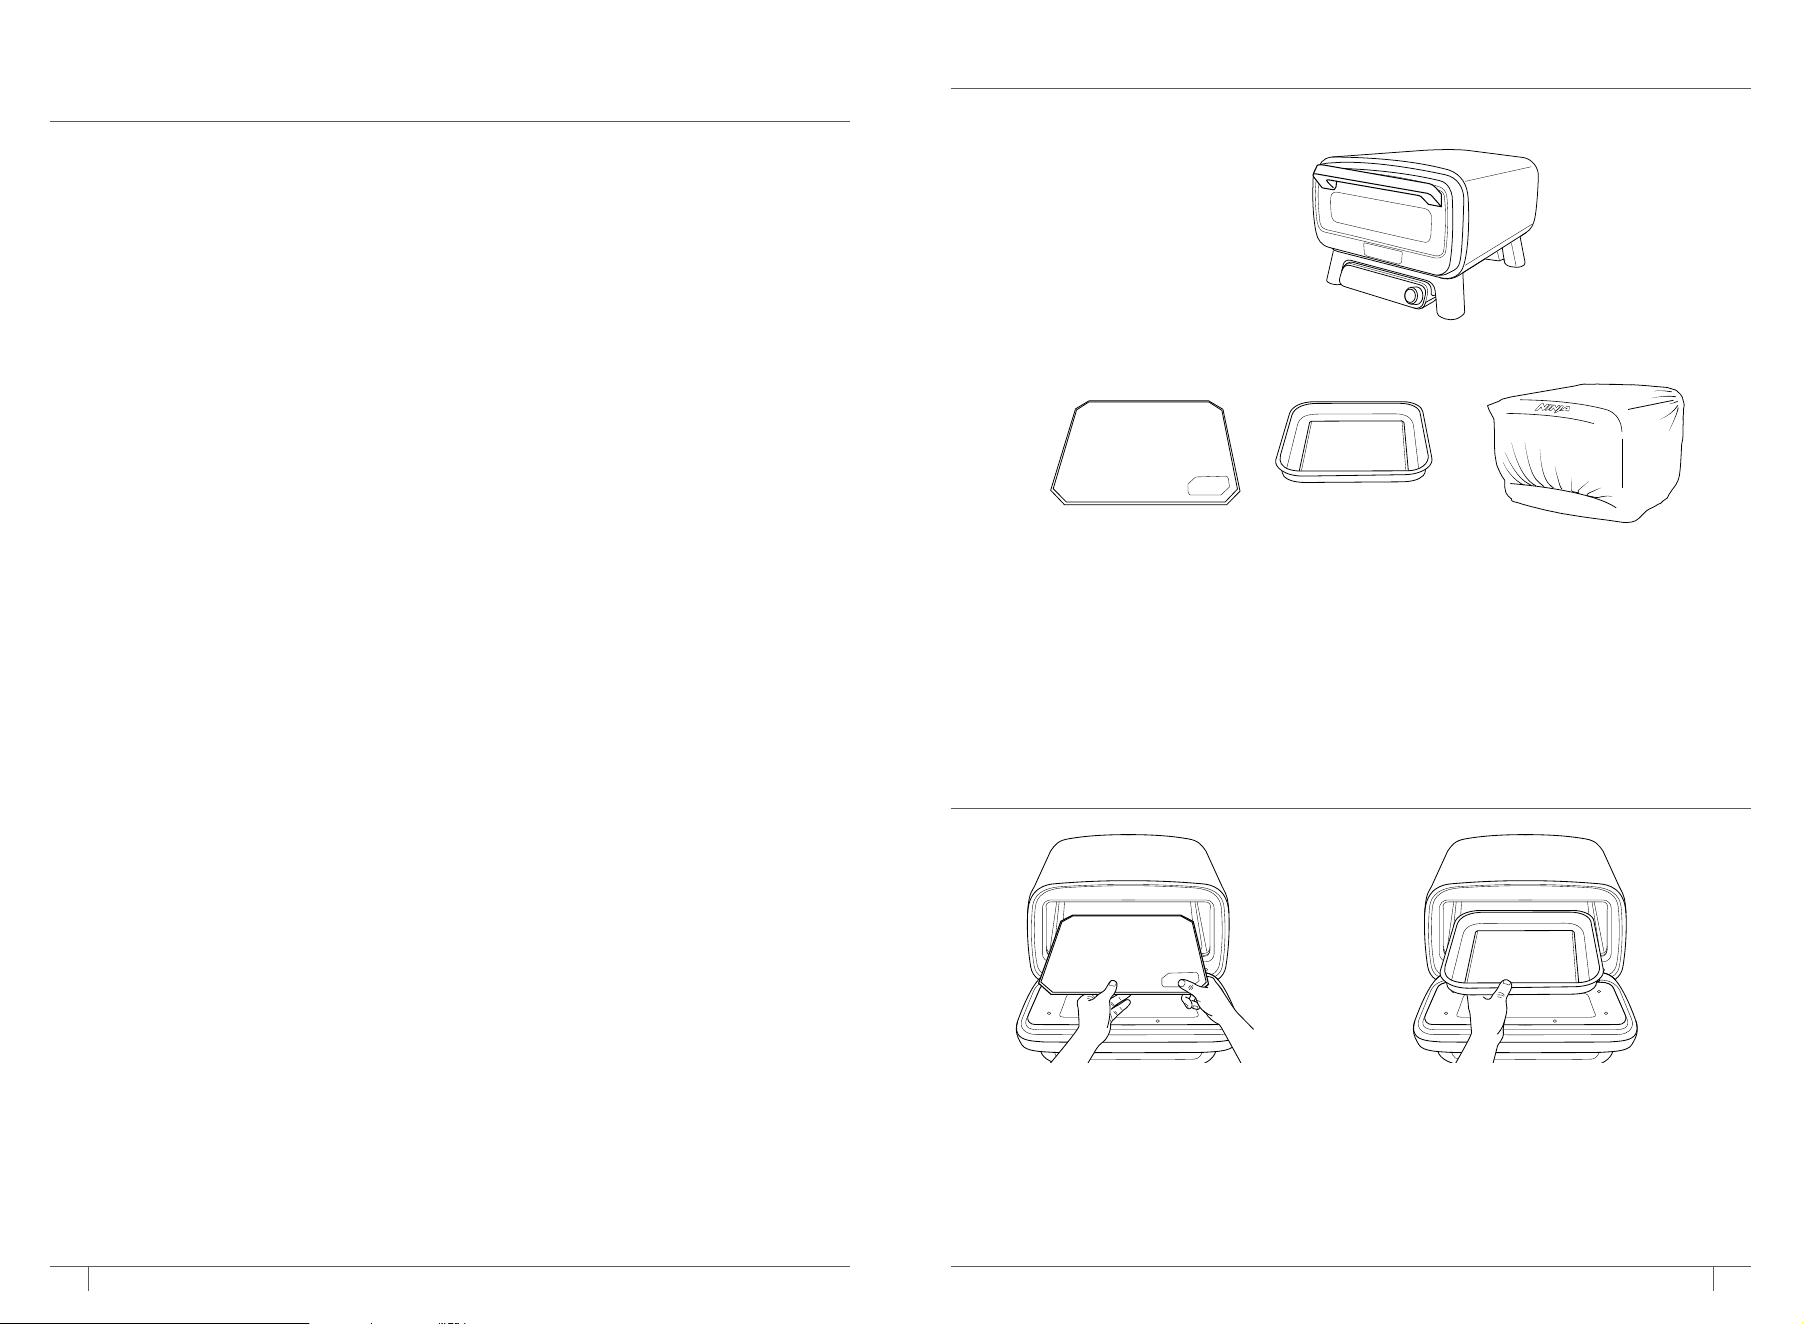
A Assembled Main Unit
(power cord not shown)
B Pizza Stone
C Bake Pan
D Cover
(not included with all
models)
A
C
D
PARTS & ACCESSORIES
1
B
ACCESSORIES INSTALLED
Pizza Stone: Place the pizza stone in the oven,
ensuring it sits flat and within the grooves. No
other accessories should ever be placed below
the stone.
Bake Pan: Before placing the bake pan, ensure
the pizza stone is clean and properly positioned
within the grooves. Then, set the bake pan on top
of the pizza stone.
3
ninjakitchen.com
4
ninjakitchen.com
GETTING TO KNOW THE NINJA ARTISAN™ OUTDOOR
PIZZA OVEN
FUNCTIONS
PIZZA: Make your favorite pizza styles at home
from fresh to frozen
Neapolitan – A chewy, puy crust that’s
spotted with crispy bubbles.
Thin – Thin, stretched pizza with a crispy
crust. A pizzeria staple.
New York Style – Large, hand-tossed pizza
with light browning and a foldable, chewy
crust.
Pan – Baked in a deep dish or pan with a thick,
chewy crust. Think Sicilian or Chicago Deep
Dish.
Custom – Use your favorite style crust and
add your favorite ingredients to create your
own custom pizza. For an 11"x6" calzone, set
temp to 400°F and cook 10–14 mins. When
cooking frozen pizzas, use CUSTOM to match
the time and temperature directions from the
box.
BAKE: Create baked goods with crispy crusts
and fluy centers.
PROOF: Create the perfect environment
for dough to rest and rise, enhancing flavor
development and improving dough workability
before baking. Ideal for achieving rich, well-
developed flavors and a smoother texture in your
baked goods.
BROIL: Quickly melt toppings or create
beautifully browned exteriors.
WARM: Keep meals warm and ready to eat after
cooking.
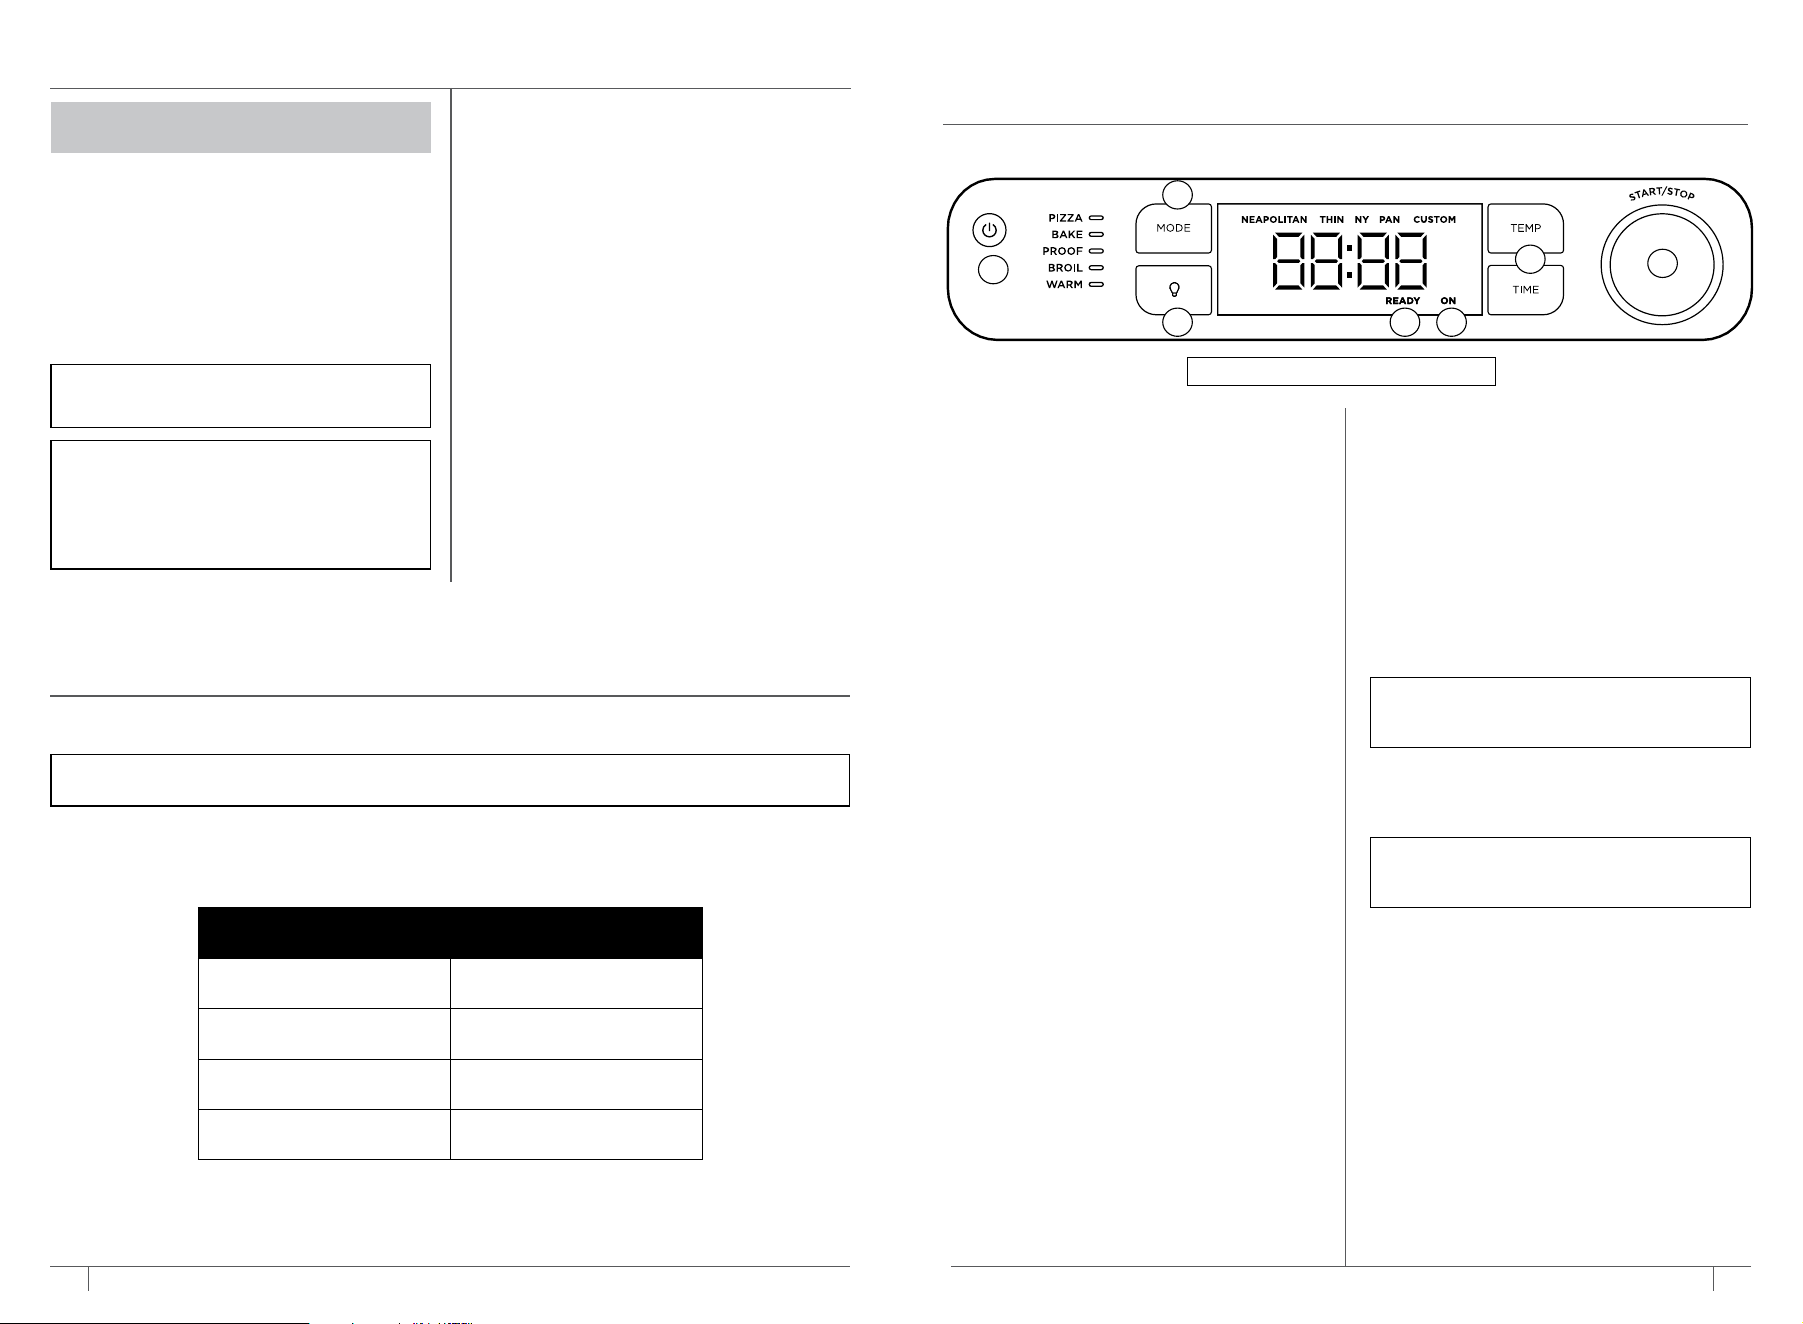
OPERATING BUTTONS/DIALS/INDICATOR
LIGHTS
1 POWER BUTTON:
Press to turn the unit on or
o. Ensure unit is o when not in use.
2 MODE BUTTON:
Press to select the desired
function.
3 TEMP/TIME BUTTONS: Press the
TEMP button,
then use the dial to select desired temperature.
Press the TIME button, then use the dial to select
desired time.
4
START/STOP
DIAL:
Use the dial to control your
TEMP and TIME or select pizza presets. Press dial
in to start or stop the current cook function.
67
3
4
2
1
NOTE:
Functions may vary by model.
BEFORE FIRST USE
NOTE:
While not recommended, preheating
can be skipped by pressing and holding the
START/STOP dial for 4 seconds.
NOTE:
Opening the door and using extension cords can extend preheat times. Please make sure
to use an extension cord rated for outdoor use.
TEMP TIME
300°F–400°F 5–7 mins
400°F–500°F 7–10 mins
500°F–600°F 10–15 mins
600°F–700°F 15–20 mins
1
Remove all accessories from the package
and read this manual carefully. Please pay
particular attention to operational instructions,
warnings, and important safeguards to avoid
any injury or property damage.
2 Wash the bake pan in warm soapy water. Rinse
and dry thoroughly.
3
DO NOT use abrasive brushes or sponges on
the cooking surface. Damage to the coating
can occur.
NOTE: DO NOT get the pizza stone wet or put
it in the dishwasher. Place it in the oven after
removing all packaging.
NOTE:
We recommend placing all accessories
inside the oven and running it on BAKE at
450°F for 20 minutes without adding food. This
removes any residues. This is completely safe
and not detrimental to the performance of the
oven or accessories.
EXTENSION CORD
1
Connect to proper 3-prong grounded GFCI
outlets only.
2
Use only outdoor extension cords marked as
“SJOW” and “suitable for use with outdoor
appliances.” For cords up to 25 feet, use
14 gauge. For 25- to 50-foot cords, use
12 gauge. Cords longer than 50 feet are
not recommended. Using the incorrect
cord could lead to the cord overheating/
melting and/or a drop in voltage that can
increase preheat times and impact cooking
performance/cook times.
PREHEAT TEMPERATURES & TIMES
5
5
READY: When cooking multiple pizzas, the
READY indicator will illuminate, indicating
the pizza stone is at temperature
to
cook the
next pizza.
IMPORTANT:
Remove all packaging, tape,
and silica packets from the oven.
6
ON: If the oven is on and running, this indicator
will illuminate, indicating the oven is still on
and hot. When the oven is not in use, press the
power button to turn the unit o.
7
LIGHT: Press to illuminate oven’s interior for 10
minutes. Light will always turn on for last 30
seconds of a cook.
NOTE:
While not recommended, preheating
can be skipped by pressing and holding the
START/STOP dial for 4 seconds.
NOTE:
If you don’t wait for the READY
indicator to appear before starting your next
cook, the pizzas may come out underdone.
5 6
ninjakitchen.com
ninjakitchen.com
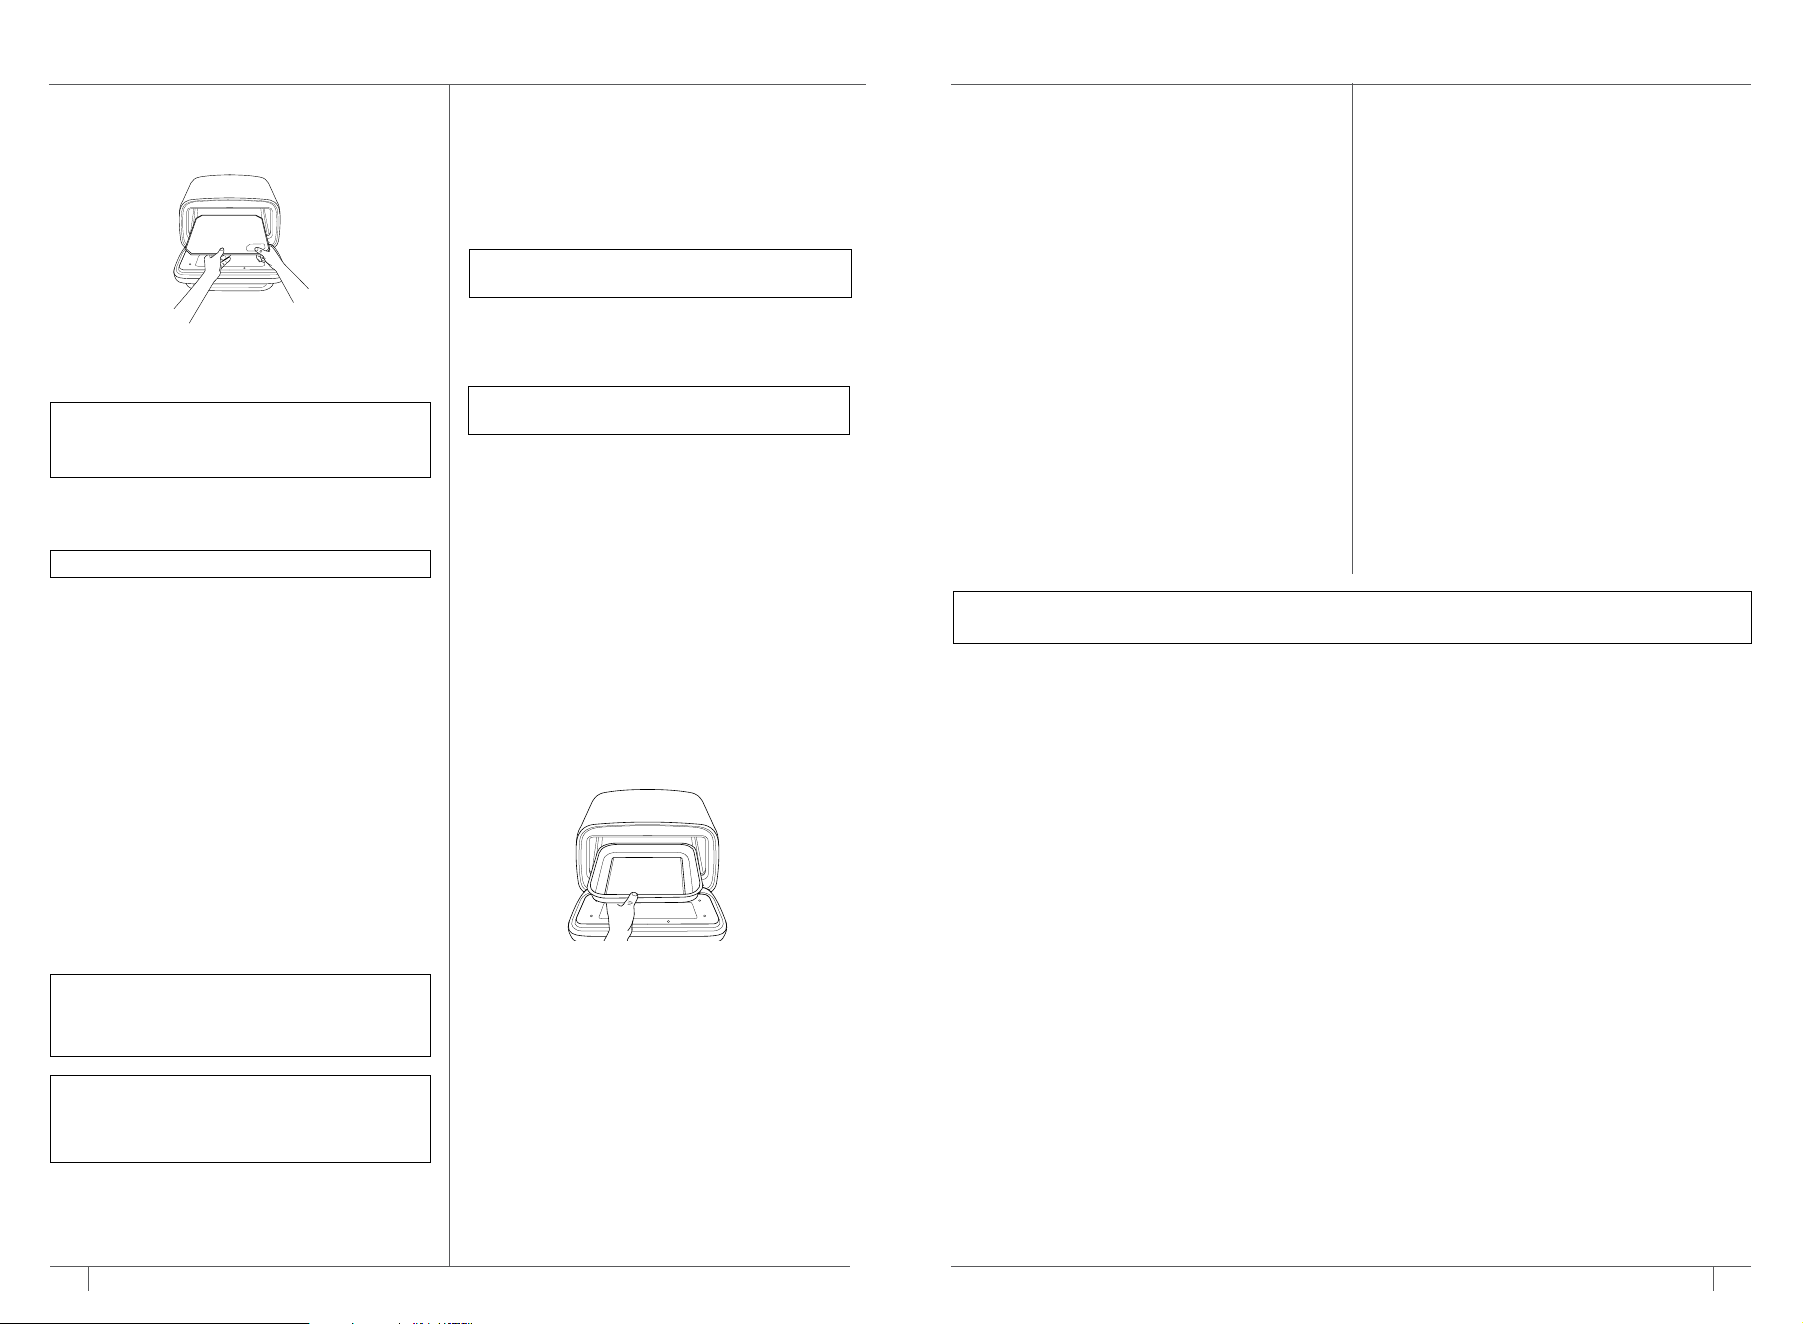
USING THE
NINJA ARTISAN™ OUTDOOR PIZZA OVEN
NOTE: There is no preheat time for the Warm
and Proof functions.
Broil
(not included on all models)
1 Place the pizza stone and bake pan in the
oven, with the stone underneath.
Bake, Proof, Warm (not included on all models)
1 Place the pizza stone in the oven.
2
Press the mode button to select BAKE,
PROOF, or WARM.
3 Press the TEMP button, then use the dial to set
the temp. Press the TIME button, then use the
dial to set the time.
COOKING FUNCTIONS
Pizza
1
Place the pizza stone in the oven.
2
Press the mode button to select PIZZA.
3
Use the dial to select the
desired preset pizza
type Neapolitan, Thin, New York, Pan, or
Custom.
4
Each pizza preset automatically sets a specific
cook time. To adjust the time, simply press
TIME and turn the dial to your preferred setting.
When cooking time is complete, the oven will
remain on for up to one hour, allowing you to
bake multiple pizzas back-to-back.
5
Press the START/STOP dial to begin preheating.
Estimated preheat time is 10–20 minutes,
depending on set temperature (refer to Preheat
Temperatures & Times section and chart).
6
Once the oven has reached temperature, ADD
FOOD, PUSH STRT will display. Place pizza
directly on the stone.
7
Press the START/STOP dial again and the
timer will begin counting down.
8
When cook time is complete, the oven will beep
and GET FOOD will appear on the display. Use
pizza peel to remove pizza from oven.
NOTE:
If cooking Pan Pizza, you will need to
prepare in a deep-dish pan (not included). Pan
must be placed on pizza stone during cooking.
NOTE:
Temp can only be set using CUSTOM.
NOTE:
We recommend using the Ninja Pizza
Peel, sold separately. If you do not have a pizza
peel, use a cutting board or underside of a
bake pan with flour to place pizza on stone.
NOTE: COOKING BACK-TO-BACK PIZZAS –
For best results, wait until READY appears on
the display. This indicates the stone is back
up to temperature. Then add the next pizza.
2
Press the mode button to select BROIL.
3 Press the TEMP button, then use the dial to
set the temp. Press the TIME button, then use
the dial to set the time.
4
Place ingredients on the bake pan.
5
Press the START/STOP dial to begin cooking.
There is no preheat time. The oven will begin
cooking and the timer will begin counting
down.
6
When cook time is complete, the oven will
beep and DONE will display.
7
Use oven mitts to remove food from the oven.
Let it rest, then serve.
NOTE: The WARM setting is automatically set
to 170°F, and the PROOF setting to 90°F.
4 Press the START/STOP dial to begin
preheating.Estimated preheat time is 5 to 25
minutes depending on set temperature (refer
to Preheat Times section and chart).
5
While oven is preheating, start prepping
ingredients.
6
When the oven is preheated, ADD FOOD,
PUSH START will appear on the display.
7 Use oven mitts to place the pan with
ingredients onto the pizza stone.
8 Press the START/STOP dial to begin cooking.
The timer will begin counting down.
9
When cook time is complete, the oven will
beep and DONE will display.
9
Use oven mitts to remove food from the oven.
Let it rest, then serve.
CLEANING & MAINTENANCE
CLEANING THE OVEN
1 The oven should be cleaned thoroughly after
each use. ALWAYS let the appliance and
accessories cool before cleaning.
2 Unplug the oven from power source before
cleaning. Keep the door open after removing
food to allow the oven to cool quicker.
3 Use soap and water with a nylon brush to
clean the interior of the oven and the inside
of the glass door. DO NOT use abrasive or
chemical cleaners, as they will damage the
oven.
4 After every use, wipe away any food splatter
on the interior walls and glass door of the unit
with a soft, damp sponge.
Bake Pan
1 Allow the bake pan to cool. DO NOT put the
bake pan in the dishwasher.
2 Use dish soap, warm water, and the rough
side of a sponge to remove any remaining
discoloration. DO NOT use steel wool or
other abrasive scrubbers as this may scratch
the cookware.
3 Rinse the pan and dry it with a dish towel.
Pizza Stone
Allow the pizza stone to cool completely before
cleaning. The pizza stone can crack or break if it
comes in contact with cold water while it’s hot.
1 Scrape lightly . DO NOT use a metal spatula or
knife, as these can scratch the pizza stone.
2 Wipe any remaining debris o the stone using
a soft cloth.
3 DO NOT wash the pizza stone. Water can
stay in the stone for a long time; if it gets wet.
allow it to dry completely before using again.
4 Expect your pizza stone to become
discolored over time - a seasoned stone is a
good thing (like a cast-iron pan).
NOTE: The unit is tested to withstand the outdoor elements. We recommend buying the cover for
extra protection, and keeping the unit clean.
Glass Door
Wait until the oven is completely cool before
cleaning the glass door. You can remove grease
using dry paper towels or a dry cloth. For more
thorough cleaning, use warm, soapy water, but
make sure the oven is completely dry before
turning it on again.

8
ninjakitchen.com
7
ninjakitchen.com
To order additional parts and accessories, visit ninjaaccessories.com or contact Customer
Service at
1-877-646-5288
.
So we may better assist you, please register the product online at
registeryourninja.com and have the product on hand when you call.
REPLACEMENT PARTS
TROUBLESHOOTING & FAQ
WARNING: To reduce the risk of shock and unintended operation, turn power o and unplug unit
before troubleshooting.
• Why does “ADD FOOD PUSH STRT” appear on the control panel display?
The oven has completed preheating, and it is now time to add the ingredients.
• Why does “E” appear on the control panel display?
The oven is not functioning properly. Contact Customer Service at 1-877-646-5288 so we may assist you.
Please register the product online at registeryourninja.com and have the product on hand when you call.
• Should I add my ingredients before or after preheating?
For best results, let the oven preheat before adding ingredients.
• Why did a circuit breaker trip while using the oven?
The oven uses 1800 watts of power, so it must be plugged into an outlet on a 15-amp circuit breaker.
Using an outlet on a 10-amp breaker will cause the breaker to trip. It is also important that the oven be
the only appliance plugged into an outlet when in use. To avoid tripping a breaker, make sure the oven
is the only appliance plugged into an outlet on a 15-amp breaker.
• Why is my unit not powering on?
To turn on the oven press the power button on the left side of the control panel. If the oven is still not
powering on, make sure it is plugged in, or try a dierent outlet. If the oven is still not powering on,
please contact Customer Service at 1-877-646-5288.
• Can I plug the oven into an RV outlet?
Only if the RV outlet can provide up to 15 amps of 120-volt power.
• Can I plug the oven into a car, SUV, or truck outlet?
Only if the car, SUV, or truck outlet can provide up to 15 amps of 120-volt power.
• Can I use an extension cord?
Yes, connect to a proper 3-prong grounded GFI outlet only and ensure you are using the correct
recommended cord. Use only outdoor extension cords marked as “SJOW” and “suitable for use with
outdoor appliances.” For cords up to 25 feet, use 14 gauge. For 25- to 50-foot cords, use 12 gauge. Cords
longer than 50 feet are not recommended. Using the incorrect cord could lead to the cord overheating/
melting and/or a drop in voltage that can increase preheat times and impact cooking performance/cook times.
• Can I use the oven when it’s raining or snowing?
Yes, but make sure you read through all safety instructions in the owner’s guide before use. Preheat
times could be impacted depending on severity of weather.
• Can I use the oven inside?
No, this unit is for outdoor use only.
• Can I use oils to cook in my oven at high temperatures?
When cooking at 500°F, be sure to use fats or oils with high smoke points. For the best results, follow
the recommended options listed in the Ninja recipes.
• How do I avoid a fire in my oven while batch cooking at high temperatures?
Remember to empty the fat/oil from the bake pan to help prevent spillover. Ensure bake pan is washed
thoroughly before each use. This will prevent grease from burning and causing smoke.
• How do I avoid flare-ups when I open the oven?
When cooking at high temperatures, specifically when roasting foods, open the door slowly and at an
arm’s length. Remember to empty the fat/oil from the bake pan to help prevent spillover. This will help
prevent smoke and flare-ups.
• What does the READY light mean?
READY indicates the pizza stone is at temperature and ready to cook.
• What does the ON light mean?
If the unit is on, this light will illuminate, indicating the unit is still on and hot. When the unit is not in
use, press the power button to turn the unit o.
• Can I use my own bake pan?
Yes. Place your bake pan (or deep-dish pizza pan if you’re using the preset Pizza “Pan” setting) on the
bake pan. DO NOT place any accessories not intended for the Outdoor Pizza & High-Heat Oven directly
on the heating elements.

9
ninjakitchen.com
The One (1) Year Limited Warranty applies to purchases made from authorized retailers of
SharkNinja Operating LLC. Warranty coverage applies to the original owner and to the original product
only and is not transferable.
SharkNinja warrants that the unit shall be free from defects in material and workmanship for a period
of one (1) year from the date of purchase when it is used under normal household conditions and
maintained according to the requirements outlined in the Owner’s Guide, subject to the following
conditions and exclusions:
What is covered by this warranty?
1. The original unit and/or non-wearable parts deemed defective, in SharkNinja’s sole discretion,
will be repaired or replaced up to one (1) year from the original purchase date.
2. In the event a replacement unit is issued, the warranty coverage ends six (6) months following the
receipt date of the replacement unit or the remainder of the existing warranty, whichever is later.
SharkNinja reserves the right to replace the unit with one of equal or greater value.
California Residents Only: The One (1) Year Limited Warranty period begins on the original date of
delivery or pickup.
What is not covered by this warranty?
1. Normal wear and tear of wearable parts (such as blending vessels, lids, cups, blades, blender
bases, removable pots, racks, pans, etc.), which require regular maintenance and/or replacement
to ensure the proper functioning of your unit, are not covered by this warranty. Replacement parts
are available for purchase at ninjaaccessories.com.
2. Any unit that has been tampered with or used for commercial purposes.
3. Damage caused by misuse, abuse, negligent handling, failure to perform required maintenance
(e.g., failure to keep the well of the motor base clear of food spills and other debris), or damage
due to mishandling in transit.
4. Consequential and incidental damages.
5. Defects caused by repair persons not authorized by SharkNinja. These defects include damages
caused in the process of shipping, altering, or repairing the SharkNinja product (or any of its parts)
when the repair is performed by a repair person not authorized by SharkNinja.
6. Products purchased, used, or operated outside North America.
How to get service
If your appliance fails to operate properly while in use under normal household conditions within the
warranty period, visit ninjakitchen.com/support for product care and maintenance self-help. Our
Customer Service Specialists are also available at 1-877-646-5288 to assist with product support and
warranty service options, including the possibility of upgrading to our VIP warranty service options
for select product categories. So we may better assist you, please register your product online at
registeryourninja.com and have the product on hand when you call.
SharkNinja will cover the cost for the customer to send in the unit to us for repair or replacement. A fee
of $20.95 (subject to change) will be charged when SharkNinja ships the repaired or replacement unit.
How to initiate a warranty claim
You must call 1-877-646-5288 to initiate a warranty claim. You will need the receipt as proof of purchase.
We also ask that you register your product online at registeryourninja.com and have the product on
hand when you call, so we may better assist you. A Customer Service Specialist will provide you with
return and packing instruction information.
How state law applies
This warranty gives you specifi c legal rights, and you also may have other rights that vary from state
to state. Some states do not permit the exclusion or limitation of incidental or consequential damages,
so the above may not apply to you.
ONE (1) YEAR LIMITED WARRANTY
NJA_1_YR_IB_LMTD_WRNTY_US_ENG
10
ninjakitchen.com
NOTES