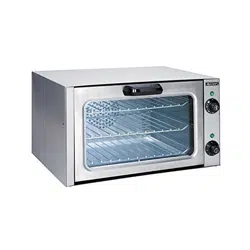

Convection Oven
Operation Manual
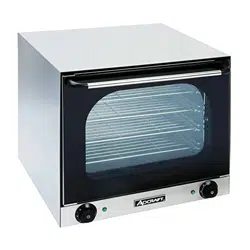
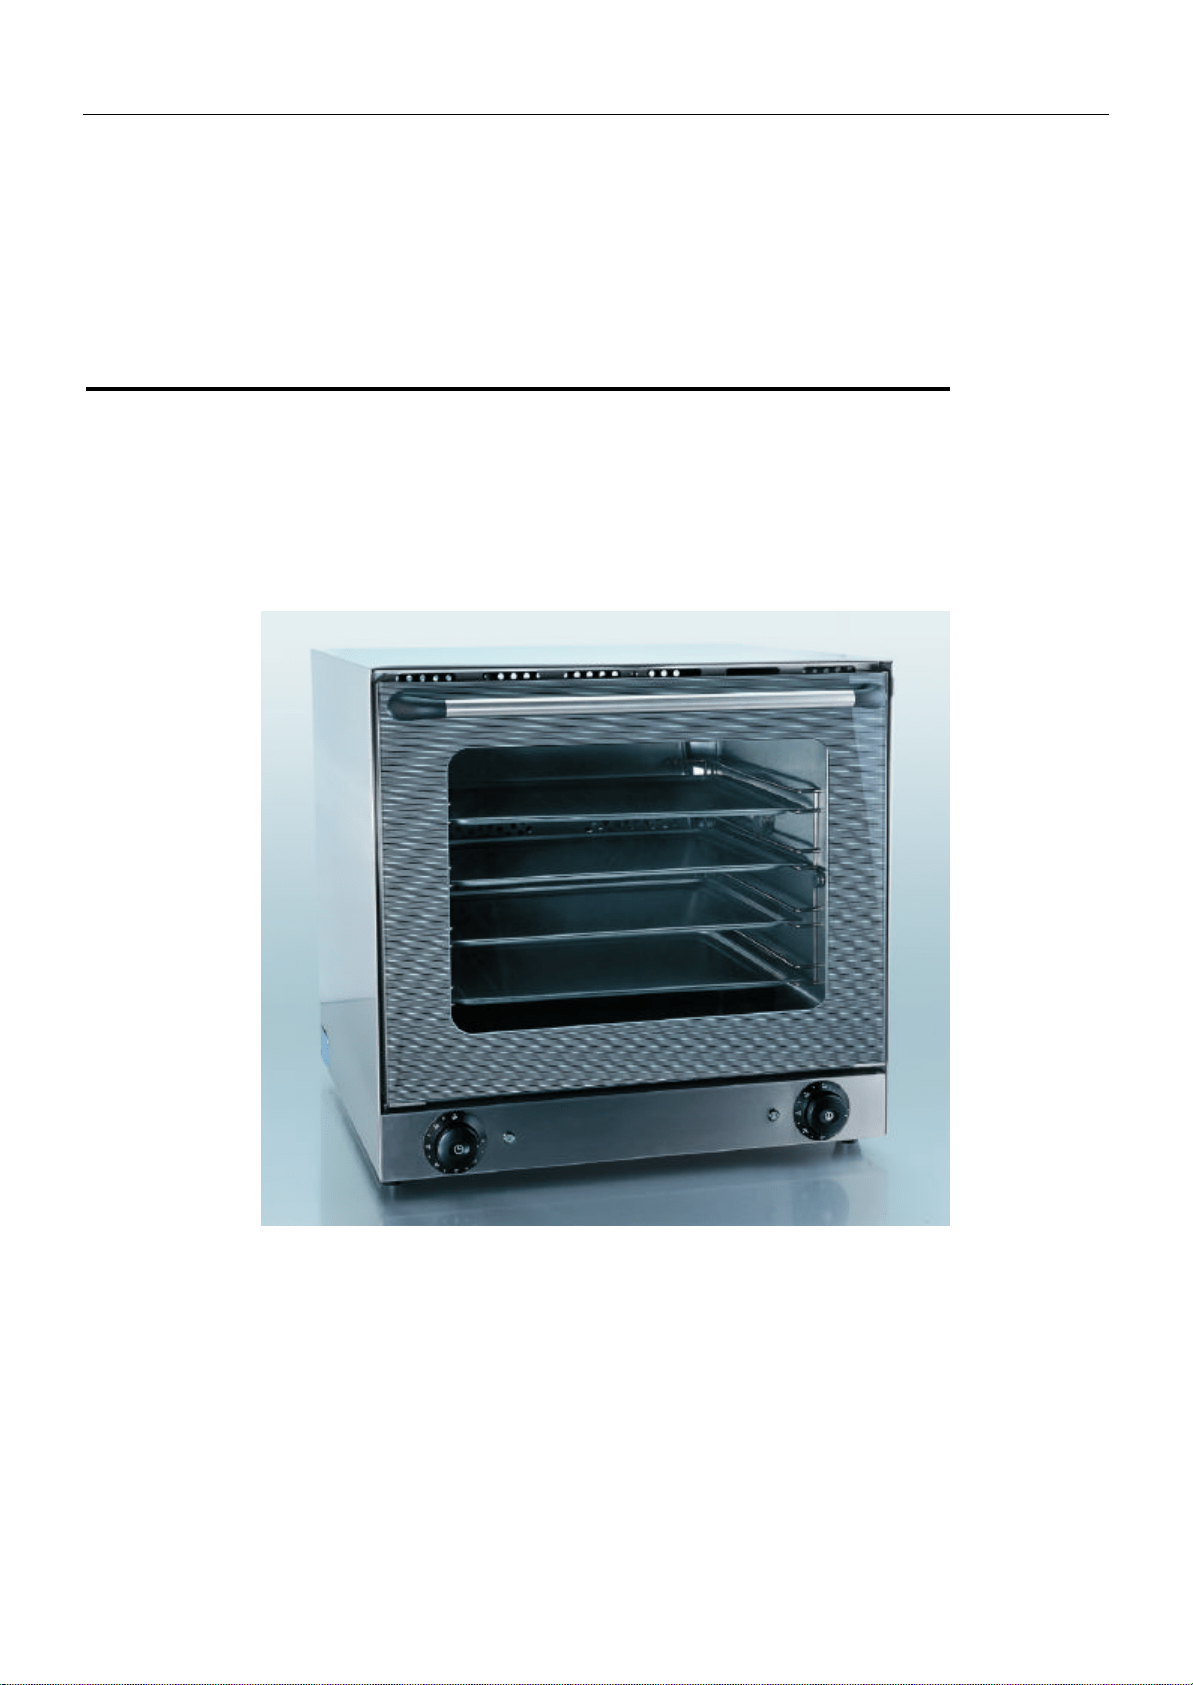
COH-2670W
OPERATION MANUAL PAGE 1
Electric Convection Oven
Operation Manual
l Thank you for purchasing the COH-2670W Electric Convection Oven.
l To ensure proper operation, please read this manual carefully before use.
l After reading, retain this manual in a convenient place for further reference.
SAVE THESE INSTRUCTIONS

OPERATION MANUAL PAGE 2
Contents
1. Safety Guidelines………………… ……………… ……………………………………..……3
1.1 Notes on installation……………………… ………………………………………………3
1.2 Notes on operation…………………………………………………………………………3
2. Purpose of Using the Oven……………………………………………………………………4
3. Using the Oven………………………………………………………… ………………………4
3.1 Preparations before Use……………………………… ……… …………………………4
3.2 Instructions for Use………………………………………………………………………… 5
4. Maintenance of Oven………………………………………………………………………… 6
5. Storing the Oven………………………………………………… …………… …… ……… 7
6. Specification…..………………………………………… ……………………………………7

OPERATION MANUAL PAGE 3
1. Safety Guidelines
1.1 Notices on installation
WARNINGS
l Install the oven, in a suitable location away from water, and close to a fire extinguisher.
l Installation of the oven must comply with industry standards. Incorrect installation can cause accidents,
electrical shock, fire.
l The rubber feet must be installed on the equipment firmly. Do not use the oven without feet.
l Do not install the equipment on the floor.
l Be sure to install the oven on a flat and stable surface. Otherwise the unit may topple over, causing
injury or burns.
l Be sure to provide clearance of at least 4 inches (10cm) between the unit and walls.
Insufficient clearance may cause generated heat to damage the other surrounding items.
l Remove all the adhesive film which covers the body surface before using.
l Be sure to connect the power cord in compliance with industry standards.
l Check the power supply to see if it is correct for the specification of the oven. The working voltage range
can not deviate by ± 10% when the oven is working.
Violating this standard can cause electrical shock or fire. If you cannot identify the specification of the
power supply used, consult the supplier.
l Be sure to connect a ground wire to the oven.
Operating the oven without grounding can cause an electrical shock or fire by a short circuit.
l A bi-pole switch must be installed between the oven and the power.
l Do not bundle up the power cord.
l Do not step on, squeeze, or forcedly twist the power cord; otherwise the power cord can become
damaged, causing electrical shock or fire.
If your power cord has been damaged, consult the supplier for replacement.
1.2 Notices on operation
WARNINGS
l Do not use combustibles (e.g., thinner), combustible gases, or volatile matter near the oven; otherwise
an explosion or fire could be caused.
l Do not put anything on top of the oven while oven is in use.
l The metal parts and glass window of the door become extremely hot during use; be careful not to
touch them when opening and closing the door.
l When hot, do not apply water to the glass window. It may cause the glass to break.
l Do not touch any place except for the handle and switch during use, otherwise you could suffer burns
since the body is very hot.
l If the oven has been submerged due to a disaster or other problem, replace unit. Otherwise, electrical
shock or fire can be caused.
l Consult the supplier where you purchased the oven for repairs.

OPERATION MANUAL PAGE 4
Incorrect repairs can cause electrical shock, burns, fire or accidents.
l Do not disassemble the oven.
l When removing dirt from the oven, do not use chemicals, such as thinner or benzene.
l Do not stack the oven by three or more (120Kg (280lb)).
l Clean the inside daily.
2. Purpose of Using the Oven
The oven was designed only to be used baking and reheating purposes. Do not use for other purposes.
3. Using the Oven
3.1 Preparations before using
A. Feet assembly
l The feet are placed inside the appliance and must be assembled. Do not use the appliance without
feet.
l Screw the support feet to the bottom of the appliance.
l Adjust the appliance height by screwing or unscrewing the feet themselves.
B. Positioning
l Install the oven on a flat and solid surface.
C. Remove the protective film.
D. Take out the tray from the body and wash it.
E. Wipe the inside and outside of the oven with a damp cloth. Then, wipe with a dry cloth.
F. Electrical connection
l Before connecting make sure that the voltage and the frequency correspond to that stated on the rating
plate on the appliance.
l Place a bi-polar switch between the appliance and the network accessible after installation, whose
contacts have a minimum opening distance of 3mm, with an appropriate input.
l The appliance must be connected to the ground line of the network.
l The conductor must have a minimum section of 10 mm
2
.
l Connect the power cord to the electrical outlet. Be sure the power cord is strongly kept in position.
3.2 Instruction for Use
3.2.1 How to use Timer
A. Set the time switch knob to the number which indicates the cooking time required by the food you are
going to cook.
B. Set the timer by turning it clockwise. The oven will turn off automatically at the end of the selected time
and a bell will ring.
C.The oven can be turned off manually during cooking by turning the timer counter-clockwise to the “0”
position.
3.2.2 Convection cooking
A. Turn on the power to the oven.
B. Set the temperature control to the desired temperature (0-570°F).
C. Turn the timer to the desired time (0-120min). The temperature light, timer light, and the inside lamp are
OPERATION MANUAL PAGE 5
on.
D. The temperature light will switch off when the temperature rises to the desired level. Then it will switch on
when the temperature drops down. This process will occur automatically.
4. Maintenance of oven
A. Turn off the power switch and disconnect the power cord from the supply.
B. Do not clean the oven until it is completely cooled down.
C. Wipe the oven using a damp cloth.
5. Storing the Oven
A. When not in use, turn off the power switch and disconnect the power cord from the supply.
B. Bundle up the power cord and put the bundle on the body.
C. Cover the body with a plastic bag and pack it in a corrugated cardboard box. Store it in a location with
low humidity.
6. Specifications
Model COH-2670W
Supply voltage 208-220 V
Rated demanded
2670W
Lighting Power 30W
Safety device Temperature fuse 626°F
Functions Convection heater
WARNING
1. When inspecting, cleaning, or maintaining the body, be sure to turn off the power switch and
disconnect the power supply; otherwise you could get an electrical shock caused by a short circuit.
2. Clean the inside of the oven daily to keep it clean.
3. When cleaning the inside of the oven, do not use any detergents, such as acidic detergent or
cleansers.
OPERATION MANUAL PAGE 6
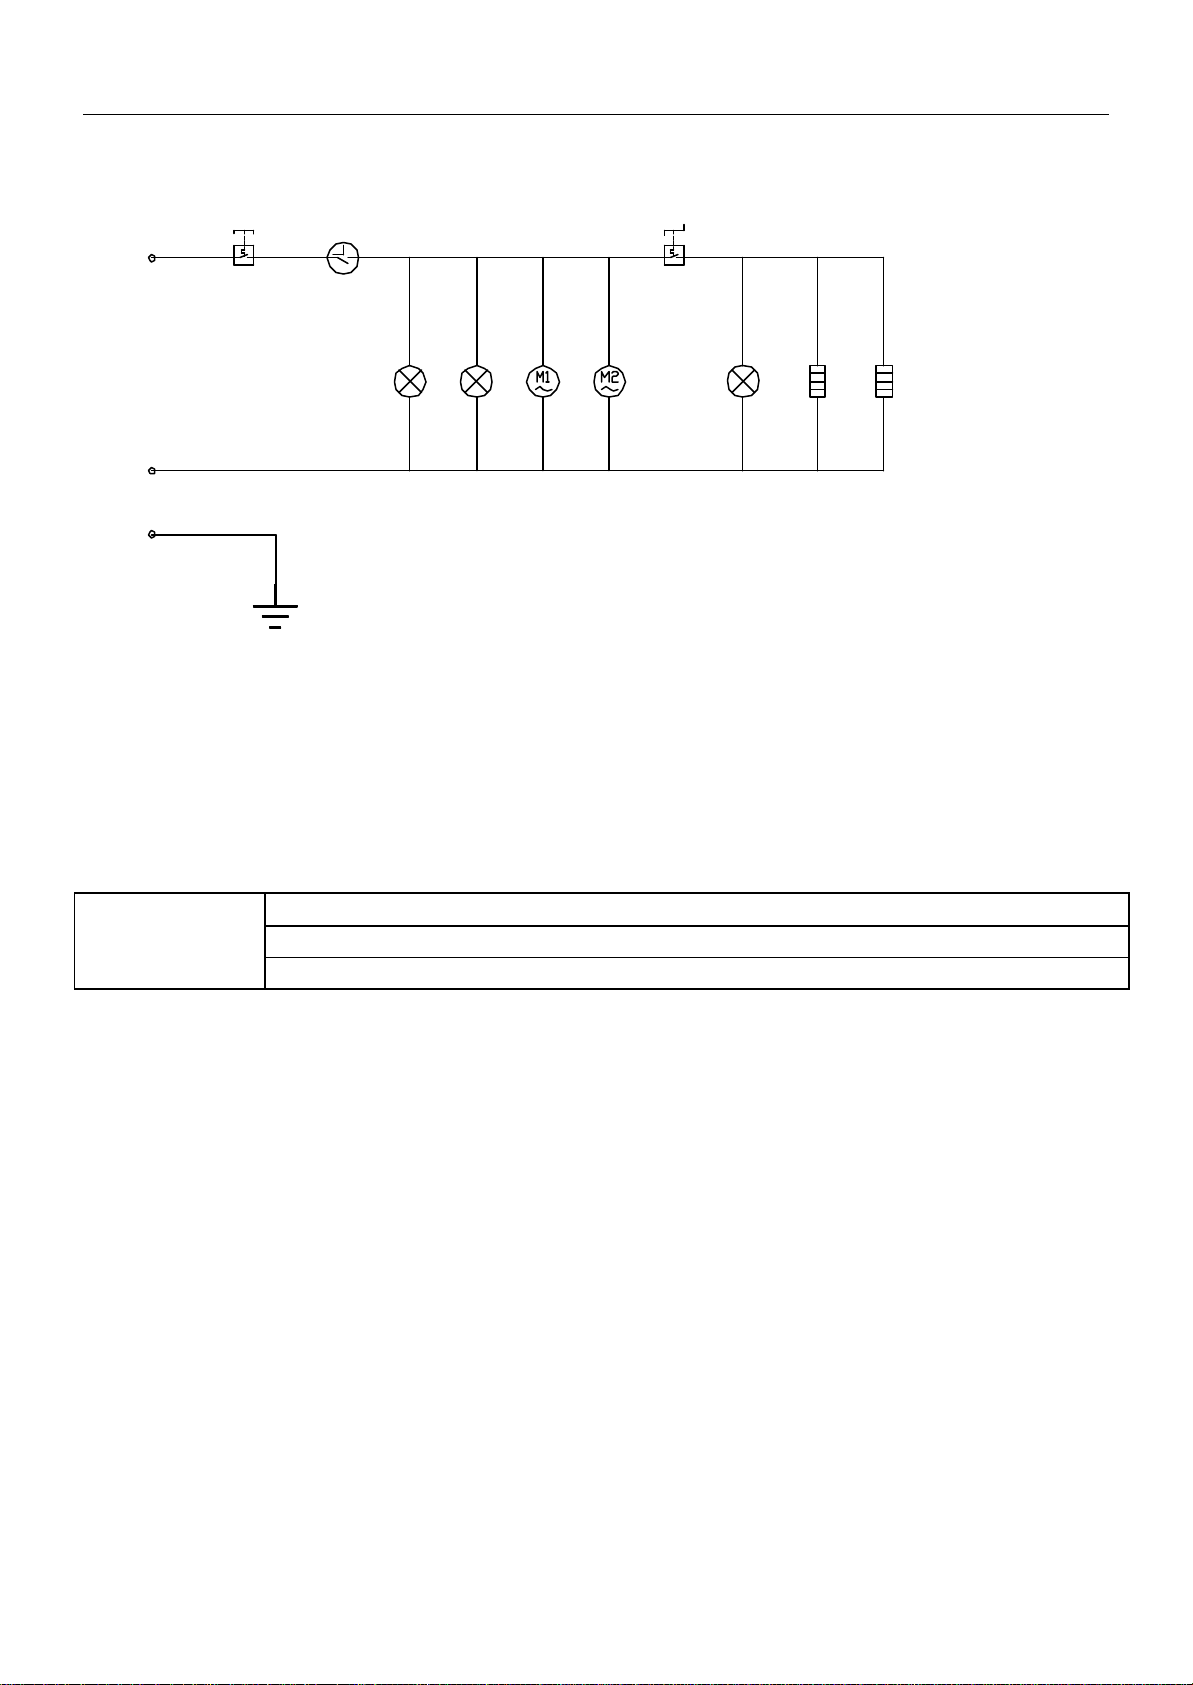
Electric circuit diagram
L
N
E
-S1 -S2-PT
-HL1 -EL -HL2 -EH1 -EH2
(COH-2670W)
EH1---Upper Heater EH2--- Main Heater EL---Inside Lamp M1? M2---Convection fan
S2---Thermostat for Upper Heater S1---Fuse PT---Timer HL1~ HL2---Pilot Light
Dimensions, Capacities, Weights
Dimensions: 595× 595× 570(㎜)
Inner: 460× 380× 360 (㎜)
COH-2670W
Weight: 35kg
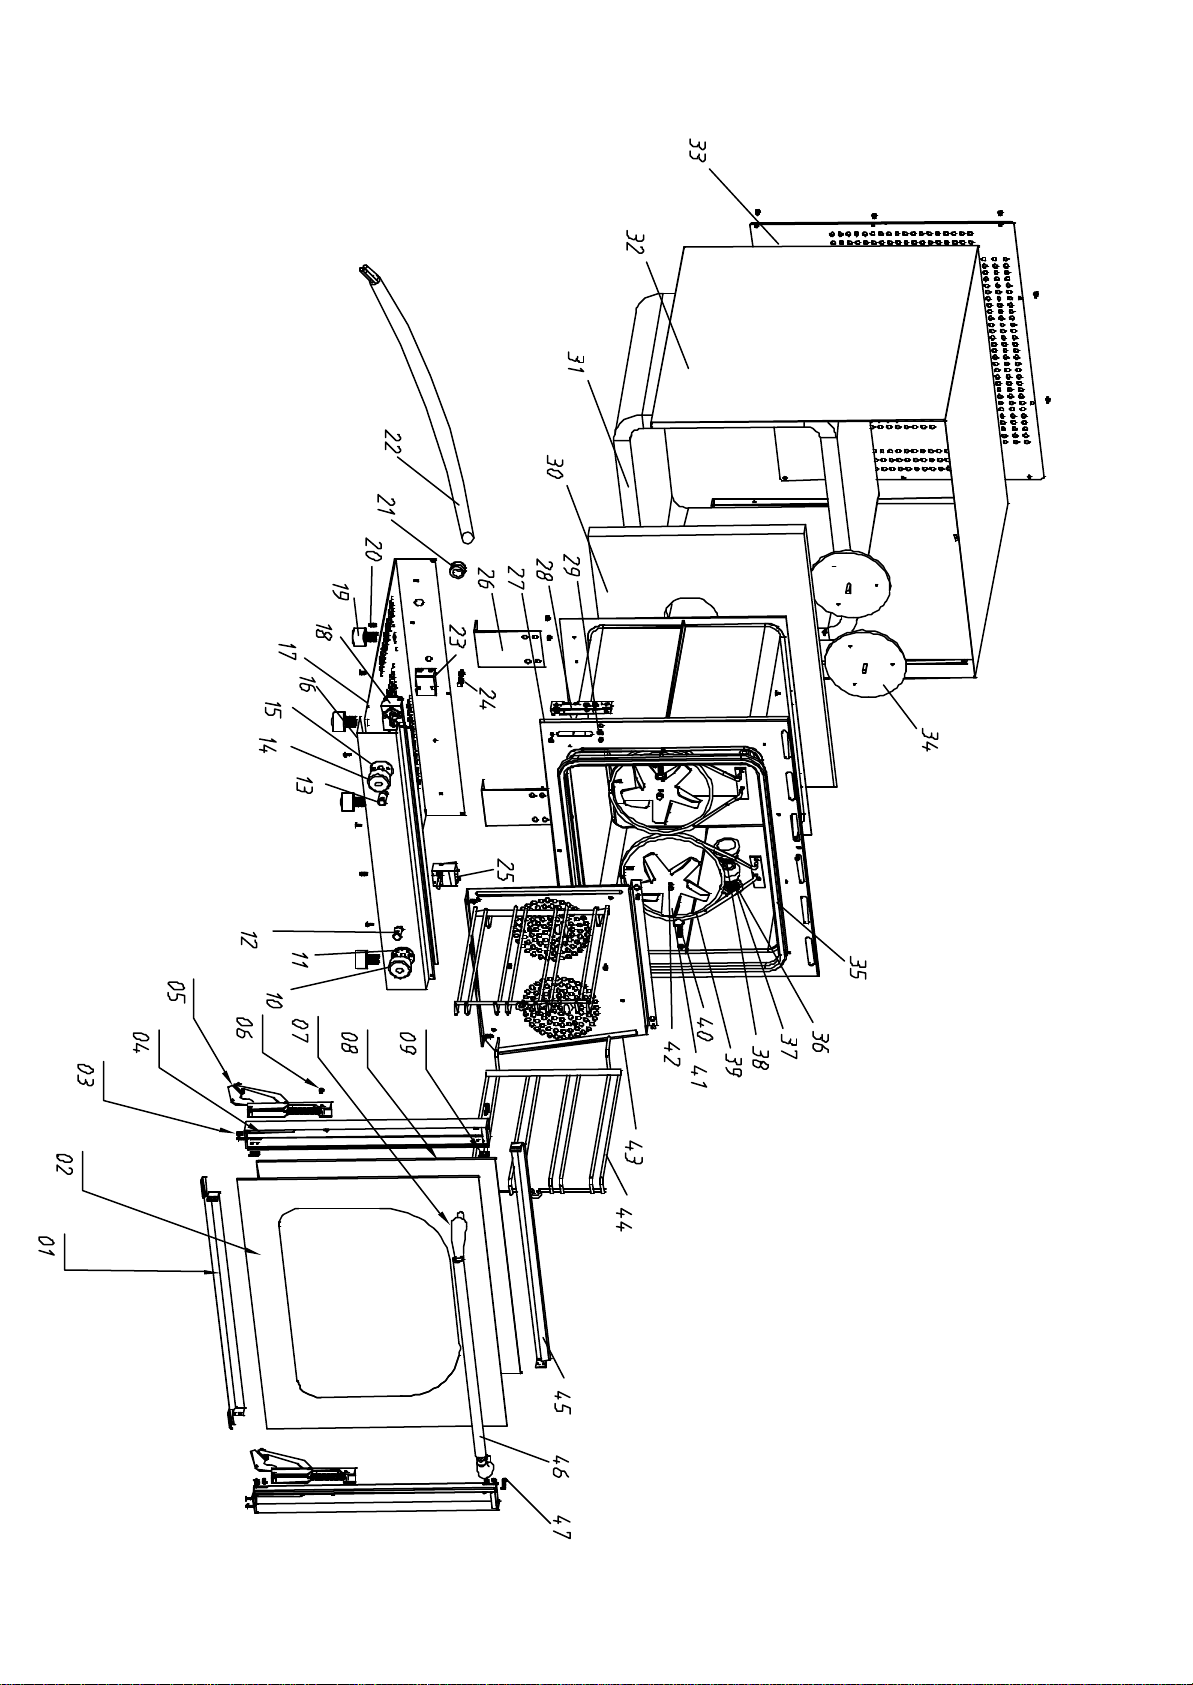
Diagram
of
Convection
Oven
SN Name Material Specification Qty
1 Bar, under door S.S 1
2 Outer toughened glass Toughened glass 577*448*5 1
3 Screw S.S M4*8 4
4 Door post S.S 2
5 Door hinge Zincificated 2
6 Sunk screw S.S M5*8 2
7 Handle terminal end Bakelite 2
8 Inner toughened glass Toughened glass 492*442*5 1
9 Screw S.S M4*8 8
10 Switch, back heating element Bakelite ¢70 1
11 Switch base, back heating element Bakelite ¢51 1
12 Indicator light, timer ¢13, green 1
13 Power indicator light ¢13, green 1
14 Switch of timer Bakelite ¢40 1
15 Switch base of timer Bakelite ¢51 1
16 Front bottom Plate, outer shell S.S 1
17 Base plate Aluminum plating 1
18 Timer 0-120MIN ,16A 1
19 Foot Bakelite 4
20 Crosshead screw 20
21 Wire jacket Brass 1
22 Power wire 1
23 Temperature limit controller S.S 1
24 Earth Screw 1
25 Thermostat 1
26 Inner body support rack S.S 2
27 Inner body S.S 1
28 Door hinge fixture rack 2
29 Crosshead screw S.S M5*10 7
30 Back heat preservation asbestus 1
31
Inner body heat preservation
asbestus 1
32 Outer Shell S.S 1
33 Back cover board Aluminum plating 1
34 Motor 25W 2
35 Door glue 1
36 Floodlight base 1
37 Floodlight 35W 1
38 Lamp chimney Toughened glass 1
39 Heating element S.S 1.26KW 2
40 Fixture screw S.S M5*12 8
41 Wind blade S.S 2
42 Fixture nut of wind blade S.S M5 2
43 Guide wind board S.S 1
44 Rack S.S 2
45 Bar, on the door S.S 1
46 Door Handle S.S ¢19*1.5 1
47 Fixture screw S.S M5*25 2
Part List of Convection oven

ACE Electrical Equipment One Year Warranty
ACE warrants its equipment against defects in materials and workmanship, subject to the following conditions:
This warranty applies to the original owner only, and is not assignable.
ACE Electrical Equipment is warranted for one year, effective from the date of purchase by the original owner. A
copy of the original receipt, or other proof of purchase is required to obtain warranty coverage.
Should any product fail to function in its intended manner under normal use within the limits defined in this
warranty, at ACE’s discretion, such product will be repaired, replaced with a refurbished unit, or replaced with a
new unit by ACE, after defective unit has been inspected and defect has been confirmed. ACE does not assume
any liability for extended delays in replacing any item beyond its control. This warranty does not apply to rubber
and non-metallic synthetic parts where usage, wear, or lack of preventative maintenance may create abnormal
replacement rates, and these parts are excluded from this limited warranty.
This warranty covers products shipped into the 48 contiguous United States, Hawaii, and metropolitan areas of
Alaska and Canada. Warranty coverage on products used outside the 48 contiguous United States, Hawaii and
metropolitan areas of Alaska and Canada may vary. Contact ACE for details at 1-800-223-7750
The following conditions are not covered by warranty:
• Equipment failure relating to improper installation, improper utility connection or supply and problems
due to improper ventilation.
• Equipment that has not properly been maintained, damage for improper cleaning, and water damage to
controls.
• Equipment that has not been used in an appropriate manner, or has been subject to misuse, neglect, abuse,
accident, alteration, negligence, damage during transit, delivery or installation, fire, flood, riot, or act of
God.
• Equipment that has the model number or serial number removed or altered.
• Equipment on which the security seal has been broken.
If the equipment has been changed, altered, modified, or repaired without express written permission from ACE,
then the manufacturer shall not be liable for any damages to any person or to any property, which may result from
the use of this equipment thereafter.
This equipment is intended for commercial use only. Warranty is void if equipment is used in other than a
commercial application.
In the event your repair is not covered under the stated warranty provisions, parts are available by calling 1-800-
223-7750. Equipment not covered by repair should be picked up from our warehouse facility within 10 business
days from notification date. Any and all arrangements and expenses for the return of this merchandise is your
responsibility.
“THE FOREGOING WARRANTY IS IN LIEU OF ANY AND ALL WARRANTIES EXPRESSED OR
IMPLIED INCLUDING ANY IMPLIED WARRANTY OF MERCHANTABILTY OR FITNESS FOR
PARTICULAR PURPOSES AND CONSTITUES THE ENTIRE LIABILITY OF ACE. IN NO EVENT DOES
THE LIMITED WARRANTY EXTEND BEYOND THE TERMS STATED HEREIN.”