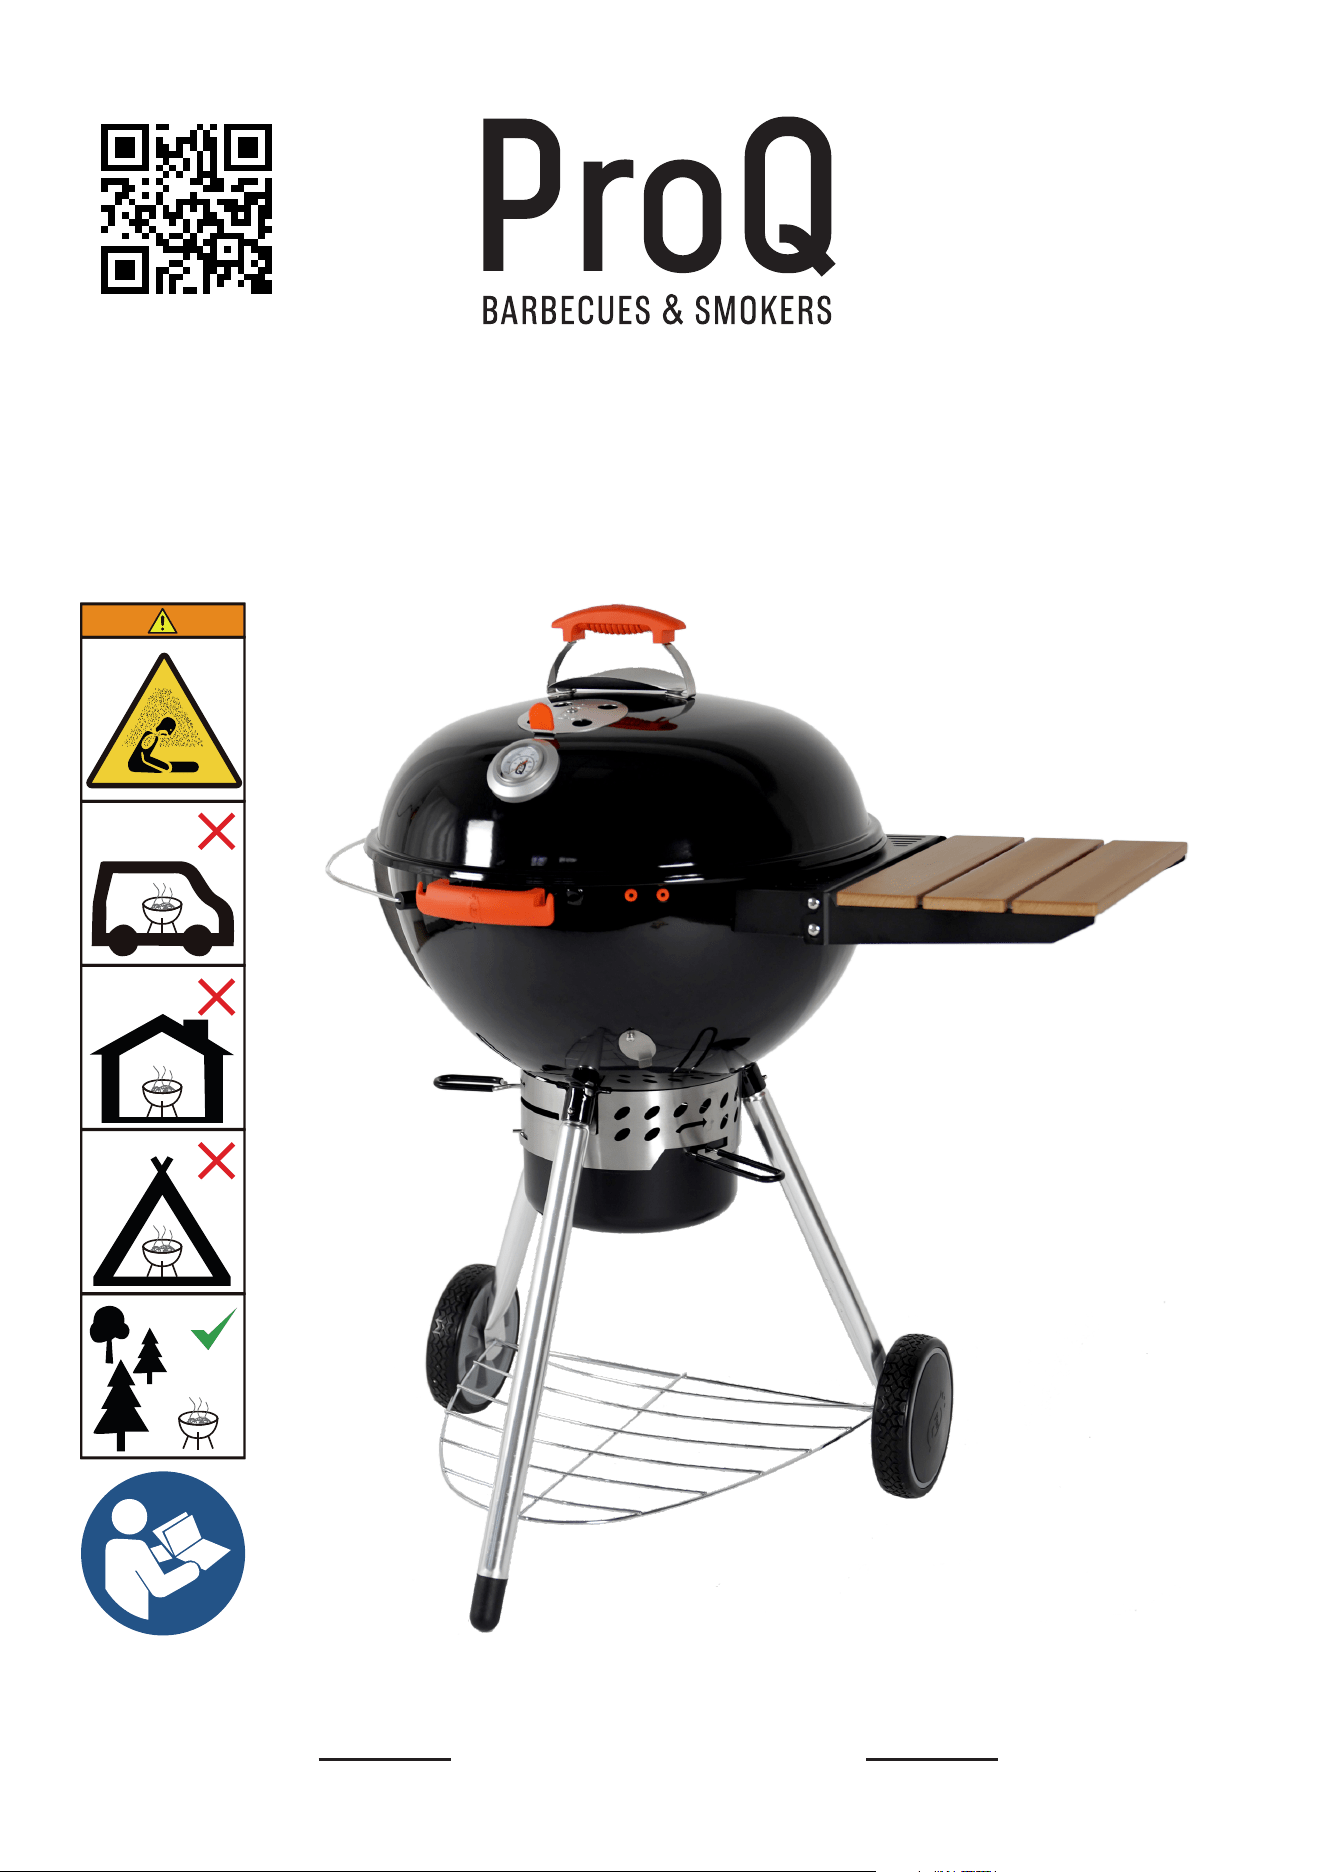
RODEO
CHARCOAL KETTLE BBQ
PROQSMOKERS.COM
SKU: 101610, 101605
ONLINE MANUAL

Thank you for purchasing the ProQ Rodeo Kettle BBQ, a true testament to quality and versatility.
Designed for the modern grill enthusiast, this BBQ combines craftsmanship with a range of
innovative features to elevate your outdoor cooking experience.
• “Whisper Vent” in the re bowl for eortless control during low’n slow cooking.
• Temperature gauge positioned for true readings during indirect cooking and close to grill level
for accuracy.
• Convenient probe eyelets and lid handle with heat deector for safety and ease of use.
• 1mm porcelain enamel coated steel bowl and lid for durability and a glossy nish. 304
stainless steel cooking grill for reliable and robust performance.
• To provide peace of mind, the ProQ Kettle BBQ is backed by a 10-year limited warranty,
reecting our commitment to quality and customer satisfaction.
• Do not use this unit with the side table in the down position. This is extremely
important and could cause the table to burn.
• Be aware of hot embers whilst cooking, the table is made from wood and can be damaged by
hot coals and embers.
• This unit is designed for outdoor use only. Do not use inside homes, vehicles, tents or
enclosed spaces. Burning charcoal without adequate ventilation can cause res, serious illness,
injury or death.
• Burning charcoal creates carbon monoxide, which has no odour. Extinguish coals and ash
after use and close all vents before leaving the BBQ unattended. Even a smouldering re can
create carbon monoxide.
• All parts of the BBQ can get hot to the touch when the re is lit – including the handles.
Always use suitable BBQ mitts for handling or making adjustments to your BBQ. Use extreme
caution when adding charcoal or wood. Do not attempt to move the BBQ when lit.
• Only use the BBQ on a hard, level and non-combustible surface. Make sure there is at least 3’/
1m clearance between the unit and any combustible materials such as bushes, trees, wooden
decks and buildings.
• Do not leave the BBQ unattended and keep children and pets away from the unit at all
times. Use common sense and caution when using this BBQ.
• Do not use instant lighting charcoal, or ammable liquids to light the BBQ. We recommend
using a chimney starter with natural lumpwood charcoal or high quality charcoal briquettes.
• To clean the BBQ, a mild solution of warm, soapy water is all that is required. The use of
abrasive cleaners or sharp objects can damage the coating, cause rust, reduce lifespan and can
invalidate your warranty.
• Once you’ve nished cooking, close all vents and put the lid on the BBQ to extinguish the re.
Do not pour water onto the re to extinguish it, this can cause serious burns.
PRODUCT SAFETY
• Assemble your BBQ on a clean, non-abrasive surface, such as grass, carpet or an old blanket to
avoid scratching the surfaces.
• Don’t overtighten xings: the attached parts should feel sturdy, but overtightening can damage
the porcelain coating.
ASSEMBLY TIPS
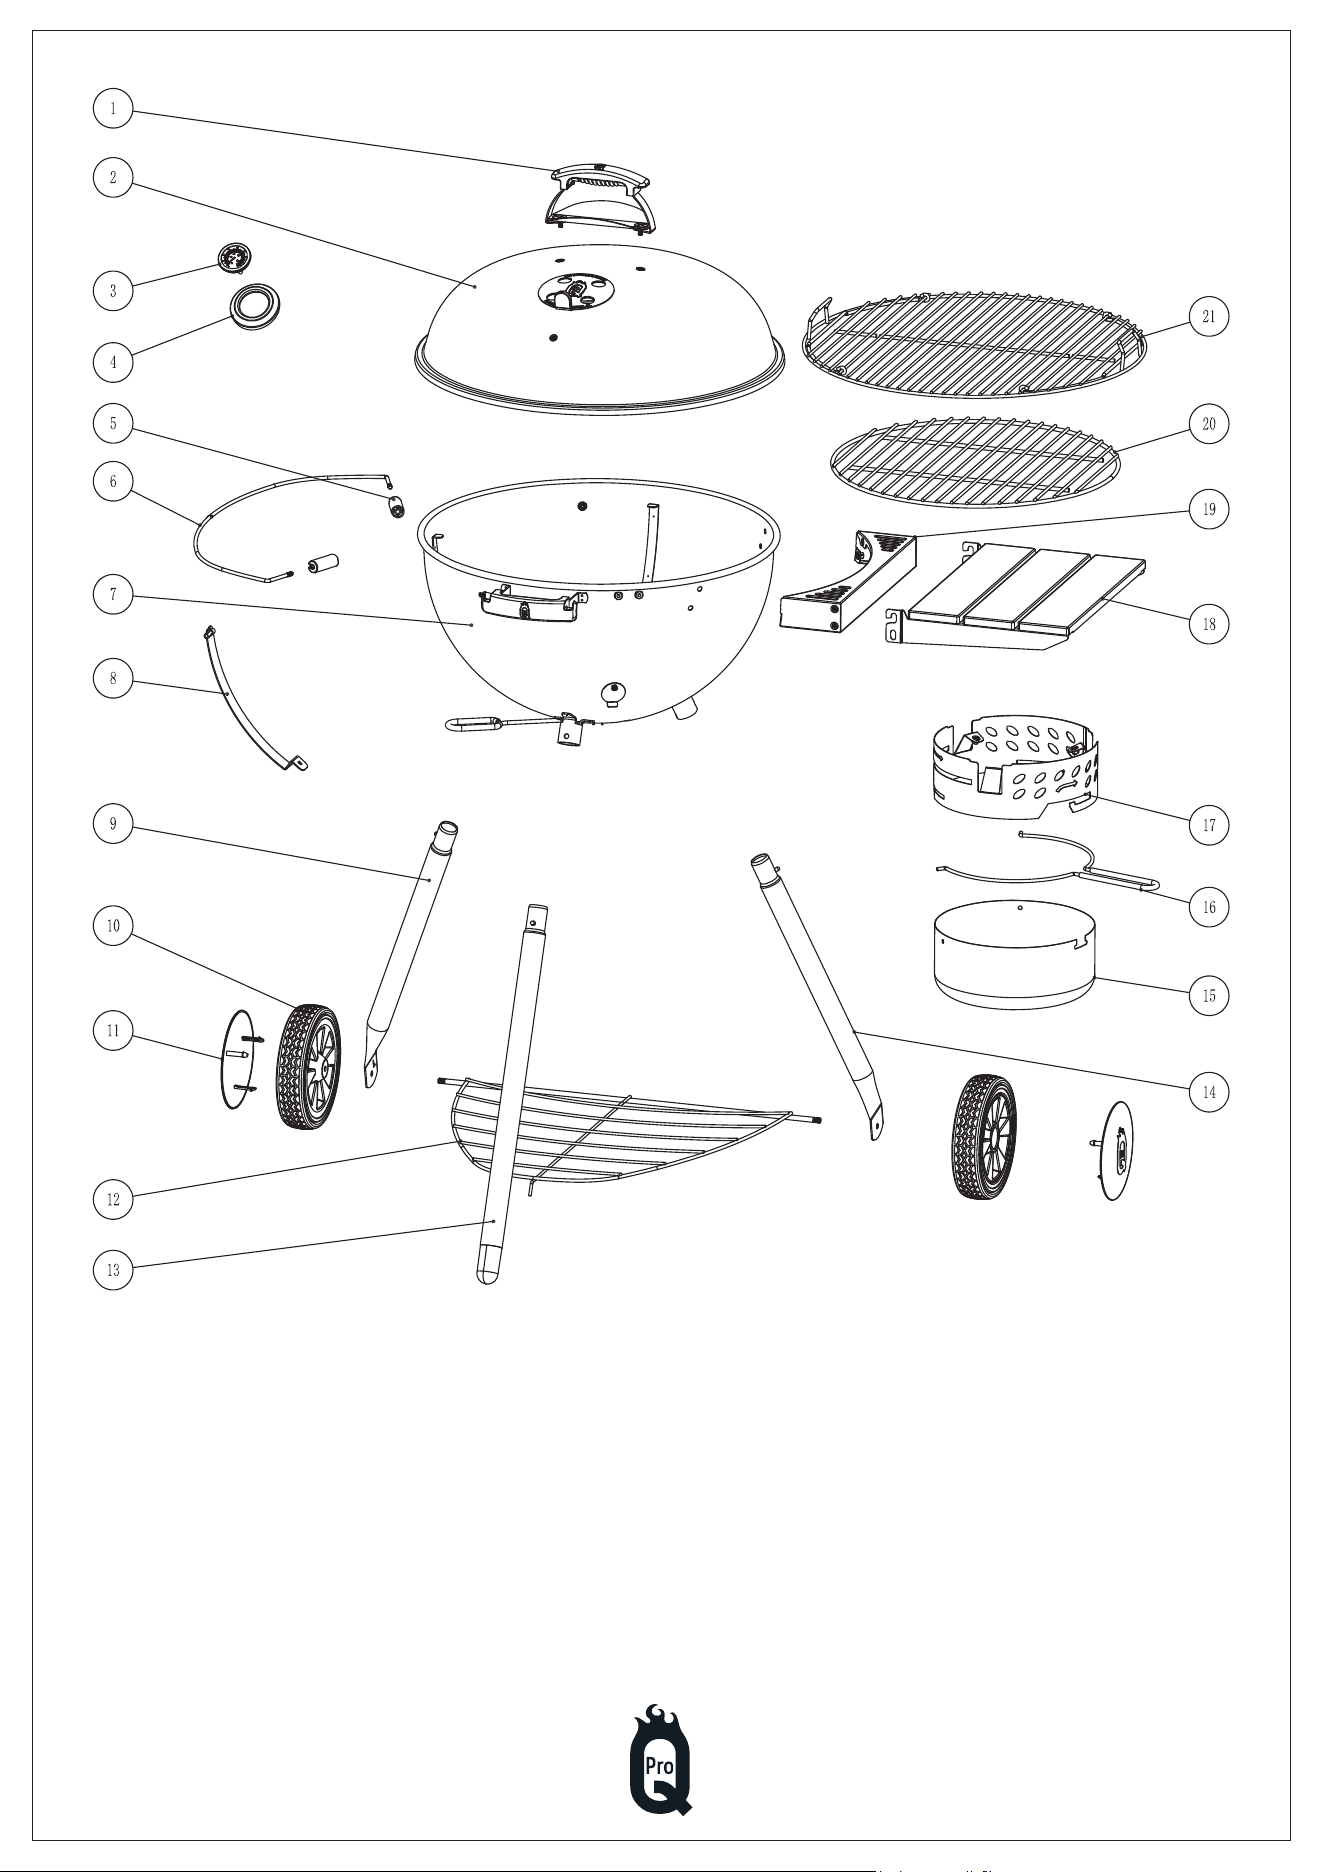
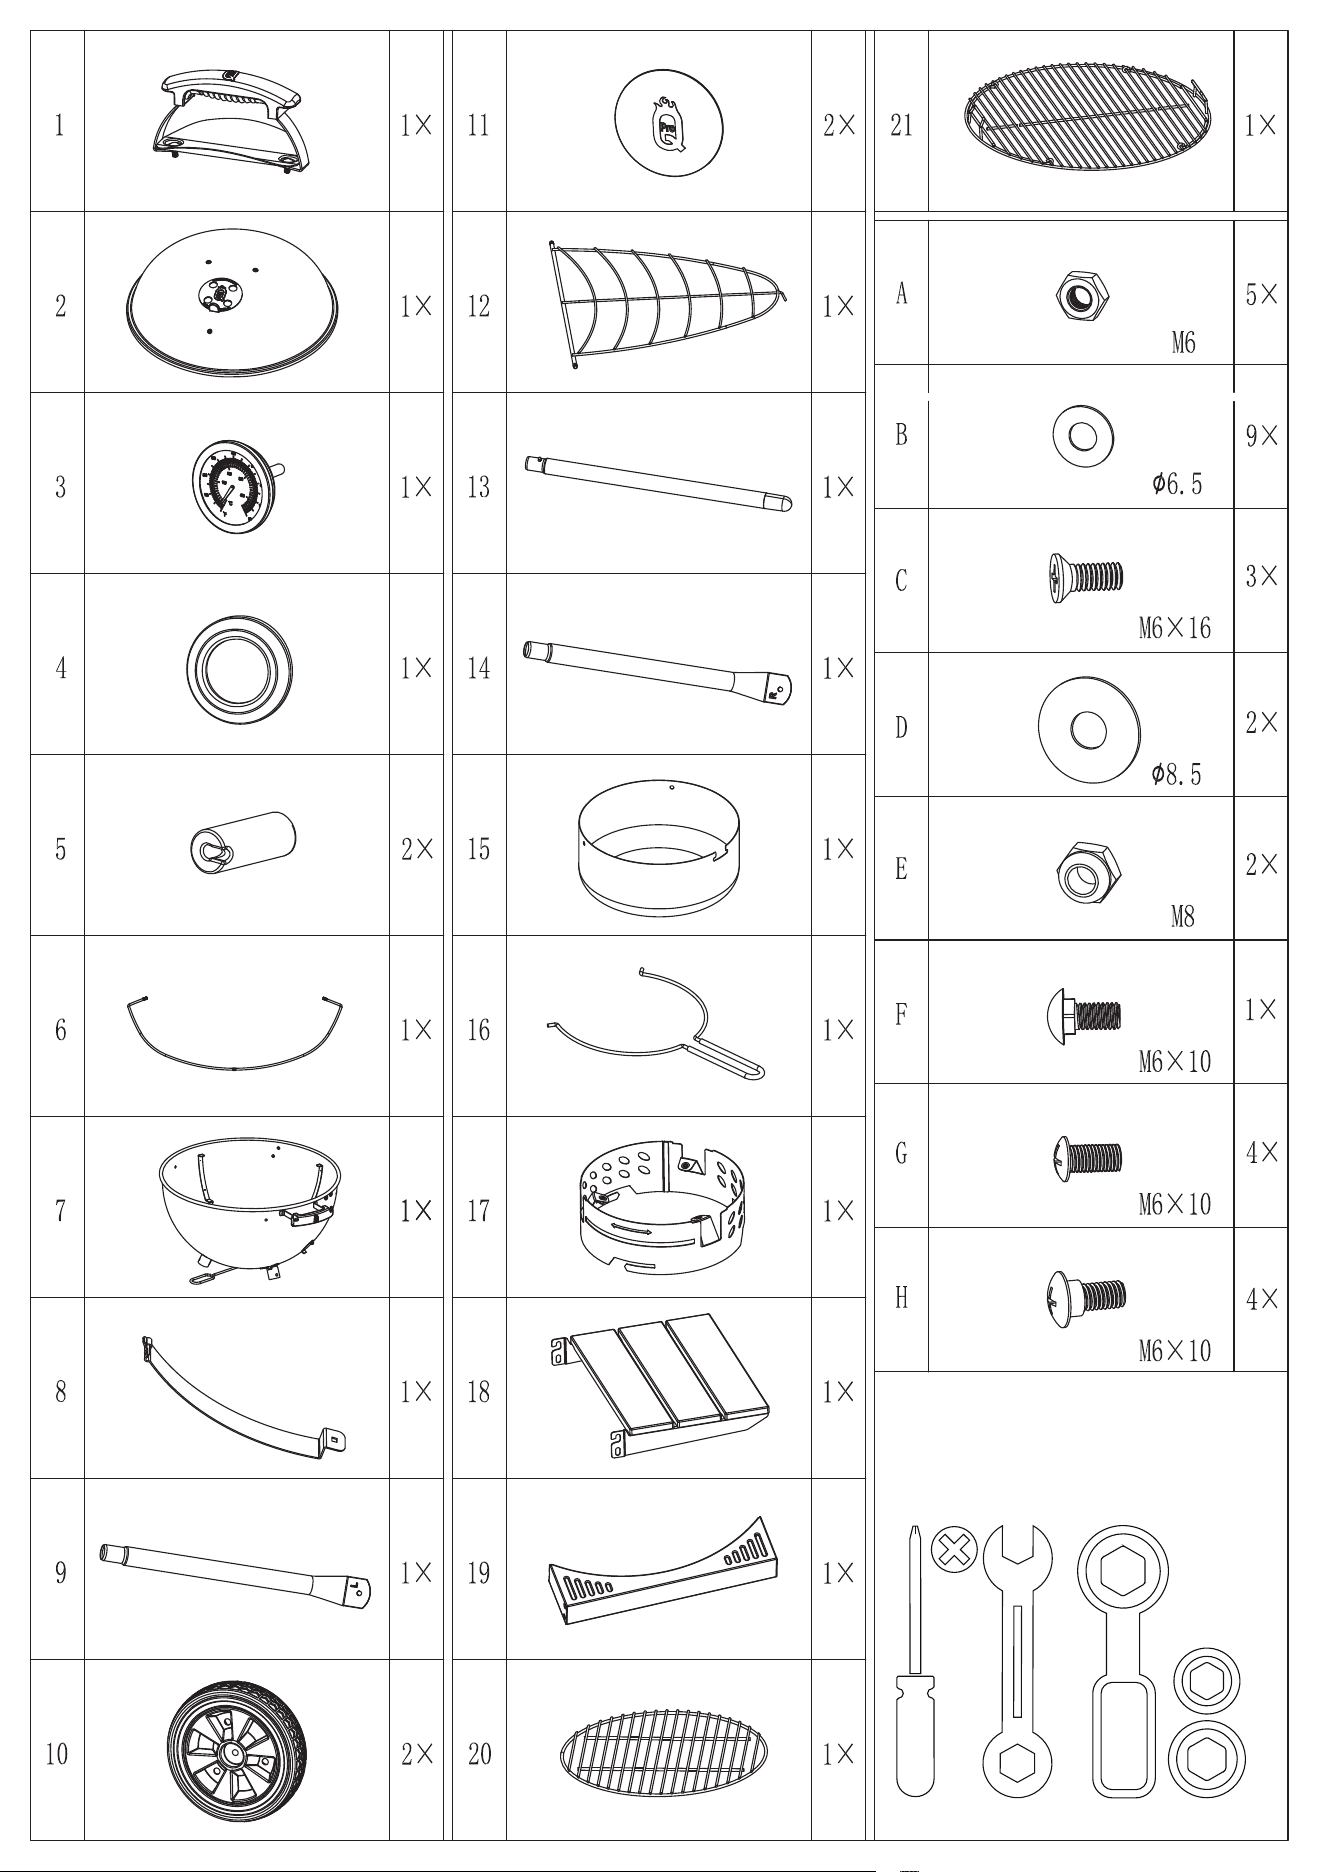
1. Lid Handle With Heat Deector
2. Porcelain Coated Lid/Dome
3. Temperature Gauge
4. Temperature Gauge Bezel
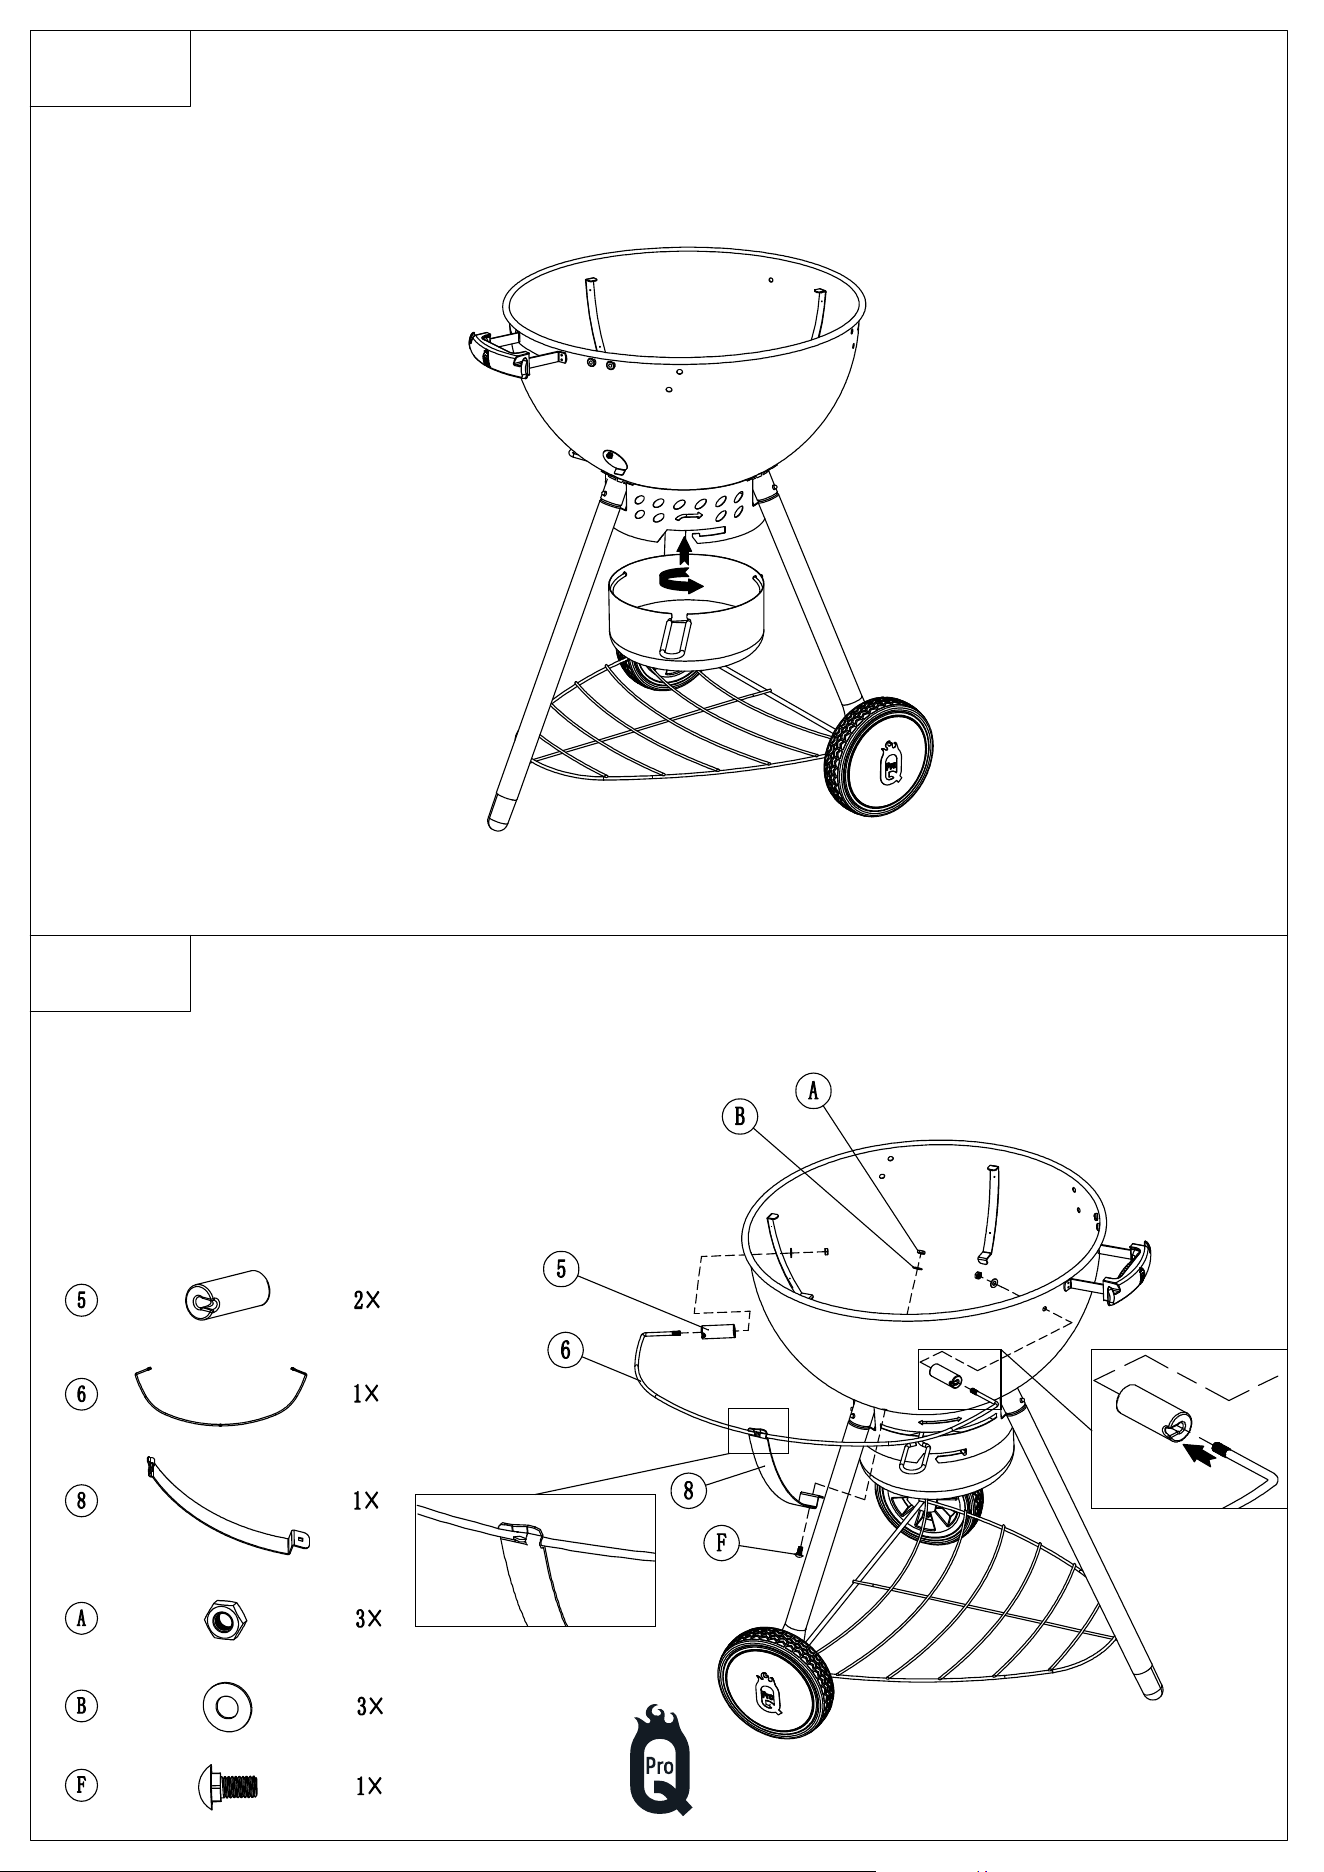
5. Lid Cradle Rollers
6. Lid Cradle Bar
7. Porcelain Coated Bowl
8. Lid Cradle Support Bracket
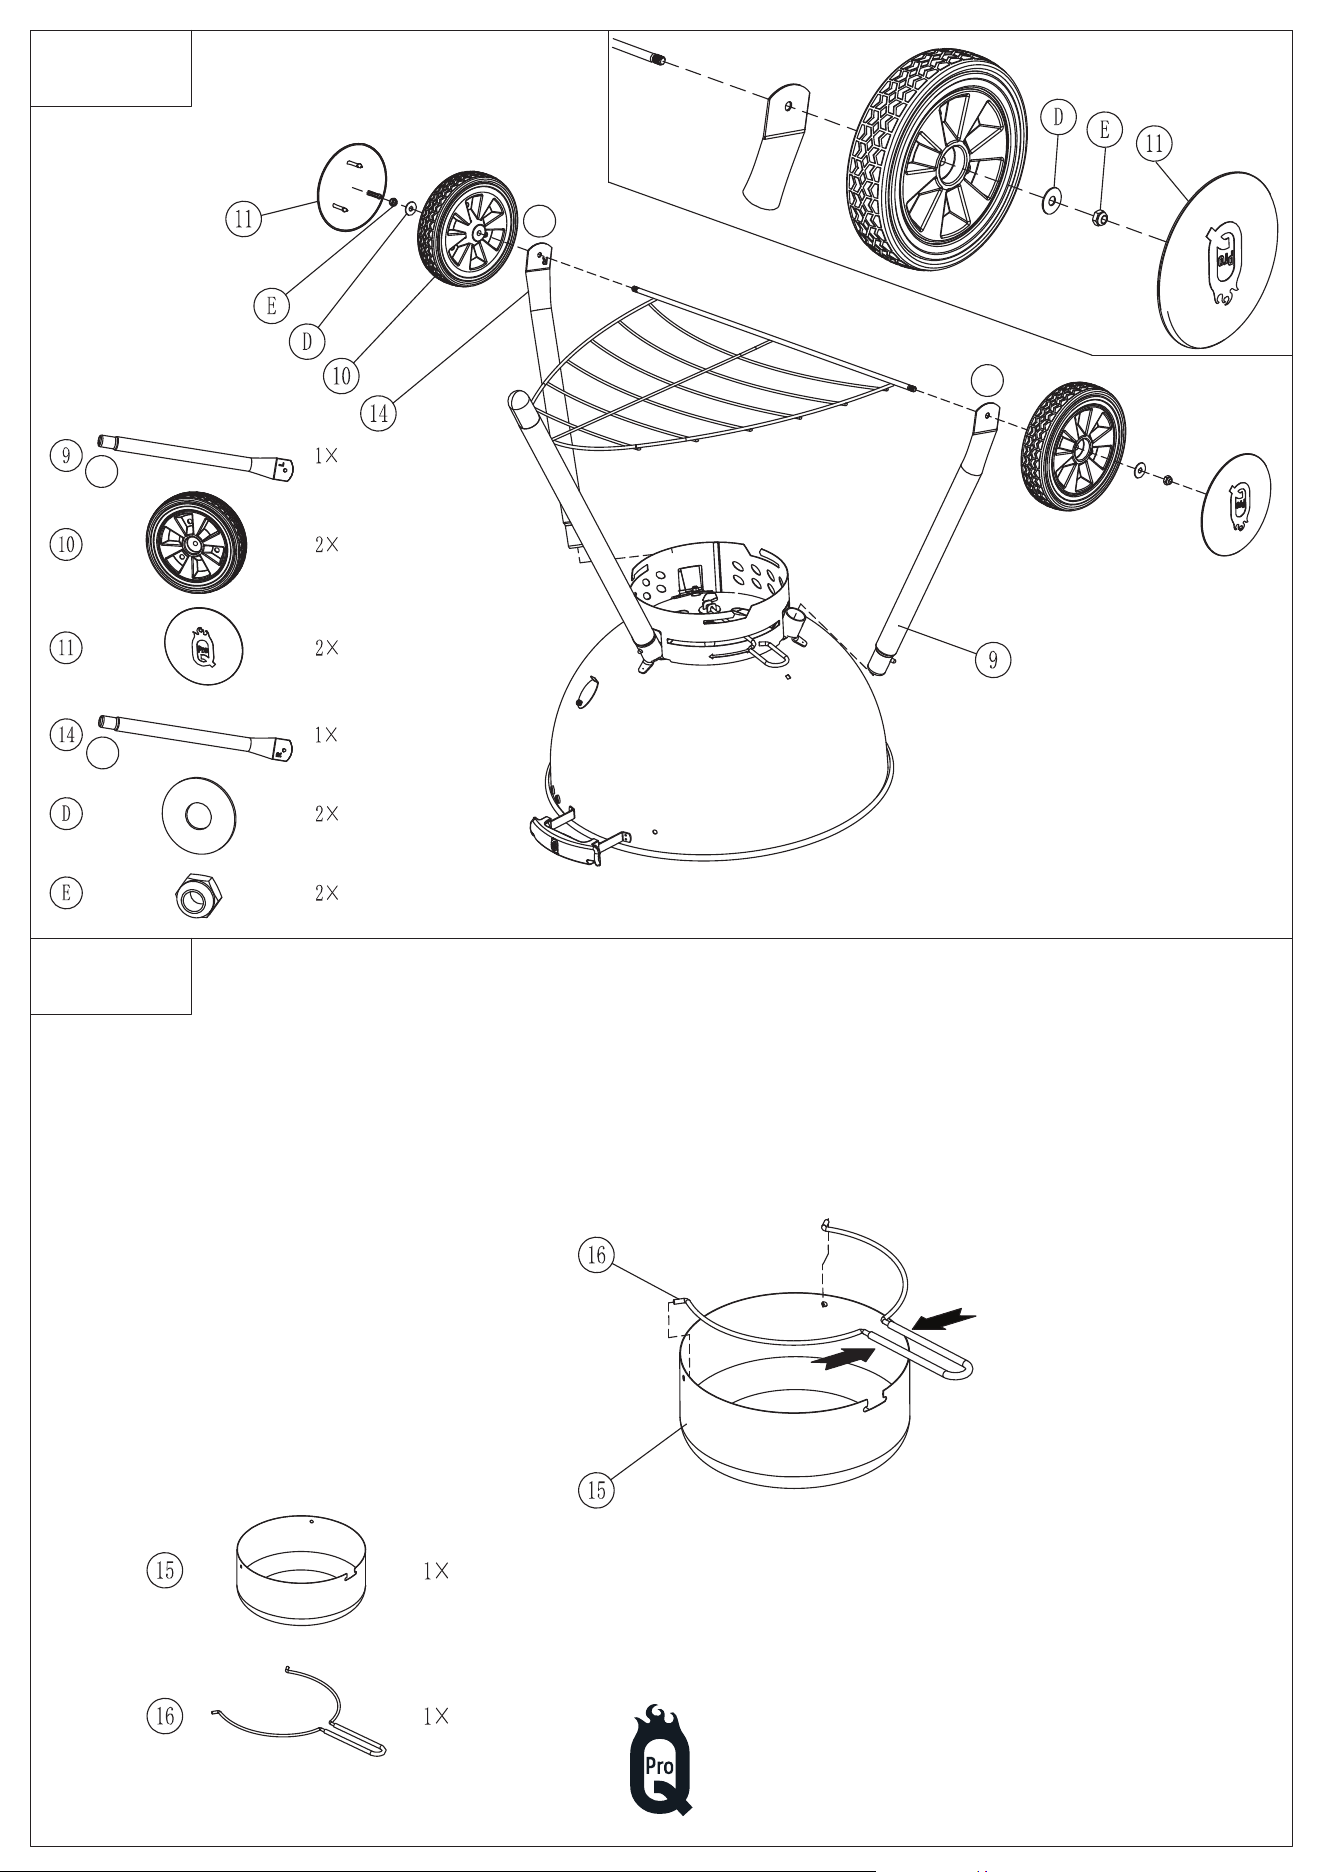
9. Left Leg
10. Rubberised Wheel
11. Hub Cap
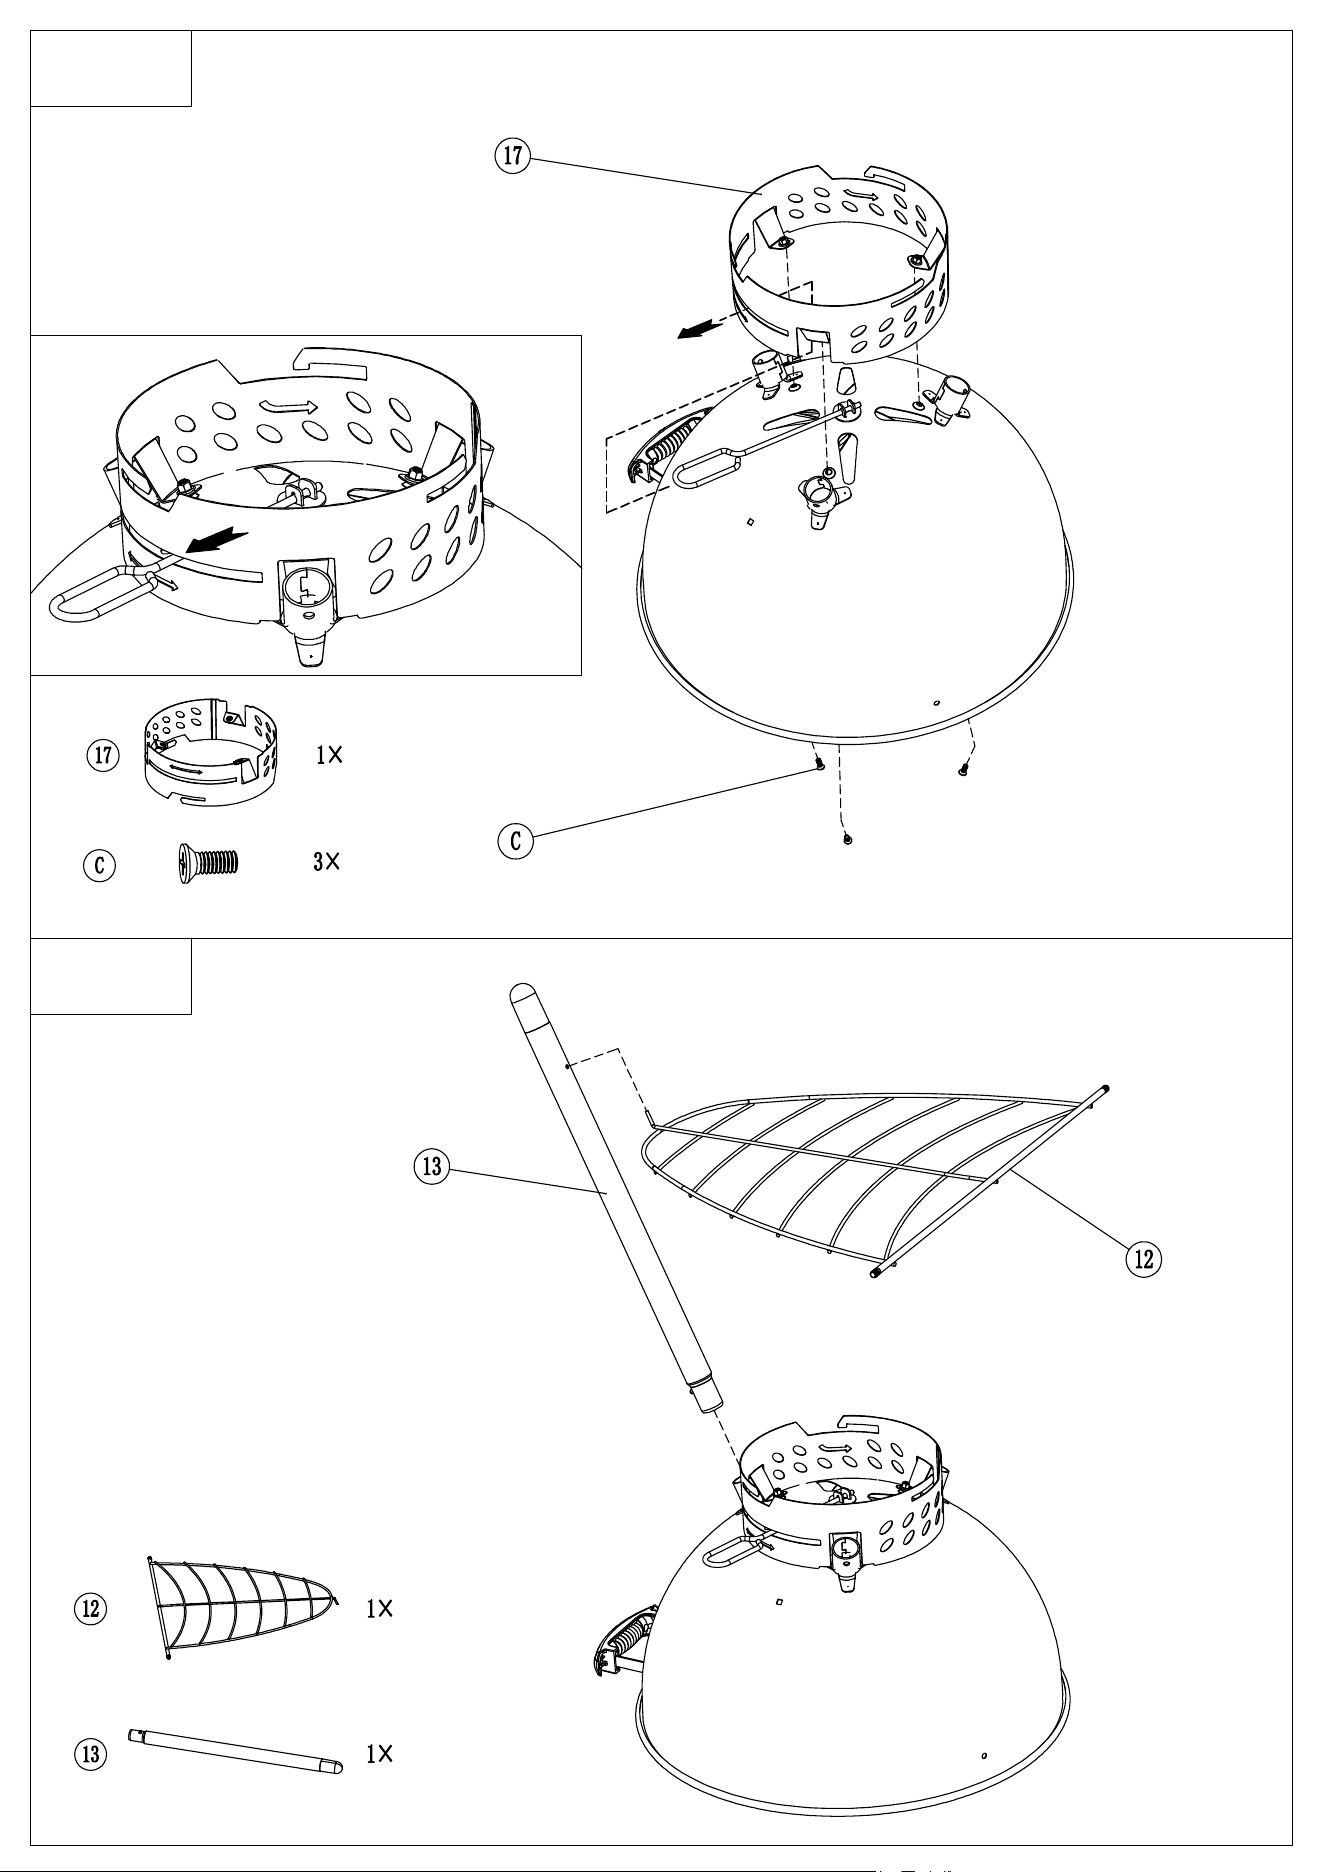
12. Storage Rack
13. Front Leg
14. Right Leg
15. Ash Pan
16. Ash Pan Handle
17. Ash Pan Holder
18. Foldable Side Table
19. Side Table Bracket
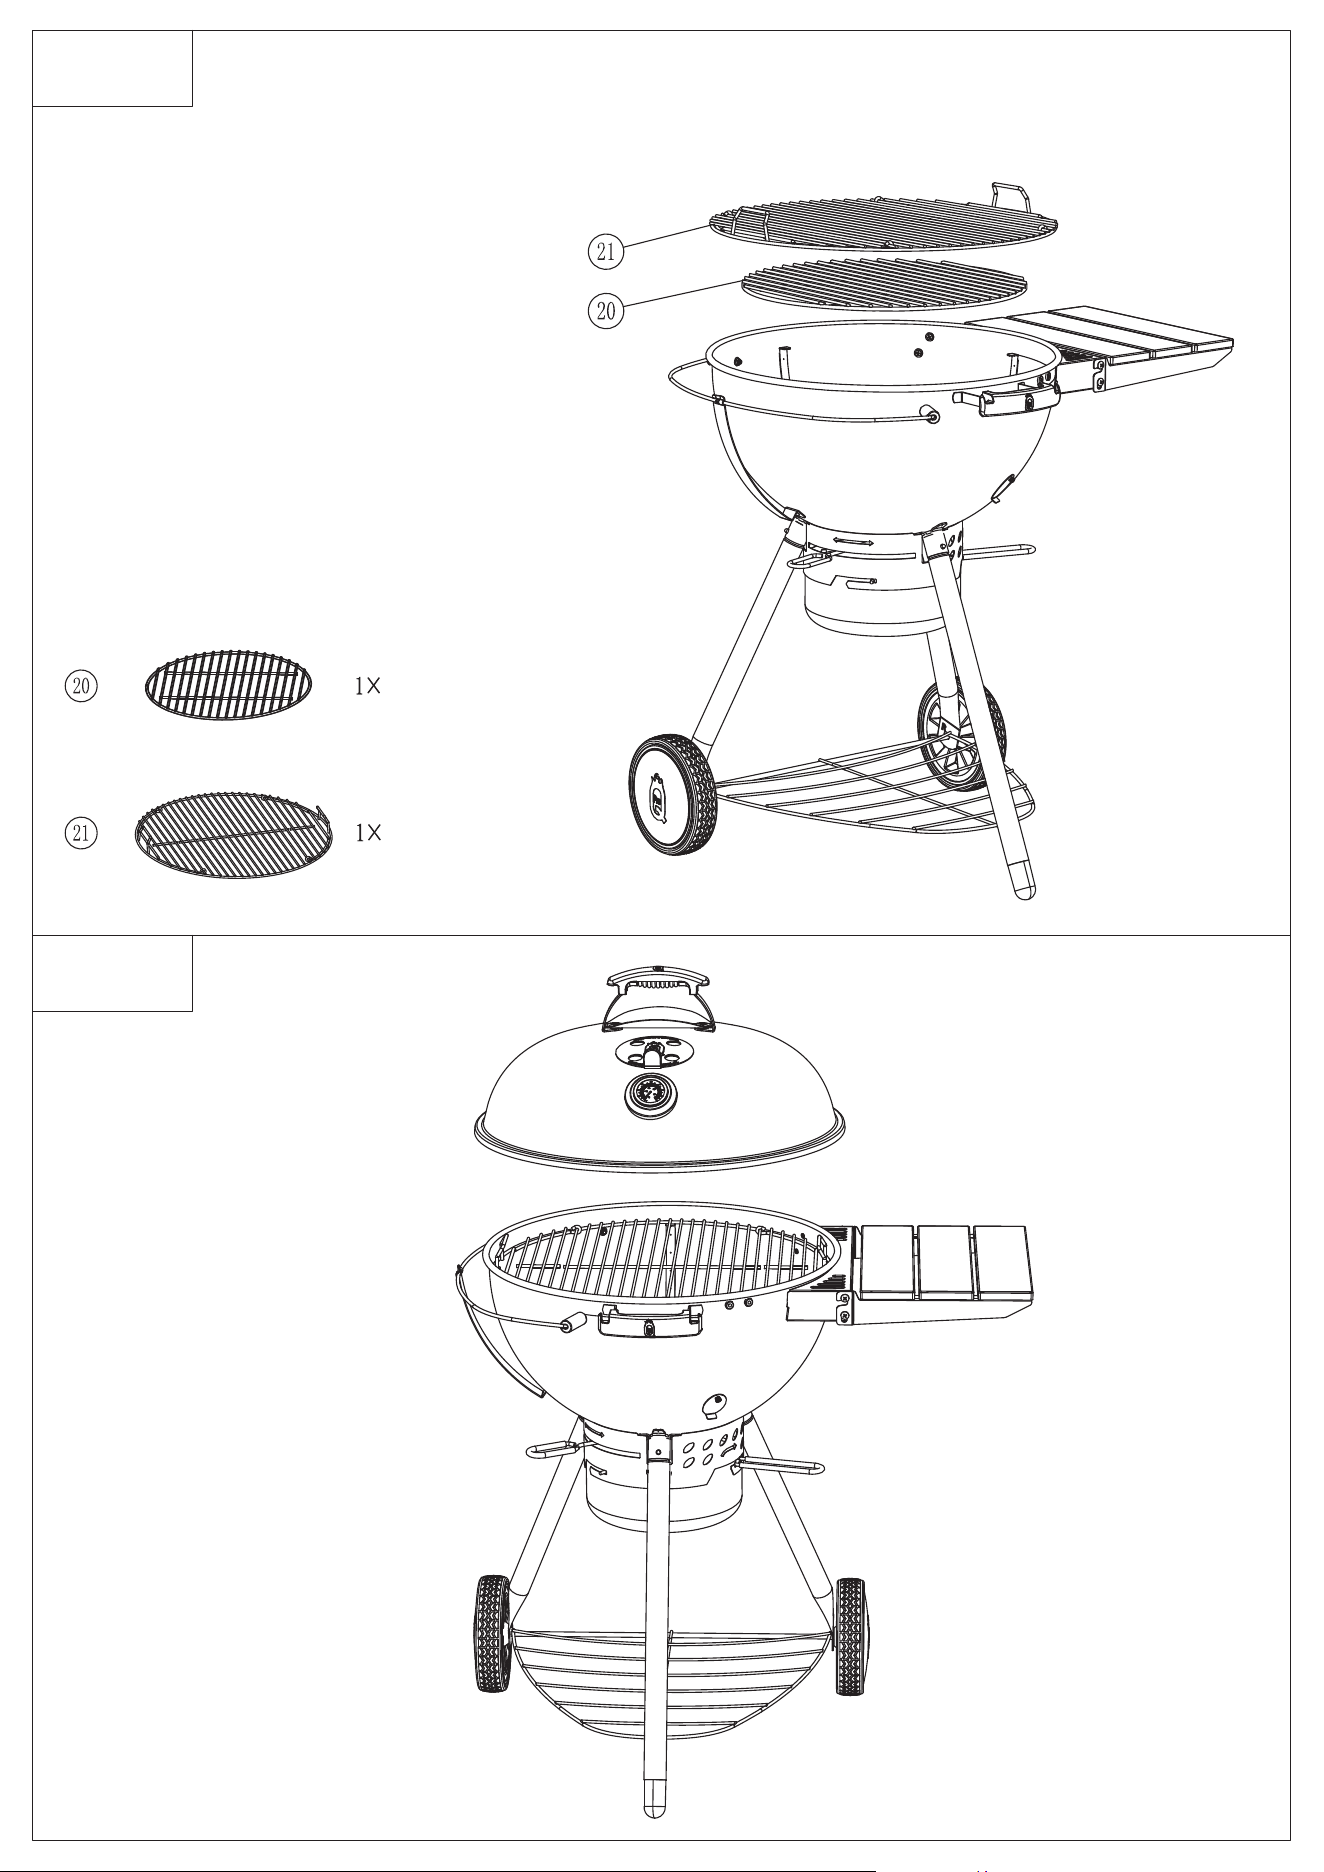
20. Charcoal Grill
21. Cooking grill
N.B. You will need a large Phillips head
screwdriver, two spanners or sockets -
10mm or 3/8” and 13mm or 1/2”
OR
10MM / 3/8”
13MM / 1/2”
AND
TOOLS REQUIRED

TIP: Ensure the square base of the bolts
are seated within the handle and heat
deector before tightening.
TIP: Check the thermometer face is the
correct orientation before tightening
down, and the arrow marking on the
back of the bezel is closest to the vent.
STEP 1
STEP 2
Slip the air vent lever through the slot
on the side of the ring before lining up
the threaded mounting holes to the holes
on the bowl.
STEP 3
STEP 4
L
L
R
R
TIP: Squeeze the ash pan handle into the
ash pan one side at a time.
STEP 5
STEP 6
TIP: Ensure the ash pan is aligned on
all sides before turning to lock in place.
STEP 7
STEP 8

STEP 9
STEP 10
WARNING: Always ensure the
table is in the “up” position as
shown before starting a re in the
BBQ.
STEP 11
STEP 12

Without a Chimney
1. Build a pile of charcoal or briquettes in the centre of the charcoal grate, and tuck a couple of
re lighters into the pile, ensuring they have a good airow.
2. Carefully light the re lighters with a long match or BBQ lighter, and wait for them to ignite
your fuel. The charcoal is ready to cook on once it’s covered in a white-grey ash.
3. Carefully add more fuel if required, and proceed to set up your re for cooking.
Before you start:
• Choose a safe place for your BBQ, following the safety warnings on Page 1.
• Ensure your side table is in the up position before starting a re.
• Decide what method you’d like to use, what temperature you’d like to cook at and for how
long before lighting the re, this will determine how much fuel you need to light.
LIGHTING THE FIRE
Tips
• Always open your bottom vents & keep the lid o when lighting a re, this will ensure the re has as
much oxygen as possible, and will reduce the smoke created.
• If your re is lighting slowly, you can add a couple more re lighters or sheets of newspaper once
they’ve burned out.
Chimney Starter
1. Open the vents in the base. Take 2-3 re lighters (or a couple sheets of scrunched up
newspaper), place them on the charcoal grill and light them.
2. Put your chimney starter above the re lighters, ll with good quality lumpwood charcoal or
briquettes and give it 10-15 minutes to get going.
3. Once you see ames coming out the top of the chimney and your coals are turning white,
carefully pour your lit fuel onto the charcoal grate using some good quality BBQ mitts.
• Use The Lid – This will create convection inside the BBQ, speeding up cooking times,
increasing smoky BBQ avours & ensuring an even temperature and reducing are-ups.
• Oset Your Fire – Put your re on one side of the kettle and cook on the other side, this will
give you a “safe zone” for cooking so you always have somewhere away from the direct heat
to put your food if it’s cooking too fast.
• Use The Vents – Close o the bottom vents to reduce temperature, and open them up to
increase it. Same goes for the lid vent, this will act as a “brake” and slow the burn down.
• Add Some Wood – Grab some wood chunks or chips and add them to your re for a lick of
smoky avour.
COOKING TIPS
CHECK OUT THE FULL ONLINE USER GUIDE HERE:
PROQSMOKERS.COM
INFO@PROQSMOKERS.COM
ProQ is a Registered Trademark.
Manufactured for and packed by:
ProQ Barbecues & Smokers Ltd (UK, EU, ROW)
ProQ Barbecues & Smokers Inc (North America)
ProQ Barbecues & Smokers Pty Ltd (Australia)