FEB24V1
USER GUIDE
serial number:
CLASSIC RETRO BY UNIQUE
OVER THE RANGE MICROWAVE
MODEL NUMBER: UNQ-30CR OTR T, UNQ-30CR OTR B, UNQ-30CR OTR LG, UNQ-30CR OTR W

2
TABLE OF CONTENTS
IMPORTANT SAFETY INSTRUCTIONS 2
• precautions to avoid possible exposure to excessive microwave energy 3
RADIO INTERFERENCE 5
GROUNDING INSTRUCTIONS 6
• utensils and cookware 6
• control panel 8
OPERATION 8
• setting the clock 8
• setting the timer 9
• programming cooking time 9
• power level chart 10
• popcorn/potato 11
• sensor cook 12
• sensor reheat 13
• melt/soften 14
• auto cook 15
• frozen entrées 16
• weight defrost 16
• time defrost 17
• defrosting tips 17
• speed cooking 18
• child lock 18
• vent fan 18
• light 19
• turntable on/o 19
• inquiring mode 19
• user preferences 19
• volume low/med/high/o 20
• weight lbs/kg 20
• clock display on/o 21
• demo setting 21
TROUBLESHOOTING GUIDE 22
WIRING DIAGRAM 23
RATING LABEL 24
WARRANTY 25
APPLIANCE INFORMATION 26
PRODUCT REGISTRATION 26
CONTACT US 27
NOTES 27

3
MANUFACTURED & CERTIFIED BY
Unique Appliances Ltd
BEFORE YOU BEGIN
IMPORTANT SAFETY INSTRUCTIONS
Read these instructions completely and carefully.
IMPORTANT
FOR YOUR SAFETY
PRECAUTIONS TO AVOID POSSIBLE EXPOSURE
TO EXCESSIVE MICROWAVE ENERGY
• Observe all governing codes and ordinances
• Note to Installer – Be sure to leave these instructions for the consumer’s and local inspector’s use
• Note to Consumer – Keep these instructions with your User Guide for future reference
•Proper installation is the responsibility of the installer. Product failure due to improper
installation is not covered under the appliance warranty.
• Before operating your new microwave oven, make sure you read and understand this Use and
Care Guide completely.
Read and observe all CAUTIONS and WARNINGS shown throughout these instructions While
performing installations described in this booklet, gloves and safety glasses or goggles should
be worn
• Do not attempt to operate this oven with the door open since open door operation can result in
harmful exposure to microwave energy
• Do not to override or tamper with the safety interlocks
• Do not place any object between the oven front face and the door or allow grease or residue to
build up on the microwave door seals
• Do not operate the oven if it is damaged It is important that the microwave door close properly
and that there is no damage to the door, hinges and latches, door seals and sealing surfaces
• The microwave should not be adjusted or repaired by anyone except properly qualified service
personnel

4
IMPORTANT SAFETY INSTRUCTIONS
1 Read all instructions before using the microwave
2 Read and follow the specific: "PRECAUTIONS TO AVOID POSSIBLE EXPOSURE TO EXCESSIVE
MICROWAVE ENERGY" found on page 3
3 This appliance must be grounded Connect only to properly grounded outlet See "GROUNDING
INSTRUCTIONS" found on page 6
4 Install or locate this appliance only in accordance with the provided installation instructions
5 Some products such as whole eggs and sealed containers (lidded containers, sealed glass jars)
can explode due to pressure build-up and should not be heated in this oven
6 Use this appliance only for its intended use as described in the manual Do not use corrosive
chemicals or vapors in this appliance This type of oven is specifically designed to heat, cook or
dry food It is not designed for industrial or laboratory use
7 HOT CONTENTS CAN CAUSE SEVERE BURNS DO NOT ALLOW CHILDREN TO USE THE MI-
CROWAVE Use caution when removing hot items
8 Do not operate this appliance if it has a damaged cord or plug, if it is not working properly, or if
it has been damaged or dropped
9 This appliance should be serviced only by qualified service personnel Contact nearest autho-
rized service facility for examination, repair, or adjustment
10 Do not cover or block any openings on the appliance
11 Do not store this appliance outdoors Do not use this product near water - for example, near a
kitchen sink, in a wet basement, near a swimming pool, or similar location
12 Do not immerse cord or plug in water
13 Keep cord away from heated surfaces
14 Do not let cord hang over edge of table or counter
15 When cleaning door surfaces, door edges and gasket, use a mild, nonabrasive soaps or deter-
gents applied with a sponge or soft cloth Rinse well
16 To reduce the risk of fire in the oven cavity:
• Do not overcook food Carefully attend appliance when paper, plastic, or other combustible
materials are placed inside the oven to facilitate cooking
• Remove wire twist-ties from bags and packaging before placing in oven
• If food or materials inside the oven catch fire, keep oven door closed, turn oven o, and dis-
connect the power cord, or shut o power at the fuse or circuit breaker panel
• Do not use the microwave for storage purposes Do not leave paper products, cooking uten-
sils, or food in the cabinet when not in use
17 Liquids, such as water, coee, or tea are can be overheated beyond the boiling point without
appearing to be boiling Visible bubbling or boiling when the container is removed from the
microwave oven is not always present
THIS COULD RESULT IN VERY HOT LIQUID SUDDENLY BOILING OVER WHEN THE CONTAIN-
ER IS MOVED OR A UTENSIL IS PLACED IN THE LIQUID
To reduce the risk of injury to persons:
• Stir the liquid both before and halfway through heating it Do not overheat the liquid
• Do not use straight-sided containers with narrow necks
• After heating, allow the container to stand in the microwave oven for a short time before
removing the container
• Use extreme care when placing a spoon or other utensil into the container
5
IMPORTANT SAFETY INSTRUCTIONS (continued)
18 Oversized food or oversized metal utensils should not be inserted in a microwave as they may
create a fire or risk of electric shock
19 Do not clean with metal scouring pads Metal debris can come o the pad and interfere with the
microwave's operation, causing arcing, sparking, or a risk of electric shock
20 Do not use paper products in the microwave; they can ignite
21 Do not store any materials, other than manufacturer's recommended accessories, in the micro-
wave when not in use
22 Do not cover the turntable or any other part of the microwave with metal foil This will cause
overheating of the microwave
23 Clean ventilation hoods frequently - grease should not be allowed to accumulate on hood or filter
24 When flaming foods under the hood, turn the fan on
25 Use care when cleaning the vent-hood filter Corrosive cleaning agents, such as lye-based oven
cleaners, may damage the filter
26 Suitable for use above both gas and electric cooking equipment
SAVE THESE INSTRUCTIONS - THIS DEVICE COMPLIES WITH PART 18 OF THE FCC RULES.
1 Operation of the microwave oven may cause interference to your radio, TV or similar equipment
2 When there is interference, it may be reduced or eliminated by taking the following measures:
• Clean door and sealing surface of the oven
• Reorient the receiving antenna of radio or television
• Relocate the microwave oven with respect to the receiver
• Move the microwave oven away from the receiver
• Plug the microwave oven into a dierent outlet so that microwave oven and receiver are on
dierent branch circuits
3 This equipment generates, uses and can radiate radio frequency energy and, if not installed and used
in accordance with the instructions, may cause harmful interference to radio communications
However, there is no guarantee that interference will not occur in a particular installation If this
equipment does cause harmful interference to radio or television reception, which can be deter-
mined by turning the equipment o and on, the user is encouraged to try to correct the interfer-
ence by one or more of the following measures:
1 Reorient or relocate the receiving antenna
2 Increase the separation between the equipment and receiver
3 Connect the equipment into an outlet on a circuit dierent from that to which the receiver is
connected
4 Consult the dealer or an experienced radio/TV technician for help
RADIO INTERFERENCE
WARNING
PROP 65 WARNING FOR CALIFORNIA RESIDENTS
The California Safe Drinking Water and Toxic Enforcement Act of 1986 (Proposition 65)
requires the Governor of California to publish a list of substances known to the State of
California to cause cancer or reproductive harm In addition, businesses must warn customers
of potential exposure to such substances

6
GROUNDING INSTRUCTIONS
This appliance must be grounded In the event of an electrical short circuit, grounding reduces
the risk of electric shock by providing an escape wire for the electric current This appliance is
equipped with a cord with a grounding wire and a grounding plug The plug must be plugged into
an outlet that is properly installed and grounded
WARNING: Improper use of the grounding can result in a risk of electric shock Consult a qualified
electrician or service agent if the grounding instructions are not completely understood, or if doubt
exists as to whether the appliance is properly grounded
A short power-supply cord is provided to reduce the risks resulting from becoming entangled in or
tripping over a longer cord If it is necessary to use an extension cord, use only a 3-wire extension
cord that has a 3-blade grounded plug, and 3-slot receptacle that will accept the plug on the appli-
ance The marked rating of the extension cord shall be equal to or greater than the electrical rating
of the appliance The longer cord should be arranged so that it will not drape over the counter top
or tabletop where it can be pulled on by children or tripped over unintentionally
DANGER - Electric Shock Hazard
Touching some of the internal components can cause serious personal injury or death Do not
disassemble this appliance
UTENSILS AND COOKWARE
CAUTION - Personal Injury Hazard
Tightly-closed containers could explode Closed containers should be opened and plastic pouches
should be pierced before cooking
Carefully review the "Materials you can use in microwave oven/ Materials you shouldn't use in a mi-
crowave oven" sections on page 7 There may be certain non-metallic utensils that are not safe to
use for microwaving If in doubt, you can test the utensil in question following the procedure below
Utensil Test:
1 Fill a microwave-safe container with 1 cup of cold water (250ml) along with the utensil in
question
2 Cook on maximum power for 1 minute Do not exceed 1 minute cooking time
3 Carefully feel the utensil If the empty utensil is warm, do not use it for microwave cooking
7
Materials you can use in a microwave oven
Browning dish
The bottom of browning dish must be at least 3/16 inch (5mm) above the turn-
table Incorrect usage may cause the turntable to break
Dinnerware
Microwave-safe only Follow manufacturer's instructions Do not use cracked
or chipped dishes
Glass jars
Always remove lid Use only to heat food until just warm Most glass jars are
not heat resistant and may break
Glassware
Heat-resistant oven glassware only Make sure there is no metallic trim Do
not use cracked or chipped dishes
Microwave
cooking bags
Follow bag manufacturer instructions Do not close with metal tie or twist-tie
Make slits or puncture the bag to allow steam to escape
Paper plates and
cups
Use for brief warming only Do not leave oven unattended while cooking
Paper towels
Use to cover food for reheating and absorbing fat Use with supervision for
short-term cooking only
Parchment paper Use as a cover to prevent splattering or a wrap for steaming
Plastic
Use plastic that is labeled "Microwave Safe"only Some plastic containers soft-
en as the food inside gets hot "Boiling bags" and tightly closed plastic bags
should be slit, pierced or vented as directed by package
Plastic wrap
Microwave-safe only Use to cover food during cooking to retain
moisture Do not allow plastic wrap to touch food
Thermometers Microwave-safe only (meat and candy thermometers)
Wax paper Use as a cover to prevent splattering and retain moisture
Materials you shouldn't use in a microwave oven
Aluminum Tray May cause arcing Transfer food into a microwave-safe dish
Food carton with
metal handle
May cause arcing Transfer food into a microwave-safe dish
Metal or metal-
trimmed utensils
Metal shields the food from microwave energy Metal trim may get very hot
and/or cause arcing
Metal twist-ties May cause arcing and could cause a fire in the oven
Paper bags May smoke or ignite
Plastic or styro-
foam
Plastic and/or styrofoam may melt or contaminate the food/liquid inside
when exposed to high temperature
Wood Wood will dry out when used in the microwave oven and may split or crack
UTENSILS AND COOKWARE (continued)
8
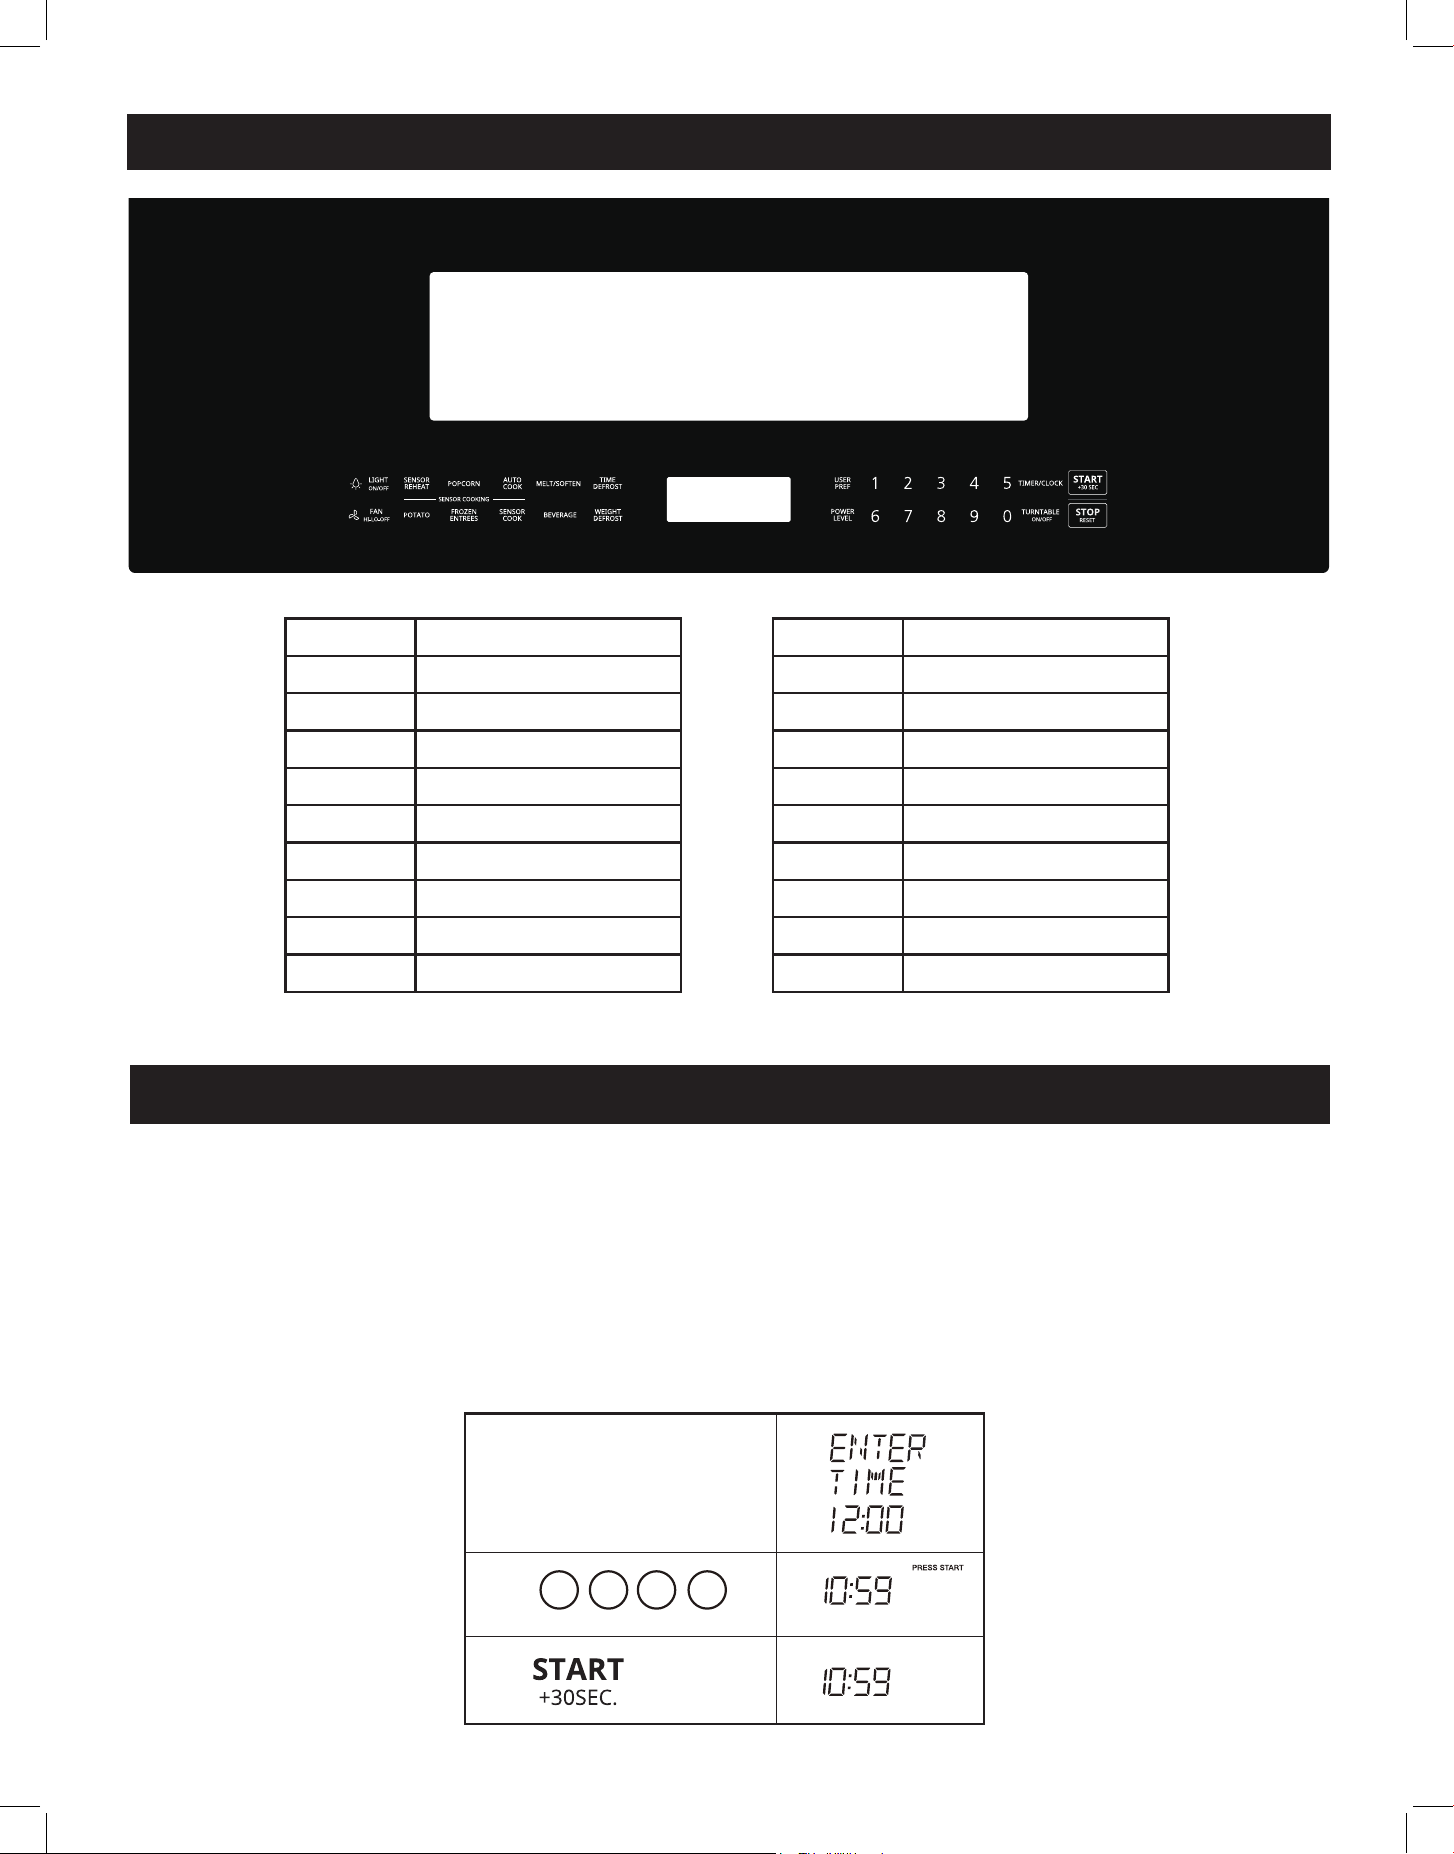
CONTROL PANEL
1
10
2
11
3
12
4
13
5
14
7
16
6
15
8
17
9
18
NUMBER SETTING
1
Light ON/OFF
2
Sensor Reheat
3
Popcorn
4
Auto Cook
5
Melt/Soften
6
Time Defrost
7
User Pref
8
Timer/Clock
9
Start/+30 Sec
NUMBER SETTING
10
Fan HI-LO-OFF
11
Potato
12
Frozen Entrees
13
Sensor Cook
14
Beverage
15
Weight Defrost
16
Power Level
17
Turntable ON/OFF
18
Stop/Reset
OPERATION
Setting the clock:
In standby mode:
Suppose you want to set the clock to the current time to 10:59
TIMER/ClOCK X2
1 0
1.
2.
3.
5 9
touch: display shows:

9
1.
2.
3.
03 0
TIMER/ClOCK X1
TIMER/ClOCK
Time counting down
touch: display shows:
2 0 0
4.
Time counting down
1.
2.
9
X1
3.
X1
or
MICRO
MICRO
touch: display shows:
2 0 0
4.
Time counting down
1.
2.
9
X1
3.
X1
or
MICRO
MICRO
touch: display shows:
OPERATION (continued)
Your microwave oven can be used as a kitchen timer You can set up to 99 minutes, 99 seconds
The kitchen timer can be used while the microwave oven is running
Setting the timer:
Example: setting the timer for three minutes:
NOTE: No timed programs can be run while the timer is running.
Your microwave oven can also be programmed for cooking times up to 99 minutes and 99 seconds
(99:99) Always enter the seconds after the minutes, even if they are both zeros
Programming a cooking time:
In Standby, Clock or Timer mode:
Suppose you want to set a cooking time of 2 minutes at 90% power:
TIMER/ClOCK X2
1 0
1.
2.
3.
5 9

10
OPERATION (continued)
PRESS POWER LEVEL DISPLAY
power level x 1 100% PL-HI
power level x 2 or 9 90% PL-90
power level x 3 or 8 80% PL-80
power level x 4 or 7 70% PL-70
power level x 5 or 6 60% PL-60
power level x 6 or 5 50% PL-50
power level x 7 or 4 40% PL-40
power level x 8 or 3 30% PL-30
power level x 9 or 2 20% PL-20
power level x 10 or 1 10% PL-10
power level x 11 or 0 0% PL-0
POWER LEVEL CHART
11
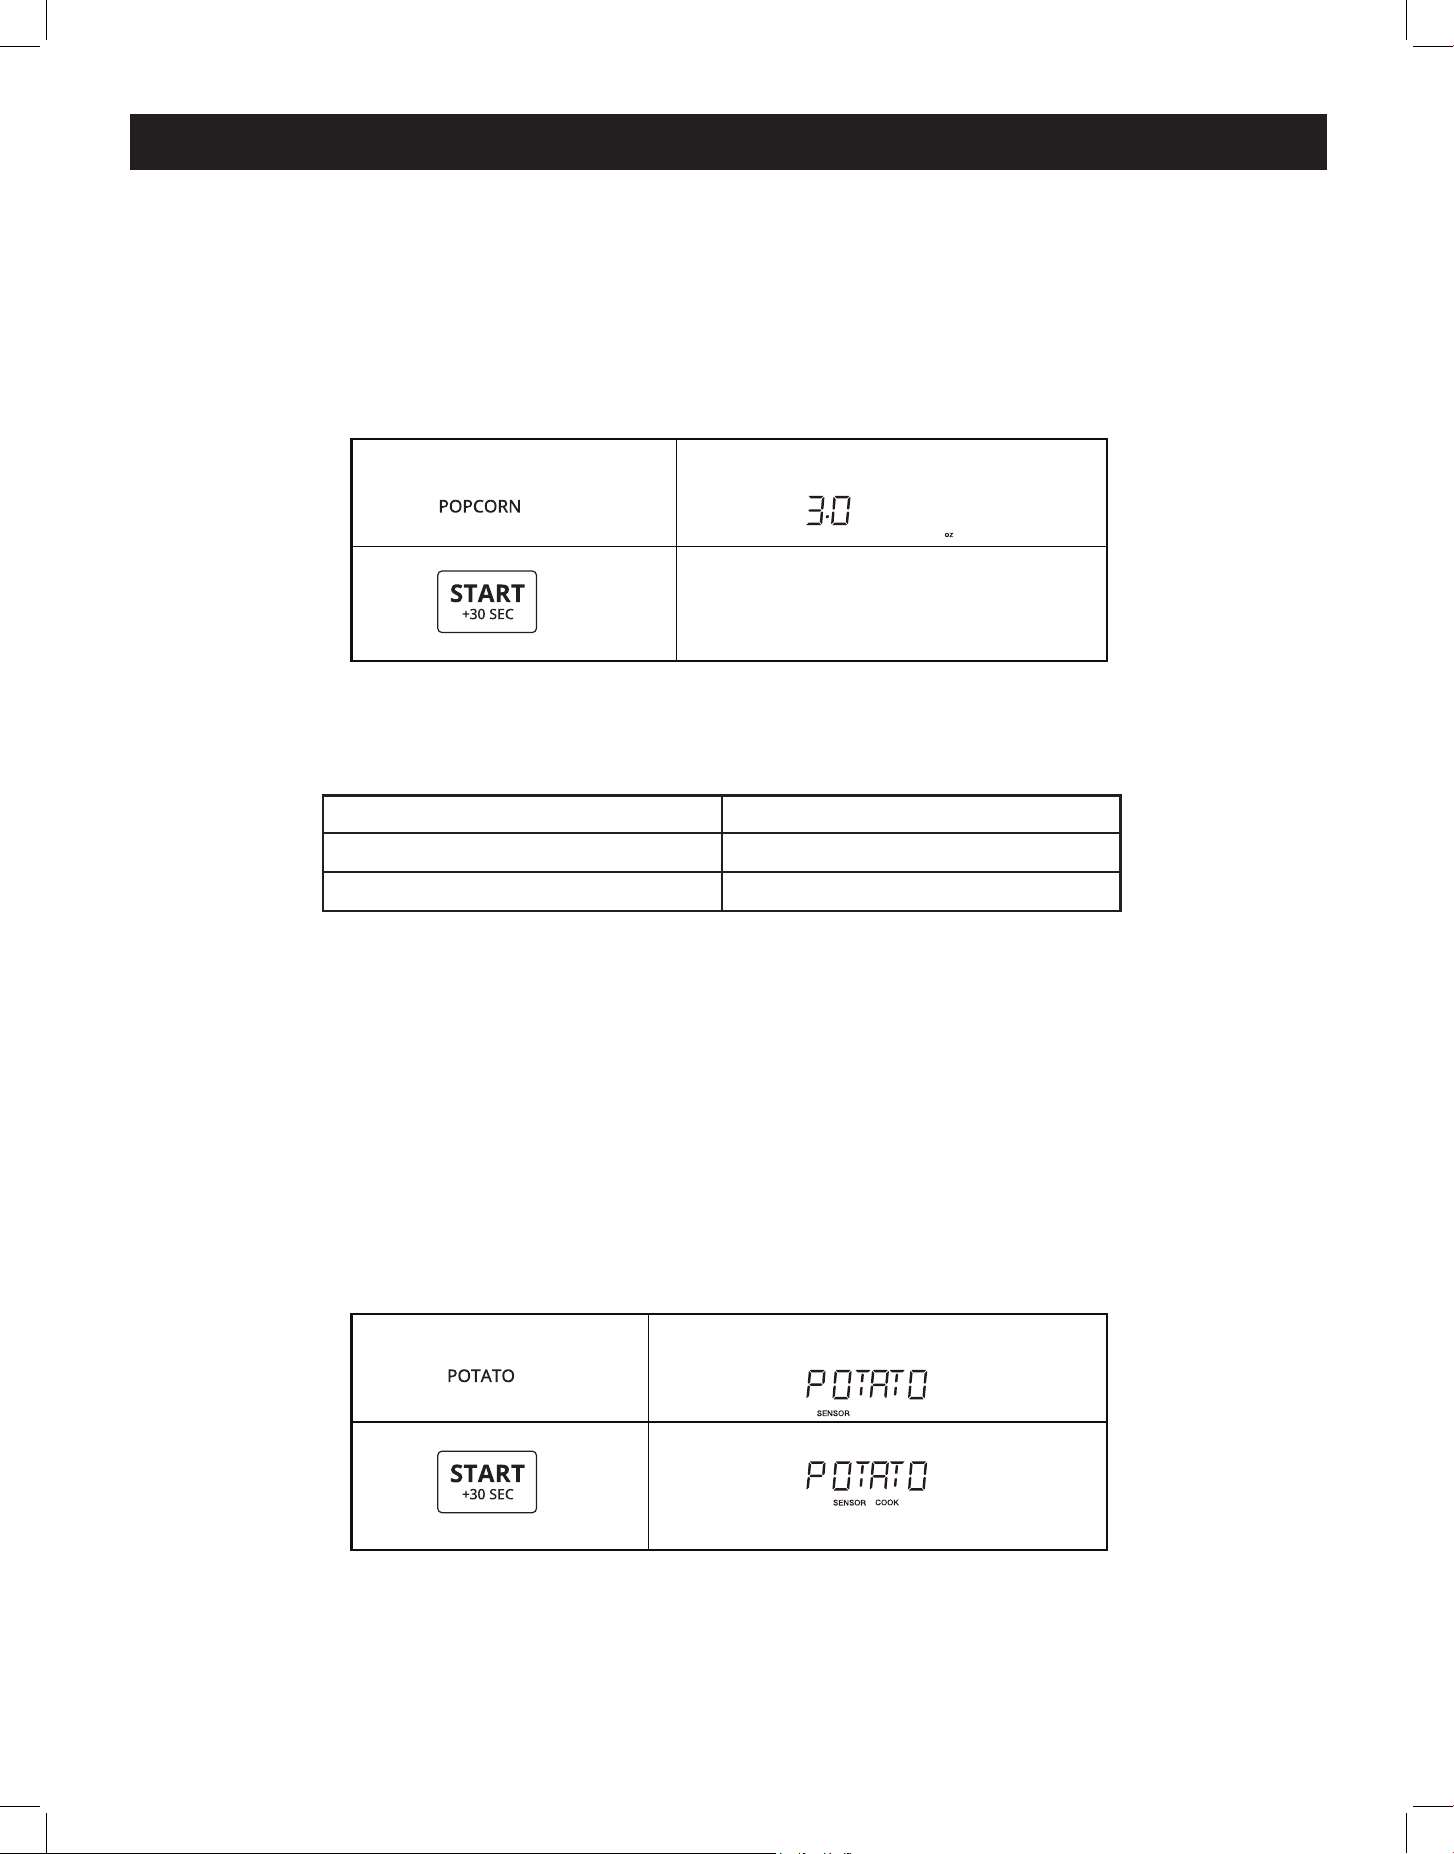
OPERATION (continued)
POTATO
To cook a potato, pierce the skin several times and place it in the microwave
In Standby, Clock or Timer mode:
Press "Potato" key and the screen will display POTATO, and press START You can press START
again to increase cooking time by 30 second increments
Press popcorn pad Amount
x 1 3 3 oz
x 2 3 0 oz
POPCORN
Press "Popcorn" key and LED displays 3 3 oz and the "PRESS AGAIN FOR OPTIONS" icon You can
press the "Popcorn" key again to select 3 0 oz
Example: setting a cook time for 3 0 oz popcorn:
(3 seconds later)
Time counting down
2.
1.
X2
PRESS AGAIN FOR OPTIONS/ PRESS START
touch: display shows:
1.
2.
PRESS START
touch:
touch:
display shows:
display shows:
12
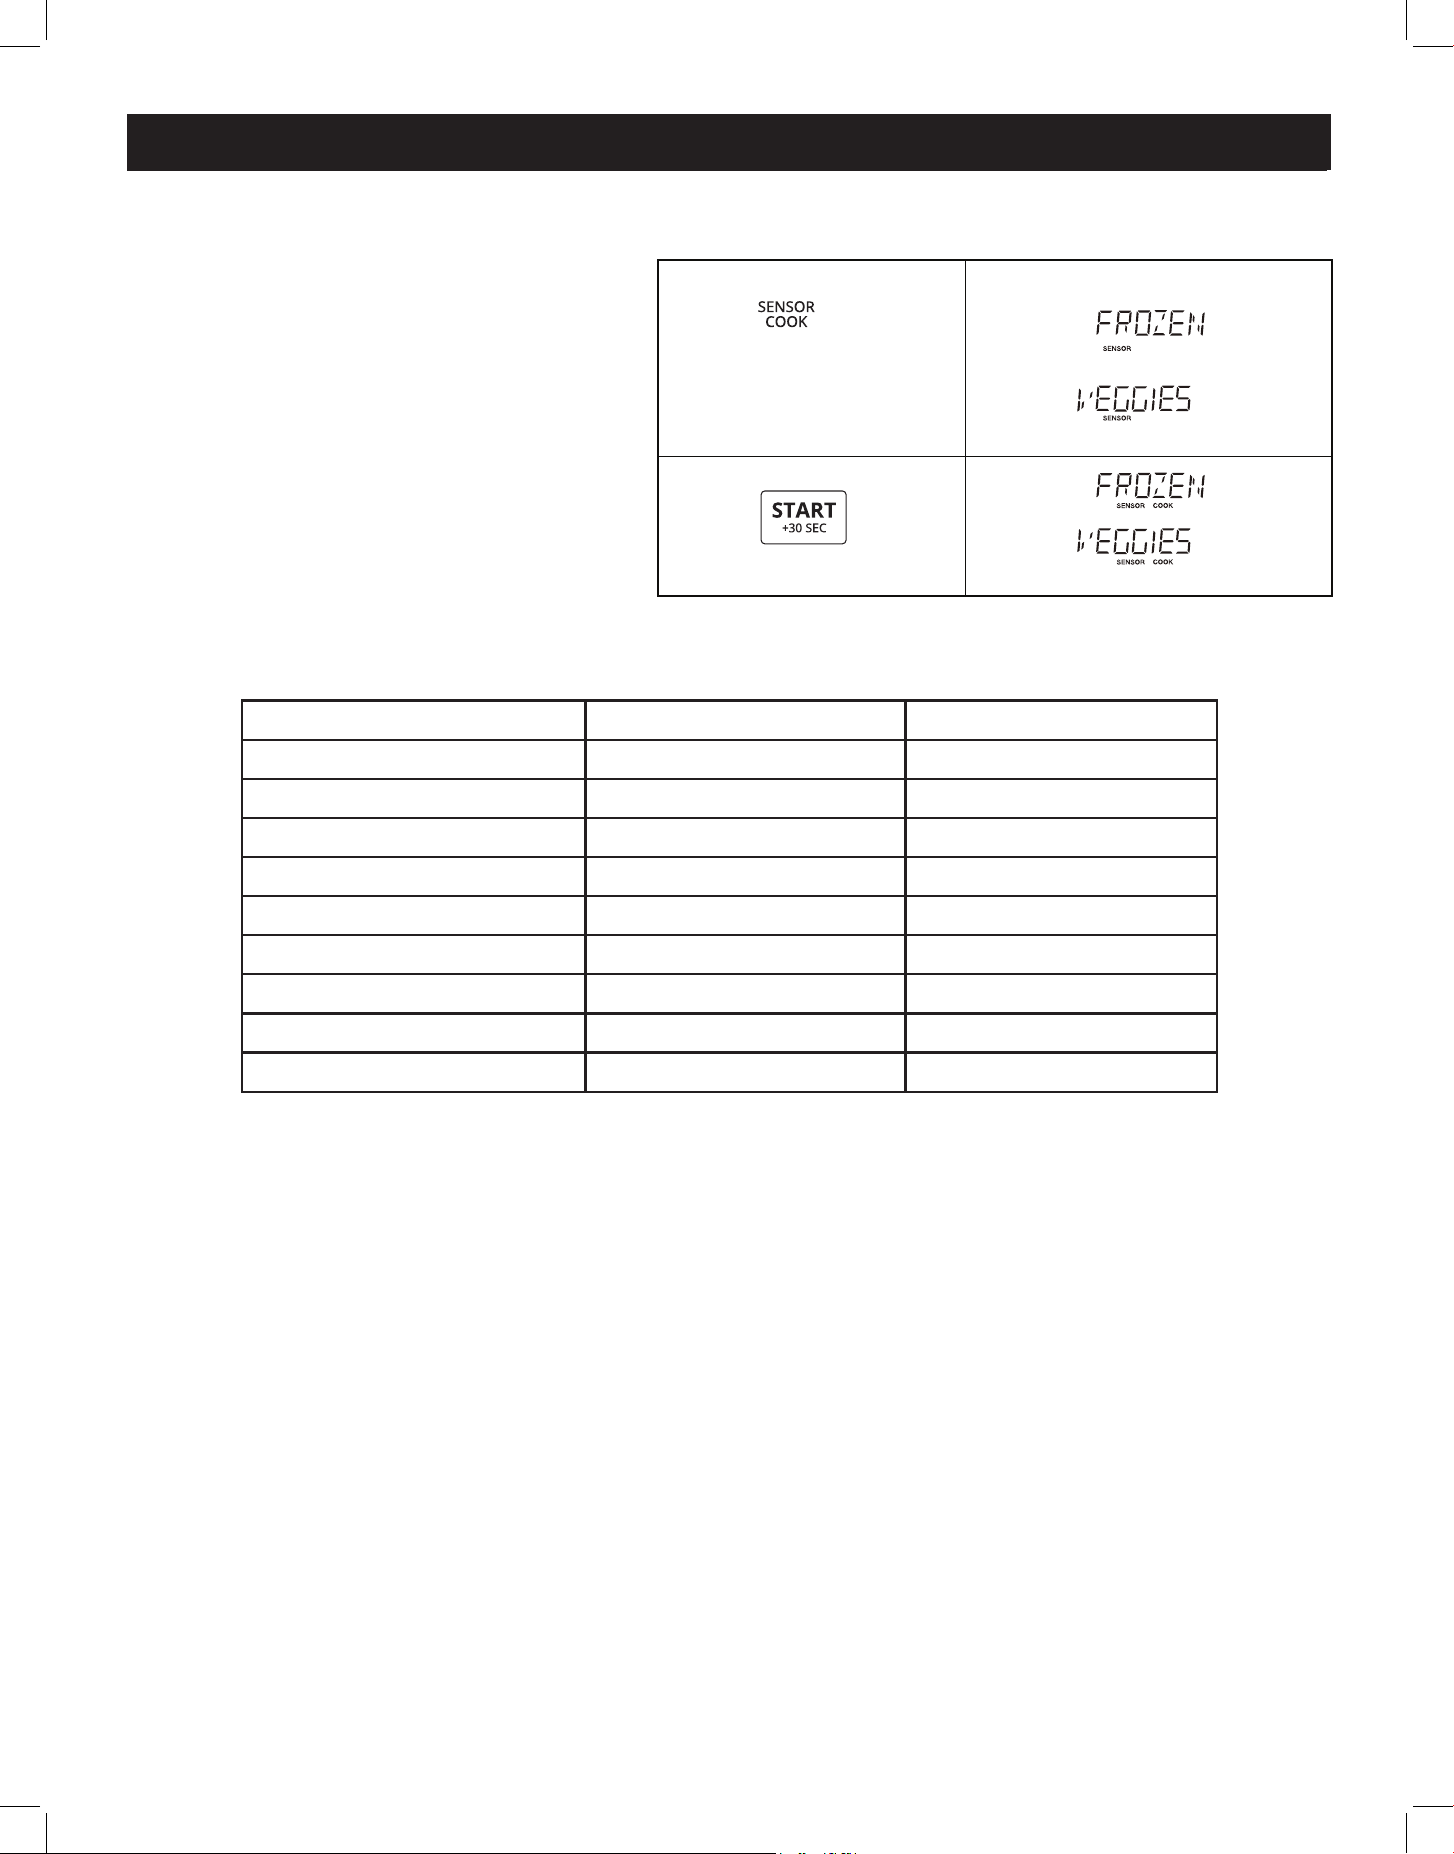
SENSOR COOK
NOTE: The weight pre-settings of these
menus cannot be adjusted
In Standby, Clock, or Timer Mode:
touch: display shows:
1.
2.
X1
PRESS AGAIN FOR OPTIONS/ PRESS START
PRESS AGAIN FOR OPTIONS/ PRESS START
touch: display shows:
OPERATION (continued)
Press Sensor Cook Food
Amount
x 1 Frozen Veggies 7-20 oz
x 2 Fresh Veggies 7-20 oz
x 3 Chicken 7-18 oz
x 4 Fish 7-18 oz
x 5 Frozen Pizza 6-12 oz
x 6 Frozen Lasagna 6-32 oz
x 7 Oatmeal /
x 8 Omelet 2-4 eggs
x 9 Soup 1-2 cups (250ml/cup)
13
OPERATION (continued)
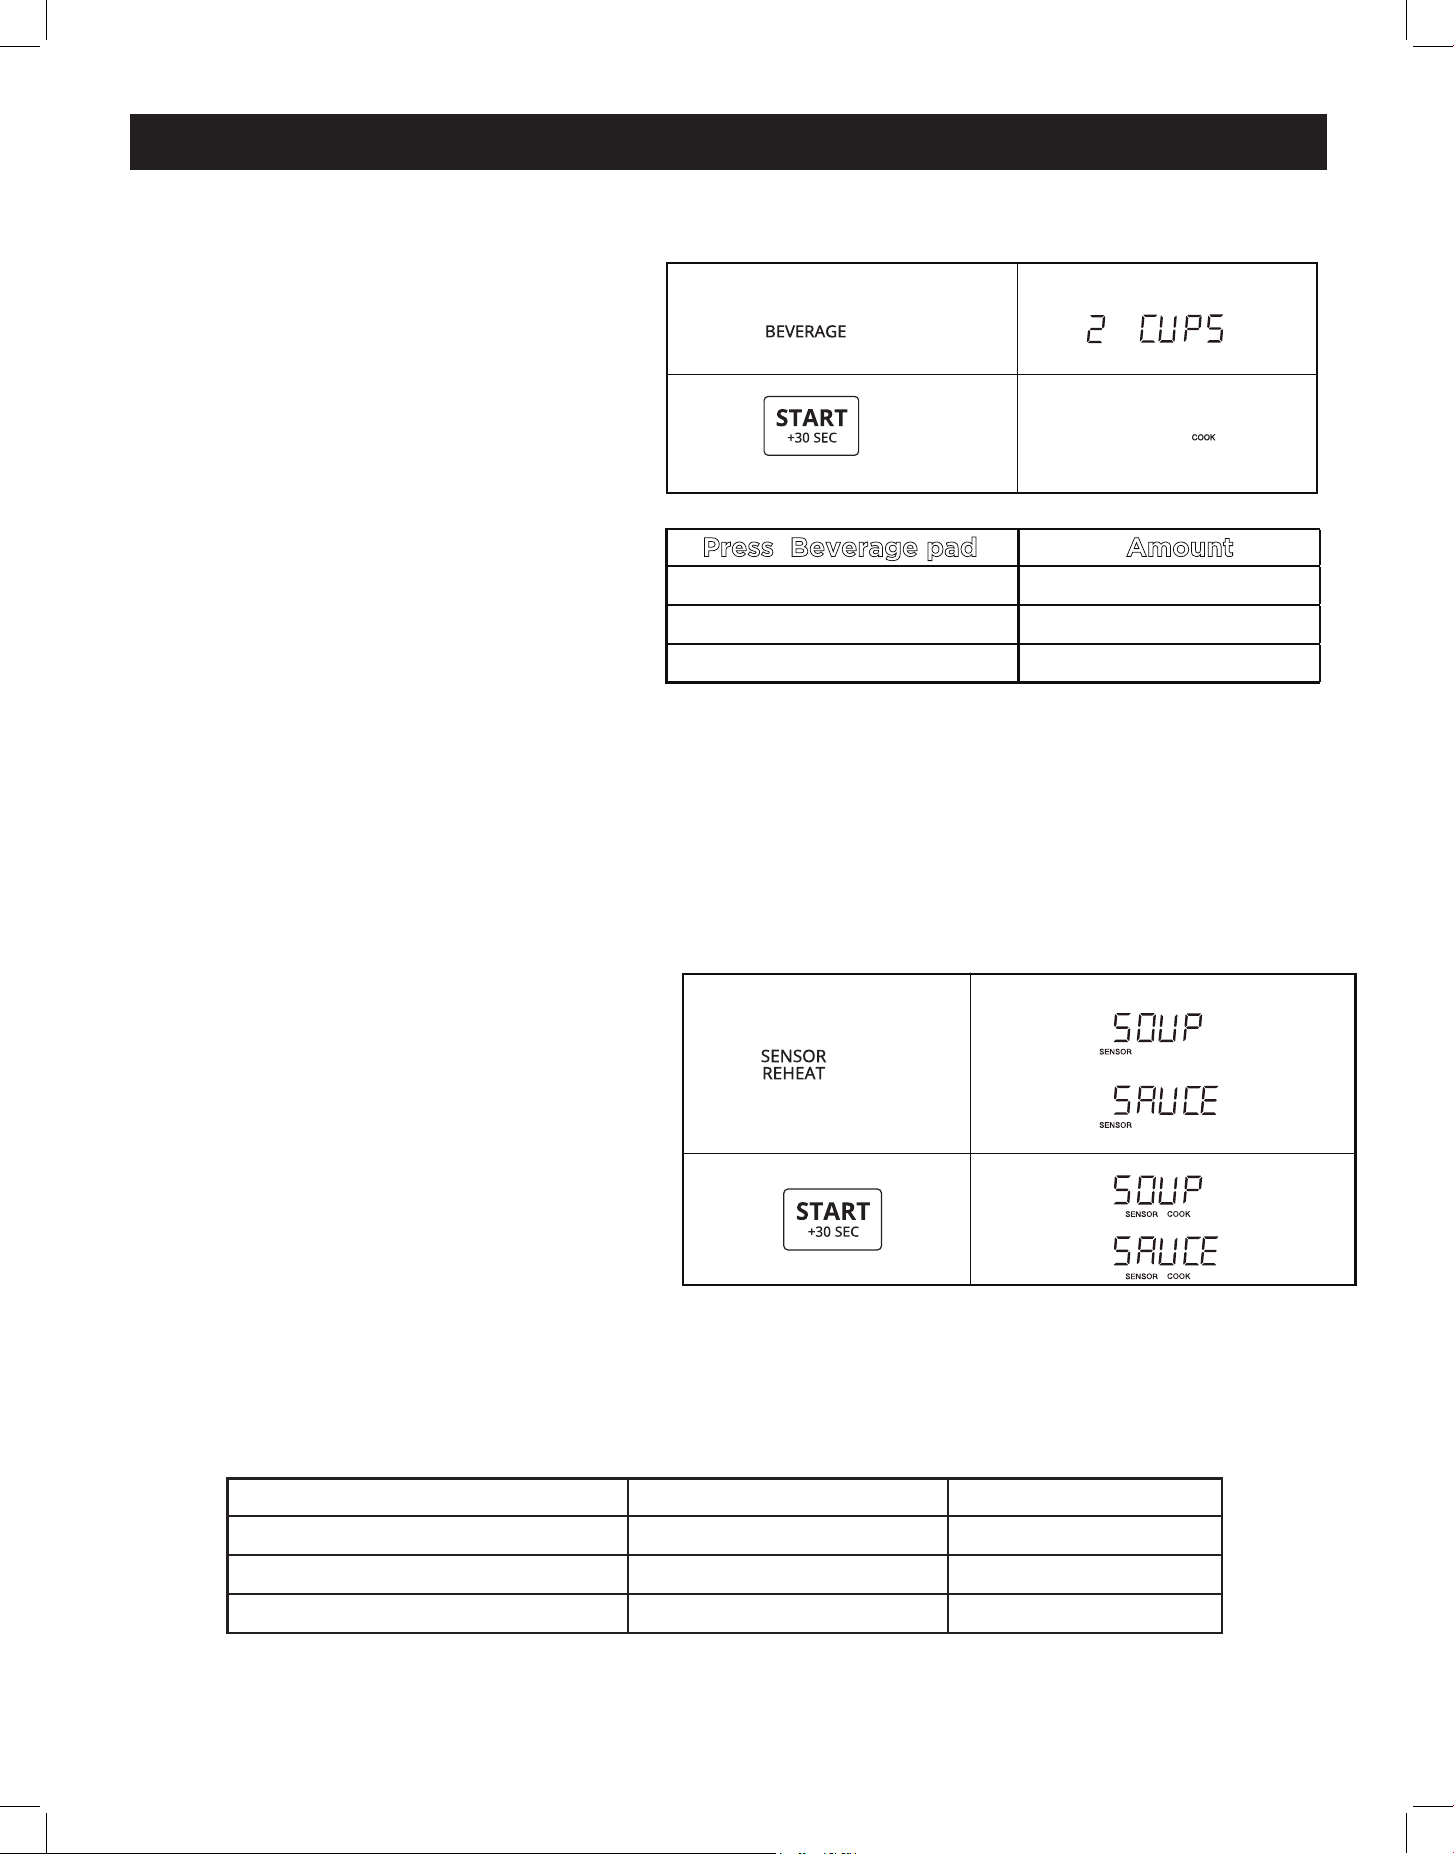
SENSOR REHEAT
BEVERAGE
In Standby or Clock mode:
To reheat a beverage, press the "Sensor
Reheat" button once, and the screen will
display "Beverage"
Press the START button, and the screen
will display "Enter 1-3 Cup"
Using the number buttons, select the
number of cups (in this case "2", as
shown) and the screen displays "2 Cups"
Press START to activate cooking process
You can press START again to increase
cooking time by 30 second increments
SENSOR REHEAT
See the chart below for Sensor Reheat
times for common foods
NOTE: The weight of these menus cannot
be adjusted: Soup/Sauce, Dinner Plate,
Casserole/Lasagna, Roll/Mun
In Standby or Clock mode:
To reheat soup or sauce, press the Sensor
Reheat button twice
Once cooking is underway, you can press
START again to increase cooking time by
30 second increments
touch: display shows:
(3 seconds later)
1.
2.
X2
Time counting down
PRESS AGAIN FOR OPTIONS/ PRESS START
Press Beverage pad Amount
x 1
1 Cup
x 2
2 Cups
x 3
3 Cups
touch: display shows:
2.
1.
X2
PRESS AGAIN FOR OPTIONS/ PRESS START
PRESS AGAIN FOR OPTIONS/ PRESS START
touch:
touch:
display shows:
display shows:
Press Sensor Reheat button Food Amount
x 1 Dinner Plate 1 -2 cups
x 2 Soup/Sauce 1 -2 cups
x 3 Cassarole 10 5 oz
14
OPERATION (continued)
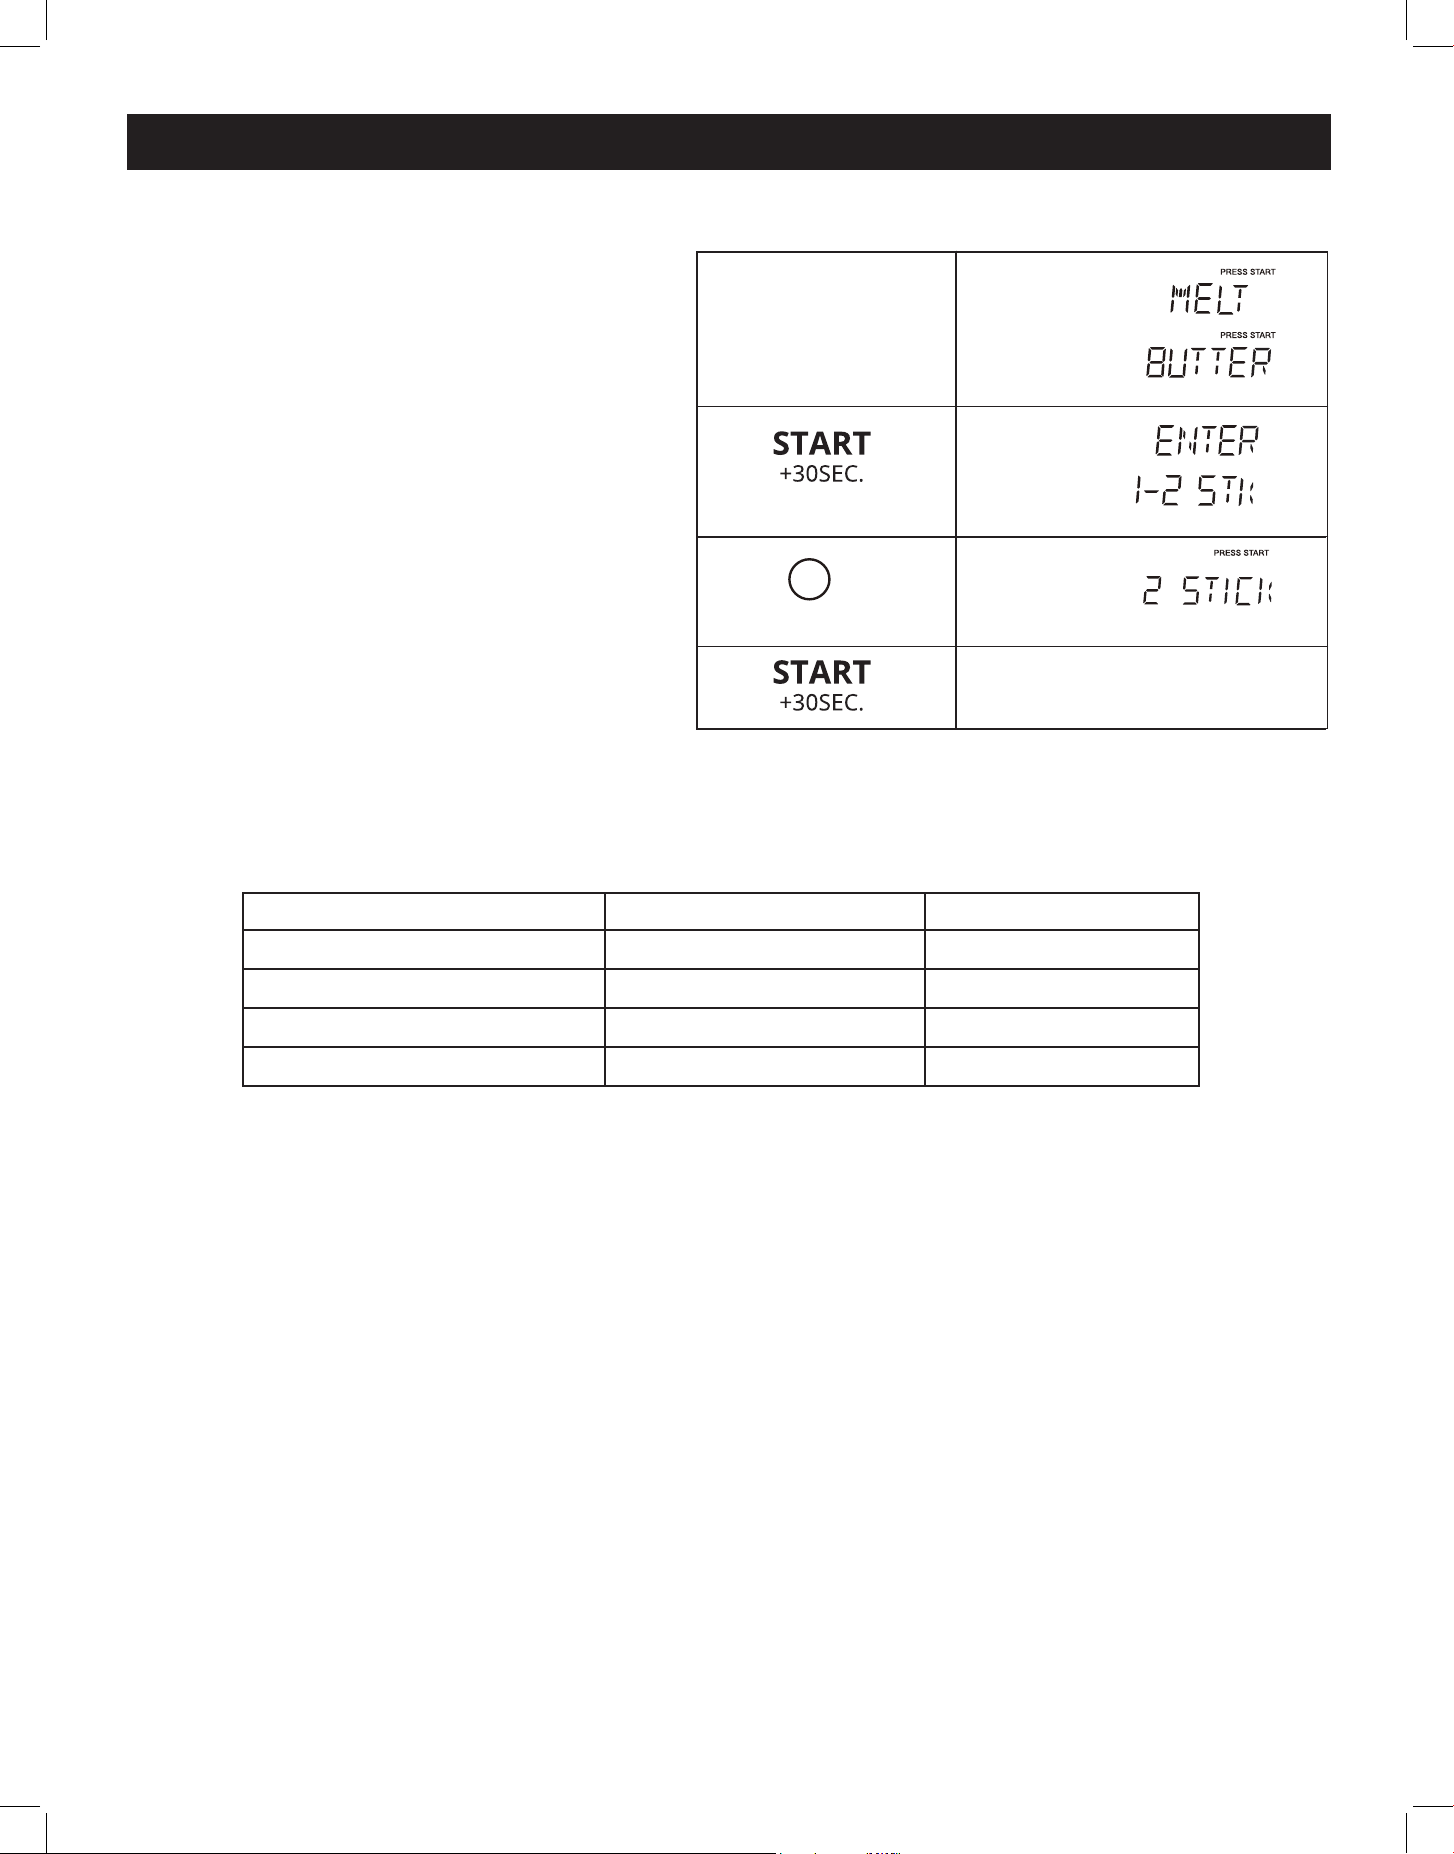
MELT/SOFTEN
The oven uses low power to melt and
soften foods See the chart below for Melt/
Soften times for common foods
In Standby, Clock, or Timer mode:
To melt butter, press the "Melt/Soften" but-
ton once, and the screen will display "Melt
Butter"
Press the START button, and the screen will
display "Enter 1-2 STK"
Using the number buttons, select the num-
ber of cups (in this case "2", as shown) and
the screen displays "2 STICK"
Press START to activate cooking process
Once cooking is underway, you can press
START again to increase cooking time by
30 second increments
(2 seconds later)
1.
2.
3.
4.
2
Time counting down
Melt/
Soften
X1
PRESS AGAIN FOR OPTION
PRESS AGAIN FOR OPTION
touch: display shows:
touch: display shows:
Press Melt Soften button Food Amount
x 1 Melt Butter 1/2 stick
x 2 Melt Chocolate 2/4/8 oz
x 3 Soften Ice Cream 1 Pint / 1 5 Quart
x 4 Soften Cream Cheese 3/8 oz
15
OPERATION (continued)
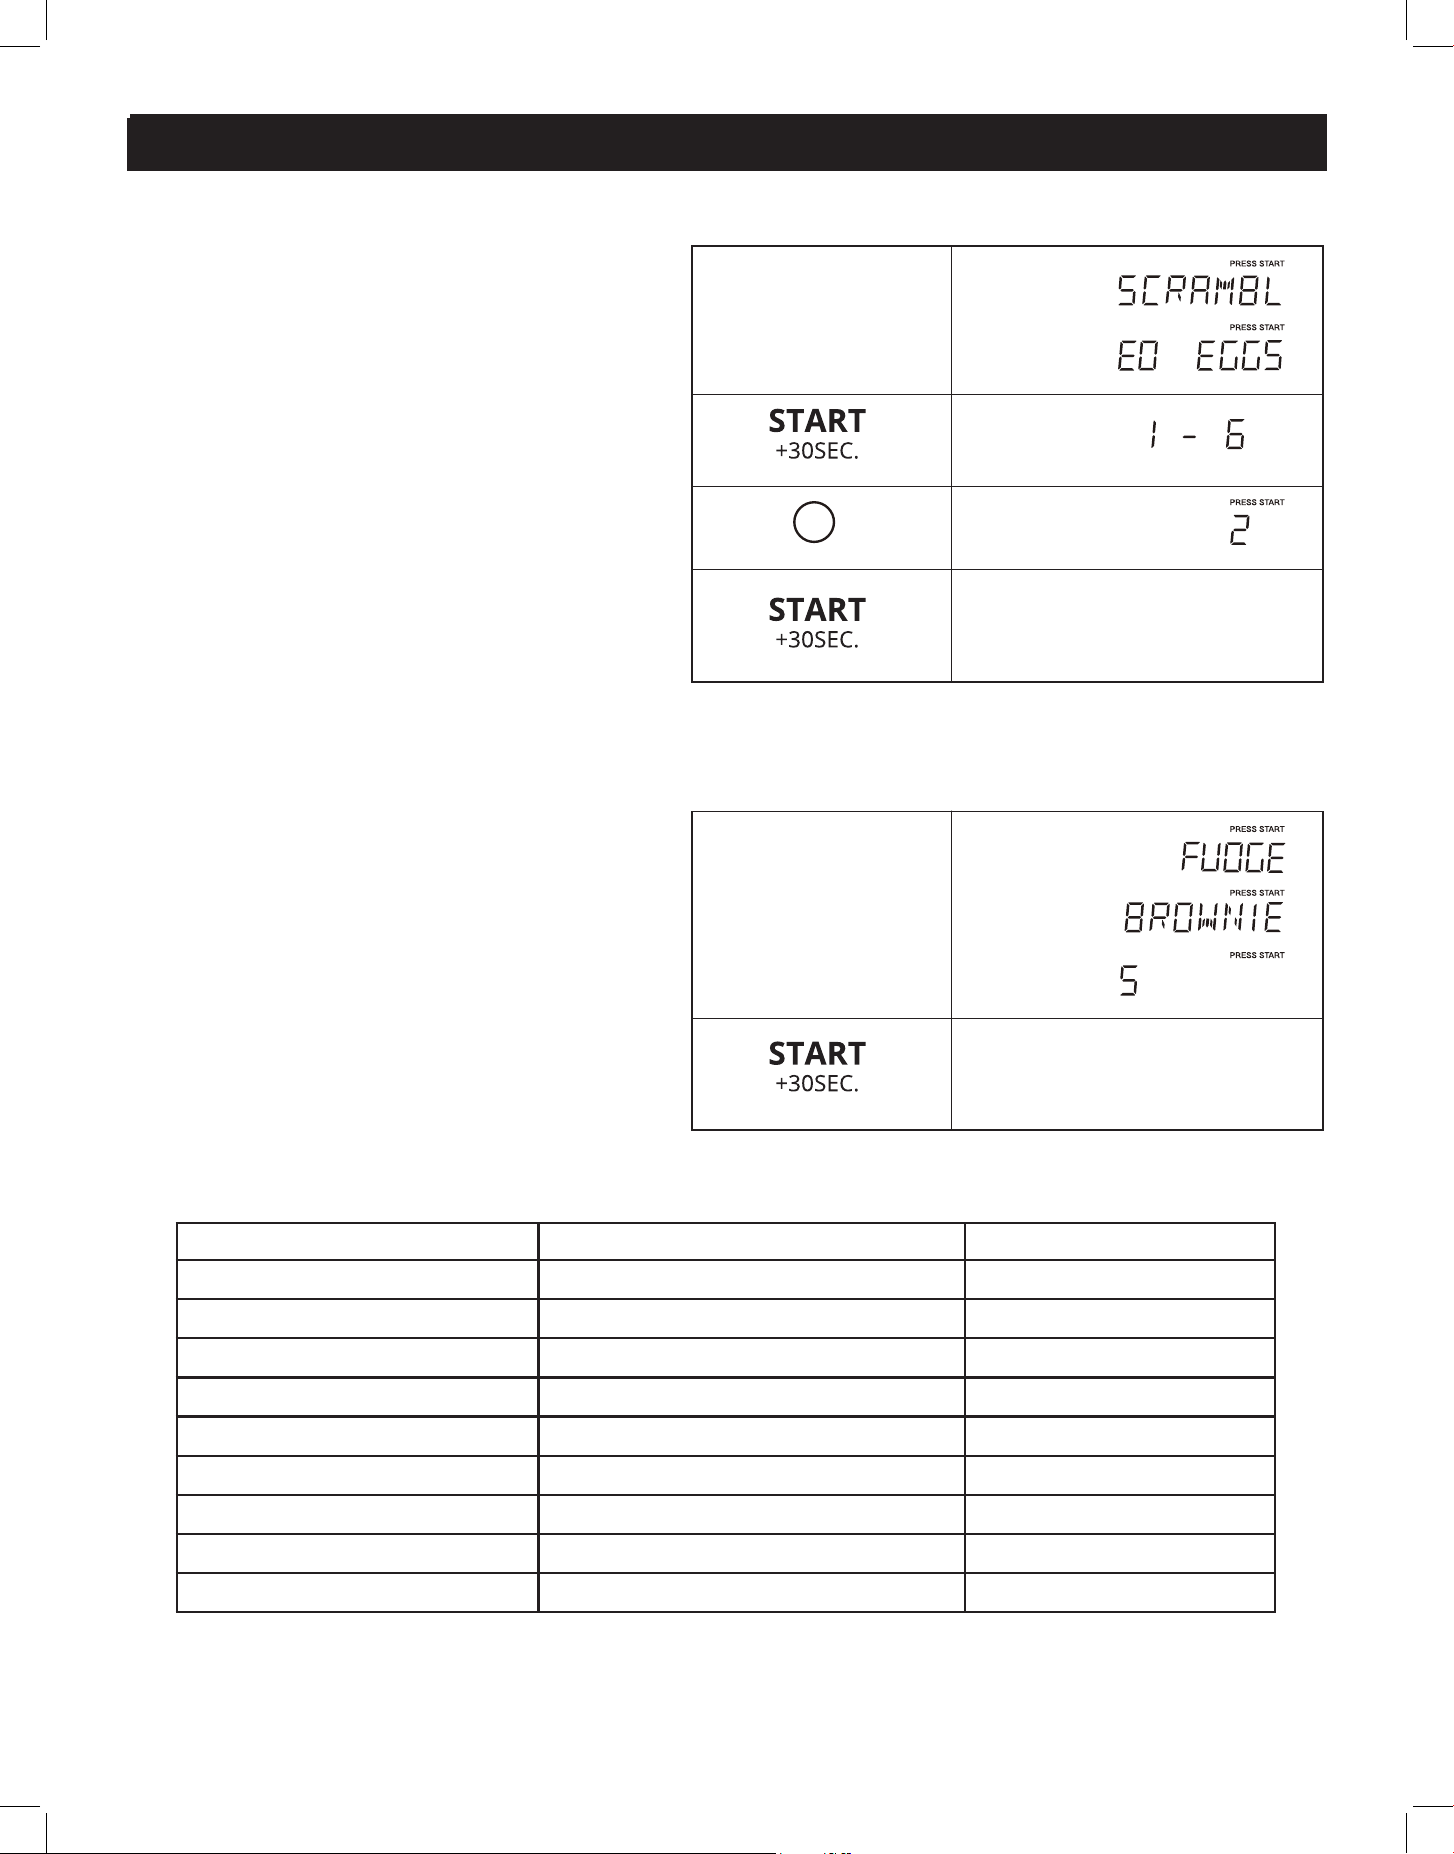
AUTO COOK
The weight of these menus items can be
set: scrambled eggs, hot cereal, frozen
pizza and other similar dishes
See the chart below for Auto Cook times
for common foods
Once cooking is underway, you can press
START again to increase cooking time by
30 second increments
The weight of these menu items cannot be
set: fudge brownies, garlic shrimp, stued
mushrooms, asiago red potatoes, roasted
vegetable medley, lemon shrimp risotto
and other similar dishes:
See the chart below for Auto Cook times
for common foods
Once cooking is underway, you can press
START again to increase cooking time by
30 second increments
(2 seconds later)
2
Time counting down
2.
3.
4.
1.
Auto cookX1
PRESS AGAIN FOR OPTION
PRESS AGAIN FOR OPTION
(2 seconds later)
Time counting down
4.
1.
Auto cook X4
PRESS AGAIN FOR OPTION
PRESS AGAIN FOR OPTION
PRESS AGAIN FOR OPTION
touch:
touch:
display shows:
display shows:
Press Auto Cook button Food Amount
x 1 Scrambled Eggs 1 - 6
x 2 Hot Cereal 1 -3 servings
x 3 Frozen Pizza 6/8/12 oz
x 4 Fudge Brownies Per Recipe
x 5 Garlic Shrimp Per Recipe
x 6 Stued Mushrooms Per Recipe
x 7 Asiago Red Potatoes Per Recipe
x 8 Roasted Vegetable Medley Per Recipe
x 9 Lemon Shrimp Risotto Per Recipe
16
OPERATION (continued)
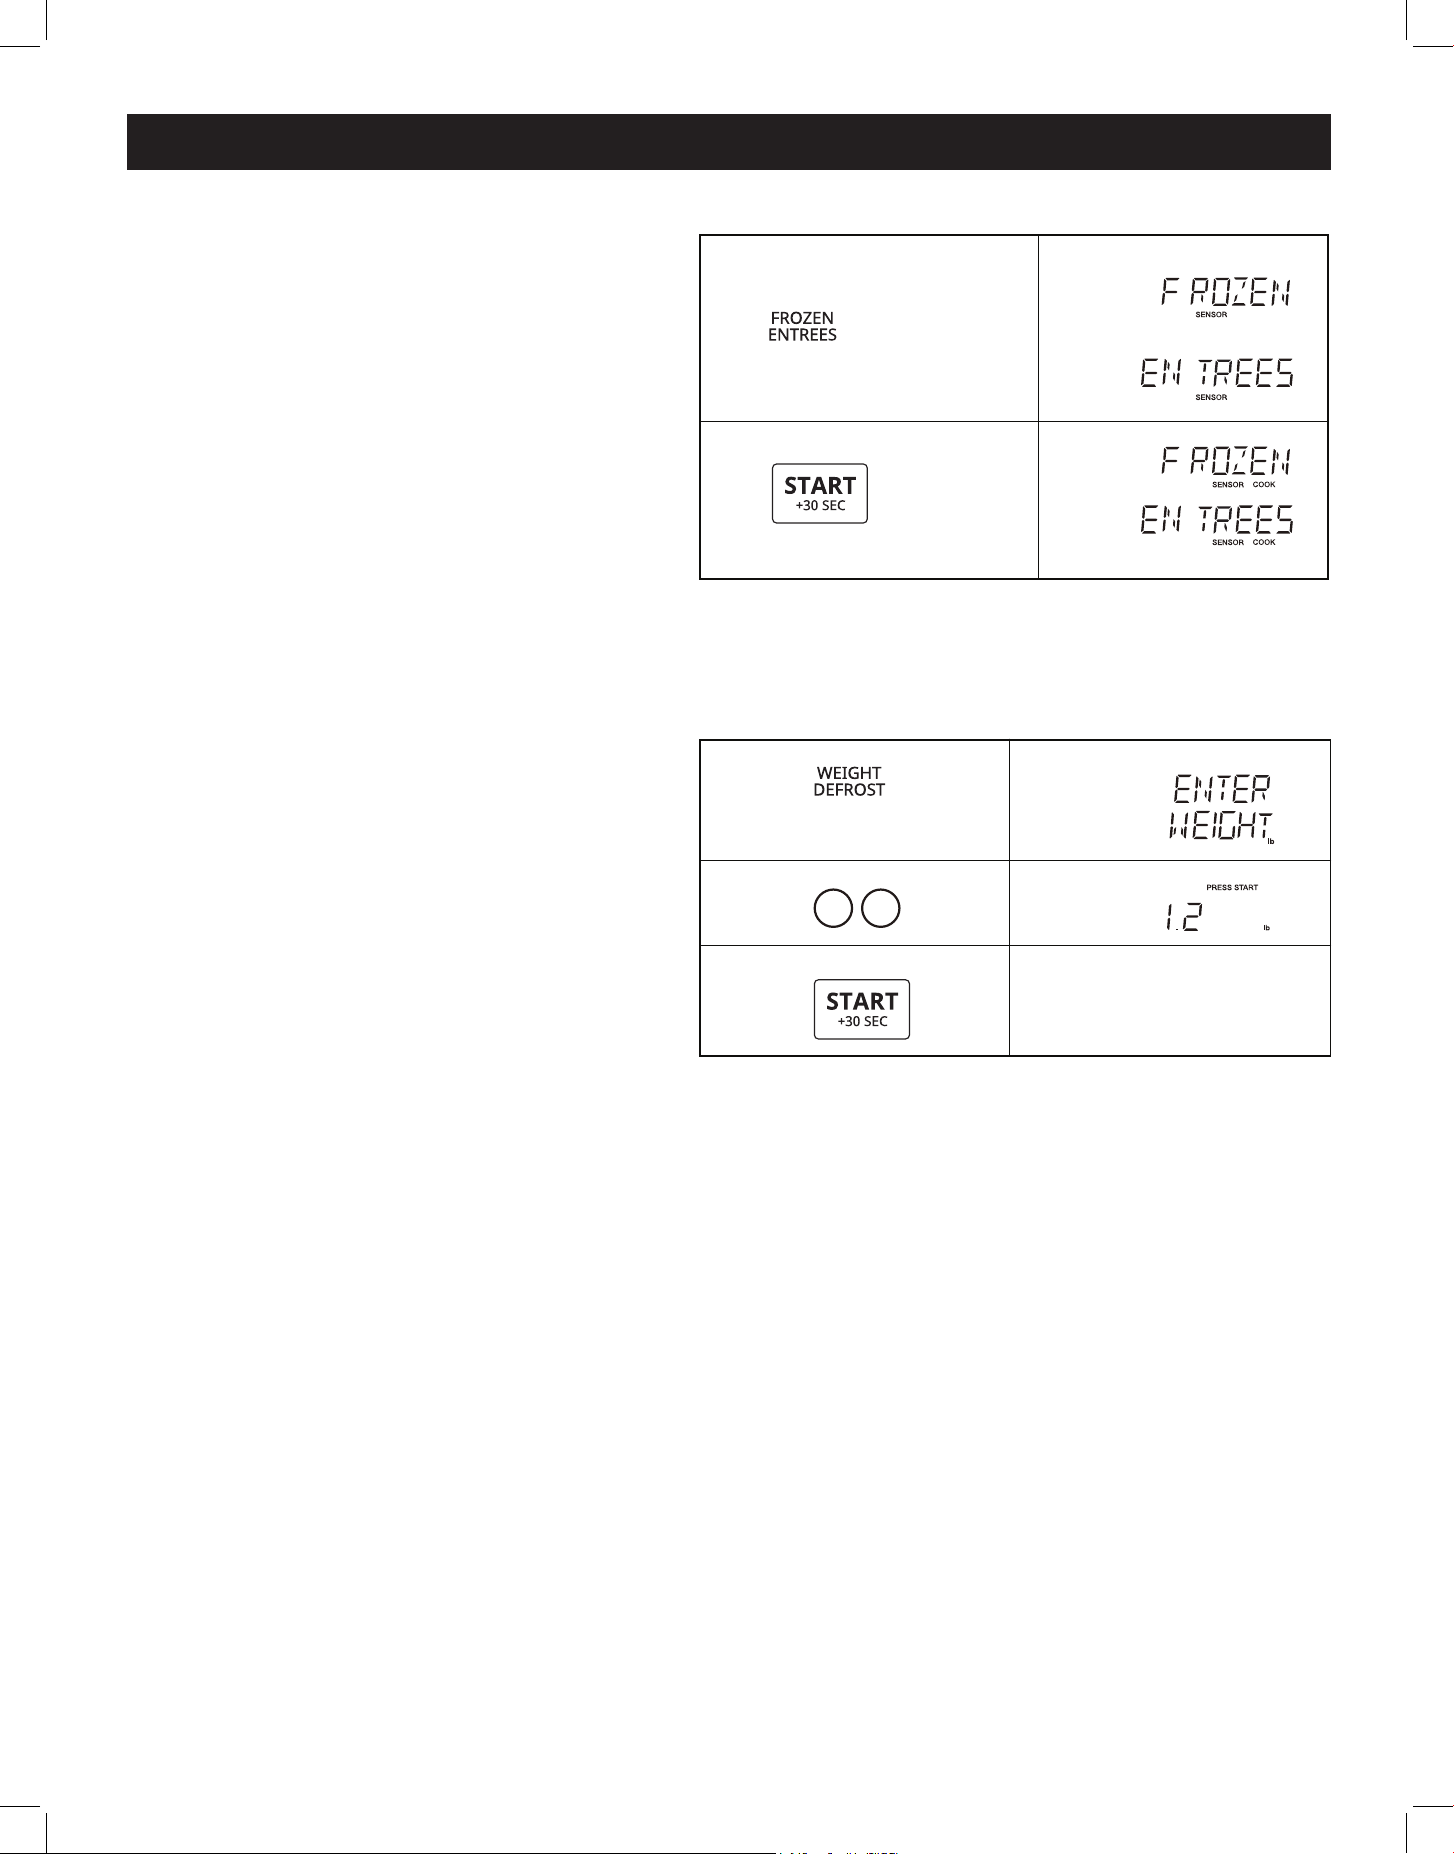
FROZEN ENTREES
In Standby, Clock or Timer mode:
• Press Frozen Entrees once
• Press Start button
Once cooking is underway, you can
press START again to increase cook-
ing time by 30 second increments
WEIGHT DEFROST
In Standby, Clock or Timer mode:
To set the defrost weight for 1 2 lb:
• Press the Weight Defrost button
once, the display will show "Enter
Weight"
• Press the 1 and 2 buttons to select a
weight of 1 2 lbs
• Press the Start button
Once defrosting is underway, you can
press START again to increase cook-
ing time by 30 second increments
touch: display shows:
X1
1.
2.
PRESS AGAIN FOR OPTIONS/ PRESS START
PRESS AGAIN FOR OPTIONS/ PRESS START
touch: display shows:
1.
1 2
2.
3.
Time counting down
(2 seconds later)
DEFR.
DEFR.
DEFR.
X1
NOTE:
1 The valid range of weight is 0 1~6 0 lb
2 A buzzer will sound to remind you to turn the food over during defrosting The count-
down will continue whether the operation is paused or not
17
OPERATION (continued)
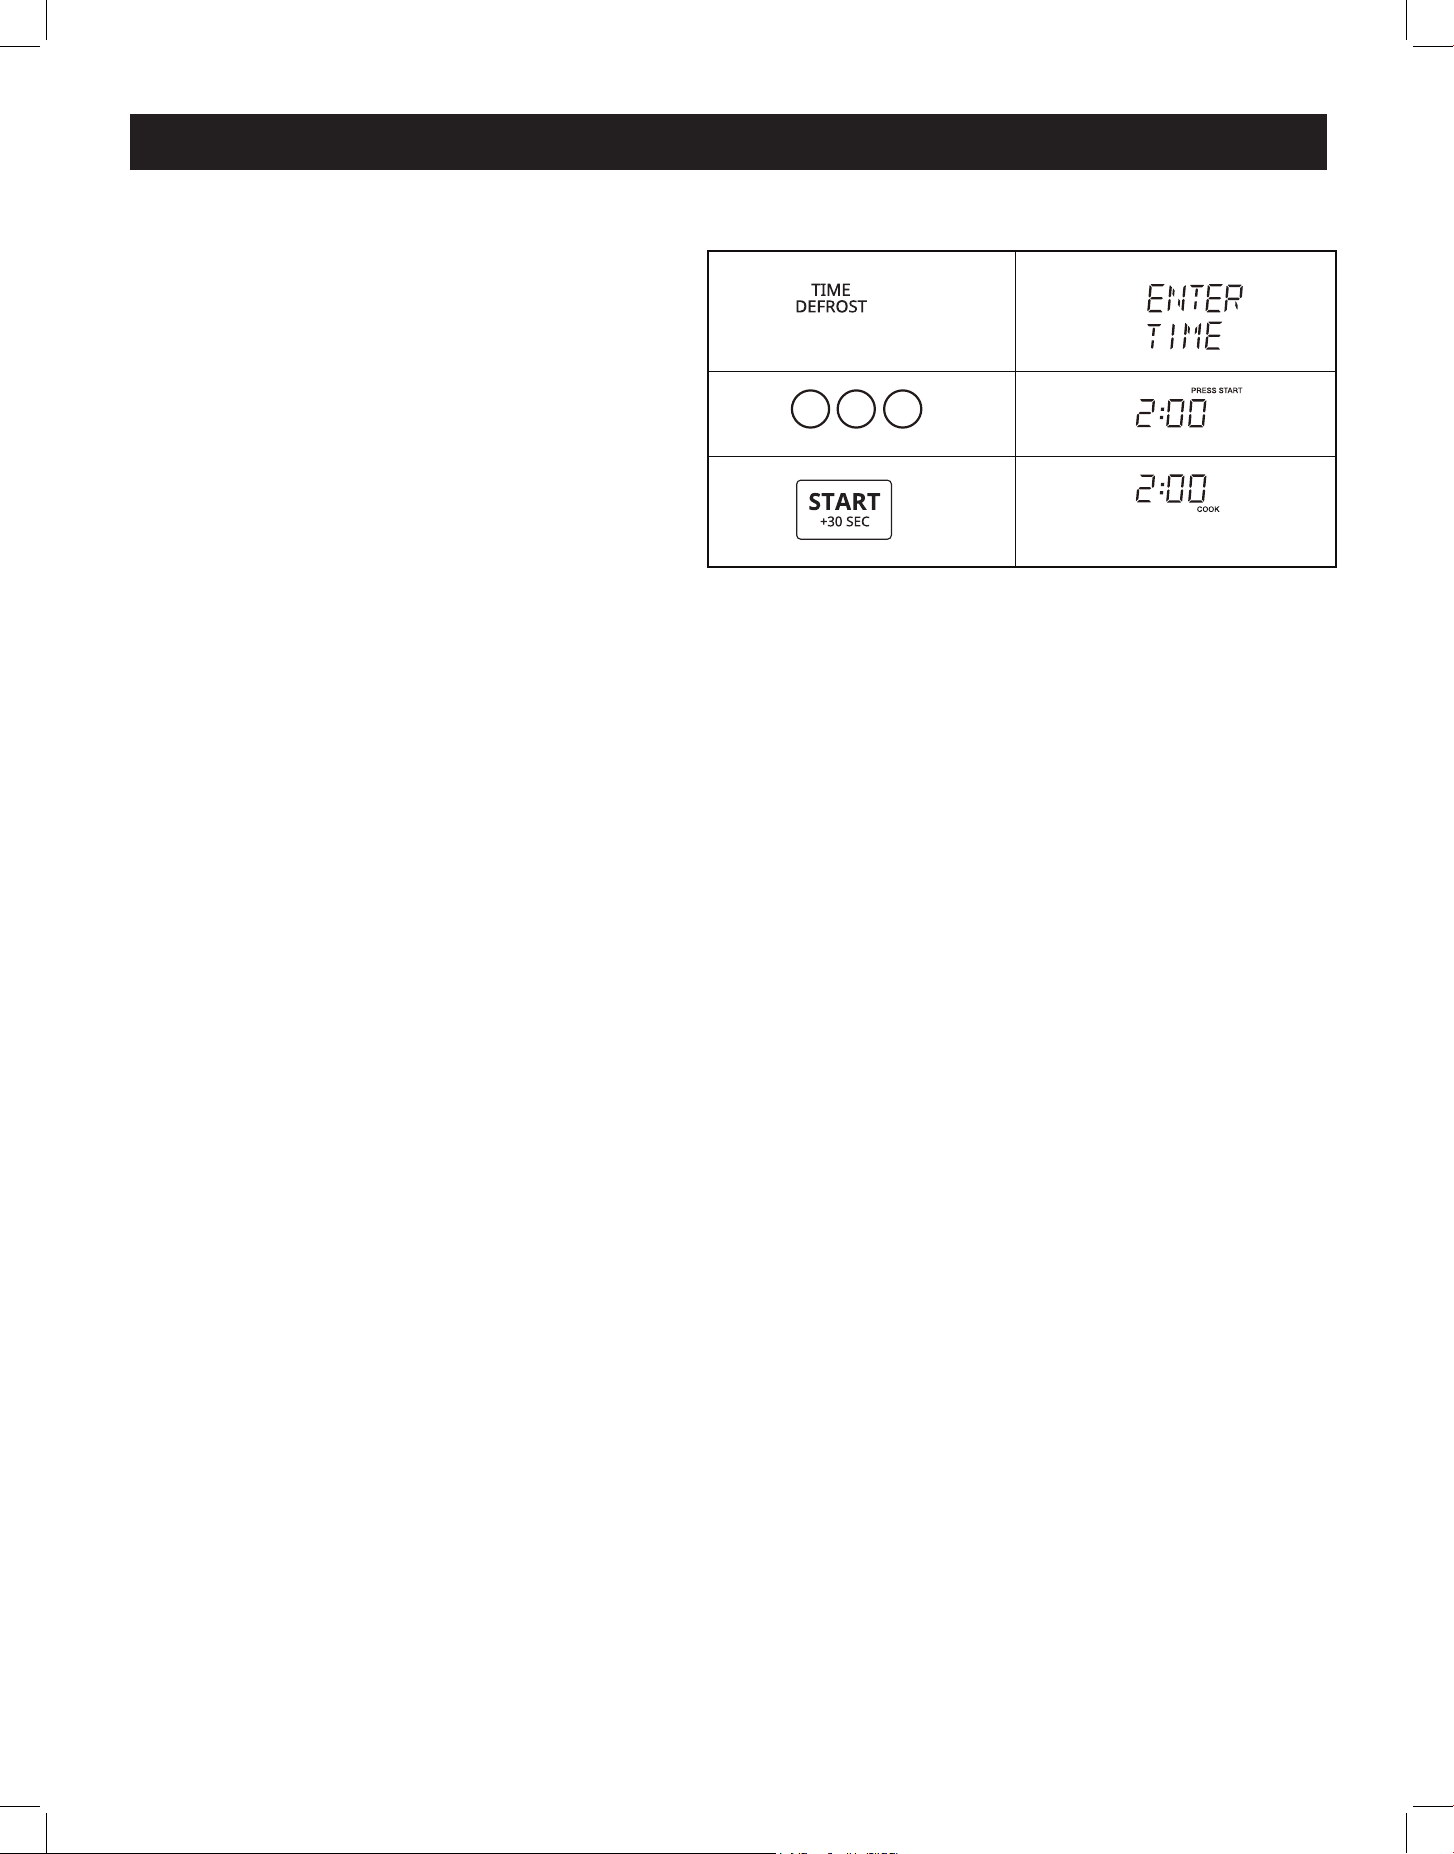
TIME DEFROST
In Standby, Clock or Timer mode:
• Press the Time Defrost button once, and
the screen will display "Enter Time"
• Using the number buttons, enter the de-
sired defrosting time (in this case, 2,0,0 are
pressed to program 2 minutes - 2:00)
• Press START to activate the defrost
process
NOTE: A buzzer will sound to remind you to
turn the food over during defrosting
The countdown will continue whether the operation is paused or not
touch: display shows:
(2 seconds later)
1.
2 0 0
2.
3.
Time counting down
DEFR.
DEFR.
DEFR.
DEFR.
X1
DEFROSTING TIPS
• When using Auto Defrost, enter the net weight in pounds and tenths of pounds (the weight of
the food minus the container)
• Before starting, make sure to remove any and all metal twist-ties and/or tags that come with fro-
zen food bags, and replace them with string or elastic bands
• Open cartons/containers before placing in the microwave Always pierce plastic pouches and
packaging before putting them in the microwave
• If the food is foil-wrapped, remove foil and place food in a microwave safe container
• Pierce or slit the skin of skinned food, such as potatoes or sausage
• Bend/squeeze plastic pouches of food to ensure even defrosting
• Always underestimate defrosting time If defrosted food is still icy in the centre, return it to the
microwave oven for more defrosting
• The length of a defrosting time varies according to how solidly the food is frozen
• The shape of the package aect how quickly food will defrost Shallow packages will defrost
more quickly than a deep block
• As food defrosts, separate the pieces so that it defrosts more quickly
• Use small pieces of aluminum foil to shield parts of food such as chicken wings, leg tips, fish tails,
or areas that start to get warm Make sure the foil does not touch the sides, top, or bottom of the
oven as the foil can damage the oven lining
• For better results, let food stand after defrosting Turn over food during defrosting or standing
time Break apart and remove defrosted food as required
• For best results, remove fish, shellfish, meat and poultry from its packaging, otherwise the wrap
will hold steam and juice close to the foods, which can cause the outer surface of food to cook
during the defrosting process
• For best results, roll your ground meat into a ball before freezing During the DEFROST cycle, the
microwave will signal when it is time to turn the meat over Scrape o any excess frost from the
meat and continue defrosting
• Place foods in a shallow container or on a microwave roasting rack to catch drippings
18
OPERATION (continued)
touch: display shows:
(3 seconds later)
1.
(Hold 3 seconds)
touch: display shows:
(3 seconds later)
1.
(Hold 3 seconds)
touch: display shows:
x1
x1
x1
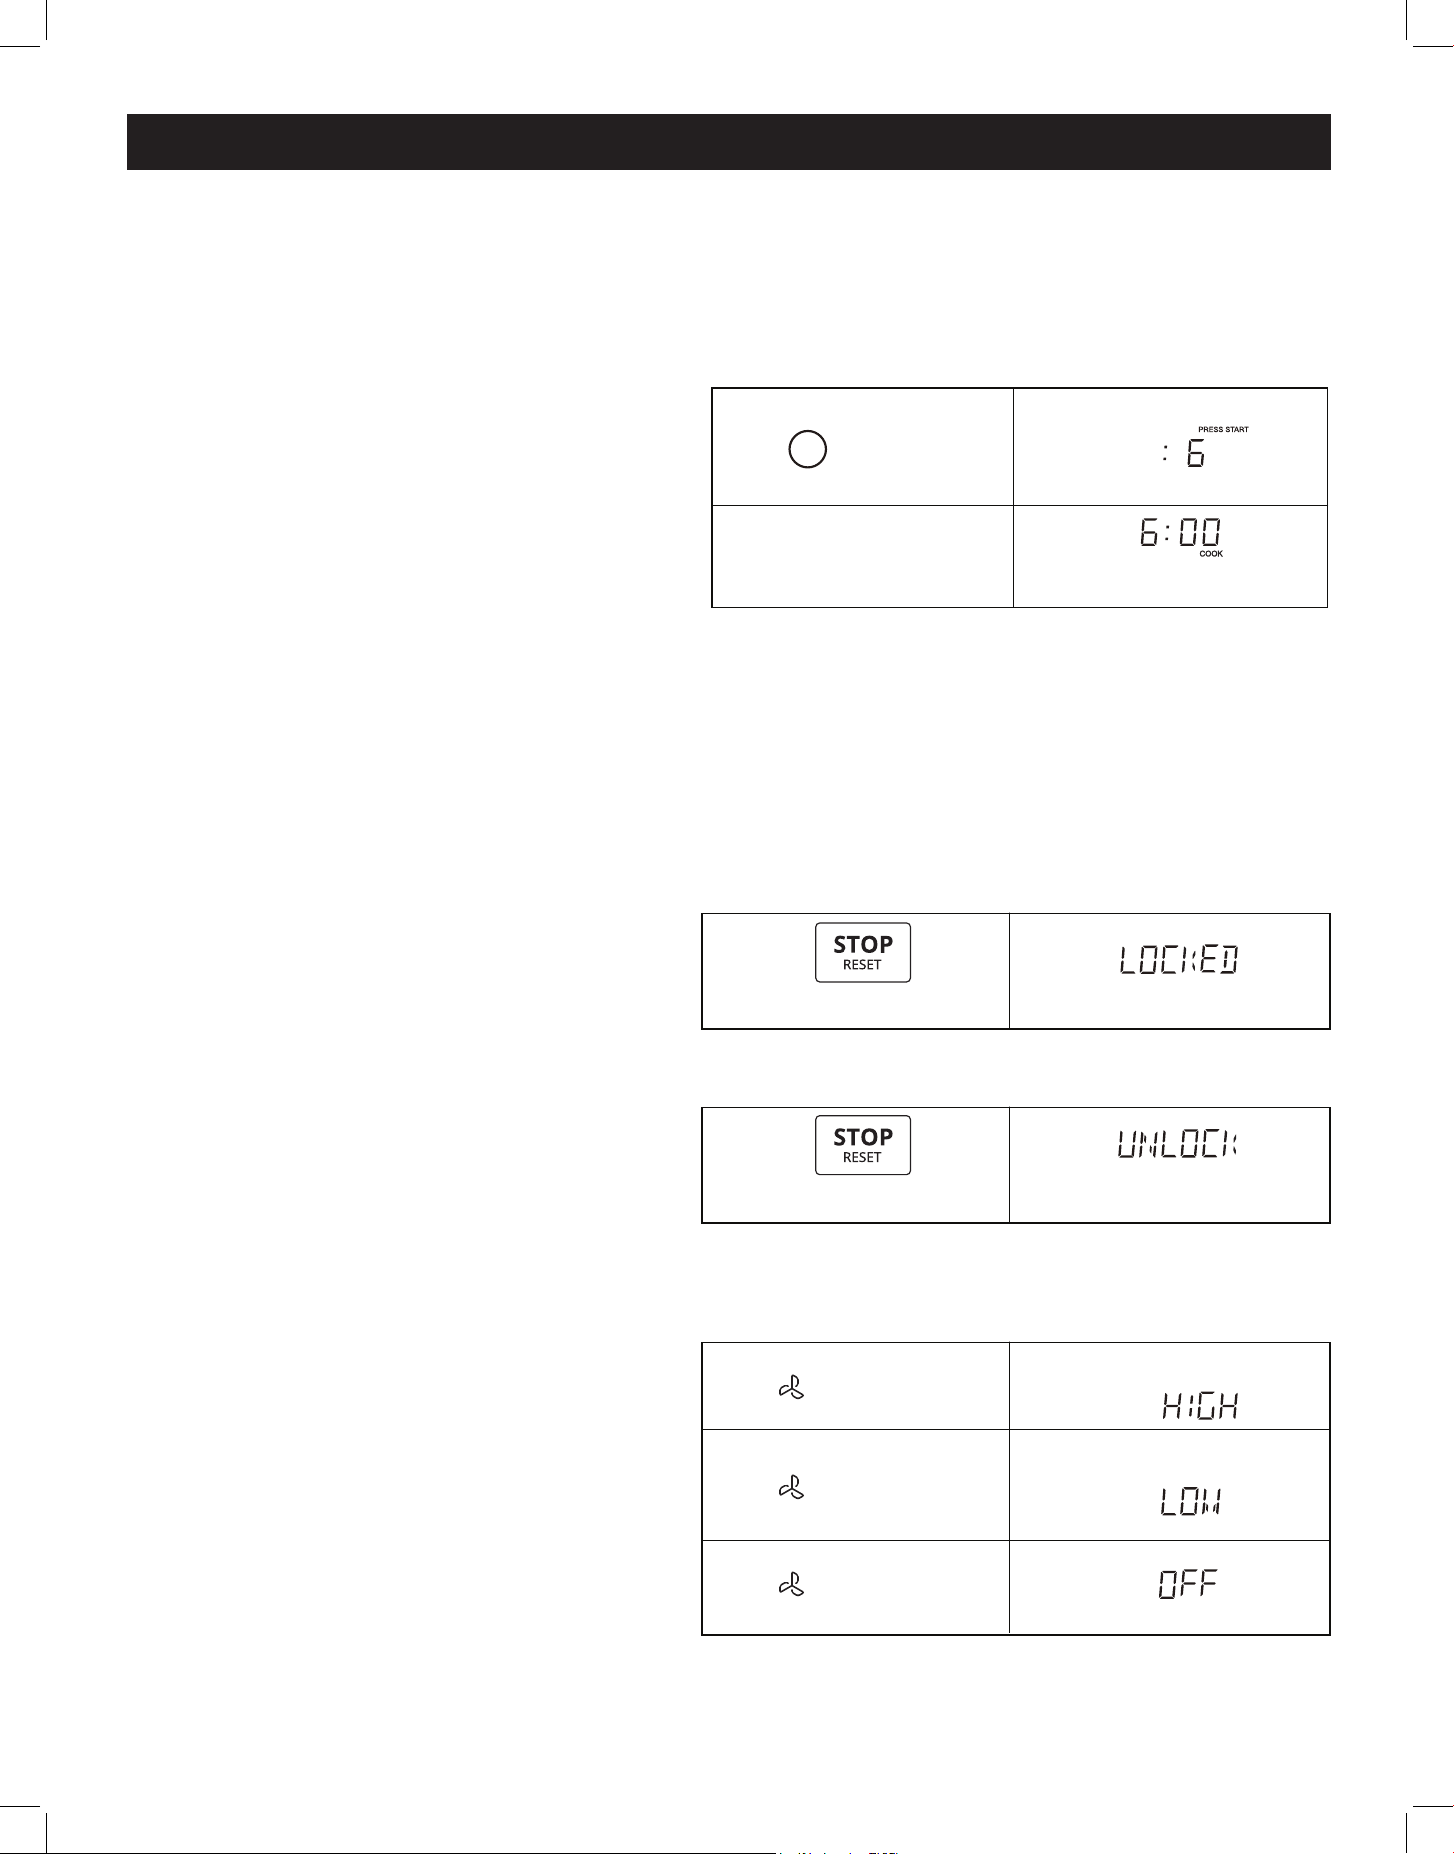
CHILD LOCK
To activate child lock in Standby mode:
• Press and hold the "Stop / Reset" button
for 3 seconds
• The display will show "LOCKED"
To cancel child lock, in "LOCKED" mode:
• Press and hold the "Stop / Reset" button
for 3 seconds
• The display will show "UNLOCK"
VENT FAN
The fan has 2 settings - LOW and HIGH
When the vent fan is OFF, the first press of
the button will turn the fan on HIGH, a sec-
ond press will switch the fan to LOW, and a
third press will turn it OFF
SPEED COOKING
If the oven door hasn't been opened/closed, or if the door has been closed for more than 5 min-
utes since the oven was plugged in, "FOOD" will appear on the display reminding you to place
food in the oven and close the door before operating
1-9 PAD
In Standby, Clock or Timer mode:
• Press the number pads 1-9 to start cooking
for 1-9 minutes at 100% power level
For example, cooking for 6 minutes at 100%
power level:
START / +30 SEC
In Standby or Timer mode, press “START/+30SEC” to start cooking with 100% power level for 30
seconds Once cooking is underway, you can press START again to increase cooking time by 30
second increments (to a maximum time of 99:99 )
touch: display shows:
1.
2.
Time counting down
6
After 2 seconds
19
OPERATION (continued)
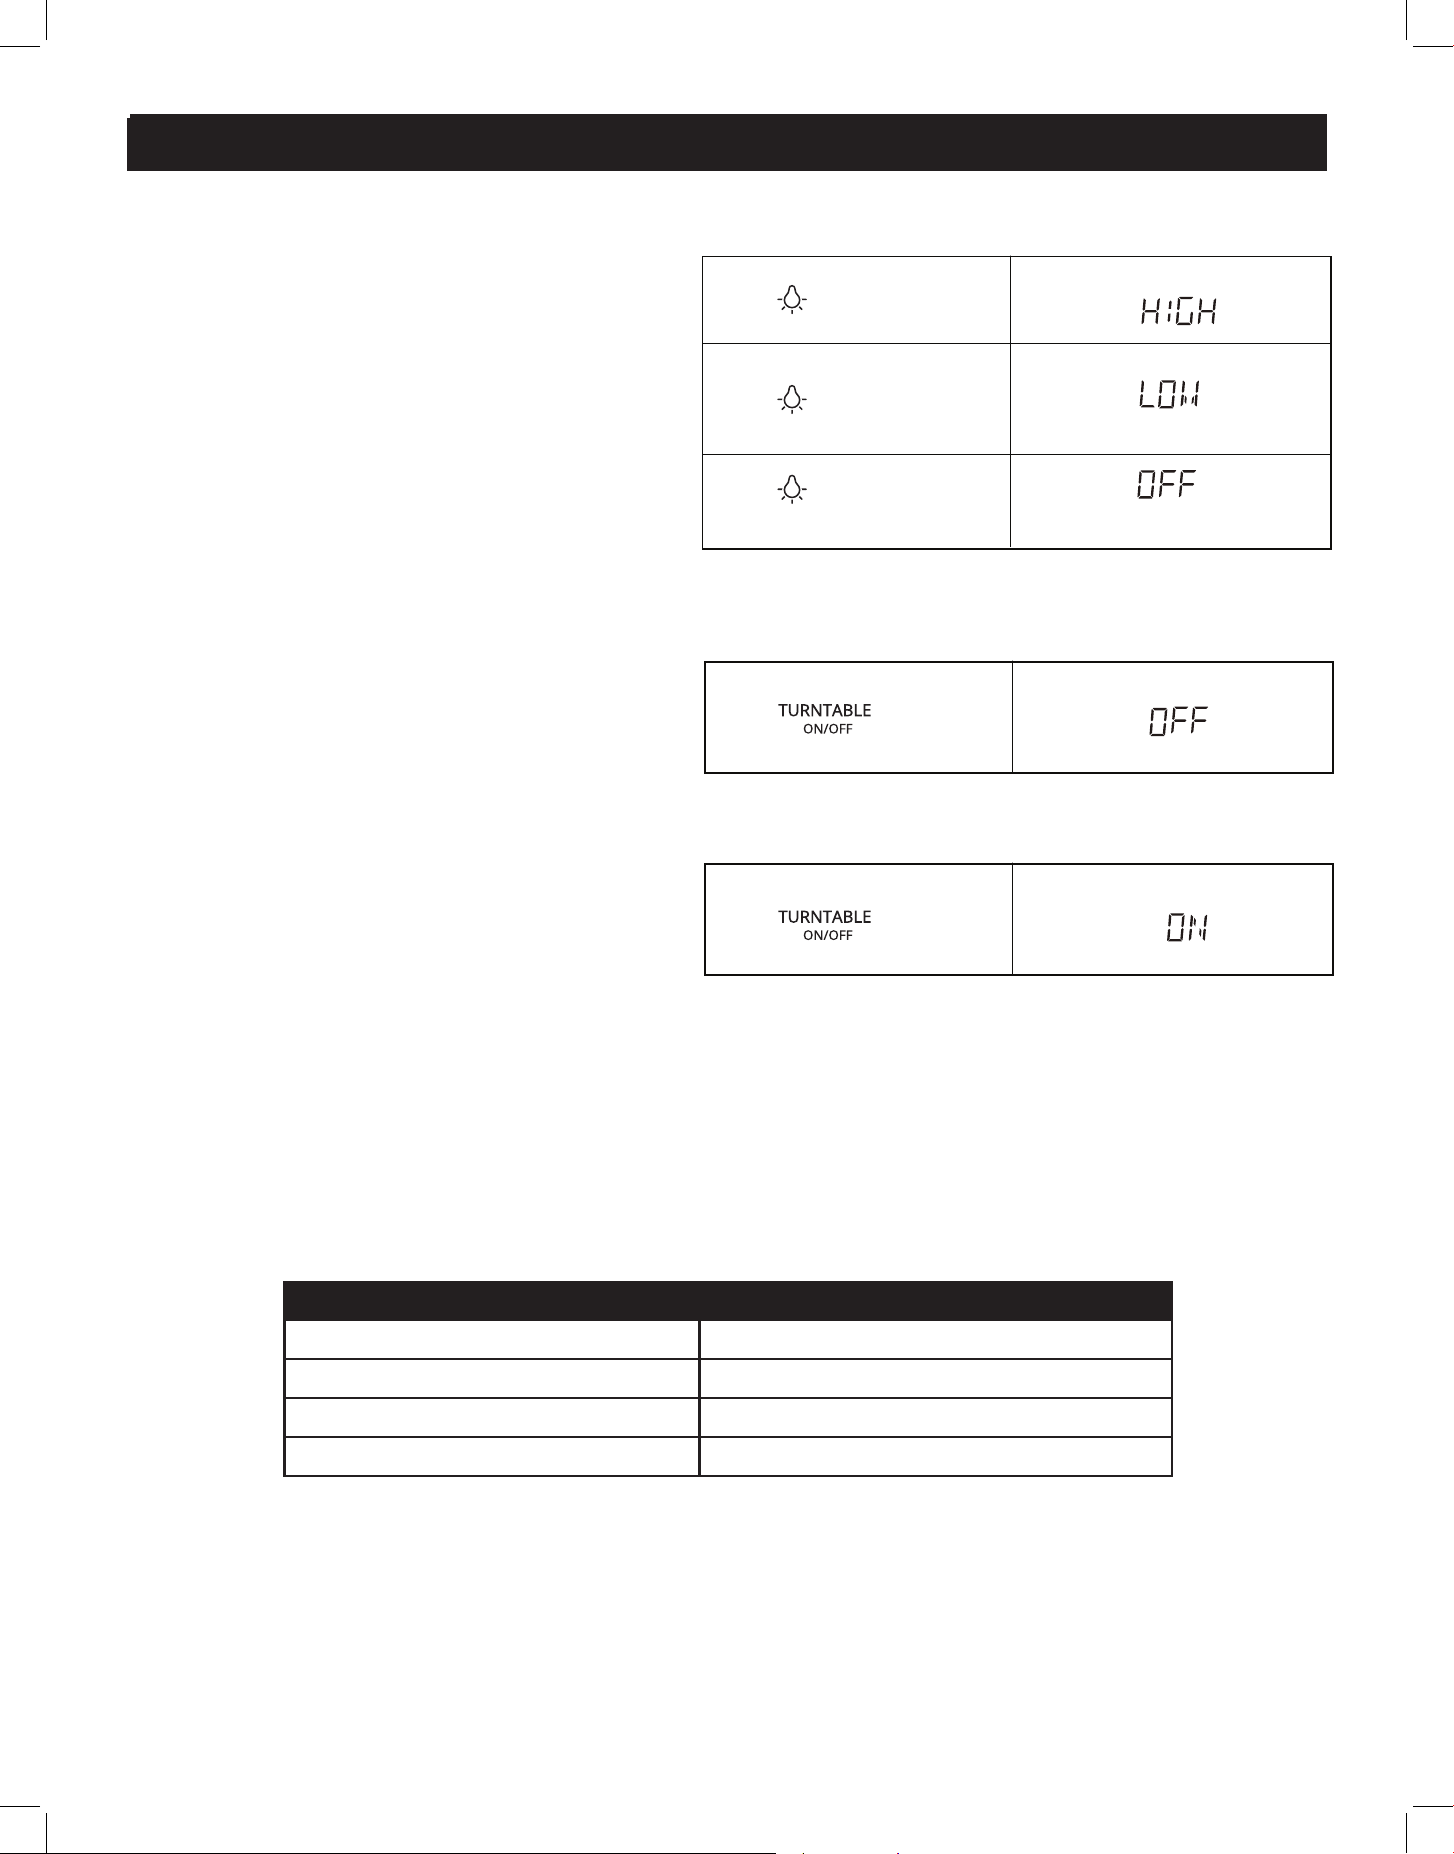
TURNTABLE ON/OFF
The default mode for the turntable is ON
• Press the TURNTABLE ON/OFF button
once to turn rotation o The display will
show "OFF"
• Press the TURNTABLE ON/OFF button
once again to turn rotation on The display
will show "ON"
NOTE: The turntable function cannot be
changed when the microwave is in menu or
defrost functions
INQURING FUNCTION
If the clock or timer has been set, the corresponding time will display for 2 seconds by pressing
“Timer/Clock” while in the cooking state
USER PREF
touch: display shows:
x1
touch: display shows:
x1
KEY SETTING
USER PREF X 1 Volume Hi/Med/Low/O
USER PREF X 2 Weight lb/kg
USER PREF X 3 Clock Display O/On
USER PREF X 4 Demo
LIGHT
The light has 2 settings - LOW and HIGH
When the light is OFF, the first press of the
button will turn the light on HIGH, a second
press will switch the light to LOW, and a
third press will turn it OFF
touch: display shows:
x1
x1
x1

20
OPERATION (continued)
VOLUME LOW/MED/HIGH/OFF
In Standby mode:
(the mode will switch every 3 seconds)
To turn the volume OFF:
• Press USER PREF once, the display will
show VOLUME LOW
• Press START to set, or press USER PREF
again, and the display will show VOLUME
MED
• Press START to set, or press USER PREF
again, and the display will show VOLUME
HIGH
• Press START to set, or press USER PREF
again, and the display will show VOLUME
OFF
• Press START to set
WEIGHT (LBS/KG)
In Standby mode:
Switch between weight units in pounds (lbs)
or kilograms (kg)
To switch weight units:
• Press USER PREF twice, the display will
show LB / KG
• Press START to set LB, or press USER PREF
again to select KG
• Press START to set
touch: display shows:
1. x1
2.
PRESS AGAIN FOR OPTIONS/ PRESS START
PRESS AGAIN FOR OPTIONS/ PRESS START
PRESS AGAIN FOR OPTIONS/ PRESS START
PRESS AGAIN FOR OPTIONS/ PRESS START
touch: display shows:
1. x2
2.
PRESS AGAIN FOR OPTIONS/ PRESS START
lb
21
OPERATION (continued)
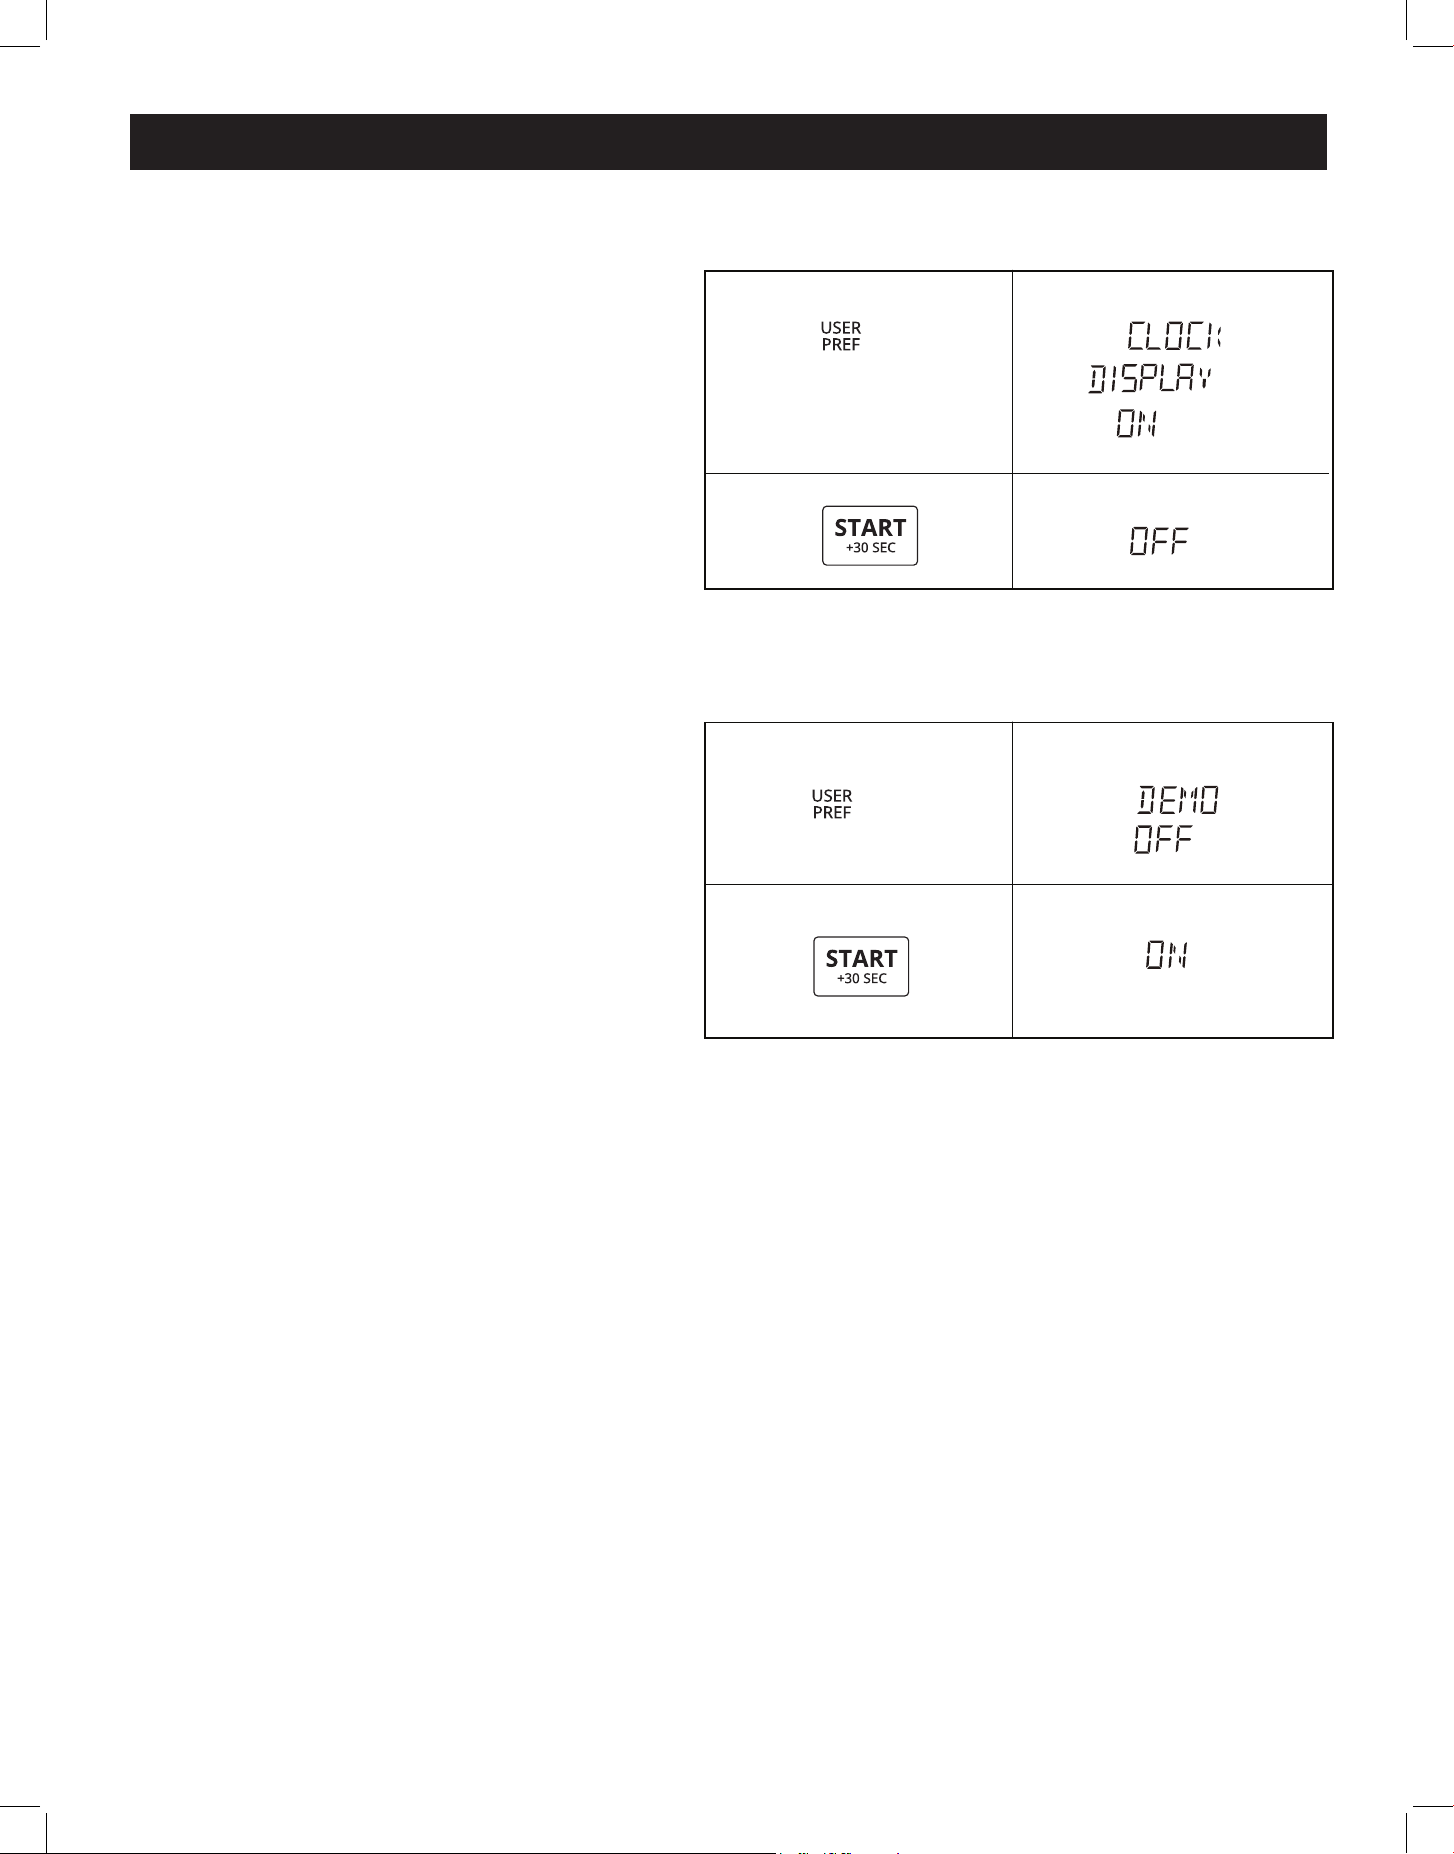
CLOCK DISPLAY ON / OFF
The default setting for the clock display is
ON
To turn clock display OFF::
• Press USER PREF three times, the display
will show CLOCK DISPLAY ON
• Press START to set ON, or press USER
PREF again to select OFF
• Press START to set
DEMO SETTING
NOTE: In Demo mode, the cooking function
can be set, but it does not actually function
The default setting for the Demo setting is
OFF
To turn Demo setting ON:
• Press USER PREF four times, the display
will show DEMO OFF
• Press START to set OFF, or press USER
PREF again to select ON
• Press START to set
touch: display shows:
1. x3
PRESS AGAIN FOR OPTIONS/ PRESS START
2.
touch: display shows:
1. x4
2.
PRESS AGAIN FOR OPTIONS/ PRESS START

22
PROBLEM
PROBLEM
POSSIBLE CAUSE
POSSIBLE CAUSE
SOLUTIONS
SOLUTIONS
Microwave will not
start
• The microwave is not plugged in
correctly
• The door is open
• The wrong operation is set
• Ensure the microwave is plugged in
correctly
• Close the door and try again
• Consult the instructions for
appropriate operation/ setting
Arcing or sparking
• Materials not compatible with
microwave have been used
• The microwave is being used
while empty
• There are spills in the microwave
cabinet
• Only use microwave-safe cookware
• Do not operate the microwave
when empty
• Clean up any spills or residue
Unevenly cooked
food
• Materials not compatible with
microwave have been used
• Food is not completely defrosted
before cooking
• Cooking time and/or power level
is not suitable
• Food has not been stirred/turned
• Only use microwave-safe cookware
• Ensure food is completely
defrosted before cooking
• Use the correct cooking time and
power level
• Turn/stir food while cooking
Overcooked food
• Cooking time and/or power level
is not suitable
• Use the correct cooking time and
power level
Undercooked food
• Materials not compatible with
microwave have been used
• Food is not completely defrosted
before cooking
• Microwave ventilation ports are
obstructed
• Cooking time and/or power level
is not suitable
• Only use microwave-safe cookware
• Ensure food is completely
defrosted before cooking
• Ensure microwave ventilation ports
are unobstructed
• Use the correct cooking time and
power level
Improper defrosting
• Materials not compatible with
microwave have been used
• Cooking time and/or power level
is not suitable
• Food has not been stirred/turned
• Only use microwave-safe cookware
• Use the correct cooking time and
power level
• Turn/stir food while cooking
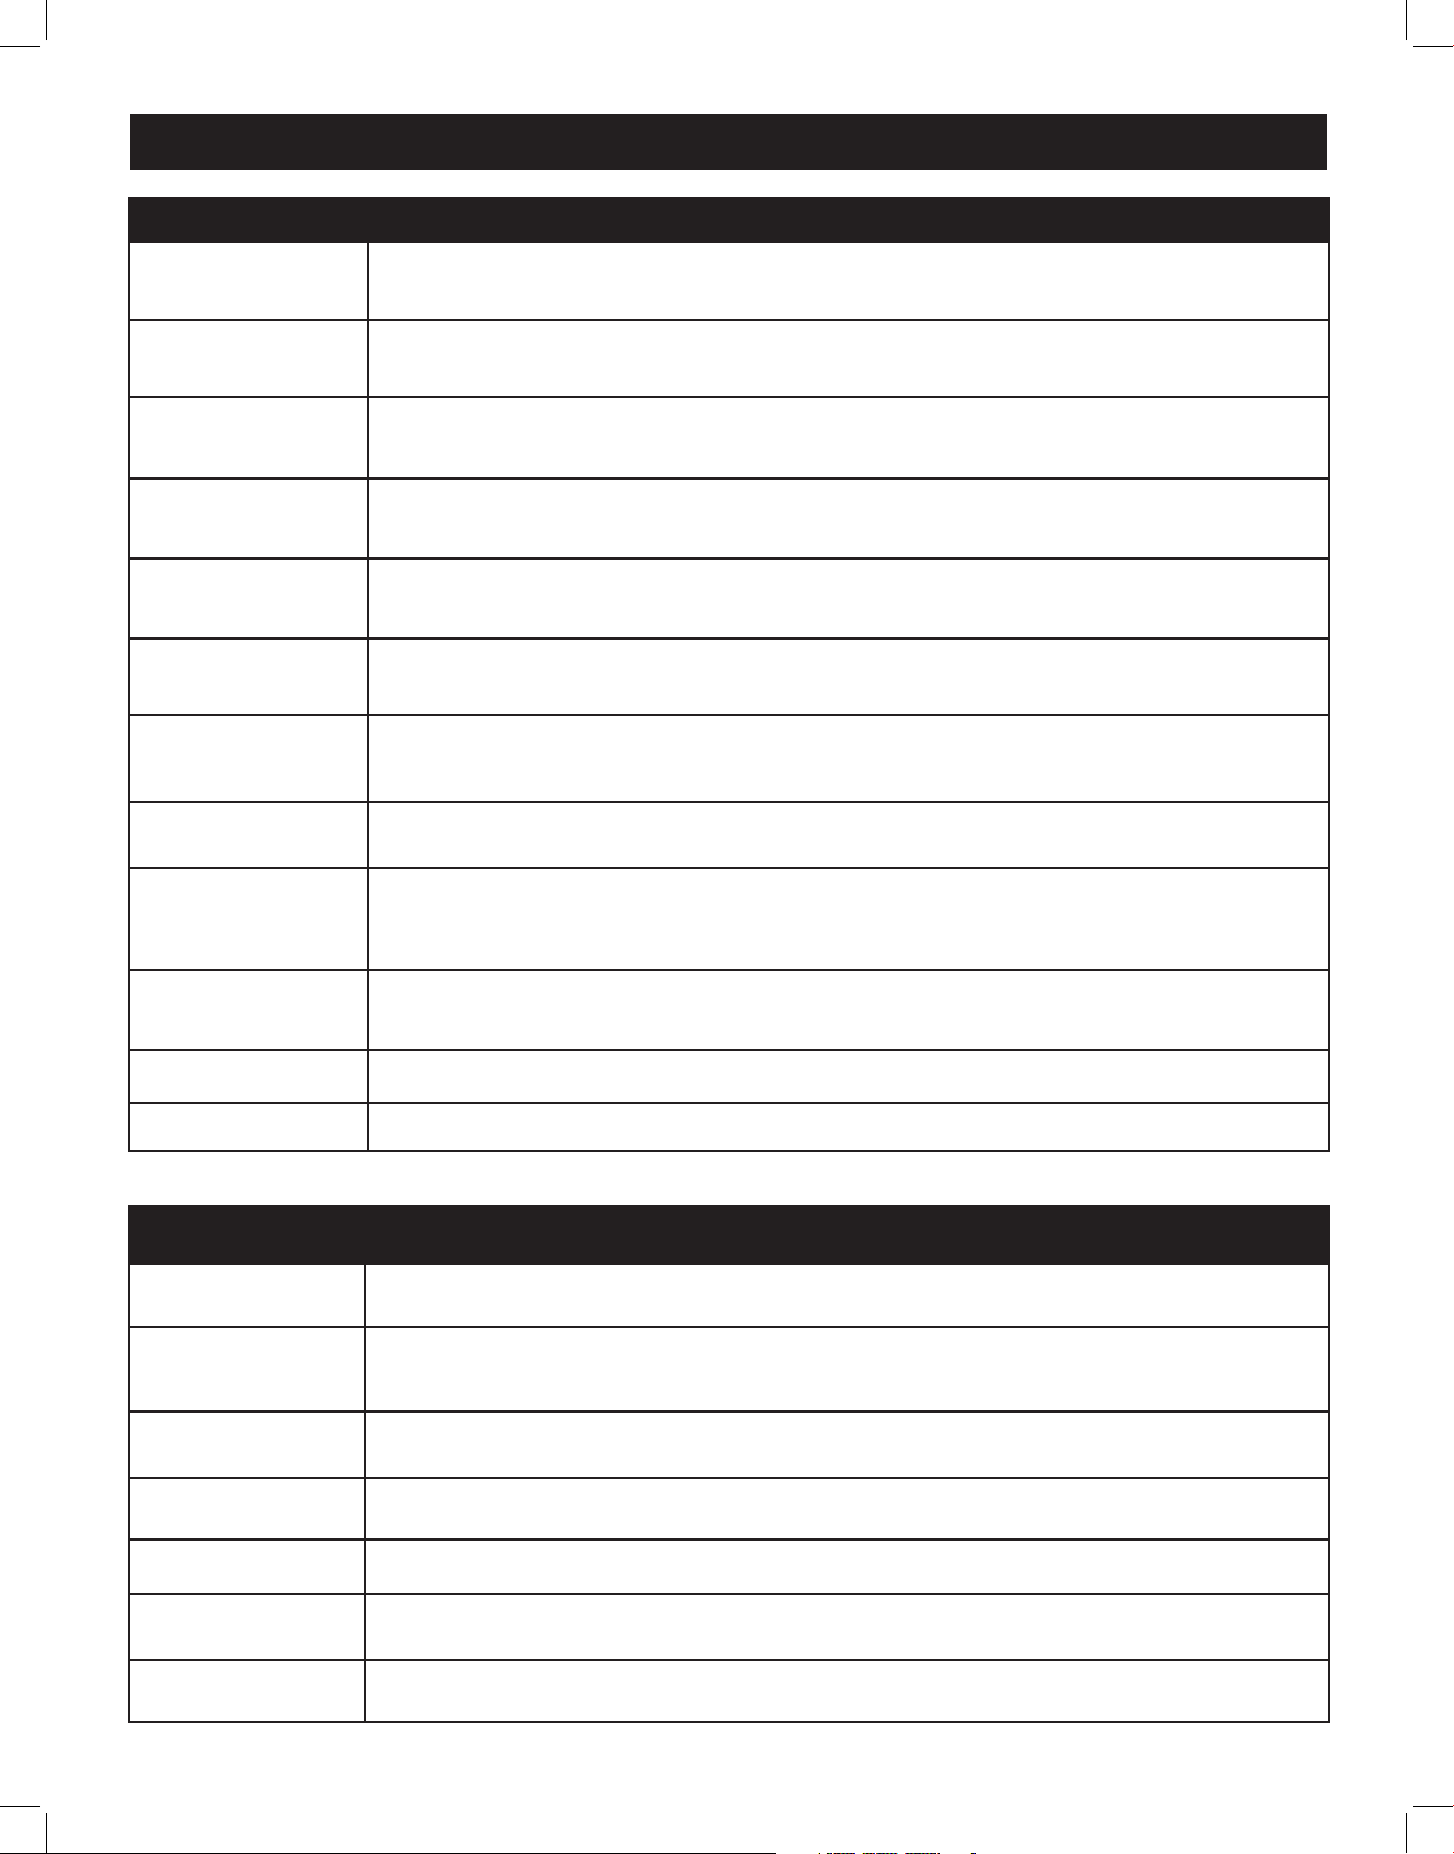
Many common appliance problems can be solved by following the suggestions below.
If the microwave still does not work properly after trying these suggestions, contact the nearest
authorized service centre or Unique Appliances Customer Service.
TROUBLESHOOTING
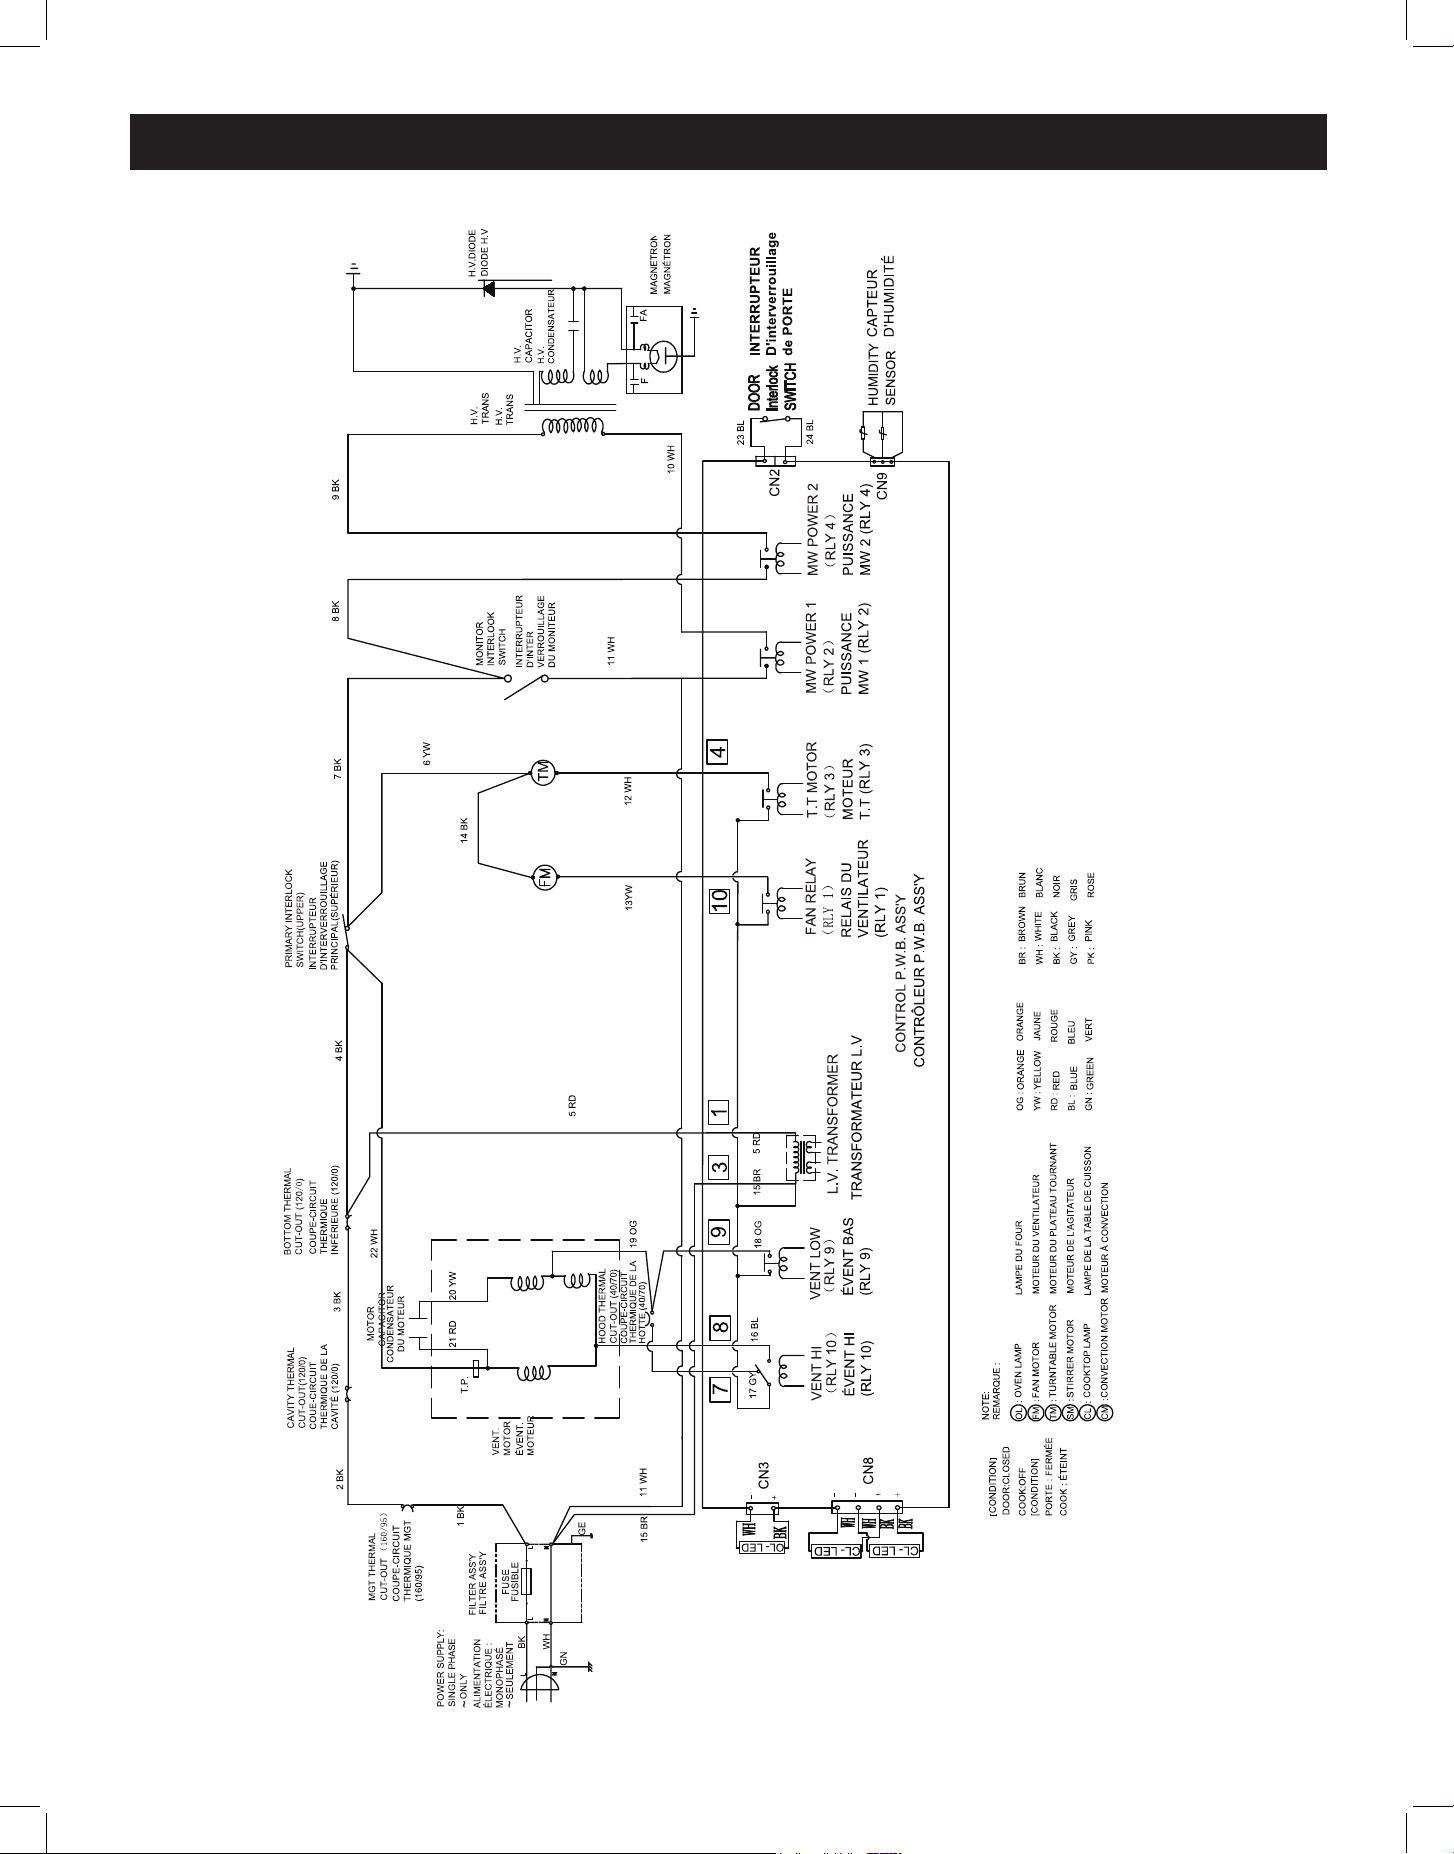
23
WIRING DIAGRAM
24
RATING LABEL
© Unique Appliances Ltd. All rights reserved / Tous droits réservés. Designed and manufactured for / Conçu et fabriqué pour:
Unique Appliances Ltd. 2245 Wyecroft Road #5, Oakville, Ontario, Canada L6L 5L7
www.UniqueAppliances.com
Model / Modèle: UNQ-30CR OTR
MICROWAVE OVEN FOUR À MICRO-ONDES
Power Supply / Alimentation: 120VAC 60Hz
Rated Input (Microwave) / Entrée Nominale (Micro-ondes) : 1500W
Rated Output (Microwave) / Puissance Nominale (Micro-ondes) :1000W
Microwave Output Frequency / Fréquence de Sortie des Micro-ondes: 2450MHz
FCC ID/ID FCC:VG8TM034KYYC
Cancer et troubles de la reproduction
P W
P W
Avertissement:
Household Use Only
Usage Domestique Uniquement
280mm
30mm
THIS DEVICE COMPLIES WITH DHHS RADIATION PERFORMANCE STANDARDS 21 CFR SUBCHAPTER J.
CET APPAREIL EST CONFORME AU DHSS NORMES DE PERFORMANCE RADIOLOGIQUE 21 CFR, SOUS-CHAPITRE J.
物料编码
编码描述
印刷品/业务
其他说明
客版铭牌 TM034K-P0HK00 280*30mm 白底UL耐高温PGDQ2标贴(格拉辛、卷装) 62700-Q6615801 UGP-30CR OTR
UNIQUE 过膜 多单 有日期 每批变
16070000B76488
李鸿飞/陈崇涛
日期没批变,按照清单备注
PN:16070000B76488
Manufacture Date/date De Fabrication :MM.YYYY
MADE IN SHUNDE CHINA / FABRIQUÉ EN SHUNDE CHINE
POWER SUPPLY: 120VAC 60Hz RATED INPUT (Microwave): 1500W RATED OUTPUT (Microwave): 1000W
MICROWAVE FREQUENCY: 2450MHz FCC ID: VG8TM034KYYC MANUFACTURE DATE: MM.YYYY
THIS DEVICE COMPLIES WITH DHHS RADIATION PERFORMANCE STANDARDS 21 CFR SUBCHAPTER J.
MADE IN CHINA / FABRIQUÉ EN CHINE
WARNING: CANCER AND REPRODUCTIVE HARM - www.p65warnings.ca.gov
© Unique Appliances Ltd. All rights reserved / Tous droits réservés. Designed and manufactured for / Conçu et fabriqué pour:
Unique Appliances Ltd. 2245 Wyecroft Road #5, Oakville, Ontario, Canada L6L 5L7
www.UniqueAppliances.com
MICROWAVE OVEN
MODEL: UNQ-30CR OTR
HOUSEHOLD USE ONLY
USAGE DOMESTIQUE
SEULEMENT
纸箱标贴:
Net weight
Gross weight
Product Size
Package Size
23.2kg
27.09kg
759*472.6*261.7mm
845*555*380mm
160
25

25
Unique Appliances Ltd. (hereafter “Unique”) warrants that this UNIQUE appliance is free from manufacturer’s
defects in material and workmanship under normal usage and service under the following terms.
Parts Warranty
This appliance has been designed for domestic household use If properly installed, adjusted and operated under
normal conditions in accordance with printed instructions, it will satisfactorily perform the functions that are
generally expected of this type of appliance
If the appliance fails to do so because of a defect in material or workmanship within one year from the original date of purchase:
Unique will at our option, repair, exchange, or correct by other means Unique consider appropriate, any part(s) Unique finds to
be defective except for the surface finish
Ownership
This Warranty is made only to the first purchaser (”original purchaser”) who acquires this appliance for his/her own use and will
be honored by Unique Appliances and by the Seller Purchaser must retain their receipt as proof of purchase date
Warranty Conditions
This warranty does not apply to any appliance that has been subjected to alterations, misuse, abuse (including damage by
foreign agents or chemicals), accident, improper installation or service, delivery damage, or other than normal household use
and service This UNIQUE appliance must be serviced regularly as outlined in the Owner’s Manual In case of damage, the owner
must provide proof of purchase, Model, and Serial Number to the selling dealer or Unique Appliances This warranty is LIMITED
STRICTLY to the terms indicated herein, and no other expressed warranties or remedies thereunder shall be binding on Unique
Purchaser’s Responsibilities
The purchaser will be responsible for the costs of any service calls requested to demonstrate or confirm the proper operation
of the appliance, the installation, or to correct malfunctions in the appearance created by the operation of the appliance in a
manner not prescribed by or cautioned against in the use and care instructions
Model and Serial Number
The appliance model number and serial number can be found on a rating plate on the range The purchaser should always refer
to the model and serial number when talking to or contacting the dealer from whom the appliance was purchased
EXCLUSIONS
Save as herein provided, by Unique, there are no other warranties, conditions, representations or guarantees, express or implied,
made or intended by Unique or its authorized distributors and all other warranties, conditions, representations or guarantees,
including any warranties, conditions, representations or guarantees under any Sale of Goods Act or like legislation or statute is
hereby expressly excluded Save as herein provided, Unique shall not be responsible for any damages to persons or property,
including the unit itself, howsoever caused or any consequential damages arising from the malfunction of the unit and by the
purchase of the unit, the purchaser does hereby agree to indemnify and hold harmless Unique from any claim for damages to
persons or property caused by the unit
Removal or disfigurement of the rating plate will void the warranty The purchaser will be responsible for any expenses
involved in making the range readily accessible for servicing The purchaser will be responsible for any extra charges where the
installation is in a remote location such as unassumed roads, islands, areas known as cottage country, more than 75 km outside a
metropolitan area, or where a technician is not available Freight damage is not covered by this warranty
GENERAL PROVISIONS
No warranty or insurance herein contained or set out shall apply when damage or repair is caused by any of the following:
1) Power failure
2) Damage in transit or when moving the appliance
3) Improper power supply such as low voltage, defective house wiring or inadequate fuses
4) Accident, alteration, abuse or misuse of the appliance such as inadequate air circulation in the room or abnormal operating
conditions (ie extremely high or low room temperature)
5) Use for commercial or industrial purposes (ie If the appliance is not installed in a domestic residence)
6) Fire, water damage, theft, war, riot, hostility, acts of God such as hurricanes, floods etc
7) Service calls resulting in customer education
8) Improper Installation (ie building-in of a free standing appliance or using an appliance outdoors that is not approved for
outdoor application, including but not limited to: garages, patios, porches or anywhere that is not properly insulated or
climate controlled)
Proof of purchase date will be required for warranty claims; retain bills of sale In the event that warranty service is required,
present the proof of purchase to our authorized service depot
Nothing within this warranty shall imply that Unique will be responsible or liable for any direct or indirect loss of foods
caused by failure in operation.
Factory Assistance
If the purchaser is unable to locate an authorized dealer/service agent, or if the purchaser does not receive satisfaction from the
dealer, they may contact Unique Appliances Customer Service directly at Toll Free 1-877-427-2266 or 905-827-6154
WARRANTY

26
APPLIANCE INFORMATION
(manual copy - keep with your records)
To make care and servicing of your microwave easy and ecient, please record the following infor-
mation for future reference:
Model:
Serial Number:
Purchased From:
Date Purchased:
APPLIANCE INFORMATION
Scan the QR Code
or
Visit our website at https://uniqueappliances com/product-registration/ to
register your product
PRODUCT REGISTRATION

27
CONTACT US
NOTES
For questions related to the operation, safety or the purchase of your appliances, please contact your
dealer for more information For general information, contact our customer service department:
Toll-free
1-877-427-2266 or 1-905-827-6154
(available during regular business
hours, 8:30 am to 4:30 pm, EST
Website
www uniqueappliances com
Email
info@UniqueAppliances com

©2024 Unique Appliances Ltd , 2245 Wyecroft Road #5,
Oakville, Ontario, Canada, L6L 5L7
www.uniqueappliances.com
