
User Manual
Date: October 2020
Doc Version: 1.0
English
Thank you for choosing our product. Please read the instructions carefully
before operation. Follow these instructions to ensure that the product
is functioning properly. The images shown in this manual are for
illustrative purposes only.
For further details, please visit our Company’s website
www.zkteco.com.
ML300

Table of Contents
Product Overview...........................................................................................................1
Product Features............................................................................................................1
Lock Setup.......................................................................................................................2
1. Resetting the Lock.....................................................................................................................................2
2. Pairing the Lock with App.......................................................................................................................2
3. Programming the Lock in Standlone Mode.....................................................................................3
4. *Adding the Smart Gateway..................................................................................................................5
5. *Connecting to Amazon Alexa or Google Assistant.......................................................................6
How to Use......................................................................................................................6
Unlocking Door with Fingerprint..............................................................................................................6
Unlocking Door with Password..................................................................................................................6
Unlocking Door with App.............................................................................................................................7
*Unlocking Door with Voice Assistant.....................................................................................................7
Important Notes
Before registration, the new locks can be unlocked by any authentication method by
default.
An administrator must be registered first, before any other operation in the
Standalone Mode.
Four alkaline AA batteries (not included) are needed to power the device. Non-
alkaline and rechargeable batteries ARE NOT RECOMMENDED.
Do not remove batteries from the lock when it is operating.
Batteries must be replaced when the lock flashes the red light along with 2-second
beeps after being turned on.
The locks are also equipped with mechanical keys for manual unlocking. Please keep
the mechanical keys at a safe place.
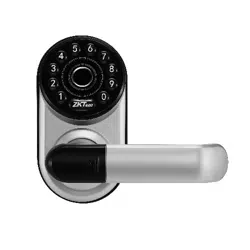
Fingerprint positioning tips:
1.
2.
3.
4.
5.
6.
7.
Note: Please use the correct method when pressing your fingers onto the fingerprint
reader for registration and identification. Our company will assume no liability for
recognition issues that may result from incorrect usage of the product. We reserve the
right of final interpretation and modification concerning this point.
Recommended fingers: Index, middle, or ring fingers; avoid using the thumb or pinky,
as it is difficult to accurately press onto the fingerprint reader using those.
Too low Too close to the edge
Vertical
1
Product Overview
Random Password: To protect the password, users may enter their password with
random digits before or after the actual password. The maximum number of entered digits
must be less than or equal to 32. For example: If the correct password is 123456, then the
random password can be 89123456807, 1234562363, 389123456, etc.
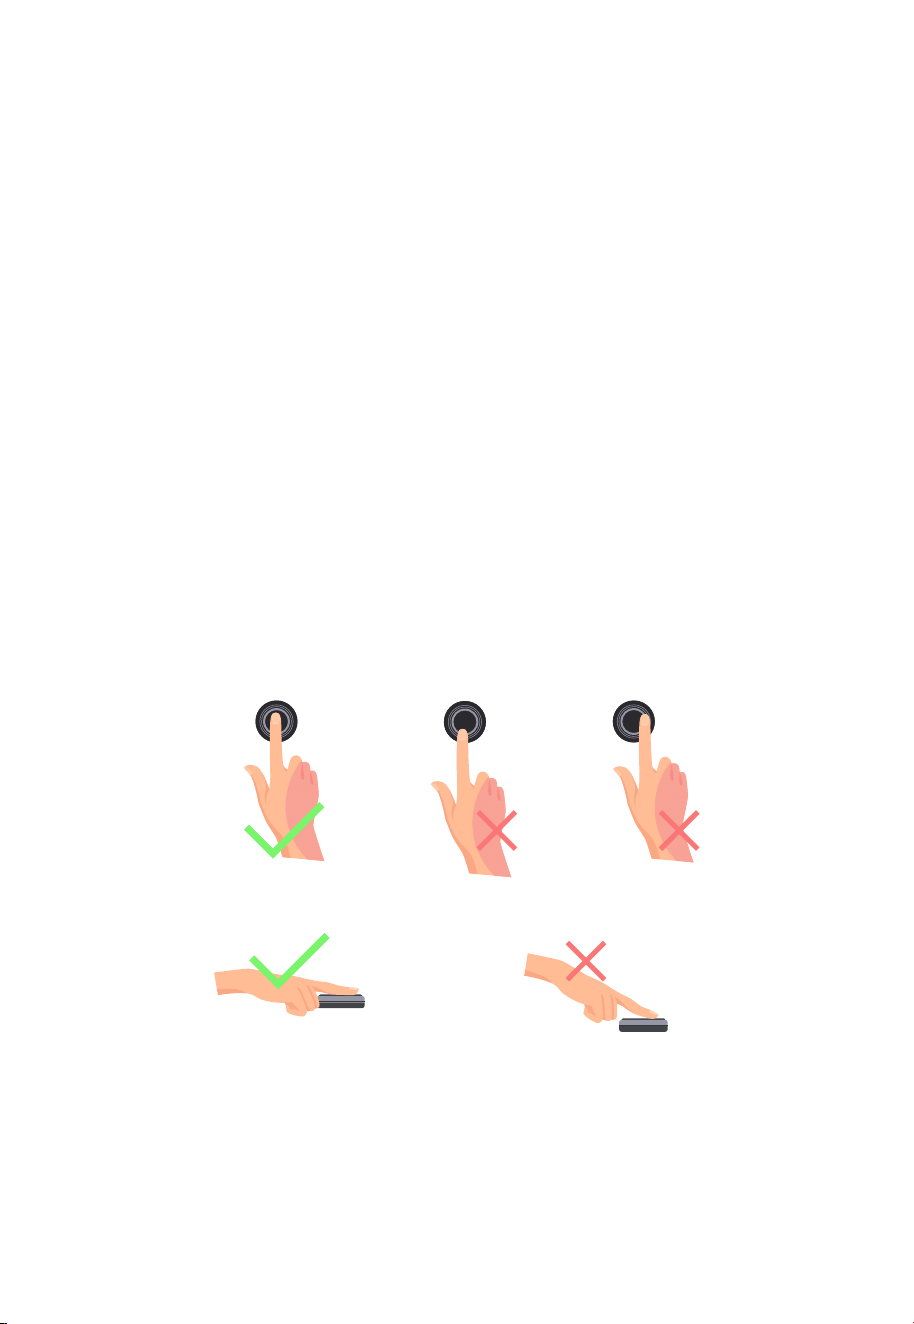
Mechanical Key Hole (hidden)
Micro-USB Interface
User Introduction:
The maximum capacity of all users is 100. The maximum capacity of each
verification method (fingerprint/password) is 100.
Owner is the person who owns the lock and registers it in ZSmart App, and has all
the privileges.
Admin can always unlock via fingerprint, password, or App. Admin can add or delete
normal users, and control all lock settings.
Normal User can always unlock via fingerprint, password, or App, and check the
opening records.
1)
2)
Low Battery Warning: When the battery power is low, the lock will flash the red light
along with 2-second beeps after being turned on. Then the batteries need to be replaced.
Product Features
Keypad
Fingerprint Sensor
Handle (reversible)
ZKTeco Button
Battery
Compartments
Reset Button
Battery Cover
3)
4)
Initialization: All registered user data will be deleted and restored to the factory default
setting.
Illegal Attempts Alert: After 5 failed verification attempts, the lock will flash the red light
along with 10-second beeps and the lock will not be operable hereafter.
Outdoor Unit Indoor Unit

2
Emergency Charging: The bottom of the outdoor unit is provided with a Micro-USB
interface. Use a power bank to charge the lock when it is out of power.
Emergency Mechanical Key: The mechanical key is used to open the door when the lock
has any electronic malfunction. Slide the key cover and insert the key to unlock in
emergency situations.
*Remote Access: This function is only available for the additional Smart Gateway. With
the Smart Gateway installed, the lock can be controlled remotely via ZSmart App.
*Voice Assistant Control: This function is only available for the additional Smart
Gateway. The lock can be unlocked using your voice commands through Amazon Alexa
and the Google Assistant.
Bluetooth Connectivity: The lock is designed with BLE5.0 communication, you can
unlock it via your smart phone when the Bluetooth is connected.
Lock Setup
Please note all registered user data will be deleted and restored to the factory
default setting.
If Never Paired: Press and hold the reset button until you hear one long beep and two
short beeps.
If Paired with App: Tap the EDIT button on the upper right corner of Device Interface,
and click “Disconnect and wipe data” to remove the lock from your ZSmart Account. Then
press and hold the reset button until you hear one long beep and two short beeps.
Step 1
Search for the “ZSmart” App in iOS App Store or
Google Play Store, or scan the QR code to download
the App.
1
Resetting the Lock
2
Pairing the Lock with App

2 short beeps with no light indication
Completed
3
Step 2
Open the ZSmart App, register and sign in to the account.
Step 3
Make sure the lock is in Factory Default Mode. Turn on Bluetooth permission on your
smartphone, and stay near the lock (within 10 meters without obstacles).
Step 4
Tap the “+” button on the upper right corner, follow the on-screen instructions to pair the
lock automatically, and start to use it.
Note: If you don’t want to use the App, please check the next section i.e. "Programming
the Lock in Standalone Mode"
It is recommended to use ZSmart App to program your lock. If you don’t have a
smartphone or don’t want to use the App, you can use the programming instructions
below.
Note:
Standalone Mode is not available after the lock is registered in App! Please
reset the lock to Factory Default Mode first to program your lock in
Standalone Mode.
3
Programming the Lock in Standalone Mode
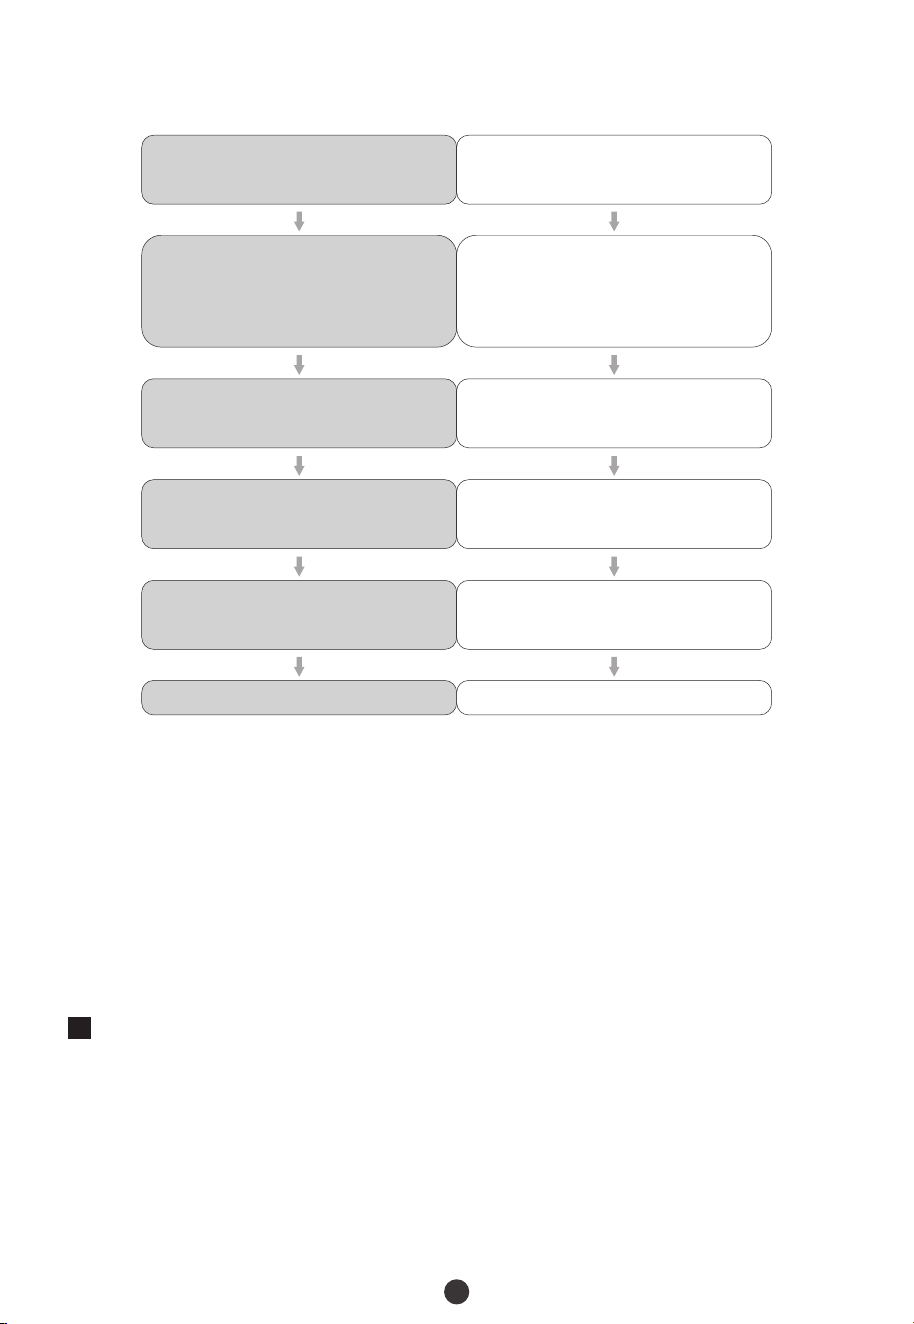
3.1 Add the Admin Password in Standalone Mode
Operation
Indicator’s Status
Press and hold the ZKTeco Button for
3 seconds
2 short beeps with flashing green
light
Enter the same six-digit password
and press ZKTeco Button again
Enter a six-digit password and press
ZKTeco Button
1 short beep with green light, then
flashing green light
1 short beep with green light
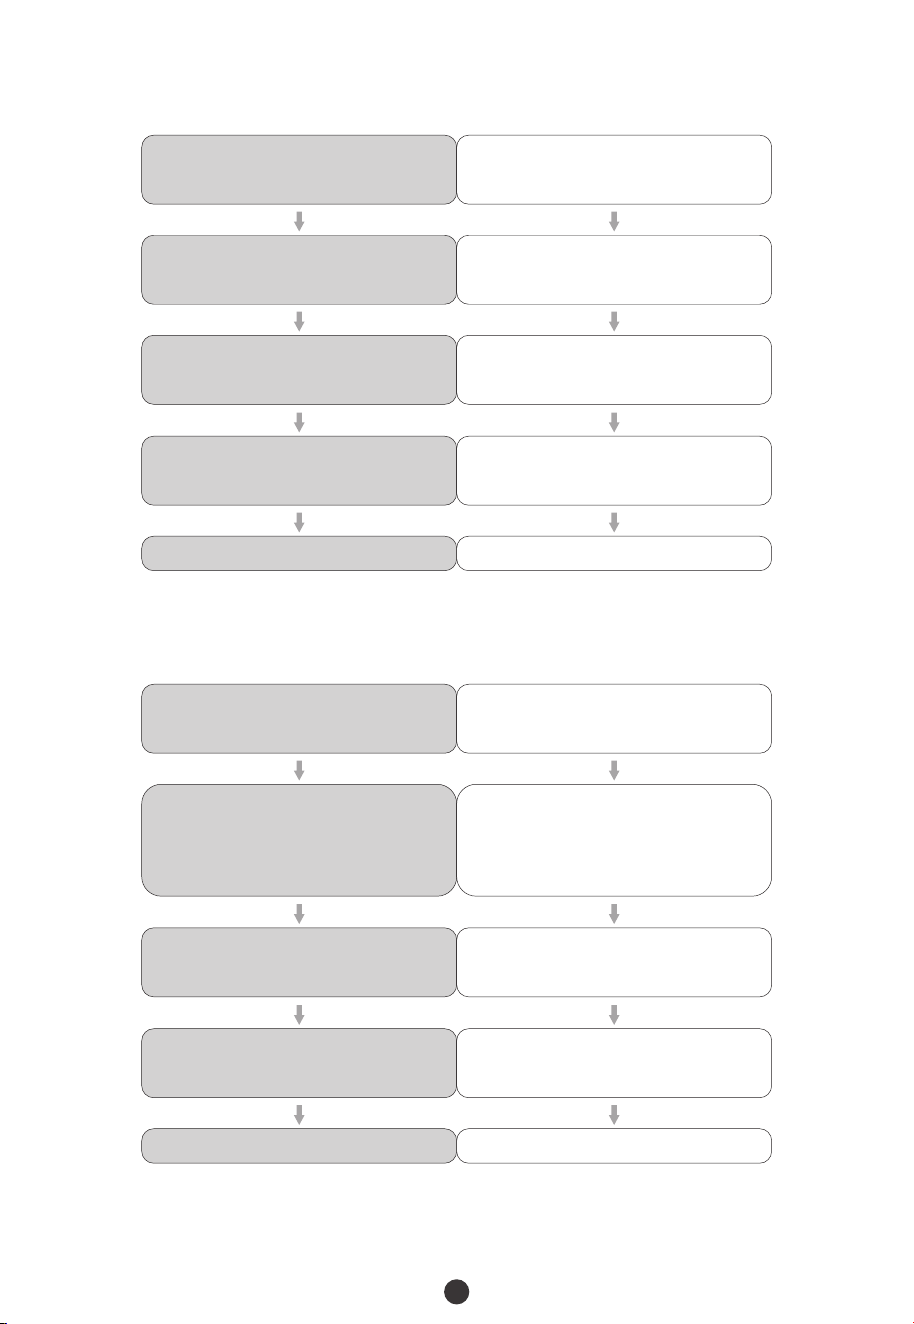
4
2 short beeps with no light indication
Completed
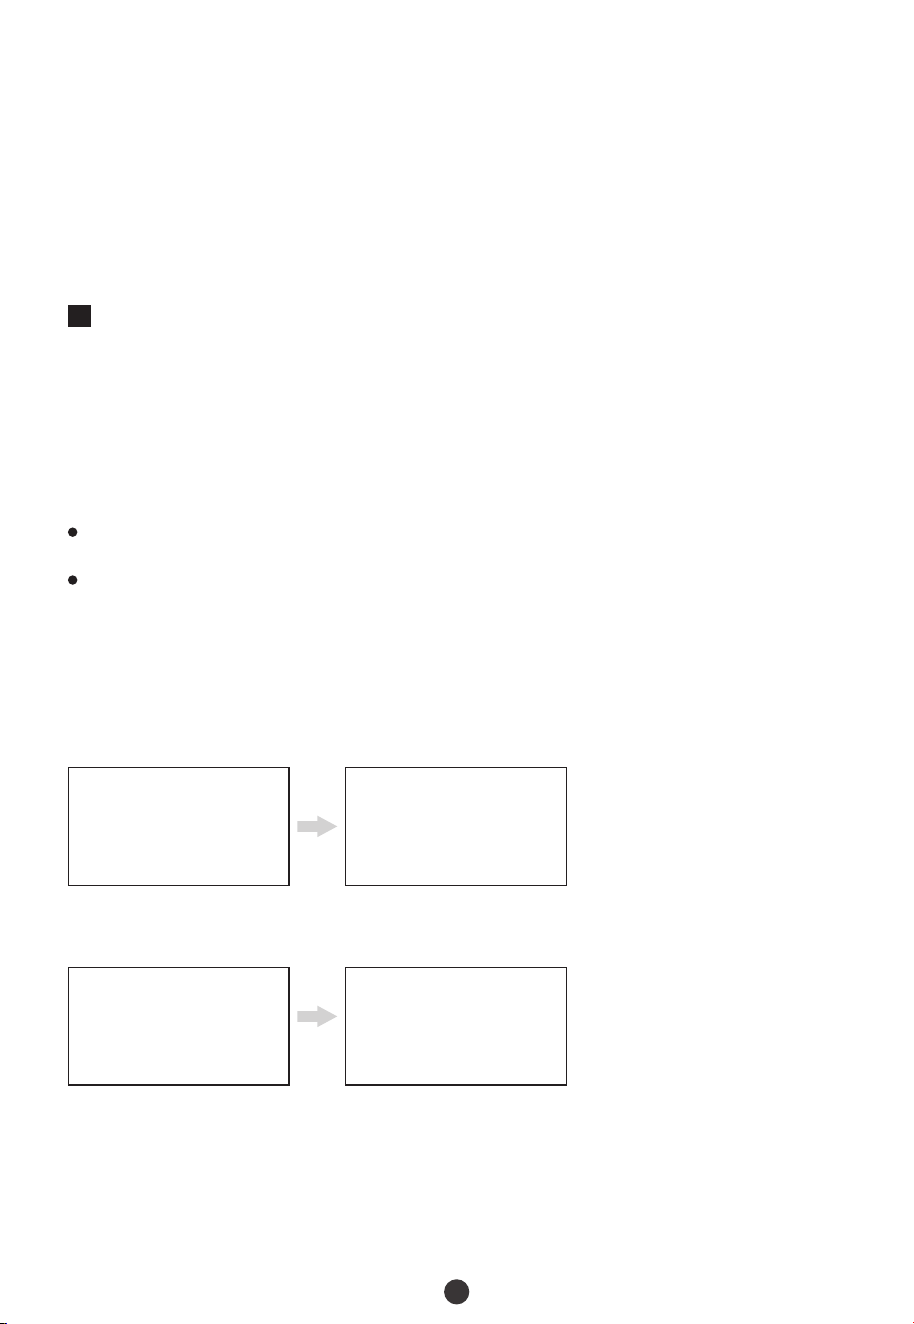
3.2 Add the Admin Fingerprint in Standalone Mode
Operation
Indicator’s Status
Press and hold the ZKTeco Button for
3 seconds
2 short beeps with flashing green
light
Pres s the s a me fi n ge r o n to t h e
fingerprint sensor again
Press the finger onto the fingerprint
sensor
1 short beep with green light, then
flashing green light
Pres s the s a me fi n ge r o n to t h e
fingerprint sensor again
1 short beep with green light, then
flashing green light
1 short beeps with green light
2 short beeps with no light indication
Completed
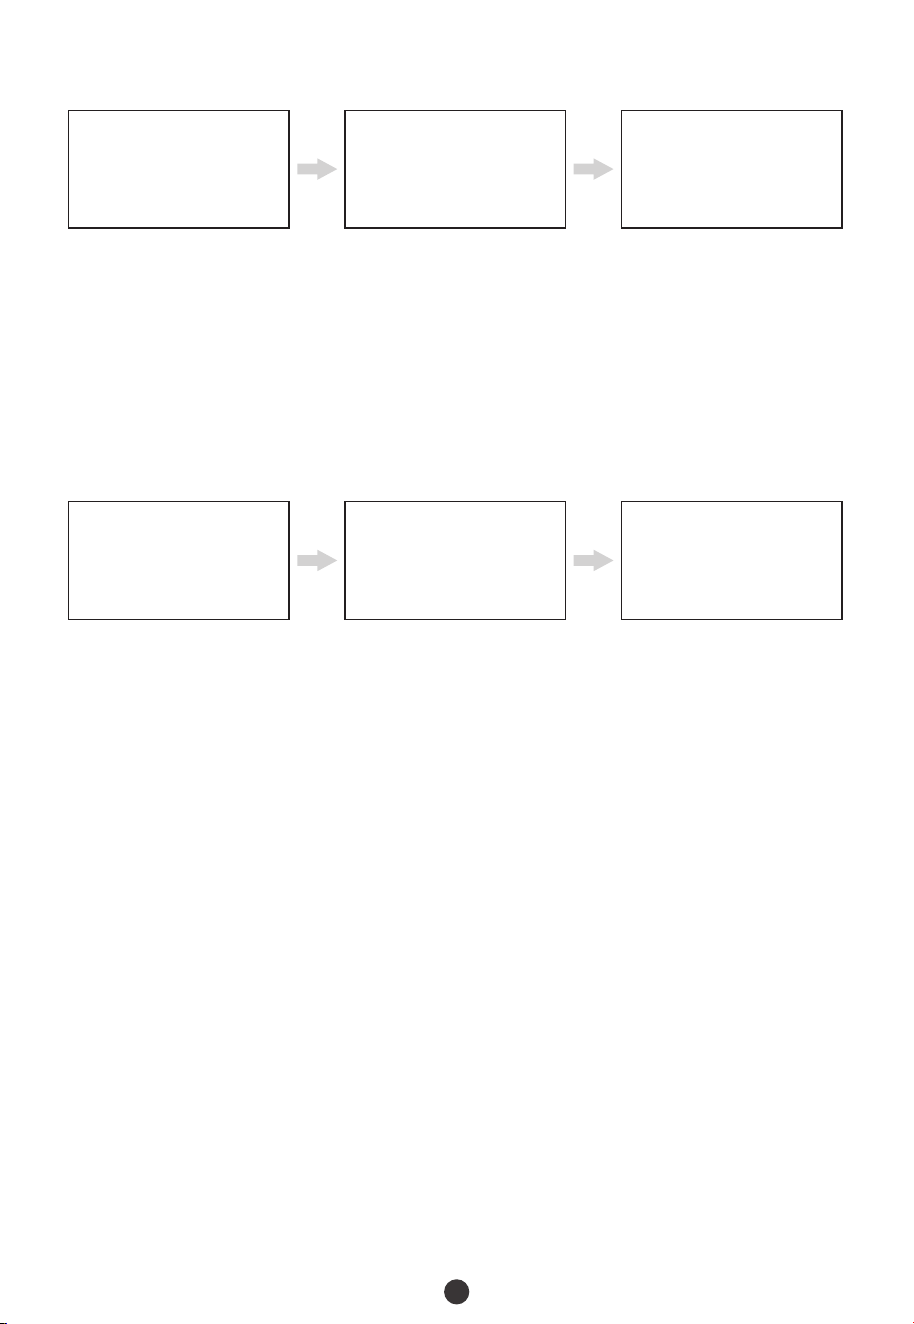
3.3 Add the User Password in Standalone Mode
Operation
Indicator’s Status
Press and hold the ZKTeco Button for
3 seconds
Enter a six-digit password and press
the ZKTeco Button
Verify the administrator ’s identity
w i t h h i s / h e r fi n g e r p r i n t , o r b y
entering the password then pressing
the ZKTeco Button to confirm
Enter the same six-digit password
and press the ZKTeco Button again
1 short beep with green light, then
flashing green light
1 short beep with green light
2 short beeps with flashing blue light
1 short beep with green light, then
flashing green light
5
2 short beeps with no light indication
Completed
3.4 Add the User Fingerprint in Standalone Mode
Operation
Indicator’s Status
Press and hold the ZKTeco Button for
3 seconds
Press the finger onto the fingerprint
sensor
Verify the administrator ’s identity
w i t h h i s / h e r fi n g e r p r i n t , o r b y
entering the password then pressing
the ZKTeco Button to confirm
Pres s the s a me fi n ge r o n to t h e
fingerprint sensor again
1 short beep with green light, then
flashing green light
2 short beeps with flashing blue light
1 short beep with green light, then
flashing green light
1 short beep with green light, then
flashing green light
Pres s the s a me fi n ge r o n to t h e
fingerprint sensor again
1 short beep with green light
Note:
Admin must be created before any other programming. Only one Admin is
available in the Standalone Mode.
The verification mode of an admin can be a fingerprint or a passcode.
The registered password must be six digits.
If you try to register the same fingerprint/password again, the lock will prompt one
long beep with a red light.
1)
2)
3)
4)
Step 1
Plug the Gateway into the outlet using the provided Power Adapter.
Step 2
Open the ZSmart App. Tap the “+” button on the upper right corner, and then select the
“Smart Lock/Wireless Gateway” category.
4
*Adding the Smart Gateway
6
Step 3
Follow the on-screen instructions to connect the Gateway to the 2.4GHz Wi-Fi network
and complete the setup.
Step 4
Enter the device interface of Gateway, and then follow the on-screen instructions to select
the corresponding lock to add.
Tap the EDIT button on the upper right corner of the device interface. Select the Alexa or
Google Assistant icon, then follow the on-screen instructions to link your ZSmart
Account to Amazon Alexa or Google Assistant.
After completing the setup, you can use the supported voice commands that include:
Alexa, unlock the front door.
OK Google, unlock the front door.
5
*Connecting to Amazon Alexa or Google Assistant
How to Use
Unlocking Door with Fingerprint
Unlocking Door with Password
Note:
You can press the ZKTeco Button to turn on the keypad backlight.
Users may enter a random password to prevent any person from observing the
password. The maximum length of a random password is 32 digits.
1)
2)
Press the registered
finger onto the
fingerprint sensor
Rotate the handle down
to open the door
Enter the registered
password and press the
ZKTeco Button to
confirm
Rotate the handle down
to open the door.
7
Note: Once the Lock and Smart Gateway has been installed and configured correctly,
make sure you enable the “ZSmart” Amazon Alexa Skill and Google Home Action first
before you can configure your voice to perform voice commands.
Unlocking Door with App
Turn on Bluetooth
permission on your
smartphone
Open the App and press
the UNLOCK button
Rotate the handle down
to open the door
Note:
If you have already paired the lock with the gateway, you don’t need to turn on
Bluetooth.
When unlocking the lock via Bluetooth, please stay near the lock (within 10 meters
without obstacles).
1)
2)
*Unlocking Door with Voice Assistant
Perform the voice
commands
Answer the additional
voice security codes
Rotate the handle down
to open the door

This device complies with Part 15 of the FCC Rules. Operation is subject to the following
two conditions: (1) This device may not cause harmful interference, and (2) this device
must accept any interference received, including interference that may cause undesired
operation.
This equipment has been tested and found to comply with the limits for a Class B digital
device, pursuant to Part 15 of the FCC Rules. These limits are designed to provide
reasonable protection against harmful interference in a residential installation. This
equipment generates, uses, and can radiate radio frequency energy and, if not installed
and used in accordance with the instructions, may cause harmful interference to radio
communications. However, there is no guarantee that interference will not occur in a
particular installation. If this equipment does cause harmful interference to radio or
television reception, which can be determined by turning the equipment off and on, the
user is encouraged to try to correct the interference by one or more of the following
measures:
IMPORTANT! Any changes or modifications not expressly approved by the party
responsible for compliance could void the user's authority to operate the equipment.
Reorient or relocate the receiving antenna.
Increase the separation between the equipment and receiver.
Connect the equipment into an outlet on a circuit different from that to which the
receiver is connected.
Consult the dealer or an experienced radio/TV technician for help.
Warning:
FCC RF Radiation Exposure Statement:
This Transmitter must not be co-located or operating in conjunction with any other
antenna or transmitter.
This equipment complies with RF radiation exposure limits set forth for an
uncontrolled environment.